

Page 1
A Division of Cisco Systems, Inc.
®
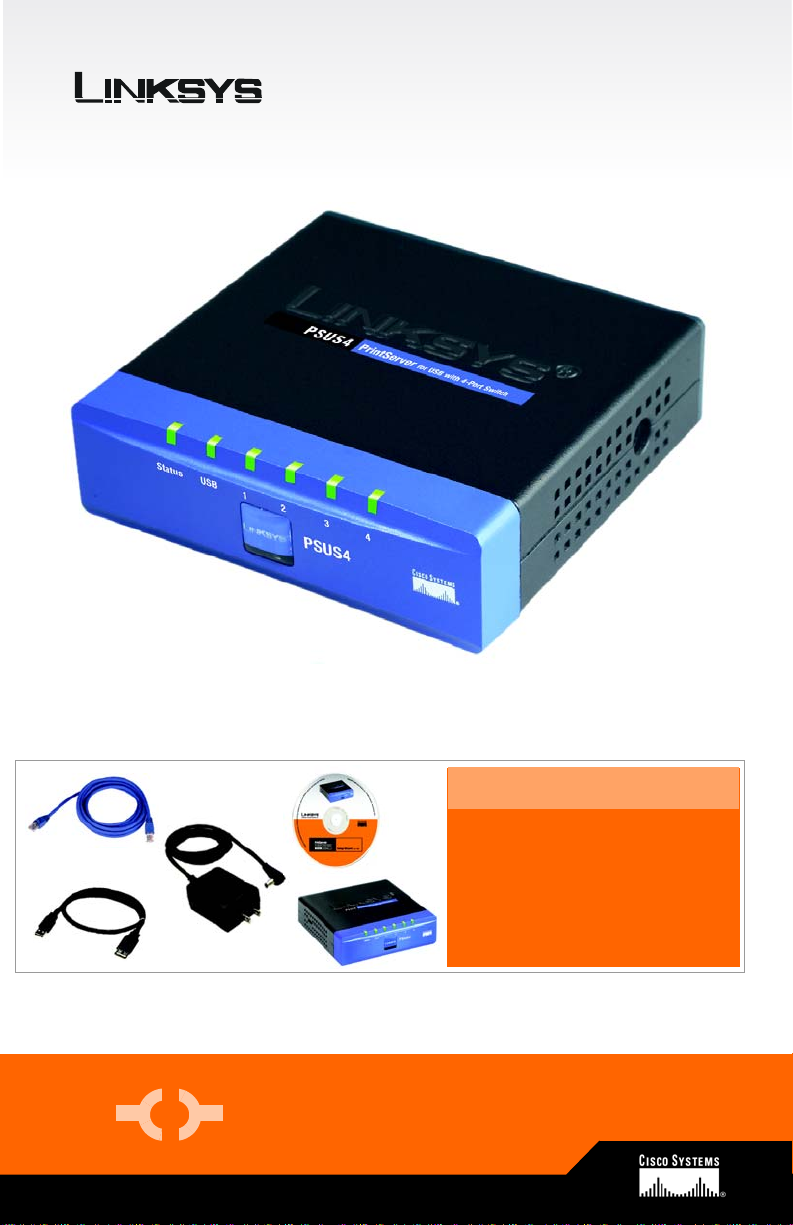
Package Contents
• One PrintServer for USB with 4-Port Switch
• One Power Supply
• One Setup CD with User Guide
• One Ethernet Network Cable
• One USB cable
• One Quick Installation
PrintServer for USB
with 4-Port Switch
Model No.
WIRED
PSUS4-UK
Quick Installation Guide
Page 2
1
Before starting the physical installation, note the PrintServer’s Default
Name on the bottom of the PrintServer for future use.
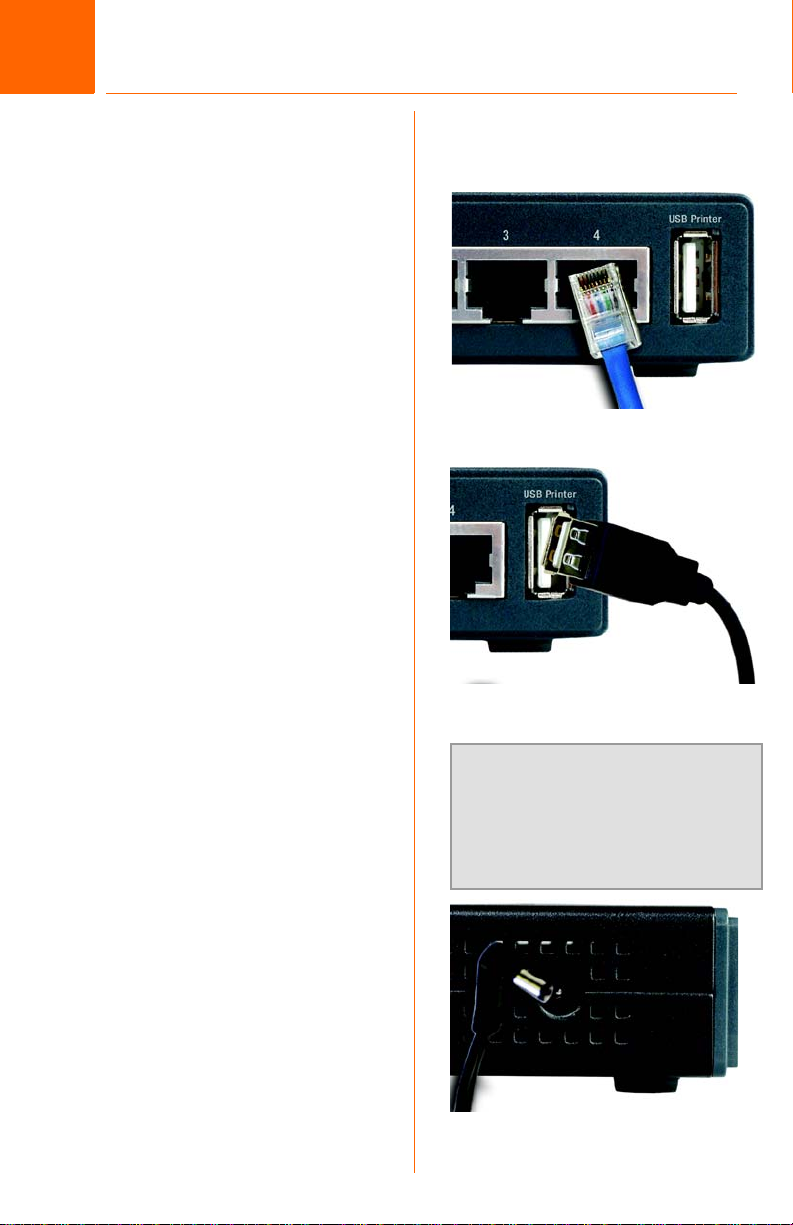
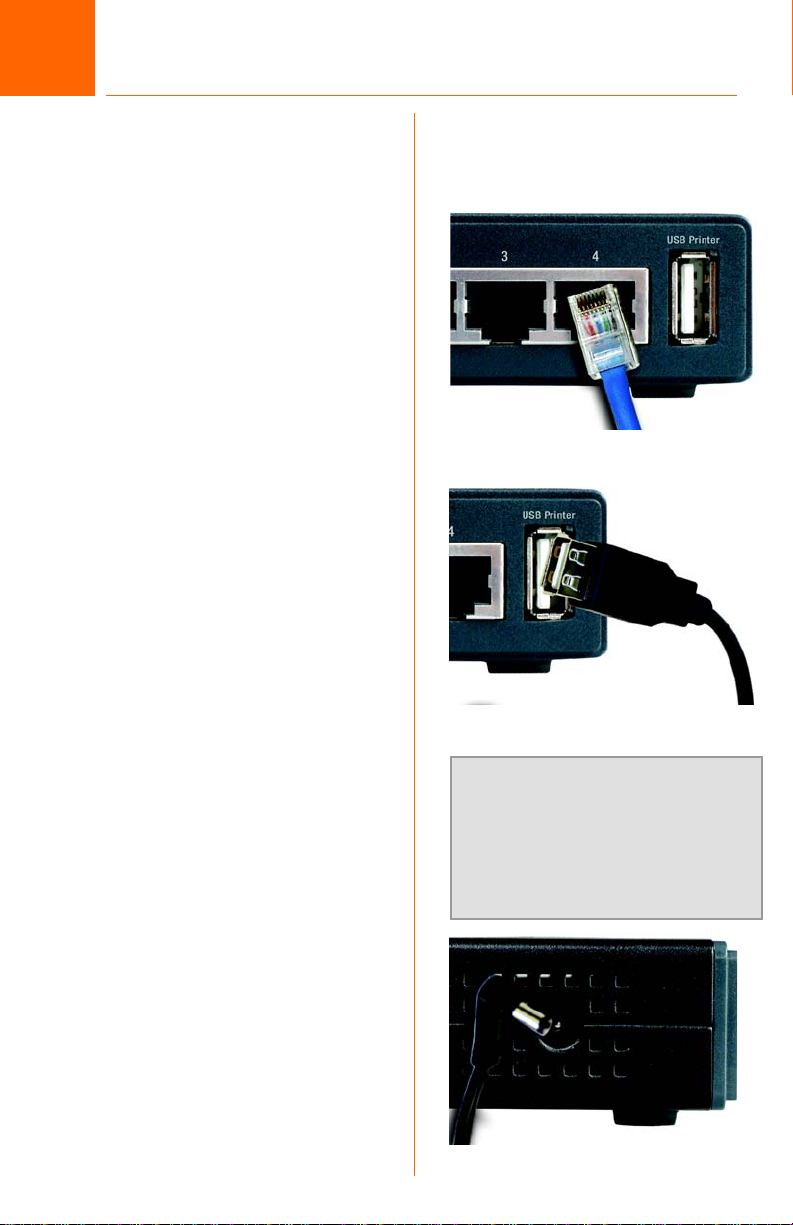
Connecting the PrintServer
A Plug one end of the Ethernet
network cable into one of the
PrintServer’s LAN Ports (1-4).
(See Figure A.)
B Connect the other end of the
cable into your networked hub,
switch, or router. The distance
between the PrintServer and
the other device should not
exceed 328 feet (100 meters).
C Use the USB cable to connect
your printer to the PrintServer’s
USB port. Plug the Type A connector end into the PrintServer
(Figure D) and the Type B connector end into the printer.
A
C
D Power on your printer.
E Plug the power adapter cord
into the PrintServer’s Power port,
which is located on the right
side of the PrintServer. (See Figure F.)
F Plug the power adapter into
an electrical outlet.
The PrintServer connection is com-
plete. Go to Step 2.
2
IMPORTANT: Make sure to use
the power adapter that is supplied with the PrintServer . Use of
a different power adapter could
damage the PrintServer.
E
Page 3
2
Configuring the PrintServer
A Insert the Setup CD-ROM into
the computer’s CD-ROM drive.
The Setup CD-ROM should run
automatically. If it does not,
click the Start button and
choose Run. In the box that
appears, enter D:\setupWiz-
ard.exe (if “D” is the letter of
your CD-ROM drive).
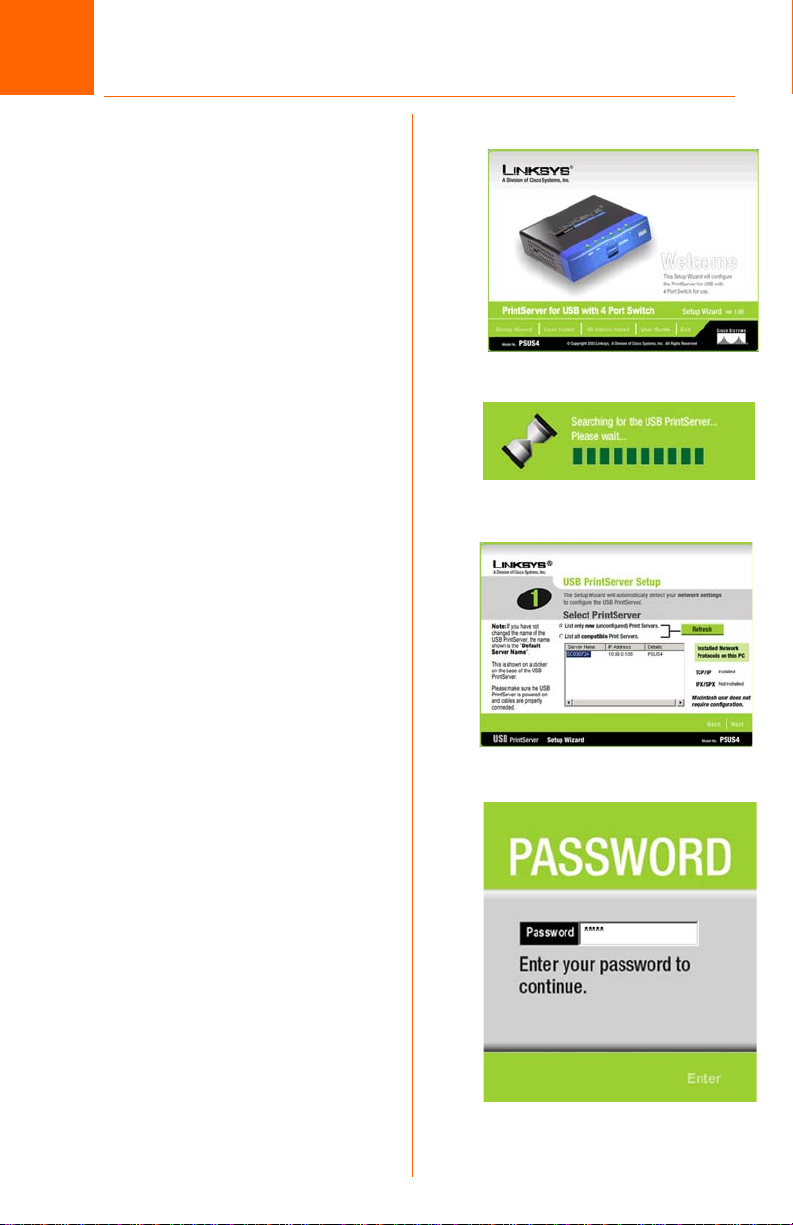
B When you see the Welcome
screen, Figure B, click Setup
Wizard to continue.
C The screen in Figure C will
appear while the Setup Wizard
is searching for the USB PrintServer.
B
C
D After the Setup Wizard has
found the USB PrintServer, the
screen in Figure D will appear.
If this is the first time you have
run the Setup Wizard, make
sure that List only new (uncon-
figured) Print Servers is
selected and your Print Server is
listed by its default server
name. If you have previously
configured the Print Server,
select List all compatible Print
Servers. Click Next to continue.
E The Password screen, Figure E,
will appear next. Enter the
default password admin in the
field. Click Enter.
D
E
3
Page 4

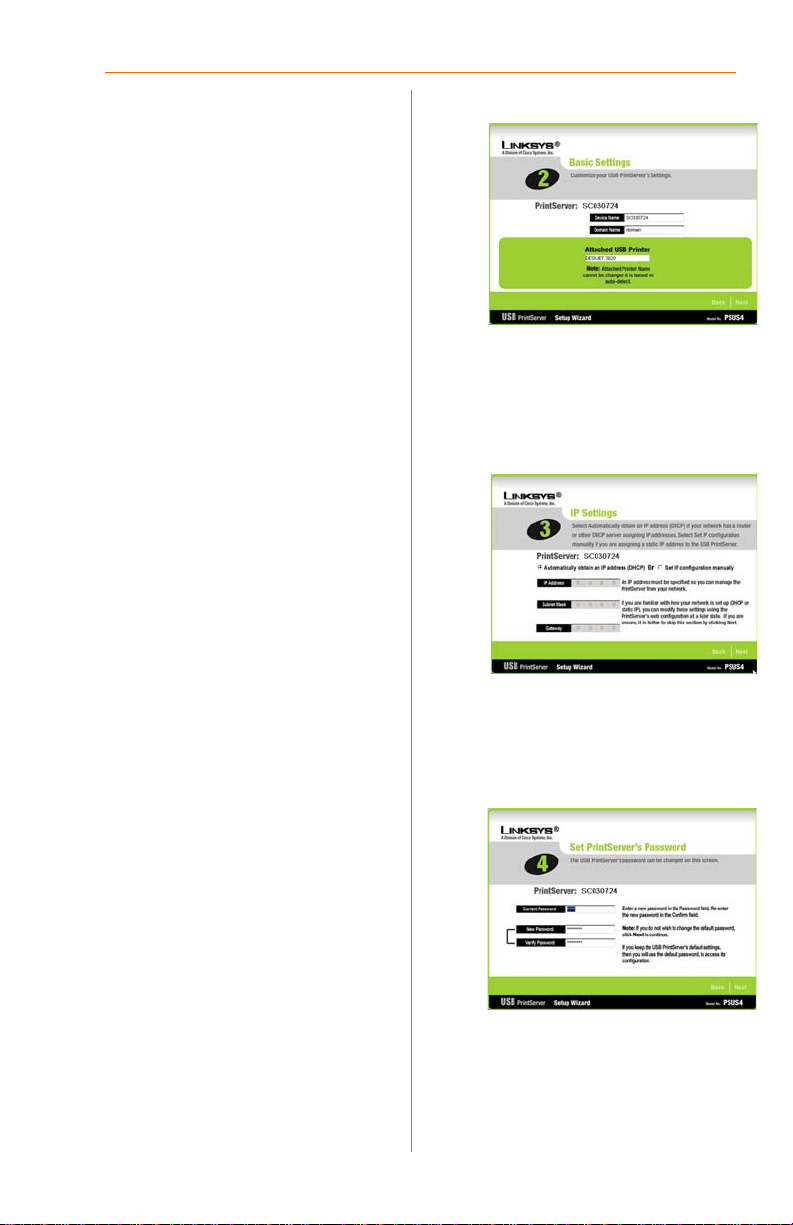
F The Basic Settings screen,
shown in Figure F, will appear. If
you want to change the
Device Name or Domain
Name, enter the Device Name
and Domain Name in the
respective fields. Click Next.
G The IP Settings screen, Figure
G, appears next. If your network
uses a router with a DHCP Internet Protocol setting that automatically assigns an IP
address, select Automatically
obtain an IP address (DHCP). If
your network uses a static IP
address, select Set IP configu-
ration manually, and enter the
IP Address, Subnet Mask, and
Gateway in the fields provided.
Click Next.
F
G
H The next screen that appears is
the Set PrintServer’s Password
screen, shown in Figure H. If
you want to change your password, enter your current password in the Current Password
screen. Enter the new password in the New Password field,
then enter it again in the Verify
Password field. Click Next.
4
H
Page 5

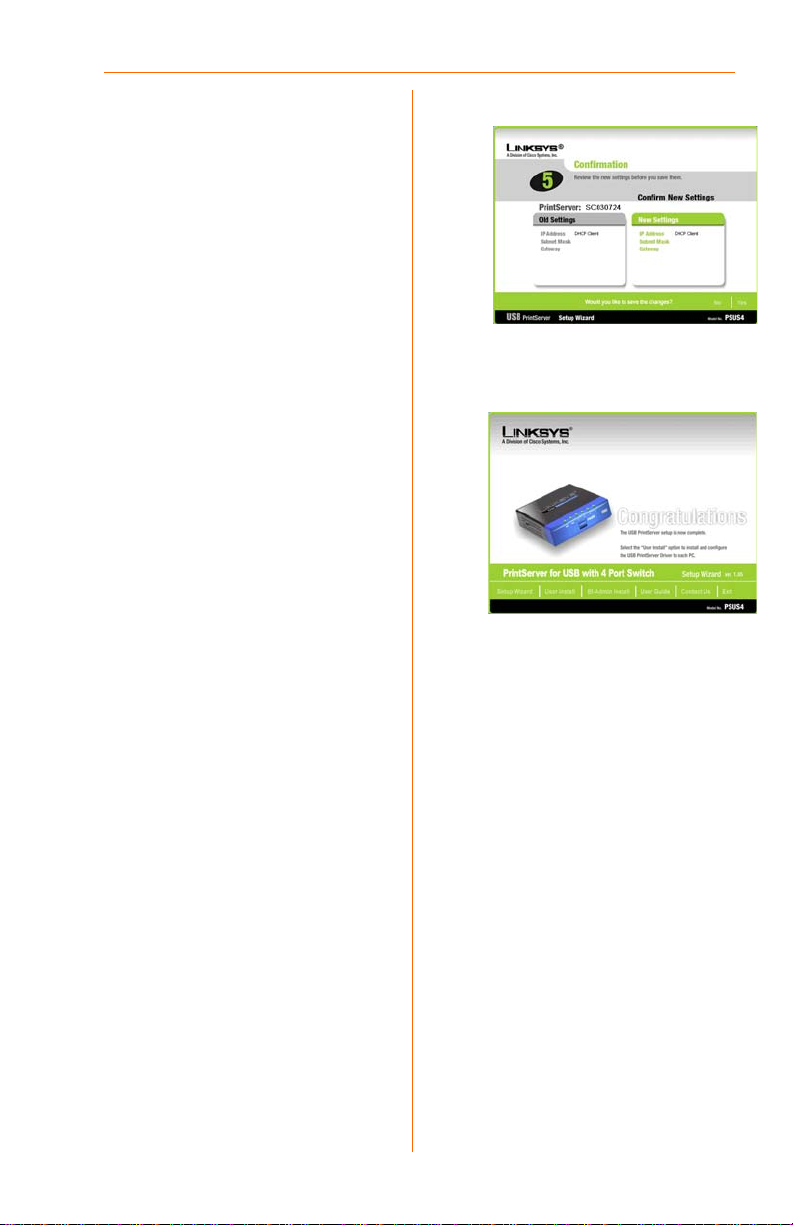
The Confirmation screen
I
appears next. See Figure I. Your
old and new settings will be displayed. If you want to make a
change, click No. If the settings
are correct and you want to
save the changes, click Yes.
J The Congratulations screen,
shown in Figure J, will appear
when the setup is complete.
K Click User Install at the bottom
of the screen, and go to Step
3.B.
Configuration of your PrintServer
is complete.
I
J
5
Page 6
3
Linksys recommends that you set up
your printer and install your printer’s
driver before you install the PrintServer’s driver.
Windows Driver Installation
A If you haven’t already done so,
insert the Setup CD-ROM into
the computer’s CD-ROM drive.
When the Setup Wizard’s Welcome screen appears, click
User Install to continue.
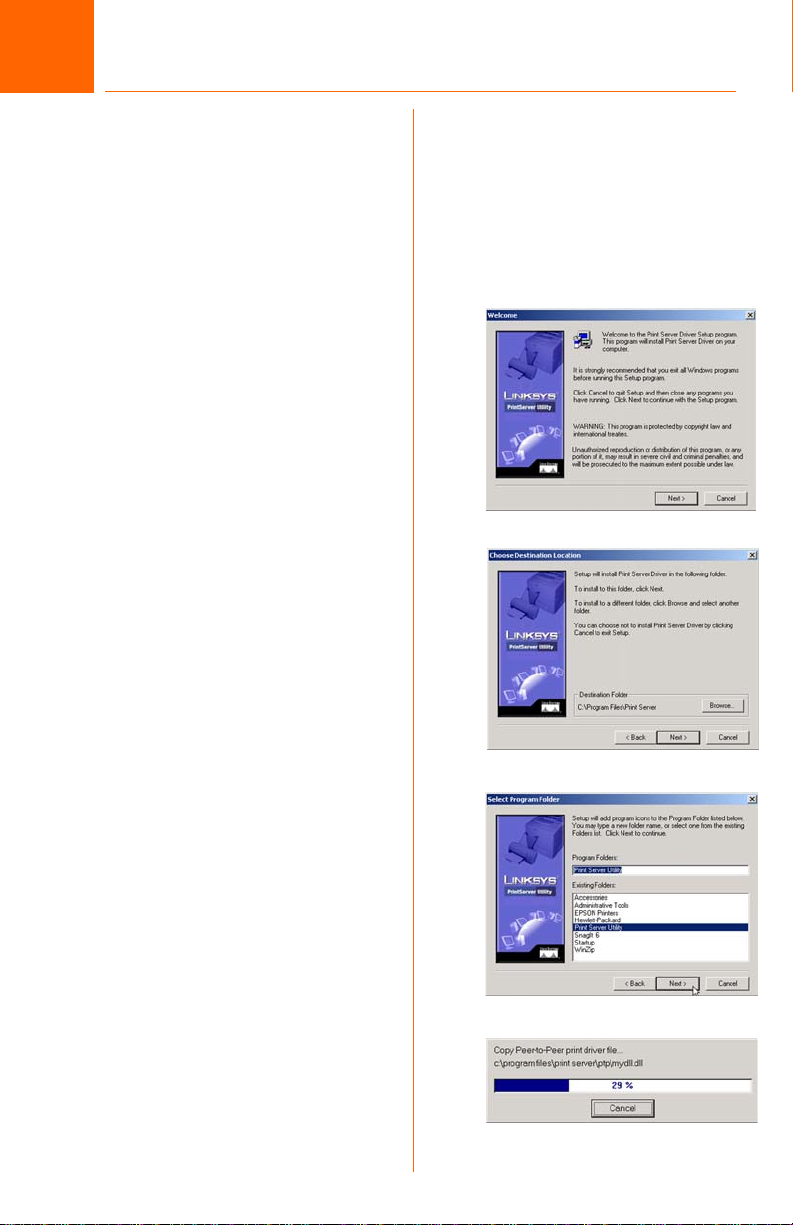
B When the Print Server Driver
Welcome screen appears,
click Next. See Figure B.
C When the next screen
appears, Figure C, choose the
location of where the driver’s
folder will be installed. If you
want the folder to be installed
in a different location, click the
Browse button and select the
location. To install the driver in
the default location, click Next
to continue.
B
C
D The next screen to appear is
Select Program Folder, shown
in Figure D. An icon will be
added to the program folder
listed. You may change the
name for the program folder.
Click Next.
E The next screen that may
appear while the driver is being
installed, is shown in Figure E.
6
D
E
Page 7

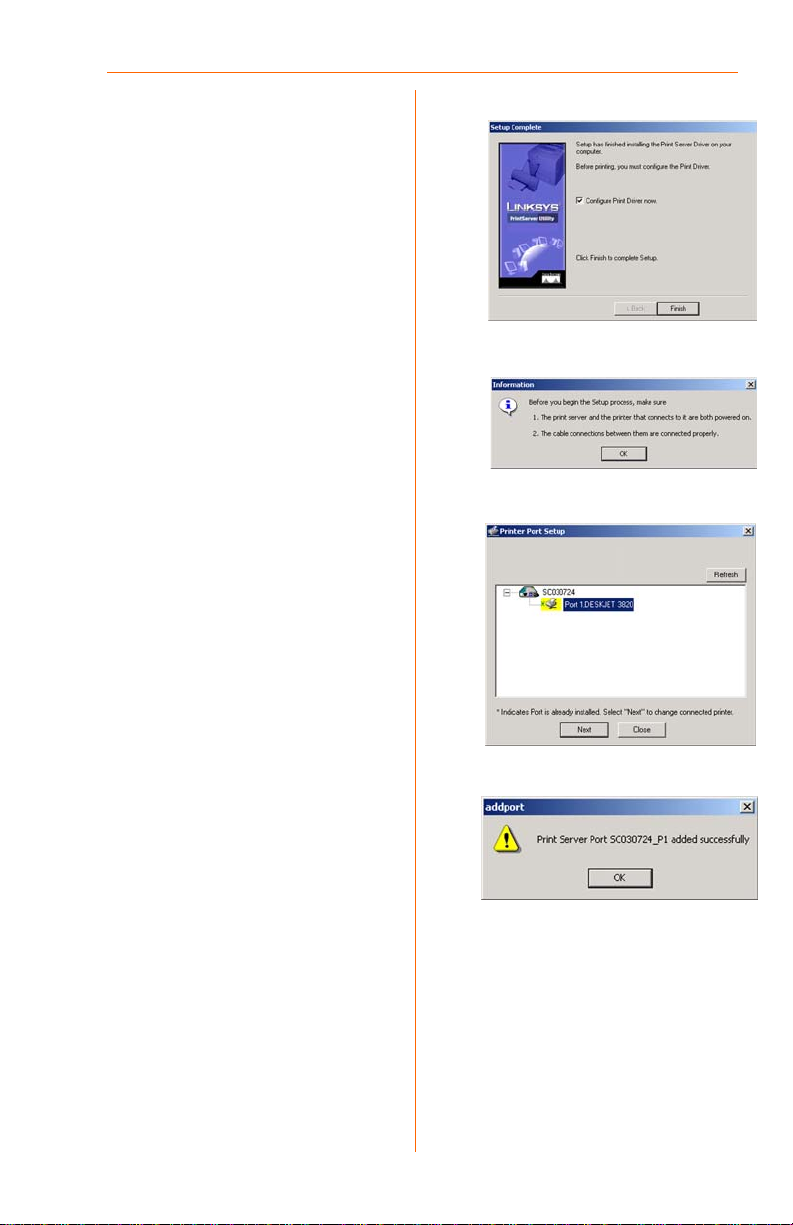
F
When the driver is installed, the
Setup Complete screen, Figure
F, will appear. The Print Driver
must still be configured, so
make sure that Configure Print
Driver now is selected. Click
Finish to continue.
G The Information screen
appears next. See Figure G.
Read the information, then
click OK.
F
H The Printer Port Setup screen will
appear, as shown in Figure H,
and list the PrintServer and the
connected printers. Select a
printer, then click Next.
If the PrintServer or printer isn’t
listed, make sure that the
cable connections are good
and that the PrintServer and
printer are on.
I You will be informed that the
PrintServer Port has been
added successfully. (Figure I.)
Click OK.
G
H
I
7
Page 8

J The Configure Printer Port
screen will appear, as shown in
Figure J. Your installed printer
will appear in the field. Click
the Connect button to connect the printer for configuration. To add another printer,
click the Add New Printer button.
The driver installation is complete.
Congratulations!
The PrintServer installation
is complete.
J
For additional information or troubleshooting
help, refer to the User Guide on the Setup CDROM. You can also call or e-mail for further
support.
E-mail Support
United Kingdom and Ireland
support.uk@linksys.com
Latin America
support.la@linksys.com
Website
http://www.linksys.com/international or
http://www.linksys.com/uk
Linksys is a registered trademark or tradem ark of
Cisco Systems, Inc. and/or its affiliates in the U .S.
and certain other countries. Copyright © 2003
Cisco Systems, Inc. All rights reserved.
PSUS4-UK-QIG-31010NC JL
8
Page 9
A Division of Cisco Systems, Inc.
®
Contenu de l'emballage
• Serveur d'impression pour USB avec
commutateur 4 ports
•Alimentation
• CD-ROM d'installation contenant le Guide de
l'utilisateur
• Câble réseau Ethernet
•Câble USB
• Guide d'installation rapide
Serveur d'impression pour USB
avec commutateur 4 ports
Modèle
WIRED
PSUS4-FR
Guide d’installation rapide
Page 10
1
Avant de commencer l'installation physique,
notez le nom par défaut du serveur
d'impression figurant en bas du serveur, afin
de pouvoir vous en servir ultérieurement.
Connexion du serveur d'impression
A Branchez l'une des extrémités du
câble réseau Ethernet sur l'un des
quatre ports (1-4) LAN du serveur
d'impression (voir figure A).
B Branchez l'autre extrémité du câble
sur votre concentrateur, votre
commutateur ou votre routeur relié
en réseau. La distance entre le
serveur d'impression et l'autre
périphérique ne doit pas excéder
100 mètres.
C Le voyant numéroté correspondant
doit s'allumer.
D Reliez votre imprimante au port USB
du serveur d'impression au moyen
d'un câble USB. Branchez le
connecteur de type A sur le serveur
d'impression (figure D) et le
connecteur de type B sur
l'imprimante.
E Mettez votre imprimante sous
tension.
F Branchez le cordon de l'adaptateur
électrique sur le port d'alimentation
(Power) du serveur d'impression. Vous
trouverez ce port sur le côté droit du
serveur d'impression (voir figure F).
A
D
IMPORTANT : Veillez à utiliser
l'adaptateur électrique fourni avec le
serveur d'impression. De fait,
l'utilisation d'un autre adaptateur
électrique pourrait endommager le
serveur d'impression.
G Branchez l'adaptateur d'alimentation
sur une prise électrique.
Le branchement du serveur d'impression
est terminé. Passez à l'étape 2.
2
F
Page 11

2
Configuration du serveur d'impression
A Insérez le CD-ROM d'installation dans
le lecteur correspondant de votre
ordinateur. Le CD-ROM d'installation
doit s'exécuter automatiquement.
Si ce n'est pas le cas, cliquez sur le
bouton Démarrer, puis sur Exécuter.
Dans le champ qui apparaît, entrez
D:\setupWizard.exe (« D »
représentant votre lecteur de
CD-ROM).
B Lorsque l'écran Welcome
(Bienvenue) (figure B) apparaît,
cliquez sur Setup Wizard (Assistant
de configuration) pour continuer.
C L'écran de la figure C apparaît tandis
que l'assistant de configuration
recherche le serveur d'impression USB.
D Une fois que le serveur d'impression
USB a été détecté, l'écran de la
figure D apparaît. Si c'est la
première fois que vous exécutez
l'assistant de configuration, n'oubliez
pas de sélectionner List only new
(unconfigured) Print Servers
(Afficher uniquement la liste des
nouveaux serveurs d'impression
(non configurés)) et de vérifier que
votre serveur d'impression est
répertorié dans la liste sous son nom
par défaut. Si vous avez déjà
configuré le serveur d'impression,
sélectionnez List all compatible
Print Servers (Afficher la liste de tous
les serveurs compatibles). Cliquez
sur Next (Suivant) pour continuer.
B
C
D
E L'écran Password (Mot de passe)
apparaît (figure E). Renseignez le
champ approprié au moyen du
mot de passe par défaut (admin).
Cliquez sur Enter (Entrée).
E
3
Page 12
F L'écran Basic Settings (Paramètres
de base) apparaît (figure F). Si vous
souhaitez modifier le nom du
périphérique ou le nom de
domaine, renseignez les champs
Device Name (Nom du
périphérique) et Domain Name
(Nom de domaine) correspondant.
Cliquez sur Next (Suivant).
G L'écran IP Settings (Paramètres IP)
apparaît (figure G). Si votre réseau
utilise un routeur intégrant le
paramètre DHCP Internet Protocol
(Protocole Internet DHCP) qui
affecte automatiquement une
adresse IP, sélectionnez l'option
Automatically obtain an IP
address (DHCP) (Obtenir une
adresse IP automatiquement
(DHCP)). Si votre réseau utilise une
adresse IP statique, sélectionnez
Set IP configuration manually
(Définir la configuration IP
manuellement), puis renseignez les
champs IP Address (Adresse IP),
Subnet Mask (Masque de sousréseau) et Gateway (Passerelle).
Cliquez sur Next (Suivant).
F
G
H L'écran Set PrintServer’s Password
(Définition du mot de passe du
serveur d'impression) apparaît
(figure H). Si vous souhaitez
modifier le mot de passe, entrez le
mot de passe actuel dans le
champ Current Password (Mot de
passe actuel). Entrez le nouveau
mot de passe dans le champ
New Password (Nouveau mot de
passe), puis de nouveau dans le
champ Verify Password
(Vérification du mot de passe).
Cliquez sur Next (Suivant).
4
H
Page 13
I L'écran Confirmation apparaît (voir
figure I). Les anciens et les
nouveaux paramètres
apparaissent. Si vous souhaitez
apporter des modifications, cliquez
sur No (Non). Si les paramètres sont
corrects et que vous souhaitez
enregistrer les modifications, cliquez
sur Yes (Oui).
J L'écran Congratulations
(Félicitations) apparaît une fois
l'installation terminée (figure J).
K Cliquez sur User Install (Installation
utilisateur) en bas de l'écran, puis
passez à l'étape 3.B.
La configuration du serveur
d'impression est terminée.
I
J
5
Page 14

3
Linksys vous conseille de configurer votre
imprimante et d'installer le pilote
d'impression avant d'installer le pilote du
serveur d'impression.
Installation du pilote pour Windows
A Si ce n'est pas déjà fait, insérez le
CD-ROM d'installation dans le
lecteur correspondant de votre
ordinateur. Lorsque l'écran
Welcome (Bienvenue) de l'assistant
de configuration apparaît, cliquez
sur User Install (Installation utilisateur)
pour continuer.
B Lorsque l'écran Print Server Driver
Welcome (Bienvenue - Pilote du
serveur d'impression) apparaît, cliquez
sur Next (Suivant). (voir figure B).
C Lorsque l'écran suivant apparaît
(figure G), choisissez à quel
emplacement vous souhaitez
installer le dossier du pilote. Si vous
souhaitez installer le dossier dans un
autre emplacement, cliquez sur
Browse (Parcourir), puis sélectionnez
l'emplacement qui vous convient.
Pour installer le pilote dans
l'emplacement pas défaut, cliquez
sur Next (Suivant) pour continuer.
B
C
D L'écran Select Program Folder
(Sélection du dossier du
programme) apparaît ensuite (figure
D). Une icône est ajoutée pour le
dossier du programme figurant dans
la liste. Vous pouvez changer le nom
du dossier du programme. Cliquez
sur Next (Suivant).
E L'écran suivant (figure E) peut
apparaître pendant l'installation
du pilote.
6
D
E
Page 15
Une fois le pilote installé, l'écran
F
Setup Complete (Installation
terminée) (figure F) apparaît. Vous
devez encore configurer le pilote
d'impression. Par conséquent,
vérifiez que l'option Configure Print
Driver now (Configurer le pilote
d'impression maintenant) est
sélectionnée. Cliquez sur Finish
(Terminer) pour continuer.
G L'écran Information (Informations)
apparaît (voir figure G). Lisez les
informations, puis cliquez sur OK.
F
H L'écran Printer Port Setup
(Configuration du port d'impression)
apparaît (figure H) et répertorie le
serveur d'impression et les
imprimantes connectées.
Sélectionnez une imprimante, puis
cliquez sur Next (Suivant).
Si le serveur d'impression ou
l'imprimante ne figure pas dans la
liste, vérifiez que les câbles sont
correctement branchés et que le
serveur d'impression et l'imprimante
sont sous tension.
I Vous êtes averti que le port du
serveur d'impression a été ajouté
avec succès (figure I). Cliquez sur OK.
G
H
I
7
Page 16

J L'écran Configure Printer Port
(Configuration du port d'impression)
apparaît (figure J). L'imprimante
installée doit apparaître dans le
champ. Cliquez sur le bouton
Connect (Connecter) pour
connecter l'imprimante, afin de la
configurer. Pour ajouter une autre
imprimante, cliquez sur Add New
Printer (Ajout d'une nouvelle
imprimante).
L'installation du pilote est terminée.
Félicitations !
L'installation du serveur d'impression
est terminée.
J
Pour obtenir de plus amples informations ou
une assistance technique, reportez-vous au
Guide de l'utilisateur figurant sur le CD-ROM
d'installation. Pour obtenir davantage d'aide,
vous pouvez également envoyer un e-mail.
E-mail du support technique
support.fr@linksys.com
Site Web
http://www.linksys.com/international ou
http://www.linksys.com/fr
Linksys est une marque déposée ou une marque
commerciale de Cisco Systems, Inc. et/ou ses
filiales aux Etats-Unis et dans certains autres
pays. Copyright © 2003 Cisco Systems, Inc. Tous
droits réservés.
PSUS4-FR-QIG-31010NC JL
8
Page 17

A Division of Cisco Systems, Inc.
®
Lieferumfang
• USB-Druckserver mit Switch mit 4 Ports
• Stromversorgung
• Installations-CD-ROM mit Benutzerhandbuch
• Ethernet-Netzwerkkabel
•USB-Kabel
• Kurzanleitung
USB-Druckserver
mit Switch mit 4 Ports
Modell
WIRED
PSUS4-DE
Kurzanleitung
Page 18

1
Bevor Sie mit der physischen Installation
beginnen, notieren Sie für die zukünftige
Verwendung den Standardnamen des
Druckservers auf der Unterseite des
Druckservers.
Anschließen des Druckservers
A Schließen Sie ein Ende des Ethernet-
Netzwerkkabels an einen der LANPorts (1 - 4) des Druckservers an
(siehe Abbildung A).
B Schließen Sie das andere Ende des
Kabels an Ihren Netzwerk-Hub,
-Switch oder -Router an. Der
Abstand zwischen dem Druckserver
und dem anderen Gerät sollte nicht
größer als 100 Meter sein.
C Die LED mit der entsprechenden
Nummer wird aktiviert.
D Schließen Sie Ihren Drucker über das
USB-Kabel an den USB-Port des
Druckservers an. Schließen Sie den
Steckverbinder des Typs A an den
Druckserver (Abbildung D) und den
Steckverbinder des Typs B an den
Drucker an.
A
D
E Schalten Sie den Drucker ein.
F Schließen Sie den
Netzstromadapter an den
Stromanschluss des Druckservers
an, der sich an der rechten Seite
des Geräts befindet (siehe
Abbildung F).
G Stecken Sie den Netzstromadapter
in eine Steckdose.
Die Verbindung zum Druckserver
ist hiermit hergestellt.
Fahren Sie mit Schritt 2 fort.
2
WICHTIG: Verwenden Sie nur den
Netzstromadapter, der im Lieferumfang
des Druckservers enthalten ist. Bei
Verwendung eines anderen
Netzstromadapters könnte der
Druckserver beschädigt werden.
F
Page 19

2
Konfigurieren des Druckservers
A Legen Sie die Installations-CD-ROM
in das CD-ROM-Laufwerk des
Computers ein. Die Installations-CDROM sollte automatisch ausgeführt
werden. Wenn dies nicht der Fall ist,
klicken Sie auf die Schaltfläche Start
und wählen Sie Ausführen aus.
Geben Sie im angezeigten Feld
D:\setupWizard.exe ein (wobei „D“
für den Buchstaben Ihres CD-ROMLaufwerks steht).
B
Wenn das Willkommensfenster
angezeigt wird (siehe Abbildung B),
klicken Sie auf
(Setup-Assistent), um fortzufahren.
C
Das in Abbildung C dargestellte
Fenster wird angezeigt, während der
Setup-Assistent nach dem USBDruckserver sucht.
D
Nachdem der Setup-Assistent den
USB-Druckserver gefunden hat, wird
das in Abbildung D dargestellte
Fenster angezeigt. Wenn Sie den
Setup-Assistenten das erste Mal
ausführen, stellen Sie sicher, dass die
Option
Print Servers
(unkonfigurierte) Druckserver
aufführen) ausgewählt und Ihr
Druckserver unter seinem StandardServernamen aufgeführt ist. Wenn Sie
den Druckserver bereits zuvor
konfiguriert haben, wählen Sie die
Option
Servers
Druckserver aufführen) aus. Klicken
Sie auf
fortzufahren.
List only new (unconfigured)
List all compatible Print
(Alle kompatiblen
Next
Setup Wizard
(Nur neue
(Weiter), um
B
C
D
E
Das Fenster
angezeigt (siehe Abbildung E).
Geben Sie im vorgesehenen Feld
das Standardkennwort
Klicken Sie auf
Password
Enter
(Kennwort) wird
admin
ein.
(Eingabe).
E
3
Page 20

F
Das in Abbildung F dargestellte
Fenster
(Grundlegende Einstellungen) wird
angezeigt. Wenn Sie den Geräteoder Domänennamen ändern
möchten, geben Sie in den
entsprechenden Feldern jeweils den
Geräte- bzw. Domänennamen ein.
Klicken Sie auf
G
Das Fenster
Einstellungen) wird angezeigt (siehe
Abbildung G). Wenn Ihr Netzwerk
einen Router mit einer DHCPInternetprotokoll-Einstellung
verwendet, die automatisch eine
IP-Adresse zuweist, wählen Sie die
Option
address (DHCP)
automatisch beziehen) aus. Wenn
Ihr Netzwerk eine statische IP-Adresse
verwendet, wählen Sie die Option
Set IP configuration manually
(IP-Konfiguration manuell einrichten)
aus, und geben Sie dann in die
vorgesehenen Felder die IP-Adresse,
die Subnetzmaske und das
Gateway ein. Klicken Sie auf
(Weiter).
Basic Settings
Next
(Weiter).
IP Settings
Automatically obtain an IP
(IP-Adresse (DHCP)
(IP-
Next
F
G
H
Als nächstes wird das Fenster
PrintServer’s Password
Kennwort festlegen) angezeigt
(siehe Abbildung H). Wenn Sie Ihr
Kennwort ändern möchten, geben
Sie im Feld
(Aktuelles Kennwort) Ihr aktuelles
Kennwort ein. Geben Sie das neue
Kennwort im Feld
(Neues Kennwort) und noch einmal
im Feld
bestätigen) ein. Klicken Sie auf
(Weiter).
Current Password
New Password
Verify Password
4
Set
(Druckserver-
(Kennwort
Next
H
Page 21

I
Das Bestätigungsfenster wird
angezeigt (siehe Abbildung I).
Sowohl die alten als auch die neuen
Einstellungen werden angezeigt.
Wenn Sie Änderungen vornehmen
möchten, klicken Sie auf
Wenn die Einstellungen richtig sind,
und Sie die Änderungen speichern
möchten, klicken Sie auf
J
Nach Abschluss der Installation wird
der in Abbildung J dargestellte
Glückwunschbildschirm angezeigt.
K
Klicken Sie auf die Schaltfläche
Install
(Benutzerdefinierte
Installation) im unteren Bereich des
Fensters, und fahren Sie mit
Schritt 3.B fort.
No
Yes
(Nein).
(Ja).
User
I
Die Konfiguration Ihres Druckservers
ist abgeschlossen.
J
5
Page 22

3
Linksys empfiehlt, dass Sie vor der
Installation des Druckserver-Treibers Ihren
Drucker einrichten und den Druckertreiber
installieren.
Windows Treiberinstallation
A Falls Sie dies noch nicht getan
haben, legen Sie nun die
Installations-CD-ROM in das
CD-ROM-Laufwerk des Computers
ein. Wenn das Willkommensfenster
des Setup-Assistenten angezeigt
wird, klicken Sie auf die Schaltfläche
für die benutzerdefinierte
Installation, um fortzufahren.
B Wenn das Willkommensfenster des
Druckserver-Treibers angezeigt wird,
klicken Sie auf Next (Weiter) (siehe
Abbildung B).
C Wenn das in Abbildung C
dargestellte Fenster angezeigt wird,
wählen Sie den Speicherort für den
Treiberordner aus. Wenn Sie den
Ordner an einem anderen
Speicherort installieren möchten,
klicken Sie auf die Schaltfläche
Browse (Durchsuchen), und geben
Sie den Pfad an. Um den Treiber im
Standardverzeichnis zu installieren,
klicken Sie auf Next (Weiter).
B
C
D Als nächstes wird das Fenster zur
Auswahl des Programmordners
angezeigt (siehe Abbildung D).
Dem aufgeführten Programmordner
wird ein Symbol hinzugefügt. Sie
können den Namen für den
Programmordner ändern. Klicken
Sie auf Weiter.
E Das nächste Fenster, das unter
Umständen angezeigt wird,
während der Treiber installiert wird,
ist in Abbildung E dargestellt.
6
D
E
Page 23

Wenn der Treiber installiert ist, wird
F
das in Abbildung F dargestellte
Fenster zum Abschluss der
Installation angezeigt. Der
Drucktreiber muss noch konfiguriert
werden; vergewissern Sie sich also,
dass die Option Configure Print
Driver now (Drucktreiber jetzt
konfigurieren) ausgewählt ist. Klicken
Sie auf Finish (Fertig stellen), um
fortzufahren.
G Als nächstes wird ein
Informationsfenster angezeigt (siehe
Abbildung G). Lesen Sie die
Informationen durch, und klicken Sie
auf OK.
H Das in Abbildung H dargestellte
Installationsfenster des Drucker-Ports
wird angezeigt, in dem der
Druckserver und die
angeschlossenen Drucker
aufgeführt werden. Wählen Sie
einen Drucker aus, und klicken Sie
auf Next (Weiter).
F
G
Sollte der Druckserver oder der
Drucker nicht aufgeführt sein, stellen
Sie sicher, dass die
Kabelverbindungen in Ordnung sind
und dass Druckserver und Drucker
eingeschaltet sind.
I Sie erhalten die Meldung, dass der
Druckserver-Port erfolgreich
hinzugefügt wurde (siehe
Abbildung I). Klicken Sie auf OK.
H
I
7
Page 24

J Das in Abbildung J dargestellte
Konfigurationsfenster des DruckerPorts wird angezeigt. Der von Ihnen
installierte Drucker wird angezeigt.
Klicken Sie auf die Schaltfläche
Connect (Verbinden), um zur
Drucker-Konfiguration eine
Verbindung mit dem Drucker
herzustellen. Um einen weiteren
Drucker hinzuzufügen, klicken Sie
auf die Schaltfläche Add New
Printer (Neuen Drucker hinzufügen).
Die Treiberinstallation ist abgeschlossen.
Herzlichen Glückwunsch!
Die Installation des Drucktreibers
ist abgeschlossen.
J
Weitere Informationen und Anweisungen zur
Fehlerbehebung finden Sie im Benutzerhandbuch
auf der Installations-CD-ROM. Sie können auch per
Telefon oder E-Mail weitere Unterstützung anfordern.
Unterstützung per E-Mail
support.de@linksys.com
Website
http://www.linksys.com/international oder
http://www.linksys.com/de
Linksys ist eine eingetragene Marke bzw . eine Mark e
von Cisco Systems, Inc. und/oder deren
Zweigorganisationen in den USA und anderen
Ländern. Copyright © 2003 Cisco Systems, Inc.
Alle Rechte vorbehalten.
PSUS4-DE-QIG-31010NC JL
8
Page 25

A Division of Cisco Systems, Inc.
®
Contenuto della confezione
• Un PrintServer per USB con switch a 4 porte
• Una presa di alimentazione
• Un CD di installazione con guida per l'utente
• Un cavo di rete Ethernet
•Un cavo USB
• Una Guida di installazione rapida
PrintServer per USB
con switch a 4 porte
Modello
WIRED
PSUS4 (IT)
Installazione rapida
Page 26

1
Prima di iniziare l'installazione fisica
prendere nota del nome predefinito
di PrintServer riportato sul fondo
dell'unità.
Collegamento di PrintServer
A Inserire un'estremità del cavo di
rete Ethernet in una delle porte
LAN di PrintServer (1-4, figura A).
B Connettere l'altra estremità
all'hub, allo switch o al router
collegato in rete. La distanza tra
PrintServer e l'altro dispositivo
non deve essere superiore a
100 metri.
C Il corrispondente LED numerato
si accenderà.
D Collegare la stampante alla
porta USB di PrintServer
mediante il cavo USB. Inserire
l'estremità Tipo A del connettore
in PrintServer (figura D) e
l'estremità del connettore Tipo B
nella stampante.
E Accendere la stampante.
F Inserire il cavo dell'adattatore di
corrente nella porta di
alimentazione di PrintServer,
situata sul lato sinistro (figure F).
A
D
IMPORTANTE! Utilizzare
l'adattatore di corrente fornito
con PrintServer. L'uso di un
adattatore diverso potrebbe
danneggiare PrintServer.
G Collegare l'adattatore di
corrente a una presa elettrica.
Il collegamento di PrintServer è
completato. Passare alla fase 2.
2
F
Page 27

2
Configurazione di PrintServer
A Inserire il Setup CD-ROM (CD-ROM
di installazione) nell'apposita unità
del computer. Il CD-ROM
dovrebbe essere eseguito
automaticamente. In caso
contrario, fare clic sul pulsante
Start e selezionare Esegui.
Immettere D:\setupWizard.exe
(dove "D" è la lettera dell'unità
CD-ROM) nel campo visualizzato.
B Quando appare la schermata di
benvenuto mostrata nella figura B
fare clic su Setup Wizard
(Impostazione guidata) per
continuare.
C Mentre la procedura guidata
ricerca PrintServer per USB viene
visualizzata la schermata riportata
nella figura C.
B
C
D Una volta che PrintServer è stato
individuato, apparirà la
schermata della figura D. Se è la
prima volta che si esegue
l'impostazione guidata, accertarsi
che l'opzione List only new
(unconfigured) Print Servers
(Elenca solo nuovi server di
stampa non configurati) sia
selezionata e che PrintServer sia
riportato come server predefinito.
Se si è configurato PrintServer in
precedenza selezionare l'opzione
List all compatible Print Servers
(Elenca tutti i server di stampa
compatibili). Fare clic su Next
(Avanti) per continuare.
E Verrà visualizzata la schermata
Password (figura E). Immettere
la password predefinita admin.
Fare clic su Enter (Invia).
D
E
3
Page 28

F Verrà visualizzata la schermata
Basic Settings (Impostazioni di
base, figura F). Se si desidera
cambiare il nome del dispositivo
o il nome del dominio, immetterli
rispettivamente nei campi Device
Name e Domain Name. Fare clic
su Next (Avanti).
G Viene visualizzata la schermata IP
Settings (Impostazioni IP) riportata
nella figura G. Se la rete utilizza un
router con un protocollo Internet
DHCP impostato per
l'assegnazione automatica degli
indirizzi IP, selezionare
Automatically obtain an IP
address (DHCP) (Ottieni
automaticamente un indirizzo IP).
Se la rete utilizza un indirizzo IP
statico, selezionare Set IP
configuration manually
(Configura IP manualmente) e
immettere l'indirizzo IP, la
maschera di sottorete e il
gateway negli appositi campi.
Fare clic su Next (Avanti).
F
G
H Viene visualizzata la schermata
Set PrintServer’s Password (Imposta
password PrintServer, figura H).
Se desidera cambiare la
password, immettere quella
corrente nella schermata Current
Password. Immettere la nuova
password nel campo New
Password e nel campo Verify
Password (Conferma password).
Fare clic su Next (Avanti).
4
H
Page 29

I Viene visualizzata la schermata di
conferma (figura I) in cui sono
riportate le nuove e le vecchie
impostazioni. Se si desidera
apportare delle modifiche fare
clic su No; se le impostazioni sono
corrette fare clic su Yes (Sì) per
salvare le modifiche.
J Al termine viene visualizzata la
schermata finale (figura J).
K Fare clic su User Install
(Installazione utente) al fondo
della schermata e passare alla
fase 3.B.
Configurazione di PrintServer
è completata.
I
J
5
Page 30

3
Linksys raccomanda di installare la
stampante e il suo driver prima di
installare il driver di PrintServer.
Installazione del driver per Windows
A Se non è ancora stato fatto,
inserire il CD-ROM di installazione
nell'unità CD-ROM del computer.
Quando appare la schermata di
benvenuto dell'impostazione
guidata fare clic su User Install
(Installazione utente) per
continuare.
B Apparirà la schermata di
benvenuto del driver di PrintServer;
fare clic su Next (Avanti) (figura B).
C Nella schermata successiva
(figura C) scegliere la
destinazione di installazione della
cartella del driver. Per cambiare la
destinazione, fare clic su Browse
(Sfoglia) e selezionare la
destinazione desiderata. Per
installare il driver nella posizione
predefinita fare clic su Next
(Avanti) per continuare.
B
C
D Successivamente appare la
schermata Select Program Folder
(Seleziona cartella di programma,
figura D). Un'icona verrà aggiunta
alla cartella di programma
elencata. È possibile cambiare il
nome della cartella di
programma. Fare clic su Next
(Avanti).
E Durante l'installazione del driver
potrebbe essere visualizzata la
schermata riportata nella figura E.
6
D
E
Page 31

Al termine dell'installazione del
F
driver apparirà la schermata
Setup Complete (Installazione
completata, figura F). Il driver
deve ancora essere configurato,
quindi accertarsi che l'opzione
Configure Print Driver now
(Configura driver ora) sia
selezionata. Fare clic su Finish
(Fine) per continuare.
G Successivamente viene
visualizzata la schermata
Information (Informazioni, figura
G). Leggere le informazioni e fare
clic su OK.
H Viene visualizzata la schermata
Printer Port Setup (Impostazione
della porta della stampante,
figura H) in cui sono elencati
PrintServer e le stampanti
collegate. Selezionare una
stampante e fare clic su Next
(Avanti).
F
G
Se PrintServer o la stampante
desiderata non sono elencati,
verificare che i cavi siano
collegati correttamente e che
PrintServer e la stampante siano
accesi.
I Verrà notificato che la porta di
PrintServer è stata aggiunta
(figura I). Fare clic su OK.
H
I
7
Page 32

J Viene visualizzata la schermata
Configure Printer Port (Configura
porta della stampante, figura J).
La stampante installata apparirà
nel campo. Fare clic sul pulsante
Connect (Connetti) per avviare la
connessione per la
configurazione. Per aggiungere
un'altra stampante fare clic sul
pulsante Add New Printer
(Aggiungi nuova stampante).
L'installazione del driver è completata.
Congratulazioni.
L'installazione di PrintServer
è completata.
J
Per ulteriori informazioni o istruzioni relative alla
risoluzione dei problemi, consultare la Guida per
l'utente nel CD-ROM di installazione. Ulteriore
assistenza è disponibile tramite e-mail o per
telefono.
Supporto e-mail
support.it@linksys.com
Sito Web
http://www.linksys.com/international
Linksys è un marchio registrato o un marchio di
Cisco Systems, Inc. e/o dei suoi affili ati negli Stati
Uniti e in altri paesi. Copyright © 2003 Cisco
Systems, Inc. Tutti i diritti riservati.
PSUS4-IT-QIG-321010NC JL
8
Page 33

A Division of Cisco Systems, Inc.
®
Conteúdo da embalagem
• Um servidor de impressão USB com comutador
de 4 portas
• Uma fonte de alimentação
• Um CD de configuração com Manual do
Utilizador
• Um cabo de rede Ethernet
• Um cabo USB
• Um Manual de Instalação Rápida
Servidor de impressão USB
com Comutador de 4 Portas
Modelo
WIRED
PSUS4 (PT)
Instalação rápida
Page 34

1
Antes de iniciar a instalação física, tenha
em atenção o nome predefinido do
servidor de impressão (PrintServer’s Default
Name) situado na parte inferior do servidor
de impressão, para futura utilização.
Ligar o servidor de impressão
A Ligue uma extremidade do cabo de
rede Ethernet a uma das portas LAN
do servidor de impressão
(1 a 4). (Consulte a Figura A.)
B Ligue a outra extremidade do cabo
ao hub, comutador ou router de
rede. A distância entre o servidor de
impressão e o outro dispositivo não
deverá exceder 100 metros.
C O LED numerado correspondente
ficará activo.
D Utilize o cabo USB para ligar a
impressora à porta USB do servidor
de impressão. Ligue a ficha do tipo
A ao servidor de impressão (Figura
D) e a ficha do tipo B à impressora.
E Ligue a impressora.
F Ligue o cabo do transformador à
porta de alimentação do servidor
de impressão, localizado no lado
direito do servidor de impressão.
(Consulte a Figura F.)
A
D
IMPORTANTE: Certifique-se de que
utiliza o transformador fornecido
juntamente com o servidor de
impressão. A utilização de um
transformador diferente poderia
danificar o servidor de impressão.
G Ligue o transformador a uma
tomada.
A ligação do servidor de impressão foi
concluída. Vá para o passo 2.
2
F
Page 35

2
Configurar o servidor de impressão
A Coloque o CD-ROM de
configuração na unidade de CDROM do computador. O CD-ROM
de configuração deverá ser
executado automaticamente. Se tal
não acontecer, clique no botão
Iniciar e escolha Executar. Na caixa
apresentada, introduza
D:\setupWizard.exe (se “D” for a
letra da unidade de CD-ROM).
B Quando for apresentado o ecrã
Welcome (Bem-vindo), Figura B,
clique em Setup Wizard (Assistente
de configuração).
C O ecrã apresentado na Figura C
será apresentado enquanto o Setup
Wizard (Assistente de configuração)
estiver a procurar o servidor de
impressão USB.
D Depois de o Setup Wizard (Assistente
de configuração) encontrar o
servidor de impressão USB, será
apresentado o ecrã na Figura D. Se
se tratar da primeira execução do
Setup Wizard (Assistente de
configuração), certifique-se de que
a opção List only new
(unconfigured) Print Servers (Listar
apenas os servidores de impressão
novos (não configurados)) está
seleccionada e que o servidor de
impressão é apresentado com o
respectivo nome predefinido. Se
tiver configurado anteriormente o
servidor de impressão, seleccione
List all compatible Print Servers
(Listar todos os servidores de
impressão compatíveis). Clique em
Next (Seguinte) para continuar.
B
C
D
E O ecrã Password (Palavra-passe),
Figura E, será apresentado em
seguida. Introduza a palavra-passe
predefinida admin no campo.
Clique em Enter.
E
3
Page 36

F Será apresentado o ecrã Basic
Settings (Definições básicas),
ilustrado na Figura F. Se pretender
alterar o Device Name (Nome do
dispositivo) ou Nome do domínio),
introduza o nome do dispositivo e o
nome do domínio nos respectivos
campos. Clique em Next (Seguinte).
G Em seguida, é apresentado o ecrã
IP Settings (Definições IP), Figura G.
Se a rede utilizar um router com a
definição de protocolo Internet de
DHCP que atribui automaticamente
um endereço IP, seleccione
Automatically obtain an IP address
(DHCP) (Obter automaticamente um
endereço IP (DHCP)). Se a rede
utilizar um endereço IP estático,
seleccione Set IP configuration
manually (Definir automaticamente
a configuração IP) e introduza o IP
Address (Endereço IP), a Subnet
Mask (Máscara de sub-rede) e o
Gateway nos campos fornecidos.
Clique em Next (Seguinte).
F
G
H Em seguida, é apresentado o ecrã
Set PrintServer’s Password (Definir
palavra-passe do servidor de
impressão), ilustrado na Figura H. Se
pretender alterar a palavra-passe,
introduza a palavra-passe actual no
ecrã Current Password (Palavrapasse actual). Introduza a nova
palavra-passe no campo New
Password (Nova palavra-passe) e,
em seguida, introduza-a novamente
no campo Verify Password (Verificar
palavra-passe). Clique em Next
(Seguinte).
4
H
Page 37

I
Em seguida, é apresentado o ecrã
Confirmation (Confirmação).
Consulte a Figura I. Serão
apresentadas as definições nova e
antiga. Se pretender efectuar uma
alteração, clique em No (Não). Se
as definições estiverem correctas e
pretender guardar estas alterações,
clique em Yes (Sim).
J O ecrã Congratulations (Parabéns),
mostrado na Figura J, será
apresentado quando a
configuração for concluída.
K Clique em User Install (Instalação do
utilizador) na parte inferior do ecrã e
vá para o Passo 3.B.
A configuração do servidor de impressão
está concluída.
I
J
5
Page 38

Instalação de controladores
3
A Linksys recomenda que configure a
impressora e que instale o respectivo
controlador antes de instalar o controlador
do servidor de impressão.
do Windows
A Se ainda não o tiver feito, coloque o
CD-ROM de configuração na
unidade de CD-ROM do
computador. Quando for
apresentado o ecrã Welcome (Bemvindo) do Setup Wlizard (Assistente
de configuração), clique em User
Install (Instalação do utilizador) para
continuar.
B Quando for apresentado o ecrã
Welcome (Bem-vindo) do Print Server
Driver (Controlador do servidor de
impressão), clique em Next
(Seguinte). Consulte a Figura B.
C Quando for apresentado o ecrã
seguinte, Figura C, escolha a
localização de instalação da pasta
do controlador. Se pretender que a
pasta seja instalada numa
localização diferente, clique no
botão Browse (Procurar) e
seleccione outra localização. Para
instalar o controlador na localização
predefinida, clique em Next
(Seguinte) para continuar.
B
C
D O ecrã seguinte a ser apresentado é
Select Program Folder (Seleccionar
pasta do programa), ilustrado na
Figura D. Será adicionado um ícone
à pasta do programa apresentada.
Poderá alterar o nome da pasta do
programa. Clique em Next
(Seguinte).
E O ecrã seguinte que poderá ser
apresentado durante a instalação
do controlador, é mostrado na
Figura E.
6
D
E
Page 39

Quando o controlador estiver
F
instalado, será apresentado o ecrã
Setup Complete (Instalação
concluída), Figura F. O controlador
da impressora continua a ter de ser
configurado, pelo que é necessário
certificar-se de que Configure Print
Driver now (Configurar controlador
da impressora agora) está
seleccionado. Clique em Finish
(Concluir) para continuar.
G Em seguida, é apresentado o ecrã
Information (Informações). Consulte
a Figura G. Leia as informações e,
em seguida, clique em OK.
H Será apresentado o ecrã Printer Port
Setup (Configuração da porta da
impressora), tal como se mostra na
Figura H e apresentará o servidor de
impressão e as impressoras ligadas.
Seleccione uma impressora e, em
seguida, clique em Next (Seguinte)
Se o servidor de impressão ou a
impressora não forem
apresentados, certifique-se de que
os cabos estão em boas condições
e que o servidor de impressão e a
impressora estão ligados.
F
G
H
I Será fornecida a informação a
indicar que a porta do servidor de
impressão foi adicionada com êxito.
(Figura I.) Clique em OK.
I
7
Page 40

J Será apresentado o ecrã Configure
Printer Port (Configurar porta da
impressora), da forma ilustrada na
Figura J. A impressora instalada será
apresentada no campo. Clique no
botão Connect (Ligar) para ligar a
impressora para configuração. Para
adicionar outra impressora, clique
no botão Add New Printer (Adicionar
nova impressora).
A instalação do controlador está
concluída.
Parabéns!
A instalação do servidor de impressão
está concluída.
J
Para obter informações adicionais ou ajuda para
resolução de problemas, consulte o Manual do
Utilizador no CD-ROM de configuração. Também
pode telefonar ou enviar uma mensagem de
correio electrónico para obter suporte.
Endereço de correio electrónico para
suporte
Brasil e Portugal
support.pt@linksys.com
América Latina
support.la@linksys.com
Web site
http://www.linksys.com/international
Linksys é uma marca registada ou marca
comercial da Cisco Systems, Inc. e/ou das
respectivas filiais nos E.U.A. e em outros países.
Copyright © 2003 Cisco Systems, Inc. Todos os
direitos reservados..
PSUS4-IT-QIG-31010NC JL
8
Page 41

A Division of Cisco Systems, Inc.
®
Contenido del paquete
• Un servidor de impresión para USB con
conmutador de 4 puertos
• Una fuente de alimentación externa
• Un CD de configuración con guía del usuario
• Un cable de red Ethernet
• Un cable USB
• Una guía de instalación rápida
Servidor de impresión para USB
con conmutador de 4 puertos
Modelo
WIRED
PSUS4 (ES)
Instalación rápida
Page 42

1
Antes de iniciar la instalación física, anote
el nombre predeterminado del servidor
de impresión en la parte inferior del
servidor de impresión por si lo necesita
más adelante.
Conexión del servidor de impresión
A Conecte un extremo del cable de
red Ethernet a uno de los puertos
LAN (numerados 1-4) del servidor
de impresión (consulte la figura A).
B Conecte el otro extremo al
concentrador, conmutador o
ruteador de red. La distancia entre
el servidor de impresión y el otro
dispositivo no debe sobrepasar los
100 metros (328 pies).
C Se enciende la luz con el número
correspondiente.
D Utilice el cable USB para conectar
la impresora al puerto USB del
servidor de impresión. Enchufe el
extremo del conector de tipo A en
el servidor de impresión (figura D) y
el extremo del conector de tipo B
en la impresora.
E Encienda la impresora.
F Conecte el cable del adaptador
de corriente al puerto de
alimentación del servidor de
impresión en el lado derecho del
mismo (consulte la figura F).
A
D
IMPORTANTE: Debe utilizar el
adaptador de corriente proporcionado
con el servidor de impresión. Si utiliza
un adaptador de corriente distinto
puede provocar daños al servidor de
impresión.
G Conecte el adaptador a la toma
de corriente.
La conexión del servidor de impresión
ha finalizado. Siga en el paso 2.
2
F
Page 43

2
Configuración del servidor de impresión
A Inserte el CD-ROM de configuración
en la unidad de
CD-ROM del ordenador. El CD de
configuración se ejecuta
automáticamente. Si no es así,
haga clic en el botón Inicio y
seleccione Ejecutar. En el cuadro
que aparece, escriba
D:\setupWizard.exe (donde “D” es
la letra de la unidad de CD-ROM).
B Cuando aparezca la pantalla de
bienvenida (figura B), haga clic en
Setup Wizard (Asistente de
configuración) para continuar.
C Aparece la pantalla de la figura C
mientras el asistente busca el
servidor de impresión USB.
D Una vez encontrado, aparece la
pantalla de la figura D. Si es la
primera vez que ejecuta el
asistente de configuración, debe
seleccionar la opción List only new
(unconfigured) Print Servers (Sólo
los servidores de impresión nuevos
(sin configurar) para que aparezca
una lista de los servidores de
impresión por el nombre
predeterminado. Si ya ha
configurado el servidor, seleccione
List all compatible Print Servers
(Todos los servidores de impresión
compatibles). Haga clic en Next
(Siguiente) para continuar.
B
C
D
E Aparece la pantalla de contraseña,
figura E. Escriba la contraseña
predeterminada admin en el
campo correspondiente. Haga clic
en Enter (Entrar).
E
3
Page 44

F Aparece la pantalla Basic Settings
(Parámetros básicos) de la figura F.
Si desea cambiar el nombre del
dispositivo o del dominio, escriba
los nombres en los campos
correspondientes (Device Name o
Domain Name respectivamente).
Haga clic en Next (Siguiente).
G A continuación aparece la pantalla
IP Settings (Parámetros IP), Figura G.
Si la red utiliza un ruteador con un
parámetro IP DHCP que asigna
automáticamente una dirección IP,
seleccione Automatically obtain
an IP address (DHCP) (Obtener una
dirección IP automáticamente
(DHCP)). Si por el contrario, la red
utiliza una dirección IP estática,
seleccione Set IP configuration
manually (Establecer la
configuración IP manualmente) y
especifique la dirección IP (IP
Address), la máscara de subred
(Subnet Mask) y la puerta de enlace
(Gateway) en los campos
correspondientes. Haga clic en
Next (Siguiente).
F
G
H Aparece la pantalla para
establecer la contraseña del
servidor de impresión (Set Print
Server's Password; consulte la figura
H). Si desea cambiar la contraseña,
escriba la contraseña actual en la
pantalla Current Password
(Contraseña actual). Escriba la
contraseña nueva en el campo
New Password (Nueva contraseña)
y, a continuación, vuelva a
escribirla en el campo Verify
Password (Confirmar contraseña).
Haga clic en Next (Siguiente).
4
H
Page 45

I A continuación aparece la pantalla
de confirmación (consulte la figura
I). Aparecen los parámetros
antiguos y nuevos. Si desea realizar
algún cambio, haga clic en No. Si
los parámetros son correctos y
desea guardar los cambios, haga
clic en Yes (Sí).
J Una vez finalizada la instalación,
aparece la pantalla de
enhorabuena de la figura J.
K Haga clic en User Install
(Instalación para usuario) al final de
la pantalla y siga en el paso 3.B.
Ha finalizado la configuración
del servidor de impresión.
I
J
5
Page 46

3
Linksys recomienda instalar la impresora y
el controlador antes de instalar el
controlador del servidor de impresión.
Instalación del controlador en Windows
A Introduzca el CD de configuración
en la unidad de CD-ROM, si aún no
lo ha insertado. Cuando aparezca
la pantalla de bienvenida el
asistente de configuración (Setup
Wizard's Welcome), haga clic en
User Install (Instalación para
usuario) para continuar.
B Cuando aparezca la pantalla de
bienvenida del controlador del
servidor de impresión (Print Server
Driver Welcome), haga clic en Next
(Siguiente). Consulte la figura B.
C Cuando aparezca la pantalla de la
figura C, elija la carpeta donde se
instalará la carpeta del controlador.
Si desea instalarla en otro lugar,
haga clic en el botón Browse
(Examinar) y seleccione otra
ubicación. Si desea instalar el
controlador en la ubicación
predeterminada, haga clic en Next
(Siguiente) para continuar.
B
C
D A continuación, aparece la
pantalla Select Program Folder
(Seleccionar carpeta de
programas) de la figura D. Se
agrega un icono a la carpeta de
programas. Puede cambiar el
nombre de la carpeta. Haga clic
en Next (Siguiente).
E A continuación aparece la pantalla
de la figura E mientras se instala el
controlador.
6
D
E
Page 47

Una vez instalado el controlador,
F
aparece la pantalla Setup
Complete (Instalación finalizada)
de la figura F. Es necesario
configurar el controlador de
impresión. Para ello, seleccione la
opción Configure Print Driver now
(Configurar controlador de
impresión ahora). Haga clic en
Finish (Finalizar) para continuar.
G A continuación, aparece la
pantalla de información. Consulte
la figura G. Lea la información y, a
continuación, haga clic en OK
(Aceptar).
H Aparece la pantalla de
configuración del servidor de
impresión (Printer Port Setup) de la
figura H, donde se muestran el
servidor de impresión y las
impresoras conectadas.
Seleccione una impresora y haga
clic en Next (Siguiente).
F
G
Si no aparecen el servidor de
impresión ni la impresora,
compruebe que los cables están
bien conectados y que el servidor
está encendido.
I Se le informará de que el puerto del
servidor de impresión se ha
agregado correctamente (consulte
la figura I). Haga clic en OK
(Aceptar).
H
I
7
Page 48

J Aparece la pantalla Configure
Printer Port (Configurar puerto de la
impresora) de la figura J. Aparece
la impresora instalada en el campo
correspondiente. Si desea conectar
la impresora para configurarla,
haga clic en el botón Connect
(Conectar). Para agregar otra
impresora, haga clic en el botón
Add New Printer (Agregar nueva
impresora).
La instalación del
controlador ha finalizado.
Enhorabuena.
Ha finalizado la instalación
del servidor de impresión.
J
Para obtener información adicional o ayuda para
resolución de problemas, consulte la guía del
usuario proporcionada en el CD-ROM. También
puede solicitar más asistencia por teléfono o
correo electrónico.
Asistencia por correo electrónico
España
support.es@linksys.com
Latinoamérica
support.la@linksys.com
Página Web
http://www.linksys.com/international
Linksys es una marca comercial registrada o
marca comercial de Cisco Systems, Inc. y/o sus
filiales de EE.UU. y otros países. Copyright ©
2003 Cisco Systems, Inc. Todos los derechos
reservados.
PSUS4-ES-QIG-31010NC JL
8
 Loading...