


Wireless-G Range Expander
Copyright and Trademarks
Specifications are subject to change without notice. Linksys is a registered trademark or trademark of Cisco
Systems, Inc. and/or its affiliates in the U.S. and certain other countries. Copyright © 2004 Cisco Systems, Inc. All
rights reserved. Other brands and product names are trademarks or registered trademarks of their respective
holders.
How to Use this Guide
Your guide to the Wireless-G Range Expander has been designed to make understanding networking with the
Range Expander easier than ever. Look for the following items when reading this User Guide:
This checkmark means there is a note of interest and
is something you should pay special attention to while
using the Range Expander.
This exclamation point means there is a caution or
warning and is something that could damage your
property or the Range Expander.
This question mark provides you with a reminder about
something you might need to do while using the Range
Expander.
In addition to these symbols, there are definitions for technical terms that are presented like this:
word: definition.
Also, each figure (diagram, screenshot, or other image) is provided with a figure number and description, like
this:
Figure numbers and descriptions can also be found in the "List of Figures" section.
wre54g-UG-40618A KL
Figure 0-1: Sample Figure Description

Wireless-G Range Expander
Table of Contents
Chapter 1: Introduction 1
Welcome 1
What’s in this Guide? 2
Chapter 2: Planning your Wireless Network 4
Network Topology 4
Roaming 4
Network Layout 5
Chapter 3: Getting to Know the Wireless-G Range Expander 6
The Front Panel 6
The Side Panel 6
The Power Plate 7
Chapter 4: Connecting the Wireless-G Range Expander 8
Wall Mounting 9
Chapter 5: Setting Up the Wireless-G Range Expander 10
Chapter 6: Configuring the Wireless-G Range Expander 15
Overview 15
The Setup Tab 16
Appendix A: Troubleshooting 20
Common Problems and Solutions 20
Frequently Asked Questions 20
Appendix B: Wireless Security 24
Security Precautions 24
Security Threats Facing Wireless Networks 24
Appendix C: Upgrading Firmware 27
Appendix D: Windows Help 28
Appendix E: Glossary 29
Appendix F: Specifications 32
Appendix G: Warranty Information 33
Appendix H: Regulatory Information 34
Appendix I: Contact Information 38

Wireless-G Range Expander
List of Figures
Figure 3-1: The Front Panel 6
Figure 3-2: The Power Plate with Cord 7
Figure 3-3: The Two-Prong Power Plate 7
Figure 4-1: Wall-mounting the Range Expander with the Power Plate with Cord 9
Figure 4-2: Wall-mounting the Range Expander with the Two-Prong Power Plate
Figure 5-1: The Setup Wizard’s Welcome screen 10
Figure 5-2: Connecting to an access point 11
Figure 5-3: Confirm Wireless Settings 11
Figure 5-4: Cannot find Wireless Network 11
Figure 5-5: Choose an access point 11
Figure 5-6: The Security Settings screen 12
Figure 5-7: Choose the Range Expander 12
Figure 5-8: The Password request screen 12
Figure 5-9: The Security Settings screen 13
Figure 5-10: The Configure Network Address Settings screen 13
Figure 5-11: The Confirm New Settings screen 14
Figure 5-12: The Congratulations screen 14
Figure 6-1: Password Screen 15
Figure 6-2: Setup Tab - Basic Setup 16
Figure 6-3: WEP Security screen 17
Figure 6-4: Setup Tab - Password 18
Figure 6-5: File Download 18
Figure 6-6: Setup Tab - Help 19
Figure 6-7: Firmware Upgrade 19
9
Figure C-1: Upgrade Firmware 27

Wireless-G Range Expander
Chapter 1: Introduction
Welcome
Thank you for choosing the Wireless-G Range Expander. This Range Expander will allow you to expand your
network beyond the range of your current access point or wireless router.
access point - a device that allows wireless-equipped
computers and other devices to communicate with a wired
network. Also used to expand the range of a wireless network.
How does the Range Expander do this? Once on your network, the Range Expander repeats the signal to all
devices within its range. By placing the Range Expander at the furthest edge of your access point or wireless
router’s signal, it could conceivably double the area of your network.
But what does all of this mean?
Networks are useful tools for sharing computer resources. You can access one printer from different computers
and access data located on another computer's hard drive. Networks are even used for playing multiplayer video
games. So, networks are not only useful in homes and offices, they can also be fun.
PCs equipped with wireless cards and adapters can communicate without cumbersome cables. By sharing the
same wireless settings, within their transmission radius, they form a wireless network. While access points and
wireless routers bridge wireless networks and wired networks, the Range Expander can then take that signal for
networks that use the 802.11b and 802.11g standards and extend it beyond its current range.
Use the instructions in this Guide to help you connect the Range Expander, set it up, and configure it to expand
the range of your Wireless-B and Wireless-B networks. These instructions should be all you need to get the most
out of the Range Expander.
network - a series of computers or devices
connected for the purpose of data sharing, storage,
and/or transmission between users.
router - a networking device that connects
multiple networks together.
adapter - a device that adds network functionality to your PC.
802.11b - an IEEE wireless networking standard that
specifies a maximum data transfer rate of 11Mbps
and an operating frequency of 2.4GHz.
802.11g - an IEEE wireless networking standard that
specifies a maximum data transfer rate of 54Mbps, an
operating frequency of 2.4GHz, and backward
compatibility with 802.11b devices.
Chapter 1: Introduction
Welcome
1

Wireless-G Range Expander
What’s in this Guide?
This user guide covers the steps for setting up and using the Wireless-G Range Expander.
• Chapter 1: Introduction
This chapter describes the Range Expander’s applications and this User Guide.
• Chapter 2: Planning Your Wireless Network
This chapter discusses a few of the basics about wireless networking.
• Chapter 3: Getting to Know the Wireless-G Range Expander
This chapter describes the physical features of the Range Expander.
• Chapter 4: Connecting the Wireless-G Range Expander
This chapter describes the steps for connecting the Range Expander to your wireless network.
• Chapter 5: Setting up the Wireless-G Range Expander
This chapter instructs you on how to use the Range Expander’s Setup Wizard and configure the Range
Expander.
• Chapter 6: Configuring the Wireless-G Range Expander
This chapter show you how to configure the Range Expander with the Web Utility.
• Appendix A: Troubleshooting
This appendix describes some potential problems and solutions, as well as frequently asked questions,
regarding installation and use of the Adapter.
• Appendix B: Wireless Security
This appendix discusses security issues regarding wireless networking and measures you can take to help
protect your wireless network.
• Appendix C: Windows Help
This appendix describes how you can use Windows Help for instructions about networking, such as installing
the TCP/IP protocol.
• Appendix D: Glossary
This appendix gives a brief glossary of terms frequently used in networking.
• Appendix E: Specifications
This appendix provides the Range Expander’s technical specifications.
Chapter 1: Introduction
What’s in this Guide?
2

Wireless-G Range Expander
• Appendix F: Warranty Information
This appendix supplies the Range Expander’s warranty information.
• Appendix G: Regulatory Information
This appendix supplies the Range Expander’s regulatory information.
• Appendix H: Contact Information
This appendix provides contact information for a variety of Linksys resources, including Technical Support.
Chapter 1: Introduction
What’s in this Guide?
3

Wireless-G Range Expander
Chapter 2: Planning your Wireless Network
Network Topology
A wireless network is a group of computers, each equipped with one wireless adapter. Computers in a wireless
network must be configured to share the same radio channel. Several PCs equipped with wireless cards or
adapters can communicate with one another to form an ad-hoc network.
Linksys wireless adapters also provide users access to a wired network when using an access point or wireless
router. An integrated wireless and wired network is called an infrastructure network. Each wireless PC in an
infrastructure network can talk to any computer in a wired network infrastructure via the access point or wireless
router.
An infrastructure configuration extends the accessibility of a wireless PC to a wired network, and can double the
effective wireless transmission range for two wireless adapter PCs. Since an access point is able to forward data
within a network, the effective transmission range in an infrastructure network can be doubled.
Roaming
Infrastructure mode also supports roaming capabilities for mobile users. Roaming means that you can move your
wireless PC within your network and the access points will pick up the wireless PC's signal, providing that they
both share the same channel and SSID.
Should you consider roaming, choose a feasible radio channel and optimum access point position. Proper access
point positioning combined with a clear radio signal will greatly enhance performance.
topology: the physical layout of a network
ad-hoc: a group of wireless devices
communicating directly with each other (peerto-peer) without the use of an access point.
infrastructure: a wireless network that is
bridged to a wired network via an access point.
roaming: the ability to take a wireless device from one access
point's range to another without losing the connection.
SSID: your wireless network's name.
Chapter 2: Planning your Wireless Network
Network Topology
4

Wireless-G Range Expander
Network Layout
Linksys wireless access points and wireless routers have been designed for use with 802.11b, and 802.11g
products. With 802.11g products communicating with the 802.11b standard and some products incorporating
both “a” and “g”, products using these standards can communicate with each other.
Access points and wireless routers are compatible with 802.11b and 802.11g adapters, such at the PC Cards for
your laptop computers, PCI Card for your desktop PC, and USB Adapters for when you want to enjoy USB
connectivity. Wireless products will also communicate with the wireless PrintServer.
When you wish to connect your wired network with your wireless network, network ports on access points and
wireless routers can be connected to any of Linksys's switches or routers.
With these, and many other, Linksys products, your networking options are limitless. Go to the Linksys website at
www.linksys.com for more information about wireless products.
Chapter 2: Planning your Wireless Network
Network Layout
5

Wireless-G Range Expander
Chapter 3: Getting to Know the Wireless-G Range Expander
The Front Panel
The Range Expander's LEDs, where information about network activity is displayed, are located on the front
panel. In addition, the Range Expander’s antenna is adjustable and located on the front panel. Make sure the
antenna is positioned straight up into the air, however the Range Expander is positioned.
Power Blue/Red. The Power LED lights up when the Range Expander is powered on. This light will
appear blue when the Range Expander has connected to a functioning network. When there is
no network with which to connect, this light will appear red.
Link Blue. The Link LED lights whenever there is a successful wireless connection and will flash
when there is network activity.
The Side Panel
On the Range Expander's side panel, you will find the Reset and Auto configuration buttons.
Auto configuration The Auto configuration button can be used to easily connect the Range Expander to the
nearest wireless network, via an access point or wireless router. Simply connect the power
and press the Auto configuration button. Your wireless network must have WEP disabled
for this feature to function.
Reset Button There are two ways to reset the Range Expander's factory defaults. Either press the Reset
Button, for approximately ten seconds, or restore the defaults from the Password tab in
the Range Expander's Web-Based Utility.
Chapter 3: Getting to Know the Wireless-G Range Expander
The Front Panel
Figure 3-1: The Front Panel
wep - a method of encrypting network data transmitted
on a wireless network for greater security.
Important: Resetting the Range Expander will
erase all of your settings (WEP Encryption and
Wireless settings, etc.) and replace them with the
factory defaults. Do not reset the Range Expander
if you want to retain these settings.
6

Wireless-G Range Expander
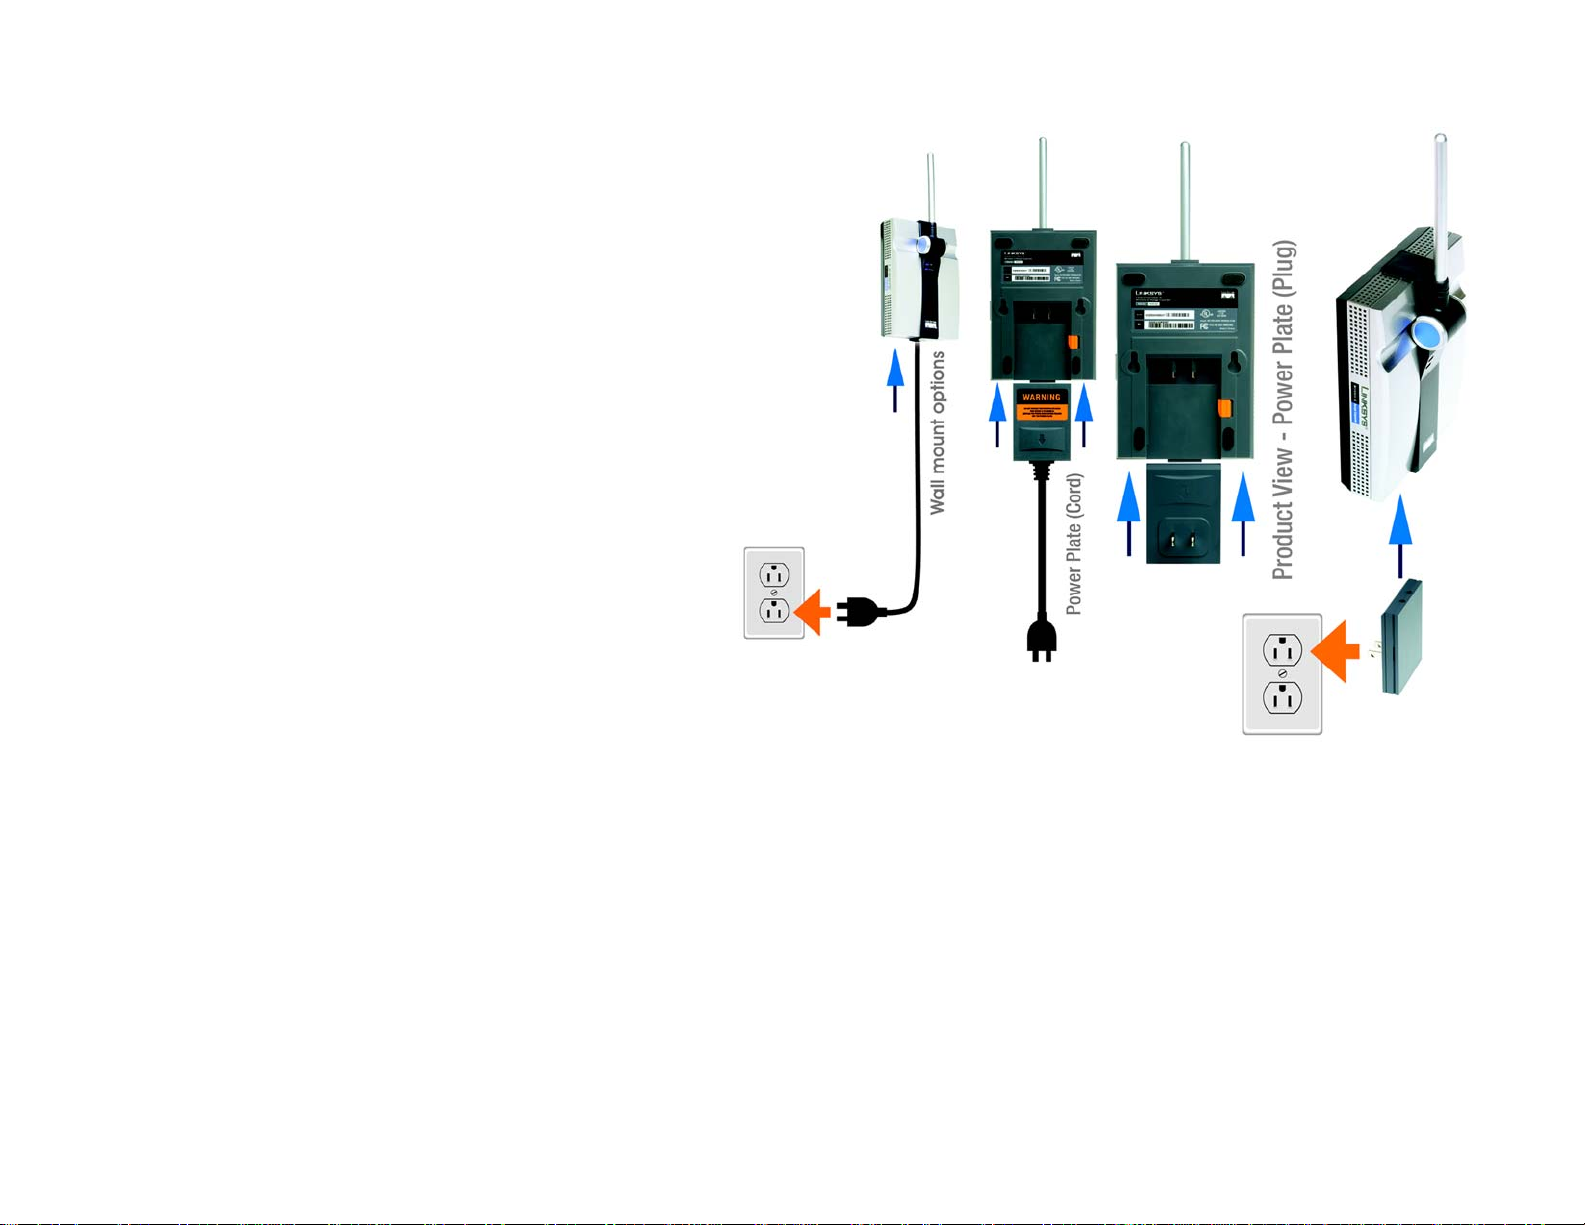
The Power Plate
The back of the Range Expander has a recess where its power plates can be connected. Two
power plates come with the Range Expander, one with two prongs for connecting directly to a
power outlet, and another with a cord to reach a power outlet.
These power plates are slid into the recess and are fully connected when the orange tab snaps
into place. To remove the power plate, slide the tab to the right and slide out the power plate.
Always unplug the Range Expander before removing the power plate.
Chapter 3: Getting to Know the Wireless-G Range Expander
The Power Plate
Figure 3-3: The Two-
Prong Power Plate
Figure 3-2: The Power Plate
with Cord
7

Wireless-G Range Expander
Chapter 4: Connecting the Wireless-G Range Expander
Since the Range Expander does not physically connect to your network, through cables, etc., connection is very
simple.
1. Locate an optimum location for the Range Expander. The best placement is usually at the edge of your
wireless network.
2. Fix the direction of the antenna. Try to place it in a position that will best cover your wireless network.
Normally, the higher you place the Range Expander’s antenna, the better the performance will be. The
antenna's position enhances the receiving sensitivity.
3. Connect the appropriate power plate and connect it to a power outlet. You should always plug your
networking gear into a surge protector.
tcp/ip: a set of instructions PCs use to
communicate over a network.
HAVE YOU: Enabled TCP/IP on your PCs? PCs
communicate over the network with this
protocol. Refer to Appendix D: Windows Help
for more information on TCP/IP.
4. If you would like to use the Range Expander’s Auto configuration button, disable your wireless network’s WEP
security setting. Then, press the Auto configuration button. It will then automatically detect your wireless
network and configure itself with those settings. Once this is done, you can once again enable WEP security.
If you would rather configure the Range Expander with the Setup Wizard included, you can leave WEP security
in place. WEP Security should always be enabled.
Now that the hardware installation is complete, proceed to Chapter 5: Setting Up the Wireless-G Range Expander,
for directions on how to set up the Range Expander with the Setup Wizard.
hardware: the physical aspect of computers,
telecommunications, and other information technology devices.
NOTE: The Auto configuration button can be
used to setup the Range Expander simply
when you have disabled WEP security on your
wireless network.
Chapter 4: Connecting the Wireless-G Range Expander
8
Wireless-G Range Expander
Wall Mounting
For more convenient placement, the Range Expander can be positioned/mounted
on any wall. There are two ways to do this.
With the Power Plate with Cord. Use the Wall Mounting Kit included with the
Range Expander
With the Two-Pronged Power Plate. Wall-mounting can be achieved simply by
plugging the Range Expander into a socket.
You should always plug your networking gear into a surge protector.
Chapter 4: Connecting the Wireless-G Range Expander
Wall Mounting
Figure 4-1: Wall-mounting the Range
Expander with the Power Plate with Cord
Figure 4-2: Wall-mounting the Range
Expander with the Two-Prong Power Plate
9

Wireless-G Range Expander
Chapter 5: Setting Up the Wireless-G Range Expander
Now that you've placed the Range Expander within your wireless network, you are ready to begin setting it up.
This Setup Wizard will take you through all the steps necessary to configure the Range Expander.
1. Insert the Setup Wizard CD into your PC's CD-ROM drive. Your PC must be communicating with your wireless
network to set up the Range Expander.
2. The Setup Wizard's Welcome screen should appear on your monitor. If it does not, this means the Setup
Wizard is not automatically running as it should. Start the Setup Wizard manually by clicking the Start button,
selecting Run, and typing d:\setup.exe (where "D" is your PC's CD-ROM drive). Click the Setup button to
continue this Setup Wizard. Clicking the User Guide button opened this Guide. To exit this Setup Wizard, click
the Exit button.
NOTE: You won’t need to use the Setup Wizard, if
you set up the Range Expander with the Auto
configuration button. The Auto configuration button
can be used to setup the Range Expander simply
when you have disabled WEP security on your
wireless network.
Chapter 5: Setting Up the Wireless-G Range Expander
Figure 5-1: The Setup Wizard’s Welcome screen
10
 Loading...