

Linksys EFR240 Owner's Manual
EtherFast®Series
Instant RAID
Use this guide to install:
Linksys EtherFast Instant RAID
(EFR240)
User Guide

COPYRIGHT & TRADEMARKS
Copyright © 2000 Linksys, All Rights Reserved. EtherFast is a registered trademark of
Linksys. Microsoft, Windows, and the Windows logo are registered trademarks of
Microsoft Corporation. All other trademarks and brand names are the property of their
respective proprietors.
LIMITED WARRANTY
Linksys guarantees that every EtherFast Instant RAID is free from physical defects in
material and workmanship under normal use for ONE year from the date of purchase. If
the product proves defective during this warranty period, call Linksys Customer
Support in order to obtain a Return Authorization Number. BE SURE TO HAVE YOUR
PROOF OF PURCHASE ON HAND WHEN CALLING. RETURN REQUESTS CANNOT
BE PROCESSED WITHOUT PROOF OF PURCHASE. When returning a product, mark
the Return Authorization Number clearly on the outside of the package and include
your original proof of purchase. All customers outside of the United States of America
and Canada shall be held responsible for shipping and handling charges.
IN NO EVENT SHALL LINKSYS’ LIABILITY EXCEED THE PRICE PAID FOR THE PRODUCT FROM DIRECT, INDIRECT, SPECIAL, INCIDENTAL, OR CONSEQUENTIAL DAMAGES RESULTING FROM THE USE OF THE PRODUCT, ITS ACCOMPANYING SOFTWARE, OR ITS DOCUMENTATION. LINKSYS OFFERS NO REFUNDS FOR ITS PRODUCTS.
Linksys makes no warranty or representation, expressed, implied, or statutory, with
respect to its products or the contents or use of this documentation and all accompanying software, and specifically disclaims its quality, performance, merchantability, or
fitness for any particular purpose. Linksys reserves the right to revise or update its
products, software, or documentation without obligation to notify any individual or entity.
Please direct all inquiries to:
Linksys P.O. Box 18558, Irvine, CA 92623.
FCC STATEMENT
This equipment has been tested and complies with the specifications for a Class B digital device, pursuant to Part 15 of the FCC Rules. These limits are designed to provide
reasonable protection against harmful interference in a residential installation. This
equipment generates, uses, and can radiate radio frequency energy and, if not
installed and used according to the instructions, may cause harmful interference to
radio communications. However, there is no guarantee that interference will not occur
in a particular installation. If this equipment does cause harmful interference to radio or
television reception, which is found by turning the equipment off and on, the user is
encouraged to try to correct the interference by one or more of the following measures:
• Reorient or relocate the receiving antenna
• Increase the separation between the equipment or device
• Connect the equipment to an outlet other than the receiver’s
• Consult a dealer or an experienced radio/TV technician for assistance
008
Linksys EtherFast® Series Instant RAID
Introduction
The EtherFast Instant RAID from Linksys is the perfect solution for any
small business or workgroup that needs extra storage. A massive 40 Gigabytes
of network attached storage ensures that you’ll have the storage space you
demand--that means no more worrying about losing valuable data.
But it doesn’t stop there. The Instant RAID’s hot-swap capability allows you
to hot-swap either hard drive with zero down time, effectively increasing your
productivity, making the Instant RAID the easiest way to add disk storage and
printer sharing to virtually any Windows-based LAN.
To compliment the seamless network integration, every Instant RAID also
boasts an impressive array of advanced features in one space-saving design.
Automatic data mirroring, disk rebuilding, and security access control provide the ultimate in network reliability and management.
The EtherFast Instant RAID from Linksys: Storage, Security, and Peace of
Mind.
RAID Features
• Continuous Data Mirroring
• Automatic Disk Rebuilding When Replacing a Hard Drive
• Hot-Swappable Drives
• Status Indicators
• Level 1 RAID Specs
General Features
• Auto-Sensing Connection for Easy LAN Installation
• Supports Windows-based LAN
• OS Tool-Based File Management
• Acts as a DHCP Server or Client
• Full Administrator Control
Table of Contents
Introduction 1
Package Contents and System Requirements 2
Getting to Know the Instant RAID 3
Rear Panel 3
Front Panel 5
Buzzer 6
Basic Installation and Configuration 7
Installing the Instant RAID 7
Configuring the Instant RAID 8
Administration 12
Overview of Administrative Options 12
The Web-Based Administrative Interface 13
The Administrative Menu: Configuration 14
The Administrative Menu:Storage Management 16
Managing Shares, Groups,and Users 17
Nested Shares 18
Common Administrative Tasks 20
Maintaining the RAID Sub-System 21
Windows Client Setup 22
Introduction 22
TCP/IP Setup for Windows 95 and 98 22
TCP/IP Setup for Windows 2000 27
Using the RAID’s Print Server 32
Troubleshooting 34
Specifications 36
Customer Support 38
1
Features
The Linksys EtherFast Instant RAID
NNoottee::
Linksys highly recommends that you regularly
backup the files on your Instant RAID. In no instance
will Linksys perform data recovery for lost data or files.
Instant RAID
3
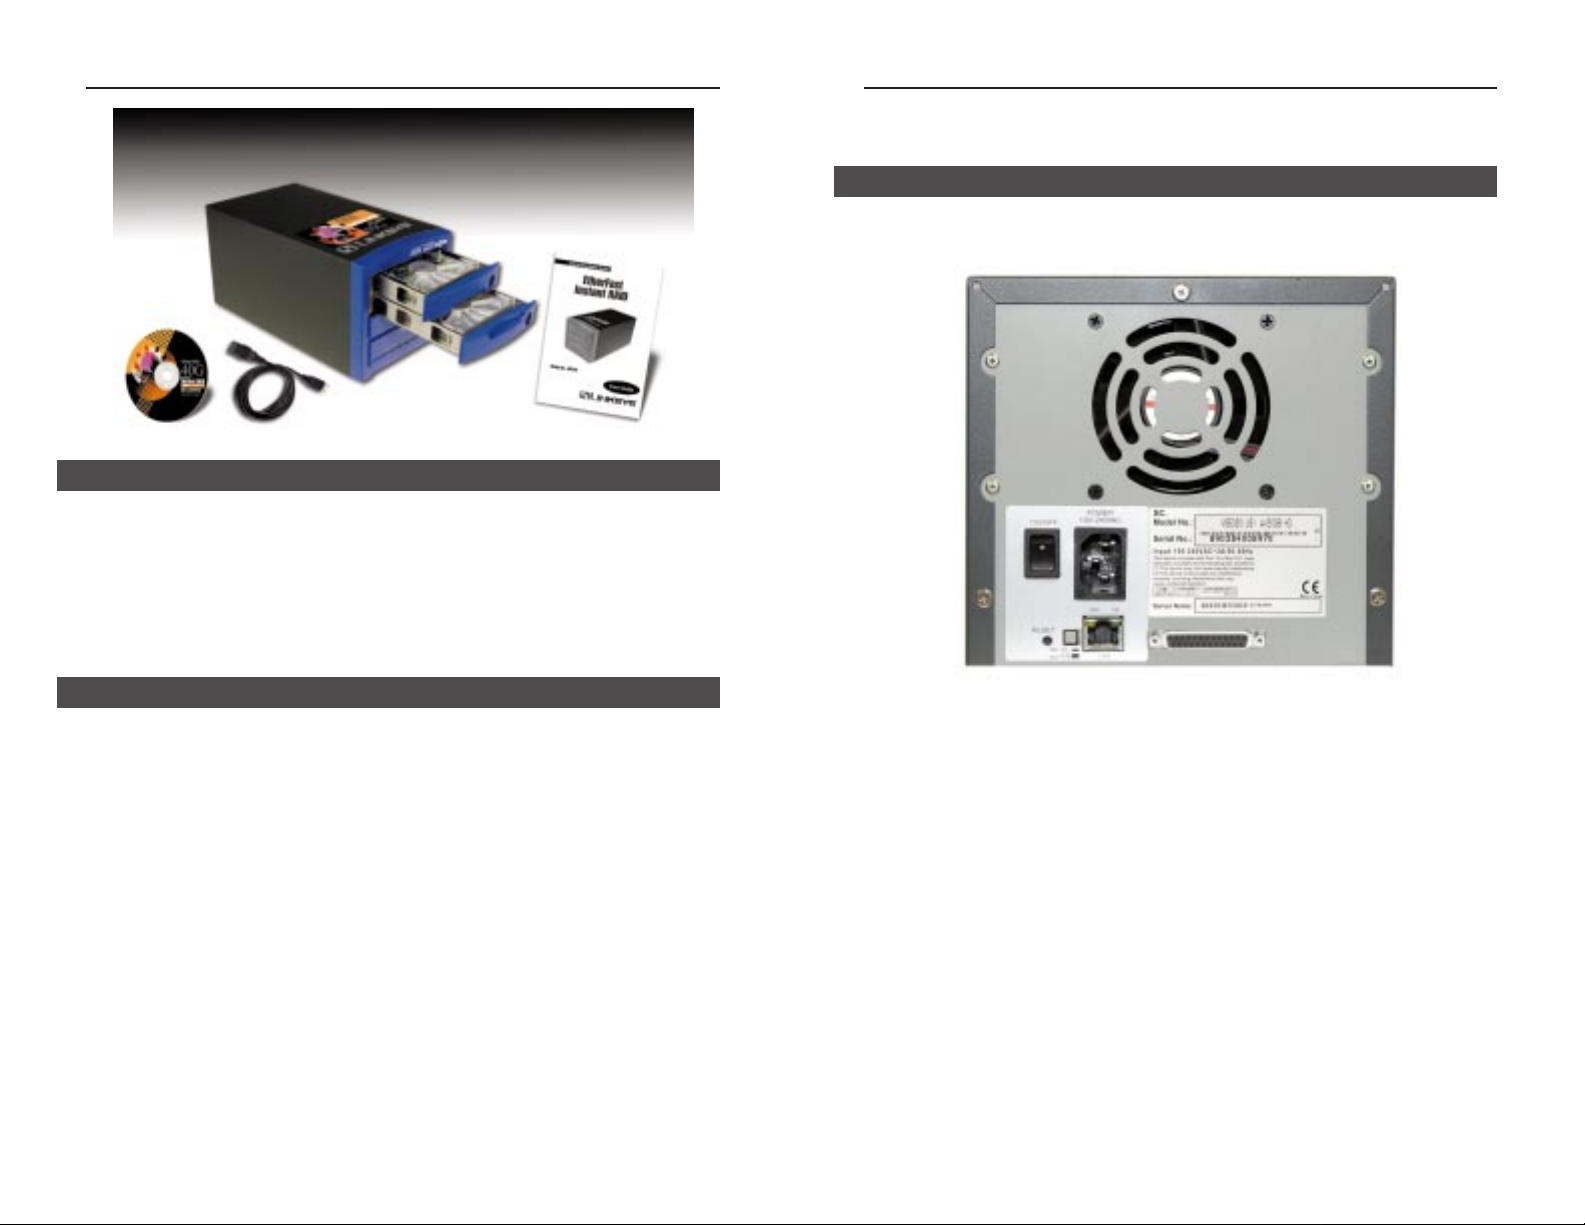
Getting to Know the Instant RAID
All of the Instant RAID’s connections and switches are on the rear panel, as
seen below.
Power Input The AC Cord plugs into the power input port.
Power Switch The power switch is a spring-loaded soft switch
which powers on and powers off the Instant RAID.
If OFF, press once to turn it on. If ON, press once
to start the Shutdown Sequence. While shutting
down, the READY LEDs will blink.
Reset IP Button If the Instant RAID’s IP Address or password is
lost, press and release this button. The Instant
RAID will beep once to indicate that the reset was
successful. The Instant RAID password will be
cleared, and its IP Address set to 192.168.0.2, with
a Network Mask of 255.255.255.0.
You can now connect to the Instant RAID and set
the correct IP Address and password.
Linksys EtherFast® Series
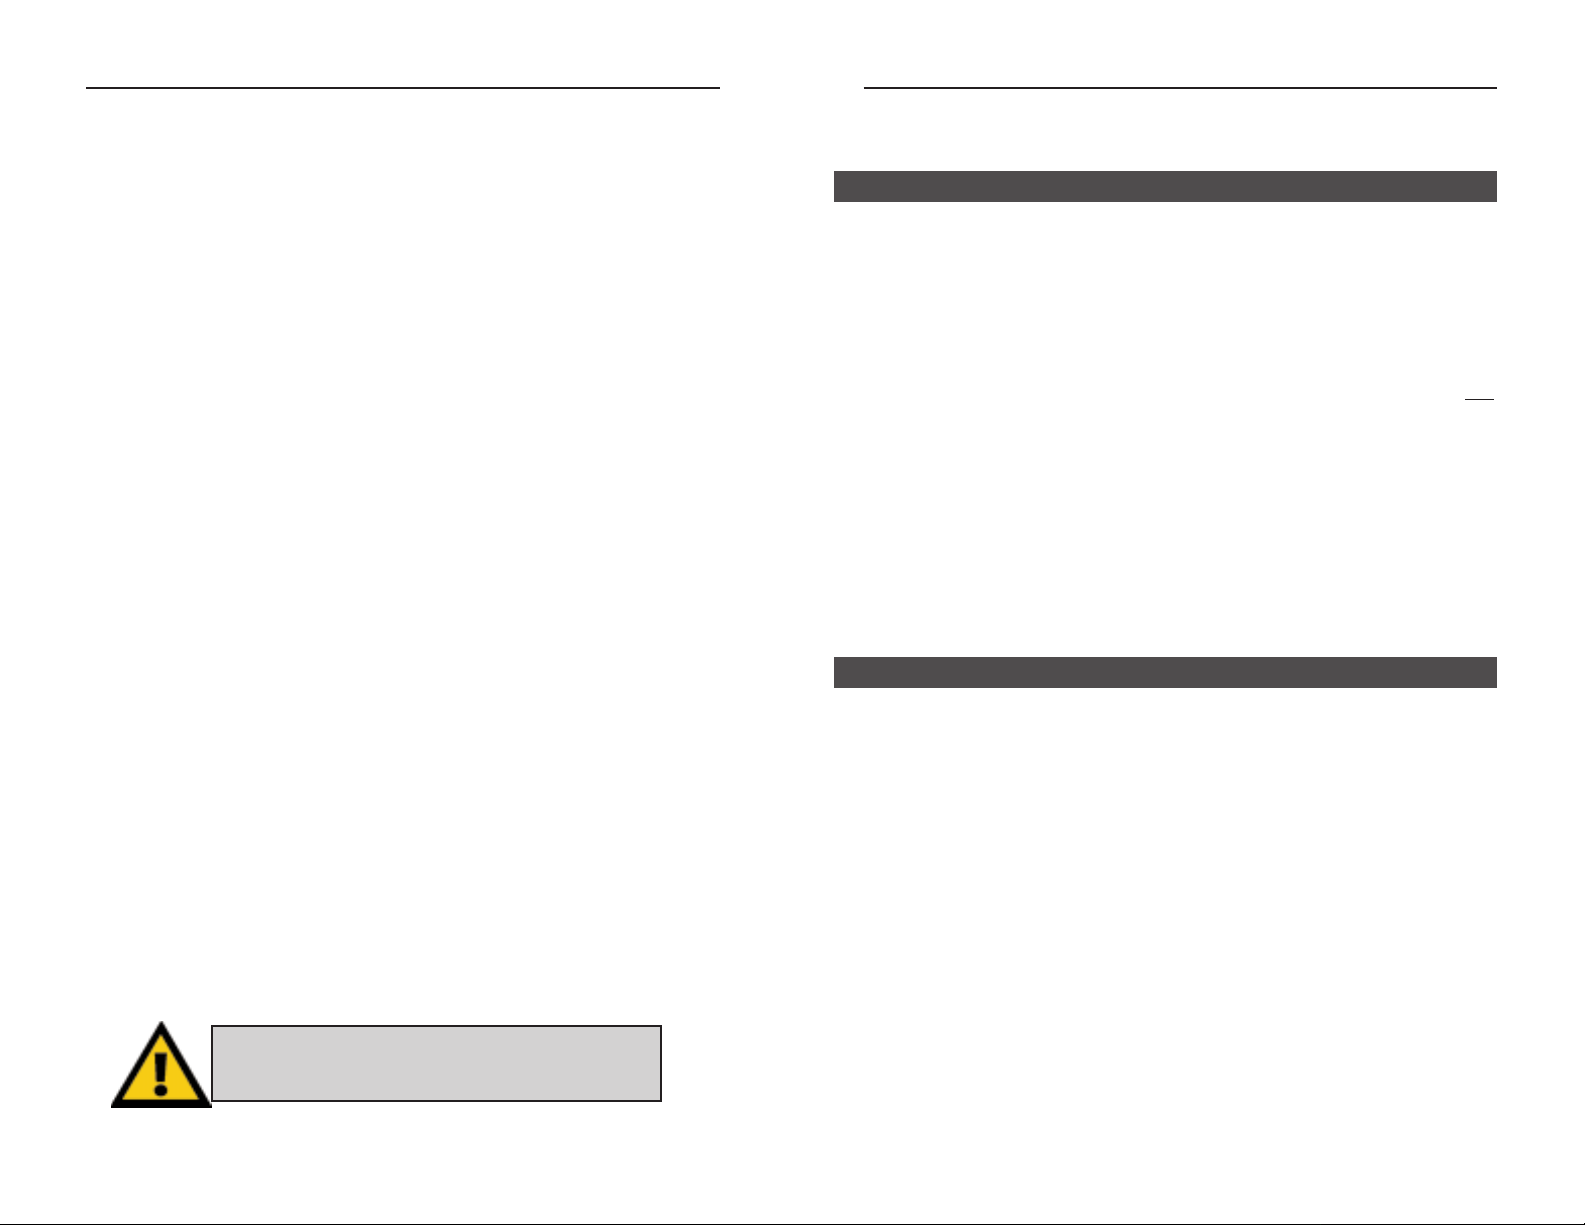
• One Linksys EtherFast Instant RAID
• AC Power Cord
• UTP Category 5 Network Cable with RJ-45 Connectors (not pictured)
• Instant RAID Setup Utility
• Keys (not pictured)
• User Guide and Registration Card
• Windows 95, 98, 2000, NT 4.0, or Millennium Operating System
• 10BaseT or 100BaseTX Ethernet Network
• TCP/IP Protocol
• CD-ROM Drive or a PC with access to a shared CD-ROM Drive
• Internet Explorer (4.0 or higher), or Netscape Navigator (4.7 or higher)
2
Rear Panel
Package Contents
System Requirements

Instant RAID
The Instant RAID has three LEDs for each disk, and six status LEDs.
RAID LEDs
Activity This LED flashes green when the disk is being
accessed.
Failure This LED is normally off. It will illuminate red if
the disk is not installed, or has failed.
Rebuilding This LED is normally off. When a new disk is
inserted, this LED will illuminate orange, indicating that data is being copied from the other disk. It
will continue to illuminate until the mirroring is
complete, then it will turn off.
Status LEDs
Ready This LED will illuminate when the Instant RAID
is on, will blink during startup or shutdown, and
will be off after the shutdown is complete.
Error This LED is normally off. It will illuminate amber
during self-test, and turn off after the test is complete. If it remains on, a hardware error is indicated.
During a software upgrade, both the Ready and
Error LEDs will blink.
5
Linksys EtherFast® Series
Printer Port The Printer Port is where you can connect the
Instant RAID to your printer using a printer cable.
Uplink Button When connecting directly to a computer via
Ethernet, this button should be depressed.
For normal operation (connecting to a hub or
switch), this button should be UP.
LAN Port Use this port to connect the Instant RAID to your
10BaseT or 100BaseTX hub or switch.
100BaseTX LED indicator This LED will glow amber if the LAN Port is
using 100BaseTX.
10BaseT LED indicator This LED will glow green if the LAN Port is using
10BaseT.
4
Front Panel
Instant RAID
7
Basic Installation
and Configuration
The following section will instruct you on how to physically connect the
Instant RAID to the network, and how to configure the Instant RAID for
basic operation in your Windows environment.
Requirements
The following conditions are required to begin the installation of the Instant
RAID to your system.
• Windows OS (95 or later)
• TCP/IP protocol.
• 10BaseT or 100BaseTX Ethernet Network or a Network-ready PC
• CD-ROM Drive or a PC with access to a shared CD-ROM
• Internet Explorer (4.0 or higher), or Netscape Navigator (4.7 or higher)
Linksys EtherFast® Series
LAN This LED will flicker when data is being transmit-
ted or received on the LAN.
Disk This LED will flicker when the disk sub-system is
being accessed.
Disk Full This LED is normally off. It will blink when the
disk is 98% full, and will illuminate when the disk
is completely full.
IP This LED is normally off. It will illuminate and
blink if the Server is a DHCP Client.
The Instant RAID has an internal buzzer that beeps to indicate certain events.
1 Beep Indicates that the reset button or power switch has
been pressed.
2 Beeps Repeated every 5 seconds for 1 minute. Indicates
that the Instant RAID is configured as a DHCP
client, but no DHCP Server responded to the
DHCP client request.
3 Beeps Repeated every 15 seconds for 3 minutes.
Indicates that the Instant RAID’s hard disk usage
exceeds 98% capacity.
5 Beeps Repeated every 15 seconds for 3 minutes.
Indicates that the Instant RAID is overheating. An
automatic shutdown will be performed 3 minutes
after the 1st beep.
6
Installing the Instant RAID
Buzzer
Overview
NNoottee
: If you are a network
administrator, please follow
the Basic Installation and
Setup process, then proceed
to the
AAddmmiinniissttrraattiioonn
section
for instructions regarding all
available administrator
options.
WWaarrnniinngg
: Never shut down the Instant RAID
by unplugging the power cable.
Instant RAID
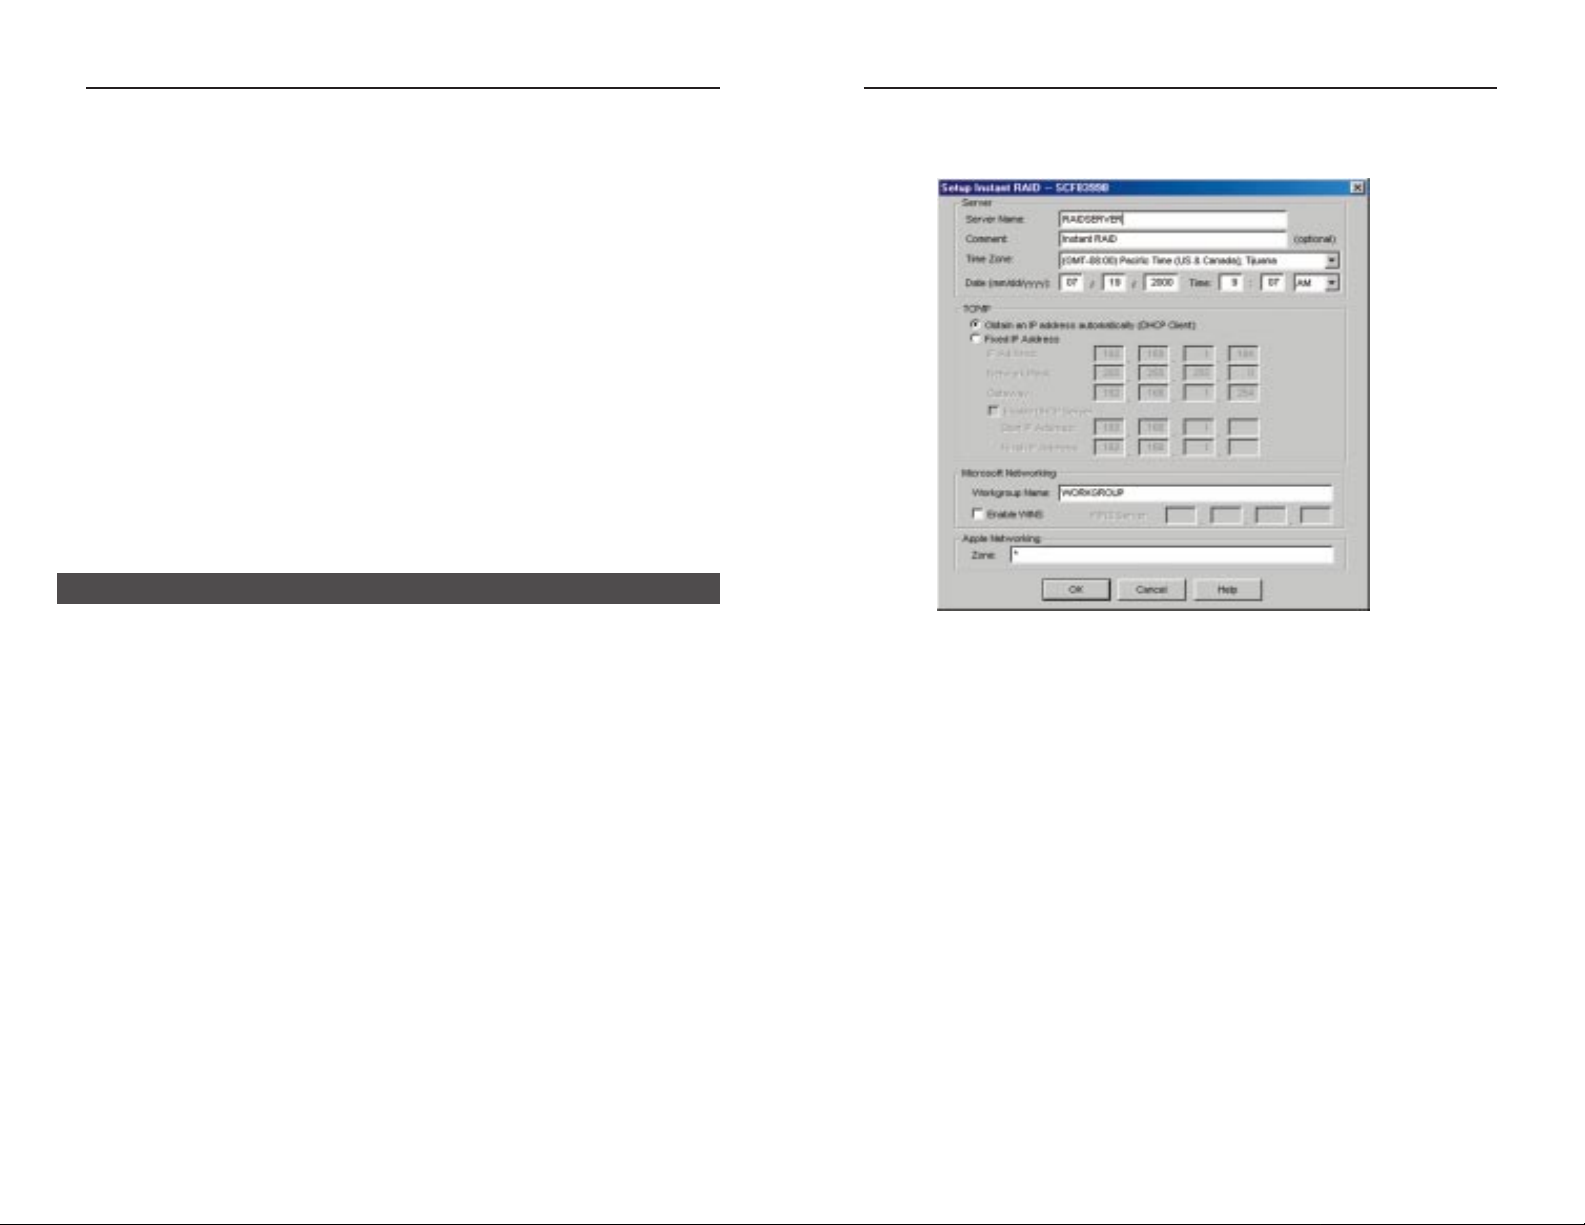
4. In the left section of the Utility window, highlight the Instant RAID
you are configuring and click the Quick Setup button on the f ar left of
the tool bar. The Setup RAID screen will appear.
5. Enter the following data in the appropriate f ields:
Server
Server Name: The default name will be shown. You can change this if you
wish.
Comment: This field is optional.
Time Zone: Select the appropriate time zone.
Date/Time: Enter the local date (mm/dd/yy) and time.
TCP/IP
Obtain an
IP Address: If you have a DHCP or Bootp ser ver on your LAN, you
can enable this setting. The Instant RAID will then obtain
its IP Address from the DHCP or Bootp server. However,
if you are using the RAID as a DHCP Server, a fixed IP
Address must be set.
9
Linksys EtherFast® Series
8
Hardware Installation
Use the following procedure to connect the Instant RAID to your LAN.
1. Connect one end of the Network Cable to the Instant RAID’s LAN Port,
then connect the other end of the Network Cable to your hub.
2. Connect the power cord to the Instant RAID’s Power Input Port, then plug
the power cord into a standard power outlet.
3. Power On the RAID using the Power Switch on the rear of the device.
The RAID will perform a self-test (lasting 2 to 3 seconds), during which
all the LEDs will be illuminated.
After the self-test is complete, the boot process will begin. The Ready and
Disk Full LEDs will be illuminated. When the boot process is completed, the
Ready LED will be illuminated and the Error LED will be off. If the Error
LED is still illuminated, or the RAID beeps repeatedly, there is a hardware
problem. It takes the Instant RAID at least 30 seconds to completely boot up.
Now that everything is connected and powered on, you are ready to configure
your Instant RAID so that it is accessible to the users on your system. Make
sure that TCP/IP is installed.
1. Insert the Driver Installation CD-ROM that came in your Instant RAID
packaging into your PC’s CD-ROM drive.
2. The pop-up menu should appear a few seconds after you insert the CD
into your CD-ROM drive. When it does, click the Install Software but-
ton.
Follow the setup program’s prompts to install the Instant RAID Setup
Utility. When installation is complete, click the Exit button on the CDROM pop-up window to return to your desktop.
3. For the default installation, click Start, Programs, Instant RAID Setup
Utility. The RAID Setup Utility window will appear.The left section of the
window will display a list of all RAIDs, and the right section will display
data about the selected RAID. If no RAIDs are listed refer to the
Troubleshooting section on page 34.
Configuring the Instant RAID
 Loading...