

Page 1
Instant GigaDriveTMSeries
EtherFast
®
Network
Attached Storage
with80 GB Hard Drive + PrintServe r
User Guide
Use this guide to install: EFG80
Page 2

COPYRIGHT & TRADEMARKS
Copyright © 2002 Linksys, All Rights Reserved. Instant EtherFast and Instant GigaDrive
are trademarks of Linksys. EtherFast is a registered trademark of Linksys. Microsoft,
Windows, and the Windows logo are registered trademarks of Microsoft Corporation. All
other trademarks and brand names are the property of their respective proprietors.
LIMITED WARRANTY
Linksys guarantees that every Instant EtherFast™ EtherFast®Instant GigaDrive™ will be
free from physical defects in material and workmanship for twq years from the date of
purchase, when used within the limits set forth in the Specification section of this User
Guide. If the product proves defective during this warranty period, call Linksys Customer
Support in order to obtain a Return Authorization Number. BE SURE TO HAVE YOUR
PROOF OF PURCHASE AND A BARCODE FROM THE PRODUCT’S PACKAGING ON
HAND WHEN CALLING. RETURN REQUESTS CANNOT BE PROCESSED WITHOUT
PROOF OF PURCHASE. When returning a product, mark the Return Authorization
Number clearly on the outside of the package and include a copy of your original proof
of purchase. All customers located outside of the United States of America and Canada
shall be held responsible for shipping and handling charges.
IN NO EVENT SHALL LINKSYS’ LIABILITY EXCEED THE PRICE PAID FOR THE PRODUCT FROM DIRECT, INDIRECT, SPECIAL, INCIDENTAL, OR CONSEQUENTIAL DAMAGES RESULTING FROM THE USE OF THE PRODUCT, ITS ACCOMPANYING SOFTWARE, OR ITS DOCUMENTATION. LINKSYS DOES NOT OFFER REFUNDS FOR ANY
PRODUCT. Linksys makes no warranty or representation, expressed, implied, or statutory, with respect to its products or the contents or use of this documentation and all
accompanying software, and specifically disclaims its quality, performance, merchantability, or fitness for any particular purpose. Linksys reserves the right to revise or
update its products, software, or documentation without obligation to notify any individual or entity. Please direct all inquiries to:
Linksys P.O. Box 18558, Irvine, CA 92623.
FCC STATEMENT
This equipment has been tested and complies with the specification for a Class B digital
device, pursuant to Part 15 of the FCC Rules. These limits are designed to provide reasonable protection against harmful interference in a residential installation. This equipment generates, uses, and can radiate radio frequency energy and, if not installed and
used according to the instructions, may cause harmful interference to radio communications. However, there is no guarantee that interference will not occur in a particular installation.
If this equipment does cause harmful interference to radio or television reception, which
is found by turning the equipment off and on, the user is encouraged to try to correct the
interference by one or more of the following measures:
• Reorient or relocate the receiving antenna
• Increase the separation between the equipment or device
• Connect the equipment to an outlet other than the receiver’s
• Consult a dealer or an experienced radio/TV technician for assistance
UG-EFG80-052802NC BW
Page 3

Instant GigaDriveTMSeries EtherFast 10/100 Instant GigaDrive
Chapter 1: Introduction
Insert 80 GB of storage space into your network with the Instant GigaDrive™
from Linksys. Compact and powerful, this Network-Attached Storage (NAS)
device adds 80 GB of storage to your network without adding the cost, space,
and maintenance hassles of a typical file ser ver.
The Instant GigaDrive™ provides solid data transfer for multiple client connections. It is also equipped with a built-in Print Server for the quick and inexpensive addition of a network printer and an extra drive bay so you can add an
additional drive as your network needs demand.
The Instant GigaDrive's 10/100 port will automatically adjust to your network's
speed. Equipped with a self-repairing feature, the Instant Gigadrive’s comprehensive, web-based conf iguration offers a wide array of management options.
The Instant GigaDrive™ also functions as a stand-alone DHCP server for easy
installation.
• Built-in Print Server Allows Addition of a Network Printer
• Automatically Adjusts to 10Mbps or 100Mbps Ethernet Speeds
• Web-based Conf iguration Interface Accessible From Networked PCs
• Acts as a Stand-Alone DHCP Server for Your Network
• Setup Wizard Program Allows for Speedy Configuration
• Built-in Pentium-Class Processor
• Automatically Maintains Itself to Provide File System Integrity
• Designate Access to Shared Data By Groups or Individual Users
• Small, Compact Footprint Makes Portability Easy
• Adds 80 GB to your Network with the Capabilities to Expand up to 240 GB .
Table of Contents
Chapter 1: Introduction 1
Features 1
Package Contents 2
Minimum Requirements 2
Chapter 2: Getting to Know the Instant GigaDriveTM3
The Instant GigaDriveTMRear Panel 3
The Instant GigaDriveTMFront Panel 4
Beeper Codes 6
Chapter 3: Installing the Instant GigaDrive
TM
7
Overview 7
Step-by-step Hardware Installation 7
Chapter 4: Using the Instant GigaDrive’s
Setup Wizard 9
Chapter 5: Using the Instant GigaDrive’s
Web-Based Utility 17
User Password Tab 18
Administration Tab - LAN 19
Administration Tab - System 21
Administration Tab - Users 22
Administration Tab - Status Information 25
Administration Tab - Group 28
Administration T ab -Shares 29
Administration Tab - Backup 30
Administration Tab - Disk 31
Administration Tab - Upgrade 33
Home Tab - User Log In 34
Home Tab - Disk 1 35
Appendix 1: Troubleshooting 36
Appendix 2: Specifications 38
Environmental 38
Appendix 3: Contact Information 39
The Linksys Instant GigaDriveTMSeries EtherFast
®
Network Attached Storage Return Policy 39
Linksys highly recommends that you regularly back up
the files that are on the Instant GigaDrive™ . Linksys is not
responsible for any data loss, nor will Linksys perform any
recovery on lost data or files.
1
The Linksys Instant GigaDrive™ Series
EtherFast® Network Attached Storage
Features
Page 4
Etherfast Network Attached Storage
Chapter 2: Getting to Know
the Instant GigaDrive™
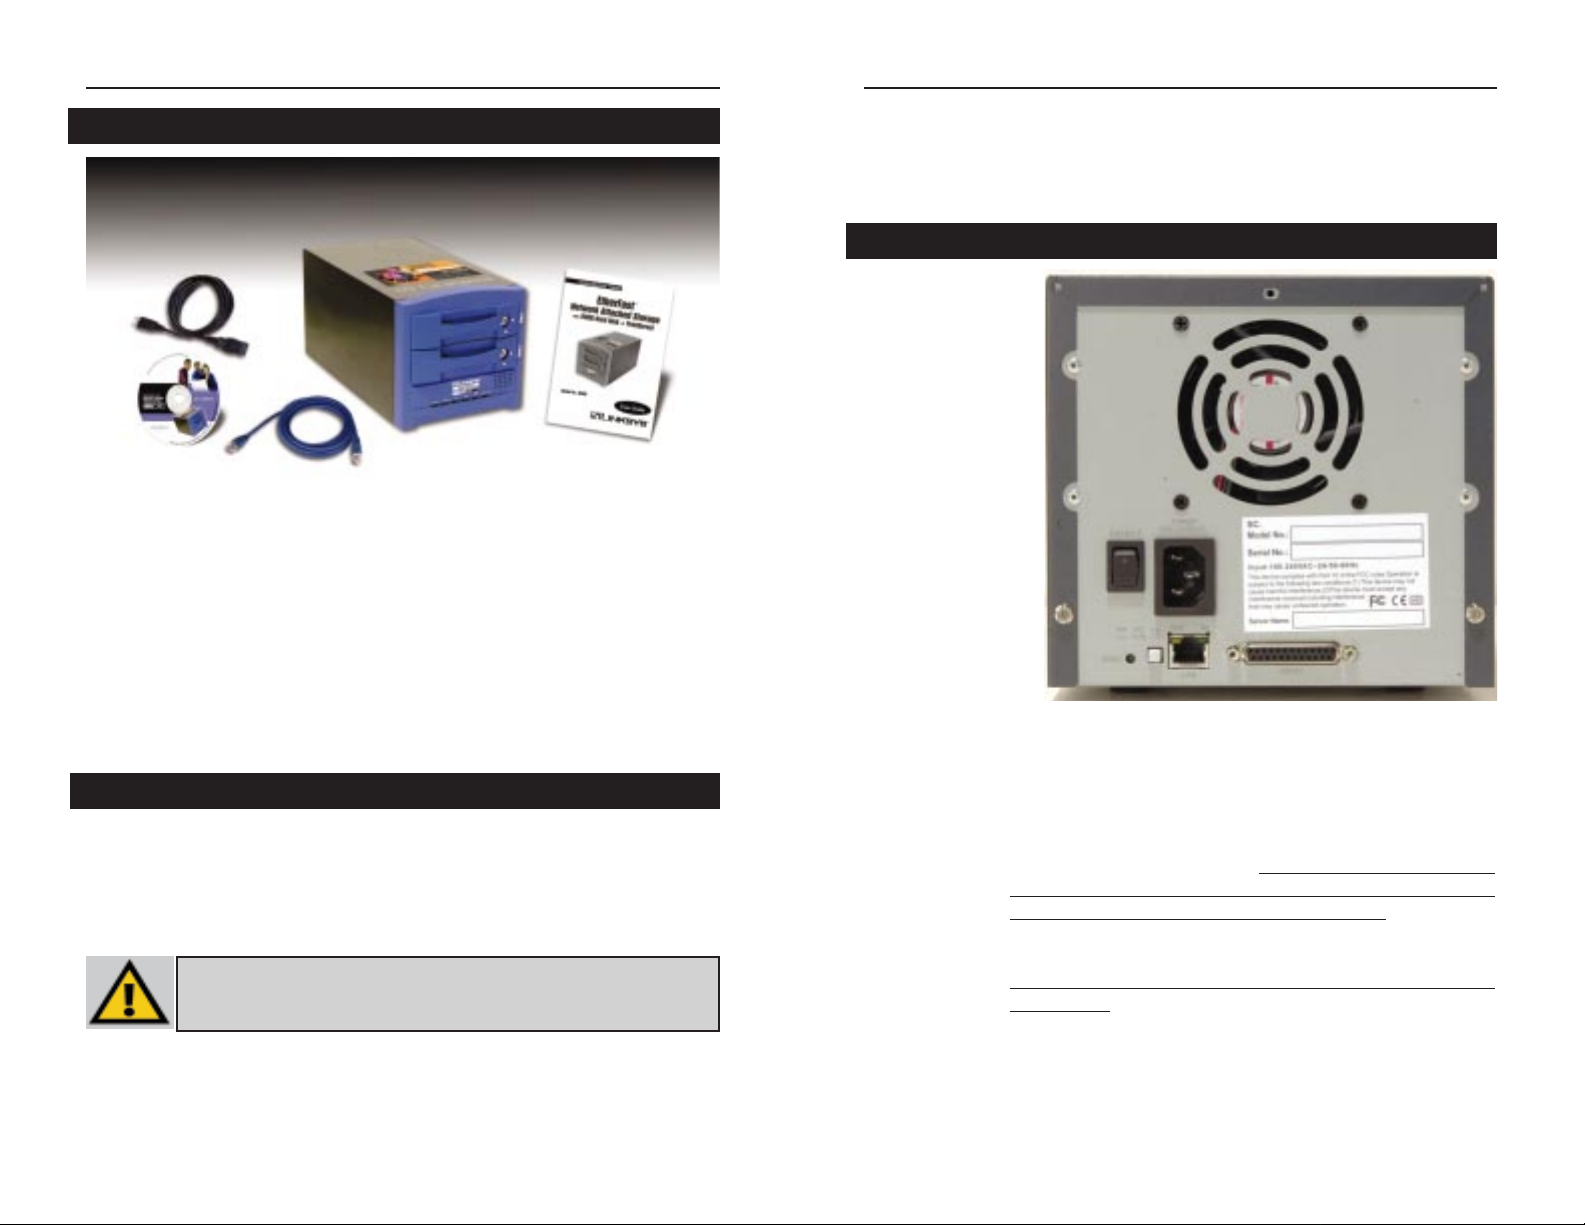
All of the Instant
GigaDrive’s connectors and switches are
on the rear panel, as
shown in Figure 2-1.
Power Switch The Power switch is a spring-loaded soft switch that powers
the Instant GigaDrive™ on and off. If the Instant GigaDrive™
is not powered on, pressing the Powe r switch will start the
Instant GigaDrive’s start-up process. Pressing the Power
switch while the Instant GigaDrive™ is turned on will begin
it’s internal shut-down process. The Instant GigaDri
ve™ must
be powered off this way, or through its internal shutdown
process that is located in the web configuration.
Powe r Po rt The Power Input port is where the power cord plugs in.
Never remove the power cord while the Instant Gigadrive™
is turned on.
Printer Port You can also add a printer to your network through the
Instant GigaDrive’s Printer port. You attach a printer using
DB-25 printer cable.
3
The Instant GigaDrive’s Rear Panel
Figure 2-1
Instant GigaDriveTMSeries
The following items should be included in the Instant GigaDrive’s packaging.
If any of these items are damaged or missing, please contact your Linksys dealer for replacements.
• One Linksys Instant GigaDrive™
• One Power Cord
• One Ethernet Network Cable
• One Setup Wizard CD-ROM
• One User Guide
• One Quick Installation and Registration Card
• Windows 98, NT 4.0, 2000, Millennium, or XP
• 10BaseT or 100BaseTX Ethernet network
• TCP/IP protocol installed
2
Minimum Requirements
Package Contents
DDiissccllaaiimmeerr
: Linksys highly recommends that you regularly back up the files
that are on the Instant GigaDrive™ . Linksys is not responsible for any data
loss, nor will Linksys perform any recovery on lost data or files.
Page 5

Etherfast Network Attached Storage
LAN Green. Flashes when data is transmitted or received via the
network.
Disk Green. Flashes when the Instant GigaDrive’s hard drive is
being accessed. It stays on during the self-test.
Disk Full Green. This LED will appear solid when the Instant
Gigadrive™ has reached its maximum storage capacity.
Backup Green.When the Instant Gigadrive’s backup utility is active,
this LED will flash.
5
Reset Button If the Instant GigaDrive’s IP Address or password is lost,
press and hold this button down for three seconds, then
release this button. The Instant GigaDrive™ will beep once
to indicate that the default IP Address (192.168.1.77, with a
Network Mask of 255.255.255.0) has been provided. This
function will also clear the Instant GigaDrive’s administrative passwords.
Uplink Button This button toggles the Instant GigaDrive’s Ethernet
Connector between an Uplink setting and a standard setting.
If the Instant GigaDrive™ is connected directly to a PC without a hub, then this button should be pressed in. If connecting
to a hub or switch, this button should not be pressed in. If it
is, press it once to release it.
LAN Port Use this port to connect the Instant GigaDrive™ to your
10BaseT or 100BaseTX hub.
100 LED This LED will glow amber if the 10/100BaseTX connector is
using 100BaseTX.
10 LED This LED will glow green if the 10/100BaseTX connector is
using 10BaseT.
The Instant GigaDrive’s front panel, shown in Figure 2-2, displays the following LEDs.
Drive LEDs Each disk drive has a green LED that flashes when the drive is
active. The LED is located next to the lock on each of the drive
trays.
Ready Green. If this light shines a steady green, then the Instant
GigaDrive™ is working properly. It blinks during Startup or
Shutdown, and turns off after the shutdown is completed. It
will also blink during a firmware upgrade.
Error Amber. If this light is flashing, then there is a hardware error.
It will also flash during the power-on self test or a f irmware
upgrade. Once the self-test or upgrade are completed, it will
turn off.
4
Figure 2-2
The Instant GigaDrive’s Front Panel
EtherFast 10/100 Instant GigaDrive
Page 6

7
Instant GigaDriveTMSeries
The Instant GigaDrive has an internal beeper that beeps to indicate certain
events.
1 Beep Signals that the Reset button or Power switch has been
pressed.
2 Beeps Repeated every 5 seconds for 1 minute. Signals that the
GigaDrive is configured as a DHCP client, but no DHCP
Server responded to the DHCP client request.3 Beeps
Repeated every 15 seconds for 3 minutes. Signals that the
GigaDrive’s hard disk usage exceeds 98% capacity.
5 Beeps Repeated every 15 seconds for 3 minutes. Signals that the
GigaDrive is overheating. An automatic shutdown will be
performed 3 minutes after the 1st beep.
6
Chapter 3: Installing the Instant
GigaDrive™
This chapter instructs you on how to physically connect the Instant
GigaDrive™ to your network. This chapter also covers the hook-up of a printer on the Instant GigaDrive’s print server port. Please note, however, that the
Instant GigaDrive™ will perform equally w ell as a storage de vice with or without an attached printer. If you aren’t interested in taking advantage of the
Instant GigaDrive’s print server function, skip any steps that deal with printer
installation. The Instant GigaDri v e’s installation process will work fine without
them.
1. Determine if the Instant GigaDrive™ will be installed onto a network or
directly to a PC. If connecting the Instant GigaDrive™ to a network device,
the Uplink button located on the Instant GigaDrive’s rear pane should not
be pressed. If connecting directly to a PC, the Uplink button should not be
pressed in. If it is, press it once to release it.
2. Connect the network cable that came with the Instant GigaDrive™ to the
LAN port. Connect the other end of the cable to your hub, switch, or PC.
3. Connect a printer to the Instant GigaDrive. Connect a standard printer cable
to the GigaDrive’s rear-panel printer port. Connect the other end of the
cable to your printer.
4. Connect the power supply. Plug the supplied power cord into the Instant
GigaDrive’s Power port that is located on the rear panel. Connect the power
cord to a power outlet.
EtherFast 10/100 Instant GigaDrive
Overview
NNoottee
: Make sure the TCP/IP protocol has been configured on your network
PCs before installing the Instant GigaDrive™.
Step-by-step Hardware Installation
Beeper Codes
Page 7
Etherfast Network Attached Storage
Chapter 4:Using the Instant
GigaDrive’s Setup Wizard
Now that everything is connected and powered on, you are ready to configure
your Instant GigaDrive so that it is accessib le to the users on your network. You
will have to runl the Instant GigaDrive’s Setup Wizrd on your PC to access the
GigaDrive’s Quick Setup feature. To run the Setup Wizard on your Windows
98, Me, NT 4.0, 2000, or XP PC, follow the instructions below.
1. Inser t the Setup Wizard CD-ROM into your PC’s CD-ROM drive.
2. An autorun menu should appear a few seconds after you insert the CD into
your CD-ROM drive. If the autorun menu does not appear after a minute,
click the Start button, select Run, type D:\SetupWizard.exe (where D is
the letter of your CD-ROM drive) into the Open window and press Enter.
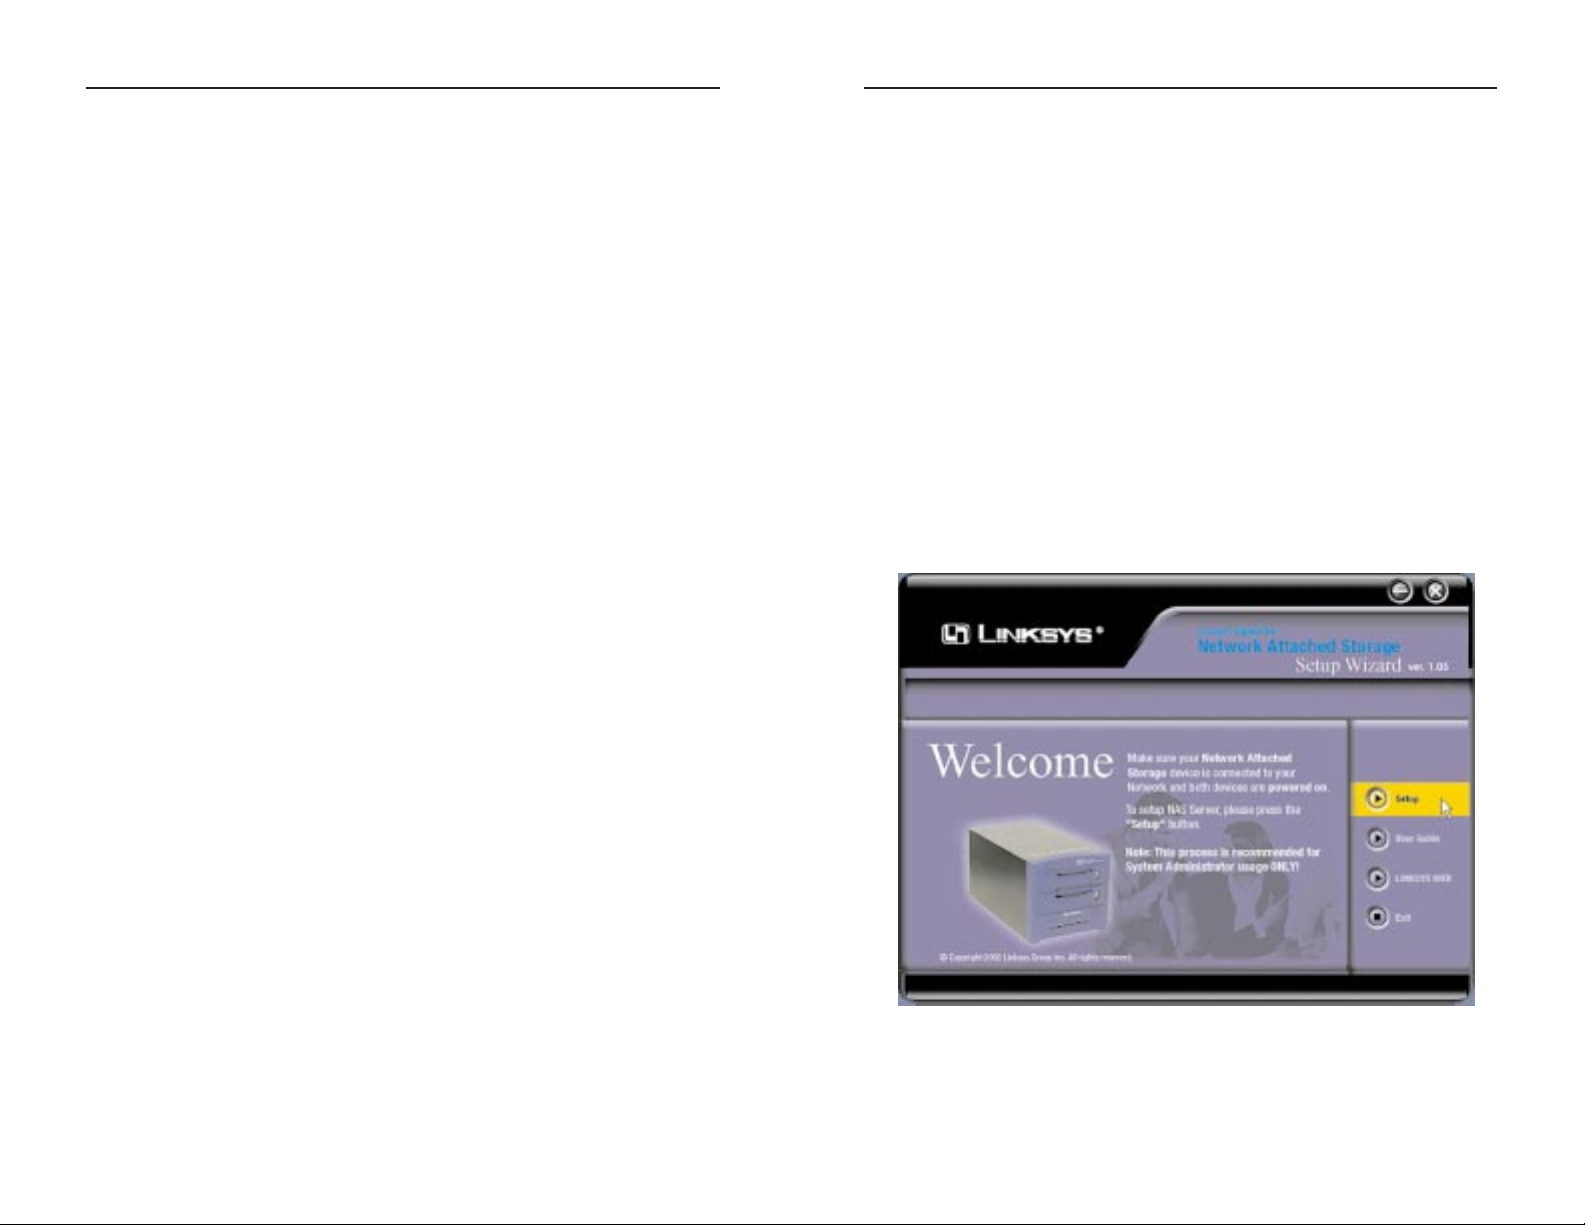
The autorun menu appears as shown in Figure 4-1.
9
Instant GigaDriveTMSeries
5. Power on. Locate the Instant GigaDrive’s power switch on the rear panel.
Press it once to power on the Instant GigaDrive™. Then, power on the network printer, if you attached one to the Instant Gigadrive™.
6. Now that its power is on, the Instant GigaDrive’s boot process will begin.
The Instant GigaDrive™ will run a brief self-test (two or three seconds)
prior to actually booting up. During the Self-Check, most of the
GigaDrive’s LEDs will be lit up or flashing. This should take a few minutes. The initial bootup, will take a bit longer, as well as any bootup following an improper shutdown.
7. When most of the LEDs turn off, leaving only the Ready LED lit up (and
not blinking), the GigaDrive’s boot up is complete. If the Error LED is
flashing, or if the GigaDrive repeatedly beeps, there is a hardware problem.
Review the Beeper Codes section in Chapter Two for possible solutions.
8
Figure 4-1
Page 8

Etherfast Network Attached Storage
When an Instant GigaDrive™ has been found by the
Setup Wizard, you can create a shortcut on your desktop for quicker access to that Instant GigaDrive™. The
shortcut appears as shown in Figure 4-3.
From the screen shown in Figure 4-2, once you have
found the Instant GigaDrive™ you wish to set up,
highlight and click on it, click the Yes button on the
right to change any of the Instant GigaDrive’s settings (as shown in Figure
4-4) or the No button to accept the settings and close the Setup Wizard.
4. The first settings that you can change are the Instant GigaDrive’s IP
Address settings. As shown in Figure 4-5, select the radio button beside
either Fixed IP Address or Dynamic IP Address.
11
Instant GigaDriveTMSeries
This Welcome screen provides you with four options in the buttons along
the right side of the screen. The first button is the Setup button. Click this
button to continue with the setup procedure. The second button is the User
Guide button. The third button, Linksys Web, connects you to the Linksys
web site if you have an active Internet connection. Lastly, clicking the Exit
button will exit the Setup Wizard.
The remainder of this chapter addresses the setup procedure you would follow
by clicking the Setup button.
3. The following screen, shown in Figure 4-2, will search for any Instant
GigaDrives currently on your network or attached to your PC. The Setup
Wizard will automatically search for an Instant GigaDrive™ when this
screen apears. If it fails to detect the Instant GigaDrive™ or if an Instant
GigaDrive™ has been installed since the Setup Wizard’s last search, click
Search Again to locate the GigaDrive.
10
Figure 4-3
Figure 4-4
Figure 4-2
Page 9

Etherfast Network Attached Storage
IP Address. Set the Instant GigaDrive’s IP Address here, making sure that
it is on the same LAN segment as the PC running the Setup Wizard.
Subnet Mask. The Subnet Mask must match the other devices on your
network. It is set by default to 255.255.255.0.
Default Gateway.The value is left blank by default. If you have a router on
your network, however, enter its IP Address here.
6. From the next screen, shown in Figure 4-7, you can set the Instant
GigaDrive™ as your network’s DHCP server if no other device is funtioning as a DHCP server on your network. If you wish to use the Instant
GigaDrive as a DHCP server, click the box next to Enable DHCP Server.
Then, enter in the range of IP Addresses you want to assign on your network. The first three Start and Finish fields must match the Instant
GigaDrive’s IP Address with the final fields ranging from 2 to 250.
Click the Next button on the right to proceed or the Back button to return
to the previous screen.
13
Instant GigaDriveTMSeries
The Fixed IP Address is set by default (192.168.1.77). Use this setting if
there is no DHCP server on your network and you want the Instant
GigaDrive™ to use a static IP Address. With the Fixed IP Address setting,
you can also use the Instant GigaDrive™ as your network’s DHCP ser ver.
Use the Dynamic IP Address setting if you already have a DHCP server
setting IP Addresses on your network devices.
Click the radio button next to your selection. Then, click the Ne xtbutton on
the right to proceed or the Back button to return to the previous screen.
Proceed to the next step if you are selecting the Fixed IP Address setting. If
selecting Dynamic IP Address, proceed to Step 7.
5. If you chose Fix ed IP Address in the previous step and clicked the Next button, you will see the screen shown in Figure 4-6. On this screen, you will
set the Instant GigaDrive’s IP Address and network information. Enter the
following information and click the Next button on the right to proceed or
the Back button to return to the previous screen.
Server Name. The Server Name is how the Instant GigaDrive™ will be
identified on your network. This name can be up to 14 hexidecimal digits
long
12
Figure 4-6Figure 4-5
Page 10

Etherfast Network Attached Storage
Local Time. Set your current time here.
Time Zone. Select your local time zone from the drop down menu here.
Local Date. Set your current date here.
Click the Next button on the right to proceed or the Back button to return
to the previous screen.
8. On the next screen, shown in F igure 4-9, re vie w the Instant GigaDri v e’s set-
tings. If they are correct, click the Save button on the right. If you would
like to change them, click the Back button to return to a previous screen.
9. A screen will appear, shown in Figure 4-10, cautioning you that changes to
the Instant GigaDrive’s settings are being made. To save these changes,
click the OK button or click the
Cancel button to
return to the previous screen.
15
Instant GigaDriveTMSeries
7. Go to the next screen (Figure 4-8) if you chose a Fixed IPAddress, or if you
selected a Dynamic IP Address in Step 4 . From this screen, you can change the
time and date on the Instant GigaDrive™.
14
Figure 4-9
Figure 4-10
Figure 4-7
Figure 4-8
Page 11

Etherfast Network Attached Storage
Chapter 5: Using the Instant
GigaDrive’s Web-Based Utility
For your convenience, an administrative utility has been prog rammed into the
Instant GigaDrive™. This chapter will explain all of the functions in this utility . All administrative tasks are performed through this web utility. The w eb utility can be accessed by any PC on the network by typing http://192.168.1.77 in
the PC’s web browser
address window, as
shown in Figure 5-1.
After you press the Enter key, the Web Management Home Page will appear,
shown in Figure 5-2. From this page, you can set a password, administer the
Instant GigaDrive™, view this user guide, and even go to the Linksys web site.
Click the disk’s links to access their contents. If you click the links to User Log
in, you will be required to enter your User Name and Password. (See the
Administration section for information about entering this information.)
17
Instant GigaDriveTMSeries
10. You have now successfully set up the Instant GigaDrive™ with the Setup
Wizard. When the screen shown in Figure 4-11 appears, click the Exit button to exit the Setup Wizard.
16
Figure 5-1
Figure 5-2
Figure 4-11
Page 12

Etherfast Network Attached Storage
When you click the
Administration tab, a password
request page will pop up, as
shown in Figure 5-4. (Windows
XP users will see a “Connect
to” window.) Enter the User
Name and Password you use to
access the Instant GigaDrive™
and click the OK button. To
cancel the log in procedure,
click the Cancel button.
After logging in, you will see the Administration tab’s LAN screen, shown in
Figure 5-5. This is the default screen that appears whenever you log in to the
Administration tab.
19
Instant GigaDriveTMSeries
From the User Password tab, any user can change their password for interacting with the Instant GigaDrive’s web-based utility. To do this, enter your User
Name in the User Name field. This should be the same as for your network
logon. Then, enter the password you use when accessing the Instant
GigaDrive’s web-based utility. Next, enter a new passwor d. This new passw ord
can be up to 15 hexidecimal characters long. Enter this new password again in
the Conf irm New Password field and click the Save button to save this new
password.
To Cancel this procedure and clear all the f ields, click the Cancel button. For
further information about anything on this screen, click the Help button.
18
Administration Tab - LAN
Figure 5-4
Figure 5-5
User Password Tab
Figure 5-3
Page 13

Etherfast Network Attached Storage
21
Instant GigaDriveTMSeries
From the LAN screen, you will be able to conf igure some of the settings you
saw in the Setup Wizard. While these changes are being made, you can click
the Save button to save these changes, Cancel to clear all changes, or Help to
get further information about anything on this screen.
IP Address These fields allow you to Obtain an IP Address Automatically
or use a Fixed IP Address. Obtain an IP Address
Automatically is the same as using the Dynamic IP Address
setting in the Setup Wizard and should be used if you already
have a DHCP server, setting IP Addresses on your network
devices. The Fixed IP Address selection is set by default. Use
this setting if there is no DHCP server on your network and
you wish the Instant GigaDrive™ to use one, static IP Address.
With the Fixed IP Address setting, you can also use the Instant
GigaDrive™ as your network’s DHCP server.
When using the Fixed IP Address setting, you must enter the
IP Address, Network Mask (the same as the Subnet Mask), and
Default Gateway. The IP Address setting should contain an
unused IP Address that contains the same LAN segment as the
network on which the Instant GigaDrive is running. The
Network Mask setting must match the other devices on your
network. It is set, by default, to 255.255.255.0. If you have a
router on your network enter its IP Address in the Default
Gateway field.
DHCP Server The Instant GigaDrive™ can serve as your network’s DHCP
server if no other device is funtioning as a DHCP server on
your network. If you wish to use the Instant GigaDrive as a
DHCP server, click the box next to Enable DHCP Server
function. Then, enter in the range of IP Addresses you wish to
assign on your network. The first three Start and Finish fields
must match the Instant GigaDrive’s IP Address with the final
fields ranging from 2-250.
DNS Server The DNS Server function translates Internet addresses to IP
Addresses. Enter the same IP Addresses as on y our network, or
recommended by your ISP. You must complete att least one
DNS Server entry if using the "E-Mail Alerts" feature.
Otherwise, the DNS entries may be left blank. When you complete multiple fields, the first available server will be used.
20
From the System screen, you will be able to change some of the Instant
GigaDrive’s basic settings, such as identification, time settings, and WINS
Server. While these changes are being made, you can click the Save button to
save these changes, or Cancel to clear all changes. To reset the Instant
GigaDrive’s default settings, click the Restore Default Config button. To get
further information about anything on this screen, click the Help button.
Administration Tab - System
Figure 5-6
Page 14

Etherfast Network Attached Storage
Properties Enter the User Name in the Name field. Punctuation and other
special characters (e.g. * / | \ ) cannot be used in the name. In
the optional Comment f ield, you can enter a comment if you
wish. In the Password and Verify Password f ields, enter the
user's password. These f ields are also used to change an existing user's password, as follows: Select the desired user. Clear
the existing values in the password fields. Enter the desired
password in both the Password and Verify Password fields. If
no password is required, leave both fields blank. Click the
Update button. When creating a new user, enter the desired
password in both of these fields. Check the Create matching
Group and Share Folder (Private Folder) to create a Group
and a Share with the same name as the user when creating a
new user . This field allows you to choose w hich disk is used for
the Share. Read/Write access will be granted to the Share. The
Users screen on the Setup menu ALWAYS performs these
functions. Check the Enable Disk Quota of box if y ou want to
23
Instant GigaDriveTMSeries
22
Figure 5-8
The Users screen allows you to manage the Users that are on the GigaDrive
Server. Users can be members of many user Groups.
Existing Users The user list shows all existing users. The details of the
selected user are displayed in the "Properties" area.
• Click on the Groups Button to view and/or modify the Group that the select-
ed user is in. (See Figure 5-9.) Select the items in the right-hand list that you
want to give access to the item in the left-hand list. Click on the left-pointing
arrows and then the items will appear in the left-hand list. Click on Close when
finished. Click on Help for more information.
• Click on the Delete Button to delete the selected user. When deleting a user,
you hav e the option of deleting the Group and Share with the same name as the
user (if they exist).
Administration Tab - Users
Figure 5-7
Page 15

Etherfast Network Attached Storage
The Status Information screen allows you the check the details and status of
your GigaDrive.
System System GigaDrive Name - The current name. This name will
be shown in "Network Neighborhood" or "My Network
Places". IP Address - IP Address currently used by the
GigaDrive Server. Current Status - Indicates the cur rent status
of the Server. This will usually state "Available". If the Server
is not available, the message will say why the Server is not
available (e.g. Scandisk in Progress.)
25
Instant GigaDriveTMSeries
set the disk usage for the user. Enter the maximum amount of
disk space the user is allow ed to use. Click on the Clear Form
button to clear the form for the entry of a new user. Click on
Save as new User to create a new user , after entering their data
in the Properties f ields. Click on the Save button to save any
changes you have made to the Proper ties for an existing user.
T o modify the properities for an existing user, select the desired
user from the list. Their details will be displayed in the
Properties fields. Edit the fields as required. Note that you cannot change the Create matching Share and Folder option when
modifying a user. However, you can use Share (Private Folder)
Location field to change to location of a user's Private Folder,
if it already exists. Click the Save button to save your changes.
24
Figure 5-9
Administration Tab - Status Information
Page 16

Etherfast Network Attached Storage
Subject Enter the text you wish to appear in the "Subject" f ield of E-
(Optional) Mail generated by the GigaDrive Server.
Click the Restart Now button to Restar t (reboot) the Server.
This will break all existing connections, including this one. The
GigaDrive Server will immediately restart, but could take a fe w
minutes before it is available again. Clicking this button does
NOT save any data you have entered. Click the View Log but-
ton to view the log file in separate window. The log f ile is a
record of activity on the GigaDrive Server, which can help in
management and troubleshooting.
Click on Save to save any changes. Click on Cancel to clear anything that you
entered. Click on Refreshbutton to update the data shown on screen. Click on
Details button to open a new window, displaying further status details, including a list of all PCs and other devices which have been allocated an IP address
by the DHCP Server function (if enabled). Click on Help to get more information.
27
Instant GigaDriveTMSeries
26
• Click the Shutdown Now button to shutdown the server immediately. This
will break all existing connections, including this one. Clicking this button
does NOT save any data you have entered.
• Click the Restart Now button to Restart (reboot) the Server. This will break
all existing connections, including this one. The GigaDrive Server will immediately restart, but could take a few minutes before it is available again.
Clicking this button does NOT save any data you have entered.
• Click the View Log button to view the log file in separate window. (See
Figure 5-10.) The lo g file is a record of activity on the GigaDrive Server, which
can help in management and troubleshooting. Click on Refresh to refresh the
screen. Click on Clear Log to clear all the data from the log.
Printer Sho ws the Current Status - P ossible states are On-line, Of f-line,
and Out of Paper. No of Print Jobs - The total number of print
jobs in the Print Queue, waiting to be printed.
Disk Disk Type - Disk type, as provided by the manufacturer. Free
Space - The amount of disk space still available to users.
E-Mail Alerts Check on Send to enable the sending of E-Mail alerts by the
GigaDrive Server. Alerts will be sent when there is some problem requiring the Administrator's attention. In the E-Mail
Address field, Enter the E-Mail Addresses. The messages generated by the GigaDrive Server will be sent to this destination.
Figure 5-10
Page 17

Etherfast Network Attached Storage
The Shares information screen allows you to create and manage shares.
Existing Shares Click on the Access button to view and configure the users
who are allowed to access the selected share. Click on
Browse to view the contents of the selected share. Click
Delete to delete the share.
Properties Fill in the Name, Comment, Location and Specify to add a
new share. Click on Save as New Share to save your new
share. Click on Clear Form to clear the fields in Properties.
Click on the Save button to save any changes you have made to Properties.
Click on the Help button to get more information.
29
Instant GigaDriveTMSeries
The Groups Information screen allows you to manage the User Groups that
exist on the GigaDrive Server.
New Group Use this area to create a new group. Enter the desired name for
the new Group in the Name field, then click Create Button.
Existing This shows the list of all Groups. Two groups - "everyone" and
Groups "administrators" - always exist and cannot be deleted.
Click on the Access button to display the shares that the members of the current Group are able to access. You can then assign, remove or modify the access
rights for this group. Click on the Members button to displa y the users who are
members of the selected Group. You can then add or delete members. The
"everyone" Group ALWAYS contains all users. You cannot add or remove
members. Click on the Delete Button to delete the selected Group. The
"administrators" and "everyone" Groups can not be deleted. Click on the Help
button to get more information.
28
Figure 5-12
Figure 5-11
Administration Tab - Group Administration Tab - Shares
Page 18

Etherfast Network Attached Storage
The Disk Settings screen allows you to perform disk maintenance.
31
Instant GigaDriveTMSeries
The Backup Settings screen allows you to back up the Gigadrive’s configuration file to you PC. You can also back up data from one disk to another.
Data Backup This is used to back up data from one disk to another. Select
Enable data backup from Disk 1 to Disk 2, then click on
Start Backup Now if you want to star t the process immedi-
ately. Select Enable data backup from Disk 1 to Disk 2,
then in Backup Time: select the time and frequency for your
backup.
Config Backup Click on Download to back up the conf iguration file to a
file. Click on Upload to upload the configuration file to the
GigaDrive.
Click on the Save button to save any changes you have made to Properties.
Click on theCancel button to clear all changes. Click on the Help button to get
more information.
30
Figure 5-14
Figure 5-13
Administration Tab - Backup Administration Tab - Disk
Page 19

Etherfast Network Attached Storage
The Upgrade screen allows you to upgrade the Firmware to your Gigadrive.
Current Firmware This shows you the current version of the firmware that is
on your Gigadrive. Click on Check for Update to browse
for the latest version of firmware.
Upgrade Click on the Bro wsebutton to browse for the latest version
of fir mware, then click on Start Upgrade.
Click on the Help button to get more information.
33
Instant GigaDriveTMSeries
Format Disk If you have installed a new hard drive into the GigaDrive’s
expansion slot, you will need to format the hard drive with
the new format utility. Click Format Disk to format the hard
drive.
Self-Test This test tells you the condition of the hard drive. Your hard
drive must support S.M.A.R. T. to run the test. Click on Test
Now if you want to run the test immediately. In Run Test:,
select the time and frequency that you want to run the test.
Scandisk This checks your hard drive for directory structure, available
space, and overall condition of files.
Defrag This checks your hard drive for fragmented f iles. Run this
test to Defrag your hard drive.
Standby Select the amount of time that you want your hard drive to
wait before going into standby mode.
Click on the Save button to save any changes you have made to Properties.
Click on theCancel button to clear all changes. Click on the Disk Log to see
the log of your disk settings. Click on the Help button to get more information.
32
Figure 5-15
Administration Tab - Upgrade
Page 20

Etherfast Network Attached Storage
Click on Disk 1 (Public Data) Disk 2 (Public Data) to show the data that is
available to everyone.
35
Instant GigaDriveTMSeries
Click on User Log in (Private Data) to access your shares.
34
Figure 5-17Figure 5-16
Home Tab - User Log In Home Tab - Disk 1
Page 21

3. When I click on the GigaDrive icon in Network Neighborhood, I’m
prompted for a password.
This can happen in the following situations:
• Your Windows Logon name is recognized by the GigaDrive, but your Logon
password is not. Simply enter your GigaDrive password, or make your
Windows password the same as the GigaDrive password.
• Your Windows Logon name is not recognized by the GigaDrive, defaulting
you to guest access rights. Ask the GigaDrive Administrator to create a user
name for you. (Use the same name as your Logon name.)
• You do not have access permission for this share. Ask the GigaDrive
Administrator to grant you access.
4. When using the Web interface, some of the data will not fit on the
screen, and there is no scroll bar.
• You are likely using extra-large fonts in your Browser or in Windows. To
change your browser’s font size, select View from your web-browser’s
menu, and change the font size there. To change the size of your Windows
fonts, go to Display in the Control Panel. Choose Settings, then click the
Advanced button. Change the font size to either Small or Large. Both
should work.
5. A print job does not print and no error message is displayed.
• The amount of free disk space on the GigaDrive is probably not sufficient to
spool (queue) the print job. The GigaDrive’s disk usage can be checked
using the Status - Disk screen on the GigaDrive’s Administrator interface. If
this is the problem, you must delete some print jobs.
1. Select Printer from the Status menu of the GigaDrive’s Administrator
interface.
2. Use the Delete Current Job option to delete the current print job, or
Delete All Jobs to delete all print jobs.
37
Instant GigaDriveTMSeries
Appendix A: Troubleshooting
1. The GigaDrive Utility can’t find my Instant GigaDrive.
• Check that the GigaDrive is properly installed, that the LAN connections
are secure, and that the GigaDrive is powered ON.
• If you are using a router, make sure that your PC and the Instant GigaDrive
are on the same network segment.
• Make sure that your PC has the TCP/IP network protocol loaded. This is
done by checking the Network option of the Control Panel. If an entry for
TCP/IP -> Network card is not listed, use Add - Protocol - Microsoft TCP/IP to add it.
2. The GigaDrive is configured, but I can’t find it in Network
Neighborhood.
• Go to the Find function in the Start menu. Choose Computer, then enter
the GigaDrive’s name. In Windows 2000, go to Files and Folders to search
the Computer option.
• If this doesn’t work, choose the Network option of the Control Panel to
check that a TCP/IP protocol is installed. If it isn’t installed, use Add Protocol - Microsoft - TCP/IP to install it. In Windows 2000, click on
Install, not Add. In Windows NT, click on the Protocols tab, then Add.
• Check the network Bindings. First, ensure that the TCP/IP protocol is
bound to your Network card (NIC). Then, select your Network card in the
Control Panel, click Properties, and choose the Bindings tab. If TCP/IP is
not bound (checked), check it.
• Ensure that the TCP/IP -> Network card entry is bound to the Client for
Microsoft Networks service. Select the TCP/IP entr y for your Network
Card, click Properties, and then choose the Bindings tab. If Client for
Microsoft Networks is not bound (checked), check it.
• If you don’t have a router, ensure that your IP Address is compatible with
the Instant GigaDrive’s. This means it needs to be in the same address range
(e.g. 192.168.1.3 to 192.168.1.254) and using the same Subnet Mask (e.g.
255.255.255.0)
• If you do have a router, check that your Gateway IP Address is set correctly.
Ask your LAN administrator for the correct value.
• Change the name back to the default Gigadrive name.
36
EtherFast 10/100 Instant GigaDrive
Page 22

Etherfast Network Attached Storage
Appendix C: Contact Information
For help with the installation or operation of your Instant GigaDrive, contact
Linksys Customer Support at one of the phone numbers or Internet addresses
below.
Sales Information 800-546-5797 (1-800-LINKSYS)
Technical Support 800-326-7114 (tollfree from U.S. or Canada)
949-271-5465
RMA Issues 949-271-5461
Fax 949-265-6655
Email support@linksys.com
Web site http://www.linksys.com
http://support.linksys.com
FTP Site ftp.linksys.com
* Linksys does not provide support for Macintosh operating systems.
For help with the installation or operation of this product, contact Linksys
Customer Support at one of the phone numbers or Internet addresses below.
The Linksys Instant GigaDriveTMSeries EtherFast
®
Network Attached Storage Return Policy
This product is guaranteed free from physical defects under normal use for
two years. If the product becomes defective during this warranty period, call
Linksys Customer Service to obtain a Return Merchandise Authorization
number. Warranty is for Repair and Replacement only. Linksys is not responsible for credit or refunds.
Linksys will not be held responsible for any data or file loss recovery under
any circumstances.
Linksys offers cross shipments, a faster process for processing and receiving
your replacement. Linksys pays for UPS Ground only. All customers located
outside of the United States of America and Canada shall be held responsible
for shipping and handling charges. Please call Linksys for more details.
39
Instant GigaDriveTMSeries
38
Appendix B: Specifications
Model Number EFG80
Standards IEEE 802.3, IEEE 802.3u
Protocols SMB/CIFS over TCP/IP
Network Port One 10/100 RJ-45 Port
Printer Port One DB-25 Standard Parallel Port
Cabling Type 10BaseT/100BaseTX:
UTP CAT 5 or better
Topology Star
LED Indicators Rear:10 and 100Mbps Mode
Front: Ready, Error, LAN, Disk, Disk Full,
Back Up
Switches Power, Reset,Uplink
Dimensions (W x H x D) 7.0" x 6.5" x 13.6"
(180 mm x 166 mm x 346 mm)
Weight 11.29 lbs without HDD (5.13 kg)
Power 12V DC,Maximum 5 Amps, 100-240V
AC,50-60Hz Power Adapter Provided
Certifications FCC Class A,CE Mark
Operating Temp. 41°F to 104°F (5°C to 40°C)
Storage Temp. 14°F to 140°F (-10°C to 60°C)
Operating Humidity 10% to 80% Non-condensing
Storage Humidity 5% to 90% Non-condensing
Storage Humidity 5% to 90%, Non-condensing
Environmental
Page 23

© Copyright 2002 Linksys,All Rights Reserved.
http://www.linksys.com
 Loading...