

Linksys EFG40 Owner's Manual

Instant EtherFast®Series
EtherFast 10/100
Instant GigaDrive
Use this Guide to install these Linksys products:
• 10/100 Instant GigaDrive - 20 Gigabytes (EFG20)
• 10/100 Instant GigaDrive - 40 Gigabytes (EFG40)
User Guide

COPYRIGHT & TRADEMARKS
Copyright © 2000 Linksys, All Rights Reserved. Instant EtherFast is a trademark of
Linksys. Microsoft, Windows, and the Windows logo are registered trademarks of
Microsoft Corporation. All other trademarks and brand names are the property of their
respective proprietors.
LIMITED WARRANTY
Linksys guarantees that every EtherFast 10/100 Instant GigaDrive is free from physical
defects in material and workmanship under normal use for two years from the date of pur-
chase. If the product proves defective during this two year warranty period, call Linksys
Customer Support in order to obtain a Return Authorization number. Warranty is for repair
or replacement only. Linksys does not issue any refunds. BE SURE TO HAVE YOUR
PROOF OF PURCHASE AND A BAR CODE FROM THE PRODUCT’S PACKAGING ON
HAND WHEN CALLING. RETURN REQUESTS CANNOT BE PROCESSED WITHOUT
PROOF OF PURCHASE AND BAR CODE. When returning a product, mark the Return
Authorization Number clearly on the outside of the package and include your original
proof of purchase and bar code. All customers located outside of the United States of
America and Canada shall be held responsible for shipping and handling charges.
IN NO EVENT SHALL LINKSYS’ LIABILITY EXCEED THE PRICE PAID FOR THE PRODUCT
FROM DIRECT, INDIRECT, SPECIAL, INCIDENTAL, OR CONSEQUENTIAL DAMAGES
RESULTING FROM THE USE OF THE PRODUCT, ITS ACCOMPANYING SOFTWARE, OR
ITS DOCUMENTATION. LINKSYS DOES NOT OFFER REFUNDS FOR ANY PRODUCT
.
Linksys makes no warranty or representation, expressed, implied, or statutory, with
respect to its products or the contents or use of this documentation and all accompany-
ing software, and specifically disclaims its quality, performance, merchantability, or fitness
for any particular purpose. Linksys reserves the right to revise or update its products, soft-
ware, or documentation without obligation to notify any individual or entity. Please direct
all inquiries to: Linksys P.O. Box 18558, Irvine, CA 92623.
FCC STATEMENT
This equipment has been tested and complies with the specification for a Class B digital
device, pursuant to Part 15 of the FCC Rules. These limits are designed to provide rea-
sonable protection against harmful interference in a residential installation. This equip-
ment generates, uses, and can radiate radio frequency energy and, if not installed and
used according to the instructions, may cause harmful interference to radio communica-
tions. However, there is no guarantee that interference will not occur in a particular instal-
lation.
If this equipment does cause harmful interference to radio or television reception, which
is found by turning the equipment off and on, the user is encouraged to try to correct the
interference by one or more of the following measures:
• Reorient or relocate the receiving antenna
• Increase the separation between the equipment or device
• Connect the equipment to an outlet other than the receiver’s
• Consult a dealer or an experienced radio/TV technician for assistance
008

Linksys Instant EtherFast® Series EtherFast 10/100 Instant GigaDrive
Introduction
The Linksys EtherFast 10/100 Instant GigaDrive
Congratulations on the purchase of your new EtherFast 10/100 Instant
GigaDrive from Linksys. The Instant GigaDrive adds 20 or 40 Gigabytes of
storage space onto your network without the cost, space, and maintenance
hassles of a full-fledged file ser ver. The Instant GigaDrive provides solid
data transfer performance for multiple client connections. It is also equipped
with a built-in PrintServer for the quick and economical addition of a network printer. Plus, you can add as many Instant GigaDrives to your network
as you like.
The EtherFast 10/100 Instant GigaDrive automatically toggles between
10Mbps and 100Mbps speeds. Its comprehensive utility software—conveniently accessed from your web browser—offers a wide array of management
options. The Instant GigaDrive can also function as a stand-alone DHCP
(Dynamic Host Configuration Protocol) ser ver or client for easy installation.
The EtherFast 10/100 Instant GigaDrive can do just about anything a standard
PC can do on a network at a fraction of the size, a fraction of the hassle, and
a fraction of the cost.
Features
• Adds 20 or 40 Gigabytes of external hard disk space to your network
• Built-in Print Ser ver allows addition of a network printer
• Automatically adjusts to either 10Mbps or 100Mbps Ethernet speed
• Web-based Interface for Conf iguration and Diagnostics is accessible from
any PC on the network
• Can act as a stand-alone DHCP ser ver or client
• Divert traffic from your primary f ile ser ver to increase network productivity
• Utility program allows for speedy conf iguration
• Built-in Pentium-grade CPU
• Automatically maintains itself to provide f ile system integrity
• The LAN Administrator can limit the amount of available disk space
• Access to shared data can be set by groups or individual users
• Small footprint minimizes space usage and ease of por tability
• Additional Instant GigaDrives can be added to the network any time
• Windows Internet Naming Service (WINS)-Client supported
• Can be set for any time zone
Table of Contents
Introduction 1
Package Contents & System Requirements 2
Getting to Know Your Instant GigaDrive 3
Rear Panel 3
Front Panel 5
Beeper Codes 6
Basic Installation & Setup 7
Connecting Everything Together & Booting Up 7
Configuring Your Instant GigaDrive 9
Quick Setup with the Instant GigaDrive Utility 10
Administration 14
The Web-based Administrative Interface 15
The Administrative Menu — Configuration 16
The Administrative Menu — Storage Management 18
Managing Shares, Groups and Users 19
Nested Shares 21
Common Administrative Tasks 22
Windows Client Setup 24
Introduction 24
TCP/IP Setup for Windows 95 &98 24
TCP/IP Setup for Windows 2000 29
Using the Instant GigaDrive’s Print Server 34
Troubleshooting 36
Appendix 38
Specifications 38
Environmental Specifications 38
Customer Support 39
The 10/100 Instant GigaDrive’s Return Policy 39
Linksys highly recommends that you back up the files on
your Instant GigaDrive on a regular basis. In no instance
will Linksys be responsible for any data loss, nor will
Linksys perform any recovery on lost data or files.
1
EtherFast 10/100 Instant GigaDrive
3
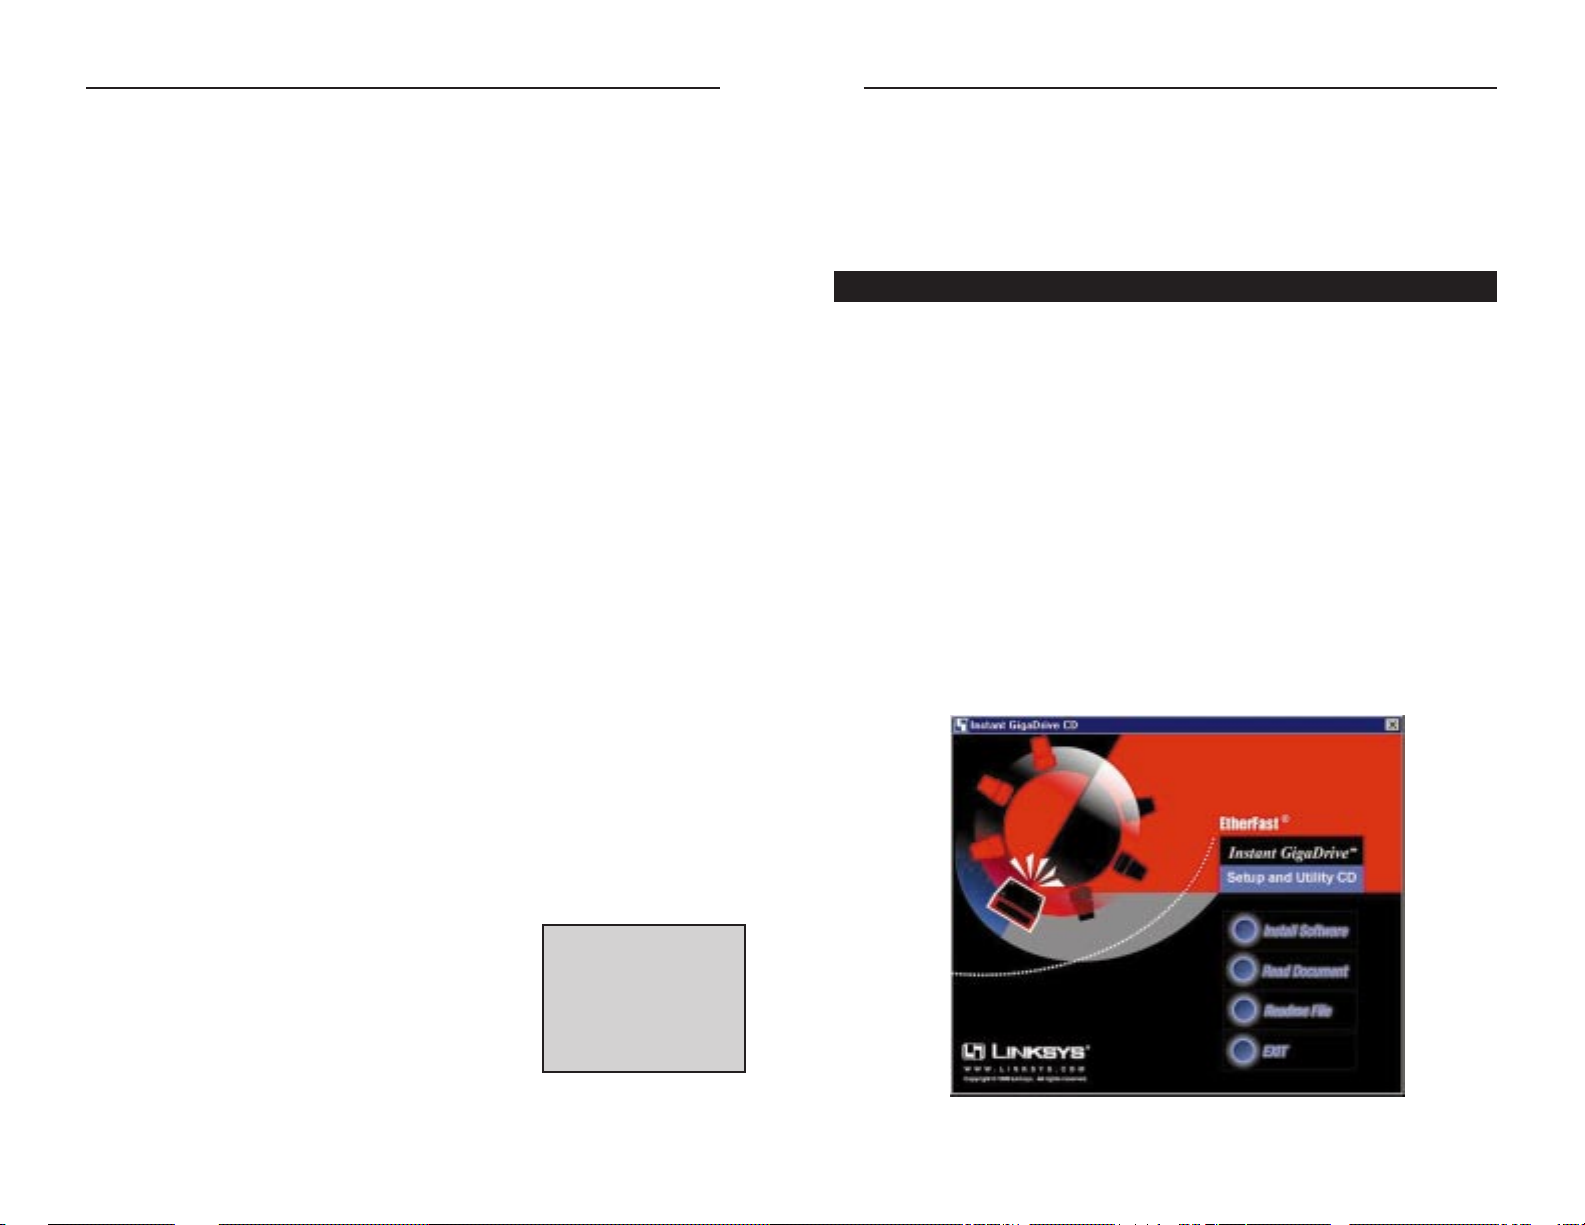
Getting to Know the Instant GigaDrive
Rear Panel
(picture for model EFG20 only)
All of the GigaDrive’s connectors and switches are on the rear panel, as seen
below.
Power Switch The Power switch is a spring-loaded soft switch
which powers the GigaDrive on and off. If the
GigaDrive is not powered on, pressing the power
switch will initiate the GigaDrive’s start-up
process. Pressing the Power switch while the
GigaDrive is turned on will begin the GigaDrive’s
internal shut-down process. The Instant GigaDrive
must be powered off this way, or through its internal shutdown process.
Power Input The Power Input port is where the power adapter
plugs in. Never remove or cut off the power supply while the Instant Gigadrive is turned on.
Printer Port You can also add a printer to your network through
the Instant GigaDrive’s Printer por t.
Linksys Instant EtherFast® Series
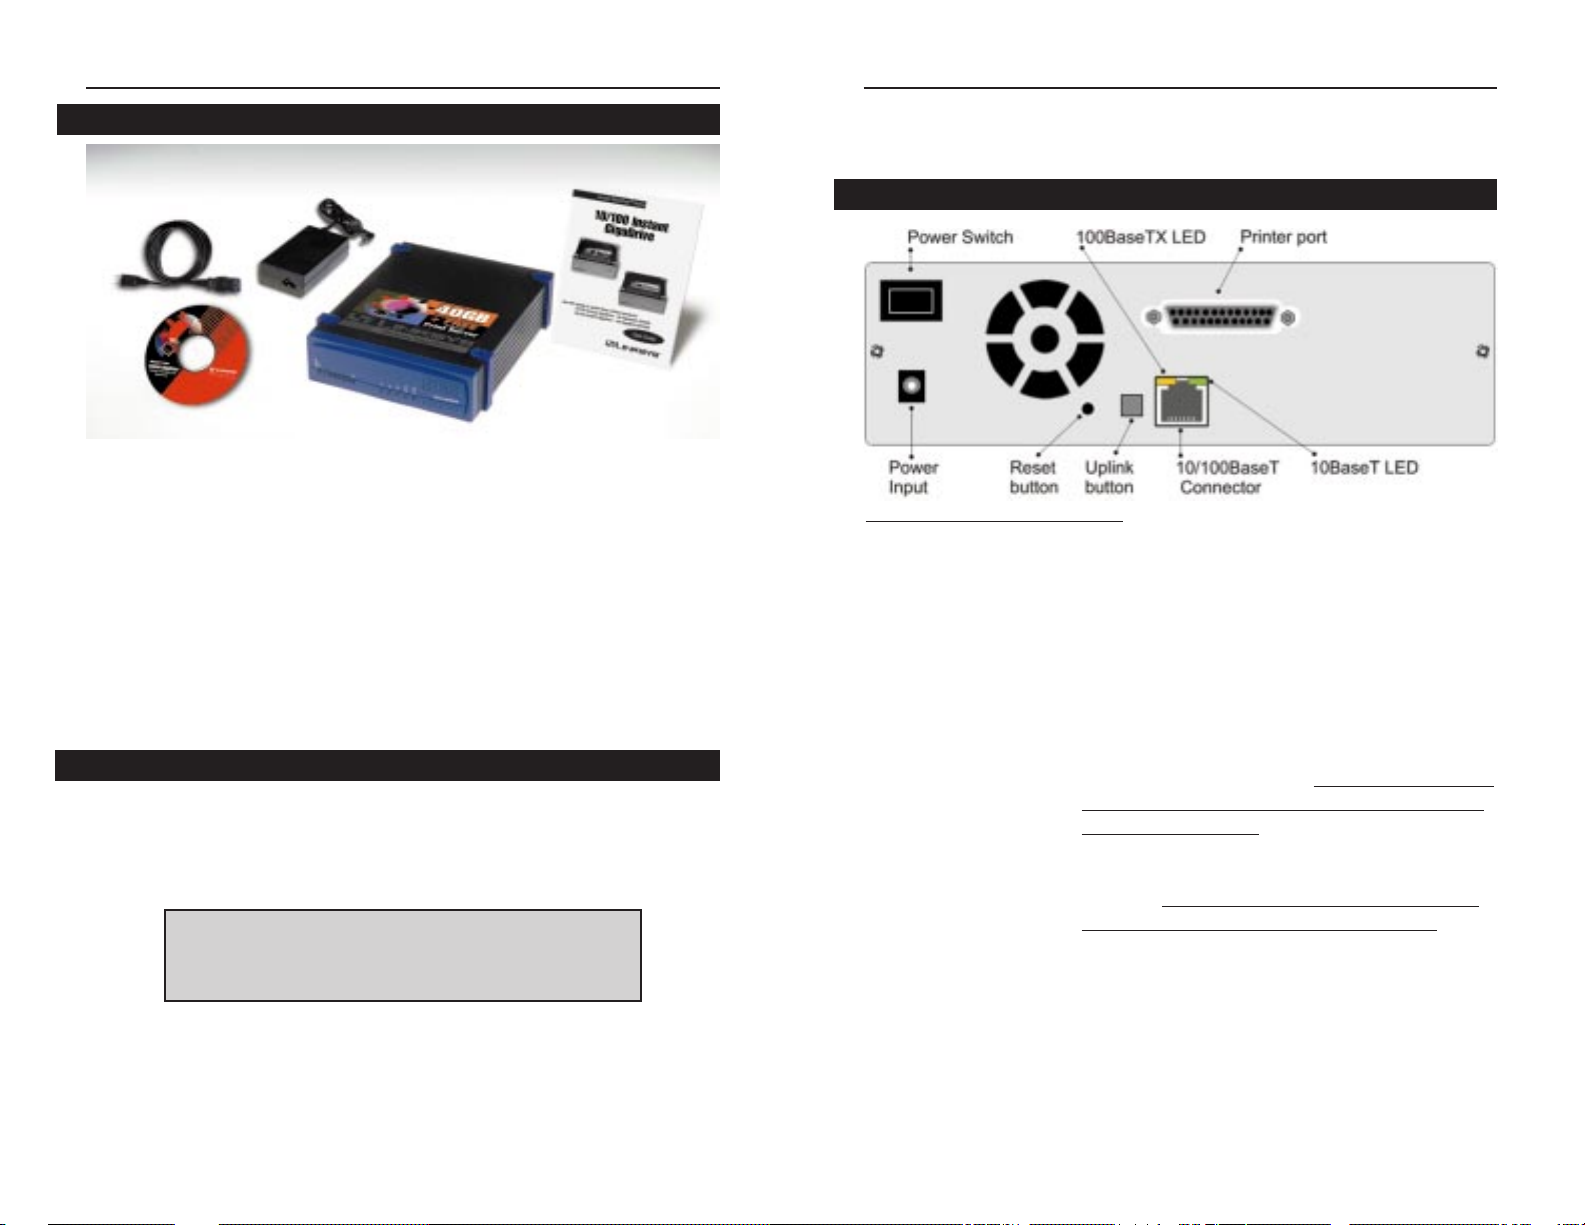
Instant Gigadrive Package Contents: 20 or 40 GBs
The following items should be included in the Instant GigaDrive packaging.
If any of these items are damaged or missing, please contact your Linksys
dealer for replacements.
• One Linksys EtherFast 10/100 Instant GigaDrive
• One AC Power Adapter and Power Cord
• One Driver CD-ROM, containing this User Guide and
GigaDrive Drivers for Windows 95, 98, NT 4.0, 2000, and Millennium
• One User Guide and Registration Card
• Four Gigadrive Stands
System Requirements
• Windows 95, 98, NT 4.0, 2000, or Millennium
• 10BaseT or 100BaseTX Ether net network
• TCP/IP protocol enabled
DDiissccllaaiimmeerr
: Linksys highly recommends that you back up the
files on your Instant GigaDrive on a regular basis. In no
instance will Linksys be responsible for any data loss, nor will
Linksys perform any recovery on lost data or files.
2

EtherFast 10/100 Instant GigaDrive
Front Panel
The Instant GigaDrive’s front panel shown below displays the majority of the
drive’s status lights.
System Green- Normally on
If this light shines a steady green, then the Instant
GigaDrive is working properly. It blinks during
Startup or Shutdown, and turns off after the shutdown is completed. It will blink during a software
upgrade.
Status Amber - Normally off
If this light is turned on, then there is a hardware
error. It will also be on during the power-on self
test. Once the self-test is completed, it should turn
off. It will blink during a software upgrade.
HD Green
Flashes when the GigaDrive’s hard drive is being
accessed. Stays on during the self-test.
LAN Green
Flashes when data is transmitted or received via
the network.
5
Linksys Instant EtherFast® Series
Reset Button If the Instant GigaDrive’s IP Address or password
is lost, press and hold this button down for three
seconds, then release this button. The GigaDrive
will beep once to indicate that a new IP Address
(192.168.0.2, with a Network Mask of
255.255.255.0) has been provided. This function
will also clear the GigaDrive’s administrative
passwords.
Uplink Button This button toggles the GigaDrive’s Ethernet
Connector between an Uplink setting and a standard setting. If the GigaDrive is connected directly to a PC without a hub, then this button should
be up. If connecting to a hub or switch, press this
button.
10/100BaseTX Connector Use this port to connect the Instant GigaDrive to
your 10BaseT or 100BaseTX hub.
100BaseTX LED This LED will glow red if the 10/100BaseTX con-
nector is using 100BaseTX.
10BaseT LED This LED will glow green if the 10/100BaseTX
connector is using 10BaseT.
4

Basic Installation & Setup
Overview
The following section instructs you on how to physically connect the Instant
GigaDrive to the network, and how to configure the Instant GigaDrive for
basic operation in your Windows environment. Everything you need to do to
get your Instant GigaDrive up and running is covered here.
This section also covers the hook-up of a printer on the GigaDrive’s printer
server port. Please note, however, that the GigaDrive will perform equally
well as a storage device with or without an attached printer. If you aren’t
interested in taking advantage of the Instant GigaDrive’s printer server function, skip any steps that deal with printer installation. The GigaDrive’s installation process will work fine without them.
Connecting Everything Together and Booting Up
Requirements
Your system must meet the following requirements before you begin the
Instant Gigadrive’s installation.
• TCP/IP protocol enabled on the network
• If connecting to a network, an available port on a hub or switch
• If connecting to a PC, an installed and available Ethernet or Fast Ethernet
port
• Inter net Explorer 4.0 or higher, or Netscape Navigator 4.04 or higher
• CD-ROM drive, or access to a network PC with a CD-ROM drive
NNoottee::
NEVER shut down the Instant GigaDrive by cutting
off its power supply. Always use either the power button or
the Shut Down feature in the GigaDrive’s Utility.
EtherFast 10/100 Instant GigaDrive
7
NNoottee
: If you are a network administrator, please follow these Basic
Installation & Setup steps, then proceed to the Administration section on page 14, which gives you the full available range of
administrator options.
Linksys Instant EtherFast® Series
IP Yellow
If this light it turned on, the GigaDrive is acting as
a DHCP client and receiving an IP address from a
DHCP server on the network. If this LED is flashing, no DHCP server responded to the client
request.
HD Usage This series of LEDs runs from green to red to
show what percentage of the GigaDrive’s hard
drive is full.
Beeper Codes
The Instant GigaDrive has an internal beeper that beeps to indicate certain
events.
1 Beep Signals that the Reset button or Power switch has
been pressed.
2 Beeps Repeated every 5 seconds for 1 minute. Signals
that the GigaDrive is configured as a DHCP client,
but no DHCP Server responded to the DHCP
client request.
3 Beeps Repeated every 15 seconds for 3 minutes. Signals
that the GigaDrive’s hard disk usage exceeds 98%
capacity.
5 Beeps Repeated every 15 seconds for 3 minutes. Signals
that the GigaDrive is overheating. An automatic
shutdown will be performed 3 minutes after the 1st
beep.
6
EtherFast 10/100 Instant GigaDrive
8. When most of the LEDs turn off, leaving only the System LED lit up
(and not blinking), the GigaDrive’s boot up is complete. If the Status
LED stays on, or if the GigaDrive repeatedly beeps, there is a hardware
problem. Consult this user guide’s entry on the GigaDrive’s beeper codes
(page 6) for possible solutions.
Configuring Your Instant GigaDrive
Now that everything is connected and powered on, you are ready to conf igure
your Instant GigaDrive so that it is accessible to the users on your system.
You will have to install the Instant GigaDrive Utility on your PC to access the
GigaDrive’s Quick Setup feature. Make sure that TCP/IP is installed and configured. See the appropriate section under Windows Client Setup for more
information
Instant GigaDrive Utility Installation
The Instant GigaDrive Utility is a simple piece of software which assists in
the quick and easy setup of your GigaDrive, and helps to keep up on the
GigaDrive’s status and settings. To install the Utility to your Windows 95, 98,
NT 4.0, 2000, or Millennium system, follow the instructions below.
1. Insert the CD-ROM. A Driver CD-ROM comes with your Instant
GigaDrive packaging. Insert the CD into your PC’s CD-ROM drive.
9
Linksys Instant EtherFast® Series
8
Hardware Installation
If the conditions on the previous page are met, follow the steps below to
install your Instant GigaDrive.
1. Connect the network cable to the Instant GigaDrive. Locate the network
cable that came with your Instant GigaDrive. Plug it into the RJ-45 port
on the GigaDrive’s rear panel.
2. Connect the Instant GigaDrive to your hub, switch, or PC. If you plan
to connect the GigaDrive to the network through a hub or switch, make
sure that the Uplink button on the rear panel of the GigaDrive is up, then
plug the other end of the network cable into one of the ports on your hub
or switch. If you want to connect the GigaDrive directly to a PC, make
sure that the uplink button is in the down position, and connect the network cable directly into the PC’s network card.
3. Connect a printer to the Instant GigaDrive. Connect a standard printer
cable to the GigaDrive’s rear-panel printer port. Connect the other end of
the cable to your printer.
4. Connect the power supply. Plug the supplied power adapter into the
GigaDrive’s Power Input port, located on the GigaDrive’s rear panel.
Connect the power adapter to a power outlet.
5. Power on. Locate the GigaDrive’s power switch on the upper left of the
GigaDrive’s rear panel. Press it once to power on the GigaDrive. Power
on the network printer, if you attached one to the Gigadrive.
6. Now that its power is on, the GigaDrive’s boot process will begin. The
GigaDrive will run a brief self-test (2 or 3 seconds) prior to actually booting up. During the Self-Check, most of the GigaDrive’s LEDs will be lit
up or flashing.
7. When the self-test is complete, most of the LEDs
will turn off. The System LED will blink continuously, and the LAN LED will blink occassionally.
This means that the GigaDrive is in the actual
process of booting up. Bootup should take approximately 1-3 minutes. The initial bootup, will take a
bit longer, as well as any bootup following an improper shutdown.
IIMMPPOORRTTAANNTT!!
After an
improper shutdown or a
time period where a SelfCheck was not done in a
long time, it may take the
Gigadrive up to 30 minutes to boot up.
 Loading...