

Page 1

E-Series
Page 2

Linksys E-Series
Table of Contents
Table of Contents
Product overview
E900/E1200/E1500/E2500/E3200 . . . . . . . . . . . . . . . . . . . .1
Back view 1
Bottom view 1
E4200 . . . . . . . . . . . . . . . . . . . . . . . . . . . . . . . . . . . . . .2
Top view 2
Back view 2
Setting Up Your E-Series Router
Where to nd more help. . . . . . . . . . . . . . . . . . . . . . . . . .3
How to set up your router . . . . . . . . . . . . . . . . . . . . . . . . .3
How to start Cisco Connect 3
Use Cisco Connect to manage your router 3
How to manually set up your router. . . . . . . . . . . . . . . . . . .3
Advanced Conguration
How to open the browser-based utility . . . . . . . . . . . . . . . .4
Setup > Basic Setup . . . . . . . . . . . . . . . . . . . . . . . . . . . . .5
Language 5
Internet Setup 5
Wireless > Basic Wireless Settings . . . . . . . . . . . . . . . . . . . .6
Wireless Settings 6
Wireless Security
Wireless > Wireless Security . . . . . . . . . . . . . . . . . . . . . . . .8
Personal options 8
Oce options 8
Option settings 8
Troubleshooting
How to run Cisco Connect after setup . . . . . . . . . . . . . . . . 11
Your router was not successfully set up . . . . . . . . . . . . . . . 12
Get Windows XP Service Pack 3 message . . . . . . . . . . . . . . . 12
Your Internet cable is not plugged in message . . . . . . . . . . . . 13
Cannot access your router message . . . . . . . . . . . . . . . . . .14
Device not found message . . . . . . . . . . . . . . . . . . . . . . . .15
Specications
Linksys E900. . . . . . . . . . . . . . . . . . . . . . . . . . . . . . . . . 17
Linksys E1200 . . . . . . . . . . . . . . . . . . . . . . . . . . . . . . . . 18
Linksys E1500 . . . . . . . . . . . . . . . . . . . . . . . . . . . . . . . . 19
Linksys E2500 . . . . . . . . . . . . . . . . . . . . . . . . . . . . . . . . 20
Linksys E3200 . . . . . . . . . . . . . . . . . . . . . . . . . . . . . . . . 21
Linksys E4200 . . . . . . . . . . . . . . . . . . . . . . . . . . . . . . . . 22
i
i
Page 3
Linksys E-Series
Product overview
Product overview
• Power indicator—Stays on steadily while power is connected and
following a successful Wi-Fi Protected Setup connection. Flashes slowly
during bootup, during firmware upgrades, and during a Wi-Fi Protected
Setup connection. Flashes quickly when there is a Wi-Fi Protected Setup
error.
• Power—Connect the included AC power adapter to this port.
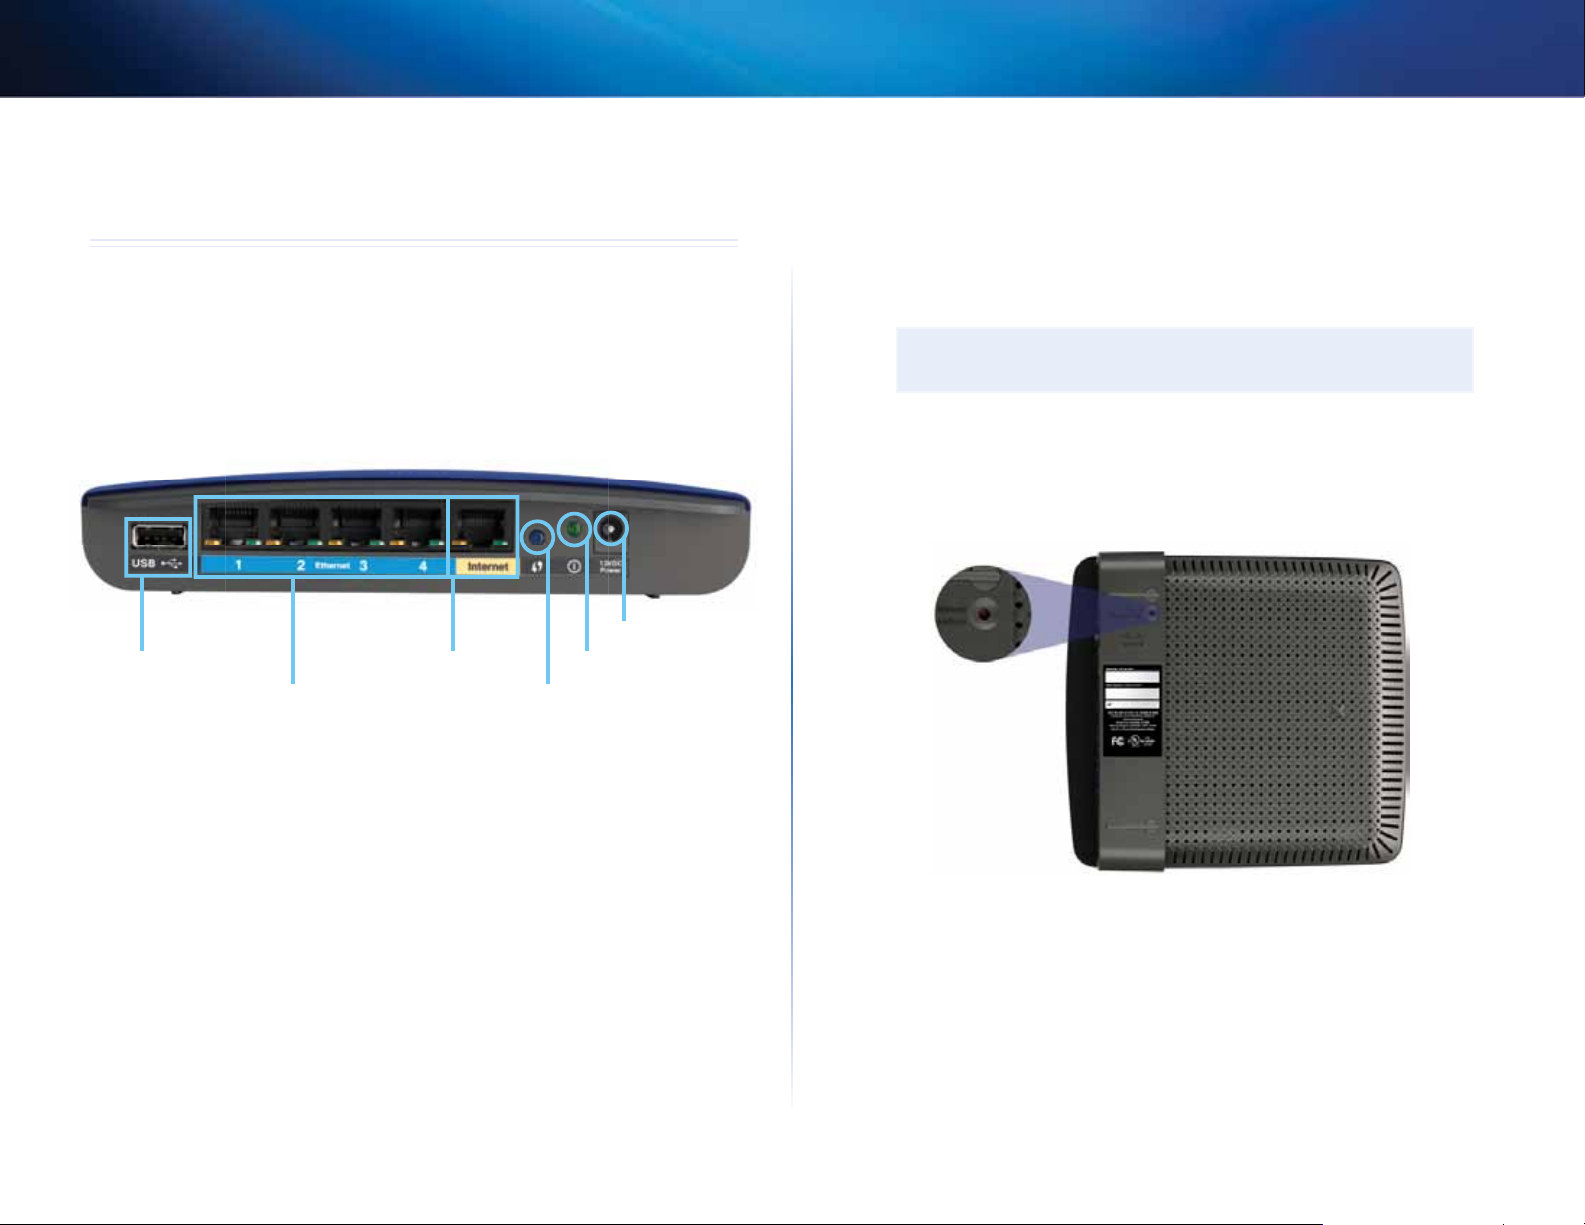
E900/E1200/E1500/E2500/E3200
Back view
Power port
Internet port
Ethernet ports Wi-Fi Protected Setup button
Your router’s appearance may vary
• USB port (E3200 only)—To easily share disk storage with other users on
your network or on the Internet, connect a USB drive to this port.
• Ethernet ports—Connect Ethernet cables (also called network cables)
to these Fast Ethernet (10/100, for E900, E1200, and E1500) or Gigabit
(10/100/1000, for E2500 and E3200) ports, color coded blue, and to other
wired Ethernet network devices on your network.
• Internet port—Connect an Ethernet cable (also called a network or
Internet cable) to this port, color coded yellow, and to your modem.
Wi-Fi Protected Setup™ button—Press this button to easily configure
wireless security on Wi-Fi Protected Setup-enabled network devices. For
more information, see “Wireless Security” on page 8.
Power indicatorUSB port (E3200 only)
CAUTION
Use only the adapter that came with your router.
• Power button—Press | (on) to turn on the router.
Bottom view
Your router’s appearance may vary
• Reset button—Press and hold this button for 5-10 seconds (until the
port lights flash at the same time) to reset the router to its factory defaults.
You can also restore the defaults using the browser-based utility.
1
1
Page 4
Linksys E-Series
Product overview
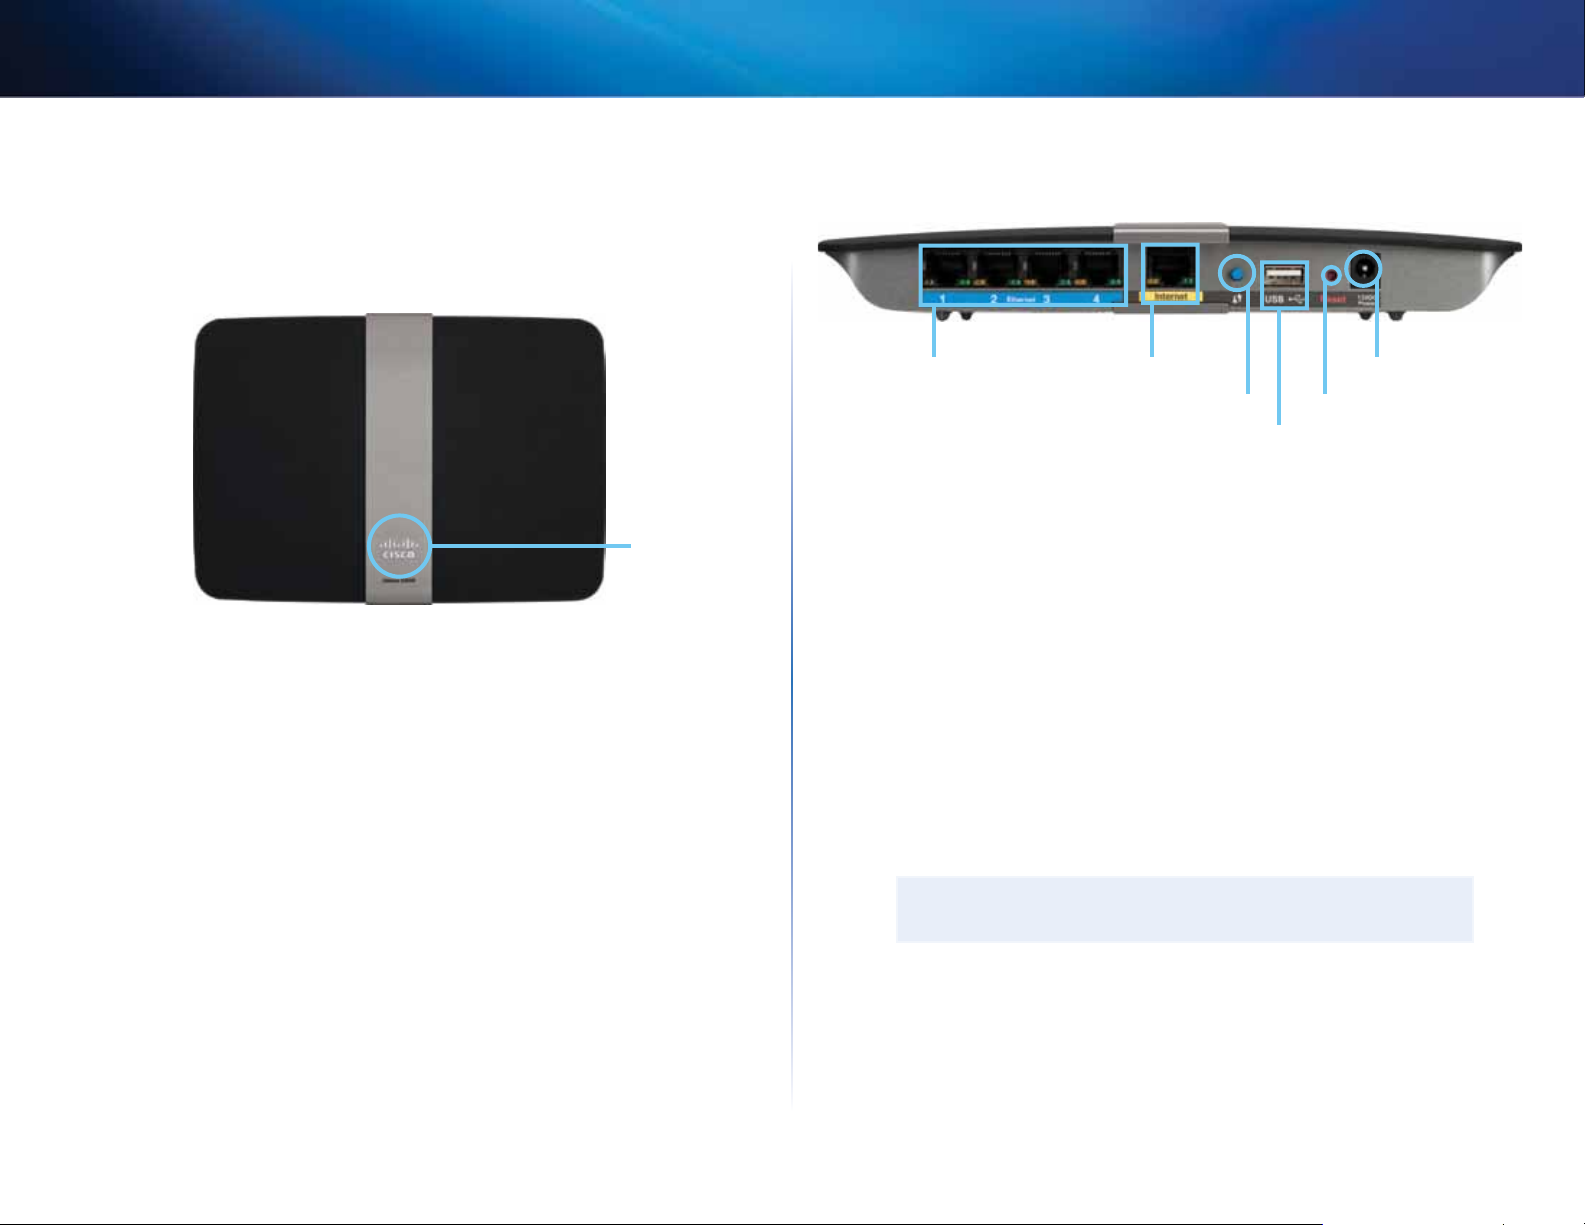
E4200
Top view
Indicator light
• Indicator light—Stays on steadily while power is connected and
following a successful Wi-Fi Protected Setup connection. Pulses slowly
during bootup, during firmware upgrades, and during a Wi-Fi Protected
Setup connection. Flashes quickly when there is a Wi-Fi Protected Setup
error.
Back view
Ethernet ports
• Ethernet ports—Connect Ethernet cables (also called network cables)
to these Gigabit (10/100/1000) ports, color coded blue, and to other
wired Ethernet network devices on your network.
• Internet port—Connect an Ethernet cable (also called a network or
Internet cable) to this port, color coded yellow, and to your modem.
• Wi-Fi Protected Setup™ button—Press this button to easily configure
wireless security on Wi-Fi Protected Setup-enabled network devices. For
more information, see “Wireless Security” on page 8.
• USB port—To easily share disk storage with other users on your network
or on the Internet, connect a USB drive to this port. .
• Reset button—Press and hold this button for 5-10 seconds (until the
port lights flash at the same time) to reset the router to its factory defaults.
You can also restore the defaults using the browser-based utility.
Internet port Power port
Wi-Fi Protected Setup button
Reset button
USB port
• Power—Connect the included AC power adapter to this port.
CAUTION
Use only the adapter that came with your router.
• Power button—Press | (on) to turn on the router.
2
Page 5

Linksys E-Series
Setting Up Your E-Series Router
Setting Up Your E-Series Router
Where to find more help
In addition to this User Guide, you can find help at these locations:
• Linksys.com/support (documentation, downloads, FAQs, technical
support, live chat, forums)
• Cisco Connect help (run Cisco Connect, then click Learn More where
available)
• Browser-based utility context-sensitive help (open the utility, then click
Help in the right-side column.)
How to set up your router
The easiest and fastest way to set up your router is to run the Cisco Connect
setup software.
How to start Cisco Connect
When you run the setup CD, Cisco Connect (your router’s setup software) is
automatically installed onto your computer. You can then use Cisco Connect to
easily manage your router.
NOTE:
If you lose your setup CD, you can download the software from
Linksys.com/support.
To start Cisco Connect for the first time:
1.
Insert the CD into your CD or DVD drive.
2.
Click Set up your Linksys Router.
If you do not see this:
• For Windows, click Start, Computer, then double-click the CD drive
and the Setup icon.
• For Mac, double-click the CD icon on your desktop, then double-click
the Setup icon.
3.
Follow the on-screen instructions to complete your router setup.
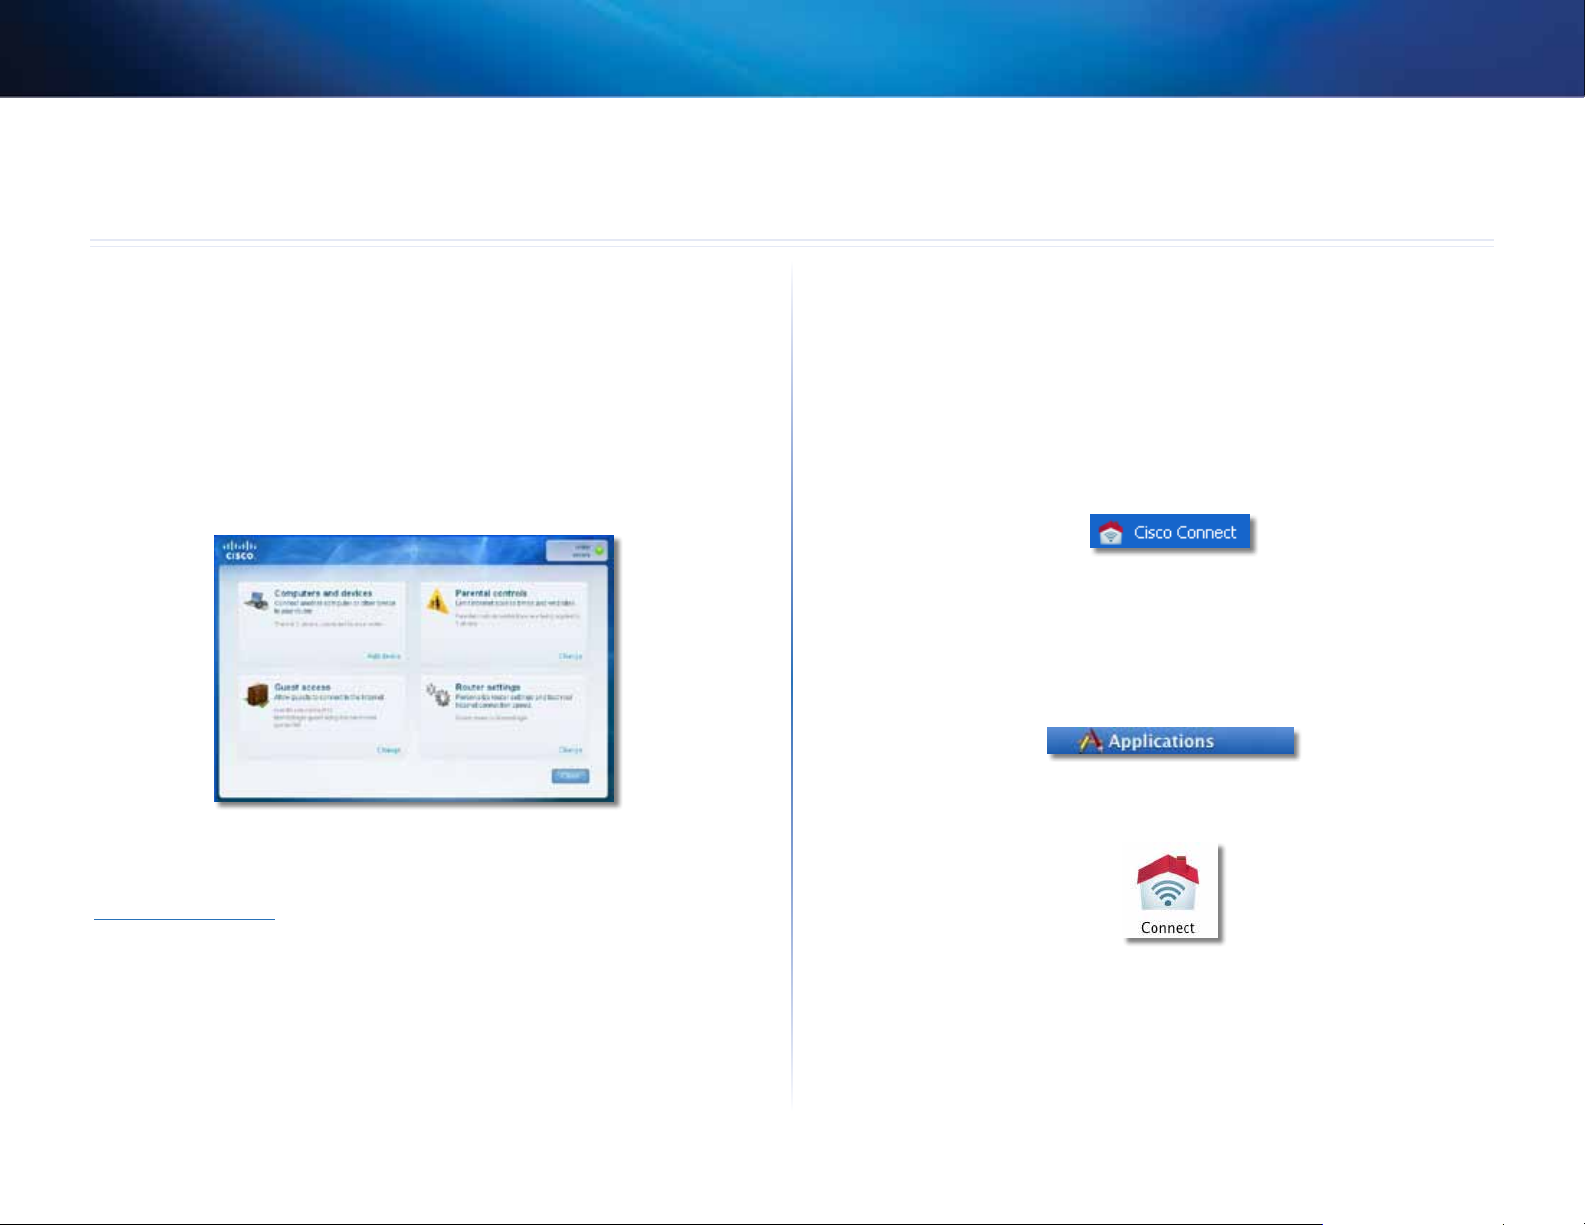
Use Cisco Connect to manage your router
After your router has been set up and Cisco Connect has been installed, you
can use Cisco Connect to easily manage many of your router’s settings such as:
• Connect devices to your network
• Test your Internet connection speed
• Configure parental controls
• Set up guest access
• Change your router’s name and password
How to manually set up your router
After setting up the router with the setup software (located on the CD), the
router will be ready for use. If you would like to change its advanced settings,
or if the software does not run, use the router’s browser-based utility.You can
access the utility with a web browser on a computer connected to the router.
For more information on using the utility, see “How to open the browser-based
utility” on page 4.
3
3
Page 6

Linksys E-Series
Advanced Configuration
How to open the browser-based utility
To access some advanced settings, you need to open the browser-based utility.
To open the browser-based utility:
1.
Run Cisco Connect, click Change under Router settings, click Advanced
settings, then click OK.
– or –
Open a web browser on a computer connected to your network, then go
to 192.168.1.1.
The router prompts you for a user name and password.
Advanced Configuration
2.
Enter the user name and password, then click OK. The utility’s main menu
opens.
TIPS
If you set up your router without using Cisco Connect, your router’s
default username and password is admin.
If you used Cisco Connect to set up your router, you can see your
router’s user name and password by running Cisco Connect, then
clicking Router settings.
4
4
Page 7
Linksys E-Series
Advanced Configuration
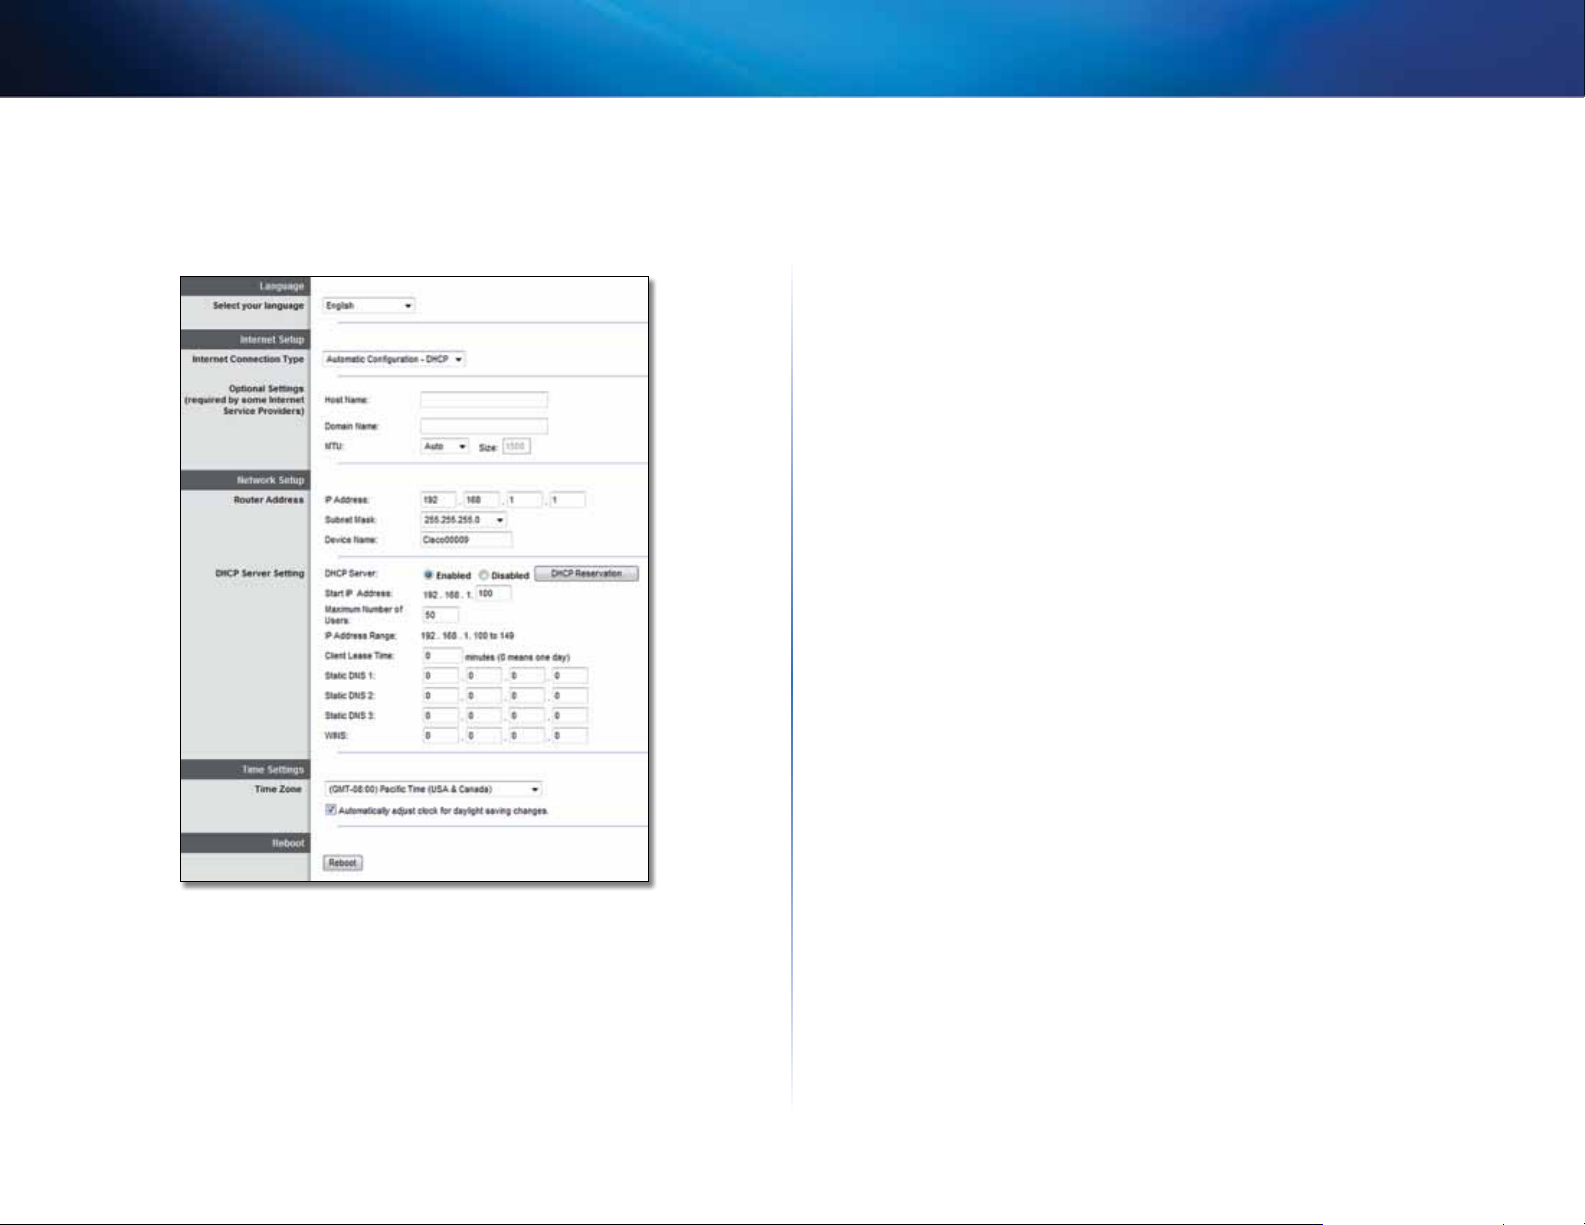
Setup > Basic Setup
The first screen that appears is the Basic Setup screen. This allows you to change
the router’s general settings.
Language
Select your language
down menu. The language of the browser-based utility will change five seconds
after you select another language.
To use a different language, select one from the drop-
Internet Setup
The Internet Setup section configures the router to your Internet connection.
Most of this information can be obtained through your Internet Service
Provider (ISP).
Internet Connection Type
Select the type of Internet connection your ISP provides from the drop-down
menu. The available types are:
• Automatic Configuration - DHCP
• Static IP
• PPPoE
• PPTP
• L2TP
• Telstra Cable
Automatic Configuration - DHCP
The default Internet Connection Type is Automatic Configuration - DHCP
(Dynamic Host Configuration Protocol). Keep the default only if your ISP
supports DHCP or if you connect using a dynamic IP address. (This option
usually applies to cable connections.)
Static IP
If you are required to use a fixed IP address to connect to the Internet, select
Static IP.
PPPoE
If you have a DSL connection, check whether your ISP uses Point-to-Point
Protocol over Ethernet (PPPoE). If so, select PPPoE.
5
Page 8

Linksys E-Series
Advanced Configuration
PPTP
Point-to-Point Tunneling Protocol (PPTP) is a service that generally applies to
connections in Europe. If your PPTP connection supports DHCP or a dynamic IP
address, then select Obtain an IP Address Automatically. If you are required
to use a fixed IP address to connect to the Internet, then select Specify an IP
Address and configure the options below.
L2TP
Layer 2 Tunneling Protocol (L2TP) is a service that generally applies to
connections in Israel.
Telstra Cable
Telstra Cable is a service that generally applies to connections in Australia.
Connect on Demand or Keep Alive
The Connect on Demand and Keep Alive options let you choose whether
the router connects to the Internet only as needed (useful if your ISP charges
for connect time), or if the router should always be connected. Select the
appropriate option.
Wireless > Basic Wireless Settings
The basic settings for wireless networking are set on this screen.
NOTE
After you set up the wireless network(s), set up the wireless security
settings.
Wireless Settings
Network Mode Select the wireless standards your network will support.
• Mixed If you have Wireless-N (2.4 GHz), Wireless-G, and Wireless-B devices
in your network, keep the default, Mixed.
• Wireless-B/G Only If you have both Wireless-B and Wireless-G (2.4 GHz)
devices in your network, select Wireless-B/G Only.
• Wireless-B Only If you have only Wireless-B devices, select Wireless-B
Only.
• Wireless-G Only If you have only Wireless-G devices, select Wireless-G
Only.
• Wireless-N Only If you have only Wireless-N (2.4 GHz) devices, select
Wireless-N Only.
• Disabled If you have no Wireless-B, Wireless-G, and Wireless-N (2.4 GHz)
devices in your network, select Disabled.
NOTE
If you have a dual-band router, you can select Mixed, Wireless-A
Only, Wireless-N Only, or Disabled for the 5 GHz band.
If you are not sure which mode to use, keep the default, Mixed.
6
Page 9

Linksys E-Series
Network Name (SSID) The Service Set Identifier (SSID) is the network name
shared by all devices in a wireless network. It is case-sensitive and must not
exceed 32 keyboard characters. The default is Cisco followed by the last 5 digits
of the router’s serial number, which is found on the bottom of the router. If
you used the setup software for installation, then the default Network Name is
changed to an easy-to-remember name.
NOTE
If you restore the router’s factory default settings (by pressing
the Reset button or using the Administration > Factory Defaults
screen), the Network Name will return to its default value. Change
the Network Name back to its original name, or you will have to
reconnect all devices on your wireless network to the new network
name.
Channel Width For best performance in a network using Wireless-B,
Wireless-G and Wireless-N (2.4 GHz) devices, select Auto (20 MHz or 40 MHz).
For a channel width of 20 MHz, keep the default, 20 MHz only.
Channel Select the channel from the drop-down list for Wireless-B, Wireless-G,
and Wireless-N (2.4 GHz) networking. If you are not sure which channel to
select, then keep the default, Auto.
Advanced Configuration
SSID Broadcast When wireless clients survey the local area for wireless
networks to associate with, they will detect the SSID broadcast by the router.
To broadcast the router’s SSID, keep the default, Enabled. If you do not want to
broadcast the router’s SSID, then select Disabled.
7
Page 10

Linksys E-Series
Wireless Security
Wireless Security
Wireless > Wireless Security
The wireless security settings configure the security of your wireless network(s).
The router supports the following wireless security options: WPA2/WPA Mixed
Mode, WPA2 Personal, WPA Personal, WPA2/WPA Enterprise Mixed Mode, WPA2
Enterprise, WPA Enterprise, WEP, and RADIUS. (WPA stands for Wi-Fi Protected
Access. WEP stands for Wireless Equivalent Privacy. RADIUS stands for Remote
Authentication Dial-In User Service.)
Personal options
Security Option Strength
WPA2 Personal Strongest
WPA2/WPA Mixed Mode
WPA Personal Strong
WEP Basic
Office options
The office options are available for networks that use a RADIUS server
for authentication. The office options are stronger than the personal
options because WPA2 or WPA provides encryption while RADIUS provides
authentication.
WPA2: Strongest
WPA: Strong
Option settings
WPA2/WPA Mixed Mode, WPA2 Personal, WPA Personal
NOTES
If you select WPA2/WPA Mixed Mode as your Security Mode, each
device in your wireless network MUST use WPA2/WPA and the
same passphrase.
If you select WPA2 Personal as your Security Mode, each device
in your wireless network MUST use WPA2 Personal and the same
passphrase.
If you select WPA Personal as your Security Mode, each device
in your wireless network MUST use WPA Personal and the same
passphrase.
Passphrase Enter a passphrase of 8-63 characters. The default is password. If
you used the setup software for installation, then the default is changed to a
unique passphrase, which you can find by running Cisco Connect, then clicking
Router settings.
Security Option Strength
WPA2 Enterprise Strongest
WPA2/WPA Enterprise Mixed
Mode
WPA Enterprise Strong
RADIUS Basic
WPA2: Strongest
WPA: Strong
8
8
Page 11

Linksys E-Series
Wireless Security
WPA2/WPA Enterprise Mixed Mode, WPA2 Enterprise, WPA
Enterprise
These option is used in coordination with a RADIUS server. (These should only
be used when a RADIUS server is connected to the router.)
NOTES
If you select WPA2/WPA Enterprise Mixed Mode as your Security
Mode, each device in your wireless network MUST use WPA2/WPA
Enterprise and the same shared key.
If you select WPA2 Enterprise as your Security Mode, each device
in your wireless network MUST use WPA2 Enterprise and the same
shared key.
If you select WPA Enterprise as your Security Mode, each device
in your wireless network MUST use WPA Enterprise and the same
shared key.
RADIUS Server Enter the IP address of the RADIUS server.
RADIUS Port Enter the port number of the RADIUS server. The default is 1812.
WEP
WEP is a basic encryption method, which is not as secure as WPA.
NOTE:
If you select WEP as your Security Mode, each device in your
wireless network MUST use WEP and the same encryption and
shared key.
Encryption Select a level of WEP encryption, (40/64-bit 10 hex digits) or
104/128-bit (26 hex digits). The default is 40/64-bit (10 hex digits).
Passphrase Enter a passphrase to automatically generate WEP keys. Then
click Generate.
Key 1-4 If you did not enter a passphrase, enter the WEP key(s) manually.
TX Key Select a default TX (Transmit) Key to use. The default is 1.
Shared Key Enter the key shared between the router and the server.
9
Page 12
Linksys E-Series
Wireless Security
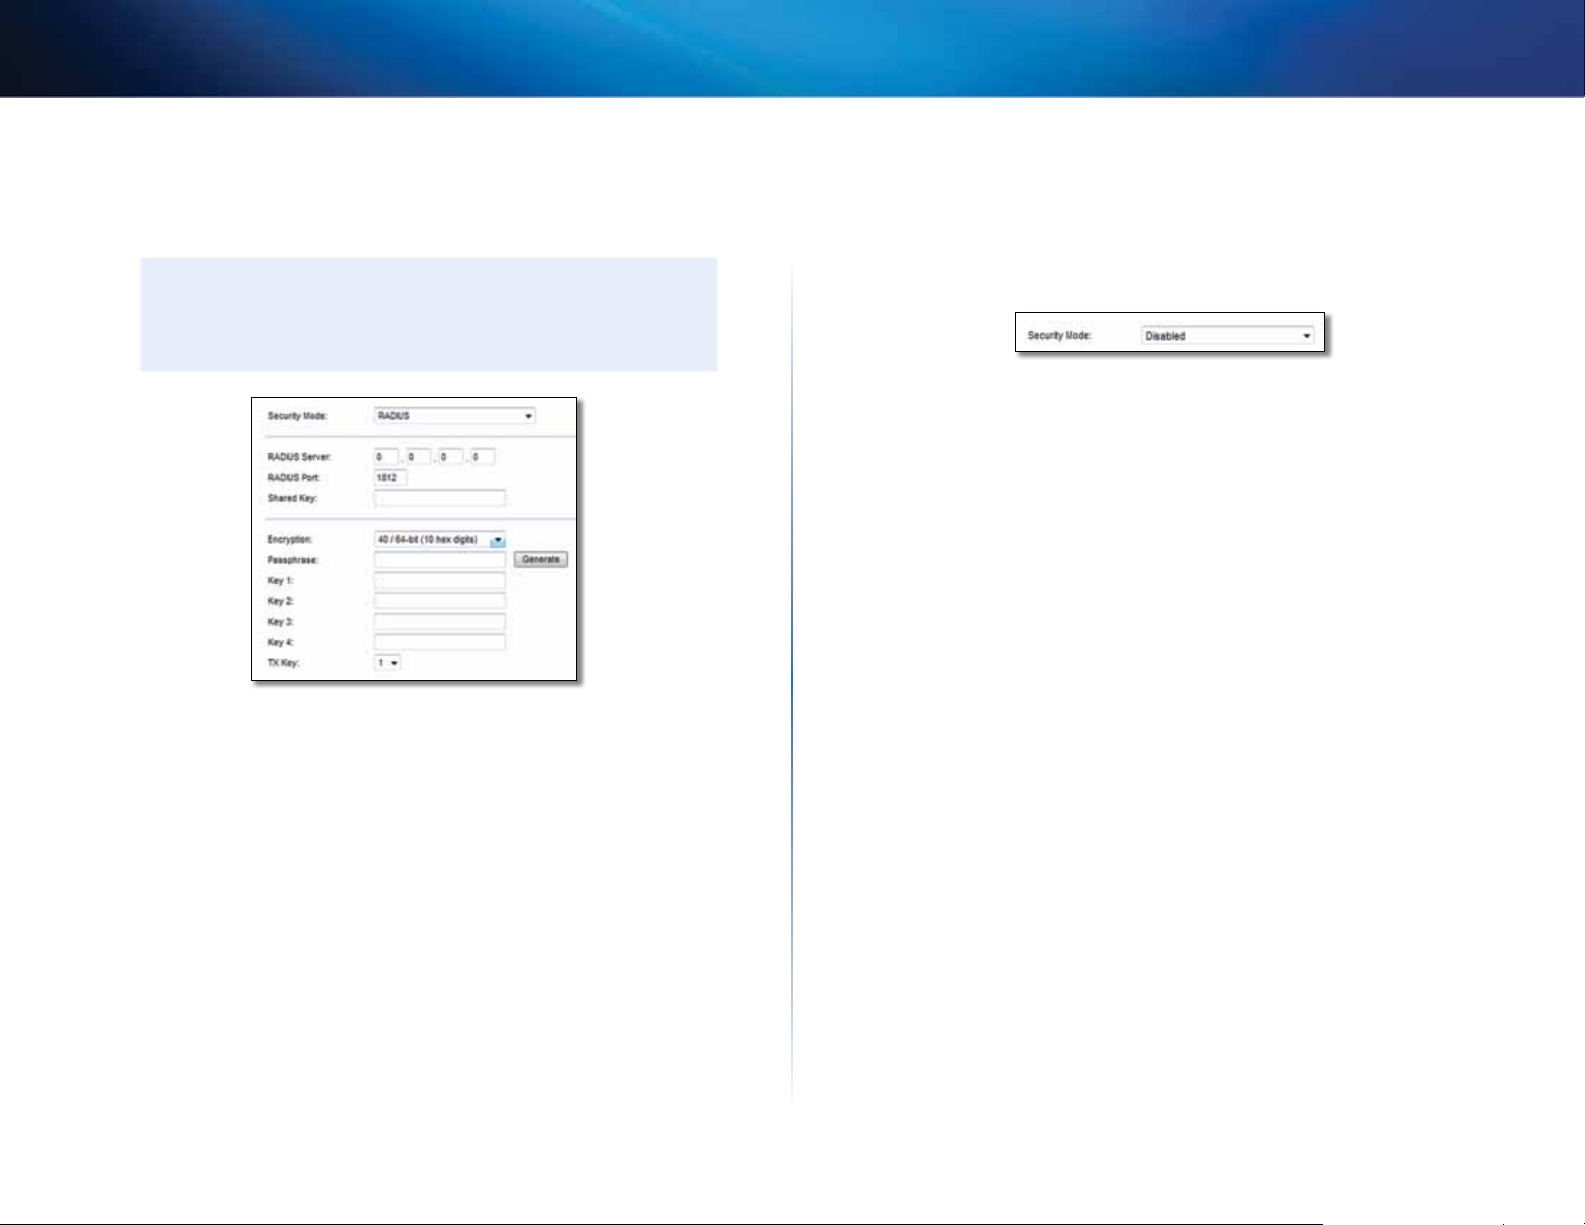
RADIUS
This option features WEP used in coordination with a RADIUS server. (This
should only be used when a RADIUS server is connected to the router.)
NOTE:
If you select RADIUS as your Security Mode, each device in your
wireless network MUST use RADIUS and the same encryption and
shared key.
RADIUS Server Enter the IP address of the RADIUS server.
Disabled
If you choose to disable wireless security, you will be informed that wireless
security is disabled when you first attempt to access the Internet. You will given
the option to enable wireless security, or confirm that you understand the risks
but still wish to proceed without wireless security.
RADIUS Port Enter the port number of the RADIUS server. The default is 1812.
Shared Secret Enter the key shared between the router and the server.
Encryption Select a level of WEP encryption, (40/64-bit 10 hex digits) or
104/128-bit (26 hex digits). The default is 40/64-bit (10 hex digits).
Passphrase Enter a passphrase to automatically generate WEP keys. Then
click Generate.
Key 1-4 If you did not enter a passphrase, enter the WEP key(s) manually.
TX Key Select a default TX (Transmit) Key to use. The default is 1.
10
Page 13
Linksys E-Series
Troubleshooting
Troubleshooting
This chapter can help you solve common setup issues and connect to the
Internet. Your router’s CD includes Cisco Connect, the router setup software
that makes it easy to connect network devices, change router settings, control
guest access, enable parental controls, and connect to the Internet. Cisco
Connect is also installed onto your computer during setup. If Cisco Connect
is prevented from completing the setup, this chapter will guide you through
finding solutions.
You can find more help from our award-winning customer support at
linksys.com/support.
How to run Cisco Connect after setup
When you run the setup CD, Cisco Connect is automatically installed onto your
computer. You can then use Cisco Connect to easily manage your network.
To start Cisco Connect on a Windows computer:
1.
Click Start, All Programs, then click Cisco Connect.
The Cisco Connect main menu opens.
To start Cisco Connect on a Mac OS X computer:
1.
Open Finder and click Applications in the left panel.
2.
Double-click the Cisco Connect icon.
The Cisco Connect main menu opens.
11
11
Page 14

Linksys E-Series
Troubleshooting
Your router was not successfully set up
If Cisco Connect did not complete the setup, you can try the following:
• Press and hold the Reset button on your router with a paperclip or pin
for 10-15 seconds, then run the Setup program again on the router’s CD.
• Temporarily disable your computer’s firewall (see the security software’s
instructions for help), then run the Setup program again on the router’s
CD.
• If you have another computer, use that computer to run the Setup
program again on the router’s CD.
Get Windows XP Service Pack 3 message
On Windows XP computers, Cisco Connect requires Service Pack 3 in order to
work. If you receive a “Get Windows Service Pack 3” message when setting up
your router for the first time, follow these troubleshooting steps.
If the currently installed Service Pack is older than version 3, you need to
download and install Service Pack 3.
Your router’s appearance may vary
TIP
To temporarily connect to the Internet and download the required
Service Pack, you can use the included Ethernet cable to connect
your computer directly to your modem.
To install Service Pack 3:
1.
Click the link in the Cisco Connect error message or connect to the
Microsoft Update website (update.microsoft.com/windowsupdate).
2.
Follow the instructions on the website or contact Microsoft if you need
further help.
3.
After downloading and installing Service Pack 3, run the Setup program
on your router’sCD.
12
Page 15

Linksys E-Series
Your Internet cable is not plugged in
message
If you get a “Your Internet cable is not plugged in” message when trying to set
up your router, follow these troubleshooting steps.
To fix the problem:
1.
Make sure that an Ethernet or Internet cable (or a cable like the one
supplied with your router) is securely connected to the yellow Internet
port on the back of the router and to the appropriate port on your
modem. This port on the modem is usually labeled Ethernet, but may
be named Internet or WAN.
Troubleshooting
Back view of cable modem
Back view of DSL modem
2.
Make sure that your modem is connected to power and is turned on. If it
has a power switch, make sure that it is set to the ON or l position.
3.
If your Internet service is cable, verify that the cable modem’s CABLE port
is connected to the coaxial cable provided by your ISP.
Or, if your Internet service is DSL, make sure that the DSL phone line is
connected to the modem’s DSL port.
4.
If your computer was previously connected to your modem with a USB
cable, disconnect the USB cable.
5.
Return to the Cisco Connect window and click Next to try again. If the
window has already been closed, run the Setup program again on the
router’s CD.
Back view of router
13
Page 16
Linksys E-Series
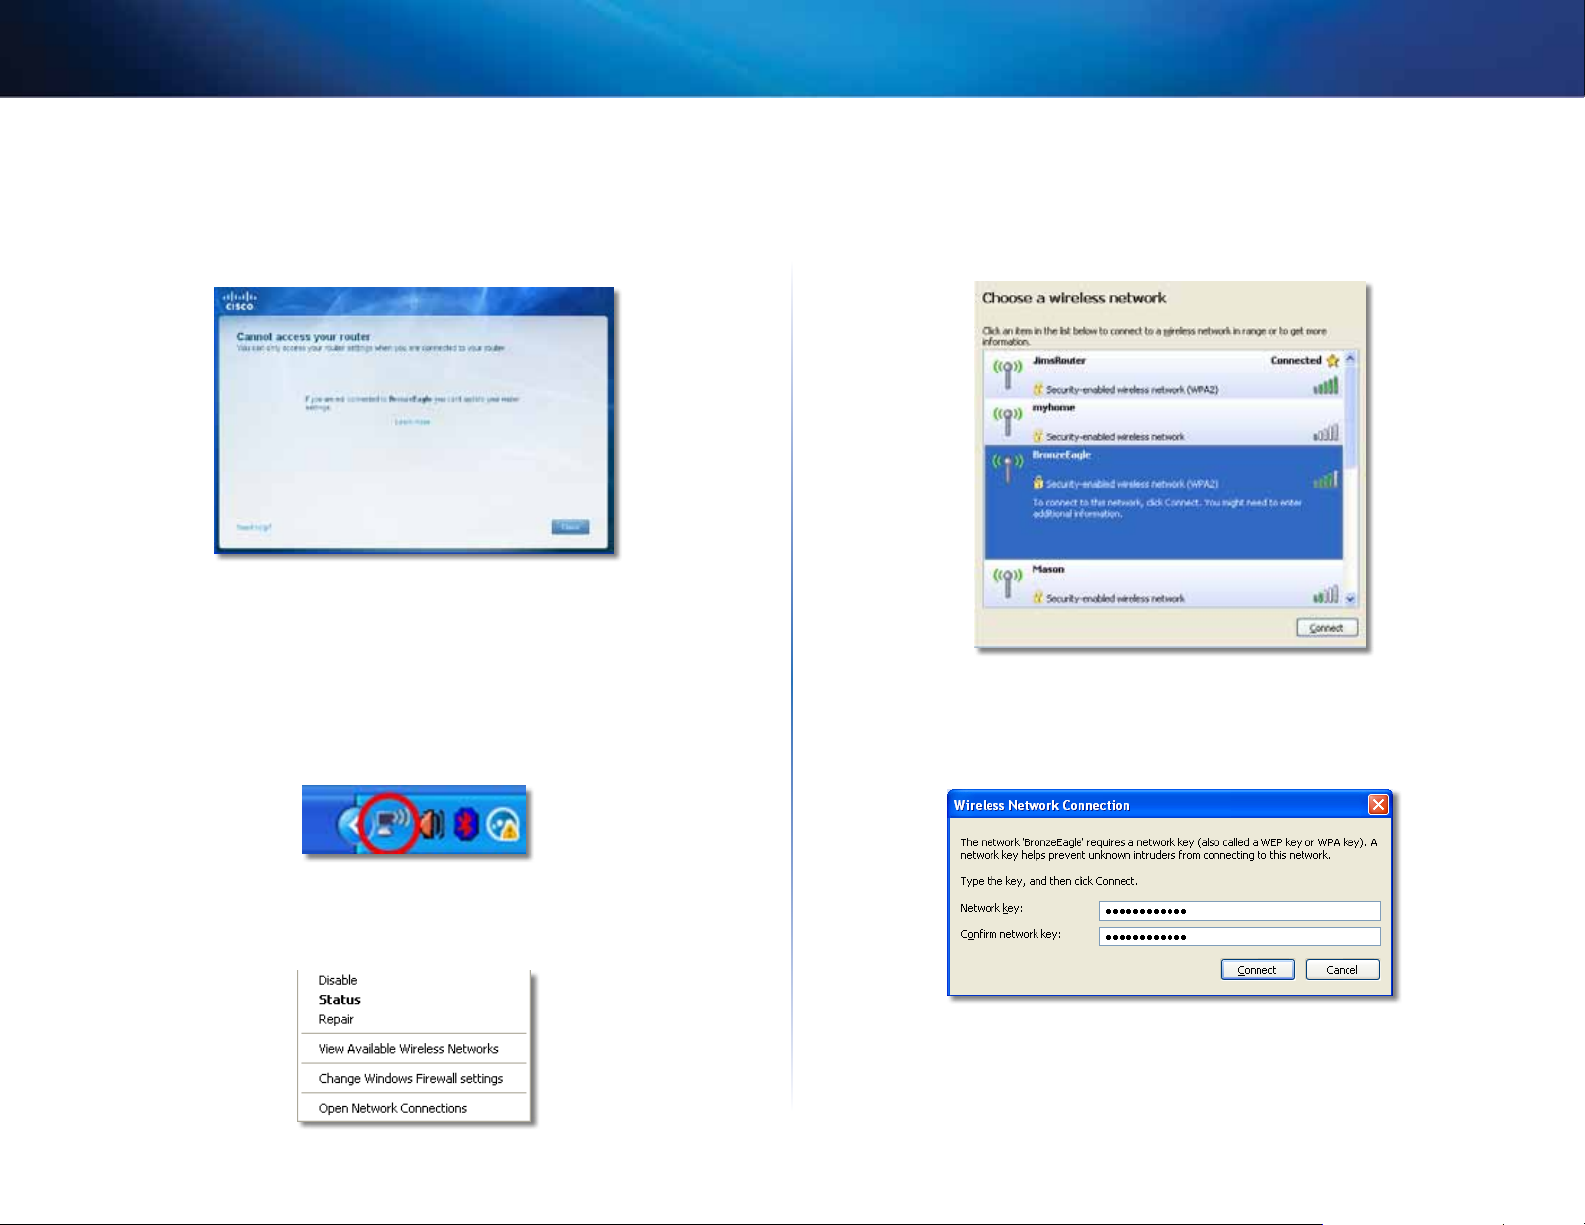
Cannot access your router message
If you cannot access your router because your computer is not connected to
your network, follow these troubleshooting steps.
To access your router, you must be connected to your own network. If you
currently have wireless Internet access, the problem may be that you have
accidentally connected to a different wireless network.
Troubleshooting
3.
Click your own network name, then click Connect. In the example
below, the computer was connected to another wireless network named
JimsRouter. The name of the Linksys E-Series network, BronzeEagle in this
example, is shown selected.
To fix the problem on Windows computers:
1.
On your Windows desktop, right-click the wireless icon in the system tray.
2.
Click View Available Wireless Networks. A list of available networks
appears.
4.
If you are prompted to enter a network key, type your password (Security
Key) into the Network key and Confirm network key fields, then click
Connect.
Your computer connects to the network, and you should now be able to
access the router.
14
Page 17

Linksys E-Series
Troubleshooting
To fix the problem on Mac computers:
1.
In the menu bar across the top of the screen, click the AirPort icon. A list
of wireless networks appears. Cisco Connect has automatically assigned
your network a name.
In the example below, the computer was connected to another wireless
network named JimsRouter. The name of the Linksys E-Series network,
BronzeEagle in this example, is shown selected.
2.
Click the wireless network name of your Linksys E-Series router
(BronzeEagle in the example).
3.
Type your wireless network password (Security Key) into the Password
field, then click OK.
Device not found message
If you get a “Device not found” message when trying to connect a network
device (such as an iPhone, iPod, or smartphone), follow these troubleshooting
steps.
TIP
For a stronger signal during initial setup, move your wireless
devices near your router. Long distances make it harder for the
router to detect the devices.
To fix the problem:
1.
Run Cisco Connect.
15
Page 18

Linksys E-Series
2.
Click Computers and devices. The Computers and other devices window
appears.
3.
Click Other Wireless devices.
Troubleshooting
Example: On your Smartphone or other wireless device, locate the WiFi menu and search for available wireless networks. In this example,
using the network information provided by Cisco Connect shown in the
previous screen, click BronzeEagle.
4.
Enable your wireless network device’s Wi-Fi connection, then search for
your wireless network name. See your device documentation for help.
NOTE
Your wireless device must support WPA/WPA2.
5.
On the wireless network device, select the network name of your router
and enter the password (Security Key).
6.
In Cisco Connect, click Next.
Android
7.
Enter the password (Security Key) provided by Cisco Connect. In this
example, the security key is B6eM9UkCjz.
NOTE
The password is case sensitive. Make sure that you enter letters in
the correct case.
8.
When your wireless device is successfully connected to your wireless
network, enter a name for the device in Cisco Connect, then click Finish.
iPhone
16
Page 19

Linksys E900
Specifications
Specifications
Linksys E900
Model Name Linksys E900
Description Wireless-N Router
Model Number E900
Standards 802.11n, 802.11g, 802.11b,
802.3u
Ports Power, Internet, and Ethernet (1-4)
Buttons Reset, Wi-Fi Protected Setup™
LEDs Power/Wi-Fi Protected Setup,
Internet, Ethernet (1-4)
Cabling Type CAT 5e
Transmitted Power 802.11n (20 MHz):
15.0 ± 1.5dBm @ CH6, MCS 0~4, MCS 8~12
13.5 ± 1.5dBm @ CH6, MCS 5~7, MCS 13~15
802.11n (40 MHz):
14.0 ± 1.5dBm @ CH6, MCS 0~4, MCS 8~12
13.5 ± 1.5dBm @ CH6, MCS 5~7, MCS 13~15
802.11g:
14.5 ± 1.5dBm @ CH6, all rates
802.11b:
16.5 ± 1.5dBm @ CH6, all rates
Antenna Gain ≤2.0 dBi, ≤4.0 dBi (2 antennas)
UPnP Supported
Wireless Security Wi-Fi Protected Access™ 2 (WPA2),
WEP, wireless MAC ltering
Security Key Bits Up to 128-bit encryption
Environmental
Dimensions 188.7 × 151.7 × 31.2 mm
(7.43” × 5.97” × 1.23”)
Unit Weight 202.0g (7.13 oz.)
Power 12V, 0.5A
Certications FCC, UL/cUL, ICES-003, RSS210,
CE, Wi-Fi (IEEE 802.11b/g/n),
WPA2™, WMM®, Wi-Fi Protected
Setup, Windows 7
Operating Temp. 0 to 40°C (32 to 104°F)
Storage Temp. -20 to 60°C (-4 to 140°F)
Operating Humidity 10 to 80% non-condensing
Storage Humidity 5 to 90% non-condensing
NOTES
For regulatory, warranty, and safety information, see the CD that
came with your router or go to Linksys.com/support.
Specifications are subject to change without notice.
Maximum performance derived from IEEE Standard 802.11
specifications. Actual performance can vary, including lower
wireless network capacity, data throughput rate, range and
coverage. Performance depends on many factors, conditions and
variables, including distance from the access point, volume of
network traffic, building materials and construction, operating
system used, mix of wireless products used, interference and other
adverse conditions.
17
17
Page 20

Linksys E1200
Specifications
Linksys E1200
Model Name Linksys E1200
Description Wireless-N Router
Model Number E1200
Standards 802.11n, 802.11g, 802.11b,
802.3u
Ports Power, Internet, and Ethernet (1-4)
Buttons Reset, Wi-Fi Protected Setup™
LEDs Power/Wi-Fi Protected Setup,
Internet, Ethernet (1-4)
Cabling Type CAT 5e
Transmitted Power 802.11n (20 MHz):
15.0 ± 1.5dBm @ CH6, MCS 0~4, MCS 8~12
13.5 ± 1.5dBm @ CH6, MCS 5~7, MCS 13~15
802.11n (40 MHz):
14.0 ± 1.5dBm @ CH6, MCS 0~4, MCS 8~12
13.5 ± 1.5dBm @ CH6, MCS 5~7, MCS 13~15
802.11g:
14.5 ± 1.5dBm @ CH6, all rates
802.11b:
16.5 ± 1.5dBm @ CH6, all rates
Antenna Gain V1: ≤2.5 dBi, ≤4.0 dBi (2 antennas)
V2: ≤2.0 dBi, ≤4.0 dBi (2 antennas)
UPnP Supported
Wireless Security Wi-Fi Protected Access™ 2 (WPA2),
WEP, wireless MAC ltering
Security Key Bits Up to 128-bit encryption
Certications FCC, UL/cUL, ICES-003, RSS210,
CE, Wi-Fi (IEEE 802.11b/g/n),
WPA2™, WMM®, Wi-Fi Protected
Setup, Windows 7
Operating Temp. 0 to 40°C (32 to 104°F)
Storage Temp. -20 to 60°C (-4 to 140°F)
Operating Humidity 10 to 80% non-condensing
Storage Humidity 5 to 90% non-condensing
NOTES
For regulatory, warranty, and safety information, see the CD that
came with your router or go to Linksys.com/support.
Specifications are subject to change without notice.
Maximum performance derived from IEEE Standard 802.11
specifications. Actual performance can vary, including lower
wireless network capacity, data throughput rate, range and
coverage. Performance depends on many factors, conditions and
variables, including distance from the access point, volume of
network traffic, building materials and construction, operating
system used, mix of wireless products used, interference and other
adverse conditions.
Environmental
Dimensions 188.7 × 151.7 × 31.2 mm
(7.43” × 5.97” × 1.23”)
Unit Weight V1: 252.7g (8.91 oz.)
V2: 202.0g (7.13 oz.)
Power 12V, 0.5A
18
 Loading...