

Page 1

Getting to know the E900
Article ID: 23417
The Linksys E900 Wireless-N Router lets you access the Internet via a 2.4 GHz
wireless connection or through one of its four-port switch. The range of this router
can reach up to 250 meters.
NOTE: Wireless signal is greatly affected by walls and other electronic devices. This
will reduce the range of the router dramatically.
Product Features:
• Wireless-N Technology
• 2.4 GHz radio frequency
• 2x2 Transmit/Receive function
• 2 internal antennas
• Guest Access feature
• 4 x 10/100 Ethernet ports
• Includes Cisco Connect Software
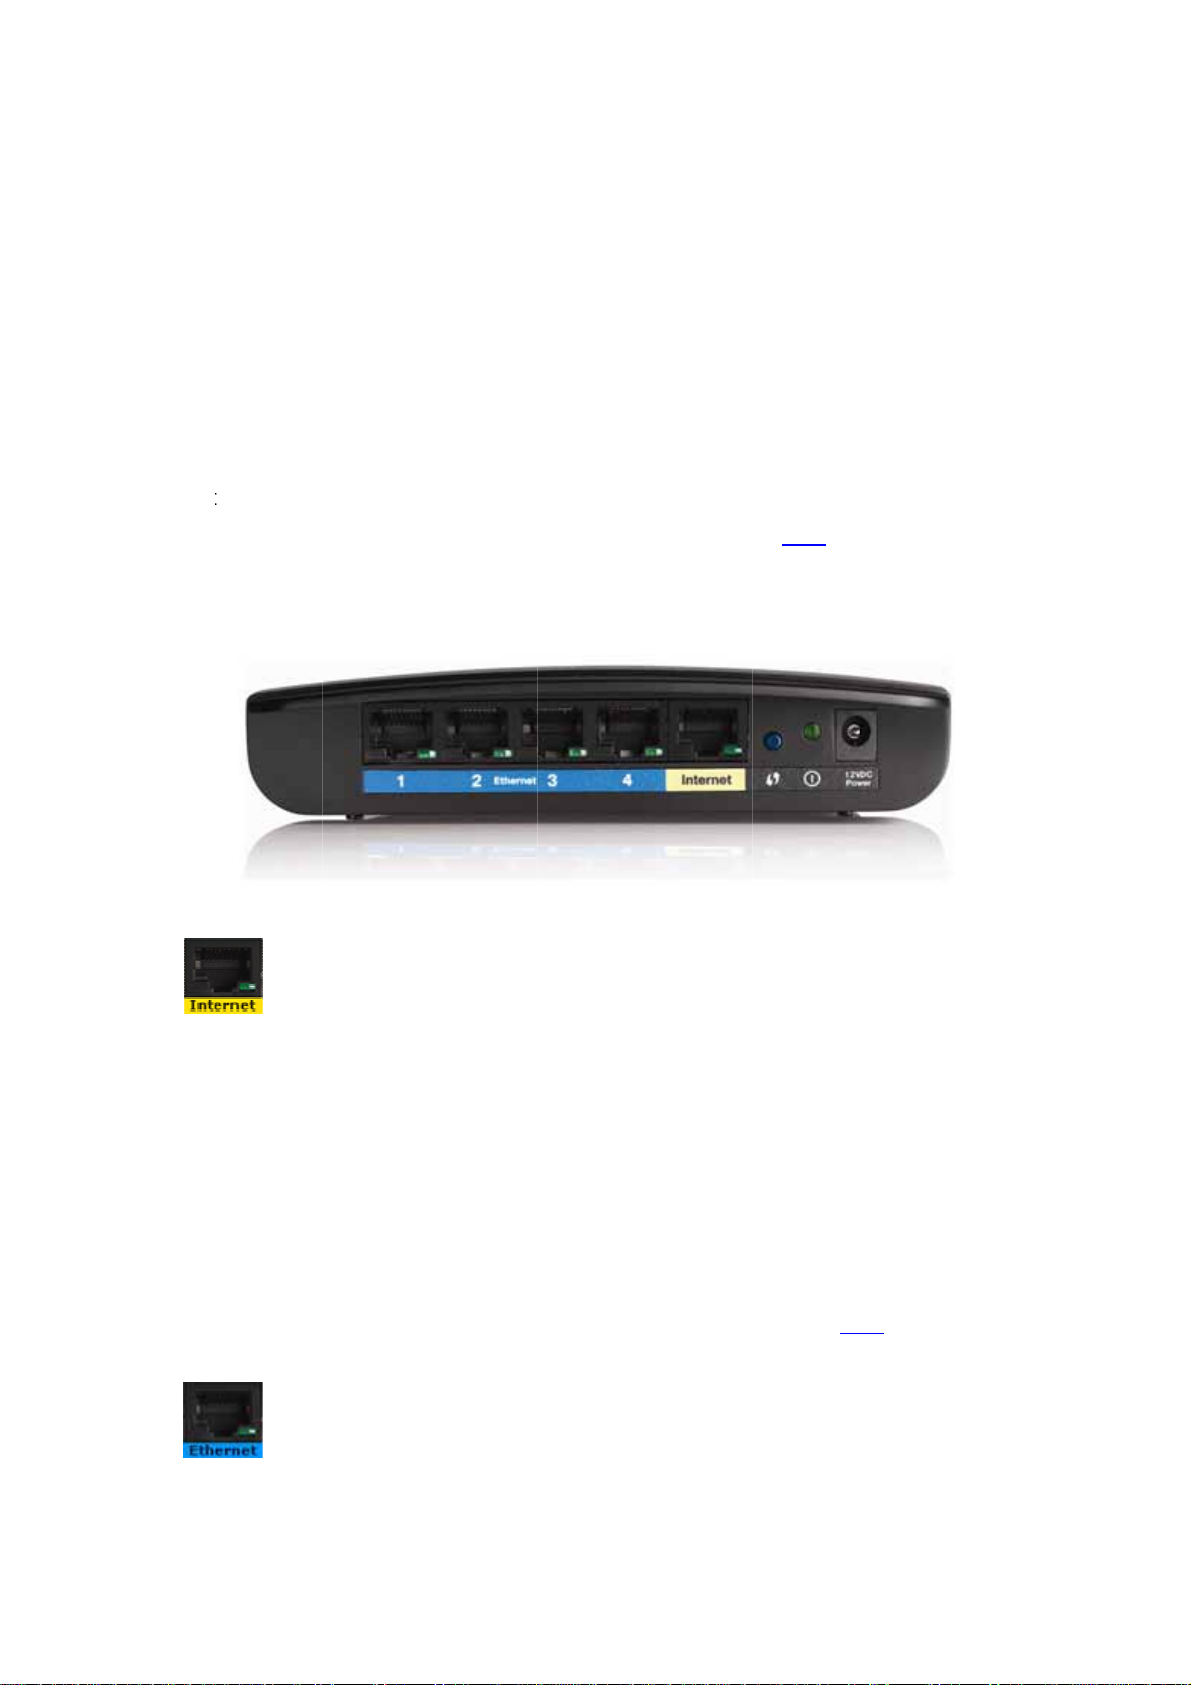
Top Panel:
Security features are included to help protect your data and privacy while connected
online. Security features are:
Page 2
t
tweb
c
eneeDSLThe
t
T
•
P
u
s
r
n
n
t
n
o
c
n
E
s
p
2
A
w
n
s
a
0
T
o
p
e
c
W
(
o
u
s
o
c
o
e
r
e
u
a
e
i
a
h
r
o
o
o
e
n
p
e
n
r
r
n
o
o
c
d
s
C
o
o
y
0
h
e
o
u
u
o
Wi-Fi
rotected
ccess 2 (
PA2) sec
rity provid
s encrypti
n for data
n
•
•
Set
ing up the
sof
ware. Co
-based se
Ba
k Panel:
your wi
Statef
Linksy
Netwo
entire
reless net
l Packet I
E900.
k Addres
etwork to
Linksys E9
figuring its
up page.
ork.
spection
Translati
ccess the I
0 is easy
advanced
o know m
SPI) firew
n (NAT) t
nternet a s
sing the la
ettings is
re about t
ll blocks u
chnology
ngle Intern
test versio
vailable th
e E900, cli
wanted ac
rotects an
t IP addre
of Cisco
ough the r
ck here.
ess to you
allows yo
s.
onnect
uter’s
r
r
Th
Internet p
d to conne
modem a
Internet L
por
. It flashe
NO
E: Rear
Inter
4, 3,
et:
rt is where
t one end
d the othe
D lights u
to indicat
ort lights
, 1:
you conne
f the netw
r end to th
when the
network a
an be turn
t the Ethe
rk cable t
Internet p
e is a conn
ctivity over
d OFF. F
net cable f
the Ether
rt on your
ection mad
the Interne
r instructi
om your m
et port on
Linksys E9
e through t
t port.
ns, click h
dem. Yo
our cable
0.
e Internet
re.
will
r
Page 3
Usi
n
e
eE90
h
o
e
t
t
h
c
r
E
e
t
e
P
n
r
e
E
n
e
e
u
S
y
e
t
w
g
i
o
B
i
n
m
n
s
N
p
a
t
r
D
s
f
e
a
S
e
k
y
u
y
g Etherne
cables, th
se Ethern
t ports co
nect the ro
uter to com
puters on
our
wir
d network
LEDs on t
Th
0 is conne
indi
cate netwo
Power L
ts up Gre
Lig
WiFi Pro
If y
u have cli
use
the WiFi
r wireless
you
and other
e back pa
ted to a d
k activity o
D:
n when th
ected Set
nt devices,
rotected
etwork(s).
thernet ne
el serve t
vice throu
ver a certa
router is p
p (WPS)
such as w
etup butto
To learn
work devic
o purpose
h one of th
n port.
wered O
utton:
reless ada
to autom
ore about
es.
. The LE
e Ethernet
.
ters, that
tically con
he WPS f
stays lit w
ports. It fl
upport WP
igure wirel
ature, clic
hen the Lin
shes to
, then yo
ss securit
here.
ksys
can
for
Power:
Power po
Th
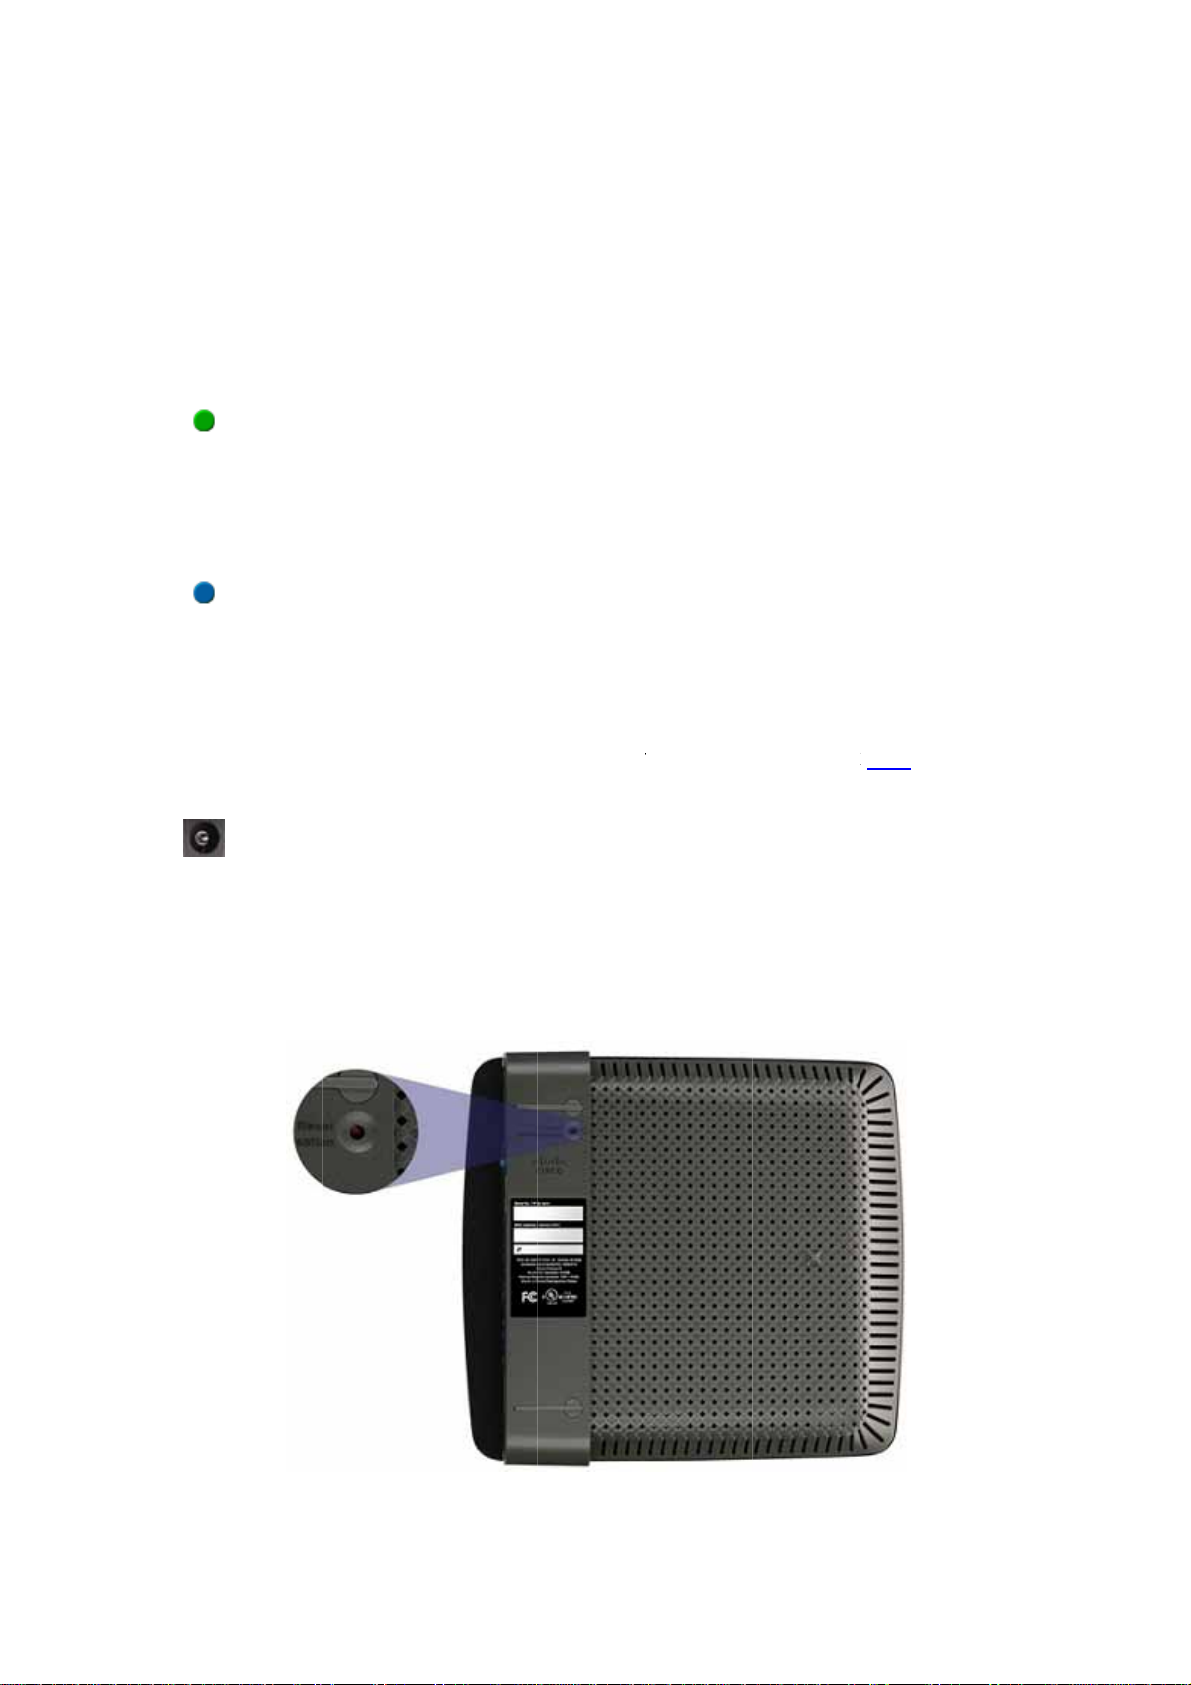
Bo
tom Panel
t is where
:
ou connec
t the powe
adapter.
Page 4

Reset:
There are two ways to reset the Linksys E900 to its factory defaults. Either press or
hold the Reset button for approximately five seconds, or restore the defaults from the
Administration > Factory Defaults page on the router's web-based setup page.
TABLE OF CONTENTS
HARDWARE INFORMATION
1. What is E900?
2. What is the default IP Address, Username and Password to login to the
E900’s web-based setup page?
3. How do I reset the E900 to factory defaults?
4. What is the Warranty period of the E900?
5. How do I reboot the E900?
6. Does E900 support remote management?
SECURITY SUPPORTED
1. What is the default SSID broadcast of E900?
2. How many security modes are supported in E900?
3. Does E900 allow VPN tunnels using IPSec, L2TP, or PPTP protocols to
pass through the router?
4. Does E900 support SPI firewall?
5. How does Web Filter work?
FIRMWARE UPGRADE METHOD
1. How do I upgrade the Firmware of the E900?
SPECIAL FEATURES
1. What DDNS providers does the E900 support?
2. How many connection types does the E900 support?
3. Does E900 support AP Isolation?
4. Does E900 support wireless and Internet Access Priority QOS?
5. Does E900 support transmission of the log information to a log server?
6. Does E900 lose the settings you have customized when its firmware has
Page 5

been updated?
7. What is Radio Band, Standard and Wide?
8. What is "MAC address clone" and what is it for?
9. What is Diagnostics and what is it for?
10. What is Port Forwarding?
11. What is Port Triggering?
12. What is "DMZ" and what is it for?
13. How many Network modes supported in E900?
14. What is wireless MAC Filter and what is it for?
15. What is UPnP?
16. Does it have a Guest access and Parental controls in the web-based
setup page?
17. What software does the E900 come with?
HARDWARE INFORMATION
1. What is E900?
The Linksys E900 is a Wireless-N router with four Ethernet ports. You can also use
the router to share resources such as computers, printers and files. Various security
features such as SPI Firewall help protect your data and your privacy while you are
online.
2. What is the default IP Address, Username and Password to login to the
E900’s web-based setup page?
The default IP Address is 192.168.1.1. The username and the password is “admin”.
3. How do I reset the E900 to factory defaults?
There are two (2) ways on how to reset the Wireless-N router to factory defaults.
• Hardware Reset
Press and hold the Reset button located at the bottom panel for about five (5)
seconds then release.
Page 6

• Software Reset
Access the web-based setup page, go to Administration tab > Factory
Defaults sub-tab, click the Restore Factory Defaults button.
4. What is the warranty period of the E900?
One (1) year limited warranty.
5. How do I reboot the E900?
You can turn OFF the power first then turn it back ON or you can click the Reboot
button when you access the web-based setup page under the Basic Setup tab.
6. Does E900 support remote management?
Remote Management is a feature that allows you to access and manage your
Linksys router from a remote location. You need to be connected to the Internet to be
able to do remote management. The Linksys E900 supports this feature. If you
want to learn more about remote management, click here
SECURITY SUPPORTED
1. What is the default SSID broadcast of E900?
The default SSID of the E900 is CiscoXXXXX.
NOTE: "XXXXX" is the last five (5) digits of the router’s serial number, which is
found at the bottom of the router.
2. How many security modes are supported in E900?
The E900 supports the following wireless security options: WPA2/WPA Mixed Mode,
WPA2 Personal, WPA Personal, WPA2/WPA Enterprise Mixed Mode, WPA2
Enterprise, WPA Enterprise, WEP, and RADIUS.
3. Does E900 allow VPN tunnels using IPSec, L2TP, or PPTP protocols to pass
.
through the router?
Yes.
4. Does E900 support SPI firewall?
Page 7

Yes.
5. How does the Web Filter on the E900 work?
Web Filter will filter Java, ActiveX, Cookies, and Proxy applications in the network.
FIRMWARE UPGRADE METHOD
1. How do I upgrade the Firmware of the E900?
Step 1:
Access the router’s web-based setup page.
Step 2:
Go to Administration tab and select Firmware Upgrade.
Step 3:
Select the file to upgrade by using the Browse... button.
Step 4:
Click Start to Upgrade.
NOTE: Do not reset or powercycle the router until the upgrade is complete.
SPECIAL FEATURES
1. What DDNS providers does the E900 support?
DynDNS.org and TZO.com
2. How many connection types does the E900 support?
The router supports six (6) connection types: Automatic Configuration – DHCP, Static
IP, PPPoE, PPTP, Telstra Cable, and L2TP.
3. Does E900 support AP Isolation?
No.
4. Does E900 support wireless and Internet Access Priority QOS?
Yes.
Page 8

5. Does E900 support transmission of the log information to a log server?
No.
6. Does E900 lose the settings you have customized when its firmware has been
updated?
Yes. Before upgrading the firmware of your E900, write down all your customized
settings. After upgrading its firmware, you will have to re-enter all of your
configuration settings.
7. What is Radio Band, Standard and Wide?
The Radio Band gives you two (2) options: Auto and Standard - 20MHz channel,
Standard channel is what all B/G/N devices use. If you select Wide channel for the
Radio Band setting, then Wireless-N can use two channels: a primary one (Auto) and
a secondary one (Standard Channel). This will improve Wireless-N performance.
8. What is "MAC address clone" and what is it for?
Some Internet Service Providers, especially Cable companies, require you to register
the MAC Address of the modem, router or Ethernet adapter of the computer in order
to access the Internet. If you do not wish to re-register the MAC address currently
registered with your ISP, you may assign the MAC address you have currently
registered with your ISP to the router using the MAC Address Clone feature.
If you want to clone the MAC address of the computer that you are using to configure
the router, and then click the Clone My MAC Address button. The router will
automatically detect your computer’s MAC address, so you do NOT have to call your
ISP to change the registered MAC address to the router’s MAC address. It is
recommended that the computer registered with the ISP is used to enable this feature
on the router.
9. What is Diagnostics and what is it for?
Diagnostics is used to check internet connect and application "ping”, "traceroute”
command to check your network’s connectivity to the Internet.
10. What is Port Forwarding?
Page 9

Port Forwarding allows you to set up public services on your network, such as web
servers, ftp servers, e-mail servers, or other specialized Internet applications.
11. What is Port Triggering?
Port Triggering will forward port based on the incoming port specified. Check your
software application to find out what is necessary to enter in these fields.
NOTE: You can set up to ten (10) port triggering entries.
12. What is "DMZ" and what is it for?
Demilitarized Zone (DMZ) allows one local user to be exposed to the Internet for use
of a special-purpose service such as Internet gaming and videoconferencing. DMZ
hosting forwards all the ports at the same time to one computer. However, Port
Range Forwarding is more secure because it only opens the ports you want to
forward, while DMZ hosting opens all the ports of one computer, exposing the
computer to the Internet.
13. How many Network modes supported in E900?
It supports three (3) Network Modes - 802.11b, 802.11g, 802.11n.
14. What is wireless MAC Filter and what is it for?
Wireless MAC Filter prevents or allows connectivity to the wireless network with the
use of the MAC address of the wireless device.
15. What is UPnP?
Universal Plug and Play (UPnP) allows Windows to automatically configure the
router for various Internet applications, such as gaming and videoconferencing.
16. Can I configure Guest access and Parental controls feature using the
web-based setup page?
Yes. To know how to set up the Guest Access feature of the E900 using the
web-based setup page, click here
To know how to set up the Parental controls of the E900 using the web-based setup
page, click here
.
.
Page 10

17. What software does the E900 come with?
The E900 comes with Cisco Connect Software version 1.3. To learn how to set up
your Linksys Wireless-N Router for the first time using Cisco Connect, click here
NOTE: Older versions of Cisco Connect for Mac computers have compatibility
issues with the latest release of Mac OS X (10.7 “Lion”). Only Cisco Connect
versions 1.4.11222 and newer are compatible with the Lion operating system. For
more information, click here
.
.
Page 11

Linksys E-Series
Setting Up Your E-Series Router
Setting Up Your E-Series Router.
Where to find more help
In addition to this User Guide, you can find help at these locations:.
• Linksys.com/support (documentation, downloads, FAQs, technical
support, live chat, forums).
• Setup CD (Troubleshooting Guide, legal and regulatory notices).
• Cisco Connect help (run Cisco Connect, then click Learn More where
available).
• Browser-based utility context-sensitive help (open the utility, then click
Help in the right-side column.).
How to set up your router
The easiest and fastest way to set up your router is to run the Cisco Connect
setup software.
How to start Cisco Connect
When you run the setup CD, Cisco Connect (your router’s setup software) is
automatically installed onto your computer.You can then use Cisco Connect to
easily manage your router.
To start Cisco Connect for the first time:
1.
Insert the CD into your CD or DVD drive.
2.
Click Set up your Linksys Router
If you do not see this:
• For Windows, click Start, Computer, then double-click the CD drive
and the Setup icon.
• For Mac, double-click the CD icon on your desktop, then double-click
the Setup icon.
3.
Follow the on-screen instructions to complete your router setup.
Use Cisco Connect to manage your router
After your router has been set up and Cisco Connect has been installed, you
can use Cisco Connect to easily manage many of your router’s settings such as:.
• Connect devices to your network.
• Test your Internet connection speed.
• Configure parental controls.
• Set up guest access.
• Change your router’s name and password.
NOTE:
If you lose your setup CD, you can download the software from
Linksys.com/support
How to manually set up your router
After setting up the router with the setup software (located on the CD), the
router will be ready for use. If you would like to change its advanced settings,
or if the software does not run, use the router’s browser-based utility.You can
access the utility with a web browser on a computer connected to the router.
For more information on using the utility, see “How to open the browser-based
utility” on page 4.
3
3
Page 12

Linksys E-Series
Advanced Configuration.
How to open the browser-based utility
To access some advanced settings, you need to open the browser-based utility.
To open the browser-based utility:
1.
Run Cisco Connect, click Change under Router settings, click Advanced
settings, then click OK
– or –
Open a web browser on a computer connected to your network, then go
to 192.168.1.1
The router prompts you for a user name and password.
Advanced Configuration.
2.
Enter the user name and password, then click OK The utility’s main menu
opens.
TIPS
If you set up your router without using Cisco Connect, your router’s
default password is admin (You can leave the user name blank.).
If you used Cisco Connect to set up your router, you can see your
router’s user name and password by running Cisco Connect, then
clicking Router settings
4
4
Page 13

Linksys E-Series.
Advanced Configuration.
Setup > Basic Setup
The first screen that appears is the Basic Setup screen.This allows you to change
the router’s general settings.
Language
Select your language
down menu. The language of the browser-based utility will change five seconds
after you select another language.
To use a different language, select one from the drop-
Internet Setup
The Internet Setup section configures the router to your Internet connection.
Most of this information can be obtained through your Internet Service
Provider (ISP).
Internet Connection Type
Select the type of Internet connection your ISP provides from the drop-down
menu. The available types are:.
•. Automatic Configuration - DHCP.
•. Static IP.
•. PPPoE.
•. PPTP.
•. L2TP.
•. Telstra Cable.
Automatic Configuration - DHCP
The default Internet Connection Type is Automatic Configuration - DHCP
(Dynamic Host Configuration Protocol). Keep the default only if your ISP
supports DHCP or if you connect using a dynamic IP address. (This option
usually applies to cable connections.).
Static IP
If you are required to use a fixed IP address to connect to the Internet, select
Static IP
PPPoE
If you have a DSL connection, check whether your ISP uses Point-to-Point
Protocol over Ethernet (PPPoE) If so, select PPPoE.
5
Page 14

Linksys E-Series
Advanced Configuration
PPTP
Point-to-Point Tunneling Protocol (PPTP) is a service that generally applies to
connections in Europe.If your PPTP connection supports DHCP or a dynamic IP
address, then select Obtain an IP Address Automatically If you are required
to use a fixed IP address to connect to the Internet, then select Specify an IP
Address and configure the options below.
L2TP
Layer 2 Tunneling Protocol (L2TP) is a service that generally applies to
connections in Israel.
Telstra Cable
Telstra Cable is a service that generally applies to connections in Australia.
Connect on Demand or Keep Alive
The Connect on Demand and Keep Alive options let you choose whether
the router connects to the Internet only as needed (useful if your ISP charges
for connect time), or if the router should always be connected. Select the
appropriate option.
Wireless > Basic Wireless Settings
The basic settings for wireless networking are set on this screen.
NOTE
After you set up the wireless network(s), set up the wireless security
settings.
Wireless Settings
Network Mode Select the wireless standards your network will support.
• Mixed If you have Wireless-N (2.4 GHz), Wireless-G, and Wireless-B devices
in your network, keep the default, Mixed
• Wireless-B/G Only If you have both Wireless-B and Wireless-G (2.4 GHz)
devices in your network, select Wireless-B/G Only
• Wireless-B Only If you have only Wireless-B devices, select Wireless-B
Only
• Wireless-G Only If you have only Wireless-G devices, select Wireless-G
Only
• Wireless-N Only If you have only Wireless-N (2.4 GHz) devices, select
Wireless-N Only
• Disabled If you have no Wireless-B, Wireless-G, and Wireless-N (2.4 GHz)
devices in your network, select Disabled
NOTE
If you have a dual-band router, you can select Mixed, Wireless-A
Only, Wireless-N Only, or Disabled for the 5 GHz band.
If you are not sure which mode to use, keep the default, Mixed
6
Page 15

Linksys E-Series.
Network Name (SSID) The Service Set Identifier (SSID) is the network name
shared by all devices in a wireless network. It is case-sensitive and must not
exceed 32 keyboard characters. The default is Cisco followed by the last 5 digits
of the router’s serial number, which is found on the bottom of the router. If
you used the setup software for installation, then the default Network Name is
changed to an easy-to-remember name.
NOTE
If you restore the router’s factory default settings (by pressing
the Reset button or using the Administration Factory Defaults
screen), the Network Name will return to its default value Change
the Network Name back to its original name, or you will have to
reconnect all devices on your wireless network to the new network
name.
Channel Width For best performance in a network using Wireless-B,
Wireless-G and Wireless-N (2.4 GHz) devices, select Auto (20 MHz or 40 MHz)
For a channel width of 20 MHz, keep the default, 20 MHz only
Channel Select the channel from the drop-down list for Wireless-B, Wireless-G,
and Wireless-N (2.4 GHz) networking. If you are not sure which channel to
select, then keep the default, Auto
>
Advanced Configuration.
SSID Broadcast When wireless clients survey the local area for wireless
networks to associate with, they will detect the SSID broadcast by the router.
To broadcast the router’s SSID, keep the default, Enabled If you do not want to
broadcast the router’s SSID, then select Disabled
7
Page 16

Linksys E-Series.
Wireless Security.
Wireless Security.
Wireless > Wireless Security
The wireless security settings configure the security of your wireless network(s).
The router supports the following wireless security options: WPA2/WPA Mixed
Mode, WPA2 Personal, WPA Personal, WPA2/WPA Enterprise Mixed Mode, WPA2
Enterprise, WPA Enterprise, WEP, and RADIUS. (WPA stands for Wi-Fi Protected
Access. WEP stands for Wireless Equivalent Privacy. RADIUS stands for Remote
Authentication Dial-In User Service.).
Personal options
Security Option Strength
WPA2 Personal. Strongest.
WPA2/WPA Mixed Mode.
WPA Personal. Strong.
WEP. Basic.
Office options
The office options are available for networks that use a RADIUS server
for authentication. The office options are stronger than the personal
options because WPA2 or WPA provides encryption while RADIUS provides
authentication.
WPA2: Strongest.
WPA: Strong.
Option settings
WPA2/WPA Mixed Mode, WPA2 Personal, WPA Personal
NOTES
If you select WPA2/WPA Mixed Mode as your Security Mode, each
device in your wireless network MUST use WPA2/WPA and the
same passphrase.
If you select WPA2 Personal as your Security Mode, each device
in your wireless network MUST use WPA2 Personal and the same
passphrase.
If you select WPA Personal as your Security Mode, each device
in your wireless network MUST use WPA Personal and the same
passphrase.
Passphrase Enter a passphrase of 8-63 characters. The default is password If
you used the setup software for installation, then the default is changed to a
unique passphrase, which you can find by running Cisco Connect, then clicking
Router settings
Security Option Strength
WPA2 Enterprise. Strongest.
WPA2/WPA Enterprise Mixed WPA2: Strongest.
Mode. WPA: Strong.
WPA Enterprise. Strong.
RADIUS. Basic.
8
8
Page 17

Linksys E-Series.
WPA2/WPA Enterprise Mixed Mode, WPA2 Enterprise, WPA WEP
Enterprise
These option is used in coordination with a RADIUS server. (These should only
be used when a RADIUS server is connected to the router.)
NOTES
If you select WPA2/WPA Enterprise Mixed Mode as your Security
Mode, each device in your wireless network MUST use WPA2/WPA
Enterprise and the same shared key.
If you select WPA2 Enterprise as your Security Mode, each device
in your wireless network MUST use WPA2 Enterprise and the same
shared key.
If you select WPA Enterprise as your Security Mode, each device
in your wireless network MUST use WPA Enterprise and the same
shared key.
WEP is a basic encryption method, which is not as secure as WPA.
Encryption Select a level of WEP encryption, (40/64-bit 10 hex digits) or
104/128-bit (26 hex digits) The default is 40/64-bit (10 hex digits)
Wireless Security.
NOTE:
If you select WEP as your Security Mode, each device in your
wireless network MUST use WEP and the same encryption and
shared key.
RADIUS Server Enter the IP address of the RADIUS server.
RADIUS Port Enter the port number of the RADIUS server.The default is 1812
Shared Key Enter the key shared between the router and the server.
Passphrase Enter a passphrase to automatically generate WEP keys. Then
click Generate
Key 1-4 If you did not enter a passphrase, enter the WEP key(s) manually.
TX Key Select a default TX (Transmit) Key to use. The default is 1
9
Page 18

Linksys E-Series
Wireless Security
RADIUS Disabled
This option features WEP used in coordination with a RADIUS server. (This If you choose to disable wireless security, you will be informed that wireless
should only be used when a RADIUS server is connected to the router.) security is disabled when you first attempt to access the Internet.You will given
the option to enable wireless security, or confirm that you understand the risks
NOTE:
If you select RADIUS as your Security Mode, each device in your
wireless network MUST use RADIUS and the same encryption and
shared key.
but still wish to proceed without wireless security.
RADIUS Server Enter the IP address of the RADIUS server.
RADIUS Port Enter the port number of the RADIUS server.The default is 1812
Shared Secret Enter the key shared between the router and the server.
Encryption Select a level of WEP encryption, (40/64-bit 10 hex digits) or
104/128-bit (26 hex digits) The default is 40/64-bit (10 hex digits)
Passphrase Enter a passphrase to automatically generate WEP keys. Then
click Generate
Key 1-4 If you did not enter a passphrase, enter the WEP key(s) manually.
TX Key Select a default TX (Transmit) Key to use. The default is 1
10
Page 19

Linksys E-Series.
Troubleshooting
Troubleshooting.
This chapter can help you solve common setup issues and connect to the
Internet. Your router’s CD includes Cisco Connect, the router setup software
that makes it easy to connect network devices, change router settings, control
guest access, enable parental controls, and connect to the Internet. Cisco
Connect is also installed onto your computer during setup. If Cisco Connect
is prevented from completing the setup, this chapter will guide you through
finding solutions.
You can find more help from our award-winning customer support at.
linksys.com/support.
How to run Cisco Connect after setup
When you run the setup CD, Cisco Connect is automatically installed onto your
computer.You can then use Cisco Connect to easily manage your network.
To start Cisco Connect on a Windows computer:
1.
Click Start, All Programs, then click Cisco Connect
The Cisco Connect main menu opens.
To start Cisco Connect on a Mac OS X computer:
1.
Open Finder and click Applications in the left panel.
2.
Double-click the Cisco Connect icon.
The Cisco Connect main menu opens.
11
11
Page 20

Linksys E-Series
Troubleshooting.
Your router was not successfully set up
If Cisco Connect did not complete the setup, you can try the following:
• Press and hold the Reset button on your router with a paperclip or pin
for 10-15 seconds, then run the Setup program again on the router’s CD
• Temporarily disable your computer’s firewall (see the security software’s
instructions for help), then run the Setup program again on the router’s
CD.
•. If you have another computer, use that computer to run the Setup
program again on the router’s CD.
Get Windows XP Service Pack 3 message
On Windows XP computers, Cisco Connect requires Service Pack 3 in order to
work. If you receive a “Get Windows Service Pack 3”.message when setting up
your router for the first time, follow these troubleshooting steps.
If the currently installed Service Pack is older than version 3, you need to
download and install Service Pack 3.
Your router’s appearance may vary
TIP
To temporarily connect to the Internet and download the required
Service Pack, you can use the included Ethernet cable to connect
your computer directly to your modem.
To install Service Pack 3:
1.
Click the link in the Cisco Connect error message or connect to the
Microsoft Update website (
2.
Follow the instructions on the website or contact Microsoft if you need
further help.
3.
After downloading and installing Service Pack 3, run the Setup program
on your router’s.CD.
update.microsoft.com/windowsupdate).
12
Page 21

Linksys E-Series
Your Internet cable is not plugged in
message
If you get a “Your Internet cable is not plugged in”.message when trying to set
up your router, follow these troubleshooting steps.
To fix the problem:
1.
Make sure that an Ethernet or Internet cable (or a cable like the one
supplied with your router) is securely connected to the yellow Internet
port on the back of the router and to the appropriate port on your
modem. This port on the modem is usually labeled Ethernet, but may
be named Internet or WAN
Troubleshooting.
Back view of cable modem
Back view of DSL modem
2.
Make sure that your modem is connected to power and is turned on. If it
has a power switch, make sure that it is set to the ON or l position.
3.
If your Internet service is cable, verify that the cable modem’s CABLE port
is connected to the coaxial cable provided by your ISP.
Or, if your Internet service is DSL, make sure that the DSL phone line is
connected to the modem’s DSL port.
4.
If your computer was previously connected to your modem with a USB
cable, disconnect the USB cable.
5.
Return to the Cisco Connect window and click Next to try again. If the
window has already been closed, run the Setup program again on the
router’s CD.
Back view of router
13
Page 22

Linksys E-Series
Cannot access your router message
If you cannot access your router because your computer is not connected to
your network, follow these troubleshooting steps.
To access your router, you must be connected to your own network. If you
currently have wireless Internet access, the problem may be that you have
accidentally connected to a different wireless network.
Troubleshooting.
3.
Click your own network name, then click Connect In the example
below, the computer was connected to another wireless network named
JimsRouter The name of the Linksys E-Series network, BronzeEagle in this
example, is shown selected.
To fix the problem on Windows computers:
1.
On your Windows desktop, right-click the wireless icon in the system tray.
2.
Click View Available Wireless Networks A list of available networks
appears.
4.
If you are prompted to enter a network key, type your password (Security
Key) into the Network key and Confirm network key fields, then click
Connect
Your computer connects to the network, and you should now be able to
access the router.
14
Page 23

Linksys E-Series
Troubleshooting.
To fix the problem on Mac computers:
1.
In the menu bar across the top of the screen, click the AirPort icon. A list
of wireless networks appears. Cisco Connect has automatically assigned
your network a name.
In the example below, the computer was connected to another wireless
network named JimsRouter The name of the Linksys E-Series network,
BronzeEagle in this example, is shown selected
2.
Click the wireless network name of your Linksys E-Series router
(BronzeEagle in the example).
3.
Type your wireless network password (Security Key) into the Password
field, then click OK
Device not found message
If you get a “Device not found”.message when trying to connect a network
device (such as an iPhone, iPod, or smartphone), follow these troubleshooting
steps.
TIP
For a stronger signal during initial setup, move your wireless
devices near your router Long distances make it harder for the
router to detect the devices.
To fix the problem:
1.
Run Cisco Connect.
15
Page 24

Linksys E-Series
2.
Click Computers and devices The Computers and other devices window Example: On your Smartphone or other wireless device, locate the Wiappears. Fi menu and search for available wireless networks. In this example,
3.
Click Other Wireless devices
using the network information provided by Cisco Connect shown in the
previous screen, click BronzeEagle
Troubleshooting.
4.
Enable your wireless network device’s Wi-Fi connection, then search for
your wireless network name See your device documentation for help.
NOTE
Your wireless device must support WPA/WPA2.
5.
On the wireless network device, select the network name of your router
and enter the password (Security Key).
6.
In Cisco Connect, click Next
Android
7.
Enter the password (Security Key) provided by Cisco Connect. In this
example, the security key is B6eM9UkCjz
NOTE
The password is case sensitive Make sure that you enter letters in
the correct case.
8.
When your wireless device is successfully connected to your wireless
network, enter a name for the device in Cisco Connect, then click Finish
iPhone
16
Page 25

Linksys E1200.
Specifications
Specifications
Linksys E1200
Model Name. Linksys E1200.
Description. Wireless-N Router.
Model Number. E1200.
Standards. 802.11n, 802.11g, 802.11b,
802.3u.
Ports. Power, Internet, and Ethernet (1-4).
Buttons. Reset, Wi-Fi Protected Setup™.
LEDs. Power/Wi-Fi Protected Setup,.
Internet, Ethernet (1-4).
Cabling Type. CAT 5e.
Transmitted Power. 802.11n (20 MHz):
15.0 ± 1.5dBm @ CH6, MCS 0~4, MCS 8~12.
13.5 ± 1.5dBm @ CH6, MCS 5~7, MCS 13~15.
802.11n (40 MHz):
14.0 ± 1.5dBm @ CH6, MCS 0~4, MCS 8~12.
13.5 ± 1.5dBm @ CH6, MCS 5~7, MCS 13~15.
802.11g:
14.5 ± 1.5dBm @ CH6, all rates.
802.11b:
16.5 ± 1.5dBm @ CH6, all rates.
Antenna Gain. ≤2.5 dBi, ≤4.0 dBi (2 antennas).
UPnP. Supported.
Wireless Security. Wi-Fi Protected Access™ 2 (WPA2),.
WEP, wireless MAC filtering.
Security Key Bits. Up to 128-bit encryption.
Environmental
Dimensions. 188.7 × 151.7 × 31.2 mm.
(7.43” × 5.97” × 1.23”).
Unit Weight. 252.7g (8.91 oz.).
Power. 12V, 0.5A.
Certifications. FCC, UL/cUL, ICES-003, RSS210,.
CE, Wi-Fi (IEEE 802.11b/g/n),
WPA2™, WMM®, Wi-Fi Protected.
Setup, Windows 7.
Operating Temp. 0 to 40°C (32 to 104°F).
Storage Temp. -20 to 60°C (-4 to 140°F)
Operating Humidity. 10 to 80% non-condensing.
Storage Humidity. 5 to 90% non-condensing.
NOTES
For regulatory, warranty, and safety information, see the CD that
came with your router or go to Linksys.com/support
Specifications are subject to change without notice.
Maximum performance derived from IEEE Standard 802.11
specifications Actual performance can vary, including lower
wireless network capacity, data throughput rate, range and
coverage Performance depends on many factors, conditions and
variables, including distance from the access point, volume of
network traffic, building materials and construction, operating
system used, mix of wireless products used, interference and other
adverse conditions.
17
17
Page 26

Linksys E1500.
Specifications.
Linksys E1500
Model Name. Linksys E1500.
Description. Wireless-N Router with SpeedBoost.
Model Number. E1500.
Standards. 802.11n, 802.11g, 802.11b,
802.3u.
Ports. Power, Internet, and Ethernet (1-4).
Buttons. Reset, Wi-Fi Protected Setup.
LEDs. Power/Wi-Fi Protected Setup,.
Internet, Ethernet (1-4).
Cabling Type. CAT 5e.
Transmitted Power. 802.11n (20 MHz):
17.0 ± 1.5 dBm @ CH6, MCS 0~4, MCS 8~12.
16.0 ± 1.5 dBm @ CH6, MCS 5~7, MCS 13~15.
802.11n (40 MHz):
15.5 ± 1.5 dBm @ CH6, MCS 0~4, MCS 8~12.
14.0 ± 1.5 dBm @ CH6, MCS 5~7, MCS 13~15.
802.11g:
18.0 ± 1.5 dBm @ CH6, 6 Mbps.
17.0 ± 1.5 dBm @ CH6, 54 Mbps.
802.11b:
18.0 ± 1.5 dBm @ CH6, all rates.
Antenna Gain. ≤3.0 dBi, ≤4.0 dBi, ≤4.5 dBi.
(3 antennas).
UPnP. Supported.
Wireless Security. Wi-Fi Protected Access 2 (WPA2),.
WEP, wireless MAC filtering.
Security Key Bits. Up to 128-bit encryption.
Environmental
Dimensions. 188.7 × 151.7 × 31.2 mm
(7.43” × 5.97” × 1.23”).
Unit Weight. 254.1g (8.96 oz.).
Power. 12V, 0.5A.
Certifications. FCC, UL/cUL, ICES-003, RSS210,.
CE, Wi-Fi (IEEE 802.11b/g/n),
WPA2, WMM, Wi-Fi Protected.
Setup, Windows 7.
Operating Temp. 0 to 40°C (32 to 104°F).
Storage Temp. -20 to 60°C (-4 to 140°F).
Operating Humidity. 10 to 80% non-condensing.
Storage Humidity. 5 to 90% non-condensing.
NOTES
For regulatory, warranty, and safety information, see the CD that
came with your router or go to Linksys.com/support
Specifications are subject to change without notice.
Maximum performance derived from IEEE Standard 802.11
specifications Actual performance can vary, including lower
wireless network capacity, data throughput rate, range and
coverage Performance depends on many factors, conditions and
variables, including distance from the access point, volume of
network traffic, building materials and construction, operating
system used, mix of wireless products used, interference and other
adverse conditions.
18
Page 27

Linksys E2500.
Specifications.
Linksys E2500
Model Name. Linksys E2500.
Description. Advanced Dual-Band N Router.
Model Number. E2500.
Standards. 802.11n, 802.11a, 802.11g, 802.11b, 802.3,
802.3u, 802.3ab.
# of Antennas. 4 total, 2 internal antennas per each
2.4 GHz & 5 GHz radio band.
Detachable (y/n). No.
Modulation. 802.11b: CCK, QPSK, BPSK
802.11g: OFDM.
802.11a: OFDM.
802.11n: BPSK, QPSK, 16-QAM,
64-QAM.
Receive Sensitivity.
(Typical).
Antenna Gain in dBi. 2.4 GHz:.
UPnP. Supported.
Security features. WEP, WPA, WPA2.
Security key bits. Up to 128-bit encryption.
2.4 GHz.
802.11b: -87 dBm @ 11 Mbps.
802.11g: -70 dBm @ 54 Mbps
802.11n 20 MHz: -70 dBm @ MCS15.
802.11n 40 MHz: -66 dBm @ MCS15.
5 GHz.
802.11a: -70 dBm @ 54 Mbps.
802.11n 20 MHz: -66 dBm @ MCS23.
802.11n 40 MHz: -62 dBm @ MCS23.
Antenna 1 (right rear): ≤2.94 dBi.
Antenna 2 (front right): ≤3.78 dBi.
5 GHz:.
Antenna 1 (right front): ≤5.86 dBi.
Antenna 2 (front left): ≤4.88 dBi.
Environmental
Dimensions. 225 x 35 x 180 mm
(8.86” x 1.38” x 7.09”).
Unit Weight. 452 g (15.94 oz).
Power. 12V, 1A.
Certifications. FCC, IC, CE, Wi-Fi A/B/G/N
Operating Temp. 0 to 40°C (32 to 104°F).
Storage Temp. -20 to 60°C (-4 to 140°F)
Operating Humidity. 10 to 80%, relative humidity,
non-condensing.
Storage Humidity. 5 to 90% non-condensing.
NOTES
For regulatory, warranty, and safety information, see the CD that
came with your router or go to Linksys.com/support
Specifications are subject to change without notice.
Maximum performance derived from IEEE Standard 802.11
specifications Actual performance can vary, including lower
wireless network capacity, data throughput rate, range and
coverage Performance depends on many factors, conditions and
variables, including distance from the access point, volume of
network traffic, building materials and construction, operating
system used, mix of wireless products used, interference and other
adverse conditions.
19
Page 28

Linksys E3200.
Specifications.
Linksys E3200
Model Name. Linksys E3200.
Description.
Model Number.
Standards.
# of Antennas.
Detachable (y/n).
Switch Port Speed.
Ports.
Buttons.
LEDs.
Modulation.
Receive Sensitivity.
Antenna Gain.
UPnP.
High Performance Dual-Band N Router.
E3200.
802.11n, 802.11a, 802.11g, 802.11b, 802.3,
802.3u, 802.3ab.
6 total, 3 internal antennas per
each 2.4 GHz & 5 GHz radio band
No
10/100/1000 Mbps
Internet, Ethernet (1-4), USB, Power
Reset, Wi-Fi Protected Setup
Power, Ethernet (1-4)
802.11b: CCK, QPSK, BPSK
802.11g: OFDM
802.11a: OFDM
802.11n: BPSK, QPSK, 16-QAM, 64-QAM
2.4 GHz
802.11b: -87 dBm @ 11 Mbps (Typical)
802.11g: -77 dBm @ 54 Mbps (Typical)
802.11n (20 MHz): -71 dBm @ MCS15 (Typical)
802.11n (40 MHz): -68 dBm @ MCS15 (Typical)
5 GHz
802.11a: -75 dBm @ 54 Mbps (Typical)
802.11n 20 MHz: -70 dBm @ MCS15 (Typical)
802.11n 40 MHz: -67 dBm @ MCS15 (Typical)
2.4 GHz (Dipole Antennas)
Antenna 1 ≤ 3 dBi
Antenna 2 ≤ 4 dBi
Antenna 3 ≤ 4 dBi
5 GHz (Dipole Antennas)
Antenna 1 ≤ 4.5 dBi
Antenna 2 ≤ 4.5 dBi
Antenna 3 ≤ 4.5 dBi
Supported
Security features. WEP, WPA, WPA2
Security key bits. Up to 128-bit encryption.
Storage File System Support. FAT, and NTFS, and HFS+.
Environmental
Dimensions. 170 x 25 x 190 mm
(6.69” x 0.98” x 7.48”).
Unit Weight. 216 g (7.62 oz).
Power. 12V, 2A.
Certifications. FCC, IC, CE, Wi-Fi A/B/G/N
Operating Temp. 0 to 40°C (32 to 104°F).
Storage Temp. -20 to 60°C (-4 to 140°F).
Operating Humidity. 10 to 80% relative humidity,
non-condensing.
Storage Humidity. 5 to 90% non-condensing.
NOTES
For regulatory, warranty, and safety information, see the CD that
came with your router or go to Linksys.com/support
Specifications are subject to change without notice.
Maximum performance derived from IEEE Standard 802.11
specifications Actual performance can vary, including lower
wireless network capacity, data throughput rate, range and
coverage Performance depends on many factors, conditions and
variables, including distance from the access point, volume of
network traffic, building materials and construction, operating
system used, mix of wireless products used, interference and other
adverse conditions.
20
Page 29

Linksys E4200.
Specifications.
Linksys E4200
Model Name. Linksys E4200.
Description. Maximum Performance Wireless-N Router.
Model Number. E4200.
Standards. 802.11n, 802.11a, 802.11g, 802.11b, 802.3,
802.3u, 802.3ab.
Radio Frequency. 2.4 and 5 GHz.
Switch Port Speed. 10/100/1000 Mbps (Gigabit Ethernet).
Ports. Power, USB, Internet, Ethernet (1-4).
Buttons. Reset, Wi-Fi Protected Setup.
LEDs. Top panel: Power.
Back panel: Internet, Ethernet (1-4).
Number of Antennas. 6 total, 3 internal antennas per
each 2.4 GHz and 5 GHz radio band.
Detachable (y/n). No.
Modulations. 802.11b: CCK, QPSK, BPSK.
802.11g: OFDM.
802.11a: OFDM.
802.11n: BPSK, QPSK, 16-QAM, 64-QAM.
Receive Sensitivity. 2.4 GHz.
802.11b: -87 dBm @ 11 Mbps (Typical).
802.11g: -77 dBm @ 54 Mbps (Typical).
802.11n: 20 MHz: -71 dBm @ MCS15 (Typical).
802.11n: 40 MHz: -68 dBm @ MCS15 (Typical).
5 GHz.
802.11a: -71 dBm @ 54 Mbps (Typical).
802.11n: 20 MHz: -70 dBm @ MCS23 (Typical).
802.11n: 40 MHz: -68 dBm @ MCS23 (Typical).
Antenna Gain in dBi. 2.4 GHz (3 internal PIFA antennas).
PIFA 1 ≤ 3.6 dBi (Right).
PIFA 2 ≤ 3.8 dBi (Left).
PIFA 3 ≤ 3.8 dBi (Front).
5 GHz (3 internal PIFA antennas).
PIFA 1 ≤ 4.8 dBi (Right).
PIFA 2 ≤ 5.3 dBi (Left).
PIFA 3 ≤ 5.2 dBi (Front).
Supported File Systems
for Storage Device. FAT32, NTFS, and HSF+
UPnP. Supported
Security Features. WEP, WPA, WPA2.
Security Key Bits. Up to 128-bit encryption.
Environmental
Dimensions. 225 x 25 x 160 mm
(8.86” x 0.98” x 6.30”).
Unit Weight. 355 g (12.52 oz).
Power. 12V, 2A.
Certifications. FCC, IC, CE, Wi-Fi a/b/g/n,
Windows.7.
Operating Temp. 0 to 40°C (32 to 104°F).
Storage Temp. -20 to 60°C (-4 to 140°F).
Operating Humidity. 10 to 80% relative humidity,
non-condensing.
Storage Humidity. 5 to 90% non-condensing.
NOTES
For regulatory, warranty, and safety information, see the CD that
came with your router or go to Linksys.com/support
Specifications are subject to change without notice.
Maximum performance derived from IEEE Standard 802.11
specifications Actual performance can vary, including lower
wireless network capacity, data throughput rate, range and
coverage Performance depends on many factors, conditions and
variables, including distance from the access point, volume of
network traffic, building materials and construction, operating
system used, mix of wireless products used, interference and other
adverse conditions.
21
Page 30

Industry Canada statement:
This device complies with RSS-210 of the Industry Canada Rules. Operation is subject to the
following two conditions: (1) This device may not cause harmful interference, and (2) this
device must accept any interference received, including interference that may cause undesired
operation.
Ce dispositif est conforme à la norme CNR-210 d'Industrie Canada applicable aux appareils
radio exempts de licence. Son fonctionnement est sujet aux deux conditions suivantes: (1) le
dispositif ne doit pas produire de brouillage préjudiciable, et (2) ce dispositif doit accepter tout
brouillage reçu, y compris un brouillage susceptible de provoquer un fonctionnement
indésirable.
Radiation Exposure Statement:
This equipment complies with IC radiation exposure limits set forth for an uncontrolled
environment. This equipment should be installed and operated with minimum distance 20cm
between the radiator & your body.
Déclaration d'exposition aux radiations:
Cet équipement est conforme aux limites d'exposition aux rayonnements IC établies pour un
environnement non contrôlé. Cet équipement doit être installé et utilisé avec un minimum de 20
cm de distance entre la source de rayonnement et votre corps.
Federal Communication Commission Interference Statement
This device complies with Part 15 of the FCC Rules. Operation is subject to the following two conditions: (1)
This device may not cause harmful interference, and (2) this device must accept any interference received,
including interference that may cause undesired operation.
This equipment has been tested and found to comply with the limits for a Class B digital device, pursuant to
Part 15 of the FCC Rules. These limits are designed to provide reasonable protection against harmful
interference in a residential installation. This equipment generates, uses and can radiate radio frequency
energy and, if not installed and used in accordance with the instructions, may cause harmful interference to
radio communications. However, there is no guarantee that interference will not occur in a particular
installation. If this equipment does cause harmful interference to radio or television reception, which can be
determined by turning the equipment off and on, the user is encouraged to try to correct the interference by
one of the following measures:
- Reorient or relocate the receiving antenna.
- Increase the separation between the equipment and receiver.
- Connect the equipment into an outlet on a circuit different from that
to which the receiver is connected.
- Consult the dealer or an experienced radio/TV technician for help.
FCC Caution: Any changes or modifications not expressly approved by the party responsible for compliance
could void the user's authority to operate this equipment.
This transmitter must not be co-located or operating in conjunction with any other antenna or transmitter.
Radiation Exposure Statement:
This equipment complies with FCC radiation exposure limits set forth for an uncontrolled environment. This
equipment should be installed and operated with minimum distance 20cm between the radiator & your body.
Visit linksys.com/support for award-winning technical support.
A listing of Cisco’s trademarks can be found at www.cisco.com/go/trademarks All other trademarks mentioned in this document are the property of their respective owners.
Cisco, the Cisco logo, and Linksys are trademarks or registered trademarks of Cisco and/or its affiliates in the United States and other countries.
© 2011 Cisco and/or its affiliates All rights reserved.
3425-TBD.
 Loading...