

Page 1
eMerge50P
eMerge5000P
User Guide
May 2014
Linear LLC
1950 Camino Vida Roble
Suite 150
Carlsbad, CA 92008
www.linearcorp.com
Document #233192
Page 2

Copyright
© Linear LLC. All rights reserved.
This guide is protected by copyright and all rights are reserved by Linear LLC. It may not, in
whole or in part, except insofar as herein directed, be copied, photocopied, reproduced,
translated or reduced to any electronic medium or machine-readable form without prior written
consent of Linear LLC.
eMerge® is a registered trademark of Linear LLC.
233192 AX4 Linear LLC ii May 2014
Page 3

Contents
Introduction ........................................................................................................................................... 1
Getting Started .................................................................................................................................. 2
The Home Page ................................................................................................................................ 3
Using Help ........................................................................................................................................ 5
How do I get to Help? ................................................................................................................ 5
Help Conventions ...................................................................................................................... 5
Using Help ................................................................................................................................. 5
Additional Information ..................................................................................................................... 6
Monitoring the System ......................................................................................................................... 7
Accessing the eMerge Monitoring Functions ............................................................................ 7
Monitoring the Activity Log ............................................................................................................ 8
Filtering Activity Log Data ............................................................................................................ 10
Navigating to a Person Record from the Activity Log ............................................................ 11
About Activity Log Messages ................................................................................................. 12
The Auto-Monitor Widget .............................................................................................................. 13
Viewing Portal Status and Unlocking Portals ................................................................................ 15
Using the Monitoring Desktop ....................................................................................................... 19
Events Tab ............................................................................................................................... 20
Activity Log Tab ...................................................................................................................... 20
Cameras Tab ............................................................................................................................ 20
Camera Views Tab ................................................................................................................... 21
Camera Monitor Tab ................................................................................................................ 21
Portal Unlock Widget .............................................................................................................. 22
Cameras Widget ....................................................................................................................... 22
Using the Widget Desktop.............................................................................................................. 22
Summary of Available Widgets ............................................................................................... 25
The Clock Widget .................................................................................................................... 25
The Explorer Widget................................................................................................................ 26
The Intrusion Panel Widget ..................................................................................................... 26
The Portal Status and Portal Unlock Widgets .......................................................................... 28
The Statistics Block Widget ..................................................................................................... 29
The Status Widget .................................................................................................................... 30
About Widget Properties.......................................................................................................... 30
Moving, Sizing, Minimizing, and Closing Widgets ................................................................ 31
Changing a Widget's Unique Properties .................................................................................. 32
Changing a Widget's Filtering Properties ................................................................................ 33
Summary of Available Filtering Properties ............................................................................. 34
Monitor Menu Page ........................................................................................................................ 35
Monitoring Cameras ................................................................................................................ 35
Monitoring Multi-Camera Views ............................................................................................ 37
Administering the System .................................................................................................................. 39
Administration Menu Page ............................................................................................................. 39
Arming and Disarming Alarm Panels ............................................................................................ 40
Handling Lost Credentials .............................................................................................................. 41
Handling Missing Credentials ........................................................................................................ 42
233192 AX4 Linear LLC iii May 2014
Page 4

Contents
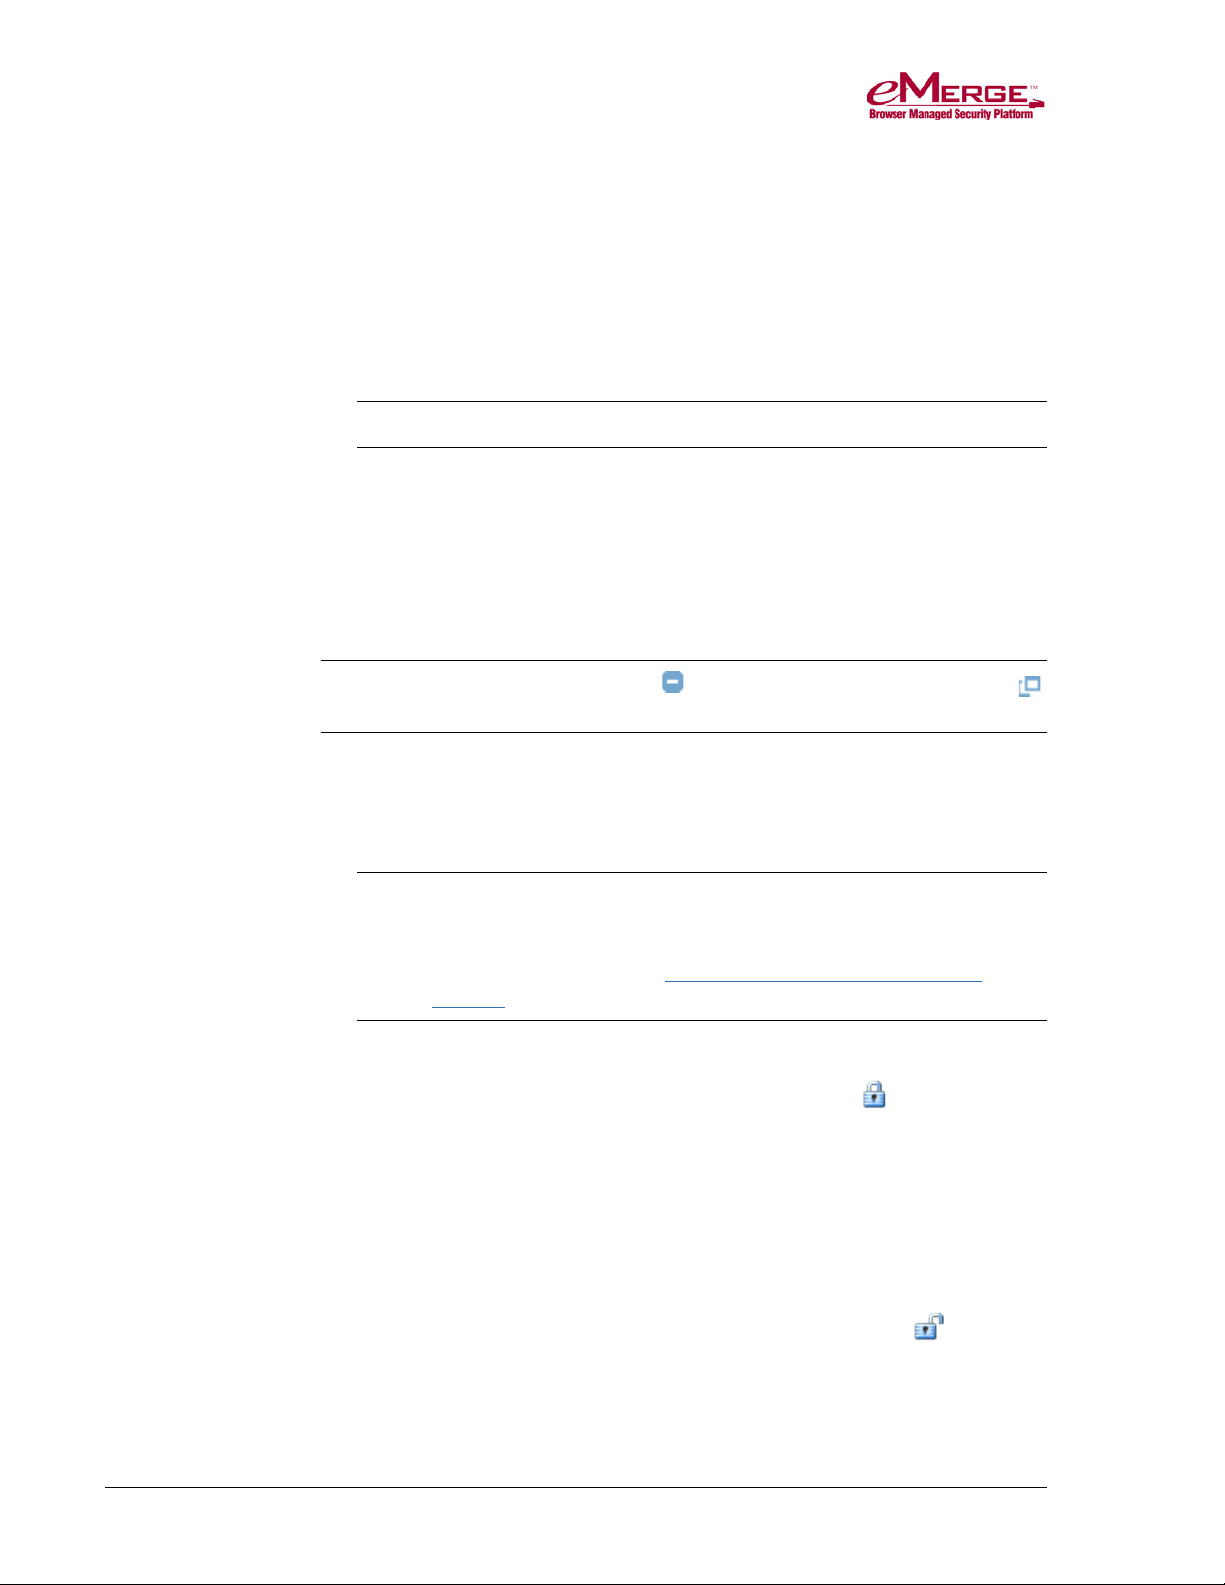
Adding People to the System ......................................................................................................... 43
Changing Personal Information ...................................................................................................... 45
The Personal Information Page ...................................................................................................... 47
Basic Information Section ........................................................................................................ 47
Personal Information Tabs ....................................................................................................... 48
Changing a Person's Access ........................................................................................................... 50
Configuration Reports .................................................................................................................... 54
As Built Report ........................................................................................................................ 54
Cameras Report ........................................................................................................................ 54
Camera Presets Report ............................................................................................................. 54
Holidays Report ....................................................................................................................... 54
Portals Report .......................................................................................................................... 54
Portal Groups Report ............................................................................................................... 54
Reader Groups Report.............................................................................................................. 54
Resources Report ..................................................................................................................... 55
Time Specs Report ................................................................................................................... 55
History Reports ............................................................................................................................... 55
Access History Reports ............................................................................................................ 55
General Event History Reports ................................................................................................ 56
Portal Access Count Reports ................................................................................................... 57
People Reports ................................................................................................................................ 58
Access Levels Report ............................................................................................................... 58
Current Users Report ............................................................................................................... 59
Photo ID Gallery Report .......................................................................................................... 59
Scheduling Actions for Inputs, Outputs, and Portals...................................................................... 60
Backing Up the System Data .......................................................................................................... 62
About Archive Files ....................................................................................................................... 64
Index ..................................................................................................................................................... 65
233192 AX4 Linear LLC iv May 2014
Page 5

Introduction
This guide is intended for users of the eMerge50P & eMerge5000P security
management systems. It provides a printable version of the information that is
found in the online help, featuring instruction for common monitoring and
administra tion ta sks.
eMerge is designed for non-security personnel to operate. The system is accessed
through a web interface that supports common browsers (Internet Explorer
versions 8 and 9, Mozilla Firefox versions 8 and 9, or Safari 5.0), and is even
usable from mobile devices. eMerge integrates credential-based access control,
intrusion detection, and video surveillance for a single facility, delivering a
unified management and administration interface to your web browser.
The user-interface features a Home page that acts as a system dashboard . It
includes User Tasks icons suitable for use with touch screens and mobile devices,
so that everything you need to operate eMerge can start from that page.
Much of the system data is displayed in windows, referred to as widgets, which
are in static formats on the Hom e page and Monitoring Desktop, and adjustable
formats on the Widget Desktop.
There are three major user roles that can be assigned for eMerge users:
• Monitor – Users with this role can use all available monitoring functions.
• Administrator – Users with this role can use all available monitoring and
administration functions.
• System Setup – Users with this role (typically your dealer or installer) can
use all available monitoring, administration, and setup functions.
This user guide is divided into an introductory section for getting started with the
system operation, followed by sections focused on the monitoring and
administra tion ta sks. The system setup tasks are covered in the eMerge online
help.
If you view this guide as an online PDF file, you can click on a TOC entry, or a
section reference (blue/underlined text) to go to the linked page. If you use this
guide as a printed book, you can find the references by looking up the section
titles, index entries, and page references.
This introductory section describes how to access information about using
eMerge:
• Getting started
• Getting to the Home page
• Using the Help system
• Locating additional information and technical documentation
233192 AX4 Linear LLC 1 May 2014
Page 6
Introduction
Getting Started
The navigation bar that appears at the top of the application window is built
dynamically for each user who logs in. It displays navigation buttons only for
areas of the application you have permission to view or use. The buttons that are
available if you have full System Setup access are:
Takes you to
the Home
page
Takes you to the Monitoring
Desktop or Widget Desktop
-or-
Takes you to
the
Administration
menu page
Takes you to
the Setup
menu page
Note: The live monitoring icon in the navigation bar can be selected using
System Setup : Site Configuration Wizard.
The following icons appear in the navigation menu below the navigation buttons:
• Back takes you to the previous page in the nav igation m enu hierarchy.
Tip: Clicking the link for any page in the path shown to the right of the
Back icon takes you back to that page.
• Info takes you to the About page, where you can view backup and
system information.
• Help displays the online help in a separate window.
• Logout logs you out of eMerge.
Note: When you are on a menu page (or any page that is not running a
monitoring function), a period of inactivity (as defined by the Session
Timeout setting under Setup : Site Settings : Network Controller) will
cause your session to time out. You will need to log in again.
233192 AX4 Linear LLC 2 May 2014
Page 7
Introduction
The Home Page
The Home page is the first page you see after logging into eMerge. Click the
Home page button in the navigation bar to return to this page from elsewhere in
the application.
For users logged in with monitor level access, the Home page provides two
navigation buttons in the navigation bar and one icon in the User Tasks widget.
For users logged in with administrator level access, the Home page provides
three navigation buttons in the navigation bar and six icons in User Tasks
widget.
233192 AX4 Linear LLC 3 May 2014
Page 8
Introduction
On the Home page you can:
• Use the Activity Log widget to view up to 1,000 of the most recent entries in
the log of system activity.
For more information, see Monitoring the Activity Log on page 8.
• Use the Auto-Monitor widget to view issues that might require attention.
This widget displays notifications of all currently active events of the
following types: Unacknowledged Events, Node Communication Loss, Door
Forced Open, and Door Held Open. It also displays all Access Denied events
that have occurred within the last hour. Pointing to a notification displays an
informational tooltip showing more detail about each event.
• Use the Video Stream widget to monitor a camera view.
The first camera in your system’s Camera Menu order will appear by default
in this widget. If there are no camera definitions in the system, the Video
Stream widget will not display a camera view.
Note: If the eMerge window is wide enough, the User Tasks widget moves
to the upper right, providing room for a larger Video Stream widget.
• Use the User Tasks widget for direct access to common features (based on
your login permissions).
Clicking the icon for a task takes you directly to the page for performing the
task. For example, if you have Administrator access, clicking People
Locator takes you to a page where you can run searches to find people in the
system.
The User Tasks widget always includes either a Widget Desktop icon or
Monitoring Desktop icon.
Widget Desktop - or - Monitoring Desktop
Note: The desktop icon you see in the User Tasks widget depends on whether
the live monitor ing button on the navigation bar is configured to display
the Monitoring Desktop or the Widget Desktop. The User Tasks widget
displays the icon for the other live monitoring desktop. This way, you
always have direct access to both desktops through a single click on the
Home page. The navigation bar live monitoring icon is configured in
System Setup : Site Configuration Wizard.
See also: Using the Monitoring Desktop on page 19
233192 AX4 Linear LLC 4 May 2014
Using the Widget Desktop on page 22
The Auto-Monitor Widget on page 13
Page 9
Using Help
How do I get to Help?
Introduction
Click the Help icon in the upper right corner of the application window. The
help system appears in a separate window.
The information displayed in the topic pane provides assistance with the task on
which you are working.
Navigation Pane Topic Pane
Help Conventions
The help system is context-sensitive. When you click Help from any page in the
application:
• If a help topic is available for the current page, that topic appears in the help
window.
• If no help topic is available for the curren t page, “ Th e Home Page” topic
appears in the help window.
To assist you in finding specific fields, buttons, and other elements in the eMerge
Security Application, their names are displayed in bold blue within help topics.
Using Help
The help navigation pane appears on the left side of the help window.
• By clicking the Contents and Search buttons, you can switch between the
help table of contents and the search feature:
• To hide the navigation pane, click the red close button . To show the pane
again, click the Contents or Search button.
• In the table of contents, click a book to see its contents. Click an
individual top ic to d isp la y it in the topic pane.
233192 AX4 Linear LLC 5 May 2014
Page 10
Introduction
• To use the search feature, enter the word or words you want to find, and then
press ENTER or click Go. To search for a phrase, enter it inside
quotation marks.
If the Highlight search results check box is selected when you click a topic
title in the search results, the words you entered will be highlighted in the
topic pane.
You can also use the buttons displayed at the top of each help topic to navigate
and print help topics:
• Back: Brings you back to the previous topic.
• Index: Displays the Index.
• Print: Prints the current help topic.
Additional Information
The following technical information is available via links in the help topic
Release Notes and Additional Information, located in the “Getting Started”
section of help:
Release Notes (PDF):
Release Notes, all builds
Top Questions for:
Installers
System Monitors and Administrators
Technical Guides and Notes (PDFs):
Installation, Setup, and Technical Documents
License Agreement:
End User License Agreement
233192 AX4 Linear LLC 6 May 2014
Page 11
Monitoring the System
This section describes how to access and use these monitoring functions:
• Using the Activity Log to monitor system activity
• Using the Auto-Monitor widget to view issues that require attention
• Viewing and managing portals
• Viewing system information using the Monitoring Desktop
• Viewing system information using the custom, real-time display on the
Widget Desktop
• Viewing individual cameras and pre-defined groups of cameras
Accessing the eMerge Monitoring Functions
To open the Monitoring Desktop or the Widget Desktop from the Home page,
click the icon in the User Tasks widget:
Widget Desktop - or - Monitoring Desktop
To access the live monitoring desktop not shown in the User Tasks widget, click
the live monitoring button in the navigation bar:
Widget Desktop - or - Monitoring Desktop
Note: The desktop icon you see in the User Tasks widget depends on whether
the live monitor ing button on the navigation bar is configured to display
the Monitoring Desktop or the Widget Desk top. The User Task s widg et
displays the icon for the other live monitoring desktop. This way, you
always have direct access to both desktops through a single click on the
Home page. The navigation bar live monitoring icon is configured in
System Setup : Site Configuration Wizard.
233192 AX4 Linear LLC 7 May 2014
Page 12
Monitoring the System
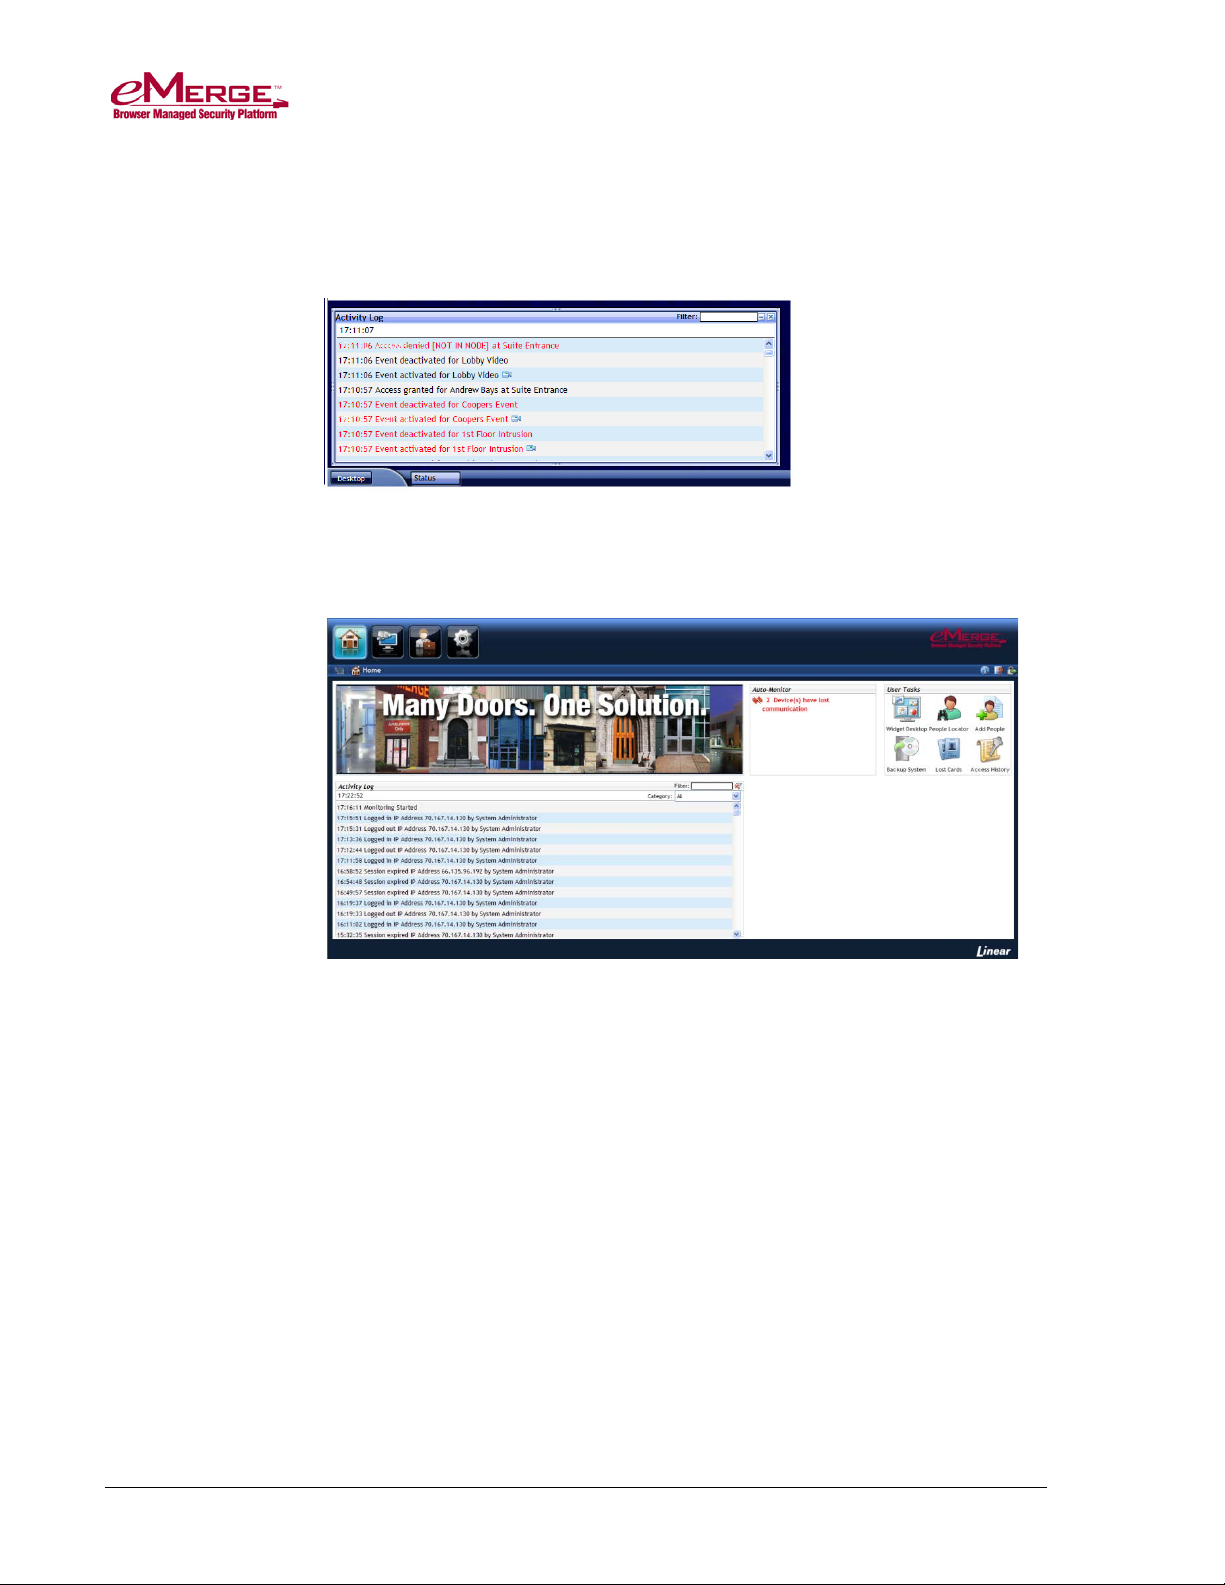
Monitoring the Activity Log
There are four ways to view the Activity Log, described here.
To use the full page view:
• From the Monitoring Desktop, click the words L iv e M o nitoring in the
navigation menu, and then click the Activity Log link.
On this page you can monitor a full page view of the Activity Log, which
displays up to 1,000 of the most recent entries in the log of system activity.
To use the Monitoring Desktop:
• On the Monitoring Desktop, click either of the Activity Log tabs.
233192 AX4 Linear LLC 8 May 2014
Page 13
Monitoring the System
To use the Widget Desktop:
• If the Activity Log widget is not already displayed, select it from the Desktop
menu in the lower left corner of the page.
To use the Home page:
You can also view the Activity Log on the Home page.
The messages in the Activity Log are color coded:
Red indicates a process failure or access control issue.
Green indicates a successful process.
The color currently selected for Trace person log color on the Network
Controller page indicates valid or invalid access attempts in the current partition
by individuals whose activity is being traced.
Black is used for all other messages.
233192 AX4 Linear LLC 9 May 2014
Page 14

Monitoring the System
Filtering Activity Log Data
When viewing the Activity Log on the Home page, Monitoring Desktop, or
Widget Desktop, you can filter the current list of log entries to narrow the data
displayed.
Depending on how your Monitoring Desktop or Widget Desktop was configured,
a Filter box may or may not be available on that Activity Log widget.
Note: Text filtering is not available on the full page view of the Activity Log.
There are two types of filt e rs y ou can apply:
• Text filters: In Activity Log tabs and widgets (displayed on the Monitoring
Desktop, Home page, and Widget Desktop), you can apply a text filter to
view only entries from the original list that contain a specific text string.
• Category filters: In Activity Log tabs and widgets, and also in the full page
view of the Activity Log, you can apply a category filter to view only entries
from the original list that belong to a particular category.
You can also combine a text filter with a category filter. For example, suppose
that after applying the text filter "Jean Gauthier," you apply the category filter
Access Denied to the results. The new results will show only denied access
requests for the cardholder Jean Gauthier.
Note: Your filter results will include only entries currently defined for the view
of the Activity Log you are monitoring. For example, in an Activity Log
widget that is configured to display only "Access denied" entries,
applying the Access Granted category filter will return no results.
Applying Text Filters
To apply a text filte r, enter the text you want in the Filter box that appears at the
top of the Activity Log, as shown in the following figure. Filtering is not casesensitive; you can enter either uppercase or lowercase characters.
Filtering begins as you start to type. For the current monitoring session, the
Activity Log will display only log entries containing the text you entered. For
example, to see only entries containing the name “Jean Gauthier,” apply the filter
shown below.
You can apply a different text filter by entering new text, and you can clear the
text filter by clicking the Clear Filters icon, entering a different text filter, or
ending the current monitoring session
Applying Category Filters
To apply a category filter, you select an entry from the Category drop-down list
in the upper right corner of the Activity Log. The results will include only entries
233192 AX4 Linear LLC 10 May 2014
Page 15

Monitoring the System
from the original list that belong to the selected category. The following
categories are available:
• All (default): Select when you want to remove the currently applied category
filter without applying a new one, and without removing the current text
filter if one is applied. (Clicking the Clear F ilters icon clears all category
and text filters.)
• Access Control: Select to view only access control related entries, such as
Access Denied, Access Granted, Forced Open, Relocked, Timed Unlock
Expired, and Unlock entries.
• Alarms and Events: Select to view only alarm and event related entries,
such as Alarm Acknowledged, Alarm Actions Cleared, Alarm Adopted,
Alarm Panel Armed, Event Actions Cleared, Event Triggered, and Tamper
Alarm entries.
• Threat Levels: Select to view only threat level related entries, such as Threat
Level Set, Threat Level Set (ALM), and Threat Level Set (API) entries.
• System Administration: Select to view only system administration related
entries, such as FTP Backup Complete, FTP Backup Failed, Log Archive
Failed, Logged In, Logged Out, and System Backup Successful entries.
• Devices: Select to view only device related activity, such as Battery Failed,
Blade Not Responding, Intrusion Panel Alarm, NAS Backup Complete, and
Secondary System Restored events.
• Network Nodes: Select to view only Network Node related entries, such as
Coproc Not Responding, NN Connected, NN Startup, and NN Timeout,
entries.
• Access Granted: Select to view only entries for granted access requests.
• Access Denied: Select to view only entries for denied access requests.
Once you have applied a category filter, the filtered data will be displayed in the
Activity Log until you click the Clear Filte rs icon, select a different filter, or
end the current monitoring session.
Navigating to a Person Record from the Activity Log
If you have the right to view a cardholder's person record, clicking that person's
name within an Activity Log entry opens a window in which his or her person
record is displayed. Any rights you have to view and edit information in a
particular person record when accessed from the Administrator page will apply
when you access the record from the Activity Log.
233192 AX4 Linear LLC 11 May 2014
Page 16

Monitoring the System
About Activity Log Messages
Activity Log entries contain message text and a number of variables, as described
below.
Times
Each Activity Log message begins with the control ler tim e—the time when the
event was communicated to the Network Controller. Depending on how your
system is configured, the controller time might be followed (in square brackets)
by the time when the event actually occurred on the node.
Names
Specific names entered into the system during setup and configuration will be
used in log entries in place of variables such as: <username>, <portalname>,
<nodename>, <eventname>, and <alarmpanel>. This provides a strong reason for
assigning names that are descriptive. The log will be much easier to understand.
Numbers
Specific numbers will be used in log entri es in place of v ariables such as
<ipaddress>, <slotnumber>, and <rev>.
Reset Types
Specific <reset_type> messages for the Network Node Ident log entry include:
• Power on reset - The node reset on power up.
• Watchdog timer reset – This occurs when the system takes too long to
process an operation involving a node. It should restart and continue
processing. If the problem persists, contact your dealer or installer.
• Normal reset - Physical reset by pushing the node reset button on the
controller/node blade.
• Network loss - No reset has occurred. The node lost network connectivity
but has now reconnected.
Reason Codes
Specific [<reasoncode>] messages for “Access denied” and “Access granted” log
entries are listed below.
Note: In addition to “Access denied” and “Access granted” log entries, “Access
not completed” entries will appear for access requests that are initiated
but not completed. For example, if a user presents his or her credentials
at a door but never opens the door, an “Access not completed” entry will
appear in the Activity Log.
233192 AX4 Linear LLC 12 May 2014
Page 17

Monitoring the System
• [BIT MISMATCH] - The data format of this credential does not match any
data format configured in the system. Clicking this message code opens the
Card Decoder window.
• [DISABLED] - This credential has been disabled.
• [EXPIRED] - This credential has expired.
• [HOLIDAY] - A defined holiday does not allow access for this person at this
time.
• [LOCATION] - This person's access level or the current threat level does not
allow the use of this reader.
• [NO PIN] - No PIN was entered within the PIN entry timeout period set on
the Network Controller page.
• [NOT IN NODE] - The node has no record of this credential and was unable
to load it in time. The name of the person who owns the credential is
displayed.
• [PIN] - The PIN entered is incorrect.
• [PASSBACK VIOLATION] - This credential was presented to enter a region
where the cardholder is already known to be. (This is a subset of tailgate
violations.)
• [TIME] - Time specs do not allow access for this person at this time.
• [UNKNOWN] - The data format of this credential is valid, but there is no
record of the credential anywhere in the system. Clicking this message opens
the Card Decoder window.
• [WRONG DAY] - Time specs or holiday definitions do not allow access for
this person on this day.
Specific [<reasoncode>] messages for Access granted log entries include:
• [DURESS] – A cardholder presented his or her card and then entered a
duress PIN (his or her assigned PIN, with the last digit incremented by 1)
into the keypad. This resulted in an apparently normal access that was
actually a duress access.
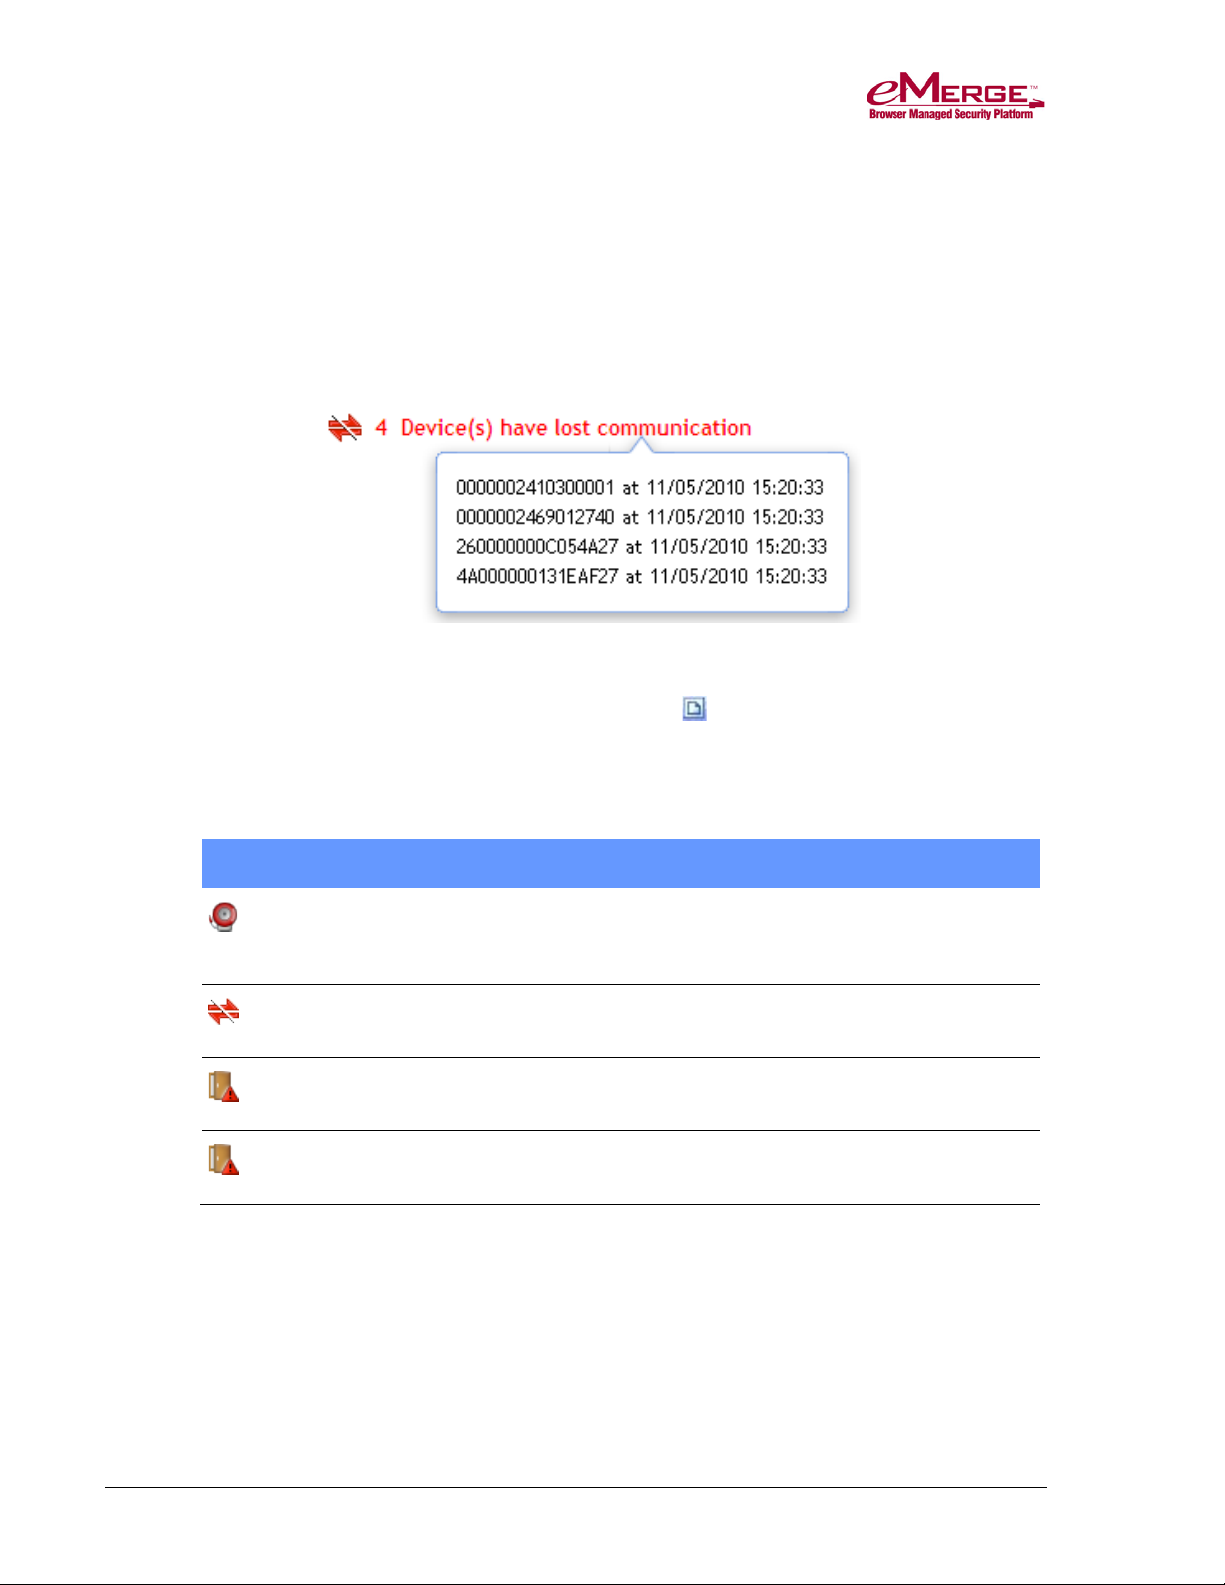
The Auto-Monitor Widget
The Auto-Monitor widget is displayed on the right side of the Home page. It
may be displayed on the Widget Desktop, depending on how your current layout
was configured. This widget provides a quick view of issues that might require
attention, such as process failures or access control issues.
233192 AX4 Linear LLC 13 May 2014
Page 18
Monitoring the System
For each type of event that has occurred, the Auto-Monitor displays a notification
indicating the number of such events that are currently active—or in the case of
Recent Access Denied Activity notifications, the number that have occurred
within a specific time period. Once an active event is resolved, the notification
disappears.
You can point to a notification to display an informational tooltip. As shown in
the example below, the tooltip shows details about each event, such as the date
and time it occurred and the name of the affected device.
If the creator of the Widget Desktop layout has allowed the Auto-Monitor widget
to be configured, you can click this icon in the widget's upper left corner to
change its unique properties. You can then specify whether the tooltip is
displayed to the left, right, above, or below the alert. The icon and font color
displayed for a notification indica tes the ev ent type, as described in the following
table.
Notification Color Meaning
Unacknowledged Events
Node Communication Loss
Door Forced Open
Door Held Open
Red One or more events requiring
acknowledgement have not yet been
acknowledged.
Red One or more Network Nodes or MicroNodes
have lost communication.
Red One or more portals are in the forced open
state.
Yellow One or more portals are in the held open
state.
233192 AX4 Linear LLC 14 May 2014
Page 19
Monitoring the System
Notification Color Meaning
Recent Access Denied Activity
Yellow One or more Access Denied events have
occurred.
When the Auto-Monitor is viewed from the
Home page, it displays all Access Denied
activities that have occurred within the last
hour.
When the Auto-Monitor is viewed from the
Widget Desktop, it displays all Invalid
Access types configured for the AutoMonitor widget that have occurred within the
Invalid Access History time period
configured for the widget.
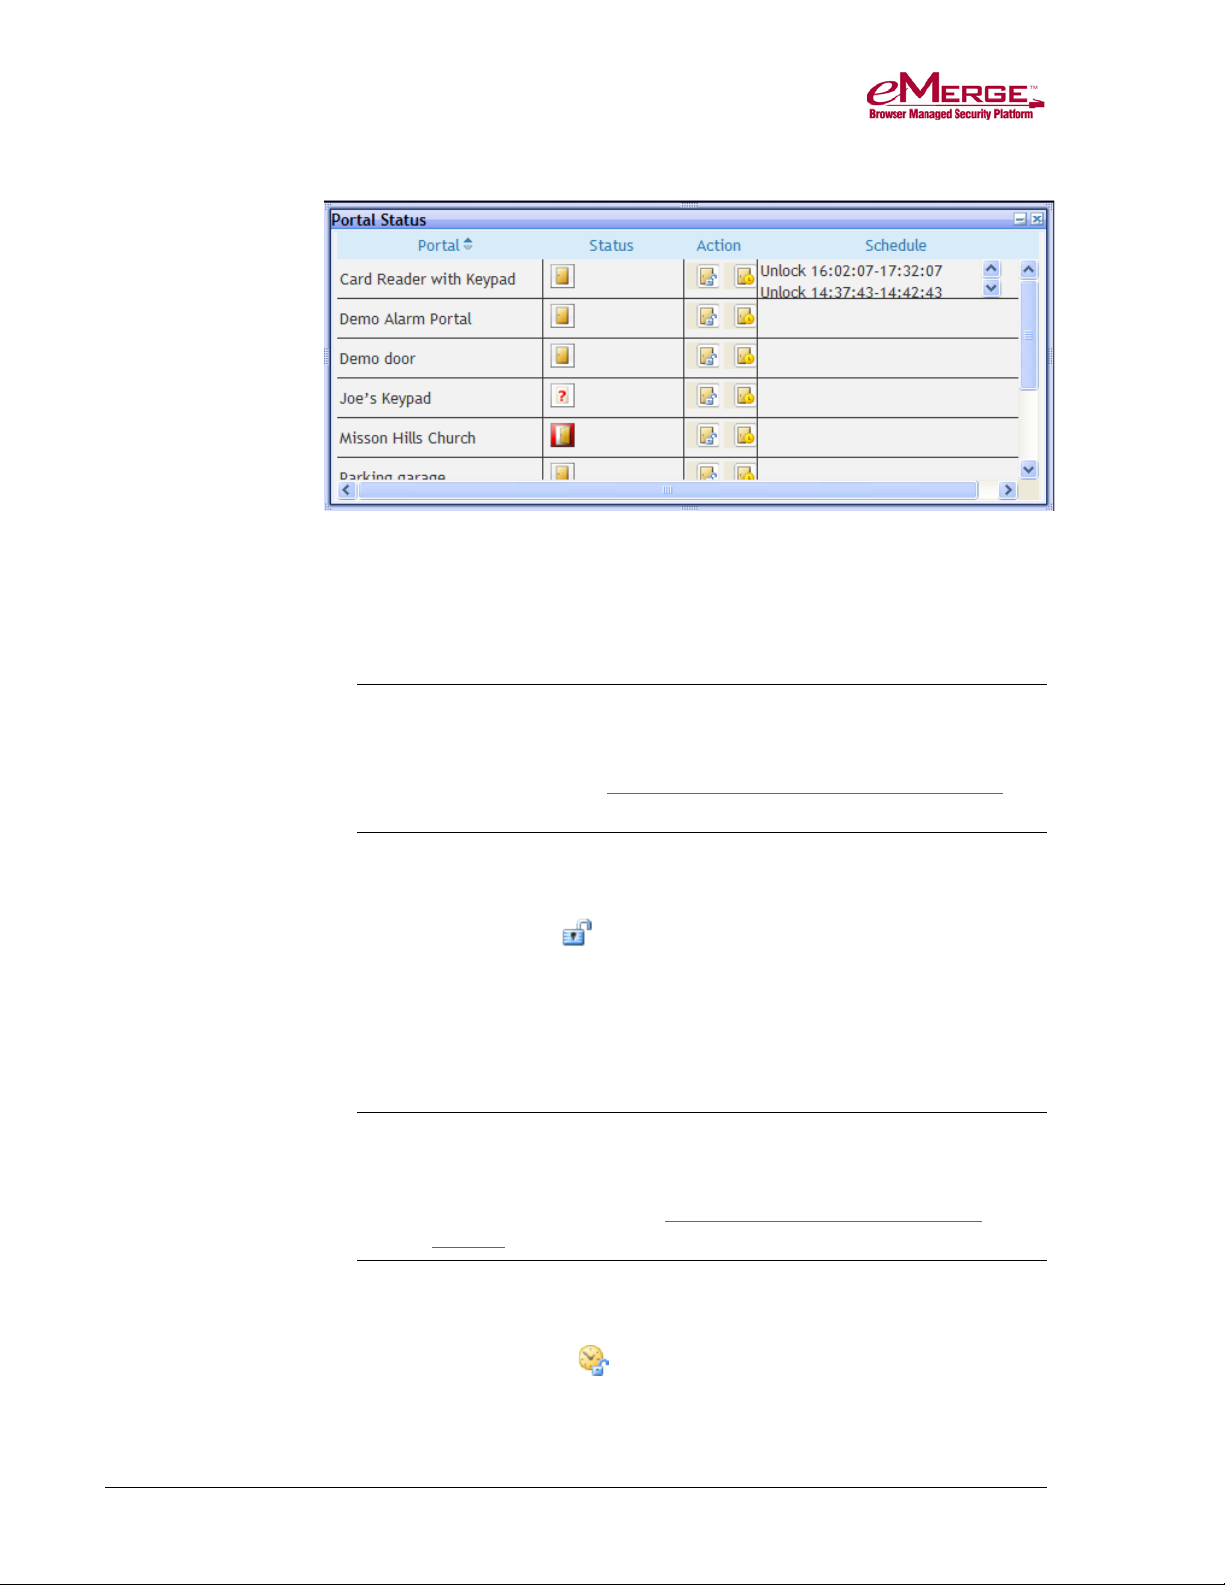
Viewing Portal Status and Unlocking Portals
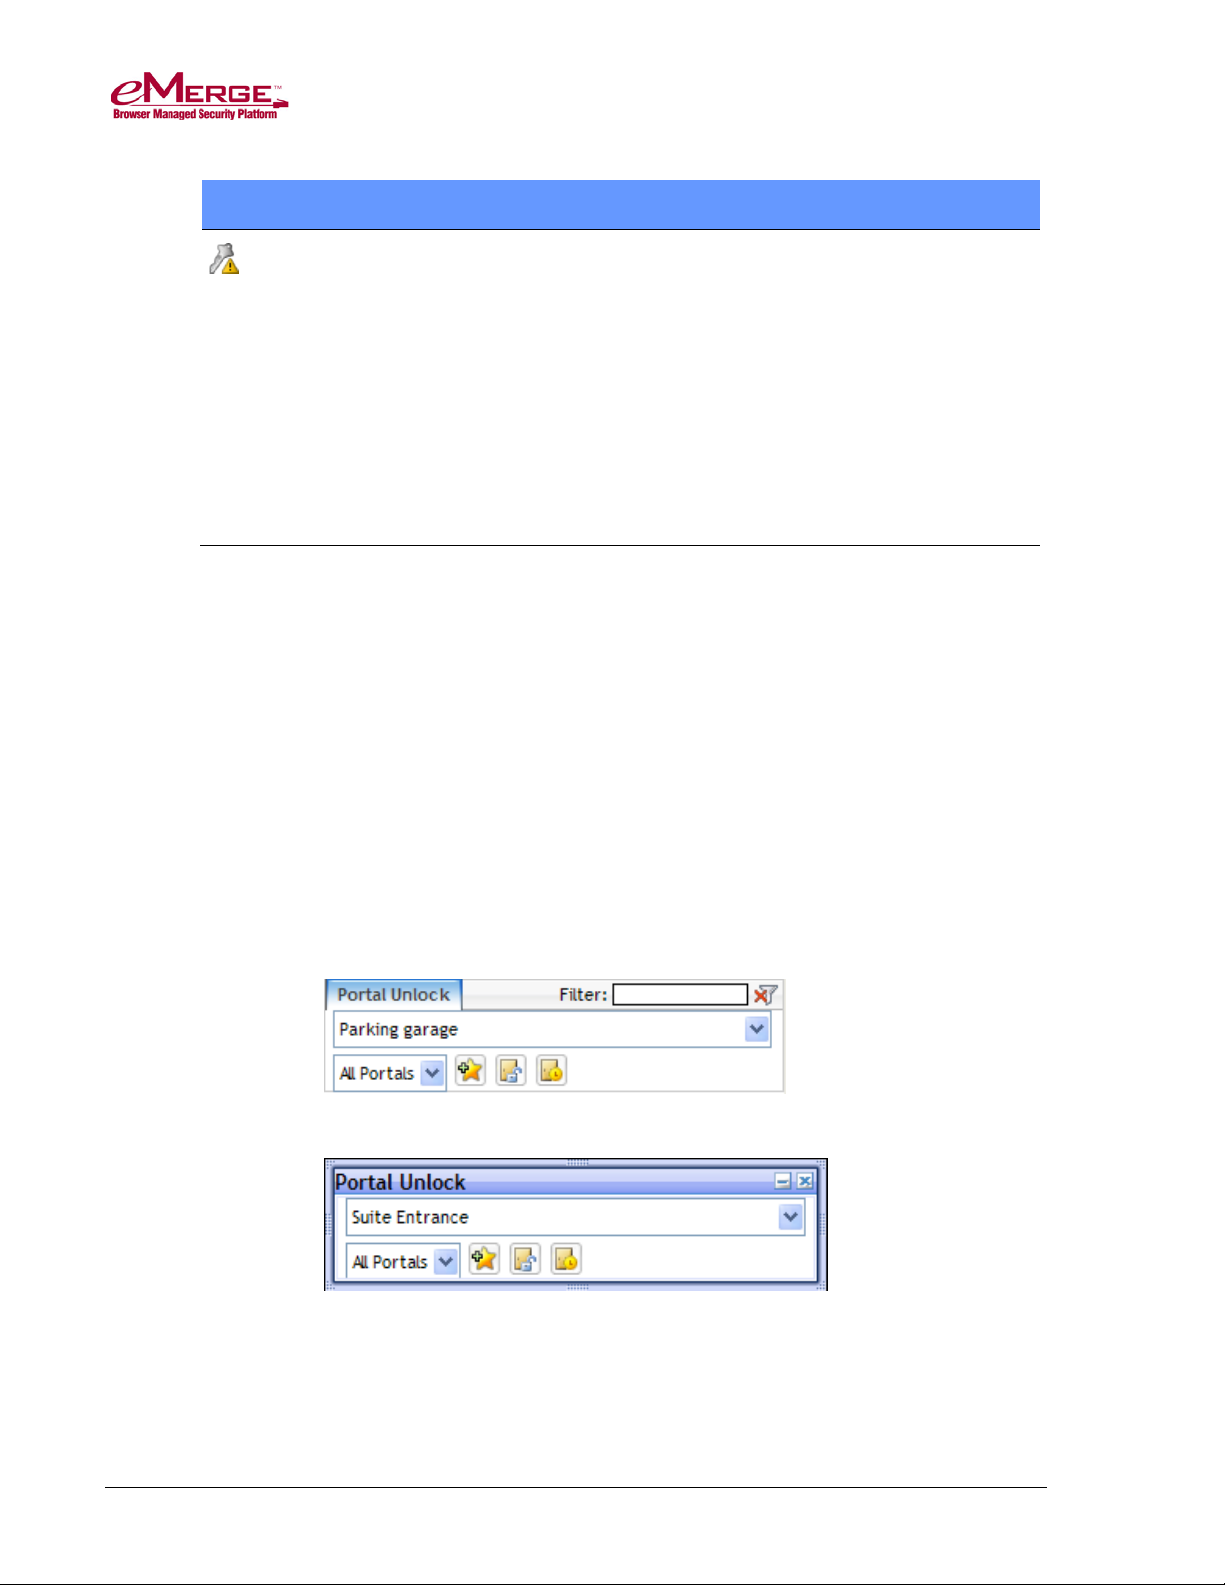
eMerge provides multiple ways to manage portals. You can use the Portal
Unlock widget on the Monitoring Desktop, the Portal Unlock and/or Portal
Status widgets on the Widget Desktop, or the Schedule Access link on the
Administration menu page, to do the following:
• View the current status and unlock schedule of any portal.
• Perform a momentary or scheduled (or extended) unlock of any portal.
• Edit the unlock schedule of any portal.
• Secure a portal by switching it to a locked state, temporarily removing it
from the automatic control of a portal group.
Figure 1. The Portal Unlock widget on the Monitoring Desktop
Figure 2. The Portal Unlock widget on the Widget Desktop
233192 AX4 Linear LLC 15 May 2014
Page 20
Monitoring the System
Figure 3. The Portal Status widget on the Widget Desktop
To momentarily unlock a portal:
1. Locate a portal:
o In the Portal Unlock widget, select one from the drop-down list.
Note: To make it easier to find portals, you can temporarily limit the number
of portals that appear on the list by changing the All Portals setting
to Favorites or Recent. For information on customizing the Portal
Unlock widget, see
page 28
.
The Portal Status and Portal Unlock Widgets on
o In the Portal Status widget or the table in Schedule Access, locate one
in the Portal column.
2. Click the Unlock icon or select Unlock from the drop-down. The portal
will unlock for the duration configured for this portal.
To schedule an extended unlock of a portal:
1. Locate a portal:
o In the Portal Unlock widget, select one from the drop-down list.
Note: To make it easier to find portals, you can temporarily limit the
number of portals that appear on the list by changing the All Portals
setting to Favorites or Recent. For information on customizing the
Portal Unlock widget, see
Widgets on page 28.
The Portal Status and Portal Unlock
o In the Portal Status widget or the table in Schedule Access, locate one
in the Portal column.
2. Click the Schedule icon to open the Schedule dialog box.
233192 AX4 Linear LLC 16 May 2014
Page 21
Monitoring the System
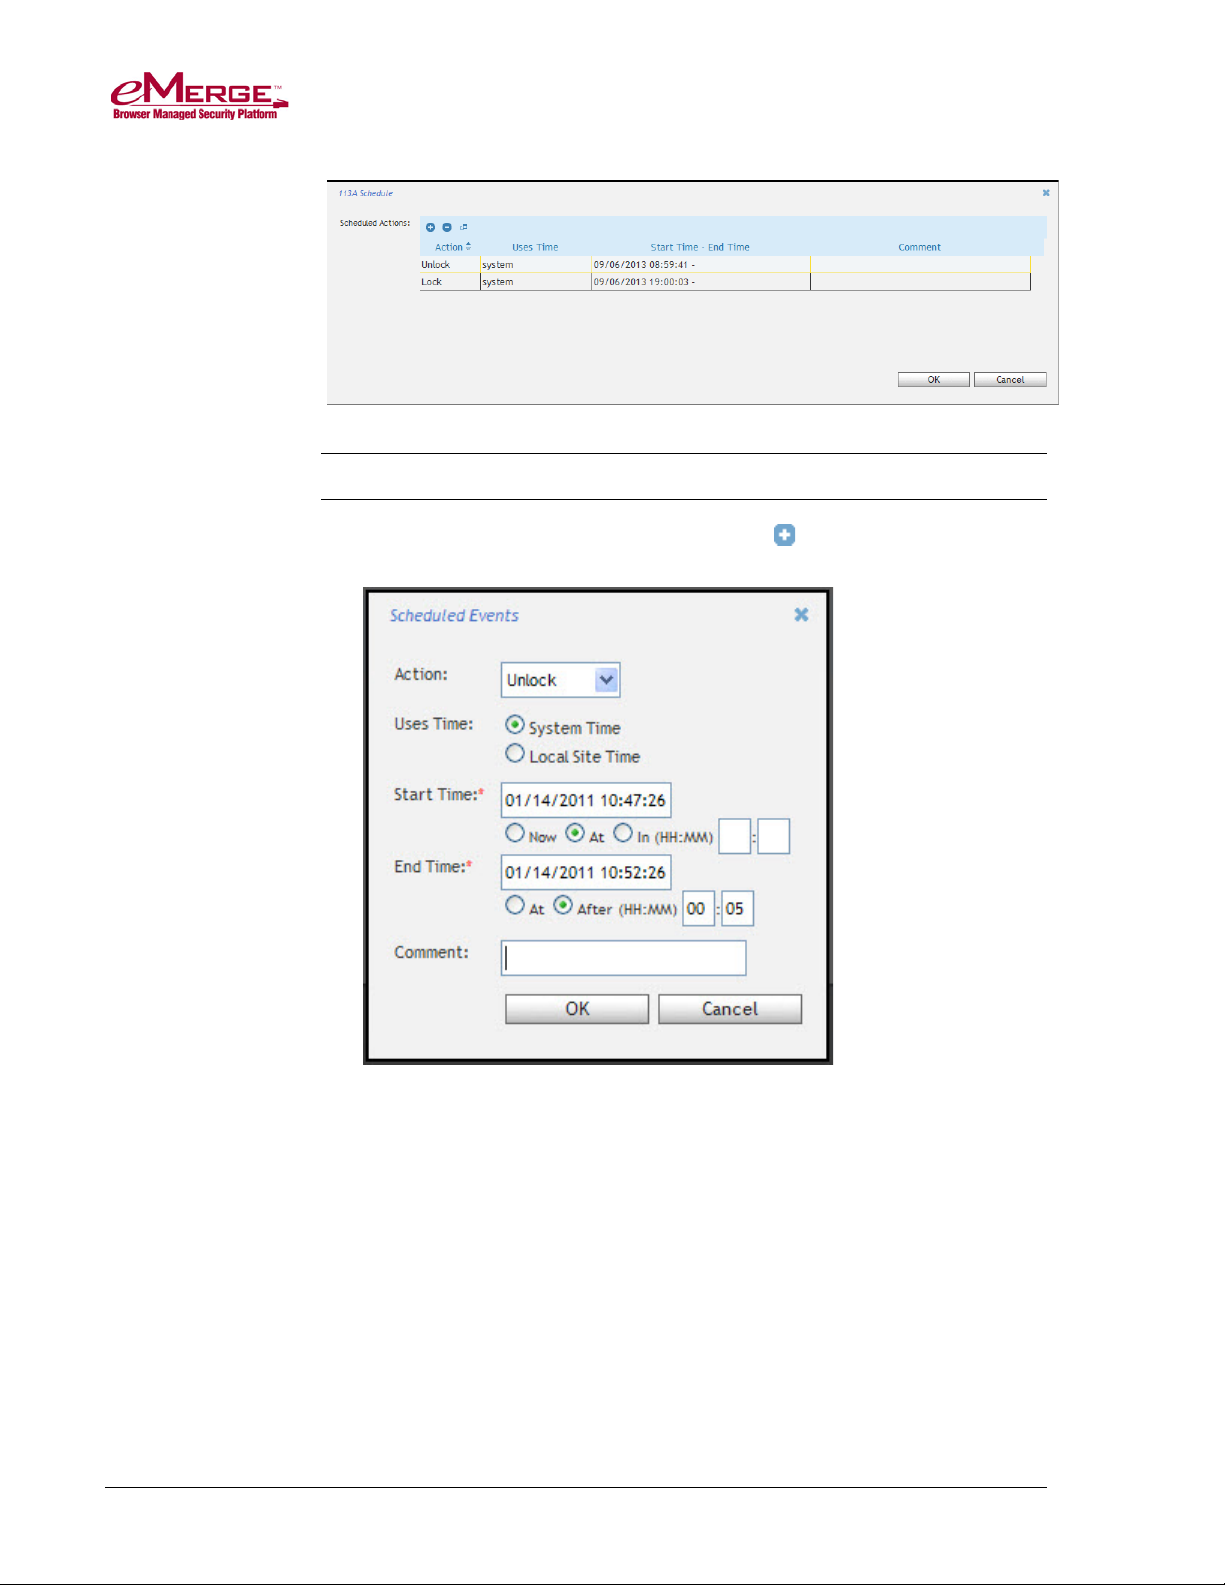
Note: You can also view scheduled events in the Portal Status widget.
3. To add a scheduled event, click the add button to open the Scheduled
Events dialog box.
4. Select Lock or Unlock from the Action drop-down list.
5. For the Uses Time setting:
o Select System Time for the time specifications to be based on the
Network Controller time zone.
o Select Local Site Time for the time specifications to be based on local
Network Node time zone.
6. To schedule the Start Time, select one of the following:
o Now: The action will start at the current date and time (filled in by
default).
o At: (selected by default) The action will start at the date and time you
enter.
233192 AX4 Linear LLC 17 May 2014
Page 22
Monitoring the System
o In: The action will start once the number of specified hours and minutes
have elapsed.
7. To schedule the End Time, select one of the following:
o At: The action will end at the date and time you enter. Use the format
shown for the Start Time.
o After: The action will end once the number of specified hours and
minutes past the action’s start time have elapsed.
Note: Fields marked with an asterisk (*) are req ui red.
8. In the Comment box, enter information you want to appear in the Scheduled
Events table.
9. When you are finished, click OK to close the Scheduled Events dialog box.
For Example: Select Unlock and set the Start Time to Now. Set the End
Time to After 1:30 (one hour and thirty minutes). Click OK. The portal will
unlock immediately and stay unlocked for one hour and thirty minutes.
Note: You can use the delete button to remove an event or the edit button
to make changes.
To switch a portal to a locked or unlocked state:
1. Locate the portal:
o In the Portal Unlock widget, select one from the drop-down list.
Note: To make it easier to find portals, you can temporarily limit the
number of portals that appear on the list by changing the All Portals
setting to Favorites or Recent. For information on customizing the
Portal Unlock widget, see
Widgets on page 28.
o In the Portal Status widget, locate one in the table.
2. To switch the portal to a locked state, click Lock Portal . The portal
locks immediately.
It will remain in a locked state until it is unlocked again – either manually via
the Unlock Portal button or a double card read, or automatically when any
new scheduled action for this portal becomes active or any portal group time
spec change involving this portal occurs. Once the portal has been returned to
automatic control by a time spec change, any suspended event action defined
for the portal is resumed.
3. To switch the portal to an unlocked state, click Unlock Portal . The
portal unlocks immediately.
The Portal Status and Portal Unlock
It will remain in an unlocked state until it is locked again – either manually
via the Lock Portal button or a double card read, or automatically when any
new scheduled action for this portal becomes active or any portal group time
233192 AX4 Linear LLC 18 May 2014
Page 23

Monitoring the System
spec change involving this portal occurs. Once the portal has been returned to
automatic control by a time spec change, any suspended event action defined
for the portal is resumed.
See also: Using the Monitoring Desktop on page 19
Portal Unlock Widget on page 21
Using the Widget Desktop on page 22
The Portal Status and Portal Unlock Widgets on page 28
Scheduling Actions for Inputs, Outputs, and Portals on page 60
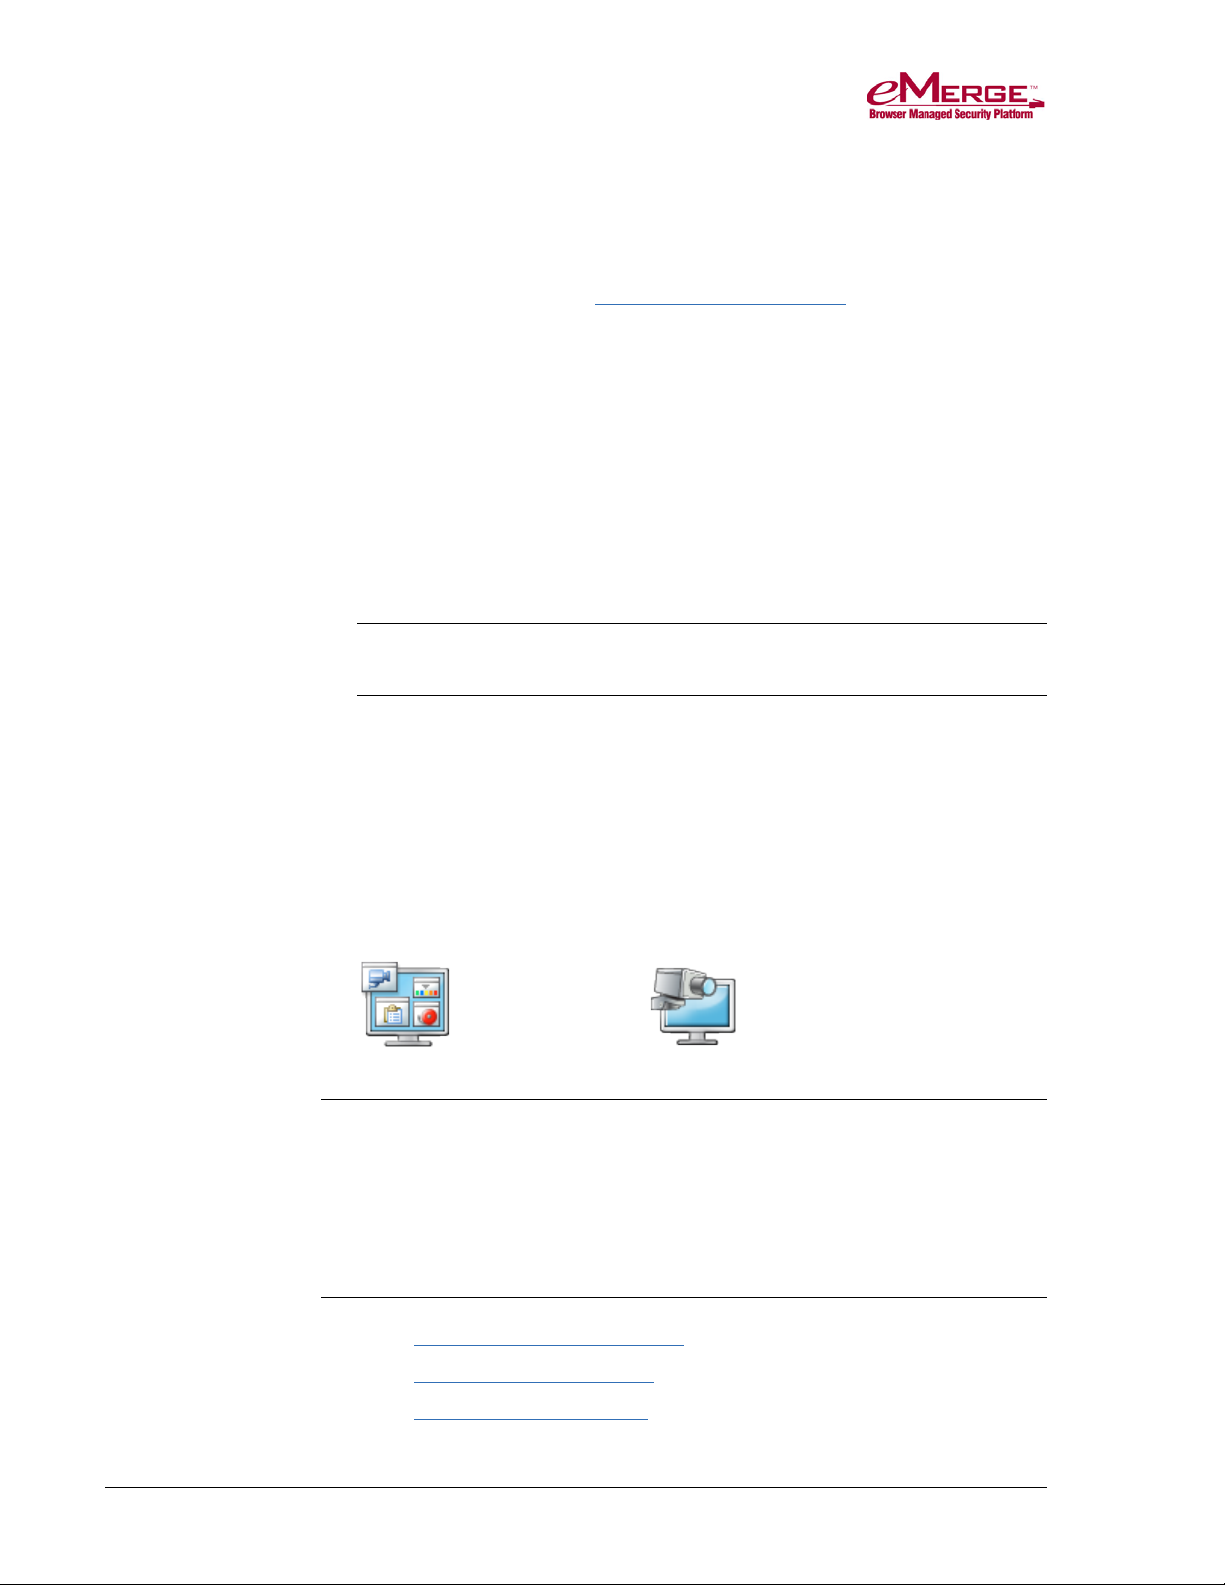
Using the Monitoring Desktop
To open the Monitoring Desktop from the Home page, click the Monitoring
Desktop icon if it appears in the User Tasks widget:
Otherwise, cl ick the live monitoring button in the navigation bar:
Note: If your system is configured to display the Widget Desktop as the default
layout for live monitoring, the Monitoring Desktop icon will appear in
the User Tasks widget.
The Monitoring Desktop provides a fixed display for monitoring the system. It
has tabbed pages for monitoring various system functions, such as the Activity
Log, events, portals, and camera views.
233192 AX4 Linear LLC 19 May 2014
Page 24

Monitoring the System
If a Filter box appears in the upper right corner of a tabbed page, you can narrow
down the data shown on that page by entering text in that box. For the remainder
of the current monitoring session (or until you enter differ en t text or click the
Clear Filter icon), the page will only show data matching the text you entered.
Note: You can also use a custom, real-time display to monitor the system. For
more information see Using the Widget Desktop on page 22.
Events Tab
By default, events are sorted in priority order. You can click the arrow next to the
column title Priority to reverse the sort order. You can also click to the right of
the column titles Date/Time and Name to sort events by those columns.
Events will display as long as they are still active and/or require
acknowledgment.
By clicking buttons that may appear for a particular event, you can perform the
following actions:
Click the video icon in the Name column to view recorded video associated
with this event.
Click the Camera button in the Commands column to display live video for
this event.
Click the Details button and an additional window displays the Operator
long message.
Click the Acknowledge button to acknowledge the event. Otherwise the
event will remain active until the event actions are concluded or the Maximum
Duration counter expires and the event auto-acknowledges.
Click the Clear Actions button to clear any active actions that have been
defined for this event.
Activity Log Tab
The Activity Log displays up to 1,000 of the most recent entries in the log of
system activity.
For more information, see
Cameras Tab
You can select any camera configured in the system for viewing.
Monitoring the Activity Log on page 8.
For more information, see
233192 AX4 Linear LLC 20 May 2014
Monitoring Cameras on page 35.
Page 25

Monitoring the System
Camera Views Tab
You can select any configured four-camera quad view for viewing.
For more information, see
Camera Monitor Tab
The Camera Monitor tab is for use on systems that are not integrated with
NetVR. By adding a camera to this tab, you can desig nate it as the camera
monitor.
The camera monitor can accept camera views and recorded video from other
cameras, and it can be used for event-driven video or event replay. For example,
you can configure a single camera monitor to switch to events as they occur.
To designate a camera as the camera monitor:
You can use the Cameras widget on the right side of the Monitoring Desktop to
select the specific camera to display on the Camera Monitor tab.
1. In the Cameras widget on the right side of the page, point to this icon
above the camera you want to select.
The icon will change to this button: .
2. Click the button to bring the Camera Monitor page forward and display the
selected video stream or image.
Monitoring Multi-Camera Views on page 37.
You can click icons on the Camera Monitor tab to perform the following actions:
Click this to display VCR controls at the bottom of the camera widget. You
can use these VCR controls to review recorded video.
Note: The VCR icon will appear only if you are viewing a video management
(VMS) camera.
Click this to display PTZ controls.
Click this to move the camera to its preset home position.
Click the arrows to move the camera one step in the arrow
direction.
Click this to zoom in.
Click this to zoom out.
Select from this drop-down the speed of camera movement. The slowest
speed is 1; the fastest is 10.
233192 AX4 Linear LLC 21 May 2014
Page 26

Monitoring the System
Note: If the camera does not have these capabilities, or if the home, tilt, pan
and zoom URLs have not been set up, these controls will not appear. If
the video management system (VMS) does not support variable speed
PTZ, the camera speed drop-down will not appear. In addition, the VMS
and other factors determine whether the PTZ buttons toggle rather than
operate with one click to move one step.
Portal Unlock Widget
The Portal Unlock widget is displayed in the upper right corner of the desktop.
You can use it to view the unlock schedule of any portal. You can also perform a
momentary or scheduled unlock of any portal. For more information, see
Viewing Portal Status and Unlocking Portals on page 15.
Cameras Widget
The Cameras widget on the right side of the Monitoring Desktop will, by default,
display the first two cameras in the Camera Menu orde r configured for your
system. You can select any IP or NVR camera defined in the system.
You can use this widget to select the specific camera to display on the Camera
Monitor tab.
For more information, see
Tab on page 21.
Using the Widget Desktop
To open the Widget Desktop from the Home page, click the Widget Desktop icon
if it appears in the User Tasks widget:
Otherwise, click the live monitoring button in the navigation bar:
Note: If your system is configured to display the Monitoring Desktop as the
default layout for live monitoring, the Widget Desktop icon will appear
in the User Tasks widget.
Monitoring Cameras on page 35 and Camera Monitor
The Widget Desktop provides a custom real-time display for monitoring the
system. When you open the Widget Desktop, you see one or more adjustable
233192 AX4 Linear LLC 22 May 2014
Page 27

Monitoring the System
windows, called widgets, arranged in your default layout. Each widget has a
special function, such as displaying system activity, unlocking portals, or
delivering real-time web content from another system (if the Explorer widget is
configured).
Note: Internet Explorer 7 or higher is required for optimal viewing of the
Widget Desktop. Page display problems may occur when the Widget
Desktop is viewed in earlier versions of Internet Explorer.
If the default Widget Desktop layout does not meet your needs, you can select
any other available layout. You can also customize a layout for the current
monitoring session, by adding available widgets and selecting a different
background. You may also be able to change the individual widgets in a layout,
depending on how it was set up. For example, you may be able to:
• Move, size, minimize, and close a widget
. See page 31.
• Change a widget's unique properties. See page 32.
Note: Changes you make to a layout are not saved across monitoring sessions.
Once you close the Widget Desktop, the layout reverts to its original
appearance. Layouts that were created and saved during system Setup are
available for selec tion in the Desktop menu in the lower left corner of the
Widget Desktop. If you need a custom layout, see your security system
administrator for assistance .
To select a Widget Desktop layout:
• If there are no saved layouts, the default layout loads automatically when you
display the Widget Desktop.
• If there are additional layouts saved, the Load Layout dialog box appears.
Select the layout you want from the list. Click OK to continue.
233192 AX4 Linear LLC 23 May 2014
Page 28

Monitoring the System
To select a different layout:
1. Select Load Layout from the Desktop menu in the lower left corner of the
page.
2. In the Load Layout dialog box, select the layout you want, and then click
OK.
3. To return to the default layout at any time, select Default from the Load
Layout dialog box.
To add a widget to the selected layout:
• Click Desktop in the lower left corner of the page to display the Desktop
menu.
• Select the widget you want to add.
To change the Widget Desktop background:
• Right-click anywhere on the background, select a number from the
Background drop-down, and then click OK.
To get Help from the Widget Desktop:
• Click the information icon in the lower right corner of the page.
To switch to Compose mode:
4. If you have setup privileges, click Compose Mode from the Desktop menu in
the lower left corner of the page.
To the right of the Desktop menu, you will now see the word “Compose” and
property sheets for changing the Desktop menu, layout properties, and
default widget properties for the selected layout:
5. Make any changes you want to the current layout, or any available layout,
and then save the layout.
6. When you have finished, select End Compose Mode from the Desktop
menu to return to monitoring mode, or select Exit from the menu to return to
the Main Menu.
To exit the Widget Desktop:
• Select Exit from the Desktop menu in the lower left corner of the page to
return to the Main Menu.
See also: Summary of Available Widg ets on page 25
233192 AX4 Linear LLC 24 May 2014
About Widget Properties on page 30
Page 29

Monitoring the System
Using the Monitoring Desktop on page 19
Summary of Available Widgets
When you load a Widget Desktop layout, the widgets you see will depend on the
way the layout was set up. If an available widget is configured for the layout, but
is not displayed by default, you can add it for the current monitoring session by
selecting it from the Desktop menu in the lower left corner of the page. If a
widget has a close box in the upper right corner, you can click that button to
remove the widget from the layout for the current monitoring session.
Some of the widgets are also available in sta ti c formats on the Monitoring
Desktop, as noted below.
The widgets that may be available for a given Widget Desktop layout include:
• Activity Log: see Monitoring the Activity Log on page 8. Also available on
the Monitoring Desktop.
• Auto-Monitor: see The Auto-Monitor Widget on page 13. Also available on
the Home page.
• Camera View: see the Camera Views Tab on page 21. Also available on the
Monitoring Desktop.
• Clock: see The Clock Widget on page 25.
• Events: see the Events Tab on page 20. Also available on the Monitoring
Desktop.
• Explorer: see The Explorer Widget on page 26.
• Intrusion Panel: see The Intrusion Panel Widget on page 26.
• Portal Status: see Viewing Portal Status and Unlocking Portals on page 15.
• Portal Unlock: see Viewing Portal Status and Unlocking Portals on page 15.
Also available on the Monitoring Desktop.
• Statistics Block: see The Statistics Block Widget on page 29.
• Status: see The Status Widget on page 30.
See also: Using the Widget Desktop on page 22
About Widget Properties on page 30
The Clock Widget
When the Clock widget is displayed on the Widget Desktop, it shows the current
Network Controller time in digital or analog format. If an alarm is set for the
clock, the widget plays the configured sound and displays any configured text
message at the scheduled time.
233192 AX4 Linear LLC 25 May 2014
Page 30

Monitoring the System
If the creator of the Widget Desktop layout has allowed the Clock widget to be
configured, monitors can click this icon in the widget's upper left corner to
change its unique properties:
• Format: Determines whether the clock has an analog or digital display.
• Number Style (Analog): For an analog display, determines the number
style. The choices are arabic numerals, uppercase roman numerals, lowercase
roman numerals, and tick marks.
• Hour Color, Minute Color, and Second Color: Determine the color used to
display hours, minutes, and seconds, respectively. Clicking the box for any of
these properties displays a color wheel for entering RGB values
automatically.
See also: Using the Widget Desktop on page 22
Summary of Available Widgets on page 25
About Widget Properties on page 30
The Explorer Widget
When the Explorer widget is displayed on the Widget Desktop, it acts essentially
as a browser window, delivering content from a web site in real time. For
example, the widget can display content from a corporate web site or a local
weather site.
If the creator of the Widget Desktop layout has allowed the Explorer widget to be
configured, you can click this icon in the widget's upper left corner to change
its unique properties:
• Type: The type of web site displayed in the widget. The choices are: Web,
Secure Web, FTP site, or about (to use an internal URI scheme, such as
about:blank, rather than a URL).
• URL: The URL for the web site displayed in the widget.
• Refresh Time: The interval at which the widget will attempt to reload the
web page. The choices are: Never, 1 minute, 5 minutes, 15 minutes, or 1
hour.
See also:
Using the Widget Desktop on page 22
Summary of Available Widgets on page 25
About Widget Properties on page 30
The Intrusion Panel Widget
When the Intrusion Panel widget is displayed on the Widget Desktop, it lists all
available intrusion panels in the system.
Users monitoring the system can view configuration and status information for
the panels. Adm in is tr ators with full setup pr ivileges can use the widget to:
233192 AX4 Linear LLC 26 May 2014
Page 31

Monitoring the System
(green)
(yellow)
(red)
• Arm and disarm areas associated with a panel.
• Bypass and reset individual zones in an area.
• Activate and deactivate outputs associated with a panel.
To view intrusion panels:
1. If the Intrusion Panel widget is not displayed on the Widget Desktop, select it
from the Desktop menu in the lower left corner of the page.
The widget displays a button for each available intrusion panel. The button
indicates how many of the areas associated with the panel are currently
armed. It also displays the following icons, which change color to indicate
the current connection, AC power, battery, and tamper status for the panel.
Icon name
Connection Status
AC Power Status
Battery Status
Tamper Status
2. Click the button for a panel to open the Panel Detail widget.
This widget displays more detailed status information for the widget and
includes options system administrators can use to control the widget, by
arming and disarming its areas, bypassing and resetting its zones, and
enabling and disabling its outputs.
Note: Unlike other widgets, the Panel Detail widget cannot be accessed from
the Desktop menu. To add it to the Widget Desktop, you must click the
button for one of the intrusion panels listed on the Intrusion Panel
widget.
Normal State
Intermediary State
Trouble State
To arm or disarm an area associated with an intrusion panel:
1. In the Intrusion Panel widget, click the button for the intrusion panel.
2. In the Panel Detail widget that appears, click the button for the area you want
to change.
3. Click the Arm or Disarm button.
Once the change takes effect on the panel, the button toggles to its opposite
state, indicating that the area is now armed or disarmed. This may take a few
minutes.
To bypass a zone associated with an intrusion panel:
1. In the Intrusion Panel widget, click the button for the intrusion panel.
233192 AX4 Linear LLC 27 May 2014
Page 32

Monitoring the System
2. In the Panel Detail widget that appears, click the area whose zone you want
to change.
3. Click the Bypass or Reset button for the zone.
Once the change takes effect on the panel, the button toggles to its opposite
state, indicating that the zone is now bypassed or reset. This may take a few
minutes.
To activate or deactivate an output associated with an intrusion
panel:
1. In the Intrusion Panel widget, click the button for the intrusion panel.
2. In the Panel Detail widget that appears, click the output you want to change.
3. Click the Activate or Deactivate button for the output.
Once the change takes effect on the panel, the button toggles to its opposite state,
indicating that the output is now activated or deactivated. This may take a few
minutes.
See also:
Using the Widget Desktop on page 22
Summary of Available Widg ets on page 25
About Widget Properties on page 30
The Portal Status and Portal Unlock Widgets
When the Portal Status and Portal Unlock widgets are displayed on the Widget
Desktop, you can use them to view portal status, unlock portals momentarily, and
schedule lock and unlock events for portals.
Note: The Portal Status and Portal Unlock widgets are available for display on
the Widget Desktop, but will only show portals if at least one or more is
defined in the system.
To lock or unlock a portal, you can use either the Portal Status or Portal Unlock
widget:
• In the Portal Unlock widget, all portals are available from a drop-down list.
To make it easier to find portals, you can temporarily limit the number of
portals that appear on the list by changing the All Portals setting to
Favorites or Recent.
• In the Portal Status widget, available portals are listed in a table. For each
portal, the table displays the portal's location and its current status. The
Action column displays buttons for performing momentary and scheduled
unlocks of the portal. The Schedule column lists the lock and unlock actions
currently scheduled for the portal.
233192 AX4 Linear LLC 28 May 2014
Page 33

Monitoring the System
To customize the Portal Unlock widget:
1. To limit the number of portals displayed on the portal selection drop-down,
do either of the following:
o Select Favorites from the leftmost drop-down to display only the portals
on the Favorites list.
o Select Recent from the leftmost drop-down to display only the portals
you have selected most recently.
Your changes will remain in effect until you change the selection from the
drop-down list, or close the widget or the selected lay out.
2. To modify the Favorites list, select a portal and do either of the following:
o Click this icon to add the portal to the Favorites list.
o Click this icon to remove the portal from the Favorites list.
Your additions or deletions remain in effect until the Favorites list is
modified again.
See also:
Monitoring the Activity Log on page 8
Using the Widget Desktop on page 22
Summary of Available Widg ets on page 25
About Widget Properties on page 30
The Statistics Block Widget
When the Statistics Block widget is displayed on the Widget Desktop, monitors
can use it to view various system information. For example, they can view
statistics on unacknowledged alarms and devices in communication failure.
If the creator of the Widget Desktop layout has set up the Statistics Block widget
to be configurable, you can click this icon in the widget's upper left corner to
specify which of the following are displayed in the widget:
• Local Time: The current Network Controller time.
• System Uptime: How long the system has been powered up.
• User: The current monitor's user name.
• Logged In: The time the current monitor logged in.
• Unacknowledged Alarms: How many of the active alarms are
unacknowledged. For example, “1/5” means that one out of five alarms
requires acknowledgement; the rest go away automatically when the
underlying condition is fixed.
• Devices in Communication Failure: How many of the configured devices
are currently in communication failure. For example, 2/9 means that two out
of nine devices are in communication failure.
See also: Using the Widget Desktop on page 22
233192 AX4 Linear LLC 29 May 2014
Page 34

Monitoring the System
Summary of Available Widg ets on page 25
About Widget Properties on page 30
The Status Widget
When the Status widget is displayed on the Widget Desktop, monitors can use it
to view the status of all configured nodes and system resources. This information
is presented in an expandable, hierarchical format.
Within the hierarchy, the icons displayed for a given resource and its node
change depending on the current status of the reso urc e. For example, when a
blade needs attention, its icon and the icon for its node change from green balls to
yellow triangles. If the blade fails, the icons change to red triangles.
If the creator of the Widget Desktop layout has set up the Status widget to be
configurable, you can click this icon in the widget's upper left corner to
specify the style it uses to display status information. The available Style settings
are:
• Node | Portal/Alarm Panel | Resources: With this setting, the widget
display is based on each node's logical resources, such as its portals and their
configured resources.
• Node | Blade | Resources: With this setting, the widget display is based on
each node's physical resources, such its blades and their configured
resources.
See also: Using the Widget Desktop on page 22
Summary of Available Widg ets on page 25
About Widget Properties on page 30
About Widget Properties
When you load a Widget Desktop layout, the initial attributes of its widgets, and
the extent to which you can change these attributes for the current monitoring
session, will depend on how the layout creator set the widget properties.
Widget properties fall into the following categories:
• Common properties are shared by all widgets. By configuring these
properties for a widget, a layout creator determines whether the widget will
appear on the Widget Desktop when the layout is loaded; the initial position,
size, and state (either open or minimized) of the widget; and whether users
will be able to mov e, size, minimize, and close the widget for individual
monitoring sessions.
For information on changing a widget's common properties for a monitoring
session, see
• Filtering properties are available for many widgets. After enabling filtering
for a widget, a layout creator can apply filters to the widget to narrow down
Moving, Sizing, Minimizing, and Closing Widgets on page 31.
233192 AX4 Linear LLC 30 May 2014
Page 35

Monitoring the System
the data it displays in the current layout. The layout creator can also
determine whether users will be able to apply their own filters to the widget.
For information on changing a widget's filtering properties for a monitoring
session, see
Changing a Widget's Filtering Properties on page 33.
• Unique properties are particular to a given widget. Like the other widget
properties, a layout creator can spec ify whethe r user s w ill be able to change
these properties for individual monitoring sessions.
For information on changing a widget's unique properties for a monitoring
session, see
See also: Using the Monitoring Desktop on page 19
Changing a Widget's Unique Properties on page 32.
The Auto-Monitor Widget on page 13
Moving, Sizing, Minimizing, and Closing Widgets
Depending on how a Widget Desktop layout was set up, you may be able to
customize it by moving, sizing, minimizing, and closing its individual widgets.
The extent to which you can modify a particular widget will depend on how the
layout creator set its properties. For example, you might be able to move and size
a particular widget, but not minimize or close it. Some widgets specify a
minimum size; some specify a fixed aspect ratio that adjusts the other dimension
as you change the width or height.
Note: Changes you make to a layout are not saved across monitoring sessions.
Once you close the Widget Desktop, the layout reverts to its original
appearance.
To move, size, minimize, or close a widget:
1. For each widget you want to change, complete any of the steps that follow.
2. If the move icon appears when you hover over the widget's title bar, drag
the title bar to move the widget to a new location.
3. If sizing handles appear in each corner of the widget, drag any edge or corner
of the widget to change its size.
4. If the minimize button appears in the upper right corner of the widget,
click the button to minimize the widget to a button on the desktop tray.
5. If the close button appears in the upper right corner of the widget, click
the button to remove the widget from the layout.
233192 AX4 Linear LLC 31 May 2014
Page 36

Monitoring the System
Note: If the properties button appears in the upper left corner of the widget,
you can click it to change various properties of the widget for the current
monitoring session.
6. Once you have finished using the selected layout, you can close it by
displaying a different layout, exiting the Widget Desktop page, or logging
off from the system. The modified layout reverts to its original appearance.
Note: If a grid is displayed on the desktop background, widgets will
automatically align to the nearest intersection of lines in the grid
whenever you move or resize them.
See also: Summary of Available Widgets on page 25
About Widget Properties on page 30
Using the Widget Desktop on page 22
Using the Monitoring Desktop on page 19
Changing a Widget's Unique Properties
Unique widget properties are particular to a given widget. Depending on how a
Widget Desktop layout was set up, you might be able to change the unique
properties of individual widgets for the current monitoring session.
To change a widget's unique properties:
1. Click the properties button in the upper left corner of any of the following
widgets:
o Auto-Monitor
o Camera View
o Clock
o Explorer
o Statistics Block
o Status
Note: If the properties button does not appear on a widget, you cannot
change its properties.
2. After changing the properties you want, click OK.
See also Moving, Sizing, Minimizing, and Closing Widgets on page 31
233192 AX4 Linear LLC 32 May 2014
Changing a Widget's Filtering Properties on page 33
Using the Widget Desktop on page 22
Summary of Available Widg ets on page 25
Page 37

Monitoring the System
Changing a Widget's Filtering Properties
Depending on how the creator of a Widget Desktop layout configured a widget,
you might be able to change its filtering properties to make it display only
specific types of data and/or only data matching specific text.
For information on which widgets have filtering properties you might be able to
change, see
To change a widget's filtering properties:
1. Click the properties button in the upper left corner of the widget to open
its Properties dialog box.
Note: If the properties button does not appear on a widget, you cannot
2. For any filter that is available for the widget, use the right-arrow button to
move the criteria you want from the Available list to t he Selected list.
Summary of Available Filtering Properties on page 34.
change its properties.
3. In the Filter box, enter any text you want to further narrow down the data.
4. Click OK.
For the current monitoring session, the widget will display data only
information matching the criteria and/or text you specified.
If you specified a text filter, the text you entered will appear in the Filter box
on the widget's title bar, as shown below.
You can apply a different text filter by entering new text, and you can clear
the text filter by clicking the Clear Filte r icon .
See also: Moving, Sizing, Minimizing, and Closing Widgets on page 31
Changing a Widget's Unique Properties on page 32
Summary of Available Widg ets on page 25
Using the Widget Desktop on page 22
Using the Monitoring Desktop on page 19
233192 AX4 Linear LLC 33 May 2014
Page 38

Monitoring the System
Summary of Available Filtering Properties
The following table shows the widgets that have filtering properties you might be
able to change for a monitoring session, depending on how the creator of the
Widget Desktop layout configured them. For each widget that can display filtered
data, the table lists the filters that might be available for narrowing down the
data.
Widget Available Filters
Log entry type
Activity Log
Reader group
Text
Camera View
Events
Portal Status / Portal Unlock Text
View type
Text
Priority filtering level
Priority filtering method
Text
See also: About Widget Properties on page 30
Changing a Widget's Filtering Properties on page 33
Moving, Sizing, Minimizing, and Closing Widgets on page 31
Changing a Widget's Unique Properties on page 32
Summary of Available Widg ets on page 25
Using the Widget Desktop on page 22
233192 AX4 Linear LLC 34 May 2014
Page 39

Monitoring the System
Monitor Menu Page
The Monitor menu page contains links for viewing cameras and accessing live
monitoring options.
This section describes how to access these monitoring functions:
• View individual cameras
• View pre-defined groups of cameras
• View system information using the Monitoring Desktop or the custom, real-
time display on the Widget Desktop
From the Monitoring Desktop, click the word Monitor in the navigation menu to
access this menu page.
Monitoring Cameras
Click on the word Cameras to access the Cameras menu page.
On the Cameras menu page you can select and aim a camera for viewing. You
can select IP cameras or NVR cameras.
To monitor a live camera view:
Select any camera in the system from the Cameras menu.
233192 AX4 Linear LLC 35 May 2014
Page 40

Monitoring the System
The controls at the bottom of the camera widget allow you to aim cameras, move
them to their home position, and zoom in or out if pan, tilt, and zoom URLs have
been set up for your system.
Icons at the bottom of the camera widget allow you to perform the following
actions:
Click this to display VCR controls at the bottom of the camera
widget. You can use these VCR controls to review recorded video.
Note: The VCR icon will appear only if you are viewing a video
management (VMS) camera.
Click this to display PTZ controls.
Click this to move the camera to its preset home position.
Click an arrow to move the camera one step in that
direction.
Click this to zoom in.
Click this to zoom out.
Select from this drop-down the speed of camera movement. The
slowest speed is 1; the fastest is 10.
233192 AX4 Linear LLC 36 May 2014
Page 41

Monitoring the System
Note: If the camera does not have these capabilities, or if the home, tilt,
pan and zoom URLs have not been set up, these controls will not
appear. If the video management system (VMS) does not support
variable speed PTZ, the camera speed drop-down will not appear. In
addition, the VMS and other factors determine whether the PTZ
buttons toggle rather than operate with one click to move one step.
See also: Using the Monitoring Desktop on page 19
Using the Widget Desktop on page 22
Monitoring Multi-Camera Views
Click on the words Camera Views to access the Camera Views menu page.
Select any pre-defined group of cameras from the Camera Views menu to
monitor a quad view, which displays up to four cameras in one widget.
To move any camera in a multi-camera view:
1. Click anywhere in the title bar above the pane displaying the camera view
you want to adjust. The selected pane is highlighted.
2. Click this icon to display the Camera Preset drop-down list.
From the Camera Preset drop-down list, select the preset position you want
to see displayed. (This drop-down list automatically fills with the presets of
the selected camera.)
233192 AX4 Linear LLC 37 May 2014
Page 42

Monitoring the System
Click this to display VCR controls at the bottom of the camera
widget. You can use these VCR controls to review recorded video.
Note: The VCR icon will appear only if you are viewing a video
management (VMS) camera.
Click this to display PTZ controls.
Click this to move the camera to its preset home position.
Click an arrow to move the camera one step in that
direction.
Click this to zoom in.
Click this to zoom out.
Select from this drop-down the speed of camera movement. The
slowest speed is 1; the fastest is 10.
Note: If the camera does not have these capabilities, or if the home, tilt,
pan and zoom URLs have not been set up, these controls will not
appear. If the video management system (VMS) does not support
variable speed PTZ, the camera speed drop-down will not appear. In
addition, the VMS and other factors determine whether the PTZ
buttons toggle rather than operate with one click to move one step.
Tip: If you are using Internet Explorer and a monitor that is too small to
display all camera views, increasing the size of the widget and then
using its scroll bars may cause the display to begin flashing. If this
happens, press F11 on the keyboard.
See also: Using the Monitoring Desktop on page 19
Using the Widget Desktop on page 22
233192 AX4 Linear LLC 38 May 2014
Page 43

Administering the System
The Administration menu page provides access to all administratio n ta s k s.
This section describes how to access and use these functions:
• Maintaining information about people in the system, their access privileges
and history
• Performing database backups
• Arming and disarming alarm panels
• Determining the owner of a lost credential
• Creating reports of system configuration, activity history, and user data
• Scheduling actions for activating/deactivating outputs, disarming inputs, or
locking/unlocking portals
Administration Menu Page
Click:
The Administration menu page provides links for the most common tasks and for
all administration tasks.
233192 AX4 Linear LLC 39 May 2014
Page 44

Adminstering the System
Arming and Disarming Alarm Panels
Select Administration : Arm Alarm Panel.
On this page you can arm or disarm an alarm panel.
To arm or disarm an alarm panel:
1. The Arm Alarm Panel displays a table listing all alarm panels configured in
the system, their current state, and any activity information.
2. Click the Arm/Disarm link in the Action column.
Note: You cannot arm a panel if it shows any zone activity.
3. When prompted, confirm the requested action.
4. If you are arming the panel, the Panel arming warning output activates for
the Warning duration set for this panel.
233192 AX4 Linear LLC 40 May 2014
Page 45

Administering the System
Handling Lost Credentials
Select Administration : Lost Cards.
If a credential is found and turned in, you can determine the identity of the
cardholder.
To handle a lost credential:
1. In the Hot stamp # text box, enter the number on the credential and click the
Search button.
2. If there is no number printed on the credential, click the Use Reader link and
a small reader window will appear.
3. Select a reader from the Reader drop-down list and swipe the credential
through that reader. The credential number will fill the Hot stamp # text box.
4. Click the Search button.
See also:
Adding People to the System on page 43
233192 AX4 Linear LLC 41 May 2014
Page 46

Adminstering the System
Handling Missing Credentials
Handling credentials that have been forgotten or temporarily lost can be a timeconsuming and error-prone process. To address this problem, the system provides
an automated procedure for quickly and accurately issuing, extending, and
returning temporary credentials. This procedure, which is available in person
records when the Enable temporary credential workflow check box is selected
on the Network Controller page, lets you:
• Issue a temporary credential.
• Extend the expiration period for a temporary credential (if your system's
Temporary Credential policy allows extensions).
• Return a temporary credential.
Note: Credential status settings applied during the temporary credentials
procedure can be used to create a Credential Audit report showing the
current state of missing and temporary credentials.
To issue a temporary credential:
1. After verifying the identity of the person reporting a lost or forgotten
credential, locate and open his or her person record.
2. Select the Access Control tab.
3. Click Issue Temporary Credential.
4. If an enrollment reader is not defined for your system, select a reader from
the drop-down list and click Go.
5. Present the temporary credent ial to the enrollm ent rea der.
The temporary credential is added to the credentials list. All other credentials
in the list might become disabled, if this is stipulated by your system's
Temporary Credential policy. Attempting to use such a credential will result
in an "Access denied" Activity Log entry with the reason code: Missing
[DISABLED].
Note: A person can have only one active temporary credential at a time. Each
time an additional temporary credential is issued to a person, the
previously issued temporary credential is disabled and its status changes
from Temporary to Temporary (Disabled).
To extend the expiration period for a temporary credential:
1. Click Extend Temporary Credential.
This button will appear only if your system's Temporary Credentials policy
allows extensions.
2. If an enrollment reader is not defined for your system, select a reader from
the drop-down list and click Go.
3. Present the temporary credent ial to the reader.
233192 AX4 Linear LLC 42 May 2014
Page 47

Administering the System
The new expiration period will be the same as if you had issued a new
temporary credential. It will extend past the current date for the number of
days specified in your system's Temporary Credential policy. Once the
credential expires, its status will change from Temporary to Temporary
(Expired).
To return a temporary credential:
1. Click Return Tempo rary C redent ial .
2. If an enrollment reader is not defined for your system, select a reader from
the drop-down list and click Go.
3. Present the temporary credent ial to the reader.
The credential is deleted from the system.
Note: If the person's missing credentials are currently disabled, and a read
is not required to reactivate them (according to your system's
Temporary Credentials policy), their status is changed from Missing
to Active. If a read is required, you will need to reactivate each
credential manually by clicking Reactivate Missing Credential and
presenting the credential to the enrollment (or a selected) reader.
If the person was issued multiple temporary credentials, the missing
credentials will not be reactivated until all temporary credentials have been
returned.
See also:
Changing Personal Information on page 45
The Personal Information Page on page 47
Adding People to the System on page 43
Adding People to the System
Select Administ r at io n : Pe o ple : Add .
A person must first be added to the system before you can issue a credential or
assign an access level.
233192 AX4 Linear LLC 43 May 2014
Page 48
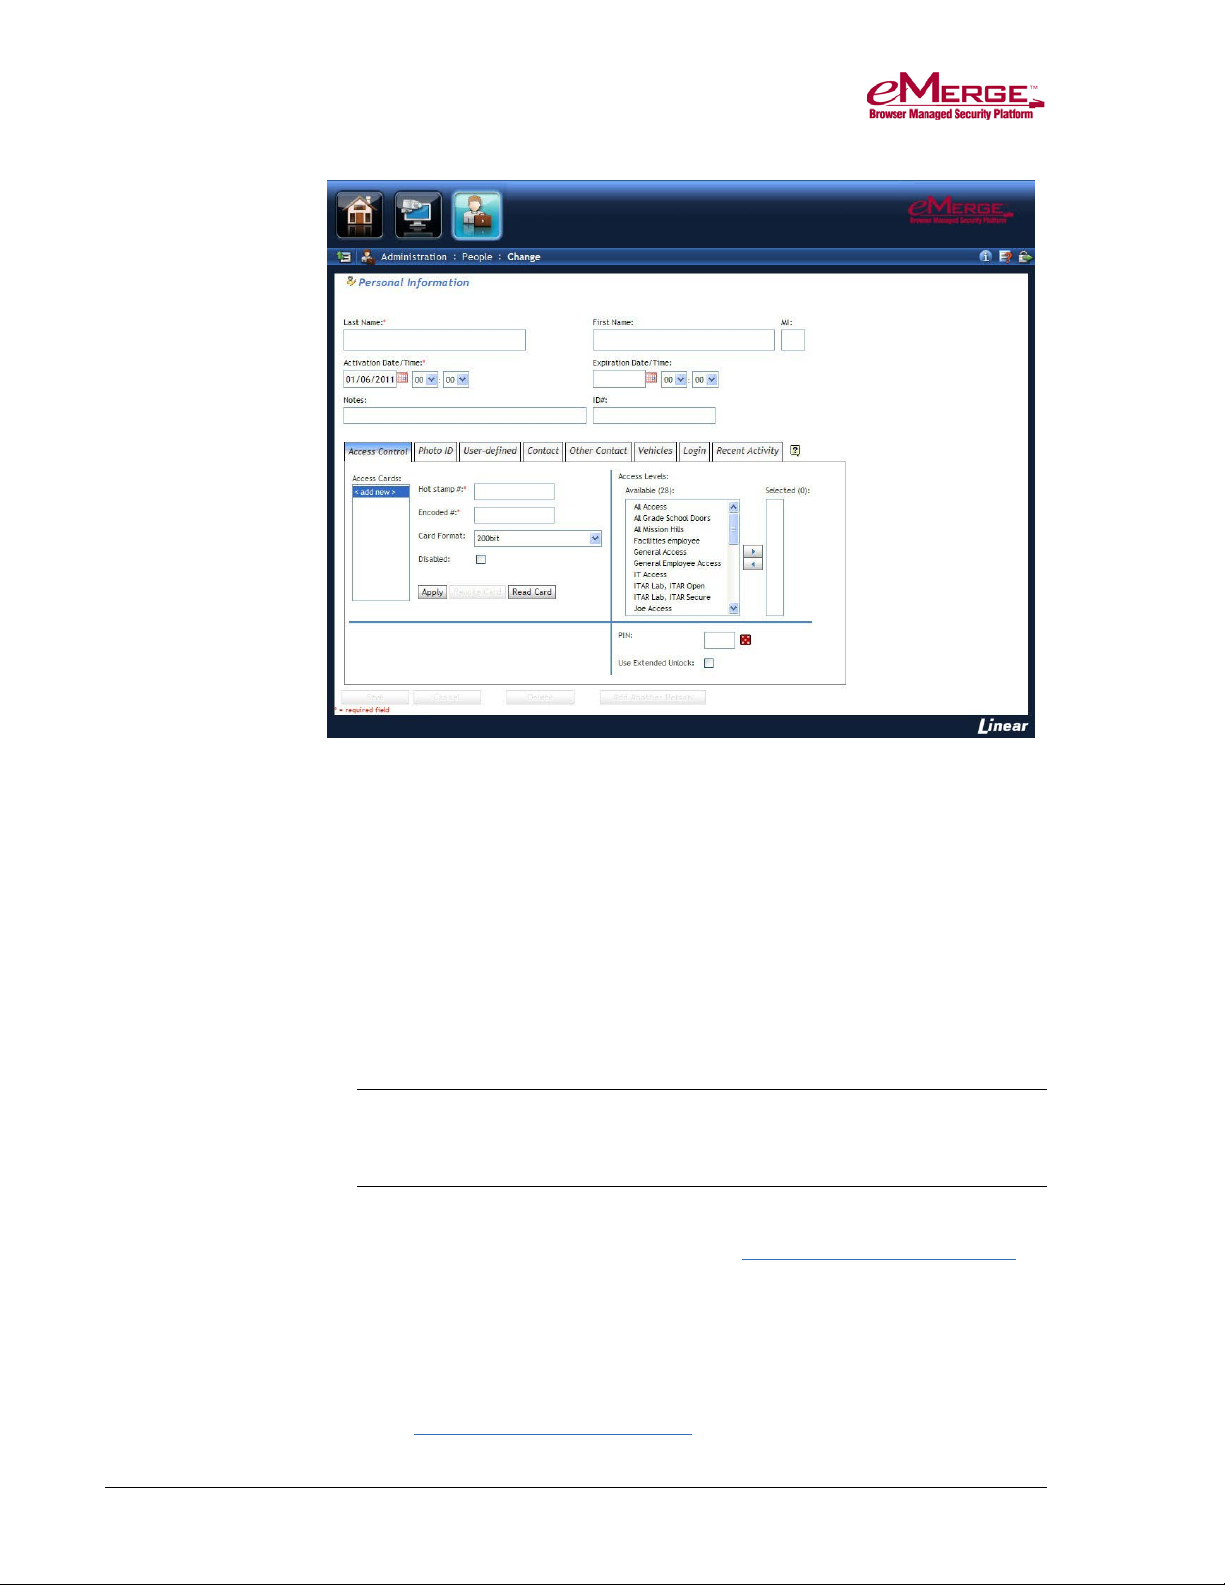
Adminstering the System
To add a person:
1. Select Administ r at io n : Pe o ple : Add .
The Personal Information page appears and displays a blank person record.
2. The Last Name and Activation Date/Time f ie lds are requ ired en tri es.
Clicking the calendar icon displays a calendar you can use to select the
activation date.
3. Enter an Expiration Date/Time if you want the person's access to expire
automatically at a particular date and time.
4. If your organization issues ID numbers, enter the person's ID number in the
ID# text box.
Note: Although the ID# is not required, supplying a unique Person ID for
each person record allows the records to be reliably retrieved,
modified, and deleted.
5. Review the information on the tabs, and make any needed changes and
additions. For information on each tab, see
page 47.
The Personal Information Page on
6. Click Save.
7. To add another person to the system, click the Add Another Person button.
See also:
233192 AX4 Linear LLC 44 May 2014
Changing Personal Information on page 45
Page 49

Administering the System
The Personal Information Page on page 47
Changing Personal Information
Select Administration : People : Change/Delete.
You can locate a person in the system and change his or her personal
information.
To search for and change a particular person's record:
1. Select Administration : People : Change/Delete.
2. To specify your search criteria, you can use any of the available fields.
o A field marked with an asterisk will find complete, exact matches only.
For example, if you enter an ID# of 123 and the person's ID# is 1234, the
person's record will not be found.
o A field not marked with an asterisk can find partial matches. For
example, if you enter the first letter of the person's Last Name, a list of
all people whose last names begin with that letter will be displayed.
o For a person record to be found, it must match the entries in all fields.
For example, if you enter the first letter of the person's Last Name and a
Department name, a list of all people whose last names begin with that
letter AND whose department name also matches, will be displayed.
3. Use the Expiration date before and Expiration date after fields to find
people whose person records have expiration dates before or after a specific
date.
233192 AX4 Linear LLC 45 May 2014
Page 50

Adminstering the System
4. To include particular types of records in the search resu lts, selec t the check
box for any of the following records:
o Include deleted records: Records that have been deleted from the
system will be included. This check box is selected by default.
o Include expired records: Records that have expired will be included.
o Include only records with non-unique person IDs: Only records with
non-unique person IDs will be included. This is useful for finding and
fixing non-unique person IDs prior to enabling the Enforce unique
person IDs option on the Network Controller page.
o Include only records that exceed max active credentials: Records that
exceed the maximum number of active credentials a person should have
per partition (as set on the Network Controller page) will be included.
o Include only records for traced persons: Only records for people
whose activity is being traced will be included. The Trace this person
check box is selected in the person record of such individuals.
5. Click the Search button.
6. If only one person record matches your search criteria, the Personal
Information page for that person appears. If multiple person records match
your criteria, a list of the matching records appears. Click the name of the
person whose record you want to edit.
7. Review the information on the tabs and make any needed changes and
additions.
8. Click Save.
To search for a person's record by scanning a credential:
1. Click the Search by Credential Scan button at the bottom of the page.
2. If an enrollment reader is not defined for your system, select a reader from
the drop-down list and click Go.
3. Scan the credential.
4. If the 90 second timeout period expires before you are able to complete the
scan, click Go to restart the timer.
5. (optional) Before the timeout period expires, click Stop to stop the timer,
then click Go to restart it when you are ready.
In the list of matching person records, click a name to open the person’s
record. If only one record has a matching hot stamp number, that record
opens automatically.
6. Make any needed changes to the person record.
See also:
People Reports on page 58
233192 AX4 Linear LLC 46 May 2014
Adding People to the System on page 43
The Personal Information Page 47
Page 51

Administering the System
Changing a Person's Access on page 50
The Personal Information Page
Select Administ r at io n : Pe o ple : Add .
On this page you can:
• Add or change personal information associated with a person’s record. For
example, you can change the person's access levels, photo, contact
information, and login information.
• Delete or undelete a person's record. Note that deleting a person's record does
not remove it from the system; it only removes it from the active roster.
When you view a deleted record, the Delete action button changes to
Undelete.
Basic Information Section
1. The Last Name and Activation Date/Time f ie lds are requ ired en tri es.
Clicking the calendar icon displays a calendar you can use to select the
activation date.
2. Enter an Expiration Date/Time if you want the person's access to expire
automatically at a particular date and time.
Note: It is possible for the activation date to be more recent than the
expiration date. This can happen, for example, when you re-activate
a person's record after it has expired. The most recently entered date
takes precedence. Even though such a person record will be active, it
is recommended that the old expiration date be deleted.
3. If your organization issues ID numbers, enter the person's ID number in the
ID# text box.
Note: Although the ID# is not required, supplying a unique Person ID for
each person record allows the records to be reliably retrieved,
modified, and deleted.
4. Modify information on any of the tabs, which are described below.
5. Click Save when you have finished making changes.
233192 AX4 Linear LLC 47 May 2014
Page 52

Adminstering the System
Note: The read-only Last Modified Data & Time and Last Modified
User fields, which are updated whenever a user modifies the
person’s data, show the current date and time and the user name used
to log into the current session, respectively.
For information about who last modified a person record and when, see the readonly fields Last Modified Date & Time and Last Modified User at the bottom
of this section.
Personal Information Tabs
You can also modify information on the tabs, shown below:
Note: Depending on how the person record is configured for your system, you
may see fewer tabs than are described here. In addition, the User-defined
tab may have been given a unique name and custom data fields.
Access Control Tab
On this tab you can assign a PIN; assign an extended unlock period; issue,
revoke, and temporarily disable credentials; trace a person’s usage, and assign
and remove access levels. For more information, see
on page 49.
Photo ID Tab
On this tab you can upload, save, and delete photo ID images.
Note: Each photo ID image must be assigned a unique filename, must end with
the extension .jpeg or .jpg, and must be no larger than 80KB.
User-defined Tab
There are 20 fields you can customize and use for data you need to capture for
people in your system.
Changing a Person’s Access
233192 AX4 Linear LLC 48 May 2014
Page 53

Administering the System
Contact Tab
The information on this tab is optional. It is intended only for reference by the
eMerge user.
Other Contact Tab
The information on this tab is optional. It is intended only for reference by the
eMerge user.
Vehicles Tab
The information on this tab is optional:
• The License# field is for the state-issued license plate number.
• The Tag# field is for the company-issued parking permit number.
Note: The Tag # field can be used to search for a person record. If your
organization does not issue parking tag numbers, you can use the
License# field to determine who owns a particular vehicle.
Login Tab
A user name and password are entered here only if the person is a eMerge user.
To enter login information for a user:
1. Enter a User Name.
2. Have the user enter his or her password in both the Password and Re-enter
password fields.
o Rules for passwords can be customized during system setup, specifying
Note: More details about the customized password requirements can be
o Passwords should be changed periodically.
o Do not use passwords that can be easily guessed, such as names of
3. Select the appropriate user role for this person from the User Role dropdown.
4. Select a default Widget Desktop layout for this person from the Default
Widget Desktop drop-down. This is the layo ut th a t wi ll ap pear automatica l ly
when the person opens the Widget Desktop after logging into the system.
minimum password length and/or whether the password must contain a
combination of letters, numbers, and special characters.
found in “Changing Your Password” in Help.
fami ly members or birth dates.
5. Click Save.
233192 AX4 Linear LLC 49 May 2014
Page 54

Adminstering the System
There are three default user roles for eMerge system users. From lowest to
highest they are:
• Monitor – Users with this role can use all available Monitor functions.
• Administrator – Users with this role can use all available Monitor and
Administration functions.
• System setup – Users with this role (typically yo ur dea ler or in s tal le r) can
use all available Monitor, Administration, and Setup functions.
See also:
Adding People to the System on page 43
Changing Personal Information on page 45
Changing a Person's Access
Select Administration : People, enter a name, and click Search to display the
person's Personal Information Page.
On the Access Control tab you can:
• Issue a new access card using a reader or using a keyboard entry.
• Revoke a credential.
• Temporarily disable a credential.
• Assign and remove access levels.
• Trace a person’s usage.
• Assign a PIN
• Assign an extended unlock period.
Note: Access levels are assigned to people, not to credentials. All credentials
issued to a particular person will have the same access levels as the
person. Each person in the system is limited to a maximum of 32 access
levels.
Note: If the Hot Stamp and encoded numbers default identical check box is
selected (Setup : Access Control : Card/Keypad Formats), whenever
you enroll a credential using a reader or manually enter a number in the
Hot Stamp # field, the system populates both Hot Stamp # and
Encoded # fields with the same value.
233192 AX4 Linear LLC 50 May 2014
Page 55

Administering the System
To issue a new credential using a reader:
1. On the Access Control tab, click the Add New Credential button.
2. Enter the hot stamp number printed on the card into the Hot stamp # box.
3. Select the credential type that is being issued from the Credential Format
drop-down list.
4. Click Read.
5. In the Issue Credential Using Reader dialog, check to make sure the
enrollment reader you are using is selected in the drop-down, then click Go.
6. Swipe or pass the credential by the reader. The encoded number appears in
the Encoded # box.
Note: If auto-incrementing of encoded credential numbers is enabled for
your system (under Misc. Information on the Network Controller
page), the value that appears in the Encoded # field will be one
number above the highest value for any encoded number in the
database.
7. Click Save.
To issue a new credential using keyboard entry:
1. On the Access Control tab, click the Add New Credential button.
2. Enter the hot stamp number printed on the credential into the Hot stamp #
box.
Note: If auto-incrementing of encoded credential numbers is enabled for
your system (under Misc. Information on the Network Controller
page), the value that appears in the Encoded # field will be one
number above the highest value for any encoded number in the
database.
3. Enter the encoded credential number into the Encoded # field.
4. Select the credential type that is being issued from the Credential Format
drop-down.
5. Click Save.
To revoke an existing credential:
1. In the list of credentials on the Access Control tab, locate the credential you
want to revoke.
2. Click the Revoke credential icon for that credential.
3. Click Yes in the Revoke Credential confirmation dialog.
The credential is immediately removed from the system and ceases to function.
233192 AX4 Linear LLC 51 May 2014
Page 56

Adminstering the System
Note: Revoking a credential is not temporary. In this respect it differs from
disabling a credential. For a revoked credential to function again, you
will have to use one of the procedures for
issuing a new credential.
To disable a credential:
1. In the list of credentials on the Access Control tab, select the credential you
want to disable.
2. On the Status drop-down list, select Disabled.
3. Click Save.
The credential will not function until its status is changed back to Active.
Note: You should consider disabling the credential of a person whose
credential has been forgotten, lost, or stolen and to whom you are issuing
a temporary credential. If the disabled credential is found, you can select
it and change its status back to Active.
To assign, edit, and remove access levels:
1. In the Access Levels section of the Access Control tab, select each access
level you want to assign from the Available box, then click the right arrow
button to move it to the Selected table.
Use SHIFT-click to select mu ltiple access levels at once.
2. To set an expiration date for an access level, do all of the following:
o Double-click anywhere in its row and select a date from the calendar that
appears.
o To have the system automatically remove the access level once it
expires, select Yes from the Auto-remove drop-down list.
o Press ENTER to confirm the changes, or press ESC to cancel them.
3. To remove an access level from the person record, select it and click the left
arrow button to move it back to the Available list.
4. Click Save.
Note: Access levels are assigned to people, not to c reden t ials (such as access
cards). All credentials issued to a particular person will have the same
access levels as the person. Each person in the system is limited to a
maximum of 32 access levels.
To trace a person's activity:
1. To trace this person's activity in the current partition, select the Trace thi s
person check box.
2. Click Save.
Whenever this person makes a valid or invalid access attempt in the current
partition, a message will appear in the Activity Log. The message text will be
233192 AX4 Linear LLC 52 May 2014
Page 57

Administering the System
displayed in bold, and in the color selected for Tr ace person log color on the
Network Controller page.
If an event is selected for Trace person event on the Network Controller page,
the event will be triggered whenever this person makes a valid or invalid access
attempt in the current partition. These event activations will be logged in the
Activity Log and you can report on them by setting a Trace people filter for a
custom history report.
To assign a PIN:
1. In the PIN text box in the lower right corner of the Access Control tab, enter
a four- to six-digit PIN.
Note: Most Wiegand keypads support four digit PINs. Bit-burst keypads
support PINs of any length.
2. Alternatively, click this icon next to the text box to en ter a n au tomatically
generated PIN containing the number of digits specified for Auto-generated
PIN digits on the Network Controller page (Setup : Site Settings : Network
Controller).
3. Click Save.
To assign a Duress PIN:
1. After assigning a PIN, select the Assign dures s PIN check box.
2. Click Save.
The duress PIN is the cardholder's assigned PIN code, with the last digit
increased by 1. For example, if the assigned PIN is 127643, the duress PIN
will be 127644
.
If the cardholder's credentials are presented at a portal to which he or she has
valid access, followed by the duress PIN, an Activity Log message will
indicate that a duress entry has occurred. For any event whose trigger is a
duress entry, the event actions will become active.
Note: To include information on duress accesses in a custom History report,
administrators can select the system event Duress access completed on
the Events tab when entering filter criteria for the report.
To assign an extended unlock period:
1. If this person requires extra time to get through a door (because of a
disability, for example), select the Use Extended Unlock check box.
Whenever this person accesses a portal, it will remain unlocked for the
number of seconds specified by the Extended Unlock Time specified in the
portal definition.
2. Click Save.
See also: Adding People to the System on page 43
233192 AX4 Linear LLC 53 May 2014
Page 58

Adminstering the System
Changing Personal Information on page 45
The Personal Information Page on page 47
Configuration Reports
Select Administration : Reports : Configuration.
This menu includes the following reports on the current configuration of the
system.
As Built Report
To run an As Built report, select a node from the Network Node drop-down and
click Run report. A new browser window will open and display an image of
each application blade in the node and the specific resources configured for that
blade. You can print this report.
See also:
Resources Report on page 55
Cameras Report
Displays all camera configuration information.
Camera Presets Report
Displays presets configured for each camera in the system (at Setup : Cameras :
Presets).
Holidays Report
Displays holiday specification information.
Portals Report
Displays por tal de f in it io n information.
Portal Groups Report
Displays all portal groups, and the porta ls includ ed in each.
Reader Groups Report
Displays defined groups of readers.
233192 AX4 Linear LLC 54 May 2014
Page 59

Administering the System
Resources Report
Displays all configured system resources including readers, inputs, outputs, and
temperature points.
Time Specs Report
Displays all defined time specifications currently in the system. Time
specifications define allowed access times. They are used as part of an access
level definition.
Start and End times for each time spec are in 24 hour format. For example, 900
is 9:00 AM and 1700 is 5:00 PM. Holidays are listed in groups as they were
entered.
History Reports
Select Administration : Reports : History.
This menu includes the following reports, which let you retrieve data from
archives when the requested report data is no longer active on the controller.
Access History Reports
Select Administration : Reports : History : Access History.
On this page you can create reports to trace system access requests. The default
Access History report searches the security database and archive files and returns
information on every access request received by the system.
Before running the report, you can set search parameters to limit the results to
particular people, event types, time periods, and portals. You can also limit the
number of records the report will return.
To create an access history report:
1. Select Administration : Reports : History : Access History.
2. To return only requests from anyone with a particular last name, enter that
name in the Person field.
3. To return only valid or invalid requests, select Valid accesses or Rejected
accesses, respectively.
4. To return only requests received during a specific period of time, select one
of the following:
o Today to return only requests received today.
o Yesterday to return only requests received yesterday.
233192 AX4 Linear LLC 55 May 2014
Page 60

Adminstering the System
o Month(s) to return only requests received from the first day of the month
you select on the From drop-down list through the last day of the month
you select on the To drop-down list.
o Custom Period to return only requests received from the date you enter
in the From field through the date you enter in the Thru field.
5. To return only requests received at a particula r porta l, select the por ta l nam e
from the At (portal name) drop-down list.
6. To return no more than a certain number of requests, enter that number in the
Maximum Records field.
7. Click Search.
The results are displayed in a table. For each access request, the table shows
the date and time the request was received on the Controller and on the node,
the person who made the request, the location where the request was
received, and a description of the event type, such as “Access granted” or
“Access denied (Unknown) ”.
8. Click any column header to sort the data on that column. Click the header
multiple times to switch between an ascending and descending sort order.
9. To view the report in PDF format, click the PDF link. To export the report as
a comma-separated values (CSV) file, click the CSV link.
General Event History Reports
Select Administration : Reports : History : General Event History.
On this page you can create a variety of reports on system activity. The default
General Event History report searches the security database and archive files and
returns information on all logged system activity.
Before running the report, you can set search parameters to limit the results to
particular time periods, portals, and event types. You can also limit the number of
records the report will return.
To generate a specific event type report:
1. Select Administration : Reports : History : General Event History.
2. To return only an activity logged during a specific period of time, enter the
beginning and end dates in the From and To date fields, or click the calendar
icons and select the dates.
Note: If you do not enter a beginning date for the report, the system will
search back through the entire history available in archives.
3. To return only activity at a particular portal, select it from the At (portal
name) drop-down list.
4. To return no more than a certain number of entries, enter that number in the
Limit to text box.
233192 AX4 Linear LLC 56 May 2014
Page 61

Administering the System
5. On the Output drop-down list, select HTML to save the results as an HTML
file, or select CSV to export the results to a comma-separated values (CS V)
file.
6. To return only activity for particular event types, clear the All event types
check box and select the check box for each event type you want to include
in the report.
7. In the Columns list, select the number of columns you want for the report.
If you leave the defaul t set of colum n s selected, the res ult s will includ e the
date and time, the activity occurred, a description of the activity, the user’s
name, the location of the activity, and – if there is recorded video associated
with the activity – a camera icon you can click to view the video.
8. Click Run report.
If you selected HTML output, the report is displayed directly on this page.
You can click the PDF link to save it as a PDF file or the CSV link to export
it as a comma-separated values (CSV) file.
See also:
About Archive Files on page 64
Portal Access Count Reports
Select Administration : Reports : History : Portal Access Count.
With this page you can request a report of portal accesses by specific people.
You can also specify dates, portals, and a user-defined field from the person
detail record.
To generate a portal access count report:
1. Select Administration : Reports : Histo ry : Portal A ccess Coun t.
2. Click the calendar icon to select a From (date). This is the start date for the
report.
233192 AX4 Linear LLC 57 May 2014
Page 62

Adminstering the System
Note: If you do not enter a From (date) to specify the beginning date for
the report the system will search back through the entire history
available in archives.
3. Click the calendar icon to select a Thru (date). This is the end date for the
report.
4. Select from the at Portals drop-down a specific portal for this report.
5. Select from the Where drop-down a specific user-defined field and to the
right select a valu e for this field.
Example: If your person records have a user-defined field called
"Department" then you could restrict the report to only those records where
the department is "Accounting" or "Manufacturing."
6. Enter a last name in the Person (last name) text box.
7. Click Run report.
See also: Monitoring the Activity Log on page 8
Using the Monitoring Desktop on page 19
People Reports
Select Administration : Reports : Peopl e.
Access Levels Report
Displays all access levels currently defined in the system. For each access level,
the report includes its specified description, time specification, reader or reader
group, and floor group.
233192 AX4 Linear LLC 58 May 2014
Page 63

Administering the System
Current Users Report
Displays a list of users who are currently logged in.
Photo ID Gallery Report
Displays the names and photo ID pictures of people in the system.
Click on a person's name to go to the detailed Personal Information page for that
person.
Select a letter from the alphabet at the top of th e p ag e to lim it the rep o rt re s ul ts to
people whose last names begin with the selected letter.
See also: Adding People to the Syste m on page 43
233192 AX4 Linear LLC 59 May 2014
The Personal Information Page on page 47
Page 64
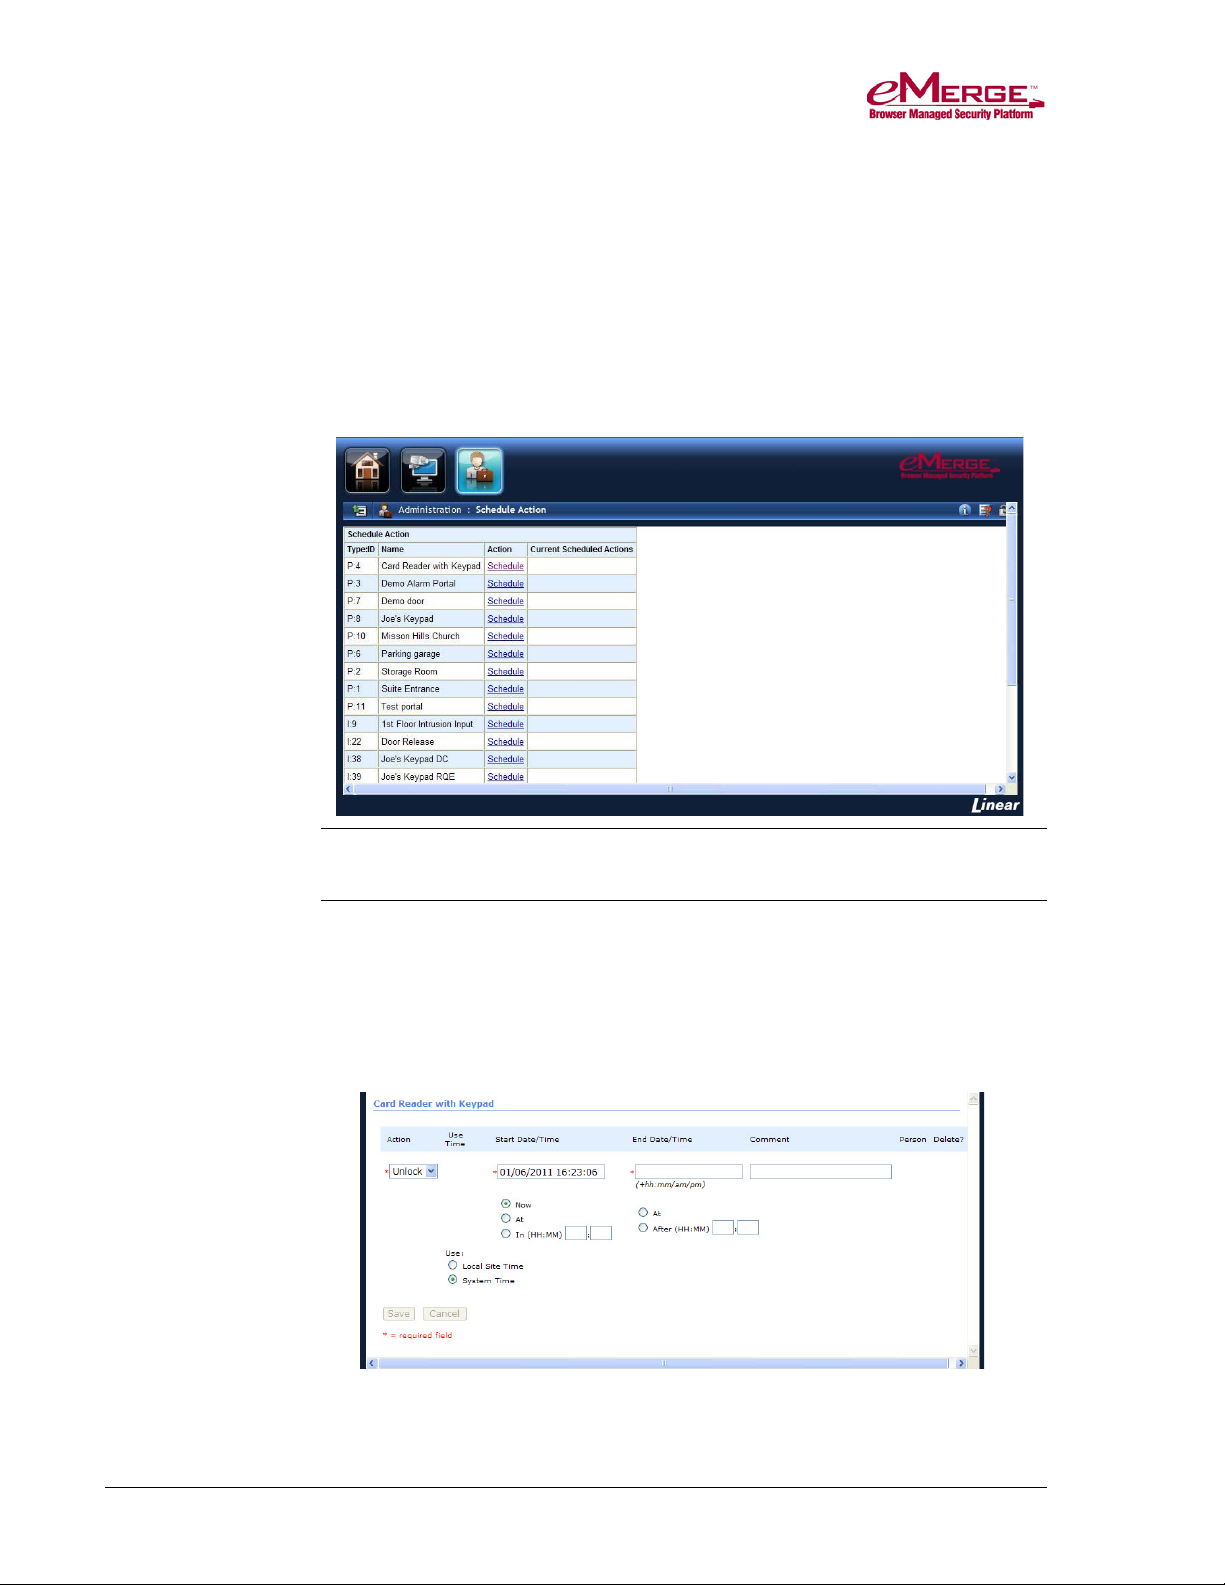
Adminstering the System
Scheduling Actions for Inputs, Outputs, and Portals
Select Administration : Schedule Action.
On this page you can:
• Specify an extended (scheduled) unlock of any portal.
• Specify a scheduled action (Disarm) for an input.
• Specify a scheduled action (Activate/Deactivate) for an output.
Note: Scheduled Actions cannot be scheduled for more than 30 days into the
future, and they cannot be set to run for more than 30 days.
To set up an extended (scheduled) action from the Schedule
Action page:
1. Select Administ r at io n : Schedule Action.
2. Click the Schedule link for the input, output, or portal for which you want to
schedule an action. A Schedule Action dialog box appears.
3. In the Action column, select Lock or Unlock for portals, Disarmed for
inputs, or Activate or Deactivate for outputs.
233192 AX4 Linear LLC 60 May 2014
Page 65

Administering the System
CAUTION: Do not unlock a portal by scheduling an action for its lock output.
This could create an alarm condition, because the portal may be
opened without a valid card read.
4. For the Uses Time setting:
o Select System Time for the time specifications to be based on the
Network Controller time zone.
o Select Local Site Time for the time specifications to be based on local
Network Node time zone.
5. In the Start Time column, select one of the following:
o Now: (the default setting) The action wi ll sta rt a t the c u rre n t da te an d
time.
o At: The action will start at the date and time you enter.
o In: The action will start once the specified number o f hours and minutes
have elapsed.
6. In the End Time column, select one of the following:
o At: The action will end at the date and time you enter. Use the format
shown for the Start Date/Time.
o After: The action will end once the specified number of hours and
minutes past the action's start time have elapsed.
Note: Fields marked with an asterisk (*) are req ui red.
7. In the Comment box, enter information you want to appear in the Schedule
Action table.
8. Click Save.
Example: For an output, select Activate and leave the Start Time at Now.
Set the End Time to After 1:30 (one hour and thirty minutes). Click Save.
The output will be activated for one hour and thirty minutes, starting
immediately.
See also:
Viewing Portal Status and Unlocking Portals on page 15
Using the Monitoring Desktop on page 19
233192 AX4 Linear LLC 61 May 2014
Page 66

Adminstering the System
Backing Up the System Data
Select Administration : Utility : Backup System.
With this page you can:
• Back up the security database to the solid state dr iv e (SSD ).
• Back up the security database to a network at ta ched sto rag e if one is
configured using Setting the Network Storage Location or FTP Backup
Settings.
• Download a backup of the security database to off-controller storage.
The system data is regularly backed up to the SSD each night at 00:15 hours.
The Sunday backup is a Full Backup. Backups on Monday through Saturday are
Differential backups.
The SSD will store a few months of backups, depending on the activity on your
system. Subsequent backups will overwrite the oldest backups on the SSD.
If an FTP server or NAS drive is configured all backups will be written there. We
strongly recommend that an FTP site or a NAS server be set up for storing
system backups off the controller.
233192 AX4 Linear LLC 62 May 2014
Page 67

Administering the System
Backups delivered to a configured FTP server or NAS drive will not be
overwritten.
You can perform additional backups whenever you choose.
Note: The system will also automatically create archive files of all data
required for General Event History Reports. Each Sunday, after the full
backup at 00:15 hours, the system checks the number of Activity Log
records. If this number exceeds 150,000 then all records in excess of
100,000 are zipped into an archive file. This file is stored on the SSD and
on any configured NAS or FTP servers.
To back up system data:
1. Select Administration : Utilit ies : Backup Sy st em.
2. Enter a Comment to explain the purpose of this backup.
3. Click Full Backup.
4. Once the backup is complete, it is listed in the Existing Backups section.
You can download a copy of this backup to a disk drive by clicking the get
link in the Download? column.
To download a backup to off-controller storage:
1. In the Existing Backups table, click get for the backup you want to save to
off-controller storage.
2. In the File Download dialog, click Save.
3. In the Save As dialog, browse to the location where you want to save this
backup.
4. Click Save.
See also:
About Archive Files on page 64
233192 AX4 Linear LLC 63 May 2014
Page 68

Adminstering the System
About Archive Files
The system will automatically create archive files of all data required for General
Event History Reports on page 56.
Each Sunday, after the full backup at 00:15 hours, the system checks the number
of Activity Log records. If this number exceeds 150,000 then all records in
excess of 100,000 are zipped into an archive file. Only full days of data are
included.
This file is stored on the SD card and on any configured NAS or FTP servers.
The archive files are named:
arch_YYYYMMDD_YYYYMMDD.zip
where the first date is the oldest day of records, and the second date is the most
recent day of records contained within the archive.
If the inclusive dates of your custom reports are weeks or months in the past, it is
likely that some of the relevant data is in archive files. The report will still run
correctly. The appropriate data will be retrieved from the archive files. This will
take a few moments.
See also:
Backing Up the System Data on page 62
233192 AX4 Linear LLC 64 May 2014
Page 69

Index
A
About page · 2
Access Control tab
changing a person's access · 50
on the Personal Information page · 48
Access Denied events · 4
on Auto-Monitor widget · 4
Access History Report
creating · 55
Access History Reports
on the Administration page · 55
overview · 55
Access Levels Report
on the Administration page · 58
Activity Log
color-coded messages · 9
entries · 12
full page view · 8
home page · 4
on Monitoring Desktop · 8
on the home page · 9
tab on the Monitoring Desktop · 20
variables · 12
Activity Log messages
times · 12
adding people
Personal Information page · 44
unique person ID# · 44
administering the system
Administration page · 39
overview · 39
Administration page
adding people to the system · 43
arm alarm panel · 40
changing personal information · 45
General Event History Reports · 56
handling lost credentials · 41
links provided for tasks · 39
People reports · 58
Personal Information page · 43
Photo Gallery ID Report · 59
Portal Access Count Reports · 57
Schedule Action page · 60
administrator
user role definition · 1
Adminstration page
History reports · 55
archive files
data for General History Reports · 64
on SD card · 64
on the Administration page · 64
archives · 55
Arm Alarm Panel
on the Administration page · 40
As Built Report · 54
assigning a PIN · 53
assigning an access level · 52
assigning an extended unlock time · 53
Auto-Monitor
access control issues · 13
access denied notifications · 14
color-coded notifications · 14
home page · 4, 13
icons for event types · 14
on the home page · 15
on the Widget Desktop · 15
process failures · 13
Widget Desktop · 13
B
backing up the system data
differential backup · 62
full backup · 62
on the Administration page · 62
storing the backup · 63
Utility link · 62
Backup System
in the Utility link · 62
on the Administration page · 62
browsers, supported · 1
C
Camera
in Video Stream widget · 4
Camera Monitor
tab on the Monitoring Desktop · 21
Camera Monitor tab
select camera to display · 21
camera preset list
selecting camera views · 37
Camera Presets Report · 54
Camera Views
tab on the Monitoring Desktop · 21
camera widget
controls · 36
cameras
aiming · 36
display flashing · 38
233192 AX4 Linear LLC 65 May 2014
Page 70

Index
menu · 35
moving · 36, 38
pan, tilt, zoom (PTZ) · 36
preset home position · 36, 38
quad view · 37
reviewing recorded video · 36, 38
selecting · 35
speed of movement · 36, 38
types · 35
viewing · 35
Cameras
tab on the Monitoring Desktop · 20
Cameras widget
on the Monitoring Desktop · 21, 22
category filter · 10
changing a person's access
on the Administration page · 50
changing personal information
on the Administration page · 45
Clock widget
on the Widget Desktop · 25
Configuration reports
As Built Report · 54, 55
Cameras Presets Report · 54, 55
Cameras Report · 54, 55
Holidays Report · 54, 55
on the Administration page · 54, 55
Portal Groups Report · 54
Portals Report · 54, 55
Reader Groups Report · 54
Resources Reports · 55
Time Specs Report · 55
Contact tabs
on the Personal Information page · 49
Current Users Report
on the Administration page · 59
D
E
End User License Agreement · 6
Events Tab
acknowledge button · 20
clear actions link · 20
details button · 20
on the Monitoring Desktop · 20
sort order · 20
exiting
from the Widget Desktop · 24
Explorer widget
change properties · 26
on the Widget Desktop · 26
F
F11 on keyboard
fix camera view · 38
filtering
Activity Log data · 10
available properties · 34
Clear Filter icon · 10, 11
clearing the text filter · 33
on the Widget Desktop · 33
properties · 33
filters
category filter · 10
text filter · 10
G
General Event History Reports
All event type, default · 56
on the Administration page · 56
overview · 56
disabling a credential · 52
displaying
widgets · 32
door forced open
reported in Auto-Monitor · 14
Door Forced Open · 4
door held open
reported in Auto-Monitor · 14
Door Held Open · 4
duress accesses
History report · 53
in History report · 53
duress entry · 53
duress PIN
assigning · 53
H
Help
Back button · 6
Contents button · 5
context-sensitive · 5
conventions · 5
Index button · 6
navigation pane · 5
Print button · 6
Search button · 5
topic pane · 5
using · 5
Help icon · 5
Holidays Report · 54
home page · 1
described · 3
233192 AX4 Linear LLC 66 May 2014
Page 71

Administering the System
getting started · 2
navigation buttons · 3
User tasks widget · 3
I
installation information
where to find · 6
Intrusion Panel widget
activate and deactivate outputs · 28
activiate and deactivate outputs · 26
arm and disarm areas · 27
bypass and reset zones · 26, 27
on the Widget Desktop · 26
selecting the Panel Detaiul widget · 27
invalid access events
reported in Auto-Monitor · 15
issuing a new credential · 51
using a reader · 51
issuing a new crredential
using keyboard entry · 51
L
live monitoring
navigation bar · 4, 7
Login tab
on the Personal Information page · 49
Lost Cards dialog box
Hot stamp # text box · 41
on the Administration page · 41
Use Reader link · 41
M
monitor
user role definition · 1
monitoring
Activity Log · 8
cameras · 35
filtering · 34
multi-camera views · 37
Monitoring Desktop
overview · 19
static display · 19
tabbed pages · 19
Monitoring Desktop icon
in User Tasks widget · 4
monitoring the system
overview · 7
N
navigation bar
navigation buttons · 2
navigation menu icons · 2
navigation menu
Back icon · 2
Help icon · 2
Info icon · 2
Logout icon · 2
Node Communication Loss · 4
node-communication loss
reported in Auto-Monitor · 14
P
People Locator
in User Tasks widget · 4
People reports
Access Levels Report · 58
Current Users Report · 58
on the Administration page · 58
overview · 58
person record
navigating to · 11
Personal Information page
access control tab · 48
changing a person's access · 50
contact tabs · 49
login tab · 49
overview · 47
personal information section · 47
photo ID tab · 48
user-defined tab · 48
vehicles tab · 49
Photo ID Gallery Report
on the Administration page · 59
Photo ID tab
on the Personal Information page · 48
Portal Access Count Reports
overview · 57
Portal Groups Report · 54
Portal Statu widget
on the Widget Desktop · 15
Portal Status widget
on the Widget Desktop · 28
Portal Unlock widget
all portals setting · 28
favorites setting · 28
on the Monitoring Desktop · 22
on the Montioring Desktop · 15
on the Widget Desktop · 15, 28
recent setting · 28
portals
managing · 15
schedule · 15
233192 AX4 Linear LLC 67 May 2014
Page 72

Index
unlocking, locking · 15
viewing status · 15
Portals Report · 54
Printing
Help topics · 6
Pronto 2 Release Notes · 6
PTZ controls · 36, 38
Q
quad view · 37
moving cameras · 37
R
Reader Groups Report · 54
recent access denied activity
reported in Auto-Monitor · 15
Resources Report · 55
revoking a credential · 51
S
Schedule Action dialog box
select Activate or Disactivate · 60
select Disarmed · 60
select Lock or Unlock · 60
schedule dialog box · 16
Scheduled Action page
on the Administration page · 60
scheduled events dialog box · 17
action drop-down list · 17
comment box · 18
end date/time · 18
start date/time · 17
uses time setting · 17
scheduling actions
Schedule Action dialog box · 60
scheduling actions (inputs, outputs, portals)
on the Administration page · 60
SD card · 64
searching
Help topics · 6
Statistics Block widget
on the Widget Desktop · 29
view various system data · 29
Status Widget
on the Widget Desktop · 30
view status of nodes and resources · 30
system setup
user role definition · 1
T
technical documents
finding additional information · 6
text filter · 10
time messages
Activity Log · 12
time out (system setting) · 2
Time Specs Report · 55
trace person
activity · 52
log entry · 9
usage · 50
U
unacknowledged events
reported in Auto-Monitor · 14
Unacknowledged Events · 4
unlocking portals
scheduling · 16
User Tasks
home page · 4
widget · 3
User-defined tab
on the Personal Information page · 48
using help
from the Widget Desktop · 24
V
variables
Activity Log · 12
variables (Activity Log)
names · 12
numbers · 12
reason codes · 12
reset types · 12
VCR controls · 36, 38
Video Stream
home page · 4
W
widget
Activity Log · 4
Auto-Monitor · 4, 13
definition · 1
User Tasks · 3, 4
Video Stream · 4
Widget Desktop
adjustable windows (widgets) · 22
changing background · 24
custom layout · 23
233192 AX4 Linear LLC 68 May 2014
Page 73

Administering the System
custom, real-time display · 20, 22
default layout · 23
exiting from this view · 24
overview · 22
using help · 24
Widget Desktop icon
in User Tasks widget · 4
widgets
Activity Log · 25
Auto-Monitor · 25
Camera View · 25
changing properties · 32
Clock · 25
closing · 31
common properties · 30
Events · 25
Explorer · 25
filtering properties · 30
Intrusion Panel · 25
minimizing · 31
moving · 31
Portal Status · 25
Portal Unlock · 25
properties · 30
sizing · 31
Statistics Block · 25
Status · 25
summary of types · 25
unique properties · 31
Z
zooming cameras · 36
233192 AX4 Linear LLC 69 May 2014
 Loading...