

Page 1

BASS POD
Pilot’s Handbook
An in-depth exploration of the revolutionary technologies and pulsing
tonal pleasures of Bass POD, plus the insider info on the optional Line 6
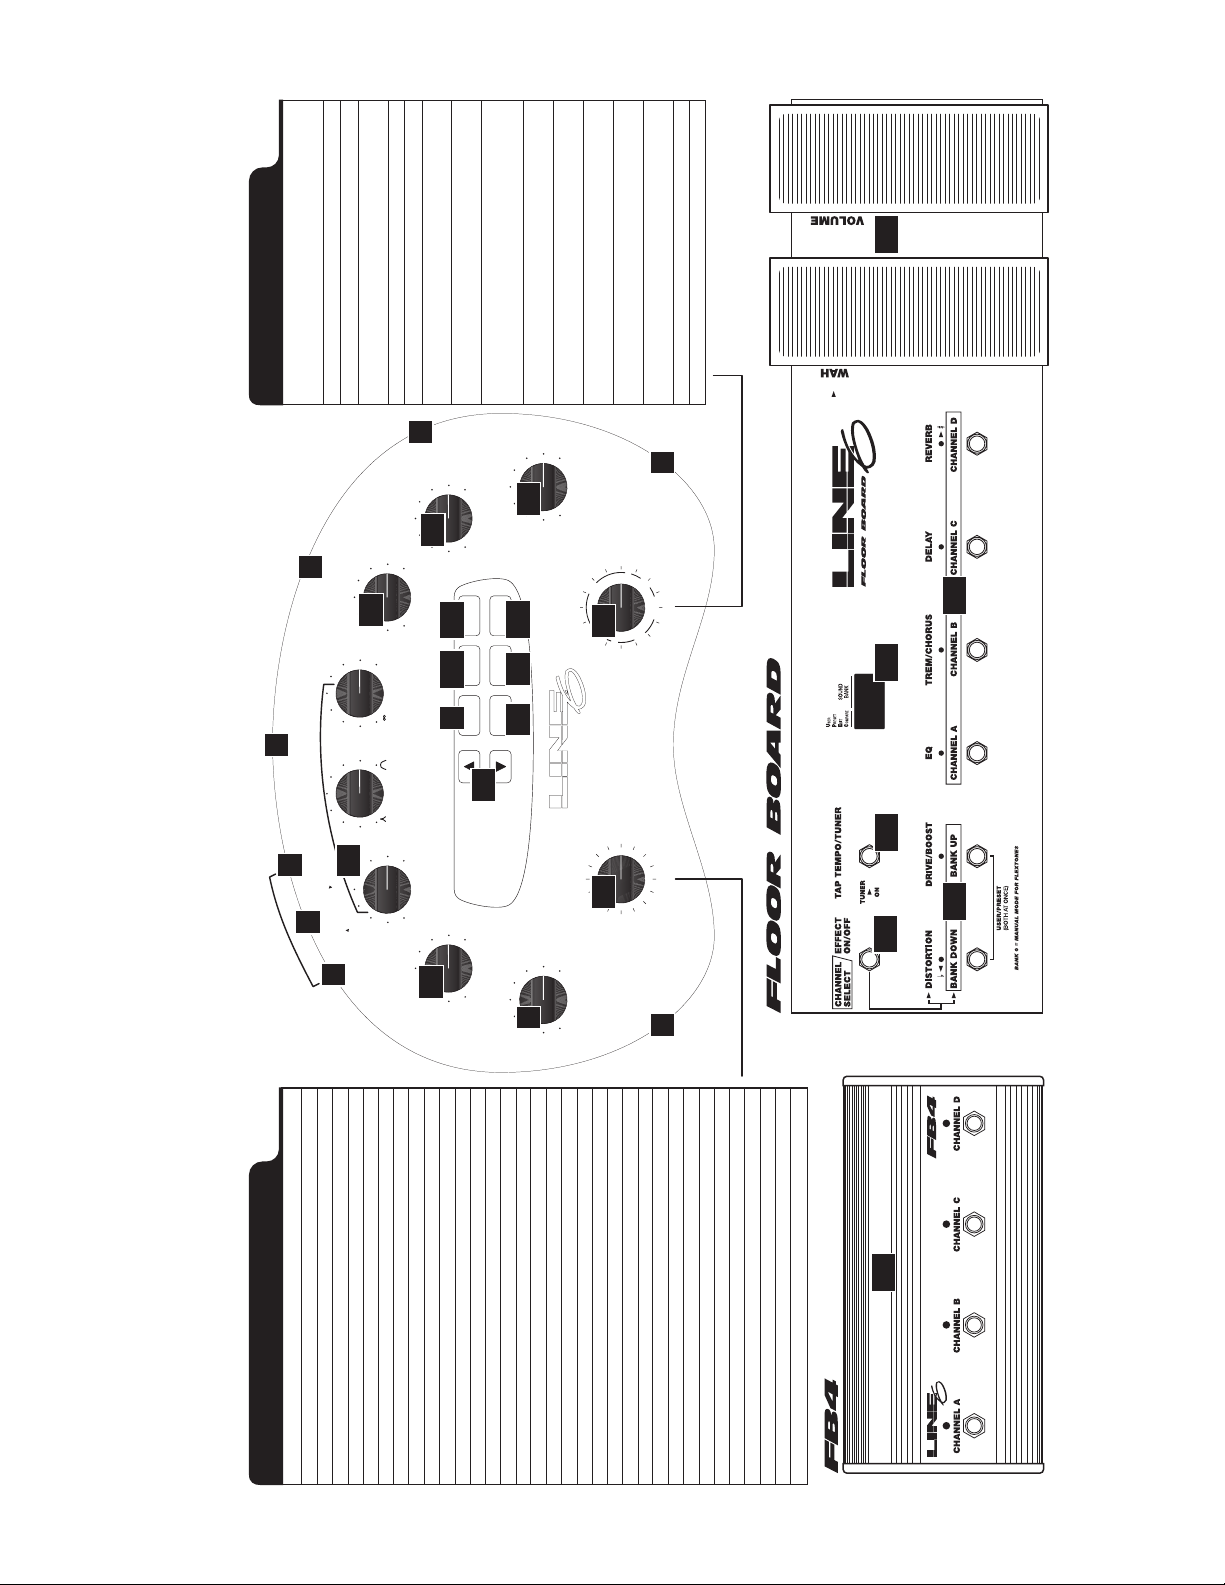
foot controllers: the
version available on included CD-Rom and at
Floor Board
and
FB4
. High tech electrophonic
www.line6.com
. Rev B.
This equipment has been tested and found to comply with the limits for a Class B digital device pursuant to Part 15 of FCC Rules. Operation is subject to the
following two conditions: (1) This device may not cause harmful interference, and (2) this device must accept any interference received, including
interference that may cause undesired operation.
Bass POD, POD, Line 6, Amp Farm, Flextone II, and Line 6 logos are all trademarks of Line 6. Pro Tools and TDM are trademarks of Digidesign. Emagic and
SoundDiver are trademarks of Emagic Software. Mackie and 1202VLZ are trademarks of Mackie. Fender, Marshall, Vox and other amplifier and effect models are
all trademarks of their respective owners, which are in no way affiliated or associated with Line 6. These trademarks of other manufacturers are used solely for the
purpose of describing certain amplifier tones modeled after some of the most popular sounds of these classic amps and effects.
Page 2
Chorus/Flanger
EFFECT SETUPS
Effect Tweak Notes
Bypass n/a Turns off the effects
Octave Down Mix modeled after Boss OC-2
Analog Chorus Range of choruses modeled after Roland CE-1
Danish Chorus Range of choruses modeled after t.c. electronics
“down” position
Orange Phase Speed modeled after MXR Phase 90
Gray Flanger Range of choruses modeled after MXR Flanger
Tron Down Filter Peak modeled after Mu-Tron III in the
Tron Up Filter Peak modeled after Mu-Tron III in the
1
R
E
W
O
P
I
D
I
N
I
M
15
8
14
+12
OFF 1 KHz
EQ
TREBLE
LO-CUT
FX
010
21
MIDI
22
9
MANUAL SAVE
I
T
D
I
U
M
O
L
A
D
E
7
P
“up” position
Controlled Filter (for a sample &
S/H Speed modeled after Oberheim Voltage
COMPRESS
OFF MAX
CABS
AND EQ
TO D.I.
APPLY FX
TUNER
hold effect)
Gray Flanger
Danish Driver
S/H + Flanger S/H Speed Sample & Hold meets the
S/H + Driver S/H Speed Sample & Hold meets the
010
16
S/H + FLANGER
S/H
TRON UP
EFFECTS / CABSAMP MODEL
18 19 20
plus a little extra attitude
Booster Line Driver + Distortion
Bass Synth Decay Inspired by the Boss Bass Synth
Danish Driver Distortion modeled after t.c. electronics
T
TWEAK
EFFECT
DANISH DRIVER
BASS SYNTH
LARGE PIE
S/H + DRIVER
15's
17
12's
10's
TRON DOWN
GRAY FLANGER
ORANGE PHASE
DANISH CHORUS
Big Muff Pi
Large Pie Distortion modeled after Electro-Harmonix
Pig Foot Distortion modeled after Hogs Foot
Rodent Distortion modeled after Pro-co Rat
2
U
P
N
I
PIG FOOT
18's
RODENT
B
A
C
O
N
BYPASS
OCTAVE DOWN
ANALOG CHORUS
28
25 2627
5
6
EQ
010 010
MIDDLE
T
U
.
P
I
.
D
UT
O
13
E
P
D
M
O
A
M
/
.
T
R
C
.
I
E
.
R
A
I
D
L
T
E
U
D
P
O
T
M
P
5
BASS POD
EQ
BASS CHAN VOL
010
30Hz 8 KHz
U
O
M
A
10
A
BASS AMP MODELER AND DIRECT BOX PLUS EFFECTS
6
ROCK CLASSIC
DRIVE
010
12
010
4
SILVER PANEL
BRIT SUPER
BRIT MAJOR
11
AMP 360
STADIUM
EIGHTIES
LEVEL
OUTPUT
BRIT CLASS A
MOTOR CITY
FLIP TOP
SUB DUB
SESSION
CALIFORNIA
JAZZ TONE
ADAM & EVE
S
E
N
O
H
P
TUBE PREAMP
24
23
3
*
29
Eden “David” 4x10
SWR “Goliath II” 4x10
Hartke 4x10
1968 Marshall 4x12 with “pre-Rola” 25’s
Polytone 1x15 closed back combo
Vox AC-100 2x15
Mesa/Boogie 2x15 (front loaded and front ported)
Fender Bassman 2x15 with JBL’s
1969 Marshall Major 4x15 cab (Yeah, Baby!)
Sunn Coliseum 8028 cab (1x18 + 1x12)
Acoustic 360 cab (1x18 in special folded horn enclosure)
AMP & CAB MODELS
Amp Model Based on:
Session 1987 SWR SM-400
California 1989 Mesa/Boogie Bass 400+
Jazz Tone 70’s Polytone Mini Brute
REDUCED SIZE BACK COVER FOLDOUT FOR ELECTROPHONIC PILOT'S GUIDE
Adam & Eve Eden WT-300 (The Traveller)
Eighties Gallien-Krueger 800RB
Staduim Sunn Coliseum 300
Amp 360 Acoustic 360
Rock Classic 1974 Ampeg SVT
Brit Major 1969 Marshall Major
FLEXTONE: TAP LIT BUTTON FOR TAP TEMPO / HOLD LIT BUTTON FOR MANUAL
* Fender, Marshall, Vox, and other amplifier and effect models are all trademarks of their respective owners, which are in no way associated or affiliated with Line 6. These trademarks of other manufacturers are used solely for the purpose of describing certain amplifier and effect tones produced using Line 6's modeling technology.
Brit Super 1968 Marshall Super Bass “Plexi”
SIlver Panel 1967 Fender “Silverface” Bassman Amp
Brit Class A 1965 Vox AC-100
Motor City 60’s Versatone Pan-O-Flex
Flip Top 60’s Ampeg B-15
Sub Dub When it's time to get ultra-low....
Tube Preamp Tube-based instrument preamp
Cabinet Models:
Cabs with 10" Speakers 1979 Ampeg SVT 8X10 Cab
Cabs with 12" Speakers 60’s Versatone Pan-O-Flex 1x12
Cabs with 15" Speakers Ampeg B-15 1x15 closed back combo
Cabs with 18" Speakers SWR 1x18
Line 6's modeling technology provides POD with a wide variety of sounds and effects modeled after some of the most popular sounds of these classic amps. Line 6, POD, Bass POD, Floor Board, the Line 6 logo, the POD logo, and the Bass POD logo are trademarks of Line 6, Inc.
Page 3

s
s
a
O
P
r
e
s
t
s
e
P
D
More great sounds for your Bass POD will soon be available at www.line6.com
A
Working Man – Rock Classic with Compression (a la Working Man by Rush)
B
Hip Hop – Sub Dub with 1X18 Cab and Compression (a la Massive Attack and Dr. Dre)
C Synth – Tube Preamp with Bass Synth and Compression
D R&B – Motor City with Compression
BANK 1BANK 2BANK 3BANK 4BANK 5BANK 6BANK 7BANK 8BANK 9
A Sleepless In Seattle – Silver Face with heavy Analog Chorus (a la Come As You Are by Nirvana)
B Major Sunshine – Brit Major, 4X12 Cab and Octave Down (a la Sunshine of Your Love by Cream)
C Brit Super – with Compression (a la Fire by Jimi Hendrix)
D Funk – with Tron Down and Compression (a la Bootsy Collins)
B
A Session – with light Compression and Danish Chorus
B Wicked Garden – Adam & Eve with Gray Flanger and Compression (a la Tool)
C Deep Goo – Flip Top with cab modeled after Versatone 1X12 plus S/H + Driver with Compression
D Chili – California with Tron Up and Compression (a la Higher Ground by Red Hot Chili Peppers)
A Eighties – with Danish Chorus (the sound of 80’s Metal)
B Stadium – with full Large Pie (a la Smashing Pumpkins)
C Class Trip – Brit Class A with Compression (a la Day Tripper by The Beatles)
D Major Jones – Brit Major w/ mid boost and Compression (a la Whole Lotta Love by John Paul Jones)
A Growling Mids – Rock Classic with mid boost and Compression (a la New Year's Day by U2)
B Mean Motor City – Motor City with everything on 10
C Sub Dub Fuzz – with full Drive and Compression
D Moody Monk – Jazz Tone with light Analog Chorus (a la Monk's Mood by Thelonious Monk)
A Rock Classic – modeled after a 1974 Ampeg SVT
B Brit Major – modeled after a 1969 Marshall Major
C Brit Super – modeled after a 1968 Marshall Super Bass “Plexi”
D Silver Panel – modeled after a 1967 Fender Bassman Head
A Brit Class A – modeled after a 1965 Vox AC-100
B Motor City – modeled after a 60’s Versatone Pan-O-Flex
C Flip Top – modeled after a 1960’s Ampeg B-15
D Sub Dub – Lo-fi goodness perfect for Electronica, Dance, Hip Hop and more...
A Tube Preamp – for direct recording of non-bass instruments
B Session – modeled after an SWR SM-400
C California – modeled after a Mesa Boogie Bass 400+
D Jazz Tone – modeled after a Polytone Mini Brute
A Adam & Eve – modeled after an Eden Traveler WT-300
B Eighties – modeled after a Gallien Krueger 800 RB
C Stadium – modeled after a Sunn Coliseum
Fender, Marshall, Vox, and other amplifier model designations, and the names of musical artists, song titles and
groups, and effects, are all trademarks of their respective owners, which are in no way associated or affiliated with
Line 6. These marks and names are used solely for the purpose of describing certain amplifier tones produced using
Line 6’s modeling technology. The Line 6 modeling technology provides Bass POD with a wide variety of sounds and
effects modeled after some of the most popular sounds of the classic amps, effects, and artists mentioned here.
D Amp 360 – modeled after an Acoustic 360
Rev A
Page 4

CHAPTER 1: Q
UICK START GUIDE
ANUAL
M
I
NTRODUCTION
? I DON’T N
Register and Get Great Free Stuff . . . . . . . . . . . . . . . . . . . . . . . . . . . . . . . . . . . . . . . . . . . . . . . . . . . . . . . 1•1
Get On-line: Line 6 Internet Resources . . . . . . . . . . . . . . . . . . . . . . . . . . . . . . . . . . . . . . . . . . . . . . . . . . 1•2
Modeling . . . . . . . . . . . . . . . . . . . . . . . . . . . . . . . . . . . . . . . . . . . . . . . . . . . . . . . . . . . . . . . . . . . . . . . . . . 1•3
Amp & Cab Models . . . . . . . . . . . . . . . . . . . . . . . . . . . . . . . . . . . . . . . . . . . . . . . . . . . . . . . . . . . . . . . . . 1•4
There’s Magic in the A.I.R.. . . . . . . . . . . . . . . . . . . . . . . . . . . . . . . . . . . . . . . . . . . . . . . . . . . . . . . . . . . . 1•5
Let’s Go Out: Bass POD’s unique outputs . . . . . . . . . . . . . . . . . . . . . . . . . . . . . . . . . . . . . . . . . . . . . . . . . 1•7
ToneTransfer . . . . . . . . . . . . . . . . . . . . . . . . . . . . . . . . . . . . . . . . . . . . . . . . . . . . . . . . . . . . . . . . . . . . . . . 1•7
CHAPTER 2: C
CHAPTER 3: G
All Purpose Basics . . . . . . . . . . . . . . . . . . . . . . . . . . . . . . . . . . . . . . . . . . . . . . . . . . . . . . . . . . . . . . . . . . . 3•1
Dual Outputs: Model & D.I. . . . . . . . . . . . . . . . . . . . . . . . . . . . . . . . . . . . . . . . . . . . . . . . . . . . . . . . . . . . 3•1
CENARIO ONE
S
Mount Up: Mounting Accessories Available for POD . . . . . . . . . . . . . . . . . . . . . . . . . . . . . . . . . . . . . . . 3•2
Gimme Some A.I.R.: The All Important Air Switch and How to Set It . . . . . . . . . . . . . . . . . . . . . . . . . 3•3
Picking The Right Inputs: Line Level Inputs Are The Ticket!. . . . . . . . . . . . . . . . . . . . . . . . . . . . . . . . . 3•3
Ready to Play Anywhere: The Versatile POD Works with Systems Large & Small . . . . . . . . . . . . . . . . . 3•3
Boom Boxes & Small Portable Studios . . . . . . . . . . . . . . . . . . . . . . . . . . . . . . . . . . . . . . . . . . . . . . . . . . . 3•4
Big Time Connections: POD Setup in High-End Studios. . . . . . . . . . . . . . . . . . . . . . . . . . . . . . . . . . . . . 3•5
Recording Like A Pro: Simple POD Operation . . . . . . . . . . . . . . . . . . . . . . . . . . . . . . . . . . . . . . . . . 3•5
Changing History: Setting Up POD for More Versatile Processing & Later Tweaking . . . . . . . . . . . 3•5
Direct Injection: Direct Signal Requirements . . . . . . . . . . . . . . . . . . . . . . . . . . . . . . . . . . . . . . . . . . 3•6
Return to Sender: Setting Up POD in a Send-Return Configuration . . . . . . . . . . . . . . . . . . . . . . . . 3•6
Level Headed: Setting Levels . . . . . . . . . . . . . . . . . . . . . . . . . . . . . . . . . . . . . . . . . . . . . . . . . . . . . . . 3•8
Radiation Alert: Computer Monitors as a Source of Hum . . . . . . . . . . . . . . . . . . . . . . . . . . . . . . . . . 3•8
Pedal Power: Foot Control Options for POD . . . . . . . . . . . . . . . . . . . . . . . . . . . . . . . . . . . . . . . . . . . 3•9
Not So Big Time Connections: POD Setup in Small Studios. . . . . . . . . . . . . . . . . . . . . . . . . . . . . . . . . . 3•10
MIDI Mania: Controlling POD with MIDI. . . . . . . . . . . . . . . . . . . . . . . . . . . . . . . . . . . . . . . . . . . . . . . . 3•11
EED NO STINKING
: W
ELCOME THE
ONTROLS
ETTING SET UP
– IN THE S
& C
TUDIO
ANUAL
M
!
. . . . . . . . . . . . . . . . . . . . . . . . . . . . . . . . . . . . 1•1
POD...
ONNECTIONS REFERENCE
. . . . . . . . . . . . . . . . . . . . . . . . . . . . . . . . . . 2•1
CENARIO TWO
S
Mount Up: Mounting Accessories Available for POD . . . . . . . . . . . . . . . . . . . . . . . . . . . . . . . . . . . . . . . 3•12
Gimme Some A.I.R.: The All Important Air Switch and How to Set It . . . . . . . . . . . . . . . . . . . . . . . . . 3•12
POD Takes Over: Using POD as a Tone-Shaping Front End for a Bass Amp. . . . . . . . . . . . . . . . . . . . . . 3•13
POD Output Level: A Word of Caution . . . . . . . . . . . . . . . . . . . . . . . . . . . . . . . . . . . . . . . . . . . . . . . . . . 3•13
Tuning Your Amplifier: Setting Up your Guitar Amplifier to Host POD . . . . . . . . . . . . . . . . . . . . . . . . . 3•13
POD Live Hook-Up Illustrations: Pictures to Help you Get Connected . . . . . . . . . . . . . . . . . . . . . . . . . 3•14
Stomp Boxes, Live Setups, & You . . . . . . . . . . . . . . . . . . . . . . . . . . . . . . . . . . . . . . . . . . . . . . . . . . . . . . . 3•16
Pedal Power: Foot Control Options for POD . . . . . . . . . . . . . . . . . . . . . . . . . . . . . . . . . . . . . . . . . . . . . . 3•16
CHAPTER 4: M
– POD P
ODELED AMPS
LAYS LIVE
& C
ABS
. . . . . . . . . . . . . . . . . . . . . . . . . . . . . . . . . . . . . . . . . . . . . . . . . . . 4•1
Page 5

CHAPTER 5: E
Deep Editing: Where to Look for More Info . . . . . . . . . . . . . . . . . . . . . . . . . . . . . . . . . . . . . . . . . . . . . . . . 5•1
POD Onboard Effects . . . . . . . . . . . . . . . . . . . . . . . . . . . . . . . . . . . . . . . . . . . . . . . . . . . . . . . . . . . . . . . . . 5•1
Compressor . . . . . . . . . . . . . . . . . . . . . . . . . . . . . . . . . . . . . . . . . . . . . . . . . . . . . . . . . . . . . . . . . . . . . . 5•2
Octave Down . . . . . . . . . . . . . . . . . . . . . . . . . . . . . . . . . . . . . . . . . . . . . . . . . . . . . . . . . . . . . . . . . . . .5•2
Analog Chorus . . . . . . . . . . . . . . . . . . . . . . . . . . . . . . . . . . . . . . . . . . . . . . . . . . . . . . . . . . . . . . . . . . . 5•3
Danish Chorus . . . . . . . . . . . . . . . . . . . . . . . . . . . . . . . . . . . . . . . . . . . . . . . . . . . . . . . . . . . . . . . . . . . 5•3
Orange Phase . . . . . . . . . . . . . . . . . . . . . . . . . . . . . . . . . . . . . . . . . . . . . . . . . . . . . . . . . . . . . . . . . . . . 5•3
Gray Flanger . . . . . . . . . . . . . . . . . . . . . . . . . . . . . . . . . . . . . . . . . . . . . . . . . . . . . . . . . . . . . . . . . . . . .5•3
Tron Down . . . . . . . . . . . . . . . . . . . . . . . . . . . . . . . . . . . . . . . . . . . . . . . . . . . . . . . . . . . . . . . . . . . . . .5•4
Tron Up . . . . . . . . . . . . . . . . . . . . . . . . . . . . . . . . . . . . . . . . . . . . . . . . . . . . . . . . . . . . . . . . . . . . . . . . . 5•4
S & H . . . . . . . . . . . . . . . . . . . . . . . . . . . . . . . . . . . . . . . . . . . . . . . . . . . . . . . . . . . . . . . . . . . . . . . . . . 5•4
S & H + Flanger . . . . . . . . . . . . . . . . . . . . . . . . . . . . . . . . . . . . . . . . . . . . . . . . . . . . . . . . . . . . . . . . . .5•4
S & H + Danish Driver. . . . . . . . . . . . . . . . . . . . . . . . . . . . . . . . . . . . . . . . . . . . . . . . . . . . . . . . . . . . . 5•4
Bass Synth . . . . . . . . . . . . . . . . . . . . . . . . . . . . . . . . . . . . . . . . . . . . . . . . . . . . . . . . . . . . . . . . . . . . . . . 5•4
Danish Driver . . . . . . . . . . . . . . . . . . . . . . . . . . . . . . . . . . . . . . . . . . . . . . . . . . . . . . . . . . . . . . . . . . . .5•5
Large Pie . . . . . . . . . . . . . . . . . . . . . . . . . . . . . . . . . . . . . . . . . . . . . . . . . . . . . . . . . . . . . . . . . . . . . . . . 5•5
Pig Foot . . . . . . . . . . . . . . . . . . . . . . . . . . . . . . . . . . . . . . . . . . . . . . . . . . . . . . . . . . . . . . . . . . . . . . . . .5•5
Rodent. . . . . . . . . . . . . . . . . . . . . . . . . . . . . . . . . . . . . . . . . . . . . . . . . . . . . . . . . . . . . . . . . . . . . . . . . . 5•5
FFECTS
. . . . . . . . . . . . . . . . . . . . . . . . . . . . . . . . . . . . . . . . . . . . . . . . . . . . .
CHAPTER 6: C
Using the Manual Mode Features . . . . . . . . . . . . . . . . . . . . . . . . . . . . . . . . . . . . . . . . . . . . . . . . . . . . . . . . 6•1
Using the Channel Program Memories . . . . . . . . . . . . . . . . . . . . . . . . . . . . . . . . . . . . . . . . . . . . . . . . . . . . 6•1
ToneTransfer . . . . . . . . . . . . . . . . . . . . . . . . . . . . . . . . . . . . . . . . . . . . . . . . . . . . . . . . . . . . . . . . . . . . . . . . 6•2
POD Sounds on the Web . . . . . . . . . . . . . . . . . . . . . . . . . . . . . . . . . . . . . . . . . . . . . . . . . . . . . . . . . .6•2
Swapping POD Channels with Friends. . . . . . . . . . . . . . . . . . . . . . . . . . . . . . . . . . . . . . . . . . . . . . . . 6•2
Edit Mode . . . . . . . . . . . . . . . . . . . . . . . . . . . . . . . . . . . . . . . . . . . . . . . . . . . . . . . . . . . . . . . . . . . . . . . . . .6•3
Customizing Amp Models and Effects. . . . . . . . . . . . . . . . . . . . . . . . . . . . . . . . . . . . . . . . . . . . . . . . . . . . .6•4
About Customization Mode . . . . . . . . . . . . . . . . . . . . . . . . . . . . . . . . . . . . . . . . . . . . . . . . . . . . . . . .6•4
Activating Customization Mode. . . . . . . . . . . . . . . . . . . . . . . . . . . . . . . . . . . . . . . . . . . . . . . . . . . . .6•6
Memory Reset: Returning your POD to its Factory-Programmed State of Mind . . . . . . . . . . . . . . . . . . . .6•7
CHAPTER 7: T
Floor Board: The Full-Featured POD Foot Controller . . . . . . . . . . . . . . . . . . . . . . . . . . . . . . . . . . . . . . . . 7•1
Getting Connected . . . . . . . . . . . . . . . . . . . . . . . . . . . . . . . . . . . . . . . . . . . . . . . . . . . . . . . . . . . . . . .7•1
REATING
HAT’S USING YOUR FEET
& S
TORING PROGRAMS
Effects On/Off. . . . . . . . . . . . . . . . . . . . . . . . . . . . . . . . . . . . . . . . . . . . . . . . . . . . . . . . . . . 7•2
Banks. . . . . . . . . . . . . . . . . . . . . . . . . . . . . . . . . . . . . . . . . . . . . . . . . . . . . . . . . . . . . . . . . . 7•2
Channel Select . . . . . . . . . . . . . . . . . . . . . . . . . . . . . . . . . . . . . . . . . . . . . . . . . . . . . . . . . . 7•2
Manual Mode . . . . . . . . . . . . . . . . . . . . . . . . . . . . . . . . . . . . . . . . . . . . . . . . . . . . . . . . . . . 7•3
Editing and Saving POD Channels with the Floor Board . . . . . . . . . . . . . . . . . . . . . . . . .7•3
Tap Tempo. . . . . . . . . . . . . . . . . . . . . . . . . . . . . . . . . . . . . . . . . . . . . . . . . . . . . . . . . . . . . .7•4
Tuner . . . . . . . . . . . . . . . . . . . . . . . . . . . . . . . . . . . . . . . . . . . . . . . . . . . . . . . . . . . . . . . . . .7•4
Wah Pedal. . . . . . . . . . . . . . . . . . . . . . . . . . . . . . . . . . . . . . . . . . . . . . . . . . . . . . . . . . . . . . 7•5
Volume Pedal . . . . . . . . . . . . . . . . . . . . . . . . . . . . . . . . . . . . . . . . . . . . . . . . . . . . . . . . . . . 7•5
Effect On/Off Setting Stored with Programmed Channels . . . . . . . . . . . . . . . . . . . . . . . .7•6
FB4: Simple Foot Control for POD . . . . . . . . . . . . . . . . . . . . . . . . . . . . . . . . . . . . . . . . . . 7•7
Page 6

CHAPTER 8: D
MIDI Basics . . . . . . . . . . . . . . . . . . . . . . . . . . . . . . . . . . . . . . . . . . . . . . . . . . . . . . . . . . . . . . . . . . . . . . . . 8•1
What’s MIDI?. . . . . . . . . . . . . . . . . . . . . . . . . . . . . . . . . . . . . . . . . . . . . . . . . . . . . . . . . . . . . . . . . . . 8•1
MIDI In/Out . . . . . . . . . . . . . . . . . . . . . . . . . . . . . . . . . . . . . . . . . . . . . . . . . . . . . . . . . . . . . . . . . . . 8•1
MIDI Channel . . . . . . . . . . . . . . . . . . . . . . . . . . . . . . . . . . . . . . . . . . . . . . . . . . . . . . . . . . . . . . . . . . 8•2
MIDI Messages. . . . . . . . . . . . . . . . . . . . . . . . . . . . . . . . . . . . . . . . . . . . . . . . . . . . . . . . . . . . . . . . . . 8•2
Transferring Sounds Between Bass PODs . . . . . . . . . . . . . . . . . . . . . . . . . . . . . . . . . . . . . . . . . . . . . . . . . 8•4
Transferring All Sounds . . . . . . . . . . . . . . . . . . . . . . . . . . . . . . . . . . . . . . . . . . . . . . . . . . . . . . . . . . . 8•4
Transferring Some Sounds . . . . . . . . . . . . . . . . . . . . . . . . . . . . . . . . . . . . . . . . . . . . . . . . . . . . . . . . . 8•4
Backing Up POD Programs to Other Devices . . . . . . . . . . . . . . . . . . . . . . . . . . . . . . . . . . . . . . . . . . . . . . 8•5
Transferring All Sounds . . . . . . . . . . . . . . . . . . . . . . . . . . . . . . . . . . . . . . . . . . . . . . . . . . . . . . . . . . . 8•5
Transferring Some Sounds . . . . . . . . . . . . . . . . . . . . . . . . . . . . . . . . . . . . . . . . . . . . . . . . . . . . . . . . . 8•5
Emagic SoundDiver Software . . . . . . . . . . . . . . . . . . . . . . . . . . . . . . . . . . . . . . . . . . . . . . . . . . . . . . . . . . 8•6
Other Things You Can Do with MIDI. . . . . . . . . . . . . . . . . . . . . . . . . . . . . . . . . . . . . . . . . . . . . . . . . . . . 8•7
Changing POD Channels with MIDI Program Changes . . . . . . . . . . . . . . . . . . . . . . . . . . . . . . . . . 8•7
Tweaking POD Tones with MIDI Controllers. . . . . . . . . . . . . . . . . . . . . . . . . . . . . . . . . . . . . . . . . . 8•7
Full MIDI Automation of POD . . . . . . . . . . . . . . . . . . . . . . . . . . . . . . . . . . . . . . . . . . . . . . . . . . . . . 8•7
Step-By-Step with SoundDiver . . . . . . . . . . . . . . . . . . . . . . . . . . . . . . . . . . . . . . . . . . . . . . . . . . . . . 8•9
Other SoundDiver Tips . . . . . . . . . . . . . . . . . . . . . . . . . . . . . . . . . . . . . . . . . . . . . . . . . . . . . . . . . . . 8•13
SoundDiver Troubleshooting. . . . . . . . . . . . . . . . . . . . . . . . . . . . . . . . . . . . . . . . . . . . . . . . . . . . . . . 8•14
APPENDIX
A: Amp Models & Cabinet Models
B: Effect Parameters: Tweaking & More
C: MIDI Program Changes
D: MIDI Controls
E: Line 6 Contact: Customer Service & Other Line 6 Products
F: Warranty Info & Instructions for Obtaining Factory Service
EEP EDITING
MIDI Program Changes. . . . . . . . . . . . . . . . . . . . . . . . . . . . . . . . . . . . . . . . . . . . . . . . . . . . . . . 8•2
MIDI Controllers. . . . . . . . . . . . . . . . . . . . . . . . . . . . . . . . . . . . . . . . . . . . . . . . . . . . . . . . . . . . 8•2
MIDI Sysex Commands. . . . . . . . . . . . . . . . . . . . . . . . . . . . . . . . . . . . . . . . . . . . . . . . . . . . . . . 8•3
& MIDI C
ONTROL
Page 7

Q
UICK START GUIDE
:
“M
ANUAL
DON’T NEED NO STINKING MANUAL
? I
!”
Q
UICK
“M
ANUAL
1. Turn the POD O
2. Plug the POD AMP M
input, or plug the AMP M
loop return. Or connect headphones to the POD’s PHONES jack.
2. If you’re plugged into an amp, set A.I.R. switch to ‘AMP.’ Otherwise,
set it to ‘DIRECT.’
3. Plug the power adapter into the POD P
plug the other end into an AC wall socket.
4. Connect your bass to the POD I
5. Flip the P
6. Select an AMP M
7. Set the C
heart’s desire. OUTPUT LEVEL sets the output level (duh).
8. Pick an E
EFFECTS TWEAK so you’re happy with the sound.
9. Browse pre-programmed settings using the UP/DOWN arrows.
You can press the M
gives you where-the-knobs-are-is-how-it-sounds operation.
10. What number 10? You’re already up and running!
S
TART
? I
DON’T NEED NO STINKING MANUAL
UTPUT LEVEL
OWER
switch near the POD power connector to fire up.
ODEL
HAN VOL
FFECTS setting and adjust the COMPRESS (compressor) and
G
UIDE
or:
control down to zero.
ODEL OUTPUT
ODEL OUTPUT
.
to max and the B
ANUAL button for a “Manual Override” that
into your recorder or mixer’s
into your amplifier’s effects
OWER CONNECTOR
NPUT JACK
ASS
.
, MID, and T
REBLE to your
, then
1 • 1
!”
But wait, before you go any further, flip to the inside back cover of this manual and
notice that it folds out. The idea is to have this handy pictorial reference always
opened out while you’re thumbing through the manual. If you photocopy the back
of it, you’ll have a handy template for making a note of your favorite POD
settings. Now then, before you run off....
REGISTER AND GET GREAT FREE STUFF!
Included in this manual is a handy, postage-paid card for you to send back to us to
register your purchase, and let us know a little about yourself. It is
very important
Page 8

QUICK START GUIDE: GET ON-LINE
1 • 2
that you fill that registration card out right now, and send it to us in the mail or
jump on the internet and register at the Line 6 Support Center – www.line6.com.
How come? Well, for one thing, it gets you all set up for warranty service should
you ever have a problem with your POD. (Warranty info is at the end of this
manual.) It also ensures that we will be able to contact you if new software
versions or other enhancements are offered – cutting edge technology and all that.
GET ON-LINE
Here at Line 6, our mission is to bring powerful new technologies to musicians. As
part of that mission, we focus great effort on making the Internet a valuable
resource for every one of our customers. You may already have surfed the Line 6
site at http://www.line6.com when you were considering your purchase, and
found all the information already there on Line 6 products and technologies.
The Line 6 web site is one of the most effective ways for us to bring you what you
need. Through the Internet, we can give you instant access to all kinds of great,
free stuff to make you and your POD ever more powerful. Like easy email access to
our product support experts, handy tips & tricks, electronic versions of this and
other documentation, the latest news of what’s happening with Line 6 and the
products we make for you, and....
Line 6 ToneTransfer and Discussion Forums: Visit the web site, and you’ll
find a powerful way to connect to other Line 6 users. Swap sounds, get and give
advice, and generally hang out and get POD-a-licious, all from the privacy of your
own comfy computer chair!
Already on the Internet? Great! Visit us often and check out the late-breaking
news and the other resources there. Not on the Internet yet? This may be the time
to make the big jump, and thereby ensure that you will get all the great resources
we can offer for you and your POD.
Page 9

INTRODUCTION: WELCOME THE POD...
INTRODUCTION
WELCOME THE POD...
Thank you for inviting a POD home with you. Whether you use your POD as a
direct recording miracle, a stomp box on steroids, for practice, or as a creative
digital signal processing tool – and heck, why should it be just one? – we think
you’ll agree that POD is about the most amazing thing to happen to electric bass
since the addition of a low B-string. POD mines the tonal heritage of the past forty
years of bass amplifier design and matches it up with the kind of digital signal
processing magic that will still be ahead of its time in the next century.
How does Bass POD help you create tone that is out of this world, and then get
that tone wherever you need it? Easy! It’s…
MODELING
1 • 3
Modeling: just what is it, and why is it so important? (By the way, you sent in that
registration card or did it on the web, right? OK, just checking.)
At its most basic, modeling means making a software-based system that delivers
the same experience as a traditional system based on physical electronics, wood,
and all the rest. Line 6 makes software that captures the heart and soul of the
components of classic amp and cabinet designs, and delivers that tonal heritage to
you in your POD. It all got started a while ago in a Los Angeles laboratory....
The engineers at Line 6, being an adventurous lot, and totally pumped about this
whole tone thing as well, decided to stock up on the coffee, bust out the
engineering equipment, and get down to learning everything there is to know
about classic amp and speaker cabinet designs. Riding high on the caffeine wave,
they began a three-year project to analyze and map out exactly how different types
Page 10

INTRODUCTION: WELCOME THE POD...
1 • 4
of tubes, other electronics, and cabinets respond under various conditions typical
of amplifier design. How the amps process an input signal, how the signal is
colored and shaped, at what point it begins to distort, the quality and
characteristic of the distortion, the important role speaker cabinets play in
communicating great tone – complicated stuff, but all analyzable as electronic
data. A guitar or bass pickup output, after all, is an electronic signal, and tubes and
the rest of the system are really just a complex form of signal processing.
Having sussed it all out, the Line 6 engineers were then able to apply their digital
expertise to develop software which simulates the signal processing of the tubes
and other electronics, as well as the speaker cabinets, entirely within the digital
domain. Cool, huh?
This revolutionary DSP (digital signal processing) software-based modeling
technology gives Line 6 the power to create super silicon-based life forms like
POD: a tonally mind-blowing, multi-FX packed, shiny wonder box with ultimate
flexibility for creating awesome tone....
AMP & CAB MODELS
This modeling know-how allowed Line 6 to create software Amp and Cab Models
modeled after a collection of amplifiers and speaker cabinets recognized by players
the world over as true “tone classics.” We got these amps and cabs together,
cranked ’em up, and had a look at the electronic data generated by the tubes,
transformers, capacitors, plate and grid voltages, tone control curves – and the
whole mess of components and elements unique to each amplifier design. This
research led to the creation of Line 6’s software Amp and Cab Models. These
models were tweaked up through careful, scientific A/B comparisons to the gear
that inspired them, with an ear open for the effects of different volume levels and
settings of the originals’ tone and gain controls. The gain and equalization
characteristics of the modeled amps were carefully measured so that changes to
amp knobs on the models would mirror the effects of these changes on the
originals as closely as possible. We’re talkin’ major attention to detail here. Tone
control center frequencies, slopes, and cut/boost range were painstakingly
analyzed, and we also carefully attended to the effect of presence switches, “bright”
channels, and other model-specific factors. Not only that, but since these old amps
Page 11

INTRODUCTION: WELCOME THE POD...
have highly interactive circuits, we paid careful attention to the way that the
setting of one knob changes the way that another knob on the amp behaves.
All in an effort to make our Amp and Cab Models as much like the amps and cabs
we modeled as possible.
The resulting Amp and Cab Models are the foundation of your POD. Now, then –
here are a couple of things we want to be completely crystal clear on:
1. The Line 6 modeling process is a patented, 100% digital software-based
technology exclusive to Line 6.
2. Line 6 Modeling is not sampling, nor is it solid state; no special bass, pickup,
or cabling is needed.
THERE’S MAGIC IN THE A.I.R.
POD delivers its modeling tones through another innovation: Line 6's A.I.R.
direct recording output. The A.I.R. (acoustically integrated recording) technology
is the result of intensive research and careful study of the tonal characteristics
produced by the interaction of amplifiers, cabinets, speakers, microphones and the
recording room during the recording process.
The direct output of many preamps, amplifiers and direct box-style amp
replacements available today offer some limited form of cabinet simulation or
speaker emulation. Those that happen to be more than simple high end roll offs
have little or no control options. These cabinet simulations cannot reproduce the
markedly different tones of different cabinets which arise from the choice of
speakers, wood, and other design elements. They also fail to reproduce the
significant tonal contribution of microphone selection and placement, and do
nothing to reproduce the subtle ambience of the recording space.
1 • 5
The result is the familiar dissatisfaction with direct recording products – even
those that deliver a reasonably usable basic tone fail to reproduce the “life” of the
sound, and destroy the proper feel in the process. Your sound lost its magic.
POD's combination of Amp Models and A.I.R. technology provides superior
direct tones by recreating all the elements contributing to a great recorded bass
sound, and giving you that tone with the same feel as playing through a classic
amp and speaker cabinet:
Page 12

INTRODUCTION: WELCOME THE POD...
1 • 6
• The effect of the amplifier electronics is emulated by the Amp Model you
choose. Each model was developed from extensive study of a classic amplifier
treasured as a tone classic.
• In a bass amp, once the signal passes through the electronics, it is output to one
or more speakers in a speaker cabinet. The specific design of the speakers, how
many there are, and how they are arranged contributes significantly to your
tone, as does the construction and resulting tone of the wood box itself. An
Ampeg SVT head driving a single 15-inch speaker in an open-back cabinet, for
instance, will sound dramatically different from the same head driving a 8x10
closed-back cabinet. Line 6 has carefully constructed virtual software speaker
cabinets that emulate the contribution made by real speaker cabinets to great
bass sound.
• Once the sound makes it out of the speaker cabinet, the next important link in
the recording system is the microphone that receives that sound. Bass recordists
select different microphones, and arrange them in different placements, to get
particular sounds. A microphone pointing directly into the cone of a speaker
will hear something different than one positioned off-axis. Line 6 carefully
analyzed the coloring that standard microphones add to the sound, as well as the
effects of different mic placement techniques, and developed a set of cabinet
simulations that give you the tone of great speaker cabinet and microphone
combinations.
• The amp, cabinet, and microphone don't just sit in empty space. The room that
they are in contributes importantly to the sound you will record. Reverb can be
used to capture the basic character of the space, simulating the effect of the
sound reflecting off the room's walls, floors and ceiling. But there are other
subtle details that have more to do with the “spread” of the sound as it passes
through the air between the speaker and microphone. This final component is
the key to the sense that the listener is in one position in the room, and the
sound is in another position, and that the two are separated by a mass of air that
sound spreads through to reach the listener.
All of these important sound-shaping components are accounted for in your POD.
Turn the Amp Model knob to call up the amplifier emulation you want. POD
automatically matches that amplifier with an appropriate cabinet and microphone
setup, and gives you the sound of that setup coming through the air of a recording
space. You can add effects to taste, and start recording incredible mic'd up sound.
The included SoundDiver MIDI-control software lets you use a Macintosh or
Windows computer to do “deep editing” of these and other POD parameters. With
Page 13

INTRODUCTION: WELCOME THE POD...
it, you can design your own custom rig, making new combinations of Amp Model
and cabinet/microphone emulation, and adjusting the contribution of the “spread”
of the sound as well.
The A.I.R. direct recording output is exclusive to Line 6. In combination with
Line 6's Amp Models, it is the key to POD's phenomenally satisfying direct
recording sound.
LET’S GO OUT...
While doing the research for your POD, we asked leading bass players and
recording engineers what’s the best way to record great bass tone. Their answer
was clear: You need two tracks, one for the mic’d up amp, and another for a high
quality direct input from the bass. That’s why your POD had two distinctly
different outputs – both serve up great tone, each with its own purpose. Be sure to
get all of the juicy details in Chapter 3.
TONETRANSFER
With your POD, you get a constantly-expanding universe of sounds. We created a
ToneTransfer Web Library for the original guitar POD at www.line6.com –
searchable by artist, musical style, and more. Look for a Bass POD ToneTransfer
library as well, where you’ll be able to grab great sounds or post your own. The
sounds you collect transfer seamlessly between Bass PODs and any Macintosh or
Windows based computer – so wherever you go, all your sounds can make the trip.
1 • 7
AND AWAY WE GO....
So, now that you know what’s in store, it’s time to experience POD for yourself.
Grab your favorite axe, plug in to POD, and flip back to the handy Quick Start
Guide on the first page of this chapter if you haven’t already been through that.
Then, press ahead to the POD Grand Tour....
Page 14

CONTROLS & CONNECTIONS
CONTROLS & CONNECTIONS
If you haven’t already done so, turn to the inside back cover of this manual and
notice that it folds out. Ooh, pretty pictures! The idea is to have this essential
pictorial reference always opened out while you’re thumbing through the manual.
And if you photocopy the back of it, you’ll have a handy template for making a
note of your favorite settings. The boxed numbers that pop up throughout the
manual correspond to the numbers on the foldout’s illustrations.
1
Power Switch - Right edge of POD. Flip this to bring your POD to life.
2
Input - Bottom right side of POD illustration. Plug your bass in here. (You
techies will want to know this is a mono, unbalanced connection).
2 • 1
Phones - Bottom left side of POD illustration. Plug in your headphones here
3
for silent practicing. Volume’s set by the Output Level knob. The headphone
amplifier is designed to provide hot signals for a variety of headphones. As a result,
you can get very loud output from this connector. Be sure to set levels carefully so
you don’t blow your head off when listening to your POD through your phones.
Note: when you plug in the headphones, the modeled sound will be output
at both the Amp Model and D.I. Outputs, and A.I.R. processing will
automatically be turned on to give you the speaker-mic-room experience in
the phones. So, if you want to use the D.I. output (when recording, say) or
you don’t want the A.I.R. processing (when feeding the front of a combo
amplifier, say), make sure you don’t have the headphones plugged in.
5
Page 15

CONTROLS & CONNECTIONS
4
Output Level - Far left knob on the POD illustration. Controls the
overall output level of POD. Also sets the headphone level. This setting is not
saved when you store settings into one of the POD’s memory locations. Changing
2 • 2
the Output Level does not change your tone. So you can get the tone you want at
any volume level.
POD will give the best signal-to-noise ratio performance when you have the
Output Level control at max. With the Output Level control turned down low, you
may get extra hiss that obviously ain’t what you want. In order to allow you to set
the Output Level as high as possible with recording, mixing, and other studio gear,
be sure you are plugging POD’s outputs into line level, not microphone or
instrument level inputs. Line level inputs should allow you to turn POD’s Output
Level up all the way (or close to it) and thereby get the best sound possible. If your
gear has inputs that function as mic/line level inputs, try to set the trim for those
inputs to the minimum level, and POD’s Output Level to maximum, when setting
your levels.
5
Amp Model and D.I. Outputs - Top left of POD illustration. These
are balanced 1/4" TRS connectors, and ready to rock with pro +4 dBu balanced
equipment. They will also work happily with unbalanced -10 dBV equipment and
standard instrument cables. If you only have one input to plug into, use the AMP
MODEL output. Details in Chapter 3.
6
A.I.R. Mode - Between AMP MODEL and DIRECT Outputs. We
discussed the benefits of POD’s A.I.R. output in the first chapter of this handbook.
When you’re setting up with POD, here’s the thing to know: if you’re plugging
your POD into a bass amplifier to use POD as a “front end” to change the amp’s
tone, flip the A.I.R. Mode switch to AMP, and set your amp for a clean tone. This
defeats the speaker-microphone-room tone simulation of the A.I.R. processing. If
you’re using POD in almost any other setup (plugging direct into a mixer, recorder,
PA, power amplifier, etc.) you want the DIRECT position of this A.I.R. switch.
Page 16

CONTROLS & CONNECTIONS
When running into an amp, be sure NOT to plug in headphones, as they will
override the A.I.R. switch position and turn A.I.R. on so that things sound right in
the headphones, but wrong on your amp. See Chapter 3 to learn how to tune
POD for your setup.
7
Foot Pedal Connector - Top of POD illustration. Looks like a
telephone connector on steroids. This is where you connect the optional Line 6
Floor Board or FB4 foot controllers.
8
MIDI In & Out - Top right of POD illustration. Connect POD to your
MIDI equipment to select channel memories (via Program Change messages) or
automate POD settings (via controllers and/or Sysex). Emagic SoundDiver
software is included on the POD Tools CD for sound editing/storage on a
computer. The POD MIDI OUT connects to another device’s MIDI IN; its MIDI
IN goes to another device’s MIDI OUT. Please also see Chapter 9, Deep Editing
and MIDI Control, to setup your MIDI gear with POD and find out what MIDI
can do for POD and you.
2 • 3
Manual Button - In the middle of the POD. Press this button to light it
9
and activate Manual Mode. In this mode, wherever the knobs are set is what you’re
hearing. Move knobs around to change sounds. Or....
Channel Up/Down Buttons - To the left of the Manual button.
10
The POD has 36 channel locations (POD is like a 36-channel amp) that store a
huge variety of complete amp-and-effect selections pre-programmed by the tone
mavens at Line 6 to rock your world. They are arranged in nine banks of four
channels each. (The four are called A, B, C, and D.) You can think of each bank as
Page 17

CONTROLS & CONNECTIONS
a sort of virtual four-channel bass amp – and you’ll find that the same layout is used
on the optional Line 6 foot controllers for POD (the Floor Board and FB4) which
are discussed later in their own chapter. You access POD channels by pressing the
2 • 4
Up and Down buttons. Tap either button to move to the next channel in the
bank; press and hold down either Up or Down button to jump from bank to bank.
The Manual button’s light goes off to let you know you’re not in Manual – the
“where-the-knobs-are-is-how-POD-sounds” – Mode anymore. When recalling a
channel, its settings will not be reflected by the present knob positions – like you
may have left the Bass knob at minimum whereas the just-recalled channel has this
control set to max. To change anything, just grab the knob you want and tweak.
More on all that later.
11
Amp Models - Bottom left knob on the POD with words all round it. When
you spin this knob, it’s essentially like changing what electronic “circuitry” is
running inside POD to make your amp sound. (Also see Modeled Amps and
Cabs in Chapter 4.)
When you choose an Amp Model, a Cabinet Model is also loaded automatically.
For instance, when you choose the Rock Classic model (based on the classic
Ampeg SVT head), a Cabinet Model based on a AMPEG SVT 8x10 will be loaded
with it. You can choose a different cabinet via the Effects/Cab knob (below). In
fact, in your Bass POD, all amp-related settings are automatically loaded when you
turn the Amp Models knob. Drive, Bass, Mid, Treble, Cab, etc. will all be
determined by the Amp Model you choose – giving you a ready-to-rock sound with
the turn of just this one knob. Once you get familiar with POD, you can change
these Amp-associated settings to customize the settings of each of the Amp Models
to fit your tastes. Complete details are in Chapter 6.
Page 18

CONTROLS & CONNECTIONS
12
Drive - Knob to the left of the button panel. This knob controls how hard
you’re driving the input of the chosen Amp Model. Like the input volume control
on a non-master volume bass amp, higher settings give you more “dirt.”
13
Tone Controls - Following the arc of knobs up and to the right. Bass,
Middle, Treble. Just like a regular bass amp, only when you change Amp Models,
the response and interactivity of the controls changes, too – to act like the tone
controls of the original amp that inspired the Amp Model you’ve selected.
Chan Vol - This knob controls the relative volume level of the “channel”
14
you are playing through. Use this to balance levels between the sounds you store in
two different POD channels (say between your fingerstyle and thumb tones). In
general, you want to set the Chan Vol as high as possible to insure you’re getting
the best signal-to-noise ratio performance.
2 • 5
15
Compress - How much compression do you want today? Spin this knob
to set the Compressor level. Since compression plays such a vital role in
successfully recording the bass, we’re included this awesome sounding
programmable compressor modeled after the legendary studio compressor, the LA2A. Turn the knob up for more compression; at the minimum knob position, the
compressor is turned off. More details in the Effects Chapter.
16
Effect Tweak - This knob varies the effect you’ve chosen. Turn it up and
the effect will go deeper, louder, faster, longer or just plain more. For all the inside
poop, look at the back cover foldout, Appendix B for Effect Parameters, and the
Effects chapter. If you set the Effects knob to Bypass, Effect Tweak will, of
course, not change anything.
Page 19

CONTROLS & CONNECTIONS
17
Effects/Cabs - This knob selects which effect or combination of effects
you get (once again, all the details on effects are in the POD Effects chapter), and
also selects which cab model you’ll be hearing. To choose a Cabinet Model, press
2 • 6
the CABS and EQ button first, and then turn this knob; the available cabinets
are labeled in gray around the knob. Turning the Amp Models knob to choose an
Amp Model will automatically select an appropriate cabinet; you can customize
this Amp/Cab pairing, as described in Chapter 6.
18
Tuner - Button in the middle of the POD. Press that puppy and – shazam!
Instant digital chromatic tuner. All POD’s Amp Model and effects processing are
bypassed so you can hear those questionably-tuned strings clearly, should you
choose to do so. Play a note on your bass and POD will show you what it is on that
handy single-character display; all notes are displayed as naturals or flats, so you’ll
see A instead of G . Play that string you’re trying to tune again, spin its tuning key
so it goes sharp and flat, and two little red arrows below the Tuner button will give
you a light show. The idea is that the left pointing arrow will light if you’re sharp.
The right pointing arrow will light if you’re flat. And both arrows will light at the
same time when you’ve got it just right. Give any one of POD’s buttons a push and
the tuner disappears just as swiftly as it came and you’re right back to normal POD
operation.
Tuner Volume - You can adjust the tuning volume of your POD by turning the
Chan Vol knob while the tuner is active. When you exit tuner, you may need to re-
set this knob to get the right Channel Volume setting. Alternatively, if you have a
Floor Board connected, the volume pedal will control the tuner volume, too.
Tuner Reference - Want a different reference than A=440Hz? When you’re in
the tuner mode, turn the Middle knob on POD while watching the display. Hey, it
changes! You can set the reference frequency anywhere from 436-445 Hz. This
setting is stored so you don’t have to reset it every time you turn on POD if you
decide you want to be different (or if that piano in your rehearsal room has decided
it wants to be different). Since there’s only one digit in the POD display, all we
display is the last number, so if you set the tuner to reference 441 Hz, you’ll see “1”.
Page 20

CONTROLS & CONNECTIONS
19
Apply FX to D.I. - This button determines if the juicy effects you’ve
programmed will also be heard on the D.I. output. (They’re always heard on the
AMP MODEL output.) More FX details in the POD Effects chapter.
20
Cabs and EQ - When this button’s light is flashing, there are three
things you can do. Here are the details:
Cab Model Select (Effects Knob): Make sure the Cabs and EQ button’s light
is flashing, then spin the Effects/Cab knob to select any of the 15 modeled bass
cabinets.
Post-Modeling EQ (Bass, Middle and Treble Knobs): This is an extra
parametric-type EQ that can be used to fine tune your POD sounds. Use it to
remove resonant frequencies of a particular bass, or to add that “little extra
something” to your favorite amp model, or you can choose to simply ignore it. In
any case, this is how you get to it: Make sure the Cabs and EQ button’s light is
flashing, then use the Bass knob to select the EQ Frequency, the Middle knob to
select a narrow or broad range of frequencies, and the Treble knob to apply up to
+12db of boost, or an infinite amount of cut. Treble at 12 o’clock turns this EQ off.
2 • 7
FX Lo-cut (Chan Vol Knob): Make sure you’re sitting for this, because it’s one of
those features that will knock you off your feet. After countless interviews with bass
players, we got the picture that effects are cool, but must not mess with the
fundamental bass tone. Enter the FX Lo-cut effects crossover. This special feature
allows you to send the higher frequencies to the effects, all the while leaving the all
important fundamental frequencies untouched and free to be felt and heard
without effectification. It’s kinda like serving up your main course (the
fundamentals), and then adding the secret sauce (the effects) as a seasoning –
instead of drowning the whole thing in mayo. Tasty indeed! Make sure the Cabs
and EQ button’s light is flashing, then spin the Chan Vol knob to set the
frequency of the FX Lo-Cut. Turn this knob to minimum for no lo-cut (so your full
signal feeds the FX).
Page 21

CONTROLS & CONNECTIONS
20
Cabs and EQ “Press-and-Hold Functions” - These are the
features that are important to some-of-the-models, some-of-the-time:
2 • 8
Mid Frequency Sweep (press and hold Cabs And EQ, turn Effect Tweak): Six
of the amps that we modeled for your POD include some kind of “selectable” or
“sweepable” mid control. Our models just wouldn’t be right if you couldn’t do the
same, so “voilá”– your very own Mid Sweep control! This function only applies to
the Adam & Eve, Amp 360, Rock Classic, Session, Stadium, and Sub Dub models.
So don’t be calling our lovable customer service folks when it doesn’t work on the
Flip Top model, okay? Details of the frequencies that are sweepable can be found
with the Amp Model descriptions in the Amp Models chapter.
Noise Gate (press and hold Cabs And EQ, turn Compress): Your POD
includes a built-in noise gate, intended to reduce the hiss and noise amps tend to
put out when you’re not playing, especially at high gain settings (since high gain
means that noise is turned up along with your awesome sound). To turn the Noise
Gate on, press and hold the Cabs and EQ button, then turn the Compress
knob to the right until it’s past the 1 o’clock position. To turn off the Noise Gate,
press and hold the Cabs and EQ button, then turn the Compress knob to the left
until it’s below the 11 o’clock position.
21
Save - When you want to store your own tweaked-up sounds in your POD,
this button is the key. Exactly how it works is detailed in Chapter 6: Creating &
Storing Sounds. But you’re probably impatient, so here are the basics:
When you are using one of the pre-programmed POD sounds, the POD’s singledigit number display will be lit, telling which bank you are in – 1 thru 9 – and one
of the channel letters – A thru D – will be lit also. If you turn one of POD’s knobs,
you’ll notice the word “EDITED” will be lit to the left of the POD single-digit
display. This is a reminder to you that you have tweaked the memorized channel,
and that you should save it if you want the memory to remember the tweak. To save
your changes, press the Save button . The button will start to flash. Press the
Up and Down buttons and you will see that you are switching through
10
21
Page 22

CONTROLS & CONNECTIONS
memory locations A, B, C, and D in each of POD’s nine numbered banks. Pick
one to store your sound in, and press that Save button a second time. The button’s
light will stop flashing, and the sound is stored at the location you chose, replacing
the sound that was stored there before. Doesn’t get much simpler than that. After
the sound is stored, you can bring it back any old time by simply pressing the Up
and Down buttons to call up the location where you stored it. (See Chapter 7 to
learn how to do all this with your feet on the Floor Board).
If you aren’t using one of the pre-programmed POD sounds – you’re in Manual
mode, and you’re just getting the sound of where the knobs are set – you can store
that state into a memory location the same way. Press Save, use the Up and Down
buttons to choose a place to save to, and press Save again. If you decide you don’t
want to store the sound after you’ve started saving, press the Manual, Tuner, or
MIDI button to cancel the save. (The save will also be canceled if you don’t press
any buttons for 5 seconds after having pressed Save.)
You may want to audition the memorized POD “preset” sounds before you start
saving anything. Note the ones you can live without as locations you can save over.
The Save button also lets you customize any of the Amp Models and Effects to
your own taste, so your customized version of the amp or effect comes up instantly
when you turn Amp Models or Effects. See Chapter 6 for the details on that.
2 • 9
22
MIDI - This button is used to set POD’s MIDI channel and dump sounds
via MIDI. Details are in the Deep Editing & MIDI Control chapter.
Page 23

GETTING SET UP: ALL PURPOSE BASICS
GETTING SET UP
The numbers in black boxes below refer to the back cover foldout’s POD illustration.
ALL PURPOSE BASICS
Plug POD’s power supply into the wall, and connect it to the power input on the
right edge
you want to listen to POD with headphones, plug them into the Phones
If you’re gonna be PODding in a recording studio, you’ll want to check out
Scenario One.
If you’re using POD for practice or live gigs, flip forward a few pages and read up on
Scenario Two.
of your POD. Plug the output of your bass to the POD Input . If
1
3
3 • 1
2
jack.
DUAL OUTPUT DESIGN
While doing the research for your POD, we asked leading bass players and
recording engineers what’s the best way to record great bass tone. Their answer
was clear: You need two tracks, one for the mic’d up amp, and another for a high
quality D.I. (direct input) from the bass. That’s why your POD had two distinctly
different outputs – both serve up great tone, but each has its own purpose.
Dual (not dueling) Outputs
AMP MODEL Output – this is where the magic lives. Juicy, punchy, organic,
fat, sweet (insert your own food adjective here) tones that have graced our ears for
over 40 years. The AMP MODEL output serves up all of the modeled amp, cab
and effects tones that are created by your POD. This is the output that takes the
5
Page 24

GETTING SET UP: SCENARIO ONE – IN THE STUDIO
place of mic’ing a great amp. Recording engineers use this track as the
“personality” and “vibe” part of the bass tone.
3 • 2
D.I. Output – this output serves as a high quality D.I., and can be sent to your
recorder/console with or without effects (thanks to the Apply FX to D.I.
button). This second track functions as reference and/or articulation support for
the dazzling amp tones coming out of the other output.
By mixing the AMP MODEL and D.I. outputs, you can achieve just about any
great bass sound known to man, plus a few new ones that can probably only be
created with your POD.
5
SCENARIO ONE – IN THE STUDIO
If you’re going to be using your POD in a recording situation, here’s what you need to
know to get set up:
19
Mount Up
When you’re looking for the perfect spot to put your POD, you’ll want to know
about the optional POD mic stand / amp top adaptor you can get from Line 6 – it’s
described on the accompanying CD and the Line 6 web site (where it can also be
purchased). We know this is a shameless plug to get you to buy more gear, but
what the heck – you just may want some! And a POD carry bag....
Page 25

GETTING SET UP: SCENARIO ONE – IN THE STUDIO
Gimme Some A.I.R.
If you’re plugging POD’s output into anything other than a bass amplifier’s input or
effects return, flip the
the A.I.R. DSP is active, and you are getting a virtual version of the speakercabinet-air-microphone experience that’s so good you may never use a regular
amplifier and microphone set up again. The POD 1/4" TRS outputs are versatile,
merrily sending their magic tones into +4dBu balanced, or -10dBu unbalanced
inputs. Quality cables are obviously recommended for best performance.
A.I.R. switch to its DIRECT position. In this mode,
6
Pick the Right Inputs
If you’re hooking your POD up to a recorder, mixer, or other equipment, be sure
you are plugging its outputs into line level inputs on your other gear, as opposed to
microphone level or instrument level inputs. This will insure that you get the best
signal-to-noise ratio (lots of juicy tone, not too much hiss) with POD. Some
equipment uses the same physical inputs for mic & line level sources, allowing you
to trim low level signals (like mics) up to a high level at the inputs. If you are
plugging your POD into one of these inputs, try setting the trim to minimum, and
twisting POD’s Output Level and Chan Vol knobs up to maximum. If your
equipment has a couple of open line-level only inputs, you’ll probably get better
performance by plugging into these, rather than the wide-ranging mic-to-line level
trimmed inputs.
3 • 3
Ready To Play Anywhere
POD makes friends easily. It’s right at home next to a multiple hundred thousand
dollar, bajillion input SSL console, and will just as happily do its thing with your
portable cassette recorder. Here’s how to hook up, starting from the simple stuff
and working our way up the recording system food chain:
Page 26

GETTING SET UP: SCENARIO ONE – IN THE STUDIO
11
SMALL PORTABLE STUDIOS
3 • 4
Connect the AMP MODEL Output of the POD to the input of your system.
Make sure the A.I.R. switch is set to DIRECT, plug your bass into the
input, and away you go. Set your POD Output Level
plenty of signal feeding into your gear, but not so loud that it’s overdriving your
system and distorting. Try the Amp Models knob to Eighties, Drive at
the 11 o’clock position, and Chan Vol at Max. Now play with the POD
Output Level knob and any input volume control on your system so you can get
the maximum sound level out of your POD without going so far that you overdrive
the input and cause unwanted distortion. If you’ve got some headphones handy,
you can plug them into the POD headphone output to make sure that it sounds
the same as what you hear through your system. Before you strap the phones on
your ears, be careful that the headphones aren’t too loud, since their level is set by
the Output Level, too.
6
14
5
2
so that you’re getting
4
12
Page 27

GETTING SET UP: SCENARIO ONE – IN THE STUDIO
BIG TIME CONNECTIONS
With bigger setups including a mixer and a multi-track recorder, or with new
fangled setups like computer-based and stand-alone Digital Audio Workstations,
you’ve got a couple choices. If you’re a MIDI computer user, you’ll also want to
check out the Deep Editing & MIDI Control chapter to learn about the
complete MIDI control available with the POD, including the SoundDiver editor/
librarian program that’s included on the POD Tools CD.
Look Mom, I’m recording like a pro!
This is where you get to use both of those nifty outputs, and impress your friends
with your vast recording knowledge ta boot! Make sure the POD A.I.R. switch
is set to DIRECT. The “normal” thing to do is plug your bass into POD, and then
connect your POD’s +4 dBu dual TRS 1/4" AMP MODEL and DIRECT outputs to
the inputs of your system (the POD outputs are also perfectly happy connecting to
-10 dBV and unbalanced equipment). POD will process your bass as you play, and
you can print that processing to tape (or disk) as you make your tracks. For most
situations, you’re all done hooking up. Go record some gold records.
6
3 • 5
Changing History
If you’re up for it, there’s also another hookup option that can give you the exciting
ability to go back in time and change your amp and effect settings weeks after
you’ve recorded your bass tracks, bringing you flexibility and creative control
during mixdown that you could never get with a traditional amplification system.
It’s like this: the simple setup just described in the preceding paragraph is basically
like taking a reverb, running your vocal mic’s preamp into it, and printing the
reverb-processed sound to your recorder’s track. Now you’ve got that vocal
performance, with that reverb setting, on tape (or disk). The more often used
studio setup is to record the vocal to your recorder’s track dry, then use an effect
send on your mixer’s tape return channel to send the vocal to the reverb to audition
the effect processing as you record your track. Finally, when it’s time to mix, you
Page 28

GETTING SET UP: SCENARIO ONE – IN THE STUDIO
can make critical decisions about the verb to insure that it’s fitting in with the rest
of your tracks. You can use a completely different verb if you want to, or no verb at
all – all your possibilities are open. You can use POD like this – in an effect send/
return set up – and get great advantages of flexibility for your tracks. Here’s how this
configuration works, plus other hook-up details:
3 • 6
Direct Injection
First thing to do to play the send/return game is get your bass to deliver a direct
input to your recorder or mixer, or the input of your computer-based audio system.
How about just plugging the bass’ output into a mixer channel? Bass pickups like
to feed into a high impedance load – at least 300 KOhms impedance;
1 MOhm is ideal for the best results. Some mixer inputs are relatively low
impedance, and therefore don’t deliver ideal tone; you will tend to get a darker,
“squashed” sound if you plug the bass in directly to these low inpedance inputs.
To avoid this, we recommend buffering your bass’ signal before the mixer with a
quality DI box or tonally “transparent” instrument preamp. Look for a unit that
delivers clean, uncolored sound. Steer clear of amp simulators. You can use a bass
preamp, as long as it is clean, with a flat frequency response – no tone shaping.
With that said, you can sometimes get acceptable results plugging direct into a
line level mixer channel if you have a bass with hot, active pickups (since the
active electronics’ output can have relatively low impedance). For instance, we’ve
sometimes plugged a bass right into a channel on a Mackie 1202 VLZ, cranked up
the trim, and gotten acceptable results.
Return to Sender
Next, we’re gonna look at how you’d connect your POD to a send and a return
from your system. Which you don’t have to do, but it gives the flexibility we talked
about in the ‘Changing History’ section a page or two back.
Configure things the way you would with a reverb: you want to be able to track
your bass unprocessed, and audition the POD processing as you are playing or
Page 29

GETTING SET UP: SCENARIO ONE – IN THE STUDIO
tracking. So, for instance, if you have a mixer with direct outputs from some or all
of its channels, along with a separate tape or disk recorder, you’ll do something
like this:
3 • 7
Plug the bass into your DI. Plug the DI into a mixer channel with a direct out. Set
the trim on your channel so your input levels look good. Plug the direct output
Page 30

GETTING SET UP: SCENARIO ONE – IN THE STUDIO
10
from the mixer channel into one of your recorder’s track inputs, and set the
recorder to monitor the input to that track. Connect the recorder’s track output to
another mixer channel input that has a direct output. Plug that direct output into
your POD’s input, and plug the POD outputs into two of your mixer’s channel
inputs. Make sure the POD A.I.R. switch is set to DIRECT. You should
3 • 8
be all ready to play your bass and hear it POD-processed, and lay down a track on
your recorder. Then you can play back the track and switch amps, effects,
whatever – welcome to the digital software revolution! And for an even more
revolutionary experience, be sure to check out the MIDI Mania section below,
plus the Deep Editing & MIDI Control chapter to learn how to automate it all.
By the way: don’t monitor the pre-POD and post-POD signals at the same time, as
you’ll get comb filtering that will mess up your sound. (Scary, huh?)
Level Headed
When setting levels in any of the above scenarios, watch carefully for the CLIP
indicator to light on your POD (it’s just under the Up and Down buttons).
This lets you know you’re clipping the POD input and so you need to turn down
the signal you’re feeding it. You should also be sure you don’t send too little level to
POD. As with any audio device, this will result in poor performance.
6
Radiation Alert
You’re also likely to find, especially if you are using a bass with single coil pickups,
that it is quite easy to pick up some serious noise from any computer monitor you
might have in your studio. CRT displays are, after all, just special purpose ray guns
that shoot photons at you all day long. Your bass pickups receive and amplify the
electro-magnetic fields that your display radiates, and you hear this in your audio
signal as buzz and hum. Moving farther from the CRT, and turning your bass so it
does not directly face the computer’s display, will minimize this problem. But if
Page 31

GETTING SET UP: SCENARIO ONE – IN THE STUDIO
you find yourself in a tight studio setup, needing to lay down some quick tracks,
and being pestered by CRT-induced buzz, you may find it helpful to do as we have
sometimes done: set up your track to record and start your pre-roll; reach up and
flick your computer monitor’s power switch off; record your part; stop your
recording, flick the monitor back on, and check out the buzz-free playback.
Pedal Power
POD has a couple of foot control options: the Line 6 Floor Board and FB4. While
we’ll go into all the details in a later chapter, for now, it’s good to know that the
FB4 is a four-button foot switch that allows you to select between four POD
channels and Tap your effect speeds/tempos. Its big brother, the Floor Board,
allows hands-free selection of any of the sounds programmed in your POD’s
channels, plus a wah pedal, a volume pedal, on/off control of effects, and tuner
control. Whichever Line 6 foot controller you choose, it will plug into the POD
Pedal
7
jack. You can also control your POD via a standard MIDI control pedal.
3 • 9
Page 32

GETTING SET UP: SCENARIO ONE – IN THE STUDIO
NOT SO BIG TIME CONNECTIONS
You can run your POD in a send/return type configuration even with a reasonably
sophisticated four (or more)-track recorder or a “native” computer audio system.
(You’ll ideally want more than two channels out and in on your computer system
3 • 10
if you want to mix bass with other instruments.)
Computer users: Plug your bass into the computer’s input (preferably using a DI
to get the signal level right). Make sure the POD A.I.R. switch is set to
DIRECT. Plug the output of the computer into POD and send your bass signal
from the computer through that output, and listen to the POD output cranking
out great amp tone as you play. Remember to check for the CLIP light to
make sure you’re not overdriving POD’s input.
Multi-trackers: Plug your bass into the multi-track’s input (preferably using a DI
to get the signal level right). Make sure the POD A.I.R. switch is set to
DIRECT. Take the output from the track on your multi-track and feed it into your
POD, adjusting the level output to POD so you don’t light that CLIP
indicator. In order to monitor POD through the multi-track, the recorded bass
signal has to be able to go from tape (or disk) to POD without you having to hear
it; otherwise you’ll hear both the direct and POD-processed bass at the same time,
which ain’t no good. So you want a multi-track with direct output from one or
more channels, or pre-fader effect sends (which means you can turn the monitor
level for the track all the way down, while still feeding signal from it to the POD
via its effect send).
6
10
6
10
Page 33

GETTING SET UP: SCENARIO ONE – IN THE STUDIO
MIDI MANIA
And for yet more control (and who can ever get enough) those of you with MIDIcapable studios will find that your POD lets you control everything via MIDI. This
is especially powerful with the send & return setup described above. Using MIDI,
you can automate any POD parameter. So, for instance, you could start recording
a track (with your bass going direct to tape, and POD’s MIDI output recording to
your MIDI sequencer), and, as you track, switch from one POD memory to
another from the front panel or your foot controller, tweak your compressor up a
bit, twiddle the tone knobs, switch from one amp to another – whatever. Stop
recording, and replay the track with the POD getting MIDI back from your
sequencer, and POD will make all the same moves as when you were recording.
You can even replay the track, this time with only the MIDI track record-enabled
and the bass track in playback, and do all the automation tweaking you want right
from the POD’s knobs and buttons or your foot controller. Or, you can go in and
edit those MIDI messages and make POD do something else. Pretty neat, huh? Be
sure to read the Deep Editing & MIDI Control chapter if you plan to venture
into this realm.
3 • 11
Page 34

GETTING SET UP: SCENARIO TWO – POD PLAYS LIVE
SCENARIO TWO – POD PLAYS LIVE
If you’re going to be using your POD in a live situation, as either the “front end” for a
bass rig, or for its direct output to a sound system, here’s what you need to know to get
set up:
3 • 12
Mount Up
If you perform live, you’ll probably want to have the POD in a handy spot on
stage. One of the easiest ways to get it there is with the optional POD mic stand /
amp top adaptor you can get from Line 6 – it’s described on the included CD and
the Line 6 web site (where it can also be purchased). We know this is another
shameless plug to get you to buy more gear, but what the heck – this really is a
handy little item to get the POD’s righteous aluminum chassis wherever you need
it for mid-show tweaking. And that custom POD carry case is just the bomb....
Now back to educational stuff:
Gimme Some A.I.R.
When you’re playing live with POD, you’ve got a choice of setups. You can plug
straight out of the POD’s outputs into the house system for awesome tone without
the hassle of mics and cabinets and all that other stage setup. You can also choose
to run POD into a power amp and speaker cabinets, using it as a preamp. Or you
can plug your POD in between your bass and a bass rig so the POD acts as a tone
shaping front end for the amp.
For plugging into a PA or other sound system, flip the
DIRECT position. In this mode, the A.I.R. DSP is active, and you are getting a
virtual version of the speaker-cabinet-air-microphone experience that’s so good you
may never use a regular bass amplifier and/or D.I. box on stage again. The POD 1/4"
TRS outputs are versatile, merrily sending their magic tones into +4dBu balanced,
or -10dBV unbalanced inputs. Quality cables are obviously recommended for best
performance.
A.I.R. switch to its
6
Page 35

GETTING SET UP: SCENARIO TWO – POD PLAYS LIVE
POD Takes Over
If your POD is running into a power amp or speakers, or into the front end of a bass
amplifier, you generally want to switch the
position. This disables the part of the digital signal processing which is simulating
a speaker, moving air, and microphone – which you probably don’t want, because
you’ve got a real physical speaker right there in the bass amp which is doing its part
to shape the tone of your POD. (Of course, we have sometimes found that small
combos sound better with the A.I.R. switch in the DIRECT position; you may
want to experiment with both for your set up). If you don’t want the A.I.R.,
DON’T connect headphones to POD, as they will override the A.I.R. switch
and turn the extra processing on so things sound right in the headphones (and
wrong on the amp). Connect a standard guitar cable from the POD AMP MODEL
output to the input of the bass amplifier.
A.I.R. switch to the AMP
6
POD Output Level: A Word of Caution
POD’s Output Level control is set up with enough gain available to drive into
almost any piece of equipment. Consequently, it also has plenty of power available
to overdrive the input of your bass amp, which you don’t want since it will add
extra distortion that will color the sound so you don’t hear the “true” POD tones.
So, set it pretty low at first, then you can experiment with higher settings.
3 • 13
Tuning Your Amplifier
When you’re having your POD “take over” another bass amplifier, it’s a good idea
to start off with that amp in neutral. What is “neutral,” you ask? Well, if you only
have one volume control on your amp, set it low enough to get a “clean” tone;
that ensures POD’s sounds come through as purely as possible. If you have a master
volume in addition to a volume control on the input, set them both so that the
first volume doesn’t overdrive the master volume (so you’re getting a clean tone).
This will vary from amp to amp, but usually the input volume is going to be less
Page 36

GETTING SET UP: SCENARIO TWO – POD PLAYS LIVE
than the master volume to get a clean, non-distorted sound. If you have passive
tone controls, try setting your mid control at max, and your treble and bass
controls at zero (this is actually “flat” equalization-wise on most amps). Active
tone controls may vary, but just be sure you’re not overdriving the amp so the
POD tone comes through without extra coloration. Once you get going, you can
3 • 14
tweak the amplifier settings to suit your tastes. Try to set the POD Output Level
so you’re not overdriving the input of the amp, be sure the A.I.R. switch is in the
AMP position, and you should be in business!
If you have an amp with an effect return or a jack that lets you connect directly to
the input to the power amp, you can plug POD’s output right into that connection
to bypass the tone controls of the amp and avoid their coloring POD’s tones.
POD Live Hook-up Illustrations
Pictures are handy. Here are a few you may appreciate. In all cases, plug the AMP
MODEL output of your POD into your amp’s input for basic operation.
Experiment to get the best from your setup; try the A.I.R. switch in the DIRECT
position (this can work great with smaller amps) and also try other knob settings
on your amp – like with everything in music, try different things and use your ears:
POD As Front End for a Combo Amp or Head
Page 37

GETTING SET UP: SCENARIO TWO – POD PLAYS LIVE
POD In Insert/Return of a Combo Amp or Head
POD Into a Power Amplifier Driving Speaker Cabinets
3 • 15
Page 38

GETTING SET UP: SCENARIO TWO – POD PLAYS LIVE
Stomp Boxes, Live Setups, & You
If you’ve been playing bass for a while, you may have some favorite pedals that you
dig. And even though POD has now graced your life with some pretty hip digital
effects, you probably still want to have the option of keeping those old pedals in
3 • 16
your arsenal. No problem! Just remember that if you’re going to use POD with
those other effects boxes in front of your amp, you’ll need to think about where to
place everybody in the line-up. If you have a distortion pedal or wah, try
positioning it in between your bass and your POD. Reverb and delay should
generally go after the POD, before the input that you are using to feed POD sound
to your amp. And things like compressor, chorus, flanger, phaser, tremolo and
vibrato might work either before or after your POD, depending on what sound
you’re looking for. Putting a volume pedal after POD lets you control the volume
without changing the tone. Or put it before POD to control how hard you’re
driving POD’s input, which lets you pedal yourself to cleaner or dirtier tones. If
your amp has a line level effects loop, you probably won’t want to try to hook your
effect send into the POD input, since POD’s input was designed for bass level
inputs (you can use just the return, as mentioned above, with your bass plugged
right into POD).
Pedal Power
POD has a couple of foot control options: the Line 6 Floor Board and FB4. While
we’ll go into all the details in a later chapter, for now it’s good to know that the
FB4 is a four-button foot switch that allows you to select between four POD
memories and Tap your effect speeds and tempos. Its big brother, the Floor Board,
allows hands-free selection of any of the sounds programmed in your POD’s
channels, plus a wah pedal, a volume pedal, master on/off control of POD effects,
and tuner control. Whichever you Line 6 foot controller you choose, it will plug
into the POD
MIDI control pedal.
7
Pedal jack. You can also control your POD with a standard
Page 39

MODELED AMPS & CABS: WHICH AMPS AND CABS ARE MODELED?
MODELED AMPS & CABS
WHICH AMPS AND CABS ARE MODELED?
Note: For the following description of the Line 6 Amp Models, and other references
that you will find throughout this manual, please be aware that Fender, Marshall, Vox,
and other amplifier model designations, and the names of musical artists and groups, and
effects, are all trademarks of their respective owners, which are in no way associated or
affiliated with Line 6. These marks and names are used solely for the purpose of
describing certain amplifier tones produced using Line 6’s modeling technology. The Line
6 modeling technology provides POD with a wide variety of sounds and effects modeled
after some of the most popular sounds of the classic amps, effects, and artists mentioned
here.
4 • 1
There are 16 Amp Models living within your POD, plus 15 Cab Model selections.
When you turn the Amp Models knob, you select an Amp/Cab combination.
You can then mix ’n’ match different cabs with the amp by pressing the Cabs and
EQ button and turning the Effects knob. Chapter 6 tells you how you can
customize these amp/cab combinations. In this chapter, we list all 16 of the Amp
Models and their companion Cabinet Models, and describe the original
equipment that inspired them. It starts at the bottom left of the dial...
Session - This is modeled from an SWR SM-400 (produced from 1985 through
1993) with a SWR Goliath 4x10 cabinet. While researching the story of this amp
and the company that made it, we uncovered a multitude of bass amp lore. See if
you can follow this: SWR founder Steve Rabe once worked for an amplifier
Page 40

MODELED AMPS & CABS: WHICH AMPS AND CABS ARE MODELED?
company called AMP Music Products. AMP was run by Russ Allee, formerly the
main engineer at Acoustic. (More on the Acoustic 360 coming up.) The SWR
Goliath cabinets were originally built by David Eden – but that story will have to
wait until we return to this saga in the Adam & Eve section. Now then, as you
might be starting to suspect, the details of bass amp design and production get a
little blurry in this era, but one thing that’s absolutely definite is the great tone
produced by this rig. SWR amps are used by a wide variety of Bassists including
John Paul Jones, Tony Campos (Static X), Michael Bradford (Kid Rock), Juan
4 • 2
Nelson (Ben Harper), Fred Mollings (Backstreet Boys and N’Sync), and 311.
Once again, our model stays true to its inspiration and pumps out the signature
tones that will get you in the groove. The Bass, Middle, and Treble knobs were
modeled to perform like the SWR’s. The Midrange frequency is set at 500 Hz, but
you can also adjust it, if you like, via the Mid Sweep feature. Mid Sweep is
available for the amp models that are based on amps, like the SWR SM-400, that
offer a “swept” mid EQ frequency (in other words, “user-selectable” mid
frequency). Press and hold the Cabs and EQ button, then turn the Effect
Tweak knob to sweep the mid frequency of your POD’s Session amp model.
The SWR Goliath 4x10 cabinet was produced from 1987 through 1990. This cab
defined the “L.A. sound.” Featuring four Eden drivers and a high-frequency
tweeter, the SWR's angel breath highs, silky mids, and round lows instantly
appealed to thumbsters – but it found its way onto some mighty loud stages as well.
This is a versatile cab, and sounds great with many of the other amp models in
your POD. Be sure to try the mix-and-match cab function with this one.
California - This is modeled after the Mesa/Boogie Bass 400+. Introduced in
the late Eighties, the Bass 400+ features 500 watts of Class A/B operation, with
twelve(!) 5881 Output tubes, four12AX7 Preamp tubes, a single channel, Volume/
Bass/Middle/Treble + Bright Switch, Master Volume, 7-band Graphic EQ, and a
Parallel Loop. The Bass 400+ has been the mainstay of Boogie’s Bass line for over
a decade. Both Michael Anthony (Van Halen) and Flea (Red Hot Chili Peppers)
have toured with the Bass 400+.
Page 41

MODELED AMPS & CABS: WHICH AMPS AND CABS ARE MODELED?
During the modeling process, we set the graphic EQ flat, and the bright switch was
off. This setting produces a warm, dynamic, and earthy tone that’s well suited for
many styles of players.
The Bass 400+ was modeled with a Boogie 2x15 front ported, closed back cabinet.
This cab is known for it’s controlled girth – we call it fat and friendly. We’re sure
you’ll love the tone, and really appreciate not having to lug the real cabinet
around to get it.
Jazz Tone - With this model, you now have your very own place to go for the
classic tones modeled after the Polytone Mini-Brute. This amp is known as the
combo that knows every wedding standard and lounge hit from the last 40 years.
The original amp houses a single 15-inch speaker that can best be described as
intimate and subdued. Plug in here when it’s time for your more introspective
mood indigo moments.
4 • 3
Adam & Eve - This modeled after the Eden Traveller WT-300, and with it,
we return to the saga of bass amps and the people who built them. In our last
installment, David Eden had been making cabs for SWR. David continued this for
3 or 4 years, and then went into the business of making his own bass amp and
cabinet line. Jim Demeter designed the electronics of the first Eden amps, and they
were quickly adopted by a veritable who’s who of modern bass society. The
inspiration for the Adam & Eve model was the WT-300, one of Eden’s latter
offerings which produces a clean, clear and rich tone. This model includes our
Mid Sweep function, so be sure to give it experiment with giving it a spin when
you’re dialing in your tone. As we’ve said in describing the earlier models, Mid
Sweep is available for the amp models that are based on amps, like the WT-300,
that offer a “swept” mid EQ frequency (in other words, “user-selectable” mid
frequency). Press and hold the Cabs and EQ button, then turn the Effect
Tweak knob to sweep the mid frequency of your POD’s Adam & Eve amp model.
Page 42

MODELED AMPS & CABS: WHICH AMPS AND CABS ARE MODELED?
Eighties - What would any collection of bass amps be without a Gallien-
Krueger 800RB? This amp’s great tone was modeled for your POD’s Eighties amp
model. After all, this amp helped define what new bass amps sounded like for the
better part of that decade. Geddy Lee had one. Will Lee used one on Letterman.
And bands like Def Leppard powered through a decade of pop metal with the
800RB.
The GK 800RB produces a very scooped sound, and doesn’t really distort. We
4 • 4
modeled this amp with another legend of the Eighties, the Hartke 410 cabinet.
This rig is known for producing what we call the “mid 80’s metal bass” tone. It’s
the perfect choice when you’re ready for a little Pyromania....
Stadium - This is the story of the Sunn Coliseum, and this is the history of the
modern bass amp. The Sunn is the amplifier that spawned the explosion of power
line-ups throughout the 60’s and 70’s. The amplifier used by Jimi Hendrix and
Noel Redding, by Pete Townsend and John Entwistle, by Tony Iommi and Geezer
Butler, by... well... take a look at the inside cover of your Woodstock album, and
you’ll get an idea of the impact that Sunn amplifiers had in revolutionizing early
rock music.
All of this can be attributed to the one band who’s music will forever be
remembered in rock history as the flashpoint for great, big, bass amplifier impact:
The Kingsmen.
The Kingsmen? That’s right! The band who brought you the party anthem “Louie
Louie”, and quickly faded into anonymity, also brought the amplifier that paved
the way for so many that would follow.
Seems as though once “Louie Louie” became a hit, the Kingsmen were starting to
play larger gigs. Norm Sundholm, bass player for the band, frequently complained
that his bass amp was getting lost in the noise from the rest of the band’s amps and
from the audience. So he called up his brother Conrad, an electronics enthusiast,
and asked if he could rig something up that might help him out. Conrad set to
work and pretty soon he’d soldered together a custom solution for brother Norm.
Page 43

MODELED AMPS & CABS: WHICH AMPS AND CABS ARE MODELED?
Other musicians soon heard the Sundholm brothers’ amplifier, and were absolutely
awed by its power. Norm and Conrad started to receive orders from guitarists and
bass players who had to have one just like it. So Conrad set up shop in his dad’s
garage, started building what would become Sunn amplifiers, and turned a small
project for his brother into rock-and-roll legend.
Unfortunately for Conrad and Norm, the Sunn was soon to set. Although the
brothers had enjoyed a great deal of success, receiving endorsements from the
Rolling Stones, The Who and Jimi Hendrix, they had quite different views on
running the business – sounds like some of the bands you’ve played in, don’t it? By
the early 70’s, Sunn had set for the final time.
Stadium is the name of the Sunn Coliseum 300-inspired model in your POD. It
includes the Mid Sweep function. As we’ve mentioned with some other models,
Mid Sweep is available for those amp models that are based on amps that offer a
“swept” mid EQ frequency (in other words, “user-selectable” mid frequency). The
Sunn gave you mid control from 250Hz - 1KHz, and the Mid Sweep lets you select
that same frequency range here. Press and hold the Cabs and EQ button, then
turn the Effect Tweak knob to sweep the mid frequency of the Stadium amp
model.
4 • 5
The Stadium model was created with Sunn’s unique cab that features one frontmounted 12-inch speaker and one upward-angled 18-inch speaker. Plug in, raise a
toast to the brothers Sundholm, and play Louie Louie for old times sake!
Amp 360 - This modeled after an Acoustic 360, as used by Larry Graham,
John Paul Jones, and Jaco Pastorius. We modeled an early 70’s Acoustic 360, that
featured a separate preamp “head,” and a powered cabinet with a single 18-inch
speaker in a folded horn.
The 360 with the built in fuzz and tuner was the choice of many of our faves
including John Paul Jones from Led Zeppelin. He can be seen playing thru two in
The Song Remains the Same film. Many think he’s responsible for some of the
coolest bass tones of the time, and the 360 was definitely part of his tone for a
Page 44

MODELED AMPS & CABS: WHICH AMPS AND CABS ARE MODELED?
while. But it was Jaco Pastorius who showed us what a versatile amp the 360 really
was. Jaco’s work with Weather Report really stands out, and when the band left
Jaco alone onstage for his bass solo he really wrenched everything he could out of
his gear which included two Acoustic 360’s, a wah pedal, a rackmount “blue”
MXR digital delay and his trusty Jazz bass. Towards the end of his solo he would
stomp on the wah pedal, turned on the fuzz and do a great rendition of the Star
Spangled Banner. He got everything out of that amp, from mellow jazz to speaker
shredding feedback, and thanks to your POD’s Amp 360 model, now it’s your turn!
4 • 6
We modeled this amp with its EQ Select #3 switched on, and the fuzz off. Be sure
to use the Mid Sweep function to get all of the dripping tone that this model can
produce. Mid Sweep is available for the amp models that are based on amps, like
the Acoustic 360, that offer a “swept” mid EQ frequency (in other words, “userselectable” mid frequency). Press and hold the Cabs and EQ button, then turn
the Effect Tweak knob to sweep the mid frequency of the Amp 360 amp model.
As we already mentioned, the cabinet for this amp model is the powered cabinet
with a single 18-inch speaker in a folded horn that was the mate for the Acoustic
360 preamp head.
Rock Classic - For 30 years now, we’ve heard the tone and felt the power of
the mighty Ampeg SVT. This workhorse has appeared on innumerable recordings
and arena stages worldwide – there is no equal to the original SVT and its 300
watts of pure tube magic. (FYI – replacing the tubes in a SVT nowadays would
cost you more than you paid for your Bass POD!) First introduced in July 1969, the
SVT set the tone, punch and arena-rattling standard for all future big gun bass
rigs. Its users have included everyone from The Rolling Stones to Van Halen, and
pretty much every “rock” bass player in between.
For your POD, we selected a 1974 Ampeg SVT with a late 70’s SVT 8x10 speaker
cabinet for our modeling efforts. We used the “normal” input of channel one, and
the “ultra high” and “ultra low” switches were in the off position. The original
SVT had a switch to select a midrange frequency of 220, 800, or 3000 Hz. In Bass
Pod, the frequency defaults to 800 Hz but you can get all these frequencies via the
Page 45

MODELED AMPS & CABS: WHICH AMPS AND CABS ARE MODELED?
mid sweep function. Mid Sweep is available for the amp models that are based on
amps, like the SVT, that offer a “swept” mid EQ frequency (in other words, “userselectable” mid frequency). Press and hold the Cabs and EQ button, then turn
the Effect Tweak knob to sweep the mid frequency of the Rock Classic amp
model.
The SVT speaker cabinet was also introduced in 1969, and features an infinite
baffle (totally sealed) design that houses eight 10-inch speakers in four
compartments. Each compartment holds a pair of speakers and is completely
sealed from the rest of the cabinet. Removable dollies were included with the early
cabinets, but by 1977, the cabinet included a pair of fixed wheels to tilt the
cabinet back while navigating the amp using the new “towel bar.” The sonic
combination of this head and cab is beyond big, but you had to pray that your
bandmates would help you move it! Thanks to Bass POD, you can now get big
classic rock bass tone without frequent visits to the chiropractor.
Brit Major - For this model, we studied our 1969 Marshall Major. While
doing the initial research, we discovered our amp had the wrong tubes in it, and
that sent us on a quest to find some NOS (new old stock) vintage KT-88s. We
called experts across the country looking for “new” thirty year old tubes. Several
months and a king’s ransom later, our search paid off, and we started over with an
original set of vintage Mullards in the amp. What an incredible difference the
“right” tubes in the “right” amp can make! We “jumped” the channel 1 input to
the channel 2 input, thus combining the high and low channels (this was a
common practice for bassists and guitarists alike.) Wow! Stand back and bow
down to the royalty of British Bass Tone. If this sound doesn’t cause your
neighbors to come looking for Jack Bruce, nothing will. Higher drive settings will
get you those warm, natural overdrive tones heard on Cream records and many
others from that era.
4 • 7
The cabinet we modeled with the Marshall Major is a ’76 Marshall 4x15 cab. The
4x15 sound is unique and awesome, and the combination of the Major and this
cab is somewhat darker that the Brit Super model (based on the Super Bass).
Page 46

MODELED AMPS & CABS: WHICH AMPS AND CABS ARE MODELED?
Brit Super - This is modeled after a 1968 Marshall Super Bass “plexi” with
vintage EL-34 tubes. In general, the Super Bass is brighter than the Major, and
sounds a little “fuzzier” with higher Drive settings. Marshalls of this era became
the signature backline for most of the British bands, and you would have seen and
heard them with John Entwhistle (The Who), Andy Fraser (Free), Noel Redding
(Jimi Hendrix Experience), Ron Wood (Jeff Beck Group), Jack Bruce (Cream),
Tim Bogart (Vanilla Fudge), and Roger Glover (Deep Purple).
4 • 8
We’ve matched this amp model up with a cabinet model crafted from our studies
of the 1967 Marshall 4x12 with pre-Rola 20 watt Celestion greenbacks. This
speaker cabinet occupies an especially respected place in our studio. The ragged
vinyl on this vintage treasure proves it has earned its way on many a road gig, and
that, along with the signature basketweave grille, gets every bassist – and guitarist
– that passes through our shop stopping to plug in and learn what we have learned:
this is the best cab we’ve ever heard. Warm and woody, this cabinet gets every
player in the building bowing down to the gods of great tone. And now, via the
wonders of modern digital technology, your POD brings you cab tone modeled
from this truly remarkable piece of tone history.
Silver Panel - Modeled after a 1967 Fender Bassman head with 2x15 cabinet.
By ’68, when the Beatles went in to record The White Album, they had pretty
much done away with their Vox amps in favor of the new “silverface” Fender line.
John and George played through Twin Reverbs and Paul through the 2x15 “tall
cab” Bassman. This amp remained his favorite through the end of the Beatles’
recording career, and can be see in the Revolution video (the cab is laying on its
side), and all over the Let it be movie – including the infamous “rooftop” concert
which closes the film. Paul went on to use the amp for his first solo recordings, and
live during the early Wings period.
For our model of this classic, we studied a 1967 silverface Fender Bassman. We
plugged into the Bass channel, and set the Deep Switch to the “on” position. The
original amp has only Bass and Treble controls, leaving us with the prospect of a
middle knob with nothing to say for itself. But fear not; in this case, we’ve set up
Page 47

MODELED AMPS & CABS: WHICH AMPS AND CABS ARE MODELED?
POD’s Middle knob so you can add some post-Amp Model midrange contouring
for a little more flexibility. Set the Middle knob to its “neutral” 12 o’clock position
for the classic Bassman sound. Turn it to the right (past 12 o’clock) and you get
mid boost – turn it to the left (below 12 o’clock) for mid cut.
The Bassman was modeled with a 2x15 closed back cab loaded with JBL’s. The
sound of this cab reminds us of the theme music from Barney Miller, and all of
those days practicing with the high-school jazz ensemble. Try playing a little of the
Peter Gunn Theme....
Brit Class A - The story goes like this: Paul McCartney took delivery of his
first Vox bass amp in late 1963 – it was a T-60 head and cab. The head was a single
channel, solid state job, and it was one of the first-ever production line solid state
guitar amps. The cab housed two speakers – a 15-inch and a 12-inch – with a large
capacitor to filter out low frequencies from the 12-inch. Within about three
months, he got rid of the T-60 head, and powered his T-60 cab with an AC-30
head (about the same volume as the T-60 head, and a lot better sounding.) This
rig was used for recording and touring thru 1964 and can be seen in many pictures
and videos of the lads playing live, most notably at the Washington Coliseum
concert which was the Beatles’ first concert appearance in the states in February
1964. It was also the amp heard but not seen on their historical first appearance on
the Ed Sullivan show. It was a great sound. When the Beatles returned to the
states in 1965 Paul was now playing thru what most people refer to as a T-100.
(Although there is no such thing as a T-100.) What he was, in fact, using was an
AC-100 head, with an AC-100 Bass Cabinet with two 15’s. Originally, Paul’s amp
was without a stand, but before long, a custom built stand was seen. This rig was
used for recording and touring thru 1965 and can be seen in countless pictures and
videos of the Beatles playing live such as the Shea Stadium concert, the
Hollywood Bowl concert and, of course, the 1965 Ed Sullivan show.
4 • 9
Brit Class A in your POD is modeled after the AC-100, and is characterized by its
low-down lows and sweet high end. Now, those of you who have had the chance
to get intimate with a Vox AC-100 may know that, true to Vox form, it’s got its
quirks. One of the more obvious ones is that the Bass knob works backwards.
Page 48

MODELED AMPS & CABS: WHICH AMPS AND CABS ARE MODELED?
You’d expect that you turn this knob to minimum and get the least bass, and turn
it to maximum to get the most bass. But no – those Vox guys decided to give their
AC-100 a Bass Cut knob. So you turn the knob up... and the bass goes down. Now,
that’s certainly novel, but not necessarily what you might expect.
This is a good opportunity, by the way, for you to get an insight into the sometimes
twisted little world we’ve got going here at modeling central. We hate the idea of
not making things just like the original, but we also hate the idea of a POD user
4 • 10
having to wonder why their POD doesn’t seem to be working right. Balancing
authenticity with ease of use keeps us up late nights.
In the end, we figured that, if we left the bass knob working backwards like the
AC-100’s, we’d get a whole lotta confused people spending money calling our
customer service crew to find out why their knob was working backwards...
sometimes. We figured we’d better help all those folks save some dough on the
phone bill, and so we have set this knob up so that you get more bass as you turn
up, and less bass as you turn down. You get the same response curve and frequency
control as the AC-100’s knob would have given you, but now you don’t have to
learn how to work things backwards. And thus, balance and harmony have been
restored to the Line 6 product design universe.
The original AC-100 amp has no Mid control, so we’ve given you a post-Model
Mid Boost that lives on the Middle knob. Turn the Middle knob to zero for
authentic Vox tones, or turn it up for an extra pint of personality.
Motor City - While researching the legends of great bass gear, we discovered
a true lost gem: the Versatone Pan-O-Flex! This single 12-inch combo was
designed by Bob Hall in the late 60’s and was a hit among the LA Studio scene –
in particular, at RCA Studios. It’s a sealed back combo with some cool internal
baffling that makes it sound much larger than it actually is. Turn it up to about 1/3,
and it has a warm tone. Turn it up a bit higher, and it will distort with a sweet
sustain. Carol Kaye used a Versatone amplifier on countless sessions, and Jack
Casady still uses one with his SWR amps.
Page 49

MODELED AMPS & CABS: WHICH AMPS AND CABS ARE MODELED?
The Pan-O-Flex has only a few controls: Volume, Tone (labeled Bass on the left
side, and Treble on the right), Pan-O-Flex balance, and a bright switch. We set
this beauty up with its best settings when crafting our model, and we think you’ll
agree that it really delivers: this model may well become the secret of your sound.
With the Middle knob in the 12 o’clock position, our model gives you classic
Pan-O-Flex sound. You can also create your own variation on the classic Pan-OFlex sound by turning the Middle knob up or down for a post-Model boost/cut.
Flip Top - This is modeled after a 60’s Ampeg B-15 – one of the most popular
studio bass amps of all time. If we had to sum up the amp’s sound up in one
sentence, we would simply say: Listen to James Jamerson’s bass playing on the
Motown/Tamala records of the 1960’s – The Supremes, The Four Tops, The
Temptations, Marvin Gaye, Stevie Wonder, and many more. Jamerson played bass
on more Motown hits than anyone else, and his choice for amplification was the
Ampeg B-15. We think you’ll agree that the sound of his P-bass through that amp
on those records is as fresh and exciting today as it was 35 years ago. And if he’s
not enough to convince you, how about “Duck” Dunn? Don’t get us started...
4 • 11
Ampeg introduced the B-15 Portaflex, flip-top bass amp in 1960. It’s tuned and
front-ported, has a closed back, is 25 watts with a single 15-inch speaker, and set a
new standard for tone, cabinet and speaker efficiency, and convenience in bass
amplification. When your Bass POD Middle knob is set to zero, you’re getting
classic B-15 inspired sound. Turn it up and you get up to 10dB of boost for extra
midrange push.
Sub Dub - This fabulous tone was brought to us by Justin Meldal-Johnsen
who’s played bass with Beck, Tori Amos, and other luminaries. He brought his
rack full of esoteric gear into the studio for us to poke and prod and model. The
resulting Amp Model is perfect for Hip Hop, Electronica, Trance, Eurodance,
Rave and all of your Alternative tone needs. Dig Justin’s own description...
Page 50

MODELED AMPS & CABS: WHICH AMPS AND CABS ARE MODELED?
“Dark and oh so deep, this is the sound you pull out when it’s time to go lower
than low... to hit deeper than the Moog line, to rock harder than the 808 kick.
The sound of this model is a particular, well-tuned, fundamental tone which gives
you a lot of serious pure “note” without the muddiness you get when you try and
make your amp do it. For myself, the sound creates a similar effect to standing in
front of a well-executed bass rig with a few 18-inch speakers involved to handle
the low parts of the sound spectrum (which is what I do playing live). Inspiration
for this sound for me came from everyone from Massive Attack to Dr. Dre,
4 • 12
DeAngelo to Aphex Twin, King Tubby to Future Sound of London, and all other
champions of the ultra-low.” Thanks Justin – we couldn’t have said it any better.
Mid Sweep is available for Sub Dub, letting you select a frequency from 250Hz 1KHz for the Middle control. Press and hold the Cabs and EQ button, then turn
the Effect Tweak knob to sweep the mid frequency.
Lower Drive settings produce virtually no clipping (distortion), while higher
Drive settings will produce massive square wave distortion (thus giving your synth
player tone envy). Once you’ve made a platinum record with this sound, be sure to
remember us – and Justin – in your Grammy speech!
Tube Preamp - The thinking went like this: ‘Once people get this POD, it’s
gonna be so great that they’re gonna wish they could use it for everything –
warming up keyboards, crunching up drums, fuzzing up vocals. We’ve gotta give
’em something to do that with!’ So we did. Tube Preamp lets you warm up any
sound source the way producers and engineers often do in the studio with vintage
tube gear. For more “edge” on vocals, send your vocal tracks through POD. Punch
up (or munch up) a synth bass track by sending it through POD and cranking up
the drive and EQ controls to suit your taste. And, although this is not actually a
bass amp model, you can certainly get some great bass tones out of it. When you
do this stuff, you want to use the Drive control like a mix knob on a reverb to
control how much processing you want to hear. You generally don’t want to mix
the pre-POD sound with the post-POD sound because of the comb filtering that
results. Instead, jack the sound source right into POD and then only monitor the
sound post-POD processing. With the tone controls at 12 o’clock, the EQ is “flat.”
Page 51

MODELED AMPS & CABS: WHICH AMPS AND CABS ARE MODELED?
Cabinet Models - The following Cabinet Models are available, and are
accessed by pressing the Cabs and EQ button and turning the Effects knob:
Modeled after....
Cabinets with
10” Speakers
Cabinets with
12” Speakers
Cabinets with
15” Speakers
Cabinets with
18” Speakers
1979 Ampeg SVT 8x10 Cab
Eden “David” 4x10
SWR “Goliath” 4x10
Hartke 4x10
60’s Versatone Pan-O-Flex 1x12
1968 Marshall 4x12 with “pre-Rola” 25’s
Ampeg B-15 1x15 closed back combo
Polytone 1x15 closed back combo
Vox AC-100 2x15
Mesa/Boogie 2x15 (front loaded and front ported)
Fender Bassman 2x15 with JBL’s
1969 Marshall Major 4x15 cab (Yeah, baby!)
SWR 1x18
Acoustic 360 cab
(1x18 in special folded horn enclosure)
4 • 13
Sunn Coliseum 8028 cab (1x18 + 1x12)
No Cab You’ll probably want to use this Cabinet model with the
Tube Preamp model for non-bass sources. It is selected by
default when you pull up the Tube Preamp Amp Model.
The Cabinet Model is automatically selected by the Amp Model. You can
customize these Amp/Cabinet pairings, as described in Chapter 6.
Page 52

POD EFFECTS: DEEP EDITING
POD EFFECTS
DEEP EDITING
For tweak heads and MIDI-philes, we’ve included a handy MIDI editor/librarian
program which is made by Emagic, and called SoundDiver. The program runs on
Macintosh and Windows computers, and can turn your computer into a POD
command station. It lets you take “remote control,” and do everything that can be
done from your POD’s front panel, plus a bunch of other cool stuff like saving and
swapping sounds on the computer, as well as accessing additional effect parameters
that lurk deep within the heart of POD. All the details are in the Deep Editing
& MIDI Control chapter. Once you’ve looked over the basic information below
on the POD effects, you may want to check out that chapter to find out about the
extras that a POD-computer-MIDI connection can bring you.
5 • 1
POD ONBOARD EFFECTS
In addition to all the great Amp Models built into POD, there are some great
sounding effects. To pick which effect you want to hear, turn the Effects
Knob. When you first select the Effect you want, your helpful POD will preset the
effect’s parameters so you’re instantly ready to go with a great sound (you can also
customize this effect “preset” as described in Chapter 6). You can adjust the
character of the effect you’ve chosen by turning the Effect Tweak knob.
Many of the effects include our Smart Control feature that automatically adjusts
the speed, depth, mix, or other parameters of the effects as you turn the Effect
Tweak, so you get a full range of effect flavors with simple one knob control.
16
17
Page 53

POD EFFECTS: POD ONBOARD EFFECTS
Compressor - A compressor “squeezes” your sound so that the softer sounds
seem louder and the louder sounds won’t be too loud and jump out at you. It helps
to even out your playing, and can also be used to give increased sustain. The
compressor starts doing its thing when the audio feeding into it exceeds a certain
threshold; above this threshold, the compressor kicks in and starts reducing the
volume changes.
The compressor effect in your Bass POD was developed from our studies of the
LA-2A tube compressor – one of those pieces of gear that’s earned a place in the
finest of studios. Part of what’s made it such a well-loved piece of gear is its
simplicity of operation. Unlike other compressors that include ratio, attack,
5 • 2
release and other settings, the LA-2A is the picture of simplicity with all of these
things hard-wired for great sound every time with minimum messing around; you
just turn one big front panel knob to determine how much compression you want.
POD’s compressor effect follows the LA-2A’s lead with great sound that’s simple:
dial up less compression (turn the knob counter-clockwise toward its minimum) or
more compression (turn the knob clockwise toward its max position).
Another great thing about the LA-2A is the fact that, even with high compression
settings, it is clear and musical, without too much “pumping” or “breathing.” Bass
POD’s compressor is designed to capture that same character, so you get sweet,
musical sound whether you’re using a little compression or a lot.
The Compress knob is adjusting the compressor threshold like the LA-2A’s knob
does (and if you’re one of those control junkies, you’ll be happy to know that
attack, decay, and ratio are controllable via the SoundDiver software). Turn the
Compress knob to its minimum setting to defeat the compression effect.
Octave Down - Modeled after the classic Boss OC-2 Octave pedal. The
Effect Tweak knob controls the mix. For those of you with four string basses, this
effects allows you to get down to that low B after all! The lower you play, the
harder it is for the octave effect to track your note (just like the OC-2). Have your
guitarist friends try this time for deep down chunk-a chunk-a chunk.
Page 54

POD EFFECTS: POD ONBOARD EFFECTS
Analog Chorus - This Chorus was massaged to closely approximate the
classic tone of an old Roland CE-1 box. The Effect Tweak knob spins you
through a range of chorus settings from subtle to extreme. Lower settings remind
us of the type of chorus Sting sometimes used on his bass with the Police, while
higher settings will get you the Nirvanna Come As You Are effect.
Danish Chorus - More modern in its personality and flavor, this is our Model of
the t.c. electronics SCF Stereo Chorus / Flanger pedal. The Effect Tweak knob spins
you through a range of chorus settings from light to down right soupy.
Orange Phase - Our Phaser model is based on the phaser that changed the
world – the MXR Phase 90. The Phase 90 is relatively subtle compared to other
phasers, and becomes part of the overall tone. Its lush, organic, and groovy swirl can
be heard all over records made in the 70’s, and again in the 90’s. The Phase 90 is a fine
example of simplicity; its single knob controls only speed. Our model stays true to the
original, with the Effect Tweak giving you the range of Phase 90 tones.
5 • 3
Gray Flanger - Flanging is that familiar “jet-plane” whoosh you remember from
recordings of the 70’s. Originally the effect was used rarely, mostly because engineers
had to use finger pressure on one of the tape reels so they could slow down and speed
up the tape in tiny increments to get this effect. Since the part of the tape reel they
pressed on is called the flange, you can see how the effect got its name. As soon as
someone figured out how to get this effect electronically, it was no longer rare and was
probably used a little too much for the next several years.
Gray Flanger is our model of the classic MXR Flanger, a very warm-sounding flanger,
featuring a bucket brigade analog circuit design, as well as a very uniquely shaped
waveform. The Effect Tweak knob gives you a range of Flanger effects from just a bit
to Holy Cow!
Page 55

POD EFFECTS: POD ONBOARD EFFECTS
Tron Down & Up - What self-respecting bass vünderbox would be without
a MuTron III envelope follower? Part auto-wah, part triggered filter, this effect is
all about Bootsy, and your POD gives it to you both coming and going! Go ahead,
un-button that shirt, put on the flares, and get down with your bad self. You’ve got
your choice of Tron Down and Tron Up, to get both flavors of this effect a la the
original MuTron’s up/down switch. Effect Tweak sets the Peak of the modeled
MuTron filter to vary the tone. With this effect active, we’ve set up the wah pedal
of the optional Floor Board to also vary this peak, rather than providing a separate
wah effect (since the Tron effect is already giving you the wah-type thing).
5 • 4
S & H - Modeled after a vintage Oberheim Voltage Controlled Filter (which is
an example of a Sample & Hold effect). Play long sustained notes and hear them
“dance” with this filter. Effect Tweak controls the speed of the dancing filter.
S & H + Flanger - Little bit of Sample Hold, with a little bit of Gray
Flanger, for a whole lotta dancing, whooshing goodness. Effect Tweak controls
Sample & Hold speed.
S & H + Danish Driver - Matches up the Sample & Hold effect with the
soon-to-be-described Danish Driver. Effect Tweak sets Sample & Hold speed.
Bass Synth - We started with a Boss Bass Synth pedal, and added a bit of our
own magic for this one. Effects Tweak works like the Decay knob to give the
effect a tight cut off, or let it ring out a bit and fade. Dial up an overdriven Amp
Model, then add this effect to give the Moog player fits! By the way, the wah pedal
(available on POD’s optional Floor Board foot controller) doesn’t do wah when
you’ve got the Bass Synth effect selected. Instead, it controls the decay (just as the
Effect Tweak knob) to let you pedal in a little bit of character for your synth effect.
Page 56

POD EFFECTS: POD ONBOARD EFFECTS
Danish Driver - Modeled after of a t.c. electronics Booster Line Driver +
Distortion, for smooth distortion, from subtle to huge. Its character comes from a
massive bass boost at 100Hz or so. Effects Tweak sets the amount of distortion.
Large Pie - That’s a model based on the Big Muff Pi to you and me. This is the
place to turn for classic fuzzy bass, brighter than the Danish Driver. The Large Pie
works well with the bass-heavy Amp Models like Brit Major, Brit Class A, and
Stadium. Very Smashing Pumpkins. Effects Tweak brings more pie to the party.
Pig Foot - Modeled after the Hogs Foot pedal, which isn’t really a distortion
per se, though distortion is what you use it for. The Hogs Foot is a bass booster and
level driver designed to drive the front-end of a tube amp into distortion. Our Pig
Foot model gets you into this same territory, great for a warm bass boost with
subtle distortion. Effects Tweak controls the amount of added distortion.
5 • 5
Rodent - The Rat is one of those distortion pedals that it seems like everybody
and their brother has used at one time or another. The Rodent model is designed
to give you the tone of that beloved box in your beloved Bass POD. Turn up
Effects Tweak for harsh buzzsaw bass complete with squealing feedback from all
those little mice-ys.
Page 57

CREATING & STORING SOUNDS: USING THE CHANNEL PROGRAM MEMORIES
10
CREATING & STORING SOUNDS
USING THE MANUAL MODE FEATURES
When you are using your POD in Manual Mode, all of the controls are active and
the sound of POD always reflects the knob settings. Sounds just like any ordinary
bass amp or pedal, doesn’t it? Who says technology is threatening? You know
you’re in Manual Mode, by the way, whenever the Manual button is lit (but
you probably already figured out that part). Play with the knobs until you get a
sound that you really like. At this point, you can either follow tradition and put
tiny little pieces of tape on POD or mess it all up with grease pencil to mark your
favorite settings, or you can take a bold step into new technology and save your
sound to one of POD’s memory locations. Which we’re about to tell you how to do
in the next section of the manual, appropriately titled…
USING THE CHANNEL PROGRAM MEMORIES
9
6 • 1
So, there you are with a sound that you really like – wouldn’t it be nice to be able
to call it up any time you want it? That’s simple once you have it stored into one of
the 36 POD channel memory locations. How do you do it? Just press the Save
button . It will start to flash. Press the Up and Down buttons and you will
see that you are switching through memory locations A, B, C, and D in each of
POD’s nine numbered banks. Pick one to store your sound in, and press that Save
button a second time. The light will stop flashing, and the sound is stored at the
location you chose, replacing the sound that was stored there before. Doesn’t get
much simpler than that. After the sound is stored, you can bring it back any old
time by simply pressing the Up and Down buttons to call up the location where
you stored it. (See Chapter 7 to learn how to do all this with your feet on the
Floor Board). If you decide that you don’t want to store the sound after you’ve got
all the lights blinking, pressing the Manual or Tuner or MIDI buttons will
abandon the save. (Save mode will also be canceled if you don’t press any buttons
for 5 seconds after having pressed Save.)
21
Page 58

CREATING & STORING SOUNDS: TONETRANSFER
TONETRANSFER
POD Sounds on the Web
Your POD gives you access to a constantly-expanding world of sounds. We’re
building a ToneTransfer Web Library at www.line6.com where you’ll find a
growing collection of sounds for your Bass POD, created by Line 6 users around
the world. The SoundDiver software included on the CD with this manual will
help you store, organize, and transfer your sounds.
Swapping POD Channels With Friends
6 • 2
OK, so you go over to a friend’s house who also had the good taste and intelligence
to buy a Bass POD. This friend has created an awesome sound that’s stored in the
Bank 1, Channel A location. You’ve got to have this sound so you can write the
song that’s going to make you rich, but your friend forgot to make a copy of the
Sound Programmer’s Sheet on the back of the POD manual and write down his
settings. (Perhaps we can learn a valuable lesson from this: always back up your
work!) Do you have to give up your dreams of rock and roll success and spend the
rest of your life cleaning bird cages to pay the bills? Luckily, we thought this one
through in advance. We provided you with a way to get those settings. Just press
and keep holding the Save button on your friend’s POD and turn any one of the
POD’s knobs (except the Output Level knob – that one’s not saved into
programs). Don’t worry, holding down the Save button won’t cause your settings
to be altered or cause Save Mode to be entered. Instead, you’ll notice one of the
little arrows below the Tuner button will light up. The arrow tells you which way
to turn the knob so that it will match the stored memory’s setting for that control.
When the knob position exactly matches the stored setting, the arrows will both
light up. (The Amp Model and Effects knobs don’t give you the left or right
arrows on their own; they will only light the two arrows together when you have
the knob in the right place.) After you’ve done this for every knob and noted the
Apply FX to DI state, you can write down the settings on the Programmer’s
Page 59

CREATING & STORING SOUNDS: EDIT MODE
sheet, take it home, enter it in your own POD, and write the anthem for a future
(or past) generation. And be sure to thank us in the album’s liner notes. To check
that you’ve got everything just right, once the knobs are set, you can also switch to
Manual Mode and see if the sound changes.
If that sounds too complicated, and you have a MIDI cable handy, flip ahead to
Chapter 8: “Deep Editing & MIDI Control” to find out how to swap sounds
between two PODs with MIDI. It’s also possible to swap POD sounds on computer,
using the emagic SoundDiver software – for both Macintosh and Windows
computers – that’s included on the CD with this manual.
EDIT MODE
Alright, so let’s say you’ve got that sound you saved in one of POD’s handy
channels, and you want to add some more Bass. No problem. If you haven’t
already selected the memory you want, then go ahead and get on those Up and
Down buttons to recall the sound. Now, grab the Bass knob and crank it up. The
word “EDITED” lights up to the left of POD’s single-digit display, letting you know
that you’ve made a change to your stored channel memory, and (if you like it
better that way) you should use the Save button to save it. This is what’s called
Edit Mode since you’ve done just that: edited a stored channel. To commit your
edit to POD’s memory, press Save and it will start to flash. Press it a second time,
and the sound will be stored into the currently selected memory. If you want to
choose a different memory location for the save, then use the Up and Down
buttons once you’ve got Save flashing and pick the memory you want.
6 • 3
If you don’t want to save your edit, that’s OK, too – just ignore the Save button. If
you decide not to save after pressing Save, you can touch the Manual, Tuner, or
MIDI button to abandon saving. Keep in mind that if you switch to another
channel without saving your edit, all your sound changes made during that edit
will be forgotten.
Page 60

CREATING & STORING SOUNDS: CUSTOMIZING AMP MODELS & EFFECTS
CUSTOMIZING AMP MODELS & EFFECTS
Because we were thing of you, we made it possible for you to customize the settings
that are called up by the Amp Models and Effects knobs. Using this powerful
new feature, you can pack your POD with all the special sound genius that only
you possess, and have this brilliance available instantly at the turn of a single
knob. Here’s how it works:
About Customization Mode
Hold (and keep holding) the Save button, then press the Manual button. The
Save, Manual, A, and B lights will all start a-flashing (and you can let go of those
6 • 4
buttons now). You have entered the Customization Mode where you get to put your
very own stamp on the settings called up by the Amp Models and Effects knobs.
To understand how this Customization works, we’ll start with an explanation of
what happens when you turn the Amp Models and Effects knobs:
Turning the Amp Models knob picks an Amp Model, and turning the Effects
knob picks an effect, right? Actually, each of these knobs is setting a number of
parameters behind the scenes.
Page 61

CREATING & STORING SOUNDS: CUSTOMIZING AMP MODELS & EFFECTS
When you pick an Amp Model, POD sets the following controls to values
determined by the Amp Models knob:
Controls affected by the Amp Models Knob
Amp Model
Drive
Bass
Middle
Treble
Chan Vol
Cabinet Model
Post-Model EQ Frequency
Post-Model EQ Shape
Post-Model EQ Gain
Compressor Threshold (set by Compress Knob)
Compressor Ratio*
Noise Gate On/Off
Noise Gate Decay *
Amp Model Mid Sweep*
Volume Pedal Minimum *
Volume Pedal Location (before or after the Amp Model) *
Wah Minimum *
Wah Maximum *
6 • 5
*You only get access to these extra controls via the SoundDiver software or MIDI.
In the same way, turning the Effects knob sets all the parameters related to the
effect you choose.
Customization allows you to store your own personal favorite adjustments for all
these parameters so they live on the 16 positions of the Amp Models and Effects
Page 62

CREATING & STORING SOUNDS: CUSTOMIZING AMP MODELS & EFFECTS
knobs. This way, when you turn the Amp Models knob to the Stadium position,
you’ll get your personal Stadium, with all the controls in the list above set for your
very own version of the Stadium. Same thing for the Effects – your Chorus, Bass
Synth, etc. is always just one knob click away.
So where is stuff going to be saved, exactly? If you’re customizing the Amp Model,
then you’ll be saving to the knob position of the selected Amp Model. For
instance, if your sound uses the Brit Major, and you do the Customized Save of the
Amp settings, you will now get those settings whenever you turn the knob to the
Brit Major position. Alternatively, if your sound uses the Jazz Tone, then doing the
Customized Save will save your settings there. Your POD will choose the correct
place to store the information regardless of the present physical position of the Amp
Models encoder – so don’t worry, you can’t accidentally copy your California
settings to the Flip Top position. Same deal goes for the effects; your POD knows
6 • 6
whether you’re using Flanger or Rodent or whatever, and will save to that knob
position.
So what if you’re not sure which Amp Model or effect you are using right now, and
want to find out before you make your Customization? That’s easy, too:
Just press (and keep holding) the Save button and turn the Amp Models or
Effects knob. Once you have them in the right position, both the arrows for the
tuning indicator will light up.
So, now that you know exactly what you’re getting yourself into, lets get to it:
Activating Customization Mode
The first thing to do is get an Amp or Effect setting that you really like and want
to store to the Amp Models or Effects knob. This amp or effect setting can come
from a factory preset, one of your own edits, a sound you downloaded off the web,
or a sound you’ve tweaked up in SoundDiver. Whatever its source, all you have to
do is get that sound into your POD so it’s active and you’re playing though it.
Page 63

CREATING & STORING SOUNDS: MEMORY RESET
With that done, you’ll hold (and keep holding) the Save button, then press the
Manual button. The Save, Manual, A and B lights will all start a-flashing (and
you can let go of those buttons now). You have entered the Customization Mode. If
you use the Up/Down buttons to select A now, you will instruct your POD that
you want to save your present Amp settings to live on the Amp Models knob. If
you select B, your POD will understand that you want to save your current effects
setting to the Effects knob. And then you’ll press the Save button to finalize your
choice. Got it? Here are the steps in handy list form:
1. Get an amp or effect you love happening on your POD.
2. Hold Save, and press Manual. Save, Manual, A, and B lights flash.
3. Use Up/Down arrows to select A (Amps) or B (Effects).
4. Press Save to complete the deed.
MEMORY RESET
If, for any reason, or just for the sheer mad joy of it, you decide you need to reset
your POD’s memory to its factory-programmed state, hold down the Up and
Down buttons as you turn on the power. That’ll blow your POD’s memory and
reset it just like it was when it left the Line 6 factory.
Warning: This will erase ALL the channels, as well as the custom amp and effect
settings you might have created. So be sure and ask yourself “Do I really want to do
this?” If the answer is yes, go on ahead with your bad self.
6 • 7
Page 64

THAT’S USING YOUR FEET: FLOOR BOARD
THAT’S USING YOUR FEET
You really get the most out of your Bass POD with a foot controller. Two different
foot controllers can be used: Line 6’s
FLOOR BOARD
Using the Floor Board with POD lets you access many features that are not
available otherwise. This all-steel chassis, oh-so-stylish foot control wonder gives
you plenty of stuff: A volume pedal. A wah pedal with a Crybaby-style toe-down
on/off switch so you can kick the wah effect in and out at any time. Master Effects
on/off control of your POD’s effects. Channel switching. Plus Tuner control.
Floor Board and FB4.
If you haven’t already discovered the back panel foldout, get set for a surprise. If
you have, go ahead and jump to the next paragraph. Still here? Alright – flip to
the inside back cover of this manual. Hmm, looks like the cover is all folded up.
Unfold it, and hey, presto! It’s your very own POD road map. The idea is to have
this handy pictorial reference always opened out while you’re breezing through
this manual and becoming an expert on all things POD. The boxed numbers
throughout the following text refer to the fold out illustration.
Getting Connected
So, how’s that Floor Board work, exactly? Well, the very first thing is to plug it
into your POD with the handy cable that came with your Floor Board. We
recommend you turn your POD off first, but you do whatever you feel like – it’s
your amp! Then, plug in your bass, turn on your POD (scared you, didn’t we?) and
just press that Volume Pedal on the far right side of the Floor Board all the
way forward so you can hear something.
26
7 • 1
Page 65

THAT’S USING YOUR FEET: FLOOR BOARD
Effect On/Off
The first thing to know is that the Floor Board is designed to work with a variety
of Line 6 products. Besides your Bass POD, it also works with our original guitar
POD, POD Pro, and amplifiers. The main thing about all this that matters to you
is that the switch at the top left of the Floor Board chooses between two
modes on our guitar products: Channel Select Mode, and Effects On/Off Mode.
With your Bass POD, this switch simply works as the Effects On/Off control,
allowing you to toggle your pre-programmed effects on or (you guessed it) off.
Banks
The two left-most stomp switches on the bottom row ( on your handy back
cover foldout Floor Board diagram) are labeled Bank Down and Bank Up. A
Bank is a section of POD memory that holds four channel settings. The POD has
nine memory banks total. These memory locations come pre-loaded with some
7 • 2
tasty little tones created at Line 6, but you can change them into whatever you
want, and store those changes back into one of the memory locations. You know
which Bank you’ve got because the Floor Board’s display will show you the
same thing as your POD.
23
24
25
The Floor Board notes that you can press the Bank Up & Down buttons at the same
time to switch between Preset and User Banks. This only applies to some of our guitar
amplifier products, not to POD.
Channel Select
So, now that we’ve got this whole Bank thing down, let’s move onto the other four
switches on the bottom row. These let you pick which of the four channels – A, B,
C, or D – you want to use in the bank you’ve selected. Pick your Bank , hit
one of the Channel Select switches , and you’re ready to roll.
28
24
Page 66

THAT’S USING YOUR FEET: FLOOR BOARD
Manual Mode
Hey, what about Manual Mode? Don’t worry – you can get there any time. Let’s
say you have a particular Channel selected. The channel’s corresponding light is
lit above its Floor Board Channel Select switch, right? OK, step on this switch a
second time and hold it for at least a second. Boom! You'll find yourself
transported directly to Manual Mode. The Floor Board display will show a zero. To
get back out of Manual Mode, press either Bank Up or Bank Down foot switch
and you’ll be switched right back to wherever you were when you entered.
Editing and Saving POD Channels with the Floor Board
The basic story on editing the programmable POD channels is in the POD
Effects Chapter. With a Floor Board you’ll find that the display will show an
E (for “Edited”) whenever you’ve edited a channel. It will display an S (Save) if
you press the Save button on your POD in preparation for saving a channel. When
you decide you want to save an edited channel, you can select any of the locations
via the Floor Board as your destination. Here’s how:
1. EDIT A CHANNEL’S SETTINGS TO YOUR LIKING.
RESS THE SAVE BUTTON ON YOUR POD.
2. P
3. PICK THE MEMORY BANK YOU WANT TO STORE TO WITH THE BANK UP AND BANK
DOWN SWITCHES ON THE FLOOR BOARD.
4A.ON YOUR POD, PICK THE CHANNEL MEMORY LOCATION (A, B, C, OR D) YOU WANT
TO SAVE TO WITHIN THE SELECTED BANK, AND
5. PRESS THE SAVE BUTTON TO COMMIT YOUR MASTERPIECE TO YOUR POD’S MEMORY.
25
7 • 3
R,
O
4B.SKIP 4A AND 5, AND JUST KICK YOUR CHOSEN FLOOR BOARD CHANNEL SELECT
SWITCH TWICE TO SAVE INTO THAT CHANNEL.
Page 67

THAT’S USING YOUR FEET: FLOOR BOARD
Tap Tempo
The Tap Tempo button on the Floor Board can be used to take over the timingcontrol centers of the brains of unruly drummers and guitar players that insist on
slaughtering your latest groove with their sloppy sense of time. Just tap here and
Vulcan mind pulses will be sent out to your bandmates’ brains to put them under
your tempo control. If you’re still reading this, take a deep breath... WE’RE
KIDDING! The Tap Tempo function really controls the speed of delay and other
effects with some of our other products. With Bass POD, the true function of this
switch is....
Tuner
7 • 4
Yep, that’s what this switch is actually for. Really. Hold that puppy down for a
second or more and – shazam! Instant digital chromatic tuner. All POD’s Amp
Model and effects processing are bypassed so you can hear those questionablytuned strings clearly, should you choose to do so. If you’d rather appear more
professional, don’t worry; the volume pedal still works. Play a note on your bass
and the Floor Board will show you what it is in that handy display . Play that
string again, spin its tuning key so it goes sharp and flat, and the six LEDs above
the bottom row of Floor Board switches give you a light show. The idea is that the
LEDs to the left light if you’re flat. The LEDs to the right light if you’re sharp. And
the two LEDs in the center will light at the same time when you’ve got it just right.
Give any one of the Floor Board’s switches a stomp and the tuner disappears just as
swiftly as it came and you’re right back to Channel Select Mode. What if you want
to tune to a different reference than A=440Hz? When you’re in the tuner mode,
turn the Middle knob on your POD while watching the display on the Floor
Board. Hey, it changes! You can set the reference frequency anywhere from 436445Hz. This setting is stored so you don’t have to reset it every time you turn on
the amp if you decide you want to be different (or if that piano in your rehearsal
room has decided to be different).
27
25
Page 68

Wah Pedal
THAT’S USING YOUR FEET: FLOOR BOARD
So how about that wah pedal? It’s the one on the left . Get yourself planted
with your foot on there nice and comfortable. Now, press down with your toes, let
go, and do it again. You should see a little light turning on and off to the left of the
wah pedal. When the light’s on, the wah’s on. When the light’s off, the wah’s off.
Neat. Incidentally, the POD wah is modeled after a late 60’s Vox wah (retuned
especially for bass), with plenty of “growl” in the heel back position. Now then,
turn the wah light on, switch to the Rock Classic Amp Model, set your Drive to
about 5, and do a little funky playing while you rock back and forth to the beat on
that pedal. Hang a disco ball, unbutton your shirt to your navel (assuming you
don’t have it that way all the time), hang some gold chains around your neck, and
get ready to party! You can do subtle things with the wah pedal too, like turning it
on just a tiny bit and leaving it there, just barely caressing your sound. But then,
that’s not as much fun as playing the theme to “Shaft,” is it?
By the way, when you’re using the Tron Up or Tron Down effects, the wah pedal
is used to adjust the character of these effects, rather than controlling a separate
wah effect, because the Mu-Tron is basically an auto-wah filter thingy.
Also, when you’re using the Bass Synth effect, the wah pedal controls the decay
of the synth instead of a wah effect.
26
7 • 5
Volume Pedal
Not nearly as fun as the wah pedal, but arguably more useful (and it doesn’t
require you to have Very Large Hair to use it convincingly). Put your foot up on
that thing . It’s the one on the far right. Press the volume pedal forward with
your toes for loud, and back with your heel for quiet. The volume pedal is tapered
for a very musical swell. It starts out slow and then gets faster as you move your toe
down, very much like an Ernie Ball volume pedal.
26
Page 69

THAT’S USING YOUR FEET: FLOOR BOARD
Effect On/Off Settings Stored With Programmed
Channels
OK, this part’s mostly for the people who fret about all the little details that make
other people think, “Wow, you’re way too concerned about all the little details!”
What happens if you turn the effects off or on and then you save your sound into
one of your POD memories? The effect on/off status gets stored, too. Cool. Now,
what happens when you decide to head over to your friends’ house to show them
how cool your POD is, and you jump on your bike, and decide taking the Floor
Board along is too much hassle, so you leave it behind, pump the pedals with your
POD bouncing along in its attractive Line 6 carry bag, strut into your friends’
place trying not to look like you’re out of breath, plug in your POD, recall your
FAVORITE sound from the handy channel select buttons, go to play that
incredibly classic-sounding Ultimate Flanger tone that you know is going to have
your friends turning pale and quivery with envy, even if they do think you're too
concerned about all the little details, and then it hits you – you turned the effects
off from the Floor Board and stored the channel like that. Feel foolish, don’t you?
Let that be a lesson – never leave your Floor Board behind. Especially when there
7 • 6
are friends to impress. But we hate to see you suffer. So here’s how to save your
bacon: just grab the Effect Tweak knob and give it a spin. Magically, your
flanger is back to make you a hero once again. That’s because the effect’s on/off
status is overridden if you tweak that effect’s setting. So Flanger on/off comes on
when you move the Effect Tweak knob to change your Flanger setting. But only
if the Floor Board’s not connected. See? A bunch of little details. Getting a
headache, aren’t you? The important thing is, if you save channels with effects on
or off and then you don’t have your Floor Board, no worries – we’ve made sure it
doesn’t cause you problems. That’s it for the Floor Board section. Fun, wasn’t it?
16
Page 70

THAT’S USING YOUR FEET: FB4: SIMPLE FOOT CONTROL FOR POD
FB4: SIMPLE FOOT CONTROL FOR POD
The FB4 gives you basic control over channel switching with POD. We tried to
make it as simple as possible. Turn off your POD. Connect the FB4 to your POD
with the thoughtfully-included connection cable. Turn on your POD. Select
Channel A, B, C, or D by pressing the appropriate button on the FB4. The
channel’s light will be lit to indicate that the channel is selected. If you press and
hold down the button below the light for about a second, your POD will switch to
Manual Mode. And finally, if you unplug the FB4 from your POD and tap on one
of its switches, nothing will happen.
Note: The FB4 is always selecting sounds from the currently chosen POD Bank. Use
the Up/Down arrows on your POD to select a different bank.
7 • 7
Page 71

Deep Editing & MIDI Control: MIDI BASICS
DEEP EDITING & MIDI CONTROL
MIDI BASICS
What’s MIDI?
MIDI (Musical Instrument Digital Interface) is a communications protocol
designed to let various music-making machines exchange information. It allows
one device to control another, and several devices to all be used together in
coordination.
In/Out
POD has two MIDI connections: In & Out. You connect POD to other MIDI
devices by connecting MIDI cables to these connections. Each connection is a
one-way street: information flows from the OUT of one device to the IN of
another device. To allow information to flow back, you must connect a second
cable, from IN to OUT.
8•1
Page 72

Deep Editing & MIDI Control: MIDI BASICS
MIDI Channel
MIDI allows 16 different channels of information to be transmitted and received
through one MIDI cable. The MIDI channel is independent of, and has nothing
to do with, POD’s channels for storing individual sound programs.
You tune POD in to listen to a particular MIDI channel (like choosing a channel
on a TV or a station on a radio), and make sure the device that you want POD to
listen to is transmitting on that same MIDI Channel. To set POD’s MIDI channel,
press the MIDI button (which will light up). The single-digit display will show
you the channel POD is currently tuned in to. Use the Up and Down arrows to
select a different MIDI channel. POD will display channels 10–16 by lighting up
the decimal point to the right of the single digit. So “2.” means channel 12.
You can also set POD to listen to all channels (Omni mode) by selecting A (A for
all) for the MIDI channel. When in Omni mode, POD will transmit on MIDI
channel 1.
MIDI Messages
8•2
MIDI allows several different kinds of messages, each with a different purpose:
MIDI Program Changes - Program change messages tell a device to switch from
one sound or setup to another. With POD, program changes change from one
channel to another. So, for instance, when POD receives program change number
1, it will select Bank 1, Channel A. When it gets program change number 2, it will
select Bank 1, Channel B. And so on, as the chart in Appendix C shows.
MIDI Controllers - MIDI controller messages allow you to control a device’s
parameters in real time. So, for instance, you can use a MIDI controller to vary the
setting the of the POD Drive control, or the Compressor level. Each of POD’s
parameters are mapped to a MIDI controller, so you can take full control of your
POD. The chart in Appendix D lists each POD parameter, the controller
assigned to it, and how that controller affects POD. Note that the wah and
Page 73

Deep Editing & MIDI Control: MIDI BASICS
volume pedals of the Floor Board also transmit MIDI controller messages via MIDI
when used with your POD. To minimize “zipper” noise when controlling
parameter changes via MIDI, try making gradual, rather than sudden
changes to POD settings.
MIDI Sysex Commands - Sysex stands for “System Exclusive.” Sysex
commands are special commands that only a particular device understands – they
are ‘exclusive’ to that device – as opposed to the more generic kind of program,
controller, and other messages that almost all MIDI devices understand. POD uses
Sysex to transmit the sounds that are programmed in its memory to another
device, or to receive new sounds from another device. This exchange of data is
typically called a “dump.” The emagic SoundDiver software included on your
POD Tools CD uses Sysex commands to dump POD programs to your computer
for backup and editing, and to send programs from your computer to POD. The
following sections tell you how all this works.
8•3
Page 74

Deep Editing & MIDI Control: TRANSFERRING SOUNDS BETWEEN BASS PODS
TRANSFERRING SOUNDS BETWEEN BASS PODS
Imagine this: you’ve had your Bass POD for a while now, and you’ve become quite
the “bass tone” sound design wizard. Soon, all of your bass playing friends – and
even your bass idols – are calling asking if you they can get access to your brilliant
sounds. Being the generous wizard you are, you consent and invite them for an
audience with your POD. You’ll need a standard MIDI cable, and they will need a
Bass POD. (Your genius cannot be transferred to a regular guitar POD.) Let the
sound transfers begin!
Connect the MIDI OUT of your POD to the MIDI IN of the receiving Bass POD.
Press the MIDI button on your POD and check to see what MIDI channel it is set
to. Use the Up and Down buttons to set it to the same channel that the receiving
Bass POD is expecting. Or alternatively, change the receiving POD to match your
POD MIDI channel – whichever ya wanna do is just fine, so long as they both end
up talking on the same MIDI Channel.
Transferring All Sounds - To dump all the programmed sounds from one POD
to another, make sure that the transmitting POD’s MIDI button is lit up, and press
its SAVE button. The POD’s single digit display will say “A” which means send
All sounds via MIDI, and the Save button will flash as if to say, “press me again to
start sending.” Now, if you do press Save a second time, the entire memory of your
8•4
POD will be dumped to the receiving Bass POD. Pressing any other button on
POD will abort the transfer.
Transferring Only Some Sounds - To transfer only one or more individual
sounds from one POD to another, here’s the procedure. Start by having POD in
normal operating mode (no MIDI button lit), and selecting the sound you want to
transfer. You can make edits to it if you like; the POD is about to transfer whatever
settings you make active. So, once you’ve got the sound you want, press MIDI.
Now press Save. Use the Up button to change from “A” to “1” which means you
only want to transfer ONE sound to the receiving MIDI recorder. Press Save again
to make the transfer, or press anything else to abort. If you want to send another
single sound, select it on your POD, and press MIDI, then Save, then Up. Press
Save on POD to execute the dump. And poof! Your a wizard’s trick is complete.
Page 75

Deep Editing & MIDI Control: BACKING UP POD PROGRAMS TO OTHER DEVICES
BACKING UP POD PROGRAMS TO OTHER DEVICES
It’s recommended that you backup the sounds programmed into your POD so that
you can restore them in case of some future disaster. If you want to transfer sounds
from POD to some other MIDI device for backup (like say a MIDI file player or a
hardware sequencer or keyboard workstation), things work pretty much the same
way as they do for Bass POD-to-Bass POD transfers. But we’ll spell it out anyway.
You’ll need a standard MIDI cable to get everybody talking.
Connect the MIDI OUT of your POD to the MIDI IN of the receiving MIDI
devices. Press the MIDI button on POD and check to see what MIDI channel it is
set to. Use the Up and Down buttons to set it to the same channel that your
MIDI device is expecting to receive on. Or alternatively, change your other MIDI
device to match the POD MIDI channel – whichever ya wanna do is just fine, so
long as they both end up talking on the same MIDI Channel.
Transferring All Sounds - To dump all the programmed sounds from POD to
your MIDI recorder, make sure that the POD MIDI button is lit up, and press the
POD SAVE button. The POD’s single digit display will say “A” which means send
All sounds via MIDI, and the Save button will flash as if to say, “press me again to
start sending.” Start your MIDI recorder. Now, if you do press Save a second time,
the entire memory of your POD will be dumped to the receiving MIDI device.
Pressing any other button on POD will abort the transfer. You also probably have
to press STOP on your MIDI recorder once the transfer is complete.
8•5
Transferring Only Some Sounds - To transfer only one or more individual
sounds from POD to your MIDI recorder, here’s the procedure. Start by having
POD in normal operating mode (no MIDI button lit), and selecting the sound you
want to transfer. You can make edits to it if you like; the POD is about to transfer
whatever settings you make active. So, once you’ve got the sound you want, press
MIDI. Now press Save. Use the Up button to change from “A” to “1” which
means you only want to transfer ONE sound to the receiving MIDI recorder. Start
the MIDI recorder going, and then press Save again to make the transfer, or press
anything else to abort. Then you probably have to press STOP on your MIDI
recorder. If you want to send another single sound, select it on your POD, and
press MIDI, then Save, then Up. Set your recorder to receive again. Press Save
on POD to execute the dump. And press STOP on your MIDI recorder.
Page 76

Deep Editing & MIDI Control: EMAGIC SOUNDDIVER SOFTWARE
EMAGIC SOUNDDIVER SOFTWARE
The Emagic SoundDiver software included on your POD Tools CD is an editor/
librarian program that turns your computer into a POD control station. Check
http://www.line6.com for the latest update for this software. SoundDiver lets
you store POD sounds on your computer and edit POD sounds on-screen, with
access to extra parameters not available when using POD on its own. Included on
the CD are installation instructions and an electronic user guide. Please refer to
them for instruction, and for information on Emagic’s technical support services.
You will need to have a MIDI interface for your computer in order to use the
SoundDiver software. Emagic makes interfaces, as well as a line of software and
hardware for music recording that you should check out for use with your POD.
See the Step-By-Step with SoundDiver section later in this chapter for an
introduction to using the SoundDiver software, as well as the SoundDiver
Troubleshooting section.
8•6
Emagic can be reached in the U.S. by phone at (530) 477-1051, or at their
German headquarters: +49 4101 495-0. They’re also on the internet at
http://www.emagic.de, and can be emailed at info@emagic.de – U.S. customers
note that the web and email addresses are “.de” not “.com” because Emagic is
headquartered in Germany. A list of Emagic distributors is under the Apple Menu
in the SoundDiver Macintosh software Mac. If you’re using Windows, this list is
available from the Welcome Window when you start up SoundDiver, or from the
Help Menu > Emagic Distributors....
MIDI interfaces are also made by Mark of the Unicorn (www.motu.com), MIDI
Man (www.midiman.com) and others.
Page 77

Deep Editing & MIDI Control: OTHER THINGS YOU CAN DO WITH MIDI
OTHER THINGS YOU CAN DO WITH MIDI
In addition to using the Emagic SoundDiver software on the POD Tools CD to
edit and store POD sounds, MIDI also gives you what you need for:
Changing POD Channels with MIDI Program Changes
The most basic thing to do with POD via MIDI is change channels. You may have
a foot controller or other device that sends MIDI program change messages. Hook
its MIDI OUT to POD’s MIDI IN, set the MIDI Channels of both devices to be
the same, and refer to the chart in Appendix C to see what program number on
the foot controller will select which POD Channel. Note that both Manual Mode
and the Tuner can be selected with MIDI Program Change messages. You can also
send MIDI Program change messages to POD from a MIDI sequencer to allow you
to change POD sounds automatically in sync with your sequences.
Tweaking POD Tones with MIDI Controllers
If you have a hardware MIDI “fader box,” assignable MIDI controllers on a
keyboard, or a stand-alone or computer software-based MIDI sequencer, you can
take control of any POD parameter via MIDI. The chart in Appendix D lists
which POD parameter is controlled by which MIDI Controller. Remember to
make sure that the MIDI Channels have been set properly when first setting up
your POD with the gear that will control it.
Full MIDI Automation of POD
When you use POD with a MIDI sequencer, you can automate any POD
parameter using MIDI Controller messages. This allows POD to give you the same
kind of capabilities as Line 6’s acclaimed Amp Farm software plug-in software for
Pro Tools TDM systems, without the Pro Tools system!
8•7
Page 78

Deep Editing & MIDI Control: OTHER THINGS YOU CAN DO WITH MIDI
The POD front panel knobs all send out appropriate MIDI controllers (as do the
wah and volume pedals of the optional Floor Board foot controller) that you can
record into a MIDI track as you play through your POD along with a MIDI
sequence. Follow the Return to Sender hook up instructions in Chapter 3 to set
up your audio.
Hook your POD’s MIDI OUT to a MIDI IN on your sequencing setup. Hook a
sequencer MIDI OUT to POD’s MIDI IN, and make sure POD and your sequencer
are set to the same MIDI Channel.
To allow MIDI-controlled automation, you need to set up a MIDI track in your
sequencer to record the data flowing from POD’s MIDI OUT. Set up a MIDI track
to receive POD’s MIDI output, record-enable it, and start the sequencer recording.
Slowly turn POD’s Drive knob all the way up and then all the way down as your
sequencer records, and then stop your sequencer. Now, look at the data that’s been
recorded into the POD MIDI track on your sequencer. You’ll see that you’ve
recorded MIDI controller #13 messages. This is the controller that’s assigned to
POD’s Drive parameter. Play back the recorded MIDI track as you play through
POD (or play back recorded direct guitar audio through POD), and you’ll hear the
8•8
Drive changes that you recorded into your MIDI track.
To minimize “zipper” noise when controlling parameter changes via
MIDI, try making gradual, rather than sudden changes to POD settings.
Page 79

Deep Editing & MIDI Control: STEP-BY-STEP WITH SOUNDDIVER
STEP-BY-STEP WITH SOUNDDIVER
As we mentioned in this chapter’s earlier section on SoundDiver, you will need to have a
MIDI interface for your computer in order to use the SoundDiver software with your POD.
MIDI interfaces are made by Emagic (www.emagic.de) which is the company that makes the
SoundDiver software. MIDI interfaces are also available from Mark of the Unicorn
(www.motu.com), MIDI Man (www.midiman.com) and others. You’ll need to get the
MIDI interface hooked up to your computer, and install its associated software to make it run
(the Troubleshooting section at the end of this chapter can help with problems you might
encounter getting your MIDI interface set up). With the MIDi interface happening, you’re
ready to give SoundDiver a go. In the following steps, we’ll show you how to get SoundDiver
running, and how to get all the sounds in your POD transferred to the computer:
Step 1 - Hook your POD up to your computer’s MIDI interface. Use both the MIDI
IN and MIDI OUT connections for bi-directional communication (so POD can talk
to your computer, and the computer can talk to POD). Remember that POD’s OUT
connects to the computer’s IN, and the computer’s OUT connects to POD’s IN. Make
sure POD is powered on.
8•9
Step 2 - We’ve included SoundDiver installers on the accompanying CD. We also
strongly recommend that you surf the Support pages at www.line6.com to check for an
updated version of the SoundDiver installer.
Run the SoundDiver installer to get SoundDiver installed on your machine. Now,
with your POD hooked up to the computer via MIDI and powered on, launch
the newly-installed SoundDiver software.
Step 3 - First you’ll see the “splash screen” with Emagic’s contact info, including
information on upgrading to the full version of the SoundDiver software. You’ll then
get a dialogue box to select English or German (SoundDiver is made by Emagic, a
German company).
Page 80

Deep Editing & MIDI Control: STEP-BY-STEP WITH SOUNDDIVER
Step 4 (Macintosh) - Then you’ll configure your ports; make sure you are plugged
into the right port on your mac (Modem, Printer, or USB) and that you’ve checked
the box for this port before hitting the OK button in the Preferences dialogue box.
Step 4 (Windows) - SoundDiver will now probably give you a series of dialogue
boxes to OK regarding MIDI ports. These will say something like “Port XXXX no
longer exists,” and will include an OK button. Typically, you’ll get two dialogues
referring to SoundBlaster ports, and eight referring to Unitor ports (the Unitor is a
particular MIDI interface). Go ahead and OK all these dialogue boxes, and then
SoundDiver should give you the dialogue box we’re about to describe in step 5....
Step 5 - SoundDiver should now establish communication with your POD (like we
said above, make sure you have both MIDI In and MIDI Out connected to allow this),
and will give you a dialogue box asking if you’d like to “Request Device’s Memories?”
OK this dialogue, and SoundDiver sucks all the sounds out of your POD, and opens
them in a window titled “Bass POD”.
8•10
Step 6 - You’ll have a window that looks about
like the one on the left. Don’t worry that the
names of the channels (“User Programs”) in your
POD are different from what’s shown here. We
hadn’t set final names at the time this manual was
sent to the printer.
Use your mouse to move your on-screen arrow
pointer to the User Programs header bar as
shown, and click once. The list of all 32 user
memories will then be highlighted to show that
they are all selected (clicking on the header bar
is a handy “select all user memories” command).
Page 81

Deep Editing & MIDI Control: STEP-BY-STEP WITH SOUNDDIVER
Step 7 (Macintosh) - Now, notice that there are two menus in this window: Entry
and Options. From the Entry menu, choose Save as... > Selected Entries, as
shown below:
SoundDiver will give you a standard Save File dialogue box. A pop-up menu at the top
of the dialogue box will say “Libraries,” letting you know you are about to save your
library to the SoundDiver Libraries folder.
8•11
You can click on this “Libraries” pop-up menu to navigate to another place if you want
to save this library file some place else. You can also change the name of your library
by typing one here (we recommend something like “Bass POD Sounds”), and then you
complete the Save by clicking Save.
Page 82

Deep Editing & MIDI Control: STEP-BY-STEP WITH SOUNDDIVER
Step 7 (Windows) - On Windows, the Entry menu is at the top of the screen with
File and the rest of ’em. From it, choose Save as... > Selected Entries. SoundDiver
will give you a standard Save File dialogue box. The SoundDiver software’s Libraries
folder has been automatically selected for you as the destination for your library file.
You can change the name of your library by typing one here (we recommend
something like “Bass POD Sounds”), and then complete the Save by clicking the
Save button.
Step 8 - As a final check to make sure
everything went as it should, choose Open
from the File menu, and open the library
you just saved. You should see a window
like the one at the left, listing all 36 of your
POD’s memories. Don’t worry that the names
in your window are different from what’s
shown here. We hadn’t named set final names
for the channels at the time this manual was
sent to the printer
Congratulations! You’ve now backed up
8•12
the memory of your POD.
Page 83

Deep Editing & MIDI Control: STEP-BY-STEP WITH SOUNDDIVER
A Few Other SoundDiver Tips
We’re done with the tutorial on how to save your sounds to the computer, but we
figured we should give you one or two other tips:
Editing a Channel Memory/Program -
The SoundDiver window shown on the left
shows you the contents of your POD’s memory.
To edit any one of your POD’s channel memories
(SoundDiver calls these “User Programs”), just
double-click its name in the list, and you’ll get an
editing window.
Transmit/Request -
The “Transmit” and “Receive” commands are
available in SoundDiver’s MIDI menu. These
commands instruct SoundDiver to Transmit
or Receive information to your POD, based
on what youhave selected in SoundDiver. So,
for instance., if you click on one of the
channels/programs in the name list of the
window above, and then choose the
Transmit command, SoundDiver will
understand you want to Transmit this sound to your POD (in other words, the
parameters that define the sound are sent from the computer to POD, so now they
both have the same information – what was in the computer has been copied to
the POD as well). If you clicked on one of the names in the list, and then chose
Request, that would instruct SoundDiver to Request this sound from your POD (in
other words, the parameters that define the sound are sent from POD to the
computer, so now they both have the same information – what was in POD has
been copied to the computer as well).
8•13
Keep these commands in mind any time your POD and computer don’t seem to be
dealing with the same information; you can use Transmit and Request to get your
POD and computer back in sync.
Page 84

Deep Editing & MIDI Control: SOUNDDIVER SETUP TROUBLE-SHOOTING
SOUNDDIVER SETUP TROUBLE-SHOOTING
There are a couple of considerations with SoundDiver and Windows sound card systems.
Here are some troubleshooting hints, courtesy of Line 6’s own product support hero,
George Van Wagner:
1. SoundBlaster type cards have more than one MIDI driver. The system will
usually default to the driver for the built-in synth on the card, rather than the
external MIDI port. This means that you must select the correct driver, before
SoundDiver can see the POD.
2. MIDI cables must run from out to in and vice versa (don’t connect POD’s MIDI
In to your computer’s MIDI In; connect POD’s MIDI In to your computer’s MIDI
Out). Think of it in terms of the direction that information is flowing; out of the
POD in to the computer. Out of the computer in to the POD.
3. MIDI channels must be set to the same value. The quickest way to ensure
8•14
communication is to simply set the POD MIDI Channel to A for all (In MIDI-ese,
this is known as Omni mode).
Here are some basic steps to ensure communication with the POD:
1. When you get the dialog box stating that no new device is found, click on the
button that says Manually. You will be dropped in the Memory Manager window
of SoundDiver.
2. On the left hand side of the Memory Manager window, you will see a list of
parameters. Make sure that the Out Port is set to the driver for the External
MIDI. As different companies have different driver names, there's no one set
name, but the selection should be fairly obvious.
Page 85

Deep Editing & MIDI Control: SOUNDDIVER SETUP TROUBLE-SHOOTING
3. Make sure that the Device ID is set to 1.
4. On the right hand side of the Memory Manager, click on the title bar that says
User Programs. This will highlight all 36 of the user preset locations that are
currently blank.
5. Now click on the left-most icon in the upper left of the Memory Manager. It
should look like a little keyboard with an arrow coming out of it and a small
question mark. This requests the current programs from the POD. At this point,
you should see all the patch names fill in, and you’re good to go.
8•15
Page 86

APPENDIX A: AMP & CAB MODELS
Please note that Fender, Marshall, Vox, and other amplifier model designations, and effects, are all trademarks of their
respective owners, which are in no way associated or affiliated with Line 6. These marks and names are used solely for the
purpose of describing certain amplifier tones produced using Line 6’s modeling technology. The Line 6 modeling
technology provides POD with a wide variety of sounds and effects modeled after some of the most popular sounds of the
classic amps and effects mentioned here.
Model Name Based On Mid Sweep
Amp Models
Tube Preamp Tube Instrument Preamp No
Session SWR SM-400 Yes
California Mesa/Boogie Bass 400+ No
Jazz Tone Polytone Mini-Brute No
Adam & Eve Eden Traveller WT-300 Yes
Eighties Gallien Krueger 800RB No
Stadium Sunn Coliseum 300 Yes
Amp 360 Acoustic 360 Yes
Rock Classic Ampeg SVT Yes
Brit Major Marshall Major No
Brit Super Marshall Super Bass No
Silver Panel Fender Bassman Amp No
Brit Class A Vox AC-100 No
Motor City Versatone Pan-O-Flex No
Flip Top Ampeg B-15 No
Sub Dub When it’s time to go lower than low... Yes
Cabinet Models
Cabs with 10’s 1979 Ampeg SVT 8x10 Cab
Eden “David” 4x10
SWR “Goliath” 4x10
Hartke 4x10
Cabs with 12’s 60’s Versatone Pan-O-Flex 1x12
1968 Marshall 4x12 with “pre-Rola” 25’s
Cabs with 15’s Ampeg B-15 1x15 closed back combo
Polytone 1x15 closed back combo
Vox AC-100 2x15
Mesa/Boogie 2x15 (front loaded and front ported)
Fender Bassman 2x15 with JBL’s
1969 Marshall Major 4x15 cab (Yeah, baby!)
Cabs with 18’s SWR 1x18
Acoustic 360 cab
Sunn Coliseum 8028 cab (1x18 + 1x12)
Page 87

APPENDIX B: EFFECT PARAMETERS
Effect Tweak Notes
Bypass n/a Turns off the effects.
Octave Down Mix Modeled afterthe Boss OC-2. HIgher settings give you more
of the octave down effect.
Analog Chorus Range of
Choruses
Danish Chorus Range of
Choruses
Orange Phase Speed Modeled after the MXR Phase 90.
Gray Flanger Range of
Flangers
Tron Down Peak Range Modeled after the Mu-Tron III in the “down” position. The
Tron Up Peak Range Modeled after the Mu-Tron III in the “up” position. The wah
S & H Speed Modeled after the Oberheim Voltage Controlled Filter (for a
S/H + Flanger Sample / Hold
Speed
S/H + Driver Sample / Hold
Speed
Bass Synth Decay Rate Inspired by the Boss Bass Synth – with a bit of extra Line 6
Inspired by the Roland CE-1. From slow and shallow to faster
and deeper.
Modeled after the t.c. electronics Chorus/Flanger. From slow
and shallow to faster and deeper.
Modeled after the MXR Flanger. From slow and shallow to
faster and deeper.
wah pedal varies the Trom effect, rather than a separate wah
(since the Tron is a sort of auto-wah).
pedal varies the Trom effect, rather than a separate wah
(since the Tron is a sort of auto-wah).
sample & hold effect).
Combines Sample & Hold with Gray Flanger.
Combines Sample & Hold with Danish Driver.
personality.
Danish Driver Distortion Modeled after the t.c. electronics Booster Line Driver +
Distortion. Good for smooth distortion.
Large Pie Distortion Modeled after the Big Muff Pi. Good for fuzz.
Pig Foot Distortion Modeled after the Hogs Foot. Good for warm bass boost.
Rodent Distortion Modeled after the Rat. Good for buzz saw bass and squeal.
Page 88

APPENDIX C: MIDI PROGRAM CHANGES
POD channels can be selected via MIDI program changes. Some devices number
programs starting at zero. Some start at one. We start at zero (Manual Mode)
and then work our way along through the stored channels as shown in this table:
POD Channel MIDI Program POD Channel MIDI Program
Bank 1 Bank 6
Channel A 01 Channel A 21
Channel B 02 Channel B 22
Channel C 03 Channel C 23
Channel D 04 Channel D 24
Bank 2 Bank 7
Channel A 05 Channel A 25
Channel B 06 Channel B 26
Channel C 07 Channel C 27
Channel D 08 Channel D 28
Bank 3 Bank 8
Channel A 09 Channel A 29
Channel B 10 Channel B 30
Channel C 11 Channel C 31
Channel D 12 Channel D 32
Bank 4 Bank 9
Channel A 13 Channel A 33
Channel B 14 Channel B 34
Channel C 15 Channel C 35
Channel D 16 Channel D 36
Bank 5
Channel A 17 Manual Mode 00
Channel B 18 Tuner 37
Channel C 19
Channel D 20
Page 89

APPENDIX D: MIDI CONTROLS (1 of 3 pages)
Parameters Notes
Programs
(Channel Memories)
MIDI Channel 0-15 - NO TRANSMIT
Apply FX to D.I. Button On/Off 64 0=Off; 127=On Rcv: 0-63=OFF, 64-127=ON
Knob Controls
Amp Model - 12 0-15 0=Tube Preamp, 1-16=Amps,
Drive - 13 0-127 0-127
Bass - 14 0-127 0-127
Mid - 15 0-127 0-127
Treble - 16 0-127 0-127
Channel Volume - 17 0-127 0-127
Compress Sets threshold
Effect Select Knob - 19 0-15 0=Bypass, 1-15 other effects,
Effect Tweak - 1 0-127 0-127
Alternate Controls (accessed via CABS AND EQ button)
Parametric EQ
Frequency
Parametric EQ
Shape/Width/Q
Parametric EQ
Gain
FX Lo-Cut Off - 1KHz 21 0-127 (Chan Vol with
Noise Gate On/Off On/Off 22 0-127 (Hold CABS &
Amp Model Mid Sweep
(on selected models)
Cabinet Type 0-15 (0 = no cab) 71 0-15 (Turn Effects
Infinite cut - +12dB 27 0-127 (Turn Treble
- - 0=Manual,
(see page 2 of 3
for additional
compressor
parameters
30Hz - 8KHz 25 0-127 (Turn Bass with
- 26 0-127 (Turn Mid with
- 28 0-127 (Hold CABS &
Cntrl
#
18 0-127 0-127
Transmitted
MIDI Range
1-36=Programs,
Tuner=37
CABS & EQ on)
CABS & EQ on)
with CABS & EQ on)
CABS & EQ on)
EQ, turn Compress)
EQ, turn Effect Tweak)
with CABS & EQ on)
Received
MIDI Range
0=Manual,
1-36=Programs,
Tuner=37
>16 treated as 16
treat >15 as 15
0-127
0-127
0-127
0-127; 0-OFF
Rcv: 0-63=OFF, 64-127=ON
0-127
0-15 (0 = no cab)
Page 90

APPENDIX D: MIDI CONTROLS (2 of 3 pages)
Parameters Notes
Noise Gate
Noise Gate Threshold 6dB-96dB 23 NO TRANSMIT 0-127
Noise Gate Decay 8.1-159.2ms 24 NO TRANSMIT 0-127
Compressor Details
Compression Ratio Ranging from less
to more: 2:1,
3.3:1 (a la LA-2A),
8:1, 12:1, and
infinity:1 (a limiter)
Compressor Attack - 51 NO TRANSMIT 0-127
Compressor Decay - 63 NO TRANSMIT 0-127
Wah Pedal
Wah Pedal - 4 0-127 0-127
Wah Wah Pedal On/Off On/Off 43 FB SWITCH
Wah Bottom Frequency - 44 NO TRANSMIT 0-127
Wah Top Frequency - 45 NO TRANSMIT 0-127
Volume Pedal
Volume Pedal - 7 0-127 Rcv: 0-63=OFF, 64-127=ON
Volume Pedal Minimum - 46 0-127 0-127
Volume Pedal Location Pre Amp Model /
Post Amp Model
Octave Down
Mix - 29 NO TRANSMIT 0-127
Analog Chorus
Speed - 30 NO TRANSMIT 0-127
Depth - 31 NO TRANSMIT 0-127
Danish Chorus
Speed - 32 NO TRANSMIT 0-127
Intensity - 33 NO TRANSMIT 0-127
Width - 34 NO TRANSMIT 0-127
Orange Phase
Speed - 35 NO TRANSMIT 0-127
Cntrl
#
42 NO TRANSMIT 0-24=2:1
47 NO TRANSMIT Rcv: 0-63=BEFORE TUBE,
Transmitted
MIDI Range
ON=127/OFF=0
Received
MIDI Range
25-49=3.3:1 (same as LA-2A)
50-74=8:1
75-99=12:1
100-127= infinity:1
Rcv: 0-63=OFF, 64-127=ON
64-127=AFTER TUBE
Page 91

APPENDIX D: MIDI CONTROLS (3 of 3 pages)
Parameters Notes
Gray Flanger
Width - 36 NO TRANSMIT 0-127
Speed - 37 NO TRANSMIT 0-127
Regen - 38 NO TRANSMIT 0-127
Tron Down
Peak - 39 NO TRANSMIT 0-127
Tron Up
Peak - 40 NO TRANSMIT 0-127
S/H
Speed - 41 NO TRANSMIT 0-127
Bass Synth
Dry Level This determines
how much of your
non-synthed bass
sound you hear
Low Pass Level This is the output
from the Low Pass
Filter section of
the synth effect
High Pass Level This is the output
from the High Pass
Filter section of
the synth effect
Decay - 52 NO TRANSMIT 0-127
Danish Driver
Distortion - 55 NO TRANSMIT 0-127
Large Pie
Distortion - 56 NO TRANSMIT 0-127
Pig Foot
Gain - 57 NO TRANSMIT 0-127
Rodent
Distortion - 58 NO TRANSMIT 0-127
Filter - 59 NO TRANSMIT 0-127
A.I.R.
Ambience Level - 72 NO TRANSMIT 0-127
Cntrl
#
48 NO TRANSMIT 0-127
49 NO TRANSMIT 0-127
50 NO TRANSMIT 0-127
Transmitted
MIDI Range
Received
MIDI Range
Page 92

APPENDIX E: LINE 6 CONTACT
CUSTOMER SERVICE
Hope you enjoy your POD. If you have any questions or comments, our diligent support
staff can be contacted at (805) 379-8900 (weekdays, 8am-6pm Pacific Time), via our
website (www.line6.com,) or via email (support@line6.com). To ensure that your support
experience is a pleasant one, we recommend taking some notes for yourself before you call.
That way, you’ll remember to ask everything you want to ask the first time, and be able to
get back to POD-ing ASAP.
OTHER LINE 6 PRODUCTS
Our full line of affordable amplifiers feature the same great tones as POD, along with builtin effects, programmable channels, foot control options, MIDI, and more. We also have
POD Pro, and the Stomp Box Modelers series effect pedals. Learn about the full line up at
the Line 6 web site (www.line6.com) or by contacting our sales or support staff via email
(sales@line6.com or support@line6.com) or phone: (805) 379-8900.
POD Series – POD Pro and POD version 2.0 are also available. These PODs for guitar
offer Amp Models, Cab Models, effects, and more. POD Pro has digital out and loop.
Flextone II Series – A selection of combos, plus a high-powered head, bring you
ToneTransfer compatibility to run all of the guitar POD sounds.
AX2 212 – The most tweakable Line 6 amplifier, AX2 matches Line 6 modeling
technology with extensive multi-effects in an all-in-one 100 Watt 2x12" combo.
Spider Series – 6 Amp Models and built-in FX in our lowest price amps.
Stomp Box Modelers – A mass of modeled vintage effects in three stomp boxes: Delay
Modeler includes Tape and Analog Delays, 14 Second Loop Sampler and more. Modulation
Modeler includes classic Choruses, Flangers, Phasers, Rotary Speakers, Tremolos and more.
Distortion Modeler brings you a collection of Distotion, Fuzz, and Overdrive models.
Amp Farm – Plug-in software for Pro Tools TDM systems puts Line 6 modeling right into
your high-end computer music system. Requires Pro Tools TDM hardware. Amp Farm is
distributed by Digidesign; contact them directly for pre-sales information.
Digidesign: 3401 A Hillview Ave., Palo Alto, CA 94304. Email prodinfo@digidesign.com
or telephone (800) 333-2137 (from USA) or (650) 842-7900. Surf www.digidesign.com.
Page 93

APPENDIX F: WARRANTY INFO
Line 6 Limited Warranty Information
Sending in your registration card allows us to register key information so that we may handle
problems faster and inform you of advance information, upgrades, and other news. Thanks in
advance for filling out your registration card and sending it to us. And good luck in your music!
Line 6, Inc., warrants this product when purchased at an Authorized Line 6 Dealer in the United States of America or Canada, to be free of defects in
materials and workmanship for a period of one year from the date of original purchase only upon completion and return of the Line 6 Warranty
Registration form within 30 days from date of purchase. Please contact your distributor for information on warranty and service outside USA and Canada.
During the warranty period Line 6 shall, at its option, either repair or replace any product that proves to be defective upon inspection by Line 6. Line 6
reserves the right to update any unit returned for repair, and reserves the right to change or improve the design of the product at any time without notice.
This warranty is extended to the original retail purchaser. This warranty can be transferred to anyone who may subsequently purchase this product within
the applicable warranty period by providing Line 6 with all Warranty Registration information for the new owner and proof of transfer within 30 days of
the purchase. Final determination of warranty coverage lies solely with Line 6.
This is your sole warranty. Line 6 does not authorize any third party, including any dealer or sales representative, to assume any liability on behalf of Line 6
or to make any warranty for Line 6.
Line 6 may, at its option, require proof of the original date of purchase in the form of a dated copy of the original authorized dealer’s invoice or sales receipt.
Service and repairs of Line 6 products are to be performed only at the factory (see below) unless otherwise authorized in advance by the Line 6 Service
Department. Unauthorized service, repair or modification will void this warranty.
To obtain factory service:
Contact Line 6 at (805) 379-8900, 8AM to 5:30 PM Monday through Friday (Pacific Time) and
request the Product Support department (or email support@line6.com). If necessary, you will be
given a return authorization (RA) number. Products returned without an RA number will be
returned to you at your sole expense. Pack the product in its original shipping carton and
attach a description of the problem along with your name and a phone number where Line 6 can
contact you if necessary. Ship the product insured and freight prepaid to:
Line 6 Product Support
6033 De Soto Avenue
Woodland Hills, CA 91367
DISCLAIMER AND LIMITATION OF WARRANTY
THE FORGOING WARRANTY IS THE ONLY WARRANTY GIVEN BY LINE 6 AND IS IN LIEU OF ALL OTHER WARRANTIES. ALL
IMPLIED WARRANTIES, INCLUDING WARRANTIES OF MERCHANTABILITY AND FITNESS FOR ANY PARTICULAR PURPOSE, ARE
HEREBY EXCLUDED. UPON EXPIRATION OF THE APPLICABLE EXPRESSED WARRANTY PERIOD, LINE 6 SHALL HAVE NO FURTHER
WARRANTY OBLIGATION OF ANY KIND, EXPRESSED OR IMPLIED. LINE 6 SHALL IN NO EVENT BE OBLIGATED FOR ANY
INCIDENTAL OR CONSEQUENTIAL DAMAGES THAT MAY RESULT FROM ANY DEFECT OR WARRANTY CLAIM, EXPRESSED OR
IMPLIED. Some states do not allow the exclusion or limitation of incidental or consequential damages or limitation on how long implied warranties last,
so some of the above limitation or exclusion may not apply to you. This warranty gives you specific legal rights, and you may also have other rights which
vary from state to state. This warranty only applies to products sold and used in the United States of America and Canada. Line 6 shall not be liable for
damages or loss resulting from negligent or intentional acts of shipper or his contract affiliates. You should contact the shipper for proper claims procedures
in the event of damage or loss resulting from shipment.
 Loading...