

Page 1

AMPLIFi Remote
PILOT’S GUIDE
A guide to the features and functionality of the Line 6 AMPLIFi Remote iOS & Android™ mobile application
Rev. A Pilot’s Guide also available at www.line6.com/manuals ©2016 Line 6, Inc.
Page 2

CONTENTS
Welcome to the AMPLIFi Family 3
Installation 3
Installing on an iOS Device 3
Installing on an Android™ Device 3
Line 6 Account 4
Getting Started 4
App Navigation 4
Connecting to an AMPLIFi Device 5
Firmware Updates 5
The Edit Screen 6
Editing a Tone 7
Saving and Publishing a Tone Preset 7
Entering Tone Details 8
Assigning a Parameter to the FX Tweak Knob & Pedal Control 9
The Tones Screen & Tones Lists 9
Deleting a Tone 10
Storing a Tone on your AMPLIFi Device 11
The Music Screen 11
Playing Music Library Songs 12
Tone Matching 13
Downloading Jam Tracks 13
Removing Jam Tracks 14
Playing Jam Tracks 14
Adjusting Overall & Guitar Output Levels 15
The Tuner Screen 16
The Settings Screen 16
Firmware Updates Using Line 6 Updater 18
Using Line 6 Updater 18
Frequently Asked Questions 19
Troubleshooting 21
Bluetooth® Connectivity 21
Please Note: Line 6, AMPLIFi, FBV, POD and Sonic Port are trademarks of Line 6, Inc., registered in the U.S. and other countries. All rights reserved.
Apple, Mac®, iPod touch, iPhone and iPad are trademarks of Apple, Inc. registered in the U.S. and other countries. App StoreSM is a service mark
of Apple, Inc. Apple is not responsible for the operation of this device or its compliance with safety and regulatory standards. The Bluetooth® word
mark and logos are registered trademarks owned by Bluetooth SIG, Inc. and any use of such marks by Line 6 is under license. Android™ is a
trademark of Google, Inc. Windows® is a registered trademark of Microsoft Corp. in the US and other countries.
Page 3

Welcome to the AMPLIFi Family
AMPLIFi was designed to be an entirely new guitar experience, allowing
you to stream music wirelessly from a Bluetooth® enabled device, directly
to a Line 6 AMPLIFi hardware device for jamming along, playing songs at
rehearsals and cranking up the volume on your music library.
At the center of the AMPLIFi world is the breakthrough AMPLIFi Remote
iOS or Android™ mobile app that lets you wirelessly control your guitar
rig. The AMPLIFi Remote app oers the following:
• For use with AMPLIFi 30, AMPLIFi 75 & AMPLIFi 150 ampliers,
AMPLIFi FX100 Floorboard and AMPLIFi TT Table Top devices
• Wireless control and deep editing of every aspect of your guitar rig
• Bluetooth® streaming of your mobile device's music library
content and included Line 6 Jam Tracks to your AMPLIFi device.
• Intelligent Tone Matching to automatically congure and load
optimal guitar amp & FX settings for jamming along with the music
you are streaming
• Create, share, download and rate unlimited tones with the online
AMPLIFi community
• An easy-to-use, responsive user interface for accessing all
AMPLIFi controls, your personal cloud-based Tone Library, and
integrated Music Player and Tuner
This guide covers the features and functionality of the AMPLIFi Remote
app. Please also be sure to read through the Pilot's Guide that came
with your AMPLIFi device for details on its specic hardware features.
The latest versions of these guides are always available from line6.com/
support/manuals.
Installation
The rst matter of business is to download and install the AMPLIFi
Remote app on your iOS or Android™ device! Please follow these steps
for your mobile device.
Installing on an iOS Device
Simply go to the Apple App StoreSM on your iPad, iPhone, or iPod touch
and search for the free Line 6 AMPLIFi Remote app. Follow the App
StoreSM instructions to install the app on your device.
AMPLIFi Remote is compatible with Apple iPad, iPhone, and iPod touch
devices running iOS v9.0 or later.
Installing on an Android™ Device
Visit the Google Play™ Store and search for the free Line 6 AMPLIFi
Remote app. Follow the Google Play™ Store instructions to install the
app on your device.
AMPLIFi Remote is compatible with Android
or later.
TM
devices running OS v4.2
3
Page 4
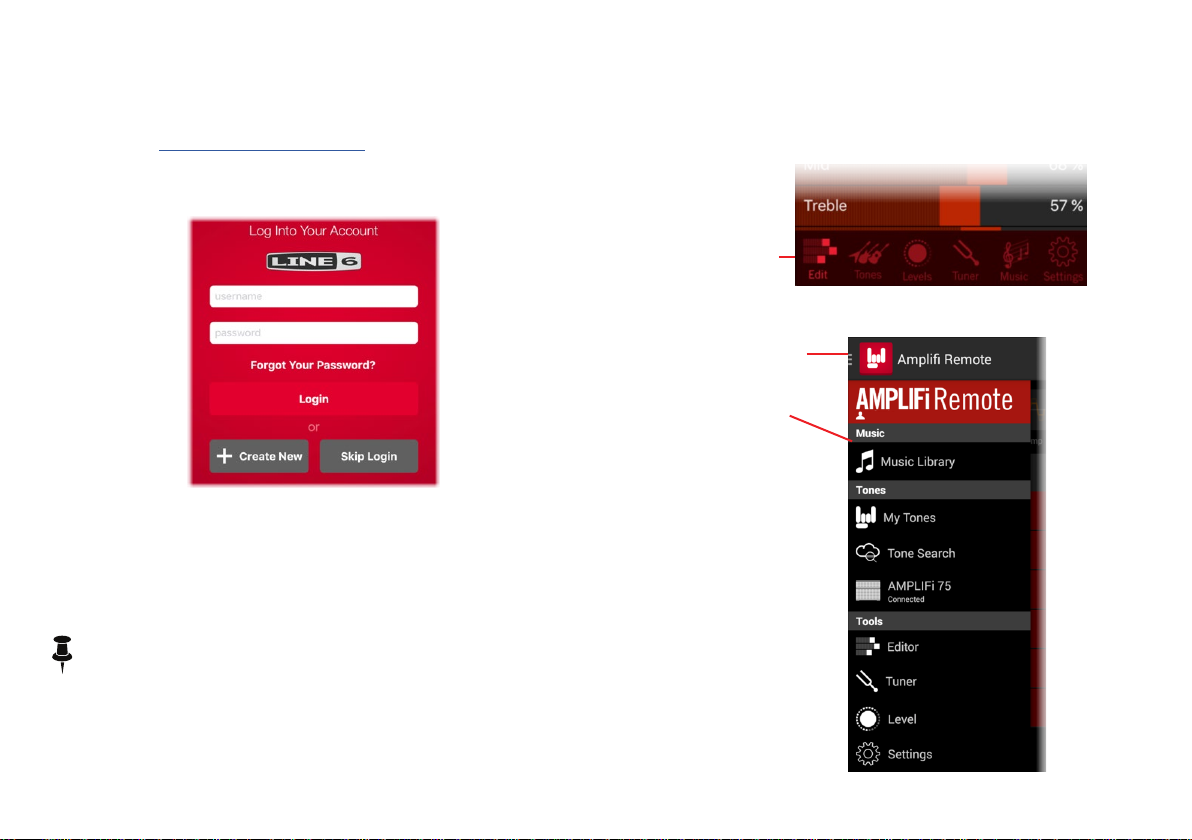
Line 6 Account
To take full advantage of all the AMPLIFi Remote app's features, you'll
need to login on the startup of the app using your Line 6 Account. If you
don't already have one, you can create a Line 6 Account for free right
now by visiting https://line6.com/login.html.
Alternatively, you can click the Create New button on the app's login
screen.
Getting Started
Now that you have the app installed, let's get started! The AMPLIFi
Remote app's Graphical User Interface (GUI) consists of 5 main tabs:
Edit, Tones, Tuner, Music and Settings.
App Navigation
Once logged in, the app will display the navigation options across the
bottom of the screen (iOS) or from the top left menu button (Android™)
to access the main screens and features. We'll be covering the features
within each of these screens in the following respective sections.
Navigation
Buttons (iOS)
Main navigation options on an iOS device
Menu Button
(Android™)
Navigation
Options
NOTE: Depending on the specic type of mobile device you are
using, (iOS or Android™ and phone or tablet), the GUI layout and
how you access these screens may dier slightly. However, the
functionality within each of these screens is essentially the same
across all devices. We'll be describing features on an iPhone
throughout this Guide, and calling out important dierences for
Android™ and/or tablet devices where applicable.
Main navigation options on an Android™ device
4
Page 5
Connecting to an AMPLIFi Device
Using Bluetooth®, AMPLIFi Remote will communicate wirelessly
with your AMPLIFi device. Before you run the AMPLIFi Remote app,
congure the Bluetooth® connection with your mobile device as follows:
• Enter Pairing Mode on your AMPLIFi device by pressing its
Bluetooth® button so that it is ashing.
• Enter Bluetooth® Pairing Mode within the Settings of your iOS
device, or open the Bluetooth® Settings menu on your Android™
device.
• Your AMPLIFi hardware's unique name will appear on your iOS
device. Android™ users may need to select "Scan for Devices" to
refresh the list of available Bluetooth® devices.
• Select your AMPLIFi device's unique name to establish the
connection - this completes the pairing conguration and you are
ready for wireless operation!
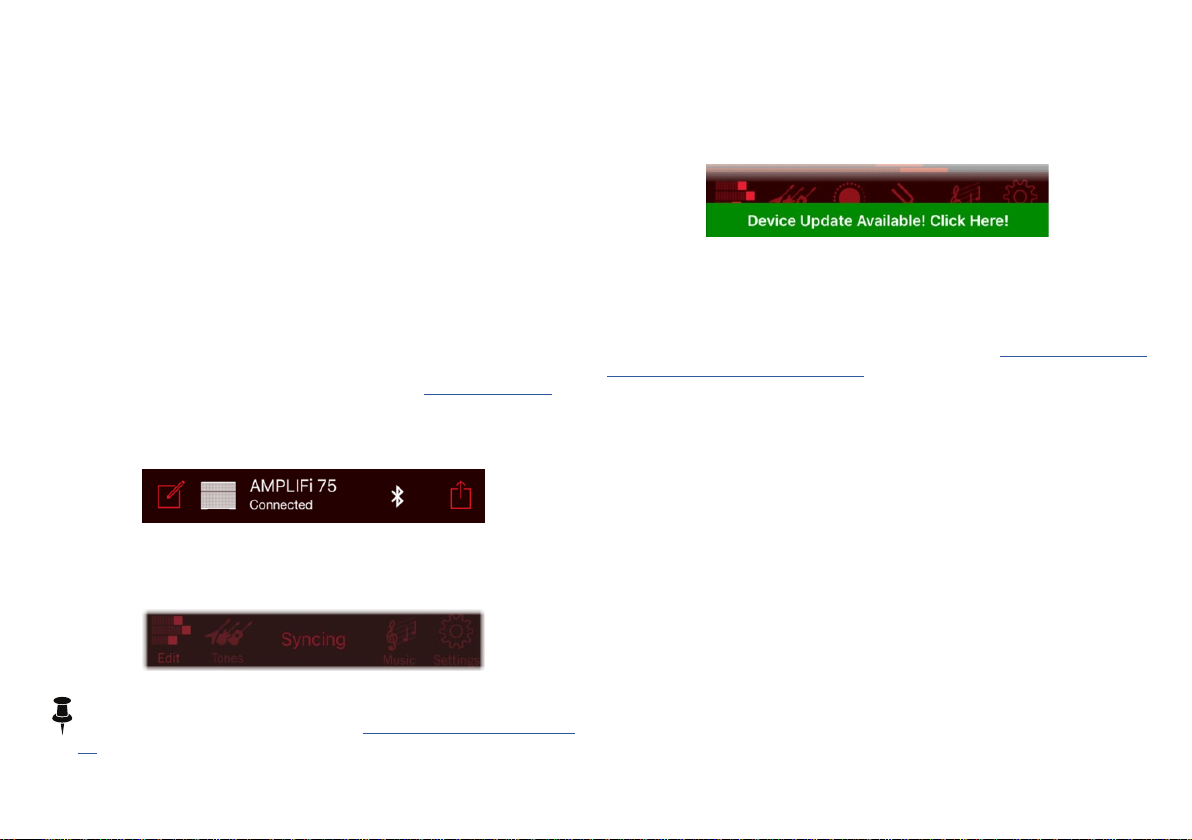
• Launch AMPLIFi Remote and login to your "Line 6 Account".
• AMPLIFi Remote will automatically connect to AMPLIFi - you'll
see the AMPLIFi device's Bluetooth® button solidly lit and your
AMPLIFi model name briey displayed in the app screen:
• The AMPLIFi Remote app will go into "Sync" mode, where it
synchronizes tone data with your AMPLIFi device. Allow the Sync
to complete and you're ready to rock!
Firmware Updates
For optimal performance, it is recommended that you always run the
latest rmware in your AMPLIFi hardware. Your AMPLIFi Remote
application will inform you whenever a rmware update is available, so
you'll always know you have the latest version.
While a rmware update is possible via your AMPLIFi Remote app,
completion may take up to one hour due to the limited connectivity speed
of Bluetooth®. We highly recommend using the free Line 6 Updater
application for Mac® and Windows® computers, which will perform the
rmware update in just a few minutes - Please see "Firmware Updates
Using Line 6 Updater" on page 18.
NOTE: If you encounter diculties creating or maintaining a
Bluetooth® connection, please see "Troubleshooting" on page
21.
5
Page 6
The Edit Screen
The Edit screen is the place where you can customize all aspects of your
tones, save them to your own My Tones library, and share them with the
world.
NOTE: On Android™ devices you'll see this screen available as
"Editor" from the main menu, but features are otherwise the same..
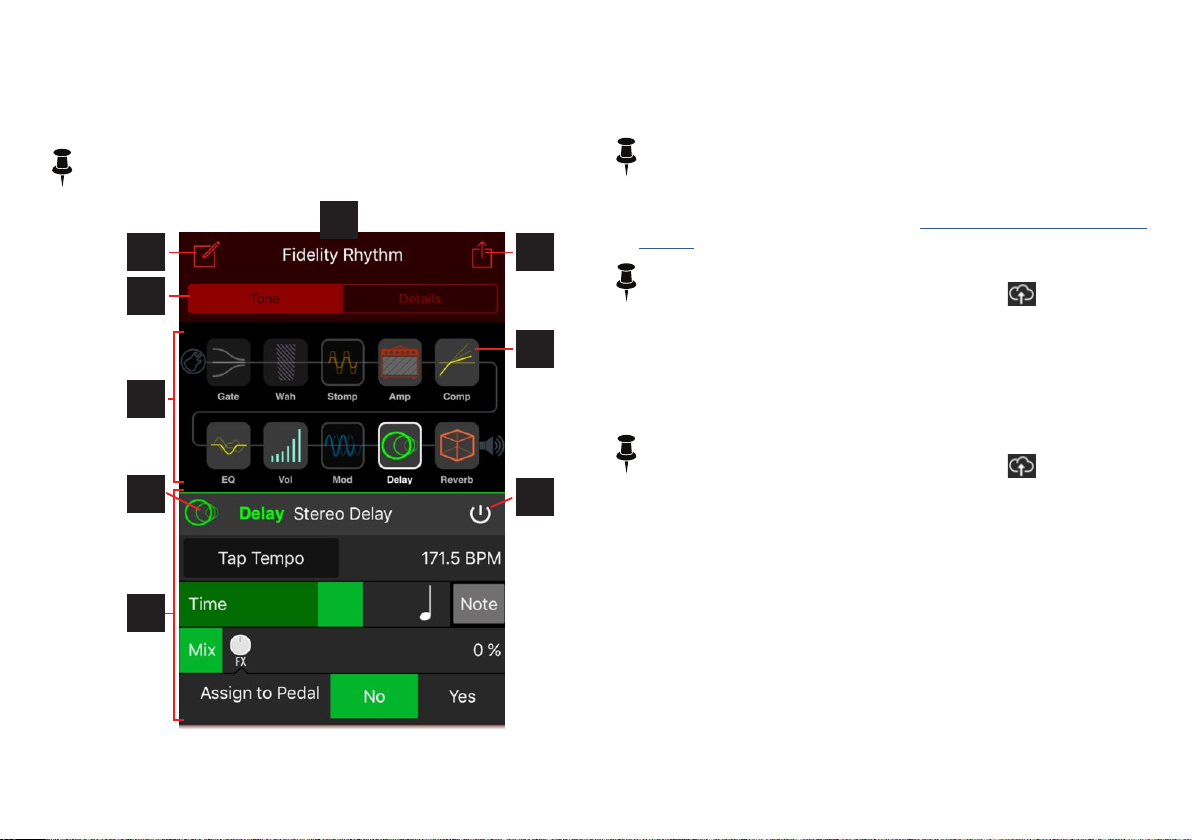
A
B
D
C
B. New Tone Button - Tap here to create a new tone preset.* If your
current tone is in an unsaved state, you'll be prompted if you want
to discard the current tone - select "Yes" to close the current tone
without saving its changes, or "No" to cancel loading a new tone.
*NOTE: This feature is not currently available on Android™ devices.
C. Save / Publish Tone Button - Tap here for a menu of options to save
or share the current tone preset.* See "Saving and Publishing a Tone
Preset".
*NOTE: On Android™ devices you can access the Save options
for the current tone by tapping the Upload icon button at the
top of the screen.
F
E
G
H
I
A. Preset Title - The title for the current Preset is shown here. Note that
when the tone is in an unsaved state, its title here appears in red text.
D. Tone & Details Tab Buttons - The Edit Screen consists of two
tabbed pages; The Tone tab (shown at left) oers access to amp &
FX blocks and parameters that make up the current tone, and the
Details page oers elds for tone naming & metadata.*
*NOTE: On Android™ devices you can access the Details screen
for the current tone by tapping the Upload icon button at the
top of the screen.
E. Signal Flow Pane - Each icon button represents a processing block
and shows the routing order and bypass state of all eects for your
current tone. Tap on any block here to select it and the block's
options are displayed within the Inspector Pane below.
F. Processing Blocks - Each of the several block types oers its own
properties and functions. Many blocks are moveable within the
signal chain, as indicated below. To move a block, press, hold and
drag the block left/right - vertical line indicators show all available
locations where you can "drop" the block.
• Standard Blocks - The amp & cab block contains your choice of
amp & cab models, and the others include a "xed" eect (EQ,
Comp and Gate). Standard blocks cannot be moved.
6
Page 7

• FX Blocks - Contain a dedicated eect type (Volume, Wah &
Reverb) and have some moveability.
• Flex FX Blocks - Can change the FX model type they contain
(Stomp, Mod, Delay or Pitch/Synth) and have more exible
routing capabilities.
G. Model Select Button - This button presents a menu to choose an
amp, cab or FX model for the selected block's type.
H. Bypass Button - Tap this button to toggle the block On/O.
I. Block Inspector Pane - All editable parameters for the selected
block are presented here.
Editing a Tone
To edit any tone, simply load it in the AMPLIFi Remote app by selecting
its Edit button > from the Tones screen list, then tap any amp or FX
block in the Signal Flow Pane and choose a dierent model and/or tweak
the settings using the sliders and options within the Inspector Pane.
When Bluetooth® connected to your AMPLIFi device, you'll hear your
changes made instantly.
Saving and Publishing a Tone Preset
There are several options for saving & sharing your tone presets, all
accessed via the Edit screen's Save & Publish Tone button.
• Save to My Tones & Save to My Tones As - These commands
allow you to name the preset and save it to your online "My
Tones" library. The My Tones library is saved as part of your Line 6
account and retrieved whenever you launch the AMPLIFi Remote
app on any mobile device.
• Store on AMPLIFi - This option provides the option to store
the current preset within the internal memory of your connected
AMPLIFi hardware device. You'll be presented with a full list of
all banks and preset locations from which to choose to store the
tone.
• Publish to Line 6 Cloud - Choose this option to share your tone
with the entire AMPLIFi community! This posts the tone live,
where any AMPLIFi Remote app user can see, download and
rate it. If you have not already done so, you'll be prompted to
ll out several of the tone info elds required for publishing (see
"Entering Tone Details").
NOTE: Once a tone is published to the Line 6 Cloud, it cannot be
deleted from the Line 6 Cloud library!
• Tweet Tone and Facebook Timeline - If you have active Twitter
and Facebook accounts, these options allow you to post the
current tone directly. Note that, if you have not already done so for
the current tone, you'll be prompted to complete the necessary
tone Details elds for publishing, and to save the tone to My
Tones rst.
7
Page 8

Entering Tone Details
The Details tab page of the Edit screen allows you to edit the title of
your tone preset as well as ll in several metadata elds and rate the
tone.* These Details are very benecial for local & online tone search
capabilities, and many elds are required for publishing your tone online
to the Line 6 Cloud, Twitter or Facebook.
A
B
C
D
E
A. Editable Fields - All elds other than the Author & Date elds (see
next item) are editable, such as the Tone Name eld shown here.
Just tap on any of these boxes and enter your desired text, or select
the desired option for items that pop up a menu.
B. Author & Updated Date Fields - These elds are lled in
automatically and are not editable. The Author eld will utilize your
Line 6 Account login name for your created tones, or displays the
author's name that created it. The Updated led displays the date
the tone was last edited.
C. Rating - Tap here to assign a rating to the tone. For Line 6 Cloud
tones, your rating (as well as all other AMPLIFi users' ratings)
determines its overall rating online!
D. Required Fields - As the instruction points out here, the elds that
appear with an asterisk (*) are required to be lled out before you can
publish the tone: Song Title, Artist Name & Style of Music elds (see
"Saving and Publishing a Tone Preset").
E. Auto Fill Song Info - If the song includes the information, you can
tap this button and the app will automatically ll in the Song Info
elds (Song Title, Artist Name & Style of Music)
NOTE: Be sure to Save your tone to retain your Details changes!
*NOTE: On Android™ devices you can access the Details screen
for the current tone by tapping the Upload icon button at the
top of the Editor screen.
8
Page 9

Assigning a Parameter to the FX Tweak Knob & Pedal Control
Using the AMPLIFi Remote app, practically any FX parameter can be
assigned to FX Tweak control - allowing it to be adjusted via the AMPLIFi
device's FX knob and, optionally, controlled by an expression pedal as
well.*
The Tones Screen & Tones Lists
The AMPLIFi Remote app includes several Tones Lists, where you
can organize, search and load presets that exist in your personal My
Tones Library, within the memory of your AMPLIFi device, or in the Line 6
Cloud. Getting to these Tones Lists is a bit dierent on iOS vs. Android™
devices, as covered below.
FX Tweak Knob
Assignment
Pedal
Assignment
Pedal
Range Slider
*NOTE: Pedal control requires the connection of a Line 6 FBV
controller.
To Assign a Parameter to the FX Knob:
• Tap the FX block within the Signal Flow which includes the FX
parameter you'd like to control.
• Tap and Hold on the desired parameter slider until you see the
Tweak Assign prompt.
• Select OK for the prompt and you'll see an "FX" indicator appear
on the slider - the parameter is now assigned.
To Assign Pedal Control of the FX Tweak Parameter:
• Use the Assign to Pedal option to turn expression pedal control
On or O for the parameter that is currently assigned to FX Tweak.
• Tap and drag either end of the Pedal Range Slider bar to set
the minimum (heel-down position) and maximum (toe forward
position) pedal range for the assigned parameter.
A
B
C
D
E
The Tones - My Tones screen on iOS devices
On iOS devices, you'll nd all the Tones Lists within the Tones Screen,
as shown above. On Android™ devices, The Tones Lists are accessed
individually from the main menu, where they appear as My Tones (this
screen also includes Favorites), Tone Search, and AMPLIFi, as shown
in the following screenshot. The following descriptions for functionality
within each list is the same for iOS and Android™, unless noted.
9
Page 10

Tones Lists are selected from the main menu on Android™ devices
A. Tone List Selector (iOS devices) - Tap to choose the Tones List you
want to display
• My Tones - Shows the tone presets you've specically saved to
My Tones. These tones can be loaded from here and optionally
stored on your AMPLIFi device, or published online (see "Saving
and Publishing a Tone Preset" on page 7).
• Favorites - Displays tone presets that you've agged as
"Favorites" when using the Tone Match feature (see "Tone
Matching" on page 13).
• Cloud - Allows you to search the vast online Line 6 Cloud
database of user-submitted tones.
• AMPLIFi Device - When Bluetooth® is connected, you'll see your
AMPLIFi device's internal bank/preset list displayed. Note that
you can tap the List Edit Button to re-order the tones in the list
- see below.
B. Search - Type any tone info (Artist, Song or Tone Name, Style, etc.)
eld to do a search of the currently displayed list.
NOTE: On Android™ devices, tap the Search icon at the top of
the screen to search the currently displayed Tones List.
D. List Edit Button - Places the current list into "Edit Mode" which
diers per list:
• AMPLIFi Device List - Displays a "grab handle" at the right of
each tone allowing you to drag presets up/down to reorder the list
- this also reorders the bank/preset list on the AMPLIFI device's
internal memory as well.
NOTE: On Android™ devices, tap the Reorder icon at the
top of the screen to enter "Edit Mode" for the AMPLIFi Device
List screen.
• My Tones and Favorites Lists - Displays a button at the left of
each tone to optionally delete it - see following section.
NOTE: On Android™ devices, tap the Pencil (edit) icon
at the top of the screen to enter "Edit Mode" for My Tones/
Favorites List screen.
E. Tone Edit Button - Tap this button > at the right of a tone to load it
in the Edit screen.
Deleting a Tone
If desired, you can delete any tone preset from your Tones Lists:
• On iOS Devices - Tap the List Edit Button on the Tones List
screen to enter Edit Mode and select the tone(s) to be deleted
(see previous section). Or, swipe left on any individual tone within
a Tones list and tap the Delete button.
• On Android™ Devices - Tap the Pencil (edit) icon at the top
of the screen, check the list items you wish to discard, then tap
the trash icon .
C. List Contents - The contents of the selected list is displayed here -
scroll up/down to view the entire contents.
10
Page 11

Storing a Tone on your AMPLIFi Device
It is possible to send your tone presets to be stored within your AMPLIFi
device's internal memory. The options dier slightly on iOS and Android™
devices.
On iOS Devices - When you have a tone selected within the My
Tones or Favorites List screens, you'll see the Upload button
appear to the right of the tone name.
You'll also see this Upload button appears at the top right of the Edit
screen, which makes it possible to save the currently displayed tone
to your AMPLIFi hardware (even if you just loaded it from the Line 6
Cloud).
• Tap this Upload button and choose the Store on AMPLIFi option.
• Choose the desired Bank/Preset location to where you would like
the tone stored. Note that this will overwrite the tone that currently
resides in the selected location.
On Android™ Devices - When you have a tone selected within the
My Tones or Favorites List screen, tap the Save to Hardware option
at the top of the screen.
• Choose the desired Bank/Preset location to where you would like
the tone stored. Note that this will overwrite the tone that currently
resides in the selected location.
If you just loaded the tone from Line 6 Cloud, you'll need to rst save
the tone to your My Tones. To save a tone to My Tones from the
Editor screen:
• Tap the Upload icon at the top of your screen.
• Fill in the desired elds on the displayed Tone Details screen.
• Select the Disk icon at the top of the screen and choose Save
to My Tones.
• You can now use the above steps to save the tone to your
AMPLIFi device from within your My Tones list.
The Music Screen
The Music screen oers access to songs on your mobile device's music
library & free Line 6 Jam Tracks and includes an integrated music player
with Tone Matching. When you choose to display the Music screen, you
are rst prompted to choose between the music source you prefer: Play
My Music or Play Jam Tracks.
11
Page 12

Playing Music Library Songs
When you select the Play My Music option, you'll see the Music Library
screen, already populated with the music from your mobile device's
music library. You can navigate through your albums, artists and songs
much like you do on your device's music library. Once you select a song
for playback, you'll have a number of options within the Now Playing
screen.
A
A. Now Playing Song - Displayed at the top of the screen is the album
art, song title, artist & album of the currently playing song (if available
for the song within your mobile device's library).
B. Scrub Bar - Drag the "play head" handle on this bar to manually
scrub through the duration of the current song.
C. 1/2 Speed Button* - Tap this button to toggle the playback between
1/2 and normal speed. The 1/2 speed option is great for learning
those fast licks!
*NOTE: This feature is currently available only on iOS devices.
B
C D
E
F
D. Loop Repeat Button - Tap this button to select what happens when
the song plays to the end. When the button's arrows are white, the
song is not repeated. When red, playback keeps repeating until
stopped. When red with a "1," playback repeats one additional time.
E. Tones List - This list becomes automatically populated with
recommended tone presets from both the online Line 6 Cloud and
your own tone lists via the AMPLIFi Tone Matching functionality (see
next section).
F. Rewind, Play/Pause, Fast Forward buttons - The familiar transport
buttons for playback of the current song.
12
Page 13

Tone Matching
Innovative Line 6 Tone Matching technology takes the work out of dialing
in the perfect tone. When you start playing any song from your music
library, AMPLIFi Remote automatically scours through your saved tones
and the Line 6 Cloud library and provides matching tone selections.
A
B
C
D
B. Favorite Button - Select a tone's "Favorite" button to have it be
automatically stored in your Favorite tones list. On the next play of
the current song, this Favorite will automatically be recalled as well.
C. Edit Tone - Tap to load the tone in the Edit screen, where you can
further tweak it and save it to your own Tone Library.
D. More Button - Select this option to nd and display more tones - be
sure to scroll down to see the complete list.
NOTE: Please also see "The Music Screen" on page 11 for more
about the Music Player features.
Downloading Jam Tracks
When displaying the Music - Jam Tracks screen, initially you'll see
a folder of "Demo" tracks that you can play right now. You'll also see
several other category sets of Line 6 Jam Tracks available for download.
Each download is free and includes a folder of instrumental music tracks
as described by style.
NOTE: Each Jam Tracks download requires up to 30MB of free
space on your mobile device.
A. Tone Matches - You'll see a list of tones, divided into sub-lists such
as "Favorites," "Recommended," "Similar," etc. The rst tone in
the list is automatically loaded on your AMPLIFi device (if you have
the Auto Tone Loading option active - see "The Settings Screen"
on page 16). Tap any tone in the list to manually load it - play
your guitar to hear it instantly. (Note that you can also still go to the
Tones screen to manually load any of your library tones during music
playback as well.)
Line 6 Jam Tracks screen
13
Page 14

Once you select and download a category set, you'll see its folder and
list of individual tracks - these tracks then remain on your mobile device
as part of the AMPLIFi Remote app, unless you choose to remove them.
Removing Jam Tracks
If desired, you can remove any Jam Tracks category folder and all its
contained tracks from your device at any time. Once removed, you'll see
the category become available for download again. To remove:
• On iOS Devices - Swipe left on any downloaded folder within the
Jam Tracks screen and tap Delete.
• On Android™ Devices - Tap the Pencil (edit) icon at the top
of the Jam Tracks screen, select the category folder(s) you wish to
delete, then tap the trash icon .
Playing Jam Tracks
When you select a downloaded Jam Tracks folder from the Jam Tracks
screen (see previous section), you can access its list of tracks for
playback, and load a suggested guitar tone to jam along. To follow are
details regarding the Tracks and Tones lists.
A
B
C
14
Jam Tracks - Tracks List
Page 15

A
B
Jam Tracks - Tones List
A. Tracks/Tones List Selector - Tap the list you want displayed:*
• Tracks List- Shows the selected category set's list of Jam Tracks.
Just tap any track to start playback.
• Tones List - Shows a number of tones recommended to work
well with tracks in the selected category. You can alternatively
go to the Tones screen to load any of your tones during track
playback as well.
*NOTE: Tablet devices display both the Tracks and Tones within
one screen.
B. List Contents - Tracks or recommended tones are displayed here
for the currently loaded Jam Tracks bundle (see description above).
C. Transport Controls - Use these controls for music playback:
• Rewind, Play/Pause, Fast Forward buttons - The familiar
navigation buttons for playback of the selected track.
• Loop Repeat Button - Tap this button at the right to select what
happens when the track plays to the end. When the button's
arrows are white, the track is not repeated. When red, playback
keeps repeating until stopped. When red with a "1," playback
repeats one additional time.
• Scrub Bar - Drag the "play head" handle on this bar to manually
scrub through the duration of the current track.
Adjusting Overall & Guitar Output Levels
To remotely adjust the overall, master volume or guitar volume of your
connected AMPLIFi device, tap the Levels option.* You'll see level sliders
displayed for independent control over each, allowing you to balance out
your guitar versus music playback levels.
*NOTE: The Levels option is found in the main manu on Android™
devices.
15
Page 16

The Tuner Screen
With your guitar plugged into your AMPLIFi device, just pluck a string
and the Tuner screen automatically detects the pitch and displays the
note and its pitch on the graph. When red bars are displayed at the left of
center, your string is at, when red bars appear at the right, your string is
sharp. When the center green bar lights up (as shown below), your string
is in tune! Your AMPLIFi output is automatically muted while the Tuner
screen is displayed.
The Tuner Screen
The Settings Screen
Here you'll nd a number of options and preferences to customize the
AMPLIFi Remote app behaviors.
The Settings Screen
Log Out Button - Click to log out from your Line 6 Account. When logged
out, Line 6 Cloud, sync and other online app features are disabled.
16
Page 17

About AMPLIFi Remote - The AMPLIFi Remote app's version number
and Terms & Conditions of use.
AMPLIFi Remote Help - Links you to additional line6.com help
resources.
Device Flash - Displays your connected AMPLIFi device and its
currently installed ash rmware version. If there is a newer rmware
version available, you will see a notication here. It is possible to perform
a rmware update for your connected AMPLIFi device directly in this
screen - see the following steps.*
*NOTE: Rather than using the AMPLIFi Remote app, we highly
recommend using the free Line 6 Updater application for Mac®
and Windows® computers, which will perform the rmware update
in just a few minutes - Please see "Firmware Updates Using Line 6
Updater" on page 18.
• Tap the Device Flash menu item. If a newer rmware version
appears in the screen, you can select it to proceed:
• As shown in the above screenshot, our AMPLIFi 75 device
currently has rmware version 2.10, and there is a newer version
2.50.2 available. Tap the arrow button for the new release version
to proceed.
Firmware Update - Details screen
The Device Updates screen
• The Update Details screen includes important information - Tap
the README links to review all instructions before going
further. When ready, tap the Update button to start the update,
and follow the onscreen instructions to complete the update.
Device Selection - Displays your Bluetooth® connected devices and
allows you to choose between them for tone editing and streaming audio
playback.
17
Page 18

Auto Tone Loading - When active, your assigned Favorite or top
recommended Tone Match tone preset will automatically load on your
AMPLIFi device when you start playback of a song. When toggled o,
your current tone preset remains loaded until you manually choose
another.
Hide Songs Not on Device* - When active, only songs that are
downloaded to your mobile device (not cloud-based songs from your
library) are displayed in the Music lists.
*NOTE: The Android™ app does not have this setting, but still only
plays back songs stored on the mobile device.
Tap Tempo LED - If you happen to nd the ashing TAP Tempo button
on your AMPLIFi hardware annoying, you can toggle this switch to have
it just stay dimmed.
Notify of Tweak Reassign* - When active, you'll see an alert displayed
whenever the FX Tweak assignment is changed to a new parameter for
the current tone - see "Assigning a Parameter to the FX Tweak Knob &
Pedal Control" on page 9.
*NOTE: This feature is currently only available on iOS devices.
Firmware Updates Using Line 6 Updater
Line 6 Updater is a free application for Mac® and Windows® computers
specically for updating the rmware in AMPLIFi devices, and other
Line 6 hardware, via USB connection.* It is the recommended method
for performing rmware updates due its speed and reliability. You can
download the latest version from http://line6.com/software.
*NOTE: Before connecting to a Windows® computer, you'll need
to rst download and install the latest AMPLIFi USB Device Driver,
available from http://line6.com/software. (No driver installation is
necessary for connecting to a Mac® computer.)
Using Line 6 Updater
Once installed on your Mac® or Windows® computer, exit all other
applications, connect your AMPLIFi device to your USB port and launch
the Line 6 Updater app. The app will automatically nd and list your
connected AMPLIFi device - select your AMPLIFi device to proceed to
the next screen to see available updates.
If it is not already the installed rmware version on your device, select
the latest rmware, read through the Release Notes, and follow the onscreen instructions carefully to complete the rmware update.
IMPORTANT! Be sure not to disturb any controls or power o
your AMPLIFi device until the update process is complete!
18
Page 19

Frequently Asked Questions
How can I reset the AMPLIFi device to its factory default settings?
Q
To perform a factory reset and restore a AMPLIFi 30, 75, 150,
A
or TT to factory settings, press and hold Master Volume knob
and Tone button as you power up the unit - keep holding them both
down until you see the LEDs around the Master Volume knob light
up.
To perform a factory reset and restore the AMPLIFi FX100 to factory
settings, press and hold the Master Volume knob and the TAP button
as you power up the unit - keep holding them both until you see '01'
in the LED display.
What can I do if I am experiencing Bluetooth® connectivity issues
Q
between my mobile device and the AMPLIFi hardware?
Make sure that you have applied the latest rmware update for
A
your AMPLIFi as well as installed the latest version of the
AMPLIFi Remote app. Also see "Bluetooth® Connectivity" on page
21.
What should I do If I am experiencing connection issues with the
Q
AMPLIFi Remote app when I switch back and forth between
apps on my mobile device?
A: Note that, in addition to the Bluetooth® connection between your
AMPLIFi hardware and your mobile device, there is a secondary
'sync' connection between the hardware and AMPLIFi Remote
app. Each time you minimize/close the app, the connection between
the app and hardware needs to be re-established, even if your
device is reporting that the AMPLIFi device is currently connected
via Bluetooth®. In this case, re-opening the AMPLIFi Remote app,
will automatically re-establish the connection within a few seconds.
Make sure to look at the main menu of the AMPLIFi Remote app
and wait for it to indicate that your amp is 'connected' before moving
forward using the app. If it does not automatically re-connect, close
the app by double-tapping your iOS device's home key and then
sliding the AMPLIFi Remote app window up and o the screen to
fully close the app. Android™ devices usually have a button that lists
all open programs where you can slide the app left or right to fully
exit it. Then re-launch the AMPLIFi Remote app and it should sync
itself with the amp.
Can the AMPLIFi Remote app's music player stream songs that
Q
are stored in the cloud and not on my mobile device?
The AMPLIFi Remote app can only play back songs that have
A
been downloaded to and are stored on your mobile device's
memory. Within the AMPLIFi Remote app Settings screen on iOS
devices, you can enable 'Hide Songs Not On Device' so that you
only see songs that are stored on your iOS device when playing
music from your library. The Android™ app does not have this
setting, but still only plays back songs stored on the device.
What do I do when tones differ drastically in volume?
Q
Tones can vary drastically in overall volume based on numerous
A
factors, such as amp model Drive amount & EQ settings, EQ/
compression gain settings, FX settings, and most importantly the
amp model volume. When you go into the Edit screen for the tone,
touch the Amp/Cab icon. The slider at the bottom of the screen
labeled 'Volume' is the amp model volume which sets the overall
volume for tone itself. Therefore, if you are having trouble balancing
the level of tones, use the amp model volume to help match the level
of your other existing tones.
A general rule of thumb is that 'clean' tones will need to have a higher
amp model volume, while tones with lots of distortion are louder and
can use a lower amp model volume. We also recommend that you
keep the Master volume of the AMPLIFi device at a lower setting
when auditioning or matching tones to prevent any loud bursts of
sound or feedback that can occur if the tone you load has a very
loud amp model volume, excessive gain, or a lot of treble/bass.
19
Page 20

What type of foot controller can I use to remotely control AMPLIFi
Q
functions?
AMPLIFi devices include a dedicated FBV™ port and support
A
Line 6 FBV Express MkII, FBV Shortboard MkII & FBV 3*
controller devices.
*NOTE: As of this writing, FBV 3 devices need to be used in
MkII Compatibility mode - please also see http://line6.com/
amps/#footcontrollers.
Can I use a Line 6 EX-1 expression pedal along with my FBV
Q
controller and AMPLIFi?
Yes! The FBV 3 & FBV Shortboard MKII controllers oer an
A
'external expression pedal' input to allow you to connect an
EX-1 as a secondary expression pedal. When connected this way,
the EX-1 controls the Volume, and the Wah eect is toggled on/o
via the FBV on-board pedal toe switch. When the "Assign to Pedal"
feature is set to Yes, the on-board pedal will control the FX Tweak
Knob's assigned parameter. (See "Assigning a Parameter to the FX
Tweak Knob & Pedal Control".)
How can I turn on and off the individual effects from my AMPLIFi
Q
presets using effects footswitches on the FBV 3 or FBV
Shortboard MKII?
AMPLIFi devices include the ability to have their Stomp, Mod,
A
Filter, and Delay eects assigned to the Stomp, Mod, and Delay
foot switches of the FBV 3 or FBV Shortboard MKII.* When you
connect the FBV controller to your AMPLIFi device and open the
preset editor window of the AMPLIFi Remote app, you will see that
your ‘Stomp,’ ‘Mod,’ ‘Filter,’ or ‘Delay’ eects icons lettered badges
on them to distinguish to which FBV footswitch they are assigned. In
addition, the Reverb eect will always be assigned to the ‘Reverb’
foot switch and the compressor eect will always been assigned to
the ‘Function 1’ footswitch.
*NOTE: As of this writing, FBV 3 footswitch LEDs illuminate in
red (the FBV 3 assignable, multi-color LED feature is not currently
supported for AMPLIFI devices).
Can I pair my AMPLIFi with more than one Bluetooth® compatible
Q
device at a time?
No, the AMPLIFi series does not support multiple Bluetooth®
A
connections at one time. If your AMPLIFi is currently paired with
a Bluetooth® device and you would like to pair it with another device,
you can press and hold the Bluetooth® button on the AMPLIFi to unpair with the Bluetooth® device that you are currently paired with and
put it back into 'Discoverable' mode so that your second Bluetooth®
device can detect it and pair with it.
Can I use the AMPLIFi Remote app to load or edit tone les from
Q
my other existing Line 6 products, such as POD® HD500? Will the
app work with Sonic Port, Sonic Port VX, or Mobile IN?
The AMPLIFi Remote app is only compatible with AMPLIFi
A
devices and only supports AMPLIFi tone les.
What Bluetooth® version is used in AMPLIFi? What Bluetooth®
Q
codecs are supported?
We use a Bluetooth® solution that supports Bluetooth® 2.1. We
A
only support the SBC codec at this time.
Where can I register my AMPLIFi?
Q
After logging into or creating a Line 6 User Account HERE, you
A
can go HERE and enter in your serial number that is found on
your AMPLIFi device - the serial number begins with '(21)TMA',
simply ll in the remaining digits.
Where can I provide my feedback or make a suggestion regarding
Q
AMPLIFi?
We encourage you to visit our IdeaScale page and let us know
A
about your ideas and suggestions.
20
Page 21

Is there a forum where I can discuss AMPLIFi with other AMPLIFi
Q
users?
We have a user forum dedicated specically to AMPLIFi
A
available HERE.
Where can I nd information on the warranty that is included with
Q
my AMPLIFi hardware?
You can nd all of the available information on the AMPLIFi’s
A
warranty HERE.
What do I do if my AMPLIFi is in need of repair?
Q
You can nd all of the available information on how to arrange
A
a repair HERE.
Troubleshooting
Bluetooth® Connectivity
Bluetooth® Interference - If you are experiencing unexpected
Bluetooth ® performance, such as audio playback drop outs, intermittent
connectivity or diculty nding or pairing between your AMPLIFi
Remote app and AMPLIFi device, you may be encountering interference
with your Bluetooth® connection. Here are some common sources of
Bluetooth® interference:
• Physical barriers such as the structure/material of the environment
or objects in the surrounding area that are within the line of sight
between the two devices
• Any wireless devices that operate in the 2.4 GHz or 5 GHz
frequency range
• Wi-Fi devices, routers, hotspots, and accessories
• Other Bluetooth® devices or accessories
• Direct Satellite service systems
• Extreme electrical sources such as power lines, electrical railroad
tracks, and power stations
Resolving Connectivity Issues - Try the following troubleshooting
steps in the order they are listed to help resolve Bluetooth® connectivity
problems.
• Quit AMPLIFi Remote by double clicking the home button and
swiping the app up o the dock, then restart the app.
• Make sure you are in range of the Bluetooth® accessory with
which you are trying to pair with as most Bluetooth® accessories
have a range of around 30 feet.
• Move your mobile device closer and/or reposition it so that it is in
direct line of sight with the AMPLIFi device.
• Double check that your mobile device is successfully paired with
your AMPLIFi device.
21
Page 22

• In your mobile device's Bluetooth® settings, Delete/‘forget’ your
AMPLIFi device from the list of available Bluetooth® devices.
Press and hold the AMPLIFi hardware's Bluetooth® button on the
upper left of the top panel for 2-3 seconds and let go; it should
begin to blink quickly to indicate that your AMPLIFi device is in
‘Pairing mode.’ Try again to pair your Bluetooth® device with the
AMPLIFi hardware.
• Disable Bluetooth® on your mobile device, then re-enable
Bluetooth® again and re-pair it with your AMPLIFi device.
• Make sure the power cable in the AMPLIFi hardware is rmly
connected.
• Turn your AMPLIFi hardware o and back on again, pair it with
your mobile device.
• Make sure that you have updated your AMPLIFi hardware to the
latest available rmware - see "Firmware Updates Using Line 6
Updater" on page 18.
• Check for your environment for the common sources interference
above of and move both the AMPLIFi hardware and mobile device
away from the interference, or move the source of interference
away from the area.
22
 Loading...