

Page 1
Gebrauchsanweisung
Tischgefrierschrank
Operating instructions
Table-height freezer
Mode d'emploi
Congélateur table-top
Gebruiksaanwijzing
Tafelmodel diepvrieskast
Istruzioni per l’uso
Congelatore da tavolo
Instrucciones de uso
Congelador "Table-Top"
Instruções de utilização
Arca congeladora de bancada
Kullanım kılavuzu
Masa derin dondurucusu
221111
7081994 - 00
GP(esf)14../GP13.. ... 6
Page 2
Gerät auf einen Blick
Inhalt
1 Gerät auf einen Blick............................................. 2
1.1 Geräte- und Ausstattungsübersicht.......................... 2
1.2 Einsatzbereich des Geräts....................................... 2
1.3 Konformität............................................................... 2
1.4 Aufstellmaße............................................................ 3
1.5 Energie sparen......................................................... 3
2 Allgemeine Sicherheitshinweise.......................... 3
3 Bedienungs- und Anzeigeelemente..................... 4
3.1 Bedien- und Kontrollelemente.................................. 4
3.2 Temperaturanzeige.................................................. 4
4 Inbetriebnahme...................................................... 4
4.1 Gerät transportieren................................................. 4
4.2 Gerät aufstellen........................................................ 4
4.3 Tueranschlagwechsel.............................................. 5
4.4 Einschub in die Küchenzeile..................................... 5
4.5 Verpackung entsorgen............................................. 6
4.6 Gerät anschließen.................................................... 6
4.7 Gerät einschalten..................................................... 6
5 Bedienung.............................................................. 6
5.1 Helligkeit der Temperaturanzeige............................. 6
5.2 Kindersicherung....................................................... 6
5.3 Temperaturalarm...................................................... 6
5.4 Lebensmittel einfrieren............................................. 7
5.5 Lebensmittel auftauen.............................................. 7
5.6 Temperatur einstellen............................................... 7
5.7 SuperFrost............................................................... 7
5.8 Schubfächer............................................................. 7
5.9 Abstellflächen........................................................... 7
5.10 VarioSpace............................................................... 8
5.11 Info-System.............................................................. 8
5.12 Kälte Akkus.............................................................. 8
6 Wartung.................................................................. 8
6.1 manuell Abtauen...................................................... 8
6.2 Gerät reinigen........................................................... 8
6.3 Kundendienst........................................................... 9
7 Störungen............................................................... 9
8 Außer Betrieb setzen............................................. 10
8.1 Gerät ausschalten.................................................... 10
8.2 Außer Betrieb setzen................................................ 10
9 Gerät entsorgen..................................................... 10
Der Hersteller arbeitet ständig an der Weiterentwicklung aller
Typen und Modelle. Bitte haben Sie deshalb Verständnis
dafür, dass wir uns Änderungen in Form, Ausstattung und
Technik vorbehalten müssen.
Um alle Vorteile Ihres neuen Gerätes kennenzulernen, lesen
Sie bitte die Hinweise in dieser Anweisung aufmerksam durch.
Die Anleitung ist für mehrere Modelle gültig, Abweichungen
sind möglich. Abschnitte, die nur auf bestimmte Geräte
zutreffen, sind mit einem Sternchen (*) gekennzeichnet.
Handlungsanweisungen sind mit einem
zeichnet, Handlungsergebnisse mit einem .
gekenn-
1 Gerät auf einen Blick
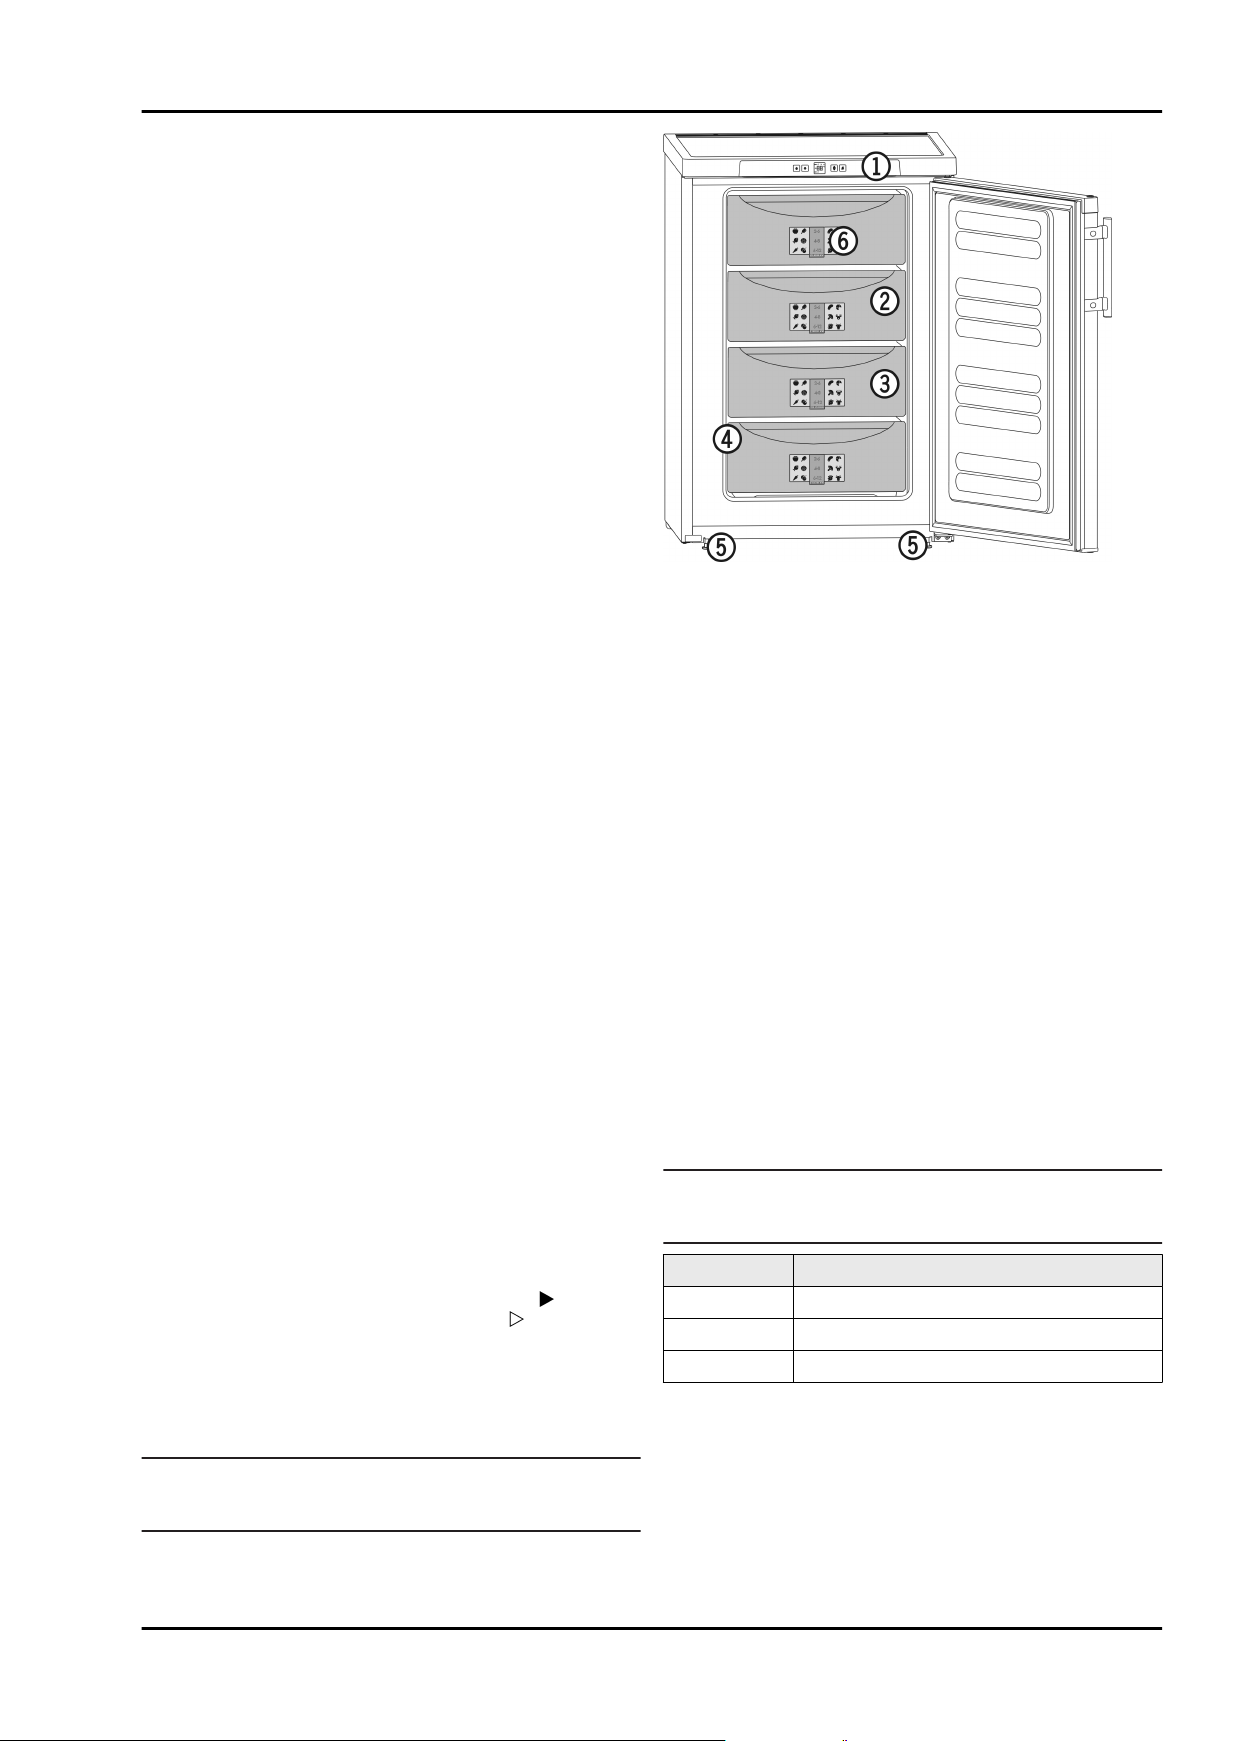
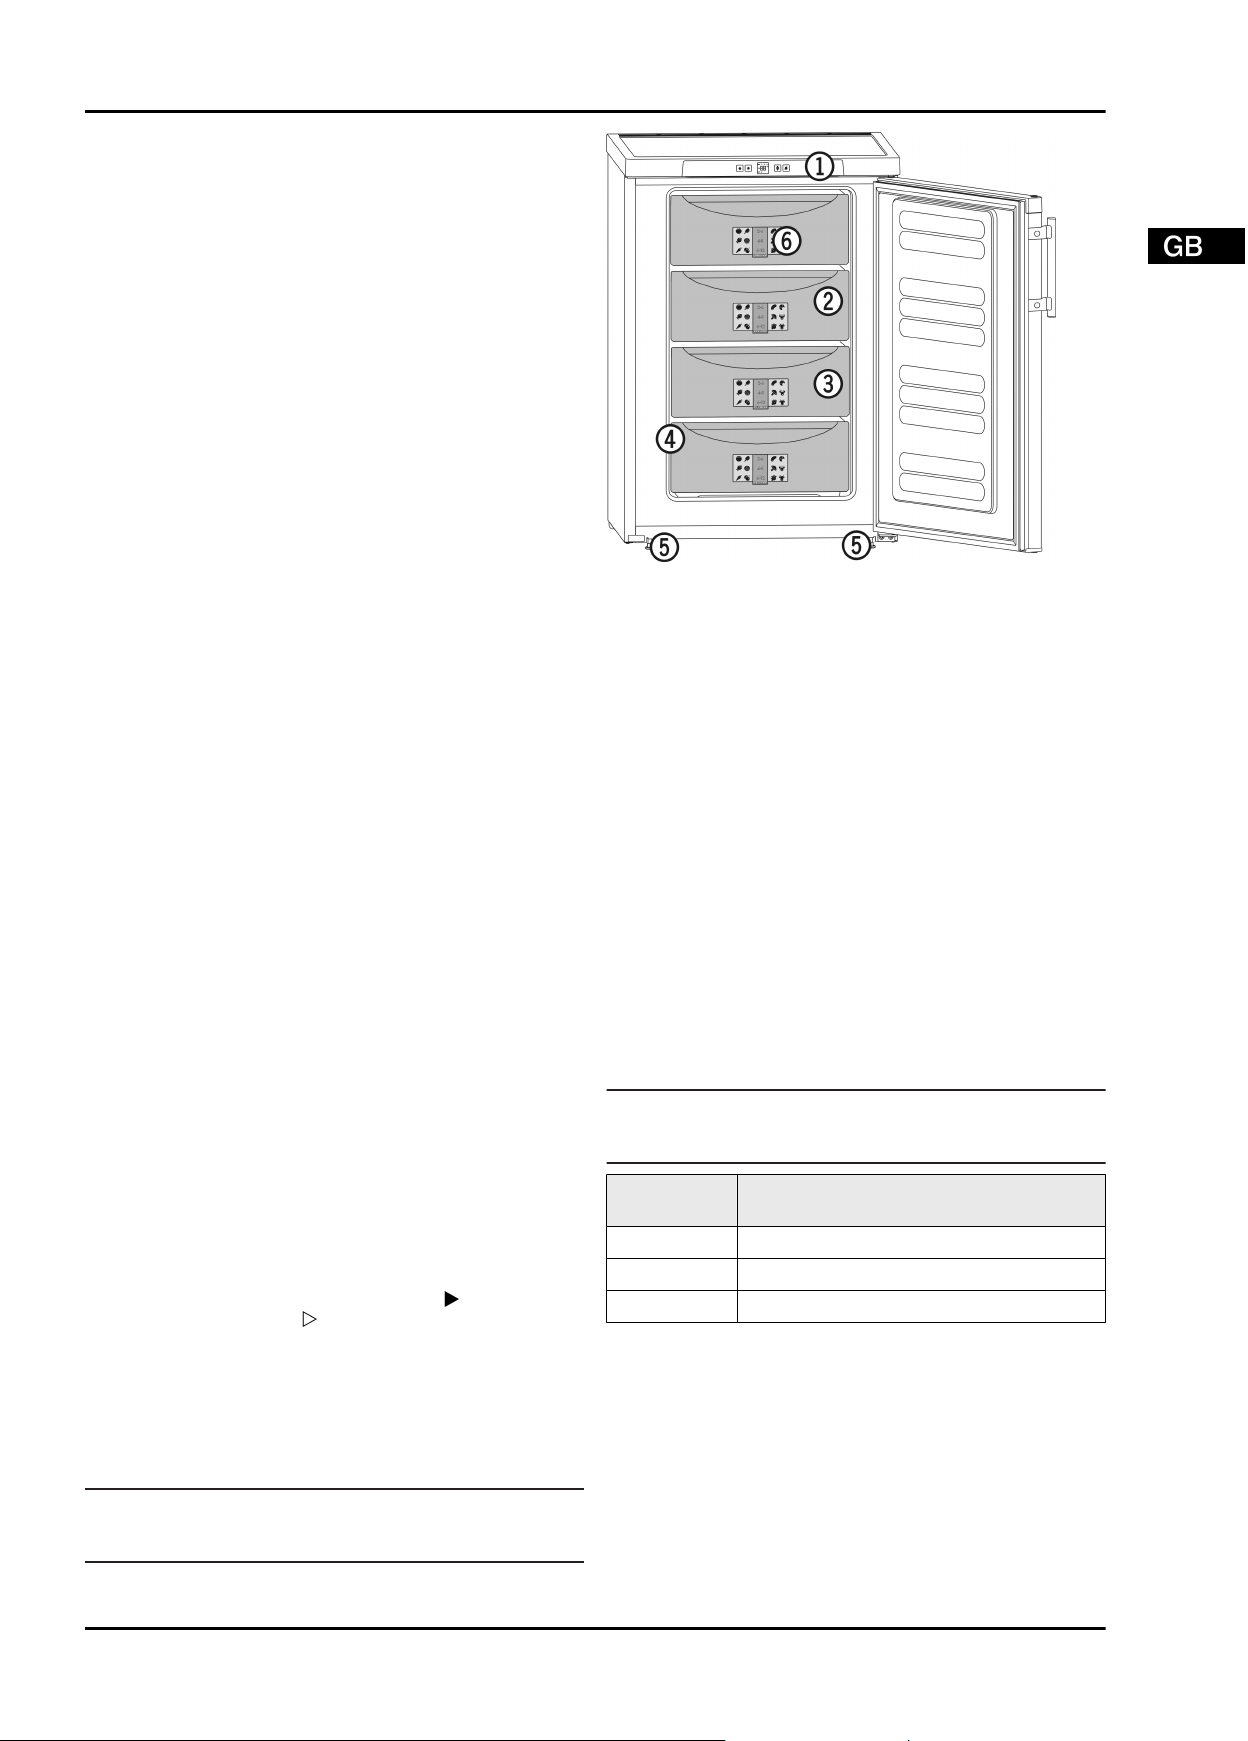
1.1 Geräte- und Ausstattungsübersicht
Fig. 1
(1) Bedien- und Kontrollele-
mente
(2) VarioSpace (5) Stellfüße
(3) Schubfach
1.2 Einsatzbereich des Geräts
Das Gerät eignet sich ausschließlich zum Kühlen von Lebensmitteln im häuslichen oder haushaltsähnlichen Umfeld. Hierzu
zählt z.B. die Nutzung
in Personalküchen, Frühstückspensionen,
-
durch Gäste in Landhäuser, Hotels, Motels, und anderen
-
Unterkünften,
beim Catering und ähnlichem Service im Großhandel
-
Benutzen Sie das Gerät ausschließlich im haushaltsüblichen
Rahmen. Alle anderen Anwendungsarten sind unzulässig. Das
Gerät ist nicht geeignet für die Lagerung und Kühlung von
Medikamenten, Blutplasma, Laborpräparaten oder ähnlichen
der Medizinprodukterichtlinie 2007/47/EG zu Grunde liegenden
Stoffe und Produkte. Eine missbräuchliche Verwendung des
Gerätes kann zu Schädigungen an der eingelagerten Ware
oder deren Verderb führen. Im Weiteren ist das Gerät nicht
geeignet für den Betrieb in explosionsgefährdeten Bereichen.
Das Gerät ist je nach Klimaklasse für den Betrieb bei
begrenzten Umgebungstemperaturen ausgelegt. Die für Ihr
Gerät zutreffende Klimaklasse ist auf dem Typenschild aufgedruckt.
Hinweis
u
Die angegebenen Umgebungstemperaturen einhalten,
sonst verringert sich die Kühlleistung.
Klimaklasse für Umgebungstemperaturen
SN, N bis 32 °C
ST bis 38 °C
T bis 43 °C
Eine einwandfreie Funktion des Gerätes ist bis zu einer unteren
Umgebungstemperatur von 5 °C gewährleistet.
(4) Typenschild
Hinweis
u
Ablagen, Schubladen oder Körbe sind im Auslieferungszustand für eine optimale Energieeffizienz angeordnet.
2
1.3 Konformität
Der Kältemittelkreislauf ist auf Dichtheit geprüft. Das Gerät
entspricht den einschlägigen Sicherheitsbestimmungen sowie
den EG-Richtlinien 2006/95/EG, 2004/108/EG, 2009/125/EG
und 2010/30/EU.
Page 3
Allgemeine Sicherheitshinweise
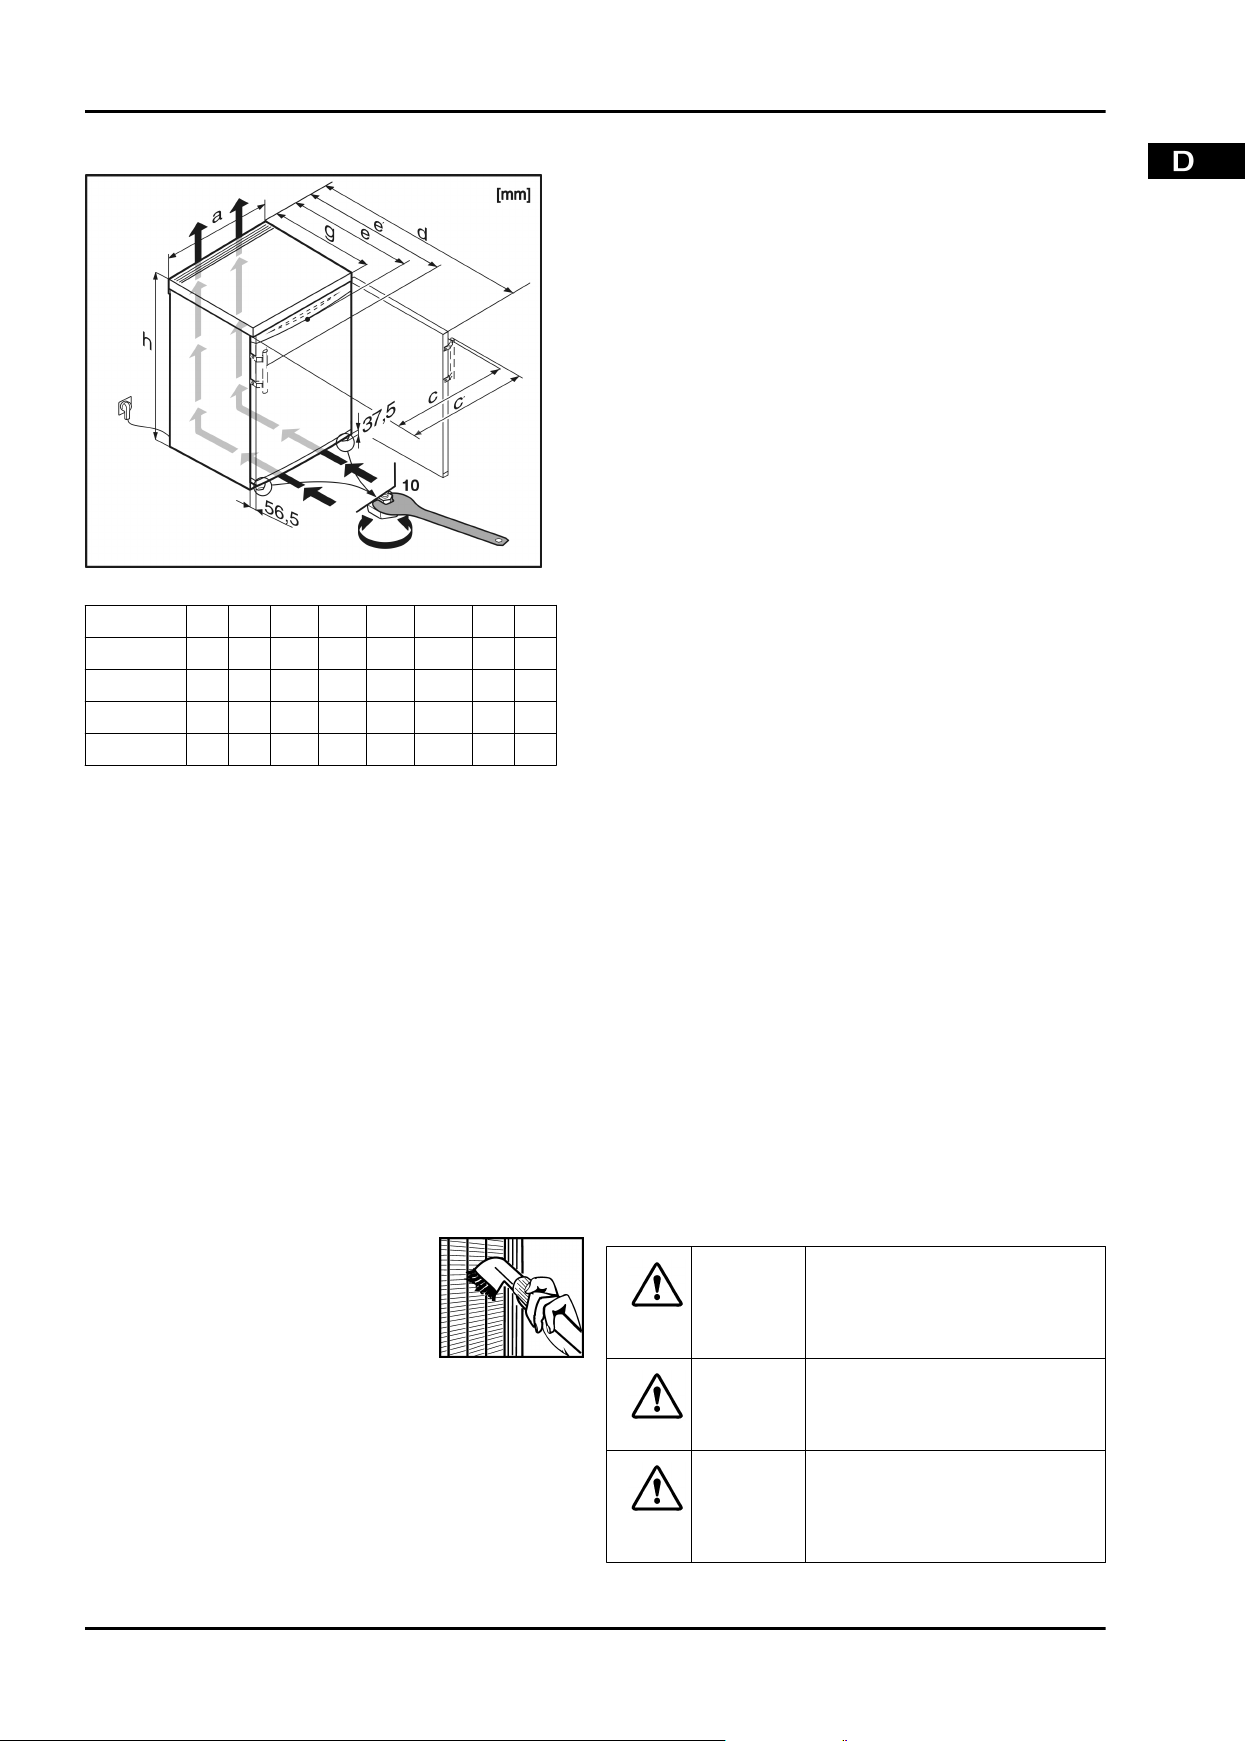
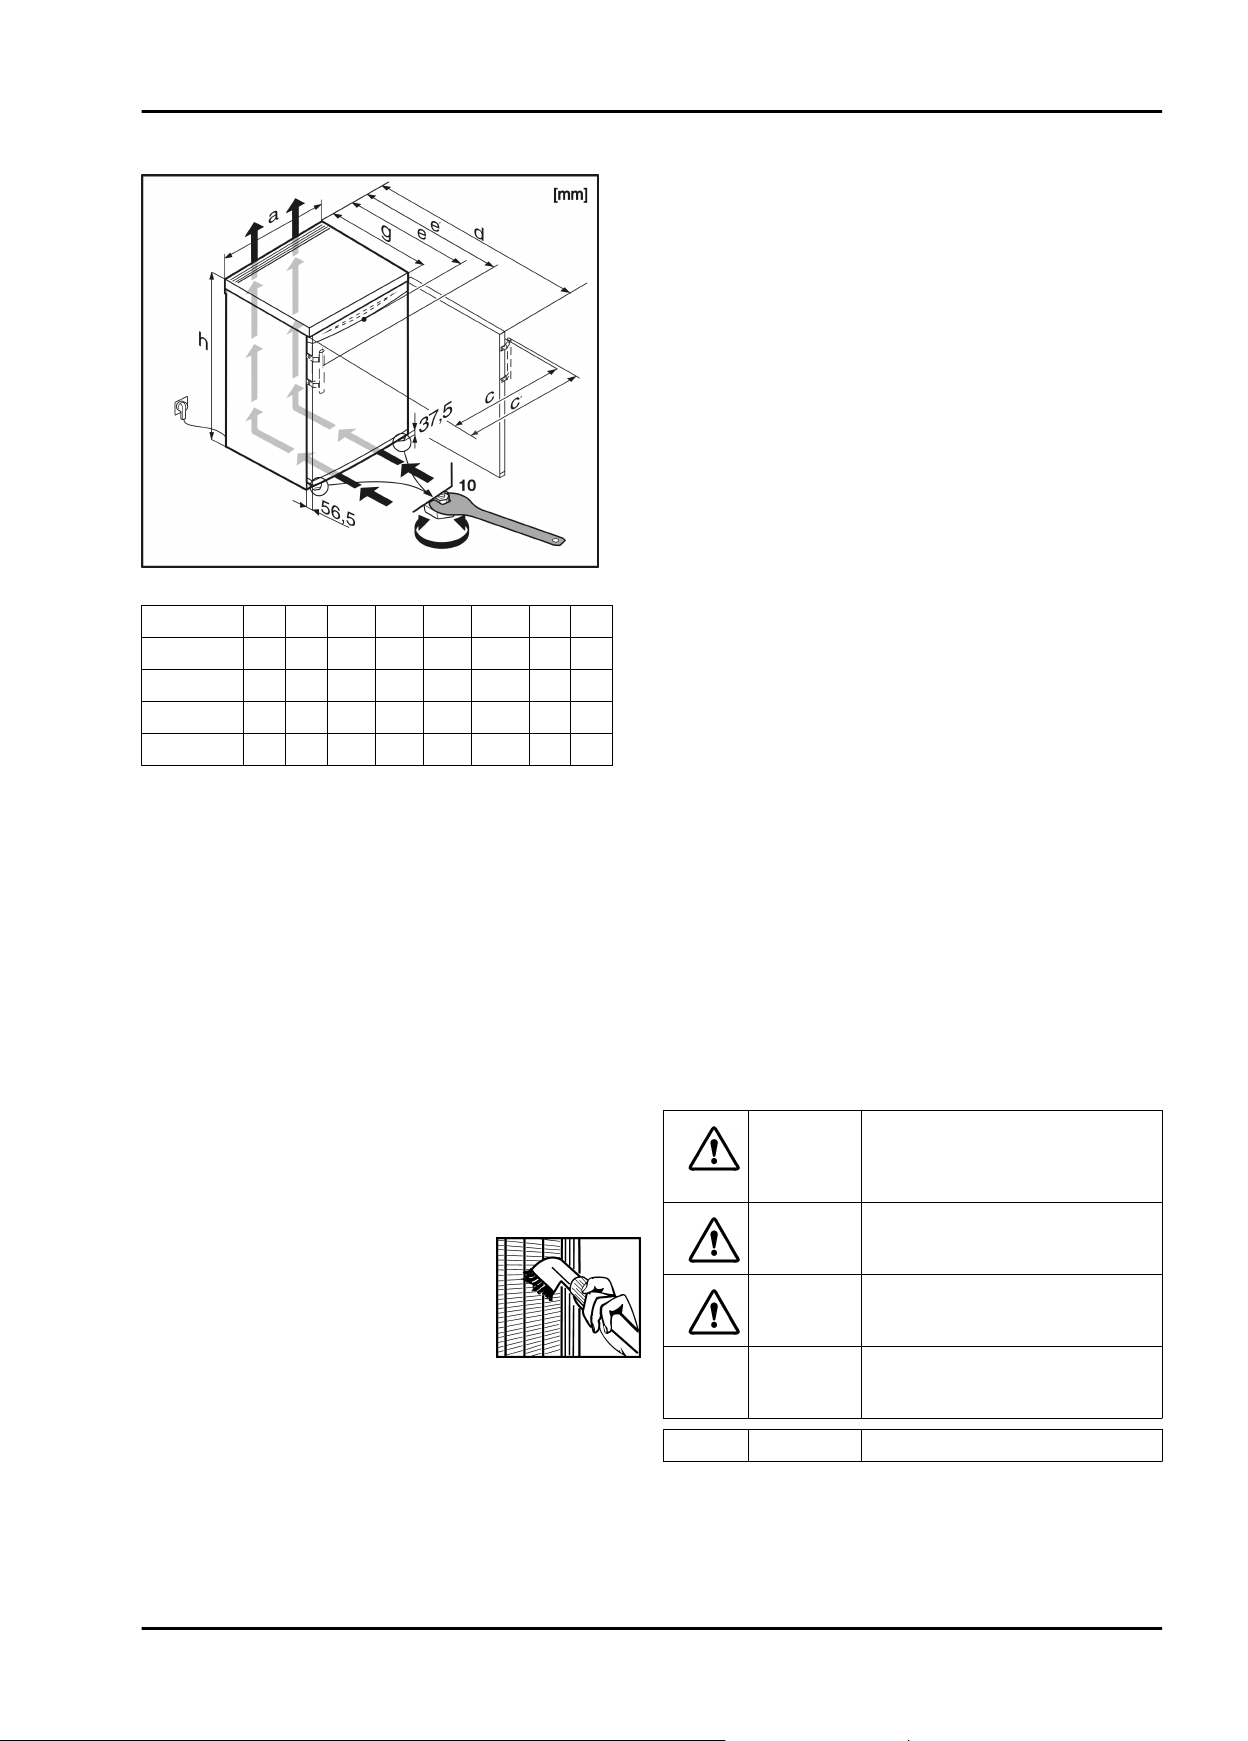
1.4 Aufstellmaße
Fig. 2
Modell h a g e e' d c c'
GP1376 851 553 611 624 653 1129 563 592
GP1476 851 602 611 628 657 1174 613 640
GPesf1476 851 602 611 610 657 1174 597 644
GP1486 851 602
x
Bei Geräten ohne beiliegende Wandabstandshalter oder
wenn die beiliegenden Abstandshalter nicht verwendet
werden, verringert sich das Maß um 35 mm (siehe 4.2) .
646x663x692x1209
x
613 640
1.5 Energie sparen
Immer auf gute Be- und Entlüftung achten. Lüftungsöff-
-
nungen bzw. -gitter nicht abdecken.
Gerät nicht im Bereich direkter Sonnenbestrahlung, neben
-
Herd, Heizung und dergleichen aufstellen.
Der Energieverbrauch ist abhängig von den Aufstellbedin-
-
gungen z.B. der Umgebungstemperatur (siehe 1.2) .
Gerät möglichst kurz öffnen.
-
Je niedriger die Temperatur eingestellt wird, desto höher ist
-
der Energieverbrauch.
Alle Lebensmittel gut verpackt und abgedeckt aufbewahren.
-
Reifbildung wird vermieden.
Lebensmittel nur solange wie nötig herausnehmen, damit
-
sie sich nicht zu sehr erwärmen.
Warme Speisen einlegen: erst auf Zimmertemperatur
-
abkühlen lassen.
Wenn im Gerät eine dicke Reifschicht ist: Gerät abtauen.
-
Staubablagerungen erhöhen den Energieverbrauch:
Die Kältemaschine mit dem Wärmetau-
-
scher - Metallgitter an der Rückseite des
Gerätes - einmal jährlich abstauben.
2 Allgemeine Sicherheitshinweise
Gefahren für den Benutzer:
Dieses Gerät ist nicht bestimmt für Personen (auch Kinder)
-
mit physischen, sensorischen oder mentalen Beeinträchtigungen oder Personen, die nicht über ausreichende Erfahrung und Kenntnisse verfügen. Es sei denn, sie wurden
durch eine Person, die für ihre Sicherheit verantwortlich ist,
in die Benutzung des Gerätes unterwiesen und anfänglich
beaufsichtigt. Kinder beaufsichtigen, damit sie nicht mit dem
Gerät spielen.
Im Fehlerfall Netzstecker ziehen (dabei nicht am Anschluss-
-
kabel ziehen) oder Sicherung ausschalten.
Reparaturen, Eingriffe am Gerät und den Wechsel der Netz-
-
anschlussleitung nur vom Kundendienst oder anderem
dafür ausgebildeteten Fachpersonal ausführen lassen.
Wenn das Gerät vom Netz getrennt wird, immer am Stecker
-
anfassen. Nicht am Kabel ziehen.
Gerät nur nach den Angaben der Anweisung montieren und
-
anschließen.
Bewahren Sie diese Anleitung sorgfältig auf und reichen Sie
-
diese gegebenenfalls an den Nachbesitzer weiter.
Brandgefahr:
Das enthaltene Kältemittel R 600a ist umweltfreundlich, aber
-
brennbar. Entweichendes Kältemittel kann sich entzünden.
Rohrleitungen des Kältekreislaufs nicht beschädigen.
•
Im Geräteinnenraum nicht mit offenem Feuer oder Zünd-
•
quellen hantieren.
Im Geräteinnenraum keine elektrischen Geräte benutzen
•
(z. B. Dampfreinigungsgeräte, Heizgeräte, Eiscremebereiter usw.).
Wenn Kältemittel entweicht: Offenes Feuer oder Zünd-
•
quellen in der Nähe der Austrittstelle beseitigen. Netzstecker ziehen. Raum gut lüften. Kundendienst benachrichtigen.
Keine explosiven Stoffe oder Sprühdosen mit brennbaren
-
Treibmitteln, wie z. B. Butan, Propan, Pentan usw. im Gerät
lagern. Entsprechende Sprühdosen sind erkennbar an der
aufgedruckten Inhaltsangabe oder einem Flammensymbol.
Eventuell austretende Gase können sich durch elektrische
Bauteile entzünden.
Brennende Kerzen, Lampen und andere Gegenstände mit
-
offenen Flammen vom Gerät fernhalten, damit diese das
Gerät nicht in Brand setzen.
Hochprozentigen Alkohol nur dicht verschlossen und
-
stehend lagern. Eventuell austretender Alkohol kann sich
durch elektrische Bauteile entzünden.
Absturz- und Umkippgefahr:
Sockel, Schubfächer, Türen usw. nicht als Trittbrett oder
-
zum Aufstützen missbrauchen. Dies gilt insbesondere für
Kinder.
Gefahr einer Lebensmittelvergiftung:
Überlagerte Lebensmittel nicht verzehren.
-
Gefahr von Erfrierungen, Taubheitsgefühlen und
Schmerzen:
Dauernden Hautkontakt mit kalten Oberflächen oder Kühl-/
-
Gefriergut vermeiden oder Schutzmaßnahmen ergreifen, z.
B. Handschuhe verwenden. Speiseeis, besonders Wassereis oder Eiswürfel nicht sofort und nicht zu kalt verzehren.
Beachten Sie die spezifischen Hinweise in den anderen
Kapiteln:
GEFAHR kennzeichnet eine unmittelbar
gefährliche Situation, die Tod oder
schwere Körperverletzungen zur
Folge haben wird, wenn sie nicht
vermieden wird.
WARNUNG kennzeichnet eine gefährliche Situa-
tion, die Tod oder schwere Körperverletzung zur Folge haben könnte,
wenn sie nicht vermieden wird.
VORSICHT kennzeichnet eine gefährliche Situa-
tion, die leichte oder mittlere Körperverletzungen zur Folge haben
könnte, wenn sie nicht vermieden
wird.
3
Page 4

Bedienungs- und Anzeigeelemente
ACHTUNG kennzeichnet eine gefährliche Situa-
tion, die Sachschäden zur Folge
haben könnte, wenn sie nicht
vermieden wird.
Hinweis kennzeichnet nützliche Hinweise
und Tipps.
3 Bedienungs- und Anzeigeelemente
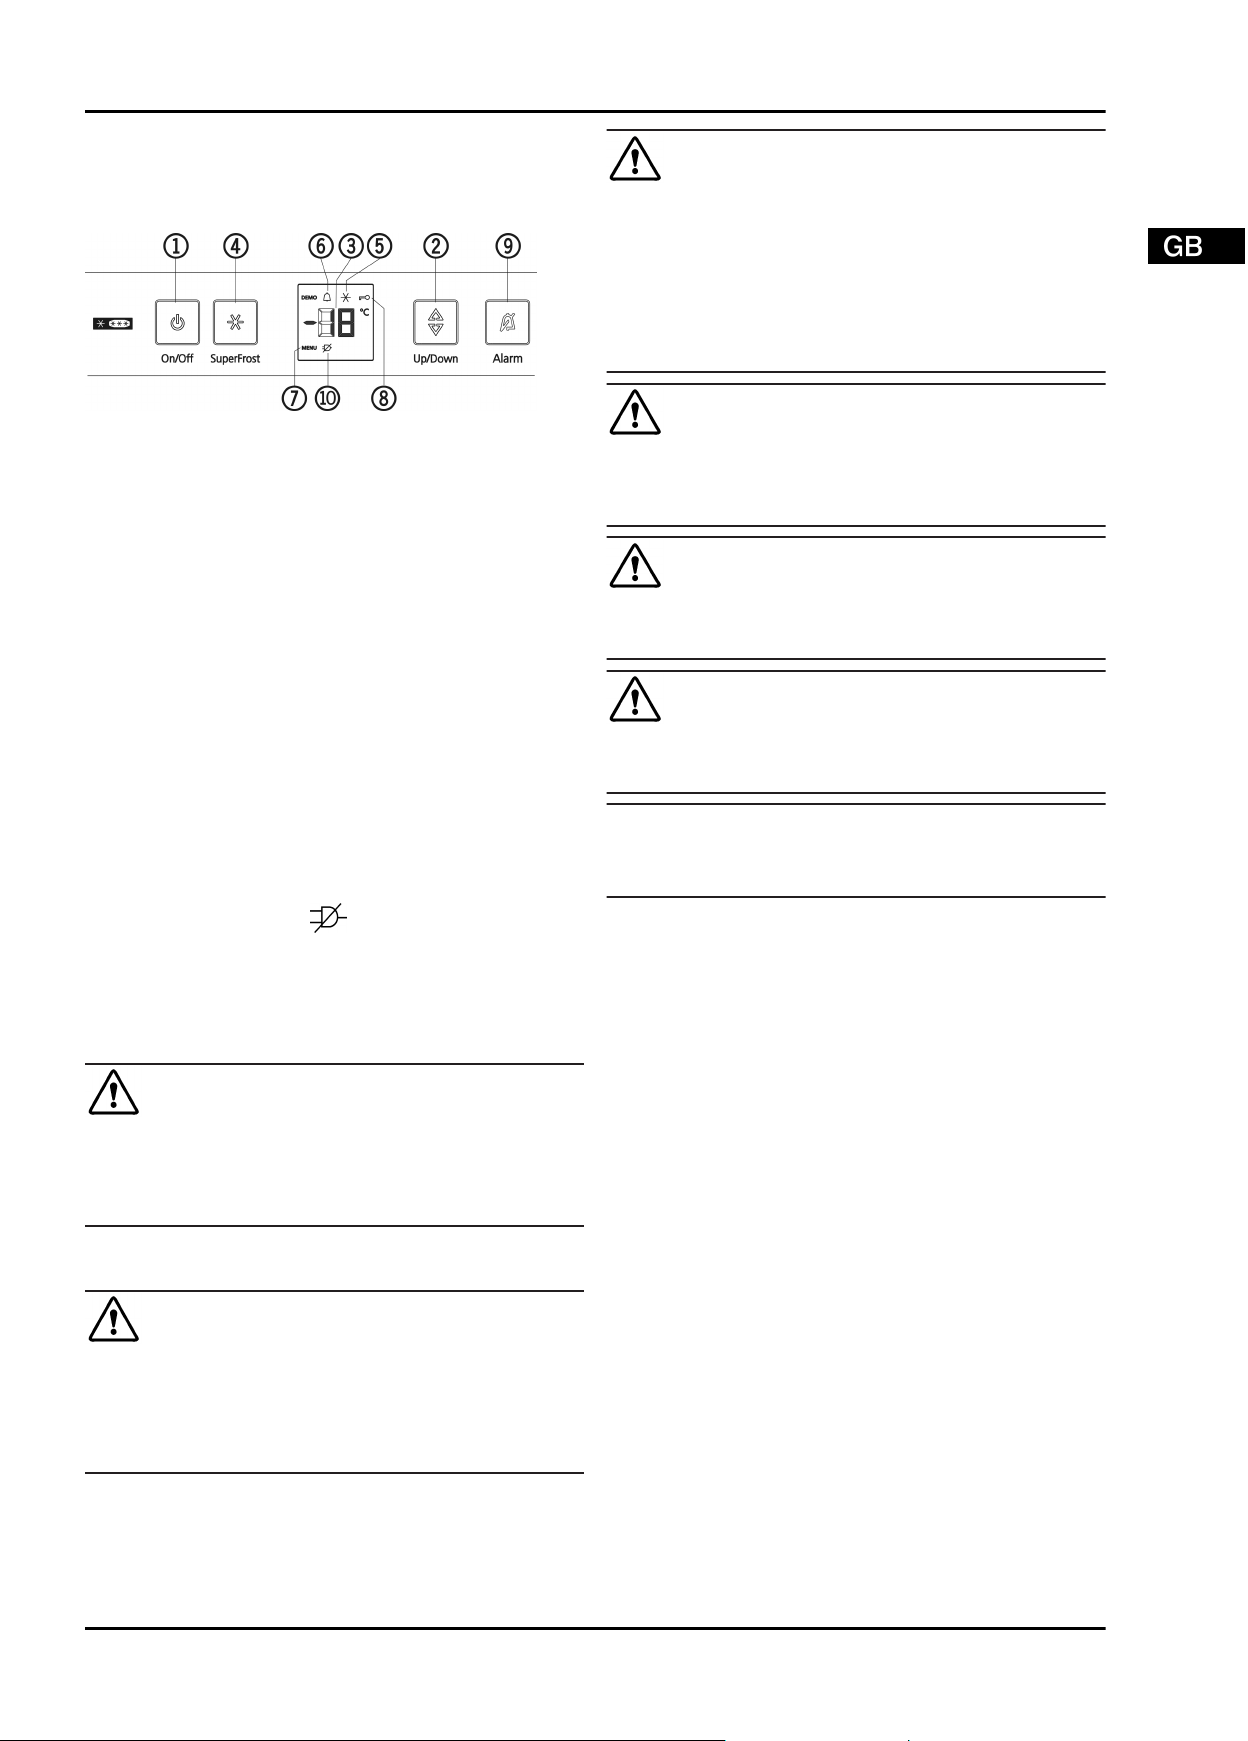
3.1 Bedien- und Kontrollelemente
Fig. 3
(1) Taste On/Off (6) Symbol Alarm
(2) Einstelltaste (7) Symbol Menu
(3) Temperaturanzeige (8) Symbol Kindersicherung
(4) Taste SuperFrost (9) Taste Alarm
(5) Symbol SuperFrost (10) Symbol Netzausfall
4.2 Gerät aufstellen
WARNUNG
Brandgefahr durch Feuchtigkeit!
Wenn stromführende Teile oder die Netzanschlussleitung
feucht werden, kann es zu einem Kurzschluss kommen.
u
Das Gerät ist für den Gebrauch in geschlossenen Räumen
konzipiert. Das Gerät nicht im Freien oder im Feuchte- und
Spritzwasserbereich betreiben.
WARNUNG
Brandgefahr durch Kurzschluss!
Wenn Netzkabel/Stecker des Gerätes oder eines anderen
Gerätes und Geräterückseite sich berühren, können Netzkabel/
Stecker durch die Vibrationen des Gerätes beschädigt werden,
so dass es zu einem Kurzschluss kommen kann.
u
Gerät so aufstellen, dass es keine Stecker oder Netzkabel
berührt.
u
An Steckdosen im Geräterückseitenbereich weder das
Gerät noch andere Geräte anschließen.
WARNUNG
Brandgefahr durch Kältemittel!
Das enthaltene Kältemittel R 600a ist umweltfreundlich, aber
brennbar. Entweichendes Kältemittel kann sich entzünden.
u
Die Rohrleitungen des Kältekreislaufs nicht beschädigen.
3.2 Temperaturanzeige
Im Normalbetrieb wird angezeigt:
die wärmste Gefriertemperatur
-
Die Temperaturanzeige blinkt:
die Temperatureinstellung wird verändert
-
nach dem Einschalten ist die Temperatur noch nicht kalt
-
genug
die Temperatur ist um mehrere Grad angestiegen
-
In der Anzeige blinken Striche:
die Gefriertemperatur liegt über 0 °C.
-
Die folgenden Anzeigen weisen auf eine Störung hin. Mögliche
Ursachen und Maßnahmen zur Behebung: (siehe Störungen).
F0 bis F5
-
-
Das Symbol Netzausfall
leuchtet.
4 Inbetriebnahme
4.1 Gerät transportieren
Verletzungs- und Beschädigungsgefahr durch falschen Transport!
u
u
u
VORSICHT
Das Gerät verpackt transportieren.
Das Gerät stehend transportieren.
Das Gerät nicht alleine transportieren.
WARNUNG
Brand- und Beschädigungsgefahr!
u
Wärmeabgebende Geräte, z. B. Mikrowellengerät, Toaster
usw. nicht auf das Gerät stellen!
WARNUNG
Brand- und Beschädigungsgefahr durch blockierte Belüftungsöffnungen!
u
Die Belüftungsöffnungen immer freihalten. Immer auf gute
Be- und Entlüftung achten!
Hinweis*
Die Beutel an der Rückseite des Gerätes sind wichtig für die
Funktionstüchtigkeit. Ihr Inhalt ist ungiftig und ungefährlich.
u
Beutel nicht entfernen!
Bei Schäden am Gerät umgehend - vor dem Anschließen -
q
beim Lieferanten rückfragen.
Der Boden am Standort muss waagerecht und eben sein.
q
Gerät nicht im Bereich direkter Sonnenbestrahlung, neben
q
Herd, Heizung und dergleichen aufstellen.
Optimaler Aufstellort ist ein trockener und gut belüfteter
q
Raum.
Das Gerät mit der Rückseite und bei Verwendung beilieg-
q
ender Wandabstandshalter (siehe unten) mit diesen stets
direkt an der Wand aufstellen.
Das Gerät nicht ohne Hilfe aufstellen.
q
Der Aufstellungsraum Ihres Gerätes muss laut der Norm
q
EN 378 pro 8 g Kältemittel R 600a ein Volumen von 1 m
aufweisen. Ist der Aufstellraum zu klein, kann im Falle einer
Leckage des Kältekreislaufes ein entzündliches Gas-LuftGemisch entstehen. Die Angabe der Kältemittelmenge
finden Sie auf dem Typenschild im Geräteinnenraum.
u
Das Anschlusskabel von der Geräterückseite abnehmen.
Dabei den Kabelhalter entfernen, sonst entstehen Vibrationsgeräusche!
u
Schutzfolien von der Gehäuseaußenseite abziehen.*
3
4
Page 5
u
Alle Transportsicherungsteile entfernen.
Liegen dem Gerät Wandabstandshalter bei, wird durch
Montage und Verwendung dieser Wandabstandshalter die
ausgewiesene Energieaufnahme erreicht. Ohne Wandabstandshalter verringert sich die angegebene Gerätetiefe um
3,50 cm. Werden beiliegende Wandabstandshalter nicht
verwendet, hat dies keinen Einfluss auf die Funktionsfähigkeit
des Gerätes. Allerdings erhöht sich bei solchen Geräten bei
geringerem Wandabstand der Energieverbrauch geringfügig.*
u
Bei einem Gerät mit beiliegenden Wandabstandshaltern
diese Wandabstandshalter auf
der Rückseite des Geräts links
und rechts oben montieren.*
Inbetriebnahme
u
Verpackung entsorgen. (siehe 4.5)
u
Gerät mit dem beiliegenden
Gabelschlüssel über die Stellfüße (A) und mit Hilfe einer
Wasserwaage fest, ebenstehend ausrichten.
Hinweis
u
Gerät reinigen (siehe 6.2) .
Wenn das Gerät in sehr feuchter Umgebung aufgestellt wird,
kann sich auf der Außenseite des Geräts Kondenswasser
bilden.
u
Immer auf gute Be- und Entlüftung am Aufstellort achten.
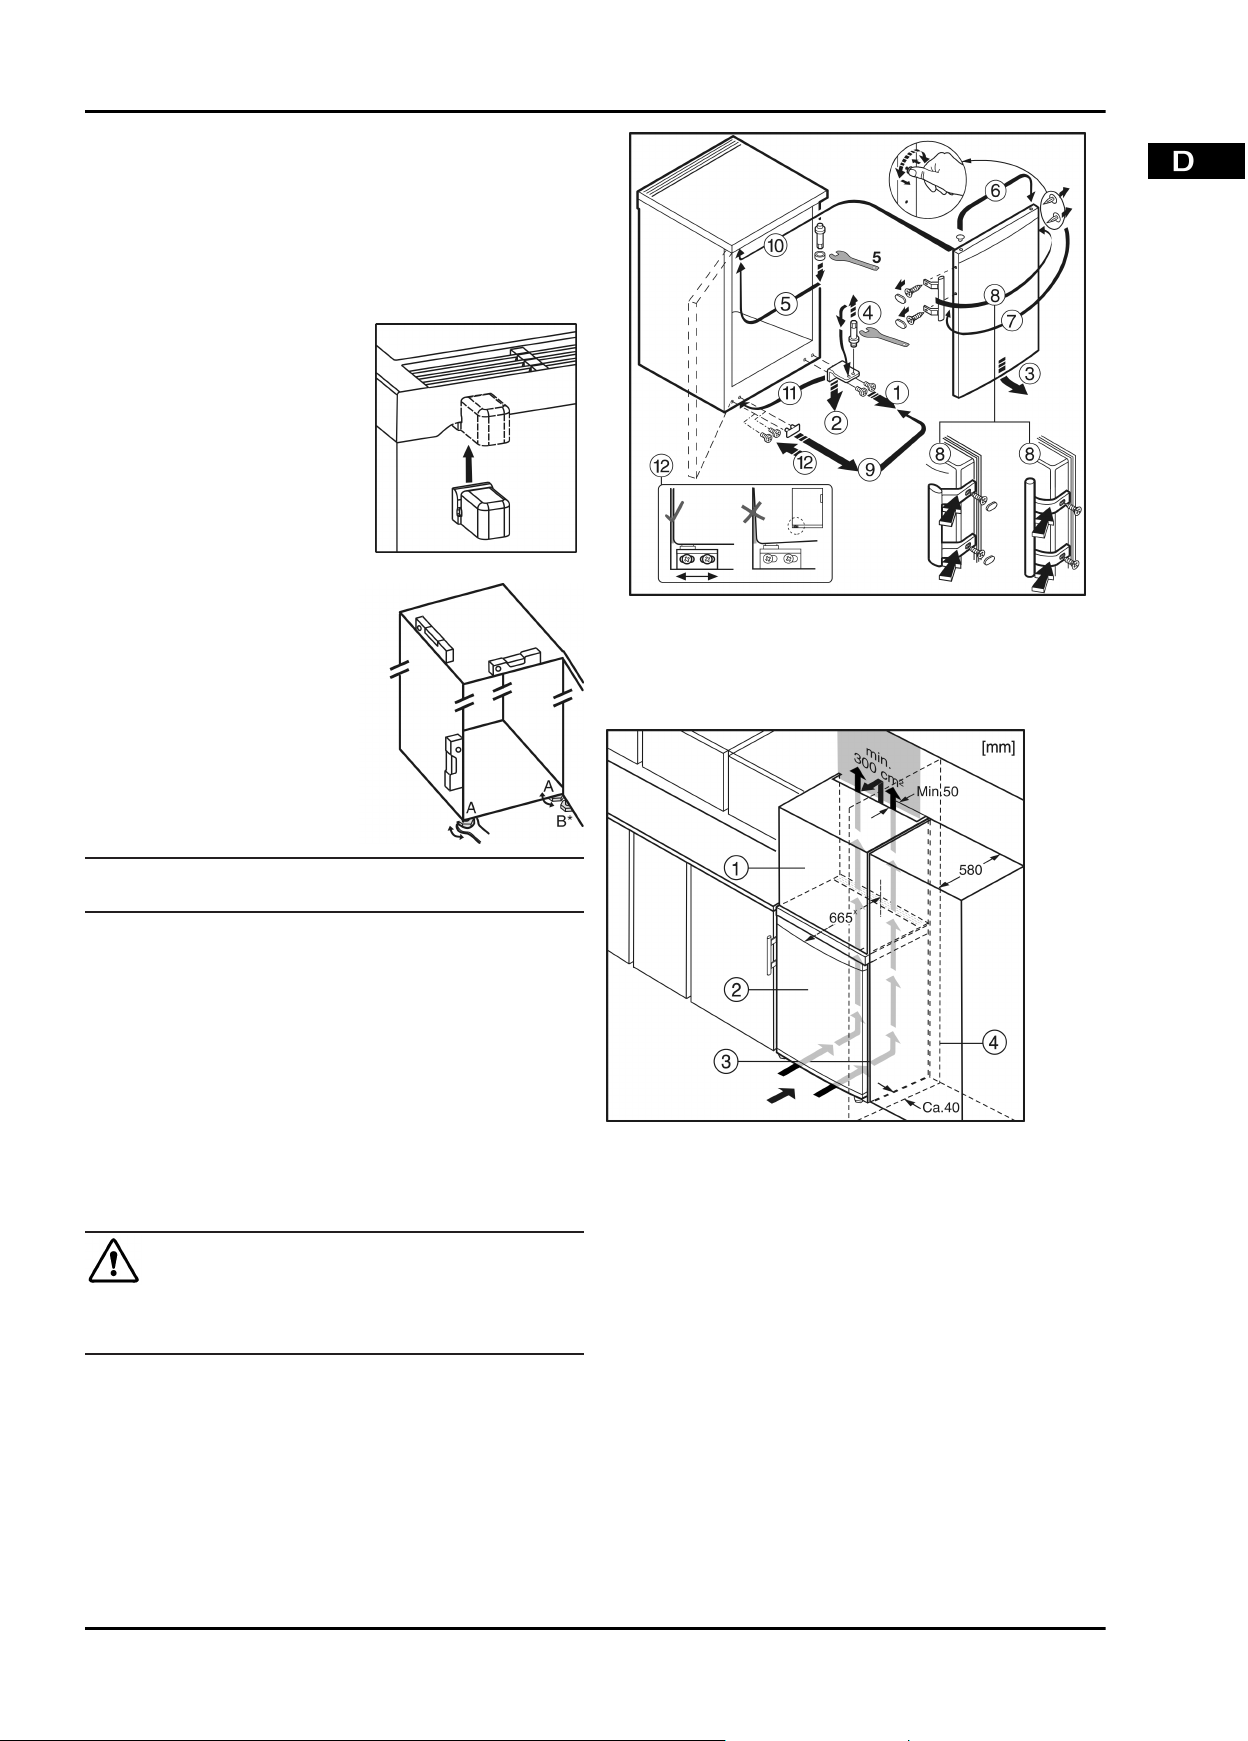
4.3 Tueranschlagwechsel
Bei Bedarf können Sie den Anschlag wechseln.
Stellen Sie sicher, dass folgendes Werkzeug bereitliegt:
Torx® 25
q
Torx® 15
q
beiliegenden Gabelschlüssel
q
ggf. zweite Person für Montagearbeit
q
Verletzungsgefahr wenn die Tür herauskippt!
u
u
VORSICHT
Tür gut festhalten.
Tür vorsichtig abstellen.
*
Fig. 4 bei Geräten mit Türgriff
u
Gehen Sie in der Reihenfolge der Positionsnummern in der
Grafik vor.
4.4 Einschub in die Küchenzeile
(1) Aufsatzschrank (3) Küchenschrank
(2) Gerät (4) Wand
x
Bei Geräten ohne beiliegende Wandabstandshalter oder
wenn die beiliegenden Abstandshalter nicht verwendet
werden, verringert sich das Maß um 35 mm (siehe 4.2) .
Das Gerät kann mit der Kücheneinrichtung umbaut werden.
Um das Gerät
kann über dem Gerät ein entsprechender Aufsatzschrank
Fig. 5 (1)
Beim Umbau mit Küchenschränken (Tiefe max. 580 mm) kann
das Gerät direkt neben dem Küchenschrank
stellt werden. Das Gerät steht seitlich 70 mmx und in der Gerätemitte 85 mmx gegenüber der Küchenschrankfront vor.
Wichtig für die Belüftung:
An der Rückseite des Aufsatzschrankes muss ein Abluft-
-
schacht von mindestens 50 mm Tiefe über die gesamte
Aufsatzschrankbreite vorhanden sein.
Der Entlüftungsquerschnitt unter der Raumdecke muss
-
mindestens 300 cm2 betragen.
Je größer der Lüftungsquerschnitt, um so energiesparender
-
arbeitet das Gerät.
Fig. 5 (2)
angebracht werden.
der Küchenzeilenhöhe anzugleichen,
Fig. 5 (3)
Fig. 5
aufge-
5
Page 6
Bedienung
Wenn das Gerät mit den Scharnieren neben einer Wand
Fig. 5 (4)
und Wand mindestens 40 mm betragen. Dies entspricht dem
Griffüberstand bei geöffneter Tür.
aufgestellt wird, muss der Abstand zwischen Gerät
4.5 Verpackung entsorgen
WARNUNG
Erstickungsgefahr durch Verpackungsmaterial und Folien!
u
Kinder nicht mit Verpackungsmaterial spielen lassen.
Die Verpackung ist aus wiederverwertbaren Materialien hergestellt:
Wellpappe/Pappe
-
Teile aus geschäumtem Polystyrol
-
Folien und Beutel aus Polyethylen
-
Umreifungsbänder aus Polypropylen
-
genagelter Holzrahmen mit Scheibe aus Poly-
-
ethylen*
u
Das Verpackungsmaterial zu einer offiziellen Sammelstelle
bringen.
4.6 Gerät anschließen
ACHTUNG
Beschädigungsgefahr für die Elektronik!
u
Keine Inselwechselrichter (Umwandeln von Gleichstrom in
Wechsel- bzw. Drehstrom) oder Energiesparstecker
verwenden.
w
In der Anzeige wird das Symbol Menu
w
In der Anzeige blinkt c .
u
Mit der Einstelltaste
u
Mit der Taste SuperFrost
w
In der Anzeige erscheint der zuletzt eingestellte
Helligkeitswert.
u
Mit der Einstelltaste
0 bis h 5 auswählen.
w
Die Helligkeit ist eingestellt.
u
Einstellmodus deaktivieren: Taste On/Off
drücken.
w
In der Temperaturanzeige wird wieder die Temperatur angezeigt.
Fig. 3 (2)
Fig. 3 (4)
Fig. 3 (2)
h auswählen.
den gewünschten Wert von h
Fig. 3 (7)
kurz bestätigen.
angezeigt.
Fig. 3 (1)
zwei mal
5.2 Kindersicherung
Mit der Kindersicherung können Sie sicherstellen, dass Kinder
beim Spielen das Gerät nicht versehentlich ausschalten.
5.2.1 Kindersicherung einstellen
Wenn die Funktion eingeschaltet werden soll:
u
Einstellmodus aktivieren: Taste SuperFrost
drücken.
w
In der Anzeige wird das Symbol Menu
w
In der Anzeige blinkt c .
u
Mit der Taste SuperFrost
w
In der Anzeige erscheint c1.
u
Mit der Taste SuperFrost
w
Das Symbol Kindersicherung
der Anzeige.
Fig. 3 (4)
Fig. 3 (4)
Fig. 3 (8)
kurz bestätigen.
kurz bestätigen.
Fig. 3 (4)
Fig. 3 (7)
leuchtet in
ca. 5 s
angezeigt.
WARNUNG
Brand- und Überhitzungsgefahr!
u
Keine Verlängerungskabel oder Verteilerleisten verwenden.
Stromart (Wechselstrom) und Spannung am Aufstellort
müssen mit den Angaben auf dem Typenschild übereinstimmen (siehe Gerät auf einen Blick).
Das Gerät nur über eine vorschriftsmäßig installierte
Schutzkontakt-Steckdose anschließen. Die Steckdose muss mit 10 A oder höher abgesichert sein.
Sie muss leicht zugänglich sein, damit das Gerät im
Notfall schnell vom Strom getrennt werden kann. Sie
muss außerhalb des Geräterückseitenbereichs
liegen.
u
Elektrischen Anschluss prüfen.
u
Den Netzstecker einstecken.
4.7 Gerät einschalten
u
Taste On/Off
w
Das Gerät ist eingeschaltet. Die Temperaturanzeige und
das Symbol Alarm
genug ist.
Fig. 3 (1)
Fig. 3 (6)
drücken.
blinken bis die Temperatur kalt
5 Bedienung
5.1 Helligkeit der Temperaturanzeige
Sie können die Helligkeit der Temperaturanzeige an die Lichtverhältnisse im Aufstellraum anpassen.
5.1.1 Helligkeit einstellen
Die Helligkeit ist einstellbar zwischen h 0 (minimale Beleuchtung) und h 5 (maximale Leuchtkraft).
u
Einstellmodus aktivieren: Taste SuperFrost
drücken.
Fig. 3 (4)
ca. 5 s
w
In der Anzeige blinkt c .
w
Die Funktion Kindersicherung ist eingeschaltet.
Wenn der Einstellmodus beendet werden soll:
u
Die Taste On/Off
w
In der Temperaturanzeige wird wieder die Temperatur angezeigt.
Wenn die Funktion ausgeschaltet werden soll:
u
Einstellmodus aktivieren: Taste SuperFrost
drücken.
w
In der Anzeige wird das Symbol Menu
w
In der Anzeige blinkt c .
u
Mit der Taste SuperFrost
w
In der Anzeige erscheint c0 .
u
Mit der Taste SuperFrost
w
Das Symbol Kindersicherung
w
In der Anzeige blinkt c .
w
Die Funktion Kindersicherung ist ausgeschaltet.
Wenn der Einstellmodus beendet werden soll:
u
Die Taste On/Off
w
In der Temperaturanzeige wird wieder die Temperatur angezeigt.
Fig. 3 (1)
Fig. 3 (1)
kurz drücken.
Fig. 3 (4)
Fig. 3 (4)
kurz bestätigen.
kurz bestätigen.
Fig. 3 (8)
kurz drücken.
Fig. 3 (4)
Fig. 3 (7)
erlischt.
ca. 5 s
angezeigt.
5.3 Temperaturalarm
Wenn die Gefriertemperatur nicht kalt genug ist, ertönt der
Tonwarner.
Gleichzeitig blinkt die Temperaturanzeige und das Symbol
Alarm
Fig. 3 (6)
Der Tonwarner verstummt automatisch, das Symbol Alarm
Fig. 3 (6)
blinken, wenn die Temperatur wieder ausreichend kalt ist.
Wenn der Alarmzustand bestehen bleibt: (siehe Störungen).
5.3.1 Temperaturalarm stumm schalten
Der Tonwarner kann stumm geschaltet werden. Wenn die
Temperatur wieder ausreichend kalt ist, ist die Alarm-Funktion
wieder aktiv.
.
geht aus und die Temperaturanzeige hört auf zu
6
Page 7
u
Taste Alarm
w
Der Tonwarner verstummt.
Fig. 3 (9)
drücken.
5.4 Lebensmittel einfrieren
Sie können maximal so viel kg frische Lebensmittel innerhalb
von 24 h einfrieren, wie auf dem Typenschild (siehe Gerät auf
einen Blick) unter "Gefriervermögen ... kg/24h" angegeben ist.
Die Schubfächer können jeweils mit max. 25 kg Gefriergut, die
Platten je mit max. 35 kg belastet werden.
VORSICHT
Verletzungsgefahr durch Glasscherben!
Flaschen und Dosen mit Getränken können beim Gefrieren
platzen. Dies gilt insbesondere für kohlensäurehaltige
Getränke.
u
Flaschen und Dosen mit Getränken nicht einfrieren!
Damit die Lebensmittel schnell bis zum Kern durchfrieren,
folgende Mengen pro Packung nicht überschreiten:
- Obst, Gemüse bis zu 1 kg
- Fleisch bis zu 2,5 kg
u
Lebensmittel in Gefrierbeuteln, wiederverwendbaren Kunststoff-, Metall- oder Aluminiumbehältern portionsweise verpacken.
5.5 Lebensmittel auftauen
- bei Raumtemperatur
- im Mikrowellengerät
- im Backofen/Heißluftherd
u
Aufgetaute Lebensmittel nur in Ausnahmefällen wieder
einfrieren.
5.6 Temperatur einstellen
Die Temperatur ist abhängig von folgenden Faktoren:
der Häufigkeit des Türöffnens
-
der Raumtemperatur des Aufstellortes
-
der Art, Temperatur und Menge der Lebensmittel
-
Empfehlenswerte Temperatureinstellung: -18 °C
Die Temperatur kann fortlaufend geändert werden. Ist die
Einstellung -28 °C erreicht, wird wieder mit -14 °C begonnen.
u
Temperaturfunktion aufrufen: Einmal Einstelltaste
drücken.
w
In der Temperaturanzeige blinkt die aktuelle Temperatur.
u
Temperatur in 1 °C -Schritten ändern: Einstelltaste
so oft drücken bis die gewünschte Temperatur in der
Temperaturanzeige leuchtet.
u
Temperatur fortlaufend ändern: Taste gedrückt halten.
w
Während des Einstellens wird der Wert blinkend angezeigt.
w
Ca. 5 s nach dem letzten Tastendruck wird die tatsächliche
Temperatur angezeigt. Die Temperatur stellt sich langsam
auf den neuen Wert ein.
Fig. 3 (2)
Fig. 3 (2)
Bedienung
Verpacken Sie die Lebensmittel und legen Sie sie möglichst
breitflächig ein. Einzufrierende Lebensmittel nicht mit bereits
gefrorener Ware in Berührung bringen, damit diese nicht
antaut.
SuperFrost müssen Sie in folgenden Fällen nicht einschalten:
beim Einlegen von bereits gefrorener Ware
-
beim Einfrieren von bis zu ca. 1 kg frischen Lebensmitteln
-
täglich
5.7.1 Mit SuperFrost einfrieren
u
Taste SuperFrost
w
Das Symbol SuperFrost
w
Die Gefriertemperatur sinkt, das Gerät arbeitet mit maximalen Kälteleistung.
Hinweis
u
Beim Betätigen der Taste SuperFrost kann es durch die
eingebaute Einschaltverzögerung zu einem bis zu 8 Minuten
verspäteten Einschalten des Kompressors kommen. Diese
Verzögerung erhöht die Lebensdauer des Kompressors.
Bei einer kleinen Gefriergutmenge:
u
Ca. 6 h warten.
u
Verpackte Lebensmittel in die unteren Schubfächer legen.
Bei der maximalen Gefriergutmenge:
u
Ca. 24 h warten.
u
Unterstes Schubfach herausnehmen und die Lebensmittel
direkt in das Gerät legen, so dass sie Kontakt zum Boden
oder den Seitenwänden haben.
w
SuperFrost schaltet sich automatisch ab. Je nach eingelegter Menge frühestens nach 30 h spätestens nach 65 h.
w
Das Symbol SuperFrost
Einfrieren abgeschlossen ist.
u
Lebensmittel in das Schubfach legen und dieses wieder
einschieben.
w
Das Gerät arbeitet im energiesparenden Normalbetrieb
weiter.
5.8 Schubfächer
u
Um Gefriergut direkt auf den Abstellflächen zu lagern:
Schubfach nach vorne ziehen und herausheben.
5.9 Abstellflächen
u
Abstellfläche herausnehmen: vorne
anheben und herausziehen.
u
Abstellfläche wieder einsetzen: bis zum
Anschlag einfach einschieben.
Fig. 3 (4)
Fig. 3 (5)
einmal kurz drücken.
leuchtet.
Fig. 3 (5)
erlischt, wenn das
5.7 SuperFrost
Mit dieser Funktion können Sie frische Lebensmittel schnell bis
auf den Kern durchfrieren. Das Gerät arbeitet mit maximaler
Kälteleistung, dadurch können die Geräusche des Kälteaggregats vorübergehend lauter sein.
Sie können maximal so viel kg frische Lebensmittel innerhalb
von 24 h einfrieren, wie auf dem Typenschild unter "Gefriervermögen ... kg/24h" angegeben ist. Diese maximale Gefriergutmenge ist je nach Modell und Klimaklasse verschieden.
Je nachdem wieviel frische Lebensmittel eingefroren werden
sollen, müssen Sie SuperFrost frühzeitig einschalten: bei einer
kleinen Gefriergutmenge ca. 6h, bei der maximalen Gefriergutmenge 24h vor dem Einlegen der Lebensmittel.
7
Page 8
Wartung
5.10 VarioSpace
Sie können zusätzlich zu den
Schubfächern auch die Abstellflächen herausnehmen. So erhalten
Sie Platz für großes Gefriergut.
Geflügel, Fleisch, große Wildteile
sowie hohe Backwaren können als
Ganzes eingefroren und weiter
zubereitet werden.
u
Die Schubfächer können jeweils
mit max. 25 kg Gefriergut, die
Platten je mit max. 35 kg belastet
werden.
5.11 Info-System
u
Netzstecker ziehen oder Sicherung ausschalten.
u
Kälte-Akkus oben auf das Gefriergut legen.
u
Gefriergut evtl. im Schubfach in Zeitungspapier oder
Decken einschlagen und an einem kühlen Ort aufbewahren.
u
Einen Topf mit heißem, nicht kochendem Wasser auf eine mittlere
Platte stellen.
-oder-
u
Die unteren beiden Schubfächer
halbvoll mit handwarmem Wasser
füllen und in das Gerät einsetzen.
w
Das Abtauen wird beschleunigt.
u
Gerätetür während des Abtauens offen lassen.
u
Losgelöste Eisstücke herausnehmen.
u
Tauwasser evtl. mehrmals mit einem Schwamm oder Tuch
aufnehmen.
u
Das Gerät reinigen und trockenreiben. (siehe 6.2) .
6.2 Gerät reinigen
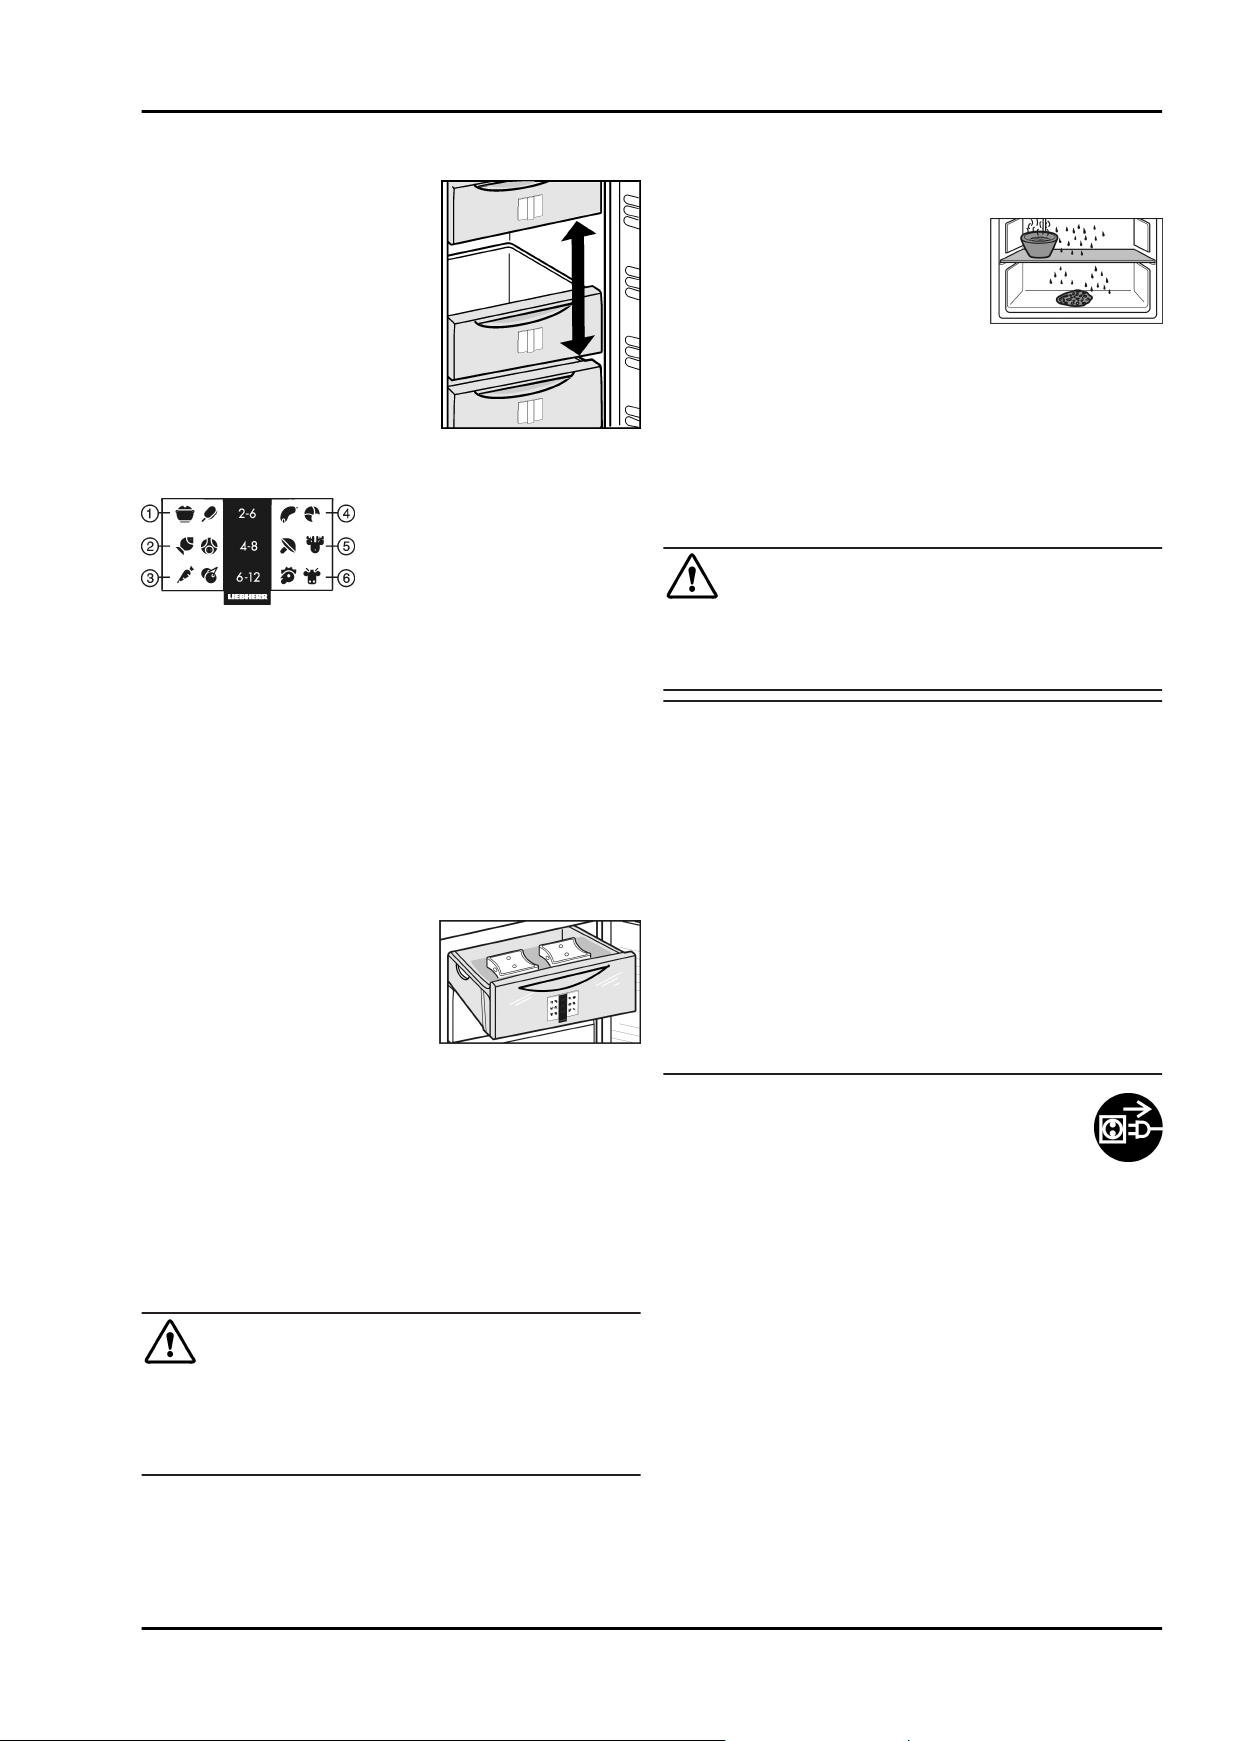
Fig. 6
(1) Fertiggerichte,
Eiscreme
(2) Schweinefleisch, Fisch (5) Wild, Pilze
(3) Obst, Gemüse (6) Geflügel, Rind/ Kalb
Die Zahlen geben jeweils für mehrere Gefriergutarten die
Lagerzeit in Monaten an. Die angegebenen Lagerzeiten sind
Richtwerte.
(4) Wurst, Brot
5.12 Kälte Akkus
Die Kälte-Akkus verhindern bei Stromausfall, dass die Temperatur zu schnell ansteigt.
5.12.1 Kälte Akkus verwenden
u
Die durchgefrorenen Kälte-Akkus
im oberen, vorderen Bereich des
Gefrierraums auf das Gefriergut
legen.
6 Wartung
6.1 manuell Abtauen
Im Gerät bildet sich nach längerem Betrieb eine Reif- bzw.
Eisschicht.
Die Reif- bzw. Eisschicht bildet sich schneller, wenn das Gerät
häufig geöffnet wird oder die eingelegten Lebensmittel warm
sind. Eine dickere Eisschicht erhöht jedoch den Energieverbrauch. Deshalb das Gerät regelmäßig abtauen.
Verletzungs- und Beschädigungsgefahr durch heißen Dampf!
u
u
u
w
u
w
w
VORSICHT
Zum Abtauen keine elektrischen Heiz- oder Dampfreinigungsgeräte, offenen Flammen oder Abtausprays
verwenden.
Eis nicht mit scharfen Gegenständen entfernen.
Einen Tag vor dem Abtauen SuperFrost einschalten.
Das Gefriergut erhält eine "Kältereserve".
Gerät ausschalten.
Die Temperaturanzeige erlischt.
Wenn die Temperaturanzeige nicht erlischt, ist die Kindersicherung aktiv. (siehe 5.2) .
VORSICHT
Verletzungs- und Beschädigungsgefahr durch heißen Dampf!
Heißer Dampf kann die Oberflächen beschädigen und zu
Verbrennungen führen.
u
Keine Dampfreinigungsgeräte verwenden!
ACHTUNG
Falsche Reinigung beschädigt das Gerät!
u
Reinigungsmittel nicht konzentriert verwenden.
u
Keine scheuernden oder kratzenden Schwämme oder
Stahlwolle verwenden.
u
Keine scharfen, scheuernden, sand-, chlorid-, chemiekalienoder säurehaltigen Putzmittel verwenden.
u
Keine chemischen Lösungsmittel verwenden.
u
Das Typenschild an der Geräteinnenseite nicht beschädigen oder entfernen. Es ist wichtig für den Kundendienst.
u
Keine Kabel oder anderen Bauteile abreißen, knicken oder
beschädigen.
u
Kein Reinigungswasser in die Ablaufrinne, die Lüftungsgitter
und elektrischen Teile dringen lassen.
u
Weiche Putztücher und einen Allzweckreiniger mit neutralem pH-Wert verwenden.
u
Im Geräteinnenraum nur lebensmittelunbedenkliche
Reiniger und Pflegemittel verwenden.
u
Gerät leeren.
u
Netzstecker ziehen.
u
Be- und Entlüftungsgitter regelmäßig reinigen.
w
Staubablagerungen erhöhen den Energieverbrauch.
u
Außen- und Innenflächen aus Kunststoff mit lauwarmem
Wasser und etwas Spülmittel von Hand reinigen.
u
Lackierte Seitenwände ausschließlich mit einem weichen,
sauberen Tuch abwischen. Bei starker Verschmutzung
lauwarmes Wasser mit Neutralreiniger verwenden.*
Edelstahlreiniger nicht auf Glas- oder Kunststoffflächen
auftragen, damit sie nicht zerkratzen. Anfängliche dunklere
Stellen und eine intensivere Farbe der Edelstahloberfläche
sind normal.*
u
Außenflächen aus Edelstahl bei Verschmutzung mit
einem handelsüblichen Edelstahlreiniger reinigen. Anschließend beiliegendes Edelstahlpflegemittel gleichmäßig in
Schliffrichtung auftragen.*
Nach dem Reinigen:
u
Gerät und Ausstattungsteile trockenreiben.
u
Gerät wieder anschließen und einschalten.
u
SuperFrost einschalten (siehe 5.7) .
Wenn die Temperatur ausreichend kalt ist:
u
Die Lebensmittel wieder einlegen.
8
Page 9
6.3 Kundendienst
Prüfen Sie zunächst, ob Sie den Fehler selber beheben
können. (siehe Störungen). Falls dies nicht der Fall ist, wenden
sie sich an den Kundendienst. Die Adresse entnehmen Sie
bitte dem beiliegenden Kundendienstverzeichnis.
WARNUNG
Verletzungsgefahr durch unfachmännische Reparatur!
u
Reparaturen und Eingriffe am Gerät und der Netzanschlussleitung, die nicht ausdrücklich genannt sind (siehe
Wartung), nur vom Kundendienst ausführen lassen.
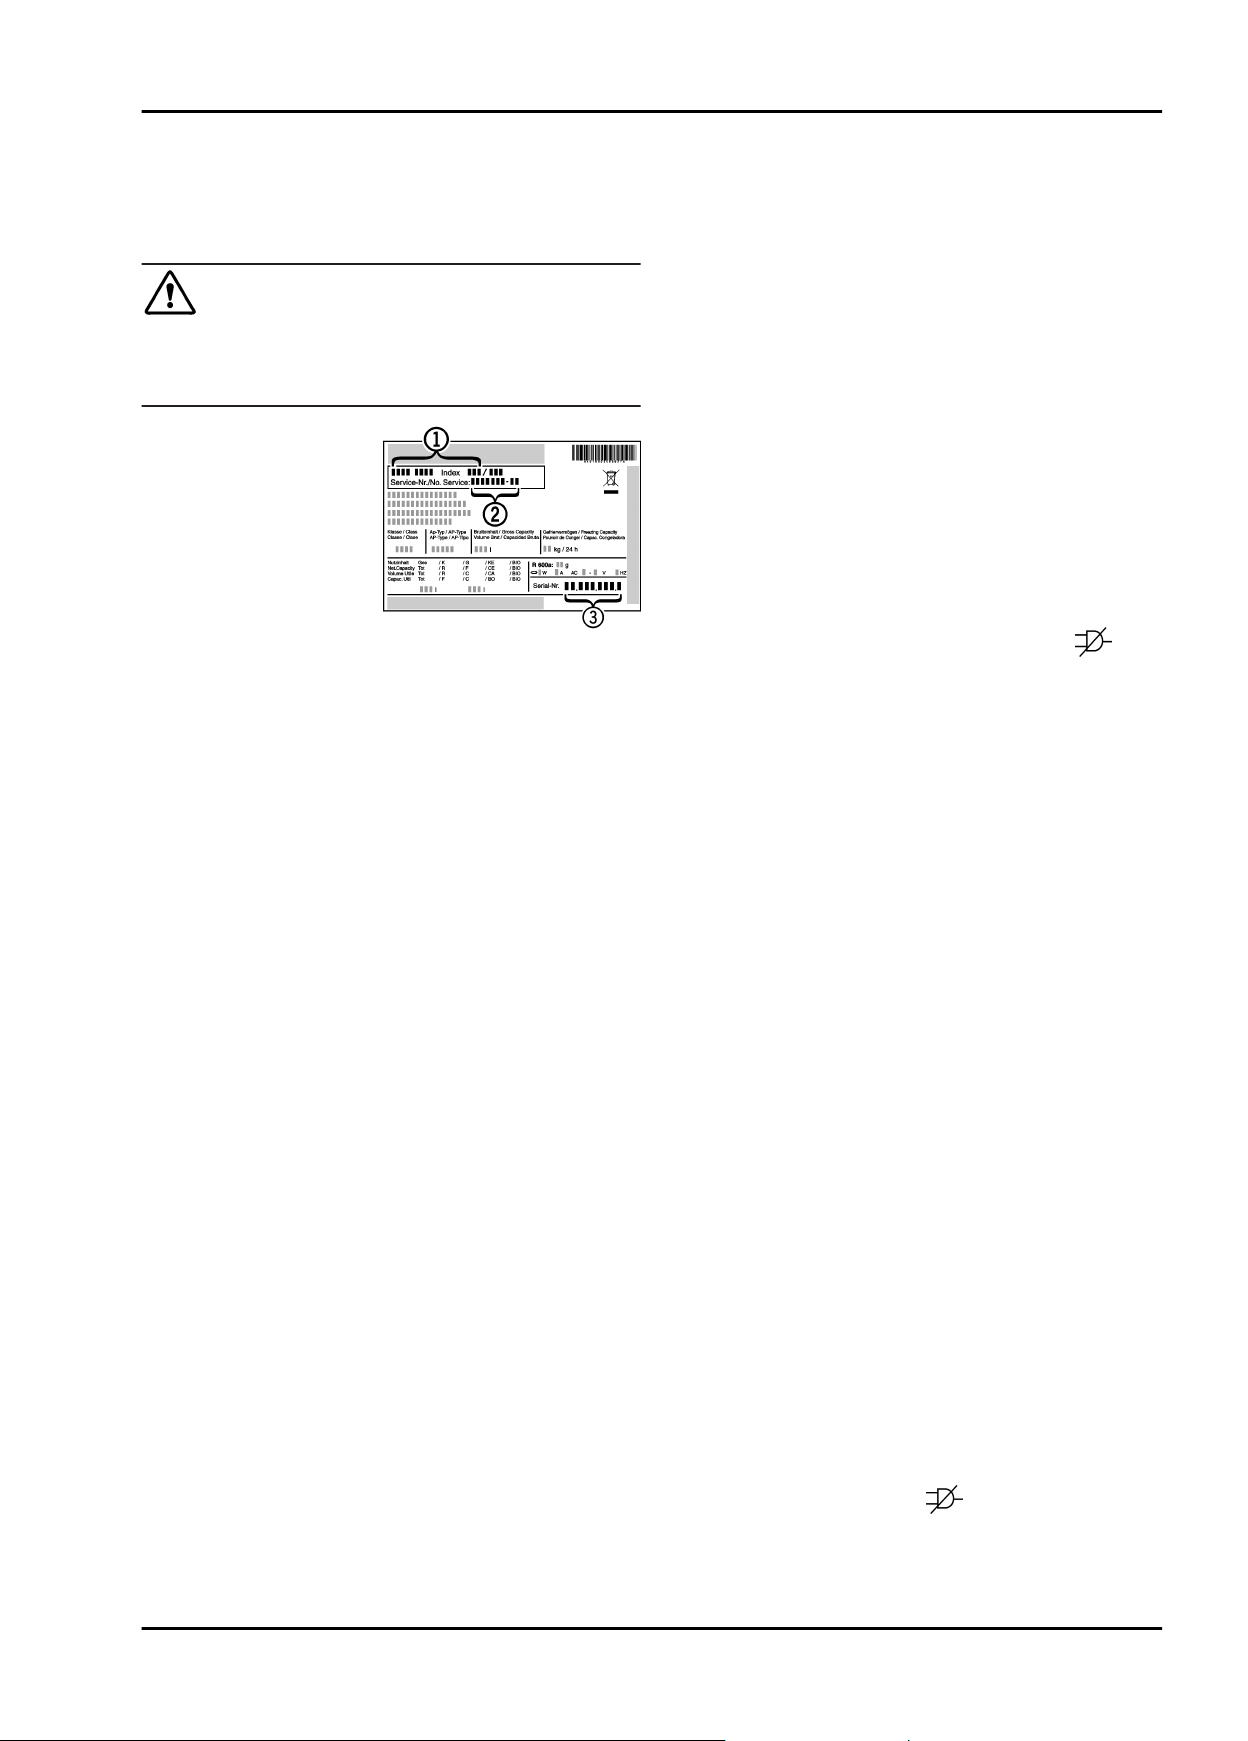
u
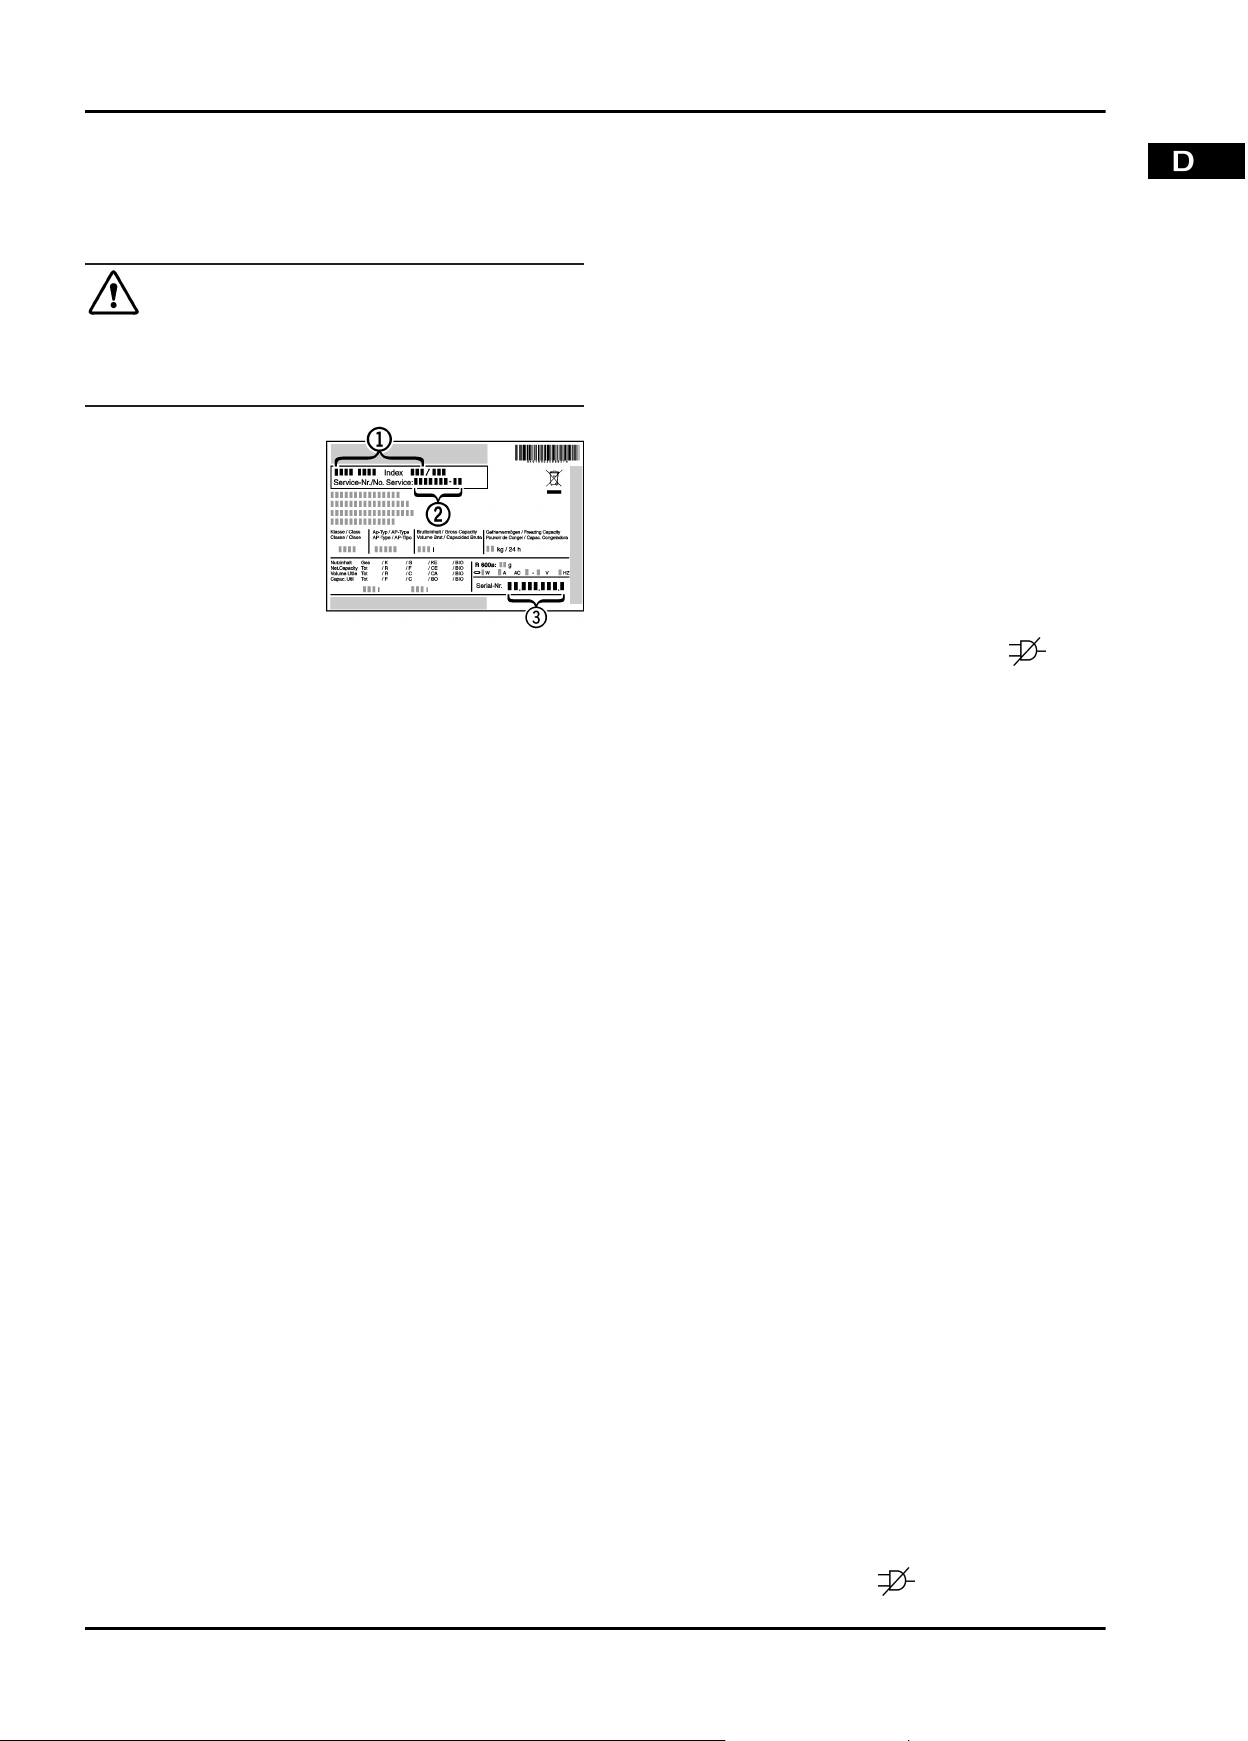
Gerätebezeichnung
Fig. 7 (1)
Nr.
Fig. 7 (2)
Serial-Nr.
vom Typenschild
ablesen. Das Typenschild befindet sich
an der linken Geräteinnenseite.
, Service-
und
Fig. 7 (3)
Fig. 7
u
Den Kundendienst benachrichtigen und den Fehler, Gerätebezeichnung
Fig. 7 (3)
w
Dies ermöglicht einen schnellen und zielgerichteten Service.
u
Das Gerät geschlossen lassen, bis der Kundendienst
eintrifft.
w
Die Lebensmittel bleiben länger kühl.
u
Netzstecker ziehen (dabei nicht am Anschlusskabel ziehen)
oder Sicherung ausschalten.
Fig. 7 (1)
mitteilen.
, Service-Nr.
Fig. 7 (2)
und Serial-Nr.
7 Störungen
Ihr Gerät ist so konstruiert und hergestellt, dass Funktionssicherheit und lange Lebensdauer gegeben sind. Sollte dennoch
während des Betriebes eine Störung auftreten, so prüfen Sie
bitte, ob die Störung auf einen Bedienungsfehler zurückzuführen ist. In diesem Fall müssen Ihnen auch während der
Garantiezeit die anfallenden Kosten berechnet werden.
Folgende Störungen können Sie selbst beheben:
Das Gerät arbeitet nicht.
Das Gerät ist nicht eingeschaltet.
→
Gerät einschalten.
u
Der Netzstecker steckt nicht richtig in der Steckdose.
→
Netzstecker kontrollieren.
u
Die Sicherung der Steckdose ist nicht in Ordnung.
→
Sicherung kontrollieren.
u
Der Kompressor läuft lang.
Der Kompressor schaltet bei geringem Kältebedarf auf eine
→
niedrige Drehzahl. Obwohl sich dadurch die Laufzeit
erhöht, wird Energie gespart.
Das ist bei energiesparenden Modellen normal.
u
SuperFrost ist eingeschaltet.
→
Um die Lebensmittel schnell abzukühlen läuft der
u
Kompressor länger. Dies ist normal.
Eine LED hinten unten am Gerät (beim Kompressor)
blinkt regelmässig alle 15 Sekunden*.
Der Inverter ist mit einer Fehler-Diagnose LED ausge-
→
stattet.
Das Blinken ist normal.
u
Geräusche sind zu laut.
Drehzahlgeregelte* Kompressoren können aufgrund der
→
verschiedenen Drehzahlstufen unterschiedliche Laufgeräusche verursachen..
Störungen
Das Geräusch ist normal.
u
Ein Blubbern und Plätschern
Dieses Geräusch kommt vom Kältemittel, das im Kälte-
→
kreislauf fließt.
Das Geräusch ist normal.
u
Ein leises Klicken
Das Geräusch entsteht immer, wenn sich das Kühlaggregat
→
(der Motor) automatisch ein- oder ausschaltet.
Das Geräusch ist normal.
u
Ein Brummen. Es ist kurzfristig etwas lauter, wenn sich
das Kühlaggregat (der Motor) einschaltet.
Bei eingeschaltetem SuperFrost, frisch eingelegten
→
Lebensmitteln oder nach lang geöffneter Tür erhöht sich
automatisch die Kälteleistung.
Das Geräusch ist normal.
u
Die Umgebungstemperatur ist zu hoch.
→
Problemlösung: (siehe 1.2)
u
Vibrationsgeräusche
u
Gerät etwas wegrücken, über die Stellfüße ausrichten.
In der Temperaturanzeige wird angezeigt: F0 bis F5.
Ein Fehler liegt vor.
→
An den Kundendienst wenden. (siehe Wartung).
u
In der Temperaturanzeige leuchtet Netzausfall . In der
Temperaturanzeige wird die wärmste Temperatur angezeigt, die während des Netzausfalls erreicht wurde.
Die Gefriertemperatur war durch einen Netzausfall oder
→
eine Stromunterbrechung während der letzten Stunden
oder Tage zu hoch angestiegen. Wenn die Stromunterbrechung beendet ist, arbeitet das Gerät in der letzten Temperatureinstellung weiter.
u
Anzeige der wärmsten Temperatur löschen: Taste Alarm
Fig. 3 (9)
u
Die Lebensmittel auf ihre Qualität prüfen. Verdorbene
Lebensmittel nicht mehr verzehren. Aufgetaute Lebensmittel
nicht wieder einfrieren.
In der Temperaturanzeige leuchtet DEMO.
Der Vorführmodus ist aktiviert.
→
An den Kundendienst wenden. (siehe Wartung).
u
Gerät ist an den Außenflächen warm.
Die Wärme des Kältekreislaufs wird zur Vermeidung von
→
Kondenswasser genutzt.
Dies ist normal.
u
Temperatur ist nicht ausreichend kalt.
Die Gerätetür ist nicht richtig geschlossen.
→
Gerätetür schließen.
u
Die Be- und Entlüftung ist nicht ausreichend.
→
Lüftungsgitter freimachen.
u
Die Umgebungstemperatur ist zu hoch.
→
Problemlösung: (siehe 1.2) .
u
Das Gerät wurde zu häufig oder zu lange geöffnet.
→
Abwarten, ob sich die erforderliche Temperatur von allein
u
wieder einstellt. Falls nicht, wenden Sie sich an den
Kundendienst. (siehe Wartung).
Es wurden zu große Mengen frischer Lebensmittel ohne
→
SuperFrost eingelegt.
Problemlösung: (siehe 5.7)
u
Die Temperatur ist falsch eingestellt.
→
Die Temperatur kälter einstellen und nach 24 h kontrol-
u
lieren.
Das Gerät steht zu nahe an einer Wärmequelle.
→
Problemlösung: (siehe Inbetriebnahme).
u
In der Anzeige werden Striche ("- -") angezeigt.
Die Gefriertemperatur ist durch einen Netzausfall oder eine
→
Stromunterbrechung über Null Grad angestiegen.
u
Siehe auch “Stomausfall” und “
drücken.
”
9
Page 10
Außer Betrieb setzen
8 Außer Betrieb setzen
8.1 Gerät ausschalten
u
Taste On/Off
w
Die Temperaturanzeige ist dunkel.
Fig. 3 (1)
ca 2 s drücken.
8.2 Außer Betrieb setzen
u
Gerät leeren.
u
Netzstecker ziehen.
u
Gerät reinigen (siehe 6.2) .
u
Tür offen lassen, damit keine schlechten Gerüche
entstehen.
9 Gerät entsorgen
Das Gerät enthält noch wertvolle Materialien und
ist einer vom unsortierten Siedlungsabfall
getrennten Erfassung zuzuführen. Die Entsorgung
von ausgedienten Geräten muss fach- und sachgerecht nach den örtlich geltenden Vorschriften und
Gesetzen erfolgen.
Das ausgediente Gerät beim Abtransport am Kältekreislauf
nicht beschädigen, damit das enthaltene Kältemittel (Angaben
auf dem Typenschild) und das Öl nicht unkontrolliert entweichen können.
u
Gerät unbrauchbar machen.
u
Netzstecker ziehen.
u
Anschlusskabel durchtrennen.
10
Page 11
Contents
1 Appliance at a glance............................................ 11
1.1 Overview of the appliance and equipment................ 11
1.2 Range of appliance use............................................ 11
1.3 Conformity................................................................ 11
1.4 Installation dimensions............................................. 12
1.5 Saving energy.......................................................... 12
2 General safety information................................... 12
3 Controls and displays........................................... 13
3.1 Operating controls.................................................... 13
3.2 Temperature display................................................. 13
4 Putting into operation............................................ 13
4.1 Transporting the appliance....................................... 13
4.2 Installing the appliance............................................. 13
4.3 Changing over the door hinge.................................. 14
4.4 Insertion into a row of kitchen units........................... 14
4.5 Disposing of packaging............................................ 15
4.6 Connecting the appliance......................................... 15
4.7 Switching on the appliance....................................... 15
5 Control.................................................................... 15
5.1 Brightness of the temperature display...................... 15
5.2 Child proofing........................................................... 15
5.3 Temperature alarm................................................... 15
5.4 Freezing food........................................................... 16
5.5 Thawing food............................................................ 16
5.6 Setting the temperature............................................ 16
5.7 SuperFrost............................................................... 16
5.8 Drawers.................................................................... 16
5.9 Shelves.................................................................... 16
5.10 VarioSpace............................................................... 17
5.11 Information system................................................... 17
5.12 Cold storage accumulators....................................... 17
6 Maintenance........................................................... 17
6.1 Manual defrosting..................................................... 17
6.2 Cleaning the appliance............................................. 17
6.3 Customer service..................................................... 18
7 Malfunction............................................................. 18
8 Decommissioning.................................................. 19
8.1 Switching off the appliance....................................... 19
8.2 Taking the appliance out of service.......................... 19
9 Disposing of the appliance................................... 19
The manufacturer works constantly on the further development
of all the types and models. Therefore please understand that
we have to reserve the right to make design, equipment and
technical modifications.
To get to know all the benefits of your new appliance, please
read the information contained in these instructions carefully.
The instructions apply to several models. Differences may
occur. Text relating only to specific appliances is marked with
an asterisk (*).
Instructions for action are marked with a
action are marked with a .
, the results of
1 Appliance at a glance
Appliance at a glance
Fig. 1
(1) Operating controls (4) Type plate
(2) VarioSpace (5) Adjustable feet
(3) Drawer
1.2 Range of appliance use
The appliance is suitable solely for cooling food in a domestic
environment or similar. This includes use in, for example
in staff kitchenettes, bed and breakfast establishments,
-
by guests in country homes, hotels, motels and other forms
-
of accommodation,
in catering and similar services in the wholesale trade
-
Use the appliance solely as is customary within a domestic
environment. All other types of use are inadmissible. The appliance is not suitable for storing and cooling medicines, blood
plasma, laboratory preparations or similar substances and
products covered by the 2007/47/EC Medical Devices Directive. Misuse of the appliance can result in the stored products
suffering harm or perishing. Furthermore, the appliance is not
suitable for operation in potentially explosive atmospheres.
The appliance is set to operate within specific ambient temperature limits according to its climate rating. The correct climate
rating for your appliance is indicated on the type plate.
Note
u
Compliance with the ambient temperatures indicated is
required, otherwise the cooling performance is reduced.
Climate
rating
SN, N up to 32 °C
ST up to 38 °C
T up to 43 °C
The appliance will function properly in ambient temperatures of
down to 5 °C.
for ambient temperatures
1.1 Overview of the appliance and equipment
Note
u
Shelves, drawers and baskets are arranged for optimum
energy efficiency on delivery.
1.3 Conformity
The refrigerant circuit is tested for leakage. The appliance
complies with the relevant safety regulations and EC Directives
2006/95/EC, 2004/108/EC, 2009/125/EC and 2010/30/EU.
11
Page 12
General safety information
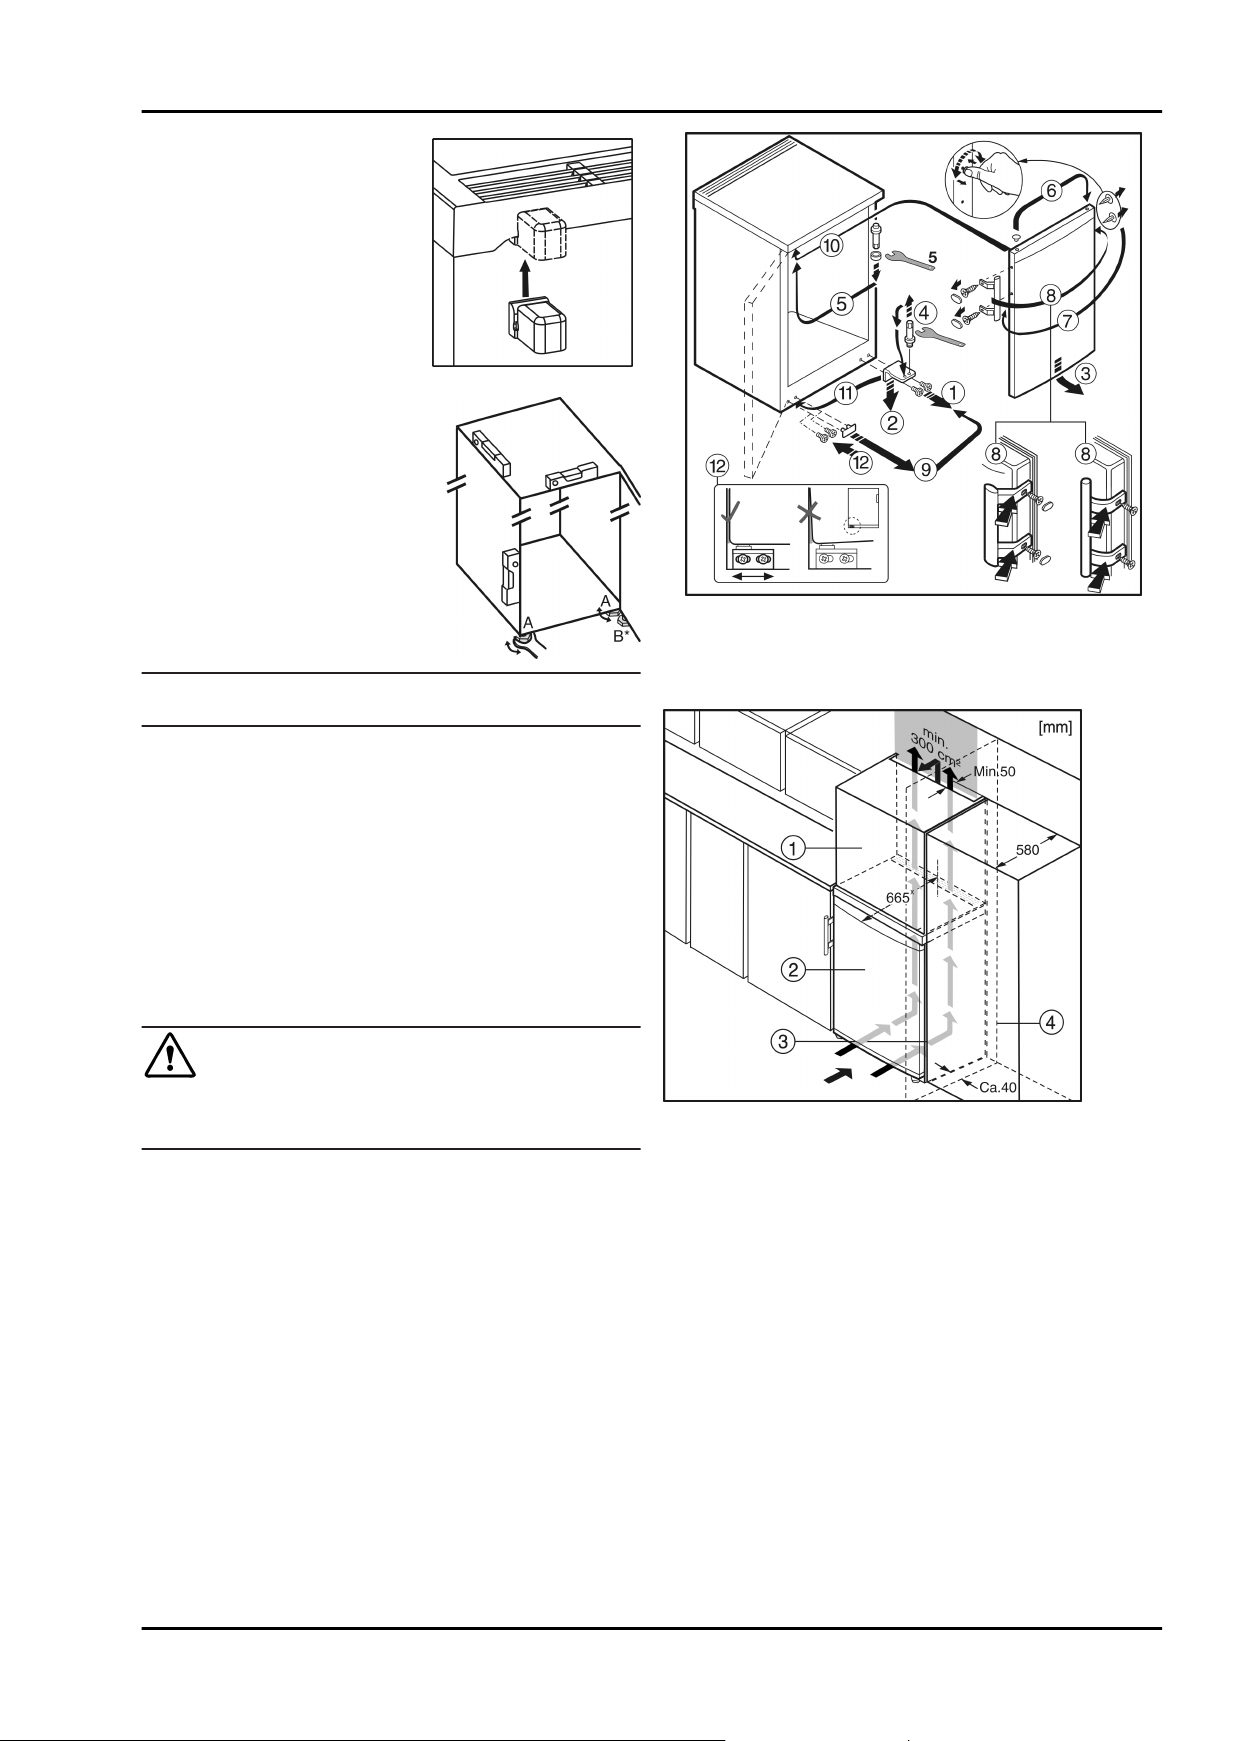
1.4 Installation dimensions
Fig. 2
Model h a g e e' d c c'
GP1376 851 553 611 624 653 1129 563 592
GP1476 851 602 611 628 657 1174 613 640
GPesf1476 851 602 611 610 657 1174 597 644
GP1486 851 602
x
On appliances not supplied with wall spacer brackets or if the
supplied spacer brackets are not used, the dimension is
reduced by 35 mm (see 4.2) .
646x663x692x1209
x
613 640
1.5 Saving energy
Always ensure good ventilation. Do not cover ventilation
-
openings or grille.
Do not place appliance in areas of direct sunlight or next to a
-
stove, heater or similar object.
The energy consumption depends on the installation condi-
-
tions, e.g. the ambient temperature (see 1.2) .
Keep the time the appliance is open to a minimum.
-
The lower the temperature setting, the higher the power
-
consumption.
Ensure that all food is well packed and covered for storage.
-
This will prevent frost from forming.
Remove food as needed in order that it does not warm too
-
much.
First cool warm food to room temperature before storing it .
-
If there is a thick layer of frost in the appliance: defrost the
-
appliance.
Accumulated dust increases the energy
consumption:
Once a year, dust the refrigerating unit
-
together with the metal grille of the heat
exchanger at the back of the appliance.
2 General safety information
Danger for the user:
This appliance is not designed for persons (including chil-
-
dren) with physical, sensory or mental impairment or
persons not having sufficient experience and knowledge,
unless they are instructed in the use of the appliance and
are initially supervised by a person responsible for their
safety. Keep children under supervision to ensure they do
not play with the appliance.
In case of a fault, pull out the mains plug (not by pulling the
-
connecting cable) or switch off the fuse.
Have any repairs to or intervention in the appliance, and any
-
change of the mains power cable, carried out by the
customer service only or by other specialised personnel
trained for the purpose.
When disconnecting the appliance from the supply, always
-
take hold of the plug. Do not pull the cable.
Install and connect the appliance only as instructed.
-
Please keep these instructions in a safe place and pass
-
them on to any subsequent owners.
Fire hazard:
The refrigerant R 600a is environmentally friendly but flam-
-
mable. Escaping refrigerant may ignite.
Do not damage the refrigerant circuit pipes.
•
Do not allow naked flames or ignition sources to enter the
•
appliance.
Do not use any electrical appliances in the interior (e.g.
•
steam cleaners, heaters, ice cream maker etc.).
If refrigerant escapes: eliminate naked flames or sources
•
of ignition from the vicinity. Pull out the power plug. Ventilate the area well. Notify customer service.
Do not store explosives or sprays using combustible propel-
-
lants such as butane, propane, pentane, etc. in the appliance. To identify these spray cans, look for the list of
contents printed on the can, or a flame symbol. Gases
possibly escaping may ignite due to electrical components.
Keep burning candles, lamps and other items with naked
-
flames away from the appliance so that they do not set the
appliance on fire.
Always store high-percentage alcohol in tightly sealed,
-
upright containers. Alcohol possibly escaping may ignite
due to electrical components.
Danger of tipping and falling:
Do not misuse the plinth, drawers, doors etc. as a step or for
-
support. This applies particularly to children.
Danger of food poisoning:
Do not consume food which has been stored too long.
-
Danger of frostbite, numbness and pain:
Avoid lasting skin contact with cold surfaces or refrigerated/
-
frozen food or take protective steps, e.g. wear gloves. Do
not consume ice cream, water ice or ice cubes immediately
and do not consume them too cold.
Please observe the specific information in the other
sections:
DANGER identifies a situation involving direct
danger which, if not obviated, may
result in death or severe bodily
injury.
WARNING identifies a dangerous situation
which, if not obviated, may result in
death or severe bodily injury.
CAUTION identifies a dangerous situation
which, if not obviated, may result in
minor or medium bodily injury.
NOTICE identifies a dangerous situation
which, if not obviated, may result in
damage to property.
Note identifies useful information and tips.
12
Page 13
3 Controls and displays
3.1 Operating controls
Controls and displays
WARNING
Risk of fire due to short circuit!
If the mains cable/connector of the appliance or of another
appliance touch the rear of the appliance, the mains cable/
connector may be damaged by the appliance vibrations,
leading to a short circuit.
u
Stand the appliance so that it is not touched by connectors
or main cables.
u
Do not plug the appliance or any others into sockets located
near the rear of the appliance.
Fig. 3
(1) On/Off button (6) Alarm symbol
(2) Adjustment button (7) Menu symbol
(3) Temperature display (8) Child lock symbol
(4) SuperFrost button (9) Alarm button
(5) SuperFrost symbol (10) Power failure symbol
3.2 Temperature display
The following are displayed in normal operation:
the warmest freezing temperature
-
The temperature display flashes:
the temperature setting is being changed
-
after switch-on the temperature is not yet cold enough
-
the temperature has risen several degrees
-
Dashes flash in the display:
the freezer temperature is above 0 °C.
-
The following displays indicate malfunction. Possible causes
and corrective action (see Malfunction).
F0 to F5
-
-
The power failure symbol shines.
4 Putting into operation
4.1 Transporting the appliance
CAUTION
Risk of injury and danger of damage as a result of incorrect
transport!
u
Transport the appliance in a packed condition.
u
Transport the appliance upright.
u
Do not transport the appliance without assistance.
4.2 Installing the appliance
Fire hazard due to dampness!
If live parts or the mains lead become damp this may cause
short circuits.
u
WARNING
The appliance is designed for use in enclosed areas. Do not
operate the appliance outdoors or in areas where it is
exposed to splash water or damp conditions.
WARNING
Fire hazard due to refrigerant!
The refrigerant R 600a is environmentally friendly but flammable. Escaping refrigerant may ignite.
u
Do not damage the piping of the refrigeration circuit.
WARNING
Fire hazard and danger of damage!
u
Do not place appliances emitting heat e.g. microwaves,
toasters etc. on the appliance!
WARNING
Blocked ventilation openings pose a risk of fire and damage!
u
Always keep the ventilation openings clear. Always ensure
that the appliance is properly ventilated!
Note*
The bags at the rear of the appliance are important for proper
operation. Their contents are nontoxic and nonhazardous.
u
Do not remove the bags!
In the event that the appliance is damaged, contact the
q
supplier immediately before connecting to the mains.
The floor at the site must be flat and level.
q
Do not install the appliance in a location where it is exposed
q
to direct radiation of the sun, next to a cooker, heater and
similar.
The ideal installation site is a dry, well ventilated room.
q
Always stand the appliance backed directly to the wall using
q
the enclosed wall spacers (see below).
Do not install the appliance without assistance.
q
Standard EN 378 specifies that the room in which you install
q
your appliance must have a volume of 1 m2 per 8 g of R
600a refrigerant used in the appliance. If the room in which
the appliance is installed is too small, a flammable gas-air
mixture may form in the event of a leakage in the refrigeration circuit. The quantity of refrigerant used in your appliance
is indicated on the type plate on the inside of the appliance.
u
Detach the connecting cable from the rear of the appliance,
removing the cable holder at the same time because otherwise there will be vibratory noise!
u
Remove the protective film from the outside of the appliance.*
u
Remove all transit supports.
If wall spacers are included with the appliance, the specified
energy consumption is achieved if these wall spacers are
mounted and used. Without wall spacers, the specified appliance depth is reduced by 3.50 cm. If the enclosed wall spacers
are not used, the function of the appliance is not affected in any
way. However, on such appliances with less wall clearance,
energy consumption will be slightly higher.*
13
Page 14
Putting into operation
u
In the case of an appliance with
enclosed wall spacers, mount
the wall spacers on the back of
the appliance at the top left and
right.*
u
Dispose of packaging material (see 4.5) .
u
Align the appliance so that it
stands firmly and on a level by
applying the accompanying
spanner to the adjustable-
height feet (A) and using a
spirit level.
Note
u
Clean the appliance (see 6.2) .
If the appliance is installed in a very damp environment,
condensate may form on the outside of the appliance.
u
Always see to good ventilation at the installation site.
4.3 Changing over the door hinge
You can change over the door hinges if necessary.
Make sure that the following tools are at hand:
Torx® 25
q
Torx® 15
q
Supplied open-ended wrench
q
If necessary, a second person to assist with installation
q
*
Fig. 4 On appliances with a door handle
u
Follow the sequence of the item numbers in the diagram.
4.4 Insertion into a row of kitchen units
CAUTION
Risk of injury if the door tips!
u
Take good hold of the door.
u
Set down the door carefully.
14
Fig. 5
(1) Stack cabinet (3) Kitchen cabinet
(2) Appliance (4) Wall
x
In the case of appliances without enclosed wall spacers, or if
the enclosed spacers are not used, the dimension is reduced
by 35 mm (see 4.2) .
The appliance can be inserted into a row of kitchen units. To
match the appliance
a suitable stack cabinet
ance.
When building in with kitchen units (max. depth 580 mm) the
appliance can be positioned directly next to the refrigerator
Fig. 5 (3)
by 70 mm x at the side and by 85 mm x at the centre.
Important for the ventilation:
-
-
-
. The appliance projects out from the kitchen unit front
At the back of the stack cabinet there has to be a ventilation
duct of at least 50 mm depth throughout the width of the
stack cabinet.
The ventilation space under the ceiling has to be at least
300 cm2.
the larger the ventilation space, the more energy-saving the
appliance is in operation.
Fig. 5 (2)
Fig. 5 (1)
to the height of the row of units,
can be fitted above the appli-
Page 15
Control
If the appliance is installed with the hinges next to a wall
Fig. 5 (4)
least 40 mm. This corresponds to the projection of the handle
when the door is open.
, the distance between appliance and wall has to be at
4.5 Disposing of packaging
WARNING
Danger of suffocation due to packing material and plastic film!
u
Do not allow children to play with packing material.
The packaging is made of recyclable materials:
corrugated board/cardboard
-
expanded polystyrene parts
-
polythene bags and sheets
-
polypropylene straps
-
nailed wooden frame with polyethylene panel*
-
u
Take the packaging material to an official collecting point.
4.6 Connecting the appliance
NOTICE
Risk of damage to the electronic control system!
u
Do not use stand-alone inverters (conversion of d.c. to a.c./
three-phase) or energy saving plugs.
u
Use the adjustment button,
u
Briefly confirm with the SuperFrost button,
w
The display shows the last set brightness value.
u
Use the adjustment button,
value from h 0 to h 5.
w
The brightness is set.
u
Deactivate the setting mode by pressing the On/Off button,
Fig. 3 (1)
w
The temperature display shows the temperature again.
, twice.
Fig. 3 (2)
Fig. 3 (2)
, to select h.
Fig. 3 (4)
, to set the desired
.
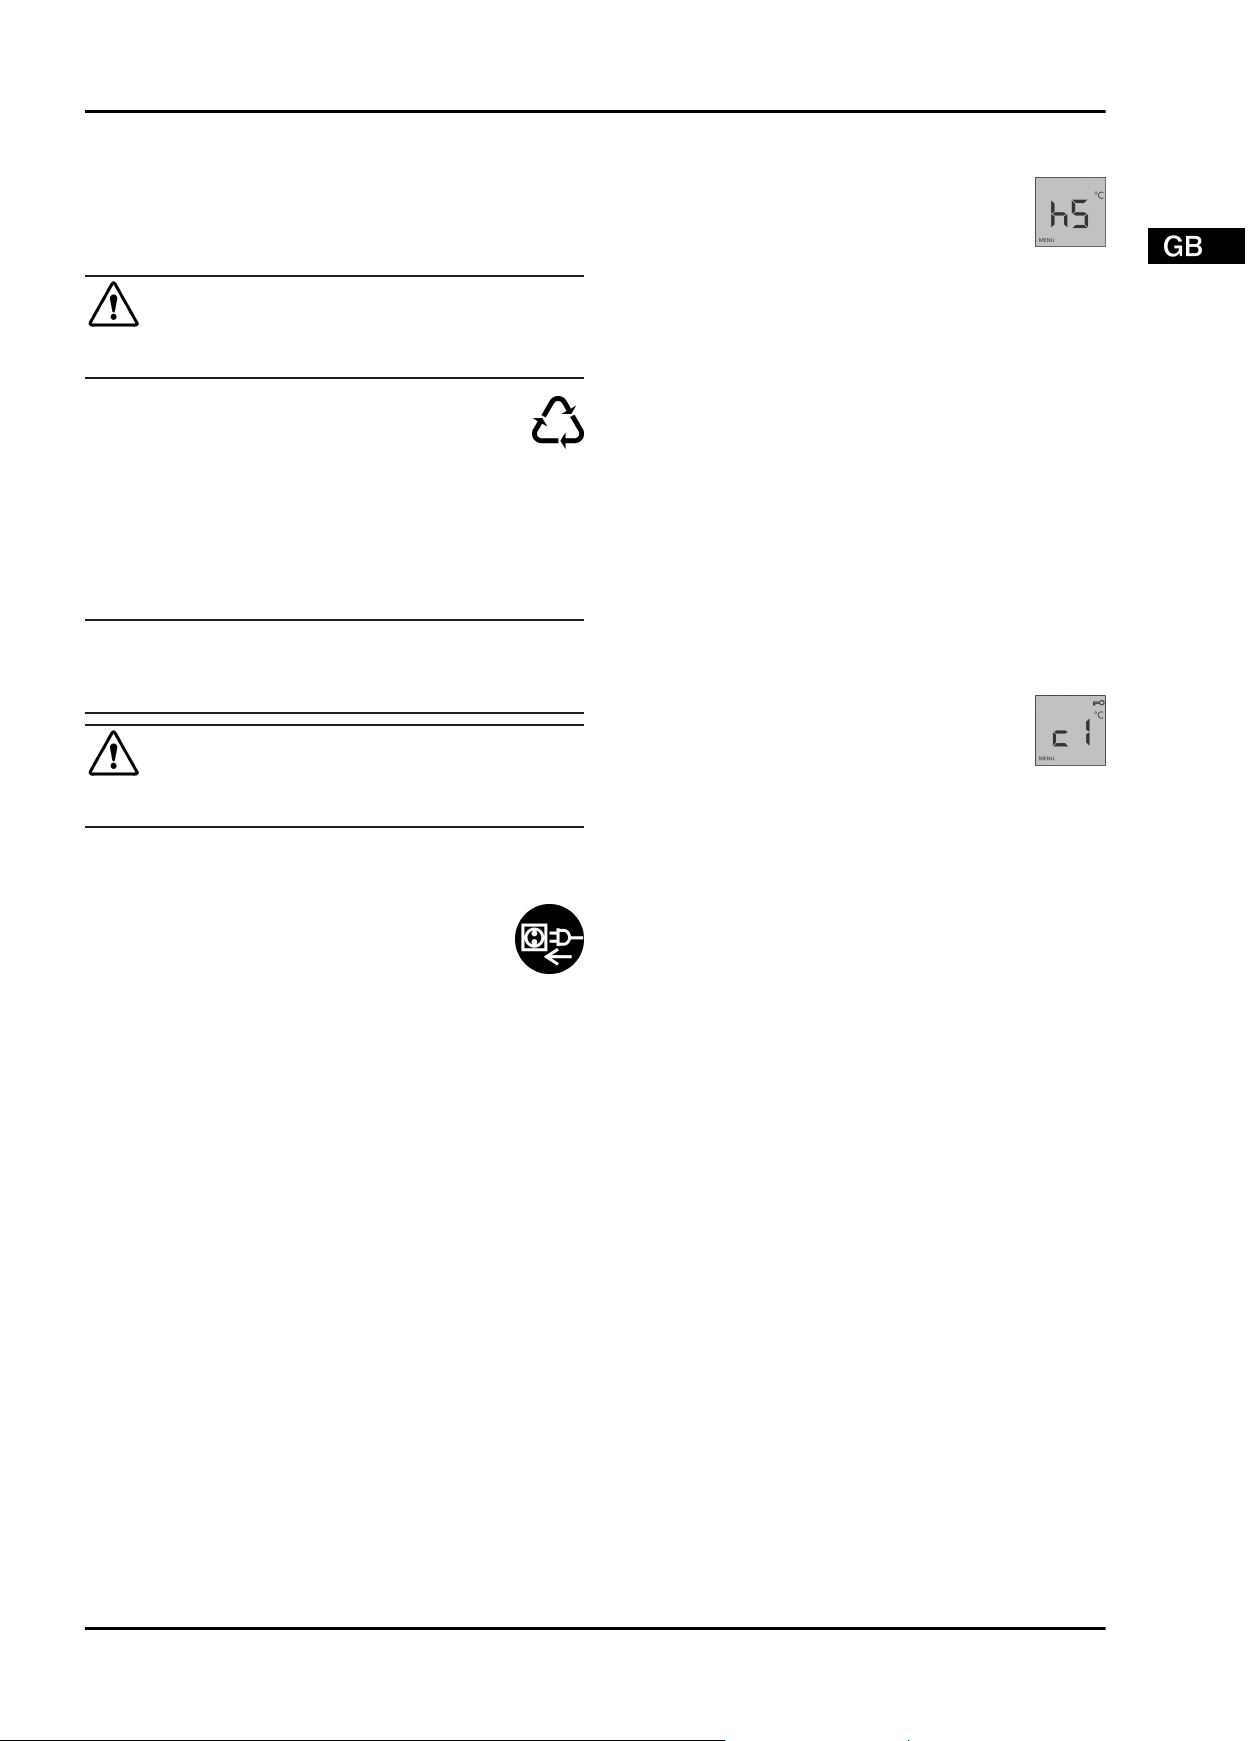
5.2 Child proofing
The child-proofing function enables you to make sure that the
appliance is not inadvertently switched off by playing children.
5.2.1 Setting the child lock
To switch on the function:
u
Activate setting mode by pressing the SuperFrost button,
Fig. 3 (4)
w
The Menu symbol is shown on the display,
w
c flashes on the display.
u
Briefly confirm with the SuperFrost button,
w
c1 appears on the display.
u
Briefly confirm with the SuperFrost button,
w
The child lock symbol,
display.
, for approx. 5 sec.
Fig. 3 (8)
Fig. 3 (7)
Fig. 3 (4)
Fig. 3 (4)
, lights up on the
.
.
.
WARNING
Fire and overheating hazard!
u
Do not use extension cables or multiple socket outlets.
The type of current (alternating current) and voltage at the
installation site have to conform with the data on the type plate
(see Appliance at a glance).
Connect the appliance only with a properly installed
socket outlet with earthing contact. The socket outlet
must be fused with 10 A or higher.
It must be easily accessible so that the appliance can
be quickly disconnected from the supply in an emergency. It must be outside the area of the rear of the
appliance.
u
Check the electrical connection.
u
Plug in the power plug.
4.7 Switching on the appliance
u
Press the On/Off button
w
The appliance is switched on. The temperature display and
Alarm symbol
enough.
Fig. 3 (6)
Fig. 3 (1)
flash until the temperature is cold
.
5 Control
5.1 Brightness of the temperature display
You can adjust the brightness of the temperature display to the
light conditions of the room in which the appliance is installed.
5.1.1 Setting the brightness
The brightness is adjustable between h 0 (minimum brightness) and h 5 (maximum brightness).
u
Activate setting mode by pressing the SuperFrost button,
Fig. 3 (4)
w
The Menu symbol is shown on the display,
w
c flashes on the display.
, for approx. 5 sec.
Fig. 3 (7)
.
w
c flashes on the display.
w
The child lock function is switched on.
To cancel setting mode:
u
Briefly press the On/Off button,
w
The temperature display shows the temperature again.
To switch off the function:
u
Activate setting mode by pressing the SuperFrost button,
Fig. 3 (4)
w
The Menu symbol is shown on the display,
w
c flashes on the display.
u
Briefly confirm with the SuperFrost button,
w
c0 appears on the display.
u
Briefly confirm with the SuperFrost button,
w
The child lock symbol,
w
c flashes on the display.
w
The child lock function is switched off.
To cancel setting mode:
u
Briefly press the On/Off button,
w
The temperature display shows the temperature again.
, for approx. 5 sec.
Fig. 3 (8)
Fig. 3 (1)
, goes out.
Fig. 3 (1)
.
Fig. 3 (7)
Fig. 3 (4)
Fig. 3 (4)
.
.
.
.
5.3 Temperature alarm
The audible alarm sounds if the freezer temperature is not cold
enough.
The temperature display and the alarm symbol
at the same time.
The audible alarm is automatically silenced, the alarm symbol
Fig. 3 (6)
when the temperature is sufficiently cold again.
If the alarm status persists: (see Malfunction).
goes out and the temperature display stops flashing
5.3.1 Muting the temperature alarm
The audible alarm can be muted. When the temperature is
sufficiently cold again, the alarm function is active again.
u
Press alarm button
w
The audible alarm is silenced.
Fig. 3 (9)
.
Fig. 3 (6)
flash
15
Page 16
Control
5.4 Freezing food
The rating plate indicates the maximum quantity of fresh food
you can freeze within 24 hours (see Appliance at a glance)
under "Freezing capacity ... kg/24h".
The maximum load of frozen food for the drawers is 25 kg each
and for the shelves 35 kg each.
CAUTION
Risk of injury due to broken glass!
Bottles and cans containing drinks may burst when being
frozen. This applies particularly to sparkling drinks.
u
Do not freeze bottles and cans containing drinks!
In order that the food is rapidly frozen through to the core, do
not exceed the following quantities per pack:
- Fruit, vegetables up to 1 kg
- Meat up to 2.5 kg
u
Pack the food in portions in freezer bags, reusable plastic,
metal or aluminium containers.
5.5 Thawing food
- at room temperature
- in a microwave oven
- in a conventional or fan oven
u
Food once thawed should be re-frozen only in exceptional
cases.
5.6 Setting the temperature
The temperature depends on the following factors:
the frequency of opening the door
-
the room temperature of the installation location
-
the type, temperature and quantity of the food
-
Recommended temperature setting: -18 °C
The temperature is changed sequentially. Once the -28 °C
setting is reached, the sequence starts again at -14 °C.
u
Call up the temperature function by pressing the adjustment
Fig. 3 (2)
button
w
The current temperature flashes on the temperature display.
u
To change the temperature in 1 °C increments, press the
adjustment button,
temperature is shown on the temperature display.
u
To change the temperature continuously, press and hold the
button.
w
During adjustment the value flashes on the display.
w
Approx. 5 sec. after the last button press, the actual temperature is displayed. The temperature gradually adjusts to the
new value.
once.
Fig. 3 (2)
, repeatedly until the desired
5.7 SuperFrost
With this function you can freeze fresh food quickly through to
the core. The appliance operates with maximum refrigeration.
The noise of the refrigeration unit may be temporarily louder as
a result.
The maximum amount of fresh food which can be frozen in 24
h is indicated on the type plate under "freezing capacity ... kg/
24h". This amount varies according to the model and climate
rating.
You have to activate SuperFrost in good time, depending on
how much fresh food is to be frozen: about 6 hours before
placing the food inside in case of small amounts and about 24
hours in advance in case of the maximum amount of food to be
frozen.
Wrap produce and spread it out as far as possible. Do not
allow produce to be frozen to touch produce that is already
frozen to prevent the latter thawing.
You do not have to activate SuperFrost in the following cases:
when placing frozen food in the freezer
-
when freezing up to approx. 1 kg fresh food daily
-
5.7.1 Freezing with SuperFrost
u
Briefly press the SuperFrost button
w
The SuperFrost symbol
w
The freezer temperature drops, the appliance operates with
maximum refrigerating performance.
Note
u
When the SuperFrost button is pressed, the built-in switchon delay may defer compressor activation by up to 8
minutes. This delay extends the service life of the
compressor.
For a smaller quantity of produce to be frozen:
u
wait approx. 6 h.
u
Place wrapped produce in the bottom drawers.
For the maximum quantity of produce to be frozen:
u
wait approx. 24 h.
u
Remove bottom drawer and place produce directly in the
appliance so that it touches the base or sides.
w
SuperFrost is automatically deactivated. Depending on the
quantity placed inside, after 30 h at the earliest, 65 h at the
latest.
w
The SuperFrost symbol
is completed.
u
Place produce in the drawer and then push the drawer back
in again.
w
The appliance continues to operate in the energy-saving,
normal mode.
Fig. 3 (5)
Fig. 3 (5)
Fig. 3 (4)
shines.
extinguishes once freezing
once.
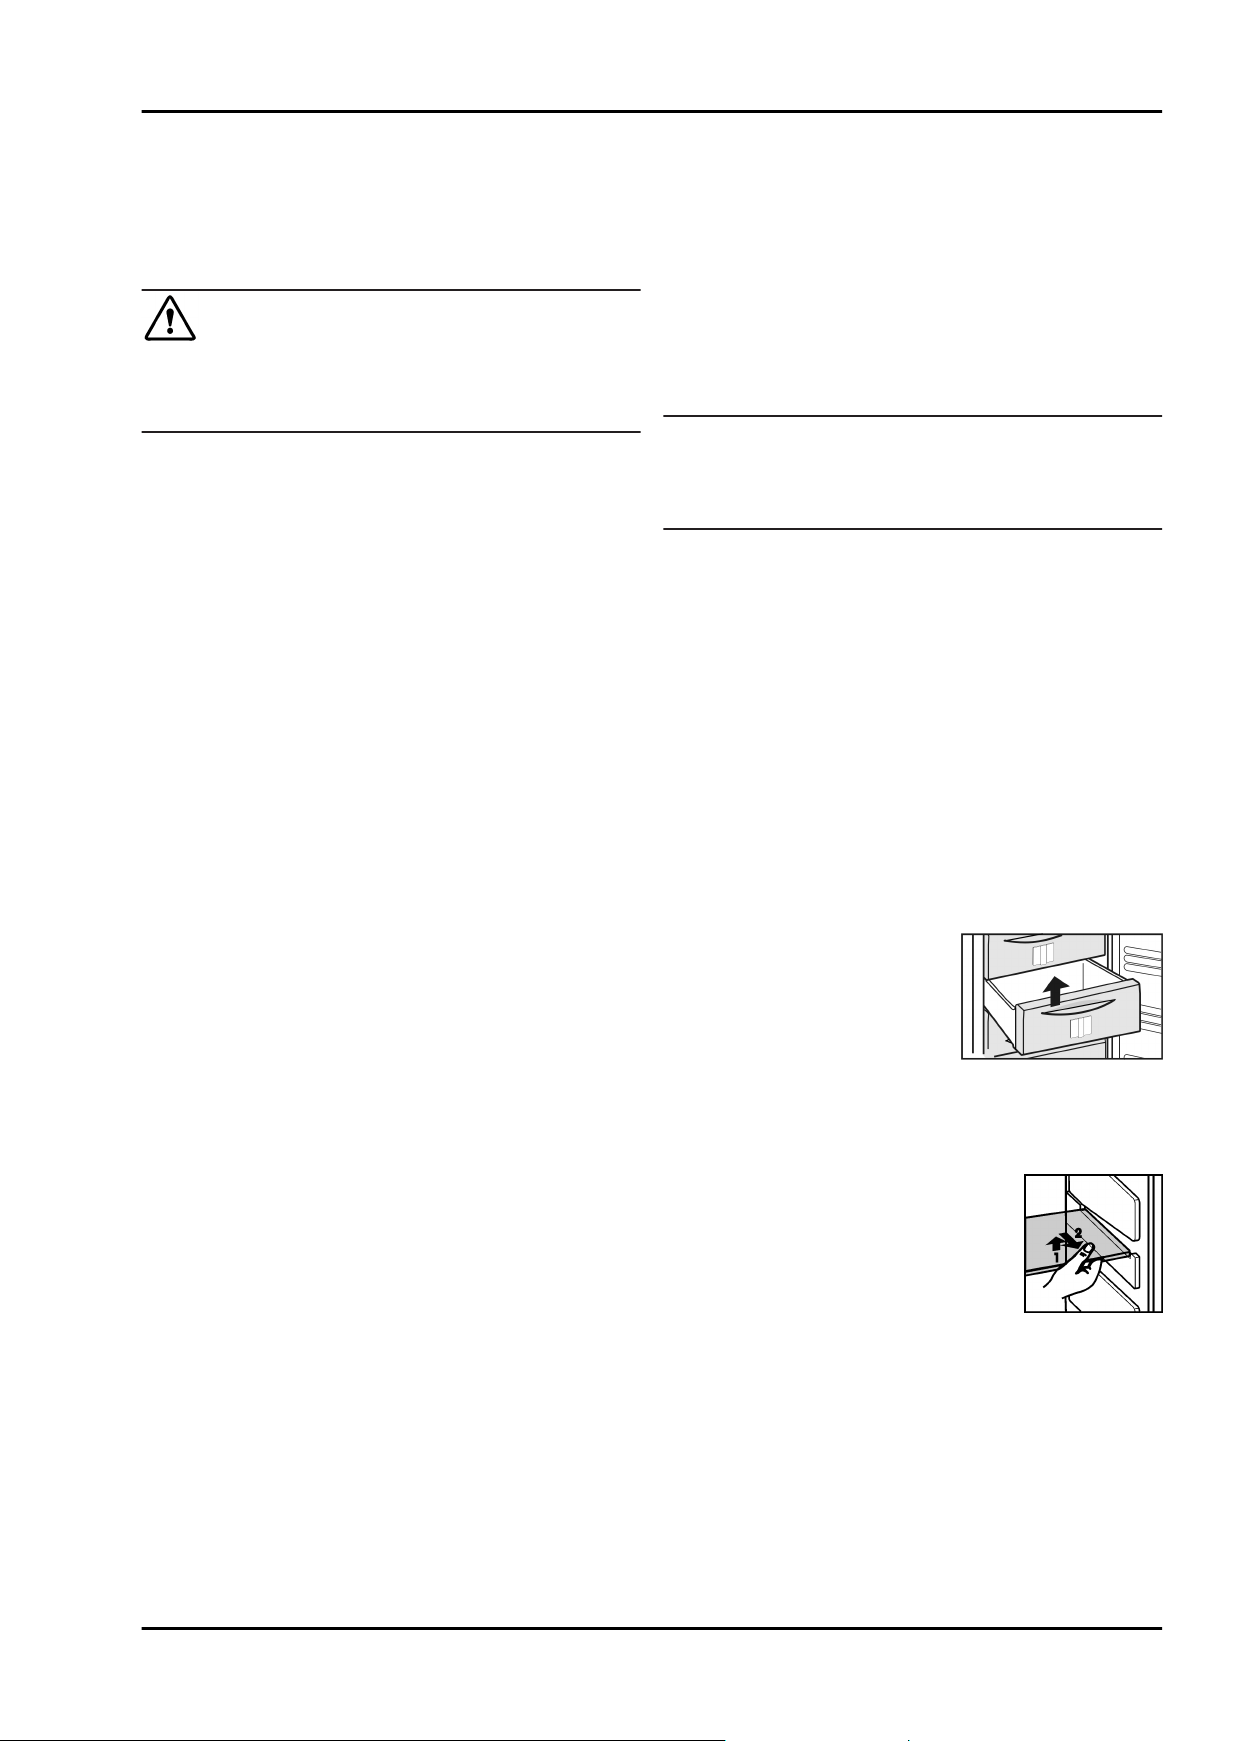
5.8 Drawers
u
To store frozen food directly on the shelves: pull the drawer
forwards and lift it out.
5.9 Shelves
u
To remove the shelf: lift up at the front
and pull out.
u
To put the shelf back: simply push in as
far as it will go.
16
Page 17
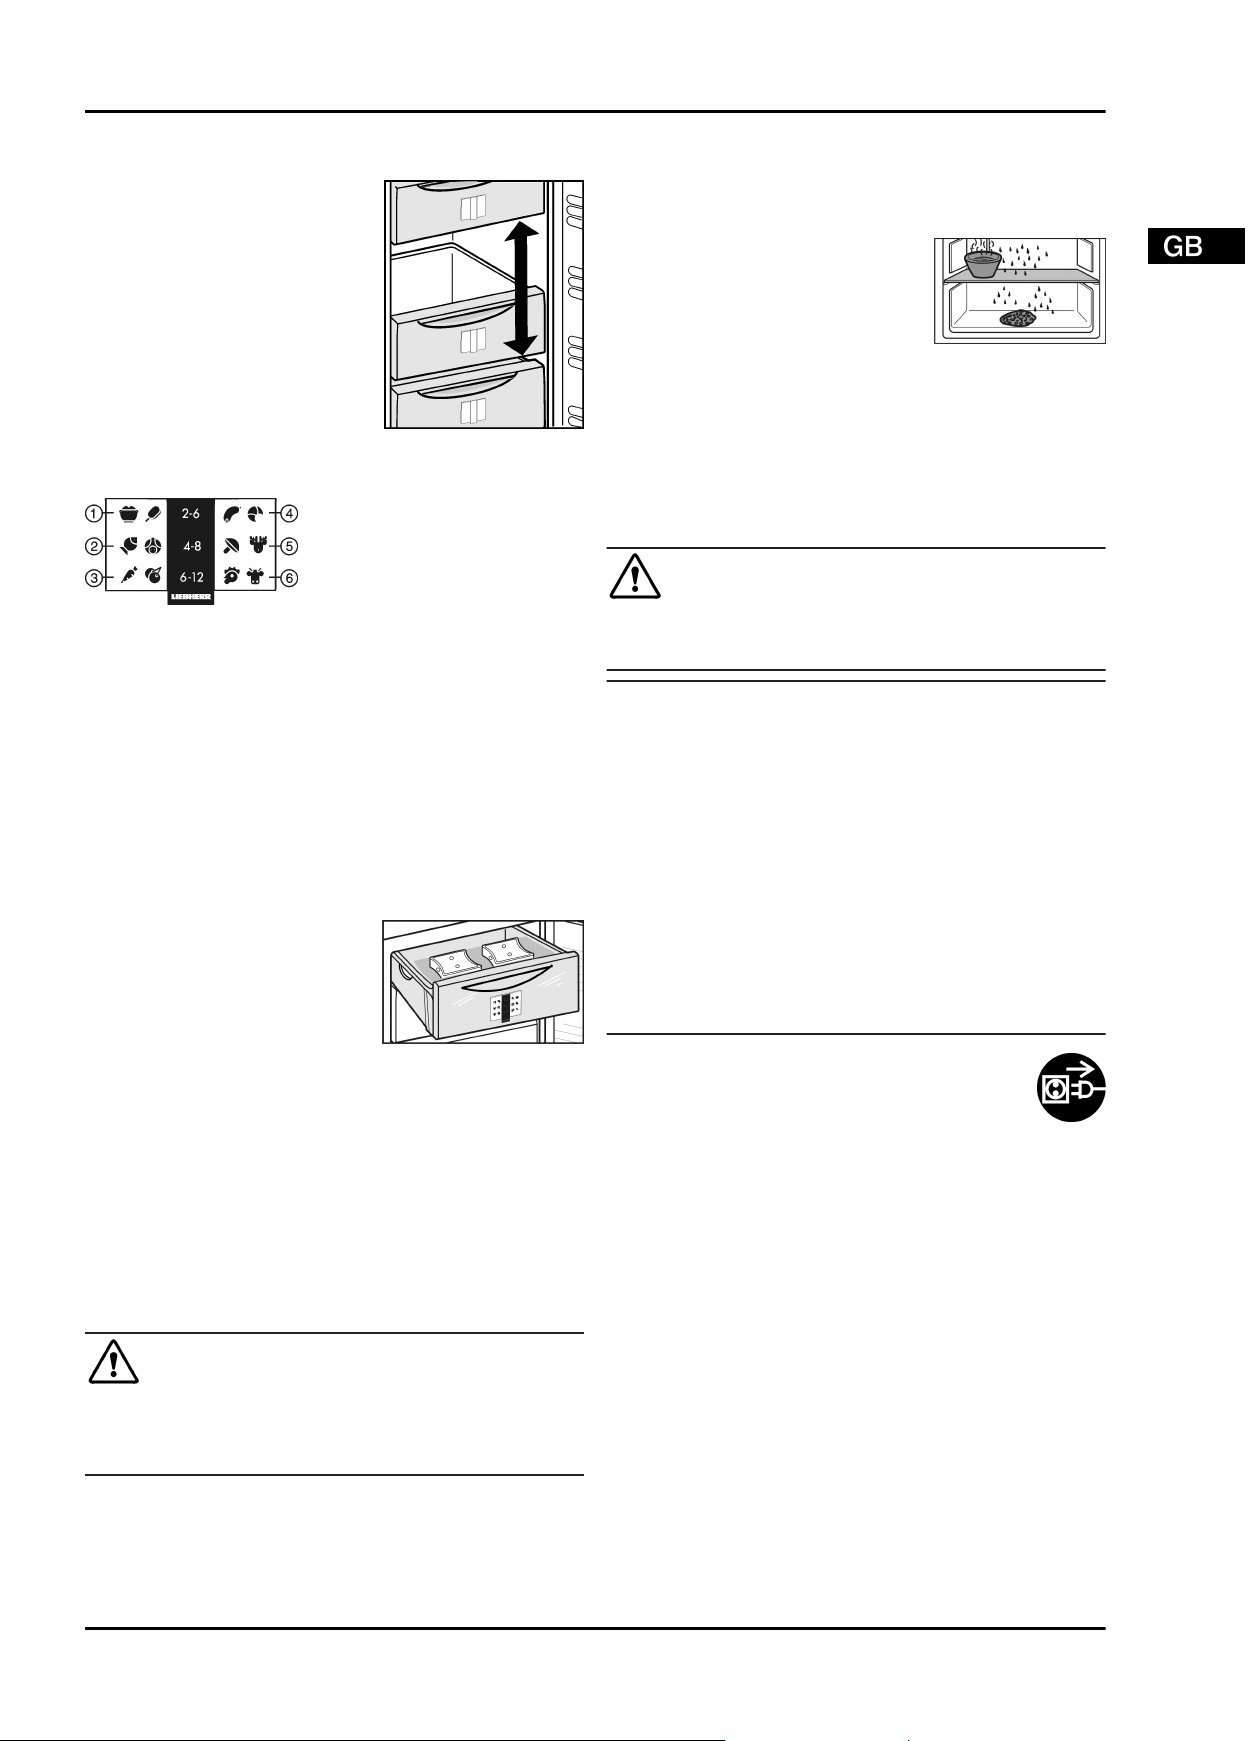
5.10 VarioSpace
Apart from being able to remove the
drawers, you can also remove the
shelves, creating space for large
items of frozen food. Poultry, meat,
large pieces of game and high
bakery products can be frozen in
one piece and prepared.
u
The maximum load of frozen food
for the drawers is 25 kg each and
for the shelves 35 kg each.
5.11 Information system
Maintenance
u
Pull out the power plug or switch off the fuse.
u
Place cold storage accumulators on top of the frozen food.
u
If possible, put the frozen goods in the freezer drawer,
wrapped in newspaper or a blanket, and store in a cool
place.
u
Place a pan with hot, not boiling
water on a middle shelf.
-or-
u
Half-fill the two lower drawers with
lukewarm water and put them in the
appliance.
w
Defrosting is speeded up.
u
Leave the door of the appliance open while defrosting.
u
Remove detached pieces of ice.
u
If necessary, pick up defrost water several times, using a
sponge or cloth.
u
Clean the appliance (see 6.2) and rub dry.
6.2 Cleaning the appliance
Fig. 6
(1) Ready-made meals, ice
cream
(2) Pork, fish (5) Game, mushrooms
(3) Fruit, vegetables (6) Poultry, beef/veal
The figures indicate the storage time in months for several
types of frozen food in each case. Storage times given are
guide times.
(4) Sausages, bread
5.12 Cold storage accumulators
The cold storage accumulators prevent the temperature from
rising too fast in the event of power failure.
5.12.1 Using cold storage accumulators
u
Place the frozen cold storage
accumulators on the frozen food
in the upper front area of the
freezer compartment.
6 Maintenance
6.1 Manual defrosting
After a long period of operation, a layer of frost or ice can build
up inside the appliance.
The layer of frost or ice builds up faster if the appliance is
opened often or if the food is warm when placed inside.
However, a thick layer of ice will increase the appliance‘s
energy consumption. You should therefore defrost the appliance regularly.
Risk of injury and damage as a result of hot steam!
u
u
u
w
u
w
w
CAUTION
Do not use electric heaters or steam cleaners, naked flames
or defrosting sprays for defrosting.
Do not remove ice using sharp instruments.
Switch on SuperFrost one day before defrosting.
The frozen goods are provided with a "cold reserve".
Switch off the appliance.
The temperature display goes out.
If the temperature display does not go out, the child lock
function (see 5.2) is active.
CAUTION
Risk of injury and damage as a result of hot steam!
Hot steam may damage the surfaces and cause burns.
u
Do not use any steam cleaners!
NOTICE
Incorrect cleaning damages the appliance!
u
Do not use cleaning agents in concentrated form.
u
Do not use any scouring or abrasive sponges or steel wool.
u
Please do not use any aggressive, scouring, sand-,
chloride-, chemical- or acid-based cleaning agents.
u
Do not use chemical solvents.
u
Do not damage or remove the type plate on the inside of the
appliance. It is important for the customer service.
u
Do not pull off, bend or damage cables or other components.
u
Do not allow any cleaning water to enter the drain channel,
ventilation grille or electrical parts.
u
Please use soft cleaning cloths and a universal pH-neutral
cleaning agent.
u
Please use cleaning and care products suitable for contact
with foodstuffs in the appliance interior.
u
Empty appliance.
u
Pull out the power plug.
u
Clean the vent grille regularly.
w
Dust deposits increase energy consumption.
u
Clean plastic outer and inner surfaces with lukewarm
water and a little washing-up liquid.
u
Only use a soft clean cloth to wipe side walls with a paint
finish. In the case of heavy soiling, use lukewarm water with
neutral cleaning agent.*
Do not apply stainless steel cleaning agent to glass or plastic
surfaces to prevent them from being scratched. Darker areas at
the beginning and quite an intensive colour of the stainless
steel surface are normal.*
u
When soiled, clean stainless steel outer surfaces with a
commercially available stainless steel cleaning agent. Then
apply the enclosed stainless steel care product evenly in the
direction of polishing.*
After cleaning:
u
Wipe dry the appliance and items of equipment.
u
Connect the appliance and switch it on again.
u
Switch on SuperFrost (see 5.7) .
When the temperature is sufficiently cold:
u
Put the food back inside.
17
Page 18
Malfunction
6.3 Customer service
First check whether you can correct the fault yourself by reference to the list (see Malfunction). If this is not the case, please
contact the customer service whose address is given in the
enclosed customer service list.
WARNING
Risk of injury if repair work is not carried out professionally!
u
Have any repairs and action - not expressly specified - on
the appliance and mains cable carried out by service
personnel only. (see Maintenance)
u
Read the appliance
designation
Fig. 7 (1)
No.
Fig. 7 (2)
serial No.
off the type plate
located inside the
appliance on the lefthand side.
, service
and
Fig. 7 (3)
Fig. 7
u
Notify the customer service, specifying the fault, appliance
designation
Fig. 7 (3)
w
This will help us to provide you with a faster and more accurate service.
u
Keep the appliance closed until the customer service
arrives.
w
The food will stay cool longer.
u
Pull out the mains plug (not by pulling the connecting cable)
or switch off the fuse.
Fig. 7 (1)
.
, service No.
Fig. 7 (2)
and serial No.
7 Malfunction
Your appliance is designed and manufactured for a long life
span and reliable operation. If a malfunction nonetheless
occurs during operation, check whether it is due to a handling
error. In this case you will have to be charged for the costs
incurred, even during the warranty period. You may be able to
rectify the following faults yourself:
Appliance does not work.
The appliance is not switched on.
→
Switch on the appliance.
u
The power plug is not properly inserted in the wall socket.
→
Check power plug.
u
The fuse of the wall socket is not in order.
→
Check fuse.
u
The compressor runs for a long time.
The compressor switches to a low speed when little cold is
→
needed. Although the running time is increased as a result,
energy is saved.
This is normal in energy-saving models.
u
SuperFrost is activated.
→
The compressor runs for longer in order to rapidly cool the
u
food. This is normal.
A LED on the bottom rear of the appliance (at the
compressor) flashes regularly every 15 seconds*.
The inverter is equipped with a diagnostic LED.
→
The flashing is normal.
u
Excessive noise.
Speed-controlled* compressors may produce varying
→
running noise due to different speed steps.
The sound is normal.
u
A bubbling and gurgling noise.
This noise comes from the refrigerant flowing in the refriger-
→
ation circuit.
The sound is normal.
u
A quiet clicking noise.
The noise is produced whenever the refrigeration unit
→
(motor) automatically switches on or off.
The sound is normal.
u
A hum. It is briefly a little louder when the refrigeration
unit (the motor) switches on.
The refrigeration increases automatically when the Super-
→
Frost, function is activated, fresh food has just been placed
in the appliance or the door has been left open for a while.
The sound is normal.
u
The ambient temperature is too high.
→
Solution: (see 1.2)
u
Vibratory noise.
u
Move the appliance away a little and align it using the
adjustable feet.
The temperature display indicates: F0 to F5.
There is a fault.
→
Contact the customer service (see Maintenance).
u
The temperature display indicates power failure . The
warmest temperature reached during the power failure
appears in the temperature display.
The freezer temperature rose too high over the last hours or
→
days due to a power failure or power interruption. When the
power interruption is over, the appliance will continue to
operate in the last temperature setting.
u
To cancel the display of the warmest temperature: press
alarm button
u
Check the quality of the food. Do not consume spoiled food.
Do not re-freeze thawed food.
DEMO shines in the temperature display.
The demo mode is activated.
→
Contact the customer service. (see Maintenance).
u
The outside surfaces of the appliance are warm.
The heat of the refrigeration circuit is used to prevent
→
condensate from forming.
This is normal.
u
The temperature is not cold enough.
The door of the appliance is not properly closed.
→
Close the door of the appliance.
u
Insufficient ventilation.
→
Clear ventilation grilles.
u
The ambient temperature is too high.
→
Solution: (see 1.2) .
u
The appliance was opened too frequently or for too long.
→
Wait until the appliance reaches the required temperature
u
itself. If not, contact the customer service. (see Maintenance).
Too much fresh food was placed inside without SuperFrost.
→
Solution: (see 5.7)
u
The temperature is incorrectly set.
→
Set to a colder temperature and check after 24 h.
u
The appliance is too close to a heat source.
→
Solution: (see Putting into operation).
u
Dashes ("- -") are indicated in the display.
The freezer temperature has risen above zero degrees due
→
to power failure or interruption.
u
See also "Power failure" and "
Fig. 3 (9)
.
"
18
Page 19
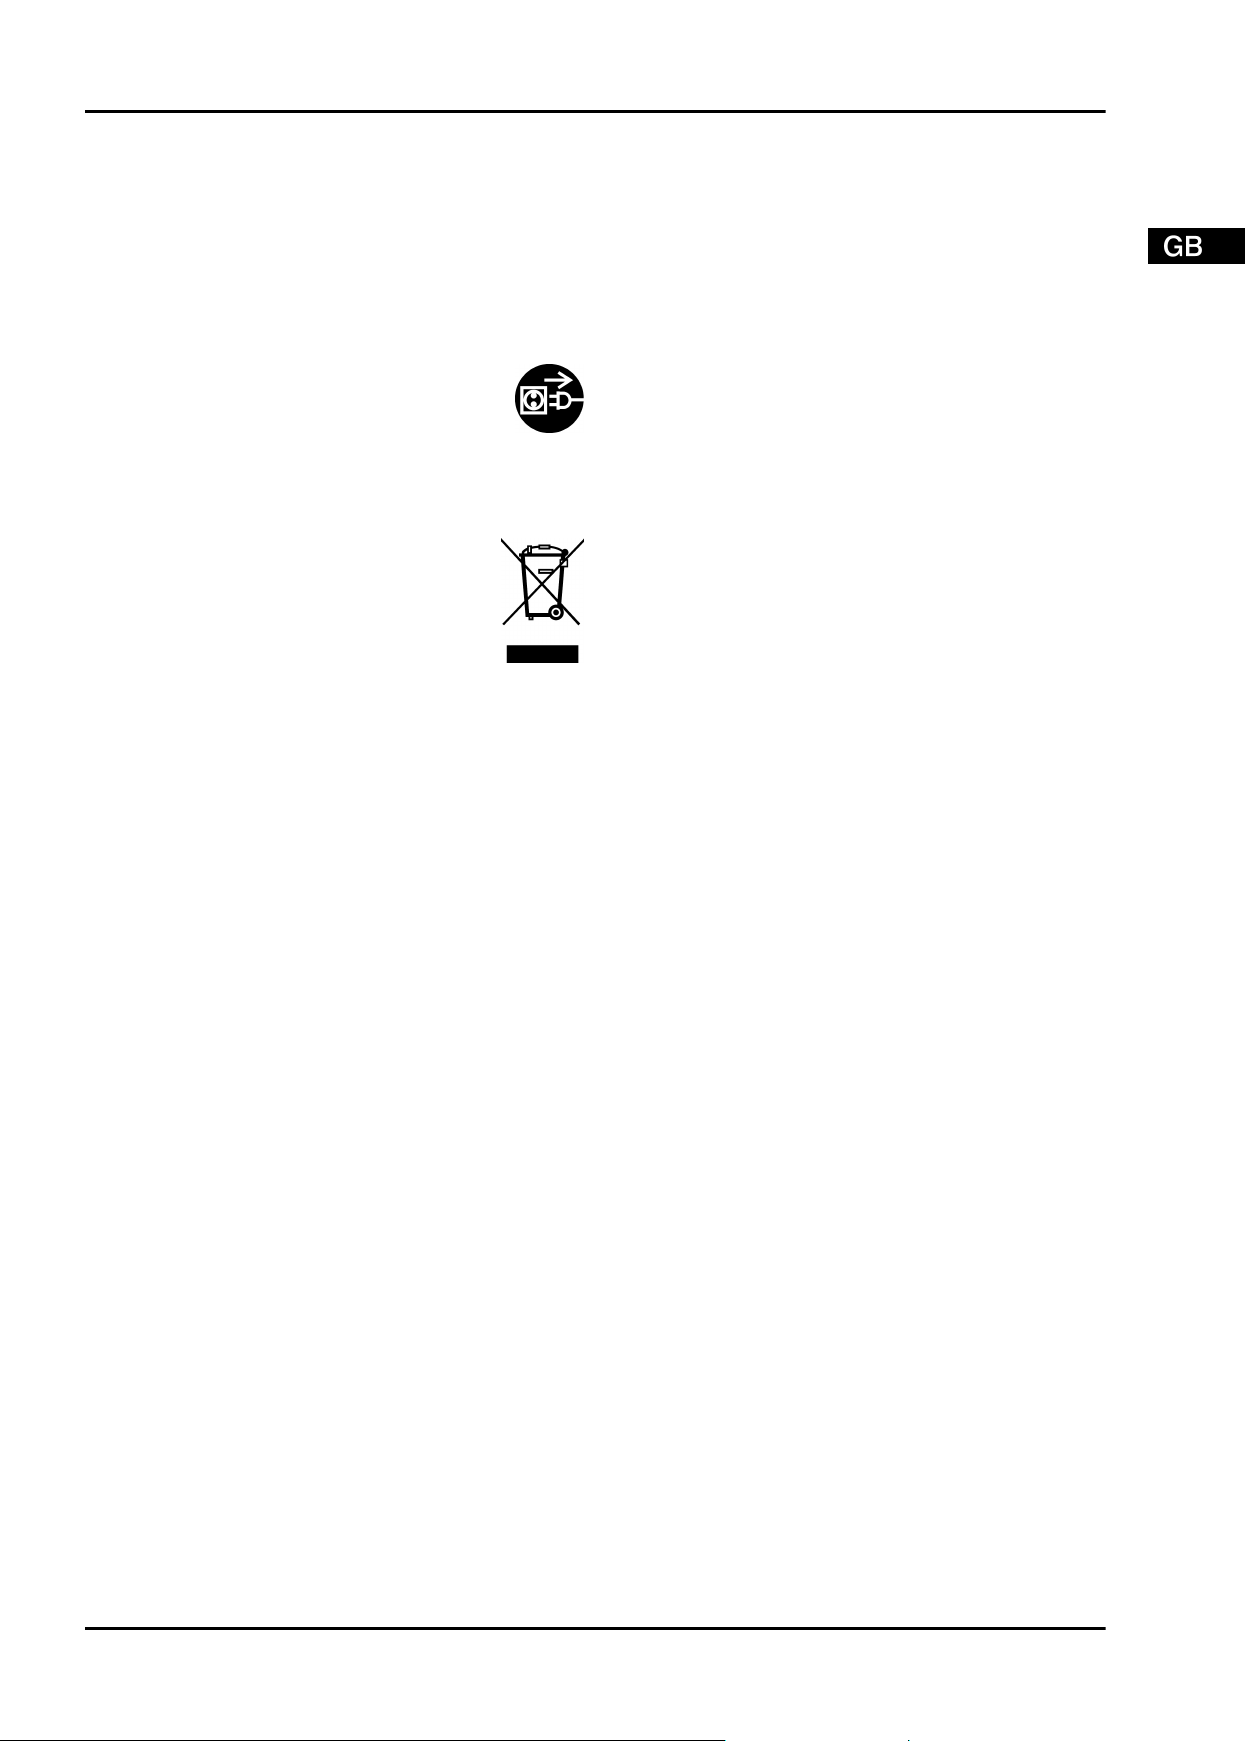
8 Decommissioning
8.1 Switching off the appliance
u
Press On/Off button
w
The temperature display is dark.
Fig. 3 (1)
for about 2 seconds.
8.2 Taking the appliance out of service
u
Empty the appliance.
u
Pull out the power plug.
u
Clean the appliance (see 6.2) .
u
Leave the door open to prevent odour.
9 Disposing of the appliance
The appliance contains some reusable materials
and should be disposed of properly - not simply
with unsorted household refuse. Appliances which
are no longer needed must be disposed of in a
professional and appropriate way, in accordance
with the current local regulations and laws.
Decommissioning
When disposing of the appliance, ensure that the refrigeration
circuit is not damaged to prevent uncontrolled escape of the
refrigerant it contains (data on type plate) and oil.
u
Disable the appliance.
u
Pull out the plug.
u
Cut through the connecting cable.
19
Page 20
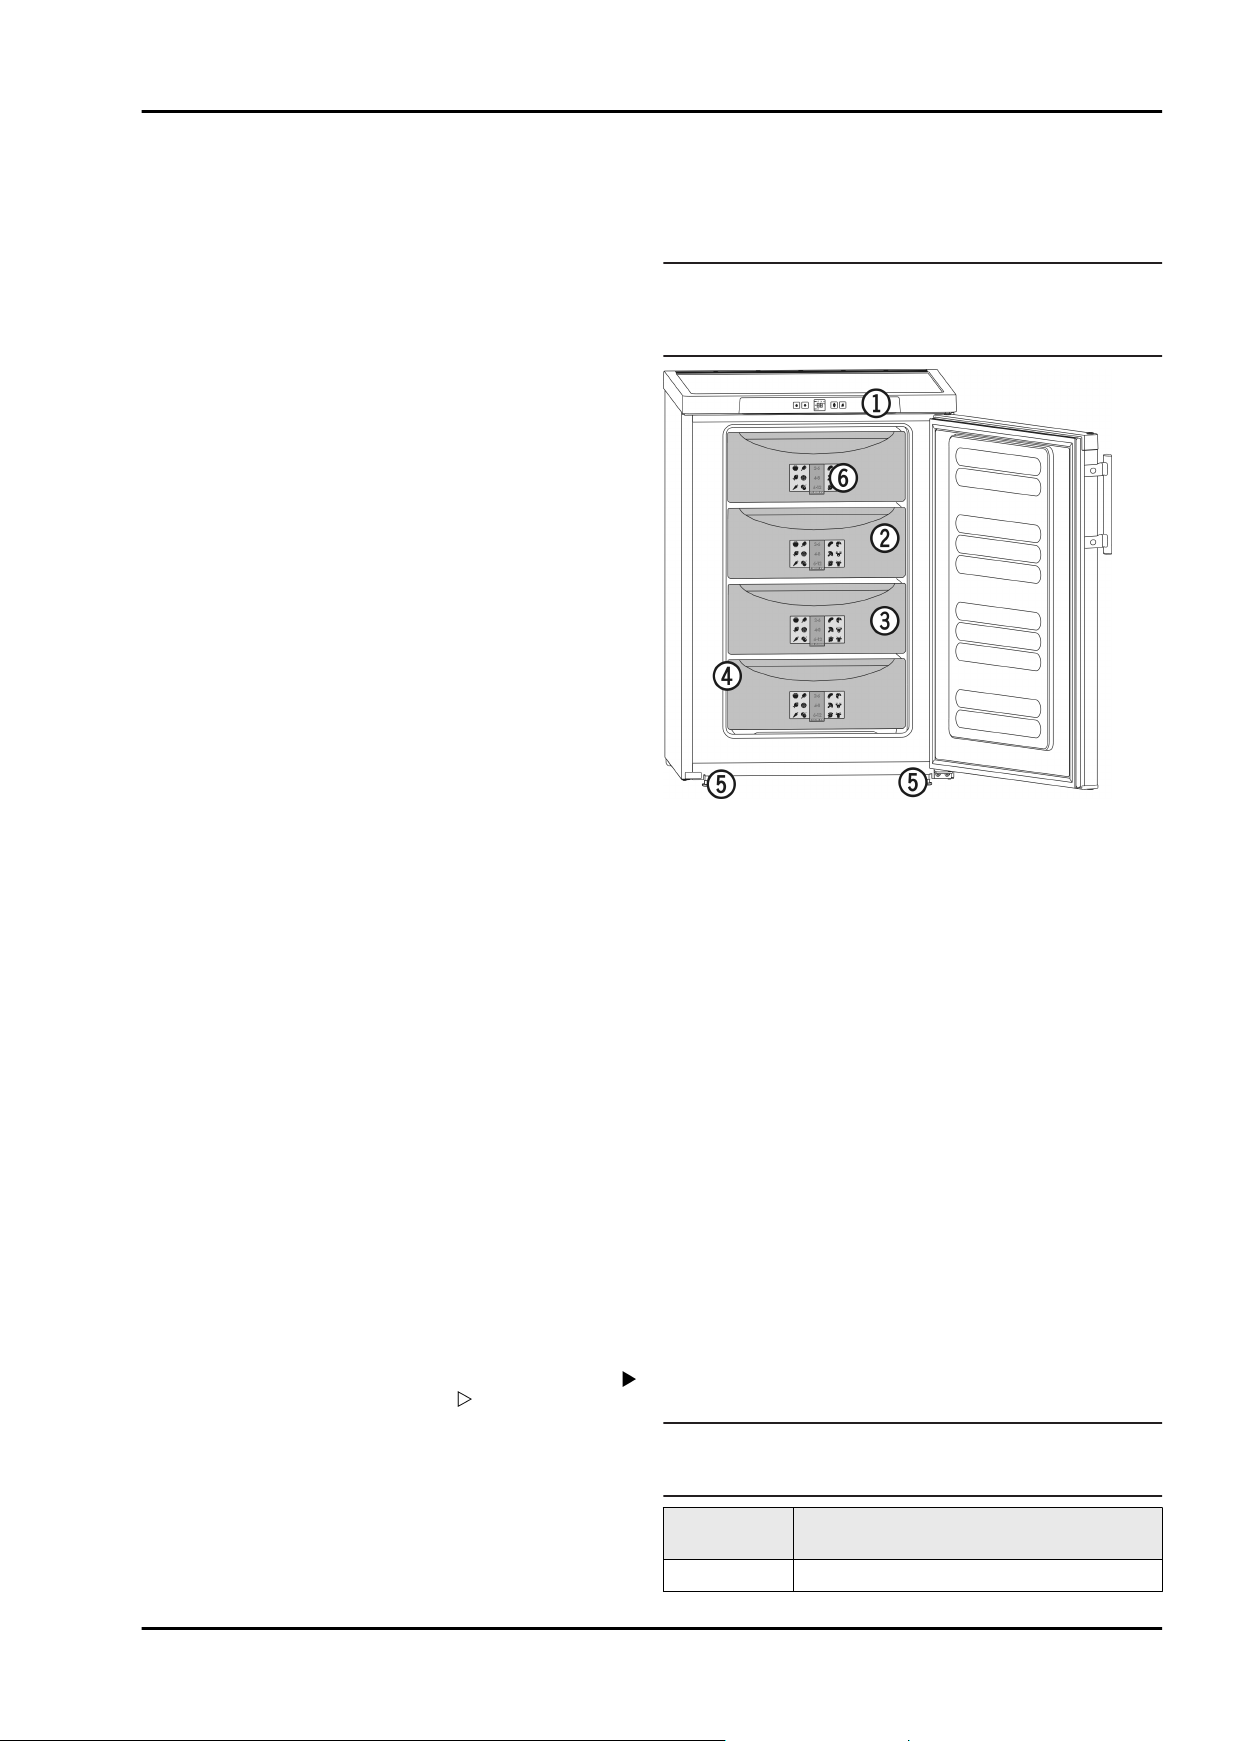
Vue d'ensemble de l'appareil
Sommaire
1 Vue d'ensemble de l'appareil............................... 20
1.1 Vue d'ensemble de l'appareil et de ses
équipements............................................................. 20
1.2 Domaine d'utilisation de l'appareil............................ 20
1.3 Conformité................................................................ 21
1.4 Dimensions.............................................................. 21
1.5 Economiser l'énergie................................................ 21
2 Consignes de sécurité générales........................ 21
3 Eléments de commande et d'affichage............... 22
3.1 Éléments de commande et de contrôle.................... 22
3.2 Affichage de la température..................................... 22
4 Mise en service...................................................... 22
4.1 Transport de l'appareil.............................................. 22
4.2 Mise en place de l'appareil....................................... 22
4.3 Remplacement de la butée de porte......................... 23
4.4 Insertion entre deux éléments de cuisine................. 23
4.5 Eliminer l'emballage................................................. 24
4.6 Brancher l'appareil................................................... 24
4.7 Enclencher l'appareil................................................ 24
5 Commande............................................................. 24
5.1 Luminosité de l'affichage de température................. 24
5.2 Verrouillage enfants................................................. 24
5.3 Alarme de température............................................. 25
5.4 Congeler des aliments.............................................. 25
5.5 Dégivrer les aliments................................................ 25
5.6 Réglage de la température....................................... 25
5.7 SuperFrost............................................................... 25
5.8 Tiroirs....................................................................... 26
5.9 Tablettes de rangement........................................... 26
5.10 VarioSpace............................................................... 26
5.11 Système info............................................................. 26
5.12 Accumulateurs de froid............................................. 26
6 Entretien................................................................. 26
6.1 Dégivrer manuellement............................................ 26
6.2 Nettoyage de l'appareil............................................. 26
6.3 S.A.V. ...................................................................... 27
7 Dysfonctionnements............................................. 27
8 Mise hors service................................................... 28
8.1 Couper l'appareil...................................................... 28
8.2 Mise hors service..................................................... 28
9 Eliminer l'appareil.................................................. 28
Le fabricant travaille constamment au développement de tous
les types et modèles d'appareils.C'est pourquoi nous nous
réservons le droit de modifier la forme, l'équipement et la technique de nos appareils. Nous vous remercions de votre
compréhension.
Afin de découvrir tous les avantages de votre nouvel appareil,
nous vous prions de lire attentivement ces instructions de
montage.
Ces instructions de montage sont valables pour plusieurs
modèles, des différences sont donc possibles.Les paragraphes ne concernant que certains appareils sont indiqués par
un astérisque (*).
Les instructions de manipulation sont indiqués par un
les résultats de manipulation par un .
1 Vue d'ensemble de l'appareil
1.1 Vue d'ensemble de l'appareil et de ses équipements
Remarque
u
A la livraison, les tablettes de rangement, les bacs et les
balconnets sont disposés de sorte à assurer une efficacité
énergétique maximale.
Fig. 1
(1) Éléments de commande
et de contrôle
(2) VarioSpace (5) Pieds réglables
(3) Tiroir
1.2 Domaine d'utilisation de l'appareil
L'appareil est exclusivement adapté à la réfrigération d'aliments dans un environnement domestique ou un environnement semblable. Est prise en compte, par exemple, l'utilisation
les cuisines du personnel, les pensions de famille,
-
les clients de maisons de campagne, hôtels, motels et
-
autres hébergements,
les traiteurs et services semblables dans le commerce de
-
gros
N'utilisez l'appareil que dans un cadre domestique. Toute autre
sorte d'utilisation est interdite. L'appareil n'est pas conçu pour
le stockage et la réfrigération de médicaments, de plasma
sanguin, de préparations de laboratoire ou autres produits ou
substances semblables concernés par la directive des produits
médicaux 2007/47/EG. Une utilisation abusive de l'appareil
peut entraîner l'endommagement des produits stockés ou leur
altération. De plus, l'appareil n'est pas adapté pour le fonctionnement dans les domaines à risque d'explosions.
En fonction de la classe climatique, l'appareil a été conçu pour
l'exploitation à des températures environnantes limites. La
,
classe climatique de votre appareil est indiquée sur la
plaquette signalétique.
(4) Plaque signalétique
20
Remarque
u
Respectez les températures environnantes indiquées, sinon
la puissance réfrigérante diminue.
Classe climatique
SN, N à 32 °C
pour températures ambiantes
Page 21

Classe climatique
ST à 38 °C
T à 43 °C
Le bon fonctionnement de cet appareil est garanti pour une
température ambiante minimale limitée à 5 °C.
pour températures ambiantes
Consignes de sécurité générales
Lorsque l'appareil présente une couche épaisse de givre :
-
dégivrer l'appareil.
Des dépôts de poussière augmentent la
consommation d'énergie :
Dépoussiérer le compresseur avec la
-
grille métallique de l'échangeur de
chaleur sur la paroi arrière de l'appareil
une fois par an.
1.3 Conformité
L'étanchéité du circuit réfrigérant est contrôlée. L'appareil est
conforme aux normes de sécurité en vigueur ainsi qu'aux directives CE 2006/95/CE, 2004/108/CE, 2009/125/CE et
2010/30/UE.
1.4 Dimensions
Fig. 2
Modèle h a g e e' d c c'
GP1376 851 553 611 624 653 1129 563 592
GP1476 851 602 611 628 657 1174 613 640
GPesf1476 851 602 611 610 657 1174 597 644
GP1486 851 602
x
Dans le cas d'appareils sans entretoise murale fournie ou si
l'entretoise en question n'est pas utilisée, la dimension est
réduite de 35 mm (voir 4.2) .
646x663x692x1209
x
613 640
1.5 Economiser l'énergie
Toujours veiller à une bonne ventilation de l'appareil. Ne pas
-
recouvrir ou obstruer les orifices et les grilles de ventilation.
Ne pas placer l'appareil dans une zone à ensoleillement
-
direct, à côté d'une cuisinière, d'un chauffage ou équivalents.
La consommation en énergie dépend des conditions
-
d’installation comme la température ambiante. (voir 1.2) .
Ouvrir l'appareil aussi brièvement que possible.
-
Plus la température est réglée basse, plus la consommation
-
en énergie est élevée.
Conserver toutes les denrées dans leur emballage ou avec
-
une protection. Toute génération de givre est ainsi empêchée.
Ne sortir les aliments que le temps dont vous en avez
-
besoin pour qu'ils ne se réchauffent pas.
Entreposer des aliments chauds : les laisser refroidir
-
d'abord à température ambiante.
2 Consignes de sécurité générales
Dangers pour l'utilisateur :
Cet appareil n'est pas destiné aux personnes souffrant de
-
troubles mentaux, physiques ou sensoriels ou aux
personnes n'ayant pas suffisamment d'expérience et de
connaissances (les enfants aussi), sauf si une personne
responsable de la sécurité leur explique l'utilisation de l'appareil et les surveille au début. Surveiller les enfants afin
qu'ils ne jouent pas avec l'appareil.
En cas de dysfonctionnement, tirer la fiche du réseau (ne
-
pas tirer sur le câble de raccord) ou couper le fusible.
Faire effectuer les réparations, les interventions sur l'appa-
-
reil et le remplacement du câble de raccord au réseau
uniquement par le S.A.V ou tout autre technicien qualifié.
Toujours débrancher l'appareil du réseau en tenant la fiche.
-
Ne pas tirer sur le câble.
Monter et raccorder l'appareil uniquement selon les indica-
-
tions mentionnées dans les instructions.
Conservez précieusement ce mode d'emploi et remettez-le
-
éventuellement au nouveau propriétaire de l'appareil.
Risque d'incendie :
Le fluide réfrigérant R 600a contenu dans l'appareil ne
-
présente aucun danger pour l'environnement mais est
inflammable. En cas de fuite, le fluide réfrigérant risque de
s'enflammer.
Ne pas endommager les tubes du circuit frigorifique.
•
Ne pas manier de feu ouvert ou de sources inflammables
•
à l'intérieur de l'appareil.
Ne pas utiliser d'appareils électriques à l'intérieur de l'ap-
•
pareil (par ex. nettoyeurs à vapeur, appareils de chauffage, sorbetières, etc.).
En cas de fuite du réfrigérant : supprimer tout feu ouvert
•
ou sources inflammables à proximité de la fuite. Débrancher la prise. Bien aérer la pièce. Informer le S.A.V.
Ne pas entreposer de matières explosives ou de bombes
-
aérosols contenant des gaz propulseurs inflammables
(butane, propane, pentane, etc.) dans l'appareil. Les
bombes aérosols de ce type sont reconnaissables aux indications de contenu imprimées ou au symbole de la flamme.
Une éventuelle fuite de gaz risque de mettre feu aux composants électriques.
Tenir les bougies, lampes et autres objets à flammes
-
ouvertes éloignés de l'appareil pour ne pas y mettre le feu.
N'entreposer de l'alcool très concentré que dans un réci-
-
pient fermé hermétiquement et en position verticale. Une
fuite d'alcool éventuelle risque de mettre feu aux composants électriques.
Risque de chute et de basculement :
Ne pas utiliser les socles, tiroirs, portes, etc. comme
-
marchepied ou appui. Ceci s'applique avant tout aux
enfants.
Danger d'intoxication alimentaire :
Ne pas consommer d'aliments périmés.
-
Risque de gelures, d'engourdissement et de douleurs :
Eviter le contact permanent de la peau avec les surfaces
-
froides ou les produits réfrigérés/congelés. Prendre des
mesures de protection, par ex. en portant des gants. Ne pas
consommer immédiatement les glaces trop froides (surtout
les sorbets et les glaçons).
21
Page 22
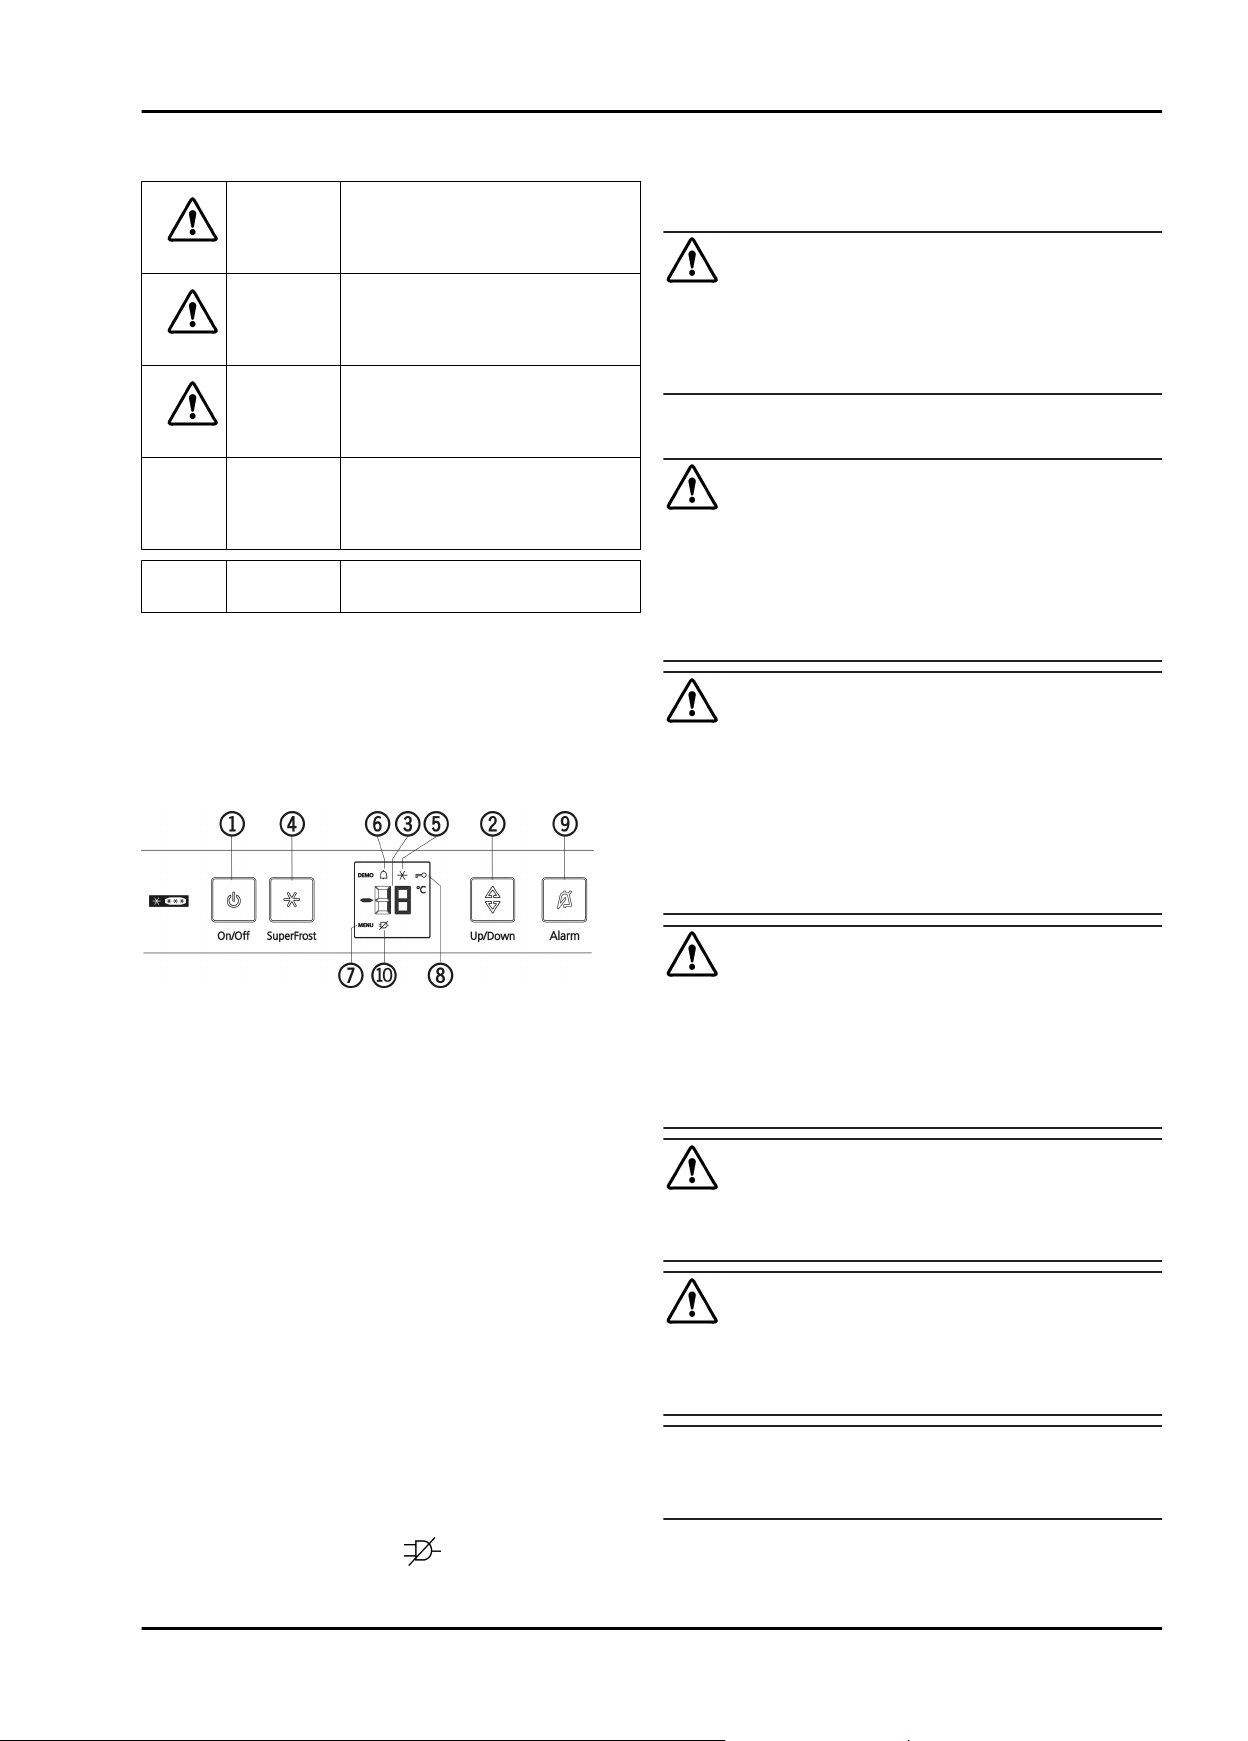
Eléments de commande et d'affichage
Respecter les indications spécifiques des autres
sections :
DANGER indique une situation dangereuse
imminente entraînant la mort ou des
blessures corporelles graves si elle
n'est pas évitée.
AVERTISSEMENT
PRUDENCE indique une situation dangereuse
ATTENTION indique une situation dangereuse
Remarque indique les remarques et conseils
indique une situation dangereuse
susceptible d'entraîner la mort ou
des blessures corporelles graves si
elle n'est pas évitée.
susceptible d'entraîner des blessures corporelles moyennes ou
légères si elle n'est pas évitée.
susceptible d'entraîner des
dommages matériels si elle n'est
pas évitée.
utiles.
3 Eléments de commande et d'affichage
3.1 Éléments de commande et de contrôle
4 Mise en service
4.1 Transport de l'appareil
PRUDENCE
Risque de blessure et d'endommagement dû à un transport
incorrect !
u
Transporter l'appareil emballé.
u
Transporter l'appareil debout.
u
Ne pas transporter l'appareil seul.
4.2 Mise en place de l'appareil
AVERTISSEMENT
Risque d'incendie dû à l'humidité !
Lorsque des pièces sous tension ou le câble de raccordement
au secteur deviennent humides, un court-circuit peut se
produire.
u
L'appareil a été conçu pour être placé dans des locaux
fermés. Ne pas exploiter l'appareil dehors ou dans des
endroits humides non à l'abri de projections d'eau.
AVERTISSEMENT
Danger de brûlures par court-circuit!
Lorsque les câbles de raccord / fiches de l´appareil se trouvent
en contact avec la partie arrière d´un autre appareil, ils peuvent
être endommagés à cause des vibrations de l´appareil et par la
suite causer un court-circuit.
u
Placer l'appareil de façon à ce qu'il n'y ait pas de contact
avec la fiche ou le câble d´alimentation.
u
Ne pas brancher d´appareils ni autres dispositifs sur les
prises de courant situées sur la partie arrière de l´appareil.
Fig. 3
(1) Touche marche/arrêt (6) Symbole Alarme
(2) Touche de réglage (7) Symbole Menu
(3) Voyant de température (8) Symbole Sécurité enfants
(4) Touche SuperFrost (9) Touche Alarme
(5) Symbole SuperFrost (10) Symbole Coupure d'ali-
mentation
3.2 Affichage de la température
Sont affichés en service normal :
la température de congélation la plus chaude
-
L'affichage de la température clignote :
le réglage de la température est modifié
-
après l'enclenchement, la température n'est pas encore
-
suffisamment froide
la température a augmenté de plusieurs degrés
-
Des traits clignotent à l'affichage :
la température de congélation est supérieure à 0 °C.
-
Les affichages suivants indiquent qu'il y a une panne. Pour les
causes possibles et les mesures à prendre : (voir Dysfonctionnements).
F0 à F5
-
-
Le symbole Panne de courant
est allumée.
AVERTISSEMENT
Risque d'incendie dû au fluide réfrigérant !
Le fluide réfrigérant R 600a contenu dans l'appareil ne
présente aucun danger pour l'environnement mais est inflammable.En cas de fuite, le fluide réfrigérant risque de s'enflammer.
u
Veiller à ne pas endommager les tubes du circuit frigorifique.
AVERTISSEMENT
Risque d'endommagement et d'incendie !
u
Ne pas placer un appareil diffusant de la chaleur (p.ex. four
à micro-ondes, grille-pain, etc.) sur l'appareil !
AVERTISSEMENT
Risque d'incendie et d'endommagement dû au blocage des
ouvertures d'aération !
u
Toujours laisser les ouvertures d'aération libres. Toujours
veiller à une bonne ventilation de l'appareil !
Remarque*
Les sachets situés à l'arrière de l'appareil sont essentiels à son
bon fonctionnement. Leur contenu n'est ni nocif, ni dangereux.
u
Ne pas retirer les sachets !
En cas de dégâts à l'appareil, contactez immédiatement le
q
fournisseur avant de brancher l'appareil.
Le sol au lieu d'emplacement doit être horizontal et plan.
q
22
Page 23
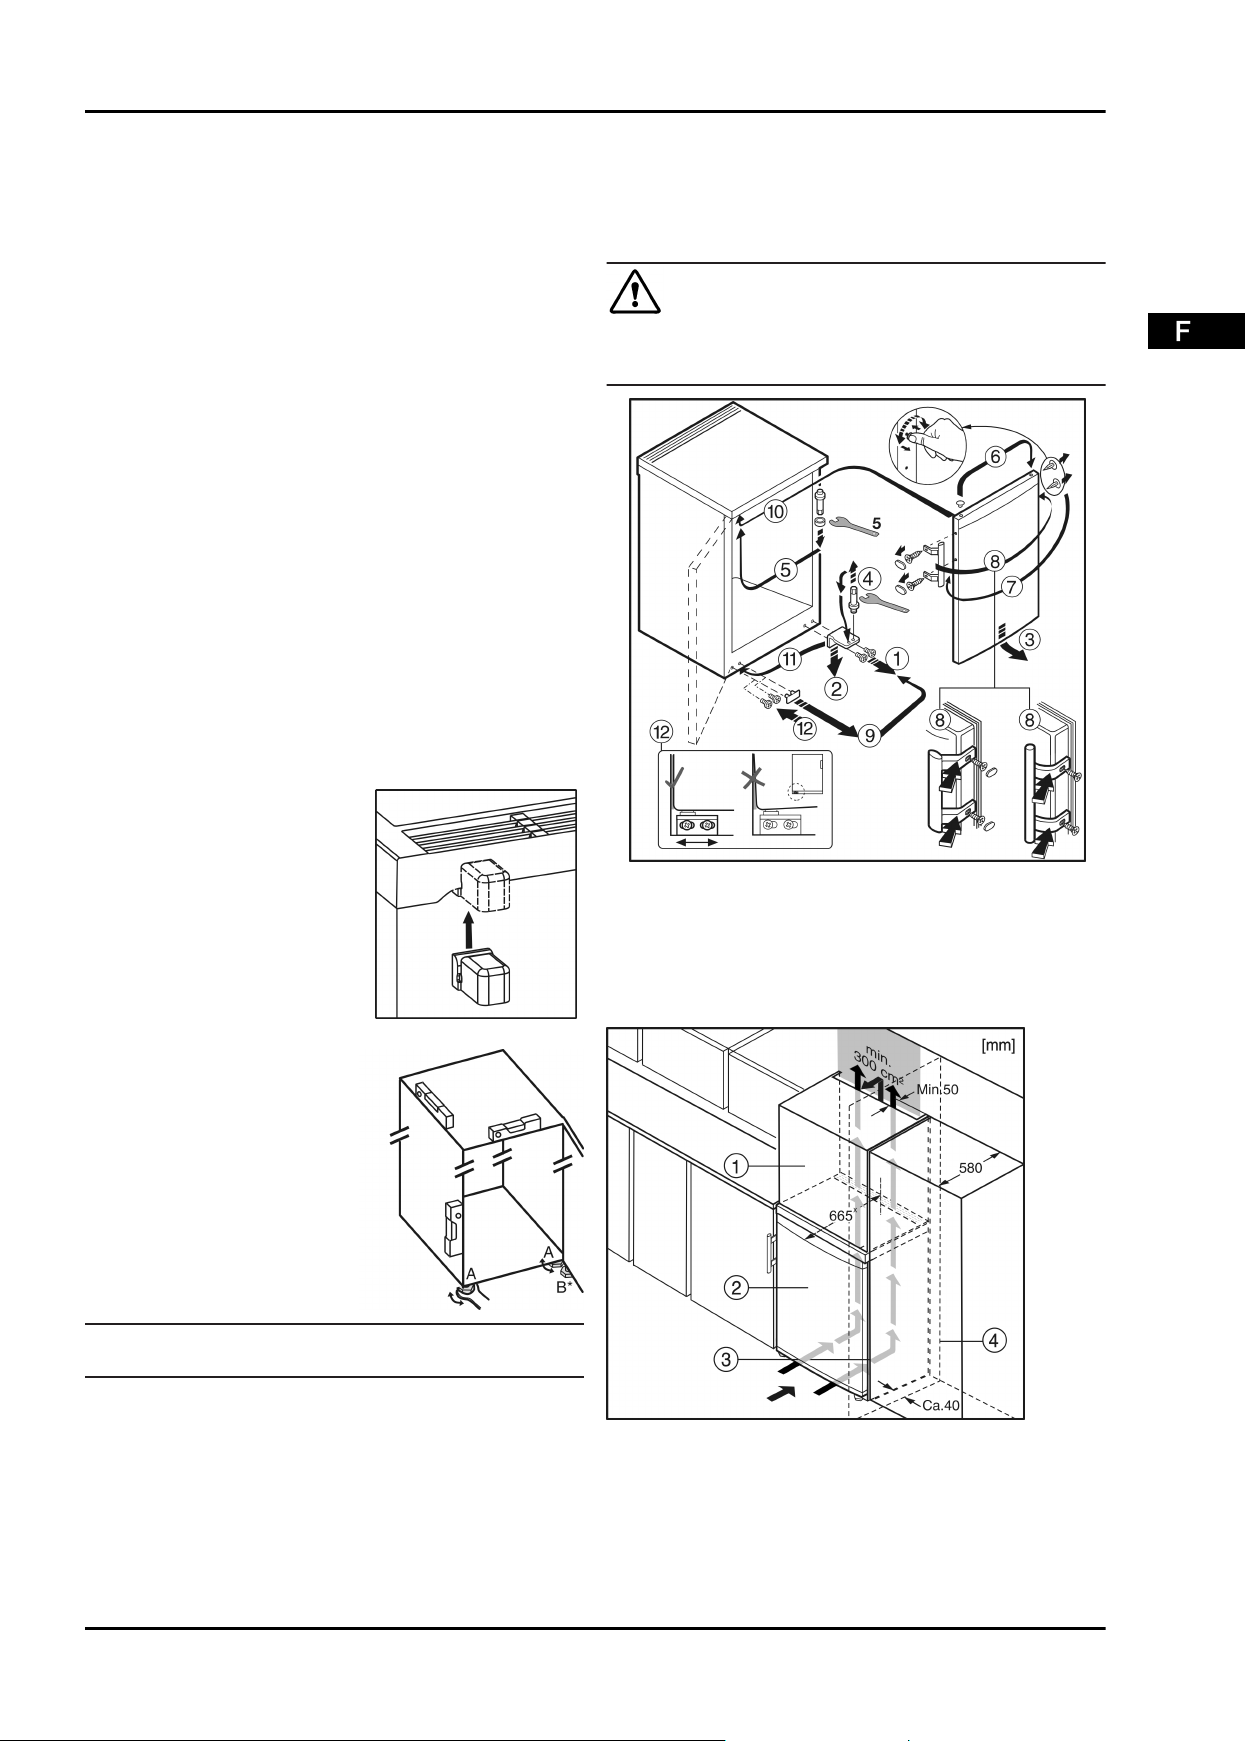
Mise en service
Ne pas placer l'appareil dans une zone à ensoleillement
q
direct, à côté d'une cuisinière, d'un chauffage ou équivalents.
Le lieu d'emplacement le plus adapté est un local sec et
q
bien aéré.
Toujours placer l'appareil avec la face arrière et avec les
q
pièces d'écartement mural (voir ci-dessous), si celles-ci sont
utilisées, directement contre le mur.
Ne pas mettre en place l'appareil sans avoir recours à une
q
aide.
Le local d'emplacement de votre appareil doit, selon la
q
norme NE 378, avoir un volume de 1 m³ pour 8 g de fluide
réfrigérant R 600a. Si le local est trop petit, un mélange
inflammable gaz-air peut se former suite à une fuite dans le
circuit réfrigérant. L'indication du dosage de fluide réfrigérant est indiqué sur la plaque signalétique à l'intérieur de
l'appareil.
u
Enlever le câble de raccord de la paroi arrière de l'appareil.
Enlever le porte-câble, sinon des bruits dus aux vibrations
surgissent !
u
Retirer les films de protection des parois extérieures de l'appareil.*
u
Enlever tous les auxiliaires de transport.
En cas de fourniture de pièces d'écartement mural avec l'appareil, leur utilisation et leur montage permettra d'atteindre l'absorption d'énergie mentionnée. Sans pièce d'écartement
mural, la profondeur de l'appareil indiquée se réduit de
3,50 cm. Le fait de ne pas utiliser les pièces d'écartement
mural fournies n'influence d'aucune façon la fonctionnalité de
l'appareil. Cependant ces appareils affichent une légère
augmentation de leur consommation d'énergie lorsque l'écartement mural est faible.*
u
Pour un appareil accompagné
de pièces d'écartement mural,
monter ces pièces d'écartement
sur la face arrière de l'appareil,
en haut à gauche et à droite.*
Assurez-vous que vous disposez des outils suivants :
Torx® 25
q
Torx® 15
q
clé fournie
q
ou deuxième personne pour le travail de montage
q
PRUDENCE
Risque de blessures lorsque la porte culbute !
u
Bien tenir la porte.
u
Déposer la porte prudemment.
Fig. 4 pour les appareils dotés d'une poignée de porte
u
Suivez les instructions en respectant l'ordre prescrit dans le
graphique.
u
Eliminer l'emballage (voir 4.5) .
u
Aligner l'appareil avec la clé à
fourche jointe aux pieds de
réglage (A) et à l'aide d'un
niveau à bulle d'eau.
Remarque
u
Nettoyer l'appareil (voir 6.2) .
Lorsque l'appareil est placé dans un environnement très
humide, du condensât peut se former sur la paroi extérieure de
l'appareil.
u
Toujours veiller à une bonne ventilation de l'appareil au lieu
d'emplacement.
4.3 Remplacement de la butée de porte
Si nécessaire, vous pouvez changer le sens d'ouverture de la
porte.
4.4 Insertion entre deux éléments de cuisine
*
(1) Elément haut (3) Placard de cuisine
(2) Appareil (4) Mur
x
Sur les appareils sans pièces d'écartement mural jointes ou si
les pièces d'écartement mural jointes ne sont pas utilisées, la
cote se réduit de 35 mm (voir 4.2) .
Fig. 5
23
Page 24

Commande
L'appareil peut être entouré de meubles de cuisine. Pour
adapter l'appareil
cuisine intégrée, on peut placer un élément haut
dessus de l'appareil.
Lors de la transformation avec des placards de cuisine
(profond. max. 580 mm), l'appareil peut être placé directement
à côté du placard
70 mm x et de 85 mm x par rapport à la face avant du placard de
cuisine.
Important pour la ventilation :
Sur la paroi arrière de l'armoire haute, il doit y avoir une
-
buse pour l'air sortant de min. 50 mm de profondeur sur
toute la largeur de l'armoire haute.
La fente d'aération sous le plafond doit être de 300 cm
-
minimum.
Plus la section de ventilation est grande, plus l'appareil
-
marche de manière économique.
Si l'appareil est installé avec les charnières à côté d'un mur
Fig. 5 (4)
40 mm min. Ceci correspond à la saillie de la poignée lorsque
la porte est ouverte.
, la distance entre l'appareil et le mur doit être de
Fig. 5 (2)
Fig. 5 (3)
à la hauteur des placards de la
Fig. 5 (1)
. L'appariel saillit latéralement de
au-
4.5 Eliminer l'emballage
AVERTISSEMENT
Risque d'étouffement avec les films et matériaux d'emballage !
u
Ne pas laisser les enfants jouer avec les matériaux d'emballage.
L'emballage est fabriqué en matériaux recyclables :
carton ondulé / carton
-
pièces en polystyrène expansé
-
films et sachets en polyéthylène
-
colliers de serrage en polypropylène
-
cadres en bois cloués avec plaque de polyéthylène*
-
u
Déposer les matériaux d'emballage à un centre officiel de
collecte des déchets.
4.6 Brancher l'appareil
ATTENTION
Risque d'endommagement du système électronique !
u
Ne pas utiliser d'onduleurs (conversion du courant continu
en courant alternatif resp. triphasé) ou de fiches économes
d'énergie.
AVERTISSEMENT
Risque d'incendie et de surchauffe !
u
Ne pas utiliser de rallonge ou de bloc multiprises.
Le type de courant (courant alternatif) et la tension au lieu
d'emplacement doivent coïncider avec les indications sur la
plaque signalétique (voir Vue d'ensemble de l'appareil).
L'appareil peut uniquement être branché à une prise
de courant de sécurité installée selon les prescriptions. La prise de courant doit être protégée par fusibles de 10 A ou supérieur.
La prise doit être bien accessible afin de pouvoir
débrancher rapidement l'appareil en cas d'urgence.Elle doit se situer en dehors de la partie
arrière de l´appareil.
u
Vérifier l'alimentation électrique.
u
Enficher la prise de courant.
4.7
Enclencher l'appareil
u
Appuyer sur la touche On/Off
w
L'appareil est enclenché. L'affichage de la température et le
symbole Alarme
température soit suffisamment froide.
Fig. 3 (6)
Fig. 3 (1)
clignotent jusqu'à ce que la
.
5 Commande
5.1 Luminosité de l'affichage de température
2
Vous pouvez adapter la luminosité de l'affichage de température aux conditions lumineuses du lieu d'installation.
5.1.1 Réglage de la luminosité
La luminosité peut être réglée entre h 0 (éclairage minimal) et h
5 (intensité lumineuse maximale).
u
Activation du mode de réglage : Maintenez la touche Super-
Fig. 3 (4)
Frost
w
Le symbole Menu
w
Dans l'affichage, c clignote.
u
Utilisez la touche de réglage pour sélectionner
u
Confirmez en appuyant brièvement sur la touche SuperFrost
Fig. 3 (4)
w
L'affichage indique la dernière valeur de luminosité réglée.
u
La touche de réglage
valeur souhaitée entre h 0 et h 5.
w
La luminosité est réglée.
u
Pour désactiver le mode de réglage : Appuyez deux fois sur
la touche marche/arrêt
w
La température réapparaît dans l'affichage correspondant.
5.2 Verrouillage enfants
Avec le verrouillage enfants vous pouvez assurer que vos
enfants ne coupent pas l'appareil par inadvertance en jouant.
5.2.1 Réglage de la sécurité enfants
Pour activer cette fonction :
u
Activation du mode de réglage : Maintenez la touche SuperFrost
w
w
u
w
u
w
w
w
u
w
Pour désactiver cette fonction :
u
w
w
u
w
Fig. 3 (4)
Le symbole Menu
Dans l'affichage, c clignote.
Confirmez en appuyant brièvement sur la touche SuperFrost
Fig. 3 (4)
Dans l'affichage, c1 apparaît.
Confirmez en appuyant brièvement sur la touche SuperFrost
Fig. 3 (4)
Le symbole Sécurité enfants
dans l'affichage.
Dans l'affichage, c clignote.
La fonction Sécurité enfants est activée.
Pour mettre fin au mode de réglage :
Appuyez brièvement sur la touche marche/arrêt
La température réapparaît dans l'affichage correspondant.
Activation du mode de réglage : Maintenez la touche SuperFrost
Fig. 3 (4)
Le symbole Menu
Dans l'affichage, c clignote.
Confirmez en appuyant brièvement sur la touche SuperFrost
Fig. 3 (4)
Dans l'affichage, c0 apparaît.
enfoncée pendant env. 5 s.
Fig. 3 (7)
.
apparaît dans l'affichage.
Fig. 3 (2)
Fig. 3 (1)
enfoncée pendant env. 5 s.
Fig. 3 (7)
.
.
enfoncée pendant env. 5 s.
Fig. 3 (7)
.
apparaît dans l'affichage.
apparaît dans l'affichage.
Fig. 3 (2)
permet de sélectionner la
.
Fig. 3 (8)
s'allume
Fig. 3 (1)
h.
.
24
Page 25

u
Confirmez en appuyant brièvement sur la touche SuperFrost
Fig. 3 (4)
w
Le symbole Sécurité enfants
w
Dans l'affichage, c clignote.
w
La fonction Sécurité enfants est désactivée.
Pour mettre fin au mode de réglage :
u
Appuyez brièvement sur la touche marche/arrêt
w
La température réapparaît dans l'affichage correspondant.
.
Fig. 3 (8)
s'éteint.
Fig. 3 (1)
.
5.3 Alarme de température
Lorsque la température de congélation n'est pas assez froide,
un avertisseur sonore retentit.
L'affichage de la température clignote en même temps que le
symbole Alarme
L'avertisseur sonore s'éteint automatiquement, le symbole
Alarme
Fig. 3 (6)
clignoter lorsque la température est de nouveau suffisamment
froide.
Lorsque l'état d'alarme persiste: (voir Dysfonctionnements).
Fig. 3 (6)
.
et l'affichage de température arrêtent de
5.3.1 Arrêter l'alarme de température
Il est possible d'arrêter l'avertisseur sonore. La fonction
d'alarme sera de nouveau active lorsque la température sera à
nouveau suffisamment froide.
u
Appuyer sur la touche Alarme
w
L'avertisseur sonore s'arrête.
Fig. 3 (9)
.
5.4 Congeler des aliments
Il est possible de congeler autant d'aliments frais en 24 h qu'il
est indiqué sur la plaque signalétique (voir Vue d'ensemble de
l'appareil)sous "capacité de congélation ... kg/24h".
Les bacs peuvent supporter jusqu'à max. 25 kg d'aliments
congelés chacun, les plaques jusqu'à max. 35 kg chacune.
Risque de blessure dû aux débris de verre !
Les bouteilles et les canettes, surtout celles qui contiennent
des boissons gazeuses, risquent d'exploser si elles sont
congelées.
u
Pour que les aliments congèlent rapidement jusqu'au coeur, ne
pas dépasser les quantités suivantes par paquet :
- Fruits, légumes jusqu'à 1 kg
- Viande jusqu'à 2,5 kg
u
PRUDENCE
Ne pas congeler de bouteilles ni de canettes !
Emballer les aliments par portions dans des sachets de
congélation, des récipients réutilisables en plastique, métal
ou aluminium.
5.5 Dégivrer les aliments
- A température ambiante
- Au micro-ondes
- Dans le four/le four à chaleur tournante
u
Ne recongeler des alimentes décongelés que dans des cas
exceptionnels.
5.6 Réglage de la température
La température est fonction des facteurs suivants :
la fréquence d’ouverture de la porte
-
La température de la pièce dans laquelle se trouve l’appareil
-
le type, la température et la quantité d'aliments
-
Valeurs recommandées pour le réglage de la température :
-18 °C
Commande
La température peut être continuellement modifiée. Lorsque la
position -28 °C est atteinte, un retour est effectué à -14 °C.
u
Appel de la fonction de température : Appuyez une fois sur
la touche de réglage
w
Au niveau du voyant de température, la température
actuelle clignote.
u
Modifiez la température par incréments de 1 °C : Appuyez
sur la touche de réglage
pour que la température souhaitée s'allume au niveau du
voyant de température.
u
Pour modifier la température en continu : maintenez la
touche enfoncée.
w
Pendant le réglage, la valeur clignote.
w
Env. 5 s après le dernier actionnement de la touche, la
température réelle est affichée. La température est lentement réglée sur la nouvelle valeur.
5.7 SuperFrost
Cette fonction vous permet de congeler rapidement des
denrées fraîches à coeur.L'appareil fonctionne à puissance
maximale, ce qui peut entraîner une augmentation du volume
sonore du groupe frigorifique.
Pour connaître la quantité maximale de denrées fraîches en
kilos que vous pouvez congeler en 24 h, reportez-vous à la
"Capacité de congélation ... kg/24h" indiquée sur la plaquette
signalétique. Cette valeur maximale varie selon le modèle et sa
classe climatique.
Selon la quantité de denrées fraiches à congeler, la fonction
SuperFrost doit être enclenchée à l´avance : environ 6h pour
une petite quantité de denrée à congeler, 24 h avant la mise en
place d´une quantité maximale de denrées à congeler.
Empaquetez les aliments et répartissez-les sur une plus
grande surface possible. Ne pas mettre des aliments à
congeler avec des produits déjà congelées en contact de sorte
que ces derniers ne se décongèlent pas.
N'activez pas la fonction SuperFrost dans les cas suivants :
lorsque vous introduisez des aliments déjà congelés
-
Lors d´une congélation de denrées fraiches allant jusqu´à
-
environ 1 kg par jour
5.7.1 Congeler avec la fonction SuperFrost
u
Appuyer une fois brièvement sur la touche SuperFrost
Fig. 3 (4)
w
Le symbole SuperFrost
w
La température de congélation baisse, l'appareil passe en
puissance frigorifique maximale.
Remarque
u
En appuyant sur la touche SuperFrost la temporisation à
l'enclenchement intégrée peut entrainer un retard de démarrage du compresseur qui peut durer jusquà 8 minutes. Ce
retard prolonge la durée de vie du compresseur.
Pour une petite quantité de produits à congeler :
u
attendre env. 6 h.
u
Déposer les aliments conditionnés dans les tiroirs inférieurs.
En cas de quantité maximale de produits à congeler :
u
attendre env. 24 h.
u
Retirer le tiroir le plus bas et poser les aliments directement
dans l'appareil de sorte qu'ils soient en contact avec le fond
ou les parois latérales.
w
La fonction SuperFrost se désactive automatiquement en
fonction de la quantité stockée : au plus tôt 30 heures après,
au plus tard 65 heures après.
w
Le symbole SuperFrost
tion est terminée.
u
Déposer les aliments dans le tiroir et reinsérer celui-ci.
w
L'appareil continue de fonctionner en mode normal d'économie d'énergie.
.
Fig. 3 (2)
Fig. 3 (2)
Fig. 3 (5)
Fig. 3 (5)
.
autant de fois qu'il le faut
s'allume.
s'éteint quand la congéla-
25
Page 26

Entretien
5.8 Tiroirs
u
Pour déposer les produits à congeler directement sur les
tablettes de rangement : tirer le tiroir vers l'avant et le sortir
en le soulevant
5.9 Tablettes de rangement
u
Retirer la tablette de rangement : la
soulever devant et la tirer en dehors.
u
Remettre en place la tablette de rangement : l'insérer jusqu'à la butée.
5.10 VarioSpace
Vous pouvez retirer les tiroirs ainsi
que les surfaces de rangement.
Vous avez ainsi plus de place pour
congeler des pièces de gros
volume. La volaille, la viande, les
grosses pièces de gibier ainsi que
les pâtisseries de grande taille
peuvent congelés sans problème
puis de nouveau préparés.
u
Les bacs peuvent supporter
jusqu'à max. 25 kg d'aliments à
congeler chacun, les plaques
jusqu'à max. 35 kg chacune.
5.11 Système info
Fig. 6
(1) Plats cuisinés, crème
glace
(2) Viande de porc, poisson (5) Gibier, champignons
(3) Fruits, légumes (6) Volaille, boeuf/veau
Les chiffres indiquent chaque fois les durées de conservation
en mois de plusieurs types d'aliments à surgeler. Les durées
de conservation mentionnées sont données à titre indicatif.
(4) Charcuterie, pain
5.12 Accumulateurs de froid
Les accumulateurs de froid évitent que la température n'augmente trop rapidement en cas de panne de courant.
6 Entretien
6.1 Dégivrer manuellement
Après un fonctionnement prolongé, une couche de givre ou de
glace se forme dans l'appareil.
La couche de givre ou de glace se forme plus rapidement lorsqu'on ouvre l'appareil fréquemment ou lorsque les aliments y
déposés sont chauds. Une couche de glace plus épaisse
augmente toutefois la consommation d‘énergie. Nous recommandons de dégivrer régulièrement l‘appareil.
PRUDENCE
Risque de blessures et d'endommagement dû à la vapeur
chaude !
u
Pour dégivrer, ne pas avoir recours à des appareils de
chauffage électriques ou des nettoyeurs au jet de vapeur,
des flammes nues ou des aérosols spéciaux dégivrage.
u
Ne pas enlever la glace avec des ustensiles tranchants.
u
Un jour avant le dégivrage, enclencher le mode SuperFrost.
w
Les denrées congelées auront ainsi une " réserve de froid
supplémentaire.".
u
Couper l'appareil.
w
L'affichage de la température s'éteint.
w
Lorsque l'affichage de la température ne s'éteint pas, la
sécurité enfants (voir 5.2) est active.
u
Débrancher l'appareil du réseau ou couper le fusible.
u
Poser les accumulateurs de froid sur les aliments congelés.
u
Conserver les aliments congelés emballés dans du papier
journal dans le tiroir ou dans des couvertures et les entreposer dans un local frais.
u
Placer un récipient contenant de
l'eau chaude, mais pas bouillante sur
l'une des tablettes du milieu.
-ou-
u
Remplir à moitié d'eau tiède les deux
tiroirs inférieurs et les placer dans
l'appareil.
w
Le dégivrage est accéléré.
u
Laisser la porte ouverte pendant le dégivrage.
u
Retirer les morceaux de glace détachés.
u
S'il y a lieu, essuyer plusieurs fois l'eau de dégivrage
restante à l'aide d'une éponge ou d'un torchon.
u
Nettoyer l'appareil (voir 6.2) et le sécher.
6.2 Nettoyage de l'appareil
PRUDENCE
Risque de blessures et d'endommagement émanant de la
vapeur très chaude !
La vapeur très chaude peut endommager les surfaces et
entraîner des brûlures.
u
Ne pas utiliser d'appareils de nettoyage à la vapeur !
5.12.1 Utilisation des accumulateurs de froid
u
Placer les accumulateurs de froid
congelés dans la partie supérieure de l'espace de congélation, sur les aliments congelés.
26
Page 27

ATTENTION
Un nettoyage incorrect endommage l'appareil !
u
Ne jamais utiliser de produits de nettoyage concentrés.
u
Ne pas utiliser d'éponges à récurer ou abrasives ni de laine
d'acier.
u
Ne pas utiliser des produits de nettoyage concentrés et
agressifs contenant du chlorure, du sable, des produits
chimiques ou des chiffons rêches.
u
Ne pas utiliser de solvants chimiques.
u
Ne pas détériorer ou enlever la plaquette signalétique située
sur la paroi intérieure de l'appareil. Ceci est important pour
le S.A.V.
u
Ne pas arracher, plier ou endommager de câbles ou d'autres composants.
u
Ne pas faire pénétrer d'eau dans le canal d'évacuation, la
grille d'aération et les composants électriques lors du
nettoyage.
u
Utiliser des chiffons doux et un détergent courant d'une
valeur pH neutre.
u
Pour l'intérieur de l'appareil, utiliser uniquement des détergents et des produits d'entretien non nocifs pour les
aliments.
Dysfonctionnements
u
Relever la désignation
de l'appareil
le n° de service
Fig. 7 (2)
série
Fig. 7 (3)
plaquette signalétique. Cette plaquette
se trouve sur la paroi
intérieure gauche de
l'appareil.
u
Informer le S.A.V. et lui communiquer la panne, la désignation de l'appareil
de série
w
Ces informations vous permettront d'obtenir un service ciblé
et rapide.
u
Laisser l'appareil fermé jusqu'à l'arrivée du S.A.V.
w
Les aliments resteront plus longtemps frais.
u
Débrancher la fiche du secteur (ne pas tirer sur le câble de
l'appareil) ou couper le fusible.
Fig. 7 (1)
et le n° de
sur la
Fig. 7 (3)
,
Fig. 7 (1)
.
, le n° de service
Fig. 7 (2)
Fig. 7
et le n°
u
Vider l'appareil.
u
Débrancher la prise.
u
Grille d'aération et de ventilation nettoyer régulièrement.
w
Des dépôts de poussière augmentent la consommation de
courant.
u
Nettoyez à la main les surfaces intérieures et extérieures
en matière synthétique avec de l'eau tiède et un peu de
détergent.
u
Nettoyez les parois latérales vernies uniquement avec un
chiffon doux et propre. En cas de salissures importantes,
utiliser un peu d'eau tiède avec un détergent neutre.*
Ne pas appliquer de nettoyant inox sur les surfaces en verre ou
en plastique afin de ne pas les rayer. Des points plus foncés et
une couleur plus intense de la surface en inox sont normaux au
début.*
u
Nettoyez avec un nettoyant inox usuel les surfaces extérieures en acier inox en cas de salissures. Appliquez
ensuite le produit d'entretien inox fourni, de manière régulière, dans le sens du polissage.*
Après le nettoyage :
u
Frotter l'appareil et les éléments d'équipement pour les
sécher.
u
Rebrancher l'appareil et l'enclencher de nouveau.
u
Enclencher la fonction SuperFrost (voir 5.7) .
Lorsque la température est suffisamment froide :
u
remettre en place les aliments.
6.3 S.A.V.
Vérifier d'abord si vous pouvez résoudre vous-même la panne
(voir Dysfonctionnements). Si ce n'est pas le cas, adressezvous au S.A.V. Vous trouverez l'adresse du S.A.V. dans le
répertoire S.A.V. fourni avec votre appareil.
Risque de blessures dû à une réparation incorrecte !
u
AVERTISSEMENT
Ne faire effectuer les réparations et interventions sur l'appareil et la ligne de réseau qui ne sont pas explicitement
nommés (voir Entretien)que par le S.A.V.
7 Dysfonctionnements
Votre appareil est construit et produit de façon à assurer sa
sécurité de fonctionnement et une longue durée de vie. Si une
panne devait cependant se produire en cours de fonctionnement, veuillez vérifier si elle est due à une erreur de manipulation. Dans ce cas, les coûts en résultant vous seront facturés
même pendant la période de garantie. Vous pouvez résoudre
vous-même les pannes suivantes :
L'appareil ne fonctionne pas.
L'appareil n'est pas enclenché.
→
Enclencher l'appareil.
u
La fiche secteur n'est pas correctement enfoncée dans la
→
prise.
Contrôler la fiche secteur.
u
Le fusible de la prise n'est pas correct.
→
Vérifier le fusible.
u
Le compresseur fonctionne lentement.
Le compresseur tourne à vitesse réduite si l'on a besoin de
→
moins de froid. Même s'il fonctionne plus longtemps, il
économise de l'énergie.
Ceci est normal pour les modèles avec économie
u
d'énergie.
La fonction SuperFrost est activée.
→
Pour refroidir rapidement les aliments, le compresseur
u
fonctionne plus longtemps. Ceci est normal.
Une LED clignote régulièrement toutes les 15 secondes*
en bas à l'arrière de l'appareil (vers le compresseur).
L'inverseur est équipé d'un diagnostic d'erreurs à LED.
→
Il est normal qu'il clignote.
u
Les bruits sont trop forts.
Les compresseurs à vitesse variable* peuvent occasionner
→
des bruits de fonctionnement divers en raison des différents niveaux de vitesse.
Ce bruit est normal.
u
Un gargouillement et un clapotis.
Ce bruit provient du fluide réfrigérant qui circule dans le
→
circuit frigorifique.
Ce bruit est normal.
u
Un léger clic.
Le bruit se produit toujours lorsque le groupe frigorifique (le
→
moteur) se met en marche ou s'arrête automatiquement.
Ce bruit est normal.
u
27
Page 28

Mise hors service
Un bourdonnement. Le bruit est brièvement plus fort
lorsque le groupe frigorifique (le moteur) se met en
marche.
L'activation de la fonction SuperFrost, l'introduction d'ali-
→
ments frais ou l'ouverture prolongée de la porte font
augmenter automatiquement la puissance frigorifique.
Ce bruit est normal.
u
La température ambiante est trop élevée.
→
Solution : (voir 1.2)
u
Bruits de vibrations.
u
Essayer de déplacer un peu l'appareil, le mettre à niveau à
l'aide des pieds réglables.
L'affichage de température indique : F0 à F5.
Il y a un dysfonctionnement.
→
S'adresser au S.A.V. (voir Entretien).
u
L'affichage de température indique une panne de
courant.
rature la plus élevée atteinte lors de la panne de courant.
La température de congélation est trop élevée suite à une
→
panne de courant ou une interruption du courant durant les
dernières heures ou jours. Lorsque le courant est rétabli,
l'appareil continue de fonctionner conformément au dernier
réglage de la température.
u
Effacer l'affichage de la température la plus élevée :
appuyer sur la touche Alarme
u
Vérifier la qualité des aliments. Ne pas consommer d'aliments avariés. Ne pas recongeler d'aliments décongelés.
L'affichage de la température est allumé : DEMO.
Le mode démonstration est activé.
→
S'adresser au S.A.V. (voir Entretien).
u
Les parois extérieures de l'appareil sont chaudes.
La chaleur du circuit frigorifique est utilisée pour éviter la
→
condensation d'eau.
Ceci est normal.
u
La température n'est pas assez froide.
La porte de l'appareil n'est pas fermée correctement.
→
Fermer la porte de l'appareil.
u
L'aération et la ventilation sont insuffisantes.
→
Dégager la grille d'aération.
u
La température ambiante est trop élevée.
→
Solution : (voir 1.2) .
u
l'appareil a été ouvert trop souvent ou trop longtemps.
→
Attendre que la température nécessaire se rétablisse d'elle-
u
même. Sinon, adressez-vous au S.A.V. (voir Entretien).
De grandes quantités d'aliments frais ont été introduites
→
sans utiliser la fonction SuperFrost.
Solution : (voir 5.7)
u
la température est mal réglée.
→
Diminuer la température puis vérifier après 24 h.
u
L'appareil est placé trop près d'une source de chaleur.
→
Solution : (voir Mise en service).
u
L'affichage indique des traits ("- -").
La température du congélateur augmente en cas de panne
→
de courant ou de coupure d'électricité.
u
Voir également "Panne de courant" et
L'affichage de température indique la tempé-
Fig. 3 (9)
.
.
8.2
Mise hors service
u
Vider l'appareil.
u
Débrancher la prise.
u
Nettoyer l'appareil (voir 6.2) .
u
Laisser la porte ouverte afin d'éviter toute formation de
mauvaises odeurs.
9 Eliminer l'appareil
L'appareil contient encore des matériaux précieux
et est à amener à un lieu de recyclage spécial.
L'élimination d'anciens appareils est à réaliser
correctement en respectant les prescriptions et lois
en vigueur.
Veiller à ne pas endommager le circuit frigorifique de l'appareil
pour empêcher au réfrigérant y contenu (indications sur la
plaque signalétique) et à l'huile de s'échapper accidentellement.
u
Rendre l'appareil inopérant.
u
Débrancher l'appareil.
u
Sectionner le câble de raccord.
8 Mise hors service
8.1 Couper l'appareil
u
Appuyer sur la touche On/Off
w
L'affichage de température est foncé.
28
Fig. 3 (1)
pendant env. 2 s.
Page 29

Inhoudsopgave
1 Het apparaat in vogelvlucht.................................. 29
1.1 Apparaat- en uitrustingsoverzicht............................. 29
1.2 Toepassingen van het apparaat............................... 29
1.3 Conformiteit.............................................................. 29
1.4 Opstelmaten............................................................. 30
1.5 Energie sparen......................................................... 30
2 Algemene veiligheidsvoorschriften..................... 30
3 Bedienings- en controle-elementen..................... 31
3.1 Bedienings- en controle-elementen.......................... 31
3.2 Temperatuurdisplay................................................. 31
4 In gebruik nemen................................................... 31
4.1 Apparaat transporteren............................................ 31
4.2 Apparaat opstellen................................................... 31
4.3 Scharnierpunt deur omwisselen............................... 32
4.4 Inbouw in het keukenblok......................................... 32
4.5 Afvalverwerking van de verpakking.......................... 33
4.6 Apparaat aansluiten................................................. 33
4.7 Apparaat inschakelen............................................... 33
5 Bediening................................................................ 33
5.1 Helderheid van het temperatuurdisplay.................... 33
5.2 Kinderbeveiliging...................................................... 33
5.3 Temperatuuralarm.................................................... 33
5.4 Levensmiddelen invriezen........................................ 34
5.5 Levensmiddelen ontdooien...................................... 34
5.6 Temperatuur instellen............................................... 34
5.7 SuperFrost............................................................... 34
5.8 Laden....................................................................... 34
5.9 Plateaus................................................................... 34
5.10 VarioSpace............................................................... 35
5.11 Info-systeem............................................................. 35
5.12 Koudeaccu's............................................................. 35
6 Onderhoud.............................................................. 35
6.1 handmatig ontdooien................................................ 35
6.2 Apparaat reinigen..................................................... 35
6.3 Technische Dienst.................................................... 36
7 Storingen................................................................ 36
8 Uitzetten.................................................................. 37
8.1 Apparaat uitschakelen.............................................. 37
8.2 Buiten werking stellen.............................................. 37
9 Apparaat afdanken................................................ 37
De fabrikant werkt voortdurend aan de verdere ontwikkeling
van alle typen en modellen. Daarom vragen wij om uw begrip
voor het feit dat wij wijzigingen in vorm, uitvoering en techniek
moeten voorbehouden.
Om alle voordelen van uw nieuwe apparaat te leren kennen, de
instructies in deze handleiding aandachtig doorlezen a.u.b.
De handleiding geldt voor meerdere modellen, afwijkingen zijn
mogelijk. Paragrafen die alleen voor bepaalde apparaten van
toepassing zijn, zijn gekenmerkt met een sterretje (*).
Gebruiksaanwijzingen zijn gekenmerkt met een
gebruiksresultaten met een .
1 Het apparaat in vogelvlucht
1.1 Apparaat- en uitrustingsoverzicht
Het apparaat in vogelvlucht
Fig. 1
(1) Bedienings- en
controle-elementen
(2) VarioSpace* (5) Verstelbare poten
(3) Schuiflade
1.2 Toepassingen van het apparaat
Het apparaat is alleen geschikt voor het koelen van levensmiddelen in huishoudelijke of soortgelijke omgeving. Hiertoe
behoort bijvoorbeeld het gebruik
in personeelskeukens, bed and breakfasts,
-
door gasten in landhuizen, hotels, motels, en andere onder-
-
komens,
voor catering en soortgelijke diensten in de groothandel
-
Gebruik het apparaat alleen voor huishoudelijke toepassingen.
Alle andere toepassingen zijn niet toegestaan. Het apparaat is
niet geschikt voor het bewaren en koelen van medicijnen,
bloedplasma, laboratoriumpreparaten en dergelijke stoffen en
producten als genoemd in de richtlijn inzake medische hulpmiddelen 2007/47/EG. Misbruik van het apparaat kan leiden tot
schade aan bewaarde producten of tot bederf ervan. Daarnaast is het apparaat niet geschikt voor gebruik op plaatsen
waar ontploffingsgevaar kan heersen.
Het apparaat is volgens de klimaatklasse gebouwd voor
gebruik bij bepaalde omgevingstemperaturen. De klimaatklasse van uw apparaat vindt u op het typeplaatje.
Aanwijzing
u
Respecteer de opgegeven omgevingstemperaturen, zoniet
vermindert de koelprestatie.
Klimaat-
klasse
,
SN, N tot 32 °C
ST tot 38 °C
T tot 43 °C
Een storingsvrije werking van het apparaat is gewaarborgd tot
een minimum omgevingstemperatuur van 5 °C.
voor omgevingstemperaturen
(4) Typeplaatje
Aanwijzing
u
Plateaus, schuifladen of manden zijn in de geleverde
toestand voor een optimale energie-efficiëntie ingedeeld.
1.3 Conformiteit
Het koelmiddelcircuit werd op lekkages gecontroleerd. Het
apparaat voldoet aan de van toepassing zijnde veiligheidsbepalingen en de EG-richtlijnen 2006/95/EG, 2004/108/EG,
2009/125/EG en 2010/30/EU.
29
Page 30

Algemene veiligheidsvoorschriften
1.4 Opstelmaten
Fig. 2
Model h a g e e' d c c'
GP1376 851 553 611 624 653 1129 563 592
GP1476 851 602 611 628 657 1174 613 640
GPesf1476 851 602 611 610 657 1174 597 644
GP1486 851 602
x
Bij apparaten waarbij geen wandafstandhouders worden
meegeleverd of de meegeleverde afstandhouders niet worden
gebruikt, ligt de maat 35 mm (zie 4.2) lager.
646x663x692x1209
x
613 640
1.5 Energie sparen
Zorg altijd voor een goede luchttoevoer en -afvoer. Ventila-
-
tieopeningen resp. -roosters niet afdekken.
Stel het apparaat niet op in direct zonlicht en ook niet naast
-
een fornuis, verwarming of dergelijke.
Het energieverbruik is afhankelijk van opstellingsomstandig-
-
heden b.v. de omgevingstemperatuur (zie 1.2) .
Open het apparaat zo kort mogelijk.
-
Hoe lager de temperatuur wordt ingesteld, des te hoger is
-
het energieverbruik.
Alle levensmiddelen goed verpakt en afgedekt opslaan.
-
Rijpvorming wordt vermeden.
Levensmiddelen slechts zolang als nodig buiten het appa-
-
raat laten staat, zodat ze niet te warm worden.
Warme gerechten in de kast plaatsen: eerst laten afkoelen
-
tot kamertemperatuur.
Wanneer het apparaat een dikke rijplaag heeft: apparaat
-
ontdooien.
Stof doet het energieverbruik toenemen:
de koelmachine met warmtewisselaar -
-
metalen rooster aan de achterkant van
het apparaat - eens per jaar afstoffen.
2 Algemene veiligheidsvoorschriften
Gevaren voor de gebruiker:
Dit apparaat is niet bestemd voor personen (ook kinderen)
-
met fysieke, sensorische of mentale beperkingen of
personen, die niet over voldoende ervaring en kennis
beschikken. Tenzij zij door een persoon, die voor hun veilig-
heid verantwoordelijk is, het gebruik van het apparaat
worden onderwezen en die aanvankelijk toezicht uitoefent.
Erop toezien, dat kinderen niet met het apparaat spelen.
In geval van storing stekker uit het stopcontact trekken
-
(daarbij niet aan het netsnoer trekken) of zekering uitschakelen.
Reparaties, aanpassingen aan het apparaat en het
-
vervangen van het netsnoer alleen laten uitvoeren door de
Technische Dienst of ander daarvoor opgeleid vakpersoneel.
Als u het stroomsnoer van het apparaat uit het stopcontact
-
trekt, altijd bij de stekker nemen. Niet aan het snoer trekken.
Apparaat alleen conform de beschrijving in de handleiding
-
monteren en aansluiten.
Bewaar deze gebruiksaanwijzing zorgvuldig en geef hem
-
eventueel aan de volgende eigenaar door.
Brandgevaar:
Het gebruikte koelmiddel R 600a is milieuvriendelijk, maar
-
brandbaar. Ontsnappend koelmiddel kan vlam vatten.
De buisleidingen van het koelmiddelcircuit niet bescha-
•
digen.
Binnenin het apparaat geen open vuur of ontstekings-
•
bronnen gebruiken.
Binnenin het apparaat geen elektrische apparaten
•
gebruiken (b.v. stoomreinigers, verwarmingsapparatuur,
ijsmachines enz.).
Wanneer koelmiddel ontsnapt: open vuur of ontstekings-
•
bronnen in de nabijheid van het lekpunt verwijderen.
Stekker uit het stopcontact trekken. Ruimte goed ventileren. Contact opnemen met de Technische Dienst.
Geen explosieve stoffen of spuitbussen met brandbare drijf-
-
gassen, zoals b.v. butaan, propaan, pentaan enz. in het
apparaat bewaren. Zulke spuitbussen zijn herkenbaar aan
de op de verpakking vermelde inhoudsstoffen of een vlammensymbool. Eventueel ontsnappende gassen kunnen door
elektrische componenten vlam vatten.
Houd brandende kaarsen, lampen en andere voorwerpen
-
met open vlammen uit de buurt van het apparaat, zodat ze
geen brand veroorzaken.
Sterke alcohol alleen goed gesloten en rechtop staand
-
opslaan. Eventueel lekkende alcohol kan door elektrische
componenten vlam vatten.
Gevaar voor vallen en omkiepen:
Plint, laden, deuren enz. niet als voetensteun of om te
-
leunen misbruiken. Dit geldt in het bijzonder voor kinderen.
Gevaar voor voedselvergiftiging:
Te lang opgeslagen levensmiddelen niet meer nuttigen.
-
Gevaar voor bevriezingen, gevoelloosheid en pijn:
Langdurig huidcontact met koude oppervlakken en
-
gekoelde of ingevroren levensmiddelen vermijden of veiligheidsmaatregelen treffen, b.v. handschoenen dragen.
Consumptie-ijs, met name waterijs of ijsblokjes niet onmiddellijk en niet te koud consumeren.
Neem de specifieke aanwijzingen in de overige hoofdstukken in acht:
GEVAAR duidt een direct gevaar aan, die de
dood of ernstig lichamelijk letsel tot
gevolg kan hebben wanneer dit
gevaar niet vermeden wordt.
WAARSCHUWING
VOORZICHTIG
duidt een gevaarlijke situatie aan,
die de dood of ernstig lichamelijk
letsel tot gevolg kan hebben
wanneer dit gevaar niet vermeden
wordt.
duidt een gevaarlijke situatie aan,
die lichamelijk letsel tot gevolg kan
hebben wanneer dit gevaar niet
vermeden wordt.
30
Page 31

Bedienings- en controle-elementen
LET OP duidt een gevaarlijke situatie aan,
die materiële schade tot gevolg kan
hebben wanneer dit gevaar niet
vermeden wordt.
Aanwijzing geeft aan dat praktische aanwij-
zingen en tips gegeven worden.
3 Bedienings- en controleelementen
3.1 Bedienings- en controle-elementen
Fig. 3
(1) Aan/uit-toets (6) Symbol alarm
(2) Insteltoets (7) Symbool menu
(3) Temperatuurdisplay (8) Symbool kinderbeveiliging
(4) SuperFrost-toets (9) Alarm-toets
(5) Symbool SuperFrost (10)Symbool stroomstoring
3.2 Temperatuurdisplay
Bij normale werking wordt aangegeven:
de warmste vriestemperatuur
-
De temperatuurdisplay knippert:
de temperatuurinstelling wordt gewijzigd
-
na het inschakelen is de temperatuur nog niet voldoende
-
koud
de temperatuur is meerdere graden gestegen
-
Op de display knipperen streepjes:
de vriestemperatuur is hoger dan 0 °C.
-
De volgende aanduidingen wijzen op een storing. Mogelijke
oorzaken en maatregelen voor het oplossen (zie Storingen).
F0 tot F5
-
-
Het symbool voor stroomuitval
licht op.
4.2 Apparaat opstellen
WAARSCHUWING
Brandgevaar door vocht!
Wanneer stroomgeleidende delen of de stroomaansluiting
vochtig worden, kan dat leiden tot kortsluiting.
u
Het apparaat is ontworpen voor gebruik in een gesloten
ruimte. Het apparaat niet buiten, in een vochtige omgeving
of binnen bereik van spatwater plaatsen.
WAARSCHUWING
Brandgevaar door kortsluiting!
Wanneer netsnoer/stekker van het apparaat of een ander
apparaat en de achterzijde van het apparaat tegen elkaar
liggen, kunnen netsnoer/stekker door trillen van het apparaat
worden beschadigd, wat tot kortsluiting kan leiden.
u
Apparaat zo opstellen, dat stekker of netsnoer niet tegen het
apparaat liggen.
u
Stopcontacten die zich aan de achterzijde van het apparaat
bevinden niet gebruiken om het apparaat of andere apparaten aan te sluiten.
WAARSCHUWING
Brandgevaar door koelmiddel!
Het gebruikte koelmiddel R 600a is milieuvriendelijk, maar
brandbaar. Ontsnappend koelmiddel kan vlam vatten.
u
De buisleidingen van het koelmiddelcircuit niet beschadigen.
WAARSCHUWING
Gevaar voor brand en beschadiging!
u
Plaats geen warmte afgevende apparaten, bijv. magnetron,
toaster enz. op het apparaat!
WAARSCHUWING
Gevaar voor brand en beschadiging door verstopte ventilatieopeningen!
u
De ventilatieopeningen regelmatig schoonmaken. Zorg altijd
voor een goede luchttoevoer en -afvoer!
Aanwijzing*
De zakjes aan de achterkant zijn belangrijk voor een goed
functioneren van het apparaat. De inhoud van de zakjes is niet
giftig en ongevaarlijk.
u
Zakjes niet verwijderen!
4 In gebruik nemen
4.1 Apparaat transporteren
Gevaar voor verwonding en beschadiging door verkeerd transport!
u
u
u
VOORZICHTIG
Het apparaat verpakt transporteren.
Het apparaat rechtop transporteren.
Het apparaat niet alleen transporteren.
Neem bij beschadiging van het apparaat onmiddellijk - nog
q
voor het aansluiten - contact op met de leverancier.
De vloer waar het apparaat komt te staan moet waterpas en
q
vlak zijn.
Stel het apparaat niet op in direct zonlicht en ook niet naast
q
een fornuis, verwarming of dergelijke.
Optimale standplaats is een droge en goed geventileerde
q
ruimte.
Het apparaat met de achterkant en indien gewenst inclusief
q
de meegeleverde wandafstandhouders (zie beneden) direct
tegen de muur plaatsen.
Stel het apparaat niet op zonder hulp.
q
De plaatsingsruimte van uw apparaat moet volgens de norm
q
EN 378 per 8 g R 600a koelmiddel over een volume van
1 m3 beschikken. Indien de plaatsingsruimte te klein is, kan
in geval van een lek in het koelmiddelcircuit een ontvlambaar gas-lucht-mengsel ontstaan. Informatie over de
hoeveelheid koelmiddel vindt u op het typeplaatje aan de
binnenkant van het apparaat.
31
Page 32

In gebruik nemen
u
Haal het aansluitsnoer van de achterzijde van het apparaat.
Verwijder hierbij de snoerhouder, anders kunnen trillingsgeluiden ontstaan!
u
Haal de beschermfolie van de buitenzijde van het apparaat.*
u
Verwijder alle transportbeveiligingsonderdelen.
Indien wandafstandhouders bij het apparaat werden geleverd,
wordt door montage en gebruik van deze wandafstandhouders
het aangegeven energieverbruik bereikt. Zonder wandafstandhouders is de diepte van het apparaat 3,50 cmminder. Het niet
gebruiken van de meegeleverde wandafstandhouders heeft
geen invloed op het functioneren van het apparaat. Het energieverbruik van deze apparaten is bij een kleinere wandafstand
echter iets hoger.*
u
Bij een apparaat met meegeleverde wandafstandhouders
deze wandafstandhouders links
en rechts boven aan de achterkant van het apparaat
monteren.*
u
Voer de verpakking af (zie 4.5) .
u
Stel het apparaat met de
meegeleverde steeksleutel en
met behulp van de stelpootjes
(A) en een waterpas stevig en
vlak op.
Aanwijzing
u
Apparaat reinigen (zie 6.2) .
Als het apparaat in een erg vochtige omgeving staat, kan er
condens worden gevormd op de buitenkant van het apparaat.
u
Zorg altijd goed voor een goede ventilatie van de plaatsingsruimte.
4.3 Scharnierpunt deur omwisselen
Indien nodig is kan het scharnierpunt worden verwisseld.
Zorg ervoor dat het volgende gereedschap klaarligt:
Torx® 25
q
Torx® 15
q
meegeleverde steeksleutel
q
evt. tweede persoon voor de montage
q
Gevaar voor verwonding wanneer de deur eruit valt!
u
u
VOORZICHTIG
Deur goed vasthouden.
Deur voorzichtig neerzetten.
Fig. 4 bij apparaten met handgreep
*
u
Ga te werk in de volgorde van de nummering in de afbeelding.
4.4 Inbouw in het keukenblok
(1) Opbouwkast (3) Keukenkast
(2) Apparaat (4) Wand
x
Bij apparaten zonder meegeleverde wandafstandhouders of
wanneer de meegeleverde afstandhouders niet worden
gebruikt, is de afmeting 35 mm (zie 4.2) minder.
Het apparaat
Om het apparaat aan de hoogte van het keukenblok aan te
passen, kunt u er een passende opbouwkast
plaatsen.
Bij ombouw met keukenkasten (max. diepte 580 mm) kan het
apparaat direct naast de keukenkast
steld. Ten opzichte van het keukenkastfront steekt het apparaat opzij 70 mm x en in het midden van het apparaat 85 mm
uit.
Belangrijk voor de ventilatie:
Houd achter de gehele breedte van de opbouwkast een
-
ruimte van minstens 50 mm diepte vrij voor luchtafvoer.
De ventilatieruimte onder het plafond moet minstens
-
300 cm2 bedragen.
Hoe groter de ventilatieruimte, hoe energiezuiniger het
-
apparaat werkt.
Fig. 5 (2)
kan worden ingebouwd in de keuken.
Fig. 5 (1)
Fig. 5 (3)
worden opge-
Fig. 5
op
x
32
Page 33

Bediening
Plaatst u het apparaat met de scharnierkant naast een muur
Fig. 5 (4)
minstens 40 mm bedragen. Dit in verband met het uitsteken
van de deurgreep bij een geopende deur.
, dan moet de afstand tussen apparaat en muur
4.5 Afvalverwerking van de verpakking
WAARSCHUWING
Gevaar voor verstikking door verpakkingsmateriaal en folie!
u
Kinderen niet met het verpakkingsmateriaal laten spelen.
De verpakking bestaat uit recyclebaar materiaal:
Golfkarton/karton
-
Onderdelen uit geschuimd polystyreen
-
Folies en zakken uit polyetheen
-
Spanbanden uit polypropeen
-
Vastgespijkerd houten raam afgewerkt met poly-
-
ethyleen*
u
Breng het verpakkingsmateriaal naar een officieel inzamelpunt.
4.6 Apparaat aansluiten
LET OP
Gevaar voor beschadiging van de elektronische componenten!
u
Gebruik geen omvormer (omzetten van gelijkstroom naar
wisselstroom) of spaarstekker.
WAARSCHUWING
Brand- en oververhittingsgevaar!
u
Gebruik geen verlengsnoer of verdeeldoos.
Stroomsoort (wisselstroom) en spanning op de plaats van
bestemming moeten met de informaties op het typeplaatje (zie
Het apparaat in vogelvlucht) overeenstemmen.
Het apparaat alleen aansluiten op een volgens de
voorschriften geïnstalleerd stopcontact. Het stopcontact moet d.m.v. een zekering van 10 A of zwaarder
beveiligd zijn.
Het moet makkelijk toegankelijk zijn, zodat het apparaat in urgentiegevallen snel van de stroomvoorziening gescheiden kan worden. Het stopcontact mag
zich niet achter het apparaat bevinden.
u
Elektrische aansluiting controleren.
u
Steek de stekker in het stopcontact.
4.7 Apparaat inschakelen
u
Toets On/Off
w
Het apparaat is ingeschakeld. Het temperatuurdisplay en
het symbool Alarm
koud genoeg is.
Fig. 3 (1)
Fig. 3 (6)
indrukken.
knipperen tot de temperatuur
5 Bediening
u
Instelmodus activeren: toets SuperFrost
indrukken.
w
Op de display wordt het symbool Menu
geven.
w
Op de display knippert c.
u
Met de Insteltoets
u
Met de toets SuperFrost
w
Op de display verschijnt de laatst ingestelde
helderheidswaarde.
u
Met de Insteltoets
en h 5 selecteren.
w
De helderheid is ingesteld.
u
Instelmodus deactiveren: Aan/uit-toets
indrukken.
w
Op de temperatuurdisplay wordt weer de temperatuur weergegeven.
Fig. 3 (2)
Fig. 3 (4)
Fig. 3 (2)
h selecteren.
de gewenste waarde tussen h 0
Fig. 3 (4)
Fig. 3 (7)
kort bevestigen.
Fig. 3 (1)
ca. 5 s
weerge-
twee keer
5.2 Kinderbeveiliging
Met de kinderbeveiliging zorgt u ervoor dat kinderen bij het
spelen het apparaat niet onbedoeld uitschakelen.
5.2.1 Kinderbeveiliging instellen
Moet de functie worden ingeschakeld:
u
Instelmodus activeren: toets SuperFrost
indrukken.
w
Op de display wordt het symbool Menu
geven.
w
Op de display knippert c.
u
Met de toets SuperFrost
w
Op de display verschijnt c1.
u
Met de toets SuperFrost
w
Het symbool Kinderbeveiliging
display gaat branden.
w
Op de display knippert c.
w
De functie kinderbeveiliging is ingeschakeld.
Als de instelmodus moet worden beëindigd:
u
de Aan/uit-toets
w
Op de temperatuurdisplay wordt weer de temperatuur weergegeven.
Moet de functie worden uitgeschakeld:
u
Instelmodus activeren: toets SuperFrost
indrukken.
w
Op de display wordt het symbool Menu
geven.
w
Op de display knippert c.
u
Met de toets SuperFrost
w
Op de display verschijnt c0.
u
Met de toets SuperFrost
w
Het symbool Kinderbeveiliging
w
Op de display knippert c.
w
De functie kinderbeveiliging is uitgeschakeld.
Als de instelmodus moet worden beëindigd:
u
de Aan/uit-toets
w
Op de temperatuurdisplay wordt weer de temperatuur weergegeven.
Fig. 3 (1)
Fig. 3 (1)
Fig. 3 (4)
Fig. 3 (4)
Fig. 3 (8)
kort indrukken.
Fig. 3 (4)
Fig. 3 (4)
Fig. 3 (8)
kort indrukken.
Fig. 3 (4)
Fig. 3 (7)
kort bevestigen.
kort bevestigen.
op de
Fig. 3 (4)
Fig. 3 (7)
kort bevestigen.
kort bevestigen.
gaat uit.
ca. 5 s
weerge-
ca. 5 s
weerge-
5.1 Helderheid van het temperatuurdisplay
U kunt de helderheid van het temperatuurdisplay aanpassen
aan het omgevingslicht.
5.1.1 Helderheid instellen
De helderheid is instelbaar tussen h 0 (minimale verlichting) en
h 5 (maximale lichtsterkte).
5.3 Temperatuuralarm
Wanneer de vriestemperatuur niet laag genoeg is, gaat het
akoestisch alarm af.
Tegelijkertijd knipperen de temperatuurdisplay en het symbool
Alarm
Fig. 3 (6)
Het akoestisch alarm stopt automatisch, het symbool Alarm
Fig. 3 (6)
peren, wanneer de temperatuur weer laag genoeg is.
Wanneer het alarm niet uitgaat (zie Storingen).
.
gaat uit en de temperatuurdisplay houdt op met knip-
33
Page 34

Bediening
5.3.1 Temperatuuralarm deactiveren
Het akoestisch alarm kan worden gedeactiveerd. Wanneer de
temperatuur weer laag genoeg is, is de alarmfunctie weer
actief.
u
Toets Alarm
w
Het akoestisch alarm is gedeactiveerd.
Fig. 3 (9)
indrukken.
5.4 Levensmiddelen invriezen
U kunt maximaal zo veel kilo verse levensmiddelen binnen
24 uur invriezen, als op het typeplaatje (zie Het apparaat in
vogelvlucht) onder "Invriescapaciteit ... kg/24h" is aangegeven.
De laden kunnen elk met max. 25 kg diepvriesproducten, de
plateaus elk met max. 35 kg worden belast.
VOORZICHTIG
Gevaar voor verwonding door glasscherven!
Flessen en blikjes drinken kunnen bij het invriezen springen.
Dit geldt met name voor koolzuurhoudend drinken.
u
Flessen en blikjes met drinken niet invriezen!
Om de levenmiddelen snel door en door te laten bevriezen,
mag u de volgende hoeveelheden per verpakking niet overschrijden:
- fruit, groente max. 1 kg
- vlees max. 2,5 kg
u
Verdeel de levensmiddelen in porties en doe ze in diepvrieszakjes of in herbruikbare bakjes van kunststof, metaal of
aluminium.
5.5 Levensmiddelen ontdooien
- bij kamertemperatuur
- in een magnetron
- in een oven/heteluchtoven
u
Ontdooide levensmiddelen alleen bij wijze van uitzondering
weer invriezen.
5.6 Temperatuur instellen
De temperatuur is afhankelijk van de volgende factoren:
hoe vaak de deur wordt geopend
-
de ruimtetemperatuur op de opstellocatie
-
de aard, temperatuur en hoeveelheid levensmiddelen
-
Aanbevolen temperatuurinstelling: -18 °C
De Temperatuur kan doorlopend gewijzigd worden. Is de
instelling -28 °C bereikt, wordt weer bij -14 °C begonnen.
u
Temperatuurfunctie oproepen: Eenmaal Insteltoets
Fig. 3 (2)
w
In het temperatuurdisplay knippert de actuele temperatuur.
u
Temperatuur in stappen van 1 °C wijzigen: Insteltoets
Fig. 3 (2)
weergegeven op de temperatuurdisplay.
u
Temperatuur doorlopend wijzigen: toets ingedrukt houden.
w
Tijdens het instellen wordt de waarde knipperend weergegeven.
w
Ca. 5 s na de laatste druk op de toets, wordt de werkelijke
temperatuur weergegeven. De temperatuur zal zich langzaam instellen op de nieuwe waarde.
indrukken.
indrukken tot de gewenste temperatuur wordt
5.7 SuperFrost
Met deze functie kunt u nieuwe levensmiddelen snel tot op de
kern invriezen. Het apparaat werkt met maximaal koelvermogen, daardoor kunnen geluiden van het koelaggregaat tijdelijk luider zijn.
U kunt maximaal zoveel nieuwe levensmiddelen binnen 24 h
invriezen, als op het typeplaatje onder "invriescapaciteit ... kg/
24h" is aangegeven. De invriescapaciteit is afhankelijk van het
model en de klimaatklasse van het apparaat.
Afhankelijk van de hoeveel nieuwe levensmiddelen die worden
ingevroren, moet SuperFrost bijtijds worden ingeschakeld: bij
een kleine hoeveelheid in te vriezen levensmiddelen ca. 6h, bij
de maximale hoeveelheid in te vriezen levensmiddelen 24h
voordat u de levensmiddelen in de vriezer legt.
Verpak de levensmiddelen en leg ze zo breed mogelijk uit. In te
vriezen levensmiddelen niet met reeds ingevroren producten in
contact brengen om ontdooien van deze producten te voorkomen.
SuperFrost hoeft u in de volgende gevallen niet in te schakelen:
wanneer u reeds ingevroren waren in de diepvriezer legt
-
bij het invriezen van max. ca. 1 kg nieuwe levensmiddelen
-
per dag
5.7.1 Met SuperFrost invriezen
u
Toets SuperFrost
w
Het symbool SuperFrost
w
De vriestemperatuur daalt, het apparaat werkt met maximaal koelvermogen.
Aanwijzing
u
Bij het indrukken van de toets SuperFrost kan het voorkomen dat de compressor door de ingebouwde inschakelvertraging maximaal 8 minuten later wordt ingeschakeld.
Deze vertraging verhoogt de levensduur van de
compressor.
Bij een kleine hoeveelheid in te vriezen levensmiddelen:
u
Ca. 6 u wachten.
u
Verpakte levensmiddelen in de onderste laden leggen.
Bij de maximale hoeveelheid in te vriezen levensmiddelen:
u
Ca. 24 u wachten.
u
Onderste lade uitschuiven en de levensmiddelen direct in
het apparaat leggen, zodat ze contact met de bodem of de
zijwanden hebben.
w
SuperFrost schakelt automatisch uit. Naargelang hoeveelheid nieuwe levensmiddelen op zijn vroegst na 30 h uiterlijk
na 65 h.
w
Het symbool SuperFrost
invriezen is afgesloten.
u
Levensmiddelen in de lade leggen en deze weer inschuiven.
w
Het apparaat werkt in de energiebesparende normale
modus verder.
Fig. 3 (4)
Fig. 3 (5)
eenmaal kort indrukken.
is verlicht.
Fig. 3 (5)
gaat uit, wanneer het
5.8 Laden
u
Om diepvriesproducten direct op de draagplateaus te
bewaren: trek de schuiflade naar voren en haal de lade uit.
5.9 Plateaus
u
Plateau uitnemen: vooraan optillen en
uittrekken.
u
Plateau terugplaatsen: tot aanslag
inschuiven.
34
Page 35

5.10 VarioSpace
Naast de schuifladen kunt u tevens
de plateaus verwijderen. Zo creëert
u plaats voor levensmiddelen van
groot formaat. Gevogelte, vlees,
groot wild en hoog gebak kunnen
geheel en al worden ingevroren en
later verder verwerkt.
u
De laden kunnen elk met max.
25 kg diepvriesproducten, de
plateaus elk met max. 35 kg
worden belast.
5.11 Info-systeem
Onderhoud
w
Als de temperatuurdisplay niet uitgaat, dan is de kinderbeveiliging (zie 5.2) geactiveerd.
u
Trek de stekker uit of schakel de beveiliging uit.
u
Koudeaccu´s boven op de ingevroren levensmiddelen
plaatsen.
u
Bewaar de ingevroren levensmiddelen evt. in een diepvrieslade, en in kranten of dekens gewikkeld, op een koele
plaats.
u
Plaats een pan met heet, niet kokend
water op een plateau in het midden.
-of-
u
De twee onderste lades half met
handwarm water vullen en in het
apparaat plaatsen.
w
Het ontdooien wordt versneld.
u
Laat tijdens het ontdooien de deur van het apparaat open
staan.
u
Losgeraakte ijsstukken uitnemen.
u
Dooiwater evt. meerdere keren met een spons of doek
opnemen.
u
Het apparaat reinigen (zie 6.2) en afdrogen.
Fig. 6
(1) Kant-en-klare
gerechten, ijs
(2) Varkensvlees, vis (5) Wild, paddestoelen
(3) Fruit, groenten (6) Gevogelte, rund-/kalfs-
De getallen geven telkens voor meerdere soorten ingevroren
levensmiddelen de bewaartijd in maanden aan. De vermelde
bewaartijden zijn richtwaarden.
(4) Vleeswaren, brood
vlees
5.12 Koudeaccu's
De koudeaccu's verhinderen bij stroomuitval, dat de temperatuur te snel stijgt.
5.12.1 Koudeaccu's gebruiken
u
De bevroren koudeaccu's boven
in het voorste vriesgedeelte op
de ingevroren levensmiddelen
leggen.
6 Onderhoud
6.1 handmatig ontdooien
In het apparaat vormt zich na langere gebruiksduur een rijpresp. ijslaag.
De vorming van een rijp- resp. ijslaag wordt in de hand gewerkt
door vaak de deur te openen of door warme levensmiddelen in
te leggen. Een dikkere ijslaag verhoogt echter het energieverbruik. Daarom moet u het apparaat regelmatig ontdooien.
Gevaar voor verwonding en beschadiging door hete stoom!
u
u
u
w
u
w
VOORZICHTIG
Voor het ontdooien geen elektrische kacheltjes of stoomreinigers, open vuur of ontdooispray gebruiken.
Gebruik geen scherpe voorwerpen om ijs te verwijderen.
Schakel één dag voor het ontdooien de SuperFrost-functie
in.
De diepvriesproducten krijgen een "koudereserve".
Schakel het apparaat uit.
De temperatuurdisplay gaat uit.
6.2 Apparaat reinigen
VOORZICHTIG
Gevaar voor verwonding en beschadiging door hete stoom!
Hete stoom kan de oppervlakken beschadigen en brandwonden veroorzaken.
u
Gebruik geen stoomreinigers!
LET OP
Verkeerd reinigen kan het apparaat beschadigen!
u
Gebruik reinigingsmiddelen niet in geconcentreerde vorm.
u
Gebruik geen schurende of krassende sponsjes of staalwol.
u
Geen bijtende, schurende, chloor- resp. oplosmiddelbevattende schoonmaakproducten gebruiken.
u
Gebruik geen chemische oplosmiddelen.
u
Beschadig of verwijder het typeplaatje aan de binnenkant
van het apparaat niet. Dit is belangrijk voor de Technische
Dienst.
u
Kabels of andere onderdelen niet afbreken, knikken of
beschadigen.
u
Laat geen reinigingswater in de afvoergoot, de ventilatieroosters en elektrische delen terecht komen.
u
Gebruik zachte poetsdoeken en een allesreiniger met een
neutrale pH-waarde.
u
Gebruik in de binnenruimte van het apparaat alleen levensmiddelenvriendelijke reinigings- en onderhoudsproducten.
u
Apparaat uitruimen.
u
Trek de stekker uit.
u
Luchttoe- en -afvoerroosters regelmatig reinigen.
w
Stof verhoogt het energieverbruik.
u
Uit- en inwendige oppervlaktes van kunststof met lauwwarm water en een beetje afwasmiddel met de hand
reinigen.
u
Gelakte zijwanden mogen uitsluitend met een zachte
schone doek worden afgeveegd. Bij hardnekkig vuil lauwwarm water met allesreiniger gebruiken.*
RVS onderhoudsmiddel niet op glazen of kunststof oppervlakken aanbrengen om krassen te vermijden. Donkere
plekken in het begin en een intensievere kleur van het edelstalen oppervlak zijn normaal.*
u
De buitenkant van roestvrijstaal kan met speciale in de
handel verkrijgbare roestvrijstaalreiniger worden gereinigd.
Vervolgens het meegeleverde rvs onderhoudsmiddel gelijkmatig in slijprichting aanbrengen.*
Na het reinigen:
35
Page 36

Storingen
u
Apparaat en onderdelen droogwrijven.
u
Apparaat weer aansluiten en inschakelen.
u
SuperFrost inschakelen (zie 5.7) .
Wanneer de temperatuur voldoende koud is:
u
de levensmiddelen er weer in leggen.
6.3 Technische Dienst
Probeer eerst of u de storing zelf kunt verhelpen (zie
Storingen). Mocht dit niet het geval zijn, neem dan contact op
met de Technische Dienst. Het adres vindt u in het bijgevoegd
overzicht.
WAARSCHUWING
Gevaar voor verwonding door onvakkundige reparatie!
u
Reparaties en ingrepen aan het apparaat en de stroomaansluiting die niet uitdrukkelijk genoemd worden (zie Onderhoud), uitsluitend door de Technische Dienst laten
uitvoeren.
u
Apparaataanduiding
Fig. 7 (1)
Fig. 7 (2)
Fig. 7 (3)
typeplaatje aflezen.
Het typeplaatje
bevindt zich aan de
linkerkant binnen in
het apparaat.
, service-nr.
en serie-nr.
van het
Fig. 7
u
Contact opnemen met de Technische Dienst en het
probleem, apparaataanduiding
Fig. 7 (2)
w
Dit maakt een snelle en doelgerichte service mogelijk.
u
Het apparaat gesloten laten, totdat de Technische Dienst
komt.
w
De levensmiddelen blijven langer koel.
u
Trek de stekker uit het stopcontact (daarbij niet aan het
snoer trekken) of de draai de zekering uit.
en serie-nr.
Fig. 7 (3)
Fig. 7 (1)
mededelen.
, service-nr.
7 Storingen
Uw apparaat is zo ontworpen en gebouwd, dat een veilige
werking en lange levensduur gegarandeerd zijn. Mocht er
desondanks een storing optreden, dan svp eerst controleren of
de storing door een bedieningsfout werd veroorzaakt. In dit
geval moeten wij de ontstane kosten ook in de garantieperiode
in rekening brengen. Volgende storingen kunt u zelf verhelpen:
Het apparaat functioneert niet.
Het apparaat is niet ingeschakeld.
→
Apparaat inschakelen.
u
De stekker zit niet goed in het stopcontact.
→
Stekker controleren.
u
De zekering van het stopcontact is niet in orde.
→
Zekering controleren.
u
De compressor blijft lopen.
De compressor schakelt bij een verminderde koudebe-
→
hoefte over op een lager toerental. Hoewel de looptijd daardoor langer is, wordt energie bespaard.
Dat is bij energiebesparende modellen normaal.
u
SuperFrost is ingeschakeld.
→
Om de levensmiddelen snel af te koelen, draait de
u
compressor langer. Dit is normaal.
Een led aan de onderachterkant van het apparaat (bij de
compressor) knippert regelmatig om de 15 seconden*.
De inverter is met een foutdiagnose led uitgevoerd.
→
Het knipperen is normaal.
u
Geluiden zijn te luid.
Op toerental gestuurde* compressoren kunnen naar aanlei-
→
ding van de verschillende draaisnelheden verschillende
geluiden veroorzaken.
Het geluid is normaal.
u
Een borrelen en klateren
Dit geluid komt van het koelmiddel, dat door het koelcircuit
→
stroomt.
Het geluid is normaal.
u
Een zacht klikken
Het geluid ontstaat bij het automatisch in- en uitschakelen
→
van het koelaggregaat (de motor).
Het geluid is normaal.
u
Een brommend geluid. Kan voor korte tijd iets luider zijn,
wanneer het koelaggregaat (de motor) inschakelt.
Bij ingeschakelde SuperFrost, nieuw opgeslagen levens-
→
middelen of na lang geopende deur wordt het koelvermogen automatisch verhoogd.
Het geluid is normaal.
u
De omgevingstemperatuur is te hoog.
→
Oplossing: (zie 1.2)
u
Vibratiegeluiden.
u
Apparaat iets verschuiven en met de stelpoten uitlijnen.
In de temperatuurdisplay wordt aangegeven: F0 tot F5.
Het betreft een storing.
→
Contact opnemen met de Technische Dienst (zie Onder-
u
houd).
In de temperatuurdisplay brandt stroomonderbreking
. De temperatuurdisplay toont de hoogste tempera-
tuur die tijdens de stroomonderbreking werd bereikt.
De vriestemperatuur was door stroomuitval of een stroom-
→
onderbreking in de afgelopen uren of dagen te hoog. Zodra
de stroomonderbreking voorbij is, werkt het apparaat weer
verder met de laatste temperatuurinstelling.
u
Aanduiding van de warmste temperatuur wissen: toets
Alarm
u
Fig. 3 (9)
De kwaliteit van de levensmiddelen controleren. Bedorven
levensmiddelen niet meer nuttigen. Ontdooide levensmiddelen niet meer opnieuw invriezen.
In de temperatuurdisplay brandt DEMO.
De demonstratie-modus is geactiveerd.
→
Contact opnemen met de Technische Dienst. (zie Onder-
u
houd).
De buitenkant van het apparaat voelt warm aan.
De warmte van het koelmiddelcircuit wordt gebruikt om
→
condenswater te voorkomen.
Dit is normaal.
u
Temperatuur is niet laag genoeg.
De deur is niet goed gesloten.
→
Deur van het apparaat sluiten.
u
Niet voldoende be- en ontluchting.
→
Luchtrooster schoonmaken.
u
De omgevingstemperatuur is te hoog.
→
Oplossing: (zie 1.2) .
u
Het apparaat werd te vaak of te lang geopend.
→
Afwachten of de benodigde temperatuur weer vanzelf
u
wordt bereikt. Zo niet, contact opnemen met de Technische
Dienst. (zie Onderhoud).
U heeft teveel nieuwe levensmiddelen zonder SuperFrost
→
opgeslagen.
Oplossing: (zie 5.7)
u
De temperatuur is verkeerd ingesteld.
→
Stel de temperatuur lager in en controleer na 24 u.
u
Het apparaat staat te dicht bij een warmtebron.
→
Oplossing: (zie In gebruik nemen).
u
indrukken.
36
Page 37

In de display worden streepjes ("- -") aangegeven.
De vriestemperatuur is door stroomuitval of een stroomon-
→
derbreking boven nul gestegen.
u
Zie ook “Stroomuitval” en “
”
8 Uitzetten
8.1 Apparaat uitschakelen
u
Toets On/Off
w
De temperatuurdisplay is uit.
8.2 Buiten werking stellen
u
Apparaat leegmaken.
u
Stekker uittrekken.
u
Apparaat reinigen (zie 6.2) .
u
Laat de deuren een stukje open staan zodat er geen onaangename geuren kunnen ontstaan.
Fig. 3 (1)
ca. 2 seconden indrukken.
Uitzetten
9 Apparaat afdanken
Het apparaat bevat nog waardevolle materialen en
mag niet met het gewoon huis- of grofvuil worden
meegegeven. Het recyclen van afgedankte apparaten moet vakkundig gebeuren overeenkomstig
de plaatselijk geldende voorschriften en wetten.
Let erop dat bij het afvoeren van het afgedankte apparaat het
koelmiddelcircuit niet wordt beschadigd, zodat het koelmiddel
(informatie op het typeplaatje) of de olie erin niet ongewild vrijkomen.
u
Apparaat onbruikbaar maken.
u
Trek de stekker uit.
u
Snijd het aansluitsnoer door.
37
Page 38

Panoramica dell’apparecchio
Indice
1 Panoramica dell’apparecchio............................... 38
1.1 Panoramica apparecchio e dotazioni....................... 38
1.2 Campo d'impiego dell'apparecchio.......................... 38
1.3 Conformità................................................................ 38
1.4 Dimensioni dell'apparecchio..................................... 39
1.5 Risparmio energetico............................................... 39
2 Avvertenze generali di sicurezza......................... 39
3 Elementi di comando e di visualizzazione.......... 40
3.1 Elementi di comando e di controllo........................... 40
3.2 Display della temperatura......................................... 40
4 Avviamento............................................................. 40
4.1 Trasporto dell'apparecchio....................................... 40
4.2 Installazione dell'apparecchio.................................. 40
4.3 Cambio arresto porta................................................ 41
4.4 Installazione ad incasso........................................... 41
4.5 Smaltimento dell’imballaggio.................................... 42
4.6 Collegamento elettrico............................................. 42
4.7 Accendere l'apparecchio.......................................... 42
5 Uso.......................................................................... 42
5.1 Luminosità del display della temperatura................. 42
5.2 Sicurezza bambini.................................................... 42
5.3 Allarme temperatura................................................. 42
5.4 Congelamento degli alimenti.................................... 43
5.5 Scongelamento degli alimenti.................................. 43
5.6 Impostazione della temperatura............................... 43
5.7 SuperFrost............................................................... 43
5.8 Cassetti.................................................................... 43
5.9 Ripiani...................................................................... 44
5.10 Variospace............................................................... 44
5.11 Sistema informativo.................................................. 44
5.12 Accumulatori di freddo............................................. 44
6 Manutenzione......................................................... 44
6.1 Sbrinamento manuale.............................................. 44
6.2 Pulizia dell'apparecchio............................................ 44
6.3 Servizio di assistenza............................................... 45
7 Guasti...................................................................... 45
8 Messa fuori servizio............................................... 46
8.1 Spegnimento dell’apparecchio................................. 46
8.2 Messa fuori servizio.................................................. 46
9 Smaltimento dell'apparecchio.............................. 46
Il costruttore è impegnato costantemente nello sviluppo di tutti i
tipi e modelli. Certi della vostra comprensione, ci riserviamo il
diritto di apportare modifiche nella forma, nella dotazione e
nella tecnica.
Per poter conoscere tutti i vantaggi del vostro nuovo apparecchio, vi preghiamo di leggere attentamente le avvertenze
contenute nelle presenti istruzioni per l'uso.
Le istruzioni per l’uso sono valide per più modelli, sono possibili
differenze. I paragrafi che si riferiscono solamente a determinati apparecchi, sono contraddistinti con un asterisco (*).
Le istruzioni per eseguire le operazioni sono contraddistinte da un
, i risultati delle operazioni con un .
1 Panoramica dell’apparecchio
1.1 Panoramica apparecchio e dotazioni
Nota
u
Allo stato della consegna ripiani, cassetti o cestelli sono
disposti in modo da garantire un’efficienza energetica ottimale.
Fig. 1
(1) Elementi di comando e
di controllo
(2) VarioSpace (5) Piedini regolabili
(3) Cassetto vano
1.2 Campo d'impiego dell'apparecchio
L'apparecchio è indicato esclusivamente per la refrigerazione
di alimenti in ambiente domestico o in un ambiente simile a
quello domestico. Si intende ad esempio l’utilizzo
in angoli cucina, pensioni con prima colazione,
-
da parte di ospiti in case di campagna, hotel, motel e altri
-
alloggi,
in caso di catering e servizi simili nella grande distribuzione
-
Utilizzare l’apparecchio esclusivamente in un contesto domestico. Tutti gli altri tipi di utilizzo non sono ammessi. L'apparecchio non è idoneo alla conservazione e refrigerazione di medicinali, plasma sanguigno, preparazioni di laboratorio o
sostanze e prodotti simili in base alla Direttiva sui Dispositivi
Medici 2007/47/CE. Un uso improprio dell'apparecchio può
provocare danni ai prodotti conservati o il loro deterioramento.
Inoltre l'apparecchio non è idoneo all'esercizio in aree a rischio
di esplosione.
L'apparecchio è progettato, a seconda della classe climatica,
per l'esercizio a determinate temperature ambiente. La classe
climatica dell'apparecchio è indicata sulla targhetta identificativa.
Nota
u
Rispettare le temperature ambiente indicate, in caso
contrario si riduce la potenza frigorifera.
Classe clima-
tica
SN a 32 °C
ST a 38 °C
T a 43 °C
Il funzionamento perfetto dell'apparecchio è garantito fino ad
una temperatura ambiente minima di 5 °C.
per temperature ambiente
1.3 Conformità
Il circuito del refrigerante è stato sottoposto a prova di tenuta.
L'apparecchio è conforme alle vigenti norme di sicurezza e alle
direttive 2006/95/CE, 2004/108/CE, 2009/125/CE e
2010/30/UE.
(4) Targhetta dati
38
Page 39

Avvertenze generali di sicurezza
1.4 Dimensioni dell'apparecchio
Fig. 2
Modello h a g e e' d c c'
GP1376 851 553 611 624 653 1129 563 592
GP1476 851 602 611 628 657 1174 613 640
GPesf1476 851 602 611 610 657 1174 597 644
GP1486 851 602
x
Per gli apparecchi senza distanziatori per parete allegati o
quando i distanziatori per parete allegati non vengono utilizzati,
la misura si riduce di 35 mm (vedere 4.2) .
646x663x692x1209
x
613 640
1.5 Risparmio energetico
Assicurare sempre una buona ventilazione. Non coprire le
-
griglie o i fori di ventilazione.
Non installare l'apparecchio in luogo esposto alle radiazioni
-
solari dirette, accanto a una cucina, calorifero e simili fonti di
calore.
Il consumo di energia dipende dalle condizioni di installa-
-
zione, ad es. dalla temperatura ambiente (vedere 1.2) .
Aprire la porta dell’apparecchio per lo stretto tempo neces-
-
sario.
Più è bassa la temperatura impostata, maggiore è il
-
consumo di energia.
Conservare tutti gli alimenti correttamente confezionati e
-
coperti. Si evita così la formazione di brina.
Estrarre gli alimenti solo per il tempo necessario, per evitare
-
che si riscaldino troppo.
Inserire cibi caldi: facendoli dapprima raffreddare a tempe-
-
ratura ambiente.
Se nell'apparecchio si forma uno spesso strato di brina: sbri-
-
nare l'apparecchio.
I depositi di polvere aumentano il consumo
energetico:
Pulire una volta all'anno la macchina
-
frigorifera e la griglia metallica dello
scambiatore di calore sul lato posteriore
dell'apparecchio.
2 Avvertenze generali di sicurezza
Pericoli per l’utente:
Il presente apparecchio non è destinato alle persone (anche
-
bambini) con anomalie fisiche, sensoriali o mentali o a
persone che non dispongono di un'esperienza e di cono-
scenze adeguate a meno che non siano state istruite
sull'uso dell'apparecchio e controllate inizialmente a una
personale responsabile della loro sicurezza. Controllare che
i bambini non giochino con l'apparecchio.
In caso di guasto staccare la spina (senza tirare il cavo di
-
alimentazione) o disinserire il fusibile.
Far eseguire le riparazioni, gli interventi sull'apparecchio e la
-
sostituzione del cavo di alimentazione solo dal servizio di
assistenza o da altro personale tecnico appositamente
qualificato.
Se l’apparecchio è staccato dalla rete, afferrare sempre la
-
spina. Non tirare per il cavo.
Montare e collegare l'apparecchio solo secondo i dati ripor-
-
tati nelle istruzioni per l'uso.
Vi preghiamo di conservare accuratamente le istruzioni per
-
l’uso e di trasmetterle eventualmente a futuri proprietari
Pericolo di incendio:
Il refrigerante contenuto R 600a è ecologico, ma infiamma-
-
bile. Il refrigerante che schizza fuori può incendiarsi.
Non danneggiare i condotti del circuito refrigerante.
•
Non operare all'interno dell'apparecchio con fiamme
•
libere o fonti di accensione.
Non utilizzare apparecchi elettrici all’interno dell’apparec-
•
chio (ad. es. pulitrici a vapore, caloriferi, fabbricatori di
gelati, ecc
In caso di fuoriuscita di refrigerante: eliminare le fiamme
•
libere o le fonti di accensione in prossimità del punto di
fuoriuscita. Estrarre la spina di rete. Ventilare bene il
locale. Rivolgersi al servizio di assistenza.
Non conservare sostanze esplosive o spray con propellenti
-
combustibili come p. es. butano, propano, pentano ecc.
nell'apparecchio. Tali spray sono riconoscibili dai dati riportati sull'etichetta stampata o da un simbolo di fiamma.
L'eventuale fuoriuscita di gas può incendiare i componenti
elettrici.
Non avvicinare all’apparecchio candele accese, lampade e
-
altri oggetti con fiamme libere, per evitare che queste incendino l’apparecchio stesso.
Conservare l'alcool di gradazione elevata solo ben chiuso e
-
in piedi. L'eventuale fuoriuscita di alcool può incendiare i
componenti elettrici.
Pericolo di caduta e ribaltamento:
Non usare zoccolo, cassetti, ante ecc. come pedane o
-
come punto di appoggio. Questo vale in particolare per i
bambini.
Pericolo di avvelenamento alimentare:
Non consumare gli alimenti conservati troppo a lungo.
-
Pericolo di congelamento, insensibilità e dolori:
Evitare il contatto prolungato della pelle con le superfici
-
fredde o con il prodotto refrigerato o congelato oppure adottare misure di protezione, p. es. utilizzare guanti di protezione. Non consumare il gelato, in particolare i ghiaccioli o i
cubetti di ghiaccio immediatamente, quando sono troppo
freddi.
Rispettare le avvertenze specifiche riportate negli altri
capitoli:
PERICOLO Segnala una situazione di pericolo
immediato che in caso di mancato
rispetto comporta come conseguenza la morte o gravi lesioni
personali.
AVVERTENZA
ATTENZIONE
Segnala una situazione di pericolo
che in caso di mancato rispetto
potrebbe comportare come conseguenza la morte o gravi lesioni
personali.
Segnala una situazione di pericolo
che in caso di mancato rispetto
potrebbe comportare come conse-
39
Page 40

Elementi di comando e di visualizzazione
guenza lesioni personali di lieve o
media gravità.
ATTENZIONE
Nota Segnala indicazioni e consigli utili.
Segnala una situazione di pericolo
che in caso di mancato rispetto
potrebbe comportare come conseguenza danni materiali.
3 Elementi di comando e di visualizzazione
3.1 Elementi di comando e di controllo
Fig. 3
(1) Tasto On/Off (6) Simbolo Allarme
(2) Tasto di impostazione (7) Simbolo Menu
(3) Indicatore temperatura (8) Simbolo Sicurezza
bambini
(4) Tasto SuperFrost (9) Tasto Allarme
(5) Simbolo SuperFrost (10)Simbolo Guasto alimenta-
zione
3.2 Display della temperatura
In funzionamento normale indica:
la temperatura più alta del congelatore
-
Il display della temperatura lampeggia:
la temperatura impostata viene modificata
-
dopo l’accensione la temperatura non è ancora sufficiente-
-
mente fredda
la temperatura è salita di diversi gradi
-
Nel display lampeggiano delle lineette:
la temperatura del vano congelatore è superiore a 0 °C.
-
Le seguenti indicazioni segnalano un guasto. Cause possibili e
misure per eliminare il guasto: (vedere Guasti).
F0 fino a F5
-
-
Il simbolo guasto di rete
si illumina.
4 Avviamento
4.1 Trasporto dell'apparecchio
Pericolo di lesioni e di danni a causa di un trasporto errato!
u
u
u
ATTENZIONE
Trasportare l'apparecchio imballato.
Trasportare l'apparecchio in posizione verticale.
Non installare l'apparecchio in posizione stand-alone.
4.2 Installazione dell'apparecchio
AVVERTENZA
Pericolo di incendio a causa dell’umidità!
Se gli elementi sotto corrente o il cavo di allacciamento alla
rete si bagnano, si può verificare un cortocircuito.
u
L’apparecchio è progettato per l’utilizzo in ambienti chiusi.
Non utilizzare l’apparecchio all’aperto o in ambienti umidi e
caratterizzati da spruzzi d’acqua.
AVVERTENZA
Pericolo di incendio per cortocircuito!
Se il connettore/cavo di rete dell'apparecchio o di un altro
apparecchio e il retro dell'apparecchio vengono a contatto, il
connettore/cavo di rete di rete possono essere danneggiati
dalle vibrazioni dell'apparecchio al punto che si può verificare
un cortocircuito.
u
Installare l'apparecchio in modo da evitare il contatto con il
connettore o con il cavo di rete.
u
Nelle prese posizionate nella zona posteriore dell'apparecchio non collegare l'apparecchio né altri apparecchi.
AVVERTENZA
Pericolo di incendio a causa del refrigerante!
Il refrigerante contenuto R 600a è ecologico, ma infiammabile.
Il refrigerante che schizza fuori può incendiarsi.
u
Non danneggiare i condotti del circuito refrigerante.
AVVERTENZA
Pericolo di incendio e di danneggiamento!
u
Non appoggiare apparecchi, ad. es. microonde, tostapane,
ecc. sull'apparecchio!
AVVERTENZA
Pericolo di incendio e di danni a causa dei fori di ventilazione
ostruiti!
u
Tenere sempre liberi i fori di ventilazione. Assicurare
sempre una buona ventilazione.
Nota*
Le buste sul retro dell’apparecchio sono importanti per la
funzionalità. Il contenuto è atossico e innocuo.
u
Non rimuovere le buste!
In caso di danni all'apparecchio, rivolgersi immediatamente
q
al fornitore - prima della sua installazione.
Il pavimento del luogo d'installazione deve essere piano e
q
livellato
Non installare l'apparecchio in luogo esposto alle radiazioni
q
solari dirette, accanto a una cucina, calorifero e simili fonti di
calore.
Il luogo di installazione ottimale è una stanza asciutta e ben
q
areata.
Montare sempre l'apparecchio con il lato posteriore e, in
q
caso di utilizzo dei distanziatori a parete in dotazione
(vedere sotto), con questi direttamente a parete.
Non installare l'apparecchio da soli.
q
Il locale in cui viene installato l'apparecchio deve avere ai
q
sensi della norma EN 378 un volume di 1 m3 per ogni8 g di
refrigerante R 600°. Se il locale d'installazione è troppo
piccolo, in caso di perdite dal circuito del refrigerante può
formarsi una miscela infiammabile di aria e gas. Il dato sulla
quantità di refrigerante è riportato sulla targhetta identificativa all'interno dell'apparecchio.
40
Page 41

u
Staccare il cavo di alimentazione dal lato posteriore dell'ap-
parecchio. Rimuovere anche il reggicavo per evitare rumori
dovuti alle vibrazioni!
u
Staccare le pellicole protettive dal lato esterno dell'invo-
lucro.*
u
Rimuovere tutti gli elementi di protezione durante il
trasporto.
Se l'apparecchio è dotato di distanziatori a parete, con il
montaggio e l'utilizzo di tali distanziatori a parete si raggiunge
l'assorbimento d'energia previsto. Senza distanziatori a parete
la profondità indicata dell'apparecchio si riduce di 3,50 cm. Il
mancato utilizzo dei distanziatori a parete in dotazione, non
influisce in alcun modo sulla funzionalità dell'apparecchio.
Tuttavia con questo tipo di apparecchi ad una distanza minore
dalla parete il consumo di energia aumenta leggermente.*
u
In caso di un apparecchio
dotato di supporti a parete,
montare tali supporti a parete
sul retro dell'apparecchio in alto
a sinistra e a destra.*
Avviamento
u
Smaltimento dell’imballaggio (vedere 4.5) .
u
Mettere stabilmente in piano
l’apparecchio agendo sui
piedini di regolazione (A) con
la chiave fissa fornita in dota-
zione e con l’ausilio di una
livella.
Nota
u
Pulire l'apparecchio (vedere 6.2) .
Se l'apparecchio è installato in ambiente umido, sul lato
esterno dell'apparecchio può formarsi della condensa.
u
Assicurare sempre un buon afflusso e deflusso dell'aria nel
luogo d'installazione.
4.3 Cambio arresto porta
Qualora necessario, è possibile cambiare l'arresto.
Assicurarsi di disporre dei seguenti utensili:
Chiave Torx® 25
q
Chiave Torx® 15
q
Chiave a forcella in dotazione
q
Eventuale aiuto di una seconda persona per il lavoro di
q
montaggio
Pericolo di lesioni in caso di ribaltamento della porta!
u
u
ATTENZIONE
Fissare in modo sicuro la porta.
Chiudere con cura la porta.
Fig. 4 Per apparecchi con maniglia della porta
u
Procedere seguendo la sequenza dei numeri di posizione
riportati in figura.
*
4.4 Installazione ad incasso
(1) Mobile da appoggio (3) Mobile da cucina
(2) Apparecchio (4) Parete
x
Per apparecchi sprovvisti di distanziatore a parete in dotazione o qualora i distanziatori in dotazione non vengano utilizzati, la misura si riduce di 35 mm (vedere 4.2) .
L'apparecchio può essere incassato nell’arredamento per la
cucina. Per adattare l’apparecchio
cucina componibile, è possibile applicare sopra l’apparecchio
un adeguato mobile da appoggio
Nell'incasso con mobili da cucina (profondità max. 580 mm)
l'apparecchio può essere installato direttamente accanto al
mobile da cucina
70 mm x e al centro dell'apparecchio 85 mm x rispetto alla parte
anteriore del mobile da cucina.
Importante per la ventilazione:
Sul retro del mobile da appoggio deve essere presente un
-
vano di uscita dell’aria della profondità minima di 50 mm
sull’intera larghezza del mobile da appoggio.
La sezione di aerazione sotto il soffitto del locale deve
-
essere minimo 300 cm2.
Quanto maggiore è la sezione di aerazione, tanto maggiore
-
è il risparmio d'energia dell'apparecchio.
Fig. 5 (3)
Fig. 5 (2)
Fig. 5 (1)
. L'apparecchio sporge di lato
all’altezza della
.
Fig. 5
41
Page 42

Uso
Se l'apparecchio con cerniere viene installato accanto ad una
parete
Fig. 5 (4)
parete deve essere almeno di 40 mm, che corrisponde alla
sporgenza della maniglia con la porta aperta.
, la distanza minima fra l'apparecchio e la
4.5 Smaltimento dell’imballaggio
AVVERTENZA
Pericolo di soffocamento a causa del materiale d’imballaggio e
di film!
u
Non lasciare giocare i bambini con il materiale d’imballaggio.
L’imballaggio è realizzato con materiali riutilizzabili:
Cartone ondulato/cartone
-
Pezzi di schiuma di polistirolo
-
Film e buste di polietilene
-
Reggette in polipropilene
-
Telaio di legno inchiodato con disco in polietilene*
-
u
Conferire il materiale di imballaggio presso un centro di
raccolta autorizzato.
4.6 Collegamento elettrico
ATTENZIONE
Pericolo di danni per l’elettronica!
u
Non utilizzare inverter per impianti ad isola (conversione di
corrente continua in corrente alternata o corrente trifase) o
connettori a risparmio energetico.
AVVERTENZA
Pericolo di incendio e di surriscaldamento!
u
Non utilizzare cavi prolunga o attacchi multipli.
Tipo di corrente (corrente alternata) e tensione del luogo d'installazione devono corrispondere ai dati riportati sulla targhetta
identificativa (vedere Panoramica dell’apparecchio).
Collegare l'apparecchio solo ad una presa con
contatto di terra installata a norma. La presa deve
essere protetta con protezione da 10 A o superiore.
La presa deve essere facilmente accessibile in modo
da poter staccare facilmente l'apparecchio dall'alimentazione elettrica in caso di emergenze. Non deve
trovarsi nella zona posteriore dell'apparecchio.
u
Controllare il collegamento elettrico.
u
Inserire la spina nella presa di rete.
4.7 Accendere l'apparecchio
u
Premere il tasto On/Off
w
L'apparecchio è acceso. Il display della temperatura e il
simbolo dell'allarme
ratura non è sufficientemente fredda.
Fig. 3 (1)
Fig. 3 (6)
.
lampeggiano finché la tempe-
u
Attivare la modalità di impostazione: premere per ca. 5 s il
tasto SuperFrost
w
Sul display viene visualizzato il simbolo menu
w
Sul display lampeggia c.
u
Con il tasto di impostazione
u
Confermare brevemente con il tasto SuperFrost
w
Nel display compare il valore relativo all'illuminazione impostato per ultimo.
u
Con il tasto di impostazione
desiderato tra h 0e h 5.
w
L'illuminazione è così impostata.
u
Disattivare la modalità di impostazione: premere due volte il
tasto On/Off
w
Nell'indicatore di temperatura viene visualizzata nuovamente la temperatura.
Fig. 3 (4)
Fig. 3 (1)
.
.
Fig. 3 (2)
Fig. 3 (2)
Fig. 3 (7)
selezionare h.
Fig. 3 (4)
selezionare il valore
.
.
5.2 Sicurezza bambini
La sicurezza bambini assicura che i bambini giocando non
spengano inavvertitamente l'apparecchio.
5.2.1 Impostare la sicurezza bambini
Quando deve essere attivata la funzione:
u
Attivare la modalità di impostazione: premere per ca. 5 s il
tasto SuperFrost
w
Sul display viene visualizzato il simbolo menu
w
Sul display lampeggia c.
u
Confermare brevemente con il tasto SuperFrost
w
Sul display appare c1.
u
Confermare brevemente con il tasto SuperFrost
w
Sul display si illumina il simbolo sicurezza bambini
Fig. 3 (8)
w
Sul display lampeggia c.
w
La funzione sicurezza bambini è attiva.
Quando deve essere terminata la modalità di impostazione:
u
Premere brevemente il tasto On/Off
w
Nell'indicatore di temperatura viene visualizzata nuovamente la temperatura.
Quando deve essere disattivata la funzione:
u
Attivare la modalità di impostazione: premere per ca. 5 s il
tasto SuperFrost
w
Sul display viene visualizzato il simbolo menu
w
Sul display lampeggia c.
u
Confermare brevemente con il tasto SuperFrost
w
Sul display appare c0 .
u
Confermare brevemente con il tasto SuperFrost
w
Il simbolo sicurezza bambini
w
Sul display lampeggia c.
w
La funzione sicurezza bambini è disattivata.
Quando deve essere terminata la modalità di impostazione:
u
Premere brevemente il tasto On/Off
w
Nell'indicatore di temperatura viene visualizzata nuovamente la temperatura.
.
Fig. 3 (4)
Fig. 3 (4)
.
.
Fig. 3 (8)
Fig. 3 (1)
si spegne.
Fig. 3 (1)
Fig. 3 (7)
Fig. 3 (4)
Fig. 3 (4)
.
Fig. 3 (7)
Fig. 3 (4)
Fig. 3 (4)
.
.
.
.
.
.
.
5 Uso
5.1 Luminosità del display della temperatura
È possibile regolare la luminosità del display della temperatura
in base alle condizioni di luce nel locale d'installazione.
5.1.1 Impostare l'illuminazione
L'illuminazione può essere impostata tra h 0 (illuminazione
minima) e h 5 (intensità luminosa massima).
42
5.3 Allarme temperatura
Se la temperatura del vano congelatore non è sufficientemente
fredda, viene emesso un allarme acustico.
Contemporaneamente lampeggia il display della temperatura e
il simbolo Allarme
L'allarme acustico si disattiva automaticamente e il simbolo
Allarme
di lampeggiare, quando la temperatura è di nuovo sufficientemente fredda.
Se lo stato di allarme permane: (vedere Guasti).
Fig. 3 (6)
Fig. 3 (6)
si spegne e il display della temperatura cessa
.
Page 43

Uso
5.3.1 Disattivazione dell'allarme temperatura
È possibile disattivare l'allarme acustico. Quando la temperatura è di nuovo sufficientemente fredda, la funzione di allarme è
nuovamente attiva.
u
Premere il tasto Allarme
w
L'allarme acustico si spegne.
Fig. 3 (9)
.
5.4 Congelamento degli alimenti
In 24 h è possibile congelare la quantità massima di alimenti
freschi indicata sulla targhetta identificativa (vedere Panoramica dell’apparecchio) alla voce "Capacità di congelamento ...
kg/24h".
I cassetti possono essere caricati con max. 25 kg di alimenti
surgelati, i ripiani rispettivamente con max. 35 kg.
ATTENZIONE
Pericolo di lesioni a causa di pezzi di vetro!
Bottiglie e barattoli con bevande possono esplodere durante il
congelamento. Questo vale in particolare per bevande contenenti anidride carbonica.
u
Non congelare bottiglie e lattine contenenti bevande!
Per congelare rapidamente gli alimenti anche nel loro interno,
non superare le seguenti quantità per porzione:
- frutta, verdura fino ad 1 kg
- carne fino a 2,5 kg
u
Confezionare gli alimenti divisi in porzioni in sacchetti
freezer, contenitori di plastica, metallo o alluminio riutilizzabili.
5.5 Scongelamento degli alimenti
- a temperatura ambiente
- nel forno a microonde
- nel forno elettrico/ventilato
u
Ricongelare gli alimenti scongelati solo in casi eccezionali.
5.6 Impostazione della temperatura
La temperatura dipende dai seguenti fattori:
la frequenza di apertura dello sportello
-
la temperatura ambiente del luogo di installazione
-
il tipo, la temperatura e la quantità degli alimenti
-
Valore raccomandato di impostazione della temperatura:
-18 °C
La temperatura può essere modificata continuamente. Quando
si raggiunge l'impostazione -28 °C, si ricomincia con -14 °C.
u
Richiamare la funzione temperatura: premere una volta il
tasto impostazione
w
Nell'indicatore di temperatura lampeggia la temperatura
attuale.
u
Modificare la temperatura di 1 °C alla volta: premere il tasto
di impostazione
tura non viene visualizzata la temperatura desiderata con la
luce fissa.
u
Modificare continuamente la temperatura: tenere premuto il
tasto.
w
Durante l'impostazione il valore lampeggia.
w
La temperatura effettiva viene visualizzata ca. 5 s dopo aver
premuto per l'ultima volta il tasto. La temperatura passa
lentamente al nuovo valore.
Fig. 3 (2)
Fig. 3 (2)
.
fintanto nell'indicatore di tempera-
rumore del gruppo refrigerante può essere temporaneamente
più forte.
In 24 h è possibile congelare la quantità massima di alimenti
freschi indicata sulla targhetta identificativa alla voce "Capacità
di congelamento ... kg/24h". Questa quantità massima di
alimenti congelati varia secondo il modello e la classe di climatizzazione.
A seconda del numero di alimenti freschi che devono essere
congelati, occorre attivare con anticipo la funzione SuperFrost:
con un quantitativo modesto di alimenti da congelare ca. 6 h
prima, con il quantitativo massimo 24 h prima dell'inserimento
degli alimenti.
Confezionare gli alimenti e sistemarli il più possibile distesi
sulla superficie. Non mettere a contatto alimenti da congelare
con prodotti già congelati, in modo che quest'ultimi non si
scongelino.
Non attivare la funzione SuperFrost nei seguenti casi:
in caso di introduzione di prodotti già congelati
-
in caso di congelamento di ca. 1 kg di alimenti freschi al
-
giorno
5.7.1 Come congelare con la funzione SuperFrost
u
Premere brevemente una volta il tasto SuperFrost
w
Il simbolo SuperFrost
w
La temperatura di congelazione si abbassa, l’apparecchio
funziona con la massima potenza di raffreddamento.
Nota
u
Al momento dell'attivazione del tasto SuperFrost grazie alla
funzione installata di inserimento ritardato è possibile ritardare l'inserimento del compressore di max. 8 minuti. Questo
ritardo aumenta la durata del compressore.
Per una quantità ridotta di alimenti congelati:
u
Attendere circa 6 ore.
u
Sistemare gli alimenti confezionati nei cassetti inferiori.
Con la quantità massima di alimenti congelati:
u
Attendere circa 24 ore.
u
Estrarre il cassetto posto più in basso e inserire gli alimenti
direttamente nell'apparecchio, in modo che siano a contatto
con il fondo o con le pareti laterali.
w
La funzione SuperFrost si disinserisce automaticamente. A
seconda della quantità inserita minimo dopo 30 h, massimo
dopo 65 ore.
w
Iltasto SuperFrost
fase di congelazione.
u
Sistemare gli alimenti nel cassetto e reinserirlo.
w
L’apparecchio continua a funzionare nella modalità normale
a risparmio energetico.
Fig. 3 (5)
Fig. 3 (5)
si illumina.
si spegne, una volta terminata la
Fig. 3 (4)
5.8 Cassetti
u
Per collocare il prodotto congelato direttamente sui ripiani:
tirare in avanti il cassetto ed estrarlo.
.
5.7 SuperFrost
Questa funzione consente di congelare rapidamente alimenti
freschi fino al loro interno. L’apparecchio funziona con la
potenza massima di raffreddamento, per questo motivo il
43
Page 44
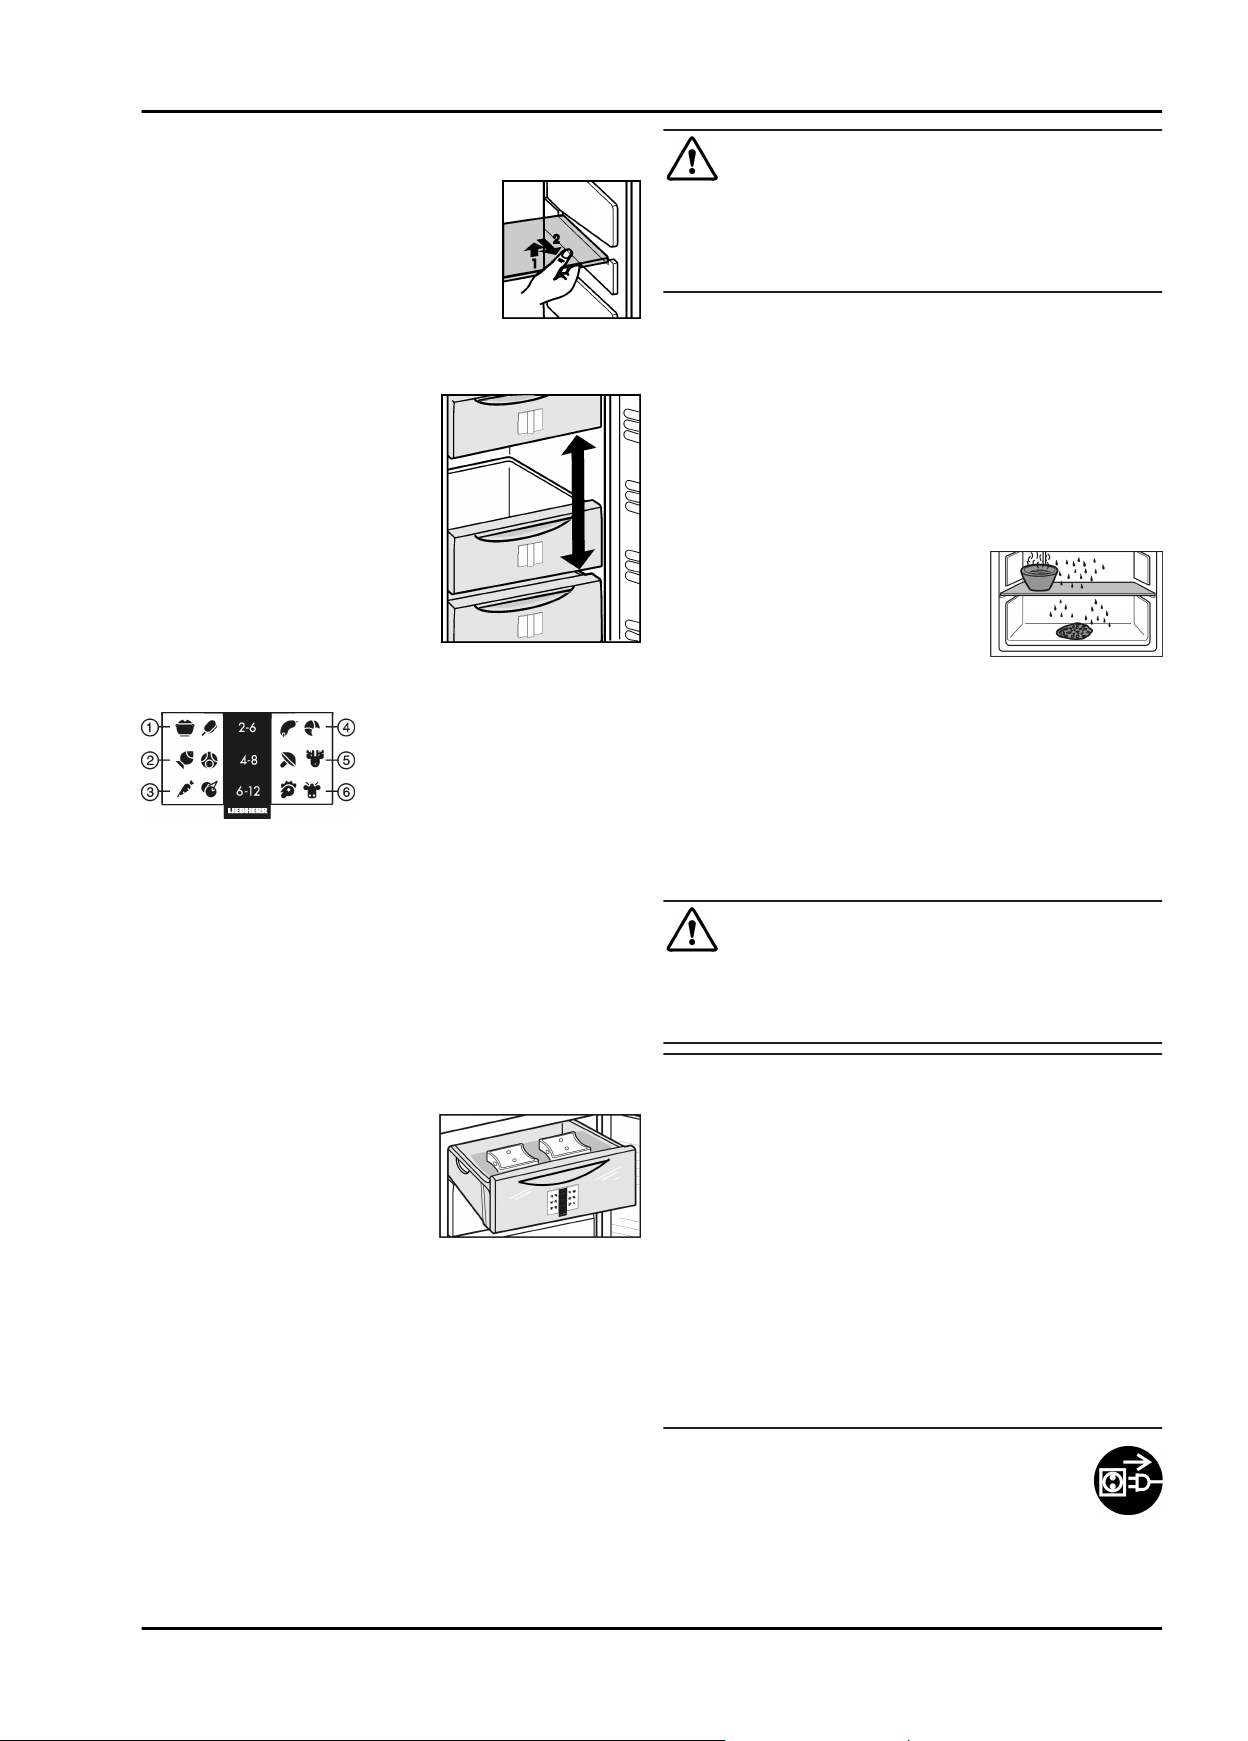
Manutenzione
5.9 Ripiani
u
Rimozione del ripiano: sollevare il ripiano
dal lato anteriore ed estrarlo.
u
Reinserimento del ripiano: spingerlo
semplicemente fino all'arresto.
5.10 Variospace
Oltre ai cassetti estraibili è possibile
togliere anche i ripiani. Si ottiene
così spazio per alimenti congelati di
grandi dimensioni. Pollame, carne,
pezzi di selvaggina di grandi dimensioni e torte alte possono essere
congelati interi e cucinati successivamente.
u
I cassetti possono essere caricati
con max. 25 kg di alimenti, i
ripiani rispettivamente con max.
35 kg.
5.11 Sistema informativo
Fig. 6
(1) Pietanze pronte, gelato (4) Salumi, pane
(2) Carne di maiale, pesce (5) Selvaggina, funghi
(3) Frutta, verdura (6) Pollame, manzo/vitello
I numeri indicano di volta in volta il tempo di conservazione di
diversi prodotti congelati in mesi. I tempi di conservazione indicati sono valori indicativi.
5.12 Accumulatori di freddo
In caso di interruzione di corrente gli accumulatori di freddo
impediscono che la temperatura aumenti troppo rapidamente.
5.12.1 Uso di accumulatori di freddo
u
Appoggiare gli accumulatori di
freddo congelati nella zona anteriore in alto del vano congelatore
direttamente sopra il prodotto
congelato.
6 Manutenzione
6.1 Sbrinamento manuale
Dopo un esercizio prolungato nell'apparecchio si forma uno
strato di brina o di ghiaccio.
Lo strato di brina o ghiaccio si forma più velocemente aprendo
frequentemente la porta o introducendo vivande calde. Uno
spesso strato di ghiaccio aumenta tuttavia il consumo
d'energia. Per questo motivo consigliamo di sbrinare regolarmente l'apparecchio.
Pericolo di danni e di lesioni a causa del vapore caldo!
u
u
u
w
u
w
w
u
u
u
u
-o-
u
w
u
u
u
u
6.2 Pulizia dell'apparecchio
Pericolo di danni e di lesioni a causa del vapore caldo!
Il vapore caldo può danneggiare le superfici e provocare
ustioni.
u
ATTENZIONE
Una pulizia sbagliata danneggia l’apparecchio!
u
u
u
u
u
u
u
u
u
u
u
u
w
ATTENZIONE
Per lo sbrinamento non utilizzare apparecchi elettrici di
pulizia con calore o a vapore, fiamme libere o spray per lo
sbrinamento.
Non rimuovere il ghiaccio con oggetti appuntiti.
Un giorno prima dello sbrinamento attivare la funzione
SuperFrost.
Il prodotto congelato incamera in tal modo una "riserva di
freddo".
Spegnimento dell’apparecchio.
Il display della temperatura si spegne.
Se il display della temperatura non si spegne, la sicurezza
bambini (vedere 5.2) è attiva.
Staccare la spina o disinserire il fusibile.
Appoggiare gli accumulatori di freddo sul cibo congelato.
Avvolgere eventualmente il prodotto congelato nel cassetto
in carta da giornale o coperte e riporlo in luogo molto fresco.
Collocare su un ripiano centrale una
pentola con acqua calda non
bollente.
Riempire i due cassetti inferiori a
metà con acqua tiepida e inserirli
nell'apparecchio.
In tal modo si accelera lo sbrinamento.
Lasciare aperta la porta dell'apparecchio durante lo sbrinamento.
Togliere i pezzi di ghiaccio che si staccano.
Raccogliere eventualmente più volte l'acqua di sbrinamento
con una spugna o un panno.
Pulire l'apparecchio (vedere 6.2) e asciugare.
ATTENZIONE
Non utilizzare pulitrici a vapore!
Non utilizzare i detergenti concentrati.
Non utilizzare spugne abrasive o paglietta.
Non utilizzare prodotti corrosivi, abrasivi, contenenti sabbia,
cloruri, prodotti chimici o acidi.
Non utilizzare solventi chimici.
Non danneggiare o asportare la targhetta identificativa all'interno dell'apparecchio. È importante per il servizio di assistenza.
Non strappare, piegare o danneggiare i cavi o altri componenti.
Non far penetrare l'acqua di pulizia nella canaletta di
scarico, nelle griglie di aerazione e nei componenti elettrici.
Utilizzare panni morbidi ed un detergente multiuso con un
pH neutro.
Per l'interno utilizzare solo detergenti e detersivi non pericolosi per gli alimenti.
Svuotare l'apparecchio.
Estrarre la spina di rete.
Pulire regolarmente la griglia di afflusso e deflusso
dell'aria.
I depositi di polvere aumentano il consumo energetico.
44
Page 45

u
Pulire le superfici interne ed esterne di plastica a mano
con acqua tiepida e poco detersivo.
u
Asciugare le pareti laterali verniciate esclusivamente con
un panno morbido e pulito. In presenza di sporco ostinato
utilizzare acqua tiepida con detergente neutro.*
Non applicare il detergente per acciaio inossidabile sulle
superfici di vetro o plastica, in modo da non graffiarle. Punti
inizialmente più scuri ed un colore più intenso della superficie
d'acciaio sono normali.*
u
In presenza di sporco, pulire le superfici esterne d’acciaio
inossidabile con un comune detergente per acciaio inossi-
dabile. Successivamente applicare uniformemente il
prodotto per acciaio in dotazione nel senso di levigatura
dell'acciaio.*
Dopo la pulizia:
u
Strofinare ed asciugare le parti in dotazione.
u
Allacciare nuovamente l'apparecchio all'alimentazione elettrica ed accenderlo.
u
Attivare la funzione SuperFrost (vedere 5.7) .
Quando la temperatura è sufficientemente fredda:
u
Inserire nuovamente gli alimenti.
6.3 Servizio di assistenza
Controllare dapprima in base alla tabella dei guasti contenuta
nel capitolo (vedere Guasti) se è possibile eliminare autonomamente il problema. Se non è possibile, rivolgersi al servizio di
assistenza. L'indirizzo è riportato nell'elenco servizio assistenza allegato.
Pericolo di lesioni a causa di riparazioni eseguite da personale
non qualificato!
u
u
AVVERTENZA
Riparazioni e interventi sull’apparecchio e sul cavo di collegamento alla rete, non espressamente indicati nel (vedere
Manutenzione), devono essere eseguiti solo dall’assistenza
tecnica.
Leggere la denominazione dell'apparecchio
Fig. 7 (1)
stenza
di serie
targhetta identificativa.
La targhetta identificativa è situata all'interno dell'apparecchio, sul lato sinistro.
, il n° assi-
Fig. 7 (2)
Fig. 7 (3)
e il n°
sulla
Fig. 7
u
Informare il servizio di assistenza e comunicare il difetto, la
denominazione dell'apparecchio
Fig. 7 (2)
w
Questi dati consentono di offrire un'assistenza rapida e
mirata.
u
Lasciare l'apparecchio chiuso fino a quando non arriva il
tecnico dell'assistenza.
w
Gli alimenti restano freschi più a lungo.
u
Staccare la spina (senza tirare il cavo di alimentazione) o
disinserire il fusibile.
e il n° di serie
Fig. 7 (3)
Fig. 7 (1)
.
, il n° assistenza
7 Guasti
L'apparecchio è progettato e realizzato in modo da garantire un
funzionamento sicuro e una lunga durata. Se però durante il
funzionamento dovesse verificarsi un guasto, verificare se il
guasto è riconducibile ad un errore di comando. In tal caso
anche durante il periodo di validità della garanzia devono
essere conteggiati i costi derivanti. I guasti indicati di seguito
possono essere risolti autonomamente:
Guasti
L'apparecchio non funziona.
L'apparecchio non è acceso.
→
Accendere l'apparecchio.
u
La spina di rete non si infila correttamente nella presa.
→
Controllare la spina di rete.
u
Il fusibile della presa non funziona bene.
→
Controllare il fusibile.
u
Il compressore funziona a lungo.
Il compressore si attiva ad un basso numero di giri in caso
→
di una modesta richiesta di raffreddamento. Sebbene
aumenti il tempo di funzionamento, si risparmia energia.
Questo è normale nei modelli a risparmio energetico.
u
La funzione SuperFrost è inserita.
→
Per raffreddare rapidamente gli alimenti, il compressore
u
funziona più a lungo. Questo è normale.
Un LED posto dietro in basso nell'apparecchio (nel
compressore) lampeggia regolarmente ogni 15 secondi*.
L’inverter è dotato di un LED per la diagnosi errori.
→
Il lampeggio è normale.
u
Rumorosità eccessiva.
I compressori a velocità regolata* a causa dei differenti
→
livelli di velocità possono provocare rumori di funzionamento diversi.
Il rumore è normale.
u
Si avverte un gorgoglio e uno scroscio.
Questo rumore è prodotto dal refrigerante, che scorre nel
→
relativo circuito.
Il rumore è normale.
u
Un lieve clic
Il rumore si avverte ogni volta che il gruppo refrigerante (il
→
motore) si inserisce e disinserisce automaticamente.
Il rumore è normale.
u
Un ronzio. È più rumoroso per un breve periodo di tempo,
quando si inserisce il gruppo refrigerante (il motore).
Con la funzione SuperFrost inserita, con alimenti freschi
→
appena inseriti o dopo un'apertura prolungata della porta, la
potenza di raffreddamento aumenta automaticamente.
Il rumore è normale.
u
La temperatura ambiente è troppo elevata.
→
Soluzione: (vedere 1.2)
u
Rumore di vibrazione
u
Spostare leggermente l'apparecchio, livellare agendo sui
piedini di regolazione.
Nel display della temperatura è visualizzato: F0 fino a F5.
È presente un errore.
→
Rivolgersi al servizio di assistenza (vedere Manutenzione).
u
Nel display della temperatura si illumina Guasto di rete
. Nel display della temperatura si visualizza la tempe-
ratura più calda, raggiunta durante il guasto di rete.
A causa di un guasto di rete o di un'interruzione di corrente
→
verificatesi nelle ultime ore o negli ultimi giorni, la temperatura di congelazione è aumentata troppo. Una volta
conclusa l'interruzione di corrente, l'apparecchio continua a
funzionare alla temperatura impostata per ultima.
u
Cancellare la visualizzazione della temperatura più calda:
Premere il tasto Allarme
u
Controllare la qualità degli alimenti. Non consumare alimenti
deteriorati. Non ricongelare gli alimenti scongelati.
Nel display della temperatura si illumina DEMO.
È attivata la modalità DEMO.
→
Rivolgersi al servizio di assistenza. (vedere Manutenzione).
u
L'apparecchio è caldo sulle superfici esterne.
Il calore del circuito del refrigerante viene utilizzato per
→
evitare la formazione di acqua di condensa.
Questo è normale.
u
Fig. 3 (9)
.
45
Page 46

Messa fuori servizio
La temperatura non è sufficientemente fredda.
La porta dell'apparecchio non è chiusa correttamente.
→
Chiudere la porta dell'apparecchio.
u
La ventilazione non è sufficiente.
→
Liberare la griglia di ventilazione.
u
La temperatura ambiente è troppo elevata.
→
Soluzione: (vedere 1.2) .
u
L'apparecchio è stato aperto troppo spesso o troppo a
→
lungo.
Attendere se la temperatura richiesta si regola di nuovo da
u
sola. In caso contrario, rivolgersi al servizio di assistenza.
(vedere Manutenzione).
Sono state introdotte quantità eccessive di alimenti freschi
→
senza aver inserito SuperFrost.
Soluzione: (vedere 5.7)
u
La temperatura è regolata in modo errato.
→
Regolare la temperatura su valori più freddi e controllare
u
dopo 24 ore.
L'apparecchio è troppo vicino ad una sorgente di calore.
→
Soluzione: (vedere Avviamento).
u
Nel display vengono visualizzate delle lineette("- -").
A causa di un guasto di rete o di un'interruzione di corrente,
→
la temperatura di congelazione è salita oltre lo zero.
u
Vedere anche “Mancanza di corrente” e “ ”
8 Messa fuori servizio
8.1 Spegnimento dell’apparecchio
u
Premere il tasto On/Off
w
Il display della temperatura è spento.
Fig. 3 (1)
per ca. 2 s.
8.2 Messa fuori servizio
u
Svuotare l'apparecchio.
u
Estrarre la spina di rete.
u
Pulire l'apparecchio (vedere 6.2) .
u
Lasciare aperta la porta per evitare la formazione di cattivi
odori.
9 Smaltimento dell'apparecchio
L'apparecchio contiene ancora materiali preziosi e
deve essere smaltito in un centro diverso dalla
raccolta indifferenziata dei rifiuti urbani. Gli apparecchi fuori uso devono essere smaltiti a regola
d'arte in conformità alle norme e leggi locali.
Non danneggiare il circuito refrigerante dell'apparecchio fuori
uso durante il trasporto per evitare che il refrigerante in esso
contenuto (dati riportati sulla targhetta identificativa) e l’olio
possano fuoriuscire senza controllo.
u
Mettere fuori uso l'apparecchio.
u
Estrarre la spina di rete.
u
Staccare il cavo di alimentazione.
46
Page 47

Contenido
1 Visión general del aparato.................................... 47
1.1 Vista general de los aparatos y la dotación.............. 47
1.2 Ámbito de uso del aparato........................................ 47
1.3 Conformidad............................................................ 47
1.4 Dimensiones de instalación...................................... 48
1.5 Ahorro de energía..................................................... 48
2 Notas generales sobre seguridad........................ 48
3 Componentes de uso e indicación...................... 49
3.1 Elementos de control y manejo................................ 49
3.2 Indicación de temperatura........................................ 49
4 Puesta en marcha.................................................. 49
4.1 Transporte del aparato............................................. 49
4.2 Instalación del aparato............................................. 49
4.3 Cambio de goznes................................................... 50
4.4 Inserción en el mueble de la cocina.......................... 50
4.5 Eliminación del embalaje.......................................... 51
4.6 Conexión del aparato............................................... 51
4.7 Encender el aparato................................................. 51
5 Uso.......................................................................... 51
5.1 Brillo de la indicación de temperatura....................... 51
5.2 Bloqueo contra la manipulación por niños................ 51
5.3 Alarma de temperatura............................................. 51
5.4 Congelación de alimentos........................................ 52
5.5 Descongelación de alimentos.................................. 52
5.6 Ajustar la temperatura.............................................. 52
5.7 SuperFrost............................................................... 52
5.8 Cajones.................................................................... 52
5.9 Superficies de depósito............................................ 53
5.10 VarioSpace............................................................... 53
5.11 Sistema de información............................................ 53
5.12 Acumuladores de frío............................................... 53
6 Mantenimiento....................................................... 53
6.1 Desescarche manual................................................ 53
6.2 Limpiar el aparato..................................................... 53
6.3 Servicio postventa.................................................... 54
7 Averías.................................................................... 54
8 Puesta fuera de servicio....................................... 55
8.1 Desconectar el aparato............................................ 55
8.2 Puesta fuera de servicio........................................... 55
9 Desechar el aparato.............................................. 55
El fabricante trabaja continuamente para seguir desarrollando
todos los tipos y modelos. Por lo tanto, agradeceríamos su
comprensión ante posibles modificaciones de la forma, el
equipo y la técnica.
Para conocer todas las ventajas de su nuevo aparato, lea detenidamente las indicaciones de este manual.
Las instrucciones son válidas para varios modelos; pueden
producirse variaciones. Las secciones que sólo se refieren a
determinados aparatos aparecen marcadas con un asterisco
(*).
Las instrucciones de procedimiento aparecen marcadas
con un
marcados con un .
, los resultados de procedimiento aparecen
1 Visión general del aparato
1.1 Vista general de los aparatos y la dotación
Nota
u
Las bandejas, cajones o cestos se entregan colocados de
tal manera que se logre una eficiencia energética óptima.
Visión general del aparato
Fig. 1
(1) Elementos de control y
manejo
(2) VarioSpace (5) Patas regulables en altura
(3) Cajón
1.2 Ámbito de uso del aparato
El aparato es adecuado exclusivamente para la refrigeración
de alimentos en entornos domésticos o similares. Entre ellos
se encuentra, por ejemplo, el uso
en cocinas para personal, hostales,
-
por parte de huéspedes de casas rurales, hoteles, moteles
-
y otros alojamientos,
en catering y servicios similares de venta al por mayor
-
Utilice el aparato exclusivamente en entornos domésticos
habituales. No se permite ningún otro tipo de aplicación. El
aparato no es adecuado para el almacenamiento y la refrigeración de medicamentos, plasma sanguíneo, preparados de
laboratorio o sustancias y productos similares basados en la
directiva sobre productos sanitarios 2007/47/CE. Un uso
abusivo del aparato puede provocar daños en el producto
almacenado o su deterioro. El aparato tampoco es adecuado
para su funcionamiento en zonas con peligro de explosión.
El aparato se ha diseñado para el funcionamiento a temperaturas ambiente limitadas en función de la clase de climatización. La clase de climatización adecuada para su aparato
figura en la placa de identificación.
Nota
u
Respete las temperaturas ambiente indicadas; de lo
contrario, disminuye la potencia de refrigeración.
Clase de
climatización
SN, N a 32 °C
ST a 38 °C
T a 43 °C
El correcto funcionamiento del aparato queda garantizado
hasta una temperatura ambiente inferior de 5 °C.
para temperaturas ambiente
1.3 Conformidad
Se ha comprobado la estanqueidad del circuito de refrigerante.
El aparato cumple las disposiciones de seguridad pertinentes y
las directivas CE 2006/95/CE, 2004/108/CE, 2009/125/CE y
2010/30/UE.
(4) Placa de características
47
Page 48

Notas generales sobre seguridad
1.4 Dimensiones de instalación
Fig. 2
Modelo h a g e e' d c c'
GP1376 851 553 611 624 653 1129 563 592
GP1476 851 602 611 628 657 1174 613 640
GPesf1476 851 602 611 610 657 1174 597 644
GP1486 851 602
x
En aparatos sin distanciador de pared incluido o cuando los
distanciadores incluidos no se utilizan, la medida disminuye en
35 mm (consulte 4.2) .
646x663x692x1209
x
613 640
1.5 Ahorro de energía
Preste siempre atención a que exista una buena ventilación
-
y escape de aire. No cubra los orificios de ventilación ni las
rejillas de aire.
No coloque el aparato en una zona de radiación solar
-
directa, ni junto a la cocina, la calefacción, etc.
El consumo de energía depende de las condiciones de
-
instalación como, por ejemplo, la temperatura ambiente
(consulte 1.2) .
Abra el aparato durante el menor tiempo posible.
-
Cuanto más baja se ajuste la temperatura, mayor será el
-
consumo de energía.
Guarde todos los alimentos bien envasados y tapados. Así
-
se evita la formación de escarcha.
Extraiga los alimentos únicamente mientras sea necesario
-
para que no se calienten en exceso.
Introducción de alimentos calientes: deje que se enfríen a
-
temperatura ambiente.
Si existe una capa de escarcha gruesa en el aparato:
-
desescarche el aparato.
La acumulación de polvo aumenta el
consumo de energía:
Elimine el polvo del frigorífico con el
-
intercambiador de calor - rejilla metálica
en la parte trasera del aparato - una vez
al año.
2 Notas generales sobre seguridad
Peligros para el usuario:
Este aparato no está destinado a personas (también niños)
-
con discapacidades físicas, sensoriales o mentales ni a
personas que no posean suficiente experiencia y conocimientos. a menos que una persona responsable de su
seguridad les instruya acerca de la utilización del aparato y
les vigile al principio. Vigile que los niños no jueguen con el
aparato.
En el caso de producirse un error, retire el enchufe de
-
alimentación de red (no tire del cable de conexión), o bien
desconecte el fusible.
Encargue las reparaciones, intervenciones en el aparato y
-
la sustitución de la línea de alimentación eléctrica al servicio
postventa o a personal técnico especializado.
Al desconectar el aparato de la red, agarre siempre el cable
-
por el enchufe. No tire del cable.
Monte y conecte el aparato siguiendo estrictamente las indi-
-
caciones.
Conserve este manual de instrucciones cuidadosamente y,
-
dado el caso, entrégueselo al siguiente propietario.
Peligro de incendio:
El refrigerante incluido R 600a respeta el medio ambiente,
-
pero es inflamable. Las salpicaduras de refrigerante pueden
inflamarse.
No dañe las tuberías del circuito frigorífico.
•
No trabaje con llamas libres ni fuentes de ignición en el
•
interior del aparato.
No utilice aparatos eléctricos en el interior del aparato
•
(por ej. aparatos de limpieza a vapor, aparatos calefactores, preparadores de helados etc.).
Si se producen fugas de refrigerante: elimine las llamas
•
libres o fuentes de ignición cercanas al lugar de la fuga.
Desconecte el enchufe de alimentación de red. Ventile
bien el recinto. póngase en contacto con el servicio postventa.
No guarde sustancias explosivas o envases aerosol con
-
propulsores inflamables como, por. ej. butano, propano,
pentano, etc. en el aparato. Estos envases aerosol se
pueden distinguir por la indicación de contenido impresa o
por el símbolo de una llama. El gas que se escape se puede
inflamar con componentes eléctricos.
Mantenga lejos del aparato velas encendidas, lámparas u
-
otros objetos con llamas libres para no prender fuego al
aparato.
Guarde el alcohol de alto porcentaje sólo herméticamente
-
cerrado y en vertical. El alcohol que se escape se puede
inflamar con componentes eléctricos.
Peligro de caída o vuelco:
No utilice indebidamente el zócalo, los cajones, las puertas,
-
etc. como peldaño o para apoyarse. Esto se aplica sobre
todo a los niños.
Peligro de intoxicación alimentaria:
No consuma alimentos superpuestos.
-
Peligro de congelación, sensación de aturdimiento y
dolor:
Evite un contacto continuado de la piel con superficies frías
-
o alimentos refrigerados/congelados o tome medidas de
protección, por ej. utilice guantes. No consuma helados y,
en particular, helados de hielo o cubitos de hielo al instante
ni demasiado fríos.
Observe las indicaciones específicas descritas en los
demás capítulos:
PELIGRO identifica una situación de peligro
inminente que, si no se evita, puede
producir lesiones graves o incluso la
muerte.
ADVERTENCIA
identifica una situación de peligro
que, si no se evita, puede producir
lesiones graves o incluso la muerte.
48
Page 49

Componentes de uso e indicación
ATENCIÓN identifica una situación de peligro
que, si no se evita, puede producir
lesiones leves o moderadas.
AVISO identifica una situación de peligro
que, si no se evita, puede producir
daños materiales.
Nota identifica indicaciones y recomen-
daciones útiles.
3 Componentes de uso e indicación
3.1 Elementos de control y manejo
Fig. 3
(1) Tecla On/Off (6) Símbolo Alarma
(2) Tecla de ajuste (7) Símbolo Menú
(3) Indicador de tempera-
tura
(4) Tecla SuperFrost (9) Tecla Alarma
(5) Símbolo SuperFrost (10)Símbolo Fallo de corriente
(8) Símbolo Seguridad para
niños
4.2 Instalación del aparato
ADVERTENCIA
Riesgo de incendio derivado de la humedad
Si las piezas conductoras de electricidad o la línea de alimentación eléctrica se humedecen, puede producirse un cortocircuito.
u
El aparato está diseñado para utilizarse en espacios
cerrados. No ponga en funcionamiento el aparato en un
lugar al aire libre, expuesto a la humedad ni a las salpicaduras de agua.
ADVERTENCIA
¡Peligro de incendio a consecuencia de un cortocircuito!
Si los cables de red/conectores del aparato o de otro aparato
entran en contacto con la parte trasera del mismo, los cables
de red/conectores pueden sufrir daños debido a las vibraciones del aparato y se puede producir un cortocircuito.
u
Coloque el aparato de tal forma que no entre en contacto
con ningún conector o cable de red.
u
No conecte el aparato ni otros aparatos en cajas de enchufe
situadas en el área de la parte trasera del aparato.
ADVERTENCIA
Riesgo de incendio derivado del refrigerante
El refrigerante R 600a contenido es respetuoso con el
medioambiente pero inflamable. Las salpicaduras de refrigerante pueden inflamarse.
u
No dañe las tuberías del circuito frigorífico.
3.2 Indicación de temperatura
Durante el funcionamiento normal se indica:
la temperatura más alta de congelación
-
La indicación de temperatura parpadea:
se modifica el ajuste de temperatura
-
la temperatura todavía no es lo suficientemente baja
-
después de la activación
la temperatura ha aumentado varios grados
-
En la pantalla parpadean unas líneas:
la temperatura de congelación es superior a 0 °C.
-
Las siguientes indicaciones advierten acerca de la existencia
de una avería. Encontrará las posibles causas y las medidas
de subsanación (consulte Averías).
F0 hasta F5
-
-
El símbolo de fallo de alimentación
se ilumina.
4 Puesta en marcha
4.1 Transporte del aparato
Riesgo de daños y lesiones derivado de un transporte inadecuado
u
u
u
ATENCIÓN
Transporte el aparato embalado.
Transporte el aparato en posición vertical.
No transporte el aparato solo.
ADVERTENCIA
Peligro de incendio y de sobrecalentamiento
u
No coloque aparatos que emiten calor como, por ej.
microondas, tostadoras etc. sobre el aparato.
ADVERTENCIA
¡Peligro de incendio y de daños a consecuencia del bloqueo
de los orificios de ventilación!
u
Deje siempre libres los orificios de ventilación. ¡Asegúrese
de que existe buena ventilación y escape de aire!
Nota*
Las bolsas situadas en la parte trasera del aparato son importantes para la capacidad de funcionamiento. Su contenido no
es tóxico ni peligroso.
u
No se deben retirar las bolsas.
Si existe algún daño en el aparato, consulte de inmediato -
q
antes de conectarlo - al proveedor.
El suelo del lugar de instalación debe ser horizontal y liso.
q
No coloque el aparato en una zona de radiación solar
q
directa, ni junto a la cocina, la calefacción o similares.
El lugar de instalación óptimo es un recinto seco y bien
q
ventilado.
Instale el aparato con la parte trasera y, si se utilizan los
q
distanciadores suministrados (consulte más abajo), con
éstos siempre colocados directamente en la pared.
No coloque el aparato sin ayuda de otra persona.
q
49
Page 50

Puesta en marcha
Según la norma EN 378, el lugar de instalación de su
q
aparato debe tener por cada 8 g de refrigerante R 600a un
volumen de 1 m3. Si el lugar de instalación es demasiado
pequeño, al producirse una fuga en el circuito frigorífico se
puede formar una mezcla inflamable de gas y aire. La
cantidad de refrigerante se indica en la placa de identifica-
ción situada en el interior del aparato.
u
Saque el cable de conexión de la parte trasera del aparato.
Retire la abrazadera de soporte del cable para que no se
produzcan ruidos por vibración
u
Retire las láminas protectoras de la parte exterior de la
carcasa.*
u
Extraiga todas las piezas de protección para el transporte.
Si el aparato se suministra con distanciadores de pared, se
logra el consumo de energía indicado mediante el montaje y la
utilización de estos distanciadores. Sin los distanciadores de
pared, la profundidad indicada del aparato disminuye 3,50 cm.
Si no se utilizan los distanciadores de pared suministrados,
esto no afecta al funcionamiento del aparato. No obstante, en
estos aparatos aumenta ligeramente el consumo de energía si
se reduce la distancia a la pared.*
u
En un aparato con distancia-
dores de pared suministrados,
monte dichos distanciadores en
la parte superior trasera del
aparato a izquierda y derecha.*
Fig. 4 En aparatos con tiradores de puerta
u
Proceda siguiendo la secuencia de números del gráfico.
4.4 Inserción en el mueble de la cocina
u
Eliminación del embalaje (consulte 4.5) .
u
Nivele el aparato con la llave
de boca suministrada
mediante las patas de ajuste
(A) y con la ayuda de un nivel
de burbuja de tal forma que se
mantenga en pie de manera
firme y nivelada.
Nota
u
Limpie el aparato (consulte 6.2) .
Si el aparato se instala en un entorno muy húmedo, en la parte
exterior del aparato se puede formar agua de condensación.
u
Procure que haya siempre una buena ventilación y escape
de aire en el lugar de instalación.
4.3 Cambio de goznes
En caso necesario, puede cambiar los goznes.
Asegúrese de disponer de las siguientes herramientas:
Torx® 25
q
Torx® 15
q
Llave de boca suministrada
q
Otra persona para el trabajo de montaje, en caso necesario
q
¡Peligro de lesiones al inclinar la puerta para extraerla!
u
u
ATENCIÓN
Sujete bien la puerta.
Deposite la puerta con cuidado.
*
(1) Armario superior (3) Armario de cocina
(2) Aparato (4) Pared
x
En aparatos sin distanciadores de pared suministrados, o si
no se utilizan los distanciadores suministrados, la medida
disminuye 35 mm (consulte 4.2) .
El aparato se puede rodear de muebles de cocina. Para
adaptar el aparato
se puede colocar sobre el aparato un armario superior
Fig. 5 (1)
Si la cocina posee armarios (profundidad máx. 580 mm), el
aparato se puede colocar directamente junto al armario de
cocina
85 mm x en el centro del aparato respecto al frente del armario
de cocina.
Importante para la ventilación:
-
-
-
adecuado y acorde con el mobiliario.
Fig. 5 (3)
En la parte trasera del armario superior debe haber un pozo
de escape de aire de una profundidad mínima de 50 mm
cuya extensión a lo ancho coincida con la del armario superior.
La sección de escape de aire ubicada bajo el techo de la
habitación debe ser de 300 cm2 como mínimo.
Cuanto mayor sea la sección de ventilación, más energía
ahorrará el aparato en funcionamiento.
Fig. 5 (2)
. El aparato sobresale 70 mm x por los lados y
a la altura del mueble de la cocina
Fig. 5
50
Page 51

Uso
Si el aparato se instala con las bisagras junto a una pared
Fig. 5 (4)
como mínimo 40 mm. Esto equivale al saliente del tirador con
la puerta abierta.
, la distancia entre el aparato y la pared debe ser de
4.5 Eliminación del embalaje
ADVERTENCIA
Peligro de asfixia derivado del material de embalaje y las
láminas
u
No permita que los niños jueguen con el material de embalaje.
El embalaje está fabricado con materiales reciclables:
Cartón paja/cartón
-
Piezas de poliestireno expandido
-
Láminas y bolsa de polietileno
-
Flejes para bandaje de polipropileno
-
Marco de madera clavado con plancha de polieti-
-
leno*
u
Deposite el material de embalaje en un punto de recogida
oficial.
4.6 Conexión del aparato
AVISO
Riesgo de daños en el sistema eléctrico
u
No utilice ningún convertidor aislante (conversión de
corriente continua en corriente alterna o trifásica) ni ningún
conector de bajo consumo.
ADVERTENCIA
Peligro de incendio y de sobrecalentamiento
u
No utilice ningún cable prolongador ni regletas de
contactos.
El tipo de corriente (corriente alterna) y la tensión en el lugar de
instalación siempre deben coincidir con las indicaciones de la
placa de identificación (consulte Visión general del aparato).
Conecte el aparato sólo mediante una toma de
corriente con toma de tierra instalada correctamente.
La toma de corriente debe estar protegida por fusibles de 10 A o superiores.
Debe ser fácilmente accesible para poder desconectar el aparato rápidamente de la toma de
corriente en caso de emergencia. Se debe encontrar
fuera del área de la parte trasera del aparato.
u
Compruebe la conexión eléctrica.
u
Introduzca el enchufe de alimentación de red.
4.7 Encender el aparato
u
Pulse la tecla On/Off
w
El aparato se ha conectado. El indicador de temperatura y
el símbolo de alarma
temperatura sea lo suficientemente baja.
Fig. 3 (1)
Fig. 3 (6)
.
parpadean hasta que la
5 Uso
5.1.1
El brillo se puede ajustar entre h 0 (iluminación mínima) y h 5
(iluminación máxima).
u
w
w
u
u
w
u
w
u
w
Ajustar brillo
Activar modo de ajuste: Pulsar tecla SuperFrost
durante 5 seg. aprox.
En el indicador se visualiza el símbolo Menú
En el indicador parpadea c .
Con la tecla de ajuste
Confirmar con la tecla SuperFrost
En el indicador se visualiza el último valor de brillo
introducido.
Con la tecla de ajuste,
deseado entre h 0 y h 5.
El brillo está ajustado.
Desactivar modo de ajuste: Pulsar la tecla On/Off
Fig. 3 (1)
Se vuelve a visualizar la temperatura en el indicador de
temperatura.
dos veces.
Fig. 3 (2)
Fig. 3 (2)
seleccionar h.
Fig. 3 (4)
seleccionar el valor
Fig. 3 (4)
Fig. 3 (7)
.
.
5.2 Bloqueo contra la manipulación por niños
El bloqueo contra la manipulación por niños le garantiza que
los niños no pueden desconectar accidentalmente el aparato
al jugar.
5.2.1 Ajustar la seguridad para niños
Para encender la función:
u
Activar modo de ajuste: Pulsar tecla SuperFrost
durante 5 seg. aprox.
w
En el indicador se visualiza el símbolo Menú
w
En el indicador parpadea c .
u
Confirmar con la tecla SuperFrost
w
En el indicador se visualiza c1.
u
Confirmar con la tecla SuperFrost
w
El símbolo de seguridad para niños
ilumina en el indicador.
w
En el indicador parpadea c .
w
La función seguridad para niños está encendida.
Para salir del modo de ajuste:
u
Presione brevemente la tecla On/Off
w
Se vuelve a visualizar la temperatura en el indicador de
temperatura.
Para apagar la función:
u
Activar modo de ajuste: Pulsar tecla SuperFrost
durante 5 seg. aprox.
w
En el indicador se visualiza el símbolo Menú
w
En el indicador parpadea c .
u
Confirmar con la tecla SuperFrost
w
En el indicador se visualiza c0 .
u
Confirmar con la tecla SuperFrost
w
El símbolo seguridad para niños
w
En el indicador parpadea c .
w
La función seguridad para niños está apagada.
Para salir del modo de ajuste:
u
Presione brevemente la tecla On/Off
w
Se vuelve a visualizar la temperatura en el indicador de
temperatura.
Fig. 3 (4)
Fig. 3 (4)
Fig. 3 (8)
Fig. 3 (1)
Fig. 3 (4)
Fig. 3 (4)
Fig. 3 (8)
Fig. 3 (1)
desaparece.
Fig. 3 (4)
Fig. 3 (7)
.
.
se
.
Fig. 3 (4)
Fig. 3 (7)
.
.
.
.
.
5.1 Brillo de la indicación de temperatura
Puede adaptar el brillo de la indicación de temperatura a las
condiciones de luz del lugar de instalación.
5.3 Alarma de temperatura
Si la temperatura de congelación no es lo suficientemente
baja, suena un tono de aviso.
Al mismo tiempo, parpadean el indicador de temperatura y el
símbolo de alarma
Fig. 3 (6)
.
51
Page 52

Uso
El tono de aviso se desactiva automáticamente, el símbolo de
alarma
Fig. 3 (6)
de parpadear cuando la temperatura vuelve a ser lo suficientemente baja.
Si el estado de la alarma se mantiene intacto: (consulte
Averías).
se apaga y el indicador de temperatura deja
5.3.1 Cancelación de la alarma de temperatura
El tono de aviso puede cancelarse. Cuando la temperatura
vuelva a descender lo suficiente, la función de alarma se activará de nuevo.
u
Pulse la tecla Alarm
w
Se cancela el tono de aviso.
Fig. 3 (9)
.
5.4 Congelación de alimentos
Como máximo, es posible congelar en 24 horas la cantidad de
alimentos frescos que se indica en la placa de identificación
(consulte Visión general del aparato) bajo "Capacidad de
congelación ... kg/24h".
Los cajones pueden soportar una carga máx. de 25 kg de
alimentos congelados, mientras que las planchas se pueden
cargar con un máx. de 35 kg cada una.
ATENCIÓN
Riesgo de lesiones derivado de vidrios rotos
Las botellas y los envases de bebidas pueden reventarse si se
congelan. En especial, las bebidas gaseosas.
u
No congele las botellas ni envases con bebidas
Para que los alimentos se congelen rápidamente por completo,
no sobrepase las siguientes cantidades por porción:
- Fruta y verdura, hasta 1 kg
- Carne, hasta 2,5 kg
u
Envase los alimentos por porciones en bolsas de congelación o recipientes reutilizables de plástico, metal y aluminio.
5.5 Descongelación de alimentos
- a temperatura ambiente
- en el microondas
- en el horno/cocina de aire caliente
u
Los alimentos descongelados sólo se pueden volver a
congelar en casos excepcionales.
5.6 Ajustar la temperatura
La temperatura depende de los siguientes factores:
frecuencia de apertura de la puerta
-
temperatura ambiente del lugar de instalación
-
tipo, temperatura y cantidad de alimentos
-
Valores recomendados para el ajuste de temperatura: -18 °C
La temperatura puede modificarse continuamente. Cuando el
ajuste ha alcanzado los-28 ºC ºC, se empieza de nuevo con
-14 ºC ºC.
u
Activar la función de temperatura: Pulsar una vez la tecla de
Fig. 3 (2)
ajuste
w
En el indicador de temperatura parpadea la temperatura
actual.
u
Modificar temperatura en intervalos de 1 °C: Presione la
tecla de ajuste
hasta que la temperatura deseada aparezca en el indicador
de temperatura.
u
Modificar continuamente la temperatura: Mantener la tecla
pulsada.
w
Mientras se realizar el ajuste, el valor parpadea.
.
Fig. 3 (2)
tantas veces como sea necesario
w
Aprox. 5 seg. después de pulsar la tecla por última vez, se
muestra la temperatura real. La temperatura se ajusta lentamente al nuevo valor indicado.
5.7 SuperFrost
Con esta función es posible congelar alimentos frescos
completa y rápidamente. El aparato funciona con la máxima
potencia frigorífica, por lo que el congelador puede emitir
mayor ruido temporalmente.
Puede congelar tantos kg de alimentos frescos durante 24 h
como indica la placa de identificación en"Capacidad de congelación ... kg/24h". Esta cantidad máxima de alimentos congelados varía según el modelo y la clase de climatización.
Según la cantidad de alimentos frescos que se deban
congelar, debe conectar SuperFrost antes de tiempo: con una
pequeña cantidad de alimentos congelados aprox. 6 h, con la
máxima cantidad de alimentos congelados 24 h antes de introducir los alimentos.
Envase los alimentos y colóquelos lo más extendidos a lo
ancho posible. No ponga en contacto los alimentos que desea
congelar con alimentos ya congelados para que así éstos no
se puedan empezar a descongelar.
SuperFrost no se debe activar en los siguientes casos:
Si se introducen alimentos ya congelados
-
Si se congela hasta aprox. 1 kg de alimentos frescos a
-
diario
5.7.1 Congelar con SuperFrost
u
Pulse brevemente la tecla SuperFrost
vez.
w
El símbolo de SuperFrost
w
La temperatura de congelación desciende; el aparato
funciona con la máxima potencia frigorífica.
Nota
u
Al accionar la tecla SuperFrost se puede retrasar la conexión del compresor hasta 8 minutos debido al retardo de
conexión incorporado. Este retardo aumenta la vida útil del
compresor.
Si se congela una pequeña cantidad de alimentos congelados:
u
Espere aprox. 6 h.
u
Coloque los alimentos envasados en los cajones inferiores.
Con la máxima cantidad de alimentos congelados:
u
Espere aprox. 24 h.
u
Extraiga el cajón inferior y coloque los alimentos directamente en el aparato para que entren en contacto con la
base o las paredes laterales.
w
SuperFrost se desactiva automáticamente. Dependiendo de
la cantidad cargada: 30 horas como mínimo y 65 horas
como máximo.
w
El símbolo de SuperFrost
termina la congelación.
u
Coloque los alimentos en el cajón y vuelva a introducir éste.
w
El aparato vuelve a funcionar en el modo normal con ahorro
de energía.
Fig. 3 (5)
Fig. 3 (5)
Fig. 3 (4)
se ilumina.
se apaga cuando
una sola
5.8 Cajones
u
Para almacenar los alimentos congelados directamente
sobre las superficies de depósito: tire del cajón hacia
delante y levántelo para extraerlo.
52
Page 53

Mantenimiento
5.9 Superficies de depósito
u
Para extraer la superficie de depósito:
levántela por la parte delantera y sáquela
tirando hacia delante.
u
Para volver a colocar la superficie de
depósito: basta con introdúzcala hasta el
tope.
5.10 VarioSpace
Además de los cajones, también
pueden extraerse las baldas. De
este modo puede ampliarse el
espacio para alimentos congelados
de gran tamaño. Las aves, la carne,
las piezas de caza de gran tamaño,
así como los productos de pastelería con cierta altura, pueden
congelarse íntegramente y prepararse de nuevo.
u
Los cajones pueden soportar una
carga máx. de 25 kg de
alimentos congelados, mientras
que las planchas se pueden
cargar con un máx. de 35 kg
cada una.
5.11 Sistema de información
Fig. 6
(1) Platos precocinados,
helado
(2) Carne de cerdo,
pescado
(3) Fruta, verdura (6) Aves, carne de vaca/
Los números indican el tiempo de conservación correspondiente en meses para diversos tipos de alimentos congelados.
Los tiempos de conservación indicados son valores orientativos.
(4) Salchichas, pan
(5) Caza, setas
ternera
5.12 Acumuladores de frío
Los acumuladores de frío evitan que la temperatura aumente
con demasiada rapidez si se produce un fallo en la corriente.
5.12.1 Utilización de acumuladores de frío
u
Coloque los acumuladores de
frío congelados en el área delantera del congelador, directamente sobre los alimentos
congelados.
6 Mantenimiento
6.1 Desescarche manual
En el aparato se forma una capa de escarcha o hielo después
de un funcionamiento. prolongado.
La capa de escarcha o hielo se forma con más rapidez si el
aparato se abre con frecuencia o los alimentos que se introducen están calientes. No obstante, una capa de hielo gruesa
aumenta el consumo de energía Para evitarlo, desescarche el
aparato periódicamente.
ATENCIÓN
¡Peligro de daños y lesiones a consecuencia del vapor
caliente!
u
Para desescarchar, no utilice ningún aparato de limpieza al
vapor o con calor, llamas libres ni 'sprays' de desescarche.
u
No retire el hielo con objetos puntiagudos.
u
Conecte SuperFrost un día antes de efectuar el desescarche.
w
Los alimentos congelados contienen una "reserva de frío".
u
Desconecte el aparato.
w
El display digital se apaga.
w
Si el display no se apaga, significa que está activo el
bloqueo contra la manipulación por niños (consulte 5.2) .
u
Retire el enchufe de alimentación de red o desconecte el
fusible.
u
Coloque los acumuladores de frío sobre los alimentos
congelados.
u
Dado el caso, envuelva. los alimentos congelados en papel
de periódico o en un mantel en el cajón y guárdelos en un
lugar fresco.
u
Coloque una cazuela con agua
caliente no hirviendo en un panel
intermedio.
-o-
u
Llene los dos cajones inferiores con
agua tibia hasta la mitad e introdúzcalos en el aparato.
w
Así se acelera el desescarche.
u
Deje abierta la puerta del aparato durante el desescarche.
u
Retire los pedazos de hielo que se desprendan.
u
Dado el caso, recoja el agua de desescarche varias veces
con una esponja o paño.
u
Limpie el aparato (consulte 6.2) y séquelo.
6.2 Limpiar el aparato
ATENCIÓN
Riesgo de daños y lesiones derivado del vapor caliente
El vapor caliente puede dañar las superficies y provocar
quemaduras.
u
No emplee nunca aparatos de limpieza a vapor
AVISO
Si no limpia correctamente el aparato, corre el peligro de
dañarlo
u
No utilice productos de limpieza concentrados.
u
No utilice esponjas o estropajos metálicos que sean abrasivos o puedan provocar arañazos.
u
No utilice productos de limpieza cáusticos, abrasivos o que
contengan arena, cloro, productos químicos o ácido.
u
No utilice disolventes químicos.
u
No dañe ni retire la placa de identificación situada en el interior del aparato. Es importante para el servicio de atención
al cliente.
u
No rompa, doble ni dañe ningún cable u otros componentes.
u
No deje que penetre agua de limpieza en el canal de
descarga, la rejilla de aire y piezas eléctricas.
u
Utilice paños de limpieza suaves y un limpiador universal
con pH neutro.
u
Utilice sólo limpiadores y productos de conservación aptos
para alimentos en el interior del aparato.
53
Page 54

Averías
u
Vacíe el aparato.
u
Retire el enchufe de alimentación de red.
u
Limpie periódicamente la rejilla de ventilación y escape
de aire.
w
La acumulación de polvo aumenta el consumo de energía.
u
Limpie a mano las superficies interiores y exteriores de
plástico con agua tibia y un poco de lavavajillas.
u
Limpie las paredes laterales lacadas únicamente con un
paño suave y limpio. Si están muy sucias, utilice agua tibia
con un limpiador neutro.*
No aplique productos de limpieza para acero sobre las superficies de cristal o plástico, pues pueden arañarse. Es normal
que la superficie de acero inoxidable presente puntos oscuros
incipientes y un color más intenso.*
u
Limpie las superficies exteriores de acero inoxidable
con un limpiador de acero inoxidable convencional si están
sucias. A continuación, aplique el producto de conservación
para acero inoxidable suministrado de manera uniforme en
el sentido del pulido.*
Después de la limpieza:
u
Seque el aparato y las piezas de equipamiento.
u
Vuelva a conectar y poner en marcha el aparato.
u
Active SuperFrost (consulte 5.7) .
Cuando la temperatura sea lo suficientemente baja:
u
Vuelva a introducir los alimentos.
6.3 Servicio postventa
En primer lugar, compruebe si puede subsanar el fallo por su
mismo (consulte Averías). Si no es posible, diríjase al servicio
postventa. La dirección figura en el directorio de centros de
servicio postventa adjunto.
Riesgo de lesiones en caso de reparación por personas no
cualificadas
u
u
u
w
u
w
u
ADVERTENCIA
Las reparaciones e intervenciones en el aparato y la línea
de alimentación eléctrica que no se nombran expresamente
(consulte Mantenimiento) sólo se deben realizar a través del
servicio postventa.
Denominación del
aparato
del servicio técnico
Fig. 7 (2)
Fig. 7 (3)
de identificación. La
placa de identificación
se encuentra en la
parte interior izquierda
del aparato.
Fig. 7 (1)
y nº de serie
en la placa
, nº
Fig. 7
Informe al servicio postventa e indique el fallo, la denominación del aparato
Fig. 7 (2)
Esto permite un servicio rápido y preciso.
Deje cerrado el aparato hasta que llegue el técnico del
servicio postventa.
Los alimentos permanecerán frescos durante más tiempo.
Retire el enchufe de alimentación de red (no tire del cable
de conexión), o bien desactive el fusible.
y el nº de serie
Fig. 7 (1)
Fig. 7 (3)
, el nº del servicio técnico
.
7 Averías
El aparato se ha construido y fabricado para proporcionar una
alto nivel de fiabilidad y durabilidad. No obstante, si durante el
funcionamiento se produce una avería, compruebe si se trata
de un fallo de uso. En este caso, los costes de reparación
correrán a cargo del usuario aunque el aparato se encuentre
dentro del periodo de garantía. El usuario puede solucionar los
siguientes fallos:
El aparato no funciona.
El aparato no se conecta.
→
Conexión del aparato.
u
El enchufe de alimentación de red no entra correctamente
→
en la toma de corriente.
Control el enchufe de alimentación de red.
u
El fusible de la toma de corriente no funciona.
→
Controle el fusible.
u
El compresor continúa en funcionamiento.
El compresor se activa con una carga calorífica reducida a
→
un bajo número de revoluciones. Aunque aumente el
tiempo de funcionamiento, se produce ahorro de energía.
En los modelos con ahorro de energía, esto es normal.
u
SuperFrost se ha activado.
→
El compresor continúa en funcionamiento durante más
u
tiempo para refrigerar los alimentos con rapidez. Esto es
normal.
Un LED situado en la parte inferior trasera del aparato (en
el compresor) parpadea periódicamente cada 15
segundos*.
El inversor está equipado con un LED de diagnóstico de
→
fallos.
Este parpadeo es normal.
u
El ruido es excesivo.
Los compresores regulados por frecuencia de rotación*
→
pueden provocar diferentes ruidos debido a los distintos
niveles de revoluciones.
Este ruido es normal.
u
Un gorgoteo y chapoteo
Este ruido procede del refrigerante que fluye por el circuito
→
frigorífico.
Este ruido es normal.
u
Un clic suave
Este ruido se produce siempre que la unidad de refrigera-
→
ción (el motor) se enciende o se apaga automáticamente.
Este ruido es normal.
u
Un zumbido. Se eleva brevemente cuando la unidad de
refrigeración (el motor) se enciende.
Si se activa la función SuperFrost, la potencia frigorífica
→
aumenta al introducir alimentos frescos o mantener la
puerta abierta prolongadamente.
Este ruido es normal.
u
La temperatura ambiente es demasiado alta.
→
Solución: (consulte 1.2)
u
Sonido de vibración
u
Retire ligeramente la unidad y alinéela con las patas de
ajuste.
En la indicación de temperatura se muestra: F0 hasta F5.
En caso de producirse un fallo,
→
póngase en contacto con el servicio postventa (consulte
u
Mantenimiento).
En la indicación de temperatura se ilumina la indicación
de fallo de alimentación
ratura se muestra la temperatura más elevada alcanzada
durante el fallo de alimentación.
Debido a un fallo de alimentación o a un corte de electri-
→
cidad, la temperatura de congelación se ha elevado demasiado durante las últimas horas o días. Una vez finalizado
el corte de electricidad, el aparato sigue funcionando con el
último ajuste de temperatura.
u
Borre la indicación de la temperatura más elevada: pulse la
tecla Alarm
Fig. 3 (9)
.
. En la indicación de tempe-
54
Page 55

Puesta fuera de servicio
u
Compruebe la calidad de los alimentos. No consuma los
alimentos deteriorados. No vuelva a congelar los alimentos
descongelados.
En la indicación de temperatura se ilumina DEMO.
El modo de demostración está activado,
→
Diríjase al servicio postventa. (consulte Mantenimiento).
u
Las superficies exteriores del aparato están calientes.
El calor del circuito frigorífico se utiliza para impedir que se
→
produzca agua de condensación.
Esto es normal.
u
La temperatura no es suficientemente baja.
La puerta del aparato no se ha cerrado correctamente.
→
Cierre la puerta del aparato.
u
La ventilación y el escape de aire son insuficientes.
→
Deje libre la rejilla de aire.
u
La temperatura ambiente es demasiado alta.
→
Solución: (consulte 1.2) .
u
El aparato se abre con demasiada frecuencia o durante
→
mucho tiempo.
Espere a que la temperatura necesaria se vuelva a ajustar
u
automáticamente. En caso contrario, diríjase al servicio
postventa. (consulte Mantenimiento).
Se han introducido cantidades demasiado grandes de
→
alimentos frescos sin SuperFrost.
Solución: (consulte 5.7) .
u
La temperatura se ha ajustado incorrectamente.
→
Reduzca el ajuste de temperatura y compruébelo transcu-
u
rridas 24 horas.
El aparato está situado demasiado cerca de una fuente de
→
calor.
Solución: (consulte Puesta en marcha).
u
En la indicación se visualizan varias rayas ("- -").
La temperatura de congelación ha subido por encima de
→
cero debido a un corte en la red o a una interrupción en la
corriente eléctrica.
u
Consulte también "Fallo en la corriente" y " "
u
Desconecte el enchufe de alimentación de red.
u
Separe el cable de conexión.
8 Puesta fuera de servicio
8.1 Desconectar el aparato
u
Pulse la tecla On/Off
w
El indicador de temperatura se apaga.
Fig. 3 (1)
durante aprox. 2 s.
8.2 Puesta fuera de servicio
u
Vacíe el aparato.
u
Desconecte el enchufe de alimentación de red.
u
Limpie el aparato (consulte 6.2) .
u
Deje la puerta abierta para que no se formen olores.
9 Desechar el aparato
El aparato todavía contiene materiales valiosos y
se debe suministrar a un sistema de recopilación
separado de la basura sin clasificar. Los aparatos
fuera de uso se deben desechar correcta y
adecuadamente según las normas y leyes locales
vigentes.
Una vez agotada la vida útil del aparato, procure que el circuito
de refrigeración no se dañe durante el transporte, pues así
evitará que el refrigerante (datos en la placa identificativa) o el
aceite se viertan de forma indiscriminada.
u
Inutilice el aparato.
55
Page 56

Visão geral do aparelho
Conteúdo
1 Visão geral do aparelho........................................ 56
1.1 Vista geral do aparelho e do equipamento............... 56
1.2 Campo de utilização do aparelho............................. 56
1.3 Conformidade.......................................................... 57
1.4 Dimensões de montagem........................................ 57
1.5 Economizar energia................................................. 57
2 Instruções gerais de segurança........................... 57
3 Elementos de comando e indicação.................... 58
3.1 Elementos de comando e de controlo...................... 58
3.2 Indicação de temperatura......................................... 58
4 Colocação em funcionamento.............................. 58
4.1 Transporte do aparelho............................................ 58
4.2 Instalação do aparelho............................................. 58
4.3 Substituição do retentor da porta............................. 59
4.4 Montagem em armários de cozinha......................... 59
4.5 Eliminar a embalagem.............................................. 60
4.6 Ligação do aparelho................................................. 60
4.7 Ligar o aparelho....................................................... 60
5 Operação................................................................ 60
5.1 Luminosidade do indicador de temperatura............. 60
5.2 Segurança para crianças......................................... 60
5.3 Alarme de temperatura............................................. 61
5.4 Congelar alimentos.................................................. 61
5.5 Descongelar alimentos............................................. 61
5.6 Ajustar a temperatura............................................... 61
5.7 SuperFrost............................................................... 61
5.8 Gavetas.................................................................... 62
5.9 Prateleiras................................................................ 62
5.10 VarioSpace............................................................... 62
5.11 Sistema de Informação............................................ 62
5.12 Acumuladores de frio............................................... 62
6 Manutenção............................................................ 62
6.1 Descongelamento manual........................................ 62
6.2 Limpar o aparelho.................................................... 63
6.3 Serviço de assistência ao cliente............................. 63
7 Avarias.................................................................... 63
8 Colocar fora de serviço......................................... 64
8.1 Desligar o aparelho.................................................. 64
8.2 Colocar o aparelho fora de serviço........................... 64
9 Eliminação do aparelho........................................ 64
O fabricante dedica todos os esforços ao permanente desenvolvimento de todos os tipos de modelos. Solicitamos a sua
compreensão para o facto de necessitarmos de nos reservar o
direito a alterações de formatos, equipamentos e de natureza
técnica.
Para que possa ficar a conhecer todas as vantagens do seu
novo aparelho, leia por favor atentamente as instruções
contidas no presente manual.
O manual é válido para diversos modelos, podendo existir
algumas divergências. As secções referentes apenas a determinados aparelhos estão assinaladas com uma estrela (*).
As instruções de procedimento estão assinaladas com
os resultados de procedimento com .
1 Visão geral do aparelho
1.1 Vista geral do aparelho e do equipamento
Observação
u
O aparelho é entregue com as prateleiras, gavetas e cestos
ordenados de forma a permitirem uma eficiência energética
ideal.
Fig. 1
(1) Elementos de comando
e de controlo
(2) VarioSpace (5) Pés de ajuste
(3) Gaveta
1.2 Campo de utilização do aparelho
O aparelho destina-se exclusivamente à refrigeração de
alimentos num contexto doméstico ou similar. Isto inclui, por
exemplo, a utilização
em cozinhas para empregados, pensões com pequeno-
-
-almoço,
por parte de hóspedes em residenciais, hotéis, motéis e
-
outros tipos de alojamento,
para catering e serviços similares no comércio grossista
-
Utilize o aparelho exclusivamente numa escala doméstica
habitual. Todos os outros tipos de utilização são interditos. O
aparelho não é indicado para o armazenamento e refrigeração
de medicamentos, plasma sanguíneo, preparado laboratoriais
ou outros produtos e substâncias semelhantes abrangidas
pela directiva para produtos medicinais 2007/47/CE. A utilização incorrecta do aparelho poderá conduzir à danificação ou
deterioração dos produtos armazenados. Além disso, o
aparelho não está indicado para utilização em zonas com um
potencial risco de explosão.
,
O aparelho está concebido para, consoante a sua classe de
climatização, operar em condições restritas de temperatura
ambiente. A classe de climatização correspondente ao seu
aparelho encontra-se impressa na placa de características do
mesmo.
(4) Placa de identificação
56
Observação
u
Ter em atenção que o aparelho deverá funcionar dentro dos
limites de temperatura ambiente prescritos, caso contrário
não poderá ser garantida a sua capacidade de refrigeração.
Page 57

Classe de
climatização
SN, N até 32 °C
ST até 38 °C
P até 43 °C
O bom funcionamento do aparelho é assegurado até uma
temperatura ambiente mínima de 5 °C.
para temperaturas ambiente
Instruções gerais de segurança
Colocação de alimentos quentes: deixar primeiro os
-
alimentos arrefecerem à temperatura ambiente.
Se o aparelho evidenciar uma camada de gelo grossa:
-
descongelar o aparelho.
A concentração de pó aumenta o consumo
de energia:
Limpar o pó acumulado no grupo frigorí-
-
fico e permutador térmico - grelha metá-
lica na parede traseira do aparelho - a
intervalos anuais.
1.3 Conformidade
O circuito de agente refrigerante foi testado relativamente à
sua estanquicidade. O aparelho está em conformidade com as
disposições de segurança relevantes, bem como com as
directivas 2006/95/CE, 2004/108/CE, 2009/125/CE e
2010/30/CE.
1.4 Dimensões de montagem
Fig. 2
Modelo h a g e e' d c c'
GP1376 851 553 611 624 653 1129 563 592
GP1476 851 602 611 628 657 1174 613 640
GPesf1476 851 602 611 610 657 1174 597 644
GP1486 851 602
x
Nos aparelhos sem distanciadores de parede incluídos ou
quando os distanciadores de parede incluídos não são utilizados, a medida diminui em 35 mm (consultar 4.2) .
646x663x692x1209
x
613 640
1.5 Economizar energia
Assegurar sempre uma boa ventilação (entrada e saída de
-
ar). Não tapar as aberturas e grelhas de ventilação.
Não instalar o aparelho num local em que fique exposto à
-
luz directa do sol, junto a um fogão, aquecimento ou
aparelho semelhante.
O consumo de energia depende das condições de insta-
-
lação como, por ex., a temperatura ambiente
(consultar 1.2) .
Abrir o aparelho com a menor frequência possível.
-
Quanto mais baixa for regulada a temperatura, maior será o
-
consumo de energia.
Conservar todos os alimentos bem embalados e fechados.
-
É evitada assim a formação de gelo.
Retirar os alimentos para fora apenas durante o período de
-
tempo necessário, para que não aqueçam demasiado.
2 Instruções gerais de segurança
Perigos para o utilizador:
A utilização deste aparelho não é indicada para pessoas
-
(incluindo crianças) com incapacidades físicas, sensoriais
ou mentais, ou pessoas que não possuam experiência e
conhecimentos suficientes sobre o mesmo. Excepto
quando instruídas acerca do aparelho ou supervisionadas
por uma pessoa responsável pela sua segurança. Supervisionar as crianças, para impedir que estas brinquem com o
aparelho.
Em caso de falha do aparelho desligar a ficha (evitando
-
puxar a mesma pelo cabo), ou desligar o fusível.
Quaisquer reparações e intervenções no aparelho, assim
-
como a substituição do cabo de alimentação deverão ser
realizadas unicamente por técnicos devidamente habilitados.
Ao desligar o aparelho da alimentação eléctrica, puxar
-
sempre pela ficha. Não puxar pelo cabo.
Montar e conectar o aparelho sempre de acordo com as
-
instruções fornecidas.
Conserve o presente manual e, em caso de transferência
-
de propriedade do aparelho, disponibilize-o ao novo proprietário.
Perigo de incêndio:
O agente refrigerante R 600a usado no aparelho é não polu-
-
ente, mas combustível. O agente refrigerante eventualmente extravasado poderá inflamar-se.
Não danificar as tubagens do circuito de refrigeração.
•
Não manusear chamas vivas ou fontes de ignição no
•
interior do aparelho.
Não utilizar dispositivos eléctricos no interior do aparelho
•
(por ex., aparelhos de limpeza a vapor, aparelhos de
aquecimento, máquinas de confecção de gelados, etc.).
Em caso de fuga de agente refrigerante: Eliminar fontes
•
de chamas vivas ou de ignição próximas do local do
derrame. Desligar a ficha de alimentação da tomada
eléctrica. Ventilar bem o local. Contactar e informar o
serviço de assistência ao cliente.
Não armazenar no aparelho substâncias explosivas ou latas
-
de spray com agentes de expansão combustíveis como, p.
ex., butano, propano, pentano, etc., no interior do aparelho.
Este tipo de latas de spray pode ser facilmente reconhecido
através das indicações de conteúdo impressas nas
mesmas ou através do símbolo de produto inflamável.
Gases eventualmente extravasados podem inflamar-se
através das componentes eléctricas existentes.
Manter afastadas do aparelho velas acesas, lâmpadas e
-
outros objectos com chamas expostas, para que o aparelho
não corra risco de incêndio.
Armazenar álcool com elevada graduação apenas bem
-
fechado e na vertical. O álcool eventualmente extravasado
poderá inflamar-se através das componentes eléctricas
existentes.
Perigo de queda:
Não utilizar a base, as gavetas, as portas, etc. como degrau
-
ou superfície de apoio. Esta recomendação aplica-se em
particular às crianças.
Perigo de intoxicação alimentar:
57
Page 58

Elementos de comando e indicação
Não consumir alimentos sobrepostos.
-
Perigo de congelamento, sensação de entorpecimento e
dores:
Evitar o contacto prolongado de superfícies frias ou
-
produtos refrigerados/congelados com a pele, ou recorrer a
medidas de protecção como, p. ex., usar luvas. Não
consumir gelados, especialmente do tipo sorvete, ou cubos
de gelo imediatamente, nem demasiado gelados.
Ter em atenção as instruções específicas fornecidas nos
outros capítulos:
PERIGO Identifica uma situação imediata-
mente perigosa, que poderá
provocar a morte ou lesões corporais graves caso não seja evitada.
AVISO Identifica uma situação perigosa,
que poderá provocar a morte ou
lesões corporais graves caso não
seja evitada.
PRECAUÇÃOIdentifica uma situação perigosa,
que poderá provocar lesões corporais ligeiras ou médias caso não
seja evitada.
NOTA Identifica uma situação perigosa,
que poderá provocar danos materiais caso não seja evitada.
Observação Identifica indicações e conselhos
úteis.
3 Elementos de comando e indi-
As seguintes indicações são avisos de avaria. Para mais informações sobre as possíveis causas e medidas de resolução de
problemas: (consultar Avarias).
F0 a F5
-
-
O símbolo de corte de energia
acende.
4 Colocação em funcionamento
4.1 Transporte do aparelho
PRECAUÇÃO
Perigo de lesões pessoais e danos materiais devido a transporte incorrecto!
u
Transportar o aparelho devidamente embalado.
u
Transportar o aparelho na vertical.
u
Não transportar o aparelho sozinho.
4.2 Instalação do aparelho
AVISO
Perigo de incêndio devido a humidade!
Se componentes sob tensão ou o cabo eléctrico ficarem
molhados pode ocorrer um curto-circuito.
u
O aparelho foi concebido para ser utilizado em espaços
fechados. Não instalar e colocar o aparelho em funcionamento ao ar livre, ou em zonas onde fique sujeito a humidade elevada ou salpicos de água.
cação
3.1 Elementos de comando e de controlo
Fig. 3
(1) Botão On/Off (6) Símbolo Alarme
(2) Botão de regulação (7) Símbolo Menu
(3) Indicação de tempera-
tura
(4) Botão SuperFrost (9) Botão alarme
(5) Símbolo SuperFrost (10)Símbolo Falha de rede
3.2 Indicação de temperatura
Em funcionamento normal é apresentada:
a temperatura de congelação mais quente
-
O indicador de temperatura pisca:
é alterada a regulação da temperatura
-
se a temperatura não for suficientemente fria após a ligação
-
a temperatura subiu vários graus
-
No mostrador são apresentados riscos intermitentes quando:
a temperatura de congelação está acima de 0 °C.
-
(8) Símbolo Bloqueio para
crianças
AVISO
Perigo de incêndio devido a curto-circuito!
Se o cabo/ficha de alimentação do aparelho ou de um outro
aparelho tocar na traseira do aparelho podem ocorrer danos
no cabo/ficha devido às vibrações do aparelho e, consequentemente, dar origem a um curto-circuito.
u
Posicionar o aparelho de forma a não tocar em qualquer
ficha ou cabo de alimentação.
u
Não ligar o aparelho, nem outros aparelhos, a tomadas
localizadas na área traseira do aparelho.
AVISO
Perigo de incêndio devido a agente refrigerante!
O agente refrigerante R 600a usado no aparelho é não poluente, mas combustível. O agente refrigerante eventualmente
extravasado poderá inflamar-se.
u
Não danificar as tubagens do circuito de refrigeração.
AVISO
Perigo de incêndio e danificação!
u
Não colocar aparelhos que irradiam calor
AVISO
Perigo de incêndio e danificação devido a aberturas de ventilação bloqueadas!
u
Manter as aberturas de ventilação sempre livres. Assegurar
sempre uma boa ventilação (entrada e saída de ar)!
58
Page 59

Colocação em funcionamento
Observação*
Os sacos na parte traseira do aparelho são importantes para a
eficácia de funcionamento. O seu conteúdo não é tóxico nem
perigoso.
u
Não remover os sacos!
Caso seja detectado algum dano no aparelho - antes de
q
ligar o mesmo - contactar de imediato o fornecedor.
A superfície do local de instalação tem que ser plana e nive-
q
lada.
Não instalar o aparelho num local em que fique exposto à
q
luz directa do sol, junto a um fogão, aquecimento ou
aparelho semelhante.
O local de instalação ideal é um compartimento seco e bem
q
ventilado.
Instalar o aparelho com as costas voltadas para a parede e,
q
se forem utilizados suportes distanciadores de parede (ver
em baixo), posicionar o aparelho com os suportes distanciadores directamente encostados à parede.
Não instalar o aparelho sem ajuda.
q
O espaço de instalação do seu aparelho deverá ter, em
q
conformidade com a Norma EN 378, para cada 8 g de
agente refrigerante R 600a um volume de 1 m3. Se o
espaço de instalação for demasiado pequeno existe em
caso de fuga de agente refrigerante do circuito de refrigeração perigo de formação de uma mistura gás/ar inflamável.
A indicação sobre a quantidade de agente refrigerante
encontra-se na placa de características, no interior do
aparelho.
u
Retirar o cabo de ligação da parte traseira do aparelho.
Para tal, remover o suporte do cabo, pois caso contrário
serão gerados ruídos de vibração!
u
Remover as películas de protecção da parte exterior do
aparelho.*
u
Remover todas as peças de protecção para transporte.
Se o aparelho for fornecido com suportes distanciadores de
parede, a montagem e utilização destes assegurará o
consumo energético especificado. Sem os suportes distanciadores de parede, a profundidade do aparelho diminui em
3,50 cm. A não utilização dos suportes distanciadores de
parede fornecidos não afecta o funcionamento do aparelho.
Contudo, os aparelhos montados a uma menor distância da
parede terão um consumo energético ligeiramente superior.*
u
Nos aparelhos fornecidos com
suportes distanciadores de
parede, montar os referidos
suportes na traseira do
aparelho, em cima, do lado
esquerdo e direito.*
Se o aparelho for instalado num ambiente muito húmido,
poderá ocorrer condensação na parte exterior do mesmo.
u
Assegurar sempre uma boa ventilação (entrada e saída de
ar) no local de instalação.
4.3 Substituição do retentor da porta
Se necessário, poderá inverter o sentido de abertura da porta.
Certifique-se de que estão disponíveis as seguintes ferra-
mentas:
Torx® 25
q
Torx® 15
q
Chave de bocas fornecida
q
Eventualmente, uma segunda pessoa para os trabalhos de
q
montagem
PRECAUÇÃO
Perigo de danos se a porta cair!
u
Segurar bem a porta.
u
Pousar a porta com cuidado.
Fig. 4 em aparelhos com pega
u
Siga a sequência dos números de posição da imagem.
u
Eliminar a embalagem (consultar 4.5) .
u
Posicionar o aparelho sobre
os pés de regulação (A), utilizando a chave de bocas
fornecida e o nível de água,
de forma a que fique devidamente fixo e nivelado.
Observação
u
Limpar o aparelho (consultar 6.2) .
4.4 Montagem em armários de cozinha
*
Fig. 5
(1) Armário suplementar (3) Armário de cozinha
59
Page 60

Operação
(2) Aparelho (4) Parede
x
Nos aparelhos fornecidos sem suportes distanciadores de
parede, ou quando os suportes distanciadores não forem utilizados, a medida diminui em 35 mm (consultar 4.2) .
O aparelho pode ser envolvido pelo mobiliário de cozinha.
Para ajustar o aparelho
cozinha, é possível criar um armário suplementar
sobre o aparelho.
No caso de uma instalação com armários de cozinha (profundidade máx. 580 mm), o aparelho pode ser instalado imediatamente ao lado do armário de cozinha
projecta-se de cada lado 70 mm x e na parte central 85 mm
em relação à frente do armário de cozinha.
Aspecto importante para a ventilação:
Na parte traseira do armário suplementar, deverá ser
-
prevista uma caixa de saída de ar com, pelo menos, 50 mm
de profundidade a toda a largura do armário.
A secção de ventilação sob o tecto da divisão deve ser, no
-
mínimo, de 300 cm2.
Quanto maior for a secção de ventilação, maior será a
-
poupança de energia do aparelho em funcionamento.
Se o aparelho for montado com as dobradiças junto a uma
parede
Fig. 5 (4)
parede deverá ser de, no mínimo, 40 mm. Esta distância
corresponde à saliência da pega com a porta aberta.
Fig. 5 (2)
à altura dos armários de
Fig. 5 (1)
Fig. 5 (3)
, a distância mínima entre o aparelho e a
. O aparelho
4.5 Eliminar a embalagem
AVISO
Perigo de asfixia provocada por material e plásticos de embalagem!
u
Não permitir que crianças brinquem com os materiais de
embalagem.
Deverá ser de fácil acesso para que, em caso de
necessidade, seja possível desligar rapidamente o
aparelho da alimentação de corrente. Esta deverá
estar localizada fora da área da traseira do aparelho.
u
Verificar a conexão eléctrica.
u
Ligar a ficha eléctrica à tomada.
4.7 Ligar o aparelho
u
Premir o botão On/Off
w
O aparelho está ligado. O indicador de temperatura e o
símbolo de alarme
x
suficientemente fria.
Fig. 3 (1)
Fig. 3 (6)
.
piscam até a temperatura ser
5 Operação
5.1 Luminosidade do indicador de temperatura
Poderá ajustar a intensidade luminosa do indicador de temperatura às condições de luminosidade no local da instalação.
5.1.1 Ajustar a claridade
A claridade é ajustável entre h 0 (luminosidade mínima) e h 5
(luminosidade máxima).
u
Activar o modo de ajuste: Premir a tecla SuperFrost
Fig. 3 (4)
w
No indicador é visualizado o símbolo Menu
w
No indicador fica intermitente c .
u
Seleccionar com o botão de configuração
u
Confirmar brevemente com a tecla SuperFrost
w
No indicador é visualizado o último valor de claridade ajustado.
cerca de 5 s.
Fig. 3 (7)
Fig. 3 (2)
Fig. 3 (4)
.
h.
.
A embalagem foi manufacturada com materiais recicláveis:
Cartão canelado/cartão
-
Placas em espuma de poliestireno
-
Películas e sacos de plástico em Polietileno
-
Cintas de Polipropileno
-
armação de madeira pregada com placa de polieti-
-
leno*
u
Entregar o material de embalagem num ponto de recolha
oficial.
4.6 Ligação do aparelho
NOTA
Perigo de danos no sistema electrónico!
u
Não utilizar inversores isolados (conversão de corrente
contínua em corrente alterna ou trifásica) ou fichas de
economia de energia.
AVISO
Perigo de incêndio e sobreaquecimento!
u
Não utilizar extensões eléctricas nem fichas múltiplas de
distribuição.
O tipo de corrente (corrente alterna) e a tensão no local de
instalação terão que corresponder aos dados fornecidos na
placa de características (consultar Visão geral do aparelho).
Ligar o aparelho utilizando unicamente uma tomada
eléctrica com ligação à terra instalada em conformidade com os regulamentos em vigor. A tomada terá
que estar protegida por fusível de 10 A ou superior.
u
Seleccionar com o botão de regulação
desejado deh 0 até h 5.
w
A claridade está ajustada.
u
Desactivar o modo de ajuste: Premir a tecla On/Off
Fig. 3 (1)
w
No indicador de temperatura é novamente visualizada a
temperatura.
duas vezes.
Fig. 3 (2)
o valor
5.2 Segurança para crianças
O sistema de segurança para crianças garante que as crianças
não desligam inadvertidamente o aparelho durante as brincadeiras.
5.2.1 Ajustar o bloqueio para crianças
Quando a função deve ser ligada:
u
Activar o modo de ajuste: Premir a tecla SuperFrost
Fig. 3 (4)
w
No indicador é visualizado o símbolo Menu
w
No indicador fica intermitente c .
u
Confirmar brevemente com a tecla SuperFrost
w
No indicador surge c1.
u
Confirmar brevemente com a tecla SuperFrost
w
O símbolo Bloqueio para crianças
acende no indicador.
w
No indicador fica intermitente c .
w
A função Bloqueio para crianças está ligada.
Quando o modo de ajuste deve ser terminado:
u
Premir brevemente a tecla On/Off
w
No indicador de temperatura é novamente visualizada a
temperatura.
Quando a função deve ser desligada:
cerca de 5 s.
Fig. 3 (8)
Fig. 3 (1)
Fig. 3 (7)
Fig. 3 (4)
Fig. 3 (4)
.
.
.
.
60
Page 61

u
Activar o modo de ajuste: Premir a tecla SuperFrost
Fig. 3 (4)
w
No indicador é visualizado o símbolo Menu
w
No indicador fica intermitente c .
u
Confirmar brevemente com a tecla SuperFrost
w
No indicador surge c0 .
u
Confirmar brevemente com a tecla SuperFrost
w
O símbolo Bloqueio para crianças
w
No indicador fica intermitente c .
w
A função Bloqueio para crianças está desligada.
Quando o modo de ajuste deve ser terminado:
u
Premir brevemente a tecla On/Off
w
No indicador de temperatura é novamente visualizada a
temperatura.
cerca de 5 s.
Fig. 3 (8)
Fig. 3 (1)
Fig. 3 (7)
.
Fig. 3 (4)
Fig. 3 (4)
desaparece.
.
.
.
5.3 Alarme de temperatura
Quando a temperatura de congelação não é suficientemente
fria, é activado um aviso sonoro.
Simultaneamente, piscam o indicador de temperatura e o
símbolo de alarme
O aviso sonoro é automaticamente desactivado, o símbolo de
alarme
Fig. 3 (6)
de piscar quando a temperatura voltar a atingir um valor suficientemente baixo
Se o alarme permanecer activado: (consultar Avarias).
Fig. 3 (6)
apaga-se e o indicador de temperatura pára
.
Operação
5.6
Ajustar a temperatura
A temperatura depende dos seguintes factores:
frequência de abertura da porta
-
temperatura ambiente do local de instalação
-
tipo, temperatura e quantidade dos alimentos
-
Ajuste da temperatura recomendado: -18 °C
A temperatura pode ser alterada de forma progressiva. Se o
ajuste de-28 °C for alcançado, o funcionamento será novamente iniciado com -14 °C.
u
Consultar a função de temperatura: Premir uma vez obotão
de configuração
w
A indicação de temperatura mostra a temperatura actual de
forma intermitente.
u
Alterar a temperatura em passos de 1 °C: Premir o botão de
configuração
temperatura pretendida se acenda no indicador da temperatura.
u
Alterar a temperatura de forma contínua: Manter a tecla
premida.
w
Durante a configuração, o valor é indicado de forma intermitente.
w
Cerca de 5 s após ter sido premida pela última vez, é indicada a temperatura real. A temperatura ajusta-se lentamente ao valor novo.
Fig. 3 (2)
Fig. 3 (2)
.
as vezes necessárias até que a
5.3.1 Desactivar o alarme sonoro
O alarme sonoro pode ser desactivado. Quando a temperatura
volta a atingir um valor suficientemente baixo, a função de
alarme volta a ficar activa.
u
Premir o botão do alarme
w
O alarme sonoro é desactivado.
Fig. 3 (9)
.
5.4 Congelar alimentos
Poderá congelar, no máximo, o número de quilos de alimentos
frescos no espaço de 24 horas que está indicado na placa de
características (consultar Visão geral do aparelho) em "Capacidade de congelação ... kg/24h".
Cada uma das gavetas pode ser carregada com, no máximo,
25 kg de alimentos congelados e cada uma das prateleiras
com, no máximo, 35 kg.
Perigo de lesões devido a fragmentos de vidro partido!
As garrafas e latas de bebidas podem rebentar se congelarem.
Isto aplica-se em especial às bebidas gasosas.
u
Para que os alimentos fiquem rapidamente congelados até ao
seu interior, não ultrapassar as seguintes quantidades por
embalagem:
- Fruta, legumes até 1 kg
- Carne até 2,5 kg
u
PRECAUÇÃO
Não congelar as garrafas e latas com bebidas!
Embalar os alimentos em porções, dentro de sacos de plástico para congelação, recipientes reutilizáveis de plástico,
metal ou alumínio.
5.7 SuperFrost
Com esta função poderá congelar rapidamente os alimentos
até ao seu interior. O aparelho funciona com a capacidade de
refrigeração máxima, o que significa que o ruído produzido
pelo grupo frigorífico poderá ser temporariamente mais alto.
Poderá congelar, no máximo, o número de quilos de alimentos
frescos no espaço de 24 horas que está indicado na placa de
características em "Capacidade de congelação ... kg/24h".
Esta quantidade máxima de produtos a congelar varia consoante o modelo e classe de climatização.
Consoante a quantidade de alimentos frescos que deverá ser
congelada, deverá ligar antecipadamente a função SuperFrost:
no caso de uma quantidade pequena de alimentos a congelar,
6h antes, e no caso da quantidade máxima de alimentos, 24h
antes de estes serem colocados no compartimento congelador.
Embale os alimentos e espalhe-os, na medida do possível.
Não colocar os alimentos a congelar em contacto com
produtos já congelados, para que estes não descongelem.
A função SuperFrost não precisa de ser activada nos
seguintes casos:
ao colocar produtos já congelados
-
no congelamento de até aproximadamente 1 kg de
-
alimentos frescos por dia
5.7.1 Congelar utilizando a função SuperFrost
u
Premir momentaneamente uma vez o botão SuperFrost
Fig. 3 (4)
w
O símbolo SuperFrost
w
A temperatura de congelação desce, o aparelho funciona
com a capacidade de refrigeração máxima.
.
Fig. 3 (5)
acende.
5.5 Descongelar alimentos
- à temperatura ambiente
- no microondas
- no forno/forno de convecção
u
Voltar a congelar os alimentos apenas em casos excepcionais.
Observação
u
Ao accionar o botão SuperFrost, mecanismo de atraso de
activação integrado poderá implicar um atraso de 8 minutos
na activação do compressor. Este atraso aumenta a longevidade do compressor.
No caso de uma pequena quantidade de produtos a
congelar:
u
Aguardar aprox. 6 horas.
u
Colocar os alimentos embalados nas gavetas de baixo.
61
Page 62

Manutenção
No caso de quantidade máxima de produtos a congelar:
u
Aguardar aprox. 24 horas.
u
Remover a gaveta de baixo e colocar os alimentos directamente no aparelho, de forma que estes fiquem em contacto
com a superfície de base ou com as paredes laterais.
w
A função SuperFrost desliga-se automaticamente. Consoante a quantidade de produtos colocados, após 30 a 65
horas o mais tardar.
w
O símbolo SuperFrost
lamento estiver concluído.
u
Colocar os alimentos na gaveta e voltar a inserir a mesma.
w
O aparelho continua a funcionar no modo de funcionamento
normal de poupança de energia.
Fig. 3 (5)
apaga-se quando o conge-
5.8 Gavetas
u
Para colocar alimentos a congelar directamente sobre as
prateleiras: Puxar a gaveta para a frente, levantar e retirar.
5.9 Prateleiras
u
Remover as prateleiras: Levantar a parte
da frente e retirar.
u
Voltar a colocar as prateleiras: Inserir
simplesmente até ao encosto.
5.12
Em caso de falha de corrente, os acumuladores de frio evitam
a rápida descida da temperatura.
Acumuladores de frio
5.12.1 Utilizar acumuladores de frio
u
Colocar os acumuladores de frio
congelados na zona dianteira
superior do compartimento
congelador, sobre os produtos
congelados.
6 Manutenção
6.1 Descongelamento manual
No aparelho forma-se, após um longo período de funcionamento, uma camada de gelo.
Acamada de gelo forma-se rapidamente se o aparelho for
aberto com frequência, ou se os produtos nele colocados estiverem quentes. Uma camada de gelo espessa aumenta,
contudo, o consumo de energia. Por isso é aconselhável um
descongelamento regular.
PRECAUÇÃO
Perigo de lesões e danos devido ao vapor quente!
u
Para descongelar, não utilizar aparelhos de aquecimento ou
de limpeza a vapor, chamas vivas nem sprays de descongelação.
u
Não remover o gelo com objectos pontiagudos ou
cortantes.
5.10 VarioSpace
Para além das gavetas, também
poderá remover as prateleiras.
Desta forma poderá obter o espaço
necessário para os produtos de
dimensões maiores que deseja
congelar. As aves, carne, grandes
nacos de caça, bem como bolos
altos podem ser congelados e
posteriormente confeccionados
inteiros.
u
Cada uma das gavetas pode ser
carregada com, no máximo,
25 kg de alimentos congelados e
cada uma das prateleiras com,
no máximo, 35 kg.
5.11 Sistema de Informação
Fig. 6
(1) Refeições pré-confec-
cionadas, gelados
(2) Carne de porco, peixe (5) Caça, cogumelos
(3) Fruta, legumes (6) Aves, carne de vaca /
Os valores representam respectivamente, o tempo de armazenamento em meses para diversos produtos alimentares. Os
tempos de armazenamento apresentados são valores de
orientação.
(4) Enchidos, pão
vitela
u
No dia anterior ao descongelamento ligar a função SuperFrost.
w
Os produtos congelados mantêm uma "reserva de frio".
u
Desligar o aparelho.
w
O indicador de temperatura apaga-se.
w
Caso o indicador de temperatura não se apague, isto significa que o sistema de segurança para crianças
(consultar 5.2) se encontra activado.
u
Retirar a ficha da tomada de alimentação eléctrica ou
desligar o fusível.
u
Colocar os acumuladores de frio sobre os produtos congelados.
u
Se necessário, envolver os produtos congelados. nas
gavetas em papel de jornal ou mantas e armazenar temporariamente num local fresco.
u
Colocar uma panela com água
quente, mas não a ferver, sobre um
tabuleiro central.
-ou-
u
Encher as duas gavetas inferiores
até meio com água morna e colocar
as mesmas no aparelho.
w
Estes procedimentos aceleram o processo de descongelamento.
u
Durante o processo de descongelamento manter a porta do
aparelho aberta.
u
Remover os pedaços de gelo soltos.
u
Se necessário, utilizar várias vezes uma esponja ou pano
para remover a restante água resultante do descongelamento.
u
Limpar o aparelho (consultar 6.2) e secar com um pano.
62
Page 63

6.2 Limpar o aparelho
PRECAUÇÃO
Perigo de lesões e danificação devido a vapor quente!
O vapor quente pode danificar as superfícies e conduzir à
ocorrência de queimaduras.
u
Não utilizar aparelhos de limpeza a vapor!
NOTA
Uma limpeza incorrecta pode danificar o aparelho!
u
Não utilizar o detergente na sua forma concentrada.
u
Não utilizar esponjas abrasivas ou que possam provocar
riscos, nem palha-de-aço.
u
Não utilizar produtos de limpeza cáusticos, abrasivos ou
que contenham areia, cloro, químicos ou ácidos.
u
Não utilizar solventes químicos.
u
Não danificar nem remover a placa de características localizada no interior do aparelho. É importante para o serviço de
assistência ao cliente.
u
Não arrancar, dobrar ou danificar o cabo ou outras componentes.
u
Não deixar escorrer água de lavagem para o colector de
escoamento, grelha de ventilação e componentes eléctricas.
u
Utilizar panos de limpeza macios e um detergente multi-
-usos de PH neutro.
u
No interior do aparelho, utilizar apenas agentes de limpeza
e conservação não nocivos para os alimentos.
u
Esvaziar o conteúdo do aparelho.
u
Desligar a ficha de alimentação da tomada
eléctrica.
u
Limpar regularmente a grelha de ventilação.
w
A concentração de pó aumenta o consumo de energia.
u
Limpar manualmente as superfícies exteriores e interiores de plástico com água morna e um pouco de deter-
gente.
u
Limpar as paredes laterais pintadas exclusivamente com
um pano macio e limpo. Caso se encontrem muito sujas,
utilizar água morna com um produto de limpeza neutro.*
Não aplicar detergente nas superfícies de vidro ou plástico,
para que as mesmas não fiquem riscadas. É normal que
surjam zonas que evidenciem início de escurecimento ou uma
cor mais intensa das superfícies de aço inoxidável.*
u
As superfícies exteriores em aço inoxidável devem ser
limpas sempre que apresentarem sujidade, com um produto
de limpeza comum para aço inoxidável. Em seguida, aplicar
uniformemente no sentido do polimento, o agente de
limpeza para aço inoxidável fornecido.*
Após proceder à limpeza:
u
Secar o aparelho e componentes do equipamento.
u
Voltar a conectar o aparelho e ligar o mesmo.
u
Ligar a função SuperFrost (consultar 5.7) .
Quando a temperatura estiver suficientemente fria:
u
Voltar a introduzir os alimentos.
6.3 Serviço de assistência ao cliente
Verifique em primeiro lugar se, com base nas informações
fornecidas na tabela de avarias (consultar Avarias), é capaz de
solucionar o problema em questão. Se não for esse o caso,
contacte o serviço de assistência ao cliente. Poderá consultar
o respectivo endereço na lista de serviços de assistência ao
cliente.
Avarias
Perigo de lesões devido a tentativa de reparação não profissional!
u
u
u
w
u
w
u
AVISO
Todas as reparações e intervenções no aparelho ou no
cabo de alimentação que não se encontram expressamente
mencionadas (consultar Manutenção) apenas poderão ser
efectuadas por técnicos do serviço de assistência ao
cliente.
Consultar a identificação do aparelho
Fig. 7 (1)
serviço
de série
placa de características. A placa de
características está
localizada no interior
do aparelho, do lado
esquerdo.
, nº de
Fig. 7 (2)
Fig. 7 (3)
e nº
na
Fig. 7
Informar o serviço de assistência ao cliente e comunicar o
tipo de falha, identificação do aparelho
serviço
Fig. 7 (2)
Este procedimento permite uma assistência mais rápida e
eficaz.
Manter o aparelho fechado até que um técnico do serviço
de apoio ao cliente se apresente no local.
Os alimentos mantêm-se frescos durante mais tempo.
Desligar a ficha (evitando puxar a mesma pelo cabo), ou
desligar o fusível.
e nº de série
Fig. 7 (3)
Fig. 7 (1)
.
, nº de
7 Avarias
O seu aparelho foi construído e fabricado de forma a assegurar
a respectiva segurança e longevidade operacional. Caso, no
entanto, ocorra uma avaria durante o seu funcionamento, verifique se a avaria poderá ser consequência de uma utilização
incorrecta. Neste caso, terão que lhe ser debitadas as
despesas incorridas, mesmo que o aparelho se encontre ainda
dentro do prazo de garantia. As seguintes avarias poderão ser
solucionadas por si:
O aparelho não funciona.
O aparelho não está ligado.
→
Ligar o aparelho.
u
A ficha eléctrica não se encontra correctamente encaixada
→
na tomada.
Controlar a ficha.
u
O fusível da tomada não está em bom estado.
→
Controlar o fusível.
u
O compressor não funciona.
O compressor passa a funcionar com uma rotação inferior
→
quando diminui a necessidade de frio. Embora isto
aumente o período de funcionamento do mesmo, será
economizada energia.
Isto é normal nos modelos concebidos para pouparem
u
energia.
A função SuperFrost está ligada.
→
Para permitir uma refrigeração mais rápida dos alimentos,
u
o compressor funciona durante mais tempo. Isto é normal.
Um LED na parte traseira inferior do aparelho (junto ao
compressor) pisca regularmente a intervalos de 15
segundos*.
O inversor está equipado com um LED de diagnóstico de
→
falha.
A intermitência é normal.
u
63
Page 64

Colocar fora de serviço
Os ruídos são excessivamente altos.
Os compressores com regulação de rotação* podem,
→
devido aos diferentes níveis de rotação emitir diferentes
ruídos de funcionamento.
Este ruído é normal.
u
Um borbulhar ou rumorejar
Este ruído provém do agente refrigerante que flúi através
→
do circuito de refrigeração.
Este ruído é normal.
u
Um leve clicar
O ruído ocorre sempre que o grupo frigorífico (o motor) se
→
desliga ou liga automaticamente.
Este ruído é normal.
u
Um ronco. É momentaneamente mais alto, quando o
grupo frigorífico (o motor) se liga.
Quando a função SuperFrost se encontra activada, quando
→
foram colocados alimentos frescos no aparelho ou após
um período prolongado com a porta aberta a potência frigorífica (capacidade de refrigeração) aumenta automaticamente.
Este ruído é normal.
u
A temperatura ambiente é demasiado elevada.
→
Solução: (consultar 1.2)
u
Ruídos de vibração
u
Afastar um pouco o aparelho, ajustar sobre os pés de apoio.
No indicador de temperatura é apresentado: F0 a F5.
Ocorreu uma falha.
→
Contactar o serviço de assistência ao cliente (consultar
u
Manutenção).
No indicador de temperatura acende-se a indicação de
corte de corrente
apresentada a temperatura mais elevada que foi atingida
durante o corte de energia.
A temperatura de congelamento subiu demasiado nas
→
últimas horas ou dias em consequência de um corte de
energia ou de uma interrupção de alimentação de corrente.
Se a interrupção de alimentação estiver ultrapassada, o
aparelho continuará a funcionar de acordo com a última
regulação de temperatura efectuada.
u
Apagar a indicação da temperatura mais elevada: Premir a
tecla de alarme
u
Controlar os alimentos quanto à sua qualidade. Não
consumir alimentos deteriorados. Não voltar a congelar os
alimentos descongelados.
No indicador de temperatura acende-se a indicação
DEMO.
O modo de demonstração está activado.
→
Contactar o serviço de assistência ao cliente. (consultar
u
Manutenção).
As superfícies exteriores do aparelho apresentam uma
temperatura morna.
O calor do circuito de refrigeração é utilizado para evitar a
→
formação de condensação.
Isto é normal.
u
A temperatura não está suficientemente baixa.
A porta do aparelho não se encontra correctamente
→
fechada.
Fechar a porta do aparelho.
u
A ventilação (entrada e saída de ar) não é suficiente.
→
Desbloquear a grelha de ventilação.
u
A temperatura ambiente é demasiado elevada.
→
Solução: (consultar 1.2) .
u
O aparelho foi aberto com demasiada frequência ou
→
permaneceu aberto durante um período de tempo excessivo.
Aguardar que a temperatura necessária volte a ser reposta
u
sem qualquer intervenção. Caso isso não suceda,
. No indicador de temperatura é
Fig. 3 (9)
.
contactar o serviço de assistência ao cliente. (consultar
Manutenção).
Foi armazenada uma quantidade excessiva de alimentos
→
frescos sem activação da função SuperFrost.
Solução: (consultar 5.7)
u
A temperatura foi incorrectamente regulada.
→
Regular a temperatura para um valor mais baixo e controlar
u
após decorridas 24 horas.
O aparelho encontra-se demasiado próximo de uma fonte
→
de calor.
Solução: (consultar Colocação em funcionamento).
u
No display são apresentados riscos ("- -").
A temperatura de congelamento subiu acima de zero graus
→
em consequência de um corte de energia ou de uma interrupção de alimentação de corrente.
u
Consultar também “Corte de corrente” e “
”
8 Colocar fora de serviço
8.1 Desligar o aparelho
u
Premir o botão On/Off
w
O indicador de temperatura fica apagado.
Fig. 3 (1)
durante aprox. 2 segundos.
8.2 Colocar o aparelho fora de serviço
u
Esvaziar o conteúdo do aparelho.
u
Desligar a ficha de alimentação da tomada eléctrica.
u
Limpar o aparelho (consultar 6.2) .
u
Manter a porta aberta para evitar a formação de odores
desagradáveis.
9 Eliminação do aparelho
O aparelho possui ainda materiais de valor e deve
ser eliminado separadamente, como lixo municipal
de carácter especial. A eliminação de aparelhos
usados deverá ser realizada de forma profissional
e apropriada, em conformidade com as normas
locais aplicáveis e legislação em vigor.
Não danificar o circuito de refrigeração do aparelho usado no
transporte, para que não ocorra um extravasamento acidental
do agente refrigerante (ver informação na placa de características) e óleo contido no mesmo.
u
Inutilizar o aparelho.
u
Desligar a ficha de alimentação da tomada eléctrica.
u
Cortar o cabo de alimentação.
64
Page 65

İçindekiler
1 Bir bakışta cihaz..................................................... 65
1.1 Cihaz ve donanımına genel bakış............................. 65
1.2 Cihazı kullanma alanı................................................ 65
1.3 Uygunluk.................................................................. 65
1.4 Kurulum ölçüleri........................................................ 66
1.5 Enerji tasarrufu......................................................... 66
2 genel güvenlik uyarıları......................................... 66
3 Kumanda ve gösterge elemanları........................ 67
3.1 Kumanda ve kontrol elemanları................................ 67
3.2 Sıcaklık göstergesi................................................... 67
4 Devreye alma.......................................................... 67
4.1 Cihazı taşıma............................................................ 67
4.2 Cihazı kurma............................................................ 67
4.3 Kapının yönünü değiştirme....................................... 68
4.4 Mutfak tezgahına sürme........................................... 68
4.5 Ambalajı imha etme.................................................. 69
4.6 Cihazı bağlama......................................................... 69
4.7 Cihazı çalıştırma....................................................... 69
5 Kullanım.................................................................. 69
5.1 Sıcaklık göstergesinin parlaklığı................................ 69
5.2 Çocuk kilidi............................................................... 69
5.3 Sıcaklık alarmı.......................................................... 69
5.4 Gıdaları dondurma.................................................... 70
5.5 Gıdaları çözdürme.................................................... 70
5.6 Sıcaklığı ayarlama.................................................... 70
5.7 SuperFrost............................................................... 70
5.8 Çekmeceler.............................................................. 70
5.9 raf alanları................................................................. 70
5.10 VarioSpace............................................................... 70
5.11 Bilgi sistemi.............................................................. 71
5.12 Soğutma aküleri....................................................... 71
6 Bakım...................................................................... 71
6.1 Manüel çözdürme..................................................... 71
6.2 Cihazı temizleyin...................................................... 71
6.3 Müşteri hizmetleri..................................................... 71
7 Arızalar.................................................................... 72
8 Devre dışı bırakma................................................. 72
8.1 Cihazı kapatma......................................................... 72
8.2 Devre dışı bırakma.................................................... 72
9 Cihazı imha etme.................................................... 73
Üretici bütün tip ve modelleri sürekli olarak geliştirir. Bu
nedenle şekil, donanım ve teknolojide değişiklik yapma hakkını
saklı tutmak zorunda olmamızı bu nedenle lütfen anlayışla
karşılayın.
Yeni cihazınızın tüm avantajlarını öğrenmek için lütfen bu
kullanım kılavuzundaki tüm uyarıları dikkatli bir şekilde okuyun.
Kullanım kılavuzu, birden fazla model için geçerli olduğundan,
burada belirtilen değerlerden sapmalar olabilir. Sadece belli
cihazlarla ilgili bölümler, yıldız (*) işaretiyle işaretlenmiştir.
Kullanım talimatları,
işaretiyle işaretlenmiştir.
işaretiyle, kullanım sonuçları ise
Bir bakışta cihaz
Fig. 1
(1) Kumanda ve kontrol
elemanları
(2) VarioSpace (5) Ayarlama ayakları
(3) Çekmece
1.2 Cihazı kullanma alanı
Cihaz sadece gıdaların evde veya eve benzer ortamlarda
soğutulması için kullanılmalıdır. Bunun arasında, örneğin
personel mutfaklarında, kahvaltılı pansiyonlarda,
-
kırlardaki evlerde, otellerde, motellerde ve diğer konaklama
-
mekanlarındaki misafirler tarafından,
toptancılardaki yemek hizmetlerinde veya benzeri hizmet-
-
lerde kullanım da sayılmalıdır.
Cihazı ancak evdeki normal çerçevede kullanın. Diğer herhangi
bir şekilde kullanılması yasaktır. Cihaz, ilaçların, kan plazmasının, laboratuar preparatlarının veya 2007/47/AT sayılı Tıp
ürünleri yönetmeliğine tabi benzer madde ve ürünlerin saklanması ve soğutulması için uygun değildir. Cihazın yanlış kullanımı, saklanan malların zarar görmesine veya bozulmasına
neden olabilir. Ayrıca cihazın, patlama tehlikesi bulunan alanlarda çalıştırılması uygun değildir.
Cihaz, iklim sınıfına göre, sınırlı ortam sıcaklıklarında çalıştırılmak üzere tasarlanmıştır. Cihazınız için geçerli olan iklim
sınıfı, model plakasında basılıdır.
Not
u
Belirtilen ortam sıcaklıklarına uyun, aksi takdirde soğutma
performansı düşer.
İklim sınıfı ortam sıcaklıkları için:
SN, N en fazla 32 °C
ST en fazla 38 °C
T en fazla 43 °C
(4) model plakasında
1 Bir bakışta cihaz
1.1 Cihaz ve donanımına genel bakış
Not
u
Raf, çekmece ve sepetler, teslimat durumunda ideal enerji
verimine göre dizilmiştir.
En düşük ortam sıcaklığı olarak 5 °C'ye kadar cihazın kusursuz
bir şekilde çalışması garanti edilir.
1.3 Uygunluk
Soğutucu madde devridaiminde sızıntı olup olmadığı kontrol
edilmiştir. Cihaz, geçerli güvenlik kurallarına ve 2006/95/EG,
2004/108/EG, 2009/125/EG ve 2010/30/EU sayılı AT yönergelerine uygundur.
65
Page 66

genel güvenlik uyarıları
1.4 Kurulum ölçüleri
Fig. 2
Model h a g e e' d c c'
GP1376 851 553 611 624 653 1129 563 592
GP1476 851 602 611 628 657 1174 613 640
GPesf1476 851 602 611 610 657 1174 597 644
GP1486 851 602
x
Yanında duvar mesafe tutucusu olmayan cihazlarda veya
yanındaki mesafe tutucuları kullanılmadığında, ölçü 35 mm
(bkz. 4.2) azalır.
646x663x692x1209
x
613 640
1.5 Enerji tasarrufu
Daima havalandırmanın yeterli olduğundan emin olun.
-
Havalandırma delik ve ızgaralarının üzerini örtmeyin.
Cihazı doğrudan güneş ışınlarına maruz kalan alanlara ya da
-
fırın, kalorifer ve benzeri yanına kurmayın.
Enerji tüketimi, kurulum koşullarına veya ortam sıcaklığına
-
bağlıdır (bkz. 1.2) .
Cihazı olabildiğince kısa bir süre için açın.
-
Sıcaklık ne kadar düşük ayarlanırsa, enerji tüketimi de o
-
kadar yüksek olur.
Tüm gıdaları iyi ambalajlı ve örtülü bir şekilde saklayın. Don
-
oluşmasını önleyin.
Çok ısınmamaları için gıdaları sadece gerektiği kadar
-
çıkartın.
Sıcak yiyecekleri koyma: Önce oda sıcaklığına soğumalarını
-
bekleyin.
Cihazda kalın bir buz tabakası olduğunda: Cihazın çözülme-
-
sini sağlayın.
Biriken toz, enerji tüketimini artırır:
Isı değiştiricili (cihazın arka tarafındaki
-
metal ızgara) soğutucunun yılda bir kez
tozunun alınması gerekir.
2 genel güvenlik uyarıları
Kullanıcı için tehlikeler:
Bu cihaz, fiziksel, sensorik veya ruhsal engelli kişiler (veya
-
çocuklar) veya yeterli bilgi ve deneyimi bulunmayan kişiler
tarafından kullanılmamalıdır. Güvenliklerinden sorumlu bir
kişi tarafından cihazın kullanımı konusunda gerekli talimatları
almaları veya başlangıçta onun gözetimi altında hareket
etmeleri durumu, bundan hariç tutulmuştur. Cihazla oyna-
madıklarından emin olmak için çocukları gözetim altında
tutun.
Hata durumunda fişini çekin (çekerken kablosundan tutup
-
çekmeyin) veya sigortayı kapatın.
Cihazdaki onarım ve müdahalelerin ve elektrik bağlantısın-
-
daki değişikliklerin sadece müşteri hizmetleri veya bunun
için gerekli eğitimi almış diğer uzman personel tarafından
yapılması gerekir.
Cihazın elektrik kablosunu çekerken her zaman fişinden
-
tutun. Daima fişten tutarak çekiniz.
Cihazı sadece kullanım kılavuzunda belirtilen talimatlar
-
doğrultusunda monte edin ve bağlayın.
Bu kullanım kılavuzunu iyi saklayın ve cihazı başkasına
-
verdiğinizde cihazla birlikte bu kullanım kılavuzunu da verin.
Yangın tehlikesi:
İçindeki soğutma maddesi R 600a, çevreye zarar vermez,
-
ancak yanıcıdır. Dışarıya sızan soğutucu tutuşabilir.
Soğutma devridaiminin boru hatlarına zarar vermeyin.
•
Cihazın içinde açık ateş veya ateş kaynaklarıyla
•
uğraşmayın.
Cihazın içinde elektrikli aletler kullanmayın (örneğin
•
buharlı temizlik aletleri, ısıtıcılar, dondurma hazırlayıcıları
vs.).
Dışarıya soğutucu madde sızdığında: Dışarı sızdığı yerin
•
yakınındaki açık ateşi veya tutuşma kaynaklarını ortadan
kaldırın. Fişini çekiniz. Odayı iyice havalandırın. Müşteri
hizmetlerine haber verin.
Cihazda, patlayıcı maddeler veya propan, bütan, pentan vs.
-
gibi yanıcı maddeler içeren sprey kutuları saklamayın. Bu tip
sprey kutularını, üzerinde basılı olan içindekiler bilgilerinden
veya bir ateş simgesinden tanıyabilirsiniz. Dışarı çıkan gaz,
elektrikli parçalardan dolayı tutuşabilir.
Cihazın yanmasına neden olmamaları için, yanan mumları,
-
lambaları ve açık alevli diğer eşyaları cihazdan uzak tutun.
Yüksek yüzdeli alkolü sadece sıkıca kapalı ve dik olarak
-
saklayın. Dışarı çıkan alkol, elektrikli parçalardan dolayı tutuşabilir.
Düşme ve devrilme tehlikesi mevcuttur:
Tabanı, çekmecelerini, kapılarını vs. üzerine basmak veya
-
dayanmak için kullanmayın. Bu özellikle çocuklar için geçerlidir.
Gıda zehirlenmesi tehlikesi mevcuttur:
Üst üste yerleştirilmiş gıdaları tüketmeyin.
-
Donma, sağırlık duygusu ve ağrı tehlikesi mevcuttur:
Soğuk yüzeylere veya soğutulmuş/dondurulmuş gıdalarla
-
uzun süreli cilt temasını sağlamaktan kaçının veya güvenlik
önlemleri, örneğin eldiven kullanın. Dondurmayı, özellikle de
dondurulmuş suyu veya buz küplerini, hemen ve çok soğuk
olarak tüketmeyin.
Diğer bölümlerdeki özel uyarılara uyun:
TEHLİKE Önlenmemesi durumunda ölüm
veya ağır bedensel yaralanmalarla
neticelenebilecek, doğrudan tehlikeli
bir durumu tanımlar.
DİKKAT Önlenmemesi durumunda ölüm
veya ağır bedensel yaralanmayla
neticelenebilecek, tehlikeli bir
durumu tanımlar.
DİKKAT Önlenmemesi durumunda hafif veya
orta bedensel yaralanmalarla neticelenebilecek, tehlikeli bir durumu
tanımlar.
DİKKAT Önlenmemesi durumunda maddi
hasarla neticelenebilecek, tehlikeli
bir durumu tanımlar.
Not Faydalı notları ve önerileri tanımlar:
66
Page 67

3 Kumanda ve gösterge elemanları
3.1 Kumanda ve kontrol elemanları
Fig. 3
(1) Açma/Kapama düğmesi (6) Alarm simgesi
(2) Ayarlama düğmesi (7) Menü simgesi
(3) Sıcaklık göstergesi (8) Çocuk kilidi simgesi
(4) SuperFrost düğmesi (9) Alarm düğmesi
(5) SuperFrost simgesi (10)Elektrik kesintisi simgesi
3.2 Sıcaklık göstergesi
Normal çalışmada aşağıdakiler gösterilir:
en yüksek dondurma sıcaklığı
-
Sıcaklık göstergesi yanıp söner:
sıcaklık ayarı değiştirilir
-
çalıştırdıktan sonra sıcaklık halen yeterince soğuk değil
-
sıcaklık, birkaç derece arttı
-
Göstergede çizgiler yanıp söner:
dondurma sıcaklığı en az 0 °C.
-
Aşağıdaki göstergeler, bir arıza olduğunu gösteriyor. Olası
nedenleri ve giderilmesiyle ilgili önlemler: (bkz. Arızalar).
F0 ila F5
-
-
Elektrik kesintisi simgesi
yanar.
4 Devreye alma
4.1 Cihazı taşıma
DÍKKAT
Yanlış taşımadan dolayı yaralanma ve hasar görme tehlikesi
vardır!
u
Cihazı ambalajıyla birlikte taşının.
u
Cihazı dik olarak taşıyın.
u
Cihazı yalnız taşımayın.
4.2 Cihazı kurma
Nem nedeniyle yangın tehlikesi!
Akım taşıyan parçalar veya elektrik bağlantısı ıslandığında kısa
devre oluşabilir.
u
UYARI
Cihaz, kapalı alanlardaki kullanıma göre tasarlanmıştır.
Cihazı dışarıda veya nemli ya da sıçrayan suların bulunduğu
alanlarda kullanmayın.
Kumanda ve gösterge elemanları
UYARI
Kısa devreden kaynaklanan yangın tehlikesi mevcuttur!
Cihazın veya başka bir cihazın elektrik kablosu/fişi birbirine ve
cihazın arkasına temas ederse, elektrik kablosu/fişi, cihazın
titreşimlerinden dolayı zarar görebilir ve bunun sonucunda bir
kısa devre oluşabilir.
u
Cihazı, hiçbir fişe veya elektrik kablosuna dokunmayacak
şekilde kurun.
u
Cihazın arka tarafındaki prizlere ne cihazı, ne de başka
cihazları takmayın.
UYARI
Soğutucudan kaynaklanan yangın tehlikesi mevcuttur!
İçindeki soğutma maddesi R 600a, çevreye zarar vermez,
ancak yanıcıdır. Dışarıya sızan soğutucu tutuşabilir.
u
Soğutma devridaiminin boru hatlarına zarar vermeyin.
UYARI
Yangın ve hasar görme tehlikesi mevcuttur!
u
Cihazın üzerine, örneğin mikrodalga fırın, ekmek kızartma
makinesi vs. gibi ısı yayan herhangi bir cihaz koymayın!
UYARI
Havalandırma deliklerinin tıklanmasından kaynaklanan yangın
ve hasar görme tehlikesi mevcuttur!
u
Havalandırma deliklerini her zaman boş bırakın. Daima
havalandırmanın yeterli olduğundan emin olunuz!
Not*
Cihazın arkasındaki torbalar, verimli çalışması için önemlidir.
İçerikleri zehirsiz ve tehlikesizdir.
u
Torbaları çıkartmayın!
Cihazda herhangi bir arıza olması durumunda derhal (cihazı
q
bağlamadan önce) satıcıya danışın.
Kurulum yerindeki zeminin yatay ve düz olması gerekir.
q
Cihazı doğrudan güneş ışınlarına maruz kalan alanlara ya da
q
fırın, kalorifer ve benzeri yanına kurmayın.
İdeal kurulum yeri, kuru ve iyi havalandırılmış bir odadır.
q
Cihazı, arka tarafı ve ekteki duvar mesafe tutucusu (aşağıya
q
bakın) kullanılıyorsa o, her zaman doğrudan duvara gelecek
şekilde kurun.
Cihazı yardım almadan kurmayın.
q
Cihazınızın kurulduğu odanın, norm EN 378 uyarınca her 8 g
q
R 600a soğutucu madde dolum miktarı başına 1 m3 kadar bir
hacme sahip olması gerekir. Kurulum odası çok küçük
olduğunda, soğutucu madde devridaiminde herhangi bir
sızıntı olması durumunda, tutuşabilir bir gaz-hava karışımı
oluşabilir. Soğutucu madde miktarıyla ilgili bilgiler için
cihazın iç kısmındaki model plakasına bakın.
u
Bağlantı kablosunu cihazın arka tarafından çıkartın. Bu
sırada kablo yuvasını sökün, aksi takdirde titreşim sesleri
oluşur!
u
Cihazın dış tarafındaki koruyucu folyoları çekip çıkartın.*
u
Tüm taşıma koruma parçalarını çıkartın.
Cihazın yanında duvar mesafe tutucuları varsa, bu duvar
mesafe tutucularının montaj ve kullanımı sonucu belirtilen enerji
alışına ulaşılır. Duvar mesafe tutucusu olmadığında, belirtilen
cihaz derinliği 3,50 cm azalır. Ekteki duvar mesafe tutucuları
kullanılmadığında, bunun, cihazın işlevselliği üzerinde hiçbir
etkisi bulunmaz. Ancak bu tür cihazlarda daha düşük duvar
mesafesinde enerji tüketimi çok az değişir.*
67
Page 68

Devreye alma
u
Yanında duvar mesafe tutucuları
olan bir cihazda bu duvar
mesafe tutucularını cihazın arkasına, sağ ve sol üst kısma takın.*
u
Ambalajı imha edin. (bkz. 4.5)
u
Cihazı ekteki çatal anahtarıyla
ayar ayaklarından (A) ve bir su
terazisi yardımıyla sıkıca ve
düz bir şekilde duracak
şekilde ayarlayın.
Not
u
Cihazı temizleyin (bkz. 6.2) .
Cihaz çok nemli bir ortamda kurulduğunda, cihazın dış tarafında su yoğuşabilir.
u
Daima havalandırmanın yeterli olduğundan emin olun!
4.3 Kapının yönünü değiştirme
Gerekirse kenarı değiştirebilirsiniz.
Aşağıdaki aletlerin hazır olduğundan emin olun:
Torx® 25
q
Torx® 15
q
Beraberinde gelen çatal anahtarı
q
montaj çalışması için gerekirse ikinci kişi
q
*
Fig. 4 kapı kolu bulunan cihazlarda
u
Grafikteki konum numaralarının sırasını izleyin.
4.4 Mutfak tezgahına sürme
DÍKKAT
Kapı dışarı devrildiğinde yaralanma tehlikesi vardır!
u
Kapıyı sıkıca tutun.
u
Kapıyı dikkatli bir şekilde bir yere yaslayın.
68
Fig. 5
(1) Takma dolabı (3) Mutfak dolabı
(2) Cihaz (4) Duvar
x
Yanında duvar mesafe tutucusu olmayan cihazlarda veya
yanındaki mesafe tutucuları kullanılmadığında, ölçü 35 mm
(bkz. 4.2) azalır.
Cihaz, mutfak tertibatıyla modifiye edilebilir. Cihazı
mutfak tezgahına göre denklemek için, cihazın üzerine uygun
bir takma dolabı
Mutfak dolaplarıyla (derinliği maks. 580 mm) değiştirildiğinde
cihaz, mutfak dolabının
yandan 70 mm x , cihazın ortasında da 85 mm x mutfak dolabı
ön kapısının karşısında durur.
Aşağıdakiler, havalandırma için önemlidir:
Takma dolabının arkasında, bütün takma dolabı genişliği
-
boyunca en az 50 mm derinliğinde bir havalandırma
boşluğunun olması gerekir.
Odanın tavanının altındaki havalandırma çapının en az
-
300 cm2 olması gerekir.
Havalandırma çaprazı ne kadar büyük olursa cihaz da o
-
kadar enerji tasarrufu sağlayarak çalışır.
Fig. 5 (1)
monte edilebilir.
Fig. 5 (3)
yanına kurulabilir. Cihaz
Fig. 5 (2)
Page 69

Kullanım
Cihaz menteşelerle bir duvarın
cihazla duvarın arasındaki mesafenin en az 40 mm olması
gerekir. Bu mesafe, kapı açık olduğunda kolunun taşma mesafesine eşittir.
Fig. 5 (4)
yanına kurulduğunda,
4.5 Ambalajı imha etme
UYARI
Ambalaj malzemesinden ve folyolardan kaynaklanan boğulma
tehlikesi!
u
Çocukların ambalaj malzemesiyle oynamasına izin
vermeyin.
Ambalajı, geri dönüştürülebilir materyallerden yapılmıştır:
Oluklu karton/mukavva
-
Köpüklü polistiroldan yapılmış parçalar
-
Polietilen folyo ve poşetler
-
Poliproilenden yapılmış çevre bantları
-
polietilen camlı, çivilenmiş ahşap çerçeve*
-
u
Ambalaj maddesini resmi bir çöp toplama yerine götürün.
4.6 Cihazı bağlama
İKAZ
Elektronik için hasar görme tehlikesi!
u
Ada invertörleri (doğru akımı alternatif akıma veya döner
akıma çevirme) veya enerji tasarrufu prizleri kullanmayın.
UYARI
Yangın ve aşırı ısınma tehlikesi mevcuttur!
u
Uzatma kablosu veya dağıtım çubukları kullanmayın.
Kurulum yerindeki akım türü (alternatif akım) ile gerilimin, model
plakasında belirtilenlerle aynı olması gerekir (bkz. Bir bakışta
cihaz).
Cihazı sadece gerektiği şekilde kurulmuş bir korumalı
priz üzerinden bağlayın. Prizin 10 A veya üstü ile
korunmuş olması gerekir.
Cihazın acil durumda elektrikten daha hızlı bir şekilde
kesilebilmesi için, kolay erişilebilir olması gerekir.
Cihazın arka kısmının dışında olması gerekir.
u
Elektrik bağlantısını kontrol edin.
u
Fişini takın.
4.7 Cihazı çalıştırma
u
Açma/Kapama düğmesine
w
Cihaz açıktır. Sıcaklık göstergesi ile Alarm simgesi
sıcaklık yeterince soğuk olana kadar yanıp söner.
Fig. 3 (1)
basın.
Fig. 3 (6)
5 Kullanım
5.1 Sıcaklık göstergesinin parlaklığı
Sıcaklık göstergesinin parlaklığını, kurulum yerindeki ışık seviyesine uygun hale getirebilirsiniz.
5.1.1 Parlaklığı ayarla
Parlaklığı h 0 (minimum aydınlatma) ile h 5 (maksimum aydınlatma gücü) arasında ayarlayabilirsiniz.
u
Ayarlama modunu devreye sokma: SuperFrost düğmesini
Fig. 3 (4)
w
Göstergede Menü simgesi
w
Göstergede c yanıp söner.
yaklaşık 5 sn boyunca basılı tutun.
Fig. 3 (7)
gösterilir.
u
Ayarlama düğmesiyle
u
SuperFrost düğmesiyle
w
Göstergede son ayarlanan parlaklık değeri belirir.
u
Ayarlama düğmesiyle
istediğiniz değeri seçin.
w
Parlaklık ayarlanmıştır.
u
Ayarlama modunu devre dışı bırakın: Açma/Kapama
düğmesine
w
Sıcaklık göstergesinde tekrar sıcaklık gösterilir.
Fig. 3 (1)
Fig. 3 (2)
h seçin.
Fig. 3 (4)
Fig. 3 (2)
iki kez basın.
kısaca onaylayın.
h 0 ile h 5 arasındaki
5.2 Çocuk kilidi
Çocuk kilidiyle, çocukların oynarken cihazı yanlışlıkla kapatmasını önleyebilirsiniz.
5.2.1 Çocuk kilidini ayarlayın
İşlev çalıştırılacaksa:
u
Ayarlama modunu devreye sokma: SuperFrost düğmesini
Fig. 3 (4)
w
Göstergede Menü simgesi
w
Göstergede c yanıp söner.
u
SuperFrost düğmesiyle
w
Göstergede c1 belirir.
u
SuperFrost düğmesiyle
w
Göstergede Çocuk kilidi simgesi
w
Göstergede c yanıp söner.
w
Çocuk kilidi işlevi devreye sokulmuştur.
Ayarlama modu sona erdirilecekse:
u
Kısaca Açma/Kapama düğmesine
w
Sıcaklık göstergesinde tekrar sıcaklık gösterilir.
İşlev kapatılacaksa:
u
Ayarlama modunu devreye sokma: SuperFrost düğmesini
Fig. 3 (4)
w
Göstergede Menü simgesi
w
Göstergede c yanıp söner.
u
SuperFrost düğmesiyle
w
Göstergede c0 belirir.
u
SuperFrost düğmesiyle
w
Çocuk kilidi simgesi
w
Göstergede c yanıp söner.
w
Çocuk kilidi işlevi devre dışı bırakılmıştır.
Ayarlama modu sona erdirilecekse:
u
Kısaca Açma/Kapama düğmesine
w
Sıcaklık göstergesinde tekrar sıcaklık gösterilir.
yaklaşık 5 sn boyunca basılı tutun.
Fig. 3 (7)
Fig. 3 (4)
Fig. 3 (4)
gösterilir.
kısaca onaylayın.
kısaca onaylayın.
Fig. 3 (8)
Fig. 3 (1)
yaklaşık 5 sn boyunca basılı tutun.
Fig. 3 (7)
Fig. 3 (4)
Fig. 3 (4)
Fig. 3 (8)
gösterilir.
kısaca onaylayın.
kısaca onaylayın.
söner.
Fig. 3 (1)
yanar.
basın.
basın.
5.3 Sıcaklık alarmı
,
Dondurma sıcaklığı yeterli soğuklukta olmadığında, uyarı sesi
duyulur.
Aynı zamanda sıcaklık göstergesi ile Alarm simgesi
yanıp söner.
Sıcaklık tekrar yeterince soğuk olduğunda uyarı sesi otomatik
olarak kesilir, Alarm simgesi
gesinin yanıp sönmesi durur.
Alarm durumu devam ettiğinde: (bkz. Arızalar).
Fig. 3 (6)
söner ve sıcaklık göster-
5.3.1 Sıcaklık alarmını sessiz durumuna getirme
Uyarı sesini sessiz konuma alabilirsiniz. Sıcaklık tekrar yeterince soğuk olduğunda, alarm fonksiyonu tekrar aktif hale gelir.
u
Alarm düğmesine
w
Uyarı sesi susar.
Fig. 3 (9)
basın.
Fig. 3 (6)
69
Page 70

Kullanım
5.4 Gıdaları dondurma
24 saat içinde maksimum kaç kg taze gıdayı dondurabileceğiniz, (bkz. Bir bakışta cihaz)"dondurma kapasitesi ... kg/24
saat" model plakası altında belirtilmiştir.
Çekmecelerin her birine maks. 25 kg, plakaların ise her birine
maks. 35 kg dondurulmuş gıda yükleyebilirsiniz.
DÍKKAT
Cam kırıkları nedeniyle yaralanma tehlikesi!
Şişeler ve içecek dolu kutular dondurulurken patlayabilir. Bu
özellikle asitli içecekler için geçerlidir.
u
Şişeleri ve içecek içeren kutuları dondurmayın!
Gıdaların hızlı bir şekilde tam donmaları için, paket başına
aşağıdaki miktarları aşmayın:
- Meyve, sebze, en fazla 1 kg
- Et, en fazla 2,5 kg
u
Gıdaları porsiyonlara bölerek, buzdolabı poşetlerine, geri
dönüşümlü plastik, metal veya alüminyum kaplara koyun.
5.5 Gıdaları çözdürme
- oda sıcaklığında
- mikrodalga fırında
- fırında/sıcak havalı fırında
u
Çözdürülen gıdaları sadece istisna durumlarında tekrar
dondurun.
5.6 Sıcaklığı ayarlama
Sıcaklık, aşağıdaki faktörlere bağlıdır:
Kapının açılma sıklığı
-
Kurulduğu yerin oda sıcaklığı
-
Gıdaların tür, sıcaklık ve miktarı
-
Tavsiye edilen sıcaklık ayarı: -18 °C
Sıcaklık sürekli değiştirilebilir. -28 °C ayarına ulaşıldığında,
tekrar -14 °C ile başlanır.
u
Sıcaklık işlevini açın: Ayarlama düğmesine
basın.
w
Sıcaklık göstergesinde geçerli sıcaklık yanıp söner.
u
Sıcaklığı 1 °C adımları halinde değiştirin: Ayarlama
düğmesine
sıcaklık yanana kadar basın.
u
Sıcaklığı sürekli olarak değiştirin: Düğmeyi basılı tutun.
w
Ayarlama sırasında değer yanıp sönerek gösterilir.
w
Son tuşa basıldıktan yaklaşık 5 saniye sonra asıl sıcaklık
gösterilir. Değişen sıcaklık yavaş yavaş kendini yeni değere
göre ayarlar.
Fig. 3 (2)
sıcaklık göstergesinde istediğiniz
Fig. 3 (2)
bir kez
daha önce dondurulmuş olan mallar yerleştirilirken
-
günlük yaklaşık 1 kg’a kadar taze gıdaların dondurulması
-
5.7.1 SuperFrost ile dondurma
u
SuperFrost düğmesine
basın.
w
SuperFrost simgesi
w
Dondurma sıcaklığı düşer, cihaz maksimum soğutma
gücünde çalışır.
Not
u
SuperFrost düğmesine basıldığında, entegre edilmiş olan
çalıştırılma gecikmesi sayesinde kompresör, 8 dakikaya
kadar gecikmeli olarak başlayabilir. Bu gecikme, kompresörün ömrünü artırır.
Az bir dondurulacak gıda miktarında:
u
Yaklaşık 6 saat bekleyin.
u
Ambalajlı gıdaları alttaki çekmecelere koyun.
Maksimum dondurulan gıda miktarında:
u
Yaklaşık 24 saat bekleyin.
u
En alttaki çekmeceyi çıkartın ve gıdayı, tabana veya yan
duvarlara temas edecek şekilde, doğrudan cihazın içine
koyun.
w
SuperFrost otomatik olarak kapanır. Yerleştirilen miktara
göre en erken 30 saat, en geç ise 65 saat sonra.
w
Dondurma tamamlandığında, SuperFrost simgesi
söner.
u
Gıdayı çekmeceye koyun ve onu tekrar içeri itin.
w
Cihaz, enerji tasarrufu sağlayan normal çalışma modunda
çalışmaya devam eder.
5.8 Çekmeceler
u
Dondurmak istediğiniz gıdaları doğrudan yerleştirme rafına
koymak için: Çekmeceyi öne doğru çekip çıkartın.
5.9 raf alanları
u
Yerleştirme rafını çıkartın: önden kaldırın
ve dışarı çekin.
u
Yerleştirme rafını tekrar takın: Sonuna
kadar içeri itin.
Fig. 3 (4)
Fig. 3 (5)
bir kez kısa bir süre için
yanar.
Fig. 3 (5)
5.7 SuperFrost
Bu fonksiyonla taze gıdaları hızlı bir şekilde çekirdeklerine
kadar dondurabilirsiniz. Cihaz maksimum soğutma gücüyle
çalışır, bu sayede soğutma cihazının sesleri geçici bir süre için
daha yüksek olabilir.
24 saat içinde maksimum kaç kg taze gıdayı dondurabileceğiniz, "dondurma kapasitesi ... kg/24 saat" model plakası
altında belirtilmiştir. Bu maksimum dondurulacak gıda miktarı,
model ve iklim sınıfına göre değişiklik gösterir.
Dondurmak istediğiniz taze gıdanın miktarına bağlı olarak,
SuperFrost'u erkenden çalıştırmanız gerekir: küçük bir dondurulacak gıda miktarında gıdaları yerleştirmeden yaklaşık 6 saat,
maksimum dondurulacak gıda miktarında ise 24 saat önce.
Gıdaları paketleyin ve bunları olabildiğince geniş yüzeye yayın.
Zaten donmuş olan ürünleri çözdürmelerini önlemek için,
dondurulacak gıdaların bunlara temas etmesini önleyin.
SuperFrost, aşağıdaki durumlarda çalıştırılmamalıdır:
70
5.10 VarioSpace
Çekmecelerin yanında raf alanlarını
da çıkartabilirsiniz. Bu sayede daha
büyük dondurulmuş gıdalar için
daha fazla yer elde edersiniz. Beyaz
et, et, büyük av hayvanları ve büyük
hamur işleri, bütün olarak dondurulabilir ve işlenmeye devam edilebilir.
u
Çekmecelerin her birine maks.
25 kg, plakaların ise her birine
maks. 35 kg dondurulmuş gıda
yükleyebilirsiniz.
Page 71

Bakım
5.11 Bilgi sistemi
Fig. 6
(1) Hazır gıdalar, dondurma (4) Sucuk, ekmek
(2) Domuz eti, balık (5) Av hayvanları, mantarlar
(3) Sebze, meyve (6) Beyaz et, sığır/ dana
Rakamlar, birden fazla dondurulan gıda türünün saklama sürelerini ay cinsinden gösterir. Belirtilen saklama süreleri,
minimum değerlerdir.
5.12 Soğutma aküleri
Soğutma aküleri, elektrik kesintisinde sıcaklığın çok hızlı artmasını önler.
5.12.1 Soğutma aküleri kullanın
u
Dondurulan soğutma akülerini
dondurma bölmesinin üst, ön
kısmına, dondurulan gıdaların
üstüne koyun.
6 Bakım
6.2
Cihazı temizleyin
DÍKKAT
Sıcak buhardan kaynaklanan yaralanma ve hasar görme tehlikesi vardır!
Sıcak buhar, yüzeylere zarar verebilir ve yangına neden olabilir.
u
Buharla temizleme aletleri kullanmayın!
İKAZ
Yanlış temizlik, cihaza zarar verir!
u
Temizlik maddelerini konsantre halinde kullanmayın.
u
Aşındırıcı olan veya çizik bırakan süngerler veya çelik yün
kullanmayın.
u
Keskin, tahriş edici, kum, klorür, kimyasal madde veya asit
içeren temizlik maddelerini kullanmayın.
u
Kimyasal çözücü maddeleri kullanmayın.
u
Cihazın iç kısmındaki model plakasını hasara uğratmayın
veya sökmeyin. Müşteri hizmetleri için önemlidir.
u
Kablo veya diğer parçaları kopartmayın, bükmeyin veya
bunlara hasar vermeyin.
u
Boşaltma kanalına, havalandırma aralıklarına ve elektrikli
parçalara temizlik suyu girmesine izin vermeyin.
u
Yumuşak bezler ve nötr pH değerine sahip genel temizleyiciler kullanın.
u
Cihazın iç kısmında sadece gıdalara zarar vermeyecek
temizlik ve bakım maddeleri kullanılmalıdır.
u
Cihazı boşaltın.
u
Fişini çekiniz.
6.1 Manüel çözdürme
Uzun süre kullanıldığında cihazda bir kırağı veya buz tabakası
oluşur.
Cihaz daha sık açıldığında veya içine yerleştirilen gıdalar sıcak
olduğunda kırağı veya buz tabakası daha hızlı oluşur. Ancak
daha kalın bir buz tabakası, enerji tüketimini artırır. Bu nedenle
cihazı düzenli olarak çözdürün.
DÍKKAT
Sıcak buhardan kaynaklanan yaralanma ve hasar görme tehlikesi vardır!
u
Çözdürmek için elektrikli ısıtma veya buharlı temizlik cihazları, açık alevler veya çözdürme spreyleri kullanmayın.
u
Buzları sivri eşyalarla çıkartmayın.
u
Çözdürmeden bir gün önce SuperFrost özelliğini çalıştırın.
w
Dondurulmuş gıdalarda bir "soğukluk rezervi" bulunur.
u
Cihazı kapatın.
w
Sıcaklık göstergesi söner.
w
Sıcaklık göstergesi sönmüyorsa, çocuk kilidi aktiftir.
(bkz. 5.2) .
u
Fişini çekin veya sigortadan kapatın.
u
Soğutma akülerini üste, dondurulan gıdaların üstüne koyun.
u
Dondurulmuş gıdaları gerekirse gazete kağıdına veya örtülere sarın ve serin bir yerde saklayın.
u
Sıcak, ancak kaynar olmayan su dolu
bir tencereyi ortadaki plakalardan
birine koyun.
- veya -
u
Alttaki iki çekmeceyi yarıya kadar ılık
suyla doldurup, cihazın içine koyun.
w
Çözdürme işlemi hızlanır.
u
Çözdürme işlemi sırasında cihazın kapısını açık bırakın.
u
Çözülen buz parçalarını dışarı çıkartın.
u
Gerekirse çözülme suyunu bir sünger veya bezle alın.
u
Cihazı temizleyin ve bezle silerek kurutun. (bkz. 6.2) .
u
Hava giriş ve çıkış ızgarasını düzenli olarak temizleyin.
w
Biriken toz, enerji tüketimini artırır.
u
Plastik dış ve iç bölmeleri ılık su ve biraz deterjanla elle
temizleyin.
u
Cilalı yan duvarları ancak yumuşak, temiz bir bezle silin.
Aşırı kirlenmişse ılık suyla nötr temizleyici kullanın.*
Çizilmemeleri için, paslanmaz çelik temizleyicilerini cam veya
plastik yüzeylere sürmeyin. Başlangıçta paslanmaz çelik yüzeyinin daha koyu yerleri ve daha yoğun bir rengi olması
normaldir.*
u
Paslanmaz çelik dış yüzeyler kirlendiğinde, piyasadaki
yaygın bir paslanmaz çelik temizleyicisiyle temizleyin.
Ardından ekteki paslanmaz çelik temizleyicisini parlatma
yönünde sürün.*
Temizlikten sonra:
u
Cihazı ve donanım parçalarını silerek kurutun.
u
Cihazı tekrar takın ve çalıştırın.
u
SuperFrost özelliğini çalıştırın (bkz. 5.7) .
Sıcaklık yeterince soğuk olduğunda:
u
Gıdaları tekrar dolaba sokun.
6.3 Müşteri hizmetleri
Önce, arızayı kendinizin giderebilip gideremeyeceğinizi kontrol
edin. (bkz. Arızalar). Olmadığında müşteri hizmetlerine
başvurun. Adresini bulmak için lütfen ekteki müşteri hizmetleri
dizinine bakın.
Uzman olmayan kişiler tarafından yapılan onarımdan kaynaklanan yaralanma tehlikesi mevcuttur!
u
UYARI
Cihaz ve elektrik bağlantısındaki, özellikle belirtilmemiş olan
(bkz. Bakım) onarım ve müdahalelerin sadece müşteri
hizmetleri tarafından yapılması gerekir.
71
Page 72

Arızalar
u
Cihazın adını
Fig. 7 (1)
numarasını
ve seri numarasını
Fig. 7 (3)
plakasından
okuyun. Model
plakası, cihazın iç
kısmında, solda
bulunur.
, servis
Fig. 7 (2)
model
Fig. 7
u
Müşteri hizmetlerini haberdar edin ve hatayı, cihazın adını
Fig. 7 (1)
Fig. 7 (3)
w
Bu, daha hızlı ve hedefe yönelik bir servis verilmesini sađlar.
u
Müşteri hizmetleri gelene kadar cihaz kapalı tutun.
w
Gıdalar daha uzun süre soğuk kalır.
u
Fişini çekin (çekerken kablosundan tutup çekmeyin) veya
sigortayı kapatın.
, servis numarasını
bildirin.
Fig. 7 (2)
ve seri numarasını
7 Arızalar
Cihazınız, çalışma güvenliğine ve uzun bir kullanım ömrüne
sahip olacak şekilde tasarlanmış ve üretilmiştir. Buna rağmen
çalışma sırasında herhangi bir arıza ile karşılaştığınız takdirde,
lütfen arızanın olası kullanım hatalarından kaynaklanıp kaynaklanmadığını kontrol edin. Bu durumda, garanti süresi içinde bile
olsa, doğan masrafları ödemeniz gerekir. Aşağıdaki arızaları
kendiniz giderebilirsiniz:
Cihaz çalışmıyor.
Cihaz açık değil.
→
Cihazı çalıştırın.
u
Elektrik fişi prize düzgün bir şekilde takılmamış.
→
Fişi kontrol edin.
u
Prizin sigortası sağlam değil.
→
Sigortayı kontrol edin.
u
Kompresör uzun çalışıyor.
Kompresör, düşük soğukluk ihtiyacında düşük bir devir
→
sayısına geçer. Bu sayede çalışma süresinin artar ve enerji
tasarrufu sağlanır.
Enerji tasarrufu sağlayan modellerde bu normaldir.
u
SuperFrost açık.
→
Gıdaları hızlı soğutmak için kompresör daha uzun süre
u
çalışır. Bu, normaldir.
Cihazın arkasındaki (kompresördeki) bir LED, düzenli
olarak her tüm 15 saniyede bir yanıp söner*.
Dönüştürücü bir hata teşhis LED'i ile donatılmıştır.
→
Yanıp sönmesi normaldir.
u
Çok gürültülü.
Devir sayısıyla ayarlanan* kompresörler, farklı devir sayısı
→
kademelerinden dolayı farklı çalışma gürültülerine neden
olabilir.
Ses, normaldir.
u
Bir fokurdama veya şıpırtı sesi
Bu ses, soğutma sirkülasyonunda akan soğutma madde-
→
sinden gelir.
Ses, normaldir.
u
Hafif bir tıklama
Ses, soğutucu (motor) otomatik olarak açılıp kapandığında
→
oluşur.
Ses, normaldir.
u
Gurultu. Soğutucu (motor) çalıştığında kısa süreli olarak
biraz daha yüksek seslidir.
SuperFrost çalıştırıldığında, taze yerleştirilmiş gıdalarda
→
veya kapı uzun süre açık bırakıldığında soğutma gücü
otomatik olarak artar.
Ses, normaldir.
u
Ortam sıcaklığı çok yüksek.
→
Sorunun çözümü: (bkz. 1.2)
u
Titreşim sesleri
u
Cihazı biraz kenara çekip, ayarlama ayaklarını ayarlayın.
Sıcaklık göstergesinde aşağıdakiler gösterilir: F0 - F5.
Bir hata var.
→
Müşteri hizmetlerine başvurun. (bkz. Bakım).
u
Sıcaklık göstergesinde elektrik kesintisi
Sıcaklık göstergesinde, elektrik kesintisinde ulaşılan en
yüksek sıcaklık gösterilir.
Dondurma sıcaklığı bir elektrik kesintisiyle son saat veya
→
günler boyunca çok fazla artmış. Elektrik kesintisi bittikten
sonra cihaz son sıcaklık ayarlamasında çalışmaya devam
eder.
u
En yüksek sıcaklık göstergesini silin: Alarm düğmesine
Fig. 3 (9)
u
Gıdaların kalitesini kontrol edin. Bozulan gıdaları tüketmeyin.
Çözdürülmüş gıdaları tekrar dondurmayın.
Sıcaklık göstergesinde DEMO yanar.
Sunum modu devreye girmiştir.
→
Müşteri hizmetlerine başvurun. (bkz. Bakım).
u
Cihazın dış yüzeyi sıcak.
Soğutma devridaiminin sıcaklığı, yoğuşma suyunun önlen-
→
mesi için kullanılır.
Bu, normaldir.
u
Sıcaklık yeterince soğuk değil.
Cihazın kapısı tam kapatılmamış.
→
Cihazın kapısını kapatın.
u
Gelen ve giden hava yeterli değil.
→
Havalandırma ızgarasının önünü boşaltın.
u
Ortam sıcaklığı çok yüksek.
→
Sorunun çözümü: (bkz. 1.2) .
u
Cihaz çok sık veya çok uzun bir süre boyunca açıldı.
→
Biraz bekleyip, gerekli sıcaklığın kendiliğinden tekrar
u
devreye girip girmediğine bakın. Olmadığında müşteri
hizmetlerine başvurun. (bkz. Bakım).
Çok fazla taze gıda, SuperFrost olmadan yerleştirildi.
→
Sorunun çözümü: (bkz. 5.7)
u
Sıcaklık yanlış ayarlanmış.
→
Sıcaklığı daha soğuğa ayarlayın ve 24 saat sonra kontrol
u
edin.
Cihaz, bir ısı kaynağına çok yakın yerleştirilmiş.
→
Sorunun çözümü: (bkz. Devreye alma).
u
Göstergede çizgiler ("- -") gösterilir.
Dondurma sıcaklığı bir elektrik kesintisi veya bir elektrik
→
şebekesi hatası sonucu sıfır derecenin üstüne çıkmış.
u
Ayrıca "Elektrik kesintisi" ve "
basın.
" bölümüne de bakın
8 Devre dışı bırakma
8.1 Cihazı kapatma
u
Açma/Kapama düğmesini
tutun.
w
Sıcaklık göstergesi sönük.
8.2 Devre dışı bırakma
u
Cihazı boşaltın.
u
Fişini çekiniz.
u
Cihazı temizleyin (bkz. 6.2) .
u
Kötü koku oluşmaması için kapısını açık bırakın.
Fig. 3 (1)
yaklaşık 2 sn basılı
yanar.
72
Page 73

9 Cihazı imha etme
Cihaz, halen değerli malzemeler içerir ve ayrılmamış yerleşim yeri çöplüğünden farklı çöp imha
tesislerine götürülmelidir. Kullanım ömrü tükenen
cihazların imhası uzmanca ve uygun bir biçimde,
geçerli atık işleme yasa, düzenleme ve talimatları
uyarınca gerçekleştirilmelidir.
İçerdiği soğutucu madde (bilgiler, model plakasındadır) ve
yağın kontrol dışı dışarı sızamaması için, atılacak olan cihazın
soğutucu devridaiminden hasar görmemesine dikkat edin.
u
Cihazı kullanılmaz hale getirin.
u
Fişini çekiniz.
u
Bağlantı kablosunu ayırın.
Cihazı imha etme
73
Page 74

Page 75

Page 76

Liebherr Hausgeräte Marica EOOD * 4202 Radinovo * Bezirk Plovdiv * Bulgarien * www.liebherr.com
 Loading...