

Page 1
Use and
Care Manual
For “NoFrost”combined
refrigerator-freezer
CS 1400
7082 663-00
Page 2

T
able
of
C
onTenTs
Additional benefits
• CFC-free
• Energy-optimized refrigerant circuit
• Energy-efficient insulation
• Low energy consumption
• User-friendly electronic controls
• Display of functions switched on
• Temperature can be controlled within climate rating range, regardless of room temperature
• Refrigerator and freezer compartments defrost
automatically - no need to spend time defrosting
• Big net refrigerator capacity
• Variable and practical features
• Safety-glass storage shelves
• Big net freezer capacity
• Freezer temperature increase alarm
• Audible door open alarm
• Power failure/“frost-control” display
• Fresh food can be fast-frozen as required
• All drawers suitable for fast freezing
• Integrated transport grips on appliance housing
• Transport castors
• Easy to clean
• This unit is certified as Sabbath compliant by the
Star-K organization thus allowing the appliance
to be used during religious holidays. For more
information please visit Star-K on the web at
www.star-k.org.
Contents Page
Safety ..................................................................... 3
Disposal of old appliance ................................. 3
Electrical safety ................................................ 3
Important safety information ............................ 4
Safety regulations ............................................ 5
Disposal of carton ............................................ 5
Features ................................................................. 6
Description of appliance and equipment ........ 6
Operating and control elements ...................... 7
Operation................................................................ 8
Turning the appliance on and off ..................... 8
Setting the temperature ................................... 8
Temperature display ......................................... 9
Ventilation ......................................................... 9
Audible alarm signal ........................................ 9
Power failure/Frost-control display ................... 9
Supercooling .................................................. 10
Setup mode ............................................ 10 - 12
Refrigerator compartment .................................... 13
Arranging food................................................ 13
Equipment ...................................................... 13
Interior light .................................................... 15
Freezer compartment ........................................... 16
Freezing ......................................................... 16
Information system ........................................ 16
Freezing with Superfrost ................................. 16
Freezing and storage ..................................... 17
Cleaning ............................................................... 18
Defrosting/Vacation .............................................. 19
Defrosting ....................................................... 19
Vacation tips ................................................... 19
Troubleshooting .................................................... 20
Customer service ........................................... 21
Appliance information .................................... 21
Liebherr Warranty Plan ........................................ 22
IMPORTANT
All types and models are subject to continuous improvement. The manufacturer reserves the right to
make modifications in the shape, equipment and technology.
2
Page 3
s
afeTy
Please read and follow these
instructions
These instructions contain Warning and Caution
statements. This information is important for safe
and efficient installation and operation.
Always read and follow all Warning and Caution
statements!
Danger indicates a hazard which
will cause serious injury or death if
precautions are not followed.
Warning indicates a potentially hazardous
situation which, if not avoided, could
result in death or serious injury.
Caution indicates a potentially hazardous
situation which, if not avoided, may result
in minor or moderate injury.
Disposal of Old Appliance
Risk of child entrapment. Before you
discard your old refrigerator or freezer:
• Be sure to follow your local requirements for disposal of appliances. Discarded appliances can be dangerous.
• Remove the doors.
• Remove the freezer drawers.
• Leave the shelves in place so that
children may not easily climb inside.
• Cut off the power cable from the
discarded refrigerator. Discard
separately from the refrigerator.
Following these instructions reduces the
possibility of causing personal injury,
especially to children playing.
Contact the trash collection agency in
your area for additional information.
IMPORTANT
This highlights information that is especially
relevant to a problem-free installation and
operation.
Make sure incoming voltage is the same as the
appliance rating.
To reduce the risk of fire, electric shock, or
personal injury, installation work and electrical
wiring must be done by a qualified electrician
in accordance with all applicable codes and
standards, including fire-rated construction.
Electrical Safety
Connect this appliance to a 110-120 VAC, 15 amp
circuit that is controlled by a circuit breaker or
fuse. This appliance should have its own separate
grounded circuit. Do not use an extension cord.
The power cord is equipped with a three-prong
(grounding) plug for your protection against
possible shock hazards. To maintain this protection:
• Do not modify the plug by removing the round
grounding prong.
• Do not use a two-prong adapter. Where a twoprong wall receptacle is encountered, contact
a qualified electrician and have it replaced with
a three-prong receptacle in accordance with all
local codes and ordinances.
• Do not use a power cord that is frayed or
damaged.
3
Page 4

s
afeTy
Important Safety Information
This appliance is intended for domestic use only.
Use the appliance only for its intended purpose,
the storage of food products. Follow the cautions
and safety warnings throughout this instruction
manual including the following:
• To prevent injury to you or damage to the unit,
the appliance should be unpacked and set up by
two people.
• If the appliance is damaged on delivery, contact
the supplier immediately before connecting to
the power source.
• To guarantee safe operation, ensure that the
appliance is set up and connected as described
in these operating instructions.
• Disconnect the appliance from the power source
if a fault occurs. Pull out the plug, turn off or
remove the fuse.
• When disconnecting the appliance, use the plug.
Do not pull on the cable.
• Any repairs and work on the appliance should
only be carried out by the customer service
department. Unauthorized work may be
dangerous to the user. Changing the power
source cable should only be done by the
customer service department.
• To prevent possible injury due to an electrical
shock, be sure to disconnect the power cord or
turn off the circuit breaker before cleaning the
appliance.
• To avoid injury or damage to the appliance, do
not use steam cleaning equipment to clean the
appliance.
• Do not operate the refrigerator in the presence
of explosive fumes.
• In the event of a power outage, minimize
opening the refrigerator door(s). Protect the food
either by placing dry ice on top of the packages
or using a local frozen food locker if the power
failure is of a long duration. Do not attempt to
re-freeze any previously frozen food that has
thawed.
• To avoid possible injury, only adjust an empty
shelf. Do not attempt to adjust a shelf with food
on it.
• To protect the refrigerator from possible damage,
allow the appliance to stand 1/2 to 1 hour in
place before turning the electricity on. This
allows the refrigerant and system lubrication to
reach equilibrium.
• Do not eat ice cream, particularly ice cream
treats, or ice cubes, immediately from the
freezer compartment. There is a risk of “burning”
because of the very cold temperatures.
• Do not consume food which has been stored for
too long; it could cause food poisoning.
• The appliance is designed for cooling, freezing
and storage of food, and for making ice. It is
intended for domestic use.
• Do not store explosives or sprays using
combustible propellants such as butane,
propane, pentane, etc. in the appliance.
Electrical components might cause leaking gas
to ignite. You may identify such sprays by the
printed contents or a flame symbol.
• Do not use electrical appliances inside the
appliance.
• Do not allow children to play with the appliance.
Children must not climb, sit or stand on the
shelves, drawers or door.
4
Page 5
Safety Regulations
The appliance complies with UL 250 / CSA C22.2
#63 and is designed to cool, freeze and store food
and to make ice (if equipped). It is designed as a
household appliance.
The appliance is set to operate within specific
ambient temperature limits according to its climate
rating. These temperature limits should not be
exceeded. The correct climate rating for your
appliance is indicated on the model plate.
This is explained as follows:
Climate
Rating Set for Ambient Temperatures of
SN 50°F to 90°F (10°C to 32°C)
N 61°F to 90°F (16°C to 32°C)
ST 61°F to 100°F (16°C to 38°C)
SN-ST 50°F to 100°F (10°C to 38°C)
SN-T 50°F to 109°F (10°C to 43°C)
T 61°F to 109°F (16°C to 43°C)
s
afeTy
Avoid placing the appliance in direct sunlight or
near the stove, range top, radiators and similar heat
sources. Do not place microwave ovens, toaster
ovens or other heat-emitting appliances on top of
this unit.
The floor under the appliance should be flat and
level.
Keep the appliance out of the weather. The
ventilation grilles should not be obstructed. Always
ensure there is good ventilation all around the
appliance.
As soon as you uncrate the unit:
• Examine the unit and packaging for shipping
damage. Contact the carrier immediately if you
suspect there is any damage.
• Note the type (model number), index, serial
number, date of purchase and where purchased
on the spaces provided in the back of this
manual.
We recommend cleaning the appliance before
turning it on for the first time. See Cleaning. Turn
on the appliance several hours before loading
it with frozen food for the first time. Do not load
with frozen food until the temperature shows
approximately 0°F (-18°C).
Do not allow children to play with the
appliance. Children must not climb, sit
or stand on the freezer drawers. Failure
to follow these instructions may result in
death or serious injury.
To avoid risk of personal injury or property
damage, have two people unpack and
move this appliance into place.
Protect the finished floor surface before
you uncrate the unit.
Disposal of Carton
The packaging is designed to protect the appliance
and individual components during moving and is
made of recyclable materials.
Keep packaging materials away from
children. Polythene sheets and bags can
cause suffocation!
• Please take the packaging material to your local
recycling facility.
5
Page 6
f
eaTures
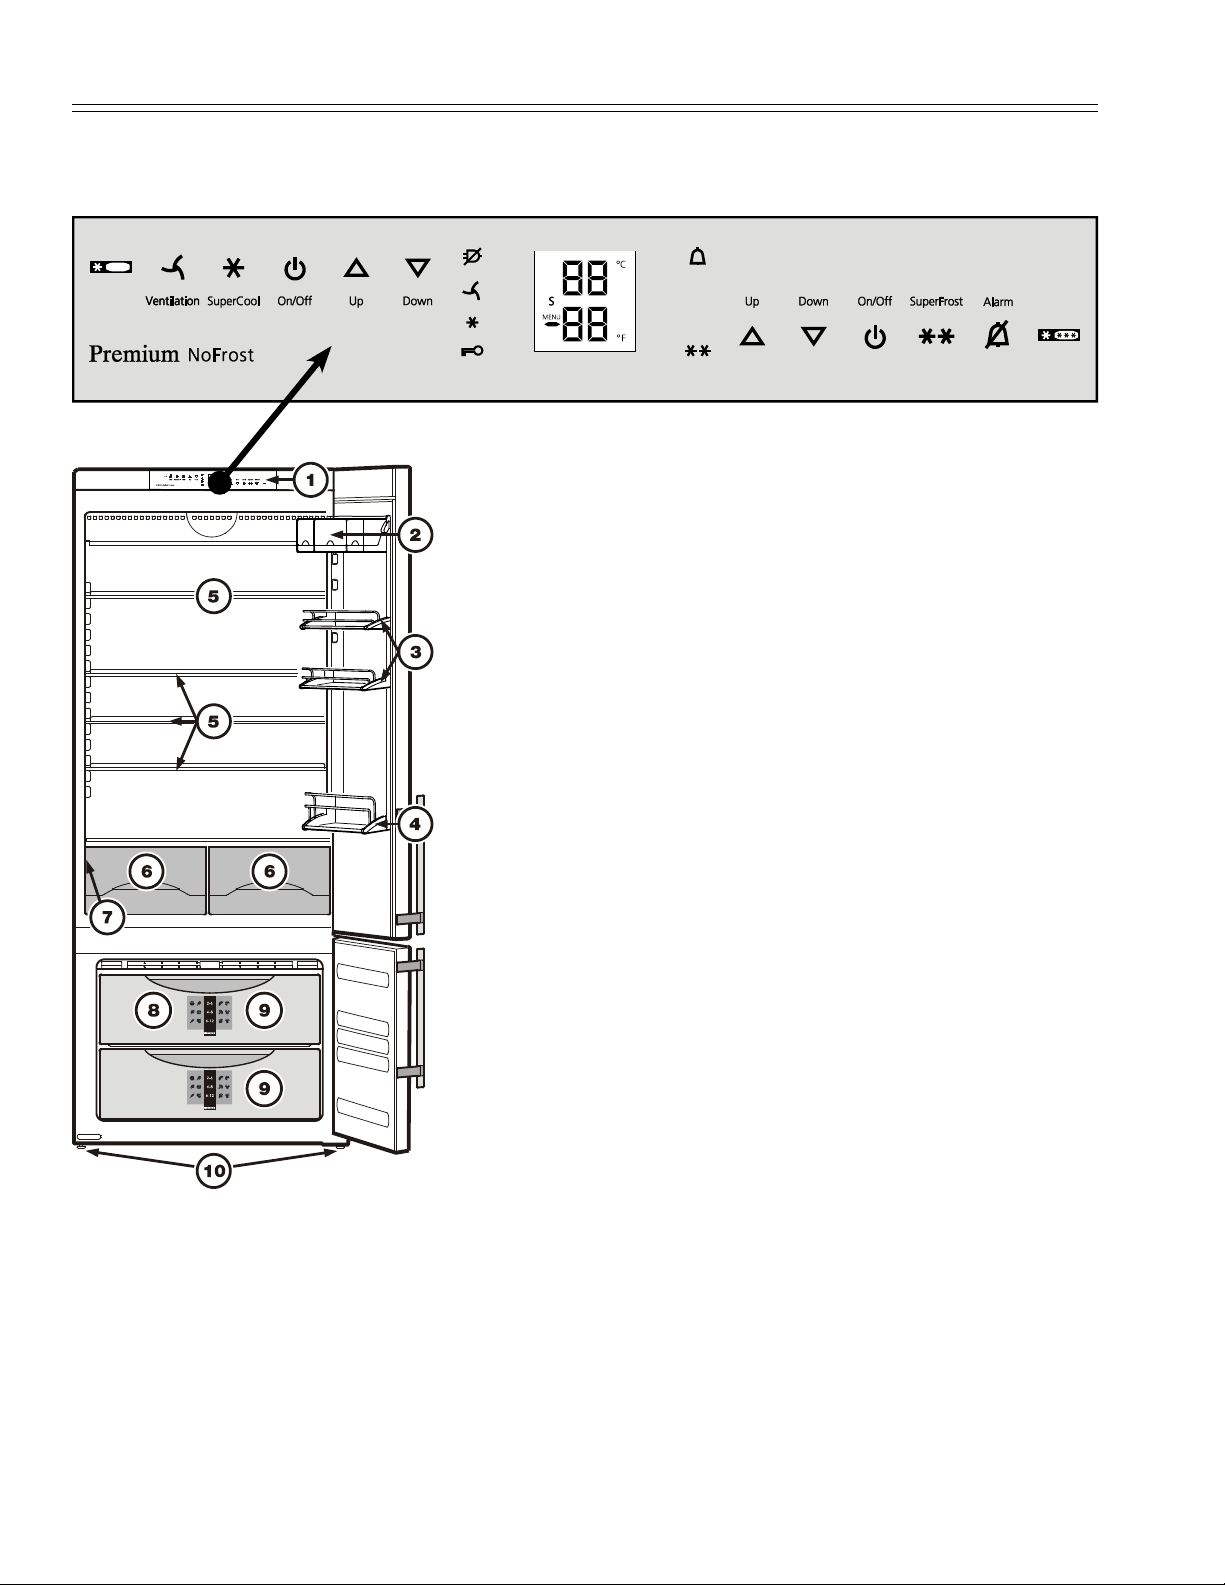
Description of Appliance and Equipment - Figure 1
Description of refrigerator
(1) Operating and control elements
(2) Butter and cheese compartment - Vario box
(3) Adjustable door racks
(4) Gallon rack
(5) Adjustable shelves
(6) Vegetable drawers
(7) Model plate (behind the vegetable drawer on the left hand
side)
Figure 1
Description of freezer
(8) Freezer drawers
(9) Information system
(10) Adjustable-height feet
6
Page 7
f
eaTures
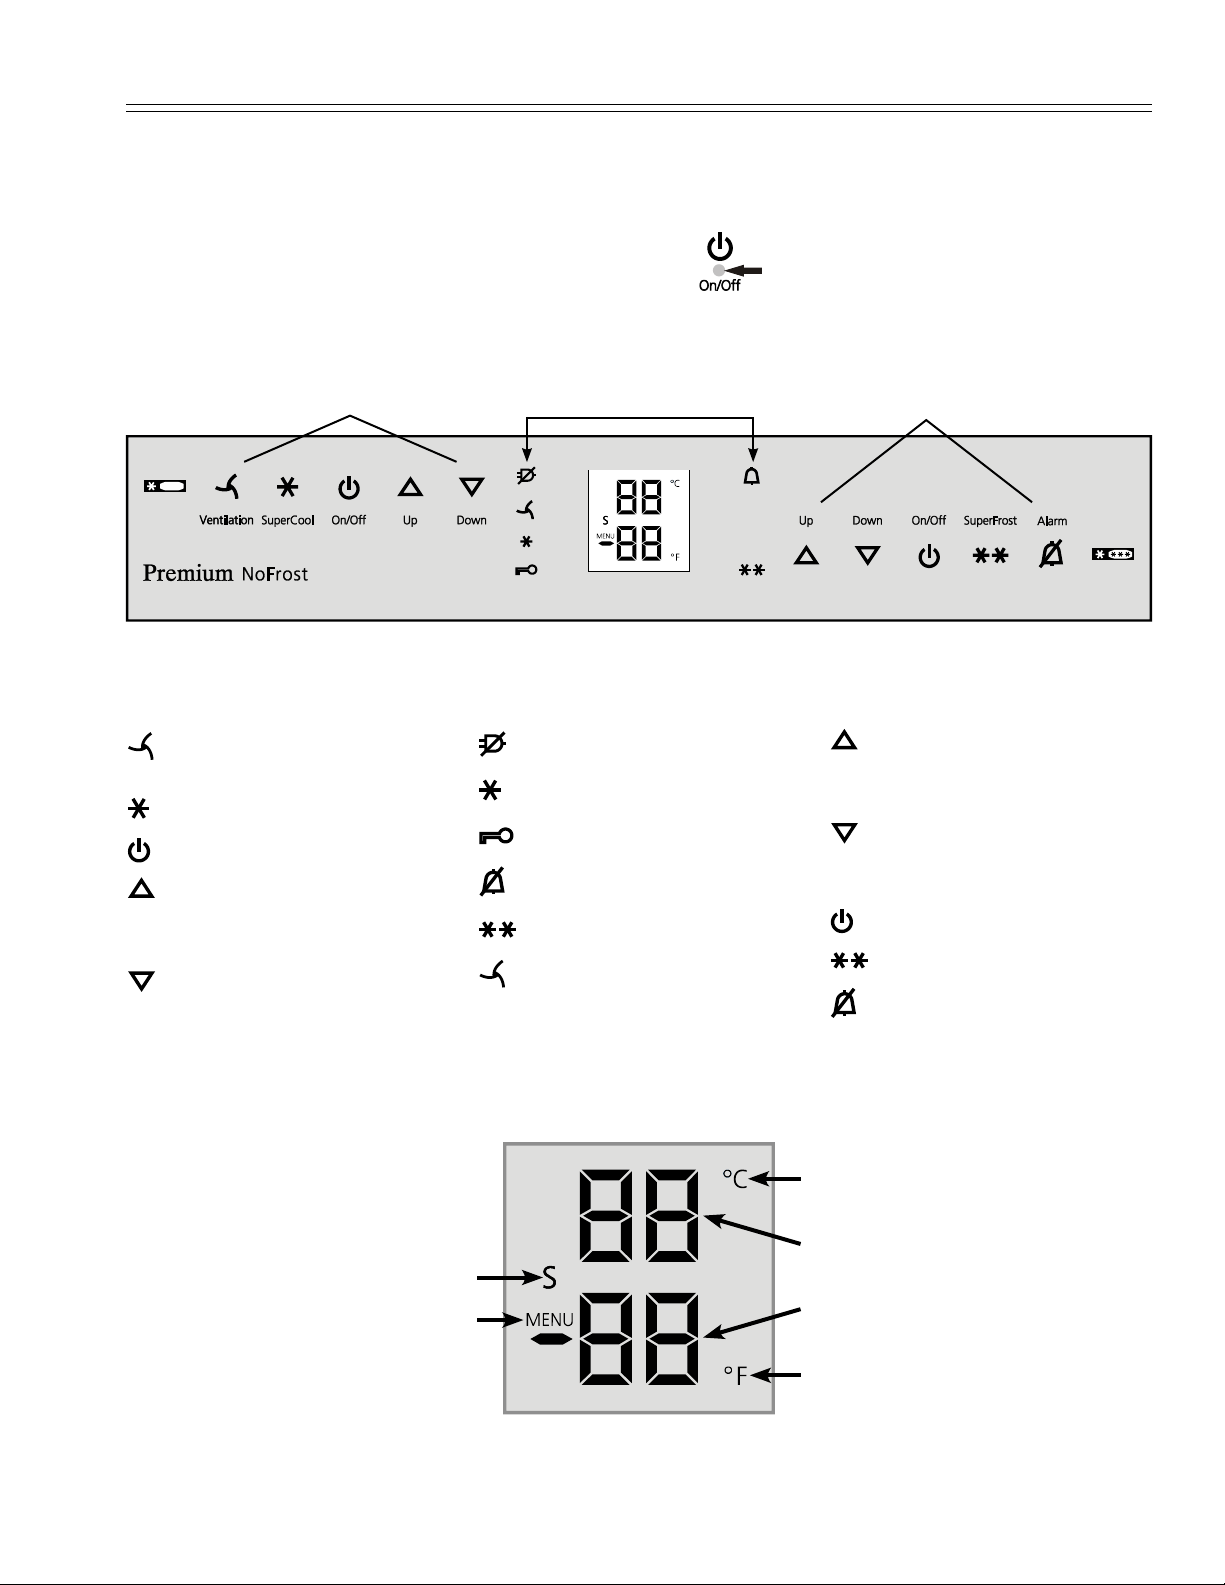
Operating and Control Elements - Figure 2, Figure 3
The electronic control panel has the new “Touch capacitance technology”. Any function can be activated
by a fingertip on the symbol of the operating icons.
The exact contact point is between the symbol and its label
Refrigerator
operating icons
Refrigerator operating icons
Ventilation (circulation) On/
Off
Supercool
Refrigerator On/Off
Temperature Up control (to
increase the refrigerator
temperature)
Temperature Down control
(to reduce the refrigerator
temperature)
Appliance
control icons
Figure 6
Appliance control icons
Power failure LED
Supercooling LED
Child lock LED
Alarm LED
Superfrost LED
Ventilation ON LED
Freezer
operating icons
Freezer operating icons
Temperature Up control (to
increase the freezer temperature)
Temperature Down control
(to reduce the freezer temperature)
Freezer On/Off
Superfrost
Alarm mute (refrigerator and
freezer)
Sabbath mode is activated
Menu mode is activated
(for setting additional functions)
Temperature and control display
Display mode degrees Celsius
Refrigerator temperature display
Freezer temperature display
Display mode degrees Fahrenheit
Figure 3
7
Page 8

o
peraTion
Turning the Appliance On and
Off - Figure 4
Clean the appliance before turning it on for the first
time. See Cleaning.
Do not place frozen food in the freezer until the
temperature shows at least 0°F / -18°C. The refrigerator and freezer compartments can be operated
separately.
1. Turning on:
Touch the Refrigerator On/Off icon
and the Freezer On/Off icon
so the Temperature Displays light up.
The interior light will turn on when the refrigerator
door is open.
2. Turning off: To turn off the refrigerator or
freezer, touch the corresponding On/Off icon for
approximately 3 seconds so the temperature display and interior lights go out.
Setting the Temperature - Figure 4
The appliance is pre-set for normal operation. We
recommend temperatures of 38°F (3°C) in the
refrigerator and 0°F (-18°C) in the freezer.
To reduce the temperature:
Touch the DOWN icon on the left to
reduce the refrigerator temperature
and the DOWN icon on the right to
reduce the freezer temperature.
To increase the temperature:
Touch the UP icon on the left to increase
the refrigerator temperature
and on the right to increase the freezer
temperature.
1. While you are entering the temperature, the set
temperature will flash on the display.
2. When you touch the temperature setting icons
for the first time, the most recent setting is displayed.
3. You can change the settings in increments of
1°F (1°C) by briefly touching the icons again. If
the icons are held the temperature setting will
change faster.
4. Approximately five seconds after the icon has
been released, the display will automatically
show the actual freezing or cooling temperature.
5. You can change the temperatures:
• In the refrigerator – between 36°F and 44°F
(2°C and 7°C) and
• In the freezer – between -15°F and 6°F
(-26°C and -14°C).
Temperature control icons - Refrigerator
Refrigerator On/Off icon
Ventilation icon
Freezer temperature display
8
Power failure LED
Ventilation LED
Figure 4
Alarm LED
Temperature control icons - Freezer
Alarm icon
Freezer On/Off icon
Page 9

o
peraTion
Temperature Display - Figure 4
In normal operation, the following settings will be
displayed:
• the average refrigerator temperature
• the warmest frozen food temperature.
When starting up for the first time or
when the appliance is warm, dashes
will appear in the freezer temperature
display, until the temperature in the
freezer compartment is 32°F (0°C).
The display will flash:
• if you change the temperature or
• if the temperature rises by several degrees, indicating cold loss, e.g. if you place fresh, “warm”
food in the freezer or if you remove or repack
frozen food, the temperature may rise for a short
time due to warm air flowing into the freezer.
• If “F1” to “F5” appears in the display, the appli-
ance has a fault. Have the fault number available
when you contact the customer service department.
Ventilation - Figure 4
The ventilation switch is used for re-circulated cool
air:
Audible Alarm Signal - Figure 4
The audible alarm signal helps to protect frozen
food and to save energy.
The audible alarm signal is switched off by
touching the alarm icon.
Audible door alarm
This sounds when the door has been left open for
longer than about 180 seconds. The sound switchoff function is active as long as the door is left open.
The alarm automatically switches back to standby
when the door is shut.
Audible/visual temperature alarm
It always sounds if the freezer temperature is not
low enough. The temperature display and the alarm
LED
This can be caused by:
- warm, fresh food being placed in the freezer;
- too much warm air from the outside entering
- a fault in the appliance.
The temperature display will continue to flash until
the cause of the alarm has been rectified. It will then
stop flashing and light up continually. The audible
warning signal is now automatically reset.
flashes at the same time.
when re-arranging or removing frozen food,
You can use the switch as required to:
• chill large quantities of fresh food fast.
• keep the temperature evenly distributed throughout the entire refrigerator compartment. The air
will circulate more intensively, keeping all the
different areas in the compartment at the same
temperature and ensuring all the food inside is
chilled at the same temperature.
We recommended you use the ventilation fan if:
• room temperatures are too high (approximately
95°F [35°C] or higher).
• the air humidity is high, during high heat and
humidity.
Turning on: Touch the Ventilation icon briefly so the
LED
Turning off: Touch the Ventilation icon again until
the LED
turns on.
turns off.
Power Failure/Frost-Control
Display - Figure 4
If the power failure LED
freezer temperature has risen too high during the
last few hours or days due to a power failure. The
freezer temperature display flashes at the same
time.
• If you touch the Alarm icon now, the highest
temperature registered during the power failure
will be displayed.
• Check the quality of the food in case it has
become too warm or even defrosted.
• The highest temperature will appear for
approximately one minute. After that, the actual
temperature in the freezer will reappear.
The display can be turned off by touching the
Alarm icon again.
is lit, this means the
9
Page 10

o
peraTion
Supercool - Figure 5
Touching the Supercool icon switches the
refrigerator compartment to maximum cooling. It is
recommended particularly if you wish to cool large
quantities of food, drinks, freshly baked goods or
meals rapidly.
• Turning on: Touch the Supercool icon
briefly so the LED
refrigerator temperature will drop to its
lowest value.
The Supercool function uses slightly more
energy. After approximately six hours,
however, the refrigerator switches back
automatically to normal energy-saving
operation. If required, the Supercooling
function can be turned off sooner.
• Turning off: Touch the Supercool icon again
until the LED
turns on. The
IMPORTANT
turns off.
Setup Mode - Figure 5
In the setup mode you can activate the following
functions:
= Sabbath mode
= Display brightness
= Temperature display mode
= Child lock
How to activate the setup mode:
• Touch the Superfrost icon for approximately five
seconds
- the Superfrost LED
onds
- after 5 seconds
The appliance is in the setup mode now.
You can select the setup mode functions by
touching the freezer compartment Up/Down icons.
In the setup mode the display will flash continu-
will flash in the display.
ously.
turns on for 5 sec-
Note
Supercool icon
Exit setup mode:
• Touch the freezer compartment On/Off icon. The
appliance will change back to normal operation.
Freezer compartment Up/Down icons
10
Supercool LED
Figure 5
Superfrost icon
Freezer compartment On/Off icon
Page 11

o
peraTion
= Sabbath Mode
This feature considers the Religious requirements
on Sabbath or Holidays. When the Sabbath Mode
is active some functions of the electronic controls
are switched off.
The door can be opened and closed at any time.
• The lighting remains off.
• The cooling fan remains in its actual state: If it is
on it remains on, if it is off it remains off.
• There is no door alarm.
• There is no temperature alarm.
• Defrost cycles are independent of the number of
times and length of door openings.
• The unit will return into Sabbath Mode after a
power failure.
How to activate the Sabbath Mode
• Activate the setup mode by touching the
Superfrost icon for 5 seconds.
- the display shows
• Touch the Superfrost icon
- the display shows
• Touch the Superfrost icon again
- the display shows
- the Sabbath mode is activated.
• Exit setup mode by touching the
freezer compartment On/Off icon.
How to deactivate the Sabbath Mode
• Activate the setup mode by touching the
Superfrost icon for 5 seconds.
- the display shows
• Touch the Superfrost icon
- the display shows
• Touch the Superfrost icon again
- the S symbol
in the Display disappears,
the Sabbath mode is deactivated.
• Exit setup mode by touching the
freezer compartment On/Off icon.
= Display brightness
How to adjust the display brightness
• Activate the setup mode by touching the
Superfrost icon for 5 seconds.
• Touch the freezer compartment Down icon until
appears in the freezer temperature display.
• Touch the Superfrost icon
- the display shows
• Touch freezer compartment
Up/Down icons to select
0 = minimum to
5 = maximum brightness
• Touch the Superfrost icon at the desired value.
• Exit setup mode by touching the freezer
compartment On/Off icon.
= Temperature display mode
You can choose the unit of temperature for the
display in degrees Fahrenheit or degrees Celsius.
Note
The factory setting is degrees Fahrenheit.
How to change the temperature display to
degrees Celsius
• Activate the setup mode by touching the
Superfrost icon for 5 seconds.
• Touch the freezer compartment Down icon
until
appears in the freezer temperature dis-
play.
• Touch the Superfrost icon
- the display shows
• Touch the Superfrost icon again
- the temperature reading is now displayed in
degree Celsius.
• Exit setup mode by touching the freezer
compartment On/Off icon.
Note
To change the temperature display back to degrees
Fahrenheit, follow the steps above.
11
Page 12

o
peraTion
Setup Mode - Figure 6
= Child lock
The child lock is designed to protect the appliance
from being turned OFF accidentally.
How to activate the child lock
• Activate the setup mode by touching the
Superfrost icon for 5 seconds
• Touch the freezer compartment Down icon
appears in the freezer temperature dis-
until
play.
• Touch the Superfrost icon
- the display shows
• Touch the Superfrost icon again
- the LED
• Exit setup mode by touching the freezer
compartment On/Off icon.
is lit and the child lock is activated.
How to deactivate the child lock
• Activate the setup mode by touching the
Superfrost icon for 5 seconds.
• Touch the freezer compartment Down icon
appears in the freezer temperature dis-
until
play.
• Touch the Superfrost icon
- the display shows
• Touch the Superfrost icon again
- the LED
vated.
• Exit setup mode by touching the freezer
compartment On/Off icon.
goes out. The child lock is deacti-
12
Child lock LED
Freezer compartment Up/Down icons
Freezer temperature display
Figure 6
Superfrost icon
Freezer compartment On/Off icon
Page 13

r
efrigeraTor
C
omparTmenT
Arranging Food - Figure 7
Figure 7
(1) Butter, cheese
(2) Eggs
(3) Cans, drinks
(4) Gallon containers, bottles
(5) Meat and sausage products, dairy products
(6) Baked goods, pre-cooked meals
(7) Fruit, vegetables, salad
(8) Frozen food
IMPORTANT
• Liquids and food which give off or absorb odors
and flavors should always be stored covered or
in closed containers.
• High-percentage alcohols should be tightly
sealed and stored upright.
Equipment
To avoid possible injury, only adjust an
empty shelf or door rack. Do not attempt to
adjust a shelf or door rack with food on it.
You can rearrange the
height of the shelves and
door racks as required.
Repositioning the door
racks - Figure 8
Slide the door rack up, pull
out toward you and replace
in reverse order.
Figure 8
Vario Box - Figure 9
The boxes can be removed
and placed on the table as a
single unit.
Re-positioning the boxes:
Lift them for removal and reposition them as required.
The box support bar
can be removed by
lifting upwards and
inserted in another
position (e.g. swapped
with a door rack).
Important! Box lids
must be shut when you
close the door - risk of
damage.
Figure 9
• Fruit, vegetables and salad can be stored
unpacked in the bins.
13
Page 14

r
efrigeraTor
r
efrigeraTor
C
C
omparTmenT
omparTmenT
Repositioning the shelves - Figure 10
1. Hold the shelf underneath with your hand
to avoid from tipping down backwards when
removing.
2. Lift the shelf at the front.
3. Remove the shelf forward until the circular cutout
of the shelf is in line with the front supports.
4. Lift the shelf up or down and replace in the
desired position.
Front supports
Figure 10
Removing the shelves - Figure 11
1. Follow the first three steps in the chapter above.
2. Lift the shelf down and stop just over the upper
vegetable bin.
3. Move the front of the shelf upwards until the
shelf is in a vertical position.
4. Turn the shelf counterclockwise and remove.
If you need space for large bottles and containers.
Place the shelf rails
provided on the supports on the left and
right at the desired
height - Figure 12.
Insert the glass shelves
as shown in fig. 13.
The glass shelf with the
raised edge must go at
the back.
If you need to make
space for tall containers, simply slide the
front half of the sectioned glass shelf carefully underneath the
back half - Figure 13.
Figure 12
Figure 13
To avoid from falling down, always hold
the shelf with both hands when removing.
Figure 11
14
Page 15

r
efrigeraTor
Interior Light
This turns OFF automatically after the door has
been opened for approximately 15 minutes. If it
does not turn ON when the door is opened briefly,
but the temperature display is working, the bulb(s)
may be defective.
The light is located behind the cover located at the
top of the refrigerator compartment and has two
bulbs.
Bulb data:
125-130 V, Maximum wattage - 25 W
Bulb fitting - E14
Current and voltage must agree with details on the
model plate.
Replacing the bulb:
C
1. Unlatch carefully the
cover at left, middle
and right using a
screwdriver - Fig. 14.
Remove the cover.
omparTmenT
To prevent possible injury due to an electrical shock, be sure to disconnect the
power cord or turn OFF the circuit breaker
before replacing the interior light bulb(s).
To prevent possible injury due to broken
glass, use hand protection when replacing
the interior light bulb(s).
2. Remove the glass
plate - Fig. 15.
3. Remove the defective
bulb. Make sure the seal
(Fig. 16) is placed on the
new bulb before installing it.
4. Install glass plate and
cover.
Figure 14
Figure 15
Figure 16
IMPORTANT
The glass plate must be inserted to the back
completely, otherwise it is not possible to click
the cover into place correctly.
15
Page 16

f
reezer
C
omparTmenT
Freezing
Fresh food should be frozen completely and as rapidly as possible. This is provided by the Superfrost
feature and ensures that the nutritional value,
appearance and flavor of the food remains intact.
Information System - Figure 17
Use frozen food within the recommended period.
The numbers between the symbols indicate the
storage period in months for different kinds of
frozen foods. Storage times given are guidelines
for food frozen at home. Whether or not the lower
or upper value is applicable depends on the food
quality and how it was processed prior to freezing.
The lower values always apply to food with a high
fat content.
Freezing with Superfrost - Figure 18
• Touch the Superfrost icon briefly
so the LED turns on.
The freezer temperature will decrease and the
appliance will change to the lowest temperature.
• For small amounts of frozen food, it is normally
sufficient to turn on Superfrost six hours beforehand. For the maximum amount (see freezing
capacity on the model plate) you will need to
turn it on 24 hours before.
• Then place the fresh food inside the freezer.
• The Superfrost function turns off automatically.
Depending on the quantity of food placed in the
freezer, this will normally be between 30 and
maximum of 65 hours.
The freezing process is now complete; the
Superfrost LED
will change back to normal energy-saving operation.
will turn off, and the freezer
Figure 17
(1) Pre-cooked meals, ice cream
(2) Fish, pork
(3) Vegetables, fruit
(4) Sausages, bread
(5) Mushrooms, game
(6) Poultry, beef
IMPORTANT
You should not turn on the Superfrost function:
• when placing frozen food in the freezer;
• when freezing up to approximately 4-1/2 lbs
(2 kg) fresh food daily.
Superfrost icon
Superfrost LED
Figure 18
16
Page 17

f
reezer
Freezing and Storage
• Pack frozen food in standard freezer bags or
reusable plastic, metal or aluminum containers.
• Do not allow fresh food which is to be frozen
to come into contact with food already frozen.
Always keep packages dry in order to avoid
them sticking together.
• Always write the date and contents on the package and do not exceed the stated storage time
for the food. This prevents spoiling.
• Pack food which you are freezing yourself in
quantities right for your household. To ensure the
food freezes right through quickly, the following
quantities should not be exceeded per package:
- fruit, vegetables: up to 2-1/4 lbs (1 kg);
- meat: up to 5-1/2 lbs (2.5 kg).
• Do not freeze bottles and cans which contain
carbonated drinks as they might burst. Drinks
can be cooled down quickly, but take the bottles
out of the freezer compartment after an hour at
the most.
C
omparTmenT
• Only take out as much food as needed for thaw-
ing. Cook food which has been thawed as quickly as possible. Frozen food can be thawed in the
following ways:
- in a microwave oven
- in the refrigerator: the safer way to thaw food
because there is less chance of bacteria
growth. Use this method for high density food
such as roasts or poultry.
17
Page 18

C
leaning
Cleaning
• To prevent possible injury due to an
electrical shock, be sure to disconnect the
power cord or turn off the circuit breaker
before cleaning the appliance.
• To avoid injury or damage, do not use steam
cleaning equipment to clean the appliance.
To avoid short-circuits, ensure no cleaning
•
water penetrates into the electrical
components when cleaning the appliance.
Do not use a sponge or cloth that is overly
wet.
• First clean the side panels with a conventional
stainless steel cleaner. Subsequently, apply the
enclosed stainless steel care product evenly
onto the surfaces in the same direction in with
they have been ground or polished.
• Only clean the door surfaces with a clean and
soft cloth. If necessary, moisten the cloth (water
+ detergent). Alternatively, use a micro-fibre
cloth.
Do not use abrasive or scouring sponges. Do not
use concentrated cleaning agents. NEVER use
abrasive or acid cleaners or chemical solvents.
• Remove all food from the refrigerator and freezer
compartments and store on a cool place temporarily. Store frozen food in other freezers if available.
• Remove the door racks as shown in Figure 8, 9.
• Remove glass shelves as shown in Figure 11.
• Remove vegetable drawers.
• Clean the equipment parts by hand with lukewarm water and dishwasher detergent.
Do not clean the equipment parts in a
dishwasher. Strips of these parts could
get loose.
• Clean the refrigerator and freezer drawers interior with lukewarm water and dishwasher detergent.
• Dry all parts well with a cloth.
• Do not damage or remove the model plate on
the inside of the appliance. It is very important
for servicing your appliance.
18
Page 19

D
efrosTing
Defrosting
Refrigerator compartment:
The refrigerator compartment defrosts automatically. The water that forms on the rear wall drains into
a reservoir at the back of the appliance and evaporates automatically through the compressor heat.
Freezer compartment:
The No-frost system automatically defrosts the
freezer compartment. Any moisture will collect on
the evaporator and freeze. It will periodically defrost
and evaporate.
Vacation Tips
Short vacations:
It is not necessary to turn off the refrigerator and
freezer if you will be away for less than four weeks.
/V
aCaTion
• Use all perishables.
• Freeze other items.
Long vacations:
If you will be away for a month or more:
• Remove all food from the refrigerator and freezer
compartments.
• Turn off the refrigerator and freezer compartments.
• Clean the appliance. Refer to Cleaning.
• Leave the door open to prevent unpleasant
odors. This will also keep mold from building up.
19
Page 20

T
roubleshooTing
If a problem occurs during operation, check whether it is due to an operating error.
Please note that even during the warranty period, some repair costs may be your responsibility.
You may be able to correct the following faults by checking the possible causes yourself:
Problem Possible Cause and Remedy
Appliance does not work,
display is off
The interior light does
not come on
Loud running noise
Motor seems to
run too long
The temperature is
not cold enough
Freezer temperature
display shows two
dashes ‘‘- -”.
- Is the appliance turned on properly?
- Is the power source plug properly inserted in the socket?
- Is the circuit breaker or fuse in operating condition?
- Is the refrigerator compartment turned on?
- Has the door been open for more than 15 minutes?
- Is the appliance standing firmly on the floor, or does the compressor
cause nearby items of furniture or objects to vibrate? If necessary, move
the appliance slightly, align by adjusting the adjustable feet, or move
bottles and containers apart.
- Is the ambient temperature too hot? See Safety Regulations.
- Has the appliance been opened too often or left open too long?
- A large amount of food has been added.
- Unit is in Supercooling mode. Verify unit is in normal operation mode.
- Is the temperature setting correct? See Setting the Temperature.
- Has an excessive amount of fresh food been placed in the appliance?
- Does a separately installed thermometer show the correct reading?
- Is the ventilation system working properly?
- Is the appliance set up too close to a heat source?
The freezer temperature display will only show temperatures that are
below freezing. When initially starting the freezer it will not be below
freezing. It will take three to five hours (depending on ambient conditions)
for freezing temperatures to be achieved and thus displayed numerically.
This may also occur after a power failure.
20
Page 21

T
roubleshooTing
Customer Service - Figure 19
If none of the above causes apply and you cannot correct the fault yourself this means there is a
fault. Please contact your nearest customer service
department (see enclosed list for addresses).
Give the fault number displayed, together with the
2
1
and
,
3
Type Designation
Service Number
Appliance / Serial Number
as given on the model plate, to ensure prompt,
accurate servicing. The model plate is located
inside the appliance on the left-hand side.
Leave the appliance closed until the customer service engineer arrives to prevent any further cold
loss.
Appliance Information
Record this information when the appliance is
installed.
Type Designation: _________________________
Service Number: __________________________
Appliance / Serial Number: __________________
Date of Purchase: _________________________
Where Purchased: _________________________
Figure 19
21
Page 22

W
arranTy
LIEBHERR WARRANTY PLAN
FULL TWO YEAR WARRANTY - For two years from the date of original purchase, your Liebherr warranty
covers all parts and labor to repair or replace any part of the product which proves to be defective in materials or workmanship.
FULL FIVE YEAR WARRANTY - For five years from the date of original purchase, your Liebherr warranty
covers all parts and labor to repair or replace any components that prove to be defective in materials or
workmanship in the sealed system. The “Sealed System” means only the compressor, condenser, evaporator, drier and all connecting tubing.
LIMITED 6TH THROUGH 12TH YEAR WARRANTY - From the 6th through 12th year from the date of
original purchase, your Liebherr warranty covers all parts that prove to be defective in materials or workmanship in the Sealed System (parts only).
TERMS APPLICABLE TO EACH WARRANTY
All service provided by Liebherr under the warranty must be performed by authorized Liebherr service representatives, unless otherwise specified by Liebherr. Service will be provided in the home during normal
business hours. This warranty applies only to products installed for normal residential use. Details regarding a non-residential warranty are available on request.
The warranty applies only to products installed in Canada and any one of the fifty States of the United
States or the District of Columbia.This warranty does not cover any parts or labor to correct any defect
caused by negligence, accident or improper use, maintenance, installation,service or repair, including but
not limited to improper removal and reinstallation of the condensing unit.
The remedies described above for each warranty are the only ones which Liebherr will provide,
either under these warranties or under any warranty arising by operation of law. Liebherr will not
be responsible for any consequential or incidental damages arising from the breach of these warranties or any other warranties, whether express, implied or statutory.
Some states do not allow the exclusion or limitation of incidental or consequential damages so the above
limitation or exclusion may not apply to you.This warranty gives you specific legal rights and you may also
have other rights which vary from State to State.
To receive parts and/or service and the name of the Liebherr authorized service representative nearest
you, contact your Liebherr dealer or distributor or contact the Liebherr designated national service pro-
vider:
in the US: Liebherr@adcoservice.com, or call 1-866-LIEBHERR or 1-866-543-2437
in Canada: www.euro-parts.ca, or call 1-888-LIEBHERR or 1-888-543-2437.
22
 Loading...