

LG SP820 User guide

OWNER’S MANUAL
Smart 3D multi-media
player
Please read this manual carefully before operating
your set and retain it for future reference.
SP820
P/NO : SAC35455203
www.lg.com
Getting Started2
Safety information
1
Getting Started
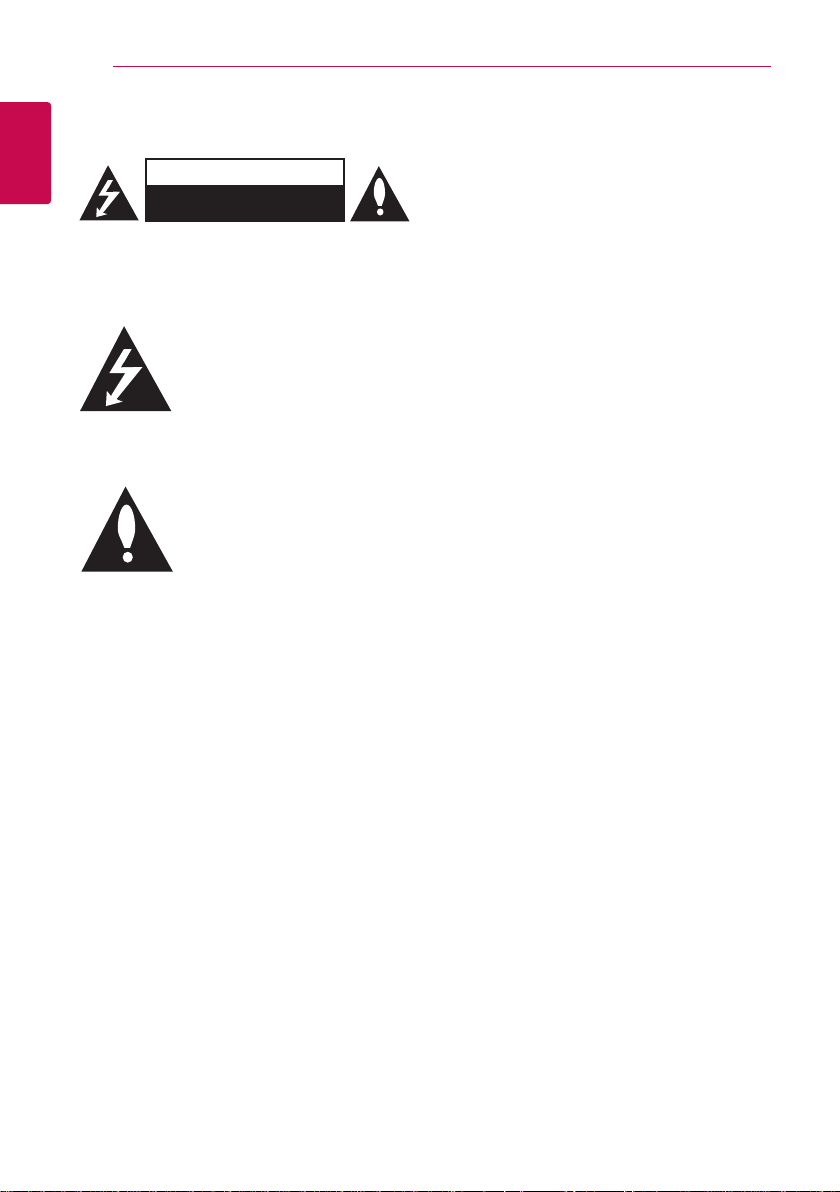
CAUTION: TO REDUCE THE RISK OF ELECTRIC
SHOCK DO NOT REMOVE COVER (OR BACK) NO
USER-SERVICEABLE PARTS INSIDE REFER SERVICING
TO QUALIFIED SERVICE PERSONNEL.
product’s enclosure that may be of sucient
magnitude to constitute a risk of electric shock to
persons.
instructions in the literature accompanying the
product.
WARNING: TO PREVENT FIRE OR ELECTRIC SHOCK
HAZARD, DO NOT EXPOSE THIS PRODUCT TO RAIN
OR MOISTURE.
WARNING: Do not install this equipment in a
conned space such as a book case or similar unit.
CAUTION: Do not block any ventilation openings.
Install in accordance with the manufacturer’s
instructions.
Slots and openings in the cabinet are provided for
ventilation and to ensure reliable operation of the
product and to protect it from over heating. The
openings shall be never be blocked by placing
the product on a bed, sofa, rug or other similar
surface. This product shall not be placed in a builtin installation such as a bookcase or rack unless
proper ventilation is provided or the manufacturer’s
instruction has been adhered to.
CAUTION
RISK OF ELECTRIC SHOCK
DO NOT OPEN
This lightning ash with arrowhead
symbol within an equilateral
triangle is intended to alert the
user to the presence of uninsulated
dangerous voltage within the
The exclamation point within an
equilateral triangle is intended
to alert the user to the presence
of important operating and
maintenance (servicing)
CAUTION concerning the Power Cord
To disconnect power from the mains, pull out the
mains cord plug. When installing the product,
ensure that the plug is easily accessible.
CAUTION: The apparatus shall not be exposed to
water (dripping or splashing) and no objects lled
with liquids, such as vases, shall be placed on the
apparatus.
This device is equipped with a portable battery or
accumulator.
Safety way to remove the battery or the
battery from the equipment: Remove the
old battery or battery pack, follow the steps
in reverse order than the assembly. To prevent
contamination of the environment and bring on
possible threat to human and animal health, the
old battery or the battery put it in the appropriate
container at designated collection points. Do
not dispose of batteries or battery together with
other waste. It is recommended that you use
local, free reimbursement systems batteries and
accumulators. The battery shall not be exposed to
excessive heat such as sunshine, re or the like.
NOTICE: For safety marking information including
product identication and supply ratings, please
refer to the main label on the bottom of the
apparatus.
Getting Started 3
Disposal of your old appliance
1.
When this crossed-out wheeled bin
symbol is attached to a product it means
the product is covered by the European
Directive 2002/96/EC.
2.
All electrical and electronic products
should be disposed of separately from the
municipal waste stream via designated
collection facilities appointed by the
government or the local authorities.
3.
The correct disposal of your old appliance
will help prevent potential negative
consequences for the environment and
human health.
4.
For more detailed information about
disposal of your old appliance, please
contact your city office, waste disposal
service or the shop where you purchased
the product.
Disposal of waste batteries/accumulators
1.
When this crossed-out wheeled bin symbol
is attached to batteries/accumulators of
Your product it means they are covered by
European Directive 2006/66/EC.
2.
This symbol may be combined with
chemical symbols for mercury(Hg),
cadmium(Cd) or lead(Pb) if the battery
Contains more that 0.0005% of
mercury,0.002% of cadmium or 0.004% of
lead.
3.
All batteries/accumulators should be
disposed separately from the municipal
waste stream via designated collection
facilities appointed by the government or
the local authorities.
4.
The correct disposal of Your old batteries/
accumulators will help to prevent
potential negative consequences for the
environment, animal and human health.
5.
For more detailed information about
disposal of Your old batteries/accumulators,
please contact Your city office, waste
disposal service or the shop where You
purchased the product.
For Wireless product European Union Notice
LG Electronics hereby
declares that this/
in compliance with the essential requirements and
other relevant provisions of Directive 1999/5/EC,
2004/108/EC, 2006/95/EC and 2009/125/EC.
Please contact to the following address for
obtaining a copy of the DoC (Declaration of
Conformity).
European Standards Centre:
Krijgsman 1, 1186 DM Amstelveen, The Netherlands
Please note that this is NOT a Customer Service
�
contact point. For Customer Service Information,
see Warranty Card or contact the dealer that you
purchased this product.
Indoor use only.
RF Radiation Exposure Statement
This equipment should be installed and operated
with minimum distance 20cm between the radiator
and your body.
these product(s) is/are
1
Getting Started

Table of Contents4
Table of Contents
1 Getting Started
2 Safety information
6 Main unit
6 Remote control
7 – Magic Remote Control Functions
2 Connecting
8 Connecting the AC Adapter
8 HDMI Connecting to Your TV
9 Connecting to an Amplifier
10 – Connecting to an Amplifier via HDMI
Output
10 – Connecting to an Amplifier via Digital
Audio Output
11 Connecting to your Home Network
11 – Wired network connection
12 – Wired Network Setup
13 – Wireless Network Connection
13 – Wireless Network Setup
3 Initial System Setting
16 Initial Setting
16 – Initial Setting
4 Operating
17 Smart function on the HOME menu
17 – Using [HOME] menu
18 Using the SmartShare
18 – What is SmartShare?
18 Playing the linked devices
18 – Playback content in the USB device
20 Connecting to home network server for
PC
20 – Installing Nero MediaHome 4
Essentials
20 – Sharing files and folders
21 – Playing a file media from a network
server (DLNA)
22 Connecting to DLNA-Certified
Smartphone
23 – Wi-Fi Direct™ connection
24 – Setting Smart Share connection
setting
25 Smart share file Playback
25 – To control movie playback
25 – To control photo view
25 – To control music playback
25 – Basic operations for video and audio
content
26 – Basic operations for photo content
28 Using the Premium
29 Using the LG Smart world (LG Apps)
31 Using the 3D World
32 Using the My Apps menu
32 – Using [Search] app
33 – Using the [Internet] Web browser app

5 Appendix
34 Adjust the Setup Settings
34 – [PICTURE] Menu
34 – [SOUND] menu
35 – [OPTION] Menu
36 – [NETWORK] menu
37 – [SUPPORT] menu
37 Network software update
37 – Network update notification
38 – Software update
39 About Nero MediaHome 4 Essentials
39 – System requirements
40 File requirement
43 – About DLNA
43 – Certain system requirements
43 – Compatibility notes
44 About Magic remote control
45 Troubleshooting
45 – General
45 – Picture
46 – Resetting
46 – Network
46 – Customer support
46 – Open source software notice
47 Audio output specifications
47 Specifications
48 Trademarks and licenses
49 Maintenance
49 – Handling the unit
49 Important information relating to network
services
Table of Contents 5
1
2
3
4
5
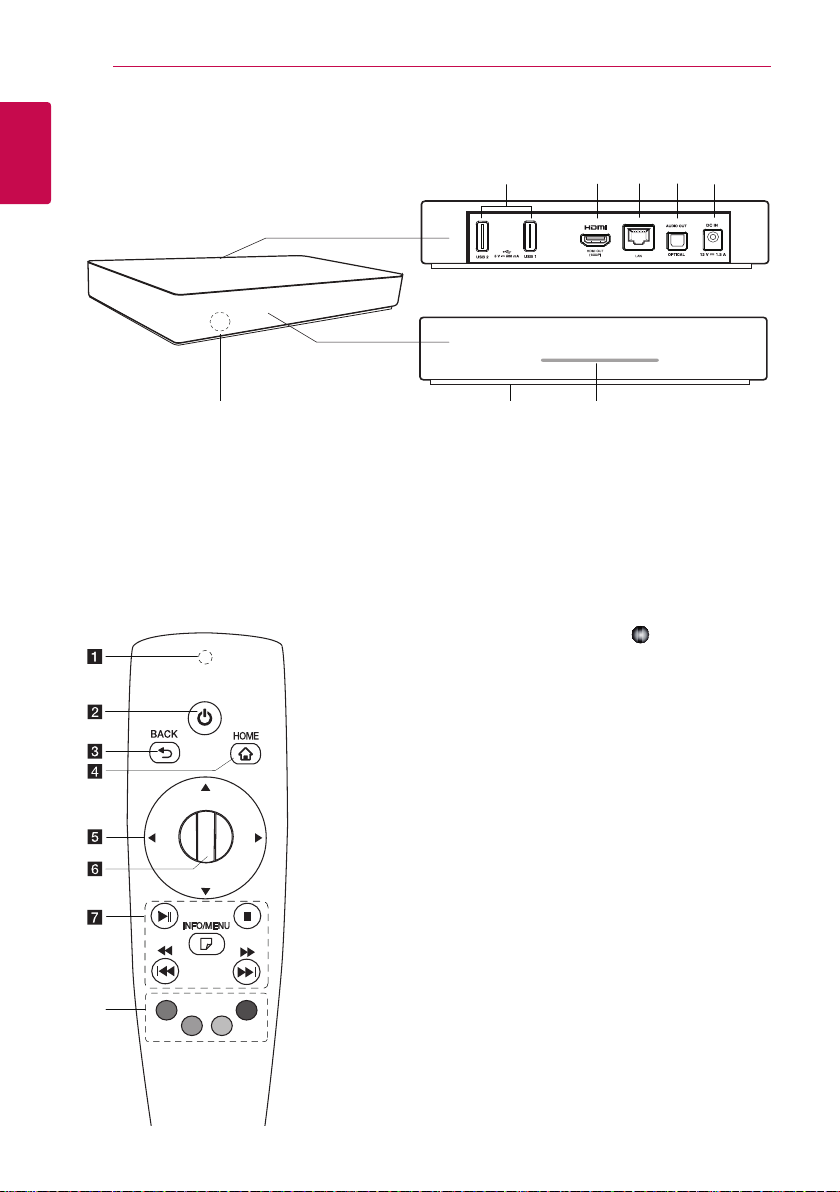
Main unit
f
a
b
c d
e
g h
1
Getting Started
Getting Started6
USB1, USB2 port
a
HDMI OUT (1080p)
b
LAN port
c
OPTICAL AUDIO OUT
d
Remote control
h
DC IN 12V (AC adapter input)
e
Remote sensor
f
RESET
g
* RESET button is located at the bottom of
the unit. ( Refer to the page 46)
Power indicator
h
Remote Control Indicator:
a
(RF & Bluetooth transmitter)
Blinks when operating.
(POWER): Switches the
b 1
unit ON or OFF.
BACK (1): Exits the menu or
c
return to the previous screen.
HOME (n): Displays or exits
d
the Home Menu.
Direction buttons: Selects
e
an option in the menu.
If you press the navigation
button while moving the
pointer on the screen, the
pointer disappears, and the
Magic remote control works
as a regular remote control.
To display the pointer again,
shake the Magic remote
control from side to side.
Wheel (
f
or options and conrms your
input ; Scrolls the screen to
search a menu on the web
browser.
g N
playback./Pauses playback.
Z
c/v
backward or forward.
C/V
next track or le.
m
exits On-Screen Display.
Colored (R, G, Y, B) buttons:
h
Use to navigate screen
menus. They are also used for
[LG Smart World], [3D World],
and [LG Apps] menu.
): Selects menus
(Play/Pause): Starts
(Stop): Stops playback.
: Searches
: Moves previous/
(INFO/MENU): Displays or

Getting Started 7
Wheel
Magic Remote Control Functions
The Magic remote Control operates by pairing with
your unit. Once you purchased the unit, please
register the Magic remote control as follows;
To register the Magic Remote
Control
To use the Magic Remote Control, register it with
your unit rst.
1. Turn on the unit and wait for about 10 seconds
and then press Wheel (
the remote control at the unit.
2. The remote control is automatically registered
and a registration completion message appears
on the screen.
Note
,
If you failed to register the Magic Remote
Control, turn o the unit and try again.
Battery Installation
) button while pairing
How to use Magic Remote Control
Shake the remote control slightly to make the
�
pointer appear on the screen.
Shake the Magic remote control slightly to the
�
right and left to make the pointer appear on the
center of screen.
The magic pointer disappears when the remote
�
control is not moved for ve seconds.
How to use Magic Remote tip
When you press the wheel, it also functions as
�
Selection button.
You can scroll through menus using the Wheel.
�
Use your wrist to move the pointer more easily.
�
Note
,
If the magic remote control ‘s connection is
unstable or have any problem, cancel the
registration and then, register again. (see the
page 44)
1
Getting Started
Open the battery cover at the bottom of the
Remote Control, and insert two (1.5 V AA ) alkaline
batteries with 4 and 5 matched correctly.
Caution
>
Do not mix old and new batteries, as this may
damage the remote control.
Connecting8
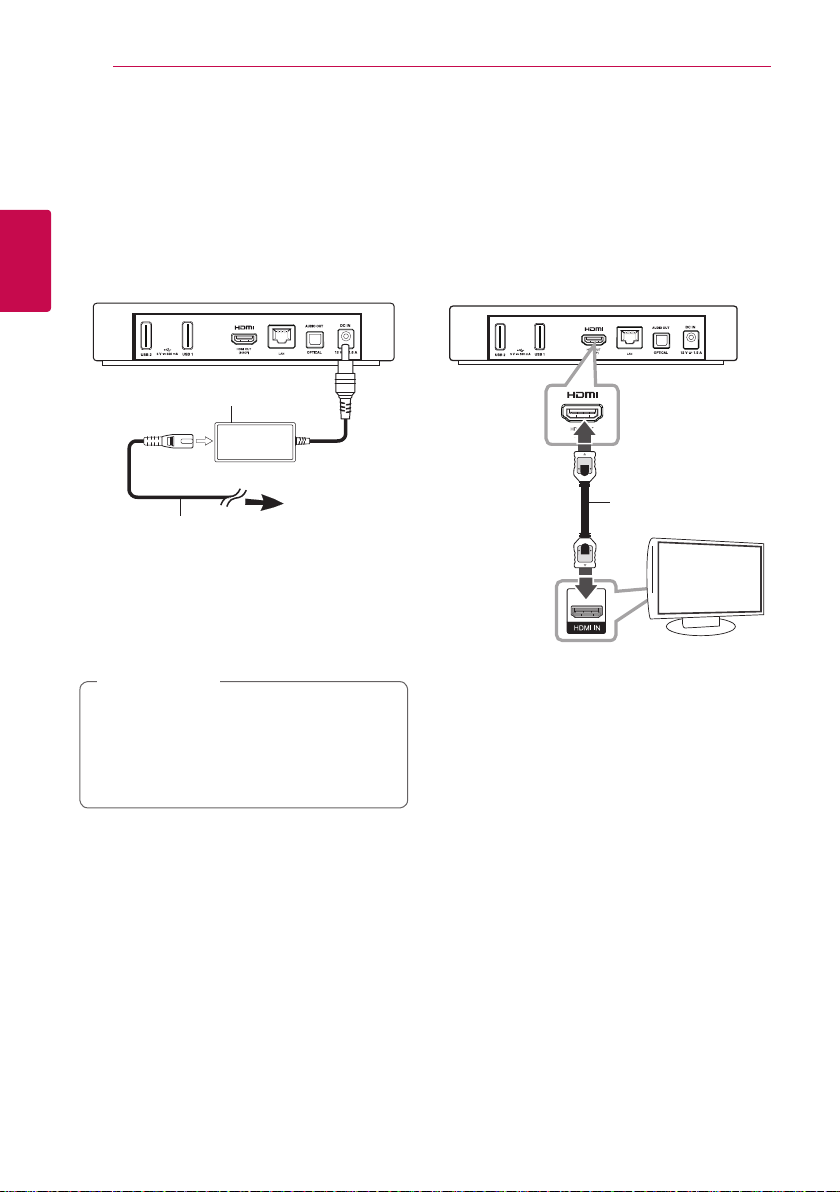
Connecting the AC Adapter
Connect the unit to the power supply with the
supplied AC adapter.
Connect the power cord to the adapter, and then
plug the other end into an AC outlet.
2
Connecting
Contact an electrical parts distributor for
�
This AC adapter is manufactured by Asian Power
�
Rear of the unit
AC adapter
AC power cord
assistance in selecting a suitable AC plug adapter
or AC power cord set.
Devices Inc.
Caution
>
Only use the AC adapter supplied with this
device. Do not use a power supply from
another device or manufacturer. Using any
other power cable or power supply may cause
damage to the device and void your warranty.
Plug into a
power source
HDMI Connecting to Your TV
If you have a HDMI TV or monitor, you can connect
it to this unit using a HDMI cable (Type A, High
Speed HDMI™ Cable). Connect the HDMI jack on
the unit to the HDMI jack on a HDMI compatible TV
or monitor.
Rear of the unit
HDMI cable
(not supplied)
TV
Set the TV’s source to HDMI (refer to TV’s Owner’s
manual).

Connecting 9
Additional Information for HDMI
When you connect a HDMI or DVI compatible
�
device make sure of the following:
-Try switching o the HDMI/DVI device and
this unit. Next, switch on the HDMI/DVI
device and leave it for around 30 seconds,
then switch on this unit.
-The connected device’s video input is set
correctly for this unit.
-The connected device is compatible with
1280x720p or 1920x1080p video input.
Not all HDCP-compatible HDMI or DVI devices
�
will work with this unit.
-The picture will not be displayed properly
with non-HDCP device.
Note
,
If a connected HDMI device does not accept
�
the audio output of the unit, the HDMI
device’s audio sound may be distorted or
may not output.
When you use HDMI connection, you can
�
change the resolution for the HDMI output.
(Refer to “Resolution Setting” on page 34)
Changing the resolution when the
�
connection has already been established
may result in malfunctions. To solve the
problem, turn o the unit and then turn it
on again.
When the HDMI connection with HDCP
�
is not veried, TV screen is changed to
black screen. In this case, check the HDMI
connection, or disconnect the HDMI cable.
If there are noises or lines on the screen,
�
please check the HDMI cable (length is
generally limited to 4.5 m).
Connecting to an Amplifier
Make one of the following connections, depending
on the capabilities of your existing equipment.
HDMI Audio connection (page 10)
�
Digital Audio connection (page 10)
�
Since many factors aect the type of audio output,
see “Audio Output Specications” on page 47 for
details.
About Digital Multi-channel sound
A digital multi- channel connection provides the
best sound quality. For this, you need a multichannel Audio/Video Receiver that supports one or
more of the audio formats supported by your unit.
Check the logos on the front of the Audio/Video
receiver and the manual. (PCM, Dolby Digital, Dolby
Digital Plus)
2
Connecting

Connecting10
Connecting to an Amplifier via HDMI Output
Connect the unit’s HDMI OUT jack to the
corresponding in jack on your amplier using a
HDMI cable.
2
Connecting
Rear of the unit
HDMI cable
Receiver/Amplier
TV
HDMI
cable
Connecting to an Amplifier via Digital Audio Output
Connect the unit’s OPTICAL AUDIO OUT jack to the
corresponding in jack (OPTICAL) on your amplier
using an optional digital audio cable.
Rear of the unit
Optical cable
Receiver/Amplier
You will need to activate the unit’s digital output.
(See “[SOUND] Menu” on page 34)
Connect the amplier’s HDMI output jack to HDMI
input jack on your TV using a HDMI cable if your
amplier has HDMI output jack.
You will need to activate the unit’s digital output.
(See “[SOUND] Menu” on page 34)
Connecting 11
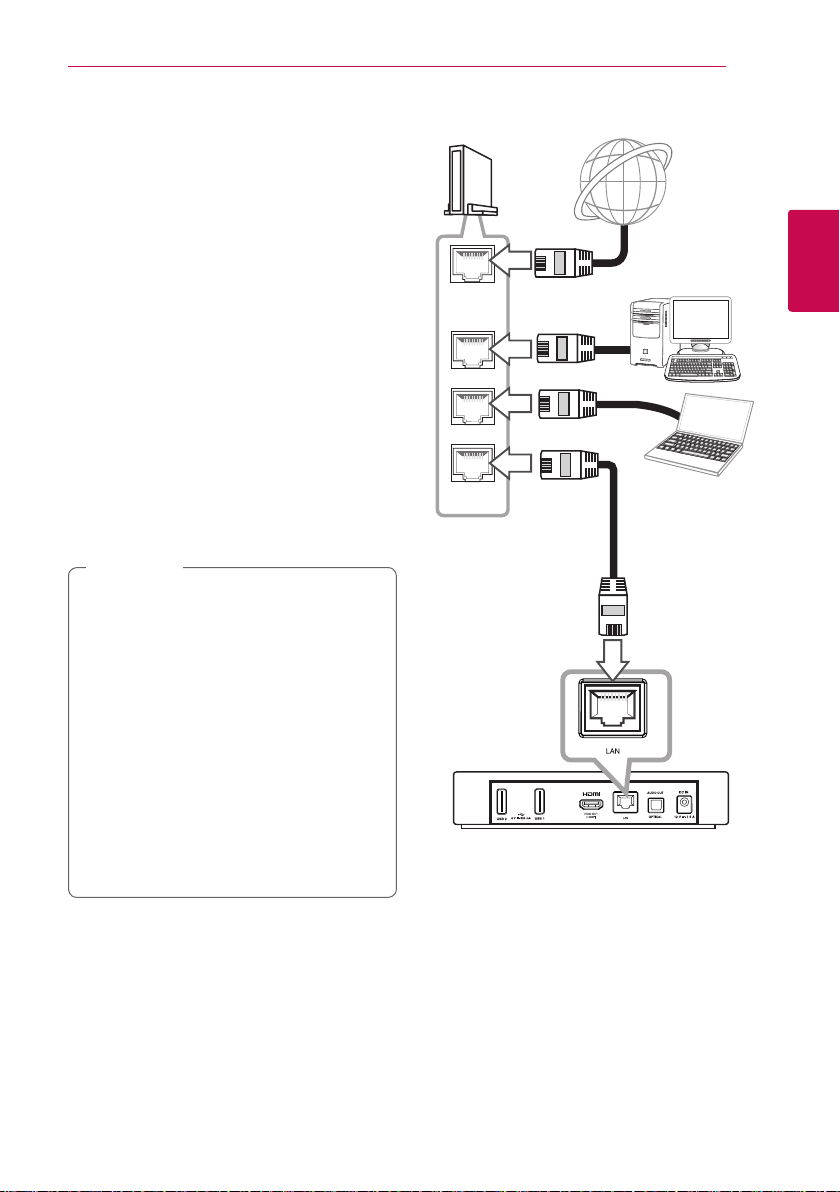
Connecting to your Home Network
This unit can be connected to a local area network
(LAN) via the LAN port on the rear panel or the
internal wireless module.
By connecting the unit to a broadband home
network, you have access to services such as
software updates and online content services.
Wired network connection
Using a wired network provides the best
performance, because the attached devices
connect directly to the network and are not subject
to radio frequency interference.
Please refer to the documentation for your network
device for further instructions.
Connect the unit’s LAN port to the corresponding
port on your Modem or Router using a
commercially available LAN or Ethernet cable.
Note
,
When plugging or unplugging the LAN
�
cable, hold the plug portion of the cable.
When unplugging, do not pull on the LAN
cable but unplug while pressing down on
the lock.
Do not connect a modular phone cable to
�
the LAN port.
Since there are various connection
�
congurations, please follow the
specications of your telecommunication
carrier or internet service provider.
If you want to access content from DLNA
�
servers, this unit must be connected to the
same local area network with them via a
router.
Router
WAN
LAN 1
LAN 2
LAN 3
Broadband
service
2
Connecting
DLNA certied
server
Rear of the unit
Connecting12
Wired Network Setup
If there is a DHCP server on the local area
network (LAN) via wired connection, this unit
will automatically be allocated an IP address after
making the physical connection.
Home menu / [Settings] / [NETWORK]
[Network Connection]
/
2
Preparation
Connecting
Before setting the wired network, you need to
connect the broadband internet to your home
network.
1. Select [Network Connection] option in the
[Settings] menu then press Wheel (
2. Read the preparations for the network settings
and then, select [Start Connection] to start the
connection.
Advanced Setting
If you want to set other network settings manually,
Select [Other Network List] on the [Network
Connection] menu and press Wheel (
1. Select the [Set Expert] to set the other network
setting.
2. Select [Wired] and press Wheel (
).
3. Select [Manual Input] to input IP adress in the IP
mode.
Normally, select [Auto Input] to allocate an IP
address automatically.
Note
,
If there is no DHCP server on the network
�
and you want to set the IP address manually,
select [Manual Input] then set [IP Address],
[Subnet Mask], [Gateway] and [DNS Server].
When you input a digit in the blank, key pad
�
will be appeared on the screen.
4. Select [OK] and press Wheel ( ) to apply
network settings.
).
).
3. Normally, when there is a DHCP server on
the local area network via wired connection,
Network will automatically be connected to the
unit.
Connecting 13
5. Network connection status is displayed on the
screen. Select [Complete] to finish the wired
network setting.
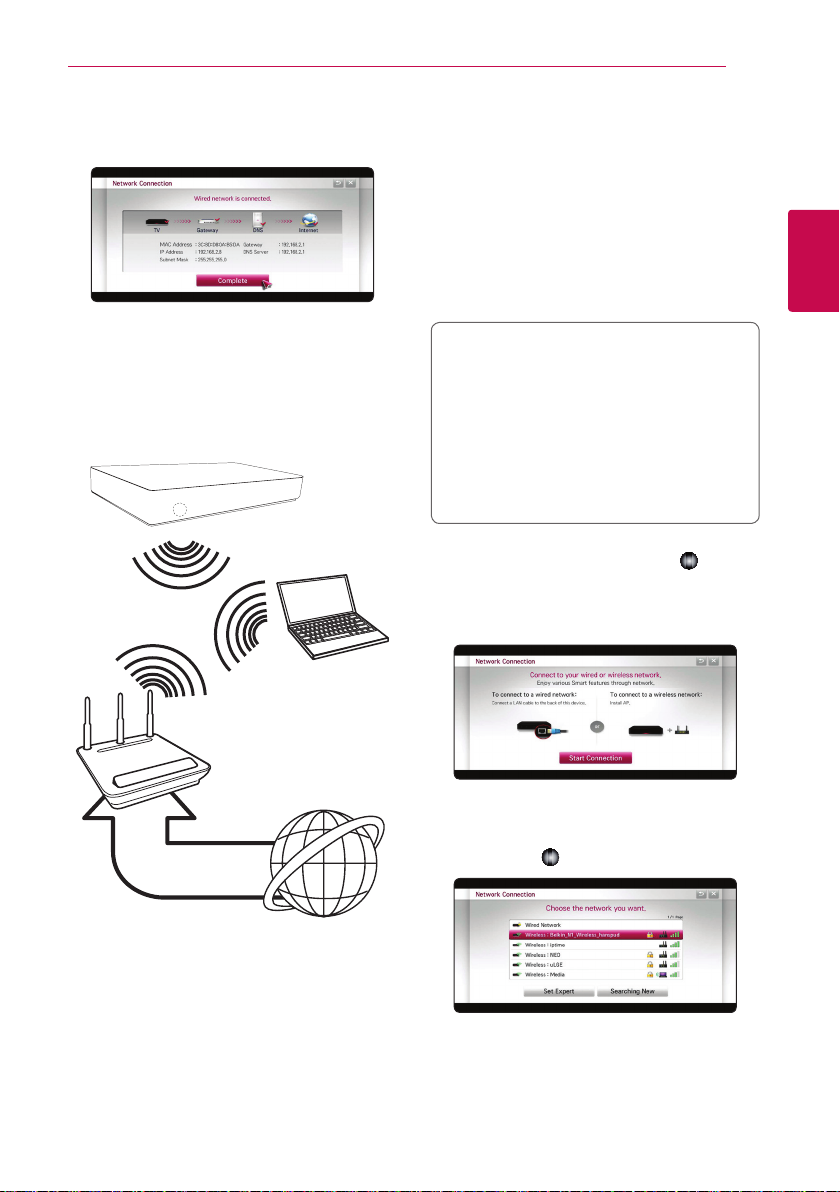
Wireless Network Connection
Another connection option is to use an Access Point
or a wireless router. The network conguration and
connection method may vary depending on the
equipment in use and the network environment.
Wireless
Communication
DLNA certied server
Wireless Network Setup
For the wireless network connection, the unit needs
to be set up for network communication. This
adjustment can be done from the [Settings] menu.
Adjust the [NETWORK] setting as follow. Setting up
the access point or the wireless router is required
before connecting the unit to the network.
Home menu
[Network Connection]
/
Preparation
Before setting the wireless network, you need
to:
-connect the broadband internet to the
wireless home network.
-set the access point or wireless router.
-note the SSID and security code of the
network.
1. Select [Network Connection] option in the
[Settings] menu then press Wheel (
2. Read the preparations for the network settings
and then select [Start Connection] to start the
connection.
[Settings] / [NETWORK]
/
).
2
Connecting
Access Point or
Wireless Router
Broadband
service
Refer to the setup instructions supplied with
your access point or wireless router for detailed
connection steps and network settings.
For best performance, a direct wired connection
from this unit to your home network’s router or
cable/DSL modem is always the best option.
If you do chose to use the wireless option, note that
performance can sometimes be aected by other
electronic devices in the home.
If wired network is not connected to the unit, all
available networks are displayed on the screen.
3. Select a desired SSID of wireless network and
press Wheel (
).
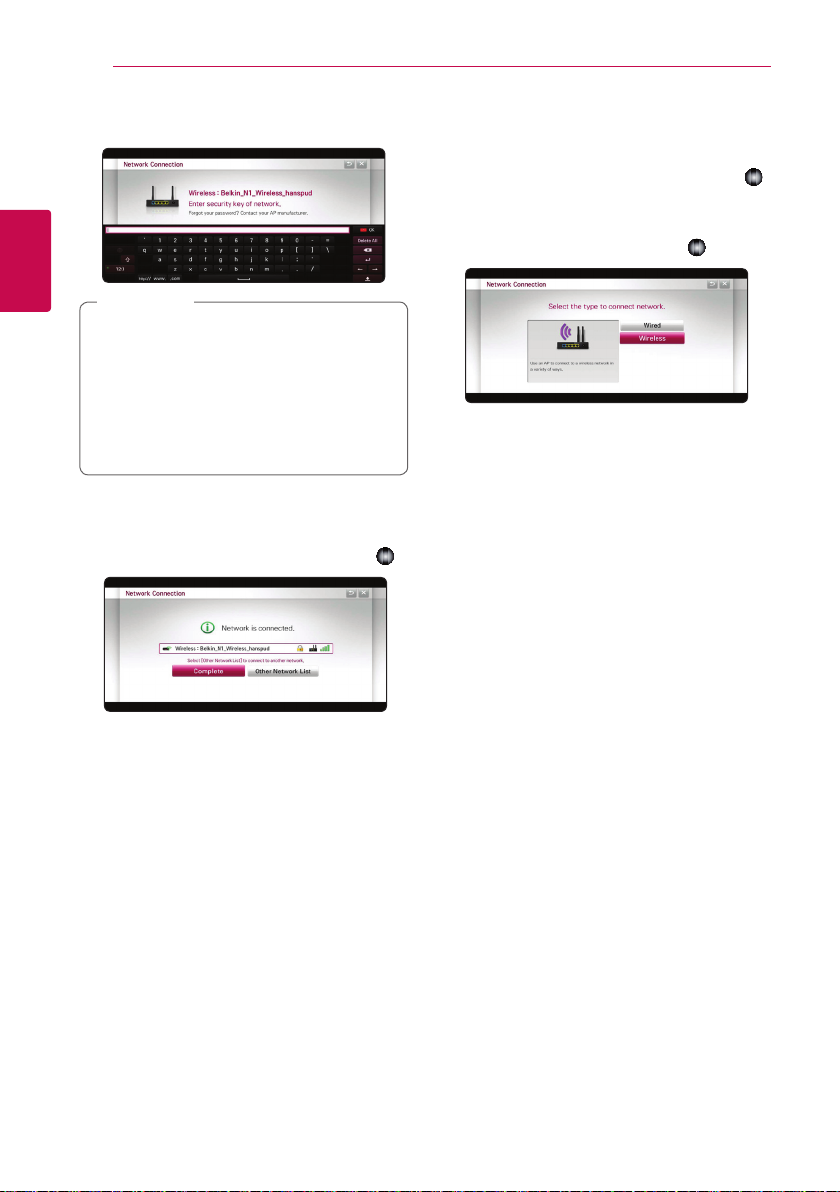
Connecting14
If you have security on your access point, you
need to input the security code as necessary.
2
Connecting
Note
,
WEP security mode generally have 4 keys
�
available on an access point setting. If your
access point or wireless router use WEP
security, enter the security code of the key
“No.1” to connect on your home network.
An Access Point is a device that allows you
�
to connect to your home network wirelessly.
4 Desired wireless network will automatically be
connected to the unit.
If you want to check available other network,
select [Other Network List] and press Wheel ( ).
Advanced Setting
If you want to set the other network settings
manually, select [Other Network List] on the
[Network Connection] menu and press Wheel (
1. Select the [Set Expert] to set the other network
setting.
2. Select [Wireless] and press Wheel (
3. When connecting via Wi-Fi, select the one of
the following network types.
If you have security on your access point or
wireless router, verify that the WEP or WPA key that
was entered into the player matches the router’s
information code as necessary.
[AP List] – Scans all available access points or
wireless routers within range and display them
as a list.
[Network name (SSID)] – Your access point
may not be broadcasting its network name
(SSID). Check your access point settings through
your computer and either set your access
point to broadcast SSID, or manually enter the
network name in [Network name(SSID)].
[WPS-PBC] – If your access point or wireless
router that supports the PBC (Push Button
Configuration) method, select this option and
press the Push Button on your access point
within 120 counts. You do not need to know the
network name (SSID) and security code of your
access point.
[WPS-PIN] – If your access point supports
the PIN Code configuration method based on
WPS(Wi-Fi Protected Setup), select this option
and note the code number on the screen. And
then, enter the PIN number on a setting menu
of your access point to connect. Refer to the
documentation for your network device.
).
).

Connecting 15
4. Follow the instructions of each connection
method on the screen.
Note
,
To use PBC and PIN network connection,
�
security mode of your access point must be
set to OPEN or AES.
When you input a digit in the blank, key pad
�
will be appeared on the screen.
If you use other characters than the English
�
alphabet or digits for the SSID of your access
point (router), wireless connection may not
be searched and connected.
Notes on Network Connection:
Many network connection problems during set
�
up can often be xed by re-setting the router or
modem. After connecting the unit to the home
network, quickly power o and/or connect the
power cable of the home network router or
cable modem. Then power on and/or connect
the power cable again.
Depending on the internet service provider (ISP),
�
the number of devices that can receive internet
service may be limited by the applicable terms
of service. For details, contact your ISP.
Our company is not responsible for any
�
malfunction of the unit and/or the internet
connection feature due to communication
errors/malfunctions associated with your
broadband internet connection, or other
connected equipment.
Some internet content may require a higher
�
bandwidth connection.
Even if the unit is properly connected and
�
congured, some internet content may not
operate properly because of internet congestion,
the quality or bandwidth of your internet service,
or problems at the provider of the content.
Some internet connection operations may not
�
be possible due to certain restrictions set by the
Internet service provider (ISP) supplying your
broadband Internet connection.
Any fees charged by an ISP including, without
�
limitation, connection charges are your
responsibility.
A 10 Base-T or 100 Base-TX LAN port is required
�
for wired connection to this unit. If your internet
service does not allow for such a connection,
you will not be able to connect the unit.
You must use a Router to use xDSL service.
�
A DSL modem is required to use DSL service and
�
a cable modem is required to use cable modem
service. Depending on the access method of and
subscriber agreement with your ISP, you may not
be able to use the internet connection feature
contained in this unit or you may be limited to
the number of devices you can connect at the
same time. (If your ISP limits subscription to one
device, this unit may not be allowed to connect
when a PC is already connected.)
The use of a “Router” may not be allowed or its
�
usage may be limited depending on the policies
and restrictions of your ISP. For details, contact
your ISP directly.
The wireless network operate at 2.4 GHz
�
radio frequencies that are also used by other
household devices such as cordless telephone,
Bluetooth® devices, microwave oven, and can be
aected by interference from them.
Turn o all unused network equipment in
�
your local home network. Some devices may
generate network trac.
For the purpose of the better transmission,
�
placing the unit from the access point as close as
possible.
In some instances, placing the access point or
�
wireless router at least 0.45 m (1.5 ft.) above the
oor may improve the reception.
Move closer to the access point if possible or re-
�
orient the unit so there is nothing between it
and the access point.
The reception quality over wireless depends on
�
many factors such as type of the access point,
distance between the unit and access point, and
the location of the unit.
Set your access point or wireless router to
�
Infrastructure mode. Ad-hoc mode is not
supported.
2
Connecting
 Loading...