

LG PDA L12C BT, PDA-L12C-WL Users manual

HP iPAQ
Product Information Guide
Antenna House XSL Formatter (Evaluation) http://www.antennahouse.com/

© 2006 Hewlett-Packard Development
Company, L.P.
Microsoft, Windows, the Windows logo,
Outlook, and ActiveSync are trademarks of
Microsoft Corporation in the U.S. and other
countries.
HP iPAQ Products are Powered by
Microsoft® Windows Mobile™ 5.0 software
for Pocket PC.
SD Logo is a trademark of its
proprietor.
Bluetooth® is a trademark owned by its
proprietor and used by Hewlett-Packard
Development Company, L.P. under license.
All other product names mentioned herein
may be trademarks of their respective
companies.
Hewlett-Packard Company shall not be liable
for technical or editorial errors or omissions
contained herein. The information is
provided “as is” without warranty of any kind
and is subject to change without notice. The
warranties for Hewlett-Packard products are
set forth in the express limited warranty
statements accompanying such products.
Nothing herein should be construed as an
additional warranty.
This document contains proprietary
information that is protected by copyright. No
part of this document may be photocopied,
reproduced, or translated to another
language without the prior written consent of
Hewlett-Packard Development Company,
L.P.
HP iPAQ Product Information Guide
First Edition (September 2006)
Antenna House XSL Formatter (Evaluation) http://www.antennahouse.com/

Table of contents
HP iPAQ Product Information Guide
Welcome .............................................................................................................................................. 1
Box Contents ........................................................................................................................................ 2
Components ......................................................................................................................................... 3
Top Components ................................................................................................................. 3
Front Components ............................................................................................................... 4
Back Components ............................................................................................................... 5
Left and Right Side Components ......................................................................................... 6
Getting Started CD Contents ................................................................................................................ 7
Navigation Quick Start .......................................................................................................................... 8
Installing the Battery ............................................................................................................ 8
Powering On and Setting Up ............................................................................................. 10
HP Quick Launch ............................................................................................................... 10
Navigation Setup ............................................................................................................... 11
Car Kit Setup ..................................................................................................................... 12
Using TomTom Navigator 6 ............................................................................................... 15
Navigating to Destinations ................................................................................ 15
Menus ............................................................................................................... 15
Saving Destinations .......................................................................................... 16
Preferences ....................................................................................................... 16
Points of Interest (POI) ...................................................................................... 17
TomTom Plus .................................................................................................... 17
Travel Tools ....................................................................................................................... 18
WorldMate Standard Edition ............................................................................. 18
Organizer Features ........................................................................................... 18
Continuing Setup ................................................................................................................................ 18
Setting Up the Travel Companion ...................................................................................... 18
Finding the Serial Number and Model Number ................................................................. 22
Protecting Your HP iPAQ with a Password ....................................................................... 22
Today Screen .................................................................................................................... 23
Status Icons ...................................................................................................... 23
iPAQ Wireless ................................................................................................... 24
Checking the Battery Charge Level ................................................................................... 25
Battery Saving Tips ............................................................................................................ 25
Entering Text ...................................................................................................................................... 25
Entering Text Using Block Recognizer .............................................................................. 26
Entering Text Using the On-screen Keyboard ................................................................... 26
Entering Text Using Letter Recognizer .............................................................................. 27
Writing with Transcriber ..................................................................................................... 27
Resetting Your HP iPAQ .................................................................................................................... 27
ENWW iii
Antenna House XSL Formatter (Evaluation) http://www.antennahouse.com/

Performing a Soft Reset .................................................................................................... 27
Performing a Factory Reset ............................................................................................... 28
Entertainment ..................................................................................................................................... 28
Windows Media Player 10 Mobile ...................................................................................... 28
Listening to Music and Watching Videos .......................................................... 29
Clearing the Now Playing List ........................................................................... 29
Updating a Library ............................................................................................. 29
HP Photosmart Mobile ....................................................................................................... 29
Attaching a Voice Note to a Picture .................................................................. 30
E-mailing Pictures ............................................................................................. 30
Viewing a Slideshow ......................................................................................... 30
Mobile Office ...................................................................................................................................... 31
Calendar ............................................................................................................................ 31
Accessing Calendar .......................................................................................... 31
Viewing Today's Agenda ................................................................................... 31
Viewing Appointments ....................................................................................... 32
Scheduling an Appointment .............................................................................. 32
Sending a Meeting Request .............................................................................. 32
Contacts ............................................................................................................................. 33
Accessing Contacts ........................................................................................... 33
Creating a Contact ............................................................................................ 33
Finding a Contact .............................................................................................. 34
Tasks ................................................................................................................................. 34
Creating a Task ................................................................................................. 34
Locating a Task ................................................................................................. 34
E-mail ................................................................................................................................. 35
Different Ways to Access E-mail Messages ..................................................... 35
Setting up an E-mail Account on an Exchange Server ..................................... 35
Setting up a POP3, HTTP, or IMAP4 E-mail Account ....................................... 36
Composing and Sending Outlook E-mail Messages ......................................... 37
Replying to or Forwarding an Outlook E-mail Message .................................... 37
Sorting the Message List ................................................................................... 37
Internet Explorer Mobile ..................................................................................................... 37
Word Mobile ....................................................................................................................... 38
Excel Mobile ...................................................................................................................... 38
PowerPoint Mobile ............................................................................................................. 38
WLAN ................................................................................................................................................. 39
Turning WLAN On or Off ................................................................................................... 39
Searching for WLAN Networks to Access ......................................................................... 40
Configuring Network Security Settings .............................................................................. 40
Bluetooth ............................................................................................................................................ 40
Turning Bluetooth On or Off ............................................................................................... 41
Connecting to a Bluetooth Headset ................................................................................... 41
Protecting the HP iPAQ Screen from Cracking or Damage ............................................................... 41
Obtaining Services for a Cracked or Damaged Screen ..................................................................... 42
Additional Guidelines for Using Your HP iPAQ .................................................................................. 42
Frequently Asked Questions .............................................................................................................. 42
Finding More Information ................................................................................................................... 43
Index ................................................................................................................................................................. 45
iv ENWW
Antenna House XSL Formatter (Evaluation) http://www.antennahouse.com/

HP iPAQ Product Information Guide
CAUTION Text set off in this manner indicates that failure to follow directions could result in
damage to equipment or loss of information.
Welcome
Thank you for purchasing the HP iPAQ Travel Companion. This guide has been designed to help you
begin using your device quickly. For more detailed information, please refer to the Finding More
Information section. In this guide you will learn how to:
Use the travel-related functionality of the Travel Companion, including the built-in Global
●
Positioning System (GPS) and WorldMate travel assistant.
Set the Travel Companion to synchronize digital media and personal information such as Calendar,
●
Contacts, and E-mail with a personal computer.
Protect the Travel Companion from unintended damage by showing how to properly replace the
●
battery cover on the device and by providing important information about protecting the device
screen.
Improve the device battery life, allowing for longer use between charges.
●
Perform a soft reset or a factory reset to adjust device performance.
●
Troubleshoot common device issues, including synchronizing.
●
Use the on-screen keyboard, function keys, Calendar, Contacts, and Tasks.
●
Use messaging, WLAN*, and Bluetooth.
●
*WLAN is available on rx5900 series models only.
ENWW Welcome 1
Antenna House XSL Formatter (Evaluation) http://www.antennahouse.com/
Box Contents
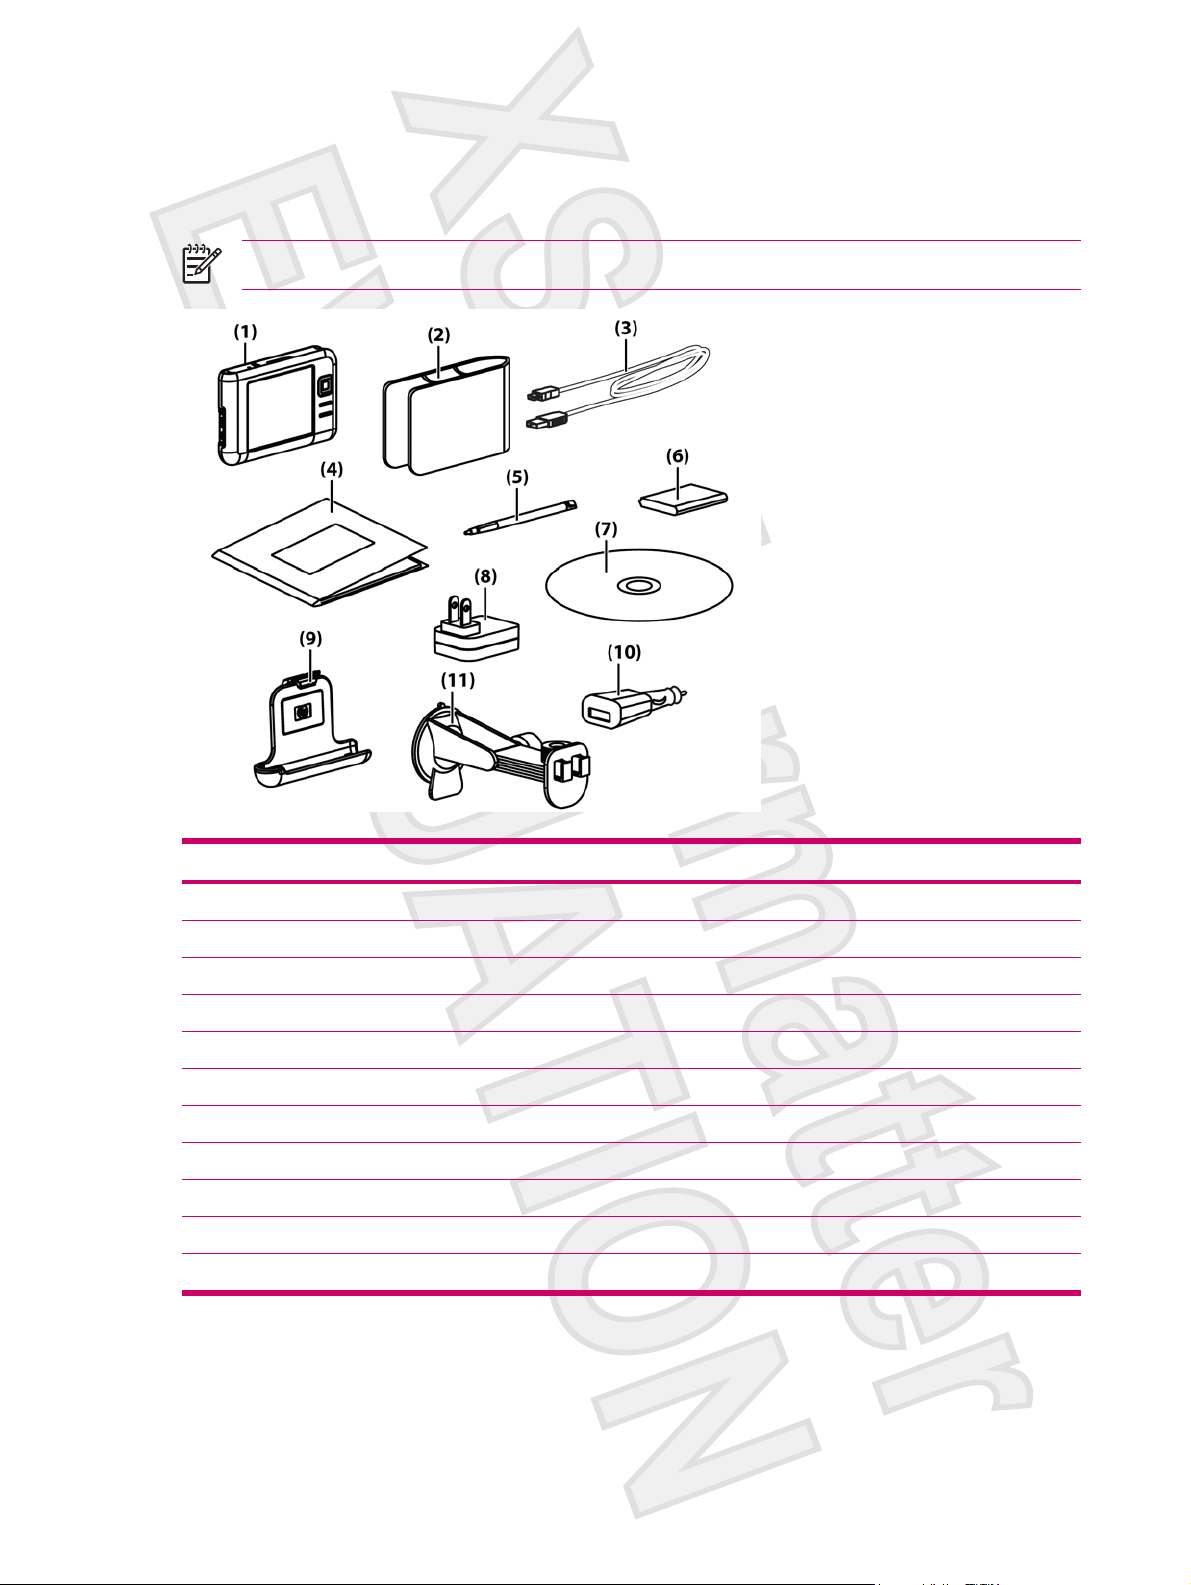
This illustration depicts the items that come in the box with the Travel Companion. Use this illustration
to become more familiar with the device.
NOTE Box contents vary by model.
Box Contents
(1) HP iPAQ
(2) Case
(3) Mini-USB synchronization cable/power cable (2 ea)
(4) HP iPAQ Documentation
(5) Stylus
(6) 1,700mAH li-ion removable/rechargeable battery
(7) Getting Started CD with special software
(8) AC adapter with interchangeable plug
(9) Car kit — holder
(10) Car kit — Travel power adapter
(11) Car kit — windshield mounting bracket
2 HP iPAQ Product Information Guide ENWW
Antenna House XSL Formatter (Evaluation) http://www.antennahouse.com/

Components
NOTE Not all models or features are available in all regions.
Top Components
Component Function
(1) Reset Button Press to perform a soft reset of the Travel Companion.
(2) Record Button Press to record voice or sound.
(3) SD Slot Insert a Secure Digital (SD) storage card for data storage or a Secure Digital
Input/Output card (SDIO) card to extend the functionality of the Travel
Companion.
ENWW Components 3
Antenna House XSL Formatter (Evaluation) http://www.antennahouse.com/
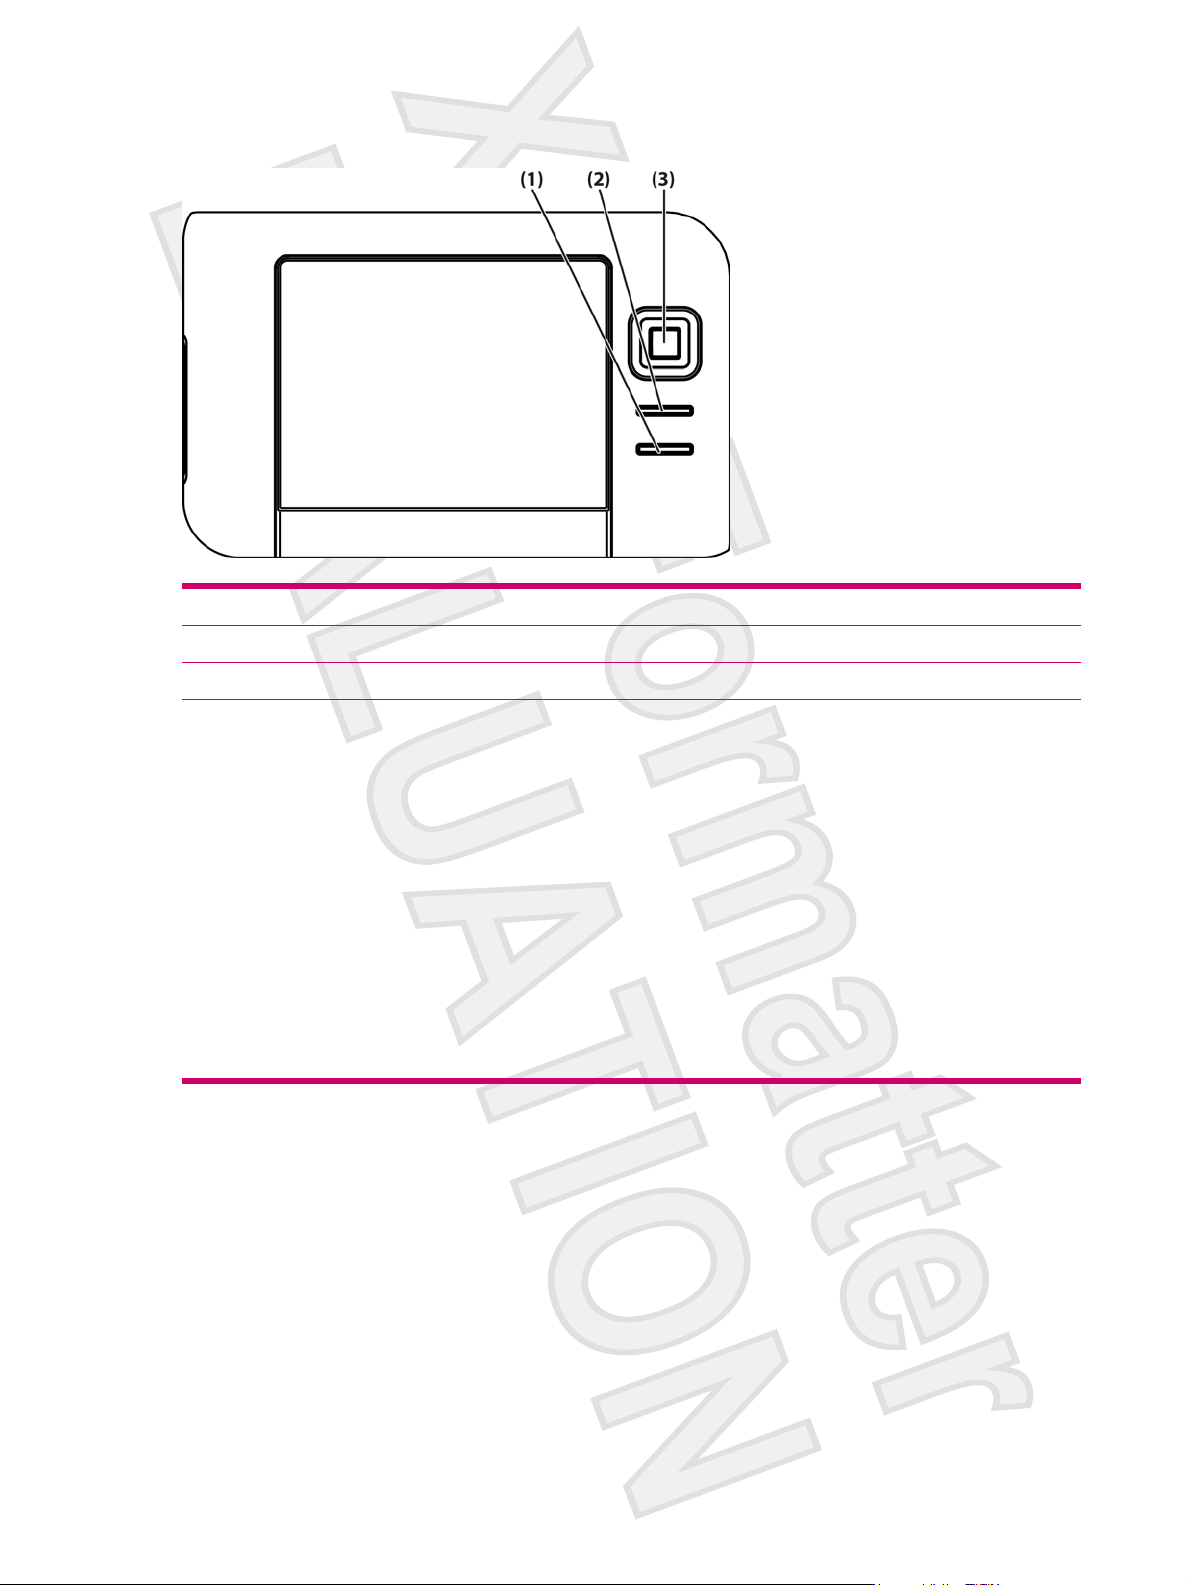
Front Components
Component Function
(1) Start Menu Button Press to open the Start menu.
(2) OK Button Press to close the current window or exit the current application.
(3) 9–Way Navigation Button
When in Standard mode:
●
Top — Scroll up
●
Bottom — Scroll down
●
Left — Scroll left
●
Right — Scroll right
●
When using GPS:
●
Top — Zoom in
●
Bottom — Zoom out
●
Left — Volume down
●
Right — Volume up
●
4 HP iPAQ Product Information Guide ENWW
Antenna House XSL Formatter (Evaluation) http://www.antennahouse.com/
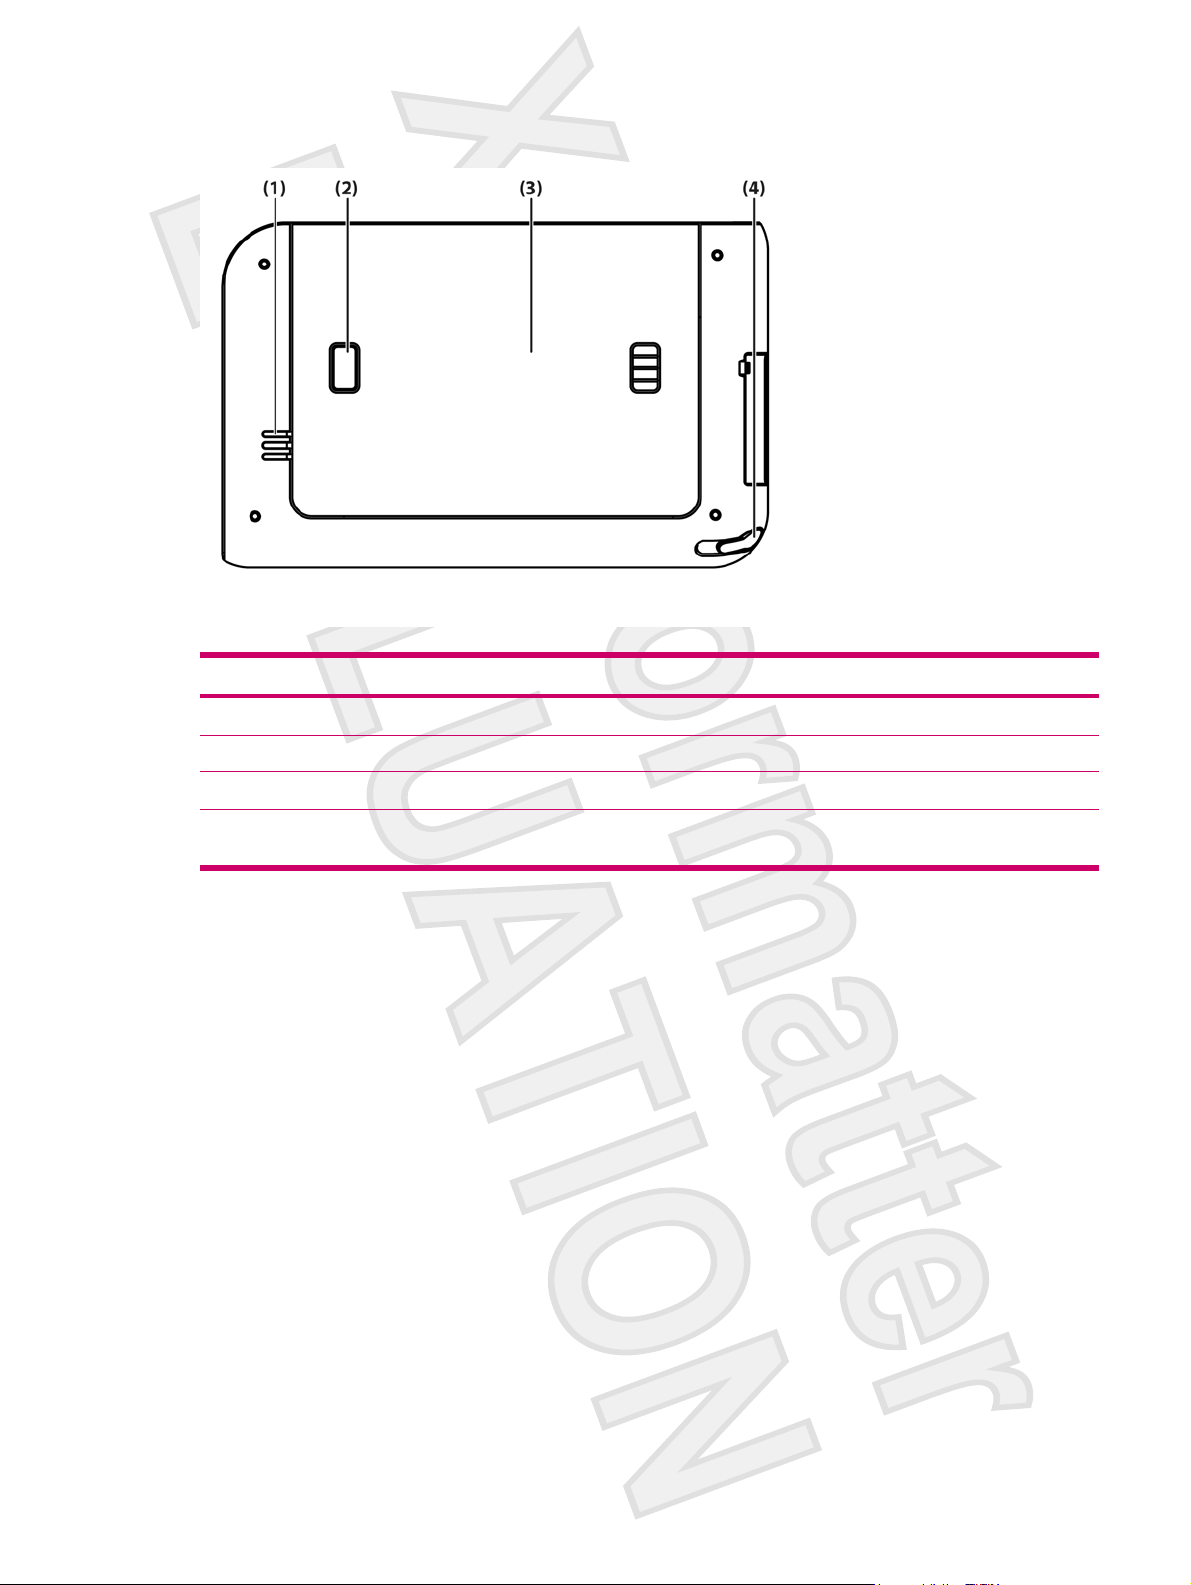
Back Components
Component Function
(1) Speaker Use the speaker to get spoken navigation instructions.
(2) Battery Cover Release Button Press to remove the battery cover.
(3) Battery Cover Remove to install or remove the battery.
(4) Stylus Use to input information. Slide out to remove the stylus. Slide in to replace
the stylus.
ENWW Components 5
Antenna House XSL Formatter (Evaluation) http://www.antennahouse.com/
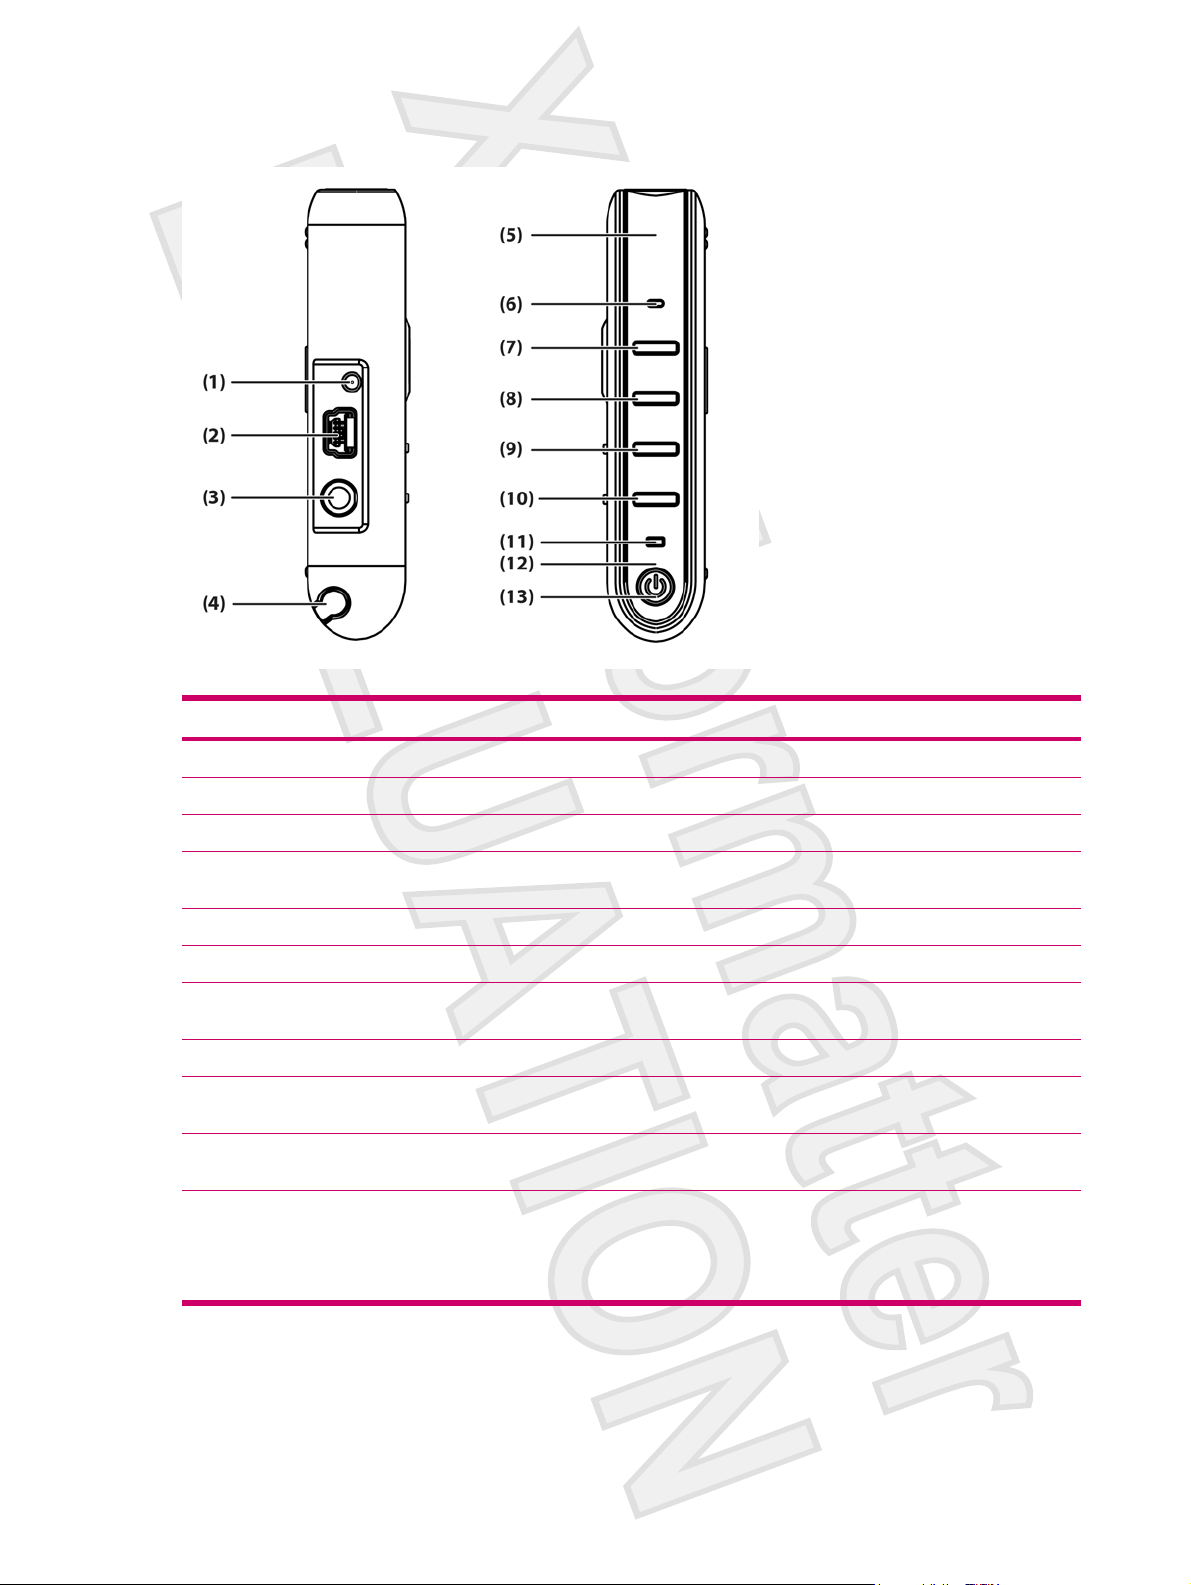
Left and Right Side Components
Component Function
(1) MMCX External Antenna Port Connects to 3V active external GPS antenna.
(2) Charging/Communications Port Connects to mini-USB synchronization cable.
(3) Headset Connector Plug a headset into this connector to listen to music.
(4) Stylus Use to input information. Slide out to remove the stylus. Slide in to replace
the stylus.
(5) Internal WLAN Antenna* Allows connection to wireless networks. (rx5900 series models only)
(6) Microphone Speak into the microphone to record voice notes.
(7) Quick Launch Button Press to access the HP Quick Launch screen. Press and hold to launch
Calendar.
(8) Navigation Button Press to launch GPS navigation. Press and hold to launch Contacts.
(9) Windows Media Player Button Press to launch Windows Media Player. Press and hold to launch Pocket
(10) Rotate Screen Button Press to rotate the screen to portrait or landscape orientation. Press and
(11) Wireless LED
Internet Explorer.
hold to launch Photosmart Mobile.
Blue LED—WLAN*, Bluetooth, or GPS is on.
●
LED off—WLAN*, Bluetooth, or GPS is off.
●
*WLAN is available on rx5900 series models only.
6 HP iPAQ Product Information Guide ENWW
Antenna House XSL Formatter (Evaluation) http://www.antennahouse.com/

Component Function
(12) Internal Bluetooth Antenna Allows connection to other Bluetooth devices.
(13) Power Button and LED Press to turn the unit on and off.
●
●
●
Getting Started CD Contents
The Getting Started CD includes:
Microsoft ActiveSync 4.1 or later
●
Microsoft Outlook 2002
●
Additional Product Information
●
Important Safety Information
●
WorldMate Active Sync Plug-in
●
HP Photosmart Premier
●
Solid amber light — Battery is charging
Solid green light — Battery is fully charged
Flashing amber light — Reminder or alarm
Additional software for the Travel Companion and personal computer
●
All software and documents are designed to be installed on a personal computer to enable use of the
Travel Companion to its full potential.
NOTE All current Microsoft operating systems are supported by ActiveSync 4.1, except
Windows 98SE and Windows ME.
ENWW Getting Started CD Contents 7
Antenna House XSL Formatter (Evaluation) http://www.antennahouse.com/
Navigation Quick Start
The Travel Companion can be used as a GPS navigation system right out of the box. The sections that
follow provide instruction to prepare and use the Travel Companion immediately after purchase.
CAUTION Drive with due care and attention when using the Travel Companion for navigation.
Installing the Battery
The battery provides power for the Travel Companion to operate. The Travel Companion comes with a
mini-USB synchronization cable, which you must use with a power adapter to charge the device.
To install the battery:
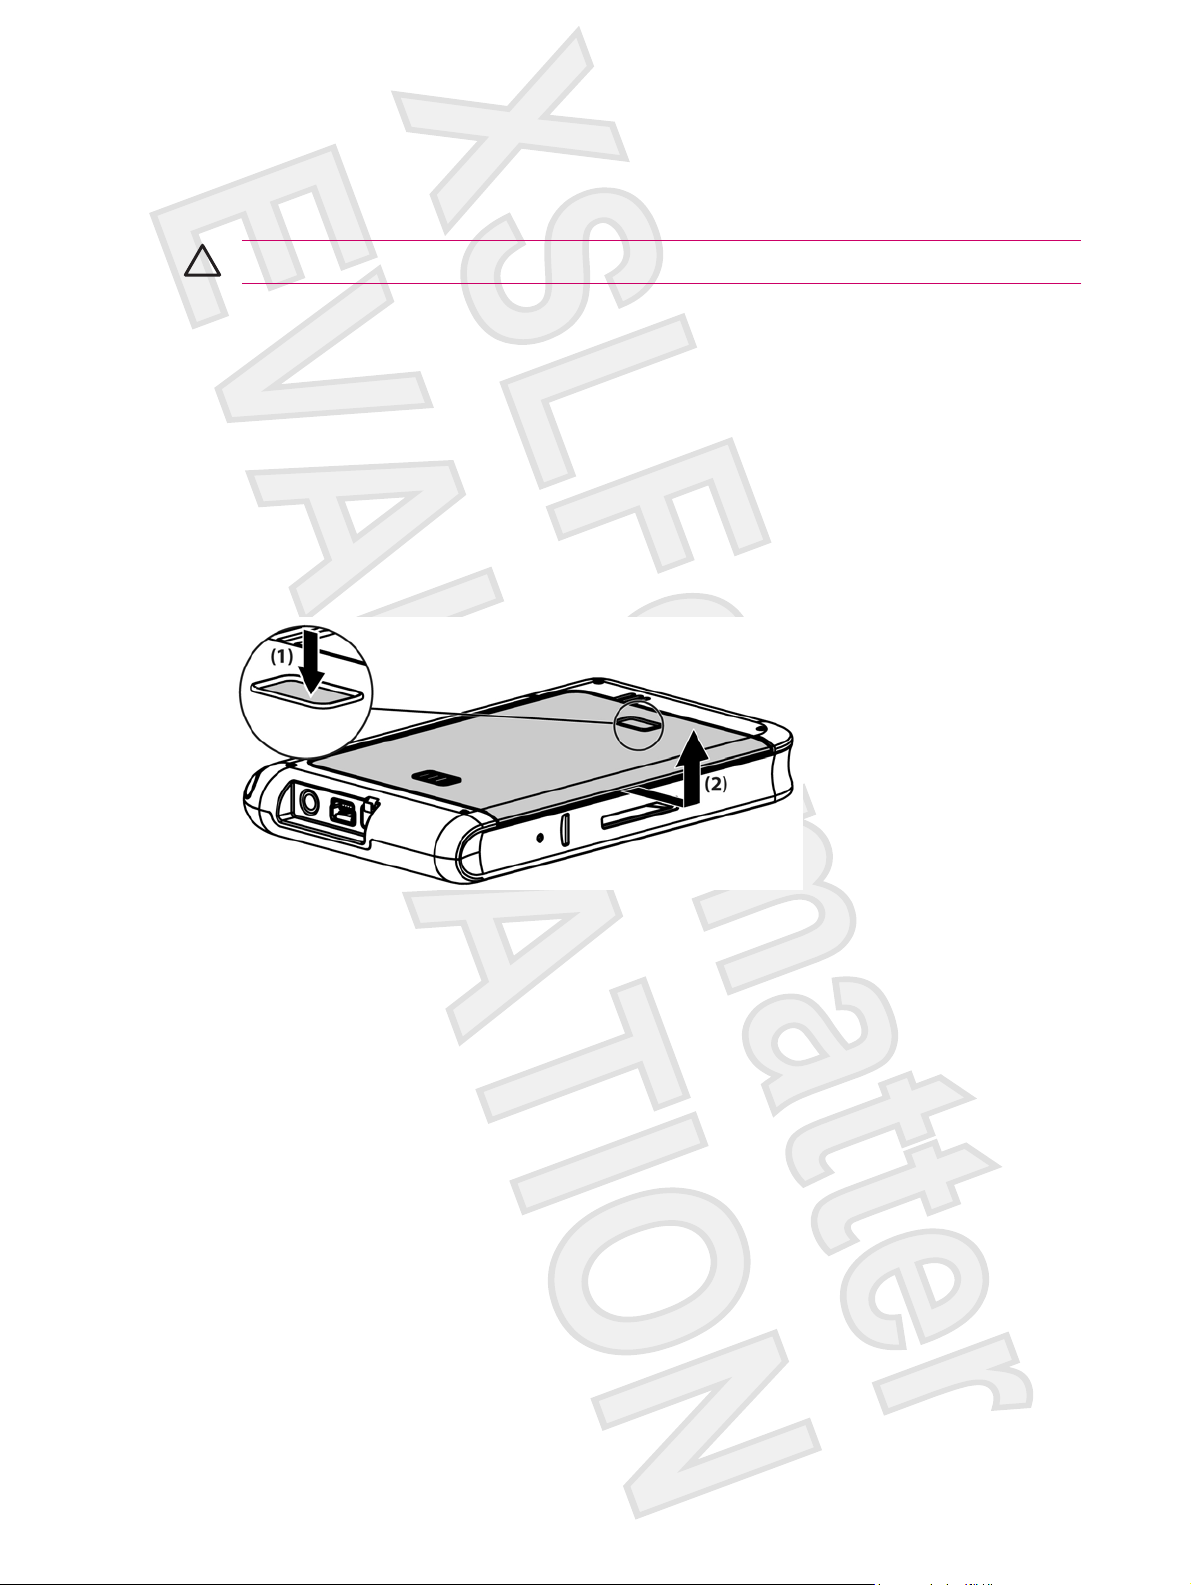
1. Turn the Travel Companion over so you can see the back battery cover.
2. Press the battery release button (1).
3. Slide the battery compartment cover down about 1/2 inch, and then lift the cover off the Travel
Companion (2).
8 HP iPAQ Product Information Guide ENWW
Antenna House XSL Formatter (Evaluation) http://www.antennahouse.com/
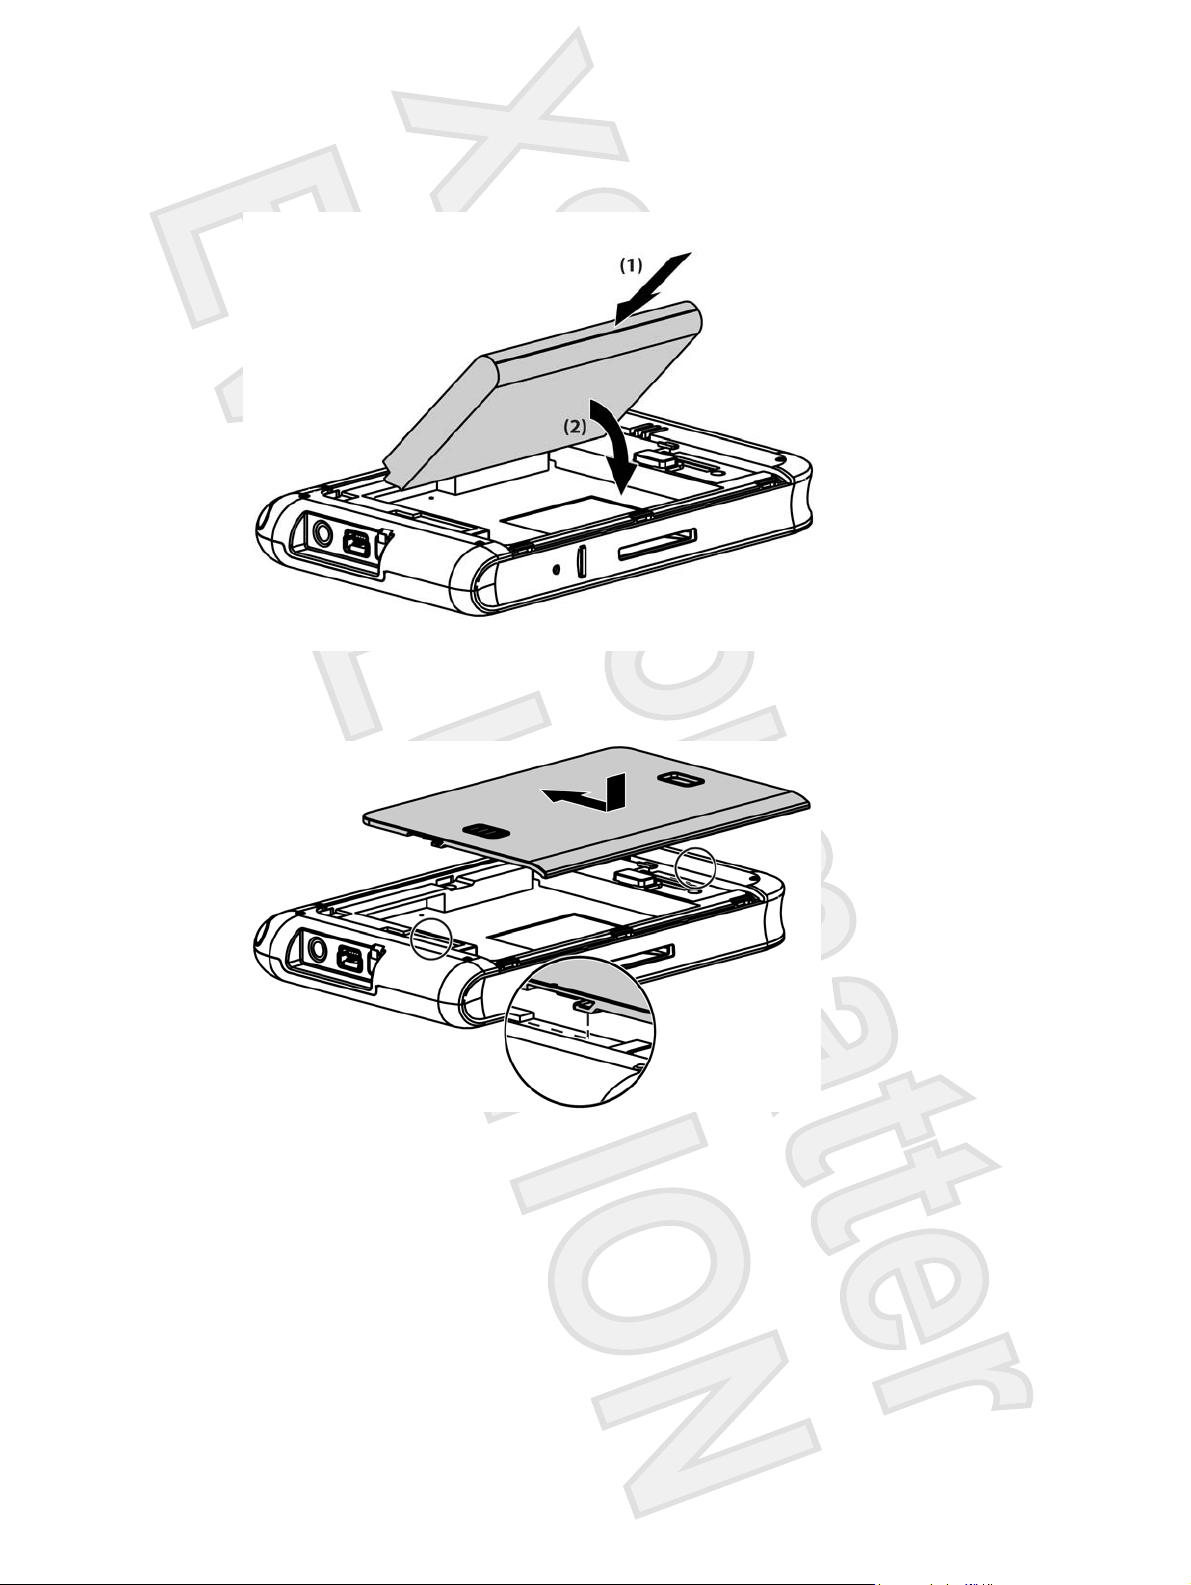
4. Insert the battery into the compartment (1) so that the connectors on the battery mate with the pins
in the battery compartment, and then press down until the battery locks into place (2). As you insert
the battery, be sure to pull the battery removal tab out so it is on the outside of the battery.
5. Replace the cover by first laying the cover on the battery compartment opening, aligning the tabs,
and then sliding the cover until it locks into place.
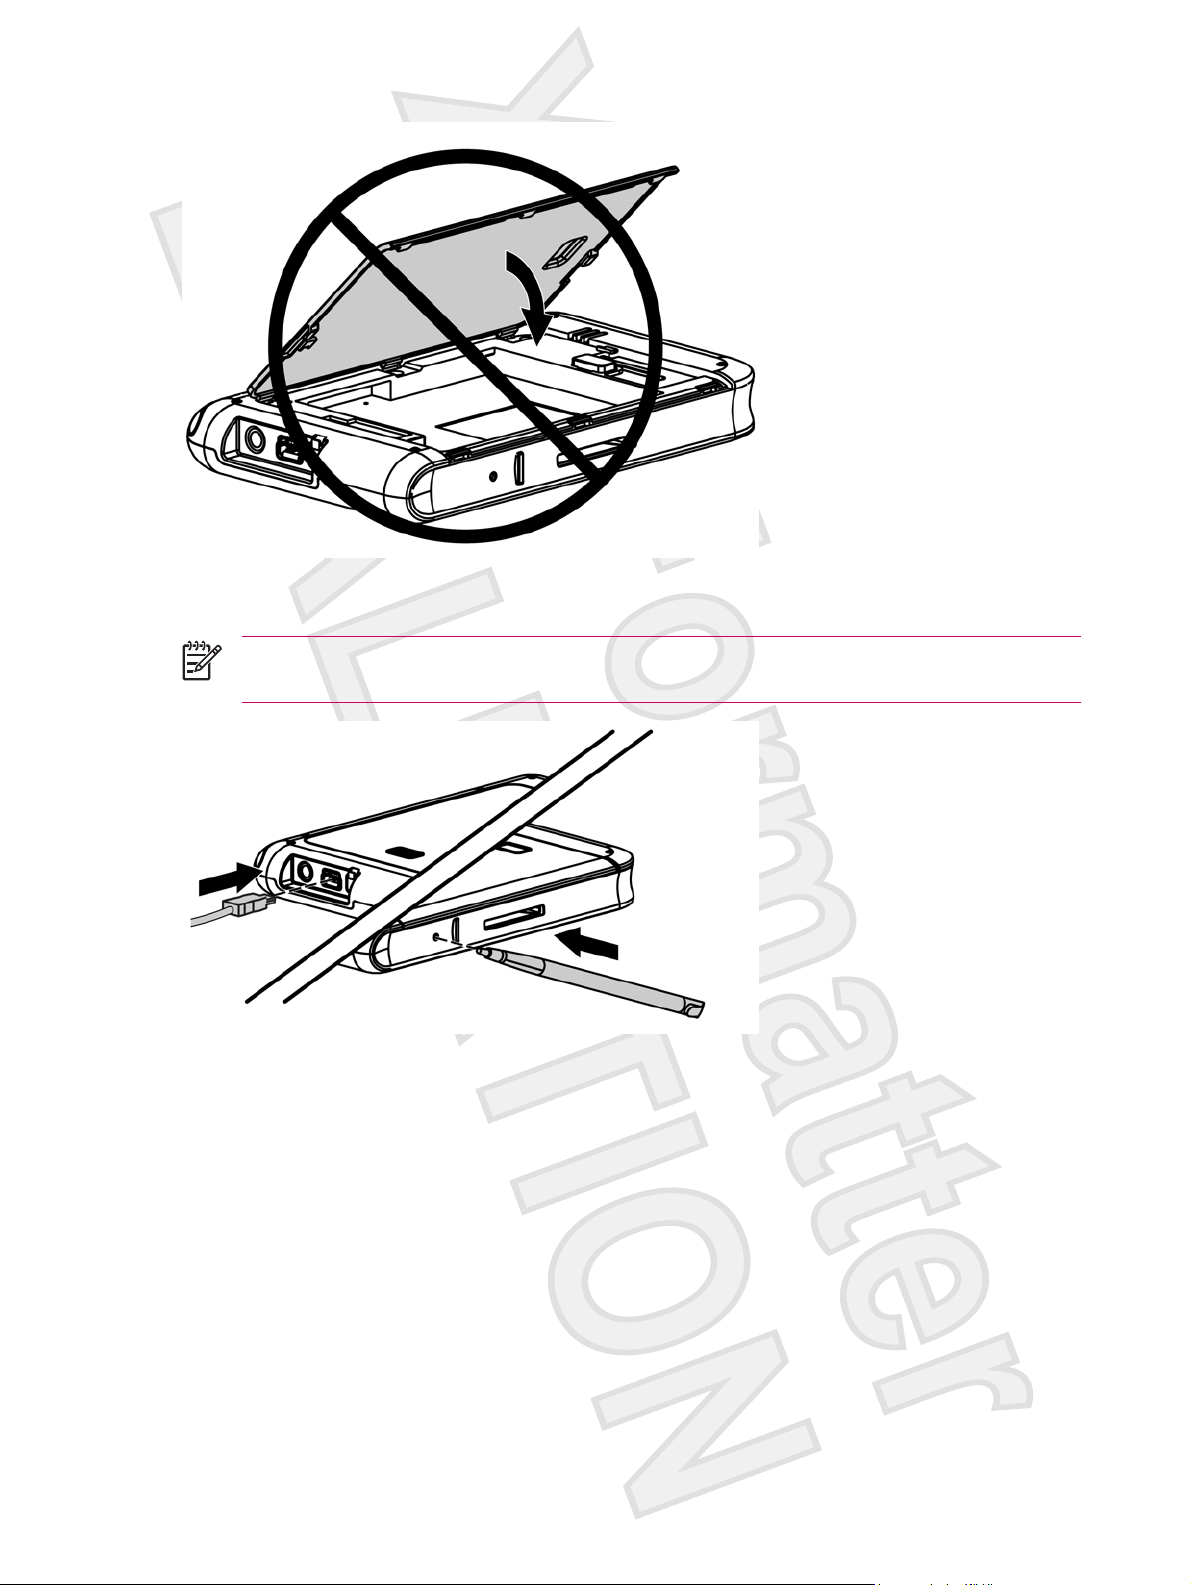
Do not attempt to insert the battery cover tabs into the compartment slots without first placing the cover
onto the compartment and sliding it closed.
ENWW Navigation Quick Start 9
Antenna House XSL Formatter (Evaluation) http://www.antennahouse.com/
Powering On and Setting Up
NOTE To start the Travel Companion after installing the battery, press and hold the Reset
button for at least two seconds, or connect to power (AC or travel adapter).
The first time you turn on the Travel Companion, follow the on-screen set up instructions. After
completing this initial setup, the Travel Companion displays the Quick Start Tour, which provides
information about using the Travel Companion. View as much of the Quick Setup Tour as needed. When
exiting the tour, the Travel Companion initiates the HP Quick Launch screen, which provides the ability
quickly and easily open applications on your iPAQ.
HP Quick Launch
HP Quick Launch is a simple way to open the most frequently used programs on the Travel Companion.
Tap the Today icon to access the Today page.
●
Tap the Travel Assistant icon to access WorldMate travel applications, Calendar, Contacts, and
●
the Calculator.
10 HP iPAQ Product Information Guide ENWW
Antenna House XSL Formatter (Evaluation) http://www.antennahouse.com/

Tap the Entertainment icon to access entertainment applications like Windows Media Player 10,
●
Photosmart Mobile, and games.
Tap the Internet icon to access the Internet browser.
●
Tap the Navigation icon to use GPS navigation.
●
HP Quick Launch is configured by default to be the home screen of the Travel Companion. Switch to
use the Today screen as the home screen by tapping Menu > Settings and clearing the check boxes.
You can also access the Today screen from the Start menu.
You can also configure Quick Launch by tapping Menu > Settings and:
Selecting Launch On Reset to automatically start Quick Launch every time the device is soft reset.
●
Selecting Launch on Wakeup to automatically start Quick Launch every time the device is
●
switched on.
To learn more about the capabilities of the Travel Companion, refer to this guide as well as the Additional
Product Information on the Getting Started CD. To begin navigation, proceed to the next step.
Navigation Setup
If you do not want to navigate now, continue learning about the Travel Companion and refer back to this
section when you do want to use navigation.
You can use the navigation features of the Travel Companion right out of the box. The easiest way to
open the GPS application is from the HP Quick Launch screen. When launching the GPS application
for the first time, follow the on-screen instructions to configure and set up personal preferences.
The Travel Companion includes a built-in GPS receiver. To navigate to a destination, the GPS
application must determine your current position, for which it uses the Global Positioning System (GPS).
Available for free and without subscription, GPS uses satellites to transmit signals to GPS receivers.
GPS signals work in all weather, anywhere in the world.
To establish a GPS signal, use the GPS receiver outdoors with a clear view of the sky. The GPS
application can take up to five minutes to find your current position during its first use. If it takes longer
than five minutes, make sure that you are in an open place without tall buildings or trees nearby. In
subsequent uses, the GPS application will find your position much faster. Once the GPS application
locates your current position, the application shows your position on the map.
If you want to immediately start navigating:
1. Press the power button to power on the Travel Companion. If this is the first time powering on the
Travel Companion, you must either press the Reset button or connect to power for the unit to power
on.
2. Start the GPS application by tapping Navigation from the HP Quick Launch screen.
3. Place the Travel Companion in a location with a clear view of the sky.
4. Install the car kit.
5. Insert the Travel Companion and plug it in using the travel power adapter.
ENWW Navigation Quick Start 11
Antenna House XSL Formatter (Evaluation) http://www.antennahouse.com/
Car Kit Setup
The car kit allows you to mount the Travel Companion in a location in your car that provides the best
access to a GPS signal.
To install the car kit:
1. Plug the power cable into the Travel Power Adapter, and then plug the adapter into a vehicle power
outlet.
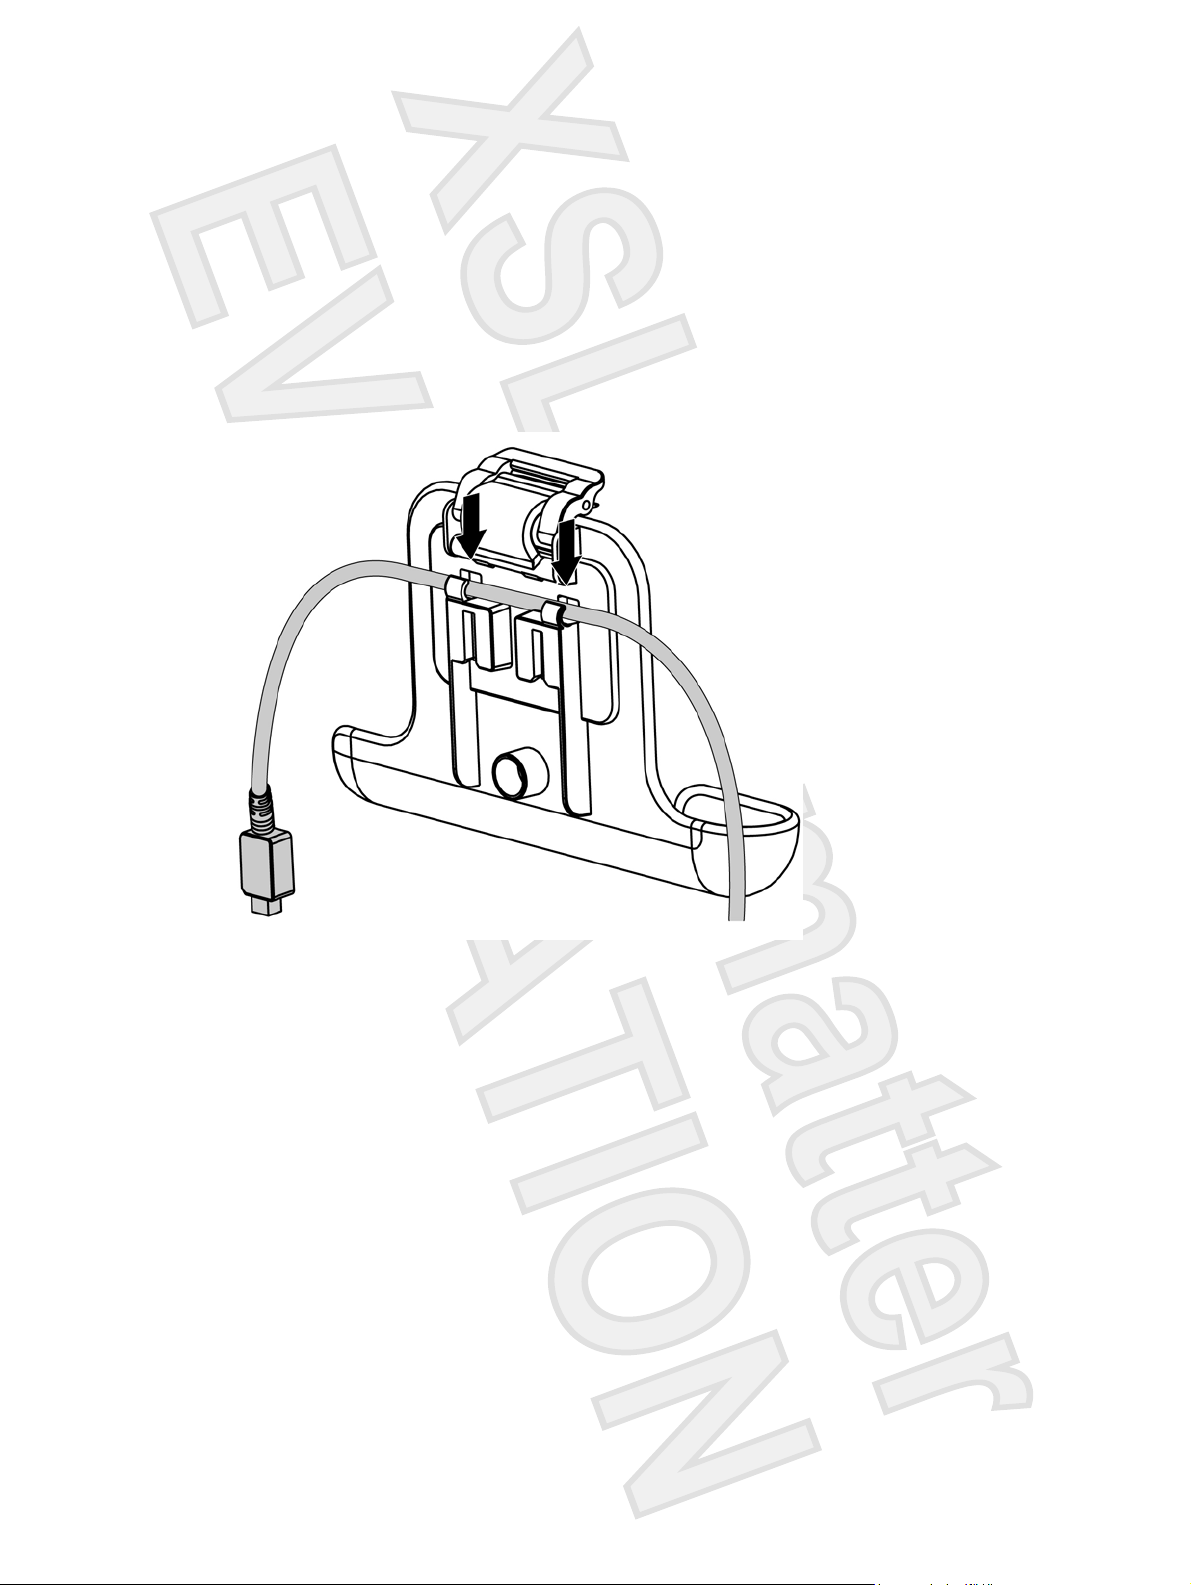
2. Attach the power cable to the clips on the back of the Travel Companion holder. Be sure to leave
enough cable to plug into the Travel Companion, and that the connector is turned the correct way
to plug into the unit.
12 HP iPAQ Product Information Guide ENWW
Antenna House XSL Formatter (Evaluation) http://www.antennahouse.com/
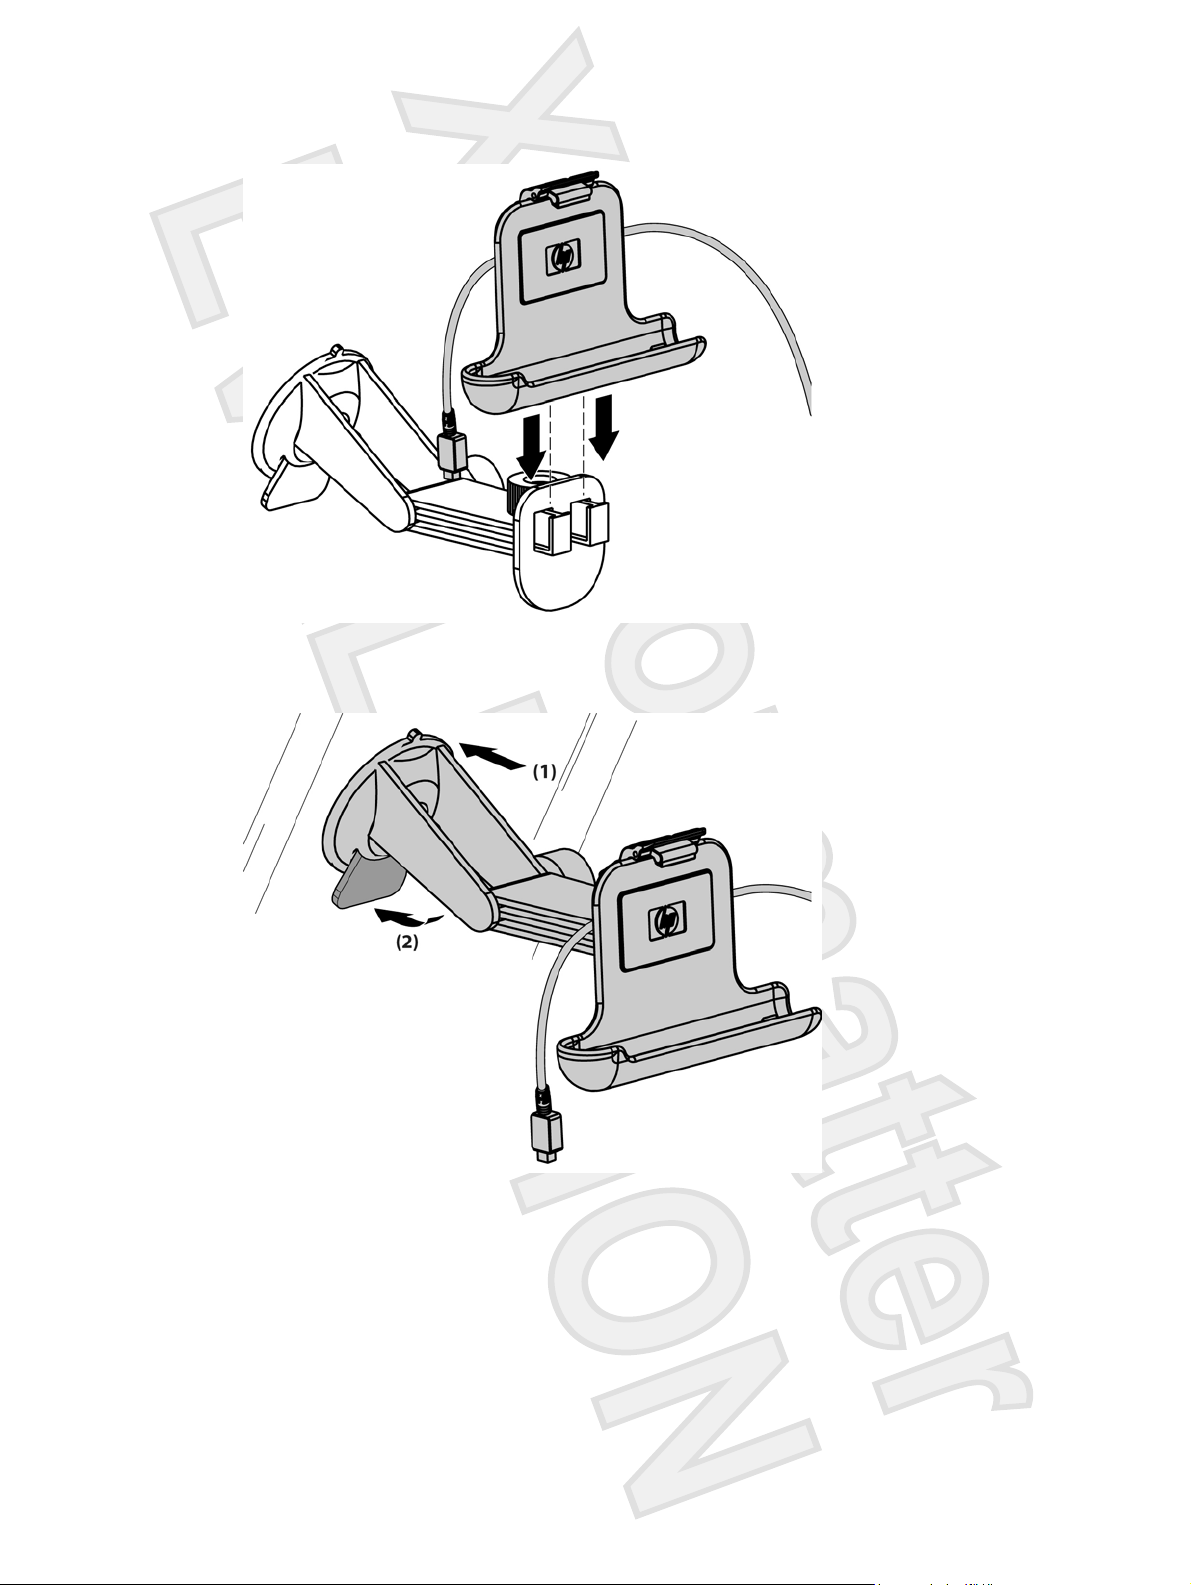
3. Install the holder onto the windshield mounting bracket.
4. Place the car kit assembly onto the windshield (1), and then press the locking lever (2) to securely
mount the assembly into place.
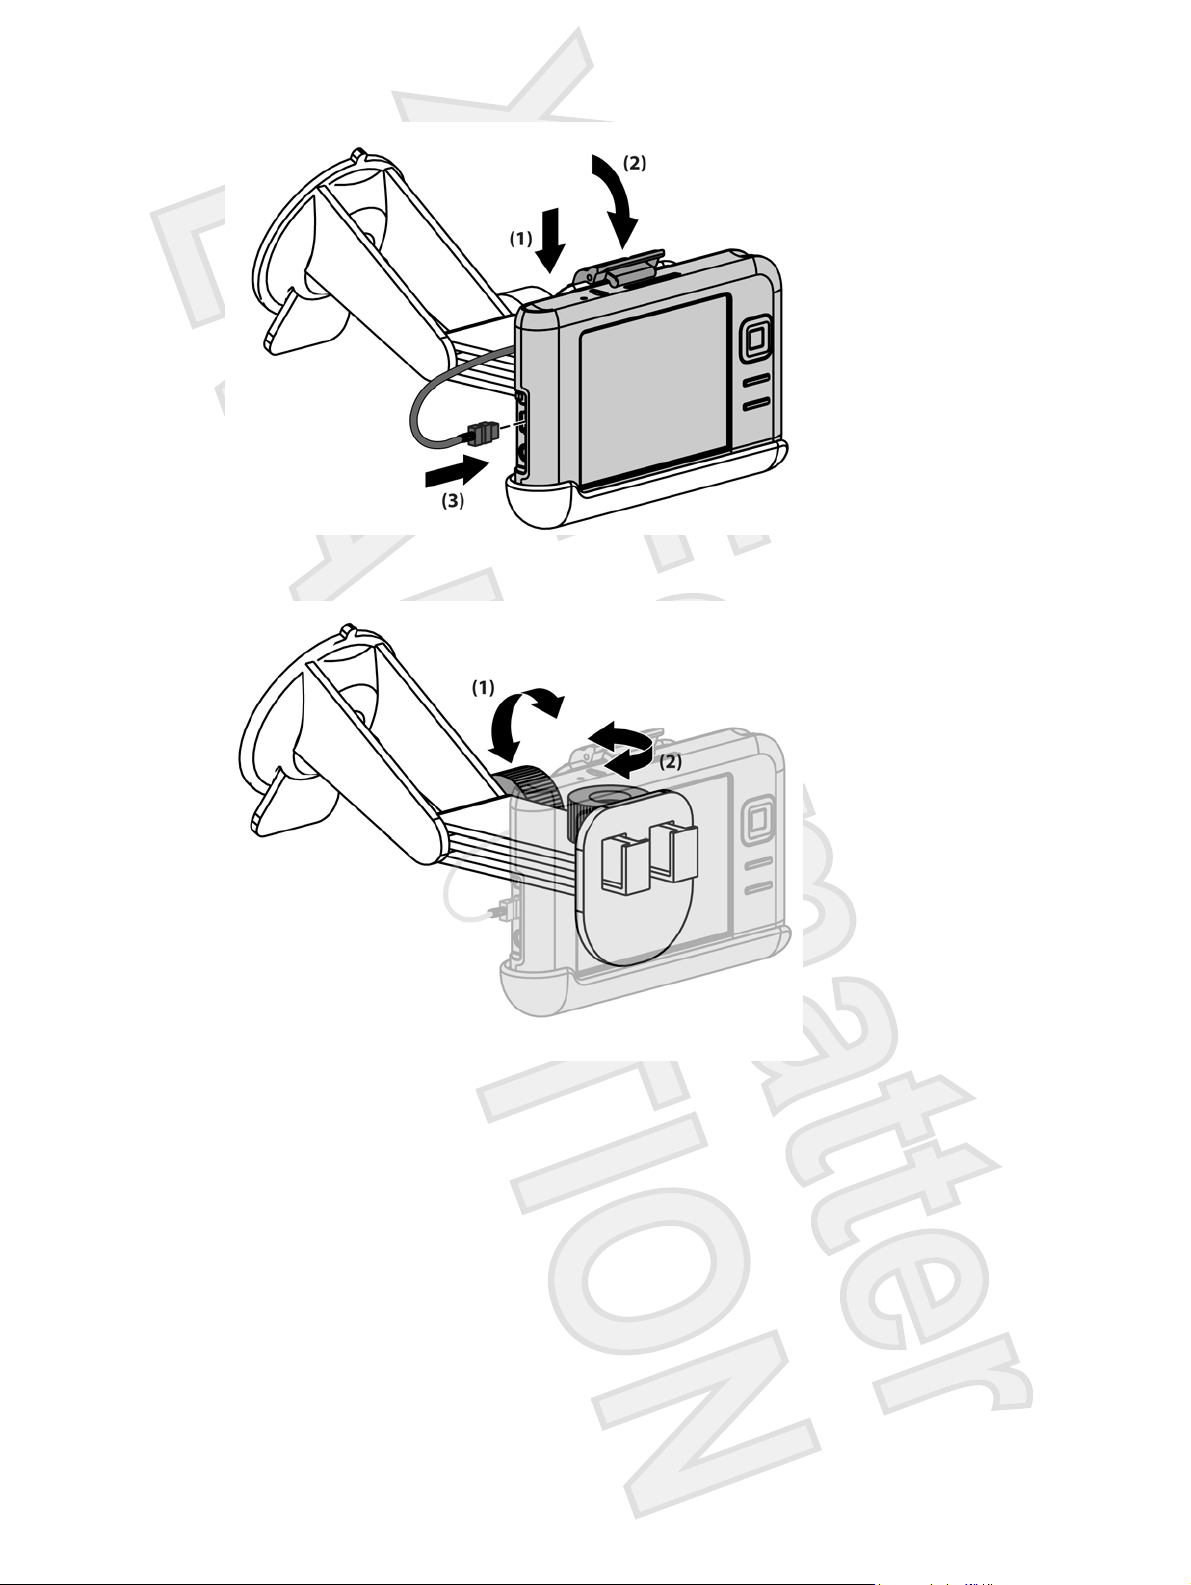
5. To install the Travel Companion:
a. Insert the Travel Companion into the mounted car kit holder (1).
b. Insert the securing clip into the slot on the top of the Travel Companion (2).
c. Plug the power cable into the Travel Companion (3).
ENWW Navigation Quick Start 13
Antenna House XSL Formatter (Evaluation) http://www.antennahouse.com/
6. Use the knobs to adjust the vertical and horizontal orientation of the Travel Companion.
14 HP iPAQ Product Information Guide ENWW
Antenna House XSL Formatter (Evaluation) http://www.antennahouse.com/

Using TomTom Navigator 6
For more detailed information about TomTom Navigator 6, see the TomTom user guide on the Getting
Started CD.
CAUTION Drive with due care and attention when using the Travel Companion for navigation.
Navigating to Destinations
NOTE TomTom Navigator 6 must first locate its current position before it can plan a route.
To plan a route:
1. With TomTom open, tap the screen to display the main menu.
2. Tap Navigate to. There are several options to navigate to. This procedure demonstrates navigating
to an address.
NOTE Travel Companion/GPS integration also allows you to navigate to any entry in your
personal Contact list that has an address entered.
3. Tap Address. When entering an address, select from the following options:
City center: Tap to set the destination as the center of a city or town.
●
Menus
Street and house number: Tap to set an exact address as the destination.
●
Zip Code: Tap to enter a zip code as the destination.
●
Cross street or intersection: Tap to set the destination as the point where two streets meet.
●
This procedure demonstrates navigating to an exact address.
4. Tap Street and house number.
5. Start to type the name of the town to which to navigate. As you type, names of towns display that
match what you have typed. When the correct town displays, select it.
6. Start to type the name of the street. As you type, the names of the streets display that match the
street you typed. When the correct street displays, select it.
7. Type the house number of the destination, and then tap Done.
8. TomTom asks whether you need to arrive at a particular time. If you tap YES and select an arrival
time, TomTom indicates whether you will arrive on time.
9. After TomTom calculates the route, tap Done.
TomTom immediately starts guiding you to your destination with spoken and visual instructions.
To open the main menu, tap the screen at any time when TomTom displays the Driving View.
NOTE The following list is only a subset of all of the available menus. For a complete list, see
the TomTom Navigator 6 documentation on the Getting Started CD.
ENWW Navigation Quick Start 15
Antenna House XSL Formatter (Evaluation) http://www.antennahouse.com/

Navigate to: Tap to start planning a route.
Find alternative: Tap if you want to avoid part of the route, travel by way of a specific location, or
calculate an alternative route.
TomTom Traffic: Tap to access information about the traffic along your route. TomTom Traffic is not
available in all countries.
Add favorite: Tap to create a Favorite, which may be a favored location, or a frequently visited location.
Change preferences: Tap to open the Preferences menu and change the way TomTom behaves.
Saving Destinations
Use the Favorites feature to save destinations to make it easy to navigate to them later. Favorites are
frequently visited places. Create Favorites to avoid entering an address every time you want to navigate
there.
To create and save a favorite destination:
1. From the Main Menu, tap Add Favorite. Select the location of the Favorite from the following list :
Home: You can specify your Home location as a Favorite.
●
Address: You can specify an address as a Favorite. When entering an address, choose from
●
the same four options available in the Navigate to menu.
2. Assign the contact a name that is easy to remember. TomTom suggests a name, usually the
Preferences
To change the behavior of TomTom, tap Change preferences in the Main Menu. Some of the options
include:
●
●
Recent destination: Select a Favorite location from a list of recently used destinations.
●
Point of interest (POI): Add a Point of Interest (POI) as a Favorite.
●
GPS position: Add your current position as a Favorite.
●
Point on map: Create a Favorite using the map browser. Select the location of the Favorite
●
using the cursor, and then tap Done.
Latitude/Longitude: Create a Favorite by entering latitude and longitude values.
●
TomTom Buddy: Create a Favorite based on the current position of a TomTom Buddy.
●
TomTom Buddies are other TomTom users that you can track, exchange Points of Interest
with, etc.
address of the Favorite. Start typing to specify a different name.
Use night colors: Tap to reduce the brightness and use darker colors on the map.
Turn off 3D display: Tap to view the map from above while navigating. When you turn off the 3D
display, you can choose whether the map shows north or your direction of travel at the top.
Enable/disable POIs: Tap to set which Point of Interest categories display on the map.
●
Safety preferences: Tap to set the safety preferences such as the safety lock. When you enable
●
the safety lock, you cannot access all buttons and features of TomTom while driving.
16 HP iPAQ Product Information Guide ENWW
Antenna House XSL Formatter (Evaluation) http://www.antennahouse.com/

Change voice: Tap change the voice that provides spoken instructions.
●
Tap the arrow to open the next page of buttons.
●
Points of Interest (POI)
Points of Interest or POIs are useful locations on the map. Examples include:
Restaurants
●
Hotels
●
Museums
●
Parking garages
●
Gas stations
●
To navigate to a POI:
1. Tap the screen to display the main menu.
2. Tap Navigate to in the main menu.
3. Tap Point of Interest.
4. Narrow the number of POIs by selecting the area of the POI location. Select one of these options:
●
●
●
If currently navigating to a destination, you can select from a list of POIs that are on the route or
near the destination. Choose one of these options:
●
●
5. Select the category of POI.
Tap any POI category to search for a POI by name. If you do not find the POI, tap its category. Tap
the arrow to choose from the complete list of categories. Select the category from the list or start
to type the name of the category and select it when it displays in the list.
6. From the list of POIs, select the POI to navigate to. If you know the name of the POI, tap Find, and
then type the name. Select it from the list when it displays.
After you select a POI, TomTom calculates the route to the POI.
TomTom Plus
TomTom PLUS is a collection of services that keep you informed and entertained while on the road.
You can subscribe to a range of extras and download them either directly to your Travel Companion or
download them to your computer, and then transfer them to your Travel Companion.
POI near you: To search from a list of POIs near your current position.
POI in city: To choose a POI in a particular town or city.
POI near Home: To search from a list of POIs near your Home location.
POI along route
POI near destination
ENWW Navigation Quick Start 17
Antenna House XSL Formatter (Evaluation) http://www.antennahouse.com/

Travel Tools
WorldMate Standard Edition
The Travel Companion comes preinstalled with WorldMate Standard Edition. This travel assistant
provides a host of tools that aid in travel planning. Features include:
Clocks for global city list
●
Currency converter with ability to automatically or manually update currency rates
●
World map with city locator
●
Weather forecasts for global city list
●
Measurement converter
●
Country phone codes and area codes
●
Clothing size chart
●
Extensive packing lists
●
Weather forecasts and automatic currency conversion require synchronizing the Travel Companion with
a PC that is connected to the Internet and running WorldMate Active PC Sync Plug-in.
For more information about WorldMate Standard Edition, see the Additional Product Information on the
Getting Started CD.
Organizer Features
The Travel Companion includes a number of organizer features that allow you to manage busy travel
times.
E-mail — While traveling, you can use an Internet Service Provider (ISP) to send and receive Outlook
and Internet e-mail. You can also access e-mail using a VPN connection.
Calendar — Sync with the company network and use the built-in Outlook calendar to update and manage
appointments, including meetings and other events. You can display appointments for the day on the
Today screen.
Contacts — Use the built-in contacts database to manage travel contacts.
Wireless — Using WLAN* and Bluetooth, connect to and exchange information with other handheld
devices, various network types, or the Internet.
NOTE WLAN is available on rx5900 series models only.
Continuing Setup
Setting Up the Travel Companion
Use the following steps to quickly set up the Travel Companion. These steps allow you to load software
so you can sync with your personal computer and update WorldMate information, integrate with e-mail
and contacts, etc.
18 HP iPAQ Product Information Guide ENWW
Antenna House XSL Formatter (Evaluation) http://www.antennahouse.com/

Step 1: Charge the battery
CAUTION To avoid damaging the Travel Companion or the AC adapter, be sure all connectors
are properly aligned before connecting.
It takes approximately 2 to 4 hours to fully charge the battery the first time. Subsequent charges may
take longer.
1. Insert the USB end of the mini-USB cable into the port on the AC adapter.
2. Install the appropriate head onto the AC adapter.
3. Connect the AC adapter to an electrical outlet.
4. Connect the mini-USB cable to the charging/communications port on the Travel Companion. The
cable connector only fits one way, so do not force it. If the connector does not insert easily, turn it
over.
NOTE Whenever a replacement battery is inserted into the Travel Companion, press and hold
the Reset button for at least two seconds, or attach an AC adapter to turn on the device.
Step 2: Insert the Getting Started CD into the CD drive of a personal computer
Use the Getting Started CD to complete the setup of the Travel Companion and to synchronize the
Travel Companion with a personal computer.
The HP Install Wizard automatically opens, and the application starts to run.
NOTE Do you have administrative rights on your personal computer? If not, you may have
problems installing the applications from the Getting Started CD. An administrator needs to install
the applications.
Step 3: Follow the personal computer on-screen instructions
The HP Install Wizard installs:
Microsoft Outlook 2002
●
Microsoft ActiveSync
●
WorldMate Active Sync Plug-in
●
Additional software applications
●
Step 4: Synchronize your HP iPAQ with your personal computer
Synchronization
Microsoft ActiveSync software, located on the Getting Started CD, allows your HP iPAQ and your
personal computer to communicate with each other.
For synchronization to work properly, install Microsoft ActiveSync on your personal computer before
connecting your HP iPAQ to your computer.
ENWW Continuing Setup 19
Antenna House XSL Formatter (Evaluation) http://www.antennahouse.com/

Use Microsoft ActiveSync to:
Synchronize information between your HP iPAQ and up to two computers or one server so that
●
the latest information is in all locations.
Change synchronization settings and the synchronization schedule.
●
Copy files between your HP iPAQ and computer.
●
Install applications on your HP iPAQ.
●
Synchronize links.
●
Send and receive e-mail.
●
Request meetings.
●
Synchronizing your HP iPAQ with a personal computer keeps the same information (such as calendar,
contacts, and e-mails) on both units, making it available when you work on your personal computer or
when you take your HP iPAQ on the go. Synchronize your HP iPAQ with a personal computer using
one of the following methods:
Mini-USB synchronization cable
●
Bluetooth
●
To synchronize your HP iPAQ and a personal computer using the mini-USB synchronization cable:
1. Be sure ActiveSync 4.1 or later is installed on your personal computer.
2. Plug the USB end of the synchronization cable into your personal computer.
3. Connect the mini-USB end on the synchronization cable to the charging/communications port on
your HP iPAQ.
CAUTION To avoid damaging your HP iPAQ or the AC adapter, check to be sure all
connectors are properly aligned before connecting them.
Synchronization begins automatically.
4. Click Next on the Synchronization Setup Wizard screen.
5. Perform one of the following:
By default, the check box is selected to synchronize directly with a Microsoft Exchange Server.
●
Clear this check box if you do not want to synchronize directly with a Microsoft Exchange
server, and then click Next.
Click Next to synchronize directly with a Microsoft Exchange server.
●
6. When the Synchronization Options screen displays, select the items to synchronize between
your HP iPAQ and your computer, and then click Next.
7. After the items have been synchronized, click Finish. The Synchronization Setup Wizard starts
synchronizing the items you checked.
If ActiveSync does not begin synchronizing, start it manually:
On your personal computer, open ActiveSync by selecting the Start menu > Programs > Microsoft
ActiveSync.
20 HP iPAQ Product Information Guide ENWW
Antenna House XSL Formatter (Evaluation) http://www.antennahouse.com/

Troubleshooting Help for Synchronization Issues
Following is a list of symptoms that may indicate synchronization issues are occurring:
No ActiveSync chimes sound (or a gray icon displays), and there is no activity in the ActiveSync
●
window on your personal computer.
ActiveSync chimes sound, and the ActiveSync icon on your personal computer changes to a
●
swirling green icon. The “retrieving settings” message appears on your personal computer, but the
ActiveSync connection drops prior to establishing the partnership.
ActiveSync is searching for a connection but none occurs. (The green icon on your personal
●
computer continues to spin.)
Synchronization has been established between your HP iPAQ and personal computer but
●
connection is dropped. (The green icon on your personal computer stops spinning and grays out.)
Firewall or other network protection software message box is displayed for ActiveSync to access
●
the network or Internet.
If you experience difficulty while synchronizing your HP iPAQ and personal computer, try the following
solutions to troubleshoot any synchronization issues:
Confirm that you are running ActiveSync on your personal computer with a supported operating
●
system (OS).
To get more information about the supported OS versions, visit:
●
www.microsoft.com/
windowsmobile.
The latest version of ActiveSync is at:
●
If you are running ActiveSync 4.1 or later and personal firewall software on your personal computer,
●
www.microsoft.com/windowsmobile/downloads.
please add ActiveSync to the firewall program’s exception list.
(Firewall software, such as Sygate Personal Firewall, TrendMicro PC-cillin Internet Security, Norton
Personal Firewall, McAfee Personal Firewall, or Zone Alarm Security Suite may block
synchronization.) Refer to the documentation that came with your firewall program to determine
how to add ActiveSync 4.1 or later to the program’s exception list. To further troubleshoot a firewall
application and enable ActiveSync 4.1 or later, visit:
www.microsoft.com/windowsmobile/help/
activesync.
During the ActiveSync installation, if you inadvertently left the Microsoft Exchange Server option
●
box checked and are not planning to connect to an Exchange server, follow these steps:
Connect your HP iPAQ to your personal computer. Be sure an ActiveSync connection is
●
established.
On your personal computer, click Start > All Programs > Microsoft ActiveSync.
●
Click Tools > Options > Sync Options tab.
●
Uncheck the boxes for the sync items listed under the Server group.
●
Place a checkmark in the boxes under the Desktop group for those items to synchronize.
●
Disconnect your HP iPAQ from your personal computer and wait for the ActiveSync message
●
confirming that your device is no longer connected. Reconnect your HP iPAQ to your personal
computer. Wait for about two minutes to see if your HP iPAQ connects to your personal computer.
ENWW Continuing Setup 21
Antenna House XSL Formatter (Evaluation) http://www.antennahouse.com/

On your personal computer, in ActiveSync, select File > Connection Settings. Confirm that USB
●
is selected as a connection method.
Connect your HP iPAQ to a different USB port on your personal computer.
●
Check your mini-USB synchronization cable. Consider using another mini-USB synchronization
●
cable if one is available.
Try synchronizing via a Bluetooth connection.
●
Restart your personal computer and perform a soft reset on your HP iPAQ. (A soft reset does not
●
erase any settings, programs or data.) Use the stylus to lightly press the Reset button. Your HP
iPAQ restarts and displays the HP QuickStart Tour. Once your personal computer and HP iPAQ
restart, reconnect your HP iPAQ to your personal computer.
Uninstall ActiveSync from your personal computer and then reinstall it. To uninstall ActiveSync
●
from your personal computer, click Start > Control Panel > Add or Remove Programs >
Microsoft ActiveSync. Then click the Remove button and click Yes.
After trying the above solutions without any success in solving the connection problem, perform a
●
factory reset on your HP iPAQ. (A factory reset clears all user-installed settings, programs, and
data and restores your HP iPAQ to factory settings.)
Reinstall applications on your HP iPAQ once the factory reset is complete by using ActiveSync on your
personal computer. Once your HP iPAQ is synchronized properly, go to ActiveSync on your personal
computer and select Tools > Add/Remove Programs and select any programs to reinstall.
Finding the Serial Number and Model Number
Locate the serial and model numbers before contacting HP Customer Support, particularly if you are
calling for in-warranty support.
View the serial number and model ID by tapping Start > Programs > HP Help And Support > Serial
and Model Number.
You can also find this information next to the battery of your HP iPAQ. To locate the serial number:
1. Remove the battery cover.
2. Locate the label containing the serial number next to the battery.
Protecting Your HP iPAQ with a Password
Keep your data more secure by requiring a password every time you turn on your HP iPAQ.
1. Tap Start >Settings > Personal tab > Lock > Password tab.
2. Select the Prompt if device unused for check box, and select the amount of time from the list
box that your HP iPAQ must be unused before the password is required.
3. In the Password type field, select the type of password you would like to use. Enter the password
and confirm the password.
22 HP iPAQ Product Information Guide ENWW
Antenna House XSL Formatter (Evaluation) http://www.antennahouse.com/

4. On the Hint tab, enter a phrase to help you remember your password. Be sure that your hint doesn't
allow others to guess your password. The hint is displayed after the wrong password is entered
five times.
5. When prompted, tap OK. The next time your HP iPAQ is unused for the specified amount of time,
you are prompted to enter your password.
Tip Use the same steps as above to change or reset your password.
Today Screen
Access the Today screen by tapping Start > Today.
The Today screen shows appointments, active tasks, and information about e-mail messages. Along
the top of the Today screen are the connectivity indicators, Volume icon, the battery level indicator,
and the clock.
Tap a section of the Today screen to open the program that is associated with that section.
To customize the Today screen:
1. Tap Start > Settings > Today.
2. On the Appearance tab, select the desired theme for the background of the Today screen.
3. On the Items tab, select the items to appear on the Today screen.
Status Icons
The following status icons are displayed on the Navigation or Command bar. Tap the icon on the HP
iPAQ screen to view more information related to the item.
Icon Status
Tip To change the order of items displayed on the Today screen, tap the item, and tap Move
Up or Move Down.
NOTE There are two default softkeys on the bottom of the Today screen: Calendar and
Contacts. On the Today screen, the Calendar softkey is also the Notification softkey. Any type
of alert, such as a meeting reminder is displayed on the Today screen as a notification.
Indicates that one or more networks are present. Tap the icon to access an available network.
Indicates connection to a wireless network.
Indicates connection to ActiveSync, but not currently synchronizing.
Inactive connection to computer or wireless network.
ENWW Continuing Setup 23
Antenna House XSL Formatter (Evaluation) http://www.antennahouse.com/

Icon Status
Microsoft ActiveSync is synchronizing.
Speaker is on.
Speaker is off (or in mute position).
Battery power is low.
Battery power is very low.
E-mail has been received.
Instant messages received.
iPAQ Wireless
Tap Start > iPAQ Wireless or tap the iPAQ Wireless icon on the Today screen to launch iPAQ
Wireless, which provides a control center to turn WLAN and Bluetooth on and off, and to configure their
settings. The GPS software controls the GPS receiver.
Icon Status
WLAN is on.
WLAN is off.
Bluetooth is on.
Bluetooth is off.
GPS receiver is on.
GPS receiver is off.
24 HP iPAQ Product Information Guide ENWW
Antenna House XSL Formatter (Evaluation) http://www.antennahouse.com/

*WLAN is available on rx5900 series models only.
The iPAQ Wireless screen has two power buttons to turn wireless features on and off. The WLAN and
Bluetooth tabs allow you to access each wireless activity individually. Configure wireless connections
by tapping View WLAN Networks on the WLAN tab or Bluetooth Settings on the Bluetooth tab.
Checking the Battery Charge Level
To monitor the battery power, tap either the Battery icon on the TodayPanel Lite or tap Start > Settings
> System tab > Power.
If the battery charge level is low, connect to AC power.
Battery Saving Tips
The HP iPAQ is as individual as you are. Adjust the settings on your HP iPAQ to fit your individual needs
and to help the battery last as long as possible between charges. Here are some recommendations for
how to conserve battery life.
Dim the Backlight – Keep the display only as bright as required to view the screen easily. On
●
the Today screen, use the stylus to adjust the Backlight Brightness Level slider, near the Light
bulb icon.
Auto Turn Off the Backlight – On the Today screen, tap the Light bulb icon and make sure the
●
first box is checked. Specify a short amount of time to wait before turning off the backlight.
Keep Wireless Features Off – Always turn off the WLAN and Bluetooth power when they are not
●
in use. Tap Start > iPAQ Wireless, and then tap the WLAN or Bluetooth button to turn the features
off. WLAN is available on rx5900 series models only.
Sounds & Notifications – Every time you are notified of an event, battery power is consumed. Go
●
to Start > Settings > Sounds & Notifications > Notifications tab and turn off any notification
types that are unnecessary.
Auto Turn Off Device – On the Today screen, tap the Battery icon, and then tap the Advanced
●
tab. Make sure the first box is checked, so the device automatically powers off when not in use.
Specify a short amount of time to wait before automatically powering off your HP iPAQ.
Turn GPS off – Always turn off the GPS receiver when you are not using GPS. Close the GPS
●
application to turn off the receiver.
To keep your HP iPAQ charged, remember to use the car charger when using your HP iPAQ in the car.
Entering Text
Depending on your preference, use the on-screen keyboard or a handwriting recognition feature such
as Block Recognizer, Letter Recognizer, or Transcriber to enter text in programs.
1. Tap Start > Settings > Personal tab > Input.
2. On the Input Method tab, select a text input method and change options as appropriate.
3. Tap OK.
You can now go to a program (such as Notes) and start entering text.
ENWW Entering Text 25
Antenna House XSL Formatter (Evaluation) http://www.antennahouse.com/

Text Input Method Definition
Block Recognizer Use a single stroke to write letters, numbers, symbols, and punctuation that are then
converted into typed text. Perform gestures to enter Return and Backspace.
Keyboard Tap keys on the on-screen keyboard displayed on the screen to enter text.
Letter Recognizer Write individual letters, numbers, and punctuation that are converted into typed text.
Transcriber Write in cursive, print, or mixed handwriting (consisting of both cursive and print) and
convert writing into typed text.
Tip Change the text input method from within any program by tapping the Input Selector arrow
and tapping an input method.
Entering Text Using Block Recognizer
1. From any program, tap the Input Selector arrow, and then Block Recognizer.
2. Write characters, numbers, and symbols in the designated writing area.
Enter letters by writing in the abc (left) area of the box.
●
Enter numbers by writing in the 123 (right) area of the box.
●
Enter symbols and punctuation by tapping in either area of the box and then writing the desired
●
character.
NOTE Block Recognizer is available when text entry is possible.
Tip For help with writing characters with Block Recognizer, tap the question mark near the
writing area.
Entering Text Using the On-screen Keyboard
1. From any program, tap the Input Selector arrow, and then Keyboard.
2. Tap on the appropriate characters, numbers, and symbols on the on-screen keyboard.
Increase the size of the on-screen keyboard keys to make them easier to tap.
1. Tap Start > Settings > Personal tab > Input.
2. On the Input Method tab, select Keyboard as the input method, and tap Large keys.
3. Tap OK.
NOTE Enlarge the keys even more by selecting the Use gestures for the following keys
check box. Fewer keys appear on the keyboard, but you can do gestures for Space, Backspace,
Enter, and Shift+key.
26 HP iPAQ Product Information Guide ENWW
Antenna House XSL Formatter (Evaluation) http://www.antennahouse.com/
 Loading...