

Page 1
KG190 USER GUIDE
Some of contents in this manual may differ from
your phone depending on the software of the
phone or your service provider.
ENGLISH
Page 2
WELCOME
WELCOME
2
Thank you for purchasing a LG Handset Mobile Phone.
We built our Handset to give user what we believe user
really want from a wireless phone, clear sound, and
fashion outlook.
Our advanced technology is designed to grow with
users communications needs so that one day you
will be able to rely entirely on users Handset to stay
connected.
This guide will familiarize user with our technology and
new Handset phone through simple, easy to follow
instructions. If users have already reviewed the Quick
Start Guide, which was packaged with new Handset,
then user are ready to explore the advanced features
outlined in this guide.
If users have not read “Quick Start Guide”, go to
Section One Getting Started. This section provides all
the information user need to quickly activate phone, and
much more.
We congratulate on your choice.
Page 3

Safety Information ................................................................5
Safety Warnings ...................................................................
Guidelines for safe and efficient use ..............................
Quick Start Guide ................................................................
Understanding Your Phone ..............................................
Front / Back view of Phone ..............................................15
Key Function List .................................................................
Idle Screen ...........................................................................
Main Menu ...........................................................................
Getting Started .....................................................................19
SIM Card and Battery Information .................................19
Personalizing your Phone .................................................
Tips for Call Options ............................................................
Using the Menu ...................................................................24
Navigating Functions .........................................................24
Writing Text ...........................................................................
Listing of Functions ............................................................26
CONTENTS
Profiles ...................................................................................
Activate ..................................................................................28
7
Personalise ...........................................................................
8
Rename ..................................................................................
13
Call register .........................................................................30
Missed calls [Menu 2-1] ....................................................30
15
Dialed calls [Menu 2-2] ......................................................
Received calls [Menu 2-3] ................................................
16
Delete call log [Menu 2-4] .................................................
17
Call time [Menu 2-5] ...........................................................
17
Call cost [Menu 2-6] ...........................................................
Text message counter [Menu 2-7] ..................................
GPRS counter [Menu 2-8] .................................................
20
Tools .......................................................................................33
21
Alarm [Menu 3-1] ................................................................33
Favorites [Menu 3-2] ..........................................................
Calculator [Menu 3-3] ........................................................
24
Units converter [Menu 3-4] ..............................................
World time [Menu 3-5] .......................................................
BMI (Body Mass Index) [Menu 3-6] ...............................
Pink schedule [Menu 3-7] .................................................
28
28
29
30
30
31
31
31
32
32
33
33
34
34
34
35
| CONTENTS
3
Page 4

CONTENTS
Organizer ...............................................................................36
CONTENTS
Contacts [Menu 4-1] ...........................................................36
Calendar [Menu 4-2] ..........................................................
To do list [Menu 4-3] ...........................................................
Messages .............................................................................41
Text message [Menu 5-1] ..................................................41
Multimedia message [Menu 5-2] ....................................
Chat [Menu 5-3] ...................................................................
Voice mail [Menu 5-4] ........................................................
Broadcast [Menu 5-5] ........................................................
Multimedia ............................................................................50
Camera [Menu 6-1] .............................................................50
MP3 player [Menu 6-2] ......................................................
FM radio [Menu 6-3] ...........................................................
Photo gallery [Menu 6-4] ...................................................
Voice recorder [Menu 6-5] ...............................................
Install USB Software for Window 2000 ........................
Install USB Software for Window 98 ............................
My stuff .................................................................................63
Java [Menu 7-1] ..................................................................63
Games [Menu 7-2] ..............................................................
File manager [Menu 7-3] ...................................................
4
Browser .................................................................................65
SIM service [Menu 8-1] .....................................................65
40
WAP [Menu 8-2] ..................................................................
40
Data account [Menu 8-3] ..................................................
Settings ..................................................................................69
Date & Time [Menu 9-1] ....................................................69
44
Display setup [Menu 9-2] ..................................................
47
Language [Menu 9-3] .........................................................
48
Call setup [Menu 9-4] .........................................................
48
Network [Menu 9-5] ...........................................................
Security setup [Menu 9-6] ................................................
Restore settings [Menu 9-7] .............................................
51
Accessories .........................................................................76
54
Technical data .....................................................................
56
Troubleshooting guide .......................................................
57
58
58
63
64
65
68
69
71
71
73
74
75
77
78
Page 5
Please read and understood the details which are both
safe to you and your environment. Failure to observe
these instructions may lead to suspension of cellular
phone services to the user, or some legal action.
Important information for parents:
Please read the operating instructions and safety
precautions carefully before use.
Explain the content and the hazards associated with
using the phone to your children.
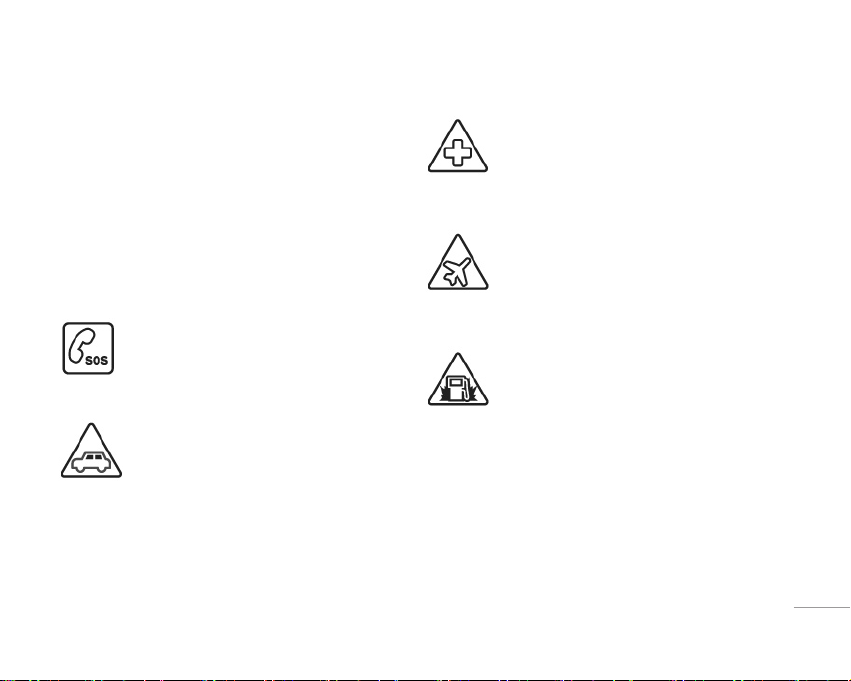
Emergency Calls (SOS)
Emergency call can be made from your
cellular phone even without a SIM in the
network service area.
Traffic Safety
Please do not use your cellular phone while
driving; find a safe place to stop first.
SAFETY INFORMATION
Switch off in Hospital
The use of cellular phones may interfere
with the functionality of some possible
insufficiently protected medical devices in
hospital.
Switch off in Airplane
The use of cellular phone in an aircraft may
be dangerous to the operation of the aircraft,
disrupt the cellular network and may be
illegal.
Switch off in Gasoline Station and
Explosive Site
It is advisable that users turn off cellular
phone when refueling is in progress, users
are reminded to observe restrictions on the
use of radio equipment in fuel depots.
| SAFETY INFORMATION
5
Page 6
SAFETY INFORMATION
SAFETY INFORMATION
6
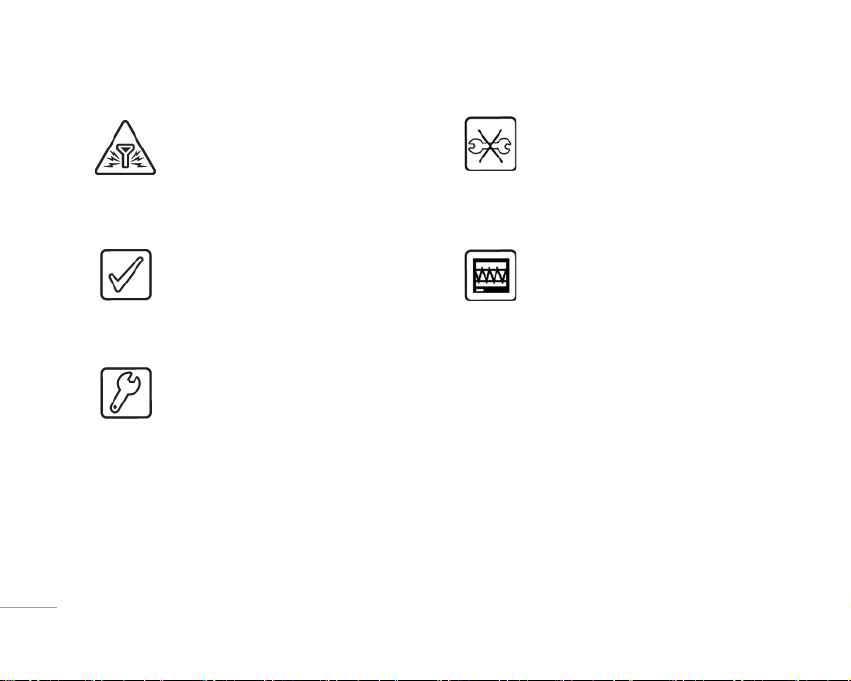
Operating Environment
Mobile radio transmitting equipment,
including cellular phones, may be subject to
interference and may cause danger. Switch
off your phone whenever it is forbidden to
use it.
Use Sensibly
Do not hold the phone to your ear when it
ring or when you have switched on the hand
free function. Otherwise you risk serious
permanent damage to your hearing.
Appropriate Maintenance
Only qualified and authorized personnel
should service your cellular phone. Faulty
installation or repair may be hazardous.
Replace
You may only open the phone to replace the
battery and SIM card. You must not open the
battery under any circumstances. All other
changes to this device are strictly prohibited
and will invalidate the operating license.
Interference Noticed
The phone may cause interference in the
vicinity of TV sets, radios and PCs.
Page 7

Accessories
Use only accessories and charging devices
approved by the phone manufacturer!
Otherwise you risk serious damage to health
and property. The battery could explode, for
instance.
Power Voltage
The mains voltage specified on the power
supply unit (Volt) must not be exceeded.
Otherwise the charging device may be
destroyed.
Waste Disposal
Dispose of worn out batteries and phone in
accordance with local provisions!
SAFETY WARNINGS
Rechargeable Battery
If battery is over discharged the handset will need to
pre-charge less than 7 minutes.
• Avoid accidental shorts across the contacts of battery
by metal parts. Shorts can cause rapid discharge
currents which can damage the battery, the part that
creates the short or cause injuries.
• Prevent extreme low and high ambient temperatures
for the battery. Therefore; do not place battery near a
heater or on the car dashboard.
• Do not open, penetrate or otherwise physically
damage the battery.
• Do not incinerate battery.
| SAFETY WARNINGS
7
Page 8

GUIDELINES FOR SAFE AND EFFICIENT USE
Please read these simple guidelines. Not following
GUIDELINES FOR SAFE AND EFFICIENT USE
these guidelines may be dangerous or illegal. Further
detailed information is given in this manual.
Exposure to radio frequency energy
Radio wave exposure and Specific Absorption Rate
(SAR) information
This mobile phone model KG190 has been designed
to comply with applicable safety requirements for
exposure to radio waves. This requirement is based
on scientific guidelines that include safety margins
designed to assure the safety of all persons, regardless
of age and health.
• The radio wave exposure guidelines employ a unit
of measurement known as the Specific Absorption
Rate, or SAR. Tests for SAR are conducted using
standardised methods with the phone transmitting at
its highest certified power level in all used frequency
bands.
8
• While there may be differences between the SAR
levels of various LG phone models, they are all
designed to meet the relevant guidelines for exposure
to radio waves.
• The SAR limit recommended by the International
Commission on Non-Ionizing Radiation Protection
(ICNIRP) is 2W/kg averaged over ten (10) gram of
tissue.
• The highest SAR value for this model phone tested by
DASY4 for use at the ear is
• SAR data information for residents in countries/
regions that have adopted the SAR limit
recommended by the Institute of Electrical and
Electronics Engineers (IEEE), which is 1.6 W/kg
averaged over one (1) gram of tissue (for example
USA, Canada, Australia and Taiwan).
0.129 W/kg (10g).
Page 9

Product care and maintenance
WARNING! Only use batteries, chargers and
accessories approved for use with this particular phone
model. The use of any other types may invalidate any
approval or warranty applying to the phone, and may be
dangerous.
• Do not disassemble this unit. Take it to a qualified
service technician when repair work is required.
• Keep away from electrical appliances such as a TV’s,
radios or personal computers.
• The unit should be kept away from heat sources such
as radiators or cookers.
• Never place your phone in a microwave oven as it will
cause battery to explode.
• Do not drop.
• Do not subject this unit to mechanical vibration or
shock.
• The coating of the phone may be damaged if covered
with wrap or vinyl wrapper.
• Do not use harsh chemicals (such as alcohol,
benzene, thinners, etc.) or detergents to clean your
phone. There is a risk of this causing a fire.
• Do not subject this unit to excessive smoke or dust.
• Do not keep the phone next to credit cards or
transport tickets; it can affect the information on the
magnetic strips.
• Do not tap the screen with a sharp object as it may
damage the phone.
• Do not expose the phone to liquid or moisture.
• Use accessories, such as earphones and headsets,
with caution. Ensure that cables are tucked away
safely and do not touch the antenna unnecessarily.
• Please remove the data cable before powering on
the handset.
| GUIDELINES FOR SAFE AND EFFICIENT USE
9
Page 10

GUIDELINES FOR SAFE AND EFFICIENT USE
Efficient phone operation
GUIDELINES FOR SAFE AND EFFICIENT USE
To enjoy optimum performance with minimum power
consumption please:
• Do not hold the antenna when the phone is in use. If
you hold it, it can affect call quality, it may also cause
the phone to operate at a higher power level than
needed and shorten talk and standby times.
Electronic devices
All mobile phones may get interference, which could
affect performance.
• Do not use your mobile phone near medical
equipment without requesting permission. Avoid
placing the phone over pacemakers (i.e. in your
breast pocket.)
• Some hearing aids might be disturbed by mobile
phones.
• Minor interference may affect TVs, radios, PCs, etc.
10
Road safety
Check the laws and regulations on the use of mobile
phones in the areas when you drive.
• Do not use a hand-held phone while driving.
• Give full attention to driving.
• Use a hands-free kit, if available.
• Pull off the road and park before making or answering
a call if driving conditions so require.
• RF energy may affect some electronic systems in
your motor vehicle such as a car stereo or safety
equipment.
• If your vehicle is equipped with an air bag, do
not obstruct it with installed or portable wireless
equipment. It can cause serious injury due to
improper performance.
If you are listening to music whilst out and about, please
ensure that the volume is at a reasonable level so that
you are aware of your surroundings. This is particularly
imperative when attempting to cross the street.
Page 11

Avoid damage to your hearing
Damage to your hearing can occur if you are exposed
to loud sound for long periods of time. We therefore
recommend that you do not turn on or off the handset
close to your ear. We also recommend that music and
call volumes are set to a reasonable level.
In aircraft
Wireless devices can cause interference in aircraft.
• Turn off your mobile phone before boarding any
aircraft.
• Do not use it on the ground without crew permission.
| GUIDELINES FOR SAFE AND EFFICIENT USE
Blasting area
Do not use the phone where blasting is in progress.
Observe restrictions, and follow any regulations or
rules.
Potentially explosive atmospheres
• Do not use the phone at a refueIling point. Don’t use
near fuel or chemicals.
• Do not transport or store flammable gas, liquid, or
explosives in the compartment of your vehicle, which
contains your mobile phone and accessories.
Children
Keep the phone in a safe place out of small children’s
reach. It includes small parts which if detached may
cause a choking hazard.
Emergency calls
Emergency calls may not be available under all mobile
networks. Therefore, you should never depend solely
on your mobile phone for emergency calls. Check with
your local service provider.
11
Page 12

GUIDELINES FOR SAFE AND EFFICIENT USE
Battery information and care
GUIDELINES FOR SAFE AND EFFICIENT USE
• You do not need to completely discharge the battery
before recharging. Unlike other battery systems,
there is no memory effect that could compromise the
battery’s performance.
• Use only LG batteries and chargers. LG chargers are
designed to maximize the battery life.
• Do not disassemble or short-circuit the battery pack.
• Keep the metal contacts of the battery pack clean.
• Replace the battery when it no longer provides
acceptable performance. The battery pack may be
recharged hundreds of times until it needs replacing.
• Recharge the battery if it has not been used for a long
time to maximize usability.
• Do not expose the battery charger to direct sunlight or
use it in high humidity, such as the bathroom.
• Do not leave the battery in hot or cold places, this may
deteriorate the battery performance.
12
Page 13

• These first two pages include some basic tips for
quick and easy use of the phone. For more detailed
information read through the user guide.
• Before using your phone: With the battery removed,
insert the SIM card, then insert the battery and
charge it. Switch on your phone by pressing and
holding
E. For details, see “Getting Started”.
• Turning Your Phone On and Off
To switch the phone on or off press and hold E.
PIN Code
• The PIN (Personal Identification Number) protects
your phone and SIM card against unauthorized use.
• With your SIM card inserted, your PIN code will be
required every time you switch on your phone.
• If a wrong PIN code is entered three consecutive
times, the phone becomes locked or disabled. You
need ask network service provider to use the PUK
code to unlock or enable the phone again.
QUICK START GUIDE
Making and Answering Call
Making call
• Ensure that the phone is on, the network operator
name is displayed and the signal strength meter
shows network coverage is available in the current
area.
• Enter phone number include area code you want
to dial. If you key in wrong character, press Clear to
delete it.
• Press
S to call the number.
• Press
E to end the call or to cancel the call attempt.
Answering call
• To receive a call, the phone must be switched on and
the signal strength meter must be displayed.
• Press
S to answer a call.
Reject call
Press E to reject the call when the phone is ringing.
Ending Call
Press S to end a call
| QUICK START GUIDE
13
Page 14

QUICK START GUIDE
Call Emergency Number
QUICK START GUIDE
You can place emergency calls (dial 112 and press
S) even if your phone is locked or your account is
restricted.
Missed call Notification
When an incoming call is not answered, the Missed call
log is displayed on your screen.
To display the Missed call entry:
• Select the entry and press
< to read call detail.
Lock/Unlock Keypad
In the Idle mode:
• Long press
• Press
# to lock keypad.
> then # to unlock keypad.
Camera
The phone provides a built-in camera. The camera can
use for taking pictures. User can attach taking picture
as wallpaper or Screen saver in Idle mode. For detail,
see “Multimedia/Camera”.
14
Listening Music and FM Radio
User can enjoy favorite music and FM radio anywhere
and anytime. For detail, see “Multimedia/MP3 player/
FM radio”.
Multimedia Message Service
The Phone is able to send multimedia messages
composed of text and a picture, and to receive
messages containing text, a picture, and sound. You can
save the pictures and ringing tones for personalizing
your phone. For detail, see “Messages / Multimedia
message”.
General Packet Radio Service (GPRS)
GPRS technology allows mobile phones to send and
receive data over a mobile network and access data
networks like the Internet.
GPRS uses a technology call packet data. Data files are
sent in short bursts over the mobile system instead of in
a continuous stream. This way, the system is busy only
when sending or receiving data. Because GPRS uses
the system more efficiently, data connections are set up
quickly and data is transferred at faster speeds.
Page 15
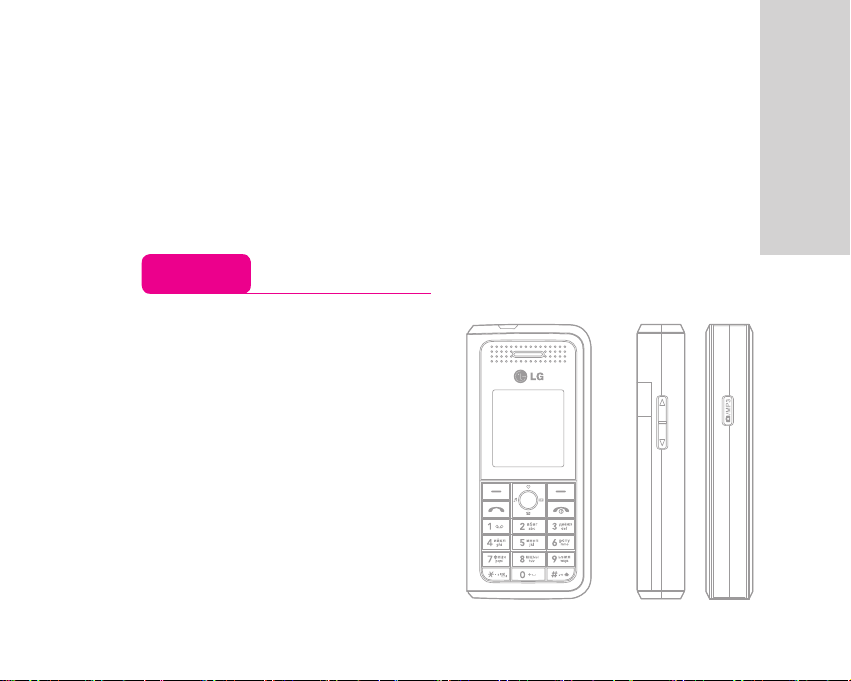
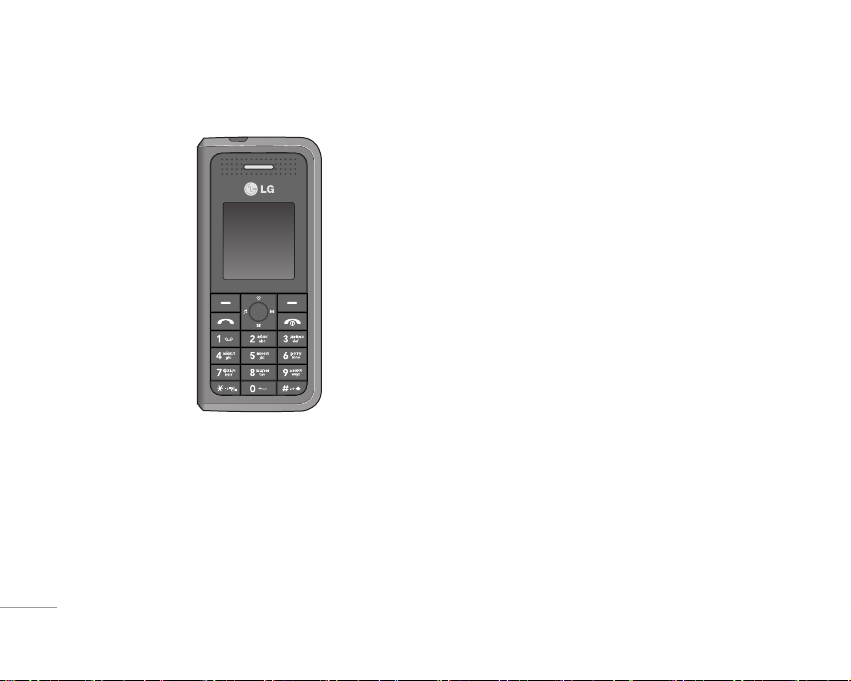
UNDERSTANDING YOUR PHONE
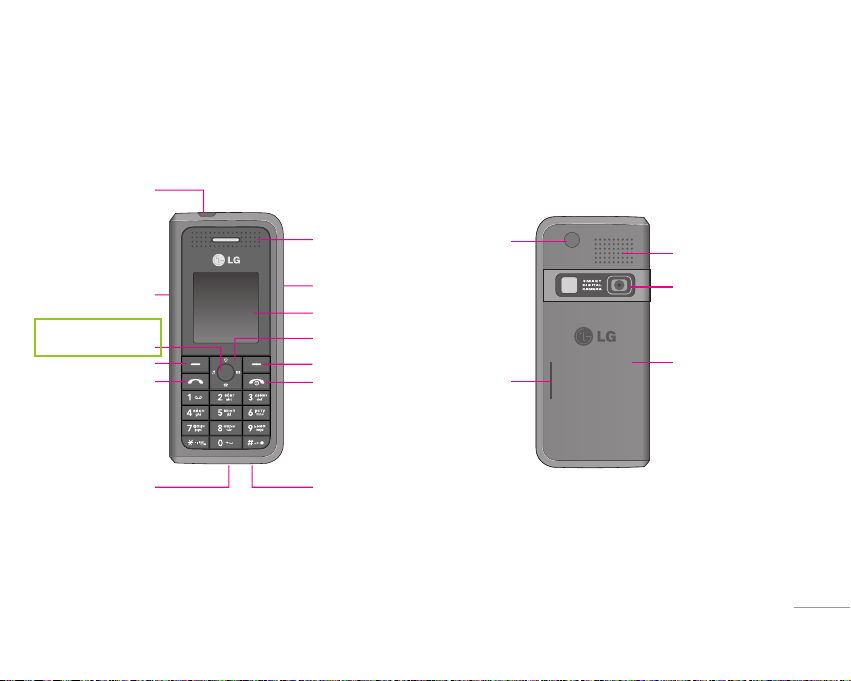
Front / Back view of Phone
Hand-Free Kit
Connection
Adjust Volume
Side Key
Power On / Charging
Indicator
USB/Charger
Connector
B
D
| UNDERSTANDING YOUR PHONE
Ear Speaker
MP3 Key
Display Screen
C
B
A
Microphone
Antenna Area
Release Knob
Loud Speaker
Camera
Battery Cover
15
Page 16

UNDERSTANDING YOUR PHONE
Key Function List
UNDERSTANDING YOUR PHONE
A. Power/End key. E
Switch phone on and off. Also, ends a call or Exit from
any function and back to Idle mode.
B. Selection Key <>
The function of the keys depends on the text shown
on the display above the keys. For example, Menu and
Contacts in Idle mode.
C. Navigation Key
Use for quick access to phone functions in Idle mode.
• Up key: Access to the Favorites menu.
• Down key: Access to the Contacts list.
• Left key: Access to the Profiles menu
• Right key: Access to the Messages menu
Scroll through names and numbers stored in the
contacts or through the phone’s menus, submenus, and
option list.
16
D. Send/Answer Key S
• Make and answer calls; press in Idle mode to see
recent dialed calls.
• 0-9 input number and character.
123
456
789
E. Left Side Key
Adjust handset volume.
*0#
F. MP3 Play Key
The shortcut to enter MP3 player in Idle mode.
For detail, see also “MP3 player”.
Page 17
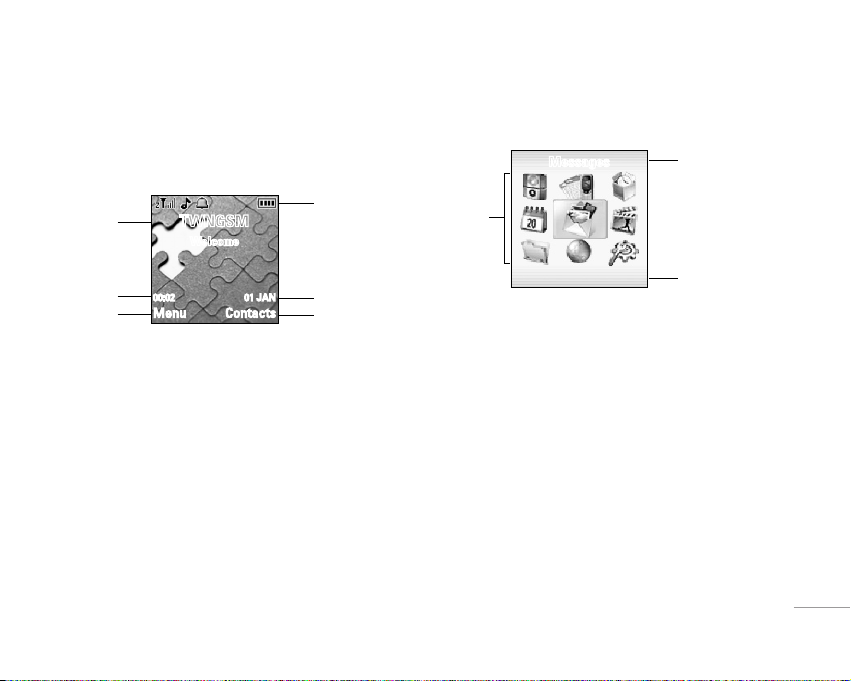
Idle Screen
2
1
3
5
3
4
[
03 Chopin
]
1 2 3
4 5
6
7 8
9
When the phone is on, and you have not keyed in any
characters, the phone is in Idle mode.
Main Menu
Messages
| UNDERSTANDING YOUR PHONE
Menu title
TWNGSM
Welcome
00:02 01 JAN
Menu Contacts
1. Top of the screen shows essential indicators.
2. Next line displays the operator name.
3. In the screen right and left side shows time/date
information.
4. To enter
5. To enter
Menu press left selection key.
Contacts press right select key.
Menu
functions
OK Back
Menu functions including:
1. Profiles
2. Call register
3. Tools
4. Organizer
5. Messages
Menu title
6. Multimedia
7. My stuff
8. Browser
9. Settings
17
Page 18
UNDERSTANDING YOUR PHONE
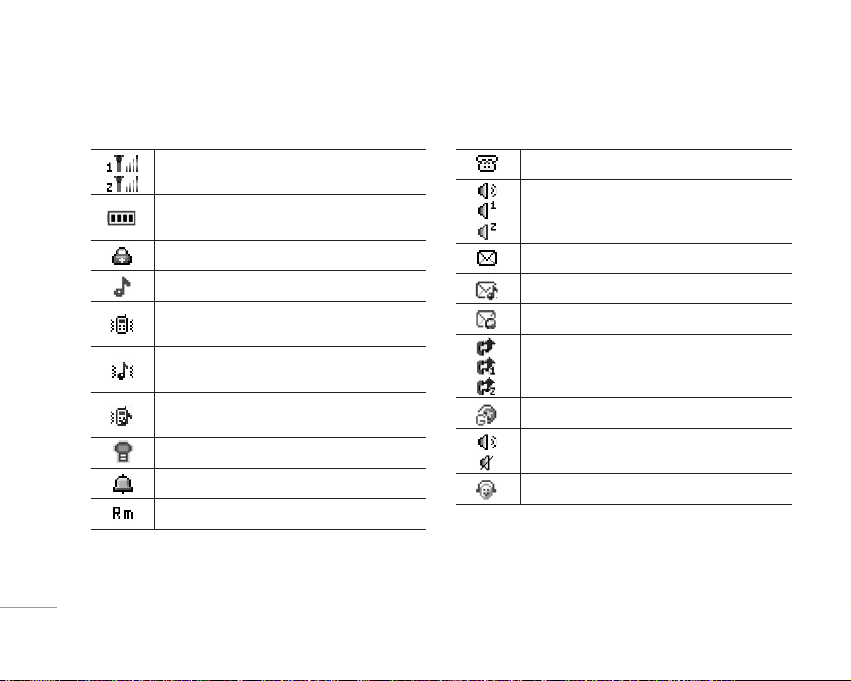
Essential indicators
UNDERSTANDING YOUR PHONE
18
Indicates signal strength and alternate
line service.
Shows handset current battery charge
strength.
Indicates the phone keypad is locked.
Indicates the profiles alert type is Ring.
Indicates the profiles alert type is
vibration.
Indicates the profiles alert type is vibration
and ring.
Indicates the profiles alert type is vibration
then ring.
Indicates the profiles alert type is slient.
The Alarm clock is set on.
Indicates “roaming”.
Indicates missed call.
Indicates Broadcast set on.
Indicates new text messages.
Indicates new multimedia messages.
Indicates push message.
Indicates call diverted is set on.
Indicates GPRS is connected.
Indicated loud speaker turn on/off.
Indicates earphone plug in
Page 19
GETTING STARTED
1
2
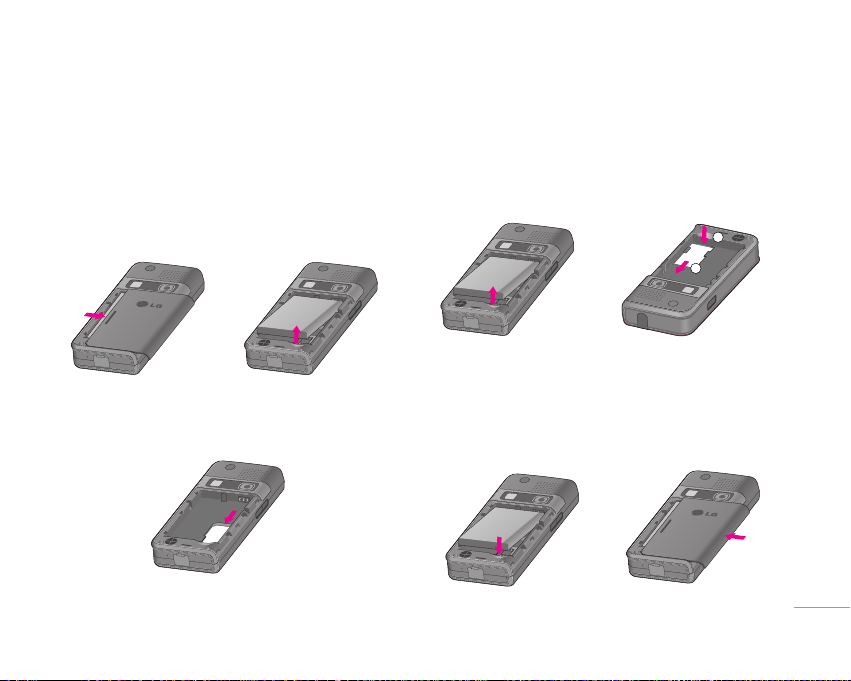
SIM Card and Battery Information
Insert SIM card
• The SIM is inserted into the back of the phone
underneath the battery.
• Press the knob and slide the battery cover off.
Remove the battery.
➞
• Place the card inside the SIM card holder such that
the golden connectors are facing downwards. Push
SIM card in to the socket.
Remove SIM card
• With the battery removed, press SIM card in the
direction of arrow ➀, then slide the SIM card in the
direction of arrow ➁ to remove the SIM card sliding
it lightly.
➞
Insert battery
• Slide the battery into the cradle and press the battery
down flat.
• Place the back cover and slide it into place.
➞
| GETTING STARTED
19
Page 20

GETTING STARTED
Charge battery
• Connect the USB cable to the power jack on the
bottom of your phone.
GETTING STARTED
• Connect the charger to an AC wall socket. The
charging icon is displayed briefly if the phone is
switched on. If the battery is completely empty, it may
take a few minutes before the charging indicator
appears on the display or any calls can be made.
! Warning:
If the battery is totally empty, charging icon or LED is not
on. Therefore, you should charge the battery maximum up
to 7 minutes.
Personalizing your Phone
Setting clock
Within the Settings menu you can set the phone to
display the clock in the Idle mode and choose whether
to use 12-hour or 24-hour format.
20
Setting display language
In the Settings menu you can select the language in
which the display texts are shown.
Setting standby note
Within Standby note menu you can write a text, which is
displayed in the Idle screen.
Activating a profile
To access the list of profiles through the menu, press
Menu, then use Navigation key scroll to Profiles and
press OK. Press Option key to activate the certain
profile and press OK.
Personalise profile
• In the Idle mode press Menu, then use Navigation Key
to access Profiles.
• Choose Profiles from list of profiles, General, Vibrate
only, Silent, Outdoor, and
personalise it.
• After choosing profiles, select
Select the setting you want to personalise, you can
personalise the following settings of the selected
profile:
Headset. Press Option to
Personalise press OK.
Page 21

• Tone setup: to set the ringing tone type for incoming
call or others.
• Volume: to set the volume level for the ringing and
keypad tones.
• Alert type: to define how the phone notifies you when
receiving an incoming call. The options are: Ring,
Vibrate, Ring & Vib., Ring after Vib., Silent
and Beep
once.
– When alert type is set to Vibrate or Silent, no ringing
tone will be heard and
phone is in the Idle mode.
or is displayed when the
• Answer mode: to set send key or any key or auto
(headset mode only) to answer an incoming voice call
on or off.
• Extra tone: to set the
Warning, Error, Camp on,
Connect On or Off. For example, when set to on, the
phone sounds a warning tone when the battery is
running out of power.
• Light: user can define handset light options.
Tips for Call Options
• A call can be connected to any single caller by
pressing Option key. When user press Option key
during active call, user can choose one of those
functions from the list:
– Hold: hold a call on.
– Retrieve: reconnect a holding call.
– Retrieve all: reconnect all holding call.
– Swap: switch between the call on hold and active.
– Conference: make a multi-party conversation.
– Transfer: transfer a call.
– Spilt: to suspend the multi-party call.
– End single: end one of conference call.
– End all: end a multi-party call.
– End: End a call.
– Mute/Unmute: mute the call during the conversation.
– New call: make a new call during an active call.
– Contacts: shortcut to contacts menu.
– Text message: shortcut to Message menu.
| GETTING STARTED
21
Page 22

GETTING STARTED
– Voice recorder: start recorder conversation.
– DTMF: set On / Off for Dual Tone Multi-Frequency tone
GETTING STARTED
dialing system.
• Adjust volume during a call
During an activate call, press left side key to adjust
volume. If the Loudspeaker is activated, use left side key
adjust volume also.
• Loudspeaker
Loudspeaker mode let handset act as loudspeaker during
a call. Do not hold the handset to your ear if loudspeaker
mode on. To activate
during a call, press
show on the screen. The loudspeaker is automatically
deactivated when you end the call or call attempt or
connect the headset to the phone. The loudspeaker is
default setting for playing MP3, voice recorder.
! Note
Using FM radio, user should plug in headphone; FM radio
does not support loudspeaker function.
22
/deactivate the loudspeaker
> H-free/H-held, the single will
• Hold a call
Pressing < and selecting Hold allows you to put an
active call on hold. This feature can be used when an
incoming call is received during an active call or if you
want to make another without disconnecting the active
call.
• Make a new call during a call
You can dial a number during a call without
disconnecting the active call.
– Press < and select Hold to put an active call on hold
then press Option
keying new number.
– Press Option and select Swap, new number will go on
hold, old number will be active and vice versa.
– You can also select record from contacts, after
select New call, press Back to option list and choose
Contacts.
• Multiparty call
– You can connect to several people together or
individually at a time.
– Make a call to the first participant.
select New call. Make a new call by
Page 23

– Call the second participant as explained in Make a
new call during a call.
< and select Conference. This joins the calls
– Press
to the conference.
– Repeat step 2 and 3 to allow new participants to be
connected to the Conference.
Option and select End all to end the call. Or
– Press
press
E.
– Any call (participant) can be disconnected by press
Option
key and select End single.
• Call waiting
– Press Options key. The first call is put on hold.
– To switch between two calls, press
Swap
.
– To end the active call press
at the same time. Press
and press
OK.)
Option, move to End all calls.
Option and choose
E. (Or to end both calls
| GETTING STARTED
23
Page 24
USING THE MENU
Navigating Functions
By scrolling
• To access the menu press Menu.
USING THE MENU
• Scroll with
for example, Organizer by pressing OK.
• If the menu contains submenus, select the one that
you want. For example, Contacts
• If the selected submenu contains further submenus,
repeat above step. Select the next submenu, for
example, View
• Select the setting of your choice.
• Press
Back the menu.
U , D , L , R through the menu and select
.
Back to return to the previous menu level and
By numbering
After entering Menu, you can access menu and
submenu items by using their matching number.
For example: Press
Display setup.
9 then 2, you can access
24
Writing Text
Typing method
• You can enter text for example, in contacts or writing
messages, by using the Multitap or T9 text input
mode.
• T9 text input mode is based on a built-in dictionary.
.
When you writing text, you can key in any letter with
a single key press. The word changes after each
keystroke.
• When you are writing text, press
input mode.
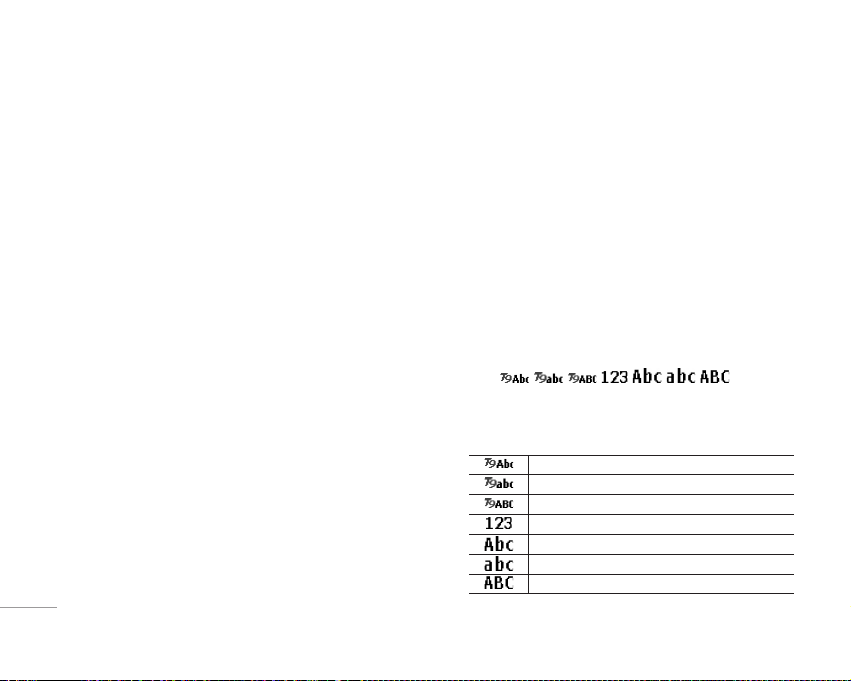
• The typing method is indicated by one of the fellowing
item:
(For detail information about text input mode, see
table below.)
, , , , , , ,
■ Text input mode
T9 Abc (T9 English input mode)
T9 abc (T9 English input mode)
T9 ABC (T9 English input mode)
Numeric
Multitap Abc (Traditional input mode)
Multitap abc (Traditional input mode)
Multitap ABC (Traditional input mode)
# either to change
Page 25

• You can change the character case by pressing #
and you can change between the letter and number
mode by pressing #.
Using traditional text input
• Press a number key 1 to 9, repeatedly until the
desired character appears. The characters available
depend on the language selected in the Settings
menu, Language.
• To input next letter you want, is located on, the same
key as the present one, wait until the cursor appears.
• The most common punctuation marks are available
under the number key
1.
Using T9 text input
T9 input mode is only available for the modes and
languages on the method list. You can key in any letter
with a single keypress. The T9 text input is based on a
built-in dictionary.
• You can select T9 languages by selecting menu by
press
Option into list, or in the editor screen long
press * enter T9 languages option. In T9 menu, you
can also select T9 off function.
! Note
The handset default setting for T9 languages is T9 on.
• Start writing a word by using the keys 2 to 9.
Press each key only once for one letter. The word
changes after each keystroke.
• Example: To write
mode is selected, press 4 once for H, 2 once
for A, 7 once for P, 7 once for other P, and 9
once for Y.
• When you have finished writing the word and it is
correct, confirm it by pressing Navigation, right key.
Pressing
• Start writing the next word.
HAPPY when the predictive test
0 by adding a space to move the cursor.
Tips for writing text
• To insert a space, press 0.
• To move the cursor to the left, right, down or up, press
the Navigation key.
• To delete a character to the left of the cursor, press
Clear. Press and hold Clear to delete all characters
more quickly.
• To insert a special character, press
table with special characters, and then press OK back
to message.
* to get the
| USING THE MENU
25
Page 26

LISTING OF FUNCTIONS
LISTING OF FUNCTIONS
Profiles [Menu 1]
1. General
2. Vibrate only
3. Silent
4. Outdoor
5. Headset
26
Call register [Menu 2]
1. Missed calls
2. Dialed calls
3. Received calls
4. Delete call log
5. Call time
6. Call cost
7. Text message counter
8. GPRS counter
Tools [Menu 3]
1. Alarm
2. Favorites
3. Calculator
4. Units converter
5. World time
6. BMI
7. Pink schedule
Organizer [Menu 4]
1. Contacts
2. Calendar
3. To do list
Page 27

Messages [Menu 5]
1. Text message
2. Multimedia message
3. Chat
4. Voice mail
5. Broadcast
Multimedia [Menu 6]
1. Camera
2. MP3 player
3. FM radio
4. Photo gallery
5. Voice recorder
My stuff [Menu 7]
1. Java
2. Games
3. File manager
Browser [Menu 8]
1. SIM service
2. WAP
3. Data account
| LISTING OF FUNCTIONS
Restore settings [Menu 9]
1. Date & Time
2. Display setup
3. Language
4. Call setup
5. Network
6. Security setup
7. Restore settings
27
Page 28

PROFILES
Within the Profiles menu, you can adjust and
personalise the phone tone for different events and
environments.
Activate
PROFILES
In the Idle mode, press Menu and select Profiles and
press OK to access the list of profiles.
Use Navigation Key to select the profile. Press
activate and personalise the profile.
Personalise
Within Profile submenu, there are following profiles.
• General
• Vibrate only
• Silent
• Outdoor
• Headset
Select
Activate and press OK.
In the Idle mode, when Head phone is unplugged, you
can hold and pressing the
Vibrate only mode quickly and easily.
* to change profiles to
28
Option to
Select the Personalise you want to customize (for
example, Tone setup, Alert type, Light etc) and press OK.
Choose to desired option and press OK.
Profile Settings
Once you have selected the setting Personalise, you
can cusomize the following settings of the selected
profile:
• Tone setup
– Ringtone: to define how the phone notifies you of an
incoming voice call.
– Power on: to define how the phone notifies you of
switching phone on.
– Power off: to define how the phone notifies you of
switching phone off.
– Message tone: to define how the phone notifies you of
receiving a message.
– Keypad tone: to set any one of the options and the
active one is highlighted.
• Volume
To set the volume level for the ringing and keypad tones.
Page 29

• Alert type
To choose the phone how to notify you for incoming calls
and receiving a message.
The options are: Ring, Vibrate, Ring & Vib., Ring after Vib.,
Silent and Beep once
• Answer mode
To set the phone answer an incoming voice call by press
Send key or Any key.
Only when user chooses Headset mode, the answer
mode have three options Send key, Any key and Auto.
• Extra tone
To set the Warning, Error, Camo on and Connect On
or Off. For example, when you set Extra tone to on,
the phone sounds a warning tone when the battery is
running out of power.
• Light
– LCD backlight: to set backlight flash time period.
;– Status LED: you can recognize the network status by
indicator light, it flicker define colors when the service
is available. The LED will flash color when handset
in different status. For example: receiving call or
message.
– Keypad backlight: to turn on/off the keypad backlight
Rename
You can change the name of selected profiles. To
rename a selected profile, within selected profile
submenu, select “Rename”.
| PROFILES
29
Page 30

CALL REGISTER
Missed calls [Menu 2-1]
Within the submenu you can view the phone numbers
from which somebody has most recently tried to call
you.
In the list of missed call press
information.
CALL REGISTER
In the Call info. press
• Delete
• Dial
• Edit
• Send text message
• Send multimedia message
OK to display call
Option, you can
Dialed calls [Menu 2-2]
Within the submenu you can view the numbers from
which you have most recently call or attempted calls.
• Press OK to display call information.
• In Idle mode, press S enter Call logs.
30
In the Call Info. press Option, you can
• Delete
• Save to contacts
• Dial
• Send text message
• Send multimedia
Received calls [Menu 2-3]
Within the submenu you can view the numbers from
which you have most recently accepted calls.
• Press OK to display call information.
In the Call Info. press
• Delete
• Save to contacts
• Dial
• Edit
• Send text message
• Send multimedia
Option, you can
Page 31

Delete call log [Menu 2-4]
In this submenu, Press OK to display
• Missed calls
• Dialled calls
• Received calls
• Delete all
Press OK to delete it.
Call time [Menu 2-5]
This function records the length of time or duration of
all incoming and outgoing calls in hours, minutes and
seconds.
• Last call: Display last one outgoing call in hours,
minutes and seconds.
• Dialed calls: Display the time for all outgoing calls in
hours, minutes and seconds.
• Received calls: Display the time for all incoming calls
in hours, minutes and seconds.
• Reset all: Clear the time records.
Call cost [Menu 2-6]
This network service allows you to check the cost
of your last call or all calls. The call costs are shown
separately for each SIM card.
• Last call: you can set the phone to show the cost of
last call. You may need the PIN2 code to select the
currency or unit. Contact your service provider for
charging unit prices.
• All calls
• Max cost call: you can limit the costs of your calls to a
• Reset cost: this option allows you to reset the call cost
: you can set the phone to show the remaining
talk time in terms of charging units or units of
currency by using this option. You may need the PIN2
code to select the currency or unit. Contact your
service provider for charging unit prices.
certain amount of charging units or units of currency
by using this option. You can make and receive
charged calls as long as the specified cost limit is not
exceeded. The number of remaining units is shown in
the idle mode. You may need the PIN2 code to set the
Max. cost
.
counter. You may need the PIN2 code to clear your
setting.
| CALL REGISTER
31
Page 32

CALL REGISTER
• Price per unit: this is the cost that the Service Provider
charges for one unit of call time. At this point you will
be asked to enter your PIN 2 code to set this function.
Text message counter [Menu 2-7]
This function can show you how many text message
CALL REGISTER
you already sent and received.
GPRS counter [Menu 2-8]
With the data counter you can check the amount of
data sent and received data in last session data sent
and received in total and to clear the counters. The
counters unit is a byte. To reset counter, answer “Yes”
when confirm window show up.
32
Page 33

TOOLS
Alarm [Menu 3-1]
The alarm clock uses the time format set for the clock.
Press
Menu, select Tools and Alarm, press OK to enter
submenu of Alarm.
To set the alarm, press
the alarm time.
You can repeat the alarm, Once, Mon-Fri, Mon-Sat and
Everyday.
Press
Stop to stop the alarm. If you let the phone
continue to alarm for a minute or press Snooze, the
alarm stops for about 4 minutes and then resumes.
If the alarm time is reached while the phone is switched
off, the phone switches itself on and starts sounding the
alarm tone, if you press Stop, the phone ask whether
you want to active the phone, Power on? Press No to
switch off the phone or Yes to switch on the phone.
Edit and set on the alarm, key in
Favorites [Menu 3-2]
The Favorites screen displays 13 favorites items set by
the user.
You can edit some specific functions to the default list
for your personal favorites list and activate them.
Within Favorites menu, turn On / Off from the function
list.
The phone offers you an extensive range of functions
which are grouped in menus and submenus. From Idle
mode the favorites menus can be accessed by press
Navigation key direction up
For some reason, if user turn
before, when user press Navigation key direction up
U in the Idle mode, handset will show ‘edit favorites
message’ to remind user.
U.
Off all favorites functions
Calculator [Menu 3-3]
You can use your phone’s calculator to add, subtract,
multiply and divide.
Press Menu, select
With the screen showing a “0”, enter the first number in
the calculation.
Use Navigation key
multiply and divide.
Press
OK to get the result.
Press
Clear to start the new calculation.
Tools and Calculator, press OK.
U , D , L , R to add, subtract,
| TOOLS
33
Page 34

TOOLS
Units converter [Menu 3-4]
In the Unit converter submenu, choose converter
Weight, Length or Currency.
You can converter Kg units expressed in Pound units
and Ounce units.
Within Length converter, you can select.
TOOLS
• Km units expressed in Mile units
• Meter units expressed in Yard units.
• Meter units expressed in Foot units
• Cm units expressed in Inch units
Enter the number unit to be converted and press
Within Currency converter, you setting the exchange
rate first. Once in the Currency converter menu, press
OK. Enter Exchange rate and press OK.
Input currency
• Before you input currency, you need select foreign
unit expressed in domestic units or domestic units
expressed in foreign units, depending on how you
wish to convert the currency.
• Enter the amount to be converted, press OK to get the
converted amount.
34
OK.
World time [Menu 3-5]
The screen shows the city name, current date and time.
Use Navigation key to choose the city and check the
local time, press
If you want to change the time display in Idle mode to
the selected time, press OK.
• The time zone setting of each city in world time menu
may be affected by network condition.
OK.
BMI (Body Mass Index) [Menu 3-6]
In this submenu, you can check your BMI value in
relation to your height and weight.
To calculate the BMI value proceed as follows:
Select your gender, Male or Female, use Navigation key
direction
U , D , L , R select it.
• Enter your height in centimeters using the numeric
keys. Enter your weight in kilos using the numeric
keys and press
• The phone calculates your BMI ratio value and
display the result.
OK.
Page 35

Pink schedule [Menu 3-7]
Using this feature, user can enter information on
menstrual cycle and determine the:
• Probability of becoming pregnant on the current date
• Period during which it is possible to become pregnant
date of next period
• To check your menstrual cycle, enter the starting date
of your last period
• Enter the average length of your menstrual cycle and
press the
OK key
• To get detail information, select one of highlight date
and press
! Note
OK to display pregnant probability.
This Schedule may not fit to your physical condition.
Therefore, use the Pink schedule just for reference.
| TOOLS
35
Page 36

ORGANIZER
Contacts [Menu 4-1]
Search [Menu 4-1-1]
You can search contacts by name characters or
number.
Name and Number, allow you key in the first characters
of the name or number for which you are searching in
the editor screen, press Search the match recorder will
ORGANIZER
be shown.
To input or edit a searched item, press
enter into the submenu.
• You can select
Send vCard an entry.
View, Edit, Delete, Copy, Move, and
Add new [Menu 4-1-2]
• It is possible to store phone numbers in two places:
– In the SIM card.
– In the Phone.
• To store a Number in the SIM card:
– In main menu, select Organizer, Contacts, and select
Add new. You can store 255 entries (Maximum) in your
SIM card for name and telephone number. See also
“Writing Text”.
36
Option key to
(The number of store entries in SIM card, it may be
different depend on your SIM card service provider.)
– Then select To SIM, press OK.
– Enter the name, number and caller group, press
• To store a Number in the Phone:
– In main menu, select Organizer, Contacts and select
Add new. You can store 500 entries in your phone for
name and telephone number.
– Then select To Phone, press OK.
– Enter the name and number, press OK.
The phone’s internal contacts allows you personalise
individual record, such as home number, company
name, Email address, office number, Fax number,
picture, Ring tone and assign to
– For each number or text item you can choose:
Name, Number, Home number, Company name, Email
address, Office number, Fax number, Picture, Sound
Caller group.
and
Caller group.
OK.
View [Menu 4-1-3]
It is possible to display all individual names and phone
number in the name list.
Page 37

Press Option key to access these function:
• View
Displays each element of the selected entry. Use
Navigation Key
previous element of the entry. Each element may be
edited.
• Edit
Displays the entry allowing you to make changes as
required.
• Delete
Delete an individual entry from the contacts.
• Copy
Copy an individual entry to SIM memory or Phone
memory. The record is both saved in SIM and Phone’s
memory.
• Move
Move an individual entry from SIM to Phone or Phone to
SIM. The record only display in one place, SIM or Phone.
• Send vCard
To send a vCard, search for the name and phone number
that you want to send from contact list. Press
select
U , D , L , R to display the next or
Option and
Send vCard and press OK, the vCard options have:
– Send by SMS: to send the vCard as text message, if the
network supported it.
– Send by MMS: to send the vCard as multimedia
message, if the network supported it.
– Save to file: save vCard in File manager.
Delete all [Menu 4-1-4]
You can remove name and phone numbers from
selected contacts all at once.
In the
Contacts Menu, select Delete all then press OK.
• Choose delete
From SIM, From phone or One by one,
then press OK. If user want to delete all phone or
SIM records, user need to enter phone code first and
press OK.
! Note
The default phone code is 0000.
• If user delete record one by one, first, select the
record want to deleted, then press Delete. Press Yes/
No at Delete?popup text display.You can view and edit
personal phone number.
• You can view and edit personal phone number.
| ORGANIZER
37
Page 38

ORGANIZER
Copy all [Menu 4-1-5]
You can copy all names and phones number from the
phone’s memory to SIM card’s memory or from SIM
card’s memory to phone’s memory.
You can also copy or move one contact record from
phone’s memory to SIM card’s memory or from SIM
card’s memory to phone’s memory.
ORGANIZER
Caller groups [Menu 4-1-6]
You can set the phone to sound a specific ringing
tone and flash a selected graphic on the display when
you receive a call from a particular name and phone
number. To do this, first include a name and number in
a caller group. Then define a ringing tone and Picture/
Animation for this group. If you want to activate this
function, please store names and phone numbers in the
phone memory.
After entering the Caller groups menu, Use Navigation
Key to change
pattern and Member list for each group.
Group default name include: Business, Family, Friends,
VIP
and Others. After each setting, press OK key
Group name, Ring tone, Picture, LED
38
Settings [Menu 4-1-7]
• Own number
You can view and edit personal phone number. To set on
this function, see also “Display item/Own number”.
• Service dial number
Your service provider may program some special phone
numbers into your SIM. It is not possible to modify the
Service dial numbers.
The phone number pointed to can only be recalled or
dialed.
• Speed dial
In this function, you can make a call by using the speed
dialing keys.
You can set any of the numbers key 2 to 9 to work
as a speed dialing key. To do this you need to assign a
contacts record to a number key.
State and select On/Off the function
Select
Select Set number and select records from contacts then
press OK.
After assigning a number to a speed dial key, you can
call, reassign the record or undo the speed dial.
Page 39

When a phone number is assigned to one of the speed
dialing keys (
in the following ways:
• If you have set the menu function
press and hold to corresponding speed dialing key until
the call is started.
• Memory status
You can check what percentage of the phone’s internal
memory is unoccupied and how many name and number
entries can still be stored in SIM card’s and Phone’s
memory.
• Preferred storage
You can choose where you want to save the name and
phone number. Select
• Fields
The phone allows you to personalise the contacts
looking. In the Setting submenu, selected Fields and
choose the item you want to display or not.
– Home number
– Company name
– Email address
– Office number
– Fax number
2 to 9), you can call the phone number
Speed dial to on,
SIM or Phone and press OK.
– Picture
– Sound
– Caller group
Press On / Off key.
• My vCard
You can edit personal vCard in the handset. Also, you
can send vCards to your friends that numbers save in the
contacts list.
Edit my card
In the My vCard submenu, select Edit my card enter the
information for your vCard then press Save.
Send my card
– In the My vCard submenu, select Send my card and
select transfer method
– Send by SMS
– Send by MMS
– Save to file
Search by
You can set the phone to search by name or number,
when you search the
the phone will ask how to search when you search the
Contacts
.
Contacts. If you select Variable,
| ORGANIZER
39
Page 40

ORGANIZER
Calendar [Menu 4-2]
• You can use the phone’s calendar to keep track of
reminders, calls you need to make, meetings and
birthdays. You can set the calendar to sound an alarm
when it’s time for you to go to a meeting.
• Press Menu, select Organizer, then Calendar. Press
OK to the options list; you can Add appointment, View,
Go to date, Set holiday, and Delete all.
ORGANIZER
• If you want to add new appointment, within the
calendar submenu, use Navigation key move to the
day you want or use Go to date option. The current
day is indicated with a frame around the day. If there
are any appointments set for the day, the day is frame.
To view the appointments, press
To do list [Menu 4-3]
• In this function, you can Add appointment, Edit task,
Reminder tone, Delete task and Delete all the list
of tasks. You can also select and view a single task.
More detail information about writing text see also
“Writing Text”.
40
• The task view allows you to view the details of the
select task. You can move through the task.
• When setting time is coming, the alarm notification is
enable, the phone will remain user his activities.
OK to Edit and Delete
Page 41

MESSAGES
Within the Messages menu you can receive, display,
edit, send and/or save text message up to 2295
characters.
Setting the Phone for Text message
Before you can send a text message, it is necessary
to ensure the Message center number is already set
in Service center. (Your service provider sill supply the
message center number.) The Message center number
may have been preprogrammed on SIM.
Setting the Message Centre Number
Within Text message submenu, select Settings, Service
center. Select one profile and enter message center
number in international number format. (the profile shall
be activated.)
Text message [Menu 5-1]
(Short Messaging Service)
Write message [Menu 5-1-1]
For detail information about how to write text in the
phone, see also “Writing Text”.
In the Option list of writing message, you can select
Alignment, and New paragraph in the Format text.
You can add pictures, animations, melodies and sound
effects to a text message and format the text using EMS
(Enhanced Messaging Service).
In the message press
The Object list are: Picture, My picture, Predefined
animation, My animation, Melody, My melody and
Predefined sound
After choosing, press OK.
The phone allows you to use templates insert into
the message when you write. Within Write message
submenu, press Option and select Use templates. You
can choose templates from the list.
To send the message, press
choose choose send options: Send only, Send and
save, Save, Send to many, Send to group and press
OK. Then enter the phone number (or recall it from the
contacts) and press OK to send the message.
You can choose
sent message is stored in the Outbox folder.
• The options list includes option for
Delete all, the message you are writing.
Option key, select Insert object.
Option select Done to
Send and save and Save option that the
View, Delete and
| ORGANIZER
41
Page 42

MESSAGES
Inbox [Menu 5-1-2]
To check an unread message later:
• From
Text message menu selects Inbox press OK.
• Move to desired message and press
message is stored in the Inbox folder after you have
read it.
•
or icon indicate whether a message is read or
unread in front of the message in the list.
MESSAGES
•
or icon indicate whether a message is illegal
message format or broken message which can not be
displayed in the Message body screen.
• While reading the inbox list, press
select through the list of options and press OK at
the highlighted option to select it. The option list
includes options for View, Delete and Delete all the
message(s) you are selected.
• The option list includes options for
Forward, Detail, Chat, Use number, Save objects and
Extract URL the message you are reading.
42
OK to read it. The
Option to
Reply, Edit,
Outbox [Menu 5-1-3]
From Text message menu selects Outbox Press OK.
Move to the desired message and press
•
or icon indicate whether a sent message or
unsent message.
• While reading the outbox list, press Option
select through the list of options and press OK at
the highlighted option to select it. The option list
includes options for View, Delete and Delete all the
message(s) you are selected.
• The option list includes options for Send, Edit, Detail,
Use number, and Extract URL the message you are
reading.
OK to view it.
to
Templates [Menu 5-1-4]
In this function, the phone allows you to edit and erase
the templates.
From the templates list, press
template message.
Option key to edit or erase
Page 43

Settings [Menu 5-1-5]
There are five kinds of message settings in your phone,
Service center, Common setting, Memory status,
Preferred storage, and Preferred bearer to all text
messages.
A message service center is a group of settings need
for sending text messages. The phone uses the
SC
name, SC address, , Valid period and Message type
under the Settings menu as a default message profile if
you don’t select another set when sending a message.
• Service center 1&2 [Menu 5-1-6]
– If more than one message service center is supported
by your SIM card, select the one you want to use. The
number of service center depends on your SIM card.
– Within the Service center submenu of the Settings
you can change the settings of a particular message
Service center include:
- SC name: Within this field you can input the message
centre name.
- SC address: Within this field you can input the
message centre number.
- Valid period: This is the duration that your message
is stored at the message centre. Delivery attempts
will be repeated until the message has been
delivered or expired.
The option of length of time has:
1 day., 1 week., Maximum
- Message type: You can select four kinds of message
type with text message.
The option of type has: Text, Fax, Page and Email.
• Common setting [Menu 5-1-7]
– The following message settings under the settings
menu are common to all outgoing text messages,
irrespective of the selected set.
- Delivery report: User can turn On
if user want to receive delivery report from service
provider or not.
- Reply path: Also, user can choose to use the same
service center as the received message to reply
or not.
• Memory status [Menu 5-1-8]
– You can check what percentage of the phone’s internal
memory is unoccupied and how messages can still be
stored in SIM card’s or Phone’s memory.
– The phone will show message to remind user if SIM
card and Phone set both out of memory.
1 hour., 12 hours.,
or Off this function
| MESSAGES
43
Page 44

MESSAGES
• Preferred storage [Menu 5-1-9]
– You can choose where you want to save the message
depend on memory status.
– If either one of storage locations, SIM card or
Phone, already full, the phone will automatically save
information to another.
SIM or Phone and press OK.
– Select
• Preferred bearer [Menu 5-1-0]
MESSAGES
The Preferred bearer settings to set the settings for
selected bearer.
The Bearer list are: Prefer GPRS, Prefer GSM, GPRS Only
and
GSM Only
Multimedia message [Menu 5-2]
! Note
This function can be used only if it is supported by your
network service provider. Only phones that offer compatible
multimedia message features can receive and display
multimedia messages.
44
A multimedia message can contain text, sound and
picture. Each contain including media object, sound and
picture, the maximum size can not exceed 90 KB, also
the phone supports multimedia messages that are total
up to 100 KB in size. If the maximum size is exceeded,
the phone may not be able to receive the message.
Depending on the network, you may receive a text
message that includes an Internet address where you
can view the multimedia message.
• Multimedia messaging supports the following formats:
– Picture: GIF, BMP and JPEG.
– Sound: MIDI (SP-MIDI), AMR , iMelody audio and
monophonic ringing tones.
• The phone does not necessarily support all variations
of the aforementioned file formats. If a received
message contains any unsupported elements, they
may be replaced with the file name and the test
Object format not supported.
Write message [Menu 5-2-1]
• For detail information about how to write text in the
phone, see also “Writing Text”.
Page 45

• To enter a name from the contacts, press Edit and
select Add number or Add E-mail then search insert
desired number and email.
• Scroll to
• To insert a file in the message, scroll to
• The handset supports the sending and receiving
• The phone allows you to use templates insert into
• To send the message, press right soft key.
Content, press Edit enter Option list of
multimedia message writing message. You can select
Add text, Add image, Add audio, Add attachment and
Templates.
attachment option then press OK. Press Open to link
a specific folder in File manager and scroll to the
desired file, press OK and Done. An attached file is
indicated with the file name in the message.
of multimedia message that contain several pages
(slides). Each slide can contain text, one image and
one sound clip.
the message when you write. In the editor screen,
scroll to
Edit content, press Edit enter Option list of
multimedia message writing message and select
Templates. You can chose templates from the list.
Add
• You can choose
option that the sent message is stored in the Outbox
and Draft folder
Save and send and Save to drafts
Inbox [Menu 5-2-2]
To check an unread message later:
• From
Multimedia message select Inbox press OK.
• Move to desired message and press
message is stored in the Inbox folder after you have
read it, press Options and then select View.
•
or icon indicate whether a message is read or
unread in front of the message in the list.
•
or icon indicate whether a message is illegal
message format or broken message which can not be
displayed in the message body screen.
• While reading the message, press Options
through the list of options and press OK at the
highlighted option to select it.
• The
Inbox option list includes options have View,
Properties, Reply, Reply to all, Forward, Delete,
Delete all, Use number and Extract URL.
• For reading message the options are:
Play, Save image as and Save audio as
OK to read it. The
to select
| MESSAGES
45
Page 46

MESSAGES
Outbox [Menu 5-2-3]
To read an send Multimedia message
• From
Multimedia message select Outbox move to
desired message and press Options to read it.
• The
Outbox option list includes options have View,
Properties, Send to others, Delete, Delete all, Use
number and Extract URL.
• For options of the message you are reading are:
MESSAGES
Save, Save image as, and Save audio as
Drafts [Menu 5-2-4]
To finished or view an draft message:
• From
Multimedia message select Drafts move to
desired message and press Options to read it.
• The Drafts option list includes options have
Properties, Send, Edit message, Delete, Delete all,
Use number and Extract URL.
Templates [Menu 5-2-5]
• In this function, the phone allows you to View,
Properties and Write message when use the
templates.
46
View,
• From the templates list, press
template message.
Option key to select
Settings [Menu 5-2-6]
• The following message settings under the Multimedia
message Setting menu. It includes Send, Retrieval,
Filters, Edit profile and Memory status.
• Within the
message you can change the settings of a Multimedia
message sending option
• Sending:
Settings submenu of the Multimedia
– Validity period: This is the duration that your message
is stored at the message centre. Delivery attempts will
be repeated until the message has been delivered or
expired.
The option of length of time have: Max., 1 hour, 12
hours, 1 day and 1 week.
– Send report: User can turn On or Off this function
if user want to receive delivery report form service
provider or not.
– Read report: User can turn On
user want to receive report from service provider or
not.
or Off this function if
Page 47

– Priority: User can choose message priority; the options
have
Normal, High, and Low.
– Slide timing: User can set slide timing by own desire.
The maximum value of the time is 60 seconds.
– Delivery time: User can set the time of message
delivery.
• Retrieval:
– Home
The option of home network have: Immediate, Delayed
and Restricted
– Roaming
– Read report
– Send report
The options of roaming network have: As home,
Delayed and Restricted
The option of read report have: On request, Send and
Never send
User can turn On or Off this function to ask the network
to send delivery reports about your message.
• Filters:
– Anonymous
The option of anonymous have: Reject and Allow
– Max Size
Set multimedia messages size by user, the maximum
value is 100
– Ads. (Advertisement)
The option of advertisement setting have: Reject and
Allow
• Edit profile:
You may use network or service provider to receive and
send multimedia message. To edit Profile detail setting,
see Edit profile under WAP/ Settings of Browser.
• Memory status:
You can check what free space of the phone’s internal
memory is unoccupied and how messages can still be
stored in SIM card’s or Phone’s memory.
The phone will show message to remind user if handset
out of memory.
Chat [Menu 5-3]
Chat is a way of sending short, simple text message.
You send your message to different person in the same
time via Chat room 1&2.
| MESSAGES
47
Page 48

MESSAGES
Starting a chat message
• Enter the Chat menu, select Chat room from the list
• Press
Option enter chat room submenu, you can see
– Chat room info
- Press OK to enter name that you want to use during
chatting and number
- Press Yes when confirm save message showup.
MESSAGES
– Start new
- Go to Start new and press OK to write chat message
Voice mail [Menu 5-4]
Voice mail is a network service and you may need to
subscribe to it first. For more information and for the
voice mail number, contact your service provider. Press
Menu, and select Messages and Voice mail.
• Each phone line may have its own voice mailbox
number.
• Within Voice mail
– The option are:
- Edit: general number editor.
- Erase: erase the voice mail number.
submenu, choose phone line 1 or 2.
48
- Connect to voice: user can dial the voice mail server
number to listen voice mails.
– Choose the option and press
– In the Idle mode, holding and pressing
connect to voice mail.
OK to save it.
1 can
Broadcast [Menu 5-5]
Cell broadcast short messages are spread by the
network service to all handsets in a cell. User can
enable/disable the service to choose if user wants to
receive broadcast messages from particular channels
or not.
Receive mode [Menu 5-5-1]
When you turn on/off the mode, you can choose to
receive or not receive the last broadcast message
received.
Message list [Menu 5-5-2]
Using the arrow of Navigation key allows you browse
through the message. Press OK or Back, if you want to
read or exit.
Page 49

Languages [Menu 5-5-3]
User can select the languages of the broadcast
message user wants to receive.
Channel settings [Menu 5-5-4]
You can select the channels from the channel list.
You can add new channels where you want the
messages to be received to the list. Then select it from
select list.
Also, the function allows you Select, Add, Edit and
Delete setting.
| MESSAGES
49
Page 50

MULTIMEDIA
Camera [Menu 6-1]
! Note
Please obey all local laws governing the taking of picture.
User can take photo with the built-in camera. The
camera lens is on the back of the handset and the
display of the handset works as viewfinder. The camera
produces pictures in JPG format.
Please pay attention, if handset is not enough memory
to take a new photo, you need to free some pictures by
MULTIMEDIA
deleting old photos or other files in the gallery.
Camera options
Image size Cont shot Frame Image qty Effect EV WB Night Zoom
128x128 Off Off High Normal +4 Auto Off 1.0x
160x120
320x240
640x480
3 shot
5 shot
9 shot
Frame 1 Normal B & W +3 Daylight On 1.5x
Frame 2 Low Sepia +2 Tungsten 2.0x
Frame 3 Negative +1 Fluorescent 2.5x
Frame 4 B&W negat. 0 3.0x
Frame 5 Oil paint -1
Frame 6 Emboss -2
Frame 7 Bluish -3
Frame 8 Black board -4
Frame 9 White Board
Frame 10 Crayon
50
Camera
options bar
Camera display
area
Selection keys
[Night mode]
ON
Option Back
When user enter the “Camera” screen, user can press
Navi-right/left key
L and R to change camera options
and Navi-up/down D and U to change camera options
status
Page 51

Taking a Photo
• In Multimedia menu, select Camera.
• The live image appears on the display, and you can
use the display as a view finder.
• To take a photo press side key
When taking a photo a shutter sound is heard. The
phone saves the photo in the Photo gallery of the
Multimedia menu.
to capture.
To setup Camera option
Press Option to enter options screen. User can select:
• To photo gallery: the folder save images taken, for
detail please see
• Camera setting: the setting option for further camera
functions
• Image setting: the settings about image
– Image size: the options of image size have: 128x128,
160x120, 320x240, 640x480
– Image quality: to define how much the photo file will
be compressed when saving the image. Select Low,
Normal, or High.
Photo gallery.
• Effect setting: to set effects of photo.
• Add frame: to select the frame style from the list when
take pictures.
– Stick frame only support when image size set for
128x128.
– When image size set for 128x128, user can press Navi-
up
U or down D key to change frame style directly.
• Cont shot: you can take a photo in various shot.
• Delay timer: to set a time delay before the camera
takes a photo. Select the length of delay you want.
• Restore default: to reset all camera settings back to
default.
MP3 player [Menu 6-2]
Your phone includes an MP3 player for listening to MP3
files.
MP3 files stored in the MP3 folder (Default setting) will
automatically be detected and added to the default
play list
.
You can listen to the sound files via a compatible
headset, or the phone’s loudspeaker. You can make or
answer a call while using the MP3 player.
| MULTIMEDIA
51
Page 52

MULTIMEDIA
[
03 Chopin
]
1_LOST_IN_LO
1_LOST_IN_LO
MULTIMEDIA
52
During a call, the playback is paused.
Name of MP3
Function key
The play number
Volume
Option Back
! Note
Because of the small dimension of the speaker, in some
cases the audio could be distorted, especially at maximum
volume and when there are lots of bass sounds. Therefore,
we recommend you to use the stereo headset in order to
appreciate the high quality of your music.
of MP3
The time of play
MP3
The MP3 player supports: [Menu 6-2-1]
• MPEG-1 Layer III: Sampling frequency up to 48 KHz.
Bit rate up to 320 Kbps stereo.
• MPEG-2 Layer III: Sampling frequency up to 48 KHz.
Bit rate up to 320 Kbps stereo.
MP3 player settings [Menu 6-2-2]
Settings: MP3 player setting options.
• Turn On/Off for List auto generate.
• When List auto generate
function turns on, the
handset will refresh the track
list automatically everytime
when the handset switch on.
• When List auto generate
functions turns off, the
handset will not refresh the
track list automatically everytime when the handset
switch on.
• Skin: to select background picture of MP3 player.
There are three skin pictures for users choose.
• Select
shuffle to play the current track or the enter
track list repeatedly.
• Turn on/off
Random function.
• Turn on/off Background play function.
– On: allow music continue playing when left MP3 player.
– Off: when user left MP3 player, music will stop.
TWNGSM
Welcome
00:02 01 JAN
Menu Contacts
Page 53

• Please turn off the handset before Add/Delete music
or handsets will automatic turn off when cable plug in.
! Note
All music tracks must be storage in MP3 folder (Default
setting, user may not be change path.)
• Plug in cable (USB) to handset and
PC, screen show two options:
– Mass storage mode: for add /
remove music or image.
- In the Mass storage mode,
user can add / remove music to
USB Config:
Mass storage
COM Port
OK Back
handset via PC.
- COM Port mode: set the USB as COM Port
.
Playing the MP3 [Menu 6-2-3]
• User can listen to music on the loudspeaker or
with headphone. The handset default setting for
MP3 playing is loudspeaker; user also can plug in
headphone to listen MP3.
• Use the functions of the four ways Navigation key as
describe in the bellow table:
Four ways Navigation Key Audio Play Function
U Up
D Down
L Left
R Right
MP3 player menu, press Option allows access
• In the
bPlay /iPause music
j Stop
g Skip to previous tracks
h Skip to next tracks
to the following settings.
– List: you can view all the tracks available on the track
list and play the desired track
– If you press
Option in the play list, you can:
■ Play: to play selected music.
■ Add: to add music which not store in the MP3 folder.
! Note
Add only support when List auto generate function turns off,
user can add music from other folder.
| MULTIMEDIA
53
Page 54

MULTIMEDIA
■ Delete: to delete the selecting music.
■ Rename: to modify the name of the selecting music.
■ Add to rings: to add selected music for ring tone.
■ Detail: to show music information
■ Delete all: to delete all the music in the play list.
FM radio [Menu 6-3]
To listen to the FM radio on your phone connect the
compatible headset connector on the left top of the
MULTIMEDIA
phone. Note that the quality of the radio broadcast
depends on the radio station’s coverage in that
particular area.
Channel frequency
Search channel
icons
Radio power on/
off indicate
*Stereo indicate
FM Radio
Option Back
54
Radio frequency
indicate bar
Volume
Channel list
* If the radio channel supports stereo effect, the stereo
indicate will show on screen. If the radio channel not
supports stereo effect and the stereo indicate will hide
from screen.
To turn on the radio
• Press
Menu and select Multimedia and FM radio.
• Press down key
! Note
Before you turn on the FM radio, please make sure the
headset is plugged well. Otherwise, the FM radio cannot
be turn on.
– On the display is frequency of the radio channel.
– If you have already saved radio channels in channel
list, you can select a radio channel location 1 to 10 by
pressing the corresponding number key.
D to turn on/off radio.
• Turning a radio channel
! Note
Using FM radio, user must plug in headphone, FM radio does
not support loudspeaker function.
Page 55

• When the radio is on, long press Navigation left/
right key for Auto search when a channel is found
searching will stop. When you short press Navigation
left/right key to search channel skip +/-0.1 MHZ.
Four ways Navigation Key FM Radio Function
D Down
L Left
R Right
Key 1~10 To change radio channel, by
Turn On/Off radio
Short press to skip -0.1 MHZ
Long press enable channel
auto search
Short press to skip +0.1 MHZ
Long press enable channel
auto search
pressing the corresponding
number key
Using the radio
When the radio is on, press Option and select
• Channel list:
To save the channel you have found, press
Option and select Edit. Key in the name of the channel
and Frequency press Done. You can save 10 radio
channels in the handset.
• Manual input: if you know the frequency of the radio
channel you would like to listen to (between 87.5 MHz
and 108.0 MHz), key it in and press OK.
• Auto search: if you want to search radio channel,
press
Yes when Preset list confirm message show up.
The search stops when a channel has been found.
• Settings: FM radio setting options:
– Skin: to select background picture of FM radio. There
are three skin pictures for users choose.
– Background play:
On: allow radio continuing playing when exit FM radio.
Off: when user exits FM radio, radio will paused.
– Loud Speaker
! Note
You can normally make a call or answer an incoming call
while listening to the radio. The volume of the radio is muted.
When you end the call, the radio volume will automatically
be turned up again. Also, when an application using GPRS
or HSCSD connection is sending or receiving data, it may
interfere with the radio.
| MULTIMEDIA
55
Page 56

MULTIMEDIA
Photo gallery [Menu 6-4]
Photo gallery is a folder under Multimedia folder. It is a
folder to save the photo images. You can view image in
this folder.
• Press Option and choose one of the following
functions that may be available for the selected file:
View, Forward, Rename, Delete, Delete all Files and
Sort. The number of photo file storage is subject to the
image quality you store.
• To use Mass storage (USB cable)
MULTIMEDIA
! Note
System default requirement: PC hardware and software for
Windows 2000/XP. For more information, please see below
“Install USB Software for Window 2000”.
! Note
Please use USB according to the standard steps as below;
otherwise the data may lose or cause damage.
56
If you want to add/remove music and images to the
Handset, connect it to a PC with USB cable
Type
A
USB port (Type
A) on PC
Type
USB Cable
B
USB port (Type B)
on the player
Connecting the handset to PC
• After connected the handset and PC, choice “Mass
Storage” handsets will automatic turn off
• The OS will automatically generate a “Removable
Disk” in My Computer. You can enter the disk to
access the data in the handset.
• You can access to the handset from the Window
Explorer (Windows 2000/XP) / File Manager
or My
Computer and add / erase audio, image or other files
to the handset.
Page 57

• If you want to remove the USB cable from the handset
after adding or erasing files,
– Double click the Remove Hardware icon in the taskbar
tray.
– Click Stop when the message “You can remove
hardware now” appears on the screen, remove the
handset.
Copy files into the handset
• After connecting the handset to a PC successfully,
there will be a new disk “Removable Disk” in My
computer.
• Enter the directory stored your music, image or other
files and select them thru your mouse. After selection,
your mouse on the selected files and click right button
of your mouse to select “Copy”, enter the
Disk from My Computer, and click right button of your
mouse to select “Paste” then the music files will be
copied into the handset.
Removable
Voice recorder [Menu 6-5]
• Voice recorder is a simple voice recording
application, which provides functionalities for the user
to manage voice files. User can play recorder voice
use loudspeaker or headphone. The loudspeaker is
default setting for playing recorder voice.
• Within
Voice recorder submenu, you can select
Record, List and Settings
– Record: Once recording is started, the remaining
time is displayed.
– List: you can play back or delete the recorded
voice. Press Option you can select from
Play: play the selected sound.
Delete: to delete the selected sound file.
Rename: to modify the name of the selecting sound.
Append: to append the new sound with the already
existing sound. This function only supports the
AMR file.
Forward: to forward the sound file to “Set as ring
tone” or “To MMS”.
Delete all: to delete the entire available sound files.
– Settings: there are two types format setting: AMR
or WAV
| MULTIMEDIA
57
Page 58

MULTIMEDIA
Install USB Software for Window 2000
! Note
Please upgrade Windows 2000 to Service Pack 4 for
supporting the USB disk function.
For more information about Windows 2000 Service Pack
4, please visit http://www.microsoft.com/windows2000/
downloads/servicepacks/default.asp
You can also download the Service Pack 4 from Microsoft
MULTIMEDIA
web site.
Copyright © 2004 Microsoft Corporation, One Microsoft
Way, Redmond, Washington 98052-6399 U.S.A. All rights
reserved.
Install USB Software for Window 98
! Note
Please use USB according to the standard steps as below;
otherwise the data may lose or cause damage.
58
• Step 1 Open Control Panels
Press Start ➝ Setting ➝ Control panels
Page 59

• Step 2 Open System
From Control panels ➝ System
Connect it to a PC with USB cable, choice “Mass
Storage” handsets will automatic turn off.
Type
A
USB port (Type A) on PC
Type
USB Cable
B
USB port (Type B)
on the player
USB Config:
Mass storage
COM Port
OK Back
• Step 3 Open Device Manager
| MULTIMEDIA
59
Page 60

MULTIMEDIA
• Step 4 Double Click the Unknown USB Device
Unknown USB device
MULTIMEDIA
• Step 5 Click the
Reinstall Driver button
60
• Step 6 Press
• Step 7 Press
Next button
Next button
Page 61

• Step 8 Assign the location where the device driver
locate. [The driver location is depending on user.]
• Step 10 Windows will search and install the USB
driver and Install complete
| MULTIMEDIA
• Step 9 Press
Next button
61
Page 62

MULTIMEDIA
• Step 11 You can see the device in the Device
Manager
In the Device Manager, you can see USB Mass Storage
Device show up.
MULTIMEDIA
! Note
You can download USB driver for Window 98 from LG WOW
site.
62
Page 63

MY STUFF
Java [Menu 7-1]
You can enjoy various Java game in this menu. You can
also change the DNS setting required for accessing
Java services. If necessary, please view the memory
status for Java games before download it.
When you access the Java menu, the list of default
game appears. Once you have installed Java games,
the games are added to the list.
! Note
Java service may not be available, depending on your
service provider.
Java game options. [Menu 7-1-1]
• Launch: To activate Java game.
• Setting: Java game setting
• Information : Show Java game detail information.
Java setting: [Menu 7-1-2]
This function design for Java use only.
• Java audio: Use Navi-right/left to setup Java audio
volume.
• Java vibration: Use Navi-right/left to setup Java
vibration On/Off.
• Java network: Use Navi-right/left to select Java
network.
• Free data space: to show free Java space information.
• Heap size: to show Java size information.
Games [Menu 7-2]
Your phone software includes some games specially
designed for this handset.
You can launch a game by pressing Menu and select
My stuff and select Games.
Use Navigation key select a game or Game setting,
press
OK.
Press
OK again, you can choose the option you want:
Resume, Start game, Game level, Best grades and
Game help.
Game setting [Menu 7-2-1]
This function design for game use only.
• Audio: turn On / Off effect of game.
• Vibration: turn On / Off effect of game.
| MY STUFF
63
Page 64

MY STUFF
File manager [Menu 7-3]
In the File manager menu, you can manage images,
photos, recordings, tones that you have.
In the
My stuff submenu press OK to enter File
manager. In the files manager screen, a list of folders
is shown.
Scroll to the desired folder and press
options, you can Open, Create folder and Format. One of
the options is available.
• Open: to view the files in the folder.
MY STUFF
64
– For selected folder, press Option, one of the options is
Open, Create folder, Rename, Delete, Sort.
• Create folder: to add a new folder into list
• Format: you can format the file list.
Option select
Page 65

BROWSER
Your phone supports both SIM service and WAP
(Wireless Application Protocol) services. These
services allow you to browse all kinds of information
such as news, weather reports, flight schedules,
dictionaries, etc. Even more, you can connect to the
Internet and go to your favorite WAP enabled web sites.
The following sections explain how to setup and use
these wonderful services.
SIM service [Menu 8-1]
In addition to the functions available in the phone, your
SIM card* may provide additional services under the
SIM service submenu**. By entering the submenu, you
can find a list of services provided by your operator.
The requested information may be responded via voice
speech or Text message (Short Message Service).
Additional charges may apply for services involve
sending a text message or making a phone call.
* Some SIM cards may not support SIM service. In such case, you won’t be able to see the SIM service submenu.
** SIM service vary from operator to operator. The name and contents of the menu depend entirely on the SIM card provided by your
operator. For availability, rates and information on using the SIM service, contact your network operator, service provider or other
third-party vendor.
WAP [Menu 8-2]
The WAP service enables your phone to surf the
Internet. Your phone offers you several default profiles
to choose from.
These default profiles are based on the connection
settings of major operators at the time this phone was
manufactured. You can apply the desired connection
settings by simply activating the respective profile and
you are ready to go.
Home [Menu 8-2-1]
For each profile you are allowed to store a Home URL
(Universal Resource Locator) address. You can quickly
access the homepage of the active profile by selecting
Home when the WAP menu is displayed.
| BROWSER
65
Page 66

BROWSER
Bookmarks [Menu 8-2-2]
You can save the addresses of web pages as
bookmarks in the phone’s memory.
• Press
Menu, and select Browser WAP and
Bookmarks.
• Choose the bookmarks you want to use and press
Option.
• Select
Goto will open a connection to the page
associated with the bookmarks. You can also Edit or
Delete the selected bookmarks, or Add bookmark by
entering the title and URL address.
BROWSER
Recent pages [Menu 8-2-3]
You can view the recent pages that you have read.
Press OK to connect to the selected page.
Go to URL [Menu 8-2-4]
Key in the URL address and press OK to connect to the
address.
66
Service inbox [Menu 8-2-5]
The received WAP push message will be stored in
the Service Inbox. This means that a service provider
sends WAP content to your phone without having you
to do anything. You can get updated news or new WAP
settings from your service provider.
In the push message list, press
Delete push message.
Options key to Accept or
Settings [Menu 8-2-6]
• Edit profile
The WAP settings are stored in a WAP profile. In most
cases you only need to use one of the default profiles
to access the Internet. The settings are different from
operator to operator. Please consult your operator or
service provider for the correct settings and proceed
with care. Wrong settings will cause the connection to
fail.
Edit profile submenu, press OK key to enter
– Within
profile editing list.
Page 67

– Activate profile: press OK to activate the selected WAP
profile.
– Rename profile: you can rename the selected WAP
profile.
– Home: enter a title and address of the WAP web site
as the homepage. You can only have a homepage for
each profile.
- Press Menu, select Browser, WAP, Settings and Edit
profile
then press OK.
- Choose the desired profile from the setting list first
and then press
- Choose
- Key in the Home title and URL address then press
OK
.
– Data account: users are only allowed to choose a data
account. The list of the accounts should be consistent
to those under Service menu – Data Account.
– Connection: select Connection-oriented,
Connectionless or HTTP from the list.
– Username: enter your user ID for the WAP gateway.
– Password: enter your password for the WAP gateway.
OK, and select Edit profile.
Homepage and press OK.
• Browser options
– Timeout: set the timeout value for the browser. The
browser will stop connecting to the web site if the web
site does not respond within the timeout time.
– Show images: set option On or Off to view pictures
while browsing.
• Service message settings
On or Off to decide whether you want to receive
Turn
the service message or not. The message is saved in the
Service Inbox.
• Clear cache
The information or data you have accessed are stored in
the cache of the phone. A cache is a file buffer which is
used to store data temporarily.
Settings submenu, select Clear cache and press
Within
OK
.
• Clear cookies
It is advisable to clear any sensitive information like
cookies of previously visited web sites. This is to avoid
privacy and security risks if your phone is misplaced, lost
or stolen.
OK to clear all the cookies
Press
| BROWSER
67
Page 68

BROWSER
• Clear recent page list
It is advisable to clear any sensitive information about
previously visited web pages in recent page list. This
is to avoid privacy and security risks if your phone is
misplaced, lost or stolen.
OK to delete all the recent pages.
Press
• Trusted certificates
For using some services, such as banking services, you
need security certificates. After you have downloaded
the required security certificate from the Internet, you
can view the certificate and then save or delete it. If
BROWSER
you save it, the certificate is added to the list of trust
certificates under the
• View the list of Trust Certificates:
Press
Menu, select, Browser, WAP, Settings and Trust
certificates
If the security indicator is displayed during a connection,
the data transmission between the phone and the
gateway server is encrypted. However, the security
indicator does not indicate that the data transmission
between the gateway and the content server (the
location where the requested resource is stored) is
secure. It is up to the service provider to secure the data
transmission between the gateway and the content
server.
press View key.
68
Settings of WAP menu.
Data account [Menu 8-3]
To display the data account information. Default data
accounts based on major operators at the time this
phone is manufactured are provided.
There are two kinds Data Account:
GSM data [Menu 8-3-1]
Press Edit to change the data account settings,
including: Account name, Number, User name,
Password, Line type, Speed and DNS.
GPRS [Menu 8-3-2]
Press Edit to change the data account settings,
including: Account name, APN, User name, Password
and Auth. Type.
Page 69

SETTINGS
Date & Time [Menu 9-1]
Date [Menu 9-1-1]
This function allows you to set the date. After key in
press OK.
Set date format [Menu 9-1-2]
This function allows you select format of the date
display, use navigation key to change it press .
Time [Menu 9-1-3]
This function allows you to set the time. The format is
<hh:mm>.
Set time format [Menu 9-1-4]
This function allows you to select the time format, 12 or
24 hours. Use navigation key to change the format and
press OK.
! Note
The time and date format display is depend on user settings.
Auto timezone [Menu 9-1-5]
This function to sets the phone to automatically update
the time and date according to the current time zone.
Auto date/time update does not change the time set for
the alarm clock, calendar or the alarm notes, but it may
cause some alarms previously set to expire.
Display setup [Menu 9-2]
Wallpaper [Menu 9-2-1]
You can set your phone to display a background picture,
wallpaper, when the phone is in Idle mode. You can also
download wallpaper from WAP and EMS and then save
them in Folder under File manager. Your phone supports
JPEG, GIF, BMP formats.
! Note
The wallpaper and screen saver should be set 128*128. In
addition, the file size can’t be over 50kb.
! Note
If BMP format image size is over 20kb and GIF format image
size is over 40kb, the image display may getting slow and
please wait for more time to show up.
| SETTINGS
69
Page 70

SETTINGS
• To select a wallpaper pictu re
– Press Menu, and select Settings, Display setup and
Wallpaper
– With Select menu, select Default; you can chose an
image or animation as screen saver from the select
list.
– Select Default and image will be shown.
– Use Navigation key up and down to select the image
and press View to choose the desired picture then
press OK.
– To set personal wallpaper, select My folder and press
OK
SETTINGS
to open the folder in the File manager.
Use Navigation key to select the image and press OK
to select.
Screen saver [Menu 9-2-2]
• The screen saver is activated when the phone is in
idle mode and none of the phone’s function been used
for a certain time. Press any key to deactivate the
screen saver.
• Turn
Setting On to activate the screen saver.
• Select the number of timeout seconds before the
screen saver activate under waiting.
70
• In Select menu, select Default; you can chose an
image or animation as screen saver from the select
list.
– To set personal for screen saver, select My folder
press OK to open the folder in the File manager.
- Use Navigation key to select the image
Standby note [Menu 9-2-3]
• Turn on this function will enable the text to be
displayed in the Idle screen.
• Press Menu, and select Settings, Display setup and
Standby note and Note. Key in the text and press
Save. For writing information see also “Writing Text”.
Display item [Menu 9-2-4]
• Date & time
Turn this function on or off to show or hide clock and
date.
• Own number
Turn this function on or off to display or hide number.
• Network name
Turn this function on or off to display or hide your service
network name in Idle screen.
.
Page 71

Handset theme [Menu 9-2-5]
• You can change the appearance of the display, for
example, the colors and background picture, by use
themes. Your phone comes with some pre-set themes.
You can not delete these you can choose themes from
the list.
• Press OK to activate the selected theme.
LCD contrast [Menu 9-2-6]
• You can change the display contrast level on the
phone display.
• Press
Menu, and select Settings, Display setup and
LCD contrast. Use Navigation key right and left to
increase or decrease the contrast level and press OK
to save it.
Language [Menu 9-3]
This allows you to switch between different languages
and to select a language for the display texts.
Call setup [Menu 9-4]
Caller ID [Menu 9-4-1]
In the Call Setup menu, the Caller ID allows you to
check the status of whether a caller’s identification is
sent.
• In the submenu, you can choose Hide ID or Send ID or
Set by network
• The phone must be registered with a network, if you
have selected Set by network
Call waiting [Menu 9-4-2]
• By activating the function the network service allows
you to answer an incoming call while you have a call
in progress.
• In the submenu, select Activate and press OK
on the function. Select Deactivate to switch off the
function.
• You can check Function Status while you select Query
status
.
.
to turn
.
| SETTINGS
71
Page 72

SETTINGS
Call divert [Menu 9-4-3]
This network service allows you to redirect incoming
calls from your phone.
• All voice calls
All voice calls are diverted and no ringing tone is played
at an incoming call.
• If out of reach
Voice calls are diverted when your phone is switched off
or outside of the network service area.
• If no reply
Voice calls are diverted when you don’t answer a call
SETTINGS
within the present timeout.
• If busy
Voice calls are diverted when your number is busy. If
divert busy is activated, rejecting an incoming call will
also divert the call.
• All data calls
All data calls are diverted.
72
• Cancel all
In the submenu, select Activate and press OK to
switch on function. As same way, select Deactivate to
switch off the function.
You can check
Function status while while you select
Query status.
Call barring [Menu 9-4-4]
This network service allows you to restrict incoming
calls and outgoing calls from your phone. A barring
password is required for using the function.
• Outgoing calls
– To bar all outgoing calls.
– To bar outgoing international calls.
– To bar outgoing international calls except home.
• Incoming calls
– To bar all calls.
– To bar all when roaming.
• Cancel all
– This cancels all call barring.
– This service may sometimes not be supported by your
network. A network code is required to access this
service.
Page 73

• Change barring password
To set barring call, you are asked to input your barring
call password. This menu enables you to change your
barring call password. Please contact your service
operator for the default password setting.
Line switching [Menu 9-4-5]
Line for outgoing calls is a network service to select
phone line 1 or 2 that is subscriber number for making
calls, within call setup submenu, select Line switching,
and choose Line1 or 2 Press OK.
• If you select Line2 and have not subscribed to this
networks service, you will not be able to make
call. However, calls on both lines can be answered
regardless of the selected line.
Call time reminder [Menu 9-4-6]
You can turn on/off the remind duration of a call.
Call time display [Menu 9-4-7]
Turn on/off the total number of call minutes record used
by current phone.
Auto redial [Menu 9-4-8]
Select On and your phone will make a maximum of ten
attempts to connect the call after an unsuccessful call
attempt.
Closed user group [Menu 9-4-9]
This is a network service that specifies the group of
people whom you can call and who can call you. For
more information contact your network operator or
service provider.
Network [Menu 9-5]
The function allows you to set network related settings.
Selection mode [Menu 9-5-1]
• The phone automatically selects one of the cellular
networks available in your area, when Auto mode is
selected.
• In
Manual mode the phone will show a list of available
network which you can choose from. Only networks
that have a roaming agreement with your home
network operator are allowed to be selected.
| SETTINGS
73
Page 74

SETTINGS
Preferred network [Menu 9-5-2]
• The network list is used when the mode is set to
automatic. The order of the preferred network list
indicates the search priority.
• Press
Option key to edit preferred networks: Add from
list, Create new, Change priority and Delete.
Band selection [Menu 9-5-3]
The wireless phone described in this guide is approved
for use on GSM900, GSM1800, GSM1900, GSM900/1800
(Dual band) networks. You can choose band from the
list.
SETTINGS
GPRS connection [Menu 9-5-4]
“When need" and / Always” options are available for
the GPRS connection status. Press OK to change option.
Security setup [Menu 9-6]
PIN lock [Menu 9-6-1]
This function allows you to lock the phone with a
specific SIM card. The feature is designed to prevent
the use of your phone by means of another person’s
SIM cards if your phone becomes lost.
74
You can switch on or off to activate the SIM lock
function. If you switch SIM lock on, every time you turn
phone on, you need to enter the PIN number to set the
request on.
Phone lock [Menu 9-6-2]
You can switch on or off to activate/deactivate the
Phone lock function to protect your phone. If you switch
phone lock on, you need to enter the password to
enable the function.
! Note
The default phone lock password is 0000.
Auto key lock [Menu 9-6-3]
This allows you to lock the phone’s keypad to prevent
accidental key presses.
In submenu, select the key lock timer after the last key
press will be disabled, then press OK.
Fixed dials [Menu 9-6-4]
You can switch mode on and off.
This function dials only the numbers in the fixed dialing
number (FDN). To save and edit numbers on the list, you
need the PIN2 code.
Page 75

Barred dials [Menu 9-6-5]
You can switch mode on and off.
Change passwords [Menu 9-6-6]
• PIN
This allows you to change the PIN number.
• PIN2
This allows you to change the PIN2 number.
• Phone lock
This allows you to change the phone lock password.
Restore settings [Menu 9-7]
Within this menu you can reset the menu settings to
their original values. The security code is needed for
this function.
Setting values will be restored to default values. Those
values includes Profile, Ring tone, Call log, Caller
groups, Time format, Home city, Wallpaper, Screen
saver, Theme, Messages counter, WAP setting etcs.
| SETTINGS
75
Page 76

ACCESSORIES
There are various accessories for your mobile phone.
You can select these options according to your personal communication requirements.
ACCESSORIES
!
76
Standard Battery
Headset
Allows hands free operation.
Note
• Always use genuine LG accessories.
• Failure to do this may invalidate your warranty.
• Accessories may be different in different regions; please check with our regional service company or agent for further enquires.
Travel Adapter
This charger allows you to
charge the Phone’s battery.
Data cable
You can connect your phone to PC to
exchange the data between them
.
Page 77

General
Product name : KG190
System : GSM 900 / DCS 1800
Ambient temperatures
Max : +55°C
Min : -10°C
TECHNICAL DATA
| TECHNICAL DATA
77
Page 78

TROUBLESHOOTING GUIDE
To save the time and expense of an unnecessary service call, perform the simple checks in this section before
contacting a service professional.
Problem Possible Corrective measures
TROUBLESHOOTING GUIDE
78
Telephone cannot be switched on Please take out battery and insert battery again then press
Battery empty Charge battery. Check charging indicator in the display.
The battery doesn’t charge properly or the phone
sometimes turns itself off
Usage time of battery becomes shorter If the battery time is short, it may be due to the user
Charging error – Temperature out of range Make sure the ambient temperature is right, wait for a
Charging error – Charger defective If the charger does not warm up, replace it.
Charging error – Wrong charger Only use original LG accessories.
Charging error – Battery defective Replace battery.
Forget the, phone code or password The default phone code is “0000”.
Enter PUK The PIN code has been entered incorrectly three times in
E to power on the phone.
Wipe the charging contacts both on the phone and on the
battery with a clear soft cloth.
environment, or large volume of calls, or weak signals.
while, and then charge again.
succession, and the phone is now blocked. Enter the PUK
supplied by your service provider.
Page 79

Problem Possible Corrective measures
Phone loses network The network connection has been lost. You may be in a
You have entered a number but it was not dialed
Your correspondent cannot hear you speaking Be sure that you have switched off the loudspeaker. Be sure
The audio quality of the call is poor Check the signal strength indicator on the display
No number is dialled when you recall a Contacts
entry
If the above guidelines do not help you to solve the
problem
weak signal area. Move and try again. You are trying to
access an option for which you have no subscription with
your service provider. Contact the service provider for
further detail.
Be sure that your phone is switched on. Press E for
more than one second. Be sure that you are accessing the
network service. Be sure that you have not set an incoming
call barring option.
that you are holding the phone close enough to your mouth.
The microphone is located at the bottom of the phone.
. The
number of bars indicates the signal strength from strong
to weak . Try moving the phone slightly or moving closer
to a window if you are in a building.
Use the Contacts/Search feature to ensure the number has
been stored correctly. Resave the number, if necessary.
Take note of the model number of your mobile phone and a
clear description of the problem. Contact your phone dealer
or LG Service Center for help.
| TROUBLESHOOTING GUIDE
79
Page 80

80
KG190
Page 81

MEMO
81
Page 82

MEMO
82
 Loading...