

LG KF750 Owner’s Manual [zh]

P/N : MMBB0274814 (1.1) H
KF750
User Guide
E N G L I S H
简 体 中 文
ELECTRONICS INC.
KF750
Us er G ui de
www.lgmobile.com

Bluetooth QD ID B013855
KF750 User Guide
Some of the contents in this
manual may differ from your phone
depending on the software of the
phone or your service provider.
Congratulations on your purchase of the
advanced and compact KF750 phone by
LG, designed to operate with the latest
digital mobile communication technology.
Disposal of your old appliance
1 When this crossed-out wheeled bin symbol is attached to
a product it means the product is covered by the European
Directive 2002/96/EC.
2 All electrical and electronic products should be disposed of
separately from the municipal waste stream via designated
collection facilities appointed by the government or the local
authorities.
3 The correct disposal of your old appliance will help prevent
potential negative consequences for the environment and
human health.
4 For more detailed information about disposal of your old
appliance, please contact your city office, waste disposal service
or the shop where you purchased the product.

Setup
Your standby screen
The basics
Get creative
Get organised
The web
Settings
Accessories
01
02
03
04
05
06
07
08

4
LG KF750 | User Guide
Contents
Setup
Getting to know your phone .............6
Installing the USIM and battery ........7
Memory card ............................................9
Your standby screen
Touch screen tips............................10
The status bar .................................. 11
The basics
Calls ..........................................................12
Making a voice call ........................12
Making a video call ........................12
Making a voice/video call from
Contacts ............................................. 12
Making international calls........... 13
Answering and rejecting a call ..13
Speed dialling .................................. 13
Making a second call..................... 13
DTMF tones ......................................14
Viewing your call logs ................... 14
Using call divert ..............................14
Using call barring ...........................15
Contacts ..................................................16
Searching for a contact ................ 16
Adding a new contact ..................16
Contact options .............................. 17
Creating a group.............................17
Using service dial numbers ........18
Viewing your own number ......... 18
Creating a business card .............. 18
Messaging ..............................................19
Messaging ......................................... 19
Sending a message .......................19
Entering text ....................................19
T9 predictive ....................................19
Message folders ..............................20
Using templates .............................. 20
Using emoticons............................. 20
Get creative
Camera .................................................... 21
Taking a quick photo ................... 21
After you’ve taken your photo ..21
Using the ash ................................. 22
Adjusting the brightness ............. 22
Choosing a shot mode ................. 22
Using the advanced settings .....23
Video camera ........................................ 25
Shooting a quick video ................25
After you’ve shot your video ...... 25
Using the advanced settings .....25
Your photos and videos ....................27
Capturing an image from a
video ................................................... 27
Editing your videos ........................ 27
Trimming the length of your
video ................................................... 27
Merging two videos together .... 27
Merging a photo with a video ...28
Adding text to a video .................. 28
Overlaying a photo ........................ 28
Multimedia............................................. 30
Games and Applications.............. 30
M-Toy menu .....................................30
Playing a game ................................ 30
Flash contents .................................30
Using options viewing the SWF/
SVG le ............................................... 30
Documents .......................................30

5
Transferring a le to your
phone .................................................31
Viewing a le .................................... 31
Others ................................................. 31
Movie maker ....................................32
Creating a movie ............................32
Music................................................... 32
Playing a song .................................33
Editing a playlist .............................33
Using the radio ................................ 33
Searching for stations ................... 34
Using voice recorder .....................35
Get organised
Organiser ................................................36
Adding an event to your
calendar .............................................36
Adding an item to your to do
list......................................................... 36
Tools .........................................................37
Setting your alarm .........................37
Using your calculator .................... 37
Using the stopwatch ..................... 37
Converting a unit ...........................38
Adding a city to your world
time .....................................................38
The web
Browser ...................................................39
Accessing the web ......................... 39
Adding and accessing your
bookmarks ........................................39
Using RSS reader ............................40
Adding the Feed ............................. 40
Updating the RSS reader ............. 40
Changing the web browser
settings ..............................................40
The web ..................................................41
Using Bluetooth .............................. 41
Sending and receiving your les
using Bluetooth ..............................41
Pairing with another Bluetooth
device .................................................42
Using a Bluetooth headset .........42
Settings
Settings ...................................................43
Changing your screen settings .43
Personalising your proles .........43
Changing your phone settings .44
Using Date & Time..........................44
Changing your other settings....44
Changing security settings .........45
Using memory manager.............. 45
Using ight mode ..........................45
Accessories..............................46
Network service .....................47
Technical data ........................47
Guidelines
Guidelines for safe and ecient
use ............................................................. 49

6
LG KF750 | User Guide
Getting to know your phone
Main LCD
• Top: Signal strength,
battery level and
various functions.
• Bottom: Soft key
indications.
Left soft key/Right
soft key
Performs the function
indicated at the bottom
of the display.
Send key
Dials a phone number
and answers incoming
calls.
Inner camera lens
Navigation touch pad
• In standby mode:
Quick menu
Contacts list
(Right) Messaging
(Left) Profiles
• In menu: Navigates
between menus.
End/Power key
Ends or rejects a call.
Turns the phone on/off.
Press once to return to
the standby screen.
Clear key
• Deletes a character
with each press.
Earpiece
Setup
7
01
02
03
04
05
06
07
08
Setup
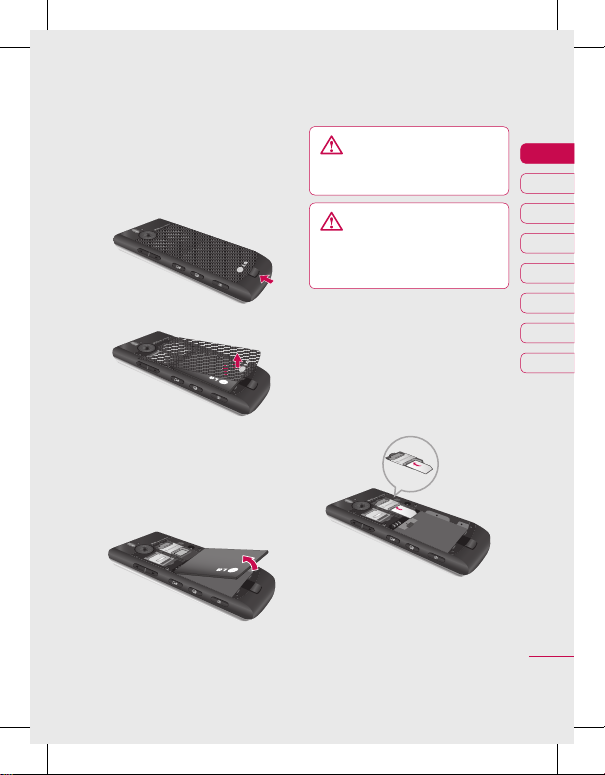
Installing the USIM and battery
1 Remove the battery cover
Press and hold down the battery
release button at the top of the
phone and lift off the battery cover.
2 Remove the battery
Hold the top edge of the battery
and lift it from the battery
compartment using the battery
cover.
WARNING: Do not use your
ngernail when removing the
battery.
WARNING: Do not remove
the battery when the phone is
switched on, as this may damage
the phone.
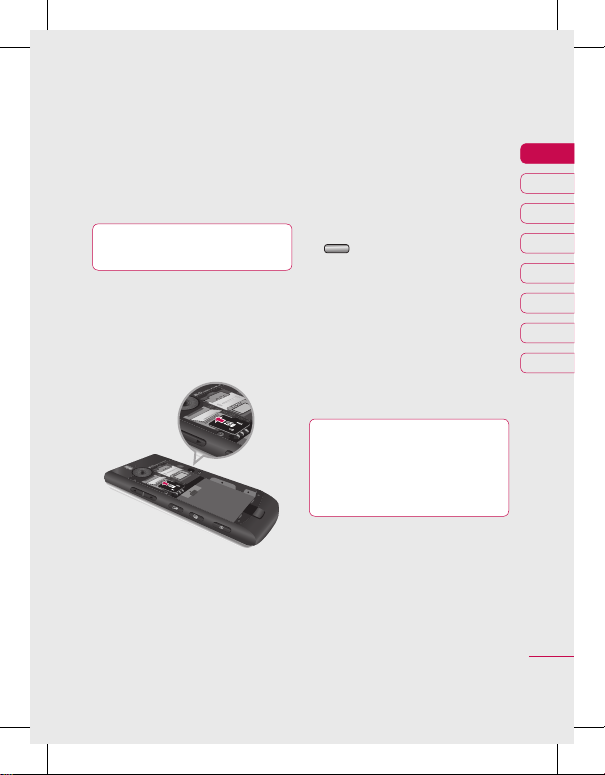
3 Install the USIM card
Slide the USIM card into the USIM
card holder. Make sure that the
gold contact area on the card is
facing downwards. To remove the
USIM card, pull it gently in the
reverse direction.
8
LG KF750 | User Guide
Setup
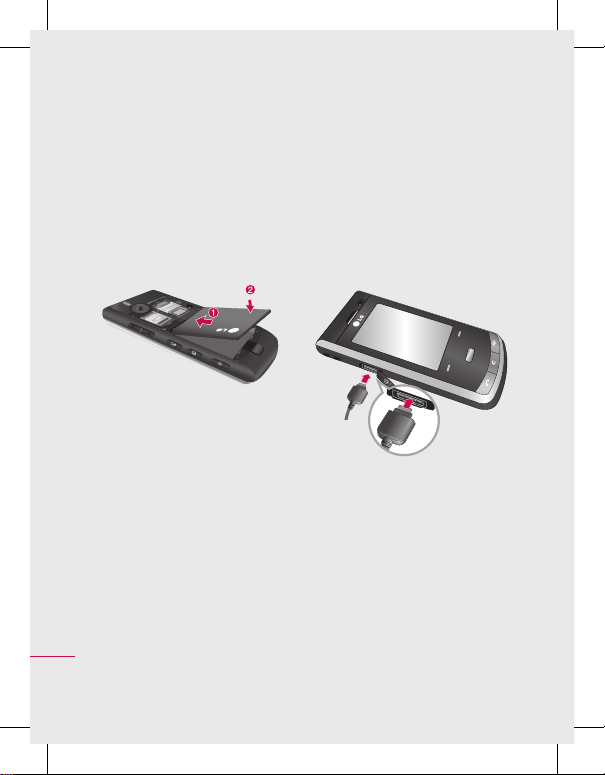
4 Install the battery
Insert the top of the battery first
into the top edge of the battery
compartment. Ensure that the
battery contacts align with the
terminals on the phone. Press down
the bottom of the battery until it
clips into place.
5 Charging your phone
Slide back the cover of the charger
socket on the side of your KF750.
Insert the charger and plug into
a mains electricity socket. Your
KF750 will need to be charged until
a message reading “Battery full”
appears on screen.
Installing the USIM and battery
9
01
02
03
04
05
06
07
08
Setup
Memory card
Installing a memory card
You can expand the memory available
on your phone using a memory card.
The KF750 will support up to a 4GB
memory card.
TIP: A memory card is an optional
accessory.
1 Remove the battery cover as before.
2 Slide the memory card into the slot
at the top, until it clicks into place.
Make sure that the gold contact
area is facing downwards.
3 Replace the battery cover.
Formatting the memory card
If your memory card is already
formatted, you can begin using
it straight away. If your card isn’t
formatted, you will need to do so.
1 From the standby screen press
then select Settings and
choose Phone settings.
2 Select Memory manager then
choose External memory.
3 Select Format and then confirm
your choice.
4 Enter the password, if one is set,
and your card will be formatted and
ready to use.
TIP! To change your
default storage destination, open
Memory manager from the
Phone settings menu and select
Primary storage settings.
NOTE: If your memory card has
existing content it will automatically
be filed in the correct folder, for
example, videos will be stored in the
My Videos folder.
10
LG KF750 | User Guide
Your standby screen
Whenever your KF750 isn’t in use it will
return to your standby screen. From
here you can access menu options,
make a quick call and change your
profile - as well as many other things.
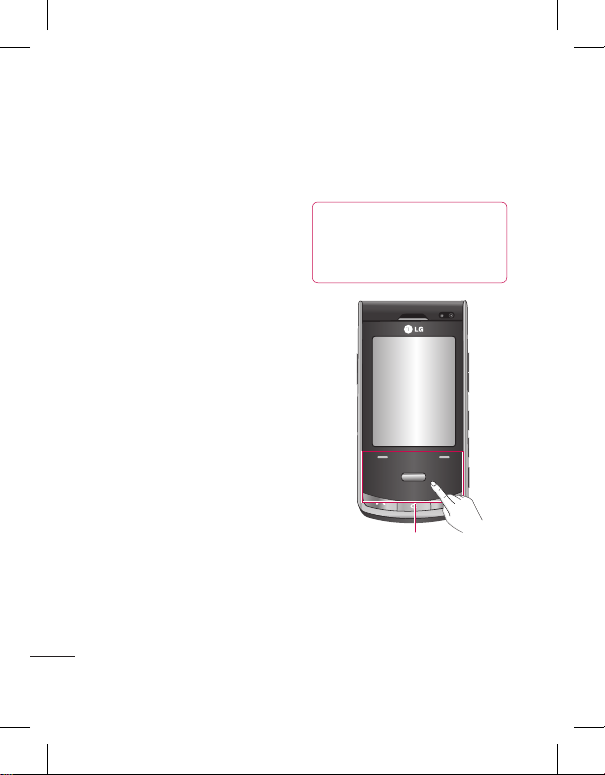
Touch screen tips
If you press the touch screen button
on the right-hand side of the phone
the screen will switch to an interactive
touch screen keypad.
Press and hold the touch screen
button from the standby screen to
enter a further multimedia menu.
To select an item, touch the icon on
the touch screen. Your KF750 will
vibrate slightly when it recognises that
you’ve touched an option.
• There’s no need to press too hard as,
the touchscreen is sensitive enough
to pick up on a light touch.
• Use the tip of your finger to touch
the option you require. Be careful
not to touch any other keys.
• Don’t cover the phone with a case
or cover, as the touch screen will not
work with any material covering it.
•
The touch pad below the screen
can be used as a four way arrow
pad to navigate you through the
phone menus.
TIP! Use the touch screen
for fast and easy access to your
Music, Photo, M-Toy, Document,
FM radio.
Touch pad
NOTE: When the screen light goes off,
you can press the camera key on the
right hand side of the phone to restore
the standby screen.
Your standby screen
11
01
02
03
04
05
06
07
08
Your standby screen
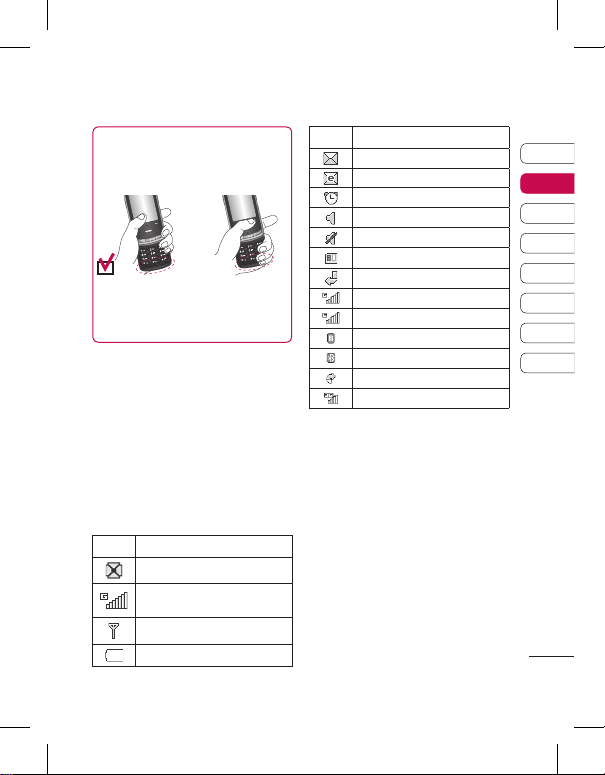
Advice to the customer
In order to allow better antenna sensitivity
LG suggest that you hold the handset as
shown below.
X
Please do not cover the antenna area with
your hand during a call or when using
a Bluetooth connection. It may reduce
signal quality.
The status bar
The status bar indicates, using various
icons, things like signal strength, new
messages and battery life as well as
telling you whether your Bluetooth or
GPRS is active.
Below is a table which explains the
meaning of icons you’re likely to see in
the status bar.
Icon Description
Multitasking
Network signal strength
(number of bars will vary)
No network signal
Battery empty
Icon Description
New text message
New email
An alarm is set
Normal profile in use
Silent profile in use
External memory
Calls are diverted
GPRS available
EDGE in use
Roaming
Bluetooth is active
Calls are rejected
3G available

12
LG KF750 | User Guide
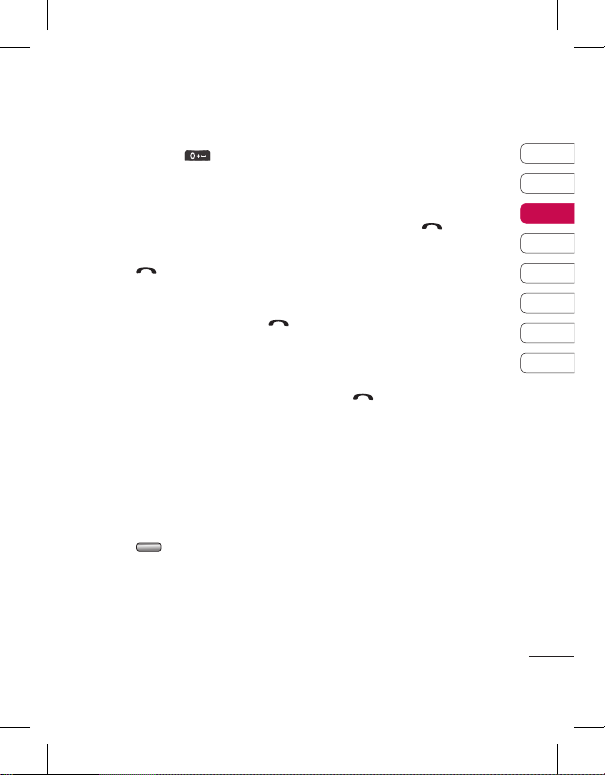
Making a voice call
1 Enter the number including the full
area code.
To delete a digit press .
To delete all digits press and hold
.
2 Press to make the call.
3 Press or close the handset to
finish the call.
Making a video call
You can make a video call in a 3Gcovered service area if the user you are
calling also has a 3G video phone in a
3G-covered service area. You can also
receive video calls. To make a video
call, do the following.
1 Enter the phone number, as before.
2 If you do not want to use the
speakerphone, ensure you have the
headset plugged in.
3 To start the video function, press
the left soft key Options and
select Make video call. You will be
notified that you will need to close
other applications to make the
video call.
NOTE: The video call may take
some time to connect. Please
be patient. While the video call
is connecting, you will see your
own image; after the other party
has answered, their image will be
displayed on the screen.
4 Adjust the camera position if
necessary.
5 Press to finish the call, or close
the handset.
Making a voice/video call from
Contacts
It’s easy to call anyone whose number
you have stored in your Contacts.
1 Press the down key on the
navigation touch pad to access the
contacts list.
2 Scroll to the contact to make a call.
3 Press to make a voice call. Press
the left soft key and select Make
video call to make a video call.
4 Press to finish the call.
Calls
The basics
13
01
02
03
04
05
06
07
08
The basics
Making international calls
1 Press and hold for the
international prefix. The ‘+’ character
prefixes the international access
code.
2 Enter the country code, area code,
and the phone number.
3 Press .
Answering and rejecting a call
When your phone rings press the
hard key to answer the call.
Press Slient key to mute the ringing.
This is great if you’ve forgotten to
change your profile to Silent for a
meeting!
Press the End key to reject the
incoming call.
Speed dialling
You can assign a frequently-called
contact to a speed dial number.
1 Press and select Contacts.
2
Select
Speed dials.
3 Your Voicemail is set to speed dial 1.
Select any other number to assign it
to a speed dial contact.
4 Your address book will open. Select
the contact you’d like to assign to
that number.
To call a speed dial number:
1 Press the assigned number then
press the send key , or
2 Press and hold the assigned number
until the contact appears on screen.
Making a second call
1 During your initial call, touch the left
soft key and select Add new call.
2 Dial the number or search your
contacts.
3 Press to connect the call.
4 Both calls will be displayed on the
call screen. Your initial call will be
locked and the caller put on hold.
5 Select Swap to change between
the calls.
6 To end one or both calls select
Options ➝ End followed by All
or Active.
NOTE: You will be charged for each
call you make.
14
LG KF750 | User Guide
The basics
Calls
DTMF tones
DTMF allows you to use numerical
commands to navigate menus
within automated messages. DTMF is
switched on as default.
Viewing your call logs
Press , then select Calling ➝
Call logs.
Choose to view:
All calls - View a complete list of all of
your dialled, received and missed calls.
Dialled calls - View a list of all the
numbers you have called.
Received calls - View a list of all the
numbers that have called you.
Missed calls - View a list of all the calls
you have missed.
Press , select Calling.
Before Calling you can also choose
to view:
Call durations - View the duration of
all your sent and received calls.
Data volume - View the amount in
kilobytes of all your received and
sent data.
Call costs - View the charges applied
to your dialled numbers (this service is
network-dependant. Some operators
are unable to support it).
TIP! From any calls list,
touch the left soft key and Delete
All to delete all the recorded
items.
Using call divert
1 Press , then select Calling.
2
Select Call divert
and choose
Voice calls and/or Video calls.
3 Choose when to divert all calls ;
when the line is busy, when there
is no answer or when you are not
reachable.
4 Input the number you’d like to
divert to.
5 Select Activate.
NOTE: Charges may be incurred for
diverting calls. Please contact your
network provider for details.
TIP! To turn o all call
diverts, choose Deactivate all.

15
01
02
03
04
05
06
07
08
The basics
Using call barring
1 Press , select Calling.
2 Select Call barring and choose
Voice calls and/or Video calls.
3 Choose any or all of the five options:
All outgoing
Outgoing international
Outgoing international calls
except home country
All incoming
Incoming when abroad
4 Enter the call barring password.
Please check with your network
operator for this service.
TIP! Select Fixed dial number
to turn on and compile a list of
numbers that can be called from
your phone. You’ll need your PIN2
code from your operator. When
activated, only numbers included
in the xed dial list can be called
from your phone.
16
LG KF750 | User Guide
The basics
Contacts
Searching for a contact
There are two ways to search for a
contact:
From the standby screen
1 From the standby screen touch the
down key on the touch pad to open
the address book.
2 Press the number key
corresponding to the first letter of
the contact you’d like to view. So, for
‘Home’ press 4 (GHI) twice.
TIP! You can search by
group by touching the left soft
key and selecting Search by
group. This will bring up a list of
all your groups.
From the main menu
1 Select Contacts.
2 Select Search and enter the first few
letters of the contact you’d like to
find using the keypad.
3 Your address book will bring up a
list of the contacts corresponding to
the letters you’ve entered.
Adding a new contact
1 Press and select Contacts.
2 Select Add new.
3 Choose whether to save the contact
to your Handset or USIM.
4 Enter the first and last name of your
new contact. You do not have to
enter both, but you must enter one
or the other.
5 Enter up to five different numbers
and assign a type for each. Choose
from Mobile, Home, Office, Pager,
Fax, VT and General.
6 Add up to two email addresses.
7 You can assign the contact to a
group. Choose from No group,
Family, Friends, Colleagues,
School or VIP.
8 You can also add a Homepage,
Home address, Company name,
Job title, Company address and
a Memo.

17
01
02
03
04
05
06
07
08
The basics
Contact options
There are many things you can do
when viewing a contact. Here’s how to
access and use the options menu:
1 Open the contact you’d like to use.
2 Press the left soft key to open the
list of options.
From here you can:
Send message - Send a message or
an email to the contact.
Send business card - Send the
contact’s details to another person
as a business card. Choose to send
as a Text message, Multimedia
message, Email or via Bluetooth.
Make voice call - Call the contact.
Make video call - Make a video call
to the contact.
Mark/Unmark - Mark your contacts
for multiple seletion.
Search by - You can search the
entry by number or group.
Save to USIM/Handset - Choose to
move or copy to the USIM card or
handset (depending on where you
originally saved the contact).
Delete - Delete the contact.
Text input - You can set the text
input method.
Creating a group
1 Press and select Contacts.
2 Select Groups and touch the left
soft key.
3 Select Add new group.
4 Enter a name for your new group.
5 Touch Done.
NOTE: If you delete a group, the
contacts which were assigned to that
group will not be lost. They will remain
in your address book.
TIP! You can edit an existing
group by highlighting it and
touching the left soft key. Choose
to Add a member to the group
from your contacts, assign a
Group ringtone, Rename the
group or Delete the group.

18
LG KF750 | User Guide
The basics
Contacts
Using service dial numbers
You can view the list of Service Dial
Numbers (SDN) assigned by your
service provider (if supported by the
USIM card). Such numbers include
emergency, directory enquiries and
voicemail numbers. After selecting
a service number, press to dial
that service.
Viewing your own number
Select Own number in the Contacts
menu to view your number.
Creating a business card
You can create your own business card
by selecting My business card, then
Add. Enter your name, number, email
address and image.
19
01
02
03
04
05
06
07
08
The basics
Messaging
Messaging
Your KF750 combines SMS, MMS and
email into one intuitive and easy to
use menu.
Sending a message
1 Select Messaging then choose
Create new message.
2 Choose Message to send an SMS or
MMS. A new SMS will open.
3 Select Options, then Insert, to add
an image, video, sound or subject.
4 Press Send. Enter the phone
number or select Contacts to open
your contacts list. You can add
multiple contacts.
WARNING: You will be
charged per 160 character text
message for each person that
you send the message to.
WARNING: If an image,
video or sound is added to an
SMS it will be automatically
convert to an MMS and you will
be charged accordingly.
Entering text
There are two ways to enter text:
T9 predictive and Abc manual.
To switch between text entry
methods, press and hold the key
when you have a blank message open.
To change between upper, lower and
title case press key.
To delete a character use the hard
key below the screen.
To enter a symbol select Options and
Insert.
T9 predictive
T9 mode uses a built-in dictionary
to recognise words you’re writing
based on the key sequences you
touch. Simply touch the number key
associated with the letter you want to
enter, and the dictionary will recognise
the word once all the letters are
entered. For example, press 8, 3, 5, 3, 7,
4, 6, 6, 3 to write ‘telephone’.

20
LG KF750 | User Guide
The basics
Messaging
Message folders
Inbox - All the messages you receive
are placed into your inbox. Here you
can read, reply to and forward your
messages.
Mailbox - All emails you receive are
placed into your Mailbox.
Drafts - If you don’t have time to finish
writing a message, you can save what
you’ve done so far here.
Outbox - This is a temporary storage
folder for messages that are being
sent.
Sent items - All the messages you
send are placed into your Sent items
folder.
Using templates
Create templates for the SMS and
MMS messages you send most
frequently. You’ll find some templates
already on your phone, and you can
edit these if you wish.
1 Select Messaging then choose
Templates.
2 Choose Text templates or
Multimedia templates. You can
then select Options to Add new,
Write MMS, Edit, Delete or Delete
all templates.
Using emoticons
Liven up your messages using
emoticons. You’ll find some commonly
used emoticons already on your
phone.
1 Select Messaging then choose
Emoticons.
2 Select Options to Add new, Edit,
Delete or Delete all emoticons.

21
01
02
03
04
05
06
07
08
Taking a quick photo
1 Press the capture button on the
right-hand side of the handset and
the camera’s viewfinder will appear
on the screen.
2 Holding the phone horizontally,
point the lens towards the subject
of the photo.
3 Slightly depress the capture button
and a focus box will appear in the
centre of the viewfinder screen.
4 Position the phone so you can see
the subject of your photo in the
focus box.
5 When the focus box turns green, the
camera has focused on your subject.
6 Press the capture button fully.
After you’ve taken your photo
Your captured photo will appear on
the screen. The name of the image
runs along the bottom of the screen
together with five icons down the
right side.
Back
Options
LGIM0006.jpg
New image
Go back to previous menu.
View the pictures you have taken
in your Album.
Send the photo as an MMS, Email,
via Bluetooth or Blog This.
Take another photo straight away.
Your current photo will be saved.
Use the image as wallpaper, as a
Contact image, or in your Start-up or
Shut down screen.
Delete the photo you have just
taken. The viewfinder will reappear.
TIP! In camera mode select
the Play icon to open the photo
album.
Camera
Get creative

22
LG KF750 | User Guide
Get creative
Using the flash
Flash is set to Auto by default, but
there are other options.
1 Select from the top right corner
of the viewfinder to enter the flash
sub-menu.
2 There are three flash options:
On - Your camera will always flash
when taking a picture.
Auto - Your camera will assess
whether or not the flash is necessary
for a good picture.
Off - The camera will never flash.
This is useful if you want to save
battery power.
Select the flash option you’d like
to use.
3 When you’ve made your selection
the flash menu will automatically
close, ready for you to take your
picture, and the flash icon in the
viewfinder will change according to
your chosen flash mode.
NOTE: Whenever you exit the camera,
the flash setting will revert to Auto
mode. You’ll need to switch the flash
back on if you still need it when you
reopen the camera.
Adjusting the brightness
Contrast defines the difference
between light and dark in an image. A
low contrast image will appear foggy,
whereas a high contrast image will
appear much sharper.
1 Select Brightness in Settings.
2 Slide the contrast indicator along
the bar, towards for a lower
contrast, hazier image or towards
for a higher contrast, sharper
image.
Choosing a shot mode
1 Select Settings to view the
available shot modes.
2 Choose from the five options:
Normal shot -This is the default
shot type. The photo will be taken
in the normal way, as outlined in
Taking a quick photo.
Continuous shot - This enables you
to take nine shots automatically in
very quick succession.
Frame shot - Choose from one
of the fun frames to transform
your friend into a pirate or just to
decorate their surroundings.
Camera

23
01
02
03
04
05
06
07
08
Get creative
Panorama - This shot type is
great for taking a photo of a large
group of people or for capturing a
panoramic view.
Music video shot - This shot type
allows to take a shot with music
or voice.
Using the advanced settings
From the viewfinder select Settings.
Size - Change the size of the photo.
Scene mode - Set the the camera to
adjust for the environment. Choose
from Auto, Portrait, Landscape,
Night, Beach, Sports, and Party.
Brightness - Set the brightness of the
image in the viewfinder of the camera.
Effect - Choose a colour tone to apply
to the photo you’re taking.
White Balance - The white balance
ensures that any white in your photo
is realistic. In order for your camera
to correctly adjust the white balance
you may need to determine the
light conditions. Choose from Auto,
Daylight, Cloudy, Illuminate and
Indoors.
Timer - The self-timer allows you to
set a delay after the capture button is
pressed. Choose from Off, 3 seconds,
5 seconds or 10 seconds. Great for
a group photo that you want to be
part of too!
Shot mode - See page 23.
ISO - ISO determines the sensitivity of
the camera’s light sensor. The higher
the ISO, the more sensitive the camera
will be to light. This is useful in darker
conditions when the flash can’t be
used. Choose an ISO value from
Auto, ISO 100, ISO 200, ISO 400 or
ISO 800.
Quality - Super fine/ Fine /Normal
Memory in use - Choose whether
to save your photos to the Handset
memory or to the External memory.
Hide icons - Hide the icons to the side
of the viewfinder.
Focus mode - Set the camera to focus
automatically.
Sound - Select one of three different
shutter sounds.

24
LG KF750 | User Guide
Get creative
Camera
NOTE: Always select Save after
selecting a new setting to implement
the changes you’ve made.
TIP! When you exit the camera,
all your settings will return to
default, except image size and
image quality. Any non-default
settings you require will need to
be reset, for example, colour tone
and ISO. Check them before you
take your next photo.
TIP! The settings menu is
superimposed over the
viewnder, so when you change
elements of the image colour or
quality, you’ll be able to see the
image change in preview behind
the settings menu. Remember
to select Save before exiting to
apply any changes.
25
01
02
03
04
05
06
07
08
Get creative
Video camera
Shooting a quick video
1 Move the camera mode switch to
and press the centre button.
The video camera’s viewfinder will
appear on screen.
2 Holding the phone horizontally,
point the lens towards the subject
of the video.
3 Press the capture button once to
start recording.
4 REC will appear at the bottom of
the viewfinder Press the capture
button again to stop recording.
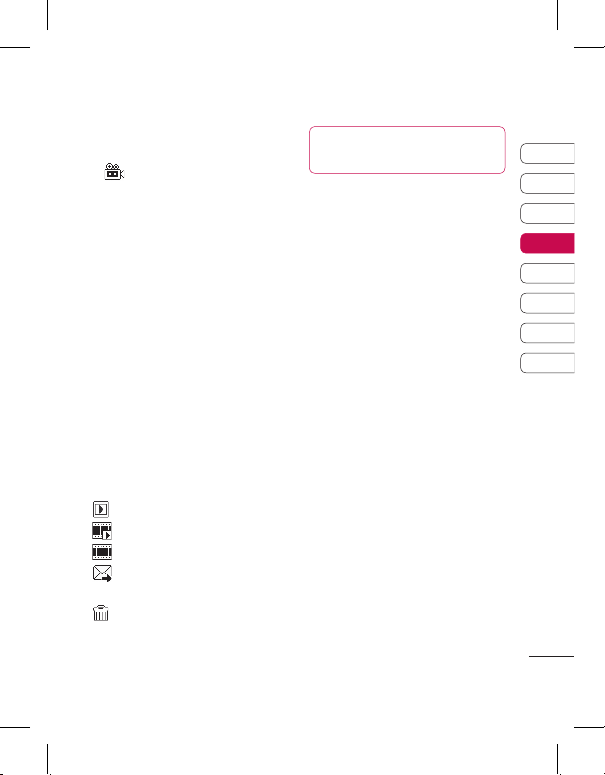
After you’ve shot your video
A still image representing your
captured video will appear on screen.
The name of the image runs along the
bottom of the screen together with
five icons down the right side.
View your video album.
Play the file.
New video is played.
Send the video as an MMS, as an
Email, via Bluetooth or YouTube.
Delete the video you have just
made. The viewfinder will reappear.
TIP! Select the album icon
to open the video album.
Using the advanced settings
From the viewfinder select Settings.
Size - Change the size of the video.
Scene mode - Set the Video for
adjusting the environment. Choose
from Auto, Portrait, Landscape,
Night, Beach, Sports, and Party.
Effect - Choose an effect tone to apply
to the video you’re making.
White Balance - The white balance
ensures that any white in your
photos is realistic. In order for your
camera to correctly adjust the white
balance you may need to determine
the light conditions. Choose from
Auto, Daylight, Cloudy, Illuminate,
Indoors.
Music video shot - This shot type
allows to take a shot with music or
voice.
Recording speed - Record the video
using Slow video, Normal, Fast
video.
Quality - Change the quality of the
video to save on memory space.
26
LG KF750 | User Guide
Get creative
Video camera
Duration - Select one of three shutter
sounds.
Memory in use - Choose whether
to save your videos to the Handset
memory or to the External memory.
Hide icons - Hide the icons to the side
of the viewfinder.
Voice - Choose Mute to record a video
without sound.
NOTE: Always touch Save after
selecting a new setting to implement
the changes you’ve made.
TIP! When you exit the video
camera all your settings will return
to default, except Video Size &
Video Quality. Any non-default
settings you require will need to
be reset, for example colour tone
and white balance. Check them
before you shoot your next video.
27
01
02
03
04
05
06
07
08
Get creative
Your photos and videos
Capturing an image from a
video
1 Play the video you would like to
capture an image from.
2 Press to pause the video on
the frame you’d like to convert to an
image and open the options menu.
3 From the options menu select
Capture.
4 The image will appear on the screen
with its assigned image name.
5 Select OK.
6 Select Back to return to the album.
7 The image will be saved in the My
stuff folder and will appear in the
album (You need to exit the album
and then re-open for this to appear).
WARNING: Some functions
may not work properly if the
multimedia le has not been
recorded on the phone.
Editing your videos
Editing features are available for all
video types except 640x480. Don’t
record in this format if you plan to edit
your video.
Trimming the length of your
video
1 Choose the video you’d like to edit,
and touch Options.
2 Select Edit and choose Trim.
3 Select Start and End to mark the
new start and end points.
Merging two videos together
1 Choose the first video you’d like to
edit, and select Options.
2 Select Edit and choose Video
merge.
3 The Videos folder will open. Choose
the video you would like to merge
to and choose Select.
4 Select Effect to choose how the
videos merge together: None,
Fade out, Pan zoom, Oval,
Uncover, Blind, Checker board or
Dissolve.

28
LG KF750 | User Guide
Get creative
Your photos and videos
5 Press to save the new merged
video. Choose to save over the
original file or as a new file.
6 Repeat these steps to merge more
videos.
Merging a photo with a video
1 Choose the video you’d like to edit,
and select Options.
2 Select Edit and choose Image
merge.
3 The Pictures folder will open.
Choose the photo you would like to
merge into your video and choose
Select.
4 Select and slide the photo to merge
it to the end or the beginning of
the video.
5 Select Effect to choose how the
photo and video merge together:
None, Fade out, Pan zoom, Oval,
Uncover, Blind, Checker board or
Dissolve.
6 Press . Choose to save over
the original file or as a new file.
7 Repeat these steps to merge more
photos.
Adding text to a video
1 Choose the video you’d like to edit,
and select Options.
2 Select Edit and choose Text
overlay.
3 Enter your text using the keypad
and press Save.
4 Press Start and mark when you’d
like the text to appear.
5 Select the area of the screen you’d
like the text to appear in.
6 Select OK to mark when you’d like
the text to disappear.
7 Select Save to save it. Choose to
save over the original file or as a
new file.
8 Repeat these steps to add more
text.
Overlaying a photo
1 Choose the video you’d like to edit,
and select Options.
2 Select Edit and choose Image
overlay.
 Loading...