

LG KF750 Owner’s Manual [in]

P/N : MMBB0299001 (1.0) G
KF750
User Guide
E N G L I S H
ELECTRONICS INC.
KF750
Us er G ui de
www.lgmobile.com

Bluetooth QD ID B013855
KF750 User Guide
Some of the contents in this
manual may differ from your phone
depending on the software of the
phone or your service provider.
Congratulations on your purchase of the
advanced and compact KF750 phone by
LG, designed to operate with the latest
digital mobile communication technology.
Disposal of your old appliance
1 W
hen this crossed-out wheeled bin symbol is attached to
a product it means the product is covered by the European
Directive 2002/96/EC.
2 A
ll electrical and electronic products should be disposed of
separately from the municipal waste stream via designated
collection facilities appointed by the government or the local
authorities.
3 T
he correct disposal of your old appliance will help prevent
potential negative consequences for the environment and
human health.
4 F
or more detailed information about disposal of your old
appliance, please contact your city office, waste disposal service
or the shop where you purchased the product.

Setup
Your standby screen
The basics
Get creative
Get organised
The web
Settings
Accessories
01
02
03
04
05
06
07
08

4
LG KF750 | User Guide
Contents
Setup
Getting to know your phone .............8
Installing the USIM and battery .....10
Memory card .........................................12
Menu map .............................................. 14
Your standby screen
Touch screen tips ................................. 16
The status bar .......................................17
The basics
Calls ..........................................................18
Making a voice call ........................18
Making a video call ........................18
Making a voice/video call
from Contacts ..................................18
Making international calls........... 19
Answering and rejecting a
call........................................................ 19
Speed dialling .................................. 19
Making a second call..................... 19
DTMF tones ......................................20
Viewing your call logs ................... 20
Using call divert ..............................20
Using call barring ...........................21
Changing the common call
settings ..............................................21
Changing your video call
settings ..............................................22
Contacts ..................................................23
Searching for a contact ................ 23
Adding a new contact ..................23
Contact options .............................. 24
Creating a group.............................24
Using service dial numbers ........25
Viewing your own number ......... 25
Creating a business card .............. 25
Changing your contact
settings ..............................................25
Messaging ..............................................27
Messaging ......................................... 27
Sending a message .......................27
Entering text ....................................27
T9 predictive ....................................27
Abc manual ......................................28
Setting up your email ................... 28
Retrieving your email ...................29
Sending an email using
your new account ..........................29
Changing your email settings ...29
Message folders ..............................30
Managing your messages ........... 30
Using templates .............................. 31
Using emoticons............................. 31
Changing your text message
settings ..............................................31
Changing your multimedia
message settings ............................ 32
Changing your other settings....32
Get creative
Camera .................................................... 33
Taking a quick photo ................... 33
After you’ve taken your
photo ..................................................33
Using the ash ................................. 34

5
Adjusting the brightness ............. 34
Choosing a shot mode ................. 34
Using continuous shot mode ....35
Using a frame shot mode ............35
Taking a panoramic shot .............35
Using the advanced settings .....36
Changing the image size ............. 37
Choosing a colour tone................ 37
Viewing your saved photos ........ 38
Setting a photo as a
wallpaper or contact image .......38
Video camera ........................................ 39
Shooting a quick video ................39
After you’ve shot your video ...... 39
Adjusting the brightness ............. 39
Using the advanced settings .....39
Changing the video size .............. 40
Choosing an eect tone ..............41
Watching your saved videos ......41
Your photos and videos ....................42
Editing photo album options ....42
Editing video album options .....42
Adjusting the volume when
viewing a video ............................... 42
Capturing an image
from a video ..................................... 42
Sending a photo or video
from the album ...............................43
Viewing your photos as a
slide show .........................................43
Setting a photo as a
wallpaper ..........................................43
Editing your photos ....................... 44
Adding an eect to a photo .......44
Morphing a photo.......................... 44
Spotlighting a photo ....................45
Editing your videos ........................ 45
Trimming the length of
your video .........................................45
Merging two videos together .... 45
Merging a photo with a
video ................................................... 46
Adding text to a video .................. 46
Overlaying a photo ........................ 46
Adding a voice recording ............ 47
Adding a soundtrack to
your video .........................................47
Changing the speed of
your video .........................................48
Adding a dimming eect ............48
Multimedia............................................. 49
Images ................................................ 49
My images option menus ...........49
Sending a photo .............................49
Using an image ............................... 50
Organising your images ..............50
Deleting an image .........................50
Moving or copying an image ..... 50
Editing an image ............................51
Marking and unmarking
images ................................................ 51
Checking your memory
status ..................................................51
Sounds ...............................................51
Using a sound .................................. 51
Videos ................................................. 52

6
LG KF750 | User Guide
Contents
Watching a video............................52
Using options while video is
paused................................................ 52
Sending a video clip ...................... 52
Using a video clip as a
ringtone .............................................52
Using the video options
menu................................................... 52
Games and Applications.............. 53
M-Toy menu .....................................53
Playing a game ................................ 53
Using the games options
menu................................................... 53
Flash contents .................................54
Viewing an SWF/SVG le .............54
Using options viewing the
SWF/SVG le..................................... 54
Documents .......................................54
Transferring a le to your
phone .................................................54
Viewing a le .................................... 55
Others ................................................. 55
Movie maker ....................................55
Creating a movie ............................55
Music................................................... 55
Playing a song .................................56
Using options while
playing music ..................................56
Creating a playlist...........................56
Editing a playlist .............................57
Deleting a playlist ..........................57
Using the radio ................................ 57
Searching for stations ................... 58
Editing the channels .....................58
Resetting channels ........................58
Listening to the radio ...................59
Using voice recorder .....................59
Sending the voice recording ...... 59
Get organised
Organiser ................................................60
Adding an event to your
calendar .............................................60
Changing your default
calendar view ..................................60
Adding an item to your
to do list .............................................60
Sharing a to do item ...................... 61
Adding a memo ..............................61
Tools .........................................................62
Setting your alarm .........................62
Using your calculator .................... 62
Using the stopwatch ..................... 62
Converting a unit ...........................63
Adding a city to your
world time ........................................63
PC Sync .................................................... 64
Installing LG PC Suite on
your computer ................................64
Connecting your
phone and PC ..................................64
Backing up and restoring
your phone’s information ............ 64
Viewing your phone les
on your PC ........................................65

7
Synchronising your
contacts .............................................65
Synchronising your
messages ........................................... 65
Synchronising your music ........... 65
Using your phone as a mass
storage device .................................66
PIN for DivX connection ..............66
The web
Browser ...................................................68
Accessing the web ......................... 68
Adding and accessing your
bookmarks ........................................68
Saving a page ..................................69
Accessing a saved page ...............69
Viewing your browser
history ................................................69
Using RSS reader ............................69
Adding the Feed ............................. 70
Updating the RSS reader ............. 70
Changing the web browser
settings ..............................................70
The web ..................................................71
Using your phone as a
modem ..............................................71
Using Bluetooth .............................. 71
Sending and receiving
your les using Bluetooth ...........72
Pairing with another
Bluetooth device ............................ 73
Using a Bluetooth headset .........73
Settings
Changing your screen settings ....... 74
Personalising your proles ............... 74
Changing your phone settings....... 75
Using Date & Time ............................... 75
Changing your other settings ......... 75
Changing security settings ..............76
Using memory manager ...................76
Using ight mode................................ 76
Anti Theft Mobile Tracker ..... 77
Accessories..............................78
Network service .....................79
Technical data ........................79
Guidelines
Guidelines for safe and
ecient use ...........................................81
8
LG KF750 | User Guide
Setup
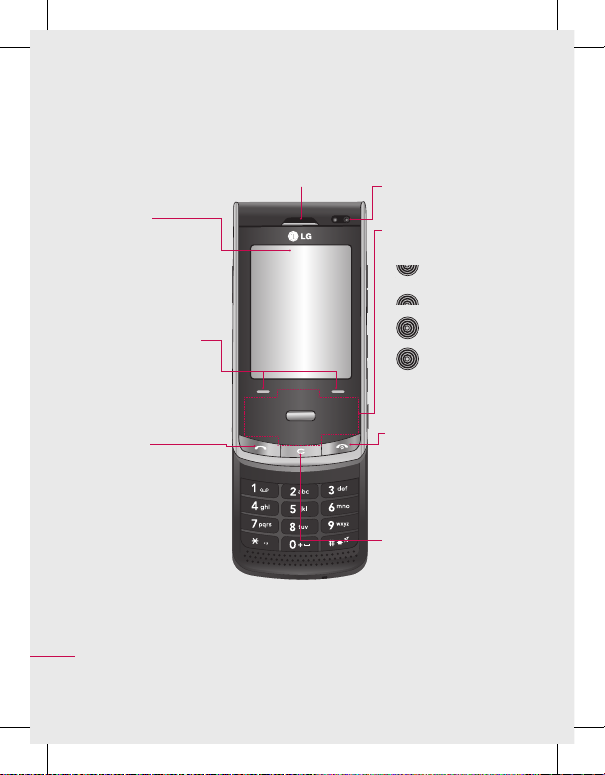
Getting to know your phone
Main LCD
• Top: Signal strength,
battery level and
various functions.
• Bottom: Soft key
indications.
Left soft key/Right
soft key
Performs the function
indicated at the bottom
of the display.
Send key
Dials a phone number
and answers incoming
calls.
Inner camera lens
Navigation touch pad
• In standby mode:
Quick menu
Contacts list
(Right) Messaging
(Left) Profiles
• In menu: Navigates
between menus.
End/Power key
Ends or rejects a call.
Turns the phone on/off.
Press once to return to
the standby screen.
Clear key
• Deletes a character
with each press.
Earpiece
9
01
02
03
04
05
06
07
08
Setup
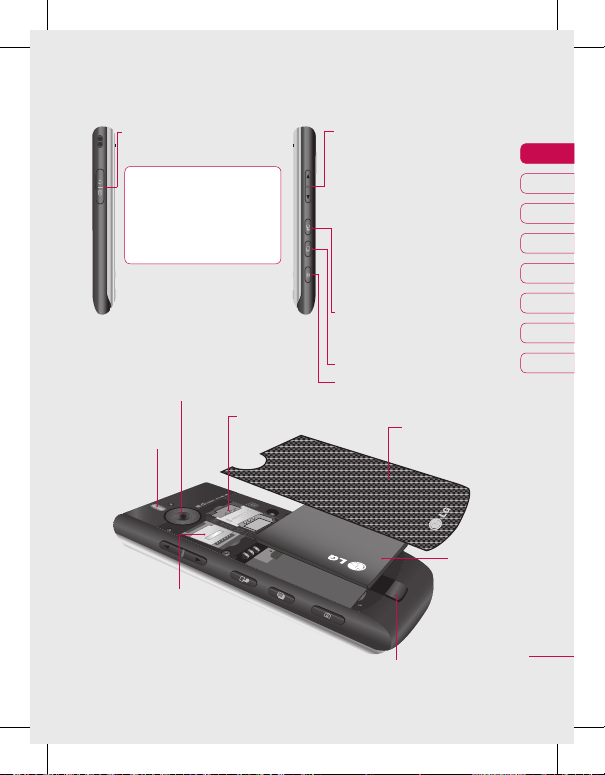
Charger, USB Cable,
Handsfree connector
TIP: To connect the
USB cable, wait until the
phone has powered up
and has registered to the
network.
Side keys
• When the screen is idle:
volume of ring tone.
•
During a call: volume of the
earpiece.
•
When playing a BGM track
-
Short press: controls the
volume.
-
Long press: move to the next
or previous music file.
Touch screen button
: turn the
LCD into a touch screen to access
your files.
Opens the multitasking menu
Capture button
Battery cover
Battery
USIM card socket
External camera lens
Flash
Micro SD memory
card socket
Battery release latch
Press this button to remove the battery.
10
LG KF750 | User Guide
Setup
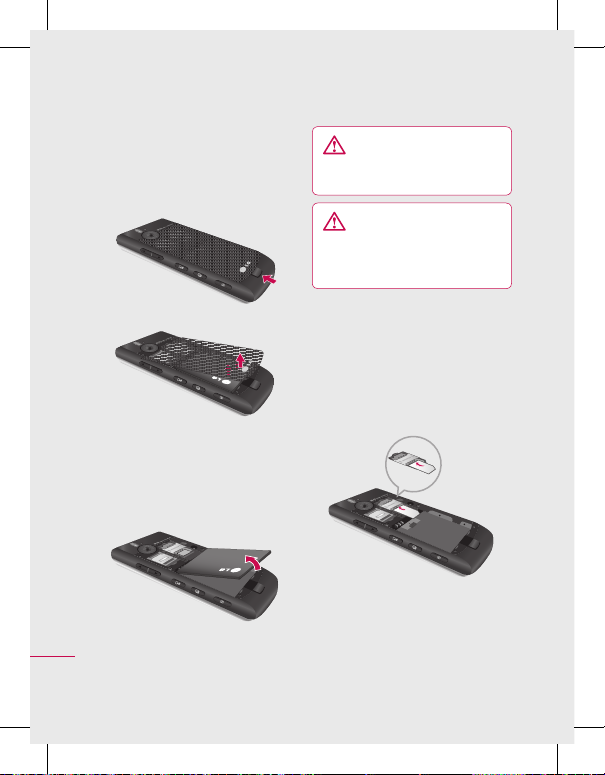
Installing the USIM and battery
1 Remove the battery cover
Press and hold down the battery
release button at the top of the
phone and lift off the battery cover.
2 Remove the battery
Hold the top edge of the battery
and lift it from the battery
compartment using the battery
cover.
WARNING: Do not use your
ngernail when removing the
battery.
WARNING: Do not remove
the battery when the phone is
switched on, as this may damage
the phone.
3 Install the USIM card
Slide the USIM card into the USIM
card holder. Make sure that the
gold contact area on the card is
facing downwards. To remove the
USIM card, pull it gently in the
reverse direction.

11
01
02
03
04
05
06
07
08
Setup
4 Install the battery
Insert the top of the battery first
into the top edge of the battery
compartment. Ensure that the
battery contacts align with the
terminals on the phone. Press down
the bottom of the battery until it
clips into place.
5 Charging your phone
Slide back the cover of the charger
socket on the side of your KF750.
Insert the charger (with the arrow
to the back of the handset) and
plug into a mains electricity socket.
Your KF750 will need to be charged
until a message reading “Battery
full” appears on screen.
12
LG KF750 | User Guide
Setup
Memory card
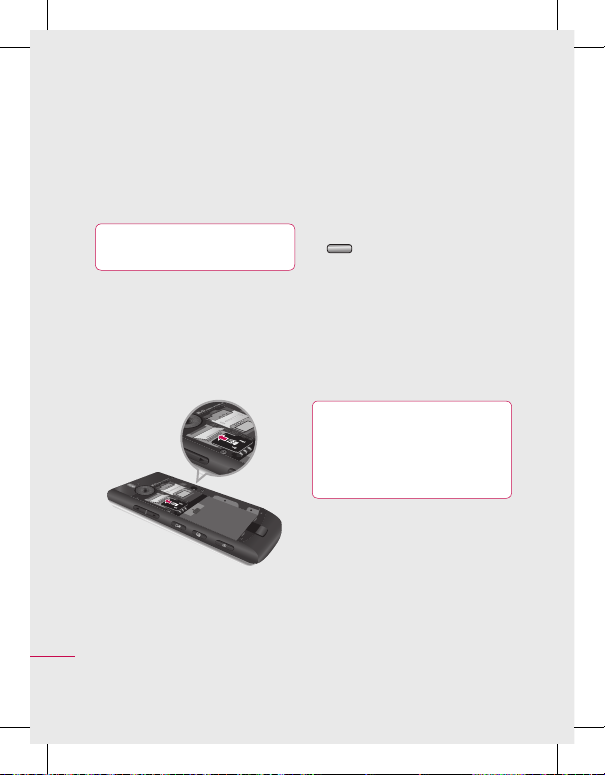
Installing a memory card
You can expand the memory available
on your phone using a memory card.
T
he KF750 will support up to a 4GB
memory card.
TIP: A memory card is an optional
accessory.
1 Remove the battery cover as before.
2 L
ift the memory card cover and
insert a micro SD card with the gold
contact area facing downwards.
Close the memory card cover so
that it clicks shut.
3 Replace the battery cover.
Formatting the memory card
If your memory card is already
formatted, you can begin using
it straight away. If your card isn’t
formatted, you will need to do so.
1 F
rom the standby screen press
then select Settings.
2 S
elect Memory manager then
choose External memory.
3 S
elect Format and then confirm
your choice.
4 E
nter the password, if one is set,
and your card will be formatted and
ready to use.
TIP! To change your
default storage destination, open
Memory manager from the
Phone settings menu and select
Primary storage settings.
NOTE: If your memory card has
existing content it will automatically
be filed in the correct folder, for
example, videos will be stored in the
My Videos folder.
13
01
02
03
04
05
06
07
08
Setup

14
LG KF750 | User Guide
Setup
Menu map
Games & apps
1 M-Toy
2 My games & apps
3 Settings
Calling
1 Make video call
2 Call logs
3 Call durations
4 Data volume
5 Call costs
6 Call divert
7 Call barring
8 Fixed dial numbers
9 Call waiting
0 Common settings
*
Video call settings
Organiser
1 Calendar
2 To do
3 Memo
4
Secret memo
5 Date finder
6 Settings
Multimedia
1 Touch media
2 Camera
3 Video camera
4
Music
5 FM radio
6
Voice recorder
7 Media editor
8 Movie maker
Messaging
1 Create new message
2 Inbox
3 Mailbox
4
Drafts
5 Outbox
6 Sent items
7
My folders
8 Templates
9 Emoticons
0 Settings
My stuff
1 My images
2 My sounds
3 My videos
4
Games & Apps
5 Flash contents
6 Documents
7
Others
8 My memory card

15
01
02
03
04
05
06
07
08
Setup
Google
1 Search
2 Mail
3 Maps
4
Blogger
5 You Tube
6 Upload History
Contacts
1 Add new
2 Search
3 Speed dials
4
Groups
5 Service dial numbers
6 Own number
7 My business card
8 Settings
Tools
1 Quick menu
2 Alarms
3 Calculator
4
Stopwatch
5 Converter
6 World time
7 SIM service
Browser
1 Home
2 Enter address
3 Bookmarks
4
RSS reader
5 Saved pages
6 History
7 Settings
8. NDTV Active
Connectivity
1 Bluetooth
2 Server sync
3 USB connection mode
4
TV out
5 PIN for DivX connection
Settings
1 Profiles
2 Phone
3 Screen
4
Date & Time
5 Network
6 Internet profile
7 Access points
8
Packet data conn.
9 Security
0 Memory manager
* Streaming settings
# Reset settings
16
LG KF750 | User Guide
Your standby screen
Your standby screen
Whenever your KF750 isn’t in use it will
return to your standby screen. From
here you can access menu options,
make a quick call and change your
profile - as well as many other things.
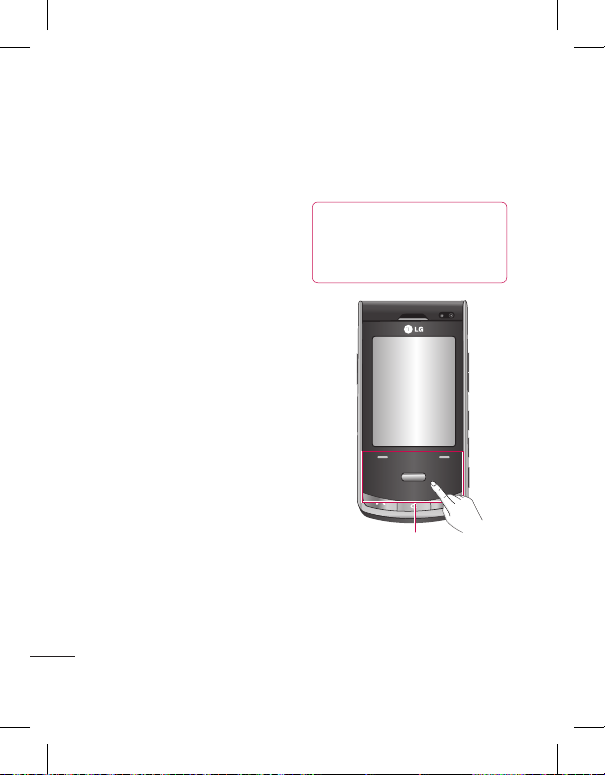
Touch screen tips
If you press the touch screen button
on the right-hand side of the phone
the screen will switch to an interactive
touch screen keypad.
Press and hold the touch screen
button from the standby screen to
enter a further multimedia menu.
To select an item, touch the icon on
the touch screen. Your KF750 will
vibrate slightly when it recognises that
you’ve touched an option.
• There’s no need to press too hard as
the touchscreen is sensitive enough
to pick up on a light touch.
• Use the tip of your finger to touch
the option you require. Be careful
not to touch any other keys.
• Don’t cover the phone with a case
or cover, as the touch screen will not
work with any material covering it.
•
The touch pad below the screen
can be used as a four way arrow
pad to navigate you through the
phone menus.
TIP! Use the touch screen
for fast and easy access to your
music, Photo, M-Toy, Document
and FM radio.
Touch pad
NOTE: When the screen light goes off,
you can press the camera key on the
right hand side of the phone to restore
the standby screen.

17
01
02
03
04
05
06
07
08
Your standby screen
Advice to the customer
In order to allow better antenna sensitivity
LG suggest that you hold the handset as
shown below.
X
Please do not cover the antenna area with
your hand during a call or when using
a Bluetooth connection. It may reduce
signal quality.
The status bar
The status bar indicates, using various
icons, things like signal strength, new
messages and battery life as well as
telling you whether your Bluetooth or
GPRS is active.
Below is a table which explains the
meaning of icons you’re likely to see in
the status bar.
Icon Description
Multitasking
Network signal strength
(number of bars will vary)
No network signal
Battery empty
Icon Description
New text message
New email
An alarm is set
Normal profile in use
Silent profile in use
External memory
Calls are diverted
GPRS available
EDGE in use
Roaming
Bluetooth is active
Calls are rejected
3G available

18
LG KF750 | User Guide
The basics
Making a voice call
1 Enter the number including the full
area code.
To delete a digit press
.
To delete all digits press and hold
.
2 P
ress to make the call.
3 P
ress or close the handset to
finish the call.
Making a video call
You can make a video call in a 3Gcovered service area if the user you are
calling also has a 3G video phone in a
3G-covered service area. You can also
receive video calls. To make a video
call, do the following.
1 E
nter the phone number, as before.
2 If
you do not want to use the
speakerphone, ensure you have the
headset plugged in.
3 T
o start the video function, press
the left soft key Options and
select Make video call. You will be
notified that you will need to close
other applications to make the
video call.
NOTE: The video call may take
some time to connect. Please
be patient. While the video call
is connecting, you will see your
own image; after the other party
has answered, their image will be
displayed on the screen.
4 A
djust the camera position if
necessary.
5 P
ress to finish the call, or close
the handset.
Making a voice/video call from
Contacts
It’s easy to call anyone whose number
you have stored in your Contacts.
1 P
ress the down key on the
navigation touch pad to access the
contacts list.
2
Scroll to the contact to make a call.
3 P
ress to make a voice call. Press
the left soft key and select Make
video call to make a video call.
4 P
ress to finish the call.
Calls
19
01
02
03
04
05
06
07
08
The basics
Making international calls
1 Press and hold for the
international prefix. The ‘+’ character
prefixes the international access
code.
2
Enter the country code, area code,
and the phone number.
3 P
ress .
Answering and rejecting a call
When your phone rings press the
hard key to answer the call.
Press Slient to mute the ringing.
This is great if you’ve forgotten to
change your profile to Silent for a
meeting!
Press the End key to reject the
incoming call.
Speed dialling
You can assign a frequently-called
contact to a speed dial number.
1 P
ress and select Contacts.
2
Select
Speed dials.
3 Y
our Voicemail is set to speed dial 1.
Select any other number to assign it
to a speed dial contact.
4 Y
our address book will open. Select
the contact you’d like to assign to
that number.
To call a speed dial number:
1 P
ress the assigned number then
press the send key
, or .
2
Press and hold the assigned number
until the contact appears on screen.
Making a second call
1 During your initial call, press OK,
then Options, and select Add
new call.
2
Dial the number or search your
contacts (see page 18 for details on
how to make a call from Contacts).
3 P
ress to connect the call.
4 B
oth calls will be displayed on the
call screen. Your initial call will be
locked and the caller put on hold.
5 S
elect Swap to change between
the calls.
6 T
o end one or both calls select
Options ➝ End followed by All
or Active.
NOTE: You will be charged for each
call you make.
20
LG KF750 | User Guide
The basics
Calls
DTMF tones
DTMF allows you to use numerical
commands to navigate menus
within automated messages. DTMF is
switched on as default.
Viewing your call logs
Press , then select Calling ➝
Call logs.
Choose to view:
All calls - View a complete list of all of
your dialled, received and missed calls.
Dialled calls - View a list of all the
numbers you have called.
Received calls - View a list of all the
numbers that have called you.
Missed calls - View a list of all the calls
you have missed.
Press
, select Calling.
Before Calling you can also choose
to view:
Call durations - View the duration of
all your sent and received calls.
Data volume - View the amount in
kilobytes of all your received and
sent data.
Call costs - View the charges applied
to your dialled numbers (this service is
network-dependant. Some operators
are unable to support it).
TIP! From any calls list,
touch the left soft key and Delete
All to delete all the recorded
items.
Using call divert
1 Press , then select Calling.
2
Select Call divert
and choose
Voice calls and/or Video calls.
3 C
hoose when to divert all calls;
when the line is busy, when there
is no answer or when you are not
reachable.
4 In
put the number you’d like to
divert to.
5 S
elect Activate.
NOTE: Charges may be incurred for
diverting calls. Please contact your
network provider for details.
TIP! To turn o all call
diverts, choose Deactivate all.
21
01
02
03
04
05
06
07
08
The basics
Using call barring
1 Press , select Calling.
2 S
elect Call barring and choose
Voice calls and/or Video calls.
3 C
hoose any or all of the five options:
All outgoing
Outgoing international
Outgoing international calls
except home country
All incoming
Incoming when abroad
4 E
nter the call barring password.
Please check with your network
operator for this service.
TIP! Select Fixed dial number
to turn on and compile a list of
numbers that can be called from
your phone. You’ll need your PIN2
code from your operator. When
activated, only numbers included
in the xed dial list can be called
from your phone.
Changing the common call
settings
1 Press , then select Calling.
2 S
elect Common settings. From
here you can amend the settings
for:
Call reject - Select On or Off and
choose to reject all calls, those
from specific groups, contacts,
unregistered numbers (those not in
your list of contacts) or those with
no caller ID.
Send my number - Choose
whether your number will be
displayed when you call someone.
Auto redial - Choose On or Off.
Answer mode - Choose whether to
answer the phone by pressing the
Send key, by pressing any key, or by
opening the slide.
Minute minder - Select On to hear
a tone every minute during a call.
BT answer mode - Choose how
to answer a call when using
a Bluetooth headset. Select
Handsfree or handset.

22
LG KF750 | User Guide
The basics
Calls
Save new number - Saves numbers
you use that aren’t already stored
in Contacts.
Slide close setting - Select End call
to be able to disconnect a call by
closing the slide.
Voice clarity- Select Yes to listen to
the voice clearly.
Changing your video call
settings
1 Press , then select Calling.
2 S
elect Video call settings.
3 D
etermine whether to Use private
picture and/or, switch on the
Mirror.

23
01
02
03
04
05
06
07
08
The basics
Contacts
Searching for a contact
There are two ways to search for a
contact:
From the standby screen
1 F
rom the standby screen touch the
down key on the touch pad to open
the address book.
2 P
ress the number key
corresponding to the first letter of
the contact you’d like to view. So, for
‘Home’ press 4 (GHI) twice.
TIP! You can search by
group by touching the left soft
key and selecting Search by
group. This will bring up a list of
all your groups.
From the main menu
1 S
elect Contacts.
2 S
elect Search and enter the first few
letters of the contact you’d like to
find using the keypad.
3 Y
our address book will bring up a
list of the contacts corresponding to
the letters you’ve entered.
Adding a new contact
1 Press and select Contacts.
2 Select Add new.
3 C
hoose whether to save the contact
to your Handset or USIM.
4 E
nter the first and last name of your
new contact. You do not have to
enter both, but you must enter one
or the other.
5 E
nter up to five different numbers
and assign a type for each. Choose
from Mobile, Home, Office, Pager,
Fax, VT and General.
6 A
dd up to two email addresses.
7 You can assign the contact to a
group. Choose from No group,
Family, Friends, Colleagues,
School or VIP.
8 Y
ou can also add a Homepage,
Home address, Company name,
Job title, Company address and
a Memo.
TIP! You can create
customised groups for your
contacts. See Creating a group
on page 2
4.
24
LG KF750 | User Guide
The basics
Contacts
Contact options
There are many things you can do
when viewing a contact. Here’s how to
access and use the options menu:
1 O
pen the contact you’d like to use.
See Searching for a contact on
page 23.
2 P
ress the left soft key to open the
list of options.
From here you can:
Send message - Send a message
or an email to the contact. See
page 27 for details on how to send
messages.
Send business card - Send the
contact’s details to another person
as a business card. Choose to send
as a Text message, Multimedia
msg, Email or via Bluetooth.
Make voice call - Call the contact.
Make video call - Make a video call
to the contact.
Edit - You can edit the contact.
Mark/Unmark - Mark your contacts
for multiple seletion.
Search by - You can search the
entry by number or group.
Save to USIM/ Handset - Choose
to move or copy to the USIM card or
handset (depending on where you
originally saved the contact).
Delete - Delete the contact.
Text input - You can set the text
input method.
Creating a group
1 Press and select Contacts.
2 S
elect Groups and touch the left
soft key.
3 S
elect Add new group.
4 E
nter a name for your new group.
5 T
ouch Done.
NOTE: If you delete a group, the
contacts which were assigned to that
group will not be lost. They will remain
in your address book.
TIP! You can edit an existing
group by highlighting it and
touching the left soft key. Choose
to Add a member to the group
from your contacts, assign a
Group ringtone, Rename the
group or Delete the group.

25
01
02
03
04
05
06
07
08
The basics
Using service dial numbers
You can view the list of Service Dial
Numbers (SDN) assigned by your
service provider (if supported by the
USIM card). Such numbers include
emergency, directory enquiries and
voicemail numbers. After selecting
a service number, press
to dial
that service.
Viewing your own number
Select Own number in the Contacts
menu to view your number.
Creating a business card
You can create your own business card
by selecting My business card, then
Add. Enter your name, number, email
address and image.
Changing your contact settings
You can adapt your contact settings
so that your address book works
according to your preferences.
1 P
ress and select Contacts.
2 S
elect Settings. From here you can
adjust the following settings:
Contact list settings - Choose
whether to view contacts saved
to both your Handset & USIM,
Handset only or USIM only. You
can also select to show the first
name or last name of a contact first,
and to show a contact picture.
Synchronise contacts - Connect
to your server to synchronise your
contacts. See Synchronising your
contacts on page 65.
Copy - Copy your contacts from
your USIM to your handset or
from your handset to your USIM.
Choose to do this one by one, or all
together.
Move - This works in the same way
as Copy, but the contact will only
be saved to the location you’ve
moved it to. If you move a contact
from the USIM to the handset it will
be deleted from the USIM memory.
Send all contacts via Bluetooth -
Send all contacts information to
another handset by Bluetooth.
Back up contacts - See Backing
up and restoring your phone’s
information
on page 64.

26
LG KF750 | User Guide
The basics
Contacts
Restore contacts - See Backing
up and restoring your phone’s
information
on page 64.
Clear contacts - Delete all your
contacts.
Memory info. - You can check how
much memory you’ve got left on
your handset or your USIM.
Sending Group message
You can send the message by
grouping at a time.
27
01
02
03
04
05
06
07
08
The basics
Messaging
Messaging
Your KF750 combines SMS, MMS and
email into one intuitive and easy to
use menu.
Sending a message
1 Select Messaging then choose
Create new message.
2 C
hoose Message to send an SMS or
MMS. A new SMS will open.
3 S
elect Options, then Insert, to add
an image, video, sound or subject.
4 P
ress Send. Enter the phone
number or select Contacts to open
your contacts list. You can add
multiple contacts.
WARNING: You will be
charged per 160 character text
message for each person that
you send the message to.
WARNING: If an image,
video or sound is added to an
SMS it will be automatically
convert to an MMS and you will
be charged accordingly.
Entering text
There are two ways to enter text:
T9 predictive and Abc manual.
To switch between text entry
methods, press and hold the
key
when you have a blank message open.
To change between upper, lower and
title case press the
key.
To delete a character use the
hard
key below the screen.
To enter a symbol select Options and
Insert.
T9 predictive
T9 mode uses a built-in dictionary
to recognise words you’re writing
based on the key sequences you
touch. Simply touch the number key
associated with the letter you want to
enter, and the dictionary will recognise
the word once all the letters are
entered. For example, press 8, 3, 5, 3, 7,
4,
6, 6, 3 to write ‘telephone’.

28
LG KF750 | User Guide
The basics
Messaging
Abc manual
In Abc mode you must press the
key repeatedly to enter a letter. For
example, to write ‘hello’, press 4 twice,
3 twice, 5 three times, 5 three times
again, then 6 three times.
Setting up your email
You can stay in touch on the move
using email on your KF750. It’s quick
a
nd simple to set up a POP3 or IMAP4
email account.
1 S
elect Messaging then select
Settings.
2 S
elect Email, then Email accounts.
3 Y
ou can now choose how your
account works:
Title - Enter a name for this account.
My name - Enter your name.
Username - Enter the account
username.
Password - Enter the account
password.
Email address - Enter the account
email address.
Reply email address - Enter the
‘reply to’ email address.
Outgoing mail server - Enter the
account details.
Incoming mail server - Enter the
account details.
Maximum receive size - Choose
the size limit of your emails, the
maximum is 1MB.
Mailbox type - Enter the mailbox
t
ype, POP3 or IMAP4.
Save to server - Choose whether to
save your emails to the server. For
I
MAP4 accounts copies are always
saved.
Save sent mail into - Choose where
t
o save your IMAP4 emails. For POP3
accounts copies are always saved
on the phone.
Access point - Choose your Internet
access point.
Auto retrieve - Choose whether
to fetch your new emails
automatically.
Advanced settings - Choose
whether to use the advanced
settings.
Incoming server port - Normally,
this is 110 for POP3 accounts and
143
for IMAP4 accounts.
 Loading...