


USER GUIDEKF310
This document is the user guide for the LG
KF310 3G Video Mobile Phone. All rights for
this document are reserved by LG Electronics.
Copying, modifying and distributing this
document without the consent of LG
Electronics are prohibited.
Disposal of your old appliance
1. When this crossed-out wheeled bin symbol is attached to a product it
means the product is covered by the European Directive 2002/96/CE.
2. All electrical and electronic products should be disposed of separately
from the municipal waste stream via designated collection facilities
appointed by the government or the local authorities.
3. The correct disposal of your old appliance will help prevent potential
negative consequences for the environment and human health.
4. For more detailed information about disposal of your old appliance,
please contact your city office, waste disposal service or the shop
where you purchased the product.
English

Part 15.21 statement
" Change or Modifications that are not expressly approved by the manufacturer could void
the user's authority to operate the equipment. "
Part 15.105 statement
This equipment has been tested and found to comply with the limits for a class B digital device,
pursuant to Part 15 of the FCC Rules.
These limits are designed to provide reasonable protection against harmful interference in a
residential installation.
This equipment generates uses and can radiate radio frequency energy and, if not installed and used
in accordance with the instructions, may cause harmful interference to radio communications.
However, there is no guarantee that interference will not occur in a particular installation. if this
equipment does cause harmful interference or television reception, which can be determined by
turning the equipment off and on, the user is encouraged to try to correct the interference by one or
more of the following measures:
- Reorient or relocate the receiving antenna.
- Increase the separation between the equipment and receiver.
- Connect the equipment into an outlet on a circuit different from that to
which the receiver is connected
- Consult the dealer or an experienced radio/TV technician for help.

LIMITED WARRANTY STATEMENT
1. WHAT THIS WARRANTY COVERS:
LG offers you a limited warranty that the enclosed subscriber unit and its enclosed accessories will be
free from defects in material and workmanship, according to the following terms and conditions:
(1) The limited warranty for the product extends for ONE (1) year beginning on the data of purchase
of the product.
(2) The limited warranty extends on to the original purchaser of the product and is not assignable or
transferable to any subsequent purchaser/end user.
(3) This warranty is good only to the original purchaser of the product during the warranty period as
long as it is in the U.S., including Alaska, Hawaii, U.S. Territories and Canada.
(4) The external housing and cosmetic parts shall not be covered under these limited warranty terms.
(5) Upon request from LG, the consumer must provide information to reasonably prove the date of
purchase.
(6) The customer shall bear the cost of shipping the product to the Customer Service Department of
LG. LG shall bear the cost of shipping the product back to the consumer after the completion of
service under this limited warranty.
2. WHAT THIS WARRANTY DOES NOT COVER:
(1) Defects or damages resulting from use of the product i n other than its normal and customary
manner.
(2) Defects or damages from abnormal use, abnormal conditions, improper storage, exposure to
moisture or dampness, unauthorized modifications, unauthorized connections, unauthorized repair,
misuse, neglect, abuse, accident, alteration, improper installation, or other acts which are not the
fault of LG, including damage caused by shipping blown fuses spills of food or liquid.
(3) Breakage or damage to antennas unless caused directly by defects in material or workmanship.
(4) That the Customer Service Department at LG was net notified by consumer of the alleged defect
or malfunction of the product during the applicable limited warranty period.
(5) Products which have had the serial number removed or made illegible.
(6) The limited warranty is in lieu of all other warranties, express or implied either in fact or by
operations law, statutory or otherwise, including, but limited to any implied warranty of
marketability or fitness for a particular use.
(7) Damage resulting from use of non-LG approved accessories.
(8) All plastic surfaces and all other externally exposed parts that are scratched or damaged due to
normal customer use.
(9) Products operated outside published maximum ratings.
3
(10) Products used or obtained in a rental prog ram.
(11) Consumables (such as fuses).
3. STATE LAW RIGHTS:
No other express warranty is applicable to this product. THE DURATION OF ANY IMPLIED
WARRANTIES, INCLUDING THE IMPLIED WARRANTY OF MARKETABILITY, IS LIMITED
TO THE DURATION OF THE EXPRESS WARRANTY HEREIN. LG INFOCOMM INC. SHALL
NOT BE LIABLE FOR THE LOSS OF THE USE OF THE PRODUCT, INCONVENIENCE, LOSS
OR ANY OTHER DAMAGES, DIRECT OR CONSEQUENTIAL, RISING OUT OF THE USE OF,
OR INABILITY TO USE, THIS PRODUCT OR FOR ANY BREACH OF ANY EXPRESS OR
IMPLIED WARRANTY, INCLUDING THE IMPLIED W ARRA NTY OF MAR KETABILITY
APPLICABLE TO THIS PRODUCT. Some states do not allow the exclusive of imitation of incidental
or consequential damages or limitations on how long an implied warranty lasts; so these limitations or
exclusions may not apply to you. This warranty gives you specific legal rights and you may also have
other rights which vary from state to state.
4. HOW TO GET WARRANTY SERVICE:
To obtain warranty service, please call the following web address:
www.lgeservice.com

8
For Your Safety
Important Information
This user guide contains important information on the use and
operation of this phone. Please read all the information
carefully for optimal performance and to prevent any damage
to or misuse of the phone. Any changes or modifications not
expressly approved in this user guide could void your warranty
for this equipment.
Before You Start
Safety Instructions
WARNING! To reduce the possibility of electric shock, do not
expose your phone to high humidity areas, such as the
bathroom, swimming pool, etc.
Always store your phone away from heat. Never store your
phone in settings that may expose it to temperatures less than
32°F or greater than 104°F, such as outside during extreme
weather conditions or in your car on a hot day. Exposure to
excessive cold or heat will result in malfunction, damage
and/or catastrophic failure.
Be careful when using your phone near other electronic
devices. RF emissions from your mobile phone may affect
nearby in adequately shielded electronic equipment. You
should consult with manufacturers of any personal medical
devices such as pacemakers and hearing aides to determine if
they are susceptible to interference from your mobile phone.
Turn off your phone in a medical facility or at a gas station.
Never place your phone in a microwave oven as this will
cause the battery to explode.
IMPORTANT! Please read the TIA SAFETY INFORMATION on
page 78 before using your phone.
Safety Information
Read these simple guidelines. Breaking the rules may be
dangerous or illegal. Further detailed information is given in this
user guide.
] Never use an unapproved battery since this could damage
the phone and/or battery and could cause the battery to
explode.
] Never place your phone in a microwave oven as it will
cause the battery to explode.
] Do not dispose of your battery by fire or with hazardous or
flammable materials.
] Make sure that no sharp-edged items come into contact
with the battery. There is a risk of this causing a fire.
] Store the battery in a place out of reach of children.
] Be careful that children do not swallow any parts such as
rubber plugs (earphone, connection parts of the phone,
etc.). This could cause asphyxiation or suffocation.

9
For Your Safety
] Unplug the power cord and charger during lightning storms
to avoid electric shock or fire.
] When riding in a car, do not leave your phone or set up the
hands-free kit near to the air bag. If wireless equipment is
improperly installed and the air bag is activated, you may be
seriously injured.
] Do not use a hand-held phone while driving.
] Do not use the phone in areas where its use is prohibited.
(For example: aircraft).
] Do not expose the battery charger or adapter to direct
sunlight or use it in places with high humidity, such as a
bathroom.
] Never store your phone in temperatures less than- 4°F or
greater than 122°F.
] Do not use harsh chemicals (such as alcohol, benzene,
thinners, etc.) or detergents to clean your phone. There is a
risk of this causing a fire.
] Do not drop, strike, or shake your phone severely. Such
actions may harm the internal circuit boards of the phone.
] Do not use your phone in high explosive areas as the phone
may generate sparks.
] Do not damage the power cord by bending, twisting, pulling,
or heating. Do not use the plug if it is loose as it may cause
a fire or electric shock.
] Do not place any heavy items on the power cord. Do not
allow the power cord to be crimped as it may cause fire or
electric shock.
] Do not handle the phone with wet hands while it is being
charged. It may cause an electric shock or seriously
damage your phone.
] Do not disassemble the phone.
] Do not place or answer calls while charging the phone as it
may short-circuit the phone and/or cause electric shock or
fire.
] Only use the batteries, antennas, and chargers provided by
LG. The warranty will not be applied to products provided by
other suppliers.
] Only authorized personnel should service the phone and its
accessories. Faulty installation or service may result in
accidents and consequently invalidate the warranty.
] Do not hold or let the antenna come in contact with your
body during a call.
] An emergency call can be made only within a service area.
For an emergency call, make sure that you are within a
service area and that the phone is turned on.

10
For Your Safety
FCC RF Exposure Information
WARNING! Read this information before operating the phone.
In August 1996, the Federal Communications (FCC) of he United
States, with its action in Report and Order FCC 96-326, adopted
an updated safety standard for human exposure to radio
frequency (RF) electromagnetic energy emitted by FCC
regulated transmitters. Those guidelines are consistent with
the safety standard previously set by both U.S. and
international standards bodies.
The design of this phone complies with the FCC guidelines and
these international standards.
CAUTION
Use only the supplied and approved antenna. Use of
unauthorized antennas or modifications could impair call
quality, damage the phone, void your warranty and/or result in
violation of FCC regulations. Do not use the phone with a
damaged antenna. If a damaged antenna comes into contact
with skin, a minor burn may result. Contact your local dealer
for a replacement antenna.
Body-worn Operation
This device was tested for typical body-worn operations with
the back of the phone kept 0.79 inches (2cm) between the
user’s body and the back of the phone. To comply with FCC RF
exposure requirements, a minimum separation distance of 0.79
inches(2cm) must be maintained between the user's body
and the back of the phone. Third-party belt-clips, holsters, and
similar accessories containing metallic components should not
be used. Body-worn accessories that cannot maintain 0.79
inches(2cm) separation distance between the user's body
and the back of the phone, and have not been tested for typical
body-worn operations may not comply with FCC RF exposure
limits and should be avoided.

11
For Your Safety
Vehicle Mounted External Antenna
(optional, if available)
A minimum separation distance of 8 inches (20cm) must be
maintained between the user/bystander and the vehicle
mounted external antenna to satisfy FCC RF exposure
requirements. For more information about RF exposure, visit
the FCC website at www.fcc.gov
FCC Part 15 Class B Compliance
This device and its accessories comply with part 15 of FCC
rules. Operation is subject to the following two conditions:
(1) This device and its accessories may not cause harmful
interference, and (2) this device and its accessories must
accept any interference received, including interference that
may cause undesired operation.
Cautions for Battery
] Do not disassemble.
] Do not short-circuit.
] Do not expose to high temperature: 60°C (140°F).]
] Do not incinerate.
Battery Disposal
] Please dispose of your battery properly or bring to your
local wireless carrier for recycling.
] Do not dispose in fire or with hazardous or flammable
materials.
Adapter (Charger) Cautions
] Using the wrong battery charger could damage your phone
and void your warranty.
] The adapter or battery charger is intended for indoor use
only.
Do not expose the adapter or battery charger to direct sunlight
or use it in places with high humidity, such as the bathroom.

Parts of the phone
Open view
KF310 Features
Earpiece
Navigation keys
v
In standby mode:
U
List of Profiles
D
Contacts list
u Messaging
d Calendar
v
In menu:
Navigates
menus.
Send key
OK (Conrm) key
Multitasking key
VGA camera
LCD screen
v
Top:
Icons showing signal
strength, battery level and
various other functions
v
Bottom:
Soft key
indications
Call End key
Clear key
Alpha numeric keys
v
In standby mode:
Input numbers to dial.
Hold down:
0
for international calls.
1
to dial voice mail
centre.
2to9
dials.
v
In editing mode:
numbers & characters.
for speed
Enter
KF310 Fe at ur es
17

KF310 Features
KF310 Fe at ur es
Send key
v
Dials a phone number and answers
a call.
v
In standby mode: Shows a history of
calls made, received, and missed.
Left soft key/ Right soft key
Performs the function indicated at the
bottom of the display.
OK (Conrm) key
Call End key
v
You can end a call.
v
You can go back to standby mode
by pressing this key when activating
the menu.
Clear key
You can delete a letter or go back to
previous menu.
18

Left side view Right side view
Handstrap Hole
Headset/Charger/
Cable connector
Side keys
KF310 Fe at ur es
19

KF310 Features
Rear view
External
camera lens
USIM card
socket
KF310 Fe at ur es
Battery cover
Battery
20

Installing the USIM
card and battery
1. Installing the USIM card.
Your USIM card contains your
phone number, service details and
contacts and must be inserted
into your handset. If your USIM
card is removed then your handset
becomes unusable (except for
emergency calls) until a valid one
is inserted. Always disconnect the
charger and other accessories from
your handset before inserting and
removing your USIM card. Slide
the USIM card into the USIM card
holder. Make sure that the USIM
card is properly inserted and the
gold contact area on the card is
facing downwards. To remove the
USIM card, press down lightly and
pull it in the reverse direction.
Getting Started
To insert the USIM card
To remove the USIM card
Note
v
The metal contact of the USIM
card can easily be damaged
by scratches. Pay special
attention to the USIM card
while handling. Follow the
instructions supplied with the
USIM card.
Getting Star ted
21

Getting Started
Note
v
After removing the battery,
insert USIM card.
2. Installing the battery.
Slide the battery upwards until it
snaps back into place.
Getting Star ted
22
3. To remove the battery.
Turn the power off. (If the power is
left on, there is a chance you could
lose the stored telephone numbers
and messages.)
Press and hold down the battery
release button and slide the battery
down.

Charging the Battery
Before connecting the travel
adapter to the phone you must first
install the battery.
1
. With the arrow facing you as
shown in the diagram push the
plug on the battery adapter into
the socket on the left side of the
phone until it clicks into place.
Getting Star ted
23

Getting Started
2. Connect the o ther end of the
travel adapter to the mains
socket.
Note
v
Only use the charger included
in the box.
3. The moving bars on the battery
icon will stop after charging is
complete.
Getting Star ted
4. Ensure the battery is fully charged
before using the phone for the
first time.
24
CAUTION!
• Do not force the connector as this
may damage the phone and/or the
travel adapter.
• If you use the battery pack charger
when abroad, use an attachment
plug adaptor for the proper
configuration.
• Do not remove your battery or the
USIM card while charging.
WARNING!
• Unplug the power cord and charger
during lightning storms to avoid
electric shock or fire.
• Make sure that no sharp-edged items
such as animal teeth or nails, come
into contact with the battery. This
may cause a fire.

Disconnecting the
charger
Disconnect the travel adapter from
the phone as shown in the diagram
below.
How to use a microSD
memory card
<MicroSD memory card>
<How to insert a microSD
memory card>
1. Turn the phone off. Inserting or
removing the microSD when the
phone is on may damage the files
stored in the memory card.
2. Lift the plastic cover which
protects the microSD slot.
Getting Star ted
25

Getting Started
3. Insert the memory card into the
slot. The gold contacts must be
kept on the back of the microSD.
Don’t push the microSD too
much. If it doesn't go into the slot
easily, you may be trying to insert
it in the wrong way or there could
be a foreign object in the slot.
4. Once inserted, push the memory
card until you hear a Click,
meaning that the microSD has
been correctly engaged.
Getting Star ted
5. Close the plastic slot protection.
26
6. To remove the memory card,
turn the phone off, open the slot
protection and push the microSD
to unlock it. Carefully extract the
memory card.
Attention:
v
Avoid using the Flash Memory
Card when the battery is low.
v
When writing to the card, wait for
the operation to complete before
removing the card.
v
The card is designed to fit easily
into the system one way only.
v
Do not bend the card or force it
into the slot.
v
Do not insert any memory
cards other than those made by
microSD.
v
If the microSD has been
formatted using FAT32, format
the microSD using FAT16 again.

For more information on the
microSD, please refer to the
memory card instruction manual.
Memory card
formatting
Before you start to use the memory
card you have to format it. After
you insert the memory card, select
Menu
→
Settings
→
Phone
settings
→
Memory manager
External memory
the left soft key.
This operation should only be done
when you insert the memory card
for the first time. During formatting
various folders will be created for
different data types.
, then press L
→
Turning the handset
on/off
Turning your handset on
Ensure that your USIM card is in
your handset and the battery is
charged. Press and hold e until
the power comes on. Enter the
USIM PIN code that was supplied
with your USIM card if the
request
is set to On.
(Note: Please refer to page 79) After
a few seconds you will be registered
on the network.
Turning your handset o
Press and hold e until the power
goes off. There may be a few
seconds delay while the handset
powers down. Do not turn the
handset on again during this time.
PIN code
Getting Star ted
27

Getting Started
Access codes
You can use the access codes
described in this section to avoid
unauthorised use of your phone.
The access codes (except the PUK
and PUK2 codes) can be changed
by using the
Change codes
PIN code (4 to 8 digits)
The PIN (Personal Identification
Number) code protects your USIM
card against unauthorised use. The
PIN code is usually supplied with
the USIM card. When the
request
is set to On, your phone
will request the PIN code every
time it is switched on. When the
PIN code request
Getting Star ted
phone connects to the network
directly without the PIN code.
is set to
28
feature.
PIN code
Off
, your
PIN2 code (4 to 8 digits)
The PIN2 code, supplied with some
USIM cards, is required to access
functions such as Fixed dial number.
These functions are only available if
supported by your USIM card.
PUK code (8 digits)
The PUK (PIN Unblocking Key) code
is required to unblock a blocked
PIN code. The PUK code may be
supplied with the USIM card. If not,
contact your network operator’s
customer service department for
the code. If you lose the code,
contact your network operator’s
customer service department.

PUK2 code (8 digits)
The PUK2 code, supplied with some
USIM cards, is required to unblock
a blocked PIN2 code. If you lose
the code, contact your network
operator’s customer service
department.
Security code (4 digits)
The security code prevents
unauthorised use of your phone.
The default security code is set
to ‘0000’ and the security code is
required to delete all phone entries
and to restore the handset to the
factory settings.
Display information
No USIM idle screen
This is the initial screen of the
phone that appears when there
is no USIM card installed in the
phone, or the installed USIM card is
invalid. In this screen, users can only
make emergency calls, and turn the
phone off. To turn the phone off,
press and hold down e for a few
seconds.
Screen structure
If there is no USIM card installed,
an animation telling you to insert a
USIM card appears. If the USIM card
inserted into the phone is invalid,
an animation telling you that the
USIM card is locked appears.
Getting Star ted
29

Getting Started
Emergency call function
The right soft key is represented
by “Emergency” on the screen.
Press the right soft key or dial your
emergency number using the
number keys, and then press O
to make an emergency call.
Idle screen
The idle screen appears when you
have installed a proper USIM card
and turned the phone on.
Screen structure
Idle screen consists of the operator's
name, indicators, date and time
on a background image. You can
change the wallpaper in the Display
Getting Star ted
settings menu.
30
Numbering screen
The numbering screen appears
when a number key is pressed in
the idle screen.
Screen structure
The numbering screen consists of
status indicators, dialled number
and soft menu. Status indicators are
the same as those of the idle screen.
You can change the size and colour
of the dialling font in the Display
settings menu. You can make a call
while dialling a phone number by
pressing s .
Soft key
You can use the soft keys for several
functions while dialling a number.
Using the left soft key, you can
make a video call, send a message
to the number, save the number to
Contacts, search contacts.

Handset lock screen
When the Handset lock function
is selected, you can only make an
emergency call, release the lock,
and turn off the phone in this
screen. As always, you can turn the
phone off by pressing and holding
for a few seconds.
e
Screen structure
The screen structure of the Handset
lock screen is the same as that of
the idle screen.
Emergency call function
You can make an emergency call
using the right soft key. As with
the No USIM idle screen, only
emergency numbers can be dialled.
Unlock function
If you press key except right soft
key and number key, a popup
screen appears asking you to
input the Security code to unlock
the phone. The Security code is
configured in the
Settings → 2. Phone settings → 6.
Security → 3. Change codes). If you
key in an incorrect Security Code,
the phone will remain in
lock
status. If you key in the correct
Security code, the phone will be
unlocked, and the idle screen will
be displayed. If you have turned
the phone off in the
status, you will find the phone
remains in
when you turn it on.
Change codes
Handset lock
Handset lock
(#.
Handset
status
Multimedia
31

Getting Started
Barring password
This service obstructs calling service
in some conditions. This condition
can be edited using the
barring
feature (#. Settings → 4.
Call settings → 2. Call barring). The
barring password is required when
you use the call barring function.
The password is obtained from
your network operator's customer
service when you subscribe to
this service. While this service is
activated, the caller will hear the
information message that the call is
not connected because of the call
barring.
Getting Star ted
Call
32

General Functions
Making and answering
calls
Making a voice call
1. Enter the number including the
full area code.
v
To delete a digit press c key.
To delete all digits press and hold
key.
c
2. Press s to make the call.
3. Press
Making a call from the call
logs
1. In standby mode, press s and
to finish the call, or
e
close the handset.
Note
v
To activate the speakerphone
during a call, activate the touch
keys and press O.
the latest incoming, outgoing
and missed phone numbers will
be displayed.
2. Select the desired number by
using d/u .
3. Press s to call the number.
Making a video call
You can make a video call in a 3G
covered service area. If the called
user has a 3G video phone in a 3G
covered service area, the call will be
established. You can also answer a
video call for video incoming call.
To make/answer a video call, do the
following.
1. Input the phone number using
the keypad, or select the phone
number from the calls made/
received lists.
v
To correct mistakes, press c
briefly to delete the last number,
or press and hold c to delete
all numbers.
General Fu nc ti on s
33

Multimedia
2. If you do not want to use the
speakerphone, ensure you have
the headset plugged in.
3. To start the video function, press
the left soft key [Options] and
select Video call.
v
You will be notified that you will
need to close other applications
to make the video call.
Note
v
The video call may take some
time to connect. Please be
patient. The connection time
will also depend on how
quickly the other party answers
the call. While the video call is
connecting, you will see your
own image; after the other
party has answered, their image
Multimedia
will be displayed on the screen.
4. Adjust the camera position if
necessary.
34
5. Press
to finish the call, or
e
close the handset.
Making a voice/video call
from Contacts
It is easy to call anyone whose
number you have stored in your
Contacts.
1. Press
list.
2. Scroll to the contact to make a
call.
3. Press
Press the left soft key and select
Make video call
call.
4. Press e to finish the call.
to access the contacts
d
to make a voice call.
s
to make a video
Making international calls
1. Press and hold 0 for the
international prefix. The
‘+’ character prefixes the
international access code.

2. Enter the country code, area
code, and the phone number.
3. Press s .
Answering a call
When you receive a call, the phone
rings and the flashing phone icon
appears on the screen. If the caller
can be identified, the caller’s phone
number (or name if stored in your
Contacts) is displayed.
1. Open the slider to answer an
incoming call.
Note
v
To reject an incoming call, press
or the right soft key twice.
e
v
If you set Answer mode as
Press send key (Menu #.4.0.4),
you can answer the call by
pressing s after opening the
slider.
v
If the answer mode is set to
Press any key, any key will
answer a call except for .
Shortcut to activate vibrate
mode
You can activate the vibrate only
mode by pressing and holding
down # after opening the
phone.
Signal strength
You can check the strength of your
signal by the signal indicator on the
LCD screen of your phone. Signal
strength can vary, particularly
inside buildings. Moving close to a
window may improve reception.
Entering text
You can enter alphanumeric
characters using the keypad. For
example, storing names in Contacts,
writing a message, creating a
personal greeting or scheduling
events in the calendar all require
entering text.
Multimedia
35

Multimedia
The following text input methods
are available with the handset.
T9 mode
This mode lets you enter words
with only one keystroke per
letter. Each key on the keypad
has more than one letter. The T9
mode automatically compares
your keystrokes with an internal
dictionary to determine the
correct word, thus requiring
far fewer keystrokes than the
traditional ABC mode. This is
sometimes known as predictive
text. If you press # key for a
long time, you can activate or
cancel T9 mode.
ABC mode
This mode lets you enter letters
by pressing the key labelled with
the required letter once, twice,
Multimedia
three or four times until the
letter is displayed.
123 mode (Number mode)
Type numbers using one
keystroke per number.
36
Changing the text input
mode
1. When you are in a field that
allows characters to be entered,
you will notice the text input
mode indicator in the upper right
corner of the LCD screen.
2. If T9 is on, you can change the
mode to T9Abc, T9ABC, 123,
T9abc by pressing # . When T9
is off, the mode will be changed
to Abc, ABC, 123, abc.
Using the T9 Mode
The T9 predictive text input mode
allows you to enter words easily
with a minimum number of key
presses. As you press each key,
the handset begins to display
the characters that it thinks you
are typing based on a built-in
dictionary. As new letters are
added, the word changes to reflect
the most likely candidate from the
dictionary.

1. When you are in the T9 predictive
text input mode, start entering a
word by pressing 2 to 9 .
Press one key per letter.
v
The word changes as letters
are typed. Ignore what’s on the
screen until the word is typed
completely.
v
If the word is still incorrect after
typing completely, press #
once or more to scroll through
the other word options.
v
If the desired word is missing
from the word choices list, add it
by using the ABC mode.
2. Enter the whole word before
editing or deleting any
keystrokes.
3. Complete each word with a
space by pressing 0 . To delete
letters, press c .
Using the ABC Mode
Use to to enter your text.
1. Press the key labelled with the
required letter:
v
Once for the first letter.
v
Twice for the second letter.
v
And so on.
2. To insert a space, press
To delete letters, press c .
0
once.
Multimedia
37
Multimedia
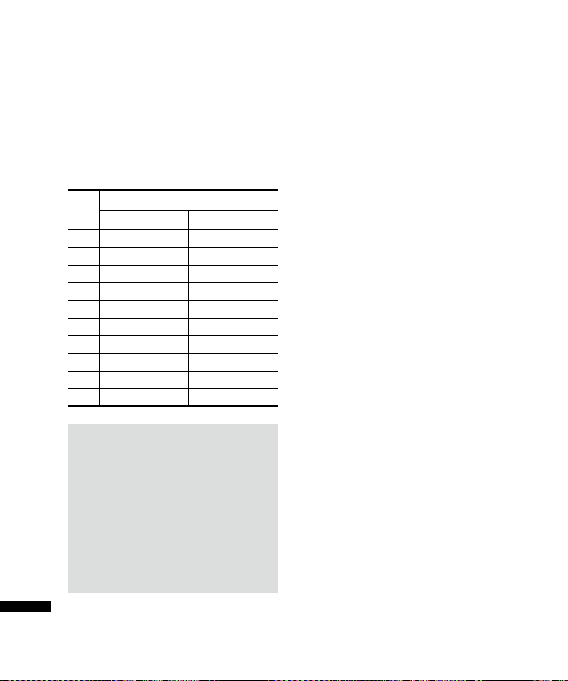
Refer to the following table for
more information on the characters
available using the alphanumeric
keys.
Characters in the order display
Key
Lower case Upper case
. ,? ! ‘ “ 1 – ( ) @ / : _ . ,? ! ‘ “ 1 – ( ) @ / : _
1
a b c 2 ä à ç AB C 2 Ä À Ç
2
d e f 3 è D E F 3 È
3
g h i 4 G H I 4
4
j k l 5 J K L 5
5
m n o 6 ö M N O 6 Ö
6
p q r s 7 ß P Q R S 7 ß
7
t u v 8 ü T U V 8 Ü
8
w x y z 9 W X Y Z 9
9
Space, 0 Space, 0
0
Note
v
The characters assigned to
the keys and their order of
Multimedia
appearance depends on the
language selected using the
option Input method. The table
above provides the characters
set for English language.
38
Using the 123 (Number)
mode
The 123 mode enables you to enter
numbers in a message(a telephone
number, for example). Press the
keys corresponding to the required
digits before manually switching
back to the appropriate text entry
mode.
Using the symbol mode
The symbol mode enables you to
enter various symbols or special
characters. To enter a symbol, select
Options
→
Insert
→
Symbols
. Use
the navigation and numeric keys to
select the desired symbol and press
.
O
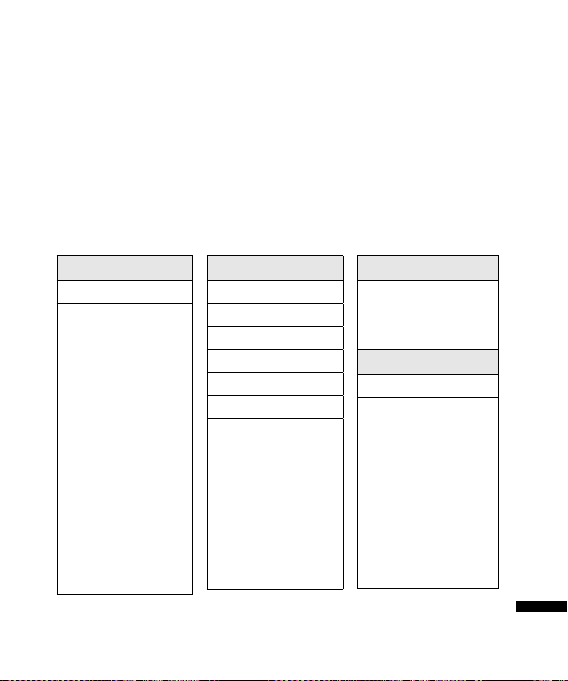
Overview of Menu Functions
You can launch a menu by pressing O in the idle screen. Move to the
desired item and press O to go into the sub menu.
From the main menu you can also go into a submenu by directly pressing
the corresponding numeric key as follows. The main menu consists of the
following top menus and sub menus.
1. Entertainment
1.1 Games
1.2 Mobile TV
2. Vodafone live!
2.1 Vodafone live!
2.2 Enter URL
2.3 Bookmarks
2.4 RSS reader
2.5 Saved pages
2.6 History
2.7 Browser settings
3. Applications
4. Camera
4.1 Still camera
4.2 Video camera
Over v i e w o f M e n u Functions
39

Overview of Menu Functions
5. Messaging
5.1 Create new
5.2 Inbox
5.3 Email
5.4 Drafts
5.5 Outbox
5.6 Sent messages
5.7 My folders
5.8 Templates
5.9 Emoticons
5.0 Messaging settings
6. My Files
Over v i e w o f M e n u Functions
6.1 Pictures
6.2 Sounds
6.3 Videos
6.4 Games
6.5 Applications
6.6 SVG contents'
6.7 Others
6.8 External memory
7. Organiser & Tools
7.1 Alarms
40
7.2 Calendar
7.3 Quick menu
7.4 SIM Tool Kit
7.5 Tasks
7.6 Memo
7.7 Voice recorder
7.8 Private memo
7.9 Calculator
7.* Stopwatch
7.0 Converter
7.# World time
7.13 Organiser settings
8. Contacts
8.1 Add new
8.2 Contacts list
8.3 Groups
8.4 Speed dials
8.5 Service dial numbers
8.6 Own number
8.7 My business card
8.8 Contact settings
9. Calls
9.1 All calls
9.2 Dialled calls
9.3 Received calls
9.4 Missed calls
*. Video call
0. Music
0.1 Recently played
0.2 My music
0.3 Radio DJ
0.4 Music store
0.5 Song recognition
#. Settings
#.1 Profiles
#.2 Phone settings
#.3 Display settings
#.4 Call settings
#.5 Messaging settings
#.6 Contact settings
#.7 Connectivity
#.8 Java settings

Entertainment [Menu 1]
Games
You can easily download games
and play the default games. If you
want to download games. select
Download games in this menu.
Mobile TV
You can access Mobile TV by
selecting this menu.
Menu 1.1
Menu 1.2
Entertainment
41

Vodafone live! [Menu 2]
Vodafone live!
You can launch the web browser
and access the homepage of
the activated profile on Browser
settings.
v
You can also directly access
Vodafone live! by pressing the
right soft key in idle mode.
Enter URL
You can manually enter a URL
address and access the associated
web page.
v
To enter a symbol, press the left
soft key [Options] and select
5.Insert symbol from Options
menu to display the symbol table.
Vo da fo ne l i ve!
v
To switch input mode, press the
left soft key [Options] and select 6.
Input method.
42
Menu2.1
Menu 2.2
Bookmarks
You can store frequently accessed
or favourite URLs/Pages. New
Folder, Add new, Edit, Delete, Move,
Send or Mark/Unmark operations
can be performed on Bookmarks.
Several preconfigured URLs are
stored as bookmarks.
Adding a new bookmark
1. Press the left soft key [Options]
and select
Options
2. Enter the title and associated URL
information.
3. Press O to save.
Connecting to a desired
bookmark
Press to connect a desired
bookmark.
Sending the bookmark to others
Select Send from Options menu.
You can send it via Message or
Email.
1. Add new
menu.
Menu 2.3
from

Deleting a bookmark
Select Delete from Options menu.
You can delete multiple bookmarks
using the Mark/Unmark option.
Editing a bookmark
Select Edit from Options menu.
Edit the title and associated URL
information. Press to save.
RSS reader
RSS reader provide news updates
from websites registered in phone
You read these files in Rss reader,
which collects news from registered
wabsites registered in your phone
and provides it to you in a simple
form.
Saved pages
The phone can save the page on
display as an offline file. Up to 20
pages can be saved.
Menu 2.4
Menu 2.5
History
You can view the list of the pages
you've already connected.
Browser settings
You can change the settings for
browser connectivity and display.
(Menu 2.7.1)
Proles
Select the appropriate profile by
pressing O . This will activate
the profile to initiate the browser
launch.
Menu 2.6
Menu 2.7
Appareance settings
(Menu 2.7.2)
You can set the browser default
character, the scroll speed, Show
image , and Java script by using
this menu.
Vo da fo ne l i ve!
43

Vodafone live!
(Menu 2.7.3)
Cache
Enabling Cache allows you to store
accessed pages to your phone.
Once a page has been stored in the
Cache it will greatly enhance the
page loading speed on subsequent
browsing of the same page.
Cookies
Enabling Cookie allows you to
store cookies sent from the server.
Disabling this function will prevent
cookies from being stored on your
phone.
Security
Certicates list
Certificates can be viewed from the
Vo da fo ne l i ve!
list.
(Menu 2.7.4)
(Menu 2.7.5)
(Menu 2.7.5.1)
44
Session clear
Secure (WTLS/TLS) session data
can be cleared using this option.
Session data should be cleared to
establish a new secure session.
Reset settings
Select this to reset your phone to its
default browser configuration.
(Menu 2.7.5.2)
(Menu 2.7.6)

Applications [Menu 3]
You can easily download other
applications when you select the
embedded link in this menu.
Please note that additional cost
may be incurred when using online
services. You can create a folder
using the left soft key [Options].
Applications
45

Camera [Menu 4]
Still camera
This application enables you to take a still picture. You can take a picture
in the size you want, and use it for the address book photo, home screen
and other more general purposes. Once taken, the picture can be sent by
Message, Email, or Bluetooth O.
Brightness:
at 0.5 intervals. The higher the
level, the brighter the screen.
Camera
Press the left soft key to access Options and set the desired environment
as follows.
v
Move between the options menus withl / r.
v
Select the desired value with u / d and confirm the
selection with O.
46
From –2.0 to 2.0
Menu 4.1

Menu Description
Go to The Pictures folder is launched
and displays existing pictures as
thumbnails.
You can view pictures by pressing
. You can also send the
O
selected picture to another party
via Message, Email, or Bluetooth.
Size 1600x1200, 1280x960, 640x480,
320X240, Wallpaper, 176x144,
Contact
Quality Super fine, Fine, Standard
Burst shot One, Three, Six, Nine (Note:
Available Burst shot depends on
the size.)
Brightness From –2.0 to 2.0 at 0.5 intervals.
The higher the level, the brighter
the screen.
White
You can adjust the tone of the
balance
background photo according
to the weather. Auto, Daylight,
Cloudy, Illuminate, Indoors
Night
You can take better pictures at
mode
night by selecting On.
Menu Description
Frame
You can apply one of 10 frame
Shot
effects when taking a picture.
(available only in case of
Wallpaper size)
Timer You can delay the camera shutter
time. None, 3 secs, 5secs, 10secs.
“ ” is shown when the timer is
activated.
Effect None, Black & White, Negative,
Sepia
Sound Select the desired shutter Sound.
Memory Select the desired memory, either
Handset or External.
Mirror You can activate the mirror effect
by selecting On.
Swap cam You can switch the camera to
activate either the Internal or the
External camera.
Preview
Select the desired Preview
screen
method, either Full image, Full
screen.
Camera
47

Camera
2. After finishing all the settings, press the right soft key [Close].
3. Focus the camera on what you want to take and press O.
4. Press O to save the picture. It is saved in the Pictures folder of My Files.
Note
v
Press the right soft key [Back] to go back to the preview mode without
saving the picture.
Camera
48

Video camera
This application enables you to record a video clip. You can play and watch
a saved video file in this menu. Once recorded, a video clip can be sent by
Message, Email or Bluetooth.
Menu 4.2
Brightness:
at 0.5 intervals. The higher the
level, the brighter the screen.
Press the left soft key to access Options and set the desired environment
as follows.
v
Move between the options menus withl / r.
v
Select the desired value with u / d and confirm the
selection with O.
From –2.0 to 2.0
Camera
49

Camera
Menu Description
Go to The Videos folder is launched
and displays existing videos
as thumbnails. You can view
videos by pressing O . You can
also send the selected video to
another party via Message, Email
or Bluetooth.
Size 176x144, 128x96
Quality Super fine, Fine, Standard
Brightness From –2.0 to 2.0 at 0.5 intervals.
The higher the level, the brighter
the screen.
White
You can adjust the tone of the
balance
background video according
to the weather. Auto, Daylight,
Cloudy, Illuminate, Indoors
Camera
50
Menu Description
Night
You can take better shots at night
mode
by selecting On.
Effect None, Black & White, Negative,
Sepia
Duration Select the desired recording time.
MMS, 30 sec , 1 mins, 2 mins, 5
mins, 60 mins.
Memory Select the desired memory, either
Handset or External.
Mirror You can activate the mirror effect
by selecting On.
Voice Decide whether to record the
sound or not.
Swap cam You can switch the camera to
activate either the Internal or the
External.

2. After finishing all the settings, press the right soft key [Close].
3. Focus the camera on what to record and press
to start recording.
O
And press O to stop recording.
v
You can pause the recording by pressing the left soft key [Pause].
4. Press
to save the video clip. It is saved in the Videos folder of My
O
Files.
Note
v
Press the right soft key [Back] to go back to the preview mode without
saving the video clip.
Camera
51

Messaging [Menu 5]
Create new
Message
You can write and edit a message
containing a combination of text,
image, video and audio.
1. Enter your message in the
Messaging
(Menu 5.1.1)
Message field.
Option menus in Message field
v
Insert:
You can perform the
following actions:
1. Image:
You can insert an
image. (Existing image/Take
picture)
2. Video:
You can insert a video
clip. (One video clip per slide)
3. Sound:
4. Symbols:
You can insert a sound
file. (One sound per slide)
You can insert
symbols. After entering the
corresponding number keys,
press O.
52
Menu 5.1
5. Template:
a text template saved on
the phone. After selecting
a template, press O. The
selected template is inserted
into the Message window.
6. Emoticon:
moticon on writing a message.
7. Name & number:
searching the name and the
number in phonebook, you
can insert the entry.
8. New slide:
new slide.
9. Subject:
subject.
v
Save to drafts:
save the message to drafts.
v
Input method:
desired dictionary mode.
v
Writing language:
select the language for writing
a message.
You can insert
You can insert an
After
Select this to add a
Select this to insert a
Select this to
Select the
You can

v
Add to dictionary: You can add
a word to the dictionary.
2. Press the right soft key [Back] to
exit the menu or go to previous
menu after setting submenus.
3. Press the confirmation key
[Send] to send the message. The
message will automatically be
saved in the Sent Items folder. If
the message has not been sent, it
will remain in the Outbox with a
failed status.
(Menu 5.1.2)
Email
To send/receive an Email, you
should set up the Email account.
(Refer to page 56-59 for how to set
up an Email account.)
1. Enter the Email addresses of the
recipients in the To, Cc, Bcc fields.
You can search the Contacts by
pressing O.
Note
v
Enter the reference Email
address to forward the Email in
Cc(Carbon copy) field.
v
Enter a hidden reference Email
address to forward the Email
without forwarding information
in Bcc(Blind Carbon Copy) field.
v
Only valid Email addresses are
allowed for the recipient (To),
reference address (Cc) and
hidden reference address (BCC)
fields. When an Email address
has been specified, another
field where you can specify
another address appears. You
can specify up to 20 recipients
for the To and Cc address fields
and 10 recipients for the BCC
address field.
2. Move the cursor to the Subject
field and key in the subject.
3. You can enter the message
contents by moving the cursor to
the Message field.
Messaging
53

Messaging
4. Use the following functions by
using the left soft key [Options].
v
Search contacts:
menu to insert Email addresses
saved in Contacts. (Only shown
in Option menu when cursor is
located in To/Cc/Bcc fields.)
v
Recently used:
latest Email address you saved
temporarily. (Only shown in
Option menu when cursor is
located in To/Cc/Bcc fields.)
v
Insert:
Select this menu to insert
special characters, templates,
and contacts. It is also possible to
attach multimedia files (Image,
videos and sounds).
v
Save to drafts :
to save the message in Drafts.
Messaging
v
View attachment:
attached files. (This item is only
available when some files have
been attached.)
54
Select this
You can use the
Select this menu
Shows the
v
Remove:
Deletes the attachment
file. (This item is only available
when the files are already
attached.)
v
Input method:
Select the desired
dictionary mode.
v
Writing language:
You can
change the writing language.
v
Add to dictionary:
You can add a
new word to the dictionary.
v
Set mail priority:
You can
configure the priority of the Email
you wish to send.
5. When you have finished writing
an Email, press O to send the
Email.

Voice message
(Menu 5.1.3)
You can send the message with a
recorded voice.
1. Enter the voice message menu.
2. Press the centre key to record
your voice message.
3. Press the centre key to stop
the recording. For sending the
message directly, press the centre
key once again.
4. If you want to preview the
message or save it to drafts, press
the left soft key [Options].
Inbox
Menu 5.2
1. You can view received messages.
Select a message and then press
to view the message.
O
2. You can view the previous or next
message by using l / r.
3. To view a multimedia message
(Notification), select Retrieve
in the message notification
view screen. The file is then
transmitted, and you can view
the file when the transmission is
complete.
You can use the following functions
by using the left soft key [Options]
in the Inbox.
v
Reply:
Creates a reply to the
sender or all recipients of the
selected message.
v
Forward:
Forwards the
selected message.
Note
v
Not supported for multimedia
message (Notification) and WAP
push messages.
v
Call:
You can make a voice call
or a video call.
Messaging
55

Messaging
Messaging
56
v
Delete:
Deletes the current
message.
v
Create new message:
You
can write a new message or an
Email.
v
Mark/Unmark:
You can select
one or more messages for
multiple deletion.
v
Copy&Move:
In case of SMS,
you can copy the message into
USIM or move the message
into my folders/USIM.
v
Move to my folders:
In case
of MMS, you can move the
message into my folders.
v
Filter:
Displays messages by
desired message types.
v
Message Info.:
In case of SMS,
you can check the message
type, subject, type, from,to,
time, priority, size and number
of slide from, date and time
and where it is saved.
Note
v
You can check the saved emails
in Email [Menu 5.6].
Email
Menu 5.3
Viewing Email message list
1. Select an Email account and then
pressO to view the received
Email list.

2. In Email list, you can use the
following functions by using the
left soft key [Options].
v
Reply:
Creates a reply to the
selected Email.
v
Forward:
Forwards the
selected Email message to
others.
v
Retrieve (POP3 only):
Retrieves new Email messages.
v
Copy to (IMAP only):
Copies
the selected email .
v
Search:
Searches the Email you
want to find out.
v
Delete:
Deletes the Email.
v
Delete from server (POP3
only):
Deletes the message or
Email from server.
v
Message synchronisation
(IMAP only):
Synchronises
Email to retrieve Email server.
v
Create new message:
Creates
a Message, Email, Voice
message.
v
Mark/Unmark:
Use mark/
unmark option for multiple
deletion.
v
Set as read/unread:
You can
set the selected Email to read
or unread.
v
Sort by:
You can sort Email
according to the conditions.
v
Expunge (IMAP only):
Removes the selected Email
data at a time.
v
Message information:
Brief
information on the message
including size, type, date, time
and filenames.
Messaging
57

Messaging
Viewing an Email message
1. Select one of the received Emails
and press the View key to receive
the contents of the Email.
2. The contents of the received
Email are automatically displayed
in the View screen.
3. In the Email View screen, you can
select the following functions by
using the left soft key [Options].
v
Reply:
Creates a reply to the
selected Email.
v
Forward:
Forwards the
selected Email message to
others.
v
Save address:
sender's address to Contacts.
v
Delete:
Messaging
v
Extract:
Email address or Web address
from Email message.
v
View attachment:
attached file.
Saves the
Deletes the Email.
Extracts the number,
Shows the
v
View recipients:
Shows
the Email addresses of the
recipients and reference (Cc).
v
Create new message:
Creates a Message,
Email,Postcard,Voice message.
v
Message infomation:
Brief
information on the message
including size, type, date, time
and filenames.
Drafts
Menu 5.4
You can view saved messages.
Select a message and then press
to edit the message.
O
You can use the following functions
by using the left soft key [Options].
v
Send:
Sends the selected
message.
v
Call:
You can make a voice call or
a video call.
v
Delete:
Deletes the selected
message.
58

v
Create new message:
You can
write a message or an Email.
v
Mark/Unmark:
You can select
one or more messages for
multiple deletion.
v
Filter:
Displays messages by
desired message types.
v
Message info.:
In case of SMS,
you can check the message type,
subject, from, date, time, size and
where it's saved.
Outbox
Menu 5.5
The Outbox is a temporary storage
place for messages waiting to be
sent. Failed messages are also
placed in Outbox. For example,
Emails will be placed in Outbox if
the Email account is not correctly
configured.
1. Select a message.
2. You can use the following
functions by using the left soft
key [Options].
[For sending / waiting messages]
v
Create new message:
You can
write a new message or an Email.
v
Cancel sending:
You can stop
sending/waiting status.
v
Message information:
You can
check the message type, subject,
from, date, time, size and where
it's saved.
[For a failed message]
v
Resend:
Resends the selected
message.
v
Delete:
Deletes the current
message.
v
Save to drafts:
You can send the
message to drafts.
v
Create new message:
You can
write a new message or an Email.
v
Message information:
You can
check the message type, subject,
from, date, time, size and where
it's saved.
Messaging
59

Messaging
Sent messages
Shows the messages you sent
(Message/Email/Postcard/Voice
message).
[Options]
v
Reply:
Creates a reply to sender
or all recipients of the selected
message.
v
Forward:
Forwards the selected
message.
v
Edit:
You can edit the selected
message.
v
Call:
You can make a voice call or
a video call.
v
Delete:
Deletes the selected
message.
v
Create new message:
write a Message or an Email.
Messaging
v
Mark/Unmark:
one or more messages for
multiple deletion.
You can select
Menu 5.6
You can
v
Copy&Move:
In case of SMS, you
can copy the message into USIM
or move the message into my
folders/ USIM
v
Filter:
Displays messages by
desired message types.
v
Message Info.:
You can check the
message type, subject, from, date,
time, size and where it is saved.
My folders
Menu 5.7
You can move messages existed
in Inbox or Sent messages into My
folders, and then you can move
those messages existed in My
folders into the original message
box.
60

Templates
Text templates
Menu 5.8
(Menu 5.8.1)
You can add, edit, and delete
frequently used useful phrases
using the left soft key [Options].
Note
v
Depending on your service
provider, useful phrases are
saved as a default.
Multimedia templates
(Menu 5.8.2)
You can create, edit and view
available templates when creating
multimedia messages. Five types
of template (Birthday, Greeting,
Holiday, Thanks, Sorry) are saved by
default.
The following options are available.
v
Add new:
You can create a new
multimedia template.
v
Write multimedia message:
Creates a multimedia message
with the selected template.
v
Edit:
Edits the selected template.
Emoticons
Menu 5.9
You can add, edit and delete
emoticons. You can insert the
emoticon which you preferred on
writing a message. If you press
confirmation key, you can view the
icon.
Messaging settings
Text message
Menu 5.0
(Menu 5.0.1)
You can configure text message
related options.
Messaging
61

Messaging
1.
Text message centre:
the address of the Text message
centre.
2.
Delivery report:
option, you can verify whether
your message has been sent
successfully.
3.
Validity period:
service allows you to set how
long your text messages will be
stored at the message centre.
4.
Message types: Text, Voice, Fax,
X.400, Email
Usually, the type of message is
set to Text. You can convert your
text into alternative formats.
Contact your service provider for
the availability of this function.
5.
Character encoding:
Messaging
Default alphabet /Unicode
62
Input
By enabling this
This network
Auto/
v
Auto(default):
with single byte character is
normally encoded in Default
alphabet(GSM7). Message
with double-byte character
is automatically encoded in
unicode(UCS2).
v
Default alphabet:
with even double byte
character is encoded in single
byte. Please note that double
byte characters with accent
may be converted into single
byte character without accent.
v
Unicode:
in double byte. Please note that
you may be charged double.
6.
Send long text as:
text message as Multiple SMS or
MMS.
Message
Message
Message is encoded
Select a long

Multimedia message
(Menu 5.0.2)
You can configure Multimedia
message related options.
1.
Retrieval mode:
set the retrieval mode using
Home network and Roaming
network respectively. If you
select Automatic, you will
receive multimedia messages
automatically. If you select
Manual, you will only receive
a notification message in the
inbox and then you can decide
whether to download multimedia
messages or not.
2.
Delivery report:
determine whether to request a
delivery confirmation mail to a
recipient, and whether to allow
sending a delivery confirmation
mail to a sender.
You can
Allows you to
v
Request report:
Determines
whether to request a delivery
confirmation mail for a
Multimedia message.
v
Allow report:
Determines
whether to allow sending a
delivery confirmation mail for
a delivery confirmation mail
request.
3.
Read reply:
Allows you to
determine whether to request
a read confirmation mail to a
recipient, and whether to allow
sending a read confirmation mail
to a sender.
v
Request reply:
Determines
whether to request a read
confirmation mail for a
Multimedia message.
v
Allow reply:
Determines
whether to allow sending a
read confirmation mail for a
read confirmation mail request.
Messaging
63

Messaging
4.
Priority:
You can select the
priority level of the messages
(Low, Normal and High).
5.
Validity period:
configure the term of validity for
a message when transmitting
a multimedia message. The
message would be saved in the
multimedia message server only
for the configured term.
6.
Slide duration:
configure the duration of each
page when writing a message.
7.
Creation mode:
the contents type supported by
MMS. (Restricted, Warning and
Free)
8.
Delivery time:
delivery time of message to
Messaging
the recipient. The Multimedia
message centre will deliver the
message after the delivery time.
Configures the
Allows you to
Allows you to
Allows to select
Multimedia msg. centre:
9.
Allows you to configure network
information such as the MMSC
and the WAP gateway, to send a
multimedia message.
Using the left soft key [Options],
you can activate, add, view or
delete a profile. A profilename
selected by a checkmark is
thecurrently configured value.
You can viewand edit the
contents of the profile by using
option menu.
v
Title:
Profile name.
v
MMSC URL:
multimedia message centre
URL.
v
Internet profiles:
Internet Profile from the list.
Press the right soft key [Save] to
save the changes and complete
Multimedia msg. centre setting.
Enter the
choose the
64

(Menu 5.0.3)
Email
You can configure settings for
receiving and transmitting emails.
1.
Vodafone Mail:
Access to
Vodafone Mail. (Note: This service
is not available in all countries.
Please contact your service
provider for further information.)
2.
Email accounts:
You can create
or configure an Email account
including the Email server and
user ID. You can edit a selected
Email account by pressing the
left soft key[option]- 2.Edit. You
can select an Email account to be
used to send an Email using . You
can select the following functions
using the left soft key [Options].
v
Add new:
Create a new Email
account.
v
Edit:
To edit the selected Email
account.
v
View:
Views a selected Email
account.
v
Mark/Unmark:
Use mark/
unmark option for multiple
deletion.
v
Delete:
Deletes a selected
Email account. All the emails
included in the account will be
deleted.
3.
Allow reply Email:
Determines
whether to allow sending a read
confirmation mail for a read
confirmation mail request.
4.
Request reply Email:
Determines
whether to request a read
confirmation mail.
5.
Retrieve interval:
You can
configure Retrieve interval to
retrieve emails automatically
from the incoming mail server.
When a new Email arrives, an icon
appears at the top of the screen.
You can select the auto receiving
time slot to
Off, 15 minutes,
30 minutes, 1 hour, 2 hours, 4
hours
or
8 hours
.
Messaging
65

Messaging
Please note that additional charges
may be incurred using the Retrieve
interval feature.
6.
Include original message:
Determines whether to include
the original message when you
forward the message or reply to
it.
7.
Include attachment:
Determines whether to include
the attachment file when you
forward the message.
8.
Auto Retrieval in Roaming:
Retrieves Email account
automatically when you move in
roaming area.
9.
New email notification:
the notification information when
arriving new Email.
Messaging
0.
Signature:
You can configure
a text signature to be attached
to the end of an Email. The
configured signature text is
automatically or manually
66
Receives
attached to the end of the Email
when it is sent.
*.
Priority:
You can select the
priority level of Emails (Low,
Normal and High).
Creating a new Email account
1. Select Add new from the Email
account menu options.
2. The following items need to be
configured.
Title Enter a title.
My name Enter the my name.
Username Enter the user name of the Email
account.
Password Enter the Email account password.
Email
Enter the Email address for
address
outgoing mail.
Reply email
Enter the Email address to reply
address
to your Email.
Outgoing
Enter the outgoing Email server.
mail server
Incoming
Enter the incoming Email server.
mail server

Title Enter a title.
Maximum
Select the maximum Email
receive
receive size using the left soft
size
key. The permissible maximum
receive size is no more than 1MB
Mailbox
Select the Email inbox type either
type
POP3 or IMAP4 using the left soft
key.
Save to
Determine whether to leave
server
a copy of messages on the
incoming server or not using the
left soft key. When the mailbox
type is set to IMAP4, a copy of
messages are always saved to the
server.
Save sent
Select where to save the sent
mail into
mails (when the mailbox type is
set to IMAP4). When the mailbox
type is POP3, sent mails are
always saved into handset.
Access
Select an access point to connect
points
to the Internet. You can select a
configured access point using the
left soft key.
Auto
You can configure Auto retrieve
retrieve
to retrieve emails automatically
from the incoming mail server.
Advanced
Sets the configuration to connect
settings
Email server.
Title Enter a title.
SMTP port
Enter the mail server port number.
number
In general, the SMTP (Outgoing
mail server port number) is 25.
Incoming
Enter the mail server port number.
server port
In general, the incoming mail
server port number is 110(POP3)
or 143(IMAP4).
SMTP
Decide whether the outgoing
authenticat
mail server to require
ion
authentication or not using the
left soft key. When the SMTP
authentication is set to On, you
can enter the SMTP Username
and SMTP Password for SMTP
authentication.
SMTP
Enters SMTP user name to require
Username
authentification.
SMTP
Enters SMTP password to require
Password
authentification.
APOP
Decide whether to activate APOP
secure
secure login or not using the left
login
soft key. When the mailbox type
is IMAP4, APOP secure login is
always set to OFF.
3. Press the centre soft key [Save]
to complete the Email account
configuration.
Messaging
67

Messaging
Voicemail
You can configure the voicemail
receipt option.
(Menu 5.0.4)
Service message
You can configure the option
settings such as Push(SI/SL)
messages.
v
Message receive:
On, all service messages will be
received.
v
Service security:
manipulate the overall receipt
options related to Push(SI/SL)
messages.
-
Service security set
-
Trusted:
If you set On, the phone
will verify the appropriateness of
message by comparing to the list
Messaging
in Trusted list.
68
(Menu 5.0.5)
If you set
You can
Untrusted:
-
the phone will verify the
appropriateness of message by
comparing to the list in Untrusted
list.
-
Update:
update the ‘Trusted/Untrusted
list’ with the address of message
server. , you can choose which list
you want to update by selecting
one of options from popup
list. In addition, server’ SMSC
& Originating address in the
message will be updated to either
of Trusted/Untrusted list.
-
Trusted list:
security > Trusted list" status is
'On'. The list indicates the valid list
of server's SMSC & Originating
address(OA). Message which has
differ value to either of SMSC or
OA address will be discarded.
If you set On,
If you set On, you can
Only valid "Service

-
Untrusted list:
Only valid "Service
security > Untrusted list" status is
'On'. Message which has matched
values(SMSC & Originating
address) means invalid. Message
which has differ value to either
of SMSC or OA address will be
accepted.
Info. service
v
Cell broadcast:
(Menu 5.0.6)
You can set the
reception status.
v
Channels:
You can add or modify
the channels.
v
Languages:
You can select the
language you want by pressing
.
O
.Then, the info service message
will be shown in the language
that you have selected.
Messaging
69

My Files [Menu 6]
Pictures
The Pictures folder consists of
embedded links for downloading
pictures through the Internet and
Default images.
Pictures taken using the camera are
stored in the Pictures folder and you
can create new folders to manage
them. You can also send multiple
files to other people.
To view the picture in details, press
the confirmation key.
When a file is selected, the following
options will be displayed by
pressing the left soft key [Options].
v
Send:
You can send the selected
image via Message, Email or
Bluetooth.
v
Use as
My Fi le s
-
Wallpaper:
image as the home screen
theme.
You can set an
70
Menu 6.1
Contacts image:
-
the image of selected entry in
contacts. When incoming a call,
the image saved in contact is
displayed.
-
Start-up:
as shut up screen theme.
-
Shut down:
image as shut down image.
v
Move:
Enables the file to be
moved to other folder.
v
Copy:
Enables the file to be
copied to other folder.
v
Delete:
Deletes the selected
image.
v
Mark/Unmark:
function, you can send, delete,
move and copy multiple files.
v
File
-
Rename:
image.
-
Edit:
Enables the image to be
edited.
You can set
You can set an image
You can set an
Using the Mark
You can rename the

Note
v
Edit menu is not displayed in
default images folder.
-
File info.:
Shows information on
the selected image file.
v
Create new folder:
You can
create a new folder within the
folder currently selected.
v
Slide show:
You can view the
images as a slide show.
v
Sort by:
You can sort the files by
date, file type or name.
v
List view/Grid view:
You can
view the images as a List view or
Grid view.
v
Memory manager:
You can view
the memory status (handset or
external memory card).
Sounds
Menu 6.2
The Sounds folder consists of
embedded links for downloading
ringtones and music as well as
folders containing the Default
sounds and Voice recordings.
Here you can manage, send or set
sounds as ringtones.
When a file is selected, the following
options will be displayed by
pressing the left soft key [Options].
v
Use as
-
Voice ringtone:
You can set the
sound file as a ringtone when
incoming a voice call.
-
Video ringtone:
You can set the
sound file as a ringtone when
incoming a video call.
-
Message tone:
You can set the
sound file as a ringtone when
receiving a message.
My Fi le s
71

My Files
-
Start-up:
You can set the sound
file as a ringtone when handset
starts up.
-
Shut down:
sound file as a ringtone when
handset shut down.
v
Sort by:
date, file type or name.
v
File info.:
on the selected sound file.
v
Memory manager:
the memory status (handset or
external memory card).
Videos
Here you can manage or send
downloaded or captured videos
clips.
If you press O, you can activate
My Fi le s
the video file.
You can set the
You can sort the files by
Shows the information
You can view
Menu 6.3
The following are available using
the left soft key [Options] in the
Video list.
v
Send:
You can send the selected
video clip via Message, Email
or Bluetooth if not protected
by Digital Rights Management
(DRM).
v
Use as:
You can set the video
file as voice ringtone or video
ringtone.
v
Move:
Moves the file into handset
memory or external memory.
v
Copy:
Copies the file in handset
memory or external memory.
v
Delete:
Deletes the selected
video.
v
Mark/Unmark:
Using the Mark
function, you can send, delete,
move and copy multiple files.
72

v
File
-
Rename:
You can rename the
video.
v
File info.:
You can check
information on video.
v
Create new folder:
You can
create a new folder.
v
Sort by:
You can sort files by
name, date, or file type.
v
List view/Grid view:
You can
view the images as a List view or
Grid view.
v
Memory manager:
Displays
the memory status (handset or
external memory card).
You can view a video using the
video player. Video files are
displayed in the list as thumbnails.
You can select a desired video by
using the u / d/l/ r.
Select a desired video and select
Play to view the recorded video.
Select the left soft key [Send] to
attach the selected video to a
message, Email or Bluetooth.
When option
Play
is selected, the
video clip will be played with the
Media Player. To pause the playback,
press during the playback. To
O
resume the paused playback, press
once again.
O
When viewing video clips in the
Media Player, the following options
are available:
v
Landscape view:
You can view
the video in wide view mode.
Note
v
You can also view the video in
wide view mode by pressing
key.
#
My Fi le s
73

My Files
v
Mute/Unmute:
set to more than 0, Mute mode
is activated and if the Volume
is set to 0, the Unmute mode is
activated.
v
Capture:
the paused screen as an image
file (only possible in Pause mode).
v
Repeat:
option (Off/One/All).
v
File info.:
information on files being played.
v
Send:
Message, Email or Bluetooth if
the file is not protected by Digital
Rights Management (DRM).
v
Delete:
video.
v
Use as:
My Fi le s
file as voice ringtone or video
ringtone. This menu is dependent
upon the contents.
If the Volume is
You can save what is on
You can set the repeat
You can check
You can send the video via
Deletes the selected
You can set the video
Games
Menu 6.4
You can easily download games
and play the default games. If you
want to download games. select
Download games in this menu.
Applications
Menu 6.5
You can easily download other
applications when you select the
embedded link in this menu. You
can create a folder using left soft
key [Options].
Note
v
In Games and Applications
menu, Additional cost may be
incurred when using online
services.
74

SVG contents'
Menu 6.6
The SVG contents' folder contains
all of your default and downloaded
SWF/SVG files.
When a file is selected, the following
options will be displayed by
pressing the left soft key [Options].
v
Play/Pause:
Pause or resume
playback.
v
Send:
Send the file as a message
or via Bluetooth.
v
Go to list:
Return to your list of
SWF/SVG files.
v
Landscape view:
View your SWF/
SVG in landscape view mode.
(this only appears if you select
Options without pausing).
v
Mute/Unmute:
Switch the sound
on/off.
v
File info.:
View the Name, Size,
Date, Type , Protect, installof the
file.
v
Send:
Send the file as a message
or Email or via Bluetooth.
v
Use as wallpaper:
Set the SWF/
SVG file as a wallpaper.
v
Delete:
Delete a SWF/SVG file.
Others
Menu 6.7
Other files except pictures, sounds,
videos, games & applications are
stored in this folder.
External memory
If you purchase an optional external
microSD memory card, you can
manage more content. Refer to the
section
How to use a microSD
memory card
to learn how to insert and remove
the memory card. You can manage
content as you do on your phone.
on page 21 and 22
Menu 6.8
My Fi le s
75

Organiser & Tools [Menu 7]
Alarms
If you set the alarm, the appears
on the indicator bar. The specified
alarm sounds at the scheduled
time. Press O to stop the alarm,
and the alarm is released. Press the
right soft key [Snooze] and choose
the snooze interval. The alarm
sound stops and resumes after the
selected Snooze duration. You can
configure up to 5 alarms.
1. Select your desired alarm to
configure in the alarm list. If there
is no alarm, press the left soft key
[Add] to add a new alarm.
2.
Set/Cancel alarm:
Organiser & To ol s
the alarm using the options for
specifying whether the alarm is
on or by choosing the alarm time.
3.
Input alarm time:
desired alarm time by specifying
Hour and Minute. Choose either
‘AM’ or ‘PM’ which is visible if 12
hour format is specified for the
76
Menu 7.1
Set or cancel
Input your
phone.
4.
Select repeat mode:
desired repeat mode using l
/ ror select the desired one
from the list by pressing left soft
key [List].
5.
Select bell:
at the alarm time opening the list
by pressing left soft key [Edit].
6.
Input memo:
7.
Snooze:
You can set the snooze
duration for the alarm.
8. When you have finished setting
the alarm, press the centre key
[Save].
Note
v
The alarm will go off even when
the phone is switched off.
Select the
Select the bell to ring
Input alarm name.

Calendar
Menu 7.2
Schedule inquiry and search
1. Reference by Months
You can refer to your schedule
by months. The cursor is on the
current date, and the registered
date is marked.
The schedule saved for the date
where the cursor is located
is represented by a grey box.
Pressing the shortcut key 1
moves to the previous year and
pressing 3 move to the next
year and pressing 5 moves to
today. Pressing 7 moves to the
previous month, and 9 moves
to the next month. Pressing *
moves to the weekly calendar.
You can move the date
using u / d/l/ r.
2. Detailed reference
You can refer to a detailed
schedule, that is the whole
contents of the schedule
configured by the user. You can
send the schedule to another
phone or an Internet site through
SMS (Text message) or MMS
(Multimidia message) or Email or
Bluetooth using the left soft key
[Options].
Add new event
You can add an event. You can
configure the start date, end date,
start time, end time, contents, type
of event, repetition, alarm of the
schedule.
v
Set Category:
Anniversary, Birthday
v
Set repeat:
Monthly, Annually, User setting
Appointment,
Once, Daily, Weekly,
Organiser & To ol s
77

Multimedia
v
Set alarm:
mins before, 30 mins before, 1
hour before, 1 day before, 3 days
before, 1 week before
Delete all schedules
You can delete all saved schedule
contents using this function.
No alarm, On time, 15
Quick menu
You can specify functions to save
in the Quick menu. If you save the
functions frequently used in the
Quick menu, you can quickly start
the functions simply by pressing
key.
Menu 7.3
Set up and release holiday
You can set up or release user
holidays. Press the left soft key
[Options] and select Set holiday.
The selected date will be displayed
in red.
To release the holiday, press the left
soft key [Options] and select Clear
Organiser & To ol s
holiday.
Schedule notication
If the user has configured the alarm
setting, the specified alarm sound
will ring. If the notification time is
before the schedule start time, you
can set up the alarm again.
78
SIM Tool Kit
Menu 7.4
(SIM dependent)
Depending on whether you have
SAT support services or not (i.e.
USIM Application Toolkit) on the
USIM card, this menu may be
different. If the USIM card supports
SAT services, this menu will be
the operator-specific service
name stored on the USIM card,
for instance “Special”. Please refer
in that case to the information
provided with your USIM card for
further information on how to use
the related options.

Tasks
You can view, edit and add tasks to
do. Tasks are displayed in time order.
Tasks that have been completed
or not completed are displayed in
different ways.
Menu 7.5
Add
To add a task, press the left soft
key [Options] in the Tasks list
management screen and select
Add new event option. Then input
the date, description and priority
for the task.
When you have finished entering
the data, press the centre key [Save]
to save the new task.
Detailed view and Edit
To view detailed task contents,
locate the cursor on the desired
item in the Tasks list, and then press
the centre key. You can send, edit
and delete a task using the left soft
key [Options].
Set job status
Tasks set as finished are displayed
as crossed out below the unfinished
tasks in the Tasks list. You can set
Finished tasks to Not finished by
selecting
Options
.
Memo
Using the memo management
function, you can view and manage
saved memo contents, and add
new memo.
Menu 7.6
Organiser & To ol s
79

Multimedia
Add memo
To add a new memo, press [Add
new memo] in Options. Enter the
contents of the memo. You can save
the memo to the list by pressing
the centre key [Save].
Edit and delete memo
Highlight the desired memo and
press O to view its contents.
You can edit or delete the contents
of a memo using the left soft key
[Options]. You can return to the
memo management screen by
pressing right soft key [Back].
You can select Multiple or All
memos using the Mark/Unmark
Organiser & To ol s
option and then delete a memo
using the Delete option.
80
Voice recorder
1. Press the left soft key [Option] to
display the option pop up menu
before recording.
2. Move to the desired menu item
using u/d and pressO.
v
Duration:
You can set the
recording duration to MMS msg.
size, 30 secs, or 1 min, No limit.
v
Quality:
You can select a
recording quality from Super fine,
Fine, and
Normal
v
Memory in use:
whether to save your photos to
the Handset memory or to the
External memory
v
Go to my sounds:
Voice recordings folder in Sounds.
3. Pressing
When a recording is started, the
recording time appears on the
LCD. To cancel the recording,
press the Back.
starts recording.
O
Menu 7.7
.
Choose
Opens the

4. When you finish the recording,
pressOto exit. The recorded
file is automatically saved in the
Voice recordings folder in My files.
If you pressOagain, you can
start recording new voice.
5. Press the left soft key to select the
various options after the voice
recording.
6. Select the desired menu
usingu/dand pressO.
v
Play:
You can play the voice.
v
Send:
To send the recorded file.
Select one from Message, Email
and Bluetooth using
u/d
v
File:
and pressO.
You can change the name of
file and view the information.
v
Delete:
Select this menu to
delete a recorded file.
v
Use as:
You can set the recorded
file athe Voice Ringtone, Video
Ringtone.
v
Go to my sounds:
Opens the
Voice recordings folder in My
Files.
7. Press the right soft key to close
the sub-menu popup window.
Private memo
Menu 7.8
You can write the private memo to
protect your privacy. You enter the
security code to use this menu.
Add private memo
To add a new memo, press the left
soft key [Add] or [Options]. Enter
the contents of the memo. You
can save the memo to the list by
pressing the centre key [Save].
Organiser & To ol s
81

Organiser & Tools
Edit and delete a private
memo
Highlight the desired memo and
pressO to view its contents. You
can edit or delete the contents
of a memo using the left soft key
[Options]. You can return to the
memo management screen by
pressing right soft key [Back]. You
can select Multiple or All memos
using the Mark/Unmark option
and then delete a memo using the
Delete option.
Calculator
The calculator module allows you to
Organiser & To ol s
perform basic arithmetic functions
such as addition, subtraction,
multiplication, and division as well
as some scientific functions. (sin,
cos, tan, log, ln, exp, sqrt, deg, rad)
1. Press the left soft key [Options].
2. Select the appropriate function.
82
Menu 7.9
You can enter numbers by using
the number keys, and the operators
by using u / d/l/ r .
You can enter a decimal point by
pressing #. Whenever you press
, characters are sequentially
c
deleted in reverse order. Whenever
you holdcdown, all the
characters are deleted in reverse
order in one go.
When calculation is complete and
the result is displayed on the screen,
pressing a symbol saves the result
into the symbol, and continues
calculation.
Stopwatch
This menu allows you to record the
elapsed time of an event.
Menu 7.*

Converter
Using this menu, users can convert
Currency, Surface, Length, Weight,
Temperature, Volume and Velocity.
1. Select the unit menu.
2. Users can set a exchange rate
using option menu.
3. Enter the current rate, and
then you can convert from one
currency to another.
4. You can view the value of units.
5. Press [Reset] to clear the current
input Field.
6. To exit the conversion function,
press the [Back] key.
Menu 7.0
World time
The World time provides time
information on major cities
worldwide.
1. You can select a desired city as
a base using the left soft key
Options → Add city → Press the
left soft key [Map].
2. You can Change the city using the
left soft key Options → Change
city or Change current city.
3. You can apply to Daylight Saving
time using the left soft key
Options → Daylight saving.
4. You can Select the Analog clock
mode Options → Analog clock.
Menu 7.#
Organiser & To ol s
83

Organiser & Tools
Organiser settings
Calendar settings
You can set the configurations to
view the calendar.
v
Default view:
default value to view a calendar;
Month view, Week view
v
Weekly start time:
3AM, 4AM, 5AM, 6AM, 7AM, 8AM,
9AM, 10AM, 11AM, 12PM
v
Week starts on:
the default day to start a week;
Sunday, Monday
Organiser & To ol s
Send all schedules & to do
via Bluetooth
You can send all data of calendar
or to do saved in phone to other
phones by using Bluetooth.
You can set the
(Menu7.13.2)
84
Menu 7.13
(Menu 7.13.1)
1AM, 2AM,
You can set
Backup calendar & tasks
(Menu 7.13.3)
You can create the backup files of
the calendar or tasks entries saved
in the phone when you insert an
external memory.
Restore calendar & tasks
(Menu 7.13.4)
You can reset the backup files of
calendar or tasks when you insert
an external memory.
Memory info.
You can view the information
of available memory regarding
Calendar, Tasks, Memo and Secret
memo.
(Menu 7.13.5)

Contacts [Menu 8]
Add new
You can register a new contact
address. You can enter the name,
different phone numbers and Email
addresses of a new contact. You can
also assign the contact to groups,
include an image or avatar, assign
a specific ringtone and even enter
a memo for the contact. Other
available fields include Home page
URL, Home address, Company
name, Job title and company
address. You can enter and manage
contact addresses depending on
the memory usage.
Menu 8.1
Contacts list
Performs the contact address
search function. The search
operation is performed based on a
first name as a default. The current
search method and results found
are displayed in the Search window.
You can make a phone call or send
a message to the selected phone
number. A Contacts search can be
performed based on the phone
number or group information.
Note
v
In Settings menu, the search
operation can be performed
based on the last name.
Menu 8.2
Cont ac ts
85

Contacts
Groups
Using this menu you can manage
group information (both stored in
the Handset and the USIM). In the
handset memory, there are 5 default
groups: Family, Friends, Colleagues,
School and VIP. You can add, edit
and delete groups. When a ringtone
for a number is not specified, a call
from the number sounds the group
ringtone assigned to the number
for the group.
Speed dials
Using this menu you can manage
speed dials. Speed dials are
configured between 2-9. You can
register speed dials for a specific
contact address up to 5 different
Cont ac ts
numbers, and a contact address
may have multiple speed dials.
86
Menu 8.3
Menu 8.4
Service dial numbers
You can view the list of Service
Dialling Numbers (SDN) assigned by
your service provider (if supported
by the USIM card). Such numbers
include emergency, directory
enquiries and voice mail numbers.
After selecting a service number,
press s to dial the service.
Own number
Allows you to display your phone
number in the USIM card. You can
save own numbers being used in
the USIM card.
Menu 8.5
Menu 8.6

My business card
You can create your own business
card by pressing the left soft key
Add. After entering the name,
number, Email and image, you
can use it as a business card when
sending the message.
Contact settings
Contact list setting
v
Contacts location:
contact information shall be
displayed (from handset memory,
from USIM card or both). All is the
default setting.
v
Name display:
display order by name.
v
Show picture:
display image/avatar or not.
Select whether to
Menu 8.7
Menu 8.8
(Menu 8.8.1)
Select which
You can set the
(Menu 8.8.2)
Copy
You can copy contacts from the
phone memory to the USIM or from
the USIM to the phone memory.
You can copy all or selected entries
at a time.
(Menu 8.8.3)
Move
You can move contacts from the
phone memory to the USIM or from
the USIM to the phone memory.
You can move all or selected items
at a time.
Send all contacts via
Bluetooth
You can send all phonebook data in
handset to other phones by using
Bluetooth
(Menu8.8.4)
Cont ac ts
87

Contacts
Backup contacts
You can save all phonebook data in
handset to external memory card
by formatting vcard.
(Menu 8.8.5)
Restore contacts
You can restore all phonebook data
in external memory card to phone
memory by formatting vcard.
Clear contacts
Clears all contact information. You
can delete all contacts saved in the
mobile phone memory as well as
on the USIM card.
Memory info.
You can check the status of contacts
memory in this menu.
Cont ac ts
(Menu 8.8.7)
(Menu 8.8.8)
88
(Menu 8.8.6)

Calls [Menu 9]
All calls
Allows you to view the missed,
received, and dialled call records.
You can make a call, or send a
message to the number you have
selected from the records. You can
also save the number in Contacts.
Dialled calls
Allows you to view dialled call
records, make a call, send a
message, and save the number in
Contacts.
Received calls
Allows you to view received
call records, make a call, send a
message, and save the number in
Contacts.
Menu 9.1
Menu 9.2
Menu 9.3
Missed calls
Allows you to view missed call
records, make a call, send a
message, and save the number in
Contacts.
Menu 9.4
Calls
89

Video call [Menu *]
You can make a video call using this
menu.
1. Enter the number you want to
dial.
v
You can key in the number.
v
You can select the number
from Search contacts using the
left soft key [Options]
2. Press the centre key [Video call]
to make a video call.
During a video call
When you are in a video call, the
screen will show the contact's
name and duration of call, contact's
image, volume indicator, video
control panel, and your image.
You can access the following option
menus by pressing the left soft key
Vi de o ca ll
[Options]
.
v
Speaker on/off or Bluetooth
talk/Handset talk
v
Hold/Resume
90
v
Capture
v
Camera in/out
v
View sender number
v
Go to contacts
v
Go to messages
v
End call
v
Settings
Incoming video call
When a video call is received, the
caller's information is displayed as
following.
v
Picture/Animation: Displays
picture ID, graphic image
configured in Contacts, or
default animation indicating the
incoming call.
v
Caller's name and number: Shows
incoming caller's number. If the
number is stored in Contacts,
displays the name of the contacts.

Picture ID and animation setting is
used in the order of Contacts, video
file used in Group ringtone, and
video file used in Profile.
Also, sound can be set for the
incoming video call. The sound
setting is used in the order of
Contacts, Group ringtone, and
Profile.
You can accept the incoming call
by pressing the centre key [Accept].
Also you can accept the incoming
call and show the private image by
pressing the left soft key [Private].
The incoming call ringing can be
silenced by pressing the right soft
key [Silent]. It can be also silenced
by long press on on the left side of
the phone.
When ringing is silenced, press the
right soft key [Reject] to reject the
call.
Vi de o ca ll
91

Music [Menu 0]
Recently played
This menu shows the last 20 tracks
that were played. And, if it starts to
play, the menu "Now playing" will
be displayed.
You can activate media player
on playing through Now playing
menu.
My music
All tracks
You can view all the music files
stored in the phone/external
memory.
Artists
You can view and play music sorted
by Artists.
Music
(Menu 0.2.1)
(Menu 0.2.2)
Menu 0.1
Menu 0.2
(Menu 0.2.3)
Albums
You can view and play music sorted
by Albums.
(Menu 0.2.4)
Genres
You can view and play music sorted
by Genres.
Playlists
You can create your own playlists by
choosing tracks from the All tracks
menu list.
Shue tracks
If you want to play the music
continuously and randomly, select
this option.
(Menu 0.2.5)
(Menu 0.2.6)
92

Radio DJ
You can listen to vodafone Radio
station.
Note
v
This service is not available in
all countries. Please contact
your service provider for further
information.
Menu 0.3
Song recognition
Selecting this menu starts dialling
a number for song recognition. For
further information, please contact
your service provider.
Menu 0.5
Music store
Connects to the Vodafone music
download site.
Note
v
Additional charges may be
incurred when downloading
music. Contact your
service provider for further
information.
Menu 0.4
Music
93

Settings [Menu #]
Profiles
You can select ringtone or vibration
for an incoming call and configure
the sound and volume of the
ringtone, key tone, and sound
effect, according to a profile. The
profiles provided include [Normal],
[Silent], [Outdoor], [Flight mode],
[Customised 1], [Customised
2], and [Customised 3]. Select a
profile, and press O to activate
the profile. After pressing the left
soft key [Options], select the Edit
menu for the [Normal], [Outdoor],
[Customised 1], [Customised 2] and
[Customised 3] profile to change
the configuration. A different list of
options is available for each profile
that has been selected for editing.
Settings
Menu #.1
v
Alert by
This option determines the
incoming call notification mode.
You can select from [Ring],
[Vibration], [Silent], [Ring &
vibration], [Ring after vibration],
[Max Ring & Vibration].
v
Voice ringtone
You can select the ringtone for
incoming voice calls.
v
Video ringtone
You can select the ringtone for
incoming video calls.
v
Volume
Set the ringtone volume.
v
Message alert
You can set how often the phone
is to inform you of a received
message until it is read.
94

v
Message tone
You can select a file from among
your own personal files or from
the default files, to be played
by the phone upon receiving a
message.
v
Key tone
You can set the key tone to be
played when pressing the keys.
v
Key tone volume
You can set the volume of the
chosen key tone, choosing from
7 available levels.
v
Slide tone
Select the desired tone the
phone will emit when you slide
up/down the phone.
v
Confirmation tone
You can set the confirmation
tone to be played by the phone
to confirm actions.
v
Start up sound
You can set the effect to be
played when the phone is
switched on.
v
Select start up sound
You can select which file will
be played when the phone is
switched on.
v
Power off sound
You can set the effect to be
played when the phone is
switched off.
v
Select power off sound
You can select which file will
be played when the phone is
switched off.
Settings
95

Settings
Phone settings
Date & Time
Although the current time is
automatically configured when the
phone is registered to the network,
users can configure the time and
date directly using this menu. The
time configured by the user is valid
only while the phone is turned on.
Time
1. Select the
Date & time list, and then press
O
2. Move to your desired field,
Minute
navigation keys. (When you have
selected
Time format
Settings
3. Enter
the number keys.
4. Select the time format using
l
(Menu #.2.1)
Time
item from the
.
, or am/pm field using the
12-hour/24-hour as
)
Hour
, and
Minutes
/ r.
96
Menu #.2
Hour
using
5. Scroll down to select the hour
indicator format i.e. Off, Cuckoo
clock or Chime bell.
6. Press the centre soft key
set the time with the specified
value.
Date
1. Select the
Date & time list, and then press .
2. Select the date format using
l / r.
3. Enter
the number keys.
4. Press the centre soft key
,
set the date with the specified
value.
Date
item from the
Day, Month
and
O
Year
O
to
using
to

Auto update date/time
When Auto Update is configured
to On, the time and date are
automatically updated according
to the current time zone. If Confirm
first is selected, the time and date
update is confirmed before it is
updated automatically.
Daylight saving
Select whether to activate the
daylight saving function or not. You
can set the Summer time difference
of selected home city for 1 hour or
2 hours.
Language
(Menu #.2.2)
Select the display language. You can
select Automatic language option
to change display language to the
USIM card supported language.
Auto key lock
(Menu #.2.3)
If you activate this function, the
keypad will be locked automatically
after predefined delay time when
the slide is closed.
Security
(Menu #.2.4)
PIN code request
When this is set to On, you are
requested to enter your PIN each
time you switch the phone on.
Note
v
Press the right soft key in the
PIN code entry window to
return to the previous step.
v
3 incorrect PIN code entries
would invalidate the PIN code.
And you have to enter the
PUK (PIN Unblock Key) code to
configure the PIN code again.
Settings
97

Settings
Note
v
The maximum number of times
you may enter the PUK code
is 10. (Note: If you enter an
incorrect PUK code 10 times,
the USIM card will be blocked
and must be replaced.)
v
If the PIN code request cannot
be disabled by operator
settings, you will not be able to
choose this menu item.
Handset lock
You can lock your phone. The
following 4 lock functions are
available.
When switching on:
handset whenever the handset is
switched on.
If USIM changed:
Settings
handset when the phone's USIM
card has been changed.
Immediate:
immediately.
Locks the
Locks the handset
Locks the
None:
Deactivates the lock
function. You are requested to enter
the security code to confirm the
selection.
v
To unlock the handset, you need
to enter the security code.
Change codes
You can change the PIN, PIN2, and
the mobile phone password.
PIN code
PIN is the abbreviation for Personal
Identification Number, and is used
to restrict use by an unauthorised
user.
PIN code change procedure
1. Select ‘PIN code’ from the ‘Change
codes' list and then press O .
2. Enter the current PIN code, and
press O.
3. Enter the new PIN code, and
press O.
4. Enter the new PIN code once
again, and press O.
98

v
If the PIN code is different from
that of step 3, the procedure is
restarted from step 3.
5. When the PIN code is changed
properly, a Changed message
is displayed. If you enter an
incorrect PIN code in step 2, the
procedure is restarted from step
2, and the number of attempts
you have left to enter the number
decreased by 1.
6. Press the right soft key in the PIN
code entry window to return to
the previous step.
Note
v
Three incorrect PIN code entries
in the PIN code entry window
would invalidate the PIN code.
In this case, you have to enter
the PUK (PIN Unblock Key)
code to configure the PIN code
again. The maximum number
of times you may enter the PUK
code is 10. (Note: If you enter an
incorrect PUK code10 times, the
USIM card will be blocked and
must be replaced.)
Settings
99

Settings
PIN2 code
PIN2 is the abbreviation for Personal
Identification Number 2, and is
used to restrict use by unauthorised
users as with the PIN. The PIN2 code
change procedure is the same as
the one for the PIN code. 3 incorrect
PIN2 code entries would invalidate
the PIN2 code. In this case, you
have to enter the PUK2 code in
order to use the PIN2 code again.
The maximum number of times
you may try to enter the PUK2 code
is 10, like PUK1. 10 incorrect PUK2
code entries would invalidate the
PIN2 code.
Security code
The security code is used to change
the mobile phone password. The
maximum number of attempts
Settings
to enter the security code is not
limited as it is with PIN and PIN2.
100
Power save
Decide whether to activate the
power save mode or not.
Memory manager
(Menu #.2.5)
(Menu #.2.6)
User memory
This function shows the status of
the user memory of the mobile
phone. Since this function scans the
overall file system for statistics, a
few seconds are required.
User reserved memory
This function shows the status
of the User reserved memory.
The usual contents are Text msg,
Contacts, Calendar, Tasks, Memo,
Alarms, Call history, and Bookmarks.
And it gives a clear illustration of
the actual amount compared with
the total amount for each item.
USIM memory
This function shows the status of
the USIM card user memory.

External memory
This function shows the status of
the External card user memory. This
function displays the In-use and
free memory usage statistics.
Primary storage setting
(Menu #.2.8)
You can select the storage to
download the file: Handset memory
or External memory.
Handset Information
(Menu #.2.9)
This functions shows the USIM card
telephone number, model name
and software version of the mobile
phone.
Reset settings
Select this to reset your phone to
its default configuration. You are
requested to enter the security
code.
(Menu #.2.10)
Display settings
This menu allows you to personalise
the display options of the screens
and of the menus entire graphic
interface.
Main Display
You can set the screen theme to be
displayed on the main screen.
Menu #.3
(Menu #.3.1)
Home screen
v
Wallpaper:
image to be displayed on the
main screen.
v
Display items:
which items to display on the
screen: Clock, Clock + Key
guide, Dual clock, Key guide ,
Do not show, Calendar+Clock or
Calendar
v
Clock type:
type of clock.
You can select an
You can select
You can select the
Settings
101

Settings
v
Clock font colour:
the colour of displaying the clock.
Start up picture
You can select the image to be
displayed while the phone is being
switched on.
Power o picture
You can select the image to be
displayed while the phone is being
switched off.
Menu style
You can select the desired menu
style from Grid style and List style.
(Menu #.3.3)
Font
You can set the font style, dialling
font size, and dialling font colour
using l / r.
Settings
You can select
(Menu #.3.2)
Backlight
You can set the backlight duration
and the brightness on the Home
screen and the duration on the
Keypad individually.
Handset theme
Select the desired handset theme
from White and Black."
Welcome message
After selecting On, you can write a
welcome message.
Call settings
Call durations
You can view call time by types.
Press the left soft key [Options] to
choose either partial initialisation or
entire initialisation. Initialization will
require your Security code.
(Menu #.3.4)
(Menu #.3.5)
(Menu #.3.6)
Menu #.4
(Menu #.4.1)
102

The following timers are available:
v
All calls:
Shows total call time.
v
Dialled calls:
Shows outgoing
call time.
v
Received calls:
Shows incoming
call time.
v
Last call:
Shows the latest call
time in units of hours/minutes/
seconds.
Call barring
(Menu #.4.2)
Call barring menus for Voice and
Video calls are provided.
The menu consists of
Video calls
and
Deactivate all
Voice calls
. The
Voice calls and Video calls menus
have the following submenus.
The
Call barring
of
All outgoing, Outgoing
menu consists
international, Outgoing
international calls except
home country, All incoming
and
Incoming when abroad
submenus.
The
All outgoing
menu bars
dialling all outgoing calls, the
Outgoing international
dialling outgoing international calls,
and the
Outgoing international
calls except home country
bars dialling outgoing international
calls except for the Home PLMN
country.
All incoming
incoming calls and the
when abroad
menu rejects
incoming calls when roaming.
Voice calls
Video calls
,
All outgoing
1. When O is selected, it receives
the Barring password from user,
and activates the barring service
on the network. A requesting
message and animation appears.
When the network answers,
the result of the operation is
displayed.
menu bars
menu
rejects all
Incoming
Settings
103

Settings
2. When the Options menu is
selected, it activates the Outgoing
calls menu. Select the Options
menu from the soft menus on the
lowest menu. Then Deactivate,
Deactivate all, View status and
Change password menus appear.
The
Deactivate
the barring service after the user's
Barring password is entered. The
Deactivate all
all barring services configured
in the network after the user's
Barring password has been
entered. The
enables users to view the current
network configuration. Selecting
View status
the Requesting message with
animation and the result of the
operation when the network
Settings
answers.
menu enables users to change
the current barring password.
104
menu deactivates
menu deactivates
View status
menu displays
Change password
menu
Outgoing international
1. When O is selected, it operates
in the same way as the
calls
menu.
2. When the Options menu is
selected, it activates and operates
the International calls menu. It
operates in the same way as the
Outgoing calls
Outgoing international calls
except home country
1. When O is selected, it operates
in he same way as the
calls
menu.
2. When the Options menu is
selected – It activates and
operates the
except home country
operates in the same way as the
Outgoing calls menu.
International
Outgoing
menu.
Outgoing
menu. It

All incoming
1. When O is selected, it operates
in the same way as the
calls
menu.
2. When the Options menu is
selected, it activates and operates
the Incoming calls menu. It
operates in the same way as the
Outgoing calls
Incoming when abroad
1. When O is selected, it operates
in the same way as the Outgoing
calls menu.
2. When the Options menu is
selected, it activates and operates
the Incoming calls when abroad
menu. It operates in the same
way as the Outgoing calls menu.
Deactivate all
You can select to deactivate all or
not.
Outgoing
menu.
Fixed dial numbers
v
Turn on/off
-
On:
Select whether to activate
FDN ornot. PIN2 authentication
is required.
-
OFF:
Select whether to activate
FDN ornot. PIN2 authentication
is required.
v
FDN List:
Displays the current
FDN list. You can edit, add, or
delete fixed dial numbers. PIN2
authentication is requried to
edit,add, or delete the list. And
the configuration information
is saved on the USIM. The
information saved on the USIM
is used when FDN restricts
outgoing calls.
(Menu #.4.3)
Settings
105

Settings
Data volume
Allows you to check the sent,
received and all data volume
transferred.
Press the left soft key [Clear all] to
choose entire initialization. You
can also use the [Clear] for the
initialization of the selected volume
type. Initialization will require your
Security code.
Call costs
1. This function displays the call
costs of the Last call and All calls.
2. To initialise, press the centre key
[Edit] and enter the PIN2 code.
3. You can select either Units
or Currency in Set call cost.
According to your setting, the
call cost is displayed during a call
Settings
(If USIM and Network support
Advice Of Charge(AOC)).
(Menu #.4.4)
(Menu #.4.5)
106
4. In the Set limit configuration,
select On to configure the
cost limit. When a cost limit is
configured, and the call costs
reach the limit, making a call will
not be allowed.
(Menu #.4.6)
Diverts
Call divert menus for voice and
video calls are provided.
If you press O, you can activate
call divert menu.
Voice calls
All voice calls
When busy
No answer
Not reachable

1. When the number list is not
exsisted
Converts to an editor for
entering a divert number. You
can input the number to divert
a call directly or search it in
phonebook. If you press [Divert],
the phone will send the request
to service provider after entering
the number. While waiting for
the result from the network,
a Requesting message and
animation appears.
2. When the number list is
exsisted
Displays To other number menu
including of the number list.
While waiting for the result
from the network, a Requesting
message and animation appears.
3. Option menu
After activating All voice calls
menu, selecting the Options
menu at the bottom of the
menus displays the Deactivate,
Deactivate all, View status and
clear list menus.
The View status menu shows the
settings on the network. If you
select this menu, Requesting.
message and animation appear.
Then the network settings are
displayed when the information
is received from the network.
If you select the Deactivate
menu, the call divert numbers
registered in the network are
deleted after user confirmation.
Clear list menu will delete all
divert number list.
Settings
107

Settings
Video calls
All video calls
1. When the number list is not
exsisted
Converts to an editor for
entering a divert number. You
can input the number to divert
a call directly or search it in
phonebook. If you press O
[Divert], the phone will send
the request to service provider
after entering the number. While
waiting for the result from the
network, a Requesting message
and animation appears.
2. When the number list is
exsisted
Displays To other number menu
including of the number list.
While waiting for the result
Settings
from the network, a Requesting
message and animation appears.
108
3. Option menu
After activating the All video
calls menu, selecting the Options
menu at the bottom of the
menus displays
the Deactivate, Deactivate all,
View status and clear list menus.
If you select the Deactivate
menu, the call divert numbers
registered in the network are
deleted after user confirmation.
Selecting the Cancel all menu will
display the operation result after
showing the Requesting message
and animation. Clear list menu
will delete all divert number list.
When busy
1. When the number list is not
exsisted
It operates the same as All voice
calls menu.

2. When the number list is
exsisted
It operates the same as All voice
calls menu.
3. When Option menu is selected
It activates and operates If busy
menu. It operates the same as All
voice calls menu.
No answer
1. When the number list is not
exsisted
It operates the same as All voice
calls menu.
2. When To a number is selected
It operates the same as All voice
calls menu.
3. When Option menu is selected
Activates and operates No
answer menu. It operates the
same as All voice calls menu
except that users can configure
delay time in the Set waiting time
menu in the menu list.
Not reachable
1. When the number list is not
exsisted
It operates the same as All voice
calls menu.
2. When the number list is
exsisted
It operates the same as All voice
calls menu.
3. When Options menu is selected
Activates and operates If out of
reach menu. It operates the same
as All voice calls menu.
Deactivate all
You can select to deactivate all or
not.
Settings
109
 Loading...