

Page 1

HCS6320 CodePlus™ Series
MUX/MOD Feature Card
Installation & Setup Guide
Warranty
© Copyright 2012 LG Electronics U.S.A., Inc.
P/N: 206-4183 (Rev A)
Page 2
For Customer Support/Service, please call: 1-888-865-3026
The latest product information and documentation is available online at:
www.LGsolutions.com/products
WARNING
RISK OF ELECTRIC SHOCK
DO NOT OPEN
WARNIN G:
TO REDUCE THE RISK OF ELECTRIC SHOCK DO NOT REMOVE COVER (OR BACK). NO
USER-SERVICEABLE PARTS INSIDE. REFER TO QUALIFIED SERVICE PERSONNEL. ALL
CARDS MUST BE INSERTED AND REMOVED BY QUALIFIED SERVICE PERSONNEL ONLY.
The lightning flash with arrowhead symbol, within an equilateral triangle, is intended to alert
the user to the presence of uninsulated “dangerous voltage” within the product’s enclosure
that may be of sufficient magnitude to constitute a risk of electric shock to persons.
The exclamation point within an equilateral triangle is intended to alert the user to the presence
of important operating and maintenance (servicing) instructions in the literature accompanying
the appliance.
WARNING:
TO PREVENT FIRE OR SHOCK HAZARDS, DO NOT EXPOSE THIS PRODUCT TO RAIN
OR MOISTURE.
Apparatus shall not be exposed to dripping or splashing and no objects filled with liquids, such
as vases, shall be placed on the apparatus.
L’appareil ne doit pas être exposé à des égouttements d’eau ou des éclaboussures et de plus
qu’aucun objet rempli de liquide tel que des vases ne doit être placé sur l’appareil.
REGULATORY INFORMATION:
This equipment has been tested and found to comply with the limits for a Class A digital
device, pursuant to Part 15 of the FCC Rules. These limits are designed to provide reasonable
protection against harmful interference when the equipment is operated in a commercial environment. This equipment generates, uses and can radiate radio frequency energy and, if not
installed and used in accordance with the instruction manual, may cause harmful interference
to radio communications. Operation of this equipment in a residential area is likely to cause
harmful interference in which case the user should be required to correct the interference at
his own expense.
CAUTION:
Do not attempt to modify this product in any way without written authorization from LG
Electronics U.S.A., Inc. Unauthorized modification could void the user’s authority to operate
this product.
NOTE TO SATELLITE DISH INSTALLER:
This reminder is provided to call your attention to Articles 810 and 820 of the 2002 National
Electrical Code. Refer to Article 810, in particular 810-1 and 810-15, for required grounding of
the metal dish antenna. Refer also to 810-2 which, by reference to Article 820, requires that
the satellite dish coaxial cable shield be connected to the grounding system of the building as
close to the point of cable entry as practical.
COMPLIANCE:
The responsible party for this product’s compliance is: LG Electronics U.S.A., Inc.
2000 Millbrook Drive, Lincolnshire, IL 60069, USA • Phone: 1-847-941-8000
Marketed and Distributed in the United States by LG Electronics U.S.A., Inc.
2000 Millbrook Drive, Lincolnshire, IL 60069
2
© Copyright 2012 LG Electronics U.S.A., Inc.
206-4183
Page 3

IMPORTANT SAFETY INSTRUCTIONS
Important safeguards for you and your new product
THIS PRODUCT HAS BEEN MANUFACTURED AND TESTED WITH SAFETY IN MIND.
IMPROPER USE, HOWEVER, CAN RESULT IN POTENTIAL ELECTRICAL SHOCK OR
FIRE HAZARDS. TO AVOID DEFEATING THE SAFEGUARDS THAT HAVE BEEN BUILT
INTO THIS PRODUCT, PLEASE READ AND OBSERVE THE FOLLOWING SAFETY
POINTS WHEN INSTALLING AND USING THIS PRODUCT.
1. Read these instructions.
Read all the safety and operating instructions
before operating the product.
2. Keep these instructions.
Retain the safety and operating instructions
for future reference.
3. Heed all warnings.
Adhere to all warnings on the product and in
the operating instructions.
4. Follow all instructions.
Follow all operating and use instructions.
5. Do not use this apparatus near water.
Do not use this product near water or moisture
or in an area, such as a basement, that might
become flooded.
6. Clean only with dry cloth.
Unplug this product before cleaning. Do not
use liquid cleaners or aerosol cleaners.
7. Refer all servicing to qualified service
personnel
Servicing is required when the apparatus has
been damaged in any way, liquid has been
spilled or objects have fallen into the apparatus, the apparatus has been exposed to rain
or moisture, does not operate normally, or has
been dropped.
8. Object and Liquid Entry
Never push objects of any kind into this
product through openings as they may touch
dangerous voltage points or short-out parts
that could result in a fire or electric shock.
Never spill liquid of any kind on the product.
.
9. Outdoor Use
Warning: To prevent fire or shock
hazards, do not expose this product
to rain or moisture.
10. Wet Location
The apparatus shall not be exposed to
dripping or splashing and no objects filled
with liquids, such as vases, shall be placed
on the apparatus.
11. Test Equipment
In some cases, LG has supplied or recommended the use of test equipment and
devices for the setup and testing of the
equipment. The operation and maintenance
of test equipment is described in their
associated instruction manuals. Please refer
to these manuals for explicit instructions
regarding the safe use and handling of the
equipment.
12. Damage Requiring Service
Unplug this product from the wall power
outlet and refer servicing to qualied service
personnel under the following conditions:
a. If liquid has been spilled, or objects have
fallen into the product.
b. If the product has been exposed to rain or
water.
c.
If the product does not operate normally by
following the operating instructions. Adjust
only those controls that are covered by the
operating instructions, as an improper
adjustment of other controls may result in
damage and will often require extensive
work by a qualied technician to restore
the product to its normal operation.
206-4183
(Continued on next page)
3
Page 4

IMPORTANT SAFETY INSTRUCTIONS
(Continued from previous page)
d. If the product has been dropped or the
cabinet has been damaged.
e. If the product exhibits a distinct change in
performance.
Caution: Refer all servicing to qualied
service personnel.
13. Servicing
the risk of electrical shock, do not perform
any servicing other than that described in
the operating instructions unless you are
qualied to do so.
Caution: These servicing instructions are for use by qualied
service personnel only. To reduce
14. Replacement Parts
When replacement parts are required, be
sure the service technician uses replacement parts specied by the manufacturer or
that have the same characteristics as the
original parts. Unauthorized substitutions
may result in re, electric shock, or other
hazards.
15. Safety Check
Upon completion of any service or repairs to
this product, ask the service technician to
perform safety checks to determine that the
product is in proper operating condition.
4
206-4183
Page 5

Table of Contents
Safety Warnings . . . . . . . . . . . . . . . . . . . . . . . 2
Important Safety Instructions. . . . . . . . . . . . 3 – 4
Table of Contents . . . . . . . . . . . . . . . . . . . . . . 5
Setup Information . . . . . . . . . . . . . . . . . . . . . . 6
HCS6320 Product Description . . . . . . . . . . . . 7
Transcoder Product Description . . . . . . . . . . . 8
Card Description . . . . . . . . . . . . . . . . . . . . . . . 9
HCS6320 Functional Blocks . . . . . . . . . . . . . 10
Installing a CodePlus Feature Card . . . . . . . .11
Satellite STB & HCS6320
Initialization & Setup Connections . . . . . . . . . 12
System Setup . . . . . . . . . . . . . . . . . . . . . 13 – 14
Typical System Installation . . . . . . . . . . . . . 13
Typical Flow Chart for HCS6320 . . . . . . . . 14
Network and Communication Setup . . . . . . . 15
Configuration Options via GUI . . . . . . . . 16 – 29
Access the CodePlus Transcoder
Series Web GUI . . . . . . . . . . . . . . . . . . . . . 16
Controller Menu Commands . . . . . . . . . . . 16
Transcoder Menu Commands . . . . . . . . . . 24
Satellite STB Menu Commands . . . . . . . . . 26
Configuration Options via Command
Line . . . . . . . . . . . . . . . . . . . . . . . . . . . . . 30 – 47
Access the HCS6320 Main Menu . . . . . . . 30
View HCS6320 System Information . . . . . . 31
Set HCS6320 RF Channels . . . . . . . . . . . . 31
Print the RF Channel Map . . . . . . . . . . . . . 31
Display a List of the Transcoder Cards
Installed in the Chassis . . . . . . . . . . . . . . . 32
Access Individual Transcoder Menus . . . . 32
Perform an External Card Reset . . . . . . . . 32
Set the HCS6320 IP Address . . . . . . . . . . . 33
Install a Pro:Idiom Key on All Transcoders . 33
Reload the Pro:Idiom Key on All
Transcoders . . . . . . . . . . . . . . . . . . . . . . . . 35
Update HCS6320 and/or Transcoder
Firmware . . . . . . . . . . . . . . . . . . . . . . . . . . 35
View MUX or Raw Bitrate Data . . . . . . . . . 36
Configure Card Number to Channel
Assignments . . . . . . . . . . . . . . . . . . . . . . . . 37
Reset Password for Reload PI Key GUI
Option . . . . . . . . . . . . . . . . . . . . . . . . . . . . . 38
Transcoder Menu Commands . . . . . . . . . . 39
Satellite Receiver Menu Commands . . . . . 43
Troubleshooting . . . . . . . . . . . . . . . . . . . . . . . 48
Specifications . . . . . . . . . . . . . . . . . . . . . . . . 49
Document Revision History / Notes . . . . . . . 50
Open Source Software Notice . . . . . . . . . . . . 51
Warranty . . . . . . . . . . . . . . . . . . . . . Back Cover
206-4183
5
Page 6

Setup Information
Check the following items before you begin HCS6320 installation and setup procedures.
HCS6320
__ The HCS6320 feature card must be installed in a CodePlus™ HCS6150 card frame with
one or more CodePlus series HCS7720 transcoder cards. Refer to the Installation & Setup
Guide for the card frame to verify that the chassis is installed properly. Note: All cards
must be used in an LG-approved card frame for this product.
__ The HCS6320 must be installed in the card frame CONTROLLER slot. If another
CodePlus feature card is currently installed in the CONTROLLER slot, the HCS6320 will
replace it.
__ The HCS6320 ships with a spare HCS6400 fan card. In an HCS6150R card frame,
HCS6400 fan cards are pre-installed in Slots 3, 6, 7, and 10.
__ For HSC6320 Service Port connections, you must use an FTDI TTL-USB cable (P/N
TTL-232R-5V-AJ).
Channel Assignments
__ Create a channel assignment plan for the installation site, or modify an existing plan
to incorporate the RF output of the HCS6320. Ensure that up to four contiguous CATV
channels are allocated for the HCS6320 RF output. The HCS6320 uses a 256-QAM
modulation format, thereby occupying approximately 24 MHz of frequency spectrum.
The RF start channel is user-assigned during system setup, and the remaining channels
are then automatically assigned per EIA-542 STD CATV frequency allocation standards.
For example, if the RF start channel assignment is channel “2,” the three remaining
channels will be “3” “4” and “5.” However, if the RF start channel assignment is “6,” the
three remaining channels will be “95” “96” and “97.” Refer to EIA-542 STD CATV frequency
allocation tables for further information as required.
The highest available RF channel number for the HCS6320 is “135.” Thus, to allocate all
four channels available for HCS6320 RF output, the RF start channel must be set no
higher than “132.”
Transcoders
__ For HCS6320 MUX/MOD functionality, HCS7720 transcoder cards should be inserted in the
following slots: 1, 2, 4, 5, 8, 9, 11, and 12. Refer to the Installation & Setup Guide for
HCS7720 transcoders to verify that the cards are installed properly.
6
206-4183
Page 7
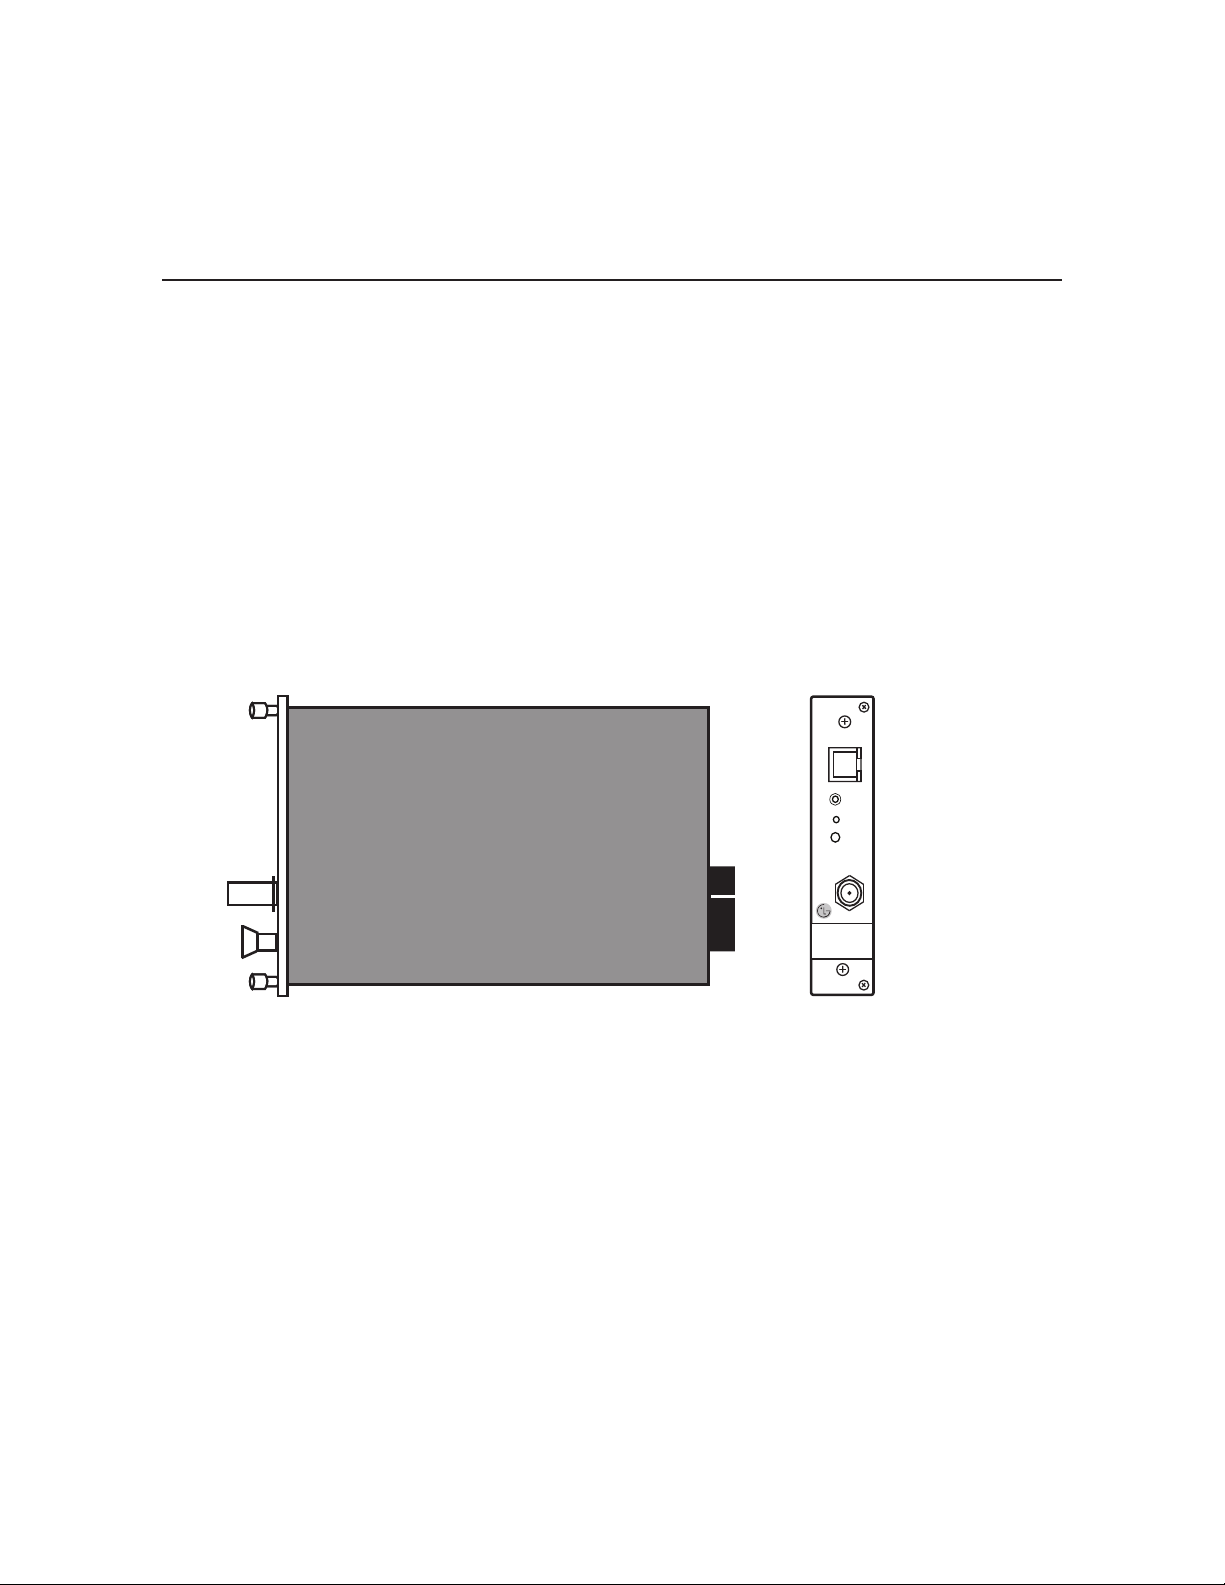
HCS6320 Product Description
The HCS6320 MUX/MOD controller is one of the LG CodePlus series feature cards.
Features
• Part of modular system, easily scaled for each application
• Controls up to eight CodePlus transcoder cards with a single IP connection
• Supports Pro:Idiom® encryption key maintenance
• Generates four contiguous 256-QAM cable channels, with up to two program streams
multiplexed on each channel
• RF output available to connect to site’s RF distribution system
• Short 3U height prole to minimize rack space usage
HCS6320
ETHERNET
SERVICE
PORT
RESET
STATUS
RF OUT
206-4183
7
Page 8

Transcoder Product Description
Typical HD Transcoder System Overview
The LG HCS6320 MUX/MOD feature card, when used with LG CodePlus series transcoders
in a CodePlus card frame, represents an eight-program HDTV solution for commercial and
institutional MATV systems (hotels, hospitals, etc.).
A typical Transcoder System with MUX/MOD functionality includes:
• An HCS6320 MUX/MOD feature card.
• One CodePlus HCS7720 HD transcoder card for each HD program offered in the facility’s
MATV system—up to eight programs supported.
• A CodePlus series card frame specified for both the HCS6320 and the transcoder card(s).
• DISH Network ® service. *
• A DISH Network ViP ® 222k satellite STB for each transcoder card. *
• A 19-inch rack for mounting. *
• Miscellaneous cables and installation hardware (see also setup information on page 6). *
The integrated elements of the Transcoder System:
• Receive up to eight HD programs from DISH Network.
• Transcode the received digital video and audio streams to MPEG-2 transport streams.
• Encrypt the transcoded digital data streams with Pro:Idiom content protection.
• Multiplex the encrypted streams into four streams of two programs each.
• Modulate and upconvert the multiplexed streams in four contiguous RF channels.
A Pro:Idiom compatible television with a QAM tuner is required to view premium HD content.
A proper session ID must be set at the TV in order for Pro:Idiom decryption to be enabled.
LG’s Pay-Per-View (PPV) partners can set up this session through their interface. LG’s FreeTo-Guest (FTG) Mode of operation also enables Pro:Idiom decryption.
Note: The RF output from the HCS6320 can be combined with other channels in the site’s
distribution grid.
* Purchased separately.
Note: Design and specifications subject to change without prior notice.
8
206-4183
Page 9
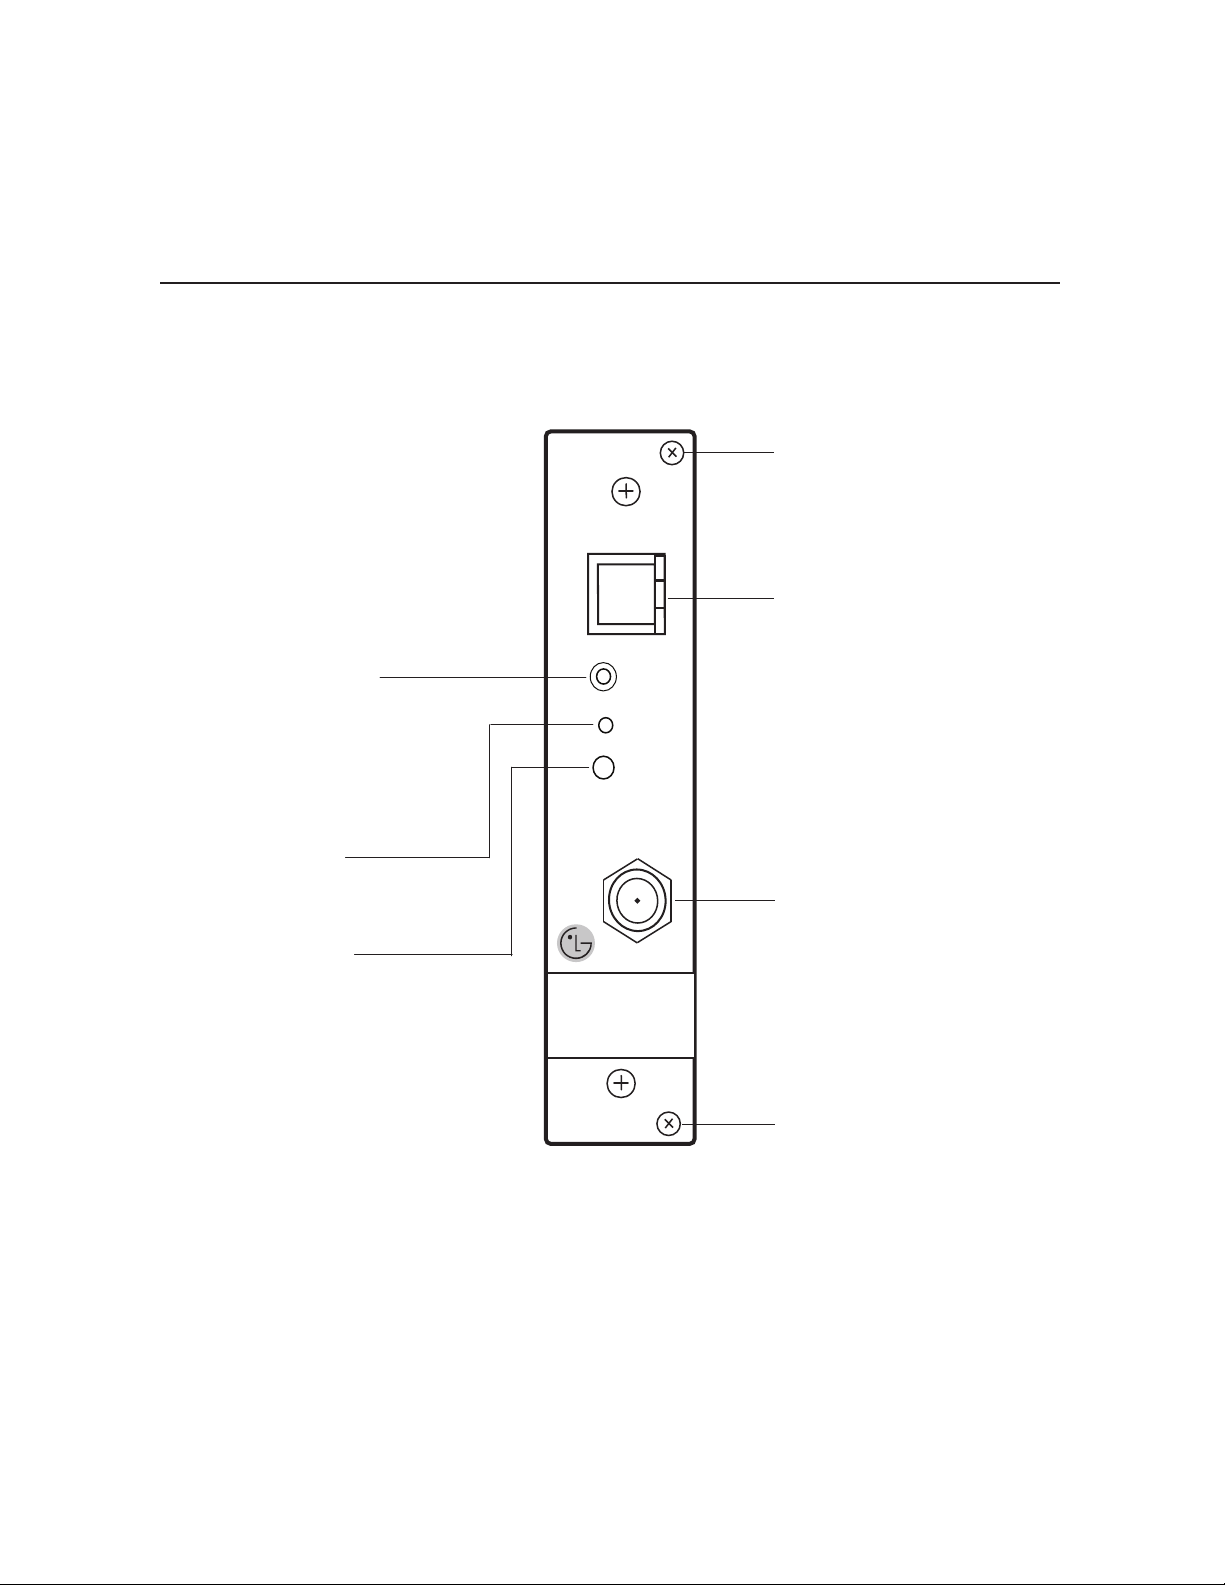
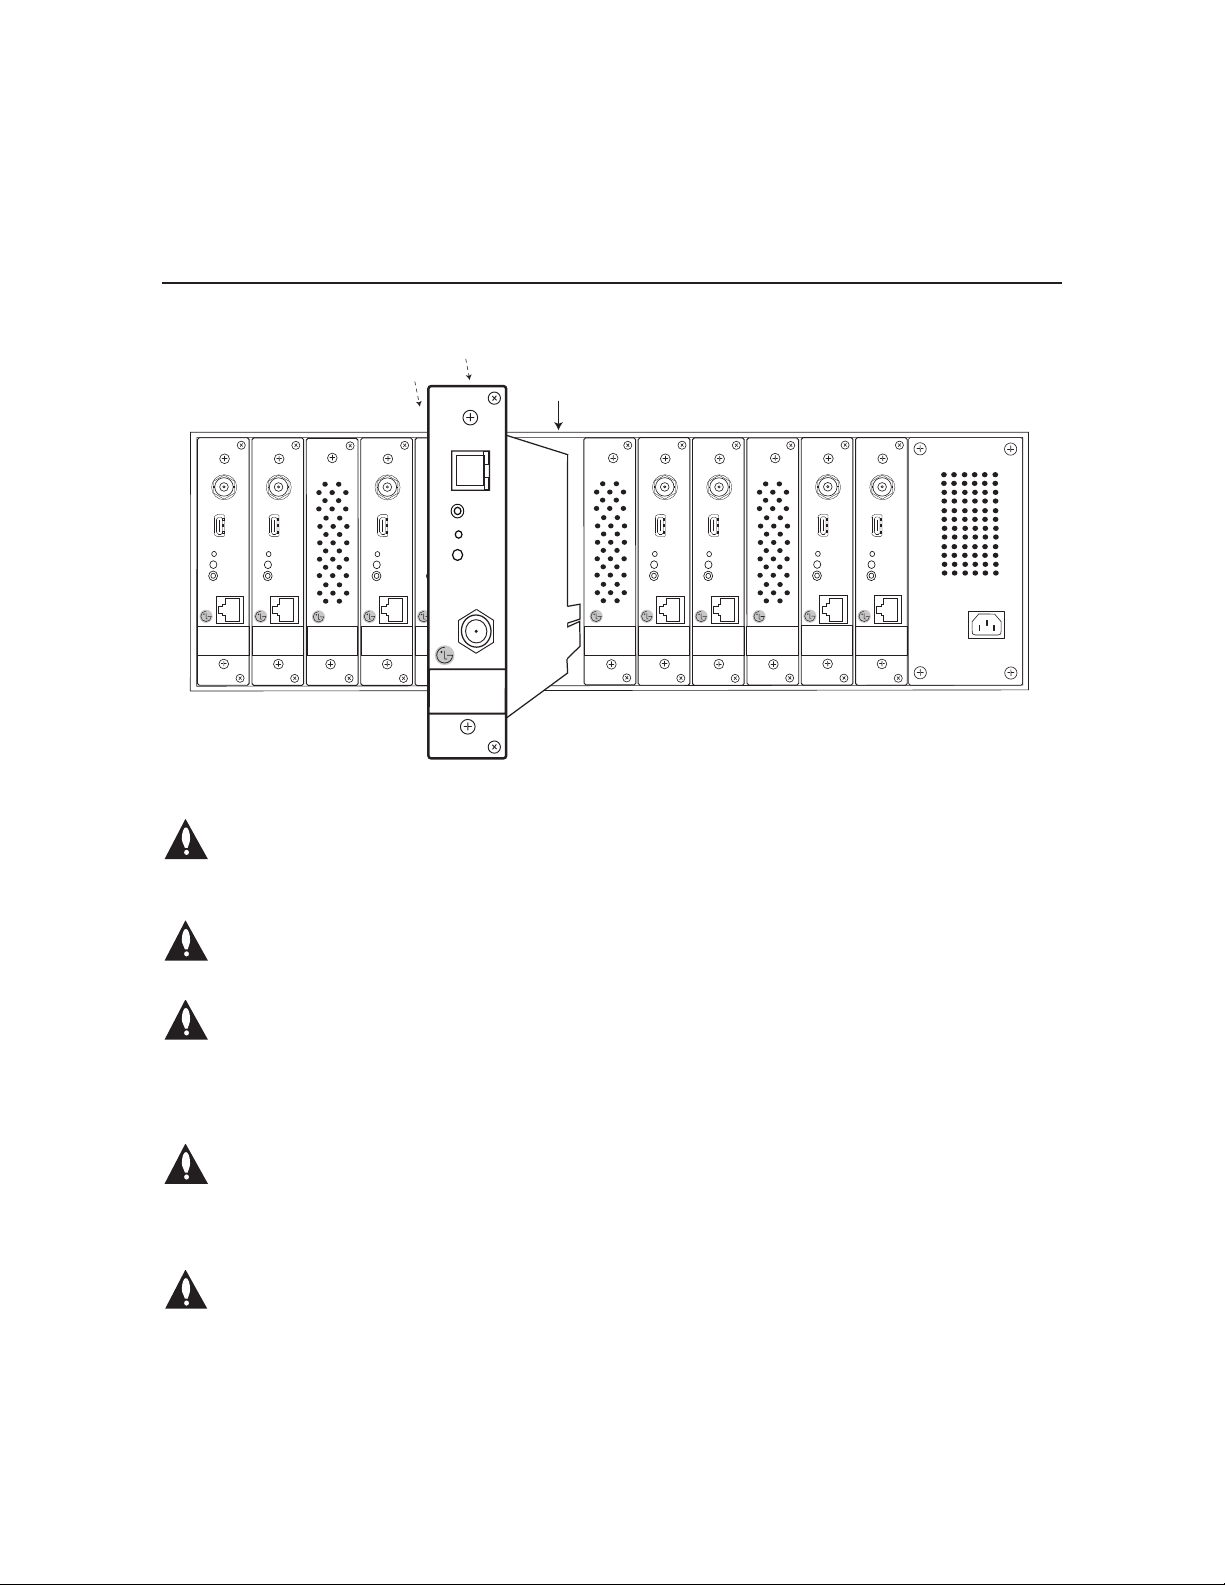
HCS6320 Card Description
SERVICE PORT
TTL-USB serial port
connection (use FTDI
TTL-232R-5V-AJ cable)
RESET
Resets card
STATUS
Blinking pattern indicates
condition of card
HCS6320
ETHERNET
RESET
STATUS
RF OUT
Retaining Screw
Install after inserting
HCS6320 card
ETHERNET
Connection for network
or local communication
SERVICE
PORT
RF OUT
DTV signal output
206-4183
Retaining Screw
Install after inserting
HCS6320 card
9
Page 10
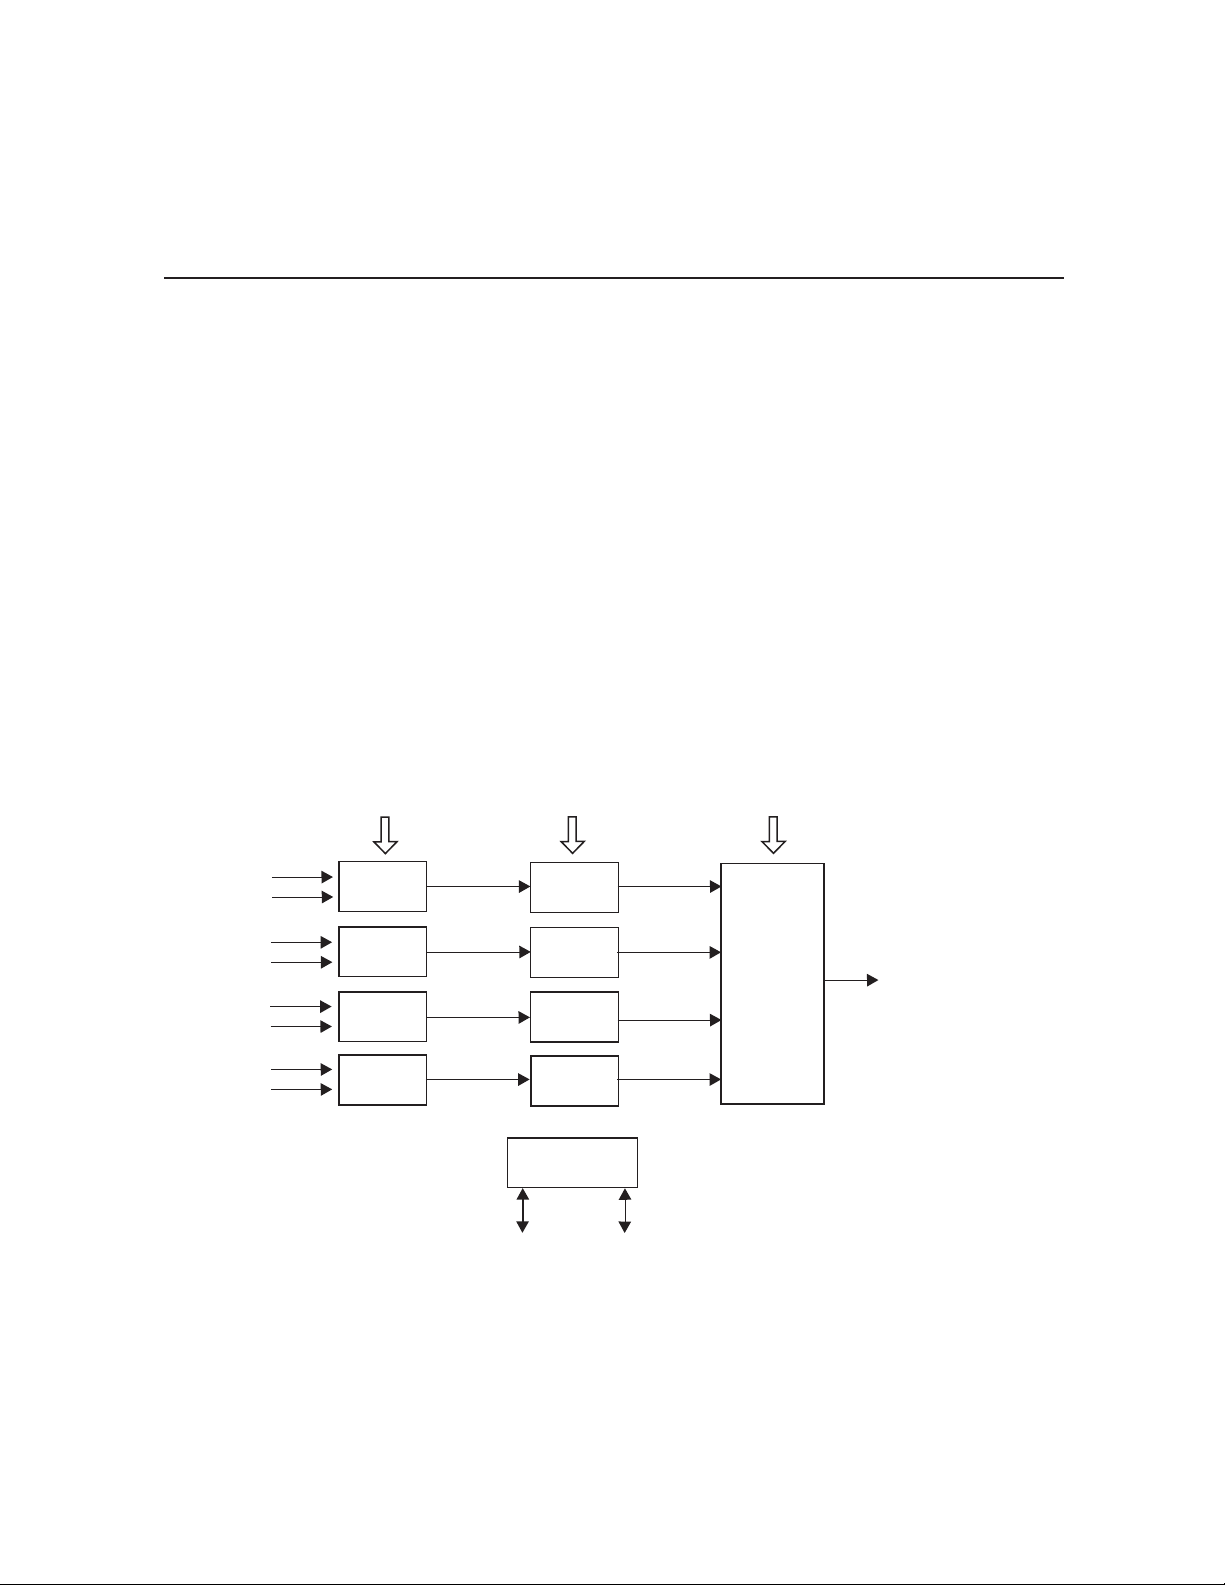
HCS6320 Functional Blocks
The HCS6320 consists of four main functional blocks:
• MUX: Four parallel multiplexers, each of which can combine up to two encrypted transport
streams into a single 38 Mbps transport stream. The transport streams from the transcoder
cards are supplied to the HCS6320 through the internal backplane circuit board of the card
frame.
• MOD: Four parallel 256-QAM modulators that take the MUX output streams and produce
four modulated outputs.
• Upconverter: This block takes the modulated output streams from the MOD block and places
them on up to four contiguous cable RF channels. The output of this block is a combined RF
signal four channels wide.
• Controller: Provides the PC interface for HCS6320 setup and conguration.
HCS6320 default settings assign the inputs of each channel MUX to specic slots in the
CodePlus card frame, where the RF start channel is assigned to card frame Slots 1 & 2, the
second channel is assigned to card frame Slots 4 & 5, etc.
Transport
Streams from
Transcoder
Cards
Slot 1
Slot 2
Slot 4
Slot 5
Slot 8
Slot 9
Slot 11
Slot 12
MUX
Blocks
2:1 MUX
2:1 MUX
2:1 MUX
2:1 MUX
38 Mbps
38 Mbps
38 Mbps
38 Mbps
Service
Port
MOD
Blocks
256-QAM
Modulator
256-QAM
Modulator
256-QAM
Modulator
256-QAM
Modulator
HCS6320
Ethernet
256-QAM
256-QAM
256-QAM
256-QAM
Upconverter
Block
Upconverter
RF Out
4 Contiguous
CATV Channels
10
206-4183
Page 11
Slot 1
Slot 2
HCS7720
HCS7720
ASI OUT
HDMI-IN HDMI-IN
RESET
STATUS
SERVICE
PORT
X PORT LINK
S/N XXXXXXX
S/N XXXXXXX
MAC ADDRESS
MAC ADDRESS
XX XX XX XX XX
XX XX XX XX XX
ASI OUT
RESET
STATUS
SERVICE
PORT
X PORT LINK
Slot 3
HCS6400
Slot 4
HCS7720
ASI OUT
HDMI-IN
RESET
STATUS
SERVICE
PORT
X PORT LINK
S/N XXXXXXX
MAC ADDRESS
XX XX XX XX XX
Slot 5
Installing a CodePlus Feature Card
Slot 6
CONTROLLER
HCS6320
HCS6720
ASI OUT
RESET
STATUS
SERVICE
PORT
X PORT LINK
S/N XXXXXXX
MAC ADDRESS
XX XX XX XX XX
ETHERNET
SERVICE
PORT
RESET
STATUS
RF OUT
Slot
Slot 7
HCS6400
Slot 8
HCS7720
ASI OUT
HDMI-IN
RESET
STATUS
SERVICE
PORT
X PORT LINK
S/N XXXXXXX
MAC ADDRESS
XX XX XX XX XX
Slot 9
HCS7720
ASI OUT
HDMI-IN
RESET
STATUS
SERVICE
PORT
X PORT LINK
S/N XXXXXXX
MAC ADDRESS
XX XX XX XX XX
Slot 10 Slot 11
HCS6400
HCS7720
ASI OUT
HDMI-IN
RESET
STATUS
SERVICE
PORT
X PORT LINK
S/N XXXXXXX
MAC ADDRESS
XX XX XX XX XX
Slot 12
HCS7720
ASI OUT
HDMI-IN
RESET
STATUS
SERVICE
PORT
X PORT LINK
S/N XXXXXXX
MAC ADDRESS
XX XX XX XX XX
Note: The CodePlus series products are NOT
designed to be hot-swappable!!! Power must be
removed to the card frame before any CodePlus
transcoder cards are inserted or removed.
Note: All cards used in the card frame must
be inserted and removed by qualied service
personnel only.
Note: Use extreme care when handling an
HCS6320 card. Always observe proper
precautions with respect to static electricity
and mechanical shock. When not installed in
a card frame, return the HCS6320 card to the
anti-static bag in which it was shipped.
Note: The card slots in the card frame are NOT
all identical!!! An HCS6320 card can only be
installed in the CONTROLLER slot. The
connector arrangement of Slots 1 to 6 and 7 to
12 is incompatible with the HCS6320.
Note: When installing cards, remove blank
cover plates and insert new cards as applicable.
For ports that will not be used, leave the blank
cover plates in place for proper ventilation and
FCC and safety agency compliance.
Follow the procedure below to install the
CodePlus feature card.
1. Unpack the HCS6320 unit.
2. Remove the AC power cord for the card
frame from the power outlet.
3. Prepare the CONTROLLER slot in
the card frame by removing either the
blank cover plate or the CodePlus card
currently in the slot.
4. Without using force, slide the HCS6320
card into the CONTROLLER slot, and
ensure that it is fully inserted.
5. Engage and tighten the top and bottom
thumbscrews of the card securely. Note
that the thumbscrews should only be
nger tight; overtightening may damage
the assembly.
6. Refer to the diagram on page 12 for
cable connections, and complete the
HCS6320 system installation procedure
on page 13.
206-4183
11
Page 12
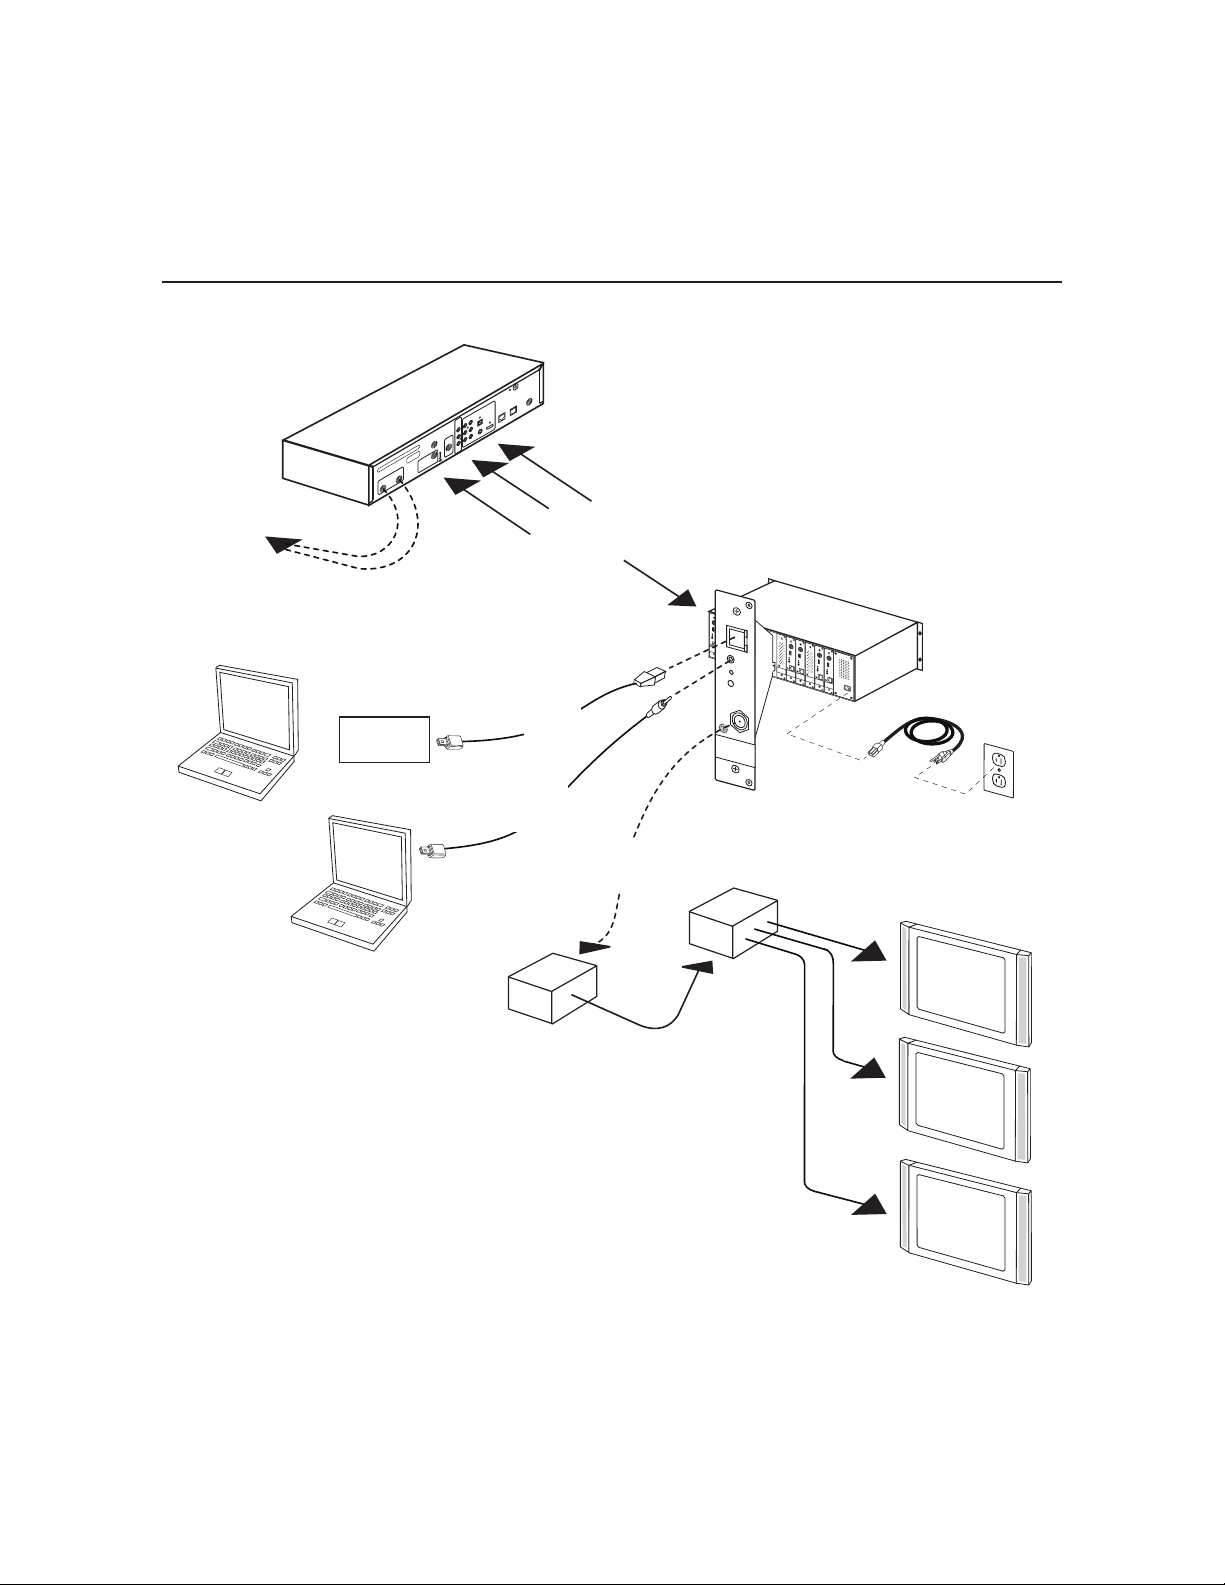
Satellite STB & HCS6320
Initialization & Setup Connections
HD STB
(1 Per Program)
VIDEO
AUDIO
SATELLITE IN SATELLITE IN
120V AC~ 60 Hz
85 WATTS
ETHERNET
VIDEO
PHONE
Digital Audio
OUTPUT
HDMI
S-VIDEO
AUDIO
RF Feed
from
Satellite
Laptop
PC
HDMI and
X-Port Links
HCS6320
HCS7720
HCS7720
HCS6700
HCS6400
ETHERNET
HCS7720
X PORT LINK
HCS6700
ASI OUT
ASI OUT
X PORT LINK
HDMI-IN
SERVICE
PORT
ASI OUT
RESET
HDMI-IN
HCS6400
RESET
STATUS
RESET
STATUS
SERVICE
PORT
STATUS
X PORT LINK
SERVICE
PORT
X PORT LINK
ASI OUT
S/N XXXXXXX
MAC ADDRESS
S/N XXXXXXX
XX XX XX XX XX
S/N XXXXXXX
MAC ADDRESS
MAC ADDRESS
XX XX XX XX XX
XX XX XX XX XX
Ethernet
.....
or
Network
Laptop
PC
.....
.....
.....
Connection
TTL-USB
Service Port
Connection
RF Out
from
HCS6320
Distribution
System
HCS7720
SERVICE
PORT
HDMI-IN
HCS7720
RESET
RESET
STATUS
STATUS
SERVICE
PORT
X PORT LINK
ASI OUT
S/N XXXXXXX
S/N XXXXXXX
MAC ADDRESS
MAC ADDRESS
XX XX XX XX XX
SERVICE
XX XX XX XX XX
PORT
RESET
STATUS
RF OUT
HCS6400
HCS7720
ASI OUT
HCS7720
ASI OUT
HDMI-IN
ASI OUT
RESET
HDMI-IN
STATUS
ASI OUT
RESET
SERVICE
PORT
STATUS
HDMI-IN
X PORT LINK
SERVICE
PORT
HDMI-IN
RESET
X PORT LINK
STATUS
RESET
SERVICE
S/N XXXXXXX
PORT
STATUS
MAC ADDRESS
X PORT LINK
SERVICE
S/N XXXXXXX
XX XX XX XX XX
PORT
MAC ADDRESS
X PORT LINK
XX XX XX XX XX
S/N XXXXXXX
MAC ADDRESS
S/N XXXXXXX
XX XX XX XX XX
MAC ADDRESS
XX XX XX XX XX
RF
HCS6320 in
CONTROLLER Slot
AC
Power
Cord
Power Outlet
(120V 60Hz AC)
Room
Receiver
Combiner
Room
Receiver
12
Room
Receiver
206-4183
Page 13

System Setup
Typical HCS6320 System Installation
(see also Typical Setup Flow Chart on the following page)
1. Verify that the individual transcoder cards are installed and set up as described in the
appropriate Installation & Setup Guide.
2. Plug in the power to the CodePlus card frame containing the newly installed feature card
and transcoder card(s).
The green STATUS LED on the HCS6320 front panel will blink approximately once every
second while the HCS6320 card boots up. The boot-up process for an HCS6320 may take
up to one minute. When the boot-up is complete, the STATUS LED will be lit continuously.
3. Once the STATUS LED is lit continuously (no longer blinking), use the FTDI TTL-232R-5VAJ cable to connect a PC to the HCS6320 Service Port.
4. Using HyperTerminal or an equivalent terminal emulation program on the PC, configure the
serial port as follows: Bits per second/baud = 115200; Data bits = 8; Parity = None; Stop
bits = 1; Flow Control = None. Then, initiate communication with the HCS6320.
Once the connection is established, press Enter to refresh the screen and display the
HCS6320 Main Menu.
5. Use the HCS6320 Main Menu “rf” command, as described on page 31, to set the RF start
channel for the HCS6320.
6. (Optional) For remote management purposes, you can connect the HCS6320 to an IP
network and then use the Service Port connection to set the HCS6320 IP address:
a) Connect an Ethernet cable from the institution’s IP network to the HCS6320
ETHERNET port.
b) Use the HCS6320 Main Menu “setip” command, as described on page 33, to set the
HCS6320 IP address.
7. Connect the HCS6320 RF OUT to the RF distribution system.
8. Check one or more room receivers to make sure all content is properly mapped and
available.
206-4183
13
Page 14
RF In
HD STB
(1 Per 2 Programs)
HDTV Service Feed
In
HCS6720
CodePlus
Transcoder Card
(1 Per 2 Programs)
RF Cable
Out
RF Out
HCS
6320
(Up to 6
Inputs)
Card
Frame
Laptop
PC
Service Port
or Ethernet
Connection
Data Bus on
Card Frame
Backplane
RF
Cable
Combiner
RF
Distribution
System
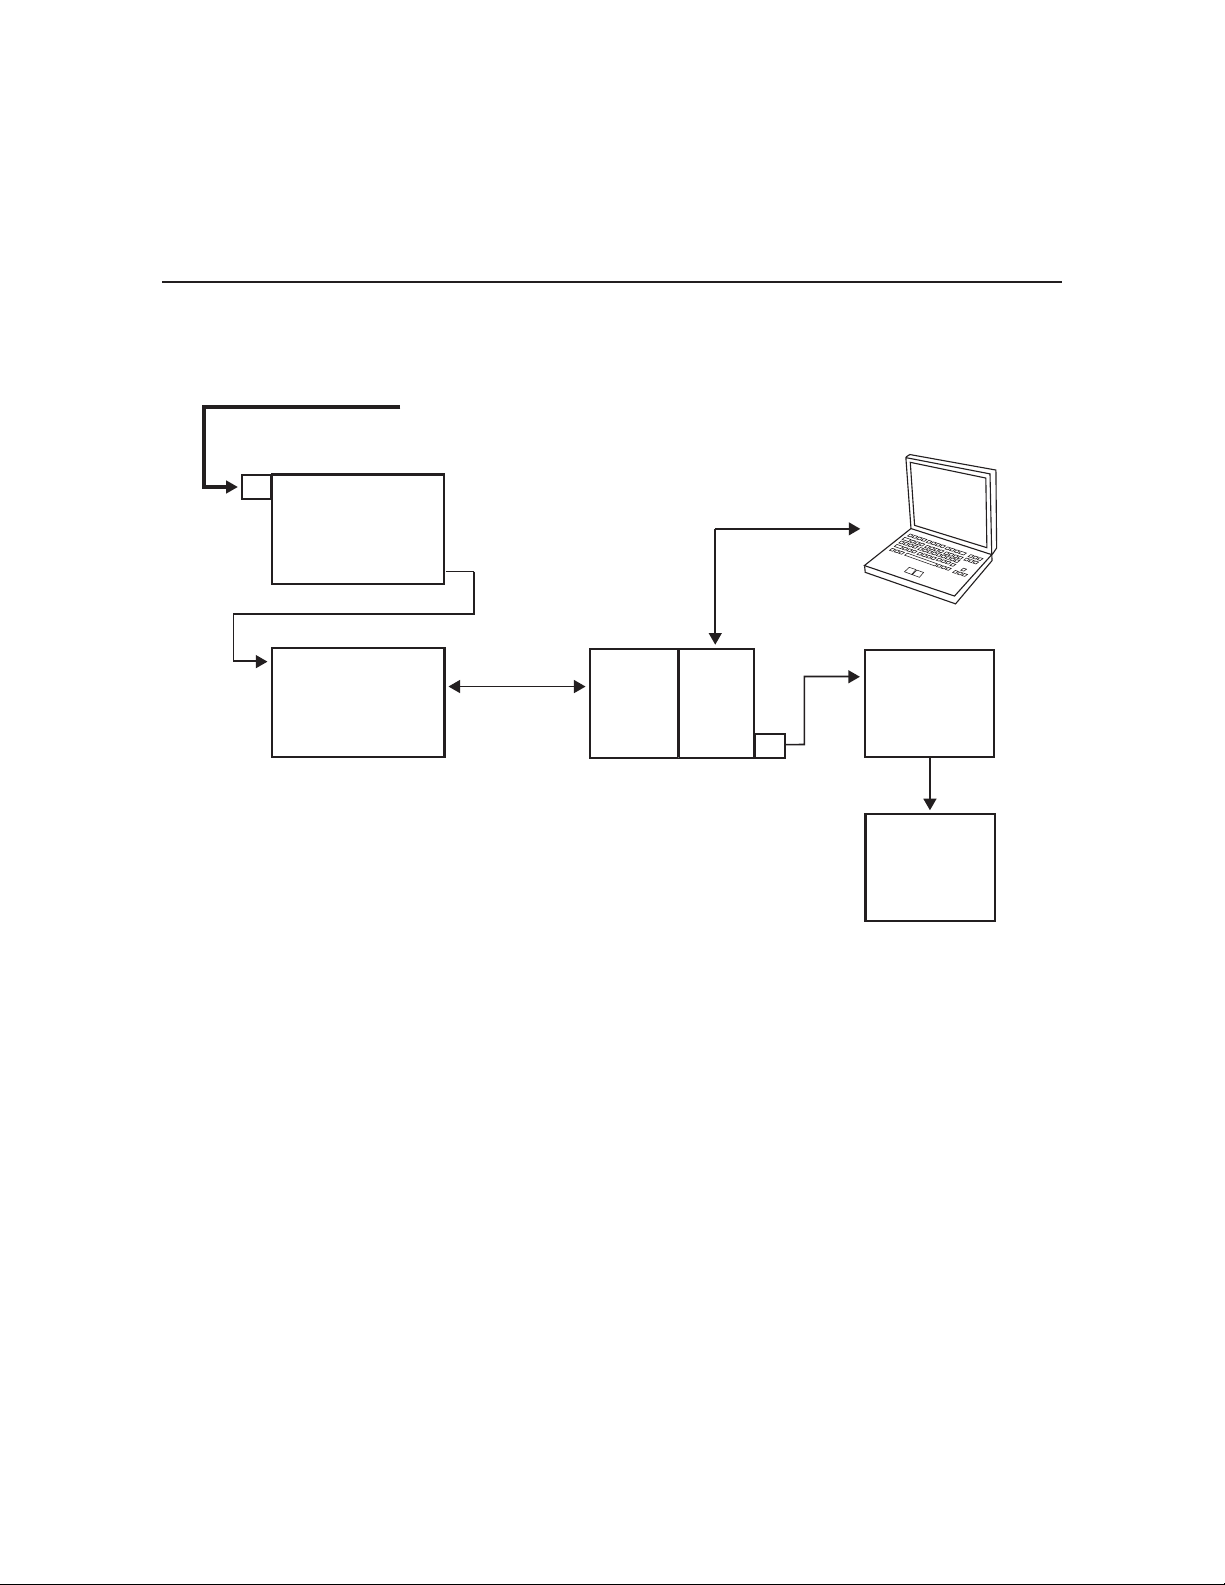
System Setup (Cont.)
Typical Setup Flow Chart for HCS6320
RF Cable
RF In
HD STB
(1 Per Program)
In
HCS7720
CodePlus
Transcoder Card
(1 Per Program)
HDTV Service Feed
Out
Backplane
Data Bus on
Card Frame
Card
Frame
(Up to 8
Inputs)
Service Port
or Ethernet
Connection
HCS
6320
RF Out
RF
Cable
Laptop
PC
Combiner
RF
Distribution
System
14
206-4183
Page 15

Network and Communication Setup
The HCS6320 feature card and the transcoder cards installed in the CodePlus card frame
contain several internal registers for different configuration options. This document describes
configuration options via a network or direct connection to the HCS6320.
Refer to the Installation & Setup Guide for HCS7720 transcoder cards for information on
performing configuration via a direct connection to the HCS7720 Service Port.
Note: Before you proceed with any additional configuration, the system (including
the feature card, transcoders, and satellite STBs) should be installed and
operating as described in the Installation and Setup sections in this document.
There are three options for communicating with the HCS6320.
• When the HCS6320 is connected to an IP network, you can use a standard Internet browser
to communicate with the HCS6320 via a graphical user interface (GUI).
• When the HCS6320 is connected to an IP network, you can also use Telnet to communicate
with the HCS6320 via a command line interface.
• To establish a direct connection to the HCS6320, connect a PC to the serial port on the
HCS6320 using the FTDI TTL-USB cable (P/N TTL-232R-5V-AJ). Plug the USB end of the
cable into an open USB port on your PC. If necessary, install the device driver. Plug the
other end of the cable into the Service Port jack on the HCS6320 front panel.
Using HyperTerminal or an equivalent terminal emulation program on the PC, configure the
serial port as follows:
− Bits per second/baud = 115200
− Data bits = 8
− Parity = None
− Stop bits = 1
− Flow Control = None
Conguration options via web GUI are described on pages 16 to 29; conguration options
via command line are described on pages 30 to 47. For security and control purposes, some
options available from the command line menus are not available from the GUI.
Note: The default network setting for the HCS6320 is DHCP, in which case the server
assigns an IP address to the HCS6320. If necessary, consult the network administrator
obtain the
Note: If you want to connect the PC directly to the HCS6320 ETHERNET port using an
Ethernet crossover cable, in order to establish communication you must rst connect the PC
to the HCS6320 Service Port, and set the HCS6320’s IP address (see “Set the HCS6320 IP
Address” on page 33). The HCS6320’s IP address must be on the same subnet as the PC’s IP
address.
206-4183
IP address that has been assigned to the HCS6320.
to
15
Page 16
Conguration Options via GUI
Caution: Do NOT initiate simultaneous menu sessions to run commands. Doing
so will interfere with active processes and may corrupt the system configuration
and/or cause the HCS6320 card to cease normal operation.
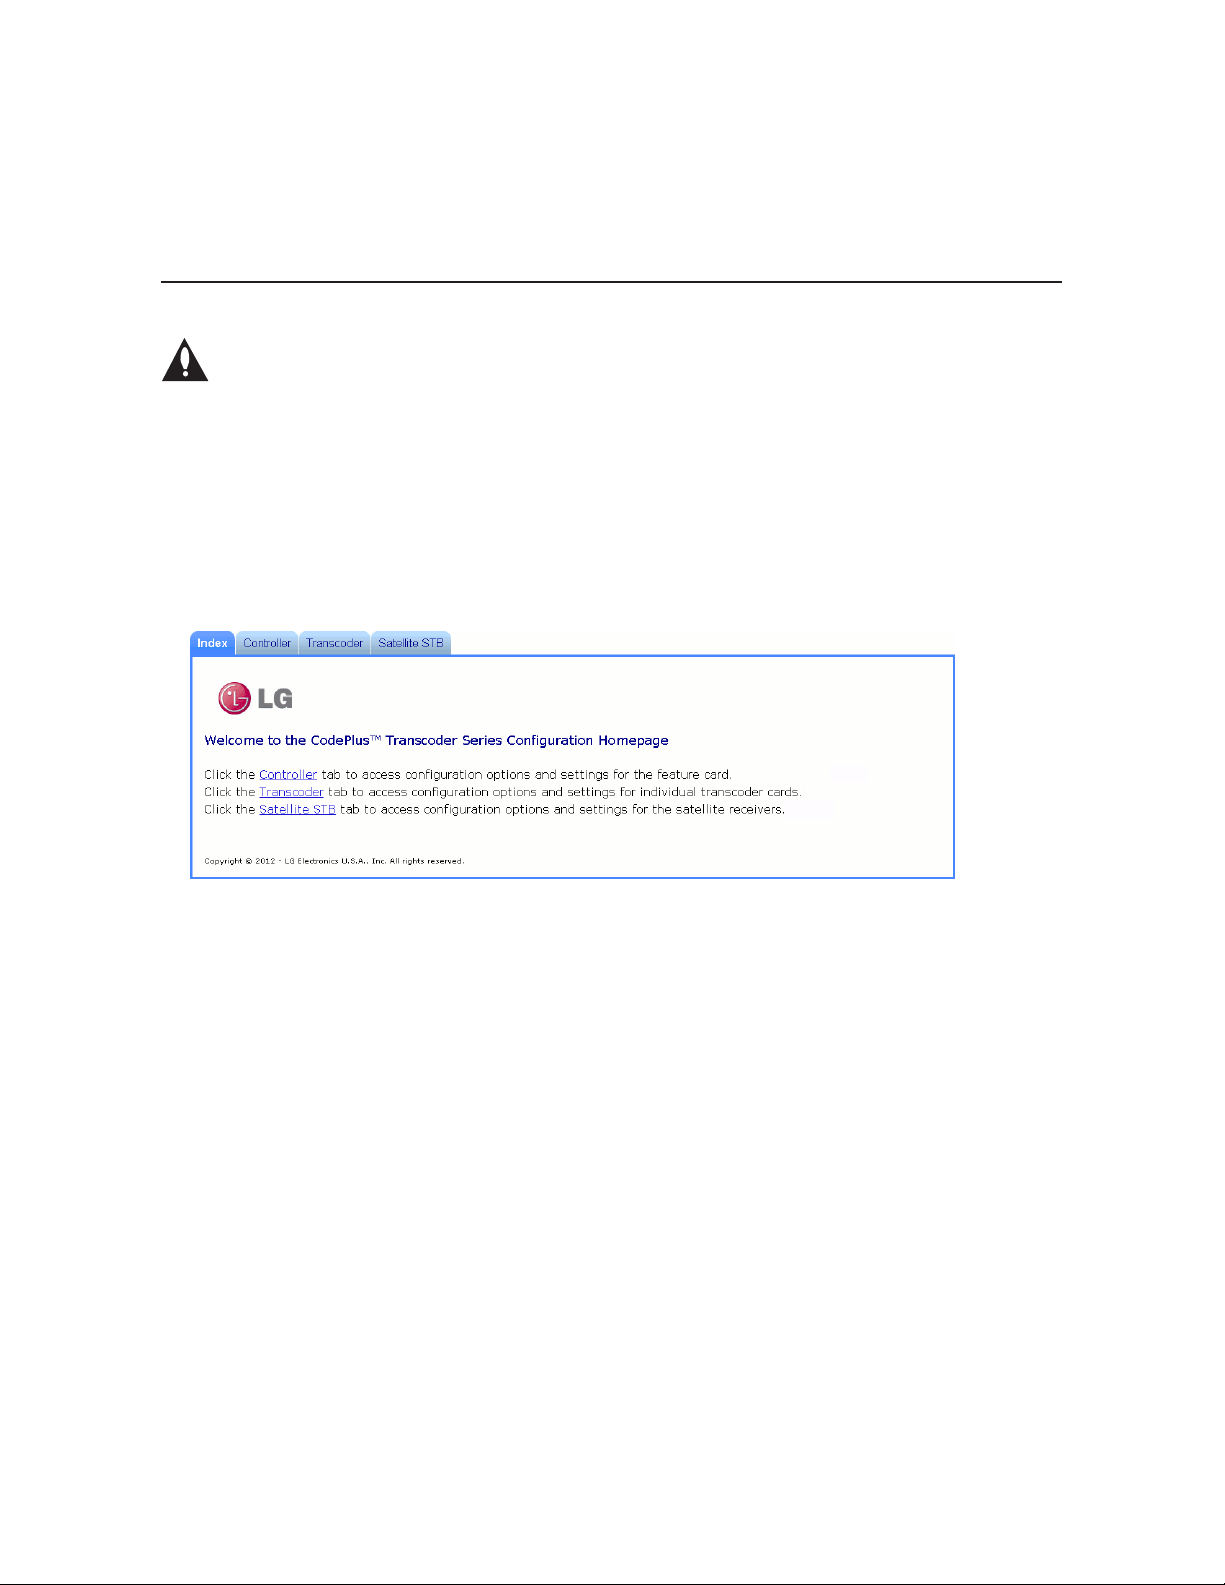
Access the CodePlus Transcoder Series Web GUI
Note: The HCS6320 must be connected to an IP network for GUI access. See “Network and
Communication Setup” on page 15 for further information.
1. Launch a web browser, and type http://ipaddress in the browser’s address bar, where
ipaddress is the IP address of the HCS6320 card. Then, press Enter.
The CodePlus™ Transcoder Series Conguration Homepage provides access to Controller
(HCS6320), Transcoder, and Satellite STB menus:
2. Click the appropriate link or tab to access the desired configuration options/settings.
The following sections provide detailed information on the conguration settings and
commands. Note that menu options may vary from the examples shown in this document,
depending on the HCS6320 rmware version.
When you have completed your activities in the web GUI, you can simply close your
browser.
Controller Menu Commands
The following subsections describe how to access and use the Controller Menu commands.
Access the Controller Menu
1. Access the CodePlus Transcoder Series web GUI as described above.
2. With the Homepage on display, click on the Controller menu tab or link.
The Controller Menu (see example on following page) enables you to view and modify
HCS6320 conguration settings and also enables you to view transcoder data. In addition,
the Controller Menu enables you to update HCS6320 and transcoder card rmware.
16
206-4183
Page 17

Example: Controller Menu
Conguration Options via GUI (Cont.)
View HCS6320 System Information
With the Controller Menu on display, click on the Read button at the right of the System
Information eld to display HCS6320 hardware and software information.
The System Information display contains important information about the HCS6320, including
the unit hardware ID (firmware version), software versions, IP address, MAC address, and
serial number, for example:
System Information
Model: HCS6320
Hardware ID: 6320-v1.0-2011-1101
OS version: HCS6320-1102-2011-1031
Application version: 2.5
IP address: 10.166.60.81
MAC address: 00:0C:63:3C:00:02
Serial#: 901-12420020
It is recommended that you record this information for future reference. If you find it necessary
to call customer service or engineering support, please have this information available.
206-4183
17
Page 18

Conguration Options via GUI (Cont.)
Set HCS6320 RF Channels
With the Controller Menu on display, type the appropriate RF start channel number in the data
entry eld at the right of the Set Start RF Channel eld. Then, click on the Set button.
The remaining channels will be automatically assigned per EIA-542 STD CATV frequency
allocation standards, and the system will display the channel assignments for the card slots
(see example under “Read the RF Channel Map” below).
Read the RF Channel Map
With the Controller Menu on display, click on the Read button at the right of the Read RF Map
eld to display the current channel assignments, for example:
Channel Map:
--------+----------Cards | RF Channel
--------+---------- 1, 2 | 2
4, 5 | 3
8, 9 | 4
11, 12 | 5
--------+-----------
Display a List of Transcoder Cards Installed in the Chassis
There are two options for listing transcoder cards installed in the chassis: one (List Cards)
identifies the type of transcoder cards and the cards’ serial numbers, while the other (List
Card Details) identifies the type of transcoder cards, along with the cards’ hardware and
software version information. See sample displays below and on the following page.
With the Controller Menu on display, either click on the List button at the right of the List
Cards eld, or click on the List button at the right of the List Card Details eld.
Example: List Cards Display
Available cards:
Card 1: [HCS7720] [001-12080017]
Card 2: [HCS7720] [001-12080018]
Card 3: [-]
Card 4: [HCS7720] [001-12080019]
Card 5: [HCS7720] [001-12080020]
Card 6: [-]
Card 7: [-]
Card 8: [HCS7720] [001-12080021]
Card 9: [HCS7720] [001-12020006]
Card 10: [-]
Card 11: [HCS7720] [001-12080023]
Card 12: [HCS7720] [001-12080024]
18
206-4183
Page 19

Conguration Options via GUI (Cont.)
Example: List Card Details Display
card# card type hardware id os version app [enc]
1: [HCS7720] [7720-v1.1-2011-1026] [HCS7720-943-2011-1025] [2.5] [1.2]
2: [HCS7720] [7720-v1.1-2011-1026] [HCS7720-943-2011-1025] [2.5] [1.2]
3: [-]
4: [HCS7720] [7720-v1.1-2011-1026] [HCS7720-943-2011-1025] [2.5] [1.2]
5: [HCS7720] [7720-v1.1-2011-1026] [HCS7720-943-2011-1025] [2.5] [1.2]
6: [-]
7: [-]
8: [HCS7720] [7720-v1.1-2011-1026] [HCS7720-943-2011-1025] [2.5] [1.2]
9: [HCS7720] [7720-v1.1-2011-1026] [HCS7720-943-2011-1025] [2.5] [1.2]
10: [-]
11: [HCS7720] [7720-v1.1-2011-1026] [HCS7720-943-2011-1025] [2.5] [1.2]
12: [HCS7720] [7720-v1.1-2011-1026] [HCS7720-943-2011-1025] [2.5] [1.2]
View MUX or Raw Bitrate Data
Bitrate data is useful for system monitoring and troubleshooting purposes. Bitrates at the
backplane (raw bitrates), are measured at the input pins prior to data processing. MUX
bitrates provide information on MUX data processing, i.e., the amount of data ltering in and
out of the MUX. See sample displays below and on the following page.
With the Controller Menu on display, either:
• Click on the Read button at the right of the Read Bitrates at Backplane eld to view raw
bitrate data for each installed transcoder card.
• Click on the Read button at the right of the Read MUX Bitrates eld to view MUX bitrate data
for each installed transcoder card.
Example: Bitrates at Backplane Connector (Raw Bitrates) Display
Slot #1 Raw bitrate data 14.228 Mbit/s total 19.396 Mbit/s
Slot #2 Raw bitrate data 12.537 Mbit/s total 19.390 Mbit/s
Slot #3 Raw bitrate data 0 total 0
Slot #4 Raw bitrate data 17.049 Mbit/s total 19.390 Mbit/s
Slot #5 Raw bitrate data 15.503 Mbit/s total 19.396 Mbit/s
Slot #6 Raw bitrate data 0 total 0
Slot #7 Raw bitrate data 0 total 0
Slot #8 Raw bitrate data 13.536 Mbit/s total 19.390 Mbit/s
Slot #9 Raw bitrate data 13.957 Mbit/s total 19.396 Mbit/s
Slot #10 Raw bitrate data 0 total 0
Slot #11 Raw bitrate data 7.520 Mbit/s total 19.396 Mbit/s
Slot #12 Raw bitrate data 18.620 Mbit/s total 19.396 Mbit/s
206-4183
Total number of
data bits that are
not null packets
Total number of
data bits in the
transport stream
19
Page 20

Conguration Options via GUI (Cont.)
Example: MUX Bitrates Display
Slot #1 Bitrate 19.035 Mbit/s (unfiltered 19.065 Mbit/s)
Slot #2 Bitrate 12.658 Mbit/s (unfiltered 12.694 Mbit/s)
Mux #1 Output Bitrate 31.746 Mbit/s
Slot #4 Bitrate 19.335 Mbit/s (unfiltered 19.359 Mbit/s)
Slot #5 Bitrate 14.679 Mbit/s (unfiltered 14.715 Mbit/s)
Mux #2 Output Bitrate 34.051 Mbit/s
Slot #8 Bitrate 13.013 Mbit/s (unfiltered 13.049 Mbit/s)
Slot #9 Bitrate 13.903 Mbit/s (unfiltered 13.933 Mbit/s)
Mux #3 Output Bitrate 26.970 Mbit/s
Slot #11 Bitrate 6.269 Mbit/s (unfiltered 6.305 Mbit/s)
Slot #12 Bitrate 18.583 Mbit/s (unfiltered 18.614 Mbit/s)
Mux #4 Output Bitrate 24.900 Mbit/s
Per Mux Total Output Bitrate 38.815 Mbit/s
Total amount of data (including null
packets) output per RF channel
Data currently in
use by the MUX
Unprocessed data
Data currently
output by the MUX
Configure Card Number/Channel Assignments
This option enables you to reconfigure the card number/channel assignments.
1. With the Controller Menu on display, click on the Edit button at the right of the Card/
Channel Assignment field.
2. In the Congure Card Number to Channel Assignment window, click on the down arrow at
the right each Card Number eld you wish to reassign, and select from the drop-down list
of options the appropriate card number or N/C (no connection) for the RF channel listed in
the Channel column.
3. When you have completed the assignments, click on the Save Conguration button
below the Assignment table.
20
(Continued on next page)
206-4183
Page 21

Conguration Options via GUI (Cont.)
(Continued from previous page)
The system will display the New Channel Map, for example:
New Channel Map:
-------+-----------
RF | Card Slot
-------+-----------
54-1 | 1
54-2 | 2
55-1 | 11
55-2 | 12
56-1 | 8
56-2 | 9
57-1 | 4
57-2 | 5
-------+-----------
Set the HCS6320 IP Address
1. With the Controller Menu on display, click on the Set button at the right of the Set IP
Address field.
2. In the Set IP Address window:
• Select the DHCP Mode setting—Enable or Disable—by clicking the radio button at the left
of the appropriate option.
• If you wish to specify static IP information (i.e., DCHP will be disabled), type the appropriate
data in the IP Address, Subnet Mask, and Default Gateway elds.
(Continued on next page)
206-4183
21
Page 22

Conguration Options via GUI (Cont.)
(Continued from previous page)
3. Click on the Submit button when you are ready to continue.
The system will display an overview of the settings and then prompt you to reset the
HCS6320, for example:
DHCP mode selected
Reset the Controller card to activate new IP settings.
or
Static IP mode selected
IP address: xxx.xxx.xxx.xxx
Subnet mask: xxx.xxx.xxx.xxx
Default gateway: xxx.xxx.xxx.xxx
Reset the Controller card to activate new IP settings.
4. If you are ready to reset the HCS6320 immediately, click on the Reset button located below
the results text.
Note: If you intend to modify additional conguration settings during the current session,
you may wait until all changes are complete before you reset the HCS6320 (see “Perform
an External Card Reset” on page 23 for further information); however, note that IP settings
will not take effect until the HCS6320 resets.
Change the (Reload Pro:Idiom Key) Password
This option enables you to change the password required to reload the Pro:Idiom key on
selected transcoders. The default password is “service”.
1. With the Controller Menu on display, click on the Change button at the right of the Change
(Reload P:I Key) Password field.
The system will initiate a series of password prompts in pop-up windows.
2. At the
3. At the
4. At the
When the password is successfully changed, the system will display conrmation, for example:
Enter the Current Password
Enter New Password
Confirm New Password
prompt, type the new password and click OK.
prompt, retype the new password and click OK.
prompt, type the current password and click OK.
Password changed.
22
206-4183
Page 23

Conguration Options via GUI (Cont.)
Update HCS6320 and/or Transcoder Firmware via TFTP
If you are not sure of the current firmware version, view and record the System Information
for the HCS6320 and/or the transcoder card(s) before you initiate the firmware update. See
“View HCS6320 System Information” on page 17 and/or “View Hardware Information for a
Selected Transcoder” on page 24, as necessary.
The firmware update requires that you set up a TFTP server on the same IP network as the
HCS6320. Consult the network administrator, as necessary, for further information.
Caution: Do NOT initiate simultaneous menu sessions while a firmware update is
in progress. Doing so will interfere with the active processes and may corrupt the
system configuration and/or cause the HCS6320 card to cease normal operation.
1. Make sure the firmware update configuration (.cfg) and package (.pkg) files are available
on the same machine as the TFTP server. Then, set up the TFTP server, and point to the
directory in which the firmware update files are located.
2. With the Controller Menu on display, select the card or cards to which to download firmware:
Click on the down arrow at the right of the Card Select field, and select the appropriate
option from the drop-down list. You can update firmware on a single transcoder (select the
appropriate card number), the Controller (HCS6320), or all transcoder cards.
3. Type the IP address for the TFTP server in the TFTP Server IP Address field and the
name of the configuration file in the format “filename.cfg” in the Software Update File
Name field. The, click Update. This will initiate the installation of both the configuration
and package files.
Note: If you wish to check the status of the rmware update while in progress, click on the
Status button at the right of the Update eld.
4. When the rmware update is successfully completed, initiate a reset of ALL the cards that
received the rmware update (see “Perform an External Card Reset” below).
Perform an External Card Reset
This option enables you to reset a single transcoder, the Controller (HCS6320), or all transcoder
cards.
1. With the Controller Menu on display, select the card or cards to reset: Click on the down
arrow at the right of the Card Select field, and select the appropriate option from the dropdown list.
2. Click on the Reset button at the right of the Card Reset field.
The system will display conrmation before initiating the reset of the selected card(s), for
example:
Success. Reset command sent to card 2.
206-4183
23
Page 24

Conguration Options via GUI (Cont.)
Transcoder Menu Commands
The following subsections describe how to access and use the Transcoder Menu commands.
Access the Transcoder Menu
1. Access the CodePlus Transcoder Series web GUI as described on page 16.
2. With the Homepage on display, click on the Transcoder menu tab or link.
The Transcoder Menu (see example below) enables you to view and modify selected transcoder
card conguration settings.
Example: Transcoder Menu
View Hardware Information for a Selected Transcoder
1. With the Transcoder Menu on display, click on the down arrow at the right of the Card
Select eld, and select the appropriate transcoder card from the drop-down list of options.
2. Click on the Read button at the right of the Read Hardware ID eld to view the selected
card’s hardware ID (rmware version), for example:
Card 1:
Card HWID# is: 7720-v1.1-2011-1026
24
206-4183
Page 25

Conguration Options via GUI (Cont.)
View Software Information for a Selected Transcoder
1. With the Transcoder Menu on display, click on the down arrow at the right of the Card
Select eld, and select the appropriate transcoder card from the drop-down list of options.
2. Click on the Read button at the right of the Read Software Version eld to view the selected
card’s software versions, for example:
Card 1:
OS version: HCS7720-943-2011-1025
Encoder version: 1.2
Application version: 2.5
View MUX Bitrate Data for a Selected Transcoder
1. With the Transcoder Menu on display, click on the down arrow at the right of the Card
Select eld, and select the appropriate transcoder card from the drop-down list of options
2. Click on the Read button at the right of the Read MUX Bitrates eld to view MUX bitrate
data (displayed in millions of bits per second [Mbit/s]) for the selected transcoder card, for
example:
Card 1:
HDMI Input Bitrate 10.955 Mbit/s (raw 10.955 Mbit/s)
Ethernet Input Bitrate: 3.826 Mbit/s (raw 3.838 Mbit/s)
Data Output Bitrate: 4.127 Mbit/s
Total Output Bitrate: 19.390 Mbit/s
Refer to the Installation & Setup Guide for HCS7720 transcoder cards for further information on
bitrate data.
View the Pro:Idiom Key Checksum
1. With the Transcoder Menu on display, click on the down arrow at the right of the Card
Select eld, and select the appropriate transcoder card from the drop-down list of options.
2. Click on the Read button at the right of the Read PI Key Checksum eld to display the
Pro:Idiom key checksum for the selected transcoder, for example:
Card 1:
PI key checksum is xxxxxxxxxx
where
the transcoder.
206-4183
xxxxxxxxxx
Note: All transcoder cards in the card frame must have the same Pro:Idiom key
le installed.
is a 10-digit number that identifies the Pro:Idiom key file installed on
25
Page 26

Conguration Options via GUI (Cont.)
Reload the Pro:Idiom Key on a Selected Transcoder
This command reloads the Pro:Idiom encryption key on a single transcoder card. Note that a
password is required to initiate this command.
1. With the Transcoder Menu on display, click on the down arrow at the right of the Card
Select eld, and select the appropriate transcoder card from the drop-down list of options.
2. Click on the Reload button at the right of the Reload PI Key eld.
3. At the pop-up window prompt for the password required to execute the operation, type the
password and click OK.
When the reload is complete, the system will display conrmation, for example:
Card 1:
Reloading the key ...
Successfully reloaded PI key
Satellite STB Menu Commands
The following subsections describe how to access and use the Satellite STB Menu commands.
Access the Satellite STB Menu
1. Access the CodePlus Transcoder Series web GUI as described on page 16.
2. With the Homepage on display, click on the Satellite STB menu tab or link.
The Satellite STB Menu (see example on following page) enables you to view and modify
selected satellite STB configuration settings.
Note: The Tuner Select field in the Satellite STB Menu is irrelevant and should be left at its
default value (Tuner “1”) when HCS7720 transcoder cards are being used. Results displays
that include tuner data for an HCS7720/ViP 222k STB pair will always specify Tuner 1.
Set the STB Channel
1. With the Satellite STB Menu on display, click on the down arrow at the right of the Card
Select eld, and select the appropriate card from the drop-down list of options.
2. Type the desired channel number (1 – 9999) in the Set Tuner Channel eld, and then click
on the Set button at the right of the entry eld.
If the channel is set successfully, the satellite STB will change to the specied DISH Network
channel and the system will display conrmation, for example:
Card 1 Tuner 1: Channel changed to 209
26
206-4183
Page 27

Example: Satellite STB Menu
Conguration Options via GUI (Cont.)
Read the STB Channel and Status
This option enables you to display the STB channel, as well as the lock status of the satellite
signal (i.e., the STB is or is not locked to the satellite) and the satellite signal strength (displayed
as a percentage) at the Satellite In jack on the satellite STB.
1. With the Satellite STB Menu on display, click on the down arrow at the right of the Card
Select eld, and select the appropriate transcoder card from the drop-down list of options.
2. Click on the Read button at the right of the Read Tuner Channel/Status field to display the
currently selected satellite STB channel number, the lock status of the satellite signal, and
the satellite signal strength, for example:
Card 1 Tuner 1:
Current STB Channel is 209
Satellite signal is locked
Satellite signal strength is 52%
If you receive an error message, it may be necessary to reset the satellite STB either using
the “Reset STB” command described on page 28 or using the RESET button on the satellite
STB front panel.
206-4183
27
Page 28

Conguration Options via GUI (Cont.)
Read STB Information
This option enables you to display the STB model number, software version, serial number,
and smart card number.
1. With the Satellite STB Menu on display, click on the down arrow at the right of the Card
Select eld, and select the appropriate transcoder card from the drop-down list of options.
2. Click on the Read button at the right of the Read STB Info field to display the satellite STB
information, for example:
Card 1:
STB model is ViP222k-HD
STB software version is X398RPLB-N
STB serial number is R0128005665-79
Smart card number is S1920968050-61
Power the STB On or Off
Power On and Power Off options in the Satellite STB Menu enable you to power ON a satellite
STB from standby mode or power OFF a satellite STB to standby mode.
1. With the Satellite STB Menu on display, click on the down arrow at the right of the Card
Select eld, and select the appropriate transcoder card from the drop-down list of options.
2. Either:
• Click on the Power On button at the right of the Power Tuner On field to power ON the
satellite STB.
The system will display conrmation, for example:
Card 1 Tuner 1: STB Powered On
• Click on the Power Off button at the right of the Power Tuner Off field to switch the satellite
STB to standby mode. HDMI output as well as Ethernet streaming is disabled.
The system will display conrmation, for example:
Card 1 Tuner 1: STB Powered Off
Reset the Satellite STB
1. With the Satellite STB Menu on display, click on the down arrow at the right of the Card
Select eld, and select the appropriate transcoder card from the drop-down list of options.
2. Click on the Reset button at the right of the Reset STB field to reset the satellite STB.
The system displays conrmation, for example:
Card 1: The STB is resetting...
After reset, the satellite STB resumes normal operation.
28
206-4183
Page 29

Conguration Options via GUI (Cont.)
Schedule an STB Update
The STB Software Update feature enables the STB to check for and download software
updates on a one-time, user-dened basis. An STB Update should periodically be scheduled
in conjunction with software updates from the satellite service provider.
Note: At the time an update is scheduled to begin, the STB will be switched to
standby in order to enable it to download the update. When the update window is
over, the STB will be switched back ON; however, note that it may take up to 10 minutes for streaming to resume. Contact your service provider for further information.
1. With the Satellite STB Menu on display, click on the down arrow at the right of the Card
Select eld, and select the appropriate transcoder card from the drop-down list of options.
2. Type the appropriate values in the Schedule STB Update fields:
• Delay Hours and Minutes: Type the number of hours and minutes to delay before the
STB Software Update is initiated.
• Length: Specify the duration for the update window in minutes.
Note: The system will not allow a maintenance window that is less than 10 minutes or over
four hours. The default value “25” is the minimum time span typically recommended for an
update. It is also recommended that you schedule a maintenance window during a time
when the STB is not likely to be used.
3. When you have completed the elds as necessary, click on the Set button at the right of the
Schedule STB Update fields.
The system will display confirmation, for example:
Card 1: STB Update successfully configured.
Read STB Update Parameters
1. With the Satellite STB Menu on display, click on the down arrow at the right of the Card
Select eld, and select the appropriate transcoder card from the drop-down list of options.
2. Click on the Read button at the right of the Read STB Update Parameters field to display
the current STB Software Update status, for example:
Card 1: STB Update is not scheduled.
or
Card 1: STB Update is scheduled to begin in 12 hours 0 minutes with
duration 25 minutes.
Disable an STB Update
1. With the Satellite STB Menu on display, click on the down arrow at the right of the Card
Select eld, and select the appropriate transcoder card from the drop-down list of options.
2. Click on the Disable button at the right of the Disable STB Update field to disable the
currently scheduled STB Software Update.
The system will display confirmation, for example:
Card 1: Successfully cleared STB Update configuration
206-4183
29
Page 30

Conguration Options via Command Line
Caution: Do NOT initiate simultaneous menu sessions to run commands. Doing
so will interfere with active processes and may corrupt the system configuration
and/or cause the HCS6320 card to cease normal operation.
Access the HCS6320 Main Menu
Note: The HCS6320 must be connected to an IP network for Telnet access. For direct access
to the HCS6320 Service Port, use the FTDI TTL-USB cable (P/N TTL-232R-5V-AJ). See also
“Network and Communication Setup” on page 15 for further information.
1. Establish communication with the HCS6320 using Telnet or via a direct connection to the
HCS6320 Service Port.
2. Once communication is established, press Enter to refresh the menu display in the terminal.
You now have access to the HCS6320 configuration Main Menu (see example below).
3. At the
Note: You can always press Enter at the
HCS6320 Main Menu. Main Menu options may vary from the example shown, depending on
the HCS6320 rmware version.
[Main] Command >
prompt, type the desired menu command and press Enter.
[Main] Command >
prompt to display the
The following sections describe the configuration commands.
Example: HCS6320 Main Menu
------------------------------------------
Main Menu (Copyright 2012 - LGE USA)
------------------------------------------
info System Information
rf Set RF Channels
mrf Print RF Channels Map
list List Cards
card Card Menu
xrst External Card Reset
setip Set Up IP Address
pi Install PI Key On All Cards
pr Reload PI Key on All Cards
upd Update Firmware
bits Read MUX Bitrates
rawbits Read Bitrates at Backplane Connector
crosspt Configure Card Number to Channel Assignment
rstpwd Reset Password (for Reload PI Key on Web UI)
[Main] Command >
30
206-4183
Page 31

Conguration Options via Command Line (Cont.)
View HCS6320 System Information
1. Access the HCS6320 Main Menu as described on the previous page.
2. At the
The System Information display contains important information about the HCS6320, including
the unit hardware ID (firmware version), software versions, IP address, MAC address, and
serial number, for example:
System Information
-----------------Model: HCS6320
Hardware ID: 6320-v1.0-2011-1101
OS version: HCS6320-1102-2011-1031
Application version: 2.5
IP address: 10.166.60.81
MAC address: 00:0C:63:3C:00:02
Serial#: 901-12420020
[Main] Command >
ware and software information.
prompt, type info and press Enter to display HCS6320 hard-
It is recommended that you record this information for future reference. If you nd it necessary
to call customer service or engineering support, please have this information available.
Set HCS6320 RF Channels
1. Access the HCS6320 Main Menu as described on the previous page.
2. At the
3. At the
The remaining channels will be automatically assigned per EIA-542 STD CATV frequency
allocation standards, and the system will display the channel assignments (i.e., the Channel
Map) for the card slots (see example under “Print the RF Channels Map” below).
[Main] Command >
prompt, type rf and press Enter.
Enter the start channel number [2 - 132] >
start channel number and press Enter.
prompt, type the appropriate
Print the RF Channels Map
1. Access the HCS6320 Main Menu as described on the previous page.
2. At the
Channel Map:
--------+----------Cards | RF Channel
--------+---------- 1, 2 | 2
4, 5 | 3
8, 9 | 4
11, 12 | 5
--------+-----------
[Main] Command >
Channel Map, for example:
prompt, type mrf and press Enter to display the current
206-4183
31
Page 32

Conguration Options via Command Line (Cont.)
Display a List of Transcoder Cards Installed in the Chassis
1. Access the HCS6320 Main Menu as described on page 30.
2. At the
The display identies the type of transcoder cards installed and their serial numbers, for
example:
Available cards:
Card 1: [HCS7720] [001-12080017]
Card 2: [HCS7720] [001-12080018]
Card 3: [-]
Card 4: [HCS7720] [001-12080019]
Card 5: [HCS7720] [001-12080020]
Card 6: [-]
Card 7: [-]
Card 8: [HCS7720] [001-12080021]
Card 9: [HCS7720] [001-12020006]
Card 10: [-]
Card 11: [HCS7720] [001-12080023]
Card 12: [HCS7720] [001-12080024]
[Main] Command >
prompt, type list and press Enter.
Access Individual Transcoder Menus
See “Transcoder Menu Commands” on pages 39 to 42 for detailed information on transcoder
configuration options.
Perform an External Card Reset
1. Access the HCS6320 Main Menu as described on page 30.
2. At the
3. At the
f you opt to reset one or more of the transcoder cards, the system will display conrmation
before initiating the reset of the selected card(s), for example:
Resetting card 5:
If you opt to reset the HCS6320, the system will initiate the reset immediately without further
conrmation.
[Main] Command >
Enter card number (1-12, ‘ctr’, or ‘all’) >
• Type the slot number of the card and press Enter to reset a single transcoder card.
• Type all and press Enter to reset each of the transcoder cards.
• Type ctr and press Enter to reset the HCS6320.
prompt, type xrst and press Enter.
prompt, either:
32
206-4183
Page 33

Conguration Options via Command Line (Cont.)
Set the HCS6320 IP Address
1. Access the HCS6320 Main Menu as described on page 30.
2. At the
3. At the
4. At each of the following prompts, type the information requested. Press Enter after each
5. Reset the HCS6320 card (see “Perform an External Card Reset” on page 32). IP settings
[Main] Command >
Using DHCP (y/n)?
• Type y and press Enter if using DHCP. The system will display:
set
.
Go to step 5.
• Type n and press Enter to assign a static IP address to the HCS6320. Then, continue
with step 4.
entry.
Enter IP address:
Enter Subnet Mask:
Enter Gateway:
Once you enter the gateway address, the system will display:
(Type the IP address of the default gateway in the format xxx.xxx.xxx.xxx.)
prompt, type setip and press Enter.
prompt, either:
IP address has been
(Type the host IP address in the format xxx.xxx.xxx.xxx.)
(Type the subnet mask in the format xxx.xxx.xxx.xxx.)
IP address has been
set.
will not take effect until the HCS6320 resets.
Note: If you intend to modify additional conguration settings during the current session,
you may wait until all changes are complete before you reset the HCS6320.
Install a Pro:Idiom Key on All Transcoders
The Pro:Idiom encrypter built into the transcoder cards contains a default encryption key. When
rst installed, the cards will use this key to encrypt content. This command enables you to
change the encryption key, if necessary.
This command installs the Pro:Idiom key on all the transcoders installed in the chassis. To
install a Pro:Idiom key on a single transcoder, see “Install a Pro:Idiom Key on the Selected
Transcoder” on page 40.
Note: In order for a Pro:Idiom encrypted channel to be displayed, the receiver
must contain a Pro:Idiom decrypter, and the receiver must be congured to allow
decryption of the desired channel.
Note: The process of updating the encryption key will synchronize the decryption
key in any receiver tuned to the cards’ output. If the target receiver is turned off or
viewing content from a different card, the synchronization will not occur, and the
output will be scrambled. Ensure that all encrypters and decrypters in a system
are synchronized to the same key.
206-4183
33
Page 34

Conguration Options via Command Line (Cont.)
(Continued from previous page)
Caution: Do NOT initiate simultaneous menu sessions while a Pro:Idiom key
installation is in progress. Doing so will interfere with the active processes and
may corrupt the system configuration and/or cause the HCS6320 card to cease
normal operation.
1. Confirm the directory location of the Pro:Idiom key (.hex) file. Note: For a TFTP file transfer,
the key file must be available on the same machine as the TFTP server.
2. Access the HCS6320 Main Menu as described on page 30.
3. At the
4. At the
5. Refer to the appropriate subsection below, depending on the file transfer option used.
[Main] Command >
Use TFTP to download key (y/n)?
• Type y and press Enter to use TFTP for the Pro:Idiom key installation.
• Type n and press Enter if you will not use TFTP for the Pro:Idiom key installation. At the
next system prompt:
Enter.
Use XMODEM to transfer files (y/n)?
prompt, type pi and press Enter.
prompt, either:
, type y and press
Xmodem File Transfer
The system will request a key file. Transfer the new Pro:Idiom key file using Xmodem
protocol.
For example, in HyperTerminal, select Transfer and then Send File.... In the Send File
window, enter or select the appropriate Pro:Idiom key file in the Filename field, and select
Xmodem in the Protocol field.
TFTP Transfer
The HCS6320 must be connected to an IP network for a TFTP transfer. TFTP transfer also
requires that you set up a TFTP server on the same IP network as the HCS6320. Consult
the network administrator, as necessary, for further information.
a) Make sure the key file is available on the same machine as the TFTP server. Then, set
up the TFTP server, and point to the directory in which the Pro:Idiom key file is located.
Note the name of the Pro:Idiom key file; you will need it to initiate the transfer.
b) At the
c) At the
The system will display progress messages as well as the result of the installation process.
Note that the new key will be stored in non-volatile storage regardless of process results.
Enter TFTP server IP
and press Enter, or simply press Enter if the default IP address shown in square
brackets is correct.
Enter the PI key file name
file in the format “filename.hex” and press Enter.
prompt, type the IP address for the TFTP server
prompt, type the name of the Pro:Idiom key
34
206-4183
Page 35

Conguration Options via Command Line (Cont.)
Reload the Pro:Idiom Key on All Transcoders
This command reloads the Pro:Idiom encryption key on all the transcoders installed in the
chassis. To reload the Pro:Idiom key on a single transcoder, see “Reload the Pro:Idiom Key
on the Selected Transcoder” on page 41.
1. Access the HCS6320 Main Menu as described on page 30.
2. At the
The system will display progress messages as it reloads the key on each transcoder. When
the reload is complete, the system will display conrmation:
Operation completed
Update HCS6320 and/or Transcoder Firmware
If you are not sure of the current firmware version, view and record the System Information
for the HCS6320 and/or the transcoder card(s) before you initiate the firmware update. See
“View HCS6320 System Information” on page 31 and/or “View Hardware Information for the
Selected Transcoder” on page 40, as necessary.
1. Confirm the directory location of the required firmware update configuration (.cfg) and
2. Access the HCS6320 Main Menu as described on page 30.
3. At the
4. At the
5. At the
6. Refer to the appropriate subsection below, depending on the file transfer option used.
[Main] Command >
immediately.
prompt, type pr and press Enter to initiate the reload
Caution: Do NOT initiate simultaneous menu sessions while a firmware update is
in progress. Doing so will interfere with the active processes and may corrupt the
system configuration and/or cause the HCS6320 card to cease normal operation.
package (.pkg) files. Note: For a TFTP file transfer, the firmware update files must be
available on the same machine as the TFTP server.
[Main] Command >
Enter card number (1-12, ‘ctr’, or ‘all’) >
• Type the slot number of the card and press Enter to update a single transcoder card.
• Type all and press Enter to update each of the transcoder cards.
• Type ctr and press Enter to update the HCS6320 rmware.
Use TFTP to transfer files (y/n)?
• Type y and press Enter to use TFTP for the rmware update.
• Type n and press Enter if you will not use TFTP for the rmware update. At the next
system prompt:
Use XMODEM to transfer files (y/n)?
prompt, type upd and press Enter.
prompt, either:
prompt, either:
, type y and press Enter.
206-4183
(Continued on next page)
35
Page 36

Conguration Options via Command Line (Cont.)
(Continued from previous page)
Xmodem File Transfer
a) The system will request a configuration (.cfg) file. Transfer the new configuration file
using Xmodem protocol.
For example, in HyperTerminal, select Transfer and then Send File.... In the Send
File window, enter or select the appropriate configuration file in the Filename field,
and select Xmodem in the Protocol field.
b) Upon receipt of the configuration file, the system will request a package (.pkg) file.
Transfer the package file using Xmodem protocol.
TFTP Transfer
The HCS6320 must be connected to an IP network for a TFTP transfer. TFTP transfer also
requires that you set up a TFTP server on the same IP network as the HCS6320. Consult
the network administrator, as necessary, for further information.
a) Make sure the firmware update files are available on the same machine as the TFTP
server. Then, set up the TFTP server, and point to the directory in which the firmware
update files are located.
Note the name of the configuration file; you will need it to initiate the transfer.
b) At the
c) At the
7. The system will display progress messages as well as the result of the update process
(which may take several minutes). When the rmware update is successfully completed,
initiate a reset of ALL the cards that received the rmware update (see “Perform an External
Card Reset” on page 32).
Enter TFTP server IP
and press Enter, or simply press Enter if the default IP address shown in square
brackets is correct.
Enter the config file name
file in the format “filename.cfg” and press Enter. This will initiate the installation of both
the configuration and package files.
prompt, type the IP address for the TFTP server
prompt, type the name of the configuration
View MUX or Raw Bitrate Data
Bitrate data is useful for system monitoring and troubleshooting purposes. MUX bitrates
provide information on MUX data processing, i.e., the amount of data filtering in and out of
the MUX. Raw bitrates are measured at the input pins prior to data processing.
1. Access the HCS6320 Main Menu as described on page 30.
2. At the
36
[Main] Command >
• Type bits and press Enter to view MUX bitrate data for each HCS6320-controlled
transcoder. See example on following page.
• Type rawbits and press Enter to view raw bitrate data for each installed transcoder
card. See example on following page.
prompt, either:
206-4183
Page 37

Conguration Options via Command Line (Cont.)
Example: MUX Bitrates Display
Slot #1 Bitrate 15.696 Mbit/s (unfiltered 15.732 Mbit/s)
Slot #2 Bitrate 12.658 Mbit/s (unfiltered 12.694 Mbit/s)
Mux #1 Output Bitrate 31.746 Mbit/s
Slot #4 Bitrate 19.335 Mbit/s (unfiltered 19.359 Mbit/s)
Slot #5 Bitrate 14.679 Mbit/s (unfiltered 14.715 Mbit/s)
Mux #2 Output Bitrate 34.051 Mbit/s
Slot #8 Bitrate 13.013 Mbit/s (unfiltered 13.049 Mbit/s)
Slot #9 Bitrate 13.903 Mbit/s (unfiltered 13.933 Mbit/s)
Mux #3 Output Bitrate 26.970 Mbit/s
Slot #11 Bitrate 6.269 Mbit/s (unfiltered 6.305 Mbit/s)
Slot #12 Bitrate 18.583 Mbit/s (unfiltered 18.614 Mbit/s)
Mux #4 Output Bitrate 24.900 Mbit/s
Per Mux Total Output Bitrate 38.815 Mbit/s
Total amount of data (including null
packets) output per RF channel
Data currently in
use by the MUX
Unprocessed data
Data currently
output by the MUX
Example: Raw Bitrates Display
Slot #1 Raw bitrate data 14.228 Mbit/s total 19.396 Mbit/s
Slot #2 Raw bitrate data 12.537 Mbit/s total 19.390 Mbit/s
Slot #3 Raw bitrate data 0 total 0
Total number of
data bits that are
not null packets
Slot #4 Raw bitrate data 17.049 Mbit/s total 19.390 Mbit/s
Slot #5 Raw bitrate data 15.503 Mbit/s total 19.396 Mbit/s
Slot #6 Raw bitrate data 0 total 0
Slot #7 Raw bitrate data 0 total 0
Total number of
data bits in the
transport stream
Slot #8 Raw bitrate data 13.536 Mbit/s total 19.390 Mbit/s
Slot #9 Raw bitrate data 13.957 Mbit/s total 19.396 Mbit/s
Slot #10 Raw bitrate data 0 total 0
Slot #11 Raw bitrate data 7.520 Mbit/s total 19.396 Mbit/s
Slot #12 Raw bitrate data 18.620 Mbit/s total 19.396 Mbit/s
Configure Card Number to Channel Assignments
This option enables you to reconger the card number/channel assignments.
1. Access the HCS6320 Main Menu as described on page 30.
2. At the
[Main] Command >
The system displays the current channel assignments and prompts for the desired action,
for example:
prompt, type crosspt and press Enter.
(Continued on next page)
206-4183
37
Page 38

Conguration Options via Command Line (Cont.)
(Continued from previous page)
1. RF 58-1 <-- Slot #1
2. RF 58-2 <-- Slot #2
3. RF 59-1 <-- Slot #4
4. RF 59-2 <-- Slot #5
5. RF 60-1 <-- Slot #8
6. RF 60-2 <-- Slot #9
7. RF 61-1 <-- Slot #11
8. RF 61-2 <-- Slot #12
Do you wish to change the mapping of physical slots to
RF channels (y/n)?
3. To change the RF channel mapping, type y and press Enter.
Note: Type n and press Enter to return to the Main Menu prompt without changing the
channel mapping.
4. At the
5. At the
6. Repeat steps 2 to 5 to remap additional channels.
Enter the mux input number [1 - 8] >
the channel you wish to reassign. Then, press Enter.
Enter the slot number [1 - 12] >
transcoder card you wish to assign to the selected channel. Then, press Enter.
The system conrms the new assignment:
prompt, type the line number for
prompt, type the slot number of the
Set Cross point switch... OK!
and then redisplays the channel assignments along with the Main Menu prompt.
Reset Password for Reload PI Key GUI Option
Users who wish to reload a selected transcoder’s Pro:Idiom key from the GUI require a
password in order to do so. This option enables you to reset the Pro:Idiom password to its
default value (“service”).
Note: Users also have the ability to set a new password during the process of reloading the
Pro:Idiom key from the GUI (see “Change the [Reload Pro:Idiom Key] Password” on page 22).
1. Access the HCS6320 Main Menu as described on page 30.
2. At the
3. At the
38
[Main] Command >
Reset password (y/n)?
• Type y and press Enter to reset the default password immediately. The system
conrms success (
• Type n and press Enter to abort the password reset. The system displays conrmation
(
Password reset. Aborted!
Password reset ok
prompt, type rstpwd and press Enter.
prompt for conrmation, either:
) and then redisplays the Main Menu prompt.
) and then redisplays the Main Menu prompt.
206-4183
Page 39

Conguration Options via Command Line (Cont.)
Transcoder Menu Commands
The following subsections describe how to access and use the Transcoder Menu commands.
Note: Refer to the Installation & Setup Guide for the applicable transcoder cards for further
information on transcoder configuration options.
Access the Transcoder Menu
1. Access the HCS6320 Main Menu as described on page 30.
2. At the
3. At the
[Main] Command >
Enter card number (1-12) >
transcoder card for which you wish to access configuration options. Then, press Enter.
The system identies the card type and then displays a command prompt for the card
menu, for example:
prompt, type card and press Enter.
prompt, type the chassis slot number of the
Card #1 is: HCS7720
[HCS7720 (1)] Command >
4. At the
Note: You can always press Enter at the
Menu.
Example: Transcoder Menu
Command >
• Press Enter to display the card menu (see example below).
• Type the desired command and press Enter.
prompt, either:
Command >
prompt to display the Transcoder
------------
HCS7720 Menu
------------
hwid Read Hardware ID
ver Read Software Versions
bits Read MUX Bitrates
pi Install PI Key
pr Reload PI Key
cksum Read PI Key Checksum
stb Satellite Receiver Menu
upd Update Firmware
irst Internal Reset
ret Return to Main Menu
[HCS7720 (1)] Command >
206-4183
39
Page 40

Conguration Options via Command Line (Cont.)
View Hardware Information for the Selected Transcoder
At the
[HCS7720 (#)] Command >
card’s hardware ID (rmware version), for example:
Card HWID# is: 7720-v1.1-2011-1026
View Software Information for the Selected Transcoder
At the
[HCS7720 (#)] Command >
card’s software versions, for example:
OS version: HCS7720-943-2011-1025
Encoder version: 1.2
Application version: 2.5
View MUX Bitrate Data for the Selected Transcoder
At the
[HCS7720 (#)] Command >
MUX bitrate data for the selected transcoder card is displayed in millions of bits per second
(Mbit/s), for example:
HDMI Input Bitrate 6.684 Mbit/s (raw 6.684 Mbit/s)
Ethernet Input Bitrate: 3.826 Mbit/s (raw 3.838 Mbit/s)
Data Output Bitrate: 4.127 Mbit/s
Total Output Bitrate: 19.390 Mbit/s
prompt, type hwid and press Enter to view the selected
prompt, type ver and press Enter to view the selected
prompt, type bits and press Enter.
Refer to the Installation & Setup Guide for HCS7720 transcoder cards for further information on
bitrate data.
Install a Pro:Idiom Key on the Selected Transcoder
This command installs the Pro:Idiom encryption key on the selected transcoder card. To
install a Pro:Idiom key on all the transcoders, see “Install a Pro:Idiom Key on All
Transcoders” on page 33.
Caution: Do NOT initiate simultaneous menu sessions while a Pro:Idiom key
installation is in progress. Doing so will interfere with the active processes and
may corrupt the system configuration and/or cause the HCS6320 card to cease
normal operation.
Note: In order for a Pro:Idiom encrypted channel to be displayed, the receiver
must contain a Pro:Idiom decrypter, and the receiver must be congured to allow
decryption of the desired channel.
(Continued on next page)
40
206-4183
Page 41

Conguration Options via Command Line (Cont.)
(Continued from previous page)
Note: The process of updating the encryption key will synchronize the decryption
key in any receiver tuned to the cards’ output. If the target receiver is turned off or
viewing content from a different card, the synchronization will not occur, and the
output will be scrambled. Ensure that all encrypters and decrypters in a system
are synchronized to the same key.
1. Confirm the directory location of the Pro:Idiom key (.hex) file. Note: For a TFTP file transfer,
the key file must be available on the same machine as the TFTP server.
2. At the
3. At the
4. Complete the update using the selected transfer mode (Xmodem or TFTP). Refer to
[HCS7720 (#)] Command >
Use TFTP to transfer files (y/n)?
• Type y and press Enter to use TFTP for the rmware update.
• Type n and press Enter if you will not use TFTP for the rmware update. At the next
system prompt:
“Install a Pro:Idiom Key on All Transcoders” on page 33 for further information.
Use XMODEM to transfer files (y/n)?
prompt, type pi and press Enter.
prompt, either:
, type y and press Enter.
The system will display progress messages as well as the result of the installation process.
Note that the new key will be stored in non-volatile storage regardless of process results.
Reload the Pro:Idiom Key on the Selected Transcoder
This command reloads the Pro:Idiom encryption key on the selected transcoder card. To
reload the Pro:Idiom key on all the transcoders, see “Reload the Pro:Idiom Key on All
Transcoders” on page 35.
1. At the
2. At the
When the reload is complete, the system will display conrmation:
[HCS7720 (#)] Command >
prompt, type pr and press Enter.
Reload PI key. Continue (y/n)?
prompt, type y and press Enter to continue.
Reload PI complete OK
View the Pro:Idiom Key Checksum for the Selected Transcoder
At the
[Card (#)] Command >
Pro:Idiom key checksum for the selected transcoder, for example:
prompt, type cksum and press Enter to display the
PI key checksum is xxxxxxxxxx
where
transcoder.
xxxxxxxxxx
Note: All transcoder cards in the card frame must have the same Pro:Idiom key
le installed.
is a 10-digit number that identies the Pro:Idiom key le installed on the
206-4183
41
Page 42

Conguration Options via Command Line (Cont.)
Access the Satellite Receiver Menu for the Selected Transcoder
See “Satellite Receiver Menu Commands” on pages 43 to 47 for detailed information on
satellite STB configuration options.
Update Firmware on the Selected Transcoder
This command updates the firmware on the selected transcoder card. To update firmware on
all transcoders or on the HCS6320, see “Update HCS6320 and/or Transcoder Firmware” on
page 35.
Caution: Do NOT initiate simultaneous menu sessions while a firmware update is
in progress. Doing so will interfere with the active processes and may corrupt the
system configuration and/or cause the HCS6320 card to cease normal operation.
If you are not sure of the current firmware version, view and record the transcoder hardware
ID (firmware version) before you initiate the firmware update. See “View Hardware
Information for the Selected Transcoder” on page 40.
1. Confirm the directory location of the required firmware update configuration (.cfg) and
package (.pkg) files. Note: For a TFTP file transfer, the firmware update files must be
available on the same machine as the TFTP server.
2. At the
3. At the
4. Complete the update using the selected transfer mode (Xmodem or TFTP). Refer to
5. Reset the transcoder card (see “Reset the Selected Transcoder Card” below).
[HCS7720 (#)] Command >
Use TFTP to transfer files (y/n)?
• Type y and press Enter to use TFTP for the rmware update.
• Type n and press Enter if you will not use TFTP for the rmware update. At the next
system prompt:
“Update HCS6320 and/or Transcoder Firmware” on page 35 for further information.
Use XMODEM to transfer files (y/n)?
prompt, type upd and press Enter.
prompt, either:
, type y and press Enter.
Reset the Selected Transcoder Card
At the
[HCS7720 (#)] Command >
After reset, the transcoder card resumes normal operation.
Return to the HCS6320 Main Menu
At the
[HCS7720 (#)] Command >
HCS6320 Main Menu.
42
prompt, type irst and press Enter to initiate the reset.
prompt, type ret and press Enter to return to the
206-4183
Page 43

Conguration Options via Command Line (Cont.)
Satellite Receiver Menu Commands
The following subsections describe how to access and use the Satellite Receiver Menu
commands.
Access the Satellite Receiver Menu
1. Access the card menu for the selected transcoder (see “Access the Transcoder Menu” on
page 39).
2. At the
3. At the
Note: You can always press Enter at the
Receiver Menu.
[HCS7720 (#)] Command >
[Satellite (#)] Command >
• Press Enter to display the Satellite Receiver Menu (see example below).
• Type the desired command and press Enter.
prompt, type stb and press Enter.
prompt, either:
Command >
prompt to display the Satellite
Example: Satellite Receiver Menu
-----------------------
Satellite Receiver Menu
----------------------getch Read Current STB Channel
setch Set STB Channel
sglvl Read Satellite Signal Strength
lksts Read Satellite Lock Status
bnum Read STB Serial Number
cnum Read Smart Card Number
on Turn STB On
off Turn STB Off (Standby)
stbrst Reset Satellite STB
getupd Read STB Update Parameters
setupd Set STB Update Parameters
model Read STB Model
ver Read STB Software Version
ret Return to Card Menu
[Satellite (#)] Command >
where:
# is the chassis card/slot
number you selected for
conguration purposes.
206-4183
43
Page 44

Conguration Options via Command Line (Cont.)
Read the Current STB Channel
At the
[Satellite (#)] Command >
currently selected satellite STB channel number, for example:
Card 1: Current STB channel is 200
If you receive an error message, it may be necessary to reset the satellite STB either using
the “Reset Satellite STB” command described on page 45 or using the RESET button on the
STB front panel.
Set the STB Channel
1. At the
2. At the
Note: Since low channel numbers may be assigned to both SD and HD channels, if this
3. At the prompt for conrmation:
[Satellite (#)] Command >
the satellite STB.
Enter channel number >
and press Enter.
is an HD channel and is also mapped to an unambiguous higher channel number, it is
recommended that you type the higher number here.
Set channel number to xxx (y/n)?
• Type y and press Enter to conrm the setting.
• Type n and press Enter to return to the
without setting a new channel.
prompt, type getch and press Enter to display the
prompt, type setch and press Enter to retune
prompt, type the desired channel number (1 – 9999)
, either:
[Satellite (#)] Command >
prompt
Once you conrm the channel number setting, the system will display conrmation, for
example:
Card 1: Changing STB channel to xxx ... OK
Read the Satellite Signal Strength
At the
[Satellite (#)] Command >
satellite signal strength (displayed as a percentage) at the Satellite In jack on the satellite
STB, for example:
prompt, type sglvl and press Enter to display the
Card 1: Satellite signal strength is 52%
Read the Satellite Lock Status
At the
[Satellite (#)] Command >
whether or not the satellite STB is locked to the satellite, for example:
prompt, type lksts and press Enter to determine
Card 1: Satellite signal is locked
44
206-4183
Page 45

Conguration Options via Command Line (Cont.)
Read the Satellite STB Serial Number
At the
[Satellite (#)] Command >
satellite STB serial number, for example:
Card 1: STB serial# is: R0128005665-79
Read the Satellite STB Smart Card Number
At the
[Satellite (#)] Command >
satellite STB smart card serial number, for example:
Card 1: Smart card# is: S1920968050-61
Power the Satellite STB On or Off
“Turn STB On” and “Turn STB Off” options in the Satellite Receiver Menu enable you to
power ON a satellite STB from standby mode or power OFF a satellite STB to standby mode.
At the
[Satellite (#)] Command >
• Type on and press Enter to power ON the satellite STB.
• Type off and press Enter to switch the satellite STB to standby mode. HDMI ouput as well
as Ethernet streaming is disabled.
prompt, type bnum and press Enter to display the
prompt, type cnum and press Enter to display the
prompt, either:
Reset the Satellite STB
1. At the
2. At the
Read and/or Set STB Update Parameters
The STB Software Update feature enables the STB to check for and download software
updates on a one-time, user-dened basis. An STB update should periodically be scheduled
in conjunction with software updates from the satellite service provider.
You can view the current STB update status (scheduled, not scheduled, or in progress), and/
or you can modify the STB update status/parameters, as required.
[Satellite (#)] Command >
satellite STB.
Reset (y/n)?
• Type y and press Enter to reset the satellite STB. After reset, the satellite STB resumes
normal operation.
• Type n and press Enter to return to the
without resetting the STB.
Note: At the time an update is scheduled to begin, the STB will be switched to
standby in order to enable it to download the update. When the update window
is over, the STB will be powered back ON; however, note that it may take up to 10
minutes for streaming to resume. Contact your service provider for further
information.
prompt, either:
prompt, type stbrst and press Enter to reset the
[Satellite (#)] Command >
prompt
206-4183
45
Page 46

Conguration Options via Command Line (Cont.)
Read STB Update Parameters
At the
[Satellite (#)] Command >
current STB update status, for example:
STB Update is scheduled to begin in 12 hours 0 minutes
with duration 25 minutes
or
STB Update is not scheduled.
or
STB Update is in progress.
It will end in 1 minutes (total duration 25 minutes).
Set STB Update Parameters
1. At the
2. At the
3. At the
4. At each of the following prompts, type the number of hours and minutes to delay before
[Satellite (#)] Command >
Change STB Update setting (y/n)?
• Type y and press Enter to modify the current STB software update parameters.
• Type n and press Enter to return to the Satellite Receiver Menu without modifying the
STB software update parameters.
Enable updates (y/n)?
• Type y and press Enter to enable and congure STB software update parameters. The
system will initiate a series of prompts that enable you to specify the maintenance
window for the update. Continue with step 4.
• Type n and press Enter to disable the STB software update. Then, press Enter again to
return to the
the STB software update is initiated, as well as the desired duration (in minutes) for the
update window. Note that all three of these elds require numerical values. Press Enter
after each entry.
If applicable, you can also press Enter at each prompt to accept the default value in
square brackets.
Command >
prompt.
Enter the number of hours to delay before starting [12]
Enter the number of minutes to delay before starting [0]
Enter the maintenance window duration in minutes [25]
Note: The system will not allow a maintenance window that is less than 10 minutes or over
four hours. The default value (25 minutes) is the minimum time span typically recommended
for an update. It is also recommended that you schedule a maintenance window during a
time when the STB is not likely to be in use.
prompt, type getupd and press Enter to display the
prompt, type setupd and press Enter.
prompt, either:
prompt, either:
46
(Continued on next page)
206-4183
Page 47

Conguration Options via Command Line (Cont.)
(Continued from previous page)
After you enter a valid maintenance window duration, the system will display conrmation,
for example:
Configured STB Update... OK
Press any key to continue
Read the Satellite STB Model Type
At the
[Satellite (#)] Command >
STB model type, for example:
STB model is: ViP222k-HD
Read the Satellite STB Software Version
At the
[Satellite (#)] Command >
STB software version, for example:
STB sw_ver is: X398RPLB-N
prompt, type model and press Enter to display the
prompt, type ver and press Enter to display the
Return to the Transcoder Menu
At the
[Satellite (#)] Command >
card menu.
prompt, type ret and press Enter to return to the
206-4183
47
Page 48

Troubleshooting
This section provides troubleshooting information for the HCS6320. You can find additional
troubleshooting help at www.dishnetwork.com.
Equipment Setup Review
• Make sure all connectors and connections are tight and secure on all entertainment system
components.
• Check the Ethernet connection; is it viable and working?
- Observe the green and amber LEDs on the Ethernet connector.
- The green LED should blink rapidly.
- The amber LED should stay lit constantly.
• Ensure the satellite STB smart card is up-to-date and authorized by DISH Network.
STATUS LED
The green STATUS LED on the HCS6320 front panel provides general information about the
operating condition of the card. Observe the STATUS LED, and refer to the following table:
STATUS LED Behavior Operating Status
Slow Blinking Power Up State
Rapid Blinking Error Condition
Continuously On Normal Operation
Continuously Off Fault Condition, No Output
Audio/Video Freeze or Blank Screen
Perform one or more of the following (in order):
• Press the RESET button located on the front of the satellite STB, and allow the STB to
retrieve the DISH Network program guide.
• Unplug the power cord of the satellite STB for 15 seconds; then plug it in again.
• Use a small object (for example, a paperclip) to press the recessed RESET button on the
HCS6320. Hold for ve seconds to initiate the reset.
• Unplug the power cord of the CodePlus card frame for 15 seconds; then plug it in again.
48
206-4183
Page 49

Specications
Dimensions
Height: 3U (130.20 mm)
Width: 1.102362 inches (28.00 mm)
Depth: 9.055118 inches (230.00 mm)
Weight: 0.5 pounds (0.221 kgrms) Est.
Environmental Storage Conditions
Temperature: -20° to 70° Celsius
-4° to 158° Fahrenheit
Humidity: 95% non-condensing
Operating Conditions
Temperature: 0° to 40° Celsius
32° to 104° Fahrenheit
Humidity: 95% non-condensing
Electrical
RF Out Connector: Type ‘F’
RF Output Span: 4 Contiguous Channels (typically 24 MHz)
RF Output Frequency Range: 54 MHz to 864 MHz
DC Input: +12V DC @ 1.1 Amps
Active Output Level at RF Out jack: + 42 dBmV Min.
Ethernet Input: 10/100BaseT
Note: Design and specications subject to change without prior notice.
206-4183
49
Page 50

Document Revision History / Notes
Document Revision History
Date Description
August 2012 Revision A: New document
Product documentation is available online at: www.LGsolutions.com/products. From the Products
page, select TVs, Systems & Solutions, then Head End Systems, then CodePlus Transcoder
Series (click Show [+] to view the list of products), then the applicable Modular System option. Click
the Literature & Downloads tab at the bottom of the Modular System page, and select the required
document(s) from the Downloads list.
Notes
50
206-4183
Page 51

Open Source Software Notice
The following GPL executables used in this product are subject to the GPL Version 2.0 License Agreements.
GPL EXECUTABLES: Linux kernel 2.6.26, boa 0.94, busybox 1.10.1, dhcpcd 0.70, eraseall 1.7, inetd 1.0,
lrzsz 0.12.20, simpleinit 1.21
To obtain the source code under GPL, LGPL, MPL and other open source licenses that are contained in this
product, please visit http://opensource.lge.com. In addition to the source code, all referenced license terms,
warranty disclaimers and copyright notices are available for download. LG Electronics will also provide open
source code to you on CD-ROM for a charge covering the cost of performing such distribution (such as the
cost of media, shipping and handling) upon e-mail request to opensource@lge.com. This offer is valid for
three (3) years from the date on which you purchased the product.
You can obtain a copy of the GPL license from: http://www.gnu.org/licenses/old-licenses/gpl-2.0.html.
This product includes:
• echo:
Copyright © 1998 David I. Bell
Permission is granted to use, distribute, or modify this source, provided that this copyright notice
remains intact.
• telnet v1.9:
Copyright © 1989 The Regents of the University of California
1. Redistributions of source code must retain the above copyright notice, this list of conditions and the
following disclaimer.
2. Redistributions in binary form must reproduce the above copyright notice, this list of conditions and
the following disclaimer in the documentation and/or other materials provided with the distribution.
3. All advertising materials mentioning features or use of this software must display the following
acknowledgement: This product includes software developed by the University of California, Berkeley
and its contributors.
4. Neither the name of the University nor the names of its contributors may be used to endorse or
promote products derived from this software without specic prior written permission.
All rights reserved.
Permission is hereby granted, free of charge, to any person obtaining a copy of this open source software
and associated documentation les (the “Software”), to deal in the Software without restriction, including
without limitation the rights to use, copy, modify, merge, publish, distribute, sublicense, and/or sell copies
of the Software, and to permit persons to whom the Software is furnished to do so, subject to the following conditions:
SUBJECT TO THE TERMS OF THE GPL VERSION 2.0 LICENSE AGREEMENTS, THE SOFTWARE IS
PROVIDED “AS IS”, WITHOUT WARRANTY OF ANY KIND, EXPRESS OR IMPLIED, INCLUDING BUT
NOT LIMITED TO THE WARRANTIES OF MERCHANTABILITY, FITNESS FOR A PARTICULAR PURPOSE AND NONINFRINGEMENT. IN NO EVENT SHALL THE AUTHORS, COPYRIGHT HOLDERS, OR
LG ELECTRONICS (THE “LICENSOR”) BE LIABLE FOR ANY CLAIM, DAMAGES OR OTHER LIABILITY, WHETHER IN AN ACTION OF CONTRACT, TORT OR OTHERWISE, ARISING FROM, OUT OF OR
IN CONNECTION WITH THE SOFTWARE OR THE USE OR OTHER DEALINGS IN THE SOFTWARE,
EVEN IF LICENSOR HAS BEEN ADVISED OF THE POSSIBILITY OF SUCH DAMAGES. LICENSEE
ASSUMES THE COST OF ALL NECESSARY SERVICING, REPAIR, OR CORRECTION.
206-4183
51
Page 52

LG HCS6320 MUX/MOD Feature Card Warranty
Broadcast Products Welcome to the LG family! We believe that you will be pleased with your new HCS6320 MUX/MOD feature card. Please
read this warranty carefully, it is a “LIMITED WARRANTY” as defined under Federal Law. This warranty gives you specific
legal rights, and you may also have other rights that vary from state-to-state within the U.S.A.
LG’s RESPO N S I BILITY
Warranty Term One year parts and labor from date of purchase or delivery date.
Parts New or remanufactured replacements for factory-defective parts may be used. Such replacement parts are warranted for
Warranty Service Warranty service is provided at LG. Customer pays for shipping charges to LG; LG pays for return shipping charges to
Not Covered This warranty covers manufacturing defects and does not cover installation, adjustment of customer controls, installation or
This warranty does not cover any missing or stolen access cards.
THIS WARRANTY IS IN LIEU OF ANY OTHER WARRANTY, EXPRESS OR IMPLIED, INCLUDING WITHOUT
the remaining portion of the original warranty period.
return HCS6320 to customer. Call 1-888-865-3026 for further information.
repair of antenna systems, cable converters or cable company-supplied equipment; it also does not cover damage due to
misuse, abuse, negligence, acts of God or other causes beyond the control of LG. Any alteration of the product after manufacture voids this warranty in its entirety.
LIMITATION, ANY WARRANTY OF MERCHANTABILITY OR FITNESS FOR A PARTICULAR PURPOSE, AND LG
SHALL NOT BE LIABLE FOR ANY CONSEQUENTIAL, INDIRECT, OR INCIDENTAL DAMAGES OF ANY KIND,
INCLUDING LOST REVENUES OR PROFITS IN CONNECTION WITH THIS PRODUCT. SOME STATES DO NOT
ALLOW LIMITATIONS ON HOW LONG AN IMPLIED WARRANTY LASTS OR THE EXCLUSION OR LIMITATION OF
INCIDENTAL OR CONSEQUENTIAL DAMAGES, SO THE ABOVE LIMITATIONS OR EXCLUSIONS MAY NOT APPLY
TO YOU
.
OWN E R ’ S R ESPONSI B I L ITY
Effective Warranty Date Warranty begins on the date of delivery of the HCS6320.
For your convenience, keep the dealer’s dated bill of sale or delivery ticket as evidence of the purchase date.
Installation Guide Read the Installation & Setup Guide carefully so that you will understand the operation of the HCS6320 and how to adjust
Antenna Reception problems caused by inadequate antenna or faulty antenna connections are the owner’s responsibility.
Warranty Service For warranty service information, Call 1-888-865-3026. Parts and service labor that are LG’s responsibility (see above)
the controls.
will be provided without charge. Other service is at the owner’s expense. If you have any problem in obtaining satisfactory
warranty service, call 1-888-865-3026.
You must provide the model number, serial number and date of purchase or date of original installation.
For Customer Support/Service, please call:
1-888-865-3026
www.LGsolutions.com
CodePlus is a trademark of LG Electronics U.S.A., Inc. Pro:Idiom is a registered trademark of
Zenith Electronics LLC. DISH, DISH Network, and ViP are registered trademarks of DISH Network
LLC. All other trademarks or registered trademarks are the property of their respective owners.
206-4183
© Copyright 2012 LG Electronics U.S.A., Inc.
Revision A
 Loading...