

Page 1
ELECTRONICS INC.
HB620T
E N G L I S H
简 体 中 文
M A L A Y
www.lgmobile.com
MMBB0304201(1.1) W
HB620T U SER GUID E
HB620T_Open_Singapore_Cover_1.1_1 1 2008.10.10 9:56:52 AM
Page 2

Bluetooth QD ID B013949
HB620T_Open_Singapore_Cover_1.1_2 2 2008.10.10 9:56:52 AM
Page 3
English
USER GUIDE
HB620T
This document is the user guide for the LG HB620T 3G Video Mobile TV
Phone. All rights for this document are reserved by LG Electronics. Copying,
modifying and distributing this document without the consent of
LG Electronics are prohibited.
Page 4

2
Table of Contents
Ta bl e o f C on t en t s
HB620T Features 5
Parts of the phone
Getting Started 8
Installing the SIM card
and battery
General Functions 11
Making and answering calls
Overview of Menu
Functions 1
4
TV 1
5
TV
Radio 1
6
Settings
Watch time
Information view mode
Call answer while watching TV
SMS/MMS popup on/off
Reset Channels
Calling 17
Call logs
All calls
Dialled calls
Received calls
Missed calls
Make video call 17
Call durations
Data volume 1
8
Call costs
Call divert
Voice calls
Video calls 1
9
Call barring 20
Voice calls 21
Video calls
Deactivate all
Fixed dial numbers
Call waiting
Common setting
Call reject
Send my number 2
2
Auto redial
Answer mode
Minute minder
BT answer mode
Save new number
Video call setting 23
Profiles 24
Multimedia 25
Camera
Video camera 2
6
Music
28
Recently played
All tracks
Artists
Albums
Genres
Playlists
Shuffle tracks
Video play list 29
Voice recorder
Messages 31
Create new message
Message
Email 3
2
Inbox 33
Mailbox 3
5
Drafts 3
6
Outbox 3
7
Sent items 3
8
My folders
Templates
Text templates
Multimedia templates
Page 5

3
Ta bl e o f C on t en t s
Emoticons 39
Settings
Text message
Multimedia message 4
0
Email 4
1
Voicemail 4
3
Service message
Info. service
My Stuff 44
My images
My sounds
My videos 4
5
My games & apps 4
7
Flash contents
Others
My memory card
Games & Apps 48
My games & apps
Settings
Contacts 49
Add new
Search
Speed dials
Groups
Service dial numbers 5
0
Own number
My business card
Settings
Display data
Copy
Move
Send all contacts via Bluetooth
5
1
Backup contacts
Restore contacts
Clear contacts
Memory info.
Browser 52
Home
Enter address
Bookmarks
RSS reader 53
Saved pages
History
Settings
Profiles
Appearance settings
Cache 54
Cookies
Security
Reset settings
Connectivity 55
Bluetooth
Server synchronisation 5
9
USB connection mode 6
1
Network 6
2
Select Network
Network mode
Preferred lists
Internet profiles 63
Access points
Streaming setting
Page 6

4
Ta bl e o f C on t en t s
Table of Contents
Organiser & Tools 64
Alarms
Calendar
To do 6
5
Memo
Calculator
Stopwatch 6
6
Converter
World time
Date finder
Quick menu
Settings
67
Calendar
Backup calendar & To do
Restore calendar & To do
Memory info.
Clear all
SIM service
Settings 68
Screen
Main screen theme
Menu style
Dialing style
Font style
Backlight
Handset theme
Greeting message
Date & Time 69
Time
Date
Auto update date/time
Daylight saving
Security 70
PIN code request
Handset lock
Change codes
Power save 71
Language
Memory manager 72
Handset common memory
Handset reserved memory
SIM memory
External memory
Primary storage setting
Handset information
Reset settings
Accessories 73
Technical data 7
4
Guidelines for safe
and efficient use 76
Page 7
5
HB620T Features
H B6 2 0T F e at u re s
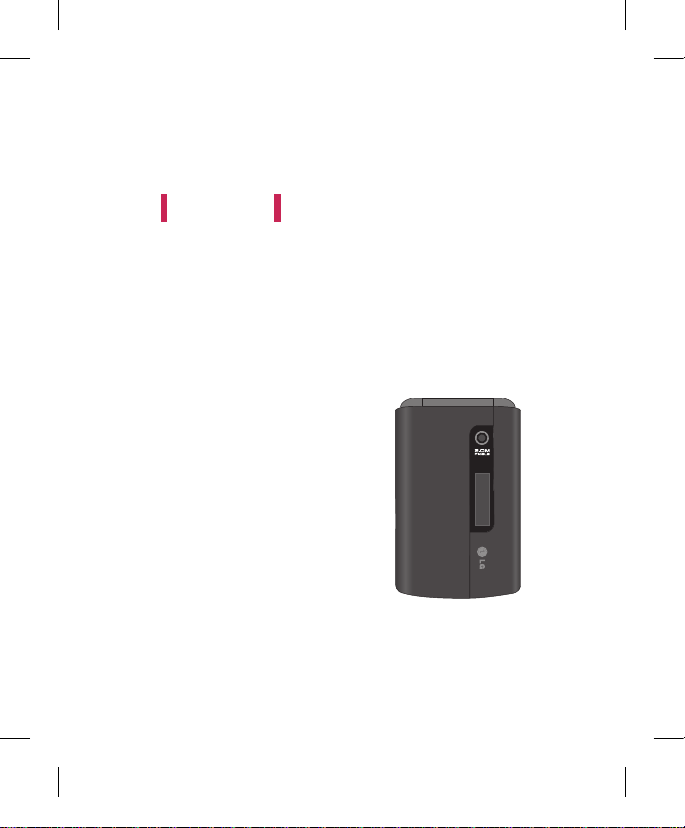
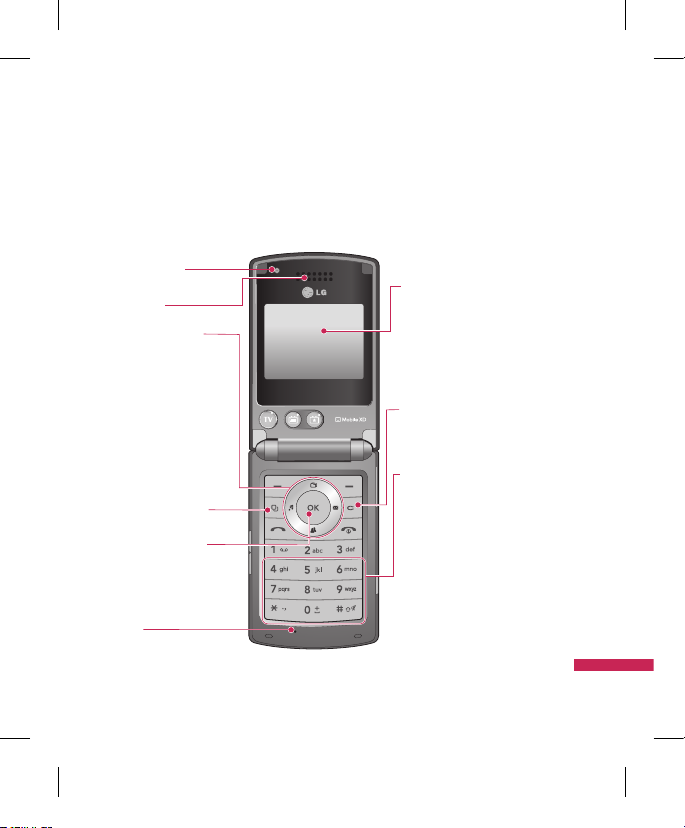
Parts of the phone
Open view
Earpiece
OK (Conrm) key
Navigation keys
v
In standby mode:
u
My stuff
d
Contacts list
l
List of Profile
r
Ceate new
message
v
In menu: Navigates
menus.
Multitasking key
VGA camera
LCD screen
Clear key
You can delete a letter.
Alpha numeric keys
v
In standby mode:
Input numbers to dial.
Hold down:
0
for international calls.
1
to dial voice mail centre.
2to9
for speed dials.
v
In editing mode: Enter
numbers & characters.
Mike
Page 8
6
HB620T Features
H B6 2 0T F e at u re s
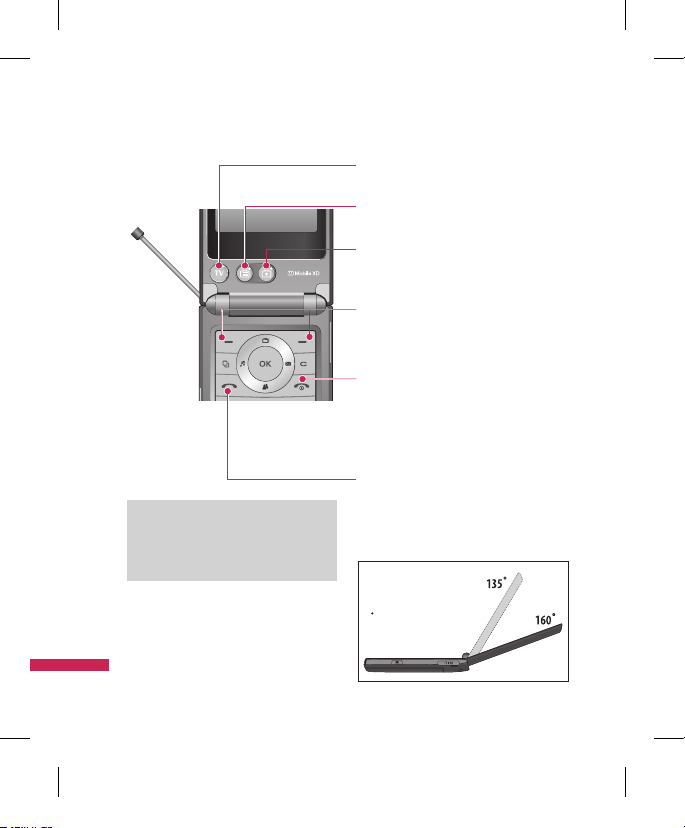
Left soft key/ Right soft key
Performs the function indicated at the bottom
of the display.
Send key
v
Dials a phone number and answers a call.
v
In standby mode: Shows a history of
calls made, received, and missed.
Call End key
v
You can end a call.
v
You can go back to standby mode by
pressing this key when activating the
menu.
(Short key) Launch TV /
(Long key) Launch Radio
(Short key) Access to Guides
(launching TV)
(Short key) Access to favorite channel
list (launching TV)
TIP !
v
For the highest TV/Radio reception,
turn down Antenna 45’.
2 stop hinge for
TV & Call scene
Joy of use
Page 9
7
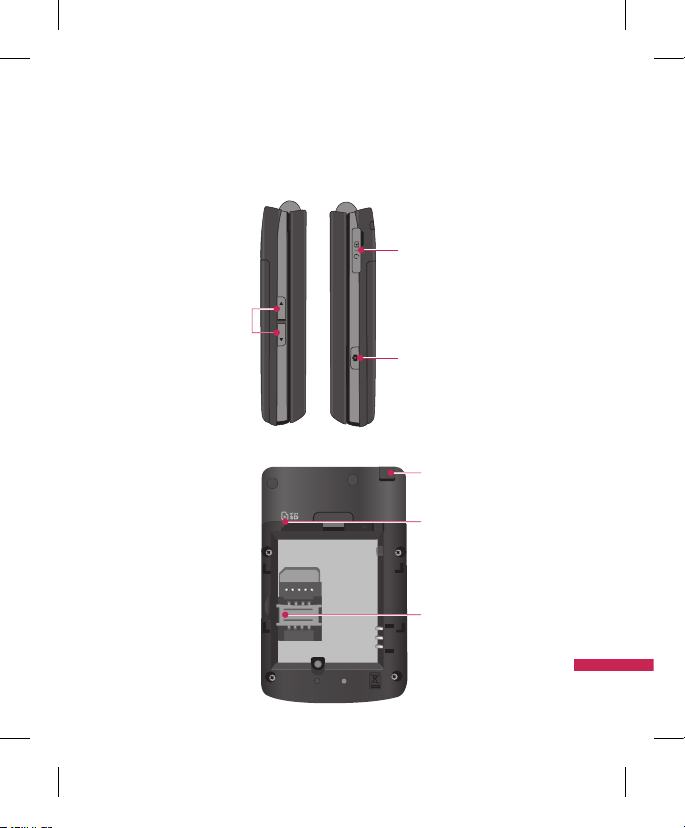
H B6 2 0T F e at u re s
Left side view / Right side view
Side keys
Headset/Charger/
Cable connector
Camera key
Rear view
SIM card socket
Micro SD card
slot
Antena
Page 10
8
Getting Started
G et t in g S ta r te d
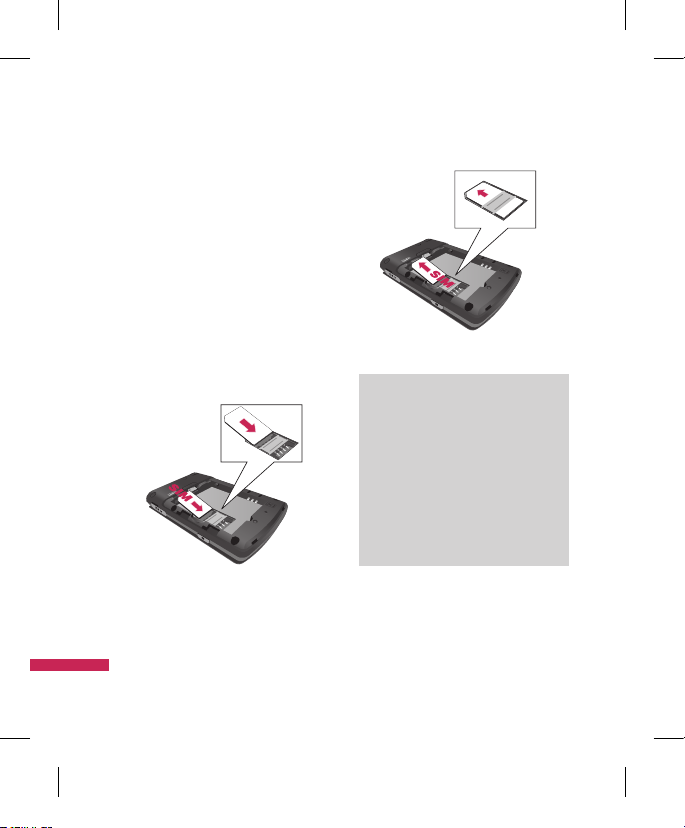
Installing the SIM card
and battery
1. Installing the SIM card.
Your SIM card contains your phone number,
service details and contacts and must be
inserted into your handset. If your SIM card
is removed then your handset becomes
unusable (except for emergency calls) until
a valid one is inserted. Always disconnect
the charger and other accessories from your
handset before inserting and removing your
SIM card.
To insert the SIM card
To remove the SIM card
Note
v
The metal contact of the SIM card
can easily be damaged by scratches.
Pay special attention to the SIM
card while handling. Follow the
instructions supplied with the SIM
card.
v
After removing the battery, insert
SIM card.
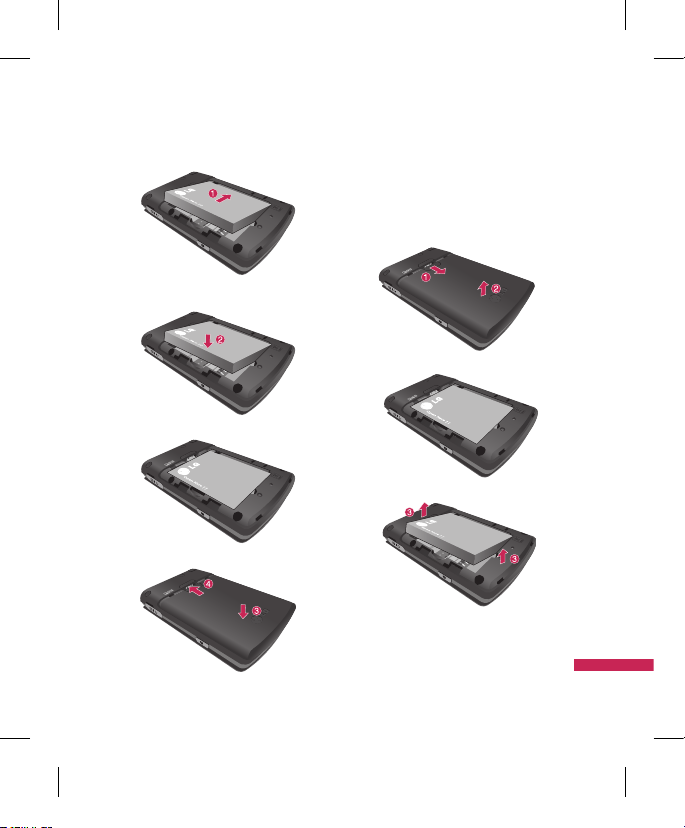
2. Installing the battery.
Slide the battery upwards until it snaps back
into place.
Page 11
9
G et t in g S ta r te d
3. To remove the battery.
Turn the power off. Press and hold down the
battery release button and slide the battery
down.
Page 12

10
Getting Started
G et t in g S ta r te d
Turning the handset
on/off
Turning your handset on
Ensure that your SIM card is in your handset
and the battery is charged. Press and hold
e
until the power comes on. Enter the
SIM PIN code that was supplied with your SIM
card if the PIN code request is set to On.
(Note: Please refer to page 79) After a few
seconds you will be registered on the network.
Turning your handset o
Press and hold e until the power goes
off. There may be a few seconds delay while
the handset powers down. Do not turn the
handset on again during this time.
Page 13

11
G en e ra l F un c ti o ns
Making and answering
calls
Making a voice call
1. Enter the number including the full area
code.
v
To delete a digit press c key.
To delete all digits press and hold c key.
2. Press s to make the call.
3. Press
e
to finish the call, or close the
handset.
Note
v
To activate the speakerphone during
a call press O.
Making a call from the call logs
1. In standby mode, press s and the
latest incoming, outgoing and missed
phone numbers will be displayed.
2. Select the desired number by using
d/u
.
3. Press sto call the number.
Making a video call
You can make a video call in a 3G covered
service area. If the called user has a 3G video
phone in a 3G covered service area, the call
will be established. You can also answer a
video call for video incoming call. To make/
answer a video call, do the following.
1. Input the phone number using the keypad,
or select the phone number from the calls
made/received lists.
v
To correct mistakes, press c briefly to
delete the last number, or press and hold
c
to delete all numbers.
General Functions
Page 14

12
2. If you do not want to use the speakerphone,
ensure you have the headset plugged in.
3. To start the video function, press the left
soft key [Options] and select Video call.
v
You will be notified that you will need
to close other applications to make the
video call.
Note
v
The video call may take some time
to connect. Please be patient. The
connection time will also depend
on how quickly the other party
answers the call. While the video
call is connecting, you will see your
own image; after the other party
has answered, their image will be
displayed on the screen.
4. Adjust the camera position if necessary.
5. Press
e
to finish the call, or close the
handset.
Making a voice/video call from
Contacts
It is easy to call anyone whose number you
have stored in your Contacts.
1. Press
d
to access the contacts list.
2. Scroll to the contact to make a call.
3. Press
s
to make a voice call. Press the
left soft key and select Make video call to
make a video call.
4. Press e to finish the call.
Making international calls
1. Press and hold 0 for the international
prefix. The ‘+’ character prefixes the
international access code.
2. Enter the country code, area code, and the
phone number.
3. Press s .
General Functions
G en e ra l F un c ti o ns
Page 15

13
G en e ra l F un c ti o ns
Answering a call
When you receive a call, the phone rings
and the flashing phone icon appears on the
screen. If the caller can be identified, the
caller’s phone number (or name if stored in
your Contacts) is displayed.
1. Open the slider to answer an incoming call.
Note
v
To reject an incoming call, press
e
or the right soft key twice.
v
If you set Answer mode as Press
send key (Menu 2.0.4), you can
answer the call by pressing s
after opening the slider.
v
If the answer mode is set to Press any
key, any key will answer a call except
for e.
2. End the call by closing the handset or
pressing e.
Note
v
You can answer a call while using the
Contacts or other menu features.
v
When the compatible headset is
connected, you can also answer a
call using the headset key, as well
as using the phone. To reject an
incoming call, press e.
v
You can mute the ringtone when a
call comes in by pressing and holding
the volume down side key.
Signal strength
You can check the strength of your signal by
the signal indicator on the LCD screen of your
phone. Signal strength can vary, particularly
inside buildings. Moving close to a window
may improve reception.
Page 16

14
Overview of Menu Functions
O ve r vi e w o f M en u F un c ti o ns
TV
1 TV
2 Radio
3 Settings
Calling
1 Call logs
2 Make video call
3 Call durations
4 Data volume
5 Call costs
6 Call divert
7 Call barring
8 Fixed dial numbers
9 Call waiting
0 Common setting
* Video call setting
Proles
1 Normal
2 Silent
3 Outdoor
4 Flight mode
5 Customised 1
6 Customised 2
7 Customised 3
Multimedia
1 Camera
2 Video camera
3 Music
4 Video play list
5 Voice recorder
Messages
1 Create new message
2 Inbox
3 Mailbox
4 Drafts
5 Outbox
6 Sent items
7 My folders
8 Templates
9 Emoticons
0 Settings
My stu
1 My images
2 My sounds
3 My videos
4 My games & apps
5 Flash contents
6 Others
7 My memory card
Games & Apps
1 My games & apps
2 Settings
Contacts
1 Add new
2 Search
3 Speed dials
4 Groups
5 Service dial numbers
6 Own number
7 My business card
8 Settings
Browser
1 Home
2 Enter address
3 Bookmarks
4 RSS reader
5 Saved pages
6 History
7 Settings
Connectivity
1 Bluetooth
2 Server synchronisation
3 USB connection mode
4 Network
5 Internet profiles
6 Access points
7 Streaming setting
Organiser & Tools
1 Alarms
2 Calendar
3 To do
4 Memo
5 Calculator
6 Stopwatch
7 Converter
8 World time
9 Date finder
0 Quick menu
* Settings
# SIM service
Settings
1 Screen
2 Date & Time
3 Security
4 Power save
5 Language
6 Memory manager
7 Handset information
8 Reset settings
Page 17
15
TV
Menu 1.1
Your HB620T is available to access the Mobile
TV services.
1. To start TV, press OK and select menu 1-1
TV.
2. TV program running, you can see TV
Channels shown the available channels
listed by pressing u.
3. You can change channel by pressing l,
r
.
4. If you press d, you can switch to Radio/
TV.
Tip!
v
To access TV easily, press shortly TV
button.
Note
v
You need to pull out Antenna.
v
If the icon appears beside
CH, it means that the program
supports multi-language. You can
press L option and select the
language you want.
TV: Access to TV directly. (short)
Access to Radio directly.(long)
Guides: Showing TV Channels.
My CH: You can set my favorite channel
with option menu.
Program running, press L option and
select ‘Add to Favourite’ and set the channel.
You can also set favorite channel in the menu
Guides and list page of Option menu.
To scan TV channel press
L
option
and select Channel Scan and choose All or
Selected Channel.
Note
v
After scanning, my CH is reset too.
v
According to radio wave
environment, each channel reception
performance can be different.
TV
T V
Page 18

16
TV
Radio
Menu 1.2
1. To start Radio, press OK and select menu 1
-2 Radio.
2. Radio program running, you can see Radio
Channels shown the available channels
listed by pressing u.
3. You can change channel by pressing
l
,
r
.
4. If you press
d
, you can switch to
TV/Radio.
This phone supports DIGITAL DVB-T Radio, not
FM Radio.
Note
v
In different parts of the country, radio
Channels may not be available to
access.
v
You need to pull out Antenna.
Settings
Menu 1.3
Watch time
(Menu 1.3.1)
You can nd the time of watching TV.
Information view mode
(Menu 1.3.2)
You can configure to view the general status
of signal strength, channel and program name
while watching TV.
Call answer while watching TV
(Menu 1.3.3)
You can set the way of call answering while
watching TV.
SMS/MMS popup on/o
(Menu 1.3.4)
You get SMS or MMS, you can set read the
message or not while watching TV.
Reset Channels
(Menu 1.3.5)
You can reset TV/Radio Channel and Favourite
My Channel List.
Note
v
If it has a problem with channel
reception performance, you need to
reset Channels.
T V
Page 19

17
Calling
Ca l li n g
Call logs
Menu2.1
All calls
(Menu 2.1.1)
Allows you to view the missed, received,
and dialled call records. You can make a call,
or send a message to the number you have
selected from the records. You can also save
the number in Contacts.
Dialled calls
(Menu 2.1.2)
Allows you to view dialled call records, make a
call, send a message, and save the number in
Contacts.
Received calls
(Menu 2.1.3)
Allows you to view received call records, make
a call, send a message, and save the number
in Contacts.
Missed calls
(Menu 2.1.4)
Allows you to view missed call records, make
a call, send a message, and save the number
in Contacts.
Make video call
Menu2.2
You can make a video phone call in this menu.
Call durations
Menu2.3
You can view call time by types. Press the
left soft key [Options] to choose either
partial initialisation or entire initialisation.
Initialization will require your Security code.
The following timers are available:
All calls
Shows total call time.
Dialled calls
Shows outgoing call time.
Received calls
Shows incoming call time.
Last call
Shows the latest call time in units of hours/
minutes/seconds.
Page 20

18
Data volume
Menu2.4
Allows you to check the sent, received and all
data volume transferred.
Press the left soft key [Options] and you can
Choose [Clear] for the initialization of the
selected volume type or [Clear all] for entire
initialization. Initialization will require your
Security code.
Call costs
Menu2.5
1. This function displays the call costs of the
Last call and All calls.
2. Press the left soft key [Options] to choose
either partial Initialization or entire
Initialization. Initialization will require the
PIN2 code.
3. You can select either Units or
Currency in
Set call cost. According to your setting, the
call cost is displayed during a call (If SIM and
Network support Advice Of Charge(AOC)).
4. In the
Set limit configuration, select On to
configure the cost limit. When a cost limit
is configured, and the call costs reach the
limit, making a call will not be allowed.
Call divert
Menu2.6
Call divert menus for voice and video calls are
provided.
If you press O , you can activate call divert
menu.
Voice calls
(Menu 2.6.1)
All voice calls
(Menu 2.6.1.1)
When busy
(Menu 2.6.1.2)
No answer
(Menu 2.6.1.3)
Not reachable
(Menu 2.6.1.4)
1. When the number list is not exsisted
Converts to an editor for entering a divert
number. You can input the number to divert
a call directly or search it in phonebook. If
you press [Divert], the phone will send the
request to service provider after entering
the number.
Calling
Ca l li n g
Page 21

19
Ca l li n g
2. When the number list is exsisted
Displays To other number menu including
of the number list. While waiting for the
result from the network, a Requesting
message and animation appears.
3.
Option menu
After activating All voice calls menu,
selecting the Options menu at the bottom
of the menus displays the Deactivate,
Deactivate all, View status and clear list
menus.
If you select the Deactivate menu, the call
divert numbers registered in the network
are deleted after user confirmation. Clear list
menu will delete all divert number list.
Video calls
(Menu 2.6.2)
All video calls
(Menu 2.6.2.1)
1. When the number list is not exsisted
Converts to an editor for entering a divert
number. You can input the number to divert
a call directly or search it in phonebook.
If you press O [Divert], the phone will
send the request to service provider after
entering the number.
2.
When the number list is exsisted
Displays To other number menu including of
the number list. While waiting for the result
from the network, a Requesting message and
animation appears.
3.
Option menu
After activating the All video calls menu,
selecting the Options menu at the bottom
of the menus displays the Deactivate,
Deactivate all, View status and clear list
menus.
Page 22

20
Calling
When busy
(Menu 2.6.2.2)
1. When the number list is not exsisted
It operates the same as All voice calls menu.
2.
When the number list is exsisted
It operates the same as All voice calls menu.
3.
When Option menu is selected
It activates and operates If busy menu. It
operates the same as All voice calls menu.
No answer
(Menu 2.6.2.3)
1. When the number list is not exsisted
It operates the same as All voice calls menu.
2.
When To a number is selected
It operates the same as All voice calls menu.
3.
When Option menu is selected
Activates and operates No answer menu.
Not reachable
(Menu 2.6.2.4)
1. When the number list is not exsisted
It operates the same as All voice calls menu.
2.
When the number list is exsisted
It operates the same as All voice calls menu.
3.
When Options menu is selected
Activates and operates If out of reach menu.
It operates the same as All voice calls menu.
Call barring
Menu2.7
Call barring menus for Voice and Video calls
are provided.
The menu consists of Voice calls, Video
calls and Deactivate all. The Voice calls
and Video calls menus have the following
submenus.
The Call barring menu consists of All
outgoing, Outgoing international,
Outgoing international calls except
home country, All incoming and
Incoming when abroad submenus.
The All outgoing menu bars dialling all
outgoing calls, the Outgoing international
menu bars dialling outgoing international
calls, and the Outgoing international
calls except home country menu bars
dialling outgoing international calls except
for the Home PLMN country. All incoming
rejects all incoming calls and the Incoming
when abroad menu rejects incoming calls
when roaming.
Ca l li n g
Page 23

21
Voice calls
(Menu 2.7.1)
Video calls
(Menu 2.7.2)
Deactivate all
(Menu 2.7.3)
You can deactivate services configured in the
network.
Fixed dial numbers
Menu2.8
v
Turn on
-
On: Select whether to activate FDN or
not. PIN2 authentication is required.
-
OFF: Select whether to activate FDN or
not. PIN2 authentication is required.
v
FDN List
Call waiting
Menu2.9
v
Activate: Activates waiting service.
Selecting this item, displays requesting
message and animation. When the
network answers, the result of the
operation is displayed.
v
Deactivate: Deactivates Call waiting
service. Selecting this item displays
requesting message and animation. When
the network answers, the result of the
operation is displayed.
v
View status: Displays activated Call
waiting service group item of the
network. Selecting this item displays
requesting message and animation. When
the network answers, the result of the
operation is displayed.
Common setting
Menu2.0
Call reject
(Menu 2.0.1)
You can set whether to reject incoming calls.
1. Select On in Reject menu to activate call
reject. The Reject list menu appears.
2. Set the desired call reject option in the
Reject list menu.
v
All calls: Rejects all calls.
v
Contacts: Rejects the calls from the
number stored in Contacts.
v
Groups: You can specify call rejects by
group units stored in Contacts.
Ca l li n g
Page 24

22
v
Unregistered: Rejects calls from the
number not stored in Contacts.
v
No caller ID: Reject calls which do not
have CLI information.
Send my number
(Menu 2.0.2)
v
Set by network: Configures with the
default settings determined by the service
provider.
v
On: Configures to send my phone number
when making an outgoing call.
v
Off: Configures not to send my phone
number when making an outgoing call.
Auto redial
(Menu 2.0.3)
Allows you to set the auto redial function
when a call attempt has failed.
Answer mode
(Menu 2.0.4)
Allows you to set the answering method. You
can choose between Press send key, Open flip
and Press any key.
Minute minder
(Menu 2.0.5)
Determines whether to sound a 1 minute tone
every 1 minute when you are on the phone.
BT answer mode
(Menu 2.0.6)
v
Hands-free: You can answer a call using
the Bluetooth headset, when the Bluetooth
is connected.
v
Handset: If you press s on the
handset to answer a call, you can talk on
the handset. If you press the Bluetooth
headset key to answer a call, you can talk
using the Bluetooth headset.
Save new number
(Menu 2.0.7)
In this menu, you can save the phone number
when ending a call if the phone number is not
saved in a phonebook.
Calling
Ca l li n g
Page 25

23
Ca l li n g
Video call setting
Menu2.*
You can set the screen display when making
/receiving a video call.
v
Use private image: Determine whether
to show the private image or not.
v
Select private image: Select the still
image to be displayed.
v
Mirror: Select to activate the mirror effect
or not.
-
On: Displays the image flipped side to
side.
- Off: Displays the image as it is.
Page 26

24
You can select ringtone or silent for an
incoming call and configure the sound and
volume of the ringtone, key tone, and sound
effect, according to a profile.
Select a profile, and press O to activate
the profile. After pressing the left soft key
[Options], select the Edit menu.
v
Alert by
This option determines the incoming call
notification mode.
v
Voice ringtone
You can select the ringtone for incoming
voice calls.
v
Video ringtone
You can select the ringtone for incoming
video calls.
v
Volume
Set the ringtone volume.
v
Message alert
You can set how often the phone is to
inform you of a received message until it is
read.
v
Message tone
You can select a file from among your own
personal files or from the default files, to
be played by the phone upon receiving a
message.
v
Key tone
You can set the key tone to be played when
pressing the keys.
v
Key tone volume
You can set the volume of the chosen key
tone, choosing from 7 available levels.
v
Flip tone
Select the desired tone the phone will emit
when you slide up/down the phone.
v
Confirmation tone
You can set the confirmation tone to be
played by the phone to confirm actions.
v
Start-up sound
You can set the effect to be played when
the phone is switched on.
v
Select start-up sound
You can select which file will be played
when the phone is switched on.
v
Shut down sound
You can set the effect to be played when
the phone is switched off.
v
Select shut down sound
You can select which file will be played
when the phone is switched off.
Profiles
P ro fi l es
Page 27

25
M ul t im ed i a
Multimedia
Camera
Menu 4.1
This application enables you to take a still
picture. You can take a picture in the size
you want, and use it for the address book
photo, home screen and other more general
purposes. Once taken, the picture can be sent
by Multimedia msg., Email, or Bluetooth O.
1. Press the left soft key to access Options and
set the desired environment as follows.
v
Move between the options menus with
l
/ r.
v
Select the desired value with u /
d
and confirm the
selection with O.
Menu Description
Go to
The Pictures folder is launched
and displays existing pictures as
thumbnails.
You can view pictures by pressing
O
. You can also send the
selected picture to another
party via Message, Email, or
Bluetooth.
Size 1600x1200, 1280x960, 640x480,
Wallpaper, Contact
Quality Super ne, Fine, Standard
Burst shot One, Three, Six, Nine (Note:
Available Burst shot depends on
the size.)
Brightness From –2.0 to 2.0 at 0.5 intervals.
The higher the level, the brighter
the screen.
White
balance
You can adjust the tone of the
background photo according to the
weather. Auto, Daylight, Cloudy,
Illuminate, Indoors
Night mode
You can take better pictures at night
by selecting On.
Page 28
26
Multimedia
M ul t im ed i a
Menu Description
Frame Shot You can apply one of 9 frame efects
when taking a picture. (available
only in case of Wallpaper size)
Timer You can delay the camera shutter
time. None, 3 secs, 5secs, 10secs.
“ ” is shown when the timer is
activated.
Eect None, Black & White, Negative, Sepia
Sound Select the desired shutter Sound.
Memory Select the desired memory, either
Handset or External.
Mirror You can activate the mirror eect by
selecting On.
Swap cam You can switch the camera to activate
either the Internal or the External
camera.
2. After finishing all the settings, press the
right soft key [Close].
3. Focus the camera on what you want to take
and press O.
4. Press
O
to save the picture. It is saved in
the Images folder of My stuff.
Note
v
Press the right soft key [Back] to go
back to the preview mode.
Video camera
Menu 4.2
This application enables you to record a video
clip. You can play and watch a saved video file
in this menu. Once recorded, a video clip can
be sent by Message, Email or Bluetooth.
Page 29

27
1. Press the left soft key to access Options
and set the desired environment as follows.
v
Move between the options menus withl
/ r.
v
Select the desired value with u /
d
and confirm the
selection with O.
Menu Description
Go to The Videos folder is launched
and displays existing videos as
thumbnails. You can view videos by
pressing O . You can also send
the selected video to another party
via Message, Email or Bluetooth.
Size 320x240,176x144, 128x96
Quality Super ne, Fine, Standard
Brightness From –2.0 to 2.0 at 0.5 intervals.
The higher the level, the brighter
the screen.
White
balance
You can adjust the tone of the
background video according to
the weather. Auto, Daylight,
Cloudy, Illuminate, Indoors
Menu Description
Night mode You can take better shots at night by
selecting On.
Eect None, Black & White, Negative, Sepia
Duration Select the desired recording time.
MMS, 30 sec , 1 min,
2 mins, 5 mins, 60 mins.
Memory Select the desired memory, either
Handset or External.
Mirror You can activate the mirror eect by
selecting On.
Voice Decide whether to record the sound
or not.
Swap cam You can switch the camera to
activate either the Internal or the
External.
M ul t im ed i a
Page 30

28
Multimedia
2. After finishing all the settings, press the
right soft key [Close].
3. Focus the camera on what to record and
press O to start recording. And press
O
to stop recording.
v
You can pause the recording by pressing the
left soft key [Pause].
4. Press
O
to save the video clip. It is saved
in the Videos folder of My stuff.
Note
v
Press the right soft key [Back] to go
back to the preview mode.
Music
Menu 4.3
Recently played
(Menu 4.3.1)
This menu shows the last 20 tracks that were
played. And, if it starts to play, the menu
"Now playing" will be displayed.
You can activate media player on playing
through Now playing menu.
All tracks
(Menu 4.3.2)
You can view all the music files stored in the
phone/external memory.
Artists
(Menu 4.3.3)
You can view and play music sorted by Artists.
Albums
(Menu 4.3.4)
You can view and play music sorted by
Albums.
Genres
(Menu 4.3.5)
You can view and play music sorted by
Genres.
Playlists
(Menu 4.3.6)
You can create your own playlists by choosing
tracks from the All tracks menu list.
Shue tracks
(Menu 4.3.7)
If you want to play the music continuously
and randomly, select this option.
M ul t im ed i a
Page 31

29
M ul t im ed i a
Video play list
Menu 4.4
You can create your own playlists by choosing
Video clip from the All Videos list.
Voice recorder
Menu 4.5
1. Press the left soft key [Option] to display the
option pop up menu before recording.
2. Move to the desired menu item using
u
/ d and press O .
v
Duration: You can set the recording
duration to Multi. Msg size, 30 secs, or 1
min. No limit
v
Quality: You can select a recording quality
from Super fine, Fine, and Normal.
v
Memory in use: You can view the
memory in use.
v
Go to my sounds: Opens the Voice
recordings folder in Sounds.
3. Pressing
O
starts recording. When a
recording is started, the recording time
appears on the LCD. To cancel the recording,
press the Back.
4. When you finish the recording, press
O
to exit. The recorded file is automatically
saved in the Voice recordings of My sounds
folder in My stuff. If you press O again,
you can start recording new voice.
5. Press the left soft key to select the various
options after the voice recording.
6. Select the desired menu using
u
/
d
and press O .
v
Send: To send the recorded file. Select one
from Message, Email and Bluetooth using
u
/ d and press O.
v
Use as: You can set the recorded file as the
Voice Ringtone, Video Ringtone.
v
Move: You can move the voice record to
the other folder.
v
Copy: You can copy the voice record.
v
Delete: Select this menu to delete a
recorded file.
v
Mark/Unmark: You can select one or
more files for multiple deletion.
Page 32

30
v
File: You can change the name of file and
view the information.
v
Sort by: You can sort the files by date, file
type or name.
v
Memory manager: Displays the memory
status (handset or external memory card).
7. Press the right soft key to close the submenu popup window.
Multimedia
M ul t im ed i a
Page 33

31
Create new message
Menu 5.1
Message
(Menu 5.1.1)
You can write and edit a message containing a
combination of text, image, video and audio.
1. Enter your message in the Message field.
Option menus in Message field
v
Insert: You can perform the following
actions:
1. Image:
You can insert an image.
(Existing image/Take picture)
2. Video:
You can insert a video clip. (One
video clip per slide)
3. Sound:
You can insert a sound file. (One
sound per slide)
4. Symbols:
You can insert symbols. After
entering the corresponding number
keys, press O.
5. Template:
You can insert a text
template saved on the phone. After
selecting a template, press O. The
selected template is inserted into the
Message window.
6. Emoticon:
You can insert an moticon
on writing a message.
7. Name & number:
After searching the
name and the number in phonebook,
you can insert the entry.
8. New slide:
Select this to add a new
slide.
9. Subject:
Select this to insert a subject.
0. More:
You can insert other things.
v
Save to drafts: Select this to save the
message to drafts.
v
Input method: Select the desired
dictionary mode.
v
Writing language: You can select the
language for writing a message.
v
Add to dictionary: You can add a word to
the dictionary.
M es s ag es
Messages
Page 34

32
Messages
M es s ag es
2. Press the right soft key [Back] to exit the
menu or go to previous menu after setting
submenus.
3. Press the confirmation key [Send] to
send the message. The message will
automatically be saved in the Sent Items
folder. If the message has not been sent,
it will remain in the Outbox with a failed
status.
Email
(Menu 5.1.2)
To send/receive an Email, you should set up
the Email account. (Refer to page 43-44 for
how to set up an Email account.)
1. Enter the Email addresses of the recipients
in the To, Cc, Bcc fields. You can search the
Contacts by pressing O.
Note
v
Enter the reference Email address to
forward the Email in Cc(Carbon copy)
field.
v
Enter a hidden reference Email
address to forward the Email without
forwarding information in Bcc(Blind
Carbon Copy) field.
v
Only valid Email addresses are
allowed for the recipient (To),
reference address (Cc) and hidden
reference address (BCC) fields. When
an Email address has been specified,
another field where you can specify
another address appears. You can
specify up to 20 recipients for the
To and Cc address fields and 10
recipients for the BCC address field.
Page 35

33
2. Move the cursor to the Subject field and key
in the subject.
3. You can enter the message contents by
moving the cursor to the Message field.
4. Use the following functions by using the
left soft key [Options].
v
Recently used: You can use the latest
Email address you saved temporarily. (Only
shown in Option menu when cursor is
located in To/Cc/Bcc fields.)
v
Insert: Select this menu to insert special
characters, templates, and contacts. It is
also possible to attach multimedia files
(Image, videos and sound, Symbols, More,
Bcc).
v
Save to drafts : Select this menu to save
the message in Drafts.
v
View attachment: Shows the attached
files. (This item is only available when
some files have been attached.)
v
Remove: Deletes the attachment file. (This
item is only available when the files are
already attached.)
v
Input method: Select the desired
dictionary mode.
v
Writing language: You can change the
writing language.
v
Add to dictionary: You can add a new
word to the dictionary.
v
Set mail priority: You can configure the
priority of the Email you wish to send.
5. When you have finished writing an Email,
press O to send the Email.
Inbox
Menu 5.2
1. You can view received messages. Select a
message and then press Oto view the
message.
2. You can view the previous or next message
by using l / r.
3. To view a multimedia message
(Notification), select Retrieve in the
message notification view screen. The file is
then transmitted, and you can view the file
when the transmission is complete.
M es s ag es
Page 36

34
You can use the following functions by using
the left soft key [Options] in the Inbox.
v
Reply: Creates a reply to the sender or all
recipients of the selected message.
v
Forward: Forwards the selected message.
Note
v
Not supported for multimedia
message (Notification) and WAP
push messages.
v
Call: You can make a video call or a voice
call.
- Make voice call:
You can make a voice
call.
-
Make video call: You can make a video
call.
v
Delete: Deletes the current message.
v
Create new message: You can write a
new message or an Email.
v
Mark/Unmark: You can select one or
more messages for multiple deletion.
v
Copy&Move: In case of SMS, you can
copy/move the message into hadset or SIM
and move the message into "My Folder"
In case of MMS, you can move the Message
into "My Folder"
v
Move to my folders: In case of MMS, you
can move the Message into "My Folder"
v
Filter: Displays messages by desired
message types.
v
Message Info: You can check the
message type, date and time.
Note
v
You can check the saved emails in
Email [Menu 5.0.3].
M es s ag es
Messages
Page 37

35
Mailbox
Menu 5.3
Viewing Email message list
1. Select an Email account and then press
O
to view the received Email list.
2. In Email list, you can use the following
functions by using the left soft key
[Options].
v
Reply: Creates a reply to the selected
Email.
v
Forward: Forwards the selected Email
message to others.
v
Retrieve (POP3 only): Retrieves new
Email messages.
v
Copy to (IMAP only): Copies the selected
email .
v
Search: Searches the Email you want to
find out.
v
Delete: Deletes the Email.
v
Delete from server (POP3 only):
Deletes the message or Email from server.
v
Create new message: Creates a
Message, Email, Voice message.
v
Mark/Unmark: Use mark/unmark option
for multiple deletion.
v
Set as read/unread: You can set the
selected Email to read or unread.
v
Sort by: You can sort Email according to
the conditions.
v
Expunge (IMAP only): Removes the
selected Email data at a time.
v
Message synchronisation (IMAP
only): Synchronises Email to retrieve Email
server.
v
Message information: Brief information
on the message including size, type, date,
time and filenames.
Viewing an Email message
1. Select one of the received Emails and press
the View key to receive the contents of the
Email.
2. The contents of the received Email are
automatically displayed in the View screen.
3. You can view the contents of the previous or
next Email by using l/r.
4. In the Email View screen, you can select the
following functions by using the left soft
key [Options].
M es s ag es
Page 38

36
v
Reply: Creates a reply to the selected
Email.
v
Forward: Forwards the selected Email
message to others.
v
Save address: Saves the sender's address
to Contacts.
v
Delete: Deletes the Email.
v
Extract: Extracts the number, Email
address or Web address from Email
message.
v
View attachment: Shows the attached
file.
v
View recipients: Shows the Email
addresses of the recipients and reference
(Cc).
v
Create new message: Creates a
Message, Email,Postcard,Voice message.
v
Message infomation: Brief information
on the message including size, type, date,
time and filenames.
Drafts
Menu 5.4
You can view saved messages. Select a
message and then press Oto edit the
message.
You can use the following functions by using
the left soft key [Options].
v
Send: Sends the selected message.
v
Call: You can make a voice call or a
video call.
v
Delete: Deletes the selected message.
v
Create new message: You can write a
message or an Email.
v
Mark/Unmark: You can select one or
more messages for multiple deletion.
v
Filter: Displays messages by desired
message types.
v
Message info.: In case of SMS, you can
check the message type, subject, from,
date, time, size and where it's saved.
M es s ag es
Messages
Page 39

37
Outbox
Menu 5.5
The Outbox is a temporary storage place for
messages waiting to be sent. Failed messages
are also placed in Outbox. For example, Emails
will be placed in Outbox if the Email account
is not correctly configured.
1. Select a message.
2. You can use the following functions by
using the left soft key [Options].
[For sending / waiting messages]
v
Cancel sending: You can stop sending/
waiting status.
v
Call: You can make a video call or a voice
call.
v
Create new message: You can write a
new message or an Email.
v
Message information: You can check
the message type, subject, from, date,
time, size and where it's saved.
[For a failed message]
v
Resend: Resends the selected message.
v
Save to drafts: Select this to save the
message to drafts.
v
Call: You can make a video call or a voice
call.
v
Delete: Deletes the current message.
v
Create new message: You can write a
new message or an Email.
v
Message info.: You can check the
message type, subject, from, date, time,size
and where it is saved using Message Info.
You can check the report information
including from and retrieving status using
Report Info.
M es s ag es
Page 40

38
Sent items
Menu 5.6
Shows the messages you sent (Message/
Email/Postcard/Voice message).
[Options]
v
Reply: Creates a reply to sender or all
recipients of the selected message.
v
Forward: Forwards the selected message.
v
Call: You can make a video call or a voice
call.
v
Delete: Deletes the selected message.
v
Create new message: You can write a
Message or an Email.
v
Mark/Unmark: You can select one or
more messages for multiple deletion.
v
Capy &Move: You can move the Message
into "My Folder"
v
Filter: Displays messages by desired
message types.
v
Information: You can check the message
type, subject, from, date, time,size and
where it is saved using Message Info.
You can check the report information
including from and retrieving status using
Report Info.
My folders
Menu 5.7
You can move messages existed in Inbox
or Sent messages into My folders, and then
you can move those messages existed in My
folders into the original message box.
Templates
Menu 5.8
Text templates
(Menu 5.8.1)
You can add, edit, and delete frequently used
useful phrases using the left soft key [Options].
Note
v
Depending on your service provider,
useful phrases are saved as a default.
Multimedia templates
(Menu 5.8.2)
You can create, edit and view available
templates when creating multimedia
messages. Five types of template (Birthday,
Greeting, Holiday, Thanks, Sorry) are saved by
default.
M es s ag es
Messages
Page 41

39
The following options are available.
v
Add new: You can create a new
multimedia template.
v
Write multimedia message: Creates
a multimedia message with the selected
template.
v
Edit: Edits the selected template.
v
View attachments: You can open the
attachment file in a message.
Emoticons
Menu 5.9
You can add, edit and delete emoticons.
You can insert the emoticon which you
preferred on writing a message. If you press
confirmation key, you can view the icon.
Settings
Menu 5.0
Text message
(Menu 5.0.1)
You can configure text message related
options.
1.
Text message centre: Input the address
of the Text message centre.
2.
Delivery report: By enabling this option,
you can verify whether your message has
been sent successfully.
3.
Validity period: This network service
allows you to set how long your text
messages will be stored at the message
centre.
M es s ag es
Page 42

40
4. Message types: Text, Voice, Fax,
X.400, Email
Usually, the type of message is set to Text.
You can convert your text into alternative
formats. Contact your service provider for
the availability of this function.
5.
Character encoding: Auto/ Default
alphabet /Unicode
v
Auto(default): Message with single byte
character is normally encoded in Default
alphabet(GSM7). Message with doublebyte character is automatically encoded in
unicode(UCS2).
v
Default alphabet: Message with
even double byte character is encoded in
single byte. Please note that double byte
characters with accent may be converted
into single byte character without accent.
v
Unicode: Message is encoded in double
byte. Please note that you may be charged
double.
6.
Send long text as: Select a long text
message as Multiple SMS or MMS.
Multimedia message
(Menu 5.0.2)
You can configure Multimedia message
related options.
1.
Retrieval mode: You can set the retrieval
mode using Home network and Roaming
network respectively. If you select Home
network, you will receive multimedia
messages automatically. If you select
Roaming network, you will only receive
a notification message in the inbox and
then you can decide whether to download
multimedia messages or not.
2.
Delivery report: Allows you to determine
whether to request a delivery confirmation
mail to a recipient, and whether to allow
sending a delivery confirmation mail to a
sender.
v
Request report: Determines whether to
request a delivery confirmation mail for a
Multimedia message.
v
Allow report: Determines whether to
allow sending a delivery confirmation mail
for a delivery confirmation mail request.
M es s ag es
Messages
Page 43

41
3. Read reply: Allows you to determine
whether to request a read confirmation
mail to a recipient, and whether to allow
sending a read confirmation mail to a
sender.
v
Request reply: Determines whether
to request a read confirmation mail for a
Multimedia message.
v
Allow reply: Determines whether to
allow sending a read confirmation mail for
a read confirmation mail request.
4.
Priority: You can select the priority level of
the messages (Low, Normal and High).
5.
Validity period: Allows you to configure
the term of validity for a message when
transmitting a multimedia message. The
message would be saved in the multimedia
message server only for the configured
term.
6.
Slide duration: Allows you to configure
the duration of each page when writing a
message.
7.
Delivery time: Allows to select the
contents type supported by MMS.
(Immediately, After 1 hour, After 1 day and
After week)
Configures the delivery time of message to the
recipient. The Multimedia message centre will
deliver the message after the delivery time.
8.
Multi. msg. centre: Allows you to
configure network information such as the
MMSC and the WAP gateway, to send a
multimedia message.
v
Title: Profile name.
v
MMSC URL: Enter the multimedia
message centre URL.
v
Internet profiles: choose the Internet
Profile from the list.
Press the right soft key [Save] to save the
changes and complete Multi. msg. centre
setting.
Email
(Menu 5.0.3)
You can configure settings for receiving and
transmitting emails.
1.
Email accounts: You can create or
configure an Email account including the
Email server and user ID. You can edit a
selected Email account by pressing the
left soft key[option]- 2.Edit. You can select
an Email account to be used to send an
Email using . You can select the following
functions using the left soft key [Options].
M es s ag es
Page 44

42
v
Add new: Create a new Email account.
v
Edit: To edit the selected Email account.
v
View: Views a selected Email account.
v
Mark/Unmark: Use mark/unmark option
for multiple deletion.
v
Delete: Deletes a selected Email account.
All the emails included in the account will
be deleted.
2.
Allow reply Email: Determines whether
to allow sending a read confirmation mail
for a read confirmation mail request.
3.
Request reply Email: Determines
whether to request a read confirmation
mail.
4.
Retrieve interval: You can configure
Retrieve interval to retrieve emails
automatically from the incoming mail
server. When a new Email arrives, an icon
appears at the top of the screen. You can
select the auto receiving time slot to Off,
15 minutes, 30 minutes, 1 hour, 2
hours, 4 hours or 8 hours.
Please note that additional charges may be
incurred using the Retrieve interval feature.
5.
Include message in Fwd & Reply:
Determines whether to include the original
message when you forward the message or
reply to it.
6.
Include attachment: Determines
whether to include the attachment file
when you forward the message.
7.
Auto Retrieval in Roaming: Retrieves
Email account automatically when you
move in roaming area.
8.
New email noti. Info: Receives the
notification information when arriving new
Email.
9.
Signature: You can configure a text
signature to be attached to the end of an
Email. The configured signature text is
automatically or manually attached to the
end of the Email when it is sent.
0.
Priority: You can select the priority level of
Emails (Low, Normal and High).
Creating a new Email account
1. Select Add new from the Email account
menu options.
2. Press the centre soft key [Save] to complete
the Email account configuration.
Editing an Email account
1. Select a desired Email account from the
Email account list and press the left soft
[Options] then select Edit.
2. You can edit desired fields by moving the
cursor up and down.
M es s ag es
Messages
Page 45

43
3. When configuration is complete, press the
centre soft key [Save] to complete the Email
account configuration.
Note
v
When you try to change the mailbox
type, all emails downloaded before
would be deleted.
Voicemail
(Menu 5.0.4)
You can send or receive the mail with a voice
file.
Service message
(Menu 5.0.5)
You can configure the option settings such as
Push(SI/SL) messages.
v
Message receive: If you set On, all service
messages will be received.
v
Service security: You can manipulate the
overall receipt options related to Push(SI/
SL) messages.
-
Service security set: If you set Service
loading to Prompt, you will see popup
asking you whether process the SL
message.
-
Trusted list: If you set Service loading to
Disable, you cannot receive SL message.
SL message will be discarded at the time
of arrival.
-
Untrusted list: If you set Service loading
to Always, SL message is automatically
launched to the Internet with URL that is
preset in the SL message.
Info. service
(Menu 5.0.6)
v
Cell broadcast: You can set the reception
status.
v
Channels: You can add or modify the
channels.
v
Languages: You can select the language
you want by pressing O . Then, the
info service message will be shown in the
language that you have selected.
M es s ag es
Page 46

44
My Stuff
My images
Menu 6.1
The Pictures folder consists of embedded links
for downloading pictures through the Internet
and Default images.
When a file is selected, the following options
will be displayed by pressing the left soft key
[Options].
v
Send: You can send the selected image via
Message, Email or Bluetooth.
v
Use as: You can set
wallpaper,contacts,start-up or shut down
image.
v
Move: Enables the file to be moved to
other folder.
v
Copy: Enables the file to be copied to other
folder.
v
Delete: Deletes the selected image.
v
Mark/Unmark: Using the Mark function,
you can send, delete, move and copy
multiple files.
v
Print via Bluetooth: You can print the
selected image via bluetooth.
v
File
-
Rename: You can rename the image.
-
Edit: Enables the image to be edited.
Note
v
Edit menu is not displayed in default
images folder.
-
File info.: Shows information on the
selected image file.
v
Create new folder: You can create a new
folder within the folder currently selected.
v
Slide show: You can view the images as a
slide show.
v
Sort by: You can sort the files by Date, file
Type or Name.
v
List view: You can view the images as a
List view.
My sounds
Menu 6.2
The Sounds folder consists of embedded links
for downloading ringtones and music as well
as folders containing the Default sounds and
Voice recordings. Here you can manage, send
or set sounds as ringtones.
M y St u ff
Page 47

45
v
Use as
-
Voice ringtone: You can set the sound
file as a ringtone when incoming a voice
call.
-
Video ringtone: You can set the sound
file as a ringtone when incoming a video
call.
-
Message tone: You can set the sound
file as a ringtone when receiving a
message.
-
Start-up: You can set the sound file as a
ringtone when handset starts up.
- Shut down: You can set the sound file
as a ringtone when handset shut down.
v
File: Shows the information on the
selected sound file.
v
Sort by: You can sort the files by date, file
type or name.
v
Memory manager: You can view the
memory status (handset or external
memory card).
My videos
Menu 6.3
Here you can manage or send downloaded or
captured videos clips.
If you press O, you can activate the video
file.
The following are available using the left soft
key [Options] in the Video list.
v
Send: You can send the selected video
clip via Message, Email or Bluetooth if not
protected by Digital Rights Management
(DRM).
v
Use as: You can set the video file as voice
ringtone or video ringtone.
v
Move: Moves the file into handset
memory or external memory.
v
Copy: Copies the file in handset memory
or external memory.
v
Delete: Deletes the selected video.
v
Mark/Unmark: Using the Mark function,
you can send, delete, move and copy
multiple files.
M y St u ff
Page 48

46
v
File
-
Rename: You can rename the video.
-
File info.: You can check information on
video.
v
Create new folder: You can create a new
folder.
v
Sort by: You can sort files by Date, Type or
Name.
v
List view/Grid view: You can view the
images as a List view or Grid view.
v
Memory manager: Displays the memory
status (handset or external memory card).
You can view a video using the video
player. Video files are displayed in the list as
thumbnails. You can select a desired video by
using the u / d/l/ r. Select
a desired video and select Play to view the
recorded video.
Select the left soft key [Send] to attach
the selected video to a message, Email or
Bluetooth.
When option Play is selected, the video clip
will be played with the Media Player. To pause
the playback, Opress during the playback.
To resume the paused playback, press
O
once again.
When viewing video clips in the Media Player,
the following options are available:
v
Full screen: You can view the video in
wide view mode.
Note
v
You can also view the video in wide
view mode by pressing #key.
v
Mute: If the Volume is set to more than 0,
Mute mode is activated and if the Volume
is set to 0, the Unmute mode is activated.
v
Capture: Capture the frozen frame as a
picture.
v
Repeat: You can set the repeat option
(Off/One/All).
v
File info.: You can check information on
files being played.
v
Send: You can send the video via Message,
Email or Bluetooth if the file is not protected
by Digital Rights Management (DRM).
My Stuff
M y St u ff
Page 49

47
v
Delete: Deletes the selected video.
v
Use as: You can set the video file as voice
ringtone or video ringtone. This menu is
dependent upon the contents.
My games & apps
Menu 6.4
You can easily download games and other
applications in this menu. It may have
two folders, no folders at all, or Games
and Applications. The default folder can be
dependent on the operator/country.
Flash contents
Menu 6.5
The Flash contents folder contains all of your
default and downloaded SWFs files.
When a file is selected, the following options
will be displayed by pressing the left soft key
[Options].
v
Pause: Pause or resume playback.
v
Full screen: You can view the file as full
screen.
v
Mute: Switch the sound on/off.
v
Use as wallpaper: Set the SWF file as a
wallpaper.
v
File info.: View the Name, Size, Date, Type
, Protect, installof the file.
Others
Menu 6.6
Other files except pictures, sounds, videos,
games & applications are stored in this folder.
My memory card
Menu 6.7
If you purchase an optional external microSD
memory card, you can manage more content.
Refer to the section How to use a microSD
memory card on page 21 and 22 to learn
how to insert and remove the memory card.
You can manage content as you do on your
phone.
M y St u ff
Page 50

48
My games & apps
Menu 7.1
You can easily download games and other
applications in this menu. It may have
two folders, no folders at all, or Games
and Applications. The default folder can be
dependent on the operator/country.
Settings
Menu 7.2
Activating a prole
1. Move the cursor to the profile you would
like to activate.
2. Press O .
Adding a new prole
1. Select Add new from the Options menu.
2. Press the
O
[Save] to save any
configuration changes.
You can edit and delete a profile by selecting
Edit and Delete from the Options menu.
Games & Apps
G am e s & A pp s
Page 51

49
Add new
Menu 8.1
You can register a new contact address. You
can enter the name, different phone numbers
and Email addresses of a new contact. You can
also assign the contact to groups, include an
image or avatar, assign a specific ringtone and
even enter a memo for the contact.
Search
Menu 8.2
Performs the contact address search function.
The search operation is performed based on
a first name as a default. The current search
method and results found are displayed in the
Search window.
Note
v
In Settings menu, the search
operation can be performed based
on the last name.
Speed dials
Menu 8.3
Using this menu you can manage speed dials.
Speed dials are configured between 2-9. You
can register speed dials for a specific contact
address up to 5 different numbers, and a
contact address may have multiple speed
dials.
Groups
Menu 8.4
Using this menu you can manage group
information (both stored in the Handset and
the SIM). When a ringtone for a number is not
specified, a call from the number sounds the
group ringtone assigned to the number for
the group.
Co n ta c ts
Contacts
Page 52

50
Contacts
Co n ta c ts
Service dial numbers
Menu 8.5
You can view the list of Service Dialling
Numbers (SDN) assigned by your service
provider (if supported by the SIM card).
Such numbers include emergency, directory
enquiries and voice mail numbers. After
selecting a service number, press s to
dial the service.
Own number
Menu 8.6
Allows you to display your phone number
in the SIM card. You can save own numbers
being used in the SIM card.
My business card
Menu 8.7
You can create your own business card by
pressing the left soft key Add. After entering
the name, number, Email and image, you can
use it as a business card when sending the
message.
Settings
Menu 8.8
Display data
(Menu 8.8.1)
v
View contacts from: Select which
contact information shall be displayed
(from handset memory, from SIM card or
both). All is the default setting.
v
Name display: You can set the display
order by name.
v
Show picture: Select whether to display
image or not.
Copy
(Menu 8.8.2)
You can copy contacts from the phone
memory to the SIM or from the SIM to the
phone memory. You can copy all or selected
entries at a time.
Move
(Menu 8.8.3)
You can move contacts from the phone
memory to the SIM or from the SIM to the
phone memory. You can move all or selected
items at a time.
Page 53

51
Send all contacts via Bluetooth
(Menu 8.8.4)
You can send all phonebook data in handset
to other phones by using Bluetooth.
Backup contacts
(Menu 8.8.5)
You can save all phonebook data in handset to
external memory card by formatting vcard.
Restore contacts
(Menu 8.8.6)
You can restore all phonebook data in external
memory card to phone memory by formatting
vcard.
Clear contacts
(Menu 8.8.7)
Clears all contact information. You can delete
all contacts saved in the mobile phone
memory as well as on the SIM card.
Memory info.
(Menu 8.8.8)
You can check the status of contacts memory
in this menu.
Co n ta c ts
Page 54

52
Browser
Home
Menu 9.1
You can launch the web browser and access
the homepage of the activated profile on
Browser settings.
Enter address
Menu 9.2
You can manually enter a URL address and
access the associated web page.
v
To enter a symbol, press the left soft key
[Options] and select 5.Insert Symbol
from Options menu.
v
To switch input mode, press the left soft key
[Options] and select 2. Input method.
Bookmarks
Menu 9.3
You can store frequently accessed or
favourite URLs/Pages. Send, Add new,
Edit, Mark/Unmark or Delete operations
can be performed on Bookmarks. Several
preconfigured URLs are stored as bookmarks.
Adding a new bookmark
1. Press the left soft key [Options] and select
2.Add new from Options menu.
2. Enter the title and associated URL
information.
3. Press O to save.
Connecting to a desired bookmark
Press O to connect a desired bookmark.
Sending the bookmark to others
Select Send from Options menu. You can
send it via Message or Email.
B ro ws e r
Page 55

53
Deleting a bookmark
Select Delete from Options menu. You
can delete multiple bookmarks using the
Mark/Unmark option.
Editing a bookmark
Select Edit from Options menu. Edit the title
and associated URL information. Press O to
save.
RSS reader
Menu 9.4
With this program, you can open and view
files created in the format with RSS.
Saved pages
Menu 9.5
The phone can save the page on display as an
offline file. Up to 30 pages can be saved.
History
Menu 9.6
This menu will shows the recent browsing
pages
Settings
Menu 9.7
You can change the settings for browser
connectivity and display.
Proles
(Menu 9.7.1)
Select the appropriate profile by pressing
O
. This will activate the profile to initiate
the browser launch.
Appearance settings
(Menu 9.7.2)
v
Character encoding
v
Scrolling control
v
Show image
B ro ws e r
Page 56

54
Browser
Note
v
Enabling this function will delay
displaying images until the
completion of transmission.
Disabling this function will prevent
the browser from downloading
images from the server, thus
allowing faster transmission.
v
Java script
Cache
(Menu 9.7.3)
The information or services you have accessed
are saved in the cache memory of the phone.
Cookies
(Menu 9.7.4)
Check whether a cookie is used or not.
Security
(Menu 9.7.5)
Certicates list
Certificates can be viewed from the list.
Session clear
Secure (WTLS/TLS) session data can be
cleared using this option.
Reset settings
(Menu 9.7.6)
Select this to reset your phone to its default
browser configuration.
B ro ws e r
Page 57

55
Bluetooth
Menu *.1
Bluetooth connection
Bluetooth enables compatible mobile devices,
peripherals and computers that are in close
proximity to communicate directly with each
other without wires.
This handset supports built-in Bluetooth
connectivity, which makes it possible to
connect them with compatible Bluetooth
headsets, computer applications and soon.
Note
v
We recommend that your phone
and the Bluetooth device you are
communicating with be within a
range of 10 meters. The connection
may be improved if there are no solid
objects between your phone and the
other Bluetooth device.
v
Your phone supports Dual Profile.
Although connecting with Bluetooth
headset, it can be used to send files
or take services like DUN etc. via
Bluetooth. But some services get low
capacity cause it works at the same
time.
1. Getting started
•
Menu → * Connectivity → 1.
Bluetooth → 1. Turn on/off
To use the Bluetooth function, you must first
set Turn on.
2. Configuring Bluetooth settings
•
Menu → * Connectivity → 1.
Bluetooth → 4. Settings
-
My device visitility: Set [My handset’s
visibility] to [Show to all] so that other
devices can detect your phone when they
are searching for a Bluetooth device. If you
select [Hidden], other devices will not be
able to detect your phone when they are
searching for a Bluetooth device.
If you select [Visble for 1 min], other devices
will be able to detect your phone for one
minute.
-
My device name: You can name or
rename your phone as it will appear on other
devices. Your phone's name will be shown
on other devices only when [My handset’s
visibility] is set to [Show to all]. If you select
[Visble for 1 min], other devices will be able
to detect your phone for1 minute.
Co n ne c ti v it y
Connectivity
Page 58

56
- Supported services: You can view the list
of devices sich as hedsets and handsfree kits
supported by this Bluetooth enabled phone.
-
Remote SIM mode: If you want to
use SIM access profile, select the [on] for
enabled SIM Access Mode. Then you can
connect from the carkit that support SIM
access profile.
-
My address: You can check the address of
Bluetooth.
Note
v
When user uses Bluetooth Device
in the handset, the security of the
handset is at risk. Therefore, we
recommend that Bluetooth visibility
be set to Hidden after configuration
or device pairing. For incoming files
via Bluetooth regardless of paired
devices, you can choose to accept or
reject the connection, after checking
the sender details.
3. Search and pair new device
<Searching new device>
You can search new device as following menu.
•
Menu → * Connectivity →
1. Bluetooth →
2. Search new device
<Pairing devices>
1. To search for a Bluetooth device to pair,
press Add new device.
2. Screen shows
Searching for devices.
Bluetooth devices within a range of 10m
will be found.
3. If Bluetooth devices are found, these devices
are listed on the screen. If no Bluetooth
device is found, you will be asked if you
want to search again.
4. Pairing procedure
- Press
O
. A window will appear on the
screen asking you to enter your password.
- After creating a password (of 1 to 16
digits), the user of the other device
must enter the password for pairing. The
user of the other device must know the
password in advance for authentication.
Connectivity
Co n ne c ti v it y
Page 59

57
v
HB620T supports follow Bluetooth services
- Object push
- File transfer
- Serial port
- Dial up
- Headset
- Handsfree
- Advanced audio distribution
- AV remote control
- Basic printing
- SIM Access
Option
v
Add new device: Using this menu, you
can pair a new Bluetooth device with your
phone.
Allow connection:
1. If you select the [Ask before connecting],
it need to confirm before connection.
2. If you select the [Always connect], it
need not to confirm.
v
Connect
1. If you want to open the connection to
the selected device, select the Connect.
2. If you want to close the connection
to the selected device, select the
Disconnect.
v
Delete: Using this menu, you can delete
the paired Bluetooth device.
v
Delete all: Using this menu, you can
delete all of the paired Bluetooth devices.
Note
v
If you connect the handset via
Bluetooth, you can use options:
Add new device, Allow connection,
Rename, Connect/Disconnect,
Delete, Delete all.
Co n ne c ti v it y
Page 60

58
<Pairing devices>
1. To search for a Bluetooth device to pair,
press Add new device.
2. Screen shows
Searching for devices.
Bluetooth devices within a range of 10m
will be found.
3. If Bluetooth devices are found, these devices
are listed on the screen. If no Bluetooth
device is found, you will be asked if you
want to search again.
4. Pairing procedure
- Press
O
. A window will appear on the
screen asking you to enter your password.
- After creating a password (of 1 to 16
digits), the user of the other device
must enter the password for pairing. The
user of the other device must know the
password in advance for authentication.
<Deleting devices>
1. Select a device to delete from the Paired
devices screen.
2. You can delete a device by pressing the
Delete key or by selecting Options →
Delete. To delete all paired devices, select
Options → Delete All.
Connectivity
Co n ne c ti v it y
Page 61

59
<Transmitting data using Bluetooth>
1. To transmit data from your phone to another
Bluetooth device, first select the application
where the target data is saved. For example,
to send data in the My Files to another
device, select Menu → 6.My stuff
→
1.My images →2.My sounds →
3.My video → 4.My games & apps
→
5.Flash contents → 6.Others →
7.My memory card
2. Transmitting data
1) Paired device found is displayed. If the
desired device does not exist in the list,
select [Refresh].
2) Select the device to which you want to
transmit data from the devices on the
screen and press O.
3) If the other party selects [Yes] for
[Connection request], the data is
transmitted.
Server synchronisation
Menu *.2
If Sync service is supported by your network
operator, this service function synchronizes
the data in a phone and the data on a server
such as Contacts, Calendar, To do, and Memo
via a wireless network.
Connect
1. Select the Connect item and then press
O
.
2. Connect to the server with the selected
server profile and the synchronization
animation is displayed while the
synchronization is performed.
Log
Select the Logs item and then press O to view
the log for the last synchronization operation
performed.
Co n ne c ti v it y
Page 62

60
Server synch. centre
1. Select the Server synch. centre item and
then press O.
2. This menu allows you to configure the
profile for a synchronization server.
v
Profile name: Input the name for the
profile.
v
Host address: Contact your service
provider.
v
SyncML proxy: Contact your service
provider.
v
User name: Enter your user ID for
synchronization server.
v
Password: Input your password.
v
Contacts: Select whether to synchronise
Contacts or not.
v
Contact name: Input the contacts
database name for server access.
v
Calendar: Select whether to synchronise
Calendar or not.
v
Calendar name: Input the calendar
database name for server access.
v
To do: Select whether to synchronise To do
or not.
v
To do name: Input the To do database
name for server access.
v
Memo: Select whether to synchronise
Memo or not.
v
Memo name: Input the Memo database
name for server access.
v
Sync type: Select the synchronization
type below.
- Normal
The phone and the server are required to
exchange information about the modified
data.
-
Backup
The phone sends all the data from a
database to the server. The server is
expected to replace all data in the target
database with the data sent by the
phone. This means the phone overwrites
all the data in the server database.
Connectivity
Co n ne c ti v it y
Page 63

61
- Restore
The server sends all its data from a
database to the phone. The phone is
expected to replace all data in the target
database with the server sent by the
server. This means the server overwrites
all data in the phone database.
v
Internet profile: Select an access point
to use for the data connection.
USB connection mode
Menu *.3
You can activate USB connecton mode of your
phone for serveral usages.
If you use Mass storage function like USB
memory card, select Mass storage in this
menu. Mass storage is available for only
external memory card.
If you use Data service such as PC suite
application, select Data service in this menu.
If you want to use Music Sync with Windows
Media Player, select Music Sync in this
menu. Music Sync is available for only music
contents. Music Sync supports both external
memory and internal memory. You can select
"External Drv."and "Internal Drv." at the PC
side.
Co n ne c ti v it y
Page 64

62
Connectivity
Co n ne c ti v it y
Network
Menu *.4
Select Network
(Menu *.4.1)
Select between Automatic and Manual.
v
Automatic
v
Manual
Note
v
When your handset lose the network
in manual mode, the popup message
to select the available network will
be shown in the Idle screen.
Network mode
(Menu *.4.2)
You can set a type of network to search for
when networks are searched in the Select
network menu.
v
Automatic: Searches all the networks
connectable.
v
UMTS: Searches only networks supporting
3G. (Except for Swiss)
v
GSM900/1800: Searches only networks
supporting GSM 900/1800 band.
v
GSM 1900: Searches only networks
supporting GSM 1900 band.
Preferred lists
(Menu *.4.3)
If the network is searching automatically, you
can add a preferable network to be connected
to. And the following options are available.
v
Add new: You can add a new network
using the followings.
-
Search: You can select one from the
network list stored in the phone.
-
Enter new network: You can enter the
country code (MCC), the network code
(MNC) and RAT to add.
v
Delete: Deletes the selected network.
v
Move up: Moves the selected network
upward.
v
Move down: Moves the selected network
downward.
Page 65

63
Co n ne c ti v it y
Internet profiles
Menu *.5
This menu shows the Internet profiles. You
can create new profiles, delete or edit them
by using the Option Menu. However, you
cannot delete or edit default configurations
depending on country variant.
Access points
Menu *.6
This menu shows the access point list. You
can create new profiles, delete or edit them
by using the Option Menu. However, you
cannot delete or edit default configurations
depending on country variant.
Streaming setting
Menu *.7
If you want to set different network setting to
play streaming content, you can set different
network settings.
Page 66

64
Alarms
Menu 0.1
You can set the alarm clock to expire at a
specified time.
1. Select Add new and enter the alarm time
you want.
2. Select the repeat period:
Once, Daily,
Mon- Fri, Mon-Sat, Sat-Sun, Except
holiday.
3. Scroll down to choose the alarm sound.
4. Scroll down and enter a name for the alarm
or keep the suggested name.
5. Select the snooze interval :
5mins,
10mins, 20mins, 30mins, 1hour, off
6. Press Done.
Note
v
Although your phone is off, alarm
function is working at the time set.
If you tap Snooze then after 5
minuites alarm is turn on again and
if you tap QUIT, the message "Turn
your phone on" is pop up.
Calendar
Menu 0.2
Schedule inquiry and search
1. Reference by Months
You can refer to your schedule by months.
The cursor is on the current date, and the
registered date is marked.
The schedule saved for the date where the
cursor is located is represented by a grey
box. Pressing the shortcut key 1 moves
to the previous year and pressing 3
move to the next year and pressing 5
moves to today. Pressing 7 moves to
the previous month, and 9 moves to
the next month. You can move the date
using u / d/l/ r.
2. Detailed reference
You can refer to a detailed schedule, that
is the whole contents of the schedule
configured by the user. You can send the
schedule to another phone or an Internet
site through SMS (Text message) or
MMS (Multimidia message) or Email or
Bluetooth using the left soft key [Options].
Organiser & Tools
O rg an i se r & To o ls
Page 67

65
Add new event
You can add an event. You can configure the
start date, end date, start time, end time,
contents, type of event, repetition, alarm of
the schedule.
v
Set Category: Appointment, Anniversary,
Birthday
v
Set repeat: Not repeated, Daily, Weekly,
Monthly, Annually, User setting.
v
Set alarm: No alarm, On time, 15 mins
before, 30 mins before, 1 hour before, 1 day
before, 3 days before, 1 week before.
Delete all schedules
You can delete all saved schedule contents
using this function.
Set up and release holiday
You can set up or release user holidays. Press
the left soft key [Options] and select Set
holiday. The selected date will be displayed
in red.
To release the holiday, press the left soft key
[Options] and select Clear holiday.
Schedule notication
If the user has configured the alarm setting,
the specified alarm sound will ring. If the
notification time is before the schedule start
time, you can set up the alarm again.
To do
Menu 0.3
You can specify functions to save in the Quick
menu. If you save the functions frequently
used in the Quick menu, you can quickly start
the functions simply by pressing key.
Memo
Menu 0.4
Using the memo management function, you
can view and manage saved memo contents,
and add new memo.
Calculator
Menu 0.5
The calculator module allows you to perform
basic arithmetic functions such as addition,
subtraction, multiplication, and division as
well as some scientific functions. (sin, cos, tan,
log, ln, exp, sqrt, deg, rad)
O rg an i se r & To o ls
Page 68

66
Stopwatch
Menu 0.6
This menu allows you to record the elapsed
time of an event.
Converter
Menu 0.7
Using this menu, users can convert Currency,
Surface, Length, Weight, Temperature, Volume
and Velocity.
1. Select the unit menu.
2. Users can set a exchange rate using option
menu.
3. Enter the current rate, and then you can
convert from one currency to another.
4. You can view the value of units.
5. Press [Reset] to clear the current input Field.
6. To exit the conversion function, press the
[Back] key.
World time
Menu 0.8
The World time provides time information on
major cities worldwide.
1. You can select a desired city as a base using
the left soft key Options → Add city →
Press the left soft key [Map].
2. You can Change the city using the left soft
key Options → Change city or Change time
zone.
3. You can apply to Daylight Saving time using
the left soft key Options → Daylight saving.
4. You can Select the Analog clock mode
Options → Analog clock.
Date finder
Menu 0.9
You can find the target date with inputting
after some days.
Quick menu
Menu 0.0
You can specify functions to save in the Quick
menu. If you save the functions frequently
used in the Quick menu, you can quickly start
the functions simply by pressing key.
O rg an i se r & To o ls
Organiser & Tools
Page 69

67
Settings
Menu 0.*
Calendar
(Menu 0.*.1)
You can set the configurations to view the
calendar.
v
Default view: You can set the default
value to view a calendar; Month view,
Week view
v
Weekly start time: 1AM, 2AM, 3AM,
4AM, 5AM, 6AM, 7AM, 8AM, 9AM, 10AM,
11AM, 12PM
v
Week starts on: You can set the default
day to start a week; Sunday, Monday
Backup calendar & To do
(Menu 0.*.2)
You can create the backup files of the calendar
or to do list saved in the phone when you
insert an external memory.
Restore calendar & To do
(Menu 0.*.3)
You can reset the backup files of calendar or
tasks when you insert an external memory.
Memory info.
(Menu 0.*.4)
You can delete all data regarding Calendar, To
do, Memo and Secret memo.
Clear all
(Menu 0.*.5)
You can delete all data regarding Calendar,
Tasks, Memo and Secret memo.
SIM service
Menu 0.#
(SIM dependent)
Depending on whether you have SAT support
services or not (i.e. SIM Application Toolkit)
on the SIM card, this menu may be different.
Please refer in that case to the information
provided with your SIM card for further
information on how to use the related options.
O rg an i se r & To o ls
Page 70

68
Screen
Menu #.1
This menu allows you to personalise the
display options of the screens and of the
menus entire graphic interface.
Main screen theme
(Menu #.1.1)
You can set the screen theme to be displayed
on the main screen.
Home screen
v
Wallpaper: You can select an image to be
displayed on the main screen.
v
Display items: You can select the
homescreen item to be displayed on the
main screen.
Start up
You can select the image to be displayed
while the phone is being switched on.
Shut down
You can select the image to be displayed
while the phone is being switched off.
Menu style
(Menu #.1.2)
Your phone provides you with Grid and List
menu themes. Set the menu style by scrolling
and pressing the left soft key [OK].
Dialing style
(Menu #.1.3)
Your phone provides you with three dialing
styles.
Font style
(Menu #.1.4)
Your phone provides you with two font styles.
Backlight
(Menu#.1.5)
You can set the light-up of the
display.
Handset theme
(Menu #.1.6)
You can choose the color.
Greeting message
(Menu #.1.7)
You can input the greeting message.
S et t in g s
Settings
Page 71

69
Date & Time
Menu #.2
Although the current time is automatically
configured when the phone is registered to
the network, users can configure the time
and date directly using this menu. The time
configured by the user is valid only while the
phone is turned on.
Time
(Menu #.2.1)
1. Select the Time item from the Date & time
list, and then press O.
2. Move to your desired field,
Hour, Minute,
or am/pm field using the navigation keys.
(When you have selected 12-hour/24-
hour as Time format)
3. Enter
Hour, and Minutes using the
number keys.
4. Select the time format using
l
/ r.
5. Scroll down to select the hour indicator
format i.e. Off, Jingle or Animal.
6. Press the centre soft key
O
to set the time
with the specified value.
Date
(Menu #.2.2)
1. Select the Date item from the Date & time
list, and then press O .
2. Select the date format using
l / r.
3. Enter
Day, Month and Year using the
number keys.
4. Press the centre soft key
O
to set the date
with the specified value.
Auto update date/time
(Menu #.2.3)
When Auto Update is configured to On, the
time and date are automatically updated
according to the current time zone. If Confirm
first is selected, the time and date update is
confirmed before it is updated automatically.
Daylight saving
(Menu #.2.4)
Select whether to activate the daylight saving
function or not. You can set the Summer time
difference of selected home city for 1 hour or
2 hours.
S et t in g s
Page 72

70
Security
Menu #.3
PIN code request
(Menu #.3.1)
When this is set to On, you are requested
to enter your PIN each time you switch the
phone on.
Note
v
Press the right soft key in the PIN
code entry window to return to the
previous step.
v
3 incorrect PIN code entries would
invalidate the PIN code. And you
have to enter the PUK (PIN Unblock
Key) code to configure the PIN code
again.
v
The maximum number of times you
may enter the PUK code is 10. (Note:
If you enter an incorrect PUK code 10
times, the SIM card will be blocked
and must be replaced.)
v
If the PIN code request cannot be
disabled by operator settings, you
will not be able to choose this menu
item.
Handset lock
(Menu #.3.2)
You can lock your phone. The following 4 lock
functions are available.
When switch on: Locks the handset
whenever the handset is switched on.
When SIM change: Locks the handset
when the phone's SIM card has been
changed.
Immediatly: Locks the handset immediately.
None: Deactivates the lock function.
You are requested to enter the security code to
confirm the selection.
v
To unlock the handset, you need to enter
the security code.
Change codes
(Menu #.3.3)
You can change the PIN, PIN2, and the
Security code.
PIN code
PIN is the abbreviation for Personal
Identification Number, and is used to restrict
use by an unauthorised user.
S et t in g s
Settings
Page 73

71
S et t in g s
Note
v
Three incorrect PIN code entries in
the PIN code entry window would
invalidate the PIN code. In this case,
you have to enter the PUK (PIN
Unblock Key) code to configure
the PIN code again. The maximum
number of times you may enter the
PUK code is 10. (Note: If you enter
an incorrect PUK code10 times, the
SIM card will be blocked and must be
replaced.)
PIN2 code
PIN2 is the abbreviation for Personal
Identification Number 2, and is used to restrict
use by unauthorised users as with the PIN. The
PIN2 code change procedure is the same as
the one for the PIN code. 3 incorrect PIN2 code
entries would invalidate the PIN2 code.
In this case, you have to enter the PUK2
code in order to use the PIN2 code again.
The maximum number of times you may try
to enter the PUK2 code is 10, like PUK1. 10
incorrect PUK2 code entries would invalidate
the PIN2 code.
Security code
The security code is used to change the mobile
phone password. The maximum number
of attempts to enter the security code is not
limited as it is with PIN and PIN2.
Power save
Menu #.4
When you don't use a phone, you can save
the power activating this menu.
Language
Menu #.5
Select the display language. You can select
Automatic language option to change display
language to the SIM card supported language.
Page 74

72
Memory manager
Menu #.6
Handset common memory
(Menu #.6.1)
This function shows the status of the user
memory of the mobile phone. Since this
function scans the overall file system for
statistics, a few seconds are required.
Handset reserved memory
(Menu #.6.2)
This function shows the status of the User
reserved memory. The usual contents are
Text msg, Contacts, Calendar, To do, Memo,
Alarms, Call history, and Bookmarks. And it
gives a clear illustration of the actual amount
compared with the total amount for each
item.
SIM memory
(Menu #.6.3)
This function shows the status of the SIM card
user memory.
External memory
(Menu #.6.4)
This function shows the status of the External
card user memory. This function displays the
In-use and free memory usage statistics.
Primary storage setting
(Menu #.6.5)
You can select the storage to download the
file: Handset memory or External memory.
Handset information
Menu #.7
You can view handset information.
Reset settings
Menu #.8
Select this to reset your phone to its default
configuration. You are requested to enter the
security code.
Settings
S et t in g s
Page 75

73
A cc es s or i es
Accessories
There are various accessories for your mobile phone. You can select these options according to
your personal communication requirements.
Travel Adapter
STA-P52R
Standard
Battery
LGIP-580A,
1000mAh
Data cable/CD
LG-US05K
You can connect
your phone to PC to
exchange the data between them.
Potable Handsfree
HC-EYD-LG067
Note
v
Always use genuine LG accessories.
v
Failure to do so may invalidate your
warranty.
v
Accessories may vary in different
regions: please check with our
regional service company or agent
for further information.
Page 76

74
Technical data
Te ch n ic a l d at a
General
Product name: HB620T
System: GSM900/DCS1800/PCS 1900/WCDMA 2100
Net weight: 99.5g, 78.5g(Without battery)
Ambient Temperatures
Max: +55°C (Normal) / +45°C (Charging)
Min: -10°C
Page 77

Page 78

76
Guidelines for safe and efficient use
Please read these simple guidelines. Not
following these guidelines may be dangerous
or illegal.
Exposure to radio frequency
energy
Radio wave exposure and Specific
Absorption Rate (SAR) information
This mobile phone model HB620T has been
designed to comply with applicable safety
requirements for exposure to radio waves.
These requirements are based on scientifi
c guidelines that include safety margins
designed to assure the safety of all persons,
regardless of age and health.
• The radio wave exposure guidelines employ
a unit of measurement known as the Specifi
c Absorption Rate, or SAR. Tests for SAR are
conducted using standardized method with
the phone transmitting at its highest certifi
ed power level in all used frequency bands.
• While there may be differences between
the SAR levels of various LG phone models,
they are all designed to meet the relevant
guidelines for exposure to radio waves.
• The SAR limit recommended by the
International Commission on Non-Ionizing
Radiation Protection (ICNIRP) is 2W/kg
averaged over 10g of tissue.
• The highest SAR value for this model phone
tested by DASY4 for use at the ear is 0.552
W/kg (10g) and when worn on the body is
1.03 W/kg (10g).
• SAR data information for residents in
countries/regions that have adopted the
SAR limit recommended by the Institute of
Electrical and Electronics Engineers (IEEE),
which is 1.6 W/kg averaged over 1g of tissue.
Product care and
maintenance
WARNING!
• O nly us e bat teries, chargers and
accessories approved for use with
th is p ar tic ula r ph on e mod el.
The use of any o ther types may
invalidate any approval or warranty
applying to the phone, and may be
dangerous..
G ui d el i ne s f or sa f e a nd e f fi c ie n t u se
Page 79

G ui d el i ne s f or sa f e a nd e f fi c ie n t u se
77
• Do not disassemble this unit. Take it to a
qualifi ed service technician when repair
work is required.
• Keep away from electrical appliances such as
TVs, radios, and personal computers.
• The unit should be kept away from heat
sources such as radiators or cookers.
• Do not drop.
• Do not subject this unit to mechanical
vibration or shock.
• S witch off the phone in any area where
you are required by special regulations. For
example, do not use your phone in hospitals
as it may affect sensitive medical equipment.
• D o not handle the phone with wet hands
while it is being charged. It may cause an
electric shock and can seriously damage your
phone.
• D o not to charge a handset near fl ammable
material as the handset can become hot and
create a fi re hazard.
• U se a dry cloth to clean the exterior of the
unit (do not use solvents such as benzene,
thinner or alcohol).
• D o not charge the phone when it is on soft
furnishings.
• T he phone should be charged in a well
ventilated area.
• D o not subject this unit to excessive smoke
or dust.
• Do not keep the phone next to credit cards or
transport tickets; it can affect the information
on the magnetic strips.
• Do not tap the screen with a sharp object as
it may damage the phone.
• Do not expose the phone to liquid or
moisture.
• Use the accessories like earphones cautiously.
Do not press the antenna unnecessarily.
Page 80

Guidelines for safe and efficient use
G ui d el i ne s f or sa f e a nd e f fi c ie n t u se
78
E cient phone operation
Electronics devices
All mobile phones may get interference,
which could affect performance.
• Do not use your mobile phone near medical
equipment without requesting permission.
Avoid placing the phone over pacemakers,
for example in your breast pocket.
• Some hearing aids might be disturbed by
mobile phones.
• Minor interference may affect TVs, radios,
PCs, etc.
Road safety
Check the laws and regulations on the use of
mobile phones in the areas when you drive.
• Do not use a hand-held phone while driving.
• Give full attention to driving.
• Use a hands-free kit, if available.
• Pull off the road and park before making
or answering a call if driving conditions so
require.
• RF energy may affect some electronic
systems in your vehicle such as car stereos
and safety equipment.
• When your vehicle is equipped with an
air bag, do not obstruct with installed or
portable wireless equipment. It can cause
the airbag to fail or cause serious injury due
to improper performance.
• If you are listening to music whilst out and
about, please ensure that the volume is at
a reasonable level so that you are aware
of your surroundings. This is particularly
imperative when near roads.
Avoid damage to your
hearing
Damage to your hearing can occur if you are
exposed to loud sound for long periods of
time. We therefore recommend that you do
not turn on or off the handset close to your
ear. We also recommend that music and call
volumes are set to a reasonable level.
Page 81

G ui d el i ne s f or sa f e a nd e f fi c ie n t u se
79
Blasting area
Do not use the phone where blasting is in
progress. Observe restrictions, and follow any
regulations or rules.
Potentially explosive
atmospheres
• Do not use the phone at a refueling point.
• Do not use near fuel or chemicals.
• Do not transport or store fl ammable
gas, liquid, or explosives in the same
compartment of your vehicle as your mobile
phone and accessories.
In aircraft
Wireless devices can cause interference in
aircraft.
• Turn your mobile phone off before boarding
any aircraft.
• Do not use it on the ground without
permission from the crew.
Children
Keep the phone in a safe place out of the reach
of small children. It includes small parts which
may cause a choking hazard if detached.
Emergency calls
Emergency calls may not be available under
all mobile networks. Therefore, you should
never depend solely on the phone for
emergency calls. Check with your local service
provider.
Battery information and care
• You do not need to completely discharge
the battery before recharging. Unlike other
battery systems, there is no memory
effect that could compromise the battery’s
performance.
• Use only LG batteries and chargers. LG
chargers are designed to maximize the
battery life.
• Do not disassemble or short-circuit the
battery pack.
Page 82

Guidelines for safe and efficient use
• Keep the metal contacts of the battery pack
clean.
• Replace the battery when it no longer
provides acceptable performance. The
battery pack maybe recharged hundreds of
times until it needs replacing.
• Recharge the battery if it has not been used
for a long time to maximize usability.
• Do not expose the battery charger to direct
sunlight or use it in high humidity, such as
the bathroom.
• Do not leave the battery in hot or cold
places, this may deteriorate the battery
performance.
• There is risk of explosion if the battery is
replaced by an incorrect type.
• Dispose of used batteries according to the
manufacturer’s instructions. Please recycle
when possible. Do not dispose as household
waste.
• If you need to replace the battery, take it to
the nearest authorized LG Electronics service
point or dealer for assistance.
• Always unplug the charger from the wall
socket after the phone is fully charged to
save unnecessary power consumption of the
charger.
G ui d el i ne s f or sa f e a nd e f fi c ie n t u se
80
Page 83

简体中文
用戶手冊
HB620T
本文档是 3G 视频手机 LG HB620T 的用户手册。
LG Electronics 保留对此文档的所有权利。
未经 LG Electronics 同意,不得复制、修改和散发本文档。
Page 84

2
目录
目录
HB620T 功能 5
打开视图
开始 8
安装 SIM 卡和手机 电
池
常规功能 11
拨打电话
菜单功能概览 14
电视 15
电视
收音机
16
设置
观看时间
信息视图模式
看电视时接听电话
短信/ 彩信 弹 出 窗 口 打开
/关闭
重置频道
呼叫 18
通话记录
所有通话
拨出电话
已接来电
未接来电
拨打视频电话 18
通话时间
数据音量
19
通话费用
呼叫转接
语音来电
可视电话
20
呼叫限制
22
语音来电
可视电话
关闭所有来电
固定拨号
呼叫等待
通用设置
23
拒接来电
发送我的号码
自动重拨
接听模式
分钟提示 24
BT 接听模式
保存新号码
视频通话设置
模式 25
多媒体 26
照相机
摄像机
28
音乐
30
最近播放
所有曲目
艺术家
专辑
流派
播放列表
随机曲目
视频播放列表
语音备忘录
信息 32
创建新消息
信息
电子邮件
33
收件箱
34
邮箱
36
草稿箱
37
发件箱
38
Page 85

3
目录
已发送的项
39
我的文件夹
模板
文本模板
多媒体模板
40
图释
设置
文本信息
多媒体信息
41
电子邮件
43
语音邮件
44
服务信息
信息服务
45
我的文档 46
我的图像
我的声音
47
我的视频
我的应用程序
49
Flash 内容
其它
我的存储卡
游戏和应用程序 50
我的应用程序
设置
电话本 51
新增
搜索
快速拨号
群组
服务号码
本机号码
52
我的名片
设置
显示数据
复制
移动
通过蓝牙发送所有联系人
备份电话本
恢复电话本
清空电话本
53
内存信息
浏览器 54
主页
输入地址
书签
RSS 阅卡器
55
已保存页面
历史记录
设置
模式
外观设置
缓存 56
Cookies
安全性
恢复初始设定
连接 57
蓝牙
服务器同步
61
USB 连接模式
63
网络
选择网络
网络模式
Page 86

4
目录
目录
首选列表
64
Internet 网络设定
接入点
流媒体设置
公文包和 工具 65
闹钟
日程表
任务
66
备忘录
计算器
秒表
67
换算器
世界时间
日期计算器
快速菜单
设置
68
日程表
备份日历和待办事项
恢复日历和待办事项
内存信息
全部清除
SIM 卡服务
设置 69
显示
屏幕主题
菜单类型
拨号样式
字体样式
背光
手机方案
欢迎信息
日期和时间
70
时间
日期
自动更新日期/时间
夏令时
安全性
71
PIN 码请求
手机锁
更改密码
省电
72
语言
内存管理器
73
手机公用内存
手机剩余内存
SIM 卡内存
外部存储器
主存储器设置
手机信息
恢复初始设置
附件 74
技术数据 75
关于安全有效使 用 手
机的准则 77
Page 87

5
HB620T 功能
HB62 0 T 功 能
打开视图
前视图
听筒
确定(确认)键
导航键
v
在待机模式下:
u
我的素材
d
联系人列表
l
情景模式列表
r
写信息
v
在菜单中: 导航键
多任务键
VGA 相机
LCD 屏幕
清除键
您可以删除一个字母。
数字键
v
在待机模式下:
输入号码 以便拨号。
长按:
0
国际电话
1
激活语音邮件中 心
菜单
2至9
快速拨号
v
在编辑模式下: 输入数字
和字符。
麦克风
Page 88

6
HB620T 功能
HB62 0 T 功 能
软键
执行显示屏底部所示的功能。
发送键
v
拨打电话号码或接听来电。
v
在待机模式下: 显示已拨电话、已接
来电和未 接来电的通话记录。
呼叫结束键
v
您可以结束呼叫。
v
在激活菜单时按此键,您可以返回
待机屏幕。
(短按键)启动电视/
(长按键)启动收音机
(短按键)访问指南
(启动电视)
(短按键)访问喜欢的频道列表
(启动电视)
提示!
v
为了获得最好的电视/收音效
果,请将天线旋转 45’。
2 种翻盖角度,
分别用于看电视
和通话
趣味使用
Page 89

7
HB62 0 T 功 能
左视图/右视图
侧键
耳机/充电器/
数据线 接口
相机键
手机背面
SIM插槽
MicroSD 卡插槽
天线
Page 90

8
开始
开始
安装 SIM 卡和手机 电池
1. 安装 SIM 卡
SIM 卡包含手机号码、服务详细
资 料和联系信息,因此必须插入手
机。 取出 SIM 卡之后,手机会无法
使 用 (紧急呼叫除外) 直到插入一
个 有效的SIM卡。 插入或取出 SIM
卡之前,请始终断开手机与充电器
和其它附件的连接。
插入SIM卡
取出SIM
注意
v
SIM 卡的金属触点很容易因刮
擦而损坏。操作时请对SIM卡
多加注意。遵守随SIM卡提供
的说明。
v
取出电池后,插入 SIM 卡。
2. 安装电池
向上滑入电池,直到其卡入到位。
Page 91

9
开始
3. 删除
关机。按住电池释放按钮,将电池
滑下。
Page 92

10
开始
开始
开机/关机
开机
确保在手机中插入 SIM 卡并装入
已 充电的电池。按住 e 直至开
机。 当 PIN 码请求设置为开时,请
输入 随 SIM 卡提供的 SIM PIN码。
(备注:请参阅第 78页)数秒钟
后, 手机便可完成网络注册。
关机
按住 e 直至关机。关机时可能
会 出现几秒钟的延迟。 在此期间,
不要再次开机。
Page 93

11
常规功能
拨打电话
拨打语音电话
1. 输入电话号码,包括完整区号。
v
要删除一个数字,请按 c
按键。
要删除所有数字,请按住 c
按键。
2. 按 s 拨打电话。
3. 按 e 或闭合翻盖结束通话。
注意
v
要在通话过程中启用扬声器按
O
.
从通话记录拨打电话
1. 在待机模式下,按 s 屏幕上
将显示最后的来电、去电和未 接
来电。
2. 使用
d/u
选择所需号码。
3. 按 s键以拨出号码。
拨打视频电话
您可以在 3G 覆盖的服务区域拨打
视频电话。如果被呼叫者具有 3G
视 频电话,且位于 3G 覆盖的服务
区 域内,那么你们即可建立通话连
接。 您还可以接听视频电话。要拨
打/应 答视频电话,请执行以下操
作。
1. 使用键盘输入电话号码,或者从
呼入/呼出列表选择电话号码。
v
要更正错误,请短按 c 删除
输入的最后一个数字,或者按住
c
或者按住 删除所有数字。
常规功能
Page 94

12
2. 若不想使用扬声器,请确保将耳
机插入。
3. 要启用视频功能,请按左软键
[选项],然后选择“拨打视频 电
话”。
v
要拨打视频电话,系统将通知您
需要关闭其它应用程序。
注意
v
视频电话可能需要一定时间进
行 连接。请耐心等待。连接时
间也 取决于对方应答呼叫的速
度。在 视频电话连接过程中,
您会看到 自己的图像;在对方
应答后,屏 幕将显示其图像。
4. 请根据需要调整相机位置。
5. 按
e
或闭合翻盖结束呼叫。
从电话本拨打语音/视频电话
拨打在电话本中存有号码的联系人
的 电话非常方便。
1. 按 d 访问联系人列表。
2. 滚动到联系人并拨打电话。
3. 按
s
拨打视频电话。按左软
键 并选择“拨打视频电话”。
4. 按 e 结束呼叫。
拨打国际电话
1. 按住 0 以输入国际前 缀。
“+”字符可作为国际接入 码前
缀。
2. 输入国家代码、地区代码和电 话
号码。
3. 按 s。
常规功能
常规功能
Page 95

13
常规功能
应答电话
当接收到电话时、手机响铃并且屏
幕 上出现闪烁的电话图标。如果可
以 识别致电者、则会显示该致电者
的 电话号码(或保存在电话本中的
姓 名/照片)。
1. 打开滑盖即可接听来电。
注意
v
要拒绝来电,请按 e 或右
软 键两次。
v
If you set Answer mode as Press
send key (菜单 2.0.4), 您可 以在
打开滑盖后按 s 接听 来
电。
v
如果接听模式设置为“按任意
键”,除了 e键,按任何
键 都将接听来电。
2. 要结束通话,请关闭翻盖或 按
e
。
注意
v
在使用电话本或其它菜单功能
时,您也可以接听来电。
v
在手机连接到兼容耳机时,您
也 可以使用耳机键来接听来
电,和 使用手机一样。要拒接
来电,请 按 e。
v
您可以通过按住下方音量侧
键, 在来电时静音。
信号强度
您可以通过手机屏幕上的信号指示
符 检查信号强度。信号强度会有所
差 别、尤其是在建筑物内。移到窗
口附 近可以改善接收质量。
Page 96

14
菜单功能概览
菜单功能 概 览
电视
1 电视
2 收音机
3 设置
呼叫
1 通话记录
2 拨打视频电话
3 通话时间
4 数据音量
5 通话费用
6 呼叫转接
7 呼叫限制
8 固定拨号
9 呼叫等待
0 通用设置
* 视频通话设置
模式
标准
静音
户外
飞行模式
用户定义 1
用户定义 2
用户定义 3
多媒体
1 照相机
2 摄像机
3 音乐
4 视频播放列表
5 语音备忘录
信息
1 创建新消息
2 收件箱
3 邮箱
4 草稿箱
5 发件箱
6 已发送的项
7 我的文件夹
8 模板
9 图释
0 设置
我的文档
1 我的图像
2 我的声音
3 我的视频
4 我的应用程序
5 Flash 内容
6 其它
7 我的存储卡
游戏和应用程序
1 我的应用程序
2 设置
电话本
1 新增
2 搜索
3 快速拨号
4 群组
5 服务号码
6 本机号码
7 我的名片
8 设置
浏览器
1 主页
2 输入地址
3 书签
4 RSS 阅卡器
5 已保存页面
6 历史记录
7 设置
连接
1 蓝牙
2 服务器同步
3 USB 连接模式
4 网络
5 Internet 网络设定
6 接入点
7 流媒体设置
公文包和 工具
1 闹钟
2 日程表
3 任务
4 备忘录
5 计算器
6 秒表
7 换算器
8 世界时间
9 日期计算器
0 快速菜单
* 设置
# SIM 卡服务
设置
1 显示
2 日期和时间
3 安全性
4 省电
5 语言
6 内存管理器
7 手机信息
8 恢复初始设置
Page 97

15
电视
功能表 1.1
HB620T 可用于访问移动电视服
务。
1. 要启动电视,请按“确定”,然
后选择“1-1 电视”菜单。
2. 此时将运行电视程序,您可以按
u
查看显示的可用频道列表中
的电视频道。
3. 您可以按 l, r 更改频道。
4. 如果按 d, 您可以切换收音机
/电视。
提示!
v
要轻松访问电视,短按电视按
钮即可。
注意
v
您需要伸出天线。
v
如果频道旁边显示图标 ,
则表示该节目支持多语言。
您可以按 L 选项,然后选择
所需语言。
电视: 直接访问电视。(短按)
直接访问收音机。(长按)
指南: 显示 TV 频道。
我的频道: 您可以使用选项菜
单设置喜爱的频道。
此时将运行程序,按 L 选项,
选择“添加到收藏夹”,然后设置
频道。
您还可以在“指南”菜单及“选
项”菜单的列表页面中设置喜爱的
频道。
要扫描电视频道,请按 L选
项,选择“频道扫描”,然后选择
“全部”或“选择的频道”。
注意
v
扫描后,“我的频道”将重
置。
v
根据无线电波环境,每个频道
的接收性能可能有所不同。
电视
电视
Page 98

16
收音机
功能表 1.2
1. 要启动收音机,请按“确定”,
然后选择菜单“1-2 收音机”。
2. 此时将运行收音机程序,您可以
按 u查看显示的可用列表中
的收音机频道。
3. 您可以按 l,r 更改频道。
4. 如果按 d,您可以切换电视
/收音机。
本手机支持数字 DVB-T 收音机,不
支持 FM 收音机。
注意
v
收音机在某些地区可能不可
用。
v
您需要伸出天线。
设置
功能表 1.3
观看时间
(功能表 1.3.1)
您可以查找观看电视的时间。
信息视图模式
(功能表 1.3.2)
您可以配置在观看电视时查看信号
强度的一般状态、频道及节目名
称。
看电视时接听电话
(功能表 1.3.3)
您可以设置观看电视时接听电话的
方式。
短信/彩信弹出窗口打开/
关闭
(功能表 1.3.4)
收到短信或彩信时,您可以设置在
观看电视时是否要阅读此信息。
重置频道
(功能表 1.3.5)
您可以重置电视/收音机频道和喜爱
的“我的频道”列表。
电视
电视
Page 99

17
注意
v
如果频道接收性能不佳,您需
要重置频道。
电视
Page 100

18
呼叫
通话记录
功能表2.1
所有通话
(功能表 2.1.1)
此菜单允许您查看未接来电、已接
来 电、和拨出电话记录。您可以拨
打电 话或者发送信息到从通话记录
中选定 的号码中。您也可以将号码
保存到 电话本中。
拨出电话
(功能表 2.1.2)
使您能够查看拨出电话的记录、拨
打 电话、发送信息以及将号码保存
到 电话本中。
已接来电
(功能表 2.1.3)
使您能够查看来电记录、拨打电
话、发送信息以及将号码保存到电
话本中。
未接来电
(功能表 2.1.4)
使您能够查看未接来电记录、拨打
电话、发送信息以及将号码保存到
电话本中。
拨打视频电话
功能表2.2
您可以在此菜单中拨打视频电话。
通话时间
功能表2.3
您可以按类型查看通话时间。按左
软 键[选项] 选择部分初始化还是全
部 初始化。初始化要求您提供安全
码。
可以使用以下计时方式:
所有通话
显示总通话时间。
拨出电话
显示拨出电话的通话时间。
已接来电
显示来电通话时间。
最后通话
以小时/分钟/秒为单位显示最近通
话时间。
呼叫
 Loading...