

Page 1

ENGLISH
FRANÇAIS DEUTSCH
NEDERLANDS
OWNER’S MANUAL
TM
Network Blu-ray Disc
/
DVD Home Cinema System
Please read this manual carefully before operating
your set and retain it for future reference.
MODEL
HB600 (HB600, SB95DB-F/W)
P/NO : MFL63740475
HB965DB-DD.BNLDLLK_ENG_0475.indd1 1HB965DB-DD.BNLDLLK_ENG_0475.indd1 1 2010.2.26 9:57:43 AM2010.2.26 9:57:43 AM
Page 2
2 Safety Information
1
1
Safety Information
Safety Information
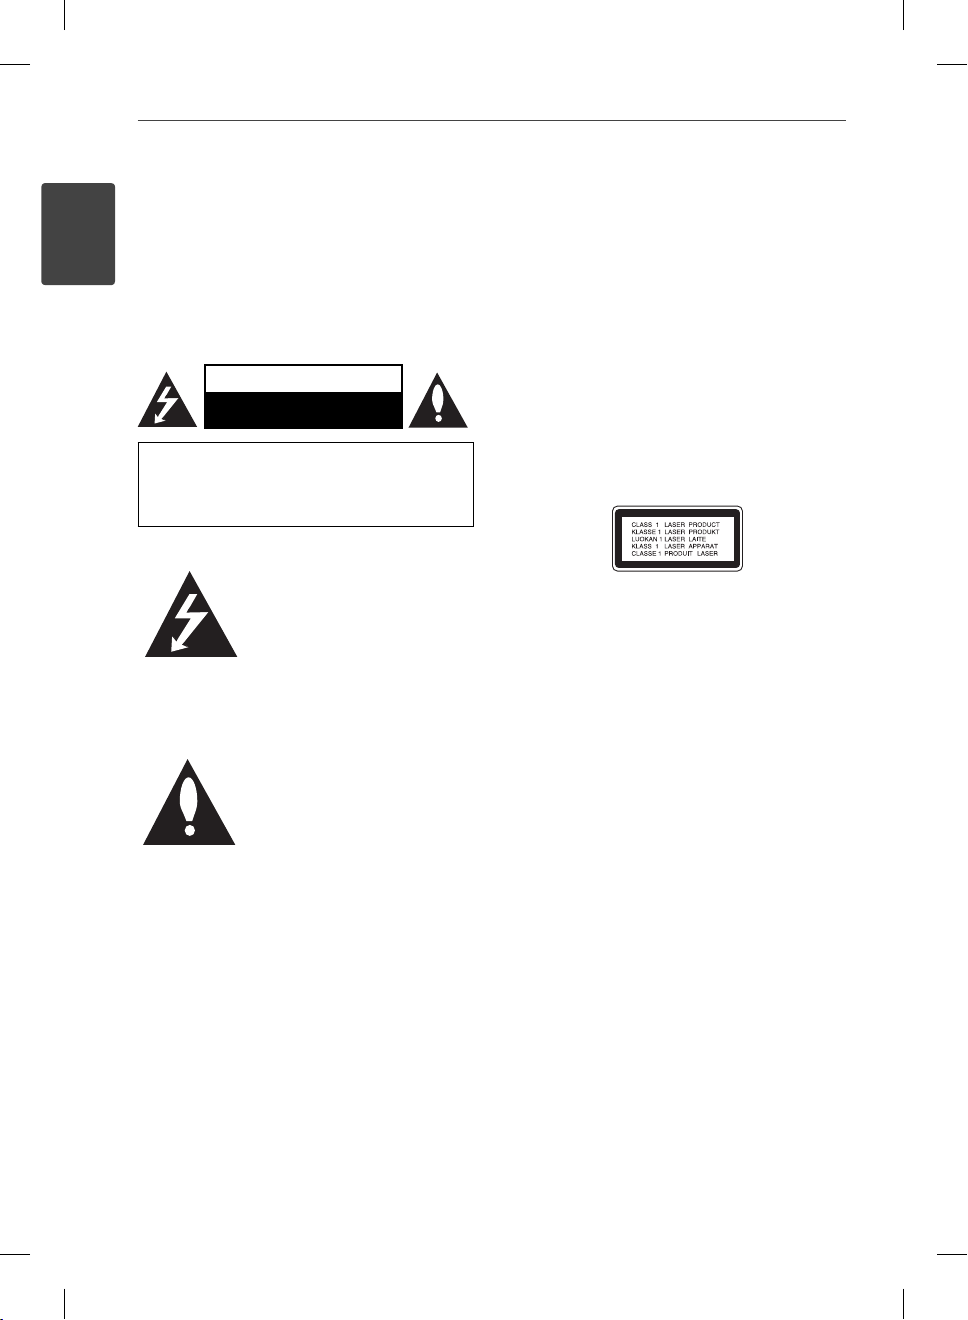
CAUTION
RISK OF ELECTRIC SHOCK
DO NOT OPEN
CAUTION: TO REDUCE THE RISK OF ELECTRIC
SHOCK DO NOT REMOVE COVER (OR BACK) NO
USER-SERVICEABLE PARTS INSIDE REFER SERVICING
TO QUALIFIED SERVICE PERSONNEL.
This lightning ash with arrowhead
symbol within an equilateral
triangle is intended to alert the
user to the presence of uninsulated
dangerous voltage within the
product’s enclosure that may be of
su cient magnitude to constitute
a risk of electric shock to persons.
The exclamation point within an
equilateral triangle is intended
to alert the user to the presence
of important operating and
maintenance (servicing)
instructions in the literature
accompanying the product.
Cautions and Warnings
WARNING: TO PREVENT FIRE OR ELECTRIC SHOCK
HAZARD, DO NOT EXPOSE THIS PRODUCT TO RAIN
OR MOISTURE.
WARNING: Do not install this equipment in a
con ned space such as a book case or similar unit.
CAUTION: Do not block any ventilation openings.
Install in accordance with the manufacturer’s
instructions.
Slots and openings in the cabinet are provided for
ventilation and to ensure reliable operation of the
product and to protect it from over heating. The
openings shall be never be blocked by placing
the product on a bed, sofa, rug or other similar
surface. This product shall not be placed in a builtin installation such as a bookcase or rack unless
proper ventilation is provided or the manufacturer’s
instruction has been adhered to.
CAUTION: This product employs a Laser System.
To ensure proper use of this product, please read
this owner’s manual carefully and retain it for future
reference. Shall the unit require maintenance,
contact an authorized service centre.
Use of controls, adjustments or the performance of
procedures other than those speci ed herein may
result in hazardous radiation exposure.
To prevent direct exposure to laser beam, do not try
to open the enclosure. Visible laser radiation when
open. DO NOT STARE INTO BEAM.
HB965DB-DD.BNLDLLK_ENG_0475.indd2 2HB965DB-DD.BNLDLLK_ENG_0475.indd2 2 2010.2.26 9:57:46 AM2010.2.26 9:57:46 AM
Page 3

3Safety Information
CAUTION concerning the Power Cord
Most appliances recommend they be placed upon a
dedicated circuit;
That is, a single outlet circuit which powers only
that appliance and has no additional outlets or
branch circuits. Check the speci cation page of this
owner’s manual to be certain. Do not overload wall
outlets. Overloaded wall outlets, loose or damaged
wall outlets, extension cords, frayed power cords, or
damaged or cracked wire insulation are dangerous.
Any of these conditions could result in electric
shock or re. Periodically examine the cord of your
appliance, and if its appearance indicates damage
or deterioration, unplug it, discontinue use of the
appliance, and have the cord replaced with an exact
replacement part by an authorized service centre.
Protect the power cord from physical or mechanical
abuse, such as being twisted, kinked, pinched, closed
in a door, or walked upon. Pay particular attention
to plugs, wall outlets, and the point where the cord
exits the appliance. To disconnect power from the
mains, pull out the mains cord plug. When installing
the product, ensure that the plug is easily accessible.
This device is equipped with a portable battery or
accumulator.
Safety way to remove the battery or the battery
from the equipment: Remove the old battery
or battery pack, follow the steps in reverse order
than the assembly. To prevent contamination of
the environment and bring on possible threat
to human and animal health, the old battery or
the battery put it in the appropriate container at
designated collection points. Do not dispose of
batteries or battery together with other waste.
It is recommended that you use local, free
reimbursement systems batteries and accumulators.
The battery shall not be exposed to excessive heat
such as sunshine, re or the like.
CAUTION: The apparatus shall not be exposed to
water (dripping or splashing) and no objects lled
with liquids, such as vases, shall be placed on the
apparatus.
Disposal of your old appliance
1. When this crossed-out wheeled bin
symbol is attached to a product it means
the product is covered by the European
Directive 2002/96/EC.
2. All electrical and electronic products
shall be disposed of separately from the
municipal waste stream via designated
collection facilities appointed by the
government or the local authorities.
3. The correct disposal of your old
appliance will help prevent potential
negative consequences for the
environment and human health.
4. For more detailed information about
disposal of your old appliance, please
contact your city o ce, waste disposal
service or the shop where you
purchased the product.
1
Safety Information
HB965DB-DD.BNLDLLK_ENG_0475.indd3 3HB965DB-DD.BNLDLLK_ENG_0475.indd3 3 2010.2.26 9:57:46 AM2010.2.26 9:57:46 AM
Page 4

4 Safety Information
1
Safety Information
Europe Notice
LG Electronics hereby declares that this/these
product(s) is/are in compliance with the essential
requirements and other relevant provisions of
Directive 1999/5/EC, 2004/108/EC, 2006/95/EC and
2009/125/EC.
Please contact to the following address for obtaining
a copy of the DoC (Declaration of Conformity).
European representative :
LG Electronics Service Europe B.V.
Veluwezoom 15, 1327
AE Almere. The Netherlands
(Tel : +31-(0)36-547-8888)
Indoor Use Only
RF Radiation Exposure Statement
This equipment should be installed and operated
with minimum distance 20 cm between the radiator
and your body.
France Notice
Pour la France métropolitaine
2.400 - 2.4835 GHz (Canaux 1à 13) autorisé en usage
intérieur
2.400 - 2.454 GHz (canaux 1 à 7) autorisé en usage
extérieur
Pour la Guyane et la Réunion
2.400 - 2.4835 GHz (Canaux 1à 13) autorisé en usage
intérieur
2.420 - 2.4835 GHz (canaux 5 à 13) autorisé en usage
extérieur
Italy Notice
A general authorization is requested for outdoor use
in Italy.
The use of these equipments is regulated by:
1. D.L.gs 1.8.2003, n. 259, article 104 (activity subject
to general authorization) for outdoor use and
article 105 (free use) for indoor use, in both cases
for private use.
2. D.M. 28.5.03, for supply to public of RLAN access
to networks and telecom services.
L’uso degli apparati è regolamentato da:
1. D.L.gs 1.8.2003, n. 259, articoli 104 (attività
soggette ad autorizzazione generale) se utilizzati
al di fuori del proprio fondo e 105 (libero uso) se
utilizzati entro il proprio
fondo, in entrambi i casi per uso private.
2. D.M. 28.5.03, per la fornitura al pubblico
dell’accesso R-LAN alle reti e ai servizi di
telecomunicazioni.
Brazil Notice
Este equipamento opera em caráter secundário, isto
é, não tem direito a proteção contra interferência
prejudicial, mesmo de estações do mesmo tipo, e
não pode causar interferência a sistemas operando
em caráter primário.
Latvia Notice
A license is required for outdoor use for operation in
2.4 GHz band.
HB965DB-DD.BNLDLLK_ENG_0475.indd4 4HB965DB-DD.BNLDLLK_ENG_0475.indd4 4 2010.2.26 9:57:46 AM2010.2.26 9:57:46 AM
Page 5

5Safety Information
Notes on Copyrights
Because AACS (Advanced Access Content System)
•
is approved as content protection system for BD
format, similar to use of CSS (Content Scramble
System) for DVD format, certain restrictions are
imposed on playback, analogue signal output,
etc., of AACS protected contents. The operation of
this product and restrictions on this product may
vary depending on your time of purchase as those
restrictions may be adopted and/or changed by
AACS after the production of this product.
Furthermore, BD-ROM Mark and BD+ are
•
additionally used as content protection systems
for BD format, which imposes certain restrictions
including playback restrictions for BD-ROM
Mark and/or BD+ protected contents. To obtain
additional information on AACS, BD-ROM Mark,
BD+, or this product, please contact an authorized
Customer Service Centre.
Many BD-ROM/DVD discs are encoded with
•
copy protection. Because of this, you should only
connect your player directly to your TV, not to a
VCR. Connecting to a VCR results in a distorted
picture from copy-protected discs.
This product incorporates copyright protection
•
technology that is protected by U.S. patents
and other intellectual property rights. Use of
this copyright protection technology must be
authorized by Macrovision, and is intended for
home and other limited viewing uses only unless
otherwise authorized by Macrovision. Reverse
engineering or disassembly is prohibited.
Under the U.S. Copyright laws and Copyright
•
laws of other countries, unauthorized recording,
use, display, distribution, or revision of television
programmes, videotapes, BD-ROM discs, DVDs,
CDs and other materials may subject you to civil
and/or criminal liability.
Important Notice for TV colour system
The colour system of this player di ers according to
currently playing discs.
For example, when the player plays the disc recorded
in the NTSC colour system, the image is outputted as
a NTSC signal.
Only the multi system colour TV can receive all
signals outputted from the player.
If you have a PAL colour system TV, you will see
•
just distorted images when using discs or video
contents recorded in NTSC.
The multi system colour TV changes the colour
•
system automatically according to input signals.
In case that the colour system is not changed
automatically, turn it o and then on to see
normal images on screen.
Even if the disc recorded in NTSC colour system
•
are well displayed on your TV, these may not be
recorded correctly on your recorder.
1
Safety Information
HB965DB-DD.BNLDLLK_ENG_0475.indd5 5HB965DB-DD.BNLDLLK_ENG_0475.indd5 5 2010.2.26 9:57:47 AM2010.2.26 9:57:47 AM
Page 6

6
Contents
3
Installation
16 Speaker Connection
16 Attaching the speakers to
1
Safety Information
2 Cautions and Warnings
2
Preparation
8 Introduction
8 About the “ ” Symbol
Display
8 Symbols Used in this
Manual
9 Supplied Accessories
9 Playable Discs
11 File compatibility
12 Regional Code
12 AVCHD (Advanced Video
Codec High Defi nition)
12 Certain System
Requirements
12 Compatibility Notes
13 Remote control
14 Front panel
15 Rear panel
17 Connecting to Your TV
17 HDMI Connection
18 What is SIMPLINK?
19 Component Video
19 Video Connection
20 Resolution Setting
21 Antenna connection
21 Connections with external device
21 AUX Connection
22 PORT. IN connection
22 OPTICAL IN 1/2 connection
23 HDMI IN 1/2 connection
24 Connecting to your Home Network
24 Wired network connection
25 Wired Network Setup
26 Wireless Network
27 Wireless Network Setup
30 USB device connection
31 Settings
31 Adjust the Setup Settings
32 [DISPLAY] Menu
33 [LANGUAGE] Menu
34 [AUDIO] Menu
35 [LOCK] Menu
36 [NETWORK] Menu
36 [OTHERS] Menu
37 Sound Effect
the player
Connection
Connection
HB965DB-DD.BNLDLLK_ENG_0475.indd6 6HB965DB-DD.BNLDLLK_ENG_0475.indd6 6 2010.2.26 9:57:47 AM2010.2.26 9:57:47 AM
Page 7

7
4
Operation
38 General Playback
40 Advanced Playback
44 On-Screen display
47 Enjoying BD-LIVE
48 Playing a movie fi le and VR disc
50 Viewing a photo
52 Listening to music
56 Playing the iPod
58 Radio Operations
59 Playing content via your home
network
TM
64 Using NetCast
Access
64 YouTube
68 Picasa Web Albums
71 Using the AccuWeather
Entertainment
5
Maintenance
7
Appendix
77 Controlling a TV with the Supplied
Remote Control
78 Area Code List
79 Language code List
80 Network Software Update
80 Network update notifi cation
80 Software Update
82 Video output resolution
83 Trademarks and Licences
85 Specifi cations
87 Important Information Relating to
Network Services
88 Open source software notice
89 Gracenote® End User Licence
Agreement
1
2
3
4
5
73 Notes on Discs
73 Handling the Unit
6
6
Troubleshooting
74 General
75 Picture
75 Sound
76 Network
HB965DB-DD.BNLDLLK_ENG_0475.indd7 7HB965DB-DD.BNLDLLK_ENG_0475.indd7 7 2010.2.26 9:57:47 AM2010.2.26 9:57:47 AM
7
8
Page 8
8 Preparation
2
Preparation
2
Preparation
Introduction
About the “ ” Symbol Display
“ ” may appear on your TV display during
operation and indicates that the function
explained in this owner’s manual is not
available on that speci c media.
Symbols Used in this Manual
NOTE
Indicates special notes and operating features.
CAUTION
Indicates cautions for preventing possible
damages from abuse.
A section whose title has one of the following
symbols are applicable only to the disc
represented by the symbol.
BD
DVD
AVC HD
ACD
MOVIE
MUSIC
PHOTO
BD-ROM disc
DVD-Video, DVD±R/RW in
Video mode or VR mode
and nalized
DVD±R/RW in AVCHD
format
Audio CDs
Movie les
Music les
Photo les
HB965DB-DD.BNLDLLK_ENG_0475.indd8 8HB965DB-DD.BNLDLLK_ENG_0475.indd8 8 2010.2.26 9:57:47 AM2010.2.26 9:57:47 AM
Page 9
9Preparation
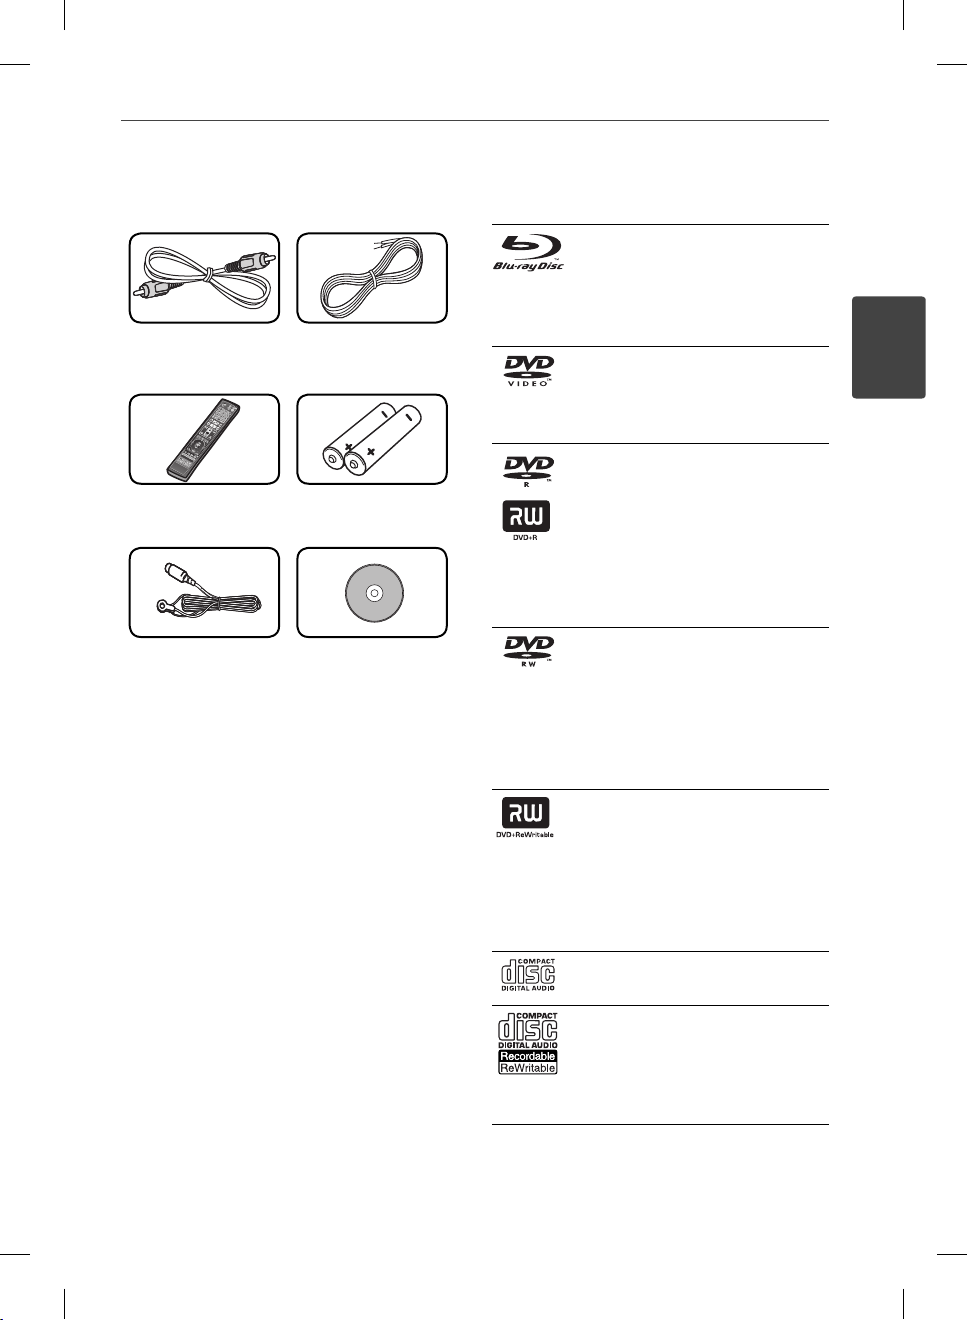
Supplied Accessories
Video cable (1) Colour-coded
Speaker Cables (3)
Remote control (1) Batteries (2)
FM antenna (1) Nero MediaHome4
Essentials software
CD-ROM (1)
Playable Discs
Blu-ray Disc
Discs such as movies that can
-
be p
BD-R/RE discs that contain
-
Movie, Music or Photo les.
DVD-VIDEO
8 / 12 cm disc
Discs such as movies that can be
purchased or rented.
DVD±R
8 / 12 cm disc
Video mode and nalized only
-
Supports the dual layer disc
-
also
Finalized AVCHD format
-
DVD±R discs that contain
-
Movie, Music or Photo les
DVD-RW
8 / 12 cm disc
VR mode
-
nalized only
Finalized AVCHD format
-
DVD-RW discs that contain
-
Movie, Music or Photo les.
DVD+RW
8 / 12 cm disc
Video mode
-
AVCHD format
-
Finalized AVCHD format
-
DVD+RW discs that contain
-
Movie, Music or Photo les.
Audio CD
8 / 12 cm disc
CD-R/RW
8 / 12 cm disc
CD-R/RW discs that contain
-
audio titles, Movie, Music or
Photo les.
urchased or rented.
2
Preparation
, Video mode and
and nalized only
HB965DB-DD.BNLDLLK_ENG_0475.indd9 9HB965DB-DD.BNLDLLK_ENG_0475.indd9 9 2010.2.26 9:57:48 AM2010.2.26 9:57:48 AM
Page 10

10 Preparation
•
•
2
•
Preparation
•
•
•
•
•
NOTE
Depending on the conditions of the recording
equipment or the CD-R/RW (or DVD±R/RW )
disc itself, some CD-R/RW (or DVD±R/RW) discs
cannot be played on the unit.
Depending on the recording software & the
nalization, some recorded discs (CD-R/RW,
DVD±R/RW, BD-R/RE) may not be playable.
BD-R/RE, DVD±R/RW and CD-R/RW discs
recorded using a personal computer or a DVD or
CD Recorder may not play if the disc is damaged
or dirty, or if there is dirt or condensation on the
player’s lens.
If you record a disc using a personal computer,
even if it is recorded in a compatible format,
there are cases in which it may not play because
of the settings of the application software used
to create the disc. (Check with the software
publisher for more detailed information.)
This player requires discs and recordings to meet
certain technical standards in order to achieve
optimal playback quality.
Pre-recorded DVDs are automatically set to
these standards. There are many di erent
types of recordable disc formats (including
CD-R containing MP3 or WMA les) and these
require certain pre-existing conditions to ensure
compatible playback.
Customers should note that permission is
required in order to download MP3 / WMA les
and music from the Internet. Our company has
no right to grant such permission. Permission
should always be sought from the copyright
owner.
You have to set the disc format option to
[Mastered] in order to make the discs compatible
with the LG players when formatting rewritable
discs. When setting the option to Live System,
you cannot use it on LG player. (Mastered/Live
File System : Disc format system for windows
Vista)
HB965DB-DD.BNLDLLK_ENG_0475.indd10 10HB965DB-DD.BNLDLLK_ENG_0475.indd10 10 2010.2.26 9:57:49 AM2010.2.26 9:57:49 AM
Page 11

11Preparation
File compatibility
Overall
Available File extensions:
“.jpg”, “.jpeg”, “.png”, “.avi”, “.divx”, “.mpg”, “.mpeg”, “
.mkv”, “.mp4”, “.mp3”, “.wma”, “.wav”
Available le extensions di er depending
•
on the DLNA
•
Some “.wav” les are not supported on this
player.
•
The le name is limited to 180 characters.
•
Depending on the size and number of the
les, it may take several minutes to read the
contents on the media.
Maximum Files/Folder: Less than 2 000 (total
number of les and folders)
CD-R/RW, DVD±R/RW, BD-R/RE Format:
ISO 9660+JOLIET, UDF and UDF Bridge format
MOVIE
Available resolution size:
1 920 x 1 080 (W x H) pixels
Playable subtitle: SubRip (.srt / .txt), SAMI
(.smi), SubStation Alpha (.ssa/.txt), MicroDVD
(.sub/.txt), VobSub (.sub), SubViewer 1.0 (.sub),
SubViewer 2.0 (.sub/.txt), TMPlayer (.txt), DVD
Subtitle System (.txt)
VobSub (.sub) is not available in the
•
[Home Link] feature.
Playable Codec format: “DIVX3.xx”, “DIVX4.
xx”, “DIVX5.xx”, “XVID”, “DIVX6.xx” (Standard
playback only), H.264/MPEG-4 AVC, MPEG1 SS,
MPEG2 PS, MPEG2 TS
Playable Audio format: “Dolby Digital”, “DTS”,
“MP3”, “WMA”, “AAC”, “AC3”
•
Not all the WMA and AAC Audio format is
compatible with this unit.
Sampling frequency:
within 32 kHz to 48 kHz (WMA),
within 16 kHz to 48 kHz (MP3)
Bit rate:
within 20 kbps to 320 kbps (WMA),
within 32 kbps to 320 kbps (MP3)
servers.
NOTE
HD movie les contained on the CD or USB
•
1.0/1.1 may not played properly. BD, DVD or USB
2.0 are recommended to play back HD movie
les.
This player supports H.264/MPEG-4 AVC pro le
•
Main, High at Level 4.1. For a le with higher
level, the warning message will appear on the
screen.
•
This player does not support the les that are
recorded with GMC
encoding techniques in MPEG4 standard, like
DivX or XVID have.
*1 GMC – Global Motion Compensation
*2 Qpel – Quarter pixel
1
or Qpel
*
2
. Those are video
*
MUSIC
Sampling frequency:
within 8 kHz to 48 KHz (WMA),
within 11 kHz to 48 kHz (MP3)
Bit rate:
within 8 kbps to 320 kbps (WMA, MP3),
NOTE
This unit cannot support the ID3 Tag embedded
•
MP3 le.
The total playback time indicated on the screen
•
may not correct for VBR les.
PHOTO
Recommended size:
Less than 4,000 x 3,000 x 24 bit/pixel
Less than 3,000 x 3,000 x 32 bit/pixel
Progressive and lossless compression photo
•
image les are not supported.
2
Preparation
HB965DB-DD.BNLDLLK_ENG_0475.indd11 11HB965DB-DD.BNLDLLK_ENG_0475.indd11 11 2010.2.26 9:57:49 AM2010.2.26 9:57:49 AM
Page 12

12 Preparation
2
Preparation
Regional Code
This unit has a regional code printed on the
rear of the unit. This unit can play only BD-ROM
or DVD discs labeled same as the rear of the
unit or “ALL”.
AVCHD (Advanced Video Codec
High Defi nition)
This player can playback AVCHD format
•
discs. These discs are normally recorded and
used in camcorders.
The AVCHD format is a high de nition
•
digital video camera format.
The MPEG-4 AVC/H.264 format is capable
•
of compressing images at higher e ciency
than that of the conventional image
compressing format.
Some AVCHD discs use the “x.v.Colour”
•
format.
This player can playback AVCHD discs using
•
“x.v.Colour” format.
Some AVCHD format discs may not play,
•
depending on the recording condition.
AVCHD format discs need to be nalized.
•
“x.v.Colour” o ers a wider colour range than
•
normal DVD camcorder discs.
Certain System Requirements
For high de nition video playback:
•
High de nition display that has
COMPONENT or HDMI input jacks.
•
BD-ROM disc with high de nition content.
•
HDMI or HDCP capable DVI input on your
display device is required for some content
(as speci ed by disc authors).
•
For up-conversion of standard de nition
DVD, a HDMI or HDCP capable DVI input
on your display device is required for copy
protected content.
Compatibility Notes
Because BD-ROM is a new format,
•
certain disc, digital connection and other
compatibility issues are possible. If you
experience compatibility problems, please
contact an authorized Customer Service
Centre.
Viewing high-de nition content and up-
•
converting standard DVD content may
require a HDMI-capable input or HDCPcapable DVI input on your display device.
Some BD-ROM and DVD discs may restrict
•
the use of some operation commands or
features.
You can use a USB device that is used
•
to store some disc related information,
including downloaded on-line content. The
disc you are using will control how long this
information is retained.
HB965DB-DD.BNLDLLK_ENG_0475.indd12 12HB965DB-DD.BNLDLLK_ENG_0475.indd12 12 2010.2.26 9:57:49 AM2010.2.26 9:57:49 AM
Page 13
Remote control
13Preparation
1
2
3
4
Battery Installation
Remove the battery cover
on the rear of the Remote
Control, and insert two R03
(size AAA) batteries with
and matched correctly.
• • • • • • •a • • • • • •
(POWER): Switches the player
1
ON or OFF.
OPEN/CLOSE: Opens and closes
Z
the disc tray.
RADIO&INPUT: Changes input
mode.
0-9 numerical buttons: Selects
numbered options in a menu.
CLEAR: Removes a mark on the
search menu or a number when
setting the password.
REPEAT: Repeats a desired section
or sequence.
• • • • • • •b • • • • • •
SCAN: Searches
m/M
backward or forward.
./>
or previous chapter / track / le.
x
B
X
SPEAKER LEVEL: Sets the sound
level of desired speaker.
SOUND EFFECT: Selects a sound
e ect mode.
VOL +/- : Adjusts speaker volume.
OPTICAL: Changes input mode to
optical directly.
MUTE: Mute the unit.
SKIP: Goes to the next
(STOP): Stops playback.
(PLAY): Starts playback.
(PAUSE): Pauses playback
• • • • • • •c • • • • • •
HOME: Displays or exits the
[Home Menu].
C ID: When connected to the
MUSI
network, can provide information
about the current song while
movie playback.
INFO/DISPLAY: Displays or exits
On-Screen Display.
Direction buttons: Selects an
option in the menu
ENTER: Acknowledges menu
selection.
RETURN: Exits the menu or
O
resumes playback.
TITLE/POPUP: Displays the DVD
title menu or BD-ROM’s pop-up
menu, if available.
DISC MENU: Accesses menu on a
disc.
• • • • • • •d • • • • • •
Coloured (R, G, Y, B) buttons: Use
to navigate on menus.
RDS: Radio Data System.
PTY: Views the programme type of
the RDS.
PTY SEARCH:
Searches programme type.
MONO/STEREO: Selects mono/
stereo in FM mode.
MARKER: Marks any point during
playback.
SEARCH: Displays or exits the
search menu.
SLEEP: Sets a certain period of time
after which the unit will switch to
o .
REC: Records an audio CD.
z
TV Control Buttons: See page 77.
.
2
Preparation
HB965DB-DD.BNLDLLK_ENG_0475.indd13 13HB965DB-DD.BNLDLLK_ENG_0475.indd13 13 2010.2.26 9:57:50 AM2010.2.26 9:57:50 AM
Page 14
14 Preparation
78 9
12345
6
78
12345
6
1
8 9
2 3 4 5 76
10
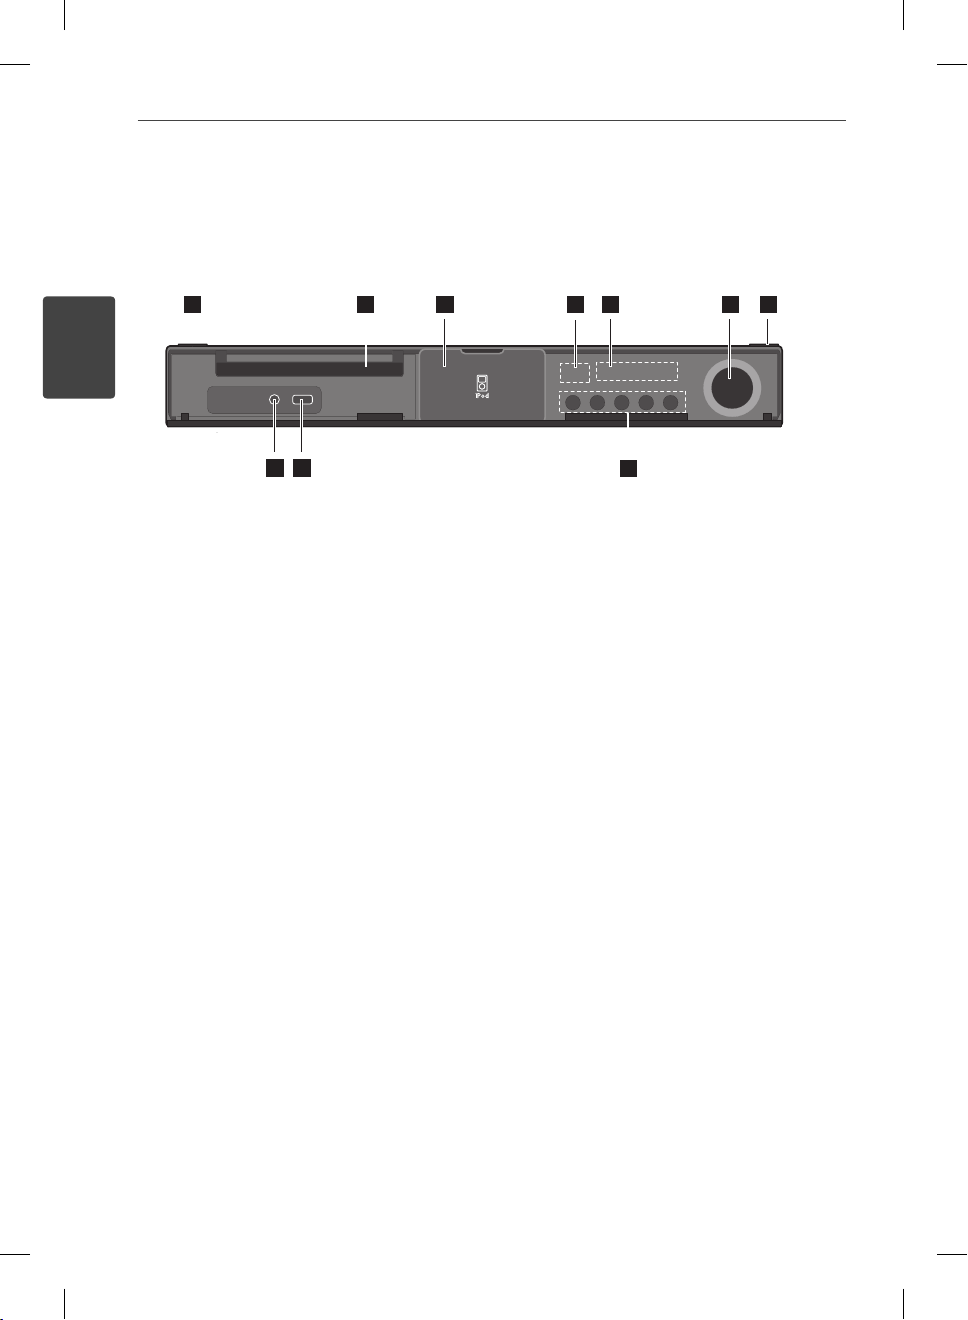
Front panel
2
Preparation
10
1/\
(POWER) Button
a
Disc Tray
b
iPod Dock
c
Remote sensor
d
Display window
e
Volume control
f
Z
(OPEN/CLOSE)
g
PORT. IN
h
USB Port
i
Operation buttons
j
B/X
(PLAY / PAUSE)
x
(STOP)
./>
(SKIP)
F (Function)
Changes the input source or function.
HB965DB-DD.BNLDLLK_ENG_0475.indd14 14HB965DB-DD.BNLDLLK_ENG_0475.indd14 14 2010.2.26 9:57:52 AM2010.2.26 9:57:52 AM
Page 15

1
78 9
12345
6
78
6
1
89
23 45 76
1110
1
89
23 45 76
10
2 3 4 5
6 7 8 9
11
Rear panel
101011
AC Power cord
a
Plug into the power source.
Speakers connectors
b
Cooling Fan
c
Antenna Connector
d
VIDEO OUT
e
AUX (L/R) INPUT
f
COMPONENT VIDEO (Y P
g
OUTPUT (PROGRESSIVE SCAN)
OPTICAL IN 1(TV) / 2
h
HDMI IN (type A, Version 1.3) 1/2
i
HDMI OUT (type A, Version 1.3)
j
Connect to TV with HDMI inputs.
LAN port
k
B PR
)
15Preparation
2
Preparation
HB965DB-DD.BNLDLLK_ENG_0475.indd15 15HB965DB-DD.BNLDLLK_ENG_0475.indd15 15 2010.2.26 9:57:52 AM2010.2.26 9:57:52 AM
Page 16
16 Installation
3
Installation
3
Installation
Speaker Connection
Attaching the speakers to the
player
1. Connect speaker wires to the main unit.
Each speaker wire is colour-coded. Use
matching colour wires for corresponding
speakers.
colour Speaker Position
Orange Sub
woofer
Red Front Front right
White Front Front left
Any front position
2. Connect the speaker wire to the terminal
on the speaker.
Make sure the wire marked black goes in
to the terminal marked “–” (minus) and the
other wire goes in to the terminal marked
“+” (plus).
CAUTION
Be careful to make sure children not to put their
hands or any objects into the *speaker duct.
*Speaker duct: A hole for plentiful bass sound on
speaker cabinet (enclosure).
HB965DB-DD.BNLDLLK_ENG_0475.indd16 16HB965DB-DD.BNLDLLK_ENG_0475.indd16 16 2010.2.26 9:57:53 AM2010.2.26 9:57:53 AM
Page 17

17Installation
Connecting to Your TV
Make one of the following connections,
depending on the capabilities of your existing
equipment.
•
HDMI connection (pages 17-18)
•
Component Video connection (page 19)
•
Video connection (page 19)
NOTE
Depending on your TV and other equipment
•
you wish to connect, there are various ways you
could connect the player. Use only one of the
connections described in this manual.
Please refer to the manuals of your TV, stereo
•
system or other devices as necessary to make
the best connections.
Make sure the player is connected directly to
•
the TV. Tune the TV to the correct video input
channel.
Do not connect your player via your VCR. The
•
image could be distorted by the copy protection
system.
HDMI Connection
If you have a HDMI TV or monitor, you
can connect it to this player using a HDMI
cable(Type A, Version 1.3). Connect the HDMI
OUT jack on the player to the HDMI IN jack on
a HDMI compatible TV or monitor.
HDMI Connection
Player
Player
HDMI IN 2
TV
TV
3
Installation
Set the TV’s source to HDMI (refer to TV’s
Owner’s manual).
HB965DB-DD.BNLDLLK_ENG_0475.indd17 17HB965DB-DD.BNLDLLK_ENG_0475.indd17 17 2010.2.26 9:57:53 AM2010.2.26 9:57:53 AM
Page 18
18 Installation
3
Installation
NOTE
Changing the resolution when the connection
•
has already been established may result in
malfunctions. To solve the problem, turn o the
player and then turn it on again.
When the HDMI connection with HDCP is not
•
veri ed, TV screen is changed to black screen.
In this case, check the HDMI connection, or
disconnect the HDMI cable.
If there is noise or lines on the screen, please
•
check the HDMI cable (length is generally
limited to 4.5 m and use a high speed HDMI
cable (version 1.3).
If a connected HDMI device does not accept the
•
audio output of the player, the HDMI
device’s audio sound may be distorted or may
not output.
When you use HDMI connection, you can
•
change the resolution for the HDMI output.
(Refer to “Resolution Setting” on page 20.)
Select the type of video output from the HDMI
•
OUT jack using [HDMI Color Setting] option on
the [Setup] menu (see page 33).
When you connect a HDMI or DVI compatible
•
device make sure of the following:
- Try switching o the HDMI/DVI device and this
player. Next, switch on the HDMI/DVI device
and leave it for around 30 seconds, then switch
on this player.
- The connected device’s video input is set
correctly for this unit.
- The connected device is compatible with
720x576p, 1280x720p, 1920x1080i or
1920x1080p video input.
Not all HDCP-compatible HDMI or DVI devices
•
will work with this player.
- The picture will not be displayed properly with
non-HDCP device.
- This player does not playback and TV screen is
changed to black screen.
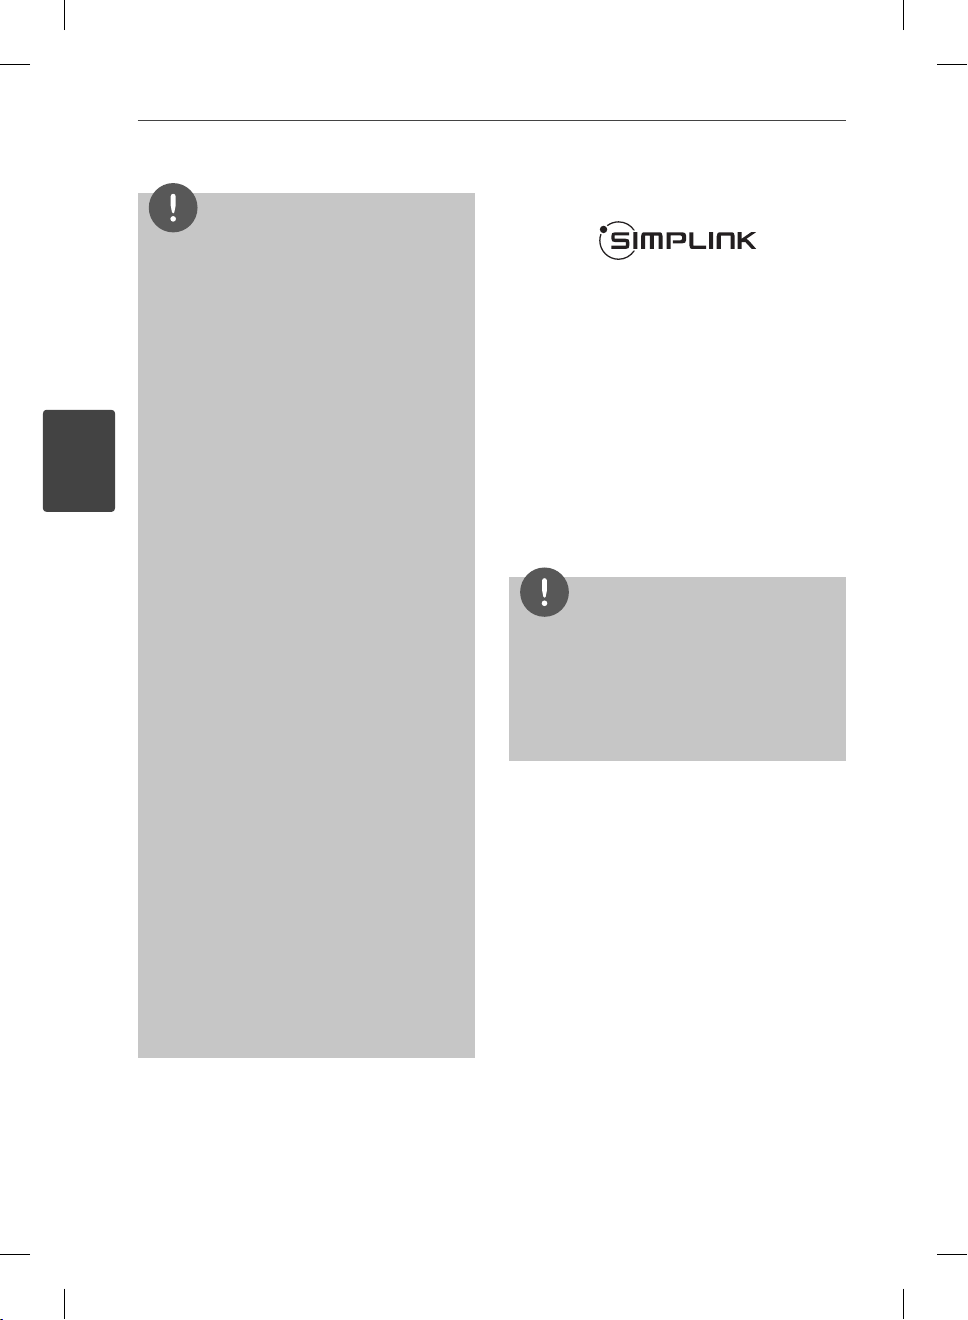
What is SIMPLINK?
Some functions of this unit are controlled by
the TV’s remote control when this unit and LG
TV’s with SIMPLINK are connected through
HDMI connection.
Controllable functions by LG TV’s remote
control; Play, Pause, Scan, Skip, Stop, Power O ,
etc.
Refer to the TV owner’s manual for the details
of SIMPLINK function.
LG TV’s with SIMPLINK function has the logo as
shown above.
NOTE
Depending on the disc type or playing status,
•
some SIMPLINK operation may di er from your
purpose or not work.
When you use SIMPLINK function, you have to
•
connect to the OPTICAL IN 1 jack to enjoy TV
sound to your speaker system.
HB965DB-DD.BNLDLLK_ENG_0475.indd18 18HB965DB-DD.BNLDLLK_ENG_0475.indd18 18 2010.2.26 9:57:53 AM2010.2.26 9:57:53 AM
Page 19

19Installation
Component Video Connection
Connect the COMPONENT VIDEO OUT jacks on
the player to the corresponding input jacks on
the TV using Y Pb Pr cables. You can hear the
sound the through the system’s speaker.
Component Connection
Player
Player
Green
Green
Blue
Blue
Red
Red
TV
TV
Video Connection
Connect the VIDEO OUT jack on the player to
the video in jack on the TV using a video cable.
You can hear the sound through the system’s
speakers.
Video Connection
Player
Player
Yellow
Ye ll o w
TV
TV
3
Installation
NOTE
When you use COMPONENT VIDEO OUT
connection, you can change the resolution for the
output. (Refer to “Resolution setting” on page 20.)
HB965DB-DD.BNLDLLK_ENG_0475.indd19 19HB965DB-DD.BNLDLLK_ENG_0475.indd19 19 2010.2.26 9:57:54 AM2010.2.26 9:57:54 AM
Page 20

20 Installation
3
Installation
Resolution Setting
The player provides several output resolutions
for HDMI OUT and COMPONENT VIDEO OUT
jacks. You can change the resolution using
[Setup] menu.
1. Press HOME ( ).
2. Use I/i to select the [Setup] and press
ENTER (
3. Use U/u to select [DISPLAY] option then
press i to move to the second level.
4. Use U/u to select the [Resolution] option
then press ENTER ( ) or i to move to the
third level.
). The [Setup] menu appears.
NOTE
If your TV does not accept the resolution you
•
have set on the player, you can set resolution to
576p as follows:
1. Press Z to open the disc tray.
2. Press x for more than 5 seconds.
Since several factors a ect the resolution of
•
video output, see “Video Output Resolution” on
page 82.
5. Use U/u to select the desired resolution
then press ENTER (
) to con rm your
selection.
HB965DB-DD.BNLDLLK_ENG_0475.indd20 20HB965DB-DD.BNLDLLK_ENG_0475.indd20 20 2010.2.26 9:57:54 AM2010.2.26 9:57:54 AM
Page 21

21Installation
Antenna connection
Connect the supplied antenna for listening to
the radio.
Antenna Connection
Player
Player
Connections with
external device
AUX Connection
You can enjoy the sound of your component
with the analogue audio output jacks from the
speakers of the system.
Connect the analogue audio output jacks of
your component into the AUX L/R (INPUT) on
this unit. And then select the [AUX] option by
pressing RADIO&INPUT and ENTER (
You can also use F button on the front panel to
select the input mode.
AUX Connection
Player
Player
).
3
Installation
NOTE
After connecting the FM wire antenna, keep it as
horizontal as possible. Be sure to fully extend the
FM wire antenna.
To the audio output jacks
To the audio output jacks
of your component
of your component
(TV, VCR, etc.)
(TV, VCR, etc.)
HB965DB-DD.BNLDLLK_ENG_0475.indd21 21HB965DB-DD.BNLDLLK_ENG_0475.indd21 21 2010.2.26 9:57:55 AM2010.2.26 9:57:55 AM
Red
Red
White
White
Page 22
22 Installation
3
Installation
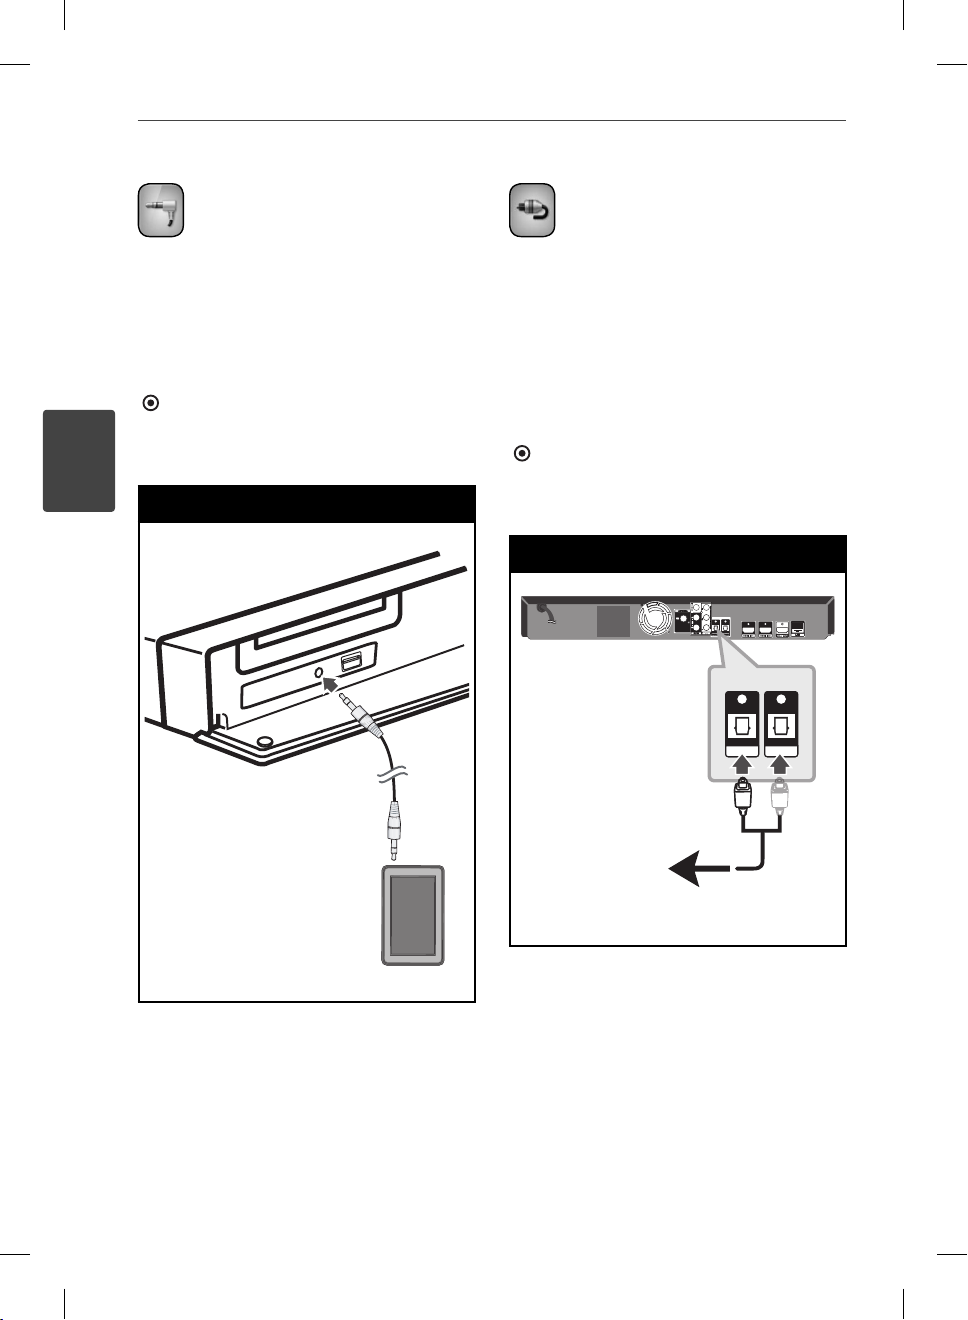
PORT. IN connection
You can enjoy the sound of your portable
audio player from the speakers of the system.
Connect the headphones (or line out ) jack of
the portable audio player into the PORT. IN
of this unit. And then select the [PORTABLE]
option by pressing RADIO&INPUT and ENTER
).
(
You can also use F button on the front panel to
select the input mode.
PORT.IN Connection
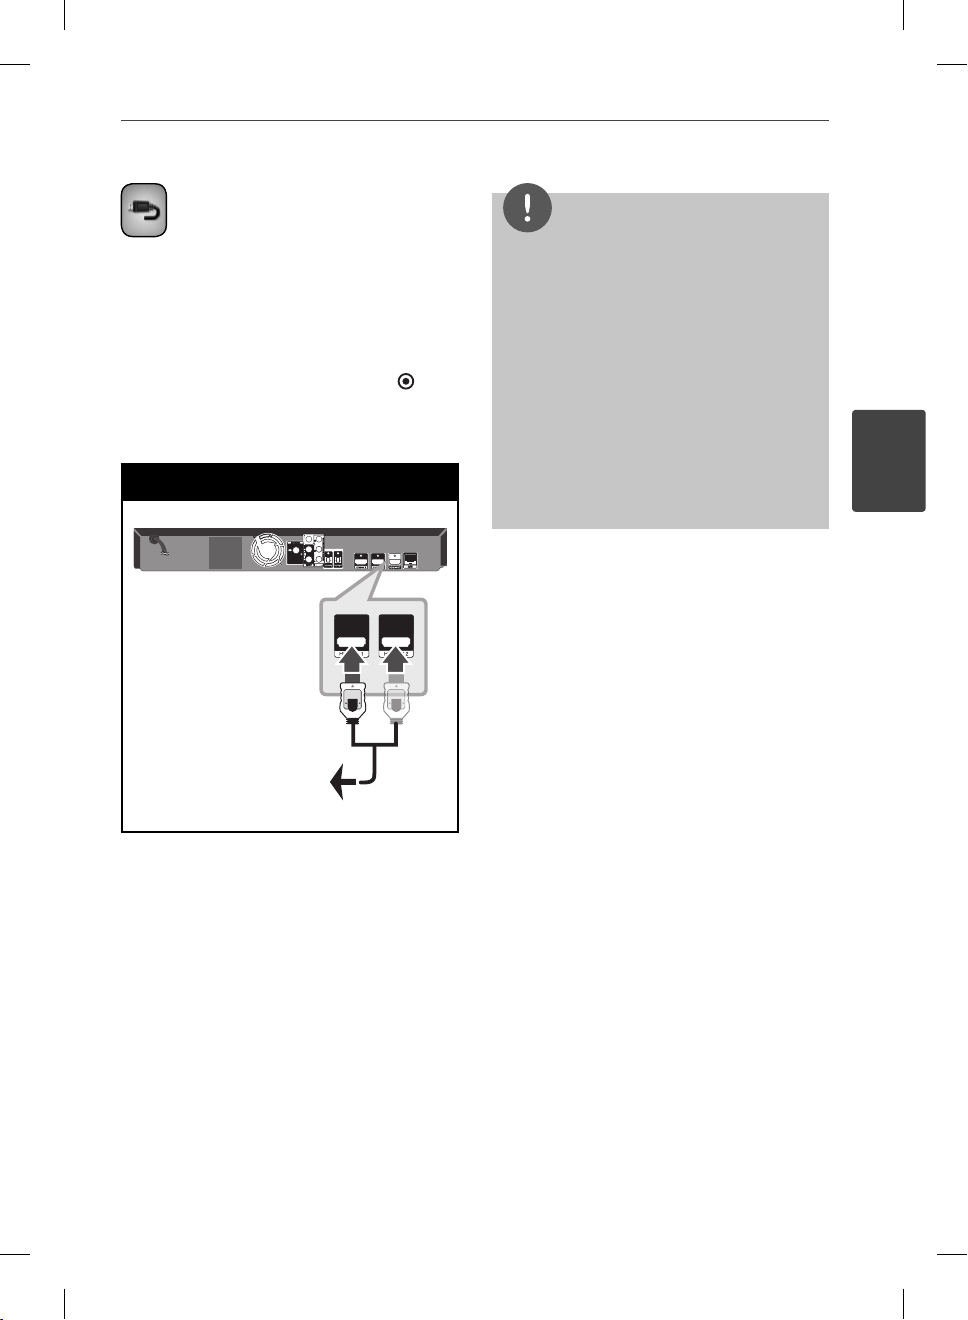
OPTICAL IN 1/2
connection
You can enjoy the sound of your component
with the digital optical connection from the
speakers of the system.
Connect the optical output jack of your
component into the OPTICAL IN 1/2 jacks on
the unit. And then select the [OPTICAL 1/2]
option by pressing RADIO&INPUT and ENTER
). Or press OPTICAL to select directly.
(
You can also use F button on the front panel to
select the input mode.
Optical Connection
To the digital
To the digital
optical output jack
optical output jack
of your component
of your component
MP3 player, etc...
twZGSGUUU
HB965DB-DD.BNLDLLK_ENG_0475.indd22 22HB965DB-DD.BNLDLLK_ENG_0475.indd22 22 2010.2.26 9:57:55 AM2010.2.26 9:57:55 AM
Page 23
HDMI IN 1/2 connection
You can enjoy the pictures and sound of your
component with this connection.
Connect the HDMI OUT jack of your
component into the HDMI IN 1 or 2 jack on this
unit. And then select the [HDMI IN 1/2] option
by pressing RADIO&INPUT and ENTER (
).
You can also use F button on the front panel to
select the input mode.
HDMI 1/2 Connection
NOTE
You cannot change the video resolution at the
•
HDMI IN 1/2 mode. Change the video resolution
of the connected component.
If the video output signal is abnormal when your
•
personal computer is connected to HDMI IN
1/2 jack, change the resolution of your personal
computer to 576p, 720p, 1080i or 1080p.
The video signal from the HDMI input cannot be
•
output from the component or composite video
outputs.
The player sends audio from the HDMI inputs
•
to both the HDMI output and to the unit’s
speakers.
23Installation
3
Installation
To the HDMI OUT jack
To the HDMI OUT jack
of your component
of your component
(set-top box, digital
(set-top box, digital
satellite receiver,
satellite receiver,
video game machine,
video game machine,
etc.)
etc.)
HB965DB-DD.BNLDLLK_ENG_0475.indd23 23HB965DB-DD.BNLDLLK_ENG_0475.indd23 23 2010.2.26 9:57:56 AM2010.2.26 9:57:56 AM
Page 24

24 Installation
3
Installation
Connecting to your
Home Network
This player can be connected to a local area
network (LAN) via the LAN port on the rear
panel or the internal wireless module.
By connecting the unit to a broadband home
network, you have access to services such
as software updates, Home Link, BD-LIVE
interactivity and streaming services.
Wired network connection
Using a wired network provides the best
performance, because the attached devices
connect directly to the network and are not
subject to radio frequency interference.
Please refer to the documentation for your
network device for further instructions.
Connect the player’s LAN port to the
corresponding port on your Modem or Router
using a commercially available LAN or Ethernet
cable (CAT5 or better with RJ45 connector).
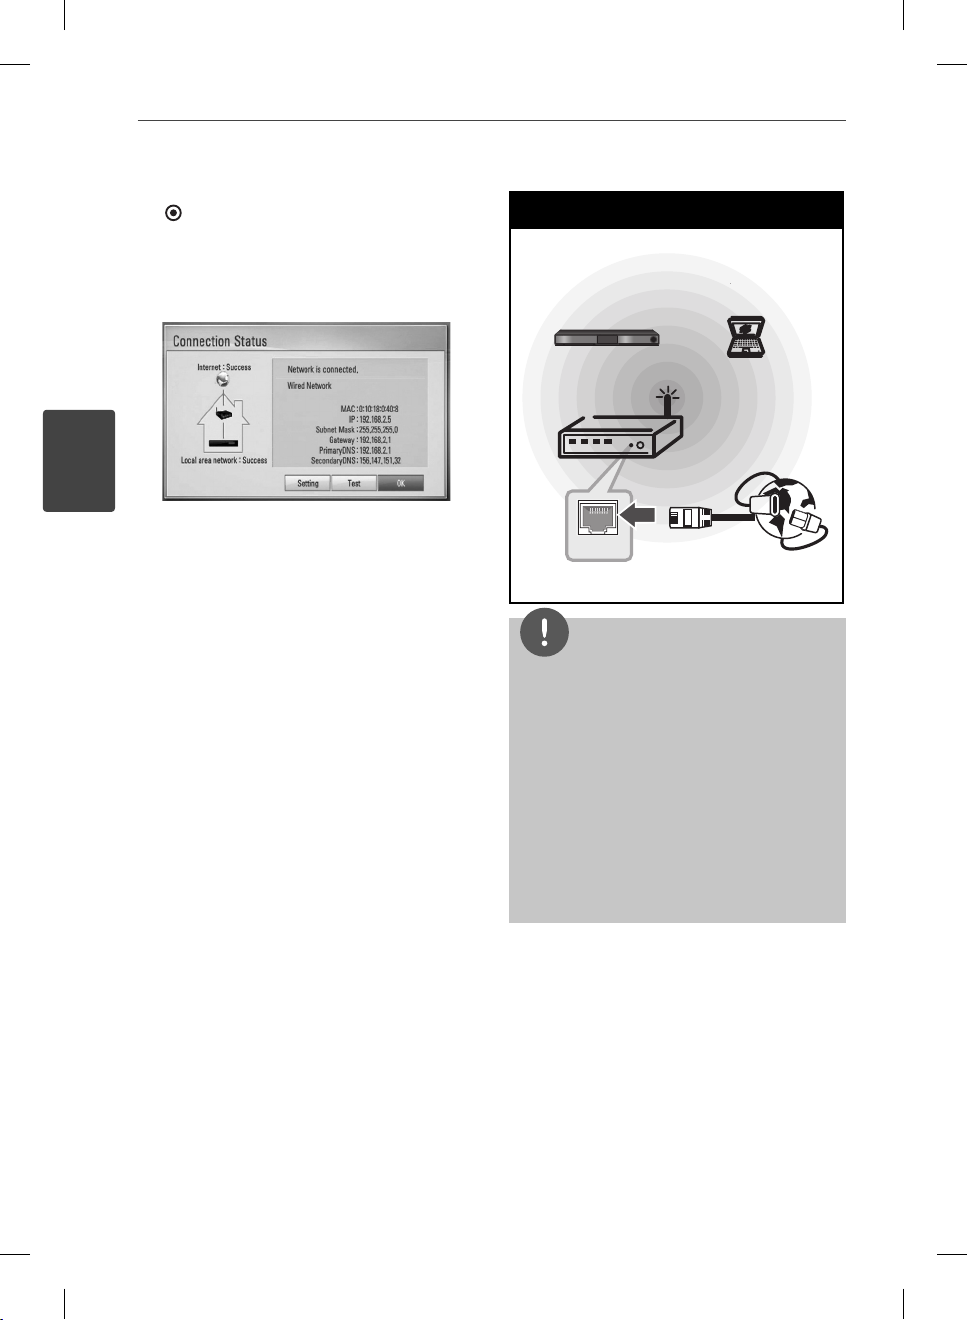
In the example con guration for wired
connection below, this player would be able to
access content from either of the PCs.
Wired Network Connection
Router
Router
Broadband
Broadband
Service
Service
WAN
LAN 1
LAN 2
LAN 3
PC
PC
Player
Player
NOTE
When plugging or unplugging the LAN cable,
•
hold the plug portion of the cable. When
unplugging, do not pull on the LAN cable but
unplug while pressing down on the lock.
Do not connect a modular phone cable to the
•
LAN port.
Since there are various connection
•
con gurations, please follow the speci cations
of your telecommunication carrier or internet
service provider.
If you want to access content from PCs or DLNA
•
servers, this player must be connected to the
same local area network with them via a router.
HB965DB-DD.BNLDLLK_ENG_0475.indd24 24HB965DB-DD.BNLDLLK_ENG_0475.indd24 24 2010.2.26 9:57:56 AM2010.2.26 9:57:56 AM
Page 25
25Installation
Wired Network Setup
Before setting the wired network, you need to
connect the broadband internet to your home
network.
If there is a DHCP server on the local area
network (LAN) via wired connection, this player
will automatically be allocated an IP address.
After making the physical connection, a small
number of home networks may require the
player’s network setting to be adjusted. Adjust
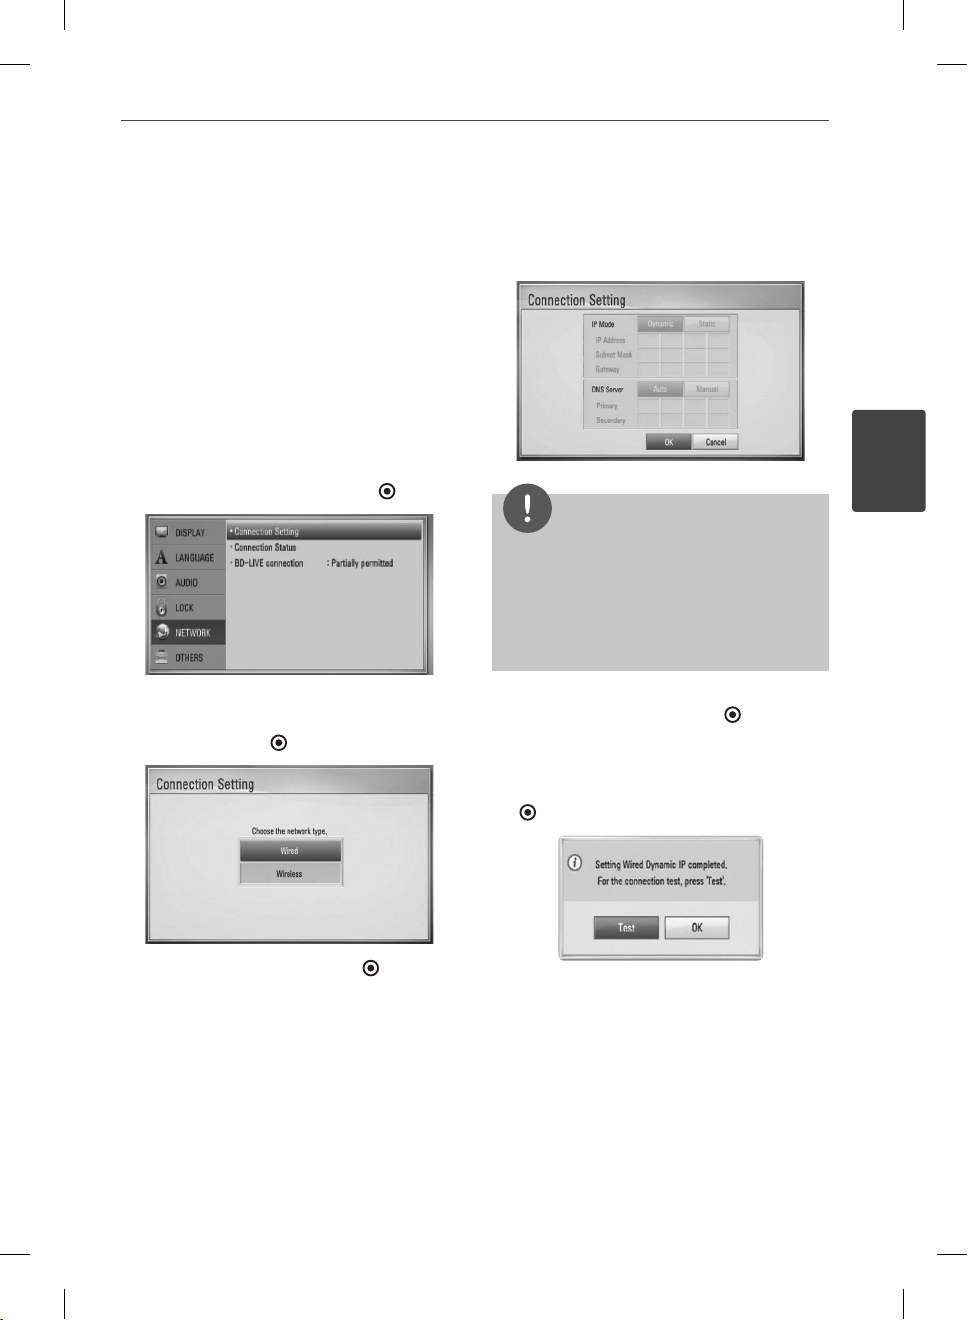
the [NETWORK] setting as follow.
1. Select [Connection Setting] option in the
[Setup] menu then press ENTER (
2. The [Connection Setting] menu appear on
the screen. Use U/
u
to select the [Wired]
and press ENTER ( ).
).
4. Use U/u/I/
i
to select the IP mode
between [Dynamic] and [Static].
Normally, select [Dynamic] to allocate an IP
address automatically.
NOTE
If there is no DHCP server on the network and you
want to set the IP address manually, select [Static]
then set the [IP Address], [Subnet Mask], [Gateway]
and [DNS Server] using U/u/I/
buttons. If you make a mistake while entering a
number, press CLEAR to clear the highlighted part.
5. Select [OK] and press ENTER ( ) to apply
network settings.
6. The player will ask you to test the network
connection. Select [OK] and press ENTER
) to complete the network connection.
(
i
and numerical
3
Installation
3. Selects [Yes] and press ENTER ( ) to
continue. The new connection setting
resets the current network settings.
HB965DB-DD.BNLDLLK_ENG_0475.indd25 25HB965DB-DD.BNLDLLK_ENG_0475.indd25 25 2010.2.26 9:57:57 AM2010.2.26 9:57:57 AM
Page 26
26 Installation
3
Installation
7. If you select [Test] and press ENTER
( ) at step 5 above, the network
connection status is displayed on the
screen.
You can also test it on the
[Connection Status] in the [Setup] menu.
Wireless Network Connection
Another connection option is to use an Access
Point or a wireless router. In the example
con guration for wireless connection below,
this player would be able to access content
from either of the PCs.
The network con guration and connection
method may vary depending on the
equipment in use and the network
environment.
This player is equipped with an IEEE 802.11n
(2.4 GHz band only) wireless module, which
also supports the 802.11b/g standards. For the
best wireless performance, we recommend
using a IEEE 802.11n (2.4 GHz band only)
certi ed Wi-Fi network (access point or wireless
router).
Refer to the setup instructions supplied with
your access point or wireless router for detailed
connection steps and network settings.
Wireless Network Connection
Wireless
Communication
Player
WAN
PC
Access Point or
Wireless Router
Broadband
service
NOTE
For best performance, a direct wired connection
•
from your Home theatre to your home network’s
router or cable/DSL modem is always the best
option. If your Home theatre is far away from
your router or cable/DSL modem. Ethernet
or LAN cables are available at many stores in
lengths of 15 m and longer. If you do chose to
use the wireless option, note that performance
can sometimes be a ected by other electronic
devices in the home.
An Access Point is a device that allows you to
•
connect to your home network wirelessly.
HB965DB-DD.BNLDLLK_ENG_0475.indd26 26HB965DB-DD.BNLDLLK_ENG_0475.indd26 26 2010.2.26 9:57:58 AM2010.2.26 9:57:58 AM
Page 27
27Installation
Wireless Network Setup
Before setting the wireless network, you need
to:
– connect the broadband internet to the
wireless home network.
– set the access point or wireless router.
– note the SSID and security code of the
network.
For the wireless network connection, the
player needs to be set up for network
communication. This adjustment can be done
from the [Setup] menu. Adjust the [NETWORK]
setting as follow. Setting up the access point
or the wireless router is required before
connecting the player to the network.
1. Select [Connection Setting] option in the
[Setup] menu then press ENTER (
2. The [Connection Setting] menu appear on
u
the screen. Use U/
press ENTER (
to select [Wireless] and
).
).
3. Selects [Yes] and press ENTER ( ) to
continue. The new connection setting
resets the current network settings.
4. The player scans the all available access
points or wireless routers within range and
display them as a list. Use U/
u
to select an
access point or wireless router on the list,
and then press ENTER ( ).
If you have security on your access point
or wireless router, verify that the WEP or
WPA key that was entered into the player
matches the router’s information exactly.
You need to input the security code as
necessary.
3
Installation
NOTE
WEP security mode generally have 4 keys available
on an access point or wireless router’s setting.
If your access point or wireless router use WEP
security, enter the security code of the key “No.1” to
connect on your home network.
HB965DB-DD.BNLDLLK_ENG_0475.indd27 27HB965DB-DD.BNLDLLK_ENG_0475.indd27 27 2010.2.26 9:57:58 AM2010.2.26 9:57:58 AM
Page 28

28 Installation
3
Installation
[Manual] – Your access point may not be
broadcasting its access point name(SSID).
Check your router settings through your
computer and either set your router to
broadcast SSID, or manually enter the
access point name(SSID) in [Manual].
[Push Button] – If your access point or
wireless router that supports Push Button
Con guration method, select this option
and press the Push Button on your access
point or wireless router within 120 counts.
You do not need to know the access point
name (SSID) and security code of your
access point or wireless router.
i
/I/
u
5. Use U/
to select the IP mode
between [Dynamic] and [Static].
Normally, select [Dynamic] to allocate an IP
address automatically.
NOTE
If there is no DHCP server on the network and you
want to set the IP address manually, select [Static]
then set [IP Address], [Subnet Mask], [Gateway]
and [DNS Server] using U/u/I/
buttons. If you make a mistake while entering a
number, press CLEAR to clear the highlighted part.
6. Select [OK] and press ENTER ( ) to apply
network settings.
7. The player will ask you to test the network
connection. Select [OK] and press ENTER
) to complete the network connection.
(
8. If you select [Test] at step 7 above, the
network connection status is displayed on
the screen.
You can also test it on the [Connection
Status] in the [Setup] menu.
i
and numerical
Notes on Network Connection:
Many network connection problems during
•
set up can often be xed by re-setting the
router or modem. After connecting the
player to the home network, quickly power
o and/or disconnect the power cable of
the home network router or cable modem.
Then power on and/or connect the power
cable again.
Depending on the internet service provider
•
(ISP), the number of devices that can
receive internet service may be limited by
the applicable terms of service. For details,
contact your ISP.
Our company is not responsible for
•
any malfunction of the player and/or
the internet connection feature due to
communication errors/malfunctions
associated with your broadband internet
connection, or other connected equipment.
The features of BD-ROM discs made
•
available through the Internet Connection
feature are not created or provided
by our company, and our company is
not responsible for their functionality
or continued availability. Some disc
related material available by the Internet
Connection may not be compatible with
this player. If you have questions about such
content, please contact the producer of the
disc.
Some internet contents may require a
•
higher bandwidth connection.
Even if the player is properly connected and
•
con gured, some internet contents may
not operate properly because of internet
congestion, the quality or bandwidth of
your internet service, or problems at the
provider of the content.
HB965DB-DD.BNLDLLK_ENG_0475.indd28 28HB965DB-DD.BNLDLLK_ENG_0475.indd28 28 2010.2.26 9:57:59 AM2010.2.26 9:57:59 AM
Page 29

Some internet connection operations may
•
not be possible due to certain restrictions
set by the Internet service provider (ISP)
supplying your broadband Internet
connection.
Any fees charged by an ISP including,
•
without limitation, connection charges are
your responsibility.
A 10 Base-T or 100 Base-TX LAN port is
•
required for wired connection to this player.
If your internet service does not allow for
such a connection, you will not be able to
connect the player.
You must use a Router to use xDSL service.
•
A DSL modem is required to use DSL service
•
and a cable modem is required to use cable
modem service. Depending on the access
method of and subscriber agreement with
your ISP, you may not be able to use the
internet connection feature contained in
this player or you may be limited to the
number of devices you can connect at the
same time. (If your ISP limits subscription
to one device, this player may not be
allowed to connect when a PC is already
connected.)
The use of a “Router” may not be allowed
•
or its usage may be limited depending on
the policies and restrictions of your ISP. For
details, contact your ISP directly.
The wireless network operate at 2.4 GHz
•
radio frequencies that are also used by
other household devices such as cordless
telephone, Bluetooth® devices, microwave
oven, and can be a ected by interference
from them.
Turn o all unused network equipment in
•
your local home network. Some devices
may generate network tra c.
For the purpose of the better transmission,
•
placing the player from the access point as
close as possible.
In some instances, placing the access point
•
or wireless router at least 0.45 m above the
oor may improve the reception.
•
Move closer to the access point if possible
or re-orient the player so there is nothing
between it and the access point.
•
The reception quality over wireless depends
on many factors such as type of the access
point, distance between the player and
access point, and the location of the player.
•
Set your access point or wireless router to
Infrastructure mode. Ad-hoc mode is not
supported.
29Installation
3
Installation
HB965DB-DD.BNLDLLK_ENG_0475.indd29 29HB965DB-DD.BNLDLLK_ENG_0475.indd29 29 2010.2.26 9:57:59 AM2010.2.26 9:57:59 AM
Page 30

30 Installation
3
Installation
USB device
connection
This player can play movie, music and photo
les contained in the USB device.
1. Insert a USB device to the USB port until it
ts into place.
USB Connection - 1
When you connect the USB device on
the HOME menu, the player plays a music
le contained in the USB storage device
automatically. If the USB storage device is
containing various types of les, a menu for
the le type selection will appear.
2. Select [Movie], [Photo] or [Music] using
I/i
, and press ENTER ( ).
3. Select a le using U/u/I/i, and press PLAY
or ENTER (
You can check the space of the USB device
on the screen.
4. Select the other mode. And withdraw the
USB device carefully.
USB Connection - 2
) to play the le.
File loading may takes few minutes depending
on the number of content stored in the USB
storage device. Press ENTER ( ) while [Cancel]
is selected to stop loading.
HB965DB-DD.BNLDLLK_ENG_0475.indd30 30HB965DB-DD.BNLDLLK_ENG_0475.indd30 30 2010.2.26 9:57:59 AM2010.2.26 9:57:59 AM
Page 31

31Installation
NOTE
This player supports USB ash memory/external
•
HDD formatted in FAT16, FAT32 and NTFS when
accessing les (music, photo, movie). However,
for BD-LIVE and Audio CD recording, only FAT16
and FAT32 formats are supported. Use the USB
ash memory/external HDD formatted in either
FAT16 or FAT32 when using BD-LIVE and Audio
CD recording.
The USB device can be used for the local storage
•
for enjoying BD-LIVE discs with Internet.
This unit can support up to 4 partitions of the
•
USB device.
Do not extract the USB device during operation
•
(play, etc.).
An USB device which requires additional
•
programme installation when you have
connected it to a computer, is not supported.
USB device: USB device that support USB 1.1
•
and USB 2.0.
Movie, music and photo les can be played.
•
For details of operations on each le, refer to
relevant pages.
Regular back up is recommended to prevent
•
data loss.
If you use a USB extension cable, USB HUB or
•
USB Multi-reader, the USB device may not be
recognised.
Some USB device may not work with this unit.
•
Digital camera and mobile phone are not
•
supported.
USB Port of the unit cannot be connected to PC.
•
The unit cannot be used as a storage device.
Settings
Adjust the Setup Settings
You can change the settings of the player in
the [Setup] menu.
1. Press HOME (
2. Use I/i to select the [Setup] and press
ENTER ( ). The [Setup] menu appears.
3. Use U/u to select a rst setup option, and
press i to move to the second level.
).
3
Installation
HB965DB-DD.BNLDLLK_ENG_0475.indd31 31HB965DB-DD.BNLDLLK_ENG_0475.indd31 31 2010.2.26 9:58:0 AM2010.2.26 9:58:0 AM
Page 32

32 Installation
4. Use U/u to select a second setup option,
5. Use U/u to select a desired setting, and
3
Installation
TV Aspect Ratio
Select a TV aspect ratio option according to
your TV type.
and press ENTER (
level.
press i or ENTER ( ) to con rm your
selection.
) to move to the third
[DISPLAY] Menu
[4:3 Letter Box]
Select when a standard 4:3 TV is connected.
Displays theatrical images with masking
bars above and below the picture.
[4:3 Pan Scan]
Select when a standard 4:3 TV is connected.
Displays pictures cropped to ll your TV
screen. Both sides of the picture are cut o .
[16:9 Original]
Select when a 16:9 wide TV is connected.
The 4:3 picture is displayed with an original
4:3 aspect ratio, with black bars appearing
at the left and right sides.
NOTE
You cannot select [4:3 Letter Box] and [4:3 Pan
Scan] option when the resolution is set to higher
than 720p.
Resolution
Sets the output resolution of the Component
and HDMI video signal. Refer to page 20 and
82 or details about the resolution setting.
[Auto]
If the HDMI OUT jack is connected to
TVs providing display information (EDID),
automatically selects the resolution
best suited to the connected TV. If the
COMPONENT VIDEO OUT is only connected,
this changes the resolution to 1080i as
default resolution.
[1080p]
Outputs 1080 lines of progressive video.
[1080i]
Outputs 1080 lines of interlaced video.
[720p]
Outputs 720 lines of progressive video.
[576p]
Outputs 576 lines of progressive video.
[576i]
Outputs 576 lines of interlaced video.
[16:9 Full]
Select when a 16:9 wide TV is connected.
The 4:3 picture is adjusted horizontally (in a
linear proportion) to ll the entire screen.
HB965DB-DD.BNLDLLK_ENG_0475.indd32 32HB965DB-DD.BNLDLLK_ENG_0475.indd32 32 2010.2.26 9:58:1 AM2010.2.26 9:58:1 AM
Page 33

33Installation
1080p Display Mode
When the resolution is set to 1080p, select
[24 Hz] for smooth presentation of lm material
(1080p/ 24 Hz) with a HDMI-equipped display
compatible with 1080p/ 24 Hz input.
NOTE
•
When you select [24 Hz], you may experience
some picture disturbance when the video
switches video and lm material. In this case,
select [50 Hz].
•
Even when [1080p Display Mode] is set to
[24 Hz], if your TV is not compatible with
1080p/ 24 Hz
the video output will be 50 Hz to match the
video source format.
, the actual frame frequency of
HDMI Color Setting
Select the type of output from the HDMI
OUT jack. For this setting, please refer to the
manuals of your display device.
[YCbCr]
Select when connecting to a HDMI display
device.
[LANGUAGE] Menu
Display Menu
Select a language for the [Setup] menu and
on-screen display.
Disc Menu/ Disc Audio/
Disc Subtitle
Select the language you prefer for the audio
track (disc audio), subtitles, and the disc menu.
[Original]
Refers to the original language in which the
disc was recorded.
[Other]
Press ENTER (
Use number buttons then ENTER (
enter the corresponding 4-digit number
according to the language code list on
page 79.
[O ] (for Disc Subtitle only)
Turn o Subtitle.
) to select another language.
) to
3
Installation
[RGB]
Select when connecting to a DVI (RGB)
display device.
HB965DB-DD.BNLDLLK_ENG_0475.indd33 33HB965DB-DD.BNLDLLK_ENG_0475.indd33 33 2010.2.26 9:58:1 AM2010.2.26 9:58:1 AM
NOTE
Depending on the disc, your language setting may
not work.
Page 34

34 Installation
3
Installation
[AUDIO] Menu
Speaker Setup
To obtain the best possible sound, use the
speaker setup display to specify the volume
of the speakers you have connected and their
distance from your listening position. Use the
test to adjust the volume of the speakers to the
same level.
[Speaker]
Select a speaker that you want to adjust.
[Volume]
Adjust the output level of each speaker.
[Distance]
Adjust the distance between each speaker
and the listening position.
[Test/ Stop test tone]
The speakers will emit a test tone.
[OK]
Con rms the setting.
[Cancel]
Cancels the setting.
HD AV Sync
Sometimes Digital TV encounters a delay
between picture and sound. If this happens
you can compensate by setting a delay on the
sound so that it e ectively ‘waits’ for the picture
to arrive: this is called HD AV Sync. Use
scroll up and down through the delay amount,
which you can set at anything between 0
and 300 ms. The delay will vary depending
on which digital TV channel you are on. If you
change channel you may need to readjust the
HD AV Sync.
U u
to
DRC (Dynamic Range Control)
When a content encoded in Dolby Digital or
Dolby Digital Plus is playing back, you may
wish to compress the dynamic range of the
audio output (the di erence between the
loudest sounds and the quietest ones). This
allows you to listen to a movie at a lower
volume without losing clarity of sound. Set
[DRC] to [On] for this e ect.
NOTE
The DRC setting can be changed only when a
disc is not inserted or the unit is in complete stop
mode.
HB965DB-DD.BNLDLLK_ENG_0475.indd34 34HB965DB-DD.BNLDLLK_ENG_0475.indd34 34 2010.2.26 9:58:2 AM2010.2.26 9:58:2 AM
Page 35

35Installation
[LOCK] Menu
To access the any features in [LOCK] settings,
you must enter the 4-digit security code you
have created.
If you have not entered a password yet, you are
prompted to do so. Enter a 4-digit password
twice, and press ENTER ( ) to create a new
password.
Password
You can create or change the password.
[None]
Enter a 4-digit password twice, and press
ENTER (
[Change]
Enter the current password and press ENTER
(
press ENTER ( ) to create a new password.
If you make a mistake before pressing ENTER
press CLEAR. Then input the correct password.
) to create a new password.
). Enter a 4-digit password twice, and
NOTE
( )
,
DVD Rating
Blocks playback of rated DVD based on their
content. (Not all discs are rated.)
[Rating 1-8]
Rating one (1) has the most restrictions and
rating eight (8) is the least restrictive.
[Unlock]
If you select this, parental control is not
active and the disc plays in full.
BD Rating
Set an age limit of BD-ROM play. Use number
buttons to input an age limit for BD-ROM
viewing.
[255]
All BD-ROM can be played.
[0-254]
Prohibits play of BD-ROM with
corresponding ratings recorded on them.
NOTE
The [BD Rating] will be applied only for the BD disc
that containing the Advanced Rating Control.
3
Installation
If you forget your password,
If you forget your password, you can clear it using
the following steps:
1. Remove any disc that might be in the player.
2. Select [Lock] option in the [Setup] menu.
3. Use number buttons to enter “210499” on the
[Lock] Menu. The password is cleared.
HB965DB-DD.BNLDLLK_ENG_0475.indd35 35HB965DB-DD.BNLDLLK_ENG_0475.indd35 35 2010.2.26 9:58:2 AM2010.2.26 9:58:2 AM
Area Code
Enter the code of the area whose standards
were used to rate the DVD video disc, based
on the list on page 78.
Page 36

36 Installation
3
Installation
[NETWORK] Menu
The [NETWORK] settings are needed to use
the software update, BD Live, Home Link and
NetCast features.
Connection Setting
If your home network environment is ready
to connect the player, the player needs to
be set the network connection for network
communication. (See “Connecting to your
Home Network” on page 24.)
Connection Status
If you want to check the network status on
this player, select the [Connection Status]
options and press ENTER ( ) to check whether
a connection to the network and the internet
have been established.
BD-LIVE connection
You can restrict Internet access when BD-LIVE
functions are used.
[Permitted]
Internet access is permitted for all BD-LIVE
contents.
[Partially permitted]
Internet access is permitted only for BDLIVE contents which have content owner
certi cates. Internet access and AACS
Online functions are prohibited for all BDLIVE contents without a certi cate.
[OTHERS] Menu
DivX VOD
ABOUT DIVX VIDEO: DivX® is a digital video
format created by DivX, Inc. This is an o cial
DivX Certi ed device that plays DivX video.
Visit www.divx.com for more information and
software tools to convert your les into DivX
video.
ABOUT DIVX VIDEO-ON-DEMAND: This DivX
Certi ed® device must be registered in order to
play DivX Video-on-Demand (VOD) content.
To generate the registration code, locate the
DivX VOD section in the device setup menu.
Go to vod.divx.com with this code to complete
the registration process and learn more about
DivX VOD.
[Register]
Displays the registration code of your player.
[Deregister]
Deactivate your player and display the
deactivation code.
NOTE
All the downloaded videos from DivX VOD with
this player’s registration code can only be played
back on this unit.
[Prohibited]
Internet access is prohibited for all BD-LIVE
contents.
HB965DB-DD.BNLDLLK_ENG_0475.indd36 36HB965DB-DD.BNLDLLK_ENG_0475.indd36 36 2010.2.26 9:58:3 AM2010.2.26 9:58:3 AM
Page 37

37Installation
Auto Power Off
The screen saver appears when you leave
the player in Stop mode for about ve
minutes. If you set this option to [On], the unit
automatically turns itself o after the Screen
Saver is displayed for 25 minutes.
Set this option to [O ] to leave the screen
saver until the unit is operated by the user.
Initialize
Factory Set
You can reset the player to its original
factory settings.
BD Storage Clear
Initializes the BD contents from the
connected USB storage.
NOTE
If you reset the player to its original factory settings
using [Factory Set] option, you have to set all the
activation for the on-line services and network
settings again.
Software
Information
Displays the current software version.
Update
You can update the software by connecting
the unit directly to the software update
server (see page 80).
Disclaimer Notice
Press ENTER ( ) to view the notice of Network
Service Disclaimer on page 87.
Sound Effect
You can select a suitable sound mode. Press
SOUND EFFECT repeatedly until the desired
mode appears on the front panel display or the
TV screen. The displayed items for the equalizer
maybe di erent depending on sound sources
and e ects.
[Natural]: You can enjoy comfortable and
natural sound.
[Bypass]: Software with multichannel surround
audio signals is played according to the way it
was recorded.
[Bass Blast]: Reinforce the bass sound
e ect from front left and right speaker and
subwoofer.
[Clear Voice]: This mode makes voice sound
clear, improving the quality of voice sound.
[Virtual]: You can enjoy more dynamic sound
with improved centre channel.
[Game]: You can enjoy more virtual sound
while playing video games.
[Night]: This may be useful when you want to
watch movies at low volumes late at night.
[Mus. ReTouch]: When listening to MP3 les or
other compressed music, you can enhance the
sound. This mode is available only to 2 channel
sources.
[Loudness]: Improves bass and treble sound.
[Natural Plus]: You can enjoy the natural
sound e ect same as 5.1 channel.
3
Installation
HB965DB-DD.BNLDLLK_ENG_0475.indd37 37HB965DB-DD.BNLDLLK_ENG_0475.indd37 37 2010.2.26 9:58:3 AM2010.2.26 9:58:3 AM
Page 38

38 Operation
4
Operation
4
Operation
General Playback
Playing Discs
1. Press OPEN/CLOSE (Z), and place a disc on
the disc tray.
2. Press OPEN/CLOSE( Z) to close the disc
tray.
For the most Audio CD, BD-ROM and
DVD-ROM discs, playback starts
automatically.
3. Press HOME (
).
4. Select [Movie], [Photo] or [Music] using
I/i
, and press ENTER ( ).
5. Select the Disc option using I/i, and press
ENTER (
When you connect up to two devices, it
appears as above.
6. Select a le using U/u/I/i, and press B
(PLAY) or ENTER (
).
) to play the le.
NOTE
Playback functions described in this manual are
•
not always available in every les and medium.
Some functions can be restricted depending on
many factors.
Depending on the BD-ROM titles, a USB device
•
connection may be needed for the proper
playback.
HB965DB-DD.BNLDLLK_ENG_0475.indd38 38HB965DB-DD.BNLDLLK_ENG_0475.indd38 38 2010.2.26 9:58:3 AM2010.2.26 9:58:3 AM
Page 39

39Operation
To stop playback
Press x (STOP) while playback.
To pause playback
Press X (PAUSE) while playback.
Press B (PLAY) to resume playback.
To play frame-by-frame
Press X (PAUSE) while movie playback.
Press X (PAUSE) repeatedly to play Frame-byFrame playback.
To scan forward or backward
Press m or M to play fast forward or fast
reverse during playback.
You can change the various playback speeds
by pressing m or M repeatedly.
To slow down the playing speed
While the playback is paused, press M
repeatedly to play various speeds of slow
motion.
To skip to the next/previous
chapter/track/fi le
During playback, press . or > to go to
the next chapter/track/ le or to return to the
beginning of the current chapter/track/ le.
Press . twice brie y to step back to the
previous chapter/track/ le.
Using the disc menu
BD DVD AVC HD
To display the disc menu
The menu screen may be displayed rst after
loading a disc which contains a menu. If you
want to display the disc menu while playback,
press DISC MENU.
Use U/u/I/i buttons to navigate through
menu items.
To display the Pop-up menu
Some BD-ROM discs contain Pop-up menu
that appears while playback.
Press TITLE/POPUP while playback, and use
U/u/I/i
items.
buttons to navigate through menu
4
Operation
HB965DB-DD.BNLDLLK_ENG_0475.indd39 39HB965DB-DD.BNLDLLK_ENG_0475.indd39 39 2010.2.26 9:58:4 AM2010.2.26 9:58:4 AM
Page 40

40 Operation
4
Operation
Resume playback
BD DVD AVC HD MOVIE ACD
MUSIC
The unit records the point where you pressed
the x (STOP) depending on the disc.
If “
(Resume Stop)” appears on the screen
Xx
brie y, press B (PLAY) to resume playback
(from the scene point).
If you press x (STOP) twice or unload the disc,
“x”(Complete Stop) appears on the screen.
The unit will clear the stopped point.
NOTE
The resume point may be cleared when a
•
button is pressed (for example; 1 (POWER),
(OPEN/CLOSE), etc).
Z
On BD-Video discs with BD-J, the resume
•
playback function does not work.
If you press x (STOP) once during BD-ROM
•
interactive title playback, the unit will be in
Complete Stop mode .
Advanced Playback
Repeat Playback
BD DVD AVC HD ACD MUSIC
During playback, press REPEAT repeatedly to
select a desired repeat mode.
BDs/DVDs
– Selected portion will be repeated
A-
continually.
Chapter
– The current chapter will be
played back repeatedly.
– The current title will be played
Title
Title
back repeatedly.
To return to normal playback, press REPEAT
repeatedly to select [O ].
Audio CDs/Music les
– The current track or le will be
played back repeatedly.
– All the tracks or les will be played
back repeatedly.
– The tracks or les will be played back
in random order.
– All the tracks or les will be
played back repeatedly in random order.
– Selected portion will be repeated
continually. (Audio CD only)
To return to normal playback, press CLEAR.
NOTE
If you press > once during Repeat Chapter/
•
Track playback, the repeat playback cancels.
This function may not work on some disc or title.
•
HB965DB-DD.BNLDLLK_ENG_0475.indd40 40HB965DB-DD.BNLDLLK_ENG_0475.indd40 40 2010.2.26 9:58:4 AM2010.2.26 9:58:4 AM
Page 41

41Operation
Repeating a specifi c portion
BD DVD AVC HD ACD
This player can repeat a portion you have
selected.
1. While playback, press REPEAT to select [A-]
at the beginning of the portion you wish to
repeat. And then press ENTER (
).
2. Press ENTER ( ) at the end of the portion.
Your selected portion will be repeated
continually.
3. To return to normal playback, press REPEAT
repeatedly to select [OFF] or press CLEAR.
NOTE
You cannot select a portion less than 3 seconds.
Marker Search
BD DVD AVC HD MOVIE
You can start playback from up to nine
memorized points.
To delete a Marker
1. Press SEARCH and the search menu appears
on the screen.
2. Press u to highlight a marker number. Use
I/i
to select a marked scene that you
want to delete.
3. Press CLEAR and the marked scene is erased
from the search menu.
NOTE
•
This function may not work depending on discs,
titles, server ability.
•
All marked points are cleared if the title is in
complete stop (x) mode, the title is changed or
if you unload the disc.
If the total length of the title is less than
•
10 seconds, this function is not available.
4
Operation
To enter a marker
1. While playback, press MARKER at the
desired point. The Marker icon appears on
the TV screen brie y.
2. Repeat step 1 to add up to nine markers.
To recall a marked scene
1. Press SEARCH and the search menu appears
on the screen.
2. Press a number button to select a marker
number that you want to recall. Playback
starts from the marked scene.
HB965DB-DD.BNLDLLK_ENG_0475.indd41 41HB965DB-DD.BNLDLLK_ENG_0475.indd41 41 2010.2.26 9:58:5 AM2010.2.26 9:58:5 AM
Page 42

42 Operation
4
Operation
Using the search menu
BD DVD AVC HD MOVIE
Using search menu, you can easy to nd the
point where you want to start playback.
To search a point
1. During playback, press SEARCH to display
the search menu.
2. Press I/i to skip the playback 15 seconds
forward or backward. You can select a
point that you want to skip by pressing and
holding I/i button.
To start playback from a marked
scene
1. Press SEARCH and the search menu appears
on the screen.
2. Press u to highlight a marker number. Use
I/i
to select a marked scene that you
want to start playback from.
3. Press ENTER (
marked scene.
) to start playback from the
Changing content list view
MOVIE MUSIC PHOTO
On the [Movie], [Music], [Photo] or [Home Link]
menu, you can change the content list view.
Method 1
Press red (R) coloured button repeatedly.
NOTE
This function may not work depending on discs,
•
titles, server ability.
This function may not work on some [Home
•
Link] contents depending on the le type and
ability of the DLNA server.
HB965DB-DD.BNLDLLK_ENG_0475.indd42 42HB965DB-DD.BNLDLLK_ENG_0475.indd42 42 2010.2.26 9:58:6 AM2010.2.26 9:58:6 AM
Page 43

43Operation
Method 2
1. On the content list, press INFO/DISPLAY ( )
to display the option menu.
2. Use U/
u
to select the [View Change]
option.
3. Press ENTER ( ) to change the content list
view.
Viewing content information
MOVIE
The player can display the content information.
1. Select a le using U/u/I/i.
2. Press INFO/DISPLAY (
option menu.
3. Select the [Information] option using U/u,
and press ENTER ( ).
The le information appears on the screen.
While movie playback, you can display the le
information by pressing TITLE/POPUP.
NOTE
The information displayed on the screen may not
correct comparing actual content information.
) to display the
Last Scene Memory
BD DVD
This unit memorizes the last scene from the
last disc that is viewed. The last scene remains
in memory even if you remove the disc from
the unit or switch o the unit. If you load a disc
that has the scene memorized, the scene is
automatically recalled.
NOTE
Last Scene Memory function for a previous disc
•
is erased once a di erent disc is played.
This function may not work depending on the
•
disc.
This unit does not memorize settings of a disc if
•
you switch o the unit before commencing to
play it.
4
Operation
HB965DB-DD.BNLDLLK_ENG_0475.indd43 43HB965DB-DD.BNLDLLK_ENG_0475.indd43 43 2010.2.26 9:58:6 AM2010.2.26 9:58:6 AM
Page 44

44 Operation
On-Screen display
Movie Information – Select this option
i
and press ENTER (
) to display movie
information
4
Operation
You can display and adjust various information
and settings about the content.
Displaying content information
on-screen
BD DVD AVC HD MOVIE
1. While playback, press INFO/DISPLAY ( ) to
show various playback information.
Title – Current title number/total number
a
of titles
Chapter – Current chapter number/total
b
number of chapters
Time – Elapsed playing time/Total
c
playback time
Audio – Selected audio language or
d
channel
Subtitle – Selected subtitle
e
Angle – Selected angle/total number of
f
angles
TV Aspect Ratio – Selected a TV aspect
g
Ratio
Picture Mode – Selected picture mode
h
a
b
c
d
e
f
g
h
i
2. Select an option using U/u.
3. Use I/i to adjust the selected option
value.
4. Press RETURN (O) to exit the On-Screen
display.
NOTE
If no button is pressed for a few seconds, the on-
•
screen display disappears.
A title number cannot be selected on some
•
discs.
Available items may di er depending on discs
•
or titles.
If BD interactive title is playing back, some
•
setting information is displayed on the screen
but prohibited to be changed.
To use the [Movie Information] option, the player
•
must be connected to the broadband internet
for accessing the Gracenote Media Database.
If the music information from the
•
Gracenote® media database is either not correct
or not exist, please contact Gracenote® at
http://www.gracenote.com for support.
LG is a licence of Gracenote® technology and is
•
not responsible or reliable for information from
the Gracenote® media database.
HB965DB-DD.BNLDLLK_ENG_0475.indd44 44HB965DB-DD.BNLDLLK_ENG_0475.indd44 44 2010.2.26 9:58:7 AM2010.2.26 9:58:7 AM
Page 45

45Operation
Playing from selected time
BD DVD AVC HD MOVIE
1. Press INFO/DISPLAY ( ) during playback.
The time search box shows the elapsed
playing time.
2. Select the [Time] option and then input
the required start time in hours, minutes,
and seconds from left to right.
For example, to nd a scene at 2 hours, 10
minutes, and 20 seconds, enter “21020”.
Press I/i to skip the pl
forward or backward.
3. Press ENTER (
) to start playback from
selected time.
NOTE
This function may not work on some disc or
•
titles.
This function may not work on some [Home
•
Link] contents depending on the le type and
ability of the DLNA server.
ayback 60 seconds
NOTE
Some discs allow you to change audio selections
•
only via the disc menu. If this is the case, press
TITLE/POPUP or DISC MENU button and choose
the appropriate audio from the selections on
the disc menu.
Immediately after you have switched sound,
•
there may be a temporary discrepancy between
the display and actual sound.
On BD-ROM disc, the multi audio format (5.1CH
•
or 7.1CH) is displayed with [MultiCH] in the onscreen display.
Selecting a subtitle language
BD DVD AVC HD MOVIE
1. During playback, press INFO/DISPLAY (
display the on-screen display.
2. Use U/
3. Use I/
u
to select the [Subtitle] option.
i
to select desired subtitle language.
4. Press RETURN (O) to exit the On-Screen
display.
) to
4
Operation
Hearing a different audio
BD DVD AVC HD MOVIE
1. During playback, press INFO/DISPLAY (
display the on-screen display.
2. Use U/
3. Use I/
u
to select the [Audio] option.
i
to select desired audio language,
) to
NOTE
Some discs allow you to change subtitle selections
only via the disc menu. If this is the case, press
TITLE/POPUP or DISC MENU button and choose
the appropriate subtitle from the selections on the
disc menu.
audio track or audio channel.
HB965DB-DD.BNLDLLK_ENG_0475.indd45 45HB965DB-DD.BNLDLLK_ENG_0475.indd45 45 2010.2.26 9:58:7 AM2010.2.26 9:58:7 AM
Page 46

46 Operation
4
Operation
Watching from a different
angle
BD DVD
If the disc contains scenes recorded at di erent
camera angles, you can change to a di erent
camera angle during playback.
1. During playback, press INFO/DISPLAY (
display the on-screen display.
display.
u
to select the [Angle] option.
i
to select desired angle.
2. Use U/
3. Use I/
4. Press RETURN (O) to exit the On-Screen
) to
Changing the TV Aspect Ratio
BD DVD AVC HD MOVIE
You can change the TV aspect ratio setting
while playback.
1. During playback, press INFO/DISPLAY (
display the on-screen display.
option.
display.
u
to select the [TV Aspect Ratio]
i
to select desired option.
2. Use U/
3. Use I/
4. Press RETURN (O) to exit the On-Screen
) to
Changing the Picture Mode
BD DVD AVC HD MOVIE
You can change the [Picture mode] option
while playback.
1. During playback, press INFO/DISPLAY (
display the on-screen display.
option.
display.
u
to select the [Picture Mode]
i
to select desired option.
2. Use U/
3. Use I/
4. Press RETURN (O) to exit the On-Screen
Setting the [User setting] option
1. During playback, press INFO/DISPLAY ( ) to
display the on-screen display.
2. Use U/
3. Use I/
u
to select the [Picture Mode]
option.
i
to select the [User setting] option,
and press ENTER (
).
) to
4. Use U/u/I/
NOTE
Even if you change the value of the [TV Aspect
Ratio] option in On-Screen display, the [TV Aspect
Ratio] option in the [Setup] menu is not changed.
HB965DB-DD.BNLDLLK_ENG_0475.indd46 46HB965DB-DD.BNLDLLK_ENG_0475.indd46 46 2010.2.26 9:58:8 AM2010.2.26 9:58:8 AM
options.
Select [Default] option then press ENTER
( ) to reset the all adjustments.
5. Use U/u/I/
and press ENTER (
i
to adjust the [Picture Mode]
i
to select the [Close] options,
) to nish setting.
Page 47

47Operation
Enjoying BD-LIVE
This unit allows you to enjoy functions such as
picture-in-picture, secondary audio and Virtual
packages, etc., with BD-Video supporting
BONUSVIEW (BD-ROM version 2 Pro le 1
version 1.1/ Final Standard Pro le).
Secondary video and audio can be played from
a disc compatible with the picture-in-picture
function. For the playback method, refer to the
instructions in the disc.
In addition to the BONUSVIEW function, BDVideo supporting BD-LIVE (BD-ROM version
2 Pro le 2) that has a network extension
function allows you to enjoy more functions
such as downloading new movie trailers by
connecting this unit to the internet.
1. Check the network connection and settings
(pages 24-29).
2. Insert a USB storage device to the USB port
on the front panel.
A USB storage device is needed to
download bonus content.
USB Connection
3 . Press Home ( ), and set the [BD-LIVE
connection] option on the [Setup] menu
(page 36).
Depending on a disc, the BD-LIVE
function may not be operated if [BDLIVE connection] option is set to [Partially
Permitted].
4 . Insert a BD-ROM with BD-LIVE.
The operations are di er depending on the
disc. Refer to the manual supplied with the
disc.
NOTE
Do not extract the connected USB device while
•
content is being downloaded or a Blu-ray disc is
still in the disc tray. Doing so may damage the
connected USB device and BD-LIVE features may
not operate properly with the damaged USB
device anymore. If the connected USB device
seems damaged from such an action, you can
format the connected USB device from the PC
and reuse it with this player.
Some BD-LIVE contents may be restrictively
•
accessed in some territories by contents
provider’s own decision.
It may take up to several minutes to load and
•
start enjoying BD-LIVE contents.
4
Operation
HB965DB-DD.BNLDLLK_ENG_0475.indd47 47HB965DB-DD.BNLDLLK_ENG_0475.indd47 47 2010.2.26 9:58:9 AM2010.2.26 9:58:9 AM
Page 48

48 Operation
4
Operation
Playing a movie fi le
and VR disc
You can play DVD-RW discs that are recorded
in Video Recording (VR) format and movie les
contained in a disc or USB device.
1. Press HOME (
2. Select [Movie] using I/i, and press ENTER
( ).
3. Select the device using I/i, and press
ENTER (
).
).
NOTE
The le requirements are described on page 11.
•
You can use various playback functions. Refer to
•
pages 38-46.
Un nalized DVD VR format discs may not be
•
played in this player.
Some DVD-VR disc are made with CPRM data
•
by DVD recorder. This unit cannot support these
kinds of discs.
What is CPRM?
CPRM is a copy protection system (with
scramble system) only allowing the recording of
‘copy once’ broadcast programmes. CPRM stands
for Content Protection for Recordable Media.
When you connect up to two devices, it
appears as above.
4. Select a le using U/u/I/i, and press PLAY
or ENTER (
HB965DB-DD.BNLDLLK_ENG_0475.indd48 48HB965DB-DD.BNLDLLK_ENG_0475.indd48 48 2010.2.26 9:58:9 AM2010.2.26 9:58:9 AM
) to play the le.
Page 49

49Operation
Selecting a subtitle fi le
MOVIE
If a movie le name and the subtitle le
name are the same, subtitle le is played
automatically when playing the movie le.
If the subtitle le name is di erent with the
movie le name, you need to select the subtitle
le on the [Movie] menu before playing the
movie.
1. Use U/u/I/
wish to play in the [Movie] menu.
2. Press ENTER (
Press ENTER ( ) again to deselect the
subtitle le. Selected subtitle le will be
displayed when you play the movie le.
i
to select the subtitle le you
).
Changing subtitle code page
MOVIE
If the subtitle is not displayed properly, You
can change the subtitle code page to view the
subtitle le properly.
1. During playback, press INFO/DISPLAY (
display the on-screen display.
2. Use U/
3. Use I/
u
to select the [Code Page] option.
i
to select desired code option.
4. Press RETURN(O) to exit the On-Screen
display.
) to
4
Operation
NOTE
If you press x (STOP) while playback, the
•
subtitle selection is cancelled.
This function may not work in the [Home Link]
•
feature.
HB965DB-DD.BNLDLLK_ENG_0475.indd49 49HB965DB-DD.BNLDLLK_ENG_0475.indd49 49 2010.2.26 9:58:10 AM2010.2.26 9:58:10 AM
Page 50

50
Operation
4
Operation
Viewing a photo
You can view photo les using this player.
1. Press HOME (
2. Select [Photo] using I/i, and press ENTER
( ).
3. Select the device using I/i, and press
ENTER (
).
).
To play a slide show
Press B (PLAY) to start slide show.
To stop a slide show
Press x (STOP) while slide show.
To pause a slide show
Press X (PAUSE) while slide show.
Press B (PLAY) to re-start the slide show.
To skip to the next/previous photo
While viewing a photo in full screen, press I or
i
to go to the previous or next photo.
NOTE
The le requirements are described on page 11.
•
You can use various playback functions. Refer to
•
pages 38-46.
When you connect up to two devices, it
appears as above.
4. Select a le using U/u/I/i, and press
ENTER (
HB965DB-DD.BNLDLLK_ENG_0475.indd50 50HB965DB-DD.BNLDLLK_ENG_0475.indd50 50 2010.2.26 9:58:10 AM2010.2.26 9:58:10 AM
) to view the photo.
Page 51

Operation
51
Options while viewing a photo
You can use various options during viewing a
photo in full screen.
1. While viewing a photo in full screen, press
INFO/DISPLAY (
menu.
2. Select an option using U/u.
Current photo/Total number of photos
a
– Use I/i to view previous/next photo.
Slide Show – Press ENTER (
b
pause slide show.
Music Select – Select the background
c
music for the slide show.
Music –Press ENTER (
d
background music.
Rotate – Press ENTER (
e
photo clockwise.
Zoom – Press ENTER (
f
[Zoom] menu.
E ect – Use I/i to select a transition
g
e ect between photos in a slide show.
Speed – Use I/i to select a delaying
h
speed between photos in a slide show.
) to display the option
a
b
c
d
e
f
g
h
) to start or
) to start or pause
) to rotate the
) to display the
Listening to music while slide
show
You can display photo les while listening to
music les.
1. Press HOME ( ).
2. Select [Photo] or [Home Link] using I/i,
and press ENTER ( ).
3. Select the [Disc] or [USB] option using I/i,
and press ENTER ( ).
Selecting a server or a share folder is
needed for [Home Link] menu.
4. Select a le using U/u/I/i, and press
ENTER (
5. Press INFO/DISPLAY (
option menu.
6. Use U/u to select [Music Select] option,
and press ENTER ( ) to display the [Music
Select] menu.
) to view the photo.
) to display the
4
Operation
3. Press RETURN (O) to exit the option menu.
HB965DB-DD.BNLDLLK_ENG_0475.indd51 51HB965DB-DD.BNLDLLK_ENG_0475.indd51 51 2010.2.26 9:58:11 AM2010.2.26 9:58:11 AM
Page 52

52
Operation
4
Operation
7. Use U/u to select a device, and press ENTER
(
).
Device that you can select are di er
depending on the location of the photo le
you are displaying in full screen.
Photo location Available Device
Disc Disc, USB
USB Disc, USB
Share Folder on
your PC (CIFS)
DLNA server DLNA server
8. Use U/u to select a le or a folder you wish
to play.
Select a folder and press ENTER ( ) to
display the lower directory.
Select
the upper directory.
and press ENTER ( ) to display
CIFS
Listening to music
The player can play Audio CDs and music les
1. Press HOME (
2. Select [Music] using I/i, and press ENTER
( ).
3. Select the device using I/i, and press
ENTER (
).
).
When you connect up to two devices, it
NOTE
When selecting music from [Home Link], folder
selection is not available. Only le selection is
available on the [Home link].
9. Use i to select [OK], and press ENTER ( )
to complete music selection.
HB965DB-DD.BNLDLLK_ENG_0475.indd52 52HB965DB-DD.BNLDLLK_ENG_0475.indd52 52 2010.2.26 9:58:12 AM2010.2.26 9:58:12 AM
appears as above.
4. Select a music le or audio track using
U/u/I/i
music.
, and press ENTER ( ) to play the
NOTE
The le requirements are described on page 11.
•
You can use various playback functions. Refer to
•
pages 38-46.
Page 53

Audio CD Recording
You can record one desired track or all of the
tracks in Audio CD to a USB storage device.
1. Insert a USB storage device to the USB port
on the front panel.
2. Press Z (OPEN/CLOSE), and place an Audio
CD on the disc tray.
Press Z (OPEN/CLOSE) to close the disc
tray. The playback starts automatically.
3. Press INFO/DISPLAY (
option menu.
Press z REC button on the remote control.
You can record all musics in the audio CD.
4. Use U/u to select [CD Recording] option,
and press ENTER (
Recording] menu.
Repeat this step to select tracks as many as
you can.
) to display the
Or
) to display the [CD
Operation
If you want to create a new folder, use U/u/
I/i
to select [New Folder] and press ENTER
( ).
Enter a folder name using virtual keyboard,
and press ENTER ( ) while [OK] is selected.
8. Use U/u/I/i to select [OK], and press
ENTER (
If you want to stop in progressing Audio CD
recording, press ENTER ( ) while [Cancel] is
highlighted.
9. A message appears when Audio CD
recording is completed. Press ENTER
(
destination folder.
) to start Audio CD recording.
) to check the music le created in the
53
4
Operation
5. Use U/u to select a track you wish to copy
on the menu, and press ENTER (
Repeat this step to select tracks as many as
you can.
Select all the tracks on an Audio
CD.
Selects an encoding option from
the pop-up menu (128 kbps,
192 kbps, 320 kbps or Lossless).
Cancels the recording and
returns to the previous screen.
6. Use U/u/I/i to select [Start], and press
ENTER (
7. Use U/u/I/i to select the destination
folder to be copied.
HB965DB-DD.BNLDLLK_ENG_0475.indd53 53HB965DB-DD.BNLDLLK_ENG_0475.indd53 53 2010.2.26 9:58:13 AM2010.2.26 9:58:13 AM
).
).
Page 54

54
Operation
4
Operation
NOTE
The table below shows the average recording
•
time from an audio track with 4 minutes of
playback time to a music le with 192 kbps as an
example.
stop mode while playback
1.4 min. 2 min.
All times in the above table are approximate.
•
Actual recording time for USB storage device
•
varies depending on the USB storage device’s
ability.
Make sure that there is minimum of 50 MB free
•
space is needed when recording into the USB
storage device.
The length of the music should be longer than
•
20 seconds for the proper recording.
Do not turn o this player or extract the
•
connected USB storage device during Audio CD
recording.
The making of unauthorized copies of
copy-protected material, including computer
programmes, les, broadcasts and sound
recordings, may be an infringement of copyrights
and constitute a criminal o ense.
This equipment should not be used
for such purposes.
Be responsible
Respect copyrights
Viewing information from
Gracenote Media Database
The player can access to the Gracenote Media
Database and loads the music information so
that Track name, Artist Name, Genre and other
text information can be displayed on the list.
Audio CD
When you insert an Audio CD, the player starts
playback automatically and load the music title
from the Gracenote® Media Database.
If there is no music information from the
database, music titles will not appear on the
screen.
Music fi le
1. Select a music le or audio track using
U/u/I/i
2. Press INFO/DISPLAY (
option menu.
3. Select the [Information] option using U/u,
and press ENTER (
The player accesses to Gracenote Media
Database for the music information.
.
) to display the
).
HB965DB-DD.BNLDLLK_ENG_0475.indd54 54HB965DB-DD.BNLDLLK_ENG_0475.indd54 54 2010.2.26 9:58:14 AM2010.2.26 9:58:14 AM
Page 55

BD/DVD
While listening to a music from the movie
playback, press MUSIC ID to start loading
music information from the Gracenote Media
Database.
NOTE
•
The player must be connected to the broadband
internet for accessing the Gracenote® Media
Database.
•
If the music information is not in the
Gracenote
on the screen.
If the music information from the
•
Gracenote® media database is either not correct
or not exist, please contact Gracenote® at
http://www.gracenote.com for support.
Depending on the cases, it will takes a few
•
minutes to load music information from the
Gracenote® media database.
Information may be displayed in English, if your
•
own language is not available on the
Gracenote® media database.
This function is not available for NetCast on-line
•
content and content in DLNA servers.
LG is a licence of Gracenote® technology and is
•
not responsible or reliable for information from
the Gracenote® media database.
Media Database, message appears
®
Operation
55
4
Operation
HB965DB-DD.BNLDLLK_ENG_0475.indd55 55HB965DB-DD.BNLDLLK_ENG_0475.indd55 55 2010.2.26 9:58:14 AM2010.2.26 9:58:14 AM
Page 56

56
Operation
4
Operation
Playing the iPod
You can enjoy the sound with your iPod. For
details about iPod, refer to the iPod’s User
Guide.
Preparation
To view iPod’s Videos and Photos on the TV
•
screen.
- Be sure to use the video connection
through the VIDEO OUT jack on the rear
panel of this unit. Select the appropriate
video input mode on the TV.
- Depending on the iPod, make sure that
select Videos > Video settings, and then
set TV Out to Ask or On from your iPod.
For details about Video Settings, refer to
the iPod User Guide.
- The viewing photos is available only if this
unit is in iPod IN mode and you can view
photos only as a slide show. You have to
start a slide show on your iPod to view a
photo on a TV. For details about a slide
show, refer to the iPod User Guide.
Before connecting the iPod, turn this unit
•
o and reduce the volume of this unit to its
minimum.
1. Connect the iPod rmly.
To open the iPod Dock, pull iPod dock.
When you connect the iPod on the HOME
menu, the player plays a music automatically.
Or a menu for the le type selection will
appear.
2. Select a le using U/u/I/i, and press
ENTER (
) to play the le.
Enjoying iPod on the screen
1. Connect the iPod rmly.
2. Press HOME ( ).
3. Select [Music] or [Movie] using I/i, and
press ENTER (
If you connected the other device
(CD or USB), select the iPod on the menu.
4. Select a content using U/u/I/i, and press
ENTER ( ) to play.
).
Connect the iPod
HB965DB-DD.BNLDLLK_ENG_0475.indd56 56HB965DB-DD.BNLDLLK_ENG_0475.indd56 56 2010.2.26 9:58:14 AM2010.2.26 9:58:14 AM
You can search easily a content by power
scroll on the screen.
Power scroll
Page 57

Operation
57
NOTE
If the iPod’s OSD language is selected to simple
chinese, the power scroll function is not operated
correctly.
Enjoying the iPod IN mode
You can operate your iPod by using the
supplied remote control and controls on your
iPod.
1. Connect the iPod rmly.
If you turn this unit on, your iPod is
automatically turned on and recharging
starts.
2. Press RADIO&INPUT to select iPod IN mode.
U/u/I/i
B
/ENTER
X
m/M
./>
REPEAT To select a desired repeat
Selects an option in the menu.
Starts playback the music or
video.
To pause while it is playing. To
resume playing, press B (PLAY)
again.
Fast-forward or rewind a song
or video
Skip the playback forward or
backward .
( )
mode: Track
, All
( )
, O
(No display).
NOTE
An error message “CHECK IPOD” or “Connected
•
iPod model is not supported.” appears when:
- your iPod is not available for the function to be
operated.
An error message “CHECK IPOD” or “Please
•
update iPod’s software.” appears when:
- your iPod has an old software version.
t
Update your iPod software to latest version.
If this unit displays an error message, follow the
•
message. An error message “CHECK IPOD” or
“Please check your iPod.” appears when:
- the communication between this unit and
your iPod is failed.
t
Undock & re-dock your iPod in this unit.
- your iPod is not connected rmly.
- this unit recognises your iPod as unknown
device.
- your iPod is exceptionally low on power.
t
The battery needs to be charged.
t
If you charge the battery while iPod is
extremely low in power, it may take longer
to charge.
You may use the dock adapter which should
•
be supplied with your iPod to the dock for the
stable use of the iPod. If you need an adapter,
consult your iPod dealer.
Compatibility with your iPod may vary
•
depending on the type of your iPod.
iPod touch and iPhone have any di erence in
•
operation other than iPod. You may need any
additional control to use them with this unit.
(e.g. “slide to unlock”)
If you use an application, make a call, or send
•
and receive SMS text message, etc. on iPod
touch or iPhone, disconnect it from iPod dock of
this unit and then use it.
Depending on your iPod’s software version, it
•
may not be possible to control your iPod from
this unit. We recommend installing the latest
software version.
The video quality depends on the video sources
•
on your iPod.
If you have a problem with your iPod, please visit
•
www.apple.com/support/ipod.
4
Operation
HB965DB-DD.BNLDLLK_ENG_0475.indd57 57HB965DB-DD.BNLDLLK_ENG_0475.indd57 57 2010.2.26 9:58:15 AM2010.2.26 9:58:15 AM
Page 58

58
Operation
4
Operation
Radio Operations
Be sure that the antenna is connected.
(Refer to the page 21)
Listening to the radio
1. Press RADIO&INPUT until TUNER (FM)
appears in the display window. The last
received station is tuned in.
2. Press and hold TUNING (-/+) for about two
seconds until the frequency indication
starts to change. Scanning stops when the
unit tunes in a station. Or Press TUNING (-/+)
repeatedly.
3. Adjust the volume by rotating VOLUME on
the front panel or by pressing VOL (+/- ) on
the remote control.
Presetting the Radio Stations
You can preset 50 stations for FM.
Before tuning, make sure that you have turned
down the volume.
1. Press RADIO&INPUT until the TUNER (FM)
appears in the display window.
2. Select the desired frequency by using
TUNING (-/+).
3. Press ENTER (
in the display window.
4. Press PRESET (-/+) to select the preset
number you want.
5. Press ENTER (
6. Repeat the steps 2 to 5 to store other
stations.
) a preset number will ash
). The station is stored.
Deleting all the saved stations
Press and hold CLEAR for two seconds.
“ERASE ALL” will ash up. Press CLEAR again.
Then all the saved stations are deleted.
Improving poor FM reception
Press B (blue) (MONO/STEREO) coloured
button on the remote control. This will change
the tuner from stereo to mono and usually
improve the reception.
See information about a radio
station
The FM tuner is supplied with the RDS (Radio
Data System) facility. This shows information
about the radio station being listened to. Press
RDS repeatedly to cycle through the various
data types:
PS (Programme Service Name)
The name of the channel will
appear in the display
PTY (Programme Type Recognition)
The programme type (e.g. Jazz or
News) will appear in the display.
RT (Radio Text)
A text message contains special
information from the broadcast
station. This text may scroll across
the display.
CT (Time controlled by the channel)
This shows the time and date as
broadcast by the station.
HB965DB-DD.BNLDLLK_ENG_0475.indd58 58HB965DB-DD.BNLDLLK_ENG_0475.indd58 58 2010.2.26 9:58:16 AM2010.2.26 9:58:16 AM
Page 59

Operation
59
Playing content via
your home network
The play can browse and play content on
your PC and DLNA certi ed media servers
connected on your home network.
About DLNA
This Player is a DLNA Certi ed digital media
player that can display and play movie,
photo and music content from your DLNAcompatible digital media server (PC and
Consumer Electronics).
The Digital Living Network Alliance (DLNA)
is a cross-industry organization of consumer
electronics, computing industry and mobile
device companies. Digital Living provides
consumers with easy sharing of digital media
through a wired or wireless network in the
home.
The DLNA certi cation logo makes it easy
to nd products that comply with the DLNA
Interoperability Guidelines. This unit complies
with DLNA Interoperability Guidelines v1.5.
When a PC running DLNA server software or
other DLNA compatible device is connected to
this player, some setting changes of software
or other devices may be required. Please refer
to the operating instructions for the software
or device for more information.
Accessing a DLNA media
server
1. Check the network connection and settings
(pages 24-29).
2. Press HOME (
3. Select [Home Link] using I/i, and press
ENTER (
4. Select a DLNA media server from the list
using U/u, and press ENTER ( ).
If you want to rescan available media server,
press the green (G) coloured button.
NOTE
Depending on the media server, this player may
needs to get permission from the server.
5. Select a le using U/u/I/i, and press
ENTER ( ) to play the le.
).
).
4
Operation
HB965DB-DD.BNLDLLK_ENG_0475.indd59 59HB965DB-DD.BNLDLLK_ENG_0475.indd59 59 2010.2.26 9:58:16 AM2010.2.26 9:58:16 AM
Page 60

60 Operation
4
Operation
NOTE
The le requirements are described on page 11.
•
You can use various playback functions. Refer to
•
pages 38-46.
Because the compatibility and available playback
•
functions on the [
on the bundle DLNA server (Nero MediaHome
4 Essentials) environment, le requirements and
playback functions on the [Home Link] menu
may di er depending on media servers.
The le requirements on page 11 are not always
•
compatible. There may have some restrictions
by le features and media server’s ability.
•
The thumbnail of the unplayable les can be
displayed in the [Home Link] menu, but those
cannot be played on this player.
•
If there is an unplayable music le in the [Home
Link] menu, the player skip the le and play the
next le.
•
Playing a movie subtitle
on DLNA media server created by supplied Nero
MediaHome 4 Essentials software on this player
package.
The subtitle le name and movie le name have
•
to be the same and located at the same folder.
The playback and operating quality of the
•
[Home Link] function may be a ected by your
home network condition.
The les from removable media such as USB
•
drive, DVD-drive etc. on your media server may
not be shared properly.
Home Link] menu are tested
les are only available
About Nero MediaHome 4
Essentials
Nero MediaHome 4 Essentials is a software for
sharing movie, music and photo les stored
on your computer to this player as a DLNAcompatiable digital media server.
NOTE
•
The Nero MediaHome 4 Essentials CD-ROM is
designed for PCs and should not be inserted in
this player or in any product other than a PC.
•
The supplied Nero MediaHome 4 Essenti
ROM is a customized software edition only for
sharing les and folders to this player.
The supplied Nero MediaHome 4 Essentials
•
software does not support following functions:
Transcoding, Remote UI, TV control, Internet
services and Apple iTunes
This manual explains operations with the
•
English version of Nero MediaHome 4 Essentials
as examples. Follow the explanation referring to
the actual operations of your language version.
Installing Nero MediaHome 4
Essentials
Before you install Nero MediaHome 4
Essentials, check the system requirement
shown below.
Windows® XP (Service Pack 2 or higher),
•
Windows Vista® (no Service Pack required),
Windows® XP Media Centre Edition 2005
(Service Pack 2 or higher), Windows Server®
2003
Windows Vista® 64-bit edition (application
•
runs in 32-bit mode)
Hard drive space: 200 MB hard drive space
•
for a typical installation of Nero MediaHome
stand-alone
•
1.2 GHz Intel® Pentium® III or AMD
Sempron™ 2200+ processors
Memory: 256 MB RAM
•
als CD-
HB965DB-DD.BNLDLLK_ENG_0475.indd60 60HB965DB-DD.BNLDLLK_ENG_0475.indd60 60 2010.2.26 9:58:17 AM2010.2.26 9:58:17 AM
Page 61

•
Graphics card with at least 32 MB video
memory, minimum resolution of 800 x 600
pixels, and 16-bit colour settings
Windows® Internet Explorer® 6.0 or higher
•
DirectX® 9.0c revision 30 (August 2006) or
•
higher
Network environment: 100 Mb Ethernet,
•
WLAN (IEEE 802.11b/g/n)
Start up your computer, and insert the Nero
MediaHome 4 Essentials CD-ROM into your
computer’s CD-ROM drive. An installation
wizard will walk you through the quick and
uncomplicated installation process. To install
Nero MediaHome 4 Essentials, proceed as
follows:
1. Close all Microsoft Windows programmes
and exit any anti-virus software that may be
running.
2. Insert the Nero MediaHome 4 Essentials
CD-ROM into your computer’s CD-ROM
drive.
3. Click [Nero MediaHome 4 Essentials]. The
installation is prepared and the installation
wizard appears.
4. Click the [Next] button to display the serial
number input screen. Click [Next] to go to
the next step.
5. If you accept all conditions, click [I accept
the Licence Conditions] check box and click
[Next]. Installation is not possible without
this agreement.
6. Click [Typical] and click [Next]. The
installation process is started.
7. If you want to take part in the anonymous
collection of data, select the check box and
click the [Next] button.
8. Click the [Exit] button to complete the
installation.
Sharing fi les and folders
On your computer, you must share the folder
contained movie, music and/or photo content
to play them using [Home Link] features.
This parts explains the procedure for selecting
the shared folders on your computer.
1. Double-click the “Nero MediaHome 4
Essentials” icon on the desktop.
2. Click [Network] icon on the left and de ne
your network name in the [Network name]
eld. The Network name you enter will be
recognised by your player.
3. Click [Shares] icon on the left.
4. Click [Local Folders] tab on the [Shares]
screen.
5. Click [Add] icon to open the [Browse Folder]
window.
6. Select the folder containing the les you
want to share. The selected folder is added
to the list of shared folders.
7. Click [Start Server] icon to start the server.
NOTE
If the shared folders or les are not displayed on
•
the player, click the folder on the [Local Folders]
tab and click [Rescan Folder] at the [More]
button.
Visit www.nero.com for more information and
•
software tools.
61Operation
4
Operation
HB965DB-DD.BNLDLLK_ENG_0475.indd61 61HB965DB-DD.BNLDLLK_ENG_0475.indd61 61 2010.2.26 9:58:17 AM2010.2.26 9:58:17 AM
Page 62

62 Operation
4
Operation
Accessing a share folder from
your PC
1. Start your PC that connected on your local
area network.
2. On your PC, share folders which contain
movie, photo or music les.
3. On the player, check the network
connection and settings (pages 24-29).
4. Press HOME (
5. Select [Home Link] using I/i, and press
ENTER (
6. Select a share folder from the list using U/u,
and press ENTER ( ).
If you want to rescan available media
servers, press the green(G) coloured button.
NOTE
Depending on the share folder, this player may
need to input network user ID and password for
accessing the folder.
).
).
NOTE
The le requirements are described on page 11.
•
You can use various playback functions. Refer to
•
pages 38-46.
The thumbnail of the unplayable les can be
•
displayed in the [Home Link] menu, but those
cannot be played on this player.
If there is an unplayable music le in the [Home
•
Link] menu, the player skips the le and play
next le.
The subtitle le name and movie le name have
•
to be the same and located at the same folder.
The playback and operating quality of the
•
[Home Link] function may be a ected by your
home network condition.
The les on an removable media such as USB
•
drive, DVD-drive etc. on your PC may not be
shared properly.
You may experience connection problems
•
depending on your PC’s environment.
PC requirements
Windows® XP (Service Pack 2 or higher),
•
Windows Vista® (no Service Pack required)
Windows 7®
1.2 GHz Intel® Pentium® III or AMD
•
Sempron™ 2200+ processors
Network environment: 100 Mb Ethernet,
•
WLAN (IEEE 802.11b/g/n)
7. Select a le using U/u/I/i, and press
ENTER ( ) to play the le.
HB965DB-DD.BNLDLLK_ENG_0475.indd62 62HB965DB-DD.BNLDLLK_ENG_0475.indd62 62 2010.2.26 9:58:17 AM2010.2.26 9:58:17 AM
NOTE
If you use Windows® XP or Windows Vista®, visit link
below for more information on le share settings.
Page 63

63Operation
Entering a network user ID and the
password
Depending on your PC’s environment, you
may need to enter a network user ID and the
password for accessing a shared folder.
1. The keyboard menu appears automatically
if the network user ID and the password are
required.
2. Use U/u/I/
press ENTER ( ) to con rm your selection
on the keyboard menu.
To enter a letter with an accent mark, select
the letter from extended character set.
Example: Select “D” and then press INFO/
DISPLAY ( ) to display the extended
character set. Use
and then press ENTER ( ).
i
to select a character then
I/i
to select “D” or “Ď”
3. When you nish entering the network user
ID and password, select [OK] using U/u/I/
i
and press ENTER (
) to access the folder.
The network user ID and password will
be remembered after accssing the folder
for your convenience. If you do not want
the network user ID and password to be
remembered, press red (R) coloured button
to un-tick the [Remember] check box
before accessing the folder.
4
Operation
[Clear] – Clear all entered characters.
[Space] – Inserts a space at the cursor
position.
[<–] – Deletes the previous character at the
cursor position.
[ABC / abc / #+-=&] – Change the keyboard
menu settings to capital letters, small letters
or symbols.
HB965DB-DD.BNLDLLK_ENG_0475.indd63 63HB965DB-DD.BNLDLLK_ENG_0475.indd63 63 2010.2.26 9:58:18 AM2010.2.26 9:58:18 AM
Page 64

64 Operation
4
Operation
Using NetCast
TM
Entertainment Access
You can use various content services via
Internet with NetCast Entertainment Access
feature.
1. Check the network connection and settings
(pages 24-29).
2. Press HOME ( ).
3. Select the [NetCast] using I/i, and press
ENTER (
4. Select an option using I/i, and press
ENTER (
YouTube – See pages 64-67
Picasa Web Albums – See pages 68-70
AccuWeather – See pages 71-72
5. While enjoying on-line content from
NetCast, press blue (B) coloured button to
go to NetCast Home screen.
The content of NetCast services and service
•
related information, including user interface, is
subject to changes. Please refer to the web site
of each service for most up-to-date information.
The background image on the NetCast home
•
indicates the weather of your favorite city in the
AccuWeather feature.
).
).
NOTE
YouTube
You can browse, search and watch YouTube
videos over the internet to your TV via your LG
Blu-ray disc player.
Watch YouTube videos on your TV
1. On the player, select the [YouTube] option
in the [NetCast] menu using I/i, and press
ENTER (
2. Press U to select the option menu bar.
3. Use I/
ENTER (
4. Use I/
( ) or N (play) to play the video.
Button Operation
or ENTER
B
INFO/
DISPLAY
X
x
./>
).
i
to select an option and press
) to search videos.
i
to select a video and press ENTER
Starts playback the video with
content detail.
Toggle between playback in
full screen and playback screen
with content detail.
To pause a video while it is
playing. To resume playing a
paused video, press B again.
Stops the video and displays
related videos list.
Skip the playback forward or
backward .
HB965DB-DD.BNLDLLK_ENG_0475.indd64 64HB965DB-DD.BNLDLLK_ENG_0475.indd64 64 2010.2.26 9:58:18 AM2010.2.26 9:58:18 AM
Page 65

About the YouTube menu
There are various options on the YouTube
menu. Use
and press ENTER (
described below.
Featured – The featured videos list will be
displayed.
Recent Videos – The most recently updated
videos list will be displayed.
Most Viewed – The most viewed videos list
will be displayed. The period option appears
at the bottom of the screen.
Top Rated – The best rated videos list from
YouTube server will be displayed. The period
option appears at the bottom of the screen.
Search – The virtual keyboard will be
displayed. See “Searching videos” on page 67
for more detail.
History – The videos list that you previously
played on this unit will be displayed.
Maximum of 25 videos can be stored.
Favorites – This option will be appeared only
when the unit is in sign-in status. Displays the
videos list that is arranged in the YouTube
server with your account. Some videos may
not appear on the [Favorites] list, even if the
videos are arranged in the server.
Sign in (Sign Out) – Displays the virtual
keyboard to sign in or returns to the sign-out
status.
See “Sign in with your YouTube account” on
page 67 for more details.
Local site – Choose which country’s videos
you would like to view. The countries listed on
the [Local Site] menu may di erent with those
listed on the YouTube web site.
U/u/I/i
to select an option
) to select the options as
NOTE
•
The YouTube menu can display 5 videos in the
videos list. Press green (G) or yellow (Y) buttons
to display previous/next 5 videos.
If you select the [Most Viewed] or [Top Rated]
•
option in the YouTube menu, the period options
appear at the bottom of the screen.
Use U/u/I/i to select a period option and
press ENTER (
the selected period.
•
The videos list searched from the player may
di er with the list searched from a web browser
on PC.
The playback of YouTube videos may be paused,
•
stopped or bu ering occurring often depending
on your broadband speed.
We recommend a minimum connection speed
of 1.5 Mbps. For the best playback condition, a
connection speed of 4.0 Mbps is required.
Sometimes your broadband speed varies based
on your ISP’s network conditions.
Contact your ISP if you have problems
maintaining a fast connection that is reliable, or
if you want to increase your connection speed.
Many ISPs o er a variety of broadband speed
options.
) to display the videos list within
65Operation
4
Operation
HB965DB-DD.BNLDLLK_ENG_0475.indd65 65HB965DB-DD.BNLDLLK_ENG_0475.indd65 65 2010.2.26 9:58:19 AM2010.2.26 9:58:19 AM
Page 66

66 Operation
4
Operation
Using the virtual keyboard
On the virtual keyboard, there are two input
mode for the entering a character. Press the
yellow (Y) coloured button to toggle display
between keyboard mode and keypad mode.
Keyboard Mode
Use U/u/I/i to select a letter on the screen,
and press ENTER ( ) to con rm your selection.
[Cancel] – Return to the previous screen.
[Space] – Inserts a space at the cursor
position.
[Backspace] – Deletes the previous character
at the cursor position.
[ABC / abc / #+-=&] – Changes the virtual
keyboard settings to capital letters, small
letters or symbols.
Press CLEAR to clear all entered characters.
To enter a letter with an accent mark:
1. Select a letter using U/u/I/i on the virtual
key board.
2. Press INFO/DISPLAY (
extended character set.
3. Use I/i to select a character then press
ENTER (
).
Available languages to enter on the keyboard
mode are as follows: English, Spanish, Italian,
French, German, Dutch, Portuguese, Swedish,
Polish and Czech.
) to display the
Keypad Mode
This mode allows you to enter letters by
pressing the buttons on the remote control.
Press the buttons with the required letter once,
twice, three or four times until the letter is
displayed.
Button Operation
CLEAR Deletes the previous character
at the cursor position.
REPEAT Inserts a space at the cursor
position.
m/M
Change the character set of
the remote control (#+-=&,
123, ABC or abc)
NOTE
The keypad mode is available only in the [YouTube]
and [Picasa Web Albums] features.
HB965DB-DD.BNLDLLK_ENG_0475.indd66 66HB965DB-DD.BNLDLLK_ENG_0475.indd66 66 2010.2.26 9:58:19 AM2010.2.26 9:58:19 AM
Page 67

67Operation
Searching videos
You can search for videos by entering search
words of up to 128 characters.
I/i
1. Use
menu and press ENTER (
virtual keyboard.
Refer to “Using the virtual keyboard” on
page 66 for using virtual keyboard.
When you entering a character, maximum
of 5 suggestion words will be displayed.
2. When you nish entering the search words,
select [OK] and press ENTER (
the related video list.
to select [Search] option from the
) to display the
) to display
Sign in with your YouTube account
To watch videos from your [Favorites] video list
on the YouTube server with your account, you
need to sign in with your YouTube account.
I/i
1. Use
menu and press ENTER (
virtual keyboard.
2. Use U/u/I/
press ENTER (
on the virtual keyboard.
Refer to “Using the virtual keyboard” on
page 66 for using virtual keyboard.
to select [Sign In] option from the
) to display the
i
to select a character then
) to con rm your selection
3. When you nish entering the user name
and the password, select [OK] and press
ENTER (
4. If you want to sign out, select the [Sign Out]
from the YouTube menu and press ENTER
(
This unit can automatically store up to 5 user
names which were previously signed-in. The
user name list appears when you select the
[Sign In] option.
Select a stored user name on the list and press
ENTER (
the selected user name is entered. You will
then only need to enter the password to sign
in.
Select the [X] symbol and press ENTER ( ) to
delete the stored user name.
) to sign in.
).
) to display the keyboard menu with
4
Operation
HB965DB-DD.BNLDLLK_ENG_0475.indd67 67HB965DB-DD.BNLDLLK_ENG_0475.indd67 67 2010.2.26 9:58:19 AM2010.2.26 9:58:19 AM
Page 68

68 Operation
4
Operation
Picasa Web Albums
Enjoy photo albums from friends and family on
the Picasa Web Albums on-line service.
View Picasa Web Albums on your TV
1. On the player, select the [Picasa Web
Albums] option in the [NetCast] menu
using I/i, and press ENTER ( ).
Featured photos are appeared on the
screen.
2. Use U/u/I/
ENTER (
Button Operation
B
INFO/
DISPLAY
X
x
I/i
i
to select a photo and press
) to view the photo in full screen.
Starts a slide show.
Displays the photo option
menu.
Pauses a slide show. To resume
slide show, press B again.
Stops the slide show and
return to the Picasa Web
Albums menu.
Moves to the next or previous
photo.
Options while viewing a photo
You can use various options during viewing a
photo in full screen.
1. While viewing a photo in full screen, press
INFO/DISPLAY (
menu.
2. Select an option using U/u.
Current photo/Total number of photos
a
– Use I/i to view previous/next photo.
Slide Show – Press ENTER (
b
pause slide show.
Add to NetCast Friends List – Add the
c
current photo owner to my friend list.
Rotate – Press ENTER (
d
photo clockwise.
Zoom – Press ENTER (
e
[Zoom] menu.
E ect – Use I/i to select a transition
f
e ect between photos in a slide show.
Speed – Use I/i to select a delaying
g
speed between photos in a slide show.
) to display the option
a
b
c
d
e
f
g
) to start or
) to rotate the
) to display the
3. Press RETURN (O) to exit the option menu.
HB965DB-DD.BNLDLLK_ENG_0475.indd68 68HB965DB-DD.BNLDLLK_ENG_0475.indd68 68 2010.2.26 9:58:20 AM2010.2.26 9:58:20 AM
Page 69

69Operation
About the Picasa Web Albums menu
There are various options on the Picasa Web
Albums menu. Use
menu option and press ENTER (
U/u/I/i
to select an
) to select
the options as described below.
Home – The featured photo list will be
displayed.
NetCast Friends – List of your friends will be
displayed.
Search – Enter a search word to nd related
photos. The virtual keyboard will be displayed
(page 70).
My Photos – Displays the photos organised in
my Picasa Web Albums. This option is available
only when the unit is in sign-in status.
Favorites – Displays up to 50 favorite web
albums that are arranged in the Picasa Web
Albums server with your account. This option
is available only when the unit is in sign-in
status.
Sign in (Sign Out) – Displays the virtual
keyboard to sign in or returns to the sign-out
status (page 70)
NOTE
Photos displayed in [My Photos] and [Favorites]
may di er with the photos from a web browser on
PC.
Adding friends
If you add your friends on the [NetCast Friends]
menu, you can see the photos of your friend’s
public photos directly.
1. Select the [NetCast Friends] on the Picasa
Web Albums menu using U/u/I/i, and
press ENTER (
).
2. Press ENTER ( ) to display the virtual
keyboard.
3. Enter a name using the virtual keyboard.
Refer to “Using the virtual keyboard” on
page 66 for using virtual keyboard.
4. Select [OK] using U/u/I/i, and press
ENTER (
) to display the web album of
your friend.
NOTE
If you want to delete your friend from the list,
•
press green (G) coloured button while the web
album is selected.
If you want to add more friends, press red (R)
•
coloured button on the list.
You can add more web albums of your friends
•
up to 50.
4
Operation
HB965DB-DD.BNLDLLK_ENG_0475.indd69 69HB965DB-DD.BNLDLLK_ENG_0475.indd69 69 2010.2.26 9:58:20 AM2010.2.26 9:58:20 AM
Page 70

70
Operation
4
Operation
Searching photos
You can enter a search word to nd related
photos.
1. Select the [Search] on the Picasa Web
Albums menu using U/u/I/i, and press
ENTER (
).
2. Enter a search word using the virtual
keyboard.
Refer to “Using the virtual keyboard” on
page 66 for using virtual keyboard.
3. Select [OK] using U/u/I/i, and press
ENTER (
) to display the search result.
NOTE
The search result from the player may di er with
the result searched from a web browser on PC.
Signing in with your account
To display photos in your web album on the
screen, you need to sign in with your Picasa
Web Albums account.
1. Select the [Sign In] on the Picasa Web
Albums menu using U/u/I/i, and press
ENTER ( ).
3. Enter the password using the virtual
keyboard, and press ENTER (
) while [OK] is
selected.
Your web album is appeared on the screen.
4. If you want to sign out, select the [Sign Out]
from the Picasa Web Albums menu and
press ENTER (
).
This unit can automatically store up to 5 user
names which were previously signed-in. The
user name list appears when you select the
[Sign In] option.
Select a stored user name on the list and press
ENTER (
) to display the virtual keyboard with
the selected user name is entered. You will
then only need to enter the password to sign
in.
Select the [X] symbol and press ENTER ( ) to
delete the stored user name.
2. Enter your user name using the virtual
keyboard, and press ENTER ( ) while [OK] is
selected.
Refer to “Using the virtual keyboard” on
page 66 for using virtual keyboard.
HB965DB-DD.BNLDLLK_ENG_0475.indd70 70HB965DB-DD.BNLDLLK_ENG_0475.indd70 70 2010.2.26 9:58:21 AM2010.2.26 9:58:21 AM
Page 71

Operation
71
Using the AccuWeather
See on-line local and global weather forcasts
from AccuWeather.com.
Viewing weather information
1. On the player, select the [AccuWeather]
option in the [NetCast] menu using I/i,
and press ENTER ( ).
The city selection menu appears on the
screen.
2. Press ENTER ( ) while [Add City to Favorite
City List] is selected.
3. Select a region using U/u, and press ENTER
).
(
5. Select a city using U/u/I/i, and press
ENTER (
).
6. Use U/u/I/i to select [Home] and press
ENTER (
) to display weather information
of the selected city.
Press red (R) coloured button to toggle
display between Fahrenheit or Celsius
thermometre.
7. Use I/i to select previous or next city, and
press ENTER (
) to display the weather
information.
This step works only when you add more
than 1 cities to the [Favorite city List].
NOTE
The weather information is not always correct.
•
The weather information may be displayed in
•
English, if your own language is not available on
the AccuWeather service.
4
Operation
4. Select a, country using U/u/I/i, and press
ENTER (
HB965DB-DD.BNLDLLK_ENG_0475.indd71 71HB965DB-DD.BNLDLLK_ENG_0475.indd71 71 2010.2.26 9:58:21 AM2010.2.26 9:58:21 AM
).
Page 72

72
4
Operation
Operation
Adding more cities
1. Use I/i to select [Favorite City List] on the
AccuWeather menu, and press ENTER
(
).
2. Press ENTER ( ) while [Add City to Favorite
City List] is selected.
3. Select a region, country and city using
U/u/I/i
4. Repeats step 2-3 to add up to 5 cities.
Select the [X] symbol and press ENTER (
to delete the stored favorite city.
5. Use U/u to select a city from the [Favorite
City List], and press ENTER (
the weather information.
and ENTER ( ).
) to display
)
HB965DB-DD.BNLDLLK_ENG_0475.indd72 72HB965DB-DD.BNLDLLK_ENG_0475.indd72 72 2010.2.26 9:58:22 AM2010.2.26 9:58:22 AM
Page 73

5
Maintenance
Maintenance
73
Notes on Discs
Handling Discs
Never stick paper or tape on the disc.
Storing Discs
After playing, store the disc in its case. Do not
expose the disc to direct sunlight or sources of
heat and never leave it in a parked car exposed
to direct sunlight.
Cleaning Discs
Do not use strong solvents such as alcohol,
benzine, thinner, commercially available
cleaners, or anti-static spray intended for older
vinyl records.
Handling the Unit
When shipping the unit
Please save the original shipping carton and
packing materials. If you need to ship the unit,
for maximum protection, re-pack the unit as it
was originally packed at the factory.
Keeping the exterior surfaces clean
Do not use volatile liquids such as
•
insecticide spray near the unit.
Wiping with strong pressure may damage
•
the surface.
Do not leave rubber or plastic products in
•
contact with the unit for a long period of
time.
Cleaning the unit
To clean the player, use a soft, dry cloth. If
the surfaces are extremely dirty, use a soft
cloth lightly moistened with a mild detergent
solution. Do not use strong solvents such as
alcohol, benzine, or thinner, as these might
damage the surface of the unit.
Maintaining the Unit
The unit is a high-tech, precision device. If
the optical pick-up lens and disc drive parts
are dirty or worn, the picture quality could be
diminished. For details, please contact your
nearest authorized service centre.
5
Maintenance
HB965DB-DD.BNLDLLK_ENG_0475.indd73 73HB965DB-DD.BNLDLLK_ENG_0475.indd73 73 2010.2.26 9:58:23 AM2010.2.26 9:58:23 AM
Page 74

74
Troubleshooting
6
Troubleshooting
General
6
Troubleshooting
The Power does not turned
on.
The unit does not start
playback.
The angle cannot be
changed.
The subtitle language
cannot be changed or
turned o .
Cannot play MP3/WMA/
JPEG/DivX les.
The remote control does
not work properly.
Plug the power cord into the wall outlet securely.•
Insert a playable disc. (Check the disc type, colour system,
•
and regional code.)
Place the disc with the playback side down.
•
Place the disc on the disc tray correctly inside the guide.
•
Clean the disc.
•
Cancel the rating function or change the rating level.
•
Multi-angles are not recorded on the DVD Video being
•
played.
Subtitles are not recorded on the DVD Video being played.•
The les are not recorded in a format that the unit can play.
•
The unit does not support the codec of the movie le.
•
The remote control is not pointed at the remote sensor of
•
the unit.
The remote control is too far from the unit.
•
There is an obstacle in the path of the remote control and
•
the unit.
The batteries in the remote control are exhausted.
•
HB965DB-DD.BNLDLLK_ENG_0475.indd74 74HB965DB-DD.BNLDLLK_ENG_0475.indd74 74 2010.2.26 9:58:23 AM2010.2.26 9:58:23 AM
Page 75

Picture
Troubleshooting
75
There is no picture. Select the appropriate video input mode on the TV so the
Picture noise appears You are playing a disc recorded in a colour system that is
•
picture from the unit appears on the TV screen.
Connect the video connection securely.
•
Check the [HDMI Color Setting] in the [Setup] menu is
•
set to the appropriate item that conforms to your video
connection.
•
Your TV may not support the resolution you have set on the
player. Change the resolution that your TV accepts.
The player’s HDMI OUT jack is connected to a DVI device that
•
does not support copyright protection.
•
di erent from your TV.
Set the resolution which your TV accepts.
•
Sound
There is no sound or the
sound is distorted.
The unit is in scan, slow motion, or pause mode.
•
The sound volume is low.
•
Check the speaker cable connection. (page 16)
•
6
Troubleshooting
HB965DB-DD.BNLDLLK_ENG_0475.indd75 75HB965DB-DD.BNLDLLK_ENG_0475.indd75 75 2010.2.26 9:58:23 AM2010.2.26 9:58:23 AM
Page 76

76
Troubleshooting
Network
6
BD-LIVE feature does not
work.
Streaming video services
(such as YouTube, etc.) are
often stopped or “bu er”
during playback.
Shared folder or les from
your PC or a media server
are not displayed on the
[Home Link] menu.
Cannot connect the player
to the access point or
wireless LAN router.
Access point is not
displayed on the “Access
point name” list.
Troubleshooting
Design and speci cations are subject to change without notice.
The connected USB storage may not have enough space.
•
Connect the USB storage with at least 1GB free space.
Ensure that the unit is correctly connected to the local area
•
network and can access the internet (see pages 24-29).
•
Your broadband speed may not fast enough to use the BDLIVE features. Contact your Internet Service Provider (ISP) and
increase the broadband speed is recommended.
•
The [BD-LIVE connection] option in the [Setup] menu is set
to [Prohibited]. Set the option to [Permitted].
Your broadband service speed may not be fast enough to
•
stream video services. Contact your Internet Service Provider
(ISP) and increase the broadband speed is recommended.
The rewall or anti-virus software on your media server is
•
running. Turn o the rewall or anti-virus software running
on your PC or media server.
The player is not connected to the local area network that
•
your PC or the media server are connected.
The wireless communication may be interrupted from
•
household devices that are using radio frequencies. Move
the player away from them.
The access point or wireless LAN router may not broadcast
•
its SSID. Set your access point to broadcast its SSID through
your computer.
Customer Support
You can update the Player using the latest software to enhance the products operation and/or
add new features. To obtain the latest software for this player (if updates have been made),
please visit http://lgservice.com or contact LG Electronics customer care centre.
HB965DB-DD.BNLDLLK_ENG_0475.indd76 76HB965DB-DD.BNLDLLK_ENG_0475.indd76 76 2010.2.26 9:58:23 AM2010.2.26 9:58:23 AM
Page 77

7
Appendix
Appendix
77
Controlling a TV with
the Supplied Remote
Control
You can control your TV using the buttons
below.
TV Control
Buttons
Button Operation
1
(TV Power)
AV/ INPUT Switch the TV’s input source
VOL +/- Adjust the volume of the
U/u
PR/CH
Turn the TV on or o .
between the TV and other
input sources.
TV.
Scan up or down through
memorized channels.
Setting up the remote to
control your TV
You can operate your LG/GoldStar TV with the
supplied remote control.
While holding down TV POWER button, press
U/u
PR/CH
complete setting.
When you replace the batteries of the remote,
you may have reset the remote control.
. Release the TV POWER button to
Appendix
7
NOTE
Depending on the unit being connected, you may
not be able to control your TV using some of the
buttons.
HB965DB-DD.BNLDLLK_ENG_0475.indd77 77HB965DB-DD.BNLDLLK_ENG_0475.indd77 77 2010.2.26 9:58:23 AM2010.2.26 9:58:23 AM
Page 78

78
Appendix
7
Appendix
Area Code List
Choose an area code from this list.
Area Code Area Code Area Code Area Code
Afghanistan AF
Argentina AR
Australia AU
Austria AT
Belgium BE
Bhutan BT
Bolivia BO
Brazil BR
Cambodia KH
Canada CA
Chile CL
China CN
Colombia CO
Congo CG
Costa Rica CR
Croatia HR
Czech Republic CZ
Denmark DK
Ecuador EC
Egypt EG
El Salvador SV
Ethiopia ET
Fiji FJ
Finland FI
France FR
Germany DE
Great Britain GB
Greece GR
Greenland GL
Hong Kong HK
Hungary HU
India IN
Indonesia ID
Israel IL
Italy IT
Jamaica JM
Japan JP
Kenya KE
Kuwait KW
Libya LY
Luxembourg LU
Malaysia MY
Maldives MV
Mexico MX
Monaco MC
Mongolia MN
Morocco MA
Nepal NP
Netherlands NL
Netherlands
Antilles AN
New Zealand NZ
Nigeria NG
Norway NO
Oman OM
Pakistan PK
Panama PA
Paraguay PY
Philippines PH
Poland PL
Portugal PT
Romania RO
Russian
Federation RU
Saudi Arabia SA
Senegal SN
Singapore SG
Slovak Republic SK
Slovenia SI
South Africa ZA
South Korea KR
Spain ES
Sri Lanka LK
Sweden SE
Switzerland CH
Taiwan TW
Thailand TH
Turkey TR
Uganda UG
Ukraine UA
United States US
Uruguay UY
Uzbekistan UZ
Vietnam VN
Zimbabwe ZW
HB965DB-DD.BNLDLLK_ENG_0475.indd78 78HB965DB-DD.BNLDLLK_ENG_0475.indd78 78 2010.2.26 9:58:25 AM2010.2.26 9:58:25 AM
Page 79

Appendix
Language code List
Use this list to input your desired language for the following initial settings: [Disc Audio],
[Disc Subtitle] and [Disc Menu].
Language Code Language Code Language Code Language Code
Afar 6565
Afrikaans 6570
Albanian 8381
Ameharic 6577
Arabic 6582
Armenian 7289
Assamese 6583
Aymara 6588
Azerbaijani 6590
Bashkir 6665
Basque 6985
Bengali; Bangla 6678
Bhutani 6890
Bihari 6672
Breton 6682
Bulgarian 6671
Burmese 7789
Byelorussian 6669
Chinese 9072
Croatian 7282
Czech 6783
Danish 6865
Dutch 7876
English 6978
Esperanto 6979
Estonian 6984
Faroese 7079
Fiji 7074
Finnish 7073
French 7082
Frisian 7089
Galician 7176
Georgian 7565
German 6869
Greek 6976
Greenlandic 7576
Guarani 7178
Gujarati 7185
Hausa 7265
Hebrew 7387
Hindi 7273
Hungarian 7285
Icelandic 7383
Indonesian 7378
Interlingua 7365
Irish 7165
Italian 7384
Japanese 7465
Kannada 7578
Kashmiri 7583
Kazakh 7575
Kirghiz 7589
Korean 7579
Kurdish 7585
Laothian 7679
Latin 7665
Latvian, Lettish 7686
Lingala 7678
Lithuanian 7684
Macedonian 7775
Malagasy 7771
Malay 7783
Malayalam 7776
Maori 7773
Marathi 7782
Moldavian 7779
Mongolian 7778
Nauru 7865
Nepali 7869
Norwegian 7879
Oriya 7982
Panjabi 8065
Pashto, Pushto 8083
Persian 7065
Polish 8076
Portuguese 8084
Quechua 8185
Rhaeto-Romance
8277
Rumanian 8279
Russian 8285
Samoan 8377
Sanskrit 8365
Scots Gaelic 7168
Serbian 8382
Serbo-Croatian 8372
Shona 8378
Sindhi 8368
Singhalese 8373
Slovak 8375
Slovenian 8376
Spanish 6983
Sudanese 8385
Swahili 8387
Swedish 8386
Tagalog 8476
Tajik 8471
Tamil 8465
Telugu 8469
Thai 8472
Tonga 8479
Turkish 8482
Turkmen 8475
Twi 8487
Ukrainian 8575
Urdu 8582
Uzbek 8590
Vietnamese 8673
Volapük 8679
Welsh 6789
Wolof 8779
Xhosa 8872
Yiddish 7473
Yoruba 8979
Zulu 9085
79
Appendix
7
HB965DB-DD.BNLDLLK_ENG_0475.indd79 79HB965DB-DD.BNLDLLK_ENG_0475.indd79 79 2010.2.26 9:58:25 AM2010.2.26 9:58:25 AM
Page 80

80 Appendix
Network Software
Update
Network update notifi cation
From time to time, performance improvements
and/or additional features or services may be
made available to units that are connected to
a broadband home network. If there is new
software available and the unit is connected
to a broadband home network, the player will
inform you about the update as follows.
Option 1:
1. The update menu will appear on the screen
when you turn on the player.
I/i
2. Use
Appendix
to select a desired option and then
press ENTER ( ).
Option 2:
If the software update is available from the
update server, the “Update” icon appears at
the bottom of the Home menu. Press blue (B)
coloured button to start the up
date procedure.
Software Update
You can update the player using the latest
software to enhance the products operation
and/or add new features. You can update the
software by connecting the unit directly to the
software update server.
CAUTION
Before updating the software in your player,
•
remove any disc and USB Device from the player.
Before updating the software in your player, turn
•
the player o and then turn it back on.
During the software update procedure, do
•
not turn o the player or disconnect AC
power, or do not press any button.
If you cancel the update, turn o the power and
•
turn it on for stable performance.
This unit cannot be updated to previous
•
software version.
1. Check the network connection and settings
[OK]
Starts the software update.
[Cancel]
7
HB965DB-DD.BNLDLLK_ENG_0475.indd80 80HB965DB-DD.BNLDLLK_ENG_0475.indd80 80 2010.2.26 9:58:25 AM2010.2.26 9:58:25 AM
Exits the update menu and displays it next
booting.
[Hide]
Exits the update menu and it does not
appear until next software is uploaded in
the update server.
(page 24
2. Select [Software] option in the [Setup]
menu then press ENTER (
3. Select [Update] option, and press ENTER
(
The player will check for the newest update.
).
).
).
Page 81

81Appendix
NOTE
•
Pressing ENTER () while checking for the
update will end the process.
If there is no update available, the Message,
•
“No update is found.” appears. Press ENTER (
to return to the [Home Menu].
4. If newer version exists, the message “A
new update was found. Do you want to
download it?” appears.
5. Select [OK] to download the update.
(Selecting [Cancel] will end the update.)
6. The player starts downloading the newest
update from the server.
takes several minutes depending on your
home network condition)
7. When downloading is completed, the
message, “Download is complete. Do you
want to update?” appears.
8. Select [OK] to start upda
(Selecting [Cancel] will end the update and
downloaded le will not be re-usable. To
update software the next time, the software
update procedure has to be started from
the beginning again.)
(Downloading will
ting.
CAUTION
Do not turn o the power during the software
update.
)
NOTE
If the software includes the driver update, disc tray
may open during the process.
9. When update is completed, the message,
“Update is complete.” will appear, and then
power will turn o automatically after 5
seconds.
10.
Turn the power back on. The system now
operates with the new version.
NOTE
The Software Update function may not work
properly depending on your internet environment.
In this case, you can obtain the latest software from
the authorized LG Electronics Service Centre then
update your player. Refer to “Customer Support” on
page 76.
Appendix
7
HB965DB-DD.BNLDLLK_ENG_0475.indd81 81HB965DB-DD.BNLDLLK_ENG_0475.indd81 81 2010.2.26 9:58:26 AM2010.2.26 9:58:26 AM
Page 82

82 Appendix
Video output resolution
When the non-copy protected media is playing back
Video Out
Resolution
576i 576p 576i
576p 576p 576p
720p 720p 720p
1080i 1080i 1080i
1080p / 24 Hz 1080p / 24 Hz 576i 1080i
1080p / 50 Hz 1080p / 50 Hz 576i 1080i
When the copy protected media is playing back
Video Out
Resolution
576i 576p 576i
576p 576p 576p
720p 720p 576i 576p
1080i 1080i 576i 576p
1080p / 24 Hz 1080p / 24 Hz 576i 576p
1080p / 50 Hz 1080p / 50 Hz 576i 576p
HDMI OUT
HDMI OUT
COMPONENT VIDEO OUT
HDMI connected HDMI disconnected
COMPONENT VIDEO OUT
HDMI connected HDMI disconnected
•
HDMI OUT connection
Appendix
For the 576i resolution setting, real output
•
resolution of HDMI OUT will change to
576p.
If you select a resolution manually and then
•
connect the HDMI jack to TV and your TV
The 1080p video output frame rate may
be automatically set to either 24 Hz or
50 Hz depending both on the capability
and preference of the connected TV and
based on the native video frame rate of the
content on the BD-ROM disc.
does not accept it, the resolution setting is
7
set to [Auto].
If you select a resolution that your TV
•
does not accept, the warning message
will appear. After resolution change,
COMPONENT VIDEO OUT
connection
BD or DVD could prevent up-scaling on
analogue output.
if you cannot see the screen, please
wait 20 seconds and the resolution will
automatically revert back to the previous
resolution.
VIDEO OUT connection
The resolution of the VIDEO OUT jack is always
outputted at 576i resolution.
HB965DB-DD.BNLDLLK_ENG_0475.indd82 82HB965DB-DD.BNLDLLK_ENG_0475.indd82 82 2010.2.26 9:58:26 AM2010.2.26 9:58:26 AM
Page 83

Trademarks and Licences
“Blu-ray Disc” is a trademark.
“BD-LIVE” logo is a trademark of Blu-ray Disc
Association.
“BONUSVIEW” is trademark of Blu-ray Disc
Association.
Java and all Java-based trademarks and logos
are trademarks or registered trademarks of Sun
Microsystems, Inc. in the United States and other
countries.
83Appendix
HDMI, the HDMI logo and High-De nition
Multimedia Interface are trademarks or registered
trademarks of HDMI licensing LLC.
“DVD Logo” is a trademark of DVD Format/Logo
Licensing Corporation.
DLNA®, the DLNA Logo and DLNA CERTIFIED® are
trademarks, service marks, or certi cation marks of
the Digital Living Network Alliance.
Appendix
The Wi-Fi CERTIFIED Logo is a certi cation mark of
the Wi-Fi Alliance.
Manufactured under licence from Dolby
Laboratories. Dolby, Pro Logic, and the double-D
symbol are trademarks of Dolby Laboratories.
DivX is a registered trademark of DivX, Inc., and is
used under licence.
Manufactured under licence under U.S. Patent
#’s: 5,451,942; 5,956,674; 5,974,380; 5,978,762;
6,226,616; 6,487,535; 7,392,195; 7,272,567;
7,333,929; 7,212,872 & other U.S. and worldwide
patents issued & pending. DTS is a registered
trademark and the DTS logos, Symbol, DTS-HD and
DTS-HD Master Audio | Essential are trademarks of
DTS, Inc. © 1996-2008 DTS, Inc. All Rights Reserved.
HB965DB-DD.BNLDLLK_ENG_0475.indd83 83HB965DB-DD.BNLDLLK_ENG_0475.indd83 83 2010.2.26 9:58:26 AM2010.2.26 9:58:26 AM
“x.v.Colour” is a trademark of Sony Corporation.
7
Page 84

84 Appendix
Appendix
7
“AVCHD” and the “AVCHD” logo are trademarks of
Panasonic Corporation and Sony Corporation.
This product is licenced under the AVC patent
portfolio licence and VC-1 patent portfolio licence
for the personal and non-commercial use of a
consumer to (i) encode video in compliance
with the AVC Standard and VC-1 Standard (“AVC/
VC-1 Video”) and/or (ii) decode AVC/VC-1 Video
that was encoded by a consumer engaged in
a personal and non-commercial activity and/or
was obtained from a video provider licenced to
provide AVC/VC-1 Video. No licence is granted
or shall be implied for any other use. Additional
information may be obtained from MPEG LA, LLC.
See http://www.mpegla.com.
iPod is a trademark of Apple Inc., registered in the
U.S. and other countries.
iPhone is a trademark of Apple Inc.
“Made for iPod” means that an electronic accessory
has been designed to connect speci cally to iPod
and has been certi ed by the developer to meet
Apple performance standards.
“Works with iPhone” means that an electronic
accessory has been designed to connect
speci cally to iPhone and has been certi ed
by the developer to meet Apple performance
standards.
Apple is not responsible for the operation of
this device or its compliance with safety and
regulatory standards.
Gracenote®, Gracenote logo and logotype, and the
“Powered by Gracenote” logo are either registered
trademarks or trademarks of Gracenote, Inc. in the
United States and/or other countries.
Music recognition technology and related data are
provided by Gracenote®.
©
Portions of the content is copyright
its providers.
Gracenote or
Energy Saving
(Extremely Low Power Consumption)
On the LG products, an innovative power
consumption system in stand-by mode is built.
It consumes less than 0.09 watts in that mode.
Therefore, the small amounts of electricity are
consumed even though the power plug is inserted.
HB965DB-DD.BNLDLLK_ENG_0475.indd84 84HB965DB-DD.BNLDLLK_ENG_0475.indd84 84 2010.2.26 9:58:27 AM2010.2.26 9:58:27 AM
Page 85

85Appendix
Specifi cations
General
Power requirements:
•
AC 200-240 V, 50/ 60 Hz
Power consumption:
•
95 W
Dimensions (W x H x D):
•
Approx. 439 x 67 x 284 mm without foot
Net Weight (Approx.):
•
4.2 kg
Operating temperature:
•
41 °F to 95 °F (5 °C to 35 °C)
Operating humidity:
•
5 % to 90 %
Bus Power supply (USB):
•
DC 5 V 500 mA
Inputs/ Outputs
VIDEO OUT:
•
1.0 V (p-p), 75 Ω, sync negative, RCA jack x 1
COMPONENT VIDEO OUT:
•
(Y) 1.0 V (p-p), 75 Ω, sync negative, RCA jack x 1,
(Pb)/(Pr) 0.7 V (p-p), 75 Ω, RCA jack x 2
HDMI IN/OUT (video/audio):
•
19 pin (HDMI standard, Type A, Version 1.3)
Analogue AUDIO IN:
•
2.0 Vrms (1 kHz, 0 dB), 600 Ω, RCA jack (L, R) x 1
DIGITAL IN (OPTICAL 1/2):
•
3 V (p-p), Optical jack x 2
PORT. IN:
•
0.5 Vrms (3.5 mm stereo jack)
Tuner
FM Tuning Range:
•
87.50 to 108.00 MHz
Amplifi er
Power output (4 Ω), (PEAK)
•
Total 560 W
Front 180 W x 2
Sub-Woofer 200 W (Passive)
Power output (4 Ω), (RMS), THD 10 % (4 Ω/ 3 Ω)
•
Total 500 W
Front 160 W x 2
Sub-Woofer 180 W (Passive)
System
Laser:
•
Semiconductor laser
Wavelength: 405 nm / 650 nm
Signal system:
•
Standard NTSC/PAL colour TV system
Frequency response:
•
20 Hz to 20 kHz (48 kHz, 96 kHz, 192 kHz sampling)
Signal-to-noise ratio:
•
More than 85 dB
Total harmonic distortion:
•
0.05 % at 1 W
Dynamic range:
•
More than 95 dB
LAN port:
•
Ethernet jack x 1, 10BASE-T/100BASE-TX
Wireless LAN (internal antenna):
•
Integrated IEEE 802.11n (2.4 GHz band) wireless
networking access, compatible with 802.11b/g
Wi-Fi networks.
Appendix
7
HB965DB-DD.BNLDLLK_ENG_0475.indd85 85HB965DB-DD.BNLDLLK_ENG_0475.indd85 85 2010.2.26 9:58:27 AM2010.2.26 9:58:27 AM
Page 86

86 Appendix
Speakers
Front speaker (Left/ Right)
•
Type: 2 Way 2 speaker
Impedance Rated: 4 Ω
Input Power: 180 W
Max. Input power: 360 W
Net Dimensions 109 x 196 x 97 mm
(W x H x D):
Net Weight: 0.55 kg
Subwoofer
•
Type: 1 Way 1 speaker
Impedance Rated: 3 Ω
Input Power: 200 W
Max. Input power: 400 W
Net Dimensions 196 x 394 x 320 mm
(W x H x D):
Net Weight: 5.8 kg
Appendix
7
HB965DB-DD.BNLDLLK_ENG_0475.indd86 86HB965DB-DD.BNLDLLK_ENG_0475.indd86 86 2010.2.26 9:58:28 AM2010.2.26 9:58:28 AM
Page 87

87Appendix
Important Information
Relating to Network
Services
PLEASE READ CAREFULLY. USE OF THE NETWORK
SERVICES IS SUBJECT TO THE FOLLOWING TERMS
AND CONDITIONS.
Use of the Network Services requires an Internet
connection which is sold separately and for which
you are solely responsible. The Network Services may
be limited or restricted depending upon the quality,
capabilities and technical limitations of your Internet
service.
The Network Services belong to third parties and
may be protected by copyright, patent, trademark
and/or other intellectual property laws. The Network
Services are provided sol\ely for your personal and
noncommercial use. Unless expressly authorized by
the respective content owner or service provider,
you shall not modify, copy, republish, upload, post,
transmit, translate, sell, create derivative works,
exploit, or distribute in any manner or medium any
content or services accessible through this product.
LG IS NOT RESPONSIBLE FOR YOUR USE OF
THE NETWORK SERVICES. THE NETWORK
SERVICES ARE PROVIDED “AS IS.” TO THE FULLEST
EXTENT PERMISSIBLE BY LAW, LG MAKES NO
REPRESENTATIONS OR WARRANTIES OF ANY KIND
WHATSOEVER (i) FOR THE ACCURACY, VALIDITY,
TIMELINESS, LEGALITY, OR COMPLETENESS OF ANY
NETWORK SERVICE MADE AVAILABLE THROUGH
THIS PRODUCT; OR (ii) THAT THE NETWORK SERVICES
ARE FREE OF VIRUSES OR OTHER COMPONENTS
THAT MAY INFECT, HARM, OR CAUSE DAMAGE TO
THIS PRODUCT, YOUR COMPUTER, TELEVISION,
OTHER EQUIPMENT, OR ANY OTHER PROPERTY. LG
EXPRESSLY DISCLAIMS ANY IMPLIED WARRANTIES,
INCLUDING BUT NOT LIMITED TO, WARRANTIES OF
MERCHANTABILITY OR FITNESS FOR A PARTICULAR
PURPOSE.
UNDER NO CIRCUMSTANCES AND UNDER NO
LEGAL THEORY, WHETHER IN CONTRACT, TORT,
STRICT LIABILITY OR OTHERWISE, SHALL LG BE
LIABLE TO YOU OR ANY THIRD PARTY FOR ANY
DIRECT, INDIRECT, INCIDENTAL, SPECIAL, STATUTORY,
CONSEQUENTIAL OR OTHER DAMAGES OR
ATTORNEY FEES OR EXPENSES RELATING TO OR
ARISING OUT OF THE NETWORK SERVICES EVEN IF
ADVISED OF THE POSSIBILITY OF SUCH DAMAGES OR
IF SUCH DAMAGES COULD HAVE BEEN REASONABLY
FORESEEN.
The Network Services may be terminated or
interrupted at any time, and LG makes no
representation or warranty that any Network Service
will remain available for any period of time. Use of the
Network Services may be subject to additional terms
and conditions of the respective third party service
provider. The Network Services are transmitted by
third parties by means of networks and transmission
facilities over which LG has no control. LG EXPRESSLY
DISCLAIMS ANY RESPONSIBILITY OR LIABILITY
FOR ANY INTERRUPTION OR SUSPENSION OF ANY
NETWORK SERVICE.
LG shall be neither responsible nor liable for
customer service related to the Network Services.
Any question or request should be made directly to
the respective Network Service providers.
“Network Service(s)” means the third party services
accessible through this product including but
not limited to all data, software, links, messages,
video and other content found thereon or used in
connection therewith.
“LG” means LG Electronics, Inc. its parent company
and all of their respective subsidiaries, a liates and
related companies worldwide.
Appendix
7
HB965DB-DD.BNLDLLK_ENG_0475.indd87 87HB965DB-DD.BNLDLLK_ENG_0475.indd87 87 2010.2.26 9:58:28 AM2010.2.26 9:58:28 AM
Page 88

88 Appendix
Appendix
7
Open source software
notice
The following GPL executables and LGPL libraries
used in this product are subject to the GPL2.0/
LGPL2.1 License Agreements:
GPL EXECUTABLES: Linux kernel 2.6, bash, busybox,
cramfs, dhcpcd, e2fsprogs, fdisk, mkdosfs, mtd-utils,
net-tools, procps, samba-3.0.25b, sysutils, tcpdump,
tftpd, tinylogin, unzip, utelnetd
LGPL LIBRARIES: uClibc, DirectFB, blow sh, cairo,
mpeg, iconv, libusb, mpg123
gSOAP Public License 1.3 LIBRARY: gsoap
LG El ectronics o ers to provide source code to
you on CD-ROM for a charge covering the cost of
performing such distribution, such as the cost of
media, shipping and handling upon e-mail request
to LG Electronics at: opensource@lge.com
This o er is valid for a period of three(3) years from
the date of the distribution of this product by LG
Electronics.
You can obtain a copy of the GPL, LGPL licenses
from http://www.gnu.org/licenses/old-licenses/gpl-
2.0.html and http://www.gnu.org/licenses/old-
licenses/lgpl-2.1.html .
Also you can obtain a copy of gSOAP public license
from http://www.cs.fsu.edu/~engelen/license.html.
This software is based in part on the work of the
Independent JPEG Group copyright © 1991 - 1998,
Thomas G. Lane.
This product includes
boost C++: copyright © Beman Dawes 1999-2003
•
c-ares : copyright © 1998 by the Massachusetts
•
Institute of Technology
curl: copyright © 1996 - 2008, Daniel Stenberg
•
expat: copyright © 2006 expat maintainers
•
freetype: copyright © 2003 The FreeType Project
•
(www.freetype.org).
jpeg: This software is based in part on the work of
•
the Independent JPEG Group copyright © 1991 –
1998, Thomas G. Lane.
mng: copyright © 2000-2007 Gerard Juyn, Glenn
•
Randers-Pehrson
ntp : copyright © David L. Mills 1992-2006
•
•
OpenSSL:
– cryptographic software written by Eric Young
(eay@cryptsoft.com).
– software written by Tim Hudson
(tjh@cryptsoft.com).
– software developed by the OpenSSL Project
for use in the OpenSSL Toolkit.
(http://www.openssl.org)
•
png: copyright © 2004 Glenn Randers-Pehrson
•
portmap : copyright © 1990 The Regents of the
University of California
•
ptmalloc : copyright © 2001-2006 Wolfram Gloger
•
UnitTest++ : copyright © 2006 Noel Llopis and
Charles Nicholson
•
UPnP SDK : copyright © 2000-2003 Intel
Corporation
•
strace :
copyright © 1991, 1992 Paul Kranenburg
copyright © 1993 Branko Lankester
copyright © 1993 Ulrich Pegelow
copyright © 1995, 1996 Michael Elizabeth Chastain
copyright © 1993, 1994, 1995, 1996 Rick Sladkey
copyright © 1999,2000 Wichert Akkerman
•
xml2 : copyright © 1998-2003 Daniel Veillard
•
XML-RPC For C/C++:
copyright © 2001 by First Peer, Inc. All rights
reserved.
copyright © 2001 by Eric Kidd. All rights reserved.
•
zlib: copyright © 1995-2002 Jean-loup Gailly and
Mark Adler.
All rights reserved.
Permission is hereby granted, free of charge, to
any person obtaining a copy of this software and
associated documentation les (the “Software”), to
deal in the Software without restriction, including
without limitation the rights to use, copy, modify,
merge, publish, distribute, sublicense, and/or sell
copies of the Software, and to permit persons to
whom the Software is furnished to do so, subject to
the following conditions:
THE SOFTWARE IS PROVIDED “AS IS”, WITHOUT
WARRANTY OF ANY KIND, EXPRESS OR IMPLIED,
INCLUDING BUT NOT LIMITED TO THE WARRANTIES
OF MERCHANTABILITY, FITNESS FOR A PARTICULAR
PURPOSE AND NONINFRINGEMENT. IN NO EVENT
SHALL THE AUTHORS OR COPYRIGHT HOLDERS
BE LIABLE FOR ANY CLAIM, DAMAGES OR OTHER
LIABILITY, WHETHER IN AN ACTION OF CONTRACT,
TORT OR OTHERWISE, ARISING FROM, OUT OF OR IN
CONNECTION WITH THE SOFTWARE OR THE USE OR
OTHER DEALINGS IN THE SOFTWARE.
HB965DB-DD.BNLDLLK_ENG_0475.indd88 88HB965DB-DD.BNLDLLK_ENG_0475.indd88 88 2010.2.26 9:58:28 AM2010.2.26 9:58:28 AM
Page 89

89Appendix
Gracenote® End User
Licence Agreement
This application or device contains software from
Gracenote, Inc. of Emeryville, California (“Gracenote”).
The software from Gracenote (the “Gracenote
Software”) enables this application to perform disc
and/or le identi cation and obtain music-related
information, including name, artist, track, and title
information (“Gracenote Data”) from online servers
or embedded databases (collectively, “Gracenote
Servers”) and to perform other functions. You may
use Gracenote Data only by means of the intended
End-User functions of this application or device.
You agree that you will use Gracenote Data, the
Gracenote Software, and Gracenote Servers for
your own personal non-commercial use only. You
agree not to assign, copy, transfer or transmit the
Gracenote Software or any Gracenote Data to any
third party. YOU AGREE NOT TO USE OR EXPLOIT
GRACENOTE DATA, THE GRACENOTE SOFTWARE,
OR GRACENOTE SERVERS, EXCEPT AS EXPRESSLY
PERMITTED HEREIN.
You agree that your non-exclusive licence to use
the Gracenote Data, the Gracenote Software, and
Gracenote Servers will terminate if you violate
these restrictions. If your licence terminates, you
agree to cease any and all use of the Gracenote
Data, the Gracenote Software, and Gracenote
Servers. Gracenote reserves all rights in Gracenote
Data, the Gracenote Software, and the Gracenote
Servers, including all ownership rights. Under no
circumstances will Gracenote become liable for any
payment to you for any information that you provide.
You agree that Gracenote, Inc. may enforce its rights
under this Agreement against you directly in its own
name.
The Gracenote service uses a unique identi er to
track queries for statistical purposes. The purpose of
a randomly assigned numeric identi er is to allow
the Gracenote service to count queries without
knowing anything about who you are. For more
information, see the web page for the Gracenote
Privacy Policy for the Gracenote service.
The Gracenote Software and each item of Gracenote
Data are licenced to you “AS IS.” Gracenote makes
no representations or warranties, express or implied,
regarding the accuracy of any Gracenote Data from
in the Gracenote Servers. Gracenote reserves the
right to delete data from the Gracenote Servers or to
change data categories for any cause that Gracenote
deems su cient. No warranty is made that the
Gracenote Software or Gracenote Servers are errorfree or that functioning of Gracenote Software or
Gracenote Servers will be uninterrupted. Gracenote
is not obligated to provide you with new enhanced
or additional data types or categories that Gracenote
may provide in the future and is free to discontinue
its services at any time.
GRACENOTE DISCLAIMS ALL WARRANTIES EXPRESS
OR IMPLIED, INCLUDING, BUT NOT LIMITED TO,
IMPLIED WARRANTIES OF MERCHANTABILITY,
FITNESS FOR A PARTICULAR PURPOSE, TITLE, AND
NON-INFRINGEMENT. GRACENOTE DOES NOT
WARRANT THE RESULTS THAT WILL BE OBTAINED BY
YOUR USE OF THE GRACENOTE SOFTWARE OR ANY
GRACENOTE SERVER. IN NO CASE WILL GRACENOTE
BE LIABLE FOR ANY CONSEQUENTIAL OR INCIDENTAL
DAMAGES OR FOR ANY LOST PROFITS OR LOST
REVENUES.
© Gracenote, Inc. 2009
Appendix
7
HB965DB-DD.BNLDLLK_ENG_0475.indd89 89HB965DB-DD.BNLDLLK_ENG_0475.indd89 89 2010.2.26 9:58:28 AM2010.2.26 9:58:28 AM
Page 90

HB965DB-DD.BNLDLLK_ENG_0475.indd90 90HB965DB-DD.BNLDLLK_ENG_0475.indd90 90 2010.2.26 9:58:28 AM2010.2.26 9:58:28 AM
 Loading...