

Page 1

This booklet is printed with soy ink. Printed in Mexico
This booklet is made from 98% post-consumer recycled paper.
User Guide
Usuario
Guía del
User Guide
MFL69301001 (1.0)
ME
Page 2

Copyright©2015 LG Electronics, Inc. All rights reserved.
LG and the LG logo are registered trademarks of LG Corp.
G Pad is a trademark of LG Electronics, Inc.
All other trademarks are the property of their respective
owners.
Page 3

Important Customer Information
Before you begin using your new tablet
Included in the box with your tablet are separate information leaflets. These
leaflets provide you with important information regarding your new device.
Please read all of the information provided. This information will help you to
get the most out of your tablet, reduce the risk of injury, avoid damage to
your device, and make you aware of legal regulations regarding the use of
this device.
It’s important to review the Product Safety and Warranty Information guide
before you begin using your new tablet. Please follow all of the product
safety and operating instructions and retain them for future reference.
Observe all warnings to reduce the risk of injury, damage, and legal
liabilities.
1
Page 4

2
Table of Contents
Important Customer Information...............................................1
Table of Contents .......................................................................2
The Basics ...................................................................................5
Tablet Overview ....................................................................................................5
Home Screen Overview ....................................................................................... 8
Help ....................................................................................................................... 9
Non-Removable Battery ...................................................................................... 9
Home Screen .......................................................................................................16
Notifications .......................................................................................................20
Capturing a Screenshot .....................................................................................27
Google Account Setup ......................................................................................28
Entering Text .......................................................................................................28
Connecting to Networks and Devices ................................... 32
Connecting to Networks and Devices .............................................................. 32
Bluetooth .............................................................................................................33
SmartShare .........................................................................................................34
PC connections with a USB cable ....................................................................35
Web ............................................................................................37
Chrome ................................................................................................................37
Communication ........................................................................ 41
Contacts ...............................................................................................................41
Email ....................................................................................................................43
Gmail ...................................................................................................................44
Hangouts .............................................................................................................50
Entertainment .......................................................................... 52
Camera ................................................................................................................52
Gallery .................................................................................................................58
Videos ..................................................................................................................60
Music ....................................................................................................................61
Play Store ............................................................................................................63
YouTube™ ............................................................................................................65
Page 5

Table of Contents
Tools .......................................................................................... 66
QPair ...................................................................................................................66
QSlide .................................................................................................................. 67
QuickMemo+ ......................................................................................................69
QuickRemote ......................................................................................................70
Clock .....................................................................................................................71
Calculator ............................................................................................................ 72
Calendar .............................................................................................................. 73
File Manager ....................................................................................................... 75
Maps .................................................................................................................... 76
Voice Recorder ................................................................................................... 76
Application Manager .......................................................................................... 77
ThinkFree Office ................................................................................................. 78
Google+ ............................................................................................................... 78
Voice Search ....................................................................................................... 79
Settings .................................................................................... 80
Specifications .......................................................................... 98
Safety ........................................................................................ 99
Safety Information .............................................................................................99
Care and Maintenance ..................................................................................... 102
Consumer Information on SAR ........................................................................ 111
Caution:
Avoid potential hearing loss ............................................................................. 112
TIA Safety Information ..................................................................................... 114
FDA Consumer Update .....................................................................................117
Driving ............................................................................................................... 125
3
Page 6

4
Table of Contents
Tablet software update ..........................................................126
Troubleshooting ......................................................................128
LIMITED WARRANTY STATEMENT ....................................129
Index ........................................................................................133
Page 7
The Basics
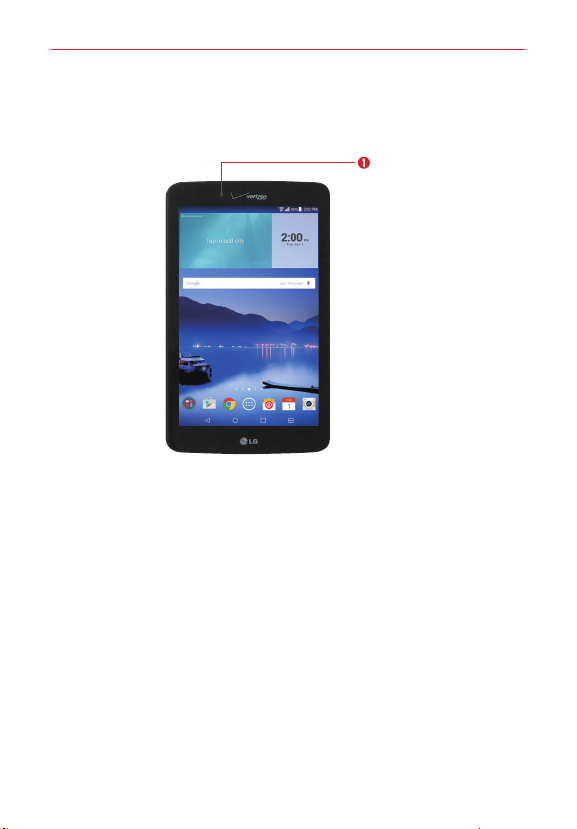
Tablet Overview
Front View
NOTES ţ All screen shots in this guide are simulated. Actual displays may vary.
ţ Instructions to perform tasks in this guide are based on the default settings and may
change depending on the software version on your tablet.
1. Front Camera Use to take pictures and record videos of yourself. You
can also use this for video chatting. Keep the lens clean for optimal
performance.
WARNING! Placing a heavy object on the tablet or sitting on it can damage the LCD and
touchscreen functions.
Front Camera
5
Page 8
6
The Basics
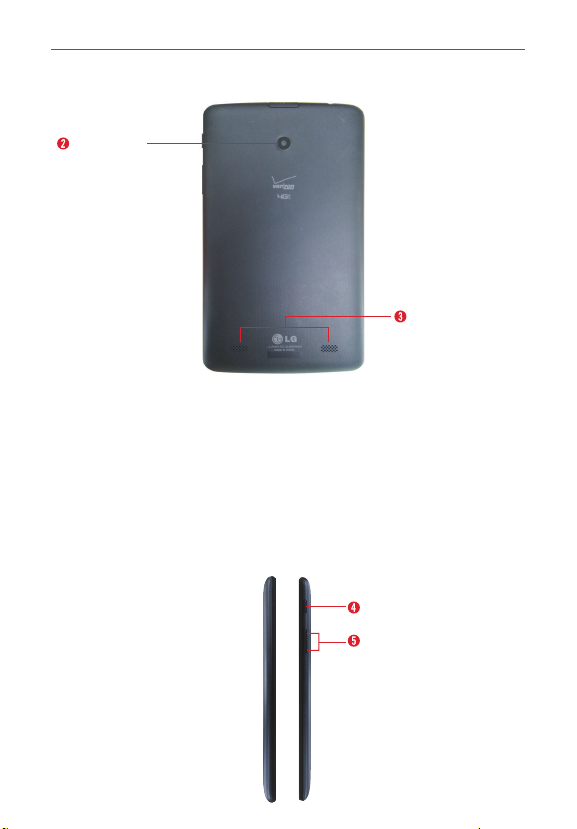
Rear View
Rear Camera
Speakers
2. Rear Camera Use to take photos and record videos. Keep the lens clean
for optimal performance.
3. Speakers Use to listen to the audio from the selected function (e.g.,
music, videos, sound clips, etc.).
NOTE Your tablet is designed to have two speaker openings on the back side for aesthetic
reasons. However, the actual sound comes from only one speaker. Please note that it’s
not a product defect.
Side Views
Power/Lock Key
Volume Keys
Page 9
The Basics
4. Power/Lock Key Press to lock/unlock the screen. Press and hold to turn
the tablet on/off, restart it, activate/deactivate airplane mode, and change
the sound settings.
5. Volume Keys Press to adjust the media volumes. If the Shortcut setting
is enabled, you can press and hold both keys at the same time to access
the QuickMemo+ application. When the Shortcut key setting is enabled
and the screen is off, you can also press and hold the Volume Down
key or Volume Up key to access the Camera application.
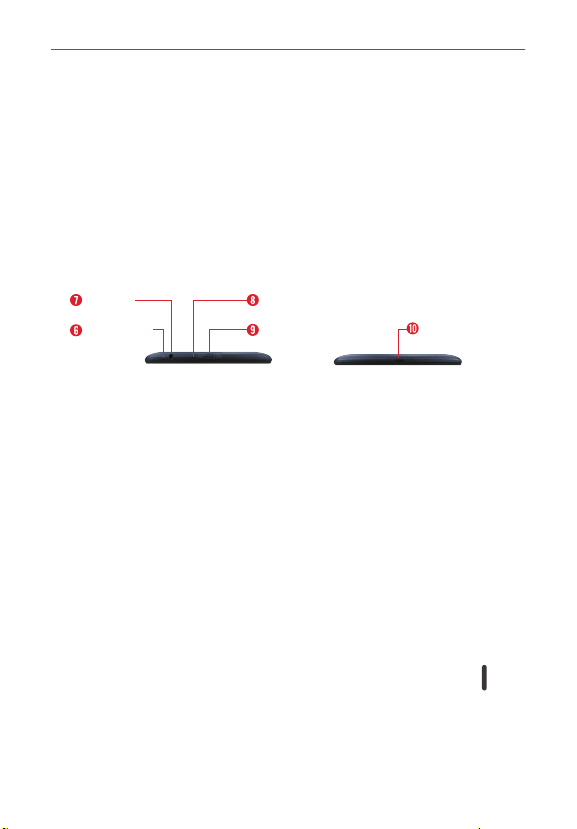
Top and Bottom Views
Headset
Jack
Microphone
Top Bottom
6. Microphone Records your voice and is used for voice-activated
functions.
NOTE Make sure that the microphone is not blocked when recording a video or audio clip.
7. Headset Jack Use to plug in an optional listening accessory, such as
headphones to listen to music.
8. Infrared (IR) LED Used as a sensor for the Quick Remote application.
9. SIM Card/microSD Card Slot Use to insert your SIM card and a
microSD card. A valid SIM card is required to have access to the mobile
network. Insert a microSD card to store your personal data files (e.g.,
music, videos, photos, etc.).
10. USB/Charging Port Use to connect the USB cable to the tablet for use
with the charger adapter
TIP! If the tablet freezes up and stops working, press and hold the Power/Lock Key (on the
right side of the tablet) for about 6 seconds until the screen turns off. Wait a few
seconds, then turn the tablet back on.
Infrared
(IR) LED
SIM Card/
microSD Card Slot
USB/Charging
Port
, your PC, or other compatible accessories.
7
Page 10
8
The Basics
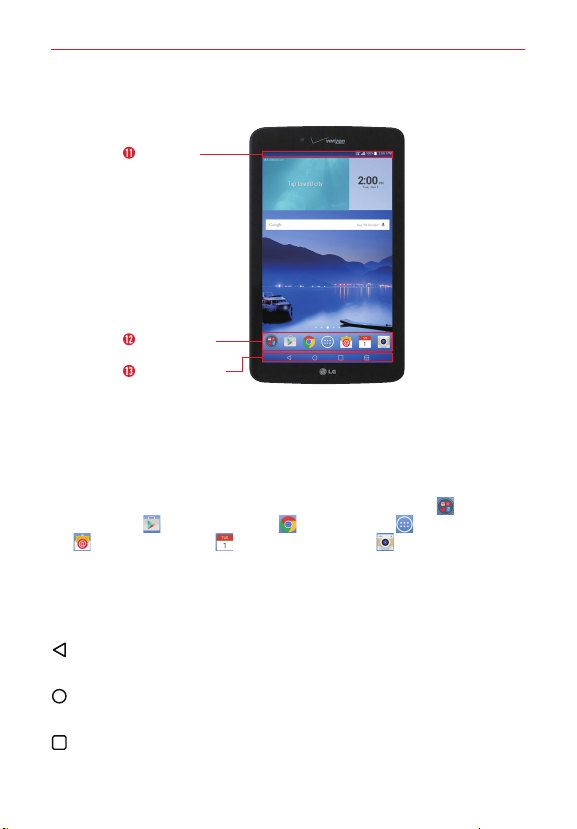
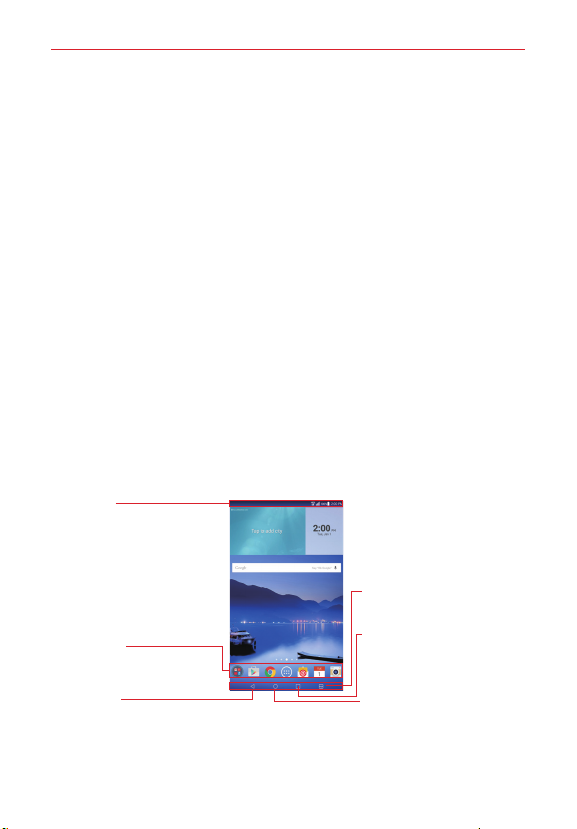
Home Screen Overview
Status Bar
QuickTap bar
Touch keys bar
11. Status Bar Shows device information, including the time, status icons
(such as signal strength, battery power, connections, etc.), and
notification icons. It also provides access to the Notifications panel.
12. QuickTap bar Provides icons for quick, one-touch access to the
functions used most often. This bar is displayed on all of the Home
screen canvases. The default icons are the Google folder
Store icon , the Chrome icon , the Apps icon , the Email icon
, the Calendar icon , and the Camera icon .
13. Touch keys bar Provide easy navigation anywhere you are in the
software. They are the Back Button, the Home Button, the Recent Apps
Button and the Dual window Button. The keys on this bar can be
changed (see the Display settings menu).
Back Button Returns to the previous screen. Also closes pop-up items,
such as menus, dialog boxes and the on-screen keyboard.
Home Button Return to the Home screen from any screen. Touch and
hold to access the Google Now shortcut.
Recent Apps Button Displays recently used applications. If you touch
and hold this button, it opens a menu of available options.
, the Play
Page 11
The Basics
Dual window Button Allows you to configure the Dual Window feature.
Help
The Help application allows you to quickly and conveniently view
information about your tablet, including basic definitions, How-to videos,
icon glossary, user guide, and more.
To access Help, tap the Home Button
> Apps > Help .
Non-Removable Battery
Your tablet has an internal, rechargeable battery that should be replaced
only by LG or an authorized LG repair center. You should never try to open
or take apart this tablet yourself. Opening the tablet can cause damage that
will void your warranty.
Charging your tablet
A rechargeable battery is used to power your tablet. Charge the battery
using the USB cable (power cord) and the charger (power outlet adapter)
included with your tablet. Make sure to fully charge the battery before
using your tablet for the first time.
WARNING! If the touchscreen won't function while the tablet’s in the process of charging, this
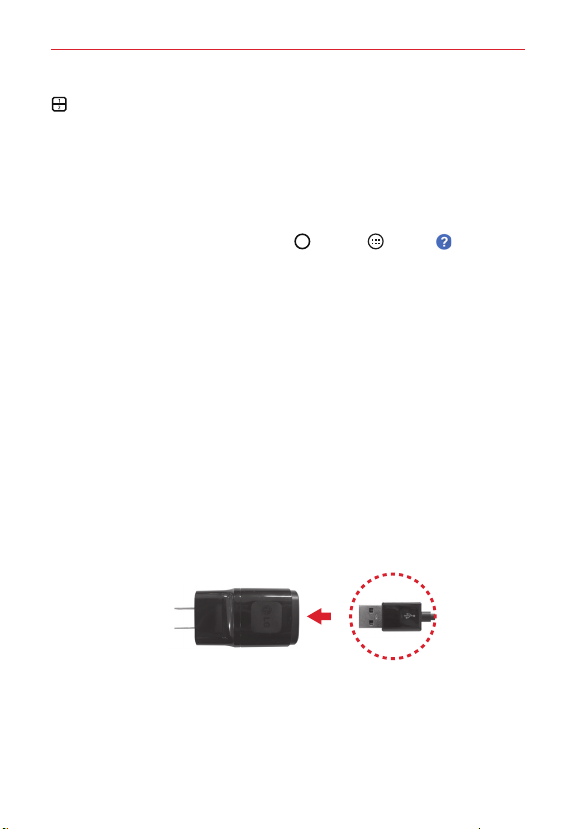
1. Connect the USB cable to the travel adapter.
may be due to an unstable power supply. If this occurs, disconnect the USB cable
from the tablet or unplug the charger from the power outlet.
USB CableTravel Adapter
9
2. Insert the other end of the USB cable into the USB/Charging port.
Page 12

10
The Basics
USB Cable
3. Plug the charger into an electrical outlet.
TIP! Use only an approved charging accessory to charge your tablet. Improper handling of the
USB/Charging port, as well as the use of an incompatible charger, may cause damage to
your tablet and void the warranty.
Optimizing Battery Life
You can extend your battery’s life between charges by turning off features
that you don’t need to run constantly in the background. You can also
monitor how applications and system resources consume battery power.
To extend the life of your battery
Turn off radio communications that you aren’t using, such as Wi-Fi,
Bluetooth, or GPS.
Turn off automatic syncing for Gmail™, Calendar, Contacts, and other
apps.
Some apps you’ve downloaded may consume high amounts of battery
power. While using your downloaded apps, check the battery charge
level and monitor the battery usage.
Lower the screen brightness setting and set a shorter screen timeout.
NOTE Allowing other devices to use your tablet's hotspot connection will also drain your
battery more quickly.
Page 13
The Basics
To view the battery charge level
1. Tap the Home Button > Apps > Settings > About tablet >
Battery.
NOTE Settings are displayed in a split-screen format with the menus on the left and
corresponding selections on the right.
2. The battery status (charging or discharging) and percent of remaining
charge are displayed at the top right side of the screen.
To monitor and control what uses the battery
1. Tap the Home Button > Apps > Settings > About tablet >
Battery > Battery usage.
2. The right side of the screen displays battery usage details and includes a
usage graph as well as a list of apps or services using battery power
from greatest amount to least.
Tablet Cards
Your tablet has two card slots located at the top edge of the tablet. The slot
toward the back of the tablet is for your required SIM card* and the slot
toward the front of the tablet accommodates an optional microSD card.
A valid SIM card is required in order to use the mobile network.
A microSD card is an optional accessory that provides additional,
portable storage space for your personal files.
Installing and Removing the SIM Card
A Subscriber Identity Module (SIM) Card is a “smartcard” that houses
personal information, such as your mobile phone number, calling plan, and
account information. The Verizon Wireless 4G LTE SIM Card is compatible
with any Verizon Wireless 4G LTE certified device that uses the same size
SIM card. The 4G LTE SIM Card can move from one device to another, and
your wireless service will support the services that are compatible with
your new device and service plan. To see which devices are compatible
with the Verizon Wireless 4G LTE SIM Card, visit verizonwireless.com/
certifieddevice.
11
Page 14
12
The Basics
Optional: Replace the SIM Card
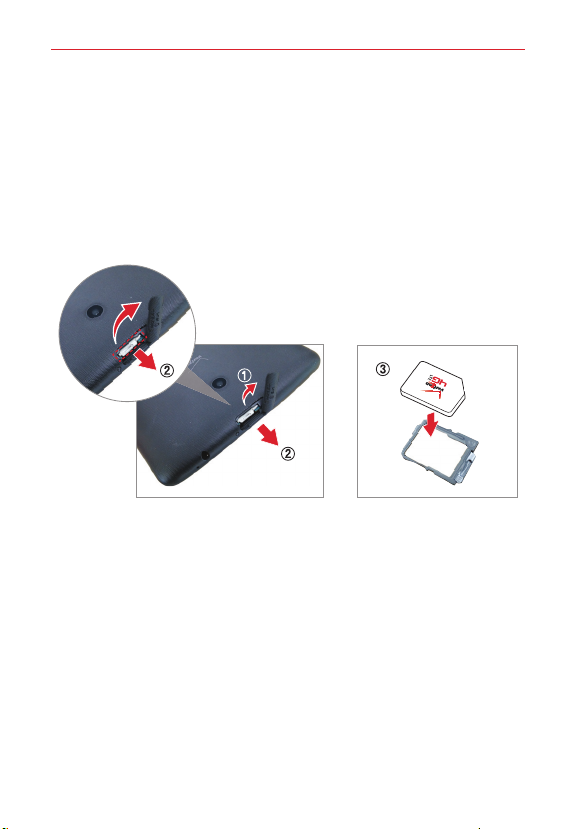
1. With the back of the tablet facing up, open the card slot cover.
2. Gently pull out the SIM card tray.
NOTE There are two card slots (the slot without a tray is for a SIM card).
3. Insert the 4G LTE SIM card into the tray with the Verizon logo facing up.
Push the tray back into the slot until it clicks into place and close the card
slot cover.
To remove the SIM card
1. Hold the tablet face down, then open the card slot cover (located at the
top of the tablet).
2. Gently pull the SIM card tray out of its slot, then remove the SIM card
from the tray.
NOTE If the tablet is held face up, the SIM card could fall out when the tray is removed from
the slot.
3. Carefully reinsert the SIM card tray into its slot and replace the slot
cover.
Page 15
The Basics
Optional: Installing & Removing the microSD Card
Your tablet supports a removable memory card (sold separately).
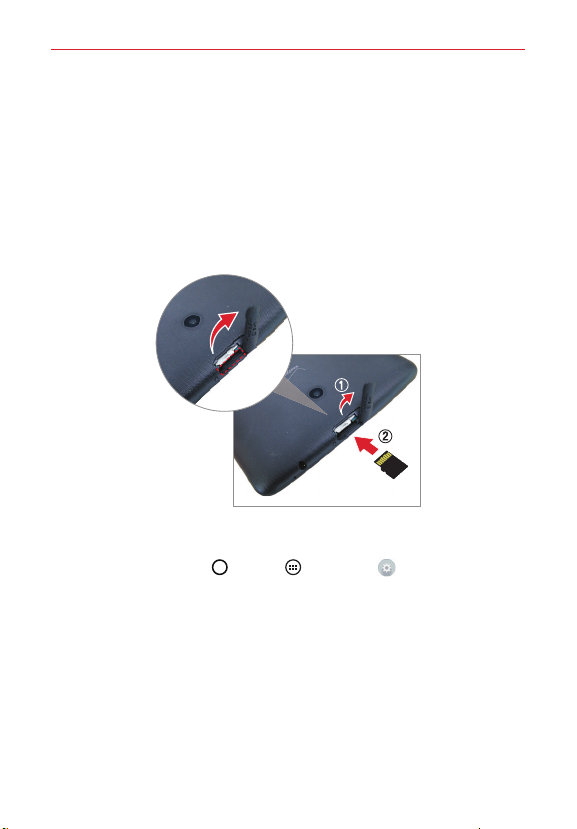
To install a microSD card
1. With the tablet facing down, open the card slot cover.
NOTE There are two card slots (the lower slot is for the microSD card).
2. Slide the microSD card into the lower slot with the gold strips facing up.
Then close the card slot cover.
Removing your microSD Card
1. Tap the Home Button > Apps > Settings > Storage >
Unmount SD card.
2. With the back of the tablet facing up, remove the card slot cover,
carefully slide the card out of the slot, and replace the cover.
WARNING! Do not remove the microSD card without unmounting it first. Otherwise, it may
damage the microSD card as well as your tablet, and the data stored on the microSD
card may be corrupted.
13
Page 16
14
The Basics
Formatting the microSD card
WARNING! All of the files stored on your microSD card are deleted when you format the card.
1. Tap the Home Button > Apps > Settings > Storage.
2. Tap Erase SD card (twice).
3. If you set an unlock pattern, enter it, then tap Erase everything. The
Back up any data stored on it before formatting.
card will then be formatted and ready to use.
Turning Your Tablet On/Off
It’s important to fully charge the battery before turning on your tablet.
Turning the tablet on
Press and hold the Power/Lock Key
couple of seconds until the screen turns on.
on the right side of the tablet for a
Turning the tablet off
1. Press and hold the Power/Lock Key (on the right side of the tablet)
until the Tablet options menu appears.
2. Tap Power off in the Tablet options menu.
3. Tap OK to confirm that you want to turn off the tablet.
Touchscreen
Your touchscreen provides an excellent way to interact with and use your
Android™ device. With the touch of your finger, you can download and use
available applications, make menu selections, and access data saved to
your tablet.
The following terms are used for describing the different available actions
using the touchscreen:
Tap or touch
A single finger tap selects items, links, shortcuts, and letters on the
on-screen keyboard.
Page 17

The Basics
NOTES ţTo select an item, tap the center of the icon.
ţDon't press too hard; the touchscreen is sensitive enough to pick up a light, yet firm
ţUse the tip of your finger to touch the option you want. Be careful not to touch any
touch.
other icons.
Touch and hold
Touch and hold an item on the screen by touching it and not lifting your
finger until an action occurs. For example, to open a contact’s available
options, touch and hold the contact in the Contacts list until the context
menu opens.
Drag
Touch and hold an item for a moment and then, without lifting your finger,
move your finger on the screen until you reach the target position. For
example, you can drag items on the Home screen to reposition them.
Swipe, slide, or flick
Move your finger quickly across the surface of the screen, without pausing
when you first touch it (so you don’t drag an item instead). For example,
you can browse through the different Home screens by swiping to the left
or right, slide the screen up or down to scroll through a list, or remove an
application from the Recent Apps screen by flicking its graphic off the
screen.
Double-tap
Tap the screen twice quickly to zoom, highlight text, or turn the screen on/
off. For example, quickly double-tap a section of a webpage to adjust that
section to fit the width of the screen and zoom in and out when viewing a
picture and when using Maps. Double-tap a word to highlight it. Double-tap
can also activate the KnockON feature to turn the touchscreen on or off.
15
Pinch-to-zoom
Use your index finger and thumb in a pinching motion (to zoom out) or
spreading motion (to zoom in) when using Chrome, a map, photos, the rear
Page 18
16
The Basics
camera lens, the Contacts list, the Favorites list, the Groups list, a music
list, and ThinkFree Office documents. Spread apart to make screen
information larger (easier to see and read), or pinch together to view more
area and information. The pinch gesture also changes the Home screen.
Pinch in on the Home screen to change to mini canvas view, then spread
apart to return to the normal Home screen view. Spread apart on the
normal Home screen to hide all of your Home screen items, then pinch in
to redisplay them.
Rotate the screen
From many apps and menus, the orientation of the screen adjusts to the
device’s physical orientation. You can deactivate this function in the Display
settings menu.
Home Screen
Simply swipe your finger to the left or right to view the panels. You can
customize each panel with apps, downloads, widgets and wallpapers.
The Quick Access Bar available at the bottom part of the Home screen
provides easy, one-touch access to the functions you use the most.
Status bar
Shows device status
information, including the
time and icons for battery
power, Wi-Fi signal strength,
notifications, and more. It also
provides access to the
Notifications panel.
QuickTap bar
Provides easy, one-touch
access to the functions used
most often.
Back Button
Backs up one step. For example,
returns to the previous screen or
closes pop-up items (e.g., dialog
boxes, and the on-screen
keyboard). Touch and hold to
access Dual window.
Dual Window Button
Displays two application
windows at the same time.
Recent Apps Button
Displays a list of your open
applications. Touch and hold it to
access the Options menu for
the current application or screen.
Home Button
Returns to the Home screen (or
returns to your default Home
screen canvas from any of the
extension canvases). Touch and
hold it to access Google Now.
Page 19

The Basics
Customizing the home screen
You can customize your Home screen by adding apps, downloads, widgets
or wallpapers. For more convenience using your tablet, add your favorite
apps and widgets to the Home screen.
To add items on your home screen:
1. Touch and hold the empty part of the Home screen.
2. Tap the Apps or Widgets tab.
3. Drag the desired item to the desired location and lift your finger.
TIP! To add an application icon to the Home screen from the Apps screen, touch and hold the
application you want to add and drag it to the desired location.
TIP! You can add several app icons in a folder. Drop one app icon over another one on a
Home screen, and a folder will be created.
To remove an item from the home screen:
Touch and hold the icon you want to remove, drag it to , and lift your
finger.
To change the look of your home screen
From the Home screen, touch and hold the Recent Apps Button (in the
Touch keys bar) > Home screen settings to access the following to
personalize your Home screen.
Wallpaper: Sets the wallpaper. Choose Wallpaper gallery, Gallery,
Live Wallpapers, Multi-photo, and Photos.
Screen swipe effect: Sets how the items on the Home screen canvases
slide from one to the next. Choose from Slide, Breeze, Accordion,
Panorama, Carousel, Layer, and Domino.
Allow Home screen looping: Enable this setting so that the Home
screen canvases rotate continuously (does not stop at the far left or right
canvas).
Allow apps list looping: Enable this setting so that the Application
screen canvases rotate continuously (does not stop at the far left or right
right canvas).
17
Page 20

18
The Basics
Help: Tap to view help information about customizing the Home screen.
Customizing app icons on the Home screen
You can customize each application icon with images from your Gallery.
1. Touch and hold an application icon until it’s unlocked from its current
position. Then drop it on the screen. The editing
the upper right corner of the application.
2. Tap the application icon (while the editing icon is still displayed).
Icon gallery
icon will appear in
Delete icon
New icon
3. Choose your icon image.
Tap an icon image from your Icon gallery, then tap OK.
OR
Page 21

The Basics
Tap the Add New icon to create a custom icon image. When you
create an icon image, follow the prompts to customize its size and
crop its image. Created icons are displayed in your Icon gallery.
NOTE You can delete a custom icon image from your Icon gallery by tapping the Delete icon (at
the top right corner of the Icon change screen). If you delete an icon image that’s
currently designated for an application icon, it reverts to its default image.
Home screen views
From the normal Home screen view, you can temporarily change to other
views.
Home screen dual view – Touch and hold an empty spot on the Home
screen to display your Home screen canvases on top and the
Applications screen on the bottom. This view can be used to add items
to your Home screen canvases.
Home screen clean view – Pinch out on the Home screen to hide all of
the items on it. This view allows you to see your wallpaper with no
obstructions.
Home screen canvas mini view – Pinch in on the Home screen to
display a miniature view of all of your Home screen canvases. This view
can be used to manage your Home screen canvases.
Returning to recently-used applications
1. Tap the Recent Apps Button . The screen displays a pop-up
containing the icons of applications you used recently.
2. Touch an icon to open the application. Or touch the Back Button
return to your previous screen.
to
19
Page 22
20
The Basics
Notifications
Notifications alert you to the arrival of new messages, calendar events, and
alarms, as well as to ongoing events, such as downloads, music, etc.
The Status Bar displays your tablet’s current status and pending
notifications. When a notification arrives, its icon appears at the top of the
screen. Pending notification icons appear on the left and system icons (that
indicate things like Wi-Fi or battery strength) are displayed on the right.
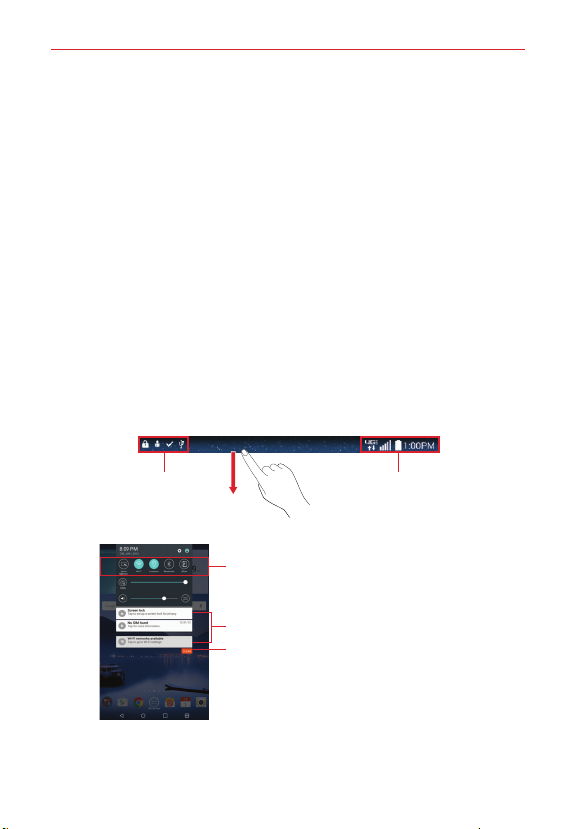
Accessing notifications
Swipe the Status Bar downward to open the Notifications Panel to access
your notifications. To close the Notifications Panel, swipe the bar at the
bottom of the screen upward.
Notifications Panel
The Notifications Panel includes your notifications, the Quick Settings bar,
the QSlide bar.
Pending notifications System notifications
Quick Settings bar
Swipe to the right or left to scroll
through the list. Tap an icon to
activate/deactivate the feature.
Tap a notification to open it.
Clear Button
Tap here to clear your list of
event-based notifications.
Notifications panel
Page 23
The Basics
Quick Settings on the Notifications Panel
The Quick Settings are located at the top of the Notifications Panel. Use
them to easily toggle function settings on and off, such as Wi-Fi, Silent
mode, Airplane mode, etc.
NOTE Touch and hold an icon in the Quick Settings Bar to view the function's settings menu.
To rearrange Quick Setting icons on the Notification Panel
Open the Notifications Panel, swipe the Quick Settings to the left, and tap
the Edit icon
to customize the Quick Settings Bar. Select the options
you want to display (or remove the checkmark to hide). Drag an icon’s
handle
NOTE Changing the checkmarks also reorganizes the icons in the Quick Settings Bar.
to move it to another position on the bar.
QSlide apps on the Notifications Panel
QSlide apps are displayed in a bar on the Notifications Panel below the
Quick Settings Bar. These icons provide a quick, convenient way to
multi-task on the same screen (similar to picture-in-picture on a TV). QSlide
displays a small window on the screen that can be moved, resized, or
made transparent.
NOTE The QSlide function can support up to two windows at the same time.
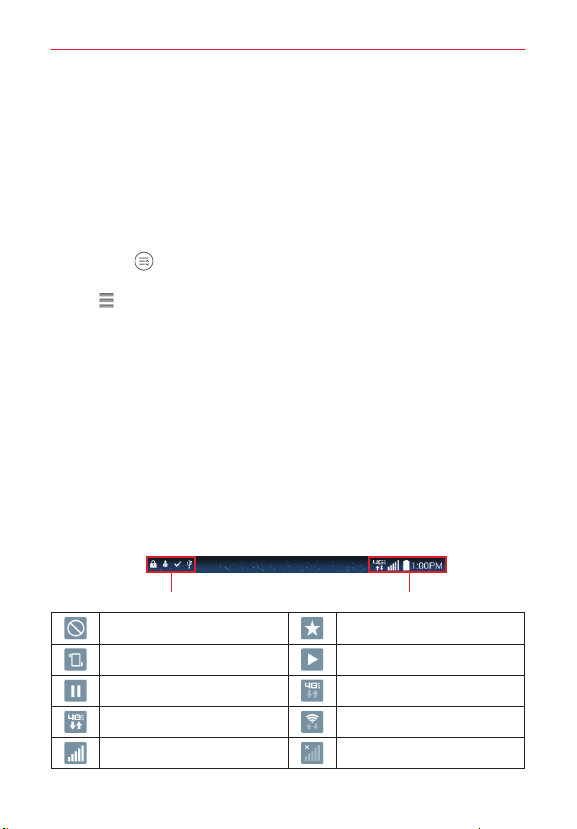
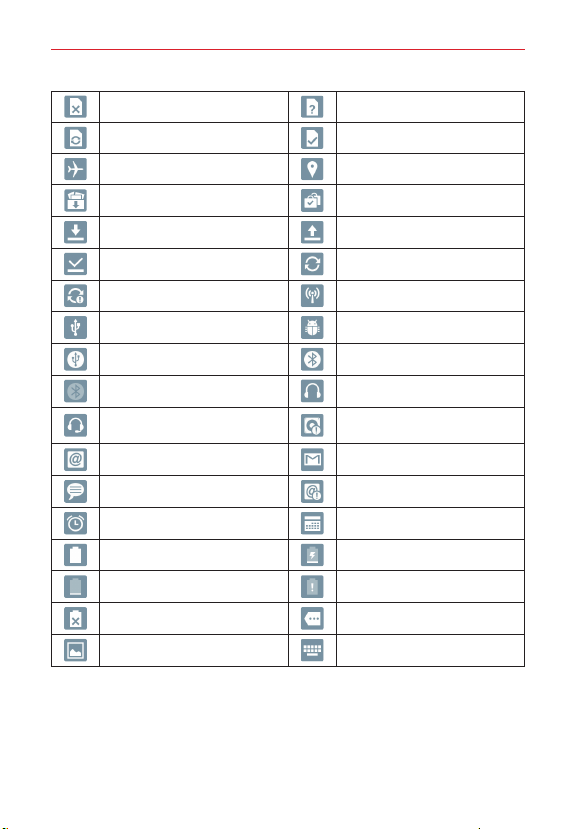
Status Bar Icons
The following icons may appear on the Status Bar.
Notification icons Status icons
No interruptions Priority interruptions only
Vibrate mode Music playing
Music paused 4G LTE connected
4G LTE in use Wi-Fi Connected
Signal strength No signal
21
Page 24
22
The Basics
NO SIM card Unknown SIM card
SIM card activating SIM card activated
Airplane mode GPS on
App update available App update successful
Downloading Uploading
Download successful Syncing
Problem with sign-in or sync Mobile Hotspot on
USB connected USB debugging mode
Mobile Broadband connected Bluetooth connected
Bluetooth on Headset connected
Headset with microphone
connected
New email New Gmail message
New Verizon message Email not sent
Alarm set Upcoming events
Fully battery Charging battery
Low battery Empty battery
Not charging More notifications
Screenshot saved Keyboard
Internal storage full
NOTE The location of the icons in the Status Bar may differ depending on the features, apps,
and services being used.
Page 25

The Basics
Using a Screen Lock
Set a screen lock to secure your tablet from unauthorized (or unintentional)
use. Tap the Home Button
Select screen lock, then select the screen lock you want to use. You are
prompted to create a Backup PIN as a safety measure in case you forget
your screen unlock sequence.
None: No lock screen is enabled so the screen will never be locked from
use.
Swipe: A swipe motion in any direction on the touchscreen unlocks the
screen. This is the default Lock screen.
Knock Code: Knock Code allows you to create your own unlock code
using a combination of knocks (or taps) on the screen.
Pattern: A pattern you draw with your finger unlocks the screen. The
first time you set an unlock pattern, you’ll see a tutorial with instructions
on how to create it. Read the tutorial, then tap Next. Draw your pattern
(connect at least 4 dots), then tap Next. Draw your pattern again, then
tap Confirm.
PIN: A number sequence unlocks the screen. Enter a PIN (at least 4
digits), then tap Next. Enter your PIN again, then tap OK to confirm it.
Password: An alphanumeric sequence unlocks the screen. Enter a
password (at least 4 characters), then tap Next. Enter your password
again, then tap OK to confirm it.
From then on, any time you want to unlock the screen, you will need to
perform the unlock action you set (swipe, Knock Code, pattern, PIN, or
password) to gain access to it.
> Apps > Settings > Lock screen >
23
When you can’t recall your unlock sequence
You have 10 attempts to successfully enter your unlock sequence.
After 5 attempts, you are prompted to manually enter text to verify that
you are trying to unlock the screen (it's not just random movements
touching the screen).
Page 26

24
The Basics
If you set Knock Code, you have the opportunity to unlock the screen by
entering your Backup PIN to unlock the screen after 5 attempts.
After 10 attempts, the tablet will automatically perform a hard reset and
erase all of the user data stored on the tablet.
NOTE A warning message is displayed after the 9th attempt.
If you didn’t activate a Google Account on the tablet and you forgot your
Backup PIN, you have to perform a hard reset.
CAUTION If you perform a hard reset, all user applications and user data will be deleted from
your tablet's memory.
Using the KnockON feature
The KnockON feature allows you to double-tap the screen to easily turn
the screen on or off.
For the best results, keep the tablet still when using KnockON.
Quickly double-tap the center of the screen to turn the screen on.
Quickly double-tap the Status Bar, an empty area on the Home screen,
or the Lock screen to turn the screen off.
Unlocking your screen using the Knock Code feature
The Knock Code feature allows you to create your own unlock code using a
combination of three to eight knocks (or taps) on the screen.
While the screen is off, tap the same sequence you established
anywhere on the screen. The Home screen will be accessed directly.
To activate Knock Code feature
1. Tap the Home Button > Apps > Settings > Lock screen >
Select screen lock > Knock Code.
2. This opens a screen that will guide you through how to select the unlock
sequence. You have to create a backup PIN as a safety measure in case
you forget your unlock sequence.
Page 27
The Basics
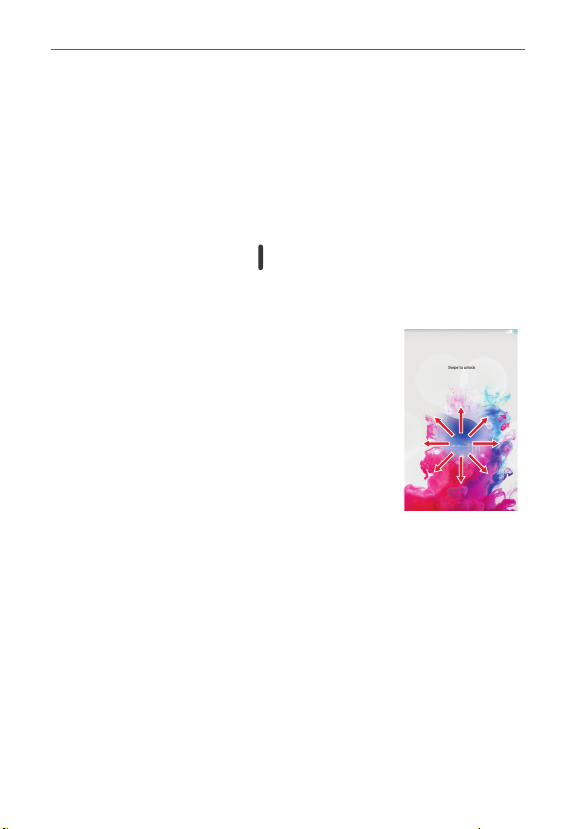
To unlock the default lock screen on the tablet
If you don’t use the tablet for a while, the screen and backlight will turn off
to conserve battery power. To unlock the tablet:
NOTE The default Lock screen simply locks the screen to prevent unintentional actions. For
more security to guard against unauthorized use, you can set an unlock requirement
(such as a pattern, PIN, password, or face recognition) that will need to be entered to
unlock it. Please refer Using a Screen Lock on page 23 for more information.
1. Turn the screen on.
Press the Power/Lock Key
on the up side of the tablet.
OR
Quickly double-tap the center of the screen (KnockON).
2. The default Lock screen will appear. From the center
of the screen, swipe in any direction to unlock it.
To use a Swipe Lock screen shortcut, swipe the
shortcut icon at the bottom of the screen in any
direction. The screen will unlock and launch the
app.
Multiple Users
Only one tablet owner ID can be created, but multiple
user IDs can be added so that others can log in and use
the tablet independently. Each user can configure their own tablet settings,
use their own storage space, and have their own app update privileges.
Tablet owner privileges
Only the tablet owner ID can add a new user log in ID and remove user
IDs.
25
Multiple tablet user limitations
All users share the same battery, internal memory, and data usage with
all of the other users.
The language settings set by one user apply to all of the other users.
Page 28
26
The Basics
Each user can configure and use only their own content and data (e.g.,
Home screen settings, Sound settings, etc.).
Any user can accept updated app permissions on the behalf of all of the
other users.
Messages and scheduled calendar events will be sent to notify the
specified user ID only.
Once a user starts printing a document using Mobile Print, the print job
will continue even if the user ID is changed.
Data transfer, download, multimedia play, and communication services
will stop if the user ID is changed. However, the data transfer through
Play Store can be continued even if the user ID is changed.
To add a new user on your tablet
1. Tap the Home Button > Apps > Settings > Users > Add
user.
2. Select the type of user you want to add.
User: Users have their own apps and content.
Restricted profile: You can restrict access to apps and content from
your account.
3. The set up wizard opens to allow the new user to enter their
information. Tap Set up now and swipe to unlock the screen. Then
follow the set-up steps.
4. After set-up is completed, the new user is logged in. Switch users, if
necessary.
To switch users
1. Swipe the Status Bar down to display the Notifications Panel.
to display a list of current users.
2. Tap
3. Tap one of the available users to switch to that user.
NOTE You can change the generic colored icon to an image to identify the user instead. Tap
Users in the Settings menu, tap the users icon, tap the photo icon next to the name,
then follow the prompts to change it.
Page 29
The Basics
Capturing a Screenshot
Press and hold the Volume Down and the Power/Lock Key at the same
time for 2 seconds to capture a screenshot of the current screen.
To view the captured image, tap the Home Button
Gallery
> Screenshots folder.
Using QuickMemo+ to capture a screenshot
On the screen you want to capture, drag the Status Bar downward and tap
the QuickMemo+ icon
(in the Quick Settings Bar).
OR
Press and hold both of the Volume keys
at the same time.
The Smart screen feature
The Smart screen feature keeps the device from activating screen timeout
when it detects your eyes looking at the screen. When you turn this feature
on, you can set a shorter screen timeout setting to conserve your battery
power, but still allow you to view a screen for a longer period of time
without having to touch it to keep it activated.
To turn this feature on, from the Home screen, touch and hold the Recent
Apps Button
checkbox.
NOTE The following situations may prevent this feature from functioning properly:
> Settings > Display > checkmark the Smart screen
s When the device is in the dark or against bright light.
s When the front camera lens cannot detect the location of your eyes.
s When the front camera is used at the same time with other apps.
> Apps >
27
Page 30
28
The Basics
Google Account Setup
When you first turn on your tablet, you have the opportunity to activate the
network, to sign into your Google Account and select how you want to use
certain Google services.
You must sign into a Google Account to use Gmail, Hangouts, Google
Calendar, and other Google apps; to download apps from the Play Store; to
back up your settings to Google servers; and to take advantage of other
Google services on your tablet.
To set up your Google Account
Sign into your Google Account from the prompted set-up screen.
OR
T
ap the Home Button
account > Google.
If you have a Google account, enter your email address, then tap NEXT.
Otherwise, tap Or create a new account and enter the necessary
information to create a new Google Account.
Once you’ve set up your Google Account on your tablet, your tablet
automatically synchronizes with your Google Account on the Web.
Your contacts, Gmail messages, Calendar events and other information
from these apps and services on the Web are synchronized with your
tablet. (This will depend on your synchronization settings.)
After signing in, you can use Gmail™ and take advantage of Google
services on your tablet.
> Apps > Settings > Accounts > Add
Entering Text
Text is entered using the on-screen keyboard. The on-screen keyboard
appears automatically on the screen when you need to enter text. To
manually display the keyboard, simply tap a text field where you want to
enter text.
Page 31

The Basics
Using the keypad and entering text
Tap once to capitalize the next letter you type. Double-tap for all
caps.
Tap to switch to the numbers and symbols keyboard that also
includes graphics, such as faces and images.
Tap to enter a space.
Tap to create a new line in the message field.
Tap to delete the previous character.
Tap change the keyboard settings. You can also touch and hold
this icon, then drag your finger to the Clip tray icon
Vioce input icon
(in the pop-up that appears).
and the
Entering special characters
The on-screen keyboard allows you to enter special characters (e.g. “á”).
Touch and hold the desired key (for example, the “a” key). A pop-up
appears with additional available characters. Slide your finger over the
character you want, then lift your finger to enter it.
NOTE A symbol at the top right of a key indicates that additional characters are available.
Text input settings
To change your text entry settings and see the dictionary of terms you’ve
used, tap the Home Button
input. The following options are available in the KEYBOARD & INPUT
METHODS section.
Default - Allows you to choose the default keyboard to use when
entering text and set up your input methods.
LG Keyboard - Tap the Settings icon
settings.
Input language and keyboard layout: Sets the keyboard language and
layout (QWERTY and Phone).
> Apps > Settings > Language &
to change the following
29
Page 32

30
The Basics
Keyboard height and layout: Allows you to adjust various height and
layout options for you keyboard to make it easier to use.
Keyboard theme: Sets the Keyboard theme. Choose White or Black.
Path input: Checkmark to enter a word by drawing a path through all of
the letters.
Word suggestions: Tap the switch on to enable the suggestion settings
you set which include Next word, Multilingual suggestions, Personal
dictionary, Update word suggestions and Clear suggestion history.
Auto-correction: Sets the level of auto-correction. Choose from Off,
Mild, Moderate, and Aggressive.
More: Provides the following additional keyboard settings.
Vibrate on keypress: Enable to provide a vibration when you tap the
keyboard keys.
Sound on keypress: Enable to provide a sound when you tap the
keyboard keys.
Auto-capitalization: Capitalize the first word of each sentence
automatically.
Auto-punctuation: Automatically inserts a period when the space key
is double-tapped.
Help: Displays text input settings information.
Google voice typing - Checkmark to select Google voice typing to enter
text. Tap the Settings icon
settings.
Languages: Sets the Google search by voice language.
Speech output: Sets when to use speech output. Choose from On,
Hands-free only, and Off. To turn on speech output only when you’ve
got a headset attached to your phone, select Hands-free only.
“Ok Google” Detection: Turn this feature On to start the Google Search
app simply by saying “OK Google”.
to change the Google voice typing
Page 33

The Basics
Offline speech recognition: Sets one or more additional languages for
speech recognition when you don’t have a network connection.
Block offensive words: Enable to hide offensive voice results.
Audio History: When you use voice activation commands, such as "Ok
Google" or touching a microphone icon, a recording of the next thing you
say, plus a few seconds before, may be used and stored by Google and
associated with your Google Account to help recognize your voice and
improve speech recognition.
Manage Audio History: Allows you to manage your audio history.
Bluetooth headset: Enable to record audio through a connected
Bluetooth headset.
Languages
You can set only one default language for your tablet, but you can set
multiple languages used for the on-screen keyboard.
To change the default language
Tap the Home Button
input > Language > tap the language you want.
To add additional languages for your keyboard
Tap the Home Button
input. Tap the Settings icon to the right of LG Keyboard, tap Input
language and keyboard layout, then enable the languages you want
the keyboard to be able to use.
OR
Open the Notifications Panel (when entering text), tap Choose input
method > Set up input methods > the Settings icon
LG Keyboard > Input language and keyboard layout, then enable the
languages you want to be able to use.
> Apps > Settings > Language and
> Apps > Settings > Language and
to the right of
31
Page 34

32
Connecting to Networks and Devices
Connecting to Networks and Devices
Wi-Fi
With Wi-Fi, you can use high-speed Internet access within the coverage of
the wireless access point (AP). Enjoy wireless Internet using Wi-Fi, without
extra charges.
Connecting to Wi-Fi networks
To use Wi-Fi on your tablet, you need to access a wireless access point or
‘hotspot’. Some access points are open and you can simply connect to
them. Others are hidden or use security features; you must configure your
tablet to be able to connect to them. Turn off Wi-Fi when you’re not using it
to extend the life of your battery.
Turning Wi-Fi on and connecting to a Wi-Fi network
1. Tap the Home Button > Apps > Settings > Wi-Fi.
2. Tap
3. Tap Search to see a list of active and in-range Wi-Fi networks.
Secured networks are indicated by a lock icon.
4. Touch a network to connect to it.
If the network is secured, you are prompted to enter a password or
5. The Status Bar displays icons that indicate your Wi-Fi status.
to turn Wi-Fi on and start scanning for available Wi-Fi networks.
other credentials. (Ask your network administrator for details)
Page 35

Connecting to Networks and Devices
Bluetooth
You can use Bluetooth to send data by running a corresponding application,
but not from the Bluetooth menu as on most other mobile phones or
tablets.
NOTE ţLG is not responsible for the loss, interception or misuse of data sent or received via
ţAlways ensure that you share and receive data with devices that are trusted and
ţSome devices, especially those that are not tested or approved by Bluetooth SIG, may
Turning on Bluetooth and pairing up your tablet with a Bluetooth
device
You must pair your device with another device before you connect to it.
1. Tap the Home Button
2. Tap
3. Choose the device you want to pair with from the list.
Once the paring is successful, your device will connect to the device.
NOTE Your tablet doesn't support the Hands-free Profile. Therefore, the use of call features
Send data using the Bluetooth wireless feature
1. Open the item and tap .
OR
Touch and hold the item and select Share.
OR
Open the item and touch and hold the Recent Apps Button
2. Tap Bluetooth to share via Bluetooth.
NOTE The method for selecting an option may vary by data type.
the Bluetooth wireless feature.
properly secured. If there are obstacles between the devices, the operating distance
may be reduced.
be incompatible with your device.
> Apps > Settings > Bluetooth.
to turn Bluetooth on. You will see the option to make your
tablet visible. Then tap Search to view the devices in range.
with some of accessories, such as Bluetooth headsets or Bluetooth-enabled devices,
may not be available for this device.
> Share.
33
Page 36

34
Connecting to Networks and Devices
3. Search for and pair with a Bluetooth-enabled device.
Receive data using the Bluetooth wireless feature
1. Tap the Home Button > Apps > Settings > Bluetooth.
2. Tap
3. Pair the devices and tap Accept when you receive a Bluetooth
to turn Bluetooth on and mark the checkbox next to the tablet
name to make the tablet visible on other devices.
Authorization Request to accept the file(s).
SmartShare
SmartShare allows you to receive multimedia content via LG phone and
tablets.
1. While viewing the content you want to share, tap
SmartShare.
2. Tap Play or Beam in the pop-up that is displayed.
Play: You can stream your content via a TV, Bluetooth speaker, etc.
Beam: You can send your content to Bluetooth devices or via
SmartShare Beam* to supported LG phones or tablets.
* SmartShare Beam quickly transfers multimedia contents through Wi-Fi
Direct.
3. Tap the deivce you want to share from the list.
If the device is not displayed on the list, make sure that Wi-Fi, Wi-Fi
Direct, or Bluetooth is turned on. Then tap Rescan.
4. Tap Send to share the fi les.
or >
Enjoying content from nearby devices on your tablet
1. To connect nearby devices to your tablet, tap the Nearby devices option
on the Gallery and Music apps.
Make sure that your tablet and nearby devices are connected to the
same Wi-Fi network and that the DLNA service on the nearby device is
turned on.
Page 37

Connecting to Networks and Devices
2. Tap the device you wish to connect to.
If the device is not listed, tap Search nearby devices.
3. After a connection is established, you can enjoy the content on your
tablet.
PC connections with a USB cable
You can connect your tablet to your PC to charge it, transfer items to the
PC from the tablet and vice versa.
Transferring music, photos, and videos using the Media sync (MTP)
mode
1. Connect your tablet to a PC using the USB cable (power cord) included
with your tablet.
2. If you haven't installed the LG Verizon United Driver on your PC, you'll
need to manually change the settings. From the Home screen, touch
and hold the Recent Apps Button
icon > USB PC connection > Media sync (MTP).
3. You can now view the Media sync (MTP) content on your PC and
transfer the files.
Synchronize with Windows Media Player
Ensure that Windows Media Player is installed on your PC.
1. Use the USB cable to connect the tablet to a PC on which Windows
Media Player has been installed.
2. Open the Notifications panel, tap USB connected, and select the Media
sync (MTP) option.
3. When connected, a pop-up window will appear on the PC. Select the
Windows Media Player option to synchronize music files.
4. Edit or enter your device’s name in the pop-up window (if necessary).
5. Select and drag music files to the sync list.
6. Start synchronization.
> Settings > Storage > the Menu
35
Page 38

36
Connecting to Networks and Devices
The following requirements must be satisfied to synchronize with
Windows Media Player.
Items Requirement
OS Microsoft Windows XP SP2, Vista or higher
Window Media Player version Windows Media Player 10 or higher
Page 39

Web
Chrome
The Chrome app allows you to access the Internet from your tablet. Access
and selections within this feature are dependent upon your service
provider. For specific information on Internet access through your tablet,
contact your service provider.
NOTES s You may incur additional charges for accessing the web and downloading media. For
Viewing webpages
1. Tap the Home Button > Apps > Chrome or tap the Chrome
2. Tap the URL input field to access a webpage. Enter the web address
details, contact your service provider.
s Chrome may differ from this user guide due to updates via Play Store.
icon directly on the Quick Access Bar.
(URL) of the web page, then tap
on the on-screen keyboard.
When you begin entering text in the URL input field suggestions appear
below the address.
You can change the search engine for your searches. Open Chrome
application, then tap the Menu icon
> Settings > Search engine.
Tap the search engine you want to use.
37
URL Input Field
(address bar)
Tap here to enter a web
address for the web page
you want to access.
Chrome Menu Icon
Tap here to access various
options for Chrome.
Page 40

38
Web
Search within a webpage
1. While viewing the page, tap the Menu icon and then tap Find in
page.
2. Type the text you’re looking for in the find bar at the top of the screen.
Matches are highlighted on the page (current match in orange and other
found matches in yellow).
The find bar displays the total number of matches. Tap the up
down
arrows to the right of the find bar to go to each match.
Found matches are also indicated in the scroll column along the right
side of the screen. Tap any of the highlights to jump directly to that
match.
Searching the web by voice
Tap the address field, tap the Microphone icon , say a keyword, then tap
one of the search results that appear.
Adding and viewing bookmarks
To add bookmarks, while viewing the page you want to bookmark, tap the
Bookmark icon
To open a bookmarked webpage, tap the Menu icon
select the desired page.
in the URL bar.
> Bookmarks and
Browse with tabs
Your device displays webpages in a tab format (they look like file folder
tabs) allowing you to easily browse several webpages simultaneously.
Create multiple tabs for the sites you want, then tap the tabs (at the top of
the screen) to quickly and easily switch between them.
and
Create a new tab
From the Chrome app, tap the Menu icon then tap New tab (or New
incognito tab). Or tap the New tab icon
at the top of the browser.
Page 41

Web
The New Tab page
The following options are available when you create a new tab. These
options, located at the bottom of the screen, help you open the page that
you want quickly.
Bookmarks Icons for sites that you’ve bookmarked are listed here. Tap a
bookmark to visit the site using the new tab you created. Touch and hold
a bookmark to open a Context menu to access Open in new tab, Open
in incognito tab, Edit bookmark, and Delete bookmark.
Recent tabs Display recently used and closed websites.
Download files
1. Touch and hold a download link.
2. In the Context menu that appears, tap Save link.
To view downloaded files:
From the Apps screen (or the Home screen), tap Downloads .
To open a downloaded file, tap it.
To view earlier downloads, tap the heading date you want to view.
To share downloads, tap the Share icon
the screen, checkmark the ones to share, then tap Share and choose a
sharing method from the list.
To clear files from your download history, tap the Clear history icon
(at the upper-right corner of the screen) > checkmark the entries to clear,
tap Clear, then Ye s to confirm.
To switch the download file sort criteria, tap the Menu icon
upper-left corner of the screen) > Date, Name or Size.
at the upper-right corner of
(at the
39
Page 42

40
Web
Chrome Settings
To access the settings specific to the Chrome app:
1. From the Chrome app, tap the Menu icon
2. Tap Settings.
3. Tap the setting you want.
.
Page 43

Communication
Contacts
You can add contacts on your tablet and synchronize them with the
contacts in your Google Account or other accounts that support syncing
contacts.
Searching for a contact
1. Tap the Home Button > Apps > Contacts to open your
contacts.
2. Tap the Search contacts box and enter the contact name using the
on-screen keyboard. You can also tap a letter along the left side of the
screen to access names starting with the chosen letter.
Adding a new contact
1. Tap the Home Button > Apps > Contacts .
2. Tap the New icon
account (if applicable).
3. If you want to add a picture to identify the contact, tap the Photo icon
Choose Take photo (to take a picture using the camera) Select from
Gallery (to browse for and select an image).
4. Enter the Contact's name. Tap the More icon
name information.
5. Enter all of the details for your contact.
6. Tap Save to save the contact entry.
to add a new contact and select the desired
to enter more specific
41
.
Favorite Contacts
To add a contact to your favorites
1. Tap the Home Button > Apps > Contacts to open your
contacts.
2. Tap a contact to view its details.
Page 44

42
Communication
3. Tap the star icon to the right of the contact’s name. The star turns gold
and the contact is added to your favorites.
To remove a contact from your favorites list
1. Tap the Home Button > Apps > Contacts to open your
contacts.
2. Tap the Favorites tab (at the top of the screen) to view your favorite
contacts.
3. Tap a contact to view its details.
4. Tap the gold star in the upper-right corner of the screen. The star turns
grey and the contact is removed from your favorites.
Creating a group
1. Tap the Home Button > Apps > Contacts to open your
contacts.
2. Tap the Groups tab (at the top of the screen), then tap
3. Select the account where you want to create the group and enter a
group name.
4. Tap Add members and select the contacts you want to add, then tap
Add.
5. Tap Save to save the group.
NOTE If you delete a group, the contacts assigned to that group will not be lost. They will
remain in your contacts.
.
Page 45

Communication
You can use the Email app to read emails from services like Yahoo!,
Outlook, and AOL. The Email app supports the following account types:
POP3, IMAP, and Exchange.
Your service provider or system administrator can provide you with the
account settings you need.
Managing an email account
The first time you open the Email app, a set-up wizard opens to help you to
set up an email account.
After the initial setup, the contents of your inbox are displayed. If you’ve
added more than one account, you can switch between your accounts.
To add another email account:
Open Email , then tap > Settings > Add account icon .
To change an email account’s settings:
Open Email , then tap > Settings > General settings to adjust the
settings that affect all accounts. Or tap an individual account to adjust
settings only for that account.
To delete an email account:
Open Email , then tap > Settings > Menu Button > Remove
account > tap the account you want to delete > Remove > Ye s.
43
Working with account folders
Open Email , then tap > Folders or tap . Each account has an
Inbox, Outbox, Sent, and Drafts folder. Depending on the features
supported by your account’s service provider, you may have additional
folders.
Page 46

44
Communication
Composing and sending email
To compose and send a message:
1. While in the Email app, tap the Compose icon .
2. Enter an address for the message’s intended recipient. As you enter
text, matching addresses will be proposed from your Contacts. Separate
multiple addresses using semicolons.
3. Tap
to Cc/Bcc a contact or tap the Attach icon to attach files, if
necessary.
4. Enter the subject and your message.
5. Tap the Send icon
If you aren’t connected to a network, for example, if you’re working in
airplane mode, the messages that you send will be stored in your
Outbox folder until you connect to a network again. If it contains any
pending messages, the Outbox will be displayed on the Accounts
screen.
TIP! When a new email arrives in your Inbox, you will be notified by a sound or vibration. Tap
the email notification to stop receiving notifications.
to send the message.
Gmail
When you open the Gmail app, the most recent conversations are
displayed at the top of your Inbox list. All of your conversations are
displayed in your Inbox unless you delete, archive, or filter them.
To open the Gmail app
Tap the Home Button > Apps > Gmail .
The current Google Account is displayed in the header at the top of the
Inbox. If you have more than one account, you can switch accounts to view
the messages in each Inbox.
Conversations with new messages are displayed with bold subject lines. To
read a message in a conversation, tap its subject line text.
Page 47

Communication
The letter icon (or contact photo) next to a Gmail message allows you to
select it and choose an action from the icons at the top of the screen.
The Favorite icon
next to a Gmail message allows you to designate it as
a favorite message.
Gmail Inbox icons
Use the following icons (in the header at the top of the screen) while
viewing your Gmail Inbox:
Accounts and labels: Tap to change to another account or label.
Compose: Tap to begin a new Gmail message.
Search: Tap to search within your Gmail messages.
NOTE You can also drag the screen downward to refresh and check for new email.
Message search
Tap the Search icon (in the Inbox header at the top of the screen), enter
the text you’re looking for, then tap the Search icon
on the on-screen
keyboard.
Adding another Google Account
From the Home screen, touch and hold the Recent Apps Button
Settings > Accounts > Add account > Google. Enter your Google
Account information, as necessary.
>
To switch accounts
Gmail displays conversations and messages from one Google Account at a
time. If you set up more than one Google Account on your tablet, you can
easily switch between them.
From your Gmail Inbox, tap
header), tap the name of the current account, then tap the desired
account.
NOTE The number to the right of the selected Google Account indicates the number of unread
messages you have in that account.
(at the upper-left corner of the Inbox
45
Page 48

46
Communication
Accounts
Tap here to open a
list of account
choices and
account labels.
Gmail Inbox
Navigating in the Gmail app
While viewing your Inbox:
Swipe the screen up and down to scroll through your list of messages.
Tap the Compose icon
start a new Gmail message.
Tap the Search icon
within the Gmail app.
Swipe a Gmail message off the screen to the left or right to quickly and
easily archive the message.
Tap the letter icon (or contact photo) to the left of one or more
messages, then tap the Delete icon
delete the selected messages.
While viewing a message, swipe the screen left and right to scroll through
all of your messages.
If you’re viewing a message or another label, tap the Back Button
you return to your Inbox.
(
at the bottom-right corner of the screen
(in the header at the top of the screen) to search
(at the top of the screen) to
) to
until
Reading Your Messages
From your Gmail Inbox, tap a conversation that contains the message you
want to read.
Page 49

Communication
The conversation opens to the first new (unread) message, or to the first
starred message, if you’ve previously starred a message in the
conversation.
Tap to set labels
for the message to
help organize your
messages.
Tap the Contact's
picture to open
Quick Contact.
Gmail Inbox
Header
Gmail Message Header
While viewing a message, you can tap the message action icons on the
Gmail Inbox header or the message header to access the following options:
Gmail Inbox header icons
Tap the Gmail icon
Tap the Delete icon
Tap the Unread icon
Tap the Move to
Tap the Menu options icon
to return to your Gmail Inbox.
to move the email to the trash folder.
to return the message to an unread state.
to move the message to the inbox.
to access more options.
Gmail message header icons
Tap the Contact’s picture to open the Quick Contact options.
Tap the Favorite icon
Tap the Reply icon
Tap the Forward icon
Tap the Menu options icon
message.
to mark it as a favorite.
to reply to the sender.
to forward to other person.
to reply to all, add star, or print the
47
Page 50

48
Communication
To reread a message
When you open a conversation, messages that you’ve already read are
minimized into a tab that indicates the number of hidden messages.
1. From your Gmail Inbox, tap the conversation you want to view.
2. Tap the contact name to open that message.
While reading a message you can tap the Unread icon
(in the Gmail
Inbox header at the top of the screen) to return a read message to the
unread state. For example, to remind yourself to read it again later.
Composing and Sending a Message
You can compose and send a message to people or groups with Gmail
addresses or other email addresses.
To compose and send a message
1. Tap the Home Button > Apps > Gmail > the Compose icon
(at the bottom-right corner of the screen).
NOTE If you set up more than one Google Account on your tablet and want to send the
message from a different Google Account, tap the current Google Account (at the top of
the screen), then tap the account you want to use.
2. Enter a recipient’s address.
As you enter text, matching addresses are offered from your Contacts
list. You can tap a suggested address or continue entering text to enter a
new one.
3. Tap To
necessary.
4. Enter a subject for the message in the Subject field.
5. Enter your email text in the Compose email field (below the Subject).
6. Tap
Gmail message. You can also tap Insert from Drive to insert files from
Google Drive.
7. Tap the Send icon
NOTE If you aren't ready to send the message, tap the Menu icon , then tap Save draft.
, then tap Cc/Bcc to copy (normal or blind copy) recipients, if
, then tap Attach file if you want to add an attachment to your
to send your message.
Page 51

Communication
Replying to or Forwarding a Message
Continue an email conversation by replying to a message or by forwarding
it without changing the Subject text. Change the Subject text to start a new
conversation.
NOTE The conversation text and previous messages are also included in your reply (or
forwarded) message.
To reply to or forward a message
1. Open the message you want to reply to or forward.
2. On the message header, tap Reply
Add others to an ongoing conversation by replying to all and then
adding the new person’s address(es) to the reply.
3. Compose your Gmail message as necessary.
4. Tap the Send icon
(at the top right corner of the screen) to send your
Gmail message.
NOTE You can change the message action after you've started the message. Simply tap the
current action
example, if you chose Reply but decide you want to Reply all instead.
(at the top left of the message header), then tap the one you want. For
Gmail account settings
1. Tap the Home Button > Apps > Gmail > the Accounts and
labels icon (at the upper-left corner of the screen).
2. Tap Settings.
3. Tap General settings to change the settings for all accounts.
, Reply all or Forward .
49
Page 52

50
Communication
Hangouts
The Hangouts app lets you have real-time text conversations with your
friends.
To open the Hangouts app
Tap the Home Button
To sign out of Hangouts
From your chatting list, tap Options icon
account > Sign out.
Chatting with Friends
1. Tap the Home Button > Apps > Hangouts .
2. Tap the New icon
Google Accounts you’ve added.
3. Tap the Message field at the bottom of the screen then enter your
message.
4. Tap the Send icon
Hangouts chatting list
Touch and hold a friend’s name in the chat screen. Use the following icons
at the top of the screen:
Tap to turn notifications off for this friend.
Tap to archive the conversation.
Tap to delete the conversation.
> Apps > Hangouts .
> Settings > tap your
to view your contacts list. It includes all of the
.
Page 53

Communication
Blocking your Friends
To block a friend from exchanging messages with you, tap the friend in
the chatting list. Tap the Menu icon
block option, then tap the Block button to confirm.
To remove a friend from the blocked list, tap the Options icon
the chatting list. Tap Blocked people > Unblock next to the person’s
name.
NOTE Once you block a friend, all of your chats with that friend are deleted from the chatting
list.
> People & options. Tap the
from
51
Page 54

52
Entertainment
Camera
The Camera application not only allows you to take high quality pictures and
share them, but also includes many specialized features eliminating the
need for any other camera. The video feature is also integrated on the
camera viewfinder so you can take a picture, then start recording a video
with a single tap without changing camera modes.
To open the Camera app, tap the Home Button
.
TIP! There are also shortcuts to open the Camera application:
ţ If you’ve set your tablet to use the Swipe unlock method, from the locked screen,
simply drag the Camera icon
ţ If you’ve enabled shortcuts in your tablet’s settings, you can open the Camera
application when your tablet is in timeout by pressing and holding the Volume Down
(on the right side of the tablet).
key
upward to open the Camera application.
Getting to know the viewfinder
Lens swap icon – Switches between the rear-facing camera and the front-facing camera.
Menu icon – Displays the camera icons on the viewfinder. Tap it again to hide the icons.
Settings icon – Opens the camera’s Settings. Tap it again to close the Settings.
See Additional settings.
Shot mode icon – Sets how the picture will be taken. Choose Auto or Panorama.
NOTE To take clear pictures, make sure the camera lens is clean.
Gallery – Tap to view the last photo you captured. This
enables you to access your Gallery and view saved
photos while in camera mode.
Record icon – Tap to start recording a video.
Capture icon – Takes a picture.
–
Back icon
application.
> Apps > Camera
Closes the Settings or exits the Camera
Additional Settings
The camera is set to automatically take high quality photos and videos.
Additional settings are available for resolution, how photos and videos are
taken, as well as how to store them. Tap the Settings icon
bottom left corner in the viewfinder) to open these additional settings. Tap
(at the
Page 55

Entertainment
a setting to toggle through its available settings.
After changing the setting(s) as you want, tap the Settings icon
Sets the resolution. For photos choose from 5M, W4M, 3M, and 1M. For
the video recorder choose from FHD, HD, and WVGA.
NOTE If you choose a high resolution, the file size will increase which means you’ll be
able to store fewer media files in your tablet’s memory.
Allows you to take pictures by voice command.
Disables the voice command function.
Sets a 3 second delay after the Capture icon or Record icon is tapped.
Sets a 10 second delay after the Capture icon or Record icon is tapped.
Disables the delay capture function.
NOTE When you exit the Camera application the Delay capture setting returns to off.
Displays an overlay grid to help you align your photos and videos horizontally
and/or vertically for better composition.
Stores your captured photos and videos in the internal memory or microSD
card memory.
NOTE The microSD card setting is only displayed if an optional microSD card is installed
and mounted in your tablet.
Displays additional information to help you use the camera.
again.
Taking a Photo with the Rear Camera Lens
1. Open the Camera application and hold the tablet so that the viewfinder
displays the shot you want to photograph.
2. Tap the Capture icon
photo.
Tap the Preview image to view the picture you just took.
(or press the Volume Down key ) to take the
53
Additional front camera lens icons
There are additional Settings icons specific to the front camera lens. The
Flash icon
uses the light from the touchscreen to brighten your face.
Page 56

54
Entertainment
The Mirror icon automatically mirrors the image viewed on the
viewfinder (flips the right side to the left).
Gesture shot using the front camera lens
The Gesture shot function allows you to take a picture with a simple hand
gesture.
This is ideal for taking selfies because there’s no awkward movement to
tap the Capture icon (or press the Volume Down key) to take the shot.
To take a photo with a gesture
1. Open the Camera application and activate the front camera lens.
2. Hold an open palm in front of you until the front camera lens detects it (a
box appears on the screen).
3. Make a fist then open your hand to start a countdown before the shot is
taken (allowing you time to position yourself).
Tap the Preview image to view the picture you just took.
or
Recording a video
There’s no need to change modes to start recording video. Both the
Capture icon
viewfinder at the same time.
and the Record icon are displayed on the camera’s
Page 57

Entertainment
1. Open the Camera application and point the lens toward the subject you
want to capture in your video.
2. Tap the Record icon
to start recording.
A timer showing the length of the video will appear.
Tap the Capture icon
to capture a still photo while you’re recording
video.
While recording a video, place two fingers on the screen to use the
dynamic zoom function (spread your fingers apart to zoom in and
pinch them together to zoom back out).
3. Tap the Stop icon
NOTE Make sure that the microphone isn’t blocked when recording a video or audio clip.
to stop recording.
After taking a photo or recording a video
After you take a photo or record a video, you can tap the Back icon to
exit the Camera application, tap the Capture icon
tap the Record icon
(Settings
, Mode , Swap , and Menu ), or tap the Preview
to record another video, tap the Camera icons
to take another photo,
image to view the last photo you took or video you recorded.
Icons while viewing a photo you just took or video you
recorded
While viewing a photo you just took or a video you just recorded, tap the
screen to display the following icons:
Tap to edit the photo. See Editing photos.
Tap to set the photo or video as a favorite and display it in your Gallery
Favorites folder.
Tap to send your photo or video to others or share it via social network
services.
Tap to delete the photo or video, then tap Yes to confirm.
55
Page 58

56
Entertainment
Tap to access the Options menu.
For photos: SmartShare, Set image as, Move, Copy, Copy to Clip Tray,
Slideshow, Rotate left, Rotate right, Crop, Add location, Rename, Print,
and Details.
For videos: SmartShare, Move, Copy, Trim, Rename, and Details.
NOTE All of your recent photos and videos are displayed in a thumbnail filmstrip at the bottom
of the screen. Tap a thumbnail image to view it on the screen.
Options menu
While viewing a photo or video, tap the screen to display the Touch keys
bar, then touch and hold the Recent Apps Button
following options.
NOTE These are the same options accessed when the Menu icon (at the top right corner of
the screen) is tapped. The options displayed depend on the media type (photo or video).
SmartShare – Tap to Play or Beam the photo or video using the
SmartShare feature.
Set image as – Tap to use the photo as a Contact photo, Home screen,
Lock screen wallpaper, or Wallpaper.
Move – Tap to move the photo or video to another album.
Copy – Tap to copy the photo or video and save it to another album.
Copy to Clip Tray – Tap to copy the photo and store in the Clip Tray for use
in other applications.
Slideshow – Tap to automatically display a slideshow of all your photos.
Rotate left – Tap to rotate the photo to the left.
Rotate right – Tap to rotate the photo to the right.
Crop – Tap to crop your photo. Drag the crop box to enclose the photo area
you want to keep, then tap OK. Your cropped photo is saved as a copy of
the original.
Trim – Tap to remove segments from the beginning or end of your
recorded video. This option is only available for videos.
to access the
Page 59

Entertainment
Add location – Tap to add the photo’s location information using the map
provided.
Rename – Tap to rename the photo or video.
Print – Tap to select a printer via Cloud print to print the photo.
Details – Tap to view the photo or video file details.
Watching your saved videos
1. In the viewfinder, tap the image Preview image.
2. Thumbnail images from your Gallery files are displayed in a small,
film-like strip along the bottom of the screen.
3. Tap the video you want, then tap the Play icon
to play it
automatically.
Live Zooming
Live Zooming allows you to zoom in or zoom out on a portion of a video
during playback to make the desired section appear larger or smaller. Live
Zooming is only available when the video is being played using the Video
application.
When viewing a video, use your index finger and thumb in a pinching or
spreading motion to zoom in or out.
57
TIPS! While a video is playing using the Video application:
ţ Slide your finger vertically along the left side of the screen to adjust the screen
ţ Slide your finger vertically along the right side of the screen to adjust the video volume.
ţ Slide your finger horizontally across the screen to rewind or fast-forward.
brightness.
Page 60

58
Entertainment
NOTE Don’t press too hard on the touchscreen; it’s sensitive enough to pick up a firm, light
touch.
Adjusting the volume while viewing a video
Press the Volume keys (on the right side of the tablet) to adjust the
volume of a video while it’s playing. If you selected the Video application to
play the video, you can also slide your finger vertically up along the right
side of the screen to increase the volume and slide your finger down to
decrease the volume during playback.
Gallery
You can store multimedia files in your tablet’s internal memory for easy
access to all your multimedia files. Use this app to view multimedia files
like pictures and videos.
Tap the Home Button
Gallery directly from the home screen.
You can manage and share all of your image and video files with the Gallery
app.
NOTES ţ Some file formats are not supported, depending on the software installed on your
ţ Some files may not play properly, depending on how they are encoded.
tablet.
Viewing pictures
Launching the Gallery app displays all of your available folders. When some
apps save a picture, a folder is automatically created to contain the picture.
Pictures are displayed in order by creation date. Tap a picture to view it in
full-screen. Scroll left or right to view the next or previous image.
> Apps > Gallery . You can also access the
Zooming in and out
Use one of the following methods to zoom in and out on an image:
Double-tap anywhere on the screen to zoom in. Double-tap again to
return to full-screen view.
Page 61

Entertainment
Place two finger on the screen and spread them apart to zoom in. Pinch
in to zoom back out.
Playing videos
The Play icon is displayed on all video files. Select a video from the
Gallery app. Select how you want to view it (Photos or Videos). Tap the
Play icon
to play it.
Viewing photo and video options
When viewing a photo or video, tap to access and use the advanced
editing options.
Deleting images and videos
While viewing your Gallery folders, tap
the screen) and select the photos and videos you want to delete, then
tap Delete (at the bottom of the screen), then tap Ye s to confirm.
While viewing a photo or video, tap the Delete icon
corner of the screen), then tap Ye s to confirm.
(in the upper-right corner of
(in the upper-right
Setting as wallpaper
When viewing a photo, tap > Set image as and select Home screen,
Lock screen wallpaper or Wallpaper.
NOTES ţ Some file formats are not supported, depending on the tablet software.
ţ If the file size exceeds the available memory, an error can occur when you open files.
59
Page 62

60
Entertainment
Videos
Your tablet has a video player that lets you play your recorded videos.
Playing a video
1. Tap the Home Button > Apps > Gallery .
2. Select the video you want to play, then tap the Video icon
pop-up that appears. Tap the screen to display and use the following
icons.
Tap to set the current video as a favorite.
Tap to use QSlide for the Videos app.
Tap to share your video using the SmartShare function.
Tap to access additional options.
Tap to adjust video volume.
Tap to rewind 10 seconds. Touch and hold to rewind in 3
second increments.
/
Touch to pause/resume video playback.
Tap to fast-forward 10 seconds. Touch and hold to fast-forward
in 3 second increments.
/
Tap to lock/unlock the screen.
in the
Page 63

Entertainment
Music
Your tablet has a music player that lets you play all of your favorite tracks.
To access the music player, tap the Home Button
.
Add music files to your tablet
Start by transferring music files to your tablet:
Transfer music using Media sync (MTP).
Download from the Web.
Synchronize your tablet to a computer.
Receive files via Bluetooth.
Transfer music using Media sync (MTP)
1. Connect the tablet to your PC using the USB Cable.
2. Slide the Status bar down and select the current USB connection. Then
select the Media sync (MTP) option. Your tablet will appear as another
hard drive on your computer. Click on the drive to view it. Copy the files
from your PC to the drive folder.
3. When you’re finished transferring files, swipe the Status Bar downward
and tap USB connected > Charge tablet. You may now safely unplug
your tablet.
Playing a song
1. Tap the Home Button > Apps > Music .
2. Tap the Songs tab.
3. Tap the song you want to play.
TIP! To find a song, you can tap the Search icon at the top of the screen or tap the letter
the song begins with using the alphabet listed along the right side of the screen.
> Apps > Music
61
Page 64

62
Entertainment
Music player icons
Tap to share your music via the SmartShare function.
Tap to set the current song as a favorite.
Tap to see the current playlist.
Tap to access additional options.
Tap to set shuffle mode.
Tap to set repeat mode.
Tap to manage the music volume. You can also use the Volume
keys on the right side of the tablet to adjust the volume.
Tap to go back to the beginning of the song. Tap 2 times to return
to the previous song. Touch and hold to rewind 3 seconds.
Tap to pause playback.
Tap to resume playback.
Tap to skip to the next track on the album or in the playlist. Touch
and hold to fast-forward 3 seconds.
Tap to set the audio effect.
Page 65

Entertainment
Other music player options
Touch and hold any song in the list to access Play, Add to playlist,
Delete, Share, Details, and Search.
In the song list, tap the Menu Button
to playlist, Settings, Delete, Share, Details and Help.
to access Select to play, Add
Turning the music player off
To stop the music player, swipe the Status Bar downward, then tap .
NOTES ţ Some file formats are not supported, depending on the device software.
ţ If the file size exceeds the available memory, an error can occur when you open files.
ţ Music file copyrights may be protected by international treaties and national copyright
laws. Therefore, it may be necessary to obtain permission or a licence to reproduce or
copy music. In some countries, national laws prohibit private copying of copyrighted
material. Before downloading or copying the file, check the national laws of the relevant
country concerning the use of such material.
Play Store
Play Store allows you to browse and search for free and paid applications.
To open the Play Store app
Tap the Home Button
Store icon on the Home screen.
To get help with Play Store
Play Store Help web pages are available from all Play Store screens.
Swipe the left edge of the screen towards the right, then tap Help &
Feedback.
The Chrome app opens to the Play Store Help page, with links to many
help topics.
> Apps > Play Store or tap the Play
63
To open a screen with details about an app
At any time while browsing in Play Store, tap an app to open its details
screen.
Page 66

64
Entertainment
The App details screens include a description, ratings, comments, and
related information about the app. From this screen, you can download,
install, uninstall, rate the app, and more.
Downloading and Installing Apps
When you find an app you want, you can install it on your tablet.
To download and install an app
NOTE Before you can download a paid app, you must set up a billing arrangement.
Price/Install button
Indicates the cost or
install for free apps.
1. From the Home screen, tap Play Store .
2. Tap a category from the homepage or tap the Search icon
right corner of the screen) to search for an app.
3. Tap INSTALL or the Price button to download the selected app.
4. If you agree with the app's access requirements, tap ACCEPT.
5. The app will be downloaded and installed.
(in the top
Play Store Options
On the Play Store homepage, drag the left edge of the screen to the right
to access Store home, My apps, My wishlist, People, My account,
Redeem, Settings, Help & Feedback, and About Google.
Page 67

Entertainment
Your Wishlist
While viewing an app (or music, games, etc.), tap the Wishlist icon at
the top of the screen to add it to your wishlist for future reference.
YouTube™
Opening YouTube and Watching Videos
You can browse, search for, view, upload, and rank YouTube videos on your
tablet with the YouTube app.
To open the YouTube app
Tap the Home Button > Apps > YouTube .
Tap a video to watch it or touch and hold the Recent Apps Button
other YouTube options (Settings, Help & Feedback, and Sign in/out).
To search for videos
1. At the top of the main YouTube screen, tap the Search icon .
2. Enter the text you want to search.
3. Tap a suggestion below the search box or tap
4. Scroll through the search results and tap a video to watch it.
on the keyboard.
for
65
Page 68

66
Tools
QPair
Stay connected with QPair when using your tablet, even when your
smartphone is in another room. Get instant notifications when your smartphone
receives an incoming call, messages, and social networking notifications.
1. Tap the Home Button > Apps > QPair > Get Started > Start
on your tablet first then run the same steps on your smartphone.
2. Bluetooth connection will be turned on automatically.
TIP! QPair may not be pre-installed on your smartphone. To download, go to the Play Store
app, then search for QPair and install it.
s QPair works with smartphones running Android 4.1 or later. Some features may be
NOTES
QPair features
limited depending on your smartphone model.
s Since QPair uses the Bluetooth function, it may not work normally if you change the
Bluetooth settings while QPair is in use.
Call notifications – Sends the tablet a notification when the smartphone
receives a call. The notification displays the caller’s number and allows you
to decline the call. You can also change call settings, such as a ringtone,
ringtone volume, ringtone with vibration, or send a decline message when
you get a call.
Message notifications – Sends the tablet a notification when the
smartphone receives a message. You can also change message settings,
Page 69

Tools
such as message pop-up, message preview, notification sound, and
notification vibration.
Social network notifications – Displays a social networking notification
on your tablet’s Status Bar when it arrives on your smartphone.
NOTE To enable this feature, turn on the QPair social network notifications option in your
tablet (Settings > Accessibility > QPair social network notifications). This option
allows you to be notified of social networking notifications on your tablet.
QuickMemo+ transfer – Saves your current QuickMemo+ in the tablet’s
Gallery, and then syncs the tablet’s Gallery with the Gallery on your
smartphone.
QSlide
The QSlide function enables an overlay window on your tablet’s display for
easy multi-tasking. The overlay window can be moved, resized, or made
transparent. QSlide windows can be opened from the QSlide apps bar on
the Notifications Panel, or directly from the apps that support the QSlide
function.
To open a QSlide window
1. Drag the Notification Panel at the top of your screen downward, tap ,
then tap the desired app from the QSLIDE APPS section.
OR
While using an app that supports QSlide, tap the QSlide icon
Using QSlide
The QSlide function opens the associated app in a window in the foreground,
allowing you to access other applications in the background. It is displayed
continuously on the screen until you close it.
.
67
Page 70

68
Tools
OR
Tap to run QSlide.
Tap to return to full window view.
Slide to adjust the transparency.
Tap to exit the QSlide function.
Drag to adjust window size.
NOTE The QSlide Function can support up to two windows at the same time. QSlide only
supports the following apps: Video, Calendar, Email, File Manager and Calculator.
Customizing the QSlide bar icons
You can set the order of the icons displayed in the QSlide bar, as well as
which icons are displayed.
1. Open the Notifications Panel and swipe to the left to the end of the
QSlide apps bar, then tap the Edit icon
Drag one of the icon handles
move its icon to another position in the QSlide icon bar.
Checkmark the icons you want to display and remove the checkmark
for the ones you want to remove.
2. Tap the Back Button
to return to the Notifications Panel.
.
at the right side of the screen to
Page 71

Tools
QuickMemo+
Use the QuickMemo+ feature to capture a screen shot and use it to write a
memo.
To access the QuickMemo+ feature
1. While viewing the screen you want
to capture, drag the Notification
Panel at the top of your screen
downward, then tap .
2. Select the desired tool from the
toolbar and create a memo.
3. Tap (at the top of the screen)
to display the toolbar. Tap to save
the memo. To exit QuickMemo+ at
any time, tap the Back Button (in
the Touch Key Bar).
69
NOTE Please use a fingertip to draw or erase pen marks. Do not use your fingernail or any
other rigid object.
Page 72

70
Tools
Using QuickMemo+ options
The following options are available when using QuickMemo+.
Tap to undo the most recent action.
Tap to redo the most recently deleted action.
Tap to insert text into your memo.
Tap to select the pen type and color.
Tap to use the eraser to erase the pen marks on the memo.
Tap to save the memo you've created.
Tap to hide or display the toolbar.
NOTE Use your fingertip instead of your fingernail to draw or erase pen marks.
Viewing saved QuickMemos
Tap the Home Button > Apps > Gallery or QuickMemo+ ,
then select the QuickMemo+ album.
QuickRemote
QuickRemote turns your tablet into a Universal Remote for your home TV
or Set Top Box.
NOTE QuickRemote may not be available for some devices and areas.
Set up QuickRemote
1. Tap the Home Button > Apps > QuickRemote .
NOTE You can also perform the initial set up of your QuickRemote from the Notifications Panel.
Swipe the Status Bar downward, tap the QuickRemote icon
Bar), then tap ADD REMOTE. After initial set up, to set up additional devices from the
Notifications Panel, tap
screen.
, then tap in the top right corner of the QuickRemote
2. Tap (at the top left corner of the screen) to select a room type,
then tap to add the device.
3. Select the type and brand of device, then follow the on-screen
instructions to configure the device(s).
(in the Quick Settings
Page 73

Tools
NOTE The QuickRemote operates the same way as an ordinary infrared (IR) remote control in
your region or country. Be careful not to cover the infrared sensor at the top of the tablet
when you use the QuickRemote function. This function may not be supported
depending on the model, the manufacturer, or service company.
Using QuickRemote
1. Open the QuickRemote app and choose the room where you
configured the remote.
2. Select the remote you want to use by tapping its type/name on the
QuickRemote bar along the left side of the screen.
3. Tap the buttons on the displayed remote.
NOTE When adding the TV remote control, QuickRemote could use the INPUT button to
configure the appropriate remote control. When configuring the INPUT button, the TV
input source could be changed. To reset the TV input source, tap the INPUT button on
QuickRemote several times (depending on the number of devices connected to the TV).
QuickRemote options
To access the QuickRemote Options menu, tap to select options
including Magic Remote setting (for LG TVs), Edit remote name, Move
remote, Delete remote, Settings and Help.
NOTE While playing music in the background, pressing any QuickRemote button will mute the
sound for a second.
Clock
You use the Clock app to access the Alarms, Timer, World clock, and
Stopwatch functions. Access these functions by tapping the tabs across
the top of the screen, or swiping horizontally across the screen.
71
Setting an alarm
1. Tap the Home Button > Apps > Clock > Add .
2. Set the desired alarm time.
3. Set Repeat, Snooze duration, Alarm with vibration, Alarm sound,
Alarm volume, Auto app starter, Puzzle lock, and Memo.
4. Tap Save.
Page 74

72
Tools
Activating your alarm(s)
1. Open the Clock app and tap the Alarms tab (if necessary).
2. Tap the grey Clock icon
to the right side of the alarm you want to
activate. The icon turns blue when it's set.
Setting the World Clock
The World clock tab allows you to set up a list of cities to easily check
current times in other time zones with a quick glance.
1. Open the Clock app, then select the World clock tab.
2. Tap the New City icon
(at the bottom of the screen), search through
the available cities, then tap the one you want.
Calculator
Using your calculator
1. Tap the Home Button > Apps > Calculator .
2. Tap the number keys to enter numbers.
3. For simple calculations, tap the function you want to perform
(
, , or ) followed by .
NOTES ţ For more complex calculations, you can switch to the Scientific calculator. Tap the
Menu icon
ţ To view the calculation history, tap the Menu icon , then tap Calculation history.
then tap Scientific Calculator.
Page 75

Tools
Calendar
Viewing Your Calendar and Events
The Calendar app allows you to track your schedule of events (that you
created or that you’ve been invited to), organized by day, week, month,
year, or agenda.
When you first set up your tablet, you configured it to use an existing
Google Account or you created a new account. The first time you open the
Calendar app on your tablet, it displays any existing calendar events from
your Google Account on the web.
Adding an event to your calendar
1. Tap the Home Button > Apps > Calendar . You can also
access the Calendar directly from the home screen.
2. Tap the drop-down menu at the top left corner to change the calendar
view (Day, Week, Month, Year, or Agenda).
3. Tap the date you want to add an event to and tap the New event icon
4. Tap the Event name field and enter the event name.
5. Tap the Location field and enter the location. Check the date and enter
the time you wish your event to start and finish.
6. If you want to add a note to your event, tap the Description field and
enter the details.
7. Enter additional options such as the All day checkbox, Repeat, Guests,
Reminders, Show me as, and Privacy, as necessary.
8. Tap Save to save the event in the calendar.
TIP! To quickly save an event, simply touch and hold the date on the calendar. Select Tablet
or your Google account and enter the event name. Tap Details to add additional details,
or just tap Save. The event is added to your selected calendar.
73
.
Page 76

74
Tools
QSlide for the Calendar app
You can view your month calendar in a QSlide window allowing you to
easily check dates, obligations, etc. while using other apps at the same
time.
1. Open the Calendar app.
2. Tap the QSlide icon
Calendar in a QSlide window.
Swipe up and down to scroll through the months.
Tap a date to view the events for that day in your Day calendar.
Drag the bottom right corner of the window to resize it.
Drag the title bar to move the window within the screen.
To move the window to the background, move the transparency slider
to the left (move the slide to the right to activate QSlide).
To return to the Calendar app, tap the QSlide icon
corner of the QSlide title bar.
To close the QSlide window, tap the Exit icon
corner of the title bar.
at the top of the screen to display the month
in the top left
in the top right
Page 77

File Manager
The File Manager application allows you to manage files in your internal/
external storage.
To open the File Manager application
Tap the Home Button
Using File Manager
1. Open the File Manager application.
2. Choose the location where the desired file is stored.
3. The following options are available.
: Allows you to run QSlide.
: Allows you to search for files.
: Allows you to create a new folder.
: Allows you to move files and folders to another folder location.
: Allows you to copy multiple files.
: Allows you to delete files and folders.
Tap the Menu icon
following options.
Sort by: Allows you to sort files and folders by Name, Size, Date, or
Type.
View by: Allows you to change the view mode to List or Grid.
Share: Allows you to select files and folders to share with others.
Zip: Allows you to select files and folders to compress into a .zip file.
Show/Hide hidden files: Allows you to show hidden files or hide them.
Exit: Exits the File Manager application.
> Apps > File Manager .
(at the top right corner of the screen) to access the
Tools
75
Page 78

76
Tools
Maps
The Maps app allows you to find places and get directions.
To open the Maps app
Tap the Home Button
Maps Options
Tap here to access map
views and options.
Search Box
Tap here to open the keyboard
to enter your search.
> Apps > Maps .
Voice Recorder
Recording a sound or voice
1. Tap the Home Button > Apps > Voice Recorder .
2. Tap the Record button
3. Tap the Stop button
4. Tap the Play icon
to begin recording.
to end the recording.
to listen to the recording.
Location Icon
Location icons are
displayed when you
search for places near
your location or where
you plan to visit.
Current Location
Tap here to show your
current location on the
map.
Directions Icon
Tap here to get directions
to a destination.
Recordings List
Tap the List button to access your list of recordings. Tap a saved
recording to listen to it. The available recording time may differ from the
actual recording time.
NOTE Touch and hold a recording entry and tap Rename to rename it for easy identification.
Page 79

Tools
Sending the voice recording
1. Once you've finished recording, you can send the audio clip by tapping
the Share icon at the top of the screen.
2. Choose from any of the available methods for sharing.
Record Button
List Button
Tap here to view a list of
your recordings.
Voice Record Screen
Tap here to start recording
a voice memo.
Application Manager
You can manage your apps using Application manager. You can easily check
the number of apps that are currently running and shut down certain apps.
Accessing Application manager
1. Tap the Home Button > Settings > Application manager.
2. Slide the right side of the screen to view the tabs: Downloaded, On SD
Card, Running, or All.
3. Tap an app to view its details and information.
Touch the Stop button to stop the running app.
Tap the Force stop button to shut down a downloaded app.
Touch and hold the Recent Apps Button
app preferences, Reset default apps, Show cached processes, Idle
apps, and Uninstall apps.
to access Sort by, Reset
77
Page 80

78
Tools
ThinkFree Office
ThinkFree Office is a professional mobile office solution that lets users
conveniently view various types of office documents, including Word, Excel,
and PowerPoint files, anywhere or anytime, using their mobile devices.
To create a new document
1. Tap the Home Button > Apps > ThinkFree Office .
NOTE You can tap Skip to ignore the registration information.
2. Tap the New document icon along the left side of the screen to
create a new document for the desired file type.
3. Modify the document using the tools at the top of the screen and the
on-screen keyboard.
4. When you're done working on the document, tap the Menu icon
the top left corner of the screen), then tap Save (or Save as to enter a
new document name) to save.
5. Enter the document name, then tap OK.
To view and edit a document on your device
You can easily view and edit a wide variety of file types, including Microsoft
Office documents and Adobe PDF, right on your tablet.
1. Open ThinkFree Office and search for the document you want.
2. Tap the document that you want to view or edit.
NOTE When viewing documents using ThinkFree Office, the objects and layout remain the
same as in the originally created document.
3. The document opens in view mode. To edit the document, tap the
screen to display the Touch keys bar, then tap the Edit icon to edit
the file.
(in
Google+
Use this app to stay connected with people via Google’s social network
service.
Page 81

Tools
Tap the Home Button > Apps > Google+ .
NOTE This app may not be available depending on the region or your service provider.
Voice Search
Use this app to search web pages using voice.
1. Tap the Home Button
2. Say a keyword or phrase when Speak now appears on the screen. Tap
one of the search results that appear.
NOTE This app may not be available depending on the region or your service provider.
> Apps > Voice Search .
79
Page 82

80
Settings
Settings
The Settings application contains most of the tools for customizing and
configuring your tablet. All of the settings in the Settings application are
described in this section.
Access the Settings menu
1. Tap the Home Button > Apps > Settings .
OR
From the Home screen, touch and hold the Recent Apps Button
Settings.
2. Tap a setting menu on the left side of the touchscreen, then tap the
option you want on the right.
Settings are displayed in a split-screen format allowing quick and easy
navigation. The left side is a vertically scrolling list of the Settings categories
and their menus. Corresponding selections within each menu/sub-menu
are displayed on the right with the current selection listed at the top.
WIRELESS NETWORKS
The Wireless and Networks category allows you to configure and manage
your device’s wireless radio communications.
Airplane mode
Tap the Airplane mode switch to toggle it on and off. On disables all
wireless communications and connections.
>
Wi-Fi
Tap the Wi-Fi switch to toggle it on and off.
Show Wi-Fi pop-up - Checkmark to be notified when a Wi-Fi network is
in range when you launch an app.
WI-FI NETWORKS
The list of all of the Wi-Fi networks that are within access range. Tap a
Wi-Fi network on the list to access it.
Page 83

Settings
Tap the Search button (at the bottom of the screen) to scan for available
Wi-Fi networks.
Tap the Menu icon
Add Wi-Fi: Allows you to manually add a Wi-Fi network by entering its
SSID and password. This is helpful if the Wi-Fi network you want is
currently out of access range.
Saved Wi-Fi: Displays a list of your saved Wi-Fi networks.
Advanced Wi-Fi: Accesses the following advanced Wi-Fi settings.
Wi-Fi notifications: Checkmark to notify if Wi-Fi networks are
available nearby or when your device is connected to a Wi-Fi network.
Manage networks: Opens a screen to specify the order in which the
available networks will be detected.
Sort list by: Sort the Wi-Fi list. Choose from Signal strength or
Alphabetical order.
Keep Wi-Fi on when screen is off: Sets the Wi-Fi status during
sleep. Choose from Ye s, Only when plugged in, and No.
Allow Wi-Fi scanning: Let Google’s location service and other apps
scan for networks, even when Wi-Fi is off.
Avoid bad Wi-Fi connections: Checkmark this box to use the mobile
network whenever the Wi-Fi network you’re connected to doesn’t
have an internet connection. (Data usage may apply.)
Wi-Fi Direct: Allows you to connect with other Wi-Fi devices without
any access point. Select from the list of available devices or groups.
You can also rename your tablet for easier identification.
Connect by WPS button: Allows you to connect to a secured Wi-Fi
network with a WPS button.
Connect by WPS PIN: Allows you to connect to a secured Wi-Fi
network with a WPS PIN.
Install certificates: Allows you to install the certificates from storage.
in the Wi-Fi menu to access the following options.
81
Page 84

82
Settings
MAC address: Displays your tablet’s MAC address (which may need
to be entered in the router to connect to some wireless networks
with MAC filters).
IP address: Displays the IP address.
Bluetooth
Tap the Bluetooth switch to toggle it on and off. Turn it on and to
access the following settings:
VK410: Checkmark to make your tablet visible (for a specified time) to other
Bluetooth devices for pairing and connection.
AVAILABLE DEVICES
The list of all of the available in-range Bluetooth devices.
Tap the Menu icon
in the Bluetooth menu to access the following
options.
Edit tablet name: Allows you to change your tablet name for easy
identification when pairing and connecting. Enter your new tablet name,
then tap Save.
Visibility timeout: Sets the amount of time other Bluetooth devices can
see your tablet for pairing and connection.
Received files: Displays a list of your Bluetooth received files.
Help: Displays information about Bluetooth features.
NOTE Tap the Search button (at the bottom of the screen) to search for in-range Bluetooth
devices.
Data usage
Tap the Data usage switch to toggle it on and off.
To access addional options, tap the Menu icon
Display in MB/GB: Displays data usage using MB or GB.
Restrict background data: Allows you to restrict background data to
limit data usage.
.
Page 85

Settings
Show Wi-Fi usage: Displays Wi-Fi data usage information.
Mobile hotspots: Opens a list to select and use another device’s mobile
network as a mobile hotspot for your mobile data. Turn on Wi-Fi and
search for mobile hotspots, if necessary.
Mobile networks: Directs you to the Mobile networks menu, which
allows you to manage your mobile network settings.
Share & connect
Allows you to share your tablet’s data with other devices via a wireless
connection.
SmartShare Beam: Tap the SmartShare Beam switch
on to allow you to receive multimedia content via SmartShare Beam from
LG smartphones or tablets.
Media server: Allows you to share the tablet’s multimedia content with
nearby DLNA-compatible devices.
NOTE Tap the Menu icon to access Use DLNA feature.
Content sharing: Checkmark to allow nearby devices to access
content on your tablet.
LG-VK410: Tap to edit your tablet name for Bluetooth, Wi-Fi Direct,
etc., then tap Save. Tap the Image icon to set your tablet image.
Content to share: Sets the types of content your tablet is allowed to
share. Checkmark Photos, Videos, or/and Music.
Receive content: Checkmark to allow nearby devices to send content
to your tablet.
Allowed devices: Displays nearby devices that can access your
tablet.
Not-allowed devices: Displays nearby devices that can’t access your
tablet.
to toggle it
83
More...
Allows you to manage other network and wireless settings.
Page 86

84
Settings
TETHERING
Tethering allows you to connect other devices to share your tablet's
internet connection. Choose from the following connection methods:
USB Tethering: Tap the USB Tethering switch
to toggle it on and
off. On allows you to share the tablet's mobile data connection using a
USB connection. This setting is greyed out if not connected via USB.
Mobile Hotspot: Tap its switch
to toggle it on and off. On allows
you to use your device as a Mobile Hotspot for other devices to use your
mobile network connection.
Set up: Sets the SSID and key for your mobile hotspot.
Manage connections: Sets the device(s) allowed to use your hotspot
connection.
Connected devices are listed at the bottom of the screen.
NOTE From the Mobile Hotspot setting, tap the Menu icon , then tap Advanced to access
additional settings.
Bluetooth tethering: Tap the Bluetooth tethering switch to toggle
it on and off. On shares the tablet's internet connection with other
Bluetooth devices.
Help: Displays information regarding USB tethering, mobile hotspot, and
Bluetooth tethering.
NETWORK
Mobile networks: Sets up options for networks, and APNs (Access
Point Names).
Mobile data: Checkmark to enable data access over the mobile
network.
Data roaming access: Sets your data services while roaming. Choose
from Deny data roaming access, Allow access only for this trip,
and Allow access for all trips.
Network type and strength: Displays the current network type and
the signal strength.
Page 87

Settings
Access point names: Sets up APN for data service. Select an APN in
the list or tap the Menu icon
one.
Roaming state: Displays your current roaming state.
View Verizon Account: Accesses your service provider account
information. If you are a prepaid user, you can access the Verizon
Broadband portal through this menu. When the balance is zero, you can
add a data plan or change your plan.
VPN: Sets up and manages Virtual Private Networks (VPNs).
Basic VPN: Sets your tablet to use the built-in Android VPN client
supporting basic features.
LG VPN: Sets your tablet to use an advanced LG VPN client
supporting full IP Security features and interoperability. You can add an
LG VPN network or select from your list of VPN connections.
NOTE Tap the Menu icon to access Import certificates, Settings, and About.
, then tap New APN to create a new
DEVICE
Sound & notification
BASIC
Sound profile: Sets the sound profile to Sound, Vibrate only or No
interruptions.
Volume: Sets individual volume levels for Notification sound, Touch
feedback & system, and Music, video, games & other media.
Notification sound: Sets the sound for notifications. You can also add a
notification sound by tapping the New icon
NOTIFICATION
Interruptions: Set interruptions for notifications.
Lock screen: Allows you to hide or display notifications on the lock
screen.
Apps: Sets notifications for apps.
.
85
Page 88

86
Settings
ADVANCED SETTINGS
Touch sounds: Checkmark to set your tablet to play a sound when you
touch buttons, icons, and other onscreen items that react to your touch.
Screen lock sound: Checkmark to set your tablet to play a sound when
the touchscreen is locked and unlocked.
Vibrate on touch: Checkmark to set vibration feedback when the screen
is touched.
Display
Brightness: Sets the screen brightness. Manually set the level you want
or tap the Night brightness checkbox to set the brightness to 0%
automatically between midnight and 6:00 am.
Screen timeout: Sets the time delay before the screen automatically
turns off (times-out). Choose from 15 sec, 30 sec, 1 min, 2 min, 5 min,
10 min, 15 min, 30 min and Keep screen turned on.
Screen-off effect: Sets the screen-off effect used when the screen is
turned off (automatically or manually).
Auto-rotate screen: Checkmark to automatically switch orientation when
you rotate the tablet.
Daydream: Tap the Daydream switch
allows the set screen saver to be displayed when the tablet is sleeping
while docked and/or charging. Choose from Clock, Google Photos.
NOTE Charging may be slower while the screen saver is on.
Font type: Sets the font (type) used on the display screens. Choose from
NewSmartGothic, Travel, Foxrain, Coffee, Purewhite, and Serif.
Font size: Sets the size of the font (type) used on the display screens.
Choose from Minimum, Small, Medium, Large, Very large, and
Maximum.
Smart screen: Checkmark to keep the screen on when the device
detects your eyes looking at the screen.
to toggle it on and off. On
Page 89

Settings
Home touch buttons: Sets the Touch Keys displayed at the bottom of all
of the screens. Set which ones are displayed, their position on the bar,
and what they look like. You can also select their color and the
background.
Motion sensor calibration: Allows you to improve the accuracy of the tilt
and speed of the sensor.
Home screen
Wallpaper: Sets the wallpaper to use on your Home screen. Select it
from Gallery, Live Wallpapers, Multi-photo, Photos, and Wallpaper
gallery.
Screen swipe effect: Sets the effect when you swipe to change
screens. Choose from Basic, Breeze, Accordion, Panorama, Carousel,
Layer, and Domino.
Allow Home screen looping: Checkmark to set the Home screens to
scroll continuously (loop back to the first screen after the last screen).
Allow apps list looping: Checkmark to allow continuous Apps list
scrolling (loop back to the first screen after the last screen).
Help: Displays information about the Home screen.
Lock screen
Select screen lock: Sets a screen lock type to secure your tablet.
Choose from None, Swipe, Knock Code, Pattern, PIN, and Password.
Smart Lock: Sets to keep your tablet unlocked when you have a trusted
Bluetooth device connected to it, when it's in a familiar location like your
home or work, or when it recognizes your face.
Screen swipe effect: Sets the screen swipe effect options. Choose from
Light particle, Vector circle, Mosaic, and Soda.
NOTE This setting name may be Pattern effect if the Screen lock is set to Pattern.
Wallpaper: Sets your Lock screen wallpaper. Select it from Gallery or
Wallpaper gallery.
87
Page 90

88
Settings
Shortcuts: Allows you to change the shortcuts on the Swipe Lock
screen.
Owner info: Checkmark to set the device owner’s name to be displayed
on the Lock screen. Tap the Text box to enter the text you want displayed
as the Owner info.
Security lock timer: Sets the amount of time before the screen
automatically locks after the screen has timed-out.
Power button instantly locks: Checkmark to instantly lock the screen
when the Power/Lock Key
Security lock timer setting.
The Screen security settings depend on the Lock type. The following
settings may also be displayed.
Hidden PIN: Checkmark to display the unlock PIN when (and where) you
tap the Lock screen.
Hidden password: Checkmark to display the unlock password when
(and where) you tap the Lock screen.
Hidden pattern: Checkmark to display the unlock dot pattern when (and
where) you tap the Lock screen.
Make pattern visible: Checkmark to make your pattern visible while
drawing it.
Randomize PIN Entry: Sets the keypad to random numbers so that
someone watching cannot detect your PIN from your hand movements.
is pressed. This setting overrides the
Storage
INTERNAL STORAGE: Displays the total amount of space in the tablet’s
memory and lists what type of data is using up space.
SD CARD: Displays the total amount of memory space on the microSD
card and how much space is available.
Mount/Unmount SD card: Mounts and unmounts the microSD card
from your tablet so that you can access the data stored in it, format the
Page 91

Settings
card, or safely remove it. This setting is dimmed if there’s no microSD
card installed, or if you’ve mounted the microSD card on your computer.
Erase SD card: Permanently erases everything on the microSD card and
prepares it for use with your tablet.
Battery
BATTERY INFORMATION
The battery charge information is displayed on a battery graphic along
with the percentage of the remaining charge and its status.
Battery usage: Touch the battery charge graphic to display the Battery
use screen to see the battery usage levels and battery use details. It
displays which components and applications are using the most battery
power. Tap one of the entries to see more detailed information.
Battery percentage on status bar: Checkmark to display the percent of
battery charge on the Status Bar.
BATTERY SAVER
:
Battery saver
saver for the following options.
Turn Battery saver on: Sets the battery level at which you want
Battery saver to turn on automatically. Choose from Immediately, 5%
battery, 15% battery.
Restric apps in background: Checkmark to restrict apps in
background. Notifications, downloading, and streaming for apps may
also be restricted.
Help: Displays battery saving tips.
Tap the switch to toggle it on and off. Tap Battery
89
Smart cleaning
The Smart cleaning menu displays the space in use and free space in your
tablet’s memory. It also allows you to optimize your tablet’s memory space.
Tap a folder, then tap Clean (at the bottom of the screen) to clean the files
in that folder to optimize the space used.
Page 92

90
Settings
Smart cleaning Options menu
From the Smart cleaning menu, tap the Menu icon
access Notification interval and Idle time period.
, then tap Settings to
Application manager
Use the Application manager menu to view details about the applications
installed on your tablet, manage their data, and force them to stop. Swipe
left and right to select one of the three tabs across the top of the screen to
view detailed information for DOWNLOADED, ON SD CARD, RUNNING,
and ALL applications. Tap an entry to view more information, tap Stop (or
Force stop), then OK to stop it from running.
Tap the Menu icon
default apps, Show cached processes, Idle, apps and Uninstall apps.
to access Sort by, Reset app preferences, Reset
Dual window
Tap the Dual window switch to toggle it on (blue) and off (gray). On
enables the Dual Window Button (in the Touch keys bar) to activate two
app windows to use at the same time.
Split view – Checkmark to automatically open the Dual window feature
when you tap a link on the full screen or tap an email attachment (for
images only).
Help – Displays help information about using the Dual window feature.
PERSONAL
Users
Owner: Tap to change the owner's name.
Guest: Tap to switch to the guest mode.
Add user: Allows you to add a new user account for the tablet and use
the Multi-user feature.
Page 93

Settings
Location
Use the Location menu to set your preferences for using and sharing your
location when you search for information and use location-based
applications, such as Maps. Tap the Location switch
On and Off.
E911 Location: E911 Location cannot be turned off on any mobile tablet.
Intended for personal safety in urgent situations, this setting cannot be
altered by the user.
Mode - Set the location mode from High accuracy (GPS and networks),
Battery saving (Networks only), and Device sensors only (GPS only).
RECENT LOCATION REQUEST
access your location.
LOCATION SERVICES: Displays Google Location Reporting.
Camera: Checkmark to automatically tag the photos and videos you take
with your current location.
: List of apps that have requested to
to toggle between
Security
Encrypt tablet: Allows you to encrypt data on the tablet for security. You
will be required to enter a PIN or password to decrypt your tablet each
time you power it on.
Encrypt SD card storage: Allows you to encrypt the data on your
MicroSD making the data unavailable for other devices.
Set up SIM card lock: Allows you to set if you want to require a PIN to
be able to access the SIM card. And, if set, allows you to change the PIN.
Password typing visible: Checkmark to briefly show the last character
of the hidden password as you type.
Tablet administrators: Displays the list of administrators, allowing you to
deactivate tablet administrators.
Unknown sources: Checkmark to allow installation of apps from
non-Play Store applications.
91
Page 94

92
Settings
Verify apps: Checkmark to disallow or warn before installation of apps
that may cause harm.
Storage type: Displays the current storage type for credentials (e.g.,
Hardware-backed).
Trusted credentials: Displays trusted CA certificates.
Install from storage: Allows you to install encrypted certificates.
Clear credentials: Removes all certificates and related credentials.
Trust agents: Select apps to use without unlocking screen.
Screen pin: This feature allows you to lock your device so that the
current user can only access the pinned app. This is useful for users with
children.
App usage access: Allows apps to view app usage info on your phone.
Accounts
Auto-sync data: Mark this box to automatically sync all accounts
you’ve added on your tablet.
Add account: Allows you to add accounts.
Language & input
Language: Sets the language to use for the text on your tablet.
KEYBOARD & INPUT METHODS
Default: Sets the default on-screen keyboard to use when entering text.
LG Keyboard: Checkmark to select the LG keyboard to enter data. Tap
the Settings icon
Google voice typing: Checkmark to select Google voice typing to enter
data. Tap the Settings icon
SPEECH
Voice Search: Allows you to manage various Voice Search settings.
to change the LG keyboard settings.
to change the Google voice settings.
Page 95

Settings
Text-to-speech output: Sets the preferred speech engine and speech
rate (very slow to very fast). You can also listen to an example.
MOUSE/TRACKPAD
Pointer speed: Sets the pointer speed on a slide bar.
Backup & reset
Back up my data: Checkmark to backup your settings and application
data to Google servers.
Backup account: Sets the account to which you want to backup data.
Automatic restore: Checkmark to allow the tablet to automatically
restore the settings and data from your file backup when an application is
reinstalled on the tablet.
LG Backup service: Backs up all information on the device and restores
it in the event of data loss or replacement.
Factory data reset: Allows you to reset your settings to the factory
default values and delete all your data. If you reset the tablet this way,
you are prompted to re-enter the same information as when you first
started Android.
Reset settings: Allows you to reset your any system settings were
changed, it can return the tablet to its original behavior.
SYSTEM
Shortcut key
Allows you to turn the Shortcut keys on and off. Press and hold the Volume
Up and Down keys together when the screen is unlocked to access
QuickMemo+. Press and hold the Volume Up or Down key when the
screen is off or locked to access the camera.
93
Date & time
Automatic date & time: Checkmark to use the network-provided date
and time.
Page 96

94
Settings
Automatic time zone: Checkmark to use the network-provided time
zone.
Set date: Tap to manually set the date to use for your device. This setting
is greyed-out when the Automatic date & time setting is checkmarked.
Set time: Tap to manually set the time to use for your device. This
setting is greyed-out when the Automatic date & time setting is
checkmarked.
Select time zone: Tap to select select a time zone other than the one
provided by the network. This setting is greyed-out when the Automatic
time zone setting is checkmarked.
Use 24-hour format: Checkmark to display the time using the 24-hour
time format (for example, 13:00 instead of 1:00 pm).
Select date format: Sets the format for displaying dates.
Accessibility
Use the Accessibility settings to configure accessibility plug-ins you have
installed on your tablet.
VISION
TalkBack: Allows you to set up the TalkBack function which assists
people with impaired vision by providing verbal feedback. Tap
top right corner of the screen to toggle it on and off. Tap Settings at the
bottom of the screen to adjust the TalkBack settings.
Font size: Checkmark to increase the size of the text.
Invert colors: Checkmark to invert the colors of the screen and content.
Color adjustment: Sets to view the screen with greater color contrast.
Tap the Color adjustment switch
to turn it on. Then tap the screen and drag across the screen in any
direction until you see the color contrast you want to use.
Touch zoom: Tap the Touch zoom switch
allows you to zoom in and out by triple-tapping the screen.
at the top right corner of the screen
to toggle it on and off. On
at the
Page 97

Settings
Lower screen brightness: Checkmark to set the screen to a darker
contrast (a darker shade).
Accessibility shortcut: When this feature is turned on, you can quickly
enable accessibility features.
Text-to-speech output: Sets the preferred speech engine and speech
rate (very slow to very fast). You can also listen to an example.
HEARING
Audio type: Allows you to set the audio type.
Sound balance: Move the slider on the bar to set the sound balance
between the left and right channel.
Turn off all sounds: Mark this box to silence all tablet sounds including
sounds from the speaker.
Captions: Customize caption setting for those with hearing impairments.
Tap the Captions switch
PHYSICAL & MOTOR
Touch feedback time: Sets the touch and hold delay (short, medium, or
long).
Touch assistant: Tap the switch icon
allows you to replace the hardware keys with a Touch assistant board
.
Tap the Touch assistant icon
Home button, Volume buttons, Screen capture button, Accessibility
button, and Pinch button.
Screen timeout: Sets the screen timeout. Choose from 15 sec, 30 sec,
1 min, 2 min, 5 min, 10 min, 15 min, 30 min, and Keep screen turned
on.
RECOGNITION
Touch control areas: Tap the switch to toggle it On or Off. On allows
you to select an area of the screen to limit touch control. Press the
to toggle it On or Off.
to toggle it on and off. On
to be able to tap its Power button,
95
Page 98

96
Settings
Volume Down Key and tap the Home Button at the same time to
activate and deactivate this feature.
SYSTEM
Auto-rotate screen: Checkmark to automatically rotate the screen
depending on the tablet orientation (portrait or landscape).
Password voice confirmation: Checkmark so that characters entered in
password fields are read out by the tablet.
Accessibility settings shortcut: Sets quick, easy access to selected
features when you triple-tap the Home Button
Choose Off, Show all, TalkBack, Invert colors, Touch assistant, or
Accessibility settings.
One-touch input: Checkmark so that each finger touch enters a letter/
character on the LG keyboard.
SERVICES
Switch Access: Allows you to control your device using configurable key
combinations.
three (3) times.
Quick Cover
Tap the switch icon to toggle it on and off. On will automatically lock
your tablet’s screen when you close the Quick Cover. Simply open the
cover to unlock the screen.
Printing
PRINT SERVICES
Cloud Print: Tap the Cloud Print switch to toggle it On or Off. This
feature allows you to use the Google Cloud Print feature and print via the
cloud.
About tablet
View legal information and check your device status and software version.
Tablet name: Allows you to set your tablet name.
Page 99

Settings
Network: Allows you to view your Network, Network type and strength,
Service state, Roaming state, Mobile network state and IP address.
Status: Allows you to view your Tablet phone number, IMEI, IMEISV,
ICCID, and Last factory data reset.
Battery: Allows you to view Battery status, Battery level, and Battery use
information.
Hardware info: Allows you to view the Model number, Up time,
Hardware version, Wi-Fi MAC address, and Bluetooth address.
Software info: Allows you to view Android version, Baseband version,
Kernel version, Build number, and Software version.
Legal info : Allows you to view LG apps rights agreement, Open source
licenses, and Google legal information.
Patent information: Displays LG patent information.
System updates
View your current system versions. You can also check for any new
updates available for your tablet and also check on the status of new
updates.
97
Page 100

98
Specifications
DivX HD
ABOUT DIVX VIDEO: DivX® is a digital video format created by DivX, LLC,
a subsidiary of Rovi Corporation. This is an official DivX Certified
that has passed rigorous testing to verify that it plays DivX video.
Visit divx.com for more information and software tools to convert your files
into DivX videos.
ABOUT DIVX VIDEO-ON-DEMAND: This DivX Certified
registered in order to play purchased DivX Video-on-Demand (VOD) movies.
To obtain your registration code, locate the DivX VOD section in your device
setup menu. Go to vod.divx.com for more information on how to complete
your registration.
DivX Certified
®
to play DivX® video up to HD 720p, including premium
content.
®
, DivX Certified® and associated logos are trademarks of Rovi
DivX
Corporation or its subsidiaries and are used under license.
Notice: Open Source Software
To obtain the source code under GPL, LGPL, MPL, and other open
source licenses, that is contained in this product, please visit
http://opensource.lge.com.
In addition to the source code, all referred license terms, warranty
disclaimers and copyright notices are available for download.
LG Electronics will also provide open source code to you on CD-ROM for
a charge covering the cost of performing such distribution (such as the
cost of media, shipping, and handling) upon email request to
opensource@lge.com. This offer is valid for three (3) years from the date
on which you purchased the product.
®
®
device must be
device
 Loading...