

LG G Pad 5 10.1 FHD User Manual

USER GUIDE
ENGLISH
Copyright ©2020 LG Electronics Inc. All rights reserved.
MFL71749201 (1.1) www.lg.com

Important Customer Information
Before you begin using your new device
Included in the box with your device are separate information leaflets.
These leaflets provide you with important information regarding your new
device. Please read all of the information provided. This information will help
you to get the most out of your device, reduce the risk of injury, avoid
damage to your device, and make you aware of legal regulations regarding
the use of this device.
It’s important to review the Product Safety and Warranty Information guide
before you begin using your new device. Please follow all of the product
safety and operating instructions and retain them for future reference.
Observe all warnings to reduce the risk of injury, damage, and legal
liabilities.
1

Table of Contents
2
Important Customer Information...............................................1
Table of Contents
Feature Highlight
Multi-tasking feature ........................................................................................... 5
Comfort view......................................................................................................... 6
Camera features
QuickMemo+
Sound quality and effects
Google Assistant
Fingerprint recognition
.......................................................................2
........................................................................5
....................................................................................................7
........................................................................................................ 8
..................................................................................10
..................................................................................................11
.......................................................................................12
The Basics ................................................................................. 15
Device Overview ..................................................................................................15
Installing the SIM card and memory card
Removing the memory card
Charging the battery
Turning the power on or off
Touch Screen
Getting to Know the Home Screen
Setting Your Lock Screen
Memory card encryption
Entering text
Capturing a Screenshot
Content sharing
......................................................................................................23
....................................................................................................... 37
..................................................................................................42
..............................................................................20
..........................................................................................20
..............................................................................22
..................................................................................34
...................................................................................36
.....................................................................................42
........................................................18
..................................................................26

Table of Contents
Useful App ............................................................................... 44
App Shortcuts ....................................................................................................44
Audio recording features
Calculator
Camera
Clock
Contacts
Gallery
Music
Google Apps
............................................................................................................46
................................................................................................................46
....................................................................................................................54
..............................................................................................................56
.................................................................................................................58
...................................................................................................................62
.......................................................................................................63
...................................................................................45
Settings .................................................................................... 65
Settings ...............................................................................................................65
Network & internet
Connected devices
.................................................................................................................. 73
Sound
................................................................................................................. 74
Display
Lock screen & security
Extensions
Apps & notifications
.................................................................................................................82
Battery
................................................................................................................83
Storage
Accounts
Accessibility
Digital Wellbeing & parental controls
................................................................................................................. 87
Google
.................................................................................................................... 87
System
System updates
.............................................................................................65
............................................................................................. 70
...................................................................................... 76
...........................................................................................................80
...........................................................................................81
.............................................................................................................83
........................................................................................................84
..............................................................86
..................................................................................................... 89
Appendix .................................................................................. 90
Device software update .....................................................................................90
Anti-Theft Guide
Open Source Software Notice Information
Regulatory Information (FCC ID number, etc.)
Trademarks
More information
.................................................................................................91
......................................................91
...............................................92
.........................................................................................................92
................................................................................................ 93
3

Table of Contents
4
Safety ........................................................................................ 94
Safety Information .............................................................................................94
SAFETY PRECAUTIONS FOR POWER SUPPLY UNIT
Safety Information
Consider device compatibility
Part 15.19 Statement
Part 15.21 Statement
Part 15.105 Statement
FCC RF Exposure Information
Bodily Contact During Operation
Consumer Information about Radio Frequency Emissions.......................... 103
Consumer Information on SAR
Caution! Avoid Potential Hearing Loss
TIA Safety Information
FDA Consumer Update
............................................................................................. 96
.......................................................................... 101
....................................................................................... 102
....................................................................................... 102
..................................................................................... 102
........................................................................ 103
................................................................... 103
.......................................................................107
.......................................................... 109
...................................................................................... 111
.................................................................................... 114
................................95
LIMITED WARRANTY - USA ...............................................124
Feature Highlight
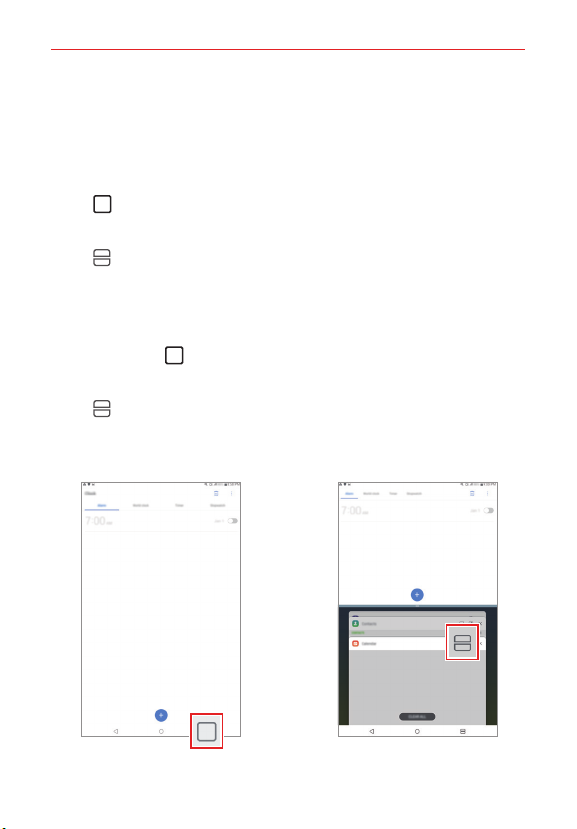
Multi-tasking feature
Multi window
You can use two apps at the same time by separating the screen into the
multiple windows.
1. Tap Recent apps from the Home touch buttons.
Recently-used apps appear.
2. Tap Multi window at the top of the desired app to use the Multi
window feature.
The selected app appears at the top half of the screen.
You can also access this feature doing the following:
1. Touch and hold Recent apps while using an app.
Recently-used apps appear on the split screen.
2. Tap Multi window at the top of the desired app to use the Multi
window feature.
The selected app appears at the bottom half of the screen.
5
Feature Highlight
6
NOTES
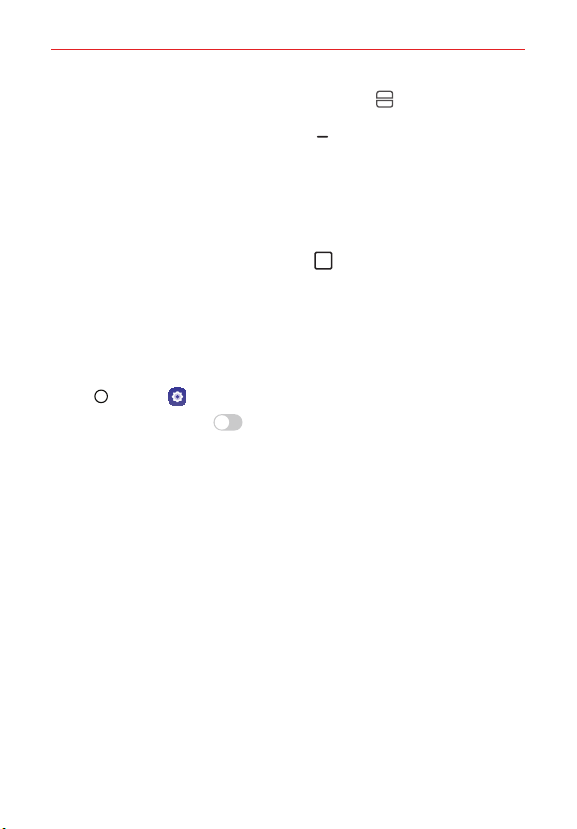
• To deactivate the Multi window feature, touch and hold Multi window on the
Home touch button.
• To adjust the size of the split screen, drag Dividing bar bar at the center of the
screen.
• The Multi window feature is not supported by some LG apps and apps downloaded
from Play Store.
Overview screen
The Overview screen provides a preview of your recently used apps.
To view the list of recently used apps, tap
Recent apps on the Home,
then tap the displayed app.
Comfort view
Set the device to reduce amount of blue light on screen to reduce eye
strain.
1. Tap Home > Settings > Display > Comfort view.
2. Tap Use Comfort view ON/OFF to turn on.
OR
Drag the status bar downward and turn on Comfort view.
3. Adjust the Blue light filter slide bar to meet your preferences.
NOTE Comfort view may not be available when some Vision Accessibility related features
are turned on.
Feature Highlight
Camera features
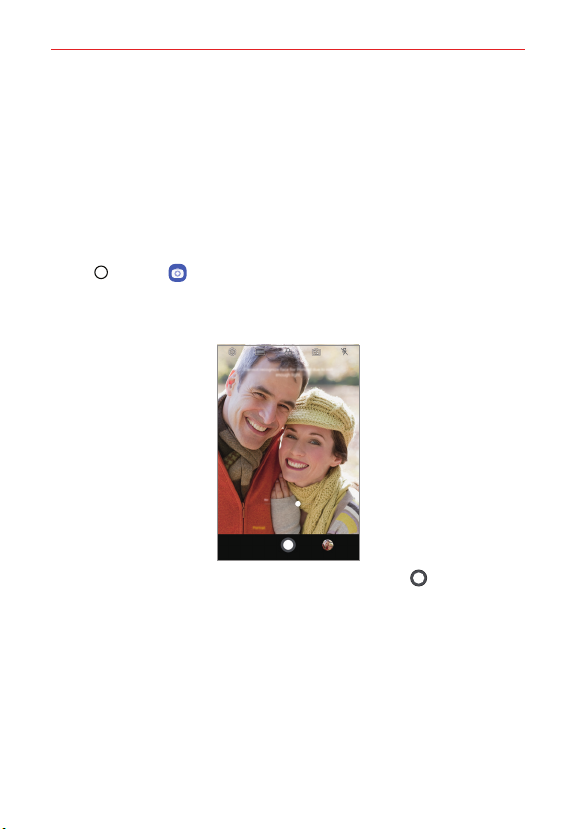
Portrait
You can create an artistic portrait photo, whereby the subject is in focus and
the background is blurred. You can also edit the image by applying lighting
or color effect to the background.
NOTES
• While t aking a photo, keep the distance to your subject to 1.3 ~ 5 feet.
• This feature is not available if the surroundings are too dark.
1. Tap Home > Camera, switch to the front camera, Portrait.
2. To adjust blur strength, drag the slide bar up, down, left or right
(depending on the orientation of the device).
3. When Portrait is available. appears on the screen, tap Capture to
take a photo.
The Portrait feature may not work if the camera cannot recognize the
subject.
7
Feature Highlight
8
AI CAM
You can use the AI Cam feature to automatically recognize the object when
taking a photo or recording a video for an optimal quality.
1. Tap Home > Camera, then tap AI CAM.
2. When the object is recognized, the best effect for the scene is applied.
To apply other effects, tap the scene icon.
A wide range of categories, such as portrait, animals, food, sunrise,
sunset, landscape, flowers, can be recognized automatically.
NOTE The result of the scene recognition may differ depending on the illumination or the
location of the subject while taking photos. Keywords do not appear on the actual photos
or videos.
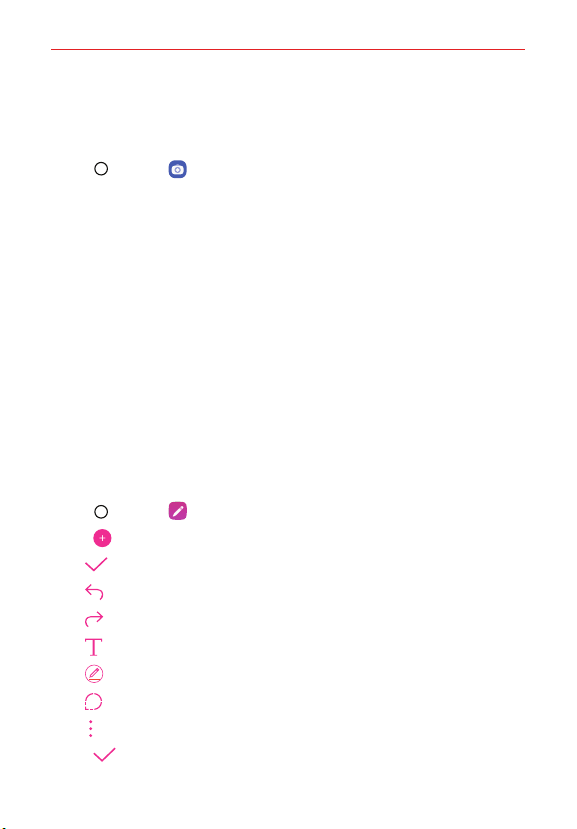
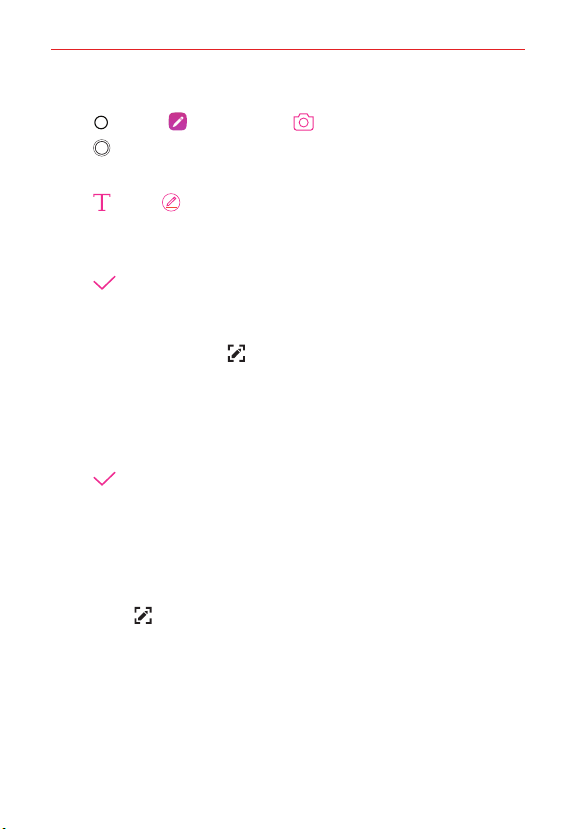
QuickMemo+
QuickMemo+ overview
You can make creative notes by using a variety of options on this advanced
notepad feature, such as image management and screenshots, which are
not supported by the conventional notepad.
Creating a note
1. Tap Home > QuickMemo+.
2. Tap Add to create a note.
: Save a note.
: Undo the previous edit.
: Redo the recently deleted edits.
: Enter a note by using the keypad.
: Write notes by hand.
: Zoom in or out, rotate or erase the parts of a handwritten note.
: Access additional options.
3. Tap Done to save the note.
Feature Highlight
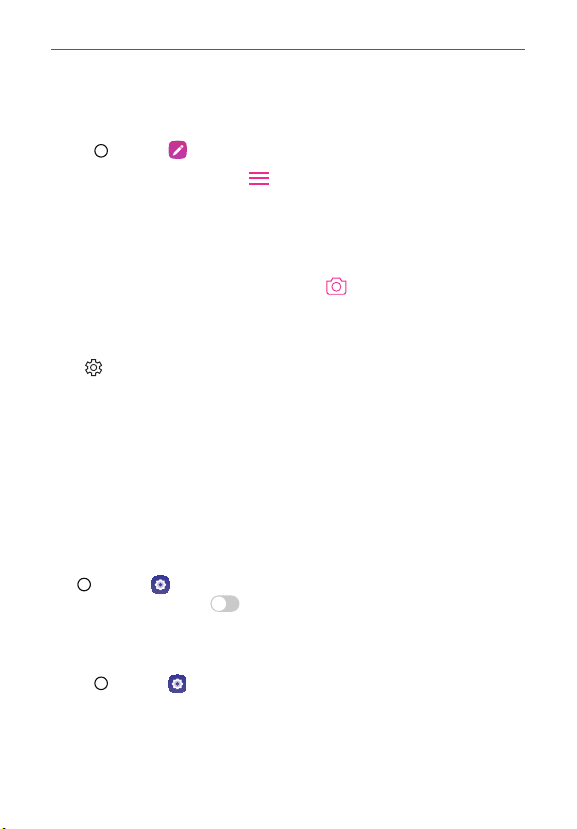
Writing notes on a photo
1. Tap Home > QuickMemo+ > Camera.
2. Tap Capture to take a photo, then tap OK.
The photo is automatically attached into the notepad.
3. Tap Type or Pen to write notes on the photo.
Write notes by hand on the photo.
Enter text below the photo.
4. Tap Done to save the note.
Writing notes on a screenshot
1. While viewing the screen you want to capture, drag the status bar
downwards and then tap Capture+.
The screenshot appears as the notepad background theme. Memo
tools appear at the top of the screen.
2. Crop the image (if necessar y) and take notes as desired.
Write notes by hand on the photo.
3. Tap Done and save the notes to the location of your choice.
Saved notes can be viewed in either QuickMemo+ or Gallery.
To save notes in the same location all the time, select the Use as
default app checkbox before selecting an app.
NOTES
• You can capture the entire screen by using the scroll capture feature.
• While using an app such as Chrome, drag the notifications panel downwards and then
Capture+ > Extended to capture the entire screen you are currently viewing as
tap
a single file.
• This feature is available only on some apps that support the scroll capture feature.
9
Feature Highlight
10
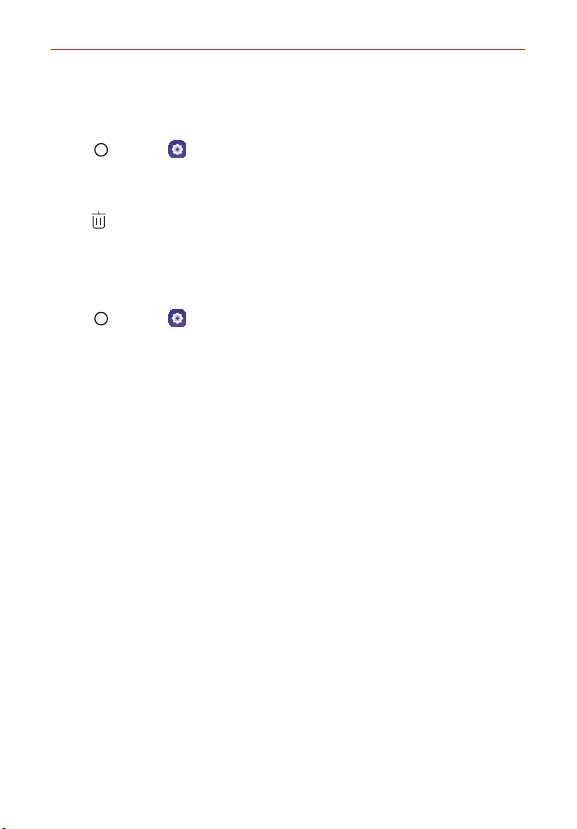
Managing folders
You can view notes grouped by the type of the notes.
1. Tap Home > QuickMemo+.
2. At the top of the screen, tap Menu and select a menu item:
All memos: View all notes saved in QuickMemo+.
My memos: View notes created by QuickMemo+.
Capture+: View notes created by Capture+.
Photo memos: View notes created by Camera.
Trash: View deleted notes.
New category: Add categories.
Settings : Rearrange, add or delete categories. To change the name
of a category, tap the category.
NOTE Some folders do not appear when launching QuickMemo+ for the first time. Disabled
folders are enabled and appear when they contain at least one related note.
Sound quality and effects
DTS:X 3D Surround
You can play a song or video in three-dimensional, immersive and vivid
sound. Connect to an earphone, speaker or other external audio devices to
use this feature.
Tap
Home > Settings > Sound > Sound quality and effects, then
tap DTS:X 3D Surround,
Adjusting the sound direction
You can adjust the sound direction as desired.
1. Tap Home > Settings > Sound > Sound quality and effects >
DTS:X 3D Surround.
2. Select the desired sound direction.
ON/OFF to activate this feature.
Feature Highlight
Google Assistant
Google Assistant overview
You can launch or use desired apps with your voice.
NOTE To use this feature, first connect to the network and sign in to your Google Account.
Sign in
1. Press and hold Home from the Home screen to launch Google Assistant.
2. Follow the on-screen instructions and say “Ok Google”.
The device saves your voice data for recognition.
3. Select whether to use voice recognition unlock feature.
When this feature is activated, you can unlock the screen by saying
“Ok Google” while the screen is turned off or unlocked.
NOTES • This feature may be more vulnerable to security than the other screen locks, such as
Knock Code, Pattern, PIN, and Password. When a similar voice or your recorded voice
is used, the screen may be unlocked.
• To use this feature, tap Home > Settings > Lock screen & security > Secure
lock settings > Smart Lock, and then use the screen lock method you set to unlock the
device. Tap Voice Match > Unlock with Voice Match, and tap
the currently used unlock method again. Note that Swipe is excluded.
• You need to unlock the device by using the specified method after failing to unlock the
device with voice recognition. See
Setting a Screen Lock
4. Tap Save.
Launching Google Assistant
1. Touch and hold Home on the Home screen.
OR
Press the Google Assistant key on the left side of the device.
OR
Say “Ok Google” when the screen is turned off or locked.
2. Say a command or question when you see on the bottom of the
screen.
NOTE Voice recognition accuracy may decrease if you speak with an unclear voice or in a
noisy place. When you use the voice recognition feature, increase its accuracy by
speaking with a clear voice in a quiet place.
ON/OFF, then enter
for details.
11

Feature Highlight
12
Fingerprint recognition
Fingerprint recognition overview
You must register your fingerprint on your device first before using the
fingerprint recognition function.
You can use the fingerprint recognition function in the following cases:
To unlock the screen.
To view locked contents in Gallery or QuickMemo+.
Confirm a purchase by signing in to an app or identifying yourself with
your fingerprint.
NOTE Your fingerprint can be used by the device for user identification. Ver y similar fingerprints
from different users may be recognized by the fingerprint sensor as the same fingerprint.
Precautions for fingerprint recognition
Fingerprint recognition accuracy may decrease due to a number of reasons.
To maximize the recognition accuracy, check the following before using the
device.
Ensure that the fingerprint sensor is not damaged by a metallic object,
such as coin or key.
When water, dust or other foreign substance is on the fingerprint sensor
or your finger, the fingerprint registration or recognition may not work.
Clean and dry your finger before having the fingerprint recognized.
A fingerprint may not be recognized properly if the surface of your finger
has a scar or is not smooth due to being soaked in water.
If you bend your finger or use the fingertip only, your fingerprint may not
be recognized. Make sure that your finger covers the entire surface of
the fingerprint sensor.
Scan only one finger for each registration. Scanning more than one finger
may affect fingerprint registration and recognition.
The device may generate static electricity if the surrounding air is dry. If
the surrounding air is dry, avoid scanning fingerprints, or touch a metallic
object such as coin or key before scanning fingerprints to remove static
electricity.
Feature Highlight
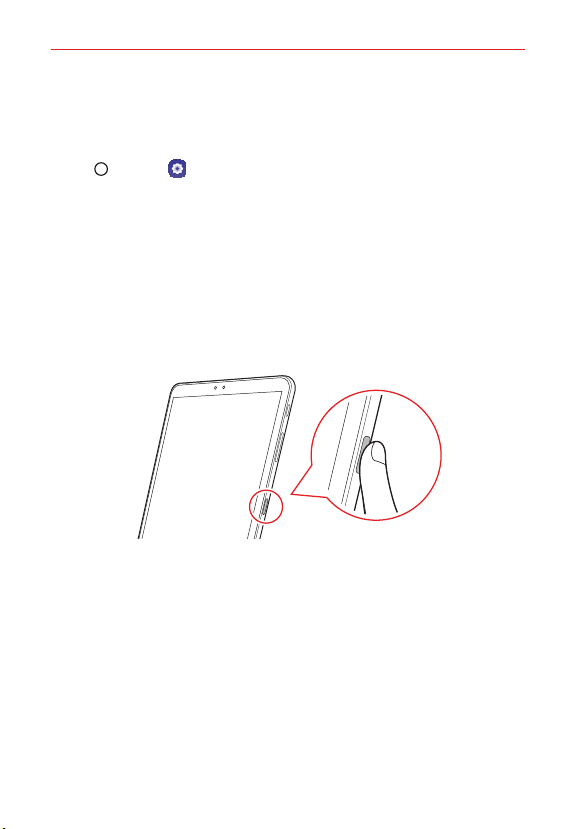
Registering fingerprints
You can register and save your fingerprint on the device to use fingerprint
identification.
1. Tap Home > Settings > Lock screen & security > Fingerprints.
NOTES • This feature is available only when the screen lock is set.
- Lock the device with a Knock Code, Pattern, PIN or Password.
• If the screen lock is not set, enable it by following the on-screen instructions. See
Setting a Screen Lock
2. Locate the fingerprint sensor on the back of the device and gently put
your finger on it to register the fingerprint.
NOTES • Gently press the fingerprint sensor so that the sensor can recognize your fingerprint.
• Ensure that your fingertip covers the entire surface of the sensor.
3. Follow the on-screen instructions.
Repeat scanning the fingerprint by moving your finger little by little
until the fingerprint is registered.
4. When the fingerprint registration is done, tap OK.
Tap ADD MORE to register another fingerprint. If you register only one
fingerprint and the corresponding finger is not in a good condition, the
fingerprint recognition may not work well. As a preventative measure,
register multiple fingerprints.
for details.
13
Feature Highlight
14
Managing fingerprints
You can edit or delete registered fingerprints.
1. Tap Home > Settings > Lock screen & security > Fingerprints.
2. Unlock according to the specified lock method.
3. From the fingerprint list, tap a fingerprint to rename it. To delete it,
tap Delete.
Unlocking the screen with a fingerprint
You can unlock the screen or view locked content by using your fingerprint.
Activate the desired function:
1. Tap Home > Settings > Lock screen & security > Fingerprints.
2. Unlock according to the specified lock method.
3. On the fingerprint settings screen, activate the desired function:
Screen lock: Unlock the screen with a fingerprint.
Content lock: Access locked contents in Gallery and QuickMemo+
with a fingerprint.
The Basics
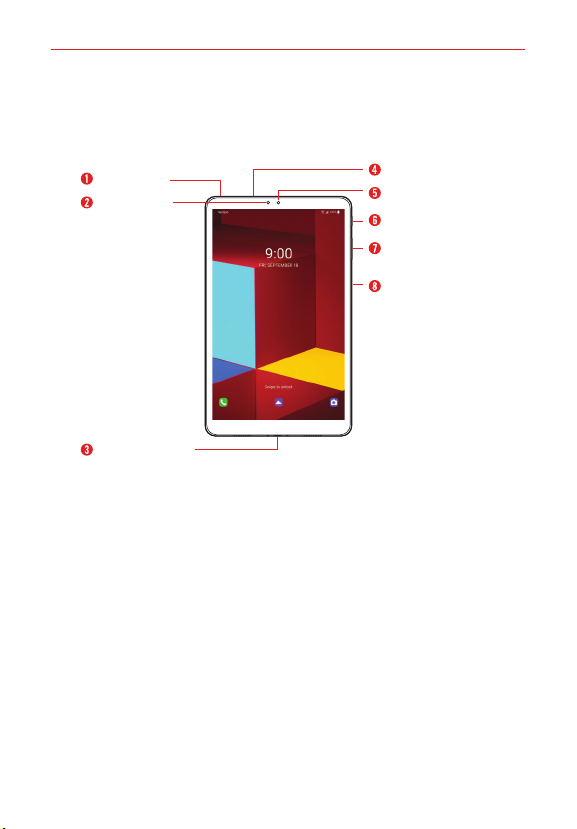
Device Overview
Front View
Headset jack
Ambient light
sensor
USB Charger port
NOTES • All screen shots in this guide are simulated. Actual displays may vary.
• Instructions to perform tasks in this guide are based on the default settings and may
change depending on the mode and software version on your device.
WARNING! Some of the device parts are made of tempered glass. If you drop your device on a
hard surface or subject it to severe impact, the tempered glass may be damaged. If
this happens, stop using your device immediately and contact the LG Customer
Service Center.
1. Headset jackAllows you to plug in an optional headset for convenient,
hands-free conversations or recording your voice using the HD Audio
Recorder app. You can also plug in headphones to listen to music.
Microphone
Front camera
Power/Lock button
Volume buttons
Fingerprint sensor
15

The Basics
16
2. Ambient light sensorSenses proximity toward other objects (such as
your head) so that tap commands are not accidentally activated during a
call or when carried inside a pocket. It also employs an ambient sensor
which measures the surrounding light and adjusts the LCD brightness to
provide a vivid screen.
NOTE Don't block the sensor or near the sensor to avoid problems with the touch screen.
3. USB/Charger portAllows you to connect the device and the USB Type-C
cable for use with the charger adapter, or other compatible accessories.
4. MicrophoneTransmits your voice to the other caller. It’s also used for
voice-activated functions.
5. Front cameraUse to take pictures and record videos of yourself. You can
also use this for video chatting. Keep the lenses clean for optimal
performance.
6. Power/Lock buttonPress to turn off the screen backlight and lock the
screen, or turn the screen backlight back on. Press and hold to turn the
device on/off, restart, or activate/deactivate Airplane mode.
7. Volume buttonsPress to adjust the ringer, the media volumes, or the
in-call volume during a call. They can also activate the camera shutter and
access shortcuts when enabled in the Settings menu.
8. Fingerprint sensorAllows you to record and use fingerprints to secure
your device.

Rear View
The Basics
17
Rear camera
NOTE Press and hold the volume down button and Power/Lock button at the same time for a
second to take a screenshot.
WARNING! Don't attempt to remove the back cover.
This device has a non-removable battery. Do not attempt to remove the back cover.
Doing so may severely damage the battery and device, which could cause
overheating, fire, and injury.
SIM/microSD
card slot
Speakers
1. Rear cameraUse to take photos and record videos. Keep the lenses
clean for optimal performance.
2. SIM/microSD card slotInsert the SIM card and an optional memor y
card (not included) for file storage.
3. SpeakersUse to listen to audio (e.g., music, videos, sound clips,
speakerphone, etc.) from the rear speaker instead of the earpiece.
The Basics
18
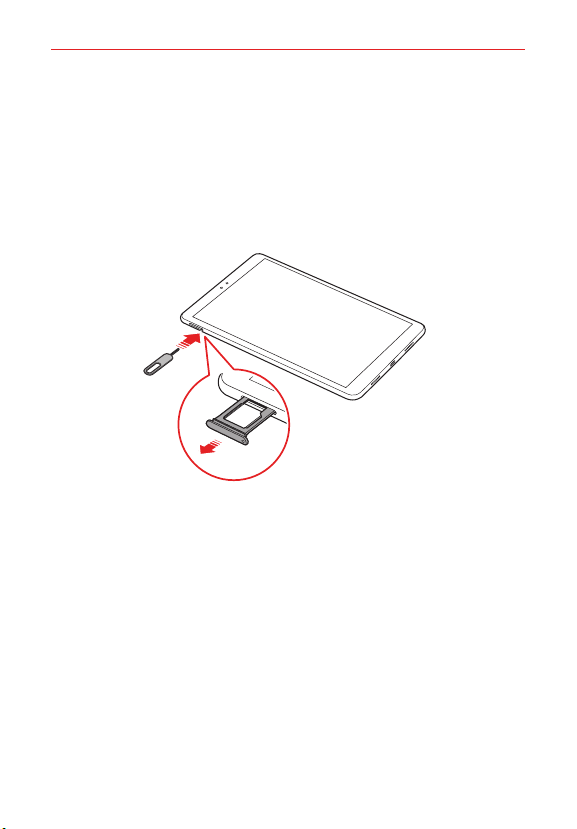
Installing the SIM card and memory card
Insert the SIM card provided by your mobile service provider to start using
your device.
NOTE Your device already has a SIM card installed.
1. Insert the ejection pin into the hole in the card tray and then pull out the
card tray from the device.
The Basics
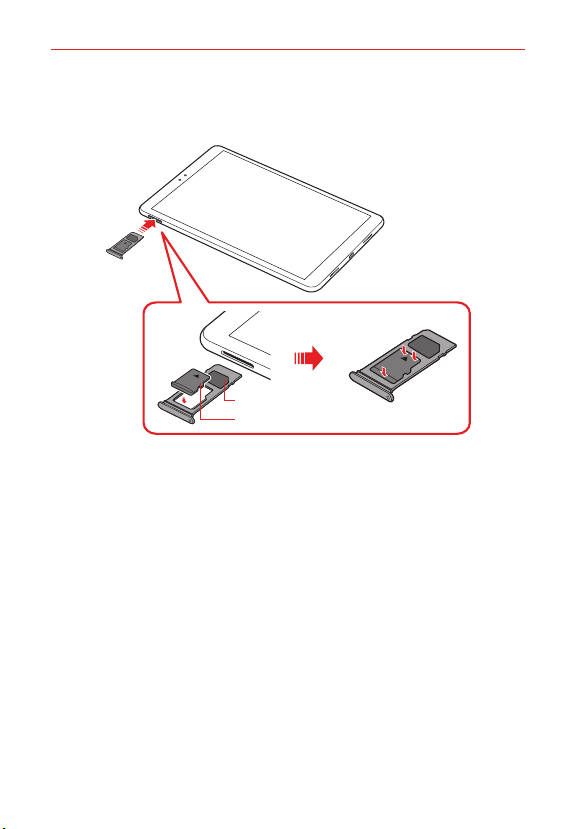
2. Place the SIM card or memor y card on the card tray and then insert the
card tray into the device in the direction of the arrow.
SIM card
Memory card (optional-sold separately)
NOTES • This device supports only Nano SIM cards.
• For problem-free performance, it is recommended to use the device with the
correct type of SIM card. Always use a factory-made SIM card supplied by the
service provider.
• Do not lose your SIM card. LG is not responsible for damage and other issues
caused by loss or transfer of a SIM card.
• Be careful not to damage the SIM card when you insert or remove it.
• When you insert the card tray back into the device, insert it horizontally in the
direction of arrow as shown in the figure. Make sure that the card placed on the
card tray does not move out of its position.
• Frequent writing and erasing of data may shorten the memory card lifespan.
• Some memory cards may not be fully compatible with the device. If you use an
incompatible card, it may damage the device or the memory card, or corrupt the
data stored in it.
19
The Basics
20
Removing the memory card
Unmount the memory card before removing it for safety.
1. Tap Home > Settings > Storage > Eject.
2. Insert the ejection pin into the hole in the card tray and then pull out the
card tray from the device.
3. Remove the memory card from the card tray.
4. Insert the card tray back into the slot.
WARNING! Do not remove the memory card while the device is transferring or accessing
information. This may cause data to be lost or corrupted, or may damage the
memory card or the device. LG is not responsible for losses that result from the
abuse or improper use of memory cards, including the loss of data.
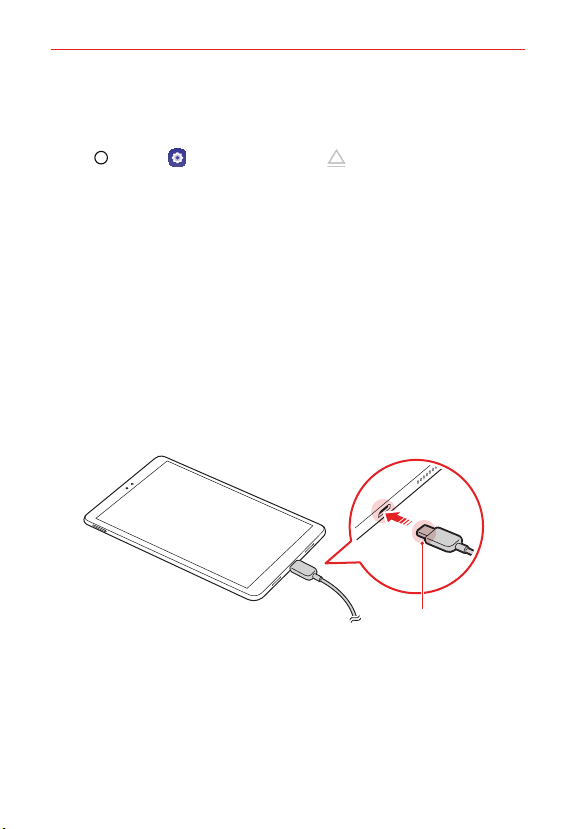
Charging the battery
Before using the device, fully charge the battery.
Charge the device with the USB Type-C cable.
Charging cable

The Basics
21
WARNING! • Do not charge while the device or charging cable is wet or contains moisture. This
NOTES
can cause fire, electric shock, injury or damage to device. If there is moisture, stop
using the device immediately and remove the moisture completely.
• Do not use unapproved USB cables or chargers with your device. The LG limited
warranty does not cover damage caused by the use of third party accessories.
• Using the device when it is charging may cause electric shock. To use the device,
stop charging it.
• Remove the charger from the power socket after the device is fully charged. This
prevents unnecessary power consumption.
• A charging adapter that supports fast charging is included with the product. The
fast charging feature may not work if a fast charging adapter other than the
genuine adapter provided with the product is used.
• Another way to charge the battery is by connecting a USB cable between the
device and a desktop or laptop computer. This may take a longer time than
plugging the adapter to a wall outlet.
• Do not charge the battery by using a USB hub that is unable to maintain the rated
voltage. Charging may fail or unintentionally stop.
• Since the battery is a consumable, the battery life may be shortened as time goes.
Using the battery efficiently
Battery lifespan may decrease if you keep many apps and functions running
simultaneously and continuously. Cancel background operations to increase
battery life. To minimize batter y consumption, follow these tips:
Turn off the Bluetooth® or Wi-Fi network function when not using them.
Set the screen timeout to as short a time as possible.
Minimize the screen brightness.
Set a screen lock when the device is not in use.
Check the battery usage details and close any downloaded apps.

The Basics
22
Turning the power on or off
Turning the power on
When the power is turned off, press and hold the Power/Lock key.
NOTE When the device is turned on for the first time, initial configuration takes place. The
Turning the power off
Press and hold the Power/Lock key, then select Power off.
Power control options
Press and hold the Power/Lock button, then select an option.
Power off: Turn the device off.
Power off and restart: Restart the device.
Turn on Airplane mode: Block telecommunication-related functions,
including browsing the Internet. Other functions remain available.
first booting time for the smart device may be longer than usual.
The Basics
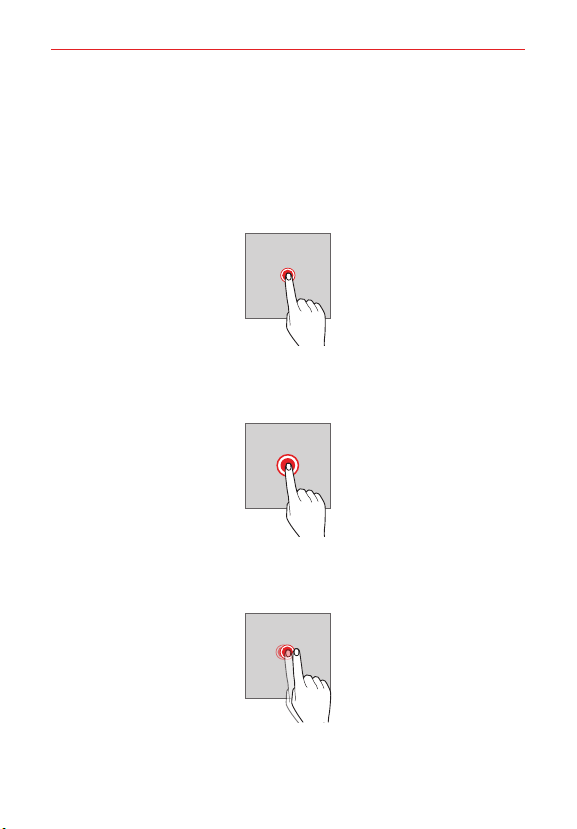
Touch Screen
You can familiarize yourself with how to control your device by using touch
screen gestures.
Tapping
Lightly tap with your fingertip to select or run an app or option.
Touching and holding
Touch and hold for several seconds to display a menu with available options.
Double-tapping
Tap twice quickly to zoom in or out on a web page or map.
23
The Basics
24
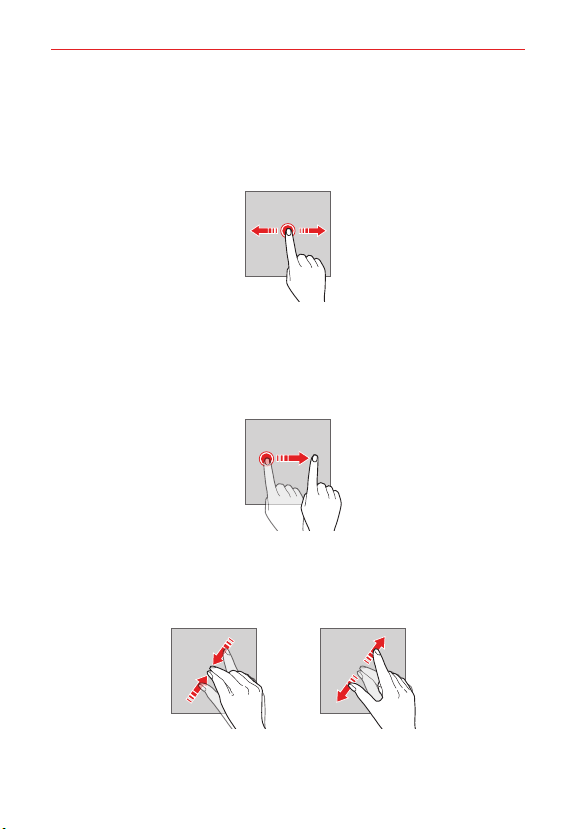
Dragging
Touch and hold an item, such as an app or widget, then move your finger to
a desired location in a controlled motion. You can use this gesture to move
an item.
Swiping
Touch the screen with your finger and move it quickly without pausing.
You can use this gesture to scroll through a list, a web page, photos,
screens, and more.
Pinching and spreading
Pinch two fingers to zoom out such as on a photo or map. To zoom in,
spread your fingers apart.

The Basics
25
WARNING! Do not expose the touch screen to excessive physical shock. You might damage the
NOTES
touch sensor.
• A touch screen failure may occur if you use the device near a magnetic, metallic or
conductive material.
• If you use the device under bright lights, such as direct sunlight, the screen may
not be visible, depending on your position. Use the device in a shady location or a
location with an ambient light that is not too bright and bright enough to read
books.
• Do not press the screen with excessive force.
• Gently tap with your fingertip on the desired option.
• The touch control may not work properly if you tap while wearing a glove or by
using the tip of your fingernail.
• Touch control may not work properly if the screen is moist or wet.
• The touch screen may not function properly if a screen-protective film or
accessory purchased from a third party store is attached to the device.
• Displaying a static image for extended periods of time may result in after images
or screen burn-in. Turn off the screen or avoid displaying the same image for a long
time when you do not use the device.
The Basics
26
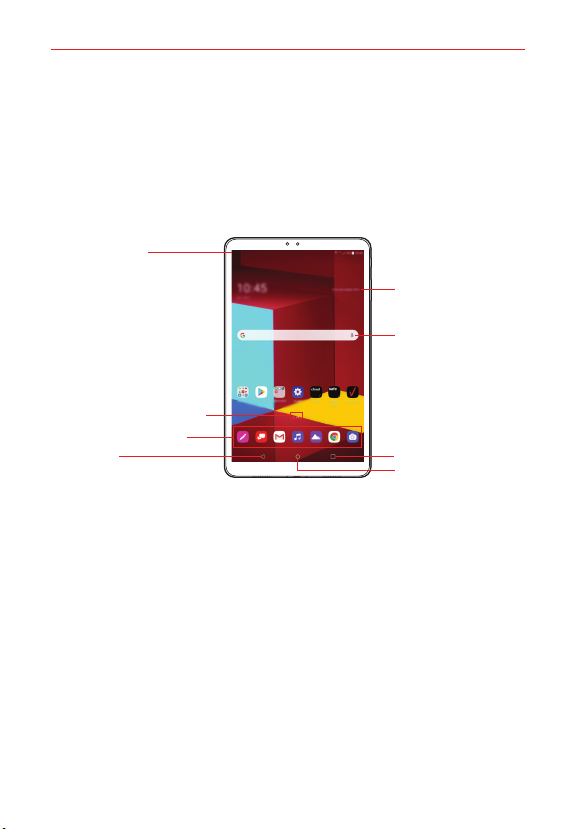
Getting to Know the Home Screen
The Home screen is your starting point to access all of the features on your
device using simple motions on the screen. It’s comprised of multiple
panels (swipe horizontally to switch). You can customize all of your Home
screen panels with app shortcuts, icons, widgets, folders, and other
features.
Status Bar
Weather widget
Google search
widget
Home screen indicator
Quick Access Area
Back
NOTE The Home screen may vary, depending on the service provider or software version.
Status bar: View status icons, the time and the battery level.
Weather widget: View the information of weather and time for a specific
area.
Google search widget: Perform a Google search by inputting spoken or
written keywords.
Home screen indicator: Display the total number of Home screen
canvases. You can tap the desired page icon to go to the page. The icon
reflecting the current canvas will be highlighted.
Quick access area: Fix main apps at the bottom of the screen so that
they can be accessed from any Home screen canvas.
Recent apps
Home

The Basics
Home touch buttons
: Return to the previous screen. Close the keypad or pop-up windows.
: Tap to go to the Home screen. To launch Google Assistant, touch and
hold.
: Tap to view a list of recently used apps or run an app from the list. To
delete all the recently used apps, tap CLEAR ALL. To use two apps
at the same time with the Multi window feature, touch and hold the
button while using an app.
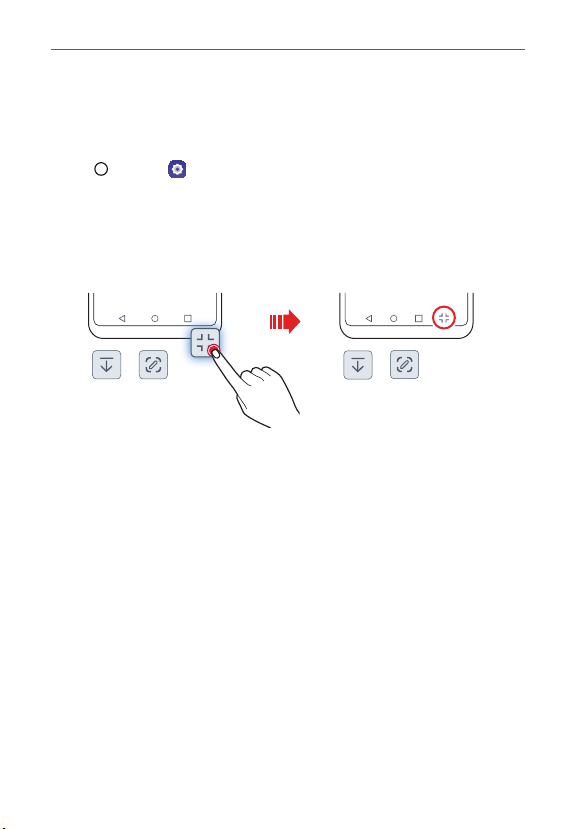
Changing the style of the Home touch buttons
You can change the style of the Home touch buttons.
1. Tap Home > Settings > Display > Home touch buttons.
2. Under STYLE, select Buttons only or Gesture and buttons to suit your
preferences.
Buttons only: / / are available. Tap to see recent apps.
Gesture and buttons: Home button and Back button are available.
To see recent apps, swipe the Home button
up.
27
The Basics
28
Modifying the Home touch buttons
You can change buttons displayed on the Home touch buttons Bar, as well
as their position and color.
1. Tap Home > Settings > Display > Home touch buttons.
2. Select the modification you want to apply.
Tap Button combination to select Home touch buttons you want to
add to the bar and their position within the bar. Choose from
Notification, Capture+, and QSlide to add.
Under Background color, select a desired color from the options
provided.
The Basics
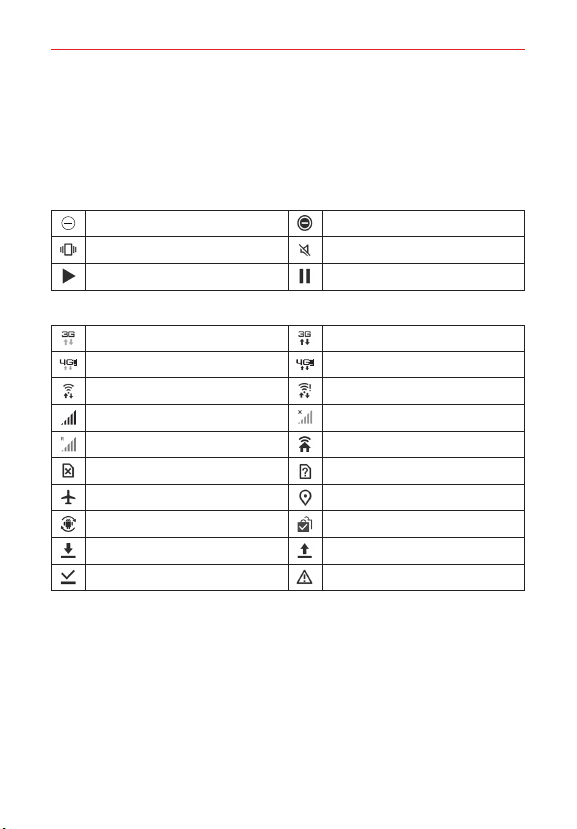
Status Bar
The Status Bar appears at the top of every screen. It displays icons
indicating that you’ve received notifications (on the left) and icons indicating
the device’s status (on the right), along with the current time.
Sound icons
Do not disturb - Priority only Do not disturb - Total silence
Vibrate mode Silent mode
Music playing Music paused
Network icons
3G connected 3G in use
4G LTE connected 4G LTE in use
Wi-Fi connected Wi-Fi with no Internet
Signal strength No signal
Roaming Network extender
No SIM card Unknown SIM card
Airplane mode GPS on
App update available App update successful
Downloading Uploading
Download successful Emergency Alert
29
 Loading...