

LG GM86SDS User Manual

OWNER’S MANUAL
FRENCH DOOR
FRIDGE
Please read this owner’s manual thoroughly before
operating and keep it handy for reference at all times.
GM86SDS
www.lg.com
ENGLISH
2
TABLE OF CONTENTS
ENGLISH
TABLE OF CONTENTS
3 PRODUCT FEATURES
4
IMPORTANT SAFETY
INSTRUCTIONS
7 COMPONENTS
7 Fridge Exterior
8 Fridge Interior
9 INSTALLATION
9 Installation Overview
10 Unpacking Your Fridge
10 Choosing the Proper Location
10 - Flooring
11 - Ambient Temperature
11 - Measuring the Clearances
11 Removing/Assembling the Fridge Door
Handles
12 Removing/Assembling the Freezer
Drawer Handle
12 Removing/Assembling the Doors and
Drawers
13 - Removing the Left Fridge Door
14 - Removing the Right Fridge Door
15 - Assembling the Right Fridge Door
16 - Assembling the Left Fridge Door
17 - Removing the Freezer Drawers
19 - Assembling the Freezer Drawers
20 Connecting the Water Line
20 - Before You Begin
20 - Water Pressure
21 - What You Will Need
21 - Water Line Installation Instructions
23 Turning On the Power
24 Leveling and Door Alignment
24 - Leveling
24 - Door Alignment
25 HOW TO USE
25 Before Use
26 Control Panel
26 - Control Panel Features
28 In-Door Ice Bin
28 - Detaching the In-Door Ice Bin
28 - Assembling the In-Door Ice Bin
29 Automatic Icemaker
29
- Turning the Automatic Icemaker On or Off
30 - When You Should Turn the Icemaker Off
30 - Normal Sounds You May Hear
30 - Preparing for Vacation
31 Ice and Water Dispenser
31 - Dispenser
31 - Using the Dispenser
31 - Locking the Dispenser
31 - Cleaning the Dispenser Stand
32 Storing Food
32 - Food Preservation Location
33 - Food Storage Tips
33 - Storing Frozen Food
34
Humidity Controlled Crisper and
Glide’N’Serve
35
Detaching and Assembling the Storage Bins
36 Door-In-Door
38 Adjusting the Fridge Shelves
39 MAINTENANCE
39 Cleaning
40 Replacing the Water Filter
42 SMART DIAGNOSIS™
42 Using Smart Diagnosis™
43 TROUBLESHOOTING
3
PRODUCT FEATURES
ENGLISH
PRODUCT FEATURES
* Depending on the model, some of the following functions may not be available.
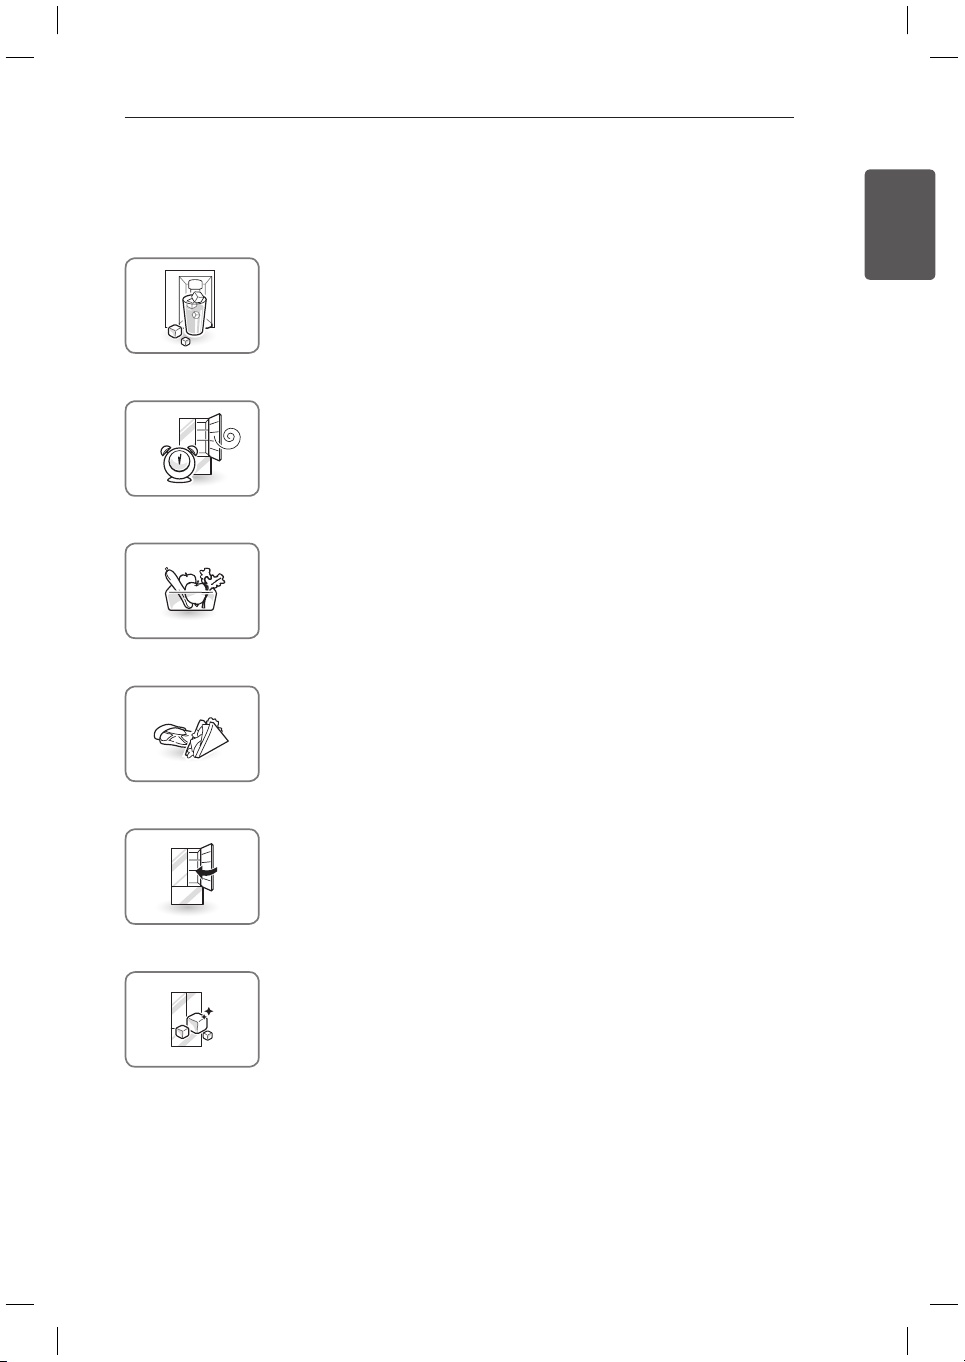
FILTERED WATER AND ICE DISPENSER
The water dispenser dispenses fresh, chilled water.
The ice dispenser dispenses cubed and crushed ice.
DOOR ALARM
The Door Alarm function is designed to prevent fridge malfunctioning that
could occur if a fridge door or freezer drawer remains open. If a fridge door
or freezer drawer is left open for more than 60 seconds, a warning alarm
sounds at 30 second intervals.
HUMIDITY CONTROLLED CRISPER
The Humidity Controlled Crisper is designed to help keep your fruits and
vegetables fresh and crisp. You can control the amount of humidity in the
crisper by adjusting the setting between Low and High.
GLIDE‘N’SERVE
Glide‘N’Serve provides storage space with a variable temperature control
that keeps the compartment colder than the fridge. It is a convenient place
to store sandwiches or meat to be cooked.
AUTO CLOSING HINGE
The fridge doors and freezer drawers close automatically with a slight push.
(The door only closes automatically when it is open at an angle less than
30°.)
EXPRESS FREEZE
Ice production can be increased by approximately 20 percent when the
freezer section is maintained at the coldest temperature for a 24-hour
period.
4
IMPORTANT SAFETY INSTRUCTIONS
ENGLISH
IMPORTANT SAFETY INSTRUCTIONS
READ ALL INSTRUCTIONS BEFORE USING THE APPLIANCE.
This guide contains many important safety messages. Always
read and obey
all safety messages.
WARNING
You can be killed or seriously injured if you do not follow instructions.
CAUTION
Indicates an imminently hazardous situation which, if not avoided, may result
in minor or moderate injury, or product damage.
WARNING
To reduce the risk of fire, electric shock, or personal injury when using your product, basic safety
precautions should be followed, including the following:
Power
NEVER unplug your fridge by pulling on the power cord. Always grip the plug firmly and pull it straight
y
out from the outlet.
If the supply cord is damaged, it must be replaced by the manufacturer or its service agent or a
y
similarly qualified person in order to avoid a hazard. Do not use a cord that shows cracks or abrasion
damage along its length or at either the plug or connector end.
Do not use an uncertified power outlet.
y
Unplug the power plug immediately in the event of a blackout or thunderstorm.
y
Plug in the power plug with the power cord facing downward.
y
Installation
Contact an authorized service center before you install or relocate the fridge.
y
When moving your fridge away from the wall, be careful not to roll over or damage the power cord.
y
Prior to use, ensure that you are connecting this product to a dedicated, grounded electrical outlet
y
rated for use with this product (220V, 50Hz, AC only). It is the user’s responsibility to replace a
standard 2-prong wall outlet with a standard 3-prong wall outlet.
Do not install the fridge where there may be a danger of the unit falling.
y
Use
DO NOT allow children to climb, stand, or hang on the fridge doors or on the shelves in the fridge.
y
They could damage the fridge and seriously injure themselves.
Do not hang on to or place heavy objects on the fridge’s dispenser.
y
Do not place heavy or dangerous objects (bottles with liquid) on the fridge.
y
Do not put live animals inside the fridge.
y
Do not allow children to climb into the product when it is in use.
y
In the event of a gas leak (propane/LPG), ensure adequate ventilation and contact an authorized service
y
center before resuming use. Do not touch or disassemble the electric outlet of the fridge.
In the event of a refrigerant leak, move flammable objects away from the fridge. Ensure adequate
y
ventilation and contact an authorized service center.
Do not use or place flammable substances (chemicals, medicine, cosmetics, etc) near the fridge or
y
store them inside the fridge. Do not place the fridge in the vicinity of flammable gas.
Do not overfill or pack items too tightly into door bins. Doing so may cause damage to the bin or
y
personal injury if items are removed with excessive force.
This is the safety alert symbol. It alerts you to safety messages that inform you of
hazards that can kill or hurt you or others, or cause damage to the product.
All safety messages will be preceded by the safety alert symbol and the hazard
signal word WARNING or CAUTION. These words mean:

5
IMPORTANT SAFETY INSTRUCTIONS
ENGLISH
This appliance is intended to be used in household and similar applications such as
y
- staff kitchen areas in shops, offices and other working environments;
- farm houses and by clients in hotels, motels and other residential type environments;
- bed and breakfast type environments;
- catering and similar non-retail applications.
This product is not to be used for special purposes such as the storage of medicine or test materials or
y
for use on ships, etc.
Unplug the power plug before cleaning or repairing the fridge.
y
When you replace the light bulb in the fridge, unplug the fridge or turn off the power.
y
Do not modify or extend the power cord.
y
Do not use a dryer to dry the interior. Do not light a candle to remove interior odors.
y
For your safety, this appliance must be properly grounded. Have the wall outlet and the circuit checked
y
by a qualified electrician to make sure the outlet is properly grounded.
Do not use an outlet that can be turned off with a switch. Do not use an extension cord. It is the user’s
y
responsibility to replace a standard 2-prong wall outlet with a standard 3-prong wall outlet.
Do not, under any circumstances, cut or remove the third (ground) prong from the power cord.
y
Do not use an adapter plug and plug the power plug into a multi-outlet extension cord.
y
Disconnect the power cord immediately if you hear a noise, smell a strange odor or detect smoke
y
coming from the appliance.
Turn the power off if water or dust penetrates into the fridge. Call a service agent.
y
Do not disassemble or modify the fridge.
y
Do not put hands, feet, or metal objects below or behind the fridge.
y
Do not operate the fridge or touch the power cord with wet hands.
y
In fridges with automatic icemakers, avoid contact with the moving parts of the ejector mechanism or
y
with the heating element that releases the cubes. Do not place fingers or hands on the automatic icemaking mechanism while the fridge is plugged in.
When dispensing ice from the dispenser, do not use crystal ceramics.
y
Do not touch the cold surfaces in the freezer compartment with wet or damp hands, when your fridge
y
is in operation.
Do not put glass containers, glass bottles or soda in the freezer.
y
Do not store explosive substances such as aerosol cans with a flammable propellant in this appliance.
y
This appliance is not intended for use by persons (including children) with reduced physical, sensory or
y
mental capabilities, or lack of experience and knowledge, unless they have been given supervision or
instruction concerning the use of the appliance by a person responsible for their safety.
Do not refreeze frozen food that has thawed completely. Doing so may result in a serious health issue.
y
If you are throwing away your old fridge, make sure the CFC coolant is removed for proper disposal by
y
a qualified servicer. If you release CFC coolant, you may be fined or imprisoned in accordance with the
relevant environmental law.
Junked or abandoned fridges are dangerous, even if they are sitting for only a few days. When
y
disposing of the fridge, remove the packing materials from the door or take off the doors but leave the
shelves in place so that children may not easily climb inside.
If connected to a circuit protected by fuses, use time delay fuse.
y
If the refrigerant gas has leaked, do not touch the fridge or the power outlet and ventilate the room
y
immediately. A spark could trigger an explosion causing a fire or burns. Because this fridge uses
natural gas (isobutene, R600a) as the environment-friendly refrigerant, even a small amount (50~90g)
is combustible. If gas leaks from severe damage during delivering, installing or using the fridge, any
spark may cause fire or burns.
READ ALL INSTRUCTIONS BEFORE USING THE APPLIANCE.
To reduce the risk of fire, electric shock, or personal injury when using your product, basic safety
precautions should be followed, including the following:

6
IMPORTANT SAFETY INSTRUCTIONS
ENGLISH
CAUTION
Installation
The refrigerator must be properly installed in accordance with the Installer Instructions that
y
were taped to the front of the refrigerator.
Be careful when you unpack and install the refrigerator. Immediately dispose of packing
y
materials (plastic) out of reach of children.
Use
Close the door carefully when children are around.
y
Keep fingers out of pinch point areas; clearances between the doors and cabinets are
y
necessarily small. Be careful closing doors when children are in the area.
If you store food properly, beware that it may fall and cause injury.
y
Maintenance
Do not use strong detergents like wax or thinners for cleaning. Clean with a soft fabric.
y
Wipe foreign objects (dust, water, etc) off the prongs of the power plug and contact areas
y
regularly.
READ ALL INSTRUCTIONS BEFORE USING THE APPLIANCE.
To reduce the risk of fire, electric shock, or personal injury when using your product, basic safety
precautions should be followed, including the following.
SAVE THESE INSTRUCTIONS
This appliance contains a small amount of isobutane refrigerant (R600a), natural gas with high
environmental compatibility, but it is also combustible. When transporting and installing the
appliance, care should be taken to ensure that no parts of the refrigerating circuit are damaged.
Refrigerant squirting out of the pipes could ignite or cause an eye injury. If a leak is detected,
avoid any naked flames or potential sources of ignition and air the room in which the appliance is
standing for several minutes.
In order to avoid the creation of a flammable gas air mixture if a leak in the refrigerating circuit
occurs, the size of the room in which the appliance may be sited depends on the amount of
refrigerant used. The room must be 1m
2
in size for every 8g of R600a refrigerant inside the
appliance. The amount of refrigerant in your particular appliance is shown on the identification
plate inside the appliance. Never start up an appliance showing any signs of damage. If in doubt,
consult your dealer.
WARNING
Keep ventilation openings, in the appliance enclosure or in the built-in structure, clear of obstruction.
y
Do not use mechanical devices or other means to accelerate the defrosting process, other than
y
those recommended by the manufacturer.
Do not damage the refrigerant circuit.
y
Do not use electrical appliances inside the food storage compartments of the appliance, unless they
y
are of the type recommended by the manufacturer.
The refrigerant and insulation blowing gas used in the appliance require special disposal procedures.
y
When disposal, please consult with service agent or a similarly qualified person.
WARNING
Connect to potable water supply only.
y
7
COMPONENTS
ENGLISH
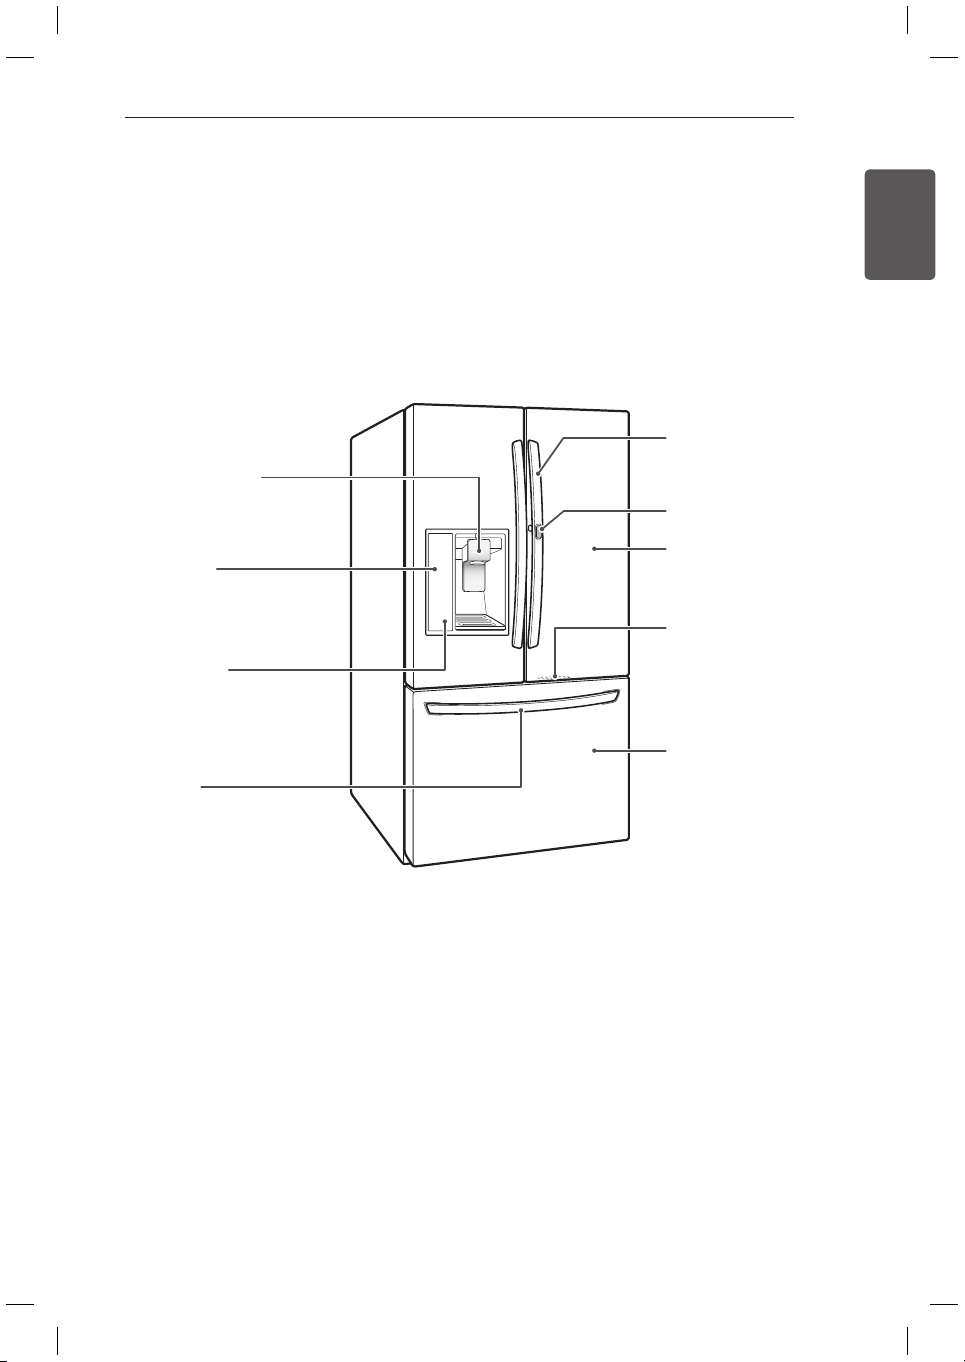
COMPONENTS
Use this page to become more familiar with the parts and features of your fridge.
*The appearance and specifications of the actual product may differ depending on the model.
Fridge Exterior
Filtered Water and
Ice Dispenser
Dispenses purified water and ice.
LED Display
Displays the fridge and freezer
temperature, the water filter
condition and the dispenser
status.
Control Panel
Sets the fridge and freezer
temperatures, the water filter
condition and the dispenser mode.
Fridge
Preserves food.
Freezer
Preserves frozen food.
Ez Handle
Easily opens the freezer
door.
LED Light
LED lights up when the
freezer door is opened.
Button
Handle
Opens and closes
the door.
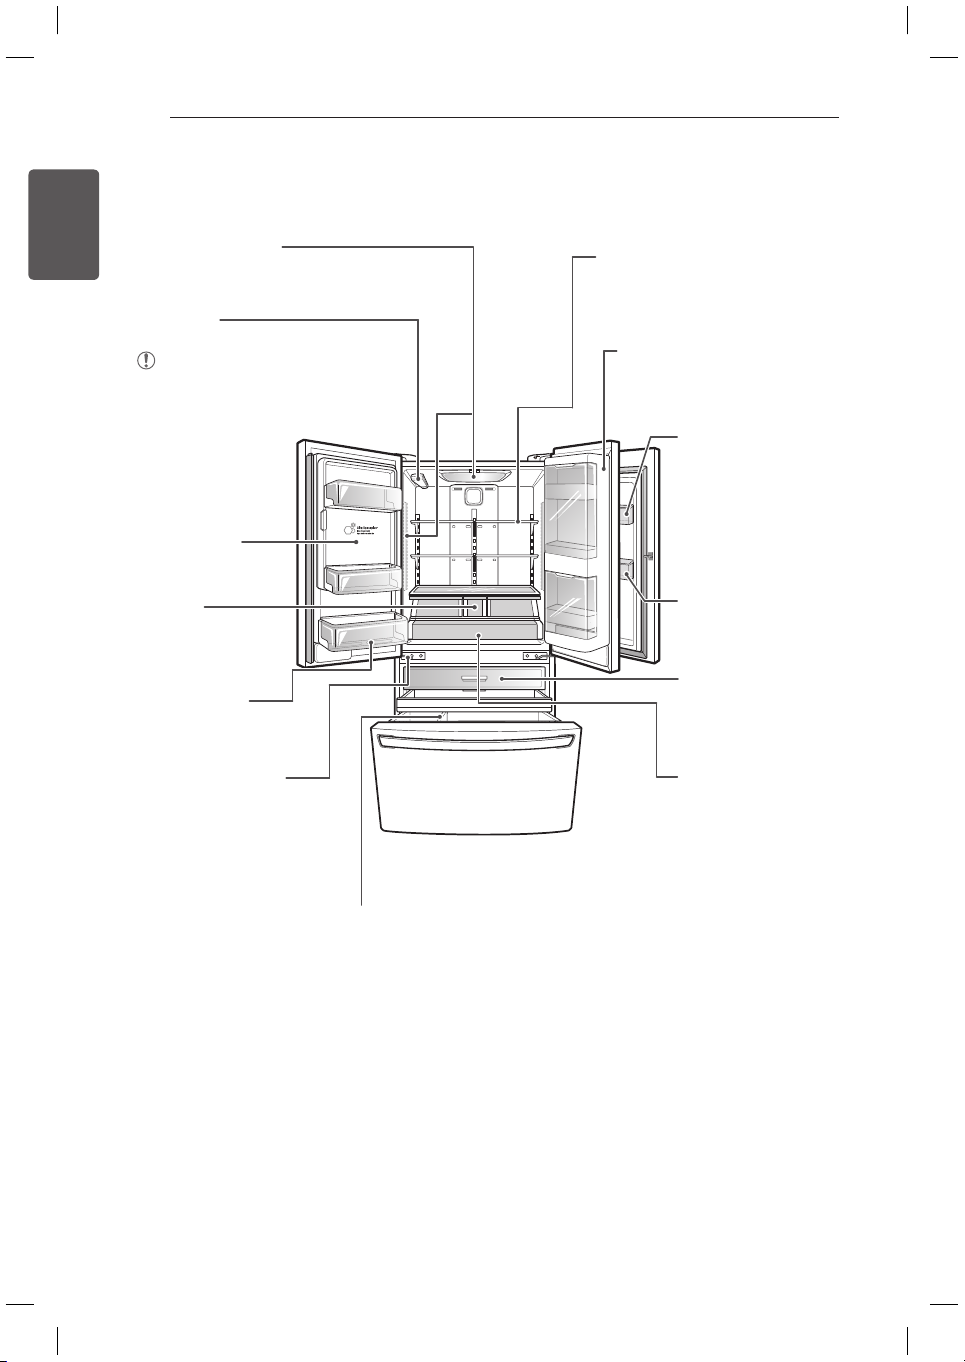
8
COMPONENTS
ENGLISH
Fridge Interior
Water filter
Purifies water.
NOTE
The filter should be replaced every 6 months.
Please refer to the “Replacing the filter”
section in this manual for details.
* This function may not
be available, depending
on the model.
Indoor Ice Bin
Ice cubes are
automatically produced.
Crisper
Controls humidity and
helps vegetables and
fruit to stay crisp.
Auto Closing Hinge
The fridge doors and freezer
drawers close automatically
when you push them slightly.
(The door only closes
automatically when it is open
at an angle of less than 30°.)
Fixed Door Bin
Used to preserve
chilled food or drinks.
Durabase® and Durabase® Divider
The Durabase is a storage space
recommended for the preservation of large
food items. The Durabase Divider is used
to organize the Durabase area into sections.
It can be adjusted from side to side to
accommodate items of different sizes.
Pullout Drawer
Used for extra storage
within the freezer
compartment.
Glide‘N’Serve
Allows you to store food
items at a different
temperature than the
regular fridge area.
LED interior lamps
The interior lamps light up the
inside of the fridge.
Door-In-Door Case
A convenient storage area for
frequently-used items that require
easy access.
Adjustable Fridge Shelf
The shelves in your fridge are
adjustable to meet your individual
storage needs.
Cheese & Butter Bin
Cheese & Butter and
Condiment bins, that
are specially designed
for these items, making
spreading butter and
slicing cheese easier.
Condiment Bin
9
INSTALLATION
ENGLISH
INSTALLATION
Installation Overview
Please read the following installation instructions first after purchasing this product or transporting
it to another location.
1 Unpacking your
fridge
2 Choosing the proper
location
3 Disassembling/Assembling
4 Connecting the water
supply and water line
5 Leveling and Door
Alignment
NOTE
Connect to potable water supply only.
10
INSTALLATION
ENGLISH
Choosing the Proper Location
Select a place where a water supply can be
y
easily connected for the automatic icemaker.
Unpacking Your Fridge
WARNING
Use two or more people to move and
y
install the fridge. Failure to do so can
result in back or other injury.
Your fridge is heavy. When moving the
y
fridge for cleaning or service, be sure to
protect the floor. Always pull the fridge
straight out when moving it. Do not
wiggle or walk the fridge when trying to
move it, as floor damage could occur.
Keep flammable materials and vapors,
y
such as gasoline, away from the fridge.
Failure to do so can result in fire,
explosion, or death.
Remove tape and any temporary labels from your
fridge before using. Do not remove any warningtype labels, the model and serial number label, or
the Tech Sheet that is located under the front of
the fridge.
To remove any remaining tape or glue, rub the
area briskly with your thumb. Tape or glue residue
can also be easily removed by rubbing a small
amount of liquid dish soap over the adhesive with
your fingers. Wipe with warm water and dry.
Do not use sharp instruments, rubbing alcohol,
flammable fluids, or abrasive cleaners to remove
tape or glue. These products can damage the
surface of your fridge.
Fridge shelves are installed in the shipping
position. Please reinstall shelves according to
your individual storage needs.
Flooring
To avoid noise and vibration, the unit must be
leveled and installed on a solidly constructed
floor. If required, adjust the leveling legs to
compensate for the unevenness of the floor.
The front should be slightly higher than the
rear to aid in door closing. Leveling legs can
be turned easily by tipping the cabinet slightly.
Turn the leveling legs to the left to raise the
unit or to the right to lower it. (See Leveling
and Door AlIgnment.)
NOTE
Installing on carpeting, soft tile surfaces,
a platform or weakly supported structure
is not recommended.
The fridge should always be plugged
y
into its own individual properly grounded
electrical outlet rated for 220 Volts, 50 Hz,
AC only, and fused at 15 or 20 amperes.
This provides the best performance and
also prevents overloading house wiring
circuits which could cause a fire hazard from
overheated wires. It is recommended that a
separate circuit serving only this appliance
be provided.
WARNING
To reduce the risk of electric shock, do not
install the fridge in a wet or damp area.
NOTE
The water pressure must be 20 – 120 psi
or 138 – 827 kPa or 1.4 – 8.4 kgf/cm². If the
fridge is installed in an area with low water
pressure (below 20 psi), you can install a
booster pump to compensate for the low
pressure.
11
INSTALLATION
ENGLISH
Ambient Temperature
Install this appliance in an area where the
temperature is between 13°C and 43°C. If the
temperature around the appliance is too low or
high, cooling ability may be adversely affected.
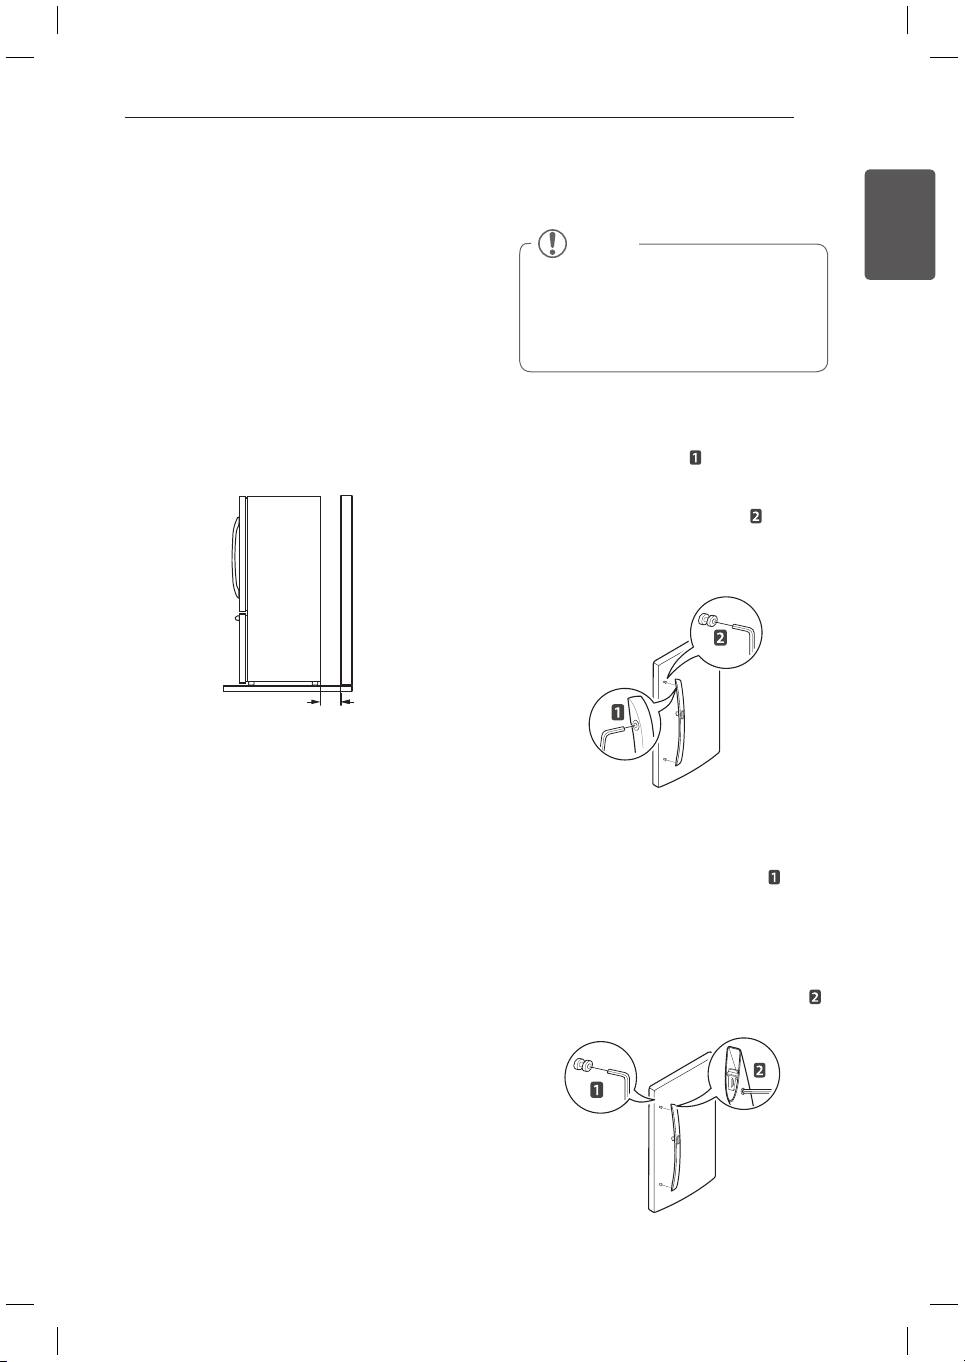
Measuring the Clearances
Too small of a distance from adjacent items
may result in lowered freezing capability and
increased electricity consumption charges.
Allow at least 24 inches (61 cm) in front of the
fridge to open the doors, and at least 2 inches
(5.08 cm) between the back of the fridge and
the wall.
2” (5.08 cm)
24” (61 cm)
Removing/Assembling the
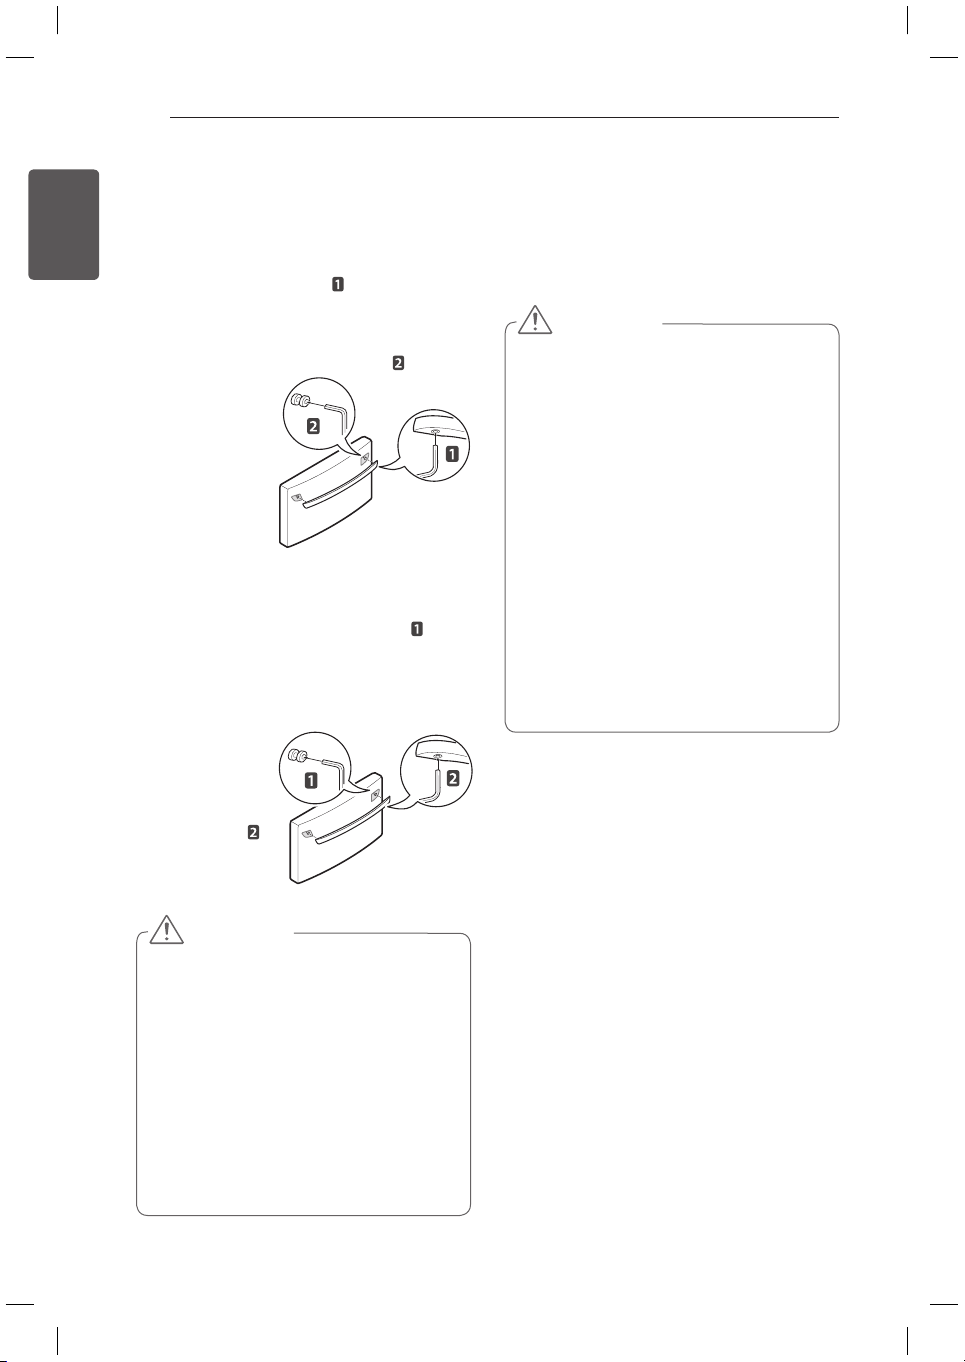
Fridge Door Handles
Removing the Handles
1
Loosen the set screws with a 3/32 in.
Allen wrench and remove the handle.
2
Loosen the mounting fasteners that
connect to the fridge door and handle
using a 1/4 in. Allen wrench, and remove
the mounting fasteners.
Assembling the Handles
1
Assemble the mounting fasteners at
both ends of the handle using a 1/4 in.
Allen wrench.
2
Place the handle on the door by fitting
the handle footprints over the mounting
fasteners and tightening the set screws
with a 3/32 in. Allen wrench.
NOTE
When it is necessary to move the fridge
through a narrow opening, removing the
doors is the recommended procedure.
If it is necessary to remove the handles,
follow the directions below.
12
INSTALLATION
ENGLISH
Removing/Assembling the
Freezer Drawer Handle
Removing the Handles
1
Loosen the set screws located on the
lower side of the handle with a 1/8 in. Allen
wrench and remove the handle.
2
Loosen the mounting fasteners that
connect to the
freezer drawer
and handle
using a
1
/4 in.
Allen wrench,
and remove
the mounting
fasteners.
Assembling the Handles
1
Assemble the mounting fasteners at
both ends of the handle using a 1/4 in. Allen
wrench.
2
Place the handle on the door by fitting
the handle
footprints over
the mounting
fasteners and
tightening the
set screws
with a 1/8 in.
Allen wrench.
WARNING
If your entrance door is too narrow for
y
the fridge to pass through, remove the
fridge doors and move the fridge sideways
through the doorway.
Use two or more people to remove and
y
install the fridge doors. Failure to do so can
result in back or other injury.
Disconnect the electrical supply to the
y
fridge before installing. Failure to do so
could result in serious injury or death.
Do not put hands, feet or other objects
y
into the air vents or bottom of the fridge.
You may be injured or receive an electrical
shock.
Be careful when handling the hinge and
y
stopper, to avoid injury.
Remove food and bins before detaching the
y
doors and drawers.
Removing/Assembling the
Doors and Drawers
When it is necessary to move the fridge
through a narrow opening, removing the doors
is the recommended procedure.
WARNING
When assembling or disassembling the
handle:
Grasp the handle tightly to avoid dropping it.
y
Do not swing the handle into nearby people
y
or animals.
Make sure that the bracket hole of the
y
handle fits properly into the stopper bolt of
the door. Assemble the set screws to fix
the handle into place.
Make sure that there is not a gap between
y
the door and handle after assembling the
handle.
13
INSTALLATION
ENGLISH
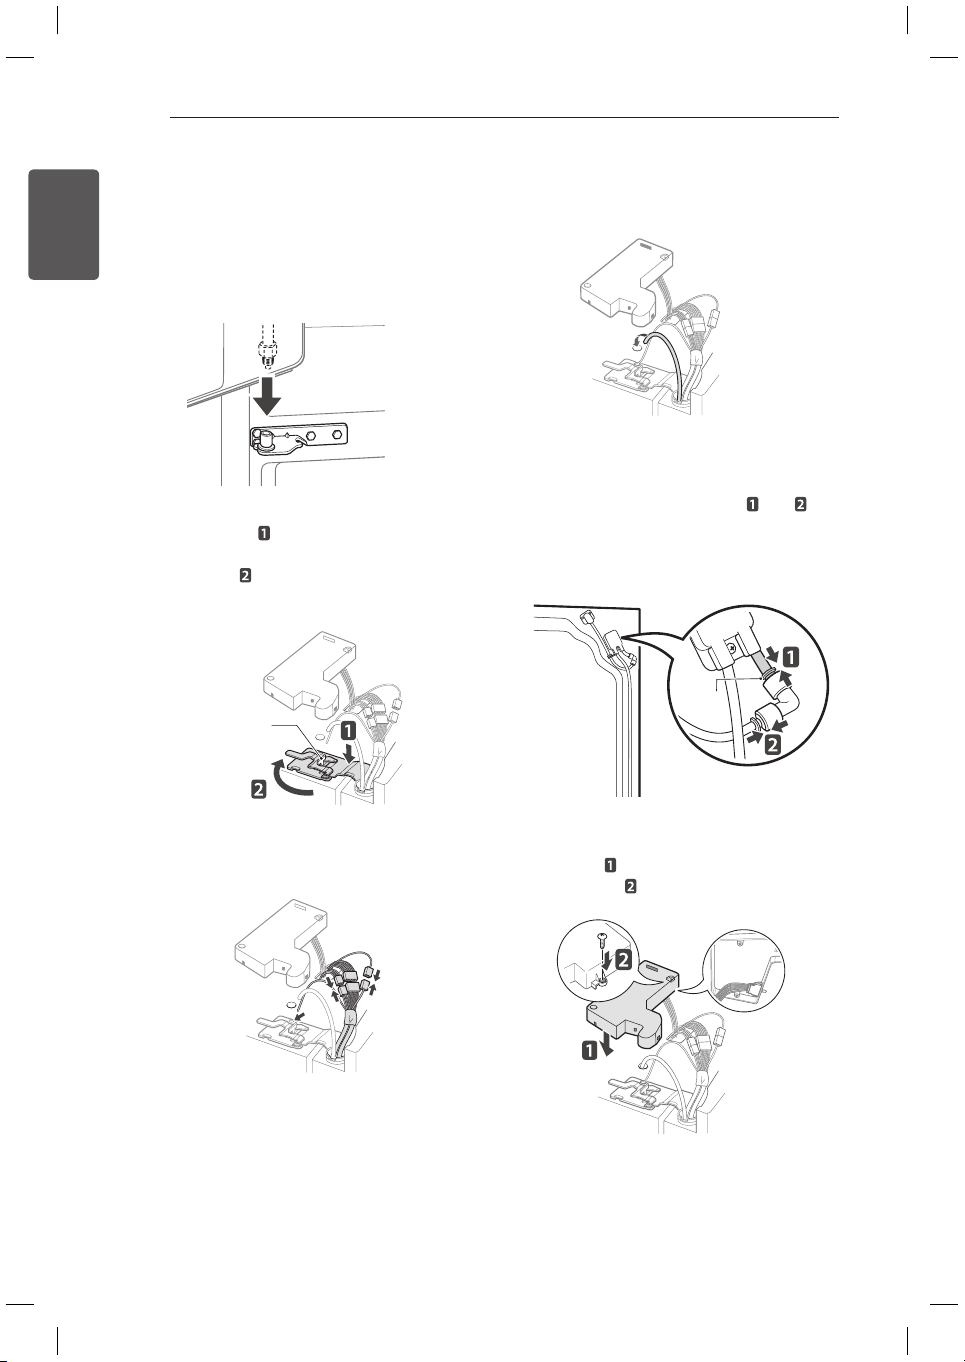
2
Remove the screw from the hinge
cover at the top of the fridge. Lift the hook
(not visible), located at the bottom of the
front side of the cover with a flat-head
screwdriver.
3
Remove the cover and pull out the tube .
Disconnect all wire harnesses
.
4
Rotate the hinge lever counterclockwise
. Lift the top hinge free of the hinge
lever latch.
CAUTION
When lifting the hinge free of the latch, be
careful that the door does not fall forward.
Hinge Lever Latch
5
Lift the door from the middle hinge pin and
remove the door.
CAUTION
Place the door, inside facing up, on a
non-scratching surface.
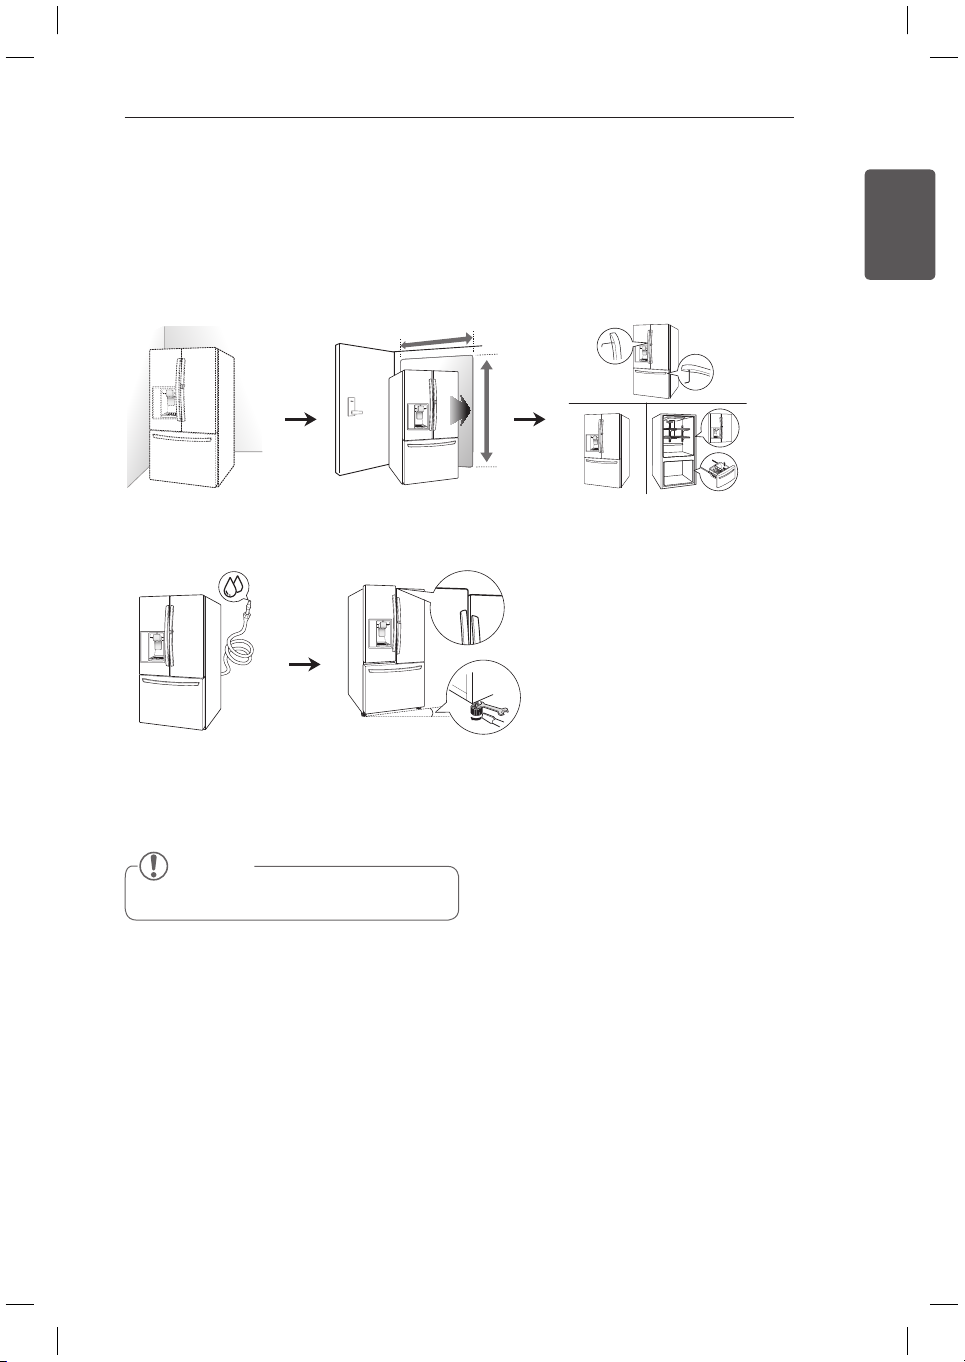
Removing the Left Fridge Door
1
The water supply is connected to the
upper right part of the rear surface of the
fridge. Remove the ring in the joint area.
Hold the water supply connection and
gently push the Collet to detach the water
supply line as shown in
and .
NOTE
Detachment of the water supply line is
applicable only when detaching the left
fridge door.
Collet
14
INSTALLATION
ENGLISH
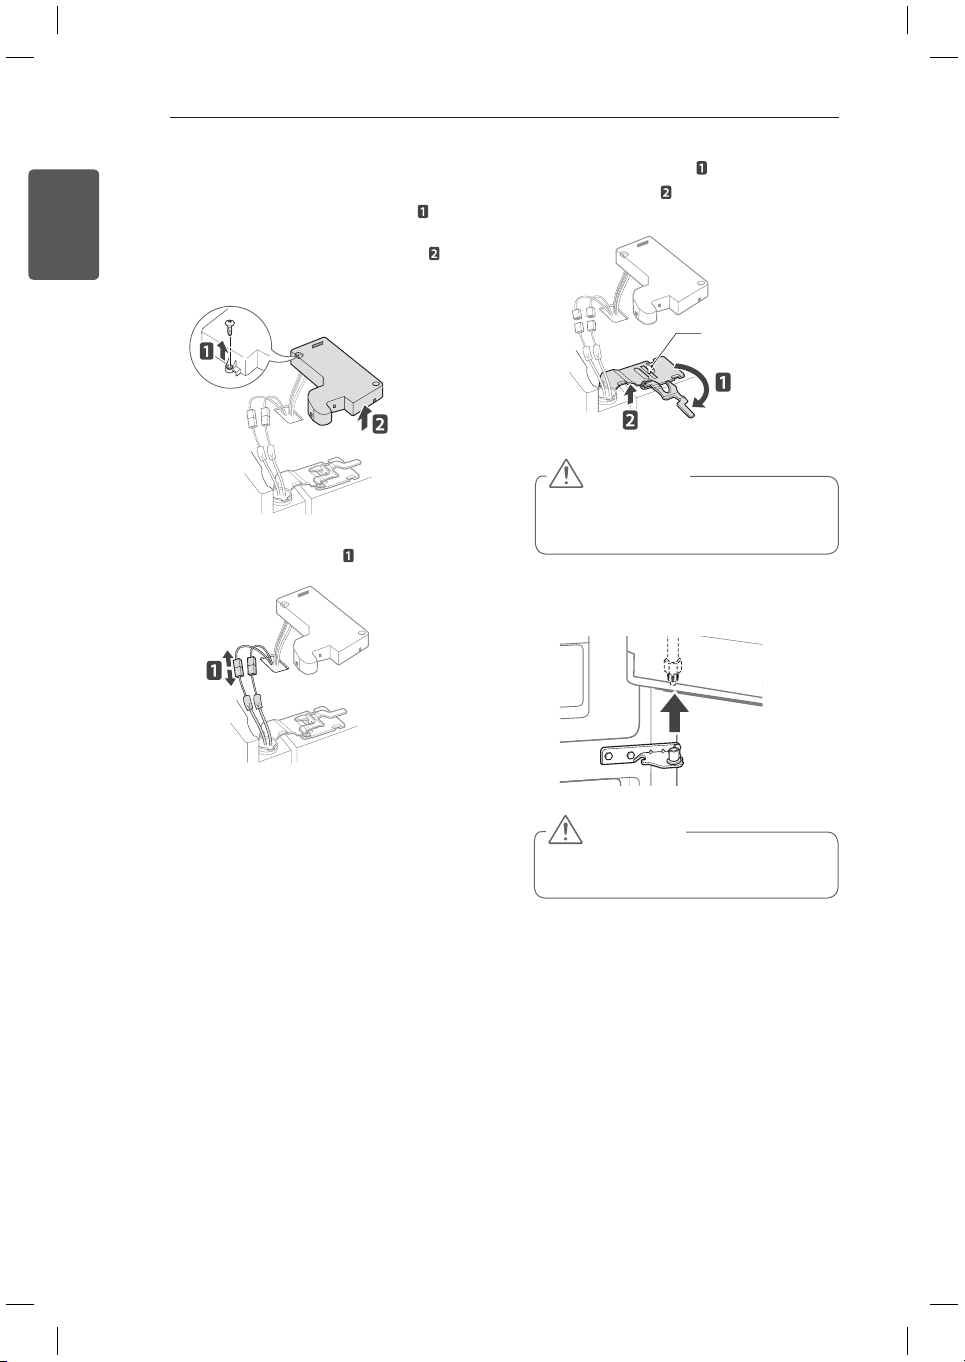
Removing the Right Fridge Door
1
Remove the top hinge cover screw .
Lift the hook (not visible), located at the
bottom of the front side of the cover
,
with a flat-head screwdriver.
2
Detach the wire harness .
CAUTION
When lifting the hinge free of the hinge
lever latch, be careful that the door
does not fall forward.
Hinge Lever Latch
3
Rotate the hinge lever clockwise.
Lift the top hinge
free of the hinge
lever latch.
4
Lift the door from the middle hinge pin and
remove the door.
CAUTION
Place the door on the floor, inside
facing up, on a non-scratching surface.
15
INSTALLATION
ENGLISH
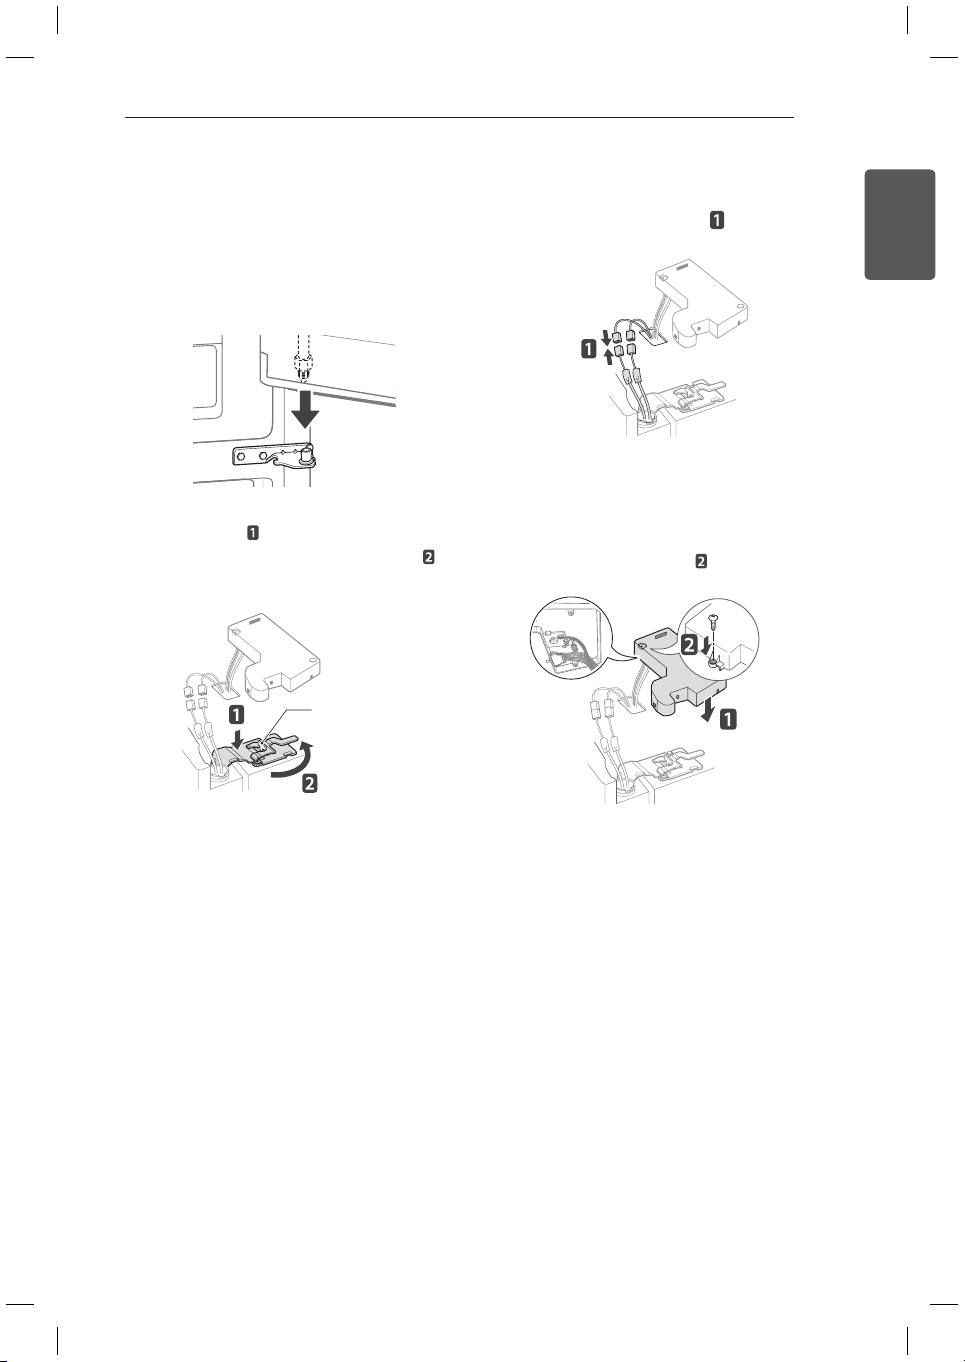
Install the right-side door first.
1
Make sure that the plastic sleeve is
inserted in the bottom of the door. Lower
the door onto the middle hinge pin as
shown in the figure.
2
Fit the hinge over the hinge lever latch
and slot it into place. Rotate the lever
counterclockwise to secure the hinge.
Assembling the Right Fridge Door
Hinge Lever Latch
4
Make sure that the door-switch located
inside the cover is tightly connected.
Position the cover in its place. Insert and
tighten the cover screw
.
3
Connect the wire harness .
16
INSTALLATION
ENGLISH
Assembling the Left Fridge Door
Install the left fridge door after the right door is
installed.
1
Make sure that the plastic sleeve is
inserted in the bottom of the door. Install
the fridge door onto the middle hinge.
2
Fit the hinge over the hinge lever latch
and slot it into place. Rotate the lever
clockwise
and fasten the hinge.
3
Connect all the wire harnesses.
Hinge Lever Latch
4
Push the water supply tube into the hole
on the top case and pull it through the
backplate.
5
Hold the water supply connection and
gently push in the collet to connect the
water supply line as shown in
and .
Insert the tube at least
5
/8 inch (15 mm) into
the connector. Assemble the clip to the
joint part for fastening.
6
Make sure that the door-switch located
inside the cover is tightly connected. Place
the cover
in its position and tighten the
cover screw
.
Collet

17
INSTALLATION
ENGLISH
CAUTION
Use two or more people to remove and
y
install the freezer drawer. Failure to do so
can result in back or other injury.
Do not hold the handle when removing
y
or replacing the drawer. The handle may
come off and it could cause personal
injury.
Be careful of sharp hinges on both sides
y
of the drawer.
When you lay the drawer down, be
y
careful not to damage the floor.
Do not sit or stand on the freezer drawer.
y
To prevent accidents, keep children
y
and pets away from the drawer. Do not
leave the drawer open. If the Durabase
®
storage bin is removed from the freezer
drawer, there is sufficient space for a
small child or pet to crawl inside.
NOTE
1) Gently press the Collet and insert the
tube until only one line shows on the
tube.
(Correct)
(Incorrect)
2) Pull the tube to make sure that the
tube is tightly fastened and then insert
the clip.
Removing the Freezer Drawers
In the following figures, the Pullout Drawer
located above the freezer drawer is not shown
for clarity.
Collet
Tube
Insert Line
Clip
(Durabase®)
 Loading...