

Page 1

ENGLISH ITALIANO ESPAÑOL FRANÇAIS DEUTSCH PORTUGUÊS
DEHUMIDIFIER
OWNER'S MANUAL
Please read the operating instructions and safety precautions carefully and thoroughly before operating your
dehumidifier.
MODEL: DHE1260DL
DHE1660DL
DHE3060DL
Page 2
2 Dehumidifier
Dehumidifier Owner’s Manual
TABLE OF CONTENTS
FOR YOUR RECORDS
Write themodel and serial numbers here:
Model #
Serial #
You can find them on a label on the side of each unit.
Dealer's Name
Date Purchased
■ Staple your receipt to this page in the event you need
it to prove date of purchase or for warranty issues.
READ THIS MANUAL
Inside you will find many helpful hints on how to use
and maintain your dehumidifier properly. Just a little
preventive care on your part can save you a great deal
of time and money over the life of your dehumidifier.
You'll find many answers to common problems in the
chart of troubleshooting tips. If you review our chart of
Troubleshooting Tips first, you may not need to call
for service at all.
PRECAUTION
• Contact the authorized service technician for
repair or maintenance of this unit.
• Contact the installer for installation of this unit.
• The dehumidifier is not intended for use by young
children or invalids without supervision.
• Young children should be supervised to ensure
that they do not play with the dehumidifier.
•
When the power cord is to be replaced, replacement
work shall be performed by authorized personnel
only using only genuine replacement parts.
Safety Precautions .......................3
Prior to Operation.........................7
Instruction .....................................8
Operating Instructions .................9
Installation...................................11
Maintenance and Service...........12
Page 3
Safety Precautions
Owner’s Manual 3
ENGLISH
RReeaaddaalllliinnssttrruuccttiioonnbbeeffoorreeuussiinng
g
■ To prevent injury to the user or other people and property damage, the following instructions must be followed.
■ Incorrect operation due to ignoring instructions will cause harm or damage; the seriousness is classified by the
following indications.
■ Meanings of symbols used in this manual are as shown below.
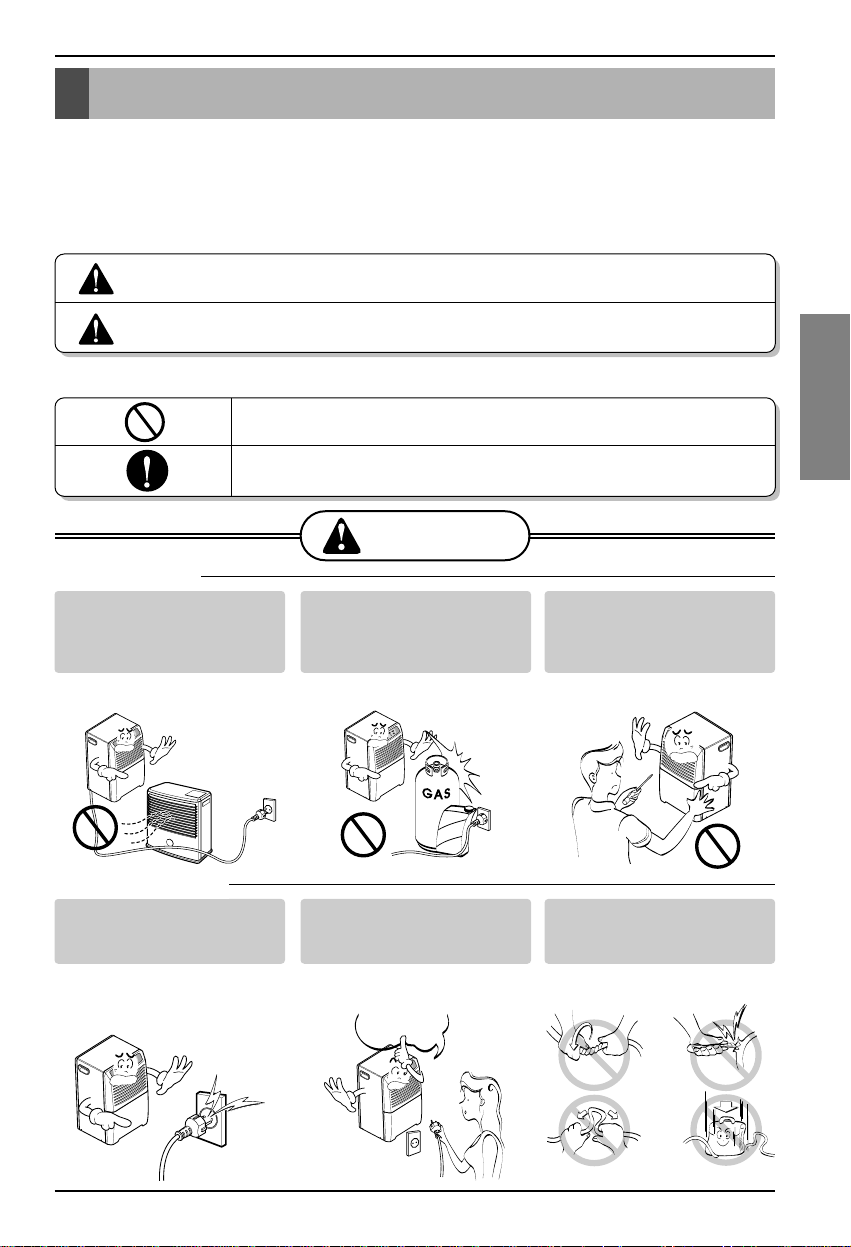
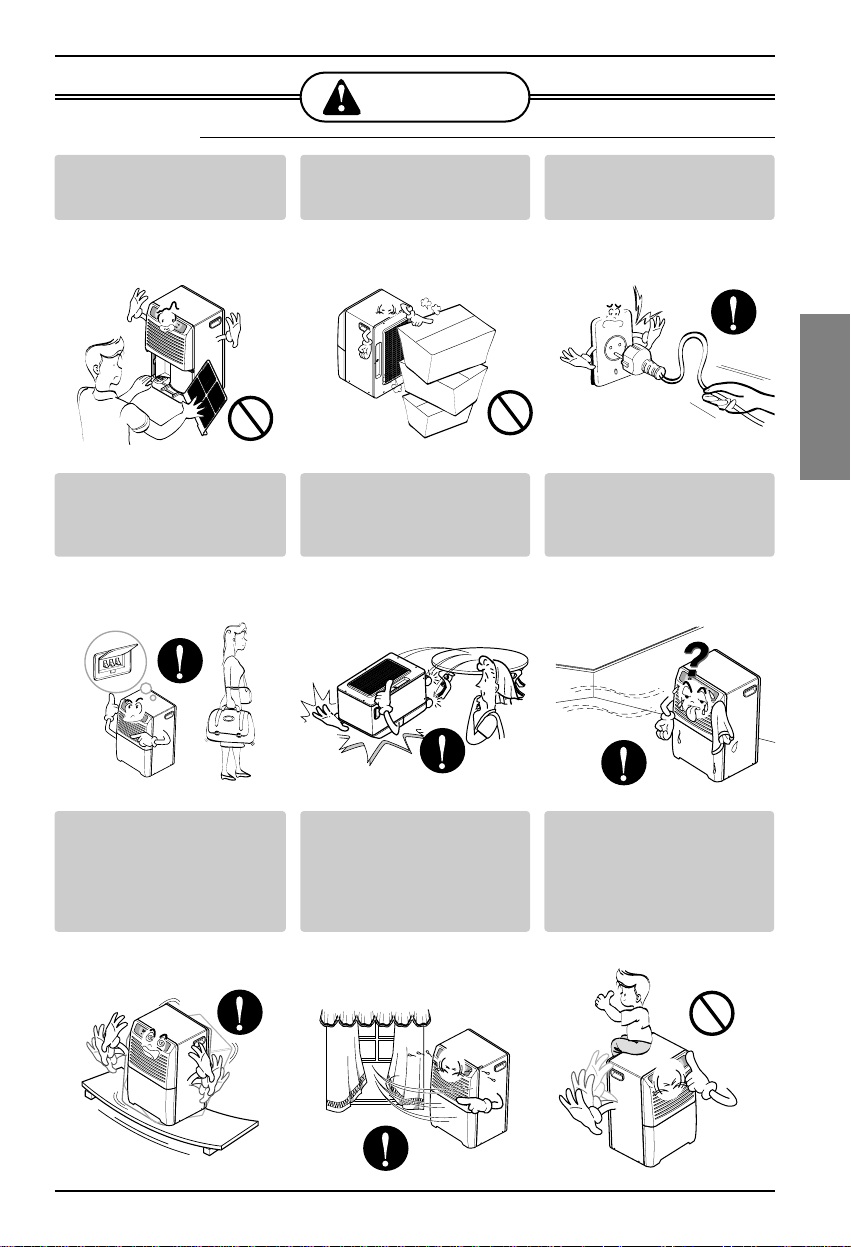
WARNING
This symbol indicates the possibility of death or serious injury.
CAUTION
This symbol indicates the possibility of injury or damage to property only.
BBeessuurreennoottttooddoo.
.
BBeessuurreettooffoolllloowwtthheeiinnssttrruuccttiioonn.
.
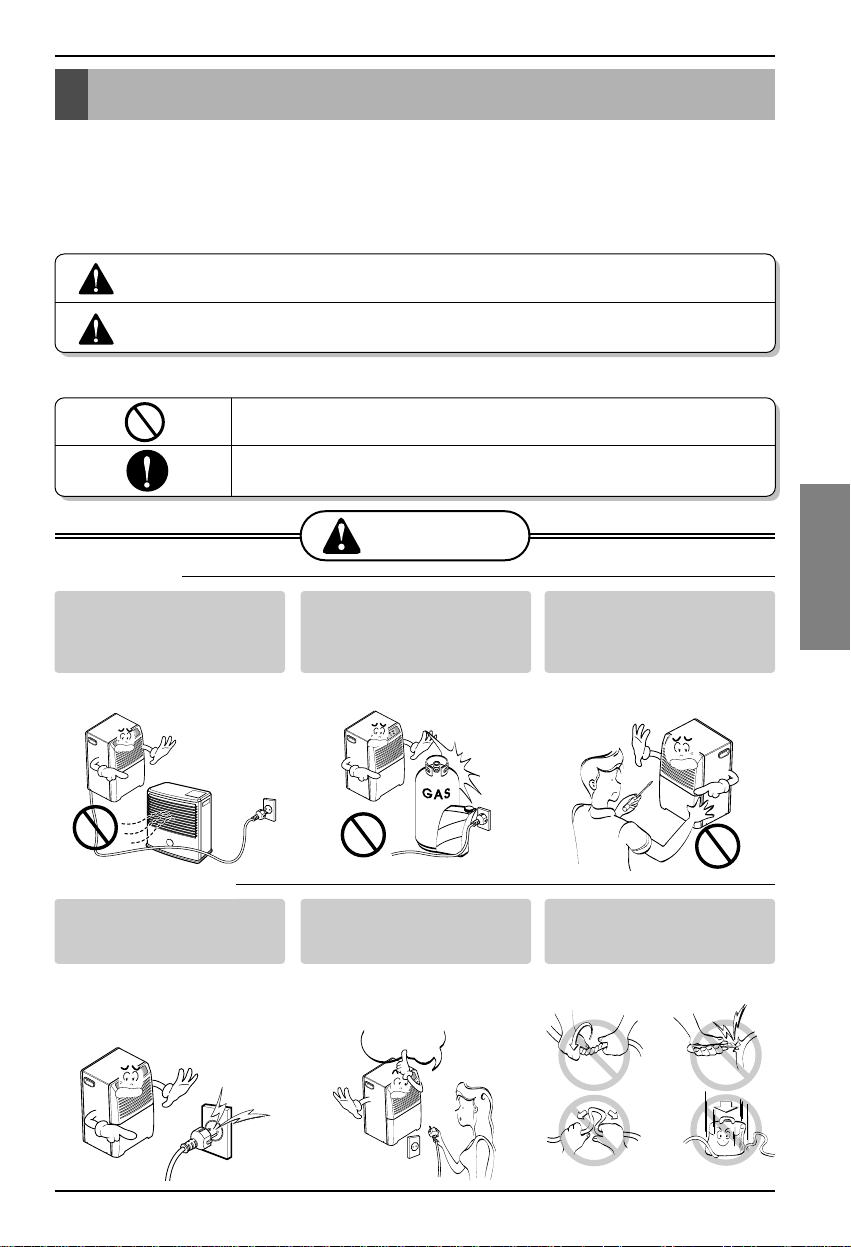
WWAARRNNIINNG
G
Plug in the power plug
properly.
• Otherwise, it will cause electric
shock or fire.
Do not operate or stop the unit
by inserting or pulling out the
power plug.
• It will cause electric shock or fire.
Do not damage or use an
unspecified power cord.
• It will cause electric shock or fire.
Safety Precautions
Gasolin
NO
■ Installation
■ Operation
Do not place the power cord
near a heater.
• It may cause fire and electric
shock.
Do not use the power cord near
flammable gas or combustibles
such as gasoline, benzene,
thinner, etc.
• It may cause explosion or fire.
Do not disassemble or modify
products.
• It may cause electric shock and
failure.
Page 4

4 Dehumidifier
Safety Precautions
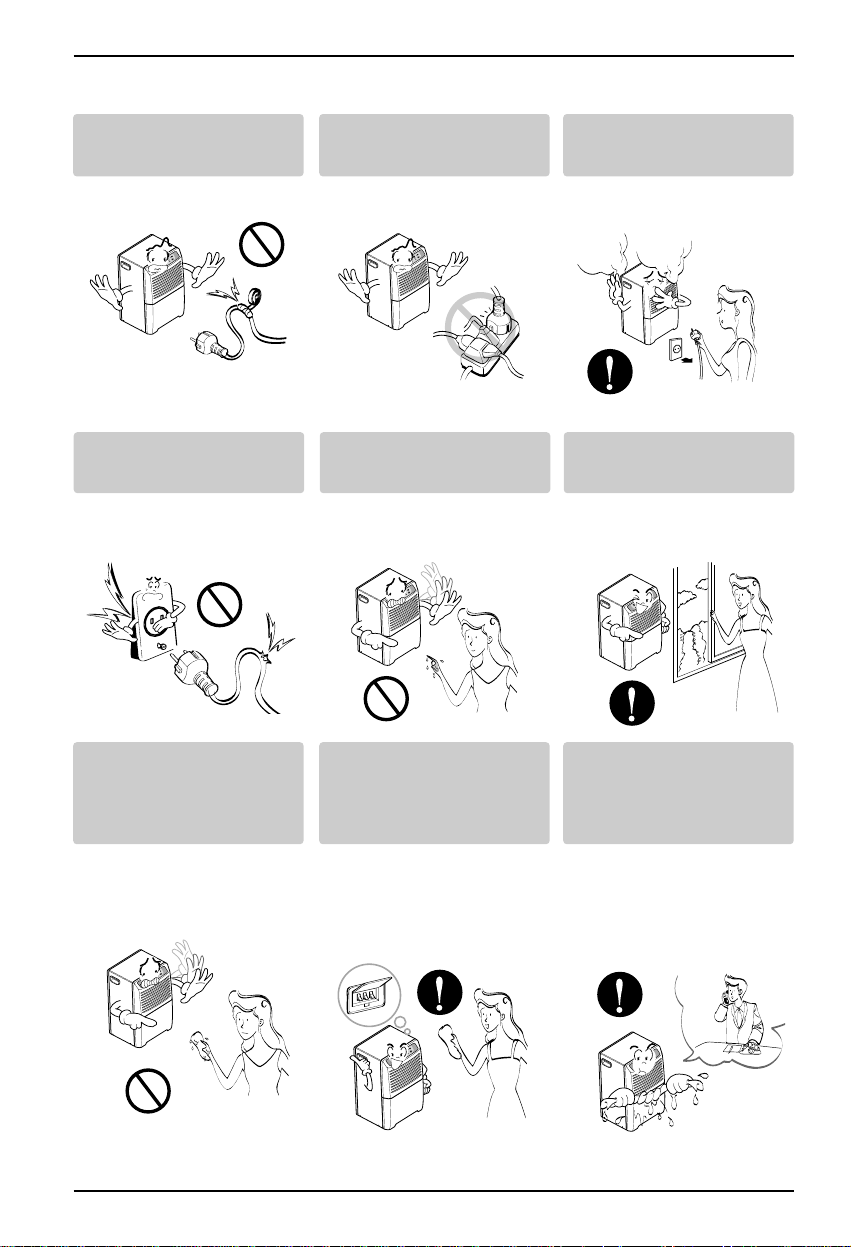
Do not modify power cord
length.
• It will cause electric shock or fire.
Do not share the outlet with
other appliances.
• It will cause electric shock or fire.
Unplug the unit if strange
sounds, odors, or smoke come
from it.
•Otherwiseitmaycauseafireor
an electric shock.
Do not use the socket if it is
loose or damaged.
• It may cause fire and electric
shock.
Do not operate with wet hands
or in damp environment.
• It may cause electric shock.
Ventilate before operating
defumidifier when gas goes out.
• It may cause explosion, fire, and
burn.
Do not clean the dehumidifier
with water.
• Water may enter the unit and
degrade the insulation. It may
cause an electric shock.
Turn off the power and breaker
first when cleaning the unit.
• Since the fan rotates at high
speed during operation, it may
cause injury.
If water enters the product, turn
off the dehumidifier's power
switch. Contact service center
after taking the power-plug out
from the socket.
• It will cause machine failure or
electric shock.
Page 5
Safety Precautions
Owner’s Manual 5
ENGLISH
CCAAUUTTIIOON
N
■ Installation
Never touch the metal parts of the
unit when removing the filter.
• They are sharp and may cause
injury.
Do not block the inlet or outlet.
• It may cause failure of appliance or
performance deterioration.
Hold the plug by the head when
taking it out.
• It may cause electric shock and
damage.
Turn off the main power switch
when not using the dehumidifier
for a long time.
•
It will waste power consumption in
vain and it may cause an accident.
Secure wheels with blocks to
prevent unit from falling when
installed on a table or shelf.
• It may damage the dehumidifier
or cause other damage or injury.
Make sure the dehumidifier is
the correct size for the area you
want to dehumidify.
• It is not designed to dehumidify
the entire house.
Install the dehumidifier properly on a
floor, table, or shelf that is level and
strong enough to support it when the
water collection bucket is full.
• It should withstand around
90 lbs (40kg) of weight.
Close all doors, windows and
other outside openings to the
room.
• The dehumidifier must be
operated in an enclosed area to
be most effective.
Do not sit down on the
dehumidifier.
Page 6
6 Dehumidifier
Safety Precautions
Use a soft cloth to clean. Do not
use wax, thinner, or a strong
detergent.
• The appearance of the
dehumidifier may deteriorate,
change color, or develop surface
flaws.
Be sure to replace the bucket
properly after emptying to
prevent water from collecting
on the floor.
• Otherwise, it will cause property
damage.
Do not install dehumidifier in an
area where temperatures will
fall below 42˚F(6˚C)
• Low temperatures could cause
coils to frost and unit may not
start.
Wax
Thinner
Do not put a pet or house plant
where it will be exposed to
direct air flow.
• This could injure the pet or plant.
Do not use this appliance for
special purposes such as pets,
foods, precision machinery, or
art objects.
• It is a general use appliance not
precision equipment.
Do not use the water collected
in the bucket for drinking
purposes.
• It is not sanitary and could cause
illness or personal injury.
Always insert the filter securely.
Clean it every two weeks.
• Operation without filters will cause
failure.
■ Operation
Page 7

ENGLISH
Owner’s Manual 7
Prior to Operation
Prior to Operation
1. Consult an installation specialist for installation.
2. Plug in the power plug properly.
3. Use a dedicated circuit.
4. Do not use an extension cord.
5. Do not start/stop operation by plugging/unplugging the power cord.
6. If the cord/plug is damaged, only replace it with an authorized replacement part.
1. Being exposed to direct airflow for an extended period of time could be hazardous to your
health. Do not expose occupants, pets, or plants to direct airflow for extended periods of time.
2. Ventilate the room when the dehumidifier is used with other heating devices. Otherwise the
oxygen supply may be inadequate.
3. Do not use this dehumidifier for non-specified special purposes (e.g. preserving precision
devices, food, pets, plants, and art objects). Such usage could damage the items.
1. Do not touch the metal parts of the unit when removing the filter. Injuries can occur when
handling sharp metal edges.
2. Do not use water to clean inside the dehumidifier. Exposure to water can destroy the insulation,
leading to possible electric shock.
3. When cleaning the unit, first make sure that the power and breaker are turned off. The fan
rotates at a very high speed during operation. There is a possibility of injury if the unit’s power
is accidently turned on while the interior of the unit is being cleaned.
For repair and maintenance, contact your authorized service dealer.
Preparing for operation
Usage
Cleaning and maintenance
Service
Page 8

8 Dehumidifier
Instruction
Instruction
This symbol alerts you to the risk of electric shock.
This symbol alerts you to hazards that could cause harm to the
dehumidifier.
This symbol indicates special notes.
NOTICE
WARNING: This appliance should be installed in accordance with national
wiring regulations. This guide acts as a guide to help to explain product
features.
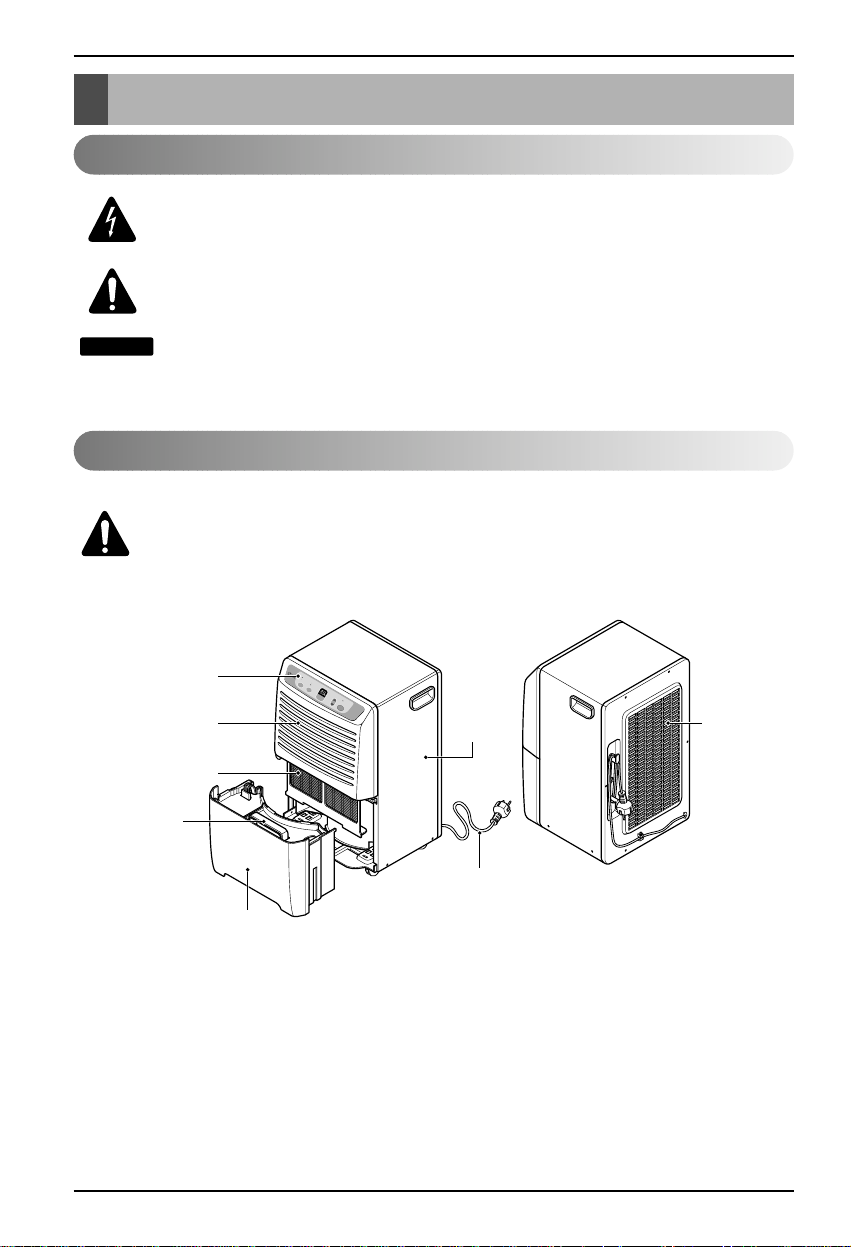
Features
Symbols used in this Manual
Power cord
Cabinet
Control panel
Water bucket
Front Grille
Air Filter
Handle
Rear Grille
C
o
n
s
t
a
n
t
l
y
O
n
.
F
A
N
S
P
E
E
D
T
I
M
E
R
H
i
g
h
L
o
w
4
h
r
.
O
n
/
O
f
f
2
h
r
.
O
n
/
O
f
f
H
U
M
I
D
I
T
Y
C
O
N
T
R
O
L
B
U
C
K
E
T
F
U
L
L
P
O
W
E
R
A
U
T
O
R
E
S
T
A
R
T
H
U
M
I
D
I
T
Y
S
E
T
T
I
N
G
Page 9
ENGLISH
Owner’s Manual 9
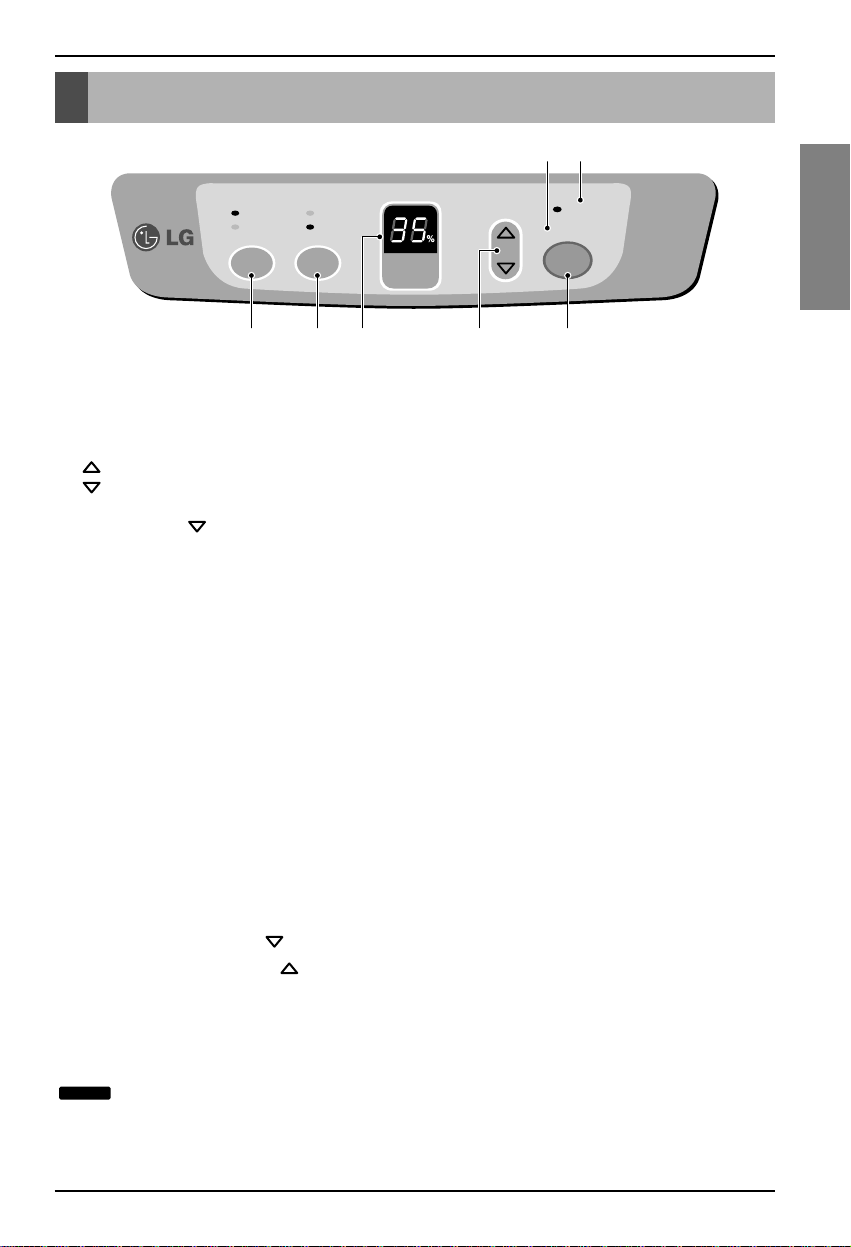
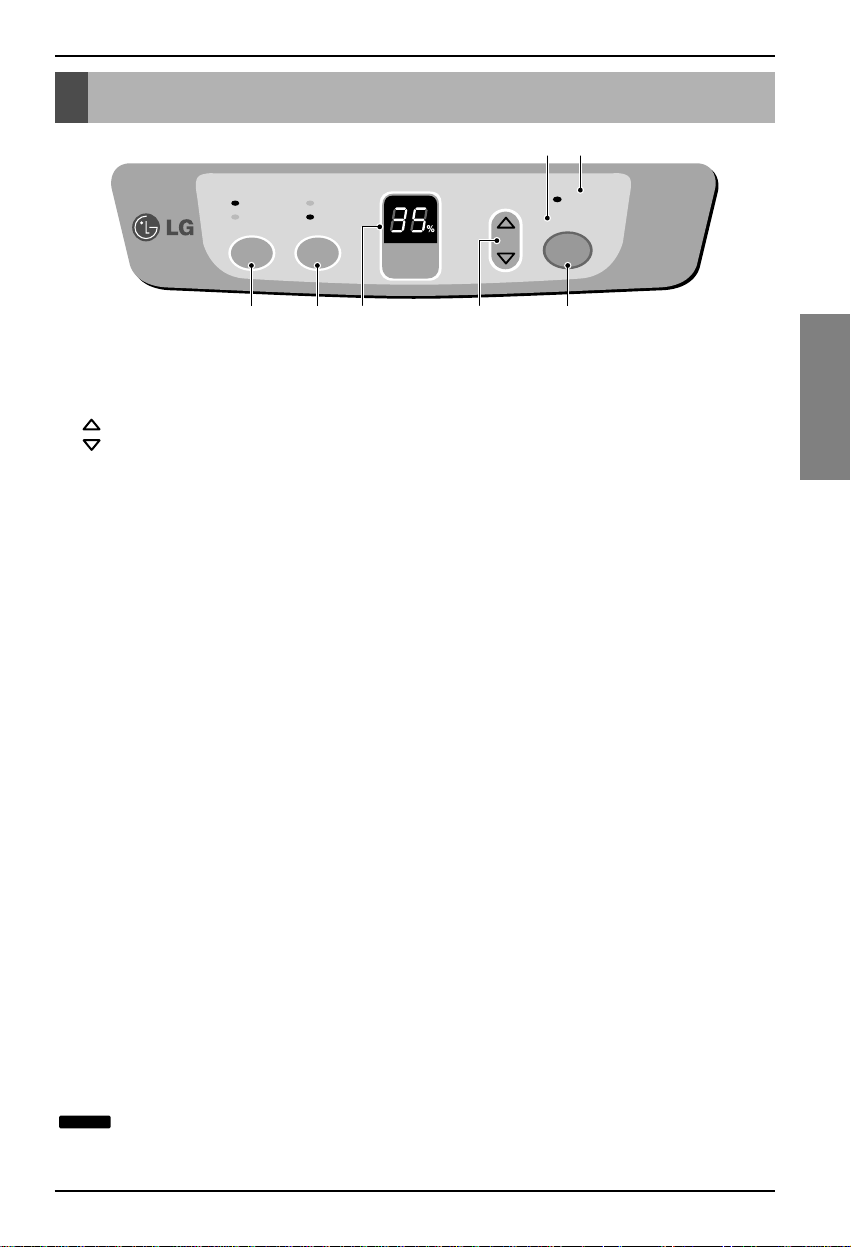
Operating Instructions
Constantly On.
FAN
SPEED
TIMER
High
Low
4hr. On/Off
2hr. On/Off
HUMIDITY
CONTROL
BUCKET
FULL
POWER
AUTO RESTART
HUMIDITY
SETTING
76
543 2 1
CONTROL PANEL HAS FOLLOWING
1. POWER key
--- Pressing this key once turns the dehumidifier "ON" and pressing again turns the
dehumidifier "OFF".
2. HUMIDITY CONTROL keys --- Areusedtoselectthedesiredhumiditysetting.
• : Used to raise the desired humidity setting.
• : Used to lower the desired humidity setting.
• The desired humidity can be selected within a range of 35% to 70% RH in increments of 5%.
• If you press the key once again at 35%RH, "On" mode is selected. In "On" mode the unit operates
continuously, regardless of humidity conditions.
3. HUMIDITY SETTING display --- The desired humidity selected is displayed here.
4. FAN SPEED key --- Is used to set the fan speed as "High" or "Low".
• Pressing this key changes the fan speed from High → Low → High.
• The selected fan speed is indicated by indicator lights marked "High" and "Low".
5. TIMER key --- It is used to select the type of operation.
• Select either 2 or 4 hr. On/Off for cycled operation.
In this case the unit will run for 2 or 4 hours, and then shut off completely for 2 or 4 hours. The cycle will
repeat until you change the setting.
• When TIMER key is pressed, the TIMER indicator lights shift from 2hr.On/Off to 4hr.On/Off.
6. BUCKET FULL Indicator --- This light glows when the bucket is full and needs to be emptied. It also
glows, when the bucket is not properly positioned. When bucket full indicator light glows, the compressor
and fan will turn "OFF".
7. AUTO RESTART --- Once the power is restored after a power outage, the unit begins to operate at its
previous operation setting. The fan will run by default for 2 minutes. After 2 minutes both fan and
compressor will be ON or OFF depending on the humidity conditions.
TO OPERATE THE DEHUMIDIFIER:
1. Plug the power cord into the electrical outlet. Press the POWER key.
2.Set the Humidity control anywhere between 35% to 70% for normal operation.
• For less humidity, press the HUMIDITY CONTROL key.
• For higher humidity, press the HUMIDITY CONTROL key.
3. Press the TIMER key, to set the amount of time for which you want the unit to cycle On and Off. The time
can be set for 2 hours or 4 hours.
4. If you want to change the fan speed, press the FAN SPEED key. Each time the FAN SPEED key is
pressed the fan speed changes as High → Low → High.
5. Press the POWER key to stop the unit manually.
Water bucket must be properly installed.
• The dehumidifier will not run if the bucket is not properly installed.
• The dehumidifier shuts off when the desired humidity setting is reached.
NOTICE
Operating Instructions
Page 10
10 Dehumidifier
Operating Instructions
Water level
control switch
HOSE-CONNECTOR
C
o
n
s
t
a
n
t
l
y
O
n
.
F
A
N
S
P
E
E
D
T
I
M
E
R
H
i
g
h
L
o
w
4
h
r
.
O
n
/
O
f
f
2
h
r
.
O
n
/
O
f
f
H
U
M
I
D
I
T
Y
C
O
N
T
R
O
L
B
U
C
K
E
T
F
U
L
L
P
O
W
E
R
A
U
T
O
R
E
S
T
A
R
T
H
U
M
I
D
I
T
Y
S
E
T
T
I
N
G
The dehumidifier will turn off automatically when the bucket is full,
or when the bucket is removed or not replaced in the proper
position.
The bucket must be replaced in the proper position for the
dehumidifier to work. The light will be on and the
dehumidifier will not run if the bucket is not in the proper
position.
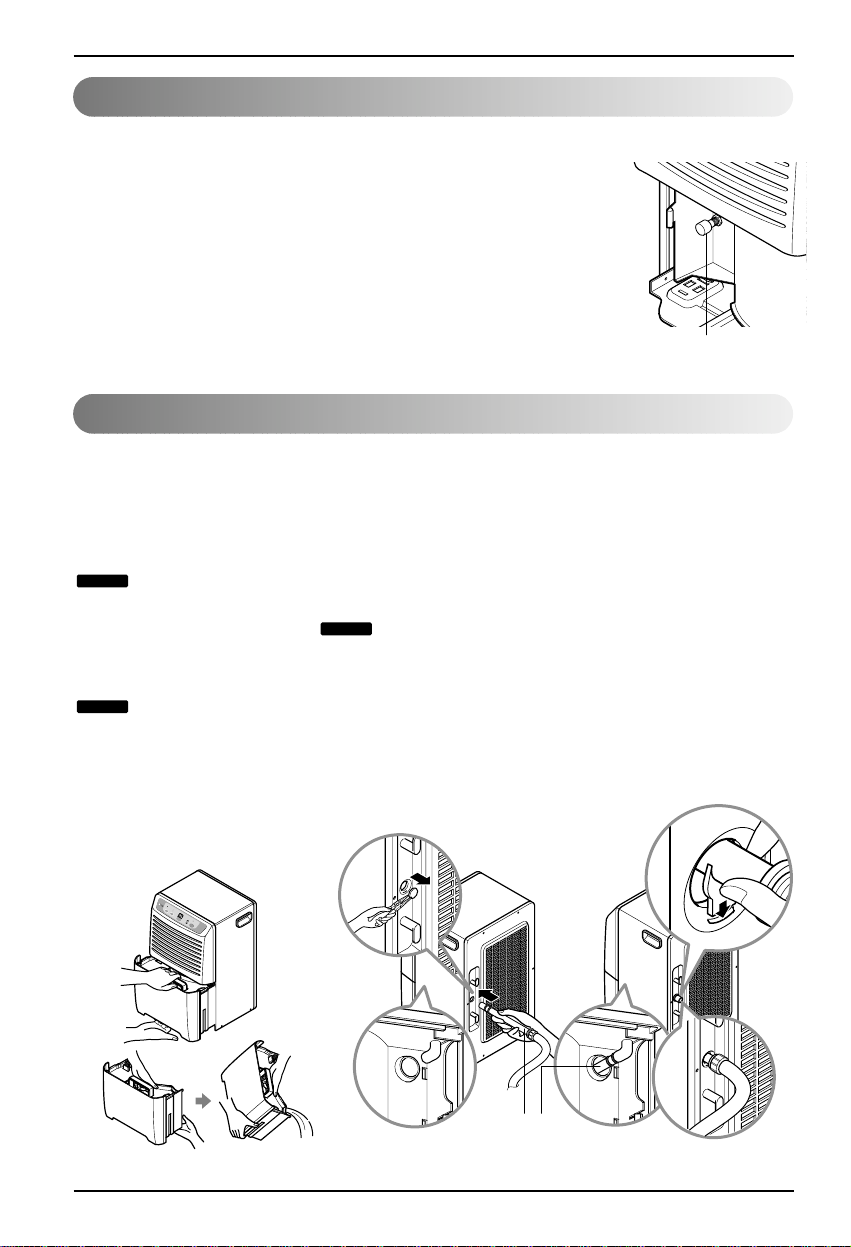
1. Empty the bucket manually. 2. Attach a length of garden hose to the threaded drain hose
connection to carry water to the drain.
When the bucket is full, pull out by
grasping the handle and empty it
into a large sink or tub and then
replace it properly.
Do not remove while
operating the dehumidifier.
Itcancausewater todroponthe
base pan or the floor.
Empty the bucket when the indicator
light turns on.
It is advisable to carry the
bucket by supporting it from the
bottom as well as by the handle.
Carrying by only the handle may
cause the handle or bucket cover to
break.
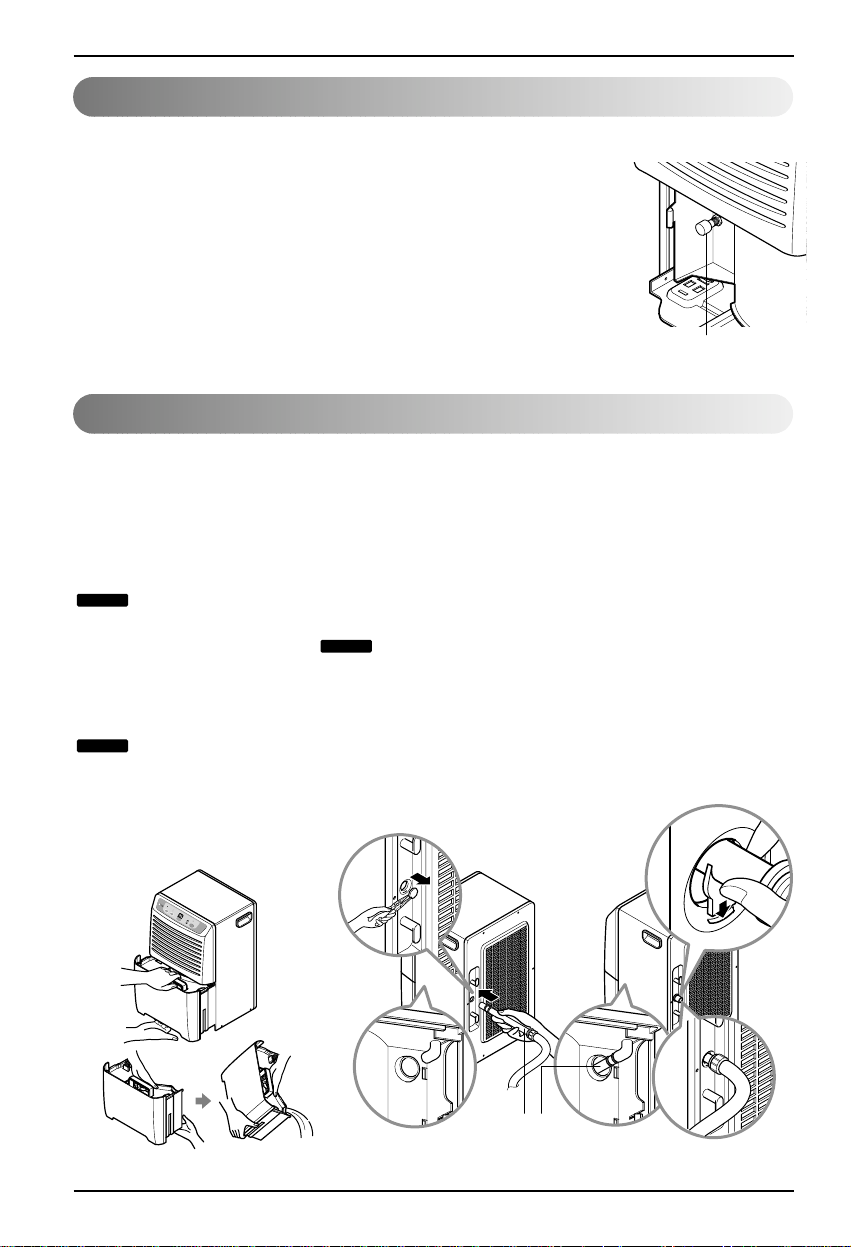
1. Remove the drain-hole cover.
2. Connect a garden hose to the
threaded drain hose connector.
3. Push hose connector tightly to
the drain-hole on Rear Grille.
The hose attachment will
accept a standard garden hose
fitting.
Do not over tighten the hose when
connecting it to the hose connector,
use a rubber washer and tighten by
hand firmly without stripping the
plastic threads.
When being attached to hose
connector drain hose connection,
do not bend or kink the hose.
The hose should lie flat from the
dehumidifier to the drain.
NOTICE
NOTICE
NOTICE
Automatic shut off
Disposing of collected water
Page 11
ENGLISH
Owner’s Manual 11
Installation
12"
12"
C
o
n
s
t
a
n
t
l
y
O
n
.
F
A
N
S
P
E
E
D
T
I
M
E
R
H
i
g
h
L
o
w
4
h
r
.
O
n
/
O
f
f
2
h
r
.
O
n
/
O
f
f
H
U
M
I
D
I
T
Y
C
O
N
T
R
O
L
B
U
C
K
E
T
F
U
L
L
P
O
W
E
R
A
U
T
O
R
E
S
T
A
R
T
H
U
M
I
D
I
T
Y
S
E
T
T
I
N
G
C
o
n
s
t
a
n
t
l
y
O
n
.
F
A
N
S
P
E
E
D
T
I
M
E
R
H
i
g
h
L
o
w
4
h
r
.
O
n
/
O
f
f
2
h
r
.
O
n
/
O
f
f
H
U
M
I
D
I
T
Y
C
O
N
T
R
O
L
B
U
C
K
E
T
F
U
L
L
P
O
W
E
R
A
U
T
O
R
E
S
T
A
R
T
H
U
M
I
D
I
T
Y
S
E
T
T
I
N
G
C
o
n
s
t
a
n
t
l
y
O
n
.
F
A
N
S
P
E
E
D
T
I
M
E
R
H
i
g
h
L
o
w
4
h
r
.
O
n
/
O
f
f
2
h
r
.
O
n
/
O
f
f
H
U
M
I
D
I
T
Y
C
O
N
T
R
O
L
B
U
C
K
E
T
F
U
L
L
P
O
W
E
R
A
U
T
O
R
E
S
T
A
R
T
H
U
M
I
D
I
T
Y
S
E
T
T
I
N
G
C
o
n
s
t
a
n
t
l
y
O
n
.
F
A
N
S
P
E
E
D
T
I
M
E
R
H
i
g
h
L
o
w
4
h
r
.
O
n
/
O
f
f
2
h
r
.
O
n
/
O
f
f
H
U
M
I
D
I
T
Y
C
O
N
T
R
O
L
B
U
C
K
E
T
F
U
L
L
P
O
W
E
R
A
U
T
O
R
E
S
T
A
R
T
H
U
M
I
D
I
T
Y
S
E
T
T
I
N
G
C
o
n
s
t
a
n
t
ly
O
n
.
F
A
N
S
PE
E
D
T
I
M
E
R
H
i
g
h
L
o
w
4
h
r
.
O
n
/
O
f
f
2
h
r
.
O
n
/
O
f
f
H
U
M
I
D
I
T
Y
C
O
N
T
R
O
L
B
U
C
K
E
T
F
U
L
L
PO
W
E
R
A
U
T
O
R
E
S
T
A
R
T
H
U
M
I
D
I
T
Y
S
E
T
T
I
N
G
1.Allow at least 12 inches of space on all sides of the unit for good air
circulation.
2.Install your dehumidifier on a floor, table, or shelf. When installing the
dehumidifier on a table or shelf, make sure the table or shelf is strong enough
to support the weight of the dehumidifier with a full bucket. Do not sit or stand
on the dehumidifier.
Secure wheels with blocks to prevent unit from falling when installed on a
table or shelf.
The height of a table or shelf might provide a better position from
which to handle the bucket and help prevent icing of the coils due to
colder air near the floor (such as in a basement.)
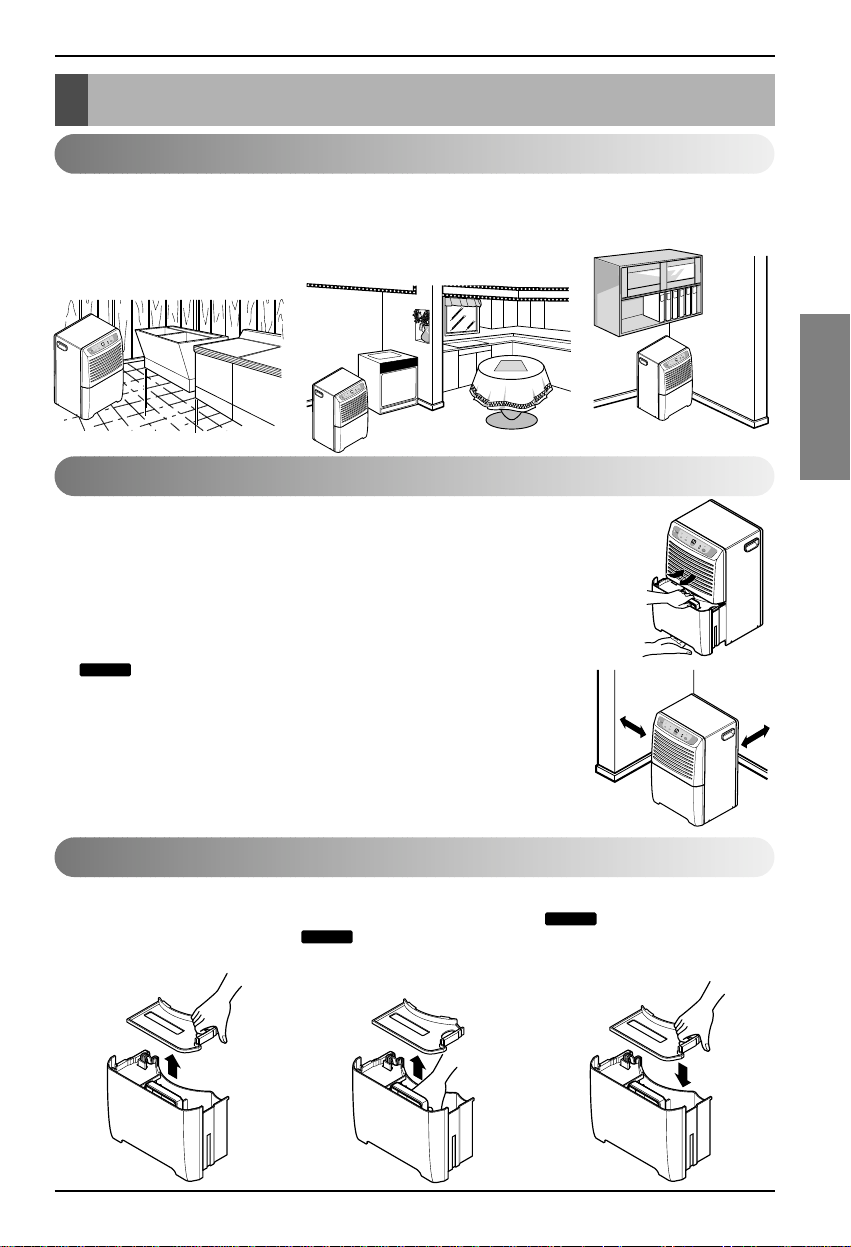
3.Lift the bucket and place it in the dehumidifier, making sure the slots on
the bottom side of the bucket are positioned correctly.
4.Rollers let you move the dehumidifier easily.
NOTICE
1.Pull out the bucket cover. 2.
Brush off the residue in the bucket.
Clean the bucket by
wiping with a brush or a cloth
dampened in a mild detergent
solution.
3. Close the cover.
Push the tabs on the top
of the bucket when installing
the bucket.
NOTICE
NOTICE
• Use the dehumidifier in a
basement to help prevent
moisture damage.
• Use the dehumidifier in laundry
drying, bathing, and dishwashing
areas which have excessive
moisture.
• Use the dehumidifier to prevent
moisture damage where books
are stored.
Installation
Installing the dehumidifier properly
Choosing the proper location for your dehumidifier
The cleaning of bucket
Page 12
12 Dehumidifier
Maintenance and Service
C
o
n
s
t
a
n
t
l
y
O
n
.
F
A
N
S
P
E
E
D
T
I
M
E
R
H
i
g
h
L
o
w
4
h
r
.
O
n
/
O
f
f
2
h
r
.
O
n
/
O
f
f
H
U
M
ID
I
T
Y
C
O
N
T
R
O
L
B
U
C
K
E
T
F
U
L
L
P
O
W
E
R
A
U
T
O
R
E
S
T
A
R
T
H
U
M
I
D
I
T
Y
S
E
T
T
I
N
G
C
o
n
s
t
a
n
t
l
y
O
n
.
FA
N
S
P
E
E
D
T
IM
E
R
H
i
g
h
L
o
w
4
h
r
.
O
n
/
O
f
f
2
h
r
.
O
n
/
O
f
f
H
U
M
I
D
I
T
Y
C
O
N
T
R
O
L
B
U
C
K
E
T
F
U
L
L
P
O
W
E
R
A
U
T
O
R
E
S
T
A
R
T
H
U
M
I
D
I
T
Y
S
E
T
T
I
N
G
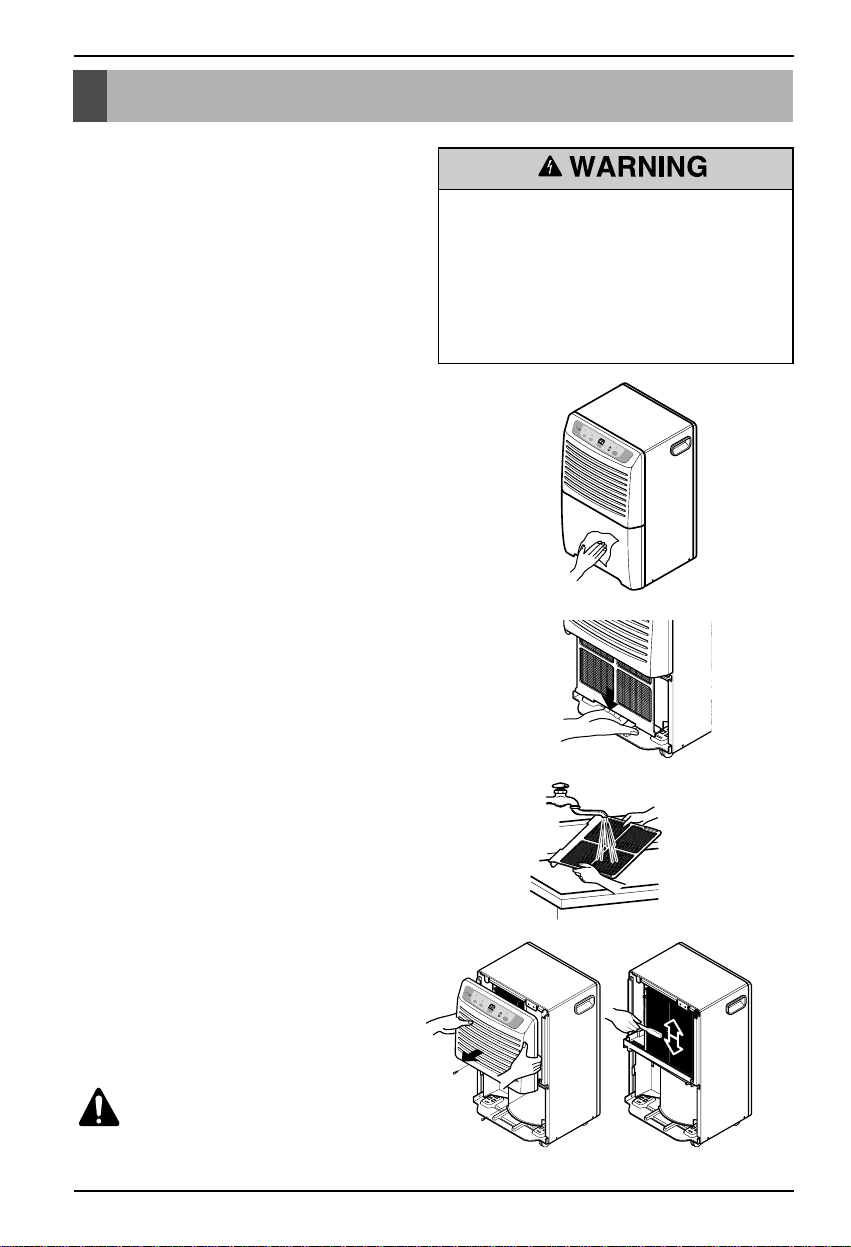
Your dehumidifier is designed to serve you yearround. It needs practically no attention. However,
you should check your dehumidifier and inspect the
coils annually.
You may want an Authorized Service Center to
perform this annual checkup. (Cost of the inspection
is the owner’s responsibility.)
OR
If you are familiar with electrical appliances and their
functions, listed below are instructions which would
allow you to perform the inspection and
maintenance for yourself.
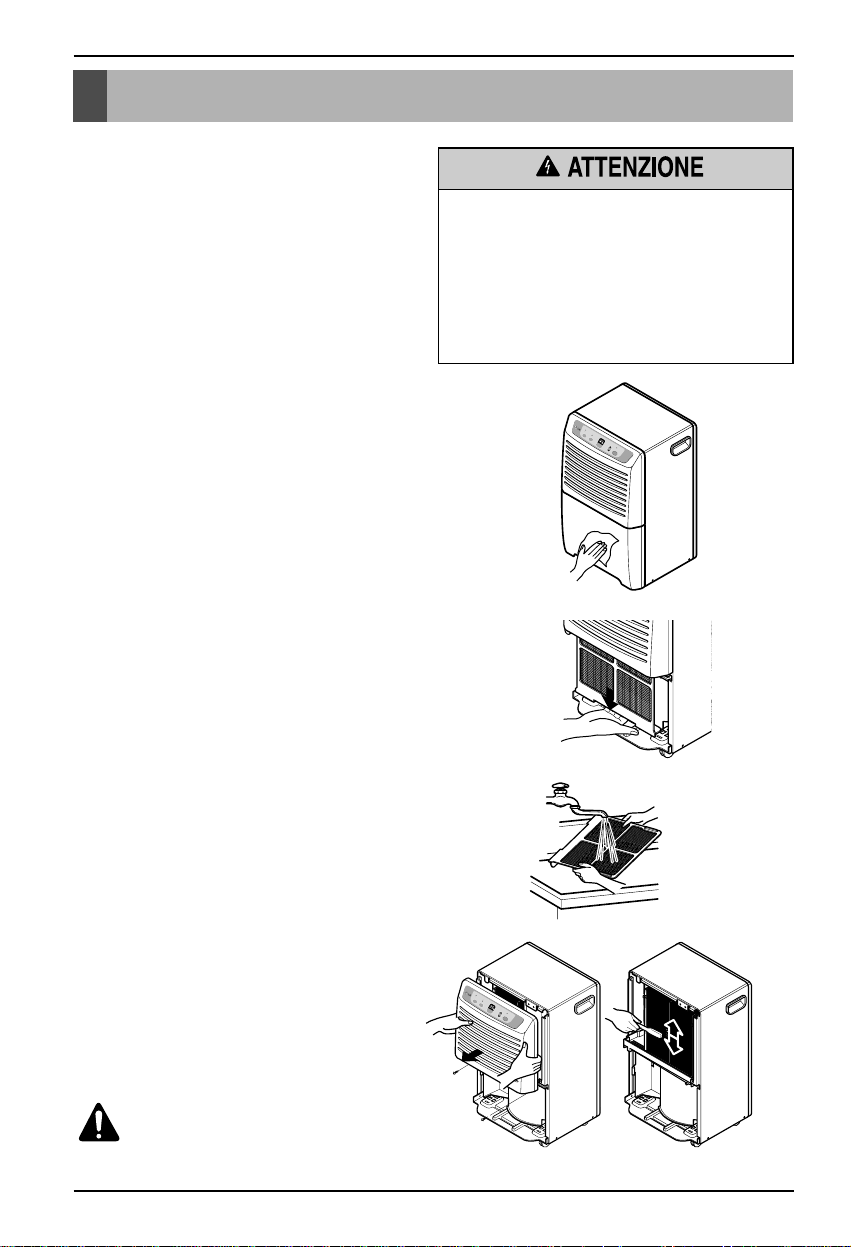
Cleaning the front case, bucket
and cabinet
Clean the front case and the cabinet with a soft
cloth, warm water, and a mild detergent.
Clean the grille with a vacuum attachment or brush.
Do not use bleach or abrasives.
Cleaning the air filter
1.Remove water bucket from the cabinet.
Pull out the air filter as shown above.
2.Wash air filter with warm water and a mild
detergent. Rinse and dry it.
Replace it in place.
Cleaning the coil
1.Remove Front Grille from the cabinet as shown
above.
2.Brush the coil gently like in the figure.
If necessary use warm water and a mild
detergent. Rinse and dry thoroughly.
CAUTION : Be careful not to
spray the coil with a water hose.
Be careful! Sharp edges!
Electrical Shock Hazard
• Disconnect power supply cord from receptacle
before performing any maintenance.
• Be careful when cleaning the coils.
Fins are sharp.
Failure to follow the above precautions could result
in electrical shock or personal injury.
Maintenance and Service
Page 13
ENGLISH
Owner’s Manual 13
Maintenance and Service
■ Water bucket is full.
■ Bucket is not installed.
■ Airflow is restricted.
■
Doors and windows are open.
• Make sure the dehumidifier plug is pushed
completely into the outlet.
• Check the house fuse or circuit breaker box
and replace the fuse or reset the breaker.
• The dehumidifier automatically turns off
when this occurs. Empty the bucket.
• Make sure the bucket is in the right place.
•
• When first installed, allow at least 3 or 4
days to maintain the desired dryness.
• Make sure there are no curtains, blinds or
furniture blocking the front or back of the
dehumidifier.
• Press the Humidity Control button to
lower the humidity.
• Check that all doors, windows and other
openings are securely closed.
• Install the dehumidifier away from the dryer.
The dryer should be vented to the outside.
• The unit will not operate satisfactorily if the
room temperature is below 42°F. (6°C.).
• Check with your dealer to see if the capacity
is adequate.
• Close all doors and windows to the outside.
• Frost will usually disappear, after hot gas
defrost system is end.
• This is normal.
• Check the hose if one is attached.
• See Removing and Emptying The Water
Bucket.
Problem Possible Causes What To Do
Dehumidifier
does not start
Dehumidifier
does not dry the
air as it should
Dehumidifier runs
too much
Frost appears on
the coils
Fan noise
Water on floor
■ In case the Room
humidity is less than
selected humidity setting.
■ The dehumidifier power
cord is unplugged.
■ The fuse is blown or circuit
breaker is tripped.
■
Did not allow enough time
to remove the moisture.
■
The Humidity Control may not
be set to low Humidity.
■ Doors and windows may
not be closed tightly.
■
Clothes dryer may be blowing
moisture-laden air into the room.
■ Room temperature is too
low.
■ Area to be dehumidified is
too large.
■ Air is moving through the
dehumidifier.
■ Drain hose connection
may be loose.
■ Water bucket is not in all
the way.
■ Room temperature is too
low
Change the humidity set to lower limits.
Dehumidifier
operates
continuously
■
Check if the unit is
operating in "ON" mode.
■
Room Humidity is high
• Change the humidity setting.
• Change the humidity setting.
The dehumidifier may be operating abnormally when:
Troubleshooting
Page 14

14 Dehumidifier
Memo
Page 15

ITALIANO
DEUMIDIFICATORE
MANUALE UTENTE
Leggere attentamente e accuratamente le istruzioni di
funzionamento e misure di sicurezza prima di usare
l’umidificatore.
Page 16
2 Deumidificatore
Manuale dell’utente del deumidificatore
SOMMARIO
DATI DA RICORDARE
Annotare qui il numero di serie e il modello:
N°. modello
N°.diserie
I numeri sono riportati sull'etichetta a lato di ogni unità.
Nome del rivenditore
Data di acquisto
■
Spillare la ricevuta su questa pagina qualora fosse necessaria
per provare la data di acquisto o per motivi di garanzia.
LEGGERE IL MANUALE
All’interno troverà molti suggerimenti utili sull’uso e la
manutenzione del deumidificatore. Un minimo di
attenzione può far risparmiare molto tempo e denaro
nel corso della vita del deumidificatore.
Nella tabella di riferimento per la risoluzione dei
problemi troverà molte risposte ai problemi più comuni.
Consultando la tabella Risoluzione dei problemi
potrebbe non essere necessario contattare il servizio di
assistenza.
AVVERTENZE
• Contattare un tecnico dell'assistenza autorizzato per la
riparazione o la manutenzione dell’unità.
• Contattare l’installatore per eseguire l’installazione
dell’unità.
• Il deumidificatore non è stato progettato per essere
utilizzato da bambini o invalidi senza supervisione.
• E’ consigliabile vigilare sui bambini affinché essi non
giochino con l’apparecchio.
• Se il cavo di alimentazione deve essere sostituito, il
servizio di sostituzione deve essere eseguito solo da
personale autorizzato utilizzando parti di ricambio
originali.
Precauzioni di sicurezza ..............3
Prima dell’uso ...............................7
Istruzioni........................................8
Istruzioni per il funzionamento....9
Installazione ................................11
Manutenzione e assistenza........12
Page 17
Precauzioni di sicurezza
Manuale dell’utente 3
ITALIANO
PPrriimmaaddeellll’’uussoo,,lleeggggeerreettuutttteelleeiissttrruuzziioonni
i
■ Perevitareinfortuniall'utenteoaterziedanni alla proprietà, attenersi alle seguenti istruzioni.
■ Un funzionamento non corretto causato dall’aver ignorato le istruzioni causerà guasti o danni, la cui serietà è
classificata sulla base delle indicazioni seguenti.
■ Il significato dei simboli utilizzati in questo manuale è spiegato di seguito.
ATTENZIONE
Questo simbolo indica la possibilità di decesso o di grave infortunio.
AVVISO
Questo simbolo indica la possibilità di infortunio o danni alle cose.
AAzziioonnee//ooppeerraazziioonneeddaannoonnffaarree.
.
AAtttteenneerrssiiaalllleeiissttrruuzziioonnii.
.
AATTTTEENNZZIIOONNE
E
Inserire l’alimentazione
correttamente.
• In caso contrario, si potrebbero
verificare incendi o scosse
elettriche.
Non avviare o arrestare l’unità
inserendo o estraendo la spina
dell’alimentazione.
• Ciò causerà incendi o scosse
elettriche.
Non danneggiare o utilizzare
cavi di alimentazione non
indicati.
• Ciò causerà incendi o scosse
elettriche.
Precauzioni di sicurezza
Gasolin
NO
■ Installazione
■ Funzionamento
Non mettere il cavo di
alimentazione in prossimità del
riscaldamento.
• Ciò potrebbe causare incendi e
scosse elettriche.
Non utilizzare il cavo di
alimentazione in prossimità di gas
infiammabili o combustibili quali
benzina, benzene, solventi, ecc.
• Si potrebbero verificare esplosioni
o incendi.
Non smontare o modificare i
prodotti.
• Ciò potrebbe causare guasti e
scosse elettriche.
Page 18
4 Deumidificatore
Precauzioni di sicurezza
Non modificare la lunghezza del
cavo di alimentazione.
• Ciò causerà incendi o scosse
elettriche.
Non utilizzare la presa
contemporaneamente per altri
apparecchi.
• Ciò causerà incendi o scosse
elettriche.
Scollegare l’unità in caso di
rumori, odori o fumo anomali.
•
In caso contrario, si potrebbero
verificare incendi o scosse elettriche.
Non utilizzare la presa se
allentata o danneggiata.
• Ciò potrebbe causare incendi e
scosse elettriche.
Non utilizzare l’unità con le
mani bagnate o in ambienti
umidi.
• Ciò potrebbe causare scosse
elettriche.
In caso di emissione di gas,
ventilare l’ambiente prima di
avviare il deumidificatore.
• Ciò potrebbe causare esplosioni,
incendi e scottature.
Non pulire il deumidificatore
con acqua.
• L'eventuale ingresso di acqua
nell'unità potrebbe deteriorarne
l’isolamento. Ciò potrebbe
causare scosse elettriche.
Prima di pulire l’unità, spegnere
l’alimentazione e l’interruttore.
• L’elevata velocità di rotazione del
ventilatore può causare infortuni.
In caso di ingresso di acqua nel
prodotto, spegnere l’interruttore di
alimentazione del deumidificatore.
Dopo aver rimosso il cavo dalla presa,
contattare il centro di assistenza.
• Ciò causerà danni all’apparecchio
o scosse elettriche.
Page 19
Precauzioni di sicurezza
Manuale dell’utente 5
ITALIANO
AAVVVVIISSO
O
■ Installazione
Non toccare le parti metalliche
dell’unità durante la rimozione
del filtro.
• Le parti metalliche sono affilate e
potrebbero causare infortuni.
Non bloccare l’ingresso o l’uscita.
• Ciò potrebbe causare guasti al
prodotto o riduzione delle
prestazioni.
Estrarre il cavo di alimentazione
tenendolo per la testa della
spina.
• In caso contrario, potrebbero
verificarsi scosse elettriche o
danni al prodotto.
Spegnere l’interruttore di
alimentazione principale in caso
di inutilizzo del deumidificatore
per lunghi periodi.
•
Tenere acceso l’interruttore può
causare un inutile consumo
energetico e provocare gravi incidenti.
Se posizionata su un tavolo o
un ripiano, bloccare le ruote per
evitare che l’unità possa cadere.
•
Se il deumidificatore dovesse
cadere potrebbe danneggiarsi o
provocare lesioni o danni alle cose.
Assicurarsi che le dimensioni
dell’unità siano adatte per il tipo
di ambiente che si intende
deumidificare.
•
L’apparecchio non è progettato per
deumidificare un’intera abitazione.
Posizionare il deumidificatore
correttamente al suolo, su un tavolo o
un ripiano orizzontali e
sufficientemente resistenti per
sopportarne il peso quando il serbatoio
di raccolta dell’acqua è pieno.
• L'unità è in grado di sopportare un
peso di circa 40 kg (90 libbre).
Chiudere tutte le porte, le
finestre e le eventuali altre
aperture che collegano
l'ambiente con l’esterno.
• Per una maggiore efficienza,
utilizzare il deumidificatore in
ambienti chiusi.
Non sedersi sull'unità.
Page 20
6 Deumidificatore
Precauzioni di sicurezza
Utilizzare un panno soffice per
la pulizia. Non utilizzare cera,
solventi o forti detergenti.
• La superficie del deumidificatore
può rovinarsi, cambiare colore o
sviluppare crepe.
Dopo aver svuotato il serbatoio di
raccolta dell'acqua, assicurarsi di
rimontarlo correttamente
nell'unità per evitare la fuoriuscita
di liquido sul pavimento.
• La fuoriuscita d'acqua può
causare gravi danni alle cose.
Non posizionare il
deumidificatore in ambienti dove
la temperatura può scendere al di
sotto dei 6°C(42° F).
•
L'esposizione a temperature molto
basse può provocare il congelamento
delle serpentine e impedire quindi il
funzionamento dell'unità.
Wax
Thinner
Non esporre animali domestici
o piante al flusso diretto
dell’aria.
• Ciò potrebbe causare danni alla
pianta o all’animale.
Non utilizzare l’unità per
applicazioni particolari che
comportino l'esposizione diretta
al flusso d’aria di animali,
alimenti, strumenti di precisione
oppure opere d’arte.
• L’apparecchio è destinato ad usi
generici, non è adatto per lavori di
precisione.
Non ingerire l'acqua del
serbatoio di raccolta.
• Ingerire l'acqua raccolta nel
serbatoio non è igienico e può
provocare malattie o gravi danni
alla salute.
Inserire sempre il filtro in modo
stabile.
Pulirlo ogni due settimane.
• Non utilizzare l’unità senza filtro.
■ Funzionamento
Page 21

ITALIANO
Manuale dell’utente 7
Prima dell’uso
Prima dell’uso
1. Rivolgersi a un tecnico specializzato per l’installazione.
2. Inserire l’alimentazione correttamente.
3. Utilizzare un circuito dedicato.
4. Non utilizzare cavi di prolunga.
5. Non avviare o arrestare l’unità semplicemente inserendo oppure disinserendo il cavo di
alimentazione.
6. Se il cavo o la spina sono danneggiati, sostituirli soltanto con ricambi originali.
1. L’esposizione prolungata al flusso diretto dell’aria può essere pericolosa per la salute. Non
esporre persone, animali o piante al flusso diretto dell’aria per periodi prolungati.
2. Aerare l’ambiente quando il deumidificatore viene utilizzato contemporaneamente ad altri
apparecchi di riscaldamento. In caso contrario, l'apporto di ossigeno potrebbe essere
insufficiente.
3. Non utilizzare questo deumidificatore per scopi specifici non contemplati dal presente manuale
(ad esempio per conservare strumenti di precisione, alimenti, animali, piante o opere d’arte).
Un uso di questo tipo potrebbe danneggiare gli oggetti.
1. Non toccare le parti metalliche dell’unità durante la rimozione del filtro. La manipolazione dei
bordi taglienti potrebbe causare lesioni.
2. Non pulire con acqua l’interno dell’unità. L’esposizione all’acqua può distruggere l’isolamento,
causando scosse elettriche.
3. Prima di pulire l’unità, accertarsi che l’alimentazione sia esclusa e l’interruttore spento. Il
ventilatore raggiunge una velocità di rotazione elevata durante il funzionamento. L’accensione
accidentale dell’unità durante la pulizia delle parti interne può causare gravi lesioni.
Per interventi di riparazione e manutenzione, rivolgersi sempre al centro di assistenza autorizzato.
Preparazione per l’uso
Uso
Pulizia e manutenzione
Riparazioni
Page 22
8 Deumidificatore
Istruzioni
Istruzioni
Questo simbolo indica il pericolo di scosse elettriche.
Questo simbolo indica pericoli che potrebbero danneggiare il
deumidificatore.
Questo simbolo indica avvisi particolari.
AVVISO
ATTENZIONE: l'apparecchio deve essere installato secondo le normative
nazionali in tema di cablaggio. La presente guida costituisce una guida per
aiutare l'utente nella comprensione delle caratteristiche del prodotto.
Caratteristiche
Simboli utilizzati nel manuale
Cavo di alimentazione
Armadietto
Pannello
di controllo
Serbatoio di raccolta
dell’acqua
Griglia anteriore
Filtro dell’aria
Maniglia
Griglia
posteriore
C
o
n
s
t
a
n
t
l
y
O
n
.
F
A
N
S
P
E
E
D
T
I
M
E
R
H
i
g
h
L
o
w
4
h
r
.
O
n
/
O
f
f
2
h
r
.
O
n
/
O
f
f
H
U
M
I
D
I
T
Y
C
O
N
T
R
O
L
B
U
C
K
E
T
F
U
L
L
P
O
W
E
R
A
U
T
O
R
E
S
T
A
R
T
H
U
M
I
D
I
T
Y
S
E
T
T
I
N
G
Page 23
ITALIANO
Manuale dell’utente 9
Istruzioni per il funzionamento
Constantly On.
FAN
SPEED
TIMER
High
Low
4hr. On/Off
2hr. On/Off
HUMIDITY
CONTROL
BUCKET
FULL
POWER
AUTO RESTART
HUMIDITY
SETTING
76
543 2 1
SUL PANNELLO DI CONTROLLO SONO PRESENTI I SEGUENTI TASTI
1. Tasto POWER
--- Premere questo tasto una volta per accendere il deumidificatore e premerlo
nuovamente per spegnere l’unità.
2. Tasti di CONTROLLO UMIDITA’ --- Si usano per selezionare il valore di umidità che si intende impostare.
• : Serve per aumentare il valore di umidità impostato.
• : Serve per diminuire il valore di umidità impostato.
• L’umidità impostata può essere selezionata all'interno di una gamma compresa tra 35% e 70% con
incrementi del 5%.
• Premere nuovamente il tasto a 35% UR per selezionare la modalità“On”. In modalità“On” l’unità
funziona senza arrestarsi, indipendentemente dalle condizioni di umidità.
3. Display UMIDITA’ IMPOSTATA --- Mostra il valore dell’umidità impostata.
4. Tasto VELOCITA’ VENTILATORE --- Serve per impostare la velocità del ventilatore su "Alta" o "Bassa".
• Premere il tasto per variare la velocità del ventilatore da Alta → Bassa → Alta.
• La velocità impostata è indicata da una spia luminosa vicino ad "Alta" oppure a "Bassa".
5. Tasto TIMER --- Serve per selezionare il tipo di funzionamento.
• Selezionare 2 oppure 4 ore. On/Off per il funzionamento a cicli.
In questo caso l’unità funziona per 2 oppure 4 ore, quindi si arresta completamente per 2 o 4 ore. Questo
ciclosiripetefinoaquandol'impostazionenonè modificata.
• PremendoiltastoTIMER,laspialuminosadelTIMERvicinoa2oreOn/Offsispegnementrelaspia
vicinoa4oreOn/Off si accende.
6. Spia SERBATOIO PIENO --- Questa spia si accende quando il serbatoio è pieno e deve essere svuotato.
Si accende inoltre quando il serbatoio non è montato correttamente. Quando la spia del serbatoio si
accende, il compressore e il ventilatore si spengono.
7. AUTO RESTART --- Dopo aver ripristinato l'alimentazione in seguito ad un'interruzione di tensione, l'unità
riprende il funzionamento secondo le impostazioni precedenti. Il ventilatore sarà attivato per un tempo
predefinito di 2 minuti. Trascorsi 2 minuti, il ventilatore ed il compressore si accendono o si spengono in
base alle condizioni di umidità.
PER ACCENDERE IL DEUMIDIFICATORE:
1. Inserire il cavo di alimentazione nella presa di corrente. Premere il tasto POWER.
2. Nel Controllo umidità, impostare un valore compreso tra 35% e 70% per avviare la modalità di
funzionamento normale.
• Per diminuire il valore, premere il tasto CONTROLLO UMIDITA’.
• Per aumentare il valore, premere il tasto CONTROLLO UMIDITA’.
3. Premere il tasto TIMER per impostare la durata dei cicli On e Off dell'unità. E' possibile impostare una
duratadi2o4ore.
4. Se si desidera modificare la velocità del ventilatore, premere il tasto VELOCITA’ VENTILATORE. Ogni
volta che si preme il tasto VELOCITA’ VENTILATORE, la velocità varia in base alla sequenza Alta →
Bassa → Alta.
5. Premere il tasto POWER per arrestare manualmente l'unità.
Assicurarsi che il serbatoio dell'acqua sia installato correttamente.
• Il deumidificatore non funziona se il serbatoio non è installato correttamente.
• Il deumidificatore si spegne quando viene raggiunto il valore di umidità desiderato.
AVVISO
Istruzioni per il funzionamento
Page 24
10 Deumidificatore
Istruzioni per il funzionamento
Interruttore di controllo
del livello dell'acqua
RACCORDO
DEL TUBO
C
o
n
s
t
a
n
t
l
y
O
n
.
F
A
N
S
P
E
E
D
T
I
M
E
R
H
i
g
h
L
o
w
4
h
r
.
O
n
/
O
f
f
2
h
r
.
O
n
/
O
f
f
H
U
M
I
D
I
T
Y
C
O
N
T
R
O
L
B
U
C
K
E
T
F
U
L
L
P
O
W
E
R
A
U
T
O
R
E
S
T
A
R
T
H
U
M
I
D
I
T
Y
S
E
T
T
I
N
G
Il deumidificatore si spegne automaticamente quando il serbatoio
è pieno, quando il serbatoio viene estratto dall’unità oppure
quando il serbatoio non viene rimontato correttamente.
Il serbatoio deve essere rimontato correttamente affinché il
deumidificatore possa funzionare. Se il serbatoio non è
installato correttamente, la spia luminosa è accesa ed è
impossibile attivare il deumidificatore.
2. Collegare un tubo di scarico all'apposito raccordo filettato
per consentire la fuoriuscita dell’acqua dall’unità.
Quando il serbatoio è pieno, estrarlo
dall'unità mediante l'apposita
maniglia e svuotarlo in un ampio
lavandino o in una vasca, quindi
reinserirlo correttamente.
Non estrarre il serbatoio
durante il funzionamento.
La rimozione del serbatoio può
causare la fuoriuscita d'acqua sulla
base dell'unità o sul pavimento.
Svuotare il serbatoio quando la spia
luminosa si accende.
Si consiglia di trasportare
il serbatoio sostenendolo alla base e
afferrando saldamente la maniglia.
Se il serbatoio non viene sostenuto
alla base, la maniglia o il coperchio
del serbatoio potrebbero rompersi.
1. Rimuovere il tappo del foro di
scarico.
2. Collegare un tubo di scarico
all'apposito raccordo filettato.
3. Inserire e fissare bene il raccordo
del tubo nel foro di scarico posto
sulla Griglia Posteriore.
Il raccordo può essere
collegatoaduntubodigomma
standard.
Assicurarsi di non stringere
eccessivamente il tubo al raccordo.
Servirsi di un giunto di gomma e
fissare manualmente con forza
senza danneggiare la filettatura.
Assicurarsi di non piegare o
avvolgere il tubo quando si collega il
raccordo al foro di scarico.
Stendere il tubo dal deumidificatore
allo scarico.
AVVISO
AVVISO
AVVISO
Spegnimento automatico
Smaltimento dell’acqua raccolta
1. Svuotare manualmente il
erbatoio.
Page 25
ITALIANO
Manuale dell’utente 11
Installazione
12"
12"
C
o
n
s
t
a
n
t
l
y
O
n
.
F
A
N
S
P
E
E
D
T
I
M
E
R
H
i
g
h
L
o
w
4
h
r
.
O
n
/
O
f
f
2
h
r
.
O
n
/
O
f
f
H
U
M
I
D
I
T
Y
C
O
N
T
R
O
L
B
U
C
K
E
T
F
U
L
L
P
O
W
E
R
A
U
T
O
R
E
S
T
A
R
T
H
U
M
I
D
I
T
Y
S
E
T
T
I
N
G
C
o
n
s
t
a
n
t
l
y
O
n
.
F
A
N
S
P
E
E
D
T
I
M
E
R
H
i
g
h
L
o
w
4
h
r
.
O
n
/
O
f
f
2
h
r
.
O
n
/
O
f
f
H
U
M
I
D
I
T
Y
C
O
N
T
R
O
L
B
U
C
K
E
T
F
U
L
L
P
O
W
E
R
A
U
T
O
R
E
S
T
A
R
T
H
U
M
I
D
I
T
Y
S
E
T
T
I
N
G
C
o
n
s
t
a
n
t
l
y
O
n
.
F
A
N
S
P
E
E
D
T
I
M
E
R
H
i
g
h
L
o
w
4
h
r
.
O
n
/
O
f
f
2
h
r
.
O
n
/
O
f
f
H
U
M
I
D
I
T
Y
C
O
N
T
R
O
L
B
U
C
K
E
T
F
U
L
L
P
O
W
E
R
A
U
T
O
R
E
S
T
A
R
T
H
U
M
I
D
I
T
Y
S
E
T
T
I
N
G
C
o
n
s
t
a
n
t
l
y
O
n
.
F
A
N
S
P
E
E
D
T
I
M
E
R
H
i
g
h
L
o
w
4
h
r
.
O
n
/
O
f
f
2
h
r
.
O
n
/
O
f
f
H
U
M
I
D
I
T
Y
C
O
N
T
R
O
L
B
U
C
K
E
T
F
U
L
L
P
O
W
E
R
A
U
T
O
R
E
S
T
A
R
T
H
U
M
I
D
I
T
Y
S
E
T
T
I
N
G
C
o
n
s
t
a
n
t
ly
O
n
.
F
A
N
S
PE
E
D
T
I
M
E
R
H
i
g
h
L
o
w
4
h
r
.
O
n
/
O
f
f
2
h
r
.
O
n
/
O
f
f
H
U
M
I
D
I
T
Y
C
O
N
T
R
O
L
B
U
C
K
E
T
F
U
L
L
PO
W
E
R
A
U
T
O
R
E
S
T
A
R
T
H
U
M
I
D
I
T
Y
S
E
T
T
I
N
G
1.
Lasciare uno spazio minimo di 30 cm a tutti i lati dell’unità per favorire la ventilazione.
2.Posizionare il deumidificatore sul pavimento, su un tavolo o un ripiano.
Se si intende posizionare il deumidificatore su un tavolo o un ripiano, assicurarsi che
i supporti siano sufficientemente resistenti per sostenere il peso del deumidificatore
quando il serbatoio di raccolta è pieno. Non sedersi né salire in piedi sull'unità.
Se posizionata su un tavolo o un ripiano, bloccare le ruote per evitare che l’unità
possa cadere.
Posizionare l’unità su un tavolo o un ripiano può rendere più agevole
l’operazione di estrazione del serbatoio ed impedire il congelamento
delle serpentine dovuto alle basse temperature che si sviluppano in
prossimità del pavimento (ad esempio nei seminterrati).
3.Sollevare il serbatoio ed inserirlo nel deumidificatore, assicurandosi che
le scanalature sulla base si trovino nella posizione corretta.
4.Le ruote consentono di spostare agevolmente l'unità.
AVVISO
1.
Rimuovere il coperchio del
serbatoio.
2.
Rimuovere con una spazzola
gli eventuali residui.
Pulire il serbatoio
servendosi di una spazzola o di un
panno inumidito con detergente non
aggressivo.
3. Chiudere il coperchio.
Per reinserire il serbatoio,
far scattare le chiusure poste sulla
parte superiore del serbatoio.
AVVISO
AVVISO
• Utilizzare il deumidificatore nel
seminterrato per evitare i danni
provocati dall’umidità.
• Utilizzare il deumidificatore in
ambienti adibiti a lavanderia,
lavaggio stoviglie e nei bagni,
dove la concentrazione di umidità
è particolarmente elevata.
• Utilizzare il deumidificatore in
ambienti in cui si conservano libri
per evitare i danni provocati
dall'umidità.
Installazione
Corretta installazione del deumidificatore
Scegliere la collocazione più indicata
Pulizia del serbatoio
Page 26
12 Deumidificatore
Manutenzione e assistenza
C
o
n
s
t
a
n
t
l
y
O
n
.
F
A
N
S
P
E
E
D
T
I
M
E
R
H
i
g
h
L
o
w
4
h
r
.
O
n
/
O
f
f
2
h
r
.
O
n
/
O
f
f
H
U
M
ID
I
T
Y
C
O
N
T
R
O
L
B
U
C
K
E
T
F
U
L
L
P
O
W
E
R
A
U
T
O
R
E
S
T
A
R
T
H
U
M
I
D
I
T
Y
S
E
T
T
I
N
G
C
o
n
s
t
a
n
t
l
y
O
n
.
FA
N
S
P
E
E
D
T
IM
E
R
H
i
g
h
L
o
w
4
h
r
.
O
n
/
O
f
f
2
h
r
.
O
n
/
O
f
f
H
U
M
I
D
I
T
Y
C
O
N
T
R
O
L
B
U
C
K
E
T
F
U
L
L
P
O
W
E
R
A
U
T
O
R
E
S
T
A
R
T
H
U
M
I
D
I
T
Y
S
E
T
T
I
N
G
Il deumidificatore è progettato per essere utilizzato
durante tutto l’arco dell’anno. Non richiede particolari
attenzioni. Tuttavia, si consiglia di verificarne il corretto
funzionamento e di controllare le serpentine almeno
una volta all’anno.
E’ possibile rivolgersi ad un Centro di Assistenza
Autorizzato per effettuare gli opportuni controlli. (I costi
delle ispezioni sono a carico dell’acquirente).
oppure
Agli utenti con una discreta conoscenza degli
apparecchi elettrici e delle loro funzioni, si consiglia di
seguire le istruzioni riportate di seguito per procedere
autonomamente alle opportune operazioni di controllo e
manutenzione.
Pulizia della superficie esterna, del
serbatoio e dell’armadietto
Pulire la superficie esterna e l’armadietto con un
panno soffice, acqua tiepida e una soluzione
detergente non aggressiva.
Pulire la griglia con un aspirapolvere o una
spazzola.
Non utilizzare candeggine o abrasivi.
Pulizia del filtro dell’aria
1.Rimuovere il serbatoio dell’acqua dall’armadietto.
Estrarre il filtro dell’aria come illustrato in figura.
2.Lavare il filtro dell’aria con acqua tiepida e un
detergente non aggressivo. Sciacquare ed
asciugare.
Reinserire il filtro.
Pulizia della serpentina
1.Rimuovere la Griglia Anteriore dall’armadietto
come illustrato in figura.
2.Spazzolare delicatamente la serpentina come
illustrato in figura. Se necessario, servirsi di
acqua tiepida e detergente non aggressivo.
Sciacquare ed asciugare a fondo.
AVVISO: Fare attenzione a non
spruzzare acqua sulla serpentina
con il tubo di scarico.
Attenzione! Spigoli affilati.
Pericolo di Scossa
• Scollegare il cavo di alimentazione prima di
effettuare qualsiasi intervento di manutenzione.
• Fare attenzione durante la pulizia delle serpentine.
I bordi sono taglienti.
La mancata osservanza delle precauzioni riportate
può esporre al rischio di scossa o provocare lesioni
all'utente.
Manutenzione e assistenza
Page 27

ITALIANO
Manuale dell’utente 13
Manutenzione e assistenza
■
Il serbatoio dell’acqua è pieno.
■
Il serbatoio non è inserito.
■ Il flusso d'aria è ostruito.
■
Le porte e le finestre sono aperte.
Problema Possibili Cause Cosa Fare
■
In questo caso l’Umidità ambiente è
inferiore al valore di umidità
impostato.
■
Il cavo di alimentazione del
deumidificatore non è collegato.
■
Il fusibile si è fuso oppure
l'interruttore del circuito è scattato.
■
E' impossibile impostare il Controllo
Umidità su Umidità bassa.
■
La temperatura ambiente è troppo
bassa.
■
La temperatura ambiente è troppo
bassa.
■
C’è aria in circolo all’interno del
deumidificatore.
■
Il raccordo del tubo di scarico non è
fissato saldamente.
■
Il serbatoio di raccolta dell’acqua non
è inserito fino in fondo.
■
Controllare se l’unità è in modalità
“ON”.
■
L'area da deumidificare è troppo
grande.
■
Le porte e le finestre non sono ben
chiuse.
■
E' possibile che l'asciugatrice
introduca aria umida nell'ambiente.
■
Non è trascorso abbastanza tempo
per consentire un’efficiente azione
deumidificante.
Il deumidificatore
funziona senza
interruzioni
■
L’Umidità Ambiente è elevata.
Il deumidificatore
non parte
Il deumidificatore
non deumidifica
come dovrebbe
Il deumidificatore
resta acceso
troppo a lungo
Si è formato del
ghiaccio sulle
serpentine
Il ventilatore è
rumoroso
Fuoriuscita
d’acqua sul
pavimento
•
Accertarsi che la spina del deumidificatore sia inserita
completamente nella presa.
•
In questo caso, il deumidificatore si spegne
automaticamente. Svuotare il serbatoio.
•
Cambiare l’impostazione dell’umidità inserendo valori
più bassi.
•
Alla prima installazione, lasciar trascorrere almeno 3 o 4
giorni per mantenere il livello di umidità desiderato.
•
Premere il pulsante di Controllo Umidità per ridurre
l’umidità.
•
Accertarsi che le porte, le finestre ed altre aperture che
collegano l’ambiente all’esterno siano ben chiuse.
•
L’unità non funziona in modo efficiente se la temperatura
dell’ambiente è inferiore a 6°C (42° F).
•
Verificare con il proprio rivenditore che la capacità sia
adeguata.
•
Vedere la sezione Estrarre e Svuotare il Serbatoio
dell’Acqua.
• Se collegato, controllare il tubo.
• Cambiare il valore di umidità impostato.
• Cambiare il valore di umidità impostato.
•
Normalmente il ghiaccio scompare dopo l’intervento del
gas caldo del sistema di scongelamento.
•
Posizionare il deumidificatore lontano dall’asciugatrice.
Assicurarsi che lo scarico dell'asciugatrice sia posizionato
verso l'esterno.
•
Accertarsi che non vi siano persiane, tende o mobili che
ostruiscono la parte anteriore o posteriore del
deumidificatore.
•
Assicurarsi che il serbatoio sia installato correttamente.
•
Chiudere le porte e le finestre che collegano l’ambiente
con l’esterno.
• E’ normale.
•
Controllare il fusibile dell’abitazione o la cassetta dell'interruttore
di circuito, quindi sostituire il fusibile o ripristinare l'interruttore.
È possibile che il condizionatore d'aria stia funzionando in maniera anomala quando:
Risoluzione dei problemi
Page 28

14 Deumidificatore
Nota
Page 29

ESPAÑOL
DESHUMIDIFICADOR
MANUAL DEL PROPIETARIO
Lea detenidamente las instrucciones de uso y
precauciones de seguridad antes de utilizar el
deshumidificador.
Page 30

2 Deshumidificador
Manual de Instalación & Operación Deshumidificador
ÍNDICE
PARA SUS REGISTROS
Escribaaquíelnúmerodemodeloyserie:
Modelo #
Serie #
Puede encontrarlos en la etiqueta situada en el lateral de cada unidad.
Nombre del distribuidor
Fechadecompra
■
Grape su recibo en esta página por si lo necesita para comprobar la
fechadecompraotemasrelacionadosconlagarantía.
LEA ESTE MANUAL
En su interior encontrará muchos consejos útiles sobre la utilización
y el mantenimiento adecuado de su deshumidificador. Una simple
atención preventiva por su parte puede ahorrarle mucho tiempo y
dinero a lo largo de la vida de su deshumidificador.
Encontrará muchas respuestas a los problemas más comunes en el
cuadro de consejos para la solución de problemas. Si en primer lugar
revisa nuestro cuadro de consejos para la solución de problemas, es
posible que no tenga necesidad de llamar al servicio técnico.
PRECAUCIÓN
• Póngase en contacto con un técnico del servicio
autorizado para las reparaciones o el mantenimiento
de esta unidad.
• Póngase en contacto con un instalador para la
instalación de esta unidad.
• El deshumidificador no está diseñado para que lo
utilicen sin supervisión niños o personas con las
facultades mentales mermadas.
• Debe vigilarse a los niños para asegurarse de que no
juegan con el deshumidificador.
• Cuando haya que sustituir el cable de alimentación,
debe realizar el trabajo de sustitución personal
autorizado utilizando únicamente piezas de recambio
originales.
Precauciones de seguridad.........3
Antes de la utilización..................7
Instrucción.....................................8
Instrucciones de
funcionamiento.............................9
Instalación...................................11
Cuidados y mantenimiento........12
Page 31
Precauciones de seguridad
Manual de usuario 3
ESPAÑOL
LLEEAAEESSTTAASSIINNSSTTRRUUCCCCIIOONNEESSAANNTTEESSDDEEUUSSAAR
R
■ Para evitar lesiones al usuario o a otras personas y daños materiales, debe seguir las siguientes instrucciones.
■ El uso incorrecto ocasionado al ignorar las instrucciones puede causar lesiones o daños. La gravedad se
clasifica mediante las siguientes indicaciones.
■ A continuación se muestran los significados de los símbolos utilizados en este manual.
ADVERTENCIA
Este símbolo indica la posibilidad de muerte o lesiones graves.
ATENCIÓN Este símbolo indica la posibilidad de lesiones o daños sólo materiales.
No lo haga.
Siga las instrucciones.
AADDVVEERRTTEENNCCIIA
A
Enchufe la clavija
correctamente.
•
De lo contrario, puede ocasionar
un incendio o una descarga
electrica.
No encienda ni apague la
unidad insertando o retirando
la clavija.
• Causará una descarga eléctrica
o incendio
No dañe el cable ni utilice un
cable de alimentación no
especificado.
• Podría producirse una descarga
eléctrica o incendio.
Gasolin
NO
■ Instalación
■ Funcionamiento
No coloque el cable de
alimentación cerca de una
estufa.
• Podría producirse un incendio y
una descarga eléctrica.
No utilice el cable de alimentación
cerca de gas inflamable o
combustibles, como gasolina,
benceno, disolvente, etc.
• Podría producirse una explosión o
incendio.
No desmonte ni modifique los
productos.
• Puede causar una descarga
eléctrica
Precauciones de Seguridad
Page 32

4 Deshumidificador
Precauciones de seguridad
No modifique la longitud del
cable de alimentación.
• Causará una descarga eléctrica o
incendio.
No comparta el enchufe con
otros aparatos.
• Causará una descarga eléctrica o
incendio.
Desenchufe la unidad si emite un
sonido extraño, olores o humo.
•
De lo contrario, puede ocasionar un
incendio o una descarga electrica.
No utilice el enchufe si está
flojoodañado.
• Podría producirse una descarga
eléctrica o incendio.
No utilice la unidad con las manos
mojadas o en un entorno húmedo.
• Puede causar una descarga
eléctrica o incendio.
Si hay una fuga de gas, ventile
la habitación antes de utilizar el
deshumidificador.
• Podría producirse una explosión,
incendio y quemaduras.
No limpie el deshumidificador
con agua.
• El agua podría introducirse en la
unidad y degradar el aislamiento.
Podría producirse una descarga
eléctrica.
Apague el aparato y el diferencial
primero al limpiar la unidad.
• Como el ventilador gira a alta
velocidad durante el
funcionamiento, podrían
producirse lesiones.
Si observa que entra agua en el
producto, apague el interruptor
de contacto del
deshumidificador. Despuésde
retirar la clavija del enchufe,
póngase en contacto con el
centro de servicio técnico.
• Causara fallo de la maquina o
descarga electrica.
Page 33

Precauciones de seguridad
Manual de usuario 5
ESPAÑOL
AATTEENNCCIIÓÓN
N
■ Instalación
No toque nunca las partes
metálicas de la unidad cuando
retire el filtro.
• Son afiladas y pueden producir
lesiones.
No bloquee la entrada ni la
salida.
• Puede causar fallas de aplicación
o deterioro en su rendimiento.
Sujete la clavija por la cabeza
cuando la saque.
• Podría producirse una descarga
eléctrica o daños.
Apague el interruptor de contacto
cuando no vaya a utilizar el
deshumidificador durante un
largo periodo de tiempo.
• Se gastará el consumo eléctrico
en vano y puede causar
accidentes.
Asegure las ruedas con bloques
para evitar que la unidad se
caiga cuando esta instalada
sobre una mesa o estanteria.
• Podría dañarse el
deshumidificador o producir otros
daños o lesiones.
Asegúrese de que el
deshumidificador tiene la
capacidad adecuada para la
zona que desea deshumidificar.
• No está diseñado para enfriar la
casa entera
Instale el deshumidificador
correctamente sobre el suelo, una
mesa o una estanteria lo
suficientemente nivelada y fuerte
como para soportar su peso cuando
la cubeta colectora de agua este llena.
• El peso a soportar es de
aproximadamente 90 libras
(40 kg).
Cierre todas las puertas,
ventanas y aberturas al exterior
de la habitación.
• Para una mayor eficacia, el
deshumidificador debe utilizarse
en una zona cerrada.
No se siente sobre el
deshumidificador.
Page 34

6 Deshumidificador
Precauciones de seguridad
Utilice un paño suave para
limpiar la unidad. No utilice
cera, disolvente ni un
detergente fuerte.
• Podría deteriorarse el aspecto del
deshumidificador, cambiar el
color o producirse desperfectos
en su superficie.
Asegurese de reemplazar la
cubeta debidamente cuando vaya
a vaciarla para evitar que el agua
caiga al suelo.
• De lo contrario, se causaran
danos a la propiedad.
No instale un deshumidificador
en un área done las
temperaturas caigan por debajo
de 42°F(6°C).
• Las bajas temperaturas podrían
causar que los serpentines se
cubrieran de escarcha, evitando
quelaunidadiniciesu
funcionamiento.
Wax
Thinner
No coloque ningúnanimalo
planta expuestos al flujo de aire
directo.
• Esto podria lesionar al animal o
danar la planta.
No utilice este aparato para una
finalidad especial como la
deshumidificación de alimentos,
animales, maquinaróade
precisión u objetos artisticos.
• Es un aparato de uso general, no
un equipo de precision.
No utilice el agua acumulada en
la cubeta para beber.
•Noessalubreypodríacausar
enfermedades o poner en riesgo
su salud.
Inserte siempre el filtro
correctamente. Límpielo una
vez cada dos semanas.
• La utilización sin filtros podría
producir un mal funcionamiento.
■ Funcionamiento
Page 35

ESPAÑOL
Manual de usuario 7
Antesdelautilización
1. Consulte a un especialista en instalaciones para realizar la instalación.
2. Enchufe la clavija correctamente.
3. Utilice un circuito apropiado.
4. No utilice una alargadera.
5. No inicie/detenga el funcionamiento enchufando/desenchufando el cable de alimentación.
6. Si el cable/clavija se daña, sustitúyalo únicamente por una pieza de recambio autorizada.
1. La exposición a flujo de aire directo durante un largo periodo de tiempo puede ser perjudicial
para su salud. No exponga a personas, animales o plantas al flujo de aire directo durante
largos periodos de tiempo.
2. Ventile la sala cuando el deshumidificador se use con otros aparatos de calefaccion.
De lo contrario, el suministro de oxigeno puede ser inadecuado.
3. No utilice este deshumidificador para finalidades no especificadas (p.ej., preservar dispositivos
de precisión, alimentos, animales, plantas y objetos de arte). Tal uso podría dañar estos
elementos.
1. No toque las partes metálicas de la unidad cuando retire el filtro. Podrían producirse lesiones
con los bordes metálicos afilados.
2. No utilice agua para limpiar el interior del deshumidificador. La exposición al agua puede
destruir el aislamiento y ocasionar una posible descarga eléctrica.
3. Cuando limpie la unidad, primero asegúrese de que la alimentación y el interruptor están
apagados. El ventilador gira a una velocidad muy alta durante el funcionamiento. Existe la
posibilidad de lesion si se enciende accidentalmente la alimentacion a la unidad mientras se
esta limpiando su interior.
Para las reparaciones y el mantenimiento, póngase en contacto con su distribuidor de servicio
técnico autorizado.
Preparación para la utilización
Utilización
Limpieza y Mantenimiento
Servicio Técnico
Antes de la utilización
Page 36

8 Deshumidificador
Instrucción
Este símbolo le avisa del riesgo de descarga eléctrica.
Este símbolo le avisa de riesgos que pueden producir daños al
deshumidificador.
Este símbolo indica notas especiales.
AVISO
ADVERTENCIA: este aparato debe instalarse de acuerdo con la normativa
nacional para instalaciones eléctricas. Este manual sirve como guíapara
ayudar a explicar las características del producto.
Cable de
alimentación
Carcasa
Panel de control
Cubeta de agua
Parrilla frontal
Filtro de aire
Asa
Parrilla
posterior
C
o
n
s
t
a
n
t
l
y
O
n
.
F
A
N
S
P
E
E
D
T
I
M
E
R
H
i
g
h
L
o
w
4
h
r
.
O
n
/
O
f
f
2
h
r
.
O
n
/
O
f
f
H
U
M
I
D
I
T
Y
C
O
N
T
R
O
L
B
U
C
K
E
T
F
U
L
L
P
O
W
E
R
A
U
T
O
R
E
S
T
A
R
T
H
U
M
I
D
I
T
Y
S
E
T
T
I
N
G
Instrucción
Símbolos utilizados en este Manual
Caracteríticas
Page 37

ESPAÑOL
Manual de usuario 9
Instrucciones de funcionamiento
Constantly On.
FAN
SPEED
TIMER
High
Low
4hr. On/Off
2hr. On/Off
HUMIDITY
CONTROL
BUCKET
FULL
POWER
AUTO RESTART
HUMIDITY
SETTING
76
543 2 1
PANEL DE CONTROL
1. Tecla POWER
--- si pulsa una vez esta tecla, el deshumidificador se enciende, “ON”, y si la vuelve a
pulsar el deshumidificador se apaga, “OFF”.
2. Teclas HUMIDITY CONTROL --- se utilizan para seleccionar el ajuste de humedad deseado.
• : se utiliza para aumentar el ajuste de humedad deseado.
• : se utiliza para disminuir el ajuste de humedad deseado.
• La humedad deseada puede seleccionarse en un rango del 35% al 70% de humedad relativa, en
incrementos del 5%.
• Si vuelve a pulsar la tecla en el 35% de humedad relativa, se selecciona el modo “ON”.Enmodo
“ON” la unidad funciona continuamente, independientemente de las condiciones de humedad.
3. Visualizador HUMIDITY SETTING --- muestra la humedad deseada seleccionada.
4. Tecla FAN SPEED --- se utiliza para ajustar la velocidad del ventilador a “High” (alta) o “Low” (baja).
• Si pulsa esta tecla la velocidad del ventilador cambia de High → Low → High.
• La velocidad del ventilador seleccionada se indica mediante pilotos con la indicación “High” y “Low”.
5. Tecla TIMER --- se utiliza para seleccionar el tipo de funcionamiento.
• Seleccione 2 ó 4hr.On/Off para un funcionamiento cíclico.
En este caso, la unidad funcionará durante 2 o 4 horas y, a continuación, se apagará completamente
durante 2 ó 4 horas. El ciclo se repetirá hasta que cambie el ajuste.
• Cuando se pulsa la tecla TIMER, el piloto indicador TIMER cambia de 2hr.On/Off a 4hr.On/Off
6. Indicador BUCKET FULL --- este piloto se ilumina cuando la cubeta está llena y es necesario vaciarla.
Tambiénseiluminacuandolacubetanoestá colocada correctamente. Cuando el piloto de cubeta llena
se ilumina, se apaga el compresor y el ventilador.
7. AUTO RESTART --- una vez se reestablece la alimentación después de un corte de energía, la unidad
comienza a funcionar con los ajustes de funcionamiento previos. El ventilador se pondrá en marcha, por
defecto, durante 2 minutos. Transcurridos 2 minutos, tanto el ventilador como el compresor estarán
encendidos o apagados dependiendo de las condiciones de humedad.
PARA UTILIZAR EL DESHUMIDIFICADOR:
1. Enchufe el cable de alimentaciónenlatomaeléctrica. Pulse la tecla POWER.
2. Ajuste el control de humedad del 35% al 70% para un funcionamiento normal.
• Para menos humedad, pulse la tecla ( ) HUMIDITY CONTROL.
• Para una mayor humedad, pulse la tecla ( ) HUMIDITY CONTROL.
3.PulselateclaTIMERparaajustarelperiododetiempoenquedeseaquelaunidadrealiceciclosde
encendidoyapagado.Eltiempopuedeajustarsea2o4horas
4. Si desea cambiar la velocidad del ventilador, pulse la tecla FAN SPEED. Cada vez que se pulsa la tecla
FAN SPEED, la velocidad del ventilador cambia de High → Low → High.
5. Pulse la tecla POWER para detener manualmente la unidad.
La cubeta de agua deberá instalarse adecuadamente.
• El deshumidificador no funcionará si la cubeta no está instalada correctamente.
• El deshumidificador se apagará cuando se alcance el ajuste de humedad deseado.
AVISO
Instrucciones de funcionamiento
Page 38

10 Deshumidificador
Instrucciones de funcionamiento
Interruptor de control
del nivel de agua
CONECTOR DE
MANGUERA
A
u
t
o
R
e
s
t
a
r
t
C
o
n
s
t
a
n
t
l
y
O
n
.
F
A
N
S
P
E
E
D
T
I
M
E
R
H
i
g
h
L
o
w
4
h
r
.
O
n
/
O
f
f
2
h
r
.
O
n
/
O
f
f
H
U
M
I
D
I
T
Y
C
O
N
T
R
O
L
B
U
C
K
E
T
F
U
L
L
P
O
W
E
R
A
U
T
O
R
E
S
T
A
R
T
H
U
M
I
D
I
T
Y
S
E
T
T
I
N
G
El deshumidificador se apagará automáticamente cuando la cubeta esté
llena, cuando se retire la cubeta o no se coloque en la posición correcta.
La cubeta debe colocarse en la posición correcta para que el
deshumidificador funcione. El deshumidificador no funcionará yse
encenderá el piloto si la cubeta no está en la posición correcta.
1.
Vacíelacubetamanualmente.
2.
Conecte un trozo de manguera de jardineríaalaconexión roscada
de la manguera de drenaje para conducir el agua al desagüe.
Cuando la cubeta esté llena, estire
agarrando el asa y vacíelaenun
fregadero grande o bañera y, a
continuación, vuelva a colocarla
adecuadamente.
No lo quite mientras el
deshumificador esta en
funcionamiento. Puede provocar que
el agua caiga al receptaculo base o
al suelo.
Vacie la cubeta cuando la luz se
encienda.
Se aconseja llevar la
cubeta apoyandola desde abajo
ademas de ayudarse del asa.
Llevarlo solo del asa puede provocar
que esta o la cubeta se rompan.
1. Retire la cubierta del orificio de
drenaje.
2. Conecte una manguera de
jardinería al conector roscado de
la manguera de drenaje.
3. Empuje firmemente el conector
de la manguera hacia el orificio
de drenaje de la parrilla posterior.
La conexióndela
manguera admitirá un tamañode
manguera de jardineríaestándar.
No sobre apriete la manguera al
conectarla a la manguera del
conector. Utilice un casquillo de
goma y apriete firmemente con la
mano sin rayar las roscas plásticas.
Al acoplarse a la conexion de la
maguera de drenaje del conector de
la manguera, no doble ni pliegue la
mangera. La manguera deberia ir
tumbada desde el deshumificador al
drenaje.
AVISO
AVISO
AVISO
Apagado Automático
Eliminación del agua almacenada
Page 39

ESPAÑOL
Manual de usuario 11
Instalación
12"
12"
C
o
n
s
t
a
n
t
l
y
O
n
.
F
A
N
S
P
E
E
D
T
I
M
E
R
H
i
g
h
L
o
w
4
h
r
.
O
n
/
O
f
f
2
h
r
.
O
n
/
O
f
f
H
U
M
I
D
I
T
Y
C
O
N
T
R
O
L
B
U
C
K
E
T
F
U
L
L
P
O
W
E
R
A
U
T
O
R
E
S
T
A
R
T
H
U
M
I
D
I
T
Y
S
E
T
T
I
N
G
C
o
n
s
t
a
n
t
ly
O
n
.
F
A
N
S
P
E
E
D
T
IM
E
R
H
i
g
h
L
o
w
4
h
r
.
O
n
/
O
f
f
2
h
r
.
O
n
/
O
f
f
H
U
M
I
D
I
T
Y
C
O
N
T
R
O
L
B
U
C
K
E
T
F
U
L
L
PO
W
E
R
A
U
T
O
R
E
S
T
A
R
T
H
U
M
I
D
I
T
Y
S
E
T
T
I
N
G
C
o
n
s
t
a
n
t
l
y
O
n
.
F
A
N
S
P
E
E
D
T
I
M
E
R
H
i
g
h
L
o
w
4
h
r
.
O
n
/
O
f
f
2
h
r
.
O
n
/
O
f
f
H
U
M
I
D
I
T
Y
C
O
N
T
R
O
L
B
U
C
K
E
T
F
U
L
L
P
O
W
E
R
A
U
T
O
R
E
S
T
A
R
T
H
U
M
I
D
I
T
Y
S
E
T
T
I
N
G
C
o
n
s
t
a
n
t
l
y
O
n
.
F
A
N
S
P
E
E
D
T
I
M
E
R
H
i
g
h
L
o
w
4
h
r
.
O
n
/
O
f
f
2
h
r
.
O
n
/
O
f
f
H
U
M
I
D
I
T
Y
C
O
N
T
R
O
L
B
U
C
K
E
T
F
U
L
L
P
O
W
E
R
A
U
T
O
R
E
S
T
A
R
T
H
U
M
I
D
I
T
Y
S
E
T
T
I
N
G
1.Deje al menos un espacio de unos 30 centímetros a cada lado de la unidad para
permitir una buena circulacióndeaire.
2.Instale su deshumidificador sobre el suelo, una mesa o estantería. Cuando
instale el deshumidificador sobre una mesa o estantería, asegúresedequelamesao
estantería es suficientemente resistente para soportar el peso del deshumidificador
con la cubeta llena de agua. No se siente ni se apoye sobre el deshumidificador.
Asegure las ruedas con bloques para evitar que la unidad se caiga cuando esta
instalada sobre una mesa o estanteria.
La altura de la mesa o estantería debe proporcionar una mejor
posición para coger la cubeta y ayudar a prevenir la congelacióndelos
serpentines ocasionada al estar el aire másfrío cerca del suelo
(comoenunsótano).
3.Levante la cubeta y colóquela en el deshumidificador, asegurándose de que las
ranuras de la parte inferior de la cubeta están colocadas correctamente.
4.Las ruedas le permiten desplazar el deshumidificador fácilmente.
AVISO
1.Retire la cubierta de la cubeta. 2. Limpie el residuo de la cubeta.
Limpie la cubeta frotando
con un cepillo o pano humedecido
en una solucion de detergente
suave.
3. Cierre la cubierta
Presione las lengüetas de
la parte superior de la cubeta
cuando instale la cubeta.
AVISO
AVISO
• Utilice el deshumidificador en un
sótano para ayudar a evitar
daños por humedad.
• Utilice el deshumidificador en
zonas de lavaderos, secadoras,
baños y lavavajillas que tengan
humedad excesiva.
• Use el deshumificador para evitar
que la humedad dane los lugares
en los que guarda libros.
Instalación
Ubicación adecuada del deshumidificador
Instalación adecuada del deshumidificador
Limpieza de la cubeta
Page 40

12 Deshumidificador
Cuidados y mantenimiento
C
o
n
s
t
a
n
t
l
y
O
n
.
F
A
N
S
P
E
E
D
T
IM
E
R
H
i
g
h
L
o
w
4
h
r
.
O
n
/
O
f
f
2
h
r
.
O
n
/
O
f
f
H
U
M
I
D
I
T
Y
C
O
N
T
R
O
L
B
U
C
K
E
T
F
U
L
L
P
O
W
E
R
A
U
T
O
R
E
S
T
A
R
T
H
U
M
I
D
I
T
Y
S
E
T
T
I
N
G
C
o
n
s
t
a
n
t
l
y
O
n
.
F
A
N
S
P
E
E
D
T
I
M
E
R
H
i
g
h
L
o
w
4
h
r
.
O
n
/
O
f
f
2
h
r
.
O
n
/
O
f
f
H
U
M
ID
I
T
Y
C
O
N
T
R
O
L
B
U
C
K
E
T
F
U
L
L
P
O
W
E
R
A
U
T
O
R
E
S
T
A
R
T
H
U
M
I
D
I
T
Y
S
E
T
T
I
N
G
Este deshumidificador está diseñado para funcionar
en cualquier época del año. Prácticamente no
necesita cuidados. No obstante, debe revisar el
deshumidificador e inspeccionar los serpentines
anualmente.
Es posible que desee que un centro de servicio
técnico autorizado realice esta revisión anual (los
costes de la revisión son responsabilidad del
propietario).
O
Si está familiarizado con los aparatos eléctricos y
sus funciones, a continuación se muestran algunas
instrucciones que le permitirán realizar a usted
mismolarevisión y el mantenimiento.
Limpieza del panel frontal, cubeta
y carcasa
Limpie el panel frontal y la carcasa con un paño
suave, agua tibia y detergente suave.
Limpie la parrilla con un aspirador o cepillo.
No utilice blanqueadores ni abrasivos.
Limpieza del filtro de aire
1.Saque la cubeta de agua de la carcasa.
Retire el filtro de aire como se muestra arriba.
2.Limpie el filtro de aire con agua tibia y un
detergente suave. Enjuáguelo y séquelo.
Vuelva a colocarlo en su sitio.
Limpieza del serpentín
1.Retire la parrilla frontal de la carcasa como se
muestra arriba.
2.Cepille el serpentín cuidadosamente como se
indica en la ilustración. Si es necesario utilice
agua tibia y un detergente suave. Enjuáguelo y
séquelo completamente.
ATENCIÓN: no rocíe el serpentín
conunamangueradeagua.
¡Cuidado! ¡Bordes afilados!
Riesgo de descarga eléctrica
• Desconecte el cable de alimentación del enchufe
antes de realizar cualquier mantenimiento.
• Tenga cuidado cuando limpie los serpentines.
Las aletas están afiladas.
Si no sigue las precauciones anteriores podría
producirse una descarga eléctrica o daños personales.
Cuidados y mantenimiento
Page 41

ESPAÑOL
Manual de usuario 13
Cuidados y mantenimiento
■
La cubeta de agua está llena.
■
La cubeta no está instalada.
■
El flujo de aire está restringido.
■
Las puertas y ventanas están abiertas.
Problema Causas posibles ¿Qué hacer?
■
Si la humedad de la habitación es
menor que el ajuste de humedad
seleccionado.
■
El cable de alimentación del
deshumidificador está desenchufado.
•
Asegúrese de que la clavija del deshumidificador está
completamente insertada en el enchufe.
■
Se ha fundido el fusible o se ha
disparado el interruptor automático.
•
Compruebe los fusibles o el cuadro del interruptor automático
y cambie el fusible o vuelva a conectar el interruptor.
■
No ha habido suficiente tiempo para
eliminar la humedad.
•
Cuando se instala por primera vez, debe esperar al menos 3
ó 4 días para mantener el nivel de humedad deseado.
■
Es posible que el control de humedad
no esté ajustado a humedad baja.
•
Pulse la tecla Humidity Control para disminuir la
humedad.
■
Es posible que las puertas y ventanas
no estén completamente cerradas.
•
Compruebe que todas las puertas, ventanas y otras
aberturas están cerradas completamente.
■
La temperatura de la habitación es
demasiado baja
■
Es posible que la conexión de la
manguera de drenaje esté suelta.
•
Compruebe la manguera, en caso de que haya incorporado
una.
■
La cubeta de agua no está colocada
correctamente.
•
Consulte cómo retirar y vaciar la cubeta de agua.
■
La zona a deshumidificar es
demasiado grande.
•
Consulte con su distribuidor para comprobar si la capacidad
es adecuada.
■
El aire está circulando por el
deshumidificador.
•
Es normal.
■
Compruebe si la unidad está
funcionando en modo “ON”.
•
Cambie el ajuste de humedad.
•
Cambie el ajuste de humedad.
•
Cierre todas las puertas y ventanas comunicadas con el
exterior.
■
Es posible que la secadora de ropa
esté expulsando aire cargado de
humedad en la habitación.
•
Instale el deshumidificador lejos de la secadora. La secadora
debe tener salida al exterior.
■
La temperatura ambiente es
demasiado baja.
•
Normalmente la escarcha desaparece después una vez
finalizado el sistema de descongelación por gas caliente
•
Asegúrese de que no hay cortinas, persianas o mobiliario
que bloquean la parte frontal o posterior del
deshumidificador.
•
El deshumidificador se apaga automáticamente cuando esto
ocurre. Vacíe la cubeta.
•
Asegúrese de que la cubeta está colocada correctamente.
•
Cambie el ajuste de humedad a un límite inferior.
El
deshumidificador
funciona de
manera continuada
El
deshumidificador
no se enciende
El
deshumidificador
no seca el aire
como debiera
El
deshumidificador
funciona durante
mucho tiempo
Aparece escarcha
en los serpentines
El ventilador hace
ruido
Hay agua en el
suelo
■
La humedad de la habitación es alta.
•
La unidad no funcionará satisfactoriamente si la temperatura
de la habitación está por debajo de los 42°F(6°C).
El deshumidificador puede funcionar de modo anormal cuando:
Solución de problemas
Page 42

14 Deshumidificador
Nota
Page 43

FRANÇAIS
DESHUMIDIFICATEUR D’AIR
MANUEL DE L'UTILISATEUR
Lisez attentivement les instructions de fonctionnement
et les précautions de sécurité avant de mettre en
marche
votre déshumidificateur.
Page 44

2 Déshumidificateur
Manuel du Propriétaire du Déshumidificateur
TABLE DES MATIÈRES
POUR VOS ARCHIVES
Écrivez les numéros de modèle et de série ci-dessous :
Modèle #
Série #
Vous trouverez cette information sur la plaque signalétique située
sur le côté de chaque unité.
Nom du Distributeur:
Date d’Achat :
■
Agrafez votre reçu à cette page au cas où vous en auriez besoin pour
démontrer la date d'achat du produit ou pour avoir droit à la garantie.
LISEZ CE MANUEL
Vous trouverez à l’intérieur de ce manuel de nombreux
conseils utiles sur la façon d’utiliser et d’entretenir
correctement votre déshumidificateur. Quelques petites
mesures préventives vous permettront d’épargner
beaucoup de temps et d’argent pendant la durée de vie
de votre appareil.
Vous trouverez dans le tableau du guide de dépannage
beaucoup de réponses aux problèmes les plus
fréquents. Si vous passez en revue notre Guide de
Dépannage d'abord, il se peut que vous n’ayez pas du
tout besoin d’appeler le Service Après-Vente.
PRÉCAUTION !
• Contactez le service technique agréé pour la réparation
ou l'entretien de cette unité.
• Contactez un technicien autorisé pour l'installation de
cette unité.
• Le déshumidificateur ne doit pas être actionné par des
petits enfants ou par des personnes infirmes sans
surveillance.
• Veillez toujours à surveiller les petits enfants pour
éviter qu’ils jouent avec l'appareil.
• Si le cordon d’alimentation doit être remplacé, cette
tâche ne doit être accomplie que par du personnel
autorisé, utilisant uniquement des pièces de rechange
authentiques.
MesuresdeSécurité.....................3
Avant l’Utilisation .........................7
Instructions ..................................8
Instructions d'Utilisation .............9
Installation...................................11
Entretien et Service ....................12
Page 45

Mesures de Sécurité
Manuel du Propriétaire 3
FRANÇAIS
LLiisseezzttoouutteesslleessiinnssttrruuccttiioonnssaavvaannttll’’uuttiilliissaattiioonndduuddéésshhuummiiddiiffiiccaatteeuur
r
■ Les instructions ci-après doivent être observées dans le but de prévenir tout risque de dommages corporels ou matériels.
■ L'utilisation non conforme, résultant de la négligence des instructions, est susceptible de provoquer des dommages
corporels ou matériels dont la gravité est signalée par les indications suivantes :
■ Les significations des symboles utilisés dans ce manuel sont indiquées ci-dessous.
AVERTISSEMENT
Ce symbole indique un risque de blessure grave, voire mortelle.
ATTENTION
Ce symbole indique un risque de blessure ou des dommages matériels seulement.
VVeeiilllleezzàànneeppaassffaaiirreecceellaa.
.
VVeeiilllleezzààssuuiivvrreelleessiinnssttrruuccttiioonnssddeecceemmaannuueel
l
AAVVEERRTTIISSSSEEMMEENNT
T
Branchez correctement la prise
d’alimentation.
• Autrement, vous risquez de
provoquer un incendie ou un choc
électrique.
Ne mettez pas en marche, ni
n’arrêtez l’appareil en insérant ou
en retirant la fiche d’alimentation.
• Autrement, vous risquez de
provoquer un choc électrique ou un
incendie.
N’endommagez pas le cordon
d’alimentation et n’utilisez pas un
cordon d’alimentation non spécifié.
• Autrement, vous risquez de
provoquer un choc électrique ou un
incendie.
Mesures de Sécurité
Gasolin
NO
■ Installation
■ Fonctionnement
Ne placez pas le cordon
d’alimentation prèsd’un poêle.
•
Autrement, vous risquez de provoquer
un incendie ou un choc électrique.
Ne placez pas le cordon
d’alimentation près du gaz ou des
combustibles inflammables, tels que
l'essence, le benzène, le diluant, etc.
•
Autrement, vous risquez de provoquer
une explosion ou un incendie.
Ne démontez ni ne modifiez
vous-même l’appareil.
•
Autrement, vous risquez de provoquer
un choc électrique ou le
dysfonctionnement de l’appareil.
Page 46

4 Déshumidificateur
Mesures de Sécurité
Ne modifiez pas la longueur du
cordon d’alimentation.
• Autrement, vous risquez de provoquer
un choc électrique ou un incendie.
Ne partagez pas la prise de courant
avec d'autres appareils.
• Autrement, vous risquez de provoquer
un choc électrique ou un incendie.
Débranchez l’appareil si vous
constatez la présence de bruits
étranges, d’odeurs ou de fumée
provenant de l’appareil.
• Autrement, vous risquez de causer un
choc électrique ou un incendie.
N'utilisez pas la prise si elle est
lâche ou endommagée.
• Autrement, vous risquez de causer un
choc électrique ou un incendie.
Ne manipulez pas l’appareil si vous
avez les mains mouillées ou si
vous êtes dans un milieu humide.
• Autrement, vous risquez de causer un
choc électrique.
Aprèsunefuitedegaz,aérez
suffisamment la pièce avant de mettre
en marche le déshumidificateur.
• Autrement, vous risquez de provoquer
uneexplosion,unincendieoudes
brûlures.
Ne nettoyez pas le
déshumidificateur avec de l'eau.
• Autrement, il peut y avoir une filtration
d’eau à l’intérieur de l'unité, ce qui
dégraderait l'isolation. En outre, ceci
peut provoquer un choc électrique.
Coupez l’alimentation et le
disjoncteur avant de procéder au
nettoyage de l’unité.
• Autrement, puisque le ventilateur
tourne à une grande vitesse lors du
fonctionnement de l’appareil, vous
risquez de vous blesser.
Si l'eau entre dans le produit,
coupez l’interrupteur d’alimentation
du déshumidificateur. Débranchez
le cordon d’alimentation de la prise
de courant puis contactez le service
après-vente.
• Autrement, vous risquez de provoquer
un choc électrique ou le
dysfonctionnement de l’appareil.
Page 47

Mesures de Sécurité
Manuel du Propriétaire 5
FRANÇAIS
AATTTTEENNTTIIOON
N
■ Installation
Ne touchez jamais les pièces
métalliques de l'unité lors de
l’enlèvement du filtre.
• Puisqu’elles sont aiguisées, vous
risquez de vous blesser.
N’obstruez pas l'entréeoulasortie
du flux d’air.
• Autrement, vous risquez
d’endommager l’appareil ou de causer
un fonctionnement défectueux.
Prenez la fiche d’alimentation par la
tête pour la retirer de la prise.
• Autrement, vous risquez de provoquer
un choc électrique ou des dégâts.
Coupez l’interrupteur de
l’alimentation principale lorsque le
déshumidificateur ne sera pas
utilisé pendant une longue période.
• Vous gaspillerez inutilement de
l’électricité et risquerez de provoquer
un accident.
Lors d’un emplacement sur une table
ou une étagère, fixez les roues du
déshumidificateur à l’aide de cales
pour éviter que celui-ci ne tombe.
• Autrement, vous risquez
d’endommager l’appareil ou de causer
d'autres dégâts.
Assurez-vous que la taille du
déshumidificateur soit adaptée à la
surface que vous voulez
déshumidifier.
• Cet appareil n'est pas conçu pour
déshumidifier toute la maison.
Installez correctement le
déshumidificateur sur un plancher,
une table ou une étagère niveléset
suffisamment solides pour
supporter le poids de l’appareil
lorsque le réservoir est plein.
• La surface doit supporter un poids
d’environ 90 livres (40kg).
Fermez toutes les portes, fenêtres
et autres ouvertures de la pièce
donnant sur l’extérieur.
• Le déshumidificateur doit fonctionner
dans un milieu clos pour être le plus
efficace possible.
Ne vous asseyez pas sur le
déshumidificateur.
Page 48

6 Déshumidificateur
Mesures de Sécurité
Utilisez un torchon doux pour
nettoyer l’appareil. N’utilisez pas de
cire, de diluant ou de détergent
puissant.
• Autrement, la surface extérieure du
déshumidificateur risquerait de se
dégrader, de changer de couleur ou
de développer des imperfections.
Assurez-vous de remettre le
réservoir en place correctement
après chaque vidange pour éviter
que l’eau ne se répande sur le sol.
• Autrement, cela causerait des
dommages matériels.
N’installez pas le déshumidificateur
dans un endroit où les températures
pourraient descendre en dessous
de 42°F(6°C).
• Des températures trop basses
pourraient geler les serpentins de
dégivrage, ce qui empêcherait l’unité
de démarrer.
Wax
Thinner
Ne placez pas d’animaux
domestiques ou de plantes à un
endroit où ils risqueraient d’être
exposés directement au flux d’air.
• Autrement, cela pourrait leur nuire.
N’utilisez pas cet appareil à n’importe
quelle fin, comme sur les animaux, la
nourriture, les mécanismes de
précision ou les objets d’art.
• Celui-ci est un appareil d’usage
commun et pas un équipement de
précision.
Ne buvez pas l’eau accumuléedans
le réservoir.
• Puisqu’elle n’est pas potable, vous
risqueriez de tomber malade.
Insérez toujours le filtre
correctement.
Nettoyez-le toutes les deux
semaines.
• Vous endommagerez l’appareil
en le faisant fonctionner sans le
filtre.
■ Operation
Page 49

FRANÇAIS
Manuel du Propriétaire 7
Avant l’Utilisation
Avant l’Utilisation
1. Contactez un technicien spécialisé pour effectuer l'installation de l’unité.
2. Branchez correctement la fiche d’alimentation.
3. Utilisez un circuit dédié.
4. N'utilisez pas de rallonge.
5. Ne mettez pas en marche, ni n’arrêtez l’appareil en branchement ou en débranchant le cordon
d’alimentation.
6. Si le cordon ou la prise d’alimentation sont endommagés, ne les remplacez que par des pièces
de rechange authentiques.
1. L’exposition directe au flux d’air pendant une période prolongée pourrait être dangereuse pour
votre santé. N'exposez ni les personnes, ni les animaux domestiques ni les plantes au flux d'air
direct pendant des périodes prolongées.
2. Aérez la pièce lorsque le déshumidificateur est utilisé en même temps que d’autres dispositifs
de chauffage. Autrement, il peut y avoir un manque d'oxygène.
3. N'utilisez pas ce déshumidificateur à des buts particuliers non spécifiés (par exemple, pour
préserver des dispositifs de précision, des aliments, des animaux domestiques, des plantes ou
des objets d'art). En effet, une telle utilisation risquerait de leur nuire.
1. Ne touchez pas les pièces métalliques de l'unité lors de l’enlèvement du filtre. Vous risquez de
vous blesser en manipulant les bords métalliques aiguisés.
2. Ne nettoyez pas l’intérieur du déshumidificateur avec de l’eau. Le contact avec de l’eau peut
détériorer l’isolation, tout en provoquant un choc électrique.
3. Lors du nettoyage de l'unité, assurez-vous d'abord d’avoir coupé l’alimentation et le disjoncteur.
Puisque le ventilateur tourne à une très grande vitesse pendant le fonctionnement de l’appareil,
vous risquez de vous blesser si l’appareil est actionné accidentellement pendant que vous en
nettoyez la partie intérieure.
Pour la réparation et l'entretien, contactez le Service Après-vente autorisé.
Mise en marche de l’appareil
Utilisation
Nettoyage et Entretien
Service
Page 50

8 Déshumidificateur
Instructions
Instructions
Ce symbole indique un risque de choc électrique.
Ce symbole indique des risques qui pourraient endommager le
déshumidificateur.
Ce symbole indique des remarques particulières.
REMARQUE
AVERTISSEMENT ! : Cet appareil doit être installé conformément aux
standards nationaux sur le câblage. Ce manuel a pour but de vous aider à
mieux comprendre les différentes fonctions de l’appareil.
Fonctions
Symboles utilisés dans ce Manuel
Cordon d’alimentation
électrique
Boîtier
Tableau de bord
Réservoir d’eau
Grille Avant
Filtre à Air
Poignée
Grille Arrière
C
o
n
s
t
a
n
t
l
y
O
n
.
F
A
N
S
P
E
E
D
T
I
M
E
R
H
i
g
h
L
o
w
4
h
r
.
O
n
/
O
f
f
2
h
r
.
O
n
/
O
f
f
H
U
M
I
D
I
T
Y
C
O
N
T
R
O
L
B
U
C
K
E
T
F
U
L
L
P
O
W
E
R
A
U
T
O
R
E
S
T
A
R
T
H
U
M
I
D
I
T
Y
S
E
T
T
I
N
G
Page 51

FRANÇAIS
Manuel du Propriétaire 9
Instructions d'Utilisation
Constantly On.
FAN
SPEED
TIMER
High
Low
4hr. On/Off
2hr. On/Off
HUMIDITY
CONTROL
BUCKET
FULL
POWER
AUTO RESTART
HUMIDITY
SETTING
76
543 2 1
TOUCHES DU TABLEAU DE COMMANDE:
1. Touche POWER (ÉNERGIE)
--- Appuyez une fois sur cette touche pour mettre en marche le
déshumidificateur ("ON"). Appuyez-y de nouveau pour l’arrêter (OFF).
2. Touches CONTRÔLE DE L'HUMIDITÉ --- Ces touches permettent de régler le niveau d’humidité désiré.
• : permet d’augmenter le taux d’humidité réglé.
• : permet de diminuer le taux d’humidité réglé.
•
Le taux désiré d'humidité ambiante peut être réglé sur une plage de 35% à 70% avec des incréments de 5%.
•
Lorsque la température ambiante est de 35%, si vous appuyez de nouveau sur la touche ( ), le mode "ON" est
sélectionné. En mode "ON" l'unité fonctionne sans interruption, indépendamment des conditions d'humidité.
3.
Affichage du REGLAGE DU NIVEAU D'HUMIDITÉ --- Le taux d'humidité désiré sélectionné est affiché sur cet écran.
4. Touche VITESSE DU VENTILATEUR --- Permet de régler la vitesse du ventilateur à "haute" ou "basse".
•
Appuyez sur cette touche pour changer la vitesse du ventilateur de « Haute »à«Basse » et de nouveau à«Haute ».
• Les voyants lumineux "High" et "Low" s’allument pour indiquer la vitesse du ventilateur sélectionnée.
5. Touche MINUTERIE --- Cette touche permet de choisir la durée du cycle de fonctionnement.
•
Vous pouvez choisir un cycle de fonctionnement de 2 heures ou de 4 heures (2 - 4 hr. On/Off).
Dans ce cas, l'unité fonctionnera pendant 2 ou 4 heures, puis elle s’arrêtera complètement et restera dans cet état
pendant 2 ou 4 heures respectivement. Le cycle reprendra indéfiniment jusqu'à ce que vous modifiiez les réglages.
•
LorsquelatoucheTIMERestpressée, les voyants lumineux de la MINUTERIE changent de
« 2hr.On/Off »à«4hr.On/Off ».
6. Voyant du RÉSERVOIR PLEIN --- Ce voyant s’allume lorsque le réservoir est plein et doit être vidé.Il
s’allume également lorsque le réservoir n'est pas correctement placé. Si le voyant lumineux du réservoir
plein s’allume, le compresseur et le ventilateur s’arrêtent.
7. REDÉMARRAGE AUTOMATIQUE --- En cas de panne d’électricité, une fois le courant rétabli, l’unité
redémarrera selon le réglage préalable à la panne. Le ventilateur fonctionnera par défaut pendant 2
minutes. Une fois les 2 minutes écoulées, le ventilateur et le compresseur se mettront en marche ou
s’arrêteront, en fonction des conditions d'humidité.
POUR METTRE EN MARCHE LE DÉSHUMIDIFICATEUR :
1. Branchez le cordon d’alimentation à la prise murale. Appuyez sur la touche POWER.
2. Pour un fonctionnement normal, réglez la touche HUMIDITY CONTROL sur une valeur comprise entre
35% à 70%.
• Pour augmenter le taux d'humidité, appuyez sur la touche HUMIDITY CONTROL ( ).
• Pour diminuer le taux d'humidité, appuyez sur la touche HUMIDITY CONTROL ( ).
3. Appuyez sur la touche TIMER pour régler à votre guise la durée du cycle de fonctionnement/arrêt. Vous
pouvez régler le temps sur 2 heures ou 4 heures.
4. Si vous voulez changer la vitesse du ventilateur, appuyez sur la touche FAN SPEED. Chaque fois que
vous appuyez sur cette touche, la vitesse du ventilateur change de « Haute »à«Basse » et de nouveau à
« Haute ».
5. Appuyez sur la touche POWER pour arrêter l'unité manuellement.
Le réservoir d'eau doit être installé correctement.
• Le déshumidificateur ne fonctionnera pas si le réservoir d’eau n'est pas correctement installé.
• Le déshumidificateur s’arrête lorsque le taux d’humidité réglé est atteint.
REMARQUE
Instructions d'Utilisation
Page 52

10 Déshumidificateur
Instructions d'Utilisation
Commande du
niveau d'eau.
CONNECTEUR
du TUY A U
C
o
n
s
t
a
n
t
l
y
O
n
.
F
A
N
S
P
E
E
D
T
I
M
E
R
H
i
g
h
L
o
w
4
h
r
.
O
n
/
O
f
f
2
h
r
.
O
n
/
O
f
f
H
U
M
I
D
I
T
Y
C
O
N
T
R
O
L
B
U
C
K
E
T
F
U
L
L
P
O
W
E
R
A
U
T
O
R
E
S
T
A
R
T
H
U
M
I
D
I
T
Y
S
E
T
T
I
N
G
Le déshumidificateur s’arrête automatiquement lorsque le
réservoir est plein, ou lorsqu’il a été enlevé ou mal positionné.
Pour que le déshumidificateur fonctionne, il faut que le
réservoir soit bien en place. Si le réservoir d’eau est mal
positionné, le voyant s’allume et le déshumidificateur ne
fonctionne pas.
1.
Vidange manuelle du réservoir.
2.
Raccordez un morceau de tuyau d’arrosage au raccord de
drainage fileté,defaçon à diriger l’eau vers l’évacuation prévue.
Lorsque le réservoir est plein, retirez-le en le
saisissant par la poignée. Videz-le dans un
grand évier ou une baignoire puis remettez-le
à sa place dans l’appareil.
Arrêtez le déshumidificateur
avant d’enlever le réservoir.
Autrement, vous risquez de faire couler
l’eau sur le socle ou sur le plancher.
Videz le réservoir lorsque le voyant
lumineux s'allume.
Il est recommandé de prendre
le réservoir aussi bien par la base que
par la poignée.
En le prenant seulement par la poignée,
vous risquez de casser la poignéeoule
couvercle du réservoir.
1. Enlevez le bouchon de l’orifice de
vidange.
2. Reliez le tuyau d’arrosage au raccord
de drainage fileté.
3. Poussez fermement le tuyau
connecteur vers l’orifice de vidange
sur la Grille Arrière.
Le tuyau admet le rajout
d’un tuyau d’arrosage standard.
Ne serrez pas à l’excèsletuyaulors
du raccordement de celui-ci au
tuyau connecteur ; utilisez une
rondelle en caoutchouc et serrez
fermement à la main sans arracher le
filetage en plastique.
Lors du raccordement du tuyau
connecteur au raccord de drainage,
ne pliez pas et n’entortillez pas le
tuyau.
Pour un bon drainage, le tuyau doit
rester à plat.
REMARQUE
REMARQUE
REMARQUE
Arrêt Automatique
Évacuation de l’eau accumulée
Page 53

FRANÇAIS
Manuel du Propriétaire 11
Installation
12"
12"
C
o
n
s
t
a
n
t
l
y
O
n
.
F
A
N
S
P
E
E
D
T
I
M
E
R
H
i
g
h
L
o
w
4
h
r
.
O
n
/
O
f
f
2
h
r
.
O
n
/
O
f
f
H
U
M
I
D
I
T
Y
C
O
N
T
R
O
L
B
U
C
K
E
T
F
U
L
L
P
O
W
E
R
A
U
T
O
R
E
S
T
A
R
T
H
U
M
I
D
I
T
Y
S
E
T
T
I
N
G
C
o
n
s
t
a
n
t
l
y
O
n
.
F
A
N
S
P
E
E
D
T
I
M
E
R
H
i
g
h
L
o
w
4
h
r
.
O
n
/
O
f
f
2
h
r
.
O
n
/
O
f
f
H
U
M
I
D
I
T
Y
C
O
N
T
R
O
L
B
U
C
K
E
T
F
U
L
L
P
O
W
E
R
A
U
T
O
R
E
S
T
A
R
T
H
U
M
I
D
I
T
Y
S
E
T
T
I
N
G
C
o
n
s
t
a
n
t
l
y
O
n
.
F
A
N
S
P
E
E
D
T
I
M
E
R
H
i
g
h
L
o
w
4
h
r
.
O
n
/
O
f
f
2
h
r
.
O
n
/
O
f
f
H
U
M
I
D
I
T
Y
C
O
N
T
R
O
L
B
U
C
K
E
T
F
U
L
L
P
O
W
E
R
A
U
T
O
R
E
S
T
A
R
T
H
U
M
I
D
I
T
Y
S
E
T
T
I
N
G
C
o
n
s
t
a
n
t
l
y
O
n
.
F
A
N
S
P
E
E
D
T
I
M
E
R
H
i
g
h
L
o
w
4
h
r
.
O
n
/
O
f
f
2
h
r
.
O
n
/
O
f
f
H
U
M
I
D
I
T
Y
C
O
N
T
R
O
L
B
U
C
K
E
T
F
U
L
L
P
O
W
E
R
A
U
T
O
R
E
S
T
A
R
T
H
U
M
I
D
I
T
Y
S
E
T
T
I
N
G
C
o
n
s
t
a
n
t
ly
O
n
.
F
A
N
S
PE
E
D
T
I
M
E
R
H
i
g
h
L
o
w
4
h
r
.
O
n
/
O
f
f
2
h
r
.
O
n
/
O
f
f
H
U
M
I
D
I
T
Y
C
O
N
T
R
O
L
B
U
C
K
E
T
F
U
L
L
PO
W
E
R
A
U
T
O
R
E
S
T
A
R
T
H
U
M
I
D
I
T
Y
S
E
T
T
I
N
G
1.
Pour une bonne circulation de l'air, prévoyez un espace d’au moins 12
pouces sur chaque côté de l’unité.
2.
Installez votre déshumidificateur sur un plancher, une table ou une étagère.
Lors de l’installation du déshumidificateur sur une table ou une étagère, assurez-vous
qu’elles soient suffisamment solides pour supporter le poids de l’appareil lorsque le
réservoir est plein. Ne vous asseyez ni ne montez sur le déshumidificateur. Lors d’un
emplacement sur une table ou une étagère, fixez les roues du déshumidificateur à l’aide
de cales pour éviter que celui-ci ne tombe.
Si vous placez le déshumidificateur sur une table ou une étagère, vous serez
dans une meilleure position pour manipuler le réservoir ; en plus, cela peut
contribuer àéviter que les serpentins ne se couvrent de givre, à cause de
l’air qui est plus froid à la hauteur du plancher (au sous-sol, par exemple.)
3.
Placez le réservoir dans le déshumidificateur, en veillant à ce que les rainures du
côté inférieur du réservoir soient correctement positionnées.
4.
Les roulettes vous permettront de déplacer le déshumidificateur facilement.
REMARQUE
1.Retirez le couvercle du réservoir. 2.
Enlevez du réservoir les déchets éventuels.
Pour le nettoyage du réservoir,
essuyez avec une brosse ou un torchon
imbibé dans une solution détersive douce.
3. Fermez le couvercle.
Poussez les onglets sur la
partie supérieureduréservoir pour
remettre celui-ci à sa place.
REMARQUE
REMARQUE
• Utilisez le déshumidificateur sur le plancher,
pour contribuer àéviter des dégâts dus à
l'humidité.
• Utilisez le déshumidificateur dans des
endroits ayant de l’humidité excessive, tels
que, par exemple, une salle de bains ou
une pièce pourvue d’un sèche-linge ou d’un
lave-vaisselle.
• Utilisez le déshumidificateur dans des
endroits où des livres sont stockés.
Installation
Installation correcte du déshumidificateur
Choix du meilleur emplacement pour votre déshumidificateur
Nettoyage du réservoir
Page 54

12 Déshumidificateur
Entretien et Service
C
o
n
s
t
a
n
t
l
y
O
n
.
F
A
N
S
P
E
E
D
T
I
M
E
R
H
i
g
h
L
o
w
4
h
r
.
O
n
/
O
f
f
2
h
r
.
O
n
/
O
f
f
H
U
M
ID
I
T
Y
C
O
N
T
R
O
L
B
U
C
K
E
T
F
U
L
L
P
O
W
E
R
A
U
T
O
R
E
S
T
A
R
T
H
U
M
I
D
I
T
Y
S
E
T
T
I
N
G
C
o
n
s
t
a
n
t
l
y
O
n
.
FA
N
S
P
E
E
D
T
IM
E
R
H
i
g
h
L
o
w
4
h
r
.
O
n
/
O
f
f
2
h
r
.
O
n
/
O
f
f
H
U
M
I
D
I
T
Y
C
O
N
T
R
O
L
B
U
C
K
E
T
F
U
L
L
P
O
W
E
R
A
U
T
O
R
E
S
T
A
R
T
H
U
M
I
D
I
T
Y
S
E
T
T
I
N
G
Votre déshumidificateur est conçu pour vous servir
toute l’année. Il n’a pratiquement pas besoin
d’entretien. Cependant, vous devriez vérifier votre
déshumidificateur et examiner les serpentins une
fois par an.
Ce contrôle annuel peut être effectué par le service
après-vente sous votre demande (les frais
d'inspection étant à la charge du propriétaire.)
OU
Si vous êtes familiarisé avec les appareils
électriques et leur fonctionnement, les instructions
ci-dessous vous permettront de faire vous-même
l'inspection et l'entretien.
Nettoyage de la partie avant, du
réservoir et du boîtier
Pour le nettoyage de la partie avant et du boîtier,
utilisez un torchon doux, de l’eau chaude, et une
solution détersive douce.
Nettoyez la grille à l’aide d’un aspirateur ou d’une
brosse. N'employez pas d’eau de Javel, ni de
solutions abrasives.
Nettoyage du filtre à air
1.Enlevez le réservoir d'eau du boîtier.
Enlevez le filtre à air comme montré ci-contre.
2.Lavez le filtre à air avec de l'eau chaude et en
utilisant une solution détersive douce.
Rincez-le et séchez-le.
Remettez-le à sa place.
Nettoyage des serpentins
1.Enlevez la grille avant du boîtier comme montré
ci-contre.
2.Brossez doucement les serpentins comme
l’illustre l’image à côté. Utilisez, au besoin, de
l'eau chaude et une solution détersive douce.
Rincez et séchez bien.
ATTENTION ! : Faites attention à
ne pas arroser de l’eau sur les
serpentins. Faites attention !
Bords aiguisés!
Risque de Choc Electrique
• Débranchez le cordon d'alimentation électrique du
réceptacle avant d'exécuter n'importe quel
entretien.
• Faites attention lors du nettoyage des serpentins.
Les ailettes sont aiguisées.
La négligence des précautions ci-dessus risque de
provoquer un choc électrique ou des blessures.
Entretien et Service
AVERTISSEMENT
Page 55

FRANÇAIS
Manuel du Propriétaire 13
Entretien et Service
■
Le réservoir n'est pas installé.
■
Le flux d'air est réduit.
■
Il y a des portes ou des fenêtres ouvertes.
Problème Causes Possibles Solution
Le déshumidificateur
ne fonctionne pas.
■
Le cordon d’alimentation du
déshumidificateur est débranché.
•
Assurez-vous que la prise de courant du déshumidificateur
est complètement introduite dans le réceptacle.
■
Les fusibles ont sauté ou le
disjoncteur s’est déclenché.
•
Vérifiez les fusibles du domicile ou la boîte à fusibles et
remplacez le fusible ou réinitialisez le disjoncteur.
■
Le réservoir est plein.
•
Le déshumidificateur s'éteint automatiquement lorsque ceci
se produit. Videz le réservoir.
■
L’humidité ambiante est inférieure
au taux d’humidité sélectionné.
•
Changez le taux d’humidité établi en sélectionnant une
valeur inférieure.
■
Il se peut qu’il y ait des portes ou
fenêtres mal fermées.
•
Vérifiez que toutes les portes, fenêtres et autres ouvertures
soient bien fermées.
■
La température ambiante est trop
basse.
•
L’appareil ne fonctionnera pas de manière satisfaisante si la
température ambiante est inférieure à 42°F. (6°C.).
•
Fermez toutes les portes et fenêtres donnant sur l'extérieur.
■
La surface à déshumidifier est trop
grande.
•
Contactez votre revendeur pour voir si la capacité de
l’appareil est adaptée à la surface que vous voulez
déshumidifier.
■
La température ambiante est trop
basse.
•
Normalement, le givre disparaît lorsque le cycle de
dégivrage par gaz chauds conclut.
■
L'air circule à l’intérieur du
déshumidificateur.
•
C'est normal.
■
Le raccordement du tuyau de
drainage est lâche.
•
Vérifiez que le tuyau soit bien fixé.
■
Le réservoir n’est pas correctement
positionné.
•
Référez-vous au chapitre sur le Démontage et le Vidange
du Réservoir ».
■
Vérifiez si l'unité est en mode "ON".
•
Changez le taux d'humidité réglé.
■
L'humidité ambiante est élevée.
•
Changez le taux d'humidité réglé.
■
Le sèche-linge peut être en train de
souffler de l'air chargé d’humidité
dans la pièce.
•
Installez le déshumidificateur loin du sèche-linge.
Le sèche-linge devrait être orienté vers l'extérieur.
■
Le temps réglé pour enlever
l’humidité n’est pas suffisant.
■
Il est possible que le Contrôle de
l’Humidité ne soit pas réglé à
Humidité basse.
•
Lorsque le déshumidificateur vient d’être installé, il faut 3 ou
4 jours au minimum pour atteindre le taux de sécheresse
désiré.
•
Appuyez sur le bouton ( ) du contrôle de l'humidité pour
diminuer le taux d'humidité.
•
Assurez-vous qu'il n'y a aucun rideau, store ou meuble
obstruant la partie avant ou le dos du déshumidificateur.
•
Assurez-vous de bien installer le réservoir.
Le déshumidificateur
ne sèche pas l'air
comme il faudrait.
Le déshumidificateur
marche trop
longtemps.
Il y a de l'eau sur le
plancher.
Le déshumidificateur
fonctionne sans
interruption.
Le serpentin de
dégivrage est couvert
de givre.
Le ventilateur fait du
bruit.
Le déshumidificateur peut ne pas fonctionner correctement lorsque :
Dépannage
Page 56

14 Déshumidificateur
Note
Page 57

DEUTSCH
ENTFEUCHTER
BENUTZERHANDBUCH
Bitte lesen Sie die Betriebsanleitungen und
Sicherheitshinweise vor Inbetriebnahme des
Entfeuchters sorgfältig und vollständig durch.
Page 58

2 Entfeuchter
Entfeuchter - Benutzerhandbuch
INHALTSVERZEICHNIS
FÜR IHRE AUFZEICHNUNGEN
Tragen Sie hier die Modell- und Seriennummer ein:
Modellnr.:
Seriennr.:
Diese Nummern finden Sie auf einem Etikett an der
Seite jedes Gerätes.
Händlername
Kaufdatum
■ Heften Sie den Kaufbeleg an diese Seite, um das
Kaufdatum bei einem evtl. Garantiefall zu belegen.
DIESES HANDBUCH LESEN
Hier finden Sie eine Reihe hilfreicher Tipps zum
ordnungsgemäßen Einsatz und zur Wartung des
Klimagerätes.
Durch eine sorgsame Behandlung des Gerätes können Sie
während der gesamten Lebensdauer des Klimagerätes viel
Zeit und Geld sparen. In der Tabelle mit Tipps zur
Störungsbehebung finden Sie viele Lösungen für häufige
Probleme. Ein genaues Lesen dieser Tipps zur
Störungsbehebung erspart u. U. einen Anruf beim
Servicebetrieb.
VORSICHTSHINWEIS
• Verständigen Sie zur Reparatur bzw. zur Wartung
dieses Gerätes einen autorisierten Service-Techniker.
• Lassen Sie diese Anlage von einem Monteur
installieren. Der Entfeuchter darf ohne Aufsicht nicht
durch Kleinkinder oder behinderte Personen betrieben
werden.
• Kleinkinder sollten beaufsichtigt werden, um
sicherzustellen, dass der Entfeuchter nicht zum Spielen
verwendet wird.
• Wenn das Netzkabel ersetzt werden muss, sollten diese
Arbeiten nur durch Fachpersonal vorgenommen und es
sollten nur Original-Ersatzteile verwendet werden.
Sicherheitshinweise ...................29
Vor dem Betrieb..........................33
Einführung...................................34
Betriebsanleitungen ...................35
Montage.......................................37
Wartung und Service..................38
Page 59

Sicherheitshinweise
Benutzerhandbuch 3
DEUTSCH
LLeesseennSSiieevvoorrddeemmBBeettrriieebbddiieesseeAAnnlleeiittuunnggeen
n
■ Um Verletzungen des Benutzers oder anderer Personen sowie Sachbeschädigungen zu vermeiden, beachten
Sie diese Anleitungen.
■ Ein unsachgemäßer Betrieb bei Missachtung der Anleitungen führt zu Verletzungen oder Beschädigungen; die
Schweregrade werden durch folgende Symbole gekennzeichnet.
■ Die Bedeutung von Symbolen in diesem Handbuch lauten wie folgt.
WARNUNG
Dieses Symbol bedeutet Lebensgefahr oder Gefahr schwerer Verletzungen.
VORSICHT
Dieses Symbol bedeutet Verletzungsgefahr oder Gefahr von Sachbeschädigungen.
DDaarrffnniicchhttaauussggeeffüühhrrttwweerrddeenn.
.
DDiieeAAnnlleeiittuunnggssoolllltteebbeeffoollggttwweerrddeenn.
.
WWAARRNNUUNNG
G
Schließen Sie den Netzstecker
festan.
• Ansonsten besteht Feuer- oder
Stromschlaggefahr.
Das Gerät nicht durch Anschließen oder Ziehen des
Netzsteckers ein-/ausschalten.
• Es besteht Feuer- oder
Stromschlaggefahr.
Netzkabel nicht beschädigen
und kein fremdes Netzkabel
verwenden.
• Es besteht Feuer- oder
Stromschlaggefahr.
Sicherheitshinweise
Gasolin
NO
■ Montage
■ Betrieb
Das Netzkabel darf nicht Nahe
einer Heizung verwendet
werden.
• Ansonsten besteht Feuer-oder
Stromschlaggefahr.
Das Netzkabel darf nicht in der
Nähe von brennbaren Gasen oder
Flüssigkeiten verwendet werden,
wie Benzin, Benzol, Verdünner usw.
• Es besteht Explosions- oder
Feuergefahr.
Geräte dürfen nicht demontiert
oder verändert werden.
•
Ansonsten besteht die Gefahr von
Stromschlägen oder Geräteausfällen.
Page 60

4 Entfeuchter
Sicherheitshinweise
Die Länge des Netzkabels darf
nicht verändert werden.
• Es besteht Feuer- oder
Stromschlaggefahr.
Die Steckdose nicht zusammen
mit weiteren Geräten
verwenden.
• Es besteht Feuer- oder
Stromschlaggefahr.
Ziehen Sie den Netzstecker, falls
ungewöhnliche Geräusche, Gerüche
oder Rauch verursacht werden.
•
Ansonsten besteht Feuergefahr und
die Gefahr von Stromschlägen.
Es darf keine lockere oder
defekte Steckdose verwendet
werden.
• Ansonsten besteht Feuer-oder
Stromschlaggefahr.
Gerät nicht mit nassen Händen
oder in feuchter Umgebung
betreiben.
• Es besteht Stromschlaggefahr.
Falls Gas aus dem Gerät
austritt, den Raum vor dem
Betrieb gut lüften.
• Es besteht Explosions-, Feuer-.
sowie Verbrennungsgefahr.
Das Gerät darf nicht mit Wasser
gereinigt werden.
•WasserkannindasGerät
eindringen und die Isolation
beschädigen. Es besteht
Stromschlaggefahr.
Vor der Reinigung Gerät und
Sicherung ausschalten.
• Da sich der Lüfter während des
Betriebs mit hoher
Geschwindigkeit dreht, besteht
Verletzungsgefahr.
Wenn Wasser in das Geräteintritt, den Entfeuchter ausschalten
und den Netzstecker ziehen.
Verständigen Sie daraufhin Ihren
Servicebetrieb.
• Es besteht die Gefahr von Fehlfunktionen oder Stromschlägen.
Page 61

Sicherheitshinweise
Benutzerhandbuch 5
DEUTSCH
VVOORRSSIICCHHT
T
■ Montage
Die Metallteile des Gerätes beim
Entfernen des Filters nicht berühren.
• Sie sind scharf und können
Verletzungen verursachen.
Lufteinlass und -auslass dürfen
nicht blockiert werden.
•
Ansonsten können Fehlfunktionen oder
Leistungsminderung verursacht werden.
Der Netzstecker muss beim Ziehen
am Stecker selbst gehalten werden.
•
Ansonsten besteht die Gefahr von
Stromschlägen und Beschädigungen.
Schalten Sie das Gerätam
Hauptschalter aus, falls es länger
nicht betrieben wird.
• Dadurch werden ein unnötiger
Energie-verbrauch sowie
mögliche Unfälle vermieden.
Die Rollen mit Keilen sichern,
damit das Gerät nicht von einem
Tisch oder Regal herunterfällt.
• Es können Schäden am Gerät
und an Gegen-ständen sowie
Verletzungen verursacht werden.
Der Entfeuchter muss fürdie
jeweilige Umgebung die
geeignete Größe aufweisen.
• Das Gerät ist nicht zur
Entfeuchtung eines ganzen
Hauses geeignet.
Entfeuchter fest auf einem ebenen
Boden, Tisch oder Regal montieren.
Das Geräte muss bei vollem Wasser-
behälter getragen werden können.
• Der Untergrund muss ein Gewicht
von ca. 40 kg tragen können.
Alle Türen, Fenster und andere
Öffnungen nach draußen
verschließen.
• Für eine optimale Leistung muss
der Entfeuchter in einem
geschlossenen Raum betrieben
werden.
Niemals auf dem Entfeuchter
sitzen.
Page 62

6 Entfeuchter
Sicherheitshinweise
Verwenden Sie zur Reinigung
nur ein weiches Tuch und kein
Wachs,Verdünner, oder starke
Reinigungsmittel.
• Die Farbe des Gerätes könnte
sich verändern oder es könnte
zerkratzt werden.
Den Wasserbehälter muss nach
dem Entleeren wieder sorgfältig
eingesetzt werden, um ein
Auslaufen zu verhindern.
• Ansonsten besteht die Gefahr von
Sachbeschädigungen.
Den Entfeuchter darf nicht an
Orten mit Temperaturen
unterhalb von 6°C montiert
werden.
• Bei zu niedrigen Temperaturen
könnten die Windungen vereisen
und der Betrieb könnte verhindert
werden.
Wax
Thinner
Haustiere und Pflanzen dürfen
nicht dem direkten Luftstrom
ausgesetzt werden.
• Haustiere könnten verletzt und
Pflanzen geschädigt werden
Das Gerät sollte nicht fürspezielle
Zwecke verwendet werden, wie z.
B. für Haustiere, Lebensmittel,
Präzisionsgeräte oder Kunstwerke.
• Es handelt sich bei diesem
Entfeuchter um kein
Präzisionsgerät.
Das im Wasserbehälter
gesammelte Wasser niemals als
Trinkwasser verwenden.
• Es ist unhygienisch und kann zu
Gesundheitsschäden führen.
Filter immer sorgfältig
einsetzen. und alle zwei
Wochen reinigen.
• Der Betrieb ohne Filter kann
Geräteausfälle verursachen.
■ Betrieb
Page 63

DEUTSCH
Benutzerhandbuch 7
Vor dem Betrieb
Vor dem Betrieb
1. Verständigen Sie zur Montage dieses Gerätes einen fachkundigen Monteur.
2. Schließen Sie den Netzstecker fest an.
3. Verwenden Sie einen separaten Stromkreis.
4. Verwenden Sie kein Verlängerungskabel.
5. Starten bzw. stoppen Sie das Gerät nicht durch Anschließen bzw. Ziehen des Netzkabels.
6. Beschädigte Kabel oder Netzstecker dürfen nur durch geeignete Ersatzteile ausgetauscht
werden.
1. Ein längeres Aussetzen dem direkten Luftstrom könnte zu Gesundheitsschäden führen.
Personen,. Haustiere oder Pflanzen niemals längere Zeit dem direkten Luftstrom aussetzen.
2. Beim gemeinsamen Betrieb des Entfeuchters mit Heizkörpern muss der Raum belüftet werden.
Ansonsten könnte der Sauerstoffgehalt in der Raumluft zu weit sinken.
3. Der Entfeuchter darf nicht für spezielle Zwecke verwendet werden (wie z. B. für
Präzisionsgeräte, Lebensmittel, Haustiere, Pflanzen und Kunstgegenstände). Ansonsten
könnten solche Objekte Schaden nehmen.
1. Die Metallteile des Gerätes dürfen beim Entfernen des Filters nicht berührt werden. Ansonsten
besteht die Gefahr von Verletzungen durch scharfe Metallkanten.
2. Der Entfeuchter darf nicht mit Wasser gereinigt werden. Das Wasser kann die Isolation
beschädigen und es könnten Stromschläge verursacht werden.
3. Vor dem Reinigen des Gerätes müssen Gerät und Sicherung ausgeschaltet werden. Der Lüfter
dreht sich während des Betriebs mit hoher Geschwindigkeit. Beim versehentlichen Einschalten
während der Reinigung der Innenteile besteht Verletzungsgefahr.
Verständigen Sie zur Reparatur und Wartung einen Fachhändler.
Vorbereitung auf den Betrieb
Betrieb
Wartung und Pflege
Service
Page 64

8 Entfeuchter
Einführung
Einführung
Dieses Symbol warnt vor einer möglichen Gefahr von Stromschlägen.
Dieses Symbol weist auf mögliche Verletzungsgefahren oder auf die
Gefahr von Beschädigungen des Gerätes hin.
Dieses Symbol weist auf besondere Hinweise hin.
ANMERKUNG
WARNUNG: Die Montage der Elektrik muss gemäß den nationalen
Bestimmungen vorgenommen werden. Dieses Handbuch dient zur
Beschreibung von Produktfunktionen.
Funktionen
In diesem Handbuch verwendete Symbole
Netzkabel
Gehäuse
Bedienungsfeld
Wasserbehälter
Vordergitter
Luftfilter
Griff
Hinteres
Gitter
C
o
n
s
t
a
n
t
l
y
O
n
.
F
A
N
S
P
E
E
D
T
I
M
E
R
H
ig
h
L
o
w
4
h
r
.
O
n
/
O
f
f
2
h
r
.
O
n
/
O
f
f
H
U
M
I
D
I
T
Y
C
O
N
T
R
O
L
B
U
C
K
E
T
F
U
L
L
P
O
W
E
R
A
U
T
O
R
E
S
T
A
R
T
H
U
M
I
D
I
T
Y
S
E
T
T
I
N
G
Page 65

DEUTSCH
Benutzerhandbuch 9
Betriebsanleitungen
Constantly On.
FAN
SPEED
TIMER
High
Low
4hr. On/Off
2hr. On/Off
HUMIDITY
CONTROL
BUCKET
FULL
POWER
AUTO RESTART
HUMIDITY
SETTING
76
543 2 1
ELEMENTE DES BEDIENUNGSFELDES
1. Netzschalter
--- Durch einmaliges Drücken dieser Taste wird der Entfeuchter "EINGESCHALTET".
Bei nochmaligem Drücken wird das Gerät wieder "AUSGESCHALTET".
2.
Tasten zur STEUERUNG DER LUFTFEUCHTIGKEIT --- Auswahl der gewünschten Feuchtigkeitseinstellung.
• :Erhöhung der gewünschten Luftfeuchtigkeit.
• : Senkung der gewünschten Luftfeuchtigkeit.
• Die gewünschte Luftfeuchtigkeit kann von 35% bis 70% RL in Schritten zu 5% eingestellt werden.
• Bei erneutem Drücken der Taste ( ) wird bei 35% RL, der "Dauerbetrieb" aktiviert. Im "Dauerbetrieb"
läuft das Gerätständig, unabhängig von der aktuellen Luftfeuchtigkeit.
3.
Anzeige der LUFTFEUCHTIGKEITSEINSTELLUNG --- Die eingestellte Luftfeuchtigkeit wird hier angezeigt.
4. Taste fürLÜFTERGESCHWINDIGKEIT --- Einstellen der Lüftergeschwindigkeit auf "High (Hoch)" bzw. "Low (Niedrig)".
• Durch Drücken dieser Taste ändert sich die Lüftergeschwindigkeit wie folgt: High (Hoch) → Low (Niedrig)
→ High (Hoch).
• Die gewählte Lüftergeschwindigkeit wird durch die Anzeigelampen "High" und "Low" dargestellt.
5. ZEITGEBER-Taste --- Zur Auswahl der Betriebsart.
• Wählen Sie entweder 2 oder 4 hr. On/Off (2/4 Std. Ein/Aus) für den Wechselbetrieb. Hierbei wird das Gerät
2 bzw. 4 Stunden betrieben und nach 2 bzw. 4 Stunden ausgeschaltet. Dieser Vorgang wird bis zu einer
Änderung dieser Einstellung fortgesetzt.
• Beim Drücken der ZEITGEBER-Taste wechselt die Anzeigeleuchte TIMER von 2hr.On/Off nach 4hr.On/Off.
6. Anzeige WASSERBEHÄLTER VOLL --- Leuchtet, wenn der Wasserbehälter geleert werden muss. Die
Anzeige leuchtet ebenfalls, wenn der Wasserbehälter nicht richtig eingesetzt ist. Bei einem vollen Behälter
leuchtet die Anzeige auf und der Kompressor sowie der Lüfter werden "AUSGESCHALTET".
7. AUTOM. NEUSTART --- Beim Einschalten nach einem Stromausfall wird das Gerät mit der vorherigen
Betriebseinstellung fortgesetzt. Der Lüfter dreht sich standardmäßig 2 Minuten lang. Nach den 2 Minuten
werden Lüfter sowie Kompressor abhängig von der aktuellen Luftfeuchtigkeit EIN- bzw.
AUSGESCHALTET.
BEDIENUNG DES ENTFEUCHTERS:
1. Schließen Sie das Netzkabel an die Steckdose an. Drücken Sie den Netzschalter POWER.
2. Stellen Sie für den Normalbetrieb eine Luftfeuchtigkeit zwischen 35% und 70% ein.
• Drücken Sie die Taste ( ) zur STEUERUNG DER LUFTFEUCHTIGKEIT für eine niedrigere Luftfeuchtigkeit.
• Drücken Sie die Taste ( ) zur STEUERUNG DER LUFTFEUCHTIGKEIT füreinehöhere Luftfeuchtigkeit.
3. Drücken Sie die Taste TIMER zum Einstellen der Zeiten, zu denen das Gerät Ein- und Ausgeschaltet werden
soll. Für diese Zeit können entweder 2 Stunden oder 4 Stunden gewählt werden.
4. Drücken Sie zum Ändern der Lüftergeschwindigkeit die Taste fürdieLÜFTERGESCHWINDIGKEIT. Bei
jedem Drücken ändert sich die Lüftergeschwindigkeit wie folgt: High (Hoch) → Low (Niedrig) → High (Hoch).
5. Drücken Sie zum manuellen Ausschalten des Gerätes den Netzschalter.
Der Wasserbehälter muss ordnungsgemäß richtig werden.
• Der Entfeuchter kann bei falsch eingesetztem Wasserbehälter nicht betrieben werden.
• Der Entfeuchter schaltet sich aus, wenn die eingestellte Luftfeuchtigkeit erreicht wird.
ANMERKUNG
Betriebsanleitungen
Page 66

10 Entfeuchter
Betriebsanleitungen
Steuerungsregler
für Wasserpegel
SCHLAUCHANSCHLUSS
C
o
n
s
t
a
n
t
l
y
O
n
.
F
A
N
S
P
E
E
D
T
I
M
E
R
H
i
g
h
L
o
w
4
h
r
.
O
n
/
O
f
f
2
h
r
.
O
n
/
O
f
f
H
U
M
I
D
I
T
Y
C
O
N
T
R
O
L
B
U
C
K
E
T
F
U
L
L
P
O
W
E
R
A
U
T
O
R
E
S
T
A
R
T
H
U
M
I
D
I
T
Y
S
E
T
T
I
N
G
Der Entfeuchter schaltet sich bei einem vollen, bei einem nicht
eingesetzten oder bei einem falsch eingesetzten Wasserbehälter
automatisch aus.
Der Wasserbehälter muss für den Betrieb des Entfeuchters
richtig eingesetzt werden. Die Anzeige leuchtet und der
Entfeuchter kann nicht eingeschaltet werden, falls der
Wasserbehälter nicht richtig eingesetzt wird.
1.Behälter manuell entleeren. 2.
Schließen Sie für den Wasserablauf einen langen Gartenschlauch an
das Gewinde für den Ablassschlauch an.
Einen vollen Wasserbehälter am
Griff herausziehen, das Wasser in
ein Waschbecken oder eine
Badewanne gießen und Behälter
wieder einsetzen.
Behälter nicht während des
Betriebs herausnehmen. Wasser
könnte in das Auffang-becken oder
auf den Boden tropfen. Den Behälter
entleeren, wenn die Anzeige
leuchtet.
Der Behälter sollte beim
Tragen sowohl von unten als auch
am Griff gehalten werden. Beim
Tragen nur am Griff könnte der Griff
oder der Behälter zerbrechen.
1. Abdeckung der Abflussöffnung
entfernen.
2. Gartenschlauch an das Gewinde für
den Ablassschlauch anschließen.
3. Schlauchanschluss fest in die
Abflussöffnung am hinteren Gitter
drücken.
Auf den
Schlauchanschluss passt ein
handelsüblicher Gartenschlauch.
Den Schlauch beim Anschluss an
den Schlauchanschluss nicht festziehen, sondern mit einer Gummidichtung mit der Hand festziehen,
ohne die Plastikgewinde zu
überdrehen.
Den Schlauch beim Anschluss an
den Abfluss nicht biegen oder
knicken. Der Schlauch sollte flach
vom Entfeuchter zum Abfluss
verlegt werden.
ANMERKUNG
ANMERKUNG
ANMERKUNG
Automatisches Ausschalten
Entsorgung von angesammeltem Wasser
Page 67

DEUTSCH
Benutzerhandbuch 11
Montage
30cm
30cm
C
o
n
s
t
a
n
t
l
y
O
n
.
F
A
N
S
P
E
E
D
T
I
M
E
R
H
i
g
h
L
o
w
4
h
r
.
O
n
/
O
f
f
2
h
r
.
O
n
/
O
f
f
H
U
M
I
D
I
T
Y
C
O
N
T
R
O
L
B
U
C
K
E
T
F
U
L
L
P
O
W
E
R
A
U
T
O
R
E
S
T
A
R
T
H
U
M
I
D
I
T
Y
S
E
T
T
I
N
G
C
o
n
s
t
a
n
t
l
y
O
n
.
F
A
N
S
P
E
E
D
T
I
M
E
R
H
i
g
h
L
o
w
4
h
r
.
O
n
/
O
f
f
2
h
r
.
O
n
/
O
f
f
H
U
M
I
D
I
T
Y
C
O
N
T
R
O
L
B
U
C
K
E
T
F
U
L
L
P
O
W
E
R
A
U
T
O
R
E
S
T
A
R
T
H
U
M
I
D
I
T
Y
S
E
T
T
I
N
G
C
o
n
s
t
a
n
t
l
y
O
n
.
F
A
N
S
P
E
E
D
T
I
M
E
R
H
i
g
h
L
o
w
4
h
r
.
O
n
/
O
f
f
2
h
r
.
O
n
/
O
f
f
H
U
M
I
D
I
T
Y
C
O
N
T
R
O
L
B
U
C
K
E
T
F
U
L
L
P
O
W
E
R
A
U
T
O
R
E
S
T
A
R
T
H
U
M
I
D
I
T
Y
S
E
T
T
I
N
G
C
o
n
s
t
a
n
t
l
y
O
n
.
F
A
N
S
P
E
E
D
T
I
M
E
R
H
i
g
h
L
o
w
4
h
r
.
O
n
/
O
f
f
2
h
r
.
O
n
/
O
f
f
H
U
M
I
D
I
T
Y
C
O
N
T
R
O
L
B
U
C
K
E
T
F
U
L
L
P
O
W
E
R
A
U
T
O
R
E
S
T
A
R
T
H
U
M
I
D
I
T
Y
S
E
T
T
I
N
G
C
o
n
s
t
a
n
t
ly
O
n
.
F
A
N
S
PE
E
D
T
I
M
E
R
H
i
g
h
L
o
w
4
h
r
.
O
n
/
O
f
f
2
h
r
.
O
n
/
O
f
f
H
U
M
I
D
I
T
Y
C
O
N
T
R
O
L
B
U
C
K
E
T
F
U
L
L
PO
W
E
R
A
U
T
O
R
E
S
T
A
R
T
H
U
M
I
D
I
T
Y
S
E
T
T
I
N
G
1.Für eine ausreichende Luftzirkulation sollte an allen Geräteseiten ein
Abstand von mind. 30 cm eingehalten werden.
2.Der Entfeuchter kann auf dem Boden, einem Tisch oder einem Regal
montiert werden. Beim Aufstellen auf einem Tisch oder in einem Regal
müssen beide Aufstellorte das Gewicht des Entfeuchters mit vollem Behälter
tragen können. Nicht auf dem Entfeuchter sitzen oder stehen. Sichern Sie die
Rollen beim Aufstellen auf einem Tisch oder in einem Regal mit Keilen, damit
das Gerät nicht herunterfällt.
Bei einem hohen Tisch oder Regal kann der Wasserbehälter u. U.
einfacher erreicht werden und die Windungen vereisen nicht so schnell,
da die Luft am Boden normalerweise kälter ist (z. B. in einem Keller.)
3.Heben Sie den Wasserbehälter an und setzen Sie ihn in den Entfeuchter
ein. Dabei müssen die Schlitze auf der Unterseite des Behälters richtig
ausgerichtet werden.
4.Mit Hilfe der Rollen lässt sich der Entfeuchter leicht verschieben.
ANMERKUNG
1.Ziehen Sie die Abdeckung des
Wasserbehälters ab.
2.
Rückstände am Behälter
abbürsten.
BürstenSiedenBehälter
ab oder wischen Sie ihn mit einem
Tuch mit milder Reinigungslösung
ab.
3. Verschließen Sie die
Abdeckung.
Drücken Sie auf die Riegel
an der Oberseite des Behälters
beim Einsetzen herunter.
ANMERKUNG
ANMERKUNG
• Verwenden Sie den Entfeuchter in
einem Keller, um Schäden durch
Feuchtigkeit zu verhindern.
• Verwenden Sie den Entfeuchter in
Wäschekammern, Badezimmern
und Spülküchen mit extrem hoher
Feuchtigkeit.
•
Verwenden Sie den Entfeuchter
gegen Schäden durch Feuchtigkeit an
Orten zur Lagerung von Büchern.
Montage
Ordnungsgemäße Montage des Entfeuchters
Wahl des geeigneten Standortes für den Entfeuchter
Reinigung des Wasserbehälters
Page 68

12 Entfeuchter
Wartung und Service
C
o
n
s
t
a
n
t
l
y
O
n
.
F
A
N
S
P
E
E
D
T
I
M
E
R
H
i
g
h
L
o
w
4
h
r
.
O
n
/
O
f
f
2
h
r
.
O
n
/
O
f
f
H
U
M
ID
I
T
Y
C
O
N
T
R
O
L
B
U
C
K
E
T
F
U
L
L
P
O
W
E
R
A
U
T
O
R
E
S
T
A
R
T
H
U
M
I
D
I
T
Y
S
E
T
T
I
N
G
C
o
n
s
t
a
n
t
l
y
O
n
.
FA
N
S
P
E
E
D
T
IM
E
R
H
i
g
h
L
o
w
4
h
r
.
O
n
/
O
f
f
2
h
r
.
O
n
/
O
f
f
H
U
M
I
D
I
T
Y
C
O
N
T
R
O
L
B
U
C
K
E
T
F
U
L
L
P
O
W
E
R
A
U
T
O
R
E
S
T
A
R
T
H
U
M
I
D
I
T
Y
S
E
T
T
I
N
G
Der Entfeuchter ist für den ganzjährigen Betrieb
ausgelegt und muss praktisch nicht gewartet
werden. Das Gerät sollte trotzdem jährlich überprüft
und die Windungen inspiziert werden.
Diese Prüfung kann auch von einem qualifizierten
Servicebetrieb vorgenommen werden. (Die Kosten
dafür übernimmt der Besitzer des Gerätes.)
ODER
Falls Sie sich mit Elektrogeräten und den
Funktionen auskennen, beachten Sie bei der selbst
durchgeführten Inspektion und Wartung die
Anleitungen.
Reinigung des vorderen Gehäuseteils,
des Wasserbehälters und des Gehäuses
Reinigen Sie das vordere Gehäuseteil und das
Gehäusemit einem weichen Tuch, warmem Wasser
und einem milden Reiniger. Das Gitter absaugen
oder abbürsten.
Verwenden Sie keine Bleich- oder Scheuermittel.
Reinigung des Luftfilters
1.
Entfernen Sie den Wasserbehälter aus dem Gehäuse.
Ziehen Sie den Luftfilter wie gezeigt heraus.
2.Waschen Sie den Filter mit warmem Wasser und
einem milden Reiniger. Anschließend abspülen
und trocknen.
Setzen Sie den Filter wieder ein.
Reinigung der Windungen
1.Entfernen Sie das Vordergitter vom Gehäuse,
wie in der Abbildung gezeigt.
2.Bürsten Sie die Windungen leicht, wie in der
Abbildung gezeigt, ab. Bei Bedarf warmes
Wasser und einen milden Reiniger verwenden,
gründlich abspülen und trocknen.
VORSICHT: Die Windungen nicht
mit Wasser bespritzen. Achtung!
Scharfe Kanten!
Electrical Shock Hazard
• Disconnect power supply cord from receptacle
before performing any maintenance.
• Be careful when cleaning the coils.
Fins are sharp.
Failure to follow the above precautions could result
in electrical shock or personal injury.
Wartung und Service
Page 69

DEUTSCH
Benutzerhandbuch 13
Wartung und Service
■ Der Wasserbehälter ist voll.
■
Wasserbehälter nicht eingesetzt.
■ Der Luftstrom ist blockiert.
■
Fenster und Türen sind geöffnet.
Störung Mögliche Ursachen Lösung
Entfeuchter
startet nicht
Entfeuchter
trocknet die Luft
nicht wie
vorgesehen
Entfeuchter läuft
zu oft
Eis bildet sich auf
den Windungen
Lüftergeräusche
Wasser auf dem
Boden
■ Bei einer geringeren Raumfeuchtigkeit im Raum als die
eingestellte Luftfeuchtigkeit.
■ Netzkabel des
Entfeuchters ist getrennt.
■ Sicherung ist durchgebrannt/
Überlastungsschalter
■
Nicht genügend Zeit zum
Entfernen der Feuchtigkeit.
■
Luftfeuchtigkeitssteuerung nicht
auf niedrige Luftf. eingestellt.
■ Fenster und Türen sind u. U.
nicht richtig geschlossen.
■ Wäschetrockner leitet feuchte
Luft in den Raum.
■ Die Raumtemperatur ist zu
niedrig.
■ Der zu entfeuchtende Raum
ist zu groß.
■ Luft strömt durch den
Entfeuchter.
■
Anschluss des Ablassschlauchs
ist u. U. locker.
■ Der Wasserbehälter ist nicht
vollständig eingesetzt.
■ Die Raumtemperatur ist zu
hoch.
Entfeuchter
läuft ohne
Unterbrechung
■
Überprüfen Sie, ob sich das Gerät
im "DAUERBETRIEB" befindet.
■
Raum-Luftfeuchtigkeit ist
• Überprüfen Sie, ob der Netzstecker fest an der
Steckdose angeschlossen ist.
• Sicherung/Überlastungsschalter prüfen und
Sicherung ersetzen/Schalter zurücksetzen.
• Der Entfeuchter schaltet sich in diesem Fall
automatisch aus. Leeren Sie den Wasserbehälter.
• Die erste Trocknung eines Raumes dauert nach
der Montage mind. 3 bis 4 Tage.
• Überprüfen Sie, ob alle Türen, Fenster und andere
Öffnungen fest verschlossen sind.
• Entfeuchter nicht Nahe dem Trockner montieren.
Trocknerabluft sollte nach außen geleitet werden.
• Das Gerät arbeitet bei einer Raumtemperatur
unterhalb von 6°C nicht optimal.
• Informieren Sie sich beim Händler, ob das Geräte
eine ausreichende Größe hat.
• Vereisungen sollten abgetaut sein, nachdem der
Abtauvorgang beendet wurde.
• Überprüfen Sie einen evtl. angeschlossenen
Schlauch.
• Ändern Sie den Wert für die Luftfeuchtigkeit.
• Ändern Sie den Wert für die Luftfeuchtigkeit.
• Siehe den Abschnitt über das Entleeren des
Wasserbehälters.
• Schließen Sie alle Fenster und Türen.
• Dies ist normal.
• Vorder- und Rückseite des Entfeuchters dürfen
nicht durch Gardinen, Jalousien oder Möbelstücke
verdeckt werden.
• Drücken Sie zum Senken der Feuchtigkeit die
Taste ( ) für die Luftfeuchtigkeitssteuerung.
• Senken Sie den Wert für die Luftfeuchtigkeit.
•
Überprüfen Sie, ob der Behälter richtig eingesetzt ist.
In folgenden Fällen liegt eine Störung des Entfeuchters vor:
Störungsbehebung
Page 70

DESUMIDIFICADOR
MANUAL DO UTILIZADOR
Por favor leia atentamente e na íntegra todas as
instruções de funcionamento e as precauções de
segurança antes de utilizar o seu desumidificador.
PORTUGUÊS
Page 71

2 Desumidificador
Manual do Utilizador do Desumidificador
ÍNDICE
PARA AS SUAS ANOTAÇÕES
Escrevaaquiomodeloeonúmerodesériedoaparelho:
Modelo #
Nº de Série #
Pode encontrar estes números na etiqueta colada no
painel lateral de cada unidade.
Nome do Concessionário
Data de Aquisição
■ Agrafe o seu recibo a esta página na eventualidade
de necessitar de comprovar a data de compra ou
para quaisquer questões relacionadas com a
garantia.
LEIA ESTE MANUAL
No interior encontrará muitos conselhos úteis sobre
como utilizar e manter o seu desumidificador
adequadamente. Alguns cuidados de prevenção da
sua parte podem poupar-lhe muito tempo e dinheiro ao
longo da vida útil do seu desumidificador.
No quadro de conselhos para resolução de avarias
encontrará muitas respostas aos problemas mais
comuns. Se começar por consultar o nosso quadro de
Conselhos para Resolução de Avarias, poderá em
muitos casos não necessitar de contactar o serviço de
reparação.
PRECAUÇÕES
•
Contacte o técnico de serviço autorizado para
quaisquer reparações e manutenção desta unidade.
• Contacte o instalador para proceder à instalação
desta unidade.
• O desumidificador não deve ser utilizado por
crianças pequenas nem por deficientes sem
supervisão.
•As crianças não devem ser deixadas sem
supervisão de modo a garantir que não brincam
com o desumidificador.
•
Quando o cabo de alimentação necessitar de ser
substituído, o trabalho de substituição só deverá
ser executado por pessoal qualificado e só deverão
ser utilizadas peças sobressalentes genuínas.
Precauções de Segurança...........3
Antes do Funcionamento.............7
Instruções......................................8
Instruções de Funcionamento.....9
Instalação ....................................11
Manutenção e Serviço ...............12
Page 72

Precauções de Segurança
M
Do Utilizador 3
PORTUGUÊS
LLeeiiaattooddaassaassiinnssttrruuççõõeessaanntteessddeeuuttiilliizzaarrooaappaarreellhho
o
■ Para evitar causar ferimentos ao utilizador ou outras pessoas e outros danos materiais , deverão ser seguidas
as seguintes instruções.
■ A operação incorrecta e o desrespeito pelas instruções podem causar ferimentos ou danos; a sua gravidade é
classificada pelas seguintes indicações.
■ O significado dos símbolos utilizados neste manual é mostrado abaixo.
AVISO
Este símbolo indica a possibilidade de morte ou ferimentos graves.
CUIDADO
Este símbolo indica a possibilidade de avarias ou danos materiais.
CCeerrttiiffiiqquuee--sseeddeeqquueennããooffaazzoosseegguuiinnttee.
.
CCeerrttiiffiiqquuee--sseeddeeqquueesseegguueeaassiinnssttrruuççõõeess.
.
AAVVIISSO
O
Ligue o cabo de alimentação
de forma correcta.
• Caso contrário, pode provocar
um choque eléctrico ou um
incêndio.
Não ligue nem desligue a
unidade introduzindo ou
puxando o cabo de
alimentação.
• Pode provocar um choque
eléctrico ou um incêndio.
Não danifique nem utilize um
cabo de alimentação não
especificado.
• Pode provocar um choque
eléctrico ou um incêndio.
Precauções de Segurança
Gasolin
NO
■ Instalação
■ Funcionamento
Não coloque o cabo de
alimentação perto de nenhum
aquecimento.
• Pode provocar um incêndio e um
choque eléctrico.
Nãoinstaleocabode
alimentação perto de gases
inflamáveis nem combustíveis
tais como gasolina, benzina,
diluentes, etc.
• Pode provocar uma explosão ou
um incêndio.
Não desmonte nem modifique
os produtos.
• Pode provocar um choque
eléctrico e avarias.
Page 73

4 Desumidificador
Precauções de Segurança
Não altere o comprimento do
cabo de alimentação.
• Pode provocar um choque
eléctrico ou um incêndio.
Nãopartilheatomadade
alimentação com outros
aparelhos.
• Pode provocar um choque
eléctrico ou um incêndio.
Desligue a unidade se detectar
ruídos estranhos, cheiros ou
fumo provenientes do aparelho.
• Caso contrário pode provocar um
incêndio ou um choque eléctrico.
Não utilize a tomada de
alimentação caso esteja solta
ou danificada.
• Pode provocar um incêndio e um
choque eléctrico.
Não opere o aparelho com as
mãos molhadas ou em
ambientes húmidos.
• Pode provocar um choque
eléctrico.
Proceda à ventilaçãodoquarto
antes de colocar o desumidificador
em funcionamento, depois do gás
se ter dissipado.
• Pode provocar uma explosão, um
incêndio e queimaduras.
Não limpe o desumidificador
com água.
• A água pode penetrar no interior
da unidade e degradar o
isolamento. Pode provocar um
choque eléctrico.
Desligue primeiro a alimentação
e o disjuntor quando proceder à
limpeza da unidade.
• Como o ventilador gira a grande
velocidade durante a operação,
pode provocar ferimentos.
Se penetrar águaparaointerior
da unidade, desligue o
interruptor de alimentaçãodo
desumidificador. Contacte o
centro de serviçodepoisdeter
retirado a ficha da tomada de
alimentação.
• Pode provocar uma avaria da
unidade ou um choque eléctrico.
Page 74

Precauções de Segurança
M
Do Utilizador 5
PORTUGUÊS
CCUUIIDDAADDO
O
■ Instalação
Nunca toque nas partes metálicas
da unidade quando estiver a
remover o filtro.
• Estas partes são afiadas e podem
provocar ferimentos.
Não bloqueie as entradas nem as
saídas da unidade.
• Pode provocar uma avaria na
unidade ou deteriorar o seu
desempenho.
Segure correctamente na ficha
de alimentaçãosempreque
quiser retirá-ladatomada.
• Pode provocar um choque
eléctrico e danos no
equipamento.
Desligue o interruptor de
alimentação quando não utilizar
o desumidificador durante um
longo período de tempo.
• Caso contrário estará a consumir
energia desnecessariamente e
pode causar um acidente.
Fixe as rodas com dispositivos
de travamento para evitar que a
unidade caia quando estiver
instaladaemcimadeumamesa
ou prateleira.
• Pode danificar o desumidificador
ou provocar outros danos ou
ferimentos.
Certifique-se de que o
desumidificador tem as
dimensões correctas para a
área que deseja desumidificar.
• A unidade não foi concebida para
desumidificar a casa toda.
Instale o desumidificador de forma
adequada no chão, mesa ou
prateleira sobre uma superfície
nivelada e que seja suficientemente
forte para suportar o aparelho com o
recipiente cheio de água.
• A superfície deverá suportar um
peso de cerca de 40Kg.
Feche todas as portas, janelas
e outras aberturas exteriores
paraasala.
• Para que o desumidificador seja o
mais eficaz possível deverá
funcionar numa área fechada.
Não se sente em cima do
desumidificador.
Page 75

6 Desumidificador
Precauções de Segurança
Utilize um pano macio para
limpar o aparelho. Não utilize
cera, solvente nem nenhum
detergente potente.
• Caso contrário, o aspecto do
desumidificador pode deteriorarse, mudar de cor ou desenvolver
defeitos na sua superfície.
Certifique-se de que instala
novamente o recipiente de
forma correcta depois de o
esvaziar para evitar que a água
recolhida escorra para o chão.
• Caso contrário, poderá causar
danos materiais.
Nãoinstaleodesumidificador
em locais onde as temperaturas
sejam inferiores a 6˚C.
• As temperaturas baixas podem
provocar o congelamento das
serpentinas e a unidade poderá
não arrancar.
Wax
Thinner
Não coloque nenhum animal
nem planta caseira exposto ao
fluxo de ar directo.
• Caso contrário, o animal poderá
ficar doente e a planta poderá
morrer.
Não utilize este electrodoméstico
para objectivos específicos tais
como animais de estimação,
alimentos, maquinaria de
precisãoouobjectosdearte.
• Este electrodoméstico é para
utilização geral e não um
equipamento de precisão.
Não ingira a água recolhida do
recipiente.
• A água não é potável e pode
provocar doenças ou indisposições
às pessoas.
Instale sempre correctamente o
filtro. Limpe o filtro de duas em
duas semanas.
• O funcionamento sem filtros
provocará a avaria da unidade.
■ Funcionamento
Page 76

PORTUGUÊS
M Do Utilizador 7
Antes do Funcionamento
Antes do Funcionamento
1. Consulte um especialista em instalações para proceder à instalação da unidade.
2. Ligue correctamente a ficha de alimentação.
3. Utilize um circuito dedicado.
4. Não utilize nenhuma extensão eléctrica.
5. Não arranque/pare a unidade ligando/desligando o cabo de alimentação.
6. Se o cabo/ficha estiverem danificados, substitua-os apenas por peças sobressalentes
autorizadas.
1. Se ficar exposto ao fluxo de ar directo durante longos períodos de tempo pode causar danos à
sua saúde. Não exponha os ocupantes, animais ou plantas ao fluxo de ar directo durante
longos períodos de tempo.
2. Proceda à ventilação da sala quando o desumidificador estiver a ser utilizado com outros
dispositivos de aquecimento. Caso contrário, o fornecimento de oxigénio poderá ser
desadequado.
3. Não utilize este desumidificador para objectivos especiais não-especificados (ex. manutenção
de dispositivos de precisão, alimentos, animais de estimação, plantas, e objectos de arte).
Uma utilização deste tipo pode danificar os itens.
1. Não toque nas partes metálicas da unidade quando estiver a retirar o filtro. Pode ferir-se ao
manusear peças metálicas afiadas.
2. Não utilize água para limpar o interior do desumidificador. A exposição à água pode destruir o
isolamento podendo originar choques eléctricos.
3. Quando limpar a unidade, certifique-se, em primeiro lugar, de que a alimentação e o disjuntor
estão desligados. O ventilador gira a uma grande velocidade durante a operação. Existe a
possibilidade de causar ferimentos se a alimentação da unidade for acidentalmente ligada
enquanto estiver a limpar o interior da unidade.
Para reparação e manutenção, contacte o seu concessionário de serviço autorizado.
Preparar para o Funcionamento
Utilização
Limpeza e Manutenção
Serviço
Page 77

8 Desumidificador
Instruções
Instruções
Este símbolo alerta-o para o risco de choques eléctricos.
Este símbolo alerta-o para as situações que podem danificar o
desumidificador.
Este símbolo indica notas especiais.
AVISO
AVISO: Este aparelho deverá ser instalado em conformidade com os
regulamentos das ligações eléctricas nacionais. Este guia constitui um
guião que o ajudará a entender as características do produto.
Características
Símbolos Utilizados Neste Manual
Cabo de alimentacao
Caixa do aparelho
Painel de controlo
Recipiente da agua
Grelha dianteira
Filtro do Ar
Pega
Grelha traseira
C
o
n
s
t
a
n
t
ly
O
n
.
F
A
N
S
P
E
E
D
T
I
M
E
R
H
ig
h
L
o
w
4
h
r
.
O
n
/
O
f
f
2
h
r
.
O
n
/
O
f
f
H
U
M
I
D
I
T
Y
C
O
N
T
R
O
L
B
U
C
K
E
T
F
U
L
L
P
O
W
E
R
A
U
T
O
R
E
S
T
A
R
T
H
U
M
I
D
I
T
Y
S
E
T
T
I
N
G
-
,
~
Page 78

PORTUGUÊS
M Do Utilizador 9
Instruções de Funcionamento
Constantly On.
FAN
SPEED
TIMER
High
Low
4hr. On/Off
2hr. On/Off
HUMIDITY
CONTROL
BUCKET
FULL
POWER
AUTO RESTART
HUMIDITY
SETTING
76
543 2 1
PAINEL DE CONTROLO COM AS SEGUINTES FUNÇÕES
1. Tecla POWER
--- Se premir esta tecla uma vez, liga o desumidificador ("ON") e se voltar a premir
desliga o desumidificador ("OFF").
2.
Teclas de Controlo da Humidade (HUMIDITY CONTROL)
---
Are used to select the desired humidity setting.
• : Utilizada para aumentar a regulação do grau de humidade desejado.
• : Utilizada para diminuir a regulaçãodograudehumidadedesejado.
•
A humidade desejada pode ser seleccionada de entre uma gama de valores de 35% a 70% RH em incrementos de 5%.
• Se premir novamente a tecla a 35%RH, será seleccionado o modo "On" (“Ligado”). No modo "On" a
unidade funciona sem interrupções, independentemente das condições de humidade.
3. Visor de Regulação da Humidade (HUMIDITY SETTING) --- Aindicação da humidade seleccionada
desejada é visualizada aqui.
4. Tecla de Velocidade do Ventilador (FAN SPEED) --- É utilizada para definir a velocidade do ventilador
para "High" (“Elevada”)ou"Low"(“Baixa”).
•
Se premir esta tecla muda a velocidade do ventilador de High (Elevada) ➔ Low (Baixa)➔ High (Elevada).
•
A velocidade do ventilador seleccionada é indicada pelas luzes indicadoras com as inscrições "High" e "Low".
5. Tecla do Temporizador (TIMER) --- É utilizada para seleccionar o tipo de funcionamento.
• Seleccione 2 ou 4 hr. On/Off (Ligado/Desligado) para o funcionamento por ciclos.
Neste caso, a unidade irá funcionar durante 2 ou 4 horas e, em seguida, será desligada durante 2 ou 4
horas. O ciclo será repetido até que seja alterada a regulaçãofeita.
• Quando a tecla TIMER é premida, o indicador TIMER acende-se para permitir seleccionar o ciclo de 2hr
On/Off ou o ciclo de 4hr On/Off.
6. Indicador de Recipiente Cheio (BUCKET FULL) --- Esta luz acende-se quando o recipiente estiver
cheio e necessitar de ser esvaziado. Esta luz acende-se também quando o recipiente nãoestiver
correctamente instalado. Quando a luz indicadora de recipiente cheio estiver acesa, o compressor e o
ventilador desligam-se ("OFF").
7. Reinício Automático (AUTO RESTART) --- Depois de reposta a energia após uma falha de electricidade,
a unidade começa a funcionar com as regulações anteriormente definidas. O ventilador funcionará por
defeito durante 2 minutos. Depois de decorridos os 2 minutos o ventilador e o compressor serão ligados
(ON) ou desligados (OFF) consoante as condições de humidade.
PARA COLOCAR O DESUMIDIFICADOR A FUNCIONAR:
1.Ligueocabodealimentação à tomada eléctrica. Prima a tecla POWER.
2. Coloque o controlo da Humidade numa posição entre 35% e 70% para um funcionamento normal.
• Para menos humidade, prima a tecla HUMIDITY CONTROL (Controlo da Humidade).
• Para mais humidade, prima a tecla HUMIDITY CONTROL.
3. Prima a tecla TIMER (Temporizador), para regular o tempo durante o qual deseja que a unidade
permaneça a funcionar em ciclos de On (Ligada) e Off (Desligada). O tempo pode ser definido para 2
horas ou 4 horas.
4. Se desejar alterar a velocidade do ventilador, prima a tecla FAN SPEED. De cada vez que a tecla FAN
SPEED é premida a velocidade do ventilador muda de High (Elevada)
➔
Low (Baixa)➔ High (Elevada).
5. Prima a tecla POWER para interromper manualmente o funcionamento da unidade.
Orecipientedaágua deve ser instalado adequadamente.
• O desumidificador não funcionará se o recipiente não estiver correctamente instalado.
•
O desumidificador desliga-se quando for atingido o grau de humidade desejado seleccionado.
AVISO
Instruções de Funcionamento
Page 79
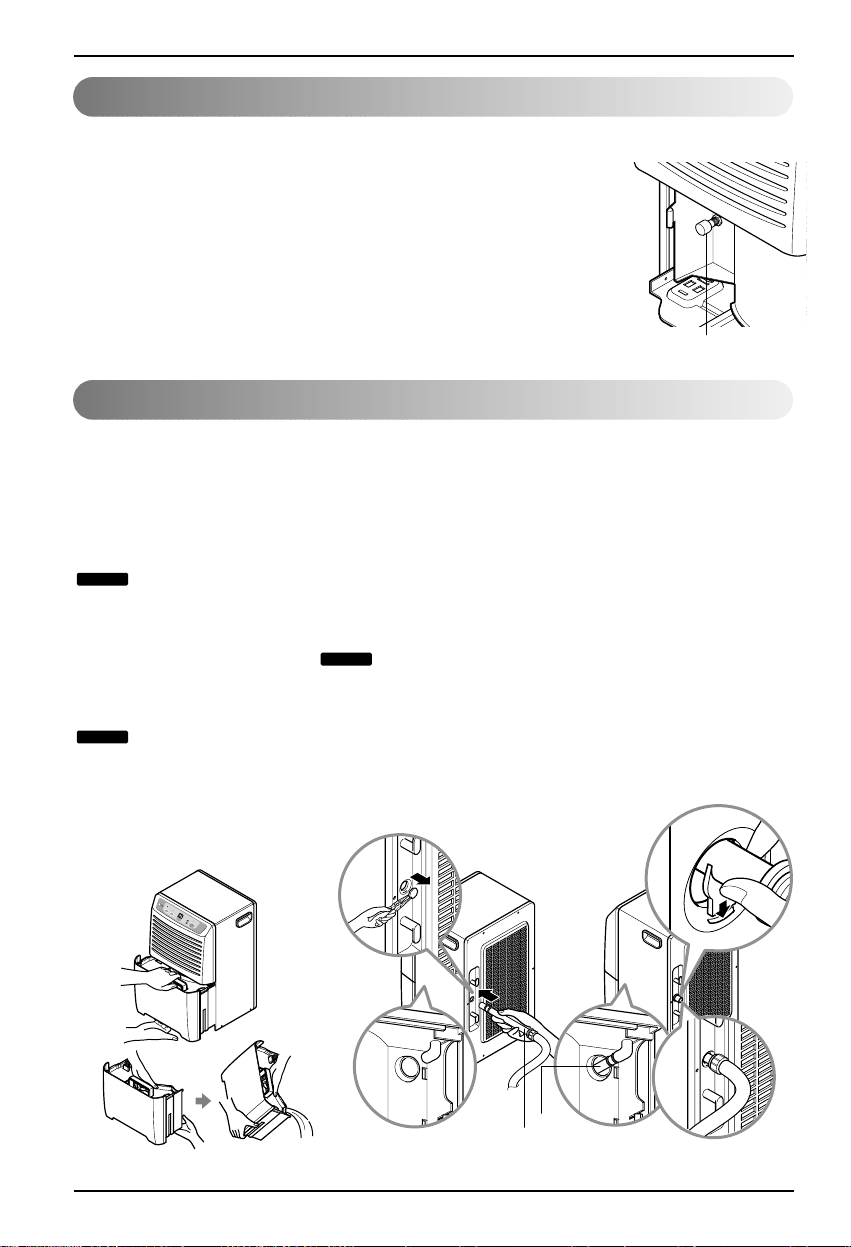
10 Desumidificador
Instruções de Funcionamento
Water level
control switch
CONECTOR DA MANGUEIRA
C
o
n
s
t
a
n
t
l
y
O
n
.
F
A
N
S
P
E
E
D
T
I
M
E
R
H
i
g
h
L
o
w
4
h
r
.
O
n
/
O
f
f
2
h
r
.
O
n
/
O
f
f
H
U
M
I
D
I
T
Y
C
O
N
T
R
O
L
B
U
C
K
E
T
F
U
L
L
P
O
W
E
R
A
U
T
O
R
E
S
T
A
R
T
H
U
M
I
D
I
T
Y
S
E
T
T
I
N
G
O desumidificador será automaticamente desligado quando o
recipiente estiver cheio, ou quando o recipiente é retirado ou não
for colocado na posiçãocorrecta.
O recipiente deverá ser colocado novamente na posição
adequada para que o desumidificador funcione. A luz
permanecerá acesa e o desumidificador não funcionará se o
recipiente não estiver instalado na posição correcta.
1. Esvazie o recipiente
manualmente.anualmente.
2. Ligue um bocado de mangueira de jardim à ligaçãoroscada
do tubo de drenagem para dirigir a água para o dreno.
Quando o recipiente estiver cheio,
retire-o puxando pela pega e
esvazie-o para uma grande bacia
ou banheira e, em seguida, volte a
instalá-lo correctamente.
Não retire o recipiente
enquanto o desumidificador estiver
a funcionar.
Pois pode fazer com que a água
escorra para o tabuleiro de recolha
ou para o chão.
Esvazie o recipiente quando a luz
indicadora se acender.
É aconselhável transportar
o recipiente segurando-o por baixo e
pela pega.
Se transportar apenas pela pega
poderá quebrar a pega ou a tampa
do recipiente.
1. Retire a tampa do orifício de
drenagem.
2. Ligue uma mangueira de jardim
ao conector roscado do tubo de
drenagem.
3. Empurre bem a mangueira de
modo a ligá-laaoorifício de
drenagem na Grelha Traseira.
A ligação para a mangueira
está preparada para aceitar uma
ligação normal para mangueiras de
jardim.
Não aperte excessivamente a
mangueira ao fixá-la ao respectivo
conector, utilize uma anilha em
borracha e aperte-a à mão
firmemente sem danificar as roscas
em plástico.
Quando a mangueira estiver ligada,
tenha cuidado para não a dobrar
excessivamente.
A mangueira deve ter um percurso
tãorectilíneo quanto possível entre
o desumidificador e o dreno.
AVISO
AVISO
AVISO
Desligamento Automático
Deitar Fora a Água do Recipiente
Page 80

PORTUGUÊS
M Do Utilizador 11
Instalação
12"
12"
C
o
n
s
t
a
n
t
l
y
O
n
.
F
A
N
S
P
E
E
D
T
I
M
E
R
H
i
g
h
L
o
w
4
h
r
.
O
n
/
O
f
f
2
h
r
.
O
n
/
O
f
f
H
U
M
I
D
I
T
Y
C
O
N
T
R
O
L
B
U
C
K
E
T
F
U
L
L
P
O
W
E
R
A
U
T
O
R
E
S
T
A
R
T
H
U
M
I
D
I
T
Y
S
E
T
T
I
N
G
C
o
n
s
t
a
n
t
l
y
O
n
.
F
A
N
S
P
E
E
D
T
I
M
E
R
H
i
g
h
L
o
w
4
h
r
.
O
n
/
O
f
f
2
h
r
.
O
n
/
O
f
f
H
U
M
I
D
I
T
Y
C
O
N
T
R
O
L
B
U
C
K
E
T
F
U
L
L
P
O
W
E
R
A
U
T
O
R
E
S
T
A
R
T
H
U
M
I
D
I
T
Y
S
E
T
T
I
N
G
C
o
n
s
t
a
n
t
l
y
O
n
.
F
A
N
S
P
E
E
D
T
I
M
E
R
H
i
g
h
L
o
w
4
h
r
.
O
n
/
O
f
f
2
h
r
.
O
n
/
O
f
f
H
U
M
I
D
I
T
Y
C
O
N
T
R
O
L
B
U
C
K
E
T
F
U
L
L
P
O
W
E
R
A
U
T
O
R
E
S
T
A
R
T
H
U
M
I
D
I
T
Y
S
E
T
T
I
N
G
C
o
n
s
t
a
n
t
l
y
O
n
.
F
A
N
S
P
E
E
D
T
I
M
E
R
H
i
g
h
L
o
w
4
h
r
.
O
n
/
O
f
f
2
h
r
.
O
n
/
O
f
f
H
U
M
I
D
I
T
Y
C
O
N
T
R
O
L
B
U
C
K
E
T
F
U
L
L
P
O
W
E
R
A
U
T
O
R
E
S
T
A
R
T
H
U
M
I
D
I
T
Y
S
E
T
T
I
N
G
C
o
n
s
t
a
n
t
ly
O
n
.
F
A
N
S
PE
E
D
T
I
M
E
R
H
i
g
h
L
o
w
4
h
r
.
O
n
/
O
f
f
2
h
r
.
O
n
/
O
f
f
H
U
M
I
D
I
T
Y
C
O
N
T
R
O
L
B
U
C
K
E
T
F
U
L
L
PO
W
E
R
A
U
T
O
R
E
S
T
A
R
T
H
U
M
I
D
I
T
Y
S
E
T
T
I
N
G
1.Deixe pelos menos 12 polegadas de distância em todos os lados da
unidade para permitir uma correcta circulaçãodoar.
2.
Instale o seu desumidificador no chão, em cima de uma mesa ou prateleira.
Quando instalar o desumidificador em cima de uma mesa ou prateleira,
certifique-se de que a mesa ou prateleira é suficientemente forte para suportar o
peso do desumidificador com o recipiente cheio. Não se sente nem se apoie no
desumidificador.
Fixe as rodas com dispositivos de travamento para evitar que a unidade caia
quando estiver instalada em cima de uma mesa ou prateleira.
A altura de uma mesa ou prateleira proporciona uma melhor posição
para segurar no recipiente e ajuda a evitar o congelamento das
serpentinas provocado pela presençadearmaisfriojuntoaochão(como
no caso de uma cave).
3.Levante o recipiente e coloque-o no desumidificador, certificando-se de
que as ranhuras existentes na parte inferior do recipiente estão
correctamente posicionadas.
4.As rodas permitem-lhe deslocar facilmente o desumidificador.
AVISO
1. Retire a tampa do recipiente. 2.
Remova os resíduos do recipiente
utilizando uma escova.
Limpe o recipiente
esfregando com uma escova ou
um pano humedecido com uma
solução de detergente suave.
3. Feche a tampa.
Empurre as patilhas
existentes na parte superior do
recipiente quando instalar
novamente o recipiente.
AVISO
AVISO
• Utilize o desumidificador numa
cave para ajudar a evitar os danos
provocados pela humidade.
• Utilize o desumidificador em zonas
tais como áreas de secagem de
lavandarias, áreas de banhos e
áreas de máquinas de lavar louça
que têm humidade excessiva.
•
Utilize o desumidificador para ajudar
a evitar os danos provocados pela
humidade em zonas onde estejam
armazenados livros.
Instalação
Instalar Correctamente o Desumidificador
Escolher o Local Ideal para o Desumidificador
Limpar o Recipiente
Page 81

12 Desumidificador
Manutenção e Serviço
C
o
n
s
t
a
n
t
l
y
O
n
.
F
A
N
S
P
E
E
D
T
I
M
E
R
H
i
g
h
L
o
w
4
h
r
.
O
n
/
O
f
f
2
h
r
.
O
n
/
O
f
f
H
U
M
ID
I
T
Y
C
O
N
T
R
O
L
B
U
C
K
E
T
F
U
L
L
P
O
W
E
R
A
U
T
O
R
E
S
T
A
R
T
H
U
M
I
D
I
T
Y
S
E
T
T
I
N
G
C
o
n
s
t
a
n
t
l
y
O
n
.
FA
N
S
P
E
E
D
T
IM
E
R
H
i
g
h
L
o
w
4
h
r
.
O
n
/
O
f
f
2
h
r
.
O
n
/
O
f
f
H
U
M
I
D
I
T
Y
C
O
N
T
R
O
L
B
U
C
K
E
T
F
U
L
L
P
O
W
E
R
A
U
T
O
R
E
S
T
A
R
T
H
U
M
I
D
I
T
Y
S
E
T
T
I
N
G
O seu desumidificador foi concebido para ser
utilizado durante todo o ano. Não exige qualquer
atenção especial. No entanto, é aconselhável
verificar o seu desumidificador e inspeccionar as
serpentinas uma vez por ano.
Se desejar pode solicitar que o Centro de Serviço
Autorizado execute estas verificações. (O custo desta
inspecção é da responsabilidade do proprietário.)
OU
Se estiver familiarizado com a manutençãode
electrodomésticos e respectivas funções, poderá ver
abaixo as instruções que lhe permitirão executar a
inspecção e a manutenção.
Limpar o painel frontal, o recipiente
eacaixa
Limpeapartedafrenteeacaixacomumpano
macio, água morna e um detergente suave.
Limpe a grelha com uma escova ou acessório
adequado do aspirador.
Não utilize lixívias nem produtos abrasivos.
Limpar o filtro do ar
1.Retire o recipiente de água da caixa.
Puxe o filtro do ar tal como mostrado acima.
2.Lave o filtro do ar com águamornaeum
detergente suave. Passe por água e seque-o.
Volte a instalar o filtro no local correcto.
Limpar a serpentina
1.Retire a Grelha Frontal da caixa tal como
mostrado acima.
2.Escove suavemente a serpentina como
mostrado na figura. Se necessário utilize água
morna e um detergente suave. Passe por água e
seque totalmente.
CUIDADOTenha cuidado para
não pulverizar a serpentina com
uma mangueira.
Tenha cuidado! Arestas afiadas!
Perigo de Choques Eléctricos
•
Desligue o cabo de alimentaçãoeléctrica da
tomada antes de proceder a qualquer intervenção
de manutenção.
• Tenha cuidado ao limpar as serpentinas.
As rebarbas são muito afiadas.
O desrespeito pelas precauções acima indicadas
pode provocar choques eléctricos ou ferimentos
pessoais.
Manutenção e Serviço
Page 82

PORTUGUÊS
M Do Utilizador 13
Manutenção e Serviço
Problema Causas Prováveis O Que Fazer
O Desumidificador
não arranca.
O Desumidificador
não seca o ar como
seria de esperar
O Desumidificador
funciona durante
muito tempo
Aparece gelo
nas serpentinas
Ruídos no
ventilador
Água no chão
■ O Cabo de alimentação do
desumidificador está desligado.
■ O fusível está queimado ou o
disjuntor do circuito disparou.
■ O recipiente da água está cheio.
■ O recipiente para recolha da água
não está instalado
■ No caso do grau de Humidade da
sala ser inferior ao valor seleccionado
na unidade.
■ Não foi deixado em funcionamento o
tempo suficiente para que a
humidade fosse retirada.
■ O fluxo de ar é restringido.
■ O Controlo da Humidade poderá não
estar definido para Humidade Baixa
(Low).
■ As portas e janelas poderão não
estar correctamente fechadas.
■ O secador de roupa poderá estar a
expelir ar carregado de humidade
para a sala.
■ A temperatura da sala é demasiado
baixa.
■ A área a desumidificar é demasiado
grande.
■ As portas e janelas estão abertas.
■ A temperatura da sala é demasiado
baixa.
■ O ar está a passar pelo
desumidificador.
■ A ligação do tubo de drenagem pode
estar solta.
■ O recipiente da água não está bem
encaixado.
■ Certifique-se de que a unidade está a
funcionar em modo “ON” (Ligada).
■ O grau de humidade da sala é
elevado.
• Certifique-se de que a ficha do desumidificador está
correctamente introduzida na tomada.
• Verifique a caixa dos fusíveis ou a caixa de disjuntores
do circuito e substitua o fusível ou rearme o disjuntor.
• O desumidificador desliga-se automaticamente quando
isto ocorre. Esvazie o recipiente da água.
• Certifique-se de que o recipiente da água está instalado
correctamente.
• Altere o valor da humidade para limites mais baixos.
• Quando instalado pela primeira vez, espere pelo menos
3 ou 4 dias para manter o grau de humidade desejado.
• Certifique-se de que não existem cortinas, palhetas ou
mobiliário a bloquear a parte da frente e de trás do
desumidificador.
• Prima a tecla de Controlo da Humidade para baixar
a humidade.
• Verifique se todas as portas, janelas e outras aberturas
estão devidamente fechadas.
• Instale o desumidificador afastado do secador.
O secador deve ficar com as saídas de ar viradas para o
exterior.
• A unidade não funcionará correctamente se a
temperatura da sala for inferior a 6°C (42°F).
• Verifique com o seu concessionário para se certificar de
que a capacidade é a adequada.
• Feche todas as portas e as janelas que dão acesso ao
exterior.
•
Habitualmente o gelo desaparecerá assim que o sistema
de descongelamento com gás começar a funcionar.
• Isto é normal.
• Verifique o tubo, se instalado.
• Consulte as secções sobre Como Retirar e Esvaziar o
Recipiente da Água.
• Altere a regulação da humidade.
• Altere a regulação da humidade.
O Desumidificador
não pára de
funcionar
Desumidificador poderá estar a funcionar incorrectamente nos seguintes casos:
Resolução de Avarias
Page 83

14 Desumidificador
Memo
Page 84

Page 85

P/No.: 3828A20399M Printed in China
 Loading...