

Page 1

Introduction
Thank you for your purchase of the Navigation System. Please read this manual carefully to ensure proper use. Keep this manual
stored in your vehicle at all times.
The Lexus Navigation System is one of the most technologically advanced vehicle accessories ever developed. The system receives satellite
signals from the Global Positioning System (GPS) operated by the U. S. Department of Defense. Using these signals and other vehicle sensors, the system can show you where you are and assist you in locating a desired destination.
The navigation system is designed to select efficient routes from your present starting location to your destination. The system is designed
to direct you to a destination that is unfamiliar to you in an efficient manner. Map database is made based on the maps, 2001 edition of Denso,
whose information source comes from Nav Tech maps and GDT maps. The calculated routes are neither the shortest routes nor routes without
traffic congestion. Your own personal local knowledge or ”short cut” may at times be faster than the calculated routes.
The navigation system’s database includes more than 50 point of interest categories to allow you to easily select destinations such as restaurants and banks. If a destination is not in the database, you can enter the street address or a major intersection close to it and the system
will route you there. The system will provide both a visual map and audio instructions. The audio instructions will announce the distance and
direction to go when you are approaching a fork or intersection. These voice instructions will help you keep your eyes on the road and are
timed to provide enough time to allow you to maneuver, change lanes or slow down.
Please be aware that all current vehicle navigation systems have certain limitations that may affect their ability to perform properly.
The accuracy of the vehicle’s position depends on the satellite condition, road configuration, vehicle condition or other circumstances. For more information on the limitations of the system, refer to pages 54 through 56.
i
Page 2
Introduction
For safety reasons, this manual indicates
items requiring particular attention with the
following marks.
CAUTION
This is a warning against something
that may cause injury to people if the
warning is ignored. You are informed
about what you must or must not do in
order to avoid or reduce the risk to
yourself and other people.
NOTICE
This is a warning against something
which may cause damage to the vehicle or its equipment if the warning is
ignored. You are informed about what
you must or must not do in order to
avoid or reduce the risk of damage to
your Lexus and its equipment.
INFORMATION
This provides additional information.
Operation is subject to the following
two conditions: (1) this device may not
cause harmful interference, and (2) this
device must accept any interference re ceived including interference that may
cause undesired operation.
Initial screen
UN001
When you start the engine system or turn the
ignition switch to “ACC”, the initial “LEXUS”
screen appea r s a nd the sys t e m b e g i n s operating.
CAUTION
When the vehicle is stopped with the
engine running, always apply the parking brake for safety.
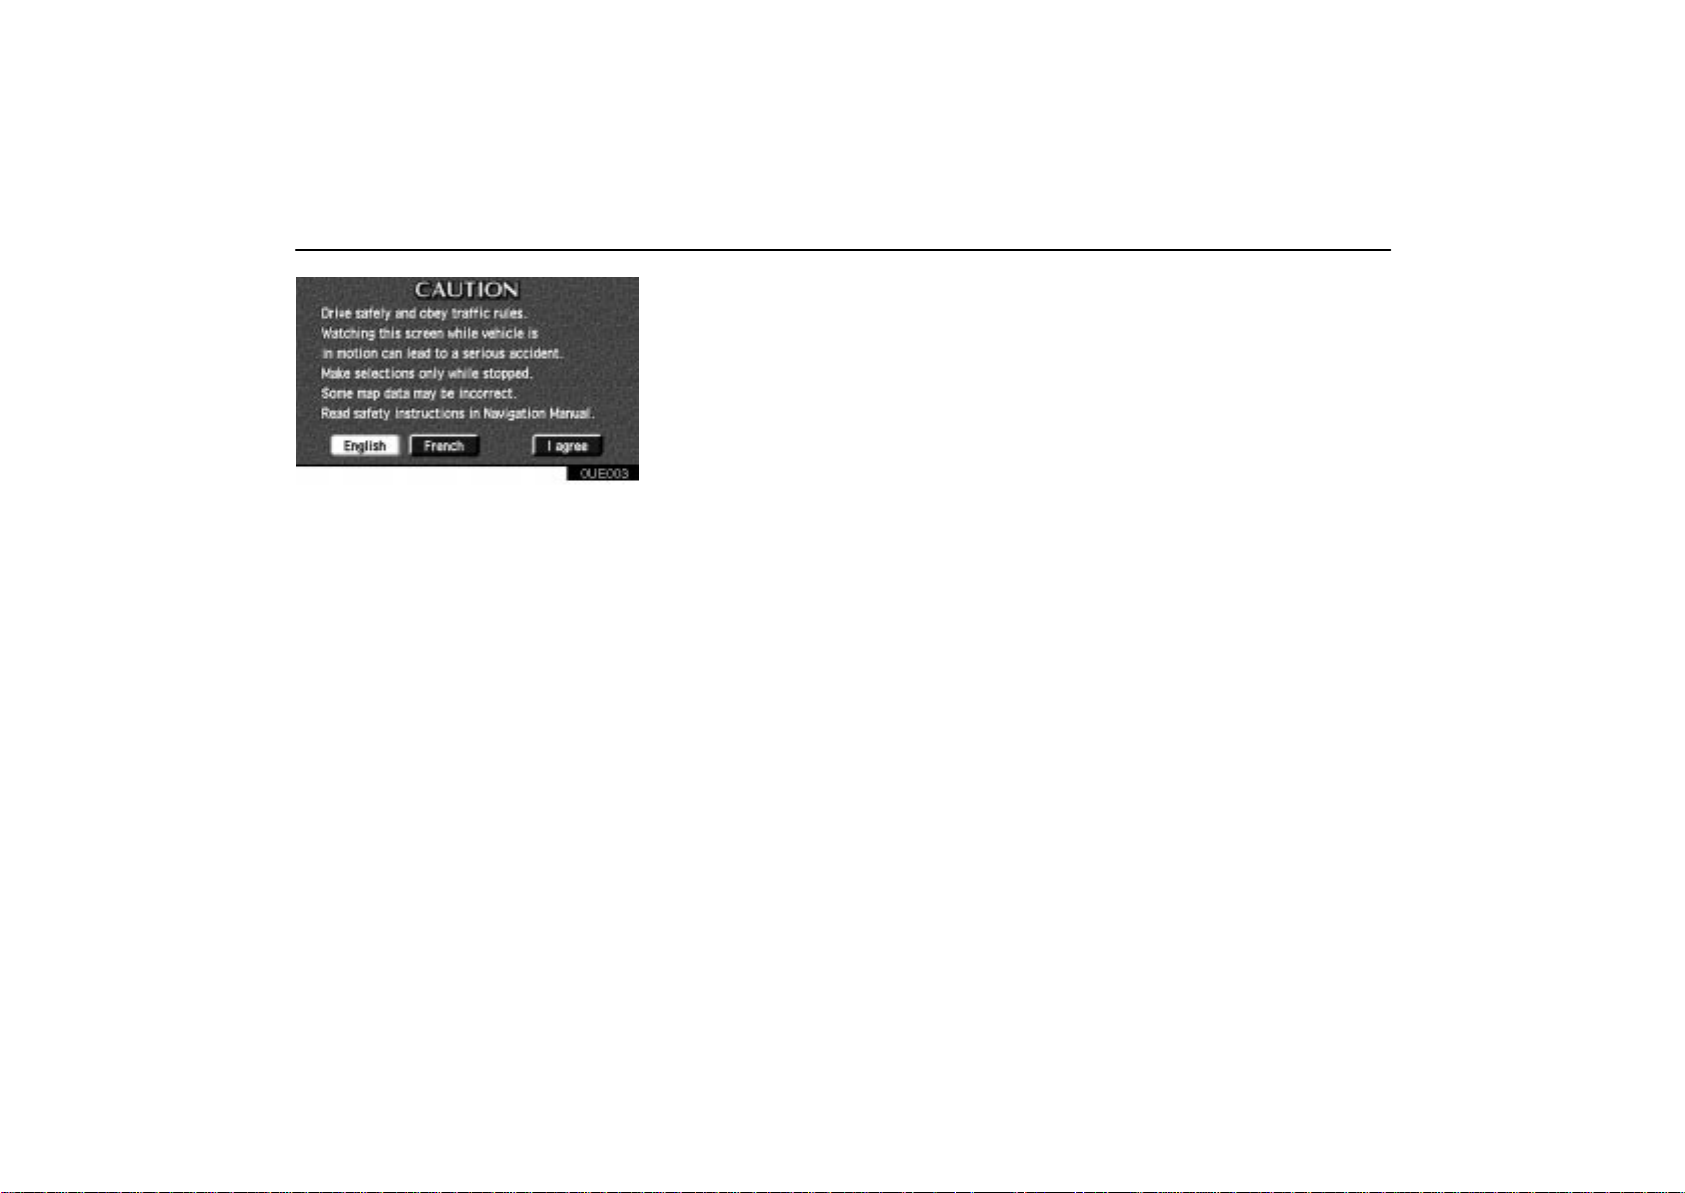
After a few seconds, the “CAUTION” screen
appears.
ii
Page 3
Introduction
0UE003
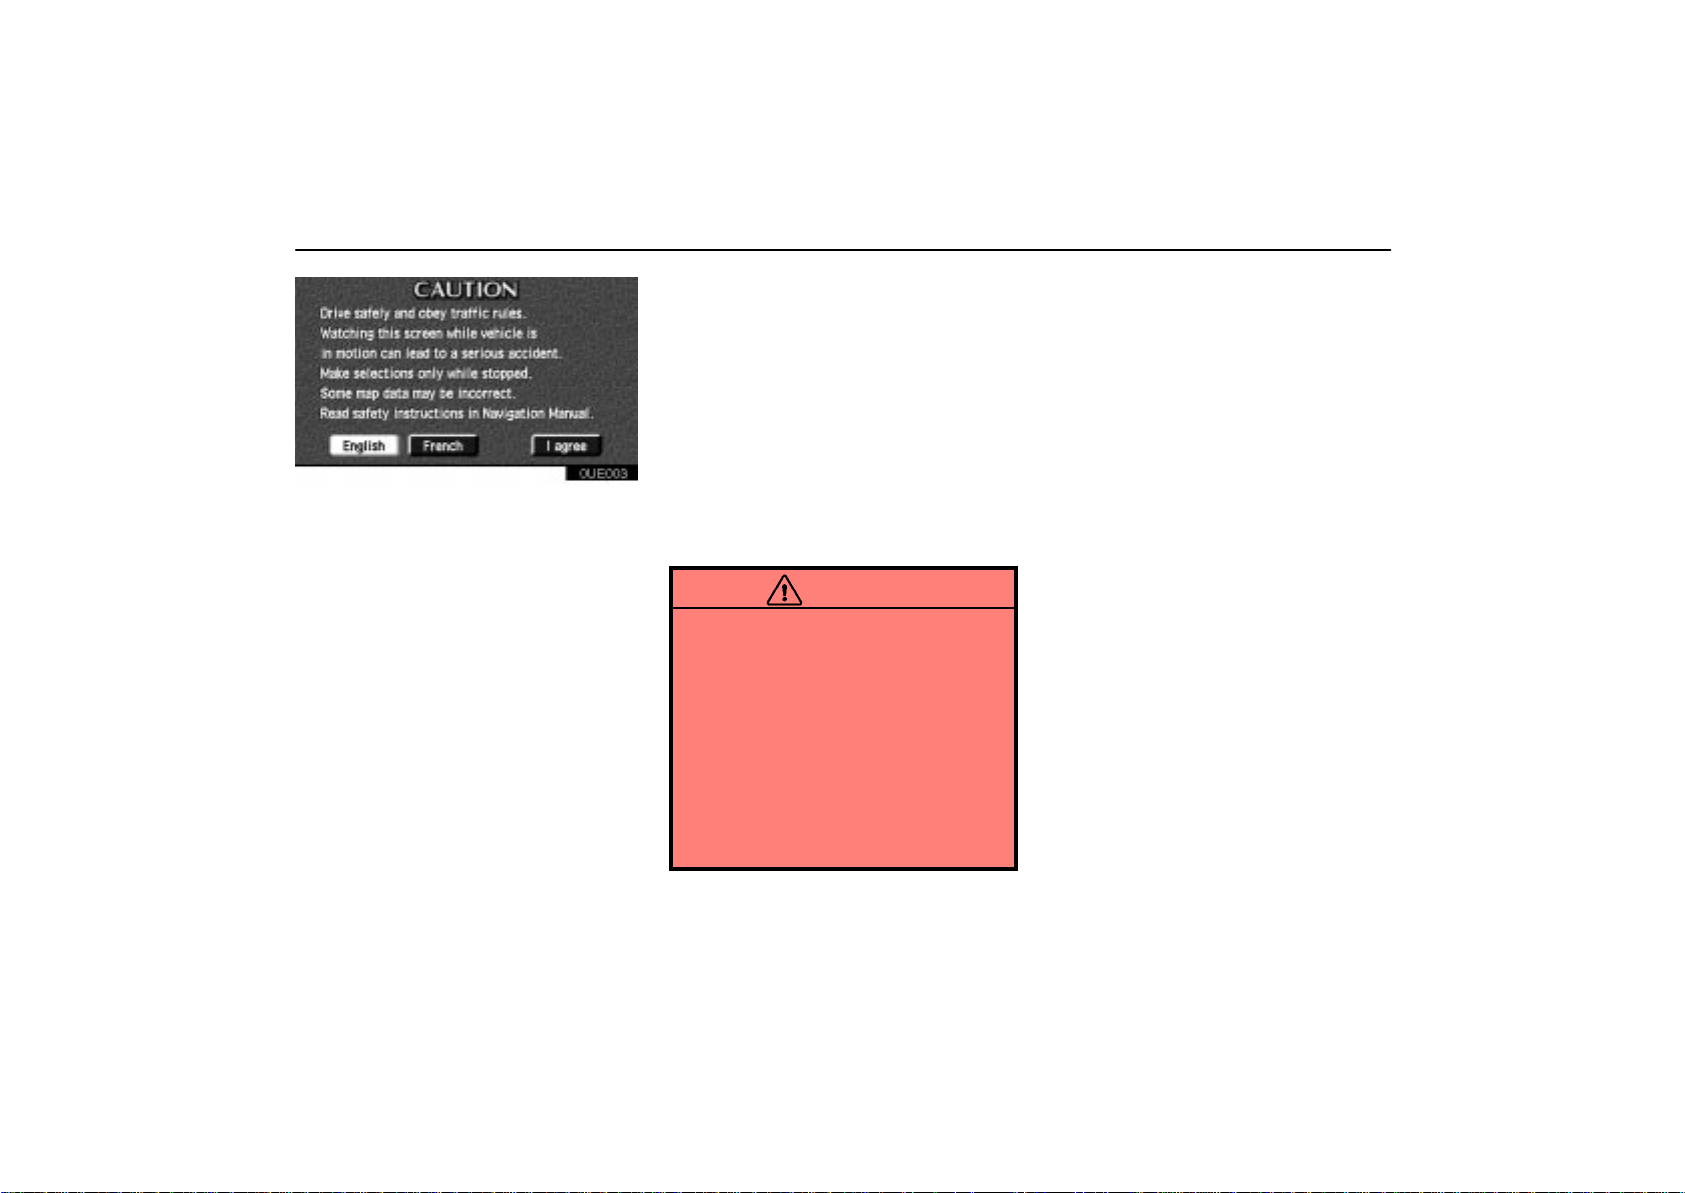
Touch either “English” or “French” to select the language. Read it and follow the
instructions.
If a screen other than for the navigation system is displayed, the current screen would
change to the
pushing the
TINATION”
automatic air conditioning control panel or by
touching the “Maintenance” switch on the
“Information Menu” screen.
When you touch the
the screen, the Map screen appears.
“CAUTION” screen by
“MAP/VOICE”, “DES-
or “MENU” button on the
“I agree” switch on
iii
Page 4
Safety Introduction
0UE003
T o use your system as safely as possible, follow all the safety tips shown below.
This system is intended to assist you in
reaching your destination and, if used properly, can do so. You, as the driver, are solely
responsible for the safe operation of your vehicle and the safety of your passengers.
Do not use any feature of this system to the
extent it distracts you from safe driving. Your
first priority while you are driving should always be the safe operation of your vehicle.
While you are driving, be sure to observe all
traffic regulations.
Before attempting to use this system while
you are driving, learn how to use it and become thoroughly familiar with it. Read the
entire Navigation System Manual to make
sure you understand the system. Do not allow others to use this system until they have
read and understood these and other instructions in this manual.
For your safety, some functions may become
inoperable when you start driving. Unavailable switches are dimmed. You can input
your destination and select your route only
when the vehicle is not moving.
CAUTION
For safety, the driver should not
operate the navigation system while
he/she is driving. Inattention to the
road and traffic may cause an
accident.
While you are driving, be sure to
follow the traffic regulations and
keep the road condition in mind. If a
traffic sign on the road has been
changed, route guidance may
provide wrong information such as
the direction of a one way street.
While you are driving, listen to the voice instructions as much as possible and glance at
the screen briefly and only when it is safe.
However, do not totally rely on voice guidance. Use it just for your information. If the
system cannot determine your current position correctly, there is a possibility of incorrect, late or non–voice guidance.
The data in the system may occasionally be
incomplete. Road conditions, including driving restrictions (no left turns, street closures,
etc.) frequently change. Therefore, before
you follow any instruction from the system,
look to see whether you can comply with the
instruction safely and legally.
This system cannot warn you about such
things as the quality of a neighborhood, condition of streets, and availability of emergency services. If you are unsure about the safety of an area, don’t drive into it. Under no
circumstances is t h i s system a substitute
for the driver’s personal judgement.
iv
Page 5

Safety Introduction
We recommend that you obtain updated
map data, when it becomes available, in order to help use the system as effectively and
safely as possible.
Use this system only in locations where it is
legal to do so. Some states/provinces may
have laws prohibiting video screens within
sight of the driver.
v
Page 6

Overview of Touch Screen and Switches
Switch operation
This system operates mainly by the
switches on the screen. To protect the
screen, lightly touch switches on the
screen with your finger. When you touch
a switch on the screen or on the automatic air conditioning control panel, a beep
sounds.
INFORMATION
If the system does not respond to a
touch of a switch, move your finger
away from the screen and then touch
it again.
You cannot operate dimmed
switches.
Wipe off fingerprints on the surface
of the display using a glass cleaning
cloth.
The displayed image may become
darker and moving images may be
slightly distorted when the display is
cold.
Under extremely cold conditions, the
map may not be displayed and the
data input by a user may be deleted.
Also, the display may take time to
change, and a button on the automatic air conditioning control panel
may be harder than usual to depress.
The display may be tinged in purple
due to the reflection of sunlight, but
this is not a malfunction.
vi
Page 7
Symbols, Switches and Buttons
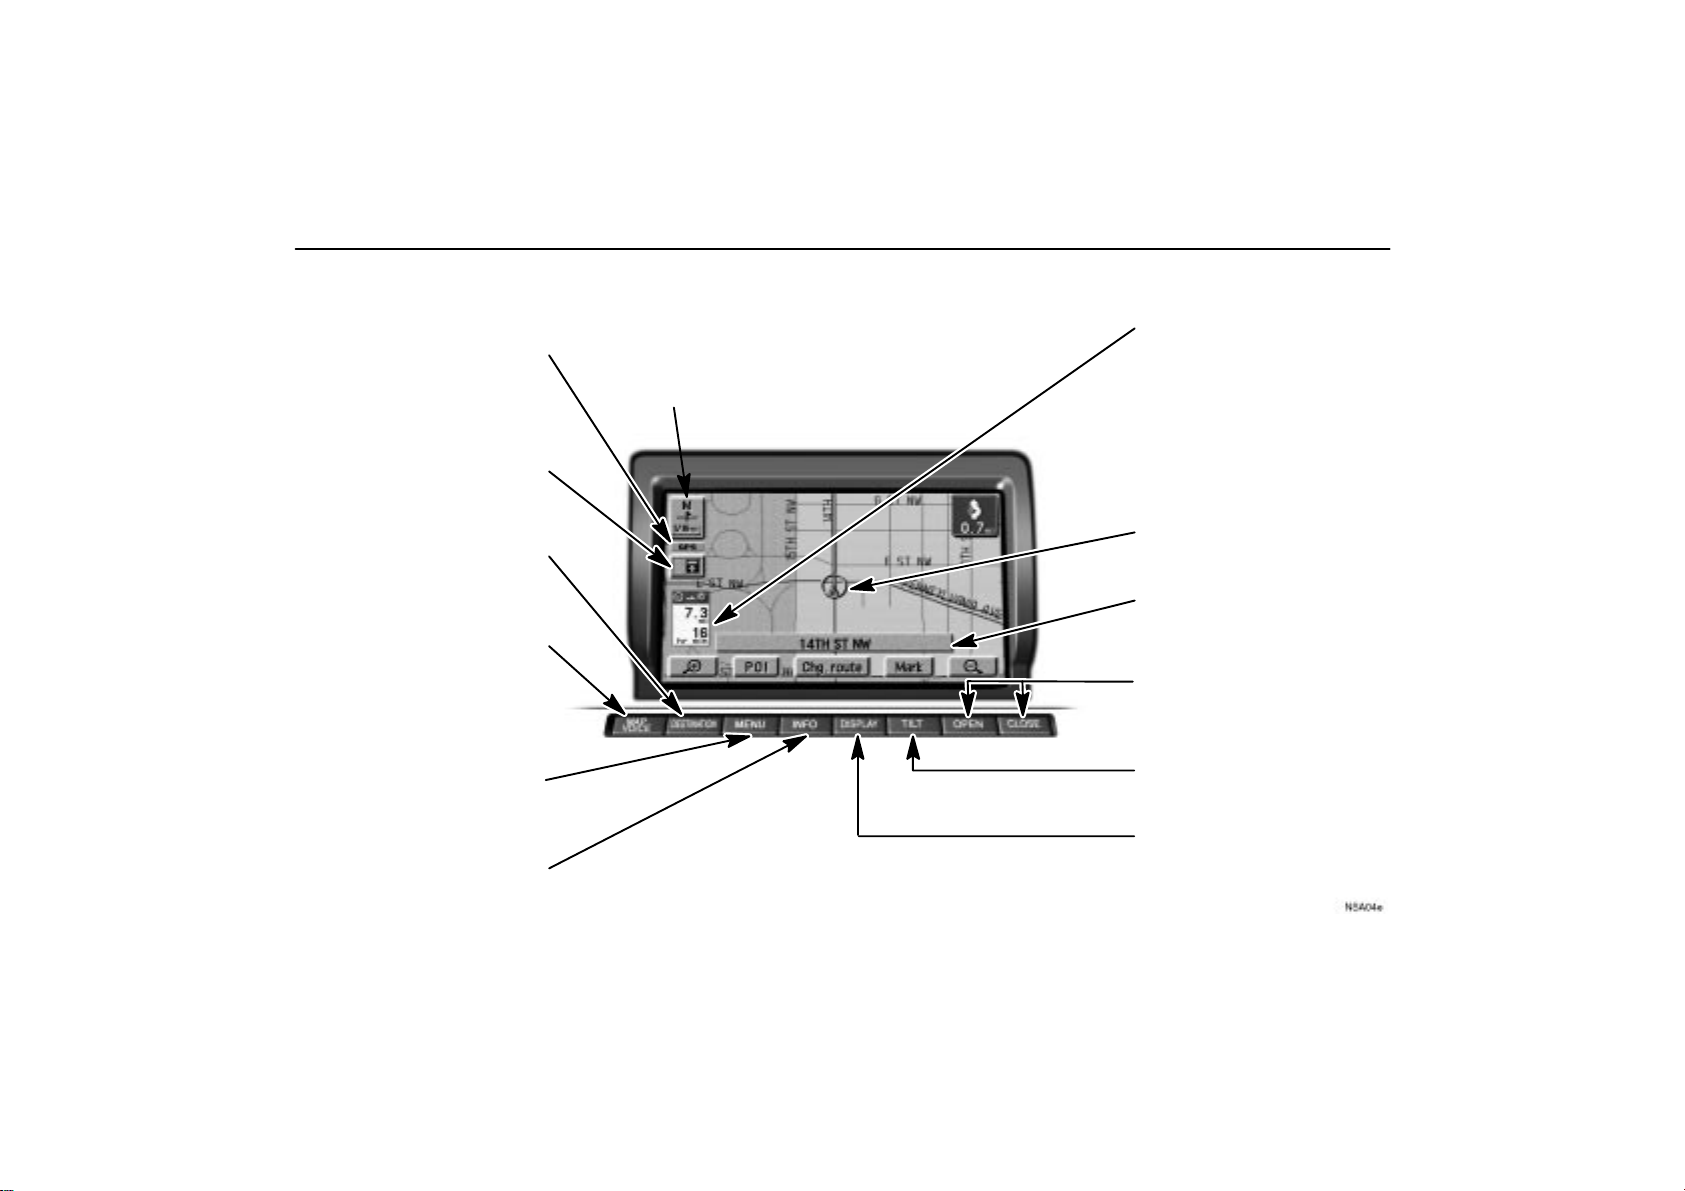
Symbols, Switches and Buttons
(Global Positioning System)
GPS Mark
Whenever your vehicle is receiv-
ing signals from the GPS, this
mark is displayed. For details, see
page 54.
Map/Guide
Push this switch to change the
screen mode. For details, see
page 32.
DESTINATION button
Push this button to display the
Destination screen. For details,
see page 5.
MAP/VOICE button
Push this button to repeat a Guid-
ance voice, cancel the one touch
scroll and start a Guidance. For
details, see page 38.
MENU button
Push this button to display the
menu screen. This screen allows
you to make adjustments or cor-
rect settings of various options
and functions.
INFO button
Push this button to display the
information menu screen. For
details, see page 91.
North–Up Symbol and Scale of Map
To indicate a map view with North up. T ouching this symbol
changes the map view to a heading–up respective. The figure
also indicates the map scale. For details, see page 53.
nsa04e
Distance and time to destination
Displays the distance and the estimated travel time to the destination. If you input more than two
destinations, it displays the distance and time to the next destination. Touching this indication
will change it to the distance and
time to the other destinations.
The direction will be indicated
when your vehicle is off the
route.
Current Vehicle Position Mark
To indicate the current position.
For details, see page 37.
Current street name
Turn on this function to indicate the
current street name. For details,
see page 91.
OPEN/CLOSE buttons
Push these buttons to open or
close the navigation door. For details, see page 2.
TILT button
Push this button to tilt the display.
For details, see page 2.
DISPLAY button
Push this button to display the ”Display” screen. For details, see page
98.
vii
Page 8

Symbols, Switches and Buttons
Changing the route
guidance
When you touch this switch, the Change
route screen will appear. For details, see
page 33.
One–touch registration
of marked point
Touch this switch to register the current vehicle position as a marked point. For details,
see page 75.
Displaying of points of
interest
Icons such as restaurants and hotels, etc.
can be displayed on the screen. For details,
see page 47.
Zoom in/Zoom out
These switches magnify or reduce the map
scale. For details, see page 51.
viii
Page 9

ix
Page 10

SECTION
I
BASIC FUNCTIONS
Descriptions of basic operations in frequent use
Your navigation system 2. . . . . . . . . . . . . . . . . . . . . . . . . . . . . . . . . . . . . . . . . . . . .
Inputting letters and numbers 3. . . . . . . . . . . . . . . . . . . . . . . . . . . . . . . . . . . . . . . .
How to move the cursor 5. . . . . . . . . . . . . . . . . . . . . . . . . . . . . . . . . . . . . . . . . . . . .
Destination input Explains 11 ways to input your destination 5. . . . . . . . . . . . .
Explains 11 ways to input your destination
Setting and deleting destination 26. . . . . . . . . . . . . . . . . . . . . . . . . . . . . . . . . . . . .
Setting and deleting preferred road 30. . . . . . . . . . . . . . . . . . . . . . . . . . . . . . . . . .
Route guidance screen 32. . . . . . . . . . . . . . . . . . . . . . . . . . . . . . . . . . . . . . . . . . . .
Route preview 36. . . . . . . . . . . . . . . . . . . . . . . . . . . . . . . . . . . . . . . . . . . . . . . . . . . .
Current position display 37. . . . . . . . . . . . . . . . . . . . . . . . . . . . . . . . . . . . . . . . . . . .
Voice guidance 38. . . . . . . . . . . . . . . . . . . . . . . . . . . . . . . . . . . . . . . . . . . . . . . . . . .
Typical voice guidance prompts 39. . . . . . . . . . . . . . . . . . . . . . . . . . . . . . . . . . . . .
Registering your home 41. . . . . . . . . . . . . . . . . . . . . . . . . . . . . . . . . . . . . . . . . . . . .
Registering preset destinations 43. . . . . . . . . . . . . . . . . . . . . . . . . . . . . . . . . . . . .
Detour setting 46. . . . . . . . . . . . . . . . . . . . . . . . . . . . . . . . . . . . . . . . . . . . . . . . . . . .
Displaying POI 47. . . . . . . . . . . . . . . . . . . . . . . . . . . . . . . . . . . . . . . . . . . . . . . . . . .
Map appearance 49. . . . . . . . . . . . . . . . . . . . . . . . . . . . . . . . . . . . . . . . . . . . . . . . . .
Map scale 51. . . . . . . . . . . . . . . . . . . . . . . . . . . . . . . . . . . . . . . . . . . . . . . . . . . . . . .
Screen scrolling 52. . . . . . . . . . . . . . . . . . . . . . . . . . . . . . . . . . . . . . . . . . . . . . . . . .
Orientation of the map 53. . . . . . . . . . . . . . . . . . . . . . . . . . . . . . . . . . . . . . . . . . . . .
Limitations of the navigation system 54. . . . . . . . . . . . . . . . . . . . . . . . . . . . . . . . .
Map database information and updates 57. . . . . . . . . . . . . . . . . . . . . . . . . . . . . .
1
Page 11
Your navigation system
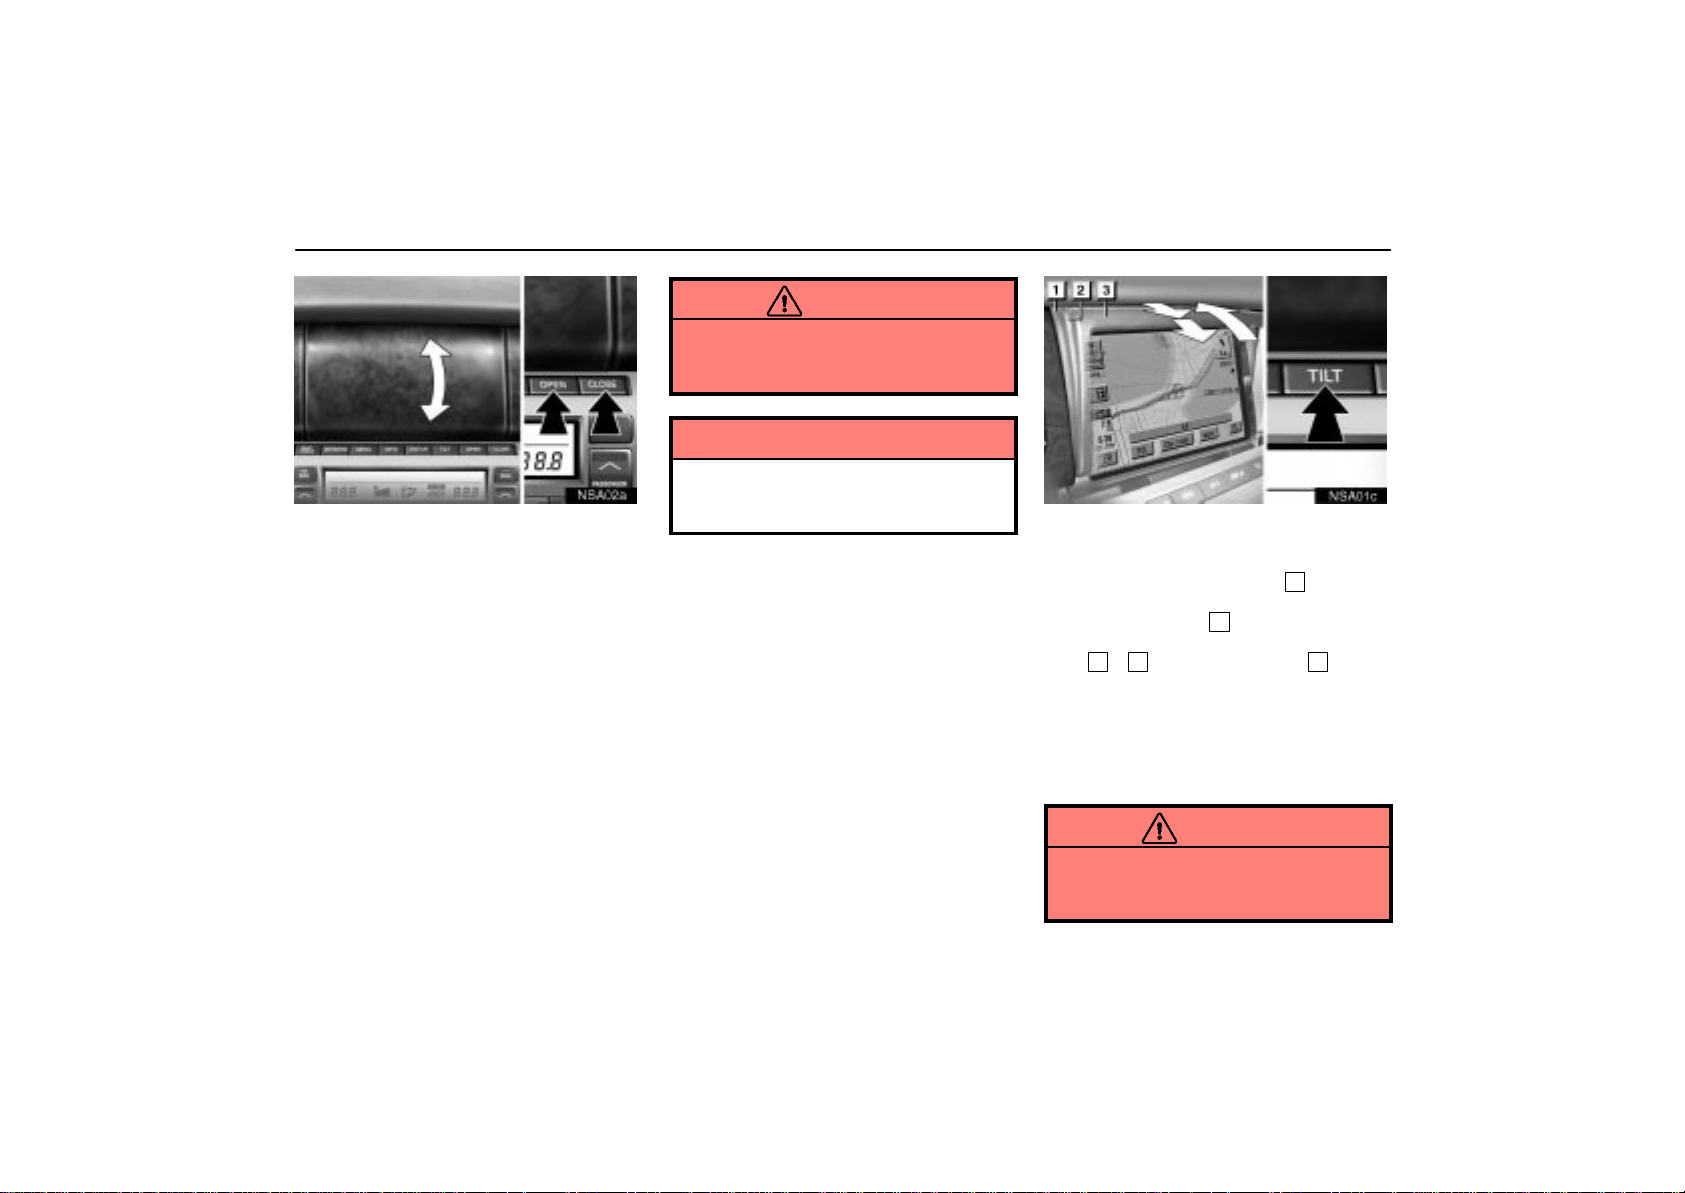
nsa02a
Push the “OPEN” or “CLOSE” button to
open or close the door and turn the system on or off. Pushing the “MAP/VOICE”,
“DESTINATION”, “MENU” or “INFO” button can also open the door and turn the
system on.
While you are using the navigation system,
turning the ignition switch to the “LOCK”
position will turn off the system and close the
door automatically. After this, if you turn the
ignition switch back to the “ACC” or “ON”
position, the door will be automatically
opened and the system will turn on the previous mode you used.
If the navigation door is stopped in the middle
of the door opening (closing) operation, push
the “CLOSE (OPEN)” button once and then
push the “OPEN (CLOSE)” button again.
Y our navigation system works when the ignition switch is in the “ACC” or “ON” position.
2
CAUTION
Take care not to jam your hand while
opening/closing the navigation door.
Otherwise you could be injured.
NOTICE
Do not obstruct the navigation door
while it is opening/closing. It could
damage your navigation system.
NSA01c
When the display is hard t o b e read due to
the lights from your surroundings, the
display can be tilted. It is recommended
to tilt the display in position
retractable hardtop is opened. If the display is in position
“TILT” button will tilt the display to position 2, 3 and then back to 1 in this
order.
The display will automatically resume the
previous position you used when the
ignition switch is turned to “ACC” or
“ON” position.
1
3
when the
, each push of the
CAUTION
Take care not to jam your hand while
tilting the display. Otherwise, you
could be injured.
Page 12
Your navigation system Inputting Letters and Numbers
NOTICE
Do not obstruct the display while it is
tilting. It could damage your navigation system.
The navigation system operates by
switches on the screen and on the automatic air conditioning control panel.
When you touch a switch, a beep sounds.
When using the switches on the touch
screen, please use only light pressure
with your finger to protect the screen
from damage. Do not use objects other
than your finger to touch the screen.
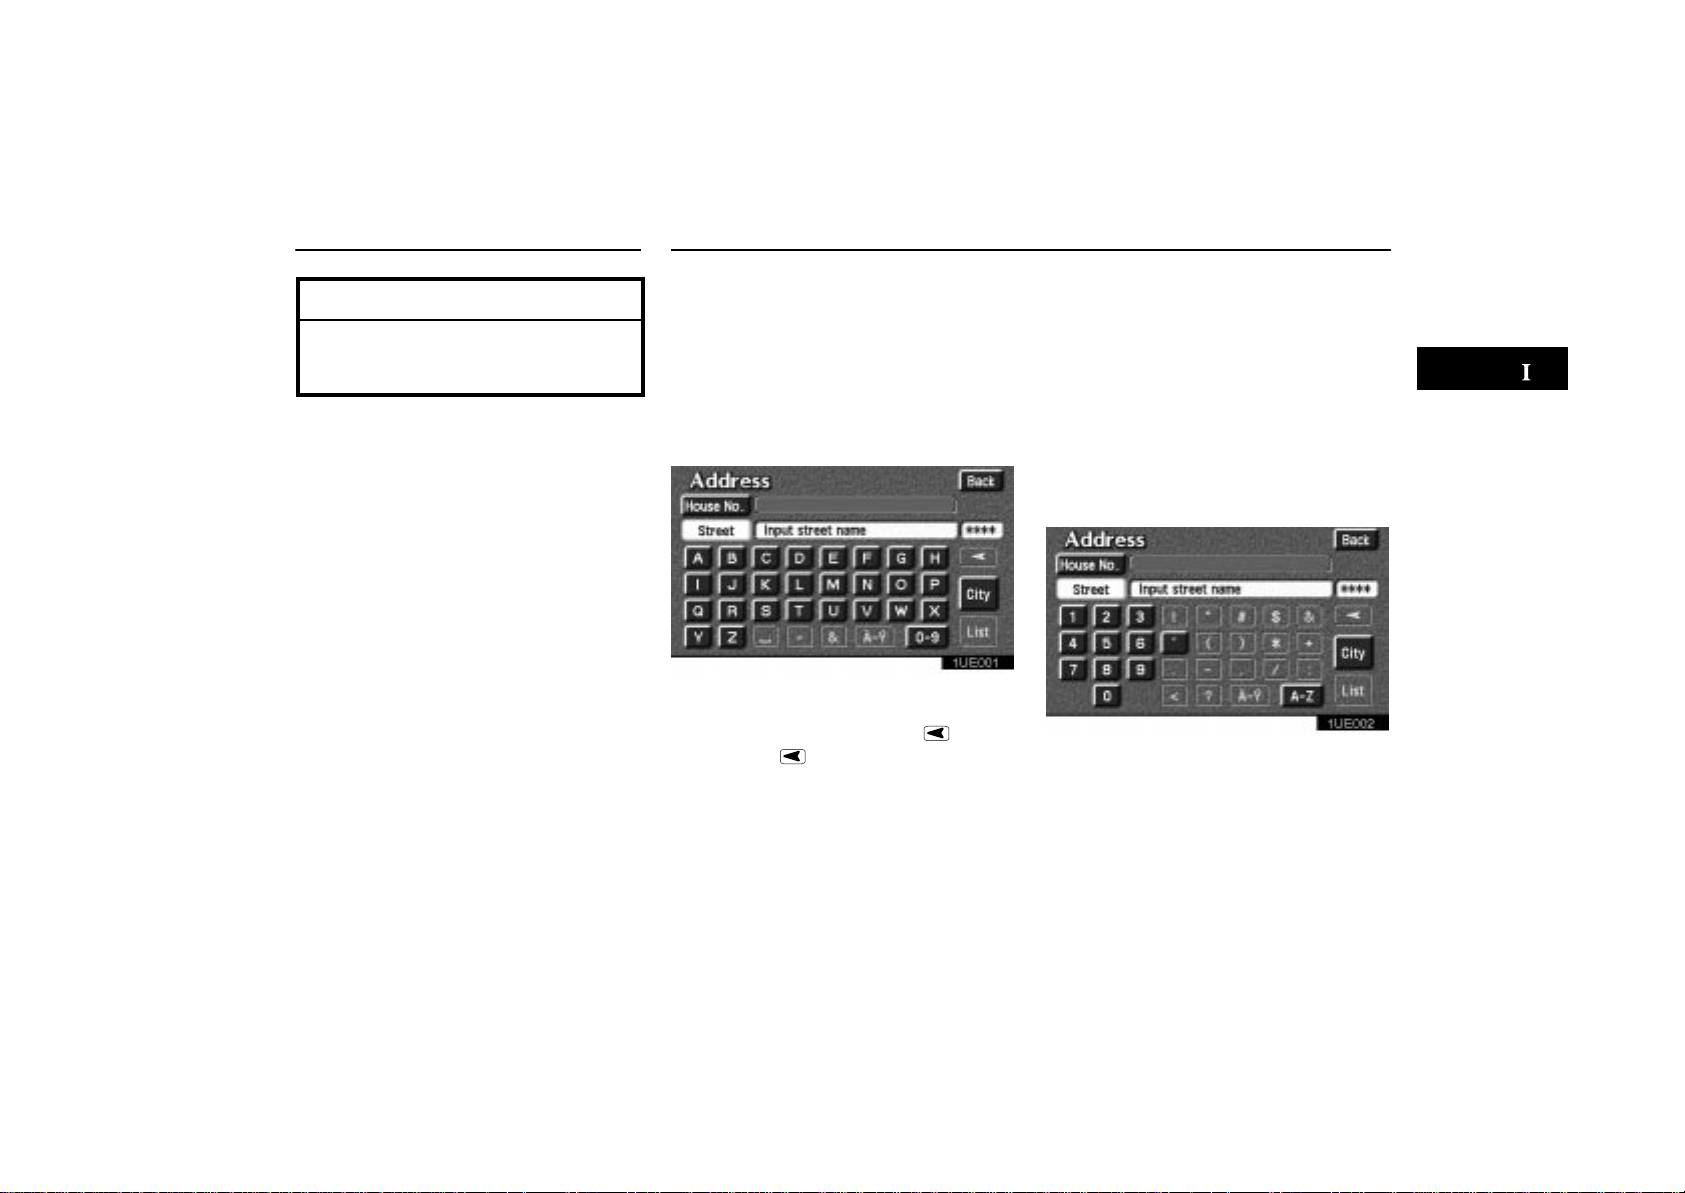
1UE001
To type in an address etc., directly touch alphabet keys on the screen. If you touch a
wrong letter, delete it using the
Touching the
switch erases one letter.
switch.
Touching the “List” switch will change the
screen to a display of the database items that
match the name or address that you have
entered on the screen. The number of
matching items is shown to the right side of
the screen. If the matching item is more than
9,999, the system displays
screen.
To input numerals, touch the
and the display will change the screen to
number input display.
“” on the
“0–9” switch
1UE002
Touching the “A–Z” switch changes the
screen back to the previous name input display.
3
Page 13

Inputting Letters and Numbers
1UE003
When a list is displayed, you can scroll or
page through the list by using the appropriate switch.
To shift to the next or previous
page.
To scroll up or down one item at a
time.
This expresses a displayed screen
position.
If appears on the right of the item
name, the complete name is too
long for the display. Touch , and
the name will scroll to the end of the
name.
Touching will scroll the name to
the beginning of the name.
4
Page 14
How to Move the Cursor Destination Input
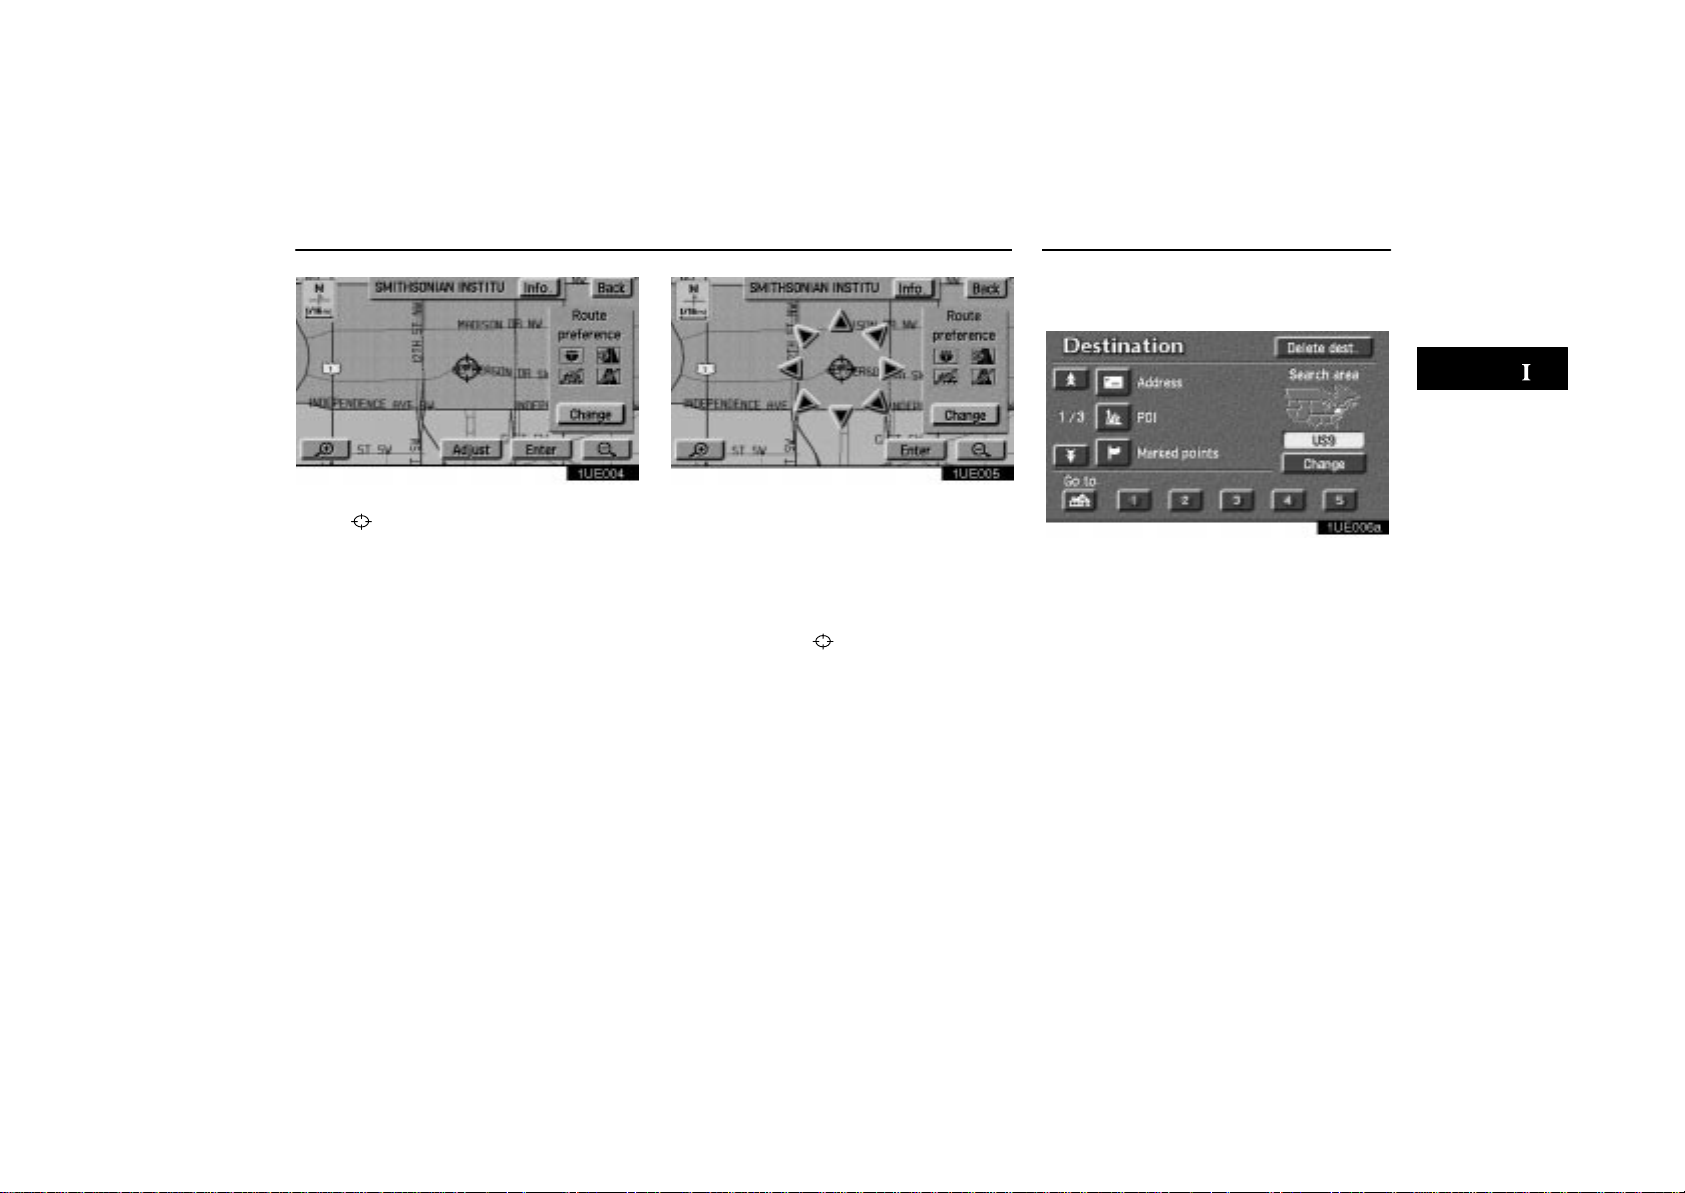
1UE004
1. Touch the “Adjust” switch to move the
cursor
.
1UE005
Position locating screen on the map
2. When you touch an arrow facing your desired point, the map scrolls in that direction.
When you release your finger, scrolling
stops.
3. If you touch the
position of cursor
“Enter” switch, the
is set.
Push the
the Destination screen appears.
“DESTINATION” button and
1UE006a
The Destination screen allows you to select
the area to search for your destination.
Touch the
tination screen to display a map of the
United States and Canada divided into 11
areas.
“Change” switch on the Des-
5
Page 15
Destination Input
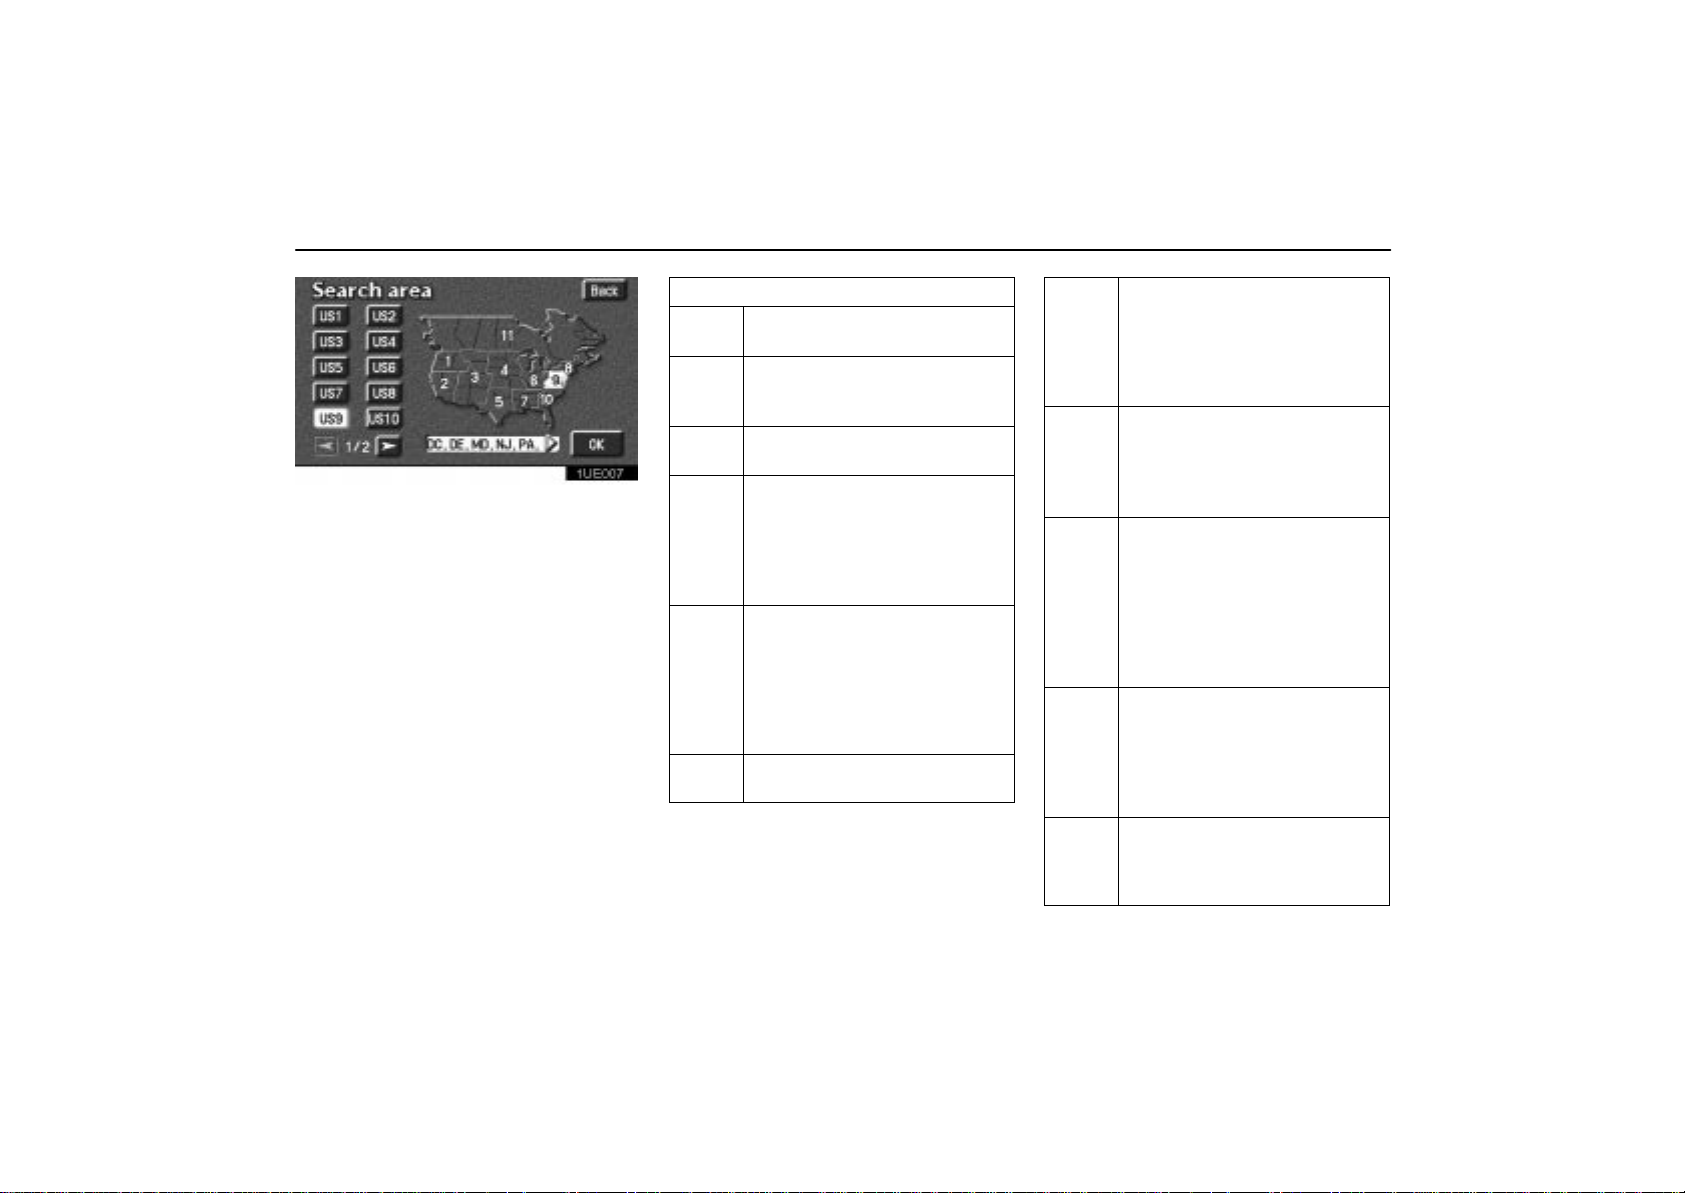
1UE007
Touch one of the “US1” through “CAN”
switches to select the search area. Touch the
“OK” switch and the Destination screen re-
turns.
Once you choose the area to search, you
can use one of 11 different methods to enter
your destination.
USA
Switch
US1
US2
US3
US4
US5
States included in the search
area
Idaho
Oregon
Washington
California
Nevada
Arizona
Colorado
Montana
New Mexico
Utah
Wyoming
Iowa
Kansas
Minnesota
Missouri
Nebraska
North Dakota
South Dakota
Oklahoma
Texas
US6
US7
US8
US9
US10
Illinois
Indiana
Kentucky
Michigan
Ohio
Wisconsin
Alabama
Arkansas
Louisiana
Mississippi
Tennessee
Connecticut
Maine
Massachusetts
New Hampshire
New Jersey
New York
Rhode Island
Vermont
Delaware
Maryland
New Jersey
Pennsylvania
Virginia
West Virginia
Florida
Georgia
North Carolina
South Carolina
6
Page 16
Destination Input
Canada
Switch
CAN
States and regions included in
the search area
Alberta
British Columbia
Manitoba
New Brunswick
Newfoundland and Labrac
Nova Scotia
Ontario
Prince Edward Island
Québec
Saskatchewan
You can find your destination using various
methods. See page 8 through 26 for the detailed steps.
1. By Home (
tion screen): You can select your own home
without entering the address each time. In
this case, it is necessary to register your
home beforehand. See page 8 for the detailed steps.
2. By Preset destination (
switches on the destination screen): You
can select one of 5 preset destinations directly. In this case, it is necessary to register
the destinations beforehand. See page 9
for the detailed steps.
3. By Address: You can input the house
number and the street address by using the
input keys. See page 10 for the detailed
steps.
4. By Point of Interest: You can select one
of the many points of interest that have been
already stored in the system’s database.
There are more than 50 categories to choose
from including restaurants, banks and automotive places. See page 13 for the detailed
steps.
switch on the Destina-
—
5. By Marked point: You can register your
own favorite destinations as a “Marked
Point”. The system allows you to store up
100 marked points. See page 19 for the detailed steps.
6. By Previous destination: You can select
a destination from any of the last 20 previously set destinations. See page 20 for the
detailed steps.
7. By Emergency: You can select one of the
three points of emergency service points
that have been already stored in the system’s database. See page 21 for the detailed
steps.
8. By Intersection: You can en ter th e
names of two intersecting streets. This is
helpful if you do not know the specific street
address of your destination but know the
general vicinity. See page 22 for the detailed
steps.
9. By Freeway Entrance/Exit: You can enter the name of the freeway (interstate) entrance or exit. See page 23 for the detailed
steps.
10. By Previous starting point: You can
enter a point where the system has started
to guide last time. See page 25 for the detailed steps.
7
Page 17

Destination Input Destination Input by Home
11. By Map Selection: You can select a
destination simply by touching the location
on the displayed map. See page 26 for the
detailed steps.
INFORMATION
When inputting the destination, the
response to the switch may be slow.
“Point of interest” are mainly registered in “Detailed map coverage
areas”. The registration is made
based on the NavTech “Standard
POI Inclusion List”.
If there is no point registered,
switches such as “Marked point”,
“Previous destination” or “Previous
starting point” are dimmed and not
available.
The route for returning may not be
the same as that for going.
The route guidance to the destination may not be the shortest route or
a route without traffic congestion.
Route guidance may not be available
if there is no road data for the specified location.
When setting the destination, you
should use the map on a scale of one
half mile or smaller.
To select an “Address”, “Point of interest”, “Freeway Entrance/Exit” or
“Intersection” in a different area, a
search area’s change is necessary.
CAUTION
While you are driving, be sure to follow
traffic regulations and keep the road
condition in mind. If a traffic sign on the
road has been changed, the route guidance may provide wrong information.
Touch the switch on the Destination
input screen.
The screen changes and displays the
map location of your home. (See ”Entering Destination” on page 26.)
The system starts the guidance from your
current position to your home immediately
after you touch the
For the steps to register your home, see
”Registering your home” on page 41.
switch.
8
Page 18

Destination Input by Preset Destination
Touch any of
tion) switches on the destination input
screen.
The screen changes and displays the map
location of the preset destination.
The system starts the guidance from your
current position to the preset destination immediately after you touch the preset destination switch.
For the steps to register the preset destination, see “Registering preset destination” on
page 43.
— (preset destina-
9
Page 19
Destination Input by Address
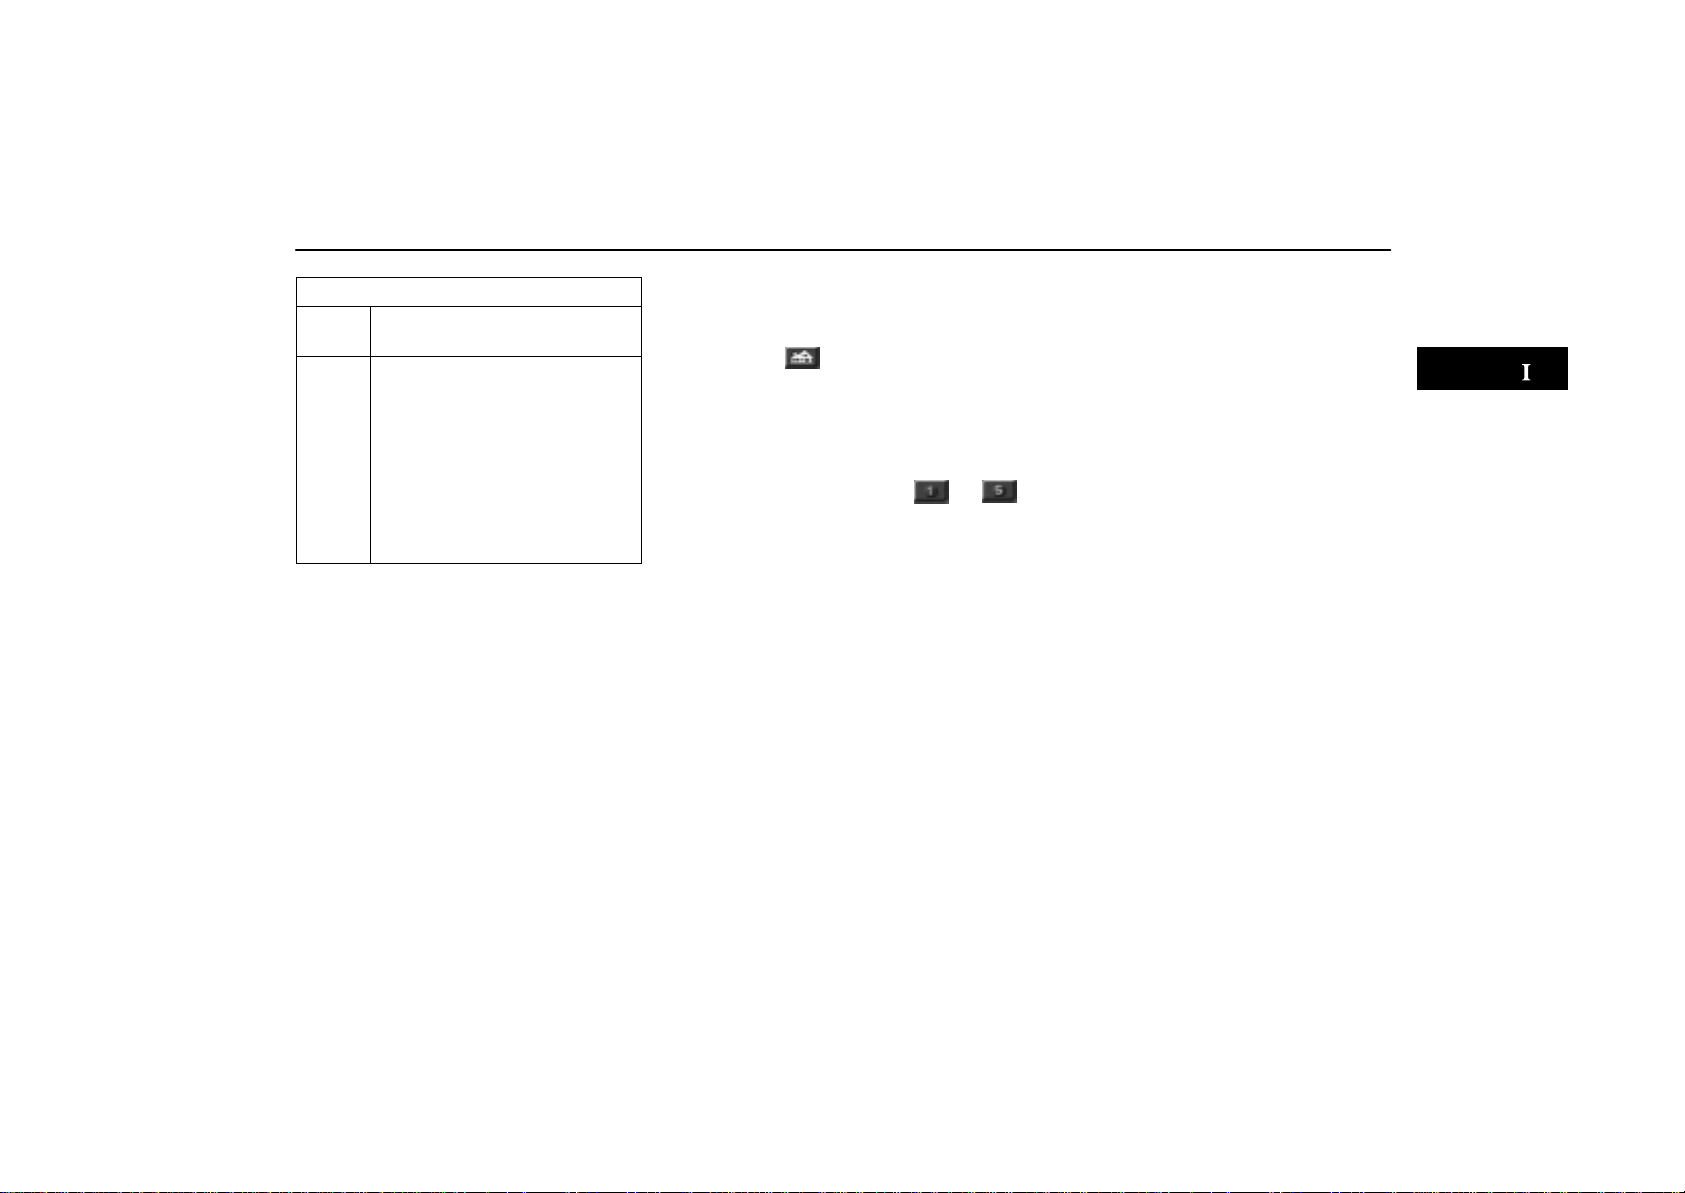
1UE008
(a) Inputting a house number and a street
name
Touch the
Destination screen. The Address screen
appears, and then you can input a house
number.
Touch letters directly on the screen to i n put a house number.
“Address” switch on the
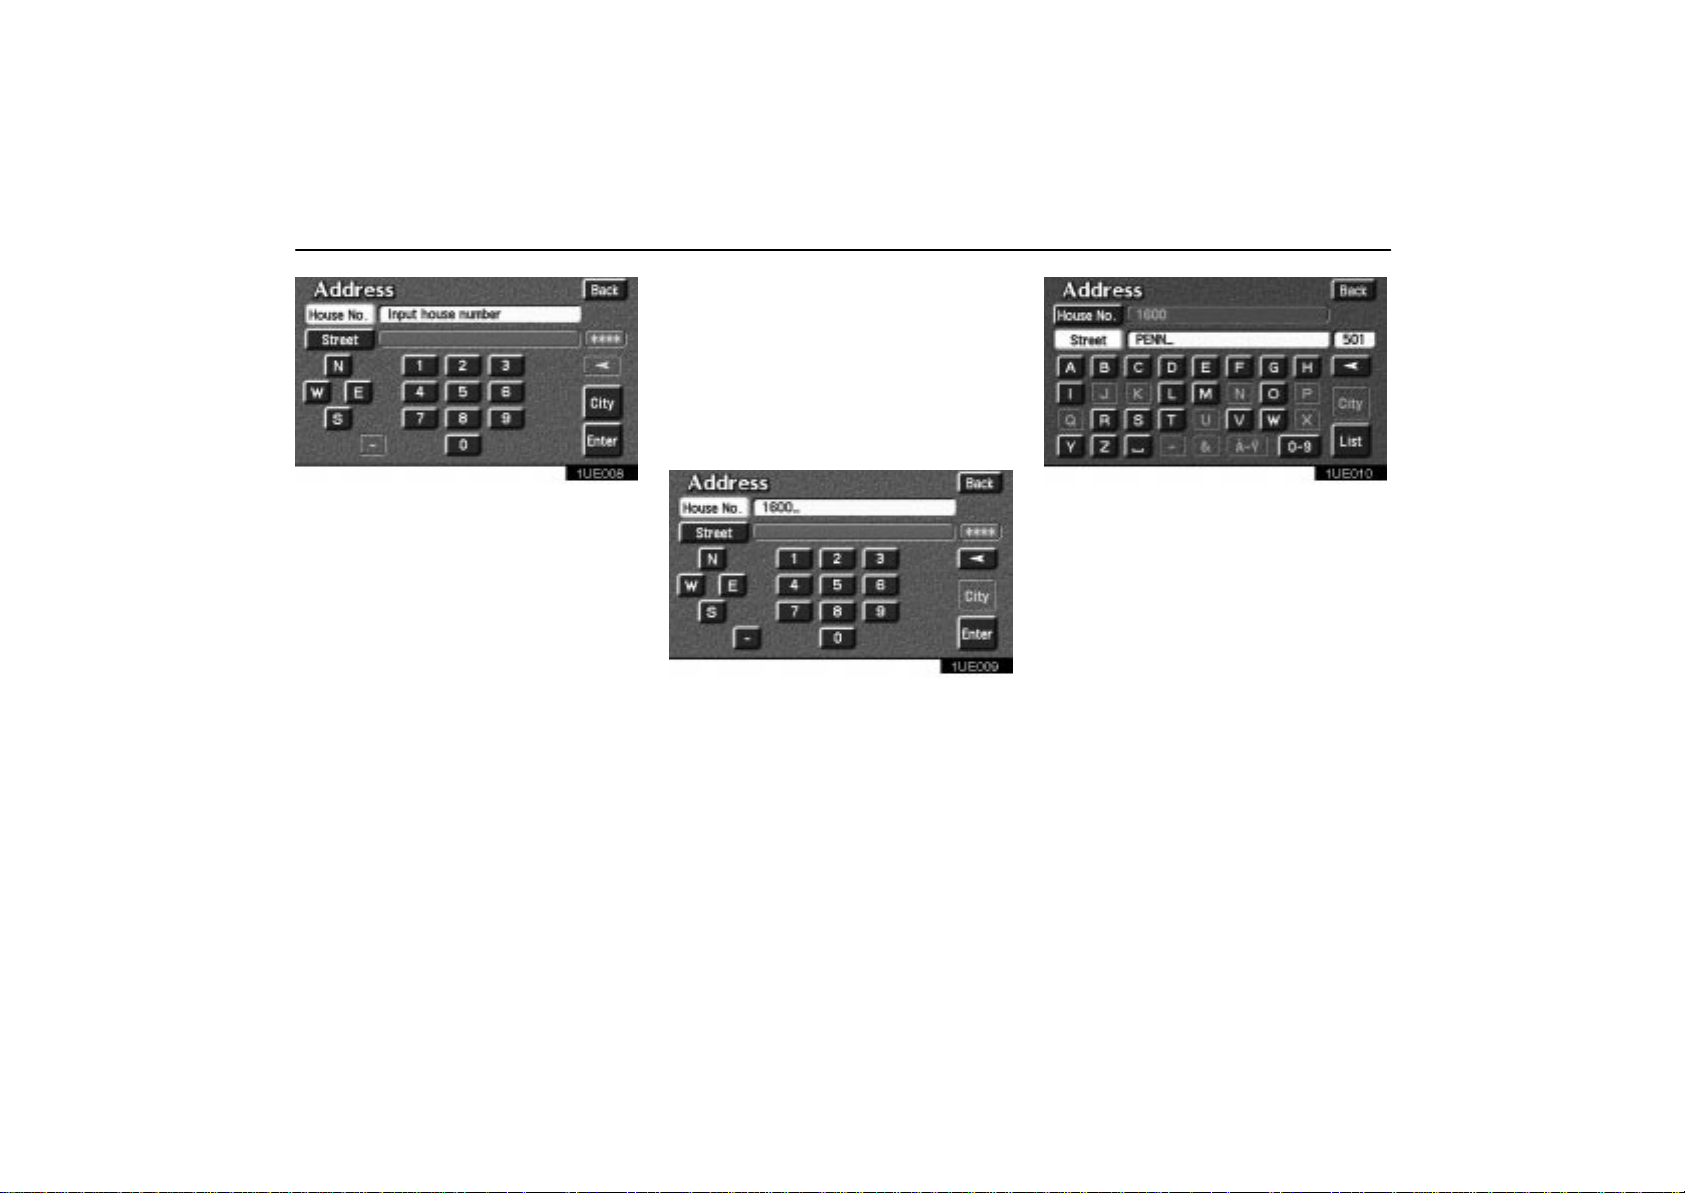
1UE010
There are 2 ways to input a destination b y
address.
10
1UE009
After inputting a house number, touch the
“Enter” switch to display the screen which
you can input a street name.
It is possible to input a street name first.
Touch the
screen which you can input a street name.
“Street” switch to display the
After each letter is input, the system
searches the database for street names that
match. Alphabet keys are dimmed if the database does not have a match for the next
letter in the remaining list of matching street
names.
When you input numerals, touch the
“0–9” switch to display the screen for
numeral input.
Based on your input, the number of matching
sites appears at the top right of the screen.
After the number decreases to some extent,
touch the
selection list. If the number of matches decreases to 4 or less, the screen changes a u tomatically to the selection list.
“List” switch to display the street
Page 20
Destination Input by Address
(b) Selecting a city to search
The screen for selecting last 5 cities appears
if you touch the
dress screen on page 10.
“City” switch on the Ad-
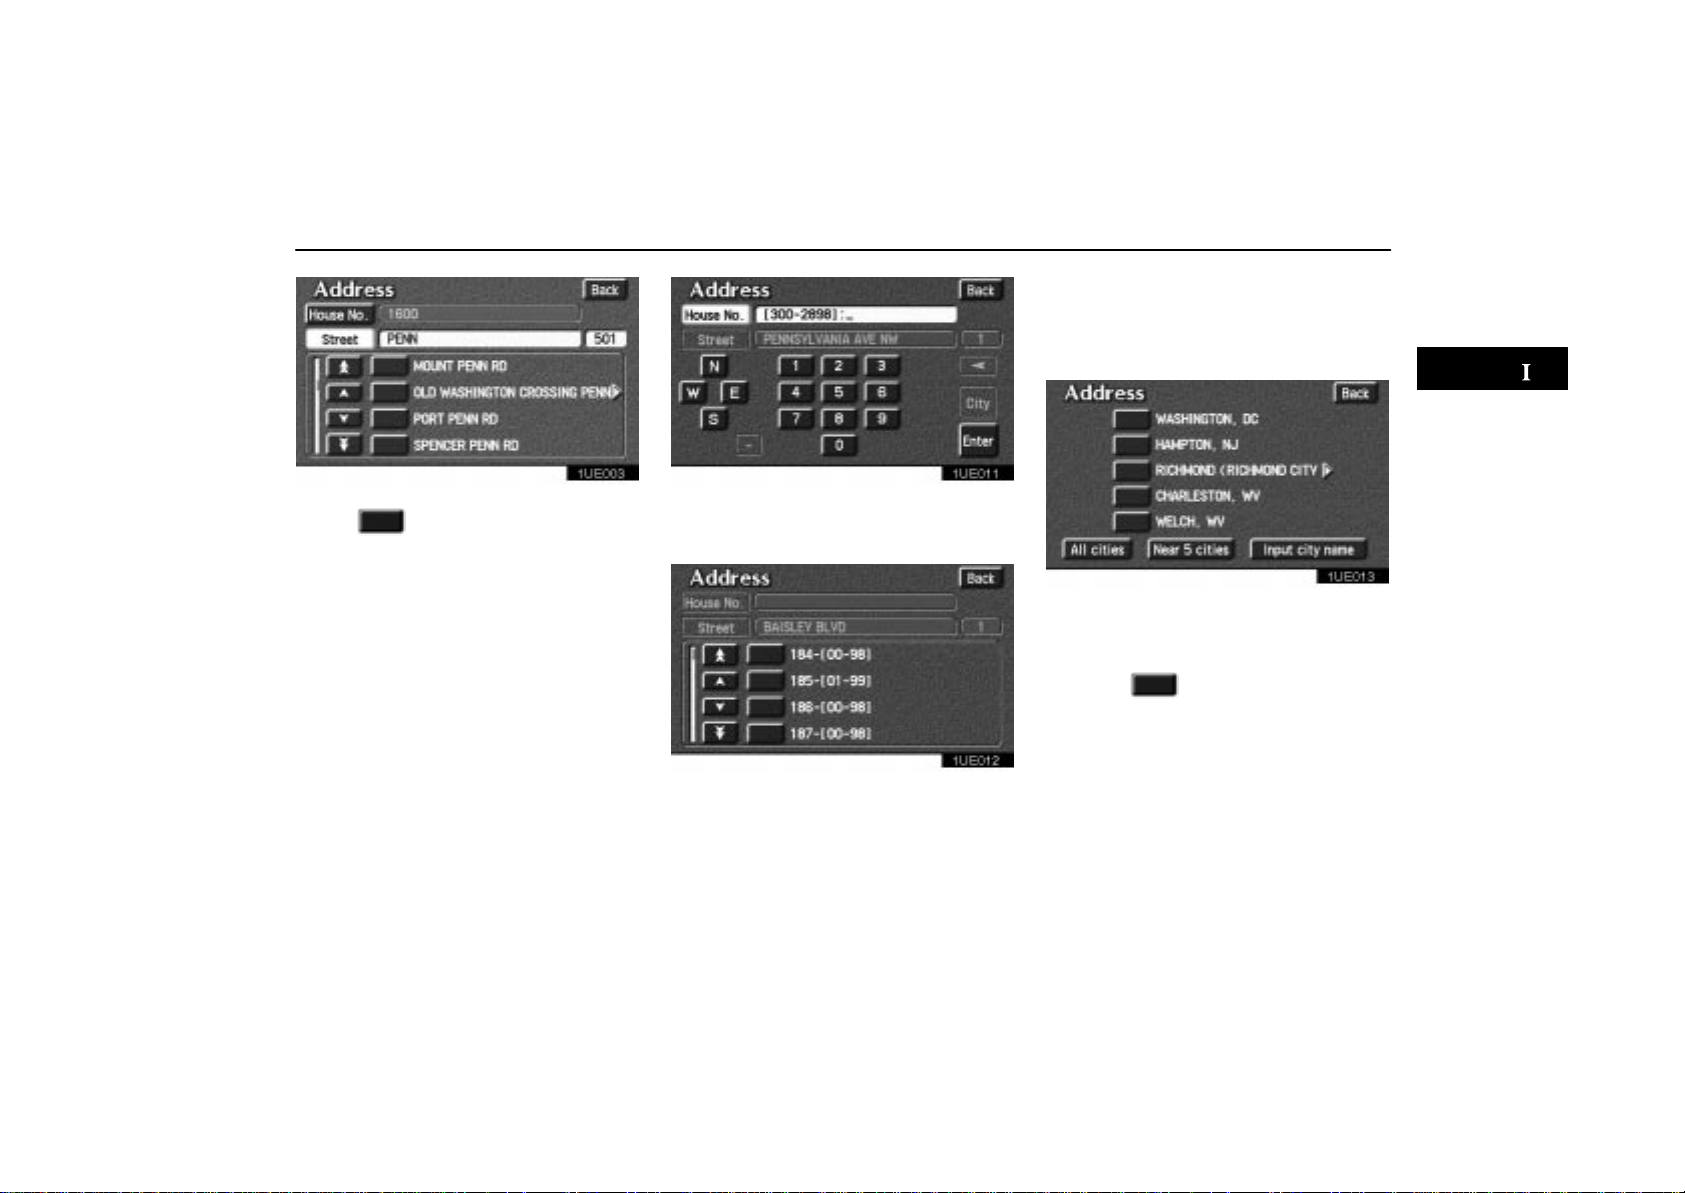
1UE003
When you find your desired street name,
touch
changes and displays the map location of
the selected destination and the route
preference. (See “(a) Entering Destination” on page 26.)
If the same address exists in more than one
city, the current screen changes to the
screen to select the city. Select or enter your
desired city.
of the item. The screen
1UE011
If you input a street name first, the screen
changes. You can then input the house number.
1UE012
If the above screen appears, you can select
an address range on that screen.
1UE013
Last 5 cities are displayed on the screen.
If you have not used the navigation yet, any
city is not displayed on the screen.
T ouch t h e
The current screen changes to the screen
which is for inputting a street name.
All cities: All cities are selected.
Near 5 cities: Near 5 cities are displayed.
Selecting a city in the list changes to the display to input a street name.
Input city name: The screen for inputting
the city name appears.
of the desired city name.
11
Page 21
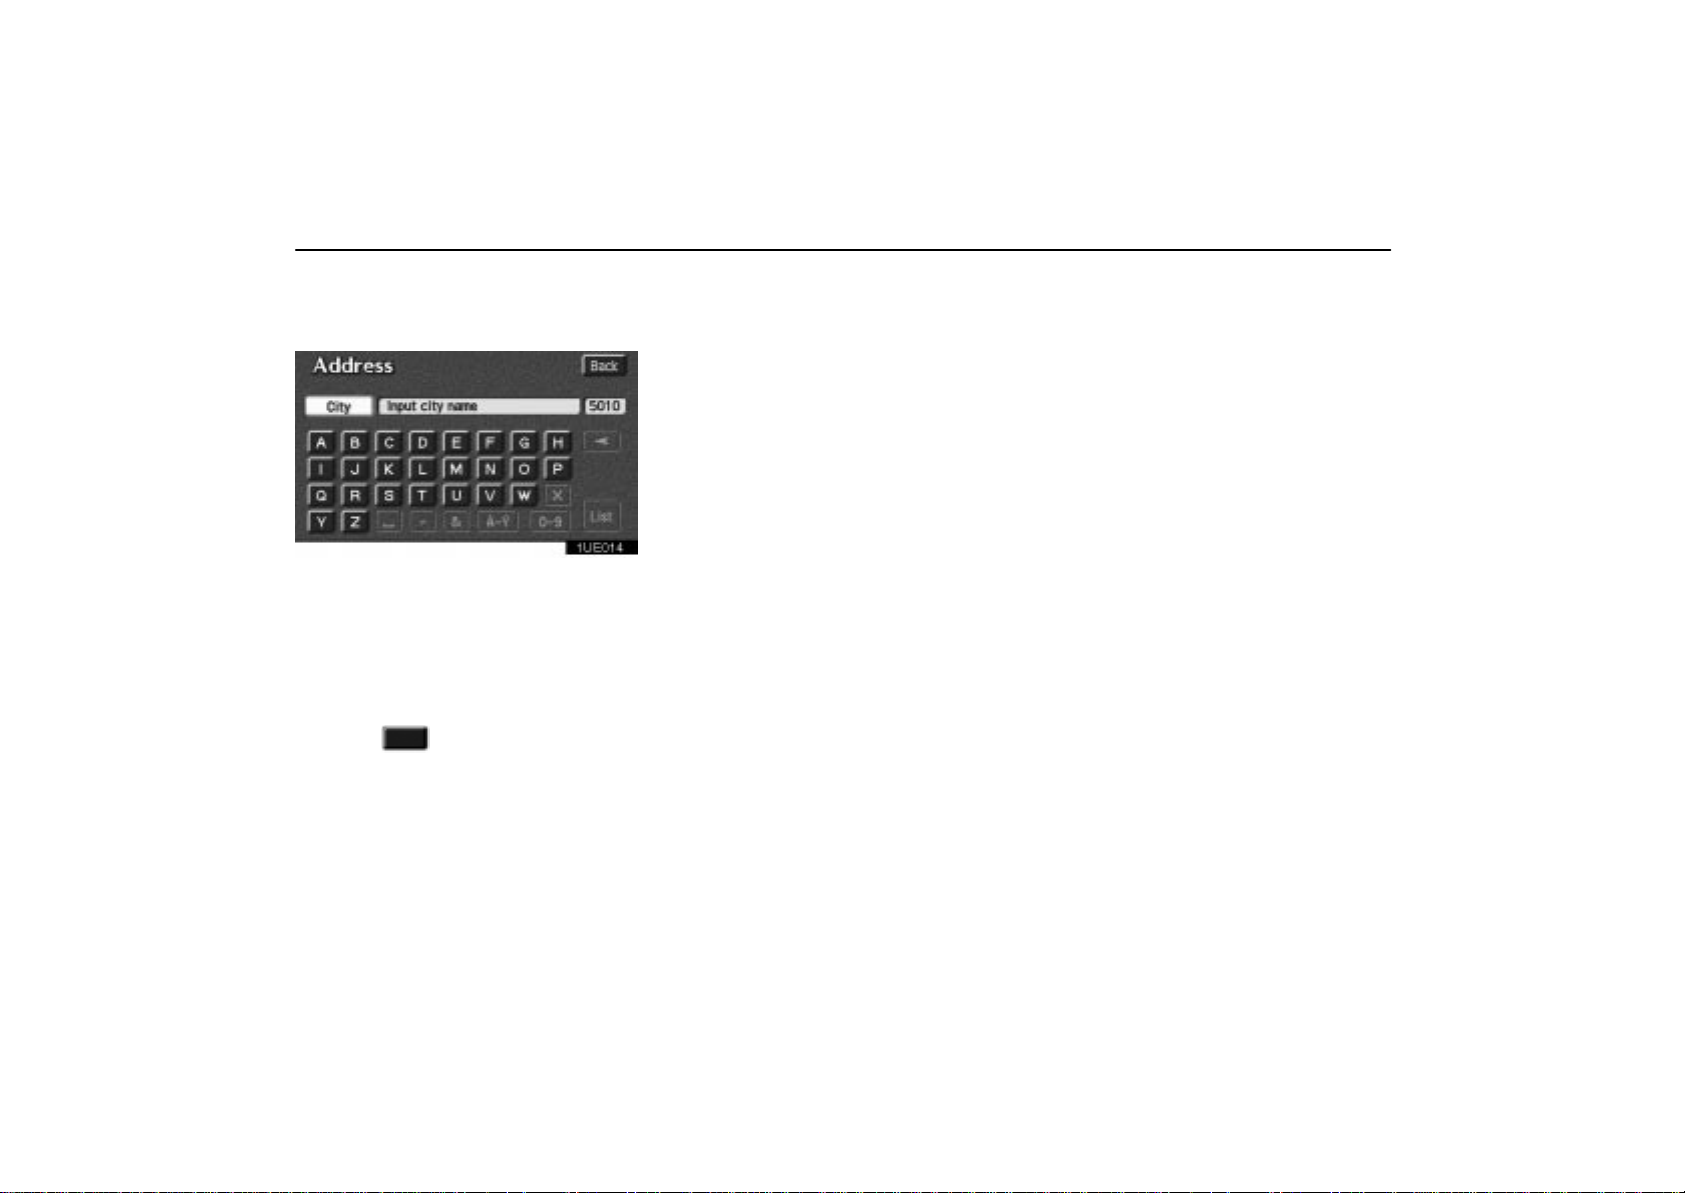
Destination Input by Address
The screen for inputting a city name appears
if you touch the “Input city name”
switch on the Address screen.
1UE014
Input the city name.
After the number decreases to some ex-
tent, touch the
the city selection list. If the number of
matches decreases to 4 or less, the
screen changes automatically to the
selection list.
Touch the
The current screen changes to the screen
which is for inputting a street name. After
inputting a street name, the screen may
change to the screen which is for inputting a house number. Input a house num-
ber. Then touch the
display the map screen.
“List” switch to display
of the desired city name.
“Enter” switch to
The screen changes and displays the
map location of the selected destination
and the route preference. (See “(a) Entering destination” on page 26.)
12
Page 22
Destination Input by POI
There are 3 ways to select a point of interest location.
(a) Input the name directly
(b) Selecting a city to search
(c) Selecting from the categories
It will not take a long time for you to find
your destination if you use a combination
of the searching ways of (a), (b) and (c).
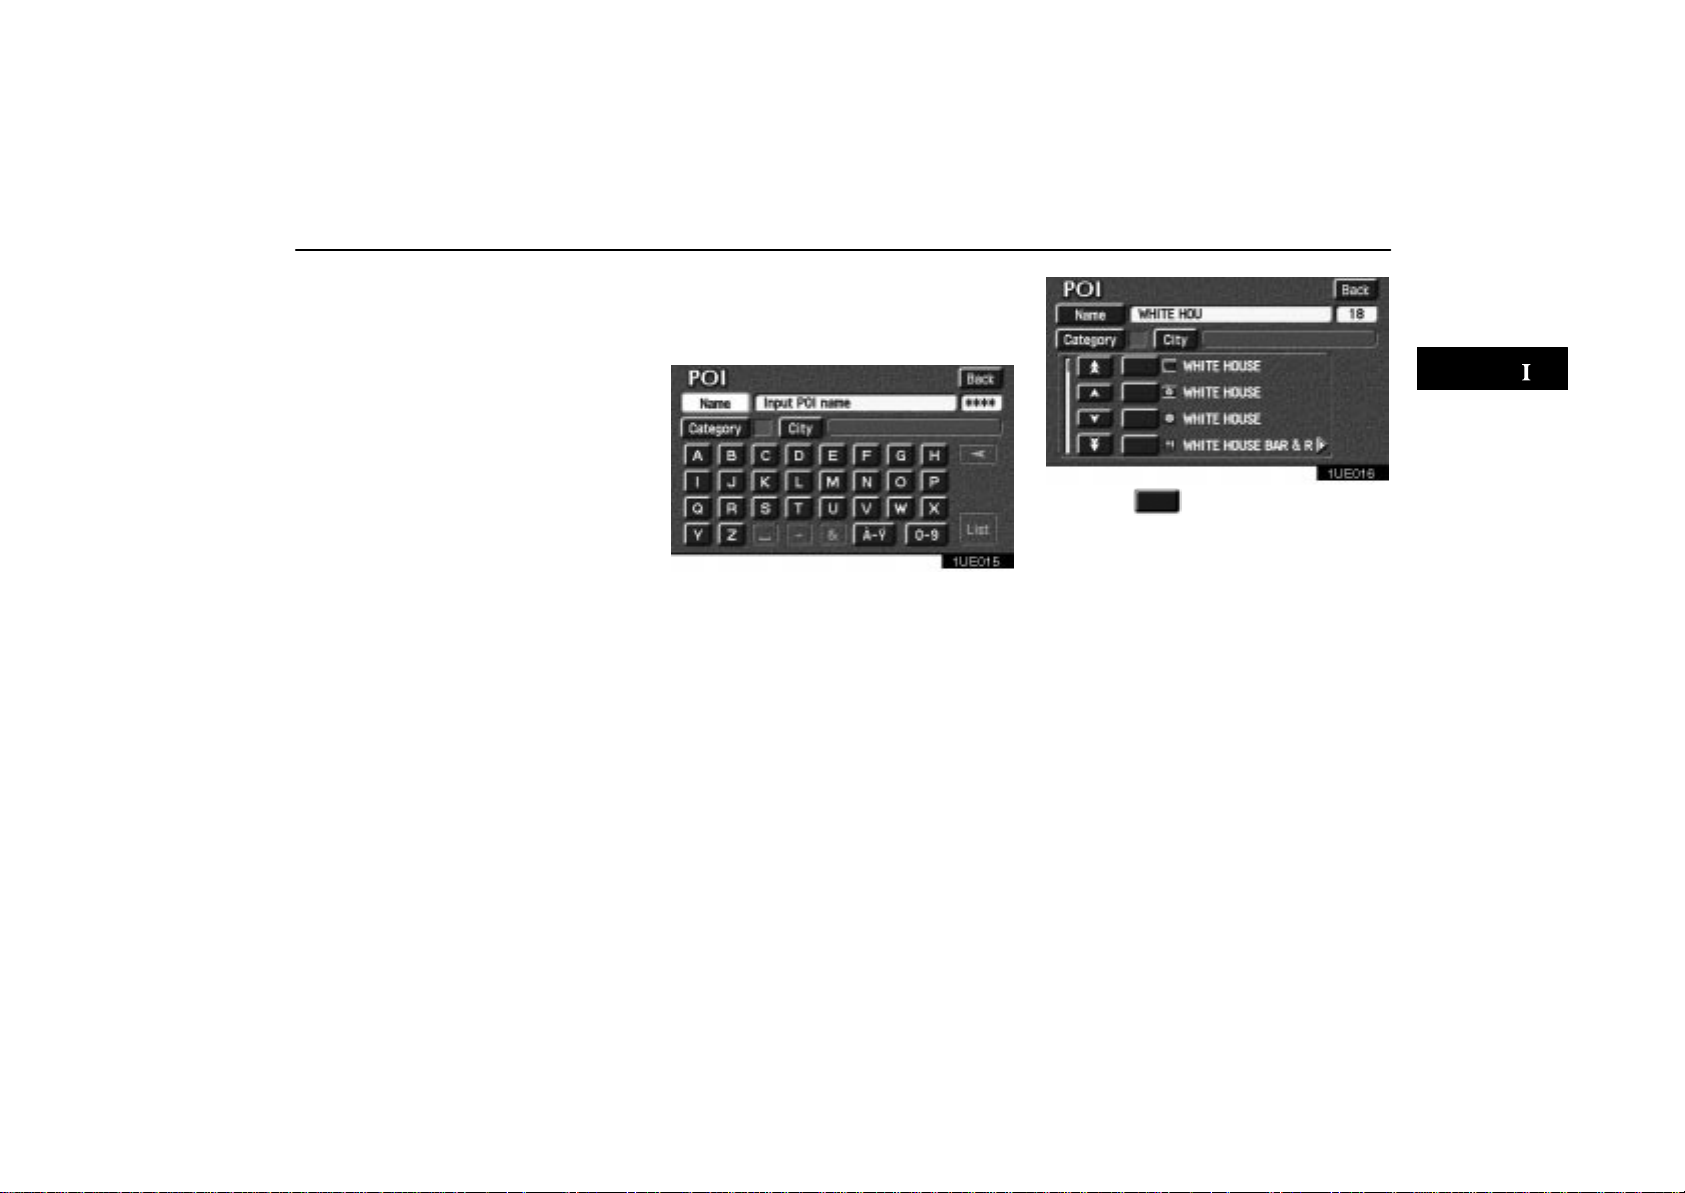
(a) Input the name directly
Touch the “POI” switch on the Destination screen.
1UE015
The POI screen appears, and then you can
input the name of the point of interest.
Touch letters directly on the screen to input
a name. When you input numerals, touch the
“0–9” switch to display the screen for nu-
meral input.
If the number of sites becomes 4 or less, or
if you touch the
right of the screen, the screen changes and
displays a list of sites.
“List” switch at the bottom
1UE016
Touch the of your desired destination. The screen changes and displays
the map location of the selected destination and the route preference. (See “(a)
Entering Destination” on page 26.)
If the same name exists in more than one
city, you can search it more easily with the
“City” and “Category” switch. (See (b)
Selecting a city to search and (c) Selecting
from the categories.)
13
Page 23
Destination Input by POI
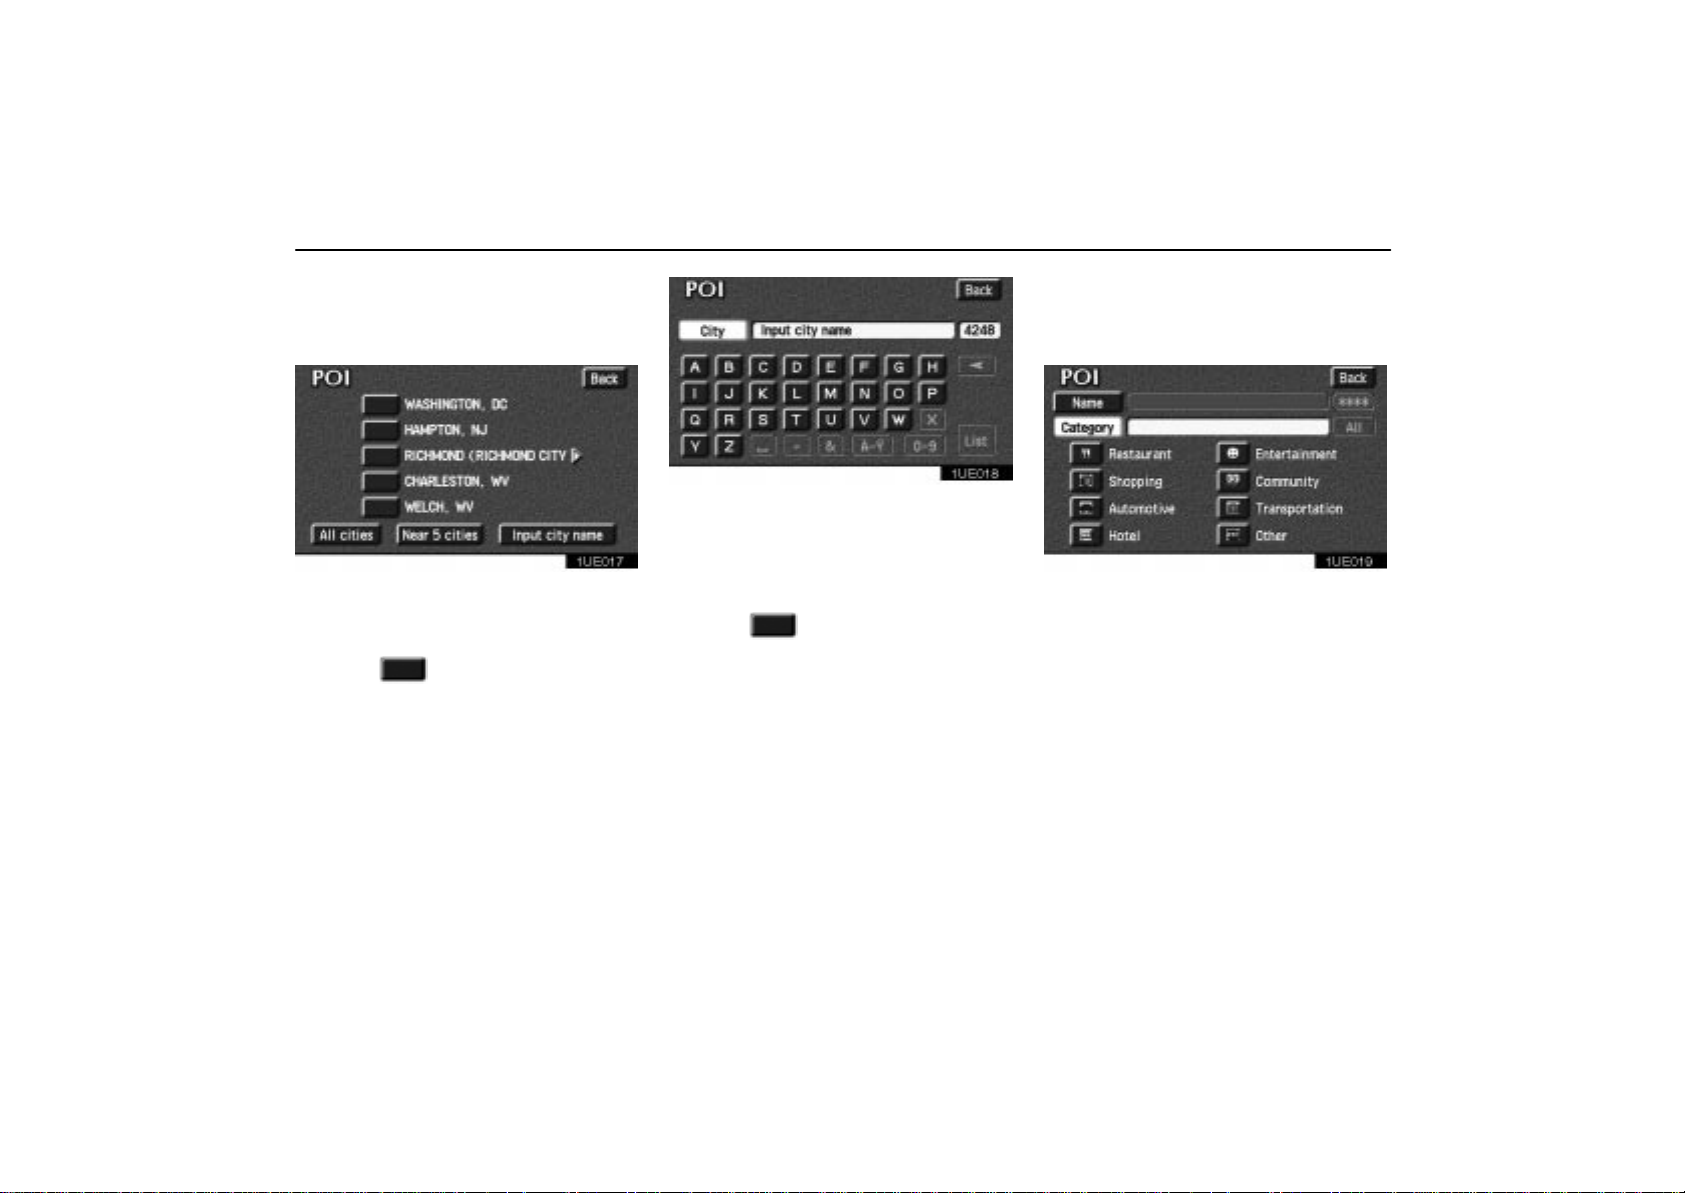
(b) Selecting a city to search
Touch the “City” switch on the POI
screen.
1UE017
Last 5 cities are displayed on the screen.
If you have not used the navigation yet, any
city is not displayed on the screen.
T ouch t h e
The current screen changes to the screen
which is for inputting a name of POI.
All cities: All cities are selected.
Near 5 cities: Near 5 cities are displayed.
Selecting a city in the list changes to the display to input the name of the POI.
Input city name: The screen for inputting
the city name appears.
of the desired city name.
1UE018
Input the city name.
If the number of sites becomes 4 or less, or
if you touch the
the screen changes and displays the selection list.
Touch the
After entering the city name, input the
name of the POI.
“List” switch on the screen,
of the desired city name.
(c) Selecting from the categories
Touch the “Category” switch on the
POI screen.
1UE019
The categories are shown on the screen.
When you touch the icon switch of your
desired category, more detailed categories are shown.
14
Page 24
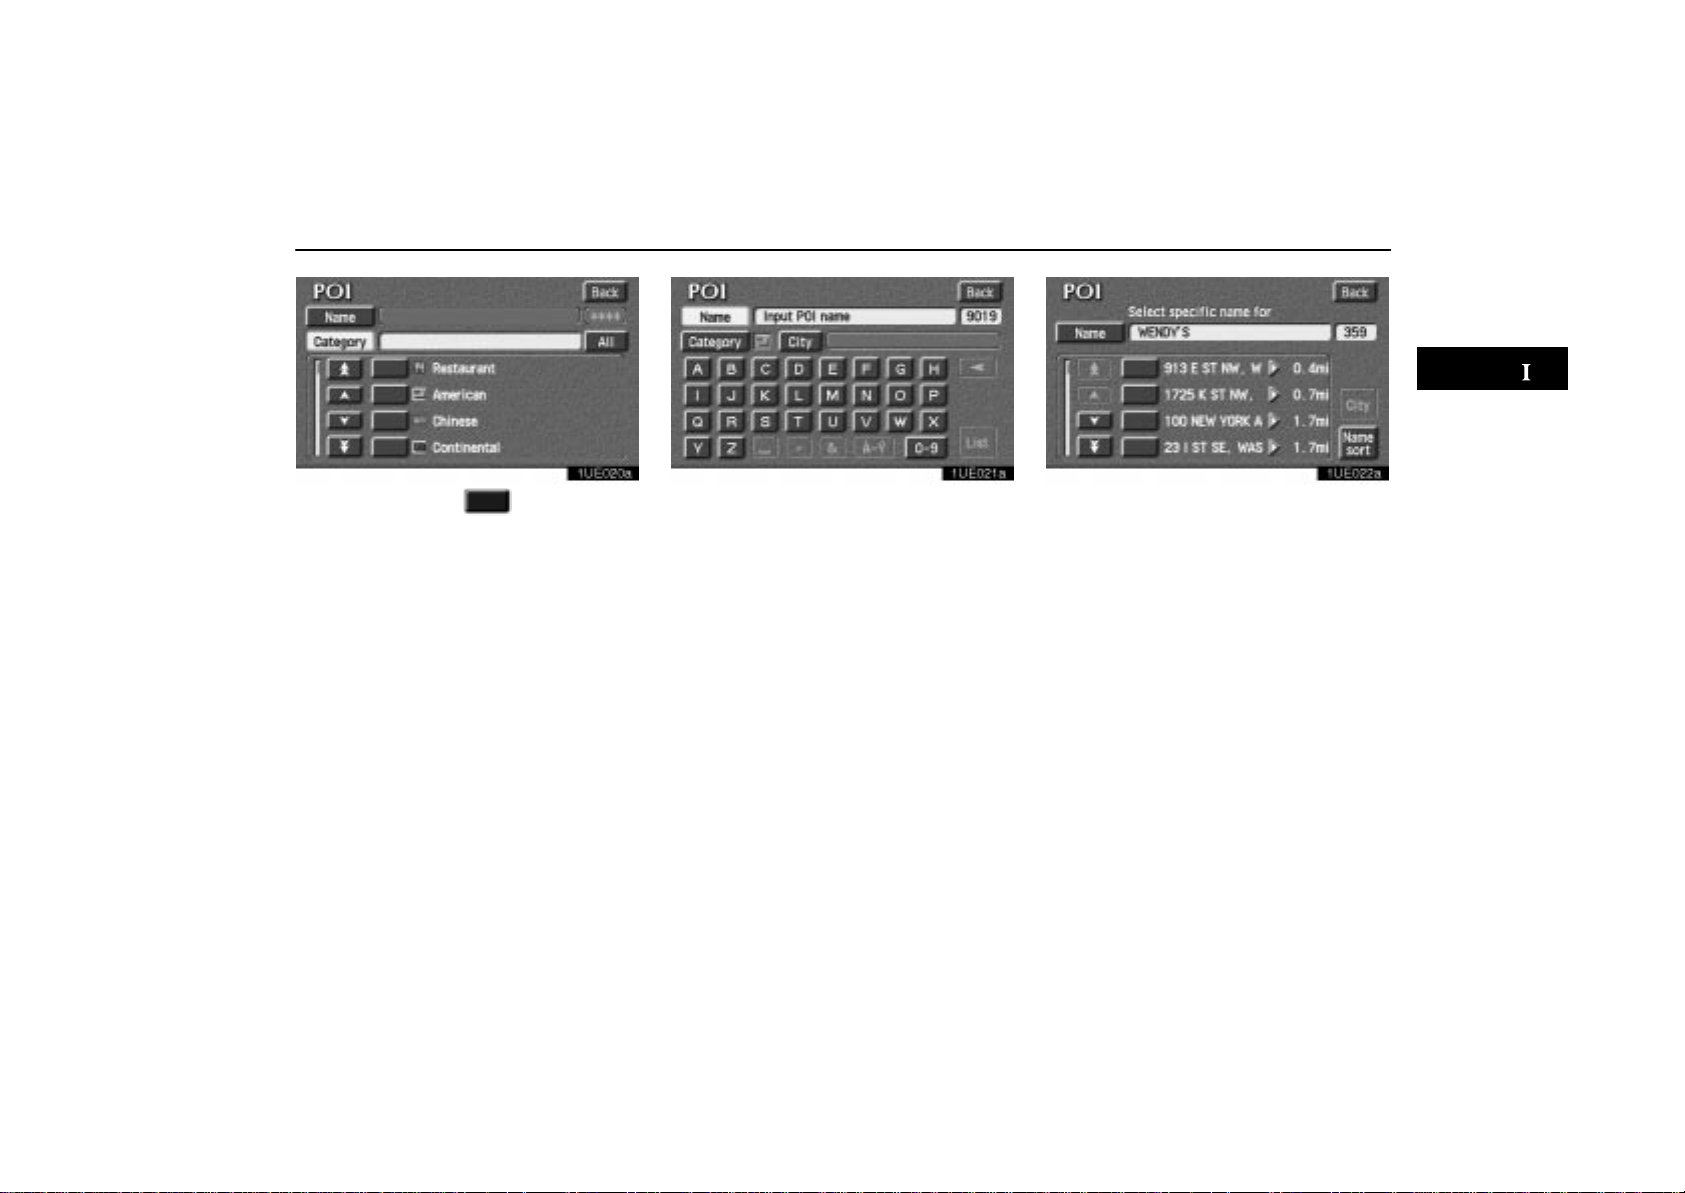
Destination Input by POI
1UE020a
When you touch the of your desired
category, the screen changes and displays the menu to input a name.
1UE021a
Once you have selected a category, you can
touch letters directly on the screen if you input a name. When you input numerals, touch
“0–9” switch to display the screen for
the
numeral input.
If the number of sites becomes 4 or less, or
if you touch the
right of the screen, the screen changes and
displays a list of sites.
“List” switch at the bottom
1UE022a
If you input the name of the specific point of
interest and if the number of sites with the
same name is more than 2, the
sort”
switch will be shown.
“Name
15
Page 25
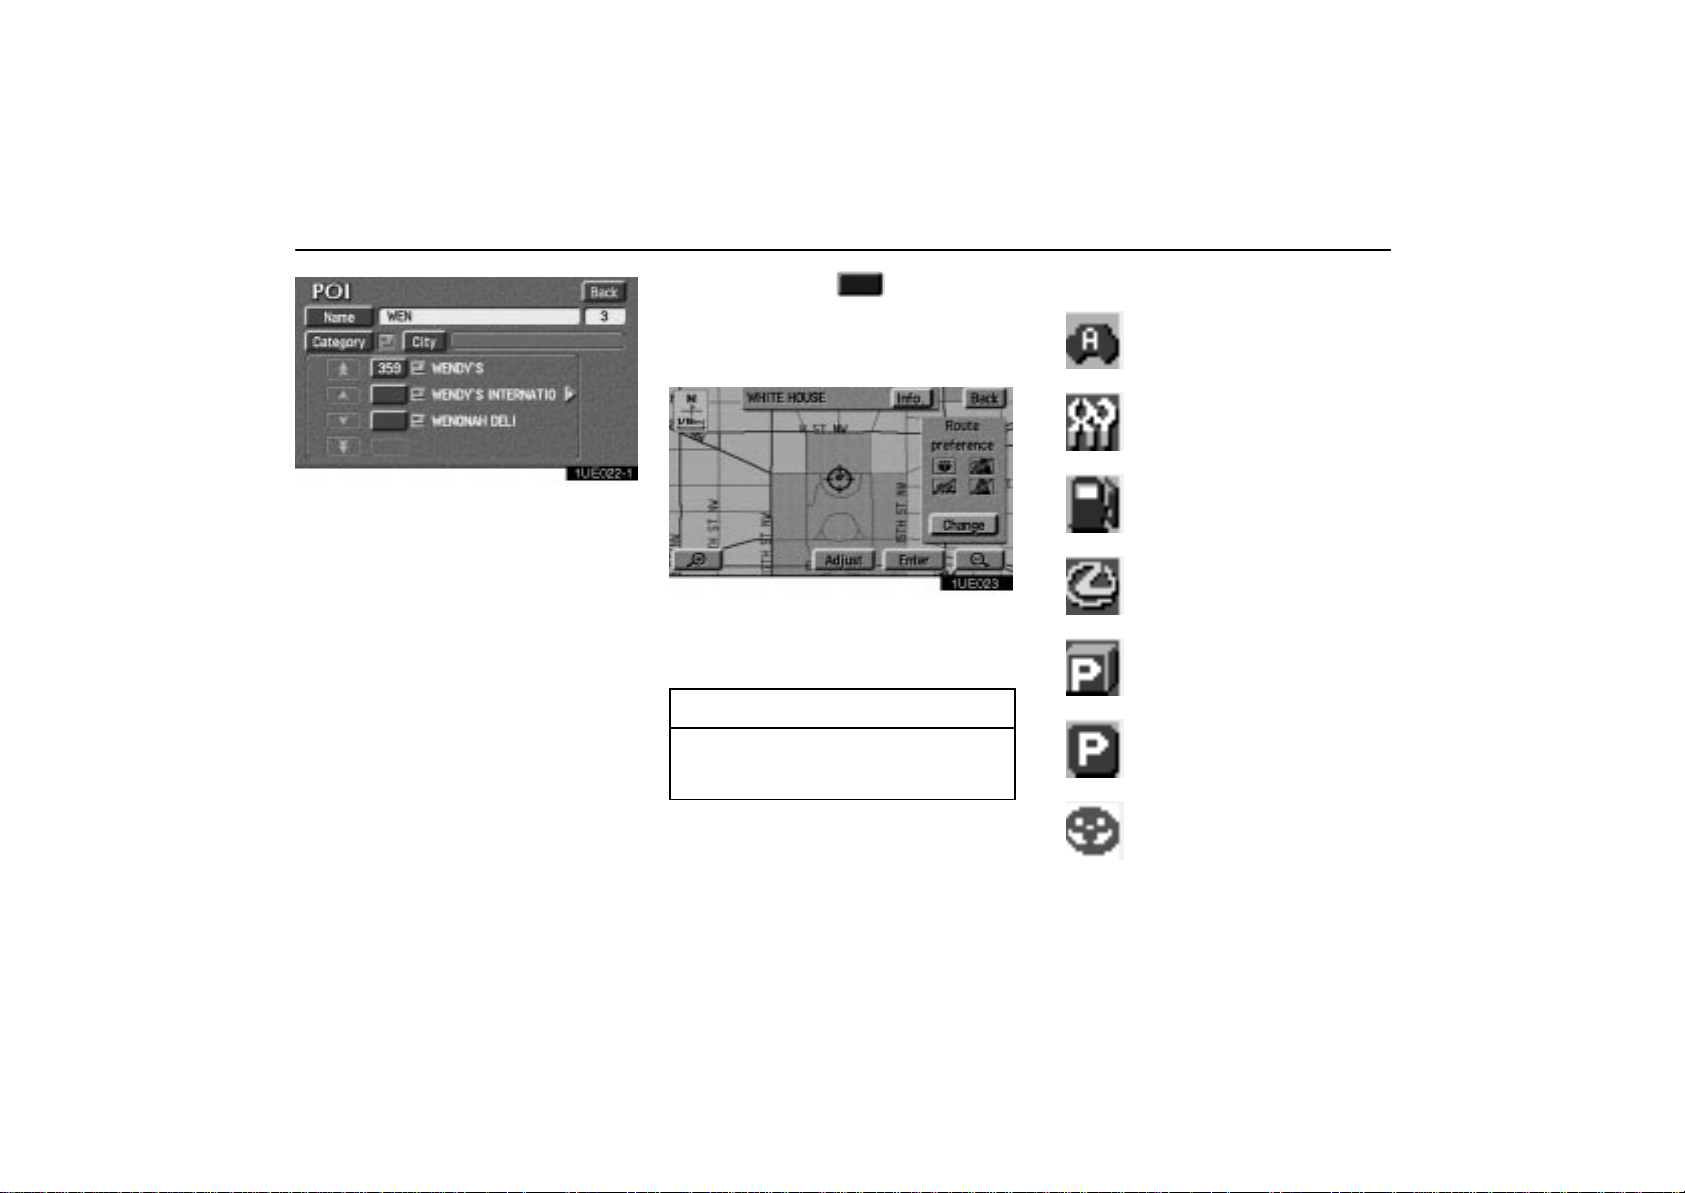
Destination Input by POI
1UE022–1
Touch the “Name sort” switch on the
screen. A listing of all the items is displayed
in alphabetical order.
When you touch the
item, the screen changes and displays
the map location of the selected destination and the route preference. (See “(a)
Entering Destination” on page 26.)
of your desired
1UE023
Touch the “Info.” switch on the screen to
display the selected destination name, address and telephone number.
INFORMATION
The desired point of interest can be displayed on the Map screen. (For details,
see page 48.)
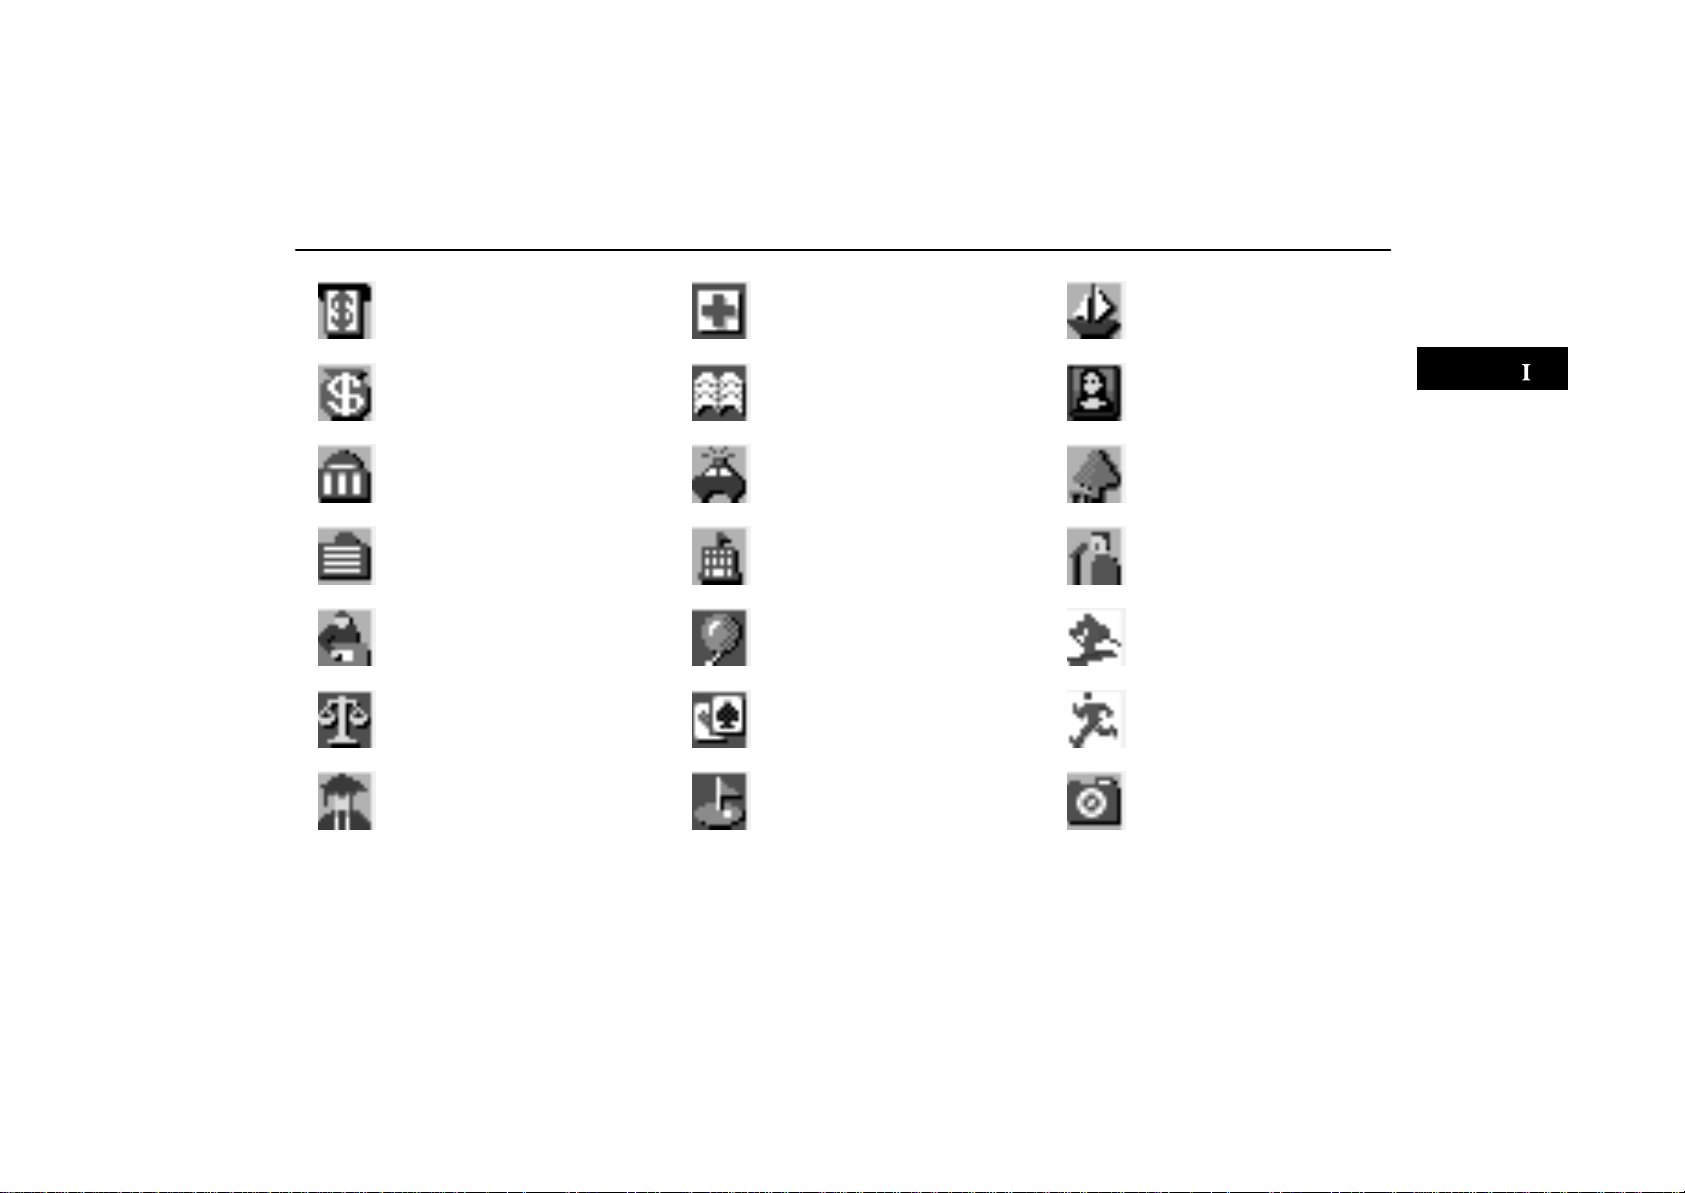
POI (Points of Interest) icons
AUTOMOBILE CLUB
AUTO SERVICE & MAINTENANCE
GAS STATION
LEXUS DEALERSHIPS
(all search areas)
PARKING GARAGE/HOUSE
PARKING LOT
TOYOTA DEALERSHIPS
(all search areas)
16
Page 26
Destination Input by POI
ATM
BANK
CITY HALL
CIVIC/COMMUNITY CENTER
CONVENTION/EXHIBITION
CENTER
COURT HOUSE
HIGHER EDUCATION
HOSPITAL
LIBRARY
POLICE STATION
SCHOOL
AMUSEMENT PARK
(all search areas)
CASINO
GOLF COURSE
MARINA
MUSEUM
PARK/RECREATION
(all search areas)
PERFORMING ARTS
SKI RESORT
SPORTS COMPLEX
TOURIST ATTRACTION
(all search areas)
17
Page 27
Destination Input by POI
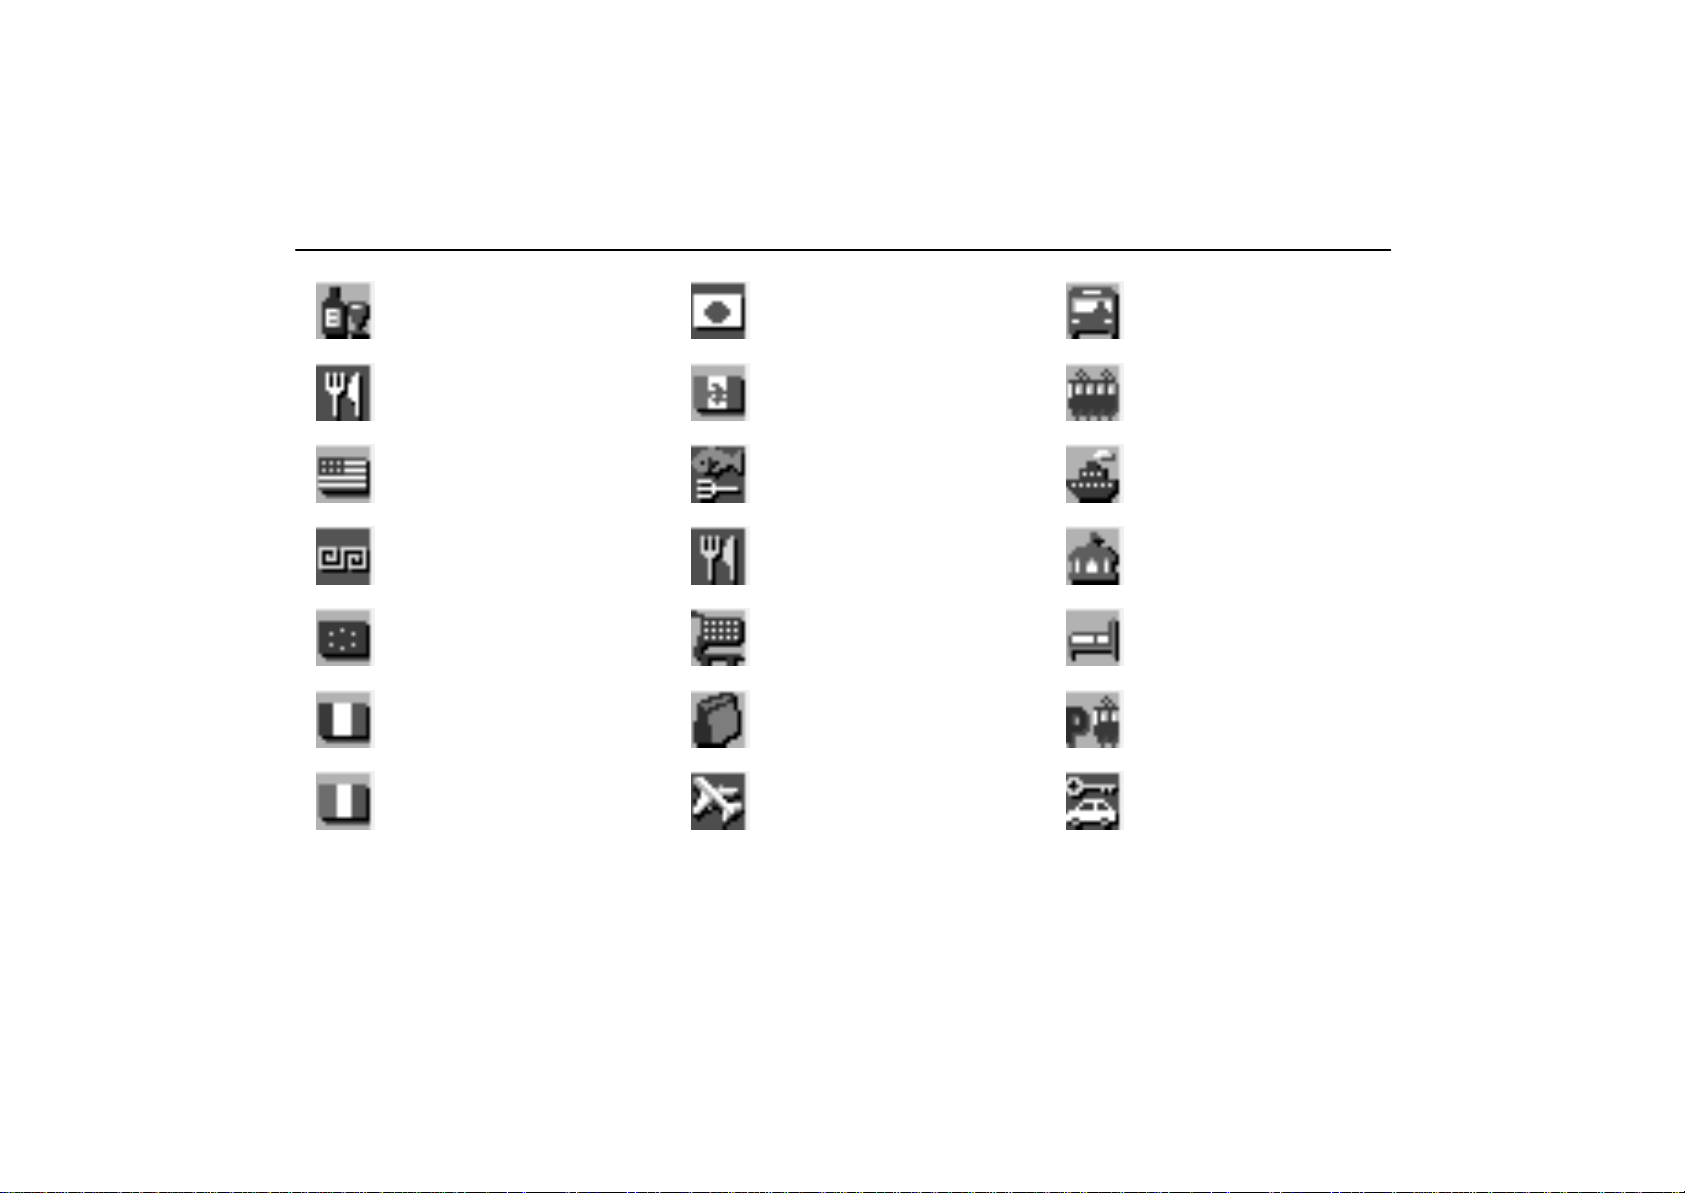
WINERY
RESTAURANT
AMERICAN
CHINESE
CONTINENTAL
FRENCH
ITALIAN
JAPANESE
MEXICAN
SEAFOOD
OTHER
GROCERY STORE
SHOPPING
AIRPORT (all search areas)
BUS STATION
COMMUTER RAIL STATION
FERRY TERMINAL
HISTORICAL MONUMENTS
HOTEL
PARK AND RIDE
RENTAL CAR AGENCY
18
Page 28
Destination Input by POI Destination Input by Marked Points
REST AREA
TOURIST INFORMATION
TRAIN STATION
BUSINESS FACILITY
CITY CENTER/NAMED
PLACE
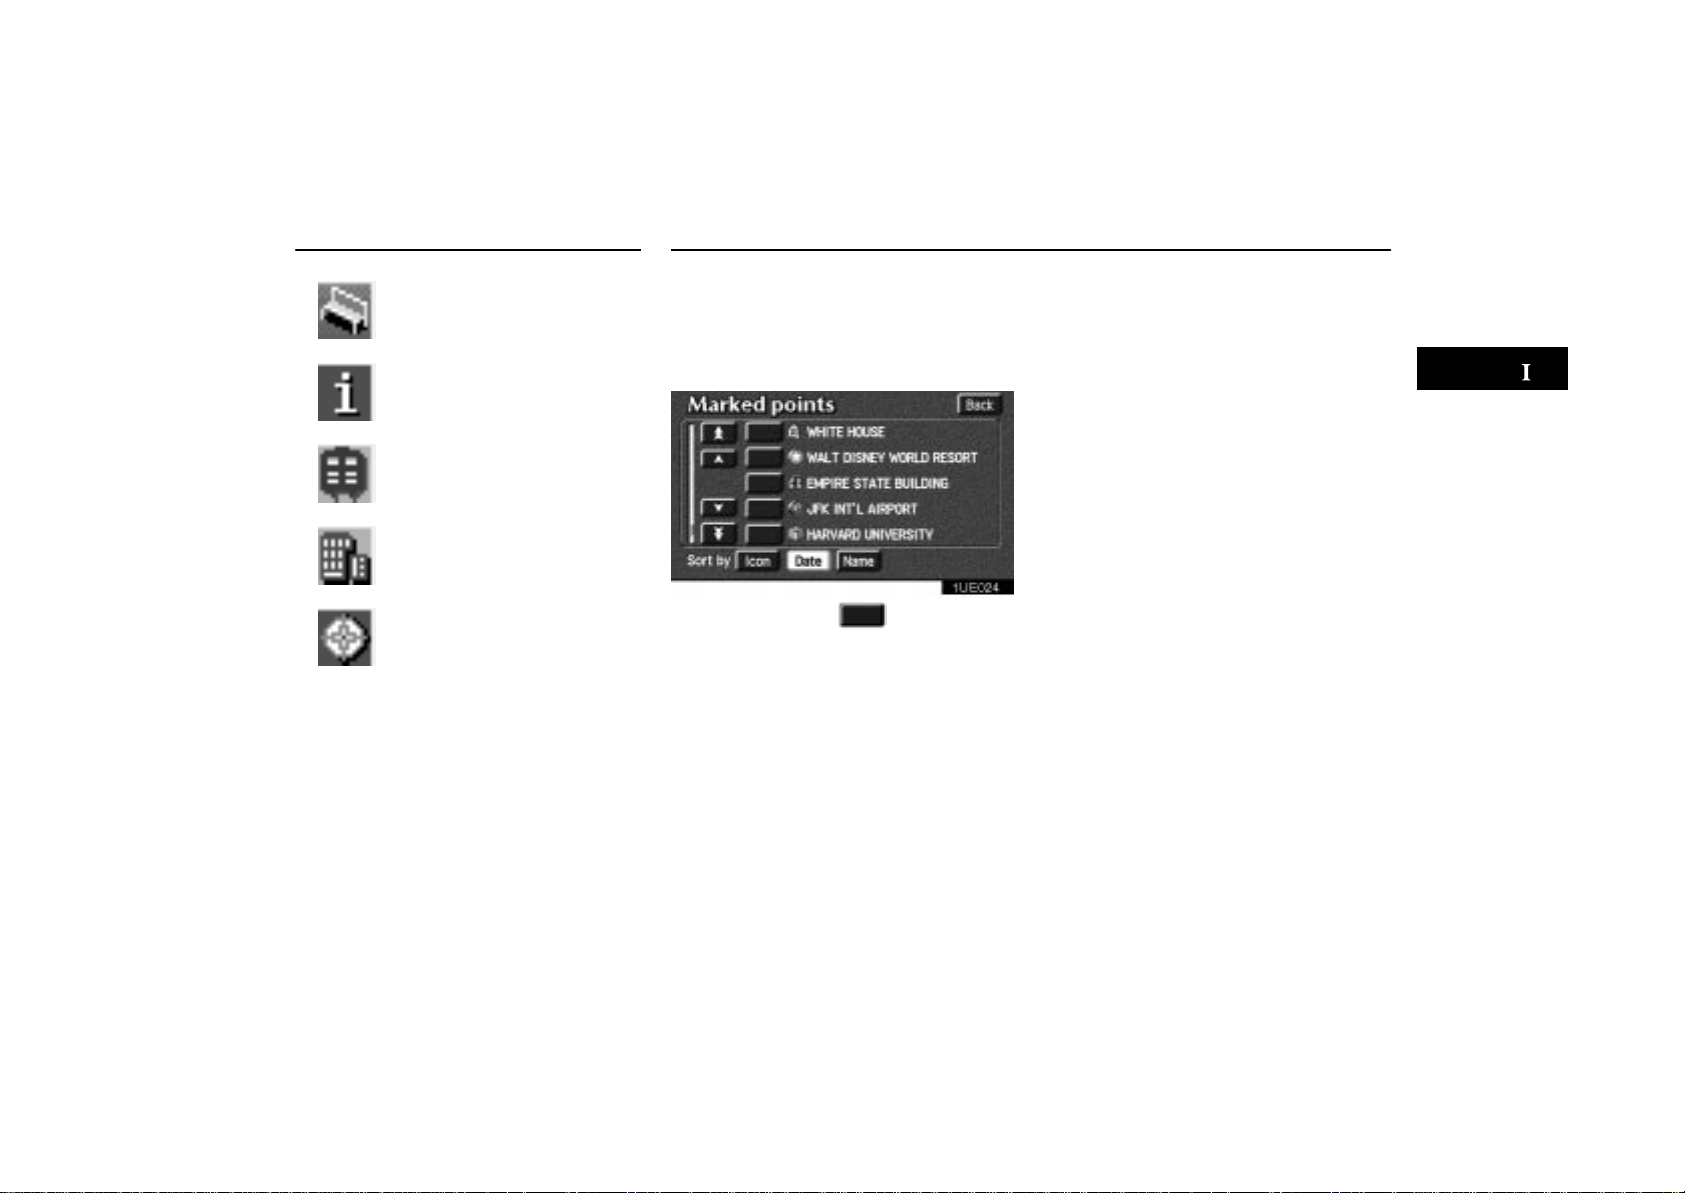
Touching the “Marked points” switch
on the Destination screen displays your
list of reg istered marked points. See page
70 on registering and editing marked
points.
1UE024
When you touch the of your desired
item, the screen changes and displays
the map location of the selected destination and the route preference. (See “Entering Destination” on page 26.)
There are 3 ways to list the marked point
by touching switches on bottom of the
screen.
Sort by Icon: Touch this switch to list the
marked points by the registered icon. There
are 46 icons and 3 sound icons. (For details,
see page 70.)
Sort by Date: Touch this switch to list the
marked points in order of registered date.
Sort by Name: Touch this switch to list the
marked points in alphabetical order.
19
Page 29
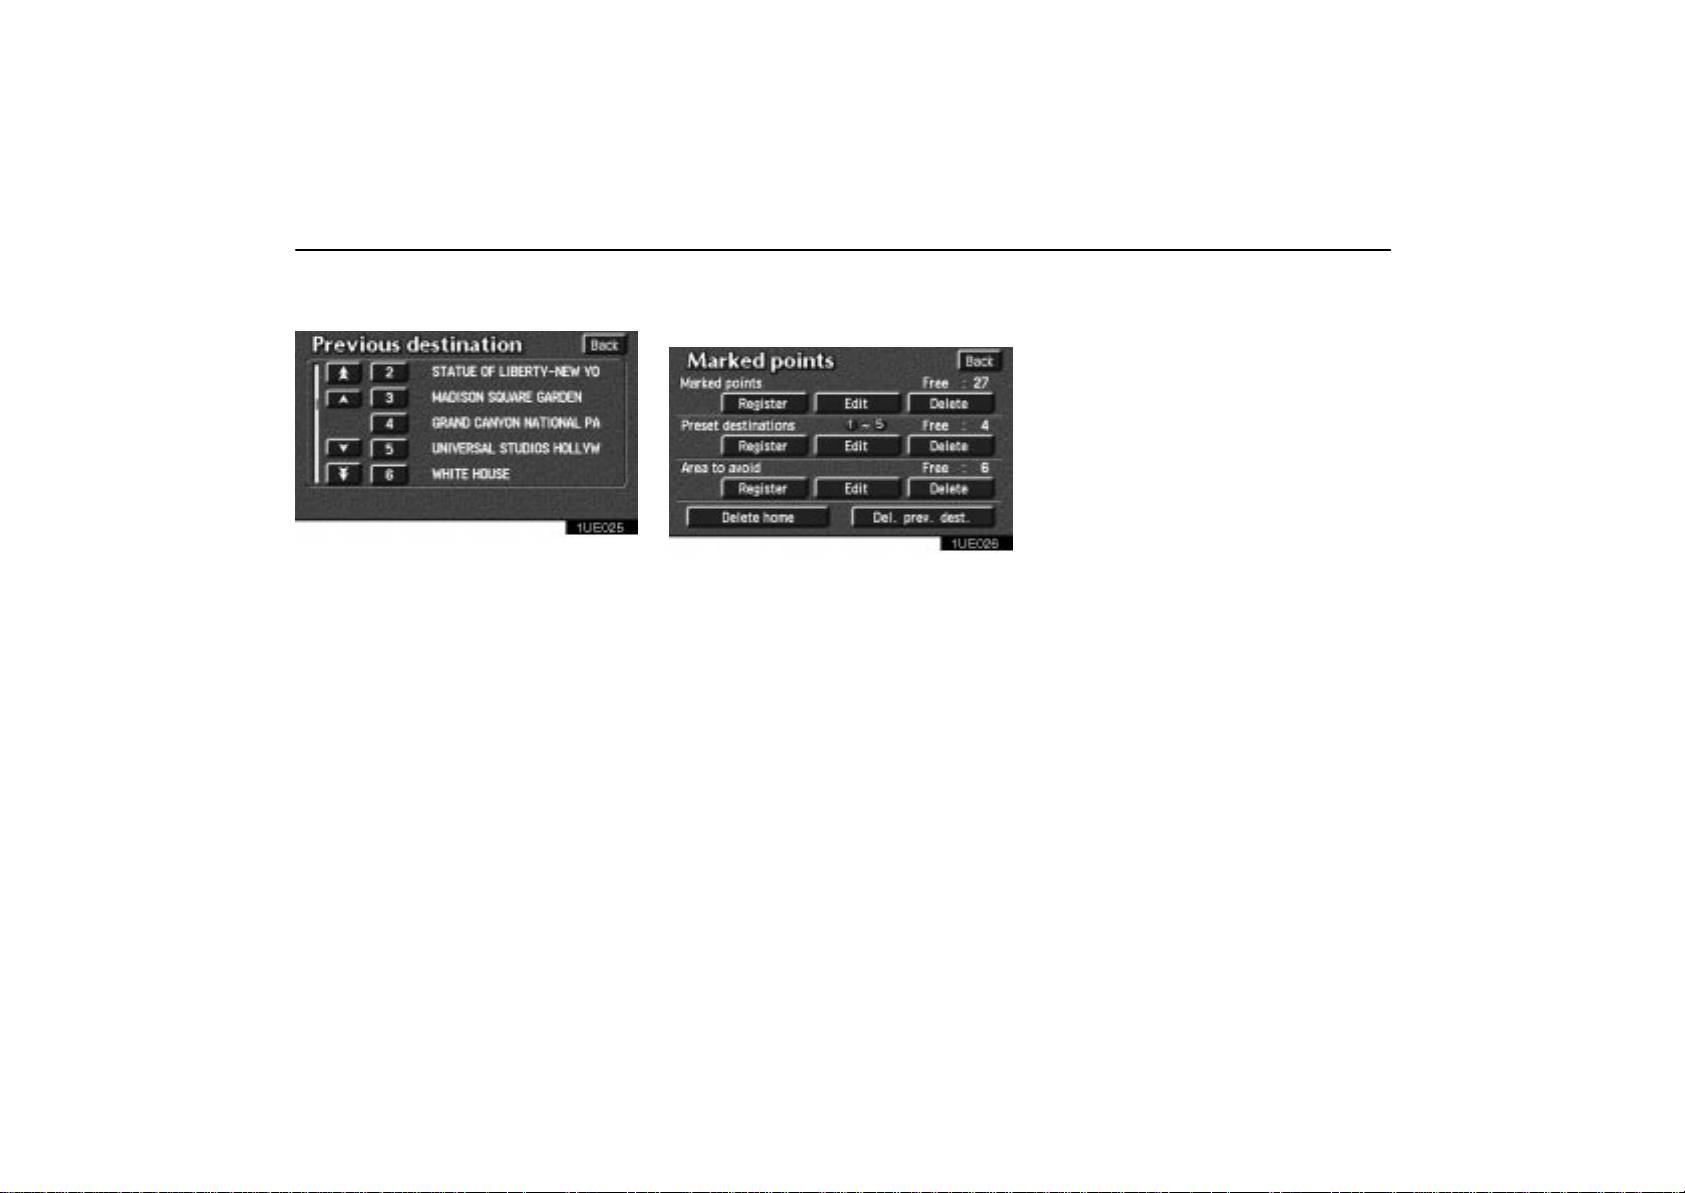
Destination Input by Previous Destination
Touch the
the Destination screen.
“Previous dest.” switch on
1UE025
The screen lists to 20 previously set destinations.
Select your desired destination. The
screen changes and displays the map
location of the selected destination and
the route preference. (See “(a) Entering
Destination” on page 26.)
You can delete the list of previous destinations while you stop your car, if you no longer
need them.
1UE026
Push the “MENU” button to display the
Menu screen and touch the
points”
switch. Touch the
“Del.prev.dest.” switch.
When you touch the switch on each previous destination or
switch, a message appears to confirm
your request. If you are sure, touch the
“Yes” switch. If not, touch the “No”
switch.
“Marked
“Delete all”
20
Page 30
Destination Input by Emergency
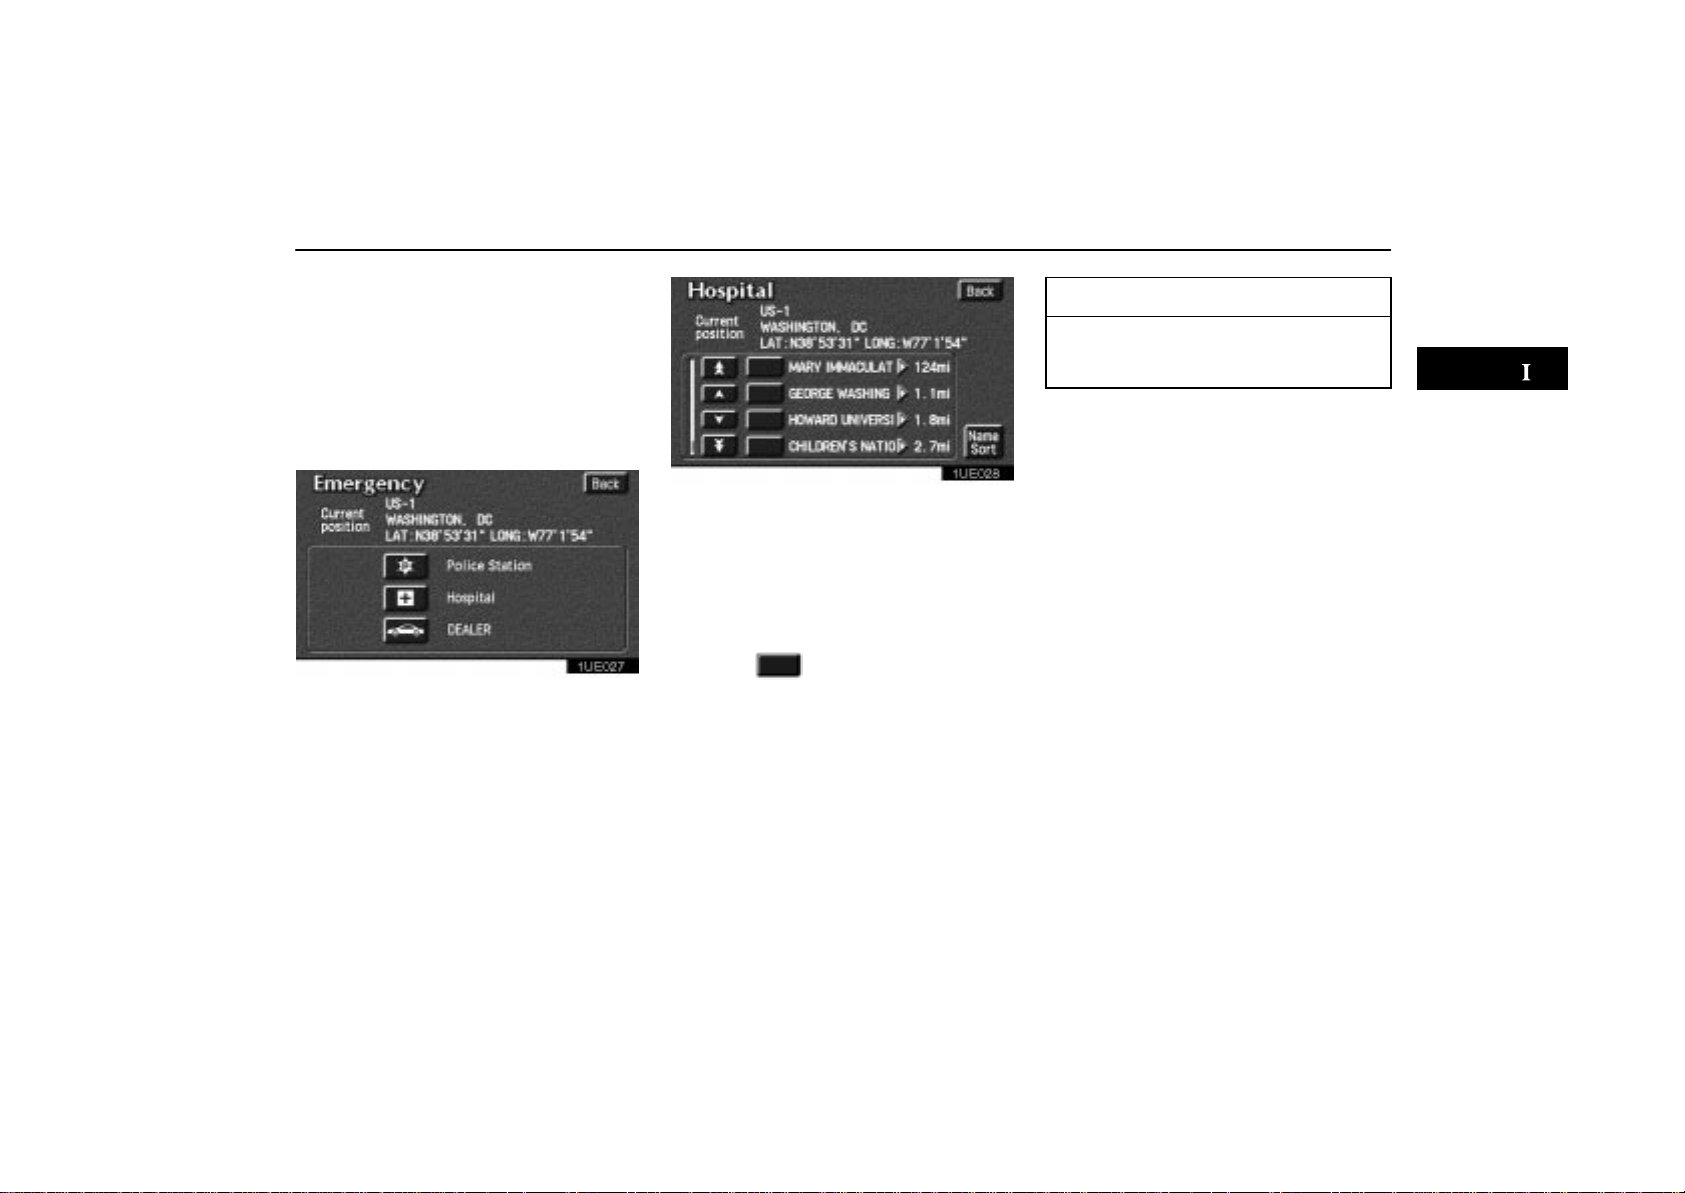
By touching the
on the Destination screen, the display
changes to a screen to select dealers,
hospitals or police stations. During driving, only nearby police stations, hospitals or dealers are shown. The current
position is shown with an address, the
latitude and the longitude at the top of t he
screen.
“Emergency” switch
1UE027
When you touch your desired emergency
category, the selected emergency category
list is displayed.
1UE028
The distance from your current position up to
the destination is displayed on the right of the
name.
You can see the names of the emergency
destinations in alphabetical order by touch-
ing the
screen.
Touch the
screen changes and displays the map
location of the selected destination and
the route preference. (See
Destination” on page 26.)
Touch the
display the selected emergency destination
name, address and telephone number.
“Name Sort” switch on the
of your desired item. The
“(a) Entering
“Info.” switch on the screen to
INFORMATION
The navigation system does not guide
in areas where route guidance is unavailable. (See page 57.)
21
Page 31

Destination Input by Intersection
Touch the
the Destination screen.
“Intersection” switch on
1UE029
Input the name of the two intersecting
streets which are located near the destination to be set.
When you touch the
number of sites becomes 4 or less, the list of
matching street names appears.
“List” switch or the
1UE030
Touch the of your desired item. After inputting the two intersecting streets,
the screen changes and displays the map
location of the selected destination and
the route preference. (See “(a) Entering
Destination” on page 26.)
EMV3111U
If the same two streets cross at more than
one intersection, the screen changes and
displays the menu to select the city name
where the streets intersect. Select the city
and the map location of the selected destination and the route preference. (See “(a) Entering Destination” on page 26.)
22
Page 32

Destination Input by Freeway Entrance or Exit
To input a freeway entrance or exit, touch
the “FWY Ent./Exit” switch on the
Destination screen.
1UE030–1
Be sure to use the complete name of the
freeway, including the hyphen, when entering the destination. Freeways and interstates use an “I” (I–405). US highways use
the state designation before the number
(CA–118).
As the number of matching freeways decreases, you can touch the
display the list. When the number of sites becomes 4 or less, the list screen appears automatically.
“List” switch to
1UE031
Select the desired freeway by touching
the
.
1UE032
You can then select either a freeway “En-
trance”
or “Exit”.
1UE033
Touch the of the desired entrance
or exit name. The screen changes and
displays the map location of the selected
destination and the route preference.
(See “(a) Entering Destination” on page
26.)
23
Page 33

Destination Input by Freeway Entrance or Exit
There are 2 ways to list the freeway entrance or exit.
Dist. sort: Touch this switch to list the en-
trances or exits in order of distance from your
current location.
1UE034
Name sort: Touch this switch to list the entrances or exits in alphabetical order.
24
Page 34

Destination Input by Previous Starting Point
T ouch t h e
switch on the Destination screen.
The screen changes and displays the
map location of the previous starting
point and the route preference. (See “(a)
Entering Destination” on page 26.)
If you have not used the navigation yet, the
“Previous starting point”
“Previous starting point” switch is
dimmed.
25
Page 35

Destination Input by Map Setting and Deleting Destination
Touch the
tion screen.
“Map” switch on the Destina-
1UE035
The screen changes and displays the
map location that is previously displayed
just before the destination input operation and the route preference. (See “(a)
Entering Destination” on page 26.)
(a) Entering destination
After you input the destination, the
screen changes and displays the map
location of the selected destination and
the route preference.
1UE036
Y ou can move and set the cursor at a desired point. (For the method of how to move
the cursor, see page 5.)
When you touch the
system starts searching for a route to your
destination using the conditions entered.
Route preference
Touch the
conditions which are to determine the route
to your destination.
“Change” switch to change the
“Enter” switch, the
You are given a number of choices on the
conditions which the system uses to determine the route to your destination.
1UE037
Touch the “Detour” switch of “Freeway” to search for a route other than free-
ways as much as possible. (In some cases,
the route cannot avoid running on a freeway.)
Touch the
road” to search for a route other than toll
roads as much as possible.
T ouch t h e
search for a route without using a ferry as
much as possible.
“Detour” switch of “Toll
“Detour” switch of “Ferry” to
26
Page 36

Setting and Deleting Destination
Touch the
stricted road” to search for a route other
than restricted road.
Touching the
allows to use it.
The switches you select are highlighted in
green. After choosing conditions, touch the
“Detour” switch of “Re-
“Allow” switch on each item
“OK” switch.
1UE038
The system starts searching for a route to
your destination.
1UE039
If you want to see the other routes and make
a comparison, touch the
switch. Three types of the routes are displayed on the screen.
“3 routes”
Quick: A route on which you can reach the
destination in the shortest time
This route is shown as a orange line.
Short: A route on which you can reach the
destination in the shortest distance
This route is shown as purple line.
Alternative: Other route
This route is shown as a green line.
Touch the switch to select the route.
If you want to add a destination, see the fol-
lowing “(b) Adding destination”.
After selecting one, you can start the route
guidance by touching the
starting to move your vehicle.
If you want to change the search condition,
touch the
screen changes and displays the Edit route
screen. (For details, see page 34.)
When you keep touching the
switch until you hear a beep, Demo mode will
start.
“Edit. route” switch. The
“Start” switch or
“Start”
27
Page 37

Setting and Deleting Destination
(b) Adding destinations
1. Push the “MENU” button to display
the Menu screen.
1UE040
2. Touch the “Edit route” switch.
1UE041
3. Touch the “Add” switch of Destina-
tion.
4. Input an additional destination in the
same way as the destination input. (See
page 26.)
1UE042
5. The Add destination screen appears.
Touch the
add a destination.
“Add” switch that you want to
(c) Reordering destinations
1. Push the “MENU” button to display
the Menu screen and touch the
route”
switch.
“Edit
1UE041
2. Touch the “Reorder” switch of Destination.
28
Page 38

Setting and Deleting Destination
(d) Deleting destination
1UE043
3. Select the destinations in the order of
arrival by touching the
After you finished selecting the destinations,
touch the
screen returns.
“OK” switch. The previous
switch.
1UE041
1. Touch the “Delete” switch of Destination.
1UE044
2. Touch the switch of destination
where you want to delete. Touch the
“Delete all” switch if you want to delete
all destinations.
3. The message appears to confirm your
request to delete. To delete the point(s),
touch the
If you touch the
not be recovered.
If you touch the
screen will return.
“Yes” switch.
“Yes” switch, the data can-
“No” switch. The previous
29
Page 39

Setting and Deleting Preferred Road
(a) Adding a preferred road
1UE040
Touch the “Edit route” switch on the
Menu screen.
1UE041
Touch the “Add” switch of Set preferred
road. The following screen appears.
1UE045
Move the cursor to your desired location and touch the
switch.
Messages appear to confirm your request on
the screen. Touch the
register the road.
“Preferred road”
“Enter” switch to
Touch the
change the road.
“Next” switch when you
1UE046
The Add preferred road screen appears.
Touch the
to add a preferred road.
“Add” switch where you want
30
Page 40

Setting and Deleting Preferred Road
(b) Modifying a preferred road
1UE041
Touch the “Modify” switch of Set preferred road. The modify preferred road
screen appears.
1UE047
Select the preferred road which you want
to modify and touch the
switch.
1UE048
Do the same procedure as adding a preferred road (see page 30).
(c) Deleting a preferred road
1. Touch the “Delete” switch of Set preferred road. The Delete preferred road
screen appears.
1UE049
2. Select the preferred road which you
want to delete. Touch the
switch if you want to delete all preferred
road.
3. Messages appear to confirm your request to delete the preferred road. T o d elete the point(s) touch the
If you touch the
not be recovered.
If you want to try again or cancel deletion,
touch the
screen will return.
“Yes” switch, the data can-
“No” switch. The previous
“Delete all”
“Yes” switch.
31
Page 41

Route Guidance Screen
The route guidance system displays two
different screen modes.
1UE050a
Single map: Map is shown in a screen.
1UE051a
Dual map: Two different maps are shown in
a screen.
1UE052a
Split screen: Map and guidance screen are
shown in a screen mode. (For detail about
Guidance screen, see page 49.)
The two route guidance screens have a
number of indicators and switches with
which you should be familiar.
Map/guidance:
To change the screen mode.
Upon reception of signals from
the GPS (Global Positioning
System), this mark appears.
(For details, see page 54.)
These switches magnify or reduce the map scale. (For details, see page 51.)
Touch this switch, and icons
of points of interest are shown
on the screen. (For details,
see page 47.)
Touch this switch for one–touch
registration of the marked point.
(For details, see page 75.)
32
Page 42

Route Guidance Screen
INFORMATION
The distance to your destination appears on the left of the screen.
The time to your destination can also
be displayed. (For the setting steps,
see page 86.)
The Change route screen
appears and the following
settings are available.
1UE053
Search condition: To change the condition
for Reroute.
Detour: To change the condition for Detour.
(For details, see page 46.)
Del. next dest.: To delete and skip the next
destination.
INFORMATION
If the calculated route includes a trip by
ferry, the route guidance shows a sea
route. After you travel by ferry, the current vehicle position may be incorrect.
Upon reception of GPS signals, it is automatically corrected.
33
Page 43

Route Guidance Screen
Search condition
Push the “MENU” button to display the
Menu screen and touch the
route”
switch.
“Edit
1UE041
Touch the “Search condition”
switch. The search condition screen appears.
1UE041
Touch the “Quick” or “Short” switch
and touch the
“OK” switch.
1UE055
Route overview
1UE040
Touch the “Route overview” switch
on the Menu screen.
1UE056
The entire route from the starting point to the
destination is displayed.
34
Page 44
Route Guidance Screen
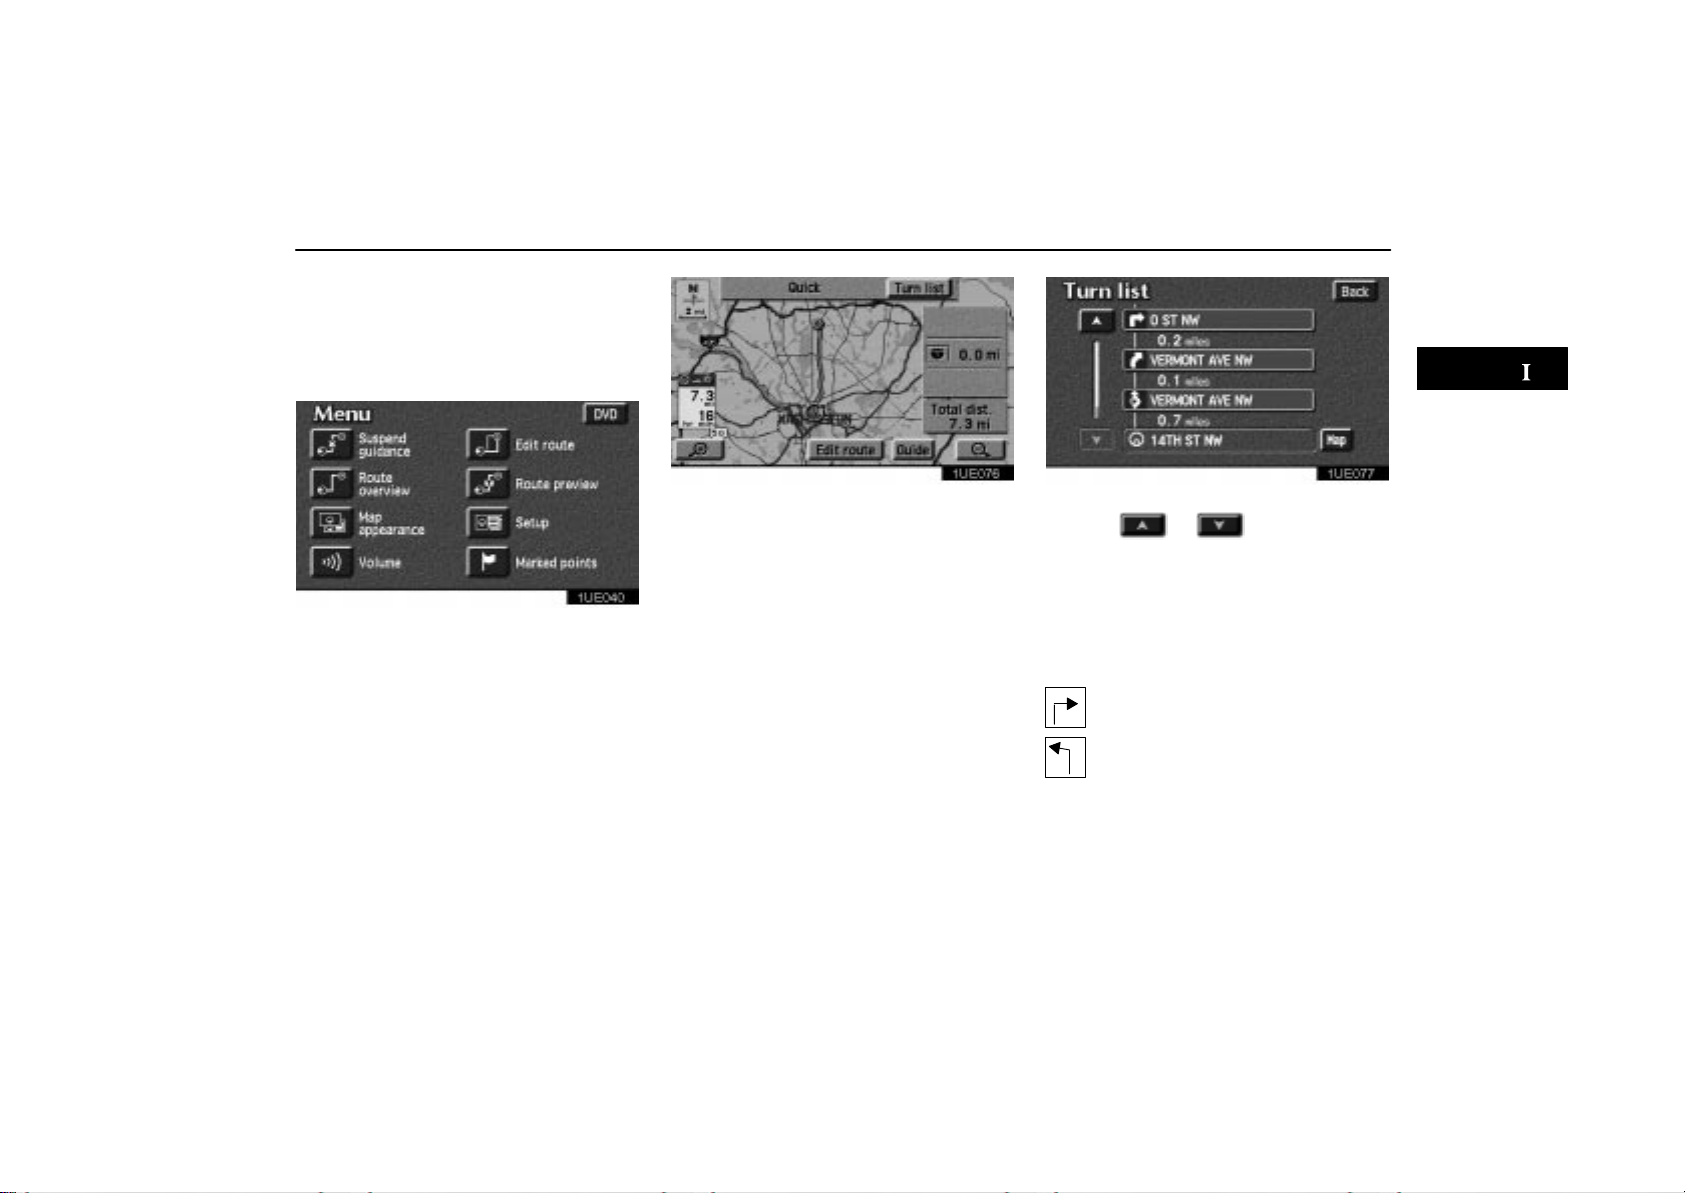
Turn list
You can change from the Map screen to a
Turn list screen that displays the list of
the roads up to your destination. This list
can be used for a route guidance.
1UE076
1UE077
1UE040
1. Push the “MENU” button to display
the Menu screen and touch the
overview”
switch.
“Route
2. The screen will change to the Entire
route map screen where you can touch
“Turn list” switch.
the
You can scroll through the list of roads by
touching
not all road names in the route may appear
on the list. If a road changes its name without
requiring a turn (such as on a street that runs
through two or more cities), the name
change will not appear on the list. The street
name closest to the starting point will be displayed with a mileage to the next turn.
or switch. However,
These marks indicate the direction which you should turn
at an intersection.
35
Page 45
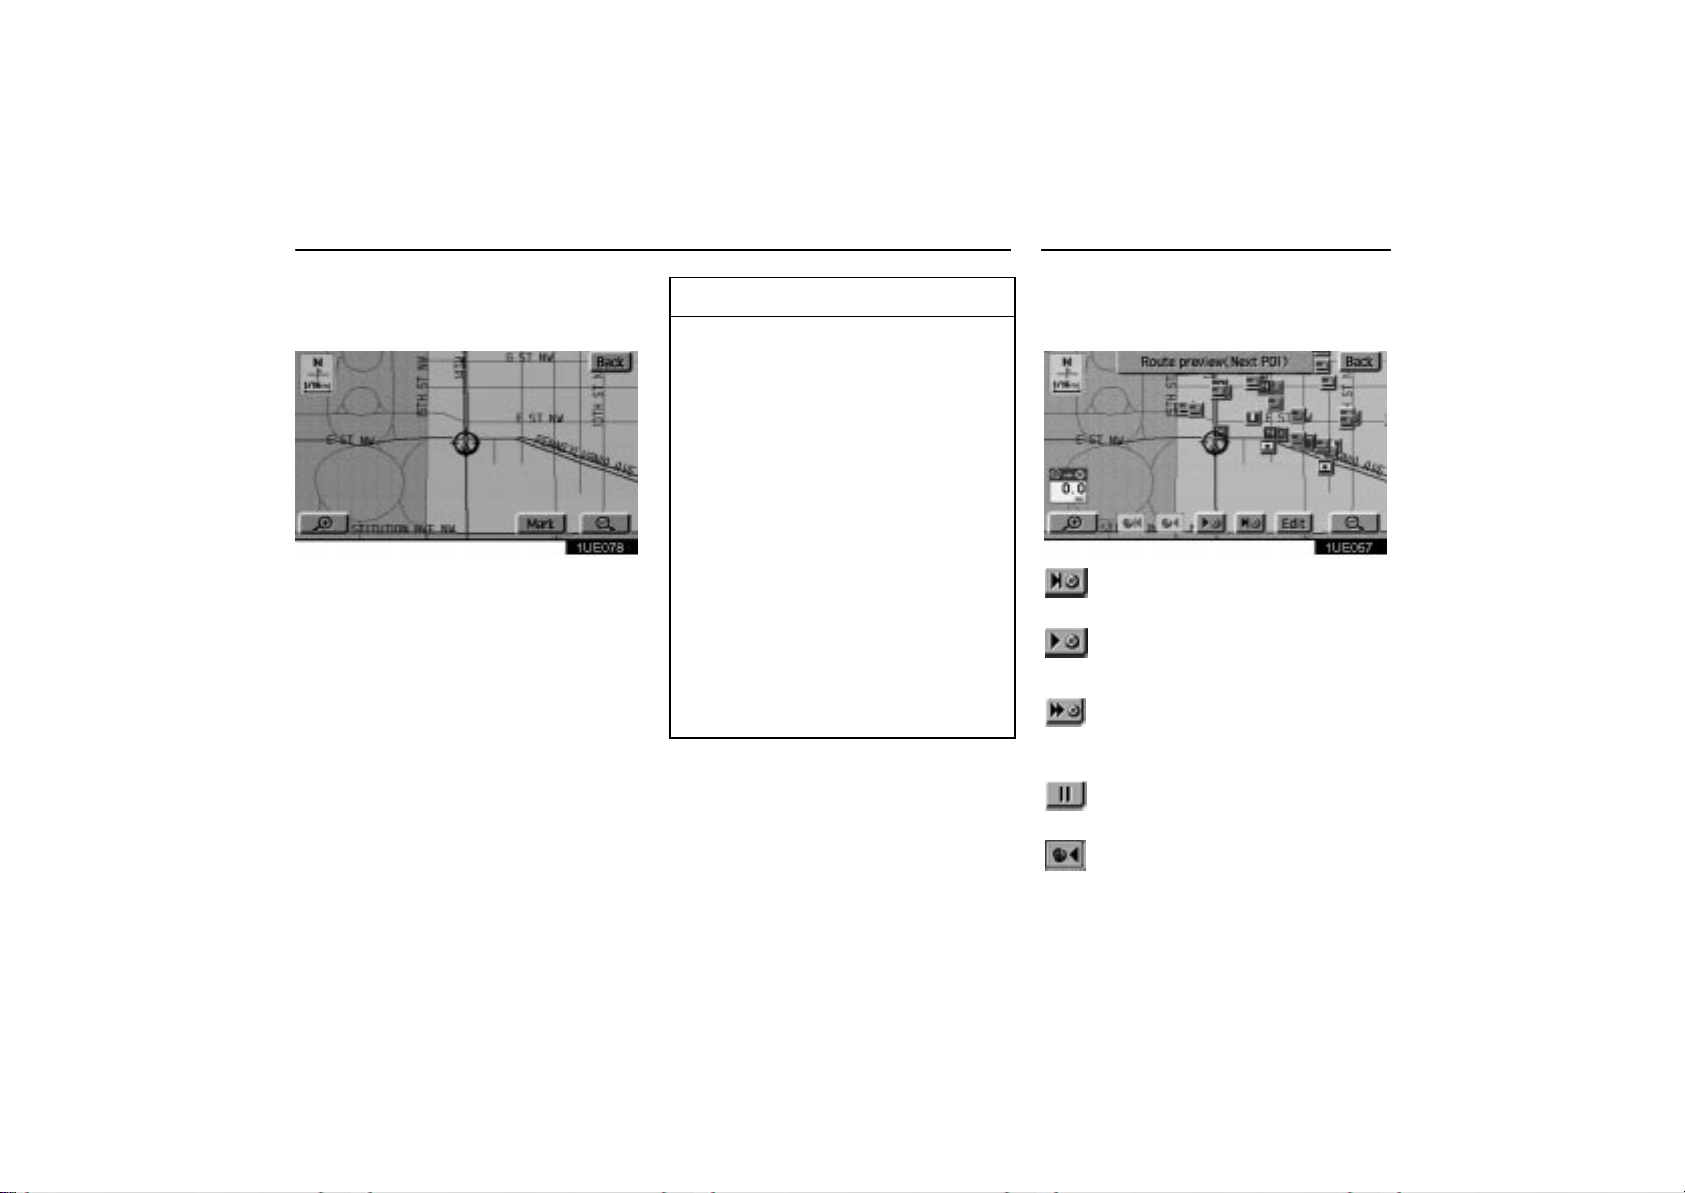
Route Guidance Screen Route Preview
Touch the
point. The point which you choose is displayed on the Map screen.
“Map” switch of your desired
1UE078
INFORMATION
The current vehicle position mark
appears at the bottom of the screen
next to the name of the street you are
driving on. The mark does not move.
If you leave the guidance route, the
name of the street you are on is not
shown on the list next to the current
vehicle position mark.
If the road type you are on changes
between a highway, a main street or
a residential street (at an interchange or fork), it will appear on the
turn list.
If a long route has been selected, it
may take a long time to display the
turn list.
Push the
return to the map display with a route
guidance.
“MAP/VOICE”
button to
Touch the “Route preview”switch on
the Menu screen. The route preview
screen appears.
1UE057
To indicate the next destination
or selected POI
To preview the route to the next
destination or selected POI
To preview the route to the next
destination in fast–forward
mode
To stop the preview
To review the route to the current position
36
Page 46

Route Preview Current Position Display
To review the route to the current position in fast–forward mode
To indicate the current position
1UE058
1UE059
Touch the “Edit” switch, the Edit route
preview screen appears.
To next POI: Preview the Next POI
To next
Delete: To delete the POI icon.
Select POI: To select the POI icon.
Touch the
: Preview the Next destination
“OK” switch after the selection.
The current vehicle position mark appears in the center of the map screen. You
can return to this map screen showing
your current position at any time from
any screen by pushing the
VOICE”
During driving, the current vehicle position
mark is fixed in the center of the screen and
the map moves.
If you move the map with a “one–touch”
scroll (see page 52 for details), the current
vehicle position mark continues to track your
current location.
button.
“MAP/
37
Page 47

Current Position Display Voice Guidance
INFORMATION
When you use the “one–touch” scroll
feature, the current vehicle position
mark may disappear from the screen.
Move the map with a “one–touch”
scroll again or push the
VOICE”
vehicle position map location display.
The current position is automatically set
as your vehicle receives signals from the
GPS (Global Positioning System). If your
current position is not correct, it is automatically corrected after your vehicle receives signals from the GPS.
button to return to the current
“MAP/
INFORMATION
After the bat t e r y d i s connection, or on a
new vehicle, the current position may
not be correct. As soon as the system
receives signals from the GPS, the correct current position is displayed.
If you must correct the current position
manually, follow the steps on page 80.
Voice guidance is offered automatically
during route guidance. Use voice guidance just for your reference.
You can adjust the volume of the voice or turn
off voice guidance.
1UE040
Push the “MENU” button to display the
Menu screen. Then touch the
switch on the Menu screen.
“Volume”
1UE060
Touch any number to select the desired
volume. Touching the “Off” switch turns
the voice route guidance off. If you turn
“Adaptive volume control” on,
the
the volume is turned up automatically
when the vehicle speed exceeds 80 km/h
(50 mph).
INFORMATION
During route guidance, the voice route
guidance continues even if the navigation screen is changed to the other
screens.
38
Page 48

Typical Voice Guidance Prompts
On freeways, interstates or other highways with higher speed limits, the
voice guidance will be made at earlier
UN301
points than on city streets in order to allow time to maneuver.
INFORMATION
IS2
The voice guidance provides various messages as you approach an intersection, or
other point where you need to maneuver the
vehicle.
1
2
3
4
“Proceed about 5 miles”
“In a quarter of a mile, right turn”
“Right turn.”
(Beep sound only)
1
2
3
4
5
6
“Proceed about 4 miles to the
traffic circle.”
“In a quarter of a mile, traffic
circle ahead, and then 3rd exit.”
“The 3rd exit ahead.”
(Beep sound only)
“The exit ahead.”
(Beep sound only)
39
Page 49

Typical Voice Guidance Prompts
EMV3114U
EMV3115U
INFORMATION
If the system cannot determine the
current vehicle position correctly (in
cases of poor GPS signal reception),
the voice guidance may be made early or delayed.
If you did not hear the voice guidance command, push the
VOICE”
button to hear it.
“MAP/
∗
: The system indicates a U–turn if the distance between two one–way roads (of opposite directions) is less than 15 m (50 ft.) in
residential areas or 50 m(164 ft.) in non–residential areas.
1
2
3
40
“In half of a mile, make a legal
U–turn.”
“Make a legal U–turn ahead.”
(Beep sound only)
The system announces your approach to the
final destination.
1
2
“Your destination is ahead.”
“Y ou have arrived at your destina-
tion. The route guidance is now
finished.”
Page 50

Registering Your Home
If you register your home address beforehand, you can easily set the route back to
your home.
1UE040
1. Push the “MENU” button to display
the Menu screen and touch the
“Marked points” switch.
1UE061
2. Touch the “Reg. home” switch of
Marked points screen for registering
your home.
If your home is registered, the
home”
switch will be shown.
“Delete
1UE062
You may register the location of your
home by some different methods: current position, address, map location, etc.
Touch the screen to select your desired
method from the menu.
Input your home in the same way as the destination input. (See page 26.)
41
Page 51
Registering Your Home
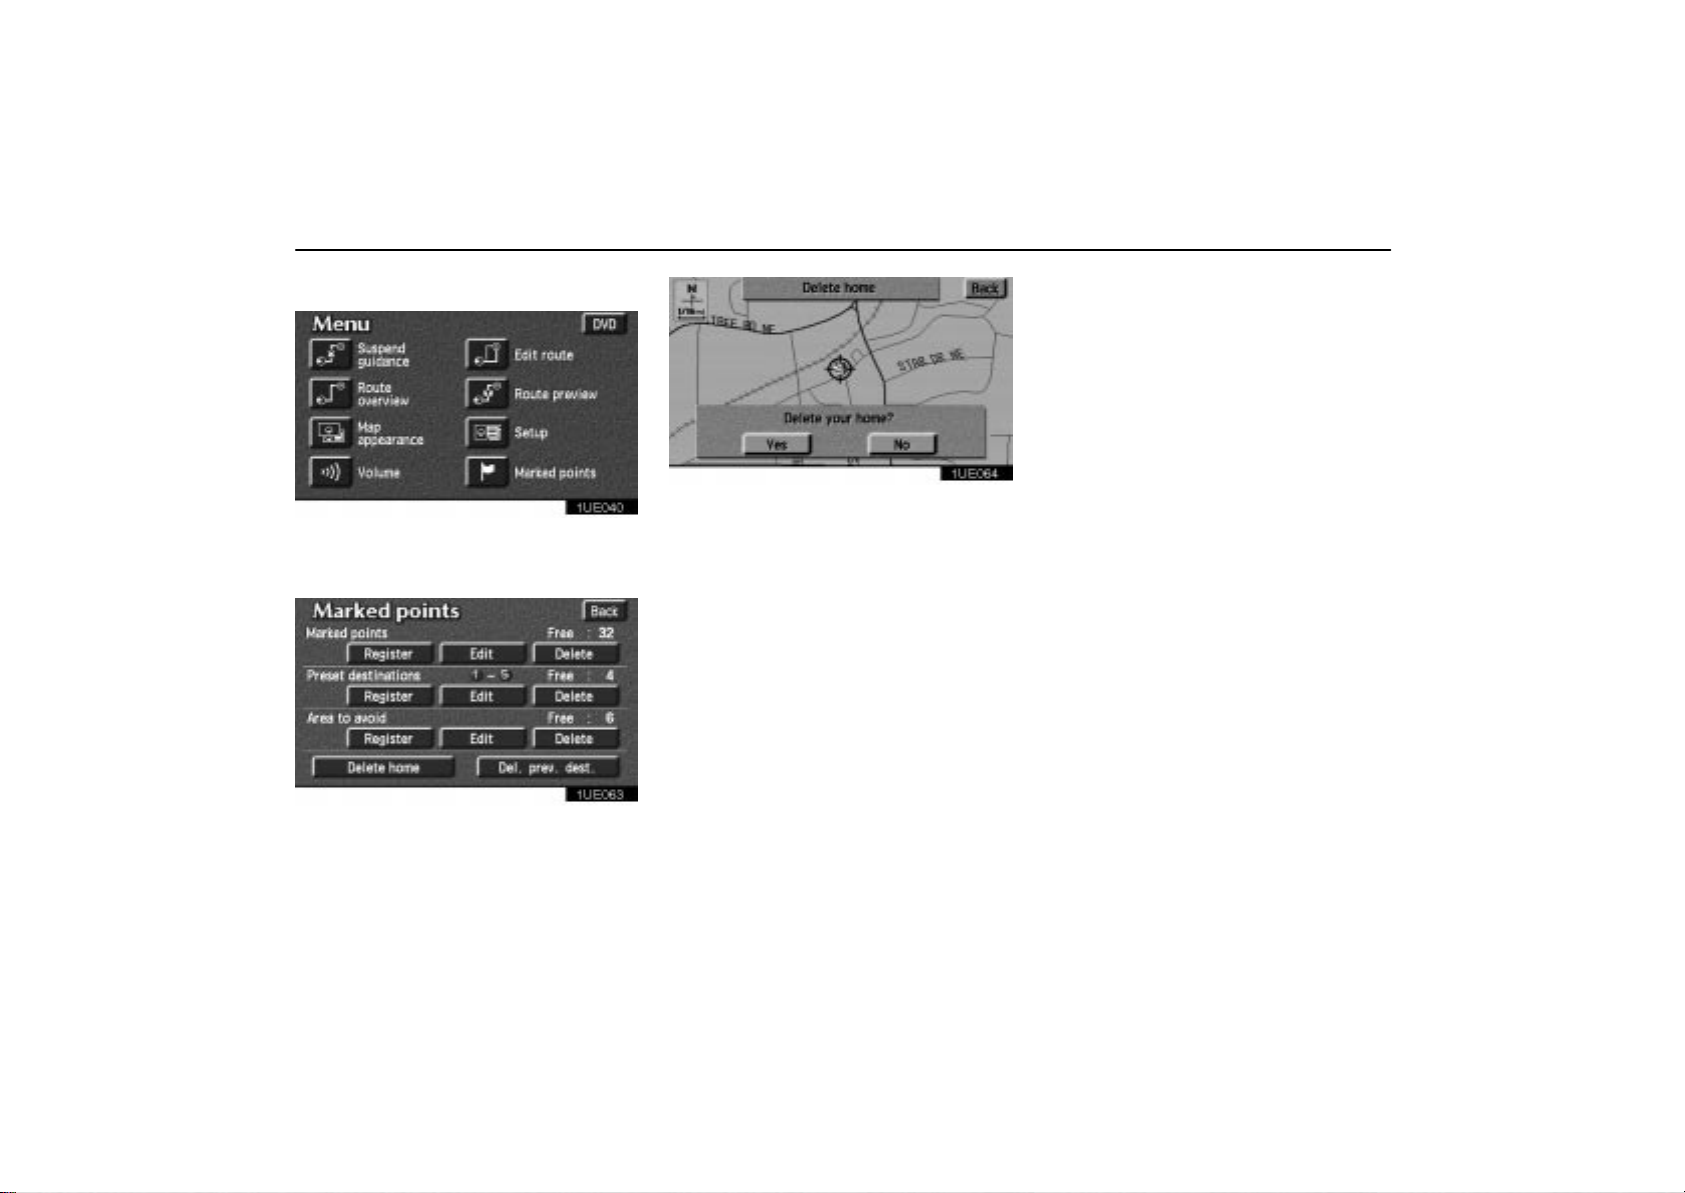
Deleting your home
1UE040
1. Push the “MENU” button to display
the Menu screen and touch the
“Marked points” switch.
1UE063
1UE064
The screen changes and displays the map
location of home and a message. If you are
sure that you want to delete the point, touch
“Yes” switch. If not, touch the “No”
the
switch.
2. Touch the “Delete home” switch of
“Marked points” screen.
42
Page 52

Registering Preset Destinations
You can register up to 5 preset destinations
1. Push the
the Menu screen and touch the
“MENU” button to display
“Marked points” switch.
1UE065
2. Touch the “Register” switch of Preset destinations
1~5
.
1UE066
3. Touch the “1~5” switch that you
want to register the preset destination.
If you have already registered the preset
destination, you can overwrite on the present
registered destination.
1UE067
4. Input the preset destination in the
same way as the destination input. (See
page 26.)
43
Page 53

Registering Preset Destinations
Editing preset destinations
1. Push the “MENU” button to display
the Menu screen and touch the
“Marked points” switch.
1UE065
2. Touch the “Edit” switch of Preset
destinations
1~5
.
1UE068
3. Select the preset destination that you
want to edit and touch the
switch.
1UE069
You can change the name, location and
phone number of the preset destination.
Touch the
72.)
“Change” switch. (See page
Deleting the preset destinations
1. Push the “MENU” button to display
the Menu screen and touch the
“Marked points” switch.
1UE065
2. Touch the “Delete” switch of Preset
destinations
1~5
.
44
Page 54

Registering Preset Destinations
1UE070
3. Select the preset destination that you
want to delete and touch the
If you want to delete all the preset destinations, touch the “Delete all” switch.
Messages appear depending on the type of
deletion. If you want to delete, touch the
“Yes” switch. To cancel the deletion, touch
the
“No” switch.
switch.
45
Page 55

Detour Setting
When you are driving while the route
guidance is operating, you can change
the route to detour around a section of
the route where a delay is caused by road
repairs, an accident, etc.
EMV3065U
1UE071
1UE059
Touch the “Chg. route” switch if you
encounter a reason to divert from the selected route.
46
This picture shows an example of how the
system would route you around a delay
caused by a traffic jam.
1
This part indicates the location where
traffic jam is occurring due to road repairs or an accident.
2
Detour route suggested by the system
When you touch the “Chg. ro u t e ” switch,
the screen changes to a change route
screen that allows you to select the distance
you want to detour. Touch one of the numeral
keys to start the detour process. After detouring, the system returns to the original
guidance route.
Whole route: If you touch this switch, the
system will calculate an entire new route to
the destination.
Page 56

Detour Setting Displaying POI
INFORMATION
When your vehicle is on a freeway,
the detour distance selections are 5,
15, and 25 miles.
The system may not be able to calculate a detour route depending on the
selected distance and surrounding
road conditions.
Points of interest such as gas stations
and restaurants can be displayed on the
Map screen. You can also set their location as a destination and use them for
route guidance.
1UE059
To display a particular type of point of i n terest on the screen, touch the
switch on the Map screen.
“POI”
1UE072
47
Page 57

Displaying POI
A window with a limited choice of points of interest will be displayed. When you touch
your desired type of point of interest, icons
will appear on the Map screen indicating
where the POI addresses are located.
1UE073
More: If you cannot find your desired point of
interest on the limited choice screen, touch
this switch. The screen then displays the
complete POI listing screen. You can display
up to 5 categories of icons on the screen.
1UE074
When you select a point of interest type from
either the limited list or the complete list, the
screen will display icons at those locations
on the Map screen.
Touching the
the last selected icon.
Local POI list: If you want to search the
nearest point of interest, touch this switch.
Then choose one of the categories. The system will list the points within 20 miles (32 km).
Y ou can sort the local POI list by three different ways as follows.
Icon: In the order of the POI icons
Dist.: In the order of distance from your cur-
rent location.
Name: In the alphabetical order
“Delete” switch will delete
By turning the
search the POI on the route when in the route
guidance mode.
Touch the
est. Points of interest which you chose are
displayed on the Map screen.
To turn off the icons of the points of interest on the Map screen, touch the
off”
switch.
“Route” switch on, you can
of your desired point of inter-
“POI
48
Page 58

Displaying POI Map Appearance
Setting a POI as a destination
You can select one of the points of inter-
est icons on the Map screen as a destination and use it for a route guidance.
1UE075
Directly touch the icon of the point of interest that you want to set as a destination.
The map will shift so the icon is centered in
the screen and overlaps with the cursor
At this time, the distance from your current
position will be displayed on the screen. The
distance shown is as measured in a straight
line from the current vehicle position to the
POI.
The name of the point of interest and the
“Info.” switch on the screen are displayed
at the top of the screen. When you touch the
“Info.” switch on the screen, the informa-
tion such as the name and address, etc. are
displayed.
When your desired point of interest overlaps with the cursor, touch the
switch. The screen changes and displays
the map location of the selected destination and the route preference. (See “(a)
Entering Destination” on page 26.)
.
“Enter”
You can select the single screen map or
the dual screen map and you can change
the half of the screen to the Guidance
screen by touching the Map/Guidance
while the Map screen is displayed.
switch
You can choose one of two types of guidance screen.
1UE040
1. Push the “MENU” button to display
the Menu screen and touch the
appearance”
switch.
“Map
49
Page 59

Map Appearance
1UE079
2. The screen will change to the Map appearance screen and you can select the
Map mode and Guidance mode.
Map mode
To display single map screen
To display dual map screen
Guidance mode
To display arrow screen
To display turn list screen
Single map
1UE059
This screen shows the single map.
Dual map
1UE080
The screen shows the Dual map. The map
on the left side is the main map. You can
change the scale of the right side map by
touching it. The screen turns into the edit
mode. You can also select to show POI icons
on the right side map.
50
To display map screen
Page 60

Map Appearance Map Scale
Arrow screen
1UE081
This screen shows the current road name
and the distance to the next corner.
Turn list screen
1UE082
The screen shows the Turn list. You cannot
scroll through the list of roads.
1UE083
Touch switch or switch to change
the scale of the map display. The scale bar
and indicator at the bottom of the screen indicates the map scale menu. The scale runs
from 1/32nd of a mile to 128 miles. Touch
switch or switch until the scale bar
changes normally. If you continue to hold
your finger on the switch, the scale bar
changes smoothly.
Y ou can change the scale of the map display
by touching the scale bar directly. It is not
available during driving.
The map scale is displayed under the North–
up symbol or Heading–up symbol at the top
left of the screen.
51
Page 61

Map Scale Screen Scrolling
INFORMATION
When the map scale is at the maximum
range of 128 mile s, w ill disappear .
When the map scale is at the minimum
range of 1/32nd mile, will disappear.
1UE084
If you wish to look at a different point on the
map other than your current vehicle position,
you can bring the desired point to the center
of the screen by using the scroll feature.
Touch any point on the screen, and that point
moves to the center of the screen and is
shown by the cursor mark . You can then set
this place as a destination. Touch the
ter
” switch on the screen.
If a destination is already registered, you can
add a destination.
If you continue to hold your finger on the
screen, the map will continue scrolling in that
direction until you lift your finger.
“En-
If you touch switches like
etc., the screen does not scroll and the respective function operates.
After scrolling the screen, the map remains
centered at the selected location until you
activate another function. The current vehicle position mark will continue to move
along your actual route and may move off the
screen. When you push the
VOICE”
tion mark returns to the center of the screen
and the map moves as you proceed on your
route.
button, the current vehicle posi-
“Mark”, “POI”,
“MAP/
INFORMATION
If you enter a destination using the
screen scrolling function, the road
nearest to the point you touched is set
as the destination.
52
Page 62

Orientation of the Map
1UE085
1UE086
You can change the orientation of the
map from North–up to Heading–up by
touching the direction symbol at the top
left of the screen.
North–up symbol
Regardless of the direction of vehicle travel,
North is always up.
Heading–up symbol
The direction of the vehicle travel is always
up. A red arrow indicates North.
53
Page 63

Limitations of the Navigation System
This navigation system calculates the
current vehicle position using satellite
signals, various vehicle signals, map
data, etc. However, the accurate position
may not be shown depending on the satellite condition, road configuration, vehicle condition or other circumstances.
The Global Positioning System (GPS) developed and operated by the U.S. Department
of Defense provides an accurate current vehicle position using 3 to 4 satellites. The GPS
system has a certain level of inaccuracy built
in for security reasons. While the navigation
system will compensate for this most of the
time, occasional positioning errors up to 300
feet can and should be expected. Generally ,
position errors will be corrected within a few
seconds.
1UE087a
When your vehicle is receiving signals from
the satellites, the “GPS” mark appears at the
top left of the screen.
The GPS signal may be physically obstructed, leading to inaccurate vehicle position on the map display. Tunnels, tall buildings, trucks, or even the placement of
objects on the instrument panel may obstruct
the GPS signals.
The installation of window tinting may also
obstruct the GPS signals. Most window tinting contains some metallic content that will
interfere with the GPS signal reception. We
recommend not to u s e t h e window tinting on
vehicles equipped with navigation systems.
The GPS satellites may not send signals due
to repairs or improvements being made to
them.
Even when the navigation system is receiving good GPS signals, the vehicle position
may not be shown accurately or inappropriate route guidance may occur in some
cases.
54
Page 64

Limitations of the Navigation System
(a) Accurate current vehicle position may not be shown in the following cases:
When driving on a small angled Y–
shaped road.
When driving on a spiral road.
When driving on a slippery road such as
in sand, gravel, snow, etc.
When driving on a long straight road.
When freeway and surface streets run in
parallel.
After moving by ferry or vehicle carrier.
When a long route is searched during high
speed driving.
When driving without setting the current
position calibration correctly.
After repeating a change of directions by
going forward and backward, or turning
on a turntable in the parking lot.
When leaving a covered parking lot or
parking garage.
When a roof carrier is installed.
When driving with the tire chains installed.
When the tires are worn.
After replacing a tire or tires.
When using tires that are smaller or larger
than the factory specifications.
When the tire pressure in any of the four
tires is not correct.
INFORMATION
If your vehicle cannot receive GPS signals, you can correct the current position manually. For the information on
setting the current position calibration,
see page 80.
(b) Inappropriate route guidance
may occur in the following cases:
When turning at a wrong intersection off
the designated route guidance
If you set more than one destinations,
auto reroute will display a route returning
to the destination on the previous route
when you try to skip any of the destinations.
When turning at an intersection, there is
no route guidance.
When passing through the intersection,
there is no route guidance.
During automatic rerouting, the route
guidance may not be available for the next
turn to the right or left.
It may take a long time to operate auto re-
route during high speed driving. In auto
reroute, a detour route may be shown.
After auto reroute, the route may not be
changed.
An unnecessary U–turn may be shown o r
announced.
A location may have multiple names and
the system will announce one or more.
55
Page 65

Limitations of the Navigation System
Some routes may not be searched.
If the route to your destination includes
gravel, unpaved roads or alleys, the route
guidance may not be shown.
Your destination point might be shown on
the opposite side of the street.
When a portion of the route has regula-
tions prohibiting the entry of the vehicle
that vary by time or season or other reason.
The road and map data stored in your
navigation system may not be complete
or may not be the latest release.
When replacing the tire(s), do the calibration. See p a g e 80 for deta ile d inf ormation.
56
Page 66

Map Database Information and Updates
Map database is made based on the
maps, 2001 edition of DENSO, whose information source comes from NavTech
maps and GDT maps.
2000 Navigation Technologies. All
rights reserved.
GDT, Geographic Data Technology, Inc.
This product contains proprietary and
confidential property of Geographic Data
Technology, Inc. Unauthorized use, including duplication of this product is expressly prohibited.
NSA03a
INFORMATION
For the up–dated map DVD–ROM, contact your Lexus dealer.
There are two types of areas available for
route guidance. (See the following
pages.) In one type of area, primarily
around metropolitan centers, detailed
route guidance is available for the entire
area. In the other type of area, all roads
are displayed on the map but route guidance is limited. The navigation route
might lack precision because the data (no
right turns, one–way traffic, etc.) is not
complete. It is still possible to reach the
destination by following the arrow direction and distance as shown on the bottom
left of the screen. The arrow points in the
direction of the destination. The distance
shown is as measured in a straight line
from the current vehicle position to the
destination area.
1UE088a
In order to provide you with accurate map information as much as possible, we are always gathering information such as road repairs and doing site investigation. However,
the names of roads, streets, facilities, and
their locations are often changed. In some
places, construction on roads may be in progress. For that reason, information on some
areas in this system might be different from
the actual location.
The map database is normally updated once
a year. Contact your dealer for updating a
map database.
57
Page 67

Map Database Information and Updates
1UE040
DVD: To determine which version of the database is currently in your vehicle, touch the
“DVD” switch on the Menu screen. It dis-
plays the map database version date. Contact your dealer to find out if there is a more
recent update released.
58
Page 68

Map Database Information and Updates
Route guidance availability
2000 by Nav Tech
Route guidance available areas
Route guidance available for main roads only
DCA1
59
Page 69

Map Database Information and Updates
Route guidance availability
2000 by Nav Tech
Route guidance available areas
Route guidance available for main roads only
DCA2
60
Page 70

Map Database Information and Updates
Route guidance availability
2000 by Nav Tech
Route guidance available areas
Route guidance available for main roads only
DCA3
61
Page 71

Map Database Information and Updates
Route guidance availability
2000 by Nav Tech
Route guidance available areas
Route guidance available for main roads only
DCA4
62
Page 72

Map Database Information and Updates
Route guidance availability
2000 by Nav Tech
Route guidance available areas
Route guidance available for main roads only
DCA5
63
Page 73

Map Database Information and Updates
Route guidance availability
2000 by Nav Tech
Route guidance available areas
Route guidance available for main roads only
DCA6
64
Page 74

Map Database Information and Updates
Route guidance availability
2000 by Nav Tech
Route guidance available areas
Route guidance available for main roads only
DCA7
65
Page 75

Map Database Information and Updates
Route guidance availability
2000 by Nav Tech
Route guidance available areas
Route guidance available for main roads only
DCA8
66
Page 76

Map Database Information and Updates
Route guidance availability
2000 by Nav Tech
Route guidance available areas
Route guidance available for main roads only
DCA9
67
Page 77

Map Database Information and Updates
Route guidance availability
2000 by Nav Tech
Route guidance available areas
Route guidance available for main roads only
DCA11
68
Page 78

SECTION
ADVANCED FUNCTIONS
Descriptions of operations for more effective use
Marked points 70. . . . . . . . . . . . . . . . . . . . . . . . . . . . . . . . . . . . . . . . . . . . . . . . . . . .
Area to avoid 77. . . . . . . . . . . . . . . . . . . . . . . . . . . . . . . . . . . . . . . . . . . . . . . . . . . . .
Current position calibration 80. . . . . . . . . . . . . . . . . . . . . . . . . . . . . . . . . . . . . . . . .
II
69
Page 79

Marked Points
You can register and keep your own
marked points of interest list (like restaurants, sports facilities, etc.) and use the
marked points to input a destination.
(a) Registering marked points
1UE040
1. Push the “MENU” button to display
the Menu screen and touch the
“Marked points” switch.
1UE063
2. Touch the “Register” switch of the
Marked points.
2UE001
A screen similar to that for destination input
appears. Input the address of the marked
point in the same way as any destination input. See page 10 through 26.
70
Page 80

Marked Points
When you finish registration of the
marked point, the Register marked point
screen appears.
2SE004U
3. Touch your desired icon. You can turn
the page by touching the
“Page 2” switch. Touching the “With
sound”
sired sound. (For details, see page 72.)
switch, you can select your de-
INFORMATION
Up to 100 marked points can be registered.
“Page 1” or
(b) Editing marked points
Once a marked point is registered, you
can edit the icon, name or telephone
number.
1. Push the
the Menu screen and touch the
“MENU” button to display
“Marked points” switch.
1UE063
2. Touch the “Edit” switch of Marked
points.
2UE003
The screen lists the marked points.
Sort by Icon: Touch this switch to list the
marked points in order of the category of
icon.
Sort by Date: Touch this switch to list the
marked points in order of the registered date.
Sort by Name: Touch this switch to list the
marked points in alphabetical order.
Touch
display the Edit marked point screen.
of the desired marked point to
71
Page 81

Marked Points
2UE002
T ouch the item to edit (on the right side of
the screen).
Changing the “Icon”
2UE004
Touch your desired icon.
Page 1 and page 2: You can select one of 46
icons.
When you touch the desired icon,
or complete the direction setting, the previous screen is displayed.
“Back”
With sound: When your vehicle ap-
proaches the marked point, the sound which
you chose will sound.
The next screen appears when you select
the “Bell (with direction)” switch.
2UE005
Touch the direction switches and adjust the
direction. Touch the
sounds when your vehicle approaches this
point in the direction that you set.
When you touch the desired icon,
or complete the direction setting, the previous screen is displayed.
“OK” switch. The bell
“Back”
72
Page 82

Marked Points
Changing the “Name”
2UE006
Touch alphabet or numeral keys directly
to input the name.
After you finish your entry , touch the
switch.
The previous screen will be displayed. If you
touch the
name of this marked point is not shown on
the map.
“Off” switch of show name, the
“OK”
Changing the “Phone number”
2UE007
Touch numeral keys directly.
After you finish your entry , touch the “OK”
switch.
The previous screen will be displayed.
Changing the “Location”
2UE008
Touch the arrows to scroll to your desired
point on the Map screen.
Touch the
moves to your desired point.
The previous screen will return.
After you finish any editing, touch the
“Back” switch on the first screen of Edit
marked points.
“OK” switch when the cursor
73
Page 83

Marked Points
You can register up to 100 marked points. If
you attempt to register more than 100, a
message appears for confirmation.
2UE009
If you want to register a new point, delete one
of the marked points. See “(c) Deleting
marked points”.
(c) Deleting marked points
1. Push the “MENU” button to display
the Menu screen and touch the
“Marked points” switch.
1UE063
2. Touch the “Delete” switch of the
marked points.
2UE010
3. T ouch of the marked point to delete.
74
Page 84

Marked Points
The screen for confirmation will appear
with the map of the marked point. If you
want to delete, touch
“Yes”. Touching
“No” or “Back” will return to the pre-
vious screen.
If you want to delete all of the marked
points, touch the
The screen for confirmation will appear.
Touching
marked points. Touching
“Yes” will delete all of the
“Delete all” switch.
“No” or
“Back” will return to the previous
screen.
To delete only specified marked points, use
“Icon”, “Date” or “Name” switch
the
to display the screen, so that you can easily
find the marked points.
2UE011
2UE012
Either of the above messages appears depending on the type of deletion. If you want
to delete, touch the
the deletion, touch the
switch.
“Yes” switch. To cancel
“No” or “Back”
(d) One–touch marked point
registration
2UE013
You can register your current position or
any points (See “Screen Scrolling”on
page 52.) from the Map screen by touch-
ing the
“Mark” switch.
75
Page 85

Marked Points
You can register up to 100 marked points. If
you attempt to register more than 100, a
message appears for confirmation.
2UE014
When you touch the “Mark” switch, the
above screen appears for a few seconds,
and then the Map screen returns.
76
2UE015
The registered point is shown by on the
map.
To change the icon or name, etc., see “(b)
Editing marked points”.
2UE016
If you want to register a new point, delete one
of the marked points. See “(c) Deleting
marked points”.
Page 86

Area to Avoid
Any areas you want to avoid due to traffic
jams, construction work or other reasons
can be registered as an area to avoid.
Push the
Menu screen and then touch the
“MENU” button to display
“Marked points” switch to disp l a y the
following screen.
1UE063
INFORMATION
Some areas and freeways may not
be able to be set as an avoid point.
If a destination is input in the area to
avoid or the route calculation cannot
be made without running through
the area to avoid, a route passing
through the area to avoid may be
shown.
(a) Registering area to avoid
1. T ouch t h e “Register” switch of Area
to avoid.
2UE017
2. Show the map of the area to avoid in
the same way as you input any destination or display the map of the area you
want to avoid. (See page 10 through 26.)
2UE018
3. Touch the “OK” switch at the center
of the area that you want to avoid.
2UE019
4. Depending on the contents to be
edited, touch either
or switch.
77
Page 87

Area to Avoid
When you touch the
lowing message appears.
“OK” switch, the fol-
2UE020
After a few seconds, the Marked points
screen returns.
(b) Editing area to avoid
1. Touch the “Edit” switch of Area to
avoid to display the Edit area to avoid
screen.
2UE021
2. Touch the point you want to edit from
the list.
2UE022
You can edit the name, location and size of
area to avoid. Touch any change switch that
you want to edit.
78
Page 88

Area to Avoid
3. Edit the name, location or size of the
area to avoid.
2UE023
2UEP69–1
2UEP69–2
When editing is completed, touch the “OK”
switch.
INFORMATION
If you try to change the map to an inappropriate scale, a message appears.
For magnification or reduction of the
map scale, see page 51.
(c) Deleting area to avoid
1. T ouch the “Delete” switch of Area to
avoid to display the Delete area to avoid
screen.
2UE024
2. Select the area you want to delete.
Delete all: All areas to avoid registered in the
system are deleted.
2UE025
79
Page 89

Area to Avoid Current Position Calibration
The current vehicle position mark will be
automatically corrected during driving
on reception of GPS signals. If your vehicle cannot receive GPS signals, you
can correct the current position mark
2UE026
manually.
2UE027–1
3. Either of the above messages appears.
To delete the area(s), touch the
switch.
If you want to try again or cancel the deletion,
touch the
screen will return.
80
“No” switch. The previous
“Yes”
1UE040
1. Push the “MENU” button to display
the Menu screen, and touch the
up”
switch.
“Set-
2. Touch the “Calibration” switch.
2UE027–2
3. Touch the “Position/Direction”
switch.
Page 90

Current Position Calibration
INFORMA TION
For additional information on current
position accuracy, see “Limitations of
the Navigation System” on page 54.
Position/Direction calibration
2UE028
1. Touch the scroll arrows to move the
cursor
Touch the
to your desired location.
“OK” switch.
2UE029
2. Touch either the left or right arrow to
correct the direction of the current vehicle position mark.
Touch the
the Map screen returns.
“OK” switch on the screen and
81
Page 91

Current Position Calibration
Tire change calibration
The tire change calibration function is to
be used when the tires are replaced. This
will adjust for any possible change in tire
circumference from the old tires to the
new ones. If this procedure is not performed when tires are replaced, the current vehicle position mark may become
incorrect.
To execute the fast distance tire calibration
procedure, touch the
switch on the Calibration screen.
“Tire change”
2UE030
The above message appears and the fast
distance calibration is automatically started.
A few seconds later, the Map screen returns.
82
Page 92

SECTION
III
MORE ADVANCED FUNCTIONS
Convenient features
Setup 84. . . . . . . . . . . . . . . . . . . . . . . . . . . . . . . . . . . . . . . . . . . . . . . . . . . . . . . . . . .
Map color 85. . . . . . . . . . . . . . . . . . . . . . . . . . . . . . . . . . . . . . . . . . . . . . . . . . . . . . . .
Auto reroute 85. . . . . . . . . . . . . . . . . . . . . . . . . . . . . . . . . . . . . . . . . . . . . . . . . . . . . .
Estimated travel time 86. . . . . . . . . . . . . . . . . . . . . . . . . . . . . . . . . . . . . . . . . . . . . .
Adjusting time zone 87. . . . . . . . . . . . . . . . . . . . . . . . . . . . . . . . . . . . . . . . . . . . . . .
Distance indication 88. . . . . . . . . . . . . . . . . . . . . . . . . . . . . . . . . . . . . . . . . . . . . . . .
Notifying seasonal restriction 89. . . . . . . . . . . . . . . . . . . . . . . . . . . . . . . . . . . . . . .
Voice guidance in all modes 90. . . . . . . . . . . . . . . . . . . . . . . . . . . . . . . . . . . . . . . .
Current street name 91. . . . . . . . . . . . . . . . . . . . . . . . . . . . . . . . . . . . . . . . . . . . . . .
Maintenance information 91. . . . . . . . . . . . . . . . . . . . . . . . . . . . . . . . . . . . . . . . . . .
Dealer setting 93. . . . . . . . . . . . . . . . . . . . . . . . . . . . . . . . . . . . . . . . . . . . . . . . . . . .
83
Page 93
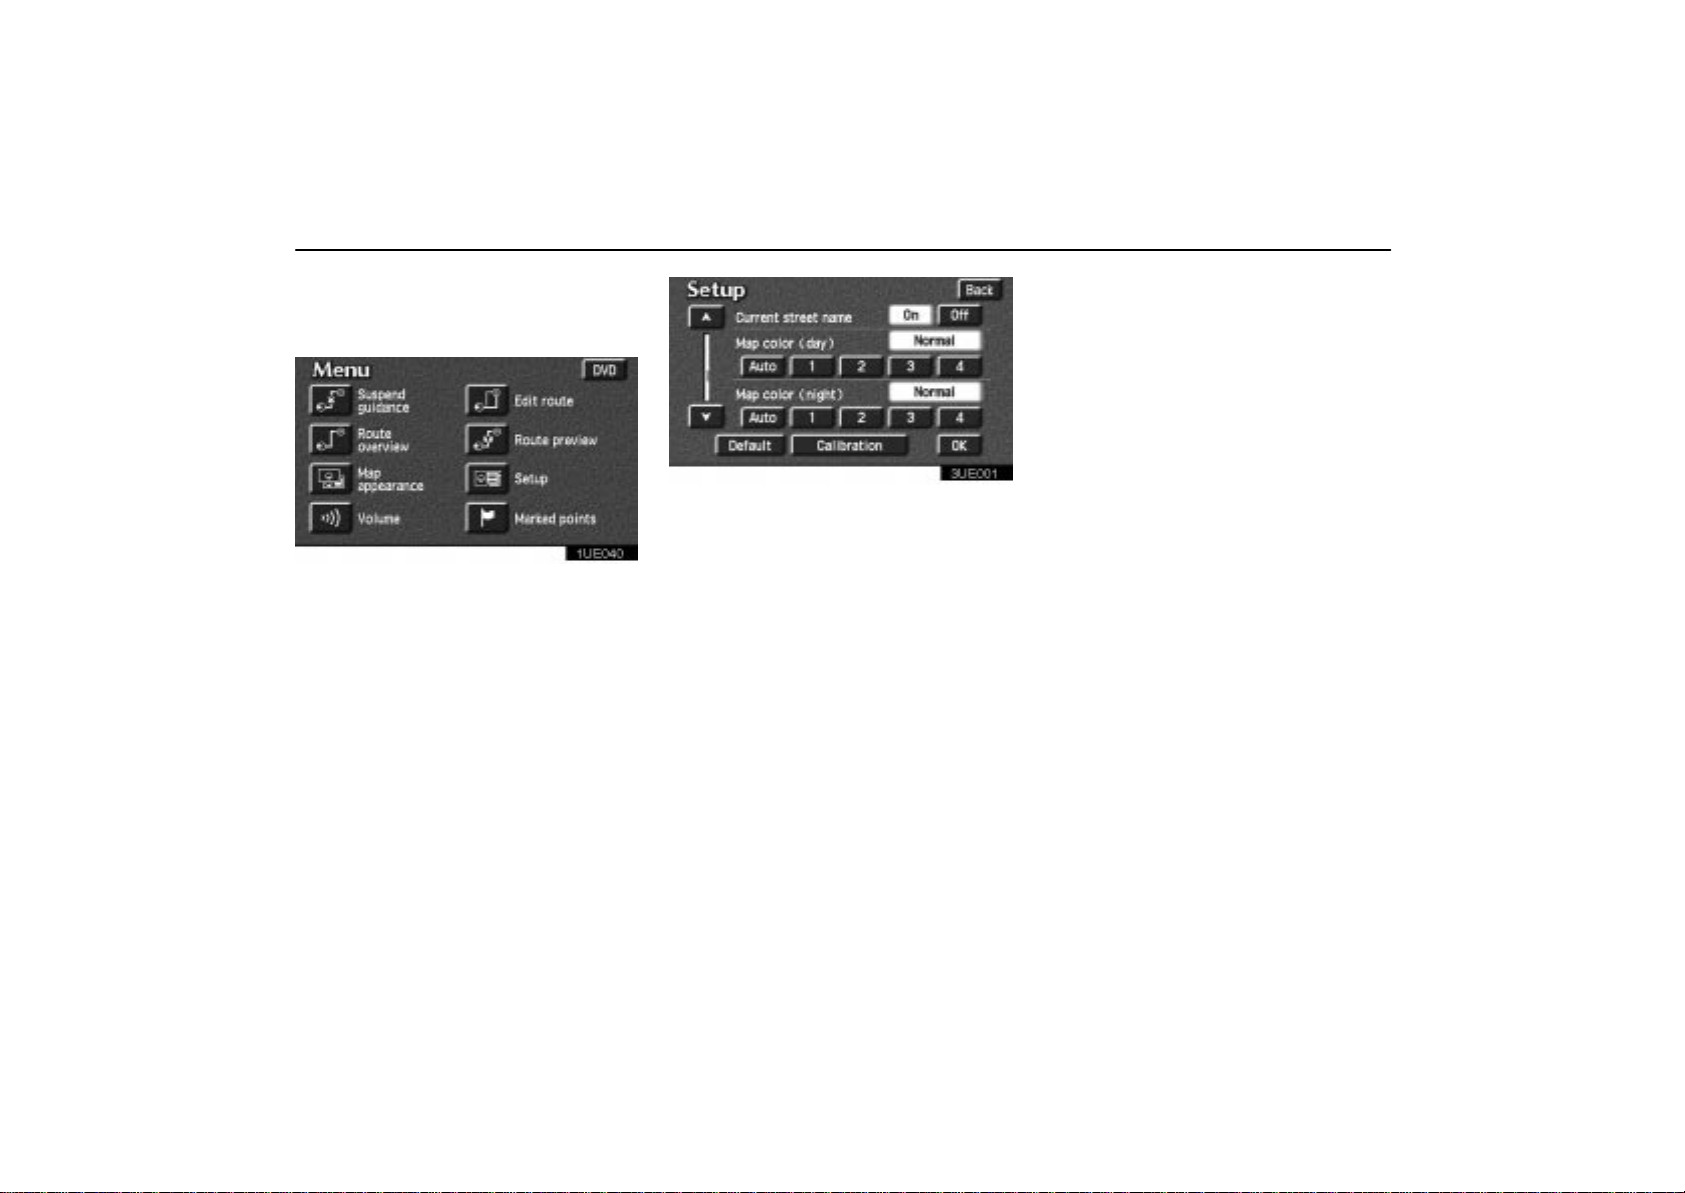
Setup
You can set the values shown on the Setup screen.
1. Push the
“MENU” button.
1UE040
2. Touch the “Setup” switch to display
the Setup screen. Select your desired
items you want to set. Selected items will
be highlighted in green.
3UE001
3. T ouch t h e “OK” switch on the screen
and the previous screen returns.
To default: Touch the
the screen. All of the settings can be defaulted.
Map color (day or night): You can select
your desired map color.
Auto reroute: You can set the system will or
will not automatically search for a new route
to the destination.
Estimated travel time: You can set to display the time required to reach the destination on the road guidance screen.
Adjust time zone: You can select your desired time zone.
Distance: You can change “km” or “miles” to
display your desired units.
“Default” switch on
Notify seasonal restrict: You can select to
notify or not to notify a seasonal restriction.
Voice guide in all modes: You can set the
voice guide in all modes or not.
Current street name: You can select to
show or no t t o show a c u rrent street name on
the Map screen.
84
Page 94

MAP Color Auto Reroute
1. Push the
2. Touch the “Setup” switch.
“MENU” button.
3UE001
3. Select your desired day and/or night
Map color and then touch the
switch to return the Map screen. See “The
map color list” below for details.
Touch the
Map color.
Touch the
color automatically. The Map color is
changed in every three month.
“Normal” switch to default the
“Auto” switch to select the Map
”OK”
The Map color list
Switch NO. Map color “Auto” mode
1
2
3
4
Green Mar.–May
Blue Jun.–Aug.
Gray Sep.–Nov.
Beige Dec.–Feb.
When the auto reroute feature is turned
on, the system will automatically search
for a new route to the destination if you
leave the guidance route. This feature
does not operate while you are driving on
roads where the guidance is not available.
1. Push the
the Menu screen, and touch the “Set-
switch.
up”
“MENU” button to display
1UE040
85
Page 95

Auto Reroute Estimated Travel Time
When the estimated travel time feature is
turned on, the time required to reach the
destination is displayed on the Route
guidance screen.
3UE002
1UE040
3UE003
2. Touch the “On” switch of the “Auto
reroute”. If you can not find the item on
the list, touch
scroll the list.
or switch to
INFORMATION
If your vehicle leaves the guidance
route, the system searches for a new
route to the destination. The new route
may or may not take you back to the
previous route depending on how far
you are off the original guidance route.
86
To turn the Estimated travel time on:
1. Push the “MENU” button to display
the Menu screen, and touch the
up”
switch.
“Set-
2. Touch the “On” switch of the Estimated travel time. If you cannot find the
item on the list, touch
and scroll the list.
or switch
Page 96

Estimated Travel Time Adjusting Time Zone
3UE004
T o set the average speeds:
1. Touch the “Change speed” switch of
Estimated travel time.
2. Touch
hicle speeds for driving on a Freeway,
Main street and Residential area.
If you touch the
fault speed is set at each item.
3. After you finish setting the desired
speeds, touch the
up screen returns.
or to set the average ve-
“Default” switch, the de-
“OK” switch. The Set-
INFORMATION
The displayed time to the destination
is the approximate driving time calculated based on the speeds you selected and your actual position
along the guidance route.
The time shown may vary greatly depending on your progress along the
route (which may be affected by road
conditions such as traffic jams,
construction work, etc.)
Up to 99 hours 59 minutes can be displayed.
1. Push the “MENU” button.
1UE040
2. Touch the “Setup” switch.
3UE005
87
Page 97

Adjusting Time Zone Distance Indication
3. Touch the
just time zone screen appears on the display.
“Adjust” switch, the Ad-
3UE006a
4. Select your desired time zone. Selected switch is highlighted in green.
Touch the
or switch to set the daylight saving time.
5. Touch “OK” switch on the screen and
the “Setup” screen returns.
“On” switch and then touch
1. Push the
“MENU” button.
1UE040
2. Touch the “Setup” switch.
3UE007
3. Touch “km” or “miles” to select
your desired units.
4. Touch the
“OK” switch.
88
Page 98

Notifying Seasonal Restriction
1. Push the
“MENU” button.
1UE040
2. Touch the “Setup” switch.
3UE008
3. Touch the “On” switch of the Notify
seasonal restrict and then touch
switch. The screen return to the current
position map.
“OK”
3UE009
The restricted road icon and the message
may appear on the screen.
89
Page 99

Voice Guidance in All Modes
1. Push the
“MENU” button.
1UE040
2. Touch the “Setup” switch.
3UE010
3. T ouch t h e “On” switch on the right of
“Voice guide in all modes”.
90
Page 100

Current Street Name Maintenance Information
1. Push the
“MENU” button.
1UE040
2. Touch the “Setup” switch.
3UE001
3. T ouch t h e “On” switch on the right of
Current street name.
The current street name appears on the Map
screen.
3UE011
3UE012L
This system has a function which informs
you of the time to replace certain parts or
components as well as other information
shown on the screen. (See “Information
Items” on page 93.) When the system
begins operating after reaching either the
Information Item’s date or driving distance, the Information screen will be displayed.
The Information screen will not be displayed
again by touching the
this message again”
“Do not display
switch.
91
 Loading...