

Page 1

SECTION 6 –
SERVICE PROCEDURES AND
SPECIFICATIONS
Chassis
Specifications 304. . . . . . . . . . . . . . . . . . . . . . . . . . . . . . . . . . . . . . . . . . .
Checking brake fluid 307. . . . . . . . . . . . . . . . . . . . . . . . . . . . . . . . . . . . . .
Checking power steering fluid 308. . . . . . . . . . . . . . . . . . . . . . . . . . . . .
Checking tire pressure 309. . . . . . . . . . . . . . . . . . . . . . . . . . . . . . . . . . . .
Rotating tires 310. . . . . . . . . . . . . . . . . . . . . . . . . . . . . . . . . . . . . . . . . . . .
Checking and replacing tires 311. . . . . . . . . . . . . . . . . . . . . . . . . . . . . .
Installing snow tires and chains 314. . . . . . . . . . . . . . . . . . . . . . . . . . . .
Replacing wheels 316. . . . . . . . . . . . . . . . . . . . . . . . . . . . . . . . . . . . . . . .
Aluminum wheel precautions 317. . . . . . . . . . . . . . . . . . . . . . . . . . . . . .
Suspension and chassis 318. . . . . . . . . . . . . . . . . . . . . . . . . . . . . . . . . .
3
303
Page 2
CHASSIS
SPECIFICATIONS
– DIFFERENTIAL
“Toyota Genuine Differential Gear Oil” is filled in your Lexus vehicle. Use Lexus approved
“Toyota Genuine Differential Gear Oil” or equivalent to satisfy the following specification.
Oil capacity
Oil type
Oil viscosity
Please contact your Lexus dealer for further details.
– AUTOMATIC TRANSMISSION
Fluid capacity
Drain and refill
Fluid type
*Change automatic transmission fluid only as necessary.
Generally, it is necessary to change automatic transmission
fluid only if your vehicle is driven under one of the Special
Operating Conditions listed in your “Owner’s Manual
Supplement / Scheduled Maintenance”. When changing the
automatic transmission fluid, use only “Toyota Genuine ATF
Type T–IV” (ATF JWS3309 or NWS6500) to aid in assuring
optimum transmission performance.
304
1.35 L (1.42 qt., 1.19 lmp.qt.)
Hypoid gear oil API GL–5
Above –18C (0F): SAE90
Below –18C (0F): SAE80W or SAE80W–90
1.8 L (1.9 qt., 1.6 lmp.qt.)
Toyota Genuine ATF Type T–IV*
NOTICE
Using automatic transmission fluid other than Toyota
Genuine ATF T ype T–IV may cause deterioration in shift
quality, locking up of your transmission accompanied
by vibration, and ultimately damage the automatic
transmission of your vehicle.
Page 3
– BRAKES
Pedal clearance *
Pedal free play
Brake pad wear limit
Parking brake lining wear limit
Parking brake adjustment *
Fluid type
1
100 mm (3.9 in.) Min.
0.2 – 20 mm (0.008 – 0.08 in.)
1.0 mm (0.04 in.)
1.0 mm (0.04 in.)
2
7 – 9 clicks
SAE J1703 or FMVSS No. 116 DOT 3
*1: Minimum pedal clearance when depressed with the pressure of 196 N (20 kgf, 44 lbf.) with the engine running
2
: Parking brake adjustment when depressed with the pressure of 294 N (30 kgf, 66 lbf.)
*
– STEERING
CHASSIS
Free play
Power steering fluid
Less than 30 mm (1.2 in.)
Automatic transmission fluid DEXRON
II or III
305
Page 4

CHASSIS
– TIRES AND WHEELS
Standard and run–flat tires
Tire size
Tire inflation pressure
Recommended cold tire inflation pressure
Wheel size
Wheel nut torque
Compact spare tire
Tire size
Tire inflation pressure
Wheel size
Wheel nut torque
NOTE: For complete information on tires (e.g. replacing tires or replacing wheels), see “Checking tire pressure” through “Aluminum
wheel precautions” on page 309 through 317.
245/40ZR18
2
Front 230 kPa (2.3 kgf/cm
Rear 230 kPa (2.3 kgf/cm
or bar, 33 psi)
2
or bar, 33 psi)
For sustained high speeds above 180 km/h (112 mph), in
countries where such speeds are permitted by law, add 80
kPa (0.8 kgf/cm
2
or bar, 12 psi) to the front tires and rear
tires, but never exceed the maximum cold tire pressure
molded on the tire sidewall.
18 x 8 JJ
103 N·m (10.5 kgf·m, 76 ft·lbf.)
T145/70R17 106M
420 kPa (4.2 kgf/cm
2
or bar, 60 psi)
17 x 4T
103 N·m (10.5 kgf·m, 76 ft·lbf.)
306
Page 5
CHASSIS
CHECKING BRAKE FLUID
63sa06
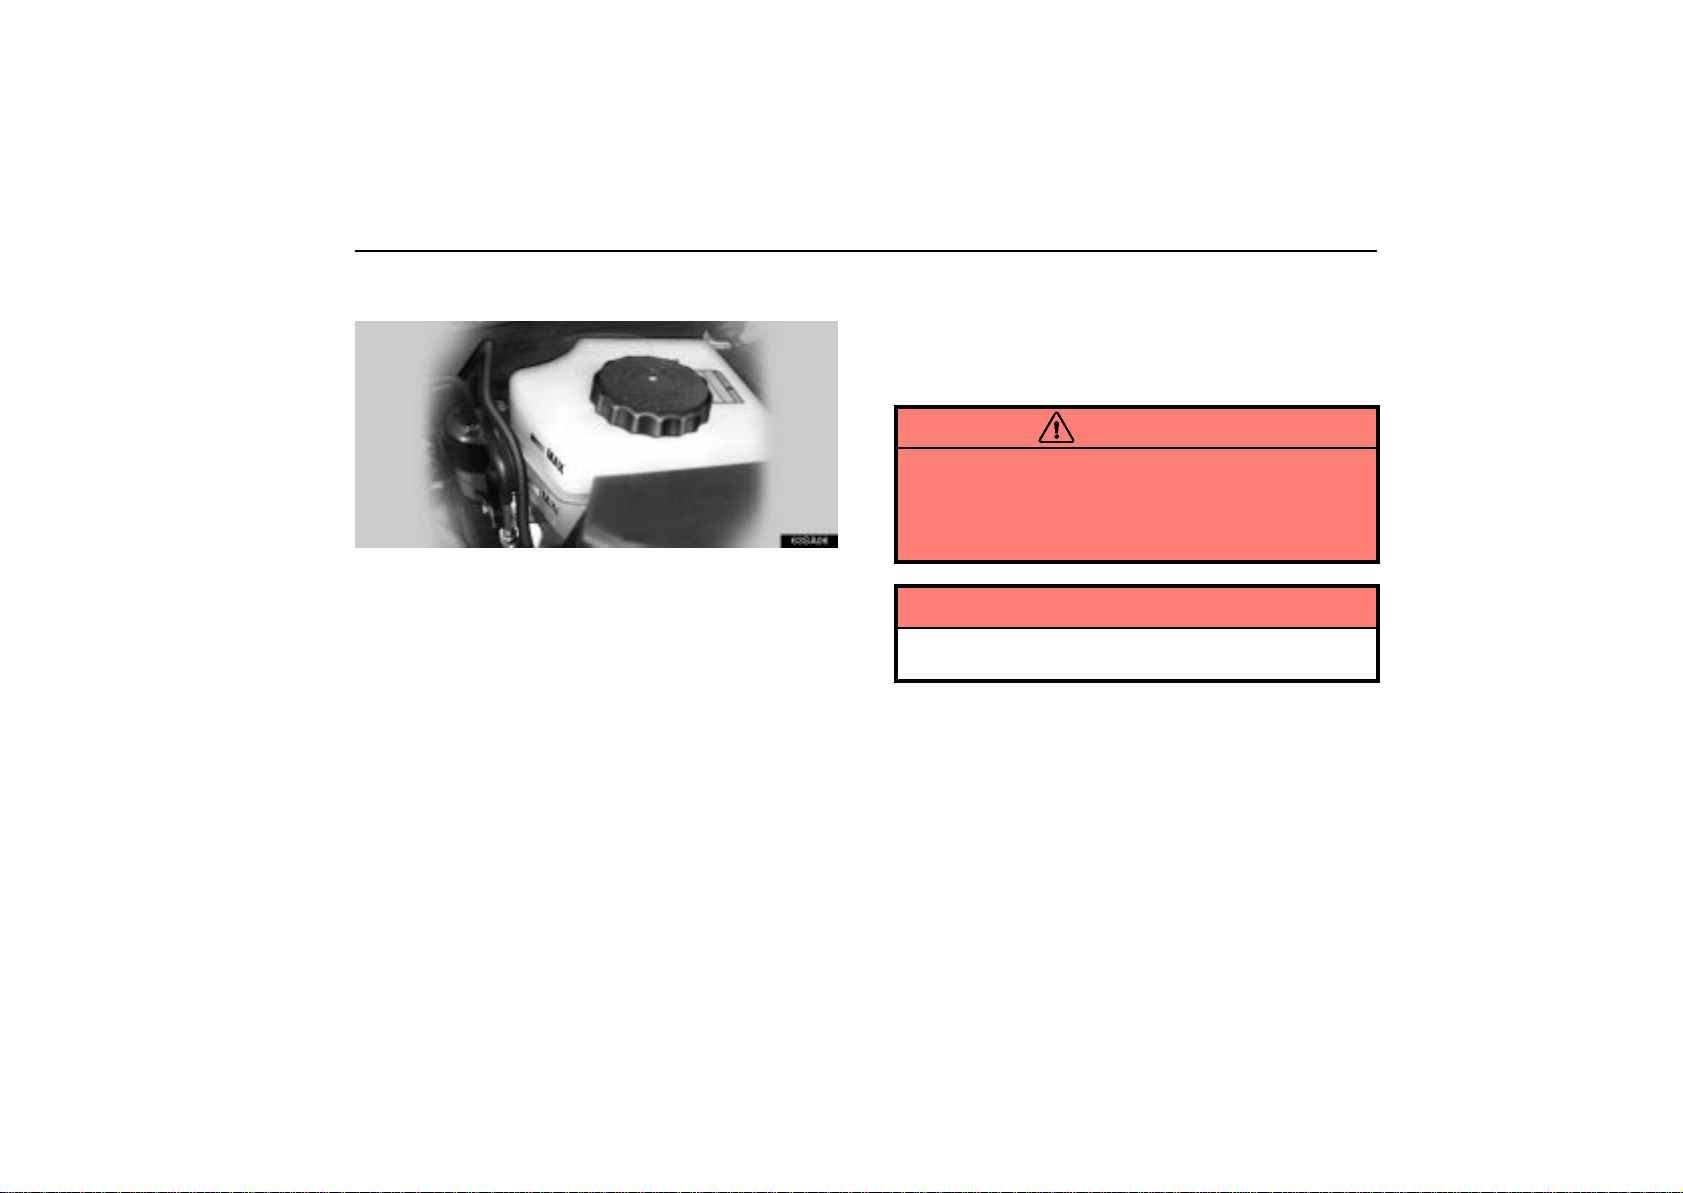
To check the fluid level, simply look at the see–through
reservoir. The level should be between the ”MAX” and
”MIN” lines on the tank.
It is normal for the brake fluid level to go down slightly as the
brake pads wear or when the fluid level in the accumulator is
high.
If the reservoir needs frequent refilling, it may indicate a
serious mechanical problem.
If the level is low, add FMVSS No.116 DOT 3 or SAE J1703
brake fluid to the brake reservoir.
Refilling brake fluid:
1. Turn the ignition switch off.
2. Depress the brake pedal more than 40 times.
3. Remove the reservoir cap by hand. Add brake fluid up to the
”MAX” line.
If you do not follow the procedure above, the reservoir may
overflow.
Use only newly opened brake fluid. Once opened, brake fluid
absorbs moisture from the air, and excess moisture can cause
a dangerous loss of braking efficiency.
CAUTION
Take care when filling the reservoir because brake fluid
can harm your hands or eyes and damage painted
surfaces. If fluid gets in your eyes, flush your eyes with
clean water immediately . If you still feel uncomfortable
with your eyes, go to the doctor.
NOTICE
If you spill some of the fluid, be sure to wipe it off to
prevent it from damaging the parts or paintwork.
307
Page 6
CHASSIS
CHECKING POWER STEERING
FLUID
63sa04
Check the fluid level on the dipstick. If necessary, add
automatic transmission fluid DEXRON
If the vehicle has been driven around 80 km/h (50 mph) for 20
minutes (a little more in frigid temperatures), the fluid is hot
(60C – 80C or 140F – 175F). You may also check the level
when the fluid is cold (about room temperature, 10C – 30C
or 50F – 85F) if the engine has not been run for about five
hours.
II or III.
63sa05
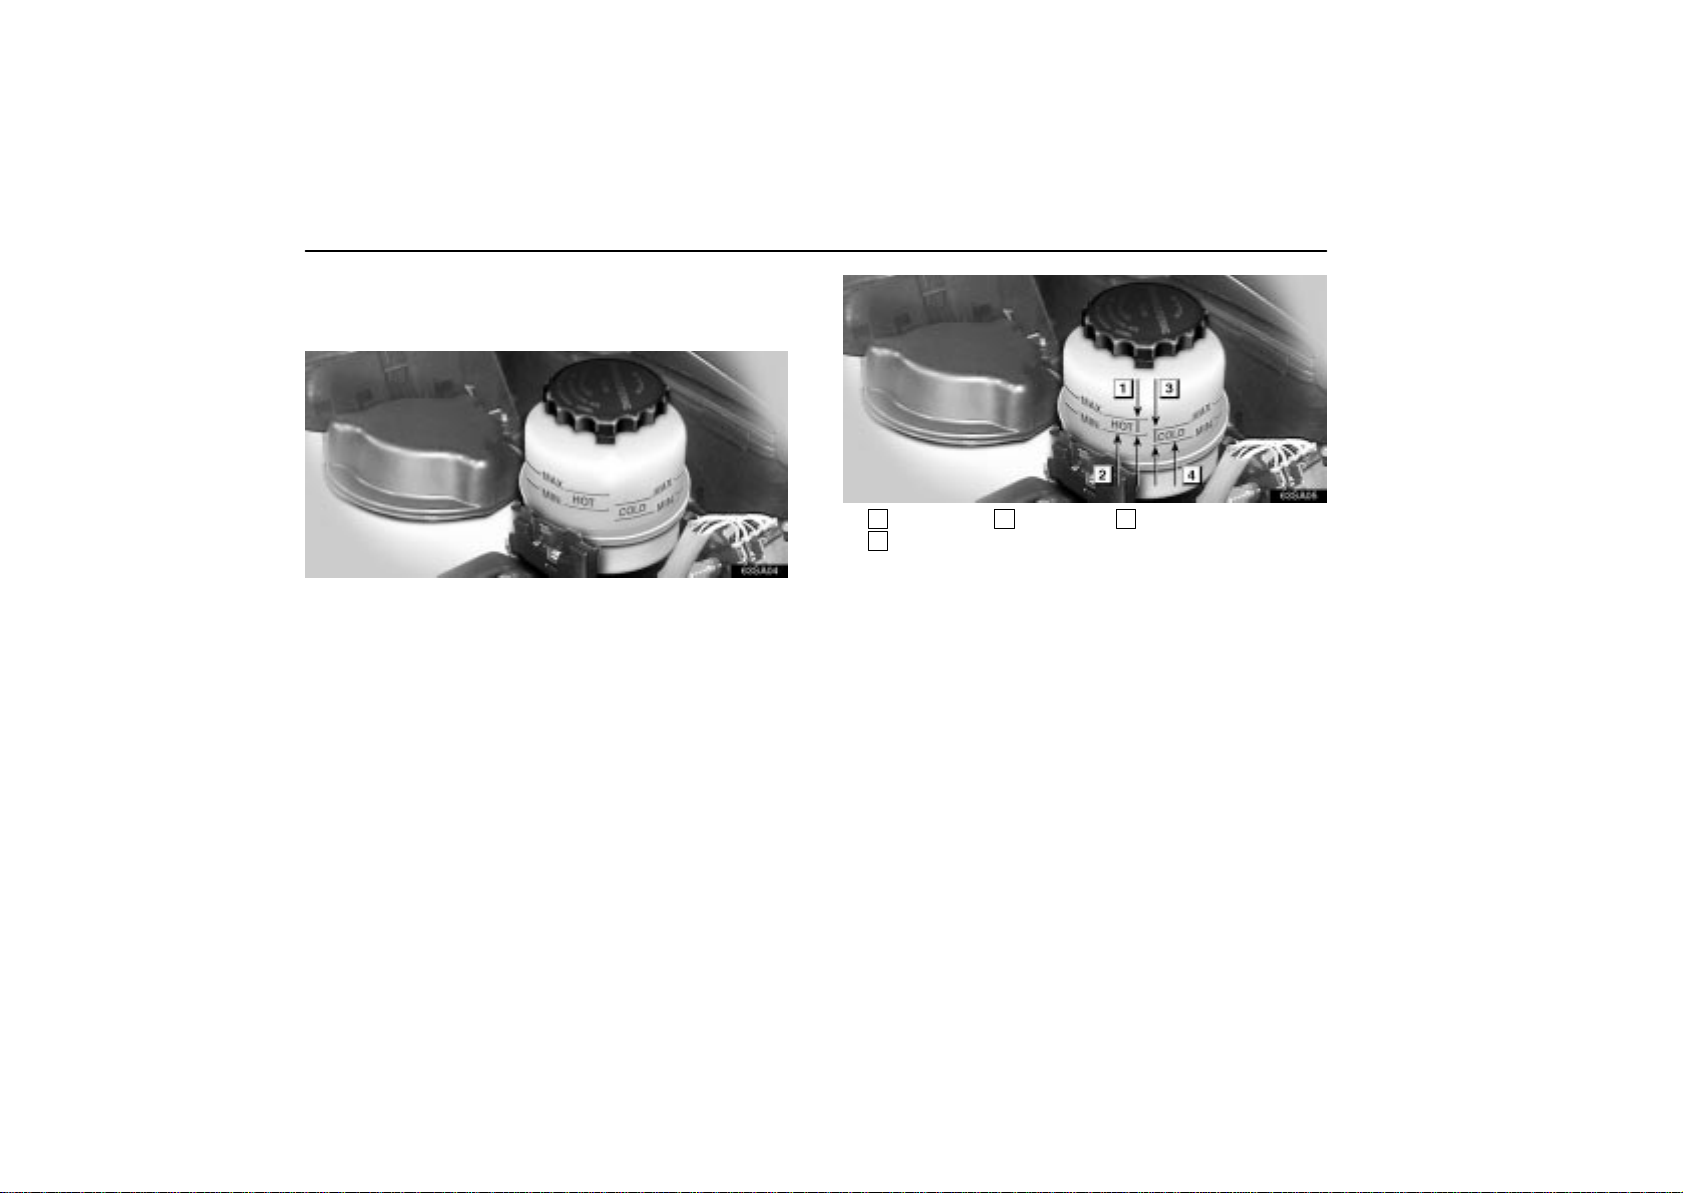
1
If hot O.K. 2If hot add 3If cold O.K.
4
If cold add
Clean all dirt off the reservoir and look at the fluid level. If the
fluid is cold, the level should be in the ”COLD” range. Similarly,
if it is hot, the fluid level should be in the ”HOT” range. If the
level is at the low side of the appropriate range, add automatic
transmission fluid DEXRON
the range.
To remove the reservoir cap, turn it counterclockwise and lift
up. To reinstall it, turn it clockwise. After replacing the reservoir
cap, visually check the steering box case, vane pump and hose
connections for leaks or damage.
II or III to bring the level within
308
Page 7
CHASSIS
CAUTION
The reservoir may be hot so be careful not to burn
yourself.
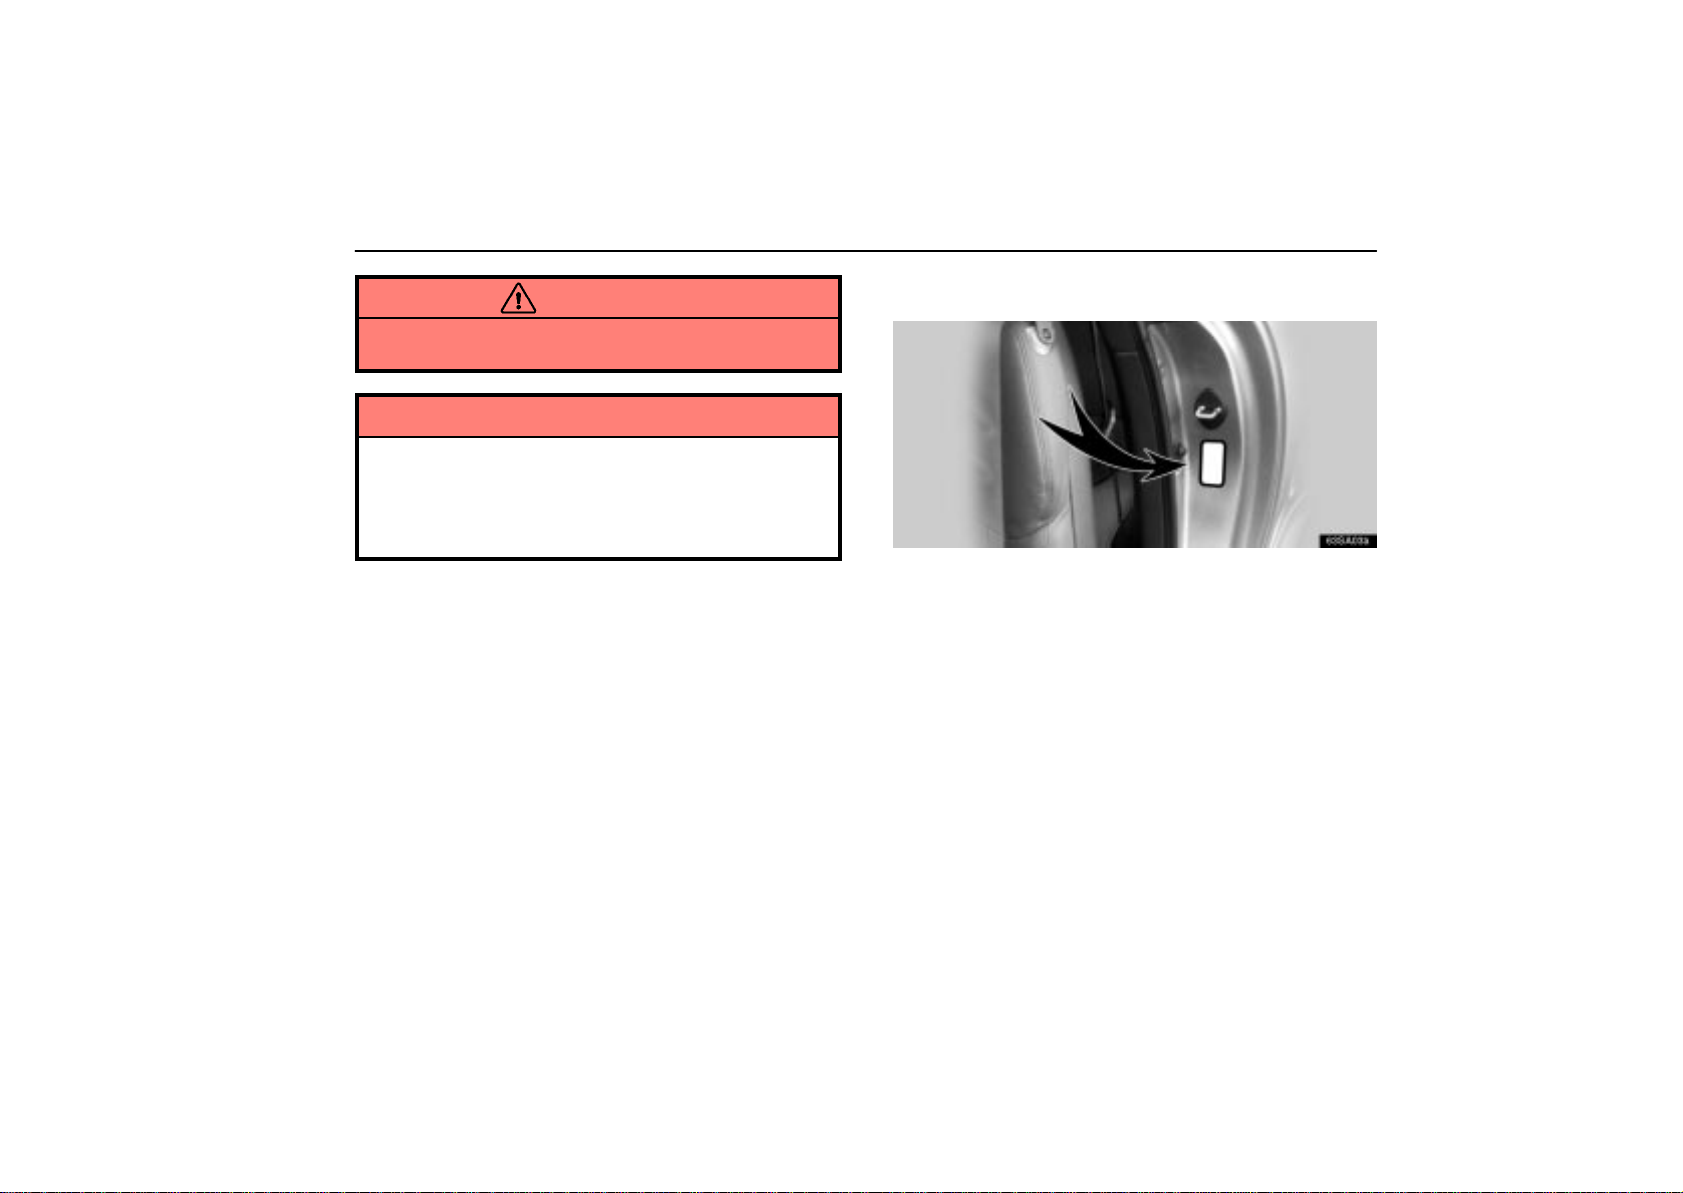
NOTICE
Avoid overfilling, or the power steering could be
damaged.
When adding the power steering fluid, avoid spilling
it. The generator under the power steering reservoir
could be damaged if fluid is spilled on it.
CHECKING TIRE PRESSURE
63sa03a
The recommended cold tire pressures, tire size and the
vehicle capacity weight are given on the label.
You should check the tire pressures every two weeks, or at
least once a month. And don’t forget the spare, if so equipped.
The pressure for the spare tire should be 420 kPa (4.2 kgf/cm
or bar, 60 psi). Incorrect tire pressure can reduce tire life and
make your vehicle less safe to drive.
Low tire pressure results in excessive wear, poor handling,
reduced fuel economy, and the possibility of blowouts from
overheated tires. Also, low tire pressure can cause poor
sealing of the tire bead. If the tire pressure is excessively low,
there is the possibility of wheel deformation and/or tire
separation. So keep your tire pressures at the proper level.
If a tire needs frequent refilling, have it checked by your Lexus
dealer.
2
309
Page 8
CHASSIS
High tire pressure produces a harsh ride, handling problems,
excessive wear at the center of the tire tread, and a greater
possibility of tire damage from road hazards.
The following instructions for checking tire pressure should be
observed:
The pressure should be checked only when the tires are
cold. If your vehicle has been parked for at least 3 hours
and has not been driven for more than 1.5 km or 1 mile
since, you will get an accurate cold tire pressure reading.
Always use a tire pressure gauge. The appearance of the
tire can be misleading. Besides, tire pressures that are
even just a few pounds off can degrade handling and ride.
Do not bleed or reduce tire pressure after driving. It is
normal for the tire pressure to be higher after driving.
Never exceed the vehicle capacity weight. The
passengers and luggage weight should be located so that
the vehicle is balanced.
Be sure to reinstall the tire valve caps. Without the valve
caps, dirt or moisture could get into the valve core and
cause air leakage. If the caps have been lost, have new
ones put on as soon as possible.
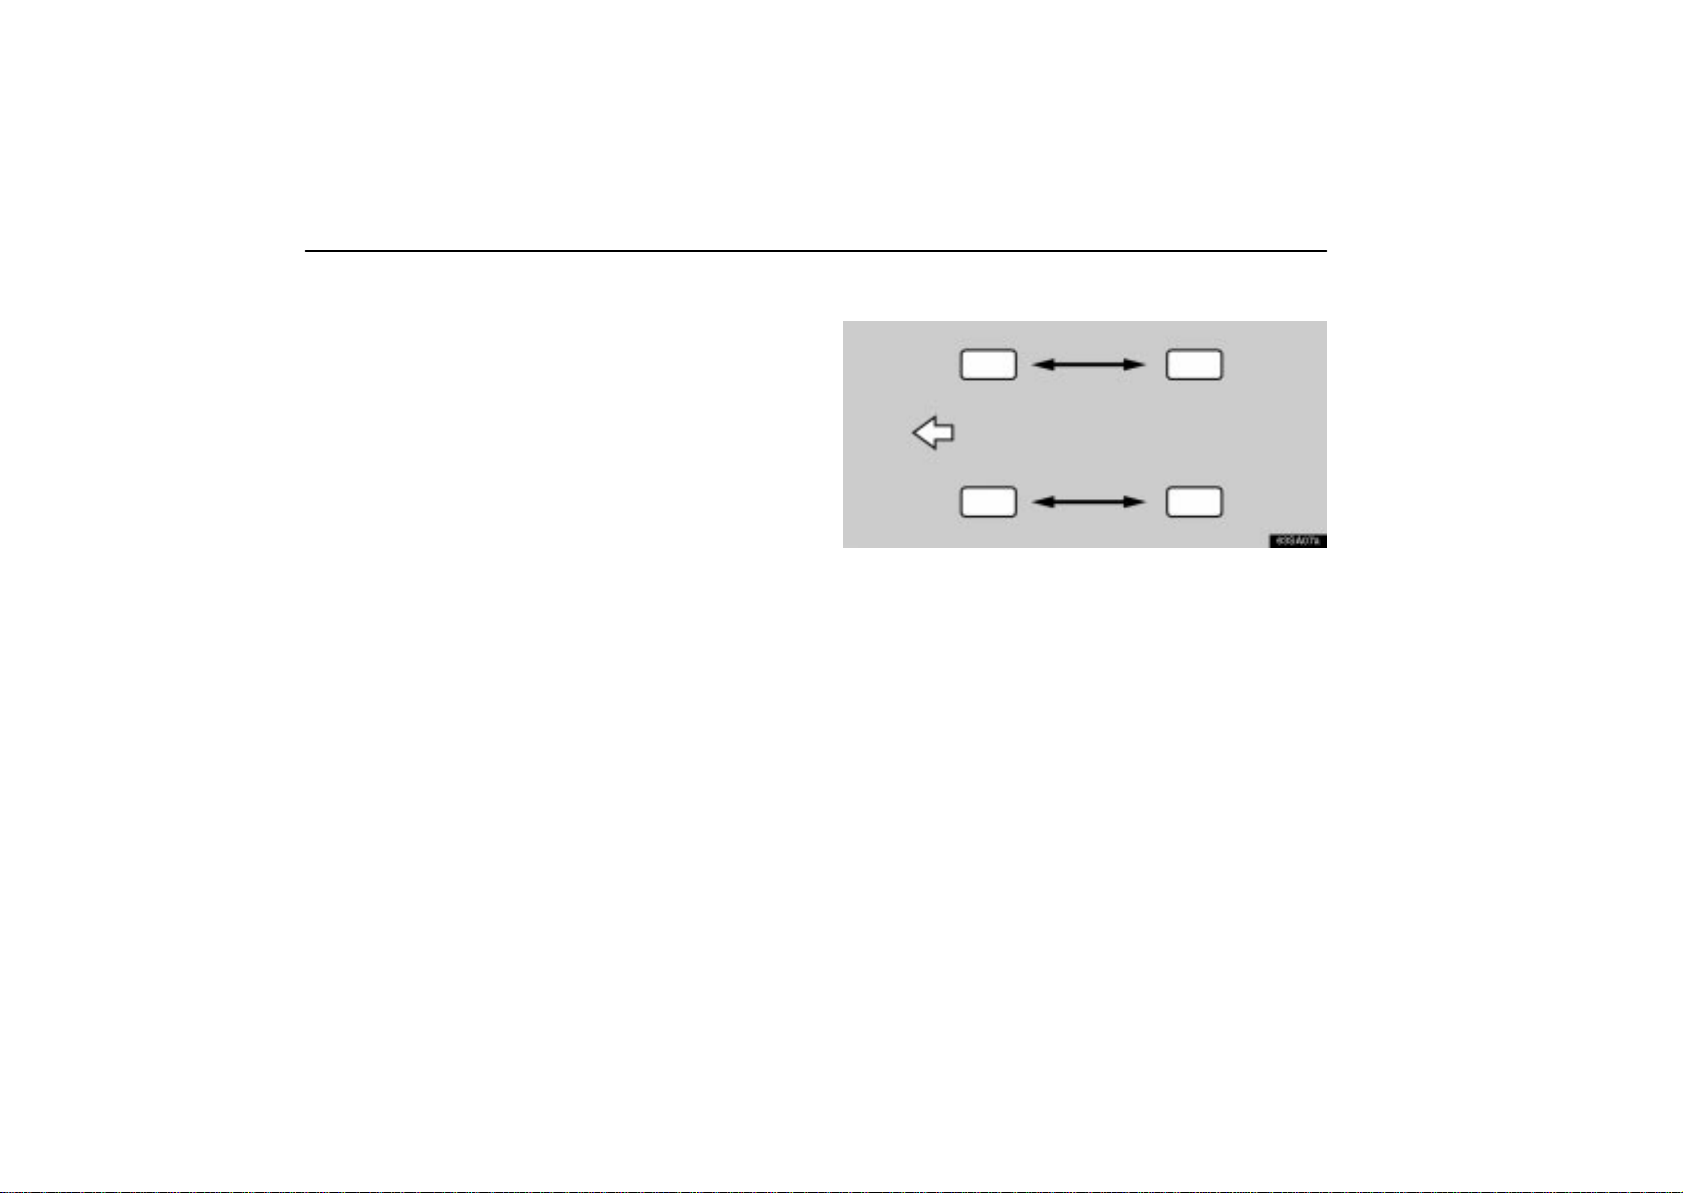
ROTATING TIRES
63sa07a
To equalize tire wear and help extend tire life, Lexus
recommends that you rotate your tires according to the
maintenance schedule. (For scheduled maintenance
information, please refer to the “Owner’s Manual
Supplement” or “Scheduled Maintenance”.) However, the
most appropriate timing for tire rotation may vary
according to your driving habits and road surface
conditions.
The wheel assemblies must be rotated as illustrated above.
When rotating tires, check for uneven wear and damage.
Abnormal wear is usually caused by incorrect tire pressure,
improper wheel alignment, out–of–balance wheels, or severe
braking.
310
Page 9
CHASSIS
Before storing radial, snow or studded tires, mark the direction
of rotation and be sure to install them in the same direction
when using them again. Tires should be stored in a cool dry
place.
CHECKING AND REPLACING TIRES
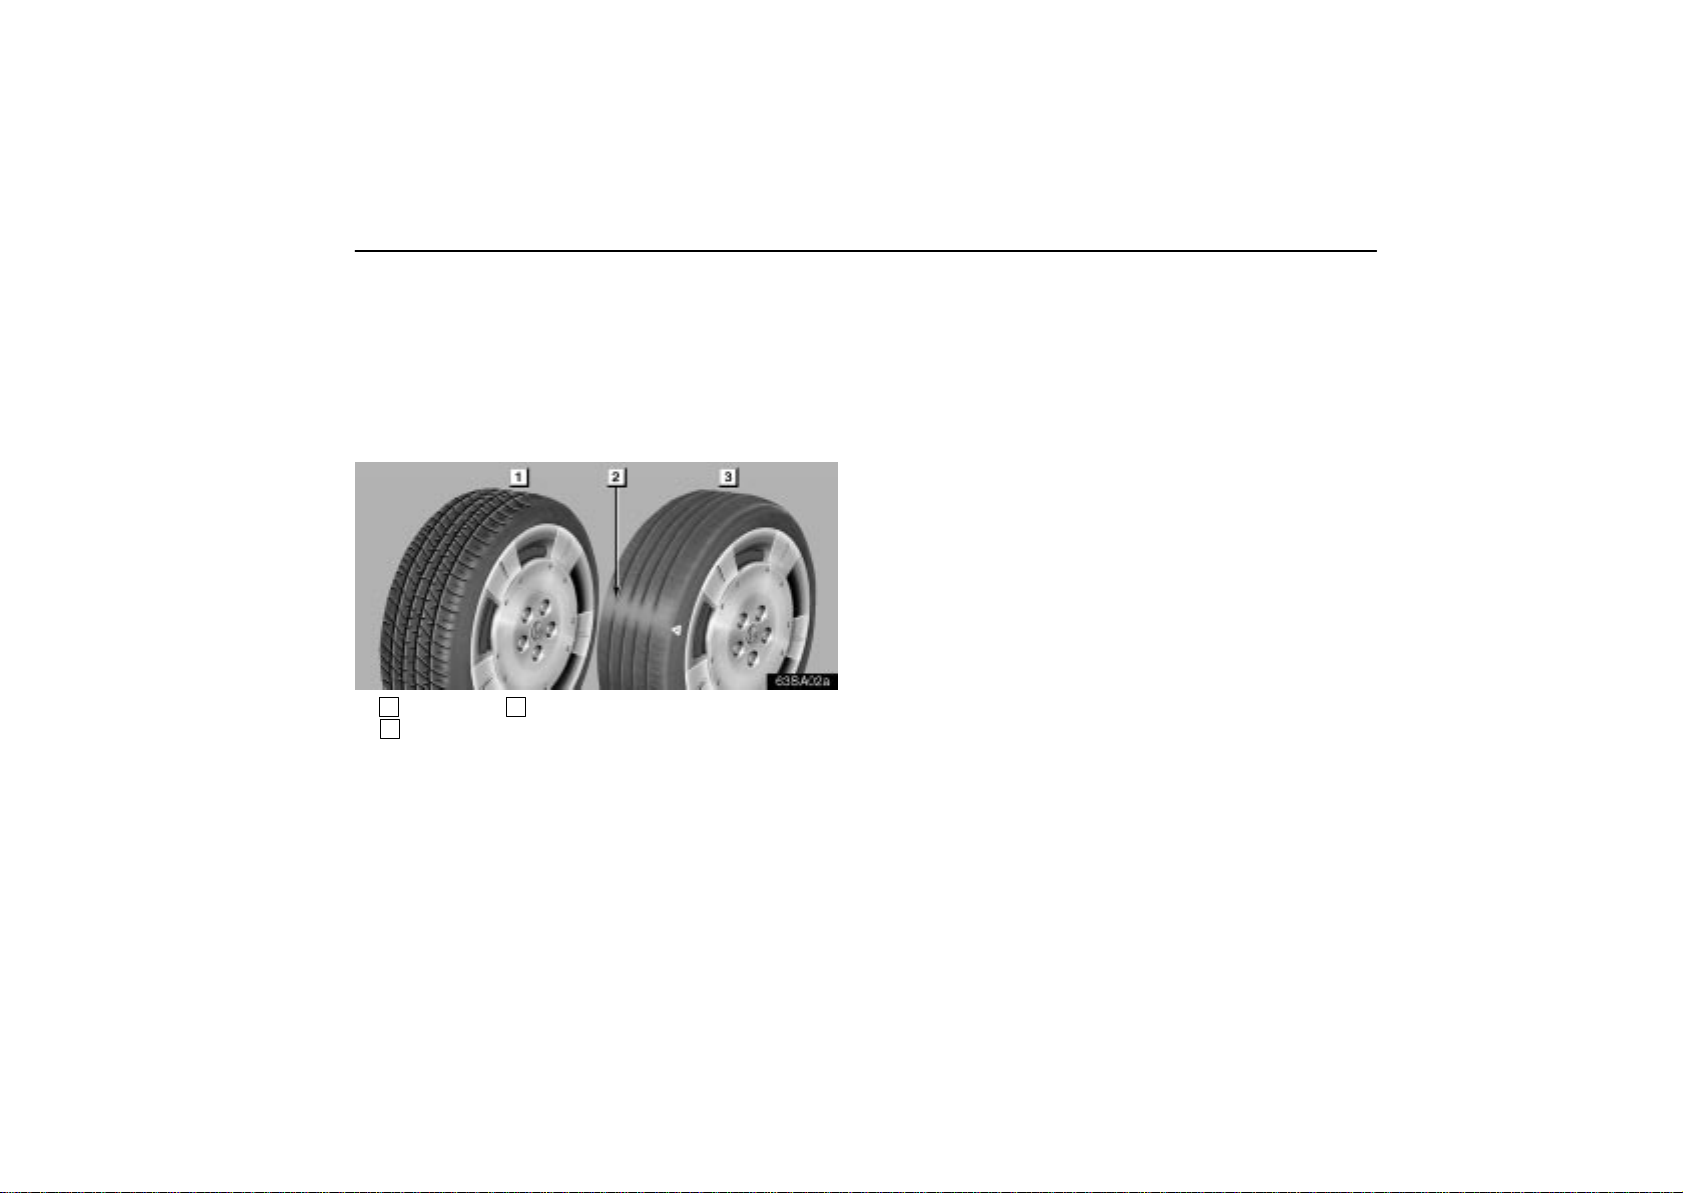
When to replace your tires
63sa02a
1
New tread 2Tread wear indicator
3
Worn tread
Replace the tires when the tread wear indicators show.
The location of the tread wear indicators is shown by the
“TWI” or “
∆” marks molded on the sidewall of each tire.
The tires on your Lexus have built–in tread wear indicators to
help you know when the tires need replacement. When the
tread depth wears to 1.6 mm (0.06 in.) or less, the indicators
will appear. If you can see the indicators in two or more
adjacent grooves, the tire should be replaced.
Your vehicle is equipped with 245/40ZR18 tires: Your
Lexus has been fitted with specially developed tires which
provide exceptional dynamic performance under general road
conditions. However your riding comfort may worsen a little
and road noise may increase during driving. Riding comfort
and road noise with the run–flat tires may be a little worse than
that with the standard tires. You may also notice that your tires
will wear more rapidly and tire grip performance will be reduced
on the snowy and/or icy roads when compared to high aspect
ratio tires, etc. Be sure to have snow tires or tire chains on the
snowy and/or icy roads and drive carefully with the speed
appropriate for road conditions.
311
Page 10

CHASSIS
NOTICE
Low profile tire like 245/40ZR18 may have greater
damage than usual tires to its tire wheel when receiving
impact from the road surface. Therefore, pay attention
to the following.
Be sure to use with proper tire pressure. If the tire
pressure is low, the tire may have greater damage.
For detailed information about tire pressure, see
page 306 or 309.
Avoid driving onto high, sharp–edged objects and
other road hazards. Failure to do so can lead to
severe tire damage.
The effectiveness of snow tires is lost if the tread wears
down below 4 mm (0.16 in.).
If you have tire damage such as cuts, splits, cracks deep
enough to expose the fabric, or bulges indicating internal
damage, the tire should be replaced.
If a tire often goes flat or cannot be properly repaired due to the
size or location of a cut or other damage, it should be replaced.
If you are not sure, consult with your Lexus dealer.
If an air loss occurs while driving, do not continue driving with
a deflated tire. Driving even a short distance can damage a tire
beyond repair.
Any tires which are over 6 years old must be checked by
a qualified technician even if damage is not obvious.
Tires deteriorate with age even if they have never or seldom
been used.
This also applies to the spare tire and tires stored for future
use.
NOTICE
When you purchase new tires, consult your Lexus
dealer. If you change from run–flat tires to standard
tires, a spare tire should also be purchased.
When the tires must be repaired or replaced, have
them repaired or replaced by Lexus dealer or
authorized dealer. The tire pressure sensors will be
affected by the installation or removal of tires.
When the tires must be replaced, replace the
grommets for air pressure sensors as well.
312
Page 11

CHASSIS
Uniform tire quality grading
This information has been prepared in accordance with
regulations issued by the National Highway Traffic Safety
Administration of the U.S. Department of Transportation.
It provides the purchasers and/or prospective purchasers
of Lexus vehicles with information on uniform tire quality
grading.
Your Lexus dealer will help answer any questions you may
have as you read this information.
DOT quality grades – All passenger vehicle tires must
conform to Federal Safety Requirements in addition to
these grades. Quality grades can be found where
applicable on the tire sidewall between tread shoulder and
maximum section width. For example: Treadwear 200
Traction AA Temperature A
Tread wear – The treadwear grade is a comparative rating
based on the wear rate of the tire when tested under controlled
conditions on a specified government test course. For
example, a tire graded 150 would wear one and a half (1 – 1/2)
times as well on the government course as a tire graded 100.
The relative performance of tires depends upon the actual
conditions of their use, however, and may depart significantly
from the norm due to variations in driving habits, service
practices and differences in road characteristics and climate.
Traction AA, A, B, C – The traction grades, from highest to
lowest, are AA, A, B and C, and they represent the tire’ s ability
to stop on wet pavement as measured under controlled
conditions on specified government test surfaces of asphalt
and concrete. A tire marked C may have poor traction
performance.
Warning: The traction grade assigned to this tire is based on
braking (straight ahead) traction tests and does not include
cornering (turning) traction.
Temperature A, B, C – The temperature grades are A (the
highest), B, and C, representing the tire’s resistance to the
generation of heat and its ability to dissipate heat when tested
under controlled conditions on a specified indoor laboratory
test wheel. Sustained high temperature can cause the
material of the tire to degenerate and reduce tire life, and
excessive temperature can lead to sudden tire failure. The
grade C corresponds to a level of performance which all
passenger car tires must meet under the Federal Motor
Vehicle Safety Standard No. 109. Grades B and A represent
higher levels of performance on the laboratory test wheel than
the minimum required by law.
Warning: The temperature grades for this tire are established
for a tire that is properly inflated and not overloaded.
Excessive speed, underinflation, or excessive loading, either
separately or in combination, can cause heat buildup and
possible tire failure.
313
Page 12

CHASSIS
Tire selection
When replacing a tire, use only the same size and
construction as originally installed and with the same or
greater load capacity.
Using any other size or type of tire may seriously affect
handling, ride, speedometer/odometer calibration, ground
clearance, and clearance between the body and tires or snow
chains.
Do not mix radial, belted, or conventional tires on your
vehicle.
Do not mix run–flat tires or standard tires on your vehicle.
Do not use tires or wheels other than the manufacturer’s
recommended size.
It can cause dangerous handling characteristics, resulting in
loss of control. If you need to change from conventional tires
to radial tires or vice versa, replace them as a set.
INSTALLING SNOW TIRES AND
CHAINS
When to use snow tires or chains
Snow tires or chains are recommended when driving on
snow or ice.
On wet or dry road, conventional or radial tires provide better
traction than snow or studded tires.
Snow tire selection
If you need snow tires, select the same size, construction
and load capacity as the original tires on your Lexus.
Do not use tires other than stated above. Since your vehicle
has radial tires as original equipment, make sure your snow
tires also have radial construction. Do not install studded tires
without first checking local regulations for possible restrictions.
Snow tire installation
Snow tires should be installed on all wheels.
Installing snow tires on the rear wheels only can lead to an
excessive difference in road grip capability between the front
and rear tires which could cause loss of vehicle control.
314
Page 13
CHASSIS
CAUTION
Do not drive with the snow tires incorrectly inflated.
Never drive over 120 km/h (75 mph) with any type of
snow tires.
Tire chain selection
Regulations regarding the use of tire chains vary
according to location or type of road. Always check the
local regulations before installing chains.
Use SAE Class ”S” type radial tire chains, with the exception
of radial cable chains or V–bar type chains.
Chain installation
Install the chains on the rear tires as tightly as possible.
Do not use tire chains on the front tires. Retighten chains
after driving 0.5 – 1.0 km (1/4 – 1/2 mile).
When installing chains on your tires, carefully follow the
instructions of the chain manufacturer.
NOTICE
When the snow tires must be repaired or replaced,
have them repaired or replaced by Lexus dealer or
authorized tire dealer. The tire pressure sensor will
be affected by the installation or removal of snow
tires.
When the snow tires must be replaced, replace the
grommets for air pressure sensors as well.
Do not attempt to use a tire chain on the compact
spare tire , a s i t may result in damage to the vehicle as
well as the tire.
INFORMATION
If the chains are installed, the air pressure warning
system may not operate properly.
CAUTION
Do not exceed 50 km/h (30 mph) or the chain
manufacturer’s recommended speed limit,
whichever is lower.
Drive carefully avoiding bumps, holes, and sharp
turns, which may cause the vehicle to bounce.
Avoid sharp turns or locked–wheel braking, as use of
chains may adversely affect vehicle handling.
315
Page 14
CHASSIS
When driving with chains installed, be sure to drive
carefully. Slow down before entering the curves to
avoid losing control of the vehicle. Otherwise an
accident may occur.
REPLACING WHEELS
As you might have difficulty in locating a flat or deflated
tire, a tire pressure warning system should be provided on
the tires of this vehicle.
When replacing the wheels, be sure to install air pressure
sensors on the wheels.
There are 2 ways to set up the air pressure sensors.
a. Remove the sensor from the old wheel and install it to the
new wheel.
b. Use a new wheel and sensor.
You have to register an ID code for a new sensor. Up to 2
sets of codes can be registered. As one ID for the originally
installed sensor is registered at “MAIN” of the selector
switch, use the “2nd” position to register an ID for the new
sensor.
You do not need to re–register the ID code for any other
replacements. For the use of the originally installed tires,
put the selector switch at “MAIN” and for the use of tires
purchased later, put the switch at “2nd”. For the sensor
selector switch, see page 224.
CAUTION
Have the tires, wheels or sensors replaced and ID
codes registered by Lexus dealer. If you need
sensors, purchase from Lexus dealer.
The use of non–genuine wheels will cause the air
pressure sensor to transmit the electronic code in
different manner, resulting in the failure of the
system.
When to replace your wheels
If you have wheel damage such as bending, cracks or
heavy corrosion, the wheel should be replaced.
If you fail to replace damaged wheels, the tire may slip off the
wheel or cause loss of handling control.
Replacement with used wheels is not recommended as they
may have been subjected to rough treatment or high mileage
and could fail without warning. Also, bent wheels which have
been straightened may have hidden structural damage and
therefore should not be used. Never use an inner tube in a
leaking wheel which is designed for a tubeless tire.
316
Page 15

CHASSIS
Wheel selection
When replacing wheels, care should be taken to ensure
that they are equivalent to those removed in load capacity,
diameter, rim width, and offset.
Correct replacement wheels are available at your Lexus
dealer.
A wheel of a different size or type may adversely affect
handling, wheel and bearing life, brake cooling,
speedometer/odometer calibration, stopping ability, headlight
aim, bumper height, vehicle ground clearance, and tire or snow
chain clearance to the body and chassis.
ALUMINUM WHEEL PRECAUTIONS
When installing aluminum wheels, check that the wheel
nuts are tight after driving your vehicle the first 1600 km
(1000 miles).
If you have rotated, repaired, or changed your tires, check
that the wheel nuts are still tight after driving 1600 km (1000
miles).
When using tire chains, be careful not to damage the
aluminum wheels.
Use only the Lexus wheel nuts and wrench designed for
your aluminum wheels.
When balancing your wheels, use only Lexus balance
weights or equivalent and a plastic or rubber hammer.
As with any wheel, periodically check your aluminum
wheels for damage. If damaged, replace immediately.
317
Page 16
CHASSIS
SUSPENSION AND CHASSIS
CAUTION
Do not modify the suspension/chassis with lift kits,
spacers, springs, etc. It can cause dangerous handling
characteristics, resulting in loss of control.
318
Page 17

SECTION 7
REPORTING SAFETY DEFECTS
FOR U.S. OWNERS
Reporting safety defects for U.S. owners 345. . . . . . . . . . . . . . . . . . . .
344
Page 18

REPORTING SAFETY DEFECTS
FOR U.S. OWNERS
If you believe that your vehicle has a defect which
could cause a crash or could cause injury or death,
you should immediately inform the National
Highway Traffic Safety Administration (NHTSA) in
addition to notifying Toyota Motor Sales, U.S.A.,
Inc. (Toll–free: 1–800–25–LEXUS).
If NHTSA receives similar complaints, it may open
an investigation, and if it finds that a safety defect
exists in a group of vehicles, it may order a recall
and remedy campaign. However, NHTSA cannot
become involved in individual problems between
you, your dealer, or Toyota Motor Sales, U.S.A.,
Inc.
To contact NHTSA, you may either call the Auto
Safety Hotline toll–free at 1–800–424–9393 (or
366–0123 in Washington, D.C. area) or write to:
NHTSA, U.S. Department of Transportation,
Washington, D.C. 20590. You can also obtain
other information about motor vehicle safety from
the Hotline.
KEYS AND DOORS
345
Page 19

SECTION 6 –
SERVICE PROCEDURES AND
SPECIFICATIONS
Body
Specifications 337. . . . . . . . . . . . . . . . . . . . . . . . . . . . . . . . . . . . . . . . . . .
Protecting your vehicle from corrosion 338. . . . . . . . . . . . . . . . . . . . . .
Washing and waxing 339. . . . . . . . . . . . . . . . . . . . . . . . . . . . . . . . . . . . .
Cleaning the interior 341. . . . . . . . . . . . . . . . . . . . . . . . . . . . . . . . . . . . . .
5
336
Page 20
SPECIFICATIONS
– DIMENSIONS AND WEIGHT
BODY
Overall length
Overall width
Overall height
Wheelbase
Tread – Front
– Rear
Vehicle capacity weight (occupants + luggage)
*: Unladen vehicle
– FUEL TANK
Capacity
4515 mm (177.8 in.)
1825 mm (71.9 in.)
1350 mm (53.1 in.)*
2620 mm (103.1 in.)
1550 mm (61.0 in.)
1535 mm (60.4 in.)
295 kg (645 lb.)
75 L (19.8 gal., 16.5 lmp.gal.)
337
Page 21

BODY
PROTECTING YOUR VEHICLE
FROM CORROSION
Proper care of your Lexus can help ensure long–term
corrosion prevention.
The most common causes of corrosion to your vehicle
are:
The accumulation of road salt, dirt and moisture in
hard–to–reach areas under the vehicle.
Chipping of paint or undercoating caused by minor
accidents or by stones and gravel.
The following conditions will cause or accelerate
corrosion of your vehicle, so it is important to keep your
vehicle, particularly the underside, as clean as possible
and to repair any damage to paint or protective coatings
as soon as possible.
The presence of road salt or dust control chemicals, salt in
the air near the sea coast, industrial air pollution.
High humidity, especially at temperatures just above
freezing point.
Certain parts of your vehicle are wet or damp for an
extended period of time, even though other parts of the
vehicle are dry.
Components of the vehicle which are prevented from
quick–drying due to lack of proper ventilation are exposed
to high ambient temperature.
To help prevent corrosion on your Lexus, follow these
guidelines:
Keep your vehicle clean by regular washing. In addition,
observe the following points.
If you drive on salted roads in the winter or if you live near
the ocean, you should hose off the undercarriage at least
once a month to minimize corrosion.
High pressure water or steam is effective for cleaning the
vehicle’s underside and wheel housings. Pay particular
attention to these areas as it is dif ficult to see all the mud and
dirt. It will do more harm than good to simply wet the mud
and debris without removing them. The lower edge of
doors, rocker panels and frame members have drain holes
which should not be allowed to clog with dirt as trapped
water in these areas can cause corrosion.
Wash the underside of the vehicle thoroughly when winter
is over.
See ”Washing and waxing” on page 339 for more tips.
Check the condition of your vehicle’s paint and trim. If you
find any chips or scratches in the paint, touch them up
immediately to prevent corrosion from starting. If the chips or
scratches have gone through the bare metal, have a qualified
body shop make the repair.
338
Page 22

BODY
Check the interior of your vehicle. Water and dirt can
accumulate under the floor mats and could cause corrosion.
Occasionally check under the mats to make sure the area is
dry. Be particularly careful when transporting chemicals,
cleansers, fertilizers, salt, etc. These should be transported in
proper containers. If a spill or leak should occur, immediately
clean and dry the area.
Keep your vehicle in a well ventilated garage or a roofed
place. Do not park your vehicle in a damp, poorly
ventilated garage. If you wash your vehicle in the garage, or
if you drive it in covered with water or snow, your garage may
be so damp it will cause corrosion. Even if your garage is
heated, a wet vehicle can corrode if the ventilation is poor.
WASHING AND WAXING
Washing your Lexus
Keep your vehicle clean by regular washing.
The following cases may cause weakness to the paint or
corrosion to the body and parts. Wash your vehicle as soon
as possible.
When driving in a coastal area
When driving on a road sprinkled with antifreeze
When having stuck of coal tar, tree sap, bird droppings and
carcass of an insect
When driving in the areas where there is a lot of smoke,
soot, dust, iron dust and chemical substance
When the vehicle becomes remarkably dirty with dust and
mud
339
Page 23
BODY
Hand–washing your Lexus
Work in the shade and wait until the vehicle body is not hot
to the touch.
1. Rinse off loose dirt with a hose. Remove any mud or road
salt from the underside of the vehicle or in the wheel wells.
2. Wash with a mild car–wash soap, mixed according to the
manufacturer’s instructions. Use a soft cotton mitt and keep
it wet by dipping it frequently into the wash water. Do not rub
hard – let the soap and water remove the dirt.
65sa01
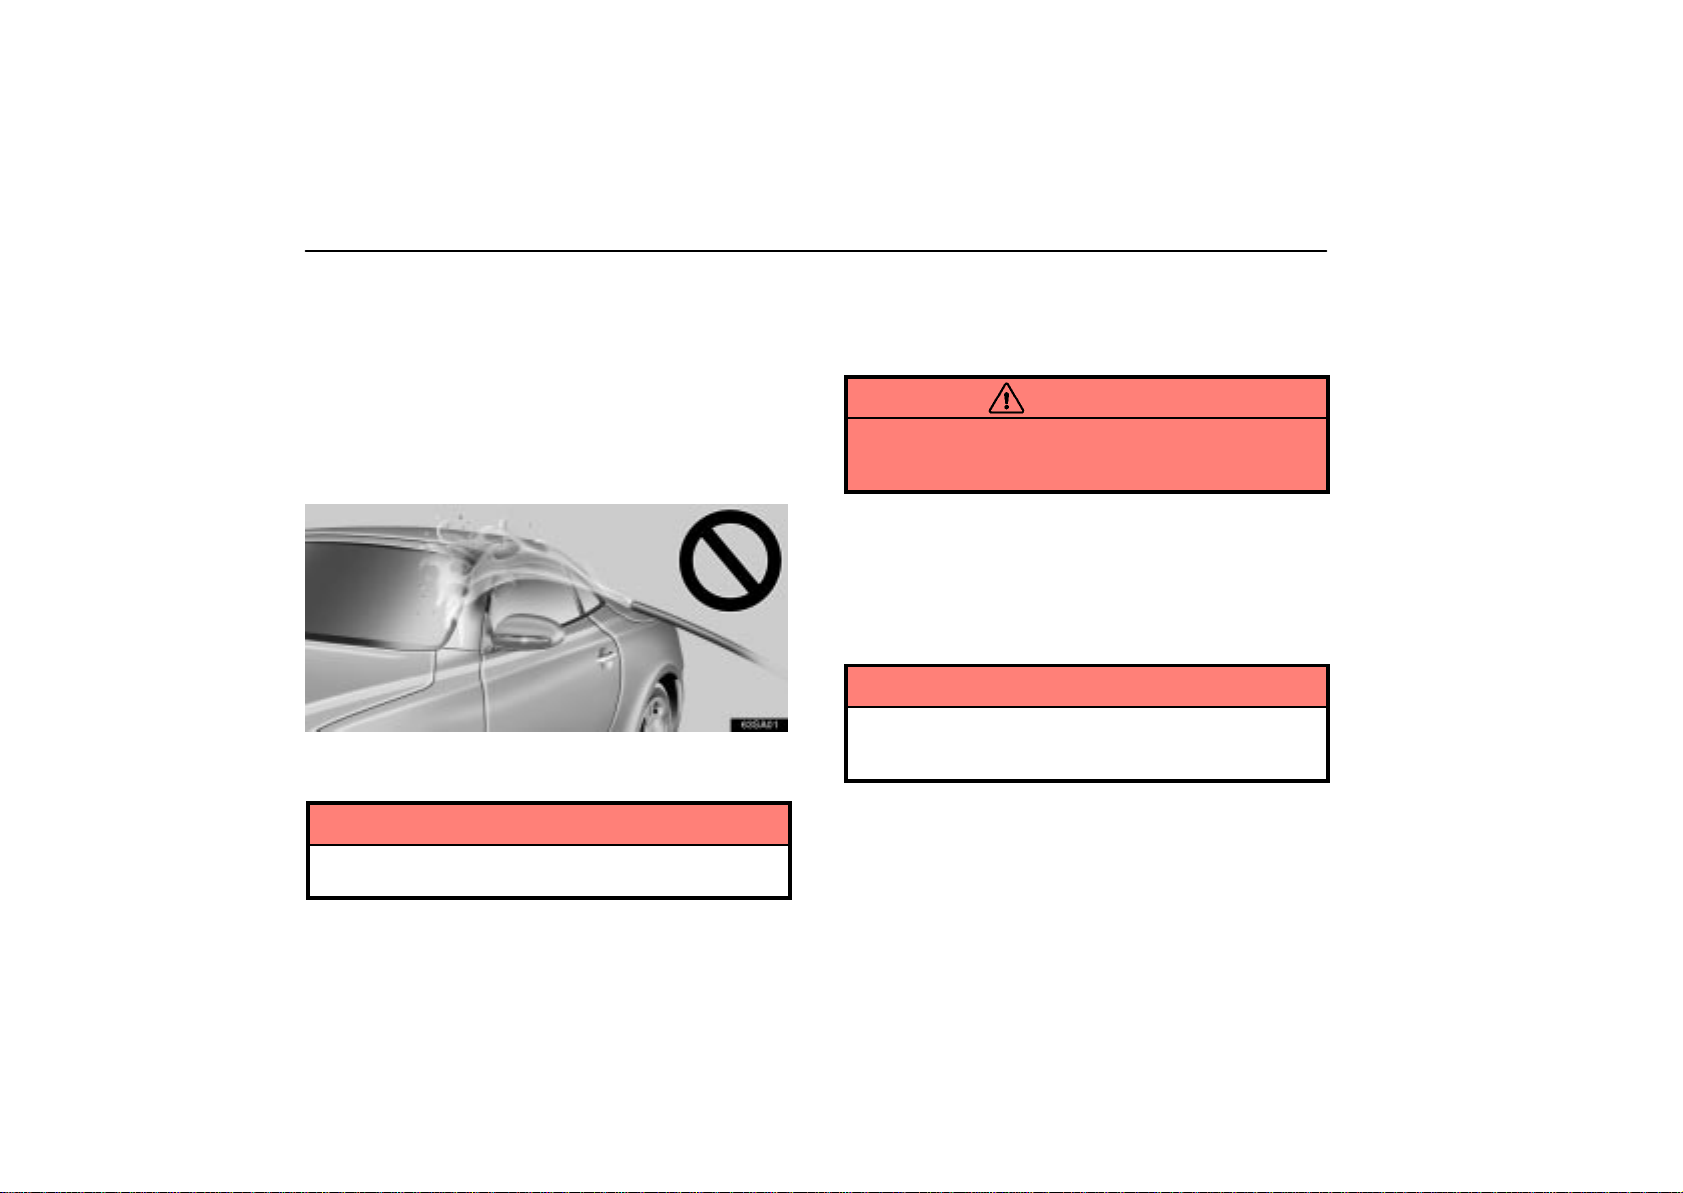
Spray water on the side windows or top seals from above, at
a 45 angle to the ground.
NOTICE
Do not spray water at side windows and top seals in a
way which may cause water to enter the vehicle.
Plastic wheel ornaments: The plastic wheel ornaments are
damaged easily by organic substances. If any organic
substance splashes an ornament, be sure to wash it off with
water and check if the ornament is damaged.
CAUTION
Do not attach the heavily damaged plastic wheel
ornament. It may fly off the wheel and cause accidents
while the vehicle is moving.
Aluminum wheels: Use only a mild soap or neutral detergent.
Urethane bumpers and side moldings: Wash carefully. Do
not scrub with abrasive cleaners. The bumper and side
molding faces are soft.
Road tar: Remove with turpentine or cleaners that are marked
safe for painted surfaces.
NOTICE
Do not use organic substances (gasoline, kerosene,
benzine or strong solvents), which may be toxic or
cause damage.
3. Rinse thoroughly – dried soap can cause streaking. In hot
weather you may need to rinse each section right after you
wash it.
4. To prevent water spots, dry the vehicle using a clean soft
cotton towel. Do not rub or press hard – you might scratch the
paint.
340
Page 24
BODY
Automatic car wash
NOTICE
To prevent damage to the antenna, make sure it is
retracted before driving your vehicle through an
automatic car wash.
Your vehicle may be washed in an automatic car wash, but
remember that the paint can be scratched by some type of
brushes, unfiltered washing water, or the washing process
itself. Scratching reduces paint durability and gloss, especially
on darker colors. The manager of the car wash should be able
to advise you whether the process is safe for the paint on your
vehicle.
Waxing your Lexus
Polishing and waxing is recommended to maintain the
original beauty of your Lexus’ finish.
Once a month or if the vehicle surface does not repel water
well, apply wax.
1. Always wash and dry the vehicle before you begin waxing,
even if you are using a combined cleaner and wax.
2. Use a good quality polish and wax. If the finish has become
extremely weathered, use a car–cleaning polish, followed by
a separate wax. Carefully follow the manufacturer’s
instructions and precautions. Be sure to polish and wax the
chrome trim as well as the paint.
3. Wax the vehicle again when water does not bead but
remains on the surface in large patches.
CLEANING THE INTERIOR
CAUTION
Be careful not to splash water or spill liquid on the
floor. This may prevent the side airbags from
activating correctly, resulting in serious injury.
Do not wash the vehicle floor with water, or allow
water to get onto the floor when cleaning the vehicle
interior or exterior. Water may get into audio
components or other electrical components above or
under the floor carpet (or mat) and cause a
malfunction; and it may cause body corrosion.
Leather Interior
The selected leather is used in your Lexus. Due to a leather
product, some parts of leather may be rough, uneven or
scratched originally.
To keep good appearance, we recommend you to clean it
periodically twice a year.
Remove dirt on the leather in the following ways:
1. Wipe it off lightly using a soft cloth (e.g. gauze) dampened
with 5% solution of neutral detergent for wool.
2. Wring water from a clean cloth and thoroughly wipe off all
traces of detergent with it.
341
Page 25

BODY
3. Wipe of f the surface of the leather with a dry soft cloth. Allow
the leather to dry in a ventilated shaded area. Excess of wet
may cause the hardening or shrinking of the leather.
NOTICE
Dirt or sand adhered to the leather may damage the
treated surface and cause it to wear earlier. Remove
dirt or sand using a vacuum cleaner.
If a stain should fail to come out with a neutral
detergent, apply a cleaner that does not contain an
organic solvent.
Never use organic substances such as benzine,
alcohol or gasoline, or alkaline or acid solutions for
cleaning the leather as these could cause
discoloring.
Use of a nylon brush or synthetic fiber cloth, etc. may
scratch the fine grained surface of the leather.
Mildew may develop on soiled leather upholstery. Be
especially careful to avoid oil spots. T ry to keep your
upholstery always clean.
Long exposure to direct sunlight may cause the
leather surface to harden and shrink. Keep your
vehicle in a shaded area, especially in the summer.
The interior of your vehicle is apt to heat up on hot
summer days, so avoid placing on the upholstery
items made of vinyl or plastic or containing wax as
these tend to stick to leather when warm.
Improper cleaning of the leather upholstery could
result in discoloration or staining.
Carpets, Windows and Seat Belts
Begin by vacuuming thoroughly to remove as much dirt as
possible. Several types of foam cleaners are available; some
are in aerosol cans and others are powders or liquids which
you mix with water to produce a foam. To shampoo the
carpets, use a sponge or brush to apply the foam. Rub in
overlapping circles. Do not apply water – the best results are
obtained by keeping the carpet as dry as possible. Read the
shampoo instructions and follow them closely.
The seat belts may be cleaned with mild soap and water
or with lukewarm water.
Use a cloth or sponge. As you are cleaning, check the belts
for excessive wear, fraying or cuts.
NOTICE
Use a good foam–type shampoo to clean the carpets.
Do not use dye or bleach on the belts – it may weaken
them.
Do not use the belts until they become dry.
The windows may be cleaned with any household
window cleaner.
When cleaning the inside of the rear window, be
careful not to scratch or damage the heater wires.
342
Page 26

Air Conditioning Control Panel, Car Audio,
Instrument Panel, Console Panel, and
Switches
Use a soft damp cloth for cleaning.
Soak a clean soft cloth in water or lukewarm water then lightly
wipe off any dirt.
NOTICE
Do not use organic substances (solvents, kerosene,
alcohol, gasoline, etc.) or alkaline or acidic solutions.
These chemicals can cause discoloring, staining or
peeling of the surface.
If you use cleaners or polishing agents, make sure
their ingredients do not include the substances
mentioned above.
If you use a liquid car freshener, do not spill the liquid
onto the vehicle’s interior surfaces. It may contain
the ingredients mentioned above. Immediately clean
any spill using the method mentioned above.
The displays of air conditioning control panel and car
audio are coated to avoid reflection. If the display
becomes dirty, do not use chemicals and detergent.
Wipe it off with a dry cloth.
BODY
If you have any questions about the cleaning of your
Lexus, your local Lexus dealer will be pleased to answer
them.
343
Page 27

SECTION 6 –
SERVICE PROCEDURES AND
SPECIFICATIONS
Electrical components
Specifications 320. . . . . . . . . . . . . . . . . . . . . . . . . . . . . . . . . . . . . . . . . . .
Checking battery condition 324. . . . . . . . . . . . . . . . . . . . . . . . . . . . . . . .
Battery recharging precautions 326. . . . . . . . . . . . . . . . . . . . . . . . . . . .
Checking and replacing the blade type fuses 327. . . . . . . . . . . . . . . .
Checking the cartridge type fuses 329. . . . . . . . . . . . . . . . . . . . . . . . . .
Adding washer fluid 330. . . . . . . . . . . . . . . . . . . . . . . . . . . . . . . . . . . . . .
Checking the headlight aim 331. . . . . . . . . . . . . . . . . . . . . . . . . . . . . . . .
Replacing light bulbs 333. . . . . . . . . . . . . . . . . . . . . . . . . . . . . . . . . . . . .
4
319
Page 28
ELECTRICAL COMPONENTS
SPECIFICATIONS
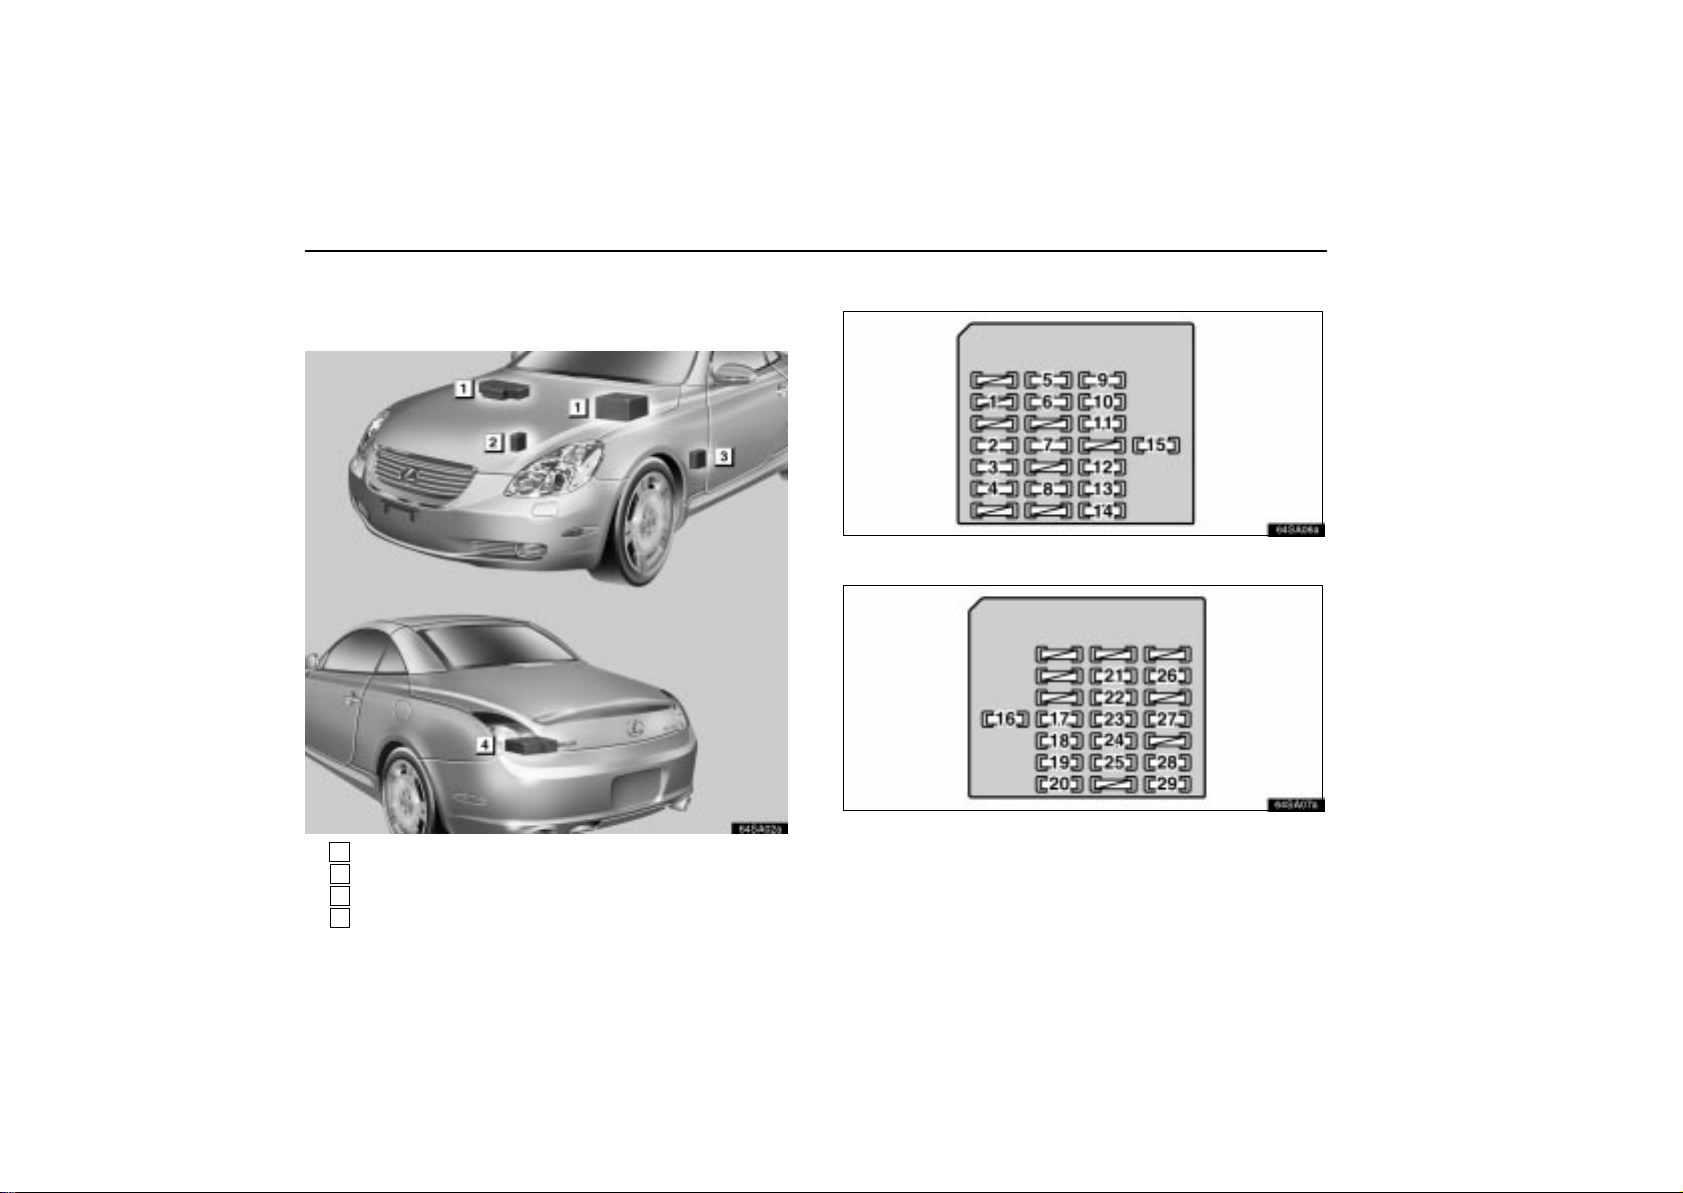
–LOCATION OF FUSES
1
Engine compartment
2
Passenger’s side kick panel
3
Driver’s side kick panel
4
Trunk
320
64sa02a
– FUSES
64sa06a
Driver’s side kick panel
64sa07a
Passenger’s side kick panel
Page 29
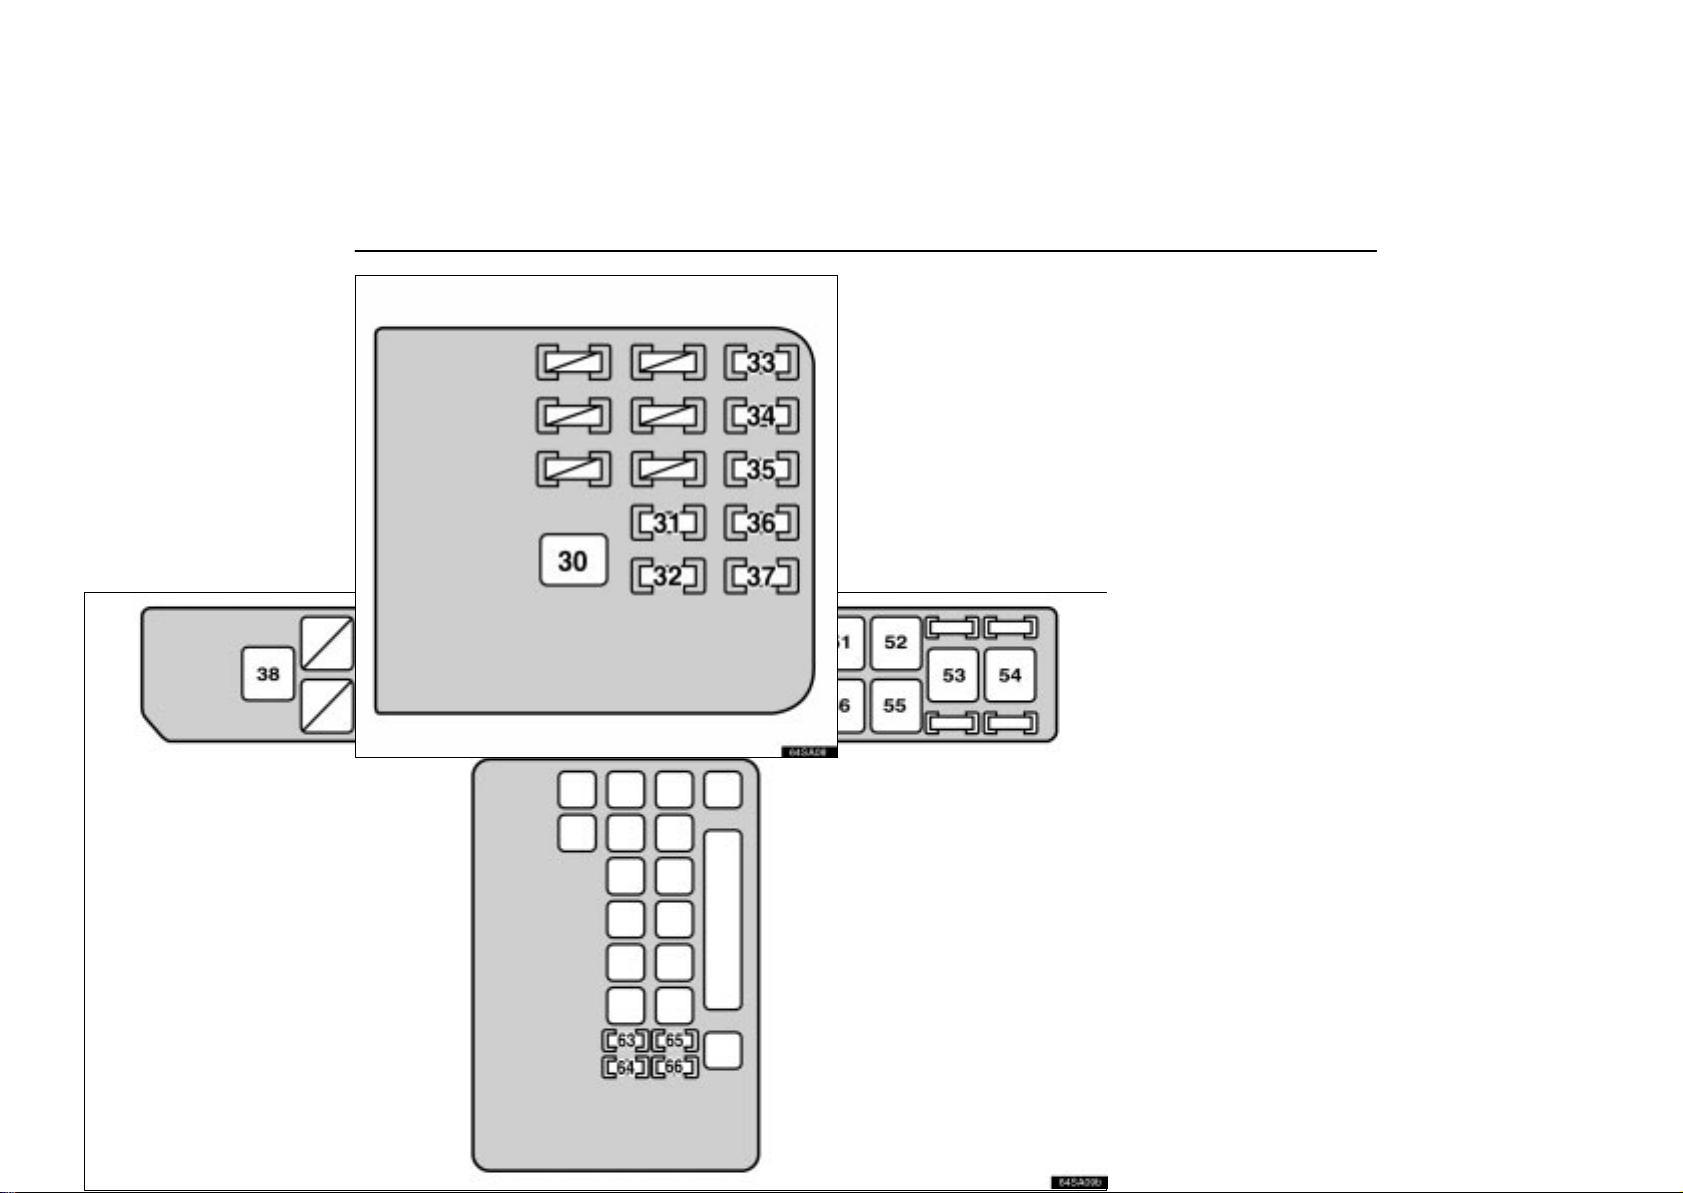
ELECTRICAL COMPONENTS
64sa08
Trunk
Engine compartment
64sa09b
321
Page 30
ELECTRICAL COMPONENTS
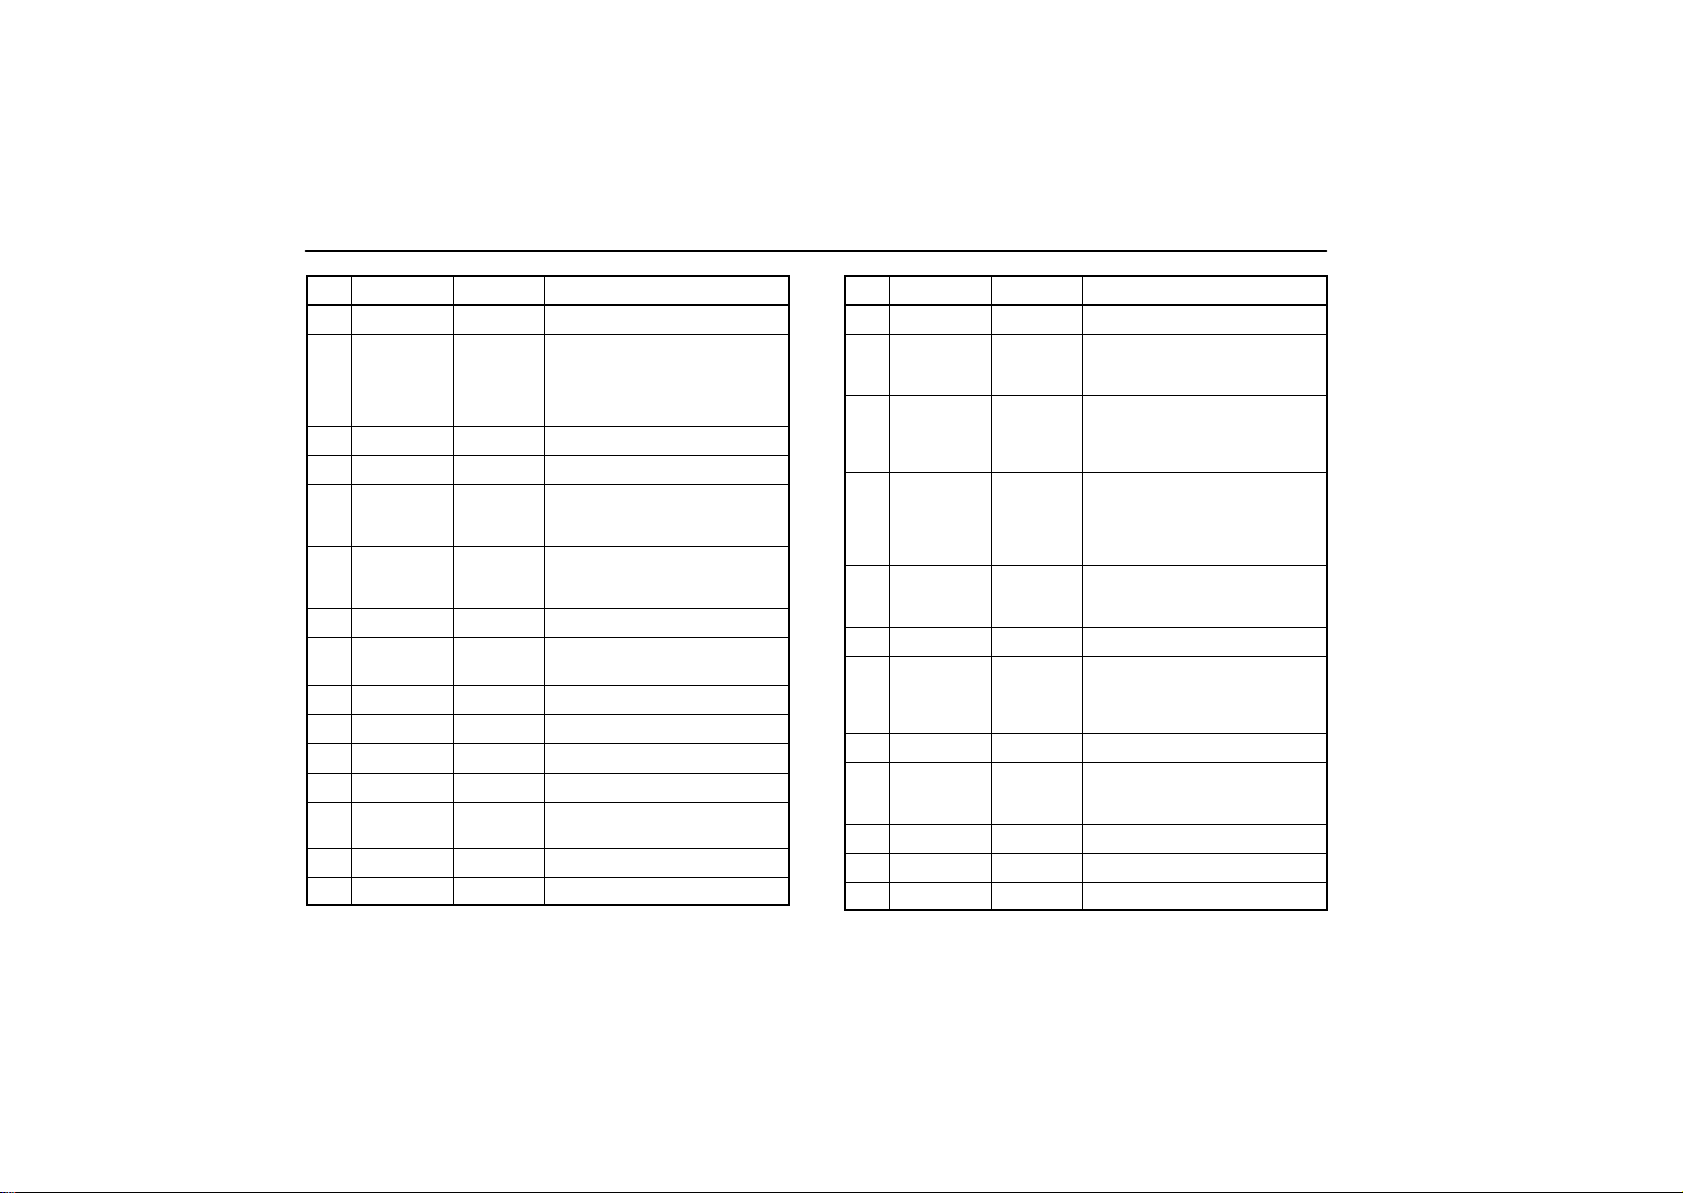
No. FUSE AMPERE CIRCUIT
1 TI & TE 15 Tilt and telescopic steering
Air conditioning system, Audio
2 PANEL 5
3 FR FOG 15 Fog lights, Headlight switch
4 D P/SEAT 30 Power seat system
5 D–IG 10
6 MPX–IG 7.5
7 WIPER 30 Windshield wiper
8
9 OBD 7.5 On–board diagnosis system
10 AM1 5 Power source
11 ABS–IG 7.5 Vehicle skid control system
12 SECURITY 7.5 Theft deterrent system
13 TAIL 7.5
14 STOP 5 Stop lights
15 HEATER 10 Air conditioning system
PWR
OUTLET
15
system, Glove box light,
Trip–information display,
Cigarette lighter, Electronic
throttle control system
Gauges and meters, Headlight
cleaner, Charging system, Seat
belt pretensioner system
Tilt and telescopic steering,
Power door lock system, SRS,
Power seat system
Power outlet
Tail lights, Side marker lights,
Parking lights, Headlight switch
No. FUSE AMPERE CIRCUIT
16 IG2 7.5 SRS
Power door lock, Steering lock,
17 MPX–B1 7.5
18 MPX–B3 7.5
19 DOME 7.5
20 MPX–B2 7.5
21 H–LP LVL 5 Headlight leveling system
22 P–IG 10
23 SEAT HTR 20 Seat heater
24
25 CIG 15 Cigarette lighter
26 WASHER 20 Windshield washer
27 A/C 5 Air conditioning system
RADIO
NO.2
10
Engine immobiliser, Power seat
system, Retractable hardtop
Tilt and telescopic steering,
Headlight switch, Windshield
wiper and washer switch, Turn
signal switch
Interior light, Personal lights,
Vanity lights, Foot lights, Ignition
switch light, Trunk light,
Antenna, Garage door opener
system, Audio system
Gauges and meters, Vehicle
skid control system, Tire
pressure warning system
Shift lock system, Seat heater,
Trip–information display,
Antenna, Inside rear view
mirror, Theft deterrent system
Audio system, Trip–information
display, Seat belt warning light,
Shift lock system
322
Page 31
ELECTRICAL COMPONENTS
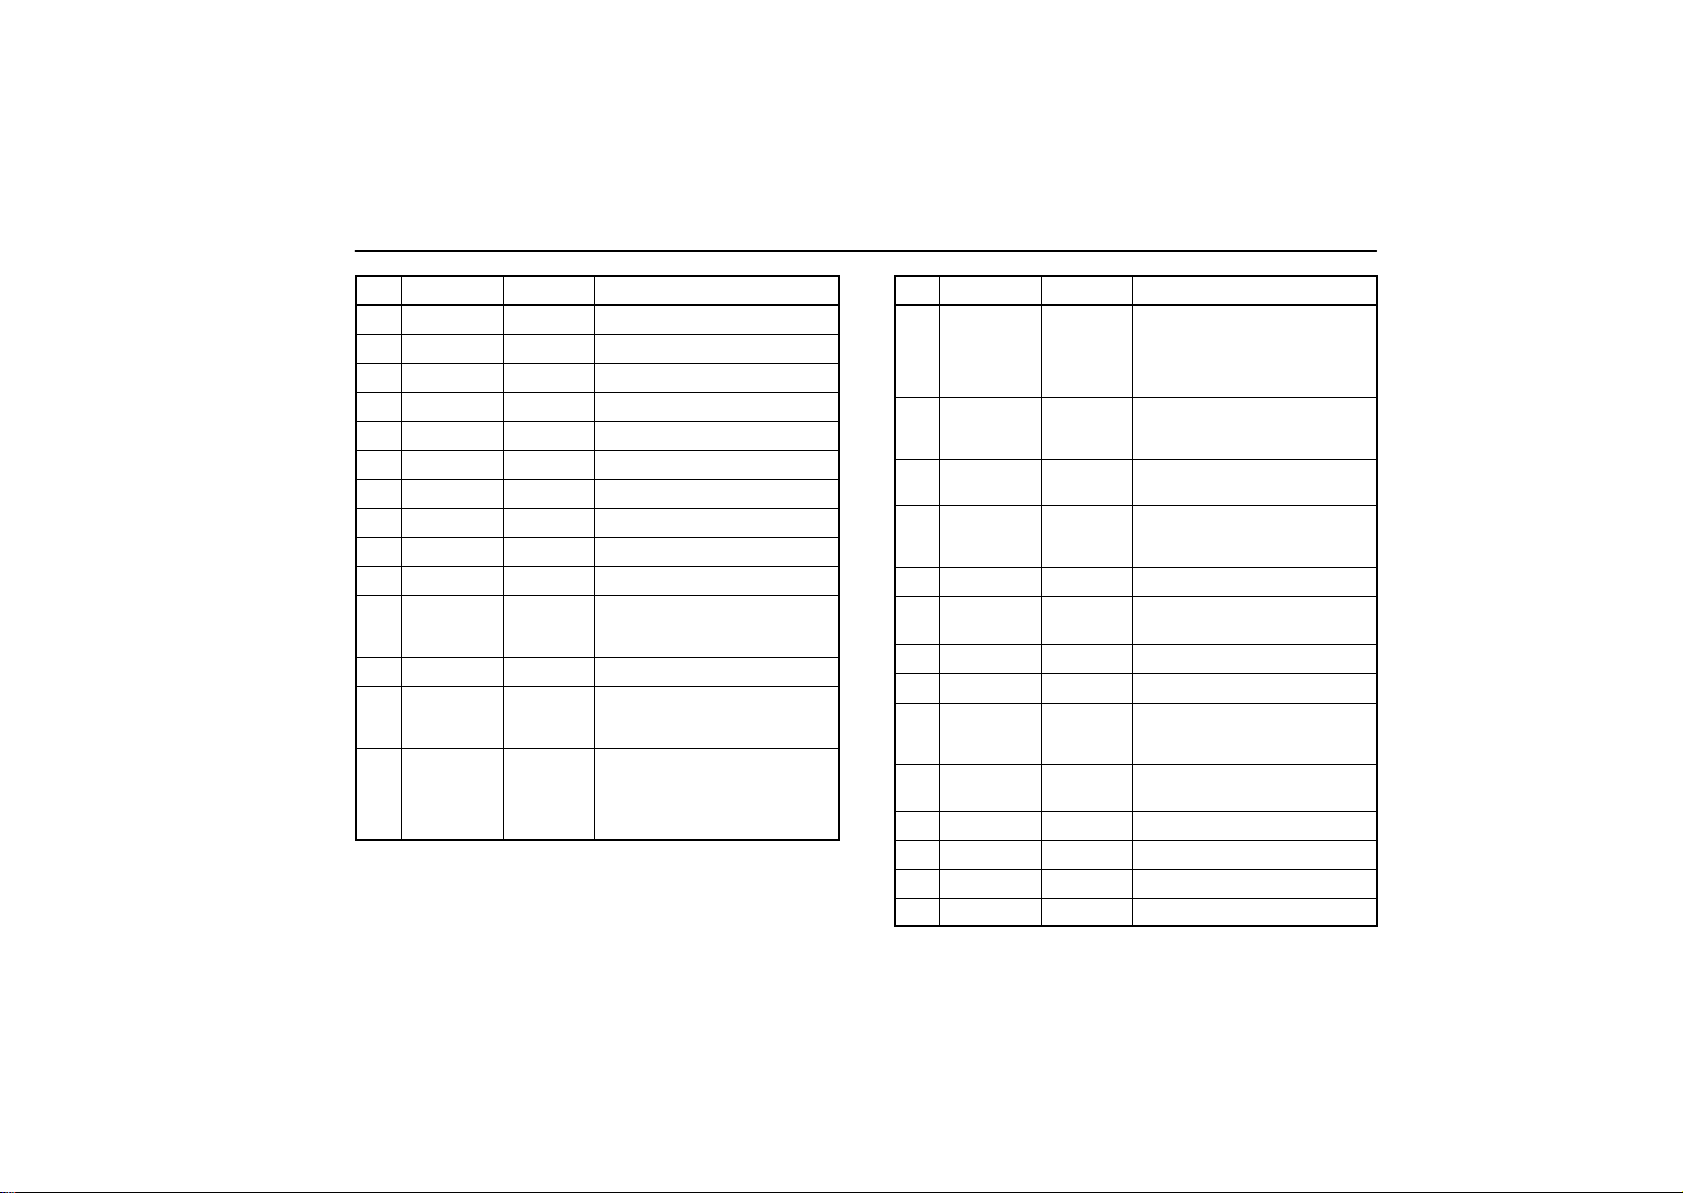
No. FUSE AMPERE CIRCUIT
28 P P/SEAT 30 Power seat system
29 TV 5 TV, Navigation system
30 DEFOG 30 Rear window defogger
31 LCE LP 7.5 License plate lights
32 ROOF RH 20 Retractable hardtop lock system
33 FUEL OPN 10 Fuel filler door opener
34 ROOF LH 20 Retractable hardtop lock system
35 P–TRAY 20 Quarter window
36 LGG LH 20 Luggage lock system
37 LGG RH 20 Luggage lock system
Multiport fuel injection
38 IG2 20
39 MAIN 50 Headlights (low beam)
40 IG2 MAIN 20
41 P–DOOR 25
system/sequential multiport fuel
injection system
Multiport fuel injection
system/sequential multiport fuel
injection system
Power windows, Power door
lock system, Power rear view
mirror control system, Outside
rear view mirror defogger, Door
courtesy lights
No. FUSE AMPERE CIRCUIT
Power windows, Power door
42 D–DOOR 25
43 D/C CUT 15
44 TURN–HAZ 15
45 ETCS 15
46 HORN 10 Horn, Headlight switch
RADIO
47
48 TEL 5 Telephone
49 ALT–S 5 Charging system
50 EFI 25
51 AM2 30
52 ABS NO.2 40 Anti–lock brake system
53 ALT 140 Charging system
54 ABS NO.1 60 Anti–lock brake system
55 HEATER 50 Air conditioning system
NO.1
30
lock system, Power rear view
mirror control system, Outside
rear view mirror defogger, Door
courtesy lights
All components in “DOME”,
“MPX–B1”, “MPX–B2” and
“MPX–B3” fuses
Turn signal lights, Emergency
flashers
Multiport fuel injection
system/sequential multiport fuel
injection system
Audio system
Multiport fuel injection
system/sequential multiport fuel
injection system
All components in “ST” and
“IG2” fuses and starting system
323
Page 32
ELECTRICAL COMPONENTS
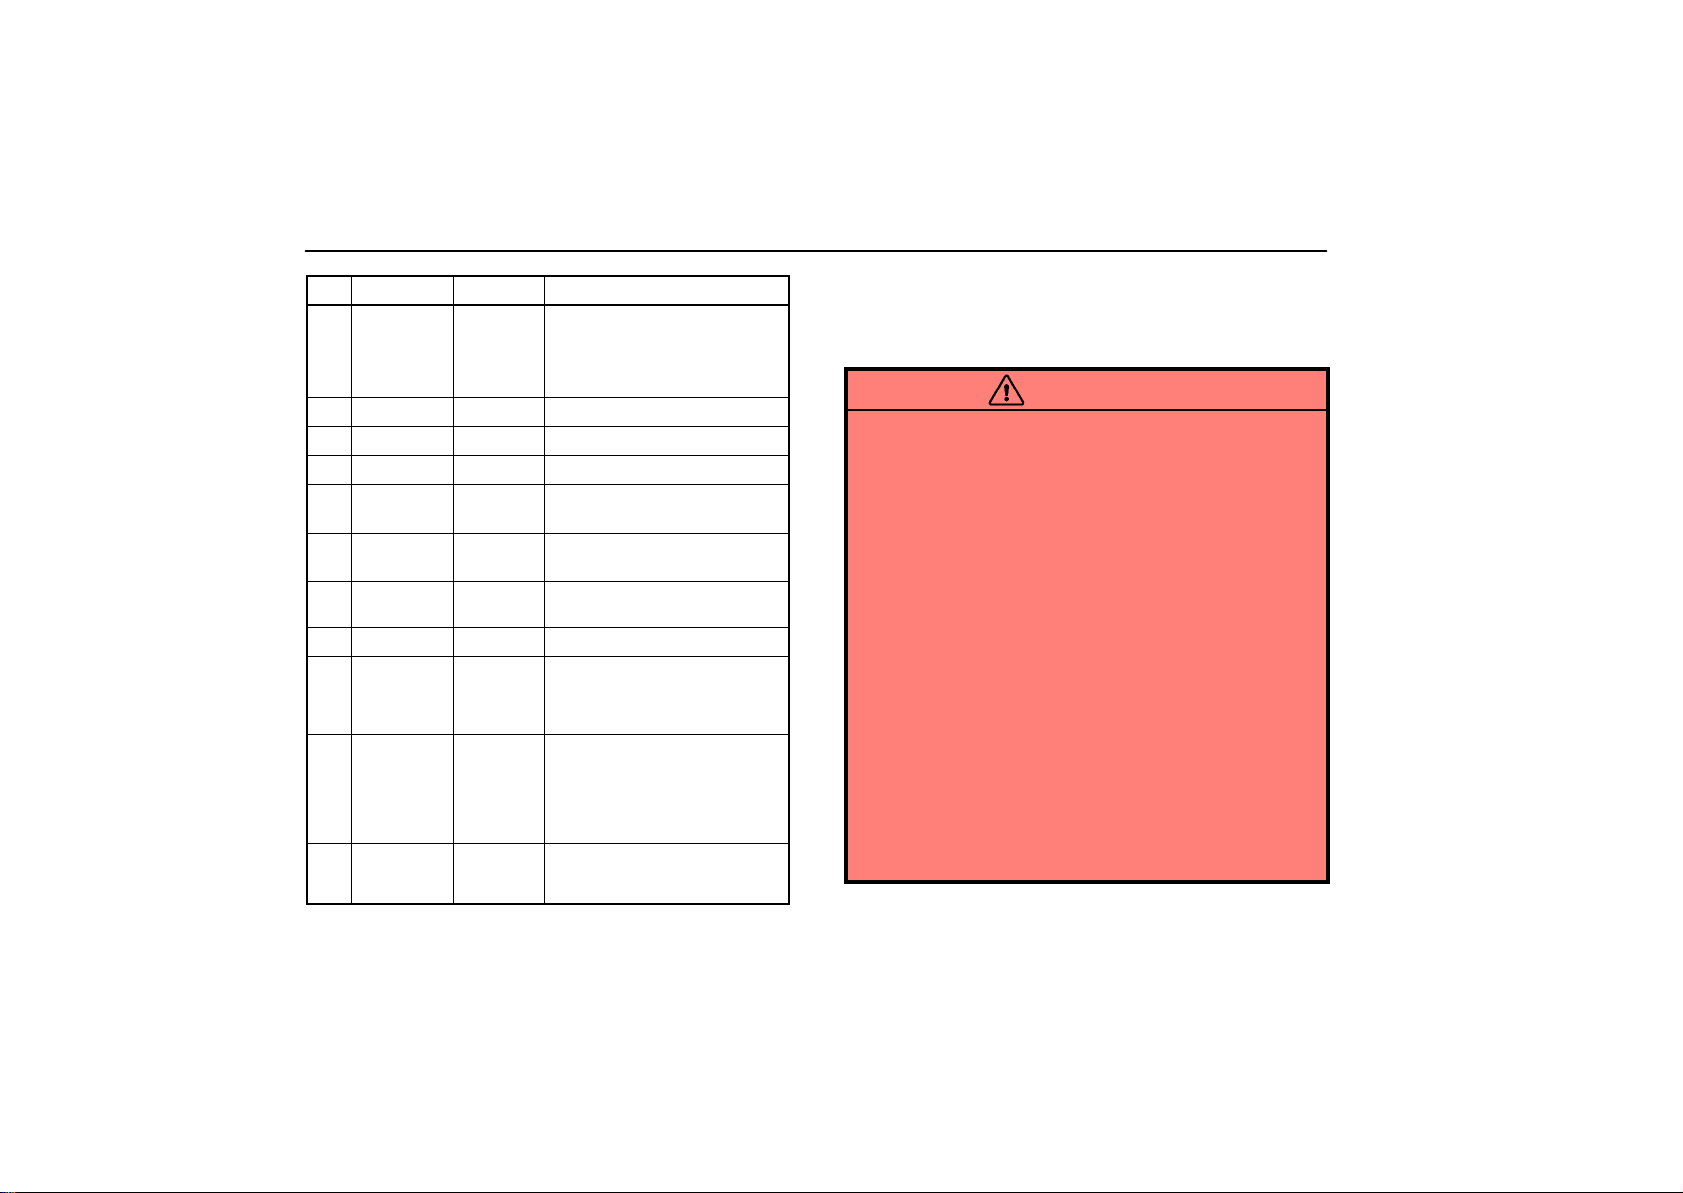
No. FUSE AMPERE CIRCUIT
All components in “DEFOG”,
56 RR J/B 50
57 H–LP CLN 30 Headlight cleaner
58 FAN 40 Air conditioning system
59 FAN NO.2 40 Air conditioning system
H–LP R
60
61
62 H–LP UPR 20
63 STARTER 7.5 Starting system
64 EFI NO.2 10
65 IGN 5
66 INJ 10
LWR
H–LP L
LWR
15
15
“ROOF RH”, “ROOF LH”, “LGG
RH”, “LGG LH”, “P–TRAY”,
“LCE LP”, and “FUEL OPN”
fuses
Right–hand headlight (low
beam)
Left–hand headlight (low beam)
Headlight (high beam),
Headlight switch
Multiport fuel injection
system/sequential multiport fuel
injection system, Emission
control system
Multiport fuel injection
system/sequential multiport fuel
injection system, Anti–lock
brake system, Traction control
system, Vehicle skid control
system, Cruise control system
Multiport fuel injection
system/sequential multiport fuel
injection system
CHECKING BATTERY CONDITION
Precautions
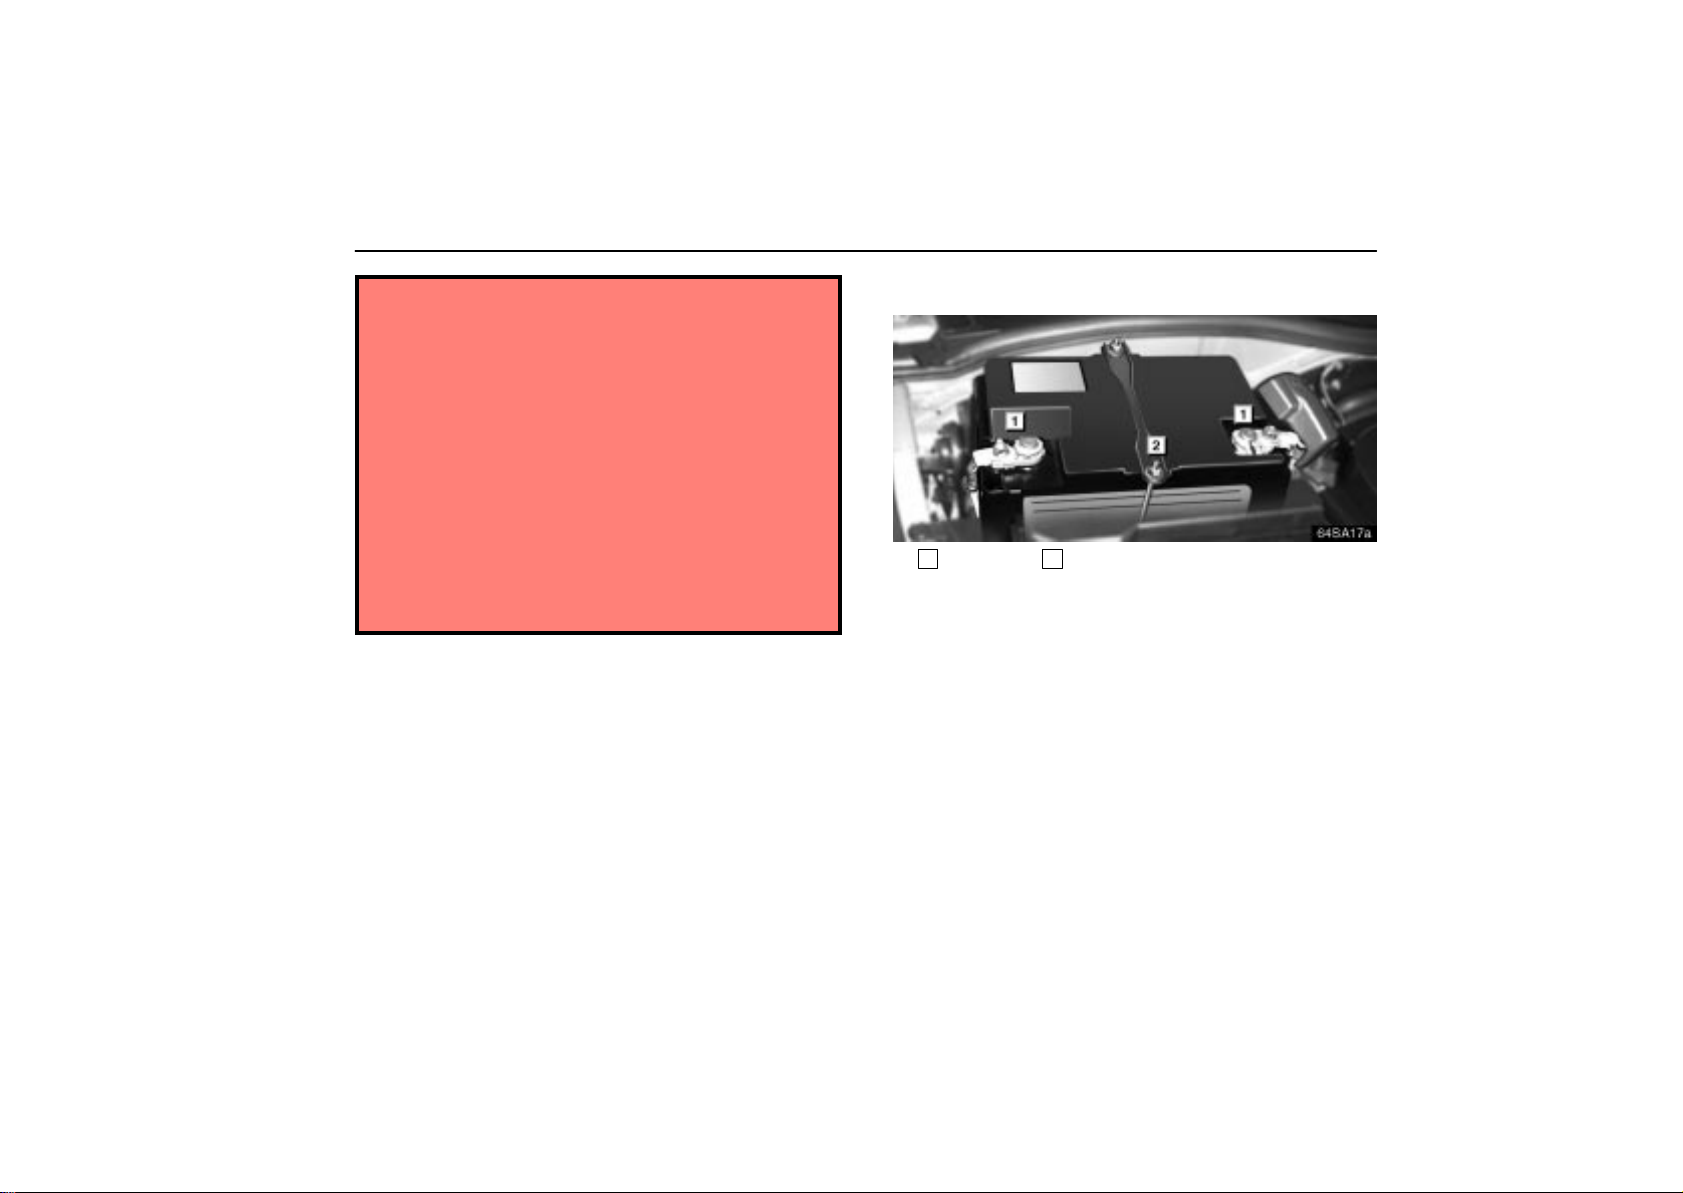
CAUTION
BATTERY PRECAUTIONS
The battery produces flammable and explosive
hydrogen gas.
Do not cause a spark by contacting the battery
terminals with tools.
Do not smoke or light a match near the battery.
The electrolyte contains poisonous and corrosive
sulfuric acid.
Avoid contact with eyes, skin or clothes.
Never inhale or swallow electrolyte.
Wear protective safety glasses when working near
the battery.
Keep children away from the battery.
EMERGENCY MEASURES
If electrolyte gets in your eyes, flush your eyes with
clean water for at least 15 minutes and get immediate
medical attention. If possible, continue to apply
water with a sponge or cloth while traveling to the
medical office.
324
Page 33
ELECTRICAL COMPONENTS
If electrolyte gets on your skin, thoroughly wash the
contact area. If you feel a pain or burn, get medical
attention immediately.
If electrolyte gets on your clothes, there is a
possibility of its soaking through to your skin, so
immediately take off the exposed clothing and follow
the procedure above, if necessary.
If you accidentally swallow electrolyte, drink a large
quantity of water or milk. Follow with milk of
magnesia, beaten raw egg or vegetable oil. Then go
immediately for emergency help.
Warning: Battery posts, terminals and related
accessories contain lead and lead compounds,
chemicals known to the State of California to cause
cancer and reproductive harm. Wash hands after
handling.
Checking battery exterior
64sa17a
1
Terminals 2Hold–down clamp
Check the battery for corroded or loose connections,
cracks, or loose hold–down clamps.
1. If the battery is corroded, wash it off with a solution of warm
water and baking soda. Coat the terminals with grease to
prevent further corrosion.
2. If the connections are loose, tighten the clamp bolts –but do
not overtighten.
3. Tighten the hold–down clamp only enough to keep the
battery firmly in place. Overtightening may damage the battery
case.
325
Page 34
ELECTRICAL COMPONENTS
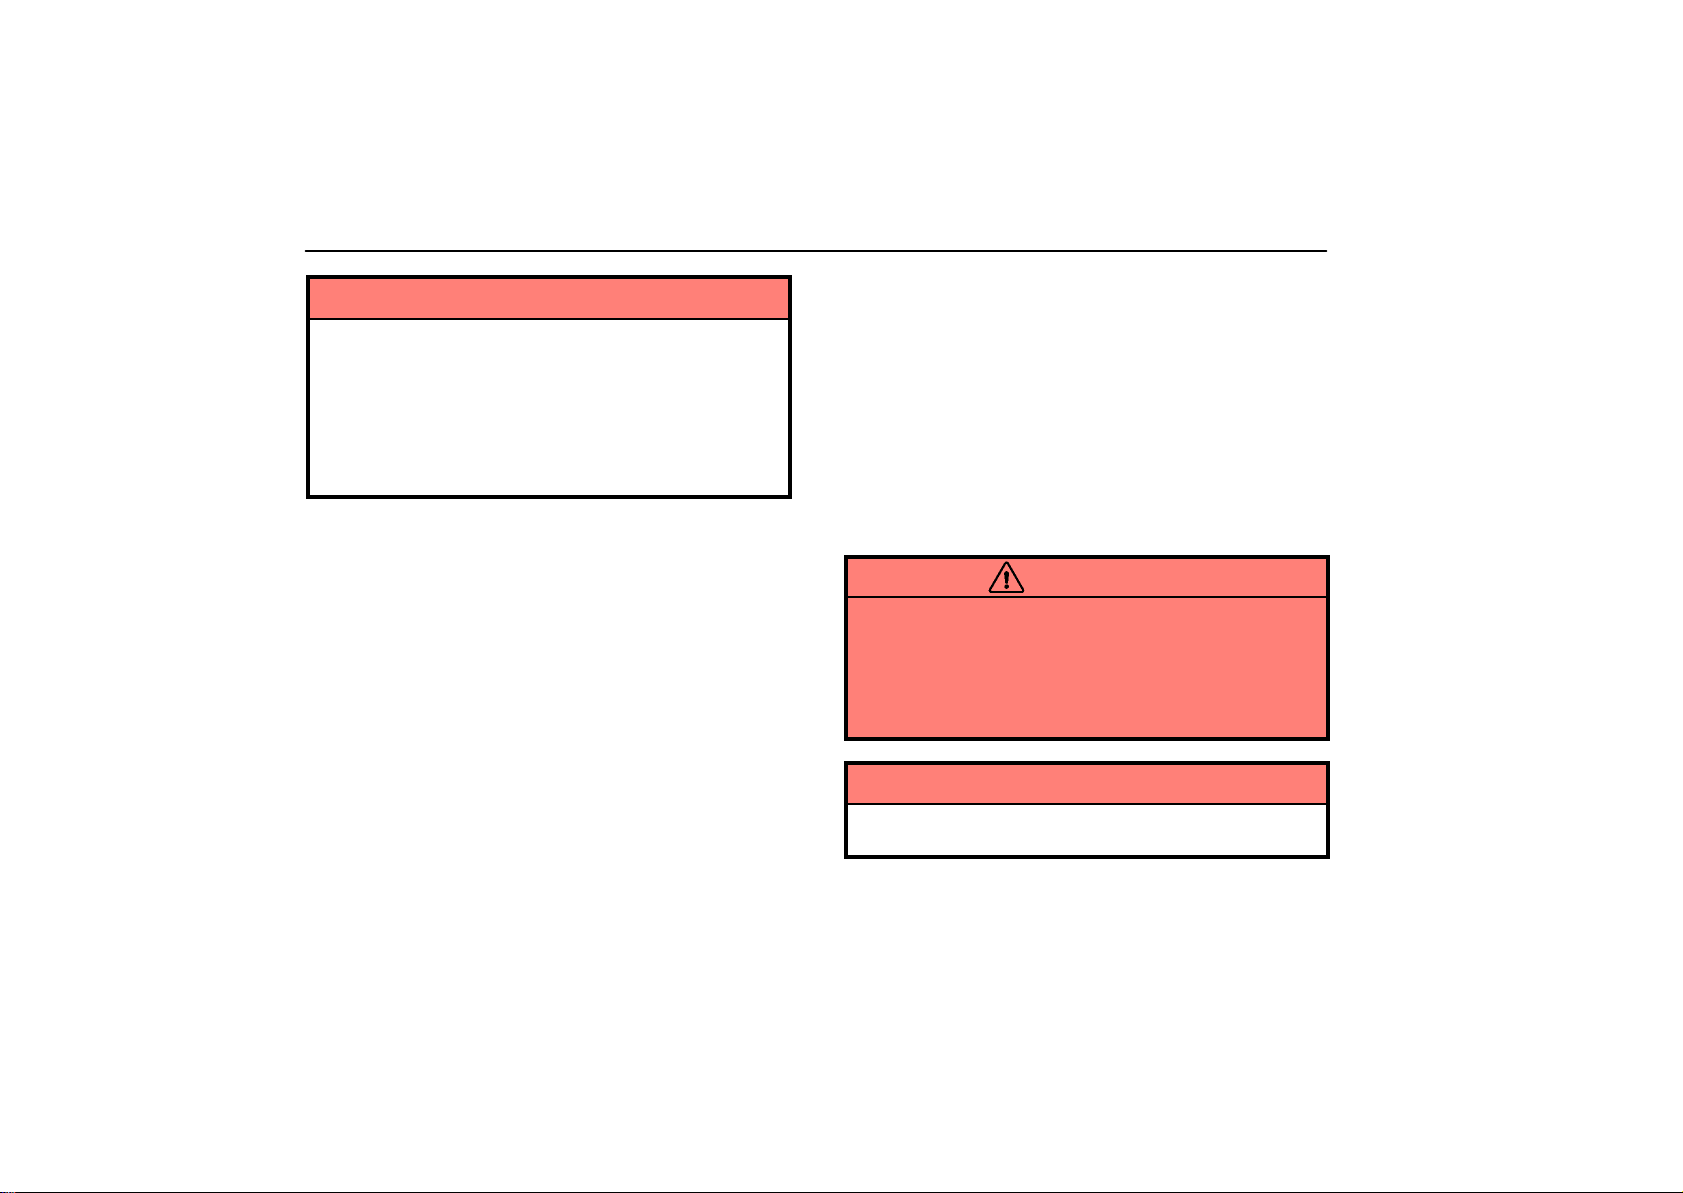
NOTICE
Make sure the engine and all accessories are turned
off before performing maintenance.
When checking the battery, remove the ground cable
first and reinstall it last.
Be careful not to cause a short circuit with tools.
Take care no solution gets into the battery when
washing it.
BATTERY RECHARGING
PRECAUTIONS
During recharging, the battery is producing hydrogen
gas.
Therefore, before recharging:
1. If recharging with the battery installed on the vehicle, be
sure to disconnect the ground cable.
2. Make sure the power switch on the recharger is off when
connecting the charger cables to the battery and when
disconnecting them.
CAUTION
Always charge the battery in an unconfined area. Do
not charge the battery in a garage or closed room
where there is not sufficient ventilation.
Only do a slow charge (5 A or less). Charging at a
quicker rate is dangerous. The battery may explode
causing personal injuries.
NOTICE
Never recharge the battery while the engine is running.
Also, make sure all accessories are turned off.
326
Page 35
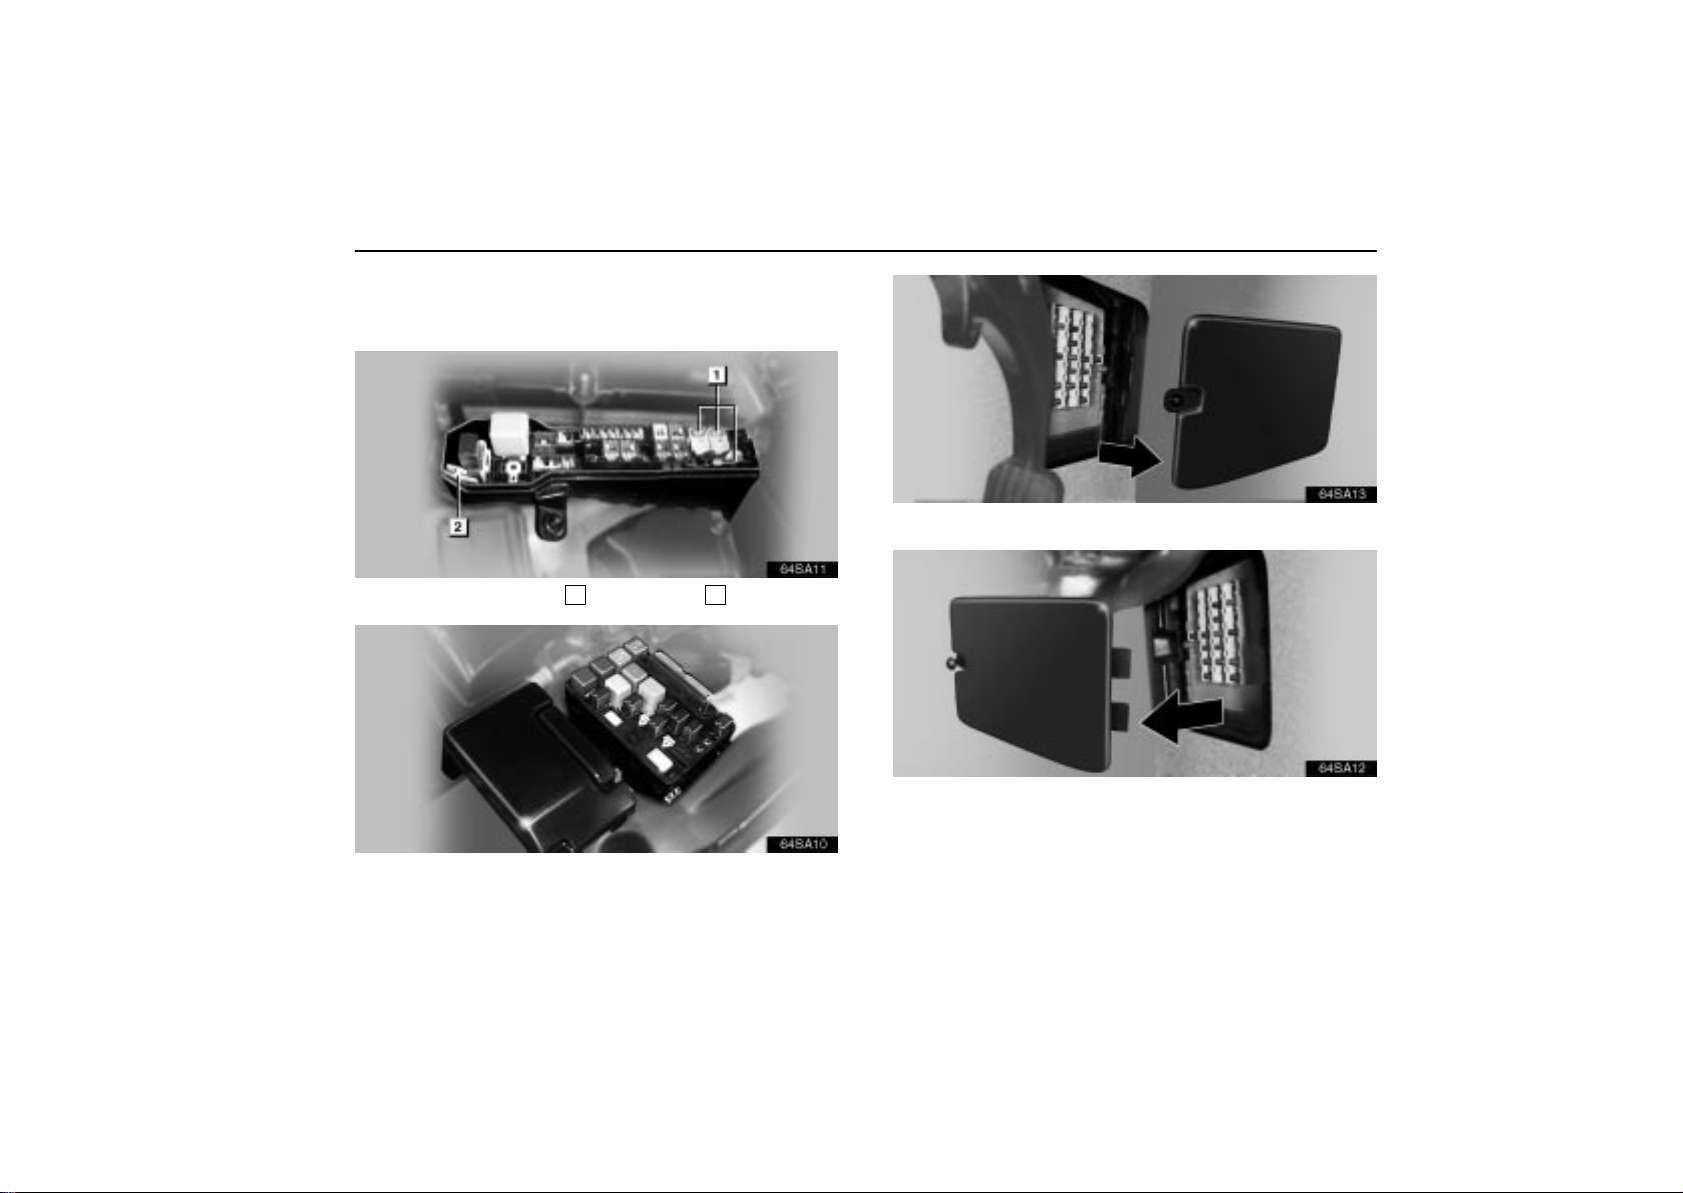
CHECKING AND REPLACING THE
BLADE TYPE FUSES
64sa11
Engine compartment 1Spare fuses 2Pull–out tool
64sa10
ELECTRICAL COMPONENTS
64sa13
Driver’s side kick panel
64sa12
Passenger’s side kick panel
Engine compartment
327
Page 36
ELECTRICAL COMPONENTS
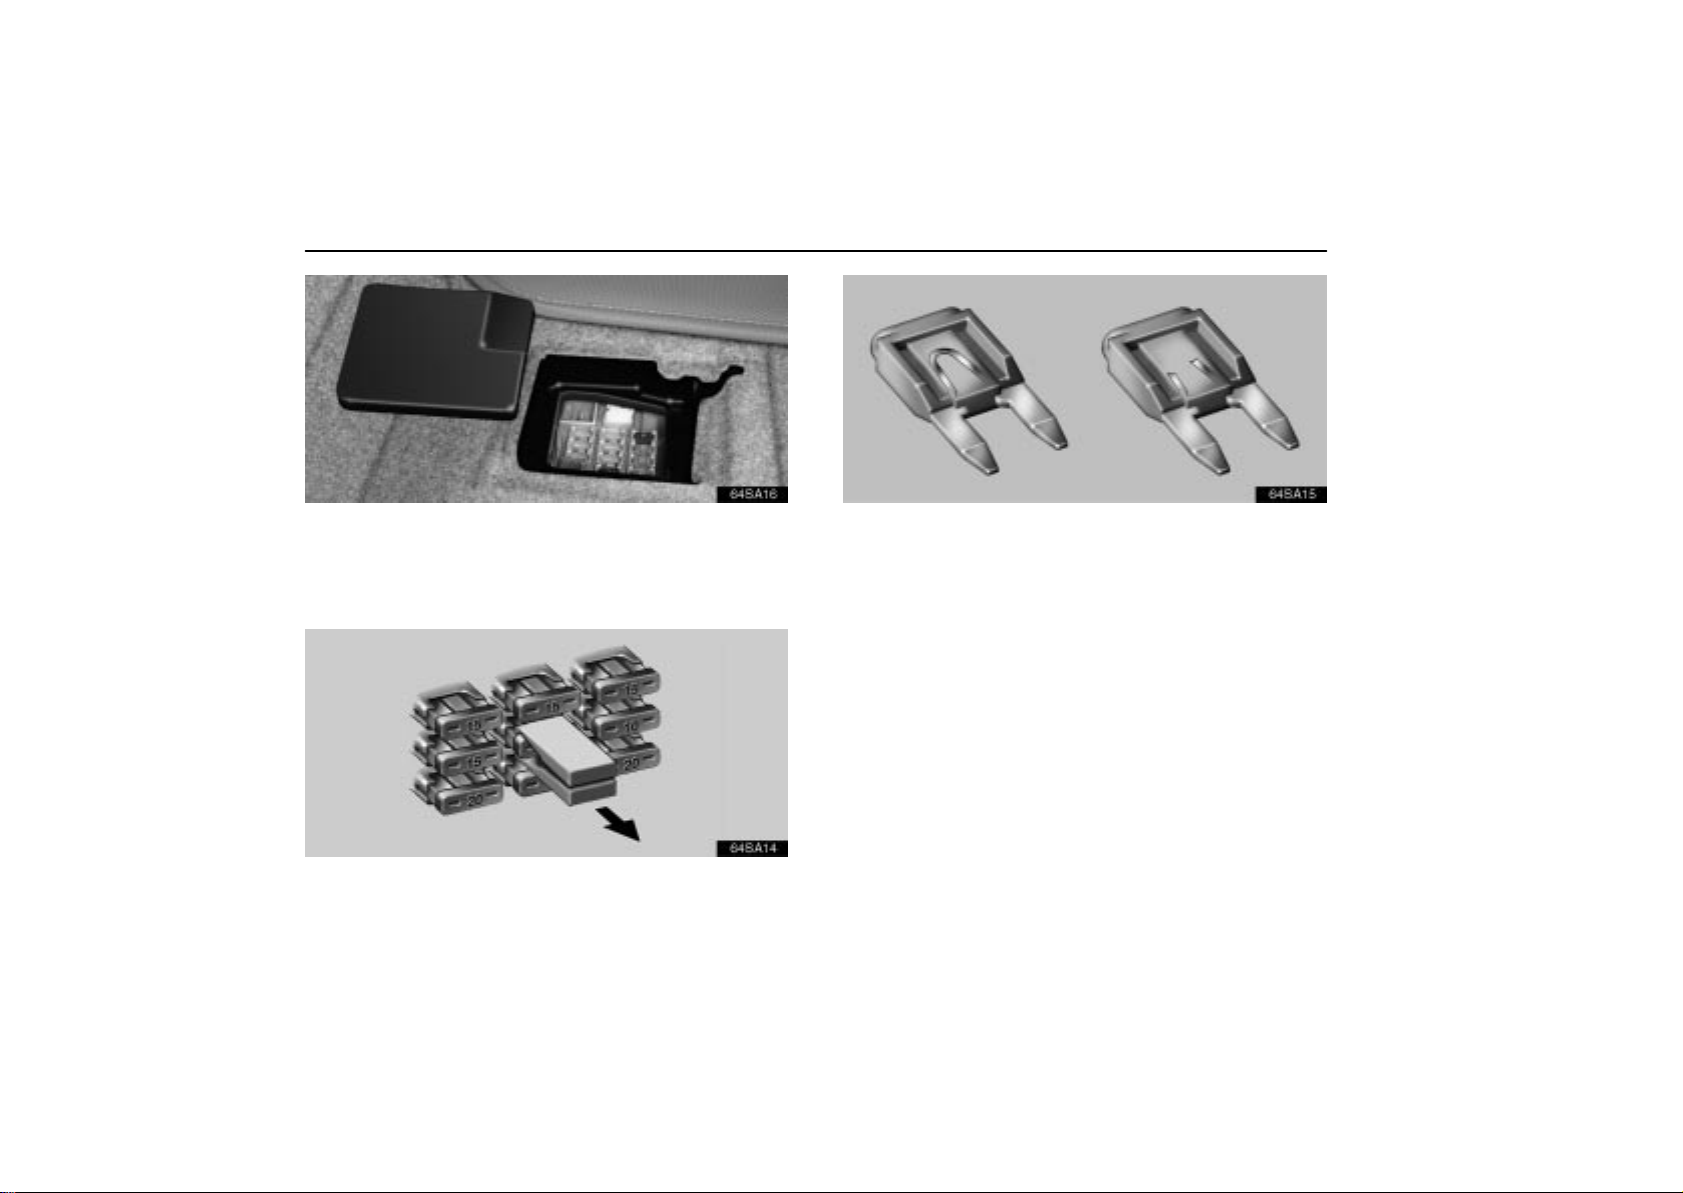
64sa16
Trunk
1. Turn the ignition switch off and open the fuse box lid.
Determine which fuse may be causing the problem. The lid of
the fuse box shows the name of the circuit for each fuse.
64sa14
2. Make sure t h e i noperative component is turned off. Pull
the suspected fuse straight out with the pull–out tool and
check it. If it has blown, push a new fuse into the clips.
328
64sa15
Good
a. Look carefully at the fuse. If the thin wire is broken, the fuse
has blown. If you are not sure or if it is too dark to see, try
replacing the suspected fuse with one of the same value that
you know is good.
b. Install only a fuse with the amperage rating designated on
the fuse box lid.
If you do not have a spare fuse, in an emergency you can pull
out the ”CIG”, ”RADIO NO.1”, ”DOME” or ”HTR” fuse, which
may be dispensable for normal driving, and use it if its
amperage rating is the same.
If you cannot use one of the same amperage, use one lower
than, but as close as possible to, the amperage. If the
amperage is lower than that specified, the fuse might blow out
again but this does not indicate anything wrong. Be sure to get
the correct fuse as soon as possible and return the substitute
to its original clips.
Blown
Page 37
ELECTRICAL COMPONENTS
It is a good idea to purchase a set of spare fuses and keep them
in your vehicle for emergencies.
If the new fuse immediately blows out, there is a problem with
the electrical system. Have your Lexus dealer correct it as
soon as possible.
CAUTION
Never use a fuse with a higher amperage rating, or any
other object, in place of a fuse. This may cause
extensive damage and possibly a fire.
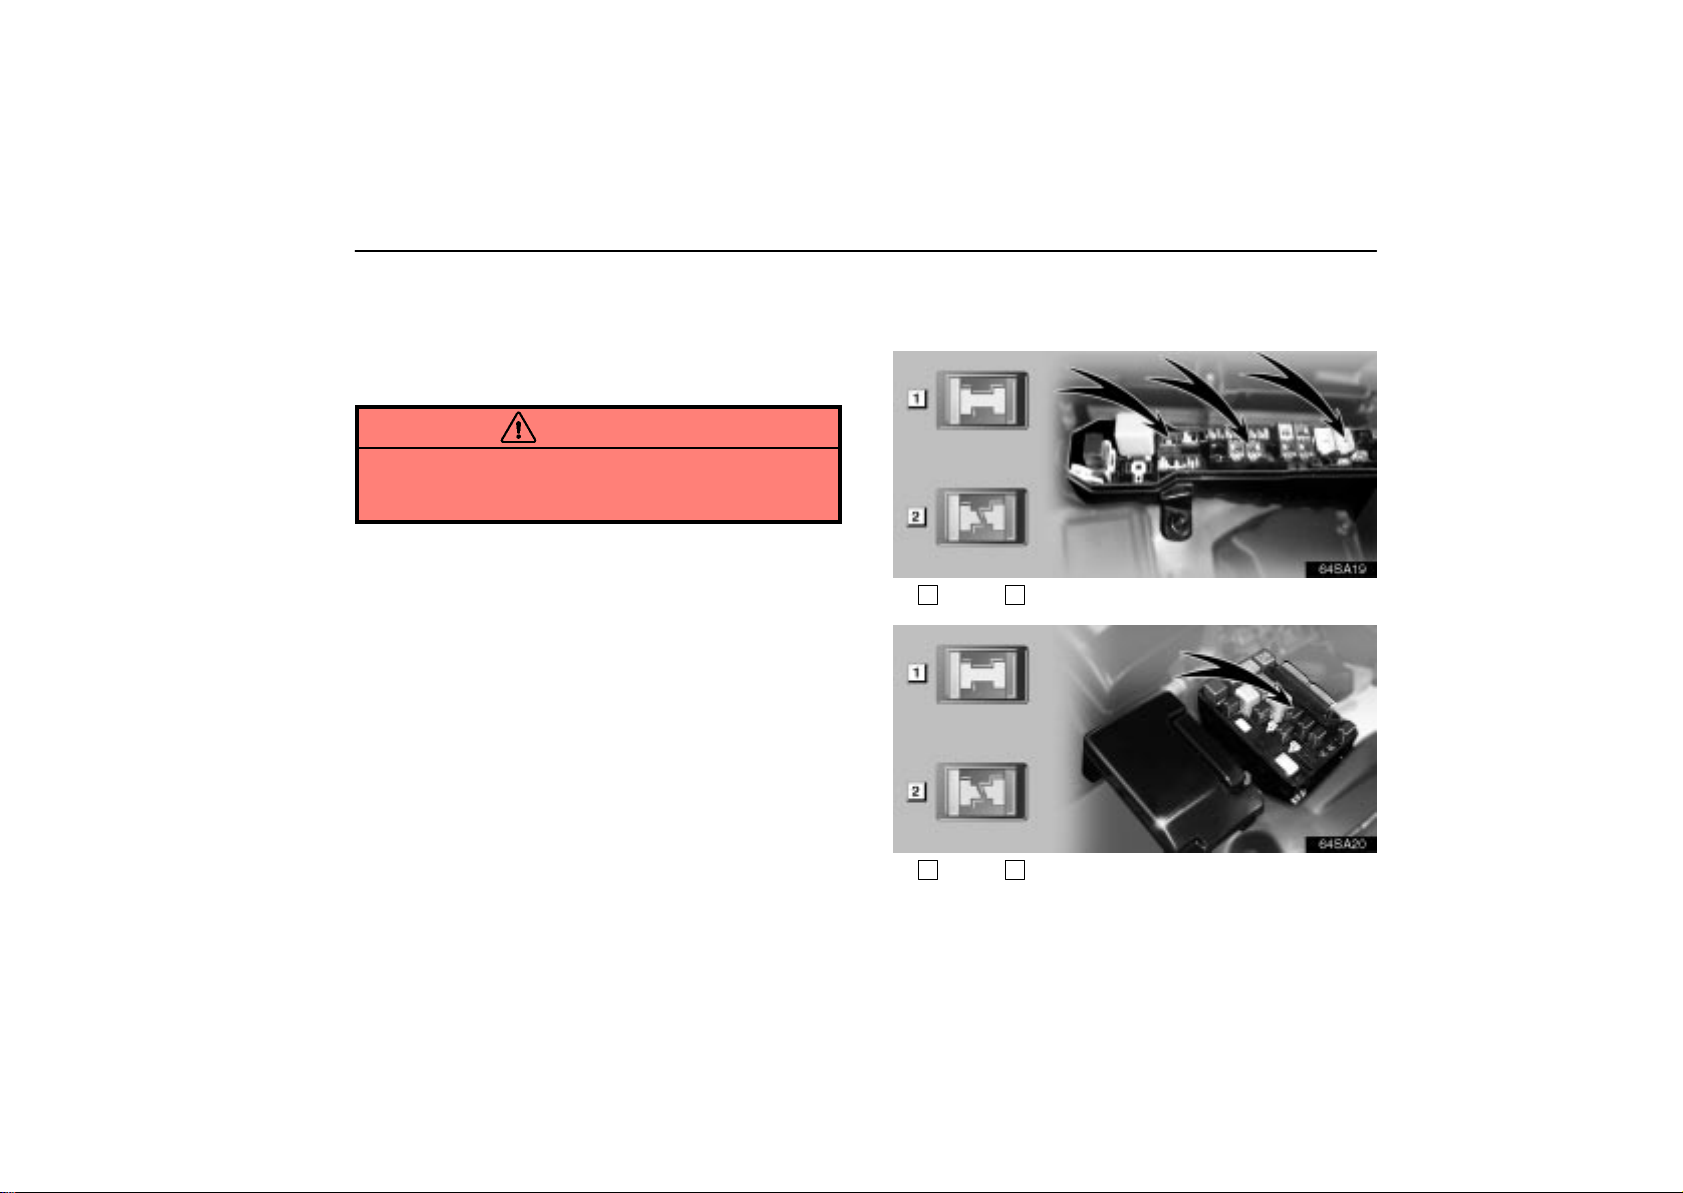
CHECKING THE CARTRIDGE TYPE
FUSES
64sa19
1
Good 2Melted
64sa20
1
Good 2Melted
329
Page 38
ELECTRICAL COMPONENTS
If the headlights or other electrical components do not
work and the blade type fuses are O.K., check the
cartridge type fuses. If any of the cartridge type fuses are
blown, they must be replaced.
If there is an overload in the circuits from the battery, the fuses
are designed to blow before the entire wiring harness is
damaged.
CAUTION
Always use a genuine Lexus fuse or equivalent for
replacement. Never install an ordinary wire – even for
a temporary fix. This may cause extensive damage and
possibly a fire.
NOTICE
Before replacing the fuses, have the cause of electrical
overload determined and repaired by your Lexus dealer .
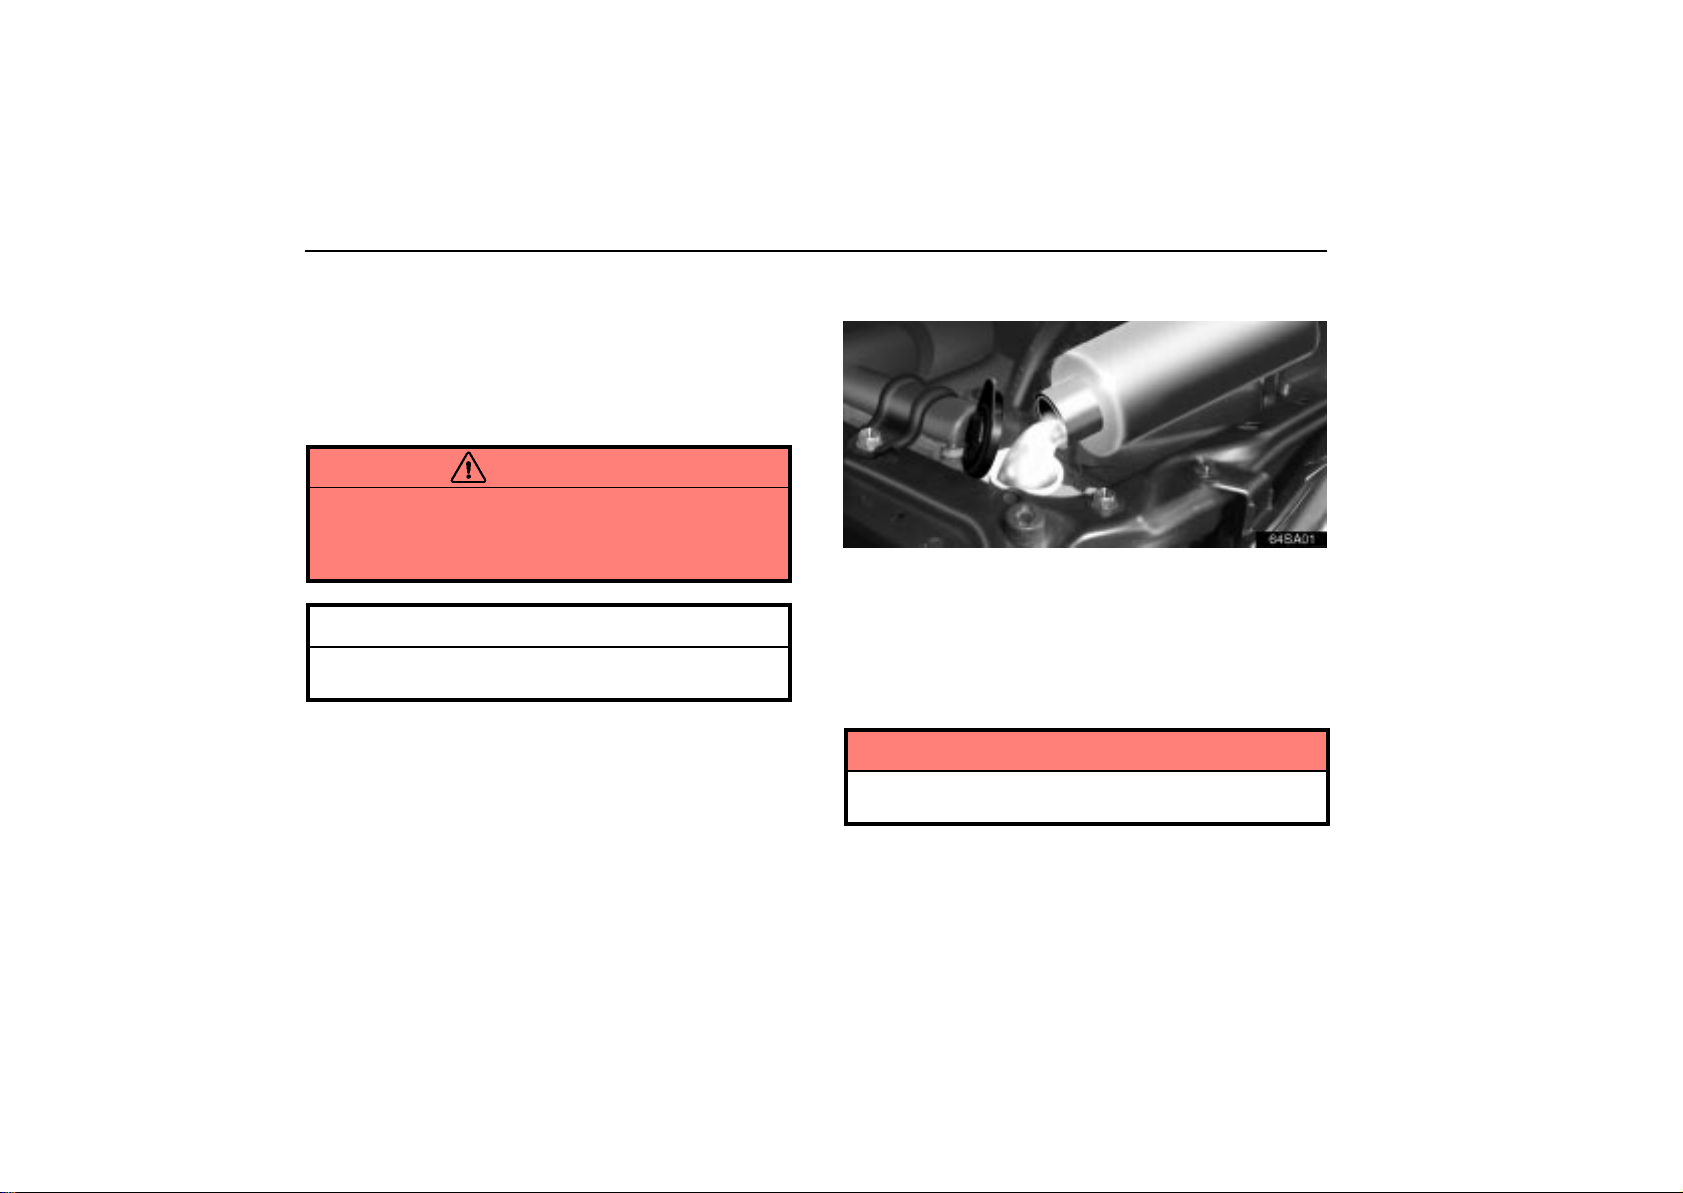
ADDING WASHER FLUID
64sa01
If the washer tank becomes nearly empty, add washer
fluid.
You may use plain water as washer fluid. However, in cold
areas where temperatures range below the freezing point, use
washer fluid containing antifreeze. This product is available at
your Lexus dealer and most auto parts stores. Follow the
manufacturer’s directions for how much to mix with water.
NOTICE
Do not use engine antifreeze or any other substitute
because it may damage your vehicle’s paint.
330
Page 39
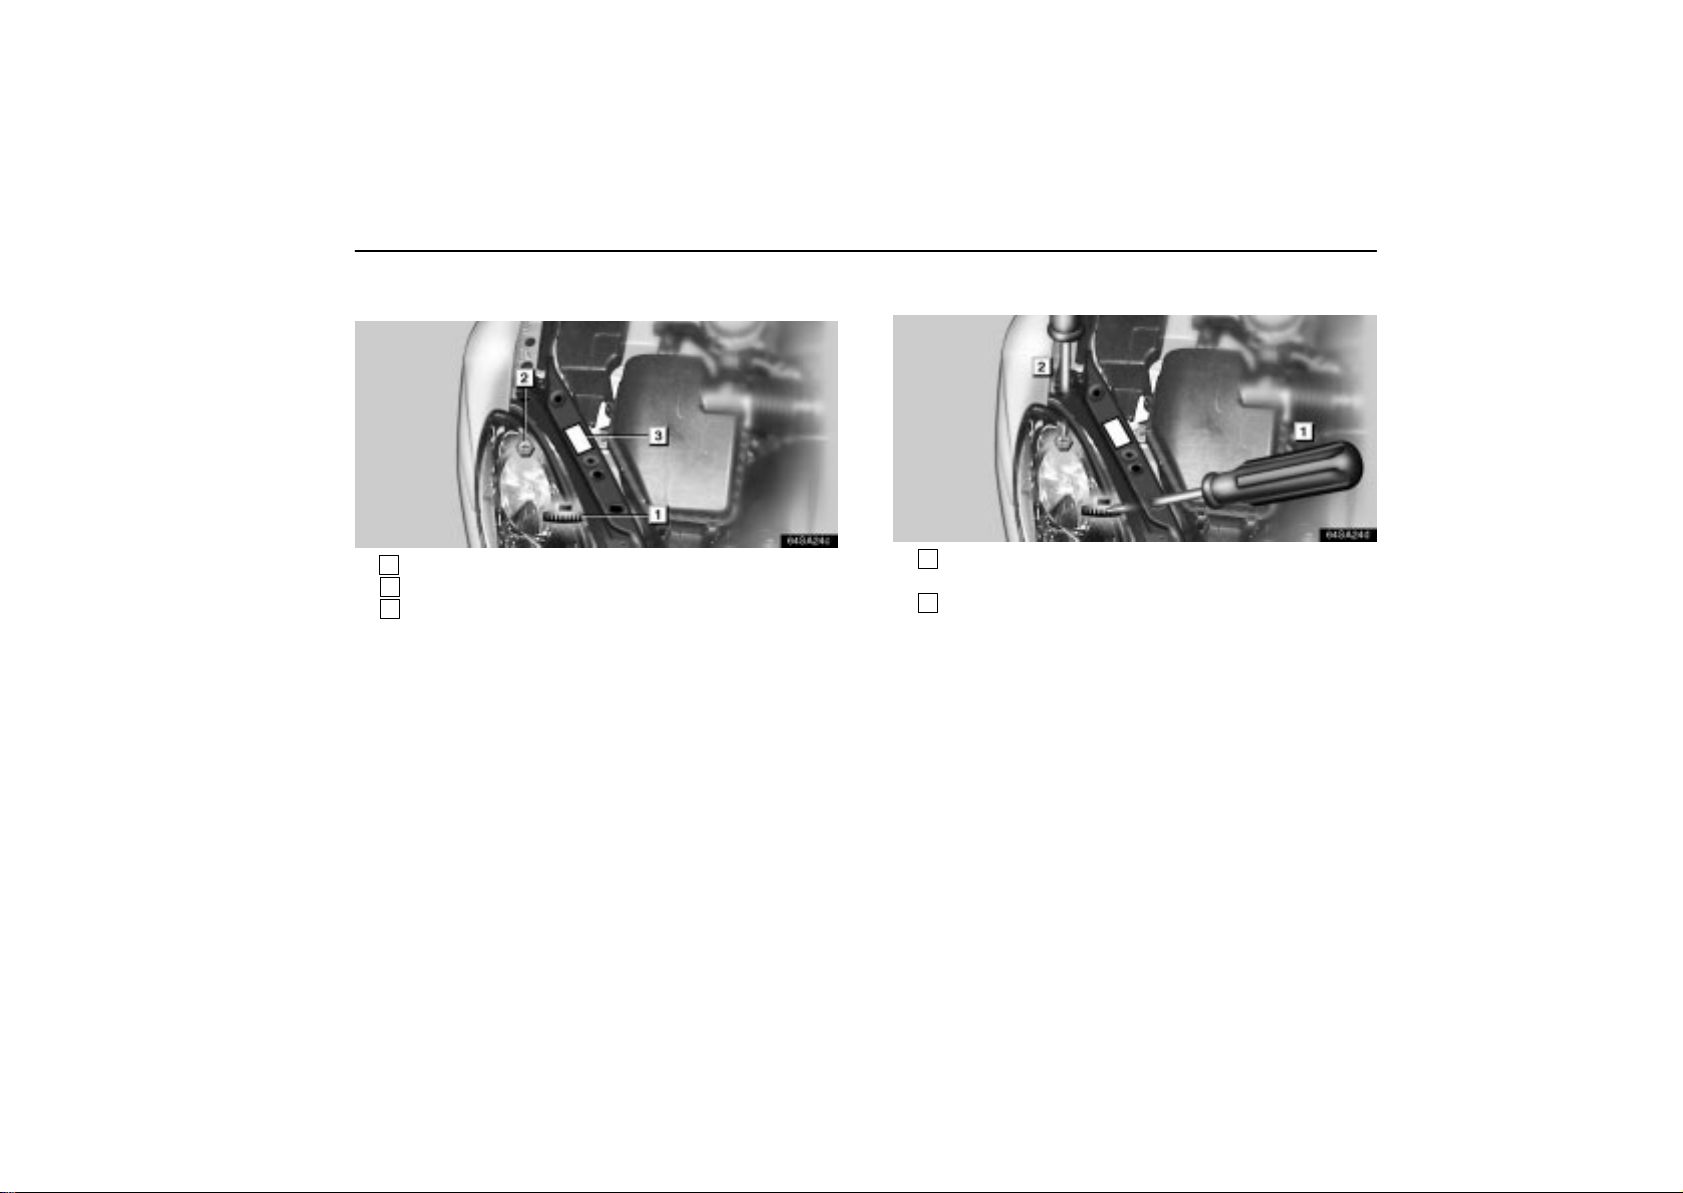
ELECTRICAL COMPONENTS
CHECKING THE HEADLIGHT AIM
64sa24c
1
Vertical movement adjusting bolt 1 (Inside screw)
2
Vertical movement adjusting bolt 2 (Outside screw)
3
Aiming caution label
Before checking the headlight aim:
1. Make sure the body around the headlight is not deformed.
2. Park the vehicle on a level spot.
3. Get into the driver’s seat and put the vehicle in a state ready
for driving (with a full tank).
4. Bounce the vehicle several times.
Adjusting the vertical aiming
64sa24d
1
For vertical movement adjusting bolt 1
(Inside screw)
2
For vertical movement adjusting bolt 2
(Outside screw)
331
Page 40
ELECTRICAL COMPONENTS
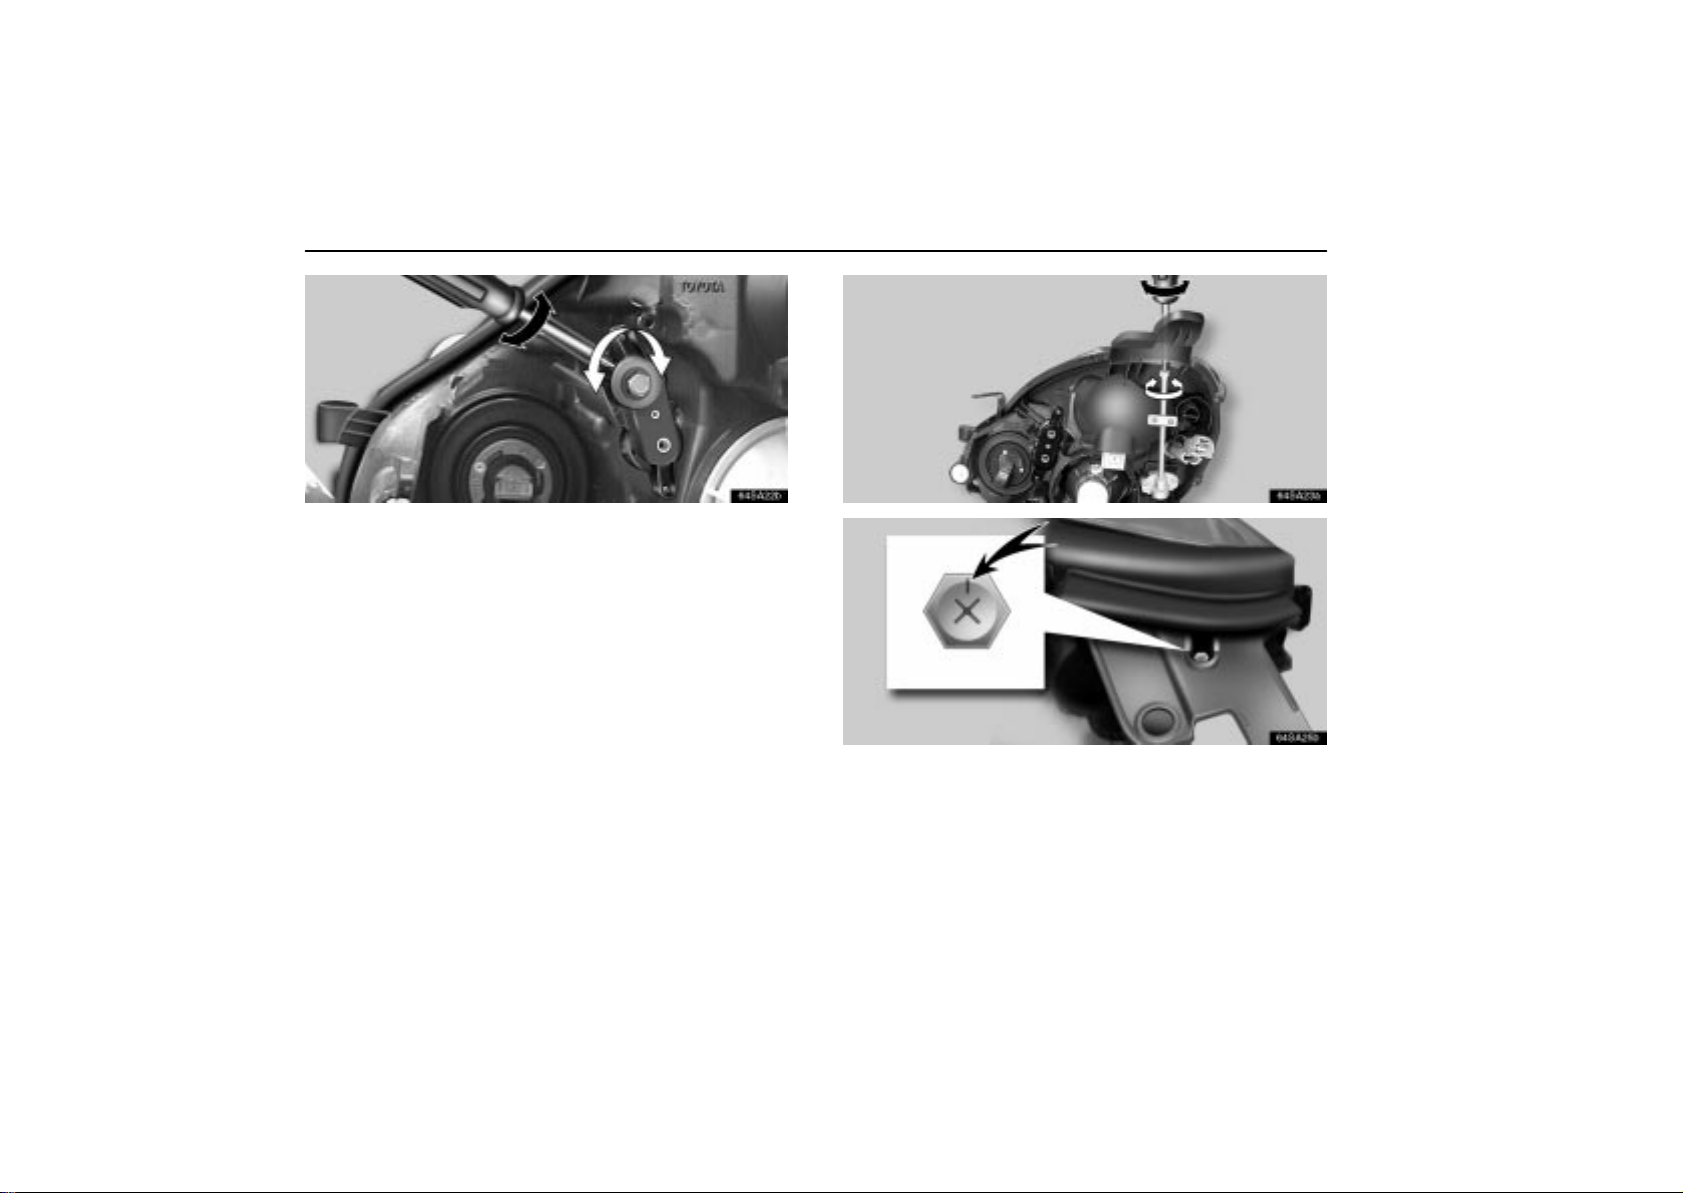
64sa22b
1. Turn the Phillips–head screwdriver five turns or
multiple–of–5 turns in either direction for turning the vertical
movement adjusting bolt 1 (inside screw). At this time, keep
the turning direction and number of turns in mind.
Every 5 turns adjust an aiming position to up or down by about
0.2.
332
64sa23a
64sa25b
2. Turn the Phillips–head screwdriver one time for turning the
vertical movement adjusting bolt 2 (outside screw) in the same
way as step 1 in relation to the 5 turns of the Phillips–head
screwdriver for turning the vertical movement adjusting bolt 1
(inside screw).
Page 41
ELECTRICAL COMPONENTS
INFORMATION
If 3 turns of the Phillips–head screwdriver are
appropriate for the vertical movement adjusting bolt
1 (inside screw) at step 1, turn the Phillips–head
screwdriver three fifth turns in the same direction as
step 1 for the vertical movement adjusting bolt 2
(outside screw).
The turning confirmation mark is stamped at the tip
of the vertical movement adjusting bolt 2 (outside
screw). Turn the Phillips–head screwdriver for
turning the vertical movement adjusting bolt 2
(outside screw) while checking this mark.
REPLACING LIGHT BULBS
The illustrations on the following pages show the locations of
light bulbs. If it is necessary to replace a bulb, take your vehicle
to your Lexus dealer as soon as possible. Use bulbs with the
bulb numbers and wattage ratings given in the table.
CAUTION
Do not disassemble, repair or take apart the low beam
headlight bulbs, connector, power supply circuits
and rotated components. Or you may be injured by
electric shocks. Call your dealer when the headlights
fail to work or have to be replaced or disposed of.
To prevent yourself from burning, do not replace the
light bulbs while they are hot.
Halogen bulbs have pressurized gas inside and
require special handling. They can burst or shatter if
scratched or dropped. Hold a bulb only by its plastic
or metal case. Do not touch the glass part of a bulb
with bare hands.
NOTICE
Only use a bulb of the listed type.
333
Page 42
ELECTRICAL COMPONENTS
The inside of the lens of exterior lights such as headlights may
temporarily fog up when the lens becomes wet in the rain or in
a car wash. This is not a problem because the fogging is
caused by the temperature difference between the outside and
inside of the lens, just like the windshield fogged up in the rain.
However, if there is a large drop of water on the inside of the
lens, or if there is water pooled inside the light, contact your
Lexus dealer.
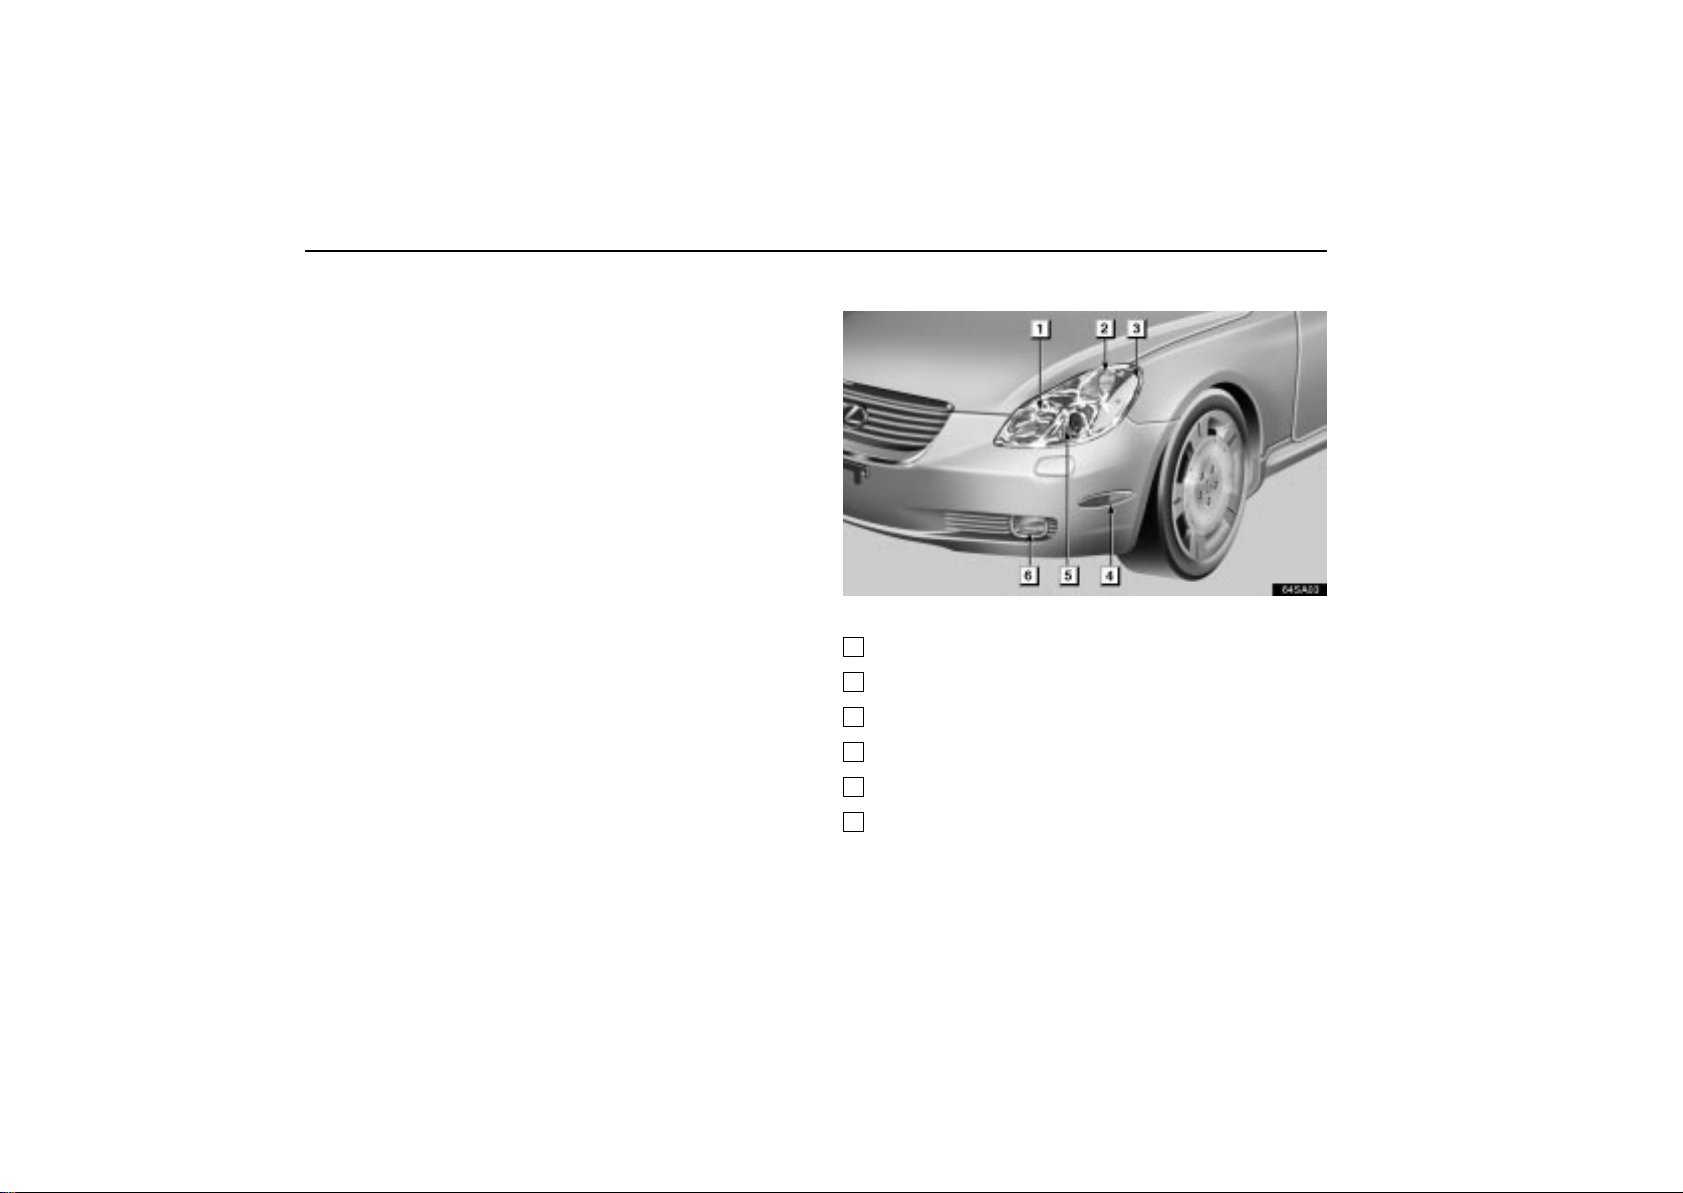
LIGHT LOCATION
64sa03
Light Bulbs Bulb No. W Type
1 Headlight (High beam) 9005 60 A
2 Front turn signal light ––– 21 D
3 Parking light 168 5 D
4 Front side marker light 168 5 D
5 Headlight (Low beam) ––– 35 B
6 Fog light ––– 55 G
334
Page 43
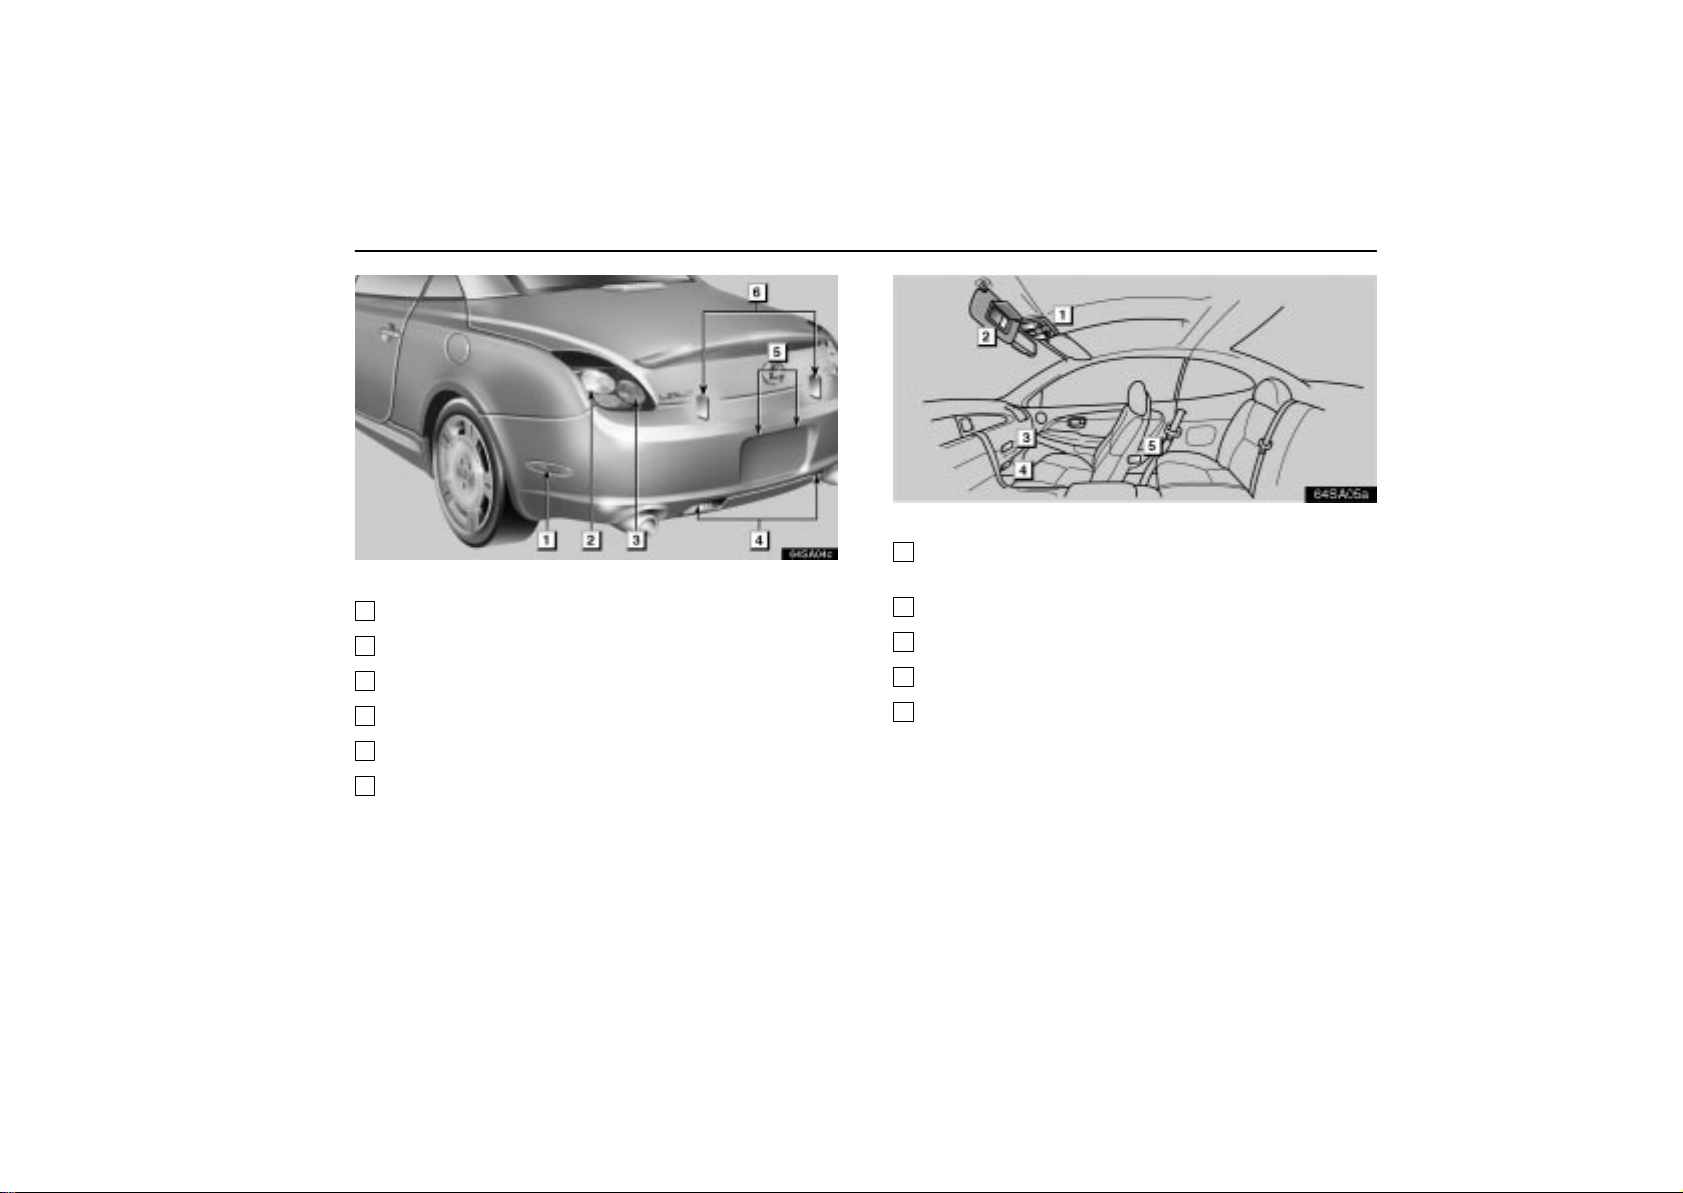
ELECTRICAL COMPONENTS
64sa04c
Light Bulbs Bulb No. W Type
1 Rear side marker light 168 5 D
2 Rear turn signal light 7440 21 D
3 Tail/stop light 7443 5/21 D
4 Back–up lights 7440 21 D
5 License plate lights 194 3.8 D
6 Trunk lights 194 3.8 D
64sa05a
Light Bulbs Bulb No. W Type
1 Front interior/personal
light ––– 8 F
2 Vanity light ––– 1.5 E
3 Glove box light ––– 1.2 D
4 Foot light ––– 1.4 D
5 Door courtesy light 194 3.8 D
A: HB3 halogen bulbs
B: D2S discharge bulbs
C: HB4 halogen bulbs
D: Wedge base bulbs
E: Double end bulbs
F: Single end bulbs
G: H3 halogen bulbs
335
Page 44

SECTION 6 –
SERVICE PROCEDURES AND
SPECIFICATIONS
Engine
Specifications 288. . . . . . . . . . . . . . . . . . . . . . . . . . . . . . . . . . . . . . . . . . .
Fuel 291. . . . . . . . . . . . . . . . . . . . . . . . . . . . . . . . . . . . . . . . . . . . . . . . . . . .
Fuel pump shut off system 293. . . . . . . . . . . . . . . . . . . . . . . . . . . . . . . .
Facts about engine oil consumption 294. . . . . . . . . . . . . . . . . . . . . . . .
Used engine oil 295. . . . . . . . . . . . . . . . . . . . . . . . . . . . . . . . . . . . . . . . . .
Checking the engine oil level 296. . . . . . . . . . . . . . . . . . . . . . . . . . . . . .
Checking the engine coolant level 299. . . . . . . . . . . . . . . . . . . . . . . . . .
Checking the radiator and condenser 301. . . . . . . . . . . . . . . . . . . . . . .
Spark plugs 302. . . . . . . . . . . . . . . . . . . . . . . . . . . . . . . . . . . . . . . . . . . . .
2
287
Page 45
ENGINE
SPECIFICATIONS
– GENERAL
Model
Type
Bore and stroke
Displacement
V alve clearance (engine cold)
Intake
Exhaust
Drive belt tension
– FUEL
Fuel type
Octane rating
3UZ–FE
8 cylinder V type, 4 cycle, gasoline
91.0 X 82.5 mm (3.58 X 3.25 in.)
4293 cm
0.15 – 0.25 mm (0.006 – 0.010 in.)
0.25 – 0.35 mm (0.010 – 0.014 in.)
Automatic adjustment
Only UNLEADED
91 (Research octane number 96) or higher
3
(262.0 cu.in.)
288
Page 46
– LUBRICATION SYSTEM
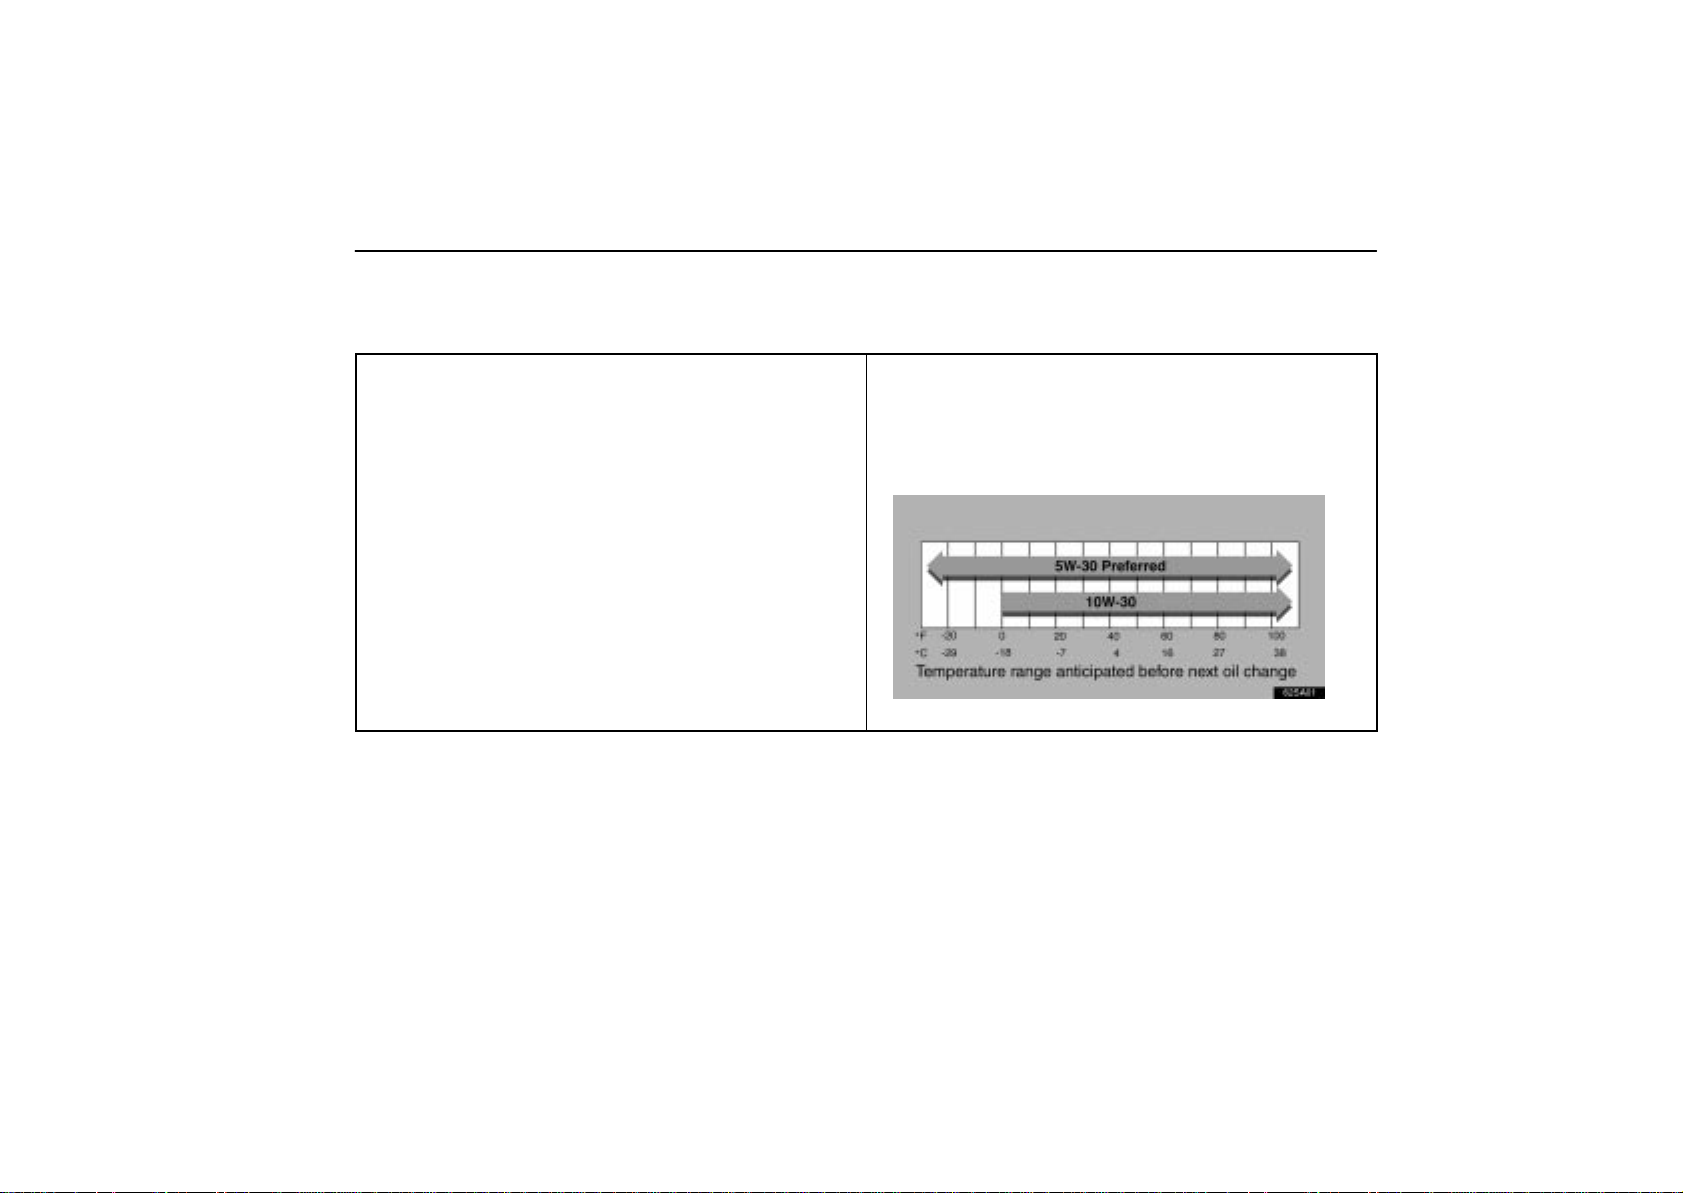
“Toyota Genuine Motor Oil” is filled in your Lexus vehicle. Use Lexus approved “Toyota
Genuine Motor Oil” or equivalent to satisfy the following grade and viscosity.
Oil capacity
Drain and refill
with filter
without filter
Oil grade
Recommended oil viscosity (SAE):
5.2 L (5.5 qt., 4.5 lmp.qt.)
4.6 L (4.9 qt., 4.0 lmp.qt.)
API grade SJ “Energy–Conserving”, SL
“Energy–Conserving” or ILSAC multigrade engine oil
62sa01
Please contact your Lexus dealer for further details.
ENGINE
289
Page 47
ENGINE
– COOLING SYSTEM
“Toyota Genuine Long Life Coolant” is filled in your Lexus vehicle. In order to avoid technical
problems, we strongly recommend using “Toyota Genuine Long Life Coolant” or equivalent.
Capacity
Coolant type
Please contact your Lexus dealer for further details.
– IGNITION SYSTEM
Spark plug – Make DENSO
NGK
– Gap
– ELECTRICAL SYSTEM
Battery Open voltage at 20C (68F):
Charging rates
9.9 L (10.5 qt., 8.7 lmp.qt.)
“Toyota Genuine Long Life Coolant” or equivalent
With ethylene–glycol type coolant for a proper corrosion
protection of aluminum components
Do not use alcohol type antifreeze or plain water alone.
SK20R11
IFR6A11
1.1 mm (0.043 in.)
12.8 V Fully charged
12.4 V Half charged
12.0 V Discharged
[Voltage that is checked 20 minutes after the key is removed
with all the lights turned off]
5A max.
290
Page 48
ENGINE
FUEL
Fuel type
Y our vehicle must use only unleaded gasoline.
To help prevent gas station mixups, your Lexus has a smaller
fuel tank opening. The special nozzle on pumps with unleaded
fuel will fit it, but the larger standard nozzle on pumps with
leaded gas will not.
At a minimum, the gasoline you use should meet the
specifications of ASTM D4814 in the U.S.A. and CGSB
3.5–M93 in Canada.
NOTICE
Do not use leaded gasoline. Use of leaded gasoline will
cause the three–way catalytic converter to lose its
effectiveness and the emission control system to
function improperly. Also, this can increase
maintenance costs.
Octane rating
Select premium unleaded gasoline with an Octane Rating
of 91 (Research Octane Number 96) or higher for optimum
engine performance. However, if such premium type
cannot be obtained, you may temporarily use unleaded
gasoline with an Octane Rating as low as 87 (Research
Octane Number 91).
Use of unleaded fuel with an octane number or rating lower
than stated above will cause persistent heavy knocking. If
severe, this will lead to engine damage.
If your engine knocks ...
If you detect heavy knocking even when using the
recommended fuel, or if you hear steady knocking while
holding a steady speed on level roads, consult your Lexus
dealer.
However, now and then, you may notice light knocking for a
short time while accelerating or driving up hills. This is no
cause for concern.
Gasoline containing detergent additives
Lexus recommends the use of gasoline that contains
detergent additives to avoid build–up of engine deposits.
However, all gasoline sold in the U.S. contains detergent
additives to keep clean and/or clean intake systems.
291
Page 49
ENGINE
Quality gasoline
Automotive manufacturers in the U.S., Europe and Japan
have developed a specification for quality fuel named
World–Wide Fuel Charter (WWFC) that is expected to be
applied world wide. The WWFC consists of three
categories that depend on required emission levels. In the
U.S., category 3 has been adopted. The WWFC improves
air quality by providing for better emissions in vehicle
fleets, and customer satisfaction through better vehicle
performance.
Cleaner burning gasoline
Cleaner burning gasoline, including reformulated
gasoline that contains oxygenates such as ethanol or
MTBE is available in many areas.
Lexus recommends the use of cleaner burning gasoline and
appropriately blended reformulated gasoline. These types of
gasoline provide excellent vehicle performance, reduce
vehicle emissions, and improve air quality.
Oxygenates in gasoline
Lexus allows the use of oxygenate blended gasoline
where the oxygenate content is up to 10% ethanol or 15%
MTBE. If you use gasohol in your Lexus, be sure that it has
an octane rating no lower than 87.
Lexus does not recommend the use of gasoline containing
methanol.
Gasoline containing MMT
Some gasoline contain an octane enhancing additive
called MMT (Methylcyclopentadienyl Manganese
Tricarbonyl).
Lexus does not recommend the use of gasoline that contains
MMT. If fuel containing MMT is used, your emission control
system may be adversely affected. The Malfunction Indicator
Lamp on the instrument cluster may come on. If this happens,
contact your Lexus dealer for service.
Gasoline quality
In a very few cases, you may experience driveability problems
caused by the particular gasoline that you are using. If you
continue to have unacceptable driveability, try changing
gasoline brands. If this does not rectify your problem, then
consult your Lexus dealer.
NOTICE
Do not use gasohol other than stated above. It will
cause fuel system damage or vehicle performance
problems.
If drivability problems are encountered (poor hot
starting, vaporizing, engine knock, etc.), discontinue
its use.
292
Page 50
ENGINE
Take care not to spill gasohol during refueling.
Gasohol may cause paint damage.
Fuel tank capacity
75 L (19.8 gal., 16.5 lmp.gal.)
FUEL PUMP SHUT OFF SYSTEM
The fuel pump shut off system stops supplying fuel to the
engine to minimize the risk of fuel leakage when the engine
stalls or an airbag inflates upon collision. To restart the engine
after the fuel pump shut off system activates, turn the ignition
switch to “ACC” or “LOCK” once and start it.
CAUTION
Inspect the ground under the vehicle before restarting
the engine. If you find that liquid has leaked onto the
ground, it is the fuel system that has been damaged and
it is in need of repair. In this case, do not restart the
engine.
293
Page 51

ENGINE
FACTS ABOUT ENGINE OIL
CONSUMPTION
Functions of engine oil
Engine oil has the primary function of lubricating and cooling
the inside of the engine, and plays a major role in maintaining
the engine in proper working order.
Engine oil consumption
It is normal that an engine should consume some engine
oil during normal engine operation. The causes of oil
consumption in a normal engine are as follows.
Oil is used to lubricate pistons, piston rings and cylinders.
A thin film of oil is left on the cylinder wall when a piston
moves downwards in the cylinder. High negative pressure
generated when the vehicle is decelerating sucks some of
this oil into the combustion chamber. This oil as well as
some part of t h e o i l film left on the cylinder wall is burned by
the high temperature combustion gases during the
combustion process.
Oil is also used to lubricate the stems of the intake valves.
Some of this oil is sucked into the combustion chamber
together with the intake air and is burned along with the fuel.
High temperature exhaust gases also burn the oil used to
lubricate the exhaust valve stems.
The amount of engine oil consumed depends on the
viscosity of the oil, the quality of the oil and the way the
vehicle is driven.
More oil is consumed by high–speed driving and frequent
acceleration and deceleration.
A new engine consumes more oil, since its pistons, piston rings
and cylinder walls have not become conditioned.
When judging the amount of oil consumption, keep in
mind that the oil may have become diluted, making it
difficult to judge the true level accurately.
For example, if a vehicle is used for repeated short trips and
consumes a normal amount of oil, the dipstick may not show
any drop in the oil level at all, even after 1000 km (600 miles)
or more. This is because the oil is gradually becoming diluted
with fuel or moisture, making it appear that the oil level has not
changed.
The diluting ingredients evaporate out when the vehicle is then
driven at high speeds, as on an expressway , making it appear
that oil is excessively consumed after driving at high speeds.
294
Page 52
ENGINE
Importance of engine oil level check
One of the most important points in proper vehicle
maintenance is to keep the engine oil at the optimum level so
that oil function will not be impaired. Therefore, it is essential
that the oil level be checked regularly. Lexus recommends that
the oil level be checked every time you refuel the vehicle.
NOTICE
Failure to check the oil level regularly could lead to
serious engine trouble due to insufficient oil.
For detailed information on oil level check, see ”Checking the
engine oil level” on page 296.
USED ENGINE OIL
CAUTION
Used engine oil contains potentially harmful
contaminants which may cause skin disorders such
as inflammation or skin cancer, so care should be
taken to avoid prolonged and repeated contact with
it. To remove used engine oil from your skin, wash
thoroughly with soap and water.
Do not leave used oil within the reach of children.
Dispose of used oil and used oil filters only in a safe
and acceptable manner. Do not dispose of used oil
and used oil filters in household trash, in sewers or
onto the ground. Call your Lexus dealer or a service
station for information concerning recycling or
disposal.
295
Page 53
ENGINE
CHECKING THE ENGINE OIL LEVEL
61sa04
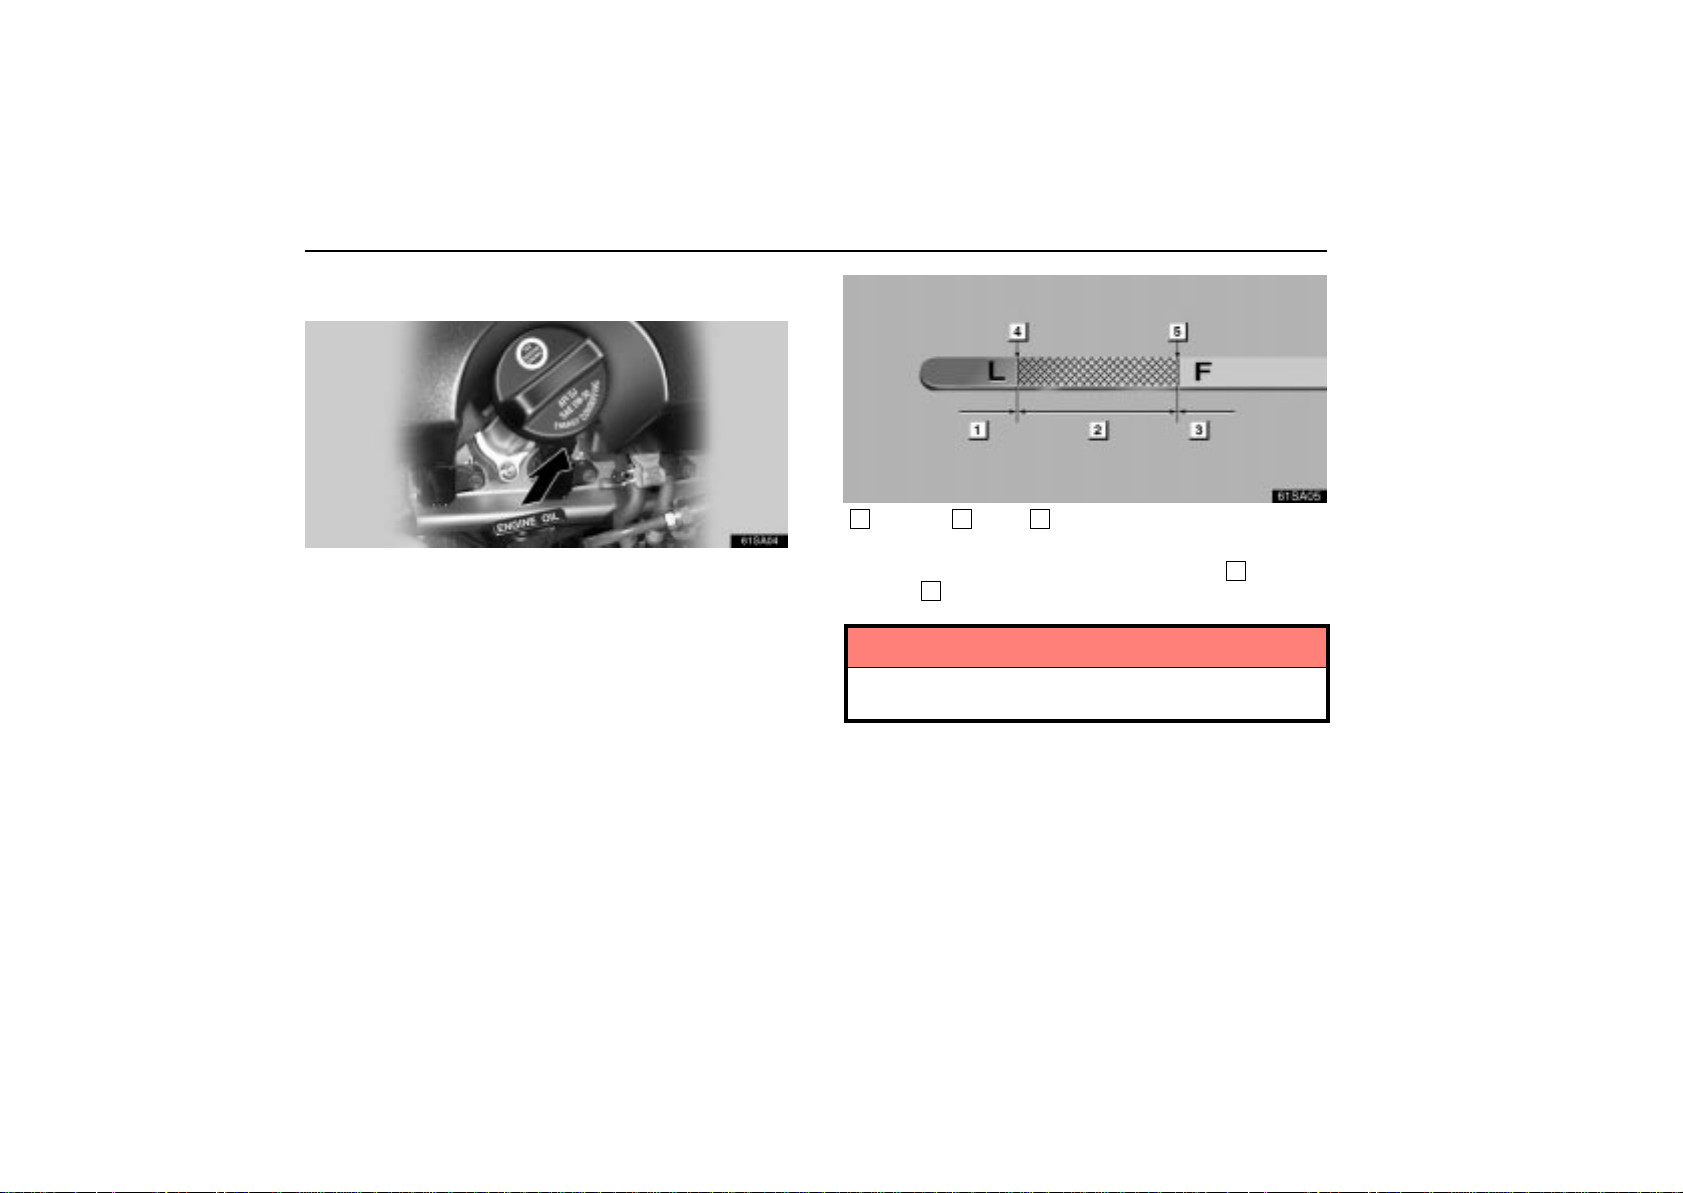
With the engine at operating temperature and turned off,
check the oil level on the dipstick.
1. To get a true reading, the vehicle should be on a level spot.
After turning off the engine, wait a few minutes for the oil to
drain back into the bottom of the engine.
2. Pull the dipstick out, hold a rag under the end and wipe it
clean.
3. Standing up on the left side of the vehicle, reinsert the
dipstick in the direction so that the ”ENGINE OIL” on top should
be read correctly and push it in as far as it will go, or the reading
will not be correct.
61sa05
1
Add oil 2O.K. 3Too full
4. Pull the dipstick out and look at the oil level while holding a
rag under the end. If it is between the full line (
low line (
4
), it is O.K.
NOTICE
Be careful not to drop the engine oil on the vehicle
components.
5
) and the
296
Page 54
61sa06
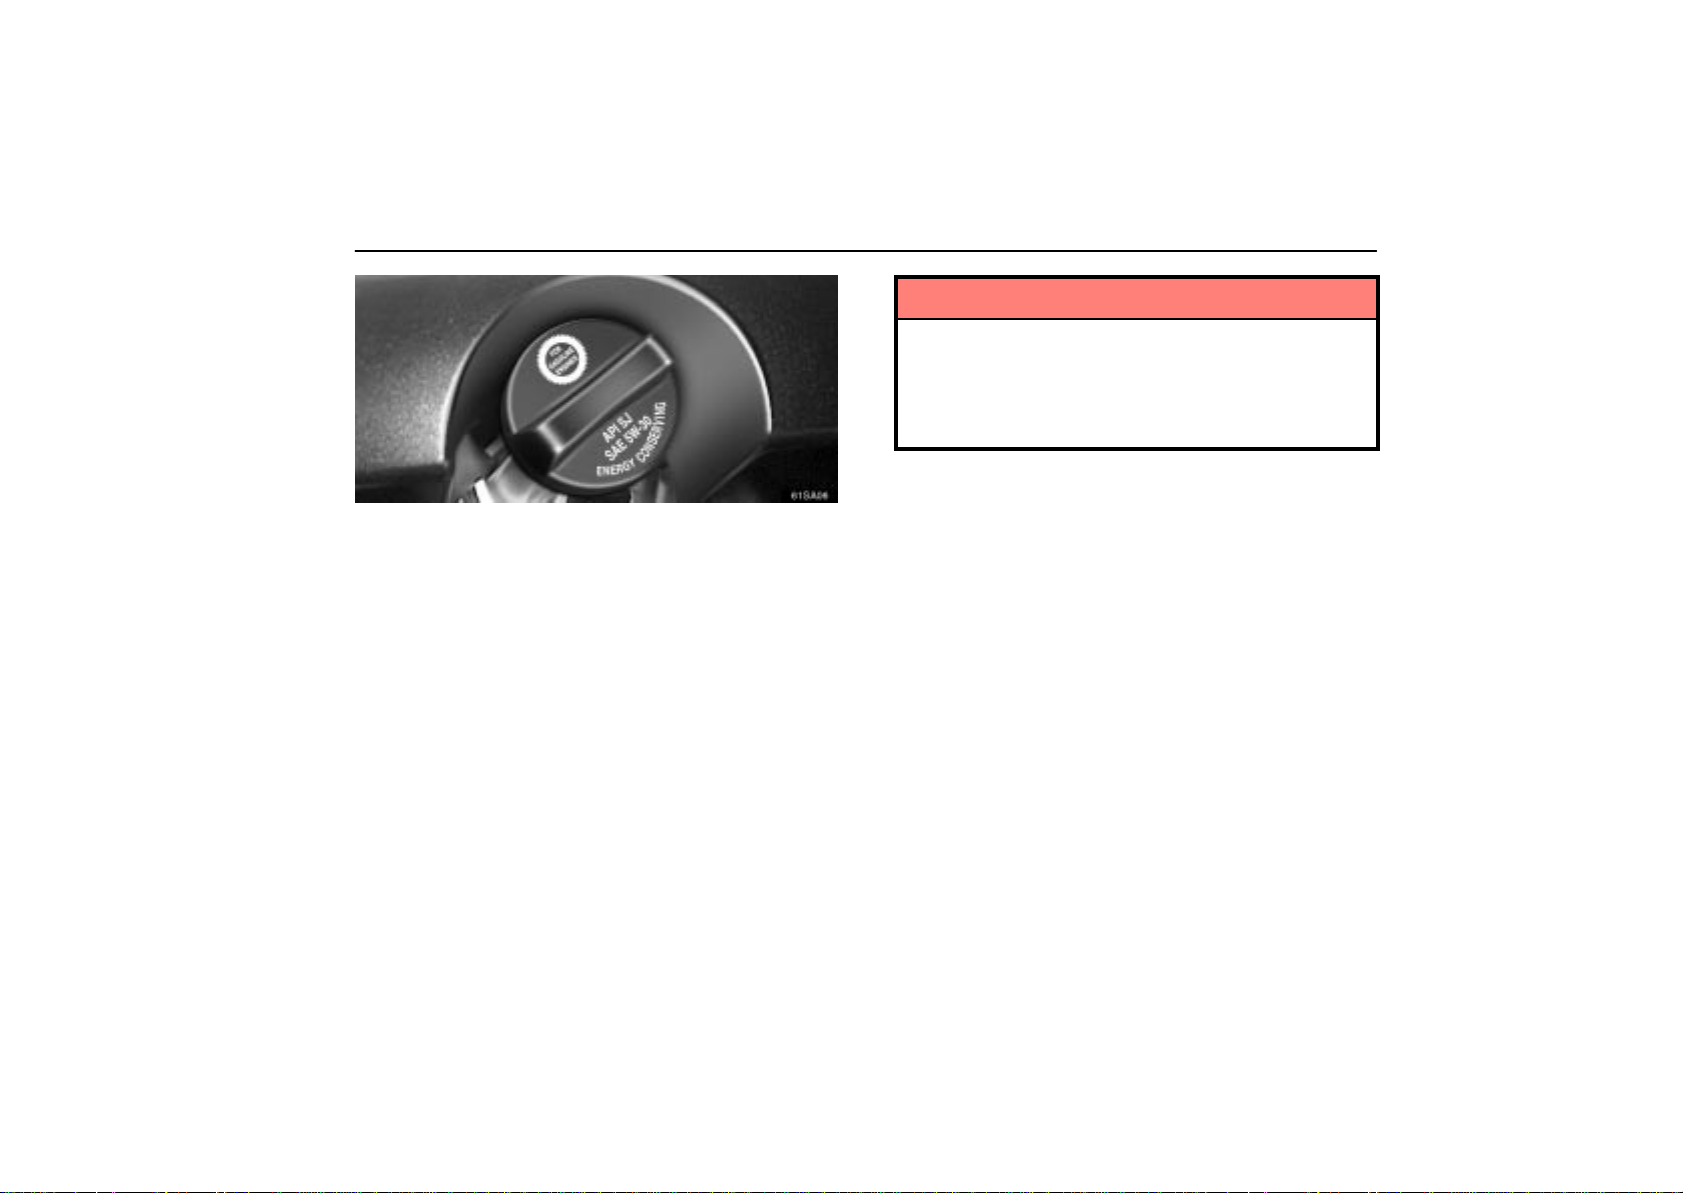
If the oil level is below or only slightly above the low level
mark, add engine oil of the same type as already in the
engine.
Remove the oil filler cap and add engine oil a little at a time,
checking the dipstick. We recommend that you use a funnel
when adding oil. The approximate quantity of oil needed to fill
between the low level mark and the full level mark on the
dipstick is indicated below for reference.
When the level reaches within the correct range, return the
filler cap and turn the cap clockwise until you hear a click.
Oil quantity. L (qt., lmp. qt.) 1.5 (1.6, 1.3)
ENGINE
NOTICE
Be careful not to spill the engine oil on the vehicle
components.
Avoid overfilling, or the engine could be damaged.
Check the oil level on the dipstick once again after
adding the oil.
297
Page 55
ENGINE
Engine oil selection
“Toyota Genuine Motor Oil” is filled in your Lexus vehicle. Use
Lexus approved “Toyota Genuine Motor Oil” or equivalent to
satisfy the following grade and viscosity.
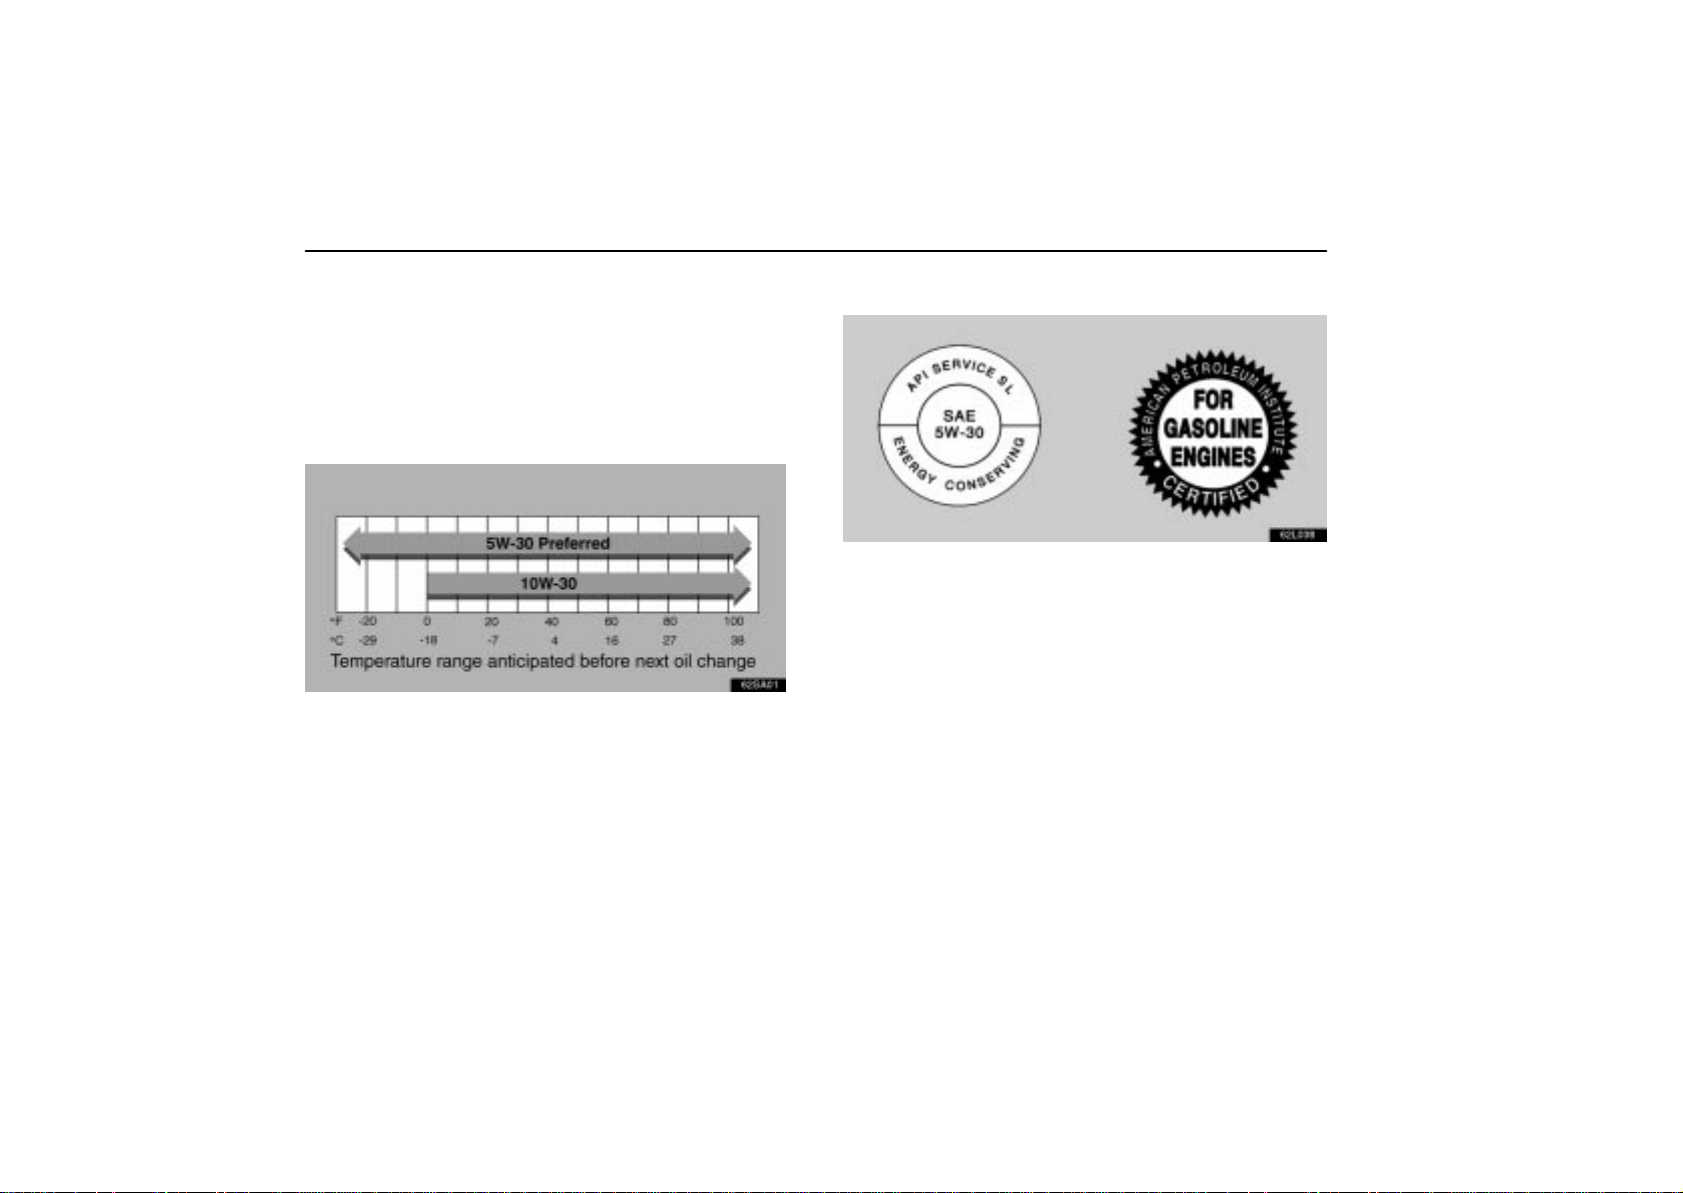
Oil grade: API grade SJ “Energy–Conserving”, SL
“Energy–Conserving” or ILSAC multigrade engine oil.
Recommended viscosity (SAE):
62sa01
SAE 5W–30 is the best choice for your vehicle, for good
fuel economy, and good starting in cold weather.
If you use SAE 10W–30 engine oil in extremely low
temperatures, the engine may become difficult to start, so
SAE 5W–30 engine oil is recommended.
Oil identification marks
62L038
API Service Symbol
Either or both API registered marks are added to some oil
containers to help you select the oil you should use.
The API Service Symbol is located anywhere on the outside
of the container.
The top portion of the label shows the oil quality by API
(American Petroleum Institute) designation such as SL.
The center portion of the label shows the SAE viscosity
grade such as SAE 5W–30. ”Energy–Conserving”, shown
in the lower portion, indicates that the oil has fuel–saving
capabilities.
The ILSAC (International Lubricant Standardization and
Approval Committee) Certification Mark is displayed on the
front of the container.
ILSAC Certification Mark
298
Page 56
ENGINE
To ensure the best possible lubrication performance for your
engine, the “Toyota Genuine Motor Oil” range is available,
which has been specifically tested and approved for all Lexus
engines.
Please contact your Lexus dealer for further details of the
“Toyota Genuine Motor Oil” range.
CHECKING THE ENGINE COOLANT
LEVEL
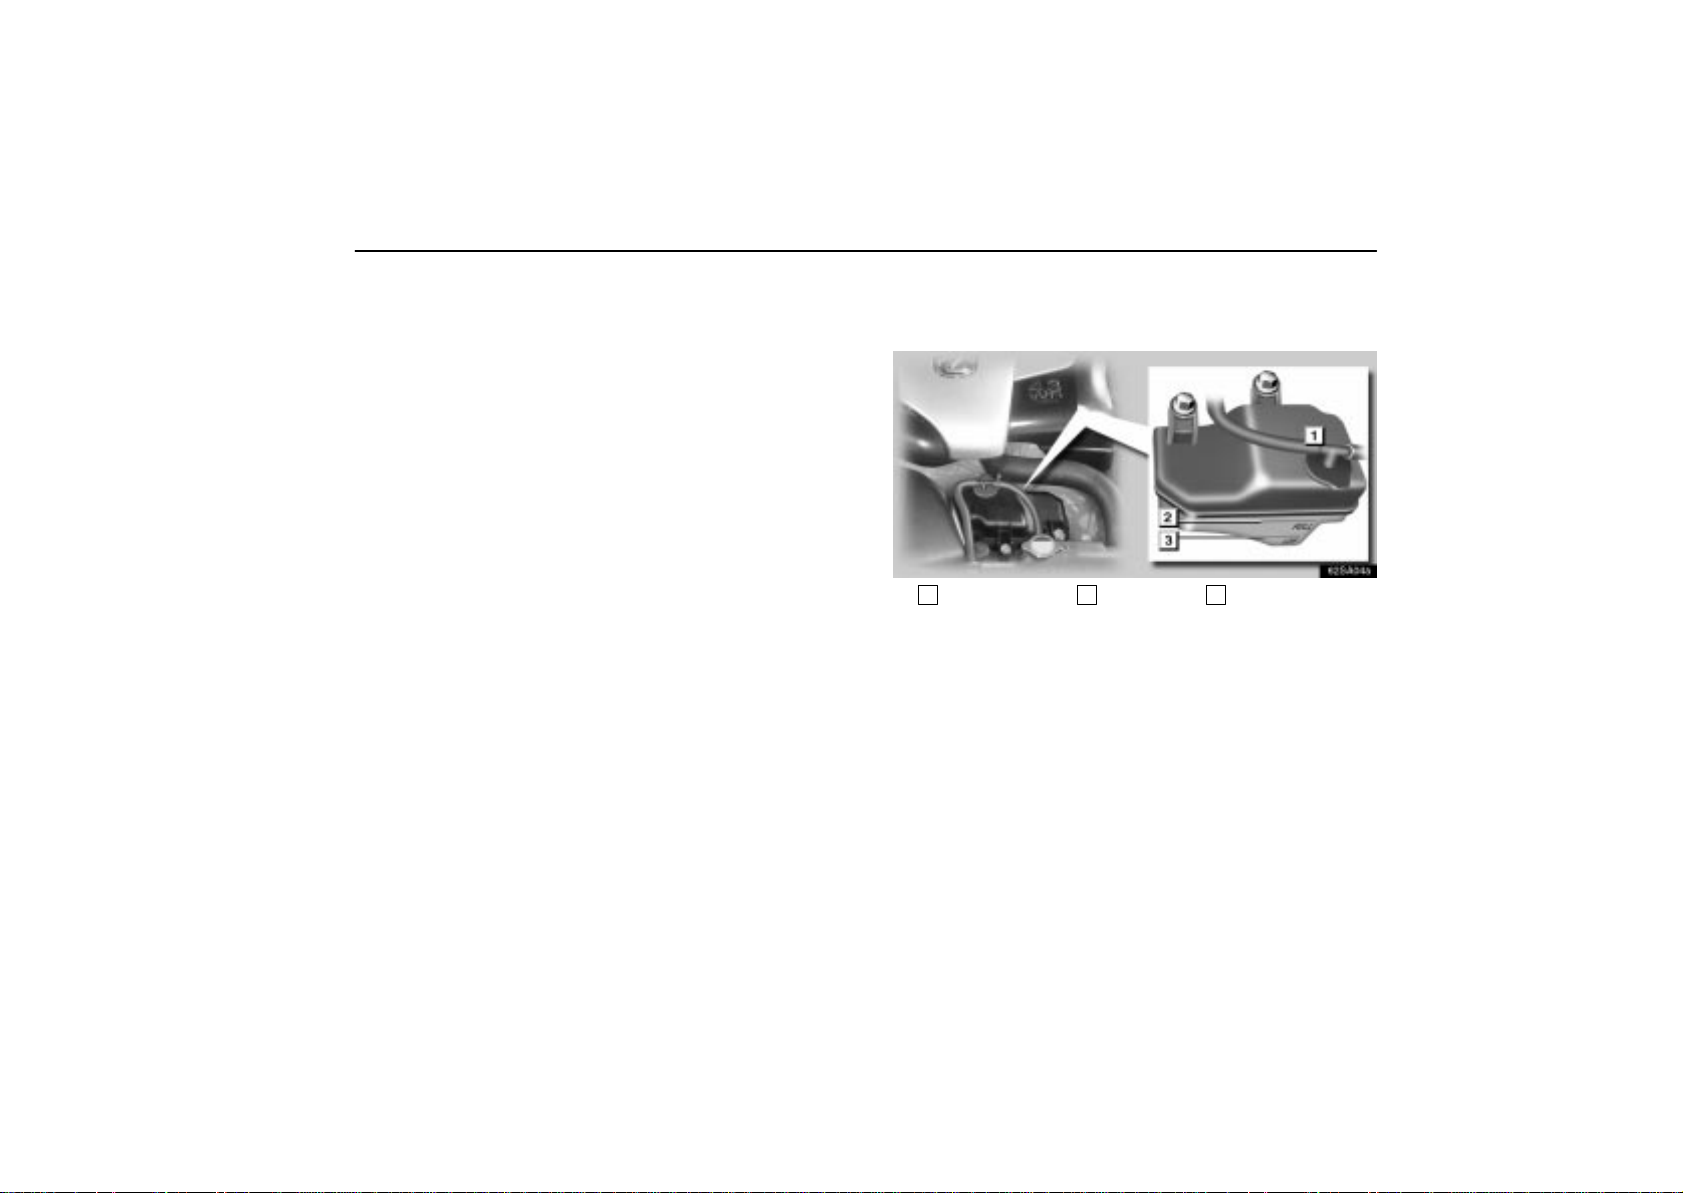
62sa04a
1
Reservoir cap 2Upper line 3Lower line
Look at the see–through coolant reservoir when the
engine is cold. The coolant level is satisfactory if it is
between the”FULL” and ”LOW” lines on the reservoir. If
the level is low, add ethylene–glycol type coolant for a
proper corrosion protection of aluminum components.
The coolant level in the reservoir will vary with engine
temperature. However, if the level is on or below the ”LOW”
line, add coolant. Bring the level up to the ”FULL” line.
Always use ethylene–glycol type coolant for a proper corrosion
protection of aluminum components. See information in the
next column.
299
Page 57
ENGINE
If the coolant level drops within a short time after replenishing,
there may be a leak in the system. Visually check the radiator,
hoses, engine coolant filler cap, radiator cap and drain cock
and water pump.
If you can find no leak, have your Lexus dealer test the cap
pressure and check for leaks in the cooling system.
CAUTION
To prevent burning yourself, do not remove the radiator
cap when the engine is hot.
Coolant type selection
Use of improper coolants may damage your engine cooling
system. Your coolant must contain ethylene–glycol type
coolant for a proper corrosion protection of your engine that
contains aluminum components. We have used “Toyota
Genuine Long Life Coolant” in your Lexus vehicle. In order to
avoid technical problems, we strongly recommend using
“Toyota Genuine Long Life Coolant” or equivalent.
In addition to preventing freezing and subsequent damage to
the engine, this type of coolant will also prevent corrosion.
Further supplemental inhibitors or additives are neither
needed nor recommended.
Read the coolant container for information on freeze
protection. Follow the manufacturer’s directions for how much
to mix with plain water (preferably demineralized water or
distilled water). The total capacity of the cooling system is
given on pages 290.
We recommend to use 50% solution for your Lexus, to provide
protection down to about –35C (–31F). When it is extremely
cold, to provide protection down to about –50C (–58F), 60%
solution is recommended. Do not use more than 70% solution
for better coolant performance.
NOTICE
Do not use alcohol type antifreeze or plain water alone.
300
Page 58
ENGINE
The engine cooling system is integral to maximizing
performance of your Lexus vehicle. In line with this, it is
strongly recommended that you use “Toyota Genuine Long
Life Coolant” for protecting the system, as it is an
ethylene–glycol based premium antifreeze coolant with
excellent corrosion protection properties that has been
specifically formulated for use in Lexus vehicles.
Please contact your Lexus dealer for further details of the
“Toyota Genuine Long Life Coolant” range.
CHECKING THE RADIATOR AND
CONDENSER
If either of the above parts are extremely dirty or you are not
sure of their condition, take your vehicle to Lexus dealer.
CAUTION
To prevent yourself from burning, be careful not to
touch the rad i a to r o r condenser when the engine is hot.
NOTICE
To prevent damage to the radiator and condenser, do
not perform the work by yourself.
301
Page 59
ENGINE
SPARK PLUGS
62r031c
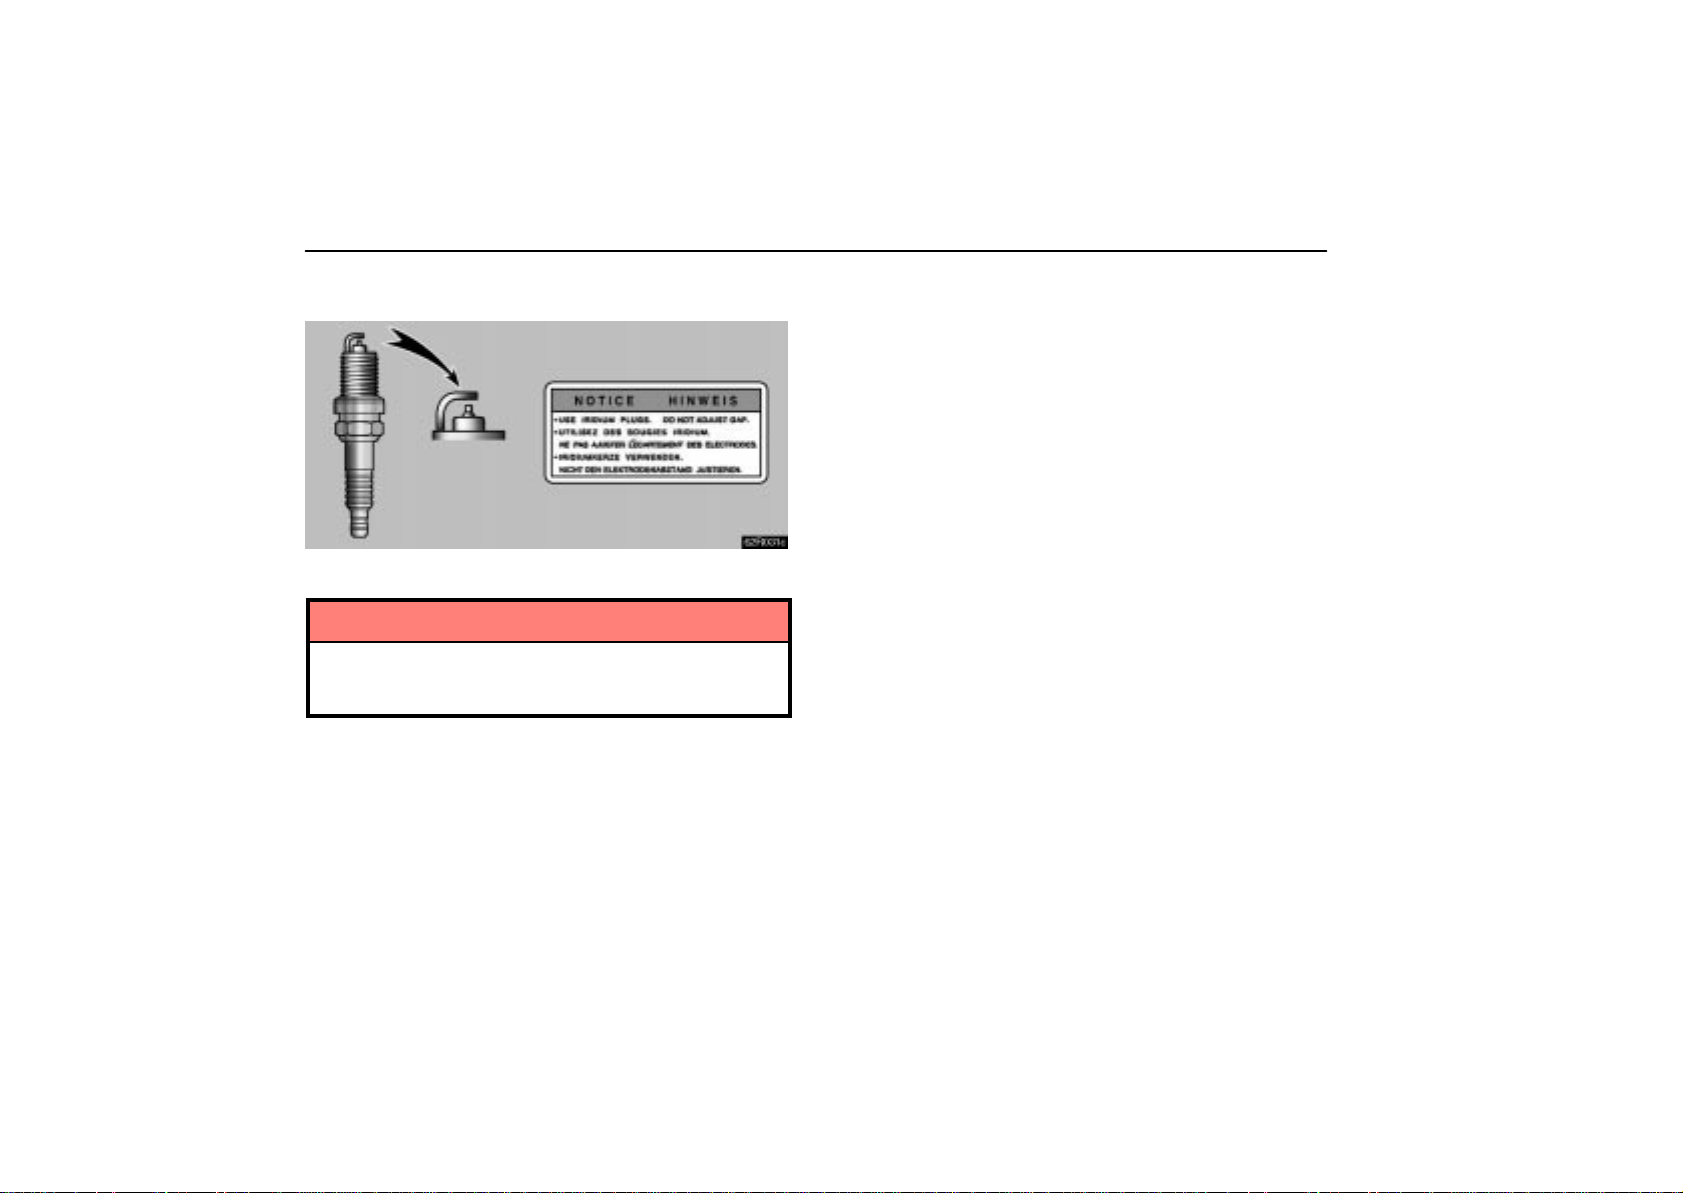
Your engine is fitted with iridium–tipped spark plugs.
NOTICE
Use only iridium–tipped spark plugs and do not adjust
gaps for your engine performance and smooth
drivability.
302
Page 60

SECTION 6 –
SERVICE PROCEDURES AND
SPECIFICATIONS
Introduction
Vehicle identification 280. . . . . . . . . . . . . . . . . . . . . . . . . . . . . . . . . . . . . .
Engine compartment overview 281. . . . . . . . . . . . . . . . . . . . . . . . . . . . .
Do–it–yourself service precautions 282. . . . . . . . . . . . . . . . . . . . . . . . .
Positioning the jack 283. . . . . . . . . . . . . . . . . . . . . . . . . . . . . . . . . . . . . .
Parts and tools 284. . . . . . . . . . . . . . . . . . . . . . . . . . . . . . . . . . . . . . . . . .
1
279
Page 61
INTRODUCTION
VEHICLE IDENTIFICATION
61sa01
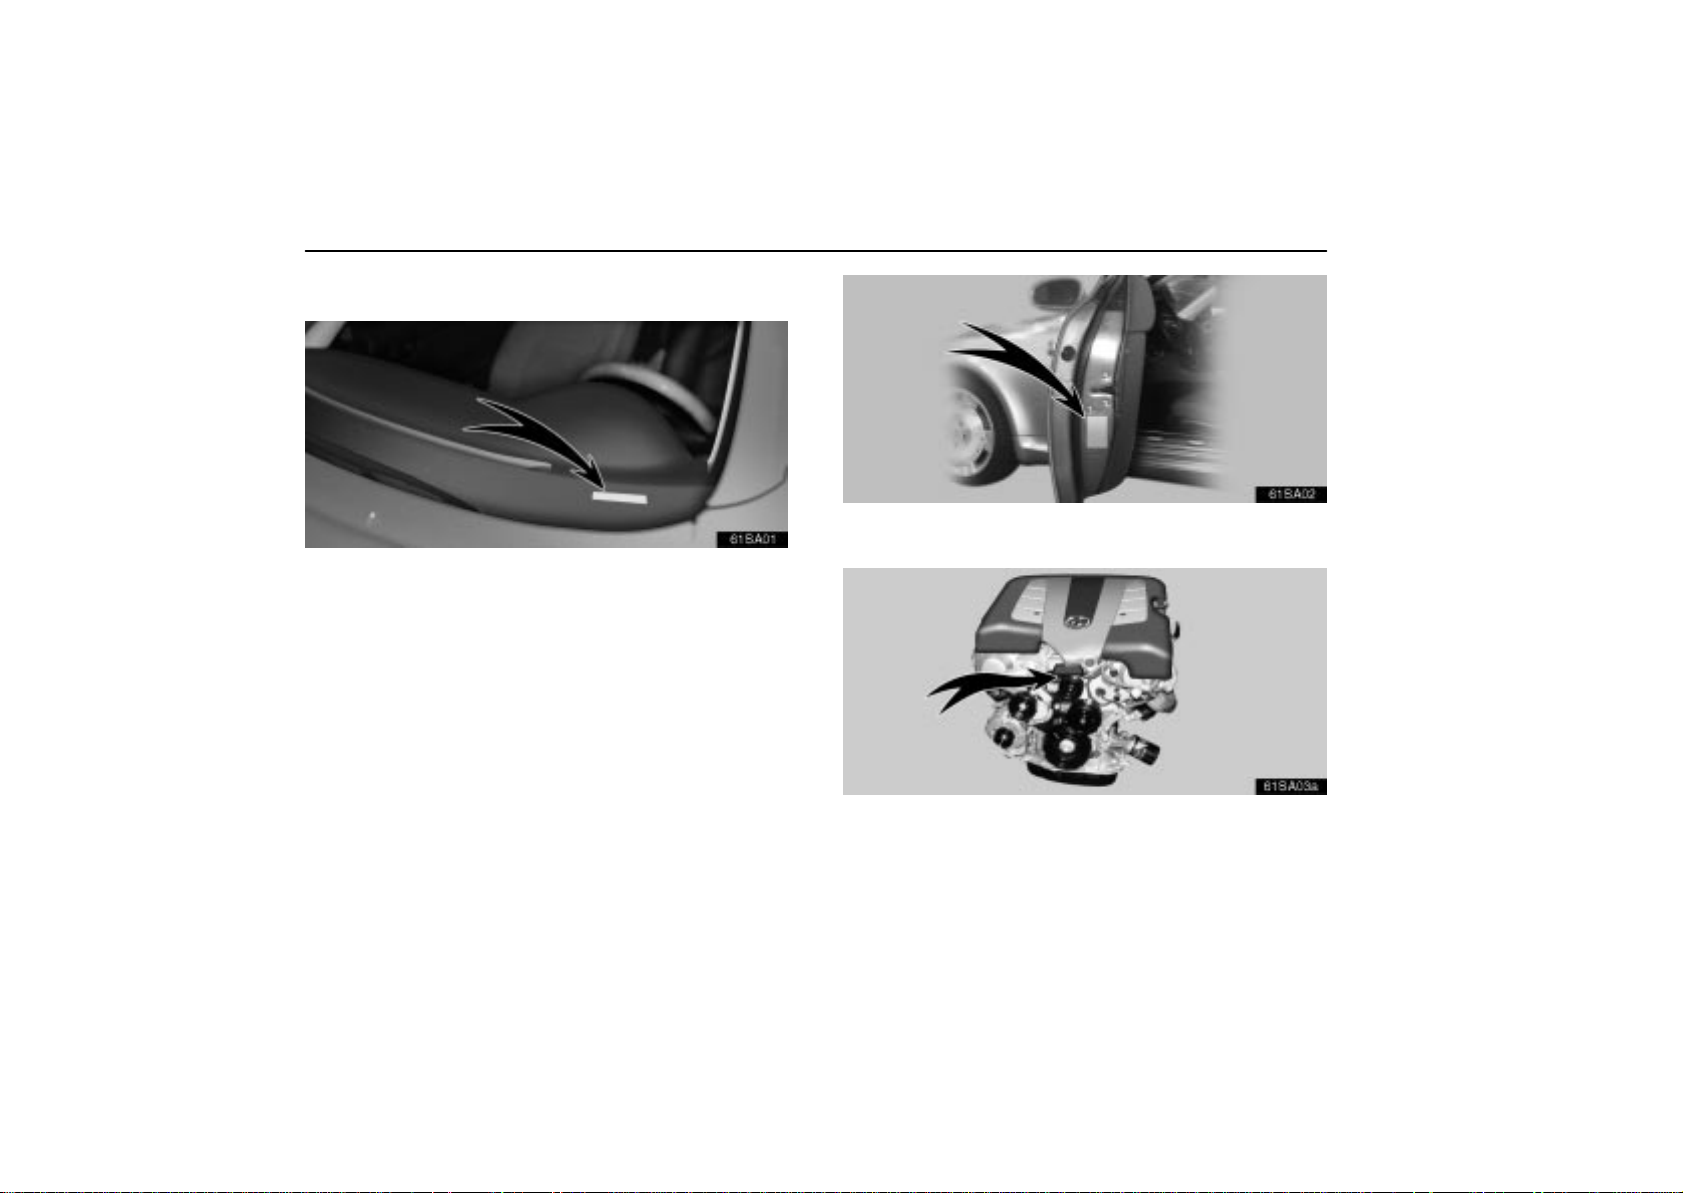
The vehicle identification number (VIN) is the legal
identifier for your vehicle. This number is on the left top
of the instrument panel and can be seen through the
windshield from outside.
This is the primary identification number for your Lexus. It is
used in registering the ownership of your vehicle.
61sa02
The vehicle identification number (VIN) is also on the
Certification Label.
61sa03a
The engine number is stamped on the engine block as
shown.
280
Page 62
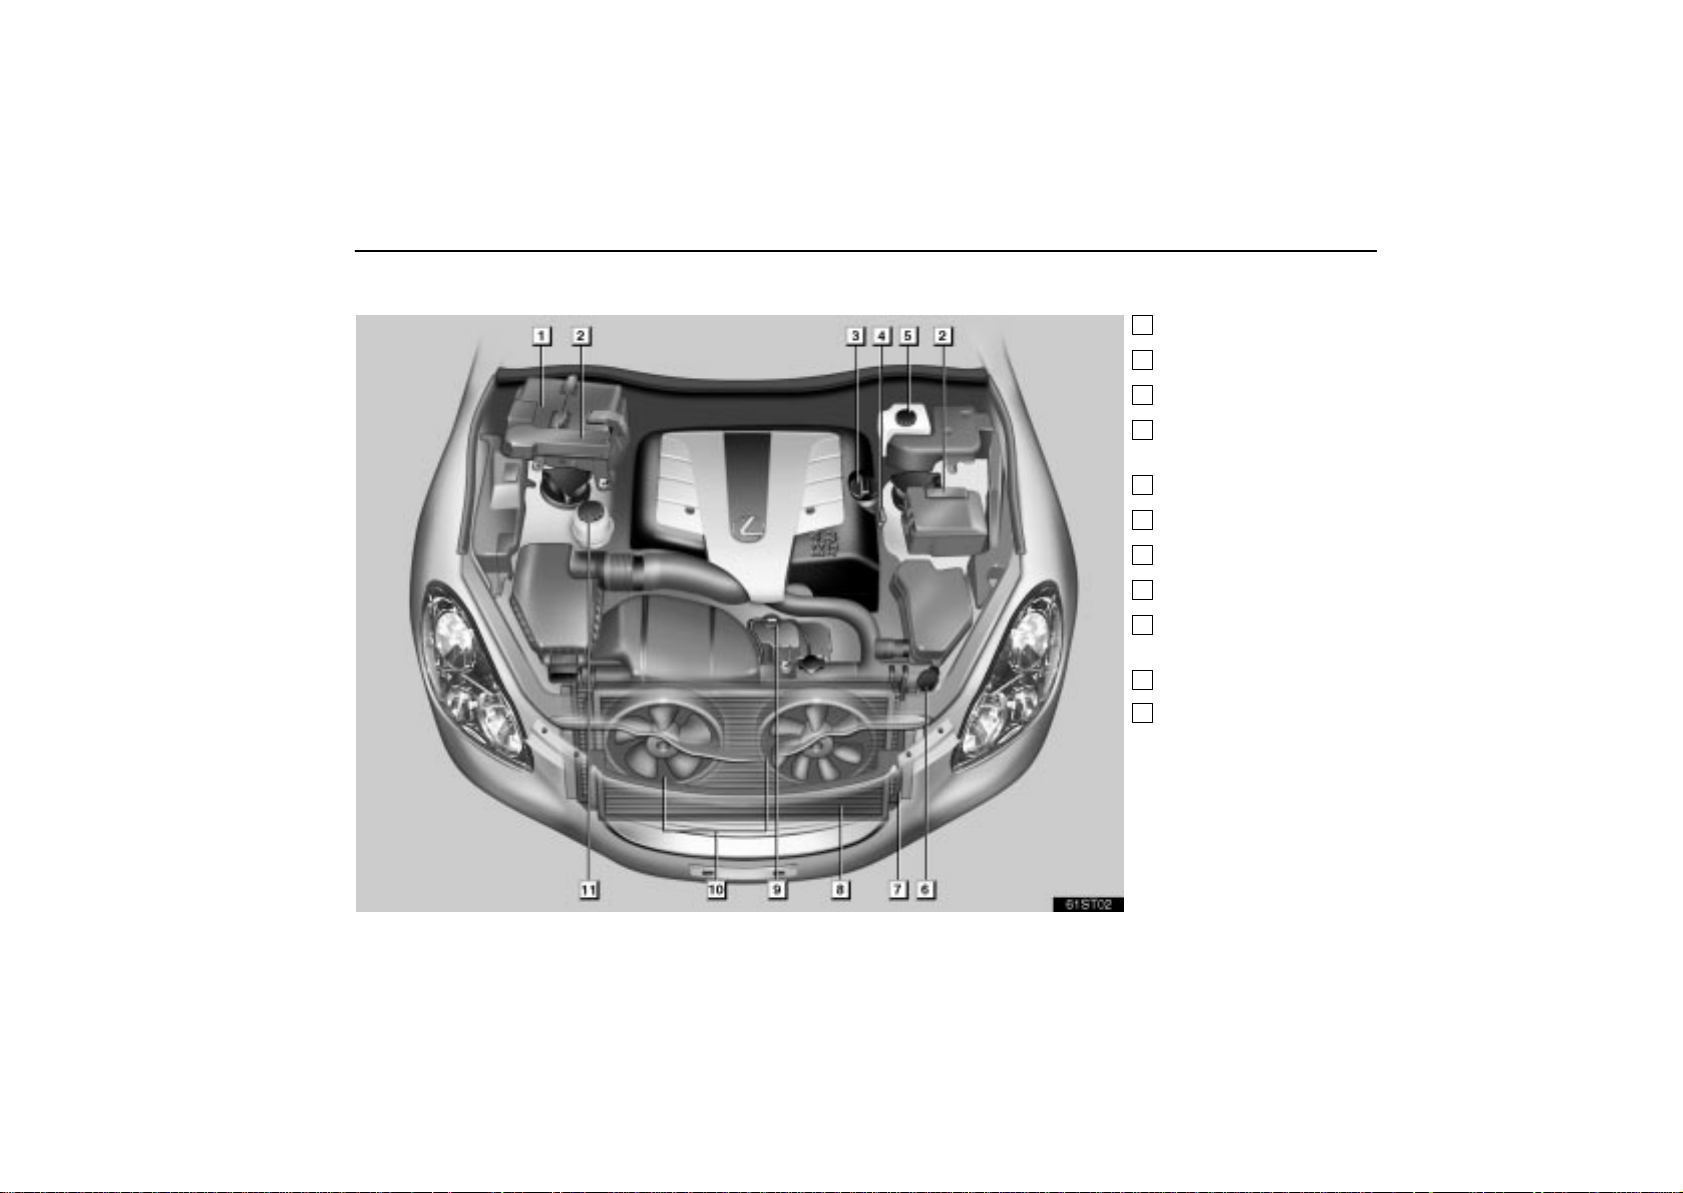
ENGINE COMPARTMENT OVERVIEW
61st02
INTRODUCTION
1
Battery
2
Fuse box
3
Engine oil filler cap
4
Engine oil level
dipstick
5
Brake fluid reservoir
6
Washer fluid tank
7
Radiator
8
Condenser
9
Engine coolant
reservoir
10
Electric cooling fans
11
Power steering fluid
reservoir
281
Page 63
INTRODUCTION
DO–IT–YOURSELF SERVICE
PRECAUTIONS
If you perform maintenance yourself, be sure to follow the
correct procedure given in this Section.
You should be aware that improper or incomplete servicing
may result in operating problems.
Performing do–it–yourself maintenance during the warranty
period may affect your warranty coverage. Read the separate
Lexus Warranty statement for details and suggestions.
This Section gives instructions only for those items that are
relatively easy for an owner to perform. As explained in
Section 5, there are still a number of items that must be
performed by a qualified technician with special tools.
For information on tools and parts for do–it–yourself
maintenance, see ”Parts and tools” on page 284.
Utmost care should be taken when working on your vehicle to
prevent accidental injury . Here are a few precautions that you
should be especially careful to observe:
CAUTION
When the engine is running, keep hands, clothing,
and tools away from the moving fan and engine drive
belt. (Removing rings, watches, and ties is
advisable.)
Right after driving, the engine compartment – the
engine, radiator, exhaust manifold and power
steering fluid reservoir, etc. – will be hot. So be
careful not to touch them. Oil and other fluids may
also be hot.
Do not smoke, cause sparks or allow open flames
near fuel or the battery. Their fumes are flammable.
Do not get under your vehicle with just the body jack
supporting it. Always use automotive jack stands or
other solid supports.
Be sure the ignition is off if you work near the electric
cooling fan or radiator grille. With the ignition on, the
electric cooling fan may automatically start to run if
the air conditioning is on and/or if the coolant
temperature is high.
Use eye protection whenever you work on or under
your vehicle where you may be exposed to flying or
falling material, fluid spray, etc.
Be extremely cautious when working on the battery.
It contains poisonous and corrosive sulfuric acid.
Warning: Battery posts, terminals and related
accessories contain lead and lead compounds,
chemicals known to the State of California to cause
cancer and reproductive harm. Wash hands after
handling.
282
Page 64
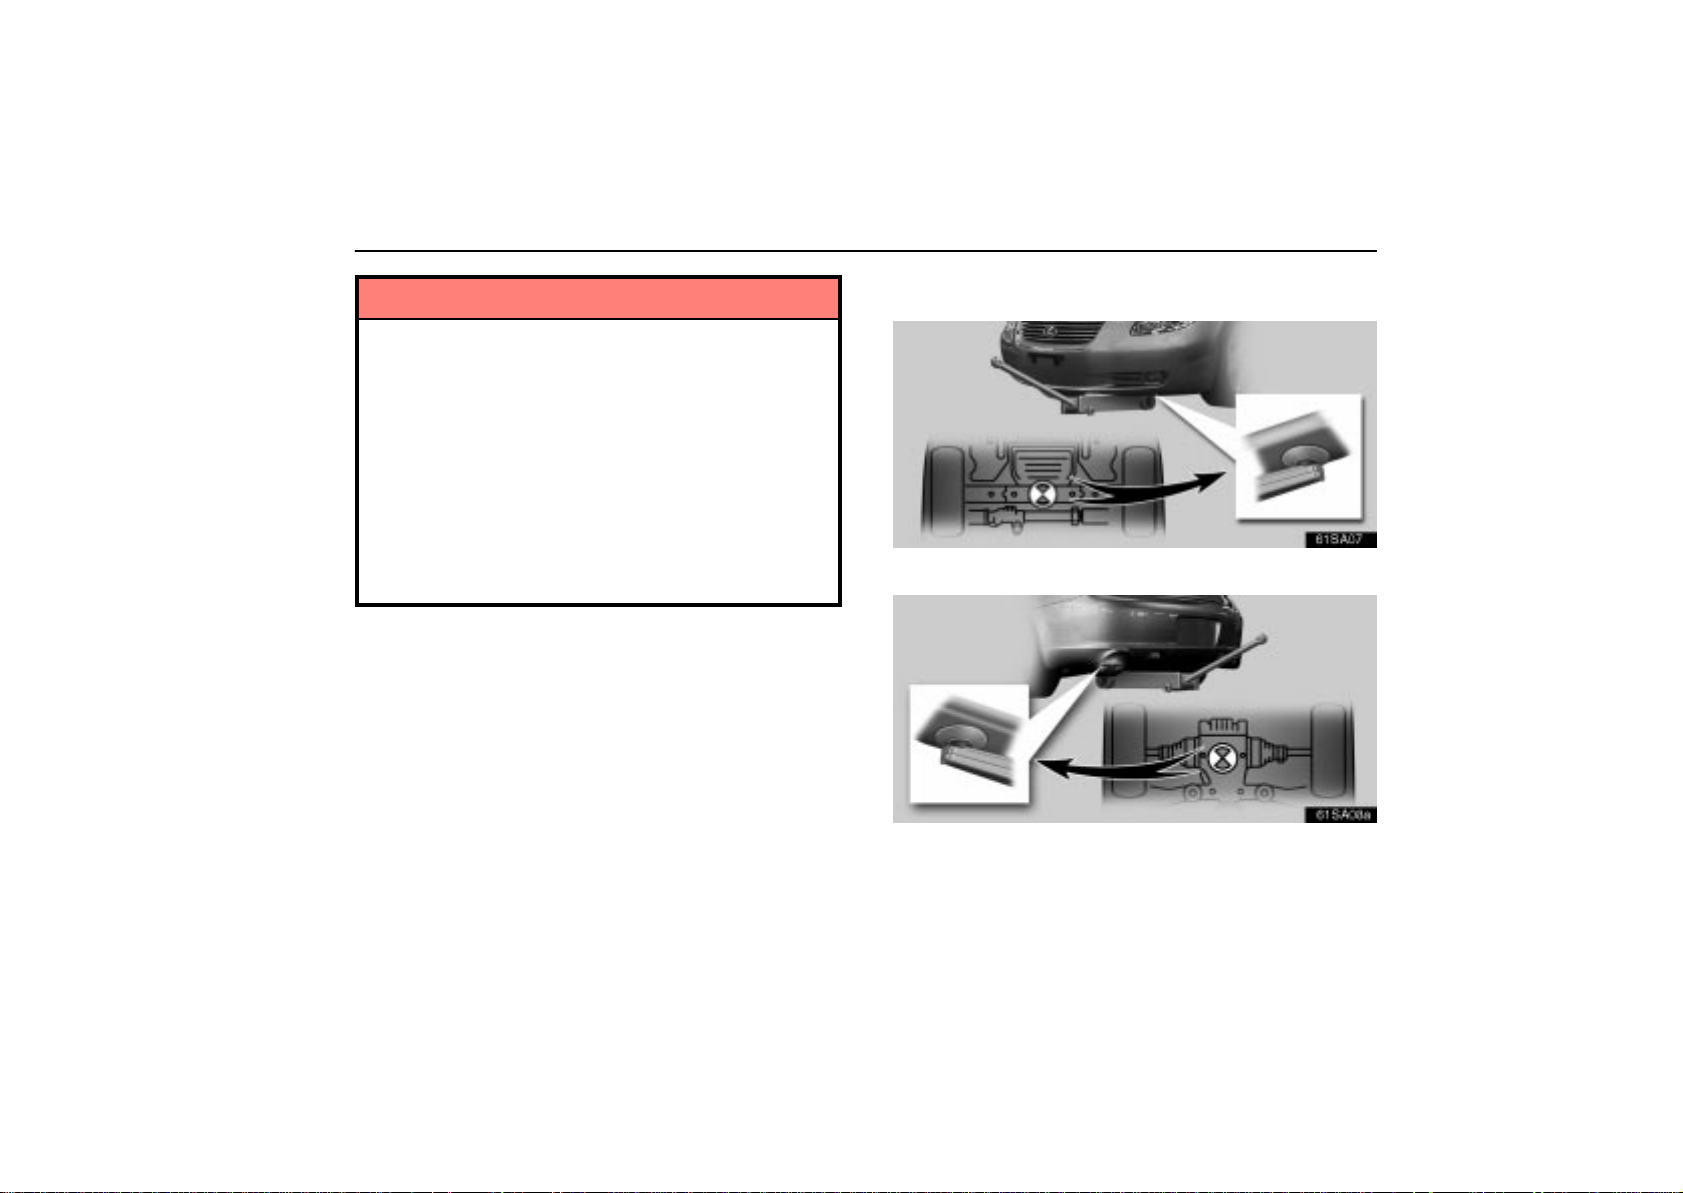
INTRODUCTION
NOTICE
Remember that battery and ignition cables carry high
currents or voltages. Be careful of accidentally
causing a short circuit.
Before closing the engine hood, check to see that you
have not forgotten any tools, rags, etc.
Do not drive with the air cleaner removed, or
excessive engine wear could result. Also backfiring
could cause a fire in the engine compartment.
Do not overfill automatic transmission fluid, or the
transmission could be damaged.
Be careful not to scratch the glass surface with the
wiper frame.
POSITIONING THE JACK
61sa07
Front
61sa08a
Rear
When jacking up your vehicle with the jack, position the
jack correctly as shown in the illustrations.
283
Page 65
INTRODUCTION
CAUTION
When jacking, be sure to observe the following to
reduce the possibility of personal injury:
Follow jacking instructions.
Do not put any part of your body under the vehicle
supported by the jack. Personal injury may occur.
Do not start or run the engine while your vehicle is
supported by the jack.
Stop the vehicle on a level firm ground, firmly set the
parking brake and put the transmission in “P”.
Make sure to set the jack properly in the jack point.
Raising the vehicle with jack improperly positioned
will damage the vehicle or may allow the vehicle to fall
off the jack and cause personal injury.
Never get under the vehicle when the vehicle is
supported by the jack alone; use vehicle support
stands.
Do not raise the vehicle with someone in the vehicle
When raising the vehicle, do not put an object on or
under the jack.
NOTICE
Make sure to place the jack correctly, or your vehicle
may be damaged.
PARTS AND TOOLS
Here is a list of parts and tools you will need to perform
do–it–yourself maintenance. Remember all Lexus parts are
designed in metric sizes, so your tools must be metric.
Checking the engine oil level
Parts (if level is low):
“Toyota Genuine Motor Oil” or equivalent
Oil grade: API grade SJ “Energy–Conserving”, SL
“Energy–Conserving” or ILSAC multigrade engine oil. For
recommended oil viscosity, see page 298.
Tools:
Rag or paper towel
Funnel (only for adding oil)
Checking the engine coolant level
Parts (if level is low):
“Toyota Genuine Long Life Coolant” or equivalent
See ”Checking the engine coolant level” on page 299 for
instructions.
Demineralized or distilled water
Tools:
Funnel (only for adding coolant)
284
Page 66

INTRODUCTION
Checking brake fluid
Parts (if level is low):
FMVSS No. 116 DOT 3 or SAE J1703 brake fluid
Tools:
Funnel (only for adding fluid)
Checking power steering fluid
Parts (if level is low):
Automatic transmission fluid DEXRON
Tools:
Rag or paper towel
Funnel (only for adding fluid)
II or III
Checking battery condition
Tools:
Warm water
Baking soda
Grease
Conventional wrench (for terminal clamp bolts)
Checking and replacing the blade type fuses
Parts (if replacement is necessary):
Fuse with same amperage rating as original
Checking the cartridge type fuses
Parts (if replacement is necessary):
Genuine Lexus fuse or equivalent with same amperage
rating as original
Adding washer fluid
Parts:
Water
Washer fluid containing antifreeze (for winter use)
Tools:
Funnel
285
Page 67

INTRODUCTION
286
Page 68

SECTION 5
MAINTENANCE
Maintenance requirements 272. . . . . . . . . . . . . . . . . . . . . . . . . . . . . . . .
General maintenance 273. . . . . . . . . . . . . . . . . . . . . . . . . . . . . . . . . . . . .
Does your vehicle need repairing? 276. . . . . . . . . . . . . . . . . . . . . . . . .
Emissions inspection and maintenance (I/M) programs 277. . . . . . . .
For scheduled maintenance information, please refer
to the “Owner’s Manual Supplement / Scheduled
Maintenance”.
271
Page 69

MAINTENANCE
MAINTENANCE REQUIREMENTS
Your Lexus vehicle has been designed for fewer maintenance
requirements with longer service intervals to save both your
time and money . However, each regular maintenance as well
as day–to–day care is more important than ever before to
ensure smooth, trouble–free, safe, and economical driving.
It is the owner’s responsibility to make sure the specified
maintenance, including general maintenance services, is
performed. Note that both the new vehicle and emission
control system warranties specify that proper maintenance
and care must be performed. See “Owner’s Guide”, “Owner’s
Manual Supplement” or “Warranty Booklet” for complete
warranty information.
General maintenance
General maintenance items are those day–to–day care
practices that are important to your vehicle for proper
operation. It is the owner’s responsibility to ensure that the
general maintenance items are performed regularly.
These checks or inspections can be done either by yourself or
your Lexus dealer.
Scheduled maintenance
The scheduled maintenance items listed in the “Owner’s
Manual Supplement / Scheduled Maintenance” are those
required to be serviced at regular intervals.
For details of your maintenance schedule, read the “Owner’s
Manual Supplement / Scheduled Maintenance”.
It is recommended that only genuine Lexus parts be used
for maintenance.
The owner may elect to use non–Lexus supplied parts for
replacement purposes without invalidating the emission
control system warranty. However, use of replacement
parts which are not of equivalent quality may impair the
effectiveness of the emission control systems.
You may also elect to have maintenance, replacement, or
repair of the emission control devices and system
performed by any automotive repair establishment or
individual without invalidating this warranty. See
“Owner’s Guide”, “Owner’s Manual Supplement” or
“Warranty Booklet” for complete warranty information.
272
Page 70
MAINTENANCE
Where to go for service?
Lexus technicians are well–trained specialists and are kept up
to date with the latest service information through technical
bulletins, service tips, and in–dealership training programs.
They are well informed about the operation of all the systems
on your vehicle.
You can be confident that your Lexus dealer’s service
department performs the best job to meet the maintenance
requirements of your vehicle.
Your copy of the repair order is proof that all required
maintenance has been performed for warranty coverage. And
if any problems should arise with your vehicle while under
warranty, your Lexus dealer will promptly take care of it. Again,
be sure to keep a copy of the repair order for any service
performed on your Lexus.
What about do–it–yourself maintenance?
Many of the maintenance items are easy to do yourself, if you
have a little mechanical ability and a few basic automotive
tools. Simple instructions for how to perform them are
presented in Section 6.
If you are a skilled do–it–yourself mechanic, the Lexus service
manuals are recommended. Please be aware that
do–it–yourself maintenance can affect your warranty
coverage. See “Owner’s Guide”, “Owner’s Manual
Supplement” or “Warranty Booklet” for the details.
GENERAL MAINTENANCE
Listed below are the general maintenance items that should be
performed at the intervals specified. It is recommended that
any problem you notice be brought to the attention of your
Lexus dealer or qualified service shop for their advice.
CAUTION
Make these checks only where adequate ventilation can
be obtained if you run the engine.
Vehicle exterior
Items listed below should be performed from time to time,
unless otherwise specified.
Tire pressure
Check the pressure with a gauge every two weeks, or at least
once a month and adjust as shown on the tire pressure label.
See page 309 for additional information.
Tire surface
Check the tires carefully for cuts, damage or excessive wear.
See page 311 for additional information.
Wheel nuts
When checking the tires, make sure to check the nuts for
looseness. Tighten them if necessary.
273
Page 71

MAINTENANCE
Tire rotation
Rotate the tires according to the maintenance schedule. (For
scheduled maintenance information, please refer to the
“Owner’s Manual Supplement” or “Scheduled Maintenance”.)
See page 310 for additional information.
Fluid leaks
Check underneath for leaking fuel, oil, water or other fluid after
the vehicle has been parked for a while. If you smell fuel fumes
or notice any leak, have the cause found and corrected
immediately.
Doors and engine hood
Check that all doors, including trunk lid, operate smoothly and
all latches lock securely. Make sure the engine hood
secondary latch secures the hood when the primary latch is
released.
Vehicle interior
Items listed below should be checked regularly, e.g. while
performing periodic services, cleaning the vehicle, etc.
Lights
Make sure the headlight, stop lights, tail lights, turn signal
lights, and other lights are working. Check headlight aim.
Service reminder indicators and warning buzzers
Check that all service reminder indicators and warning
buzzers function properly.
Steering wheel
Check that it has the specified free play. Be alert for changes
in steering condition, such as hard steering, excessive free
play or strange noise.
Seats
Check that all front seat controls such as seat adjusters,
seatback recliner, etc. operate smoothly. Check that the head
restraints move up and down smoothly and that the locks hold
securely in any latched position.
Seat belts
Check that the seat belt system such as buckles, retractors
and anchors operate properly and smoothly. Make sure the
belt webbing is not cut, frayed, worn or damaged.
Accelerator pedal
Check the pedal for smooth operation and uneven pedal effort
or catching.
Brake pedal
Check the pedal for smooth operation and the proper
clearance and free play. Check the brake booster function.
Brakes
At a safe place, check that the brakes do not pull to one side
when applied.
Parking brake
Check that the lever has the proper travel and that, on a safe
incline, your vehicle is held securely with only the parking
brake applied.
274
Page 72

MAINTENANCE
Automatic transmission ”Park” mechanism
On a safe incline, check that your vehicle is held securely with
the selector lever in ”P” position and all brakes released.
Engine compartment
Items listed below should be checked from time to time,
e.g. each time when refueling.
Washer fluid
Make sure there is sufficient fluid in the tank. See page 330 for
additional information.
Engine coolant level
Make sure the coolant level is between the Upper and Lower
lines on the see–through reservoir when the engine is cold.
See page 299 for additional information.
Battery
Your Lexus has a maintenance free battery. You do not have
to add distilled water. For longer life of the battery, however,
see page 324 for additional information.
Brake fluid level
Make sure the brake fluid level is correct. See page 307 for
additional information.
Engine oil level
Check the level on the dipstick with the engine turned off and
the vehicle parked on a level spot. See page 296 for additional
information.
Power steering fluid level
Check the level on the dipstick. The level should be in the
”HOT” or ”COLD” range depending on the fluid temperature.
See page 308 for additional information.
Exhaust system
If you notice any change in the sound of the exhaust or smell
exhaust fumes, have the cause located and corrected
immediately. (See “Engine exhaust caution” on page 193.)
275
Page 73
MAINTENANCE
DOES YOUR VEHICLE NEED
REPAIRING?
Be on the alert for changes in performance and sounds, and
visual tip–offs that indicate service is needed. Some important
clues are:
Engine missing, stumbling, or pinging
Appreciable loss of power
Strange engine noises
A fluid leak under the vehicle (However, water dripping from
the air conditioning after use is normal.)
Change in exhaust sound (This may indicate a dangerous
carbon monoxide leak. Drive with the windows open and
have the exhaust system checked immediately.)
Flat–looking tires, excessive tire squeal when cornering,
uneven tire wear
Vehicle pulls to one side when driving straight on a level
road
Strange noises related to suspension movement
Loss of brake effectiveness, spongy feeling brake pedal,
pedal almost touches floors, vehicle pulls to one side when
braking
Engine coolant temperature continually higher than normal
If you notice any of these clues, take your vehicle to your Lexus
dealer as soon as possible. It probably needs adjustment or
repair.
CAUTION
Do not continue driving with the vehicle unchecked. It
could result in serious vehicle damage and possibly
personal injury.
276
Page 74

EMISSION INSPECTION AND
MAINTENANCE (I/M) PROGRAMS
Some states have vehicle emission inspection programs
which include OBD (On–Board Diagnostics) checks.
The OBD system monitors the operation of the emission
control system. When the OBD system determines that a
problem exist s somewhere in the emission control system, the
malfunction indicator lamp comes on. In this case, your vehicle
may not pass the I/M test and need to be repaired. Contact
your Lexus dealer to service the vehicle.
Even if the malfunction indicator lamp does not come on, your
vehicle may not pass the I/M test as readiness codes have not
been set in the OBD system.
Readiness codes are automatically set during ordinary driving.
However, when the battery is disconnected or run down, the
codes are erased. Also, depending on your driving habits, the
codes may not be completely set.
Also, if the malfunction indicator lamp had come on recently
due to temporary malfunction such as a loose fuel tank cap,
your vehicle may not pass the I/M test.
The malfunction indicator lamp will go off after taking several
driving trips, but the error code in the OBD system will not be
cleared unless about 40 trips or more are taken.
If your vehicle does not pass the I/M test and the malfunction
indicator lamp does not come on, contact your Lexus dealer to
prepare the vehicle for re–testing.
MAINTENANCE
277
Page 75

MAINTENANCE
278
Page 76

SECTION 4
IN CASE OF AN EMERGENCY
If your engine stalls while driving 234. . . . . . . . . . . . . . . . . . . . . . . . . . .
If your vehicle will not start 234. . . . . . . . . . . . . . . . . . . . . . . . . . . . . . . .
If you cannot increase the engine speed 238. . . . . . . . . . . . . . . . . . . .
If your vehicle overheats 238. . . . . . . . . . . . . . . . . . . . . . . . . . . . . . . . . .
If you have a flat tire (vehicles with run–flat tires) 239. . . . . . . . . . . . .
If you have a flat tire (vehicles with standard tires) 241. . . . . . . . . . . .
If your vehicle needs to be towed 249. . . . . . . . . . . . . . . . . . . . . . . . . .
If the retractable hardtop does not close 254. . . . . . . . . . . . . . . . . . . . .
If you cannot shift automatic transmission selector lever 269. . . . . . .
If you lose your keys or lock yourself out 270. . . . . . . . . . . . . . . . . . . .
233
Page 77
IN CASE OF AN EMERGENCY
IF YOUR ENGINE STALLS WHILE
DRIVING
If your engine stalls while driving . . . .
1. Reduce your speed gradually, keeping a straight line. Move
cautiously off the road to a safe place.
2. Turn on your emergency flashers.
3. Try starting the engine again.
If the engine will not start, see ”If your vehicle will not start”.
CAUTION
If the engine is not running, the power assist for the
brakes and steering will not work, so steering and
braking will be much harder than usual.
IF YOUR VEHICLE WILL NOT
START
(a) Simple checks
Before making these checks, make sure you have followed the
correct starting procedure instructions in ”How to start the
engine” on page 196 and that you have sufficient fuel. Since
your vehicle is equipped with the engine immobiliser system,
also check whether the other keys will start the engine. If they
work, your key may be broken. Have the key checked at your
Lexus dealer. If none of your keys work, the system is possibly
broken. Call your Lexus dealer. See ”Keys” on page 8.
If the engine is not turning over or is turning over too
slowly –
1. Check that the battery terminals are tight and clean.
2. If the battery terminals are O.K., switch on the interior light.
3. If the light is out, dim or goes out when the starter is cranked,
the battery is discharged. You may try jump starting. See ”(c)
Jump starting” for further instruction.
If the light is O.K., but the engine still will not start, it needs
adjustment or repair. Call a Lexus dealer, Roadside
Assistance or Customer Service Assistance. (See
”Foreword”.)
234
Page 78
IN CASE OF AN EMERGENCY
NOTICE
Do not pull–or push–start the vehicle. It may damage
the vehicle or cause a collision when the engine starts.
Also the three–way catalytic converter may overheat
and become a fire hazard.
If the engine turns over at its normal speed but will not
start –
1. The engine may be flooded because of repeated cranking.
See ”(b) Starting a flooded engine” for further instructions.
2. If the engine still will not start, it needs adjustment or repair.
Call a Lexus dealer, Roadside Assistance or Customer
Service Assistance. (See ”Foreword”.)
(b) Starting a flooded engine
If the engine will not start, your engine may be flooded
because of repeated cranking.
If this happens, turn the ignition switch to ”START” with the
accelerator pedal held down. Continue this operation for 30
seconds and then stop cranking. Then try starting the engine
with your foot off the accelerator pedal.
If the engine does not start after 30 seconds of cranking,
release the ignition switch, wait a few minutes and try again.
If the engine still will not start, it needs adjustment or repair.
Call a Lexus dealer, Roadside Assistance or Customer
Service Assistance. (See ”Foreword”.)
NOTICE
Do not crank for more than 30 seconds at a time. This
may overheat the starter and wiring systems.
(c) Jump starting
To avoid serious personal injury and damage to your
vehicle which might result from battery explosion, acid
burns, electrical burns, or damaged electronic
components, these instructions must be followed
precisely.
If you are unsure about how to follow this procedure, we
strongly recommend that you seek help from your Lexus
dealer, Roadside Assistance or Customer Service Assistance.
(See ”Foreword”.)
235
Page 79
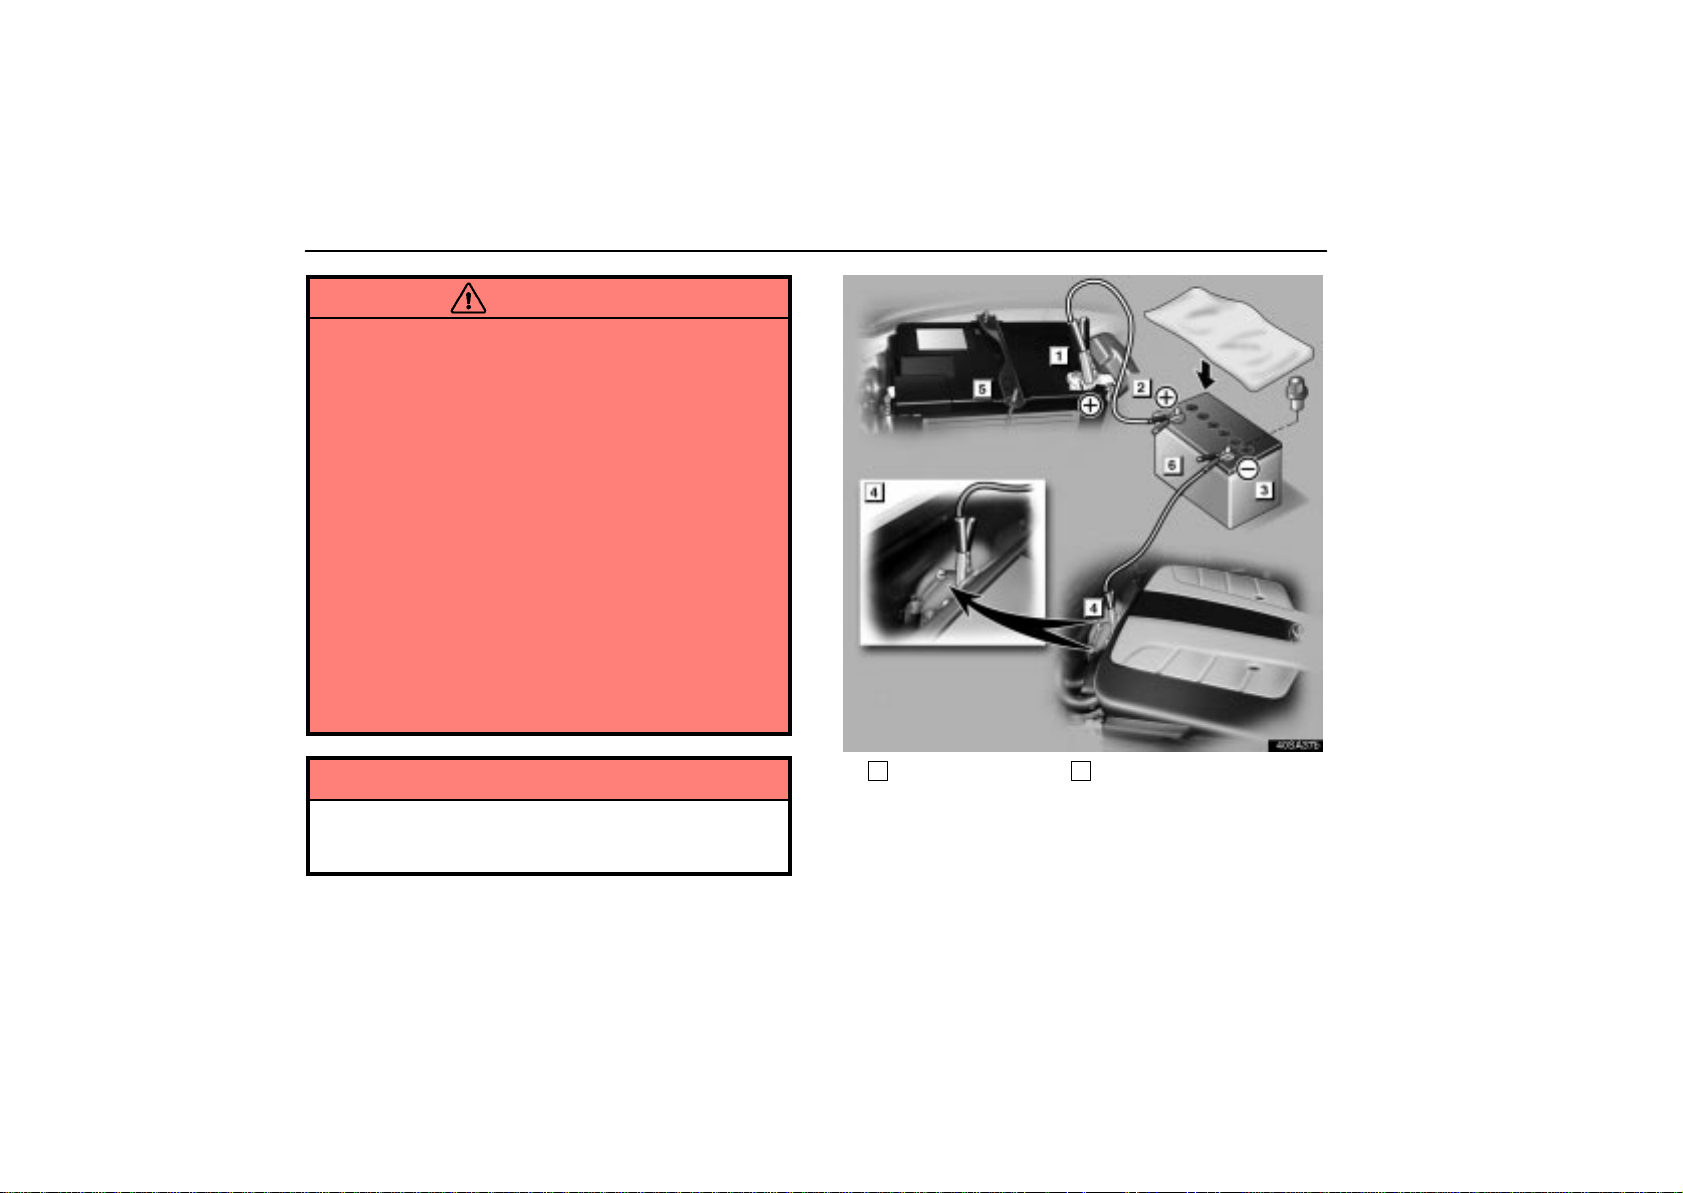
IN CASE OF AN EMERGENCY
CAUTION
Batteries contain sulfuric acid which is poisonous
and corrosive. Wear protective safety glasses when
jump starting, and avoid spilling acid on your skin,
clothing, or vehicle.
If you should accidentally get acid on yourself or in
your eyes, remove any contaminated clothing and
flush the affected area with water immediately . Then
get immediate medical attention. If possible,
continue to apply water with a sponge or cloth while
en route to the medical office.
The gas normally produced by a battery will explode
if a flame or spark is brought near. Use only
standardized jumper cables and do not smoke or
light a match while jump starting.
Warning: Battery posts, terminals and related
accessories contain lead and lead compounds,
chemicals known to the State of California to cause
cancer and reproductive harm. Wash hands after
handling.
NOTICE
The battery used for boosting must be 12 V. Do not jump
start unless you are sure that the booster battery is
correct.
40sa37b
5
Discharged battery 6Booster battery
JUMP STARTING PROCEDURE
1. If the booster battery is installed in another vehicle, make
sure the vehicles are not touching. Turn off all unnecessary
lights and accessories.
236
Page 80
IN CASE OF AN EMERGENCY
2. If required, remove all the vent plugs from the booster
battery . Lay a cloth over the open vents on the booster battery.
(This helps reduce the explosion hazard, personal injuries and
burns.)
If the booster battery is an extended maintenance interval
battery, it is not necessary to remove the vent plugs.
3. If the engine in the vehicle with the booster battery is not
running, start it and let it run for about 5 minutes. During jump
starting, run the engine at about 2000 rpm with the accelerator
pedal lightly depressed.
4. Locate positive (+) and negative (–) terminals of each
battery . C onnect the jumper cables in the exact order (
3 4
) shown in the illustration.
1
Connect a positive (red) jumper cable clamp to the
positive (+) terminal of the discharged battery.
2
Connect the clamp at the other end of the positive (red)
cable to the positive (+) terminal of the booster battery.
3
Connect a negative (black) cable clamp to the negative
(–) terminal of the booster battery.
4
Connect the clamp at the other end of the negative (black)
cable to a solid, stationary, unpainted metallic point (such
as shown in the illustration) away from the battery. Do not
connect it to o r near any part that moves when the engine
is cranked.
1 2
CAUTION
When making the connections, to avoid serious injury,
do not lean over the battery or accidentally let the
jumper cables or clamps touch anything except the
correct battery terminals or the ground.
5. Start your engine in the normal way. After starting, run it at
about 2000 rpm for several minutes with the accelerator pedal
lightly depressed.
6. Carefully disconnect the cables in the exact reverse order:
the negative cable and then the positive cable.
7. Carefully dispose of the battery cover cloths which may now
contain sulfuric acid.
8. If removed, replace all the battery vent plugs.
If the cause of your battery discharging is not apparent (for
example, lights left on), you should have it checked.
237
Page 81
IN CASE OF AN EMERGENCY
IF YOU CANNOT INCREASE THE
ENGINE SPEED
If the engine speed does not increase when the
accelerator pedal is depressed, the electronic throttle
control system may be faulty . Move the vehicle to a safe
place by means of creeping and call a Lexus dealer for
assistance:
1. Depress the brake pedal and shift to the “D” position.
2. Gradually release the brake pedal, and the vehicle starts to
move by creeping. After arriving at a safe place, stop the
vehicle and call a Lexus dealer for assistance.
CAUTION
The above method of moving the vehicle is for
emergency. Use it only for moving minimum
distances to a safe place.
Be especially careful to prevent erroneous pedal
operation.
IF YOUR VEHICLE OVERHEATS
If your engine coolant temperature gauge indicates
overheating, if you experience a loss of power, or if you
hear a loud knocking or pinging noise, the engine has
probably overheated.
When the engine overheats
Pull safely off the road, stop the vehicle and turn on your
emergency flashers. Put the transmission in ”P” and apply the
parking brake.
A: If steam is coming from your engine:
Turn off the engine. Leave the hood closed until there is no sign
of steam or coolant. Your engine could have been seriously
damaged already. Call your Lexus dealer for assistance.
CAUTION
To help avoid personal injury, keep the hood closed until
there is no steam. Escaping steam or coolant is sign of
very high pressure.
B: If no steam is coming from your engine:
Leave the engine running and turn off the air conditioning.
Check the following.
Is the cooling fan operating?
Is the coolant in the acceptable range?
Is the engine drive belt O.K.?
238
Page 82
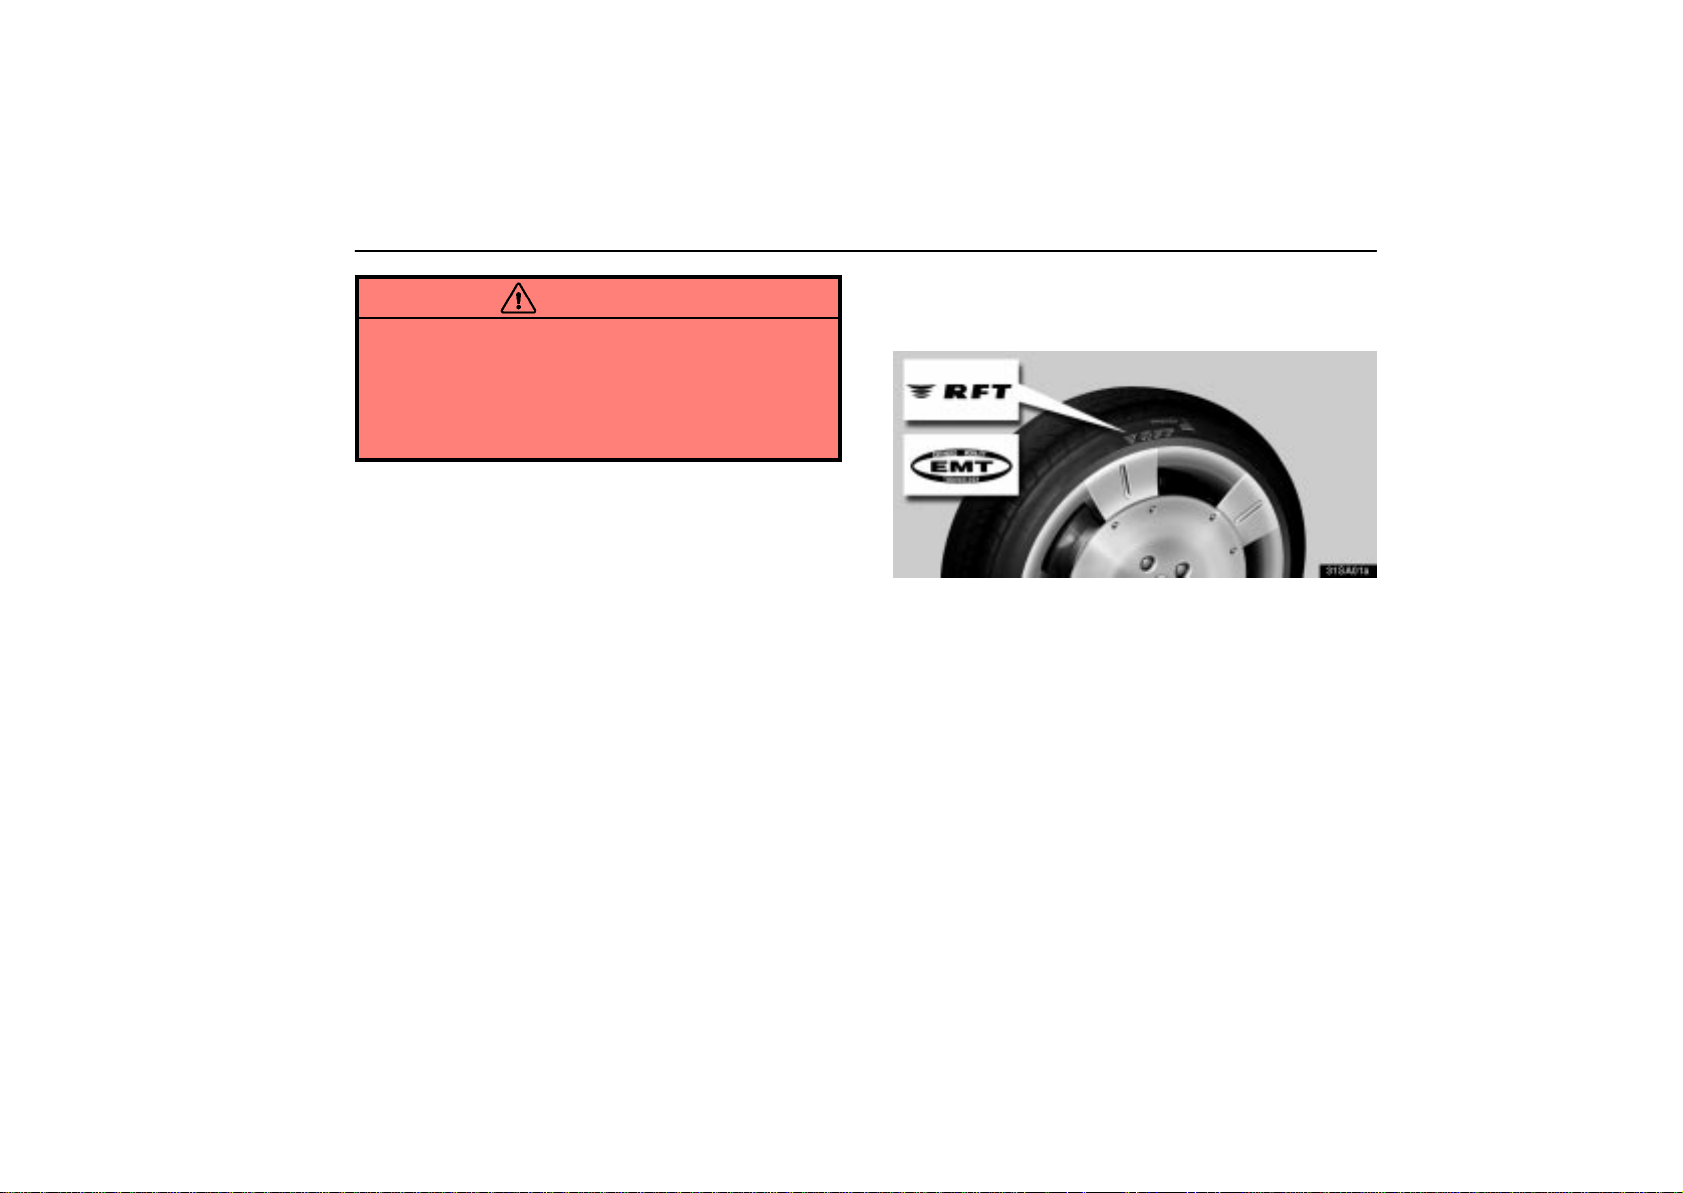
IN CASE OF AN EMERGENCY
CAUTION
When the engine is running, keep hands and clothing
away from the moving fan and engine drive belt.
Do not attempt to remove the radiator cap when the
engine and radiator are hot. Serious injury could
result from scalding hot fluid and steam blown out
under pressure.
If the cooling fan is not operating or the coolant is not in the
acceptable range, turn off the engine and call your Lexus
dealer.
If both conditions are O.K., after the engine coolant
temperature has cooled to normal, continue driving your
vehicle.
If the engine coolant temperature does not cool down, or your
vehicle overheats again, have it checked as soon as possible
by your Lexus dealer.
IF YOU HAVE A FLAT TIRE
(Vehicles with run–flat tires)
31sa01a
You can continue driving a vehicle with run–flat tires even
if any tire goes flat. It is able to run for a maximum of 160
km (100 miles) at a speed below 90 km/h (55 mph) after the
low tire pressure warning light blinks and chimes sound.
When you drive your vehicle after the low tire pressure
warning light blinks and chimes sound, the tire must be
replaced. Do not use the repaired tire. A spare tire is not
provided on the vehicle with run–flat tires.
Observe the fol l o w i n g p r e c a utions and take your vehicle to the
nearest Lexus dealer or authorized tire dealer.
239
Page 83
IN CASE OF AN EMERGENCY
CAUTION
If the low tire pressure warning light comes on or blinks
and chimes sound, take your vehicle to the nearest
Lexus dealer or authorized tire dealer as soon as
possible, observing the following instructions:
Decelerate as soon as possible to the most
appropriate speed that conditions permit. Do not
drive for longer than 160 km (100 miles) or over 90
km/h (55 mph).
Avoid abrupt steering wheel maneuvering and
braking. If the vehicle tires deteriorate, you could
lose control of the steering wheel or the brakes,
causing death or serious injury.
NOTICE
Do not use liquid sealants for a flat tire as air pressure
sensors will be damaged.
Take due care not to go over a curb stone and be
careful of the dents in the road because deflated tire
pressure affects tire cushion performance. The
wheels, tires, body, suspension and other
components could be damaged.
Your ground clearance is reduced if the run–flat tire
goes flat so avoid driving over obstacles and drive
slowly on rough, unpaved roads and speed bumps.
Also, do not attempt to go through an automatic car
wash as the vehicle may get caught, resulting in
damage.
When the tires must be replaced, have them replaced
by the nearest Lexus dealer or authorized tire dealer.
The tire pressure sensors will be affected by the
installation or removal of tires.
When the tires must be replaced, replace the
grommets for air pressure sensors as well.
240
Page 84
IN CASE OF AN EMERGENCY
IF YOU HAVE A FLAT TIRE
(Vehicles with standard tires)
CAUTION
If the low tire pressure warning light blinks and chimes
sound, observe the following instructions:
Decelerate as soon as possible to the most
appropriate speed that conditions permit.
Avoid abrupt steering wheel maneuvering and
braking. If the vehicle tires deteriorate, you could
lose control of the steering wheel or the brakes,
causing death or serious injury.
The warning system may not activate immediately if
bursts or sudden air leakage should occur.
1. Reduce your speed gradually, keeping a straight line. Move
cautiously off the road to a safe place – well away from the
traffic. A void stopping on the center divider of a highway. Park
on a level spot with firm ground.
2. Stop the engine and turn on your emergency flashers.
3. Firmly set the parking brake and put the transmission in ”P”.
4. Have everyone get out of the vehicle on the side away from
traffic.
5. Read the following instructions thoroughly.
CAUTION
When jacking, be sure to observe the following to
reduce the possibility of personal injury:
Follow jacking instructions.
Do not put any part of your body under a vehicle
supported by a jack. Otherwise, personal injury may
occur.
Do not start or run the engine while your vehicle is
supported by the jack.
Stop the vehicle on a level firm ground, firmly set the
parking brake and put the transmission in ”P”. Block
the wheel diagonally opposite to the one being
changed if necessary.
Make sure to set the jack properly in the jack point.
Raising the vehicle with jack improperly positioned
will damage the vehicle or may allow the vehicle to fall
off the jack and cause personal injury.
Never get under the vehicle when the vehicle is
supported by the jack alone.
Use the jack only for lifting your vehicle during wheel
changing.
Do not raise the vehicle with someone in the vehicle.
When raising the vehicle, do not put an object on or
under the jack.
Raise the vehicle only high enough to remove and
change the tire.
241
Page 85
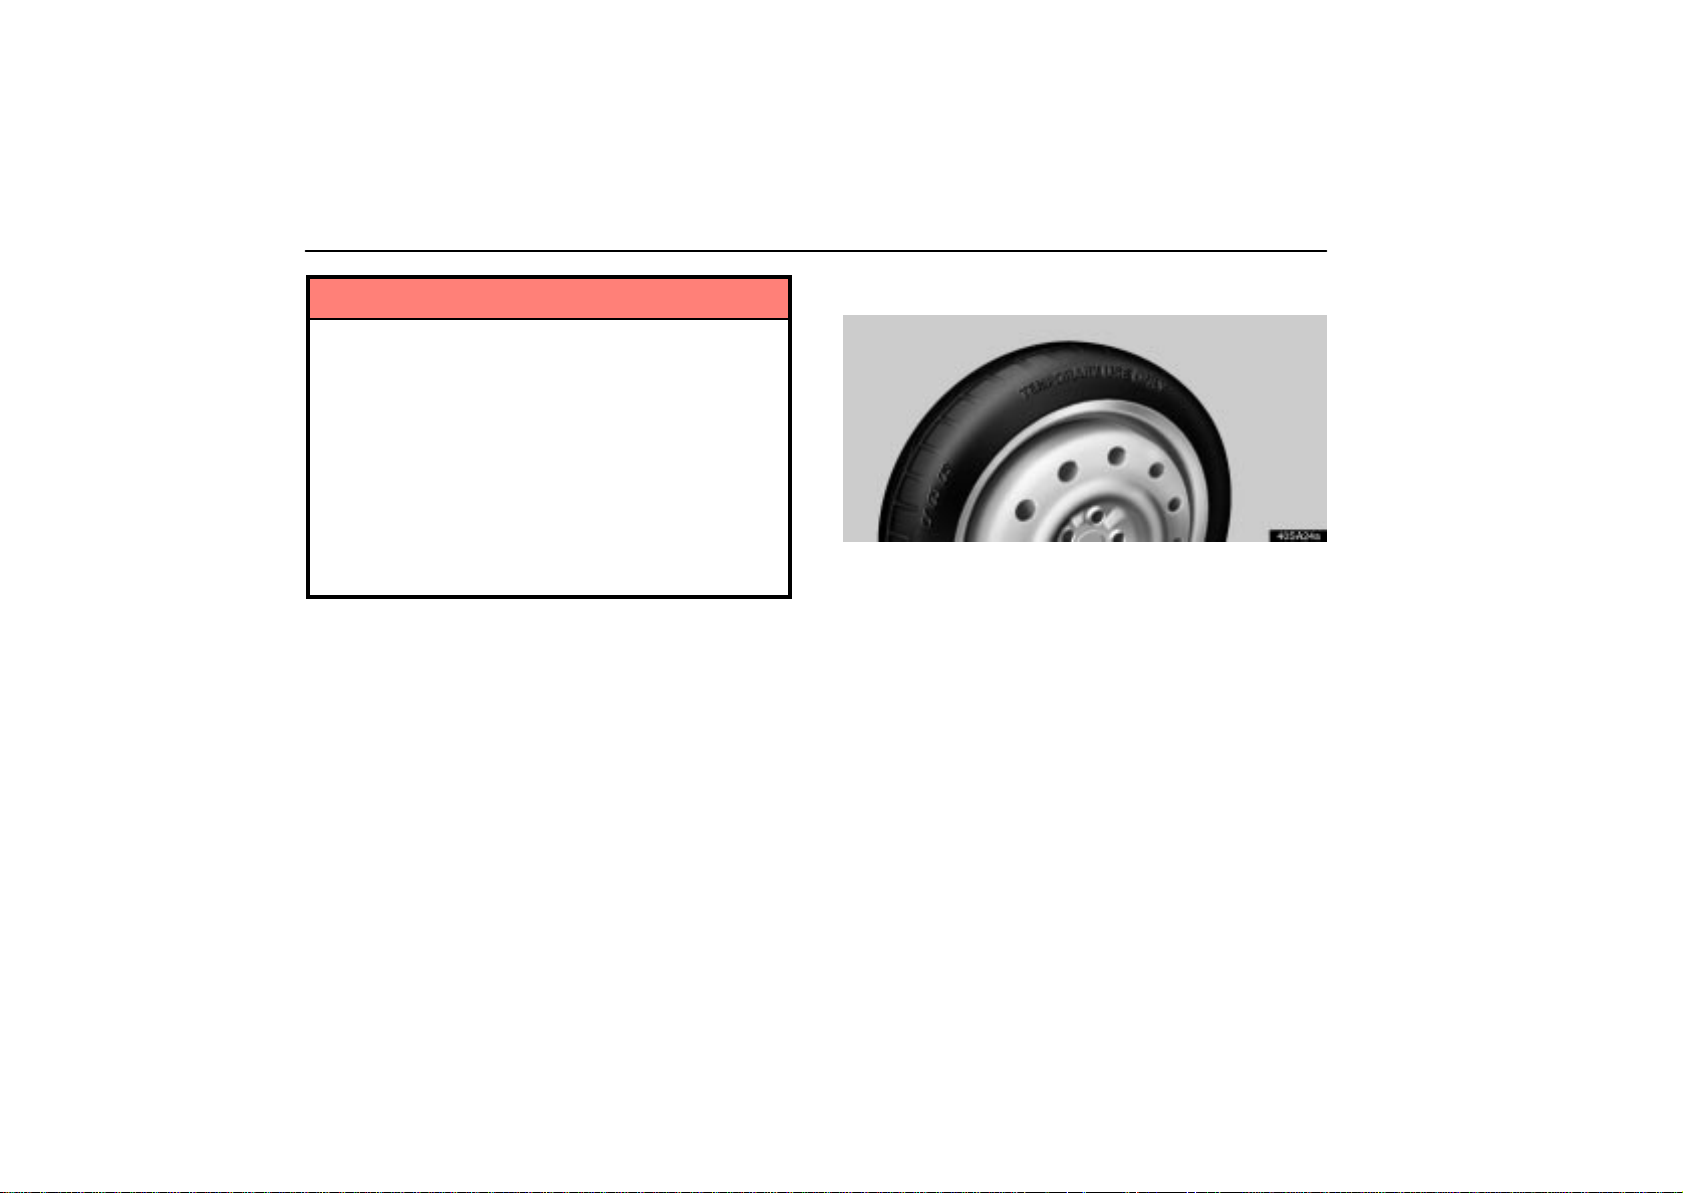
IN CASE OF AN EMERGENCY
NOTICE
Do not use liquid sealants for a flat tire as air pressure
sensors will be damaged.
Do not continue driving with a deflated tire. Driving
even a short distance can damage a tire beyond
repair.
When the tires must be repaired or replaced, have
them repaired or replaced by the nearest Lexus
dealer or authorized tire dealer. The tire pressure
sensors will be affected by the installation or removal
of tires.
When the tires must be replaced, replace the
grommets for air pressure sensors as well.
Compact spare tire
40sa24a
The compact spare tire is designed for temporary
emergency use only.
The compact spare tire is identified by the distinctive wheel
design and color and special wording “TEMPORARY USE
ONLY” molded into the side wall of the tire.
The standard tire should be repaired and replaced as soon as
possible.
To keep the compact spare tire noticeable, do not hide the
wheel by a wheel cover or such.
The compact spare tire saves space in your luggage
compartment, and its lighter weight helps to improve fuel
economy and permits easier installation in case of a flat tire.
242
Page 86
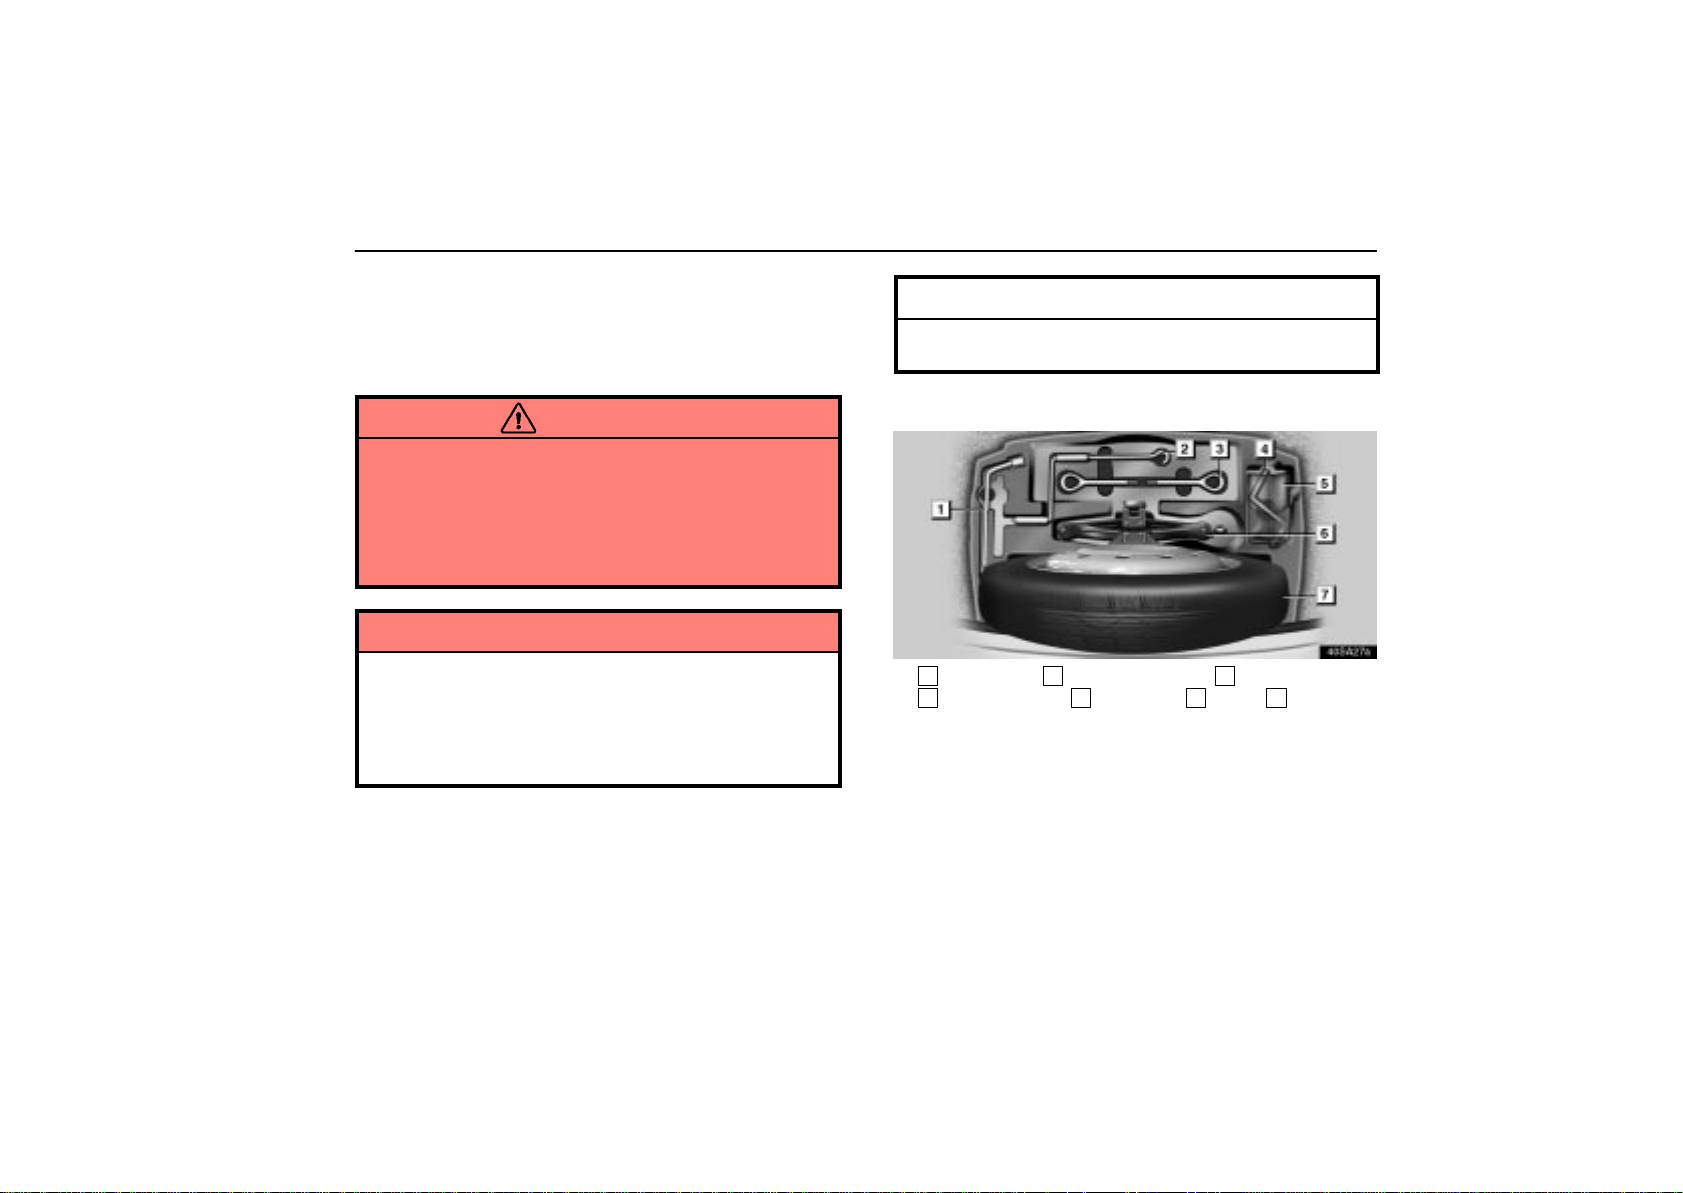
IN CASE OF AN EMERGENCY
The compact spare tire can be used many times, if necessary.
It has tread life of up to 4800 km (3000 miles) depending on
road conditions and your driving habits. When tread wear
indicators appear on the tire, replace the tire. (See “Checking
and replacing tires on page 311.)
CAUTION
The compact spare tire was designed especially for
your Lexus. Do not use it on any other vehicle.
Do not exceed 80 km/h (50 mph) when driving with the
compact spare tire.
Avoid sudden acceleration, sudden deceleration and
sharp turns with the compact spare tire.
NOTICE
Your ground clearance is reduced when the compact
spare tire is installed so avoid driving over obstacles
and drive slowly on rough, unpaved roads and speed
bumps. Als o , d o not attempt to go through an automatic
car wash as the vehicle may get caught, resulting in
damage.
INFORMATION
As the spare tire is not equipped with the tire pressure
sensor, low pressure of the spare tire will not be warned.
Changing procedure
40sa27a
1
Wrench 2Jack handle 3Towing eyelet
4
Allen wrench 5Tool bag 6Jack 7Spare tire
1. Get the tool, jack and spare tire.
To prepare yourself for an emergency, you should familiarize
yourself with the use of the jack and each tool, and their
storage locations.
The air pressure gauge is located in the tool bag. The Allen
wrench under the tool bag is provided to close the retractable
hardtop manually in case the retractable hardtop does not
close. The towing eyelet is needed in emergency towing.
243
Page 87
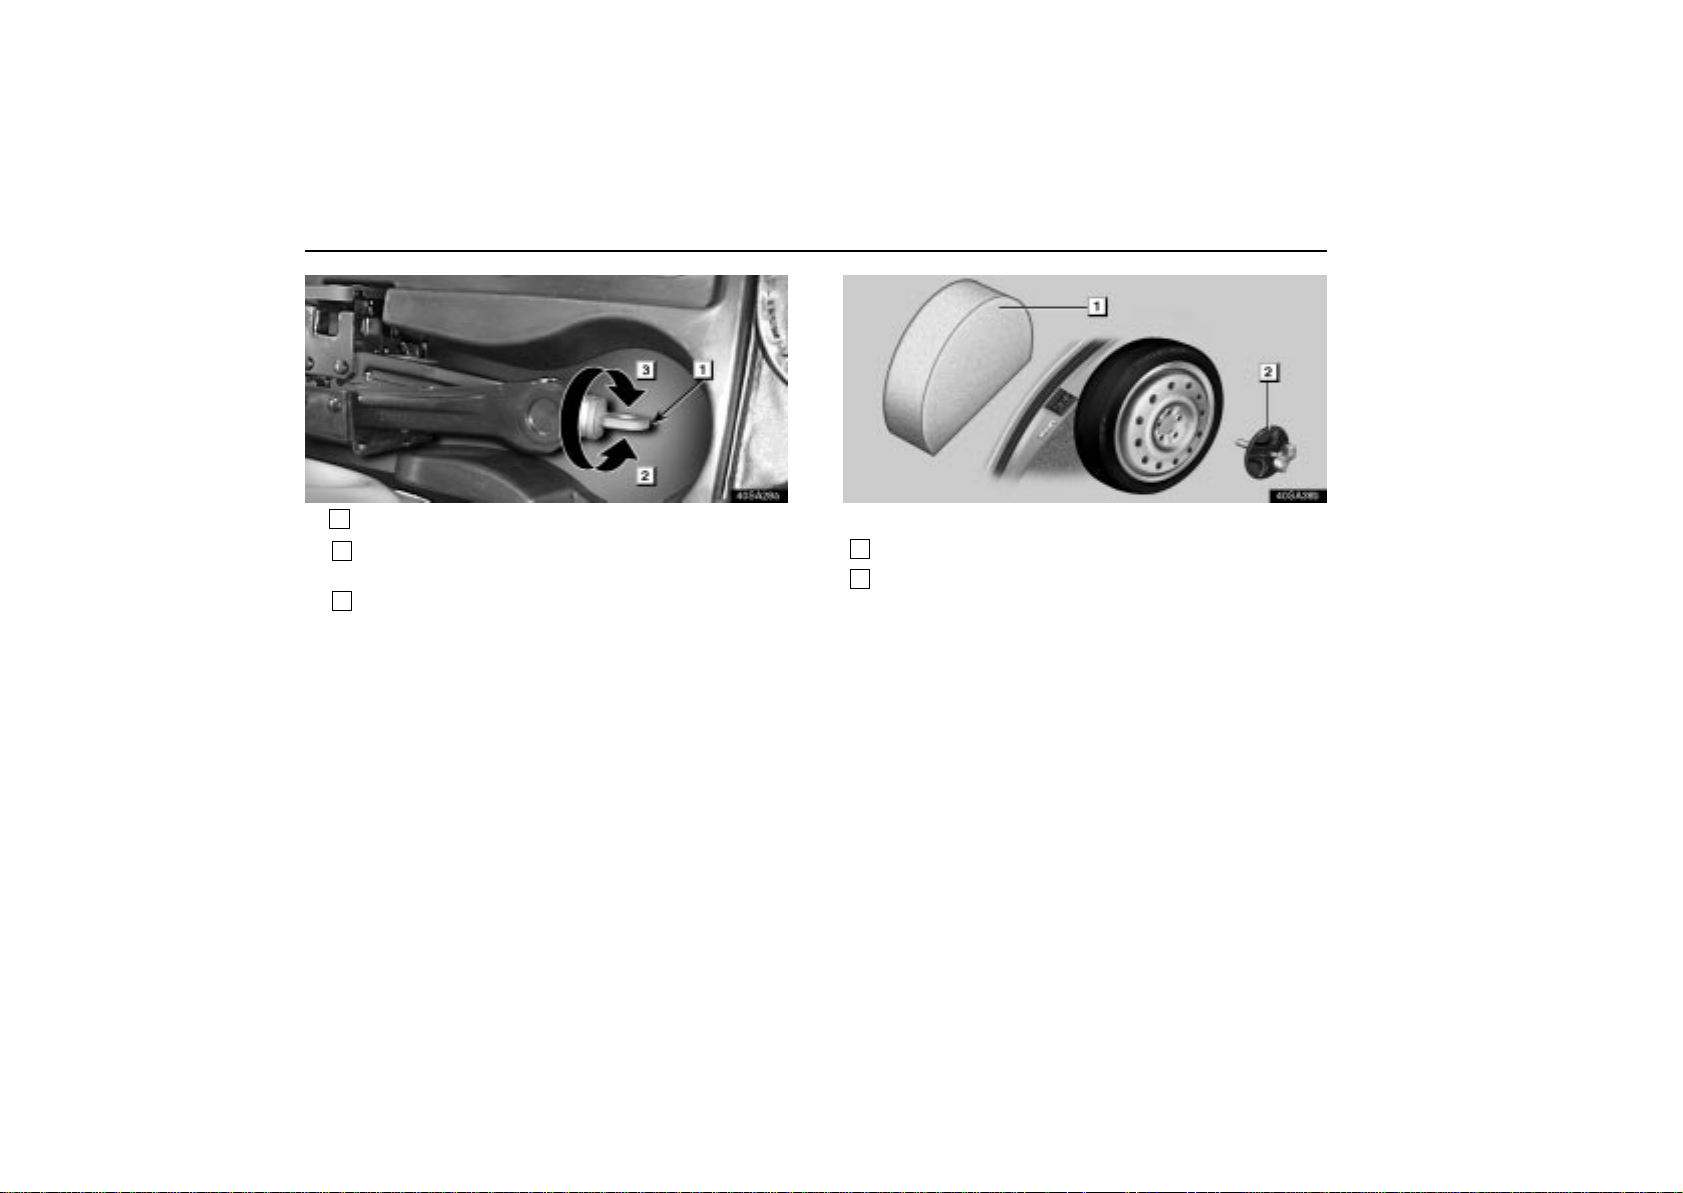
IN CASE OF AN EMERGENCY
244
40sa28a
1
Joint
2
When removing the jack, turn the joint by hand in the
”contract” direction until the jack is free.
3
When storing, turn the joint by hand in the ”expand”
direction until the jack is firmly secured to prevent it
from flying forward during a collision or sudden
braking.
40sa38b
To remove the spare tire:
1
Remove the tire cover.
2
Loosen the bolt and remove it.
When storing the spare tire, place it with the outer side of the
wheel facing the inside of the vehicle. Then bolt the tire in place
to prevent the tire from flying forward during a collision or
sudden braking.
Page 88
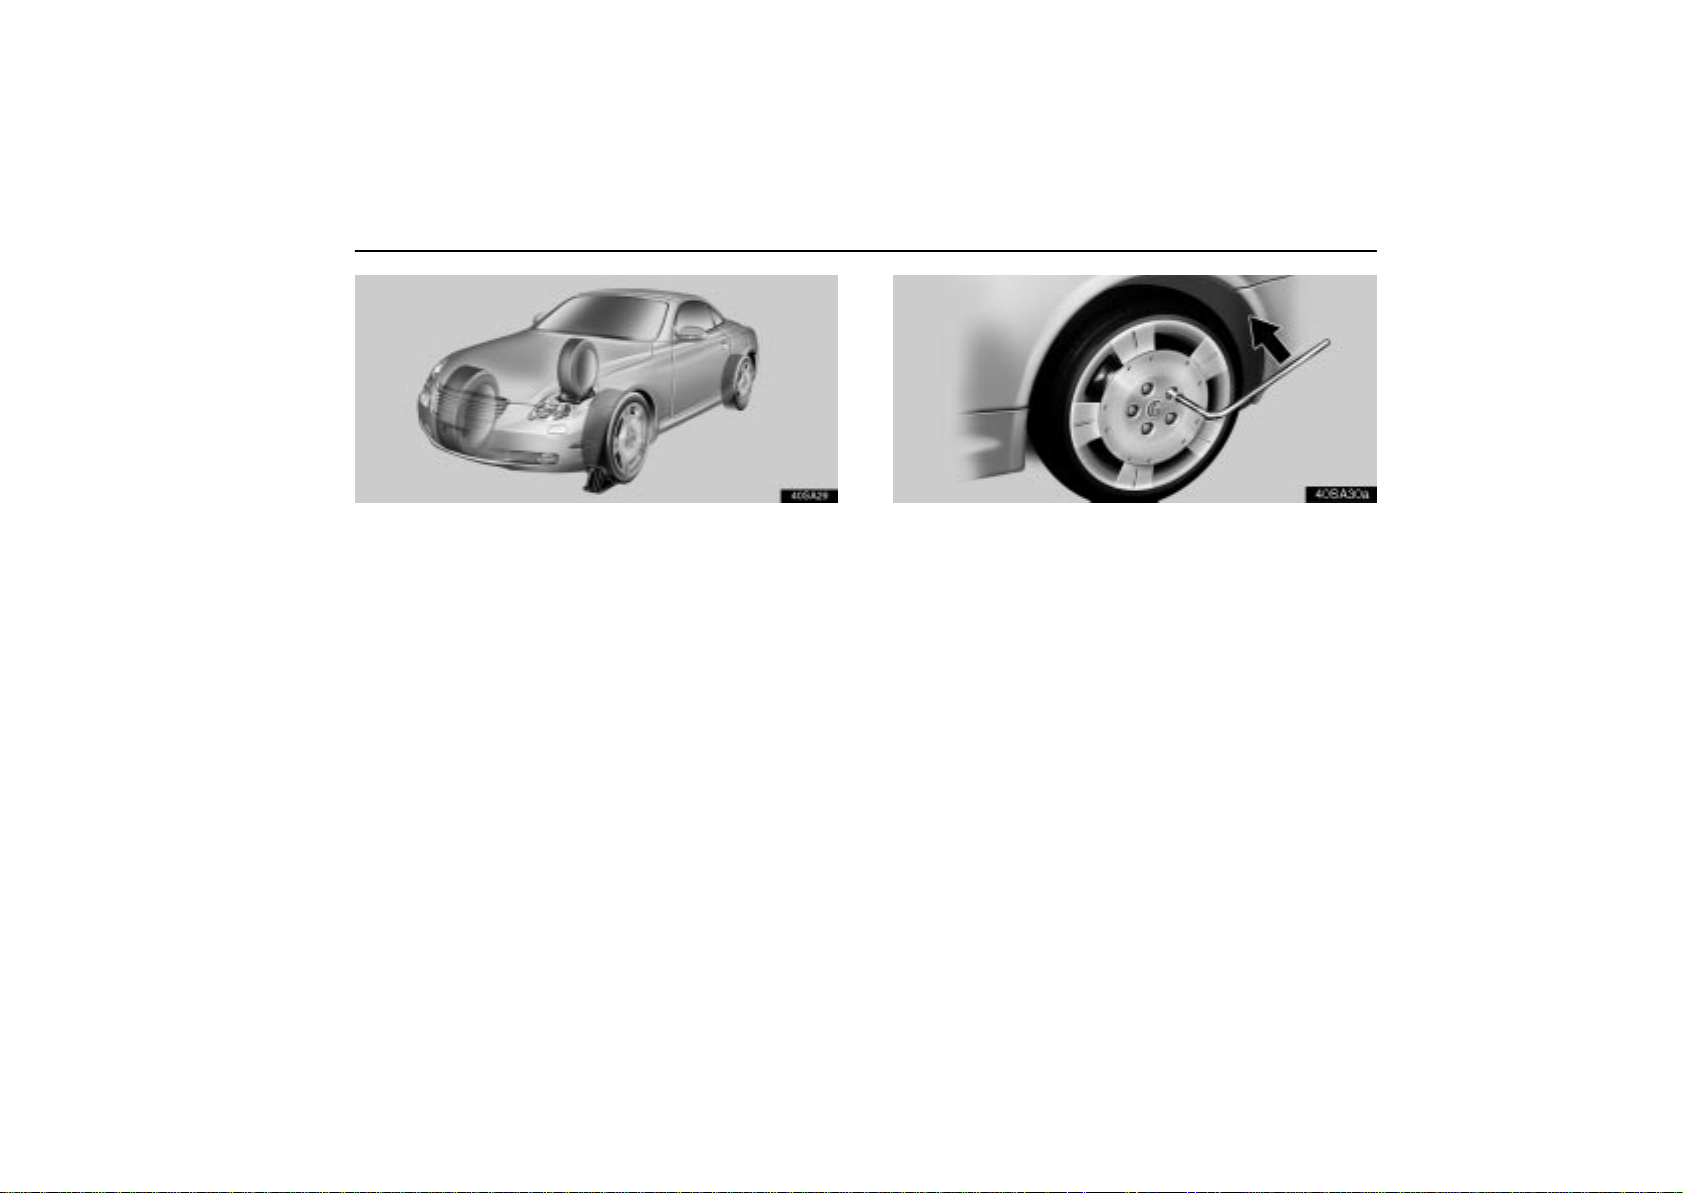
IN CASE OF AN EMERGENCY
40sa29
2. Block the wheel diagonally opposite the flat tire to keep
the vehicle from rolling when it is jacked up.
When blocking the wheel, place a wheel block in front of the
front wheels or behind the rear wheels.
40sa30a
3. Loosen all the wheel nuts.
Always loosen the wheel nuts before raising the vehicle.
Turn the wheel nuts counterclockwise to loosen them. To get
maximum leverage, fit the wrench to the nut so that the handle
is on the right side, as shown above. Grab the wrench near the
end of the handle and pull up on the handle. Be careful that the
wrench does not slip off the nut.
Do not remove the nuts yet – just unscrew them about one–half
turn.
245
Page 89
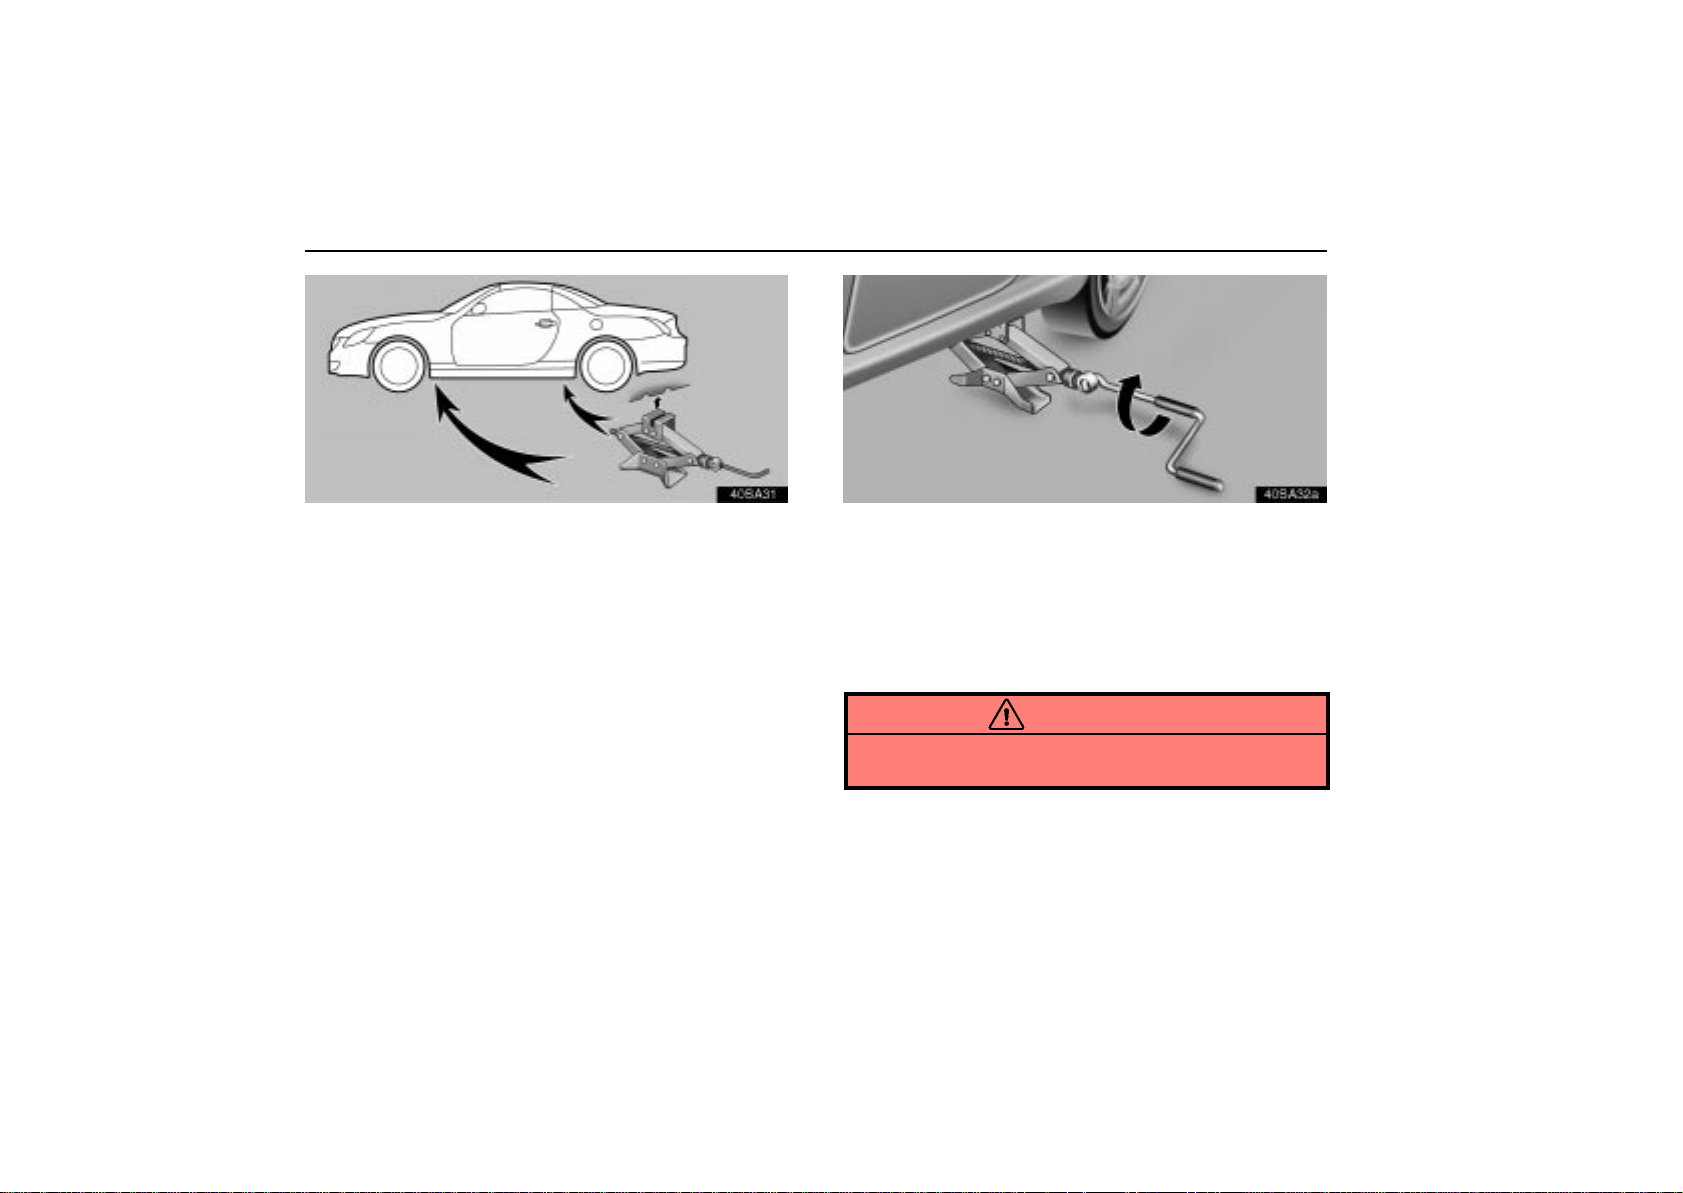
IN CASE OF AN EMERGENCY
40sa31
4. Position the jack at the jack points as shown.
Make sure the jack is positioned on a level and solid surface.
246
40sa32a
5. After making sure no one is in the vehicle, raise it high
enough so that the spare tire can be installed.
Allow for the fact that you need more ground clearance when
putting on the spare tire than when removing the flat tire.
To raise the vehicle, insert the jack handle into the jack (it is a
loose fit) and turn it clockwise. As the jack touches the vehicle
and begins to lift, double–check that it is properly positioned.
CAUTION
Never get under the vehicle when the vehicle is
supported by the jack alone.
Page 90
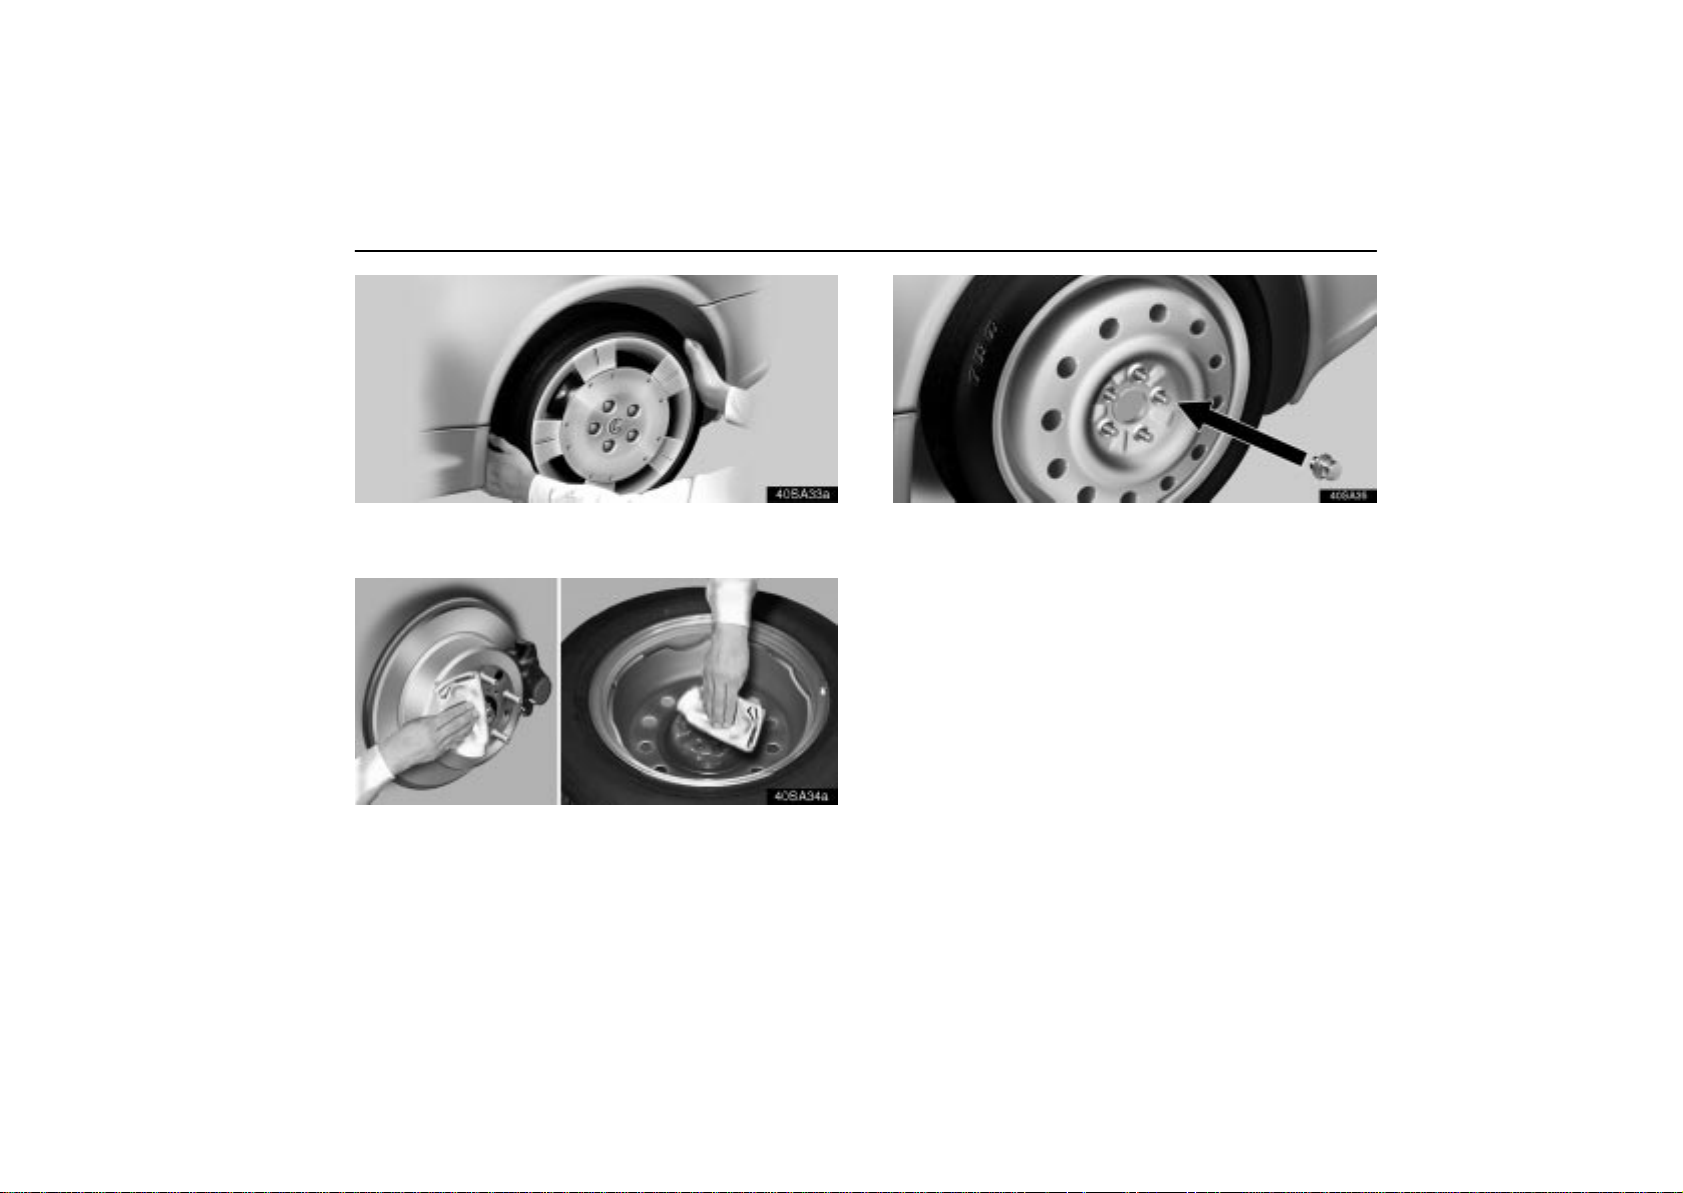
IN CASE OF AN EMERGENCY
40sa33a
6. Remove the wheel nuts and remove the flat tire.
Lift the flat tire straight off and put it aside.
40sa34a
Before putting on the wheel, remove any corrosion on the
mounting surfaces with a wire brush or such. Installation of
wheels without good metal–to–metal contact at the mounting
surface can cause wheel nuts to loosen and eventually cause
a wheel to come off while driving.
40sa35
7. Reinstall all the wheel nuts finger tight.
Align the holes in the wheel with the bolts. Then lift up the
wheel and get at least the top bolt started through its hole.
Wiggle the tire and press it back over the other bolts.
Reinstall the wheel nuts and tighten them as much as you can
by hand. Press the tire back and see if you can tighten them
more.
247
Page 91
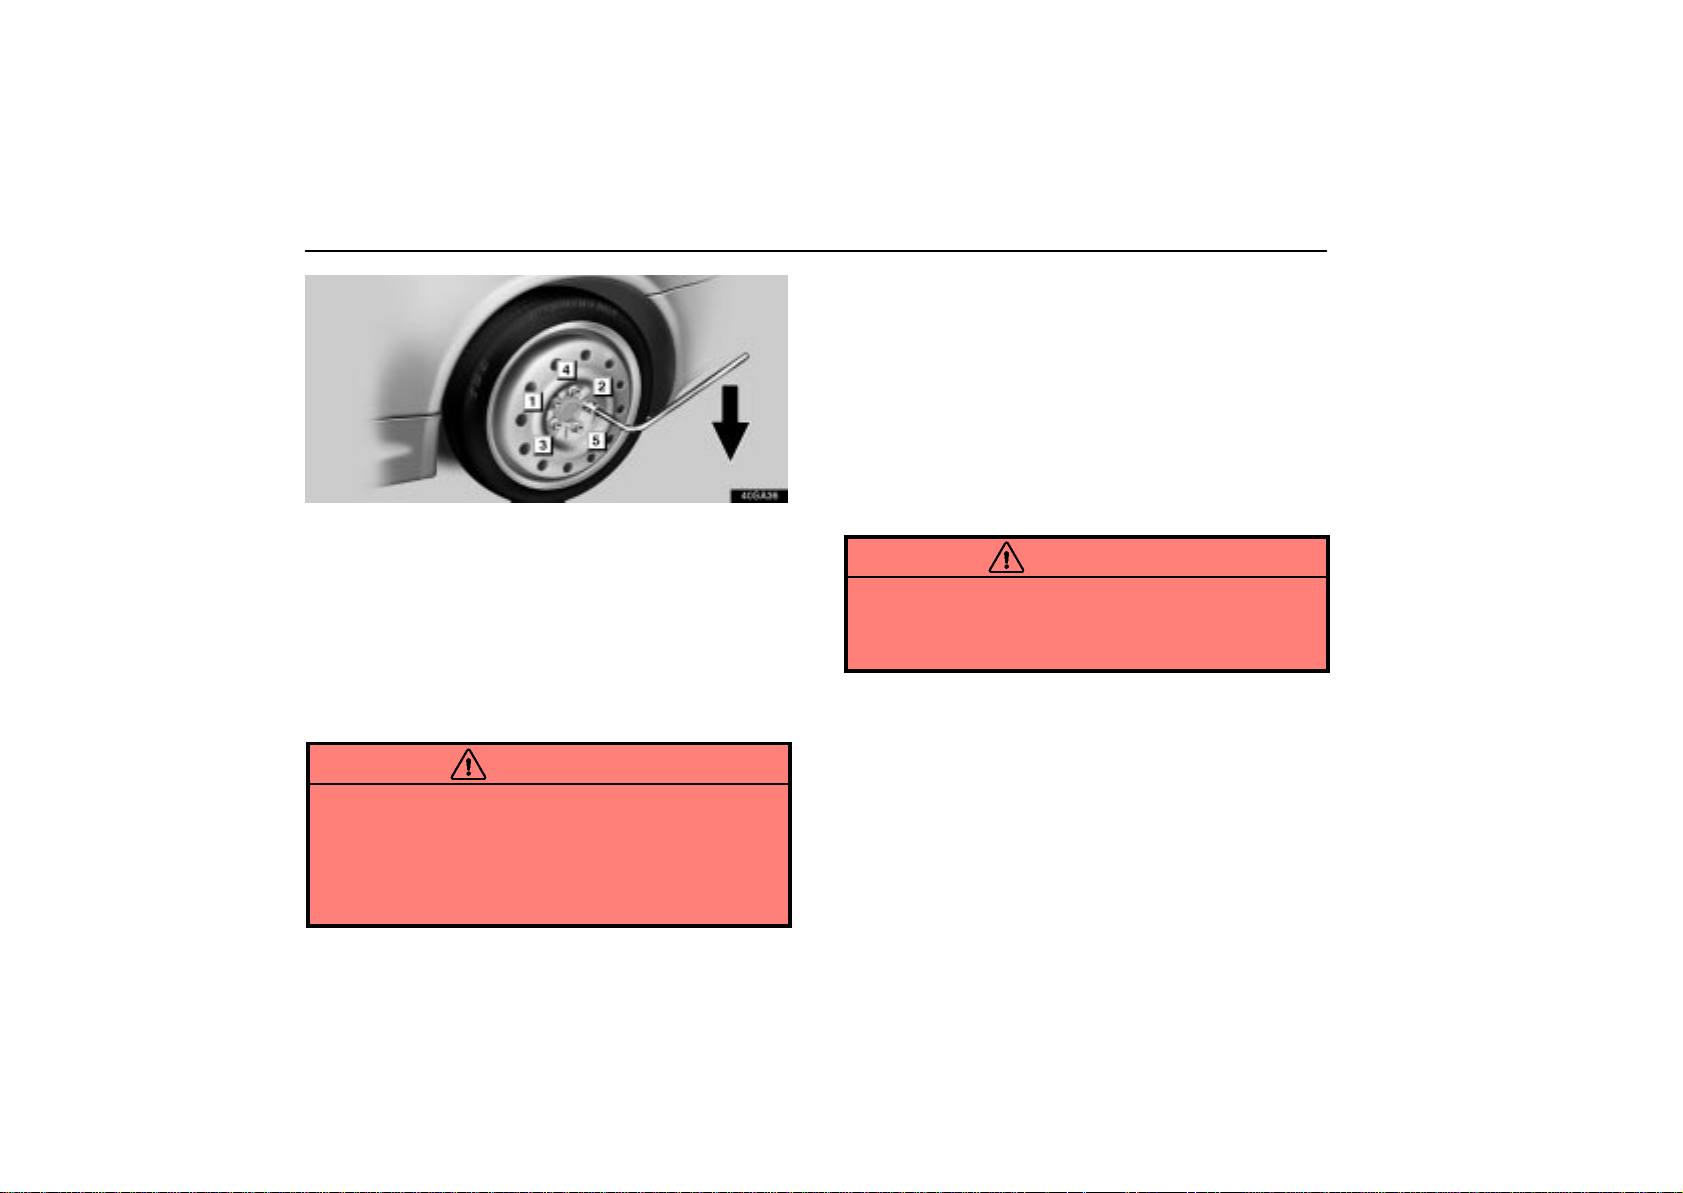
IN CASE OF AN EMERGENCY
40sa36
8. Lower the vehicle completely and tighten the wheel
nuts.
Turn the jack handle counterclockwise to lower the vehicle.
Use only the wheel nut wrench to tighten the nuts. Do not use
other tools or any additional leverage other than your hands,
such as a hammer, pipe or your foot. Make sure the wrench
is securely engaged over the nut.
Tighten each nut a little at a time in the order shown. Repeat
the process until all the nuts are tight.
CAUTION
When lowering the vehicle, make sure all portions of
your body and all other persons around will not be
injured as the vehicle is lowered to the ground.
As soon as possible after changing wheels, have the
wheel nuts tightened by torque wrench at 103 N·m
(10.5 kgf·m, 76 ft·lbf.).
9. After changing the wheel, check the air pressure of the
replaced tire. Stow all the tools, jack and flat tire securely.
Load the flat tire in the trunk with the retractable hardtop
closed.
If the pressure of the replaced tire is low, drive slowly to the
nearest service station and fill to the correct pressure.
Do not forget to reinstall the tire valve cap as dirt and moisture
could get into the valve core and possible cause air leakage.
If the cap is missing, put a new one on as soon as possible.
This is the same procedure for changing or rotating your tires.
CAUTION
Before driving, make sure all the tools, jack and flat tire
are securely in place in their storage location to reduce
the possibility of personal injury during a collision or
sudden braking.
248
Page 92
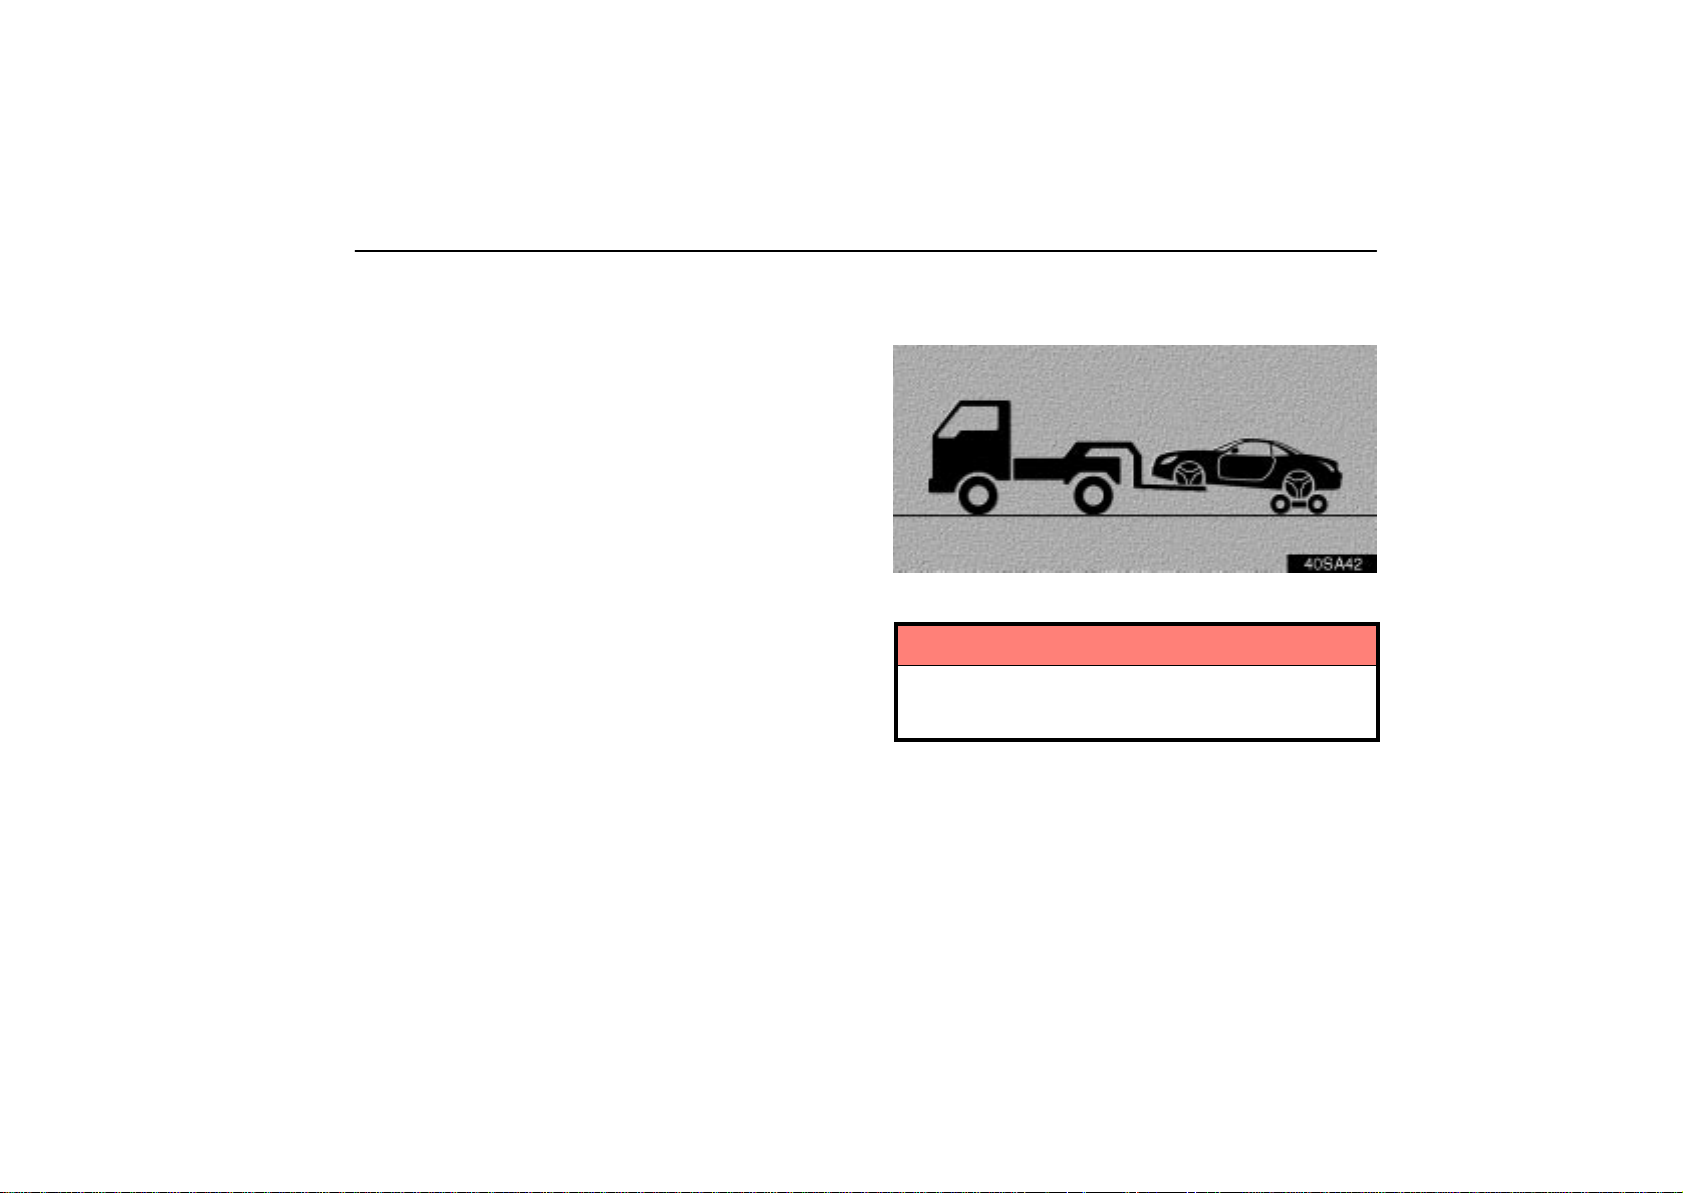
IN CASE OF AN EMERGENCY
IF YOUR VEHICLE NEEDS TO BE
TOWED
If towing is necessary, we recommend you to have it done
by your Lexus dealer or a commercial tow truck service.
In consultation with them, have your vehicle towed using
either (a) or (b).
(a) Towing with a wheel lift type truck
(b) Using a flat bed truck
(c) Never tow with a sling type truck
Only when you cannot receive a towing service from a
Lexus dealer or commercial tow truck service, tow your
vehicle carefully in accordance with the instructions
given in ”(d) Emergency towing” on page 252.
Proper equipment will help ensure that your vehicle is not
damaged while being towed. Commercial operators are
generally aware of the state/provincial and local laws
pertaining to towing.
Your vehicle can be damaged if it is towed incorrectly.
Although most operators know the correct procedure, it is
possible to make a mistake. To avoid damage to your vehicle,
make sure the following precautions are observed. If
necessary, show this page to the tow truck driver.
TOWING PRECAUTIONS:
Use a safety chain system for all towing, and abide by the
state/provincial and local laws. The wheels and axle on the
ground must be in good condition. If they are damaged, use
a towing dolly.
(a) Towing with a wheel lift type truck
From front
40sa42
Use a towing dolly under the rear wheels.
NOTICE
Never tow a vehicle with an automatic transmission
from the front with rear wheels on the ground, as this
may cause serious damage to the transmission.
249
Page 93
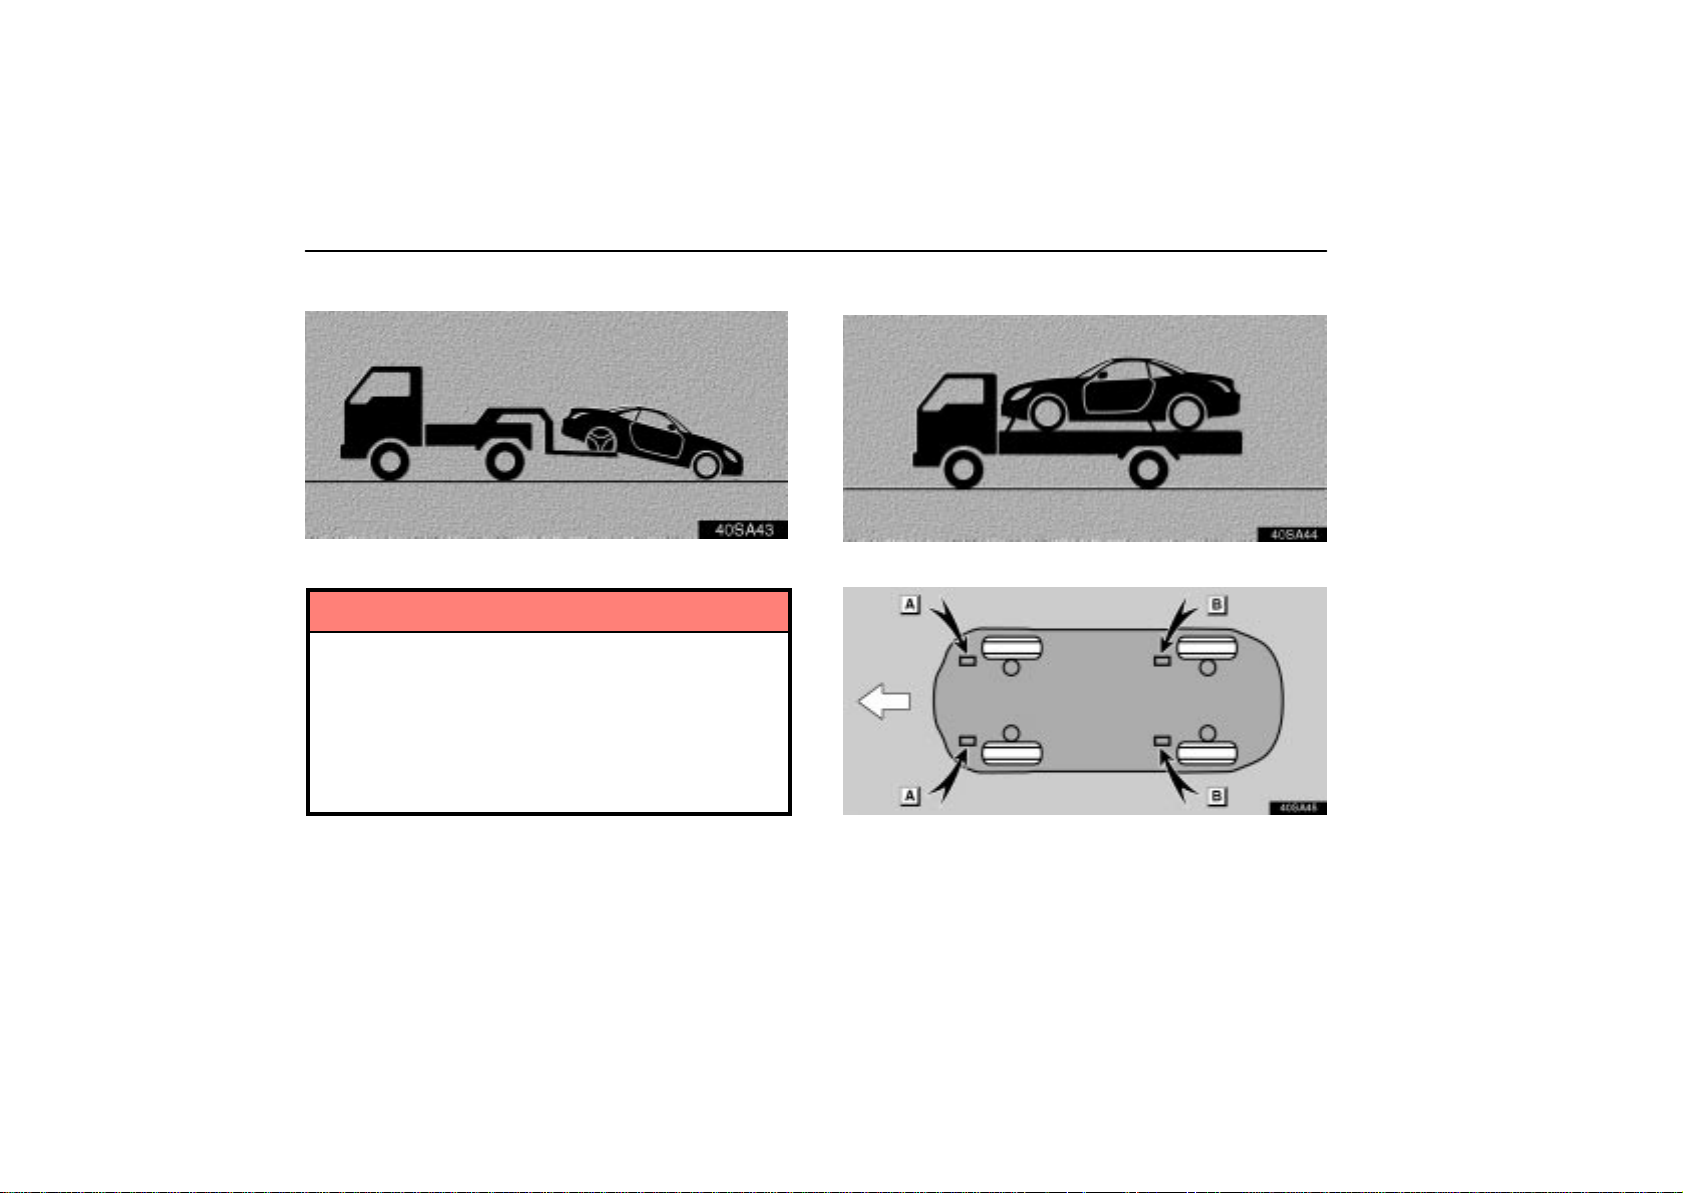
IN CASE OF AN EMERGENCY
From rear
40sa43
Place the ignition switch in the ”ACC” position.
NOTICE
Do not tow with the key removed or in the ”LOCK”
position, as the steering lock mechanism is not
strong enough to hold the front wheels straight.
When lifting wheels, take care to ensure adequate
ground clearance for towing at the opposite end of
the raised vehicle. Otherwise, the bumper and/or
underbody of the towed vehicle will be damaged
during towing.
(b) Using a flat bed truck
40sa44
Tie down points
40sa45
250
Page 94
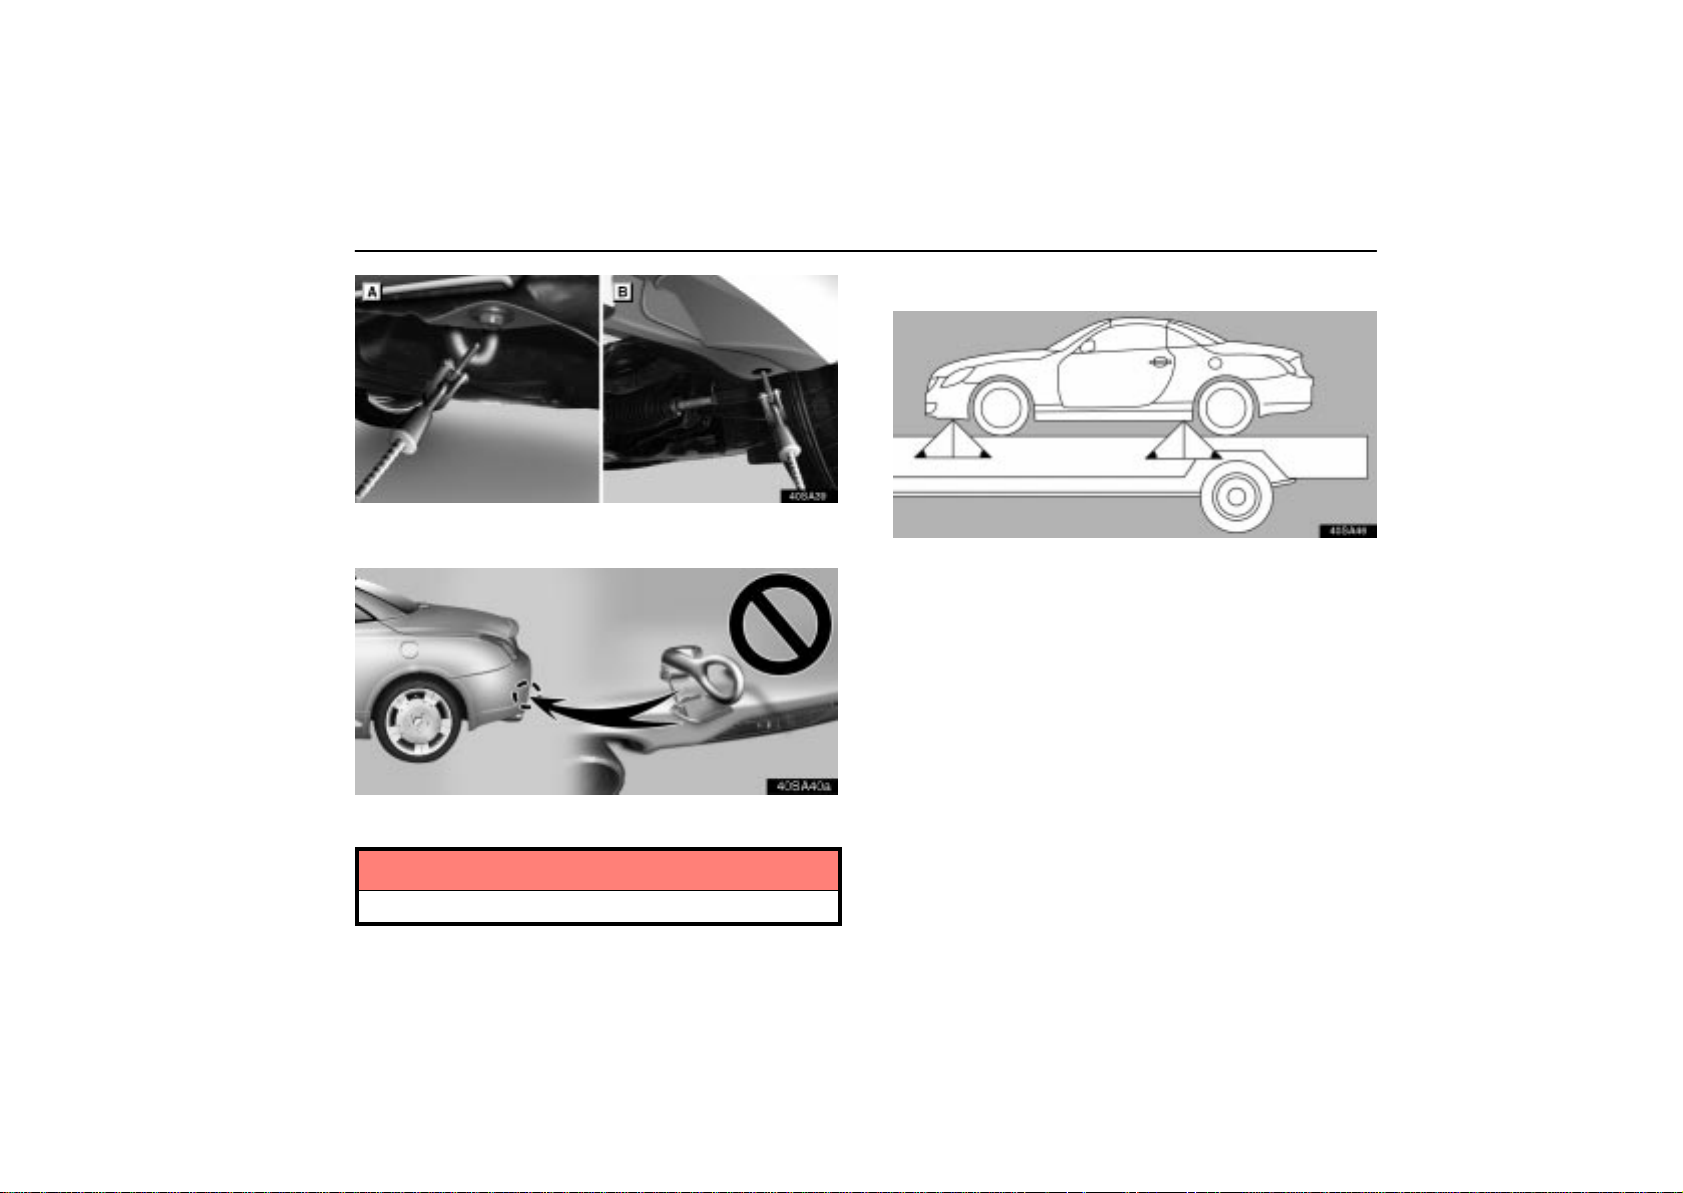
40sa39
If your Lexus is transported by a flat bed, it should be tied
down at locations A and B as shown above.
40sa40a
Rear emergency towing eyelets
IN CASE OF AN EMERGENCY
Tie down angle
40sa46
If you use chains or wires to tie down your vehicle, the
angles shaded black must be at 45.
NOTICE
Do not use the rear emergency towing eyelets.
251
Page 95
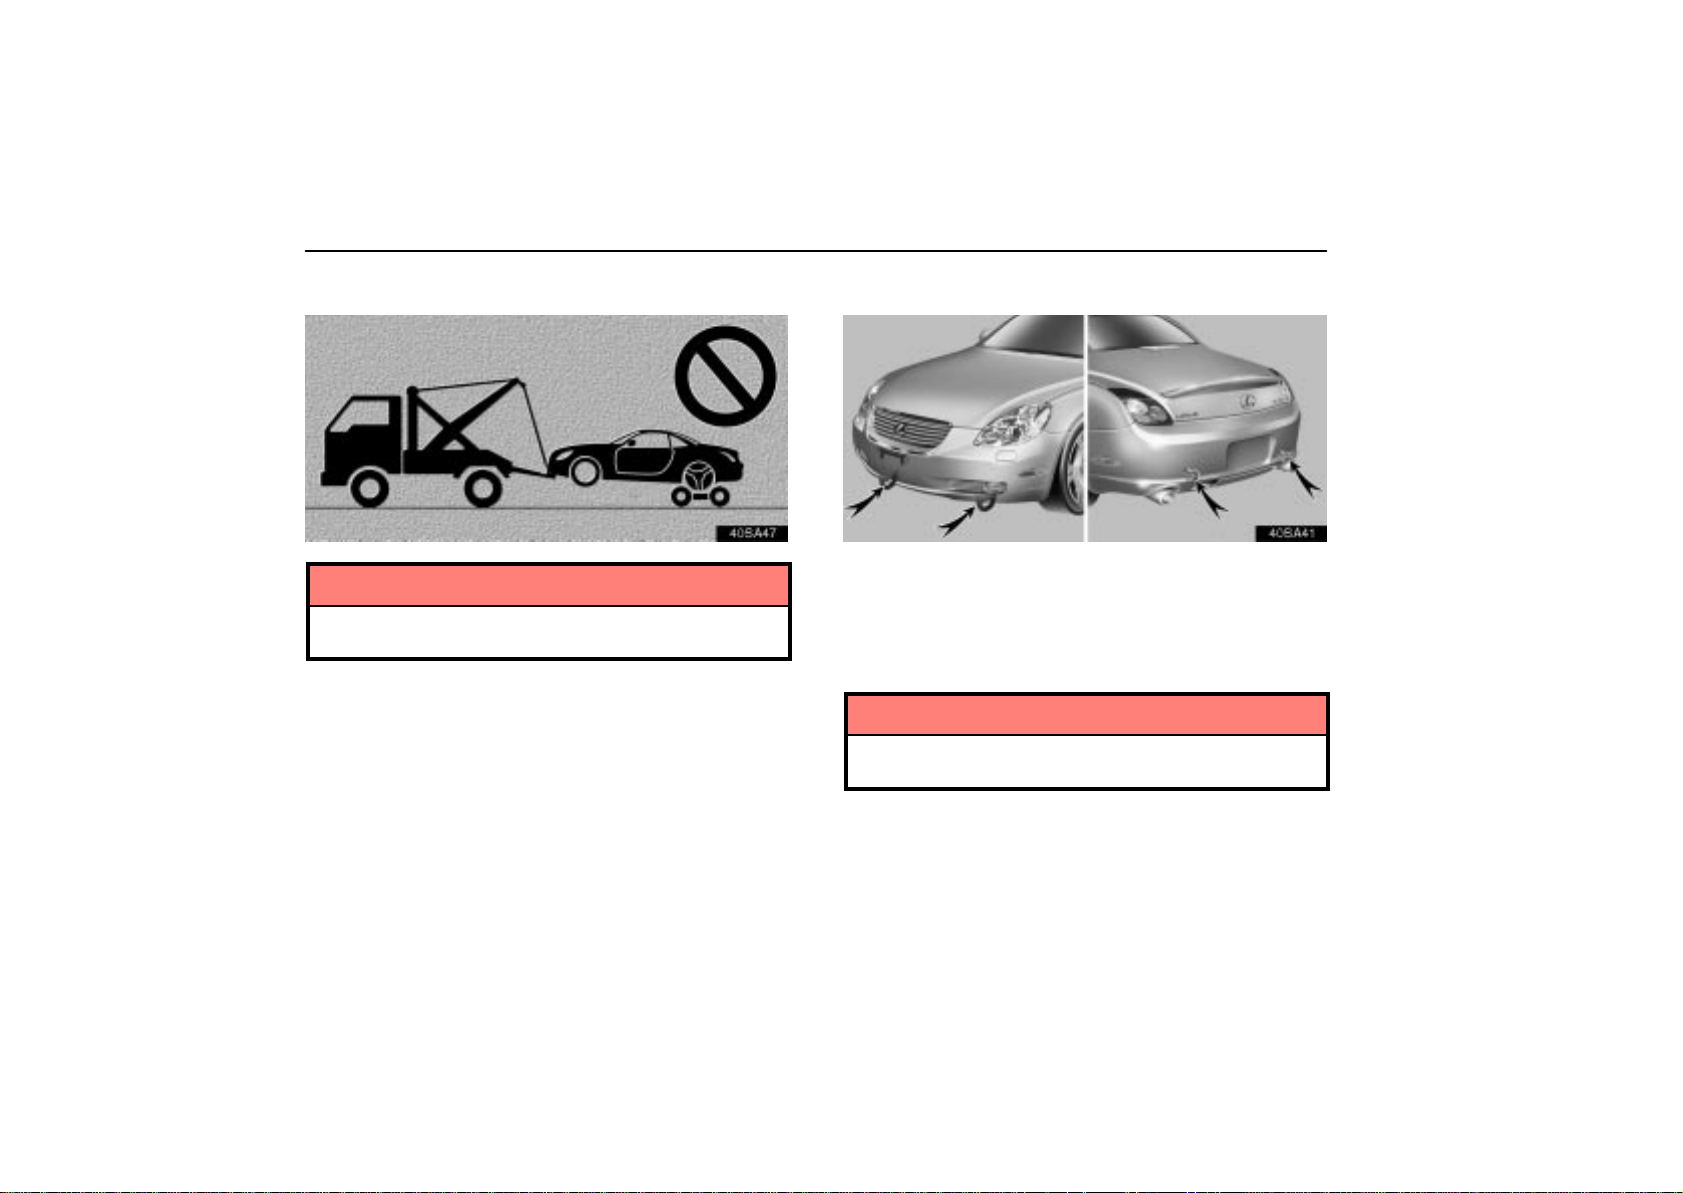
IN CASE OF AN EMERGENCY
(c) Towing with a sling type truck
40sa47
NOTICE
Do not tow with a sling type truck, either from the front
or rear. This may cause body damage.
252
(d) Emergency towing
40sa41
If towing is necessary, we recommend you to hav e i t d one
by your Lexus dealer or a commercial tow truck service.
If towing service is not available in an emergency, your
vehicle may be temporarily towed by a cable or chain
secured to the emergency towing eyelet. Use extreme
caution when towing the vehicle.
NOTICE
Only use specified towing eyelet; otherwise your vehicle may be damaged.
A driver must be in the vehicle to steer it and operate the
brakes.
Towing in this manner may be done only on hard–surfaced
roads for a short distance and at low speeds. Also, the wheels,
axles, drive train, steering and brakes must all be in good
condition.
Page 96
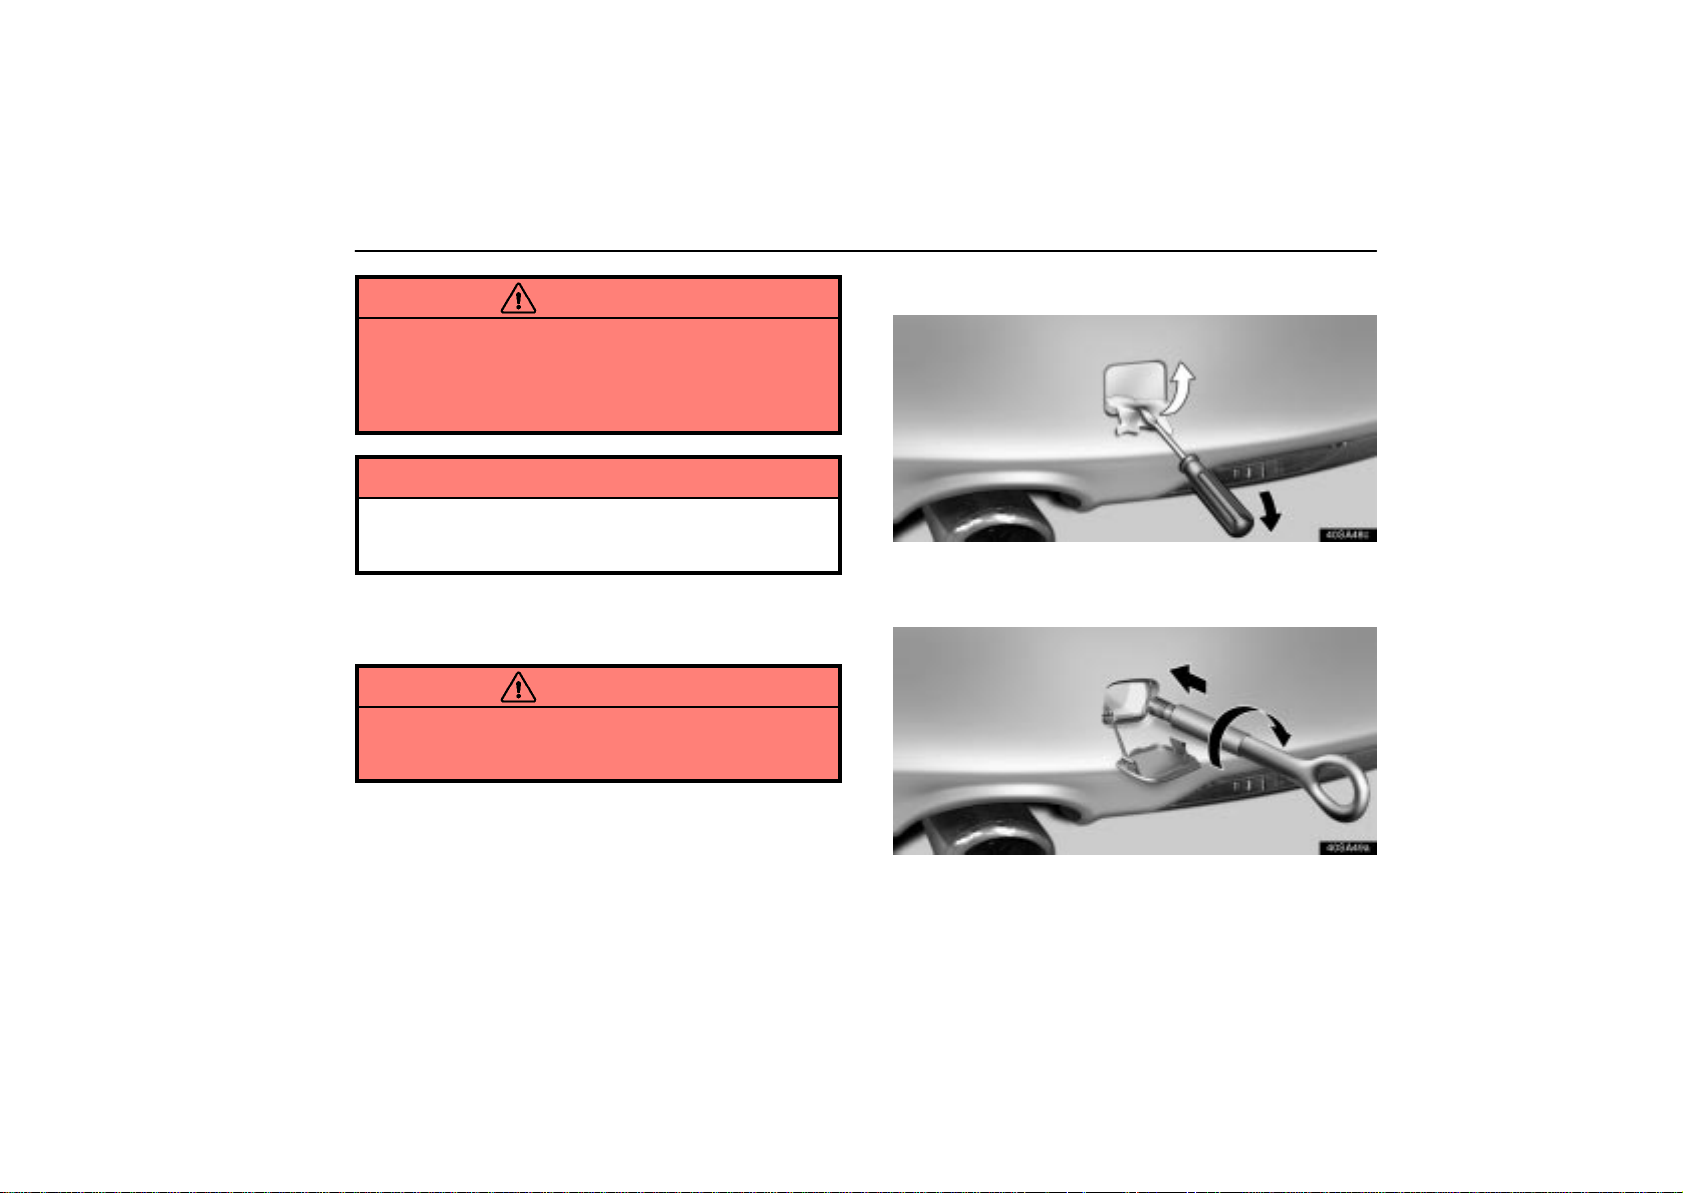
IN CASE OF AN EMERGENCY
CAUTION
Use extreme caution when towing the vehicle. Avoid
sudden starts or erratic driving maneuvers which would
place excessive stress on the emergency towing eyelet
and towing cable or chain. The eyelet and towing cable
or chain may break and cause serious injury or damage.
NOTICE
Use only a cable or chain specifically intended for use
in towing vehicles. Securely fasten the cable or chain
to the towing eyelet provided.
Before towing, release the parking brake and put the
transmission in ”N”. The ignition switch must be in ”ACC”
(engine off) or ”ON” (engine running).
CAUTION
If the engine is not running, the power assist for the
brakes and steering will not work so steering and
braking will be much harder than usual.
(e) Installing rear towing eyelet
40sa48c
1. Remove the rear towing eyelet cover on the rear bumper
using a flat–bladed screwdriver. To protect the bodywork,
place a piece of rag over the cover.
40sa49a
2. Use the rear towing eyelet in the trunk. Secure it to the hole
on the bumper by turning clockwise. (For the eyelet location,
see page 243.)
253
Page 97
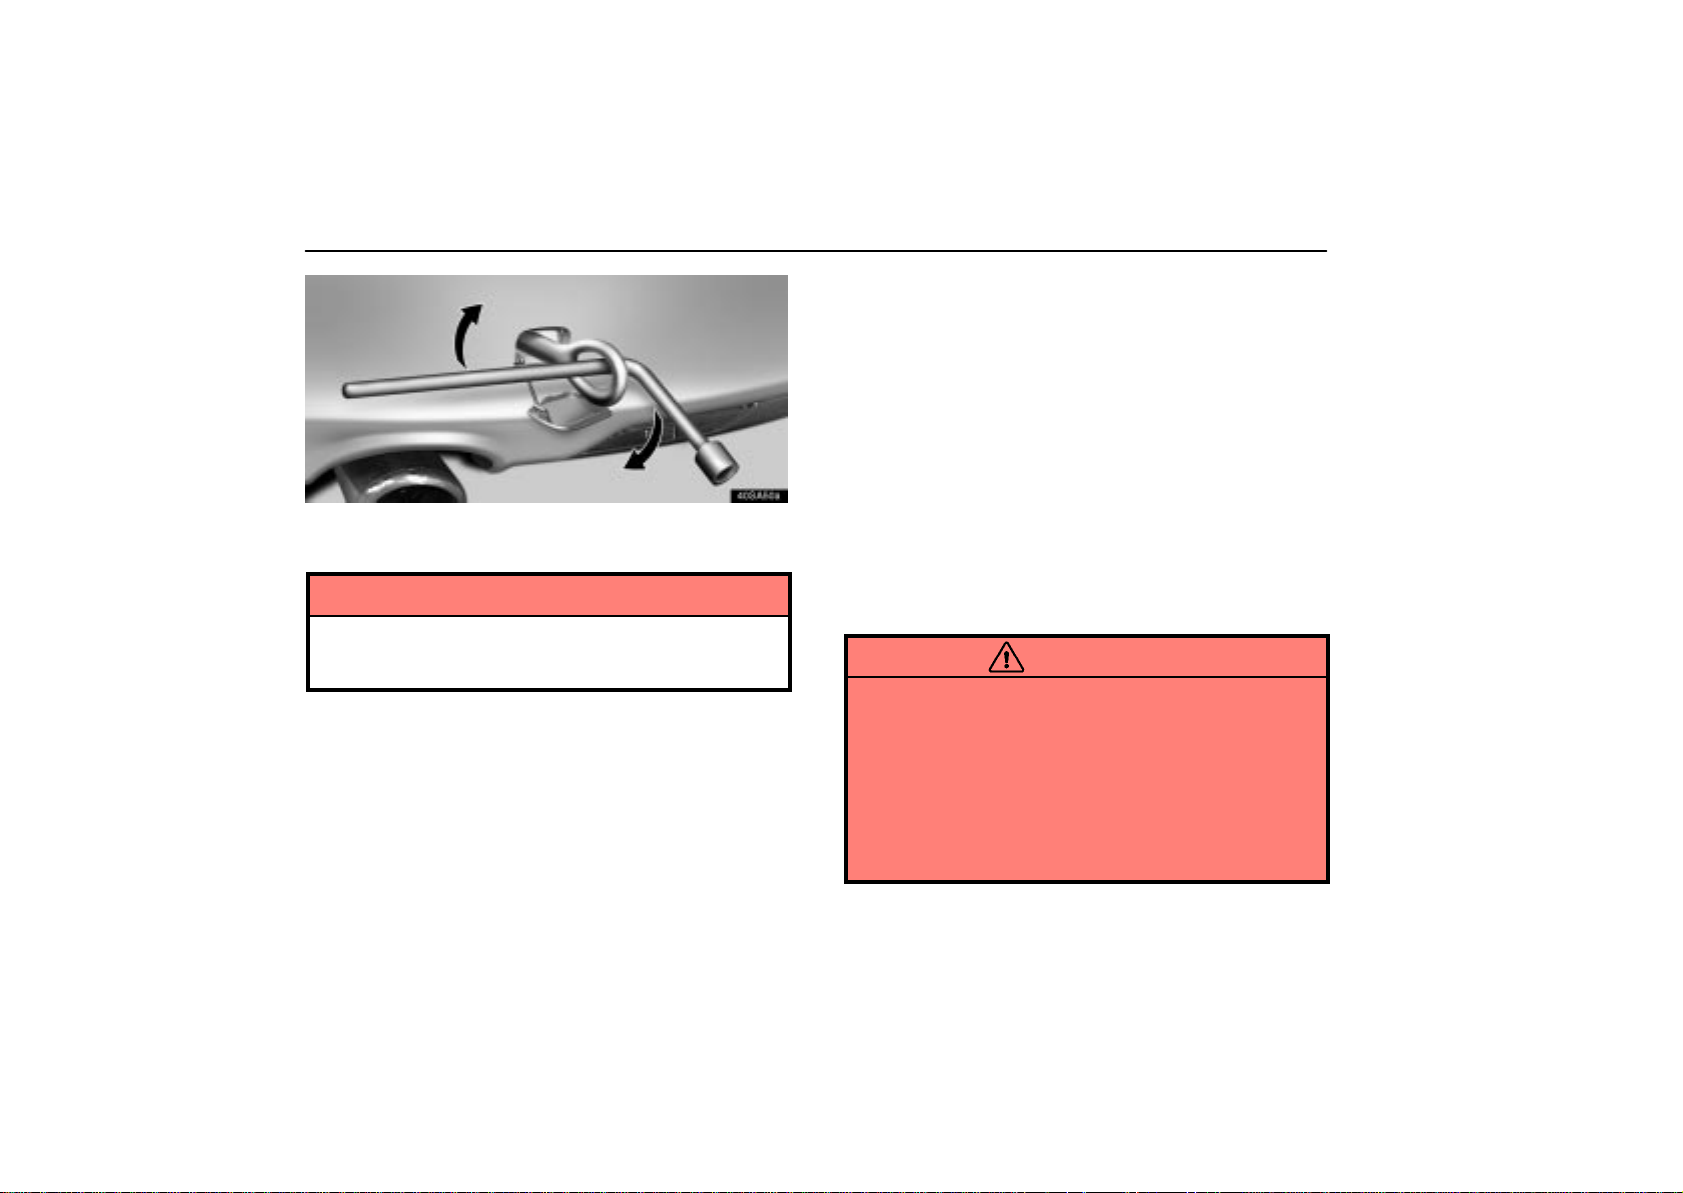
IN CASE OF AN EMERGENCY
40sa50a
3. Tighten the rear towing eyelet securely by a wheel nut
wrench.
NOTICE
Make sure the rear towing eyelet is tightened securely,
or it may be loosened or removed when towing the
vehicle.
IF THE RETRACTABLE HARDTOP
DOES NOT CLOSE
If the retractable hardtop does not close, check to see that the
trunk lid and trunk lid opener main switch are set properly in
accordance with the conditions for retractable hardtop
activation shown on page 81. Although these requirements
are met, if the retractable hardtop does not close, close it
manually following the procedure below.
Some procedures require 2 skilled people having strength. If
they are not confident in strength and if there is no other
person, besides you, to perform the work, have your Lexus
inspected at Lexus dealer as soon as possible. In other
procedures, you may be injured by performing them with bare
hands. In that case, wear gloves or use a piece of rag for
protection.
CAUTION
Stop your vehicle in a safe and level place.
Apply the parking brake and put the selector lever in
the “P” position.
Do not perform the work if anyone is in the vehicle.
Do not perform the work where the wind is blowing
harder.
Leave the ignition switch off with the retractable
hardtop partially closed.
254
Page 98
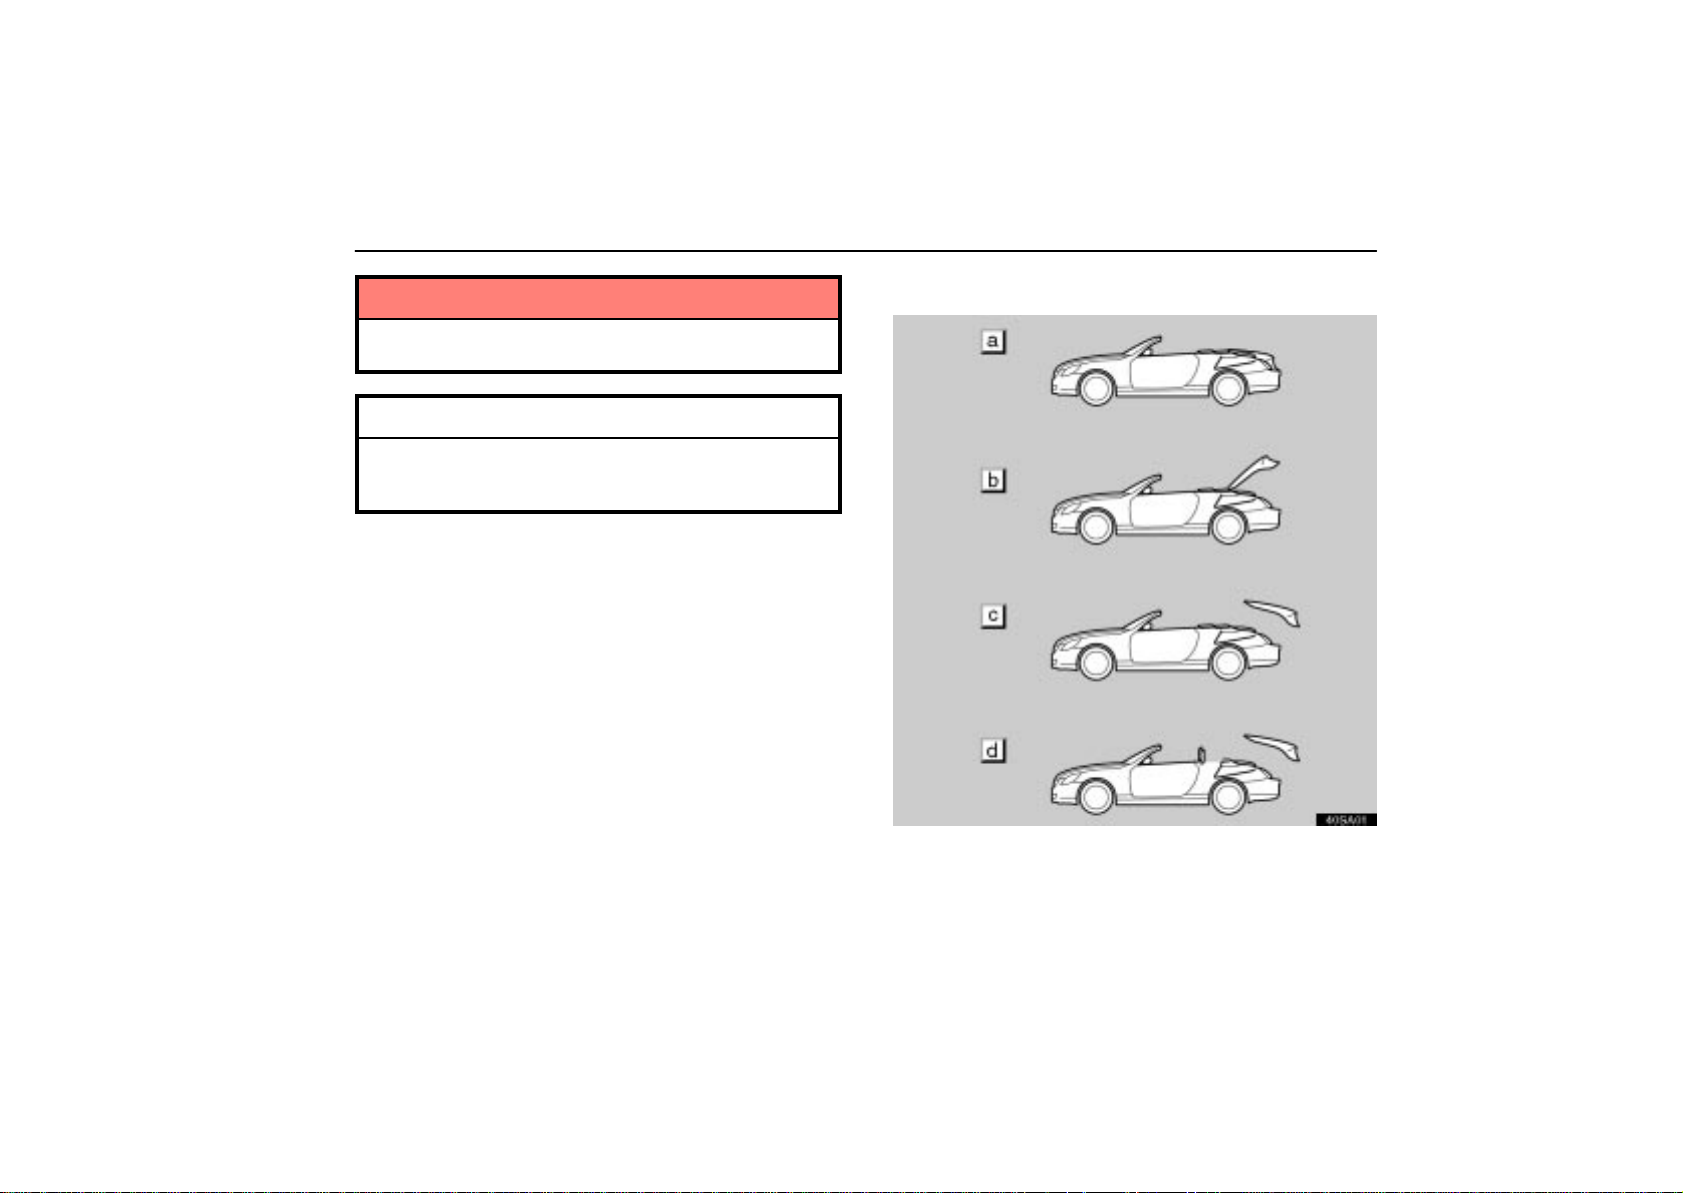
IN CASE OF AN EMERGENCY
NOTICE
The radio antenna should be lowered to avoid damage
during this procedure.
INFORMATION
Some procedures require 2 people. They should stand
on each side of the rear of the vehicle and work in
unison.
Closing the retractable hardtop manually
40sa01
255
Page 99
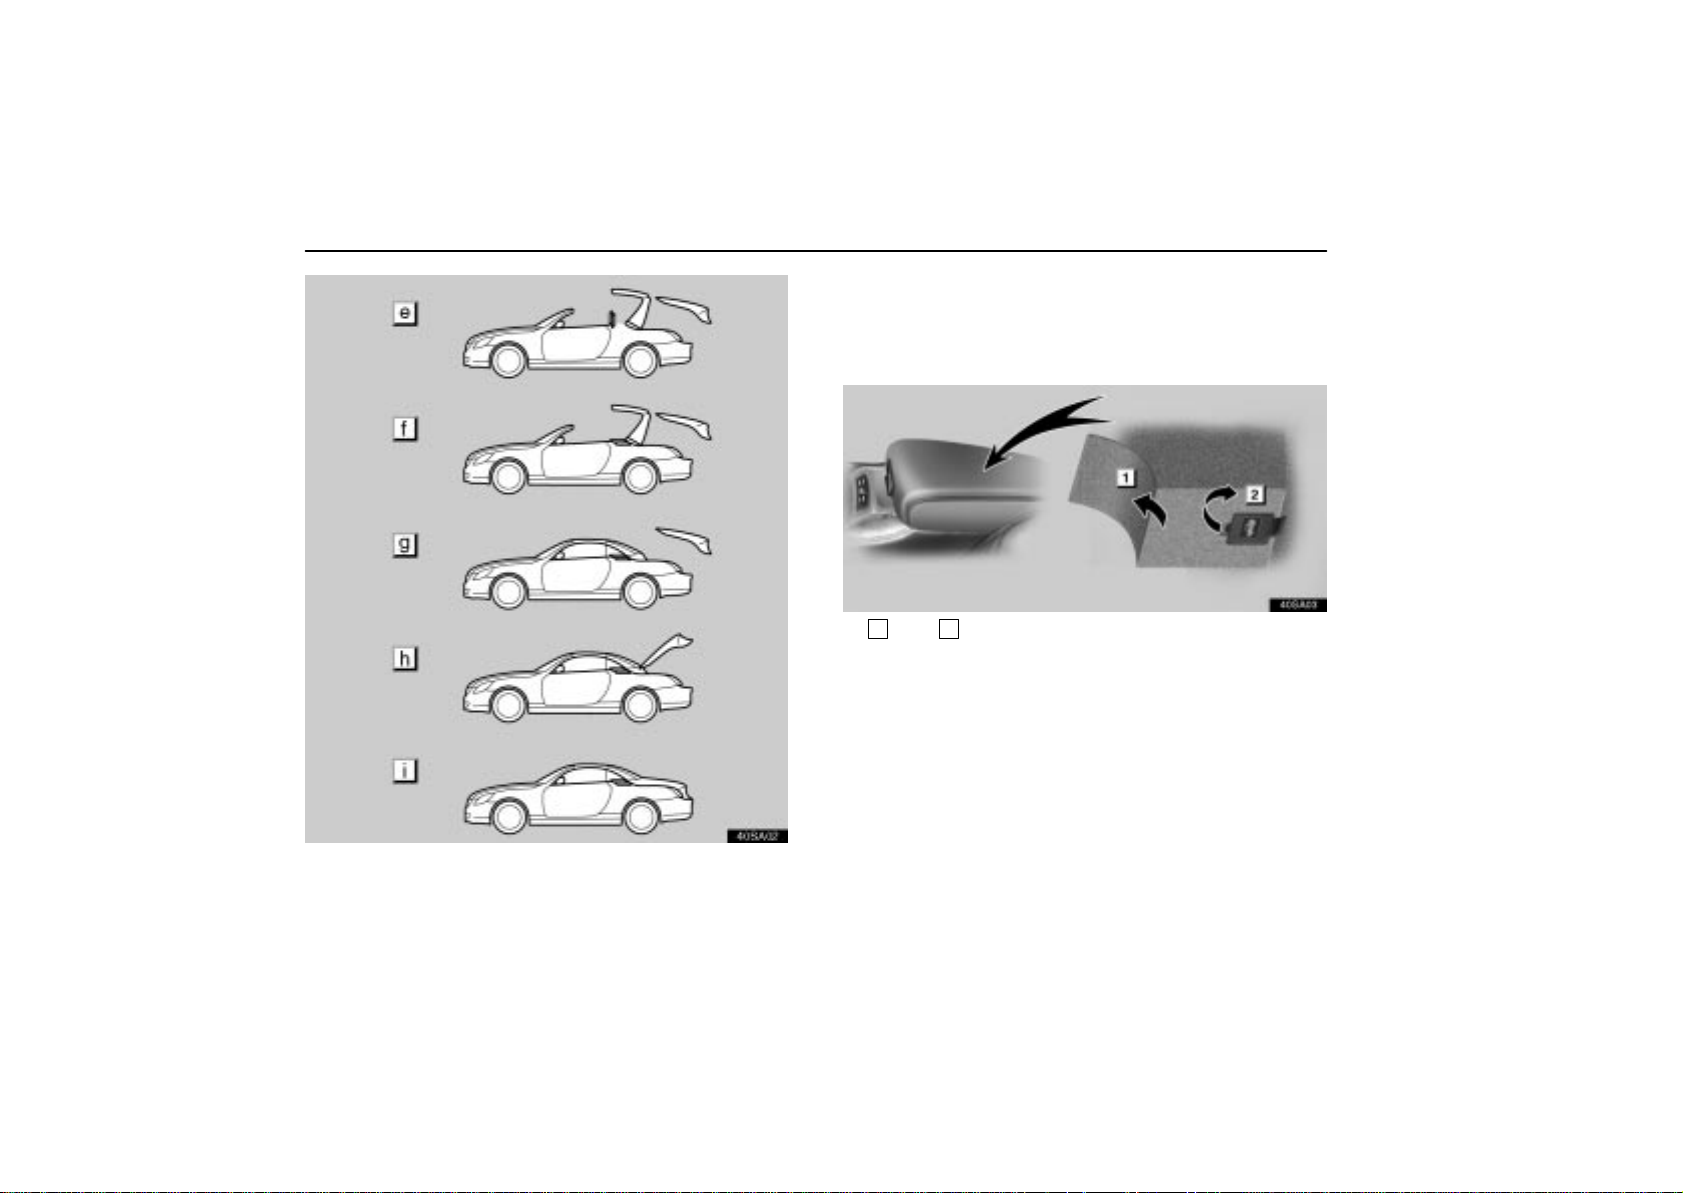
IN CASE OF AN EMERGENCY
40sa02
(a) Unlocking the trunk lid
Push the trunk lid opener switch to unlock the trunk lid. If the
trunk lid opener does not operate properly, unlock the trunk lid
in accordance with the following procedure.
40sa03
1
Mat 2Cover
1. Lift up the mat in the lower box contained in the rear
console box and remove the cover.
256
Page 100
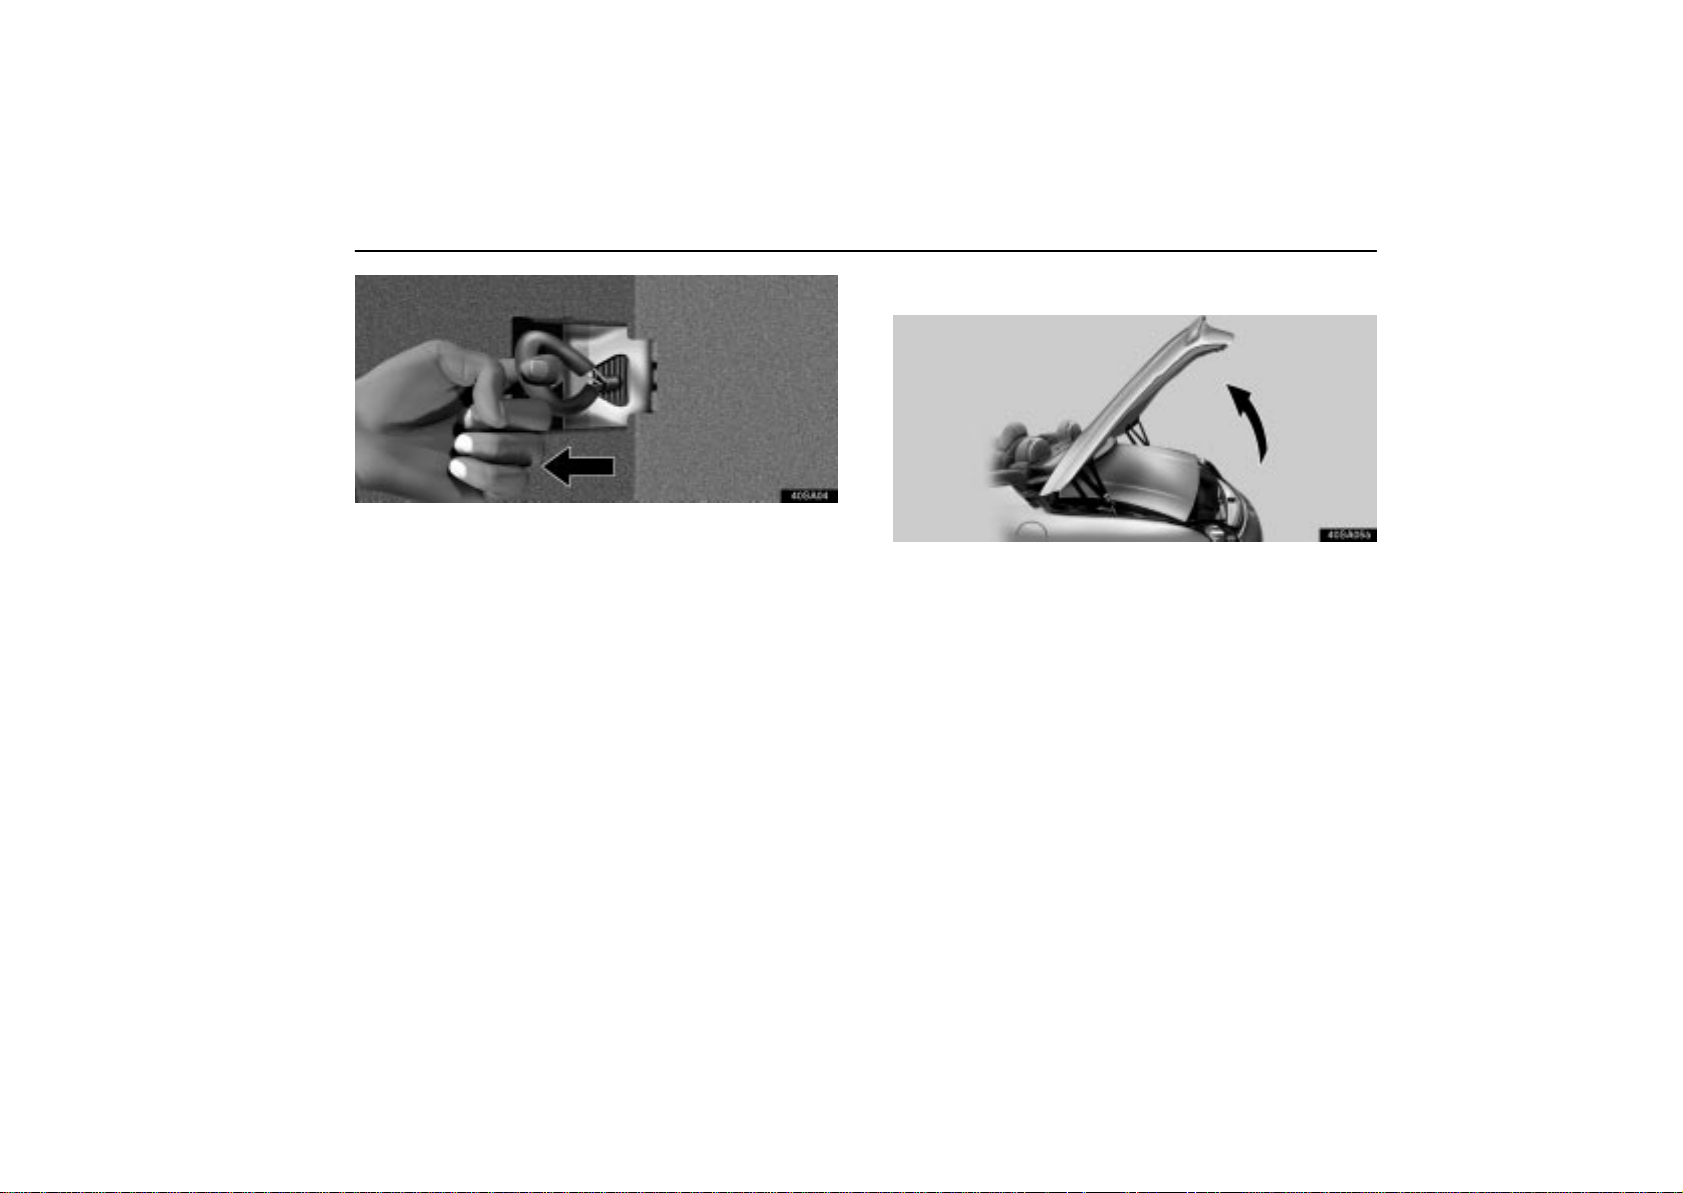
40sa04
Loop of wire
2. Pull the loop of wire to unlock the trunk lid.
IN CASE OF AN EMERGENCY
(b) Opening the trunk lid
40sa05a
Open the trunk lid fully.
257
 Loading...