


Contents
The Quick Guide is not intended as a substitute for your
Manual
. We strongly encourage you to review the
Manual
and supplementary manuals so you will have a better
understanding of your vehicle’s capabilities and limitations.
Owner’s
Owner’s
Air Conditioning System (with navigation system)
Using the automatic mode........................................................................................................48
Adjusting the temperature........................................................................................................48
To turn off the airflow...................................................................................................................48
Air Conditioning System (without navigation system)
Using the automatic mode........................................................................................................60
Adjusting the temperature........................................................................................................60
To turn off the airflow...................................................................................................................60
Audio System (with navigation system)
Audio control screen................................................................................................................... 44
Basic operation .............................................................................................................................. 44
Radio................................................................................................................................................... 45
DVD player/CD player..............................................................................................................45
Operating an iPod
Remote control (steering wheel switches)..........................................................................47
Audio System (without navigation system)
Basic operation ..............................................................................................................................55
Radio................................................................................................................................................... 56
CD player.........................................................................................................................................57
Operating an iPod
Remote control (steering wheel switches).........................................................................59
Automatic High Beam....................................................................................................................... 23
Back Door ...............................................................................................................................................76
Cruise Control........................................................................................................................................18
Door Locks..............................................................................................................................................72
Dynamic Radar Cruise Control......................................................................................................19
Eco Driving Indicator Light ...............................................................................................................17
Energy Monitor / Consumption Screens .................................................................................... 8
Fuel Tank Cap....................................................................................................................................... 75
Hands-free System For Cellular Phone (with navigation system)
Bluetooth
Phonebook transfer ......................................................................................................................37
Registering a voice tag ...............................................................................................................38
Registering a speed dial .............................................................................................................39
Calling by name.............................................................................................................................40
Calling by speed dial......................................................................................................................41
Receiving a call............................................................................................................................... 42
®
XM
NavWeather...................................................................................................................... 43
®
.....................................................................................................................47
®
....................................................................................................................59
®
phone pairing.........................................................................................................36
1

Hands-free System For Cellular Phone (without navigation system)
Bluetooth
®
phone pairing .........................................................................................................49
Calling by number........................................................................................................................ 50
Calling by name............................................................................................................................. 50
Calling by speed dial.....................................................................................................................51
Phonebook transfer......................................................................................................................52
Changing the registered name................................................................................................53
Registering a speed dial..............................................................................................................54
Headlights...............................................................................................................................................22
Head-up Display ................................................................................................................................... 21
Hybrid System..........................................................................................................................................7
Intuitive Parking Assist........................................................................................................................14
Keys ............................................................................................................................................................10
Lexus Enform with Safety Connect..............................................................................................70
Moon Roof..............................................................................................................................................74
Multi-information Display and Switch..........................................................................................15
Navigation System
Register home.................................................................................................................................30
Destination input ⎯⎯ Search by address ......................................................................... 31
Destination input ⎯⎯ Search points of interest by name..........................................33
Destination input ⎯⎯ Search points of interest by category...................................34
Destination input ⎯⎯ Search points of interest by telephone number ...............35
Portable Audio Device Adapters .................................................................................................67
Power (Ignition) Switch ...................................................................................................................... 13
Power Windows...................................................................................................................................73
Rear Window Wiper and Washer................................................................................................26
Remote Touch
Basic operation...............................................................................................................................27
Start .....................................................................................................................................................28
Display................................................................................................................................................28
Screen scroll operation...............................................................................................................29
Setting a route.................................................................................................................................29
Safety Connect .....................................................................................................................................68
Smart Access System with Push-button Start ............................................................................11
Speech Command System
Basic operation................................................................................................................................61
Command list ..................................................................................................................................62
Theft Deterrent System ......................................................................................................................12
Turn Signal Lever ...................................................................................................................................17
Windshield Wipers and Washer...................................................................................................24
2
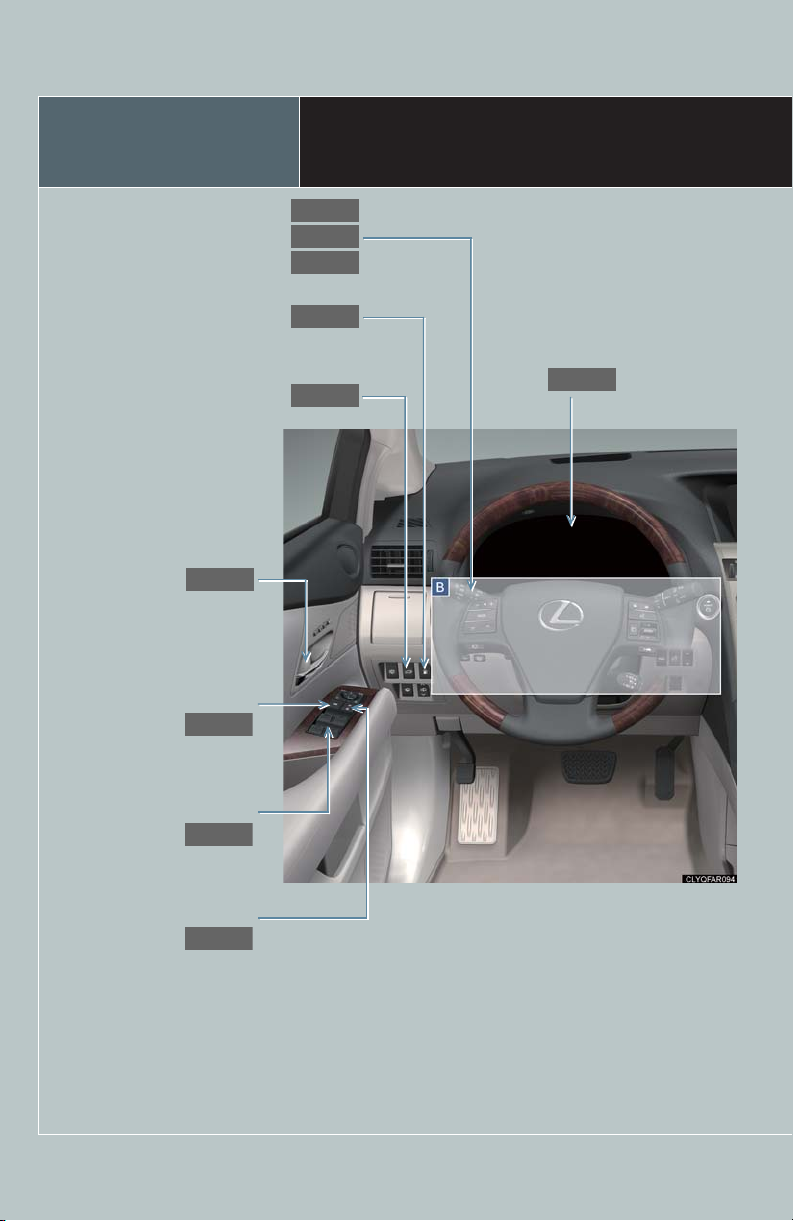
Overview
P.72
P.72
P.73
P.73
P.22
P.23
P.17
P.15
P.76
P.75
Headlight switch
Automatic high beam
Turn signal lever
Fuel filler door opener
Power back door switch ∗
Inside lock buttons
Window lock switch
Instrument Panel
∗
Multi-information
display
Power window switches
Door lock switches
3
Windshield wiper and washer switch
P.24
P.26
P.13
P.77
P.27
P.21
Rear window wiper and washer switch
Power (ignition) switch
Power back door main
switch
∗
Remote Touch
∗
Head-up display main switch ∗
∗ : If equipped
4
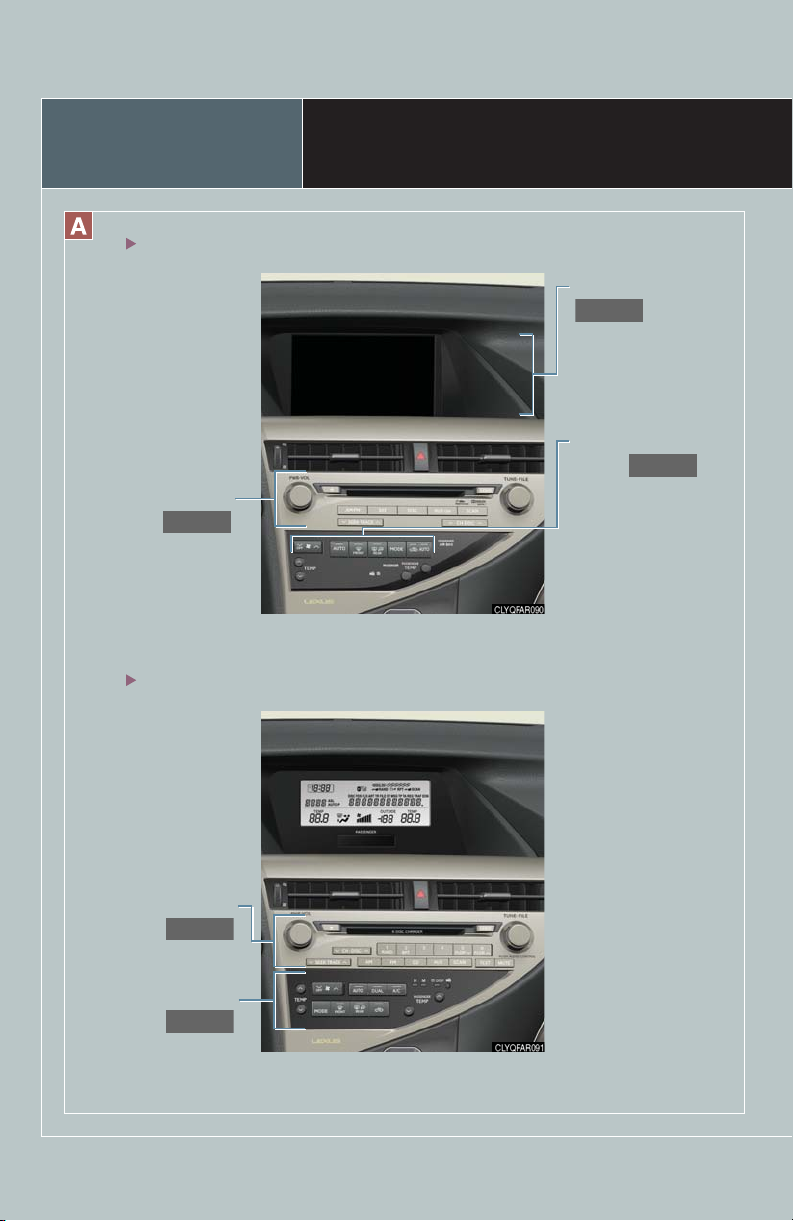
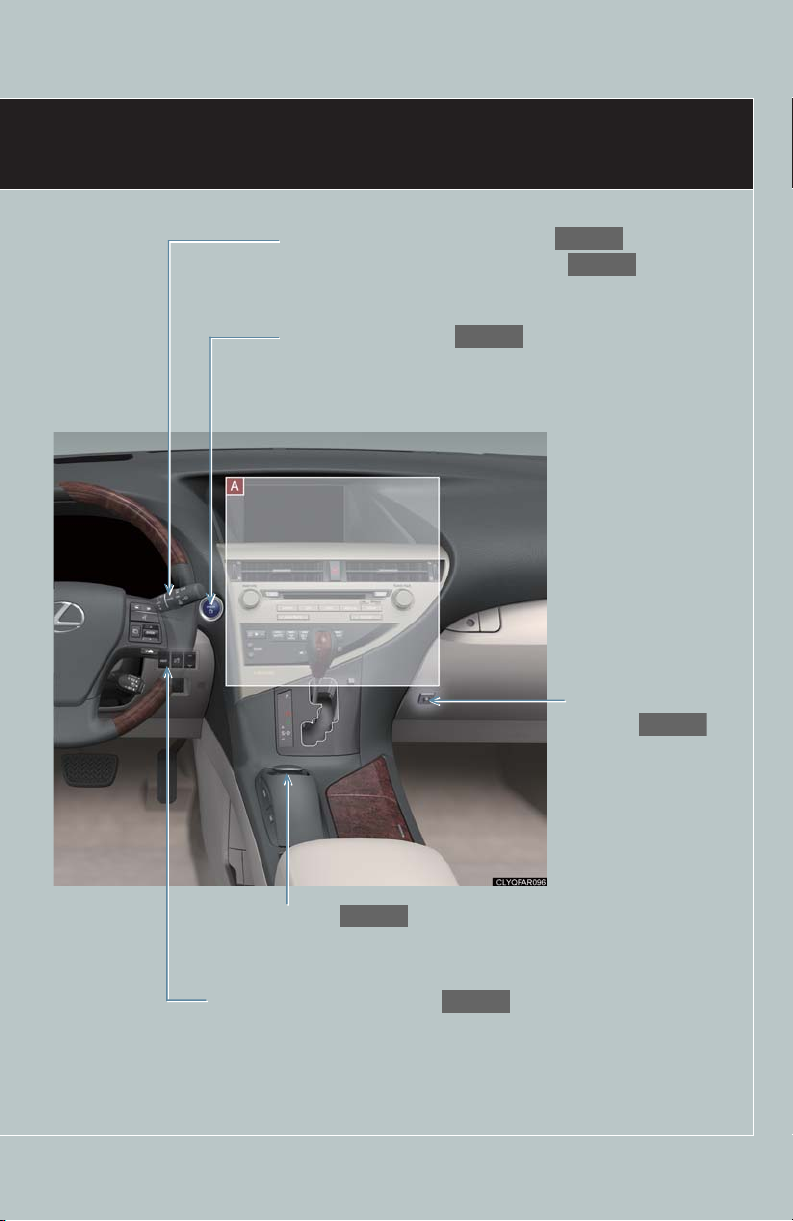
Overview
P.44
P.30
P.48
P.55
P.60
With navigation system
Audio system
Without navigation system
Instrument Panel
Navigation system
Air conditioning
system
5
Audio system
Air conditioning
system

Audio remote control
P.47, 59
P.18, 19
P.19
P.15
switches
Cruise control switch
Multi-information switches
Distance switch ∗
∗ : If equipped
6
Hybrid System
Your vehicle is a hybrid vehicle. It has characteristics different from conventional vehicles. Be
sure you are closely familiar with the characteristics of your vehicles, and operate with care.
The hybrid system combines a gasoline engine and an electric motor (traction motor)
according to driving conditions, improving fuel efficiency and reducing exhaust emissions.
For details, refer to the “Owner's Manual”.
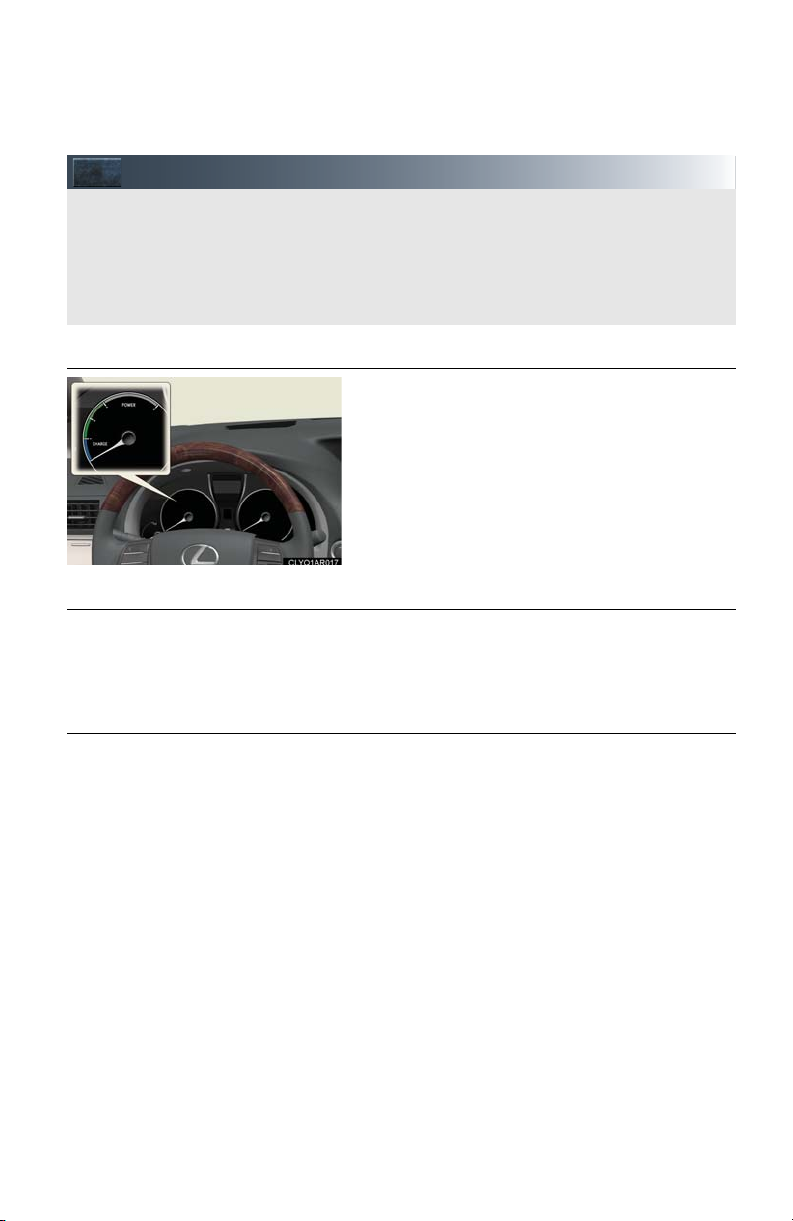
■ Hybrid System Indicator
Displays the output and regeneration level of the
hybrid system.
● By keeping the indicator within the Eco area,
more fuel-efficient driving can be achieved.
● The Charge area indicates regeneration status.
■ Regenerative braking
The motor generator converts kinetic energy to electric energy when:
● The accelerator pedal is released.
● The brake pedal is depressed with the shift lever in D or S.
■ Sounds and vibrations specific to a hybrid vehicle
There may be no engine sounds or vibrations even though the vehicle is able to move.
Always put the shift lever in P when parked.
The following sounds or vibrations may occur when the hybrid system is operating, and are
not a malfunction:
● Motor sounds may be heard from the engine compartment.
● Sounds may be heard from the hybrid battery (traction battery) under the rear seat when
the hybrid system starts or stops.
● Sounds from the hybrid system may be heard when the back door is open.
● Sounds may be heard from the hybrid transmission when the engine is started or
stopped, or while the engine is idling.
● Engine sounds may be heard when accelerating sharply.
● Sounds may be heard due to regenerative braking when the brake pedal is depressed
and accelerator is loosened.
● Vibrations may be felt when the gasoline engine starts or stops.
● Cooling fan sounds may be heard from the air intake vents under the rear seat.
7
Energy Monitor / Consumption Screens
You can view the status of your hybrid system on the multi-information display and the
Navigation system screen.
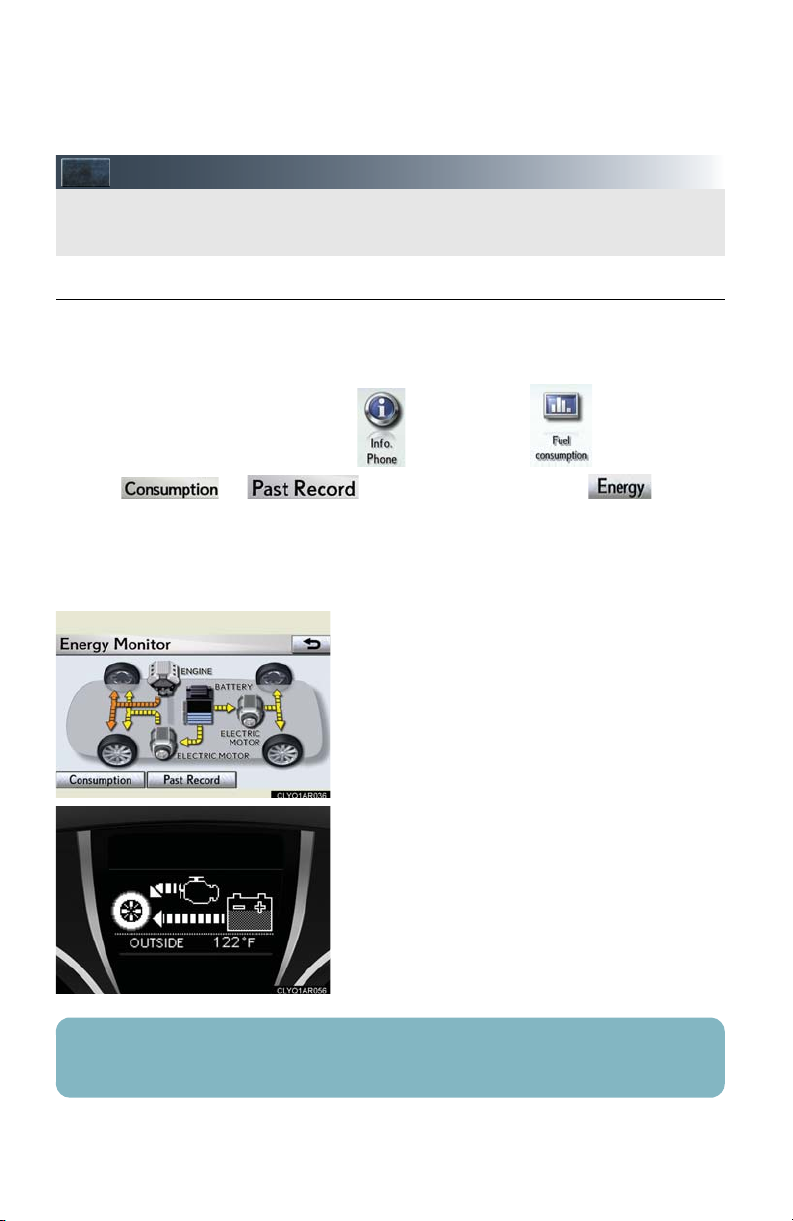
■ Energy monitor
The energy monitor can be displayed on both the Navigation system screen and the multiinformation display.
● How to display on the Navigation system screen (→P.27):
Press the “MENU” button, and select after that select .
If the or screen is displayed, select the and push
the “ENTER” button.
● How to display on the multi-information display:
Toggle the “ENTER” switch on the steering wheel upward or downward through several
items to select the energy monitor display.
● The flow of energy is displayed on the Navigation system screen. (The rear electric motor is
equipped AWD models only.)
Amber: gasoline energy
Yellow: electrical energy
Green: energy recovery
A green arrow appears when regenerative
braking occurs.
● The flow of energy is indicated by the movement of the arrows on the multi-information
display.
● The battery display acts as an 9-step indicator
of the hybrid battery level.
The displayed energy flow, battery level, etc. will change in response to the current driving
conditions.
8
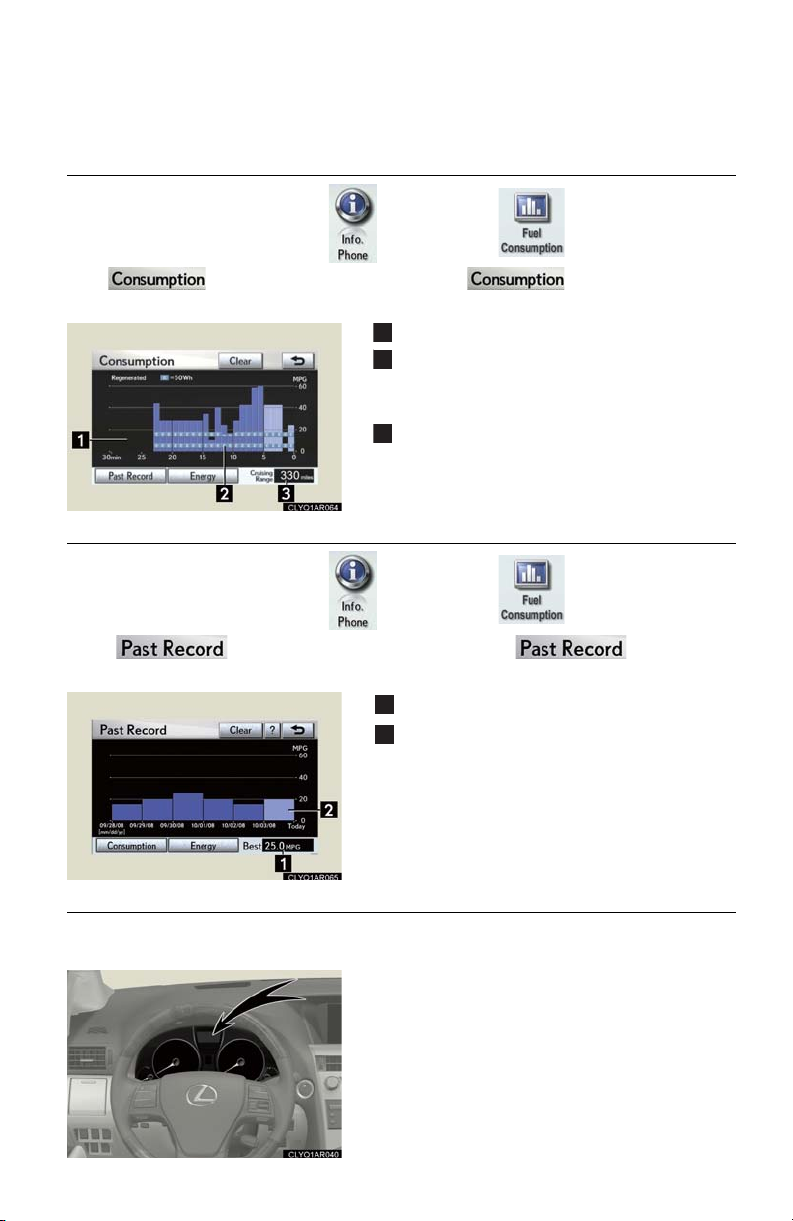
■ Consumption (with navigation system)
1
2
3
1
2
Press the “MENU” button and select , after that select and push the “ENTER”.
If the screen does not appear, select the and push the “ENTER”
button.
Fuel consumption in the past 30 minutes
Regenerated energy in the past 30 minutes
One symbol indicates 50 Wh. Up to 4 symbols are shown.
Cruising range
■ Past record (with navigation system)
Press the “MENU” button and select , after that select and push the “ENTER”.
If the screen does not appear, select the and push the
“ENTER” button.
Best past fuel consumption
Average fuel consumption
■ Hybrid warning message
A message is automatically shown when a malfunction occurs in the hybrid system or an
improper operation is attempted.
If a warning message is shown on the multi-information display, read the message and follow the
instructions.
9
Keys
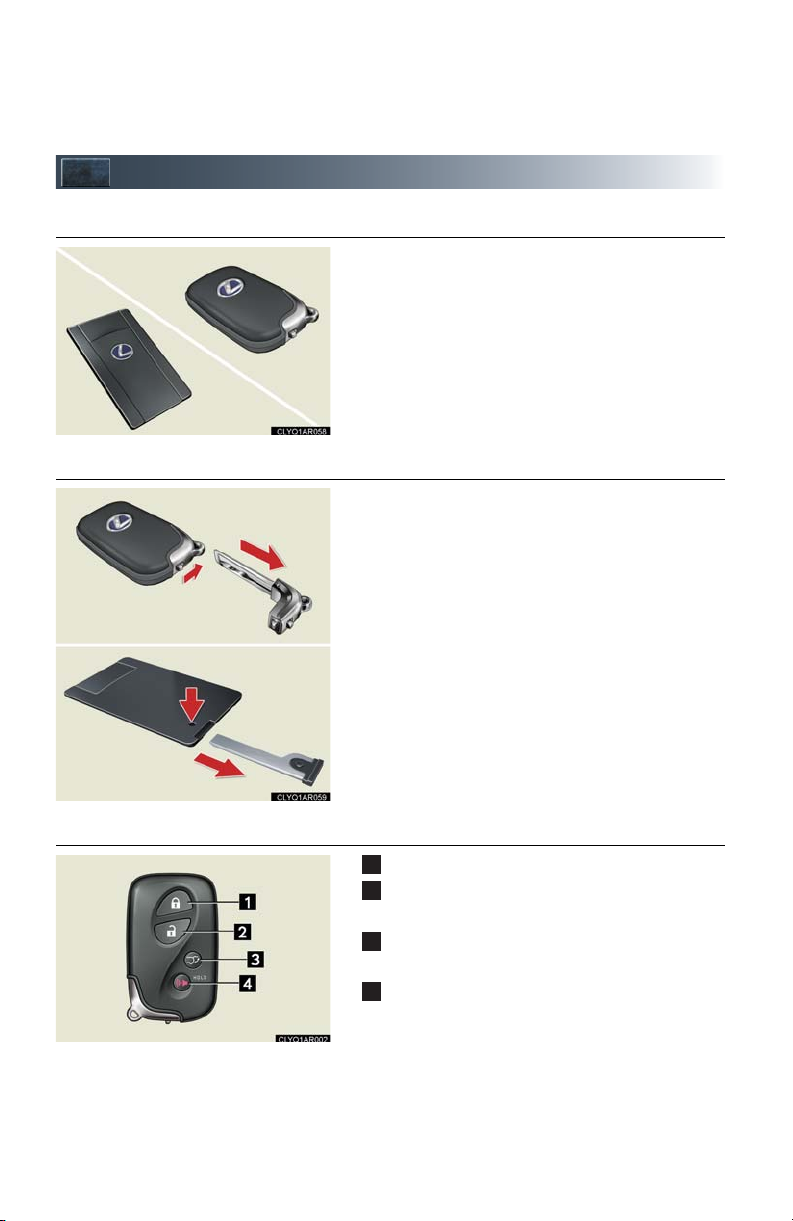
Card key*
1
2
3
4
■ Electronic key
■ Mechanical key
Smart access system with push-button start
(→P.11, 13)
*: If equipped
● Locks and unlocks the doors
● Locks and unlocks the glove box
The mechanical key is stored inside the electronic
key. To extract the key, release the latch and pull,
or if equipped with a card key, press the button
and pull.
■ Wireless remote control
Press: locks all doors
Press once: unlocks the driver's door
Press twice: unlocks all doors
Press and hold: opens and closes the back
door
*
Press and hold: sounds the alarm
(Use the alarm to attract attention to the vehicle in
order to help deter break-ins. To stop the alarm,
press any button on the wireless remote control.)
*: If equipped
10
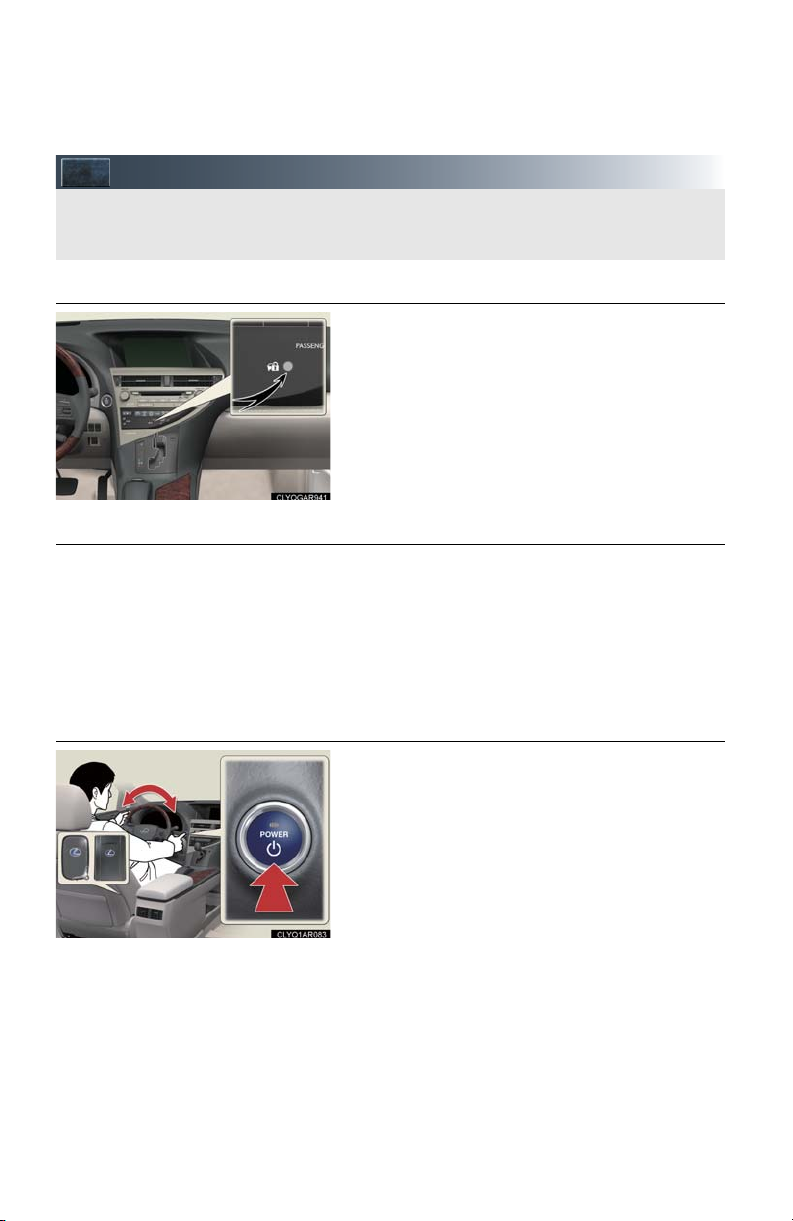
Smart Access System with Push-button Start
The smart access system with push-button start allows you to enter and exit the vehicle
or start the hybrid system by simply carrying the electronic key in your pocket or bag.
For details on starting the hybrid system, see page 13.
1
2
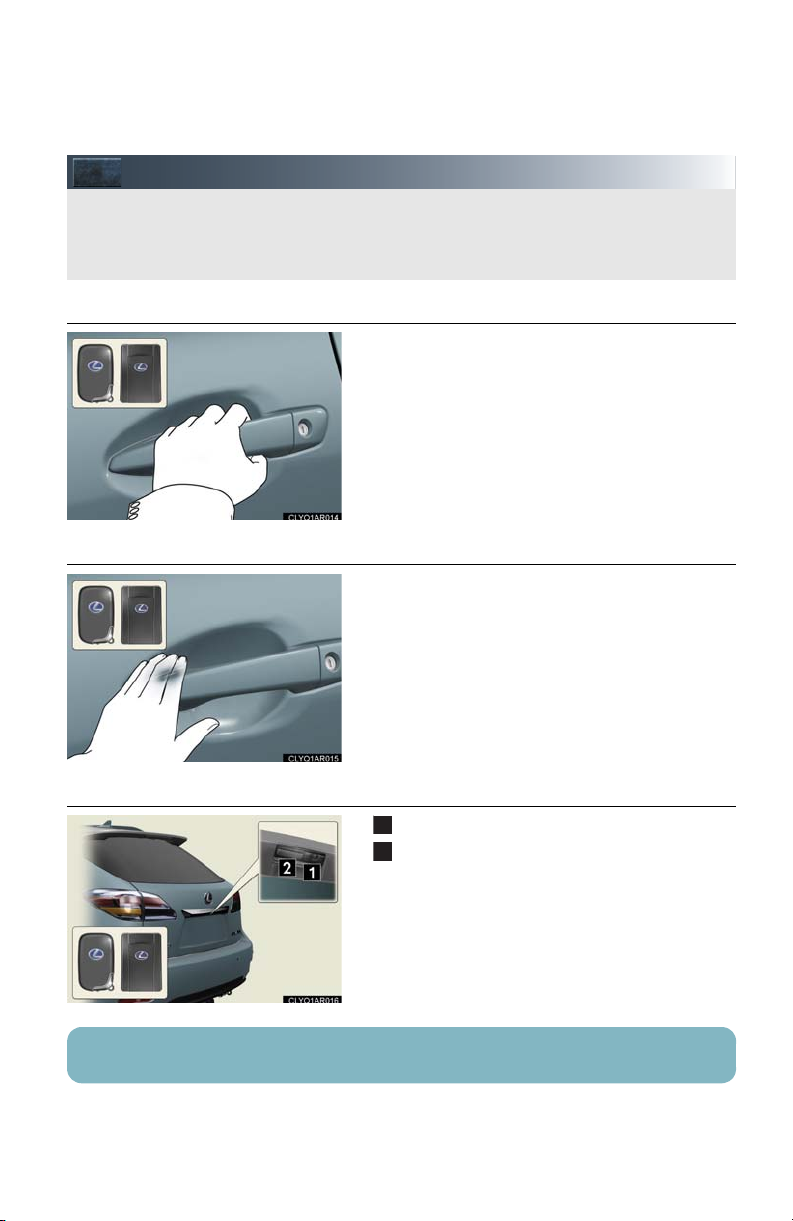
■ Entering the vehicle
■ Exiting the vehicle
To unlock the vehicle, simply grasp either of the
front door handles.
To lock the vehicle, touch the lock sensor on
either of the front door handles.
■ Locking and unlocking the back door
Locks
Unlocks
For details on what to do when the electronic key does not operate properly, see page 80.
11
Theft Deterrent System
The theft deterrent system includes the following features to help protect your vehicle
from theft.
■ Immobilizer system
The immobilizer system prevents the hybrid system from being started in the event that an
attempt is made to start the vehicle using an
unregistered key.
The security indicator light flashes to indicate that
the system is set.
■ Alarm
The system sounds the alarm and flashes lights when an attempt to steal the vehicle is
detected.
To set the alarm: close the doors and hood, and lock all doors. The security indicator light
comes on to indicate that the alarm is in its preparation state. When the indicator light
begins to flash, the system is armed.
To deactivate or stop the alarm: start the hybrid system, or unlock the doors.
■ Steering lock
The steering wheel locks when the “POWER”
switch is turned OFF and the driver’s door is
opened.
When the steering lock cannot be released, the
green indicator light on the “POWER” switch will
flash and a message will be shown on the multiinformation display. To release it, press the
“POWER” switch while gently turning the steering wheel left or right.
12
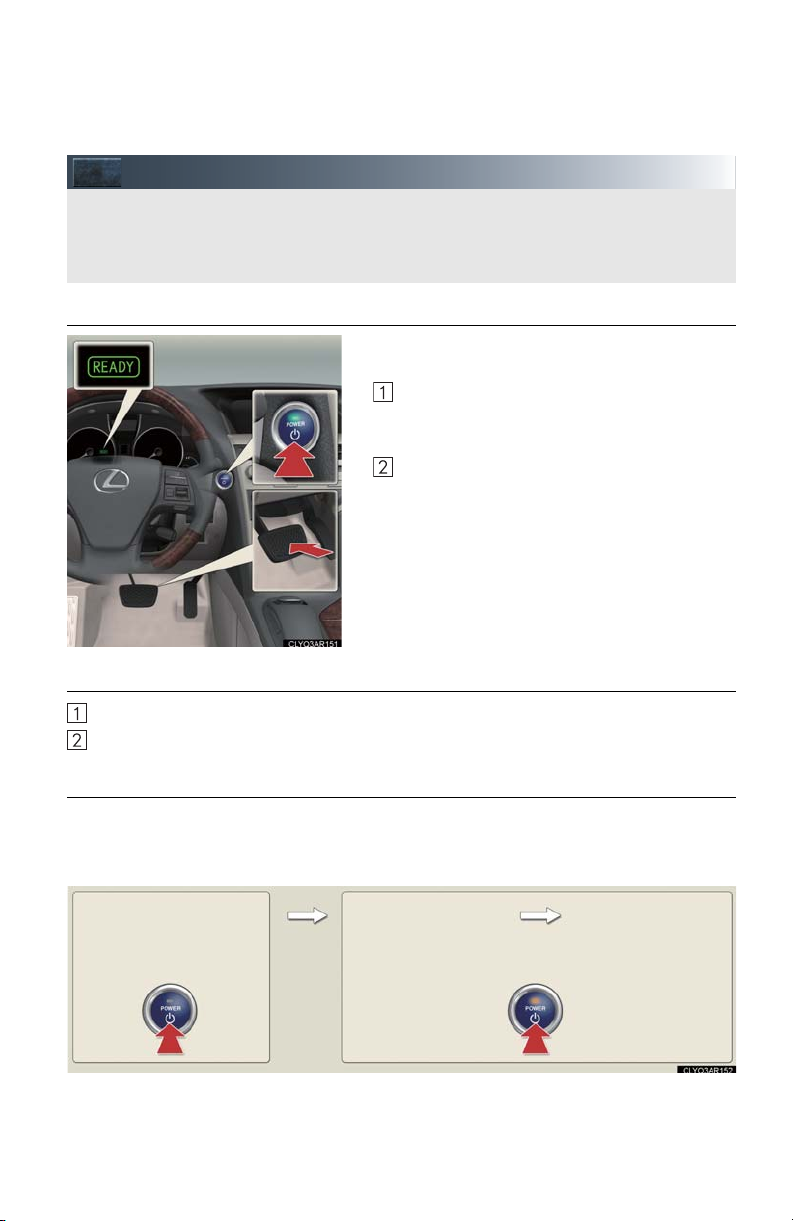
Power (Ignition) Switch
With the electronic key on your person, the hybrid system can be started by simply pressing the “POWER” switch, while depressing the brake pedal.
(The mechanical key cannot be used to start the hybrid system.)
ACCESSORY mode
ON mode
(Indicator light: amber)
OFF
(Indicator light: off)
■ Starting the hybrid system
Make sure the parking brake is set and the shift
lever is in P.
■ Stopping the hybrid system
Set the parking brake and shift the shift lever to P.
Press the “POWER” switch.
Depress the brake pedal.
The “POWER” switch indicator light turns
green.
Press the “POWER” switch.
When the “READY” indicator changes
from flashing to on, the hybrid system is
properly started.
■ Changing “POWER” switch mode
To change the “POWER” switch mode without turning on the hybrid system, press the
“POWER” switch without depressing the brake pedal. The mode can be changed in the following order:
13
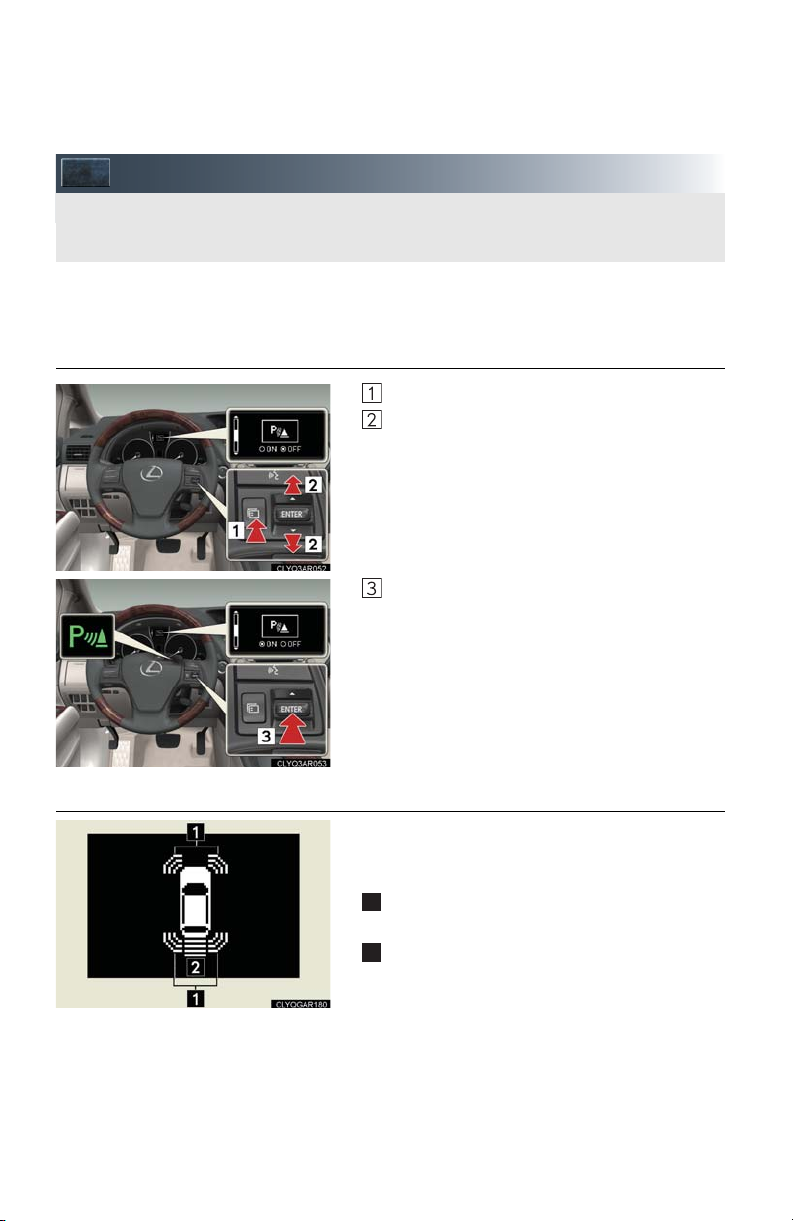
Intuitive Parking Assist (If Equipped)
The system uses a screen display and buzzer to inform the driver of obstacles near the
vehicle when parking or driving at low speed.
1
2
Owners of models equipped with a navigation system should refer to the “Navigation System
Owner's Manual”.
■ Turning the system on and off
Press the menu switch
Press the “ENTER” switch upwards or down-
wards until the Intuitive parking assist mark
appears in the multi-information display.
Press the “ENTER” switch to select on/off.
Press the menu switch to change to the normal
display.
■ Screen display
Sensors are used to detect obstacles near the
vehicle. The distance to a detected obstacle is
shown by the number of indicator bars.
Indicates obstacles detected by the corner
sensors
Indicates obstacles detected by the back sensors
14
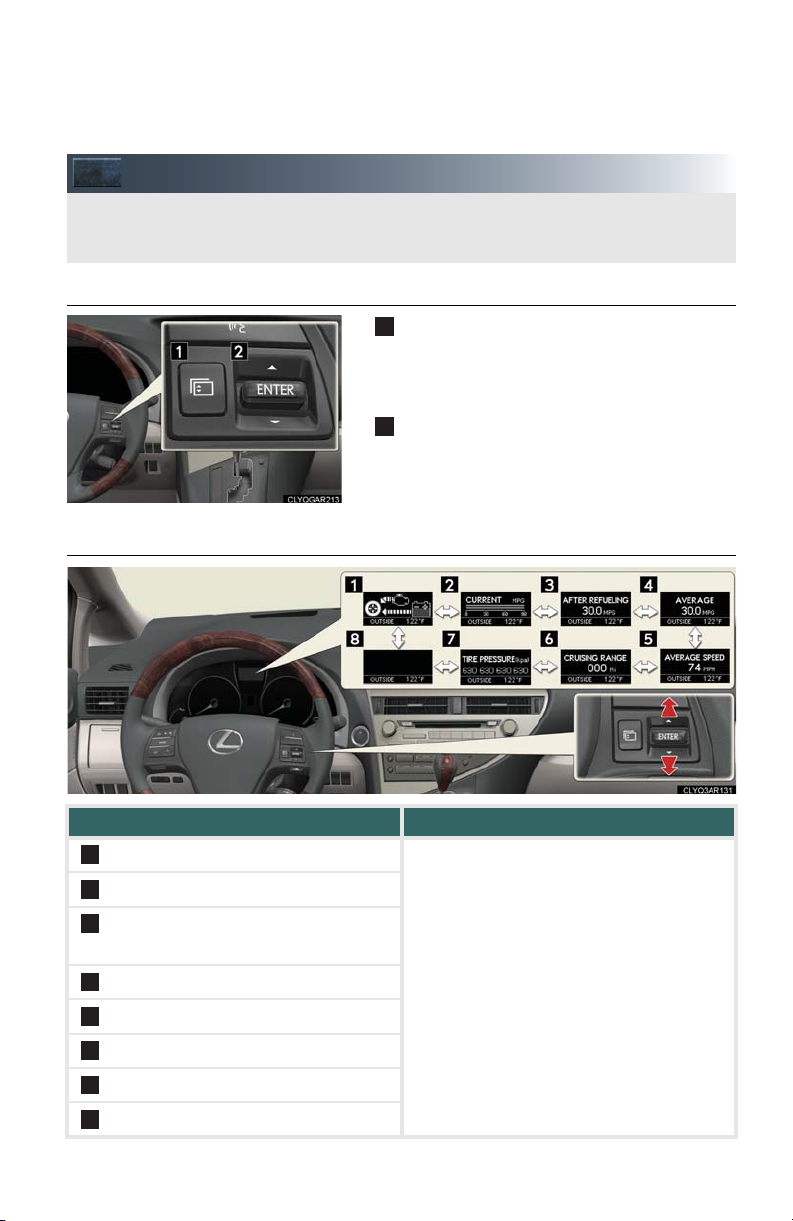
Multi-information Display and Switch
The multi-information display shows information about your vehicle, including the items
shown below.
1
2
3
4
5
6
7
8
■ Multi-information switches
■ Display contents
Menu switch
1
Changes modes to electronic features control
mode, customization mode or back to normal
display mode.
“ENTER” switch
2
Changes trip information items. This switch is
also used to turn on/off electronic features
controls and to change customization settings.
Trip information contents Switching display items
Energy monitor
Current fuel consumption
Average fuel consumption after refueling
Average fuel consumption
Press the “ENTER” switch upwards or
downwards.
Average vehicle speed
Cruising range
Tire inflation pressure
- (off)
15
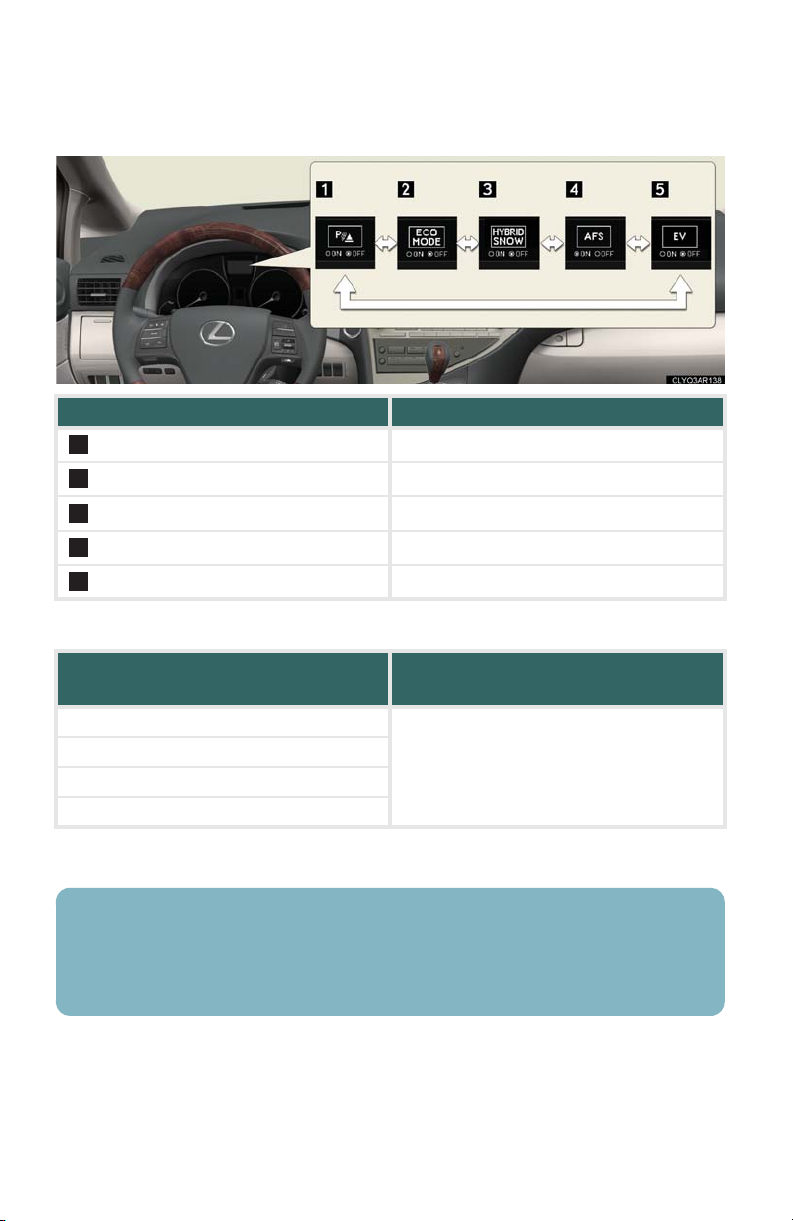
Electronic features control contents Setting electronic features controls
Intuitive parking assist*
1
Eco mode
2
Snow mode
3
AFS*
4
EV drive mode
5
→P. 14
For details, see the Owner's Manual.
For details, see the Owner's Manual.
For details, see the Owner's Manual.
For details, see the Owner's Manual.
Display order may vary depending on vehicle condition.
Other contents
Customizing settings and other informa-
tion to be displayed
Outside temperature
Customization
Dynamic radar cruise control settings*
For details, see the Owner's Manual.
Warning message
*: If equipped
■ When using intuitive parking assist or dynamic radar cruise control the appropriate display is shown on the screen.
■ In the event that a problem is detected in any of the vehicle's systems, a warning message is
shown on the multi-information display.
16
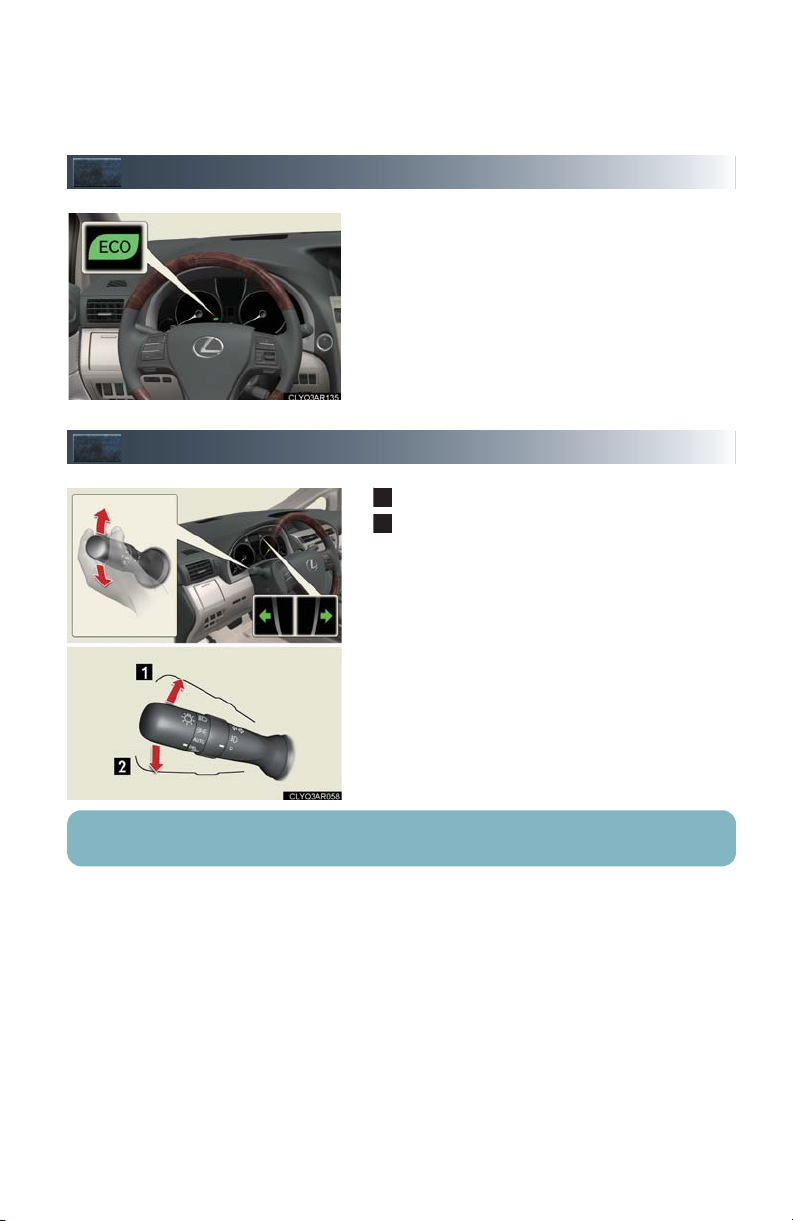
Eco Driving Indicator Light
1
2
Environment-friendly driving
During environment-friendly acceleration operation (Eco driving), Eco Driving Indicator Light will
turn on.
If the accelerator pedal is depressed more than
necessary, the indicator will turn off.
Turn Signal Lever
Right turn signal
Left turn signal
To signal a lane change, move the lever partway and hold.
17

Cruise Control (If Equipped)
Cruise control allows the driver to maintain a constant speed without having to operate
the accelerator pedal.
Use for highway driving or when traveling at a constant speed for long periods of time.
1
2
3
1
2
■ Setting the speed
■ Canceling
Indicator
Display
Cruise control switch
Press the “ON-OFF” button.
The system will turn on.
Accelerate or decelerate to the desired
speed, and then push the lever down.
This sets the speed in the cruise control
memory.
To temporarily cancel the cruise control, pull
the lever toward you. To resume the cruise
control, push the lever up.
To turn the system off, press the “ON-OFF”
button.
■ Adjusting the speed setting
To increase speed: push the lever up.
To decrease speed: push the lever down.
Release the lever when the desired speed is
reached.
18
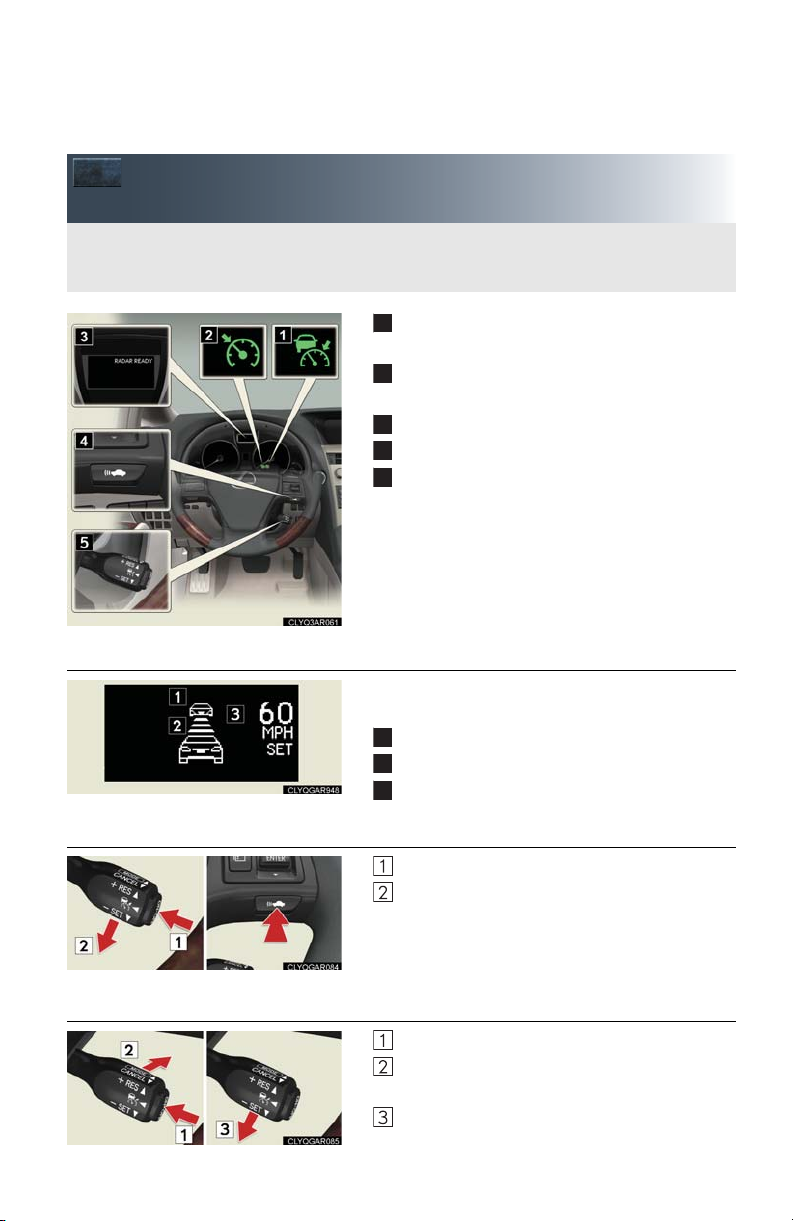
Dynamic Radar Cruise Control
Dynamic radar cruise control supplements conventional cruise control with a vehicle-tovehicle distance control mode.
1
2
3
4
5
1
2
3
(If Equipped)
■ Cruise control display
Indicator (vehicle-to-vehicle distance control
mode)
Indicator (constant vehicle speed control
mode)
Display
Distance switch
Cruise control switch
Cruise control settings are shown on the multiinformation display.
Vehicle ahead indicator
Vehicle-to-vehicle distance
Preset speed
■ Vehicle-to-vehicle distance control mode
Press the “ON-OFF” button.
Accelerate or decelerate to the desired
speed, and then push the lever down.
Vehicle-to-vehicle distance can be adjusted using
the distance switch.
■ Constant speed control mode
Press the “ON-OFF” button.
Push the lever forward and hold for at least
one second.
Accelerate or decelerate to the desired
speed, and then push the lever down.
19

■ Canceling
1
2
To temporarily cancel the dynamic radar
cruise control, pull the lever toward you. To
resume the cruise control, push the lever up.
To turn the system off, press the “ON-OFF”
button.
■ Adjusting the speed setting
To increase speed: push the lever up.
To decrease speed: push the lever down.
Release the lever when the desired speed is
reached.
The vehicle-to-vehicle distance control mode maintains the preset cruising speed as long
as no vehicle is detected ahead.
20
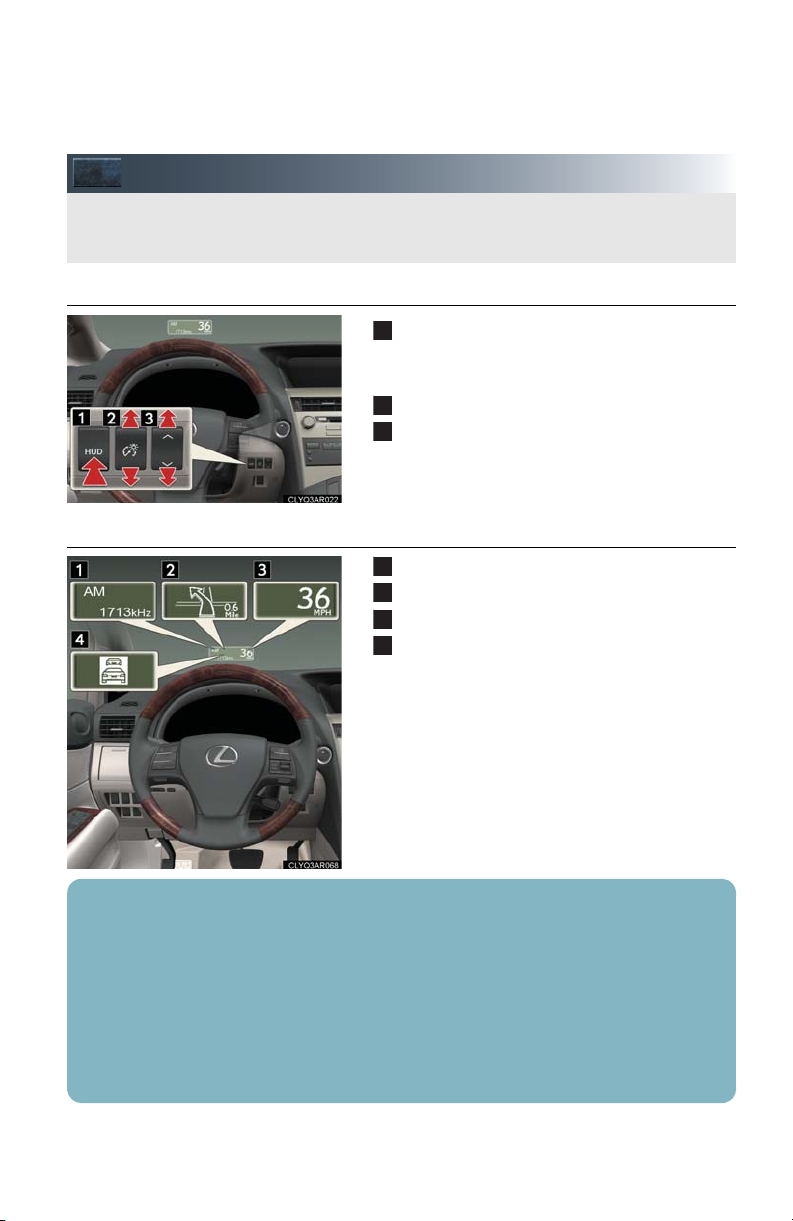
Head-up Display (If Equipped)
The head-up display can be used to project vehicle speed and other information onto the
windshield.
1
2
3
1
2
3
4
■ Head-up display main switch
■ Head-up display contents
Pressing the switch turns the Head-up display
on/off and changes the vehicle speed display
units.
Adjusting display contrast
Adjusting display position
Audio display
Turn-by-turn navigation*
Vehicle speed display
Dynamic radar cruise control (if equipped)
■ When using audio system or navigation system the appropriate display is shown on the
screen.
■ Warning messages will be displayed when necessary.
■ Pressing and holding the head-up display main switch for more than 2 seconds changes
the display to audio display on/off mode. Press the head-up display main switch to turn the
audio display on/off.
■ The head-up display may seem dark and hard to see when viewed through sunglasses.
Adjust the brightness of the head-up display or remove your sunglasses.
*: Refer to “Navigation System Owner's Manual”.
21
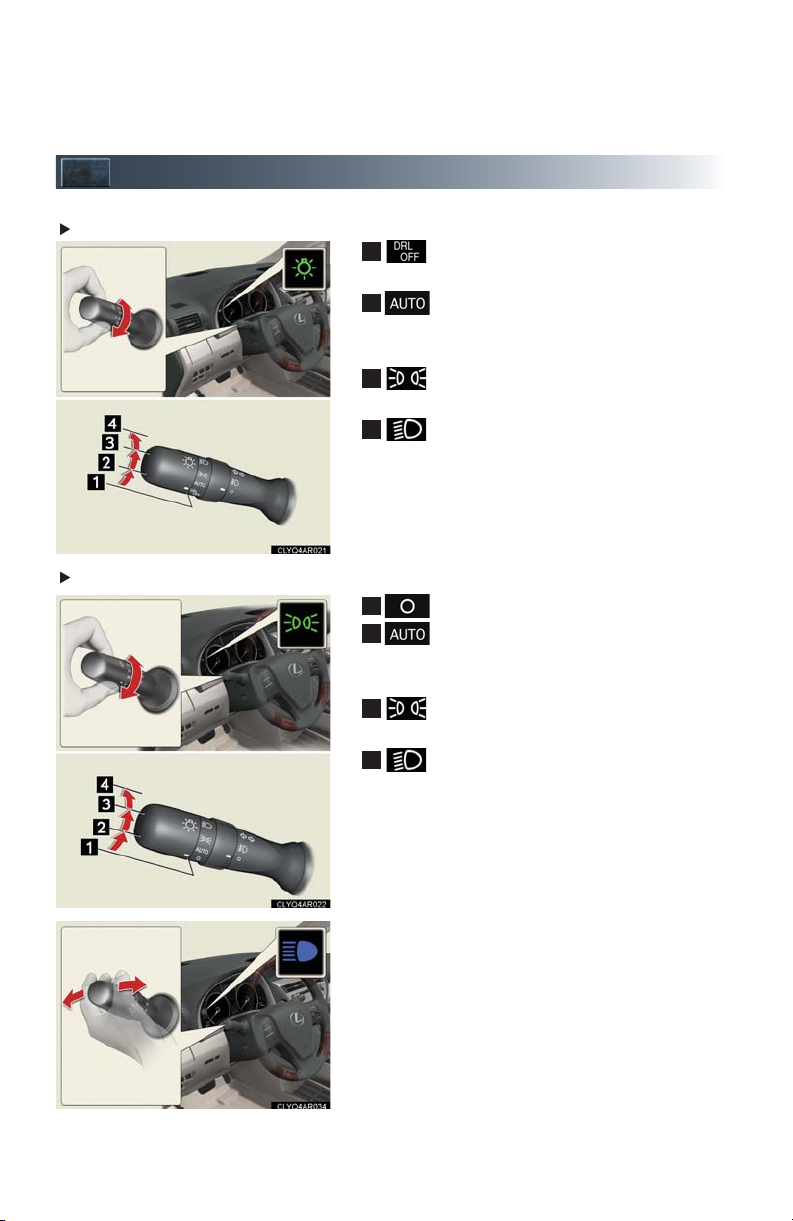
Headlights
1
2
3
412
3
4
U.S.A
Canada
Turn off the daytime running light system.
The headlights and parking lights turn
on/off automatically in accordance with
ambient light levels.
The instrument panel, side marker, parking, tail and license plate lights turn on.
The headlights and all lights listed above
turn on.
Off
The headlights and parking lights turn
on/off automatically in accordance with
ambient light levels.
The instrument panel, side marker, parking, tail and license plate lights turn on.
The headlights and all lights listed above
turn on.
To engage the high beams, push the lever forward.
To flash the high beams temporarily, pull the lever
toward you.
22
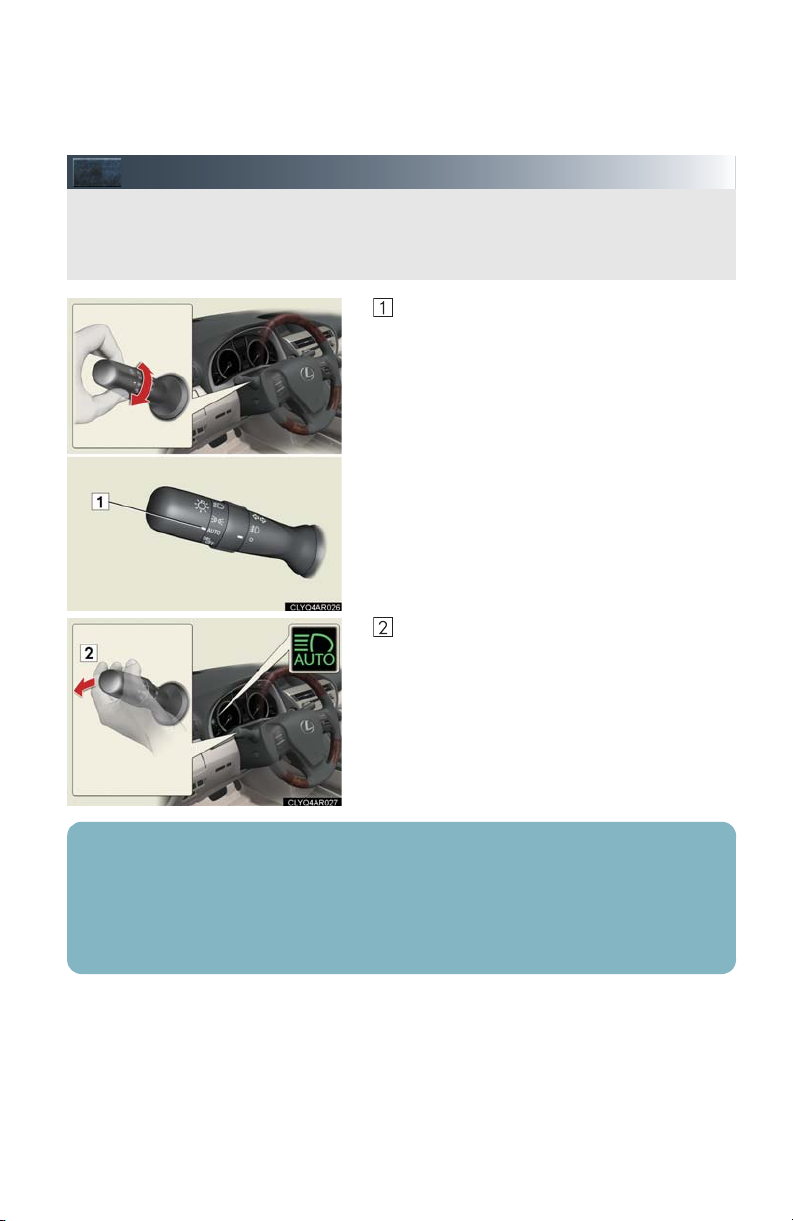
Automatic High Beam (If Equipped)
The Automatic High Beam uses an in-vehicle camera sensor to assess the brightness of
streetlights, the lights of oncoming and preceding vehicles, etc., and automatically turns
high beam on or off as necessary.
Headlight switch in “AUTO” position.
Push the lever away from you.
When all of the following conditions are fulfilled, high beam will be automatically turned on
(after approximately 1 second):
Vehicle speed is above approximately 20 mph (32 km/h).
The area ahead of the vehicle is dark.
There are no oncoming or preceding vehicles with headlights or tail lights turned on.
23

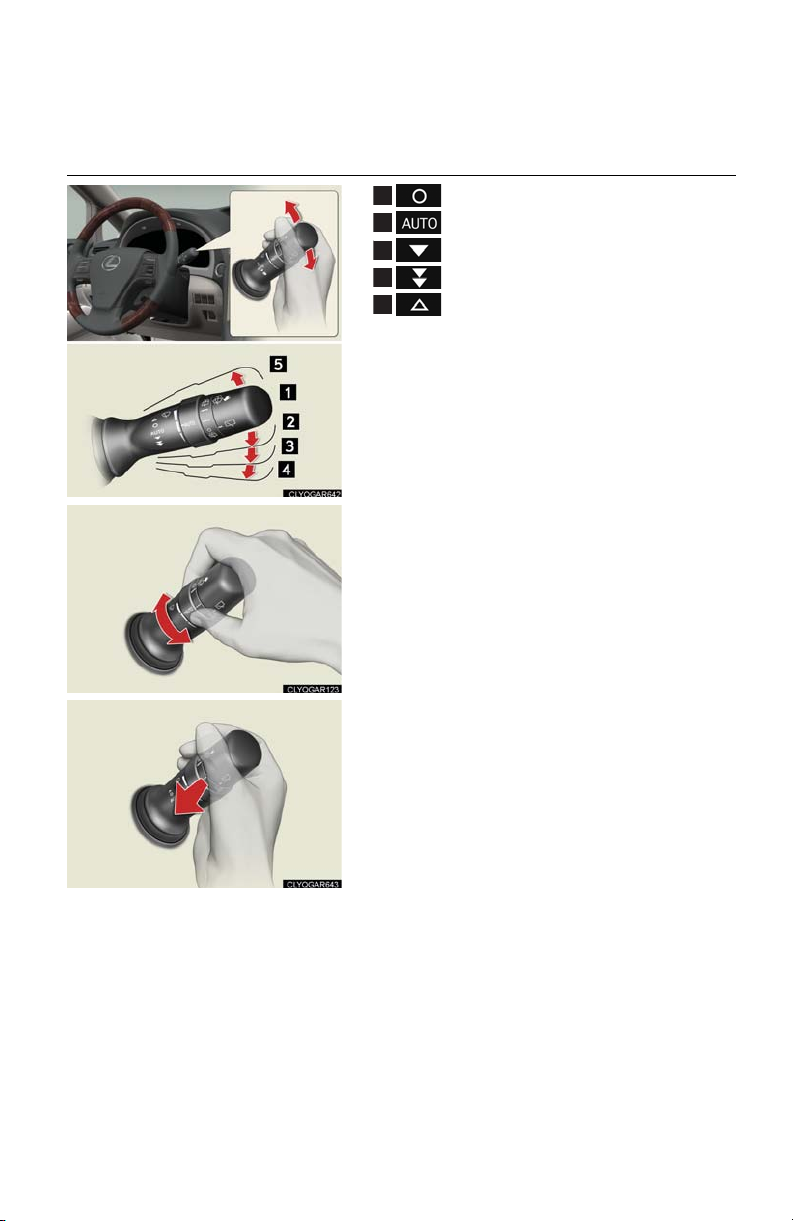
Windshield Wipers and Washer
1
2
3
4
5
■ Intermittent wiper with interval adjuster (if equipped)
Off
Intermittent operation
Low speed
High speed
Single wipe
Intermittent operation: Wiper interval can be
adjusted by turning the band.
To spray washer fluid, pull the lever. The wipers
will operate automatically.
24
■ Rain-sensing windshield wipers (if equipped)
1
2
3
4
5
Off
Automatic operation
Low speed
High speed
Single wipe
Sensitivity can be adjusted by turning the band.
To spray washer fluid, pull the lever. The wipers
will operate automatically.
25
 Loading...