

Page 1

What to do if...
What to do if...
A tire punctures
The engine does not start
P. 58 0
If you have a flat tire
P. 58 8
If the engine will not start
P. 64
Engine immobilizer system
P. 59 7
If the battery is discharged
The shift lever cannot be
moved out
The engine coolant temperature
gauge enters the red zone
Steam can be seen coming
from under the hood
The key is lost
The battery runs out
The doors cannot be locked
The horn begins to sound
If the shift lever cannot be shifted
P. 59 0
from P
P. 60 0
If your vehicle overheats
P. 593
If you lose your keys
P. 59 7
If the battery is discharged
P. 22
Doors
P. 6 6
Alarm
646
The vehicle is stuck in mud or
sand
P. 60 3
If the vehicle becomes stuck
Page 2
What to do if...
A warning light or indicator
light comes on
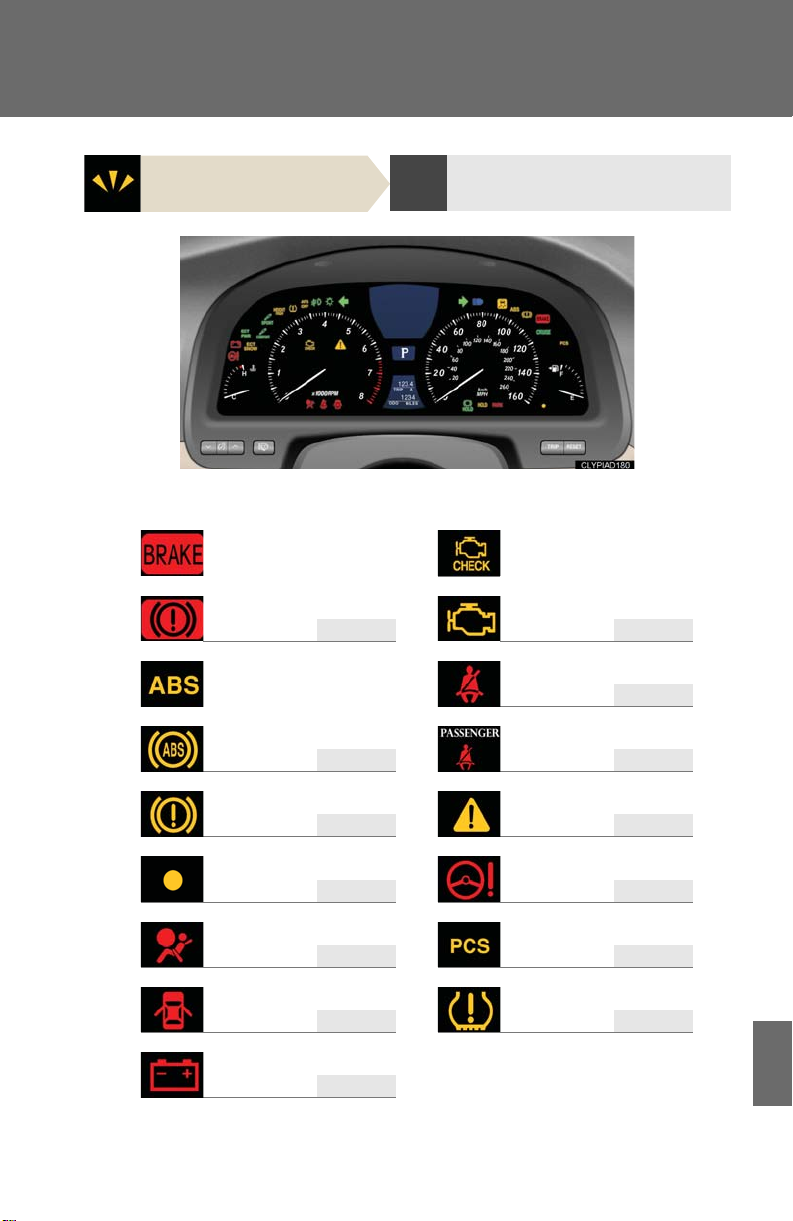
nWarning lights
Brake system warning light
(red indicator)
or or
P. 570 P. 571
“ABS” warning light
or
P. 57 1 P. 5 72
P. 570
If a warning light turns on
Malfunction indicator lamp
Driver’s seat belt reminder
light
P. 572
Front passenger’s seat belt
reminder light
Brake system warning light
(yellow indicator)
P. 57 1 P. 5 72
Master warning light with
warning message
Low fuel level warning light Electric power steering warning
P. 572 P. 571
light
SRS warning light Pre-collision system
P. 57 1 P. 57 1
Open door warning light
P. 572 P. 572
warning light
Tire pressure warning light
Charging system warning
light
P. 570
647
Page 3

648
Page 4

649
Page 5
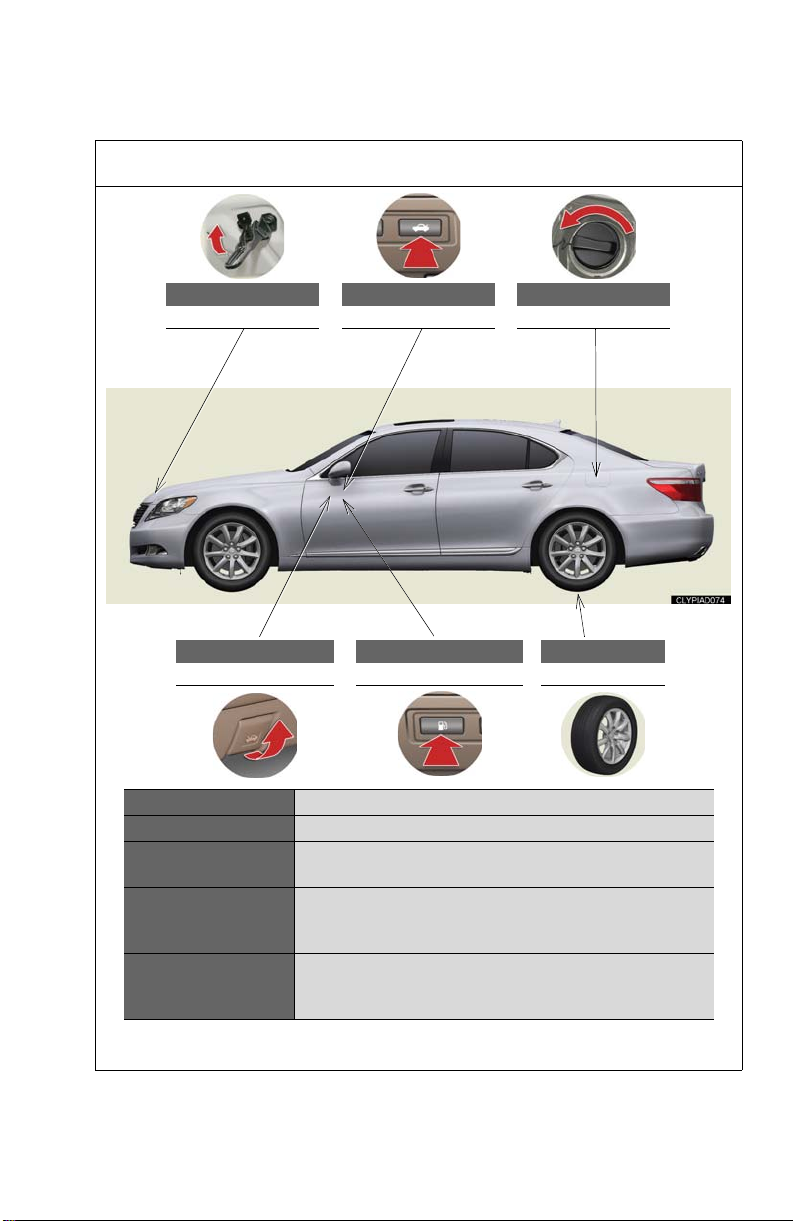
GAS STATION INFORMATION
Auxiliary catch lever
P. 492
Hood lock release lever
P. 49 2
Trunk opener
P. 26
Fuel filler door opener
P. 64
Fuel filler door
P. 64
Tire inf lation pressure
P. 613
Fuel tank capacity 22.1 gal. (84L, 18.4 lmp.gal.)
Fuel type Unleaded gasoline only P. 65, 608
Cold tire inflation
pressure
Engine oil capacity
(Drain and refill)
With filter 9.1 (8.6, 7.6)
qt. (L, Imp.qt.)
Without filter 8.9 (8.4
, 7.4)
P. 61 3
Toyota Genuine Motor Oil or equivalent
Engine oil type
Oil grade: ILSAC multigrade engine oil P. 609
Recommended oil viscosity: SAE-5W-20, -0W-20
650
Page 6

Alphabetical index
Alphabetical index
A
A/C (Air conditioning system)
Air conditioning filter .......................525
Automatic air conditioning
system................204, 212, 220, 228
Front air conditioning
system............................204, 212, 220
Rear air conditioning system ....... 228
ABS (Anti-lock brake system) ......... 173
AFS (Adaptive front lighting
system).................................................... 139
Adaptive front lighting system
(AFS)........................................................ 139
Air conditioning filter ..........................525
Air conditioning system (A/C)
Air conditioning filter .......................525
Front air conditioning
system............................204, 212, 220
Rear air conditioning system ....... 228
Airbags
Airbag operating conditions........... 75
Airbag precautions for your
child..........................................................80
Airbag warning light ..........................571
Curtain shield airbag operating
conditions.............................................. 75
Curtain shield airbag
precautions ..........................................80
Front passenger occupant
classification system.........................85
General airbag precautions ...........80
Locations of airbags.............................. 71
Modification and disposal of
airbags.................................................... 84
Proper driving posture .............69, 80
Side airbag operating
conditions.............................................. 75
Side airbag precautions ....................80
636
SRS airbags................................................71
Alarm............................................................ 66
Antenna.................................................... 242
Anti-lock brake system (ABS)..........173
Armrest ....................................................438
Ashtrays.....................................................427
Audio system
Antenna...................................................242
AUX adapter .......................................257
A/V input adapter............................358
CD player/changer..........................243
DVD player.................. 283, 327, 328
MP3/WMA disc................................249
Optimal use .........................................255
Radio ....................................................... 240
Rear seat audio system.................... 312
Rear seat entertainment
system....................................................318
Steering wheel audio switch........ 258
Automatic air conditioning system
Air conditioning filter ..........................525
Automatic air conditioning
system ...................204, 212, 220, 228
Front air conditioning
system ...............................204, 212, 220
Rear air conditioning system ...........228
Automatic headlight leveling
system ..................................................... 140
Automatic light control system........ 138
Automatic transmission
Automatic transmission .....................118
If the shift lever cannot be
shifted from P...................................590
S mode .......................................................119
AUX adapter ......................................... 257
A/V input adapter................................358
Page 7

Alphabetical index
B
BA (Brake assist).................................... 173
Back-up lights
Wattage ...................................................615
Battery
Checking...............................................507
If the vehicle has discharged
battery.................................................. 597
Preparing and checking
before winter......................................187
®
Bluetooth
..............................................362
Brake
Fluid..........................................................506
Brake hold ..............................................125
Parking brake........................................ 123
Brake assist (BA).................................... 173
Brake hold................................................. 125
C
Care
Exterior................................................... 478
Interior.....................................................480
Seat belts .................................................481
Cargo capacity .......................................182
Cargo hooks .......................................... 453
CD changer ............................................243
CD player.................................................243
Chains......................................................... 187
Child restraint system (CRS)
Booster seats, definition.................... 90
Booster seats, installation................. 95
Convertible seats, definition ...........90
Convertible seats, installation ........95
Front passenger occupant
classification system ........................85
Infant seats, definition .........................90
Infant seats, installation....................... 95
Installing CRS with lower
anchorages...........................................98
Installing CRS with seatbelts...........95
Installing CRS with top straps.........99
Child safety
Airbag precautions............................. 80
Battery precautions ............509, 599
Child restraint system.........................90
Child-protectors ................................... 23
How your child should wear
the seatbelt..............................................51
Installing child restraints.....................94
Moon roof precautions......................63
Power window lock switch..............59
Power window precautions ............60
Removed electronic key battery
precautions........................................529
Seat belt comfort guide .....................49
Seat belt extender precautions......53
Seat belt precautions ..........................52
Seat heater precautions..................433
Trunk precautions.................................28
Child-protectors...................................... 23
Cigarette lighter....................................428
Cleaning
Exterior....................................................478
Interior ....................................................480
Seat belts................................................. 481
Climate control seat ............................434
Climate control seat filter..................525
Clock ......................................................... 424
Coat hooks............................................... 451
Coin holder .............................................. 414
Compass ................................................... 461
Condenser ..............................................506
Console box ............................................ 416
Cool box.....................................................417
637
Page 8

Alphabetical index
Cooling system
Engine overheating .........................600
Cornering assist sensors ....................159
Cruise control
Cruise control .......................................146
Dynamic radar cruise control.......149
Cup holder ...............................................415
Curtain shield airbags..............................71
Customizable features .......................627
D
Daytime running light system ........... 139
Defogger
Rear window........................................236
Side mirror ............................................236
Dimension................................................606
Dinghy towing ......................................... 192
Display
Dynamic radar cruise control.......149
Touch screen.........................................196
Trip information....................................135
Warning message............................. 577
Do-it-yourself maintenance .............489
Door courtesy lights
Door courtesy lights.........................406
Wattage................................................... 615
Door pockets........................................... 414
Doors
Door glasses...........................................59
Door lock...................................................22
Side mirrors............................................. 57
Driver's seat belt reminder light..... 572
Driving
Correct posture.................................... 69
Procedures............................................ 108
Driving position memory......................40
DVD player......................283, 327, 328
638
E
Electric power steering (EPS) ..........173
Electronically modulated air
suspension............................................. 168
Electronic key
If your electronic key battery
is discharged....................................594
Emergency, in case of
If the electronic key does not
operate properly............................ 594
If the engine will not start...............588
If the parking brake cannot be
released................................................591
If the shift lever cannot be
shifted from P...................................590
If the vehicle has discharged
battery ................................................. 597
If the warning buzzer sounds......570
If the warning light turns on.......... 570
If the warning message is
displayed.............................................577
If you have a flat tire ........................580
If you lose your keys ........................593
If you think something is
wrong ..................................................566
If your vehicle becomes stuck.... 603
If your vehicle needs to be
towed...................................................560
If your vehicle overheats................600
Engine
Compartment..................................... 495
Engine switch ..........................................115
Hood ........................................................492
How to start the engine .....................115
Identification number ......................607
If the engine will not start...............588
Overheating ........................................600
Engine compartment cover............. 496
Page 9

Alphabetical index
Engine coolant
Capacity...................................................610
Checking...............................................504
Preparing and checking
before winter......................................187
Engine coolant temperature
gauge ....................................................... 127
Engine immobilizer system ..................64
Engine oil
Capacity.................................................609
Checking............................................... 499
Preparing and checking
before winter......................................187
Engine oil maintenance data ...........502
EPS (Electric power steering).......... 173
Event data recorder............................ 568
F
First-aid kit storage belt..................... 453
Floor mat...................................................452
Fluid
Brake.......................................................506
Washer.................................................... 510
Fog lights
Switch..........................................................141
Wattage ...................................................615
Footwell lighting ................................... 406
Front fog lights
Switch..........................................................141
Wattage ...................................................615
Front passenger occupant
classification system ........................... 85
Front passenger's seat belt
reminder light ......................................572
Front seats
Adjustment ..............................................30
Driving position memory .................40
Front turn signal lights
Wattage...................................................615
Fuel
Capacity................................................ 608
Fuel gauge...............................................127
Fuel pump shut off system.............567
Gas station information.................650
Information............................................. 616
Refueling.................................................... 64
Fuel filler door ........................................... 64
Fuel pump shut off system................. 567
Fuses ......................................................... 530
G
Garage door opener ..........................456
Gas station information......................650
Gauges .......................................................127
Glove box ................................................. 413
H
Hands-free system ...............................362
Head restraints
Adjusting .................................................. 46
Headlight aim.........................................547
Headlight cleaner.................................. 145
Headlights
Discharge headlights
precautions.......................................558
Replacing light bulbs....................... 549
Switch........................................................ 138
Wattage...................................................615
Heaters
Seat heaters..........................................434
Side mirror.............................................236
Height control
Electronically modulated air
suspension.......................................... 168
Hill-start assist control ..........................173
639
Page 10

Alphabetical index
Hood ..........................................................492
Hooks
Cargo......................................................453
Coat ...........................................................451
Shopping bag......................................453
I
I/M test..................................................... 488
Identification
Engine .....................................................607
Vehicle....................................................607
Illuminated entry system ....................406
Indicator lights.........................................130
Initialization
Items to initialize................................. 632
Inside rear view mirror ..........................56
Interior lights
Interior lights.........................................406
Switch ..................................................... 408
Wattage................................................... 615
J
Jack
Positioning the jack........................... 493
Replacing the wheel........................ 580
Jack handle............................................. 580
K
Keys
Electronic key.............................................2
Engine switch.......................................... 115
If you lose your keys.........................593
If your electronic key battery
is discharged ....................................594
Key number.................................................2
Keys.................................................................2
Mechanical key..........................................3
Wireless remote control.....................19
L
Lexus link system.................................. 465
Light bulbs
Replacing ..............................................549
Wattage................................................... 615
Lights
Door courtesy lights........................ 406
Fog light switch ......................................141
Headlights switch................................138
Interior light switch ...........................408
Outer foot lights.................................406
Overhead courtesy light ...............406
Personal light switch........................408
Replacing light bulbs....................... 549
Shift lever lighting.............................. 406
Turn signal lever....................................122
Vanity lights...........................................423
Wattage................................................... 615
Load capacity.......................................... 185
M
Maintenance
Do-it-yourself maintenance......... 489
General maintenance..................... 485
Maintenance data.............................606
Maintenance requirements..........483
Meter
Instrument panel light control.......128
Meters........................................................127
Mirrors
Inside rear view mirror ...................... 56
Side mirror heater..............................236
Side mirrors..............................................57
Vanity mirrors......................................423
Moon roof..................................................... 61
MP3 disc.................................................. 249
Multi-information display ....................134
640
Page 11

Alphabetical index
O
Odometer................................................. 127
Oil
Engine oil...............................................499
Opener
Fuel filler door .........................................64
Hood ....................................................... 492
Trunk............................................................26
Outer foot lights
Outer foot lights.................................406
Wattage ...................................................615
Outside rear view mirrors
Adjusting and folding ..........................57
Driving position memory .................40
Outside temperature display............ 135
Overhead console .............................. 420
Overhead courtesy lights
Overhead courtesy lights .............406
Wattage ...................................................615
Overheating, Engine ..........................600
P
Parking assist sensors ..........................159
Parking brake ..........................................123
Parking lights
Replacing light bulbs .......................549
Switch........................................................138
Wattage ...................................................615
PCS (Pre-collision system)................ 179
Penlight ......................................................581
Personal lights
Switch......................................................408
Pollen removal mode .... 207, 216, 224
Power outlet........................................... 430
Power windows........................................ 59
Pre-collision system (PCS)................ 179
R
Radar cruise control............................. 149
Radiator ....................................................506
Radio..........................................................240
RDS (Radio data system) ................... 241
Rear seat
Seat adjustment ............................33, 36
Seat position memory ........................44
Rear seat entertainment system......318
Rear seat relaxation system .............439
Rear sunshade ....................................... 443
Rear turn signal lights
Replacing light bulbs....................... 549
Wattage...................................................615
Rear view mirror
Compass................................................. 461
Rear view monitor system.................. 170
Rear window defogger ...................... 236
Replacing
Electronic key battery..................... 528
Fuses........................................................ 530
Light bulbs............................................ 549
Reporting safety defects for
U.S.A. owners .....................................634
S
Seat belts
Adjusting the seat belt........................49
Automatic Locking Retractor
(ALR)...................................................... 50
Child restraint system
installation.............................................. 94
Cleaning and maintaining
the seat belts ......................................481
Emergency Locking Retractor
(ELR) ...................................................... 50
How to wear your seat belt.............48
641
Page 12

Alphabetical index
How your child should wear
the seat belt............................................51
Pregnant women,
proper seat belt use.........................50
Reminder light..................................... 572
Seat belt extenders................................51
Seat belt pretensioners...................... 49
Seat heaters ............................................434
Seat position memory................... 40, 44
Seating capacity .....................................185
Seats
Child seats/child restraint
system installation .............................94
Cleaning................................................ 480
Climate control................................... 434
Climate control seat......................... 434
Driving position memory.................. 40
Head restraint......................................... 46
Properly sitting in the seat................ 69
Rear seat adjustment ................. 33, 36
Rear seat position memory ............. 44
Rear seat relaxation system..........439
Seat adjustment..................................... 30
Seat adjustment precautions ...........32
Seat heaters..........................................434
Seat position memory............... 40, 44
Service reminder indicators .............130
Shift lever
Automatic transmission..................... 118
If the shift lever cannot be
shifted from P.................................. 590
Shift lever lighting .................................406
Shift lock system................................... 590
Shopping bag hooks............................453
Side airbags..................................................71
Side marker lights
Switch ....................................................... 138
642
Side mirror
Adjusting and folding..........................57
Driving position memory .................40
Smart access system with
push-button start
Entry function .............................................5
Starting the engine................................115
Spare tire
Inflation pressure .................................519
Spare tire...............................................580
Spark plug ................................................ 610
Specifications......................................... 606
Speedometer ...........................................127
Steering wheel
Adjustment ..............................................55
Audio switches................................... 258
Driving position memory .................40
Steering wheel heater......................432
Storage feature ...................................... 410
Stuck
If your vehicle becomes stuck.... 603
Sun visors................................................. 422
Sunshade
Rear...........................................................443
Rear door.............................................. 446
Roof..............................................................62
Switch
ECT switch...............................................119
Engine switch ..........................................115
Fog light switch ......................................141
Light switches........................................138
Parking brake switch......................... 123
Power door lock switch..................... 22
Power trunk lid .......................................26
Power trunk opener and closer ....26
Power window switch ....................... 59
Window lock switch........................... 59
Page 13

Alphabetical index
Wipers and washer switch.............142
T
Tachometer .............................................. 127
Tail lights
Switch........................................................138
Theft deterrent system
Alarm.......................................................... 66
Engine immobilizer system ..............64
Theft prevention labels ......................... 68
Tire inflation pressure........................... 519
Tire information
Glossary ................................................624
Size.............................................................621
Tire identification number.............620
Uniform tire quality grading..........622
Tires
Chains.......................................................187
Checking...................................................511
If you have a flat tire......................... 580
Inflation pressure .................................519
Inflation pressure sensor.................. 512
Information..............................................619
Replacing.............................................. 580
Rotating tires............................................511
Size.............................................................613
Snow tires................................................187
Tire pressure warning
system..........................................511, 572
Tools ..........................................................580
Total load capacity.................................185
Touch screen ...........................................196
Towing
Dinghy towing....................................... 192
Emergency towing...........................560
Trailer towing...........................................191
TRAC (Traction control) ....................173
Traction control (TRAC).....................173
Trip meter ..................................................127
Trunk
Extending a space.............................449
Opener ...................................................... 26
Closer......................................................... 26
Trunk light
Wattage...................................................615
Turn signal lights
Replacing light bulbs....................... 549
Switch.........................................................122
Wattage...................................................615
V
Vanity lights
Vanity lights ..........................................423
Wattage...................................................615
Vanity mirrors ........................................423
VDIM (Vehicle dynamics
integrated management) .................173
Vehicle dynamics integrated
management (VDIM)........................173
Vehicle identification number.........607
Vehicle stability control (VSC).........173
VSC (Vehicle stability control).........173
W
Warning buzzers
Brake system....................................... 570
Open door ...........................................572
Seat belt reminder...............................571
Warning lights
Anti-lock brake system (ABS) ......571
Brake assist system.............................571
Brake system............................570, 572
Charging system............................... 570
Electric power steering
warning light .......................................571
643
Page 14

Alphabetical index
Electronic engine control
system....................................................571
Low fuel level....................................... 572
Low tire pressure warning
light........................................................ 572
Master warning light ........................ 572
Open door ........................................... 572
Pre-collision system ...........................571
Pretensioners......................................... 571
Seat belt reminder light ..................572
SRS airbags ............................................571
Tire pressure warning light........... 572
Warning messages ..............................577
Washer
Checking................................................ 510
Preparing and checking
before winter......................................187
Switch ........................................................142
Washing and waxing...........................478
Weight
Cargo capacity.....................................182
Load limits ..............................................185
Weight ................................................... 606
Wheels ......................................................523
Window glasses ......................................59
Window lock switch ...............................59
Windows
Power windows..................................... 59
Rear window defogger ..................236
Washer..................................................... 142
Windshield wiper de-icer.................. 237
Windshield wipers................................. 142
Wireless remote control
Replacing the battery ......................528
WMA disc ...............................................249
644
Page 15

Alphabetical index
645
Page 16

Index
Alphabetical index ........................... 636
What to do if... ................................... 646
635
Page 17

Reporting safety defects for U.S. owners
If you believe that your vehicle has a defect which could cause a crash
or could cause injury or death, you should immediately inform the
National Highway Traffic Safety Administration (NHTSA) in addition
to notifying the Lexus Division of Toyota Motor Sales, U.S.A., Inc. (Tollfree: 1-800-25-LEXUS).
If NHTSA receives similar complaints, it may open an investigation,
and if it finds that a safety defect exists in a group of vehicles, it may
order a recall and remedy campaign. However, NHTSA cannot
become involved in individual problems between you, your dealer, or
Lexus Division of Toyota Motor Sales, U.S.A., Inc.
To contact NHTSA, you may either call the Auto Safety Hotline tollfree at 1-888-327-4236 (or 366-0123 in Washington, DC area) or
write to: NHTSA, U.S. Department of Transportation, Washington, DC
20590. You can also obtain other information about motor vehicle
safety from the Hotline.
634
Page 18

For US owners
Reporting safety defects
for U.S. owners........................ 634
7
633
Page 19

6-3. Initialization
Items to initialize
The following items must be initialized for normal system operation in cases such as after the battery is reconnected, or maintenance is performed on the vehicle.
Item When to initialize Reference
Engine oil maintenance
data
Tire inflation pressure
warning system
After changing engine oil P. 50 2
• When tire pressure sensors are
replaced
• When driving with the tires inflated to
a higher than standard tire pressure
P. 51 1
632
Page 20

Vehicle specifications
6
6-1. Specifications ......................... 606
Maintenance data..................... 606
Fuel information........................... 616
Tire information............................ 619
6-2. Customization ........................ 627
Customizable features ............ 627
6-3. Initialization............................. 632
Items to initialize........................ 632
605
Page 21

6-2. Customization
Customizable features
Your vehicle includes a variety of electronic features that can be personalized to your preferences. Programming these preferences requires specialized equipment and may be performed by an authorized Lexus
dealership.
Some function settings are changed simultaneously with other functions being customized. Contact your Lexus dealer for further details.
Item Function Default setting
Smart access system
Smart access
system with
push-button
start
(
→P. 5)
with push-button start
Operation signal
(Emergency flashers)
Operation signal
(Buzzer)
Wireless remote control
Driver's door
Wire less
remote control
(
→P. 19)
Unlocking operation
unlocked in one
step, all doors
unlocked in two
steps
Automatic door lock
function to be activated
if door is not opened
after being unlocked
Customized
setting
ON OFF
ON OFF
ON OFF
ON OFF
All doors unlocked
in one step
6
Vehicle specifications
ON OFF
627
Page 22

6-2. Customization
Item Function Default setting
Time elapsed before
automatic lock function
is activated if door is
60 seconds
not opened after being
unlocked
Wir ele ss
remote control
(
→P. 1 9)
Operational signal
(Emergency flashers)
Operational signal
(Buzzer)
Door lock buzzer ON OFF
Trunk unlocking operation
Push and hold
Pan ic fu nct ion ON OFF
Speed-detecting automatic door lock func-
OFF ON
tion
Customized
setting
30 seconds
120 seconds
ON OFF
ON OFF
Push twice
One short push
Door lock
(
→P. 2 2 ,
594)
628
Opening driver's door
unlocks all doors.
Shifting gears to P
unlocks all doors.
Shifting gears to position other than P locks
all doors.
Unlocking using a key
OFF ON
ON OFF
ON OFF
Driver's door
unlocked in one
step, all doors
unlocked in two
steps
All doors unlocked
in one step
Page 23

6-2. Customization
Item Function Default setting
Tr u n k
(
→P. 26 )
Power trunk opener
and closer function
Mechanical key linked
operation
Powe r windows
(
→P. 59 )
Mechanical key linked
operation
Wireless remote con-
Open and close
trol linked operation
Linked entry operation ON OFF
Mechanical key linked
operation
Mechanical key linked
operation
Open and close
Linked operation of
Moon roof
(
→P. 61 )
components when
door key is used
Wireless remote con-
Slide only Tilt only
trol linked operation
Linked operation of
components when
wireless remote con-
Slide only Tilt only
trol used
Customized
setting
ON OFF
ON OFF
Open only
Close only
ON OFF
ON OFF
Open only
Close only
ON OFF
6
Vehicle specifications
Linked entry function ON OFF
629
Page 24

6-2. Customization
Item Function Default setting
Light sensor sensitivity Level 3 Level 1 to 5
Automatic
light control
system
(
→P. 1 38 )
Time elapsed before
headlights automatically turn off after
30 seconds
doors are closed
Lights
(
→P. 1 38 )
Intuitive
parking
assist-sensor
(
→P. 1 59 )
Daytime running light
system (U.S.A. only)
Buzzer volume Level 3 Level 1 to 5
Distance at which the
front and back sensors
Level 1 Level 2
detect an obstacle
Time elapsed before
lights turn off
15 seconds
Operation when the
doors are unlocked
Illumination
(
→P. 4 06 )
Operation after the
engine switch is turned
OFF
Customized
setting
0 second
60 seconds
90 seconds
ON OFF
7.5 se co nds
30 seconds
ON OFF
ON OFF
Seat belt
reminder
(
→P. 572 )
630
Footwell lighting ON OFF
Shift lever lighting ON OFF
Outer foot lights ON OFF
Vehicle speed linked
seat belt reminder
ON OFF
buzzer
Page 25

6-2. Customization
Multi-information display (→P. 134)
Country Ava ilable languages
U.S .A. English and Spanish
Canada English, French, German, Spanish and Italian
631
6
Vehicle specifications
Page 26
5-1. Essential information
If your vehicle needs to be towed
If towing is necessary, we recommend having your vehicle towed by your
Lexus dealer or a commercial towing service, using a lift-type truck or a flat
bed truck.
Use a safety chain system for all towing, and abide by all state/provincial
and local laws.
If towing from the rear, the vehicle’s front wheels and axles must be in good
condition. (→P. 56 4)
If they are damaged, use a towing dolly or flat bed truck.
Before towing
The following may indicate a problem with your transmission. Contact your Lexus dealer before towing.
l The engine is running, but the vehicle will not move.
l The vehicle makes an abnormal sound.
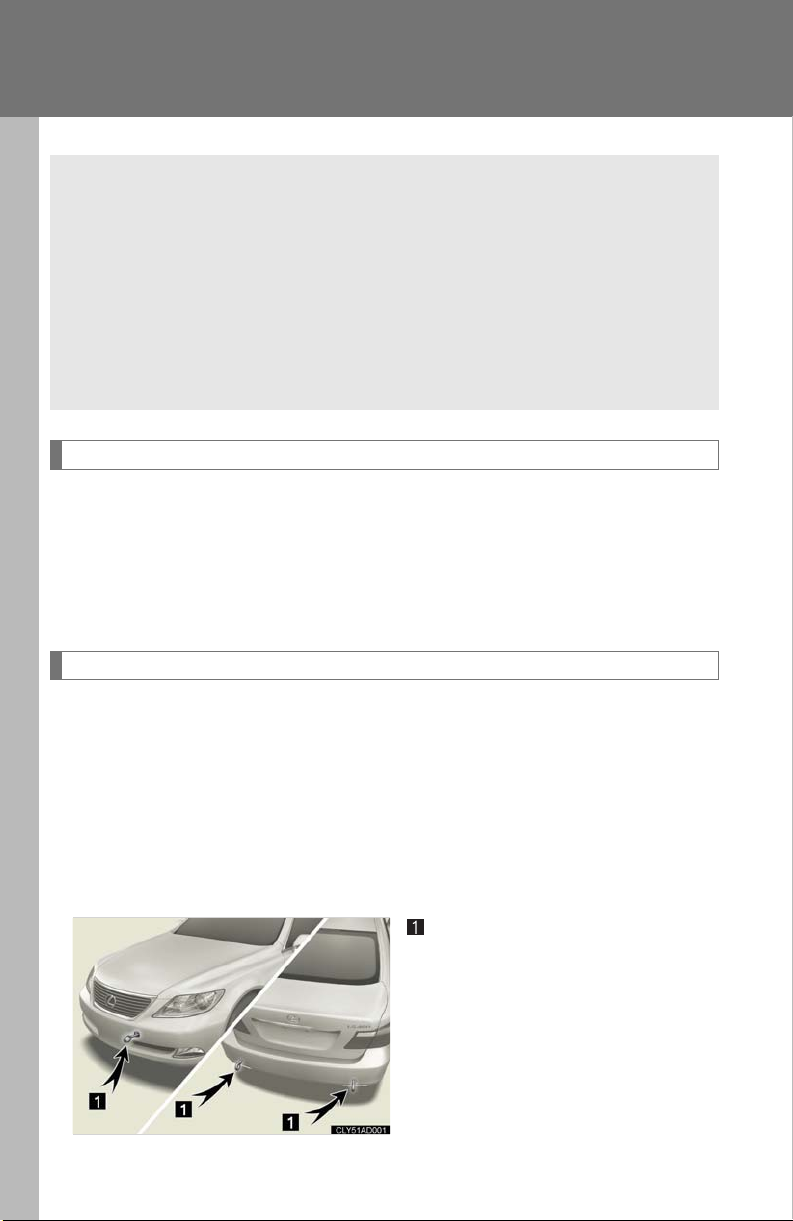
Emergency towing
If a tow truck is not available, in an emergency your vehicle may be temporarily towed using a cable or chain secured to the emergency towing
eyelet(s). This should only be attempted on hard, surfaced roads for short
distances at low speeds.
A driver must be in the vehicle to steer and operate the brakes. The vehicle’s wheels, drive train, axles, steering and brakes must be in good condition.
Towing eyelets
560
Page 27
5-1. Essential information
n Emergency towing procedure
STEP 1
STEP 2
STEP 3
Release the parking brake.
Put the transmission in N.
Put the engine switch in ACC mode (engine off) or IG-ON mode (engine running).
CAUTIO N
n Caution while towing
l Use extreme caution when towing the vehicle.
Avoid sudden starts or erratic driving maneuvers which place excessive stress on
the emergency towing eyelets and the cables or chains.
l If the engine is not running, the power assist for the brakes and steering will not
function, making steering and braking more difficult.
NOTICE
n To prevent causing serious damage to the transmission
Never tow this vehicle from the front with the rear wheels on the ground. This may cause serious damage to the transmission.
5
When trouble arises
561
Page 28
5-1. Essential information
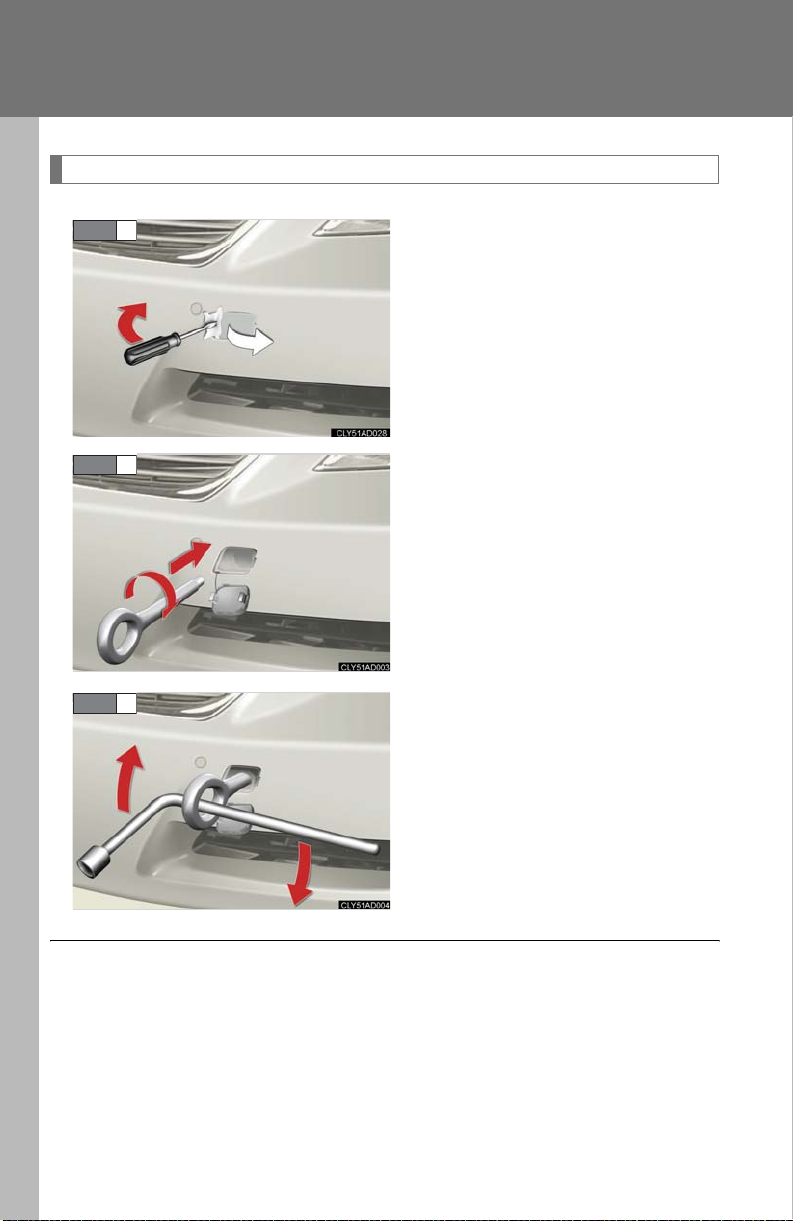
Installing towing eyelets
STEP 1
STEP 2
STEP 3
Remove the eyelet cover using a
flat head screwdriver.
To protect the bodywork, place a
rag between the screwdriver and
the vehicle body, as shown in the
illustration.
Insert the towing eyelet into the
hole and tighten partially by hand.
Tighten down the towing eyelet
securely using a wheel nut wrench.
n Location of the emergency towing eyelet
→P. 5 80
562
Page 29
5-1. Essential information
CAUTIO N
n Installing towing eyelets to the vehicle
Make sure that towing eyelets are installed securely. If not securely installed, towing eyelets may come loose during towing. This may lead to accidents that cause serious injury or even death.
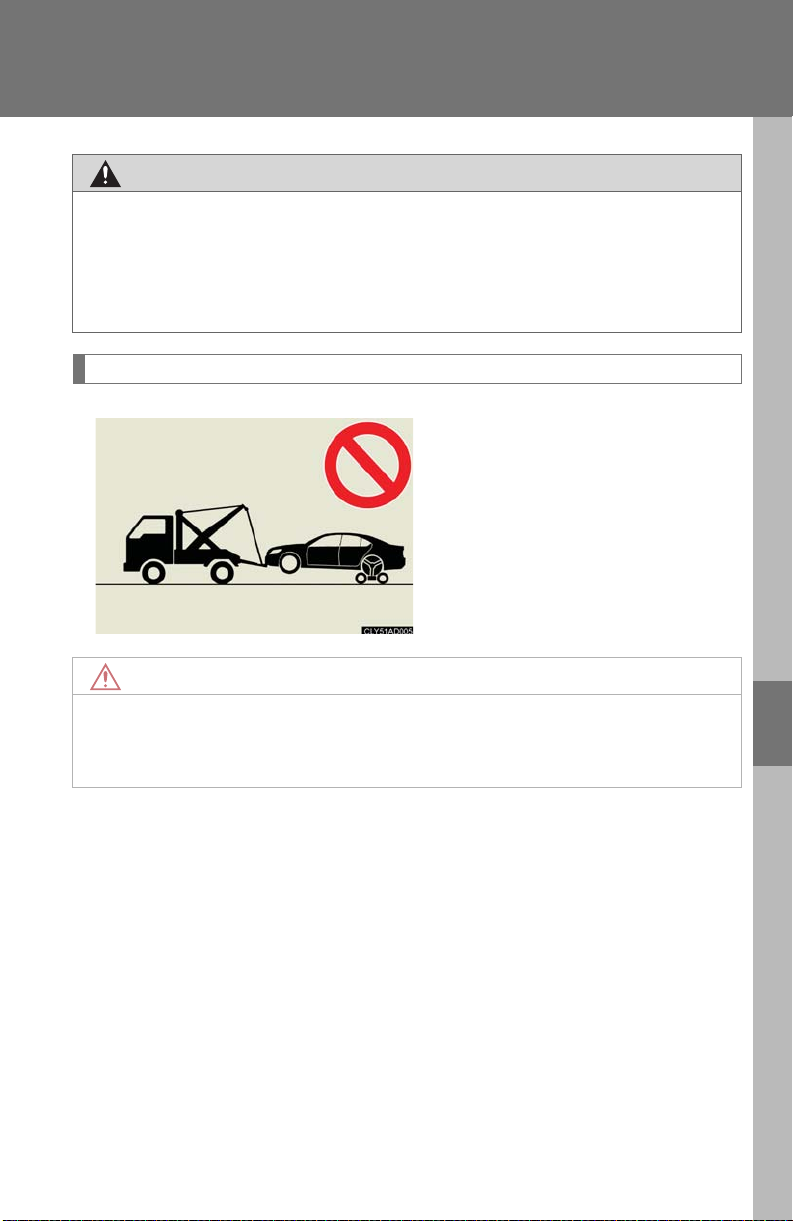
Towing with a sling-type truck
NOTICE
n To prevent body damage
Do not tow with a sling type truck, either from the front or rear.
5
When trouble arises
563
Page 30
5-1. Essential information
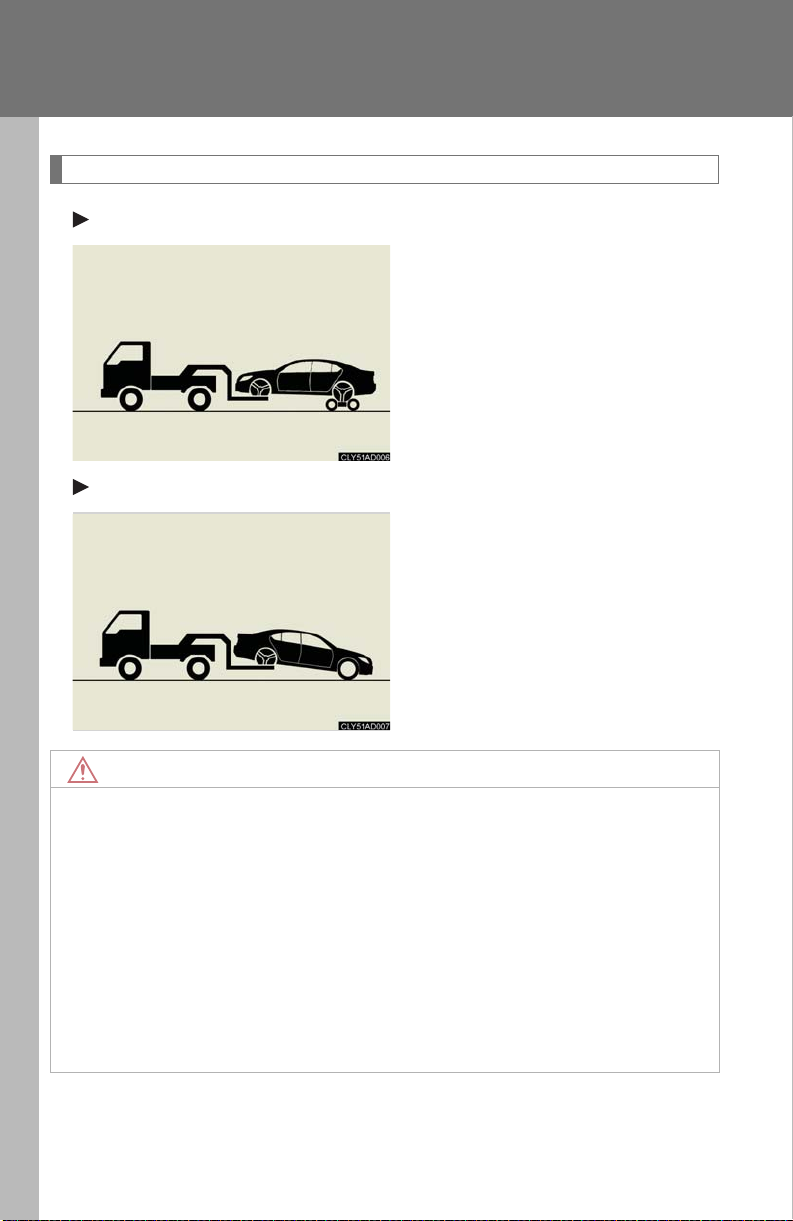
Towing with a wheel lift-type truck
From front
From rear
Use a towing dolly under the rear
wheels.
Switch to ACC mode so that the
steering wheel is unlocked.
NOTICE
n To prevent causing serious damage to the transmission
Never tow this vehicle from the front with the rear wheels on the ground.
n To prevent damaging the vehicle
l Do not tow the vehicle with the engine switch OFF.
The steering lock mechanism is not strong enough to hold the front wheel
straight.
l When raising the vehicle, ensure adequate ground clearance for towing at the
opposite end of the raised vehicle. Without adequate clearance, the vehicle
could be damaged while being towed.
564
Page 31

Using a flat bed truck
5-1. Essential information
If your Lexus is transported by a
flat bed truck, it should be tied
down at the locations shown in the
illustration.
If you use chains or cables to tie
down your vehicle, the angles
shaded in black must be 45°.
Do not overly tighten the tie downs
or the vehicle may be damaged.
565
5
When trouble arises
Page 32

5-1. Essential information
If you think something is wrong
If you notice any of the following symptoms, your vehicle probably needs adjustment or repair. Contact your Lexus dealer as soon as possible.
n Visible symptoms
l Fluid leaks under the vehicle
(Water dripping from the air conditioning after use is normal.)
l Flat-looking tires or uneven tire wear
l Engine coolant temperature gauge needle continually points
higher than normal
n Audible symptoms
l Changes in exhaust sound
l Excessive tire squeal when cornering
l Strange noises related to the suspension system
l Pinging or other noises related to the engine
n Operational symptoms
l Engine missing, stumbling or running rough
l Appreciable loss of power
l Vehicle pulls heavily to one side when braking
l Vehicle pulls heavily to one side when driving on a level road
l Loss of brake effectiveness, spongy feeling, pedal almost touches
the floor
566
Page 33

5-1. Essential information
Fuel pump shut off system
To minimize the risk of fuel leakage when the engine stalls or an airbag inflates upon collision, the fuel pump shut off system stops supplying fuel to the engine.
Follow the procedure below to restart the engine after the system is activated.
STEP 1
STEP 2
Switch to ACC mode or OFF.
Restart the engine.
NOTICE
n Before starting the engine
Inspect the ground under the vehicle. If you find that fuel has leaked on to the ground, the fuel system has been damaged and is in need of repair. Do not restart the engine.
5
When trouble arises
567
Page 34

5-1. Essential information
Event data recorder
Your vehicle has computers that monitor and control certain aspects of your vehicle. These computers assist in driving and maintaining optimal vehicle performance.
Besides storing data useful for troubleshooting, there is an event data recorder (EDR) that records data in a crash or a near car crash event.
In a crash or a near car crash event
The SRS airbag sensor assembly contains the EDR. In a crash or a near
car crash event, this device may record some or all of the following information:
l Engine speed
l Whether the brake pedal was applied or not
l Ve hic le s pee d
l To what extent the accelerator pedal was depressed
l Position of the transmission shift lever
l Whether the driver and front passenger wore seat belts or not
l Driver's seat position
l SRS airbag deployment data
l SRS airbag system diagnostic data
The VSC Electronic Control Unit (ECU) may contain another EDR. In
case the VSC or Brake Assist system is activated, or the lateral acceleration is beyond a certain value, this device may record some or all of the
following information:
l Behavior of the vehicle
l Steering wheel angle
l Ve hic le s pee d
568
Page 35

5-1. Essential information
l To what extent the accelerator pedal was depressed
l To what extent the brake pedal was applied
l To what extent the ECU controlled the condition of the 4 wheels
l Vehicle stability control system diagnostic data
The information above is intended to be used for the purpose of improving vehicle safety performance. Unlike general data recorders, the EDR
does not record sound data such as conversation between passengers.
Disclosure of the data
Lexus will not disclose the data recorded in an EDR to a third party except when:
l An agreement from the vehicle's owner (or the leasing company for a
leased vehicle) is obtained
l Officially requested by the police or other authorities
l Used as a defense for Lexus in a law suit
l Ordered by a court law
However, if necessary Lexus will:
l Use the data for research on Lexus vehicle safety performance
l Disclose the data to a third party for research purposes without dis-
closing details of the vehicle owner, and only when it is deemed necessary
l Disclose summarized data cleared of vehicle identification information
to a non-Lexus organization for research purposes
569
5
When trouble arises
Page 36

When trouble arises
5
5-1. Essential information............ 560
If your vehicle needs to be
towed .......................................... 560
If you think something is
wrong.......................................... 566
Fuel pump shut off system..... 567
Event data recorder................. 568
5-2. Steps to take in an
emergency............................ 570
If a warning light turns on or a
warning buzzer sounds... .. 570
If a warning message is
displayed.................................... 577
If you have a flat tire................. 580
If the engine will not start...... 588
If the shift lever cannot be
shifted from P........................... 590
If the parking brake cannot
be released................................ 591
If you lose your keys................. 593
If the electronic key does
not operate properly ............ 594
If the vehicle battery is
discharged................................ 597
If your vehicle overheats....... 600
If the vehicle becomes
stuck ............................................ 603
559
Page 37

6-1. Specifications
Maintenance data
Dimensions and weights
Overall length
LS460 198.0 in. (5030 mm)
LS460L 202.8 in. (5150 mm)
Overall width 73.8 in. (1875 mm)
Overall height
1
*
58.1 in. (1475 mm)*
57.7 in. (1465 mm)*
LS460 116.9 in. (2970 mm)
Wheelbase
LS460L 121.7 in. (3090 mm)
Front
63.6 in. (1615 mm)*
63.4 in. (1610 mm)*
Tr e a d
Rear
Vehicle capacity weight
(Occupants + luggage)
1
*
: Unladen vehicles
2
*
: Vehicles without an electronically modulated air suspension
3
*
: Vehicles with an electronically modulated air suspension
4
*
: Vehicles with 18-inch tires
5
*
: Vehicles with 19-inch tires
6
*
:5-seat models
7
*
:4-seat models
63.8 in. (1620 mm)*
63.6 in. (1615 mm)*
825 lb. (375 kg)*
675 lb. (307 kg)*
6
7
2
3
4
5
4
5
606
Page 38

6-1. Specifications
Vehicle identification
n Vehicle identification number
The vehicle identification number (VIN) is the legal identifier for your vehicle. This is the primary identification number for your Lexus. It is used in registering the ownership of your vehicle.
This number is stamped on the top left of the instrument panel and in the engine compartment.
n Engine number
This number is also on the Certification Label.
6
Vehicle specifications
The engine number is stamped on
the engine block as shown.
607
Page 39

6-1. Specifications
Engine
Model 1UR-FSE
Ty p e
Bore and stroke
Displacement
8-cylinder V type,
4-cycle, gasoline
3.70 × 3.27 in.
(94.0 × 83.0 mm)
281.2 cu.in.
(4608 cm
3
)
Drive belt tension Automatic adjustment
Fuel
Fuel type Unleaded gasoline only
Octane rating 91 (Research octane number 96) or higher
Fuel tank capacity 22.1 gal. (84 L, 18.4 lmp.gal.)
608
Page 40

Lubrication system
Oil capacity
(drain and refill)
with filter 9.1 qt. (8.6 L, 7.6 lmp.qt.)
without filter 8.9 qt. (8.4 L, 7.4 lmp.qt.)
Oil grade ILSAC multi-grade engine oil
Use Lexus approved "Toyota Genuine Motor Oil" or
equivalent to satisfy the grade and viscosity shown
below.
Recommended oil
viscosity
6-1. Specifications
Temperature range anticipated before
next oil change
0W-20 is an oil that provides optimal levels of fuel
efficiency.
Oil viscosity
l The 0W portion of the oil viscosity rating indicates a characteristic of the
oil which allows cold startability. Oils with a lower value before the W
allow for easier starting of the engine in cold weather.
l The 20 in 0W-20 indicates the oil viscosity when the oil is at its operating
temperature. An oil with a higher viscosity may be better suited if the
vehicle is operated at high speeds, or under extreme load condition.
609
6
Vehicle specifications
Page 41

6-1. Specifications
Cooling system
Capacity
11.7 qt.
(11.0 L, 9.7 lmp.qt.)
Use either of the following.
• “Toyota Super Long Life Coolant"
Coolant type
• Similar high-quality ethylene glycol-based non-silicate, non-amine, non-nitrite, and non-borate coolant with long-life hybrid organic acid technology
Do not use plain water alone.
Ignition system
Spark plug
Make
Gap
NOTICE
n Iridium-tipped spark plugs
Use only iridium-tipped spark plugs. Do not adjust gap when tuning engine.
DENSO FK20HBR11
0.043 in. (1.1 mm)
610
Page 42

Electrical system
Battery
6-1. Specifications
Open voltage at
68°F (20°C):
12.6 ⎯ 12.8 V Fully charged
12.2 ⎯
11.8 ⎯
12.4 V Half charged
12.0 V Discharged
(Voltage checked 20 minutes after the
key is removed with all the lights turned
off)
Charging rates 5A max.
Differential
Oil capacity 1.42 qt. (1.35 L, 1.19 lmp.qt.)
Oil type and viscosity
Toyota Genuine Differential gear oil LT
75W-85 GL-5 or equivalent
6
611
Vehicle specifications
Page 43

6-1. Specifications
Automatic Transmission
Fluid capacity
Drain and refill
3.0 qt.
(2.8 L, 2.5 lmp.qt.)
Fluid type Toy ot a G en ui ne AT F W S
NOTICE
n Automatic transmisson fluid type
Using automatic transmission fluid other than "Toyota Genuine ATF WS" may cause deterioration in shift quality, locking up of your transmission accompanied by vibration, and ultimately damage the automatic transmission of your vehicle.
Brake
Pedal cleara nce * 3.7 in. (95.0 mm) Min.
Pedal free play 0.04 ⎯ 0.08 in. (1.0 ⎯ 2.0 mm)
Brake pad wear limit 0.04 in. (1.0 mm)
Parking brake lining wear limit 0.04 in. (1.0 mm)
Fluid type SAE J1703 or FMVSS No. 116 DOT 3
*: Minimum pedal clearance when depressed with a force of 50 lbf (200 N, 20
kgf).
Steering
Free play Less than 1.2 in. (30 mm)
612
Page 44

6-1. Specifications
Tires and wheels
18-inch tires
Tire si ze 235/50R18 97W, P235/50R18 97V
Driving under normal conditions
Front and rear tire inflation pressure
(Recommended cold tire inflation
pressure)
Front tires:
33 psi (230 kPa, 2.3 kgf/cm
Rear tires:
33 psi (230 kPa, 2.3 kgf/cm
Driving at high speeds above 100 mph (160
km/h) (in countries where such speeds are permitted by law)
Add 3 psi (20 kPa, 0.2 kgf/cm
front tires, 9 psi (60 kPa, 0.6 kgf/cm
rear tires. Never exceed the maximum cold
tire inflation pressure indicated on the tire
sidewall.
2
or bar)
2
or bar)
2
or bar) to the
2
) to the
Wheel size 18 × 7 1/2J
Wheel nut torque 103.3 ft•lbf (140 N•m, 14.3 kgf•m)
6
Vehicle specifications
613
Page 45

6-1. Specifications
19-inch tires
Tir e s ize 245/45R19 98Y
Driving under normal conditions
Front tires:
33 psi (230 kPa, 2.3 kgf/cm
Front and rear tire inflation pressure
(Recommended cold tire inflation
pressure)
Wheel size 19 × 8J
Wheel nut torque 103.3 ft•lbf (140 N•m, 14.3 kgf•m)
Rear tires:
33 psi (230 kPa, 2.3 kgf/cm
Driving at high speeds above 100 mph (160
km/h) (in countries where such speeds are permitted by law)
Add 6 psi (40 kPa, 0.4 kgf/cm
front tires and rear tires. Never exceed the
maximum cold tire inflation pressure indicated
on the tire sidewall.
2
or bar)
2
or bar)
2
or bar) to the
614
Page 46

Light bulbs
Headlights
Front side marker lights 194 3.8 C
Front turn signal lights ⎯ 21 D
Parking lights ⎯ 5 C
Light Bulbs Bulb No. W Ty p e
High beam (halogen bulbs)
Low beam (discharge bulbs)
9005
⎯
6-1. Specifications
60
35
A
B
Exterior
Front fog lights 9006 51 E
Side turn signal lights ⎯ 5 D
Trunk lid light 194 3.8 C
Tr un k l ig h t ⎯ 3.8 C
Rear tunr signal lights 921 16 C
Back-up lights 921 16 C
Outer foot lights ⎯ 5 C
Vanity lights
Front
Rear
Interior
Interior lights
Front
Rear
Door courtesy lights ⎯ 5 C
A: HB3 halogen bulbs B: D4S discharge bulbs C: Wedge base bulbs (clear) D: Wedge base bulbs (amber) E: HB4 halogen bulbs F: Double end bulbs
⎯
⎯
⎯
⎯
8
3
8
8
C
F
6
C
F
Vehicle specifications
615
Page 47

6-1. Specifications
Fuel information
Your vehicle must use only unleaded gasoline. Premium unleaded gasoline with an Octane Rating of 91 (Research Octane Number 96) or higher required for optimum engine performance.
At minimum, the gasoline you use should meet the specifications of ASTM D4814 in the U.S.A. and CGSB3.5-M93 in Canada.
n Fuel tank opening for unleaded gasoline
To help prevent incorrect fueling, your Lexus has a fuel tank opening that only accommodates the special nozzle on unleaded fuel pumps.
n If premium gasoline is not available
If 91 rating gasoline cannot be obtained, you may use unleaded gasoline with an octane rating as low as 87 (Research Octane Rating 91).
n If your engine knocks
l Consult your Lexus dealer.
l You may occasionally notice light knocking for a short time while accelerating
or driving uphill. This is normal and there is no need for concern.
n Gasoline quality
In very few cases, driveability problems may be caused by the brand of gasoline you are using. If driveability problems persist, try changing the brand of gasoline. If this does not correct the problem, consult your Lexus dealer.
616
Page 48

6-1. Specifications
n Gasoline quality standards
l Automotive manufacturers in the US, Europe and Japan have developed a
specification for fuel quality called World-Wide Fuel Charter (WWFC) that is
expected to be applied worldwide.
l The WWFC consists of four categories that are based on required emission
levels. In the US, category 4 has been adopted.
l The WWFC improves air quality by lowering emissions in vehicle fleets, and
customer satisfaction through better performance.
n Lexus recommends the use of gasoline containing detergent additives
l Lexus recommends the use of gasoline that contains detergent additives to
avoid build-up of engine deposits.
l All gasoline sold in the US contains detergent additives to clean and/or keep
clean intake systems.
n Lexus recommends the use of cleaner burning gasoline
Cleaner burning gasoline, including reformulated gasoline that contains oxygenates such as ethanol or MTBE (Methyl Tertiary Butyl Ether) is available in many
areas.
Lexus recommends the use of cleaner burning gasoline and appropriately blended
reformulated gasoline. These types of gasoline provide excellent vehicle performance, reduce vehicle emissions and improve air quality.
n Lexus does not recommend blended gasoline
l Lexus allows the use of oxygenate blended gasoline where the oxygenate con-
tent is up to 10% ethanol or 15% MTBE.
l If you use gasohol in your Lexus, be sure that it has an octane rating no lower
than 87.
l Lexus DOES NOT recommend the use of gasoline containing methanol.
n Lexus does not recommend gasoline containing MMT
Some gasoline contains octane enhancing additive called MMT (Methylcy clopentadienyl Manganese Tricarbonyl).
Lexus DOES NOT recommend the use of gasoline that contains MMT. If fuel containing MMT is used, your emission control system may be adversely affected.
The malfunction indicator lamp on the instrument cluster may come on. If this happens, contact your Lexus dealer for service.
6
Vehicle specifications
617
Page 49

6-1. Specifications
NOTICE
n Notice on gasoline quality
l Do not use leaded gasoline.
Leaded gasoline can cause damage to your vehicle’s three-way catalytic converters causing the emission control system to malfunction.
l Do not use gasohol other than that stated here.
Other gasohol may cause fuel system damage or vehicle performance problems.
l Use of unleaded gasoline with an octane rating lower than 91 may result in engine
knocking and significantly reduced performance. Persistent knocking can lead to
engine damage and should be corrected by refueling with higher octane
unleaded gasoline.
n Fuel-related poor driveability
If after using a different type of fuel, poor driveability is encountered (poor hot starting, vaporization, engine knocking, etc.), discontinue the use of that type of fuel.
n When refueling with gasohol
Take care not to spill gasohol. It can damage your vehicle's paint.
618
Page 50

6-1. Specifications
Tire information
Ty p ic a l ti re s ym b o ls
Tire size (→P. 621)
DOT and Tire Identification Number (TIN) (→P. 62 0)
Location of tread wear indicators (→P. 622)
Tire ply composition and materials
Plies are layers of rubber-coated parallel cords. Cords are the strands which form the plies in a tire.
Radial tires or bias-ply tires
A radial tire has RADIAL on the sidewall. A tire not marked RADIAL is a bias-ply tire.
TUBELESS or TUBE TYPE
A tubeless tire does not have a tube and air is directly filled in the tire. A
tube type tire has a tube inside the tire and the tube maintains the air pressure.
Load limit at maximum cold tire inflation pressure (→P. 624 )
Maximum cold tire inflation pressure (→P. 6 24)
This means the pressure to which a tire may be inflated.
Uniform tire quality grading
For details, see "Uniform tire quality grading" that follows.
6
Vehicle specifications
619
Page 51

6-1. Specifications
Summer tire or all season tire (→P. 622)
An all season tire has "M+S" on the sidewall. A tire not marked "M+S" is a summer tire.
Typical DOT and tire identification number (TIN)
DOT symbol
*
Tire Identification Number (TIN)
Tire manufacturer's identifica-
tion mark
Tire size code
Manufacturer's optional tire
type code (3 or 4 letters)
Manufacturing week
Manufacturing year
*: The DOT symbol certifies that
the tire conforms to applicable
Federal Motor Vehicle Safety
Standards.
620
Page 52

Tire size
n Typical tire size information
6-1. Specifications
The illustration indicates typical
tire size.
Tir e us e
(P = Passenger car,
T = Temporary use)
Section width (millimeters)
Aspect ratio
(tire height to section width)
Tire construction code
(R = Radial, D = Diagonal)
Wheel diameter (inches)
Load index (2 or 3 digits)
Speed symbol
(alphabet with one letter)
n Tire dimensions
Section width
Tire height
Wheel diameter
6
Vehicle specifications
621
Page 53

6-1. Specifications
Tire section names
Uniform Tire Quality Grading
Bead
Sidewall
Shoulder
Tre a d
Belt
Inner liner
Reinforcing rubber
Carcass
Rim lines
Bead wires
Chafer
This information has been prepared in accordance with regulations
issued by the National Highway Traffic Safety Administration of the
U.S.A. Department of Transportation.
It provides the purchasers and/or prospective purchasers of Lexus vehicles with information on uniform tire quality grading.
Your Lexus dealer will help answer any questions you may have as you read this information.
n DOT quality grades
All passenger vehicle tires must conform to Federal Safety Requirements in addition to these grades. Quality grades can be found where
applicable on the tire sidewall between tread shoulder and maximum
section width.
For example: Treadwear 200 Traction AA Temperature A
622
Page 54

6-1. Specifications
n Treadwear
The treadwear grade is a comparative rating based on the wear rate of
the tire when tested under controlled conditions on a specified government test course.
For example, a tire graded 150 would wear one and a half (1 - 1/2) times as
well on the government course as a tire graded 100.
The relative performance of tires depends upon the actual conditions of
their use, however, and may depart significantly from the norm due to variations in driving habits, service practices and differences in road characteristics and climate.
n Traction AA, A, B, C
The traction grades, from highest to lowest, are AA, A, B and C, and they represent the tire's ability to stop on wet pavement as measured under controlled conditions on specified government test surfaces of asphalt and concrete.
A tire marked C may have poor traction performance.
Warning: The traction grade assigned to this tire is based on braking
(straight ahead) traction tests and does not include cornering (turning) traction.
n Temperature A, B, C
The temperature grades are A (the highest), B, and C, representing the tire's resistance to the generation of heat and its ability to dissipate heat when tested under controlled conditions on a specified indoor laboratory test wheel.
Sustained high temperature can cause the material of the tire to degenerate
and reduce tire life, and excessive temperature can lead to sudden tire failure.
The grade C corresponds to a level of performance which all passenger car tires must meet under the Federal Motor Vehicle Safety Standard No. 109.
Grades B and A represent higher levels of performance on the laboratory test wheel than the minimum required by law.
6
Vehicle specifications
623
Page 55

6-1. Specifications
Warning: The temperature grades for this tire are established for a tire that
is properly inflated and not overloaded.
Excessive speed, underinflation, or excessive loading, either separately or in
combination, can cause heat buildup and possible tire failure.
Glossary of tire terminology
Tire related term Meaning
The combined weight (in excess of those standard
items which may be replaced) of automatic transmis-
Accessory weight
sion, power steering, power brakes, power windows,
power seats, radio and heater, to the extent that these
items are available as factory-installed equipment
(whether installed or not)
Cold tire inflation pressure
Curb weight
Maximum inflation pressure
Maximum loaded vehicle
weight
Normal occupant weight
Tire pressure when the vehicle has been parked for
three hours or more, or has not been driven more
than 1 mile or 1.5 km under that condition
The weight of a motor vehicle with standard equipment, including the maximum capacity of fuel, oil and
coolant, and if so equipped, air conditioning and
additional weight optional engine
The maximum cold inflated pressure to which a tire
may be inflated, shown on the sidewall of the tire
The sum of:
(a) Curb weight
(b) Accessory weight
(c) Vehicle capacity weight
(d) Production options weight
150 lb. (68 kg) times the number of occupants specified in the second column of Table 1
* that follows
624
Page 56

Tire related term Meaning
The combined weight of installed regular production
options weighing over 5 lb. (2.3 kg) in excess of the
Production options
weight
standard items which they replace, not previously
considered in curb weight or accessory weight,
including heavy duty brakes, ride levelers, roof rack,
heavy duty battery, and special trim
6-1. Specifications
Vehicle capacity weight
(Total load capacity)
The rated cargo and luggage load plus 150 lb. (68
kg) times the vehicle's designated seating capacity
(a) The sidewall that contains a whitewall, bears
white lettering, or bears manufacturer, brand,
and/or model name molding that is higher or
Intended outboard sidewall
deeper than the same molding on the other side-
wall of the tire, or
(b) The outward facing sidewall of asymmetrical tire
that has a particular side that must always face
outward when mounted on a vehicle
Occupant distribution
Recommended inflation
pressure
Rim
Rim diameter
(Wheel diameter)
Distribution of occupants in a vehicle as specified in
the third column of Table 1
Cold tire inflation pressure recommended by a manufacturer.
A metal support for a tire or a tire and tube assembly
upon which the tire beads are seated
Nominal diameter of the bead seat
Rim size designation Rim diameter and width
* below
6
Vehicle specifications
Rim type designation
The industry manufacturer's designation for a rim by
style or code
Rim width Nominal distance between rim flanges
625
Page 57

6-1. Specifications
Tire related term Meaning
Vehicle maximum load on
the tire
Vehicle normal load on
the tire
Weat he r si de
The load on an individual tire that is determined by
distributing to each axle its share of the maximum
loaded vehicle weight, and dividing by two
The load on an individual tire that is determined by
distributing to each axle its share of curb weight,
accessory weight, and normal occupant weight (distributed in accordance with Table 1
dividing it by two
The surface area of the rim not covered by the
inflated tire
* below), and
*:Table 1 ⎯ Occupant loading and distribution for vehicle normal load for
various designated seating capacities
Designated seating
capacity, Number of
occupants
2 through 4 2 2 in front
5 through 10 3 2 in front, 1 in second seat
Vehicle normal load,
Number of occupants
Occupant distribution in
a normally loaded vehicle
626
Page 58

5-2. Steps to take in an emergency
If a warning light turns on or a warning buzzer sounds...
Calmly perform the following actions if any of the warning lights turn on or
flash. If a light turns on or flashes, but then turns off, this does not necessarily indicate a malfunction in the system.
Stop the vehicle immediately. Continuing to drive the vehicle may be dangerous.
The following warning indicates a possible problem in the brake system. Immediately stop the vehicle in a safe place and contact your Lexus dealer.
Warning light Warning light/Details
(U.S.A.)
(Canada)
Brake system warning light (red indicator)
•Low brake fluid
• Malfunction in the electronically controlled brake system
Stop the vehicle immediately.
The following warning indicates the possibility of damage to the vehicle that may lead to an accident. Immediately stop the vehicle in a safe place and contact your Lexus dealer.
Warning light Warning light/Details
Charging system warning light
Indicates a malfunction in the vehicle’s charging system.
570
Page 59

5-2. Steps to take in an emergency
Have the vehicle inspected by your Lexus dealer immediately.
Failing to investigate the cause of the following warnings may lead to the system operating abnormally and possibly cause an accident. Have the vehicle inspected by your Lexus dealer immediately.
Warning light Warning light/Details
Malfunction indicator lamp
(U.S.A.)
(Canada)
Indicates a malfunction in:
• The electronic engine control system;
• The electronic throttle control system; or
• The electronic automatic transmission control system.
SRS warning light
Indicates a malfunction in:
• The SRS airbag system; or
• The seat belt pretensioner system.
(U.S.A.)
(Canada)
ABS warning light
Indicates a malfunction in:
•The ABS; or
• The brake assist system.
Brake system warning light (yellow indicator)
Indicates a malfunction in:
• The electronically controlled brake system; or
• The electro-mechanical parking brake system.
Electric power steering system warning light
• Indicates a malfunction in the EPS (Electric Power Steering)
system.
Pre-collision system warning light (if equipped)
• Indicates a malfunction in the pre-collision system.
571
5
When trouble arises
Page 60

5-2. Steps to take in an emergency
n If the electronic engine control system warning light comes on while driving
First check the following:
l Is the fuel empty?
If it is, fill the fuel tank immediately.
l Is the fuel tank cap loose?
If it is, tighten it securely.
The light will go off after taking several driving trips. If the light does not go off even after several trips, contact your Lexus dealer as soon as possible.
n Power steering warning light
When the battery is low or when the voltage drops temporarily, the power steering warning light may come on.
CAUTIO N
n When the power steering warning light comes on
The steering wheel may become extremely heavy. If the steering wheel becomes heavier than usual when operating, firmly hold and operate it using more force than usual.
Have the malfunction repaired immediately.
After taking the specified steps to correct the suspected problem, check that the warning light turns off.
Warning light Warning light/Details Correction procedure
Open door warning light
(warning buzzer)
Indicates that a door or the
trunk is not fully closed.
572
1
*
Check that all doors and the
trunk are closed.
Page 61

5-2. Steps to take in an emergency
Warning light Warning light/Details Correction procedure
Low fuel level warning light
In the fuel
gauge
Remaining fuel
(Approximately 3.4 gal. [13L,
2.8 Imp.gal.] or less)
Refuel the vehicle.
Driver’s seat belt reminder
light (warning buzzer)
Warns the driver to fasten
2
*
Fasten the seat belt.
his/her seat belt.
Front passenger’s seat belt
reminder light
(warning buzzer)
2
*
Fasten the seat belt.
Warns the front passenger to
fasten his/her seat belt.
Tire pressure warning light
Indicates low tire pressure. Adjust the tire pressure.
When the light stays on after
blinking for 1 minute:
Indicates a malfunction in the
Have the system checked by
your Lexus dealer.
tire pressure warning system.
Master warning light
A buzzer sounds and the
warning light comes on or
flashes to indicate that the
→P. 5 7 7
master warning system has
detected a malfunction.
5
When trouble arises
573
Page 62

5-2. Steps to take in an emergency
1
*
:Open door warning buzzer:
The open door warning buzzer sounds to alert one or more of the doors is not fully closed (with the vehicle having reached a speed of 3 mph [5 km/h]).
2
*
:Driver's and front passenger’s seat belt reminders:
The driver’s and front passenger’s seat belt reminders sound to alert the driver
and front passenger that his or her sear belt is not fastened. The buzzer sounds
intermittently for 10 seconds after the vehicle has reached a speed of at least 12
mph (20 km/h). Then, if the seat belt is still unfastened, the buzzer will sound in a
different tone for 20 more seconds.
n Front passenger detection sensor and passenger seat belt reminder
l If luggage is placed on the front passenger seat, the front passenger detection
sensor may cause the warning light to flash, even if a passenger is not sitting in
the seat.
l If a cushion is placed on the seat, the sensor may not detect a passenger, and the
warning light may not operate properly.
574
Page 63

5-2. Steps to take in an emergency
n Tire pressure warning light
At the same time that the tire pressure warning light comes on, the tire pressure values appear on the multi-information display.
n If the tire pressure warning system is inoperative
The tire pressure warning system may become inoperative in the following conditions:
(When the condition becomes normal, the system will work properly.)
l If tires not equipped with tire pressure warning valves and transmitters are used.
l If the ID code on the tire pressure warning valves and transmitters is not regis-
tered.
l If electronic devices or facilities using similar radio wave frequencies are nearby.
l If a large metallic object which can interfere with signal reception is put in the
trunk.
l If a radio set at similar frequencies is in use in the vehicle.
l If a window tint that affects the radio wave signals is installed.
l If there is a lot of snow or ice on the vehicle, in particular around the wheels or
wheel housings.
l If non-genuine Lexus wheels are used.
l If tire chains are used.
l If the spare tire is in a location subject to poor radio wave signal reception.
l If the tire inflation pressure is 73 psi (500 kPa, 5.1 kgf/cm
n If the tire pressure warning light comes on after blinking for 1 minute frequently
2
or bar) or higher.
If the tire pressure warning light comes on after blinking for 1 minute frequently when the engine switch is turned to IG-ON mode, have it checked by your Lexus dealer.
Even if you use genuine wheels, the tire pressure warning system may not work properly with some types of tires.
Pushing the tire pressure reset switch should not turn off the tire pressure warning light.
n Customization
The vehicle speed linked seat belt reminder buzzer can be disabled. (→P. 6 27 )
5
When trouble arises
575
Page 64

5-2. Steps to take in an emergency
CAUTIO N
n Maintenance of the tires
Each tire, including the spare (if provided), should be checked monthly when cold
and inflated to the inflation pressure recommended by the vehicle manufacturer on
the vehicle placard or tire inflation pressure label (tire and load information label).
(If your vehicle has tires of a different size than the size indicated on the vehicle
placard or tire inflation pressure label [tire and load information label], you should
determine the proper tire inflation pressure for those tires.)
As an added safety feature, your vehicle has been equipped with a tire pressure
monitoring system (TPMS-tire pressure warning system) that illuminates a low tire
pressure telltale (tire pressure warning light) when one or more of your tires is significantly under-inflated. Accordingly, when the low tire pressure telltale (low tire
pressure warning light) illuminates, you should stop and check your tires as soon as
possible, and inflate them to the proper pressure. Driving on a significantly underinflated tire causes the tire to overheat and can lead to tire failure. Under-inflation
also reduces fuel efficiency and tire tread life, and may affect the vehicle's handling
and stopping ability.
Please note that the TPMS (tire pressure warning system) is not a substitute for
proper tire maintenance, and it is the driver's responsibility to maintain correct tire
pressure, even if under-inflation has not reached the level to trigger illumination of
the TPMS low tire pressure telltale (tire pressure warning light).
NOTICE
n Precaution when installing a different tire
When a tire of a different specification or maker is installed, the tire pressure warning system may not operate properly.
576
Page 65

5-2. Steps to take in an emergency
If a warning message is displayed
The multi-information display shows warnings of system malfunctions,
incorrectly performed operations, or shows messages that indicate a need
for maintenance. When a message is shown, perform the correction procedure appropriate to the message.
Master warning light
The master warning light comes
on or flashes when a message is
being shown on the multi-information display.
Multi-information display
If any of the warning messages is shown again after its correction procedure has been performed, contact your Lexus dealer.
577
5
When trouble arises
Page 66

5-2. Steps to take in an emergency
Messages and warnings
The warning lights and warning buzzers operate as follows depending on
the content of the message. If a message indicates the need for inspection by a dealer, have the vehicle inspected by your Lexus dealer immediately.
System
warning
light
Comes on ⎯ Sounds
⎯
Flashes ⎯ Sounds
Comes on ⎯
Comes on
or flashes
Wa r n i n g
buzzer*
Sounds
Does not
sound
Wa r n i n g
Indicates an important situation, such
as when a system related to driving is
malfunctioning or that danger may
result if the correction procedure is
not performed.
Indicates an important situation, such
as when the system shown on the
multi-information display may be
malfunctioning.
Indicates a situation, such as when
damage to the vehicle or danger may
result.
Indicates a condition, such as malfunction of electrical components,
their condition, or indicates the need
for maintenance.
Indicates a situation, such as when an
Flashes ⎯
*A buzzer sounds first time a message is shown on the multi-information display.
578
Does not
sound
operation has been performed incorrectly, or indicates how to perform an
operation correctly.
Page 67

5-2. Steps to take in an emergency
n System warning lights
The master warning light does not come on or flash when a message indicates the following. Instead, a separate system warning light will come on or flash along with the message shown on the multi-information display.
l Malfunction of the AFS (Adaptive Front Lighting System)
The AFS OFF indicator light flashes. (→P. 1 39 )
l Malfunction of the brake system
The brake system warning light (red indicator) comes on. (→P. 570 )
l Malfunction of the electronically controlled brake system or electro-mechani-
cal parking brake
The brake system warning light (yellow indicator) comes on. (→P. 57 1)
l Malfunction of the ABS
The ABS warning light comes on. (→P. 57 1)
l Malfunction of the charging system
The charging system warning light comes on. (→P. 570 )
l High engine coolant temperature
The needle of the engine coolant temperature gauge enters the red zone.
(→P. 1 27 )
n When "Electrical equipment operation is limited" is shown
This message indicates that the battery is low. When the message is shown, operation of electrical equipment that uses a large amount of electric power, such as the
air conditioning system, may be limited temporarily. This does not indicate a malfunction. Operation of electrical equipment will be restored after the battery is
charged.
5
When trouble arises
579
Page 68

5-2. Steps to take in an emergency
If you have a flat tire
Remove the flat tire and replace it with the spare provided.
n Before jacking up the vehicle
l Stop the vehicle on a hard, flat surface.
l Set the parking brake.
l Shift the shift lever to P.
l Stop the engine.
l Turn on the emergency flashers.
n Location of the spare tire, jack and tools
Parking brake release tool
Penlight batteries
Towing eyelet
Penlight
Jack handle
Spare tire
Wr en c h
Jack
Tools
580
Page 69

5-2. Steps to take in an emergency
Pe n li g h t
The vehicle is equipped with a penlight, located inside the trunk. The penlight is provided in case it is necessary to perform an unexpected service
operation at night, such as installation of the spare tire.
Turn the top portion to remove
it.
Insert batteries.
Install the top portion.
ON/OFF
Taking out the jack and spare tire
STEP 1
STEP 2
Lift up the hook of the panel on the
trunk floor.
5
When trouble arises
Secure the panel using the hook
provided.
581
Page 70

5-2. Steps to take in an emergency
STEP 3
STEP 4
STEP 5
Remove the tool tray.
Remove the hook.
Loosen the center fastener that
secures the spare tire.
If the center fastener cannot be
turned by hand, use the wrench
that is stored in the trunk.
582
Page 71

Replacing a flat tire
5-2. Steps to take in an emergency
STEP 1
STEP 2
Chock the tires.
Flat tire
Lefthand side
Front
Righthand side
Lefthand side
Rear
Righthand side
Wheel chock
positions
Behind the
rear righthand side tire
Behind the
rear lefthand side tire
In front of the
front righthand side tire
In front of the
front lefthand side tire
Slightly loosen the wheel nuts (one
turn).
5
When trouble arises
STEP 3
Turn the tire jack portion “A” by
hand until the notch of the jack is in
contact with the jack point.
583
Page 72

5-2. Steps to take in an emergency
STEP 4
STEP 5
Raise the vehicle until the tire is
slightly raised off the ground.
Remove all the wheel nuts and the
tire.
When resting the tire on the
ground, place the tire so that the
wheel design faces up to avoid
scratching the wheel surface.
584
Page 73

Installing the spare tire
5-2. Steps to take in an emergency
STEP 1
STEP 2
STEP 3
Wa s h e r
Wheel nut
Disc wheel
Remove any dirt or foreign matter
from the wheel contact surface.
If foreign matter is on the wheel
contact surface, the wheel nuts
may loosen while the vehicle is in
motion, and the tire may come off
the vehicle.
Install the spare tire and loosely
tighten each wheel nut by hand to
approximately the same amount.
Turn the lug nuts until the washers
come into contact with the wheel.
Lower the vehicle.
5
When trouble arises
STEP 4
Firmly tighten each nut two or
three times in the order shown in
the illustration.
Tightening torque:
103.3 ft•lbf (140 N•m, 14.3 kgf•m)
585
Page 74

5-2. Steps to take in an emergency
STEP 5
Stow the flat tire, tire jack and all tools.
CAUTIO N
n Using the tire jack
Improper use of the tire jack may lead to death or injuries due to the vehicle suddenly falling off the jack.
l Do not use the tire jack for any purpose other than replacing tires or installing and
removing tire chains.
l Only use the tire jack that comes with this vehicle for replacing a flat tire.
Do not use it on other vehicles, and do not use other tire jacks for replacing tires
on this vehicle.
l Always check that the tire jack is securely set to the jack point.
l Do not put any part of your body under the vehicle supported by a jack.
l Do not start or run the engine while your vehicle is supported by the jack.
l Do not raise the vehicle while someone is in it.
l When raising the vehicle, do not put an object on or under the jack.
l Do not raise the vehicle to a height greater than that required to replace the tire.
l Use a jack stand if it is necessary to get under the vehicle.
l Vehicles with electronically modulated air suspension: Be sure to turn off the
height control and stop the engine.
Take particular care when lowering the vehicle to ensure that no one working on or near the vehicle may be injured.
n Replacing a flat tire
Observe the following precautions to reduce the risk of death or serious injury.
l Never use oil or grease on the wheel bolts or wheel nuts.
The oil or grease can cause the wheel nuts to loosen, causing a serious accident.
Remove any oil or grease on the wheel bolts or wheel nuts.
l Have the wheel nuts tightened with a torque wrench to 103.3 ft•lbf (140 N•m,
14.3 kgf•m) as soon as possible after changing wheels.
Failure to follow these precautions could cause the nuts to loosen and the wheels
may fall off, which could lead to an accident causing death or serious injury.
586
Page 75

5-2. Steps to take in an emergency
NOTICE
n Do not drive the vehicle with a flat tire.
Do not continue driving with a flat tire. Driving even a short distance with a flat tire can damage the tire and the wheel beyond repair.
587
5
When trouble arises
Page 76

5-2. Steps to take in an emergency
If the engine will not start
If the engine will not start, even though correct starting procedures are
being followed (
n The engine will not start even when the starter motor operates
normally.
One of the following may be the cause of the problem.
l There may not be sufficient fuel in the vehicle’s tank.
Refuel the vehicle.
l The engine may be flooded.
Try to restart the engine once more following correct starting
procedures. (→P. 115)
l There may be a malfunction in the engine immobilizer system.
(→P. 6 4)
n The starter motor turns over slowly, the interior lights and head-
lights are dim, or the horn does not sound or sounds at a low volume.
One of the following may be the cause of the problem.
→P. 115), consider each of the following points.
l The battery may be discharged. (→P. 5 97 )
l The battery terminal connections may be loose or corroded.
n The starter motor does not turn over.
The following may be the cause of the problem.
l The engine starting system may be malfunctioning due to an elec-
trical problem such as an open circuit or a blown fuse. However, a
interim measure is available to start the engine. (→P. 589)
588
Page 77

5-2. Steps to take in an emergency
n The starter motor does not turn over, the interior lights and head-
lights do not turn on, or the horn does not sound.
One of the following may be the cause of the problem.
l One or both of the battery terminals may be disconnected. l The battery may be discharged. (→P. 5 97 )
l There may be a malfunction in the steering lock system.
Contact your Lexus dealer if the problem cannot be repaired, or if repair procedures are unknown.
Emergency start function
When the engine does not start, the following steps can be used as an
interim measure to start the engine if the engine switch is functioning normally.
STEP 1
STEP 2
STEP 3
STEP 4
Set the parking brake.
Put the shift lever in P.
Set the engine switch to ACC mode.
Push and hold the engine switch about 15 seconds while depress-
ing the brake pedal firmly.
Even if the engine can be started using the above steps, the system may be malfunctioning. Have the vehicle checked by your Lexus dealer.
589
5
When trouble arises
Page 78

5-2. Steps to take in an emergency
If the shift lever cannot be shifted from P
If the shift lever cannot be shifted with your foot on the brake, there may be
a problem with the shift lock system (a system to prevent accidental operation of the shift lever). Have the vehicle inspected by your Lexus dealer
immediately.
The following steps may be used as an emergency measure to ensure that
the shift lever can be shifted.
STEP 1
STEP 2
STEP 3
STEP 4
STEP 5
Set the parking brake.
Turn the engine switch to the ACC mode.
Depress the brake pedal.
Pry the cover up with a flathead
screwdriver or equivalent.
Press the shift lock override button.
The shift lever can be shifted
while the button is pressed.
590
Page 79

5-2. Steps to take in an emergency
If the parking brake cannot be released
In the event that the battery is discharged or switch operation does not
release the parking brake, the parking brake can be released manually
using the procedure below. This procedure should be performed only if
necessary, such as in an emergency.
If the switch cannot be operated even when the battery is normal, the parking brake system may be malfunctioning. Have the vehicle inspected by
your Lexus dealer immediately.
n Before releasing the parking brake manually
l Shift the shift lever to P.
l Turn the engine switch OFF.
l Check that the parking brake indicator is off.
l Chock the tires.
Releasing the parking brake manually
STEP 1
STEP 2
Take out the parking brake release
tool from the trunk. (→P. 580)
Take out the spare tire. (→P. 580)
Install the parking brake release
tool into the screwdriver handle.
591
5
When trouble arises
Page 80

5-2. Steps to take in an emergency
STEP 3
STEP 4
n Manual operation of the parking brake
The parking brake cannot be set manually.
Remove the plug.
Insert the tool and press it down
firmly while turning it counterclockwise until it stops.
CAUTIO N
n When releasing the parking brake manually
l Shift the shift lever to P, turn the engine switch OFF and chock the tires.
Failure to do so may cause the vehicle to move, resulting in an accident.
l Turn the engine switch OFF and check that the parking brake indicator is off.
Failure to do so may cause the system to operate and turn the parking brake
release tool that is inserted, resulting in an injury.
592
Page 81

5-2. Steps to take in an emergency
If you lose your keys
New genuine Lexus keys can be made by your Lexus dealer using one of
the other keys or the key number stamped on your key number plate.
593
5
When trouble arises
Page 82

5-2. Steps to take in an emergency
If the electronic key does not operate properly
If communication between the electronic key and vehicle is interrupted
(→P. 10) or the electronic key cannot be used because the battery is
depleted, the smart access system with push-button start and wireless
remote control cannot be used. In such cases, the doors and trunk can be
opened or the engine can be started by following the procedure below.
Locking and unlocking the doors, unlocking the trunk and key linked functions
Doors
Remove the cover on the driver’s
door handle using the mechanical
key in order to perform the following operations.
Locks all doors
Closes the windows/moon roof
(turn and hold)
Unlocks the door
594
Tu r n i n g t h e k e y r e a r w a r d u nl o c k s
the driver's door. Turning the key
once again unlocks the other
doors.
Opens the windows/moon roof
(turn and hold)
Return the cover to the original
position after use.
Page 83

Starting the engine
5-2. Steps to take in an emergency
Tr u n k
Turn the mechanical key clockwise to open.
STEP 1
STEP 2
Put the shift lever in P and apply the brakes.
Touch the Lexus emblem side of
the electronic key to the engine
switch.
An alarm will sound to indicate that
the start function cannot detect the
electronic key that is touched to
the engine switch if any of the
doors is opened and closed while
the key is touched to the switch.
STEP 3
Press the engine switch within 10 seconds [after the buzzer sounds], keeping the brake pedal depressed.
In the event that the engine still cannot be started, contact your Lexus dealer.
5
When trouble arises
595
Page 84

5-2. Steps to take in an emergency
n Replacing the key battery
As this procedure is the temporary measure, it is recommended that the electronic
battery be replaced immediately. (→P. 528 )
596
Page 85

5-2. Steps to take in an emergency
If the vehicle battery is discharged
The following procedures may be used to start the engine if the vehicle’s
battery is discharged.
You can call your Lexus dealer, Roadside Assistance or Lexus Customer
Service Assistance.
If you have a set of jumper (or booster) cables and a second vehicle with a 12-volt battery, you can jump start your Lexus following the steps below.
STEP 1
STEP 2
Remove the engine compartment covers and battery cover.
(→P. 4 96 )
Connect the jumper cables.
If required, remove all vent plugs from the booster battery. Lay a cloth over the open vents on the booster battery. (This helps reduce the explosion hazard, personal injuries and burns.)
Positive (+) battery terminal on your vehicle
Positive (+) battery terminal on the second vehicle
Negative (-) battery terminal on the second vehicle
Connect the jumper cable to ground on your vehicle as shown in the
illustration.
STEP 3
Start the engine of the second vehicle. Increase the engine
speed slightly and maintain that level for approximately 5 minutes to recharge the battery of your vehicle.
STEP 4
Open and close any of the doors with the engine switch OFF.
5
When trouble arises
597
Page 86

5-2. Steps to take in an emergency
STEP 5
Maintain the engine speed of the second vehicle and turn the ignition switch to IG-ON mode, then start the vehicle’s engine.
STEP 6
Once the vehicle’s engine has started, remove the jumper
cables in the exact reverse order in which they were connected.
Once the engine starts, have the vehicle checked at your Lexus dealer as soon as possible.
n Avoiding a discharged battery
l Turn off the headlights and the audio system while the engine is turned off.
l Turn off any unnecessary electrical components when the vehicle is running at a
low speed for an extended period, such as in heavy traffic, etc.
n When the battery is removed or discharged
The tire pressure warning system must be initialized.
(→P. 5 12 )
CAUTIO N
n Avoiding battery fires or explosions
Observe the following precautions to prevent accidentally igniting the flammable gas that may be emitted from the battery.
l Make sure the jumper cable is connected to the correct terminal and that it is not
unintentionally in contact with any part other than the intended terminal.
l Do not allow the jumper cables to come into contact with the “+” and “-” termi-
nals.
l Do not allow open flame or use matches, cigarette lighters or smoke near the
battery.
598
Page 87

5-2. Steps to take in an emergency
CAUTIO N
n Battery precautions
The battery contains poisonous and corrosive acidic electrolyte, while related parts
contain lead and lead compounds. Observe the following precautions when handling the battery.
l When working with the battery, always wear safety glasses and take care not to
allow any battery fluids (acid) to come into contact with skin, clothing or the vehicle body.
l Do not lean over the battery
l In the event that battery fluid comes into contact with the skin or eyes, immedi-
ately wash the affected area with water and seek medical attention.
Place a wet sponge or cloth over the affected area until medical attention can be
received.
l Always wash your hands after handling the battery support, terminals, and other
battery-related parts.
l Do not allow children near the battery.
NOTICE
n To prevent damaging the vehicle
Do not pull- or push-start the vehicle, because the three-way catalytic converter may overheat and cause a fire hazard.
n When handling jumper cables
Be careful that the jumper cables do not become tangled in the cooling fan or any of the belts when connecting or disconnecting them.
5
When trouble arises
599
Page 88

5-2. Steps to take in an emergency
If your vehicle overheats
If your engine overheats:
STEP 1
STEP 2
STEP 3
STEP 4
STEP 5
Stop the vehicle in a safe place and turn off the automatic air conditioning system.
Check to see if steam is coming out from under the hood.
If you see steam:
Stop the engine and carefully lift the hood.
If you do not see steam:
Leave the engine running and carefully lift the hood.
Remove the engine compartment cover. (→P. 496 )
Check to see if the cooling fan is operating.
If the fan is operating:
Wait until the temperature of the engine (shown on the
instrument cluster) begins to fall and then stop the engine.
If the fan is not operating:
Stop the engine immediately and call your local Lexus
dealer.
After the engine has cooled
down sufficiently, check the
engine coolant level and inspect
the radiator core (radiator) for
any leaks.
600
Page 89

5-2. Steps to take in an emergency
STEP 6
Add engine coolant if required.
Water can be used in an emergency measure if engine coolant
is unavailable. (→P. 61 0)
Have the vehicle checked at your nearest Lexus dealer as soon as possible.
n Overheating
If you observe the following, your vehicle may be overheating.
l The engine coolant temperature gauge enters the red zone or a loss of power is
experienced.
l Steam is coming from under the hood.
5
When trouble arises
601
Page 90

5-2. Steps to take in an emergency
CAUTIO N
n To prevent an accident or injury when inspecting under the hood of your vehicle
l Keep hands and clothing away from the fan and other belts while the engine is
running.
l Do not loosen the coolant reservoir cap while the engine and radiator are hot.
Serious injury, such as burns, may result from hot coolant and steam released
under pressure.
NOTICE
n When adding engine coolant
Wait until the engine has cooled down before adding engine coolant. When adding coolant, do so slowly. Adding cool coolant to a hot engine too quickly can cause damage to the engine.
602
Page 91

5-2. Steps to take in an emergency
If the vehicle becomes stuck
Carry out the following procedures if the tires spin or the vehicle becomes
stuck in mud, dirt, or snow.
STEP 1
Stop the engine. Set the parking brake and put the selector lever in P.
STEP 2
STEP 3
Remove the mud, snow, or sand from around the stuck tire.
Place wood, stones or some other material to help provide
traction under the tires.
STEP 4
STEP 5
Restart the engine.
Shift the shift lever to the D or R position and carefully apply
the accelerator to free the vehicle.
Turn off TRAC/VSC if these functions are hampering your attempts
to free the vehicle. (→ P. 17 5)
CAUTIO N
n When attempting to free a stuck vehicle
If you choose to rock the vehicle back and forth to free it, make sure the surrounding area is clear, to avoid striking other vehicles, objects or persons. The vehicle
may also lunge forward or lunge back suddenly as it becomes free. Use extreme
caution.
n When shifting the shift lever
Be careful not to shift the shift lever with the accelerator pedal depressed. This may lead to unexpected rapid acceleration of the vehicle that may cause an accident and result in death or serious injury.
5
When trouble arises
NOTICE
n To avoid damaging the transmission and other components
l Avoid spinning the wheels and do not rev the engine.
l If the vehicle remains stuck after trying these procedures, the vehicle may require
towing to be freed.
603
Page 92

5-2. Steps to take in an emergency
604
Page 93

4-2. Maintenance
Maintenance requirements
To ensure safe and economical driving, day-to-day care and regular maintenance is essential. It is the owner’s responsibility to perform regular
checks. Lexus recommends the following maintenance.
n General maintenance
Should be performed on a daily basis. This can be done by yourself or by a Lexus dealer.
n Scheduled maintenance
Should be performed at specified intervals according to the maintenance schedule.
For details about maintenance items and schedules, refer to the “Warranty and Service Guide/Owner’s Manual Supplement/Scheduled
Maintenance”.
n Do-it-yourself maintenance
You can perform some maintenance procedures yourself.
Please be aware that do-it-yourself maintenance may affect warranty coverage.
The use of Lexus Repair Manuals is recommended.
4
Maintenance and care
For details about warranty coverage, see the separate “Owner’s Guide”,
“Warranty and Service Guide”, “Owner’s Manual Supplement” or “Warranty Booklet”.
n Repair and replacement
It is recommended that genuine Lexus parts be used for repair to ensure performance of each system. If non-Lexus parts are used in replacement or if a repair
shop other than a Lexus dealer performs repairs, confirm the warranty coverage.
483
Page 94

4-2. Maintenance
n Allow inspection and repairs to be performed by a Lexus dealer
l Lexus technicians are well-trained specialists and are kept up to date with the
latest service information. They are well informed about the operations of all
systems on your vehicle.
l Keep a copy of the repair order. It proves that the maintenance that has been
performed is under warranty coverage. If any problem should arise while your
vehicle is under warranty, your Lexus dealer will promptly take care of it.
CAUTIO N
n Warning in handling of battery
l Engine exhaust, some of its constituents, and a wide variety of automobile com-
ponents contain or emit chemicals known to the State of California to cause cancer and birth defects and other reproductive harm. Work in a well ventilated area.
l Oils, fuels and fluids contained in vehicles as well as waste produced by compo-
nent wear contain or emit chemicals known to the State of California to cause
cancer and birth defects or other reproductive harm. Avoid exposure and wash
any affected area immediately.
l Battery posts, terminals and related accessories contain lead and lead com-
pounds which are known to cause brain damage. Wash your hands after handling. (→P. 5 07 )
l Used engine oil contains chemicals that have been shown to cause cancer in lab-
oratory animals. Avoid prolonged and repeated contact. Always protect your
skin by washing thoroughly with soap and water.
484
Page 95

4-2. Maintenance
General maintenance
Listed below are the general maintenance items that should be performed
at the intervals specified in the “Warranty and Service Guide” or “Owner’s
Manual Supplement”. It is recommended that any problem you notice
should be brought to the attention of your Lexus dealer or qualified service
shop for advice.
Engine compartment
Items Check points
Battery Maintenance-free? (→P. 507 )
Brake fluid At the correct level? (→P. 5 06)
Engine coolant At the correct level? (→P. 50 4)
Engine oil At the correct level? (→P. 499)
Exhaust system No fumes or strange sounds?
Radiator/condenser/hoses
Not blocked with foreign matter?
(→P. 5 06 )
4
Maintenance and care
Was he r fl u id At the correct level? (→P. 51 0)
485
Page 96

4-2. Maintenance
Vehicle interior
Items Check points
Accelerator pedal
Automatic transmission “Park”
mechanism
• Moves smoothly (without uneven
pedal effort or catching)?
• Can the vehicle be hold securely
on an incline with the shift lever in
P?
• Moves smoothly?
Brake pedal
• Does it have appropriate clearance
and correct amount of free play?
• Not pull to one side when applied?
Brakes
• Loss of brake effectiveness?
• Spongy feeling brake pedal?
• Pedal almost touches floor?
Head restraints • Move smoothly and lock securely?
Indicators/buzzers •Function properly?
• Do all the lights come on?
Lights
• Headlights aimed correctly?
(→P. 547 )
• Moves smoothly?
Parking brake
• Can hold the vehicle securely on
an incline?
486
Seat belts
Seats
• Does the seat belt system operate
smoothly?
• Are the belts undamaged?
• Do the seat controls operate properly?
Page 97

4-2. Maintenance
Items Check points
• Moves smoothly?
Steering wheel
• Has correct free play?
• No strange noises?
Vehicle exterior
Items Check points
Door/trunk • Operate smoothly?
Engine hood • The lock system works properly?
Fluid leaks • Is there any leakage after parking?
• Inflation pressure is correct?
• Tire surfaces not worn or dam-
Ti r e
aged?
• Tires rotated according to the
maintenance schedule?
• Wheel nuts are not loose?
4
Maintenance and care
CAUTIO N
n If the engine is running
Turn the engine off and ensure that there is adequate ventilation before performing maintenance checks.
487
Page 98

4-2. Maintenance
Emission inspection and maintenance (I/M) programs
Some states have vehicle emission inspection programs which include
OBD (On Board Diagnostics) checks. The OBD system monitors the operation of the emission control system.
n If the electronic engine control system warning light comes on
The OBD system determines that a problem exists somewhere in the emission control system. Your vehicle may not pass the I/M test and may need to be repaired. Contact your Lexus dealer to service the vehicle.
n Your vehicle may not pass the I/M test:
l When the battery is disconnected or discharged
Readiness codes that are set during ordinary driving are erased. Also, depending on your driving habits, the readiness codes may not be completely set.
l When the fuel tank cap is loose
The electronic engine control system warning light comes on as a temporary malfunction and your vehicle may not pass the I/M test.
n When the electronic engine control system warning light goes off
after several driving trips
The error code in the OBD system will not be cleared unless the vehicle is driven 40 or more times.
n If your vehicle does not pass the I/M test
Contact your Lexus dealer to prepare the vehicle for re-testing.
488
Page 99

4-1. Maintenance and care
Cleaning and protecting the vehicle exterior
Perform the following to protect the vehicle and maintain it in prime condition.
l Working from top to bottom, liberally apply water to the vehicle
body, wheel wells and underside of the vehicle to remove any dirt
and dust.
Wash the vehicle body using a sponge or soft cloth, such as a
chamois.
l For hard-to-remove marks, use car wash soap and rinse thor-
oughly with water.
l Wipe away any water.
l Wax the vehicle when the waterproof coating deteriorates.
If water does not bead on a clean surface, apply wax when the vehicle body is cool.
n Automatic car washes
l Fold the mirrors back before washing the vehicle.
l Brushes used in automatic car washes may scratch the vehicle surface and
harm your vehicle’s paint.
n High pressure automatic car washes
Do not allow the nozzles of the car wash to come within close proximity of the windows. Before entering an automatic car wash, check that the fuel filler door on your
vehicle is closed properly.
n Aluminum wheels
Remove any dirt immediately by using a neutral detergent. Do not use hard brushes or abrasive cleaners. Do not use strong or harsh chemical cleaners. Use the same mild detergent and wax as used on the paint.
478
Page 100

4-1. Maintenance and care
n Bumpers and side moldings
Do not scrub with abrasive cleaners.
n To prevent deterioration and do by corrosion
l Wash the vehicle immediately in the following cases:
• After driving near the sea coast
• After driving on salted roads
• If you see coal tar or tree sap on the paint surface
• If you see dead insects, insect droppings or bird droppings on the paint
• After driving in an area contaminated with soot, oily smoke, mine dust, iron
powder or chemical substances
• If the vehicle becomes heavily soiled in dust or mud
• If liquids such as benzene and gasoline are spilled on the paint surface
l If the paint is chipped or scratched, have it repaired immediately.
CAUTIO N
n Caution about the exhaust pipes and rear bumper diffusers
Exhaust gasses cause the exhaust pipes and rear bumper diffusers to become quite hot.
When washing the vehicle, be careful not to touch the pipes and diffusers until it has cooled sufficiently, as touching a hot exhaust pipes and rear bumper diffusers can cause burns.
NOTICE
n To protect your vehicle’s painted surfaces
Do not use organic cleaners such as benzene or gasoline.
n Cleaning the exterior lights
l Wash carefully. Do not use organic substances or scrub with a hard brush.
This may damage the surfaces of the lights.
l Do not apply wax on the surfaces of the lights.
Wax may cause damage to the lenses.
4
Maintenance and care
479
 Loading...