

Lexus LS 460 Quick Guide

Contents
The Quick Guide is not intended as a substitute for your
Manual
. We strongly encourage you to review the
Manual
and supplementary manuals so you will have a better
understanding of your vehicle’s capabilities and limitations.
Owner’s
Owner’s
Audio System (with navigation system)*
Basic operation ..............................................................................................................................64
Radio................................................................................................................................................... 64
DVD player/CD player.............................................................................................................. 65
Operating an iPod.........................................................................................................................67
Remote control (steering wheel switches)..........................................................................67
Audio System (without navigation system)
Basic operation .............................................................................................................................. 57
Radio...................................................................................................................................................58
CD player.........................................................................................................................................59
Operating an iPod........................................................................................................................ 62
Remote control (steering wheel switches)......................................................................... 62
Rear seat audio controls ............................................................................................................63
Automatic Transmission (with paddle shift switches) ...................................................... 25
Automatic Transmission (without paddle shift switches) ............................................... 23
Brake Hold............................................................................................................................................. 29
Compass................................................................................................................................................. 75
Cruise Control .................................................................................................................................... 32
Door Locks ............................................................................................................................................ 82
Driving Pattern Selector Switch/“ECO MODE” Switch ............................................. 28
Dynamic Radar Cruise Control..................................................................................................33
Eco Driving Indicator .........................................................................................................................31
Engine (Ignition) Switch ...................................................................................................................22
Fog Lights ............................................................................................................................................... 36
Front Air Conditioning System (with touch screen)*
Using the automatic mode..........................................................................................................71
Adjusting the temperature in dual mode
(without rear air conditioning system)................................................................................71
Adjusting the temperature in individual mode
(with rear air conditioning system).......................................................................................71
To turn off the airflow.....................................................................................................................71
Front Air Conditioning System (without touch screen)
Using the automatic mode........................................................................................................68
Adjusting the temperature in dual mode ............................................................................ 69
To turn off the airflow................................................................................................................... 69
Front Seats...............................................................................................................................................13
Fuel Tank Cap ......................................................................................................................................84
Hands-free System For Cellular Phone*
Bluetooth
Phonebook transfer .......................................................................................................................51
Registering a voice tag ............................................................................................................... 52
Registering a speed dial .............................................................................................................53
Calling by name............................................................................................................................. 54
Calling by speed dial....................................................................................................................55
Receiving a call............................................................................................................................... 56
*: This feature may be operated by Voice command (See P.77)
®
phone pairing......................................................................................................... 49
1

Head Restraints ...................................................................................................................................20
Headlights ..............................................................................................................................................35
Heated Steering Wheel ..................................................................................................................73
Instrument Panel Light Control.................................................................................................. 38
Keys ............................................................................................................................................................10
Lexus Enform with Safety Connect........................................................................................... 80
Moon Roof ............................................................................................................................................ 83
Multi-information Display ..............................................................................................................30
Navigation System*
Register home.................................................................................................................................43
Destination input Search by address ........................................................................44
Destination input Search points of interest by name..........................................46
Destination input Search points of interest by category................................... 47
Destination input Search points of interest by telephone number...............48
Voice Command System...........................................................................................................77
Parking Brake.......................................................................................................................................29
Power Rear Seat ................................................................................................................................. 16
Power Windows .................................................................................................................................83
Rear Air Conditioning System
Front controller (touch screen) ...............................................................................................72
Rear Sunshade/Rear Door Sunshades ....................................................................................73
Rear Window and Outside Rear View Mirror Defoggers ........................................... 38
Safety Connect ....................................................................................................................................78
Seat Belts .................................................................................................................................................21
Smart Access System with Push-button Start .........................................................................11
Theft Deterrent System .................................................................................................................... 12
Touch Screen
Set up screen...................................................................................................................................40
Display................................................................................................................................................. 41
Screen scroll operation (with navigation system)............................................................42
Setting a route (with navigation system)..............................................................................42
Trunk ........................................................................................................................................................ 85
Trunk Storage Extension.................................................................................................................75
Turn Signal Lever ................................................................................................................................32
Voice Command System*
Basic operation...............................................................................................................................77
Windshield Wipers and Washer..................................................................................................37
*: This feature may be operated by Voice command (See P.77)
2
Overview
P.35
P.32
P.36
P.82
P.85
P.82
P.83
P.83
P.84
P.30
P.21
P.38
P.73
P.35
P.25
P.28
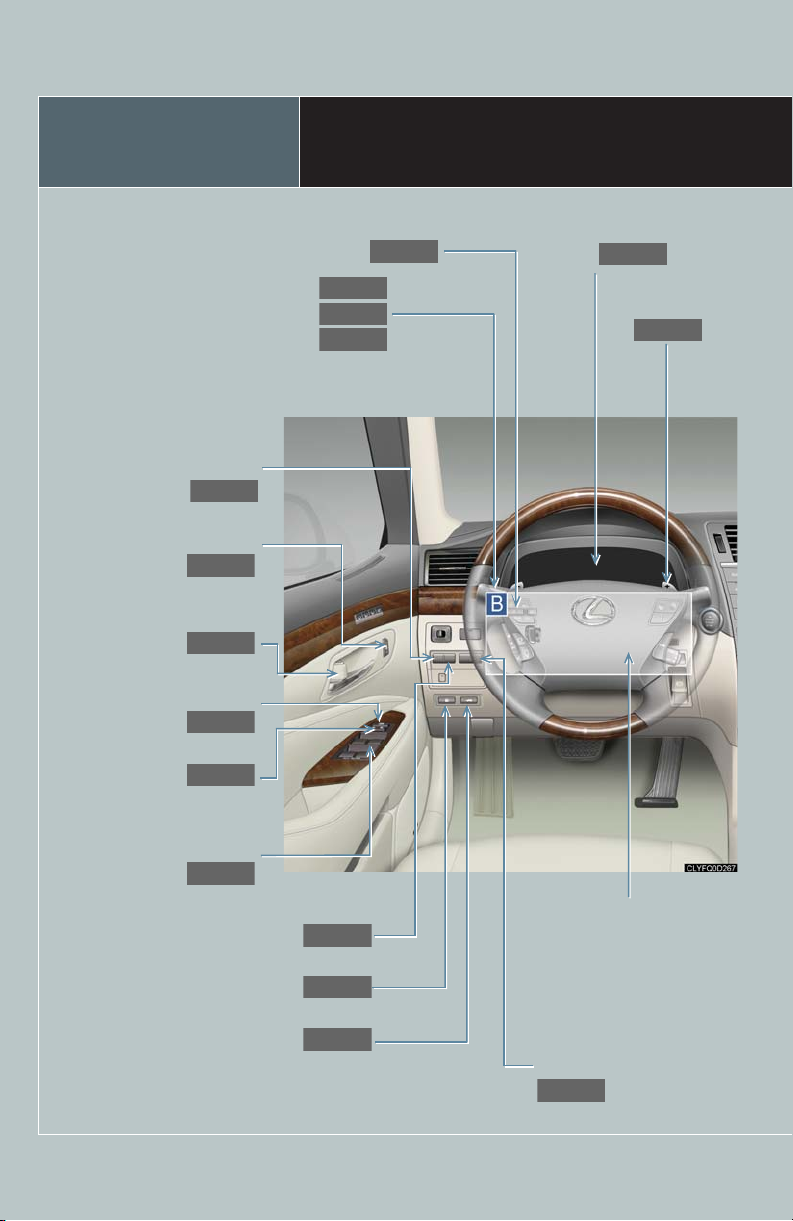
Instrument panel light control buttons
Headlight switch
Turn signal lever
Fog light switch
“ECO MODE” switch
Shoulder anchor control
switches
Inside lock buttons
Window lock switch
Instrument Panel
Multi-information
display
Paddle shift
switches
Door lock switch
Power window switches
Heated steering wheel switch
Fuel filler door opener
3
See P.6.
Trunk opener
“AFS OFF” switch

Windshield wiper and washer switch
P.37
P.22
P.85
P.23, 25
P.29
Engine (ignition) switch
See P.5.
Trunk opener main
switch
See P.7.
Automatic transmission shift lever
Parking brake switches
: If equipped
4

Overview
P.57
P.43
P.70
P.38
P.57, 64
P.68
P.38
P.39
A
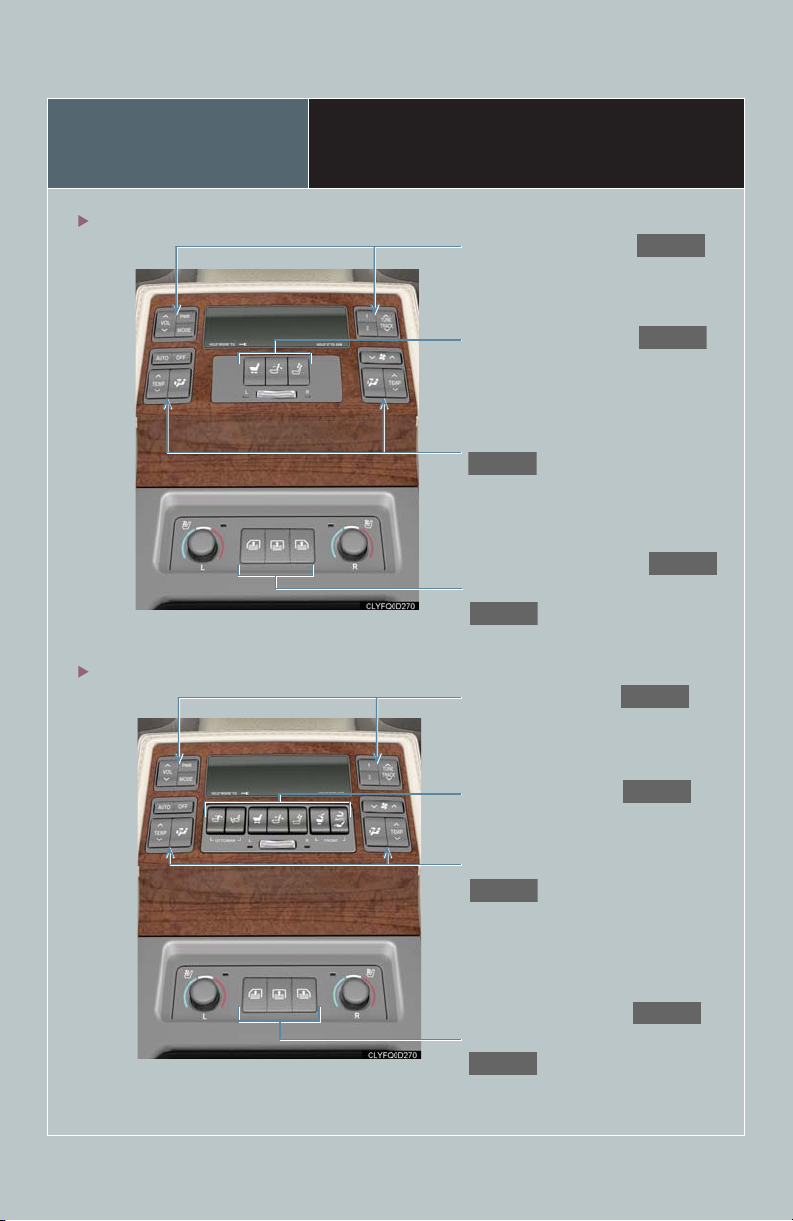
Instrument Panel
Type A
Type B
Rear window and outside rear
view mirror defoggers
Air conditioning system
Audio system
Navigation system
Touch screen
Rear window and outside rear
view mirror defoggers
Air conditioning system
5
Audio system

B
P.62, 67
P.29
P.30
P.32, 33
P.33
P.56
P.77
Audio remote control switches
“DISP” switch
Type A
Type B
Type A
Type B
Type A Type B
Telephone switch
Type A
Type B
Type A Type B
Cruise control switch
Talk switch
Brake hold switch
Distance switch
: If equipped
6
P.14
P.28
P.16
P.73
P.73
P.28
P.73
P.16
P.73
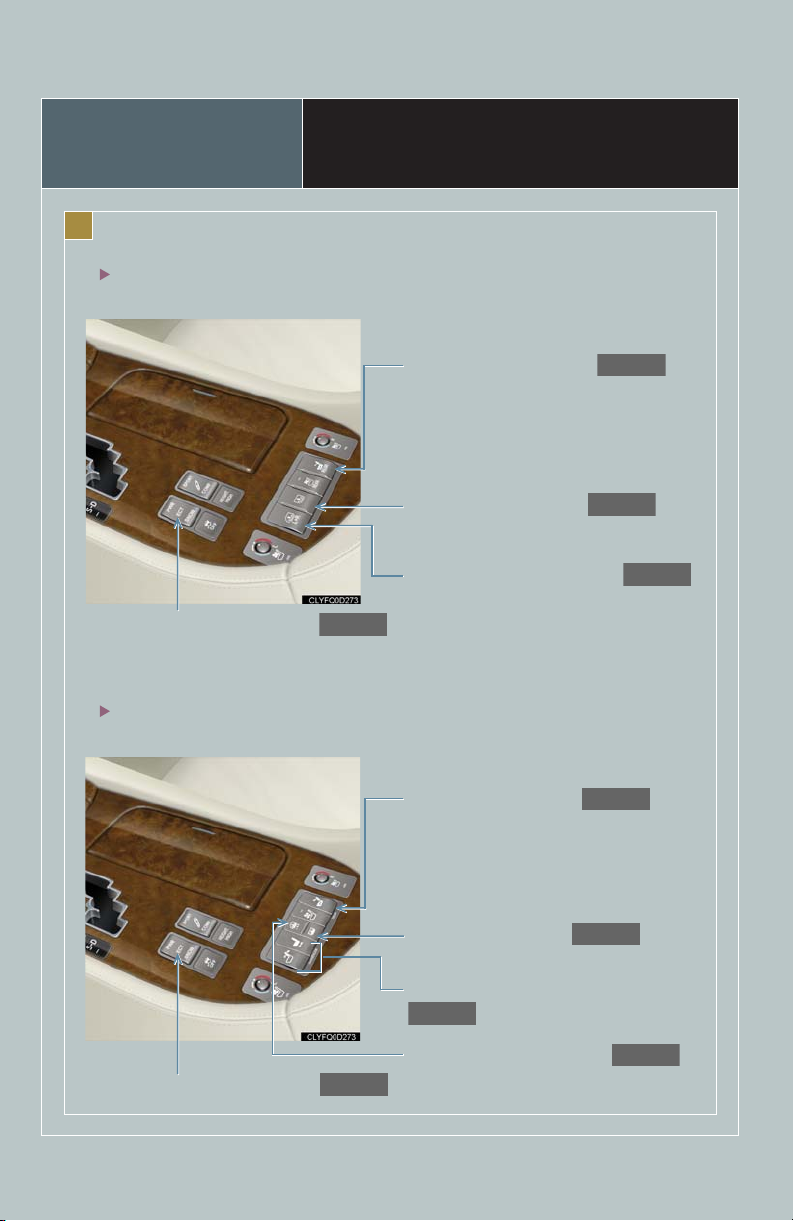
Overview
C
Without rear console display
Driving pattern selector switch
With rear console display
Instrument Panel
Rear seat return switch
Rear sunshade switch
Rear door sunshade switch
7
Rear seat return switch
Rear sunshade switch
Front passenger’s power seat switches
Rear door sunshade switch
Driving pattern selector switch
: If equipped
Overview
P.16
P.63
P.72
P.73
P.73
P.16
P.63
P.72
P.73
P.73
Without relaxation seat
With relaxation seat
Rear Armrest (5-seat models)
Rear audio switches
Power seat switches
Rear air conditioning switches
Rear sunshade switch
Rear door sunshade switches
Rear audio switches
Power seat switches
Rear air conditioning switches
Rear sunshade switch
Rear door sunshade switches
: If equipped
8

Overview
P.16
P.63
P.72
P.73
P.73
Rear Armrest (4-seat models)
Rear air conditioning
switches
Rear sunshade switch
Rear door sunshade
switches
Rear audio switches
9
Power seat switches
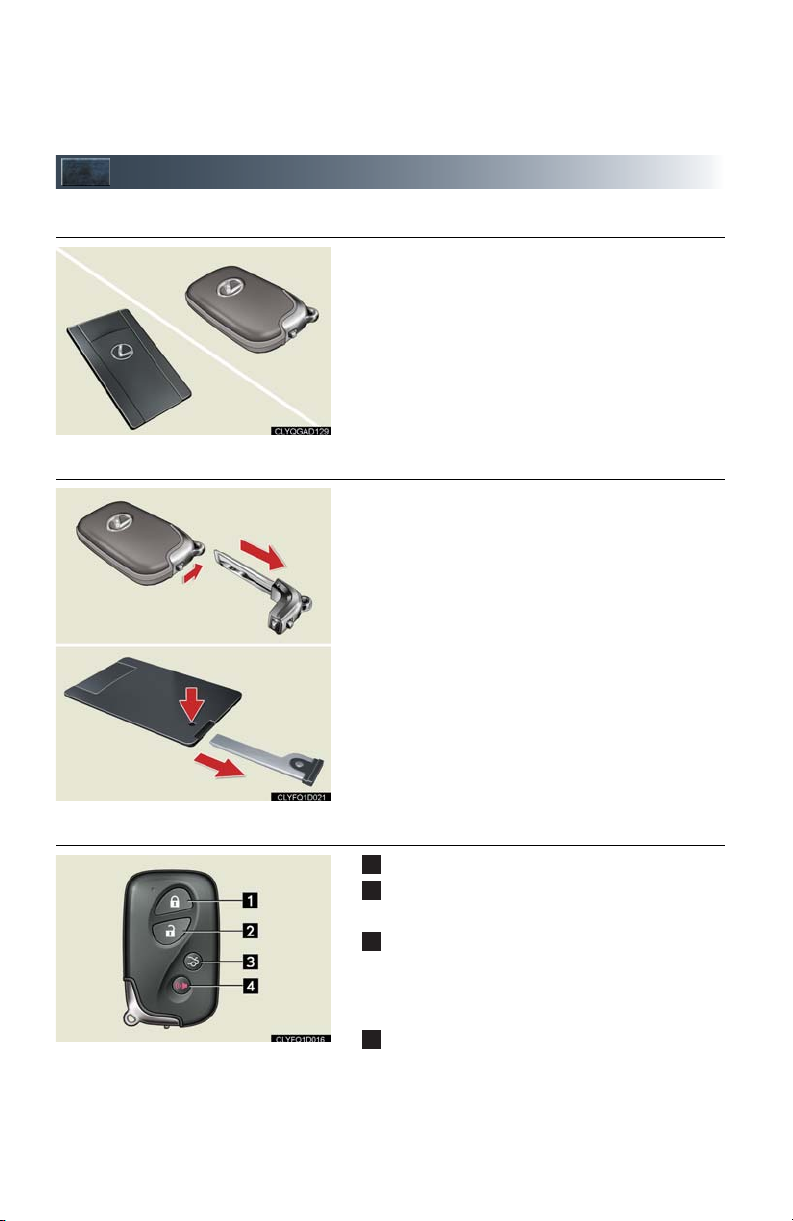
Keys
Card key*
1
2
3
4
■ Electronic key
■ Mechanical key
Smart access system with push-button start
(P.11, 22)
*: If equipped
● Locks and unlocks the doors
● Opens the trunk
● Locks and unlocks the glove box
● Locks and unlocks the trunk storage extension
The mechanical key is stored inside the electronic
key. To extract the key, release the latch and pull,
or if equipped with a card key, press the button
and pull.
■ Wireless remote control
Press: locks all doors
Press once: unlocks the driver's door
Press twice: unlocks all doors
Press and hold: opens the trunk
If the vehicle is equipped with a power trunk
opener and closer, the trunk lid automatically
opens fully.
Press and hold: sounds the alarm
(Use the alarm to attract attention to the vehicle in order to help deter break-ins. To stop the
alarm, press any button on the wireless remote
control.)
10

Smart Access System with Push-button Start
The smart access system with push-button start allows you to enter and exit the vehicle
or start the engine by simply carrying the electronic key in your pocket or bag.
For details on starting the engine, see page 22.
■ Entering the vehicle
■ Exiting the vehicle
To unlock the vehicle, simply grasp one of the
door handles.
To lock the vehicle, press the lock button on one
of the door handles.
To close the windows and the moon roof, press
and hold the lock button.
■ Opening the trunk
To open the trunk, press the trunk release button.
If the vehicle is equipped with a power trunk
opener and closer, the trunk lid automatically
opens fully.
For details on what to do when the electronic key does not operate properly, see page 88.
11
Theft Deterrent System
The theft deterrent system includes the following features to help protect your vehicle
from theft.
■ Engine immobilizer system
The engine immobilizer system prevents the
engine from being started in the event that an
attempt is made to start the vehicle using an
unregistered key.
The security indicator light flashes to indicate that
the system is set.
■ Alarm
The system sounds the alarm and flashes lights when forcible entry is detected.
To set the alarm: close the doors, trunk and hood, and lock all doors. The security indicator
light comes on to indicate that the alarm is in its preparation state. When the indicator light
begins to flash, the system is armed.
To deactivate or stop the alarm: turn the “ENGINE START STOP” switch to IGNITION
ON mode, start the engine, or unlock the doors or trunk.
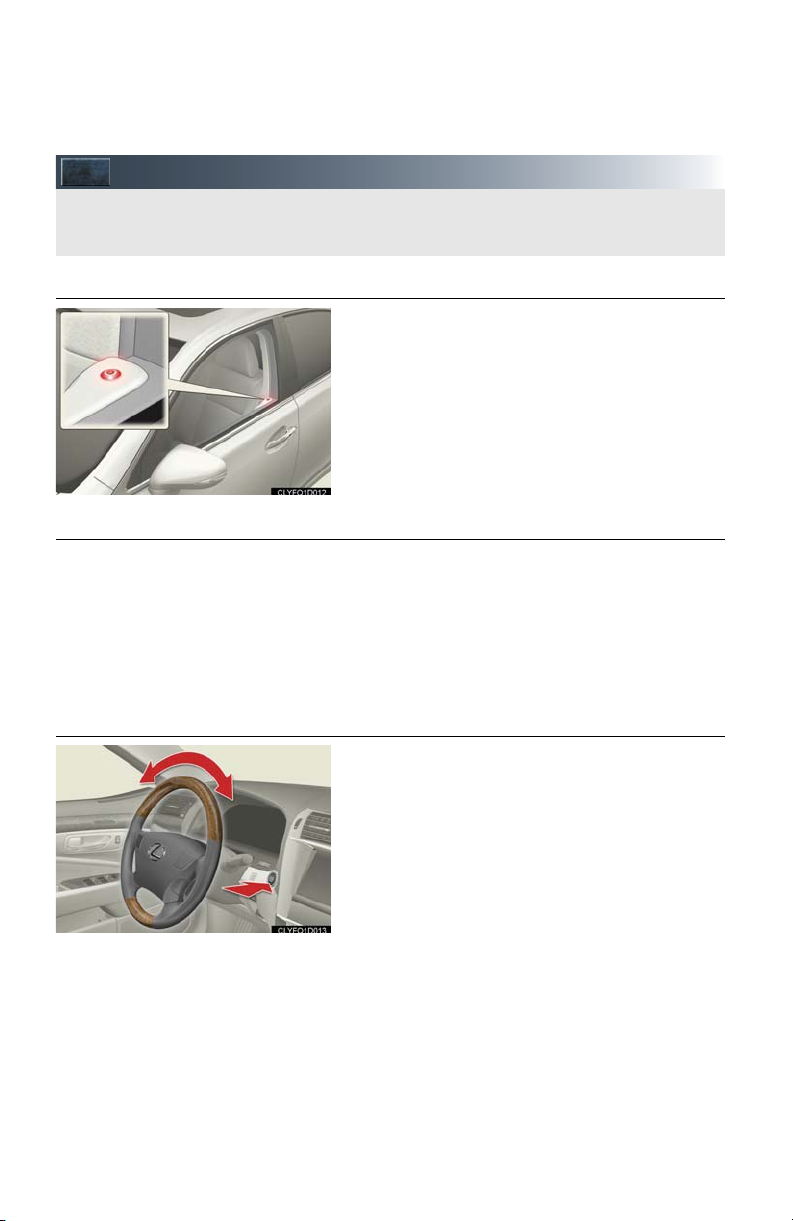
■ Steering lock
The steering wheel locks when the “ENGINE
START STOP” switch is turned OFF and the
driver’s door is opened.
When the steering lock cannot be released, the
green indicator light on the “ENGINE START
STOP” switch will flash and a message will be
shown on the multi-information display. To release
it, press the “ENGINE START STOP” switch
while gently turning the wheel left or right.
12

Front Seats
1
2
1
2
1
2
1
2
■ Adjusting seat position
■ Adjusting seatback angle
■ Adjusting vertical height
Moves the seat forward
Moves the seat backward
The height of the driver's head restraint is automatically adjusted simultaneously with the seat
position adjustment operation.
Tilts the seatback forward
Reclines the seatback
Raises the height of the seat
Lowers the height of the seat
■ Adjusting the seat cushion length (driver's seat)
Lengthens the seat cushion
Shortens the seat cushion
13
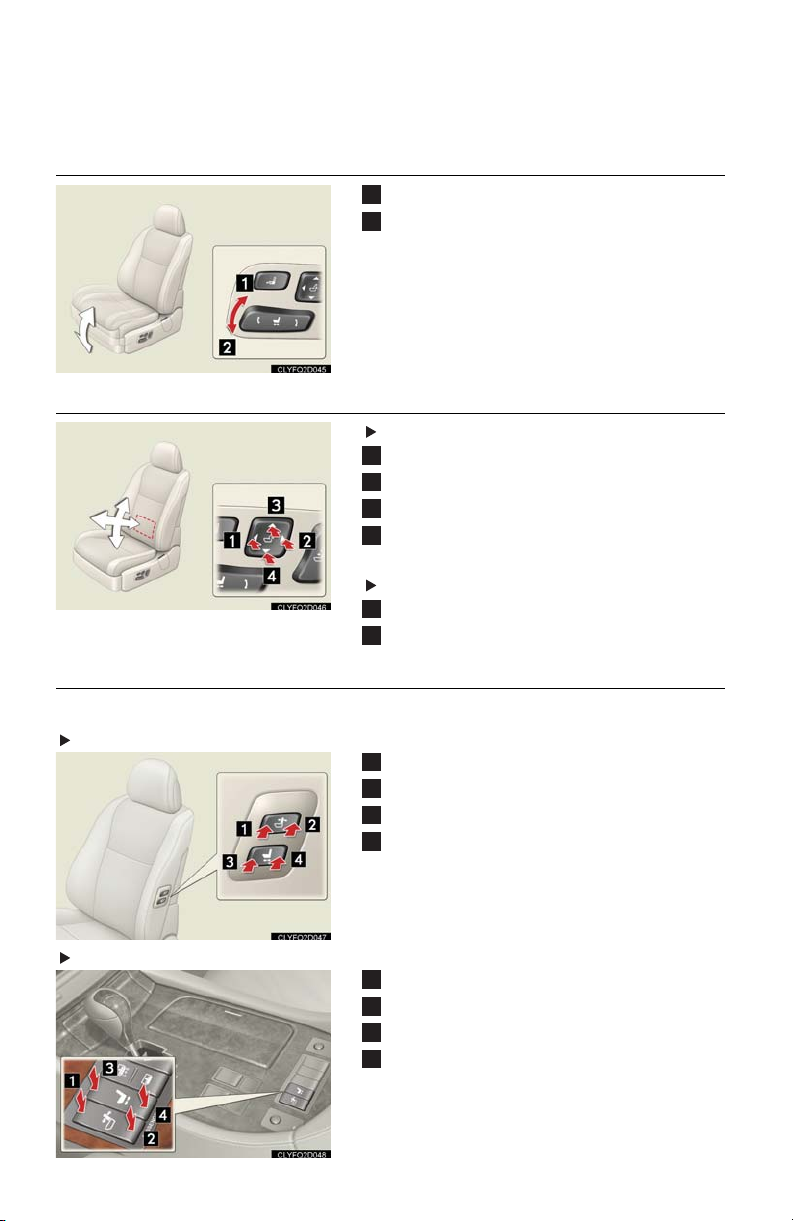
■ Adjusting the seat cushion (front) angle
1
2
1
2
3
4
1
2
1
2
3
4
1
2
3
4
Raises the front of the cushion
Lowers the front of the cushion
■ Adjusting the lumbar support
Driver’s seat
Firmer
Softer
Up
Down
Front passenger’s seat
Firmer
Softer
■ Operating the front passenger's seat from driver's seat or rear seat
■ Operating the front passenger's seat from the driver's seat
Without rear console display
Tilts the seatback forward
Tilts the seatback backward
Moves the seat forward
Moves the seat backward
With rear console display
Tilts the seatback forward
Tilts the seatback backward
Moves the seat forward
Moves the seat backward
14
■ Operating the front passenger’s seat from the rear seat (with relaxation seat)
1
2
1
2
5-seat models
Moves the front passenger’s seat forward
Moves the front passenger’s seat backward
The seatback will return to the neutral position.
4-seat models
Moves the front passenger’s seat forward
Moves the front passenger’s seat backward
The seatback will return to the neutral position.
The operation can be performed when the “ENGINE START STOP” switch is in IGNITION ON mode.
15

Power Rear Seat
123
4
1
2
3
4
5
6
(If Equipped)
5-seat models without relaxation seat
Selecting the seat
Adjusting the seat position
5-seat models with relaxation seat
Selecting the seat
Adjusting the seat position
Adjusting the seatback upper angle
Adjusting the seatback angle
Adjusting the seatback upper angle
Pelvic support seat controller
Adjusting the ottoman angle
Rear seat relaxation system/pelvic sup-
port seat controller
16

4-seat models
1
2
3
4
5
6
Selecting the seat
Adjusting the seat position
Adjusting the seatback upper angle
Adjusting the ottoman angle
Rear seat relaxation system/pelvic sup-
port seat controller
Adjusting the seatback angle
■ Returning the rear seat from the front seats
The seat will return to the neutral position while
the button is pressed and held.
17

■ Relaxation mode (relaxation seat)
1
2
1
2
5-seat models
Moves the seats to the relaxation mode
Returns the seats to the neutral position
The rear seat seatback, ottoman and the front
passenger seat operate simultaneously.
The operation can be performed when the
“ENGINE START STOP” switch is in IGNITION
ON mode.
4-seat models
Moves the seats to the relaxation mode
Returns the seats to the neutral position
The rear seat seatback, ottoman and the front
passenger seat operate simultaneously.
The operation can be performed when the
“ENGINE START STOP” switch is in IGNITION
ON mode.
When a rear door is opened, the seat on that side will automatically return to the neutral
position.
18

■ Pelvic support seat with seat vibrator
Ty pe B
Ty pe A
1
2
1
2
3
4
5
6
7
Support plate position adjustment switch
Vibration switch
Press to operate the vibration function. Vibration will start in the same speed level
as when previously operated. Each time
is pressed, the speed changes
between 3 levels. Pressing “OFF” stops the
vibration function.
Automatic stop function: Vibration will automatically stop approximately 15 minutes after
starting.
■ Rear seat relaxation system (with relaxation seat)
Turns the system on and off
If no buttons are selected within approximately
3 minutes of operating this switch, the system
will automatically turn off.
Starts the “SHIATSU” program
Partial pressure for the whole back
Starts the “STRETCH” program
Stretches and relaxes the lower back
Starts operation for the upper back
Starts operation for the lower back
Adjusts the intensity of the air pressure
3 intensity levels are available.
Adjusts the speed of the air unit
3 speed levels are available.
Automatic stop function: Each operation will automatically stop approximately 15 minutes
after starting.
19

Head Restraints
1
2
1
2
Lock release
button
1
2
■ Front seats
■ Outside rear seats
Pow er t yp e
Manual type
Vertical adjustment
Horizontal adjustment
Vertical adjustment
Side support adjustment
Vertical adjustment
Pull the head restraints up when raising.
Push and hold the lock release button when
lowering.
Horizontal adjustment
20

■ Rear center seat (5-seat models)
1
2
1
2
To us e
To fo ld
Seat Belts
■ Adjusting the seat belt shoulder anchor height (front seats)
Up
Down
■ Seat belts comfort guides (outside rear seats)
If the shoulder belt sits close to the neck, slide the
comfort guide forward.
21

Engine (Ignition) Switch
With the electronic key on your person, the engine can be started by simply pressing the
“ENGINE START STOP” switch, while depressing the brake pedal.
(The mechanical key cannot be used to start the engine.)
ACCE SSORY m ode
IGNITION ON mode
(Indicator light: amber)
OFF
(Indicator light: off)
■ Starting the engine
Make sure the parking brake is set and the shift
lever is in “P”.
Depress the brake pedal.
Press the “ENGINE START STOP” switch.
■ Stopping the engine
Set the parking brake and shift the shift lever to “P”.
Press the “ENGINE START STOP” switch.
The “ENGINE START STOP” switch indicator light turns green.
If the shift lever is in a position other than P when turning off the engine, the “ENGINE
START STOP” switch will be turned to ACCESSORY mode, not to OFF. To avoid unexpected battery discharge, make sure the lever is in the P position when stopping the engine.
■ Changing “ENGINE START STOP” switch mode
To change the “ENGINE START STOP” switch mode without turning on the engine, press
the “ENGINE START STOP” switch without depressing the brake pedal. The mode can be
changed in the following order:
22

Automatic Transmission (without paddle shift switches)
■ Shift positions
P Pa rk
R Reverse
N Neutral (drive not engaged)
D Drive
S “S” mode
23
The vehicle can only be shifted out of “P” when
the “ENGINE START STOP” switch is in
IGNITION ON mode and the brake pedal is
depressed.

■ “S” mode
“S” mode allows the driver to select the shift range manually based on driving conditions.
Shift the shift lever to “S”.
To u ps h i f t: shift the shift lever toward “+”.
To d ow n s hif t: shift the shift lever toward “-”.
The selected shift range is displayed in the
meter.
24

Automatic Transmission (with paddle shift switches)
■ Shift positions
P Pa rk
R Reverse
N Neutral (drive not engaged)
D Drive
M “M” mode
25
The vehicle can only be shifted out of “P” when
the “ENGINE START STOP” switch is in
IGNITION ON mode and the brake pedal is
depressed.

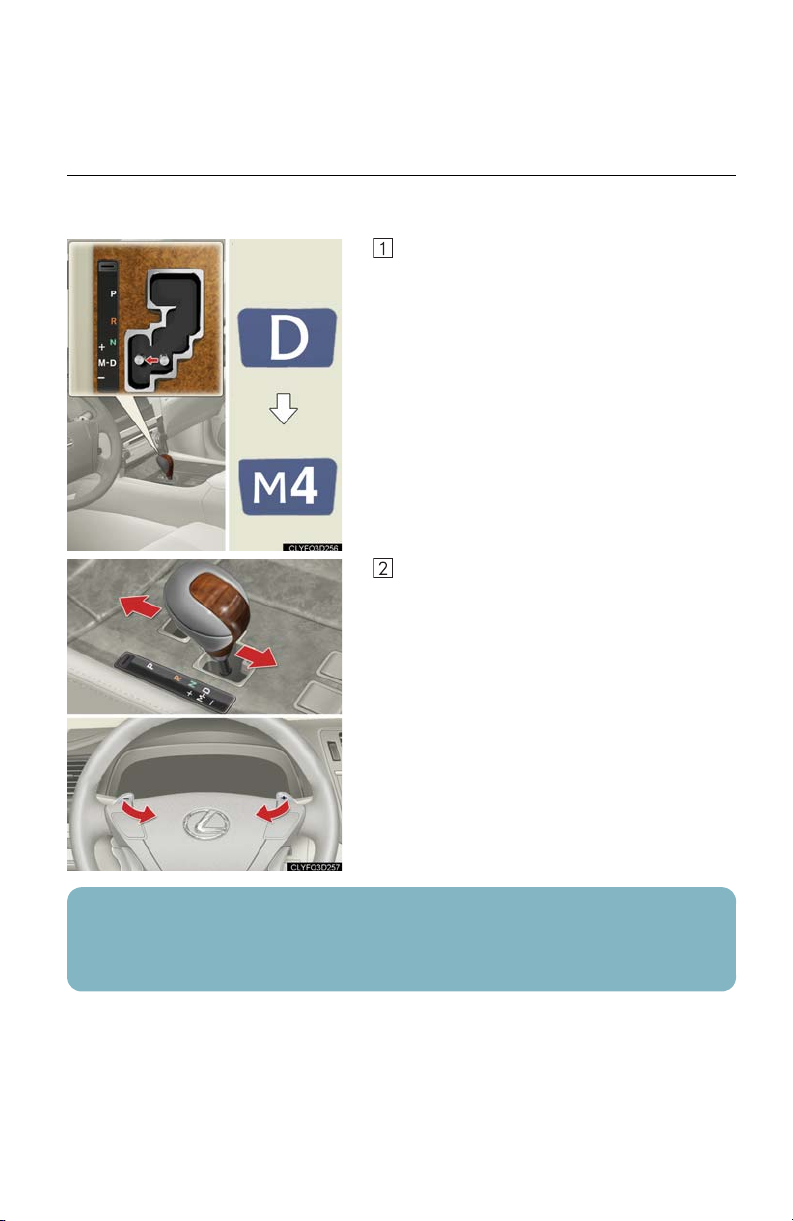
■ Changing shift ranges in the “D” position
Operating the paddle shift switches allows shift ranges to be selected to suit the driving conditions.
Pull the “-” paddle shift switch toward you.
The display in the meter will change to the
display that indicates the selected shift
range.
Higher shift range:
Pull the “+” paddle shift switch toward you.
Lower shift range:
Pull the “-” paddle shift switch toward you.
Pulling and holding the “+” paddle shift switch for a certain period of time allows you to
return to normal “D” position driving. If the accelerator pedal is depressed for more than a
certain period of time in “6”, “7” or “8” without changing the shift range, shift range selection in the “D” position will be automatically deactivated.
26
■ Changing gears in the “M” position
Operating the shift lever or paddle shift switches allows a gear to be selected and held, enabling
you to time gear shifts as you please while driving.
Shift the shift lever to “M”.
The display in the meter will change to the
display that indicates the selected gear.
To u ps h i f t:
Move the shift lever in the “+” direction or
pull the “+” paddle shift switch toward you.
To d ow n s hif t:
Move the shift lever in the “-” direction or
pull the “-” paddle shift switch toward you.
In “M” mode, the gear will change only when the shift lever or paddle shift switches are
operated. However, when the vehicle speed drops the gear will be automatically downshifted.
27

Driving Pattern Selector Switch/
The following modes can be selected in any shift position to suit driving conditions.
1
2
3
Ty pe B
Ty pe A
4
“ECO MODE” Switch
Pow er mode
For more powerful acceleration and uphill
driving.
Normal mode
Snow mode
For starting or accelerating on snow-covered
roads or other slippery surfaces.
Eco drive mode
For controlling vehicle driving force and
operation of the air conditioning system
(heating/cooling) with the aim of improving
fuel efficiency.
■ To cancel a mode (power, snow or eco drive mode), press that mode's switch again.
■ Only one mode can be selected at a time.
28
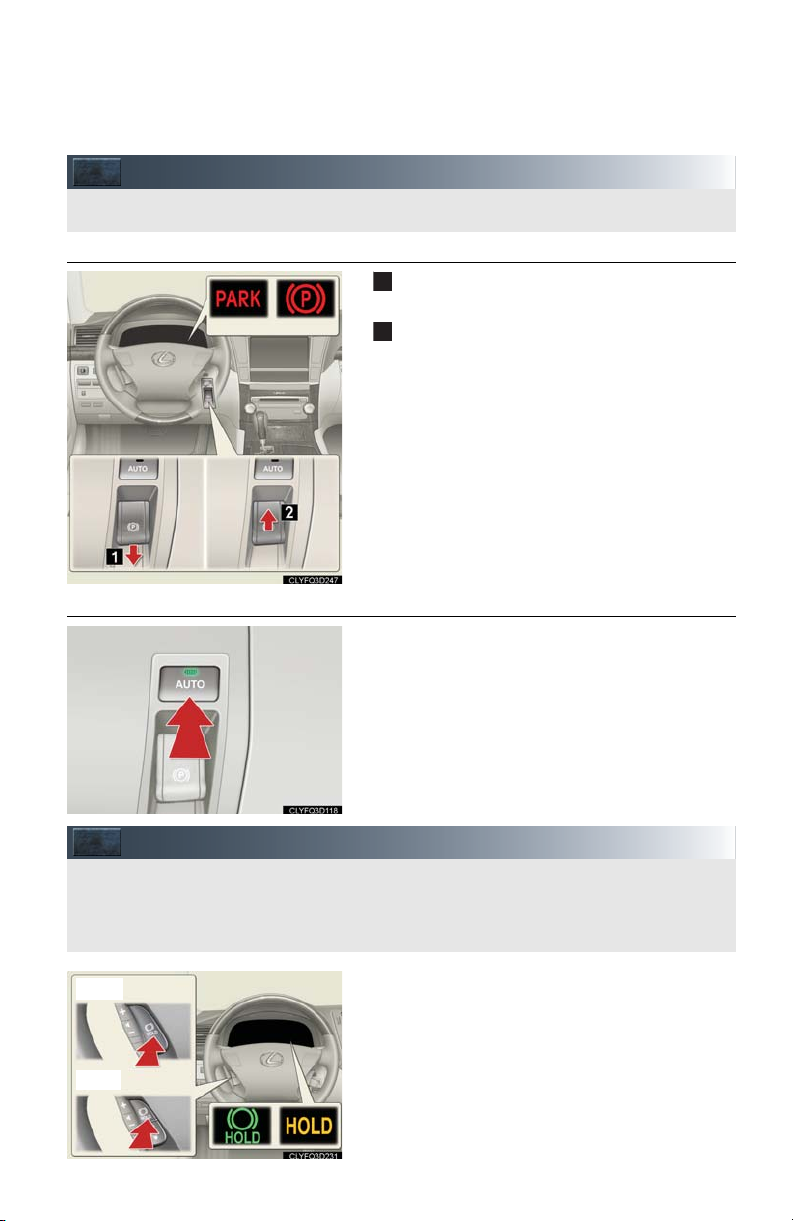
Parking Brake
For the parking brake, an electrical parking brake system is adopted.
U.S. A. Canad a
1
2
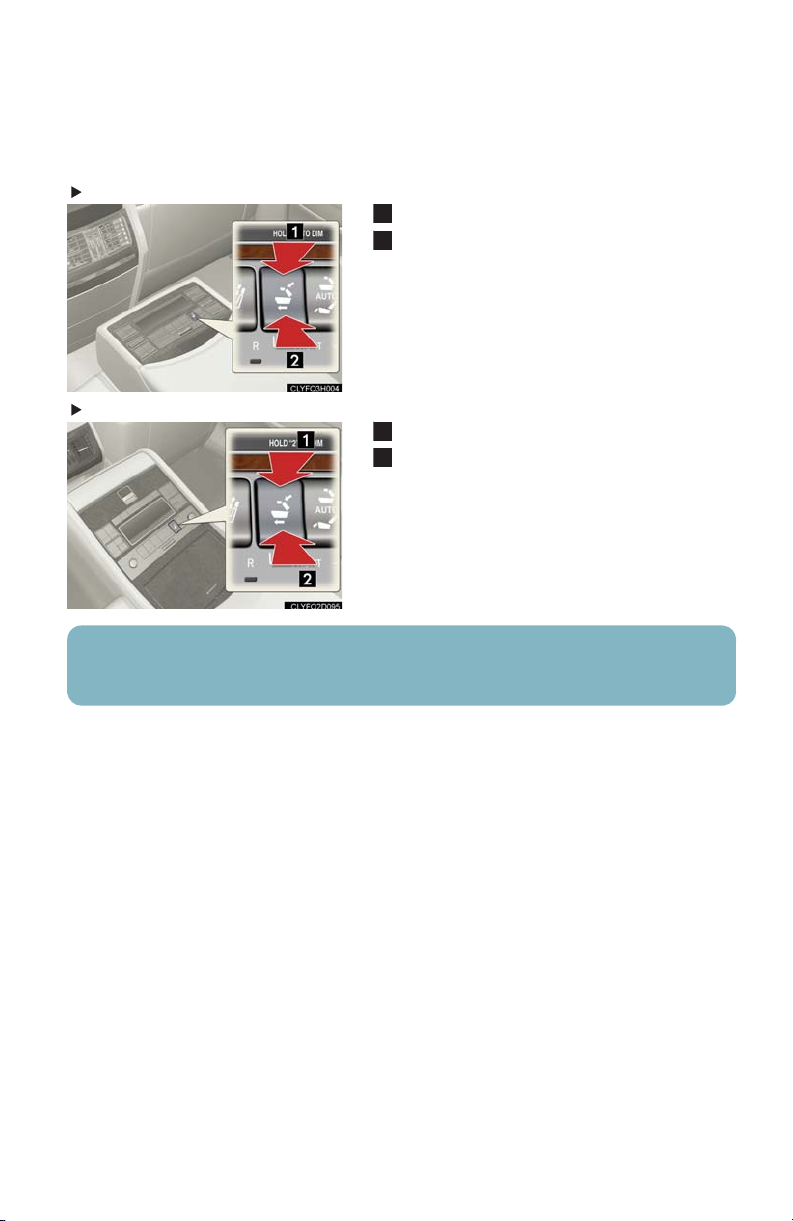
The brake hold system keeps the brake applied when the shift lever is in “D”, “N”, or “S”
(without paddle shift switches) or “M” (with paddle shift switches) with the system on and
the brake pedal has been depressed to stop the vehicle.
Ty pe B
Ty pe A
■ Manual mode
■ Automatic mode
To set the parking brake: push the parking
brake switch.
To release the parking brake: pull the parking
brake switch.
Operate the parking brake switch while
depressing the brake pedal. Make sure that
the parking brake indicator light goes off.
In automatic mode, the parking brake automatically sets according to shift lever operation. To use
the automatic mode, press the “AUTO” switch.
When the shift lever is moved out of “P”: The
parking brake will be released.
When the shift lever is moved into “P”: The parking brake will be set.
Brake Hold
29
To turn the system on, press the “HOLD” switch.
An indicator comes on while the system is holding
the brake.
The system releases the brake when the accelerator pedal is depressed with the shift lever in “D”,
“S” or “M” to allow smooth start off.

Multi-information Display
The multi-information display shows information about your vehicle, including the items
shown below.
Ty pe B
Ty pe A
■ Display information
● Trip information
Outside temperature
Cruising range
Eco Driving Indicator Zone Display and
Current fuel consumption
Average fuel consumption after refueling
Distance after refueling
Elapsed time
Average vehicle speed
Tire inflation pressure
Eco Driving Indicator customization
● Intuitive parking assist display*
● Dynamic radar cruise control display*
● Warn in g m es sa ge s
*: If equipped
■ Changing the display of trip information
Trip information items can be switched by pressing the “DISP” switch.
Average fuel consumption
■ When using Intuitive parking assist-sensor, dynamic radar cruise control or lane keeping
assist the appropriate display is shown on the screen.
■ In the event that a problem is detected in any of the vehicle's systems, a warning message is
shown on the multi-information display.
30
 Loading...