


IS350/250_Navi_U
(L/O 0508)
Introduction
Thank you for your purchase of the Navigation System. Please read
this manual carefully to ensure proper use. Keep this manual in your
vehicle at all times.
The Navigation System is one of the most technologically advanced
vehicle accessories ever developed. The system receives satellite signals from the Global Positioning System (GPS) operated by the U.S.
Department of Defense. Using these signals and other vehicle sensors, the system indicates your present position and assists in locating
a desired destination.
The navigation system is designed to select efficient routes from your
present starting location to your destination. The system is also designed
to direct you to a destination that is unfamiliar to you in an efficient manner.
The system uses DENSO maps. The calculated routes may not be the
shortest nor the least traffic congested. Your own personal local knowledge or “short cut” may at times be faster than the calculated routes.
The navigation system’s database includes about 75 Point of Interest
categories to allow you to easily select destinations such as restaurants
and banks. If a destination is not in the database, you can enter the street
address or a major intersection close to it and the system will guide you
there.
The system will provide both a visual map and audio instructions. The audio instructions will announce the distance remaining and the direction to
turn in approaching an intersection. These voice instructions will help you
keep your eyes on the road and are timed to provide enough time to allow
you to maneuver, change lanes or slow down.
i
2006 IS350/250 Navigation
from Aug. ’05 Prod. (OM53515U)

IS350/250_Navi_U
(L/O 0508)
Please be aware that all current vehicle navigation systems have
certain limitations that may affect their ability to perform properly.
The accuracy of the vehicle’s position depends on the satellite condition, road configuration, vehicle condition or other circumstances. For more information on the limitations of the system, refer to
pages NO TAG through NO TAG.
ii
2006 IS350/250 Navigation
from Aug. ’05 Prod. (OM53515U)
Important information about
this manual
Safety Instruction
For safety reasons, this manual indicates
items requiring particular attention with the
following marks.
CAUTION
This is a warning against anything
which may cause injury to people if
the warning is ignored. You are informed about what you must or must
not do in order to reduce the risk of
injury to yourself and others.
NOTICE
This is a warning against anything
which may cause damage to the vehicle or its equipment if the warning
is ignored. You are informed about
what you must or must not do in order to avoid or reduce the risk of damage to your vehicle and its equipment.
INFORMATION
This provides additional information.
IS350/250_Navi_U
(L/O 0508)
To use this system in the safest possible
manner, follow all the safety tips shown below.
This system is intended to assist in reaching the destination and, if used properly,
can do so. The driver is solely responsible
for the safe operation of your vehicle and
the safety of your passengers.
Do not use any feature of this system to the
extent it becomes a distraction and prevents safe driving. The first priority while
driving should always be the safe operation of the vehicle. While driving, be sure
to observe all traffic regulations.
Prior to the actual use of this system, learn
how to use it and become thoroughly familiar with it. Read the entire Navigation System Owner’s Manual to make sure you understand the system. Do not allow other
people to use this system until they have
read and understood the instructions in
this manual.
For your safety, some functions may become inoperable when driving. Unavailable touch−screen buttons are dimmed.
Only when the vehicle is not moving, can
the destination and route selection be
done.
iii
2006 IS350/250 Navigation
from Aug. ’05 Prod. (OM53515U)

IS350/250_Navi_U
(L/O 0508)
CAUTION
D For safety, the driver should not
operate the navigation system
while he/she is driving.
Insufficient attention to the road
and traffic may cause an accident.
D While driving, be sure to obey the
traffic regulations and maintain
awareness of the road conditions.
If a traffic sign on the road has
been changed, route guidance
may provide wrong information
such as the direction of a one way
street.
While driving, listen to the voice instructions as much as possible and glance at
the screen briefly and only when it is safe.
However, do not totally rely on voice guidance. Use it just for reference. If the system cannot determine the current vehicle
position correctly, there is a possibility of
incorrect, late, or non−voice guidance.
The data in the system may occasionally
be incomplete. Road conditions, including
driving restrictions (no left turns, street closures, etc.) frequently change. Therefore,
before following any instruction from the
system, look to see whether the instruction
can be done safely and legally.
This system cannot warn about such
things as the safety of an area, condition of
streets, and availability of emergency services. If unsure about the safety of an
area, do not drive into it. Under no cir-
cumstances is this system a substitute
for the driver’s personal judgement.
Use this system only in locations where it
is legal to do so. Some states/provinces
may have laws prohibiting the use of video
and navigation screens next to the driver.
iv
2006 IS350/250 Navigation
from Aug. ’05 Prod. (OM53515U)
Quick guide —
— Overview buttons and guidance screen
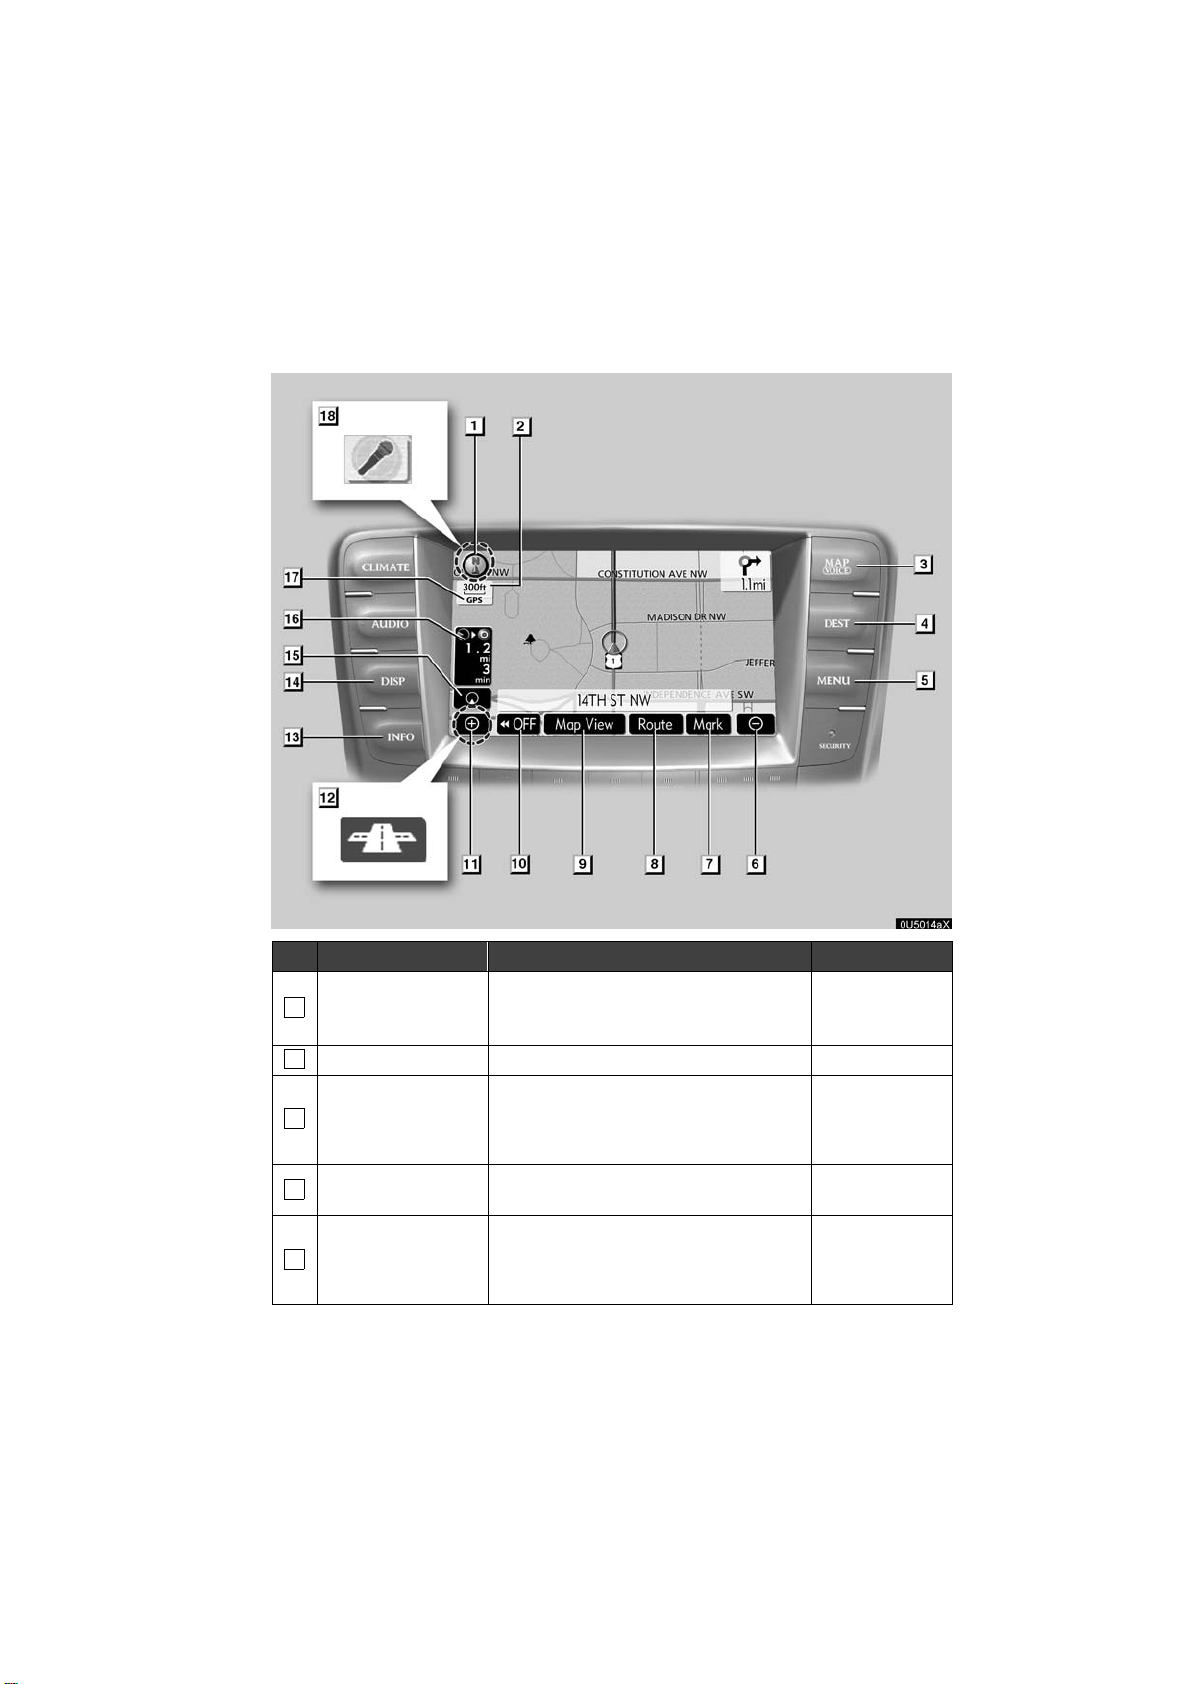
0U5014aX
No. Name Function Page
North−up or
1
heading−up
symbol
2
Scale indicator This figure indicates the map scale. 14
“MAP/VOICE”
3
button
4
“DEST” button
5
“MENU” button
This symbol indicates a map view with
north−up or heading−up. Touching this
symbol changes the map orientation.
Push this button to repeat a voice guidance, cancel one touch scroll, start
guidance, and display the current position.
Push this button to display the “Destination” screen.
Push this button to display the “Menu”
screen.
16
8, 48
xi, xii, 18,
19
vii, ix, 64,
66, 67, 68, 70,
83, NO TAG,
NO TAG
v
2006 IS350/250 Navigation
from Aug. ’05 Prod. (OM53515U)

No. Name Function Page
Zoom out
6
touch−screen
button
Touch this button to reduce the map
scale.
14
Touch this button to register the current
7
“Mark”
position or the cursor position as a
9
memory point.
8
“Route” Touch this button to change the route. 50, 52
Touch this button to browse information
9
“Map View”
about guidance route, to set the Points
of Interest to be displayed on the
56, 59, 60, 61
screen, or to record the route.
Touch this button to obtain a broader
10
“AAOFF”
view. Some of the buttons on the screen
are not displayed. They are displayed
87
again by touching “ON""”.
Zoom in
11
touch−screen
button
Foot print map
12
touch−screen
button
13
“INFO” button
14
“DISP” button
Touch this button to magnify the map
scale.
Touch this button to display the foot print
map and the building information.
Push this button to display the “Information” screen.
Push this button to display the “Display”
screen.
14
15
2, 96, 99, 106,
155, 158
154
Screen
configuration
15
touch−screen
Touch this button to change the screen
mode.
12
button
Distance and time
16
to destination
“GPS” mark
(Global
17
Positioning
System)
Speech
18
command system
indicator
Displays the distance, the estimated
travel time to the destination, and the
estimated arrival time at the destination.
Whenever the vehicle is receiving signals from the GPS, this mark is displayed.
The microphone is shown by pushing
the speech command switch. The
speech command system can be operated while this indicator is shown.
49
NO TAG
150
vi
2006 IS350/250 Navigation
from Aug. ’05 Prod. (OM53515U)
0U5028X
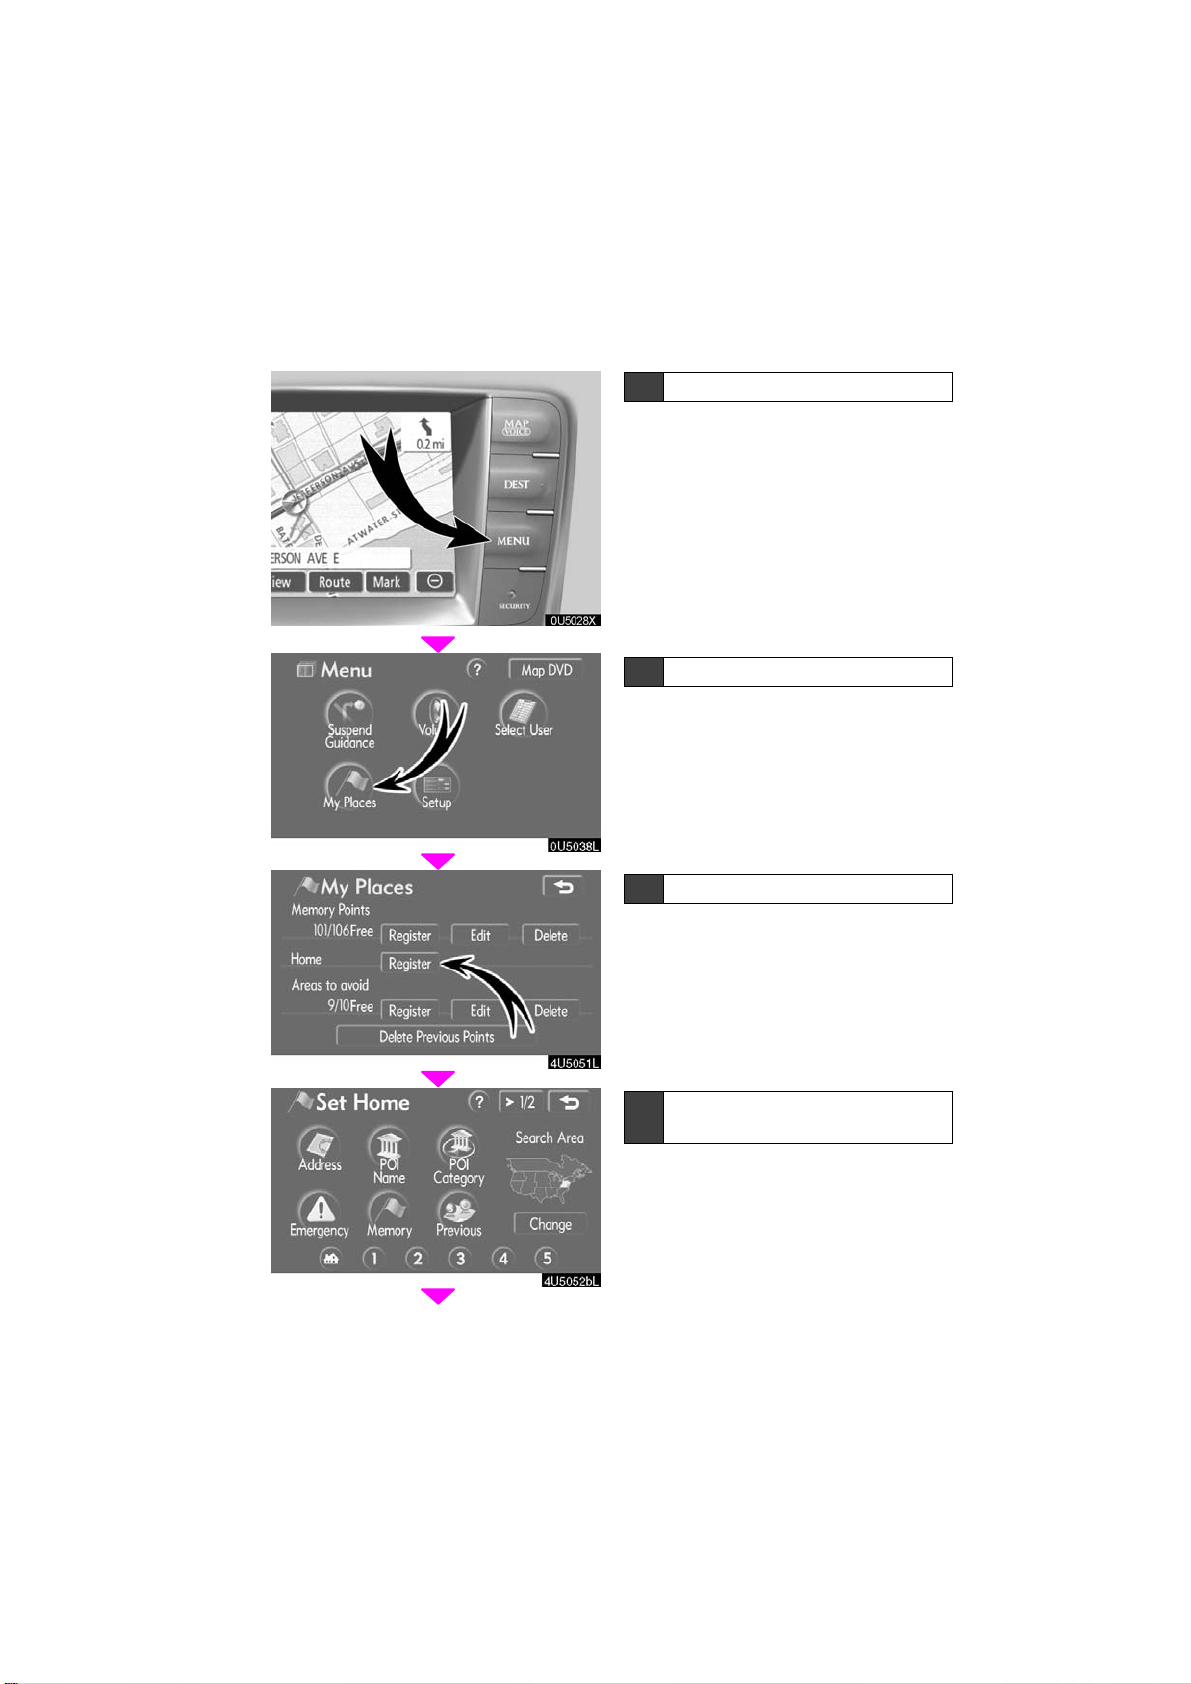
— Registering home
0U5038L
1 Push “MENU” button.
2 Touch “My Places”.
3 T ouch “Register” of the home.
4U5051L
4U5052bL
4 There are 13 different methods t o
search your home.
See “Destination search” on page 19.
vii
2006 IS350/250 Navigation
from Aug. ’05 Prod. (OM53515U)

1U5046bL
0U5036L
5 Touch “Enter”.
The “Memory Point” screen is displayed.
6 Touch “OK”.
Registration of home is complete.
You can change the icon, quick access,
name, location and phone number. (See “
— Editing memory points” on page 72.)
viii
2006 IS350/250 Navigation
from Aug. ’05 Prod. (OM53515U)
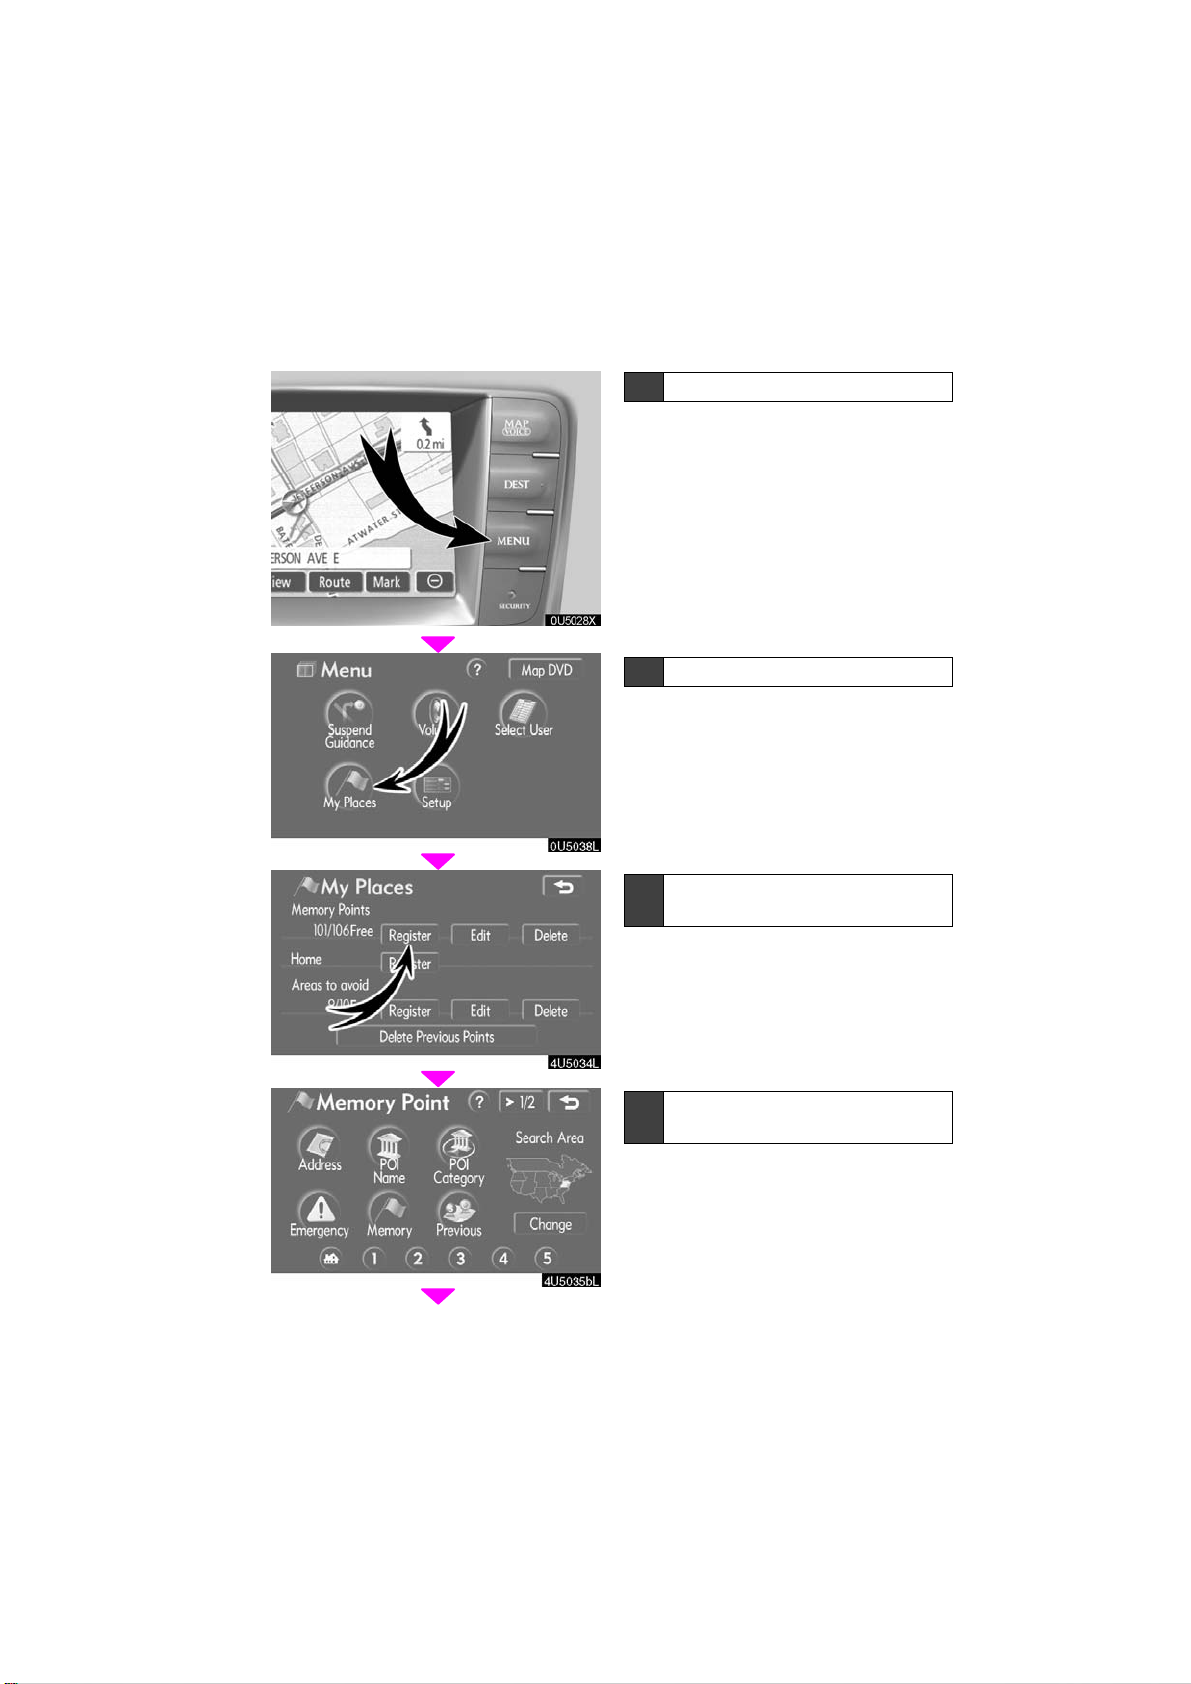
0U5028X
— Registering preset destinations
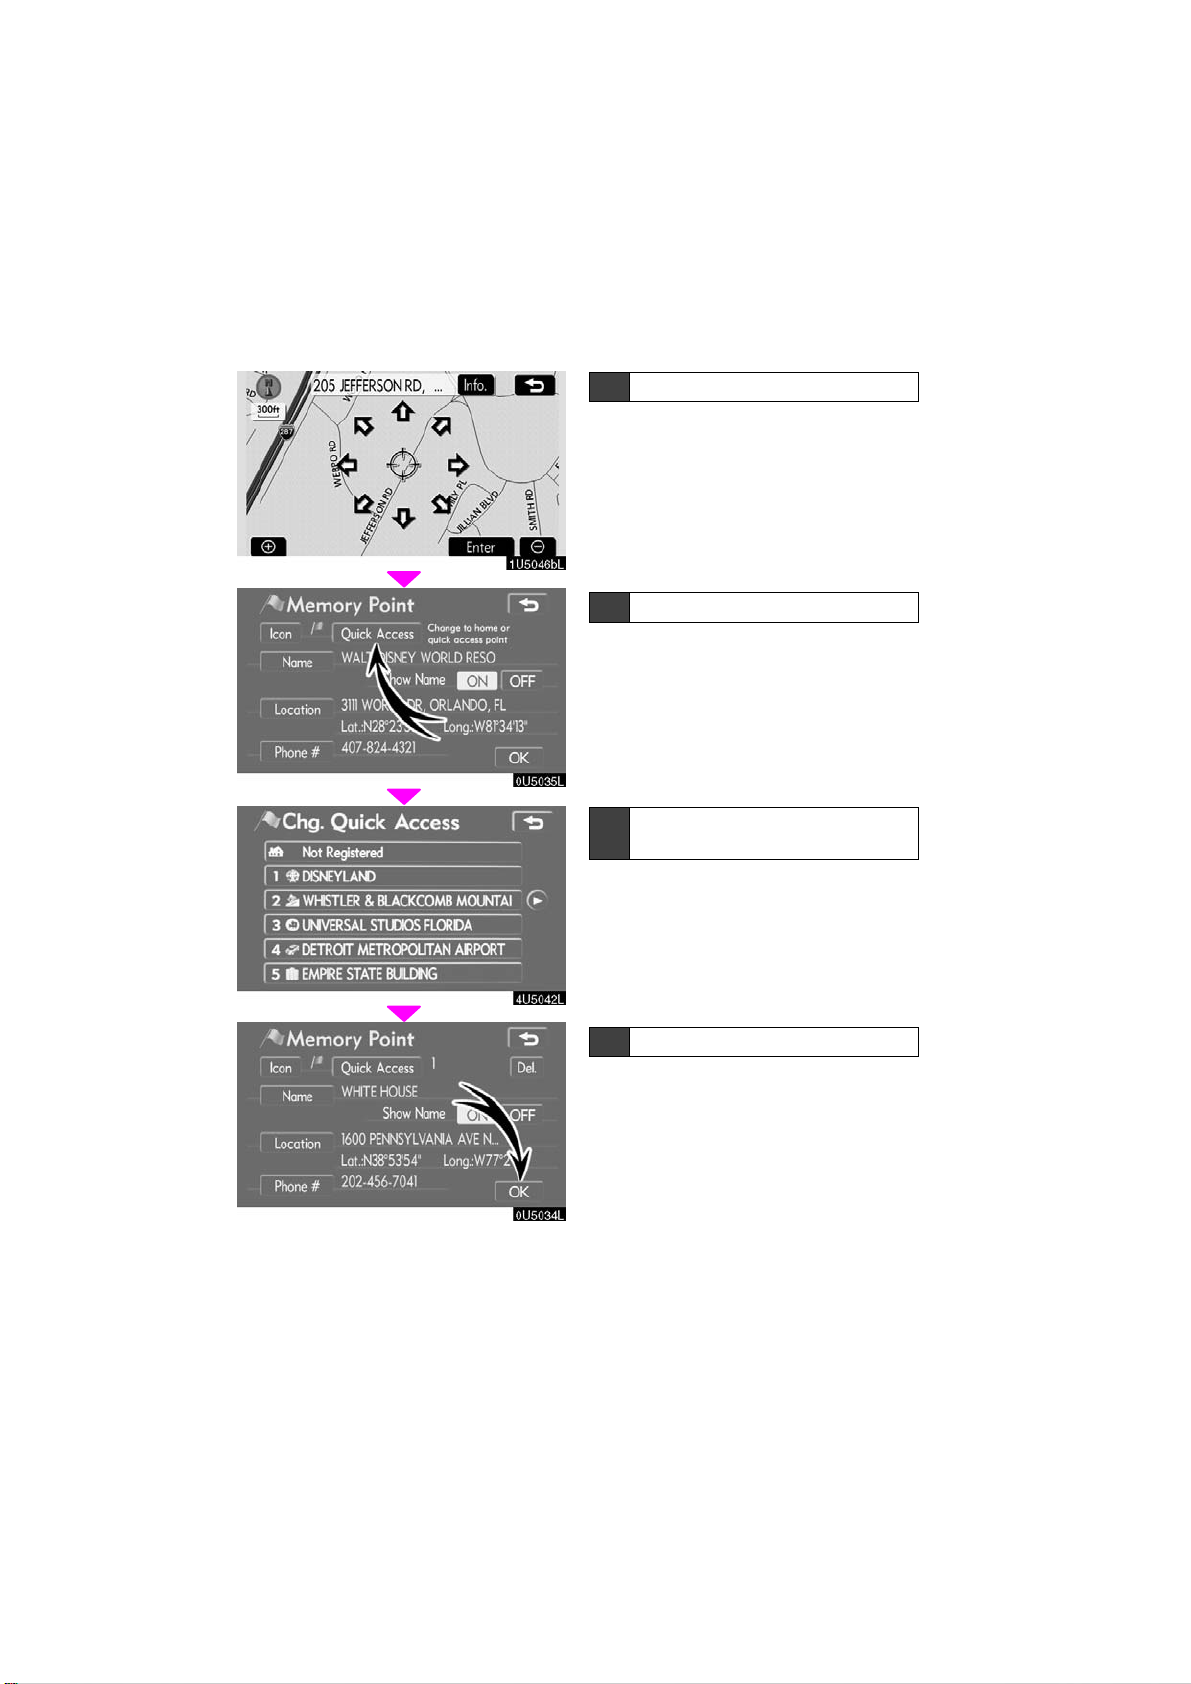
0U5038L
1 Push “MENU” button.
2 Touch “My Places”.
3 Touch “Register” of the memory
points.
4U5034L
4U5035bL
4 There are 13 different methods t o
search preset destinations.
See “Destination search” on page 19.
ix
2006 IS350/250 Navigation
from Aug. ’05 Prod. (OM53515U)
1U5046bL
0U5035L
4U5042L
5 Touch “Enter”.
The “Memory Point” screen is displayed.
6 Touch “Quick Access”.
7 T ouch one of preset buttons 1 to
5.
0U5034L
8 T ouch “OK”.
Registration of preset destinations is complete.
You can change the icon, quick access,
name, location and phone number. (See “
— Editing memory points” on page 72.)
x
2006 IS350/250 Navigation
from Aug. ’05 Prod. (OM53515U)
0U5027X
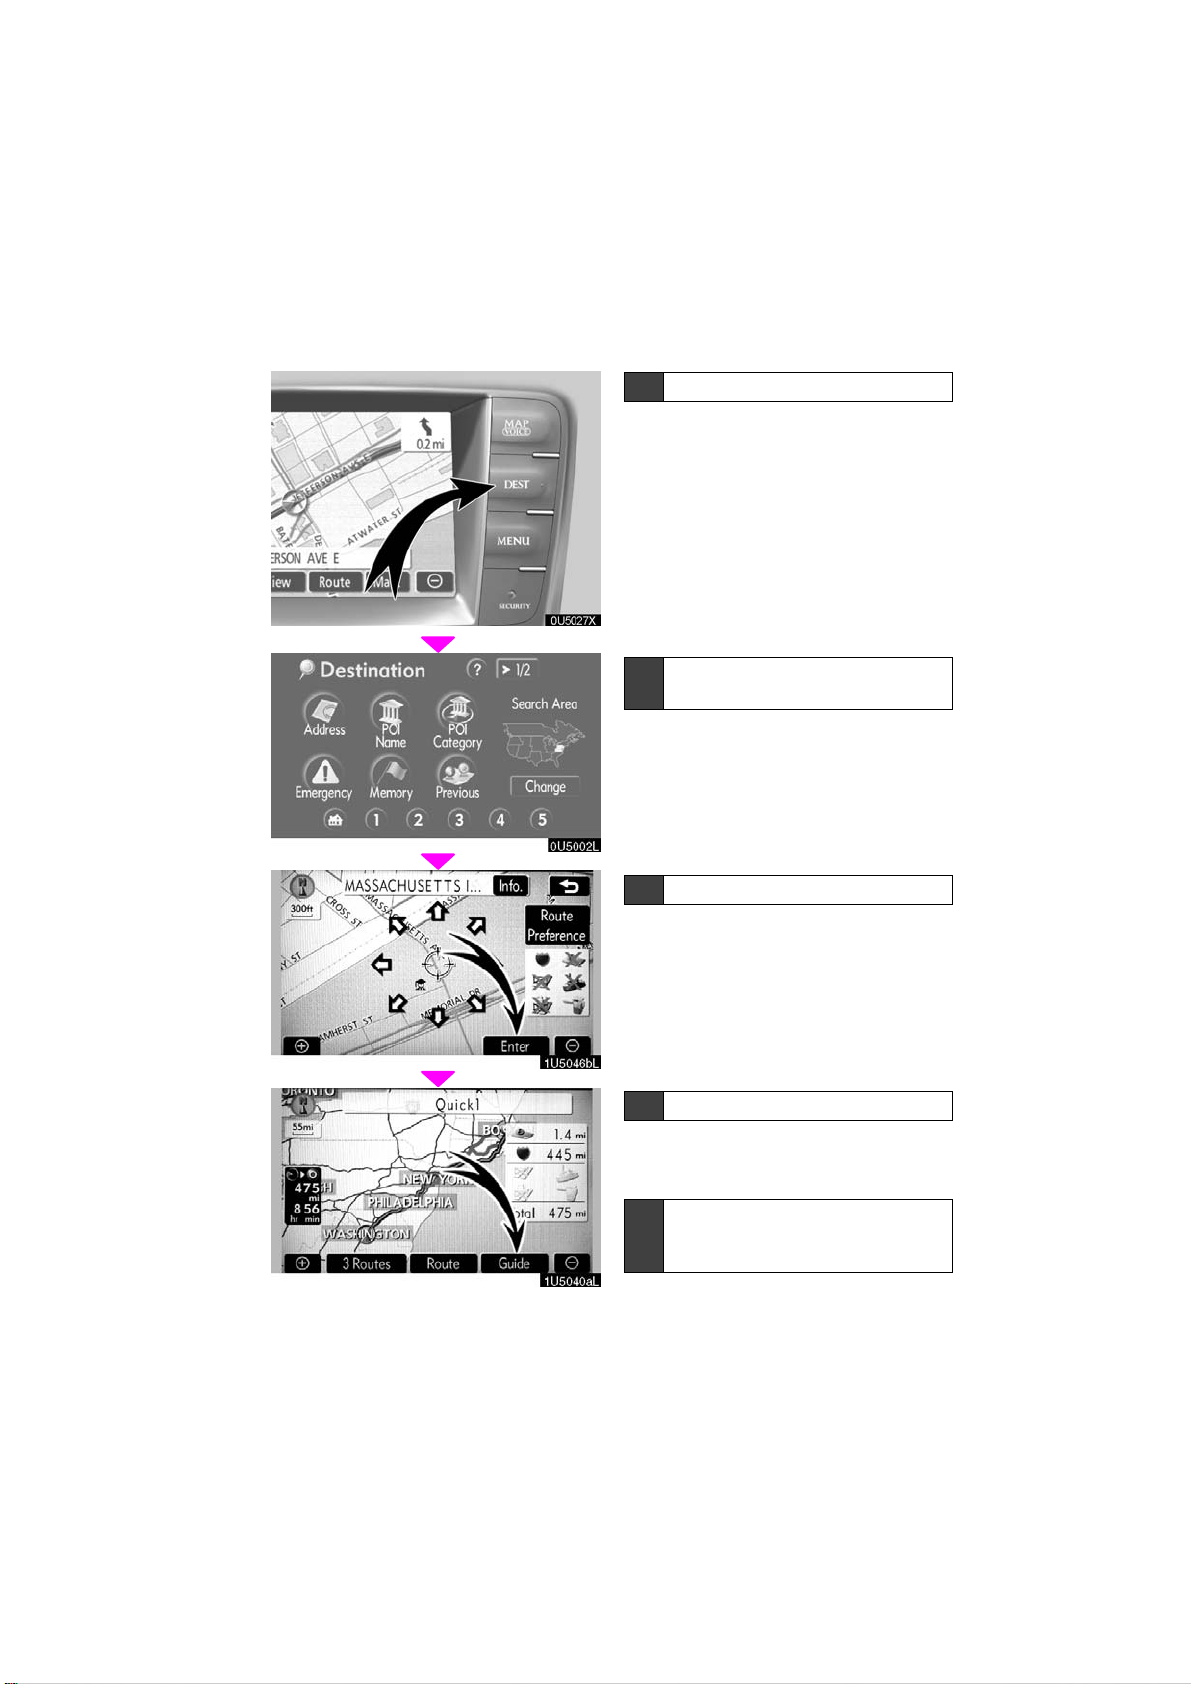
— Operation flow: guiding the route
0U5002L
1U5046bL
1 Push “DEST” button.
2 There are 13 different methods t o
search destinations.
See “Destination search” on page 19.
3 Touch “Enter”.
The navigation system performs a search
for the route.
1U5040aL
4 Touch “Guide”, and start driving.
Routes other than the one recommended
can also be selected. (See “Starting route
guidance” on page 38.)
5 Guidance to the destination is
given via voice and on the guidance screen.
xi
2006 IS350/250 Navigation
from Aug. ’05 Prod. (OM53515U)
0U5027X
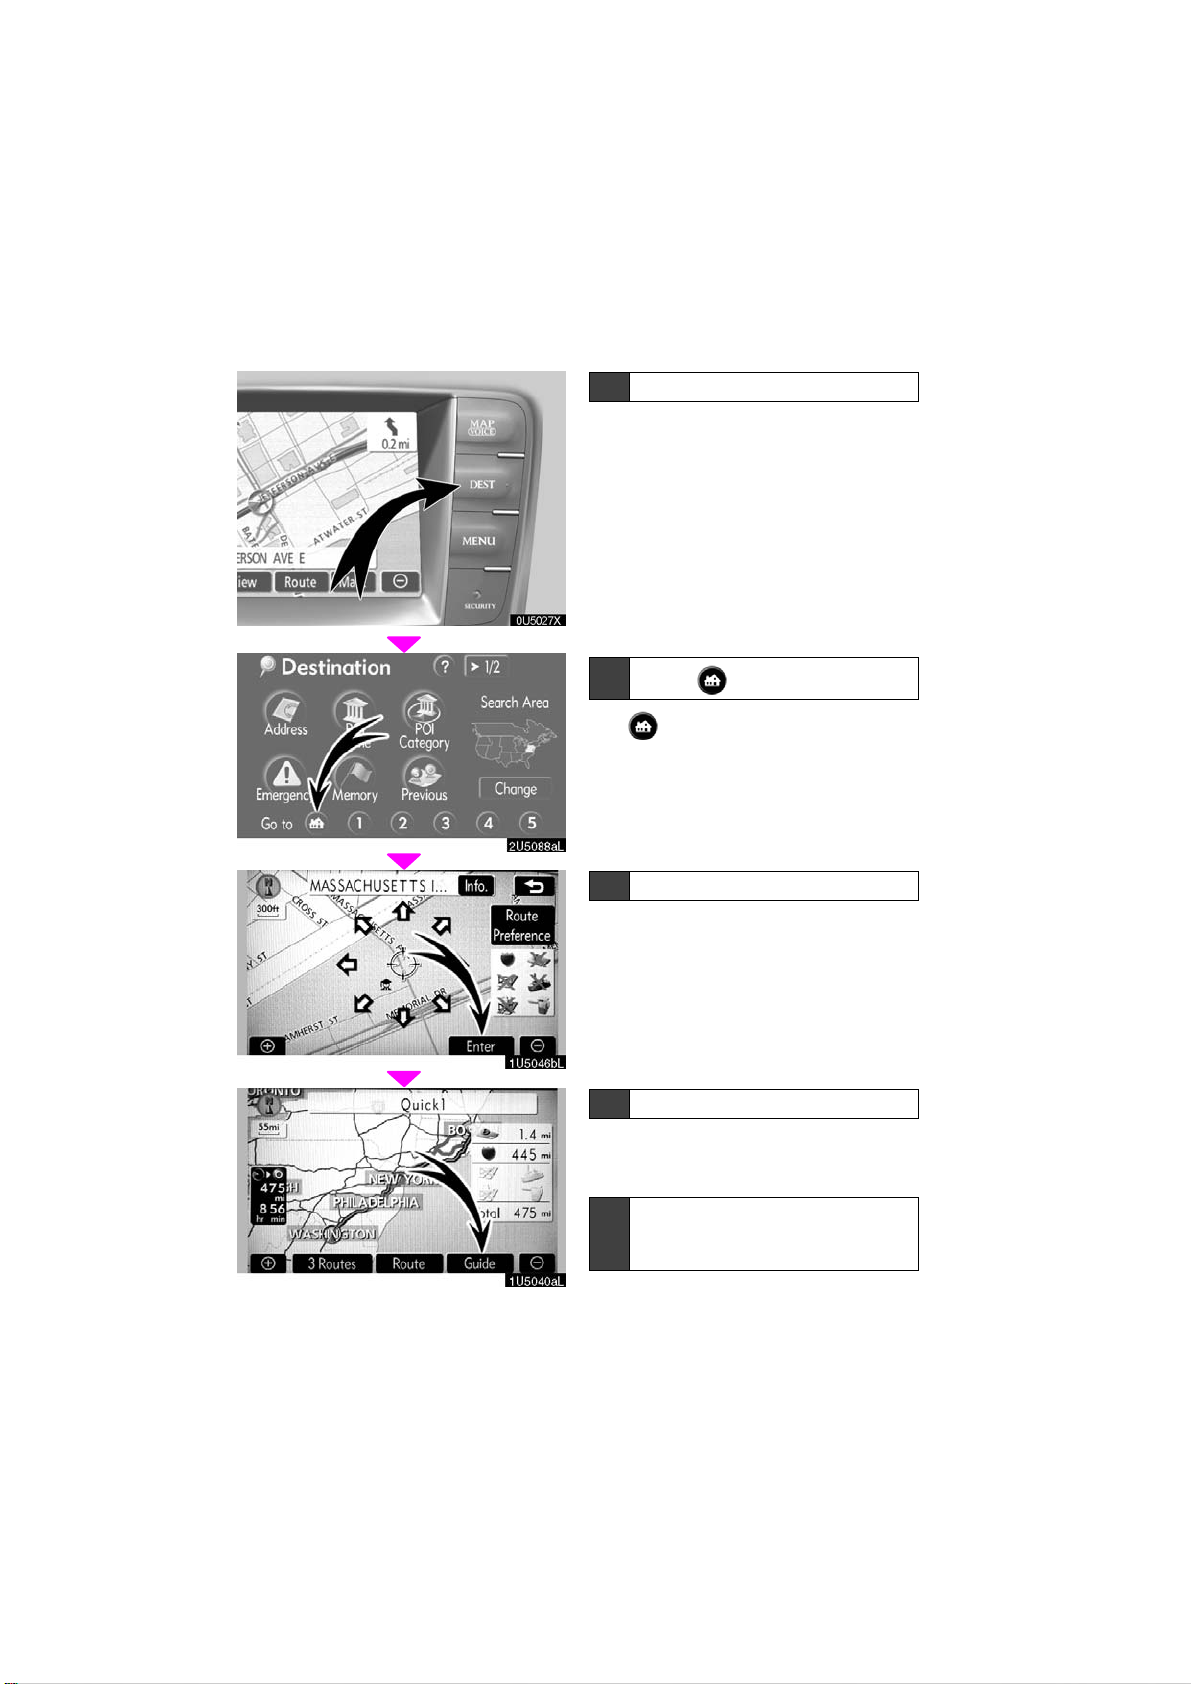
— Setting home as the destination
2U5088aL
1 Push “DEST” button.
2
Touch .
The can be used if your home has
been registered. (To register “Home”, see
“ — Registering home” on page 77.)
3 Touch “Enter”.
The navigation system performs a search
for the route.
1U5046bL
1U5040aL
4 Touch “Guide”, and start driving.
Routes other than the one recommended
can also be selected. (See “Starting route
guidance” on page 38.)
5 Guidance to the destination is
given via voice and on the guidance screen.
xii
2006 IS350/250 Navigation
from Aug. ’05 Prod. (OM53515U)

SECTION I
BASIC FUNCTIONS
Basic information before operation
D Initial screen 2
D Touch screen operation 3
D Inputting letters and numbers/List screen operation 4
D Function help 7
D Map screen operation 8
Current position display 8. . . . . . . . . . . . . . . . . . . . . . . . . . . . . . . . .
Screen scroll operation 8. . . . . . . . . . . . . . . . . . . . . . . . . . . . . . . . .
Switching the screens 12. . . . . . . . . . . . . . . . . . . . . . . . . . . . . . . . .
Map scale 14. . . . . . . . . . . . . . . . . . . . . . . . . . . . . . . . . . . . . . . . . . .
Foot print map 15. . . . . . . . . . . . . . . . . . . . . . . . . . . . . . . . . . . . . . .
Orientation of the map 16. . . . . . . . . . . . . . . . . . . . . . . . . . . . . . . .
. . . . . . . . . . . . . . . . . . . . . . . . . . . . . . . . . . . . . . . . . .
. . . . . . . . . . . . . . . . . . . . . . . . . . . . . . . . . . .
. . . . . . . . . . .
. . . . . . . . . . . . . . . . . . . . . . . . . . . . . . . . . . . . . . . . . . . .
. . . . . . . . . . . . . . . . . . . . . . . . . . . . . . . . . . . . .
. . .
1
2006 IS350/250 Navigation
from Aug. ’05 Prod. (OM53515U)
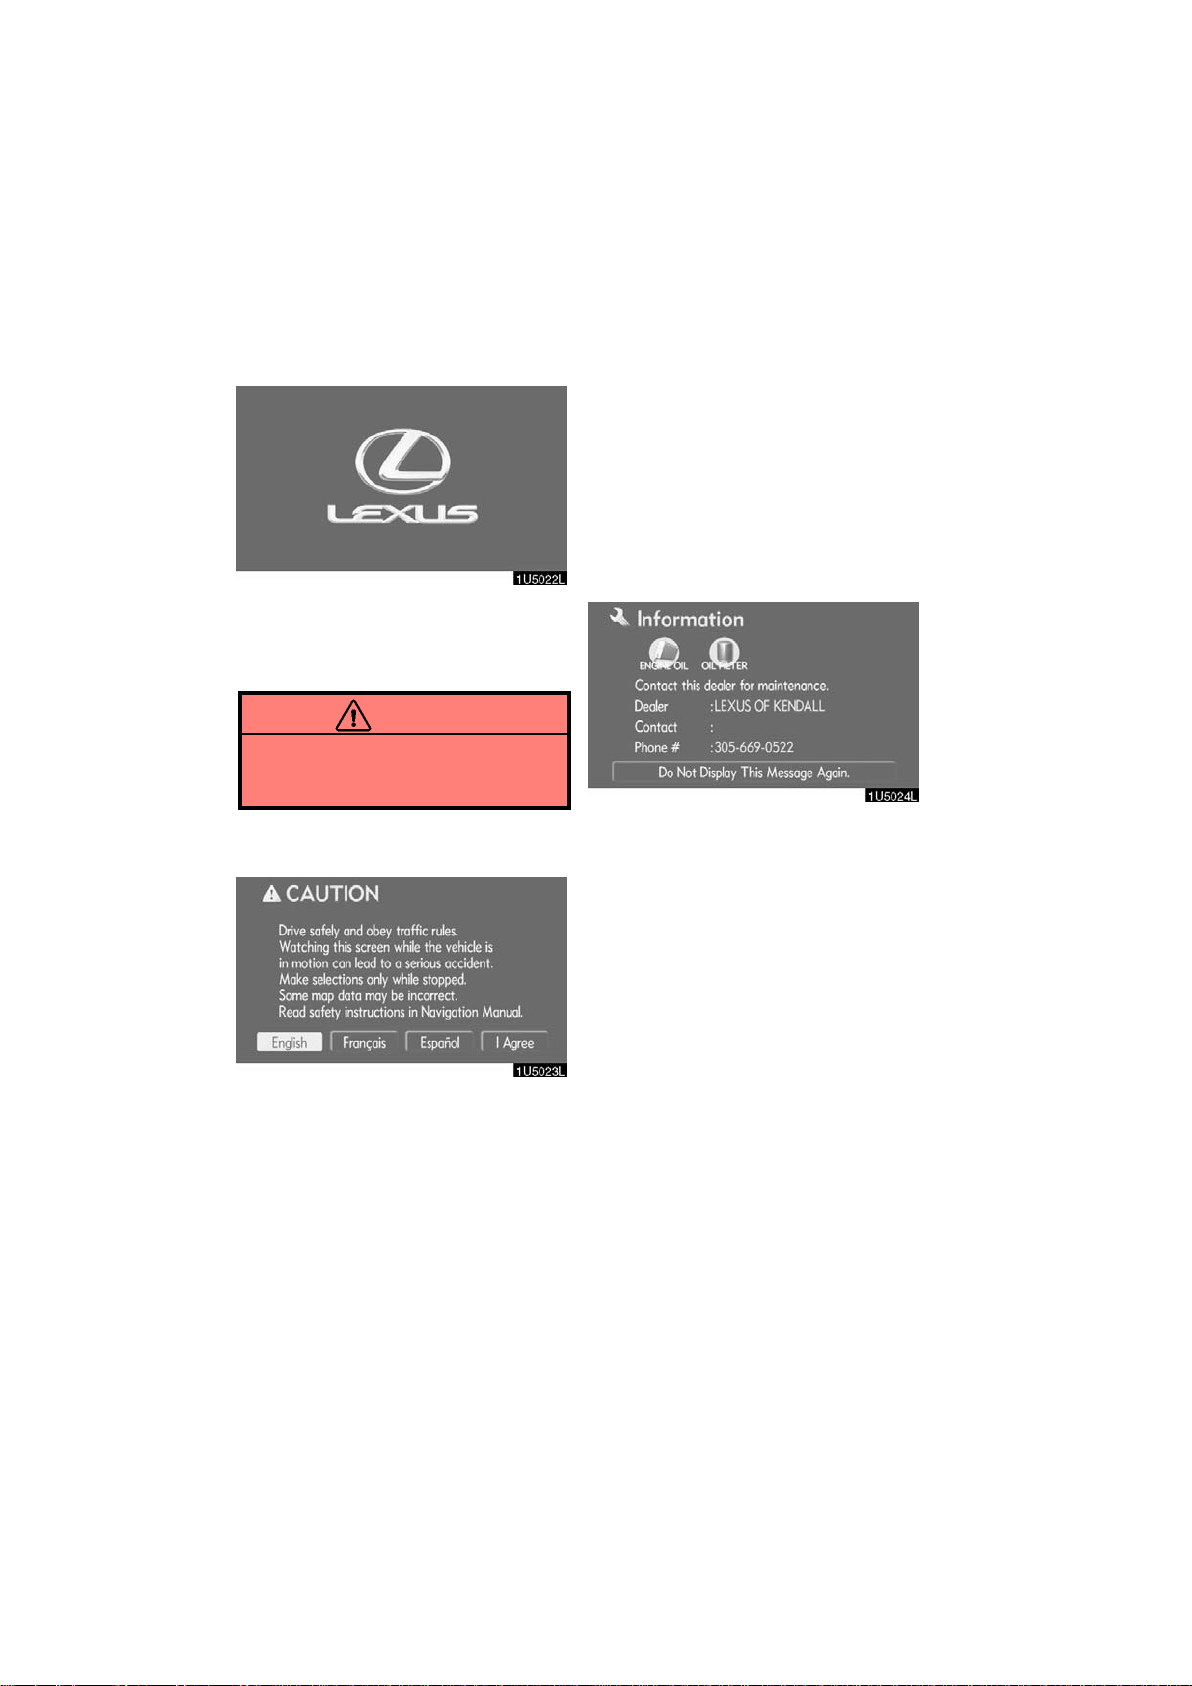
When the engine switch is in “ACC” or
Initial screen
“IG−ON” mode, the initial screen will be
displayed and the system will begin operating.
CAUTION
When the vehicle is stopped with the
engine running, always apply the
parking brake for safety.
D Maintenance information
This system informs about when to replace
certain parts or components and shows
dealer information (if registered) on the
screen.
When the vehicle reaches a previously set
driving distance or date specified for a
scheduled maintenance check, the “Information” screen will be displayed when the
navigation system is in operation.
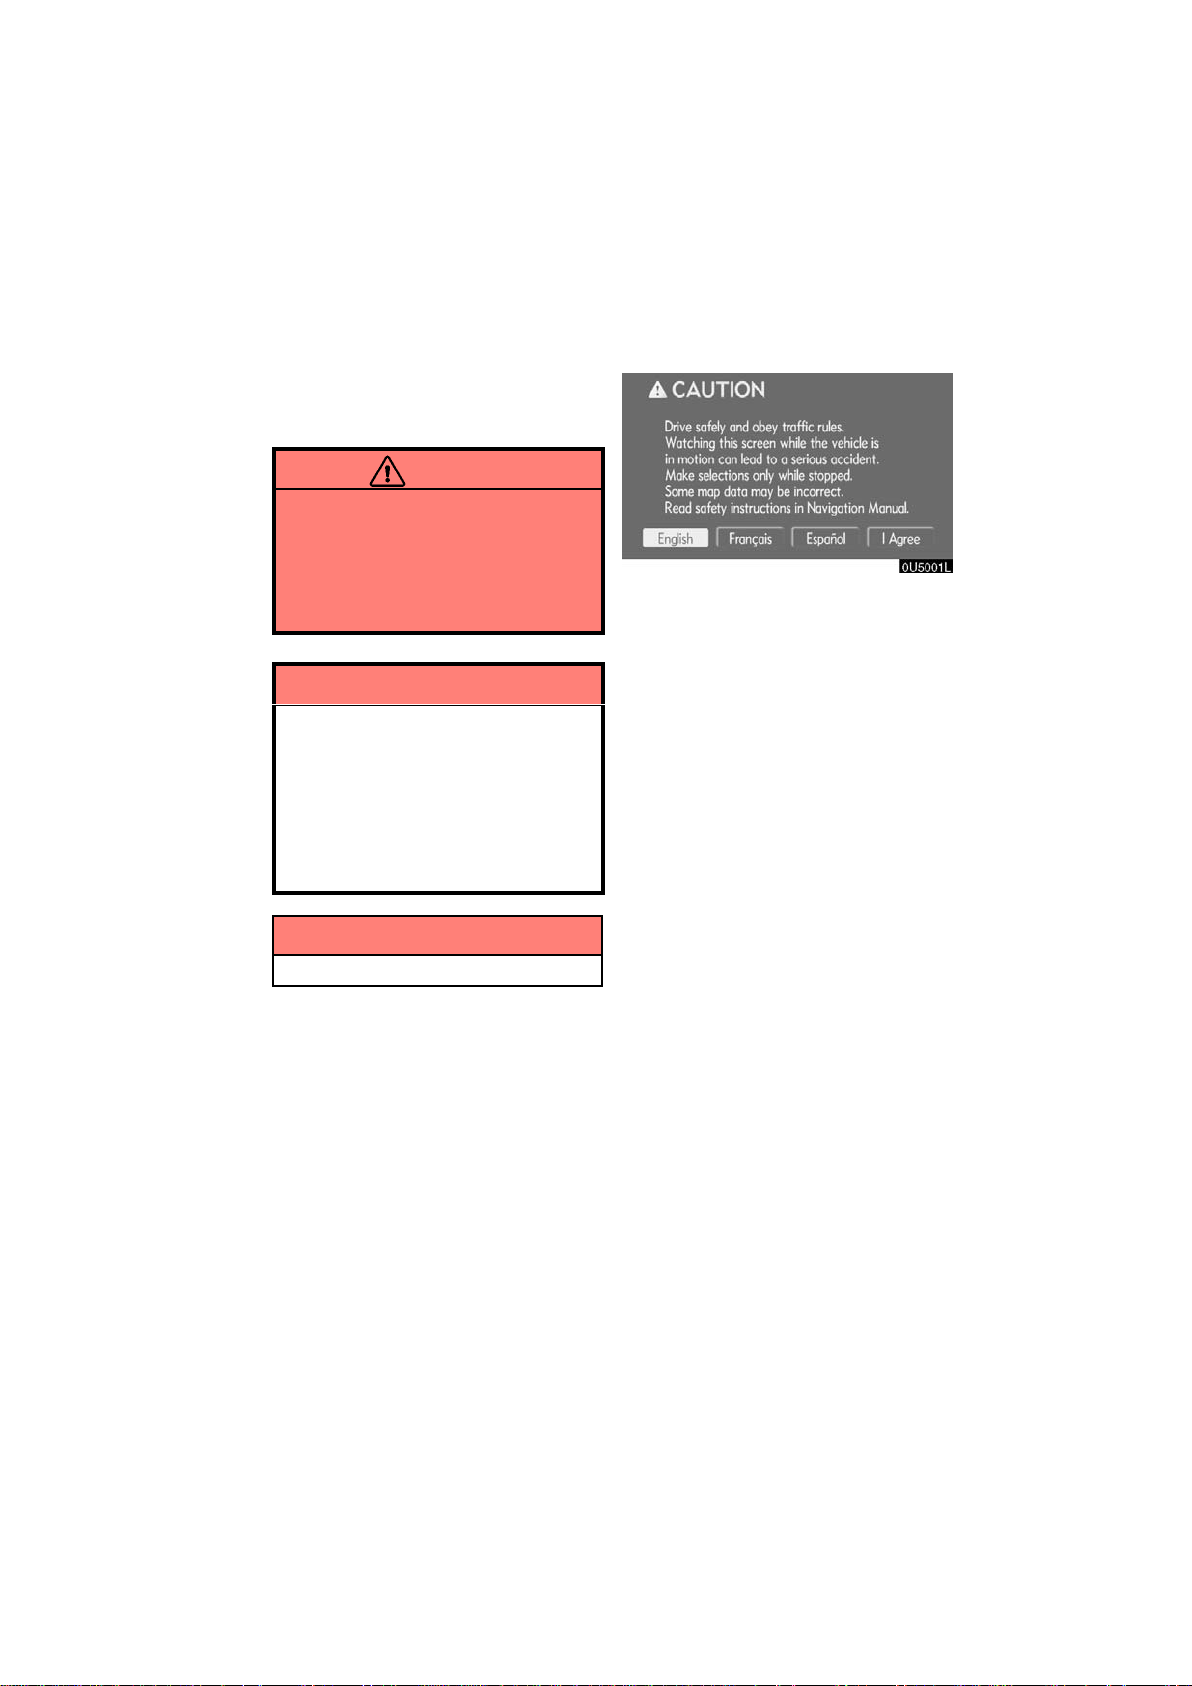
After a few seconds, the “CAUTION”
screen will be displayed.
Touch “English”, “Français” or “Español” to select a language.
When “I Agree” is touched
screen, the map screen will be displayed.
The “CAUTION” screen will be displayed
when the “INFO” button is pushed and
“Language” is touched. Then select a
language. (See “Selecting a language” on
page 158.)
on the
To disable this screen, touch “Do Not
Display This Message Again.”. This
screen goes off if the screen is not operated for several seconds.
To prevent this information screen from being displayed again, touch “Do Not
Display This Message Again.”.
To register “Maintenance information”, see
“Maintenance information” on page 96.
2
2006 IS350/250 Navigation
from Aug. ’05 Prod. (OM53515U)
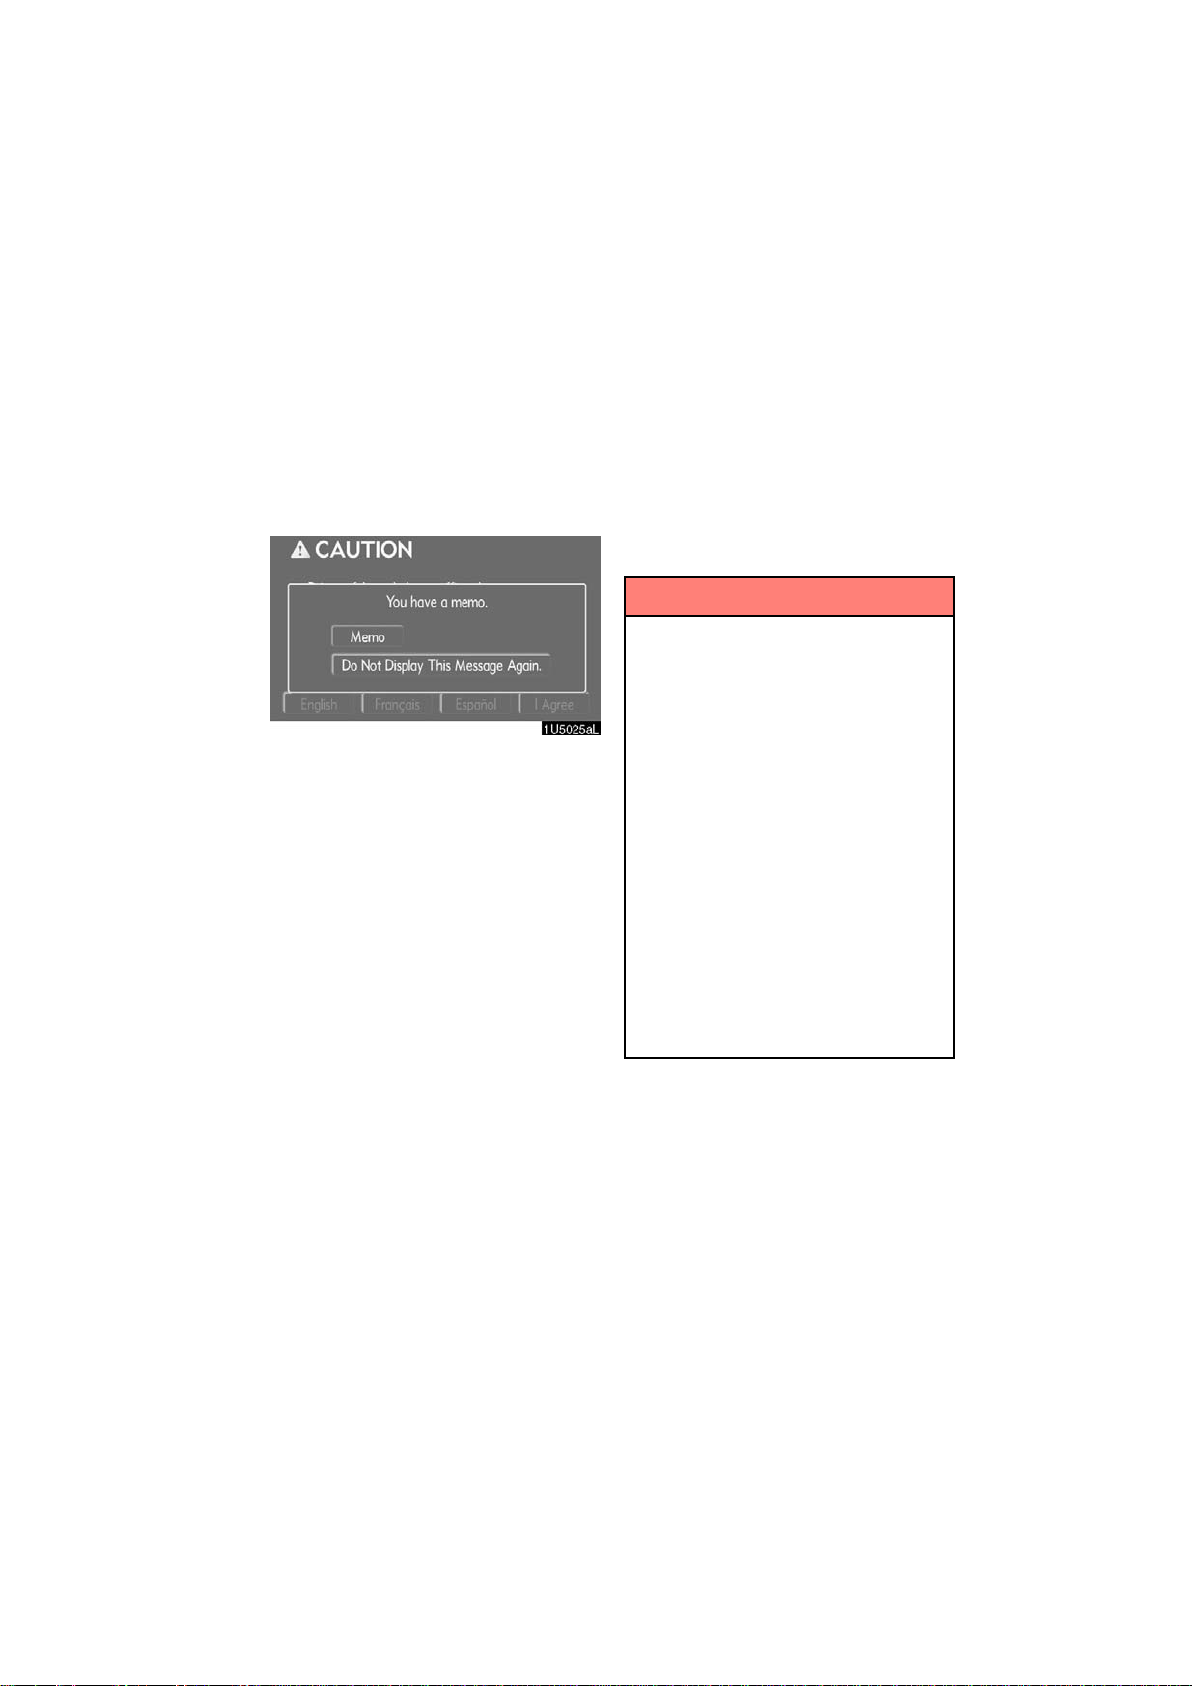
D Memo information
Touch screen operation
This system notifies about a memo entry.
At the specified date, the memo information will be displayed when the navigation
system is in operation. The memo information screen will be displayed every time the
system is turned on.
The memo of the current date can be
viewed by touching “Memo”. (See “ —
Editing a memo” on page 101.)
To disable this screen, touch “Do Not
Display This Message Again.”. This
screen goes off if the screen is not operated for several seconds.
To prevent this information screen from being displayed again, touch “Do Not
Display This Message Again.”.
To register “Memo information”, see “Calendar with memo” on page 99.
This system is operated mainly by the
touch−screen buttons on the screen.
To prevent damage to the screen, lightly touch buttons on the screen with the
finger. When a button on the screen is
touched, a beep sounds.
Do not use objects other than the finger
to touch the screen.
INFORMATION
D If the system does not respond to
a touch on a touch−screen button,
move the finger away from the
screen and then touch it again.
D Dimmed touch−screen buttons
cannot be operated.
D Wipe off fingerprints using a glass
cleaning cloth. Do not use chemical cleaners to clean the touch
screen.
D The displayed image may become
darker and moving images may be
slightly distorted when the display
is cold.
D Under extremely cold conditions,
the map may not be displayed and
the data input by a user may be deleted. Also, the touch−screen buttons may be harder than usual to
depress.
3
2006 IS350/250 Navigation
from Aug. ’05 Prod. (OM53515U)
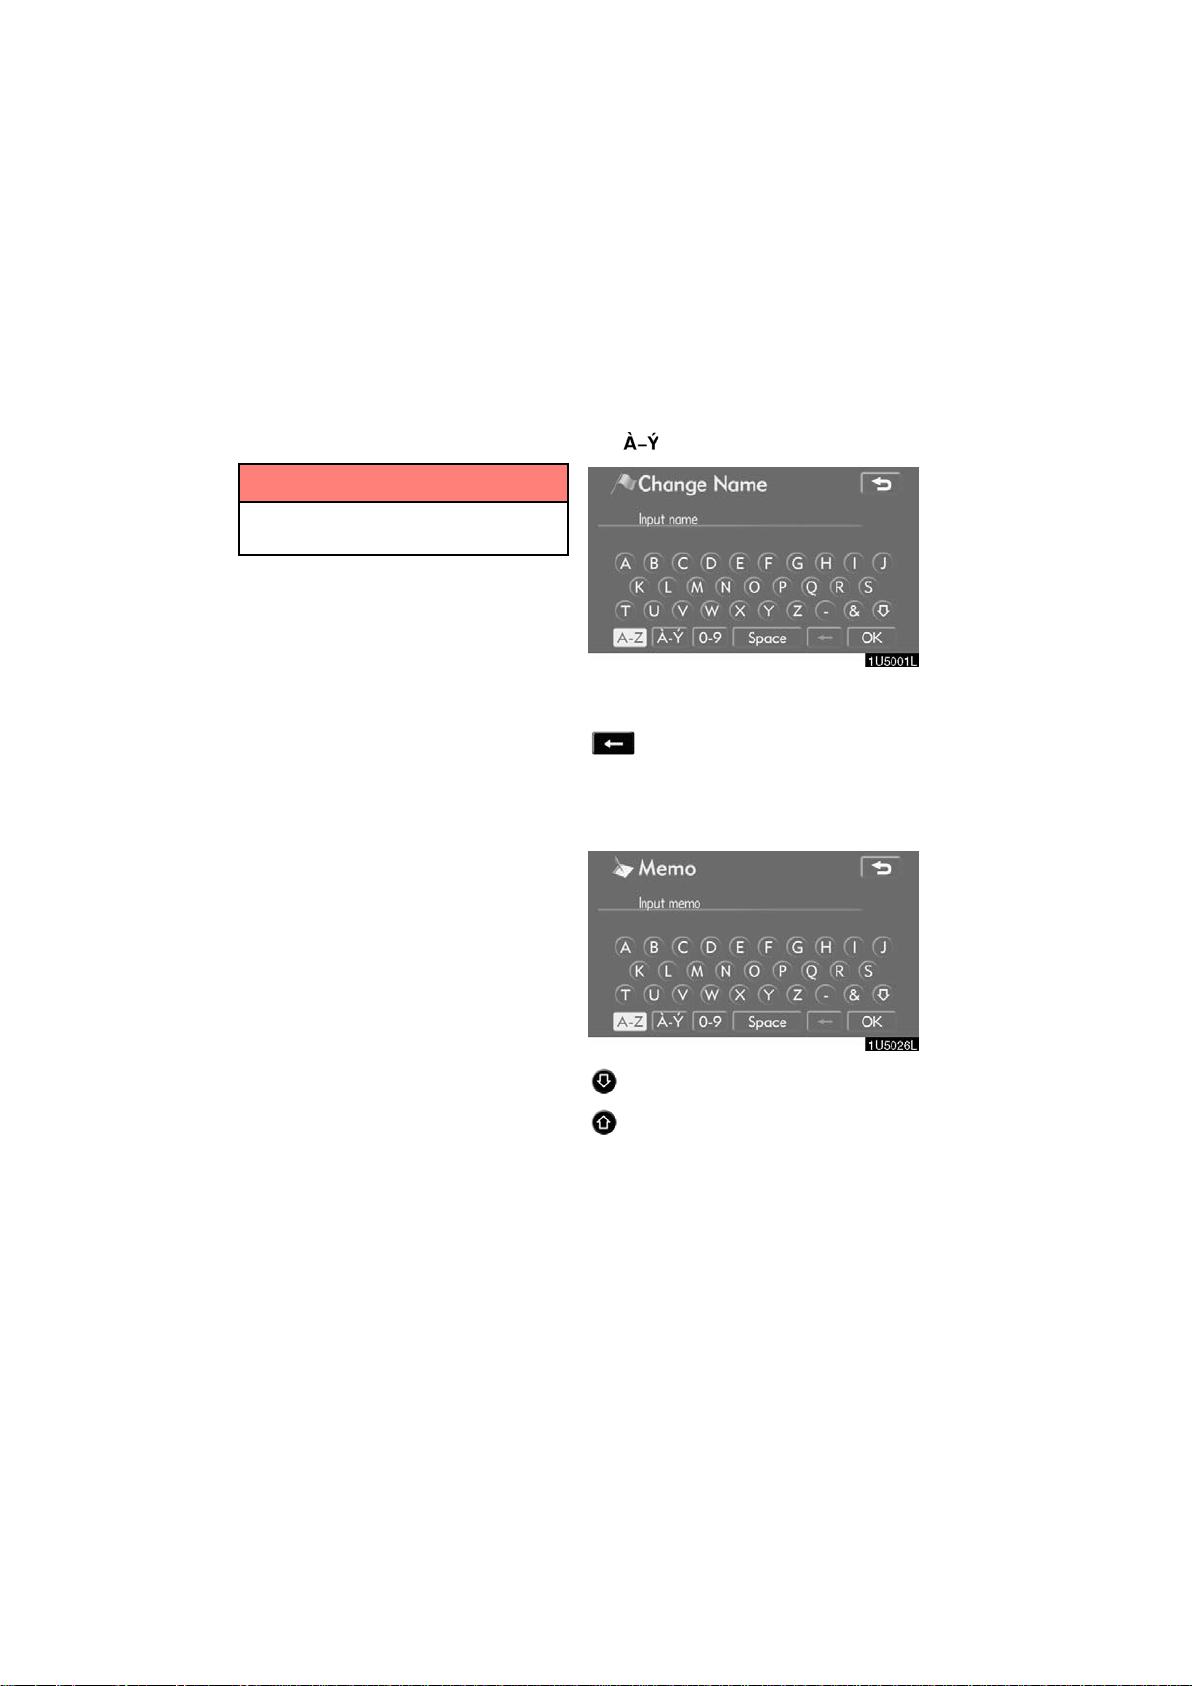
Inputting letters and
numbers/List screen
operation
When searching for an address or a name,
or entering a memo, letters and numbers
can be input via the touch screen.
INFORMATION
Keyboard layout can be changed.
(See page 85.)
D To input letters
To display the alphabet keys, touch “A−Z”
or
“ ”.
Enter letters by touching the alphabet keys
directly.
: Touching this button erases one
letter. By holding this button, letters will continue to be erased.
On certain letter entry screens, letters can
be entered in upper or lower case.
: To enter in lower case.
: To enter in upper case.
4
2006 IS350/250 Navigation
from Aug. ’05 Prod. (OM53515U)
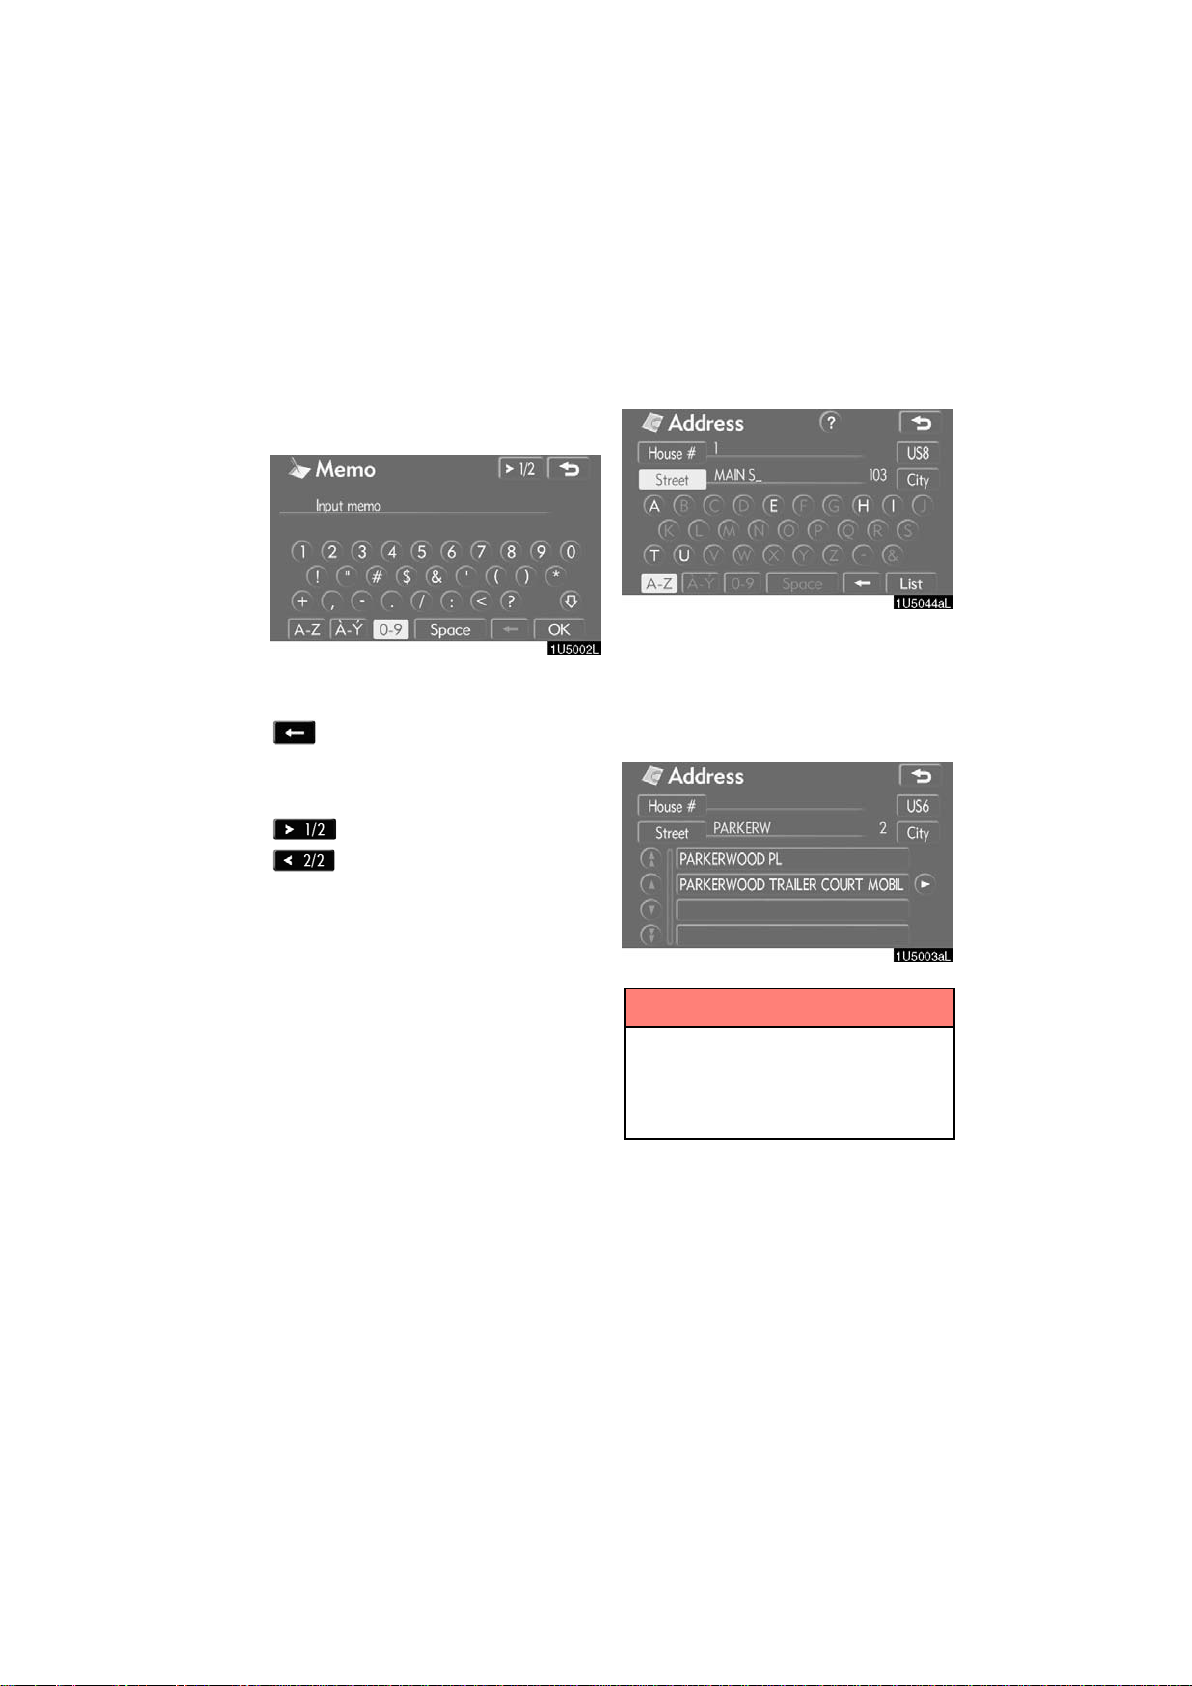
D To input numbers and symbols
:
To display the number keys and symbol
keys, touch “0−9”.
Enter numbers and symbols by touching
the number keys and symbol keys directly.
Touching this button erases
one letter. By holding this
button, letters will continue to
be erased.
: Touching this button displays
other symbols.
D To display the list
To search for an address or a name, touch
“List”. Matching items from the database
are listed even if the entered address or
name is incomplete.
If the number of matches is four or less, the
list is displayed without touching “List”.
INFORMATION
The number of matching items is
shown to the right side of the screen.
If the number of matching items is
more than 9,999, the system displays
∗∗∗∗” on the screen.
“
5
2006 IS350/250 Navigation
from Aug. ’05 Prod. (OM53515U)
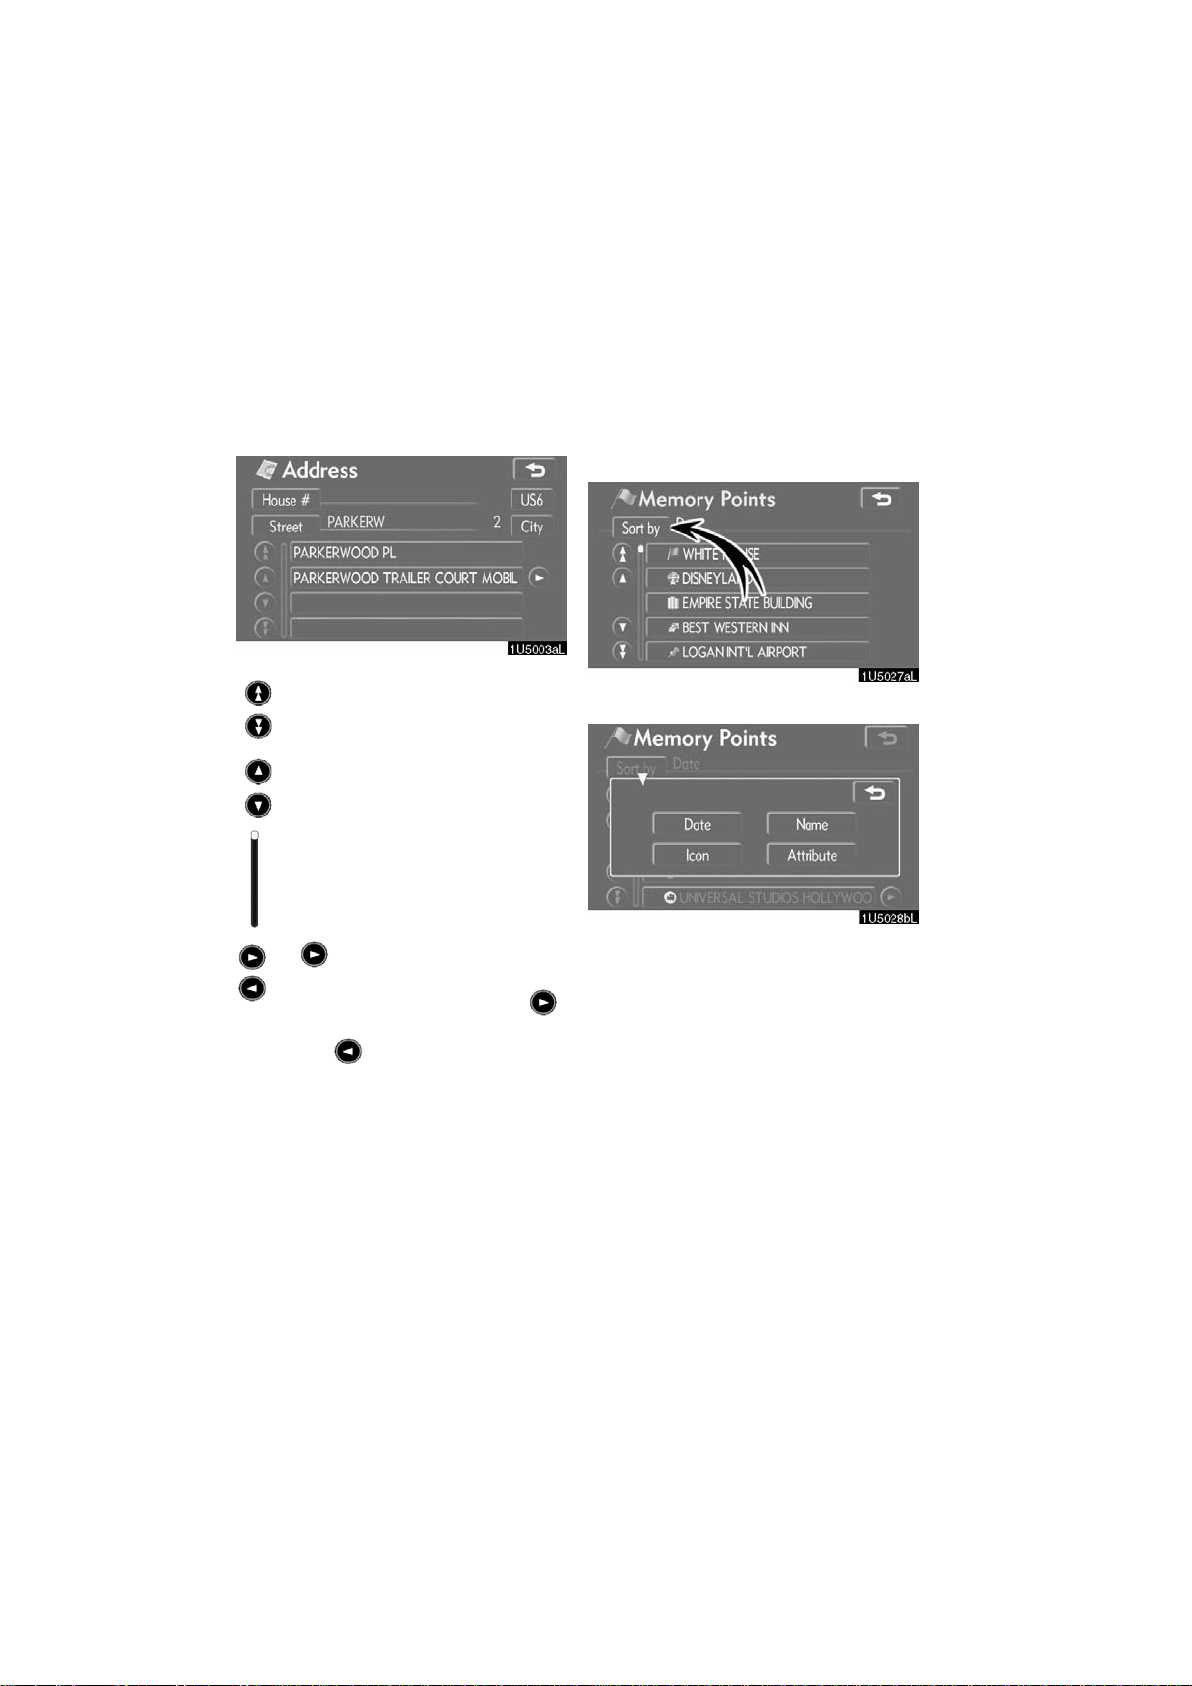
D List screen operation
When a list is displayed, use the appropriate button to scroll through the list.
D Sorting
The order of a list displayed on the screen
can be rearranged.
TYPE A
To shift to the next or previous
page.
To scroll up or down one item at a
time.
This expresses a displayed
screen position.
If appears to the right of the
item name, the complete name is
too long for the display. Touch
to scroll to the end of the name.
T ouch t o scroll to the beginning
of the name.
1. Touch “Sort by”.
2. Select the desired sorting criteria.
Sorting criteria are as follows:
“Distance”: To sort in the order of dis-
tance from your current location.
“Date”: To sort in the order of the date.
“Category”: To sort in the order of the
category.
“Icon”: To sort in the order of the icons.
“Name”: To sort in order by name.
“Attribute”: To sort in order by attribute.
6
2006 IS350/250 Navigation
from Aug. ’05 Prod. (OM53515U)
TYPE B
Function help
“Dist. Sort”: To sort in the order of dis-
tance from the current vehicle location.
The distance from current vehicle position
up to the destination is displayed to the
right of the name.
“Name Sort”: To sort in alphabetical order
by name.
Explanations for the functions of the “Destination”, “Setup” and “Menu” screens can
be viewed.
Touch .
: To view the previous page.
: To view the next page.
: To return to the previous screen.
7
2006 IS350/250 Navigation
from Aug. ’05 Prod. (OM53515U)
Map screen operation —
— Current position display
— Screen scroll operation
(one−touch scroll)
When starting the navigation system, the
current position is displayed first.
This screen displays the current vehicle
position and a map of the surrounding local
area.
The current vehicle position mark (1) appears in the center or bottom center of the
map screen.
A street name will appear on the bottom of
the screen, depending on the scale of the
2
map (
You can return to this map screen that
shows your current position at any time
from any screen by pushing the “MAP/
VOICE” button.
While driving, the current vehicle position
mark is fixed on the screen and the map
moves.
The current position is automatically set as
the vehicle receives signals from the GPS
(Global Positioning System). If the current
position is not correct, it is automatically
corrected after the vehicle receives signals from the GPS.
).
When any point on the map is touched,
that point moves to the center of the screen
and is shown by the cursor mark (
Use the scroll feature to move the desired
point to the center of the screen for looking
at a point on the map that is different from
the current position of the vehicle.
If the finger is continuously held on the
screen, the map will continue scrolling in
that direction until the finger is removed.
A street name, city name, etc. of the
touched point will be shown, depending on
the scale of the map (
the current position to
shown (
After the screen is scrolled, the map remains centered at the selected location
until another function is activated. The current vehicle position mark will continue to
move along your actual route and may
move off the screen. When the “MAP/
VOICE” button is pushed, the current vehicle position mark returns to the center of
the screen and the map moves as the vehicle proceeds along the designated route.
3
).
2
). Distance from
1
).
will also be
D After battery disconnection, or on
a new vehicle, the current position
may not be correct. As soon as the
system receives signals from the
GPS, the correct current position
is displayed.
D To correct the current position
manually, see page 92.
INFORMATION
INFORMATION
When the one−touch scroll feature is
used, the current vehicle position
mark may disappear from the screen.
Move the map with a one−touch scroll
again or push the “MAP/VOICE” button to return to the current vehicle
position map location display.
8
2006 IS350/250 Navigation
from Aug. ’05 Prod. (OM53515U)

D To set the cursor position as a des-
tination
A specific point on the map can be set as
a destination using the one−touch scroll
function.
Touch “Enter ”.
The screen changes and displays the map
location of the selected destination and the
route preference. (See “Starting route
guidance” on page 38.)
D To register the cursor position as a
memory point
Memory point registration enables easy
access to a specific point.
Touch “Mark”.
When you touch “Mark”, the following
screen appears for a few seconds, and
then the map screen returns.
The registered point is shown by on the
map.
To change the icon or name, etc., see “ —
Editing memory points” on page 72.
Up to 106 memory points can be registered. If there is an attempt to register
more than 106, a message appears for
confirmation.
9
2006 IS350/250 Navigation
from Aug. ’05 Prod. (OM53515U)
D To see information about the icon
where the cursor is set
To display information about an icon, set
the cursor on it.
POI INFORMATION
When the cursor is set on a POI icon, the
name and “Info.” are displayed on the top
of the screen.
Touch “Info.”.
Information such as the name, address,
and phone number are displayed.
If “Enter
cursor is set as a destination.
If there is already a set destination, “Add
to
“Add to
“Replace
tinations and set a new one.
To register this POI as a memory point,
touch “Mark”. (See page 71.)
If
number can be called.
” is touched, the position of the
” and “Replace ” are displayed.
”: To add a destination.
”: To delete the existing des-
is touched, the registered telephone
INFORMATION
The desired Point of Interest can be
displayed on the map screen. (See “
— Display POI icons” on page 56.)
10
2006 IS350/250 Navigation
from Aug. ’05 Prod. (OM53515U)
MEMORY POINT INFORMATION
When the cursor is set on a memory point
icon, the name and “Info.” are displayed
on the top of the screen.
DESTINATION INFORMATION
When the cursor is set on a destination
icon, the name and “Info.” are displayed
on the top of the screen.
Touch “Info.”.
Information such as the name, address,
and phone number are displayed.
If “Enter
” is touched, the position of the
cursor is set as a destination.
If there is already a set destination, “Add
” and “Replace ” are displayed.
to
“Add to
“Replace
”: To add a destination.
”: To delete the existing des-
tinations and set a new one.
T o edit a memory point, touch “Edit”. (See
“ — Editing memory points” on page 72.)
To delete a memory point, touch “Delete”.
is touched, the registered telephone
If
number can be called.
Touch “Info.”.
Information such as the name, address,
and phone number are displayed.
To delete a destination, touch “Delete”.
is touched, the registered telephone
If
number can be called.
11
2006 IS350/250 Navigation
from Aug. ’05 Prod. (OM53515U)
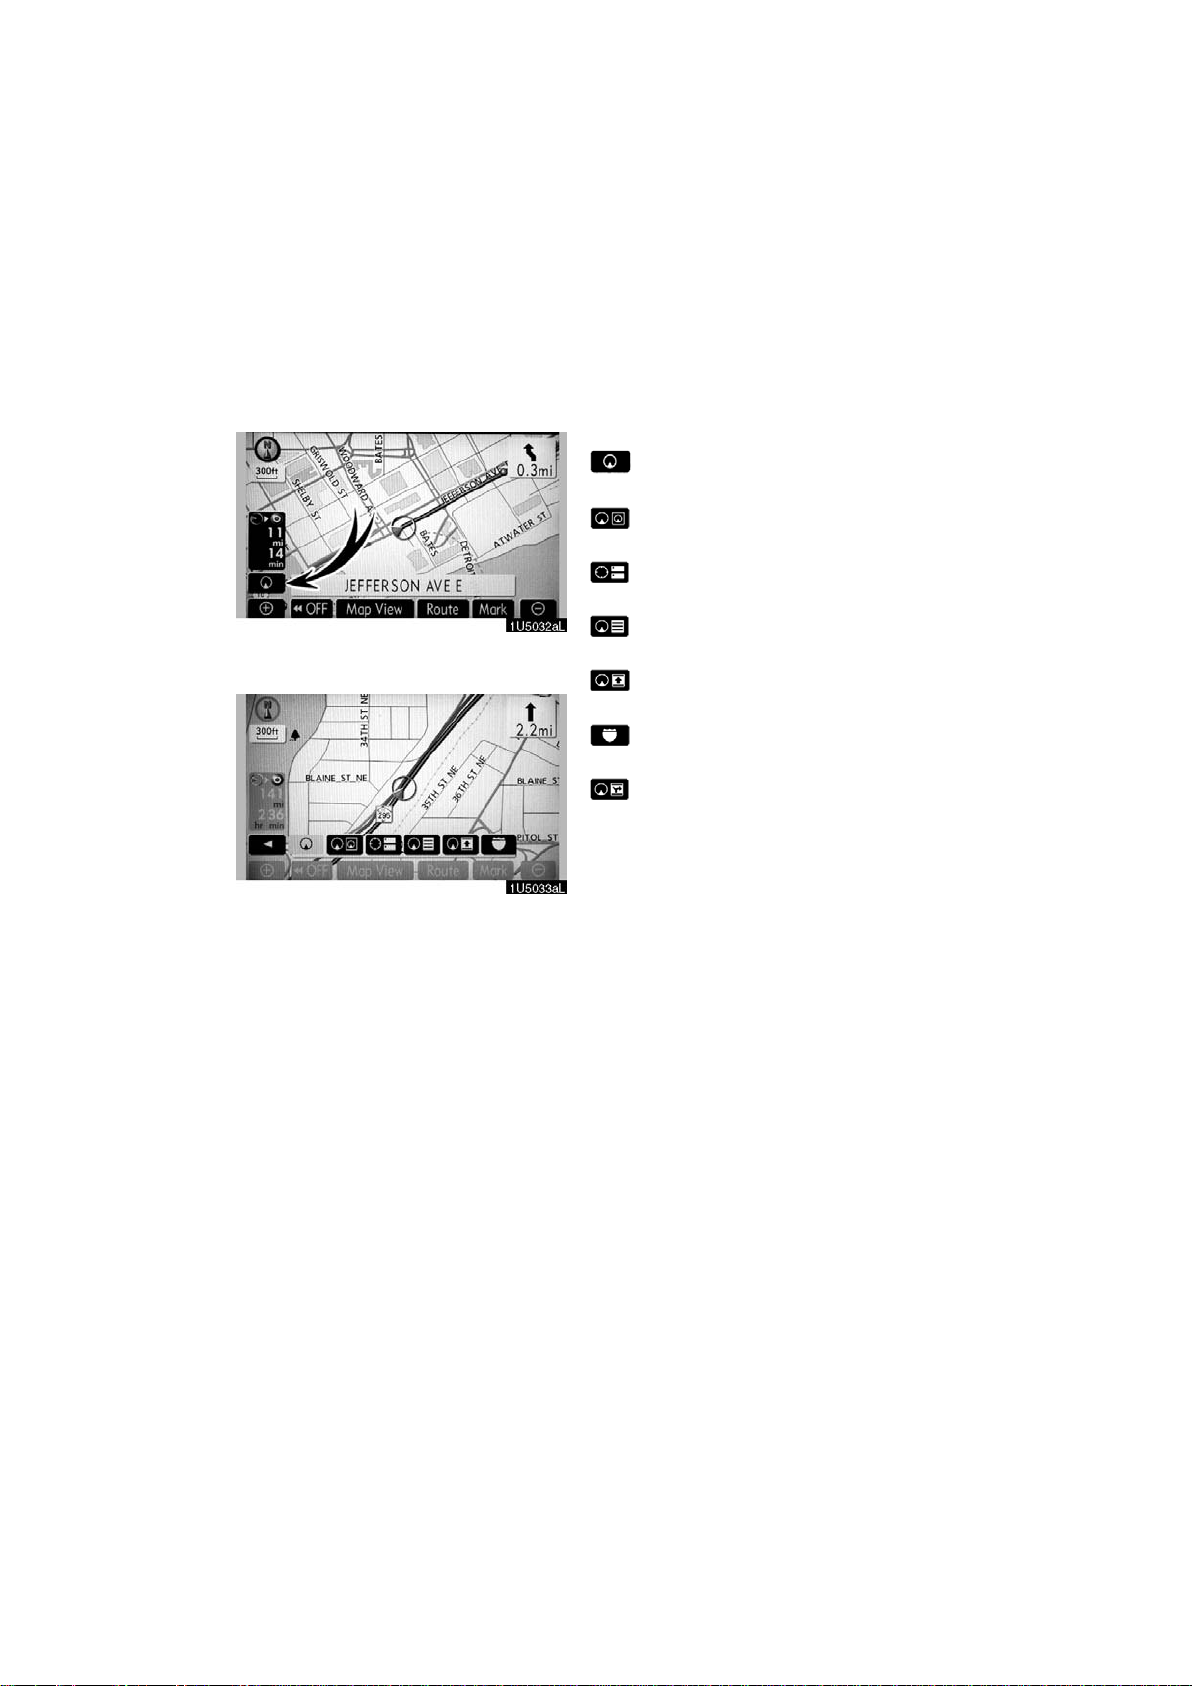
Any one of the screen configurations can
— Switching the screens
be selected .
1. Touch this button to display the following screen.
2. To select the desired screen configuration, touch one of the following buttons.
Depending on the conditions, certain
screen configuration buttons cannot be
selected.
: To display the single map screen.
(See page 13.)
: To display the dual map screen.
(See page 13.)
: To display the compass mode
screen. (See page 14.)
: To display the turn list screen.
(See page 46.)
: To display the arrow screen. (See
page 46.)
: To display the freeway information
screen. (See page 45.)
: To display the intersection guid-
ance screen or the guidance
screen on the freeway. (See page
45.)
12
2006 IS350/250 Navigation
from Aug. ’05 Prod. (OM53515U)
D Screen configurations
SINGLE MAP
This is a regular map screen.
While on a d i f ferent screen, touching
will display the single map screen.
The screen shows the single map.
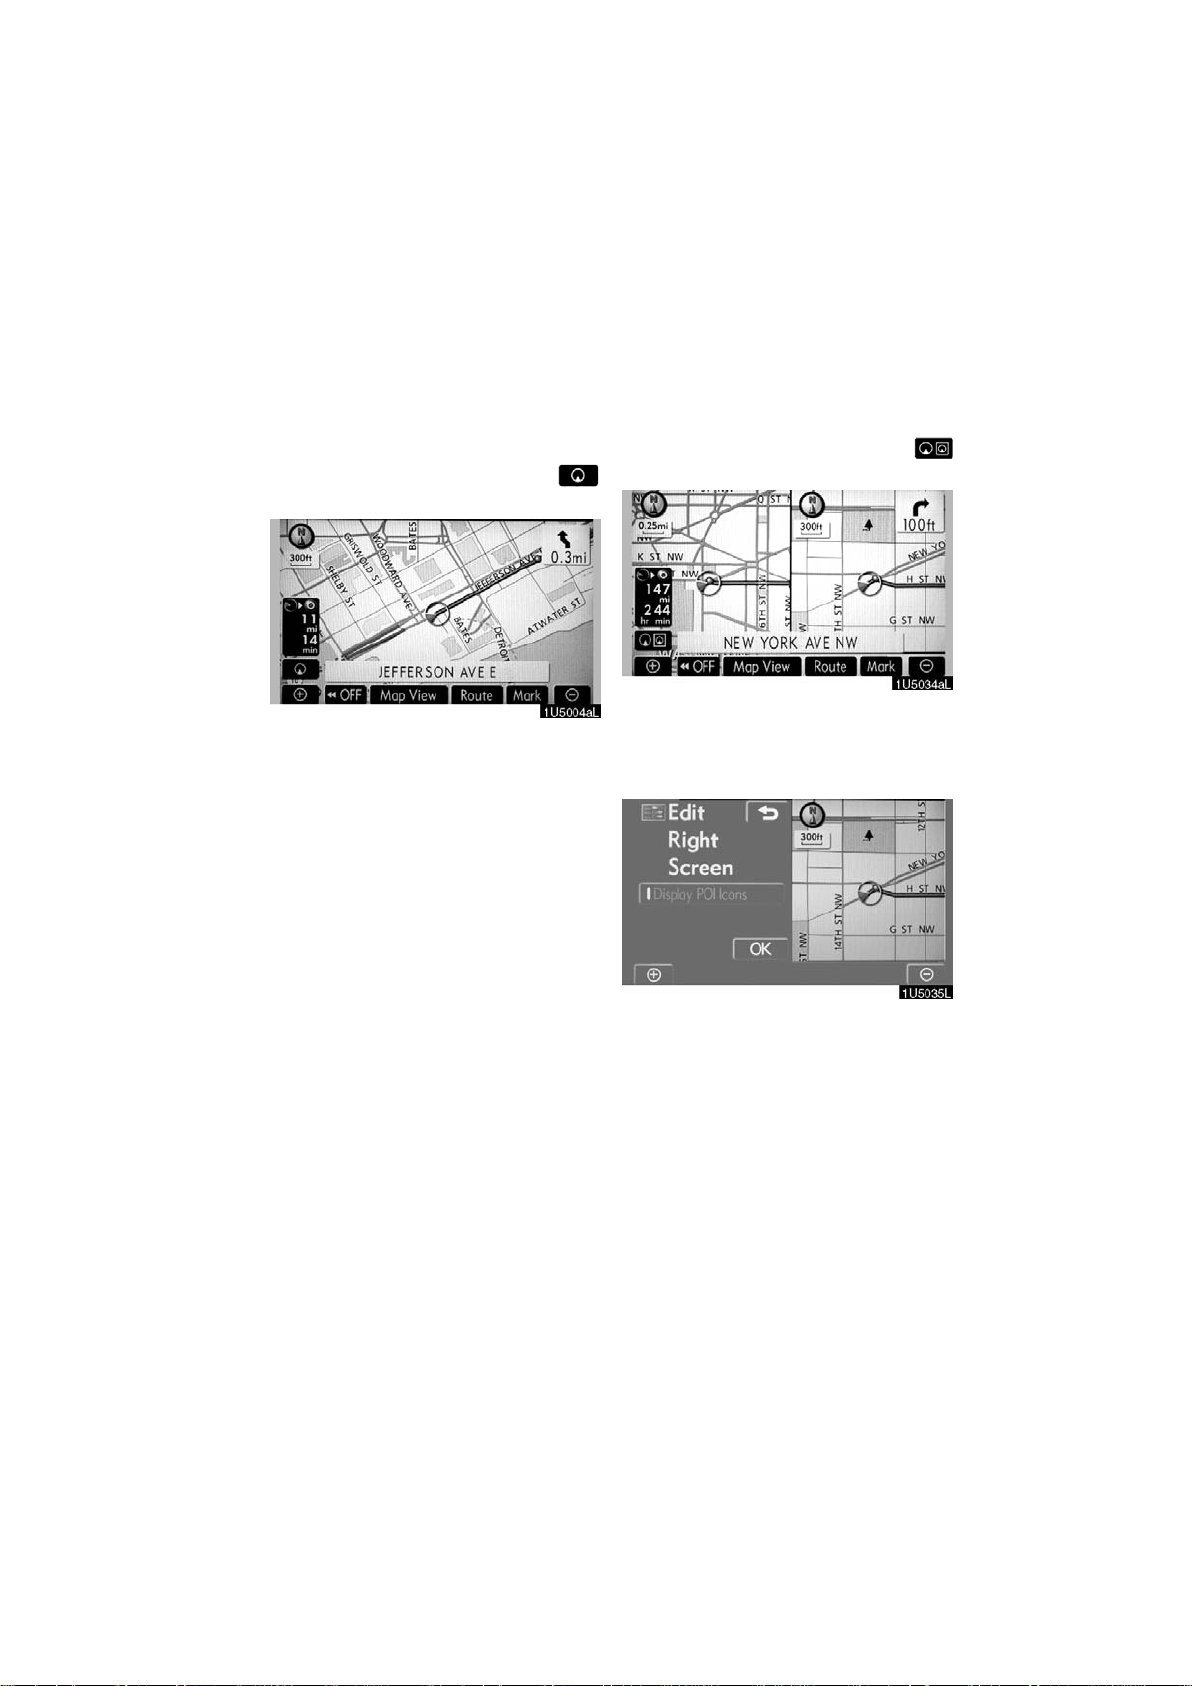
DUAL MAP
A map can be displayed split in two.
While on a d i fferent screen, touching
will display the dual map screen.
The screen shows the dual map. The map
on the left is the main map.
The right side map can be edited by touching any specific point on the right side map.
This screen can perform the following procedures:
1. Changing the map scale
2. Displaying the POI icon
3. Changing the orientation of the map
Touch “OK” when you complete editing.
The screen returns to the dual map screen.
13
2006 IS350/250 Navigation
from Aug. ’05 Prod. (OM53515U)
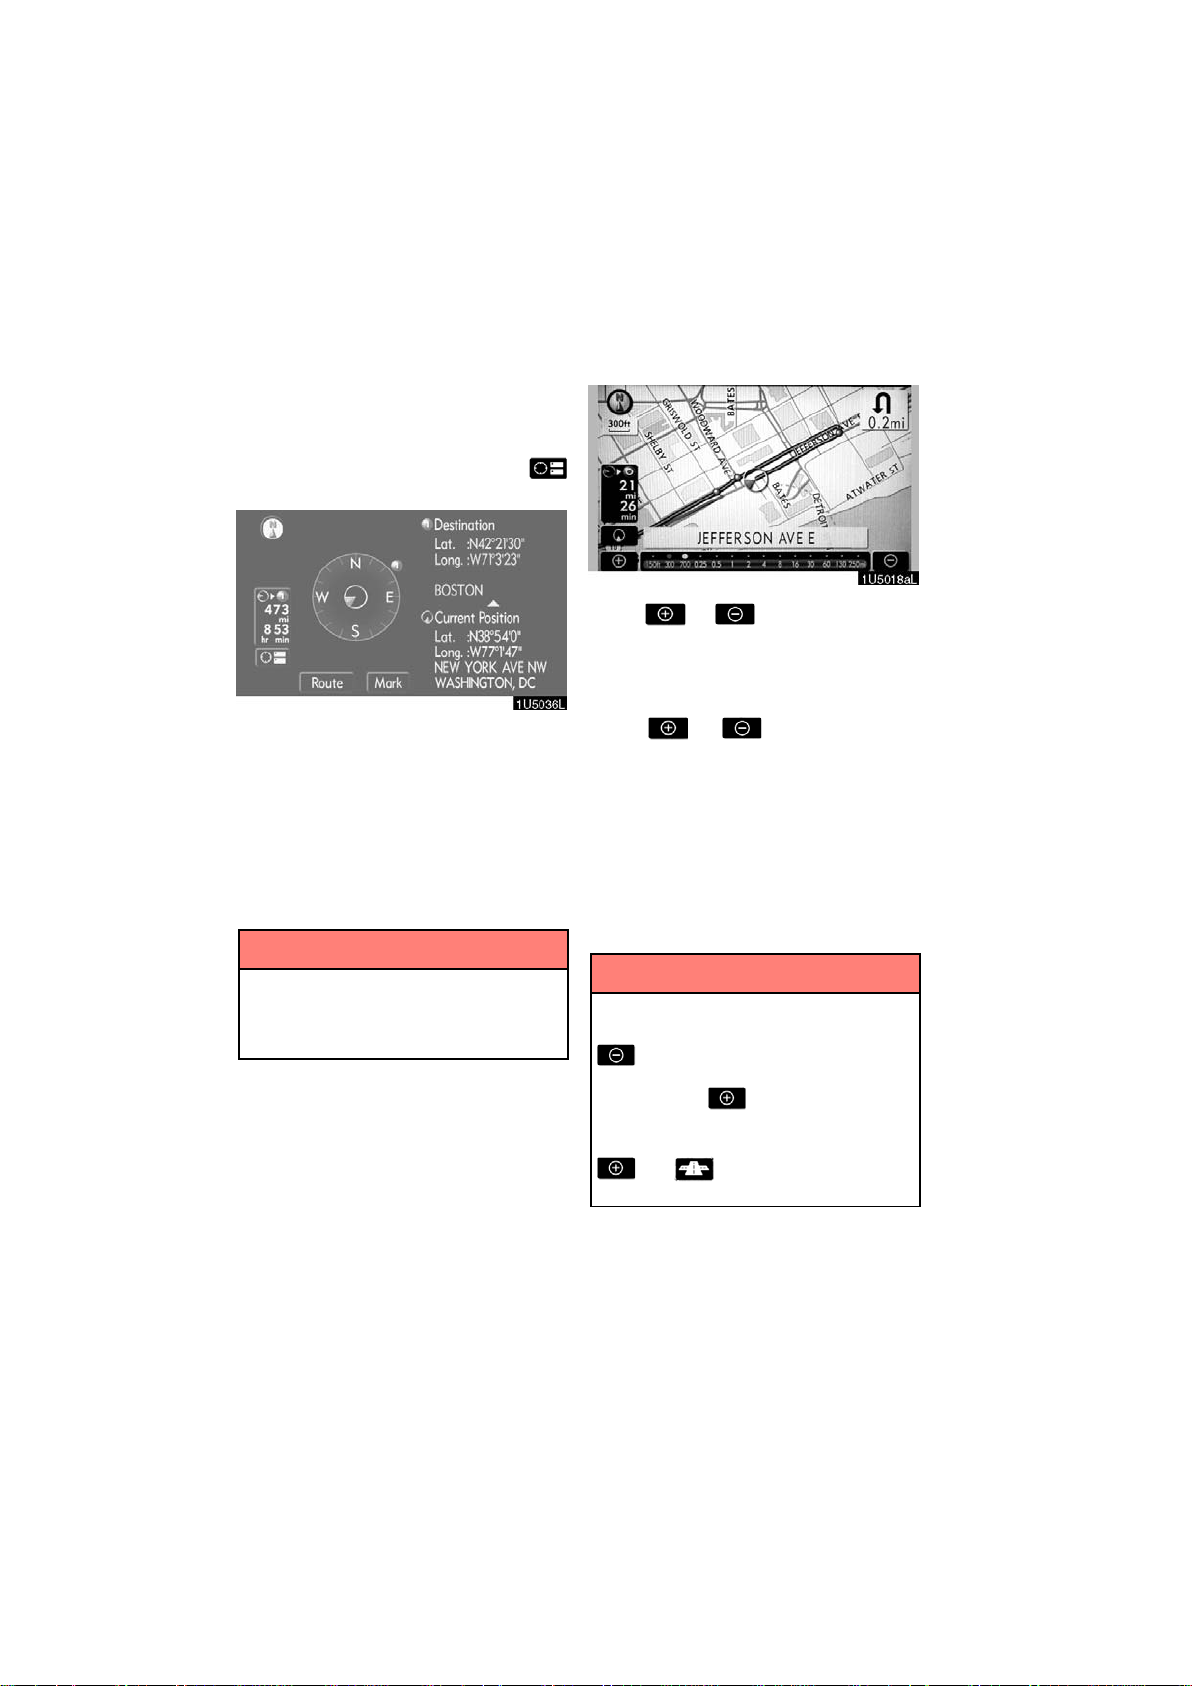
COMPASS MODE
— Map scale
Current vehicle position is indicated with a
compass, not with a map.
While on a d i fferent screen, touching
will display the compass mode screen.
Information about the destination and current position, as well as a compass, is displayed on the screen.
The destination mark is displayed in the direction of the destination. When driving refer to the longitude and latitude coordinates, and the compass, to make sure that
your vehicle is headed in the direction of
the destination.
INFORMATION
When the vehicle travels out of the
coverage area, the guidance screen
changes to the compass mode
screen.
Touch or to change the scale
of the map display. The scale bar and indi-
cator at the bottom of the screen indicates
the map scale menu. The scale range is
150 feet (50 m) to 250 miles (400 km).
Touch
changes normally . By continuing to touch
the button, the scale bar changes smoothly.
The scale of the map display can be
changed by to u c h i n g t h e s c a l e bar directly.
It is not available while driving.
The map scale is displayed under the
north−up symbol or heading−up symbol at
the top left of the screen.
or until the scale bar
INFORMATION
When the map scale is at the maximum range of 250 miles (400 km),
is not shown. When the map
scale is at the minimum range of 150
feet (50 m), is not shown. In
areas where the foot print map is
available the map scale changes from
to when at the minimum
range.
14
2006 IS350/250 Navigation
from Aug. ’05 Prod. (OM53515U)
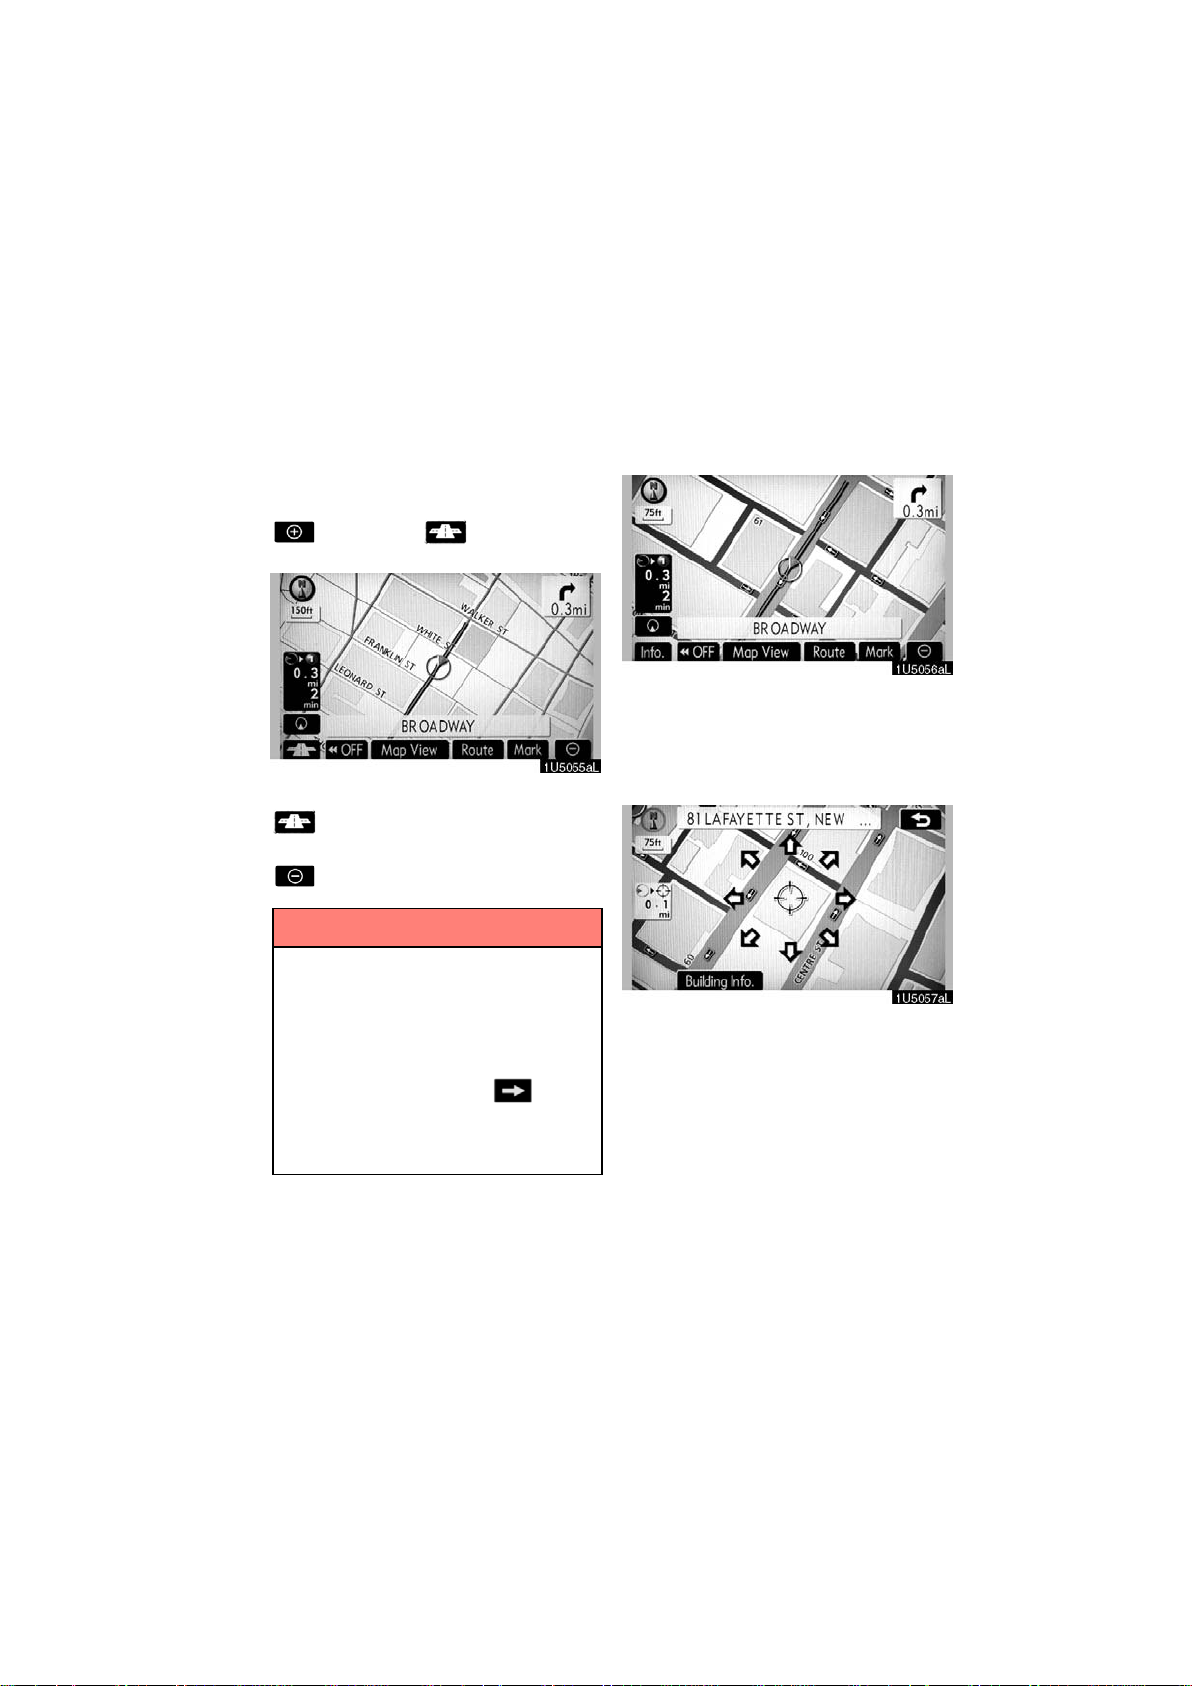
For the area which is covered by the foot
Foot print map
print map (Some areas in the following cities: Detroit, Chicago, N.Y., L.A), you can
switch to the foot print map on a scale of 75
feet (25 m).
D To switch to the foot print map
changes into when the map is
scaled down to 150 feet (50 m).
To display the foot print map, touch
.
To delete the foot print map display, touch
.
INFORMATION
D If the map or the current position is
moved to the area which is not covered by the foot print map, the
screen scale automatically
changes to 150 feet (50 m).
D On the foot print map, a one way
street is displayed by .
D It is not possible to perform scroll-
ing on the foot print map (one−
touch scroll) while driving.
D To display building information
Information is available only for buildings
for which information is recorded on the
map disc.
1. Touch “Info.” while the foot print
map is displayed.
If the map is displayed by a split screen,
the map will change into a single map display.
2. Using the eight−direction arrow,
move the cursor to the position of the
building to display building information.
3. Touch “Building Info.”.
15
2006 IS350/250 Navigation
from Aug. ’05 Prod. (OM53515U)
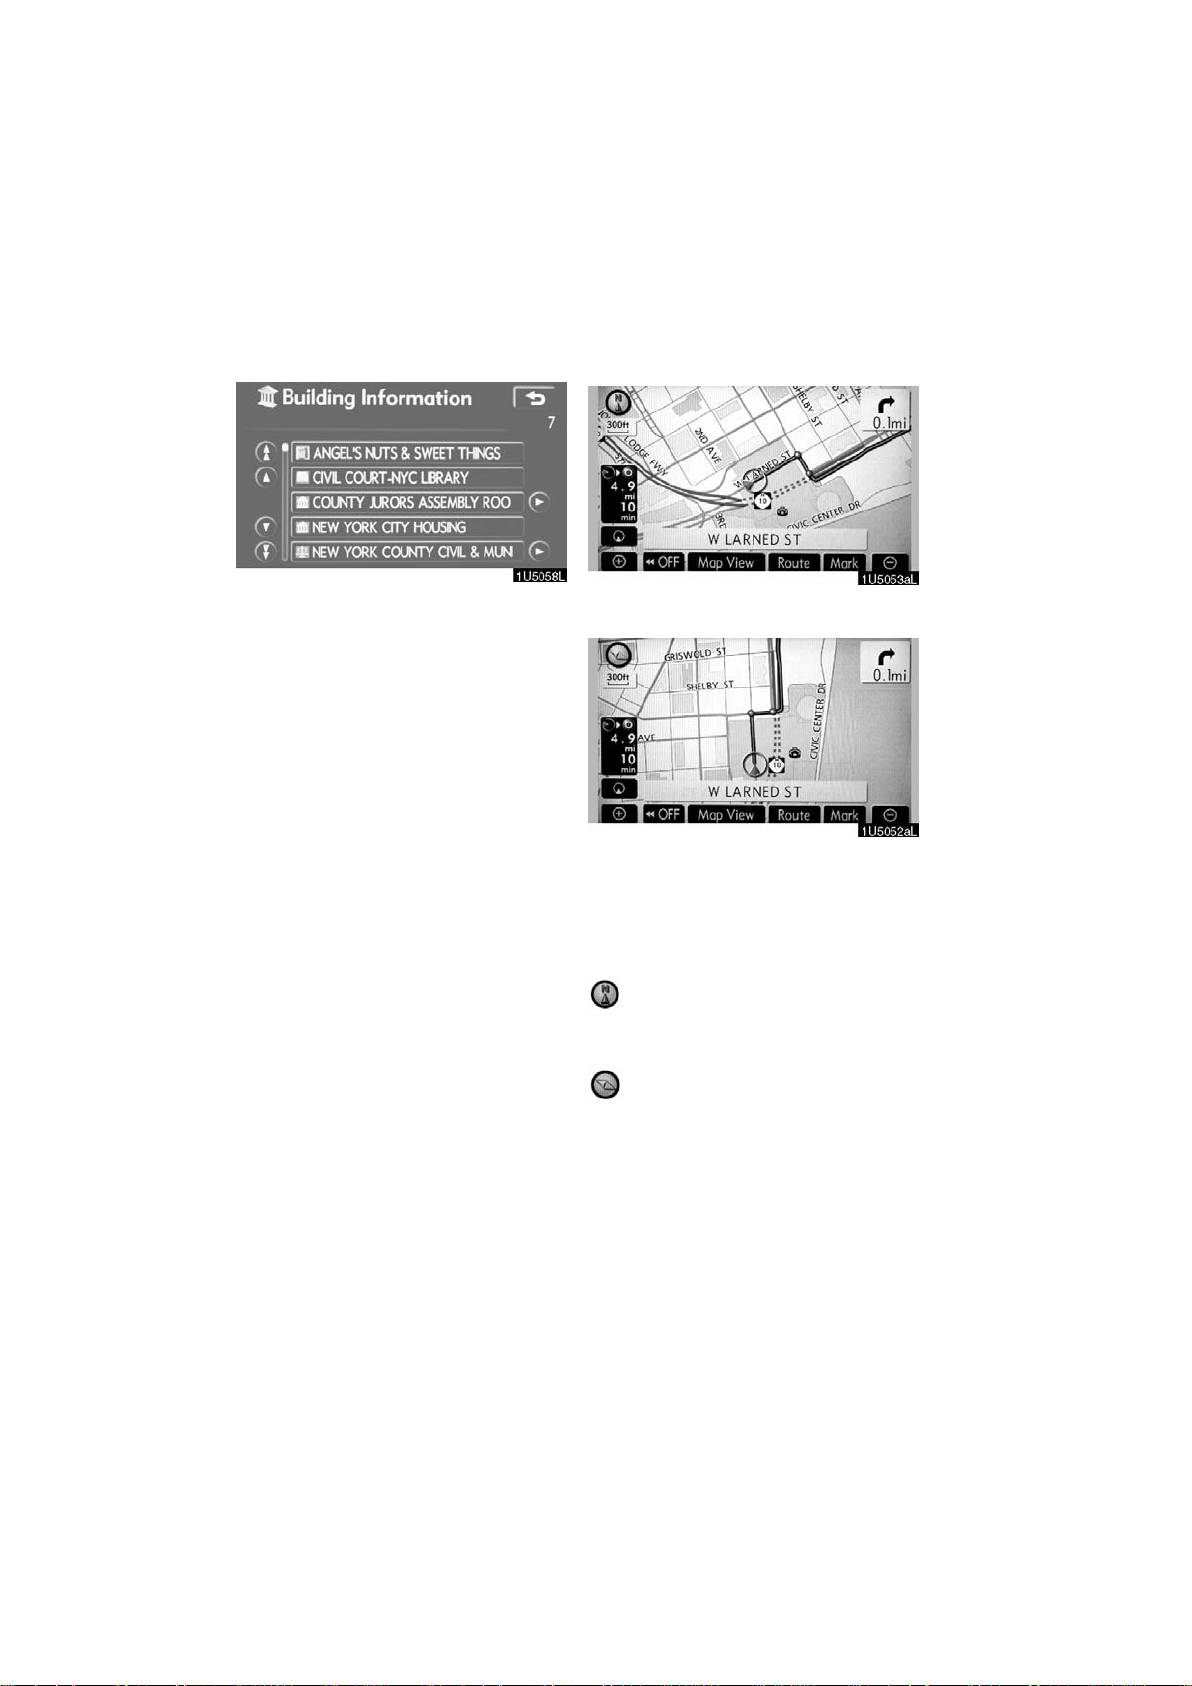
Details of POIs in some buildings may be
— Orientation of the map
displayed.
For detailed POI information, touch the
building name. You can see details of the
selected POIs.
" North−up screen
" Heading−up screen
The orientation of the map can be changed
from North−up to Heading−up by touching
the orientation symbol at the top left of the
screen.
North−up symbol
Regardless of the direction of vehicle travel, North is always up.
Heading−up symbol
The direction of vehicle travel is always up.
A red arrow indicates North.
16
2006 IS350/250 Navigation
from Aug. ’05 Prod. (OM53515U)

DESTINATION SEARCH
Destination search
SECTION II
D Quick reference (“Destination” screen) 18
D Destination search 19
Selecting the search area 20. . . . . . . . . . . . . . . . . . . . . . . . . . . . .
Destination search by Home 22. . . . . . . . . . . . . . . . . . . . . . . . . . .
Destination search by Quick access 22. . . . . . . . . . . . . . . . . . . .
Destination search by “Address” 23. . . . . . . . . . . . . . . . . . . . . . .
Destination search by “POI Name” 27. . . . . . . . . . . . . . . . . . . . .
Destination search by “POI Category” 30. . . . . . . . . . . . . . . . . . .
Destination search by “Emergency” 33. . . . . . . . . . . . . . . . . . . . .
Destination search by “Memory” 34. . . . . . . . . . . . . . . . . . . . . . . .
Destination search by “Previous” 34. . . . . . . . . . . . . . . . . . . . . . .
Destination search by “Map” 35. . . . . . . . . . . . . . . . . . . . . . . . . . .
Destination search by “Intersection” 35. . . . . . . . . . . . . . . . . . . .
Destination search by “Freeway Ent./Exit” 36. . . . . . . . . . . . . . .
Destination search by “Coordinates” 37. . . . . . . . . . . . . . . . . . . .
Destination search by “Phone #” 38. . . . . . . . . . . . . . . . . . . . . . .
D Starting route guidance 38
. . . . . . . . . . . . . . . . . . . . . . . . . . . . . . . . . . . . . .
. . . . . . . . . . . . . . . . . . . . . . . . . . . . . . . . .
. . . . . . . . . . . . . . . . . . . . .
17
2006 IS350/250 Navigation
from Aug. ’05 Prod. (OM53515U)
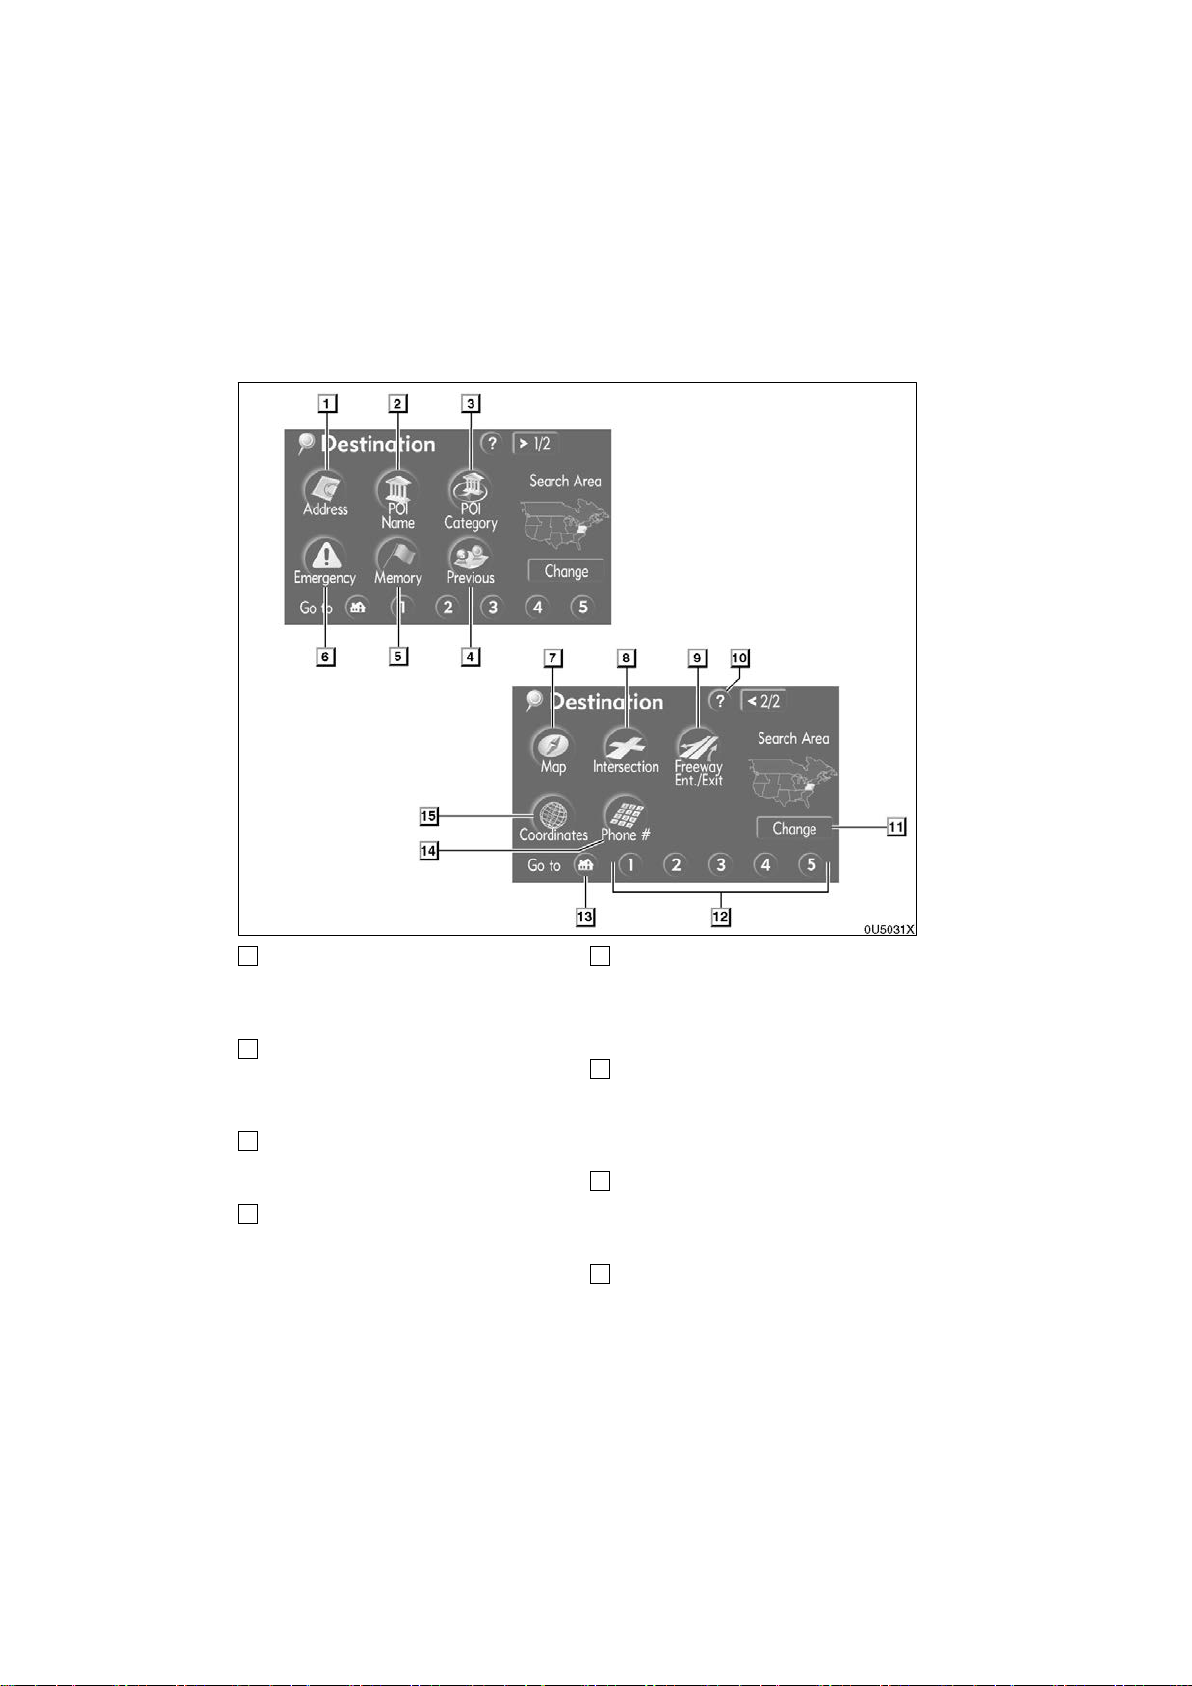
1
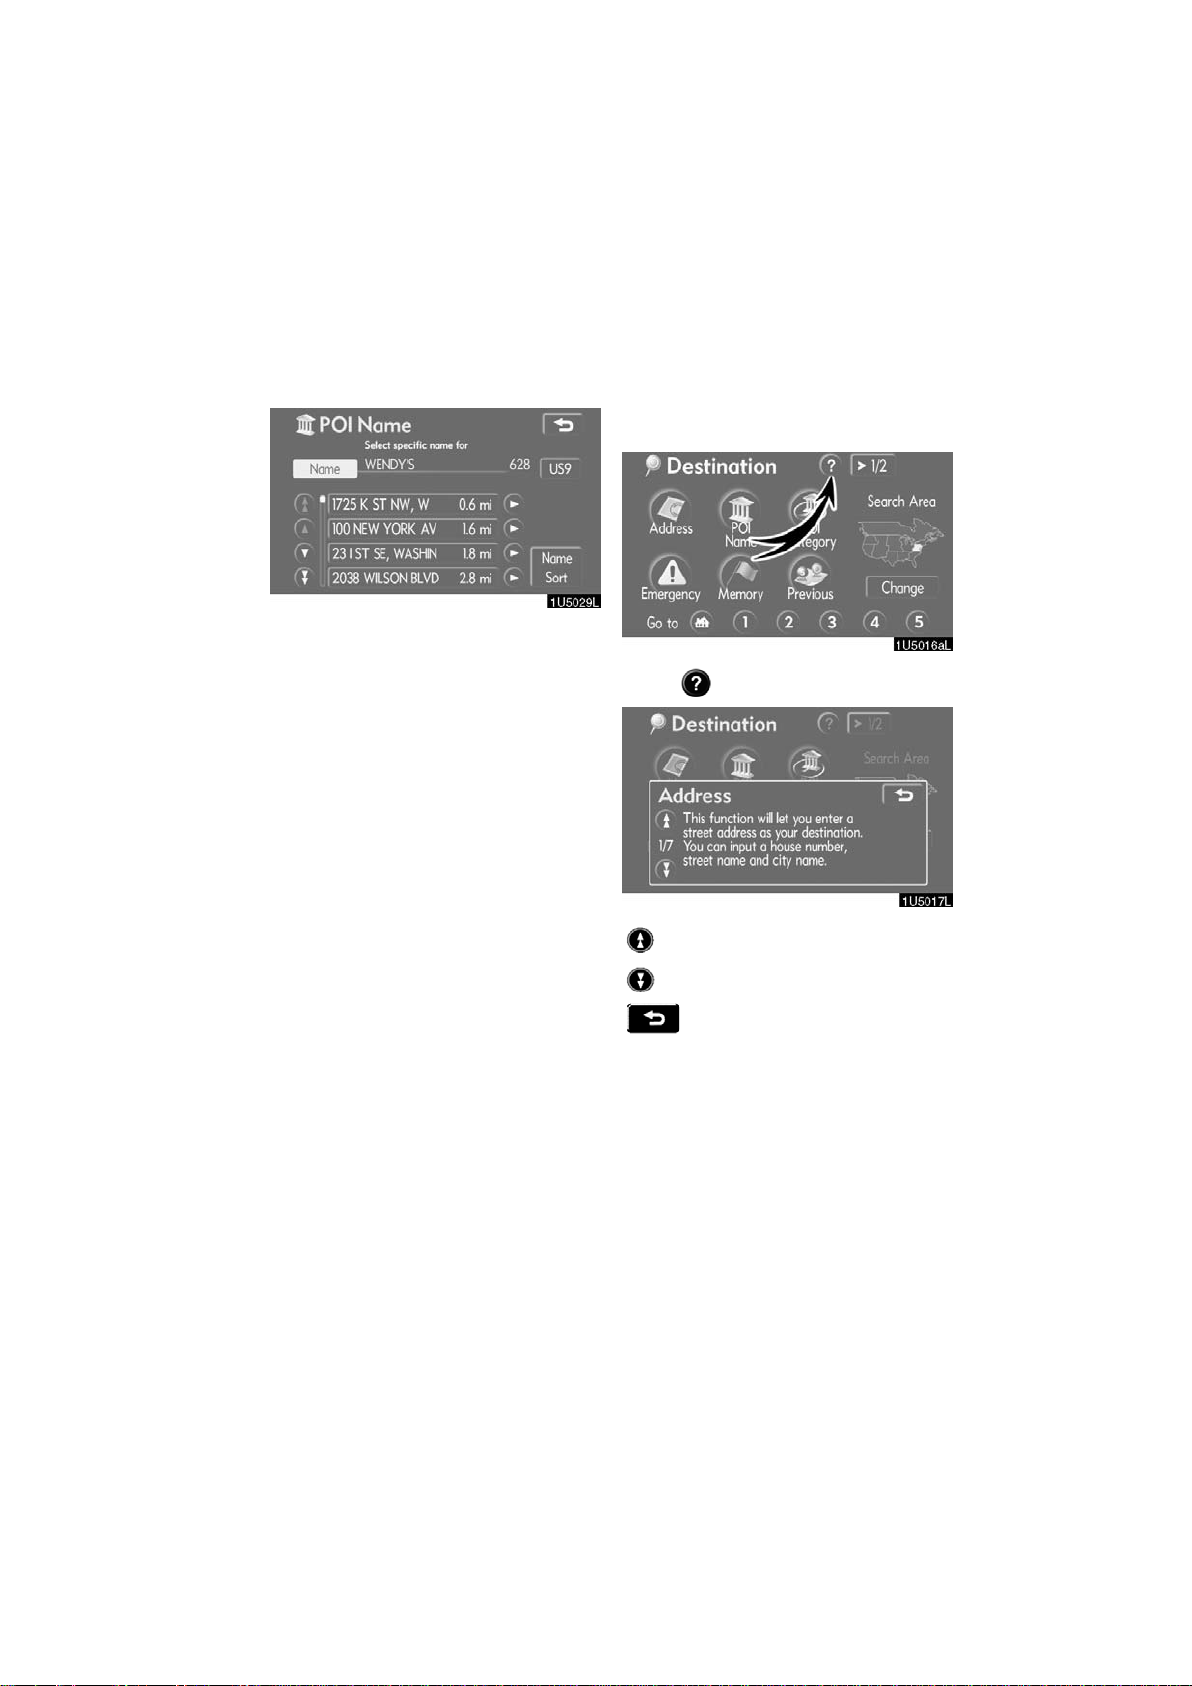
Quick reference (“Destination” screen)
“Address”
A house number and the street address
can be input by using the input keys.
23. . . . . . . . . . . . . . . . . . . . . . . . . . . . . . . . . .
2
“POI Name”
Select one of the many POIs (Points of Interest) that have already been stored in the
system’s database. 27. . . . . . . . . . . . . . . .
3
“POI Category”
A destination can be selected from the POI
category. 30. . . . . . . . . . . . . . . . . . . . . . . . .
4
“Previous”
A destination can be selected from any of
the last 100 previously set destinations
and from the previous starting point.
34. . . . . . . . . . . . . . . . . . . . . . . . . . . . . . . . . .
5
“Memory”
The location can be selected from the registered “Memory points”. (To register
memory points, see “ — Registering
memory points” on page 71.) 34. . . . . . . .
6
“Emergency”
One of the four categories of emergency
service points that are already stored in the
system’s database can be selected.
33. . . . . . . . . . . . . . . . . . . . . . . . . . . . . . . . . .
7
“Map”
A destination can be selected simply by
touching the location on the displayed
map. 35. . . . . . . . . . . . . . . . . . . . . . . . . . . . .
8
“Intersection”
The names of two intersecting streets can
be entered. This is helpful if only the general vicinity, not the specific address, is
known. 35. . . . . . . . . . . . . . . . . . . . . . . . . . .
18
2006 IS350/250 Navigation
from Aug. ’05 Prod. (OM53515U)

9
Destination search —
“Freeway Ent./Exit”
The name of a freeway (interstate) en-
trance or exit can be entered. 36. . . . . . .
10
“?”
Function help for the “Destination” screen
can be viewed on this screen. 7. . . . . . . .
11
“Change”
To change the search area, touch this but-
ton. 20. . . . . . . . . . . . . . . . . . . . . . . . . . . . . .
12
Quick access touch−screen buttons
One of 5 preset destinations can be selected by touching the screen directly. To
use this function, it is necessary to set the
“Quick Access” for each memory point.
(To register a “Quick Access”, see “ —
Editing memory points” on page 72.) 22.
13
Home touch−screen button
A personal home address can be selected
without entering the address each time. To
use this function, it is necessary to set
“Home” for the memory point. (To register
“Home”, see “ — Registering home” on
page 77.) 22. . . . . . . . . . . . . . . . . . . . . . . . .
14
“Phone #”
A destination can be entered by the tele-
phone number. 38. . . . . . . . . . . . . . . . . . . .
15
“Coordinates”
A destination can be set by using latitude
and longitude as coordinates. 37. . . . . . .
Push the “DEST” button and the “Destination” screen appears.
You can use one of 13 different methods to
search your destination. (See pages 22
through 38.)
INFORMATION
When searching the destination, the
response to the touch−screen button
may be slow.
19
2006 IS350/250 Navigation
from Aug. ’05 Prod. (OM53515U)

SELECTING THE SEARCH AREA ON
— Selecting the search area
THE DESTINATION SCREEN
1. Touch “Change” on the “Destination” screen to display a map of the
United States and Canada divided into
11 areas. (For map database information
and updates, see “Map database information and updates” on page NO TAG.)
SELECTING THE SEARCH AREA ON
THE INPUT SCREEN
Change the search area in order to set a
destination from a different area by using
“Address”, “POI Name”, “Freeway Ent./
Exit” or “Intersection”.
1. Touch the search area button like
“US8” on the input screen to display a
map of the United States and Canada
divided into 11 areas. (For map data-
base information and updates, see “Map
database information and updates” on
page NO TAG.)
2. Touch one of “US1” through “CAN”
to select a search area.
3. Touch “OK” and the “Destination”
screen returns.
2. Touch one of “US1” through “CAN”
to select a search area.
3. Touch “OK” and the previous
screen returns.
20
2006 IS350/250 Navigation
from Aug. ’05 Prod. (OM53515U)

Button
“US1”
“US2”
“US3”
“US4”
“US5”
“US6”
“US7”
“US8”
U.S.A.
States included in the search
area
Idaho
Oregon
Washington
California
Nevada
Arizona
Colorado
Montana
New Mexico
Utah
Wyoming
Iowa
Kansas
Minnesota
Missouri
North Dakota
Nebraska
South Dakota
Oklahoma
Texas
Illinois
Indiana
Kentucky
Michigan
Ohio
Wisconsin
Arkansas
Alabama
Louisiana
Mississippi
Tennessee
Connecticut
Massachusetts
Maine
New Hampshire
New Jersey
New York
Rhode Island
Vermont
“US9”
“US10”
Button
“CAN”
Washington, D.C.
Delaware
Maryland
New Jersey
Pennsylvania
Virginia
West Virginia
Florida
Georgia
North Carolina
South Carolina
Canada
Provinces and regions included in the search area
All provinces and regions in
Canada included in this button.
21
2006 IS350/250 Navigation
from Aug. ’05 Prod. (OM53515U)

— Destination search by
Home
— Destination search by
Quick access
Touch the home touch−screen button
on the “Destination” screen.
The screen changes and displays the map
location for home and the route preference. (See “Starting route guidance” on
page 38.)
To use this function, it is necessary to set
“Home” for the memory point. (To register
“Home”, see page 77.)
INFORMATION
Guidance starts from the current vehicle position to your home if “Enter”
is touched even while driving.
Touch any of the quick access touch−
screen buttons on the “Destination”
screen.
The screen changes and displays the map
location of the quick access point and the
route preference. (See “Starting route
guidance” on page 38.)
To use this function, it is necessary to set
“Quick Access” for each memory point.
(To register “Quick Access”, see page 74.)
INFORMATION
Guidance starts from the current vehicle position to the quick access
point if “Enter” is touched even while
driving.
22
2006 IS350/250 Navigation
from Aug. ’05 Prod. (OM53515U)

— Destination search by
“Address”
There are 2 ways to input a destination by
address.
Touch “Address” on the “Destination”
screen.
(a) Inputting a house number and a
street name
1. Touch numbers directly on the
screen to input a house number.
After inputting a house number, touch
“OK” to display the screen for inputting a
street name.
It is possible to input a street name first.
Touch “Street” to display the screen for inputting a street name.
2. Input the street name.
23
2006 IS350/250 Navigation
from Aug. ’05 Prod. (OM53515U)

3. When the desired street name is
found, touch the corresponding button.
The screen changes and displays the map
location of the selected destination and the
route preference. (See “Starting route
guidance” on page 38.)
If the same address exists in more than
one city, the current screen changes to the
city list screen.
4. Select or enter the desired city.
“Input Name”: To narrow down the listed
items by inputting the city name.
If inputting a street name first, the screen
changes. The house number can then be
input.
If the above screen appears, an address
range on the screen can be selected.
If the same address exists in more than
one city, the current screen changes to the
city list screen.
24
2006 IS350/250 Navigation
from Aug. ’05 Prod. (OM53515U)

(b) Selecting a city to search
Touch “City”.
To search by city , the following three methods are possible.
1. Input the city name
2. Select from the nearest 5 cities
3. Select from the last 5 cities
INFORMATION
D To change the search area, touch
“Search Area”.
D To cancel the city setting, touch
“Any City”.
INPUTTING THE CITY NAME
1. Touch “Input City Name”.
2. Input a city name.
3. Touch the button of the desired city
name from the displayed list.
“Map”: To display the selected destination
and the route preference. (See “Starting
route guidance” on page 38.)
The current screen changes to the screen
for inputting a house number or a street
name. (See “(a) Inputting a house number
and a street name” on page 23.)
25
2006 IS350/250 Navigation
from Aug. ’05 Prod. (OM53515U)

SELECTING FROM THE NEAREST 5
CITIES
1. Touch “Nearest 5 Cities”.
2. Touch the button of the desired city
name from the displayed list.
The current screen changes to the screen
for inputting a house number or a street
name. (See “(a) Inputting a house number
and a street name” on page 23.)
SELECTING FROM THE LAST 5 C I T I E S
Touch the button of the desired city
name.
If the navigation has not be used, no cities
will be displayed on the screen.
The current screen changes to the screen
for inputting a house number or a street
name. (See “(a) Inputting a house number
and a street name” on page 23.)
26
2006 IS350/250 Navigation
from Aug. ’05 Prod. (OM53515U)

— Destination search by
“POI Name”
1. Touch “POI Name” on the “Destination” screen.
2. Input the name of the Point of Interest.
3. Touch the button of the desired destination.
The screen changes and displays the map
location of the selected destination and the
route preference. (See “Starting route
guidance” on page 38.)
When inputting the name of a specific
Point of Interest, and there are two or more
sites with the same name, the list screen
is displayed.
Touch the button of the desired destination.
If the same name exists in more than one
city, a search can be performed more easily with “City” and “Category”. (See “(a)
Selecting a city to search” on page 28 and
“(b) Selecting from the categories” on page
30.)
INFORMATION
The desired Point of Interest can be
displayed on the map screen. (See “
— Display POI icons” on page 56.)
27
2006 IS350/250 Navigation
from Aug. ’05 Prod. (OM53515U)

(a) Selecting a city to search
Touch “City”.
To search by city , the following three methods are possible.
1. Input the city name
2. Select from the nearest 5 cities
3. Select from the last 5 cities
INPUTTING THE CITY NAME
1. Touch “Input City Name”.
2. Input the city name.
3. Touch the button of the desired city
name from the displayed list.
INFORMATION
D To change the search area, touch
“Search Area”.
D To cancel the city setting, touch
“Any City”.
28
2006 IS350/250 Navigation
from Aug. ’05 Prod. (OM53515U)

SELECTING FROM THE NEAREST 5
CITIES
1. Touch “Nearest 5 Cities”.
2. Touch the button of the desired city
name.
SELECTING FROM THE LAST 5 CITIES
Touch the button of the desired city
name.
If the navigation has not be used, no cities
will be displayed on the screen.
29
2006 IS350/250 Navigation
from Aug. ’05 Prod. (OM53515U)

(b) Selecting from the categories
— Destination search by
Touch “Category”.
If the desired POI category is on the
screen, touch the name to display a detailed list of the POI category.
If the desired POI category is not on the
screen, touch “List All Categories” to list
all POI categories.
“POI Category”
The destination can be set by selecting the
search point and the POI category.
Touch “POI Category” o n t h e “Destination” screen.
Set the search point by the following
method:
1. Input the city center
2. Set the current position as the search
point
3. Set the search point via the map
screen
4. Set the search point from any destination
It is possible to display the names of POIs
located within approximately 20 miles (32
km) from the selected search point.
When the desired category is touched, the
POI name list screen or POI name input
screen is displayed.
30
2006 IS350/250 Navigation
from Aug. ’05 Prod. (OM53515U)

INPUTTING THE CITY CENTER
1. Touch “Input City Center”.
2. Input the city center name.
3. Touch the button of the desired city
center name.
SETTING THE CURRENT POSITION AS
THE SEARCH POINT
Touch “Current Position”.
The search point is set at the current position, and the “POI Category” screen will be
displayed.
SETTING THE SEARCH POINT VIA THE
MAP SCREEN
1. Touch “Map”.
When an arrow facing the desired point is
touched, the map scrolls in that direction.
Releasing the finger from the arrow will
stop the scrolling.
2. Touch “Enter”.
The search point is set and the “POI Category” screen will be displayed.
When an arrow facing the desired point is
touched, the map scrolls in that direction.
Releasing the finger from the arrow will
stop the scrolling.
4. Touch “Enter”.
The search point is set and the “POI Category” screen will be displayed.
31
2006 IS350/250 Navigation
from Aug. ’05 Prod. (OM53515U)

SETTING THE SEARCH POINT FROM
DESTINATIONS
1. Touch the destination buttons at the
bottom of the screen.
D To search POIs near the search
point
When the search point is set, the “POI
Category” screen will be displayed.
When an arrow facing the desired point is
touched, the map scrolls in that direction.
Releasing the finger from the arrow will
stop the scrolling.
2. Touch “Enter”.
The search point is set and the “POI Category” screen will be displayed.
Select the desired POI categories.
“List”: If the desired POI categories have
already been selected, a list of POI will be
displayed from among the selected categories.
The selected category icon appears on the
top left of the screen.
If the desired POI category is not on the
screen, touch “List All Categories” to list
all POI categories.
Select the desired POI categories from
the list and touch “OK”.
The selected category icon appears on the
top left of the screen.
32
2006 IS350/250 Navigation
from Aug. ’05 Prod. (OM53515U)

“Select Category”: To return to the POI
— Destination search by
category selection screen.
“Show List”: To display the list of POIs in
the selected categories.
By touching the button of the desired item,
the screen changes and displays the map
location of the selected destination and the
route preference. (See “Starting route
guidance” on page 38.)
The direction arrows of POIs are displayed
only when the current position is set as the
search point.
“On Route”: When the indicator is illuminated by touching this button, the list of the
items searched along the route is displayed.
“Emergency”
1. Touching “Emergency” on the
“Destination” screen.
The display changes to a screen to select
police stations, dealers, hospitals or fire
stations. While driving, only nearby police
stations, dealers, hospitals, or fire stations
are shown. The current position is shown
with an address, and the latitude and the
longitude at the top of the screen.
2. Touch the desired emergency category.
The selected emergency category list is
displayed.
3. Touch the button of the desired destination.
The screen changes and displays the map
location of the selected destination and the
route preference. (See
guidance” on page 38.)
“Starting route
INFORMATION
The navigation system does not
guide in areas where route guidance
is unavailable. (See page NO TAG.)
33
2006 IS350/250 Navigation
from Aug. ’05 Prod. (OM53515U)

— Destination search by
“Memory”
— Destination search by
“Previous”
1. Touch “Memory” on the “Destination” screen.
A list of registered memory points is displayed. (To register or edit memory points,
see “My places” on page 70.)
2. Touch the button of your desired
memory point.
The screen changes and displays the map
location of the selected destination and the
route preference. (See “Starting route
guidance” on page 38.)
1. Touch “Previous”
tion” screen.
The previous starting point and up to 100
previously set destinations are displayed
on the screen.
2. Touch the button of the desired des-
tination.
The screen changes and displays the map
location of the selected destination and the
route preference. (See “Starting route
guidance” on page 38.)
on the “Destina-
INFORMATION
The list of previous destinations can
be deleted when the vehicle is
stopped. (See “ — Deleting previous
points” on page 83.)
34
2006 IS350/250 Navigation
from Aug. ’05 Prod. (OM53515U)

— Destination search by
“Map”
— Destination search by
“Intersection”
Touch “Map” on the second page of the
“Destination” screen.
The screen changes and displays the map
location that was previously displayed just
before the destination input operation and
the route preference. (See “Starting route
guidance” on page 38.)
INFORMATION
Guidance starts if “Enter” is touched
even while driving. However, the cursor cannot be moved.
1. Touch “Intersection” on the second
page of the “Destination” screen.
2. Input the name of the two intersecting streets which are located near the
destination to be set.
3. Touch the button of the desired
item.
After inputting the two intersecting streets,
the screen changes and displays the map
location of the selected destination and the
route preference. (See “Starting route
guidance” on page 38.)
35
2006 IS350/250 Navigation
from Aug. ’05 Prod. (OM53515U)

— Destination search by
“Freeway Ent./Exit”
1. To input a freeway entrance or exit,
touch “Freeway Ent./Exit” on the second page of the “Destination” screen.
If the same two streets cross at more than
one intersection, the screen changes and
displays the menu to select the city name
where the streets intersect. Select the city,
and the map location of the selected destination and the route preference. (See
“Starting route guidance” on page 38.)
Be sure to use the complete name of the
freeway or highway , including the hyphen,
when entering the destination. Freeways
and interstates use an “I” (I−405). US highways use the state designation before the
number (CA−118).
2. Select the desired freeway by touch-
ing the button.
3. Either a freeway “Entrance” or
“Exit” can be selected.
36
2006 IS350/250 Navigation
from Aug. ’05 Prod. (OM53515U)

4. Touch the button of the desired en-
— Destination search by
trance or exit name.
The screen changes and displays the map
location of the selected destination and the
route preference. (See
guidance” on page 38.)
“Input Name”: An applicable list is displayed by touching this button and inputting the name.
“Starting route
“Coordinates”
1. Touch “Coordinates” on the second
page of the “Destination” screen.
2. Input the latitude and the longitude.
3. When the input is finished, touch
“OK”.
By touching the button of the desired point,
the screen changes and displays the map
location of the selected destination and the
route preference. (See
guidance” on page 38.)
“Starting route
37
2006 IS350/250 Navigation
from Aug. ’05 Prod. (OM53515U)

— Destination search by
“Phone #”
Starting route guidance
1. Touch “Phone #” on the second
page of the “Destination” screen.
2. Input a telephone number.
3. After inputting a telephone number,
touch “OK”.
The screen changes and displays the map
location of the selected destination and the
route preference. (See “Starting route
guidance” on page 38.)
If there is more than one site having the
same number, the following screen will b e
displayed.
INFORMATION
D If there is no match for the tele-
phone number inputted, a list of
identical numbers with different
area codes will be displayed.
D To set a memory point as a destina-
tion using the phone number, the
number must be registered previously. (See page 76.)
After inputting the destination, the screen
changes and displays the map location of
the selected destination and the route preference.
1. When an arrow facing the desired
point is touched, the map scrolls in that
direction.
Releasing the finger from the arrow will
stop the scrolling.
2. Touch “Enter”.
The system starts route search and displays recommended routes.
If there is already a set destination, “Add
” and “Replace ” are displayed.
to
“Add to ”: To add a destination.
“Replace
tinations and set a new one.
“Route Preference”: To change the route
preference. (See page 40.)
“Info.”: If this button is displayed on the
top of the screen, touch it to view items
such as name, address, and phone number.
”: To delete the existing des-
38
2006 IS350/250 Navigation
from Aug. ’05 Prod. (OM53515U)

1
Current position
2
Destination point
3
Type of the route and the distance
4
Distance of the entire route
3. To start guidance, touch “Guide”.
“3 Routes”: To select the desired route
from three possible routes. (See page 40.)
“Route”: To change the route. (See
pages 50 and 52.)
INFORMATION
D Guidance can be suspended or re-
sumed. (See “Suspending and resuming guidance” on page 66.)
D If “Guide” is touched until a beep
sounds, demo mode will start.
Push the “MAP/VOICE” button to
finish Demo mode.
D The route for returning may not be
the same as that for going.
D The route guidance to the destina-
tion may not be the shortest route
nor a route without traffic congestion.
D Route guidance may not be avail-
able if there is no road data for the
specified location.
D When setting the destination on a
map with a scale larger than 0.5
miles (800 m), the map scale
changes to 0.5 miles (800 m) automatically. Set the destination
again.
D If a destination is entered, the road
nearest to the point you selected is
set as the destination.
CAUTION
Be sure to obey traffic regulations
and keep road conditions in mind
while driving. If a traffic sign on the
road has been changed, the route
guidance may provide wrong information.
39
2006 IS350/250 Navigation
from Aug. ’05 Prod. (OM53515U)

D To change the route before starting
guidance
ROUTE PREFERENCE
1. You can change route preference by
touching “Route Preference”.
2. Select the desired route preference
by touching the button.
When searching for a route, the system will
avoid routes when the indicator is off.
3. After choosing the desired route
preference, touch “OK”.
INFORMATION
D Even if the “Allow Freeway” indi-
cator is dimmed, the route cannot
avoid including a freeway in some
cases.
D If the calculated route includes a
trip by ferry, the route guidance
shows a sea route. After you travel
by ferry, the current vehicle position may be incorrect. Upon reception of GPS signals, it is automatically corrected.
3 ROUTES SELECTION
1. To select the desired route from
three routes, touch “3 Routes”.
2. Touch “Quick1”, “Quick2” or
“Short” to select the desired route.
“Quick1”: Recommended route.
This route is indicated by an orange line.
“Quick2”: Alternative route.
This route is indicated by a purple line.
“Short”: A route by which you can reach
the destination in the shortest distance.
This route is indicated by a green line.
“Info.”: To display the following information about each of the 3 routes.
40
2006 IS350/250 Navigation
from Aug. ’05 Prod. (OM53515U)

1
Time necessary for the entire trip
2
Distance of the entire trip
3
Toll road
4
Freeway
5
Ferry
41
2006 IS350/250 Navigation
from Aug. ’05 Prod. (OM53515U)

42
2006 IS350/250 Navigation
from Aug. ’05 Prod. (OM53515U)

ROUTE GUIDANCE
Route guidance
SECTION III
D Route guidance screen 44
D Typical voice guidance prompts 47
D Distance and time to destination 49
D Setting and deleting destination 50
Adding destinations 50. . . . . . . . . . . . . . . . . . . . . . . . . . . . . . . . . . .
Reordering destinations 50. . . . . . . . . . . . . . . . . . . . . . . . . . . . . . .
Deleting destinations 51. . . . . . . . . . . . . . . . . . . . . . . . . . . . . . . . .
D Setting route 52
Search condition 52. . . . . . . . . . . . . . . . . . . . . . . . . . . . . . . . . . . . .
Detour setting 53. . . . . . . . . . . . . . . . . . . . . . . . . . . . . . . . . . . . . . . .
Route preference 55. . . . . . . . . . . . . . . . . . . . . . . . . . . . . . . . . . . .
Starting route from adjacent road 55. . . . . . . . . . . . . . . . . . . . . . .
D Map view 56
Display POI icons 56. . . . . . . . . . . . . . . . . . . . . . . . . . . . . . . . . . . .
Route overview 59. . . . . . . . . . . . . . . . . . . . . . . . . . . . . . . . . . . . . .
Route preview 60. . . . . . . . . . . . . . . . . . . . . . . . . . . . . . . . . . . . . . .
Route trace 61. . . . . . . . . . . . . . . . . . . . . . . . . . . . . . . . . . . . . . . . . .
. . . . . . . . . . . . . . . . . . . . . . . . . . . . . . . . . . . . . . . . . .
. . . . . . . . . . . . . . . . . . . . . . . . . . . . . . . . . . . . . . . . . .
. . . . . . . . . . . . . . . . . . . . . . . . . . . . . . . . . .
. . . . . . . . . . . . . . . . . . . . . . . . . . .
. . . . . . . . . . . . . . . . . . . . . . . . . .
. . . . . . . . . . . . . . . . . . . . . . . . . . .
.
. . . .
43
2006 IS350/250 Navigation
from Aug. ’05 Prod. (OM53515U)

During route guidance, various types of
Route guidance screen
guidance screens can be displayed depending on conditions.
D Screen layout
1
Distance to the next turn and the
arrow indicating turning direction
2
Current street name
3
Distance and travel/arrival time to
the destination
4
Current position
5
Guidance route
INFORMATION
D If the vehicle goes off the guidance
route, the route is searched again.
D For some areas, the roads have not
been completely digitized in our
database. For this reason, the
route guidance may select road
that should not be traveled on.
D When you arrive at your destina-
tion, the destination name will be
displayed on the top of the screen.
Touching “OFF” clears the display .
D During freeway driving
During freeway driving, the freeway exit information screen will be displayed.
This screen displays the distance to the
next junction and exit, or POIs in the vicinity of the freeway exit.
1
Current position
2
Points of Interest that are close to
a freeway exit
3
Exit number and junction name
4
Distance from the current position
to the exit or junction
5
Current street name
: To display the selected map of the
exit vicinity.
: T o scroll for farther junctions or exits.
: T o scroll for closer junctions or exits.
: To scroll for the closest three junc-
tions or exits.
44
2006 IS350/250 Navigation
from Aug. ’05 Prod. (OM53515U)

D When approaching a freeway exit or
junction
When the vehicle approaches an exit or
junction, the guidance screen for the freeway will be displayed.
1
Road/area name
2
Distance from the current position
to the exit or junction
3
Current position
“OFF”: The guidance screen on freeway
disappears and the map screen appears.
When touching
“MAP/VOICE” button, the guidance
screen on freeway reappears.
or pushing the
D When approaching an intersection
When the vehicle approaches an intersection, the intersection guidance screen will
be displayed.
1
Next street name
2
Distance to the intersection
3
Current position
“OFF”: The intersection guidance screen
disappears and the map screen appears.
When touching
“MAP/VOICE” button, the intersection
guidance screen reappears.
or pushing the
45
2006 IS350/250 Navigation
from Aug. ’05 Prod. (OM53515U)

D Other screens
TURN LIST SCREEN
On this screen, the list of turns on the guidance route can be viewed.
Touching
the turn list.
1
Next street name or destination
name
2
Turn direction
3
Distance between turns
4
Current street name
during guidance displays
ARROW SCREEN
On this screen, information about next
turns on the guidance route can be viewed.
Touching
during guidance displays
the arrow screen.
1
Exit number, street name containing number or next street name
2
Turn direction
3
Distance to the next turn
4
Current street name
46
2006 IS350/250 Navigation
from Aug. ’05 Prod. (OM53515U)

Typical voice guidance
prompts
The voice guidance provides various messages as you approach an intersection, or
other point where you need to maneuver
the vehicle.
4.7 miles
0.25 miles
+α
4.2 miles
0.25 miles
1
2
“Proceed about 5 miles.”
“In a quarter of a mile, right
turn.”
3
4
“Right turn.”
(Beep sound only)
INFORMATION
On freeways, interstates or other
highways with higher speed limits,
the voice guidance will be made at
earlier points than on city streets in
order to allow time to maneuver.
1
“Proceed about 4 miles to the
traffic circle.”
2
“In a quarter of a mile, traffic
circle ahead, and then 3rd exit
ahead.”
3
4
5
“The 3rd exit ahead.”
“The exit ahead.”
(Beep sound only)
47
2006 IS350/250 Navigation
from Aug. ’05 Prod. (OM53515U)

One−way road
One−way road
∗
: The system indicates a U−turn if the distance between two one−way roads (of opposite directions) is less than 50 feet (15
m) in residential areas or 164 feet (50 m)
in non−residential areas.
1
“In half of a mile, make a legal
U−turn.”
The system announces the approach to
the final destination.
1
2
“Your destination is ahead.”
“You have arrived at your des-
tination. The route guidance is
now finished.”
2
3
“Make a legal U−turn ahead.”
(Beep sound only)
INFORMATION
D If the system cannot determine the
current vehicle position correctly
(in cases of poor GPS signal reception), the voice guidance may be
made early or delayed.
D If you did not hear the voice guid-
ance command, push the “MAP/
VOICE” button to hear it again.
D To adjust the voice guidance vol-
ume, see “Volume” on page 67.
48
2006 IS350/250 Navigation
from Aug. ’05 Prod. (OM53515U)

Distance and time to
destination
When the vehicle is on the guidance route,
the distance and the estimated travel/arrival time to the destination are displayed.
When the vehicle is not on the guidance
route, the distance and the direction of the
destination are displayed.
When driving on the guidance route and
more than one destination is set, the distance and the estimated travel/arrival time
from the current position to each destination are displayed.
1. Touch this button to display the following screen.
2. Touch the number button to display
the desired destination.
The distance, the estimated travel time
and the estimated arrival time from the current position to the selected destination
are displayed.
Estimated travel time is displayed.
Estimated arrival time is displayed.
To switch to estimated arrival
time.
To switch to estimated travel
time.
Displayed while driving off the
guidance route. The destination direction is indicated by
an arrow.
INFORMATION
When the vehicle is on the guidance
route, the distance measured along
the route is displayed. Travel time
and arrival time is calculated based
on the set vehicle speed information.
(See page 84.) However, when the vehicle is not on the guidance route, the
distance is the linear distance between the current position and the
destination.
49
2006 IS350/250 Navigation
from Aug. ’05 Prod. (OM53515U)

Setting and deleting
destination —
— Reordering destinations
— Adding destinations
Adding destinations and searching again
for the routes can be done.
1. Touch “Route”.
2. Touch “Add”.
3. Input an additional destination in
the same way as the destination
search. (See “Destination search” on
page 19.)
When more than one destination is set,
you can change the arrival order of the
destinations.
1. Touch “Route”.
2. Touch “Reorder”.
4. Touch the desired “Add” to determine the arrival order of the additional
destination.
3. Select the destination in the order of
arrival by touching the destination button.
Reordered number of arrival is displayed
on the right side of the screen.
Touching “Undo” will cancel each selected order number from the previously
input number.
50
2006 IS350/250 Navigation
from Aug. ’05 Prod. (OM53515U)

4. After selecting the destinations,
— Deleting destinations
touch “OK”.
The system searches for the guidance
route again, and displays the entire route.
Even if “OK” is not touched, the entire
route is displayed automatically within a
few seconds when the order is fixed.
A set destination can be deleted.
1. Touch “Route”.
2. Touch “Delete”.
When more than one destination is set, a
list will be displayed on the screen.
3. Touch the destination for deletion.
“Delete All”: To delete all destinations on
the list.
A message appears to confirm the request
to delete.
51
2006 IS350/250 Navigation
from Aug. ’05 Prod. (OM53515U)

4. To delete the destination(s), touch
Setting route —
“Yes”.
If “Yes” is touched, the data cannot be re-
covered.
If “No” is touched, the previous screen will
return.
5. If more than one destination is set,
touch “OK” after deleting the destinations.
The system searches for the guidance
route again, and displays the entire route.
— Search condition
You can designate the route conditions of
the route to the destination.
1. Touch “Route”.
2. Touch “Search Condition”.
3. Touch “Quick”, “Quick1”, “Quick2”
or “Short” and touch “OK”.
52
2006 IS350/250 Navigation
from Aug. ’05 Prod. (OM53515U)

The entire route from the starting point to
— Detour setting
the destination is displayed.
“Guide”: To start guidance.
“Route”: To change a route. (See pages
50 and 52.)
While the route guidance is operating, you
can change the route to detour around a
section of the route where a delay is
caused by road repairs, or an accident,
etc.
1. Touch “Route”.
2. Touch “Detour”.
53
2006 IS350/250 Navigation
from Aug. ’05 Prod. (OM53515U)

3. Select the button below to select the
desired detour distance.
“1 mile (km)”, “3 miles (km)” or “5 miles
(km)”: Touch one of these buttons to start
the detour process. After detouring, the
system returns to the original guidance
route.
“Whole Route”: By touching this button,
the system will calculate an entire new
route to the destination.
This picture shows an example of how the
system would guide around a delay
caused by a traffic jam.
1
This position indicates the location of
a traffic jam caused by road repairs or
an accident.
2
This route indicates the detour suggested by the system.
INFORMATION
D When your vehicle is on a freeway,
the detour distance selections are
5, 15, and 25 miles (km).
D The system may not be able to cal-
culate a detour route depending on
the selected distance and surrounding road conditions.
54
2006 IS350/250 Navigation
from Aug. ’05 Prod. (OM53515U)

— Route preference
— Starting route from
adjacent road
A number of choices are provided on the
conditions which the system uses to determine the route to the destination.
1. Touch “Route”.
2. Touch “Route Preference” to
change the conditions that determine
the route to the destination.
You can start the route guidance from the
adjacent road.
(ex. When route guidance is set on the
freeway, but the vehicle is driven parallel
along the freeway.)
1. Touch “Route”.
2. Touch “Start from Adjacent Road”.
When there is no adjacent road, this button
will not be displayed.
3. Select the desired route preference
by touching the button.
When searching for a route, the system will
avoid routes when the indicator is off.
4. After choosing the desired route
preference, touch “OK”.
55
2006 IS350/250 Navigation
from Aug. ’05 Prod. (OM53515U)

Map view —
— Display POI icons
Points of Interest such as gas stations and
restaurants can be displayed on the map
screen. You can also set their location as
a destination and use them for route guidance.
1. Touch “Map View”.
2. Touch “Display POI Icon” to display
a particular type of Point of Interest on
the screen.
D Selecting POIs to be displayed
Up to 5 categories of icons can be displayed on the screen.
Touch the desired Point of Interest
category to display POI location symbols on the map screen.
By selecting the desired POI category and
then touching “OK”, the selected POI
icons are displayed on the map screen.
To turn off the Points of Interest icon on the
map screen, touch “Delete”.
“Other POIs”: If the desired Point of Interest can not be found on the limited choice
screen, touch this button.
“Local POI List”: When searching for the
nearest Point of Interest, touch this button.
Then choose one of the categories. The
system will list the points within 20 miles
(32 km). (See page 58.)
A screen with a limited choice of Points of
Interest will be displayed. (To change the
displayed POI, see page 87.)
56
2006 IS350/250 Navigation
from Aug. ’05 Prod. (OM53515U)

Touch “Other POI’s” on the “Display
POI icons” screen.
When a Point of Interest category is selected from either the limited list or the
complete list, the screen will display symbols of those locations on the map screen.
Select the desired POI categories.
The selected category icon appears on the
top left of the screen.
By selecting the desired POI category and
then touching “OK”, the selected POI
icons are displayed on the map screen.
If the desired POI category is not on the
screen, touch “List All Categories” to list
all POI categories.
Select the desired POI categories from
the list.
The selected category icon appears on the
top left of the screen.
By selecting the desired POI category and
then touching “OK”, the selected POI
icons are displayed on the map screen.
To return to the POI category selection
screen, touch “More”.
57
2006 IS350/250 Navigation
from Aug. ’05 Prod. (OM53515U)

D To display the local POI list
Points of Interest that are within 20 miles
(32 km) of the current position will be listed
from among the selected categories.
D To set a POI as a destination
Y ou can select one of the Points of Interest
icons on the map screen as a destination
and use it for route guidance.
1. Touch “Local POI List” on the “Display POI icons” screen.
2. Touch the button of the desired
Point of Interest.
The selected Points of Interest are displayed on the map screen.
“On Route”: When the indicator is illuminated by touching this button, the list of the
items searched along the route is displayed.
1. Directly touch the Point of Interest
icon that you want to set as a destination.
The map will shift so that the icon is centered on the screen and overlaps with the
cursor
the current position is displayed on the
screen. The distance shown is measured
as a straight line from the current vehicle
position to the POI.
2. When the desired Point of Interest
overlaps with the cursor, touch “Enter
The screen changes and displays the map
location of the selected destination and
route preference. (See
guidance” on page 38.)
. At this time, the distance from
”.
“Starting route
58
2006 IS350/250 Navigation
from Aug. ’05 Prod. (OM53515U)

1. Touch “Map View”.
— Route overview
2. Touch “Route Overview”.
The entire route from the current position
to the destination is displayed.
“Guide”: To start guidance.
“Route”: To change the route. (See
pages 50 and 52.)
“Turn List”: The following screen displays
the list of the roads up to the destination.
You can scroll through the list of roads by
touching
names in the route may appear on the list.
If a road changes its name without requiring a turn (such as on a street that runs
through two or more cities), the name
change will not appear on the list. The
street names will be displayed in order
from the starting point, along with the distance to the next turn.
Touch “Map” on the “T urn List” screen.
The point which you choose is displayed
on the map screen.
or . However, not all road
These marks indicate the
direction in which you should
turn at an intersection.
59
2006 IS350/250 Navigation
from Aug. ’05 Prod. (OM53515U)

1. Touch “Map View”.
— Route preview
2. Touch “Route Preview”.
: To indicate the next destination.
: To preview the route to the next
destination.
: To preview the route to the next
destination in fast−forward mode.
: To stop the preview.
: T o review the route to the previous
destination or starting point.
: T o review the route to the previous
destination or starting point in
fast−forward mode.
: To indicate the previous destina-
tion or starting point.
60
2006 IS350/250 Navigation
from Aug. ’05 Prod. (OM53515U)

It is possible to store the traveled route up
— Route trace
to 124 miles (200 km) and retrace the route
on the display.
INFORMATION
This feature is available on the map
with more detailed map scale than 30
mile (50 km).
Touch “Map View”.
“Record”: To start recording the route
trace.
“Stop”: To stop recording the route trace.
If you touch “Stop” to display the following
screen.
Touching “Yes” stops recording and the
route trace remains displayed on the
screen.
Touching “No” stops recording and the
route trace is erased.
61
2006 IS350/250 Navigation
from Aug. ’05 Prod. (OM53515U)

62
2006 IS350/250 Navigation
from Aug. ’05 Prod. (OM53515U)

SECTION IV
ADVANCED FUNCTIONS
Descriptions of functions for more effective use
D Quick reference (“Menu” screen) 64
D Quick reference (“Setup” screen) 65
D Suspending and resuming guidance 66
D Volume 67
D User selection 68
D My places 70
D Setup 83
. . . . . . . . . . . . . . . . . . . . . . . . . . . . . . . . . . . . . . . . . . . . . . . .
. . . . . . . . . . . . . . . . . . . . . . . . . . . . . . . . . . . . . . . . . .
. . . . . . . . . . . . . . . . . . . . . . . . . . . . . . . . . . . . . . . . . . . . . .
Registering memory points 71. . . . . . . . . . . . . . . . . . . . . . . . . . . .
Editing memory points 72. . . . . . . . . . . . . . . . . . . . . . . . . . . . . . . .
Deleting memory points 77. . . . . . . . . . . . . . . . . . . . . . . . . . . . . . .
Registering home 77. . . . . . . . . . . . . . . . . . . . . . . . . . . . . . . . . . . . .
Deleting home 78. . . . . . . . . . . . . . . . . . . . . . . . . . . . . . . . . . . . . . .
Registering area to avoid 78. . . . . . . . . . . . . . . . . . . . . . . . . . . . . .
Editing area to avoid 79. . . . . . . . . . . . . . . . . . . . . . . . . . . . . . . . . .
Deleting area to avoid 82. . . . . . . . . . . . . . . . . . . . . . . . . . . . . . . . .
Deleting previous points 83. . . . . . . . . . . . . . . . . . . . . . . . . . . . . . .
. . . . . . . . . . . . . . . . . . . . . . . . . . . . . . . . . . . . . . . . . .
. . . . . . . . . . . . . . . . . . . . . . . . . .
. . . . . . . . . . . . . . . . . . . . . . . . . .
. . . . . . . . . . . . . . . . . . . . . . .
. . . . . . . .
63
2006 IS350/250 Navigation
from Aug. ’05 Prod. (OM53515U)

1
Quick reference (“Menu” screen)
“Suspend Guidance” and “Resume Guidance”
Suspends or resumes guidance. 66. . . .
2
“Volume”
Sets the volume for voice guidance.
67. . . . . . . . . . . . . . . . . . . . . . . . . . . . . . . . .
3
“?”
Function help for the “Menu” screen can be
viewed on this screen. 7. . . . . . . . . . . . .
4
“Map DVD”
Displays information regarding the disc
version or covered area. NO TAG. . . . . .
5
“Select User”
Up to 3 dif ferent settings for different users
can be memorized. 68. . . . . . . . . . . . . . .
6
“Setup”
Enables various settings for the navigation
system. 65, 83. . . . . . . . . . . . . . . . . . . . . .
7
“My Places”
Enables changes to “Memory points”,
“Home” and “Areas to avoid”. Enables
deletion of the previous point. 70. . . . . .
64
2006 IS350/250 Navigation
from Aug. ’05 Prod. (OM53515U)

1
Quick reference (“Setup” screen)
“Distance”
The distance units “km” or “miles” can be
selected. 84. . . . . . . . . . . . . . . . . . . . . . . .
2
“Estimated Travel Time”
The system to display the travel time and
the arrival time to the destination on the
route guidance screen can be set.
84. . . . . . . . . . . . . . . . . . . . . . . . . . . . . . . . .
3
“Keyboard Layout”
Key layout can be changed. 85. . . . . . . .
4
“Time Zone”
The desired time zone can be selected.
86. . . . . . . . . . . . . . . . . . . . . . . . . . . . . . . . .
5
“ Function”
The choice whether to display each touch−
screen button and current street name on
the map screen can be set. 87. . . . . . . .
65
6
“Display POI Icons”
A selection of 6 icons displayed on the
“Display POI Icons” top screen is possible.
87. . . . . . . . . . . . . . . . . . . . . . . . . . . . . . . . .
7
“Display Building Shapes”
Selection of either ON or OFF to display
the building shape on the map screen is
possible. 88. . . . . . . . . . . . . . . . . . . . . . . .
8
“Traffic Restrict. Notification”
Notification of seasonal restrictions can be
selected. 89. . . . . . . . . . . . . . . . . . . . . . . .
9
“Voice Recognition Guidance”
Voice recognition guidance can be set.
89. . . . . . . . . . . . . . . . . . . . . . . . . . . . . . . . .
2006 IS350/250 Navigation
from Aug. ’05 Prod. (OM53515U)

10
Suspending and resuming
“Voice Guidance in All Modes”
Voice guidance can be set in all modes.
90. . . . . . . . . . . . . . . . . . . . . . . . . . . . . . . . .
11
“Auto Voice Guidance”
Automatic voice guidance can be set.
90. . . . . . . . . . . . . . . . . . . . . . . . . . . . . . . . .
12
“Pop−up Message”
Selection of either ON or OFF to display
the pop−up message is possible. 91. . .
13
“Calibration”
Adjustment of the current vehicle position
mark can be done manually. 92. . . . . . .
14
“Default”
This touch−screen button initializes all of
the settings. 83. . . . . . . . . . . . . . . . . . . . .
15
“?”
Function help for the “Setup” screen can
be viewed. 7. . . . . . . . . . . . . . . . . . . . . . .
guidance
D To suspend guidance
1. Push the “MENU” button.
2. Touch “Suspend Guidance”.
INFORMATION
Without route guidance, “Suspend
Guidance” cannot be used.
The screen will return to the current position map without route guidance.
66
2006 IS350/250 Navigation
from Aug. ’05 Prod. (OM53515U)

D To resume guidance
Volume
1. Push the “MENU” button.
2. Touch “Resume Guidance”.
The screen will change to the current position map with route guidance.
The voice guidance volume can be adjusted or switched off.
1. Push the “MENU” button.
2. Touch “Volume”.
To adjust the volume, select the desired
level by touching the appropriate number.
If voice guidance is not needed, touch
“OFF” to disable the feature.
When selected the number or “OFF” will
be highlighted.
3. Touch “OK” to confirm your selection.
67
2006 IS350/250 Navigation
from Aug. ’05 Prod. (OM53515U)

INFORMATION
User selection
During route guidance, the voice
guidance continues even if the navi-
gation screen is changed to other
screens.
“Adaptive Volume Control”: By turning
“Adaptive V olume Control” on, the volume
is turned up automatically when the vehicle speed exceeds 50 mph (80 km/h).
To turn the “Adaptive Volume Control”
system on, touch the button. The indicator
will be highlighted.
The system can memorize the following
settings for up to three users.
D Map direction
D Map scale
D Map configuration
D Guidance mode
D Setup
D Volume
D Language
D Route trace
D Travel time/arrival time
D Right screen of dual map
D Road preference
D Maintenance notification
1. Push the “MENU” button.
2. Touch “Select User”.
68
2006 IS350/250 Navigation
from Aug. ’05 Prod. (OM53515U)

D T o register
D To change user
1. Touch “Memorize”.
The confirmation screen will be displayed.
2. To register, touch “Yes”. To return to
the previous screen, touch “No” or
.
When a button that is already registered is
touched, the following screen appears.
Touch “User number”.
The above message appears, then the
map screen will be displayed.
To replace, touch “Yes”. To cancel the replacement, touch “No” or .
69
2006 IS350/250 Navigation
from Aug. ’05 Prod. (OM53515U)

D To delete user
My places —
1. Touch “Delete”.
The confirmation screen will be displayed.
2. To delete, touch “Yes”. To return to
the previous screen, touch “No” or
.
Points or areas on the map can be registered.
The registered points can be used on the
“Destination” screen. (See “ — Destination
search by Home” on page 22, “ — Destination search by Quick access” on page 22
and “ — Designation search by Memory”
on page 34.)
Registered areas are avoided at the time of
route search.
1. Push the “MENU” button.
2. Touch “My Places”.
70
2006 IS350/250 Navigation
from Aug. ’05 Prod. (OM53515U)

— Registering memory
points
On this screen, the following operations
can be performed.
1
Registers memory points
(See “ — Registering memory points”
on page 71.)
2
Edits memory points
(See “ — Editing memory points” on
page 72.)
3
Deletes memory points
(See “ — Deleting memory points” on
page 77.)
4
Registers or deletes home
(See “ — Registering home” on page
77 or “ — Deleting home” on page 78.)
5
Registers areas to avoid
(See “ — Registering area to avoid”
on page 78.)
6
Edits areas to avoid
(See “ — Editing area to avoid” on
page 79.)
7
Deletes areas to avoid
(See “ — Deleting area to avoid” on
page 82.)
8
Deletes previous points
(See “ — Deleting previous points” o n
page 83.)
9
Number of remaining memory
points
10
Number of remaining areas to
avoid
1. Touch “Register”.
2. Enter the location in the same way
as for a destination search. (See “Des-
tination search” on page 19.)
After memory point registration is com-
pleted, the “Memory Point” screen will be
displayed.
3. Touch “OK”.
To edit registered information, see “ —
Editing memory Points” on page 72.
INFORMATION
Up to 106 memory points can be registered.
71
2006 IS350/250 Navigation
from Aug. ’05 Prod. (OM53515U)

The icon, attribute, name, location and/or
— Editing memory points
telephone number of a registered memory
point can be edited.
1. Touch “Edit”.
2. Touch the desired memory point
button.
3. Touch the button to be edited.
“Icon”: To select icons to be displayed on
the map. (See page 73.)
“Quick Access”: To set an attribute.
Memory points with a set attribute can be
used as a “Quick access” or “Home” button. (See page 74.)
“Name”: To edit memory point names.
The names can be displayed on the map.
(See page 75.)
“Location”: To edit location information.
(See page 76.)
“Phone #”: To edit telephone numbers.
(See page 76.)
4. Touch “OK”.
72
2006 IS350/250 Navigation
from Aug. ’05 Prod. (OM53515U)

D To change “Icon”
1. Touch “Icon” on the “Memory
Point” screen.
2. Touch the desired icon.
Turn the page by touching “Page 1”,
“Page 2” or “with Sound”.
SOUND ICONS
When the vehicle approaches the memory
point, the selected sound will be heard.
1. Touch “with Sound” on the “Change
Icon” screen.
2. Touch the desired sound icon.
The next screen appears when “Bell (with
Direction)” is touched.
Touch either or to adjust the
direction. Touch “Enter”.
The bell sounds only when the vehicle approaches this point in the direction that has
been set.
73
2006 IS350/250 Navigation
from Aug. ’05 Prod. (OM53515U)

D To change “Quick Access”
It is possible to change attributes of the
quick access points. Memory points with
a set attribute can be used as a “Quick
Access” or “Home” touch−screen button.
(See “ — Destination search by Home” on
page 22 and “ — Destination search by
Quick access” on page 22.)
1. Touch “Quick Access” on the
“Memory Point” screen.
2. Touch the desired attribute.
It is possible to replace a registered attribute.
DELETING “Quick Access”
1. Touch “Del.”.
2. To delete an attribute, touch “Yes”.
To return to the previous screen, touch
“No” or
.
3. To replace the attribute, touch
“Yes”. To return to the previous screen,
touch “No” or .
INFORMATION
One “Home” and five “Quick Access”
can be set.
74
2006 IS350/250 Navigation
from Aug. ’05 Prod. (OM53515U)

D To change “Name”
1. Touch “Name” on the “Memory
Point” screen.
DISPLAYING MEMORY POINT NAMES
The name of a memory point that may be
displayed on the map can be set.
2. Enter the name using the alphanumeric keys.
Up to 24 letters can be entered.
3. Touch “OK”.
The previous screen will be displayed.
To show the name, touch “ON” on the
“Memory Point” screen. To not show it,
touch “OFF”.
75
2006 IS350/250 Navigation
from Aug. ’05 Prod. (OM53515U)

D To change “Location”
1. Touch “Location” on the “Memory
Point” screen.
2. Touch the eight directional touch−
screen button to move the cursor to
the desired point on the map.
3. Touch “Enter”.
The previous screen will be displayed.
D To change “Phone #” (telephone
number)
1. Touch “Phone #” on the “Memory
Point” screen.
2. Enter the number using number
keys.
3. Touch “OK”.
The previous screen will be displayed.
76
2006 IS350/250 Navigation
from Aug. ’05 Prod. (OM53515U)

1. Touch “Delete”.
— Deleting memory points
— Registering home
2. Touch the button to be deleted.
“Delete All”: To delete all memory points
in the system.
3. To delete the memory point, touch
“Yes”. To cancel the deletion, touch
“No”.
If home has been registered, that information can be recalled by using the “Home”
touch−screen button on the “Destination”
screen. (See “ — Destination search by
Home” on page 22.)
1. Touch “Register”.
2. Enter the location in the same way
as for a destination search. (See “Des-
tination search” on page 19.)
When registration of home is completed,
the “Memory Point” screen will be displayed.
3. Touch “OK”.
To edit registered information, see “ —
Editing memory points” on page 72.
77
2006 IS350/250 Navigation
from Aug. ’05 Prod. (OM53515U)

1. Touch “Delete”.
— Deleting home
— Registering area to avoid
2. To delete home, touch “Yes”. To
cancel the deletion, touch “No”.
Areas you want to avoid because of traffic
jams, construction work or other reasons
can be registered as areas to avoid.
1. Touch “Register”.
2. Enter the location in the same way
as for a destination search, or display
the map of the area to be avoided. (See
“Destination search” on page 19.)
3. Touch the eight directional touch−
screen button to move the cursor
the desired point on the map.
4. Touch “Enter”.
to
78
2006 IS350/250 Navigation
from Aug. ’05 Prod. (OM53515U)

5. Touch either or to
— Editing area to avoid
change the size of the area to be
avoided.
6. Touch “OK”.
INFORMATION
D If a destination is input in the area
to avoid or the route calculation
cannot be made without running
through the area to avoid, a route
passing through the area to be
avoided may be shown.
D Up to 10 locations can be regis-
tered as points/areas to avoid. If
there are 10 locations already registered, the following message will
be displayed: “Unable to register
additional points. Perform operation again after deleting unnecessary points.”.
The name, location and/or area size of a
registered area can be edited.
1. Touch “Edit”.
2. Touch the desired area button.
79
2006 IS350/250 Navigation
from Aug. ’05 Prod. (OM53515U)

3. Touch the button to be edited.
“Name”: To edit the name of the area to
avoid. The names can be displayed on the
map. (See page 80.)
“Location”: To edit area location. (See
page 81.)
“Area Size”: To edit area size. (See page
82.)
“Active”: To tur n on or o f f the area to avoid
feature. To turn on the feature touch “ON”
on the “Edit Area to Avoid” screen. To turn
off the feature touch “OFF” on the “Edit
Area to Avoid” screen.
4. Touch “OK”.
D To change “Name”
1. Touch “Name” on the “Edit Area to
Avoid” screen.
2. Enter the name using alphanumeric
keys.
Up to 24 letters can be entered.
3. Touch “OK”.
The previous screen will be displayed.
80
2006 IS350/250 Navigation
from Aug. ’05 Prod. (OM53515U)

DISPLAYING NAMES OF AREAS TO B E
AVOIDED
The name of an area to be avoided that
may be displayed on the map can be set.
To show the name, touch “ON” on the
“Edit Area to Avoid” screen. To not
show it, touch “OFF”.
D To change “Location”
1. Touch “Location” on the “Edit Area
to Avoid” screen.
2. Touch the eight directional touch−
screen button to move the cursor to
the desired point on the map.
3. Touch “Enter”.
The previous screen will be displayed.
81
2006 IS350/250 Navigation
from Aug. ’05 Prod. (OM53515U)

D To change “Area Size”
— Deleting area to avoid
1. Touch “Area Size” on the “Edit Area
to Avoid” screen.
2. Touch either or to
change the size of the area to be
avoided.
3. Touch “OK”.
The previous screen will be displayed.
1. Touch “Delete”.
2. Touch the button to be deleted.
“Delete All”: To delete all registered areas
to avoid in the system.
3. To delete the area, touch “Yes”. To
cancel the deletion, touch “No”.
82
2006 IS350/250 Navigation
from Aug. ’05 Prod. (OM53515U)

The previous destination can be deleted.
— Deleting previous points
Setup
1. Touch “Delete Previous Points”.
2. Touch the b u tton you want to delete.
“Delete All”: To delete all previous points
in the system.
Setting the items shown on the “Setup”
screen can be done. (See page 65.)
1. Push the “MENU” button.
2. Touch “Setup”.
3. Touch the items to be set.
4. Touch “OK”.
The previous screen will be displayed.
3. To delete the point, touch “Yes”. To
cancel the deletion, touch “No”.
83
INFORMATION
To reset all setup items, touch “Default”.
2006 IS350/250 Navigation
from Aug. ’05 Prod. (OM53515U)

D Distance unit
Distance unit can be changed.
1. Touch “Setup” on the “Menu”
screen.
2. Touch “km” or “miles” of “Distance” to choose the distance unit.
The selected button is highlighted.
3. Touch “OK”.
INFORMATION
This function is available only in En-
glish or Spanish. T o switch language,
see “Selecting a language” on page
158.
D Estimated travel time
The speed that is used for the calculation
of the estimated travel time and the estimated arrival time can be set.
1. Touch “Setup” on the “Menu”
screen.
2. Touch “Set Speed” of the “Estimated Travel Time”.
3. Touch or to set the average
vehicle speeds for “Residential”, “Main
street”, and “Freeway”.
To set the default speeds, touch “De-
fault”.
4. After setting of the desired speeds is
completed, touch “OK”.
84
2006 IS350/250 Navigation
from Aug. ’05 Prod. (OM53515U)

INFORMATION
D The displayed time to the destina-
tion is the approximate driving time
that is calculated based on the selected speeds and the actual position along the guidance route.
D The time shown on the screen may
vary greatly depending on progress along the route, which may be
affected by road conditions such
as traffic jams, and construction
work.
D It is possible to display up to 99
hours 59 minutes.
D Input key layout
Key layout can be changed.
1. Touch “Setup” on the “Menu”
screen.
2. Touch “ABC” or “QWE” of “Keyboard Layout” to choose the input key
layout.
85
2006 IS350/250 Navigation
from Aug. ’05 Prod. (OM53515U)

LAYOUT TYPE
" “ABC” type
" “QWE” type
The selected button is highlighted.
3. Touch “OK”.
D Time zone
Time zone can be changed.
1. Touch “Setup” on the “Menu”
screen.
2. Touch “Change” of “Time Zone”.
The “Adjust Time Zone” screen will be displayed on the display.
3. Touch the desired time zone.
The selected button is highlighted.
“Daylight Saving Time”: Daylight saving
time can be set or cancelled.
To set daylight saving time, touch “ON”,
and to cancel it, touch “OFF”.
4. Touch “OK”.
86
2006 IS350/250 Navigation
from Aug. ’05 Prod. (OM53515U)

D Screen layout function
( Function)
Each touch−screen button and current
street name on the map screen can be displayed or hidden.
1. Touch “Setup” on the “Menu”
screen.
D POI category change
(Display POI Icons)
Select from among the 6 icons displayed
on the “Display POI Icons” top screen, so
that setting of the icons to be displayed on
the map screen can be done easily.
1. Touch “Setup” on the “Menu”
screen.
2. Touch “Change” of “ Function”.
3. Touch the button to be turned off.
The button becomes dimmed.
To set the default, touch “Default”.
4. Touch “OK”.
Then touch
“Setup” screen.
2. Touch “Change” of “Display POI
Icons”.
3. Touch the category button to be
changed.
to display page 2 of the
87
2006 IS350/250 Navigation
from Aug. ’05 Prod. (OM53515U)

D Display of building shape
When the “Display Building Shapes” feature is turned on, the system will display the
building shape on the map screen using a
scale of 150 feet (50 m) to 300 feet (100 m).
To turn the “Display Building Shapes” on:
1. Touch “Setup” on the “Menu”
screen.
4. Touch the category button to be displayed on the “Display POI Icons” top
screen.
5. Touch “OK”.
Then touch
“Setup” screen.
2. Touch “ON” of “Display Building
Shapes”.
The selected button is highlighted.
3. Touch “OK”.
to display page 2 of the
88
2006 IS350/250 Navigation
from Aug. ’05 Prod. (OM53515U)
 Loading...