

Page 1

2200 Series All-In-One
Setup Solutions
www.lexmark.comJanuary 2004
Lexmark and Lexmark with diamond design are trademarks of Lexmark
International, Inc., registered in the United States and/or other countries.
© 2003 Lexmark International, Inc. All rights reserved.
740 West New Circle Road
Lexington, Kentucky 40550
Page 2

Edition: January 2004
The following paragraph does not apply to any country where such provisions are incons istent
with local law: LEXMARK INTERNATIONAL, INC., PROV IDE S THIS PUBLICATION “AS IS” WITHOUT
WARRANTY OF ANY KIND, EITHER EX PRESS OR IMPLIED , INCLUDING, BUT NO T LIMI TED T O, T HE
IMPLIED WARRANTIES OF MERCHANTABILITY OR FITNESS FOR A PARTICULAR PURPOSE. Some
states do not allow disclaimer of express or implied warranties in certain transactions; therefore, this
statement may not apply to you.
This publication could include technical inaccuracies or typographical errors. Changes are periodically
made to the information herein; these changes will be incorporated in later editions. Improvements or
changes in the products or the programs described may be made at any time.
Comments about this publication may be addressed to Lexmark International, Inc., Department F95/032-2,
740 West New Circle Road, Lexington, Kentucky 40550, U.S.A. In the United Kingdom and Eire, send to
Lexmark International Ltd., Marketing and Services Department, Westhorpe House, Westhorpe, Marlow
Bucks SL7 3RQ. Lexmark may use or distribute any of the information you supply in any way it believes
appropriate without incurring any obligation to you. You can purchase additional copies of publications
related to this product by calling 1-800-553-9727. In the United Kingdom and Eire, call +44 (0)8704 440
044. In other countries, contact your point of purchase.
References in this publication to products, programs, or services do not imply that the manufacturer intends
to make these available in all countries in which it operates. Any ref erence to a product, program, or service
is not intended to state or imply that only that product, program, or service may be used. Any functionally
equivalent product, program, or service that does not infringe any existing intellectual property right may
be used instead. Evaluation and verification of operation in conjunction with other products, programs, or
services, except those expressly designated by the manufacturer, are the user’s responsibility.
Lexmark and Lexmark with diamond design are trademarks of Lexmark International, Inc., registered in the
United States and/or other countries.
Other trademarks are the property of their respective owners.
© 2003 Lexmark International, Inc.
All rights reserved.
UNITED STATES GOVERNMENT RIGHTS
This software and any accompanying documentation provided under this agreement are commercial
computer software and documentation developed exclusively at private expense.
Safety information
•Use only the power supply provided with this product or the manufacturer's
authorized replacement power supply.
•Connect the power supply cord to an electrical outlet that is near the product
and easily accessible.
•Refer service or repairs, other than those described in the user
documentation, to a professional service person.
CAUTION: Do not use the f ax feat ure during a lightning storm. Do not set up
this product or make any electrical or cabling connections, such as the power
supply cord or telephone, during a lightning storm.
2
Page 3
Start here
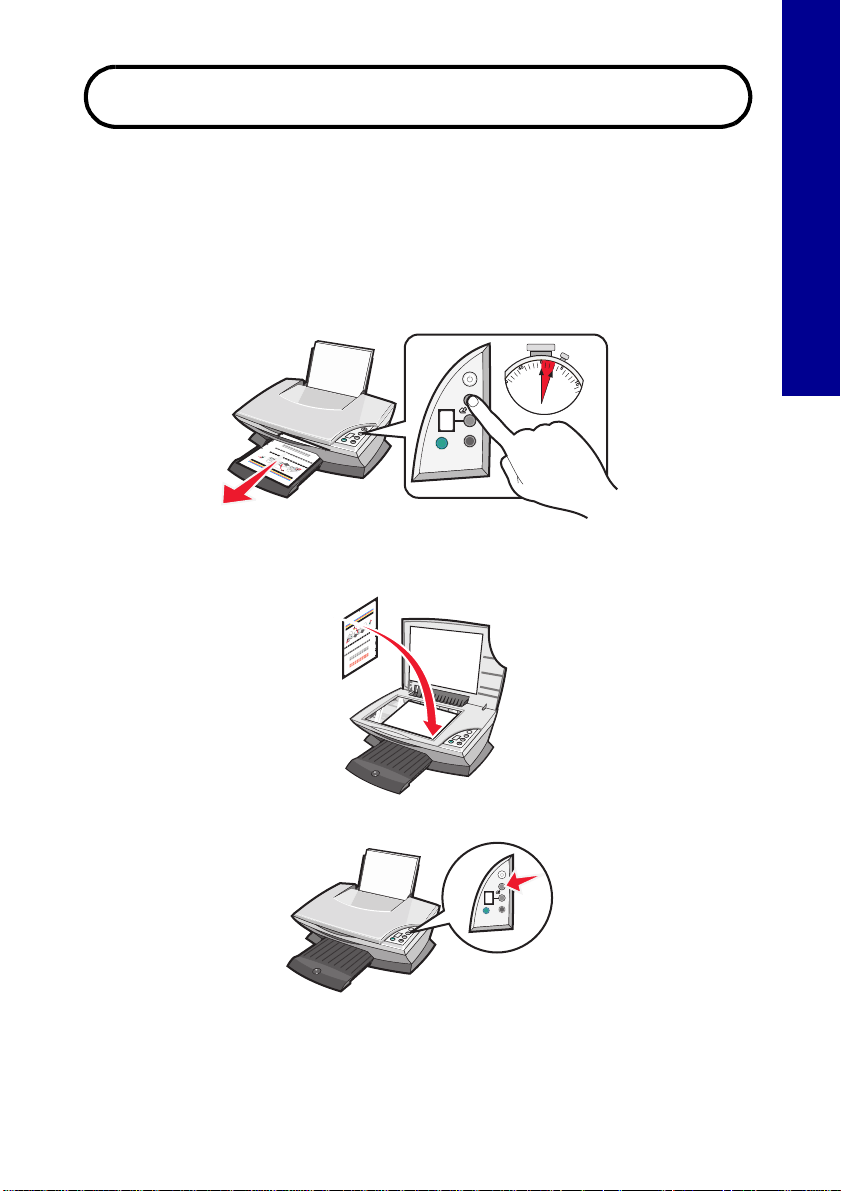
Aligning your print cartridges without a computer
Make sure you follow the steps on the Setup sheet to complete hardware
installation. Continue with the following steps to optimize print quality.
1 Make sure you have loaded paper into the paper support, and then press
and hold Scan for three seconds. For help, see “Using the control panel”
on page 4.
An alignment page prints.
2 Place the printed alignment page onto the scanner glass.
English
3 Press Scan. For help, see “Using the control panel” on page 4.
Once scanning is complete, your print cartridges are aligned for optimal
print quality.
3
Page 4

Using the control panel
1
English
6
5
Use this To
1 Power/Resume Turn the All-In-One on or off.
2 Scan Start the scanning process and open the Lexmark
All-In-One Center.
3 Copy Quantity Change the number of copies to make.
4 Black Copy Make a black and white copy.
Note: To make a black copy using the Best quality,
press this button and hold for at least two seconds.
5 Color Copy Make a color copy.
Note: To make a color copy using the Best quality,
press this button and hold for at least two seconds.
2
3
4
6 Display • View the number of copies selected.
• View error codes. For help clearing error codes, see
“Understanding error codes on the display” on
page 9.
Note: You can print using only the color cartridge. For opt imal pri nt
quality, install a black print cartridge.
4
Page 5

Setup troubleshooting
When your All-I n-One has a p roblem, before contacting Lexmark Customer
Support, check the following items.
Make sure:
• You have only one Lexmark 2200 Series attached to your computer.
• You are using one of the following supported operating systems:
• Windows 98 • Windows 2000
• Windows XP • Mac OS X version 10.1.5 or later
• Windows Me • Mac OS X version 10.2.3 or later
• The power cord is firmly attached to the All-In-One and an electrical outlet.
• The USB cable is securely attached to your computer and to your printer.
• Your printer is on.
Note: If your All-In-One is on, the Power button is lit.
• The computer is on if y o u are sca nni ng or printing.
• You removed the sticker and tape from the bottom of the print cartridges.
• You installed the print cartridges correctly.
The color print cartridge is secure in the left carrier and the black print
cartridge is secure in the right carrier.
• The paper is loaded correctly.
English
Note: Do not force paper into the printer.
• There are no flashing error codes on the All-In-One display. For help, see
“Understanding error codes on the display” on page9.
• You installed the software. To check:
Windows:
From your desktop, click Start
If Lexmark 2200 Series does not appear in your list of programs, install the
All-In-One software.
Macintosh:
On your desktop, check to see if there is a Lexmark 2200 Series folder.
If it does not appear on your desktop, install the All-In-One software.
Æ Programs (or All Programs).
5
Page 6

• The Lexmark 2200 Series is set as your default printer.
Windows:
1 Click Start Æ Settings Æ Printers (Windows 98, Me, 2000).
Click Start Æ Control Panel Æ Printers and Faxes (Windows XP).
2 Right-click the Lexmark 2200 Series and make sure that Set as
English
Default is selected.
Macintosh:
1 From the Finder window, choose Applications Æ Utilities Æ Print
Center.
The Printer List dialog is displayed.
2 Select Lexmark 2200 Series.
3 Click Make Default.
Power light does not come on
1 Check the power supply connections.
2 Press Power on the control panel.
Alignment page does not print
1 Make sure you remove the sticker and transparent tape from both print
cartridges.
2 Make sure the colo r print cartridge is secure in the left carrier and the b la c k
print cartr idge is secure in the right carrier.
3 Make sure you loaded the paper correctly and did not force the paper into
the printer.
Print quality is poor
Align your print cartridges. For help, see “Aligning your print cartridges without a
computer” on page 3.
6
Page 7

When I insert the printer software CD, nothing happens
Windows:
1 Eject and reinsert the printer software CD.
If the printer software installat ion screen doe s not appear , co ntinue w ith the
following step.
2 From your desktop, double-click My Computer (In Windows XP, click
Start
Æ My Computer).
3 Double-click the CD-ROM drive icon. If necessary, double-click setup.exe.
4 When the printer software installation screen appears, click Install.
5 Follow the instructions on each screen to complete printer software
installation.
Macintosh:
1 Remove the All-In-One software CD from the CD-ROM drive.
2 Restart your computer.
3 Insert the All-In-One software CD.
4 Double-click the Install icon.
5 Follow the instructions on each screen to complete printer software
installation.
The All-In-One is not communicating with the computer
English
1 Disconnect and reconnect both ends of the USB cable.
2 Unplug the printer from the electrical wall outlet.
3 Reconnect the pow e r suppl y.
4 Make sure your All-In-One is on.
Note: If your All-In-One is on, the Power button is lit.
5 Restart the computer.
Note: If the problem continues, remove and th en reinstall the
software. For help, see “Removing and reinstalling the
software” on page 8.
7
Page 8

Installation appears incomplete
Windows users:
1 Right-click the My Computer icon.
Windows XP users, click Start to access the My Computer icon.
English
2 Click Properties.
3 Select the Hardware tab, and then click the Device Manager button.
4 Look for the Other Devices category. If there are any Lexmark devices
shown here, highlight them, and then press the Delete key.
Note: The Other Devices c ategory displays only wh en unknown
devices a re p res ent. Do not delete an y L exmark items unless
they are present under the Other Devices category.
5 Insert the CD, and install the software again. Do not restart the computer.
For help, refer to the setup documentation.
Removing and reinstalling the software
If the All-In-One is not functioning properly or if a communications error message
appears when you try to use your All-In-One, remove and then reinstall the
All-In-One software.
Windows:
1 From your desktop, click Start Æ Programs Æ Lexmark 2200 Series Æ
Uninstall.
2 Follow the instructions on your screen to remove the All-In-One software.
3 Restart your computer before reinstalling the All-In-One software.
4 Insert the CD, and then follow the instructions on your screen to install the
software.
Mac OS X:
1 From your desktop, double-click the Lexmark 2200 Series folder.
2 Double-click the Lexmark 2200 Series Uninstaller icon.
3 Complete the user authentication notice, and then click OK.
4 Click Uninstall, and then click OK.
8
Page 9

Understanding error codes on the display
When your control panel displays blinking numbers, see the table to correct the
problem.
Error code What you should do
02
Pap er Out
03
Pap er Jam
04-05
Carrier Stall
1 Load paper .
2 Press Power to feed paper and resume printing.
1 Press Power.
2 Lift the scanner unit until the scanner support keeps it
open.
3 Pull gently to remove the paper jam.
4 Close the scanner unit.
5 Press Power.
6 Print your document again.
1 Press Power.
2 Open the scanner unit.
3 Make sure nothing is blocking the paper or print cartridge
path.
4 Close the scanner unit.
5 Press Power.
6 Print your document again.
If this does not correct your problem, contact Lexmark
Customer Support.
English
06-14 Contact Lexmark Customer Support.
Copying without a computer
1 Open the scanner lid of the All-In-One.
2 Place the item y ou w ant to cop y f ace d ow n on th e glas s, and the n close th e
scanner lid.
3 Press Copy Quantity repe ate dly un til the n u mb er of c op ies (1-9) you want
to make appears on the display.
4 Press Black Copy or Color Copy to copy using Normal quality.
Note: To copy using Best quality, press and hold Black Copy or
Color Copy for at least two seconds.
9
Page 10

Using other help sources
If these solutions do not solve your problem:
• Refer to the setup documentation that came with your All-In-One.
• Refer to the User’s Guide or Help for information about using and
English
maintaining your All-In-One and for more troubleshooting information.
Windows:
To access the User’s Guide, click Start
Æ View User’s Guide.
Series
Mac OS X:
From your desktop, double-click the Lexmark 2200 Series folder.
1 Double-click the Lexmark 2 200 Series Help icon.
The Main Page appears.
2 From the Main Page, type a keyword in the search box or click the
Troubleshooting topic link.
• Refer to the Lexmark Solution Center software or Lexmark 2200 Series
Utility for more troubleshooting information:
Windows:
1 Click Start Æ Programs (or All Programs) Æ Lexmark 2200
Series Æ Lexmark Solution Center.
2 Click the Troubleshooting tab on the left side of the screen.
Mac OS X:
• From your desktop, double-click the Lexmark 2200 Series folder 2200
Series Utility
• Double-click the wrench icon on the All-In-One Center software dialog,
if available.
• From your software application, choose File Æ
menu in the upper left corner, choose Printer Services. Double-click
Lexmark 2200 Series Utility.
• Go to http://support.lexmark.com/ for help.
Æ Programs Æ Lexmark 2200
Æ Print. From the pop-up
ÆÆ
10
 Loading...