


Lexmark X1110, X1130, X1140, X1150, X1155 User Guide
...X1100 Series
All-In-One
User’s Guide
•Learning about the All-In-One
•Understanding the software
•Using the All-In-One
•Maintenance
•Troubleshooting
www.lexmark.com
Edition: May 2003
The following paragraph does not apply to any country where such provisions are inconsistent with local law: LEXMARK INTERNATIONAL, INC., PROVIDES THIS PUBLICATION “AS IS” WITHOUT WARRANTY OF ANY KIND, EITHER EXPRESS OR IMPLIED, INCLUDING, BUT NOT LIMITED TO, THE IMPLIED WARRANTIES OF MERCHANTABILITY OR FITNESS FOR A PARTICULAR PURPOSE. Some states do not allow disclaimer of express or implied warranties in certain transactions; therefore, this statement may not apply to you.
This publication could include technical inaccuracies or typographical errors. Changes are periodically made to the information herein; these changes will be incorporated in later editions. Improvements or changes in the products or the programs described may be made at any time.
Comments about this publication may be addressed to Lexmark International, Inc., Department F95/032-2, 740 West New Circle Road, Lexington, Kentucky 40550, U.S.A. In the United Kingdom and Eire, send to Lexmark International Ltd., Marketing and Services Department, Westhorpe House, Westhorpe, Marlow Bucks SL7 3RQ. Lexmark may use or distribute any of the information you supply in any way it believes appropriate without incurring any obligation to you. You can purchase additional copies of publications related to this product by calling 1-800-553-9727. In the United Kingdom and Eire, call +44 (0)8704 440 044. In other countries, contact your point of purchase.
References in this publication to products, programs, or services do not imply that the manufacturer intends to make these available in all countries in which it operates. Any reference to a product, program, or service is not intended to state or imply that only that product, program, or service may be used. Any functionally equivalent product, program, or service that does not infringe any existing intellectual property right may be used instead. Evaluation and verification of operation in conjunction with other products, programs, or services, except those expressly designated by the manufacturer, are the user’s responsibility.
Lexmark and Lexmark with diamond design are trademarks of Lexmark International, Inc., registered in the United States and/or other countries.
Other trademarks are the property of their respective owners.
© 2003 Lexmark International, Inc. All rights reserved.
UNITED STATES GOVERNMENT RIGHTS
This software and any accompanying documentation provided under this agreement are commercial computer software and documentation developed exclusively at private expense.
Safety information
•Use only the power supply provided with this product or the manufacturer’s authorized replacement power supply.
•Connect the power cord to an electrical outlet that is near the product and easily accessible.
•Refer service or repairs, other than those described in the user documentation, to a professional service person.
CAUTION: Do not use the fax feature during a lightning storm. Do not set up this product or make any electrical or cabling connections, such as the power supply cord or telephone, during a lightning storm.
Copyright advisory
It may be illegal to copy certain materials without permission or license, including documents, images, and currency. If you are not sure whether you have permission, seek legal advice.

Contents
Learning about the All-In-One .......................................... |
1 |
Setting up the All-In-One ............................................................... |
1 |
Understanding the parts of the All-In-One .................................... |
1 |
Using the control panel ................................................................. |
2 |
Understanding the software ............................................. |
3 |
Using the Lexmark All-In-One Center ........................................... |
3 |
Using Print Properties ................................................................... |
6 |
Using the Lexmark Solution Center .............................................. |
8 |
Using the Lexmark Photo Editor ................................................... |
9 |
Using the All-In-One ........................................................ |
10 |
Printing ........................................................................................ |
10 |
Scanning ..................................................................................... |
13 |
Copying ....................................................................................... |
14 |
Faxing ......................................................................................... |
16 |
Maintenance ..................................................................... |
17 |
Replacing the print cartridges ..................................................... |
17 |
Troubleshooting ............................................................... |
19 |
Troubleshooting checklist ........................................................... |
19 |
Setup troubleshooting ................................................................. |
20 |
Printing troubleshooting .............................................................. |
22 |
Scanning, copying, and faxing troubleshooting .......................... |
24 |
iii
Removing and reinstalling the software ...................................... |
26 |
Other help sources ...................................................................... |
26 |
Thank you for purchasing a Lexmark X1100 Series All-In-One!
Congratulations on your purchase. The Lexmark™ X1100 Series All-In-One combines the functionality of an inkjet printer, a scanner, a copier, and a fax machine all into a single, multifunction device, making it one of the most exciting products on the market today.
This guide tells you how to perform printing, copying, scanning, and faxing tasks. Also included are sections describing the All-In-One software and troubleshooting information.
iv
Learning about the All-In-One
Setting up the All-In-One
If you have not already done so, follow the steps on the Setup Sheet to complete the hardware and software installation. If problems occur during the setup process, see “Setup troubleshooting” on page 20.
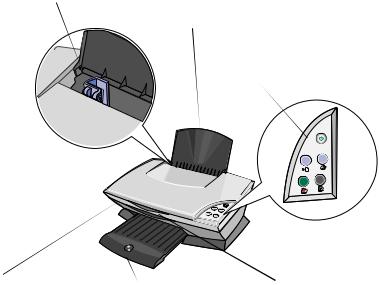
Understanding the parts of the All-In-One
Paper guide
Slide next to paper to ensure proper feeding.
Paper support
Lift to load paper into the All-In-One.
Control panel
Use the buttons to operate the All-In-One (see page 2 for details about each of the buttons).
Top cover
Lift to place an item on the scanner glass.
Paper exit tray
Extend to hold paper as it exits the All-In-One.
 Scanner unit
Lift to access the print cartridges.
1

USB cable connector
2
1
USB cable
Power supply
Silver, metal contacts are on the left side of the power supply.
Using the control panel
The All-In-One has a control panel that lets you scan and copy with the press of a button.
Paper Feed button
Press to feed paper through the All-In-One.
Color Copy button 
Press to make a color copy.
 Power button
Press to turn the All-In-One on and off.
 Scan button
Press to start the scanning process and open the All-In-One Center.
 Black Copy button
Press to make a black and white copy.
Note: Both the computer and the All-In-One must be turned on to make copies.
2
Understanding the software
The All-In-One software consists of four main components:
•The Lexmark X1100 Series All-In-One Center (scanning, copying, and faxing)
•Print Properties (printing)
•The Lexmark X1100 Series Solution Center (troubleshooting, maintenance, and cartridge ordering information)
•The Lexmark Photo Editor (editing graphics)
Using the Lexmark All-In-One Center
Use the Lexmark X1100 Series All-In-One Center software to scan, copy, and fax documents. There are three ways to open the All-In-One Center:
•Click Start  Programs
  Lexmark X1100 Series
  Lexmark All-In-One Center.
•Double-click the Lexmark X1100 Series All-In-One Center icon on the desktop.
•Press Scan on the control panel. For more information about using the control panel, see page 2.
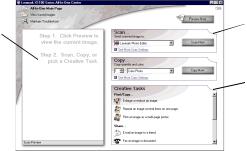
The All-In-One Main Page displays.
All-In-One Center
All-In-One Main Page
Scan section
Preview section
 Copy section
Creative Tasks section
3
The All-In-One Main Page
The All-In-One Main Page consists of four main sections: Scan, Copy, Creative Tasks, and Preview.
From this section: |
You can: |
Scan |
• Select a program to send the scanned image to. |
|
• Choose what type of image is being scanned. |
|
• Choose how the scan will be used. |
|
Note: Click See More Scan Settings to view all |
|
settings. |
|
|
Copy |
• Select the quantity and color of your copies. |
|
• Select a quality setting for your copies. |
|
• Adjust the size of the scanned area. |
|
• Lighten or darken your copies. |
|
• Enlarge or reduce your copies. |
|
Note: Click See More Copy Settings to view all |
|
settings. |
|
|
Creative Tasks |
Choose from a variety of creative ideas. |
|
• Enlarge or reduce an image. |
|
• Repeat an image several times on one page. |
|
• Print an image as a multi-page poster. |
|
• E-mail an image to a friend. |
|
• Fax using your computer’s modem. |
|
• Save an image on my computer. |
|
• Edit text found in a scanned document (OCR). |
|
• Modify an image with a photo editor. |
|
|
Preview section |
• Select a region of the preview image to scan. |
|
• View an image of what will be printed or copied. |
|
|
Note: For more information about the All-In-One Main Page, click the Help button located in the upper right corner of the screen.
4
View Saved Images page
Use the View Saved Images page to perform tasks with images that are saved on the computer. The View Saved Images page consists of three sections.
From this section: |
You can: |
Open with... |
Select a program to send the saved image to. |
|
|
Print a Copy... |
• Choose the quantity and color of your copies. |
|
• Select a quality setting for your copies. |
|
• Lighten or darken your copies. |
|
• Enlarge or reduce your copies. |
|
Note: Click See More Copy Settings to view all |
|
settings. |
|
|
Creative Tasks |
Select from a variety of creative ideas. For help, see |
|
page 4. |
|
|
Note: For more information about this page, click the Help button located in the upper right corner of the screen.
Maintain/Troubleshoot page
The Maintain/Troubleshoot page provides you with direct links to the Lexmark Solution Center. Choose from these topics:
•Maintain or fix quality problems
•Troubleshoot All-In-One problems
•Device status and ink levels
•More printing ideas and how to’s
•Contact information
•Advanced (skin, voice, and communication options)
•View the software version and copyright information
For more information about the Lexmark Solution Center, see page 8.
Note: For more information about this page, click the Help button located in the upper right corner of the screen.
5
Using Print Properties
Print Properties is the software that controls the All-In-One printing function. You can change the settings in Print Properties based on the type of project you want to create. You can open Print Properties from almost any program:
1From the program File menu, click Print.
2In the Print dialog box, click the Properties, Preferences, Options, or Setup button (depending on the program).
The Print Properties screen displays.
Note: Some programs open Print Properties differently.
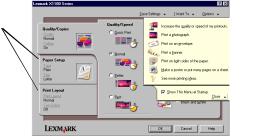
|
Print Properties |
|
|
Quality Copies tab and I Want To menu |
|
Print Properties |
|
I Want To menu |
|
||
tabs |
|
Select one of the |
|
|
|
Use the Quality/ |
|
projects from the |
Copies, Paper |
|
menu to help |
Setup, and Print |
|
print photos, |
Layout tabs to |
|
banners, |
select the print |
|
envelopes, |
settings. |
|
posters, and |
|
|
more. |
The I Want To menu
The I Want To menu displays when you open Print Properties. It contains a variety of task wizards to help you select the correct print settings for your project. Close the menu for a full view of the Print Properties dialog box.
6
Print Properties tabs
All of the print settings are on the three main tabs of the Print Properties software: Quality/Copies, Paper Setup, and Print Layout.
From this tab: |
You can change these settings: |
Quality/Copies |
Quality/Speed — Select a Quality/Speed setting. |
|
Multiple Copies — Customize how the All-In-One prints |
|
several copies of a single print job: collated or normal. |
|
Print Color Images in Black and White — Select this to |
|
print color images in black and white. |
|
|
Paper Setup |
Type — Select the type of paper you are using. |
|
Paper Size — Select the size of the paper you are using. |
|
Orientation — Select how you want the document |
|
oriented on the printed page: portrait or landscape. |
|
|
Print Layout |
Layout — Select the layout you want to print. |
|
Duplexing — Select this when you want to print on both |
|
sides of the paper. |
|
|
Note: For additional information about these settings, right-click a setting on the screen, and then select the
What’s This? item.
Save Settings menu
From the Save Settings menu, you can name and save the current Print Properties settings for future use. You can save up to five custom settings.
Options menu
Use the Options menu to make changes to the Quality Options, Layout Options, and Printing Status Options settings. For more information on these settings, open the tab dialog box from the menu, and then click the Help button on the dialog box.
The Options menu also provides you with direct links to different parts of the Lexmark Solution Center (see page 8), as well as software version information.
7
 Loading...