

Page 1
SMP300IM cover SMP300IM content
SMP300
F
GB
E
D
IT
NL
P
Français
English
Español
Deutsch
Italiano
Nederlands
Português
Page 2

SMP300IMF1 SMP300IMF2
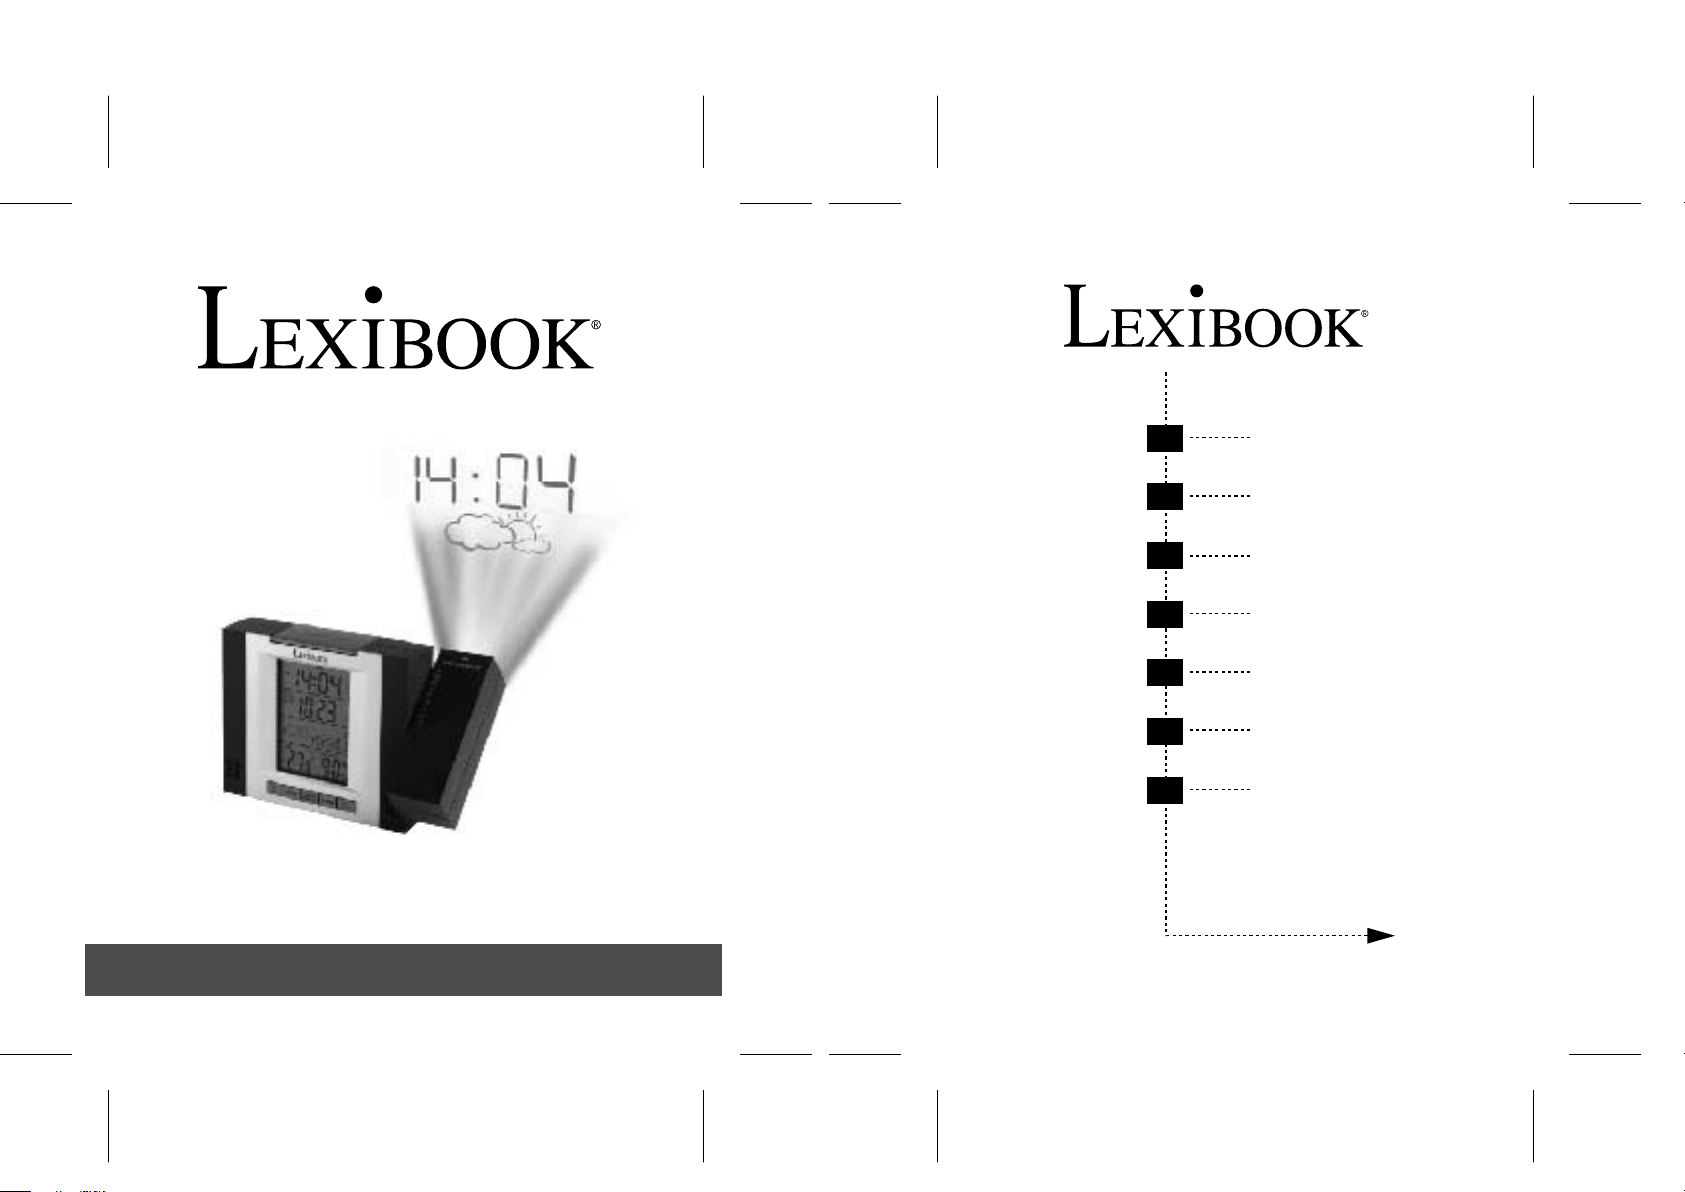
Félicitations pour l’achat de votre réveil Station Météo SMP300 de
Lexibook® aux doubles fonctions exclusives : mesure de la pression
atmosphérique et projection de l’heure et de la prévision météo.
Il est recommandé de lire attentivement ce mode d’emploi pour
vous assurer de bien comprendre le fonctionnement. Veuillez le
conserver pour toute référence ultérieure.
MISE EN MARCHE
Lorsque vous utilisez le réveil pour la première fois :
1. Retirez la protection plastique sur l’écran d’affichage.
2. Retirez la languette plastique de protection des piles AG13 à
l’arrière du produit. Cela mettra l’appareil en marche (les piles
sont fournies).
3. Si celui-ci est fourni, branchez l’adaptateur secteur pour pouvoir
vous servir de la projection. Si vous ne pouvez ou ne souhaitez
pas vous servir de l’adaptateur vous pouvez placez 2 piles AA
(LR6) dans le compartiment au dos de l’appareil en l’ouvrant
avec un tournevis.
RÉGLAGE DE L’HEURE
1. Appuyez simultanément sur les touches [MODE] et [SET] et
maintenez-les enfoncées pendant 2 secondes jusqu’à ce que
l’année clignote, puis appuyez sur [ ] ou [ ] pour la régler..
2. Appuyez sur [MAX/MIN/LIGHT] pour confirmer et passer au
réglage suivant.
3. Procédez de la même manière pour régler successivement :
a. Mois
b. Date du Jour
c. Jour de la semaine
d. Heure
e. Minutes
Remarque: lors du réglage de l’heure, notez que « PM » signifie
Après-midi et « AM » Matin (ex : 5:00 PM = 17:00).
Français
RÉGLAGE DE L’ALARME
1. Appuyez simultanément sur les touches [ALARM] et [SET] et
Français
maintenez- les enfoncées pendant 2 secondes jusqu’à ce que
l’année clignote, puis appuyez sur [ ] ou [ ] pour la régler.
2. Appuyez sur [MAX/MIN/LIGHT] pour confirmer et passer au
réglage suivant.
3. Procédez de la même manière pour régler successivement :
a. Heure
b. Minutes
Remarque :
• L’ icône (((•))) s’affiche lorsque l’alarme est en marche. Appuyez
sur [ALARM] pour mettre en marche/arrêt l’alarme pré-réglée.
• Fonction Auto-Répétition (Auto-Snooze). L’alarme retentit
pendant 1 minute puis s’arrête puis retentit de nouveau 5 minutes
après et ceci 3 fois. L’ icône Zz clignote lorsque l’alarme à
répétition est en marche.
• Appuyez sur n’importe quelle touche pour stopper l’alarme.
BAROMÈTRE
1. La mesure et l’affichage de la pression atmosphérique varie de:
840 à 1050 mb/hPa (24.80 à 31.00 inHg). Mb= « millibars » ;
hPa = « hectopascals » : ce sont les unités européennes, égales
l’une à l’autre (1 mb = 1 hPa). inHg = « inches of mercury », c’est
le standard américain.
2. Appuyez 1 fois sur [PRESSURE MEMORY/UNIT] pour afficher le
relevé de pression atmosphérique d’il y a une heure. Appuyez 2
fois pour connaître la pression d’il y a 2 heures, etc. jusqu’à 8
heures.
3. Le graphique en barres en dessous de l’affichage de la pression
récapitule visuellement l’historique de variation de la pression
durant les 8 dernières heures.
4. Appuyez sur la touche [PRESSURE MEMORY/UNIT] pendant 2
secondes pour changer l’unité d’affichage de la pression de
mb/hPa en inHg.
Copyright © Lexibook 2003 1 Copyright © Lexibook 2003 2
Page 3
SMP300IMF3 SMP300IMF4
5. La flèche sur le coté indique la tendance barométrique de la
pression : hausse, baisse ou stable.
PREVISIONS MÉTÉOROLOGIQUES
Le capteur barométrique électronique intégré permet de prévoir
l’évolution probable de la météo dans les 12 prochaines heures.
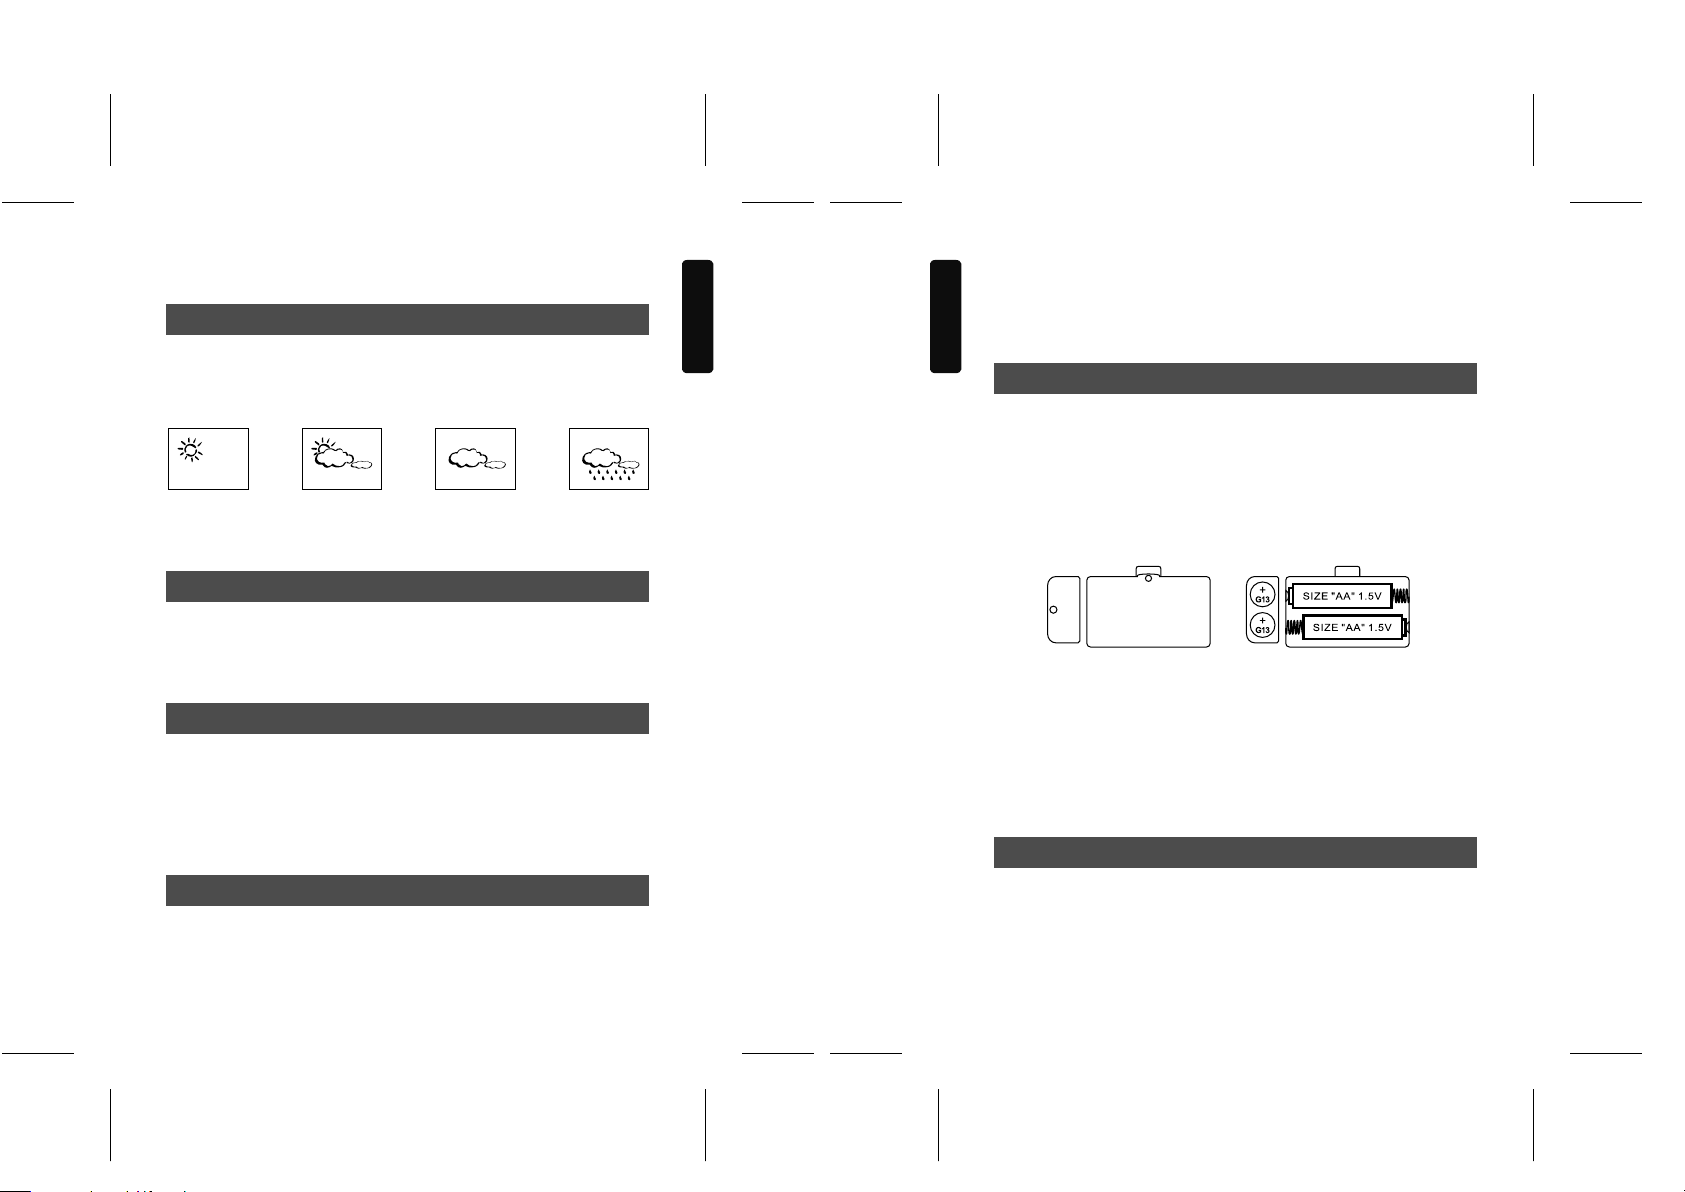
Les icônes suivantes pourront être affichées :
Soleil
Eclaircie Nuage Pluie
Lexibook® ne prétend aucunement à l’exactitude de ces prévisions.
HYGROMÈTRE
La mesure et l’affichage de l’hygrométrie varie de 25% à 95%.
L’hygrométrie d’une maison conditionne le confort de ses habitants
et le bon fonctionnement de leurs voies respiratoires. Entre 30% et
65% celle-ci est correcte.
THERMOMÈTRE
La mesure et l’affichage de la température varie de 0°C (32°F) à
50°C (122°F).
Appuyez sur la touche [°C/°F] pour passer des degrés Celsius aux
degrés Fahrenheit.
6. Appuyez pendant 2 secondes sur [MAX/MIN/LIGHT] pour vérifier
la température maximum/minimum.
mètres. Pour que la projection fonctionne, veillez à avoir branché
l’adaptateur secteur ou avoir inséré 2 piles AA/LR6 dans le
Français
compartiment prévu à cet effet (voir ci-dessous).
Français
2. L’angle de projection idéal ne doit pas excéder un angle de 90°
dans le sens des aiguilles d’une montre.
REMPLACEMENT DES PILES
Ce réveil utilise 2 piles AG13/LR44 et un adaptateur secteur (ou 2
piles AA/LR6) ou équivalent.
1. Retirez le couvercle des piles à l’arrière de l’appareil en utilisant
un tournevis.
2. Insérez les piles en respectant le sens des polarités.
3. Replacez le couvercle en utilisant un tournevis.
Couvercle des piles
Compartiment à piles
Attention :
1. Il est préférable de remplacer les piles à l’intérieur de l’appareil
chaque année.
2. Ne pas mélanger des piles neuves et des piles anciennes ou des
piles de différents types.
3. Si les piles fuient et que le contenu a touché votre peau et vos
yeux, veuillez rincer immédiatement avec beaucoup d’eau.
4. Les piles doivent être manipulées sous la supervision d’un adulte.
PROTÉGEZ L’ENVIRONNEMENT !
RÉVEIL PROJECTEUR
Assurez-vous de jeter les piles d’une manière adéquate en suivant
les recommandations du fabricant de piles.
1. Appuyez sur [MAX/MIN/LIGHT] pour projeter l’heure et la
prévision météorologique à distance. Utilisez le bouton de
réglage [FOCUS] à l’arrière de l’appareil pour ajuster la netteté
de la projection. La distance maximale de projection est de 3
Copyright © Lexibook 2003 3 Copyright © Lexibook 2003 4
Page 4

SMP300IMF5 SMP300IMF6
ADAPTATEUR SECTEUR
(option : peut ne pas être fourni dans certains modèles)
1. Un adaptateur optionnel AC/DC peut être utilisé à la place des 2
piles AA en insérant la prise dans la prise DC située à l’arrière du
réveil projecteur.
2. Caractéristiques de l’adaptateur AC/DC :
Sortie : DC 3V
Courant : >150mA
Prise interne : pôle positif (+ve), 2.5mm
Prise externe : pôle négatif (-ve), 5.5mm
REMISE À ZÉRO
Si vous observez une erreur, appuyez sur [RESET] au bas de
l’appareil avec un objet pointu pour remettre à zéro et redémarrer
normalement.
PRÉCAUTIONS D’EMPLOI :
• Ne jamais placer le réveil projecteur à un endroit susceptible de
recevoir des vibrations et chocs car cela peut endommager
l’appareil et causer une lecture faussée.
• Evitez d’exposer l’appareil à de soudains changements de
températures tels que la lumière directe du soleil, des froids
extrêmes et des conditions d’humidité.
• Utilisez un chiffon doux légèrement humide pour nettoyer
l’appareil et l’écran. Ne pas utiliser de solvants ou des agents
corrosifs car ils risquent de marquer l’écran et la coque.
• Ne pas laisser tomber le réveil ou le plonger dans l’eau.
• Ne pas essayer de faire des réparations soi-même. Le retourner
Français
au distributeur pour toute réparation.
Français
GARANTIE
Ce produit est couvert par notre garantie de deux ans.
Pour toute mise en œuvre de la garantie ou de service après-vente,
vous devez vous adresser à votre revendeur muni de votre preuve
d'achat. Notre garantie couvre les vices de matériel ou de montage
imputables au constructeur à l'exclusion de toute détérioration
provenant du non-respect de la notice d'utilisation ou de toute
intervention intempestive sur l'article (telle que démontage,
exposition à la chaleur ou à l'humidité…).
Tel. Assistance technique : 0821 23 3000 (0,12 € TTC/mn)
FAX : +33 (0)1 73 23 23 04
Site Internet : http://www.lexibook.com
Copyright © Lexibook 2003 5 Copyright © Lexibook 2003 6
Page 5

SMP300IMGB1 SMP300IMGB2
Congratulations on purchasing this Lexibook® SMP300 alarm clock
and weather station, with its two exclusive features : measurement
of atmospheric pressure, projection of time and weather forecasts.
We recommend you reading this manual thoroughly to ensure you
make the most of your unit. Please keep it for future reference.
GETTING STARTED
Before you start using the alarm clock for the first time :
1. Remove the protective film from the display screen.
2. Remove the plastic strap from the AG13 batteries located at the
back of the unit. This will turn the station on (batteries are
supplied with this product).
3. If you want to use the projection feature, connect the unit to the
main electricity supply with the AC adapter (if supplied). If you
can’t or don’t wish to use the adapter you can insert two AA (R6)
batteries in the compartment at the back of the unit. Use a
screwdriver to open it.
SETTING THE CLOCK
1. Press and hold both [MODE] and [SET] buttons for two seconds
until the year digits flash, then press [ ] or [ ] to set the year.
2. Press [MAX/MIN/LIGHT] to confirm and to switch to the next
setting.
3. Proceed as above to make the following settings :
a. Month
b. Day
c. Weekday
d. Hours
e. Minutes
Note : when setting the time, it is shown in a 12-hour format, where
PM stands for afternoon and AM for morning (ex : 5:00 PM = 17:00).
2. Press [MAX/MIN/LIGHT] to confirm and to switch to the next
setting.
3. Proceed as above to make the following settings :
a. Hours
b. Minutes
Notes :
• This indicator (((•))) will show when the alarm is active. Press
English
[ALARM] to activate or de-activate the alarm function.
• Auto-Snooze function : the alarm will go off for 1 minute, then it
English
will stop and go off again five minutes later. This process is
repeated three times. When the Auto-Snooze function is active,
the Zz indicator will flash.
• Press any button to stop the alarm.
BAROMETER
1. The atmospheric pressure can be displayed in various units, mb,
hPa or inHg. Mb (« millibars ») or hPa (« hectopascals ») are
equivalent to European units, 1 mb = 1 hPa. inHg (« inches of
mercury ») are the American standard. The measurements and
display will range between 840 and 1050 mb/hPA or 24.80 to 31
inHg.
2. Press once on [PRESSURE MEMORY/UNIT] to display the
pressure measurement for the past hour. Press twice to read the
display of the measurement taken two hours ago, and so forth
for the past 8 hours.
3. The recorded atmospheric changes for the past 8 hours are
displayed in a visually clear bar chart.
4. Press and hold [PRESSURE MEMORY/UNIT] for two seconds to
switch the pressure units from mb/hPa to inHg.
5. The arrow located on the side indicates the pressure trend :
rising, steady, falling.
SETTING THE ALARM
1. Press and hold both [ALARM] and [SET] for two seconds until
the digits flash, then press [ ] or [ ] to set it.
Copyright © Lexibook 2003 1 Copyright © Lexibook 2003 2
Page 6
SMP300IMGB3 SMP300IMGB4
WEATHER FORECASTING
The unit’s detection of atmospheric pressure changes enables one
to predict the probable weather conditions for the forthcoming 12
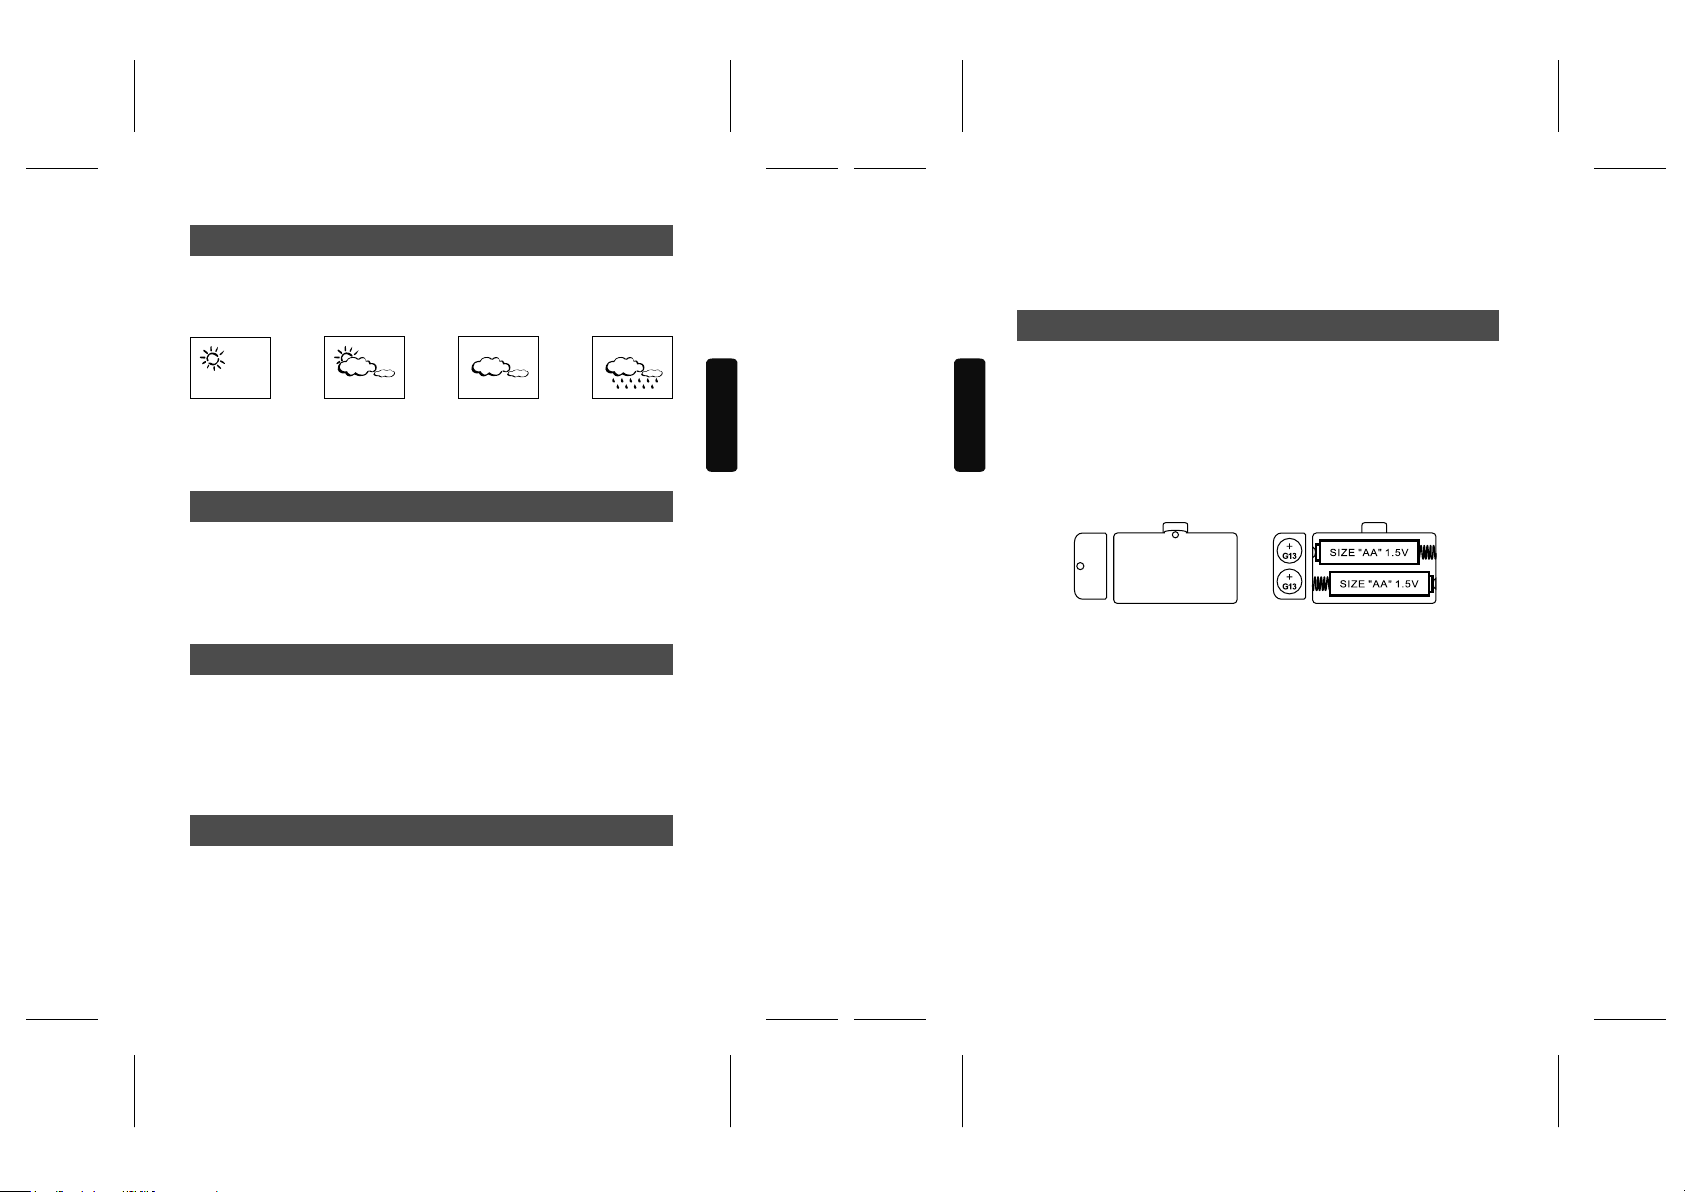
hours. The following icons will be displayed :
Sunny
Partly Cloudy Cloudy Rainy
Lexibook® does not guarantee in any way the accuracy of weather
predictions.
HYGROMETER
The indoor relative humidity is measured and displayed within a
range of 30% to 90%.
The relative humidity within a home will affect the comfort level of
its occupants, as well as their respiratory system.The comfort zone
is found between 30% and 65% of relative humidity.
THERMOMETER
The temperature is measured and displayed within a range of 0°C
(32°F) to 50°C (122°F).
1. Press [°C/°F] to switch the displayed temperature from degrees
Celsius to degrees Fahrenheit.
2. Press and hold [MAX/MIN/LIGHT] for two seconds to check the
maximum/minimum temperatures recorded.
ALARM CLOCK PROJECTOR
the main electricity supply via the adapter or that you have
inserted 2 AA/LR6 batteries in their compartment (see below).
2. For best results, the projection angle should not exceed 90° in a
clockwise direction.
BATTERY REPLACEMENT
This alarm clock uses two AG13/LR44 batteries and an AC adapter
(or two AA/LR6 batteries) or equivalent.
English
1. Remove the battery cover at the back of the unit using a
English
screwdriver.
2. Insert the batteries, taking care to follow their polarity directions.
3. Replace the cover using a screwdriver.
Battery cover
Battery compartment
Warning:
1. It is preferable to replace the batteries in the unit every year.
2. DO NOT mix new and old batteries or batteries of different types.
3. If battery leakage occurs and comes in to contact with the skin
or eyes, wash immediately with plenty of water.
4. Batteries should be handled under adult supervision.
SAVE NATURE! Ensure batteries are disposed of safely according
to the battery manufacturers’ instructions.
1. Press [MAX/MIN/LIGHT] to project the time and weather forecast
to a distant surface. Use the [FOCUS] knob at the back of the
unit to adjust the sharpness of the projection. The maximum
distance recommended is 3 meters (9 feet). In order for the
projection to operate, make sure you have connected the unit to
Copyright © Lexibook 2003 3 Copyright © Lexibook 2003 4
Page 7

SMP300IMGB5 SMP300IMGB6
OPTIONAL ADAPTOR
1. Optional AC/DC adapter can be used instead of 2 x AA batteries
by inserting the plug into the DC jack located at the back of the
projector clock.
2. Another series of projector clock with adapters may be available
with this option.
3. AC/DC adapter rating:
Output: DC 3V
Current: >150mA
Plug inner: positive pole (+ve), 2.5mm
Plug outer: negative pole (-ve), 5.5mm
RESET
Should an error occur, press [RESET] on the bottom of the unit with
a pointed object to resume normal operation.
GENERAL CARE
• Never place the projection clock in areas subject to vibrations and
shocks as this may damage it and cause inaccurate readings.
• Avoid exposure to sudden changes in temperature such as direct
sunlight, extreme cold and wet or moist conditions.
• When cleaning the display and casing, only use a soft damp cloth.
Do not use solvents or scouring agents as they may mark the
LCD and casing.
• Do not drop the alarm clock or immerse in water.
• Do not attempt to make any repairs to the alarm clock yourself.
Return it to the original retailer for repair.
WARRANTY
This product is covered by our two-year warranty.
For warranty or after-sales service, please return the product to the
retailer with proof of purchase. Our warranty covers material or
production defects attributable to the manufacturer and excludes
any damage arising from the disrespect of the instructions for use
or any inappropriate handling of the unit (such as dismantling,
English
exposure to heat or moisture, etc.).
Freephone Helpline: 0808 100 3015
English
FAX: + 44 (0)1730 269147
Internet site: http://www.lexibook.co.uk
Copyright © Lexibook 2003 5 Copyright © Lexibook 2003 6
Page 8

SMP300IME1 SMP300IME2
Enhorabuena por su compra del Reloj y Estación Meteorológica
SMP300 de Lexibook® con doble función exclusiva : medida de la
presión atmosférica y proyección de la hora y de la previsión del
tiempo.
Se recomienda leer con atención las instrucciones de empleo para
comprender bien el funcionamiento del aparato. Guardar las
instrucciones para futuras consultas.
INICIO
Al utilizar el reloj despertador por primera vez :
1. Retirar la lámina plástica situada sobre el visualizador.
2. Retirar la lengüeta plástica de protección de las pilas G13
situada en la parte posterior del aparato. Esto pondrá el aparato
en marcha (las pilas vienen incluidas).
3. Si el adaptador viene incluido, conectarlo a una toma de
corriente eléctrica para utilizar la función de proyección. Si no
tiene adaptador, o no desea usarlo, coloque 2 pilas AA (LR6) en
el compartimiento localizado en la parte posterior del aparato
abriéndolo con un destornillador.
PUESTA EN HORA
1. Pulsar simultáneamente los botones [MODE] y [SET] y
mantenerlos pulsados durante 2 segundos hasta que los dígitos
del año parpadeen, a continuación pulsar los botones [ ] o [ ]
para ajustar la hora.
2. Pulsar el botón [MAX/MIN/LIGHT] para confirmar la hora y pasar
al siguiente ajuste.
3. Proceder del mismo modo para ajustar lo siguiente :
a. Mes
b. Día del mes
c. Día de la semana
d. Hora
e. Minutos
Observación : al poner el reloj en hora tener en cuenta que « PM »
1. Pulsar los botones [ALARM] y [SET] y mantenerlos pulsados
durante 2 segundos hasta que los dígitos del año parpadeen, a
continuación pulsar [ ] o [ ] para programar la alarma.
2. Pulsar [MAX/MIN/LIGHT] para confirmar el ajuste y pasar a la
siguiente programación.
3. Proceder como indicado anteriormente para programar lo
siguiente :
a. Hora
b. Minutos
Observaciones :
• Este indicador (((•))) aparecerá cuando la alarma esté activada.
Pulsar el botón [ALARM] para activar o desactivar la función de
Español
alarma.
• Función de repetición automática : la alarma sonará durante 1
Español
minuto, a continuación parará y comenzará a sonar cinco minutos
más tarde. Este proceso se repetirá tres veces. Cuando la función
de repetición está activada el indicador Zz parpadeará.
Pulsar cualquier botón para parar la alarma.
1. La presión atmosférica puede verse en diferentes unidades de
medida, mb, hPa o inHg. Mb (« milibares ») o hPa
(« hectopascales ») son unidades europeas equivalentes, 1 mb =
1 hPa. inHg (« pulgadas de mercurio ») son medidas estándar
americanas. Las mediciones y su aparición en pantalla van de
840 a 1050 mb/hPA o 24.80 a 31 inHg.
2. Pulsar una vez el botón [PRESSURE MEMORY/UNIT] para ver la
medición de la presión en la hora anterior. Pulsar dos veces para
ver la medición tomada dos horas antes, y repetir la operación
para ver los resultados de las 8 horas anteriores.
3. Los cambios atmosféricos de las 8 horas anteriores se pueden
ver en el gráfico de barras.
PROGRAMACIÓN DE LA ALARMA
BARÓMETRO
significa después del mediodía y « AM » antes del mediodía (por
ejemplo : 5:00 PM = 17:00).
Copyright © Lexibook 2003 1 Copyright © Lexibook 2003 2
Page 9

SMP300IME3 SMP300IME4
4. Pulsar y mantener pulsado durante 2 segundos el botón
[PRESSURE MEMORY/UNIT] para pasar las unidades de presión
de mb/hPa a inHg.
5. La flecha situada a un lado indica la tendencia de la presión
atmosférica : subiendo, estable, bajando.
PREDICCIÓN DEL TIEMPO
La detección, por parte del aparato, de los cambios en la presión
atmosférica permite predecir las condiciones probables del tiempo
en las siguientes 12 horas.
Los siguientes iconos aparecerán en pantalla :
1. Pulsar el botón [MAX/MIN/LIGHT] para proyectar la hora y la
predicción del tiempo sobre una superficie. Usar el botón
[FOCUS] situado en la parte posterior del aparato para ajustar la
nitidez de la proyección. La distancia máxima recomendada es
de 3 metros (9 pies). Para que la proyección funcione
correctamente, comprobar que el aparato principal está
conectado a la toma de corriente eléctrica con el adaptador, o
con las pilas 2 AA/LR6 que usted habrá previamente colocado
en su compartimiento (ver a continuación).
2. Para obtener un resultado óptimo el ángulo del proyector no
PROYECTOR DE LA ALARMA Y HORA
deberá exceder los 90o en la dirección de las agujas del reloj.
CAMBIO DE PILAS
Soleado
Parcialmente nublado Nublado Lluvioso
Lexibook® no garantiza en modo alguno la precisión de estas
predicciones climatológicas.
HIGRÓMETRO
La humedad relativa en interiores se mide y se muestra en una
gama que va del 30% al 90%.
Español
Este reloj funciona con dos pilas AG13/LR44 y un adaptador para
Español
la corriente eléctrica (o dos pilas AA/LR6 ) o equivalentes.
1. Con un destornillador, retire la tapa del compartimiento de las
pilas, situado en la parte trasera del aparato.
2. Inserte las pilas, respetando el sentido de la polaridad.
3. Vuelva a colocar la tapa, utilizando el destornillador.
Tapa del compartimiento de pilas Compartimiento de pilas
La humedad relativa del aire dentro de una vivienda afecta el nivel
de confort de sus ocupantes, así como sus funciones respiratorias.
La zona de óptimo confort se encuentra entre el 30% y el 65% de
humedad relativa.
TERMÓMETRO
La temperatura se mide y muestra dentro de una gama de entre
0°C (32°F) y 50°C (122°F).
1. Pulsar el botón [°C/°F] para cambiar las unidades de temperatura
de grados Celsius a grados Fahrenheit.
2. Pulsar el botón [MAX/MIN/LIGHT] y mantenerlo pulsado durante
2 segundos para verificar las temperaturas máxima y mínima
Aviso:
1. Conviene reemplazar las pilas cada año.
2. No mezcle pilas nuevas con pilas agotadas o distintos tipos de
pilas entre si.
3. Si las pilas rezumasen, y el líquido entrase en contacto con la
piel o los ojos, lávese inmediatamente con abundante agua.
4. La pilas deberán de ser manejadas bajo la supervisión de un
adulto.
registradas.
Copyright © Lexibook 2003 3 Copyright © Lexibook 2003 4
Page 10

SMP300IME5 SMP300IME6
¡PROTEJA LA NATURALEZA! Asegúrese que las pilas son
desechadas de forma segura, de acuerdo con las instrucciones del
fabricante.
ADAPTADOR OPCIONAL
1. También puede utilizarse un adaptador CA/CC opcional, en lugar
de las 2 pilas, conectando el enchufe en la conexión de CC
situado en la parte posterior del reloj proyector.
2. Otras series de reloj proyector con adaptador podrán ser
disponibles con esta opción.
3. Potencia del adaptador CA/CC:
Mas largo que 10mm
Medidas aconsejadas
Potencia de salida: CC 3V
Corriente: >150mA
Enchufe interior: polo positivo (+ve), 2,5mm
Enchufe exterior: polo negativo (-ve), 5,5mm
REAJUSTE
De ocurrir un error, pulse el botón [RESET] situado en la parte
inferior del aparato, con un objeto puntiagudo, para resumir al
funcionamiento normal.
No utilice disolventes o estropajos. Estos podrán dañar el visualizar
LCD y la caja.
• No moje o deje caer el reloj en el agua.
• No trate de efectuar reparaciones al reloj. Llévelo al comerciante
para su reparación.
GARANTIA
Este producto está cubierto por una garantía de dos años
Para hacer uso de la garantia o del servicio post-venta, debe
remitirse al lugar del compra del producto con la prueba de haber
realizado la misma (ticket). Nuestra garantia cubre los defectos de
material atribuibles al fabricante excluyendo cualquier daño
proveniente del manl uso del producto por no haber seguido las
indicaciones del manual de instrucciones o por haber realizado un
uso inapropiado del producto (tal como abrirlo, exponerlo al calor
Español
o a la humedad etc, ).
Español
FAX: + 34 91 548 92 33
web: http://www.lexibook.com
CUIDADOS GENERALES
• No coloque el reloj en lugares sujetos a vibraciones y golpes, ya
que esto dañará el aparato y causará una lectura incorrecta.
• Evite exponer el aparato a cambios bruscos de temperaturas,
como en lugares bajo la luz solar directa, húmedos y fríos.
• Cuando limpie el visualizador y la caja, utilice solamente un paño
suave y húmedo.
Copyright © Lexibook 2003 5 Copyright © Lexibook 2003 6
Page 11

SMP300IMD1 SMP300IMD2
Glückwunsch zum Kauf Ihres Weckers / Wetterstation SMP300 von
Lexibook® mit ausschließlicher Doppelfunktion : Messung des
Anmerkung : Bei der Stundeneinstellung bedeuten « PM »
Nachmittag und « AM » Vormittag (z.B. : 5:00 PM = 17:00).
Luftdrucks und Uhrzeit–wiedergabe, sowie Wettervorschau.
Es wird empfohlen, die Bedienungsanleitung aufmerksam
EINSTELLEN DER ALARMZEIT
durchzulesen, damit Sie die genaue Funktionsweise verstehen.
Bewahren Sie diese bitte zur späteren Referenz gut auf.
1. Halten Sie die Tasten [ALARM] und [SET] gleichzeitig für 2
Sekunden gedrückt, bis die Jahreszahl zu blinken geginnt.
INBETRIEBNAHME
Danach drücken Sie [ ] oder [ ] um die Einstellung
vorzunehmen.
Wenn Sie den Wecker zum ersten Mal benutzen :
1. Entfernen Sie den Plastikschutz von der Bildanzeige.
2. Entfernen Sie den Batterie (AG13) – Schutzstreifen an der
Rückseite des Gerätes. Dies schaltet das Gerät ein (die Batterien
sind mitgeliefert)
3. Falls mitgeliefert, schließen Sie den Netzadapter an. Falls Sie
2. Drücken Sie [MAX/MIN/LIGHT] zur Bestätigung und zum
Fortfahren zu den nachfolgenden Einstellungen.
3. Verfahren Sie in gleicher Weise für die aufeinander folgenden
Einstellungen :
a. Stunden
b. Minuten
nicht in der Lage sind, oder es nicht wünschen, den Netzadapter
zu benutzen, öffnen Sie stattdessen die Kammer an der
Rückseite des Gerätes mit einem Schraubenzieher und legen 2
Batterien AA (LR6) ein.
Anmerkung:
• Das Icon (((•))) leuchtet auf, wenn der Alarm eingeschaltet ist.
Drücken Sie [ALARM] um die voreingestellte Alarmzeit zu starten
oder stoppen.
EINSTELLEN DER UHRZEIT
1. Halten Sie die Tasten [MODE] und [SET] gleichzeitig für 2
Sekunden gedrückt, bis die Jahreszahl zu blinken geginnt.
Danach drücken Sie [ ] oder [ ] um die Einstellung
Deutsch
• Funktion Auto - Wiederholung (Auto-Snooze). Der Alarmton
erklingt 1 Minute lang bis er aufhört. Danach erklingt der Alarmton
Deutsch
dreimal alle 5 Minuten. Das Icon Zz blinkt, wenn die
Alarmwiederholung in Betrieb ist.
• Drücken Sie irgendeine Taste um den Alarm abzuschalten.
vorzunehmen.
2. Drücken Sie [MAX/MIN/LIGHT] zur Bestätigung und zum
BAROMETER
Fortfahren zu den nachfolgenden Einstellungen.
3. Verfahren Sie in gleicher Weise für die aufeinander folgenden
Einstellungen :
a. Monat
b. Datum
c. Wochentag
d. Stunden
e. Minuten
1. Die Messung und Anzeige des Luftdrucks variiert von: 840 bis
1050 mb/hPa (24.80 bis 31.00 inHg). Mb= « millibar » ; hPa =
« hektopascal » : Dies sind die europäischen Einheiten, die beide
gleichzusetzen sind (1 mb = 1 hPa). inHg = « inches of mercury »,
ist der amerikanische Standard.
2. Drücken Sie einmal auf [PRESSURE MEMORY/UNIT] um den
stündlichen Luftdruck abzulesen. Bei zweimaligem Drücken
erfahren Sie den Luftdruck nach 2 Stunden, usw. bis 8 Stunden.
3. Das untenstehende Balkendiagramm der Druckanzeige
rekapituliert bildlich den Verlauf der Druckveränderung während
der letzten 8 Stunden.
Copyright © Lexibook 2003 1 Copyright © Lexibook 2003 2
Page 12

SMP300IMD3 SMP300IMD4
4. Drücken Sie für 2 Sekunden die Taste [PRESSURE MEMORY/
UNIT] um die Einheit der Druckanzeige von mb/hPa in inHg zu
ändern.
5. Der Pfeil an der Seite zeigt die barometrische Tendenz des
Druckes an : hoch, tief oder stabil.
5. Der Pfeil an der Seite zeigt die barometrische Tendenz des
Druckes an : hoch, tief oder stabil.
WETTERVORSCHAU
Der integrierte elektronische, barometrische Messfühler erlaubt eine
Vorschau der wahrscheinlichen Wetterentwicklung in den nächsten
12 Stunden.
Die nachfolgenden Icons können erscheinen :
Sonne
Sonne und Wolk Wolk Regen
Lexibook® gewährt keine Garantie über die Genauigkeit dieser
Vorschau.
FEUCHTIGKEITSMESSER
Die Messung und Anzeige der Luftfeuchtigkeit variiert von 30% bis
90%. Die Feuchtigkeit in einer Wohnung beeinflusst das
Wohlbefinden seiner Bewohner und die gute Funktion ihrer
Atemwege. Zwischen 30% und 65% wäre optimal.
THERMOMETER
Die Messung und Anzeige der Temperatur variiert von 0°C (32°F)
bis 50°C (122°F). Drücken Sie die Taste [°C/°F] um zwischen
Celsius und Fahrenheit auszuwählen. Drücken Sie 2 Sekunden lang
die Taste [MAX/MIN/LIGHT] um das Temperaturmaximum
und–minimum zu überprüfen.
WECKER - PROJEKTOR
1. Drücken Sie [MAX/MIN/LIGHT] um die Zeitanzeige und
Wettervorschau auf Entfernung zu projizieren. Verwenden Sie den
Einstellknopf [FOCUS] an der Rückseite des Gerätes um die
Schärfe der Bildprojektion zu regulieren. Die maximale
Projektionsdistanz beträgt 3 Meter. Damit die Projektion
funktioniert, achten Sie bitte darauf, dass Sie den Netzadapter
angeschlossen oder 2 Batterien AA/LR6 in die dafür vorgesehene
Kammer eingelegt haben (siehe unten).
2. Der ideale Projektionswinkel sollte einen Winkel von 90° im
Uhrzeigersinn nicht übersteigen.
BATTERIEWECHSEL
Dieser Wecker verwendet 2 Batterien des Typs AG13/LR44 und
einen Netzadapter (oder 2 Batterien AA/LR6) oder Gleichwertiges.
1. Entfernen Sie die Batteriefachabdeckung auf der Rückseite des
Gerätes mit einem Schraubendreher.
2. Legen Sie die Batterien unter Beachtung der richtigen Polarität
ein.
Deutsch
3. Setzen Sie die Abdeckung mit einem Schraubendreher wieder
auf.
Deutsch
Batteriefachabdeckung
Batteriefach
Warnung:
1. Es wird empfohlen die Batterien jedes Jahr zu wechseln.
2. Verwenden Sie NICHT neue und alte Batterien oder Batterien
verschiedenen Typs zusammen.
3. Wenn es zum Auslaufen der Batterien kommt, und dies in
Kontakt mit Haut oder Augen gerät, waschen Sie es umgehend
mit viel Wasser ab.
4. Der Umgang mit Batterien sollte unter Aufsicht Erwachsener
erfolgen.
Copyright © Lexibook 2003 3 Copyright © Lexibook 2003 4
Page 13

SMP300IMD5 SMP300IMD6
SCHÜTZEN SIE DIE UMWELT! Achten Sie darauf, dass Batterien
gemäß den Angaben des Herstellers entsorgt werden.
OPTIONALER ADAPTER
1. Ein optionaler AC/DC-Adapter kann anstelle der 2 AA Batterien
verwendet werden, indem er an den DC Eingang auf der
Rückseite der Projektoruhr angeschlossen wird.
2. Eine andere Produktserie von Projektoruhren mit Adaptern wird
eventuell mit dieser Option angeboten.
3. AC/DC-Adapterdaten:
Länger als 10mm
empfohlene Abmessungen
Ausgang: DC 3V
Stromstärke: >150mA
Innerer Kontakt: positiver Pol (+ve), 2.5mm
Äußerer Kontakt: negativer Pol (-ve), 5.5mm
ZURÜCKSETZEN
Sollten Fehlfunktionen auftreten, drücken Sie mit einem spitzen
Objekt [RESET] auf der Unterseite des Gerätes, um den
Normalbetrieb wieder herzustellen.
ALLGEMEINE HINWEISE ZUM UMGANG
• Stellen Sie die Projektionsuhr nie an Orten auf, an denen das
Gerät Vibrationen und Erschütterungen ausgesetzt wird, da dies
zu Beschädigungen und zu undeutlichem Ablesen führen kann.
• Vermeiden Sie Situationen, in denen es zu starken
Temperaturschwankungen, wie direkter Sonnenlichteinstrahlung,
extremer Kälte oder feuchten und nassen Umweltbedingungen,
kommt.
• Verwenden Sie zum Reinigen der Anzeige und des Gehäuses nur
einen leicht angefeuchteten Lappen. Verwenden Sie keine
Lösungs- oder Scheuermittel, da diese das LCD und das
Gehäuse beschädigen können.
• Lassen Sie den Wecker nicht fallen und lassen Sie kein Wasser
ins Gerät kommen.
• Versuchen Sie nicht, den Wecker selbst zu reparieren. Bringen
Sie ihn für Reparaturen zum ursprünglichen Händler zurück.
GARANTIE
Auf dieses Gerät werden 2 Jahre Garantie gewährt. Um eine
optimale Bearbeitung zu gewährleisten, wenden Sie sich bitte mit
Ihrem Einkaufsbeleg an Ihren Fachhändler. Unter die Garantie fallen
Material- sowie Produktionsfehler, die bei der Herstellung
entstanden sind. Nicht unter die Garantie fallen Beschädigung
durch unsachgemäße Handhabung, falsche Bedienung bei
Nichtbeachtung der Bedienungsanleitung, nicht autorisierte
Eingriffe in das Gerät, Beschädigungen durch Hitze, Feuchtigkeit,
etc.
Tel. Technischer Service: +33 0821 23 3000
FAX Kundendienst: 00 49 6341 982 1439
Internet Site: http://www.lexibook.com
HELFEN SIE MIT, UNSERE UMWELT ZU SCHÜTZEN!
Deutsch
Verbrauchte Batterien gehören nicht in den Hausmüll. Der
Verbraucher ist gesetzlich verpflichtet, gebrauchte Batterien bei
entsprechenden Sammelstellen abzugeben, z.B. der
Deutsch
Gemeindeverwaltung oder im Supermarkt. Sollten Sie keine
Möglichkeit haben, die verbrauchten Batterien bei einer
Sammelstelle in Ihrer Nähe abzugeben, so schicken Sie sie bitte an
folgende Adresse:
Lexibook GmbH
Alfred-Nobel-Platz
D-76829 LANDAU (Pfalz)
Diese Zeichen befinden sich auf schadstoffhaltigen Batterien:
Pb = Batterie enthält Blei
Cd = Batterie enthält Cadmium
Hg = Batterie enthält Quecksilber
Copyright © Lexibook 2003 5 Copyright © Lexibook 2003 6
Page 14

SMP300IMIT1 SMP300IMIT2
Congratulazioni per aver acquistato la sveglia Postazione Meteo
SMP300 di Lexibook®, dotata di doppie funzioni esclusive: misura
della pressione atmosferica e proiezione dell’ora e della previsione
meteorologica.
Si raccomanda di leggere attentamente queste istruzioni per l’uso
per una piena comprensione del funzionamento. Conservare le
istruzioni per eventuali consultazioni future.
AVVIAMENTO
Al momento di utilizzare la sveglia per la prima volta:
1. Rimuovere l’etichetta di protezione in plastica situata sul display
dello schermo.
2. Rimuovere la linguetta protettiva in plastica dalle batterie AG13
sulla parte posteriore del prodotto. Questo accenderà
l’apparecchio (le batterie sono in dotazione).
3. Se in dotazione, collegare l’adattatore per poter fare uso della
proiezione. Nel caso in cui non fosse possibile o non desideraste
impiegare l’adattatore, inserire 2 batterie AA (LR6) nello
scomparto presente sulla parte posteriore dell’apparecchio,
aprendolo con un cacciavite.
REGOLAZIONE DELL’ORA
1. Premere contemporaneamente i tasti [MODE] e [SET] e
mantenere la pressione per 2 secondi fino a quando l’anno inizia
a lampeggiare, quindi premere [ ] o [ ] per regolarlo.
2. Premere [MAX/MIN/LIGHT] per confermare e passare alla
regolazione successiva.
3. Procedere allo stesso modo per regolare successivemente:
a. Mese
b. Data
c. Giorno della settimana
d. Ora
e. Minuti
Nota: al momento della regolazione dell’ora, ricordate che « PM »
significa Pomeriggio e « AM » Mattino (es : 5:00 PM = 17:00).
REGOLAZIONE DELLA SVEGLIA
1. Premere contemporaneamente i tasti [ALARM] e [SET] e
mantenere la pressione per 2 secondi, fino a quando l’anno inizia
a lampeggiare, quindi premere [ ] o [ ] per regolarlo.
2. Premere [MAX/MIN/LIGHT] per confermare e passare alla
regolazione successiva.
3. Procedere allo stesso modo per regolare successivamente:
a. Ora
b. Minuti
Nota:
• L’ icona (((•))) viene visualizzata quando la sveglia è in funzione.
Premere [ALARM] per attivare/fermare la sveglia predisposta.
• Funzione Auto-Ripetizione (Auto-Snooze). La sveglia suona per 1
minuto, quindi s’interrompe per poi riprendere nuovamente dopo
5 minuti; farà lo stesso per 3 volte. L’ icona Zz lampeggia quando
è in funzione la sveglia a ripetizione.
• Premere un tasto qualsiasi per fermare la sveglia.
BAROMETRO
1. La misurazione e la visualizzazione della pressione atmosfrica
varia da: 840 a 1050 mb/hPa (24.80 a 31.00 inHg). Mb=
« millibar » ; hPa = « ettopascal »: sono le unità europee,
coincidenti (1 mb = 1 hPa). inHg = « inches of mercury », è lo
standard americano.
2. Premere 1 volta [PRESSURE MEMORY/UNIT] per visualizzare la
Italiano
lettura della pressione atmosferica di un’ora prima. Premere 2
volte per conoscere la pressione di 2 ore prima, ecc. fino a 8 ore.
Italiano
3. Il grafico a barre al di sotto della visualizzazione della pressione
riassume visivamente la cronistoria delle variazioni di pressione
durante le ultime 8 ore.
4. Premere il tasto [PRESSURE MEMORY/UNIT] per 2 secondi per
cambiare l’unità di visualizzazione della pressione da mb/hPa a
inHg.
5. La freccia posta di lato indica la tendenza barometrica della
pressione: in rialzo, in discesa o stabile.
Copyright © Lexibook 2003 1 Copyright © Lexibook 2003 2
Page 15

SMP300IMIT3 SMP300IMIT4
PREVISIONI METEOROLOGICHE
Il sensore barometrico elettronico integrato permette di prevedere
la probabile evoluzione meteorologica nelle successive 12 ore.
Potranno essere visualizzate le seguenti icone:
Sole
Soleggiato Nuvole Pioggia
Lexibook® non garantisce l’esattezza di queste previsioni.
IGROMETRO
La misurazione e la visualizzazione dell’igrometria varia dal 30% al
90%.
L’igrometria di una casa condiziona il confort dei suoi abitanti e il
buon funzionamento delle loro vie respiratorie. È corretta quando è
compresa tra il 30% e il 65%.
TERMOMETRO
La misurazione e la visualizzazione della temperatura varia da 0°C
(32°F) a 50°C (122°F).
Premere il tasto [°C/°F] per passare dai gradi Celsius ai gradi
Fahrenheit.
6. Mantenere la pressione sul tasto [MAX/MIN/LIGHT] per 2
secondi per verificare la temperatura massima/minima.
SVEGLIA PROIETTORE
1. Premere [MAX/MIN/LIGHT] per proiettare l’ora e le previsioni
meteorologiche a distanza. Servirsi del tasto di regolazione
[FOCUS] situato sulla parte posteriore dell’apparecchio per
regolare la messa a fuoco della proiezione. La distanza massima
di proiezione è di 3 metri. Affinchè la proiezione funzioni, è
necessario che sia stato collegato l’adattatore o che siano state
inserite 2 batterie AA/LR6 nel relativo scomparto (vedi sotto).
2. L’angolo di proiezione ideale non deve superare i 90° in senso
orario.
SOSTITUZIONE DELLE BATTERIE
La sveglia impiega 2 batterie AG13/LR44 e un adattatore (o 2
batterie AA/LR6) o equivalente.
1. Rimuovere lo sportelino del vano batterie situato sul retro
dell’unita’ con un cacciavite.
2. Inserire le batterie, facendo attenzione a seguire la polarita’.
3. Rimettere il coperchio usando un cacciavite.
Batteriefachabdeckung
Batteriefach
Avvertenza:
1. E’ consigliabile cambiare le batterie dell’unita’ ogni anno.
2. NON mischiare batterie vecchie e nuove o batterie di tipi
differenti.
3. Se le batterie perdono e la sostanza di fuoriuscita viene in
contatto con gli occhi o con la pelle, lavarsi immediatamente con
molta acqua.
4. Le batterie devono essere maneggiate sotto alla supervisione di
Italiano
un adulto.
Italiano
SALVA LA NATURA! Assicurarsi di buttare le batterie in modo
appropriato seguendo le istruzioni del produttore.
Copyright © Lexibook 2003 3 Copyright © Lexibook 2003 4
Page 16

SMP300IMIT5 SMP300IMIT6
ADATTATORE OPZIONALE
1. Un adattatore opzionale AC/DC puo’ essere usato al posto delle
2 batterie x AA inserendo lo spinotto nella presa DC che si trova
sul retro del proiettore dell’orologio.
2. Un’altra serie di proiettore orologio con adattatore puo’ essere
utilizzata con questa opzione.
3. Caratteristiche adattatore AC/DC:
Länger als 10mm
empfohlene Abmessungen
Emissione: DC 3V
Corrente>150mA
Entrata spina: polo positivo (+ve), 2.5mm
Uscita spina: polo negativo (-ve), 5.5mm
NUOVO SETTAGGIO
In caso capiti un errore, premere [RESET] sul fondo dell’unita’ con
un oggetto appuntito per ritornare alle operazioni normali.
CURA GENERALE
• Mai appoggiare l’orologio proiettore su superfici soggete a
vibrazioni od urti in quanto si puo’ danneggiare e puo’ provocare
una lettura non accurata.
• Evitare l’esposizione a bruschi cambiamenti di temperatura quail
l’esposizione diretta al sole, freddo estremo, bagnato, o umido.
• Quando si pulisce il display e l’unita’, usare solo un panno umido
e soffice. Non usare solventi o agenti corrosivi in quanto possono
danneggiare il visore LCD e l’unita’.
• Non far cadere la sveglia od immergerla in acqua.
• Non provare a fare alcuna riparazione sdull’orologio da soli.
Ritornarlo al rivenditore originale per le eventuali riparazioni.
GARANZIA
Il prodotto è coperto da garanzia* di due anni. Per la validità della
garanzia o dell’assistenza in garanzia, rivolgersi al rivenditore con la
prova d’acquisto. La garanzia copre i vizi di materiale o di
montaggio dovuti al costruttore ad esclusione di deterioramento
causato dal mancato rispetto delle istruzioni d’uso o da qualsiasi
intervento sull’articolo (come montaggio, esposizione a calore o
umidità...)
TEL: 02 2040 4959
FAX: + 33 (0)1 73 23 23 04
Sito Internet: http://www.lexibook.com
*non comprende il deterioramento dello schermo LCD
Italiano
Italiano
Copyright © Lexibook 2003 5 Copyright © Lexibook 2003 6
Page 17

SMP300IMNL1 SMP300IMNL2
Gefeliciteerd met de aankoop van jouw Wekker/weerstation
Lexibook® SMP300 met exclusieve dubbele functies: het meten van
de luchtdruk, tijdprojectie en weersvoorspelling.
Wij raden je aan om deze gebruikshandleiding aandachtig te lezen
om vertrouwd te raken met de werking van het apparaat. Gelieve
het te bewaren als referentiemiddel in de toekomst.
IN WERKING STELLEN
Indien je de wekker voor de eerste maal gebruikt:
1. Verwijder de plastiek bescherming van het displayscherm.
2. Verwijder het plastiek beschermstrookje van de AG13 batterijen
aan de achterkant van het apparaat. Dit zal het apparaat in
werking stellen (de batterijen zijn bijgeleverd).
3. Indien deze is bijgeleverd, verbind de sector adapter om de
projectie te kunnen gebruiken. Indien je de adapter niet kan of wil
gebruiken, kan je 2 AA(LR6)-batterijen in het batterijvak aan de
achterkant van het apparaat steken, door het te openen met een
schroevedraaier.
INSTELLEN VAN DE KLOK
1. Druk gelijktijdig op de toetsen [MODE] en [SET] en hou deze
voor 2 seconden ingedrukt, tot het jaar begint te flikkeren, druk
daarna op [ ] of [ ] om het aan te passen.
2. Druk op [MAX/MIN/LIGHT] om te bevestigen en ga naar de
volgende instelling.
3. Gebruik dezelfde werkwijze voor de volgende instellingen:
a. Maand
b. Datum en Dag
c. Dag van de week
d. Uur
e. Minuten
Opmerking: bij het instellen van de uren, noteer dat « PM »
namiddag betekent en « AM » voormiddag (bv.: 5:00 PM = 17:00).
INSTELLEN VAN HET ALARM
1. Druk gelijktijdig op de toetsen [MODE] en [SET] en hou deze
voor 2 seconden ingedrukt, tot het jaar begint te flikkeren, druk
daarna op [ ] of [ ] om het aan te passen.
2. Druk op [MAX/MIN/LIGHT] om te bevestigen en ga naar de
volgende instelling.
3. Gebruik dezelfde werkwijze voor de volgende instellingen:
a. Uur
b. Minuten
Opmerking:
• Wanneer het alarm aan staat, verschijnt het symbool (((•))). Druk
op [ALARM] om het vooraf ingestelde alarm aan/uit te zetten.
• Functie Auto-Snooze. Het alarm biept gedurende 1 minuut, houdt
daarna op en biept 5 minuten daarna opnieuw 3 maal. Het
symbool Zz flikkert als het herhalingsalarm aan staat.
• Druk op eender welke toets om het alarm te stoppen.
BAROMETER
1. Het meten en weergeven van de luchtdruk variëert tusen: 840 en
1050 mb/hPa (24.80 tot 31.00 inHg). Mb= « millibars » ; hPa =
« hectopascals » : het zijn de Europese eenheden, de ene gelijk
aan de andere (1 mb = 1 hPa). inHg = « inches of mercury », de
Amerikaanse standaard.
2. Druk eenmaal op [PRESSURE MEMORY/UNIT] om de
opgemeten luchtdruk binnen 1 uur weer te geven. Druk twee
maal om de druk binnen 2 uur te kennen, enzovoort tot 8 uur.
3. De balkgrafiek onderaan de weergave van de luchtdruk
recapituleert visueel de variatie in druk voor de voorbije 8 uur.
4. Druk gedurende 2 seconden op de toets [PRESSURE MEMORY/
UNIT] om de eenheid van de luchtdrukweergave te veranderen
Nederlands
van mb/hPa naar inHg.
5. De pijl aan de zijkant verwijst naar de tendens van de
barometrische druk: hoog, laag of stabiel.
Nederlands
Copyright © Lexibook 2003 1 Copyright © Lexibook 2003 2
Page 18

SMP300IMNL3 SMP300IMNL4
WEERSVOORSPELLINGEN
De geïntegreerde elektronische barometer ontvanger maakt het
mogelijk om de waarschijnlijke evolutie van het weer in de 12
komende uren te voorzien.
De volgende pictogrammen kunnen worden afgebeeld :
Zon
Zon en Wolk Wolk Regen
Lexibook® maakt geenszins aanspraak op de nauwkeurigheid van
deze voorspellingen.
HYGROMETER
Het opmeten en weergeven van de hygrometrie variëert tussen
30% en 90%.
De hygrometrie van een huis is afhankelijk van het comfort van de
inwoners en de goede werking van hun luchtwegen. Deze is correct
indien tussen 30% en 65%.
THERMOMETER
Het opmeten en weergeven van de temperatuur variëert tussen
0°C (32°F) en 50°C (122°F).
Druk op de toets [°C/°F] om van Celsius naar Fahrenheit over te
gaan.
6. Druk gedurende 2 seconden op [MAX/MIN/LIGHT] om de
maximum/minimum temperatuur te controleren.
WEKKER PROJECTOR
1. Druk op [MAX/MIN/LIGHT]] om het uur en de weersvoorspelling
op afstand te projecteren. Gebruik de aanpastoets [FOCUS] aan
de achterkant van het apparaat om de helderheid van de
projectie bij te sturen. De maximale projectieafstand is 3 meter.
Om het projecteren te laten werken, moet ofwel de adapter zijn
aangesloten ofwel 2 AA/LR6-batterijen zijn ingestoken in het
voorziene batterijvak (zie hieronder).
2. De ideale projectiehoek kan niet groter zijn dan 90° in de richting
van de wijzers van de klok.
VERVANGEN VAN BATTERIJEN
Deze wekker gebruikt 2 AG13/LR44-batterijen en een sector
adapter (of 2 AA/LR6-batterijen) of equivalent.
1. Verwijder het deksel van het batterijvak aan de achterkant van
het toestel met een schroevendraaier.
2. Plaats de batterijen en houd rekening met hun polariteit.
3. Plaats het deksel terug met een schroevendraaier.
Batteriefachabdeckung
Batteriefach
Waarschuwing:
1. Wij raden aan de batterijen in het toestel elk jaar te vervangen.
2. MENG GEEN nieuwe en oude batterijen of batterijen van een
verschillend type.
3. Als de batterij lekt en in contact komt met de huid of ogen, was
dan onmiddellijk met veel water.
4. Het uitvoeren van handelingen aan batterijen mag enkel onder
supervisie van volwassenen geschieden.
SPAAR DE NATUUR! Zorg ervoor dat u de batterijen verwijdert
overeenkomstig de instructies van de fabrikant van de batterijen.
Nederlands
Nederlands
Copyright © Lexibook 2003 3 Copyright © Lexibook 2003 4
Page 19

SMP300IMNL5 SMP300IMNL6
OPTIONELE ADAPTOR
1. Een optionele AC/DC-adapter kan worden gebruikt in de plaats
van 2 x AA-batterijen door de plug in de gelijkstroomingang te
steken aan de achterkant van de projectieklok.
2. Het is mogelijk dat een andere projectieklok met adapters
beschikbaar is met deze optie.
3. Toelaatbare belasting van AC/DC-adapter:
Länger als 10mm
empfohlene Abmessungen
Output: DC 3V
Stroom: >150mA
Binnenste plug: positieve pool (+ve), 2,5mm
Buitenste plug: negatieve pool (-ve), 5,5mm
RESET
Indien er iets fout loopt, druk dan met een scherp voorwerp op
[RESET] op de onderkant van het toestel om terug in normale
modus te kunnen werken.
ALGEMEEN ONDERHOUD
• Plaats de projectieklok nooit in plaatsen die onderhevig zijn aan
vibraties en schokken. Dit kan uw toestel beschadigen en onjuiste
weergave van gegevens veroorzaken.
• Vermijd blootstelling aan plotselinge temperatuursveranderingen
zoals direct zonlicht, extreme koude en natte of vochtige
omstandigheden.
• Gebruik een zachte vochtige doek bij de reiniging van het display
en de behuizing. Gebruik geen oplossings- of reinigingsmiddelen
omdat dit sporen kan nalaten op het LCD-scherm en de
behuizing.
• Laat de alarmklok niet vallen en dompel deze ook niet onder in
water.
• Probeer niet om de alarmklok zelf te herstellen. Breng het terug
naar de handelszaak waar u het kocht voor reparatie.
WAARBORG
Dit product wordt gedekt door onze waarborg van twee jaar. Om
gebruik te maken van de waarborg of van de servicedienst moet u
met uw aankoopbewijs naar uw winkelier gaan. Onze waarborg
dekt materiaal- of montagefouten die te wijten zijn aan de
constructeur, met uitzondering van elke beschadiging die ontstaan
is omdat de gebruiksaanwijzing niet is nageleefd of omdat er een
ongepaste ingreep is uitgevoerd (zoals demontage, blootstelling
aan warmte of vocht, …).
Fax: + 33 (0)1 73 23 23 04
Website: http://www.lexibook.com
Nederlands
Nederlands
Copyright © Lexibook 2003 5 Copyright © Lexibook 2003 6
Page 20

SMP300IMP1 SMP300IMP2
Parabéns pela compra do seu despertador com previsão
meteorológica SMP300 da Lexibook®, que também tem duas
funções exclusivas: mede a pressão atmosférica e mostra a hora e
a previsão meteorológica.
Recomenda-se que leia atentamente o manual de utilização para
se certificar que compreendeu bem o modo de funcionamento.
Queira também conservá-lo para futuras referências.
INÍCIO
Quando utilizar o despertador pela primeira vez:
1. Retire a protecção plástica do visor óptico.
2. Retire a Lingueta plástica de protecção das pilhas AG13 na parte
de trás do produto. Isto fará com que o aparelho comece a
funcionar (o aparelho não vem com pilhas).
3. Caso o adaptador seja distribuído conjuntamente, ligue-o à
electricidade para se poder servir da projecção. Caso não possa
ou não queira servir-se do adaptador, poderá colocar duas pilhas
AA (LR6) no compartimento traseiro do aparelho, abrindo-o com
uma chave de fendas.
ACERTAR A HORA
1. Prima ao mesmo tempo os botões [MODE] e [SET] e mantenha os premidos durante 2 segundos até que o ano comece a piscar,
de seguida carregue em [ ] ou [ ] para o acertar.
2. Prima [MAX/MIN/LIGHT] para confirmar e passar ao acerto
seguinte.
3. Proceda do mesmo modo para acertar sucessivamente:
a. Mês
b. Dia
c. Dia da semana
d. Horas
e. Minutos
Nota: Após o acerto da hora, tenha em conta que “PM” significa
Tarde e “AM” significa Manhã (por ex: 5:00 PM = 17:00).
Português
ACERTAR O ALARME
1. Prima ao mesmo tempo os botões [ALARM] e [SET] e
Português
mantenha-os premidos durante 2 segundos até que o ano
comece a piscar, de seguida carregue em [ ] ou [ ] para
o acertar.
2. Prima [MAX/MIN/LIGHT] para confirmar e passar ao acerto
seguinte.
3. Proceda do mesmo modo para acertar sucessivamente:
a. Horas
b. Minutos
Nota:
• O ícone (((•))) aparece quando o alarme estiver ligado. Prima o
botão [ALARM] para ligar / desligar o alarme pré-regulado.
• Modo de Auto-Repetição (Auto-Snooze). O alarme toca durante 1
minuto, depois pára, voltando a tocar novamente 5 minutos
depois, fazendo isto 3 vezes. O ícone Zz pisca quando o alarme
estiver ligado em modo de repetição.
• Prima um botão qualquer para parar o alarme.
BARÓMETRO
1. A medição e apresentação da pressão atmosférica varia dos 840
a 1050 mb/hPa (24.80 a 31.00 inHg). Mb= “milibares”; hPa =
“hectopascais”: são as unidades europeias, iguais uma à outra
(1 mb = 1 hPa). inHg = “inches of mercury” é a unidade
americana.
2. Prima 1 vez em [PRESSURE MEMORY/UNIT] para ver a
informação da pressão atmosférica de há uma hora atrás. Prima
2 vezes para saber a pressão de há duas horas, etc, até às 8
horas anteriores.
3. O gráfico de barras abaixo da pressão recapitula visualmente o
histórico da variação da pressão durante as 8 horas anteriores.
4. Prima o botão [PRESSURE MEMORY/UNIT] durante 2 segundos
para alterar a unidade de apresentação da pressão de mb/hPa
para inHg.
Copyright © Lexibook 2003 1 Copyright © Lexibook 2003 2
Page 21

SMP300IMP3 SMP300IMP4
5. A seta do lado indica a tendência barométrica da pressão: se
aumenta, diminui ou fica estável.
PREVISÃO METEOROLÓGICA
O sensor barométrico electrónico integrado permite a previsão da
provável evolução da meteorologia nas 12 horas seguintes.
Os ícones seguintes poderão ser apresentados:
Sol
Algumas nuvens Nublado Chuva
A Lexibook® não assegura, de maneira nenhuma, a exactidão
destas previsões.
HIGRÓMETRO
A medição e apresentação da higrometria variam dos 30% aos
90%.
A higrometria de uma casa condiciona o conforto dos seus
habitantes e o bom funcionamento das vias respiratórias dos
mesmos. É considerada correcta se estiver entre os 30% e os 65%.
TERMÓMETRO
A medição e apresentação da temperatura varia entre os 0°C (32°F)
e os 50°C (122°F).
Prima o botão [°C/°F] para passar de graus Celsius para graus
Fahrenheit.
6. Prima [MAX/MIN/LIGHT] durante 2 segundos para verificar a
temperatura máxima / mínima.
DESPERTADOR PROJECTOR
projecção. A distância máxima de projecção é de 3 metros. Para
Português
que a projecção funcione, verifique se ligou o adaptador ou se
colocou 2 pilhas AA/LR6 no compartimento existente para esse
fim (ver descrição abaixo).
Português
2. O ângulo de projecção ideal não deverá exceder um ângulo de
90° no sentido dos ponteiros de um relógio.
SUBSTITUIÇÃO DAS PILHAS
Este despertador utiliza 2 pilhas AG13/LR44 e um adaptador (ou 2
pilhas AA/LR6) ou equivalente.
1. Retire a tampa do compartimento das baterias na parte traseira
da unidade, com uma chave de parafusos.
2. Insira as baterias, tomando em atenção a direcção de polaridade.
3. Torne a colocar a tampa, com uma chave de parafusos.
Tampa do Compartimento das Baterias Compartimento das Baterias
Aviso:
1. É preferível substituir as baterias na unidade todos os anos.
2. NÃO MISTURE baterias novas e usadas ou baterias de tipos
diferentes.
3. Se houver derrame das baterias e entrar em contacto com a pele
ou os olhos, lave imediatamente com muita água.
4. As baterias devem ser manuseadas sob supervisão de um adulto.
PROTEJA A NATUREZA! Certifique-se de que as baterias são
descartadas de acordo com as instruções de segurança do
fabricante.
1. Prima [MAX/MIN/LIGHT]] para projectar a hora e a previsão
meteorológica à distância. Utilize o botão de regulação [FOCUS]
na parte de trás do aparelho para ajustar a focagem da
Copyright © Lexibook 2003 3 Copyright © Lexibook 2003 4
Page 22

SMP300IMP5 SMP300IMP6
ADAPTADOR OPCIONAL
Português
GARANTIA
1. O adaptador opcional CA/CC pode ser utilizado em vez das 2
baterias AA, inserindo a ficha na tomada macho CC localizada
na parte traseira do relógio projector.
2. Outra série de relógio projector com adaptadores está disponível
com esta opção.
3. Classificação do adaptador CA/CC:
Português
Este produto tem a garantia de 2 anos.
Para qualquer reclamação de garantia ou serviço após venda, é
favor contactar o seu fornecedor local com a sua prova de compra.
A nossa garantia cobre todos os defeitos de fabrico ou de
montagem imputáveis ao fabricante mas não cobre a deterioração
pelo não respeito do Manual de Instruções ou mau manuseamento
do produto (tal como exposição ao calor ou humidade ou
desmantelamento do produto).
Maior que 10mm
Dimensões Sugeridas
Fax serviço após venda : + 21 204 91 17
http://www.lexibook.com
Saída: CC 3V
Corrente: >150mA
Interior da ficha: polo positivo (+ve), 2.5mm
Exterior da ficha: polo negativo (-ve), 5.5mm
RECONFIGURAÇÃO
Se ocorrer um erro, prima [RESET] na parte inferior da unidade
com um objecto pontiagudo para recomeçar a operação normal.
CUIDADOS GERAIS:
• Nunca coloque o relógio de projecção em áreas sujeitas a
vibrações e a choques, já que isso pode danificá-lo e provocar
leituras erradas.
• Evite a exposição a alterações repentinas de temperatura, tais
como a luz directa do sol, frio intenso ou condições de humidade.
• Sempre que limpar o visor e o aparelho, utilize apenas um pano
húmido. Não utilize solventes ou agentes abrasivos, pois estes
podem marcar o LCD e o aparelho.
• Não deixe cair o relógio despertador e não o meta dentro de água.
• Não tente reparar o relógio despertador por si. Devolva-o ao
fornecedor original para reparação.
SMP300IM0483
Copyright © Lexibook 2003 5 Copyright © Lexibook 2003 6
 Loading...