

Page 1
Stud Finder Instructions
Operating Tips:
1. This Stud Finder is not suitable for use on walls or ceilings insulated with metallic foil/fi ber composition, or on walls of lath and heavy
drag plaster surfaces.
2. It is important to double check the location of the stud with several readings.
3. An object such as wire, pipe, conduit, or braces inside the wall may read as a stud or joist. Before mounting the TV Wall Mount to the
wall, ensure you have located a wooden stud.
4. Extreme care should be exercised when drilling, sawing, or nailing in walls, ceilings, and fl oors, where plumbing or electrical wires may
be located.
5. When the wall is thick or dense, a fast blinking Red LED light will indicate the nearest stud edge.
6. To avoid interference and inaccuracy, keep your free hand away from the unit while operating.
7. After you have determined the spot where you believe the center of the stud to be (using the Stud Finder), hammer a small nail into
that spot to confi rm that you are hammering into solid wood (and not something less dense, like particle board).
How to Use:
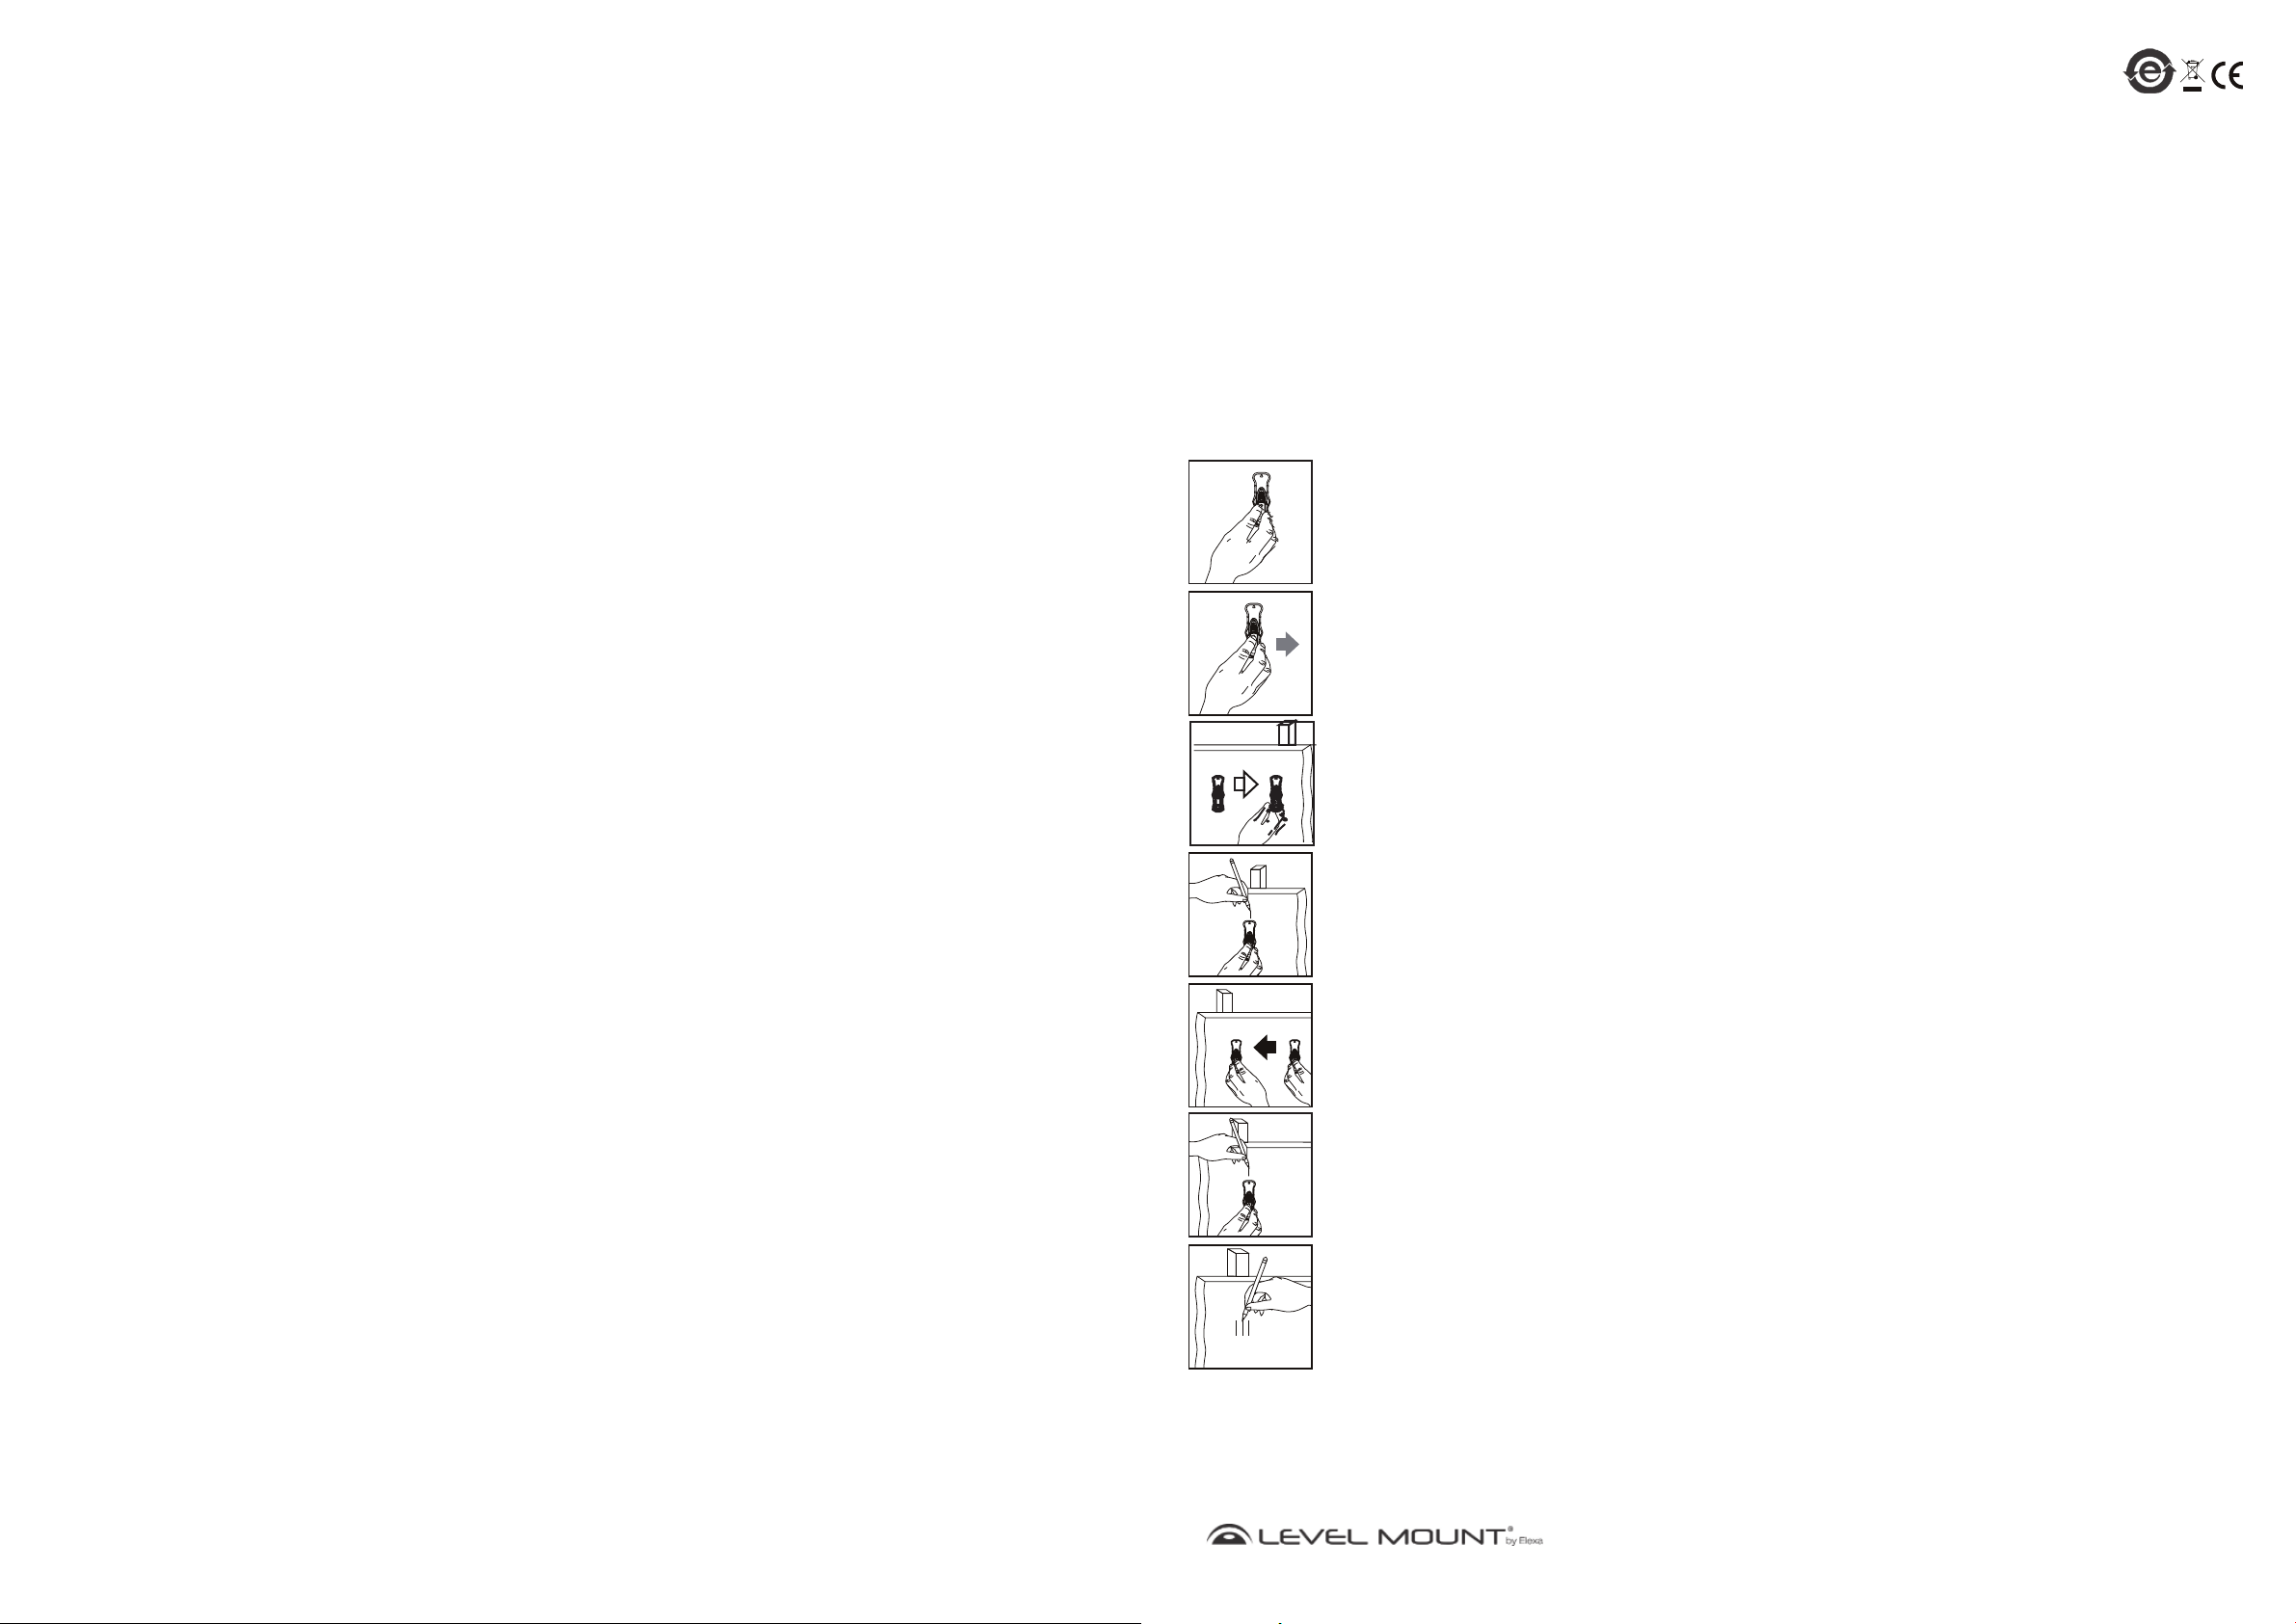
Step 1 – Calibrating the Stud Finder
Remove the plastic tab from the battery to operate. Place the Stud Finder on the wall. Press and hold down the
Operating Button. The Red LED light is bright and quickly changes to a duller constant light, which means that the
calibration is complete and the unit is ready for use.
Step 2 – Operating Stud Finder
Continue pressing the Operating Button while slowly moving the unit across the wall in one direction. Move the
Stud fi nder from left to right without lifting up or tilting.
Step 3 – Locating the Edge of the Stud
Continue to slide the Stud Finder along the wall. A steady red light will start to blink slowly and then fast. The fast
blinking means the sensor is on top of or near the edge of the stud.
Step 4 – Marking the Edge of the Stud
Use a pencil to mark the edge of the stud.
Step 5 – Locating the Other Edge of the Stud
Release the Operating Button and go to the other side of the stud and repeat the process on the stud in the
opposite direction
Step 6 – Marking the Other Edge of the Stud
Use a pencil to mark the other side of the stud edge. Now both sides of the stud should be marked on the wall.
Step 7 – Marking the Center of the Stud
With a pencil, mark a point in the middle of the two lines. This is the center of the stud.
11
www.levelmount.com
1-888-229-1459
EU: +0044 844 567 2657
©2011 Level Mount - Patents Pending
UK: 0844 567 2657
Page 2
Stud Finder Instructions
Specifi cations:
The operating temperature range is from 14°F to 122°F (-10°C to +50°C), with the best temperature being up to 77 F (25°C), humidity
below 60% and altitude up to 6,500 feet (2,000 meters). Do not use the Stud Finder in conditions that are not within these parameters
or it may not function correctly.
1. The detector must not be used in the presence of moisture such as dew or rain.
2. Do not operate the detector with the battery cover removed.
Multi Indication LED
• Auto-Calibration (Solid Bright Red Light)
• Ready To Use (Solid but Dimmer Red Light)
• Stud Edge (Blinking Red Light)
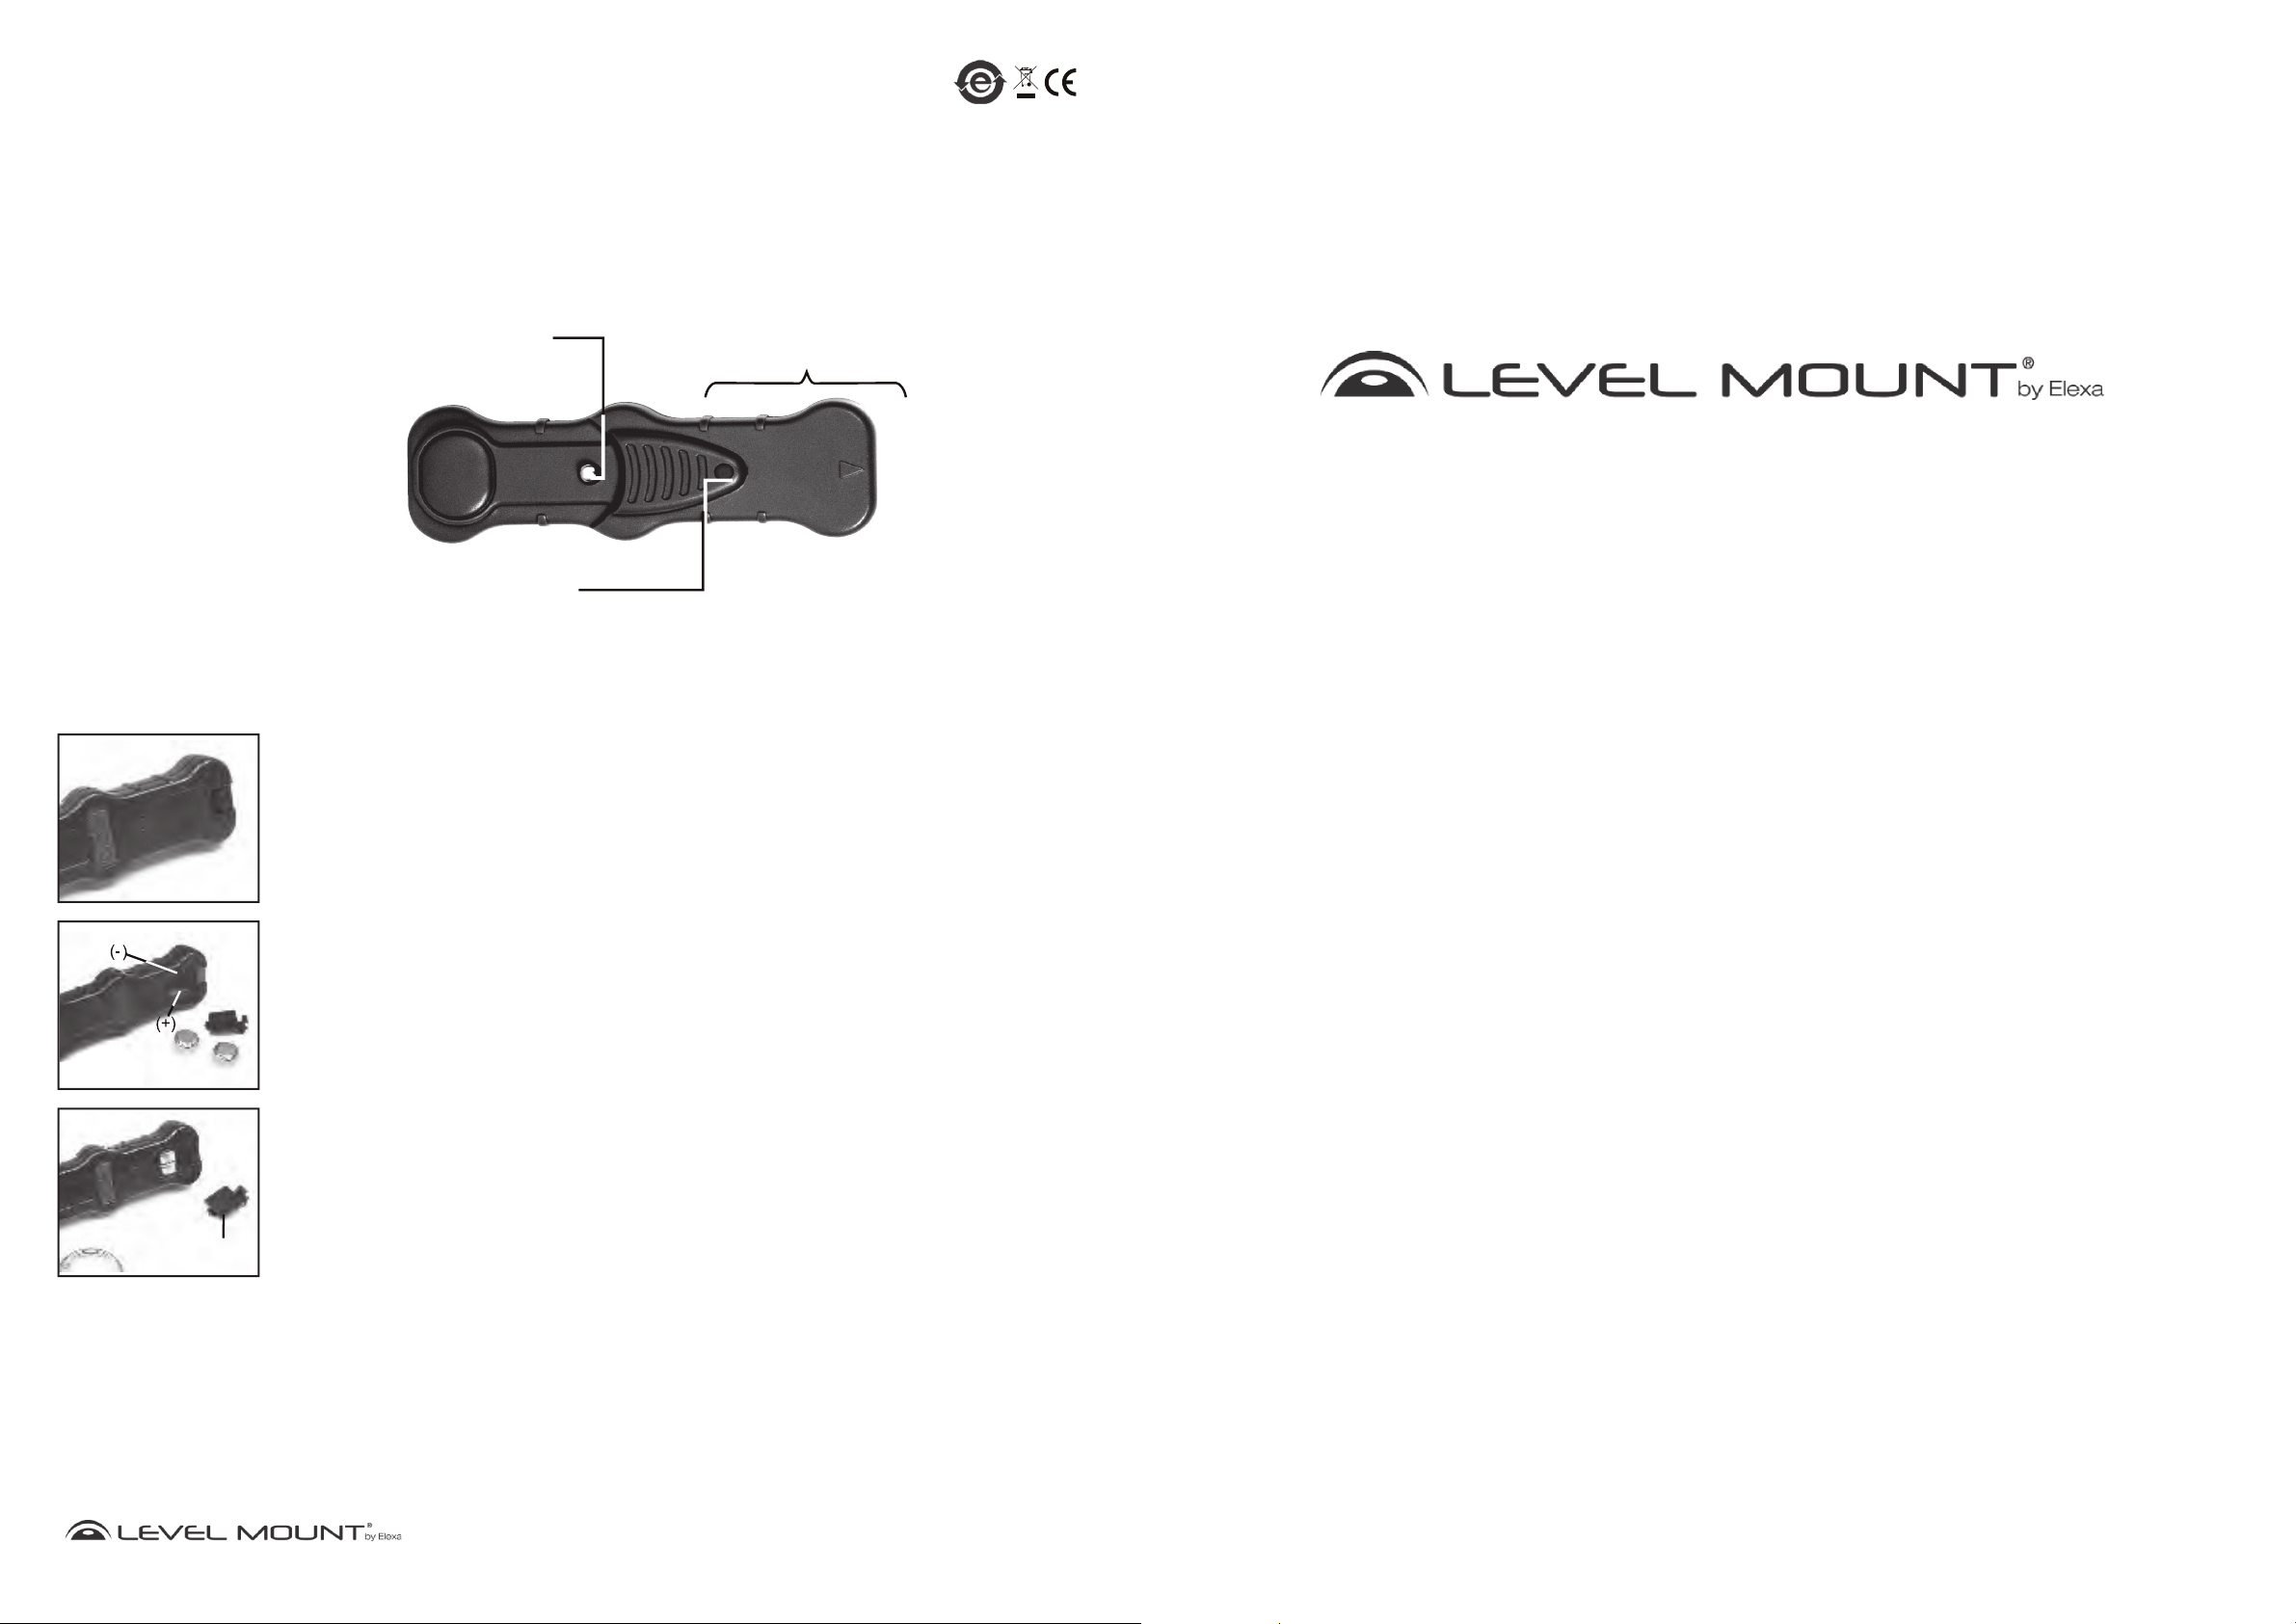
Battery Replacement:
Step 1 – Remove Battery cover
Remove the back cover and the old batteries.
Operating Button
ON: Press and Hold
OFF: Release
Stud Sensor
© 2011. All rights reserved. Patents Pending. Level Mount is a trademark of Elexa Consumer
Products, Inc. All other trademarks are the property of their respective owners.
Step 2 – Battery Replacement
Replace the 2 button cell batteries with two 1.5V batteries, number AG13, LR44, L1154, A76 or 157.
When installing the batteries into the unit, place the positive (+) side of the battery away from the spring
inside the unit.
Step 3 – Replace Battery Cover
Replace the back cover.
Cover
Note: Only use the batteries specifi ed (1.5V, AG13, LR44, L1154, A76 or 157). Put positive and negative pole in the right place. Do
not throw away used batteries in the household garbage. Give them to the collections station or dispose of them at a special
garbage depot that accepts batteries. Remove depleted batteries from the product. Non-rechargeable batteries must not
be recharged. Do not use different types of batteries and do not mix new and used batteries. Do not short-circuit connector
clips (which you could do, for example, by touching the connector clips with something metallic). Do not mix alkaline,
standard (carbon-zinc), or rechargeable batteries.
www.levelmount.com
22
©2011 Level Mount - Patents Pending
1-888-229-1459
EU: +0044 844 567 2657
UK: 0844 567 2657
© 2011. Tous droits réservés. Brevets en instance Level Mount est une marque déposée de
Elexa Consumer Products, Inc. Toutes les autres marques de commerce appartiennent à leurs proprié-
taires ou détenteurs respectifs.
© 2011. Todos los derechos reservados. Pendiente de patente. Level Mount es una marca registrada
de Elexa Consumer Products, Inc. El resto de marcas registradas pertenecen a sus correspondi-
entes dueños.
Page 3

Instrucciones del Detector de Madera
Especifi caciones:
Instructions – Localisateur de montants
La temperatura media de funcionamiento es de 14°F a 122°F (-10°C a +50°C); la mejor temperatura es 77ºF (25°C), con humedad por debajo
de 60% y una altitud de hasta 6.500 pies (2.000 metros). No utilice el Detector de Madera en condiciones que no estén dentro de dichos
parámetros, pues podría funcionar mal.
1. No utilice el detector en condiciones de mucha humedad, como el rocío o lluvia.
2. No utilice el detector sin la tapa de las pilas.
Botón de Funcionamiento
ENCENDER:
APAGAR:
Presione y mantenga pulsado
Suéltelo
Sensor de madera
LED multi-indicador
• Auto-calibración (Luz roja sólida y brillante)
• Listo para su uso (Luz roja sólida pero más apagada)
• Borde de la estructura (Luz roja parpadeante)
Cómo reemplazar las pilas:
Conseils d’utilisation :
1. Cette unité ne convient pas aux murs ou plafonds isolés par une feuille de métal / de fi bres, ou sur les murs en contreplaqué ou
surfaces plastiques.
2. Il est important de bien vérifi er l’emplacement des clous et vis.
3. Il est important de vérifi er la présence d’objet tel que câble, conduit ou tuyau à l’intérieur du mur avant la mise en place.
4. Une attention particulière doit être portée lors des travaux de perçage ou de préparation des murs, plafonds ou sols dans lesquels
des éléments de plomberie ou éléments électriques pourraient se trouver.
5. Certaines pièces additionnelles sont ajoutées dans certaines portes ou fenêtres. L‘unité détectera ces dernières et indiquera la
présence de clous.
6. Si le mur est épais ou dense, une LED rouge clignotant lentement ou au contraire plus rapidement indiquera le clou le plus proche.
7. Éviter toute interférence, maintenez votre main libre éloignée de l’unité lors de l’utilisation de cette dernière.
Comment Utiliser :
Etape 1
Placez le Localisateur de montants sur le mur. Maintenez appuyé le bouton de fonctionnement. La LED rouge
restera allumée, ce qui signifi e que la calibration est terminée et que l’unité peut être utilisée.
Etape 2
Continuez à appuyer sur le bouton tout en déplaçant l’unité sur le mur dans une direction. Déplacez le localisateur
de montants de la gauche vers la droite sans à-coup.
Cover
Paso 1 – Quitar la tapa de las pilas
Quite la tapa trasera y las pilas usadas.
Paso 2 – Reemplazar las pilas
Sustituya las 2 pilas de botón por dos pilas 1.5V, números AG13, LR44, L1154, A76 o
157. Al poner las pilas nuevas en el dispositivo, coloque lado positivo (+) de la pila lejos
del muelle que encontrará dentro del dispositivo.
Paso 3 – Vuelva a colocar la tapa de las pilas
Vuelva a colocar la tapa trasera.
Etape 3
Continuez à faire glisser le localisateur de montants le long du mur. Une lumière rouge commencera à clignoter.
Cela signifi e que le capteur est sur, ou près d’une extrémité du tableau.
Etape 4
Utilisez un crayon pour marquer le côté du tableau.
Etape 5
Relâchez le bouton pour vous rendre dans l’autre sens et répétez l’opération dans la direction opposée.
Etape 6
Utilisez un crayon pour marquer l’autre côté du bord. Les deux côtés devraient alors être marqués.
Nota:
Utilice sólo las pilas indicadas (1.5V, AG13, LR44, L1154, A76 o 157). Ponga correctamente los
polos negativos y positivos. No tire las pilas usadas a la basura; tírelas en un contenedor especial para pilas.
Quite las pilas gastadas del dispositivo. No recargue nunca pilas no recargables. No utilice distintos tipos de pilas,
y no mezcle pilas usadas con pilas nuevas. No provoque un corto-circuito con los clips de conexión (cosa que
podría hacer, por ejemplo, tocando los clips de conexión con algo metálico). No mezcle pilas alcalinas, estándares
(carbono-zinc) y recargables.
www.levelmount.com
66
©2011 Level Mount - Patents Pending
1-888-229-1459
EU: +0044 844 567 2657
UK: 0844 567 2657
Etape 7
Avec un crayon, faites un point au centre des deux lignes. C’est la mnarque centrale du tableau.
33
©2011 Level Mount - Patents Pending
www.levelmount.com
1-888-229-1459
EU: +0044 844 567 2657
UK: 0844 567 2657
Page 4

Instructions – Localisateur de montants
Instrucciones del Detector de Madera
Consejos de operación:
Specifi cations :
La température d’utilisation est comprise entre 14° F et 122° F (-10° C à +50° C), la température idéale étant de 77 F (25° C),
l’humidité en dessous de 60% et ‘altitude jusqu’à 6 500 pieds (2 000 mètres).
1. Le détecteur ne doit pas être utilisé en présence d’humidité ou en cas de pluie.
2. Ne pas utiliser si la protection des piles est enlevée.
Bouton de fonctionnement
ON : Maintenez appuyé
OFF : Relâchez
LED Multi Indication
• Auto-Calibration (Lumière rouge fi xe)
• Prêt à utiliser (Lumière rouge fi xe moins intense)
• Clou à proximité (Lumière rouge clignotante)
Capteur clou
1. Este Detector de Madera no es apto para su uso en paredes o techos aislados con láminas de metal/fi bras, ni en paredes con
superfi cies pesadas de listones de madera y yeso.
2. Es importante realizar varias lecturas para comprobar la localización de la estructura de madera.
3. El Detector puede confundir objetos tipo cables, tuberías, conductos o refuerzos dentro de la pared con estructuras o vigas de madera.
Antes de instalar el soporte de pared para televisores, asegúrese de haber localizado una estructura de madera.
4. Preste especial atención a la hora de taladrar, serrar o clavar clavos en las paredes, techos y suelos por donde podrían pasar tuberías o
cables de electricidad.
5. En paredes gruesas o densas, el parpadeo rápido de una luz LED roja indicará el borde de la estructura de madera más cercana.
6. Para evitar interferencias e inexactitudes, quite la mano que le quede libre de la unidad mientras ésta esté en funcionamiento.
7. Cuando haya encontrado el lugar donde crea que está el centro de la estructura de madera (utilizando el Detector de Madera), clave un clavito
en el hueco para confi rmar que está clavando sobre madera sólida (y no en algo menos denso, como un tablón de aglomerado).
Modo de uso:
Paso 1 – Calibrar el Detector de Madera
Quite la lengüeta de plástico de la batería para empezar a utilizarlo. Coloque el Detector de Madera sobre la pared.
Presione y mantenga pulsado hacia abajo el Botón de Funcionamiento. La luz LED roja brillará y cambiará rápidamente a
una luz constante y más apagada, indicando que la calibración ha terminado y que el dispositivo está listo para utilizarse.
Paso 2 – Cómo funciona el Detector de Madera
Mantenga pulsado el Botón de Funcionamiento mientras lo mueve despacio por la pared, en una sola dirección. Mueva el
Detector de Madera de izquierda a derecha sin levantarlo ni ladearlo.
Remplacement des piles :
Etape 1
Enlevez le couvercle et les piles usagées.
Etape 2
Remplacez les 2 piles par une pile 1,5V, numéro AG13, LR44, L1154, A76 ou 157. Lors de
l’installation des piles dans l’unité placez le signe positif (+) de la pile à l’intérieur de l’unité.
Etape 3
Replacez la protection.
Paso 3 – Cómo localizar el borde de la estructura
Siga desplazando el Detector de Madera por la pared. La luz roja empezará a parpadear despacio, y luego deprisa.
El parpadeo rápido signifi ca que el sensor está sobre el borde de la estructura, o cerca de él.
Paso 4 – Cómo marcar el borde de la estructura
Utilice un lápiz para marcar el Borde de la Estructura.
Paso 5 – Cómo localizar el otro borde de la estructura
Suelte el Botón de Funcionamiento, vaya al otro lado de la estructura y repita el proceso en dirección contraria.
Paso 6 – Cómo marcar el otro borde de la estructura
Utilice un lápiz para marcar el otro borde de la estructura. Ya tiene marcados sobre la pared los dos bordes de la
estructura de madera.
Paso 7 – Cómo marcar el centro de la estructura
Protection
Note : N’utilisez que les piles spécifi ées (1,5V, AG13, LR44, L1154, A76 ou 157). Placez les signes positifs et négatifs au bon
emplacement. Ne jetez pas de piles usagées dans les déchets ménagers. Rendez-vous à des centres de récupération agréés.
Enlevez les piles usagées. Les piles non rechargeables ne doivent pas être rechargées. Ne pas utiliser de types de piles différents et
ne pas mélanger piles neuves et usagées. Ne pas court-circuiter les connecteurs. Ne pas mélanger les piles alcalines (carbone-zinc)
et les piles rechargeables.
www.levelmount.com
44
©2011 Level Mount - Patents Pending
1-888-229-1459
EU: +0044 844 567 2657
UK: 0844 567 2657
Marque con un lápiz un punto en mitad de los dos puntos previamente marcados. Ya tiene el centro de la estructura.
www.levelmount.com
55
©2011 Level Mount - Patents Pending
1-888-229-1459
EU: +0044 844 567 2657
UK: 0844 567 2657
 Loading...