


Installation Instructions
Small Wall Mounts fit 10”-32” (254 mm - 812,8 mm) Flat Panel Displays - Up to 45 lbs (21kg) (AISTA, BSFMD, DC30DJ & LM30DJ) or 50 lbs (22,68 kg) (AISOA, DC30LP, LM30LP, LM30LPW, DC30T, LM30T, DC30SJ, LM30SJ, LM30SJW, RSMSL & RSMSS) depending on model.
Fits VESA Patterns: 75mm x 75mm 100mm x 100mm 200mm x 100mm 200mm x 200mm 300mm x 300mm 400mm x 200mm
Medium Wall Mounts fit 10”-47” (254 mm - 1194,8 mm) Flat Panel Displays - up to 70 lbs (31,75 kg) (AIMOA, AIMTA, BLSFD, DC37DJ, LM37DJ, LM37DJW, DC37LP, LM37LP, DC37SJ, LM37SJ, RSMML & RSMMS) or 80 lbs (37kg) (DC42DJ & LM42DJ) depending on model.
Fits VESA Patterns: 75mm x 75mm 100mm x 100mm 200mm x 100mm 200mm x 200mm 300mm x 300mm 400mm x 200mm 400mm x 400mm 600mm x 400mm
Please read these Installation Instructions entirely, including the Warnings, before you start the installation and assembly of the TV Wall Mount.
Instructions en Francais, Page 10
Instrucciones en Español, Página 22
Need Help?
Helpful Hints
If you have installation questions about your TV Wall Mount, please go to www.levelmount. com to view product tutorials.
Contacting Level Mount Customer Service
If you have questions, our trained Customer Service Department is happy to assist you 24 hours a day, 7 days a week, every day of the year. Contact Level Mount Customer Service as follows:
•In North America dial: 1-888-229-1459
•In Europe dial: +0044 844 567 2657
•In the United Kingdom dial: 0844 567 2657
•E-mail Level Mount at www.customersupport@elexausa.com
DO NOT RETURN THIS PRODUCT TO THE STORE OR WEB SITE FROM WHICH IT WAS PURCHASED
If you believe the product is defective, has a missing or broken part or are having difficulty with assembly, please contact Level Mount directly 24 hours a day, 7 days a week, 365 days a year as listed above, for a quick and efficient solution to your problem.
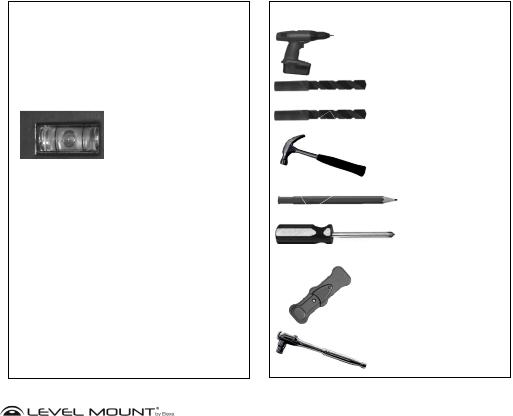
Tools Required
Included |
Not Included |
|
Drill |
|
Drill Bit 4mm |
|
Drill Bit |
|
Masonry 12mm |
Built-in Bubble Level |
|
Spirit Level |
Hammer |
|
|
|
Pencil |
|
Phillips |
|
Screwdriver |
|
Stud Finder |
|
Socket Wrench |
|
www.levelmount.com |
|
1-888-229-1459 |
|
EU: +0044 844 567 2657 |
2 |
UK: 0844 567 2657 |
©2012 Level Mount - Patents Pending |
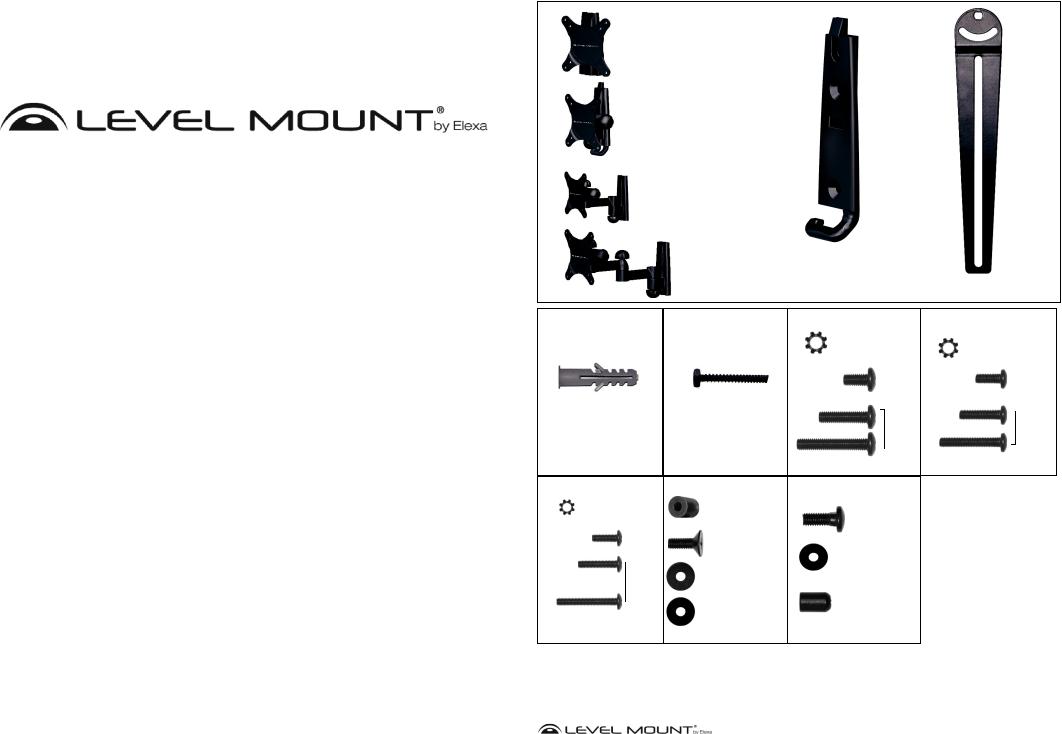
What’s in the box? 30LP, 30T, 30SJ, 30DJ, RSMSL & RSMSS
© 2012. All rights reserved. Patents Pending. Level Mount is a trademark of Elexa Consumer Products, Inc.
All other trademarks are the property of their respective owners.
30LP/RSMSL TV Bracket
30T
TV Bracket
30SJ/RSMSS TV Bracket
30DJ
TV Bracket
Bag 1 |
Bag 2 |
© 2012. Tous droits réservés. Brevets en instance Level Mount est une marque déposée de Elexa Consumer Products, Inc.
Toutes les autres marques de commerce appartiennent à leurs propriétaires ou détenteurs respectifs.
(2) Concrete Anchors |
(2) |
Screw |
© 2012. Todos los derechos reservados. Pendiente de patente. Level Mount es una marca registrada de Elexa Consumer Products, Inc.
El resto de marcas registradas pertenecen a sus correspondientes dueños.
Bag 5 |
|
Bag 6 |
|
(4) M4 Lock Washer |
(4) Spacer |
||
14mm x 16mm, |
|||
|
|
||
|
Flat Back |
(1) M4 x 8mm |
|
(4) M4 x12mm Phillips Bolt |
TV Hardware |
||
|
Theft Deterrent |
||
|
|
Screw |
|
(4) M4 x 20mm Phillips Bolt |
Recessed |
(4) Washer |
|
|
Back |
16mm x 6.3mm x 1.2mm |
|
TV |
|
|
|
|
|
Hardware |
|
(4) M4 x 30mm Phillips Bolt |
|
(4) Washer |
|
16mm x 5.3mm x 1.2mm |
|
|
|
Wall Plate |
|
|
|
|
|
(4) Mini Bayonet |
|
Bag 3 |
|
Bag 4 |
|
(4) M6 Lock Washer |
|
|
|
|
|
(4) M5 Lock Washer |
|
|
Flat Back |
|
Flat Back |
|
TV Hardware |
(4) M5 x12mm Phillips Bolt |
TV Hardware |
(4) M6 x12mm Phillips Bolt |
|
|
|
|
|
|
|
|
Recessed |
(4) M5 x 20mm Phillips Bolt |
Recessed |
(4) M6 x 24mm Phillips Bolt |
Back |
Back |
|
|
TV |
|
TV |
|
Hardware |
|
Hardware |
(4) M5 x 30mm Phillips Bolt
(4) M6 x 35mm Phillips Bolt
Bag 7
(8) M5 x 12mm
Anti-Theft Bolt
(8) Washer
16mm x 5.3mm x 1.2mm
(8) Phillips
M5 Nut Screw
|
www.levelmount.com |
|
1-888-229-1459 |
|
EU: +0044 844 567 2657 |
3 |
UK: 0844 567 2657 |
©2012 Level Mount - Patents Pending |

What’s in the box? 37LP, 37SJ, 37DJ, 42DJ, RSMML & RSMMS
Bag 1
(4)Concrete Anchors
(4)ex Screw
37LP/RSMML TV Bracket
37SJ/RSMMS TV Bracket
37DJ
TV Bracket
|
|
|
|
(4) Second |
|
42DJ |
|
Wall Plate |
|
Extension Arm |
|
TV Bracket |
|
(4) First |
|
||
|
|
|
Extension Arm |
|
|
Bag 2 |
|
Bag 3 |
|
Bag 4 |
|
(4) M8 Lock Washer |
(4) M6 Lock Washer |
(4) M5 Lock Washer |
|||
|
|
|
|
||
|
Flat Back |
|
|
|
|
|
TV Hardware |
|
Flat Back |
|
|
(4) M8 x16mm Phillips Bolt |
|
|
|
Flat Back |
|
|
|
|
TV Hardware |
(4) M5 x12mm Phillips Bolt |
TV Hardware |
|
|
(4) M6 x12mm Phillips Bolt |
|
|
|
|
|
|
|
|
|
(4) M8 x 25mm Phillips Bolt |
Recessed |
|
Recessed |
(4) M5 x 20mm Phillips Bolt |
Recessed |
|
Back |
(4) M6 x 24mm Phillips Bolt |
Back |
Back |
|
|
TV |
|
TV |
|
TV |
|
Hardware |
|
Hardware |
|
Hardware |
(4) M8 x 40mm Phillips Bolt |
(4) M6 x 35mm Phillips Bolt |
(4) M5 x 30mm Phillips Bolt |
|
||
|
|
Bag 5 |
|
Bag 6 |
Bag 7 |
(4) M4 Lock Washer |
|
Extension Arms |
|
|
|
(4) Spacer |
|
|
|
14mm x 16mm, |
(8) M5 x 12mm |
|
Flat Back |
|
Anti-Theft Bolt |
|
|
|
|
(4) M4 x12mm Phillips Bolt |
TV Hardware |
|
(8) M4 Nut |
|
|
|
|
|
|
(1) M5 x 15mm |
(8) M4 x 36mm |
|
|
Theft Deterrent |
|
(4) M4 x 20mm Phillips Bolt |
Recessed |
Screw |
Phillips Bolt |
|
|
||
|
Back |
|
(8) M4 Lock Washer |
|
TV |
(4) Washer |
|
|
|
||
|
Hardware |
|
|
|
16mm x 6.3mm x 1.2mm |
|
|
|
|
|
|
|
|
|
(8) Washer |
(4) M4 x 30mm Phillips Bolt |
|
|
16mm x 5.3mm x 1.2mm |
(4) Washer |
(8) Phillips |
|
16mm x 5.3mm x 1.2mm |
||
M5 Nut Screw |
||
|
Montaje/Instalación
Llave de Tubo Imagen 13
Nivel de burbuja incorporado/Nivel
Tornillo Hexagonal
Placa de Soporte
Imagen 14
Soporte de TV
TV |
Placa de Soporte |
|||
|
|
|
|
|
|
|
|
|
|
|
|
|
|
|
|
|
|
|
|
|
|
|
|
|
Imagen 15
Tuerca antirrobo
Quick-Lock
Soporte de TV
botón de ajuste de inclinación
botón de ajuste
Gancho gerente
Paso 5 - Coloque la placa de pared a la pared
Para colocar la placa de pared de vigas de madera o tornillos de concreto, el uso. Con una llave de tubo apretar los tornillos superiores sólo, como se muestra en Imagen 13.
Una vez más, utilizando la incorporada en el nivel de burbuja / nivel de burbuja, ajustar la placa de pared hasta que esté nivelado, como se muestra en Imagen 12. Cuando la placa de pared es el nivel, utilice una llave de tubo para apretar el tornillo en el orificio inferior de la placa de pared. Vissezassez empresa para producir un fuerte vínculo, pero no en exceso o dañará los medios de comunicación o los tornillos.
Utilizar los tornillos para montar la placa de pared a la pared.
Paso 6 - Coloque el televisor a la placa de pared
Para montar el televisor en la pared, deslice el soporte para TV (con la televisión) sobre la placa de pared (que se fija a la pared como se muestra arriba) y la inferior como se muestra en magen 14.
La configuración de Quick-Lock se incorporará soporte para el televisor a la placa de la pared.
Paso 7 - Coloque, la inclinación y extender el soporte de TV
Una vez que el apoyo de la TV en la placa de pared, instale el tornillo de bloqueo (Bolsa 6) como se muestra en Imagen 15.
Si la TV no es recta después de ser asegurado para el montaje, la nivelación puede ser ajustado 7-8 ° simplemente colocando ambas manos en ambos lados de la pantalla del televisor y girar hacia arriba o hacia abajo hasta su nivel.
Para inclinar la TV, use la perilla de ajuste de inclinación para apretar o aflojar el sello como se muestra en Imagen 15.
Para ampliar la TV, afloje la perilla de ajuste, haga el ajuste y apriete la perilla de ajuste como se muestra en Imagen 15.
El sistema de gestión de cable evita enredos de cables, como se muestra en Imagen 15.
|
www.levelmount.com |
|
www.levelmount.com |
|
1-888-229-1459 |
|
1-888-229-1459 |
|
EU: +0044 844 567 2657 |
|
EU: +0044 844 567 2657 |
4 |
UK: 0844 567 2657 |
25 |
UK: 0844 567 2657 |
©2012 Level Mount - Patents Pending |
©2012 Level Mount - Patents Pending |
Montaje/Instalación
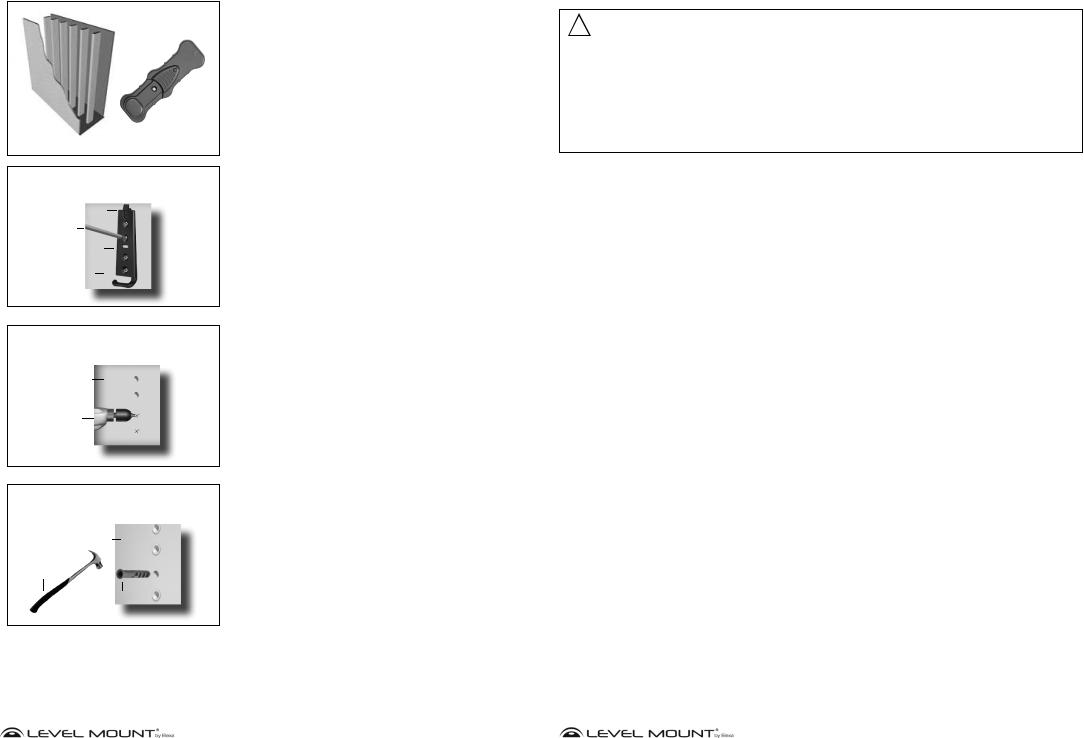
Imagen 9
Detector de Madera
Pladur con estructuras visibles
Imagen 10
Placa de Soporte
Lápiz
Nivel de burbuja incorporado/Nivel
Muro de hormigón
Imagen 11
Muro de hormigón
Broca para madera 12 mm
Étape 4 - Percer des trous dans le mur pour la plaque murale
Opción A – Si las paredes son de pladur
Para fijar la placa de soporte a una pared de pladur, localice las estructuras de madera con un detector de madera. Cuando haya encontrado el lugar donde crea que está el centro de la estructura de madera (utilizando el Detector de Madera), clave un clavito en el hueco lo suficiente para confirmar que está clavando sobre madera sólida
(y no en algo menos denso, como una tabla de aglomerado); una vez realizado, vuelva a quitar el clavito.
Alinee el agujero superior de la Placa de soporte con el centro de la estructura de madera que haya marcado en la pared, a la altura deseada. Utilice un lápiz para marcar la pared a través del agujero superior izquierdo de la Placa de soporte sobre el centro de la estructura, tal y como muestra la Imagen 10.
Opción B – Si las paredes son de hormigón
Para fijar la Placa de soporte al hormigón, colóquela a la altura deseada. Marque los agujeros con un lápiz cuando haya nivelado la Placa de Soporte usando el Nivel de burbuja que viene incorporado o el nivel, tal y como muestra la Imagen 10.
Deje la Placa de soporte a un lado. Taladre agujeros en el hormigón, en el lugar marcado, tal y como muestran las Imágenes 11. Para taladrar los agujeros de los tacos para hormigón en el hormigón, utilice un taladro eléctrico con una broca de 12 mm para madera.
Cuidado: No utilice un martillo neumático, pues rompería y debilitaría el hormigón.
Inserte los tacos para hormigón en los agujeros, tal y como muestra la Imagen 12, e introdúzcalos con un martillo hasta que queden a ras de la pared de hormigón, como muestra la Imagen 12.
Imagen 12
Muro de hormigón
Martillo
hormigón
|
www.levelmount.com |
|
1-888-229-1459 |
|
EU: +0044 844 567 2657 |
24 |
UK: 0844 567 2657 |
©2012 Level Mount - Patents Pending |
Warnings
!CAUTION!
The Small TV Wall Mounts were designed specifically to hold: 10”-32” (254 mm-812,8 mm) Flat Panel Displays - up to 45 lbs (21kg) (AISTA, BSFMD, DC30DJ & LM30DJ) or 50 lbs (22,68kg) (AISOA, DC30LP, LM30LP, LM30LPW, DC30T, LM30T, DC30SJ, LM30SJ, LM30SJW, RSMSL
& RSMSS), The Medium TV Wall Mounts were designed specifically to hold: 10”-47” (254 mm - 1194,8 mm) Flat Panel Displays up to 70 lb (31,75kg) (AIMOA, AIMTA, BLSFD, DC37DJ, LM37DJ, LM37DJW, DC37LP, LM37LP, DC37SJ, LM37SJ, RSMML & RSMMS) or up to 80 lb
(37kg) (DC42DJ & LM42DJ). Using this product with a TV heavier than the maximum weight, or that exceeds these dimensions, may result in serious personal injury and damage to equipment and property.
1.Do not begin the installation of the TV Wall Mount until you have read and understood the instructions and warnings contained in these Installation Instructions. Failure to read, thoroughly understand and follow the instructions can result in serious personal injury and damage to equipment and property. It is the installer’s responsibility to make sure all components are properly assembled and installed using the instructions provided.
2.If you have questions that do not appear to be covered in these Installation Instructions, please refer to the “Helpful Hints” section of the detail page for the TV Wall Mount or contact us as described under the “Need Help” section. If you are at all unsure about any step in these instructions or your ability to install the TV Wall Mount safely and securely, you should seek professional help from a qualified contractor.
3.This TV Wall Mount contains small items that could be a hazard if swallowed. Keep these items away from children.
4.The TV Wall Mount must be attached to wood studs or to properly installed anchors in concrete. Do not install the TV Wall Mount only to drywall or plasterboard. If mounting to wood studs, make sure that
mounting screws are anchored into the center of the studs. See Stud Finder Instructions, included below. Do not use the TV Wall Mount for devices other than as specified in these instructions.
5.Make sure all screws and bolts are tightened before allowing the TV Wall Mount to bear the full weight of the TV. Tighten screws and bolts firmly but do not over-tighten them. Once the screw is flush against the TV and the screwdriver is more difficult to turn and will not turn further, stop; otherwise there is a risk of overtightening the bolt. Over-tightening the screws or bolts could damage the TV Wall Mount, greatly reducing its holding power. Periodic tightening may be required.
6.Screws should easily and completely thread into the TV mounting holes. If any of the screws provided are not suitable for the TV Wall Mount system, the installer must not under any circumstances drill holes into the TV or into the TV Wall Mount components. Using screws of improper size can damage the TV.
7.Do not lift more weight than you can handle. Use at least two people when lifting and positioning the TV on the TV Wall Mount.
8.Before installing, check to make sure all parts of the TV Wall Mount indicated in these Installation Instructions are included and undamaged. Never use damaged parts or try to install the TV Wall Mount if you do not have all needed parts.
9.It is the installer’s responsibility to select the appropriate installation location and the supporting surface on which to mount this TV Wall Mount and to ensure that the TV Wall Mount is anchored properly to the wall. It is also the installer’s responsibility to ensure that the TV is properly and securely attached to the TV Wall Mount using only the enclosed fasteners and components and to verify that the screws and power cords do
not touch wires, pipes, or metal parts within the wall (since this could cause damage to these items or cause electrical shock).
10.Level Mount has made every effort to make these Installation Instructions accurate and complete. However, Level Mount makes no claim that the information contained herein covers all details, conditions or variations, nor does it provide for every possible contingency in connection with the installation, assembly or use of this product. Level Mount makes no representation or warranty, express or implied, regarding the accuracy, completeness or sufficiency of the information contained in this document. Level Mount is not responsible for any damage or injury caused by incorrect mounting, assembly, installation or use.
|
www.levelmount.com |
|
1-888-229-1459 |
|
EU: +0044 844 567 2657 |
5 |
UK: 0844 567 2657 |
©2012 Level Mount - Patents Pending |
 Loading...