

English
Installation Instructions
Power Tilt Plasma/LCD Wall Mount
M o d e l : P W T LT- 0 7 , L M 6 5 P W T,
DM65PWT
CAUTION:
DO NOT RETURN THIS PRODUCT TO THE STORE OR WEB
SITE YOU PURCHASED IT FROM!
IF YOU BELIEVE THIS MOUNT IS DEFECTIVE, HAS
MISSING OR BROKEN PARTS, OR IF YOU ARE HAVING
DIFFICULTY INSTALLING THIS MOUNT TO YOUR WALL
OR FITTING YOUR TV, PLEASE CONTACT OUR COMPANY,
LEVEL MOUNT, DIRECTLY.
Dial 1 888 229 1459 or email us at CustomerSupport@
ElexaUSA.com any time of the day or night for a quick and
efficient solution to your problem.
Our trained Customer Service Department is open 24 hours
a day, 7 days a week, every day of the year and is prepared
to assist you in both English and Spanish.
Please also visit our Web Site at www.LevelMount.com
for assistance.
Features:
• Integrated Bubble Level
• Durable Steel Construction
• Easy 2 Piece Mounting
• Remotely Tilts down (up to 15 degrees)
• Locking Lever
• Stud Finder Included
Tools required for attachment to stud:
1/2’’ (12mm) Socket Wrench (Included)
Stud finder (Included)
Tools required for attaching to concrete:
Electric drill
1/2’’ (12mm) Masonry Bit
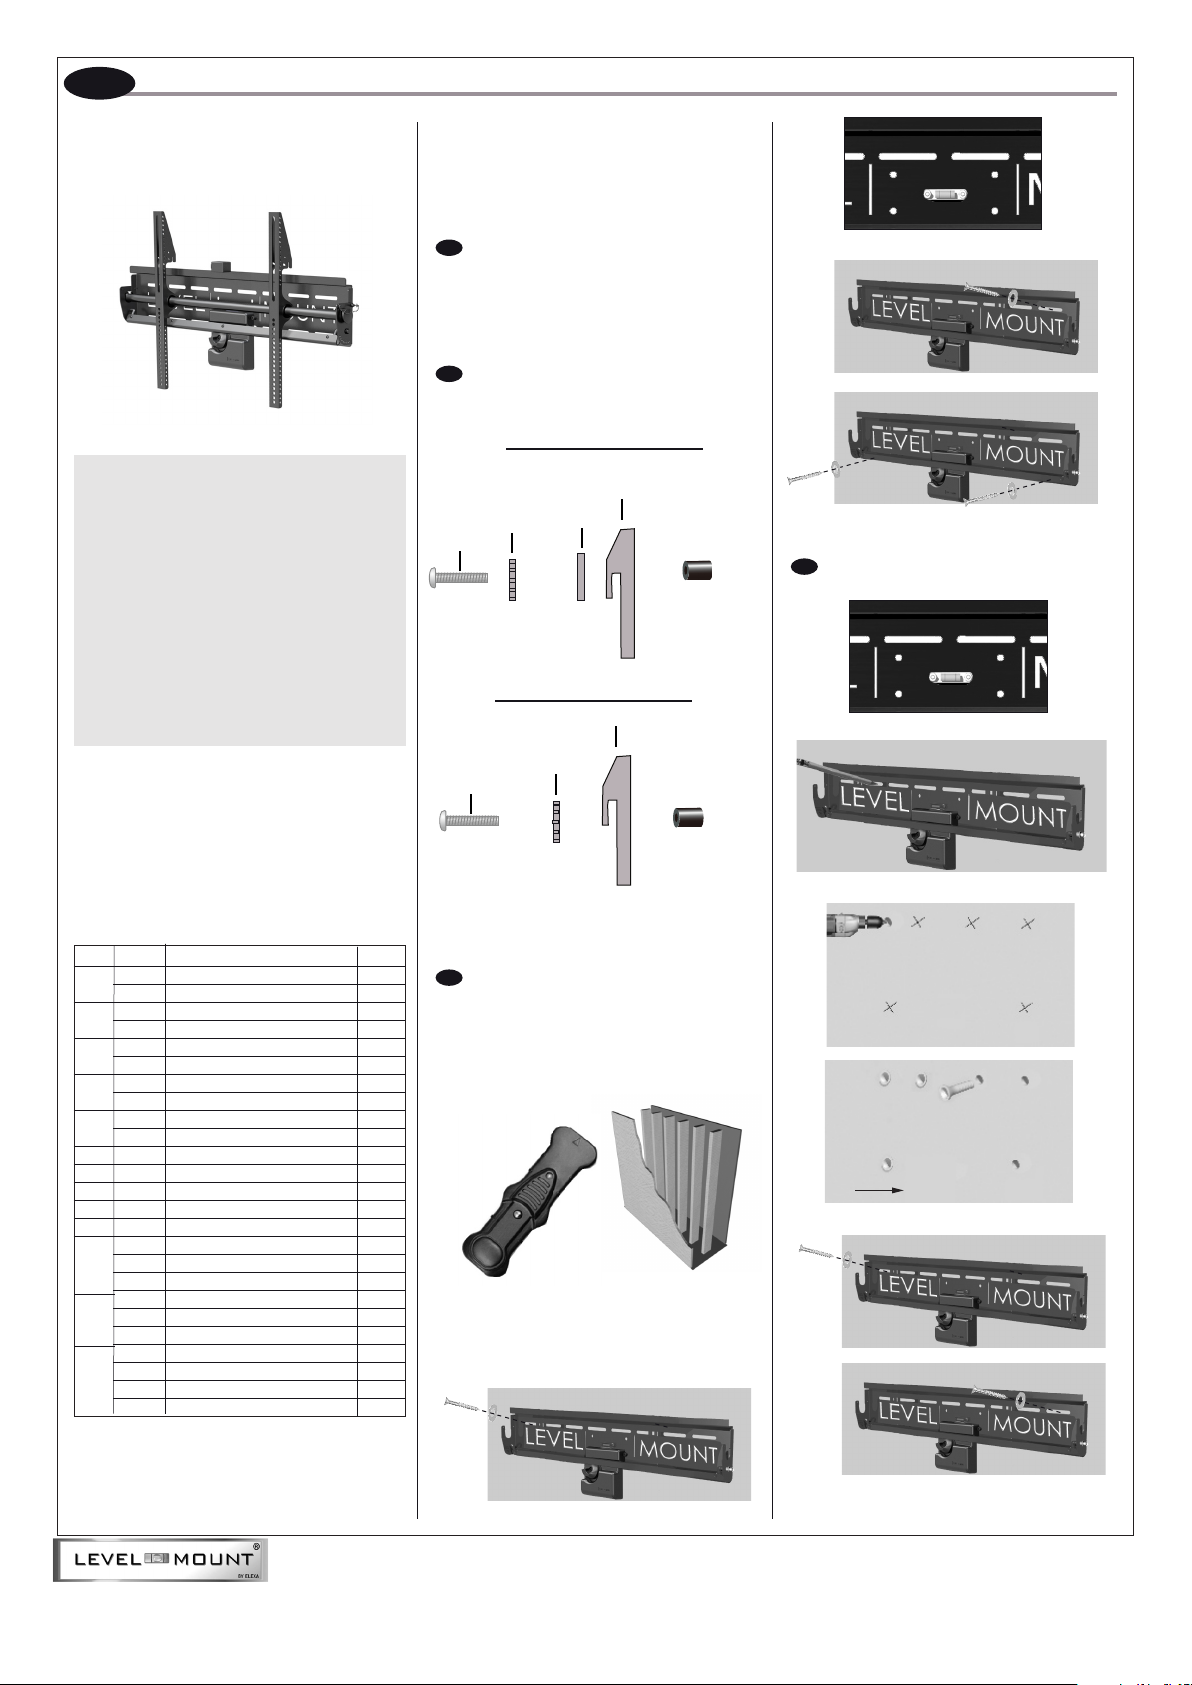
1
DETERMINE CORRECT BOLT
Caution: Carefully thread the bolt into the back of your
LCD to determine which bolt is to be used. If there is any
resistance remove the bolt immediately.
2
ATTACH TO TV
M4 OR M5 BOLT
TILT ARM
LOCK WASHER
BOLT
WASHER
(USE SPACER
ONLY IF NEEDED)
M6 OR M8 BOLT
TILT ARM
LOCK WASHER
BOLT
(USE SPACER
ONLY IF NEEDED)
3b
ATTACH TV TO CONCRETE
Mounting Equipment Included:
Bag REF Description QTY
1 A Phillips M4 x 12 Bolt 4
B Phillips M4 x 30 Bolt 4
2 C Phillips M5 x 12 Bolt 4
D Phillips M5 x 30 Bolt 4
3 E Phillips M6 x 12 Bolt 4
F Phillips M6 x 35 Bolt 4
4 G Phillips M8 x 16 Bolt 4
H Phillips M8 x 40 Bolt 4
5 I M4/M5 Washer 4
J M4/M5 Spacer 4
5 K M6/M8 Spacer 4
1 L M4 Lock Washer 4
2 M M5 Lock Washer 4
3 N M6 Lock Washer 4
4 O M8 Lock Washer 4
P 3’’ Hex Screw 6
6 Q Hex Washer 6
R Concrete Anchor 6
S M5 x 48 Bolt 8
7 T M5 Hex Nut 8
U M5 Washer 8
V L-Shape Bar Lock 2
8 W Phillips screws M5 x 10 Bolt 4
X M5 Hex Nut 2
Y M5 Butterfly Nut 2
3a
ATTACH TV TO WOOD STUDS
NOTE: Due to the weight of the LCD/Plasma TV’s, it is
necessary to mount the Wall Plate to at least 2 studs.
Locate stud with Stud Finder
(See manual included)
P
Q
R
P
Q
www.LevelMount.com
1-888-229-1459
©2008 Level Mount
Patents Pending
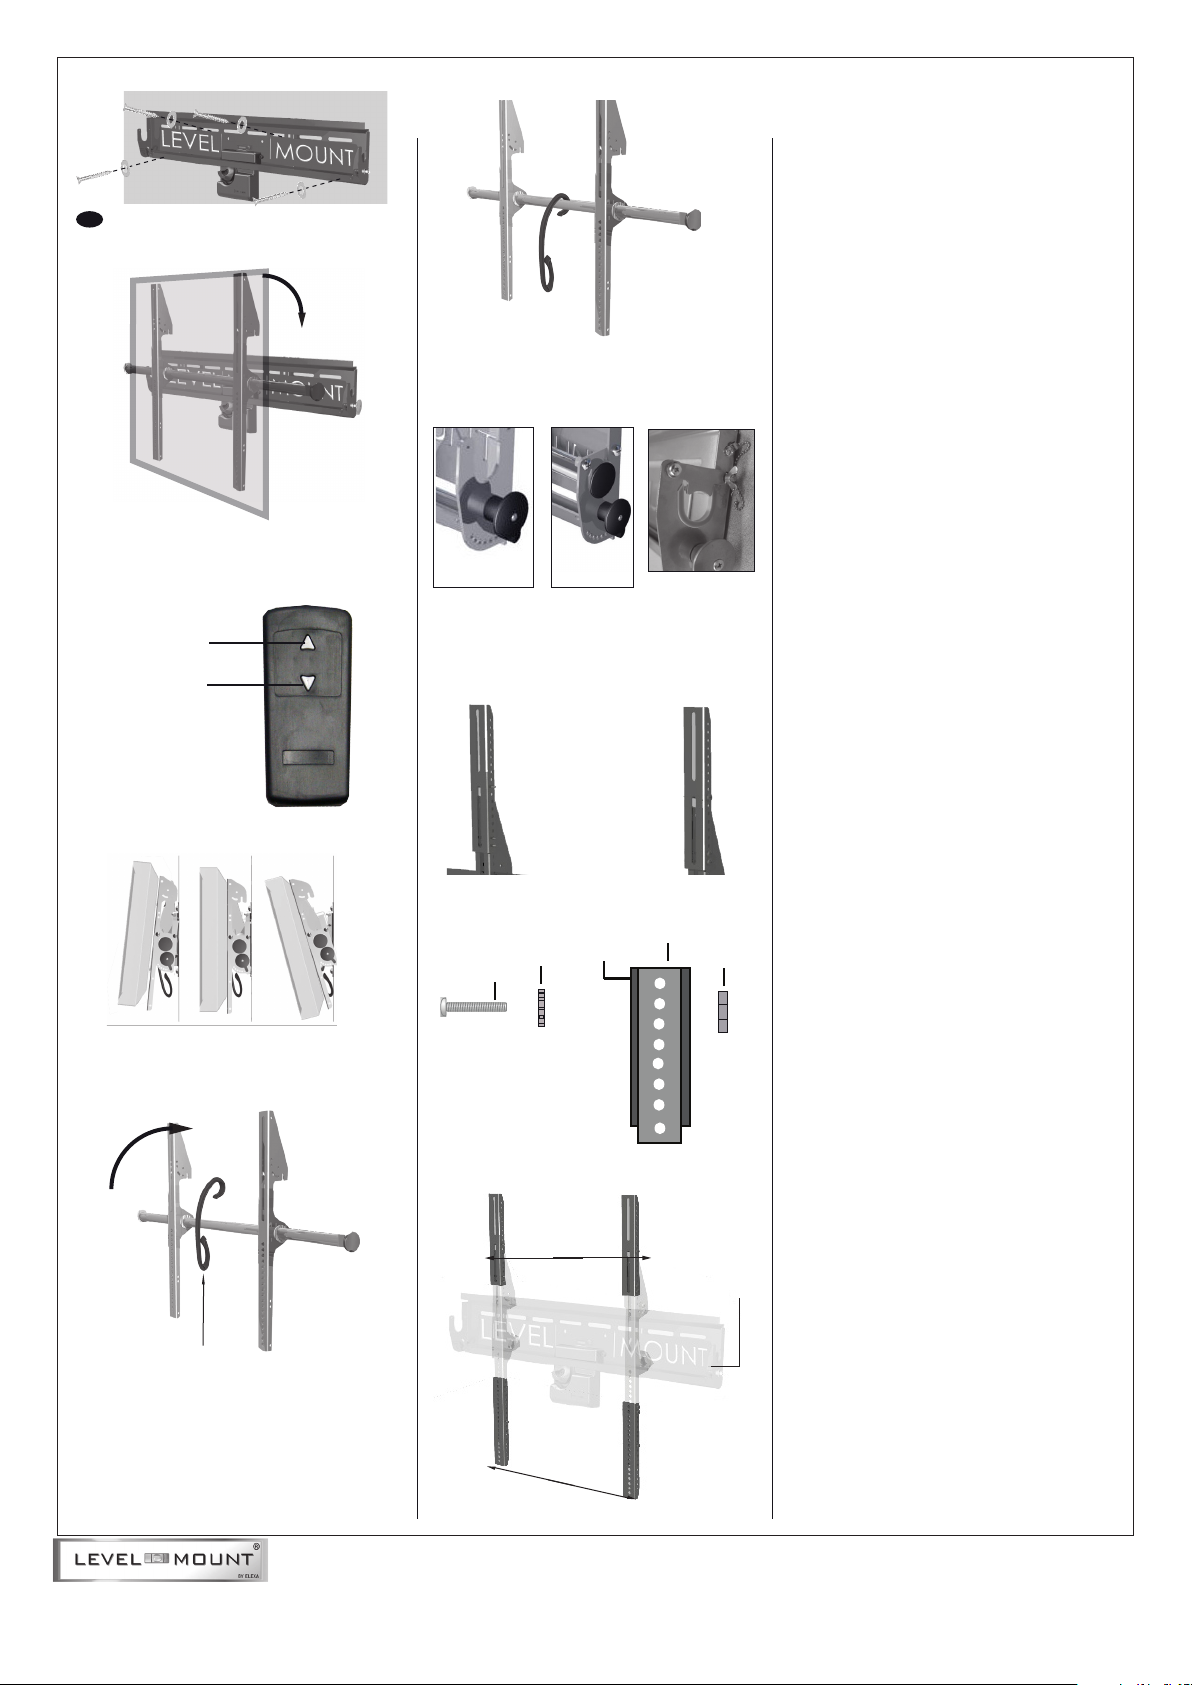
4
SLIDE TOGETHER
TILTING THE DISPLAY
LOCKING THE DISPLAY
UP Arrow (Tilt up)
DOWN Arrow
(Tilt Down)
-15 0 15
ATTACHING CORD MANAGEMENT
ATTACHING EXTENSION ARMS
LOCK WASHER
BOLT
EXTENSION
PLATE
TILT ARM
HEX NUT
Cord Management
Upper Extension
Arms
Lower Extension
Arms
Locking
Lever
www.LevelMount.com
1-888-229-1459
©2008 Level Mount
Patents Pending

Espanol
Installation Instructions
Soporte fijo para televisores de
plasma/LCD. Modelos: PWTLT07,LM65PWT, DM65PWT
NO DEVUELVA ESTE PRODUCTO A LA TIENDA O SITIO
WEB EN EL QUE LO COMPRÓ.
SI EL SOPORTE ESTÁ DEFECTUOSO, PRESENTA PARTES
ROTAS O LE FALTAN PIEZAS; SI TIENE DIFICULTADES
PARA MONTARLO EN LA PARED O PARA COLOCAR EN ÉL
SU TELEVISOR, PÓNGASE EN CONTACTO DIRECTAMENTE
CON LA EMPRESA LEVEL MOUNT.
Si desea obtener una solución rápida y eficaz para su
problema, llame al número de teléfono 1 888 229 1459 o
envíenos un mensaje de correo electrónico a la dirección
CustomerSupport@ElexaUSA.com, a cualquier hora del día
o de la noche.
Nuestro personal del departamento de atención al cliente
es muy competente, está disponible de manera permanente durante todo el año y le atenderán tanto en inglés
como en español.
Si desea obtener más información, acuda a nuestro sitio
Web www.LevelMount.com
Características
•Nivel de burbuja integrado
•Construcción duradera de acero
•Construcción de 2 piezas, de fácil instalación
•Inclinación de hasta 30°
•Palanca de bloqueo
•Se incluye un detector de montantes
Herramientas necesarias para la fijación a montantes:
Llave de cubo de 1/2’’ (12 mm)
Detector de travesaños
Herramientas necesarias para la fijación a paredes de
mampostería o concreto:
Taladro eléctrico de mano
Broca de 1/2’’ (12 mm) para mampostería
1
ELIJA EL TORNILLO ADECUADO
Precaución: Para determinar qué tornillo deberá usarse,
enrosque manualmente el tornillo en la parte trasera de
su televisor LCD. No siga enroscando si los tornillos no
encajan perfectamente.
2
AJUSTAR AL TELEVISOR
M4 Y M5 TORNILLO
RANDELA
DE SEGURIDAD
TORNILLO
BRAZOS DE INCLINACION
ARANDELA
(UTILICE EL ESPACIADOR SÓLO CUANDO
SEA NECESARIO)
M6 Y M8 TORNILLO
RANDELA
DE SEGURIDAD
TORNILLO
BRAZOS DE INCLINACION
(UTILICE EL ESPACIADOR SÓLO CUANDO
SEA NECESARIO)
3b
FIJE EL TELEVISOR A LA PARED
Accesorios de instalación incluidos:
Kit REF Descripción CANT
1 A Tornillo de estrella M4 x 12 4
B Tornillo de estrella M4 x 30 4
2 C Tornillo de estrella M5 x 12 4
D Tornillo de estrella M5 x 30 4
3 E Tornillo de estrella M6 x 12 4
F Tornillo de estrella M6 x 35 4
4 G Tornillo de estrella M8 x 16 4
H Tornillo de estrella M8 x 40 4
5 I Arandela M4/M5 4
J Espaciador M4/M5 4
5 K Espaciador M6/M8 4
1 L Arandela M4 4
2 M Arandela de seguridad M5 4
3 N Arandela de seguridad M6 4
4 O Arandela de seguridad M8 4
P Tornillo hexagonal de 3’’ 6
6 Q Arandela hexagonal 6
R Taco para cemento 6
S Tornillo M5 x 48 8
7 T Tuerca hexagonal M5 8
U Arandela M5 8
V Cierre en L 2
8 W Tornillos de estrella M5 x 10 4
X Tuerca hexagonal M5 2
Y Tuerca de mariposa M5 2
3a
FIJE EL TELEVISOR A LOS
TRAVESAÑOS DE MADERA
NOTA: Debido al peso de los televisores de LCD y de
plasma, se debe fijar la placa de pared al menos a dos
montantes.
Ubique el travesaño con el detector
(Consulte el manual incluido)
P
Q
R
P
Q
www.LevelMount.com
Línea de asistencia las 24 horas
1-888-229-1459
©2008 Level Mount

4
DESLIZAR Y UNIR
UP Arrow
COMO INCLINAR EL TELEVISOR
BLOQUEO DE LA PANTALLA
la flecha hacia arriba
(la inclinación arriba)
La flecha hacia
abajo (la Inclinación
hacia abajo)
-15 0 15
COLOCACION DEL SISTEMA
SUJETACABLES
FIJAR LOS BRAZOS DE EXTENSION:
BRAZOS DE
INCLINACION
TORNILLO
ARANDELLA
BRAZOS
DE EXTENSION
TUERCA
HEXAGONAL
El sistema sujetacables
Brazos
de extensión
Brazos de extensión
Palanca de
Seguridad
www.LevelMount.com
Línea de asistencia las 24 horas
1-888-229-1459
©2008 Level Mount

Francias
Installation Instructions
Support mural fixe/basculant pour
téléviseur LCD ou plasma - Modèles :
PWTLT-07,LM65PWT, DM65PWT
1
CHOIX DE LA VIS
Caution: Carefully thread the bolt into the back of your
LCD to determine which bolt is to be used. If there is any
resistance remove the bolt immediately.
2
FIXATION AU TÉLÉVISEUR
M4 OR M5 VIS
NE RENVOYEZ PAS CE PRODUIT AU MAGASIN OU SITE WEB OÙ
VOUS L’AVEZ ACHETÉ!
SI VOUS ESTIMEZ QUE CE SUPPORT EST DÉFECTUEUX, QUE
CERTAINES DE SES PIÈCES SONT MANQUANTES OU CASSÉES, OU
SI VOUS AVEZ DU MAL À FIXER LEDIT SUPPORT À VOTRE MUR
OU À INSTALLER VOTRE TÉLÉVISEUR, VEUILLEZ COMMUNIQUER
DIRECTEMENT AVEC NOTRE SOCIÉTÉ, LEVEL MOUNT.
Composez le 1 888 229 1459 ou envoyez-nous un courriel à l’adresse
CustomerSupport@ElexaUSA.com, de jour comme de nuit, afin d’obtenir une solution rapide et efficace à votre problème.
Notre service à la clientèle est ouvert 24h/24, 7j/7 toute l’année,
et nos employés qualifiés pourront vous répondre en anglais ou
en espagnol.
Nous vous invitons également à visiter notre site Web www.
LevelMount.com si vous avez besoin d’aide.
Caractéristiques :
• Niveau à bulle d’air intégré
• Construction métallique durable
• Support de montage facile en 2 parties
• S’incline jusqu’à 30 degrés
• Levier de blocage
• Détecteur de montant inclus
Équipement de montage fourni :
Sachet REF Description QTÉ
1 A Vis cruciformes M4 x 12 mm 4
B Vis cruciformes M4 x 30 mm 4
2 C Vis cruciformes M5 x 12 mm 4
D Vis cruciformes M5 x 30 mm 4
3 E Vis cruciformes M6 x 12 mm 4
F Vis cruciformes M6 x 35 mm 4
4 G Vis cruciformes M8 x 16 mm 4
H Vis cruciformes M8 x 40 mm 4
5 I Rondelles M4/M5 4
J Entretoises M4/M5 4
5 K Entretoises M6/M8 4
1 L Rondelles frein M4 4
2 M Rondelles frein M5 4
3 N Rondelles frein M6 4
4 O Rondelles frein M8 4
P Vis à tête hexagonale de 7 cm 6
6 Q Rondelles hexagonales 6
R Ancrage pour béton 6
S Vis M5 x 48 mm 8
7 T Écrous hexagonaux M 8
U Rondelle M5 8
V Équerre de verrouillage 2
8 W Vis cruciformes M5 x 10 mm 4
X Écrous hexagonaux M5 2
Y Écrou à oreilles M5 2
Outils nécessaires :
Clé à douille de 12 mm (1/2 po)
Détecteur de montant
Outils nécessaires pour fixer le support sur un mur en
béton :
Perceuse électrique
Foret de maçonnerie de 12 mm (1/2 po)
BRAS DE’ EXTENSION
R ON D E L LES
FREIN
VIS
RONDELLES
(UTILISEZ LES
ENTRETOISES SI
NÉCESSAIRE)
M6 OR M8 VIS
BRAS DE’ EXTENSION
R O N D E L L E S
FREIN
VIS
(UTILISEZ LES
ENTRETOISES SI
NÉCESSAIRE)
3a
FIXATION DU TÉLÉVISEUR AUX
MONTANTS EN BOIS
REMARQUE : Le poids d’un téléviseur LCD ou plasma
exige de fixer la plaque murale à deux montants
minimum.
P
Q
3b
FIXATION DU TÉLÉVISEUR AU
BÉTON
R
P
Q
Service d’assistance 24 h/24, 7 j/7
www.LevelMount.com
Tél. : 1-888-229-1459
©2008 Level Mount

4
FAITES GLISSER LE TOUT
INCLINASION DE L’ECRAN
La flèche ascendante
(la Pente en haut)
La flèche descendante (la Pente en
bas)
VERROULLAGE DE L’ECRAN
FIXATION DES BRAS D’EXTENSION
-15 0 15
FIXATION DU SYTEME DE GESTION DE
CABLE
Système de gestion de câbles
RONDELLES FREIN
BRAS DE’ EXTENSION
VIS
Bras d’extension
BRAS DE’ INCLINAISON
ECROUS
Levier de
Blocage
Bras d’extension
Service d’assistance 24 h/24, 7 j/7
www.LevelMount.com
Tél. : 1-888-229-1459
©2008 Level Mount
 Loading...