

Page 1
90°
Yoga 27
1
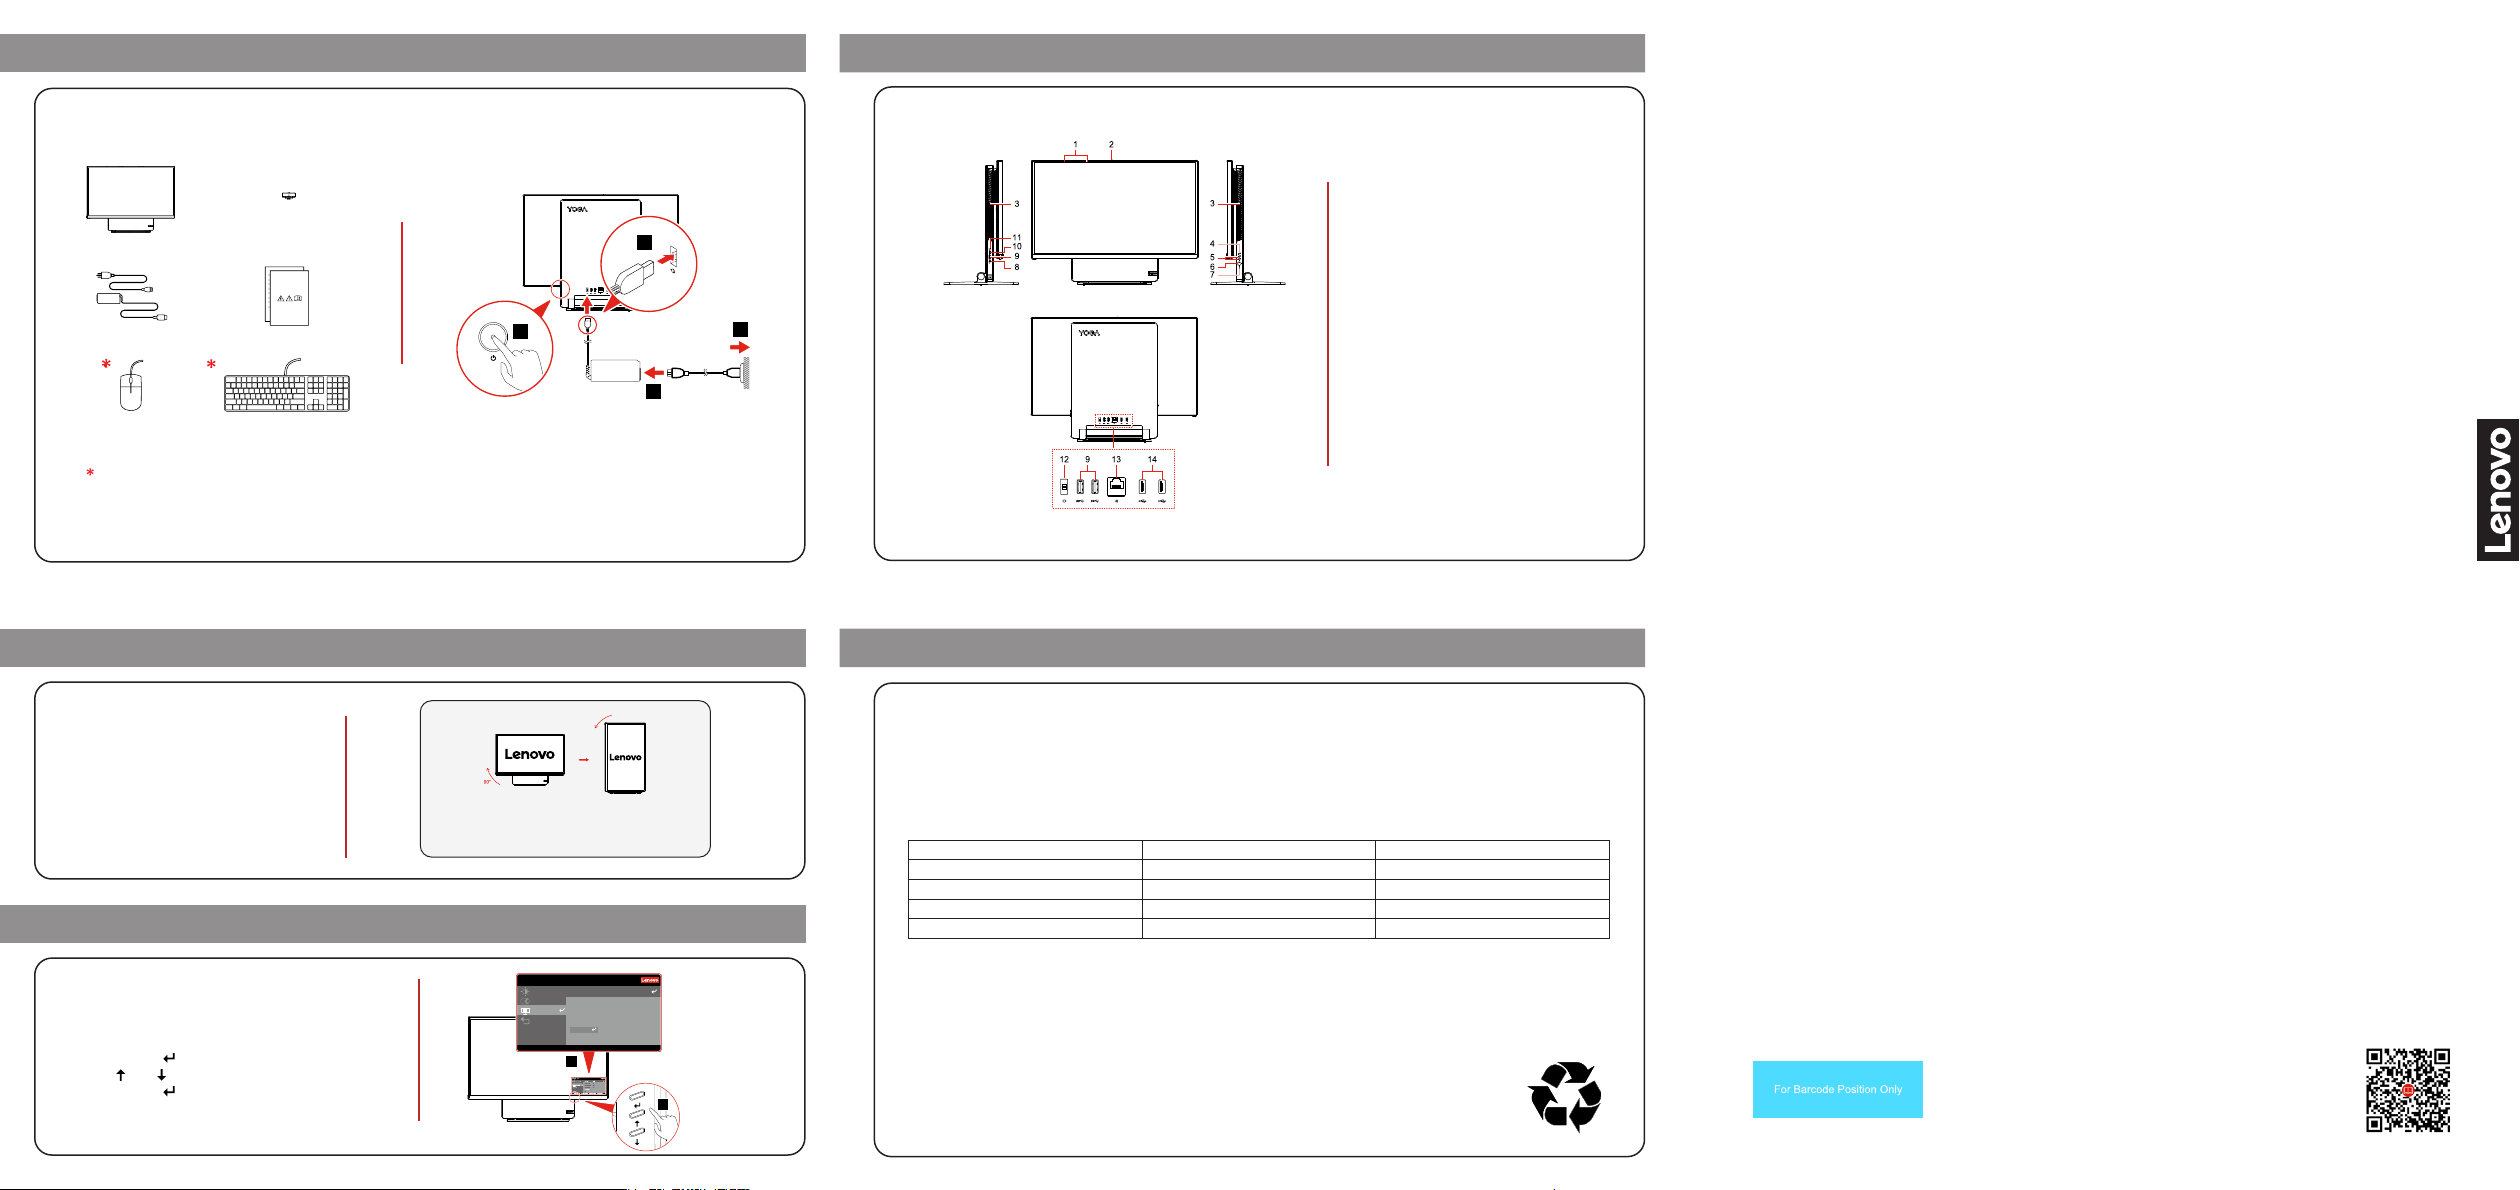
Initial SetupInitial Setup
For selected models
OverviewOverview
1. Microphones
2. Camera connector
3. Air vents (2)
4. On-Screen-Display (OSD)
switch
2
4
3
5. OSD adjustment buttons
6. Power button
7. Reset button
8. Combo audio jack
9. USB 3.2 Gen 2 connectors (3)
10. USB-CTM connector
11. Switch button
12. Power connector
13. Ethernet connector
14. USB 2.0 connectors (2)
Notes:
In Cast Mode, you can reset the
•
network settings by pushing the reset
button with a pin.
Yoga AIO 7 (27″, 6) has three working
•
modes: Base Mode, Cast Mode and
Link Mode. Press the Switch button to
switch between the working modes.
Yoga AIO 7 Yoga AIO 7
(27″, 6)(27″, 6)
Setup GuideSetup Guide
Rotate the MonitorRotate the Monitor
You can rotate the monitor
when necessary.
On-Screen-Display (OSD) Menu On-Screen-Display (OSD) Menu
The OSD switch is used for setting color eld,
brightness level, and low blue light of the computer.
Access monitor settings:
1. Press Enter ( ) to display the OSD main menu.
2. Use ( ) or ( ) to navigate the OSD menu.
3. Press Enter ( ) to select a menu.
Note: OSD settings may vary on dierent models.
In Cast Mode and Base Mode, content
displayed on the monitor rotates with the
monitor.
Monitor Controls
Language English
Advanced Settings
MenuTime Out 30
Menu Horizontal 100%
Menu Settings
MenuVertical 0%
Exit
Factory Reset
Exit
Input Signal:Type C DP Resolution:3840×2160 Color Mode: Low Blue Light Refresh Rate: 60Hz
2
Additional Information Additional Information
European Union — compliance with the Radio Equipment Directive
Hereby, Lenovo (Singapore) Pte. Ltd., declares that the radio equipment type Yoga AIO 7 27ARH6 is in
compliance with Directive 2014/53/EU.
The full text of the system EU declaration of conformity is available at the following Internet address:
https://www.lenovo.com/us/en/compliance/eu-doc
This radio equipment operates with the following frequency bands and maximum radio-frequency power:
Technology Frequency band [MHz] Maximum transmit power
WLAN 802.11b/g/n/ax 2400 - 2483.5 < 20 dBm
WLAN 802.11a/n/ac/ax 5150 - 5725 < 23 dBm
WLAN 802.11a/n/ac/ax 5725 - 5875 < 16 dBm
Bluetooth BR/EDR/LE 2400 - 2483.5 < 20 dBm
Usage of all the radio devices is limited to indoor in the band 5150 MHz to 5350 MHz (channels 36, 40, 44, 48,
52, 56, 60, 64).
1
Reduce Reuse Recycle
First edition (December 2020)
© Copyright Lenovo 2020
LIMITED AND RESTRICTED RIGHTS NOTICE: If data or software is delivered
pursuant to General Services Administration "GSA" contract, use, reproduction, or
disclosure is subject to restrictions set forth in Contract No. GS-35F-05925.
Trademarks
LENOVO, LENOVO logo, and YOGA are trademarks of Lenovo. Wi-Fi and Miracast are
registered trademarks of Wi-Fi Alliance. USB-C is a trademark of USB Implementers Forum.
All the other trademarks are the property of their respective owners.
Printed in China
PN: SP40Q62583
Page 2
Sleep
Restart
Shut down
Yoga27
CHENJS1-F1580P4
Wireless display
JIAZZ3-R90VLWAL
Wireless display
Nearby screen device
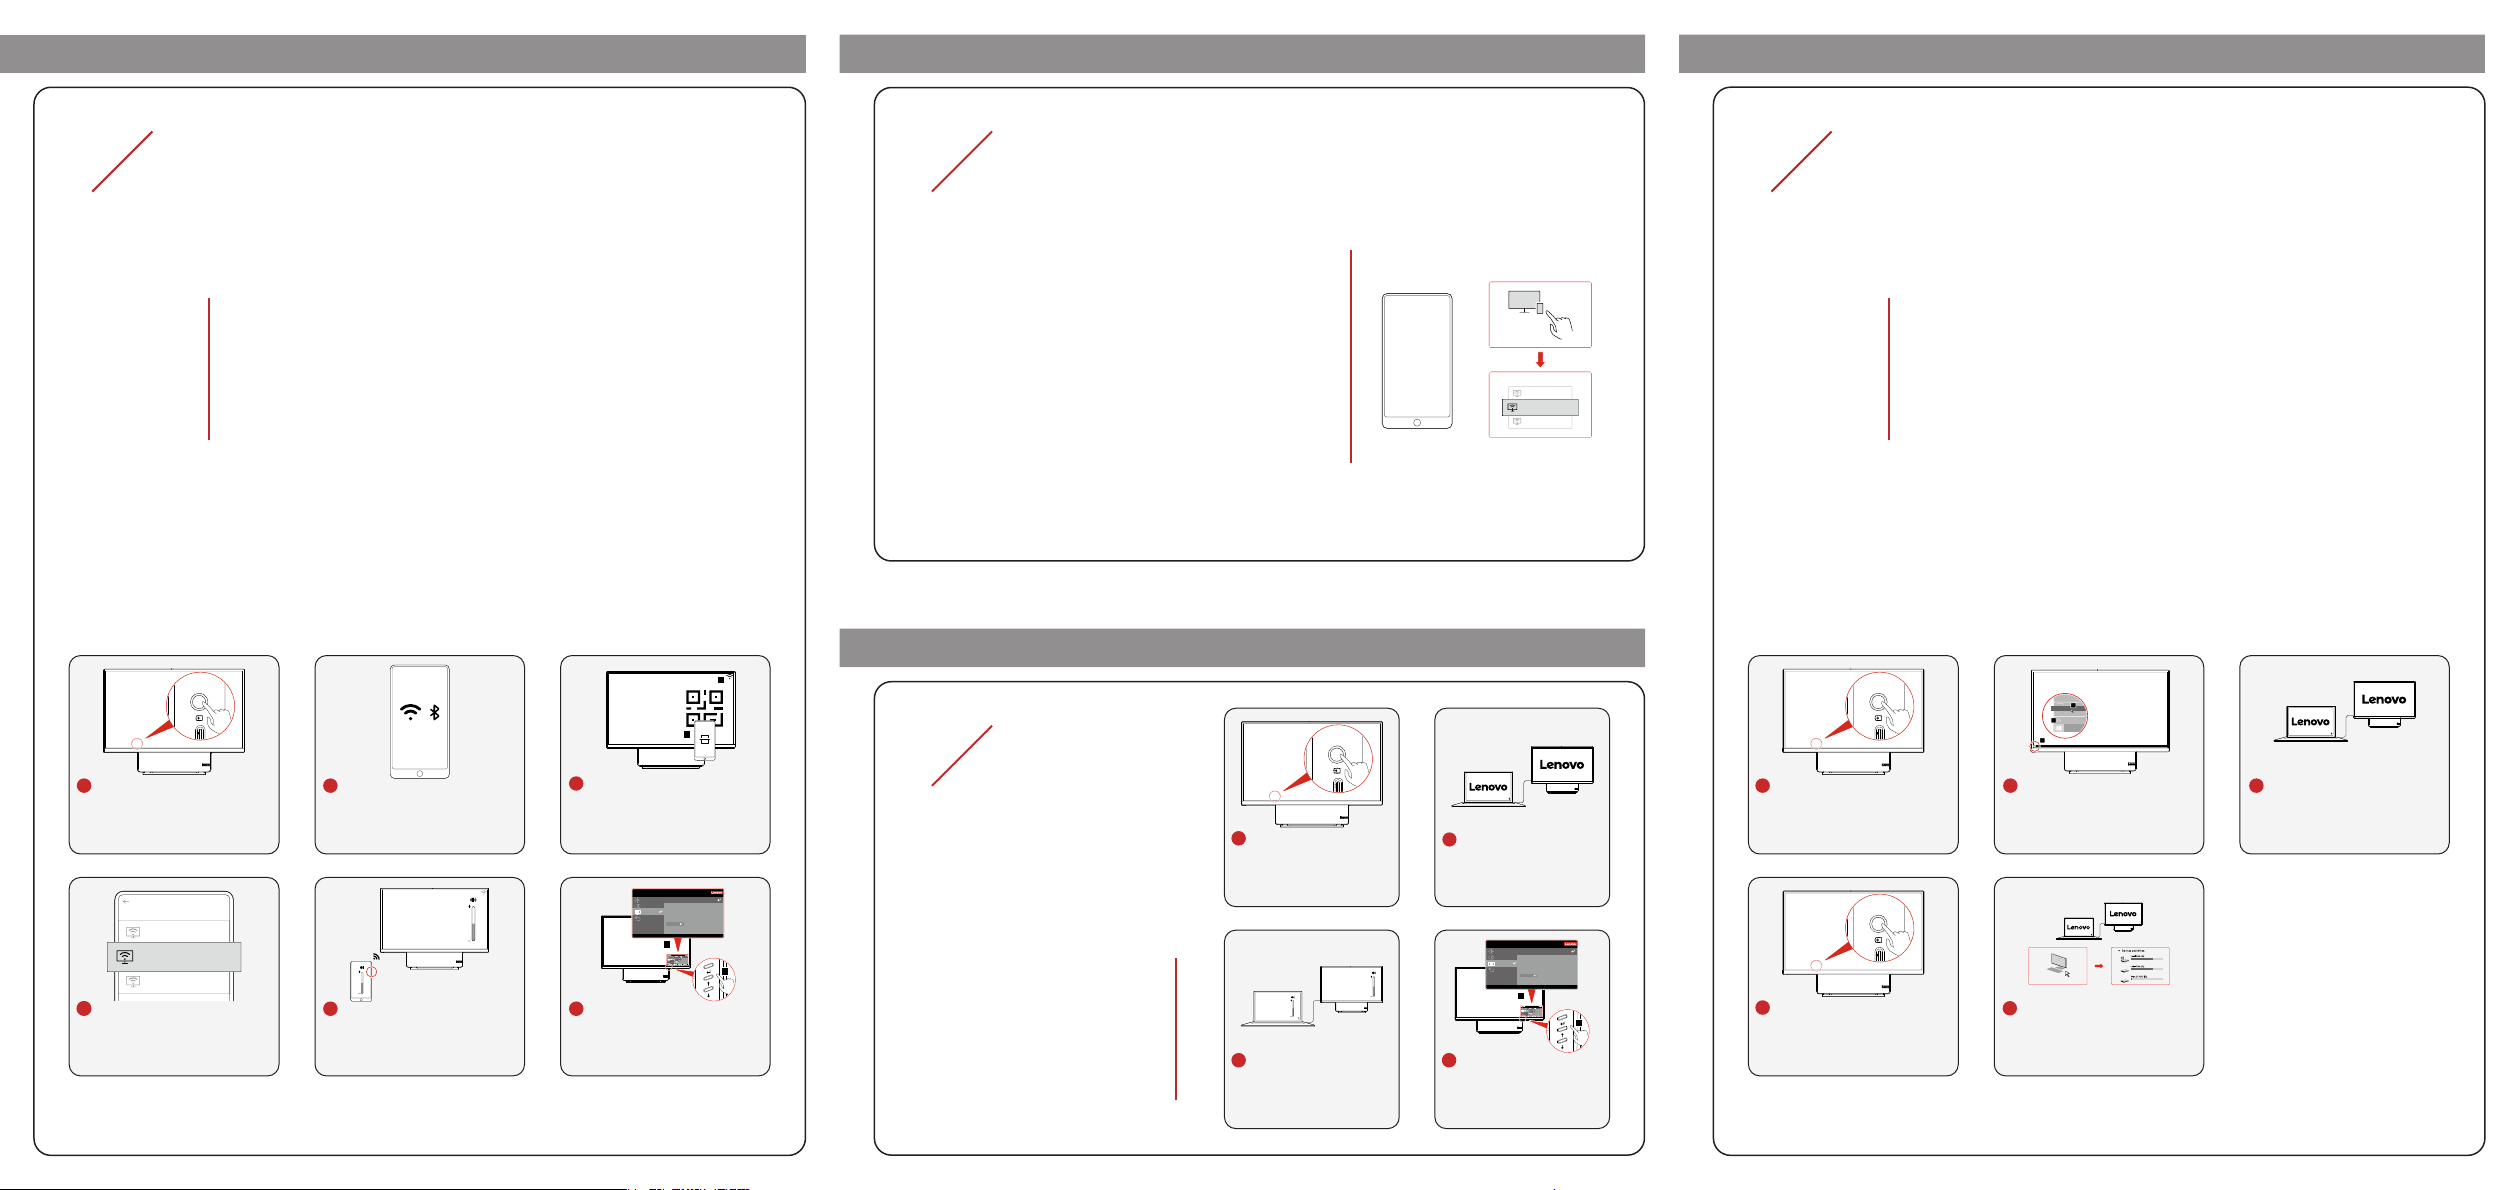
Cast ModeCast ModeCast ModeCast Mode
CHENJS1-F1580P4
Wireless display
JIAZZ3-R90VLWAL
Wireless display
Nearby screen device
Yoga27
Link ModeLink Mode
01
Phone projection
Notes:
The computer must be connected to a reliable Wi-FiTM network to use Cast Mode.
•
The phone and the computer must be connected to the same Wi-Fi network or signal
•
channel.
Using Cast Mode on a LAN network is recommended. A phone in Wi-Fi hotspot mode
•
can' t be projected to the computer.
Some third-party applications may not detect this computer while trying to project. This
•
problem is caused by the third-party applications.
If the phone doesn' t support Wireless display, it cannot be projected to the computer.
•
Enable the wireless display function of the external video device before using Cast
•
Mode.
If the phone doesn't support Miracast protocol, it can not be projected to the computer
•
via Miracast protocol.
1
02
Phone Projection Setting
02
Access the Hard Disk Drive (HDD)
Before accessing the HDD of your computer via USB-C, congure your
computer as follows.
To use mirror projection, do one of the followings:
Settings→Wireless projection/Wireless display/Wireless
• Tap
sharing/Mult-screen interaction
• Swipe down and then tap
. Select a projection device.
Wireless projection/Wireless
display/Wireless sharing/Multi-screen interaction/Screen
mirroring
• Swipe up and then tap
. Select a projection device.
Screen mirroring
. Select a projection
device.
Mirror projection
Mirror projection
DESKT OP-MO7708
Wireless display
Enable Type-C hard drive sharing in BIOS:Enable Type-C hard drive sharing in BIOS:
1. Start the computer. Press the F1 until the BIOS Settings are displayed.
2. Select Device. Under Type-C hard drive sharing, select Open.
3. Press F10 to save changes and exit.
Disable Fast Startup:Disable Fast Startup:
1. Go to Start→Settings→System→Power & sleep→Additional power
settings→Choose what the power buttons do→Change settings
that are currently unavailable.
2. Uncheck Turn on "Fast Startup"(recommended).
Save changes
3. Click
.
Link Mode
2
3
2
01
1
1
Press the Switch button to
change your computer to Cast
Mode.
4
Tap Settings→Wireless
projection on your phone. Select
a projection device.
DESK TOP-MO 7708
Wireless display
2
Connect your phone to an
available Wi-Fi network, and
then turn on the bluetooth of
your phone.
5
You can adjust the volume of
the computer via your phone.
3
Download the Lenovo Screen
Share APP by scanning the QR
code on the computer screen. Then
scan the QR code again to connect
the computer to the same Wi-Fi
network as that of your phone.
Monitor Controls
Language English
Advanced Settings
MenuTime Out 30
Menu Horizontal 100%
Menu Settings
MenuVertical 0%
Exit
Factory Reset
Exit
Input Signal:Type C DP Resolution:3840×2160 Color Mode: Low Blue Light Refresh Rate:60Hz
2
1
6
Press the OSD switch to
display OSD menu and set
the brightness and color of the
computer.
Notebook projection
Ensure that the USB-C cable
meets the following requirements:
• Compatible with USB 3.2 Gen 2
connector.
• Support 4K 60Hz display output.
• Support 100W PD fast charge.
• Support data transfer rates up to
10Gbps.
Note: Your notebook can be charged in
Link Mode.
1
Press the Switch button to
change the computer to
Link Mode.
3
You can adjust the volume
of the computer via both
the notebook and the
desktop computer.
2
Connect the notebook and
the computer with a USB-C
cable.
Monitor Controls
Language English
Advanced Settings
MenuTime Out 30
Menu Horizontal 100%
Menu Settings
MenuVertical 0%
Exit
Factory Reset
Exit
Input Signal:Type C DP Resolution:3840×2160 Color Mode: Low Blue Light Refresh Rate:60Hz
2
4
Press the OSD switch to
display the OSD menu and
set the brightness and color
of the computer.
1
Press the Switch button to
change your computer to Base
Mode.
4
1
Press the Switch button to
change your computer to Link
Mode.
2
Go to Start → Power → Shut
down.
This PC
5
Click "This PC" of the notebook
or desktop computer, the hard
disk drives of both the notebook
and the computer are displayed.
3
Connect the notebook and the
computer with a USB-C cable.
 Loading...