

Page 1

ThinkCentreM79
UserGuide
MachineTypes:10CT,10CU,10CV,10CW,10J9,10JA,10JB,and
10JC
Page 2

Note:Beforeusingthisinformationandtheproductitsupports,besuretoreadandunderstandthe“Read
thisfirst:Importantsafetyinformation”onpagev
andAppendixF“Notices”onpage131.
FourthEdition(May2016)
©CopyrightLenovo2014,2016.
LIMITEDANDRESTRICTEDRIGHTSNOTICE:IfdataorsoftwareisdeliveredpursuanttoaGeneralServices
Administration“GSA”contract,use,reproduction,ordisclosureissubjecttorestrictionssetforthinContractNo.
GS-35F-05925.
Page 3

Contents
Readthisfirst:Importantsafety
information...............v
Beforeusingthismanual............v
Serviceandupgrades.............v
Staticelectricityprevention...........vi
Powercordsandpoweradapters........vi
Extensioncordsandrelateddevices......vii
Plugsandoutlets..............vii
Externaldevices..............vii
Heatandproductventilation.........vii
Operatingenvironment...........viii
Lasercompliancestatement.........viii
Powersupplystatement............ix
Cleaningandmaintenance...........ix
Chapter1.Productoverview......1
Locations..................1
Locatingconnectors,controls,andindicators
onthefrontofyourcomputer........2
Locatingconnectorsontherearofyour
computer................3
Locatingcomponents...........5
Locatingpartsonthesystemboard.....6
Locatinginternaldrives..........7
Locatingthemachinetypeandmodellabel..8
Features..................8
Specifications...............12
Lenovoprograms.............12
Accessingaprogramonyourcomputer...12
AnintroductiontoLenovoprograms....13
Chapter2.Usingyourcomputer...17
UsingWindowsshortcutkeys.........17
Usingthewheelmouse...........17
Settingthecomputervolume.........18
AddinganicontotheWindowsnotificationarea.18
Usingadisc................18
Usingtheopticaldrive..........18
Handlingandstoringadisc........19
Playingandremovingadisc.......19
Recordingadisc............19
NavigatingamongscreensontheWindows8.1
operatingsystem..............20
AccessingControlPanelontheWindows8.1
operatingsystem..............21
Frequentlyaskedquestions.........21
Chapter3.Y ouandyourcomputer..23
Accessibilityandcomfort..........23
Arrangingyourworkspace........23
Comfort...............23
Glareandlighting............24
Aircirculation.............24
Electricaloutletsandcablelengths.....24
Accessibilityinformation.........24
Registeringyourcomputer..........27
Movingyourcomputertoanothercountryor
region..................27
Chapter4.Security..........29
Securityfeatures..............29
Lockingthecomputercover.........29
AttachingaKensington-stylecablelock.....31
Preventingunauthorizedaccesstoyour
computer.................31
Usingfingerprintauthentication........32
Usingandunderstandingfirewalls.......32
Protectingdataagainstviruses........32
Chapter5.Advancedconfiguration..33
UsingtheSetupUtilityprogram........33
StartingtheSetupUtilityprogram.....33
Viewingandchangingsettings......33
UsingBIOSpasswords.........34
Enablingordisablingadevice.......35
Selectingastartupdevice........36
EnablingErPLPScompliancemode....36
ICEperformancemode.........37
ICEthermalalert............37
ExitingtheSetupUtilityprogram......38
UpdatingorrecoveringtheBIOS.......38
Usingsystemprograms.........38
UpdatingtheBIOS...........39
RecoveringfromaBIOSupdatefailure...39
Chapter6.Preventingproblems...41
Keepingyourcomputercurrent........41
Gettingthelatestdevicedriversforyour
computer...............41
Gettingthelatestsystemupdates.....41
Cleaningandmaintenance..........41
Basics................42
Cleaningyourcomputer.........42
Goodmaintenancepractices.......43
Movingyourcomputer...........44
©CopyrightLenovo2014,2016
i
Page 4

Chapter7.T roubleshootingand
diagnostics..............45
Basictroubleshooting............45
Troubleshootingprocedure..........46
Troubleshooting..............46
Audioproblems............47
CDproblems.............47
DVDproblems.............48
Intermittentproblems..........49
Harddiskdriveproblems.........49
Problemswiththekeyboardormouse...50
Monitorproblems............51
Networkingproblems..........52
Ihaveconnectedanoptiontomycomputer,
butitdoesnotwork...........54
Performanceandlockupproblems.....54
Theprinterdoesnotwork........55
Serialconnectorcannotbeaccessed....55
Softwareproblems...........55
MyUSBconnectorscannotbeaccessed..56
Diagnostics................57
LenovoSolutionCenter.........57
Chapter8.Recoveryinformation...59
RecoveryinformationfortheWindows7operating
system..................59
Creatingandusingrecoverymedia.....59
Performingbackupandrecoveryoperations.60
Creatingandusingarescuemedium....62
Reinstallingprogramsanddevicedrivers..62
Solvingrecoveryproblems........64
RecoveryinformationfortheWindows8.1
operatingsystem..............64
Refreshingyourcomputer........64
Resettingyourcomputertothefactory-default
settings................64
Usingtheadvancedstartupoptions....65
RecoveringyouroperatingsystemifWindows
8.1failstostart.............65
RecoveryinformationfortheWindows10operating
system..................65
Chapter9.Installingorreplacing
hardware...............67
Handlingstatic-sensitivedevices.......67
Installingorreplacinghardware........67
Installingexternaloptions........67
Removingthecomputercover.......67
Removingandreinstallingthefrontbezel..68
Accessingthesystemboardcomponentsand
drives................70
Installingorreplacingamemorymodule...71
InstallingorreplacingaPCIcard......73
Replacingthebattery..........75
Replacingtheharddiskdrive.......76
Replacingthesolid-statedrive......78
Installingorreplacingtheopticaldrive...83
Replacingtheslimcardreader......86
Replacingtheheatsinkandfanassembly..88
Replacingthepowersupplyassembly...91
Replacingthemicroprocessor.......94
ReplacingthefrontaudioandUSB
assembly...............97
Replacingthesystemfanassembly....98
Replacingthethermalsensor.......99
InstallingorremovingthefrontWi-Fi
antenna...............101
InstallingorremovingtherearWi-Fi
antenna...............103
ReplacingtheWi-Fiunits.........105
Replacingthekeyboardormouse.....109
Completingthepartsreplacement.....110
Chapter10.Gettinginformation,help,
andservice.............113
Informationresources............113
Windowshelpsystem..........113
SafetyandWarranty...........113
LenovoWebsite............113
LenovoSupportWebsite.........114
Helpandservice..............114
Usingthedocumentationanddiagnostic
program...............114
Callingforservice............114
Usingotherservices..........115
Purchasingadditionalservices......115
AppendixA.Regulatory
information.............117
Exportclassificationnotice..........117
Electronicemissionsnotices.........117
FederalCommunicationsCommission
DeclarationofConformity........117
Eurasiancompliancemark..........119
Brazilaudionotice.............119
Mexicowireless-radiocomplianceinformation..120
Additionalregulatoryinformation.......120
AppendixB.WEEEandrecycling
information.............121
ImportantWEEEinformation.........121
RecyclinginformationforJapan........121
RecyclinginformationforBrazil........122
BatteryrecyclinginformationforTaiwan.....122
iiThinkCentreM79UserGuide
Page 5

BatteryrecyclinginformationfortheEuropean
Union..................123
AppendixC.RestrictionofHazardous
Substances(RoHS)Directive....125
EuropeanUnionRoHS...........125
TurkishRoHS...............125
UkraineRoHS...............125
IndiaRoHS................125
ChinaRoHS................126
TaiwanRoHS...............126
AppendixD.ChinaEnergyLabel..127
AppendixE.ENERGYSTARmodel
information.............129
AppendixF .Notices.........131
Trademarks................132
Index.................133
©CopyrightLenovo2014,2016
iii
Page 6

ivThinkCentreM79UserGuide
Page 7
Readthisfirst:Importantsafetyinformation
Thischaptercontainsthesafetyinformationthatyoumustbefamiliarwith.
Beforeusingthismanual
CAUTION:
Beforeusingthismanual,besuretoreadandunderstandalltherelatedsafetyinformationforthis
product.RefertotheinformationinthissectionandthesafetyinformationintheSafety,Warranty,and
SetupGuidethatyoureceivedwiththisproduct.Readingandunderstandingthissafetyinformation
reducestheriskofpersonalinjuryanddamagetoyourproduct.
IfyounolongerhaveacopyoftheSafety,Warranty,andSetupGuide,youcanobtainaPortableDocument
Format(PDF)versionfromtheLenovo
LenovoSupportWebsitealsoprovidestheSafety,Warranty,andSetupGuideandthisUserGuidein
additionallanguages.
®
SupportWebsiteathttp://www.lenovo.com/UserManuals.The
Serviceandupgrades
DonotattempttoserviceaproductyourselfunlessinstructedtodosobytheCustomerSupportCenteror
yourdocumentation.OnlyuseaServiceProviderwhoisapprovedtorepairyourparticularproduct.
Note:Somecomputerpartscanbeupgradedorreplacedbythecustomer.Upgradestypicallyare
referredtoasoptions.ReplacementpartsapprovedforcustomerinstallationarereferredtoasCustomer
ReplaceableUnits,orCRUs.Lenovoprovidesdocumentationwithinstructionswhenitisappropriatefor
customerstoinstalloptionsorreplaceCRUs.Youmustcloselyfollowallinstructionswheninstallingor
replacingparts.TheOffstateofapowerindicatordoesnotnecessarilymeanthatvoltagelevelsinsidea
productarezero.Beforeyouremovethecoversfromaproductequippedwithapowercord,alwaysensure
thatthepoweristurnedoffandthattheproductisunpluggedfromanypowersource.Formoreinformation
onCRUs,refertoChapter9“Installingorreplacinghardware”onpage67
concerns,contacttheCustomerSupportCenter.
Althoughtherearenomovingpartsinyourcomputerafterthepowercordhasbeendisconnected,the
followingwarningsarerequiredforyoursafety.
CAUTION:
.Ifyouhaveanyquestionsor
Hazardousmovingparts.Keepfingersandotherbodypartsaway.
CAUTION:
BeforereplacinganyCRUs,turnoffthecomputerandwaitthreetofiveminutestoletthecomputer
coolbeforeopeningthecover.
©CopyrightLenovo2014,2016
v
Page 8

Staticelectricityprevention
Staticelectricity,althoughharmlesstoyou,canseriouslydamagecomputercomponentsandoptions.
Improperhandlingofstatic-sensitivepartscancausedamagetothepart.Whenyouunpackanoption
orCRU,donotopenthestatic-protectivepackagecontainingthepartuntiltheinstructionsdirectyou
toinstallit.
WhenyouhandleoptionsorCRUs,orperformanyworkinsidethecomputer,takethefollowingprecautions
toavoidstatic-electricitydamage:
•Limityourmovement.Movementcancausestaticelectricitytobuilduparoundyou.
•Alwayshandlecomponentscarefully.Handleadapters,memorymodules,andothercircuitboardsbythe
edges.Nevertouchexposedcircuitry.
•Preventothersfromtouchingcomponents.
•Whenyouinstallastatic-sensitiveoptionorCRU,touchthestatic-protectivepackagecontainingthe
parttoametalexpansion-slotcoverorotherunpaintedmetalsurfaceonthecomputerforatleasttwo
seconds.Thisreducesstaticelectricityinthepackageandyourbody.
•Whenpossible,removethestatic-sensitivepartfromthestatic-protectivepackagingandinstallthepart
withoutsettingitdown.Whenthisisnotpossible,placethestatic-protectivepackagingonasmooth,
levelsurfaceandplacethepartonit.
•Donotplacethepartonthecomputercoverorothermetalsurface.
Powercordsandpoweradapters
Useonlythepowercordsandpoweradapterssuppliedbytheproductmanufacturer.Donotusetheac
powercordforotherdevices.
Thepowercordsshallbesafetyapproved.ForGermany,itshallbeH03VV-F,3G,0.75mm
connectedtothepoweradapter),H05VV-F,3G,0.75mm
supplyassembly),orbetter.Forothercountries,thesuitabletypesshallbeusedaccordingly.
Neverwrapapowercordaroundapoweradapterorotherobject.Doingsocanstressthecordinwaysthat
cancausethecordtofray,crack,orcrimp.Thiscanpresentasafetyhazard.
Alwaysroutepowercordssothattheywillnotbewalkedon,trippedover,orpinchedbyobjects.
Protectpowercordandpoweradaptersfromliquids.Forinstance,donotleaveyourpowercordorpower
adapternearsinks,tubs,toilets,oronfloorsthatarecleanedwithliquidcleansers.Liquidscancausea
shortcircuit,particularlyifthepowercordorpoweradapterhasbeenstressedbymisuse.Liquidsalsocan
causegradualcorrosionofpowercordterminalsand/ortheconnectorterminalsonapoweradapter,
whichcaneventuallyresultinoverheating.
Ensurethatallpowercordconnectorsaresecurelyandcompletelypluggedintoreceptacles.
Donotuseanypoweradapterthatshowscorrosionattheacinputpinsorshowssignsofoverheating(such
asdeformedplastic)attheacinputoranywhereonthepoweradapter.
Donotuseanypowercordswheretheelectricalcontactsoneitherendshowsignsofcorrosionor
overheatingorwherethepowercordappearstohavebeendamagedinanyway.
2
(thepowercordconnectedtotheinternalpower
2
(thepowercord
viThinkCentreM79UserGuide
Page 9

Extensioncordsandrelateddevices
Ensurethatextensioncords,surgeprotectors,uninterruptiblepowersupplies,andpowerstripsthatyouuse
areratedtohandletheelectricalrequirementsoftheproduct.Neveroverloadthesedevices.Ifpowerstrips
areused,theloadshouldnotexceedthepowerstripinputrating.Consultanelectricianformoreinformation
ifyouhavequestionsaboutpowerloads,powerrequirements,andinputratings.
Plugsandoutlets
Ifareceptacle(poweroutlet)thatyouintendtousewithyourcomputerequipmentappearstobedamaged
orcorroded,donotusetheoutletuntilitisreplacedbyaqualifiedelectrician.
Donotbendormodifytheplug.Iftheplugisdamaged,contactthemanufacturertoobtainareplacement.
Donotshareanelectricaloutletwithotherhomeorcommercialappliancesthatdrawlargeamountsof
electricity;otherwise,unstablevoltagemightdamageyourcomputer,data,orattacheddevices.
Someproductsareequippedwithathree-prongedplug.Thisplugfitsonlyintoagroundedelectricaloutlet.
Thisisasafetyfeature.Donotdefeatthissafetyfeaturebytryingtoinsertitintoanon-groundedoutlet.If
youcannotinserttheplugintotheoutlet,contactanelectricianforanapprovedoutletadapterortoreplace
theoutletwithonethatenablesthissafetyfeature.Neveroverloadanelectricaloutlet.Theoverallsystem
loadshouldnotexceed80percentofthebranchcircuitrating.Consultanelectricianformoreinformation
ifyouhavequestionsaboutpowerloadsandbranchcircuitratings.
Besurethatthepoweroutletyouareusingisproperlywired,easilyaccessible,andlocatedclosetothe
equipment.Donotfullyextendpowercordsinawaythatwillstressthecords.
Besurethatthepoweroutletprovidesthecorrectvoltageandcurrentfortheproductyouareinstalling.
Carefullyconnectanddisconnecttheequipmentfromtheelectricaloutlet.
Externaldevices
DonotconnectordisconnectanyexternaldevicecablesotherthanUniversalSerialBus(USB)cableswhile
thecomputerpowerison;otherwise,youmightdamageyourcomputer.Toavoidpossibledamageto
attacheddevices,waitatleastfivesecondsafterthecomputerisshutdowntodisconnectexternaldevices.
Heatandproductventilation
Computers,poweradapters,andmanyaccessoriescangenerateheatwhenturnedonandwhenbatteries
arecharging.Alwaysfollowthesebasicprecautions:
•Donotleaveyourcomputer,poweradapter,oraccessoriesincontactwithyourlaporanypartofyour
bodyforanextendedperiodwhentheproductsarefunctioningorwhenthebatteryischarging.Your
computer,poweradapter,andmanyaccessoriesproducesomeheatduringnormaloperation.Extended
contactwiththebodycouldcausediscomfortor,potentially,askinburn.
•Donotchargethebatteryoroperateyourcomputer,poweradapter,oraccessoriesnearflammable
materialsorinexplosiveenvironments.
•Ventilationslots,fans,andheatsinksareprovidedwiththeproductforsafety,comfort,andreliable
operation.Thesefeaturesmightinadvertentlybecomeblockedbyplacingtheproductonabed,sofa,
carpet,orotherflexiblesurface.Neverblock,cover,ordisablethesefeatures.
©CopyrightLenovo2014,2016
vii
Page 10

Inspectyourdesktopcomputerfordustaccumulationatleastonceeverythreemonths.Beforeinspecting
yourcomputer,turnoffthepowerandunplugthecomputer'spowercordfromtheelectricaloutlet;then
removeanydustfromventsandperforationsinthebezel.Ifyounoticeexternaldustaccumulation,then
examineandremovedustfromtheinsideofthecomputerincludingheatsinkinletfins,powersupplyvents,
andfans.Alwaysturnoffandunplugthecomputerbeforeopeningthecover.Ifpossible,avoidoperating
yourcomputerwithintwofeetofhigh-trafficareas.Ifyoumustoperateyourcomputerinornearahigh-traffic
area,inspectand,ifnecessary,cleanyourcomputermorefrequently.
Foryoursafetyandtomaintainoptimumcomputerperformance,alwaysfollowthesebasicprecautions
withyourdesktopcomputer:
•Keepthecoverclosedwheneverthecomputerispluggedin.
•Regularlyinspecttheoutsideofthecomputerfordustaccumulation.
•Removedustfromventsandanyperforationsinthebezel.Morefrequentcleaningsmightberequiredfor
computersindustyorhigh-trafficareas.
•Donotrestrictorblockanyventilationopenings.
•Donotstoreoroperateyourcomputerinsidefurniture,asthismightincreasetheriskofoverheating.
•Airflowtemperaturesintothecomputershouldnotexceed35°C(95°F).
•Donotinstallairfiltrationdevices.Theymayinterferewithpropercooling.
Operatingenvironment
Theoptimalenvironmentinwhichtouseyourcomputeris10°C–35°C(50°F–95°F)withhumidityranging
between35%and80%.Ifyourcomputerisstoredortransportedintemperatureslessthan10°C(50°F),
allowthecoldcomputertoriseslowlytoanoptimaloperatingtemperatureof10°C–35°C(50°F–95°F)before
use.Thisprocesscouldtaketwohoursinextremeconditions.Failuretoallowyourcomputertorisetoan
optimaloperatingtemperaturebeforeusecouldresultinirreparabledamagetoyourcomputer.
Ifpossible,placeyourcomputerinawell-ventilatedanddryareawithoutdirectexposuretosunshine.
Keepelectricalappliancessuchasanelectricfan,radio,high-poweredspeakers,airconditioner,and
microwaveovenawayfromyourcomputerbecausethestrongmagneticfieldsgeneratedbythese
appliancescandamagethemonitoranddataontheharddiskdrive.
Donotplaceanybeveragesontopoforbesidethecomputerorotherattacheddevices.Ifliquidisspilledon
orinthecomputeroranattacheddevice,ashortcircuitorotherdamagemightoccur.
Donoteatorsmokeoveryourkeyboard.Particlesthatfallintoyourkeyboardcancausedamage.
Lasercompliancestatement
CAUTION:
Whenlaserproducts(suchasCD-ROMs,DVDdrives,fiberopticdevices,ortransmitters)are
installed,notethefollowing:
•Donotremovethecovers.Removingthecoversofthelaserproductcouldresultinexposureto
hazardouslaserradiation.Therearenoserviceablepartsinsidethedevice.
•Useofcontrolsoradjustmentsorperformanceofproceduresotherthanthosespecifiedherein
mightresultinhazardousradiationexposure.
viiiThinkCentreM79UserGuide
Page 11
DANGER
SomelaserproductscontainanembeddedClass3AorClass3Blaserdiode.Notethefollowing:
Laserradiationwhenopen.Donotstareintothebeam,donotviewdirectlywithoptical
instruments,andavoiddirectexposuretothebeam.
Powersupplystatement
Neverremovethecoveronapowersupplyoranypartthathasthefollowinglabelattached.
Hazardousvoltage,current,andenergylevelsarepresentinsideanycomponentthathasthislabelattached.
Therearenoserviceablepartsinsidethesecomponents.Ifyoususpectaproblemwithoneoftheseparts,
contactaservicetechnician.
Cleaningandmaintenance
Keepyourcomputerandworkspaceclean.Shutdownthecomputerandthendisconnectthepower
cordbeforecleaningthecomputer.Donotsprayanyliquiddetergentdirectlyonthecomputeroruse
anydetergentcontainingflammablematerialtocleanthecomputer.Spraythedetergentonasoftcloth
andthenwipethecomputersurfaces.
©CopyrightLenovo2014,2016
ix
Page 12

xThinkCentreM79UserGuide
Page 13

Chapter1.Productoverview
Thischapterprovidesthefollowinginformation:
•Locationsofconnectors
•Locationsofcomponents
•Locationsofpartsonthesystemboard
•Locationsofinternaldrives
•Computerfeatures
•SoftwareprogramsprovidedbyLenovo
Locations
Thissectionprovidesthefollowingtopics:
•“Locatingconnectors,controls,andindicatorsonthefrontofyourcomputer”onpage2
•“Locatingconnectorsontherearofyourcomputer”onpage3
•“Locatingcomponents”onpage5
•“Locatingpartsonthesystemboard”onpage6
•“Locatinginternaldrives”onpage7
•“Locatingthemachinetypeandmodellabel”onpage8
Note:Thecomponentsinyourcomputermightlookslightlydifferentfromtheillustrations.
©CopyrightLenovo2014,2016
1
Page 14

Locatingconnectors,controls,andindicatorsonthefrontofyour
1
2
computer
Thefollowingillustrationshowsthelocationsoftheconnectors,controls,andindicatorsonthefrontofyour
computer.
Figure1.Frontconnector,control,andindicatorlocations
1Opticaldriveeject/closebutton
3Powerindicator4Harddiskdriveactivityindicator
5USB2.0connector(USBconnector2)
7Headphoneconnector
2Powerbutton
6Microphoneconnector
8USB2.0connector(USBconnector1)
2ThinkCentreM79UserGuide
Page 15
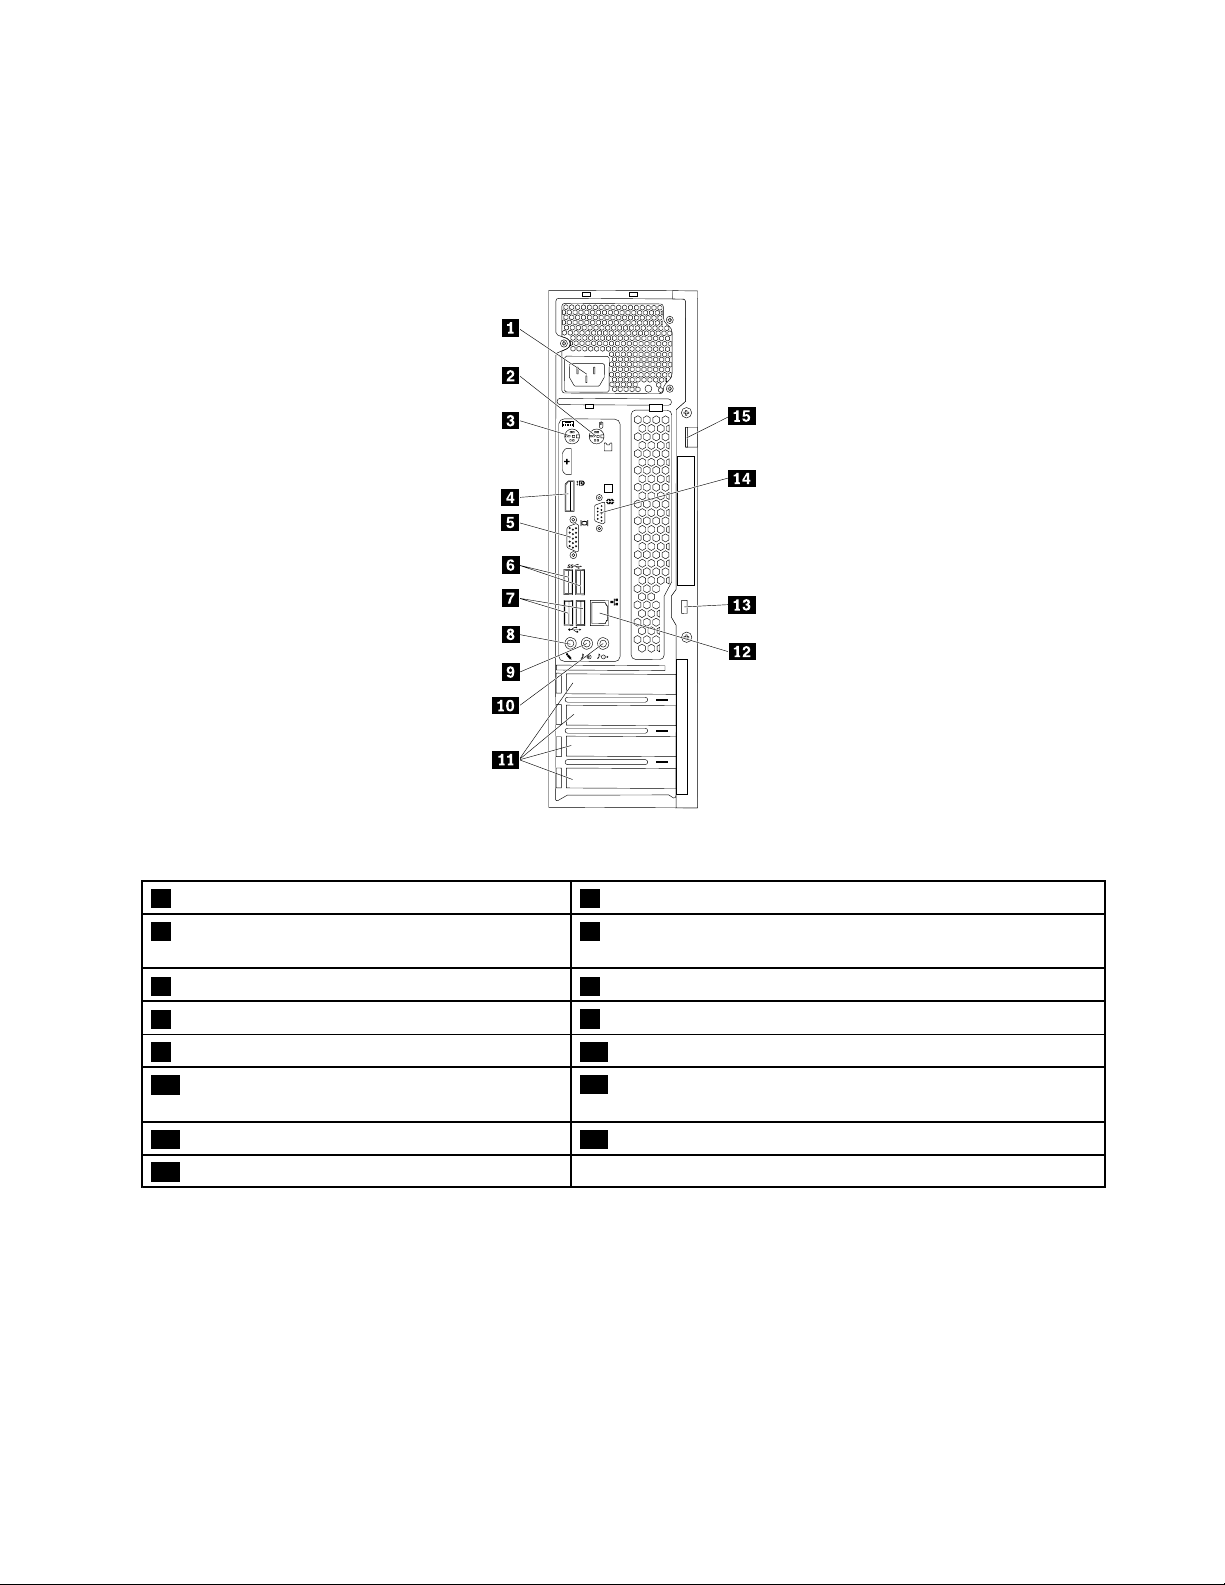
Locatingconnectorsontherearofyourcomputer
3
4
5
6
Thefollowingillustrationshowsthelocationsoftheconnectorsontherearofyourcomputer.Some
connectorsontherearofyourcomputerarecolor-codedtohelpyoudeterminewheretoconnectthe
cablesonyourcomputer.
Figure2.Rearconnectorlocations
1Powercordconnector
3PS/2keyboardconnector(availableonsome
2PS/2mouseconnector(availableonsomemodels)
4DisplayPort
®
connector
models)
5VGAconnector6USB3.0connectors(2)
7USB2.0connectors(2)
8Microphoneconnector
9Audioline-outconnector10Audioline-inconnector
11PCI/PCIExpresscardarea(differentcards
12Ethernetconnector
providedifferentconnectors)
13Security-lockslot14Serialconnector
15Padlockloop
Note:Adiscretegraphicscard,anetworkinterfacecard,oranaudiocardcanbeinstalledintheappropriate
PCIorPCIExpresscardslot.Ifsuchacardisinstalled,ensurethatyouusetheconnectorsonthecard
insteadofthecorrespondingconnectorsonthecomputer.
Chapter1.Productoverview3
Page 16

ConnectorDescription
Audioline-inconnector
Audioline-outconnector
DisplayPortconnector
Ethernetconnector
Microphoneconnector
PS/2keyboardconnector
(availableonsomemodels)
PS/2mouseconnector
(availableonsomemodels)
Serialconnector
USB2.0connectorUsedtoattachadevicethatrequiresaUSB2.0connection,suchasakeyboard,a
USB3.0connectorUsedtoattachadevicethatrequiresaUSB2.0or3.0connection,suchasa
VGAconnectorUsedtoattachaVGAmonitororotherdevicesthatuseaVideoGraphicsArray
Usedtoreceiveaudiosignalsfromanexternalaudiodevice,suchasastereo
system.Whenyouattachanexternalaudiodevice,acableisconnectedbetween
theaudioline-outconnectorofthedeviceandtheaudioline-inconnectorofthe
computer.
Usedtosendaudiosignalsfromthecomputertoexternaldevices,suchaspowered
stereospeakers(speakerswithbuilt-inamplifiers),headphones,ormultimedia
keyboards.T oattachastereosystemorotherexternalrecordingdevice,acableis
connectedbetweentheaudioline-inconnectorofthedeviceandtheaudioline-out
connectorofthecomputer.
Usedtoattachahigh-performancemonitor,adirect-drivemonitor,orotherdevices
thatuseaDisplayPortconnector.
UsedtoattachanEthernetcableforalocalareanetwork(LAN).
Note:TooperatethecomputerwithinFCCClassBlimits,useaCategory5,5e,or
6Ethernetcable.
Usedtoattachamicrophonetoyourcomputerwhenyouwanttorecordsoundorif
youusespeech-recognitionsoftware.
UsedtoattachakeyboardthatusesaPersonalSystem/2(PS/2)keyboard
connector.
Usedtoattachamouse,atrackball,orotherpointingdevicesthatuseaPS/2
mouseconnector.
Usedtoattachanexternalmodem,aserialprinter,orotherdevicesthatusea
9-pinserialconnector.
mouse,ascanner,aprinter,orapersonaldigitalassistant(PDA).
keyboard,amouse,ascanner,aprinter,orapersonaldigitalassistant(PDA).A
USB3.0connectorprovideshightransmissionspeedstoreducethetimethatis
requiredfordatatransmission.
(VGA)connector.
4ThinkCentreM79UserGuide
Page 17
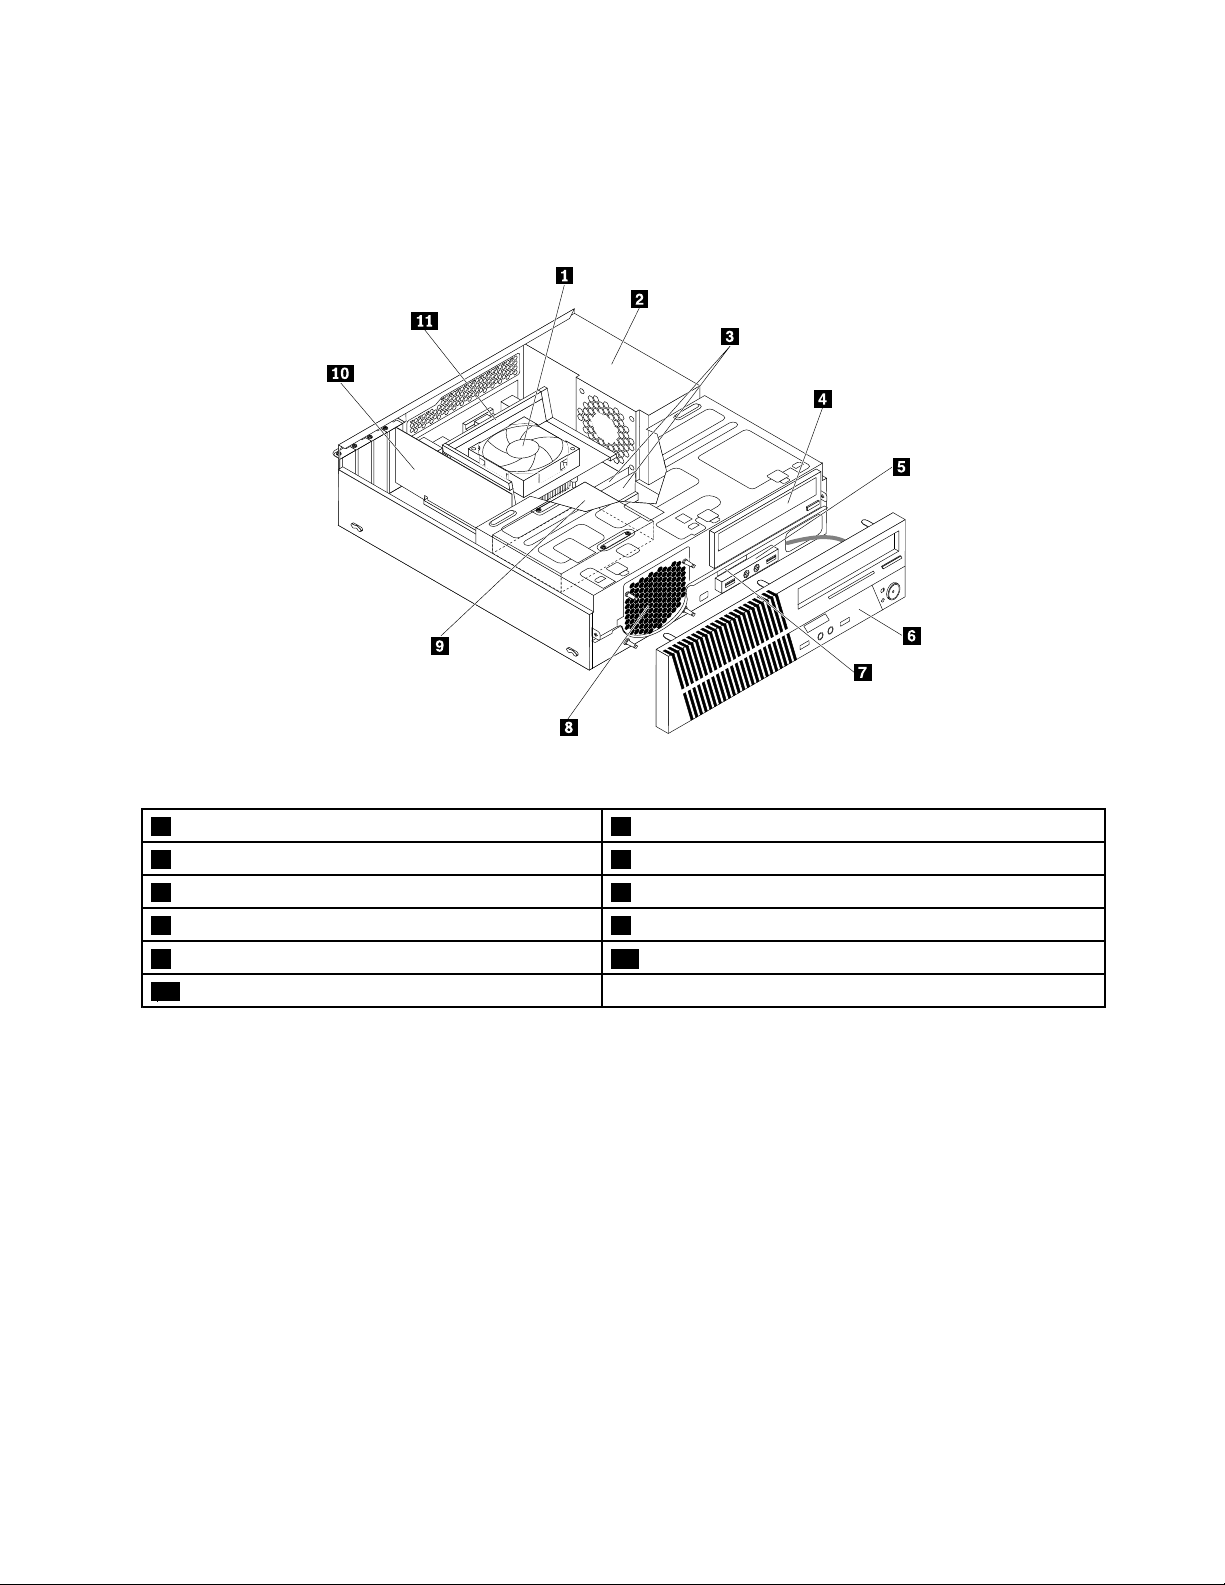
Locatingcomponents
Thefollowingillustrationshowsthelocationsofthevariouscomponentsinyourcomputer.Toremovethe
computercover,see“Removingthecomputercover”onpage67.
Figure3.Componentlocations
1Heatsinkandfanassembly
3Memorymodules
5FrontaudioandUSBassembly
7Slimcardreader8Frontfan(systemfan)assembly
9Harddiskdrive(orsolid-statedrive)10PCIExpresscard
11Heatsinkfanduct
2Powersupplyassembly
4Opticaldrive
6Frontbezel
Chapter1.Productoverview5
Page 18
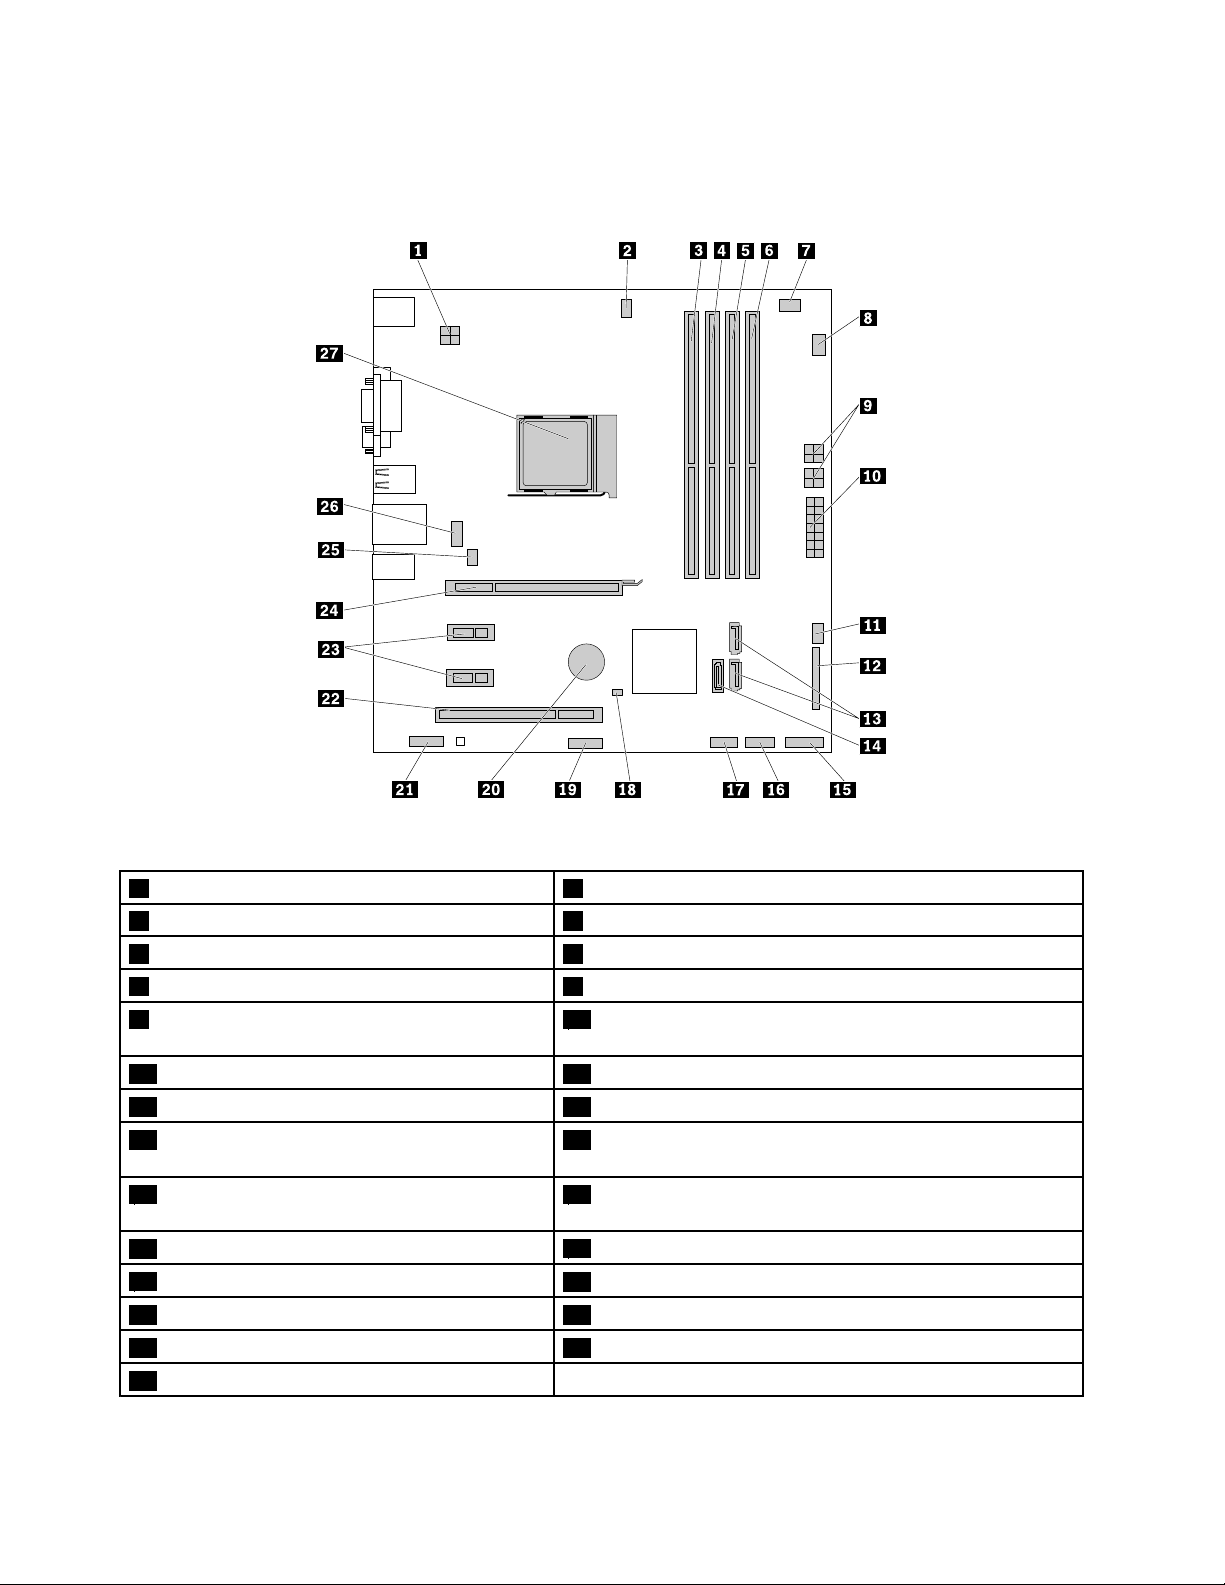
Locatingpartsonthesystemboard
Thefollowingillustrationshowsthelocationsofthepartsonthesystemboard.
Figure4.Systemboardpartlocations
1Microprocessorpowerconnector
3Memoryslot14Memoryslot2
5Memoryslot36Memoryslot4
7Thermalsensorconnector
9Opticaldriveandharddiskdrivepower
2Microprocessorfanconnector
8Harddiskdrivefanconnector
10Systempowerconnector
connectors(2)
11Powerfanconnector
13SATA3.0connectors(2)14SATA3.0connector
15Frontpanelconnector(forconnectingLED
indicatorsandpowerbutton)
17FrontUSB2.0connector2(forconnectingan
additionalUSBdevice)
19Serialconnector
21Frontaudioconnector
23PCIExpressx1cardslots(2)24PCIExpressx16graphicscardslot
25Systemfanconnector
27Microprocessor
12Parallelconnector
16FrontUSB2.0connector1(forconnectingUSBconnectors
1and2onthefrontbezel)
18ClearCMOS(ComplementaryMetalOxideSemiconductor)
/Recoveryjumper
20Battery
22PCIcardslot
26DisplayPortconnector
6ThinkCentreM79UserGuide
Page 19

Locatinginternaldrives
Internaldrivesaredevicesthatyourcomputerusestoreadandstoredata.Youcanadddrivestoyour
computertoincreasestoragecapacityandenableyourcomputertoreadothertypesofmedia.Internal
drivesareinstalledinbays.
Whenyouinstallorreplaceaninternaldrive,notethetypeandsizeofthedrivethateachbaysupportsand
correctlyconnecttherequiredcables.Refertotheappropriatesectionin“Installingorreplacinghardware”
onpage67
Thefollowingillustrationshowsthelocationsofthedrivebays.
forinstructionsonhowtoinstallorreplaceinternaldrivesforyourcomputer.
Figure5.Drivebaylocations
1Secondarysolid-statedrivebay(witha2.5-inchsolid-statedriveorahybridharddiskdriveinstalledonsome
models)
2Opticaldrivebay(withanopticaldriveinstalledonsomemodels)
3Slimcardreaderdrivebay(withaslimcardreaderinstalledonsomemodels)
4Harddiskdrivebay(witha3.5-inchharddiskdriveora2.5-inchsolid-statedriveinstalled)
Chapter1.Productoverview7
Page 20
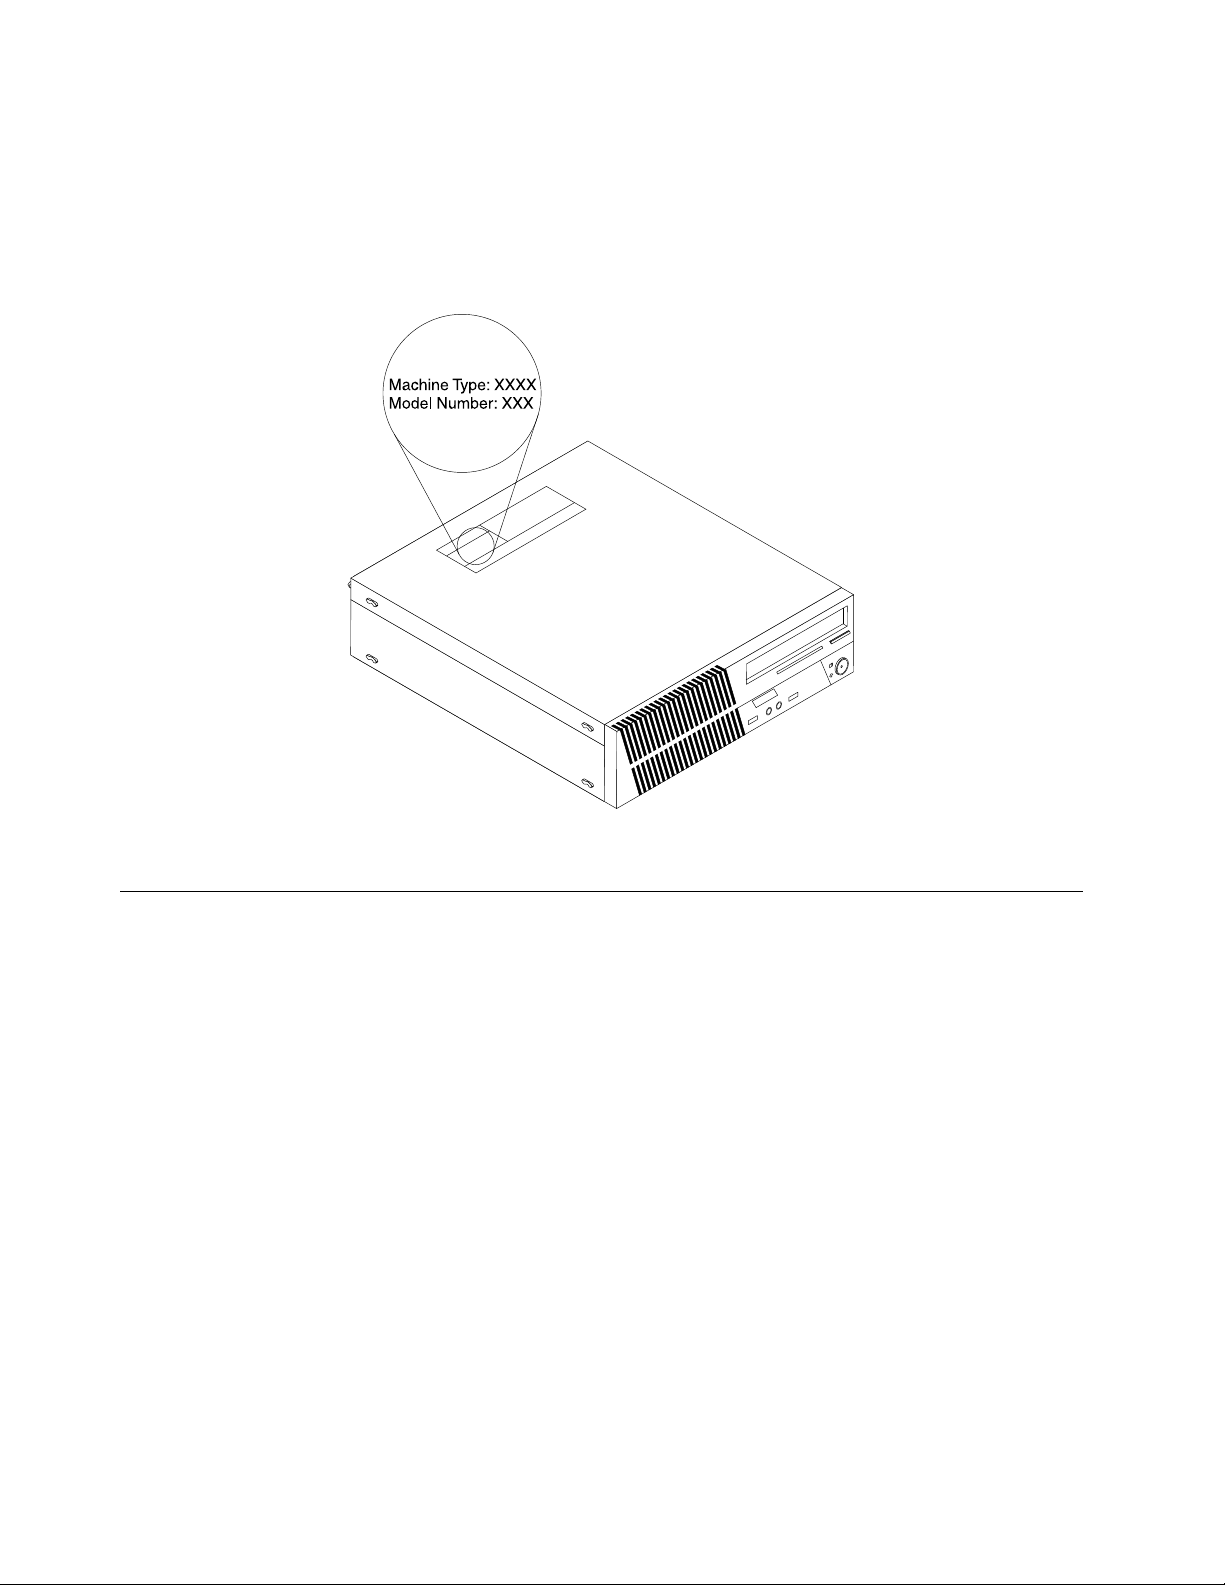
Locatingthemachinetypeandmodellabel
Themachinetypeandmodellabelidentifiesyourcomputer.WhenyoucontactLenovoforhelp,themachine
typeandmodelinformationhelpssupporttechnicianstoidentifyyourcomputerandprovidefasterservice.
Themachinetypeandmodellabelisattachedonthesideofyourcomputerasshown.
Figure6.Machinetypeandmodellabel
Features
Thissectionintroducesthecomputerfeatures.Theinformationcoversavarietyofmodels.
Microprocessor
Toviewthemicroprocessorinformationofyourcomputer,dothefollowing:
•OntheMicrosoft
toviewtheinformation.
•OntheMicrosoftWindows8.1operatingsystem,gotothedesktopandmoveyourpointertothe
top-rightorbottom-rightcornerofthescreentodisplaythecharms.ThenclickSettings➙PCinfoto
viewtheinformation.
•OntheMicrosoftWindows10operatingsystem,clicktheStartbuttontoopentheStartmenu.Then,click
Settings➙System➙Abouttoviewtheinformation.
Memory
Yourcomputersupportsuptofourdoubledatarate3unbuffereddualinlinememorymodules(DDR3
UDIMMs).
Todeterminetheamountofmemoryinstalledonyourcomputer,dothefollowing:
•OntheMicrosoftWindows7operationsystem,clickStart,right-clickComputer,andselectProperties
toviewtheinformation.
®
Windows
®
7operationsystem,clickStart,right-clickComputer,andselectProperties
8ThinkCentreM79UserGuide
Page 21

•OntheMicrosoftWindows8.1operatingsystem,gotothedesktopandmoveyourpointertothe
top-rightorbottom-rightcornerofthescreentodisplaythecharms.ThenclickSettings➙PCinfoto
viewtheinformation.
•OntheMicrosoftWindows10operatingsystem,clicktheStartbuttontoopentheStartmenu.Then,click
Settings➙System➙Abouttoviewtheinformation.
Formoreinformation,see“Installingorreplacingamemorymodule”onpage71
.
Internaldrives
•Opticaldrive
•SerialAdvancedTechnologyAttachment(SATA)harddiskdrive
•SATAhybriddrive(availableonsomemodels)
•SATAsolid-statedrive(availableonsomemodels)
Videofeatures
•Integratedgraphicssupportsthefollowingconnectorsonyourcomputer:
–DisplayPortconnector
–VGAconnector
•DiscretegraphicscardinstalledinoneofthePeripheralComponentInterconnect(PCI)Expressx16
graphicscardslots(availableonsomemodels)(connectorsvarybygraphicscard)
Audiofeatures
•Integratedaudiocontrollersupportsthefollowingconnectorsanddevicesonyourcomputer:
–Audioline-inconnector
–Audioline-outconnector
–Headphoneconnector
–Internalspeaker(availableonsomemodels)
–Microphoneconnectors
•DiscreteaudiocardinstalledinoneofthePCIcardslots(availableonsomemodels)(theconnectors
varybyaudiocard)
Input/Output(I/O)features
•9-pinserialconnectors
•Audioconnectors(audioline-inconnector,audioline-outconnector,headphoneconnector,and
microphoneconnector)
•Ethernetconnector
•Displayconnectors(DisplayPortconnectorandVGAconnector)
•PersonalSystem/2(PS/2)keyboardconnector
•PS/2mouseconnector
•USBconnectors
Formoreinformation,see“Locatingconnectors,controls,andindicatorsonthefrontofyourcomputer”on
page2
and“Locatingconnectorsontherearofyourcomputer”onpage3.
Expansion
•Cardreaderbay
Chapter1.Productoverview9
Page 22

•Harddiskdrivebays
•Memoryslots
•Opticaldrivebay
•PCIcardslot
•PCIExpressx1cardslots
•PCIExpressx16graphicscardslot
Formoreinformation,see“Locatinginternaldrives”onpage7and“Locatingpartsonthesystemboard”
onpage6.
Powersupply
•180-wattautomaticvoltage-sensingpowersupply
•240-wattautomaticvoltage-sensingpowersupply
Wirelessfeatures
Dependingonyourcomputermodel,thefollowingwirelessfeaturesaresupported:
•Wirelesslocalareanetwork(LAN)
•Bluetooth
Systemmanagementfeatures
•Abilitytostorepower-onself-test(POST)hardwaretestresults
•DesktopManagementInterface(DMI)
DesktopManagementInterfaceprovidesacommonpathforuserstoaccessinformationaboutall
aspectsofacomputer.Theinformationincludesprocessortype,installationdate,attachedprintersand
otherperipherals,powersources,maintenancehistory,andsoon.
•ErPLPScompliancemode
Theenergy-relatedproductsdirective(ErP)lowestpowerstate(LPS)compliancemodereducesthe
consumptionofelectricitywhenyourcomputerisinsleeporoffmode.Formoreinformation,see
“EnablingErPLPScompliancemode”onpage36
.
•IntelligentCoolingEngine(ICE)
TheIntelligentCoolingEngineisasystemthermalmanagementsolutionthatenablesyourcomputer
torunwithbetterthermalandacousticperformance.TheICEfunctionalsomonitorsthethermal
performanceofyourcomputertoidentifythermalproblems.Formoreinformation,see“ICEperformance
mode”onpage37and“ICEthermalalert”onpage37.
•PrebootExecutionEnvironment(PXE)
PrebootExecutionEnvironmentenablescomputerstostartthroughanetworkinterfaceindependentof
datastoragedevices(suchastheharddiskdrive)orinstalledoperatingsystems.
•SystemManagement(SM)BasicInput/OutputSystem(BIOS)andSMsoftware
TheSMBIOSspecificationdefinesdatastructuresandaccessmethodsthatcanbeusedtoread
managementdatastoredintheBIOSofacomputer.
•WakeonLAN
WakeonLANisanEthernetcomputernetworkingstandardthatallowsacomputertobeturnedon
orwokenupbyanetworkmessage.Themessageisusuallysentbyaprogramrunningonanother
computeronthesamelocalareanetwork.
•WindowsManagementInstrumentation(WMI)
WindowsManagementInstrumentationisasetofextensionstotheWindowsDriverModel.Itprovidesan
operatingsysteminterfacethroughwhichinstrumentedcomponentsprovideinformationandnotification.
10ThinkCentreM79UserGuide
Page 23

Securityfeatures
•Abilitytoenableanddisableadevice
•AbilitytoenableanddisableUSBconnectorsindividually
•ComputraceAgentsoftwareembeddedinfirmware
•Coverpresenceswitch(alsocalledintrusionswitch)(availableonsomemodels)
•Keyboardwithfingerprintreader(shippedwithsomemodels)
•Power-onpassword(POP),administratorpassword,andharddiskpasswordtodeterunauthorized
useofyourcomputer
•Startupsequencecontrol
•Startupwithoutkeyboardormouse
•SupportforaKensington-stylecablelock
•Supportforapadlock
•TrustedPlatformModule(TPM)
Formoreinformation,seeChapter4“Security”onpage29
.
Preinstalledoperatingsystem
Yourcomputerispreinstalledwithoneofthefollowingoperatingsystems:
•MicrosoftWindows7operatingsystem
•MicrosoftWindows8.1operatingsystem
•MicrosoftWindows10operatingsystem
Operatingsystem(s),certifiedortestedforcompatibility(variesbymodeltype)
Theoperatingsystem(s)listedherearebeingcertifiedortestedforcompatibilityatthetimethispublication
goestopress.AdditionaloperatingsystemsmightbeidentifiedbyLenovoascompatiblewithyourcomputer
followingthepublicationofthismanual.Thislistissubjecttochange.Todetermineifanoperatingsystem
hasbeencertifiedortestedforcompatibility,checktheWebsiteoftheoperatingsystemvendor.
•Linux
®
Chapter1.Productoverview11
Page 24

Specifications
Thissectionliststhephysicalspecificationsforyourcomputer.
Dimensions
Width:99.7mm(3.93inches)
Height:338mm(13.31inches)
Depth:385mm(15.16inches)
Weight
Maximumconfigurationasshipped:6.6kg(14.55lb)(withoutpackage)
Maximumconfigurationasshipped:8.96kg(19.75lb)(withpackage)
Environment
•Airtemperature:
Operating:From10°C(50°F)to35°C(95°F)
Storageinoriginalshippingpackage:From-40°C(-40°F)to60°C(140°F)
Storagewithoutpackage:From-10°C(14°F)to60°C(140°F)
•Humidity:
Operating:20%–80%(non-condensing)
Storage:20%–90%(non-condensing)
•Altitude:
Operating:From-15.2m(-50ft)to3048m(10000ft)
Storage:From-15.2m(-50ft)to10668m(35000ft)
Electricalinput
Inputvoltage:
•Lowrange:
Minimum:100Vac
Maximum:127Vac
Inputfrequency:50/60Hz
•Highrange:
Minimum:200Vac
Maximum:240Vac
Inputfrequency:50/60Hz
Lenovoprograms
YourcomputercomeswithLenovoprogramstohelpyouworkmoreeasilyandsecurely.Dependingon
theWindowsoperatingsystempreinstalled,theprogramsmightvary.
Accessingaprogramonyourcomputer
Note:ForWindows7,someoftheLenovoprogramsmightbereadytobeinstalled,soyouneedtoinstall
themmanually.Then,youcanaccessandusetheseprograms.Toinstallaprogramthatisreadytobe
installed,opentheLenovoThinkVantage
Followtheinstructionsundergreyed-outiconstolocatetheiconforthedesiredprogram.Double-click
theicontoinstalltheprogram.
®
Toolsprogram,andthenviewtheprogramiconsusingTiles.
12ThinkCentreM79UserGuide
Page 25

Toaccessaprogramonyourcomputer,dooneofthefollowing:
•ForWindows7orWindows10:
–FromWindowsSearch:
1.DependingonyourWindowsversion,dooneofthefollowing:
–ForWindows7:ClicktheStartbuttontoopentheStartmenu,andthentypetheprogram
nameintothesearchbox.
–ForWindows10:TypetheprogramnameintothesearchboxnexttotheStartbutton.
2.Inthesearchresults,clickthenameofthedesiredprogramtolaunchtheprogram.
–FromtheStartmenuorControlPanel:
1.ClicktheStartbuttontoopentheStartmenu.
2.DependingonyourWindowsversion,dooneofthefollowing:
–ForWindows7:ClickAllProgramstodisplaytheprogramlist.Fromthelistorafolderinthe
list,clickthenameofthedesiredprogramtolaunchtheprogram.
–ForWindows10:Fromtheprogramlistorafolderinthelist,clickthenameofthedesired
programtolaunchtheprogram.
3.IftheprogramnameisnotdisplayedontheStartmenu,dooneofthefollowing:
–ForWindows7:ClickControlPanelontheStartmenu.
–ForWindows10:Right-clicktheStartbuttontoopentheStartcontextmenu,andthenclick
ControlPanel.
4.ViewControlPanelusinglargeiconsorsmallicons,andthenclickthenameofthedesired
programtolaunchtheprogram.
•ForWindows8.1:
1.PresstheWindowskeytogototheStartscreen.Clickthenameofthedesiredprogramto
launchtheprogram.
2.Clickthearrowiconinthebottom-leftcornerofthescreentogototheAppsscreen.Findthe
desiredprogramintheappslistorsearchforitinthesearchboxinthetop-rightcornerofthescreen.
AnintroductiontoLenovoprograms
ThissectionprovidesinformationaboutthemajorLenovoprogramsavailableonyouroperatingsystem.
Note:Dependingonyourcomputermodel,someofthefollowingprogramsmightnotbeavailable.
•ForWindows7only:
–CreateRecoveryMedia
TheCreateRecoveryMediaprogramenablesyoutorestoreonlytheCdriveortheentirestorage
drivetothefactory-defaultsettings.
–LenovoPowerENGAGE
TheLenovoPowerENGAGEprogramenablesyoutoregisteryourcomputerwithLenovo.
–MessageCenterPlus
TheMessageCenterPlusprogramautomaticallydisplaysmessagesinformingyouaboutimportant
noticesfromLenovo,suchasalertsonsystemupdatesandalertsonconditionsthatrequireyour
attention.
Chapter1.Productoverview13
Page 26

–RescueandRecovery
®
TheRescueandRecoveryprogramisaone-buttonrecoveryandrestoresolution.Itincludesaset
ofself-recoverytoolstohelpyoudiagnosecomputerproblems,gethelp,andrecoverfromsystem
crashes,evenifyoucannotstarttheWindowsoperatingsystem.
•ForWindows8.1only:
–LenovoSupport
TheLenovoSupportprogramenablesyoutoregisteryourcomputerwithLenovo,checkthecomputer
healthconditionandbatterystatus,downloadandviewusermanualsforyourcomputer,getthe
warrantyinformationofyourcomputer,andexplorehelpandsupportinformation.
•ForWindows10only:
–LenovoID
TheLenovoIDprogramenablesyoutocreateyourLenovoIDandaccessallsupportedLenovo
programsandwebportalswithsinglesign-on.
•ForWindows7andWindows8.1:
–FingerprintManagerProorThinkVantageFingerprintSoftware
TheFingerprintManagerProorThinkVantageFingerprintSoftwareprogramenablesyoutousea
fingerprintreader.Theintegratedfingerprintreaderprovidedonsomekeyboardsenablesyoutoenroll
yourfingerprintandassociateitwithyourpower-onpassword,harddiskpassword,andWindows
password.Asaresult,fingerprintauthenticationcanreplacepasswordsandenablesimpleandsecure
useraccess.
–LenovoBluetoothLock
TheLenovoBluetoothLockprogramenablesyoutouseaBluetoothdevice(suchasyoursmartphone)
asaproximity-basedunitforlockingorunlockingyourcomputerautomatically.Bydetectingthe
distancebetweenyourcomputerandthepredefinedBluetoothdevicethatyouarecarrying,theLenovo
BluetoothLockprogramautomaticallylocksyourcomputerwhenyouwalkawayandunlocksyour
computerwhenyoucomeback.Thisisasimplewaytoprotectyourcomputeragainstunauthorized
accessincasethatyouforgettolockyourcomputer.
–PasswordManager
ThePasswordManagerprogramautomaticallycapturesandfillsinauthenticationinformationfor
WindowsprogramsandWebsites.
–PowerManager
ThePowerManagerprogramprovidesconvenient,flexible,andcompletepowermanagementfor
yourcomputer.Itenablesyoutoadjustyourcomputerpowersettingstoachievethebestbalance
betweenperformanceandpowersaving.
–SystemUpdate
TheSystemUpdateprogramprovidesregularaccesstothesystemupdatesforyourcomputer,such
asdevicedriverupdates,softwareupdates,andBIOSupdates.Theprogramgathersinformationfrom
theLenovoHelpCenteraboutnewupdatesforyourcomputer,thensortsanddisplaystheupdatesfor
downloadandinstallation.Y ouhavecompletecontrolofwhichupdatestodownloadandinstall.
•ForWindows8.1andWindows10:
14ThinkCentreM79UserGuide
Page 27

–LenovoCompanion
Yourcomputer’sbestfeaturesandcapabilitiesshouldbeeasytoaccessandunderstand.WithLenovo
Companion,theyare.UseLenovoCompaniontodothefollowing:
–Optimizeyourcomputer’sperformance,monitoryourcomputer’shealth,andmanageupdates.
–Accessyouruserguide,checkwarrantystatus,andviewaccessoriescustomizedforyourcomputer.
–Readhow-toarticles,exploreLenovoforums,andstayup-to-dateontechnologynewswitharticles
andblogsfromtrustedsources.
LenovoCompanionisfilledwithexclusiveLenovocontenttohelpyoulearnmoreaboutwhatyou
candowithyourcomputer.
•ForWindows7,Windows8.1,andWindows10:
–LenovoDeviceExperienceorLenovoPCExperience
TheLenovoDeviceExperienceorLenovoPCExperienceprogramhelpsyouworkmoreeasilyand
securely.TheprogramprovideseasyaccesstoLenovoThinkVantageToolsorLenovoTools,important
settingsandinformationaboutyourcomputer,theLenovoSupportWebsite,andsoon.
–LenovoSolutionCenter
TheLenovoSolutionCenterprogramenablesyoutotroubleshootandresolvecomputerproblems.It
combinesdiagnostictests,systeminformationcollection,securitystatus,andsupportinformation,
alongwithhintsandtipsformaximumsystemperformance.
–PCCloudManager
ThePCCloudManager(PCM)programisabrowser-basedsolutionforclient-computermanagement.
ThePCMprogramhastwocomponents:PCMServerandPCMClient.PCMServerisinstalledon
thecomputer,wheretheadministratorperformsmanagementwork,suchaspowermanagement
andsecuritymanagement.PCMClientisinstalledontheclientcomputerstobemanaged.The
administratorcanlogintoPCMServertomanagecomputerswithPCMClientinstalled,throughthe
InternetWebbrowser.
Chapter1.Productoverview15
Page 28

16ThinkCentreM79UserGuide
Page 29

Chapter2.Usingyourcomputer
Thischapterprovidesinformationaboutthefollowingtopics:
•“UsingWindowsshortcutkeys”onpage17
•“Usingthewheelmouse”onpage17
•“Settingthecomputervolume”onpage18
•“AddinganicontotheWindowsnotificationarea”onpage18
•“Usingadisc”onpage18
•“NavigatingamongscreensontheWindows8.1operatingsystem”onpage20
•“AccessingControlPanelontheWindows8.1operatingsystem”onpage21
•“Frequentlyaskedquestions”onpage21
UsingWindowsshortcutkeys
Boththestandardkeyboardandthefingerprintreaderkeyboardprovidethreekeysyoucanusewithyour
MicrosoftWindowsoperatingsystem.
•ThetwoWindowslogokeysarelocatedbesidetheAltkeyoneithersideofthespacebar.Theyfeature
theWindowslogo.OntheWindows7orWindows10operatingsystem,presstheWindowskey
toopentheStartmenu.OntheWindows8.1operatingsystem,presstheWindowskeytoswitch
betweenthecurrentworkspaceandtheStartscreen.ThestyleoftheWindowslogovariesdepending
onthekeyboardtype.
•Thecontext-menukeyislocatednexttotheCtrlkeyontherightsideoftheSpacebar.Pressingthe
context-menukeyopensthecontextmenufortheactiveprogram,icon,orobject.
Note:YoucanusethemouseortheUpandDownarrowkeystohighlightmenuselections.
Usingthewheelmouse
Thewheelmousehasthefollowingcontrols:
1PrimarymousebuttonUsethisbuttontoselectorstartaprogramormenuitem.
2Wheel
3Secondarymousebutton
Usethewheeltocontrolthescrollingactionofthemouse.Thedirectioninwhichyou
rotatethewheelcontrolsthedirectionofthescrollingaction.
Usethisbuttontodisplayamenufortheactiveprogram,icon,orobject.
©CopyrightLenovo2014,2016
17
Page 30

Youcanswitchthefunctionoftheprimaryandsecondarymousebuttonsandchangeotherdefaultbehavior
throughthemousepropertiesfunctionintheWindowsControlPanel.
Settingthecomputervolume
Tosetthecomputervolume,dothefollowing:
1.ClickthevolumeiconintheWindowsnotificationareaonthetaskbar.
Note:IfthevolumeiconisnotdisplayedintheWindowsnotificationarea,addtheicontothe
notificationarea.See“AddinganicontotheWindowsnotificationarea”onpage18.
2.Followtheinstructionsonthescreentoadjustthevolume.Clickthespeakericontomutetheaudio.
AddinganicontotheWindowsnotificationarea
ToaddanicontotheWindowsnotificationarea,dothefollowing:
1.Clickthearrownexttothenotificationareatoviewhiddenicons.Then,clickthedesirediconand
dragittothenotificationarea.
2.Iftheiconisnotdisplayed,turnontheicon.
a.DependingonyourWindowsversion,dooneofthefollowing:
•ForWindows7:ClicktheStartbuttontoopentheStartmenu,andthenclickControlPanel.
ViewControlPanelusingLargeiconsorSmallicons,andthenclickNotificationAreaIcons➙
Turnsystemiconsonoroff.
•ForWindows8.1:OpenControlPanel.ViewControlPanelusingLargeiconsorSmallicons,and
thenclickNotificationAreaIcons➙T urnsystemiconsonoroff.
Note:FordetailedinformationonhowtoopenControlPanelonWindows8.1,see“Accessing
ControlPanelontheWindows8.1operatingsystem”onpage21
•ForWindows10:ClicktheStartbuttontoopentheStartmenu.Then,clickSettings➙
Personalization➙Taskbar➙Turnsystemiconsonoroff.
b.Turnonthedesiredicon.
3.IftheiconisstillnotdisplayedintheWindowsnotificationarea,repeatstep1.
.
Usingadisc
Thissectionprovidesinformationaboutthefollowingtopics:
•“Usingtheopticaldrive”onpage18
•“Handlingandstoringadisc”onpage19
•“Playingandremovingadisc”onpage19
•“Recordingadisc”onpage19
Usingtheopticaldrive
Dependingonthemodel,yourcomputerisequippedwithoneofthefollowingopticaldrives:
•CD-ROMdrive:UsedtoreadCDsonly.
•DVD-ROMdrive:UsedtoreadDVDsandCDs.
•BD-ROMdrive:Usedtoreadblu-raydiscs(BDs),DVDs,andCDs.
•Recordableopticaldrive:Usedtoreadandrecordadisc.
18ThinkCentreM79UserGuide
Page 31

Whenusingtheopticaldrive,followtheseguidelines:
•Donotplacethecomputerinalocationwherethedriveisexposedtoanyofthefollowingconditions:
–Hightemperature
–Highhumidity
–Excessivedust
–Excessivevibrationorsuddenshock
–Aninclinedsurface
–Directsunlight
•Donotinsertanyobjectotherthanadiscintothedrive.
•Donotinsertdamageddiscsintothedrive.Warped,scratched,ordirtydiscscandamagethedrive.
•Beforemovingthecomputer,removethediscfromthedrive.
Handlingandstoringadisc
Whenhandlingandstoringadisc,followtheseguidelines:
•Holdthediscbyitsedges.Donottouchthesurfaceofthesidethatisnotlabeled.
•Toremovedustorfingerprints,wipethediscwithaclean,softclothfromthecentertotheoutside.Wiping
thediscinacirculardirectionmightcauselossofdata.
•Donotwriteorstickpaperonthedisc.
•Donotscratchormarkthedisc.
•Donotplaceorstorethediscindirectsunlight.
•Donotusebenzene,thinners,orothercleanerstocleanthedisc.
•Donotdroporbendthedisc.
Playingandremovingadisc
Toplayadisc,dothefollowing:
1.Withthecomputeron,presstheeject/closebuttononthefrontoftheopticaldrive.Thetrayslides
outofthedrive.
2.Insertadiscintothetray.Someopticaldrivehasasnaphubinthecenterofthetray.Ifyourdrivehasa
snaphub,supportthetraywithonehandandthenpushcenterofthediscuntilitsnapsintoplace.
3.Presstheeject/closebuttonagainorgentlypushthetrayforwardtoclosethetray.Thediscplayer
programstartsautomatically.Formoreinformation,refertothehelpsystemofthediscplayerprogram.
Toremoveadiscfromtheopticaldrive,dothefollowing:
1.Withthecomputeron,presstheeject/closebuttononthefrontoftheopticaldrive.Thetrayslides
outofthedrive.
2.Carefullyremovethediscfromthetray.
3.Presstheeject/closebuttonagainorgentlypushthetrayforwardtoclosethetray.
Note:Ifthetraydoesnotslideoutofthedrivewhenyoupresstheeject/closebutton,turnoffyourcomputer.
Then,insertastraightenedpaperclipintotheemergency-ejectholeadjacenttotheeject/closebutton.
Usetheemergencyejectonlyinanemergency.
Recordingadisc
Ifyouropticaldrivesupportsrecording,youcanrecordaCDorDVD.
Chapter2.Usingyourcomputer19
Page 32

TorecordaCDorDVD,dothefollowing:
1.Insertarecordablediscintotheopticaldrivethatsupportsrecording.
2.OpenthePowerDVDCreate,PowerProducer,orPower2Goprogram.See“Accessingaprogramon
yourcomputer”onpage12.
3.Followtheinstructionsonthescreen.
NavigatingamongscreensontheWindows8.1operatingsystem
Tonavigateamongthedesktop,theStartscreen,andapplicationsopenedfromtheStartscreenonthe
Windows8.1operatingsystem,dooneofthefollowing:
•FromtheStartscreen,dooneofthefollowingtonavigatetothemostrecentlyaccessedworkspace
(application,setting,ordesktop):
–Usingapointingdevice:Movethepointertotheextremebottom-leftcornerofthescreenuntilthe
Windowsscreen-controliconisdisplayed;thenclicktheicon.
–Usingatouchscreen:Swipeinandoutontheleftedgeofthescreen.Representationsofallavailable
workspacesaredisplayedalongtheleftedgeofthescreen.T aptheWindowsscreen-controlicon
atthebottom.
Note:TheWindowsscreen-controliconisdisplayedonlywhenyouhaveatleastoneactive
workspaceinthebackgroundofthesystem.
•FromthedesktoporanyotherworkspacethatisopenedfromtheStartscreen,dooneofthefollowingto
navigatetotheStartscreen:
–Usingapointingdevice:
–Fromthedesktop,clicktheWindowsscreen-controliconinthebottom-leftcornerofthescreen.
–Fromanyotherworkspace,movethepointertotheextremebottom-leftcornerofthescreenuntil
theWindowsscreen-controliconisdisplayed;thenclicktheicon.
–Usingatouchscreen:Dooneofthefollowing:
–Fromthedesktop,taptheWindowsscreen-controliconinthebottom-leftcornerofthescreen.
–Fromanyotherworkspace,dooneofthefollowing:
•Swipeinandoutontheleftedgeofthescreen.Representationsofallavailableworkspaces
aredisplayedalongtheleftedgeofthescreen.TaptheWindowsscreen-controlicon
thebottom.
•Swipeinfromtherightedgeofthescreentodisplaythecharms;thentapStart.
•Fromanyworkspace(Startscreen,desktop,PCsettings,orapplicationopenedfromtheStartscreen),go
toanotherpreviously-openedworkspaceusinganyofthefollowingprocedures:
–Tonavigatetoapreviouslyaccessedworkspace(application,setting,ordesktop),dooneofthe
following:
–Usingapointingdevice:
1.Dooneofthefollowing:
•Movethepointertotheextremetop-leftcornerofthescreenandthenmovethepointer
downwardalongtheleftedgeofthescreen.
•Movethepointertotheextremebottom-leftcornerofthescreenandthenmovethepointer
upwardalongtheleftedgeofthescreen.
at
Representationsofallavailableworkspacesaredisplayedalongtheleftedgeofthescreen.
20ThinkCentreM79UserGuide
Page 33

Note:OnlyactiveworkspacesthatyouhaveaccessedduringthecurrentWindowssessionare
displayedalongtheleftedge.Ifyoucloseanactiveworkspace,itsrepresentationwillnotbe
displayedalongtheleftedgeofthescreen.
2.Clicktherepresentation.
–Usingatouchscreen:
•Method1
1.Swipeinandoutontheleftedgeofthescreen.Representationsofallavailableworkspaces
aredisplayedalongtheleftedgeofthescreen.
2.Tapthedesiredworkspace.
•Method2
1.Swipeinfromtheleftedgeofthescreentonavigatetothenextavailableworkspace.
2.Repeatstep1untilyounavigatetothedesiredworkspace.
–Tonavigatetothemostrecentlyaccessedworkspace(application,PCsettings,ordesktop),doone
ofthefollowing:
–Usingapointingdevice:Movethepointertotheextremetop-leftcornerofthescreenuntilthe
Windowsscreen-controlicon
–Usingatouchscreen:Swipeinfromtheleftedgeofthescreen.
ForinformationaboutusingotherfeaturesoftheWindows8.1operatingsystem,opentheHelp+Tips
applicationfromtheStartscreenorAppsscreen.Alternatively,refertotheWindowshelpsystem.Formore
information,see“Windowshelpsystem”onpage113.
isdisplayed;thenclicktheicon.
AccessingControlPanelontheWindows8.1operatingsystem
OntheWindowsoperatingsystem,youcanviewandchangecomputersettingsthroughControlPanel.To
accessControlPanelontheWindows8.1operatingsystem,dooneofthefollowing:
•Fromthedesktop
1.Movethepointertothetop-rightorbottom-rightcornerofthescreentodisplaythecharms.
2.ClickSettings.
3.ClickControlPanel.
•FromtheStartscreen
1.Clickthedownarrowinthebottom-leftcornerofthescreentogototheAppsscreen.
2.Scrolltotherightside,andclickControlPanelintheWindowsSystemsection.
Frequentlyaskedquestions
Thefollowingaresomeofthefrequentlyaskedquestionsandtheiranswers.Theanswerscanhelpyou
optimizetheuseofyourcomputer.
Fortheanswerstomorefrequentlyaskedquestionsaboutusingyourcomputer,goto:
http://www.lenovo.com/support/faq
HowcanIgetmyuserguideinanotherlanguage?
Theuserguideisavailableinvariouslanguagesat:
http://www.lenovo.com/UserManuals
Chapter2.Usingyourcomputer21
Page 34

WhereismyrecoverydiscsetorrecoveryUSBkey?
DependingonyourWindowsversion,yourcomputercomeswitharecoverydiscsetorrecovery
USBkey.Ifyourcomputerdoesnotcomewithit,contacttheLenovoCustomerSupportCenterto
orderarecoverydiscsetorrecoveryUSBkey.ForalistofLenovoSupportphonenumbers,goto
http://www.lenovo.com/support/phone.Ifyoucannotfindthesupporttelephonenumberforyourcountry
orregion,contactyourLenovoreseller.
WherecanIfindhelpabouttheWindowsoperatingsystem?
See“Windowshelpsystem”onpage113.
HowcanIchangetheWindows8.1startupbehaviortoopeneitherthedesktoportheStartscreen?
OntheWindows8.1operatingsystem,youcansetthecomputertoopeneitherthedesktoportheStart
screenbydefault.Tosetthedefaultstartupscreen,dothefollowing:
1.Onthedesktop,right-clickonthetaskbaratthebottomofthescreen.
2.ClickProperties.The“TaskbarandNavigationproperties”windowisdisplayed.
3.OntheNavigationtab,locatetheStartscreensection,andthendooneofthefollowing:
•Tosetthedesktopasyourdefaultstartupscreen,selectWhenIsigninorcloseallappsona
screen,gotothedesktopinsteadofStart.
•TosettheStartscreenasyourdefaultstartupscreen,cleartheWhenIsigninorcloseallappson
ascreen,gotothedesktopinsteadofStartcheckbox.
4.ClickOKtosavethenewsetting.
22ThinkCentreM79UserGuide
Page 35
Chapter3.Youandyourcomputer
Thischapterprovidesinformationaboutaccessibility,comfort,andrelocatingyourcomputertoother
countriesorregions.
Accessibilityandcomfort
Goodergonomicpracticeisimportanttogetthemostfromyourpersonalcomputerandtoavoiddiscomfort.
Arrangeyourworkplaceandtheequipmentyouusetosuityourindividualneedsandthekindofwork
thatyouperform.Inaddition,usehealthyworkhabitstomaximizeyourperformanceandcomfortwhile
usingyourcomputer.
Thefollowingtopicsprovideinformationaboutarrangingyourworkarea,settingupyourcomputer
equipment,andestablishinghealthyworkhabits.
Arrangingyourworkspace
Togetthemostfromyourcomputer,arrangeboththeequipmentyouuseandyourworkareatosuityour
needsandthekindofworkyoudo.Yourcomfortisofforemostimportance,butlightsources,aircirculation,
andthelocationofelectricaloutletscanalsoaffectthewayyouarrangeyourworkspace.
Comfort
Althoughnosingleworkingpositionisidealforeveryone,hereareafewguidelinestohelpyoufinda
positionthatsuitsyoubest.
Sittinginthesamepositionforalongtimecancausefatigue.Thebackrestandseatofyourchairshould
adjustindependentlyandprovidegoodsupport.Theseatshouldhaveacurvedfronttorelievepressureon
thethighs.Adjusttheseatsothatyourthighsareparalleltothefloorandyourfeetareeitherflatonthe
floororonafootrest.
Whenusingthekeyboard,keepyourforearmsparalleltothefloorandyourwristsinacomfortableposition.
Usealighttouchonthekeyboardandyourhandsandfingersrelaxed.Changetheangleofthekeyboard
formaximumcomfortbyadjustingthepositionofthekeyboardfeet.
Adjustthemonitorsothetopofthescreenisat,orslightlybelow,eyelevel.Placethemonitorata
comfortableviewingdistance,usually51–61cm(20–24inches).Then,positionthemonitorsothatyoucan
viewitwithouttwistingyourbody.Also,positionotherequipmentyouuseregularly,suchasthetelephone
oramouse,withineasyreach.
©CopyrightLenovo2014,2016
23
Page 36

Glareandlighting
Positionthemonitortominimizeglareandreflectionsfromoverheadlights,windows,andotherlightsources.
Reflectedlightfromshinysurfacescancauseannoyingreflectionsonyourmonitorscreen.Placethe
monitoratrightanglestowindowsandotherlightsources,whenpossible.Reduceoverheadlighting,if
necessary,byturningofflightsorusinglowerwattagebulbs.Ifyouinstallthemonitornearawindow,use
curtainsorblindstoblockthesunlight.Youcanadjustthebrightnessandcontrastcontrolsonthemonitor
astheroomlightingchangesthroughouttheday.
Whereitisimpossibletoavoidreflectionsortoadjustthelighting,anantiglarefilterplacedoverthescreen
mightbehelpful.However,thesefiltersmightaffecttheclarityoftheimageonthescreen;trythemonlyafter
youhaveexhaustedothermethodsofreducingglare.
Dustbuildupcompoundsproblemsassociatedwithglare.Remembertocleanyourmonitorscreen
periodicallyusingasoftclothasdirectedinyourmonitordocumentation.
Aircirculation
Yourcomputerandmonitorproduceheat.Thecomputerhasafanthatpullsinfreshairandforcesouthot
air.Themonitorletshotairescapethroughvents.Blockingtheairventscancauseoverheating,whichmight
resultinamalfunctionordamage.Placethecomputerandmonitorsothatnothingblockstheairvents;
usually,51mm(2inches)ofairspaceissufficient.Also,ensurethattheventedairisnotblowingonpeople.
Electricaloutletsandcablelengths
Thefollowingfactorsmightdeterminethefinalplacementofyourcomputer:
•Locationofelectricaloutlets
•Lengthofpowercords
•Lengthofthecablesthatareconnectedtothemonitorandotherdevices
Whenarrangingyourworkspace:
•Avoidtheuseofextensioncords.Whenpossible,plugthecomputerpowercorddirectlyintoanelectrical
outlet.
•Keeppowercordsandcablesneatlyroutedawayfromwalkwaysandotherareaswheretheymight
getkickedaccidentally.
Formoreinformationaboutpowercords,see“Powercordsandpoweradapters”onpagevi
.
Accessibilityinformation
Lenovoiscommittedtoprovidinguserswhohavehearing,vision,andmobilitylimitationswithgreater
accesstoinformationandtechnology.Thissectionprovidesinformationaboutthewaystheseuserscanget
themostoutoftheircomputerexperience.Youalsocangetthemostup-to-dateaccessibilityinformation
fromthefollowingWebsite:
http://www.lenovo.com/accessibility
Keyboardshortcuts
Thefollowingtablecontainskeyboardshortcutsthatcanhelpmakeyourcomputereasiertouse.
Note:Dependingonyourkeyboard,someofthefollowingkeyboardshortcutsmightnotbeavailable.
24ThinkCentreM79UserGuide
Page 37

KeyboardshortcutFunction
Windowslogokey+U
RightShiftforeightseconds
ShiftfivetimesTurnonorturnoffStickyKeys
NumLockforfivesecondsTurnonorturnoffToggleKeys
LeftAlt+LeftShift+NumLock
LeftAlt+LeftShift+PrtScn(orPrtSc)TurnonorturnoffHighContrast
OpenEaseofAccessCenter
TurnonorturnoffFilterKeys
TurnonorturnoffMouseKeys
Formoreinformation,gotohttp://windows.microsoft.com/,andthenperformasearchusinganyofthe
followingkeywords:keyboardshortcuts,keycombinations,shortcutkeys.
EaseofAccessCenter
EaseofAccessCenterontheWindowsoperatingsystemenablesuserstoconfiguretheircomputersto
suittheirphysicalandcognitiveneeds.
TouseEaseofAccessCenter,dothefollowing:
1.DependingonyourWindowsversion,dooneofthefollowing:
•ForWindows7:ClicktheStartbuttontoopentheStartmenu,andthenclickControlPanel.View
ControlPanelusingLargeiconsorSmallicons,andthenclickEaseofAccessCenter.
•ForWindows8.1:Movethepointertothetop-rightorbottom-rightcornerofthescreentodisplaythe
charms.Then,clickSettings➙ChangePCsettings➙EaseofAccess.
•ForWindows10:ClicktheStartbuttontoopentheStartmenu.Then,clickSettings➙Easeof
Access.
2.Choosetheappropriatetoolbyfollowingtheinstructionsonthescreen.
EaseofAccessCentermainlyincludesthefollowingtools:
•Magnifier
Magnifierisausefulutilitythatenlargestheentirescreenorpartofthescreensothatyoucansee
theitemsbetter.
•Narrator
Narratorisascreenreaderthatreadsaloudwhatisdisplayedonthescreenanddescribeseventssuchas
errormessages.
•On-ScreenKeyboard
Ifyouprefertotypeorenterdataintoyourcomputerusingamouse,joystick,orotherpointingdevice
insteadofaphysicalkeyboard,youcanuseOn-ScreenKeyboard.On-ScreenKeyboarddisplaysavisual
keyboardwithallthestandardkeys.
•HighContrast
HighContrastisafeaturethatheightensthecolorcontrastofsometextandimagesonyourscreen.Asa
result,thoseitemsaremoredistinctandeasiertoidentify.
•Personalizedkeyboard
Adjustkeyboardsettingstomakeyourkeyboardeasiertouse.Forexample,youcanuseyourkeyboard
tocontrolthepointerandtypecertainkeycombinationseasier.
•Personalizedmouse
Adjustmousesettingstomakeyourmouseeasiertouse.Forexample,youcanchangethepointer
appearanceandmakeiteasiertomanagewindowswiththemouse.
Chapter3.Youandyourcomputer25
Page 38

SpeechRecognition
SpeechRecognitionenablesyoutocontrolyourcomputerbyvoice.
Usingonlyyourvoice,youcanstartprograms,openmenus,clickobjectsonthescreen,dictatetextinto
documents,andwriteandsende-mails.Everythingyoudowiththekeyboardandmousecanbedonewith
onlyyourvoice.
TouseSpeechRecognition,dothefollowing:
1.DependingonyourWindowsversion,dooneofthefollowing:
•ForWindows7:ClicktheStartbuttontoopentheStartmenu,andthenclickControlPanel.
•ForWindows8.1:OpenControlPanel.See“AccessingControlPanelontheWindows8.1operating
system”onpage21.
•ForWindows10:Right-clicktheStartbuttontoopentheStartcontextmenu,andthenclickControl
Panel.
2.ViewControlPanelusingLargeiconsorSmallicons,andthenclickSpeechRecognition.
3.Followtheinstructionsonthescreen.
Screen-readertechnologies
Screen-readertechnologiesareprimarilyfocusedonsoftwareprograminterfaces,helpinformationsystems,
andvariousonlinedocuments.Foradditionalinformationaboutscreenreaders,seethefollowing:
•UsingPDFswithscreenreaders:
http://www.adobe.com/accessibility.html?promoid=DJGVE
•UsingtheJAWSscreenreader:
http://www.freedomscientific.com/jaws-hq.asp
•UsingtheNVDAscreenreader:
http://www.nvaccess.org/
Screenresolution
Youcanmakethetextandimagesonyourscreeneasiertoreadbyadjustingthescreenresolutionofyour
computer.
Toadjustthescreenresolution,dothefollowing:
1.Right-clickablankareaonthedesktop.
2.DependingonyourWindowsversion,dooneofthefollowing:
•ForWindows7orWindows8.1:ClickScreenresolution.
•ForWindows10:ClickDisplaysettings.OntheDisplaytab,clickAdvanceddisplaysettings.
3.Followtheinstructionsonthescreen.
Note:Settingtheresolutiontoolowmightpreventsomeitemsfromfittingonthescreen.
Customizableitemsize
Youcanmaketheitemsonyourscreeneasiertoreadbychangingtheitemsize.
•Tochangetheitemsizetemporarily,usetheMagnifiertoolinEaseofAccessCenter.See“Easeof
AccessCenter”onpage25
.
•Tochangetheitemsizepermanently,dothefollowing:
–Changethesizeofalltheitemsonyourscreen.
26ThinkCentreM79UserGuide
Page 39

1.Right-clickablankareaonthedesktop.
2.DependingonyourWindowsversion,dooneofthefollowing:
–ForWindows7orWindows8.1:ClickScreenresolution➙Maketextandotheritemslarger
orsmaller.
–ForWindows10:ClickDisplaysettings.
3.Changetheitemsizebyfollowingtheinstructionsonthescreen.
–ChangethesizeoftheitemsonaWebpage.
PressandholdCtrl,andthenpresstheplus-signkey(+)toenlargeortheminus-signkey(-)to
reducethetextsize.
–Changethesizeoftheitemsonthedesktoporawindow.
Note:Thisfunctionmightnotworkonsomewindows.
Ifyourmousehasawheel,pressandholdCtrl,andthenscrollthewheeltochangetheitemsize.
Industry-standardconnectors
Yourcomputerprovidesindustry-standardconnectorsthatenableyoutoconnectassistivedevices.
Formoreinformationaboutthelocationandfunctionoftheconnectors,see“Locations”onpage1.
TTY/TDDconversionmodem
Yourcomputersupportstheuseofatexttelephone(TTY)orthetelecommunicationsdeviceforthedeaf
(TDD)conversionmodem.ThemodemmustbeconnectedbetweenyourcomputerandaTTY/TDD
telephone.Then,youcantypeamessageonyourcomputerandsendittothetelephone.
Documentationinaccessibleformats
Lenovoprovideselectronicdocumentationinaccessibleformats,suchasproperlytaggedPDFfilesor
HyperTextMarkupLanguage(HTML)files.Lenovoelectronicdocumentationisdevelopedtoensure
thatvisuallyimpaireduserscanreadthedocumentationthroughascreenreader.Eachimageinthe
documentationalsoincludesadequatealternativetextsothatvisuallyimpaireduserscanunderstandthe
imagewhentheyuseascreenreader.
Registeringyourcomputer
WhenyouregisteryourcomputerwithLenovo,youenterrequiredinformationintoaLenovodatabase.The
informationenablesLenovotocontactyouwhenthereisarecallorothersevereproblemandprovide
quickerservicewhenyoucallLenovoforhelp.Inaddition,somelocationsofferextendedprivilegesand
servicestoregisteredusers.
ToregisteryourcomputerwithLenovo,ensurethatyourcomputerisconnectedtotheInternet.Then,goto
http://www.lenovo.com/registerandfollowtheinstructionsonthescreen.
Movingyourcomputertoanothercountryorregion
Whenyoumoveyourcomputertoanothercountryorregion,youmusttakelocalelectricalstandards
intoconsideration.
Ifyourelocateyourcomputertoacountryorregionthatusesanelectricaloutletstyledifferentfromthe
typeyouarecurrentlyusing,youwillhavetopurchaseeitherelectricalplugadaptersornewpowercords.
YoucanorderpowercordsdirectlyfromLenovo.
Chapter3.Youandyourcomputer27
Page 40

Forpowercordinformationandpartnumbers,goto:
http://www.lenovo.com/powercordnotice
28ThinkCentreM79UserGuide
Page 41

Chapter4.Security
Thischapterprovidesinformationabouthowtoprotectyourcomputerfromtheftandunauthorizeduse.
Securityfeatures
Thefollowingsecurityfeaturesareavailableonyourcomputer:
•ComputraceAgentsoftwareembeddedinfirmware
TheComputraceAgentsoftwareisanITassetmanagementandcomputertheftrecoverysolution.
Thesoftwaredetectsifchangeshavebeenmadeonthecomputer,suchashardware,software,or
thecomputercall-inlocation.
Note:YoumighthavetopurchaseasubscriptiontoactivatetheComputraceAgentsoftware.
•Coverpresenceswitch(alsocalledintrusionswitch)
Thecoverpresenceswitchpreventsyourcomputerfromloggingintotheoperatingsystemwhenthe
computercoverisnotproperlyinstalledorclosed.Toenablethecoverpresenceswitchconnector
onthesystemboard,dothefollowing:
1.StarttheSetupUtilityprogram.See“StartingtheSetupUtilityprogram”onpage33.
2.Settheadministratorpassword.See“Setting,changing,anddeletingapassword”onpage34.
3.FromtheSecuritysubmenu,selectChassisIntrusionDetection➙Enabled.Thecoverpresence
switchconnectoronthesystemboardisenabled.
Whenyouturnonthecomputer,ifthecoverpresenceswitchdetectsthatyourcomputercoverisnot
correctlyinstalledorclosed,anerrormessagewillbedisplayed.T obypasstheerrormessageand
logintotheoperatingsystem,dothefollowing:
1.Properlyinstallorcloseyourcomputercover.See“Completingthepartsreplacement”onpage110.
2.PressF1toentertheSetupUtilityprogram.ThenpressF10tosaveandexittheSetupUtility
program.Theerrormessagewillnotbedisplayedagain.
•AbilitytoenableanddisabledevicesandUSBconnectors
Formoreinformation,see“Enablingordisablingadevice”onpage35.
•Integratedfingerprintreader(availableonsomemodels)
Fingerprintauthenticationcanreplacepasswordsandenablesimpleandsecureuseraccess.Formore
information,see“Usingfingerprintauthentication”onpage32.
•TrustedPlatformModule(TPM)
TrustedPlatformModuleisasecurecryptoprocessorthatcanstorecryptographickeysthatprotect
informationstoredinyourcomputer.
Lockingthecomputercover
Lockingthecomputercoverhelpspreventunauthorizedpeoplefromgainingaccesstotheinsideofyour
computer.Y ourcomputercomeswithapadlockloopsothatthecomputercovercannotberemoved
whenapadlockisinstalled.
©CopyrightLenovo2014,2016
29
Page 42

Figure7.Installingapadlock
30ThinkCentreM79UserGuide
Page 43

AttachingaKensington-stylecablelock
YoucanuseaKensington-stylecablelocktosecureyourcomputertoadesk,table,orothernon-permanent
fixture.Thecablelockattachestothesecurity-lockslotattherearofyourcomputer.Dependingonthetype
selected,thecablelockcanbeoperatedwithakeyorcombination.Thecablelockalsolocksthebuttons
usedtoopenthecomputercover.Thisisthesametypeoflockusedwithmanynotebookcomputers.Y ou
canordersuchacablelockdirectlyfromLenovobysearchingforKensingtonat:
http://www.lenovo.com/support
Figure8.Kensington-stylecablelock
Preventingunauthorizedaccesstoyourcomputer
YoucanuseBIOSpasswordsandWindowsaccountstopreventunauthorizedaccesstoyourcomputerand
data.
•TouseBIOSpasswords,see“UsingBIOSpasswords”onpage34.
•TouseWindowsaccounts,dothefollowing:
1.DependingonyourWindowsversion,dooneofthefollowing:
–ForWindows7:ClicktheStartbuttontoopentheStartmenu,andthenclickControlPanel➙
UserAccounts.
–ForWindows8.1:Movethepointertothetop-rightorbottom-rightcornerofthescreentodisplay
thecharms.Then,clickSettings➙ChangePCsettings➙Accounts.
–ForWindows10:ClicktheStartbuttontoopentheStartmenu,andthenclickSettings➙
Accounts.
2.Followtheinstructionsonthescreen.
Chapter4.Security31
Page 44

Usingfingerprintauthentication
Ifyourkeyboardhasafingerprintreader,youcanusefingerprintauthenticationtoreplacepasswordsfor
simpleandsecureuseraccess.Tousefingerprintauthentication,firstenrollyourfingerprintsandassociate
themwithyourpasswords(suchasthepower-onpassword,harddiskpassword,andWindowspassword).
Usethefingerprintreaderandthefingerprintprogramtocompletethisprocedure.
Tousefingerprintauthentication,dooneofthefollowing:
•ForWindows7orWindows8.1:UsetheFingerprintManagerProorThinkVantageFingerprintSoftware
programprovidedbyLenovo.Toopentheprogram,see“Accessingaprogramonyourcomputer”on
page12.Formoreinformationaboutusingtheprogram,refertothehelpsystemoftheprogram.
•ForWindows10:UsethefingerprinttoolprovidedbyWindows.ClicktheStartbuttontoopentheStart
menu,andthenclickSettings➙Accounts➙Sign-inoptions.Followtheinstructionsonthescreen.
Tousethefingerprintreader,refertothedocumentationshippedwiththefingerprintkeyboardorlocatedon
theLenovoSupportWebsiteathttp://www.lenovo.com/support/keyboards.
Usingandunderstandingfirewalls
Afirewallcanbehardware,software,oracombinationofbothdependingonthelevelofsecurityrequired.
Firewallsworkonasetofrulestodeterminewhichinboundandoutboundconnectionsareauthorized.If
yourcomputerispreinstalledwithafirewallprogram,ithelpsprotectagainstcomputerInternetsecurity
threats,unauthorizedaccess,intrusions,andInternetattacks.Italsoprotectsyourprivacy.Formore
informationabouthowtousethefirewallprogram,refertothehelpsystemofyourfirewallprogram.
TheWindowsoperatingsystempreinstalledonyourcomputerprovidestheWindowsFirewall.Fordetailson
usingtheWindowsFirewall,referto“Windowshelpsystem”onpage113.
Protectingdataagainstviruses
Yourcomputerispreinstalledwithanantivirusprogramtohelpyouguardagainst,detect,andeliminate
viruses.
Lenovoprovidesafullversionofantivirussoftwareonyourcomputerwithafree30-daysubscription.After
30days,youmustrenewthelicensetocontinuereceivingtheantivirussoftwareupdates.
Note:Virusdefinitionfilesmustbekeptup-to-datetoguardagainstnewviruses.
Formoreinformationabouthowtouseyourantivirussoftware,refertothehelpsystemofyourantivirus
software.
32ThinkCentreM79UserGuide
Page 45

Chapter5.Advancedconfiguration
Thischapterprovidesthefollowinginformationtohelpyouconfigurethecomputer:
•“UsingtheSetupUtilityprogram”onpage33
•“UpdatingorrecoveringtheBIOS”onpage38
UsingtheSetupUtilityprogram
TheSetupUtilityprogramisusedtoviewandchangetheconfigurationsettingsofyourcomputer,regardless
ofwhichoperatingsystemyouareusing.However,theoperatingsystemsettingsmightoverrideanysimilar
settingsintheSetupUtilityprogram.
StartingtheSetupUtilityprogram
TostarttheSetupUtilityprogram,dothefollowing:
1.Ensurethatyourcomputeristurnedoff.
2.RepeatedlypressandreleasetheF1keywhenturningonthecomputer.Whenyouhearmultiple
beepsorseealogoscreen,releasetheF1key.
Note:Ifapower-onpasswordoranadministratorpasswordhasbeenset,theSetupUtilityprogram
menuwillnotbedisplayeduntilyouenterthecorrectpassword.Formoreinformation,see“Using
BIOSpasswords”onpage34
.
WhenthePOSTdetectsthattheharddiskdrivehasbeenremovedfromyourcomputerorthememorysize
hasdecreased,anerrormessagewillbedisplayed.Youmustdooneofthefollowing:
•PressF1toentertheSetupUtilityprogram.
Note:AfteryouentertheSetupUtilityprogram,pressF10tosavechangesandexittheSetupUtility
program.PressEnterwhenpromptedtoconfirmtheexit.Theerrormessagewillnotbedisplayedagain.
•PressF2tobypasstheerrormessageandlogintotheoperatingsystem.
Note:YouhavetoenabletheconfigurationchangedetectionfeatureforthePOSTtodetecttheremovalof
theharddiskdrive.Toenabletheconfigurationchangedetectionfeature,dothefollowing:
1.StarttheSetupUtilityprogram.
2.FromtheSetupUtilityprogrammainmenu,selectSecurity➙ConfigurationChangeDetection,
andpressEnter.
3.SelectEnabledandpressEnter.
4.PressF10tosavechangesandexittheSetupUtilityprogram.PressEnterwhenpromptedtoconfirm
theexit.
Viewingandchangingsettings
TheSetupUtilityprogrammenulistsvariousitemsaboutthesystemconfiguration.Tovieworchange
settings,starttheSetupUtilityprogram.See“StartingtheSetupUtilityprogram”onpage33.Then,follow
theinstructionsonthescreen.
Youcanuseeitherthekeyboardorthemousetonavigatethroughmenuchoices.Thekeysusedtoperform
varioustasksaredisplayedatthebottomofeachscreen.
©CopyrightLenovo2014,2016
33
Page 46

UsingBIOSpasswords
ByusingtheSetupUtilityprogram,youcansetpasswordstopreventunauthorizedaccesstoyourcomputer
anddata.
Youdonothavetosetanypasswordstouseyourcomputer.However,usingpasswordsimproves
computingsecurity.Ifyoudecidetosetanypasswords,readthefollowingsections.
SetupUtilityprogrampasswordtypes
Thefollowingtypesofpasswordsareavailable:
•Power-onpassword
Whenapower-onpasswordisset,youarepromptedtoenteravalidpasswordeachtimethecomputeris
turnedon.Thecomputercannotbeuseduntilthevalidpasswordisentered.
•Administratorpassword
Settinganadministratorpassworddetersunauthorizedusersfromchangingconfigurationsettings.Ifyou
areresponsibleformaintainingtheconfigurationsettingsofseveralcomputers,youmightwanttoset
anAdministratorpassword.
Whenanadministratorpasswordisset,youarepromptedtoenteravalidpasswordeachtimeyou
trytoaccesstheSetupUtilityprogram.TheSetupUtilityprogramcannotbeaccesseduntilavalid
passwordisentered.
Ifboththepower-onpasswordandadministratorpasswordareset,youcanentereitherpassword.
However,youmustuseyourAdministratorpasswordtochangeanyconfigurationsettings.
•Harddiskpassword
Settingaharddiskpasswordpreventsunauthorizedaccesstothedataontheharddiskdrive.Whena
harddiskpasswordisset,youarepromptedtoenteravalidpasswordeachtimeyoutrytoaccessthe
harddiskdrive.
Notes:
–Afteryousetaharddiskpassword,yourdataontheharddiskdriveisprotectedeveniftheharddisk
driveisremovedfromonecomputerandinstalledinanother.
–Iftheharddiskpasswordisforgotten,thereisnowaytoresetthepasswordorrecoverdatafromthe
harddiskdrive.
Passwordconsiderations
Apasswordcanbeanycombinationofupto64alphabeticandnumericcharacters.Forsecurityreasons,it
isrecommendedtouseastrongpasswordthatcannotbeeasilycompromised.
Note:TheSetupUtilityprogrampasswordsarenotcasesensitive.
Tosetastrongpassword,considerthefollowingguidelines:
•Haveatleasteightcharactersinlength
•Containatleastonealphabeticcharacterandonenumericcharacter
•Notbeyournameoryourusername
•Notbeacommonwordoracommonname
•Besignificantlydifferentfromyourpreviouspasswords
Setting,changing,anddeletingapassword
Toset,change,ordeleteapassword,dothefollowing:
1.StarttheSetupUtilityprogram.See“StartingtheSetupUtilityprogram”onpage33.
2.FromtheSetupUtilityprogrammainmenu,selectSecurity.
34ThinkCentreM79UserGuide
Page 47

3.Dependingonthepasswordtype,selectSetPower-OnPassword,SetAdministratorPassword,or
HardDiskPassword.
4.Followtheinstructionsontherightsideofthescreentoset,change,ordeleteapassword.
Note:Apasswordcanbeanycombinationofupto64alphabeticandnumericcharacters.Formore
information,see“Passwordconsiderations”onpage34
.
Erasinglostorforgottenpasswords(clearingCMOS)
Thissectionprovidesinstructionsonhowtoeraselostorforgottenpasswords,suchasauserpassword.
Toerasealostorforgottenpassword,dothefollowing:
1.Removeallmediafromthedrivesandturnoffallattacheddevicesandthecomputer.Then,disconnect
allpowercordsfromelectricaloutletsanddisconnectallcablesthatareconnectedtothecomputer.
2.Removethecomputercover.See“Removingthecomputercover”onpage67.
3.LocatetheClearCMOS/Recoveryjumperonthesystemboard.See“Locatingpartsonthesystem
board”onpage6.
4.Movethejumperfromthestandardposition(pin1andpin2)tothemaintenanceposition(pin2and
pin3).
5.Reinstallthecomputercoverandconnectthepowercord.See“Completingthepartsreplacement”on
page110.
6.Turnonthecomputerandleaveitonforapproximately10seconds.Then,turnoffthecomputerby
holdingthepowerbuttonforapproximatelyfiveseconds.
7.Repeatstep1throughstep2.
8.MovetheClearCMOS/Recoveryjumperbacktothestandardposition(pin1andpin2).
9.Reinstallthecomputercoverandconnectthepowercord.See“Completingthepartsreplacement”on
page110.
Enablingordisablingadevice
Thissectionprovidesinformationonhowtoenableordisableuseraccesstothefollowingdevices:
USBSetupUsethisoptiontoenableordisableaUSBconnector.WhenaUSBconnectoris
disabled,thedeviceconnectedtotheUSBconnectorcannotbeused.
SATAControllerWhenthisoptionissettoDisable,alldevicesconnectedtotheSATAconnectors
(suchasharddiskdrivesoropticaldrives)aredisabledandcannotbeaccessed.
Toenableordisableadevice,dothefollowing:
1.StarttheSetupUtilityprogram.See“StartingtheSetupUtilityprogram”onpage33.
2.FromtheSetupUtilityprogrammainmenu,selectDevices.
3.Dependingonthedeviceyouwanttoenableordisable,dooneofthefollowing:
•SelectUSBSetuptoenableordisableaUSBdevice.
•SelectATADriveSetuptoenableordisableaninternalorexternalSATAdevice.
4.SelectthedesiredsettingsandpressEnter.
5.PressF10tosavechangesandexittheSetupUtilityprogram.See“ExitingtheSetupUtilityprogram”
onpage38.
Chapter5.Advancedconfiguration35
Page 48

Selectingastartupdevice
Ifyourcomputerdoesnotstartupfromadeviceasexpected,dooneofthefollowingtoselectthestartup
deviceyouwant.
Selectingatemporarystartupdevice
Usethisproceduretoselectatemporarystartupdevice.
Note:Notalldiscsandharddiskdrivesarebootable.
1.Turnonorrestartyourcomputer.
2.Whenyouseethelogoscreen,repeatedlypressandreleasetheF12key.TheStartupDeviceMenu
windowisdisplayed.
3.SelectthedesiredstartupdeviceandpressEnter.Thecomputerwillstartupfromthedeviceyou
selected.
Note:SelectingastartupdevicefromtheStartupDeviceMenuwindowdoesnotpermanentlychange
thestartupsequence.
Selectingorchangingthestartupdevicesequence
Tovieworpermanentlychangetheconfiguredstartupdevicesequence,dothefollowing:
1.StarttheSetupUtilityprogram.See“StartingtheSetupUtilityprogram”onpage33.
2.FromtheSetupUtilityprogrammainmenu,selectStartup.
3.SelectthedevicesforthePrimaryStartupSequence,theAutomaticStartupSequence,andtheError
StartupSequence.Readtheinformationdisplayedontherightsideofthescreen.
4.PressF10tosavechangesandexittheSetupUtilityprogram.See“ExitingtheSetupUtilityprogram”
onpage38.
EnablingErPLPScompliancemode
Lenovocomputersmeettheeco-designrequirementsoftheErPLot3regulation.Formoreinformation,go
to:
http://www.lenovo.com/ecodeclaration
YoucanenableErPLPScompliancemodeintheSetupUtilityprogramtoreducetheconsumptionof
electricitywhenyourcomputerisofforinsleepmode.
ToenableErPLPScompliancemodeintheSetupUtilityprogram,dothefollowing:
1.StarttheSetupUtilityprogram.See“StartingtheSetupUtilityprogram”onpage33.
2.FromtheSetupUtilityprogrammainmenu,selectPower➙EnhancedPowerSavingMode,and
pressEnter.
3.SelectEnabledandpressEnter.
4.FromthePowermenu,selectAutomaticPowerOnandpressEnter.
5.SelectWakeonLanandpressEnter.
6.SelectDisabledandpressEnter.
7.PressF10tosavechangesandexittheSetupUtilityprogram.PressEnterwhenpromptedtoconfirm
theexit.
WhenErPLPScompliancemodeisenabled,youcanwakeupyourcomputerbydoingoneofthefollowing:
•Pressthepowerbutton
•Enablethewakeuponalarmfeature
36ThinkCentreM79UserGuide
Page 49

Thewakeuponalarmfeatureenablesyourcomputertowakeupatasettime.T oenablethewake
uponalarmfeature,dothefollowing:
1.StarttheSetupUtilityprogram.
2.FromtheSetupUtilityprogrammainmenu,selectPower➙AutomaticPowerOn,andpressEnter.
3.SelectWakeUponAlarmandpressEnter.Thenfollowtheinstructionsonthescreen.
4.PressF10tosavechangesandexittheSetupUtilityprogram.PressEnterwhenpromptedto
confirmtheexit.
•Enabletheafterpowerlossfeature
Theafterpowerlossfeatureenablesyourcomputertowakeupwhenthepowersupplyresumesaftera
suddenlossofelectricity.Toenabletheafterpowerlossfeature,dothefollowing:
1.StarttheSetupUtilityprogram.
2.FromtheSetupUtilityprogrammainmenu,selectPower➙AfterPowerLoss,andpressEnter.
3.SelectPowerOnandpressEnter.
4.PressF10tosavechangesandexittheSetupUtilityprogram.PressEnterwhenpromptedto
confirmtheexit.
ICEperformancemode
YoucanadjusttheacousticandthermalperformanceofyourcomputerthroughtheICEPerformance
Modemenu.T wochoicesareavailable:
•BetterAcousticPerformance(defaultsetting)
•BetterThermalPerformance
ByenablingBetterAcousticPerformance,yourcomputerwillrunwithlessnoiseatanormalthermal
level.ByenablingBetterThermalPerformance,yourcomputerwillrunatabetterthermallevelwith
normalacousticperformance.
ToconfiguretheICEperformancemode,dothefollowing:
1.StarttheSetupUtilityprogram.See“StartingtheSetupUtilityprogram”onpage33.
2.FromtheSetupUtilityprogrammainmenu,selectPower.
3.SelectIntelligentCoolingEngine(ICE).TheIntelligentCoolingEngine(ICE)windowisdisplayed.
4.SelectICEPerformanceMode.TheICEPerformanceModewindowisdisplayed.
5.SelectBetterAcousticPerformanceorBetterThermalPerformanceasdesired.
6.PressF10tosavechangesandexittheSetupUtilityprogram.See“ExitingtheSetupUtilityprogram”
onpage38.
ICEthermalalert
YoucanmonitorthethermalfunctionofyourcomputerundercriticalthermalsituationsthroughtheICE
ThermalAlertmenu.Twochoicesareavailable:
•Enabled(defaultsetting)
•Disabled
AfterenablingtheICEthermalalertfunction,whencriticalthermalsituationsoccur,suchasmalfunctioning
fans,abnormallyhightemperature,andpoorcoolingperformances,analertlogwillbewrittenintothe
Windowssystemlog.Thealertlogcanhelpyouidentifythethermalproblems.
ToconfiguretheICEthermalalertfunction,dothefollowing:
Chapter5.Advancedconfiguration37
Page 50

1.StarttheSetupUtilityprogram.See“StartingtheSetupUtilityprogram”onpage33.
2.FromtheSetupUtilityprogrammainmenu,selectPower.
3.SelectIntelligentCoolingEngine(ICE).TheIntelligentCoolingEngine(ICE)windowisdisplayed.
4.SelectICEThermalAlert.TheICEThermalAlertwindowisdisplayed.
5.SelectEnabledorDisabledasdesired.
6.PressF10tosavechangesandexittheSetupUtilityprogram.See“ExitingtheSetupUtilityprogram”
onpage38
.
ExitingtheSetupUtilityprogram
Afteryoufinishviewingorchangingsettings,pressEsctoreturntotheSetupUtilityprogrammainmenu.
YoumighthavetopressEscseveraltimes.Dooneofthefollowing:
•Ifyouwanttosavethenewsettings,pressF10tosavechangesandexittheSetupUtilityprogram.
•Ifyoudonotwanttosavethesettings,selectExit➙DiscardChangesandExit,andthenpressEnter.
WhentheResetWithoutSavingwindowdisplays,selectY es,andthenpressEntertoexittheSetup
Utilityprogram.
•Ifyouwanttoreturntothedefaultsettings,pressF9toloadthedefaultsettings,andthenpressF10to
saveandexittheSetupUtilityprogram.
UpdatingorrecoveringtheBIOS
LenovomightmakechangesandenhancementstotheBIOS.Whenupdatesarereleased,theyareavailable
asdownloadablefilesontheLenovoWebsiteathttp://www.lenovo.com/drivers.Instructionsforusingthe
BIOSupdatesareavailableinaTXTfilethatisincludedwiththeupdatefiles.Formostmodels,youcan
downloadeitheranupdateprogramtocreateasystem-program-updatediscoranupdateprogramthat
canberunfromtheoperatingsystem.
ThischapterprovidesinformationaboutupdatingtheBIOS,andhowtorecoverfromaBIOSupdatefailure.
Usingsystemprograms
Systemprogramsarethebasiclayerofsoftwarebuiltintoyourcomputer.Systemprogramsincludethe
POST,theBIOS,andtheSetupUtilityprogram.ThePOSTisasetoftestsandproceduresthatare
performedeachtimeyouturnonyourcomputer.TheBIOSisalayerofsoftwarethattranslatesinstructions
fromotherlayersofsoftwareintoelectricalsignalsthatthecomputerhardwarecanexecute.Youcanusethe
SetupUtilityprogramtovieworchangetheconfigurationsettingsofyourcomputer.See“UsingtheSetup
Utilityprogram”onpage33
Thesystemboardofyourcomputerhasamodulecalledelectricallyerasableprogrammableread-only
memory(EEPROM,alsoreferredtoasflashmemory).ItenablesyoutoupdatethePOST,theBIOS,and
theSetupUtilityprogrameasily.Toperformsuchanupdate,youcaneitherstartyourcomputerwitha
system-program-updatediscorrunaspecialupdateprogramfromyouroperatingsystem.
LenovomightmakechangesandenhancementstothePOSTandBIOS.Whenupdatesarereleased,they
areavailableasdownloadablefilesontheLenovoWebsiteathttp://www.lenovo.com.Instructionsforusing
thePOSTandBIOSupdatesareavailableinaTXTfilethatisincludedwiththeupdatefiles.Formost
models,youcandownloadanupdateprogramthatcanbeusedtocreateasystem-program-updatedisc
orberunfromtheoperatingsystem.
fordetailedinformation.
38ThinkCentreM79UserGuide
Page 51

UpdatingtheBIOS
Whenyouinstallanewprogram,hardwaredevice,ordevicedriver,youmightbeinformedtoupdate
theBIOS.Y oucanupdatetheBIOSfromyouroperatingsystemoraflashupdatedisc(supportedonly
onsomemodels).
ToupdatetheBIOS,dothefollowing:
1.Gotohttp://www.lenovo.com/drivers.
2.DownloadtheflashBIOSupdatedriverfortheoperatingsystemversionortheISOimageversion(used
tocreateaflashupdatedisc).Then,downloadtheinstallationinstructionsfortheflashBIOSupdate
driveryoudownload.
3.PrinttheinstallationinstructionsyoudownloadandfollowtheinstructionstoupdatetheBIOS.
Note:IfyouwanttoupdatetheBIOSfromaflashupdatedisc,theinstallationinstructionsmightnotprovide
theinformationabouthowtorecordtheupdatedisc.See“Recordingadisc”onpage19.
RecoveringfromaBIOSupdatefailure
TorecoverfromaBIOSupdatefailure,dothefollowing:
1.Removeallmediafromthedrivesandturnoffallattacheddevicesandthecomputer.Then,disconnect
allpowercordsfromelectricaloutletsanddisconnectallcablesthatareconnectedtothecomputer.
2.Removethecomputercover.See“Removingthecomputercover”onpage67.
3.LocatetheClearCMOS/Recoveryjumperonthesystemboard.See“Locatingpartsonthesystem
board”onpage6
4.RemoveanycablesthatimpedeaccesstotheClearCMOS/Recoveryjumper.
5.Movethejumperfromthestandardposition(pin1andpin2)tothemaintenanceposition(pin2and
pin3).
6.ReconnectanycablesthatweredisconnectedandreinstallthePCIcardifremoved.
7.Reinstallthecomputercoverandreconnectthepowercordsforthecomputerandmonitortoelectrical
outlets.See“Completingthepartsreplacement”onpage110.
8.PressthepowerbuttontoturnonthecomputerandinserttheBIOSupdatediscintotheopticaldrive.
Waitafewminutes.Therecoveryprocessbegins.Aftertherecoveryprocessiscompleted,your
computerwillbeturnedoffautomatically.
.
Note:Dependingonthecomputermodel,therecoveryprocesswilltaketwotothreeminutes.
9.Repeatstep1throughstep4.
10.MovetheClearCMOS/Recoveryjumperbacktothestandardposition(pin1andpin2).
11.ReconnectanycablesthatweredisconnectedandreinstallthePCIcardifremoved.
12.Reinstallthecomputercoverandreconnectanycablesthatweredisconnected.
13.Pressthepowerbuttontoturnonthecomputerandrestarttheoperatingsystem.
Chapter5.Advancedconfiguration39
Page 52

40ThinkCentreM79UserGuide
Page 53

Chapter6.Preventingproblems
Thischapterprovidesinformationthatcanhelpyouavoidcommonproblemsandkeepyourcomputer
runningsmoothly.
Keepingyourcomputercurrent
Inmostcases,itisagoodpracticetohavethemostup-to-dateoperatingsystemupdatepatches,software
programs,anddevicedrivers.Thissectionprovidesinformationabouthowtogetthelatestupdatesforyour
computer.
Gettingthelatestdevicedriversforyourcomputer
Attention:Reinstallingdevicedriverswillchangethecurrentconfigurationofyourcomputer.
Togetthelatestdevicedriversforyourcomputer,dooneofthefollowing:
•Downloadthedevicedriversthatarepreinstalledonyourcomputer.Gotohttp://www.lenovo.com/drivers.
•UsetheLenovoprogramorWindowsUpdate.See“Gettingthelatestsystemupdates”onpage41
Note:ThedevicedriversprovidedbyWindowsUpdatemightnotbetestedbyLenovo.Itisrecommended
thatyougetdevicedriversfromLenovo.
Gettingthelatestsystemupdates
.
Togetthelatestsystemupdatesforyourcomputer,ensurethatyourcomputerisconnectedtotheInternet
anddooneofthefollowing:
•UseoneofthefollowingLenovoprogramstogetthesystemupdates,suchasdevicedriverupdates,
softwareupdates,andBIOSupdates:
–ForWindows7orWindows8.1:UsetheSystemUpdateprogram.
–ForWindows10:UsetheLenovoCompanionprogram.
ToopentheSystemUpdateorLenovoCompanionprogram,see“Accessingaprogramonyourcomputer”
onpage12
•UseWindowsUpdatetogetthesystemupdates,suchassecurityfixes,newversionsofWindows
components,anddevicedriverupdates.
1.DependingonyourWindowsversion,dooneofthefollowing:
–ForWindows7:ClicktheStartbuttontoopentheStartmenu,andthenclickControlPanel.View
–ForWindows8.1:Movethepointertothetop-rightorbottom-rightcornerofthescreento
–ForWindows10:ClicktheStartbuttontoopentheStartmenu.Then,clickSettings➙Update&
2.Followtheinstructionsonthescreen.
.Formoreinformationaboutusingtheprogram,refertothehelpsystemoftheprogram.
ControlPanelusingLargeiconsorSmallicons,andthenclickWindowsUpdate.
displaythecharms.Then,clickSettings➙ChangePCsettings➙Updateandrecovery➙
WindowsUpdate.
security➙WindowsUpdate.
Cleaningandmaintenance
Withappropriatecareandmaintenanceyourcomputerwillserveyoureliably.Thefollowingtopicsoffer
informationtohelpyoukeepyourcomputerintopworkingorder.
©CopyrightLenovo2014,2016
41
Page 54

Basics
Herearesomebasicpointsaboutkeepingyourcomputerfunctioningproperly:
•Keepyourcomputerinaclean,dryenvironment.Ensurethatthecomputerrestsonaflat,steadysurface.
•Donotcoveranyoftheventsinthecomputerormonitor.Theseventsprovideairflowtokeepyour
computerfromoverheating.
•Keepfoodanddrinksawayfromallpartsofyourcomputer.Foodparticlesandspillsmightmakethe
keyboardandmousestickandunusable.
•Donotgetthepowerswitchesorothercontrolswet.Moisturecandamagethesepartsandcausean
electricalhazard.
•Alwaysdisconnectapowercordbygraspingthepluginsteadofthecord.
Cleaningyourcomputer
Itisagoodpracticetocleanyourcomputerperiodicallytoprotectthesurfacesandensuretrouble-free
operation.
CAUTION:
Besuretoturnoffthecomputerandmonitorbeforecleaningthecomputerandmonitorscreen.
Computer
Useonlymildcleaningsolutionsandadampclothtocleanthepaintedsurfacesofthecomputer.
Keyboard
Tocleanyourcomputerkeyboard,dothefollowing:
1.Applysomeisopropylrubbingalcoholtoasoft,dust-freecloth.
2.Wipeeachkeytopsurfacewiththecloth.Wipethekeysonebyone;ifyouwipeseveralkeysatatime,
theclothmayhookontoanadjacentkeyandpossiblydamageit.Ensurethatnoliquiddripsonto
orbetweenthekeys.
3.Toremoveanycrumbsordustfrombeneaththekeys,youcanuseacamerablowerwithabrush
orcoolairfromahairdryer.
Note:Avoidsprayingcleanerdirectlyontothekeyboard.
Opticalmouse
Anopticalmouseusesalight-emittingdiode(LED)andanopticalsensortonavigatethepointer.Ifthe
pointeronthescreendoesnotmovesmoothlywiththeopticalmouse,youmightneedtocleanthemouse.
Tocleananopticalmouse,dothefollowing:
1.Turnoffyourcomputer.
2.Disconnectthemousecablefromthecomputer.
3.Turnthemouseupsidedowntocheckthelens.
•Ifthereisasmudgeonthelens,gentlycleantheareawithaplaincotton-tippedswab.
•Ifthereisdebrisinthelens,gentlyblowthedebrisawayfromthearea.
4.Checkthesurfaceonwhichyouareusingthemouse.Ifyouhaveaveryintricatepictureorpattern
beneaththemouse,itmightbedifficultforthedigitalsignalprocessortodeterminechangesinthe
mouseposition.
5.Reconnectthemousecabletothecomputer.
6.Turnyourcomputerbackon.
42ThinkCentreM79UserGuide
Page 55

Displayscreen
Dustbuildupcompoundsproblemsassociatedwithglare.Remembertocleanyourmonitorscreen
periodically.
Cleaningaflat-panelmonitorsurface
Tocleantheflexiblefilmsurfaceofaflat-panelcomputerdisplay,wipeitgentlywithasoft,drycloth,or
blowonthescreentoremovegritandotherlooseparticles.ThenmoistenaclothwithLCDcleanerand
wipethescreensurface.
Manycomputersupplystorescarrythespecialcleaningfluidsfordisplays.Usecleaningfluidsdevelopedfor
LCDdisplaysonly.Firstapplythefluidtoalint-free,softcloth,thencleantheLCDdisplay.Somecomputer
supplystorescarrypre-moistenedtowelettesforLCDmaintenance.
Cleaningaglass-screensurface
Tocleanaglass-screensurface,wipeitgentlywithasoft,drycloth,orblowonthescreentoremovegritand
otherlooseparticles.Thenuseasoftclothmoistenedwithanonabrasiveliquidglasscleaner.
Goodmaintenancepractices
Byperformingafewgoodmaintenancepractices,youcanmaintaingoodcomputerperformance,protect
yourdata,andbepreparedincaseofacomputerfailure.
•Keepyourcomputersoftware,devicedrivers,andoperatingsystemup-to-date.See“Keepingyour
computercurrent”onpage41.
•Emptyyourrecyclebinonaregularbasis.
•CleanoutyourInbox,SentItems,andDeletedItemsfoldersinyoure-mailapplicationonaregularbasis.
•Cleanupfilesandfreeupstoragedrivespaceandmemoryspaceoccasionallytopreventperformance
problems.See“Performanceandlockupproblems”onpage54.
•Keepalogbook.Entriesmightincludemajorsoftwareorhardwarechanges,device-driverupdates,
intermittentproblemsandwhatyoudidtoresolvethem,andotherissuesyoumighthaveexperienced.
Thecauseofaproblemmightbechangeinhardware,changeinsoftware,oranyotheractionsthatmight
havetakenplace.AlogbookcanhelpyouoraLenovotechniciandeterminethecauseofaproblem.
•Backupyourdataonthestoragedriveregularly.Youcanrestorethestoragedrivefromabackup.
Tobackupyourdata,dooneofthefollowing:
–ForWindows7:OpentheRescueandRecoveryprogram.See“Accessingaprogramonyour
computer”onpage12
oftheprogram.
–ForWindows8.1:OpenControlPanel.ViewControlPanelusingLargeiconsorSmallicons,andthen
clickFileHistory.Followtheinstructionsonthescreen.
Note:FordetailedinformationonhowtoopenControlPanelonWindows8.1,see“AccessingControl
PanelontheWindows8.1operatingsystem”onpage21
–ForWindows10:Right-clicktheStartbuttontoopentheStartcontextmenu,andthenclickControl
Panel.ViewControlPanelusingLargeiconsorSmallicons,andthenclickFileHistory.Followthe
instructionsonthescreen.
•Createarecoverymediumasearlyaspossible.Y oucanusetherecoverymediumtorecoveryour
operatingsystemevenifWindowsfailstostartup.
Tocreatearecoverymedium,dooneofthefollowing:
–ForWindows7:OpentheCreateRecoveryMediaprogram.See“Accessingaprogramonyour
computer”onpage12
systemoftheprogram.
.Formoreinformationaboutbackingupyourdata,refertothehelpsystem
.
.Formoreinformationaboutcreatingarecoverymedium,refertothehelp
Chapter6.Preventingproblems43
Page 56

–ForWindows8.1:OpenControlPanel.ViewControlPanelusingLargeiconsorSmallicons,andthen
clickRecovery.Followtheinstructionsonthescreen.
Note:FordetailedinformationonhowtoopenControlPanelonWindows8.1,see“AccessingControl
PanelontheWindows8.1operatingsystem”onpage21
–ForWindows10:Right-clicktheStartbuttontoopentheStartcontextmenu,andthenclickControl
Panel.ViewControlPanelusingLargeiconsorSmallicons,andthenclickRecovery.Followthe
instructionsonthescreen.
•ForWindows7,createarescuemediumasearlyaspossible.Youcanusetherescuemediumto
recoverfromfailuresthatpreventyoufromgainingaccesstotheRescueandRecoveryworkspace
onyourstoragedrive.
Tocreatearescuemedium,opentheRescueandRecoveryprogram.See“Accessingaprogramonyour
computer”onpage12
oftheprogram.
.Formoreinformationaboutcreatingarescuemedium,refertothehelpsystem
.
Movingyourcomputer
Takethefollowingprecautionsbeforemovingyourcomputer:
1.Backupallfilesanddatafromtheharddiskdrive.Thereareavarietyofbackupprogramsavailable
commercially.IfyouusetheWindows7operatingsystem,LenovoprovidestheRescueandRecovery
programtohelpyoubackupandrestoredata.See“Performingbackupandrecoveryoperations”
onpage60.
2.Removeallmediafromyourcomputer,suchasdiscs,USBstoragedevices,memorycards,andsoon.
3.Turnoffthecomputerandallattacheddevices.Yourharddiskdriveautomaticallyparkstheread/write
headinanondataarea.Thispreventsdamagetotheharddiskdrive.
4.Unplugthepowercordsfromelectricaloutlets.
5.Disconnectcommunicationcables,suchasmodemornetworkcables,fromtheoutletsfirst,andthen
disconnecttheotherendsfromthecomputer.
6.Notewhereanyremainingcablesareattachedtothecomputer;then,removethem.
7.Ifyousavedtheoriginalshippingcartonsandpackingmaterials,usethemtopacktheunits.Ifyouare
usingdifferentcartons,cushiontheunitstoavoiddamage.
44ThinkCentreM79UserGuide
Page 57

Chapter7.Troubleshootinganddiagnostics
Thischapterprovidesinformationaboutdiagnosingandtroubleshootingcomputerproblems.Ifyour
computerproblemisnotdescribedhere,seeChapter10“Gettinginformation,help,andservice”onpage
113foradditionaltroubleshootingresources.
Basictroubleshooting
Thefollowingtableprovidessomebasicinstructionstohelpyoutroubleshootyourcomputerproblems.
Note:Ifyoucannotcorrecttheproblem,havethecomputerserviced.Foralistofserviceandsupport
telephonenumbers,refertotheSafety,Warranty,andSetupGuidethatcomeswithyourcomputerorgoto
theLenovoSupportWebsiteat:
http://www.lenovo.com/support/phone
SymptomAction
Thecomputerdoesnotstart
whenyoupressthepower
button.
Themonitorscreenisblank.Ensurethat:
Thekeyboarddoesnotwork.Ensurethat:
Themousedoesnotwork.Ensurethat:
Ensurethat:
•Thepowercordiscorrectlyconnectedtotherearofthecomputerandtoa
workingelectricaloutlet.
•Ifyourcomputerhasasecondarypowerswitchontherearofthecomputer,
ensurethatitisswitchedon.
•Thepowerindicatoronthefrontofthecomputerison.
•Thecomputervoltagematchesthevoltageavailableattheelectricaloutletfor
yourcountryorregion.
•Themonitorsignalcableiscorrectlyconnectedtothemonitorandtothe
appropriatemonitorconnectoronthecomputer.
•Themonitorpowercordiscorrectlyconnectedtothemonitorandtoaworking
electricaloutlet.
•Themonitoristurnedonandthebrightnessandcontrastissetcorrectly.
•Thecomputervoltagematchesthevoltageavailableattheelectricaloutletfor
yourcountryorregion.
•Ifyourcomputerhasadiscretegraphicscardinstalled,besuretouseamonitor
connectoronthediscretegraphicscard.
•Thecomputeristurnedon.
•ThekeyboardissecurelyconnectedtoaPS/2keyboardconnectororaUSB
connectoronthecomputer.
•Nokeysarestuck.
•Thecomputeristurnedon.
•ThemouseissecurelyconnectedtoaPS/2mouseconnectororaUSB
connectoronthecomputer.
•Themouseisclean.Referto“Opticalmouse”onpage42forfurtherinformation.
©CopyrightLenovo2014,2016
45
Page 58

SymptomAction
Theoperatingsystemdoesnot
start.
Thecomputerbeepsmultiple
timesbeforetheoperating
systemstarts.
Ensurethatthestartupsequenceincludesthedevicewheretheoperatingsystem
resides.Usually,theoperatingsystemisontheharddiskdrive.Formore
information,see“Selectingastartupdevice”onpage36
Ensurethatnokeysarestuck.
.
Troubleshootingprocedure
Usethefollowingprocedureasastartingpointfordiagnosingproblemsyouareexperiencingwithyour
computer:
1.Ensurethatthecablesforallattacheddevicesareconnectedcorrectlyandsecurely.
2.Ensurethatallattacheddevicesthatrequireacpowerareconnectedtoproperlygrounded,functioning
electricaloutlets.
3.EnsurethatallattacheddevicesareenabledintheBIOSsettingsofyourcomputer.Formoreinformation
aboutaccessingandchangingtheBIOSsettings,referto“UsingtheSetupUtilityprogram”onpage33.
4.Goto“T roubleshooting”onpage46andfollowtheinstructionsforthetypeofproblemyouare
experiencing.IftheTroubleshootinginformationdoesnothelpyouresolveaproblem,continuewiththe
nextstep.
5.Tryusingapreviouslycapturedconfigurationtoseeifarecentchangetohardwareorsoftwaresettings
hascausedaproblem.Beforerestoringapreviousconfiguration,captureyourcurrentconfigurationin
casetheolderconfigurationsettingsdonotsolvetheproblemorhaveadverseeffects.Torestorea
capturedconfiguration,dothefollowing:
a.OpenControlPanelbydoingoneofthefollowing:
•ForWindows7:ClicktheStartbuttontoopentheStartmenu,andthenclickControlPanel.
•ForWindows8.1:See“AccessingControlPanelontheWindows8.1operatingsystem”on
page21.
•ForWindows10:Right-clicktheStartbuttontoopentheStartcontextmenu,andthenclick
ControlPanel.
b.ViewControlPanelusingLargeiconsorSmallicons,andthenclickRecovery➙OpenSystem
Restore.
c.Followtheinstructionsonthescreen.
Ifthisdoesnotcorrecttheproblem,continuewiththenextstep.
6.Runthediagnosticprogram.See“LenovoSolutionCenter”onpage57formoreinformation.
•Ifthediagnosticprogramdetectsahardwarefailureorifyouareunabletorunthediagnostic
program,contacttheLenovoCustomerSupportCenter.SeeChapter10“Gettinginformation,help,
andservice”onpage113formoreinformation.
•Ifthediagnosticprogramdoesnotdetectahardwarefailure,continuewiththenextstep.
7.Useanantivirusprogramtoseeifyourcomputerhasbeeninfectedbyavirus.Iftheprogramdetectsa
virus,removethevirus.
8.Ifnoneoftheseactionssolvetheproblem,seektechnicalassistance.SeeChapter10“Getting
information,help,andservice”onpage113
formoreinformation.
Troubleshooting
Usethetroubleshootinginformationtofindsolutionstoproblemsthathavedefinitesymptoms.
46ThinkCentreM79UserGuide
Page 59

Ifthesymptomoccurredimmediatelyafteryouinstallednewsoftwareoranewhardwareoption,dothe
followingbeforereferringtothetroubleshootinginformation:
1.Removethenewhardwareoptionorsoftware.Ifyoumustremovethecomputercovertoremovea
hardwareoption,ensurethatyoureviewandfollowtheelectricalsafetyinformationprovidedwithyour
computer.Foryoursafety,donotoperatethecomputerwiththecoverremoved.
2.Runthediagnosticprogramtoensureyourcomputerisoperatingcorrectly.
3.Reinstallthenewhardwareoptionorsoftwarefollowingtheinstructionsprovidedbythemanufacturer.
Audioproblems
Thissectionprovidessolutionstoaudio-relatedproblems.
NoaudioinWindows
Solutions:
•IfyouareusingpoweredexternalspeakersthathaveanOn/Offcontrol,ensurethefollowing:
–TheOn/OffcontrolissettotheOnposition.
–Thespeakerpowercableisconnectedtoaproperlygrounded,functionalacelectricaloutlet.
•Ifyourexternalspeakershaveavolumecontrol,ensurethatthevolumeisnotsettoolow.
•OntheWindowsdesktop,clickthespeakericonintheWindowsnotificationarea.ThenclickMixer.
Ensurethatthemutespeakerssettingsarenotselectedandnoneofthevolumesettingsissettoolow.
•Somemodelshaveafrontaudiopanelyoucanusetoadjustvolume.Ifyouhaveafrontaudiopanel,
ensurethatthevolumeisnotsettoolow.
•Ensurethatyourexternalspeakers(andheadphones,ifused)areconnectedtothecorrectaudio
connectoronthecomputer.Mostspeakercablesarecolor-codedtomatchtheconnector.
Note:Whenexternal-speakerorheadphonecablesareattachedtotheaudioconnector,theinternal
speaker,ifpresent,isdisabled.Inmostcases,ifanaudioadapterisinstalledinoneoftheexpansion
slots,theaudiofunctionbuiltintothesystemboardisdisabled.Therefore,youmustusetheaudio
connectorsontheaudioadapter.
•EnsurethattheprogramyouarerunningisdesignedforuseintheMicrosoftWindowsoperatingsystem.
IftheprogramisdesignedtoruninDOS,theprogramdoesnotusetheWindowssoundfeature.The
programmustbeconfiguredtouseSoundBlasterProorSoundBlasteremulation.
•Ensurethattheaudiodevicedriversarecorrectlyinstalled.SeeWindowshelpsystemformore
information.
Soundcomesfromoneexternalspeakeronly
Solutions:
•Ensurethatthespeakercableisinsertedcompletelyintotheconnectoronthecomputer.
•Ensurethatthecablethatattachestheleftspeakertotherightspeakerissecurelyconnected.
•ClickthespeakericonintheWindowsnotificationarea.Thenclickthespeakericonontopofthevolume
control.ClicktheLevelstabandensurethattheBalancesettingsaresetcorrectly.
CDproblems
ThissectionprovidessolutionstoCD-relatedproblems.
AnaudiodiscorAutoPlay-enableddiscdoesnotautomaticallyplaywhenitis
insertedintoaCDdrive
Solutions:
Chapter7.Troubleshootinganddiagnostics47
Page 60

•IfyouhavemultipleCDorDVDdrivesinstalled(oracombinationofCDandDVDdrives),tryinsertingthe
discintotheotherdrive.Insomecases,onlyoneofthedrivesisconnectedtotheaudiosubsystem.
•Ifthisdoesnotcorrecttheproblem,followthesolutionsfor“ACDorDVDdoesnotwork”onpage48.
ACDorDVDdoesnotwork
Solutions:
•Ensurethatthediscisinsertedcorrectly,withitslabelup.
•Ensurethatthediscyouareusingisclean.T oremovedustorfingerprints,wipethedisccleanwithasoft
clothfromthecentertotheoutside.Wipingadiscinacircularmotionmightcauselossofdata.
•Ensurethatthediscyouareusingisnotscratchedordamaged.T ryinsertinganotherdiscthatyou
knowisgood.Ifyoucannotreadfromaknown-gooddisc,youmighthaveaproblemwithyouroptical
driveorthecablingtoyouropticaldrive.Ensurethatthepowercableandsignalcablearesecurely
connectedtothedrive.
Unabletouseabootablerecoverymedium,suchastheProductRecoveryCD,to
startyourcomputer
Solution:EnsurethattheCDorDVDdriveisinthestartupsequencebeforetheharddiskdrive.Referto
“Selectingorchangingthestartupdevicesequence”onpage36forinformationonviewingandchanging
thestartupsequence.Notethatonsomemodelsthestartupsequenceispermanentlysetandcannot
bechanged.
DVDproblems
ThissectionprovidessolutionstoDVD-relatedproblems.
BlackscreeninsteadofDVDvideo
Solutions:
•RestarttheDVDplayerprogram.
•Tryalowerscreenresolutionorcolordepth.
•Closeanyopenfiles,andthenrestartthecomputer.
DVDmoviedoesnotplay
Solutions:
•Ensurethatthediscsurfaceiscleanandnotscratched.
•Checkthediscorpackageforregionalcoding.Y oumightneedtopurchaseadiscwithcodingfor
theregionwhereyouareusingyourcomputer.
NoaudioorintermittentaudiowhileplayingaDVDmovie
Solutions:
•Checkthevolumecontrolsettingsonyourcomputerandonyourspeakers.
•Ensurethatthediscsurfaceiscleanandnotscratched.
•Checkallcableconnectionstoandfromthespeakers.
•UsetheDVDmenuforthevideotoselectadifferentaudiotrack.
Playbackissloworchoppy
Solutions:
•Disableanybackgroundprograms,suchasAntiVirusorDesktopThemes.
48ThinkCentreM79UserGuide
Page 61

•Ensurethatvideoresolutionissettolessthan1152x864pixels.
Invaliddiscornodiscfoundmessage
Solutions:
•EnsurethataDVDdiscisinthedrivewiththeshinysideofthediscfacingdown.
•Ensurethatvideoresolutionissettolessthan1152x864pixels.
•OncomputersthathaveaCD-ROMorCD-RWdriveinadditiontoaDVD-ROMdrive,ensurethatthe
DVDdiscisinthedrivelabeled“DVD”.
Intermittentproblems
Someproblemsoccuronlyoccasionallyandaredifficulttorepeat.
Solutions:
•Ensurethatallcablesandcordsaresecurelyconnectedtothecomputerandattacheddevices.
•Ensurethatwhenthecomputerison,thefangrillisnotblocked(thereisairflowaroundthegrill),andthe
fansareworking.Ifairflowisblockedorthefansarenotworking,thecomputermightoverheat.
•IfSmallComputerSystemInterface(SCSI)devicesareinstalled,ensurethatthelastexternaldevicein
eachSCSIchainisterminatedcorrectly.Formoreinformation,seeyourSCSIdocumentation.
Harddiskdriveproblems
Selectyoursymptomfromthefollowinglist:
•“SomeorallharddiskdrivesmissingfromtheSetupUtilityprogram”onpage49
•“"NoOperatingSystemFound"messageorthesystemnotstartingfromthecorrectharddiskdrive”
onpage49
SomeorallharddiskdrivesmissingfromtheSetupUtilityprogram
Symptom:SomeorallharddiskdrivesmissingfromtheSetupUtilityprogram
Actions:
•Ensurethatallharddiskdrivesignalcablesandpowercablesareconnectedcorrectly.
•Ensurethatyourcomputerisconfiguredcorrectlytosupporttheharddiskdrives.
–IfyourcomputerisinstalledwithfiveSAT Aharddiskdrives,ensurethattheSATAharddiskdrive
enablementmodule(onetofiveharddiskdrives)isinstalled.
–IfyourcomputerisinstalledwithSASharddiskdrives,ensurethattheSASharddiskdriveenablement
module(onetofiveharddiskdrives)ortheLSIMegaRAIDSASadapterisinstalled.
Iftheseactionsdonotcorrecttheproblem,runthediagnosticprogramLenovoSolutionCenter.See
“LenovoSolutionCenter”onpage57
help,andservice”onpage113.
.Ifyouneedtechnicalassistance,seeChapter10“Gettinginformation,
"NoOperatingSystemFound"messageorthesystemnotstartingfromthecorrect
harddiskdrive
Symptom:"NoOperatingSystemFound"messageorthesystemnotstartingfromthecorrectharddiskdrive
Actions:
•Ensurethatallharddiskdrivesignalcablesandpowercablesareconnectedcorrectly.Referto
“Replacingtheharddiskdrive”onpage76
.
Chapter7.Troubleshootinganddiagnostics49
Page 62

•EnsurethattheharddiskdriveyourcomputerstartsfromislistedasthefirststartupdeviceintheSetup
Utilityprogram.Referto“Selectingastartupdevice”onpage36
Note:Inrarecases,theharddiskdrivewiththeoperatingsystemmightgetcorruptedordamaged.Insuch
cases,youmightneedtoreplacetheharddiskdrive.Referto“Replacingtheharddiskdrive”onpage76
Iftheseactionsdonotcorrecttheproblem,runthediagnosticprogramLenovoSolutionCenter.See
“LenovoSolutionCenter”onpage57.
.
Problemswiththekeyboardormouse
Thissectionprovidessolutionstokeyboard-relatedandmouse-relatedproblems.
Keysonthekeyboarddonotwork
Solutions:
•ConnectthekeyboardcabletoaUSBconnectororPS/2keyboardconnector.
•IfyouareusingaUSBkeyboard,enabletheUSBconnectorsintheBIOSsettings.Formoreinformation,
see“Enablingordisablingadevice”onpage35.
•IfyouareusinganEnhancedPerformanceUSBkeyboard,usethehelpsystemintheEnhanced
PerformanceCustomizationKeyboardprogramtohelpdiagnoseproblems.
ToopentheEnhancedPerformanceCustomizationKeyboardprogram,dooneofthefollowing:
–OnWindows7:
1.ClickStart➙ControlPanel.
2.ClickHardwareandSound.
3.ClickDevicesandPrinters.
4.Double-clickUSBEnhancedPerformanceKeyboard.
–OnWindows8.1:
1.OpenControlPanel.Formoreinformation,see“AccessingControlPanelontheWindows8.1
operatingsystem”onpage21
2.ClickHardwareandSound.
3.ClickDevicesandPrinters.
4.Double-clickUSBEnhancedPerformanceKeyboard.
.
.
Themousedoesnotwork
Solutions:
•ConnectthemousecabletoaUSBconnectororPS/2mouseconnector.
Note:Dependingonyourkeyboard,integratedUSBconnectorsmightbeavailabletobeusedto
connectaUSBmouse.
•Installthedevicedriversforthemouse.
•IfyouareusingaUSBmouse,enabletheUSBconnectorsintheBIOSsettings.Formoreinformation,
see“Enablingordisablingadevice”onpage35
.
Thepointeronthescreendoesnotmovesmoothlywiththemouse
Solution:Cleanthemouse.Formoreinformation,see“Opticalmouse”onpage42.
Thefingerprintreaderonthekeyboarddoesnotwork
Solutions:
50ThinkCentreM79UserGuide
Page 63

•Enrollyourfingerprintcorrectly.
•Neverscratchthesurfaceofthereaderwithahard,pointedobject.
•Neverscrapthesurfaceofthereaderwithyournailoranythinghard.
•Useortouchthereaderwithacleanfinger.
•Ensurethatthesurfaceofyourfingeristhesamewiththeonewhenyoulastenrolled.
Thewirelesskeyboarddoesnotwork
Solutions:
•IfthetransceivercommunicationsLEDisnoton,reconnectthetransceiverandthekeyboard.
•IfthewirelesskeyboarddoesnotworkwhenthetransceivercommunicationsLEDison,restartyour
computer.
Iftheproblempersistsaftertherestart,ensurethat:
•Thebatteriesareinstalledcorrectly.
•Thebatteriesstillretaintheircurrent.
•Thedistancefromthewirelesskeyboardtothetransceiverislessthan10m(393.7inches).
•Thetransceiverisinstalledfully.
Monitorproblems
Thissectionprovidessolutionstomonitor-relatedproblems.
Myscreengoesblankwhilethecomputerison
Solutions:Yourscreensaverorpowermanagementmighthavebeenenabled.Dooneofthefollowing:
•Pressakeytoexitthescreensaver.
•Pressthepowerbuttontoresumethecomputerfromsleeporhibernationmode.
ThemonitorworkswhenIturnonthecomputer,butgoesblankwhenIstartsome
applicationprograms
Solutions:
•Connectthemonitorsignalcablefromyourmonitortoanappropriateconnectoronthecomputer.A
loosecablemightcauseintermittentproblems.
•Installthedevicedriversfortheapplicationprograms.Refertothedocumentationfortheaffected
applicationprogramtocheckwhetheranydevicedriversarerequired.
Theimageappearstobeflickering
Solutions:
•Thescreenmightbeaffectedbyinterferencefromnearbyequipment.Magneticfieldsaroundother
devices,suchastransformers,appliances,fluorescentlights,andothermonitorsmightbecausingthe
problem.Movefluorescentdesklightingoranyequipmentthatproducesmagneticfieldsfartheraway
fromthescreen.Ifthisdoesnotcorrecttheproblem,turnoffthecomputer.Then,adjusttheplacementof
thecomputerandotherdevicessothattheyareatleast305mm(12inches)apart.Turnonthecomputer.
•Resettherefreshratesupportedbyyourcomputer.
1.Right-clickablankareaonthedesktop.
2.DependingonyourWindowsversion,dooneofthefollowing:
–ForWindows7orWindows8.1:ClickScreenresolution➙Advancedsettings.
Chapter7.Troubleshootinganddiagnostics51
Page 64

–ForWindows10:ClickDisplaysettings.OntheDisplaytab,clickAdvanceddisplaysettings➙
Displayadapterproperties.
3.ClicktheMonitortab,andthenresettherefreshratetobethehighestandnoninterlaced.
Theimageisdiscolored
Solution:Themonitormightbeaffectedbyinterferencefromnearbyequipment.Movefluorescentdesk
lightingoranyequipmentthatproducesmagneticfieldsfurtherawayfromthemonitor.Iftheproblem
persists,dothefollowing:
1.Turnoffthemonitor.
2.Adjusttheplacementofthemonitorandotherdevicessothattheyareatleast305mm(12inches)apart.
3.Turnonthemonitor.
Networkingproblems
Thissectionprovidessolutionstonetworking-relatedproblems.
Ethernetproblems
Mycomputercannotbeconnectedtothenetwork
Solutions:
•ConnectthecablefromtheEthernetconnectortotheRJ45connectorofthehub.
•Havethelatestdevicedriverinstalledonyourcomputer.
Tocheckwhetheryouareusingthelatestdevicedriver,dooneofthefollowing:
–OnWindows7:
1.ClickStart➙ControlPanel.
2.ClickHardwareandSound.
3.ClickDeviceManager.Typetheadministratorpasswordorprovideconfirmationifprompted.
4.IfanexclamationmarkisdisplayednexttoanadapternameunderNetworkadapters,theadapter
drivermightnotbethelatestorisdisabled.Right-clickthehighlightedadaptertoupdatethedriver.
5.ClickUpdateDriverSoftware,andthenfollowtheinstructionsonthescreen.
–OnWindows8.1:
1.OpenControlPanel.Formoreinformation,see“AccessingControlPanelontheWindows8.1
operatingsystem”onpage21.
2.ClickHardwareandSound.
3.ClickDeviceManager.Typetheadministratorpasswordorprovideconfirmationifprompted.
4.IfanexclamationmarkisdisplayednexttoanadapternameunderNetworkadapters,theadapter
drivermightnotbecorrectorisdisabled.Right-clickthehighlightedadaptertoupdatethedriver.
5.ClickUpdateDriverSoftware,andthenfollowtheinstructionsonthescreen.
•Setthesameduplexfortheswitchportandtheadapter.
Ifyouconfiguredtheadapterforfullduplex,ensurethattheswitchportisalsoconfiguredforfullduplex.
Settingthewrongduplexmodemightdegradeperformance,causedataloss,orresultinlostconnections.
•Installallnetworkingsoftwarethatisnecessaryforyournetworkenvironment.
CheckwithyourLANadministratorforthenecessarynetworkingsoftware.
52ThinkCentreM79UserGuide
Page 65

Theadapterstopsworkingfornoreason
Solution:Thenetworkdriverfilesmightbecorruptormissing.Updatethedriverbyreferringtothe“Solution”
descriptionforthepreviousproblemtoensurethatthelatestdevicedriverisinstalled.
TheWakeOnLANfeatureisnotworking
Solution:EnabletheWakeOnLAN(WOL)featureintheBIOSprogram.
MycomputerisaGigabitEthernetmodelandIuseaspeedof1000Mbps,buttheconnectionfails
orerrorsoccur
Solution:ConnectthenetworkcabletotheEthernetconnectorusingCategory5wiringanda100BASE-T
hub/switch(not100BASE-X).
MycomputerisaGigabitEthernetmodel,butitcannotbeconnectedtothenetworkat1000Mbps,
butatonly100Mbps
Solutions:
•Tryanothercable.
•Setthelinkpartnertoauto-negotiate.
•Settheswitchtobe802.3ab-compliant(gigabitovercopper).
IcannotconnecttoawirelessLANusingthebuilt-inwirelessnetworkingcard
Solutions:
•InstallthelatestwirelessLANdrivers.
•Placeyourcomputerwithintherangeofawirelessaccesspoint.
•Enablethewirelessradio.
•CheckNetworkName(SSID)andyourpassword.
–OnWindows7:
1.ClickStart➙LenovoThinkVantageT ools➙AccessConnections.
2.SwitchtotheAdvancedview,andthenclicktheMobileHotspottabtocheckyourSSIDand
password.
–OnWindows8.1:
1.OpenControlPanel.Formoreinformation,see“AccessingControlPanelontheWindows8.1
operatingsystem”onpage21.
2.ClickNetworkandInternet➙NetworkandSharingCentertocheckyourSSIDandpassword.
SounddoesnotcomefromtheBluetoothheadsetorheadphonebutcomesfrom
thelocalspeakereventhoughtheheadsetorheadphoneisconnectedusingthe
HeadsetprofileorAVprofile
Solution:
1.Exittheapplicationthatusesthesounddevice(forexample,WindowsMediaPlayer).
2.OpenControlPanel.
Note:FordetailedinformationonhowtoopenControlPanelonWindows8.1,see“AccessingControl
PanelontheWindows8.1operatingsystem”onpage21
3.ClickHardwareandSound➙Sound.
4.SelectthePlaybacktab.
5.IfyouareusingtheHeadsetprofile,selectBluetoothHands-freeAudio,andthenclickSetDefault.If
youareusingtheAVprofile,selectStereoAudio,andthenclickSetDefault.
.
Chapter7.Troubleshootinganddiagnostics53
Page 66

6.ClickOK.
Note:Bluetoothissupportedonlyonsomecomputermodels.
Ihaveconnectedanoptiontomycomputer,butitdoesnotwork
Solution:Refertothedocumentationthatcomeswiththeoptiontoensurethatyouhaveconnectedthe
optioncorrectly.
Performanceandlockupproblems
Thissectionprovidessolutionstoperformance-relatedproblemsofyourcomputer.
Insufficientfreeharddiskdrivespace
Solutions:Freeupharddiskdrivespace.
•CleanoutyourInbox,SentItems,andDeletedItemsfoldersfromyoure-mailapplication.
•CleanupyourCdrive.
1.DependingonyourWindowsversion,dooneofthefollowing:
–ForWindows7:ClicktheStartbuttontoopentheStartmenu,andthenclickComputer.
–ForWindows8.1:OpenFileExplorer.
–ForWindows10:ClicktheStartbuttontoopentheStartmenu,andthenclickFileExplorer➙
ThisPC.
2.Right-clickyourCdriveandthenclickProperties.
3.Checktheamountoffreespace,andthenclickDiskCleanup.
4.Alistofunnecessaryfilecategoriesisdisplayed.Selecteachfilecategoryyouwanttodelete,
andthenclickOK.
•TurnsomeWindowsfeaturesofforremovesomeunnecessaryprograms.
1.OpenControlPanelbydoingoneofthefollowing:
–ForWindows7:ClicktheStartbuttontoopentheStartmenu,andthenclickControlPanel.
–ForWindows8.1:See“AccessingControlPanelontheWindows8.1operatingsystem”onpage
.
21
–ForWindows10:Right-clicktheStartbuttontoopentheStartcontextmenu,andthenclick
ControlPanel.
2.ViewControlPanelusingLargeiconsorSmallicons,andthenclickProgramsandFeatures.
3.Dooneofthefollowing:
–ToturnsomeWindowsfeaturesoff,clickTurnWindowsfeaturesonoroff.Followthe
instructionsonthescreen.
–Toremovesomeunnecessaryprograms,selecttheprogramyouwanttoremove,andthenclick
Uninstall/ChangeorUninstall.
Excessivenumberoffragmentedfiles
Solution:UsetheWindowsdiskdefragmentationordiskoptimizationfeaturetocleanupthefiles.
Note:Dependingonthevolumeofthestoragedrivesandamountofdatastoredonthestoragedrives,the
disk-defragmentationprocessmighttakeuptoseveralhours.
1.Closeanyopenprogramsandwindows.
2.DependingonyourWindowsversion,dooneofthefollowing:
54ThinkCentreM79UserGuide
Page 67

•ForWindows7:ClicktheStartbuttontoopentheStartmenu,andthenclickComputer.
•ForWindows8.1:OpenFileExplorer.
•ForWindows10:ClicktheStartbuttontoopentheStartmenu,andthenclickFileExplorer➙
ThisPC.
3.Right-clickyourCdriveandthenclickProperties.
4.ClicktheT oolstab.
5.DependingonyourWindowsversion,dooneofthefollowing:
•ForWindows7:ClickDefragmentnow.
•ForWindows8.1orWindows10:ClickOptimize.Selectthedesireddrive,andthenclickOptimize.
6.Followtheinstructionsonthescreen.
Insufficientmemory
Solution:Installadditionalmemorymodules.Forinstructionsoninstallingmemorymodules,see“Installing
orreplacingamemorymodule”onpage71
Topurchasememorymodules,goto:
http://www.lenovo.com
.
Theprinterdoesnotwork
Solutions:
•IfyouareusingIEEE-approvedprintersignalcables,dothefollowing:
1.Connecttheprintersignalcablefirmlytothecorrectparallel,serial,orUSBconnectoronthe
computer.
2.Loadthepapercorrectly.
3.Turnontheprinterandkeeptheprinteronline.
•Ifyouareusingnon-IEEE-approvedprintersignalcables,dothefollowing:
1.Correctlyinstalldevicedriversandsoftwarethatcomewiththeprinter.
2.Assigntheprinterportcorrectlyinyouroperatingsystem,applicationprogram,orBIOSsettings.For
moreinformationaboutBIOSsettings,see“UsingtheSetupUtilityprogram”onpage33.
Iftheproblempersists,runthetestsdescribedinthedocumentationthatcomeswithyourprinter.Ifyou
cannotcorrecttheproblem,havethecomputerserviced.SeeChapter10“Gettinginformation,help,and
service”onpage113.
Serialconnectorcannotbeaccessed
Solutions:
•Connecttheserialcabletotheserialconnectoronthecomputerandtotheserialdevice.Iftheserial
devicehasitsownpowercord,attachthepowercordtoagroundedelectricaloutlet.
•Turnontheserialdeviceandkeepthedeviceonline.
•Installanyapplicationprogramssuppliedwiththeserialdevice.Refertothedocumentationthatcomes
withtheserialdeviceformoreinformation.
•Ifyouaddedoneserial-connectoradapter,installtheadaptercorrectly.
Softwareproblems
Thissectionprovidessolutionstosoftware-relatedproblems.
Chapter7.Troubleshootinganddiagnostics55
Page 68

Whenusingasortfeature,datescannotbesortedinthecorrectorder
Solution:Someprogramsdevelopedbeforetheyear2000usedonlythelasttwodigitsofayeartosort
dates,assumingthefirsttwodigitswere19.Consequently,datescannotbesortedinthecorrectorder.
Checkwithyoursoftwaremanufacturertoseeifanyupdatesareavailable.Manysoftwaremanufacturers
makeupdatesavailablefromtheWorldWideWeb.
Someapplicationprogramsdonotworkasexpected
Symptom:Softwaredoesnotworkasexpected.
Actions:
•Mostsoftwareprogramshavebuilt-inhelpsystemsthatprovideinstructionsformosttasks.Ifyouare
havingdifficultyperformingaspecifictaskwithinasoftwareprogram,refertothehelpsystemforthat
program.Helpsystemsaretypicallyaccessiblefromamenuorbuttonintheprogram,andfrequently
fromtheF1key.
•IfyouhavedifficultywiththeWindowsoperatingsystemoroneofitscomponents,refertotheWindows
helpsystem.
•Todetermineifproblemsarecausedbynewlyinstalledsoftware,verifythat:
–Yourcomputerhastheminimummemoryrequirementsneededtousethesoftware.Seethe
informationsuppliedwiththesoftwaretoverifymemoryrequirements.(Ifyoujustinstalledanadapter
ormemory,youmighthaveamemory-addressconflict.)
–Thesoftwareisdesignedtooperateonyourcomputer.
–Othersoftwareworksonyourcomputer.
–Thesoftwareyouareusingworkscorrectlyonanothercomputer.
•Ifyoureceivedanyerrormessageswhileusingthesoftwareprogram,seetheprinteddocumentation
suppliedwiththesoftwareorthehelpsystemforthatsoftwareforadescriptionofthemessagesand
solutionstotheproblem.
•Checkwithyoursoftwaremanufacturertoseeifanyupdatesareavailable.Manysoftwaremanufacturers
makeupdatesavailablefromtheWorldWideWeb.
•Ifthesoftwareprogramusedtoworkcorrectly,butdoesnotworkcorrectlynow,dothefollowing:
1.OpenControlPanelbydoingoneofthefollowing:
–ForWindows7:ClicktheStartbuttontoopentheStartmenu,andthenclickControlPanel.
–ForWindows8.1:See“AccessingControlPanelontheWindows8.1operatingsystem”onpage
.
21
–ForWindows10:Right-clicktheStartbuttontoopentheStartcontextmenu,andthenclick
ControlPanel.
2.ViewControlPanelusingLargeiconsorSmallicons,andthenclickRecovery➙OpenSystem
Restore.
3.Followtheinstructionsonthescreen.
•Ifyouareunabletoresolvetheproblemthroughothermethods,uninstallthesoftwareprogramand
reinstallit.
Iftheseactionsdonotcorrecttheproblem,youmightneedtechnicalassistance.Contactyoursoftware
manufacturerorseeChapter10“Gettinginformation,help,andservice”onpage113fordetails.
MyUSBconnectorscannotbeaccessed
Solutions:
56ThinkCentreM79UserGuide
Page 69

•ConnecttheUSBcablefromtheUSBconnectortotheUSBdevice.IftheUSBdevicehasitsownpower
cord,attachthepowercordtoagroundedelectricaloutlet.
•TurnontheUSBdeviceandkeepthedeviceonline.
•InstallanydevicedriversorapplicationprogramssuppliedwiththeUSBdevice.Refertothe
documentationthatcomeswiththeUSBdeviceformoreinformation.
•DetachandreattachtheUSBconnectortoresettheUSBdevice.
Diagnostics
Thediagnosticprogramisusedtotesthardwarecomponentsofyourcomputer.Thediagnosticprogramcan
alsoreportoperating-system-controlledsettingsthatinterferewiththecorrectoperationofyourcomputer.
Youcanusethepreinstalleddiagnosticprogramtodiagnosecomputerproblems,ifyourcomputeris
runningtheWindowsoperatingsystem.
Notes:
1.Y ourcomputerispreinstalledwiththeLenovoSolutionCenterprogramfordiagnosticpurposes.For
moreinformationabouttheLenovoSolutionCenterprogram,see“LenovoSolutionCenter”onpage57.
2.Ifyouareunabletoisolateandrepairtheproblemyourselfafterrunningthediagnosticprogram,save
andprintthelogfilescreatedbythediagnosticprogram.Y ouwillneedthelogfileswhenyouspeaktoa
Lenovotechnicalsupportrepresentative.
LenovoSolutionCenter
TheLenovoSolutionCenterprogramenablesyoutotroubleshootandresolvecomputerproblems.It
combinesdiagnostictests,systeminformationcollection,securitystatus,andsupportinformation,along
withhintsandtipsformaximumsystemperformance.
•YourcandownloadtheLenovoSolutionCenterprogramfromhttp://www.lenovo.com/diags.
•IfyouareusingaWindowsoperatingsystemotherthanWindows7,Windows8.1,orWindows10,goto
http://www.lenovo.com/diagsforthelatestinformationondiagnosticsforyourcomputer.
ToruntheLenovoSolutionCenterprogram,see“Lenovoprograms”onpage12
Note:Ifyoucannotisolateandrepairtheproblemyourselfafterrunningtheprogram,saveandprintthelog
files.YouwillneedthelogfileswhenyouspeaktoaLenovotechnicalsupportrepresentative.
Foradditionalinformation,refertotheLenovoSolutionCenterhelpsystem.
.
Chapter7.Troubleshootinganddiagnostics57
Page 70

58ThinkCentreM79UserGuide
Page 71

Chapter8.Recoveryinformation
Thischapterprovidesinformationabouttherecoverysolutions.Thereareavarietyofmethodstochoose
fromwhenconsideringhowtorecoverfromasoftware-orhardware-relatedproblem.Somemethods
varydependingonthetypeofoperatingsystemthatisinstalled.Youcanrestorethecomputersettings
usingaprogramortherecoverydiscset.Formoreinformationaboutusingtherecoverydiscset,see
thedocumentationthatcomeswiththediscset.
Thischaptercontainsthefollowingtopics:
•“RecoveryinformationfortheWindows7operatingsystem”onpage59
•“RecoveryinformationfortheWindows8.1operatingsystem”onpage64
•“RecoveryinformationfortheWindows10operatingsystem”onpage65
RecoveryinformationfortheWindows7operatingsystem
TherecoveryinformationinthissectiononlyappliestothecomputersthathavetheRescueandRecovery
programortheProductRecoveryprograminstalled.IftheEnhancedBackupandRestoreiconinthe
LenovoThinkVantageToolsprogramisdimmed,itindicatesthatyoumustinstalltheRescueandRecovery
programmanuallybeforeenablingitsfeatures.T oinstalltheRescueandRecoveryprogram,dothefollowing:
1.ClickStart➙AllPrograms➙LenovoThinkVantageTools,anddouble-clickEnhancedBackup
andRestore.
2.Followtheinstructionsonthescreen.
3.Whentheinstallationprocessfinishes,theEnhancedBackupandRestoreiconisactivated.
Thissectioncontainsthefollowingtopics:
•“Creatingandusingrecoverymedia”onpage59
•“Performingbackupandrecoveryoperations”onpage60
•“Creatingandusingarescuemedium”onpage62
•“Reinstallingprogramsanddevicedrivers”onpage62
•“Solvingrecoveryproblems”onpage64
Creatingandusingrecoverymedia
Recoverymediaenableyoutorestoretheharddiskdrivetothefactory-defaultstateandputthecomputerin
anoperationalstateafterallotherrecoverymethodshavefailed.Recoverymediaareusefulifyoutransfer
thecomputertoanotherarea,sellthecomputer,orrecyclethecomputer.Asaprecautionarymeasure,itis
importanttocreaterecoverymediaasearlyaspossible.Thedataontherecoverymediacanbeusedfor
thefollowingpurposes:
•Reinstalltheprogramsanddevicedriversonyourcomputer
•Reinstalltheoperatingsystem
•ModifythedatafilesontheharddiskdriveusingtheAdditionalFiles
Note:Therecoveryoperationsyoucanperformusingrecoverymediavarydependingontheoperating
systemfromwhichtherecoverymediawerecreated.Therecoverymediamightcontainabootmedium
andadatamedium.Y ourMicrosoftWindowslicensepermitsyoutocreateonlyonedatamedium.Itis
recommendedthatyoustoretherecoverymediainasafeplaceafteryouhavemadethem.
©CopyrightLenovo2014,2016
59
Page 72

Creatingrecoverymedia
Note:OntheWindows7operatingsystem,youcancreaterecoverymediausingdiscsorexternalUSB
storagedevices.
TocreaterecoverymediaontheWindows7operatingsystem,clickStart➙AllPrograms➙Lenovo
ThinkVantageT ools➙FactoryRecoveryDisks.Then,followtheinstructionsonthescreen.
Usingrecoverymedia
Attention:Whenyouuserecoverymediatorestoretheharddiskdrivetothefactory-defaultstate,allthe
filescurrentlyontheharddiskdrivewillbedeleted.Thesefileswillbereplacedbythefactory-defaultfiles.
TouserecoverymediaontheWindows7operatingsystem,dothefollowing:
1.Dependingonthetypeofyourrecoverymedia,connectthebootUSBstoragedevicetothecomputer,
orinsertthebootdiscintotheopticaldrive.
2.Turnonorrestartyourcomputer.
3.Whenyouseethelogoscreen,repeatedlypressandreleasetheF12key.TheStartupDeviceMenu
windowisdisplayed.
4.SelectthedesiredstartupdeviceandpressEnter.Therestoreprocessbegins.
5.Followtheinstructionsonthescreentocompletetheoperation.
Note:Afterrestoringyourcomputerharddiskdrivetothefactory-defaultstate,youmighthavetoreinstall
devicedriversforsomedevices.See“Reinstallingprogramsanddevicedrivers”onpage62.
Performingbackupandrecoveryoperations
TheRescueandRecoveryprogramenablesyoutobackupallyourharddiskdrivecontentsincluding
theoperatingsystem,datafiles,softwareprograms,andpersonalsettings.Youcanstorethebackupat
thefollowinglocations:
•TheRescueandRecoveryworkspace
•Thesecondaryharddiskdriveifasecondaryharddiskdriveisinstalledinyourcomputer
•AnexternalUSBharddiskdriveconnectedtoyourcomputer
•Anetworkdrive
•Recordablediscs(arecordableopticaldriveisrequiredforthisoption)
Afteryouhavecompletedthebackupoperation,youcanrestorepartsorwholeofthedataonthehard
diskdrive.
Performingabackupoperation
ToperformabackupoperationusingtheRescueandRecoveryprogramontheWindows7operating
system,dothefollowing:
1.FromtheWindowsdesktop,clickStart➙AllPrograms➙LenovoThinkVantageTools➙Enhanced
BackupandRestore.TheRescueandRecoveryprogramopens.
2.IntheRescueandRecoverymainwindow,clicktheLaunchadvancedRescueandRecoveryarrow.
3.ClickBackupyourharddriveandselectbackupoperationoptions.Then,followtheinstructionson
thescreentocompletethebackupoperation.
Performingarecoveryoperation
Thissectionprovidesthefollowingtopics:
•“PerformingarecoveryoperationfromWindows7”onpage61
60ThinkCentreM79UserGuide
Page 73

•“PerformingarecoveryoperationfromtheRescueandRecoveryworkspace”onpage61
PerformingarecoveryoperationfromWindows7
ToperformarecoveryoperationusingtheRescueandRecoveryprogramontheWindows7operating
system,dothefollowing:
1.FromtheWindowsdesktop,clickStart➙AllPrograms➙LenovoThinkVantageTools➙Enhanced
BackupandRestore.TheRescueandRecoveryprogramopens.
2.IntheRescueandRecoverymainwindow,clicktheLaunchadvancedRescueandRecoveryarrow.
3.ClicktheRestoreyoursystemfromabackupicon.
4.Followtheinstructionsonthescreentocompletetherecoveryoperation.
PerformingarecoveryoperationfromtheRescueandRecoveryworkspace
TheRescueandRecoveryworkspaceresidesinaprotectedandhiddenareaofyourharddiskdrivethat
operatesindependentlyfromtheWindowsoperatingsystem.TheRescueandRecoveryworkspaceenables
youtoperformrecoveryoperationsevenifyoucannotstarttheWindowsoperatingsystem.Y oucanperform
thefollowingrecoveryoperationsfromtheRescueandRecoveryworkspace:
•Rescuefilesfromyourharddiskdriveorfromabackup:
Youcanlocatefilesonyourharddiskdriveandtransferthemtoanetworkdriveorotherrecordable
media,suchasaUSBdeviceoradisc.Thissolutionisavailableevenifyoudidnotbackupyourfilesorif
changesweremadetothefilessinceyourlastbackupoperation.Y oualsocanrescueindividualfilesfrom
aRescueandRecoverybackuplocatedonyourlocalharddiskdrive,aUSBdevice,oranetworkdrive.
•RestoreyourharddiskdrivefromaRescueandRecoverybackup:
IfyouhavebackedupyourharddiskdriveusingtheRescueandRecoveryprogram,youcanrestorethe
harddiskdrivefromaRescueandRecoverybackup,evenifyoucannotstarttheWindowsoperating
system.
•Restoreyourharddiskdrivetothefactory-defaultstate:
Youcanrestorethecompletecontentsofyourharddiskdrivetothefactory-defaultstateevenifyou
cannotstarttheWindowsoperatingsystem.Ifyouhavemultiplepartitionsonyourharddiskdrive,you
havetheoptiontorestoretheC:partitionandleavetheotherpartitionsintact.
Attention:YoucanrestoretheharddiskdrivefromaRescueandRecoverybackuporrestoretheharddisk
drivetothefactory-defaultsettings.Duringeitherprocess,allfilesontheprimaryharddiskdrivepartition
(usuallydriveC:)willbedeleted.Ifpossible,makecopiesofimportantfiles.IfyoucannotstarttheWindows
operatingsystem,youcanusetherescuefilesfeatureoftheRescueandRecoveryworkspacetocopyfiles
fromyourharddiskdrivetoothermedia.
ToperformarecoveryoperationfromtheRescueandRecoveryworkspace,dothefollowing:
1.Turnonorrestartyourcomputer.
2.Whenyouseethelogoscreen,pressEnter,andthenpressF11toentertheRescueandRecovery
workspace.
3.IfyouhavesetaRescueandRecoverypassword,enteryourpasswordwhenprompted.TheRescue
andRecoveryworkspaceopensafterashortdelay.
Note:IftheRescueandRecoveryworkspacefailstoopen,see“Solvingrecoveryproblems”onpage64.
4.Dooneofthefollowing:
•Torescuefilesfromyourharddiskdrive,clickRescuefilesandfollowtheinstructionsonthescreen.
•TorestoreyourharddiskdrivefromaRescueandRecoverybackuportorestoreyourharddiskdrive
tothefactory-defaultstate,clickFullRestoreandfollowtheon-screeninstructions.
Note:Afterrestoringyourcomputerharddiskdrivetothefactory-defaultstate,youmighthaveto
reinstalldevicedriversforsomedevices.See“Reinstallingprogramsanddevicedrivers”onpage62
Chapter8.Recoveryinformation61
.
Page 74

FormoreinformationaboutthefeaturesoftheRescueandRecoveryworkspace,clickHelp.
Creatingandusingarescuemedium
CreaterescuemediausingdiscsorUSBstoragedevicesasearlyaspossible.Y oucanusearescuemedium
torecoverfromfailuresthatpreventyoufromgainingaccesstotheWindowsenvironmentortheRescue
andRecoveryworkspaceonyourharddiskdrive.
Notes:
•Therecoveryoperationsyoucanperformusingarescuemediumvarydependingontheoperatingsystem.
•Therescuedisccanbestartedinalltypesofopticaldrives.
Creatingarescuemedium
TocreatearescuemediumontheWindows7operatingsystem,dothefollowing:
1.FromtheWindowsdesktop,clickStart➙AllPrograms➙LenovoThinkVantageTools➙Enhanced
BackupandRestore.TheRescueandRecoveryprogramopens.
2.IntheRescueandRecoverymainwindow,clicktheLaunchadvancedRescueandRecoveryarrow.
3.ClicktheCreateRescueMediaicon.The“CreateRescueandRecoveryMedia”windowopens.
4.IntheRescueMediaarea,selectthetypeoftherescuemediumyouwanttocreate.Youcancreatea
rescuemediumusingadisc,aUSBstoragedevicewithsufficientcapacity,orasecondaryinternal
harddiskdrive.
5.ClickOKandfollowtheinstructionsonthescreentocreatearescuemedium.
Usingarescuemedium
DependingonwhetheryouhavecreatedarescuemediumusingadiscoraUSBharddiskdrive,doone
ofthefollowing:
•Ifyouhavecreatedarescuemediumusingadisc,dothefollowing:
1.Turnonorrestartyourcomputer.
2.Whenyouseethelogoscreen,repeatedlypressandreleasetheF12key.TheStartupDeviceMenu
windowisdisplayed.
3.Selectthedesiredopticaldriveasthefirstbootdevice.Then,inserttherescuediscintotheoptical
driveandpressEnter.Therescuemediumstarts.
•IfyouhavecreatedarescuemediumusingaUSBharddiskdrive,dothefollowing:
1.ConnecttheUSBharddiskdrivetooneoftheUSBconnectorsonyourcomputer.
2.Turnonorrestartyourcomputer.
3.Whenyouseethelogoscreen,repeatedlypressandreleasetheF12key.TheStartupDeviceMenu
windowisdisplayed.
4.SelecttheUSBharddiskdriveasthefirstbootdeviceandpressEnter.Therescuemediumstarts.
Whentherescuemediumstarts,theRescueandRecoveryworkspaceopens.Thehelpinformationfor
eachfeatureisavailablefromtheRescueandRecoveryworkspace.Followtheinstructionstocomplete
therecoveryprocess.
Reinstallingprogramsanddevicedrivers
Thissectionprovidesthefollowingitems:
•“Reinstallingpreinstalledprogramsanddevicedrivers”onpage63
•“Reinstallingprogramsanddevicedriversthatarenotpreinstalled”onpage63
62ThinkCentreM79UserGuide
Page 75

Reinstallingpreinstalledprogramsanddevicedrivers
Yourcomputerenablesyoutoreinstallpreinstalledprogramsanddevicedrivers.
Reinstallingpreinstalledprograms
ToreinstallprogramspreinstalledonyourLenovocomputer,dothefollowing:
1.Turnonthecomputer.
2.GotoC:\SWTOOLS.
3.Opentheappsfolderandlocatethesubfolderthatisnamedaftertheprogrampreinstalledonyour
computer.
4.OpenthesubfolderandlocatetheEXEfile.
5.Double-clicktheEXEfileandfollowtheinstructionsonthescreentocompletetheinstallation.
Reinstallingpreinstalleddevicedrivers
Attention:Reinstallingdevicedriverswillchangethecurrentconfigurationofyourcomputer.Reinstall
devicedriversonlywhenitisnecessarytocorrectaproblemwithyourcomputer.
Toreinstallthedevicedriverforafactory-installeddevice,dothefollowing:
1.Turnonthecomputer.
2.GotoC:\SWTOOLS.
3.OpentheDRIVERSfolderandlocatethesubfolderthatisnamedafterthefactory-installeddevicein
yourcomputer,suchasAUDIOorVIDEO.
4.Openthesubfolder.
5.Dooneofthefollowing:
•LocatetheEXEfile.Double-clicktheEXEfileandfollowtheinstructionsonthescreentocomplete
theinstallation.
•Locatethereadmefilewiththe.txtextension.Thedevicedriverinstallationinformationisincludedin
thereadmefile.Followtheinstructionstocompletetheinstallation.
•IfthedevicesubfoldercontainsanINFfileandyouwanttoinstallthedevicedriverusingtheINFfile,
seetheWindowshelpsystemfordetailedinformation.
Note:Formoreinformationaboutthelatestdevicedrivers,see“Gettingthelatestdevicedriversforyour
computer”onpage41.
Reinstallingprogramsanddevicedriversthatarenotpreinstalled
Yourcomputerenablesyoutoreinstallprogramsanddevicedriversthatarenotpreinstalled.
Reinstallingprogramsthatarenotpreinstalled
Ifasoftwareprogramyouinstalledonyourcomputerisnotworkingcorrectly,youmightneedtouninstall
andthenreinstallit.Reinstallingaprogramoverwritestheexistingprogramfilesandusuallyfixesany
problemsthatyoumighthavehadwiththeprogram.
Touninstallaprogramfromyoursystem,refertotheMicrosoftWindowshelpsystem.
Toreinstallmostcommerciallyavailableprogramsonyoursystem,refertotheMicrosoftWindowshelp
systemtogetherwiththedocumentationprovidedwiththeprogram.
Reinstallingdevicedriversthatarenotpreinstalled
Toreinstalladevicedriverforanoptionyouinstalled,refertothedocumentationthatcomeswiththeoption.
Chapter8.Recoveryinformation63
Page 76

Note:Reinstalldevicedriverswillchangethecurrentconfigurationofyourcomputer.Reinstalldevicedrivers
onlywhenitisnecessarytocorrectaproblemwithyourcomputer.
Solvingrecoveryproblems
Note:Ensurethatyourrescuedeviceissetasthefirstbootdeviceinthestartupdevicesequencein
theSetupUtilityprogram.See“Selectingastartupdevice”onpage36fordetailedinformationabout
temporarilyorpermanentlychangingthestartupdevicesequence.FormoreinformationabouttheSetup
Utilityprogram,see“UsingtheSetupUtilityprogram”onpage33.
IfyoucannotaccesstheRescueandRecoveryworkspaceortheWindowsenvironment,dooneofthe
following:
•UsearescuemediumtostarttheRescueandRecoveryworkspace.See“Creatingandusingarescue
medium”onpage62
•Userecoverymediaifallothermethodsofrecoveryhavefailedandyoumustrestoretheharddiskdrive
tothefactory-defaultsettings.See“Creatingandusingrecoverymedia”onpage59
Itisimportanttocreatearescuemediumandasetofrecoverymediaasearlyaspossibleandstorethem
inasafeplaceforfutureuse.
.
.
RecoveryinformationfortheWindows8.1operatingsystem
Thissectioncontainsthefollowingtopics:
•“Refreshingyourcomputer”onpage64
•“Resettingyourcomputertothefactory-defaultsettings”onpage64
•“Usingtheadvancedstartupoptions”onpage65
•“RecoveringyouroperatingsystemifWindows8.1failstostart”onpage65
Refreshingyourcomputer
Ifyourcomputerdoesnotperformwellandtheproblemmightbecausedbyarecentlyinstalledprogram,
youcanrefreshyourcomputer.
Attention:Ifyourefreshyourcomputer,theprogramspreinstalledonyourcomputerandtheprogramsthat
youinstalledfromWindowsStorewillbereinstalled.However,allotherprogramswillbeuninstalled.
Torefreshyourcomputer,dothefollowing:
1.Movethepointertothetop-rightorbottom-rightcornerofthescreentodisplaythecharms.Click
Settings➙ChangePCsettings➙Updateandrecovery➙Recovery.
2.IntheRefreshyourPCwithoutaffectingyourfilessection,clickGetstarted.
Resettingyourcomputertothefactory-defaultsettings
Youcanresetyourcomputertothefactory-defaultsettings.Resettingthecomputerwillreinstallthe
operatingsystemandalltheprogramsthatcomewithyourcomputer.
Attention:Ifyouresetyourcomputer,allyourpersonalfilesandsettingswillbedeleted.T oavoiddataloss,
makeabackupcopyofallthedatathatyouwanttokeep.
Toresetyourcomputer,dothefollowing:
1.Movethepointertothetop-rightorbottom-rightcornerofthescreentodisplaythecharms.Click
Settings➙ChangePCsettings➙Updateandrecovery➙Recovery.
64ThinkCentreM79UserGuide
Page 77

2.IntheRemoveeverythingandreinstallWindowssection,clickGetstarted.
Usingtheadvancedstartupoptions
AdvancedstartupoptionsenableyoutochangethestartupsettingsofyourWindowsoperatingsystem,
startthecomputerfromanexternaldevice,orrestoretheWindowsoperatingsystemfromasystemimage.
Tousetheadvancedstartupoptions,dothefollowing:
1.Movethepointertothetop-rightorbottom-rightcornerofthescreentodisplaythecharms.Click
Settings➙ChangePCsettings➙Updateandrecovery➙Recovery.
2.IntheAdvancedstartupsection,clickRestartnow➙Troubleshoot➙Advancedoptions.
3.Restartyourcomputerfollowingtheinstructionsonthescreen.
RecoveringyouroperatingsystemifWindows8.1failstostart
TheWindowsrecoveryenvironmentonyourcomputeriscapableofoperatingindependentlyfromthe
Windows8.1operatingsystem.ItenablesyoutorecoverorrepairtheoperatingsystemeveniftheWindows
8.1operatingsystemfailstostart.
Aftertwoconsecutivefailedbootattempts,theWindowsrecoveryenvironmentstartsautomatically.Then
youcanchooserepairandrecoveryoptionsbyfollowingtheinstructionsonthescreen.
Note:Ensurethatyourcomputerisconnectedtoacpowerduringtherecoveryprocess.
FormoredetailsabouttherecoverysolutionsprovidedoncomputerspreinstalledwiththeWindows8.1
operatingsystem,refertothehelpinformationsystemoftheWindows8.1operatingsystem.
RecoveryinformationfortheWindows10operatingsystem
TorecoveryourWindows10operatingsystem,usethefollowingsolutions:
•UseWindowsrecoverysolutions.
–UserecoverysolutionsinWindowsSettings.
1.ClicktheStartbuttontoopentheStartmenu.
2.ClickSettings➙Update&security➙Recovery.
3.Choosetheappropriaterecoverysolutionbyfollowingtheinstructionsonthescreen.
–UseSystemRestoretorestoresystemfilesandsettingstoanearlierpoint.
1.Right-clicktheStartbuttontoopentheStartcontextmenu.
2.ClickControlPanel.ViewControlPanelusingLargeiconsorSmallicons,andthenclick
Recovery➙OpenSystemRestore.
3.Followtheinstructionsonthescreen.
–UsetheFileHistorytooltorestoreyourfilesfromabackup.
Note:IfyouusetheFileHistorytooltorestoreyourfilesfromabackup,ensurethatyoubackedup
yourdataearlierwiththetool.
1.Right-clicktheStartbuttontoopentheStartcontextmenu.
2.ClickControlPanel.ViewControlPanelusingLargeiconsorSmallicons,andthenclickFile
History➙Restorepersonalfiles.
3.Followtheinstructionsonthescreen.
–UsetheWindowsrecoveryenvironmentbydoingoneofthefollowing:
Chapter8.Recoveryinformation65
Page 78

–Afterseveralconsecutivefailedbootattempts,theWindowsrecoveryenvironmentmightstart
automatically.Followtheinstructionsonthescreentochoosetheappropriaterecoverysolution.
–SelecttherecoverymediumyoucreatedearlierwiththeWindowstoolasthestartupdevice.See
“Selectingatemporarystartupdevice”onpage36
.Then,followtheinstructionsonthescreen
tochoosetheappropriaterecoverysolution.
Note:Tocreatearecoverymedium,see“Goodmaintenancepractices”onpage43.
•UsetherecoveryUSBkeyprovidedbyLenovotorestoretheentirestoragedrivetothefactory-default
settings.
–IfyourcomputercomeswiththerecoveryUSBkey,followtheinstructionsshippedwiththeUSBkey.
–IfyourcomputerdoesnotcomewiththerecoveryUSBkey,contacttheLenovoCustomer
SupportCentertoorderarecoveryUSBkey.ForalistofLenovoSupportphonenumbers,goto
http://www.lenovo.com/support/phone.Ifyoucannotfindthesupporttelephonenumberforyour
countryorregion,contactyourLenovoreseller.
66ThinkCentreM79UserGuide
Page 79

Chapter9.Installingorreplacinghardware
Thischapterprovidesinstructionsonhowtoinstallorreplacehardwareforyourcomputer.
Handlingstatic-sensitivedevices
Donotopenthestatic-protectivepackagecontainingthenewpartuntilthedefectiveparthasbeenremoved
andyouarereadytoinstallthenewpart.Staticelectricity,althoughharmlesstoyou,canseriouslydamage
computercomponentsandparts.
Whenyouhandlepartsandothercomputercomponents,taketheseprecautionstoavoidstatic-electricity
damage:
•Limityourmovement.Movementcancausestaticelectricitytobuilduparoundyou.
•Alwayshandlepartsandothercomputercomponentscarefully.HandlePCIcards,memorymodules,
systemboards,andmicroprocessorsbytheedges.Nevertouchanyexposedcircuitry.
•Preventothersfromtouchingthepartsandothercomputercomponents.
•Touchthestatic-protectivepackagecontainingtheparttoametalexpansion-slotcoverorother
unpaintedmetalsurfaceonthecomputerforatleasttwoseconds.Thisreducesstaticelectricityfrom
thepackageandyourbodybeforeyouinstallorreplaceanewpart.
•Whenpossible,removethenewpartfromthestatic-protectivepackage,andinstallitdirectlyinthe
computerwithoutsettingthepartdown.Whenthisisnotpossible,placethestatic-protectivepackage
thatthepartcameinonasmooth,levelsurfaceandplacethepartonthepackage.
•Donotplacethepartonthecomputercoverorothermetalsurface.
Installingorreplacinghardware
Thissectionprovidesinstructionsonhowtoinstallorreplacehardwareforyourcomputer.Y oucanexpand
thecapabilitiesofyourcomputerandmaintainyourcomputerbyinstallingorreplacinghardware.
Attention:Donotopenyourcomputerorattemptanyrepairbeforereadingandunderstandingthe“Read
thisfirst:Importantsafetyinformation”onpagev.
Notes:
•UseonlycomputerpartsprovidedbyLenovo.
•Wheninstallingorreplacinganoption,usetheappropriateinstructionsinthissectionalongwiththe
instructionsthatcomewiththeoption.
Installingexternaloptions
Youcanconnectexternaloptionstoyourcomputer,suchasexternalspeakers,aprinter,orascanner.For
someexternaloptions,youmustinstalladditionalsoftwareinadditiontomakingthephysicalconnection.
Wheninstallinganexternaloption,see“Locatingconnectors,controls,andindicatorsonthefrontofyour
computer”onpage2
requiredconnector.Usetheinstructionsshippedwiththeoptiontohelpyoumaketheconnectionandinstall
anysoftwareordevicedriversthatarerequiredfortheoption.
and“Locatingconnectorsontherearofyourcomputer”onpage3toidentifythe
Removingthecomputercover
Attention:Donotopenyourcomputerorattemptanyrepairbeforereadingandunderstandingthe“Read
thisfirst:Importantsafetyinformation”onpagev
.
©CopyrightLenovo2014,2016
67
Page 80
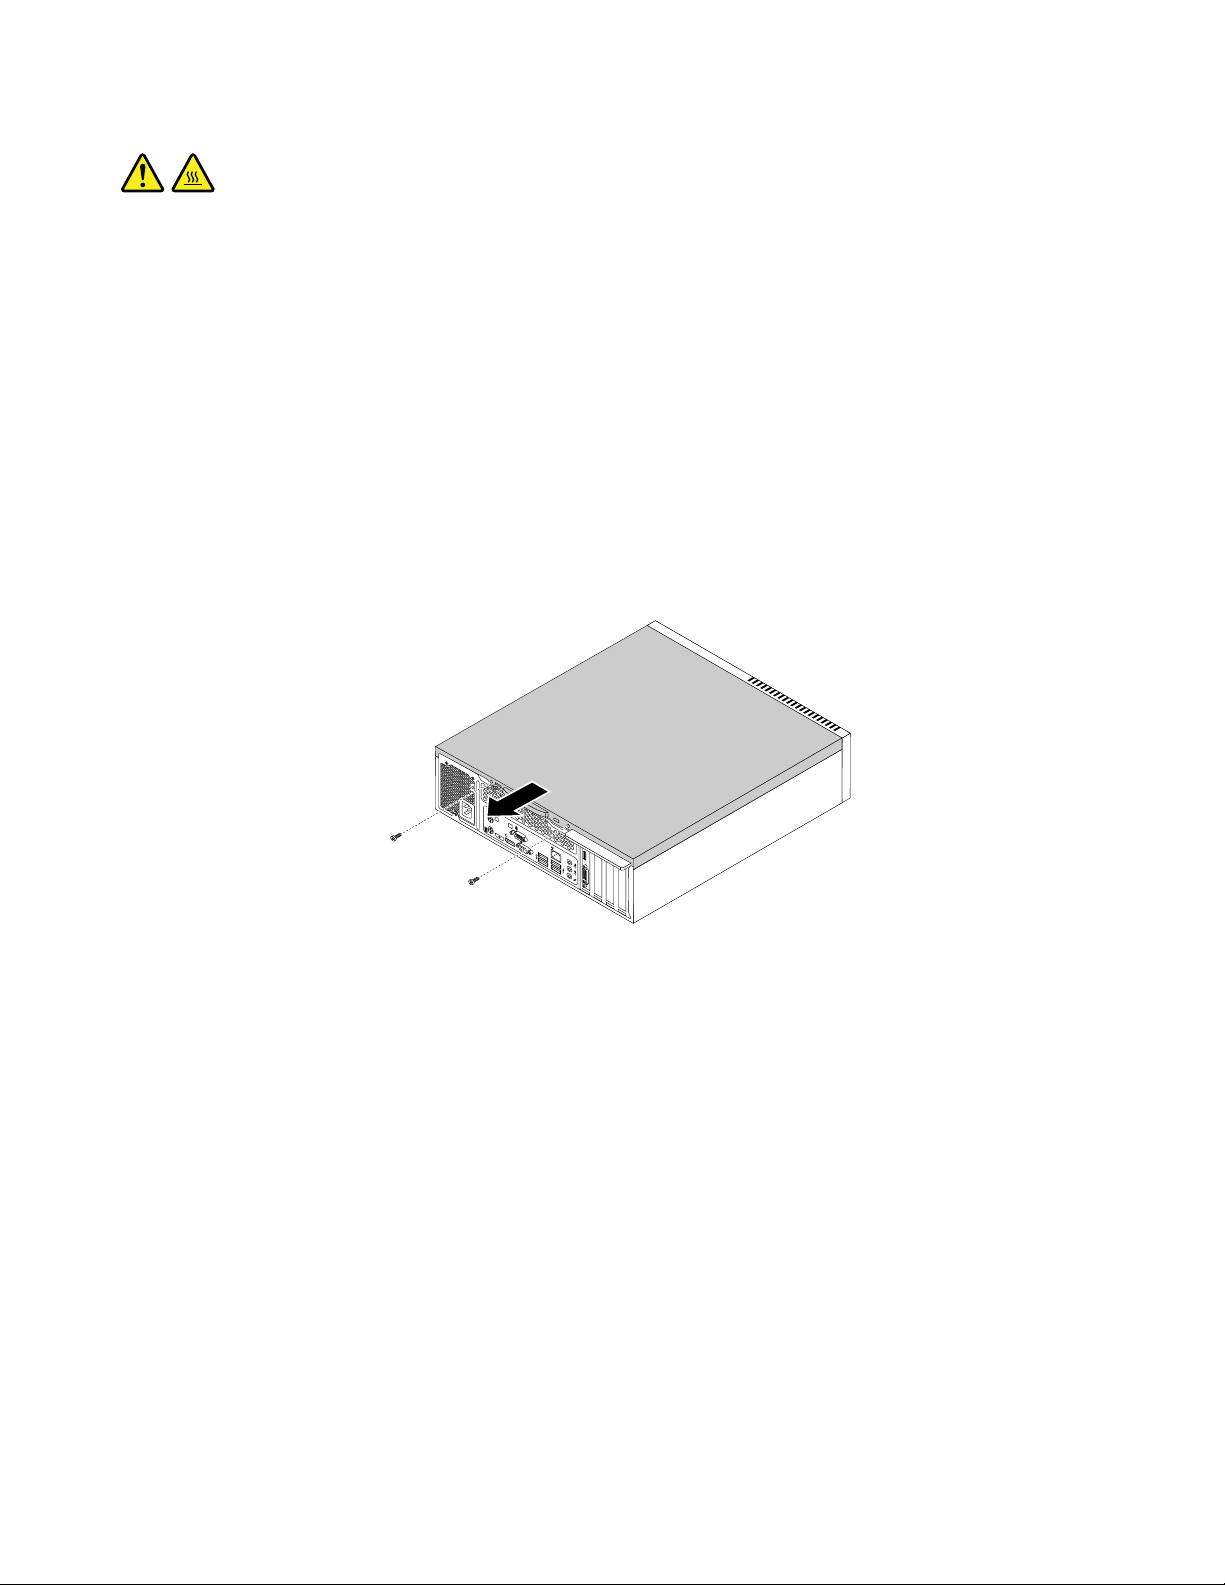
CAUTION:
5
6
3
4
Turnoffthecomputerandwaitthreetofiveminutestoletthecomputercoolbeforeremovingthe
computercover.
Toopenthecomputercover,dothefollowing:
1.Removeanymediafromthedrivesandturnoffallattacheddevicesandthecomputer.
2.Disconnectallpowercordsfromelectricaloutlets.
3.Disconnectthepowercord,Input/Outputcables,andanyothercablesthatareconnectedtothe
computer.See“Locatingconnectors,controls,andindicatorsonthefrontofyourcomputer”onpage2
and“Locatingconnectorsontherearofyourcomputer”onpage3.
4.Removeanylockingdevicethatsecuresthecomputercover,suchasanintegratedcablelockora
padlock.See“AttachingaKensington-stylecablelock”onpage31or“Lockingthecomputercover”
onpage29.
5.Removethetwoscrewsthatsecurethecomputercoverandslidethecomputercovertotherearto
removeit.
Figure9.Removingthecomputercover
Removingandreinstallingthefrontbezel
Attention:Donotopenyourcomputerorattemptanyrepairbeforereadingandunderstandingthe“Read
thisfirst:Importantsafetyinformation”onpagev.
Toremoveandreinstallthefrontbezel,dothefollowing:
1.Removeanymediafromthedrivesandturnoffallattacheddevicesandthecomputer.Then,disconnect
allpowercordsfromelectricaloutletsanddisconnectallcablesthatareconnectedtothecomputer.
2.Removethecomputercover.See“Removingthecomputercover”onpage67.
68ThinkCentreM79UserGuide
Page 81
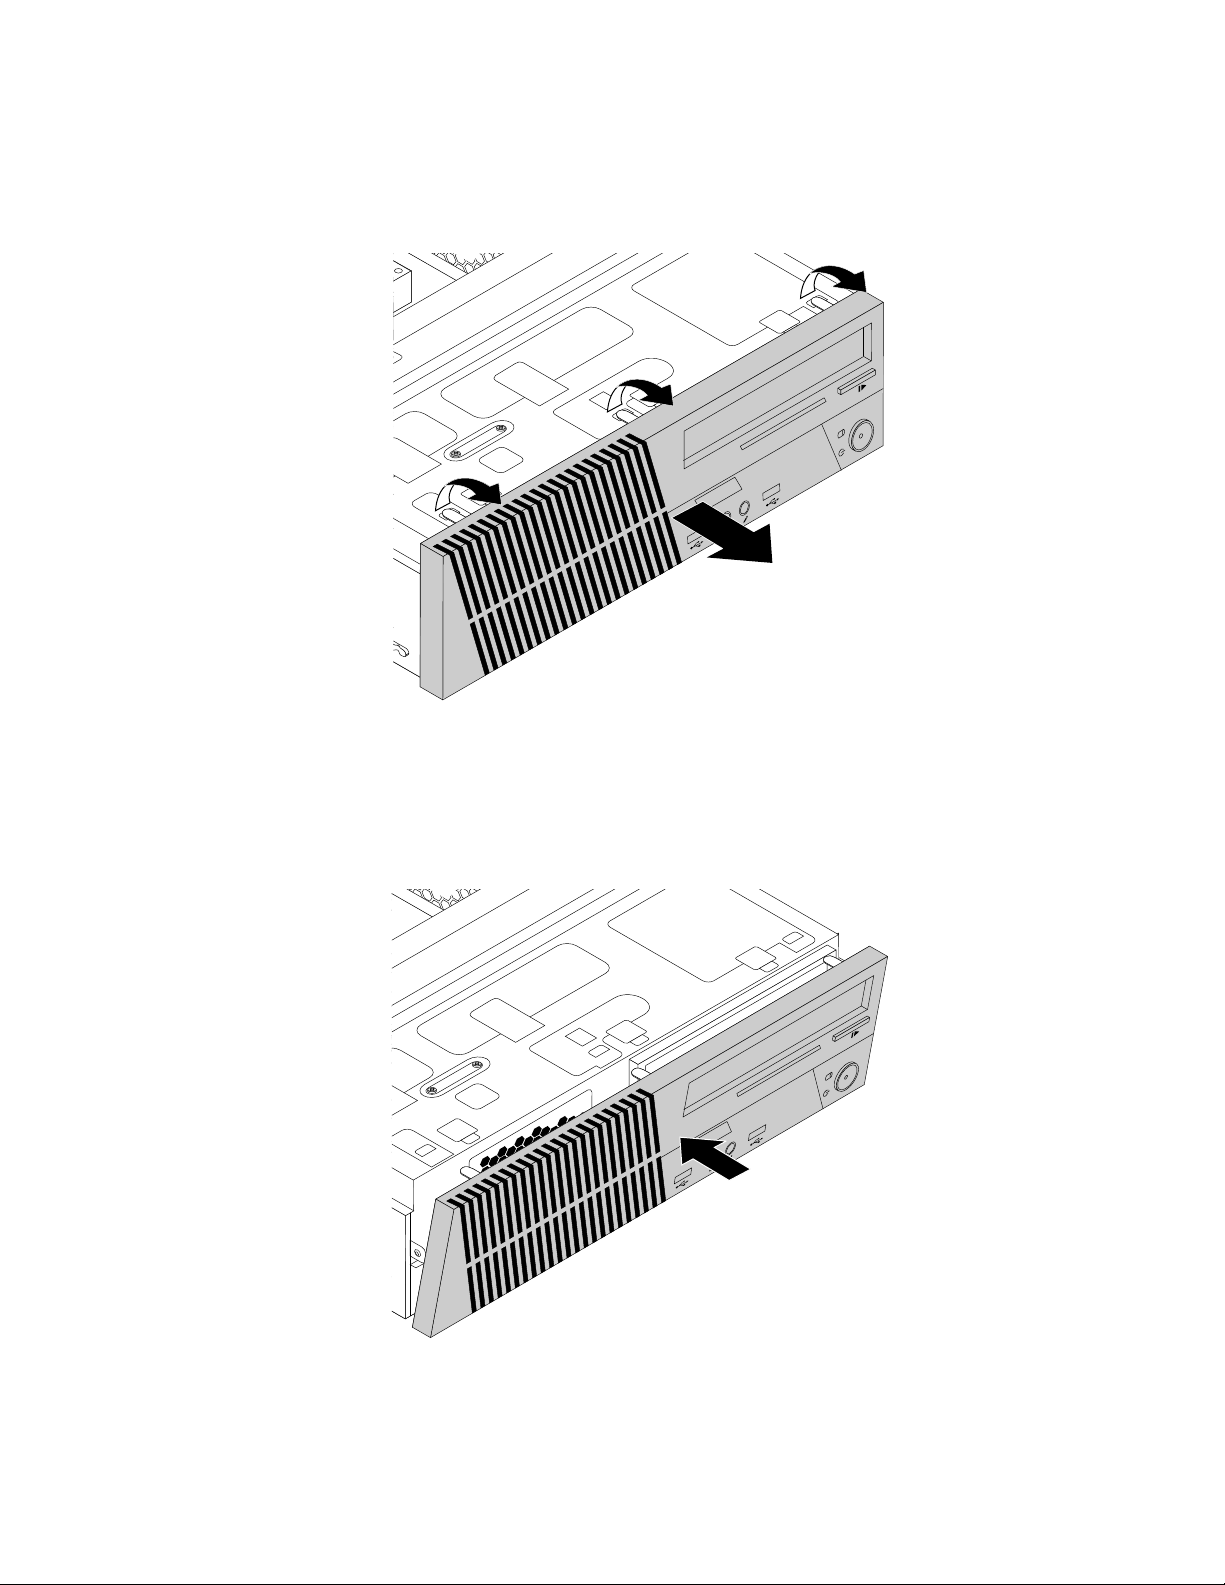
3.Removethefrontbezelbyreleasingthethreeplastictabsonthetopofthefrontbezelandpivoting
1
2
1
2
thefrontbezeloutwardtoremoveitfromthecomputer.Carefullylaythefrontbezelasidewithout
disconnectingthepowerswitchandlight-emittingdiode(LED)assemblycable.
Figure10.Removingthefrontbezel
4.Toreinstallthefrontbezel,aligntheotherthreeplastictabsonthebottomofthefrontbezelwiththe
correspondingholesinthechassis,thenpivotthefrontbezelinwarduntilitsnapsintoposition.
Figure11.Reinstallingthefrontbezel
Chapter9.Installingorreplacinghardware69
Page 82
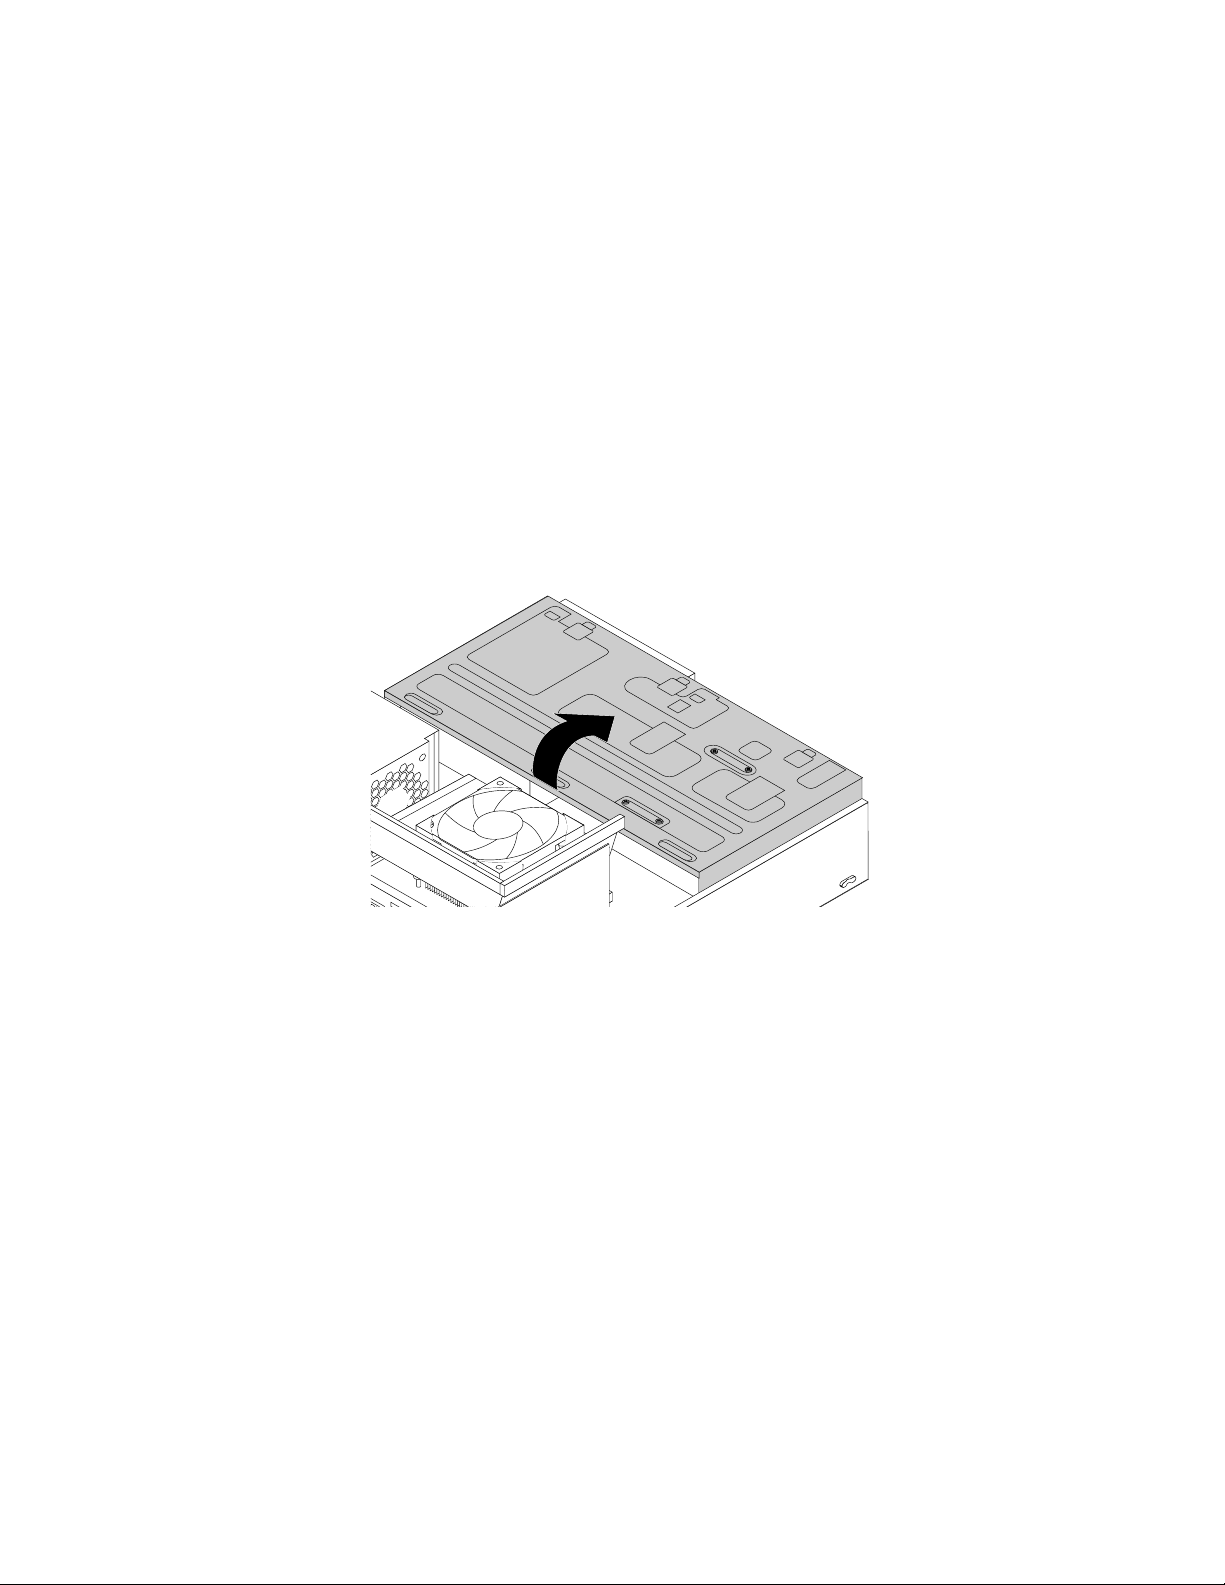
Whattodonext:
•Toworkwithanotherpieceofhardware,gototheappropriatesection.
•Tocompletetheinstallationorreplacement,goto“Completingthepartsreplacement”onpage110.
Accessingthesystemboardcomponentsanddrives
Attention:Donotopenyourcomputerorattemptanyrepairbeforereadingandunderstandingthe“Read
thisfirst:Importantsafetyinformation”onpagev.
Toaccessthesystemboardcomponentsanddrives,dothefollowing:
1.Removeanymediafromthedrivesandturnoffallattacheddevicesandthecomputer.Then,disconnect
allpowercordsfromelectricaloutletsanddisconnectallcablesthatareconnectedtothecomputer.
2.Removethecomputercover.See“Removingthecomputercover”onpage67.
3.Removethefrontbezel.See“Removingandreinstallingthefrontbezel”onpage68.
4.Pivotthedrivebayassemblyupwardtoaccessalltheinternaldrives,cables,andothercomponents.
Figure12.Pivotingthedrivebayassemblyupward
70ThinkCentreM79UserGuide
Page 83

5.Tolowerthedrivebayassembly,slightlypressthedrivebayassemblyclip1inwardandpivotthedrive
bayassemblydownwardasshown.
Figure13.Loweringthedrivebayassembly
Installingorreplacingamemorymodule
Attention:Donotopenyourcomputerorattemptanyrepairbeforereadingandunderstandingthe“Read
thisfirst:Importantsafetyinformation”onpagev.
YourcomputerhasfourslotsforinstallingorreplacingDDR3UDIMMsthatprovideuptoamaximumof
32GBsystemmemory.Wheninstallingorreplacingamemorymodule,use2GB,4GB,or8GBDDR3
UDIMMsinanycombinationuptoamaximumof32GB.
Thefollowingtableprovidesinformationaboutthememorymoduleinstallationrulesthatyoushould
considerwheninstallingorremovingamemorymodule.The“X”markindicatesthememoryslot(s)into
whichthememorymodule(s)shouldbeinstalledindifferentsituations.Thenumbers1,2,3,and4indicate
theinstallationsequence.Tolocatethememorymoduleslots,see“Locatingpartsonthesystemboard”
onpage6
OneUDIMM
TwoUDIMMsX,1X,2
ThreeUDIMMsX,1X,3X,2
FourUDIMMsX,1X,3X,2X,4
Toinstallorreplaceamemorymodule,dothefollowing:
1.Removeanymediafromthedrivesandturnoffallattacheddevicesandthecomputer.Then,disconnect
2.Removethecomputercover.See“Removingthecomputercover”onpage67.
3.Laythecomputeronitssideforeasieraccesstothesystemboard.
4.Removetheheatsinkfanduct.See“Replacingtheheatsinkandfanassembly”onpage88.
.
UDIMMDIMM1DIMM2DIMM3DIMM4
X
allpowercordsfromelectricaloutletsanddisconnectallcablesthatareconnectedtothecomputer.
Chapter9.Installingorreplacinghardware71
Page 84

5.Locatethememoryslots.See“Locatingpartsonthesystemboard”onpage6.
6.Removeanypartsthatmightpreventaccesstothememoryslots.
7.Dependingonwhetheryouareinstallingorreplacingamemorymodule,dooneofthefollowing:
•Ifyouarereplacinganoldmemorymodule,opentheretainingclipsandgentlypullthememory
moduleoutofthememoryslot.
Figure14.Removingamemorymodule
•Ifyouareinstallingamemorymodule,opentheretainingclipsofthememoryslotintowhichyou
wanttoinstallthememorymodule.
Figure15.Openingtheretainingclips
72ThinkCentreM79UserGuide
Page 85

8.Positionthenewmemorymoduleoverthememoryslot.Makesurethatthenotch1onthememory
modulealignscorrectlywiththeslotkey2onthesystemboard.Pushthememorymodulestraight
downintotheslotuntiltheretainingclipsclose.
Figure16.Installingamemorymodule
Whattodonext:
•Toworkwithanotherpieceofhardware,gototheappropriatesection.
•Tocompletetheinstallationorreplacement,goto“Completingthepartsreplacement”onpage110.
InstallingorreplacingaPCIcard
Attention:Donotopenyourcomputerorattemptanyrepairbeforereadingandunderstandingthe“Read
thisfirst:Importantsafetyinformation”onpagev.
YourcomputerhasonestandardPCIcardslot,twoPCIExpressx1cardslots,andonePCIExpressx16
graphicscardslot.
ToinstallorreplaceaPCIcard,dothefollowing:
1.Removeanymediafromthedrivesandturnoffallattacheddevicesandthecomputer.Then,disconnect
allpowercordsfromelectricaloutletsanddisconnectallcablesthatareconnectedtothecomputer.
2.Removethecomputercover.See“Removingthecomputercover”onpage67.
3.Removethefrontbezel.See“Removingandreinstallingthefrontbezel”onpage68.
4.Pivotthedrivebayassemblyupward.See“Accessingthesystemboardcomponentsanddrives”
onpage70.
5.DependingonwhetheryouareinstallingorreplacingaPCIcard,dooneofthefollowing:
•IfyouarereplacinganoldPCIcard,removethescrewthatsecurestheoldPCIcardandreleasethe
oldPCIcardfromthePCIcardslot.
Chapter9.Installingorreplacinghardware73
Page 86
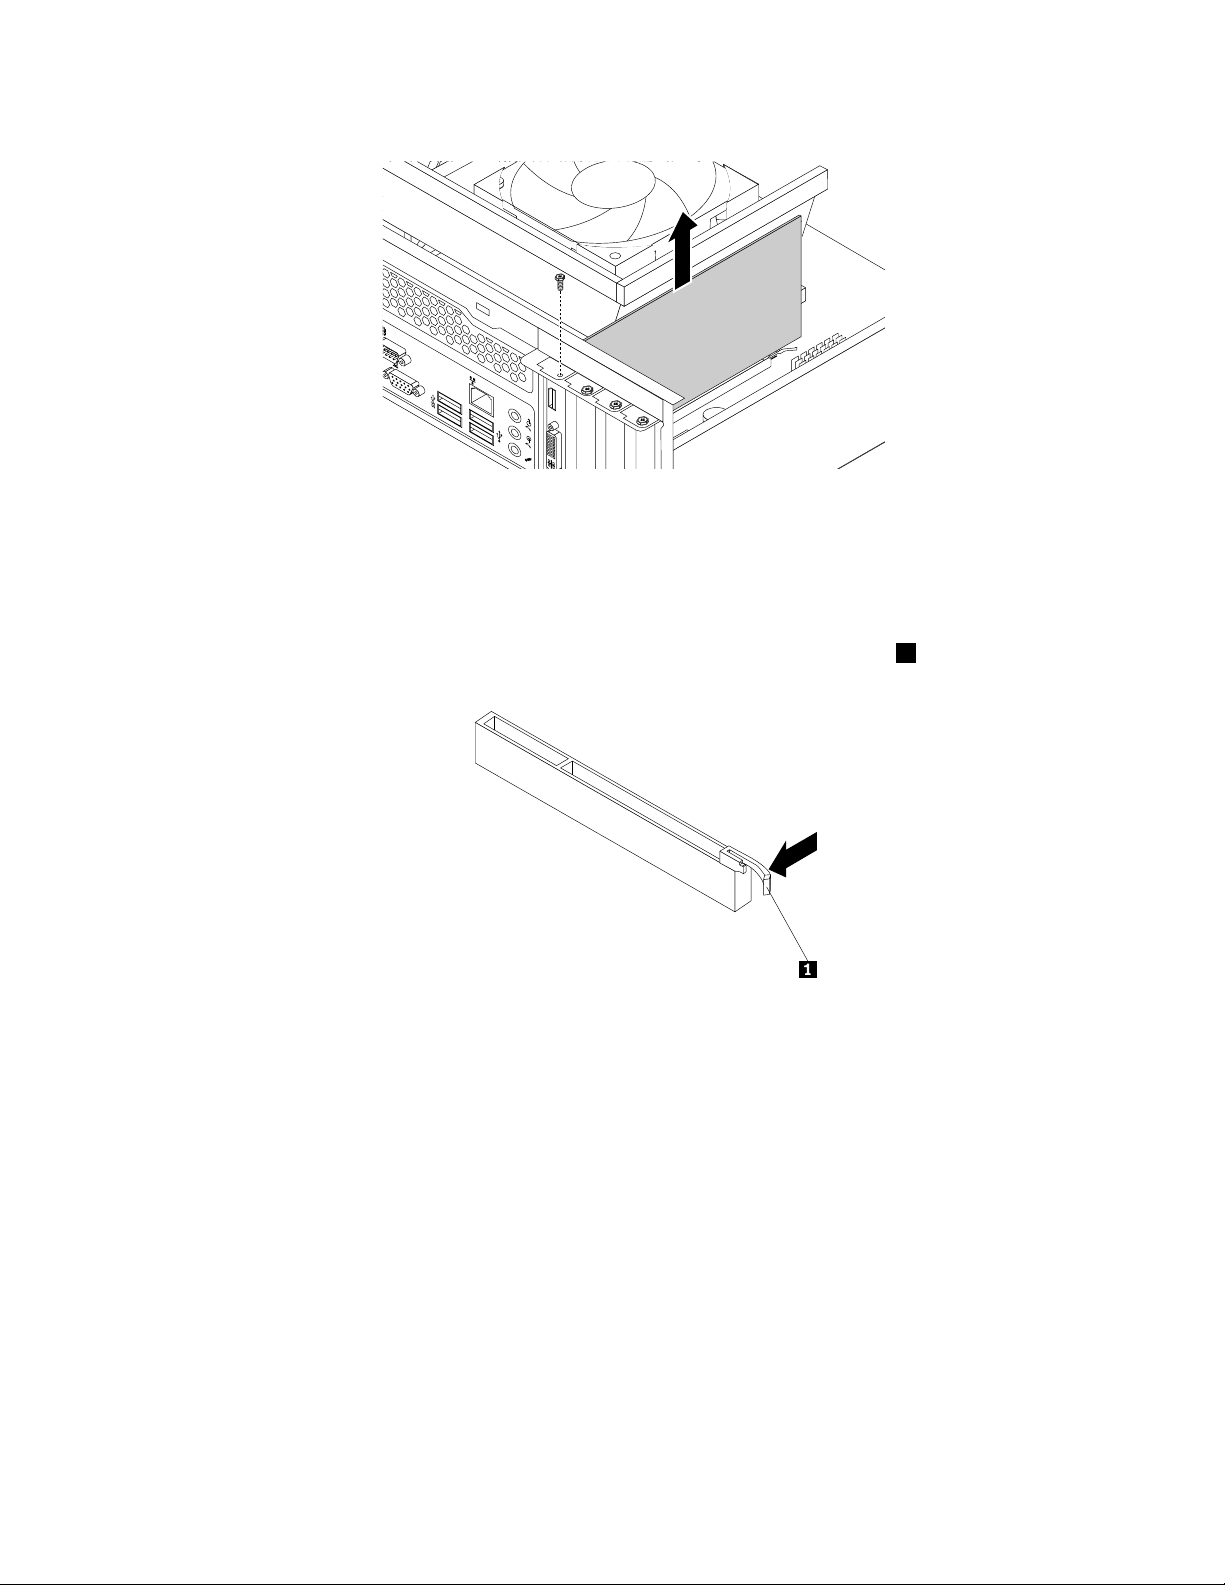
5
6
3
4
Figure17.RemovingaPCIcard
Notes:
–Thecardfitstightlyintothecardslot.Ifnecessary,alternatemovingeachsideofthecardasmall
amountuntilitisremovedfromthecardslot.
–Ifthecardisheldinplacebyaretaininglatch,pressthecardretaininglatch
1asshownto
disengagethelatch.Graspthecardandgentlypullitoutoftheslot.
•IfyouareinstallingaPCIcard,removethescrewthatsecurestheappropriatemetalslotcover.
Then,removethemetalslotcover.
6.RemovethenewPCIcardfromitsstatic-protectivepackage.
74ThinkCentreM79UserGuide
Page 87
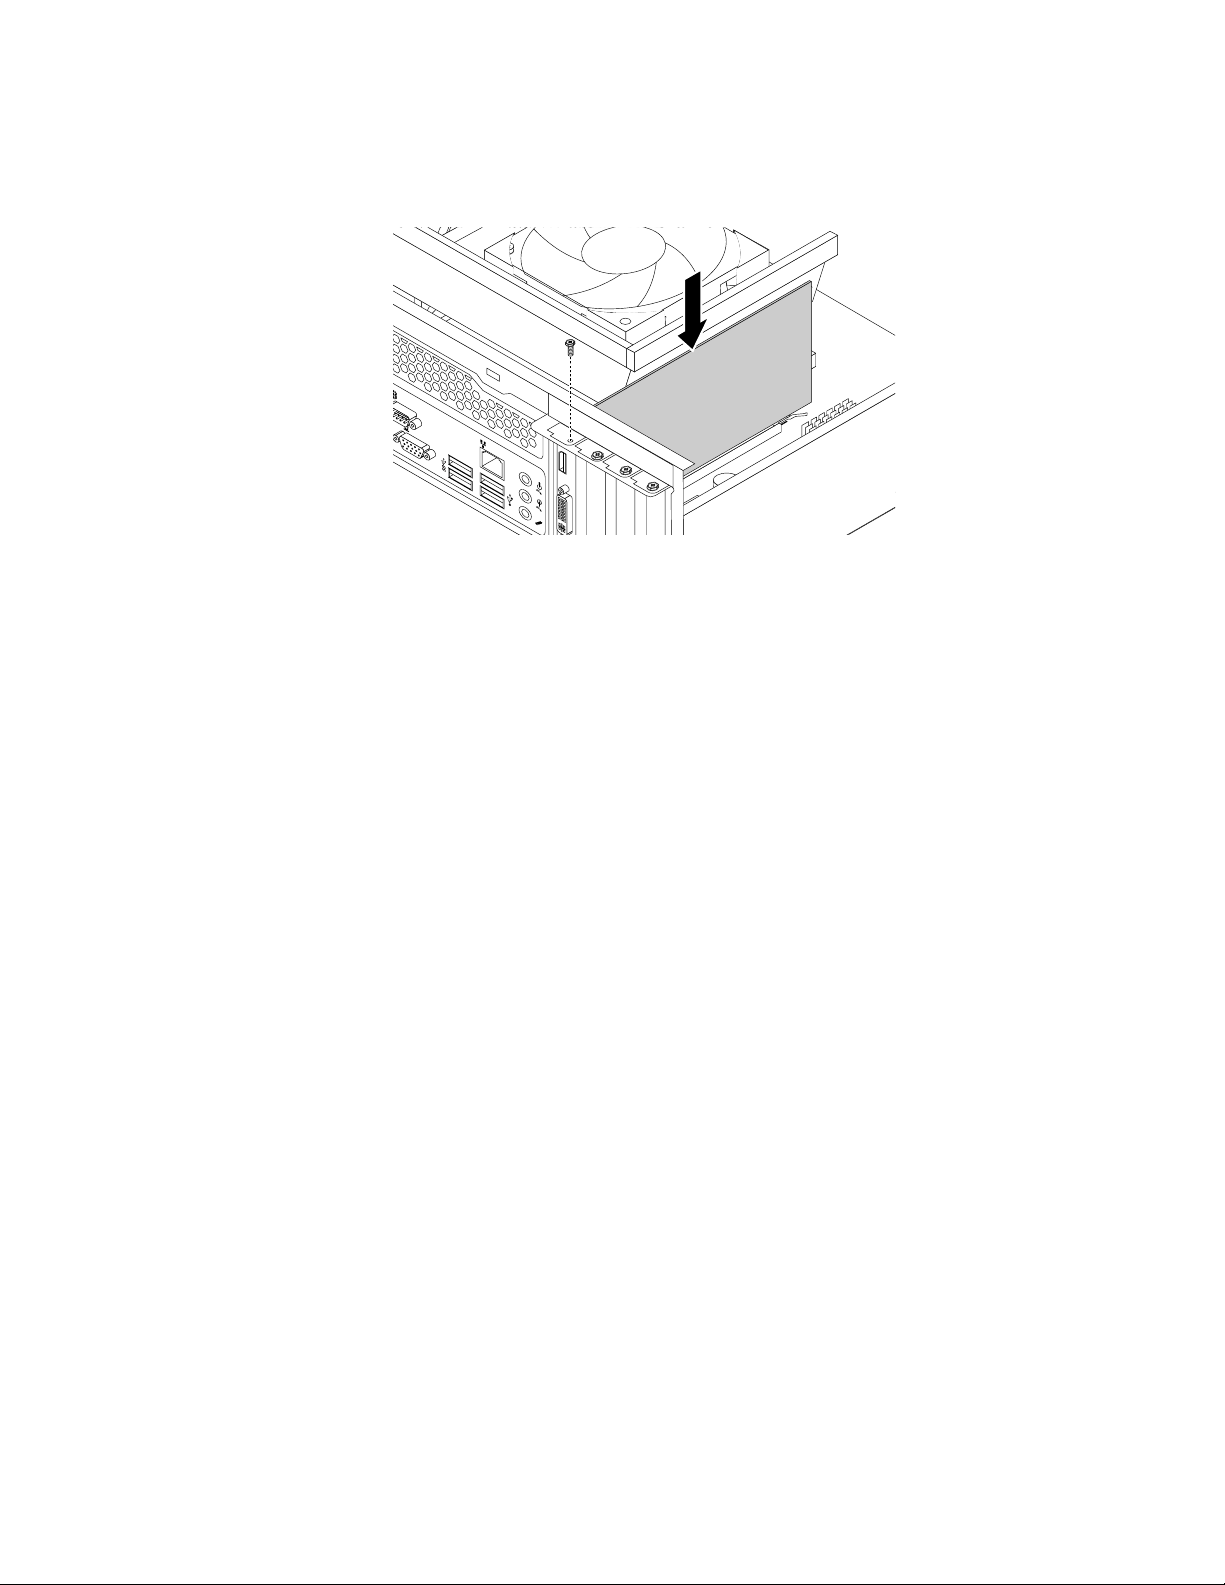
7.InstallthenewPCIcardintotheappropriatePCIcardslotonthesystemboard.Then,installthescrew
5
6
3
4
tosecurethenewPCIcardinplace.
Figure18.InstallingaPCIcard
8.Ifnecessary,connectanycablesbetweenthePCIcardandthesystemboard.See“Locatingpartson
thesystemboard”onpage6toidentifythevariousconnectorsonthesystemboard.
Whattodonext:
•Toworkwithanotherpieceofhardware,gototheappropriatesection.
•Tocompletetheinstallationorreplacement,goto“Completingthepartsreplacement”onpage110.
Replacingthebattery
Attention:Donotopenyourcomputerorattemptanyrepairbeforereadingandunderstandingthe“Read
thisfirst:Importantsafetyinformation”onpagev.
Yourcomputerhasaspecialtypeofmemorythatmaintainsthedate,time,andsettingsforbuilt-infeatures,
suchasparallel-connectorassignments(configuration).Abatterykeepsthisinformationactivewhenyou
turnoffthecomputer.
Thebatterynormallyrequiresnochargingormaintenancethroughoutitslife;however,nobatterylasts
forever.Ifthebatteryfails,thedate,time,andconfigurationinformation(includingpasswords)arelost.An
errormessageisdisplayedwhenyouturnonthecomputer.
Refertothe“Lithiumcoincellbatterynotice”intheSafety,Warranty,andSetupGuideforinformationabout
replacinganddisposingofthebattery.
Toreplacethebattery,dothefollowing:
1.Removeanymediafromthedrivesandturnoffallattacheddevicesandthecomputer.Then,disconnect
allpowercordsfromelectricaloutletsanddisconnectallcablesthatareconnectedtothecomputer.
2.Removethecomputercover.See“Removingthecomputercover”onpage67.
3.Locatethebattery.See“Locatingpartsonthesystemboard”onpage6.
Chapter9.Installingorreplacinghardware75
Page 88
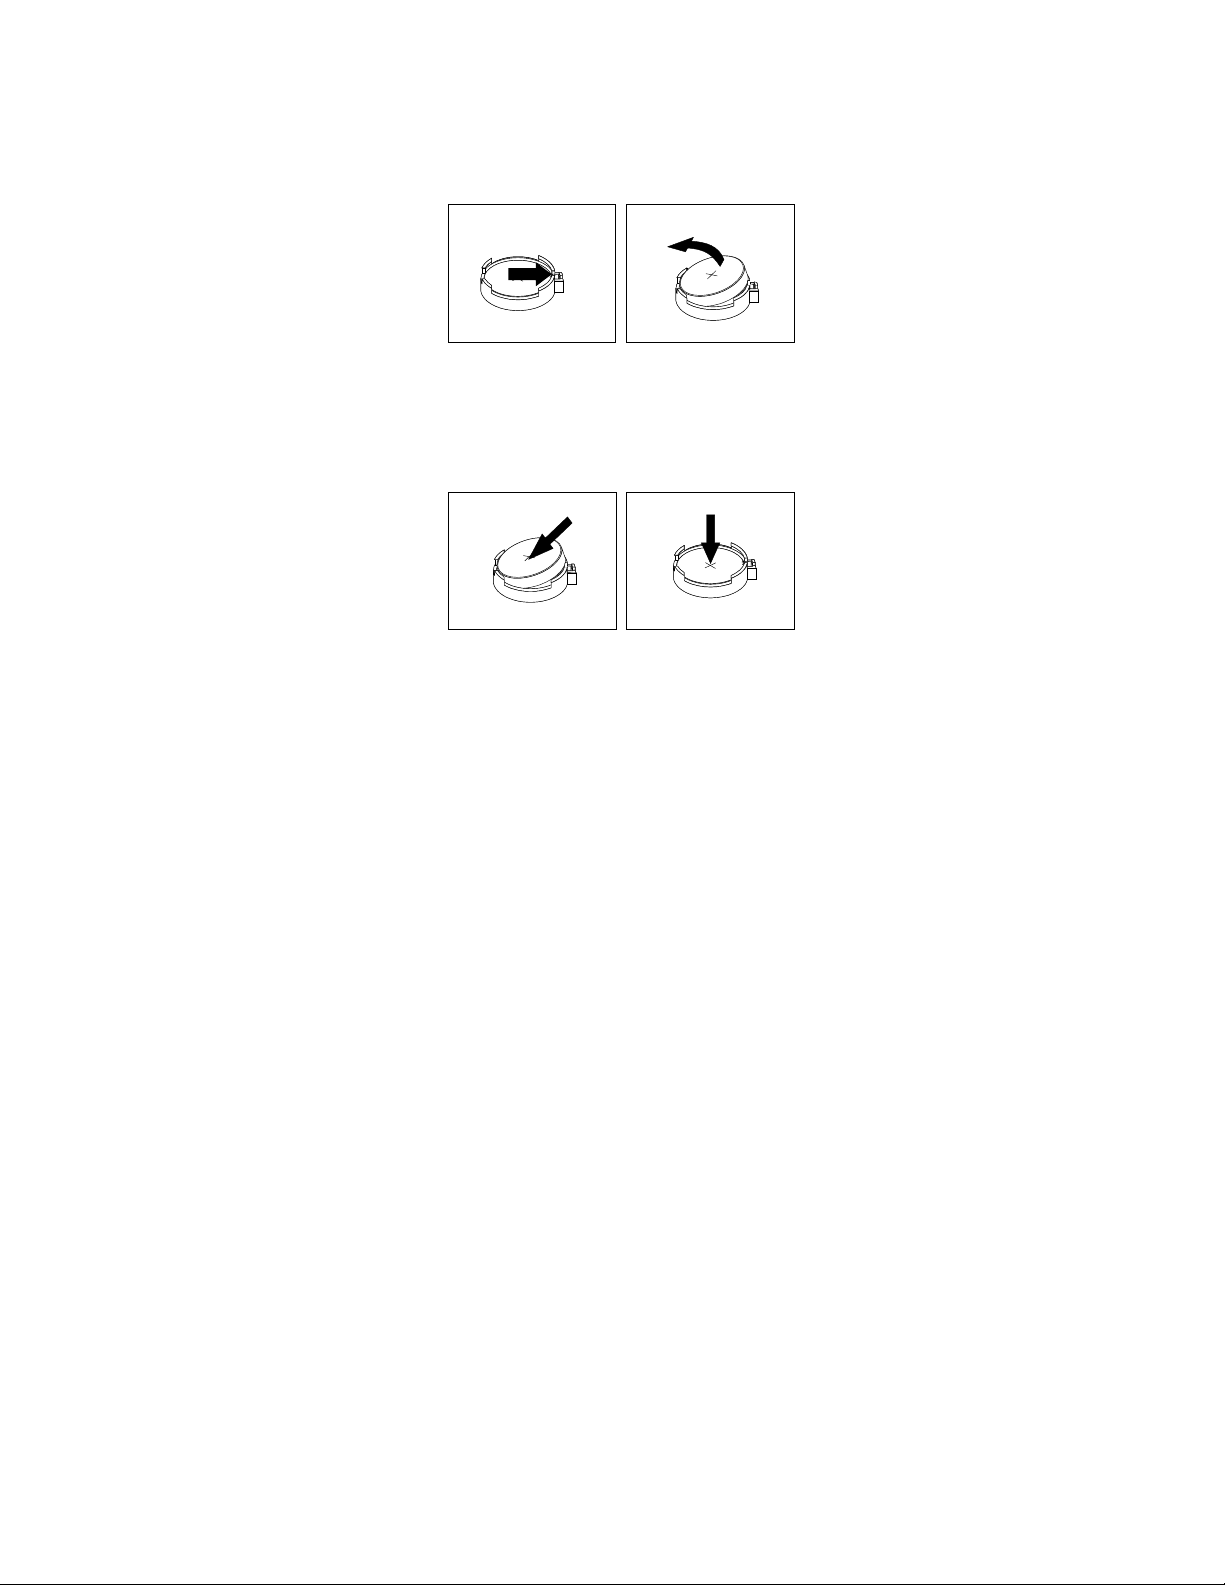
4.Removetheoldbattery.
Figure19.Removingtheoldbattery
5.Installanewbattery.
Figure20.Installinganewbattery
6.Reinstallthecomputercoverandconnectthecables.See“Completingthepartsreplacement”on
page110.
Note:Whenthecomputeristurnedonforthefirsttimeafterreplacingthebattery,anerrormessage
mightbedisplayed.Thisisnormalafterreplacingthebattery.
7.Turnonthecomputerandallattacheddevices.
8.UsetheSetupUtilityprogramtosetthedate,time,andanypasswords.See“UsingtheSetupUtility
program”onpage33.
Whattodonext:
•Toworkwithanotherpieceofhardware,gototheappropriatesection.
•Tocompletetheinstallationorreplacement,goto“Completingthepartsreplacement”onpage110.
Replacingtheharddiskdrive
Attention:Donotopenyourcomputerorattemptanyrepairbeforereadingandunderstandingthe“Read
thisfirst:Importantsafetyinformation”onpagev.
Toreplacetheharddiskdrive,dothefollowing:
1.Removeanymediafromthedrivesandturnoffallattacheddevicesandthecomputer.Then,disconnect
allpowercordsfromelectricaloutletsanddisconnectallcablesthatareconnectedtothecomputer.
2.Removethecomputercover.See“Removingthecomputercover”onpage67.
3.Removethefrontbezel.See“Removingandreinstallingthefrontbezel”onpage68.
76ThinkCentreM79UserGuide
Page 89
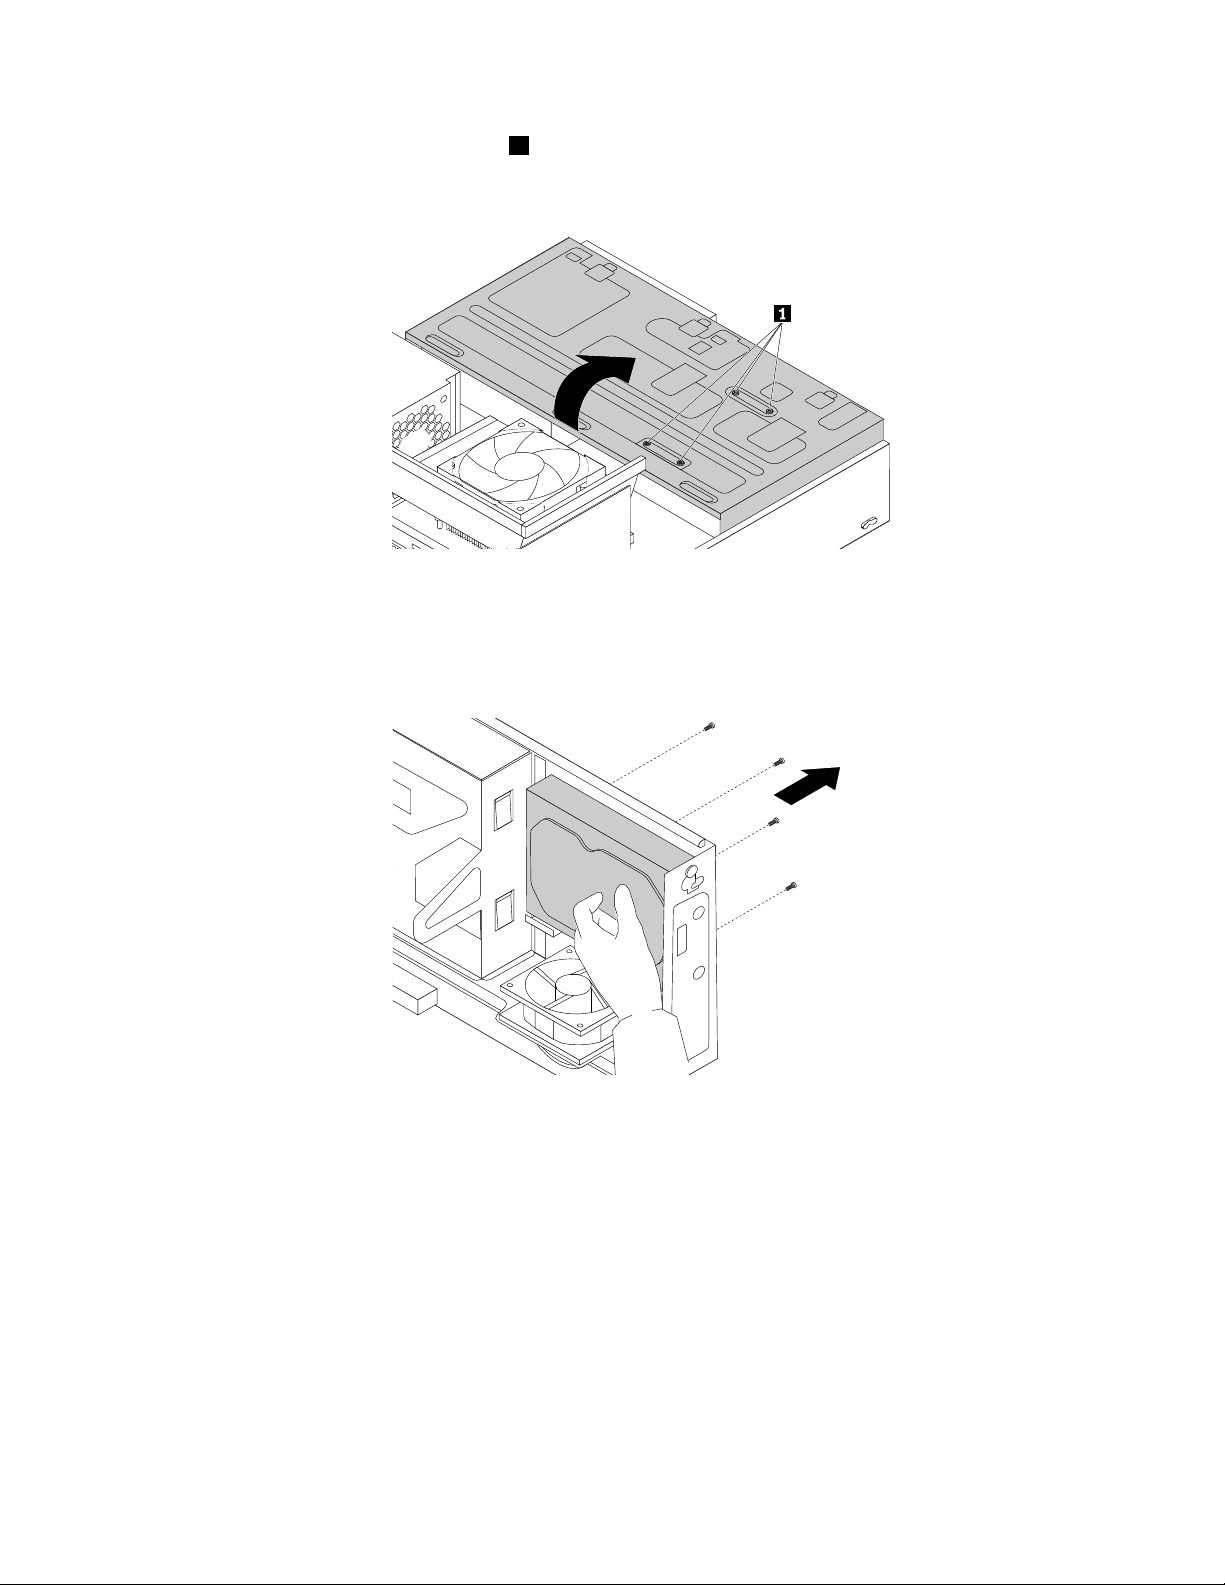
4.Notethelocationofthefourscrews1thatsecuretheharddiskdrive.Then,pivotthedrivebay
assemblyupward.
Figure21.Pivotingthedrivebayassembly
5.Holdtheharddiskdriveandremovethefourscrewsthatsecuretheharddiskdrive.Then,remove
theharddiskdrivefromthedrivebayassembly.
Figure22.Removingtheharddiskdrive
6.Disconnectthesignalcableandthepowercablefromtheharddiskdrivetocompletelyremovethehard
diskdrivefromthechassis.
Chapter9.Installingorreplacinghardware77
Page 90

7.Connectoneendofthesignalcabletotherearofthenewharddiskdriveandtheotherendtoan
availableSATAconnectoronthesystemboard.See“Locatingpartsonthesystemboard”onpage6.
Then,locateanavailablefour-wirepowerconnectorandconnectittotherearofthenewharddiskdrive.
Figure23.ConnectingaSATAharddiskdrive
8.Positionthenewharddiskdriveintotheharddiskdrivebayandalignthescrewholesinthenewhard
diskdrivewiththecorrespondingholesinthedrivebay.Then,installthefourscrewstosecurethe
newharddiskdriveinplace.
Figure24.Installingtheharddiskdrive
Whattodonext:
•Toworkwithanotherpieceofhardware,gototheappropriatesection.
•Tocompletetheinstallationorreplacement,goto“Completingthepartsreplacement”onpage110.
Replacingthesolid-statedrive
Attention:Donotopenyourcomputerorattemptanyrepairbeforereadingandunderstandingthe“Read
thisfirst:Importantsafetyinformation”onpagev.
Thesolid-statedriveisonlyavailableonsomemodels.Itmightbeinstalledintheharddiskdrivebayor
onthebottomoftheopticaldrivebay.
•Toreplacethesolid-statedriveintheharddiskdrivebay,see“Replacingthesolid-statedriveinthehard
diskdrivebay”onpage79
•Toreplacethesolid-statedriveonthebottomoftheopticaldrivebay,see“Replacingthesolid-statedrive
onthebottomoftheopticaldrivebay”onpage80
78ThinkCentreM79UserGuide
.
.
Page 91
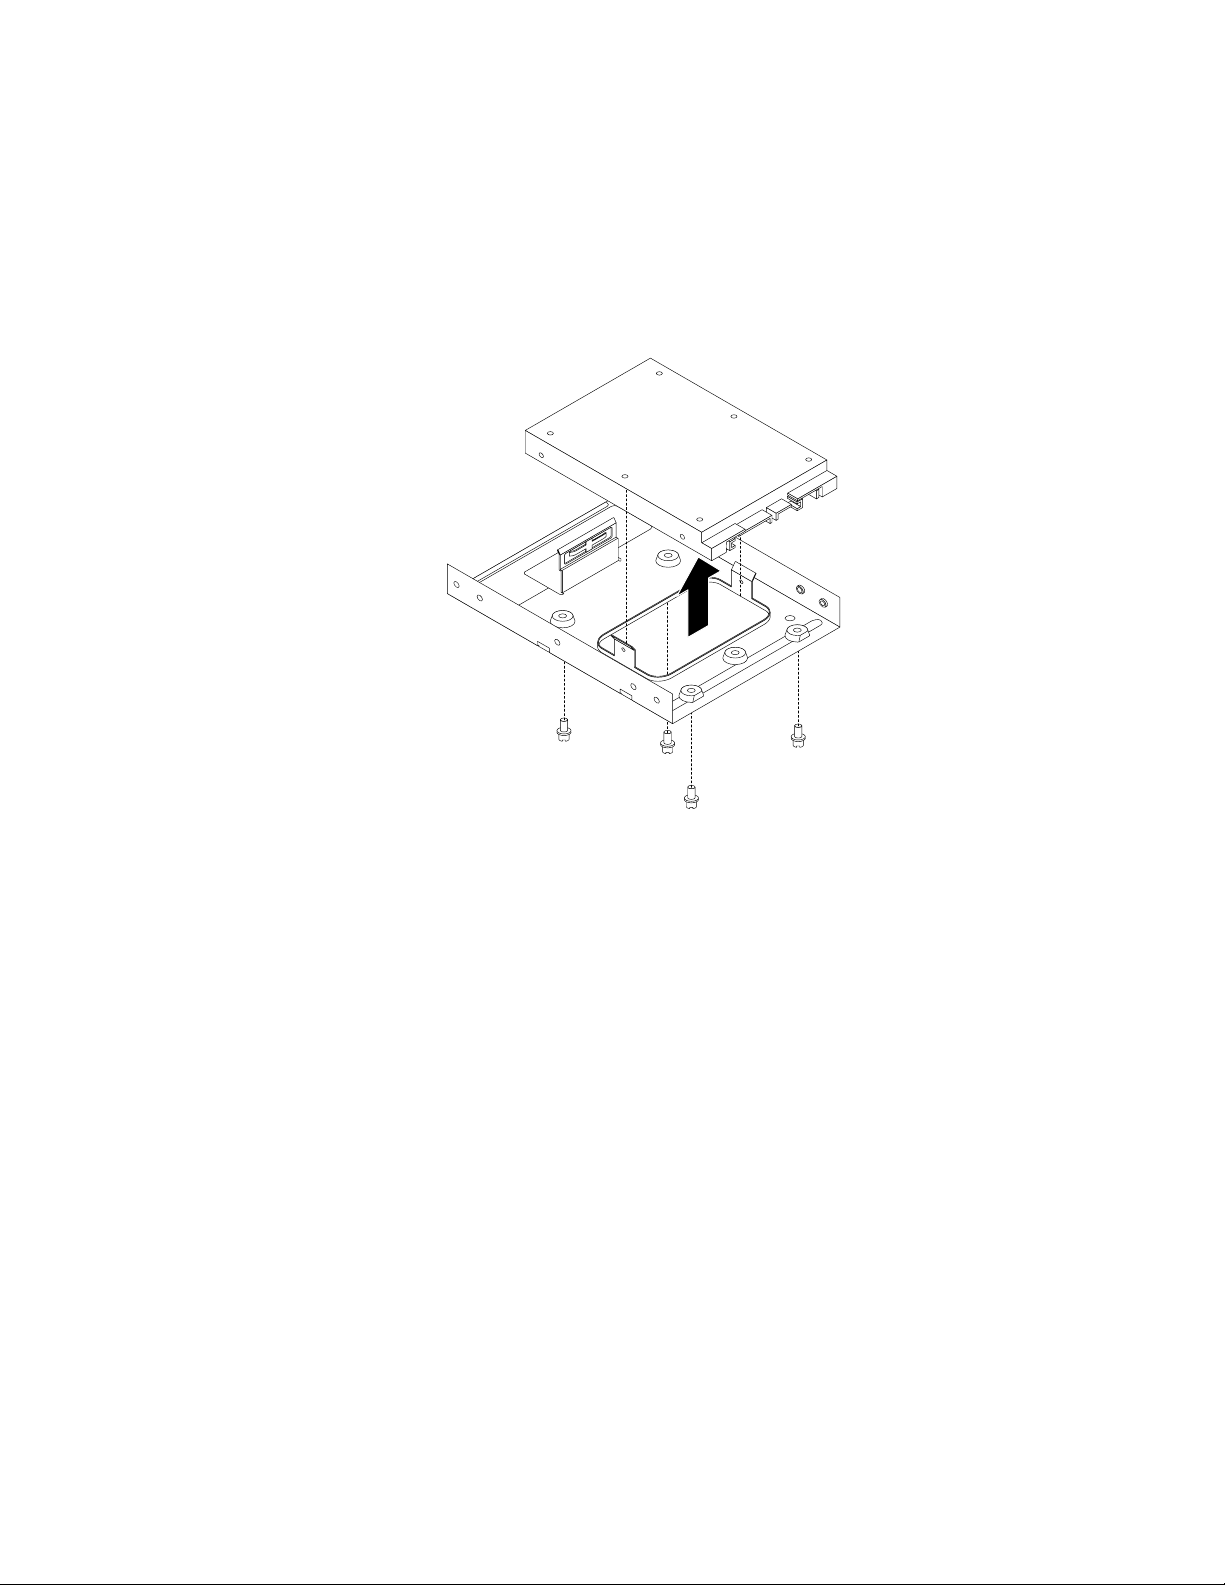
Replacingthesolid-statedriveintheharddiskdrivebay
Toreplacethestorageconverterwiththesolid-statedriveinstalledinit,youmightfollowthestepsof
replacingtheharddiskdrive.See“Replacingtheharddiskdrive”onpage76.
Toreplacethesolid-statedriveinthestorageconverter,dothefollowing:
1.Removethefourscrewsthatsecurethesolid-statedrivetothestorageconverter.Then,removethe
drivefromtheconverterasshown.
Figure25.Removingthesolid-statedrivefromthestorageconverter
2.Takethenewsolid-statedriveoutofthestatic-protectivepackage.
Chapter9.Installingorreplacinghardware79
Page 92

3.Positionthesolid-statedriveintothestorageconvertersothattheholesinthedrivearealignedwith
thecorrespondingholesintheconverter.Then,installthefourscrewstosecurethesolid-statedrive
totheconverter.
Figure26.Installingthesolid-statedriveintothestorageconverter
Replacingthesolid-statedriveonthebottomoftheopticaldrivebay
Toreplacethesolid-statedriveonthebottomoftheopticaldrivebay,dothefollowing:
1.Removeanymediafromthedrivesandturnoffallattacheddevicesandthecomputer.Then,disconnect
allpowercordsfromelectricaloutletsanddisconnectallcablesthatareconnectedtothecomputer.
2.Removethecomputercover.See“Removingthecomputercover”onpage67.
3.Removethefrontbezel.See“Removingandreinstallingthefrontbezel”onpage68.
4.Pivotthedrivebayassemblyupward.See“Accessingthesystemboardcomponentsanddrives”
onpage70
5.Disconnectthesignalcableandthepowercablefromthesolid-statedrive.
.
80ThinkCentreM79UserGuide
Page 93

6.Removethescrew1andthencarefullyslidethesolid-statedrivebracketupwardtoremovethebracket
fromthebottomoftheopticaldrivebay.
Figure27.Removingthesolid-statedrivebracket
7.Removethefourscrewsthatsecurethesolid-statedrivetothebracket.Then,slidethedriveasshown
toremoveitfromthebracket.
Figure28.Removingthesolid-statedrivefromthebracket
8.Takethenewsolid-statedriveoutofthestatic-protectivepackage.
Chapter9.Installingorreplacinghardware81
Page 94

9.Slidethenewsolid-statedriveintothesolid-statedrivebracketasshownuntilthefourholesinthe
drivearealignedwiththecorrespondingholesinthebracket.Then,installthefourscrewstosecurethe
newsolid-statedrivetothebracket.
Figure29.Installingthesolid-statedriveintothebracket
10.Carefullyslidethesolid-statedrivebracketdownwarduntilitissecuredbythethreeretainingclips1on
thebottomoftheopticaldrivebay.
Figure30.Installingthesolid-statedrivebracket
82ThinkCentreM79UserGuide
Page 95

11.Installthescrew1tosecurethebracketonthebottomoftheopticaldrivebay.
Figure31.Installingthescrewtosecurethebracketonthebottomoftheopticaldrivebay
12.Connectoneendofthesignalcabletothebottomofthenewsolid-statedriveandtheotherendto
anavailableSATAconnectoronthesystemboard.See“Locatingpartsonthesystemboard”on
page6.Then,locateanavailablefour-wirepowerconnectorandconnectittothebottomofthenew
solid-statedrive.
Whattodonext:
•Toworkwithanotherpieceofhardware,gototheappropriatesection.
•Tocompletetheinstallationorreplacement,goto“Completingthepartsreplacement”onpage110
Installingorreplacingtheopticaldrive
Attention:Donotopenyourcomputerorattemptanyrepairbeforereadingandunderstandingthe“Read
thisfirst:Importantsafetyinformation”onpagev.
Note:Theopticaldriveisonlyavailableonsomemodels.
Toinstallorreplaceanopticaldrive,dothefollowing:
1.Removeanymediafromthedrivesandturnoffallattacheddevicesandthecomputer.Then,disconnect
allpowercordsfromelectricaloutletsanddisconnectallcablesthatareconnectedtothecomputer.
2.Removethecomputercover.See“Removingthecomputercover”onpage67.
3.Removethefrontbezel.See“Removingandreinstallingthefrontbezel”onpage68.
4.Pivotthedrivebayassemblyupward.See“Accessingthesystemboardcomponentsanddrives”
onpage70
5.Disconnectthesignalcableandthepowercablefromtheopticaldrive.
.
.
Chapter9.Installingorreplacinghardware83
Page 96

6.Holdtheopticaldriveandremovethetwoscrewsthatsecuretheopticaldrive.
Figure32.Removingtheopticaldrivescrews
7.Slightlypressthedrivebayassemblyclip1inwardandpivotthedrivebayassemblydownwardas
shown.
Figure33.Loweringthedrivebayassembly
84ThinkCentreM79UserGuide
Page 97

8.Slidetheopticaldriveoutofthefrontofthecomputer.
Figure34.Removingtheopticaldrive
9.Slidethenewopticaldriveintotheopticaldrivebayfromthefrontofthecomputer.
Figure35.Installinganewopticaldrive
Chapter9.Installingorreplacinghardware85
Page 98
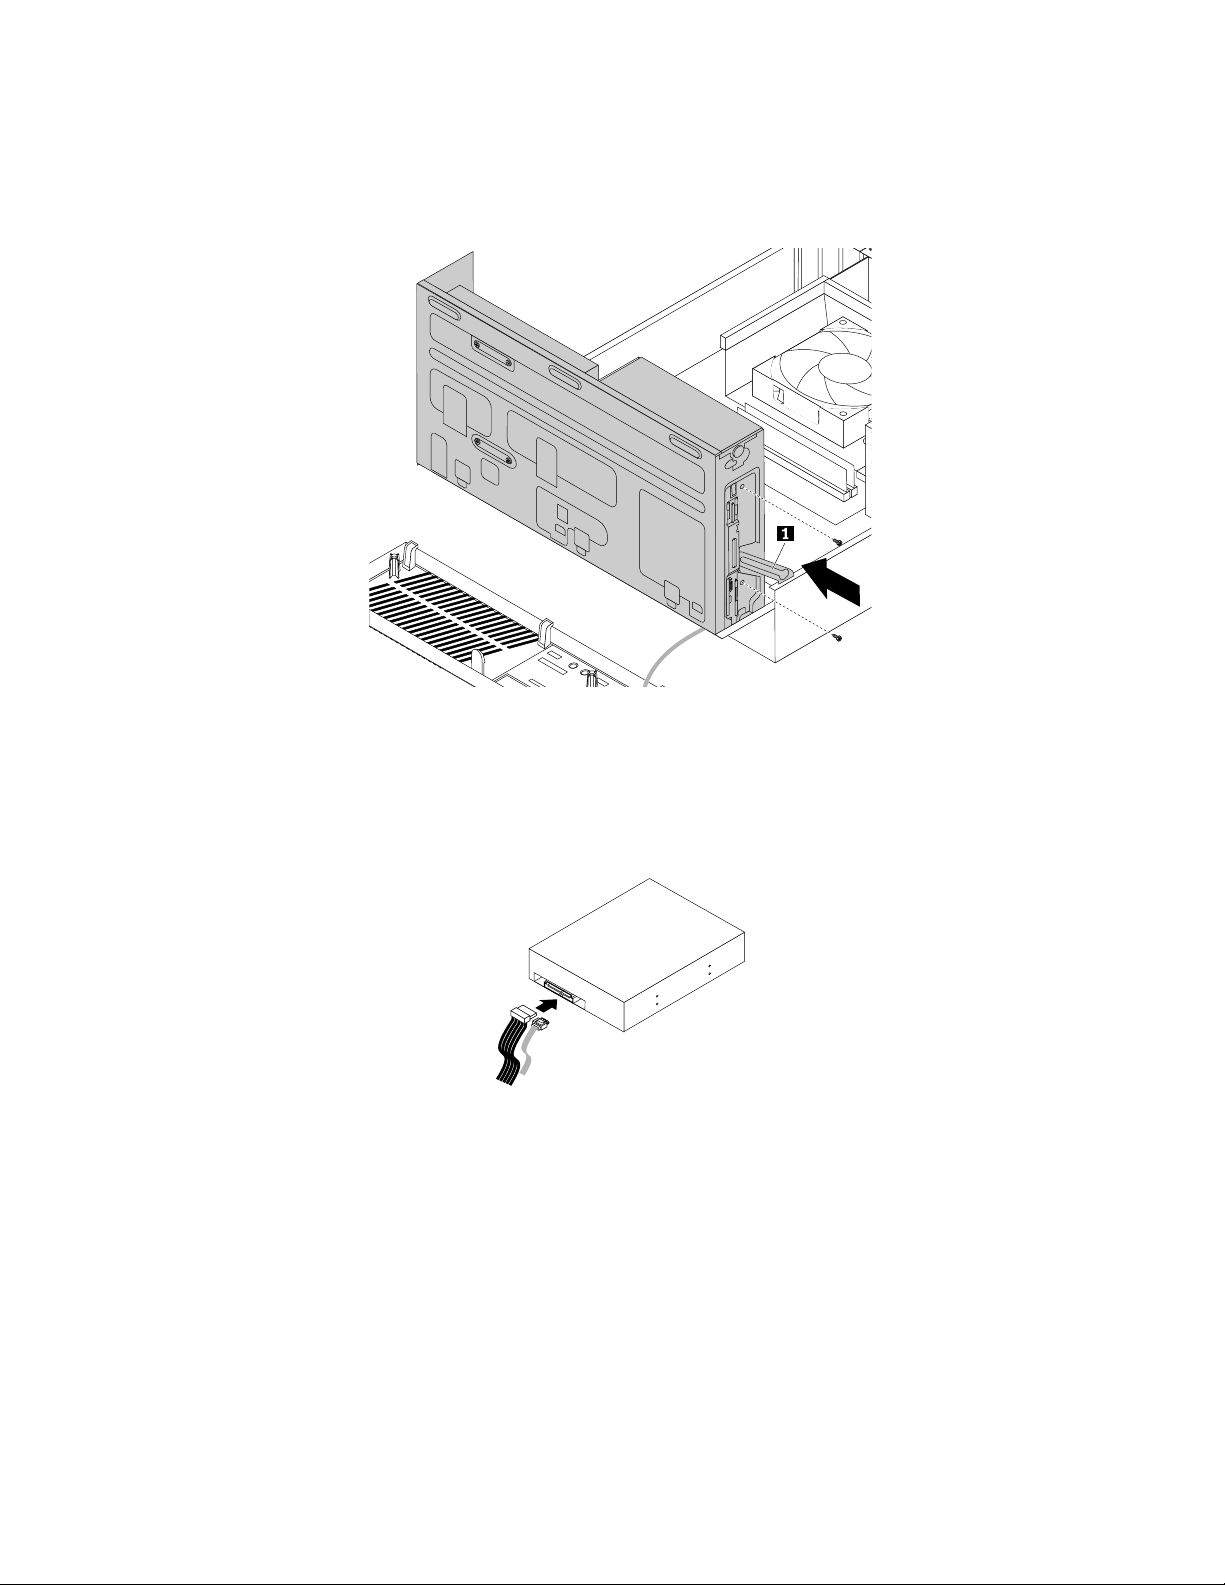
10.Holdthenewopticaldriveandpivotthedrivebayassemblyupward.Alignthescrewholesinthenew
opticaldrivewiththecorrespondingholesinthedrivebay.Then,installthetwoscrewstosecure
thenewopticaldriveinplace.
Figure36.Installingtheopticaldrive
11.Connectoneendofthesignalcabletotherearofthenewopticaldriveandtheotherendtoanavailable
SATAconnectoronthesystemboard.See“Locatingpartsonthesystemboard”onpage6.Then,
locateanavailablefour-wirepowerconnectorandconnectittotherearofthenewopticaldrive.
Figure37.ConnectingaSATAopticaldrive
Whattodonext:
•Toworkwithanotherpieceofhardware,gototheappropriatesection.
•Tocompletetheinstallationorreplacement,goto“Completingthepartsreplacement”onpage110.
Replacingtheslimcardreader
Attention:Donotopenyourcomputerorattemptanyrepairbeforereadingandunderstandingthe“Read
thisfirst:Importantsafetyinformation”onpagev.
Note:Theslimcardreaderisonlyavailableonsomemodels.
Toreplacetheslimcardreader,dothefollowing:
86ThinkCentreM79UserGuide
Page 99

1.Removeanymediafromthedrivesandturnoffallattacheddevicesandthecomputer.Then,disconnect
allpowercordsfromelectricaloutletsanddisconnectallcablesthatareconnectedtothecomputer.
2.Removethecomputercover.See“Removingthecomputercover”onpage67.
3.Removethefrontbezel.See“Removingandreinstallingthefrontbezel”onpage68.
4.Recordthecableroutingoftheinstalledslimcardreaderanddisconnectthecableoftheslimcard
readerfromthesystemboard.
5.Removethescrewthatsecurestheslimcardreaderbracketandthenremovethebracketfromthe
chassis.
Figure38.Removingtheslimcardreaderbracket
6.Removethetwoscrewsthatsecuretheslimcardreadertothebracket.Then,slidetheslimcard
readerasshowntoremoveitfromthebracket.
Note:Touchonlytheedgesoftheslimcardreader.Donottouchthecircuitboardofit.
Figure39.Removingtheslimcardreaderfromthebracket
7.Takethenewslimcardreaderoutofthestatic-protectivepackagebyitssides.
8.Alignthenewslimcardreaderintheslimcardreaderbracketandslidetheslimcardreaderintotherail
asshownuntilitstops.Then,installthetwoscrewstosecurethenewslimcardreadertothebracket.
Chapter9.Installingorreplacinghardware87
Page 100
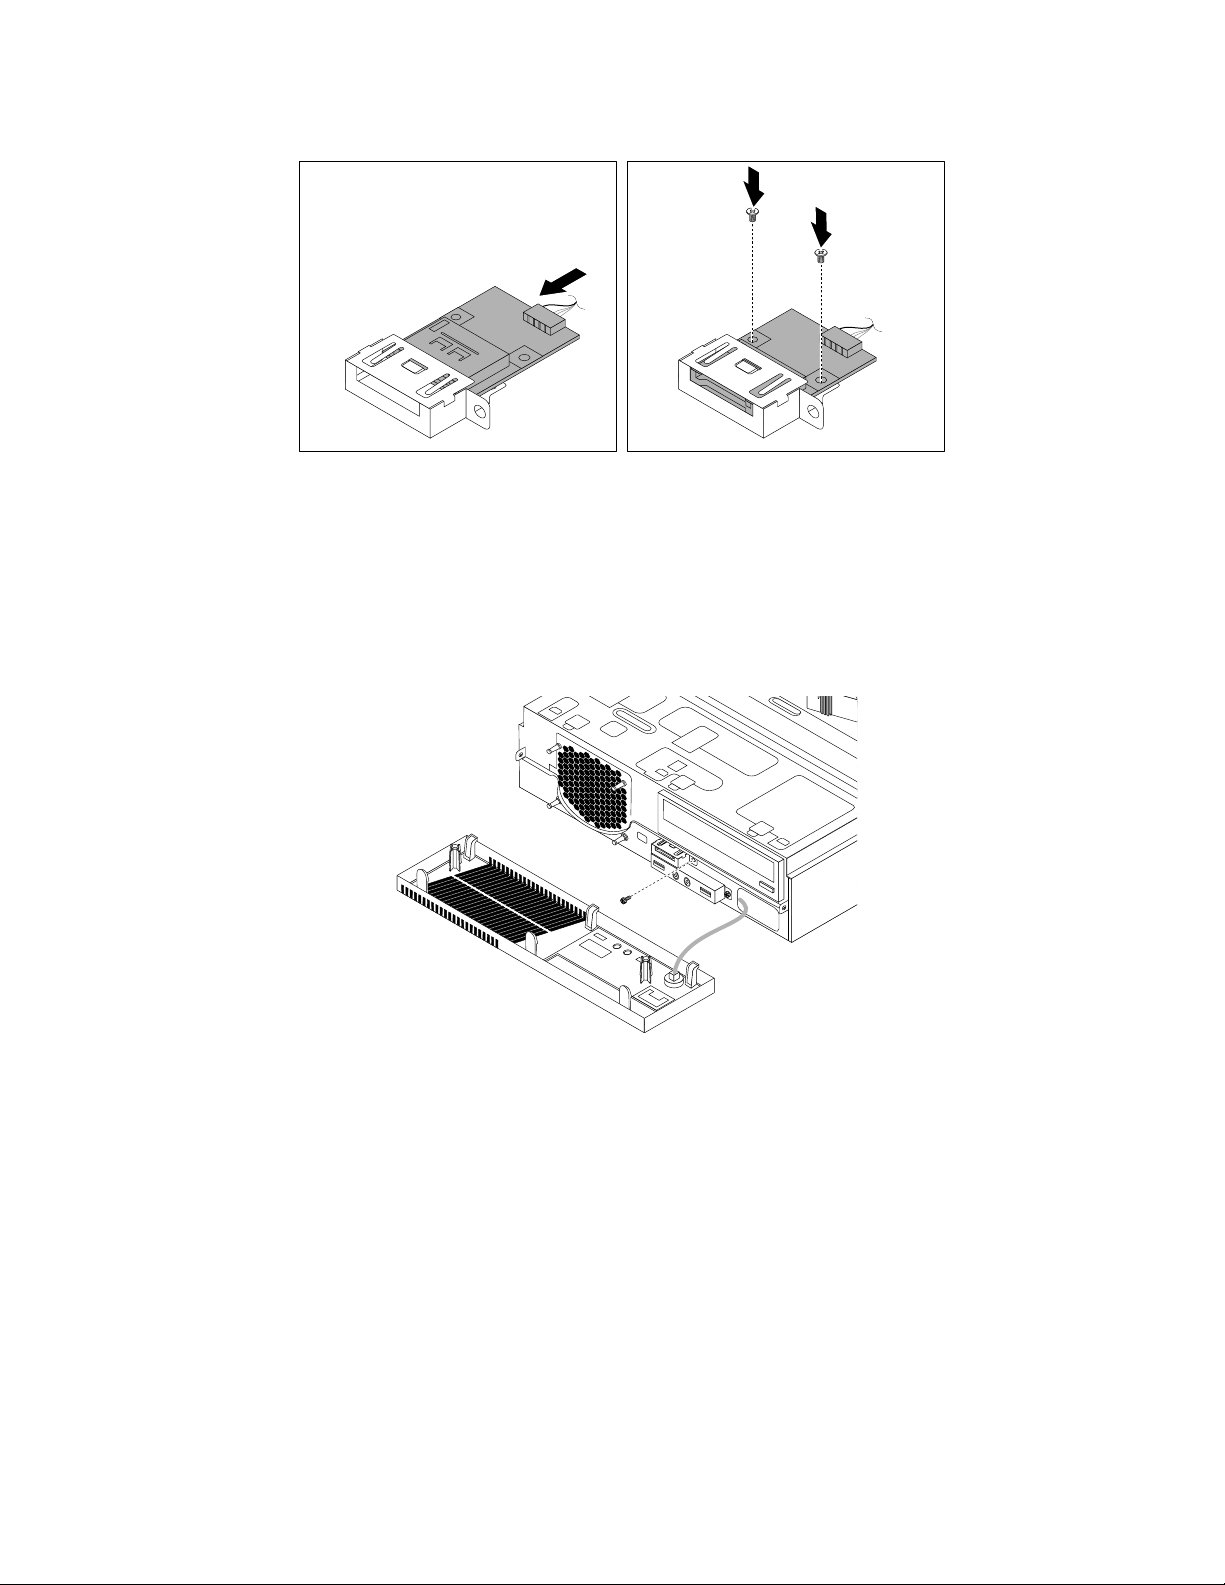
Figure40.Installingthenewslimcardreaderintothebracket
9.Routethecableofthenewslimcardreaderthroughthecorrespondingholefortheslimcardreader
bracketinthefrontofthechassis.
10.Installtheslimcardreaderbracketintothechassissothattheholeinthebracketisalignedwiththe
correspondingholeinthechassis.Then,Installthescrewtosecuretheslimcardreaderbracketto
thechassis.
Figure41.Installingtheslimcardreaderbracket
11.Connectthecableofthenewslimcardreadertothesystemboard.See“Locatingpartsonthesystem
board”onpage6.
Whattodonext:
•Toworkwithanotherpieceofhardware,gototheappropriatesection.
•Tocompletetheinstallationorreplacement,goto“Completingthepartsreplacement”onpage110
Replacingtheheatsinkandfanassembly
Attention:Donotopenyourcomputerorattemptanyrepairbeforereadingandunderstandingthe“Read
thisfirst:Importantsafetyinformation”onpagev
88ThinkCentreM79UserGuide
.
.
 Loading...