

Page 1
Mark & Find
and Tile Scan
Motorized Stage Applications
LAS AF
Page 2
Mark & Find and Tile Scan are part of the basic Leica Application Suite
for Advanced Fluorescence. When using a motorized stage, both modules are activated to give full advantage of a high precision stage over a
manual stage. Mark & Find enables the user to define multi position
experiments to observe a large number of cells within one experiment,
saving precious time. The Tile Scan feature allows the acquisition of
overview images of the specimen with multiple channels and in three
dimensions.
Mark & Find and Tile Scan are available on both the Leica AF6000
system series for widefield imaging and analysis and the Leica TCS SP5
confocal systems.
High precision positioning is even more important when working with
live cells. Preparing a live cell experiment not only takes time but also
occupies the resources of the laboratory such as incubators, clean
benches, etc. The experiment itself might run over hours or even several
days. During the course of the experiment the acquisition system is out
of use for other experiments. In the worst case scenario, the cells under
observation do not show the desired behavior or do not react to the
reagents added during the course of the experiment and the experiment
has to be repeated. Precious time and resources are lost.
Such situations can be avoided with the Leica Mark & Find feature
in combination with a high precision stage. These stages allow very
precise repositioning of previously defined locations. Multiple positions, for example multiple cells in the same Petri dish, can be stored
in advance of performing the experiment.
Motorized Stage Applications –
Mark & Find and Tile Scan
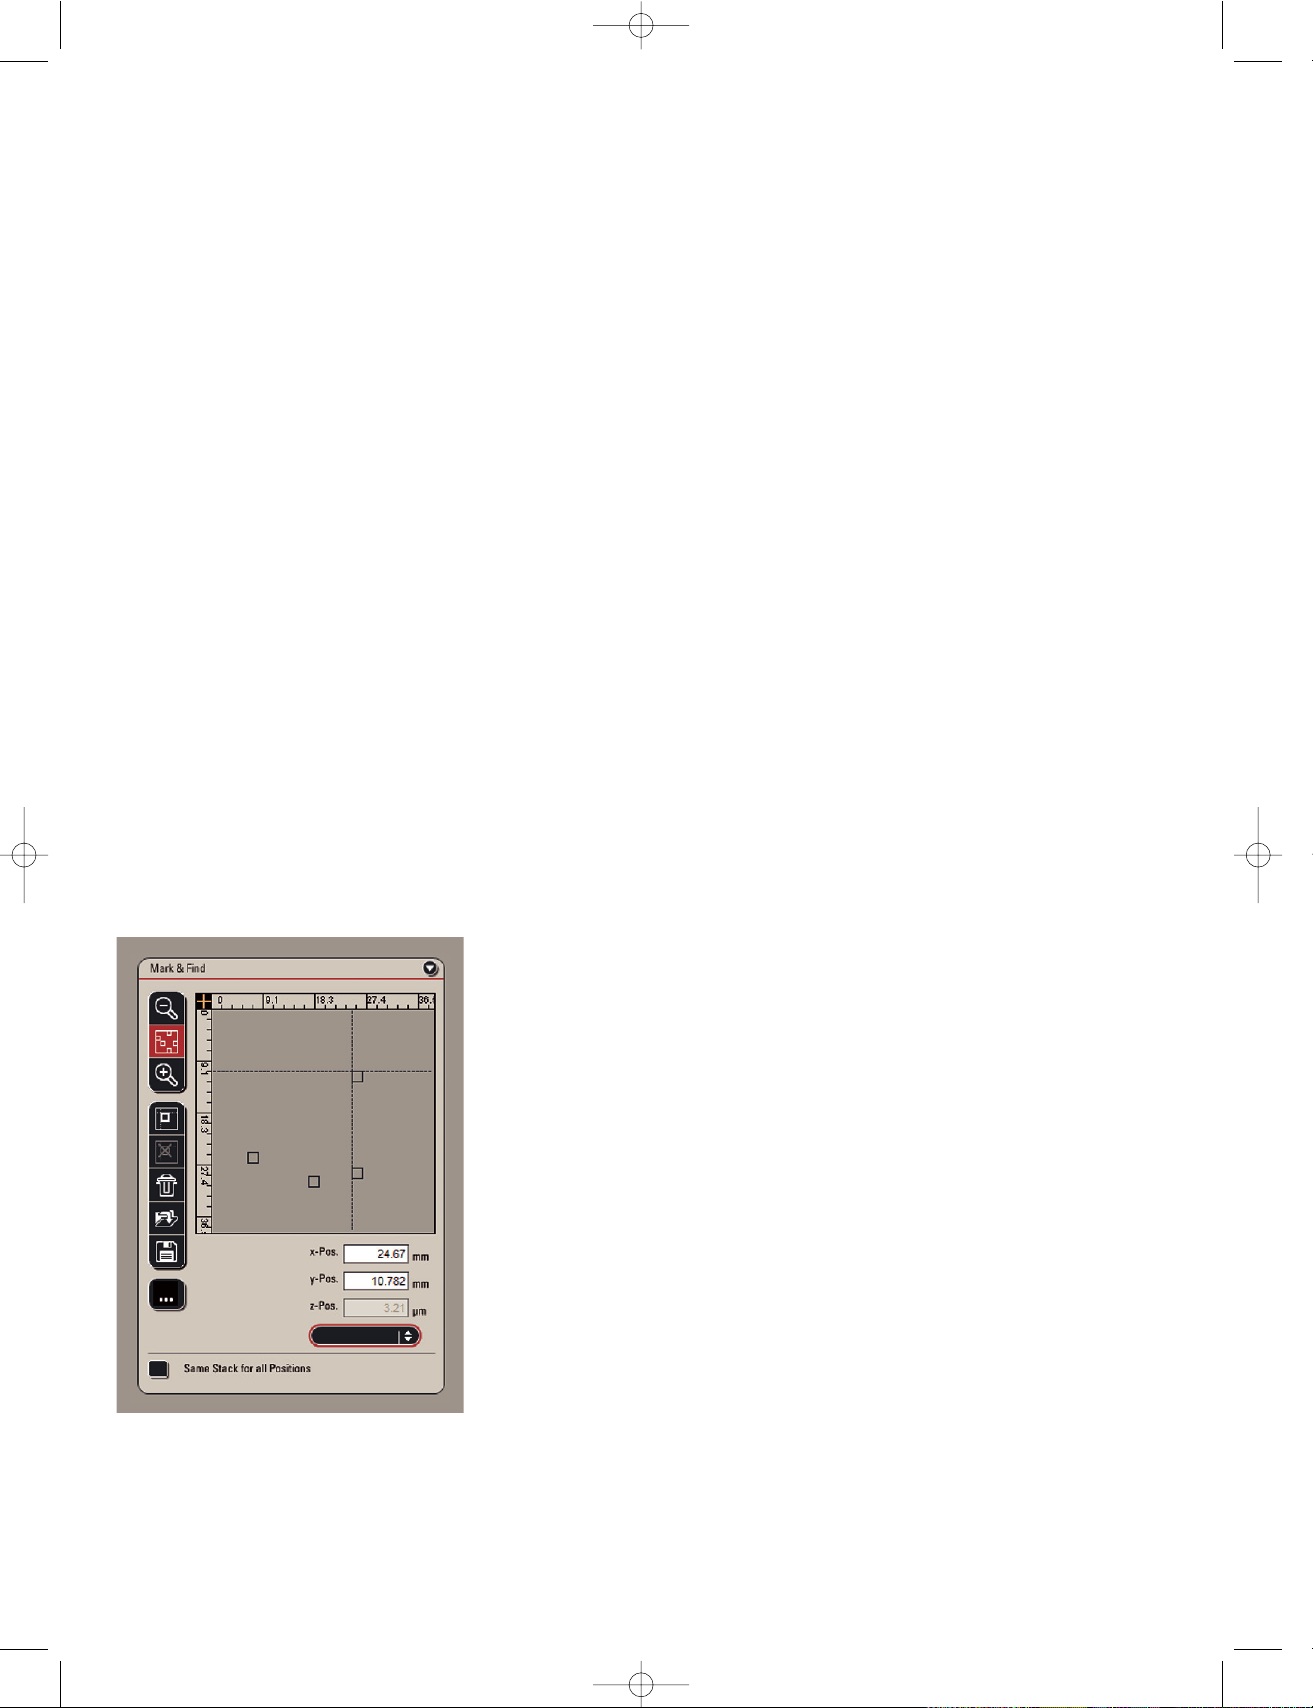
Mark & Find
Fig. 1: Mark & Find interface: Perform multi positioning
experiments and define location specific stack sizes.
Leica_Mark_&_Find 23.09.2005 10:00 Uhr Seite 1
Page 3

How it works
With the Mark & Find tool the user can define the current position of the
sample and recall it later on from a list together with other previously
stored positions. This enables the user to quickly step through several
positions to compare them or record multiple time series in a pseudoparallel manner.
The user observes the live image and moves the stage to an interesting
cell or location. Once the mark button is clicked, the x, y and z values of
this position is stored. This procedure can be repeated for an unlimited
number of additional positions. At each stage position a cell specific z
stack size can be defined. Mark & Find can be combined with different
contrasting methods such as fluorescence and DIC and with other
experimental set-ups, for example, time-lapse.
Powerful in live cell imaging
A simple, yet powerful application in live cell imaging is to mark miscellaneous positions of positive transfectants while searching for the most
appropriate location. This helps users in the time-consuming process
of screening through their sample, as they can always go back to a
previous location if it is the right one.
Record multiple time series simultaneously
Mark & Find is particularly useful for studying dynamic processes in
live cells. In many cases one needs to block and induce the biological
process of interest by adding and removing drugs or replacing incubation media. The difficulty is then to quickly find a typical cell which
displays the expected behavior during the course of the experiment.
Fig. 2: Capture all cell dynamics by recording multiple image series
in a single experiment.
A) Three positions have been marked prior to initiation of the
experiment.
B) Multiple movies can be recorded in a quasi-parallel manner
and compared in real-time or stored for off-line quantification.
y
x t = 0 1 2 3
A – Acquisition B – Image series
Pos. 1
Pos. 2
Pos. 3
á
Leica_Mark_&_Find 23.09.2005 10:00 Uhr Seite 2
Page 4

In such a case, Mark & Find is very useful, because the user is able
to mark multiple cells previous to induction (Fig.2 A). By recording a
time series in conjunction with Mark & Find, it is now possible to record
multiple cells in a quasi-parallel manner (Fig. 2 B). The chances of
observing a process of interest in one single experiment are much higher
compared to the conventional situation where only one cell can be
observed at a time.
In effect, Mark & Find can help the user to save time or observe a larger
number of cells. If the aim is to obtain quantitative parameters from
the experiment (i.e. size, migration speed, particle tracking) a gain in
throughput will effectively improve the statistical significance of the
data.
Mark & Find can be applied over several rounds of cell cycles, too.
Additionally, multiple cells can be observed and their behavior can be
compared.
Applications in developmental biology
Since Mark & Find can be combined with both t-series and z-scans,
very complex recording scenarios become possible such as following
dynamic processes in large specimen at multiple positions over time,
each with an independent z-stack. Applications in developmental biology are perfectly suited to such tools, for example to follow the development of the nervous system and transport systems of animal models.
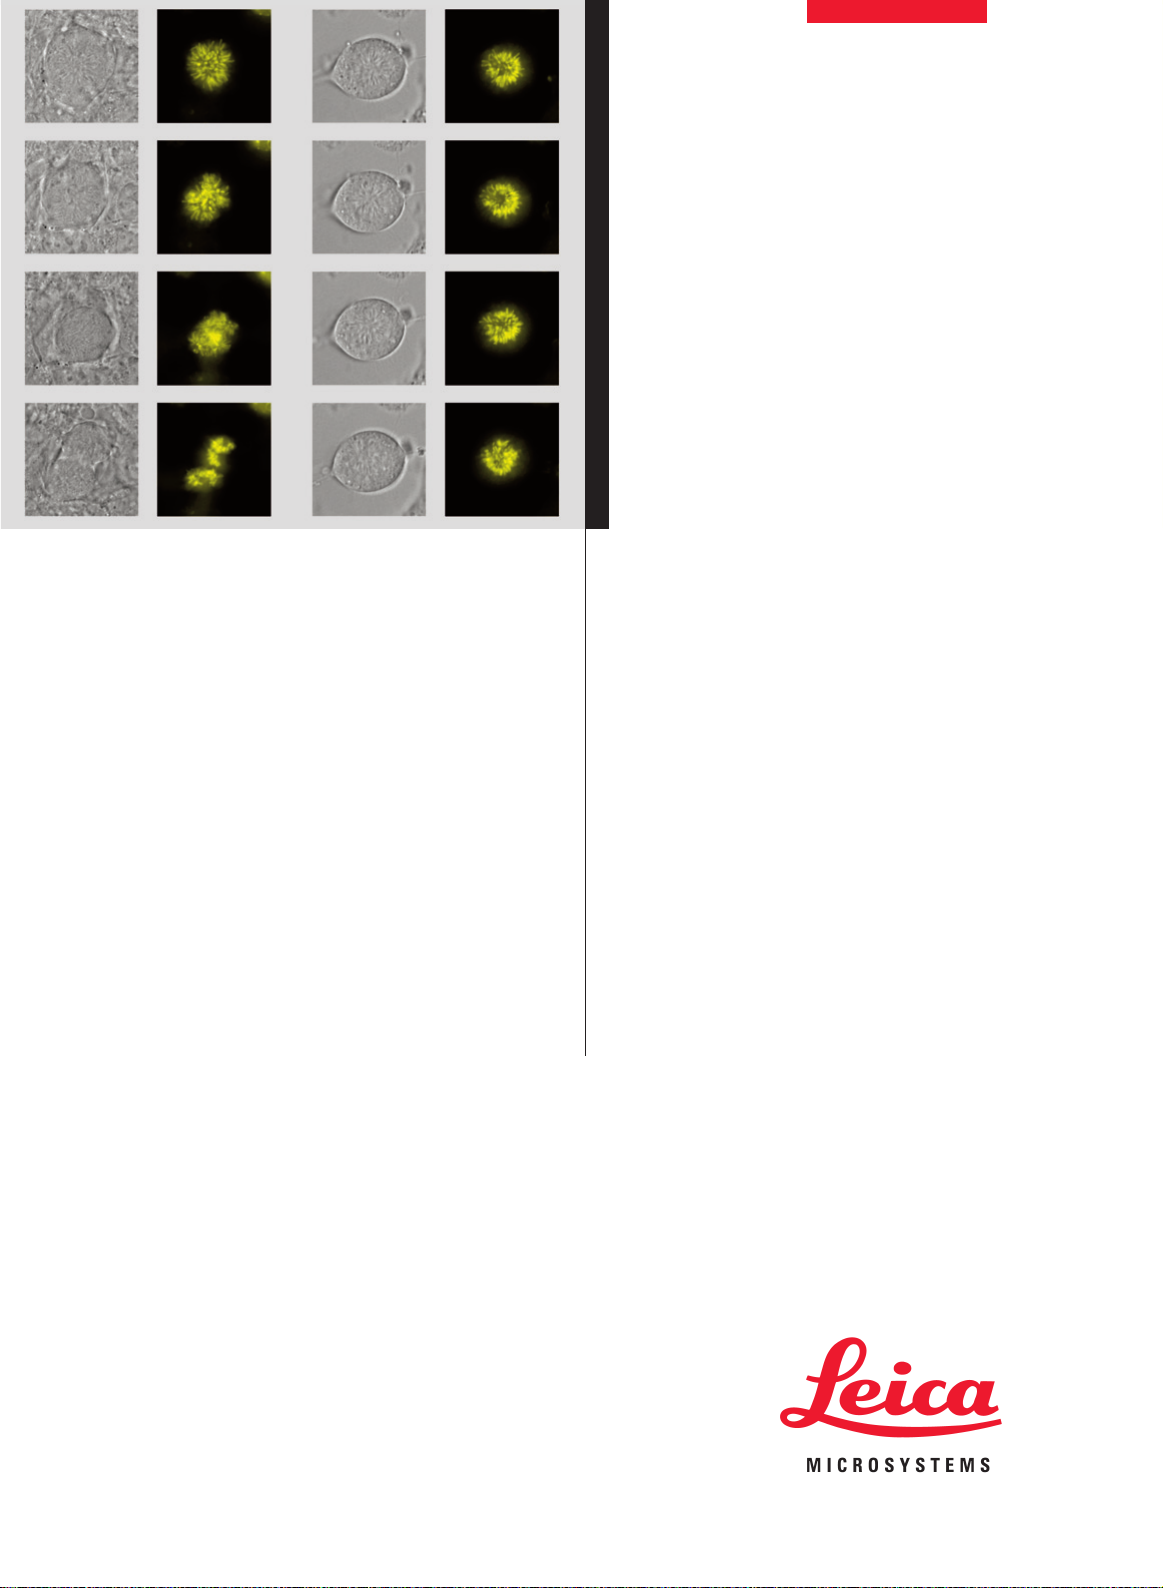
Figure 3 shows a real-world example of a time-lapse recorded using
Mark & Find. NIH 3T3 mouse fibroblast cells expressing H2A-YFP stably
and were incubated with Aphidicolin over night. This leads to an arrest
in the G1-/S-phase transition. The shown time series was observed 4.5
hours after removal of the blocking agent. The cells were monitored for
another 4 hours. In total 10 positions were selected using Mark & Find
over time, and z-stacks of 7-8 µm with a z-step size of 0.3 µm were
recorded for each cell. Out of those ten cells, only one could be followed
through mitosis (left column), whilst the others did not divide during the
observation time (right column). This is a typical situation in live cell
imaging when biological processes are triggered using specific drugs.
Mark & Find increases the chances of observing such a process in a
single experiment. DIC (differential interference contrast) and fluorescence images of the cells are shown over time from the top to the bottom. All DIC images are single in focus slices of their respective z-stacks,
H2A-YFP images shown as maximum projections over the whole stack
after deconvolution. Magnification 63x objective.
mitosis observed no mitosis observed
DIC H2A-YFP DIC H2A-YFP
Fig 3: NIH 3T3 mouse fibroblast cells expressing H2A-YFP.
Two positions of a Mark & Find experiment.
Courtesy of Constantin Kappel, DKFZ, Heidelberg, Germany
t1
t2
t3
t4
t5
t6
t7
Leica_Mark_&_Find 23.09.2005 10:00 Uhr Seite 3
Page 5

The Tile Scan module allows the user to automatically assemble an
image from multiple smaller images. Large specimens that are bigger
than the current field of view can be viewed as a whole using the Tile
Scan function. This works by taking a number of adjoining images of the
sample (the “tiles”) and merging them digitally to a larger view of the
scene.
How it works
A tile scan area can be defined by marking just two opposite positions
defining the outer points of the area to be scanned. The positions are
marked in the same way as locations in Mark & Find. Depending on the
field of view, the Tile Scan feature will calculate the number of tiles
needed to cover the scan field.
Produce high resolution overview images
Figure 5 shows reconstructed Drosophila larval salivary glands taken
with a 20x objective lens. The user is presented with the option of preserving the original images as well as the overview image for reference.
Since the automated stage under full software control, the user only
needs to specify the boundaries of the area of interest, the software
will automatically calculate the area to be scanned.
Find live transfectants fast
In the live cell imaging of transiently transfected cells, one often faces
the problem of finding a cell expressing the protein of interest at the
correct level. With Tile Scan it is now possible to produce a “bird’s eye
view” image of the entire coverslip or culture dish to aid the user in
finding interesting parts of the sample more quickly. Such an overview
image can serve as a reference for the whole experiment and can also
be used to obtain important quality parameters, for instance cell density,
transfection efficiency or cell viability. An added advantage is that the
cell, which was captured in more detail, can still be viewed in its context
later on.
Author: Constantin Kappel, Div. Theoretical Bioinformatics,
German Cancer Research Center (DKFZ), Heidelberg, Germany
in cooperation with Leica Microsystems
B
Fig. 5: Drosophila salivary glands at 20x magnification with bright field
and fluorescence channels overlaid. The whole image was assembled
from 5x3 single images at full resolution (1392x1040 per image). Image
shows nuclei (DAPI) in blue, Neurons/Axons (Alexa 488/Cy3) in green
and neuronal nuclei (Alexa 594) in red. Note; some crosstalk between
Cy3 and Alexa 594 is visible, as the image was captured with a broad
band pass BGR cube. The merged image is completely unprocessed.
Courtesy of Dr. Christoph Melcher, Research Center Karlsruhe,
Karlsruhe, Germany
Tile Scan
Fig. 4: Tile Scan interface: Get an overview image of
your specimen with multiple channels and combine
it with z-stacks.
Leica_Mark_&_Find 23.09.2005 10:00 Uhr Seite 4
Page 6

@
www.confocal-microscopy.com
Copyright
©
Leica Microsystems CMS GmbH
•
Am Friedensplatz 3
•
D-68165 Mannheim, Germany
•
Tel. +49 621/70 28 0
•
Fax +49 621/70 28 10 28 LEICA and the Leica Logo are registered trademarks of Leica IR GmbH.
Order no: 15915321
•
September 2005
Leica_Mark_&_Find 23.09.2005 10:00 Uhr Seite 5
 Loading...