


Leica
StereoZoom
®
User Manual

Leica StereoZoom User Manual
2
Contents
Page
Information
Safety rules . . . . . . . . . . . . . . . . . . . . . . . . . . . . . . . . . . . . . . . 4
Symbols . . . . . . . . . . . . . . . . . . . . . . . . . . . . . . . . . . . . . . . . . . .7
Description: Features, lens system . . . . . . . . . . . . . . . . . . .8
Models . . . . . . . . . . . . . . . . . . . . . . . . . . . . . . . . . . . . . . . . . .10
Design
System diagram . . . . . . . . . . . . . . . . . . . . . . . . . . . . . . . . . . .12
Incident-light equipment . . . . . . . . . . . . . . . . . . . . . . . . . . .14
Transmitted-light equipment . . . . . . . . . . . . . . . . . . . . . . . .14
Objectives . . . . . . . . . . . . . . . . . . . . . . . . . . . . . . . . . . . . . . . .16
Eyepieces . . . . . . . . . . . . . . . . . . . . . . . . . . . . . . . . . . . . . . . .16
High-performance lighting . . . . . . . . . . . . . . . . . . . . . . . . . .17
Leica L2 cold-light source . . . . . . . . . . . . . . . . . . . . . . . . . .17
Graticules . . . . . . . . . . . . . . . . . . . . . . . . . . . . . . . . . . . . . . . .18
Camera assembly for Leica S6 D and S8 APO . . . . . . . . .20
Operating
Controls . . . . . . . . . . . . . . . . . . . . . . . . . . . . . . . . . . . . . . . . .22
Interpupillary distance and exit pupil . . . . . . . . . . . . . . . .23
Eyecups . . . . . . . . . . . . . . . . . . . . . . . . . . . . . . . . . . . . . . . . . .24
Setting working distance and focusing . . . . . . . . . . . . . . .24
Zoom magnification changer . . . . . . . . . . . . . . . . . . . . . . .25
Diopter adjustment . . . . . . . . . . . . . . . . . . . . . . . . . . . . . . . .28
Photography with Leica S6 D and S8 APO . . . . . . . . . . . .32
Special notes
What do I do if . . . . . . . . . . . . . . . . . . . . . . . . . . . . . . . . . . . .33
Care and maintenance . . . . . . . . . . . . . . . . . . . . . . . . . . . . .34
Calculating total magnification and field diameter . . . . .37
Optical data . . . . . . . . . . . . . . . . . . . . . . . . . . . . . . . . . . . . . .38
Dimension . . . . . . . . . . . . . . . . . . . . . . . . . . . . . . . . . . . . . . . .41
Leica Microsystems . . . . . . . . . . . . . . . . . . . . . . . . . . . . . . .47

Leica StereoZoom User Manual
3
Dear Customer
Thank you for the trust you have shown in choosing one
of our products. We hope you will have much enjoyment
and success with your new stereomicroscope from Leica
Microsystems.
With its new StereoZoom®line the Swiss Stereomicroscopy Business Unit offers a comprehensive range of
stereomicroscopes for every application. The Leica L2
cold-light illuminator – also new – transforms any of the
instruments into a compact, streamlined complete outfit
of modern design. Possible applications range from inspection and assembly work, OEM and schools to quality
assurance functions. The stereomicroscopes, cold-light
source and stand are all antistatic to protect against
ESD. A Terminator version is available for problematic
working areas in electronics.
One of our major development goals was to make our
new StereoZoom®line simple and intuitive to use. Nevertheless, please take the time to read these instructions.
They will familiarize you with your stereomicroscope’s
advantages and enable you to use it to best effect. If you
have questions at any time, please contact your Leica
representative or Leica Microsystems (Switzerland) Ltd.
We will be glad to help you. We place great emphasis on
customer service – before and after purchase (see p. 47).
Leica Microsystems (Switzerland) Ltd
Stereo & Macroscope Systems
www.stereomicroscopy.com

Read the instructions for use and safety instructions before putting the
stereomicroscope into operation.
Leica S4 E, S6 E, S6, S6 T, S6 D and S8 APO stereomicroscopes are precision
optical instruments for making technical and scientific objects, object details
or specimens more easily visible by means of magnification. Stands, illuminators and accessories complete the equipment.
• Use of the instrument other than in the manner described in these
instructions could result in personal injury or material damage.
• The Leica S series stereomicroscopes must not be used for examining
and operating on the eye.
• Never fit other equipment connectors or dismantle optical systems
and mechanical parts unless the user manual gives express instructions
for doing so.
• The Leica S4 E, S6 E, S6, S6 T, S6 D and S8 APO stereomicroscopes are
intended primarily for indoor use.
• If used outdoors the stereomicroscope must be protected against dust
and moisture. Leica Microsystems electric illuminators and stands must
not be used outdoors.
The following must be observed when installing Leica products in third-party
products:
The manufacturer of the basic system or the person putting the product into
circulation is responsible for compliance with existing safety regulations,
laws and directives.
The Leica S series can be used in clean rooms without any problems and
they can be cleaned as described on page 35. Please observe the following
rules:
• Do not clean our stereomicroscopes and accessories in a different
manner from that described in this user manual. Do not use unsuitable
cleaning agents, chemicals and techniques. Do not clean painted
surfaces and accessories with rubber parts with chemicals.
This can damage the surfaces. Particles or grindings can contaminate
the specimen.
• If the customer cleans our instruments with chemicals without our
written approval he will do it at his own risk.
• In most cases we can offer special solutions on request. Some products
can be modified or we could recommend other accessories for use in
clean rooms.
Repair work must only be carried out by service engineers trained by Leica
Microsystems. Only original spare parts from Leica Microsystems are to be
used.
• Make sure that personnel using this stereomicroscope have read and
understood these instructions, especially the safety instructions.
• Take steps to ensure that Leica S4 E, S6 E, S6, S6 T, S6 D and
S8 APO stereomicroscopes are only operated, serviced and repaired
by authorized and trained personnel
.
General instructions
Intended application
Improper use
Place of use
Istallation in
third-party products
Use in Clean Rooms
Service work
Obligations of the
operator
4
Leica StereoZoom User Manual
Safety rules

5
Leica StereoZoom User Manual
Workplaces with stereomicroscopes facilitate and improve the
viewing task, but they also impose high demands on the eyes
and holding muscles of the user. Dependent upon the duration
of uninterrupted activity, this may lead to asthenic trouble and
muscular-skeletal pain so that suitable measures must be taken
to reduce the strain:
– perfect design of workplace, work content and work process
(frequently changing activities).
– detailed introduction of the personnel while considering
ergonomic and organizational work-related aspects.
The ergonomic optics concept and the design of the
Leica S series aim at limiting the strain on the user to the
lowest possible level.
Direct contact with eyepieces can be a potential transmission
path for bacterial and viral infections of the eye. Users should
be made aware of the potential risk of infection. The risk can be
kept at a minimum by using individual eyepieces or attachable
eyecups (see p. 17).
Electrically operated equipment
Handle liquids carefully.
Liquids spilt on the instrument
– can cause the stereomicroscope and other equipment to
become electrically live and injure persons,
– can cause damage to the instrument.
Check regularly to ensure that the mains cable is
undamaged and avoid jerking or pulling the cable hard.
Faulty mains cables
• can injure persons,
• can cause the stereomicroscope and other equipment to
become electrically live and injure persons.
Ensure the cable is not in a position where someone could
accidentally catch it, otherwise the instrument could tip
over and fall, damaging itself or other equipment, or injuring
people nearby.
Electrical equipment may only be repaired by authorized
Leica personnel.
Disconnect the mains cable before opening the instrument.
Touching the open instrument when voltage is
applied may result in injury.
Liquids
Mains cable
Cable routing
Opening the
instrument
Safety regulations

Make sure that the instrument is set for the correct mains
voltage. Incorrect setting can damage the instrument.
Only devices with the correct power rating may be
connected to the transformers. Overloading can result
in damage to the instrument.
• Disconnect the mains cable from the mains supply before
changing lamps.
• Never put your hand in the lamp housing or transmittedlight stand when the instrument is connected to the mains.
• Wait for filament lamps to cool down before
changing. Touching hot filament lamps can result
in burns.
Observe all statutory accident prevention and environmental
protection requirements.
National laws and regulations must be observed for the disposal of these products.
Electrically operated accessories for Leica S4 E, S6 E, S6, S6 T,
S6 D and S8 APO stereomicroscopes are manufactured using
state-of-the-art technology and carry an EC
declaration of conformity.
Mains voltage
Connections
Changing lamps
Statutory regulations
Disposal
EC declaration
of conformity
6
Leica StereoZoom User Manual – Safety instructions

7
Leica StereoZoom User Manual
User Manual
Your instrument is accompanied by a printed English user
manual. Additional language versions and information can
be found on the interactive CD-ROM. User manuals and
updates are available for download on our homepage at
www.stereozoom.com.
You will find the address of the closest local representative
as well as valuable information about products and
services from Leica Microsystems on our homepage at
www.leica-microsystems.com
Symbols in this manual
Safety warnings
This symbol denotes information that must be read and acted
upon without fail.
Disregarding safety warnings can put persons at risk!
Disregarding safety warnings can also result in malfunctioning
or damage to the instrument.
Warning against exposed hot points, e.g. filament lamps.
Risk of burns if disregarded!
Important information
This symbol denotes additional information or explanations to
assist understanding.
Action
왘 This symbol denotes action to be taken.
Additional information
• This symbol denotes additional information or
explanations.
Symbols

The optical system of the Leica StereoZoom®line consists of two beam paths converging at 12°. Since the
pairs of objectives are very close together, the stereomicroscopes can be constructed very “slim” towards
the base. This has a number of advantages: less space
required for use on bonders and machines, unimpeded
working on the object, plenty of room for tools, free view
of the object field.
The Greenough system provides a low-cost solution for
correcting aberrations such as chromatism, curvature of
the field of view and distortion. On the new Leica StereoZoom®line the optimally corrected centre of the objective is used for the image. This results in excellent
optical performance with large, flat, distortion-free fields
of vision and high-contrast images with maximum
chromatic correction.
The Leica S4 E, S6 E, S6, S6 D and S8 APO stereomicroscopes including cold-light source and stand are made of
antistatic material with a surface resistance of 2×10
11
ohm/square and a discharge time from 1000V to 100V of
under 2 seconds.
The Leica S6 T Terminator for problematical work areas
and the T incident-light stand are made of antistatic material with a surface resistance of 102–106ohm/square
and a discharge time from 1000V to zero of under
0.1 seconds.
The Leica StereoZoom®S6 D and S8 APO models are
equipped with a built-in video/photo tube that allows for
simple, quick setting up of digital, film and analog video
cameras.
Greenough
optical system
Protection
against ESD
Photography
8
Leica StereoZoom User Manual
Description

Features
StereoZoom
®
Zoom Magnification Viewing Extras
angle
Leica S4 E 4.8:1 6.3×–30× 38° ErgoLens
Leica S6 E 6.3:1 6.3×–40× 38° ErgoLens
Leica S6 6.3:1 6.3×–40× 60° ErgoLens
Leica S6 T 6.3:1 6.3×–40× 38° Terminator
ErgoLens
Leica S6 D 6.3:1 6.3×–40× 38° Video/photo
tubes Ergonomic objectives
Leica S8 APO 8:1 10×–80× 38° Apochromatic
Greenough
system
Apochromatic
zoom
Apochromatic
objectives
Video/photo
tube
9
Leica StereoZoom User Manual – Description
StereoZoom®is registered as a trademark in the Principal Register of the
US Patent and Trademark Office
World first Leica StereoZoom®S8 APO is the first stereomicroscope
on the market with completely apochromatic corrected
Greenough system. Apochromatic optics corrects perfectly chromatic aberrations, eliminates interfering color
fringes and renders even the finest details ultra sharp.
Contrast, brilliance, sharpness, resolution, color fidelity
and reproduction accuracy are unsurpassed. The advantage of apochromatic correction is best observed in
objects that have fine, low-contrast structures such as
large animal cells, cilia plants or metallic microelectronic
structures.

10
Leica StereoZoom User Manual – Description
StereoZoom
®
Leica S4 E
StereoZoom
®
Leica S6 E
StereoZoom
®
Leica S6
Leica Design
by Christophe Apothéloz

11
Leica StereoZoom User Manual – Description
StereoZoom
®
Leica S6 T
StereoZoom
®
Leica S6 D
StereoZoom
®
Leica S8 APO

12
Leica StereoZoom User Manual
Design
Leica StereoZoom
®
System diagram
2
Leica S6 E
10 446 294
Leica S6
10 446 295
10 445 363
10 445 367
10 446 359
10 445 387
10 446 394
10 446 339
10 446 340
10 446 341
10 447 106
10 446 395
10 446 22810 446 301 10 446 303
10 447 040
10 315 306
10 446 347
10 446 348
Low Eyepoint Eyepieces
Eyepieces, fixed Eyepieces, adjustable*
Standard ergonomic Standard ergonomic
10×/23 10 447 130 10×/23 10 447 131
16×/16 10 446 354 10 447 132 16×/16 10 446 355 10 447 133
20×/12 10 446 356 10 447 134 20×/12 10 446 357 10 447 135
* Adjustable eyepieces accept reticles
10 447 057
10 447 065
10 447 058
10 447 153
Leica S4 E
10 446 293
7
5
6
3
1
1 StereoZoom
®
Optics carriers
2 Objectives
3 Eyepieces
4 Carriers/
Focus arms
5 Focus columns
6 Incident-light bases
7 Transmitted-light
bases
8 Stages
9 Stands
(Swing arm,
Flex arm)
8

13
Leica StereoZoom User Manual
3
Leica S6 T
10 446 296
Leica S6 D
10 446 297
10 446 34210 446 34310 446 34410 446 345
13 312 610 10 446 299
10 376 070
13 312 714
High Eyepoint Eyepieces
Eyepieces, fixed Eyepieces, adjustable*
ergonomic ergonomic
10×/23 10 447 136 10×/23 10 447 137 * Adjustable eyepieces accept reticles
16×/15 10 447 138 16×/15 10 447 139
10 447 036
25×/9.5B 10 445 302 Spacing Ring required with eyepieces
40×/6B 10 445 303 10 445 302, 10 445 303
Photo / Video documentation
Leica DC cameras
Objectives
for S4 E, S6 E, S6, S6 T, S6 D
0.32× 10 446 316
0.5× 10 446 318
0.63× 10 446 319
0.75× 10 446 320
1.6× 10 446 321
2× 10 446 322
Lens 10 446 324
shield
Adjustable Lens
0.3×–0.4× 10 446 325
Ergolenses
0.6×–0.75× 10 446 323
0.7×–1× 10 446 317
Objectives for S8 APO
0.32× 10 446 334
APO 0.63× 10 446 335
APO 1.6× 10 446 336
APO 2× 10 446 337
Leica S8 APO
10 446 298
13 312 613
13 312 614
13 312 611
9
4
2
1 Incident-light base with stage
plate
2 Transmitted-light base with
glass stage plate
3 Focus column with microscope
carrier
4 StereoZoom
®
optics carrier
5 Optional additional objective
6 Eyepieces, fixed and/or
adjustable
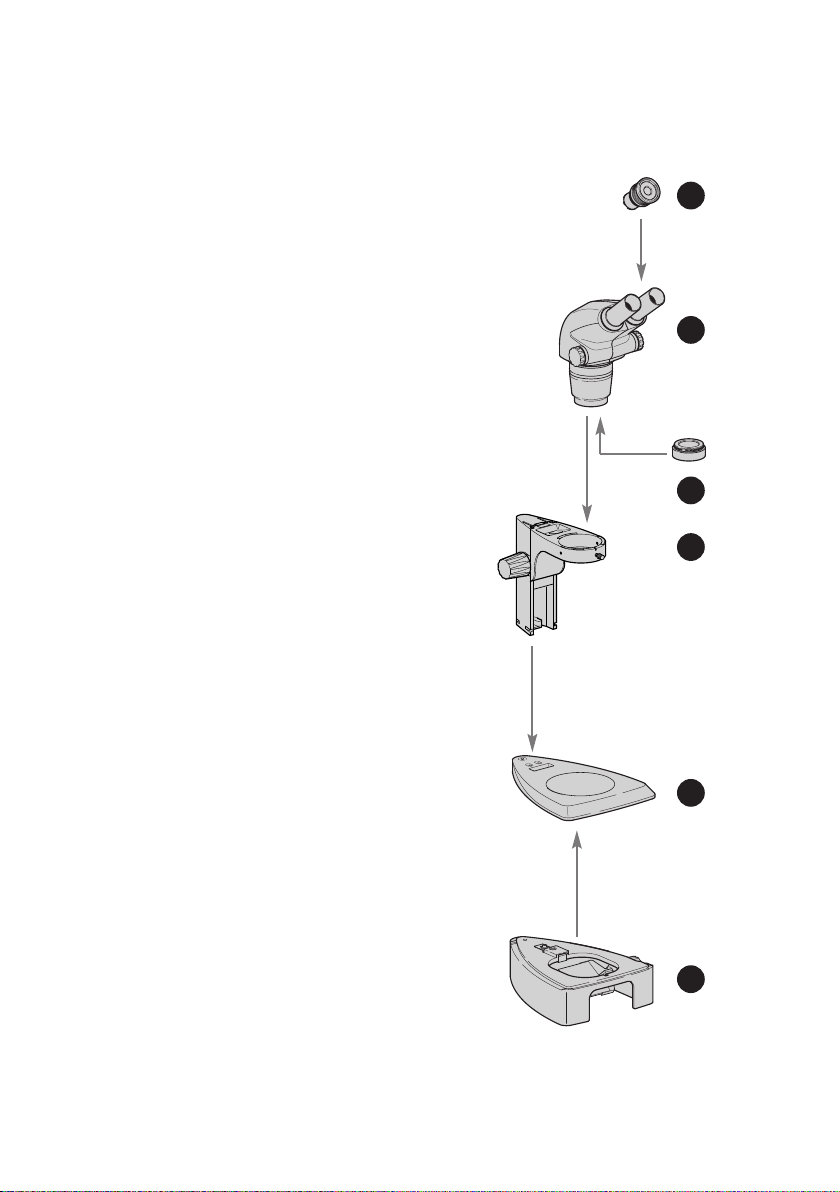
The components
14
Leica StereoZoom User Manual
Design, Basic equipment
5
4
3
2
1
6

Never loosen the 3 screws
on the right-hand side of the
focus column.
왘 Remove stage plate.
왘 Insert 3 hexagon head
screws through the underside of the baseplate and
screw tight in the focus
column.
왘 Replace stage plate.
왘 Remove glass stage plate.
왘 Undo locking device.
왘 Place incident-light stand
on the transmitted-light
base and engage in the
connecting screw.
왘 Close locking device.
왘 Replace glass stage plate.
왘 Insert universal light guide
in the socket at the back
(see user manual for the
Leica L2 cold-light source).
Focus column ➔
Incident-light base
Transmitted-light base ➔
Incident-light base
15
Leica StereoZoom User Manual
Assembly

왘 Insert optics carrier
carefully in the microscope
carrier.
왘 Fix optics carrier in the
desired position with the
clamping screw.
왘 Screw selected objective tight
in counterclockwise direction.
왘 Screw the lens shield tightly
into the thread on the StereoZoom
®
or onto the additional
objective.
왘 Push eyepiece into the eye-
piece tube as far as it will go.
왘 Check that it sits firmly and
snugly.
You can combine your StereoZoom
®
with a fixed and an
adjustable eyepiece. Two adjustable eyepieces are required for equipment which has a reticle in an eyepiece
for measurement or photography purposes. We recommend that you also equip the high-performance Leica
StereoZoom®S8 APO with two adjustable eyepieces.
Optics carrier ➔
Stand
Additional objective
(optional) ➔
Optics carrier
Lens shield
(optional)
Eyepieces ➔
Eyepiece tube
16
Leica StereoZoom User Manual
Assembly
Leica StereoZoom User Manual

Soft
eyecups
Leica L2 cold-light
source ➔ Stand
High-performance
lighting
17
The eyepieces are supplied with soft eyecups, which can
be attached to achieve the following:
– Prevent eye infections if several users are working at
the same instrument (see p. 5).
– Protect your glasses from being scratched.
With its fibre-optic light guides
the Leica L2 cold-light source
is the illumination of choice for
the Leica S4 E, S6 E, S6 and
S6 T stereomicroscopes. Matching adapters are available
for connecting the Leica L2
cold-light source to various
stereomicroscope stands and
for standalone operation.
Detailed information on the construction and use of the
Leica L2 can be found in the relevant user manual.
Please note that the universal light guide on the Leica
S8 APO can only be used with the sideways-mounted
lamp arm.
For higher requirements, e.g. for photography or in
combination with the Leica S8 APO, we offer a diverse,
high-performance transmitted light stand and lowvoltage lighting. Please ask your Leica advisor about the
options.
Leica StereoZoom User Manual – Assembly

18
The following graticules and stage micrometers
are available for calibration:
Graticule 10mm/0.1mm
Graticule 5mm/0.1mm
Graticule 5mm/0.05mm
Graticule 100 div./0.002"
Graticule 100 div./0.001"
Graticule 150 div./0.0005"
Crosshair
Stage micrometer 50mm, 0.1/0.01mm divisions
Stage micrometer 1", 0.001" divisions
For photography, a 10× format reticle is available.
Two adjustable eyepieces are required for equipment
which has a reticle in an eyepiece for measurement or
photography purposes.
The graticules can be inserted into adjustable eyepieces
and eyepieces for spectacle wearers:
왘 Ascertain with the aid of the stereomicroscope on
which side the vacuum-metalized scale is located.
The scale should be visible on the correct side.
왘 Pull out the insert
from the bottom of
the eyepiece and
place it with the
knurled side on the
table.
Graticule ➔
Adjustable
eyepieces
Assembly
Leica StereoZoom User Manual

19
Leica StereoZoom User Manual – Assembly
왘 Pick up the graticules at
the edge so as not to leave
fingerprints and slide into
the holder from the side.
왘 Put the insert back into the
eyepiece and press firmly in
place.
왘 Insert the eyepiece into the
eyepiece tube and line up
the graticule by turning the
eyepiece in the eyepiece
tube.
The measuring process is described in the “Measuring”
instructions.

20
Leica
MPS30 / MPS60
Photoautomats
11 541 038
0,55× – 1,1×
11 543 703
11 543 706
10 445 932
10 446 120
8×
10 445 304
10×
10 445 305
16×
10 404 207
10 445 541
10 162 226
Adapter
SLR
SLR
camera housings
10 445 929
1/2”, 0,5×
10 445 928
1/3”, 0,32×
11 541 006
1”, 1×
11 541 007
2/3”, 0,63×
11 541 016
1/2”, 0,5×
1”, 2/3”, 1/2”, 1/3”
C-Mount, CCD cameras
Leica DC cameras
1”
C-Mount
CCD camera
3-Chip 1/2”
B-Mount
CCD camera
3-Chip 2/3”
B-Mount
CCD camera
11 543 702
10 445 930
1×
10 446 175
10 446 261
2/3", 0,63×
10 446 307
2/3", 0,8×
Leica S6 D
10 446 297
Leica S8 APO
10 446 298
Assembly
Leica StereoZoom User Manual

21
Leica StereoZoom®S6 D and S8 APO are equipped with a
built-in video/photo tube that allows for simple, quick setting up of digital, film and analog video cameras. Please
ask your Leica advisor about the options.
You can find detailed information about Leica camera
systems, accessories and image management software
in the corresponding manuals.
왘 Remove the dust cover from the video/photo output.
왘 Always close the video/photo output with the dust
cover if there is no camera attached.
왘 Attach appropriate video or photo objective, accor-
ding to which camera is used (see scheme p.20).
The format reticle is used to test the sharpness and
picture detail. Borderlines are displayed on the reticle
for all film formats.
The left observation beam path and the photo output
are aligned with one another. Always judge, therefore,
the picture detail and the sharpness in the left eyepiece.
왘 Insert format reticle into an adjustable eyepiece
(see p.18).
왘 Insert eyepiece with reticle into the left tube.
Camera assembly for
Leica S6 D and
S8 APO
Format reticle
Leica StereoZoom User Manual – Assembly

22
1 Magnification changer,
right-hand pinion knob with magnification scale
2 S6 models: zoom limiter stop
3 Focusing drive
4 Fixing screw
fixes the optics carrier in the microscope carrier
5 Adjustable eyepiece tubes:
Interpupillary distance adjustable from 55–75mm
6 Eyepieces and eyecups
7 Lamp bracket mounting thread (on both sides and
at rear)
8 Socket for connecting for the Leica L2 universal
light guide (not for Leica S8 APO)
9 Thread for additional objective/lens shield
Overview
Standard controls
and their functions
Leica StereoZoom User Manual
OperatingOperating
6
5
2
4
1
97
3
7
8

23
• Pay great attention when setting up your stereomicroscope. You will only benefit fully from the outstanding
optical and ergonomic advantages of the instrument if
you set it up precisely in accordance with the
directions already given.
• Arrange your workplace as well as possible, and pay
attention to the heights of chair and table.
• When sitting, use the entire seat area and also the
back support of the chair.
• Support your forearms.
• During work breaks, stand up and move around for
exercise.
Please also observe the note on p. 5.
The achromatic ErgoLenses for Leica S4E and the S6
models ensure an ergonomic, fatigue-free head position.
The 0.6x – 0.75x ErgoLens with variable working distance
of 77 – 137 mm and the 0.7x – 1x ErgoLens with variable
working distance of 48 mm – 98 mm permit fine adjustment of magnification, working distance, as well as
viewing height without time-consuming lens changes.
Leica S6 with 60° viewing angle offers optimal comfort at
the tilted stereomicroscope.
The interpupillary distance can be
adjusted from 55–75mm.
The exit pupil is the distance
between the eye and eyepiece.
It is
– 12mm on the 10×/23,
16×/16 and 20×/12 low eyepoint
eyepieces
– 22mm on the 10×/23,
16×/15B, 25×/9.5B and 40×/6B
high eyepoint eyepieces for
spectacle wearers
왘 Carefully put your eyes against
the eyepieces and push the
eyepiece tubes together or
apart until with both eyes you
can see a single shadowfree circular field.
Preconditions for
working comfortably
Ergonomic viewing
Interpupillary
distance and
exit pupil
Leica StereoZoom User Manual – Operating
12 / 22
55
75

24
The eyepieces are supplied with
detachable eyecups (see also p. 5).
If you do not wear spectacles and
want the eyecups to fit snugly
round your eyes:
왘 Attach the eyecups to the
eyepieces.
You wear spectacles for your
work.
왘 Fold the eyecups downwards.
• The folded-down eyecups will
protect your spectacle lenses
against scratching.
To focus the stereomicroscope, raise or lower it using the
focusing drive until the desired object segment is in
focus, i.e. inside the objective’s working distance. The
working distances of the various objectives are listed in
the tables on pages 38–40.
You can operate the focusing drive with either your right
or left hand.
왘 Position the object under
the objective.
왘 Select the minimum
magnification.
• You should select the minimum
magnification because it is
easier to find the desired
object segment in a large field
of vision.
왘 Look into the eyepieces.
왘 Focus the object by turning the pinion knob.
Eyecups
Setting working
distance and
focusing
Leica StereoZoom User Manual
Operating

25
Leica StereoZoom User Manual – Operating
Is the focusing drive too stiff/too loose or does the set-up
slip down unassisted? You can tension the focusing drive
to suit the weight of the set-up and your own needs:
왘 Take one pinion knob in each hand and turn in
opposing directions until the desired tension is
reached.
The optics carrier can be tilted
sideways if the user wants to
work from a lateral position:
왘 Loosen the clamping bolt.
왘 Tilt the optic carrier side-
ways to the desired position.
왘 Tighten the clamping bolt.
All StereoZoom
®
models are equipped with a continuously
adjustable magnification changer that can be operated
with either the right or left hand. The right-hand pinion
knob carries a magnification scale. The ranges are:
– 0.63 to 3 on the S4 E and
– 0.63 to 4 on the S6 models
– for S8 APO from 1 to 8
The tables on pages 38 to 40 list the magnifications and
field diameters as a function of magnification changer
position and the eyepiece/objective combination being
used.
왘 Look into the eyepieces.
왘 Bring the object into focus
(p.24)
왘 Rotate the magnification
changer until the desired
magnification is achieved.
Tension adjustment
Tilting the optics
carrier to a lateral
position
Zoom magnification
changer
Changing
magnification

Leica StereoZoom User Manual
26
Operating
On the S6 models and for the S8 APO it is
possible to fix the maximum and minimum
zoom. The same function can be used to set
a fixed level of magnification.
1. Set the minimum zoom level at 1 using the
stop on the left-hand pinion knob:
왘 Loosen the hexagon head
screws on the left-hand
pinion knob using the Allen
key supplied.
왘 Turn the right-hand pinion
knob to 1.
왘 Move the stop on the left-
hand pinion knob forwards
until it touches the built-in
zoom stop.
왘 Tighten the hexagon head
screws.
Setting the
zoom limiter
Example:
Setting a zoom
range of 1 to 3.2
1

27
Leica StereoZoom User Manual – Operating
2. Set the maximum zoom level at 3.2 using the stop on
the right-hand pinion knob:
왘 Loosen the hexagon head
screws on the right-hand
pinion knob.
왘 Turn the right-hand pinion knob
to 3.2.
왘 Move the stop on the right-
hand pinion knob backwards
until it touches the built-in
zoom stop.
왘 Tighten the hexagon head
screws.
3.2

28
Operating
Diopter adjustment
and setting
parfocality
Preparations
Bring the test
object into focus
If you adjust the diopters at the adjustable eyepiece as
described below, the focus will remain constant, or parfocal, from minimum to maximum magnification. In other
words, you will not have to refocus when you change
magnification, but only when you want to examine a
higher- or lower-positioned object segment. Make full
use of this feature, which is not available on every stereo
microscope.
• Diopter adjustment is possible within a range
from +5 to –5.
Every user has to make the following adjustments
only once.
If you are using a graticule, the diopter adjustment and
parfocality setting procedure is slightly different to that
described here. Please refer to the section on measurement in the graticule user manuals.
Setting up diopter with an adjustable and a fixed
eyepiece
왘 Set up illuminator.
왘 Set interpupillary distance (p.23).
왘 Set approximate working distance using the focusing
drive (see p.38–40 for the working distances of the
various objectives).
왘 Position a flat test object
beneath the objective.
왘 Set the microscope to
minimum magnification.
왘 Close the eye that is
looking into the adjustable
eyepiece and look into the
fixed eyepiece with the
other eye.
왘 View the test object and
bring into focus with the
focusing drive.
Leica StereoZoom User Manual

29
Leica StereoZoom User Manual – Operating
왘 Without looking into the eye-
pieces, turn the eyelens of the
adjustable eyepiece as far as
possible in the “+” direction.
왘 Close the eye that is looking
into the fixed eyepiece and
look into the adjustable
eyepiece with the other eye.
왘 View the test object and
slowly turn the eyelens clockwise (the “–” direction) until
the object is in focus.
왘 Set the microscope to
maximum magnification.
왘 View the test object with both
eyes and bring it into sharp
focus with the focusing drive.
View the object while zooming
from minimum to maximum magnification.
• The object should remain in
constant focus (parfocal) at all
times. If it does not, please
repeat the procedure above.
Diopter adjustment
at the adjustable
eyepiece
Checking
parfocality

30
Leica StereoZoom User Manual
Special notes
Setting up diopter with two adjustable eyepieces
왘 For Leica S6 D and S8 APO, set pinion knob to
Vis position.
왘 Set approximate working distance by means of
focusing drive (working distances of various
objectives see p.38–40).
왘 Set up lighting
왘 Set viewing distance (p.23).
왘 Set ‘0’ diopters on both eyepieces.
왘 Place flat test object under
the objective.
왘 Set lowest magnification.
왘 View test object through
the eyepiece and focus
using the focusing drive.
왘 Set highest magnification.
왘 Optimize sharpness using the focusing drive.
Preparations
Focusing on
test object

Leica StereoZoom User Manual – Special notes
31
왘 Set lowest magnification.
왘 Do not look into the eyepiece!
왘 Turn lens counterclockwise in
the ‘+’ direction until it stops.
왘 Now look into the eyepiece.
왘 Close one eye.
왘 With the other eye, observe
the test object and turn the
lens slowly clockwise in the ‘–’
direction, until this eye sees
the object clearly.
왘 Set the diopter for the other
eye in the same way.
왘 Select highest magnification.
왘 View object and, if necessary,
gently refocus.
왘 Adjust magnification changer
from the lowest to the highest
magnification.
• When doing this, the sharpness must remain constant
over the entire zoom range
(parfocal). Otherwise,
please repeat the procedure.
Regulating diopters
Testing
parfocality
31

32
It is possible to switch between the observation
and photo beam paths. Light distribution:
– in ‘Vis’ position: 100% light in
both eyepieces/no light in
the video/photo beam path
– in ‘Doc’ position: 100% light
in the right eyepiece/no light
in the left eyepiece/100%
light in the video/photo beam
path
Focusing and framing down the left eyepiece
(video/photo beam path).
왘 When the picture detail and sharpness are set to
your satisfaction, switch to the ‘Doc’ position and
take your photo.
Please note: Images of flat specimen are partly unsharp
(left and right edge).
Leica StereoZoom User Manual
Operating
Photography with
Leica S6 D and
S8 APO
DOC
VIS

… the field of vision is in shadow?
• Adjust interpupillary distance and ensure that it is
correct (p.23).
• Check pupil position (p.23).
… the image will not stay in focus?
• Insert eyepieces correctly (p.16).
• Correct diopter adjustment exactly as described
(p.28–31).
… the focusing drive slides down or is difficult to turn?
• Adjust tension (p.24).
If you encounter problems with electrically powered
equipment, first check:
• that the voltage selector is set to the correct voltage.
• that the mains power switch is in the ‘on’ position.
• that the mains power cable is correctly connected.
• that all connector cables are correctly connected.
• that none of the fuses have blown.
… the image is too dark?
• Set regulating knob high enough.
Photographs are blurred.
• Focus precisely (p.24).
• Focus on reticles and carry out diopters-correction
exactly according to the instructions (p.30).
• Insert eyepieces all the way in (p.16).
• Check that the reticles are firmly placed in the
eyepiece (p.18).
No image on the film
• Switch light divider on the photo tube to the ‘Doc’
position (p.32).
Special notes
What do I do if …
Remedy
Remedy
Remedy
Remedy
Remedy
Remedy
Leica StereoZoom User Manual
33

34
In this section we would like to explain how you can
take care of your microscope and give you a few tips on
cleaning.
• against moisture, vapours, acids, alkalis and caustic
substances.
Never keep chemicals close to your microscope.
• against improper handling.
Never fit other equipment connectors or dismantle
optical systems and mechanical parts unless the user
manual gives express instructions for doing so.
• against oil and grease.
Never grease guides and mechanical parts.
• Cover your microscope with its dust cover during
breaks.
• Put dust covers over tube openings, eyepieces,
and eyepiece tubes without eyepieces.
• Remove dust with a rubber blower and soft brush.
• Clean eyepieces and objectives with special optical
cleaning cloths and pure alcohol.
• Keep accessories in a dust-free environment when
not in use.
Protect your
microscope
Dust and dirt
impair your results.
Therefore:
Care
Leica StereoZoom User Manual
Care

35
Various components are made of plastic or are plasticcoated to make them pleasant to touch and handle.
However, incorrect cleaning with unsuitable detergents
can damage the plastic. Please observe the following
do’s and don’ts:
• in an ultrasonic cleaner. The plastic may become
brittle and eventually break.
• with caustic or acetone-containing substances such
as ether substitute.
• with any other solvents except ethanol and
isopropanol.
• warm soapy water, rinsing the plastic afterwards
with distilled water.
• ethanol (industrial alcohol) and isopropanol.
Always take appropriate safety precautions when using
ethanol and isopropanol.
Cleaning
plastic parts
Never clean plastics
To clean plastics
safely use
Leica StereoZoom User Manual – Care

Leica StereoZoom User Manual
36
You are working with a high-performance precision
instrument, whose quality we guarantee.
The warranty covers manufacturing and materials faults,
but not damage resulting from negligence or incorrect
handling.
If you treat your valuable optical instrument with due care,
it will repay you with the decades of reliable precision for
which Leica instruments are renowned.
However, should you encounter problems with your microscope at any time, please contact your local Leica representative or Leica Microsystems (Switzerland) Ltd.,
CH-9435 Heerbrugg.
We guarantee
quality
Special notes

3737
Leica StereoZoom User Manual – Special notes
M
O
Objective magnification
M
E
Eyepiece magnification
z Magnification changer setting
N
FOV
Eyepiece field number. Field numbers are printed
on the eyepieces:
10×/23, 16×/16, 20×/12, 10×/23B, 16×/14B,
25×/9.5B, 40×/6B
Example:
M
O
1.6× objective
M
E
20×/12 eyepiece
z Zoom position 4.0
Magnification in the binocular tube:
M
TOT VIS
=MO× ME× z 1.6 × 20 × 4 = 128
Field diameter in the object:
N
FOV
12
∅OF=
__________ __________
= 1.9mm
MO× z 1.6 × 4
Calculating total
magnification and
field diameter

Leica StereoZoom User Manual
38
with additional objectives
0.32× 0.5× 0.63×
0.75× 1.6×
110mm 300mm 200mm 155mm 130mm 55mm
Total magnification
Working distance
Eyepieces
Zoom position
*4.0: S6
40× /6B
10 445 303
6.3
8.0
10.0
12.5
16.0
20.0
25.0
32.0
40.0
10.1
12.8
16.0
20.0
25.6
32.0
40.0
51.2
64.0
12.6
16.0
20.0
25.0
32.0
40.0
50.0
64.0
80.0
10.1
12.8
16.0
20.0
25.6
32.0
40.0
51.2
64.0
15.8
20.0
25.0
31.3
40.0
50.0
62.5
80.0
100.0
25.2
32.0
40.0
50.0
64.0
80.0
100.0
128.0
160.0
36.5
28.8
23.0
18.4
14.4
11.5
9.2
7.2
5.8
25.3
20.0
16.0
12.8
10.0
8.0
6.4
5.0
4.0
19.0
15.0
12.0
9.6
7.5
6.0
4.8
3.8
3.0
22.2
17.5
14.0
11.2
8.8
7.0
5.6
4.4
3.5
15.0
11.9
9.5
7.6
5.9
4.8
3.8
3.0
2.4
9.5
7.5
6.0
4.8
3.8
3.0
2.4
1.9
1.5
2.0
2.6
3.2
4.0
5.1
6.4
8.0
10.2
12.8
3.2
4.1
5.1
6.4
8.2
10.2
12.8
16.4
20.5
4.0
5.1
6.4
8.0
10.2
12.8
16.0
20.5
25.6
3.2
4.1
5.1
6.4
8.2
10.2
12.8
16.4
20.5
5.0
6.4
8.0
10.0
12.8
16.0
20.0
25.6
32.0
8.1
10.2
12.8
16.0
20.5
25.6
32.0
41.0
51.2
115.0
88.5
71.9
57.5
45.1
35.9
28.8
22.5
18.0
80.0
62.4
50.2
40.0
31.2
25.1
20.0
15.6
12.5
60.0
47.1
37.5
30.0
23.5
18.8
15.0
11.7
9.4
70.0
54.6
43.9
35.0
27.3
22.0
17.5
13.7
10.9
47.5
37.1
29.7
23.8
18.6
14.8
11.9
9.3
7.4
29.6
23.5
18.8
15.0
11.7
9.4
7.5
5.9
4.7
3.2
4.0
5.0
6.3
8.0
10.0
12.5
16.0
20.0
5.0
6.4
8.0
10.0
12.8
16.0
20.0
25.6
32.0
6.3
8.0
10.0
12.5
16.0
20.0
25.0
32.0
40.0
5.0
6.4
8.0
10.0
12.8
16.0
20.0
25.6
32.0
7.9
10.0
12.5
15.6
20.0
25.0
31.3
40.0
50.0
12.6
16.0
20.0
25.0
32.0
40.0
50.0
64.0
80.0
71.9
57.5
46.0
36.5
28.8
23.0
18.4
14.4
11.5
51.2
40.0
32.0
25.6
20.0
16.0
12.8
10.0
8.0
38.1
30.0
24.0
19.2
15.0
12.0
9.6
7.5
6.0
44.8
35.0
28.0
22.4
17.5
14.0
11.2
8.8
7.0
30.1
23.8
19.0
15.2
11.9
9.5
7.6
5.9
4.8
19.0
15.0
12.0
9.6
7.5
6.0
4.8
3.8
3.0
4.0
5.0
6.3
7.9
10.1
12.6
15.8
20.2
25.2
6.4
8.1
10.1
12.6
16.1
20.2
25.2
32.3
40.3
7.9
10.1
12.6
15.8
20.2
25.2
31.5
40.3
50.4
6.4
8.1
10.1
12.6
16.1
20.2
25.2
32.3
40.3
9.9
12.6
15.8
19.7
25.2
31.5
39.4
50.4
63.0
15.9
20.2
25.2
31.5
40.3
50.4
63.0
80.6
100.8
57.5
46.0
36.5
29.1
22.8
18.3
14.6
11.4
9.1
40.0
31.6
25.3
20.3
15.9
12.7
10.2
7.9
6.4
30.4
23.8
19.0
15.2
11.9
9.5
7.6
6.0
4.8
35.0
27.7
22.2
17.8
13.9
11.1
8.9
6.9
5.6
24.0
18.8
15.0
12.1
9.4
7.5
6.0
4.7
3.8
15.1
11.9
9.5
7.6
6.0
4.8
3.8
3.0
2.4
4.7
6.0
7.5
9.4
12.0
15.0
18.8
24.0
30.0
7.6
9.6
12.0
15.0
19.2
24.0
30.0
38.4
48.0
9.5
12.0
15.0
18.8
24.0
30.0
37.5
48.0
60.0
7.6
9.6
12.0
15.0
19.2
24.0
30.0
38.4
48.0
11.8
15.0
18.8
23.4
30.0
37.5
46.9
60.0
75.0
18.9
24.0
30.0
37.5
48.0
60.0
75.0
96.0
120.0
48.9
38.3
30.7
24.5
19.2
15.3
12.2
9.6
7.7
33.7
26.7
21.3
17.1
13.3
10.7
8.5
6.7
5.3
25.3
20.0
16.0
12.8
10.0
8.0
6.4
5.0
4.0
29.5
23.3
18.7
14.9
11.7
9.3
7.5
5.8
4.7
20.1
15.8
12.6
10.1
7.9
6.3
5.1
4.0
3.2
12.7
10.0
8.0
6.4
5.0
4.0
3.2
2.5
2.0
10.1
12.8
16.0
20.0
25.6
32.0
40.0
51.2
64.0
16.1
20.5
25.6
32.0
41.0
51.2
64.0
81.9
102.4
20.2
25.6
32.0
40.0
51.2
64.0
80.0
102.4
128.0
16.1
20.5
25.6
32.0
41.0
51.2
64.0
81.9
102.4
25.2
32.0
40.0
50.0
64.0
80.0
100.0
128.0
160.0
40.3
51.2
64.0
80.0
102.4
128.0
160.0
204.8
256.0
22.8
18.0
14.4
11.5
9.0
7.2
5.8
4.5
3.6
15.9
12.5
10.0
8.0
6.2
5.0
4.0
3.1
2.5
11.9
9.4
7.5
6.0
4.7
3.8
3.0
2.3
1.9
13.9
10.9
8.8
7.0
5.5
4.4
3.5
2.7
2.2
9.4
7.4
5.9
4.8
3.7
3.0
2.4
1.9
1.5
6.0
4.7
3.8
3.0
2.3
1.9
1.5
1.2
0.9
Field diameter mm
Total magnification
Field diameter mm
Total magnification
Field diameter mm
Total magnification
Field diameter mm
Total magnification
Field diameter mm
Total magnification
Field diameter mm
0.63
0.8
1.0
1.25
1.6
2.0
2.5
3.2
4.0*
0.63
0.8
1.0
1.25
1.6
2.0
2.5
3.2
4.0*
0.63
0.8
1.0
1.25
1.6
2.0
2.5
3.2
4.0*
0.63
0.8
1.0
1.25
1.6
2.0
2.5
3.2
4.0*
0.63
0.8
1.0
1.25
1.6
2.0
2.5
3.2
4.0*
0.63
0.8
1.0
1.25
1.6
2.0
2.5
3.2
4.0*
10 446 332
10 446 333
10× /23
10×/23B
10 446 326
10 446 329
16× /16
10 446 354
10 446 355
20×/12
10 446 356
10 446 357
16×/14B
10 445 301
25×/9.5B
10 445 302
Optical Data, Leica S4 E, S6 E, S6, S6 T, S6 D

39
Leica StereoZoom User Manual
39
12.6
16.0
20.0
25.0
32.0
40.0
50.0
64.0
80.0
20.2
25.6
32.0
40.0
51.2
64.0
80.0
102.4
128.0
25.2
32.0
40.0
50.0
64.0
80.0
100.0
128.0
160.0
20.2
25.6
32.0
40.0
51.2
64.0
80.0
102.4
128.0
31.5
40.0
50.0
62.5
80.0
100.0
125.0
160.0
200.0
50.4
64.0
80.0
100.0
128.0
160.0
200.0
256.0
320.0
18.3
14.4
11.5
9.2
7.2
5.8
4.6
3.6
2.9
12.7
10.0
8.0
6.4
5.0
4.0
3.2
2.5
2.0
9.5
7.5
6.0
4.8
3.8
3.0
2.4
1.9
1.5
11.1
8.8
7.0
5.6
4.4
3.5
2.8
2.2
1.8
7.5
5.9
4.8
3.8
3.0
2.4
1.9
1.5
1.2
4.8
3.8
3.0
2.4
1.9
1.5
1.2
0.9
0.8
2.5
3.1
3.9
4.9
6.2
7.8
9.8
12.5
15.6
3.9
5.0
6.2
7.8
10.0
12.5
15.6
20.0
25.0
4.9
6.2
7.8
9.8
12.5
15.6
19.5
25.0
31.2
3.9
5.0
6.2
7.8
10.0
12.5
15.6
20.0
25.0
6.1
7.8
9.8
12.2
15.6
19.5
24.4
31.2
39.0
9.8
12.5
15.6
19.5
25.0
31.2
39.0
49.9
62.4
92.0
74.2
59.0
46.9
37.1
29.5
23.5
18.4
14.7
65.6
51.2
41.3
32.8
25.6
20.5
16.4
12.8
10.2
49.0
38.7
30.8
24.5
19.2
15.4
12.3
9.6
7.7
57.4
44.8
36.1
28.7
22.4
17.9
14.4
11.2
9.0
38.9
30.4
24.2
19.5
15.2
12.2
9.7
7.6
6.1
24.5
19.2
15.4
12.3
9.6
7.7
6.2
4.8
3.8
1.8
2.2
2.8
3.5
4.5
5.6
7.0
9.0
11.2
2.8
3.6
4.5
5.6
7.2
9.0
11.2
14.3
17.9
3.5
4.5
5.6
7.0
9.0
11.2
14.0
17.9
22.4
2.8
3.6
4.5
5.6
7.2
9.0
11.2
14.3
17.9
4.4
5.6
7.0
8.8
11.2
14.0
17.5
22.4
28.0
7.1
9.0
11.2
14.0
17.9
22.4
28.0
35.8
44.8
127.8
104.5
82.1
65.7
51.1
41.1
32.9
25.6
20.5
91.4
71.1
56.9
45.7
35.6
28.4
22.9
17.9
14.3
68.6
53.3
42.9
34.3
26.7
21.4
17.1
13.4
10.7
80.0
62.2
49.8
40.0
31.1
24.9
20.0
15.7
12.5
54.0
42.4
33.9
27.0
21.2
17.0
13.6
10.6
8.5
33.8
26.7
21.4
17.1
13.4
10.7
8.6
6.7
5.4
4.7
6.0
7.5
9.4
12.0
15.0
18.8
24.0
30.0
7.6
9.6
12.0
15.0
19.2
24.0
30.0
38.4
48.0
9.5
12.0
15.0
18.8
24.0
30.0
37.5
48.0
60.0
7.6
9.6
12.0
15.0
19.2
24.0
30.0
38.4
48.0
11.8
15.0
18.8
23.4
30.0
37.5
46.9
60.0
75.0
18.9
24.0
30.0
37.5
48.0
60.0
75.0
96.0
120.0
48.9
38.3
30.7
24.5
19.2
15.3
12.2
9.6
7.7
33.7
26.7
21.3
17.1
13.3
10.7
8.5
6.7
5.3
25.3
20.0
16.0
12.8
10.0
8.0
6.4
5.0
4.0
29.5
23.3
18.7
14.9
11.7
9.3
7.5
5.8
4.7
20.1
15.8
12.6
10.1
7.9
6.3
5.1
4.0
3.2
12.7
10.0
8.0
6.4
5.0
4.0
3.2
2.5
2.0
3.5
4.5
5.6
7.0
9.0
11.2
14.0
17.9
22.4
5.6
7.2
9.0
11.2
14.3
17.9
22.4
28.7
35.8
7.1
9.0
11.2
14.0
17.9
22.4
28.0
35.8
44.8
5.6
7.2
9.0
11.2
14.3
17.9
22.4
28.7
35.8
8.8
11.2
14.0
17.5
22.4
28.0
35.0
44.8
56.0
14.1
17.9
22.4
28.0
35.8
44.8
56.0
71.7
89.6
65.7
51.1
41.1
32.9
25.6
20.5
16.4
12.8
10.3
45.7
35.6
28.4
22.9
17.9
14.3
11.4
8.9
7.2
33.8
26.7
21.4
17.1
13.4
10.7
8.6
6.7
5.4
40.0
31.1
24.9
20.0
15.7
12.5
10.0
7.8
6.3
27.0
21.2
17.0
13.6
10.6
8.5
6.8
5.3
4.2
17.0
13.4
10.7
8.6
6.7
5.4
4.3
3.3
2.7
6.2
7.9
9.9
12.4
15.8
19.8
24.8
31.7
39.6
10.0
12.7
15.8
19.8
25.3
31.7
39.6
50.7
63.4
12.5
15.8
19.8
24.8
31.7
39.6
49.5
63.4
79.2
10.0
12.7
15.8
19.8
25.3
31.7
39.6
50.7
63.4
15.6
19.8
24.8
30.9
39.6
49.5
61.9
79.2
99.0
24.9
31.7
39.6
49.5
63.4
79.2
99.0
126.7
158.4
37.1
29.1
23.2
18.5
14.6
11.6
9.3
7.3
5.8
25.6
20.2
16.2
12.9
10.1
8.1
6.5
5.0
4.0
19.2
15.2
12.1
9.7
7.6
6.1
4.8
3.8
3.0
22.4
17.6
14.2
11.3
8.9
7.1
5.7
4.4
3.5
15.2
12.0
9.6
7.7
6.0
4.8
3.8
3.0
2.4
9.6
7.6
6.1
4.8
3.8
3.0
2.4
1.9
1.5
4.5
5.7
7.1
8.9
11.4
14.2
17.8
22.7
28.4
7.2
9.1
11.4
14.2
18.2
22.7
28.4
36.4
45.4
8.9
11.4
14.2
17.8
22.7
28.4
35.5
45.4
56.8
7.2
9.1
11.4
14.2
18.2
22.7
28.4
36.4
45.4
11.2
14.2
17.8
22.2
28.4
35.5
44.4
56.8
71.0
17.9
22.7
28.4
35.5
45.4
56.8
71.0
90.9
113.6
51.1
40.4
32.4
25.8
20.2
16.2
12.9
10.1
8.1
35.6
28.1
22.5
18.0
14.1
11.3
9.0
7.0
5.6
27.0
21.1
16.9
13.5
10.6
8.5
6.8
5.3
4.2
31.1
24.6
19.6
15.8
12.3
9.9
7.9
6.2
4.9
21.2
16.7
13.3
10.7
8.4
6.7
5.3
4.2
3.3
13.4
10.6
8.5
6.8
5.3
4.2
3.4
2.6
2.1
Total magnification
Field diameter mm
Total magnification
Field diameter mm
Total magnification
Field diameter mm
Total magnification
Field diameter mm
Total magnification
Field diameter mm
Total magnification
Field diameter mm
Total magnification
Field diameter mm
35mm 200mm 350mm 77mm 137mm 48mm 98mm
with additional objectives
2.0× 0.3×–0.4× 0.3×– 0.4× 0.6×–0.75× 0.6×– 0.75× 0.7× –1.0× 0.7× –1.0×

40
75mm 101mm 37mm 25mm 200mm
Apochromats Achromate
0.63× 1.6× 2.0×
0.32×
Total magnification
Working distance
Eyepieces
Zoom position
10.0
12.5
16.0
20.0
25.0
32.0
40.0
50.0
63.0
80.0
16.0
20.0
25.6
32.0
40.0
51.2
64.0
80.0
100.8
128.0
25.0
31.3
40.0
50.0
62.5
80.0
100.0
125.0
157.5
200.0
40.0
50.0
64.0
80.0
100.0
128.0
160.0
200.0
252.0
320.0
23.0
18.4
14.4
11.5
9.2
7.2
5.8
4.6
3.7
2.9
16.0
12.8
10.0
8.0
6.4
5.0
4.0
3.2
2.5
2.0
9.5
7.6
5.9
4.8
3.8
3.0
2.4
1.9
1.5
1.2
6.0
4.8
3.8
3.0
2.4
1.9
1.5
1.2
1.0
0.8
6.3
7.9
10.1
12.6
15.8
20.2
25.2
31.5
39.7
50.4
10.1
12.6
16.1
20.2
25.2
32.3
40.3
50.4
63.5
80.6
15.8
19.7
25.2
31.5
39.4
50.4
63.0
78.8
99.2
126.0
25.2
31.5
40.3
50.4
63.0
80.6
100.8
126.0
158.8
201.6
36.5
29.1
22.8
18.3
14.6
11.4
9.1
7.3
5.8
4.6
25.3
20.3
15.9
12.7
10.2
7.9
6.4
5.1
4.0
3.2
15.0
12.1
9.4
7.5
6.0
4.7
3.8
3.0
2.4
1.9
9.5
7.6
6.0
4.8
3.8
3.0
2.4
1.9
1.5
1.2
16.0
20.0
25.6
32.0
40.0
51.2
64.0
80.0
100.8
128.0
25.6
32.0
41.0
51.2
64.0
81.9
102.4
128.0
161.3
204.8
40.0
50.0
64.0
80.0
100.0
128.0
160.0
200.0
252.0
320.0
64.0
80.0
102.4
128.0
160.0
204.8
256.0
320.0
403.2
512.0
20.0
25.0
32.0
40.0
50.0
64.0
80.0
100.0
126.0
160.0
32.0
40.0
51.2
64.0
80.0
102.4
128.0
160.0
201.6
256.0
50.0
62.5
80.0
100.0
125.0
160.0
200.0
250.0
315.0
400.0
80.0
100.0
128.0
160.0
200.0
256.0
320.0
400.0
504.0
640.0
11.5
9.2
7.2
5.8
4.6
3.6
2.9
2.3
1.8
1.4
8.0
6.4
5.0
4.0
3.2
2.5
2.0
1.6
1.3
1.0
4.8
3.8
3.0
2.4
1.9
1.5
1.2
1.0
0.8
0.6
3.0
2.4
1.9
1.5
1.2
0.9
0.8
0.6
0.5
0.4
3.2
4.0
5.1
6.4
8.0
10.2
12.8
16.0
20.2
25.6
5.1
6.4
8.2
10.2
12.8
16.4
20.5
25.6
32.3
41.0
8.0
10.0
12.8
16.0
20.0
25.6
32.0
40.0
50.4
64.0
12.8
16.0
20.5
25.6
32.0
41.0
51.2
64.0
80.6
102.4
71.9
57.5
45.1
35.9
28.8
22.5
18.0
14.4
11.4
9.0
43.9
35.0
27.3
22.0
17.5
13.7
10.9
8.8
6.9
5.5
29.7
23.8
18.6
14.8
11.9
9.3
7.4
5.9
4.7
3.7
18.8
15.0
11.7
9.4
7.5
5.9
4.7
3.8
3.0
2.3
Field diameter mm
Total magnification
Field diameter mm
Total magnification
Field diameter mm
Total magnification
Field diameter mm
Total magnification
Field diameter mm
1.0
1.25
1.6
2.0
2.5
3.2
4.0
5.0
6.3
8.0
1.0
1.25
1.6
2.0
2.5
3.2
4.0
5.0
6.3
8.0
1.0
1.25
1.6
2.0
2.5
3.2
4.0
5.0
6.3
8.0
1.0
1.25
1.6
2.0
2.5
3.2
4.0
5.0
6.3
8.0
10 446 332
10 446 333
10×/23
10×/23B
10 446 326
10 446 329
16×/16
10 446 354
10 446 355
25×/9.5B
10 445 302
40×/6B
10 445 303
14.4
11.5
9.0
7.2
5.8
4.5
3.6
2.9
2.3
1.8
10.0
8.0
6.2
5.0
4.0
3.1
2.5
2.0
1.6
1.3
5.9
4.8
3.7
3.0
2.4
1.9
1.5
1.2
0.9
0.7
3.8
3.0
2.3
1.9
1.5
1.2
0.9
0.8
0.6
0.5
Optical Data, StereoZoom
®
S8 APO
Leica StereoZoom User ManualLeica StereoZoom User Manual

Leica StereoZoom User Manual
41
with incident-light stand
Dimensions, Leica S4 E, S6 E, S6 T
161
107
23
25
81110
351
38°
22
134
223
278
393
ø58
ø76
46
278
393
205
144
104
113
148
205
Leica S4 E, S6 E, S6 T
Dimensions in mm

42
161
107
23
25
81110
351
38°
22
65
134
223
278
393
ø58
ø76
46
with transmitted-light stand
Dimensions, Leica S4 E, S6 E, S6 T
144
104
113
148
205
220
278
393
205
Leica S4 E, S6 E, S6 T
Dimensions in mm
42
Leica StereoZoom User Manual

207
107
23
25
81110
351
38
22
134
223
278
393
ø58
ø76
171
278
393
205
144
104
113
148
205
43
with inclining focusing drive
Dimensions, Leica S6
Leica StereoZoom User Manual
Dimensions, Leica S6 D
120
148
25
81
110
390
60°
ø15.8
25
26
35
ø58
ø76
46
144
104
150.4
Leica S6
Dimensions
in mm
Dimensions
in mm
Leica S6 D
with incident-light stand

44
Leica StereoZoom User Manual
207
107
23
25
81110
351
38
22
65
134
223
278
393
ø58
ø76
171
278
393
205
144
104
113
148
205
220
Leica S6 D
with incident-light stand
Dimensions, Leica S6 D
Dimensions in mm

Leica StereoZoom User Manual
45
Leica StereoZoom User Manual
with incident-light stand
Dimensions, Leica S8 APO
207
107
23
25
11675
351
38
22
134
223
278
393
ø58
ø76
171
278
393
205
144
104
113
148
205
Dimensions in mm
Leica S8 APO

46
with transmitted-light stand
Dimensions, Leica S8 APO
207
107
23
25
11675
351
38
22
65
134
223
278
393
ø58
ø76
171
144
104
113
148
205
220
278
393
205
Dimensions in mm
Leica S8 APO
Leica StereoZoom User Manual

4747
Leica StereoZoom User Manual
Leica Microsystems is active in microscopy, sample
preparation, image analysis, confocal laser technology,
medical equipment and equipment for the semiconductor industry. With headquarters in Wetzlar, Germany,
this international technology group has grown from five
companies with a long tradition – Wild, Leitz, Reichert,
Jung and Cambridge Instruments.
Leica Microsystems develops high-utility end-to-end
solutions and innovative cutting-edge technologies of
internationally renowned quality. The same high quality
standards are in force in each of the Group’s 11 production sites in seven countries, making the name Leica
synonymous with quality.
Technology is one key factor in the success of Leica
Microsystems, customer focus the other. Our friendly
staff offer competent, on-the-spot advice and service
in your own language. Naturally we also cater reliably
and without fuss for all customer wishes and ensure
that your goods arrive on time and in perfect condition.
You will find valuable information on the products and
services of Leica Microsystems on the Internet as well
as contact information for distributors near you. Visit us
to get more information on the new StereoZoom®line.
Made by Leica
Leica for you
www.stereozoom.com
Leica Microsystems worldwide

Leica Microsystems – the brand
Illustrations, descriptions and technical data are not binding and may be changed without notice.
M2-188-0en • © Leica Microsystems (Switzerland) Ltd • CH-9435 Heerbrugg, 2000 – III.2005 – RDV
Leica Microsystems (Switzerland) Ltd
Stereo & Macroscope Systems
CH-9435 Heerbrugg
Telephone +41 71 726 33 33
Fax +41 71 726 33 99
www.leica-microsystems.com
www.stereomicroscopy.com
for outstanding products
Leica Microsystems’ mission is to be the world’s first-choice provider of innovative
solutions to our customers’ needs for vision, measurement, lithography and analysis
of microstructures.
Leica, the leading brand for microscopes and scientific instruments, developed from
five brand names, all with a long tradition: Wild, Leitz, Reichert, Jung and Cambridge
Instruments. Yet Leica symbolizes innovation as well as tradition.
Leica Microsystems – an international company
with a strong network of customer services
Australia: Gladesville, NSW Tel. + 1 800 625 286 Fax +61 2 9817 8358
Austria: Vienna Tel. +43 1 486 80 50 0 Fax +43 1 486 80 50 30
Canada: Richmond Hill/Ontario Tel. +1 905 762 20 00 Fax +1 905 762 89 37
China: Hong Kong Tel. +8522 564 6699 Fax +8522 564 4163
Denmark: Herlev Tel. +45 44 5401 01 Fax +45 44 5401 11
France: Rueil-Malmaison
Cédex Tel. +33 1 4732 8585 Fax +33 1 4732 8586
Germany: Bensheim Tel. +49 6251 1360 Fax +49 6251 136 155
Italy: Milan Tel. +39 02 57 486 1 Fax +39 02 5740 3273
Japan: Tokyo Tel. +81 3 543 596 09 Fax +81 3 543 596 15
Korea: Seoul Tel. +82 2 514 6543 Fax +82 2 514 6548
Netherlands: Rijswijk Tel. +31 70 41 32 130 Fax +31 70 41 32 109
Portugal: Lisbon Tel. +35 1 213 814 766 Fax +35 1 213 854 668
Singapore: Tel. +65 6 77 97 823 Fax +65 6 77 30 628
Spain: Barcelona Tel. +34 93 494 9530 Fax +34 93 494 9532
Sweden: Sollentuna Tel. +46 8 625 45 45 Fax +46 8 625 45 10
Switzerland: Glattbrugg Tel. +41 44 809 34 34 Fax +41 44 809 34 44
United Kingdom: Milton Keynes Tel. +44 1908 246 246 Fax +44 1908 609 992
USA: Bannockburn/Illinois Tel. +1 800 248 0123 Fax +1 847 405 0164
and representatives of Leica Microsystems
in more than 100 countries.
The companies of the Leica Microsystems
Group operate internationally in four business
segments, where we rank with the market
leaders.
●
Microscopy Systems
Our expertise in microscopy is the basis for all
our solutions for visualization, measurement
and analysis of microstructures in life sciences
and industry. With confocal laser technology
and image analysis systems, we provide threedimensional viewing facilities and offer new
solutions for cytogenetics, pathology and materials sciences.
●
Specimen Preparation
We provide comprehensive systems and services for clinical histo- and cytopathology
applications, biomedical research and industrial quality assurance. Our product range
includes instruments, systems and consumables for tissue infiltration and embedding,
microtomes and cryostats as well as automated stainers and coverslippers.
●
Medical Equipment
Innovative technologies in our surgical microscopes offer new therapeutic approaches in
microsurgery.
●
Semiconductor Equipment
Our automated, leading-edge measurement and
inspection systems and our E-beam lithography
systems make us the first choice supplier for
semiconductor manufacturers all over the world.
In accordance with the ISO 9001 certificate, Leica Microsystems (Switzerland) Ltd,
Business Unit Stereo & Macroscope Systems has at its disposal a management system
that meets the requirements of the international standard for quality management. In
addition, production meets the requirements of the international standard ISO 14001 for
environmental management.
 Loading...