

Page 1
Not For Resale – Free Download at http://homepage.ntlworld.com/joechan/manuals
Page 2

Not For Resale – Free Download at http://homepage.ntlworld.com/joechan/manuals
We hope that your new LEICA® will give
you a great deal of pleasure and wish you
many years of successful photography with
it.
To enable you to fully enjoy and take advantage of the wide range of possibilities offered
by this high-quality, precision camera, we
recommend that you first read this manual
carefully.
The Leica Akademie:
Apart from
developing and manufacturing high-quality
products for its chain of highest optical
performance ranging from photography
through photo-graphic reproduction to
observation. The Leica Camera Group offers
a special service through the Leica Academy.
For many years, this internationally famous
facility has been teaching photographic
know-how in application-oriented seminars
and training courses. It meets the needs of
keen photographers, both beginners and
advanced students, for special training in
demanding areas of 35mm photography,
projection, and enlargement.
Up-to-date, well-equipped classrooms at our
Solms headquarters are available for these
This instruction booklet was printed on paper bleached
without chlorine - an expensive process that preserves
the environment, especially natural water resources.
courses, which are held by experienced
instructors, with syllabuses ranging from
general photography to specialized fields of
interest. They provide a wealth of practical
suggestions, help and advice.
Further information and details of seminars
are available from:
Leica Camera GmbH, Leica Akademie,
Oskar-Barnack-Strasse 11,
D-35606 Solms, Germany
Telephone +49(6442)208-421.
II
Page 3
Not For Resale – Free Download at http://homepage.ntlworld.com/joechan/manuals
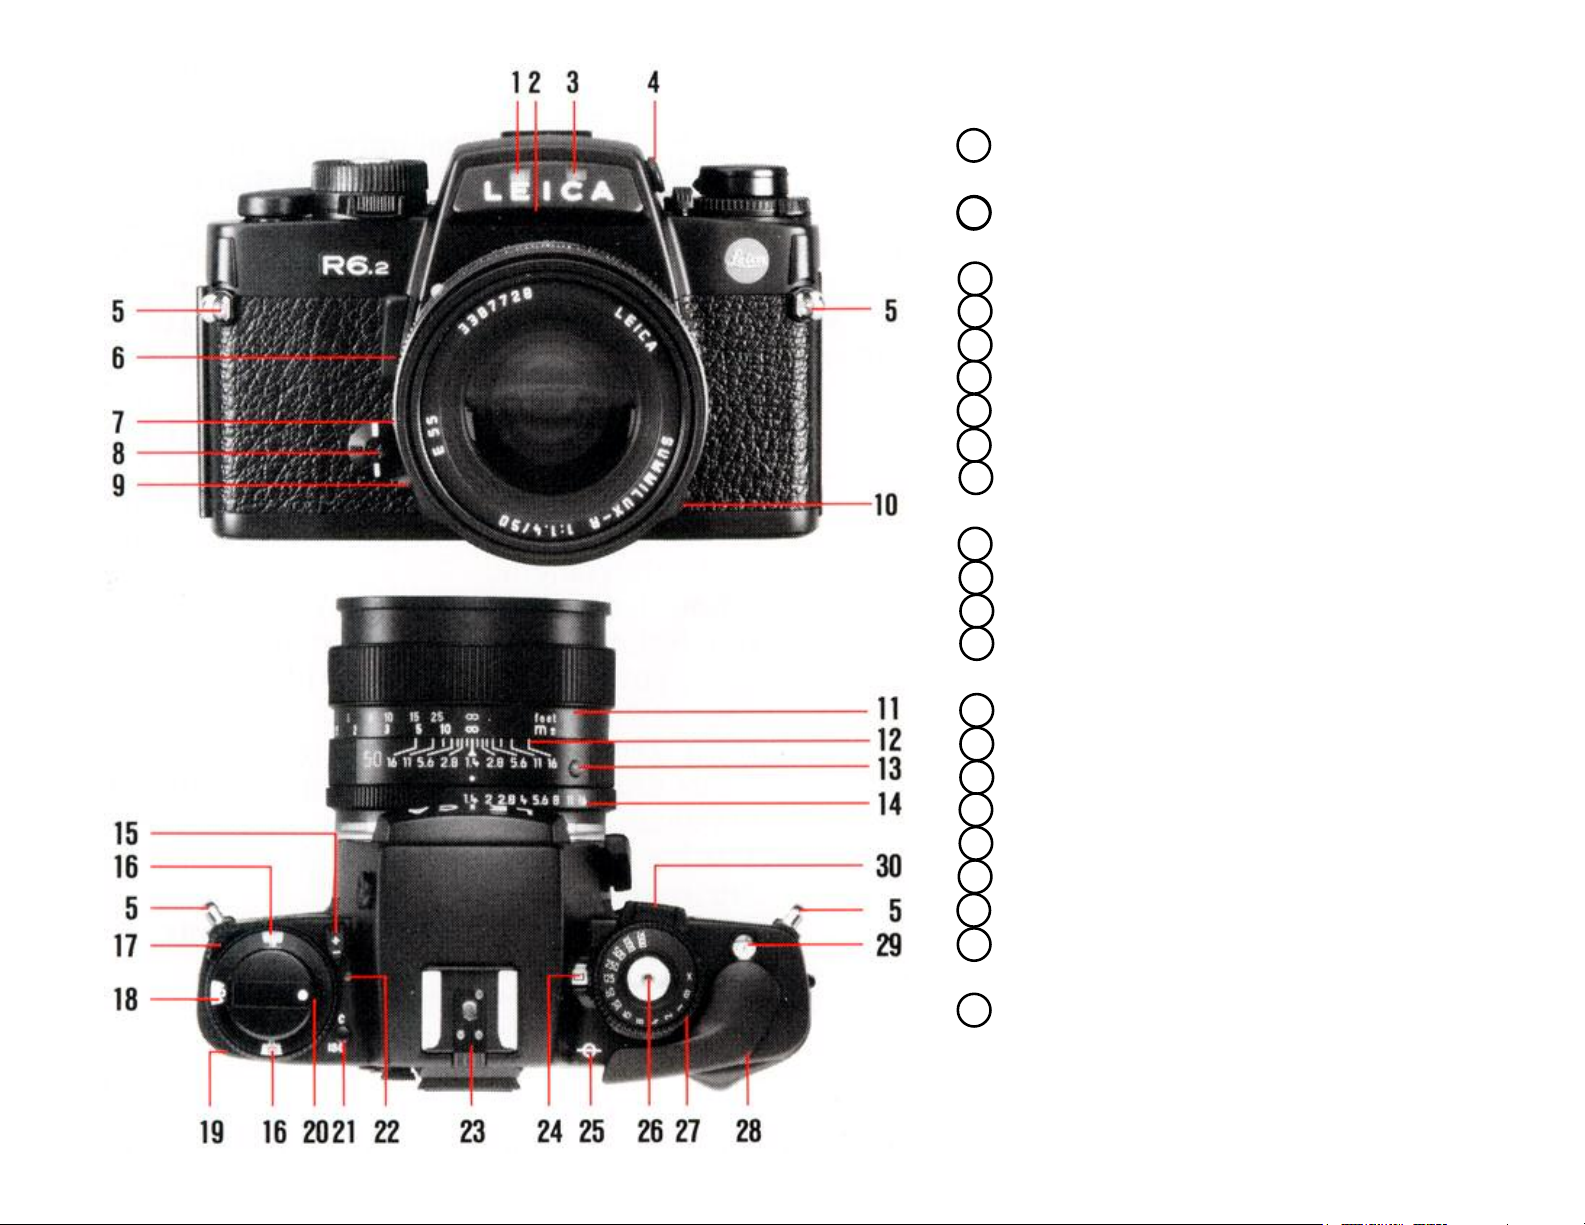
Brief description
1
Illuminating window for shutter-speed
indicator
2
Illuminating window for aperture
indicator
3 Self-timer LED
4
Coaxial flash-cable contact
5
Eyelet for carrying strap
6 Depth of field lever
7
Bayonet lock
8
Electronic self-timer
9
Cable socket for independent
mirror release
10 Supplementary viewfinder light
11
Focusing ring
12
Depth of field scale
13
Red dot for alignment of
interchangeable lenses
14
Aperture setting ring
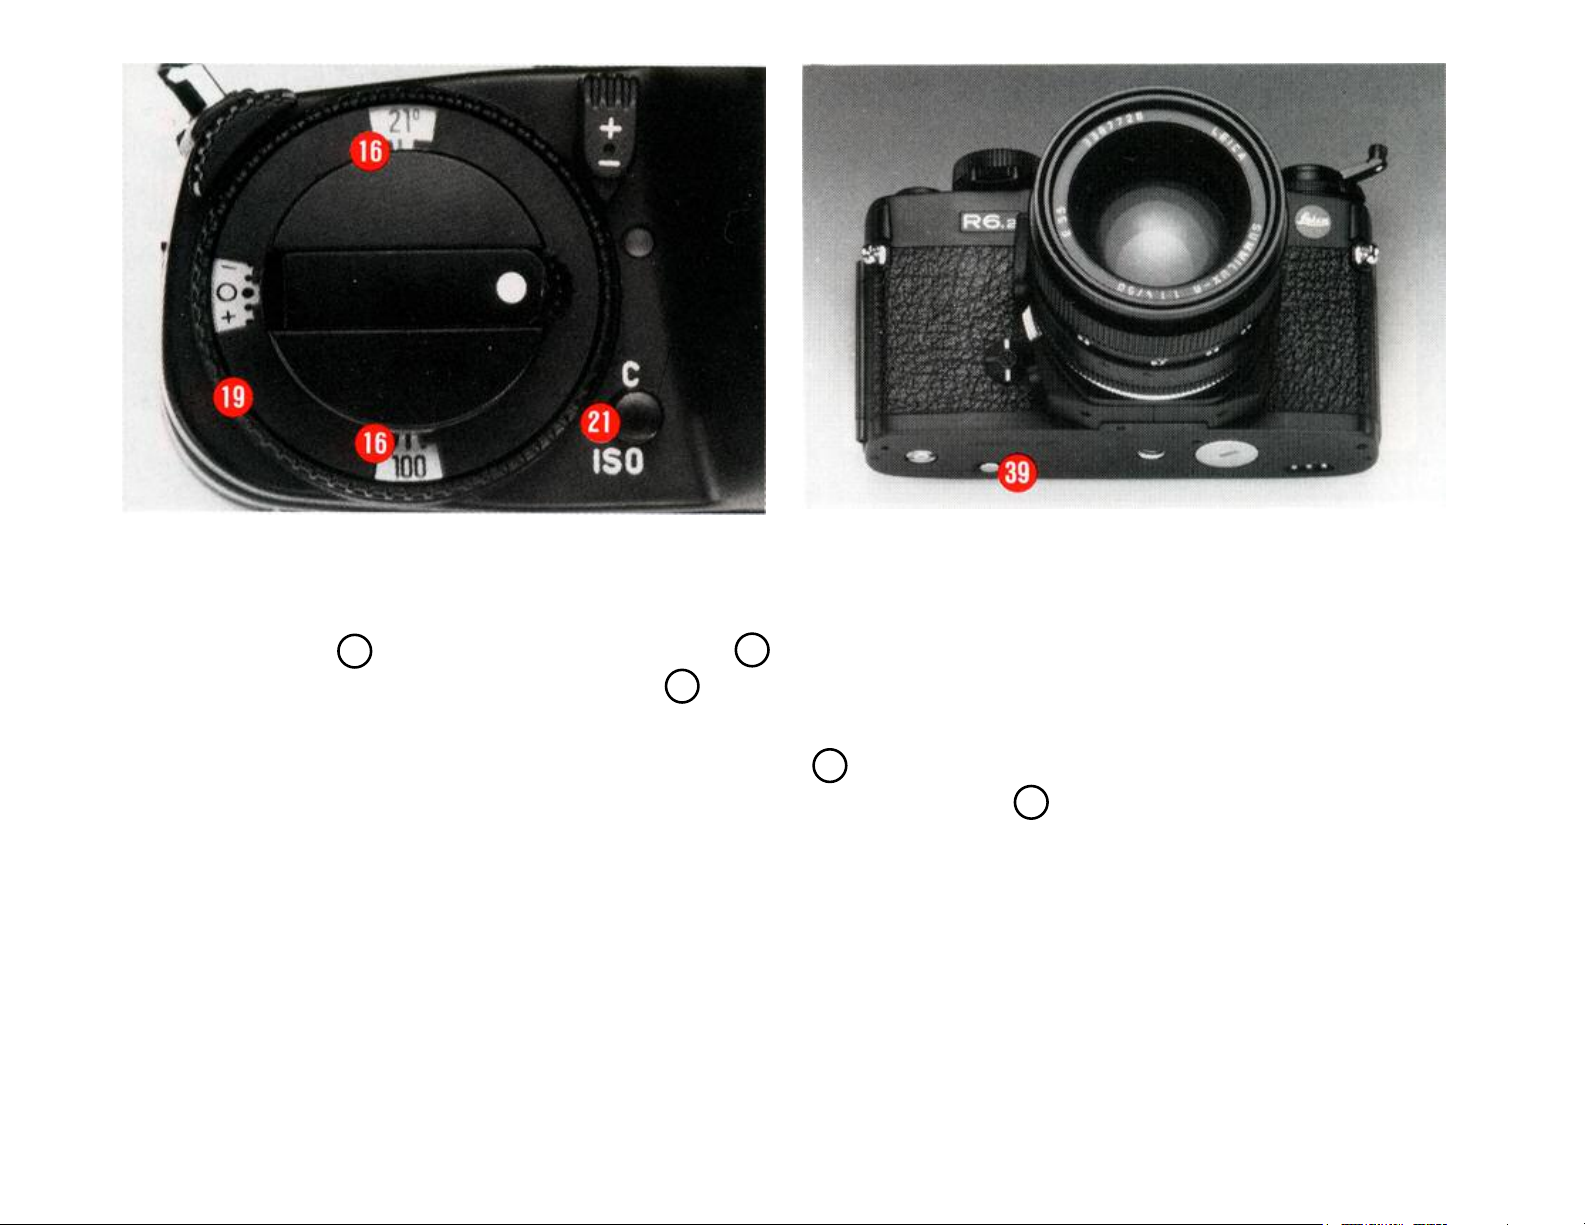
15
Override lock
16
ISO film speed control window
17 Override setting lever
18
Override scale
19
Film speed setting ring
20
Hinged rewind crank
21
Locking button for setting (ISO)
film speed and battery check (C)
22
LED for battery check
III
Page 4

Not For Resale – Free Download at http://homepage.ntlworld.com/joechan/manuals
Contents
Brief description III, VI
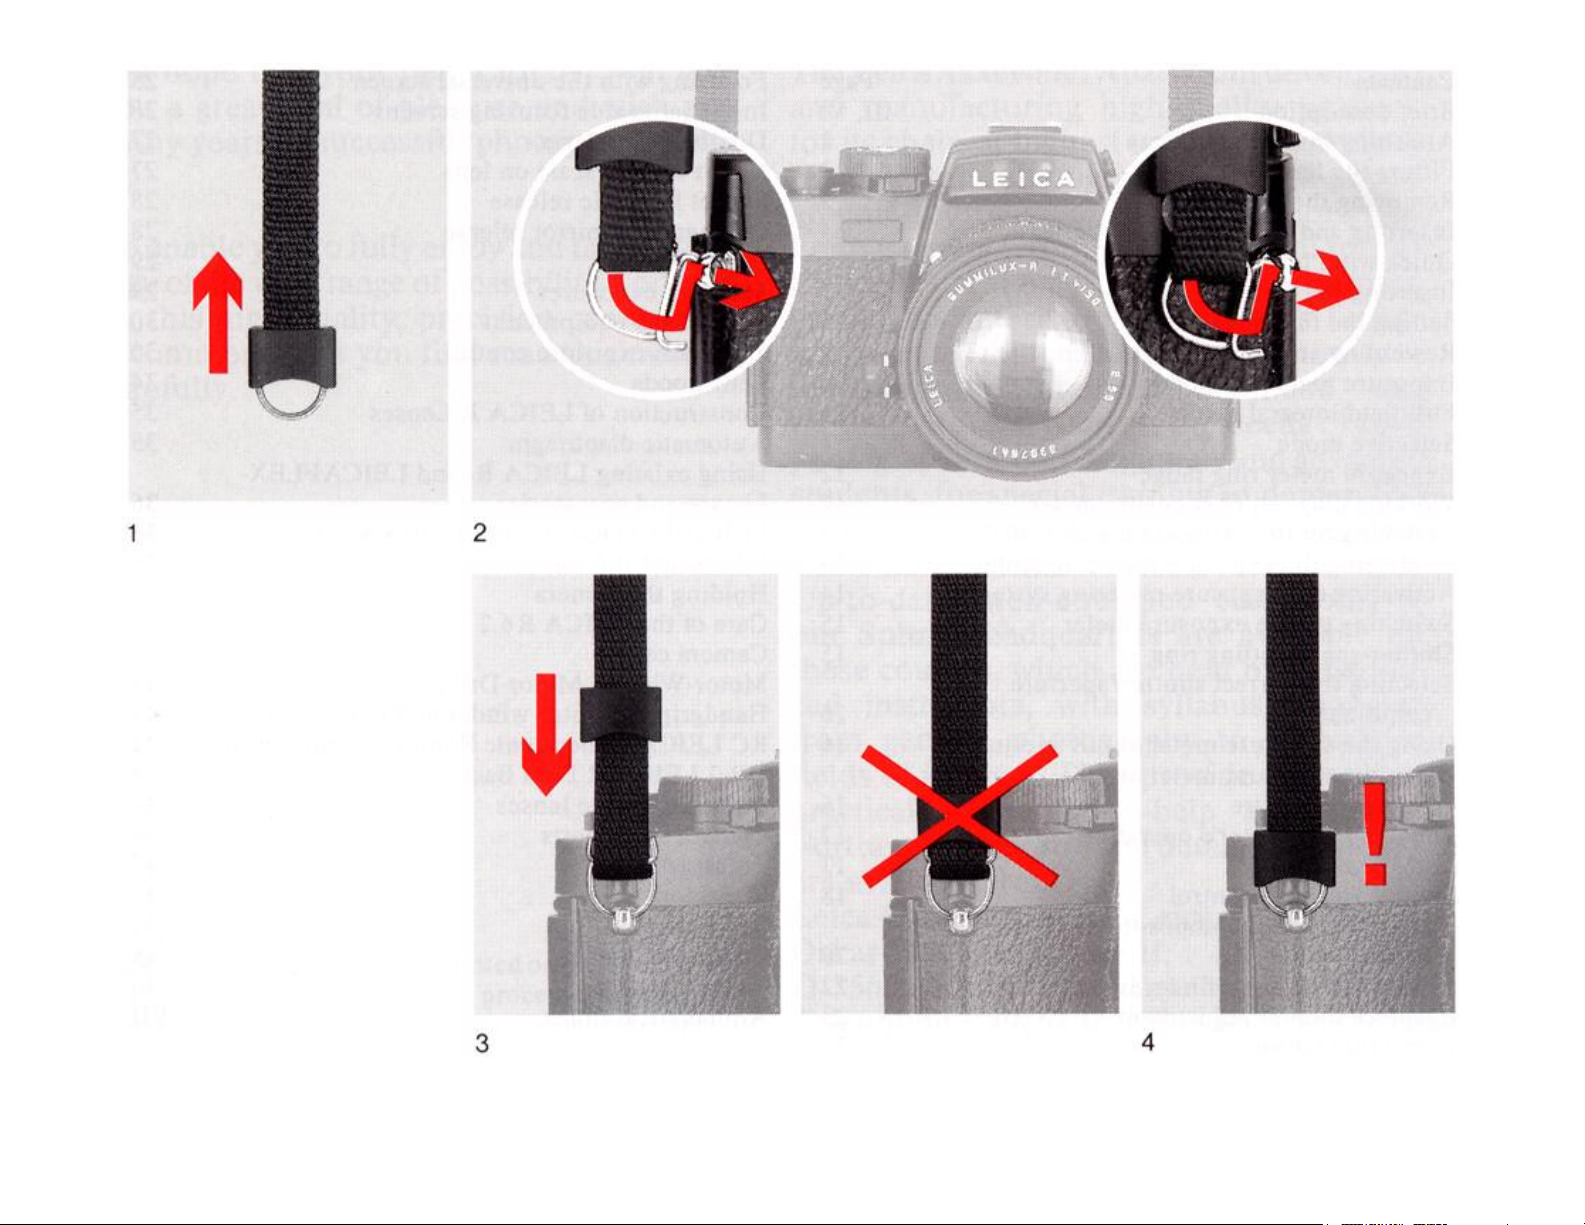
Attaching the carrying strap 2
Pitting the lens 3
Removing the lens 3
Inserting and checking the batteries 4
Quick-wind lever 6
Inserting the film 7
Setting the film-speed 9
Rewinding and removing the film 9
Exposure metering modes 10
Full-field integral mode 11
Selective mode 11
Exposure meter ring range 12
Working diagram of exposure meter 12
Switching on the exposure meter and
selecting the exposure metering mode 14
Activating the exposure metering system 14
Switching off the exposure meter 15
Shutter-speed setting ring 15
Selecting the correct shutter/aperture
combination 16
Using the exposure meter at full aperture 16
Using the exposure meter at
working aperture 16
The exposure meter's operating range 17
Low-light warning 17
Manual override control 18
The viewfinder as composition and
control center 20
Supplementary viewfinder light 22
Eyepiece diopter adjustment 23
Correction lenses 23
Eyecup 24
Eyepiece shutter 24
Page
Focusing with the universal screen 25
Interchangeable focusing screens 26
Depth of field lever 27
Depth of field scale on lens 27
Socket for cable release 28
Independent mirror release 28
Self-timer 29
Multiple exposures 29
Using flash equipment 30
TTL flash-exposure control 30
Lens hoods 34
Construction of LEICA R-Lenses 35
Automatic diaphragm 35
Using existing LEICA R- and LEICAFLEXLenses and accessories 36
LEICA M-Lenses on the LEICA R6.2 36
Filters and their use 37
Holding the camera 39
Care of the LEICA R6.2 40
Camera cases 41
Motor-Winder, Motor-Drive 42
Handgrip for motor winder and motor drive 43
RC LEICA R electronic Remove Control unit 43
DB-2 LEICA R Data Back 44
Interchangeable lenses 44
Camera spare parts 44
Enlarger 45
Projectors 45
Binoculars 45
Customer Service 45
Technical data 46
Alphabetical index VII
1
Page 5
Not For Resale – Free Download at http://homepage.ntlworld.com/joechan/manuals
2
Page 6
Not For Resale – Free Download at http://homepage.ntlworld.com/joechan/manuals
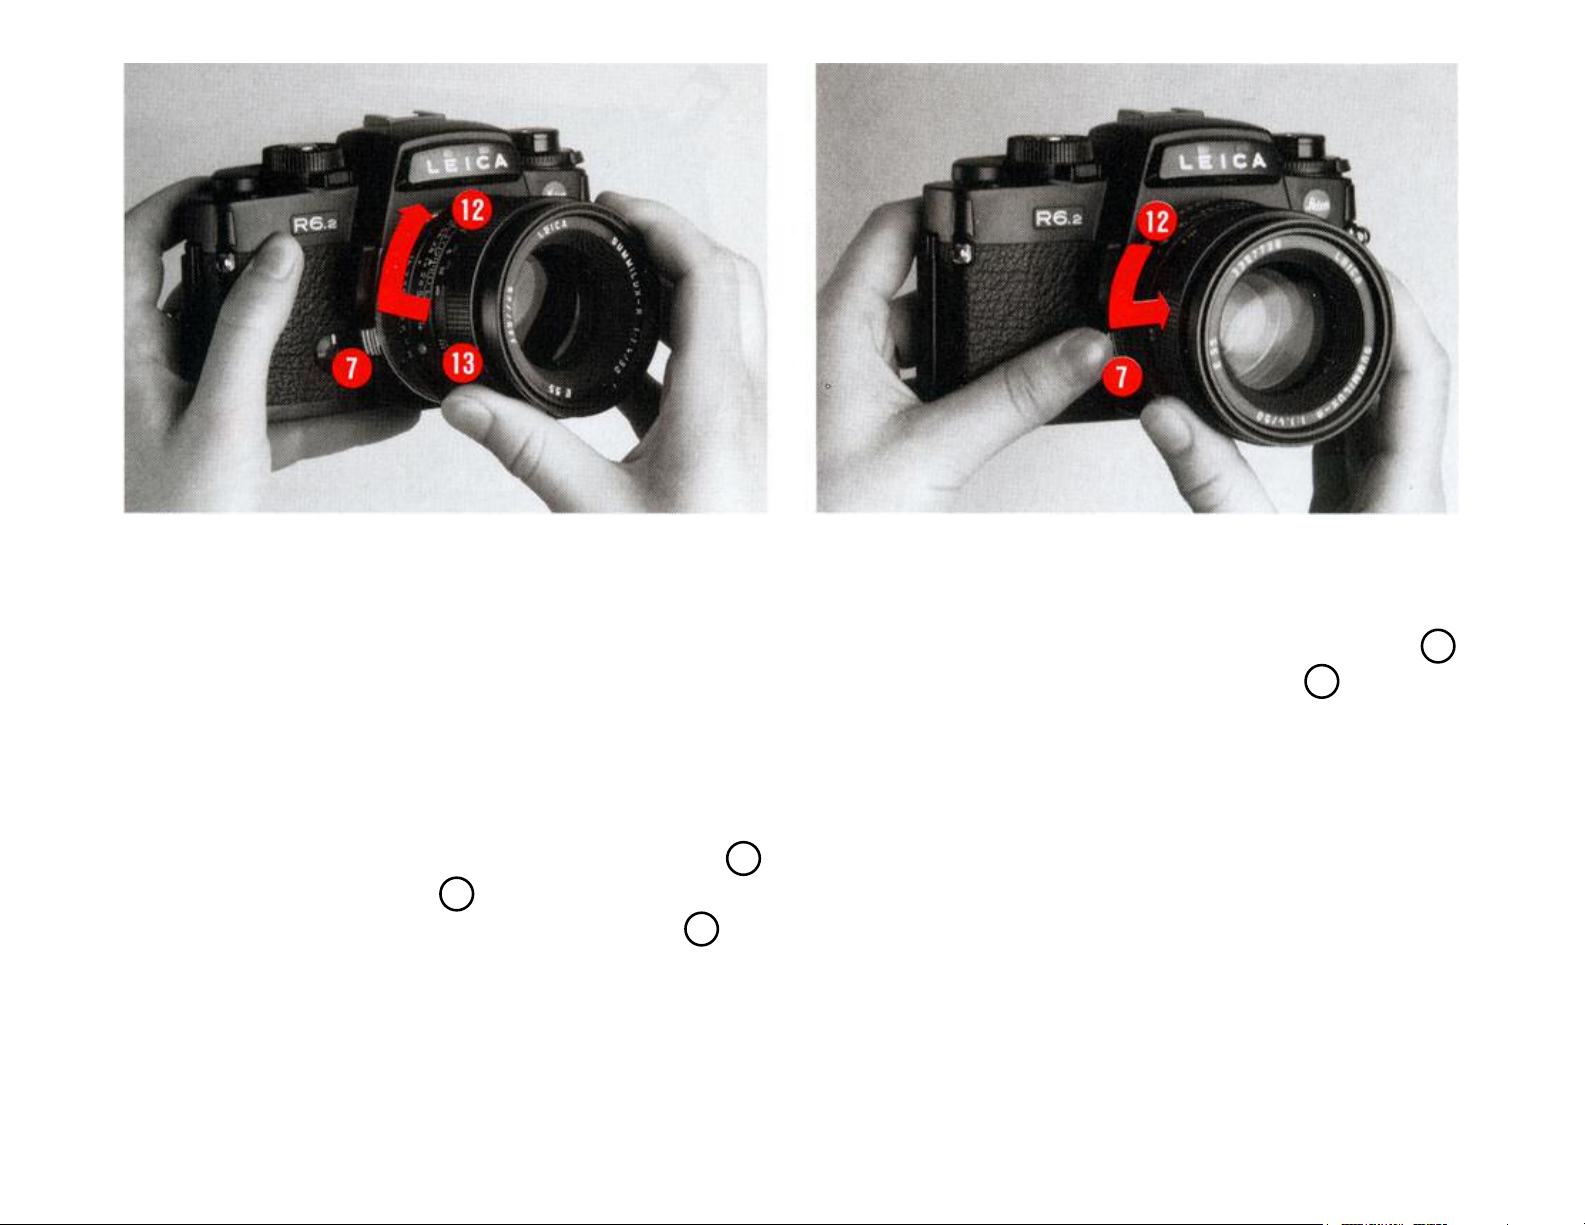
Fitting the lens
Only lenses equipped with a control cam for
LEICA R-Cameras (see page 36) may be
used on the LEICA R6.2 to avoid damage to
the camera. To insert a LEICA R-Lens
regardless of the focus and aperture settings,
proceed as follows:
Removing the lens
Hold the lens Firmly by its fixed ring 12.
7
Press down the bayonet lock
on the
3camera body. Turn the lens anticlockwise
and remove. Always change lenses in the
shade or in your body's shadow.
Hold the lens firmly by its fixed ring
Position the red dot
13
on the lens mount
opposite the dot on the bayonet lock
12.
7 on
the camera body. Insert the lens in this position. A slight clockwise turn seats the lens
securely in position with an audible click.
3
Page 7
Not For Resale – Free Download at http://homepage.ntlworld.com/joechan/manuals
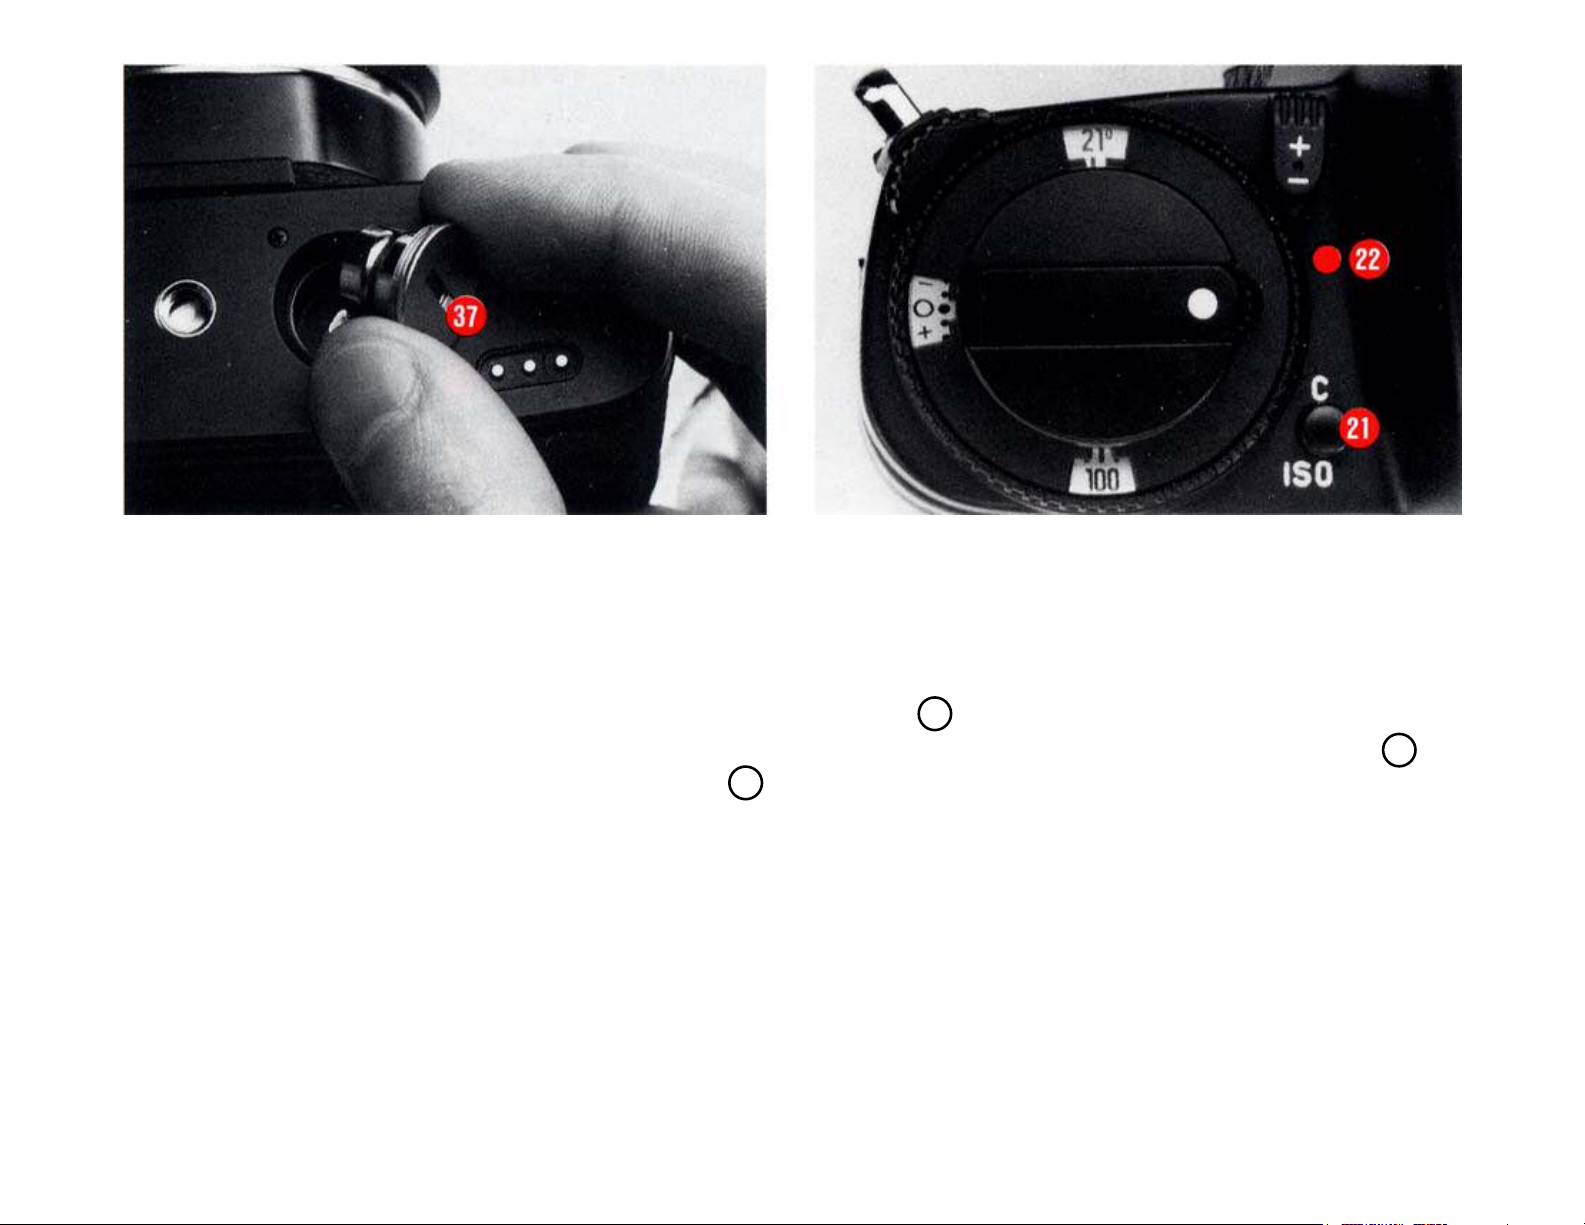
Inserting and checking the batteries
The LEICA R6.2's exposure meter, electronic self-timer, LED display and supplementary viewfinder light are powered by two
silver oxide button cells or a lithium cell;
see page 9 for a list of suitable battery cells.
Insert a coin in the slot of the battery cap
37
to unscrew. Use a clean cloth to wipe off
any oxidization on the surface of the
battery cells and insert them in the battery
cap; position them as marked in the battery
cap. Screw the cap with the battery cells
back into the baseplate of the camera.
Always check the state of the batteries
before attempting to take any photographs,
especially when the camera has not been
used for some time. To do so, press the test
button
are in working order, the red LED
21 for about 5 s. If the battery cells
22 in
front of the test button lights. If, in these
five seconds, the LED dims noticeably, the
battery cells are nearly flat and should be
replaced as soon as possible.
If the LED does not light, the outside of the
battery cells may have oxidized. If so,
simply wipe them clean.
4
Page 8

Not For Resale – Free Download at http://homepage.ntlworld.com/joechan/manuals
Silver oxide button cells
suitable for the LEICA R6.2
Duracell D 357
Duracell 10 L 14
Ever Ready EPX 76
Kodak KS 76
Maxell SR 44
National SR 44
Panasonic SR 44
Philips 357
Ray-o-vac Panas 357
Sony SR 44
Ucar EPX 76
Varta V 76 PX
Lithium battery cells
suitable for the LEICA R6.2
Important!
When a Motor-Winder or
Motor-Drive is fitted, the camera is powered by the batteries of the motorized film
transport, i.e. you cannot check the camera's
batteries. To check that the motor batteries
are in fact supplying power to the exposure
meter and the viewfinder displays, press the
battery-test button 21, at the same time
switching on the exposure meter, e.g. by
pressing the locking button on the selector
switch (see chapter: Switching on the
exposure meter). However, this is not a
battery-check for the motor functions.
Notes on battery care and use:
Store battery cells in a cool, dry place.
Never use old and new battery cells
Duracell DL
Kodak K 58 L
Philips CR '/
Ucar 2 L 76
Varta CR
Caution!
Always remove the battery cells if the camera
is unlikely to be used for some time.
1
/3N
3
1
/3N
N
together.
Do not mix battery cells of different makes.
These battery cells are not rechargeable.
Batteries contain toxic and environmentally dangerous substances. Do not discard
used battery cells in normal household
trash, but return them to your camera dealer
for recycling.
5
Page 9
Not For Resale – Free Download at http://homepage.ntlworld.com/joechan/manuals
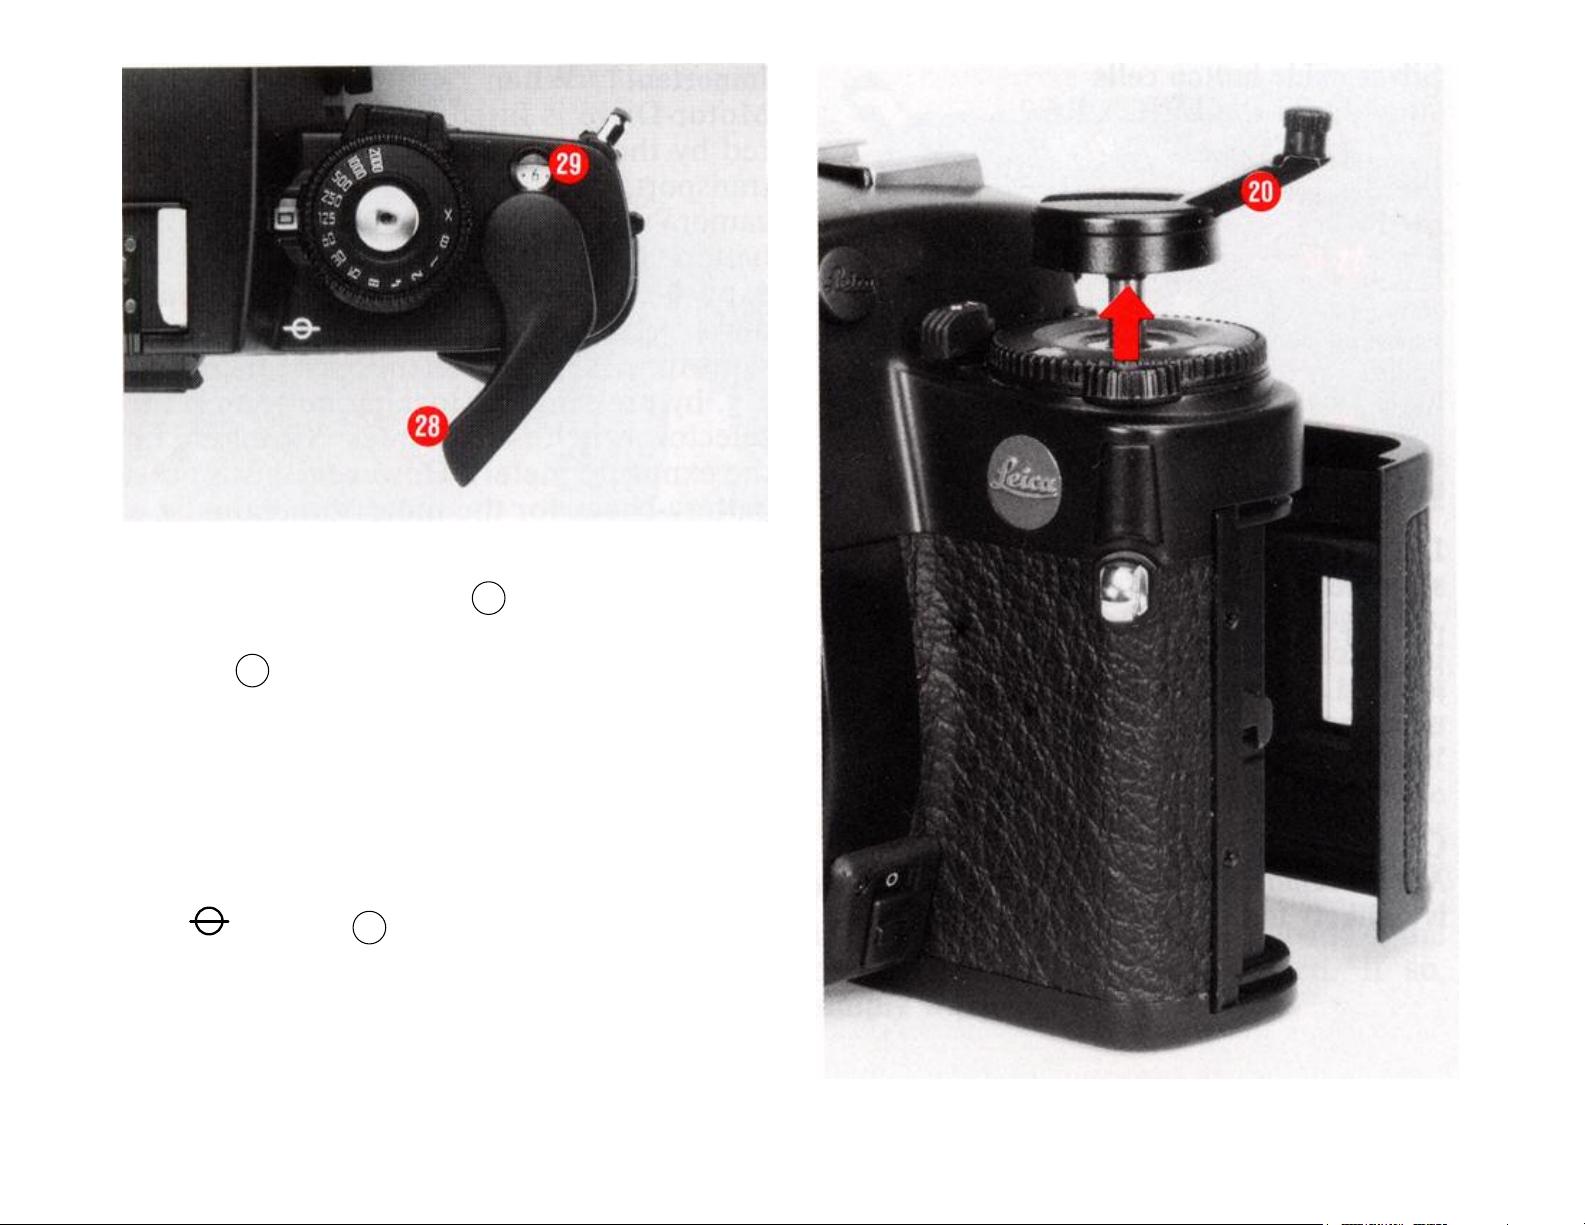
Quick-wind lever
The quick-wind lever
28 winds the film,
cocks the shutter, and turns the frame
counter 29.
When you hinge out the lever in the standby position, there is room to slide your
thumb behind it and firmly support the
camera. For use with a Motor Winder or
Motor Drive, see the user manual supplied
with the motor unit.
The
symbol 25 marks the film plane.
6
Page 10
Not For Resale – Free Download at http://homepage.ntlworld.com/joechan/manuals
Correct Incorrect
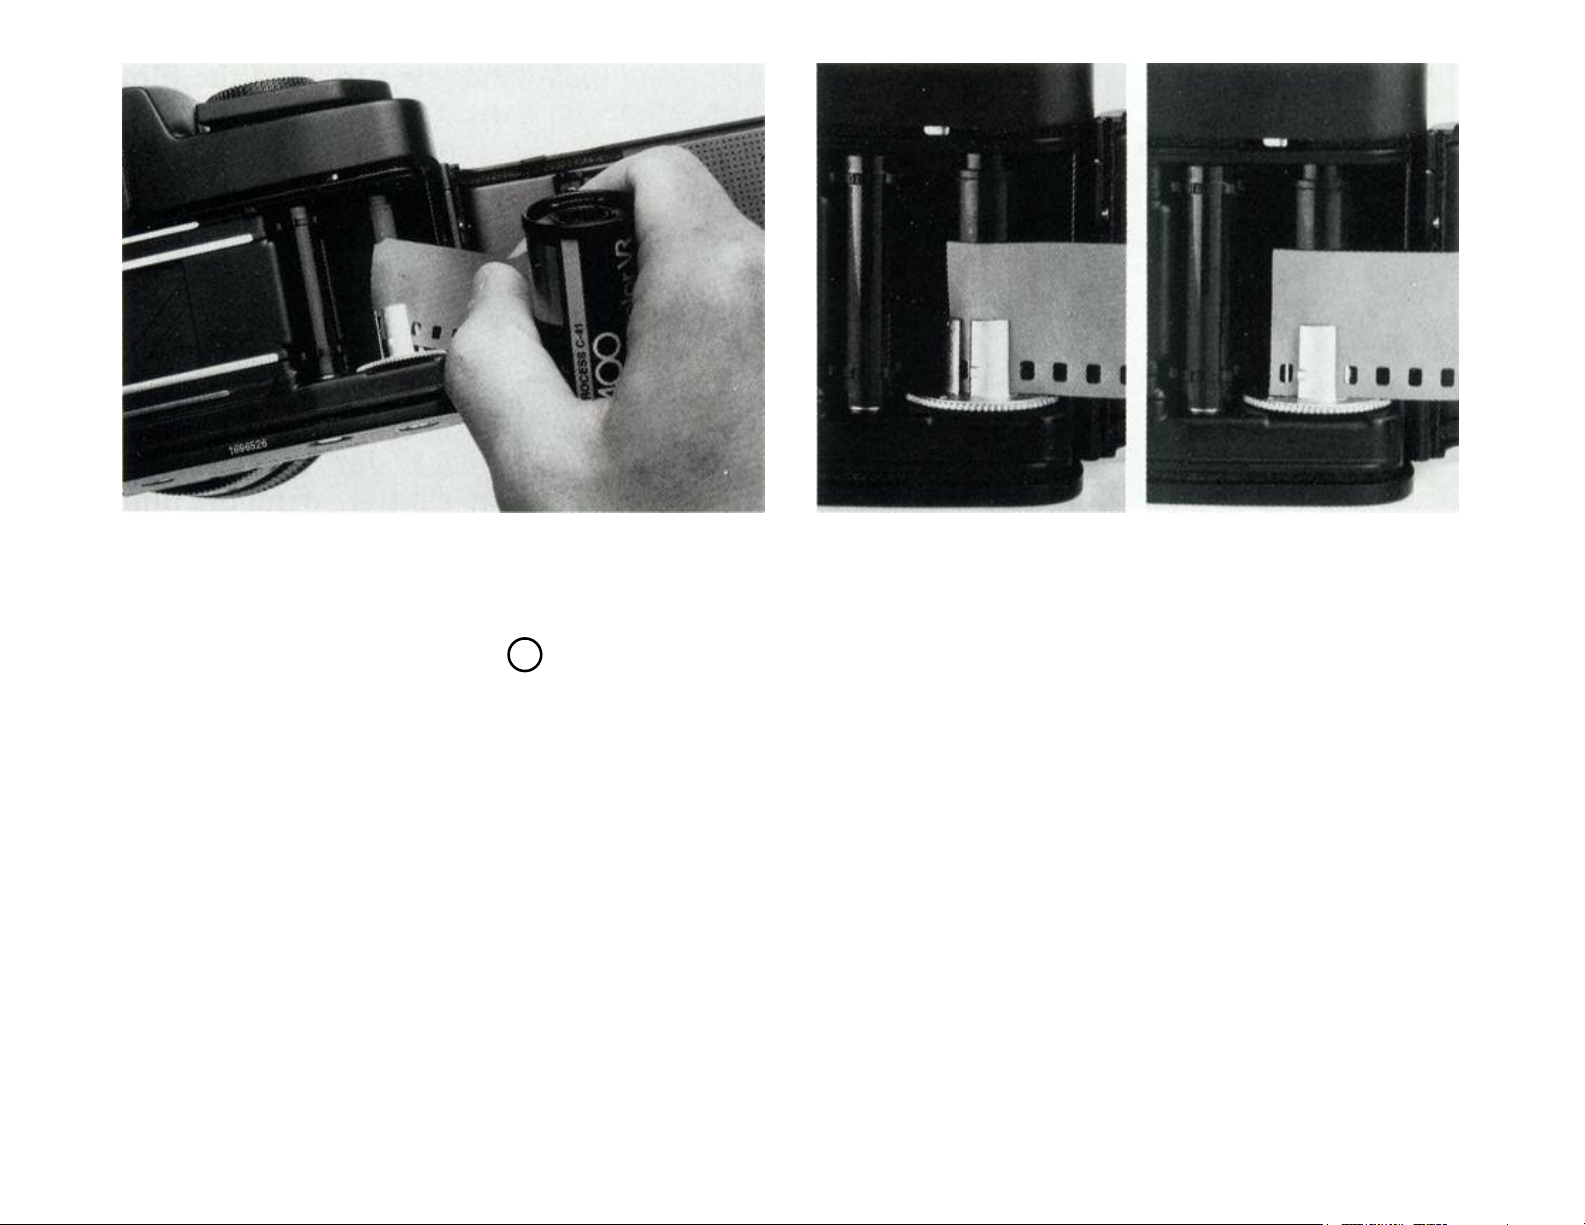
Inserting the film
Pull up the rewind crank
20 and knob past
he spring resistance to release and open the
camera back*. This also resets the frame
counter to S (start).
Pick up the film cartridge as shown above,
with the emulsion side facing up. Slide the
end of the film obliquely from above into
one of the slots of the take-up spool, making
sure that the film is gripped by at least one
of the retaining clips and projects under the
next clip.
* = The procedure is identical when a Data Back is fitted.
7
Page 11
Not For Resale – Free Download at http://homepage.ntlworld.com/joechan/manuals
Use the quick-wind lever to wind the film
one frame forward, to ensure that it lies
tensioned in the film guide and that the
mouth of the cartridge does not project too
far.
You may occasionally wish to take out a
partly exposed film and later insert it again.
To ensure that the film is always inserted
under the same conditions, use the quickwind lever to cock the shutter, then release
the shutter before you insert the film.
Snap the camera back shut to close the
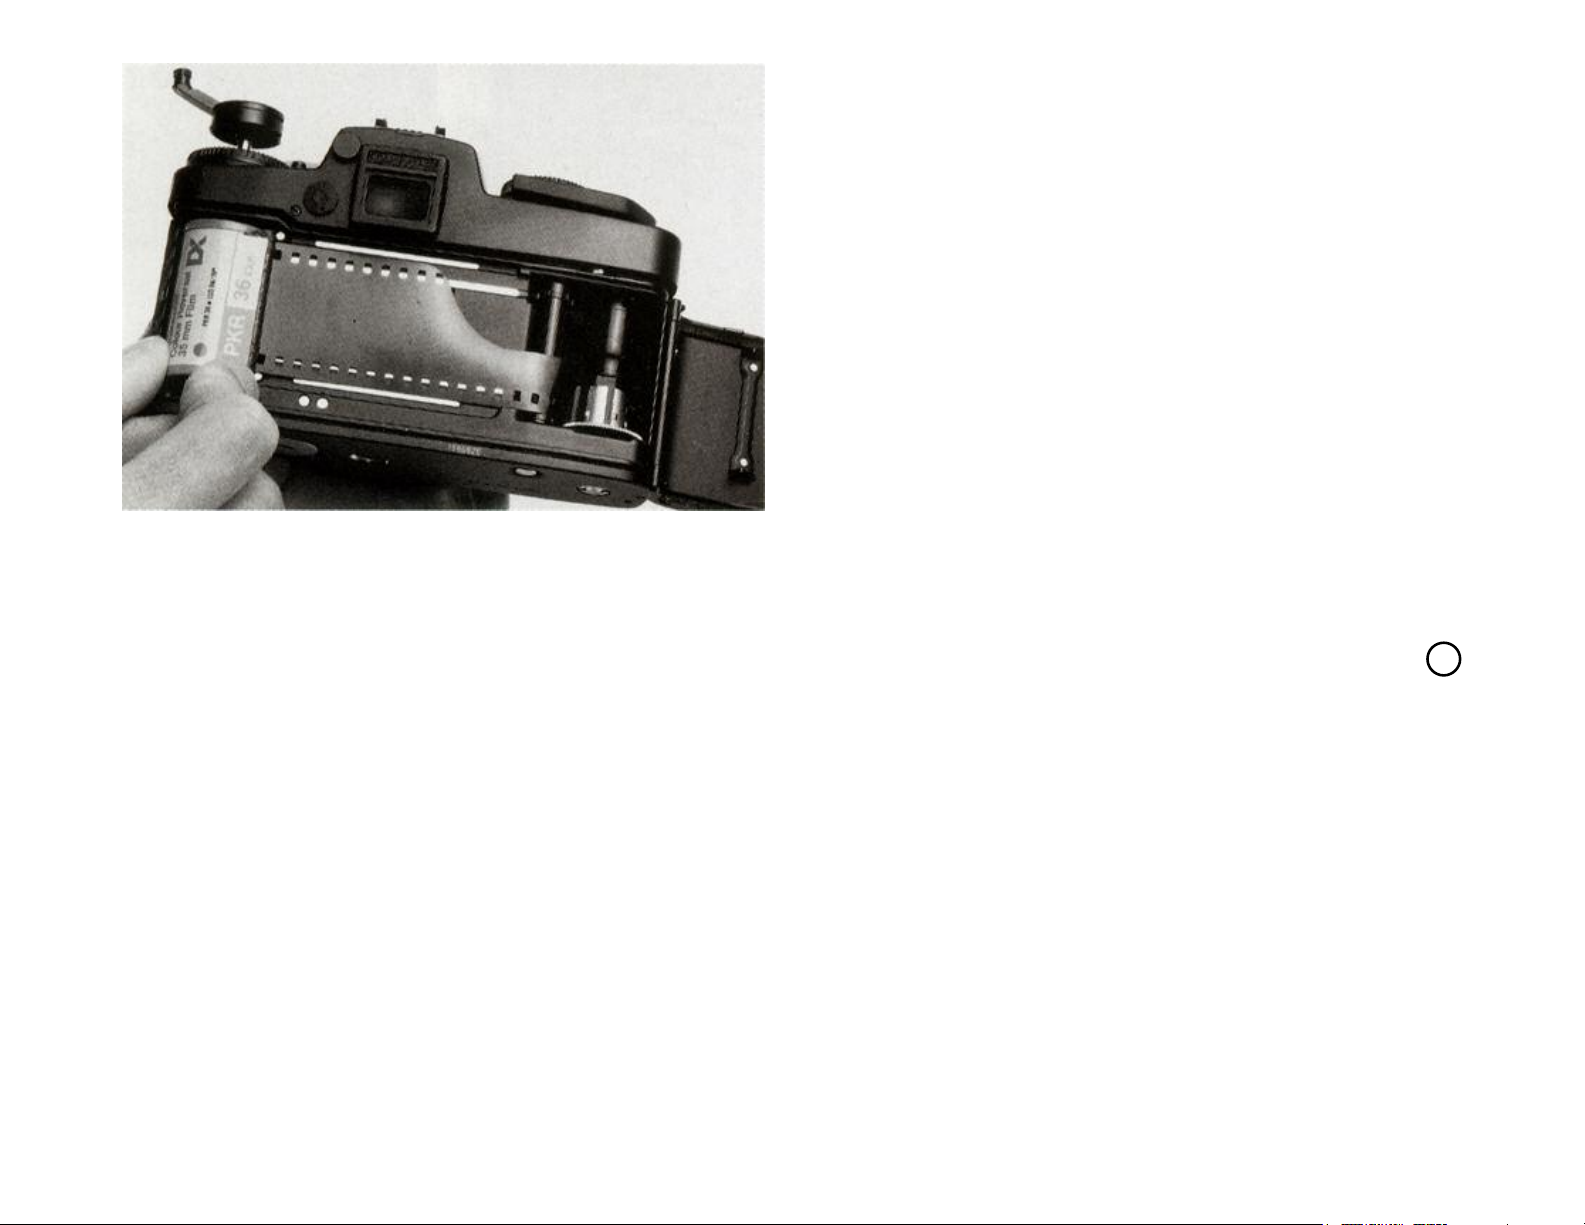
Pull up the rewind crank as far as it will go
and insert the film cartridge in the empty
cartridge chamber, then push in the rewind
crank. The edge of the film must be parallel
with the film guide. As you move the quickwind lever, the sprockets of the transport
drum must engage in the edge perforations
of the film.
camera. Release the shutter. Wind the film
one frame forward, release the shutter again,
hen wind on one more frame. The camera is
now ready for use. The frame counter
29
stands at 1. It counts up to "36". To indicate
the various lengths of film available, the
figures "20", "24", and "36" are marked in
red.
Important!
Bright light may enter through the mouth
of the cartridge and damage your film.
Never insert a Him in bright light.
8
Page 12
Not For Resale – Free Download at http://homepage.ntlworld.com/joechan/manuals
Setting the film speed
To set the film speed in ISO units, press the
locking button
at the same time until the window
21 and turn the setting ring 19
16
displays the required Film speed. The display
of all ISO values is split, e.g. for ISO
100/210, 100 appears in the lower window
and 21 in the upper. The setting range
covers all values from ISO 12/12° to
3200/36° inclusive.
Rewinding and removing the exposed film
Exposure of the last frame blocks the action
of the quick-wind lever. Rewind the film
into its cartridge before removing it from
the camera. Press the rewind release button
39
in the camera's baseplate, hinge out the
rewind crank
20 and turn it clockwise in the
direction indicated by the arrow until you
feel a slight resistance as the film is pulled
out of the take-up spool. Pull up rewind
crank and knob to open the camera back,
and remove the cartridge with the exposed
film.
To use a MOTOR WINDER R or MOTOR
DRIVE R, see the manual supplied with the
winder or drive.
9
Page 13
Not For Resale – Free Download at http://homepage.ntlworld.com/joechan/manuals
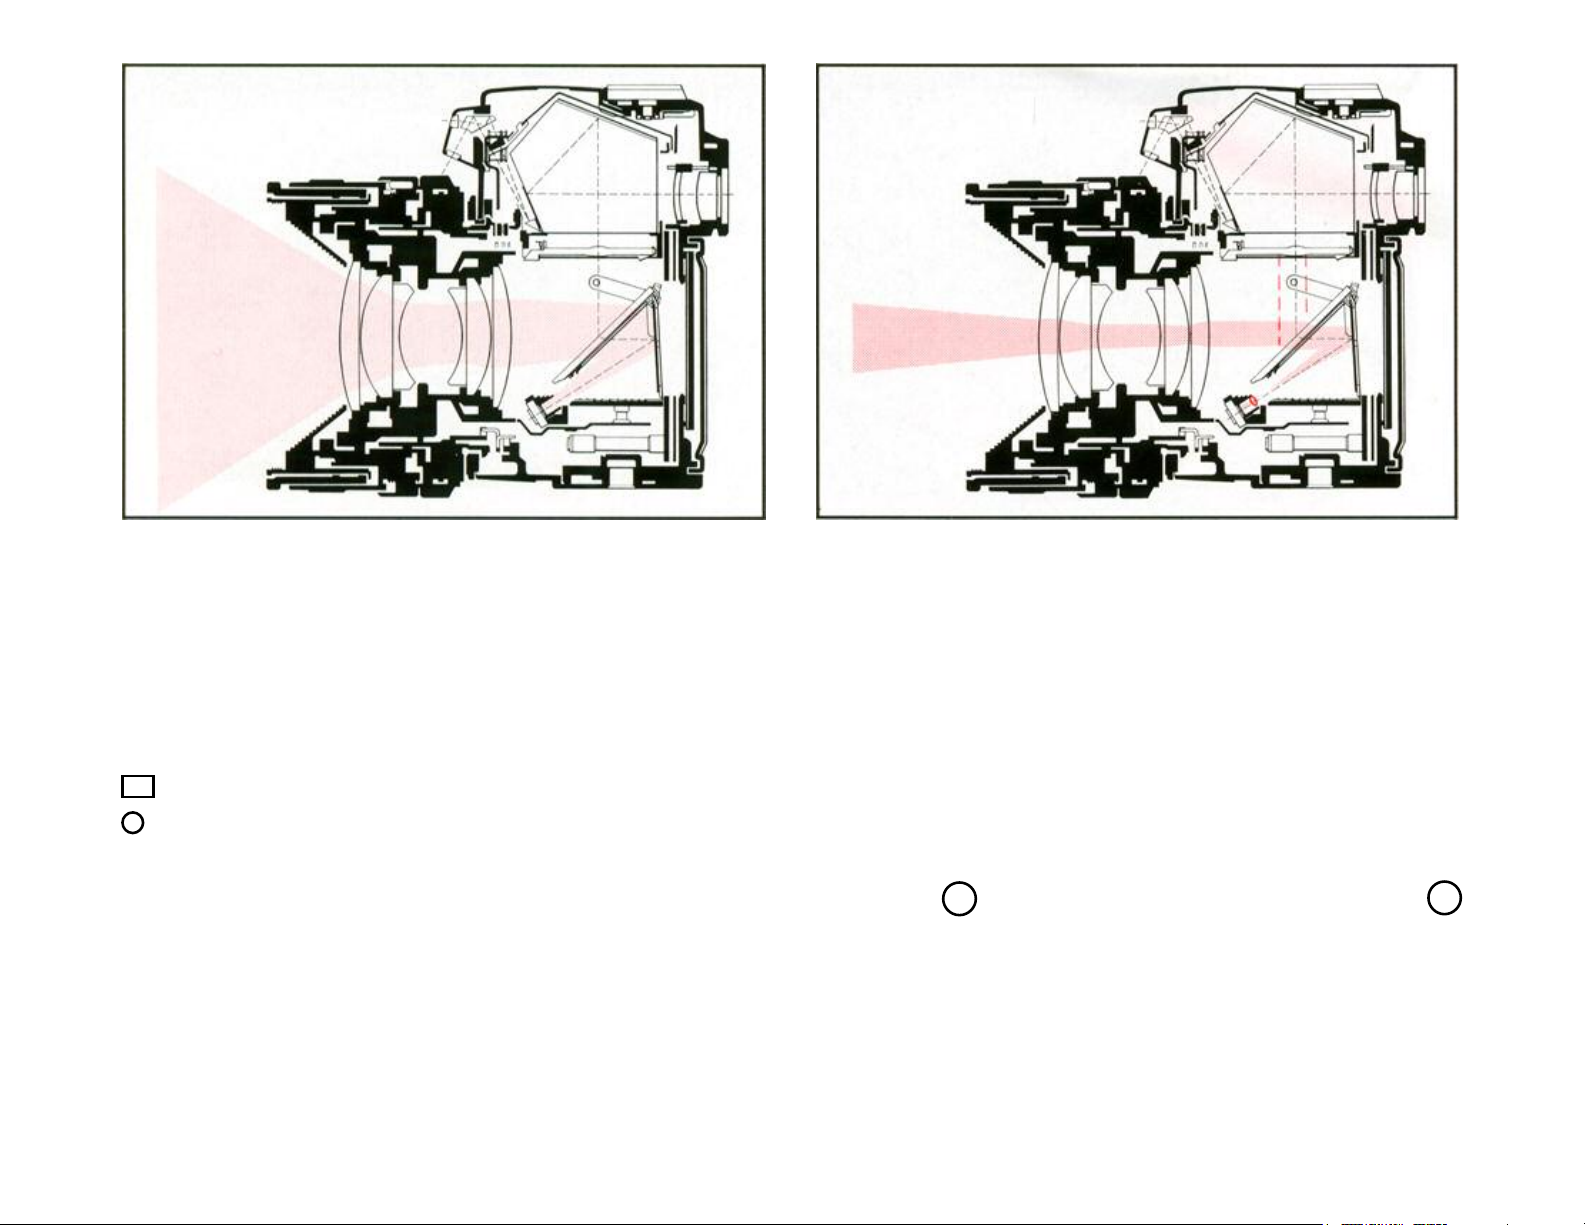
Full-field integral metering
The two exposure metering modes:
The LEICA R6.2 has an exposure metering
system that provides two alternative modes:
Full-field integral mode
Selective mode
Selective mode
Exposure is measured through the lens. The
exposure meter uses a silicon photodiode,
placed in the base of the camera to protect it
from stray light. When you use any LEICA
R-Lens with an automatic spring-back
diaphragm, the exposure meter works at full
aperture. The symbol displayed in the
window
24 next to the program selector 30
and at the lower left of the viewfinder indicates the mode selected.
10
Page 14
Not For Resale – Free Download at http://homepage.ntlworld.com/joechan/manuals
Full-Held integral mode
Most photographic subjects contain details
of varied brightness. The light reflected by
this type of subject has a mean grey value of
18%, i.e. it is the same as that of a standard
grey area that reflects 18% of the light it
receives (average grey value). This is the
calibration value for all exposure meters.
The full-field integral mode is suitable for
all subjects in normal light, with no extremes of light or color, and where the light
and dark areas are fairly evenly distributed
over the entire visual field. For this type of
subject, choose full-field integral mode.
Selective mode
This is the method of choice when the subject has a very wide brightness range and
the correct exposure of a certain detail is
particularly important.
The large central circle in the viewfinder
indicates the field covered in this mode, in
which the exposure meter measures only the
light reflected by the exact area of the
subject that you want to determine the
exposure. The field is the same size on all
focusing screens and for all lenses, whatever their focal length, and is clearly
marked in the viewfinder.
11
Page 15

Not For Resale – Free Download at http://homepage.ntlworld.com/joechan/manuals
Range of exposure meter
In integral mode the exposure meter has a
range from 0.063 cd/m2 at f/stop 1.4 to
125000 cd/m2 (candela per square meter) at
f/stop 22.
For ISO 100/21° film this is equal to the
standard exposure values Ev -1 to +20, i.e.
from 4s at f/1.4 to
1
/
s at f/22.
2000
In selective mode, its range is from 0.25
cd/m2at f/1.4 to 125000 cd/m2. For ISO
100/21° film, this is equal to the standard
exposure values Ev +1 to +20 at f/1.4, or 1s
to '/
s at f/22. The diagram on page 16
2000
gives all necessary data for the exposuremetering system of the LEICA R6.2, such
as sensitivity and range.
indicate the working range of the exposure
meter in selective ( ) and large-field integral ( ) modes. The film speeds Sv are
marked across the top.
The left side of the diagram shows the
camera's working range. In the column of
shutter speeds TV, the long-time exposure
range from 1 s to 60 s is overprinted on a
grey screen. The aperture range (Av) is
marked in the footnote along the base.
A typical example marked in red, shows
how these values correlate. Assuming a film
speed of ISO 400/27°, follow the vertical
line to the point where it intersects with the
horizontal line for brightness, in the case 0.5
cd/m
2
, typical for night-time photography.
Working diagram of the exposure meter
The diagram shows the relationship between film speed Sv and brightness Bv on
the one hand, and between shutter-speed TV
and aperture Av on the other, together with
the resulting exposure value Ev. The
diagram is in two parts connected by diagonal lines that represent the exposure value
Ev. On the right, you will find the
brightness value Bv determined by the
exposure meter. The adjacent grey wedges
The diagonal which passes through this
point of intersection leads to the relevant
exposure value, in this case Ev 5. Various
combinations of aperture and shutter speed
can produce this value. For correct
exposure, the points of intersection of the
vertical Av and the horizontal TV lines
must always lie exactly on a diagonal Ev
line. In the example, three such combinations are shown: A = stop 1,4 at 1/15 s;
B = stop 2,8 at 1/4 s; and C = stop 16 at 8s.
12
Page 16

Not For Resale – Free Download at http://homepage.ntlworld.com/joechan/manuals
13
Page 17
Not For Resale – Free Download at http://homepage.ntlworld.com/joechan/manuals
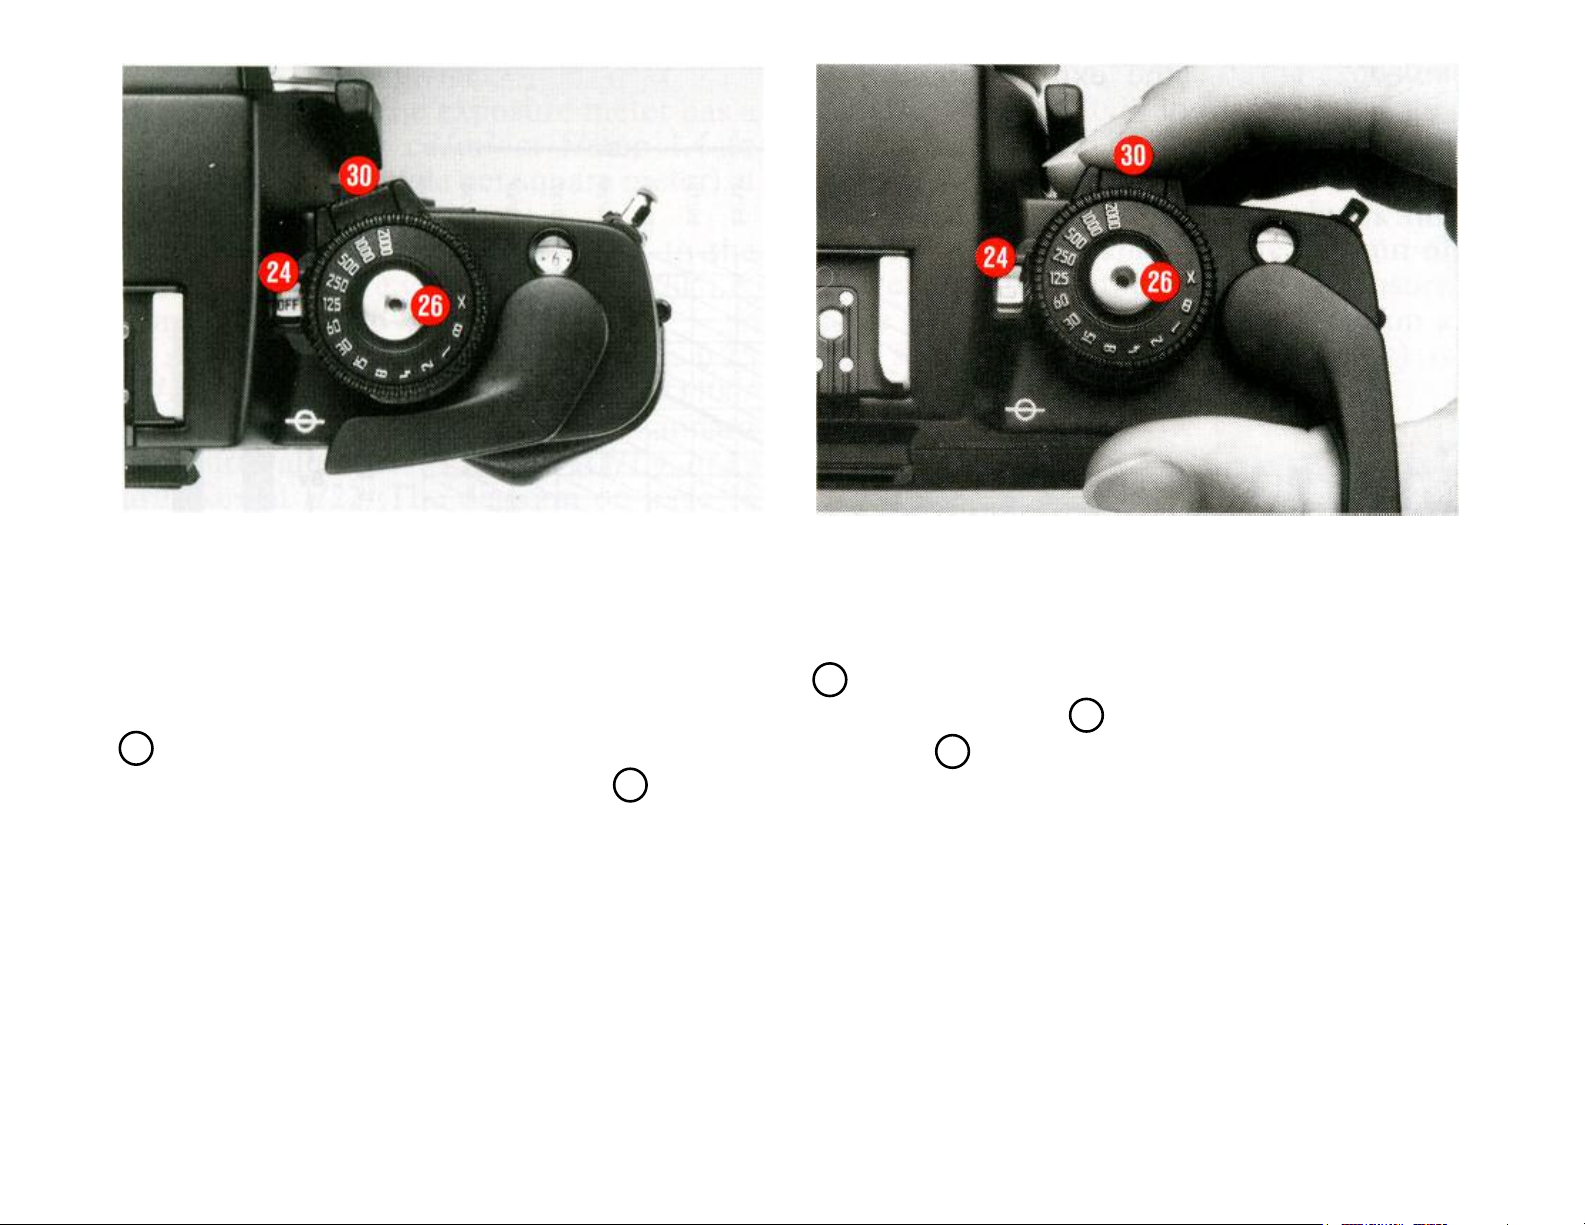
Switching on the exposure metering system
and selecting the exposure metering mode
The exposure metering system is switched
on by pressing the locking button while
simultaneously shifting the selector switch
30
, following through from the "OFF"-
setting - displayed in the window
24 - via its
selective exposure metering position to the
large-field integral metering setting. The
exposure metering mode set is displayed in
the window. By selecting an exposure metering mode, the camera's exposure metering
system is activated (see: "Activating the
exposure metering system").
Activating the exposure metering system
After selecting the exposure metering mode,
light pressure on the exposure release button
26, pressing the locking button on the
selector switch
button
21
activates the LEICA R6.2's
30 or the battery check
exposure metering system. The LEDsymbol in the viewfinder lights up.
If the shutter is cocked when you release the
button you have used to activate the system,
the LED's continue to light for about 12 s. If
the shutter is not cocked, they go out at once
if pressure on one of the activator buttons is
not maintained.
14
Page 18

Not For Resale – Free Download at http://homepage.ntlworld.com/joechan/manuals
To indicate that the exposure meter is ready,
one or two of the LED's in the shutter/aperture balance light. With very poor
light, on the threshold region of the exposure meter's range, it may take between 2
and 3 seconds for the metering system to
stabilize before giving an accurate reading.
Shutter-speed setting ring
Shutter-speeds from
1
/
s to 1s are set via
2000
the shutter-speed setting ring
27
. The springloaded setting ring engages at all setting
values marked. Do not attempt to set it to an
intermediate value. At B, the shutter
remains open as long as you hold the shutter
release button down. Exposure metering is
not possible in this setting. When using nonsynchronized* electronic flash units, "X" =
1
/
s is set.
100
Note:
After releasing the shutter of the
LEICA R6.2 at a shutter speed of 1/250 s, a
faint slow-speed mechanical sound is
audible.
*see chapter "flash units"
15
Page 19

Not For Resale – Free Download at http://homepage.ntlworld.com/joechan/manuals
Setting the correct shutter/aperture
combination
For correct exposure, check that the shutter
is fully cocked and the shutter-speed setting
ring is set to the required click stop. Activate the exposure meter. Turn the shuttersetting ring on the camera and/or the aperture-setting ring on the lens until the round
middle LED in the viewfinder's shutter/
aperture balance lights up. The two arrowshaped triangular LED's in the viewfinder
shutter/aperture balance indicate under- or
overexposure and show the direction in
which either setting ring should be turned
for correct exposure, as follows:
underexposure by at least one f/
stop; turn clockwise;
Metering at full aperture
LEICA R-Lenses are equipped with an
automatic spring-back diaphragm. This
means that, when you take an exposuremeter reading, a spring opens the diaphragm to full aperture regardless of the
preset stop and then closes it again to the
required aperture setting for the exposure.
Working-aperture exposure metering
Some lenses and accessories do not have an
automatic spring back diaphragm or lack the
linkage mechanism for it. This applies, for
example, to lenses with adaptations for
balancing the angle of view or those with a
long focal length, e.g. the quick-focusing
lenses TELYT-R f/6.8/400 mm and f/6.8/
560 mm. In these cases, you have to obtain
underexposure by half an f/stop;
turn clockwise;
correct exposure;
overexposure by half a stop; turn
anticlockwise;
overexposure by at least one f/stop;
turn anticlockwise
the exposure-meter reading at working
aperture, stopping up or down to adjust the
amount of light reaching the exposure
meter's photocell.
Important!
To prevent wrong exposure values, do
not press the depth of field lever while the
exposure meter is in use.
16
Page 20

Not For Resale – Free Download at http://homepage.ntlworld.com/joechan/manuals
Time exposures
With the LEICA R6.2, the exposure meter's
working range depends on the sensitivity of
the photodiode, the film-speed setting, the
nominal aperture of the lens in use, the
camera's shutter-speed setting range and the
lens's aperture-setting range (see: "Working
diagram of exposure meter, page 12).
Depending on the lens in use, it extends
from 1/1.4 to f/32.
If poor light and a small aperture do not
permit correct balancing, it is possible to
measure the exposure value at full aperture
and, converting the shutter-speed measured to a different aperture setting (Note:
Remember to correct the film speed setting
after the exposure!), expose in the "B"-
Low-light warning
The camera's photodiode has a linear
measuring range for correct exposures.
When there is too little light for this range,
the exposure meter's photoelectric cell can
no longer produce an accurate reading and
the exposure that the viewfinder displays
may produce a poor result. To avoid this,
one or more LED's in the viewfinder's
shutter/aperture balance may flash.
setting (see working diagram).
17
Page 21

Not For Resale – Free Download at http://homepage.ntlworld.com/joechan/manuals
Manual override control (exposure correction)
Exposure meters are calibrated to a standard
Generally, you correct the indicated
exposure only after you have balanced the
shutter-speed and aperture, by correcting
either for shutter-speed or aperture. By
employing the override, the exposure mete-
ring value adapts to take account of the
respective correction.
grey value for an average photographic
subject. If the subject does not conform to
this standard, manual override correction of
the exposure-meter reading may be
necessary.
Manual override is more often necessary in
the full-field integral mode. In selective
mode, the more limited metering field
makes it possible to measure a representative detail with an average grey value, thus
ensuring accurate measurement.
18
Page 22

Not For Resale – Free Download at http://homepage.ntlworld.com/joechan/manuals
Example of positive override „+“
For a very brightly lit subject, such as snow,
sand or water, the high reflectivity causes
the exposure meter to indicate too short an
exposure. To prevent such underexposure,
set a slower shutter-speed. For snow, for
example, you may have to increase the
exposure from
1
/
500
s to 1/
s, i.e. in this case
125
set the override control to +2.
Negative override correction „-“
For a very dark subject that reflects little
light, the exposure meter indicates too long
an exposure. To prevent such underexposure, select a faster shutter-speed, e.g. from
1
/60 s to 1/
s, i.e. in this case set the
125
override to -1.
When override is active, the exposure metering mode symbol flashes in the LEICA
R6.2's viewfinder.
To set the override control, press the
locking button
18
as required by adjusting the lever 17.
Afterwards, the button
15 and turn the setting scale
15 can be locked into
position by pressing it down and turning it
anticlockwise. When the override control is
at 0, the lever
17 fits snugly into the camera
body. The override control can be set in
steps of
1
/3of an exposure value, from Ev +
2 to Ev -2. At the extremes of the ISO scale,
the override control's working range is
strictly limited.
19
Page 23

Not For Resale – Free Download at http://homepage.ntlworld.com/joechan/manuals
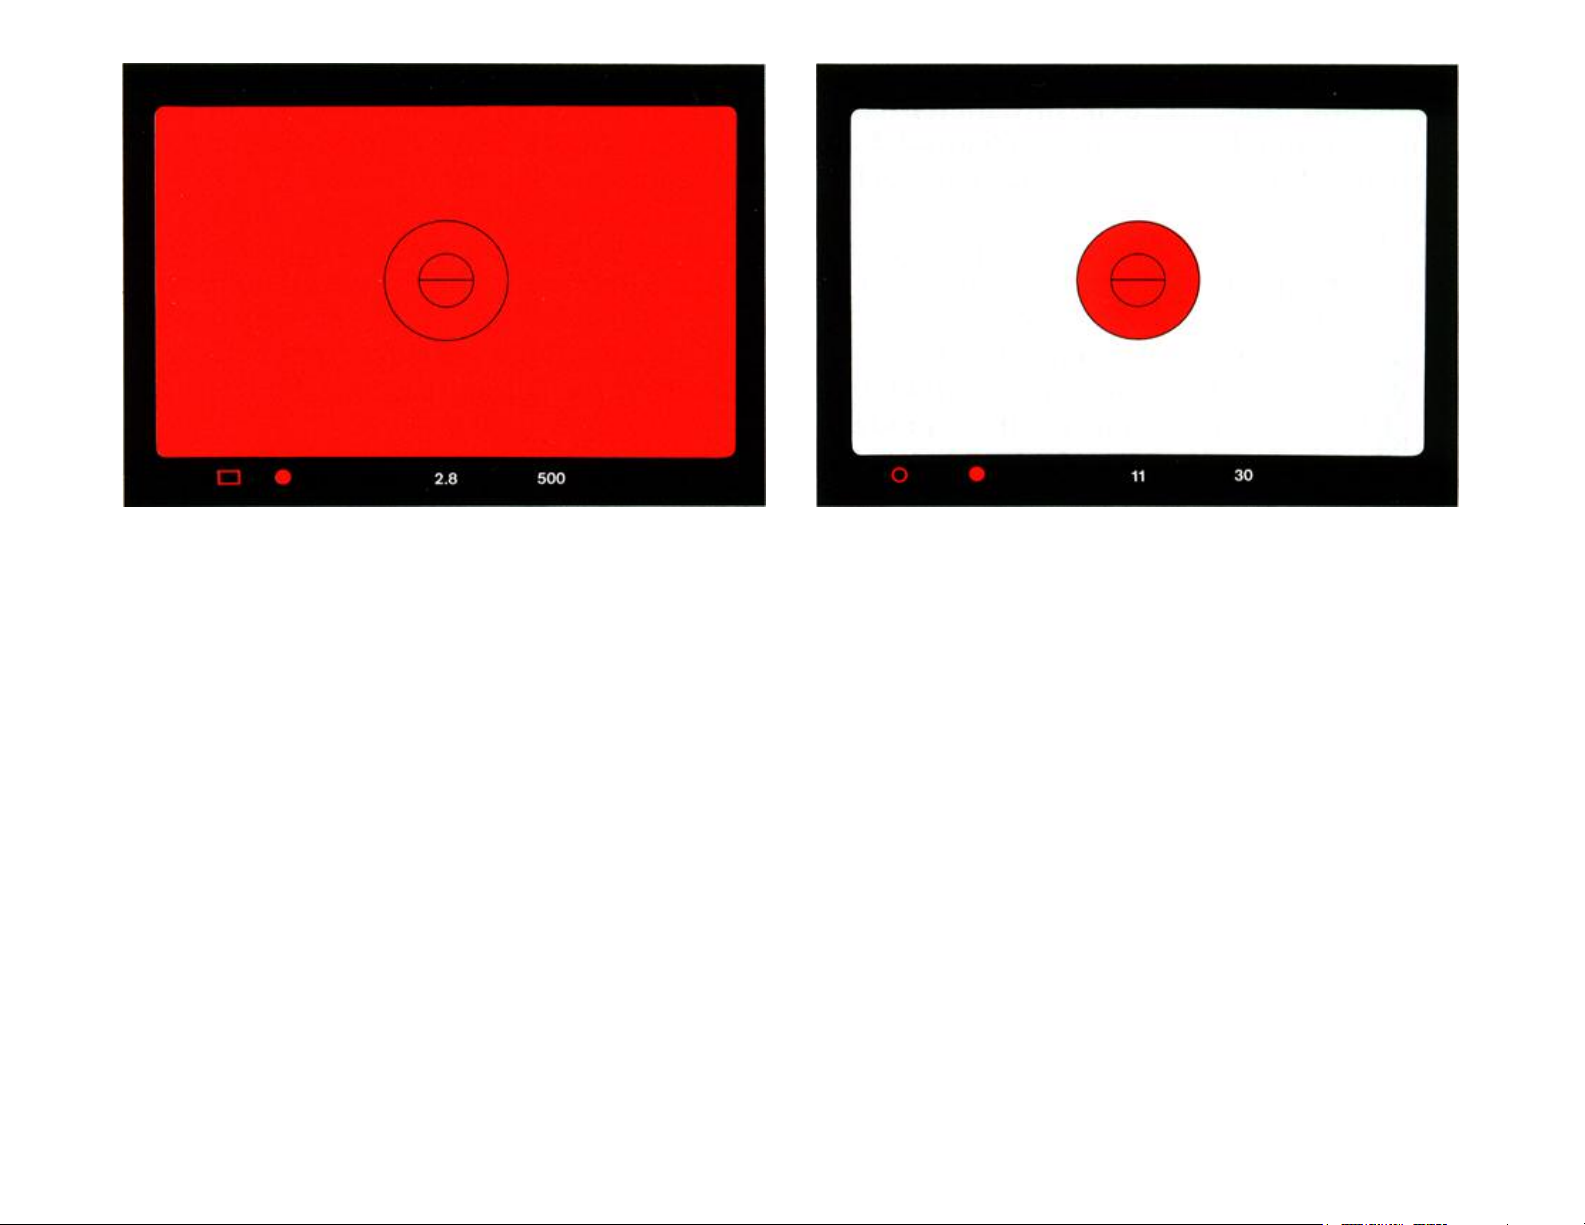
The viewfinder as composition and control
center
The viewfinder of the LEICA R6.2 helps
you compose your photographs and is the
control center for all important data:
It allows you to assess focus, perspective,
and depth of field; see page 27 for details.
The larger of the two central circles clearly
defines the field used in the selective
exposure-metering mode. The viewfinder
area is 92% of the frame size. With the eyepiece at 0 diopters and a standard 50mm
lens fitted and focused to infinity, it has an
0.8x magnification.
The viewfinder displays all essential data
for the program you have set. The LED's
light when you press the mode selector to
indicates "flash ready" and "flash exposure
successful" (see page 30). At its right are
the symbols indicating the exposure
metering mode activated, i.e. selective ( ) or
large-field integral ( ). Further to the right
are the three shutter/aperture balance symbols. The preselected aperture is projected
into the center of the viewfinder frame display. Adjacent to it, the selected shutterspeed is indicated. In poor light, both displays can be illuminated supplementarily
(see page 22).
or , the locking button on the selector
switch, the battery-test button, or the shutter
release. With shutter cocked, they remain lit
for approximately 12 s after the respective
activating button has been released. To
avoid confusion, the viewfinder displays
only the essential data.
The adjacent illustration shows all the
available displays simultaneously. It applies
to the universal focusing screen.
When flash units of the SCA 300 and SCA
500 systems are used, the symbol at the
lower left of the viewfinder display
20
Page 24

Not For Resale – Free Download at http://homepage.ntlworld.com/joechan/manuals
21
Page 25

Not For Resale – Free Download at http://homepage.ntlworld.com/joechan/manuals
viewfinder light is visible from the outside
in the illumination window for shutter-
Supplementary viewfinder light
For perfect control of the viewfinder
shutter-speed and aperture display even in
the dark, the LEICA R6.2 offers supplementary viewfinder light that can be added
speed
2 . After releasing any of the activating
1
and in the aperture display window
buttons, the supplementary viewfinder light
remains switched on for about 12s before
switching off automatically. The supplementary viewfinder light can also be
switched on with the shutter-speed setting
ring set to "B".
To avoid battery drain, do not leave the
supplementary viewfinder light switched on
unnecessarily.
10
whenever necessary. The switch
is
located on the mirror housing. The symbol
indicates that the supplementary viewfinder light is switched off. To switch it on,
push the switch down to position . To activate supplementary viewfinder light, check
that the exposure meter is switched on and
lightly press the shutter release button, the
locking button, the selector switch or the
battery-check button. The supplementary
22
Page 26

Not For Resale – Free Download at http://homepage.ntlworld.com/joechan/manuals
Eyepiece diopter adjustment
A sharply defined viewfinder image is
essential for exploiting the full potential of
the LEICA R6.2 and the high performance
of LEICA R-Lenses. The eyepiece lens is
therefore adjustable to your eyesight, within
the range from + 2 to - 2 diopters.
To adjust the eyepiece, pull out the small
setting wheel
32 at its left and turn this to the
required setting. To do so, set the lens out of
focus, e. g. at the shortest focusing distance,
point the camera at the sky, look through
the viewfinder, and turn the setting wheel
until the circle that indicates the edge of the
field for the selective exposure-meter mode
Press the wheel back into its normal
position to retain the setting obtained.
In its normal position, the setting wheel
turns readily, but without altering the eyepiece setting. When the wheel is pulled out,
you feel distinct click stops as you turn it.
Correction lenses
If the standard eyepiece adjustment from +2
to -2 diopters is inadequate for your
eyesight, the following positive and negative supplementary correction lenses are
available: 0.5,1.0,1.5, 2.0, and 3.0 diopters.
The correction lens is held in place firmly
is sharply defined and in good contrast.
by a special holder or by the eyecup. You
23
Page 27

Not For Resale – Free Download at http://homepage.ntlworld.com/joechan/manuals
can slide these over the eyepiece mount. A
safety catch holds them in place immovably.
Eyecup
A flexible eyecup is available to shield the
eye from stray light. This makes the viewfinder image still more brilliant and permits
more accurate focusing.
The eyecup can also be used for fitting a
correction lens.
Eyecup, Order No 14215
*)Caution: If the shutter is not completely swung back, it may
cover up the display in the lower margin of the viewfinder
frame.
Eyepiece shutter
The silicon photodiode of the exposure
meter is located in the base of the camera,
where it is protected from stray light.
Normally, therefore, there is little likelihood of light entering the viewfinder eyepiece and affecting exposure-meter readings, except when you are not using the
viewfinder, e.g. for taking photographs from
a tripod, when direct sunlight or bright
artificial light may enter through the eyepiece. To prevent this, turn the knob of the
31
eyepiece shutter
at the left of the eyepiece in the direction of the arrow. When
the shutter is in place, a white triangle
appears in the eyepiece.
24
Page 28

Not For Resale – Free Download at http://homepage.ntlworld.com/joechan/manuals
Focusing with the universal screen
Standard delivery of the LEICA R6.2 includes a universal focusing screen. This produces a bright, high-contrast image and is
suitable for photography in most of the
situations that are normally encountered. To
focus, turn the focusing ring
11
on the lens.
When the image is out of focus, the edges
and lines of the subject are discontinuous in
the upper and lower semicircles of the splitimage rangefinder.
A ring formed by a screen of rectangular
microprisms surrounds the central split
wedge. When the image is out of focus, this
screen appears to flicker. The outer circumference of this ring also marks the outline of
the field in the selective exposure-metering
mode.
The remainder of the screen looks like a
ground-glass screen and is ideal for
focusing telephoto lenses as well as for
close-range photography.
25
Page 29

Not For Resale – Free Download at http://homepage.ntlworld.com/joechan/manuals
Interchangeable focusing screens
In addition to the universal screen, four
optional focusing screens are available for
the LEICA R6.2. Each of these is supplied
in a case, complete with a pair of tweezers
and a lens brush.
Important!
To change the focusing screen, always use the
tweezers supplied (see the instructions
supplied with the interchangeable focusing
screens). Do not touch any focusing screen
with your fingers.
Special tasks require tailor-made systems
for fast, accurate work. This is why four
further focusing screens are available for the
LEICA R6.2: the plain ground-glass screen
2 for extreme close-range photography and
very long focal lengths; the microprism
screen 3 for maximum ease of composition;
the full-field ground-glass screen 4 with a
grid for architectural photography and the
reproduction of documents, including marks
for making slides for TV projection; and the
clear-glass focusing screen 5 with crosslines for scientific photography, such as
photomicrography and astrophotography.
26
Page 30

Not For Resale – Free Download at http://homepage.ntlworld.com/joechan/manuals
Depth of field lever
When you use a lens with an automatic
diaphragm, the exposure meter of the
LEICA R6.2 works at full lens aperture.
Press the depth of field lever 6to close the
lens diaphragm to the preset value; when it
is in this position, you can visually check
the depth of field. This is particularly useful
for close-ups.
Depth of field scale on lens
The depth field scale
12
on the lens indicates
the depth of field available for the focusing
distance at the aperture you have set.
For example, if you focus a 50mm f/1,4
®
SUMMILUX
R-Lens at 5m, the depth of
field at stop 11 is from 3m to about 20m. At
stop 4, the field is in focus from about 4m to
8m.
The LEICA Depth of Field Table 920003
Important:
To avoid misleading exposure-meter readings
during exposure metering and with
independent mirror release (see pages 14 and
28) do not press the depth of field lever while
taking a reading.
27
contains full details of the depth of field
available at any focal length.
Page 31

Not For Resale – Free Download at http://homepage.ntlworld.com/joechan/manuals
Not For Resale – Free Download at http://homepage.ntlworld.com/joechan/manuals
Socket for cable release
The shutter release button
26 has a socket
for a standard cable release with a conical
screw thread.
By means of the mirror lock-up release R*,
the swing mirror of the LEICA R6.
2 and can
be raised before exposure, and the spring
diaphragm can be closed to the selected
stop.
The mirror lock-up release R is screwed into
the special socket underneath the bayonet
lock. The described functions can be triggered simply by pressing the release pin.
To release the shutter, press the shutter
release button either manually or by cable
release. The mirror and automatic diaphragm are reset automatically when the
When the mirror lock-up release is used, the
electromagnetic shutter release becomes
inoperative. This applies also to the selftimer, shutter release with motorized film
transport, and electric cable release.
shutter is released, but cannot be reset
manually. The mirror lock-up release R
must be activated each time you wish to
hinge up the mirror.
Attention:
The correct aperture/shutter speed balance
must be set before the mirror has been
hinged!
To avoid inadvertently releasing the shutter,
do not press the depth of field lever at the
same time as the mirror lock-up release.
* Accessory, order-no. 14087
28
Page 32

Not For Resale – Free Download at http://homepage.ntlworld.com/joechan/manuals
Self-timer
To set the self-timer, cock the shutter and
turn the self-timer button
8
through 30°
clockwise in the direction indicated by the
arrow. To start the self-timer, with the
selector switch in either position or ,
gently press the shutter release or the
locking button for the program selector; the
camera remains switched on and the shutter
is released after a delay of about 9s. To
indicate that the self-timer is activated, the
3
LED
flashes; about 2s before the selftimer releases the shutter, the flashing
changes to continuous light. Throughout the
countdown you can stop the self-timer at
any time by turning back the self-timer
button
8 to its original position; to prolong
it by restarting, simply press the release
button again.
Multiple exposures
Take the first exposure, press the rewindrelease button
39
, and move the quick-wind
lever. The same frame is now ready for a
further exposure.
At the end of its travel, the quick-wind lever
automatically resets the rewind button. To
expose the same frame yet again, simply
39
press the rewind-release button
each time
before you move the quick-wind lever. The
Motor Winder and Motor Drive also permit
multiple exposures. For details, see the
manuals supplied with these accessories.
29
Page 33

Not For Resale – Free Download at http://homepage.ntlworld.com/joechan/manuals
Using flash equipment
The LEICA R6.2 is designed for throughthe-lens flash-exposure control. This uses a
separate silicon photodiode, well protected
from stray light, in the base of the camera
next to the photocell for the selective/
integral exposure-metering modes (see page
10).
Used with an SCA 300 or SCA 500 systemcompatible electronic flash unit fitted with
an SCA 351 or SCA 551 adapter, the
LEICA R6.2 permits TTL flash-exposure
control, i.e. the viewfinder indicates when
the flash is ready for use and immediately
after exposure it shows whether the flash
output was adequate for correct exposure.
The shortest exposure for X is
1
/
s, while
100
the shutter-speed can also be set manually
to any speed from 1/60 to 1s, and to B. With
flash units that do not offer TTL-exposure
control (non-compatible units), lens aperture is set to the correct position manually
(refer to the instruction manual supplied
with your flash unit).
TTL flash-exposure control
The accessory shoe of the LEICA R6.2 has
a central hot-shoe contact and control contacts for any electronic flash fitted with an
SCA 351 or SCA 551 adapter. If you have
switched the flash unit to TTL, the flash is
Used with an SCA 350 or SCA 550 adapter,
the LEICA R6.2 also switches automatically to X, but in this case the amount of
light is controlled by the flash unit's own
photocell; flash-exposure control is indicated on the flash unit itself.
You may use any commercially available
flash unit with a standard coaxial or central
hot-shoe flash contact. Connecting two flash
units with different voltages (e.g. without
thyristor light control) simultaneously is not
recommended, as malfunctioning may
result.
30
measured and synchronized through the
lens. You may use any aperture available on
the lens, provided it is within the flash unit's
range; for details, see the instruction manual
supplied with your flash unit. With the
exposure meter switched on (see page 14)
and an SCA 300 or SCA 500 flash unit used
in conjunction with an SCA 350, SCA 351,
SCA 550 or SCA 551 adapter, 'flash' ready
is indicated as follows:
When the shutter is set to X
, the symbol
at lower left in the viewfinder flashes twice
a second.
Page 34

Not For Resale – Free Download at http://homepage.ntlworld.com/joechan/manuals
When the shutter is set to any speed from
l
/
s to 1s, the symbol remains lit
60
constantly.
When using an SCA 351 or SCA 551 adapter, leave the finger on the shutter release
after exposure to check that the flash was
adequate:
In the "X"-setting.
The symbol in the lower left of the viewfinder flashes slowly at 2 Hz (Hertz): flash
was adequate; only slight discharge of
condenser, flash immediately ready for use
again.
Fast flashing eight times a second, then
slow flashing (2 Hz): flash was adequate;
moderate discharge of condenser, flash
l
Shutter-speed setting ,,B” or 1 s to
/60 s
After exposure, the symbol in the viewfinder display remains lit (see table). If the
setting was too fast for flash, i.e.
1
\
s, the symbol does not light.
2000
1
/
125
s to
Caution:
The film speed set on the camera
(see page 9) also governs TTL flashexposure control. Settings on the flash unit
are disregarded.
ready for use in 2 s. Slow flashing indicates
'flash ready'.
Fast flashing (8 Hz) for 2 s, break (no light),
then slow flashing (2 Hz): flash was adequate; heavy discharge of condenser.
Resumption of flashing indicates 'flash
ready'.
No light, followed by slow flashing (2 Hz):
flash was inadequate and the condenser was
fully discharged. Resumption of flashing
indicates 'flash ready' (also see table).
31
Page 35

Not For Resale – Free Download at http://homepage.ntlworld.com/joechan/manuals
LEICA R6.2 viewfinder display when SCA 300 or
SCA 500 flash units are used
Setting of
shutter speed
X flashes
B; l s to 1/60 s
Before exposure with
SCA 351, SCA 551,
SCA 350, or SCA 550
Flash ready Flash was adequate: Flash was
twice a second (2 Hz)
lights continually
After exposure with SCA 351 or SCA 551
Flash ready
immediately
flashes
twice a second
(2 Hz)
lights
continually
Flash ready
after 2 s
flashes 2 s
at 8 Hz,
then at 2 Hz
lights
continually
Flash ready
after
some time
flashes 2 s
at 8 Hz, off,
then at 2 Hz
lights 2 s
continually,
off,
inadequate:
off, then at 2 Hz
off, then
lights continually
1
/
s to 1/
l25
s off off
1000
then lights
continually
32
Page 36

Not For Resale – Free Download at http://homepage.ntlworld.com/joechan/manuals
Override with TTL flash-exposure control
Exposure control is always integral. The
light reflected by the film is transmitted to a
silicon photodiode next to the photocell for
the integral/selective exposure-metering
modes (see page 10). Though the appearance of the film emulsions used in standard
35 mm film varies, their reflectivity is about
the same regardless of type, and this ensures
that, as a rule, the exposure is correct. In
exceptional circumstances you may have to
correct exposure by manual override. For
example Polaroid instant film requires
negative correction by four to five clickstops. Override correction is also necessary
when the subject for flash photography consists mainly of light or dark details (see
Conventional flash units
Connect via coaxial flash socket or central
hot-shoe contact of the LEICA R6.2.
Coaxial plug
Any commercially available electronic flash
unit and studio flash equipment with a
standard coaxial plug is suitable for use
with a LEICA R6.2. Connect the plug to the
X synchronized-flash cable socket (
4 on the
left of the prism housing. If you use a
commercially available multiple-plug adapter, you can connect several flash units to
the X socket.
Connecting two flash units with different
voltages (e.g. without thyristor light control) simultaneously is not recommended, as
page 18).
Caution:
Some flash units indicate "flash
ready" and automatically switch the camera
to X when the flash unit is still only about
70% fully charged. If you use this type of
unit for a flash exposure as soon as the flash
ready" sign appears, and the photograph
requires the full power of the flash unit, the
photograph will be underexposed. It is
therefore always advisable in this type of
situation to wait a few seconds longer, in
order to allow the flash unit to recharge
fully before the next flash exposure.
malfunctioning may result.
Hot-shoe contact
Connect conventional electronic flash units
to the X hot-shoe contact in the accessory
shoe.
33
Page 37

Not For Resale – Free Download at http://homepage.ntlworld.com/joechan/manuals
Lens hoods
A functionally designed lens hood is an
The screw-in lens hood for the f/2.8/28 mm
PC-SUPER-ANGULON-R also serves as a
holder for size 67 EW extra wide-angle
filters.
essential part of every LEICA R-Lens. Use
the lens hood whenever you use the camera,
because it protects the lens against stray
light and glare, raindrops and fingerprints.
Most LEICA R-Lenses are supplied with a
fixed telescopic lens hood. Some lenses
have a removable lens hood. Fit the hood,
white dot against white dot, and turn it
clockwise to lock into place. To remove it,
raise it slightly and release by turning it
anticlockwise. These lens hoods also serve
as filter holders for standard filters.
34
Page 38

Not For Resale – Free Download at http://homepage.ntlworld.com/joechan/manuals
Design of LEICA R-Lenses
The layout of the controls is standard for all
LEICA R-Lenses fitted with an automatic
diaphragm. This ensures that no matter what
Automatic spring-back diaphragm
Most LEICA R-Lenses have an automatic
spring-back diaphragm, i.e. before and after
exposure the viewfinder image is always at
full aperture and thus at maximum viewfinder brightness. Just before the exposure
or when you press the depth of field lever,
the lens diaphragm closes to the preset
value.
Some LEICA R-Lenses do not have an
automatic diaphragm. These are the 28mm
PC-SUPER-ANGULON
f/4 PA-CURTAGON
®
TELYT
-R, the 500mm f/8 MR-TELYT-R,
the 560mm f/6.8 TELYT
800mm f/6.3 MR-TELYT
®
-R f/2.8; 35 mm;
®
-R, the 400mm f/6.8
®
-R, and the
®
-S. See page 18:
Using the exposure meter at working aperture.
focal length you use, the left hand can work
fast and reliably. These controls are the
aperture-setting ring
field scale
12
, and the focusing ring
14 , the fixed depth of
11
.
35
Page 39

Not For Resale – Free Download at http://homepage.ntlworld.com/joechan/manuals
Using existing LEICA R- and LEICAFLEXLenses and accessories
All lenses and accessories for LEICA RCameras can be used without modification
on the LEICA R6.2.
To avoid damaging the camera body of your
LEICA R6.2, do not attempt to use it with
®
lenses and accessories for LEICAFLEX
models without a control cam. To use your
LEICAFLEX-Lenses with the LEICA R
exposure-meter system, you can have them
fitted with a control cam (see illustration) at
any time. You can continue to use such
modified lenses and accessories without
restriction on all LEICAFLEX models.
LEICA M-Lenses on the LEICA R6.2
You can use the LEICA R6.2 with any lens
of the LEICA M-Range which is compatible
®
with the VISOFLEX
adapter. The operating conditions, such as focusing distance
and object field obtainable, are the same as
those that apply to the use of these LEICA
M-Lenses with the VISOFLEX. A special
adapter (order No 14167) ensures compatibility of these two LEICA 35mm camera
systems, but because these lenses have no
automatic diaphragm, the exposure meter
has to use the working aperture (see page
16).
36
Page 40

Not For Resale – Free Download at http://homepage.ntlworld.com/joechan/manuals
Filters
Any LEICA R-Lens with a fixed telescopic
35mm f/4 PA CURTAGON-R have a
turning mechanism for turning circular
polarization filters.
Screw-in filters and filter holders are easy to
remove. To prevent strain on the filter, hold it
on one side only and unscrew.
lens hood is suitable for screw-in and
standard filters. For standard filters, a filter
holder must be used. These are available as
optional accessories.
Generally, screw-in filters are preferable,
because they are easy to use. This applies
particularly to circular polarization filters.
Removable lens hoods also serve as filter
holders for standard filters. First insert the
filter in the lens hood, then attach the hood
and filter to the lens (not applicable to the
19mm f/2.8 ELMARIT
®
Lens). The 24mm
and 28mm f/2.8 ELMARIT-R and the
37
Page 41

Not For Resale – Free Download at http://homepage.ntlworld.com/joechan/manuals
Filters and their use
In TTL systems, the exposure meter automatically takes into account the reduced
amount of light absorbed by the filter in use
and that still passes through the lens, but
sensitivity in various parts of the spectrum
may vary according to the type of film
emulsion used. Extreme and very dense
filters may therefore cause deviant readings.
For example, an orange filter as a rule needs
about one extra stop and a red filter an
average of about two stops more than the
exposure-meter reading obtained. However, the red sensitivity of black-and-white
film can vary widely, and no generally
applicable values can be given.
In the case of the circular polarization filters
we supply for LEICA lenses, determine the
exposure as you would do with any other
filter, in either integral or selective mode.
The highly effective multiple coating on the
semi-transparent swing mirror of the
LEICA R6.2 acts as a powerful polarizing
surface. As a result, the use of linear polarization filters is not advisable, because their
positioning to inhibit and transmit light may
seriously affect the accuracy of the exposure
meter.
38
Page 42

Not For Resale – Free Download at http://homepage.ntlworld.com/joechan/manuals
Holding the camera correctly
To give the camera steady three-point
support, and for fast focusing and film
transport, hold the camera with the right
hand, the index finger resting on the release
button
4 and the thumb inserted behind the
For upright format (portrait) exposures,
simply turn the camera through 90°, with
your hands in the same position as before,
ready to transport the film and focus the
lens.
hinged-out quick-wind lever, while the left
hand supports the lens from below.
39
Page 43

Not For Resale – Free Download at http://homepage.ntlworld.com/joechan/manuals
Tips on the care of your LEICA R6.2
and its lenses
Carefully remove dust and fluff on the mirror by means of a soft, dry sable brush from
which you repeatedly remove any grease
with ether before and during cleaning. For
cleaning, the brush must be perfectly dry.
Avoid mechanical damage to the focusing
screen: do not allow the metal ferrule of the
brush to touch the screen. To avoid forcing
dust into the camera's interior, do not blow
into the mirror chamber.
To remove dust on external lens surfaces,
carefully use a soft sable brush or a clean,
dry, soft cotton cloth. Do not use eyeglasscleaning tissue or cloth impregnated with
chemicals that may attack the glass of your
jects. Do not use a filter in such conditions;
the lens hood also provides some protection
against fingerprints and raindrops.
When pointed at the sun, a camera lens acts
as a burning glass. To protect your camera,
always use a lens cap, keep the camera in its
bag, and place it in the shade.
In addition to its designation by type and
model, each lens has a serial number. Make
a note of the serial numbers of all your
lenses and of your camera (on the camera
baseplate); this information may be important in case of loss.
camera lens; the composition of glass used
for eyeglasses is different from that of highperformance camera lenses.
In unfavorable conditions such as the seaside, a colourless ultraviolet filter protects
the front lens from damage by seawater
spray, sand, etc. Although such a filter is
optically flat, it forms an additional pair of
surfaces which at a certain angle of incidence may cause unwanted light reflection
in the image, particularly in photography
against the light and with high-contrast sub-
40
Page 44

Not For Resale – Free Download at http://homepage.ntlworld.com/joechan/manuals
Camera cases
Two ever-ready cases are available for the
LEICA R6.2, one with a standard front flap
and one with an extra long front flap. To
detach the front flap, slide up the press stud
at the back of the case to unlock. An
additional ever-ready case is offered for the
LEICA R-Camera with the VARIOELMAR f/3.5 - 4.5/28 - 70 mm lens. The
three cases are suitable for use with the
following lenses:
Standard
ever-ready
case
(Order
No 14510)
16 mm f/2.8 - yes yes
19 mm f/2.8 - yes1) yes
21 mm f/4 yes
24 mm f/2.8 yes
28 mm f/2.8 yes
35 mm f/2 yes
35 mm f/2.8 yes
35 mm PA f/4 yes
50mmf/1.4 yes yes yes
50 mm f/2 yes yes yes
60 mm f/2.8 - yes yes
1)
yes
1)
yes1) yes
1)
yes yes
2)
yes yes
3)
yes yes
1)
yes yes
Ever-ready
case with
long front
flap
(Order
No 14515)
1)
yes
Ever-ready
case for
VARIO-ELMAR
28-70 mm
(Order
No 14520)
80 mm f/1.4 - yes yes
90 mm f/2 - yes yes
90 mm f/2.8 - yes yes
35 to 70 mm - yes yes
1)
without lens hood
2)
from serial No 2791417
3)
from serial No 2928901
In addition, there is a wide choice of combination bags for camera outfits that include
several lenses and various accessories.
41
Page 45

Not For Resale – Free Download at http://homepage.ntlworld.com/joechan/manuals
MOTOR WINDER R
MOTOR DRIVE R
A Motor-Winder R or Motor-Drive R fitted
to the LEICA R6.2 automatically transports
the film and cocks the shutter after each
exposure. The motor winder transports the
film at a speed of up to 2 frames per second.
The motor drive can be set for single exposures, 2 fps, or 4fps. Either unit is suitable
for all shutter speeds available on the
When using the motorized film transport's
shutter release, ensure that the exposure
meter of the LEICA R6.2 is switched on. If
the exposure meter is switched off, the
motor functions only when you use the
camera's shutter release.
Motor Winder R, (Order No 14208)
Motor Drive R, (Order No 14 310)
camera. The winder is powered by six
standard NiCd rechargeable batteries or
non-rechargeable alkaline batteries; the
drive requires ten such batteries.
42
Page 46

Not For Resale – Free Download at http://homepage.ntlworld.com/joechan/manuals
Handgrip for motorized film transport units
The handgrip with its adjustable leather
loop lets you hold the LEICA R6.2 with
motor winder or drive more securely and
more comfortably.
Handgrip (Order No 14308)
RC LEICA R electronic Remote-Control unit
This handy electronic remote-control shutter
release for the LEICA R6.2 has a digital
frame counter that indicates each exposure
by feedback from the camera. The RC
LEICA R also acts as a timer for sequences
of exposures at preset time intervals, from
about two exposures a second to an
exposure about every ten minutes. You can
fit the RC LEICA R electronic remotecontrol unit to a Motor Winder R or a Motor
Drive R.
RC LEICA R Remote Control
(Order No 14277)
43
Page 47

Not For Resale – Free Download at http://homepage.ntlworld.com/joechan/manuals
Any six-digit figure
Automatic numbering of exposures, in
ascending on reverse order
DB 2 LEICA R Data Back
(Order No 14216)
Interchangeable lenses
The LEICA R-System provides perfect
solutions for any photographic problem,
whatever the task or situation. There is a
large choice of lenses, from fisheye to zoom
and shift lens, from distortion-free 15mm
DB 2 LEICA R Data Back
The DB 2 LEICA R is a quartz- and microprocessor-controlled camera back for projecting data on the film during exposure. It
is interchangeable with the standard LEICA
R6.2 camera back supplied. No cable link is
necessary between camera and Data Back.
The following data can be projected into the
lower right hand corner of the frame:
Day, hour, minute
Automatic calendar to 31 December 2099,
with day, month, and year in any preferred
order
ultra-wide-angle to 800mm telephoto.
Spare parts for the LEICA R6.2
Order No
Protective cap to bayonet
fitting of camera 14103
Carrying strap 14253
Rash-contact cap 14315
Universal focusing screen 14303
Focusing screens Order No
Plain ground-glass screen 14304
Microprism screen 14305
Ground-glass screen with super-
imposed grid and TV markings 14306
Clear-glass screen with
central cross-lines 14307
44
Page 48

Not For Resale – Free Download at http://homepage.ntlworld.com/joechan/manuals
Enlargers
When you use a superb camera like the
LEICA R6.2, the reproduction equipment
should match the camera's quality and performance. The LEICA FOCOMAT
®
V35
autofocus enlarger is the perfect complement to your LEICA R6.2.
Projectors
For your LEICA R6.2 slides there is a comprehensive range of versatile, easy-to-use
projectors, with a large choice of options.
The LEICA P2000 PRADOVIT, the LEICA
P150, as well as the LEICA P155 and
LEICA P255 range offer total user convenience and a versatile range upgrade
options. Superb optical performance in
Binoculars
Superb optics are the most outstanding
single feature of all LEICA binoculars.
They are made of the same high-grade optical glass as the world-famous LEICA
lenses. Their brilliant optical performance
and exceptional resolution ensure that you
obtain a vivid three-dimensional image even
in poor light.
Customer Service
For the maintenance and, in the unlikely
case of damage, repairs to your LEICA
R6.2, please consult the Customer Service
of Leica Camera GmbH or the Customer
Service of any national Leica Camera
agency (see warranty card for address list).
combination with traditional LEICA precision mechanics are the common denominator of all LEICA projectors.
Ask your authorized dealer or specialist for
advice.
45
Page 49

Not For Resale – Free Download at http://homepage.ntlworld.com/joechan/manuals
Technical data
Camera type: compact 35mm single-lens reflex camera
with mechanically controlled shutter release and throughthe-lens exposure metering system.
Shutter: mechanically controlled metal-blade focal- plane
shutter, vertical action, compact design.
Shutter speeds: click-stop settings for B and from 1s to
1
/
s: X=1/
2000
Shutter-speed setting ring: projects 6.5 mm for positive
grip, central release button.
Lens mount: LEICA R-Bayonet.
Lenses: Choice of more than thirty LEICA R-Lenses with
focal lengths from 15mm to 800mm.
Switching on the camera: (after setting the mode selector
switch from "OFF" to one of the exposure metering
modes) press the shutter-release button, the locking button
to the mode selector, or the battery-test button (the LED's
in the viewfinder light up - the exposure meter has been
activated). By pressing the Motor-Winder/Motor-Drive
exposure release button. The LED's remain lit for about
12s after releasing whatever "switch-on" method has been
activated.
s for electronic flash synchronization.
100
Switching off exposure metering system: in the selective
mode setting, press the locking button on the mode selector
switch again and set it to the "OFF" position.
Exposure metering modes: selective and full-field inte-
gral exposure metering through-the-lens. Set via mode
selector switch under shutter-speed setting ring by
clockwise or anticlockwise movement. Exposure metering
works at full aperture on LEICA R-Lenses with automatic
spring-back diaphragm, at working aperture with lenses
and accessories not equipped with automatic spring-back
diaphragm.
Display of selected exposure metering mode: through
symbols in display window next to shutter-speed setting
ring and in the viewfinder.
Balancing shutter and aperture: set manually by selec-
ting aperture and turning shutter-speed setting ring or by
selecting shutter and turning aperture setting ring until
central, circular LED of the viewfinder's shutter/ aperture
balance lights up. The two triangular LEDs, either alone or
together with the central LED, indicate over- or
underexposure and the direction in which to turn the
respective setting ring.
Display for balancing shutter-speed and aperture, in
viewfinder.
Exposure meter: Selective and integral through-the-lens
modes, functions linked to operating mode. Exposure
meter works at full aperture with LEICA R-Lenses with
automatic spring-back diaphragm, and at working aperture
with lenses and accessories without automatic spring-back
diaphragm.
Photocell: silicon photodiode, protected from stray light in
lower part of camera. For selective mode, the selector
switch automatically places a condenser lens in front of the
photodiode.
Selective exposure metering: Measuring field 7mm dia-
meter, marked in viewfinder.
46
Page 50

Not For Resale – Free Download at http://homepage.ntlworld.com/joechan/manuals
Integral exposure metering: center-weighted mean of
full-field measurement.
Measuring range of exposure meter: Selective mode from
2
0.25 cd/m
+20 for ISO 100/21° film, or from 1s at f/1.4 to '/
to 125 000 cd/m2at f/1.4, i.e. from Ev +1 to
s at
2000
f/22.
2
Integral mode from 0.063 cd/m
to 125000 cd/m2at f/1.4,
i.e. from Ev -1 to + 20 for ISO 100/21° film, or from 4s at
f/1.4 to 1/2000s at f/22.
Film-speed range: ISO 12/12° to ISO 3200/36°.
Exposure override: From + 2 to -2 aperture stops, with
click-stops for 1/3 values. The viewfinder warning display indicates override in use. At the extremes of the ISOscale, the use of override is strictly limited.
Power supply: Two silver oxide button cells or lithium
cell. Press test button to check battery voltage.
Data displays in viewfinder: the aperture set on the lens;
the shutter-speed selected.
Supplementary viewfinder light may be switched on in
poor ambient light for projected viewfinder display of
shutter-speed and aperture; activated only when exposure
meter is switched on.
LED display when exposure meter is activated: symbols
indicate exposure metering mode selected, shutterspeed/aperture balance; blinking flash symbols indicate
'flash ready' and exposure check.
LED warning indicators in viewfinder: for override and
low-light warning (insufficient light for exposure
metering)
Electronic flash synchronization: Standard X coaxial
contact socket adjacent to prism housing, for bulb and
electronic flash units. Central X hot-shoe contact.
Viewfinder system: Built-in pentaprism. Five interchangeable focusing screens.
Viewfinder eyepiece: Setting ring for adjustment from +2
to -2 diopters. Built-in eyepiece shutter. Eyepiece mount
with mount for supplementary correction lenses, eyecup,
and 90°-viewfinder attachment.
Viewfinder field: 23 x 34.6mm, i.e. 92% of frame size.
Viewfinder magnification: 0.8x at 0 diopter with 50 mm
lens.
LED display in viewfinder aligned below viewfinder
image.
47
TTL flash-exposure control: with electronic flash units
compatible with 300 or 500 SCA (system camera adaption) i.e. SCA 300 or 500 dedicated flash units with SCA
351 or 551 adapters, flash exposure is measured through
the lens used.
1
/
Shutter-speed setting for synchronized flash: X =
100
s,
all settings from 1 s to l/60 s, and B.
Override for TTL flash-exposure control: plus/minus
two aperture stops with 1/3 click-stops; simple one-hand
control. Viewfinder displays override warning.
Photocell for TTL flash-exposure control: Silicon photodiode, next to photocell of exposure meter, protected from
stray light in lower part of camera.
Page 51

Not For Resale – Free Download at http://homepage.ntlworld.com/joechan/manuals
Film-speed range for TTL flash exposure control:
ISO 12/12° to ISO 3200/36°.
Swing-mirror system: Semi-transparent swing mirror
coated with 17 layers by vacuum deposition, reflects 70%
and transmits 30% light, backed by Fresnel reflector for
selective and full-field integral modes; Fresnel reflector
consists of 1345 micro-reflectors that concentrate light on
exposure meter's photocell. Vibration-free mirror action.
Independent mirror release: special cable-release socket
for hinging up mirror without releasing shutter, also sets
aperture of lens used to selected stop. Shutter controlled by
main shutter-release button, with or without cable release.
Film transport: Single-movement quick-wind lever (130°
movement), optional Motor Winder R (2 fps) or Motor
Drive R (single frame, 2 fps, 4 fps).
Film plane: Mark at top of camera.
Frame counter at top of camera: Counts frames in as-
cending values. Automatic reset when camera back is
opened. In front of the quickwind lever: Frame counter
window with magnifier.
Multiple exposures: Press rewind locking button. Automatic reset when shutter is cocked; exposure counter does
not move on. Any number of exposures possible. Multiple
exposures also possible with motor winder / motor drive.
Shutter release: Shutter-release button with standard
thread for cable release. Press down 0.3mm to first
pressure point to switch on (viewfinder LED's light,
exposure meter works). Press down 1.6mm for shutter
release.
Self-timer (electromagnetic): About 9s countdown;
flashing red LED on front of camera indicates that selftimer is set.
Camera body: Die-cast aluminum, camera top 1mm diecast zinc, bottom panel 0.8 mm brass. Camera back with
right-hand thumbhold and film cartridge window (show
type and speed of film in use), interchangeable with Data
Back. Electric contacts for DB2 LEICA R Data Back.
Lever at right of lens mount for visual check of depth of
field. Standard ¼ " A (DIN 4503; ¼") thread for tripod
screw. Eyelets at sides for carrying strap. Mechanical
contact for Motor Winder R or Motor Drive R. Black or
silver chromium finish.
Dimensions and weight (camera body only, without lens):
89.1mm (3.5") high, 138.5mm (5.5") long, 32.2 (1.25")
deep (camera body only; total depth 62.2/2.5"); weight
625g (1lb 6oz).
Rewind lever: Hinged crank at top left of camera.
48
Page 52

Not For Resale – Free Download at http://homepage.ntlworld.com/joechan/manuals
23
Accessory shoe with central
hot-shoe and control contacts
24
Display window for exposure
metering mode selected
25
Film plane mark
26
Shutter release, with threaded
socket for cable release
27
Shutter-speed setting ring
28
Quick-wind lever to wind film
and cock shutter
29
Automatic frame counter
30
Selector switch with locking button
31
Eyepiece shutter
32
Diopter adjustment setting
ring
33
Viewfinder eyepiece, with correction
lens holder
34
Film cartridge window
35
Data Back contacts (without cable;
visible with back opened)
36
Contacts and linkage for motorized
film transport
37
Battery compartment cap
38
A-type 1/4" tripod thread
39
Rewind release and
multiple-exposure button
VI
Page 53

Not For Resale – Free Download at http://homepage.ntlworld.com/joechan/manuals
Alphabetical Index of Terms Page
Activating the exposure metering system 14
Attaching the carrying strap 2
Automatic spring-back diaphragm 35
Balancing shutter-speed and aperture 16
Batteries 4
Binoculars 45
Brief description III/VI
Cable release socket 28
Camera cases 41
Camera spare parts 44
Care of the LEICA R6.2 40
Construction of LEICA R-Lenses 35
Contents 1
Correction lenses 23
DB-2 LEICA R Data Back 44
Depth of field lever 27
Depth of field scale on lens 27
Electronic control unit 43
Enlarger 45
Exposure-metering modes 10
Eyecup 24
Eyepiece adjustment 23
Eyepiece shutter 24
Film loading 7
Film-speed setting 9
Filters and their use 37
Fitting the lens 3
Focusing screens 25
Focusing with the universal screen 25
Flash connection via hot-shoe
contact or coaxial socket 30
Frame counter 8
Page
Full-field integral mode 11
Handgrip for Motor Winder and Motor Drive 43
Holding the camera 39
Independent mirror release 28
LEICA M-Lenses on the LEICA R6.2 36
Lens hoods 34
Low-light warning 17
Motor-Winder, Motor-Drive 42
Multiple exposures 29
Override control 18
Override correction 18
Projectors 45
Quick-wind lever 6
Range of exposure meter 12
Removing the lens 3
Rewinding and removing the film 9
Selective mode 11
Self-timer 29
Shutter-speed setting ring 15
Supplementary viewfinder light 22
Switching on the exposure meter 14
Technical Data 46
TTL flash-exposure control 30
Using existing lenses and accessories 35
Using flash equipment 30
Using the exposure meter at full aperture 16
Using the exposure meter at working aperture 16
Viewfinder as composition and control center 20
Working diagram of exposure meter 12
VII
Page 54

Not For Resale – Free Download at http://homepage.ntlworld.com/joechan/manuals
® = Registered trademark
Illustrations, specifications, descriptions and technical data are
not binding and may be changed without notice.
Trademark of
The Leica Camera Group
Leica Camera AG, Oskar-Barnack-Strasse 11, D-35606 Solms, Germany
Telephone +49 6442/208-0, Fax +49 6442/208-333
http://www.leica-camera.com cpr@leica.camera.com
germ. 930 422 / engl. 930 423 /french 930 424 Printed in Germany VIII/99/FX/L
 Loading...