

Page 1
Version 1.1
English
Leica
User Manual
Page 2
Leica mojoMINI 2, Introduction
Introduction
Purchase Congratulations on the purchase of a Leica mojoMINI 2 system.
This manual contains important safety directions as well as instructions for setting
up the product and operating it. Refer to "6 Safety Directions" for further information. Read carefully through this User Manual before you switch on the product.
To ensure safety when using the system, please also observe the directions and
instructions contained in the User Manual and Safety Handbook issued by the:
• Agricultural machinery manufacturer.
2
Product identification
The type and serial number of your product are indicated on the type plate. Enter the
type and serial number in your manual and always refer to this information when you
need to contact your agency or Leica Geosystems authorised service workshop.
Type: _______________
Serial No.: _______________
Page 3

Symbols used in
this manual
Trademarks • Windows is a registered trademark of Microsoft Corporation
Leica mojoMINI 2, Introduction 3
The symbols used in this manual have the following meanings.
Type Description
DANGER Indicates an imminently hazardous situation which, if not
WARNING Indicates a potentially hazardous situation or an unintended
CAUTION Indicates a potentially hazardous situation or an unintended
• SD is a trademark of the SD Card Association
All other trademarks are the property of their respective owners.
avoided, will result in death or serious personal injury.
use which, if not avoided, could result in death or serious
personal injury.
use which, if not avoided, may result in minor or moderate
personal injury, appreciable material, financial and environmental damage, or all of these.
Important paragraphs which must be adhered to in practice as
they enable the product to be used in a technically correct and
efficient manner.
Page 4

Leica mojoMINI 2, Table of Contents
Table of Contents
In this manual Chapter Page
1 Getting Started 7
1.1 In the Box 7
1.2 mojoMINI 2 Display 9
1.3 GeoSpective 2 Smart Antenna 11
1.4 Precautions 12
2 System Installation 13
2.1 Before Installation 13
2.2 Installing the GeoSpective 2 Smart Antenna 14
2.3 Installing the mojoMINI 2 17
2.4 Connecting the mojoMINI 2 to the GeoSpective 2 Smart Antenna 21
2.5 Other Connections for the GeoSpective 2 Smart Antenna 23
3 System Start Up and Settings 24
3.1 Start-Up 25
3.2 Changing the Brightness 26
3.3 Main Navigation Screen 27
3.4 Lightbar Configuration 30
4
Page 5

3.5 Day/Night Settings 33
3.6 Calculator 34
4 Field Navigation 35
4.1 Starting Field Navigation 35
4.2 Starting a New Field 37
4.3 Setting AB Waylines 41
4.4 Setting A+ Heading Guidance 43
4.5 Setting Fixed Contours Guidance 45
4.6 Setting Pivot Guidance 48
4.7 Recording Coverage 50
4.8 Field Boundaries 52
4.9 Continue Last Field 54
4.10 Data Export 56
4.11 Nudging 59
4.12 SBAS 61
5 Care and Transport 63
5.1 Transport 63
5.2 Storage 64
5.3 Cleaning and Drying 65
Leica mojoMINI 2, Table of Contents 5
Page 6

Leica mojoMINI 2, Table of Contents
6 Safety Directions 66
6.1 General Introduction 66
6.2 Intended Use 67
6.3 Limits of Use 68
6.4 Responsibilities 69
6.5 Hazards of Use 70
6.6 Electromagnetic Compatibility EMC 76
6.7 FCC Statement, Applicable in U.S. 79
6.8 Labelling 81
7 Technical Data 82
7.1 GeoSpective 2 Smart Antenna Performance 82
7.2 GeoSpective 2 Smart Antenna Specifications 84
7.3 mojoMINI 2 Specifications 86
7.4 Conformity to National Regulations 88
8 International Limited Warranty, Software Licence Agreement 89
Appendix A Troubleshooting 91
6
Page 7
1 Getting Started
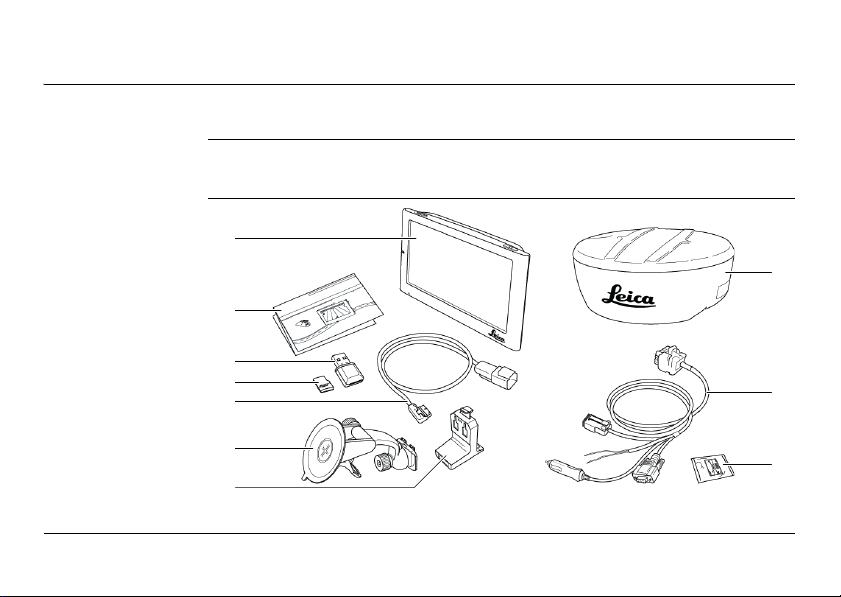
mojoMINI_2_001
a
b
c
d
e
f
g
h
i
j
The images in this manual are for reference purposes only. Individual screens and
icons may differ from the actual items.
1.1 In the Box
Contents
Leica mojoMINI 2, Getting Started 7
Page 8

Leica mojoMINI 2, Getting Started
a) mojoMINI 2 display
b) Product documentation
c) USB, micro SD card reader
d) Micro SD memory card
e) mojoMINI 2 cable
8
f) Mounting bracket with suction cup
g) Mounting cradle
h) GeoSpective 2 smart antenna
i) GeoSpective 2 cable
j) GeoSpective 2 mounting kit
Page 9
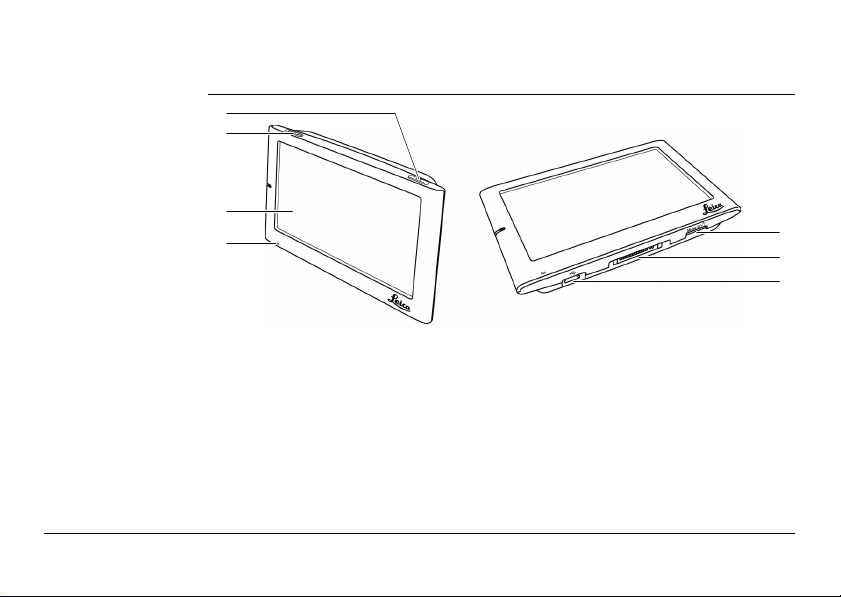
1.2 mojoMINI 2 Display
Components
a
b
c
d
mojoMINI_2_002
a) Sleep button
b) On-Off (Power) switch
c) LCD screen
d) Charge indicator
Leica mojoMINI 2, Getting Started 9
e) USB Charger connection
f) Cradle connection
g) Micro SD Card slot
e
f
g
Page 10

Leica mojoMINI 2, Getting Started
Description
Component Function
LCD screen The mojoMINI 2 is operated by touching images on the screen,
Charge indicator When the battery is charging the light is red. When the battery
Sleep button To enter standby mode, or to return from standby mode, press
Micro SD Card
slot
On-Off (Power)
switch
USB-style
charging port
Cradle connection
10
either with a fingertip or with a stylus.
is fully charged the light is blue.
the power button for a few seconds.
Insert the micro SD card into this slot.
Use this switch to reset the system.
For storage ensure this switch is in the OFF position to prevent
the internal battery from being drained.
Ensure the switch is in the ON position to operate the
mojoMINI 2.
Not used in the normal operation of the mojoMINI 2.
The connection to the cradle for communications and power.
Page 11
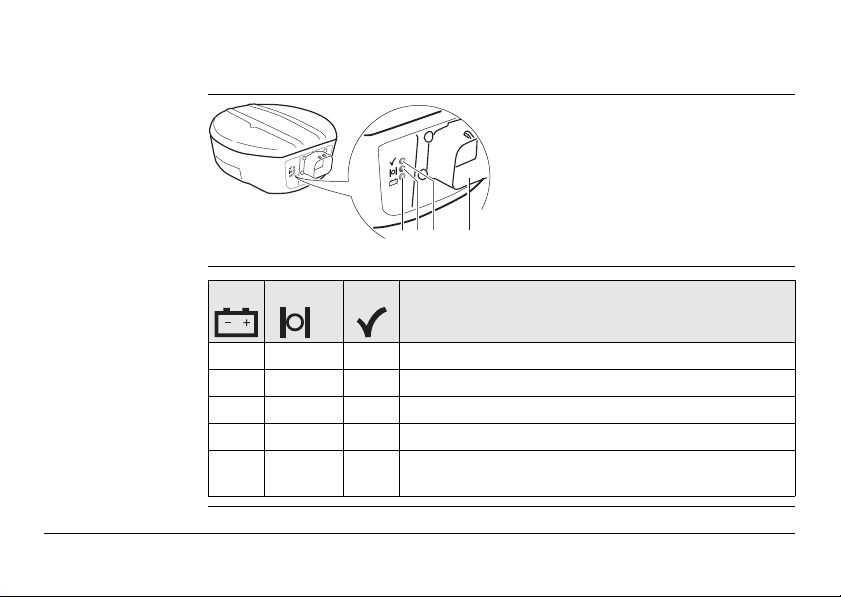
1.3 GeoSpective 2 Smart Antenna
Components
mojoMINI_2_003
abc d
a) Power LED
b) Position status LED
c) Position type LED
d) Power/Data port
LED description
Red Yellow Green Condition
Off Off Off Power is not available.
On Off Off Power available but no satellites are tracking yet.
On Flashing Off Tracking at least one satellite but not a valid position.
On On Off Position valid in basic autonomous mode.
On On On Position valid in an enhanced accuracy mode
(WAAS/EGNOS/MSAS).
Leica mojoMINI 2, Getting Started 11
Page 12

Leica mojoMINI 2, Getting Started
1.4 Precautions
12
General precautions
WARNING This product should not be used in aircraft navigation.
The following precautions should be followed when using the mojoMINI 2.
• To reduce the risk of electric shock, do not open any covers. There are no userserviceable parts inside. Refer all servicing to qualified personnel.
• If the mojoMINI 2 will not be used for a length of time, unplug any external power
source.
• Keep liquids away from the mojoMINI 2: do not place containers of liquid on or
near it.
• Clean the mojoMINI 2 only with a dry cloth.
• Do not block any ventilation openings. Do not block air flow around the
mojoMINI 2.
• Do not install near any heat sources (for example: radiators, stoves, electronic
amplifiers).
• Ensure that the power cords are not damaged.
• Unplug the mojoMINI 2 during storms.
Page 13

2 System Installation
2.1 Before Installation
General installation information
Two major components
Leica mojoMINI 2, System Installation 13
• The following instructions are to be used as a general guide during the installa-
• Install the system in a clean and dry environment. Failure to do so may result in
• Ensure that the cables do not chafe or rub.
• The two major components of the mojoMINI 2 system are the mojoMINI 2 display
Installation does not require specialist knowledge. This user manual
contains sufficient information for installation and safe use.
tion of the mojoMINI 2.
product malfunctions.
and the GeoSpective 2 smart antenna.
Page 14

Leica mojoMINI 2, System Installation
2.2 Installing the GeoSpective 2 Smart Antenna
14
Equipment
required
WARNING • If the power supply voltage is outside the specified range, the GeoSpective 2
Mounting requirements
The GeoSpective 2 smart antenna is a high-performance GPS receiver, which is used
in conjunction with the mojoMINI 2.
For installation and setup, you will need:
• the GeoSpective 2 smart antenna;
• alcohol wipes;
• adhesive strips;
• a GeoSpective 2 cable, to connect the GeoSpective 2 smart antenna to the
vehicle’s cigarette lighter outlet and the mojoMINI 2.
smart antenna will not operate.
• If the power supply voltage exceeds +36 V DC, then the GeoSpective 2 smart
antenna may be permanently damaged. This damage is not covered by warranty.
• When installing the GeoSpective 2 smart antenna, choose a location that has a
clear view of the sky, so that all satellites above the horizon can be tracked.
• Mount the GeoSpective 2 smart antenna on a secure, stable structure where it
will not present any danger. Most installations are on the tractor cab roof.
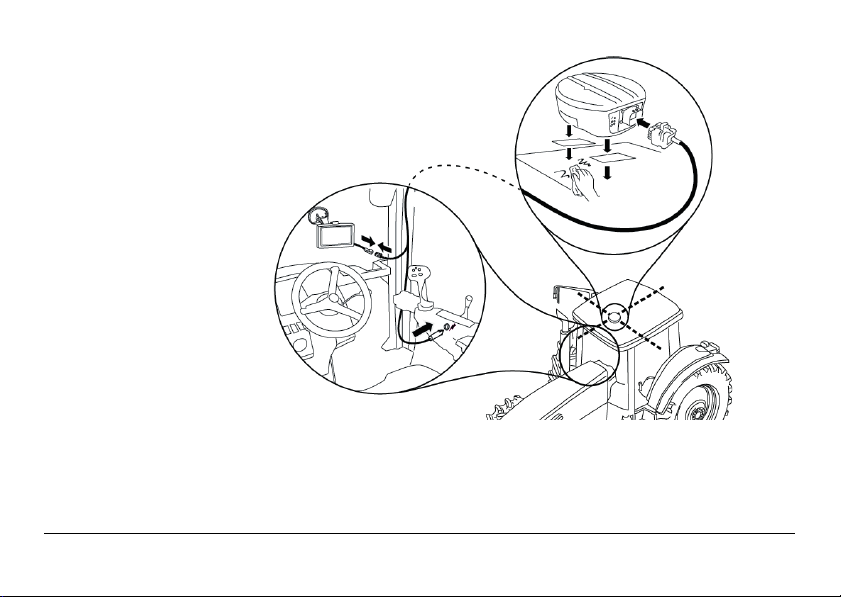
Page 15
Installation
2
3
1
4
5
mojoMINI_2_004
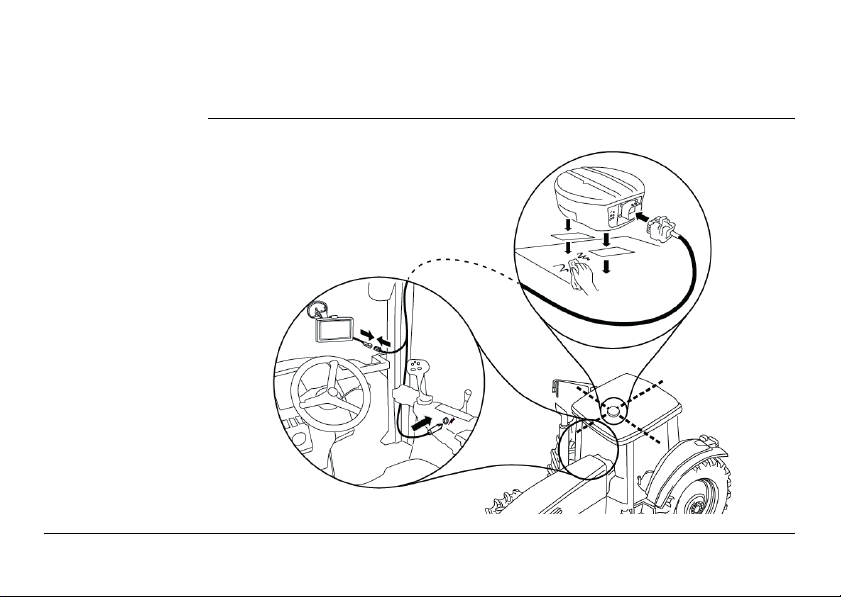
1. Clean the mount points with the alcohol wipes provided.
2. Mount the GeoSpective 2 smart antenna on the roof of the vehicle. Use the
adhesive tape provided or the built-in magnets.
Leica mojoMINI 2, System Installation 15
Page 16

Leica mojoMINI 2, System Installation
3. Plug the GeoSpective 2 cable into the port at the back of the smart antenna. The
connector fits one way only.
4. Thread the GeoSpective 2 cable into the vehicle’s cab taking care not to kink the
cable and to locate it so chafing does not occur.
5. Plug the GeoSpective 2 cable into the vehicle’s cigarette lighter outlet.
16
Page 17
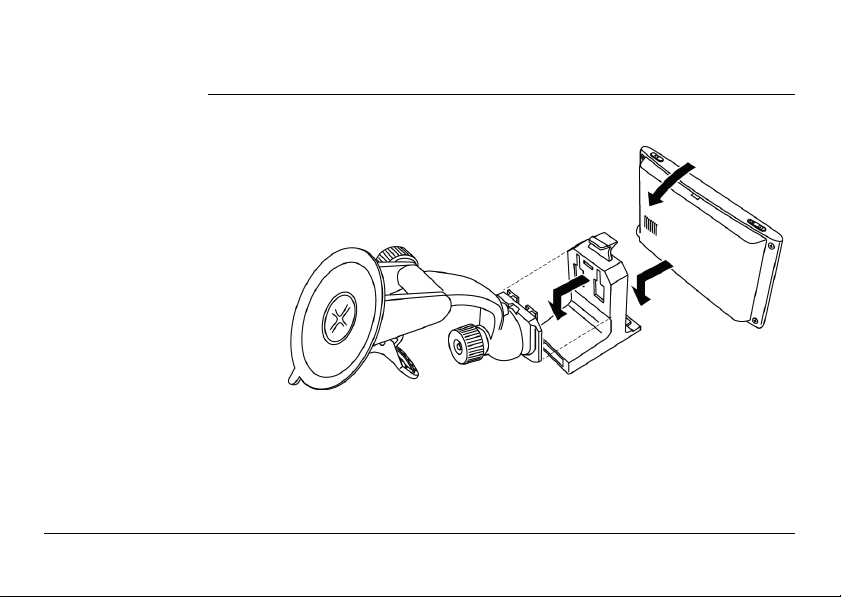
2.3 Installing the mojoMINI 2
mojoMINI_2_005
1
2
3
mojoMINI 2 installation
Leica mojoMINI 2, System Installation 17
The mounting bracket for the mojoMINI 2 is held in place on the windscreen of the
vehicle by a suction cup.
1. Slide the mounting cradle onto the end of the mounting bracket.
2. Set the bottom edge of the mojoMINI 2 unit onto the mounting cradle.
3. Push the top edge of the mojoMINI 2 under the clip at the top of the mounting
cradle.
Page 18
Leica mojoMINI 2, System Installation
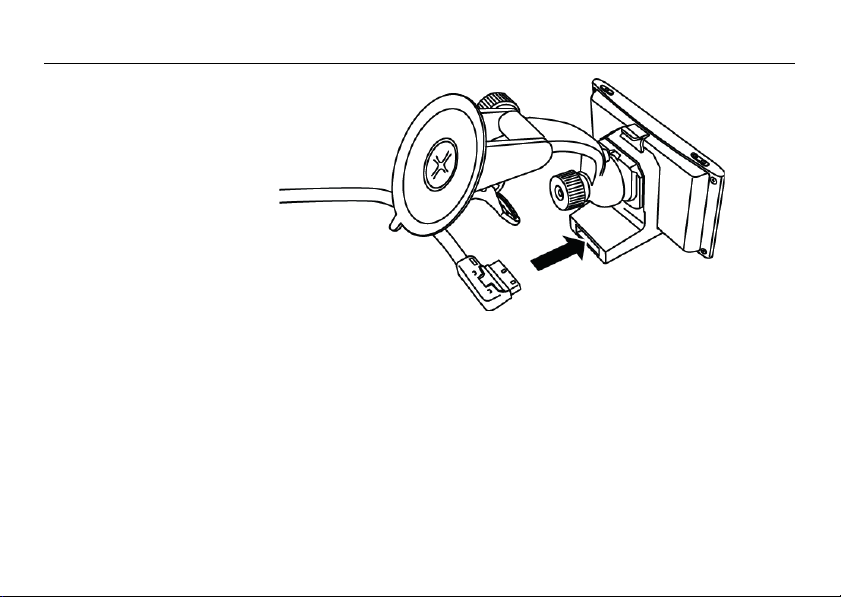
mojoMINI_2_006
4
4. Plug the rectangular connector of the mojoMINI 2 cable into the socket of the
CAUTION To prevent permanent damage, ensure the cable is disconnected from power before
connecting the mounting cradle.
5. Clean the area of the windshield where the suction cup will be placed.
6. Lift the suction cup lever, and press the suction cup to the windshield.
7. Push down the suction cup lever, to attach the cup firmly to the windshield.
8. Rotate the unit until the screen is comfortably visible.
18
mounting cradle.
Page 19
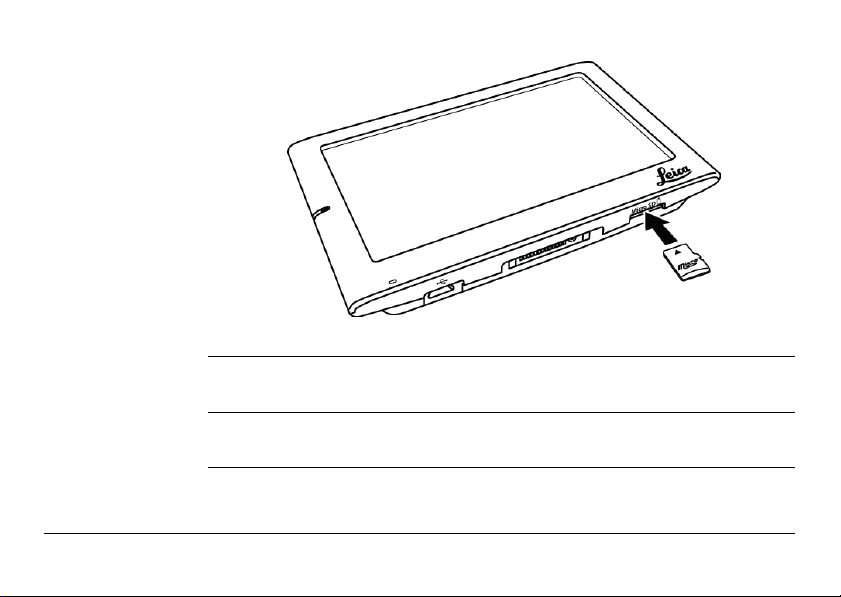
9. Insert the micro SD card into the slot at the bottom right of the mojoMINI 2.
mojoMINI_2_007
9
CAUTION To prevent loss of data or damage to the card or device, the card should only be
CAUTION Take care when inserting the card. The card must be inserted in the correct orienta-
Leica mojoMINI 2, System Installation 19
inserted or removed when the device is turned off.
tion to prevent permanent damage to the card or device.
Page 20

Leica mojoMINI 2, System Installation
WARNING Do not mount the mojoMINI 2 where it may obscure the driver’s view of the road or
WARNING Do not mount the mojoMINI 2 where it may be struck by a deploying airbag.
field.
20
Page 21
2.4 Connecting the mojoMINI 2 to the GeoSpective 2 Smart Antenna
Connecting
mojoMINI 2 to
GeoSpective 2
smart antenna
To connect the mojoMINI 2 and the GeoSpective 2 smart antenna:
1
mojoMINI_2_008
Leica mojoMINI 2, System Installation 21
Page 22

Leica mojoMINI 2, System Installation
1. Connect the mojoMINI 2 cable to the grey square plug of the GeoSpective 2 smart
antenna’s cable.
2. Ensure all cables are carefully routed so no kinking or chafing occurs, as this may
degrade performance, and so they do not hinder the operator of the vehicle.
22
Page 23

2.5 Other Connections for the GeoSpective 2 Smart Antenna
The GeoSpective 2 smart antenna’s cable offers two other connections:
• NMEA output through the D9 port; and
• Ground speed radar simulation through the spade connectors.
If these outputs are required, make the appropriate connections.
The default NMEA configuration is:
• Port - 9600 Baud, 8 Data Bits, Parity None, 1 Stop Bit
• Messages - GGA @ 5Hz, VTG @ 5Hz
The NovAtel Connect utility, available from www.novatel.com, can be used to
customize the NMEA output on the COM1 port.
Leica mojoMINI 2, System Installation 23
Page 24

Leica mojoMINI 2, System Start Up and Settings
3 System Start Up and Settings
This chapter details how to start the mojoMINI 2 system and explains the main navigation screen - the screen that the operator will view the majority of the time. How
to configure the lightbar, and the screen background and brightness is also
discussed, along with how to use the calculator feature.
24
Please ensure that your mojoMINI 2 and GeoSpective 2smart antenna have
been installed in accordance with the installation instructions in Chapter "2
System Installation".
Page 25
3.1 Start-Up
Starting the
mojoMINI 2 system
Leica mojoMINI 2, System Start Up and Settings 25
To start the mojoMINI 2 system:
1. Turn the vehicle on or at least turn the key to Accessories, so the cigarette lighter
outlet is powered.
This provides power to the mojoMINI 2 and the GeoSpective 2 smart antenna.
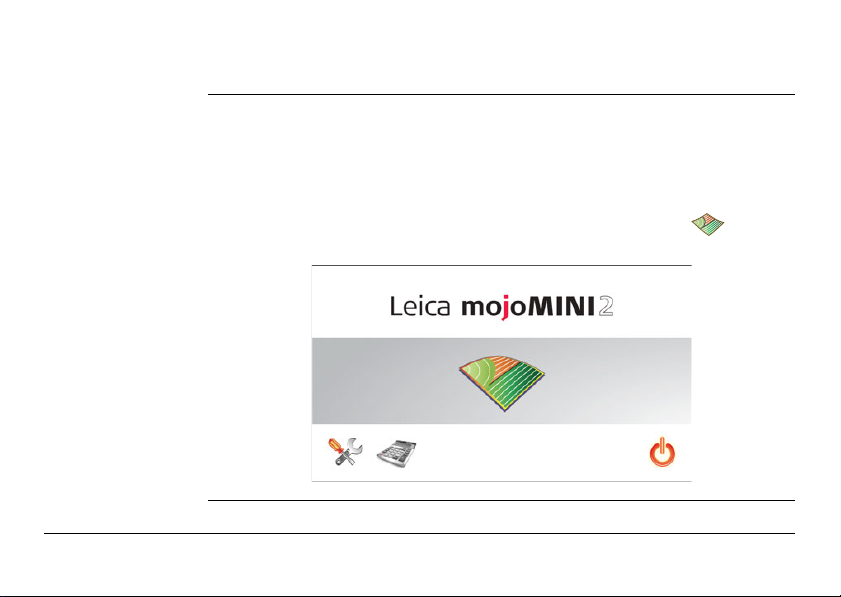
2. On the mojoMINI 2, turn the On-Off (Power) switch to the On position.
The mojoMINI 2 starts up, and the screen displays a Field button in a grey
band in the middle of the screen (as shown below).
Page 26

Leica mojoMINI 2, System Start Up and Settings
3.2 Changing the Brightness
26
Brightness To change the brightness of the screen, carry out the following procedure:
1. On the opening screen, tap the tools icon at the bottom left of the screen.
2. Tap the right arrow to make the screen brighter, and tap the left arrow to make
the screen dimmer.
3. To return to the opening screen, tap the return button.
Page 27
3.3 Main Navigation Screen
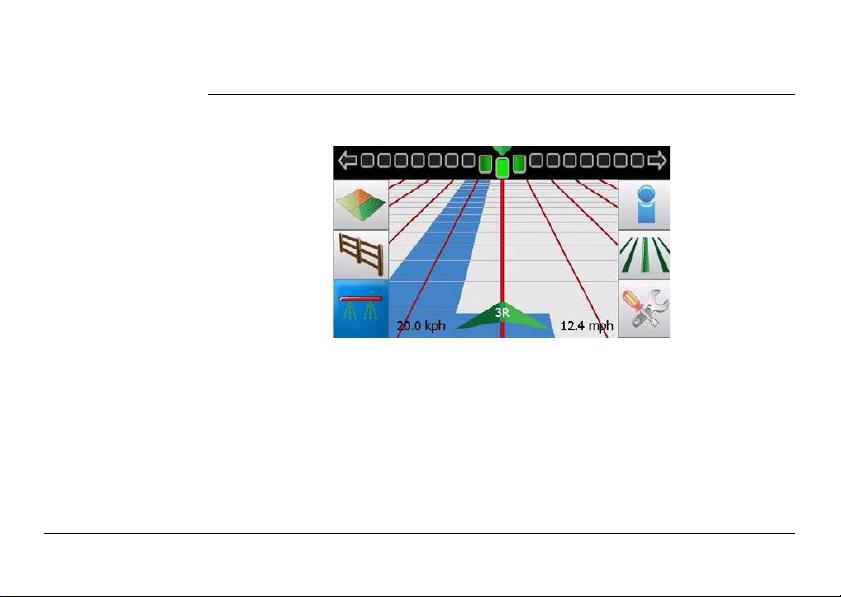
Overview The main navigation screen is the screen that the operator will view most of the time
Leica mojoMINI 2, System Start Up and Settings 27
during normal operation.
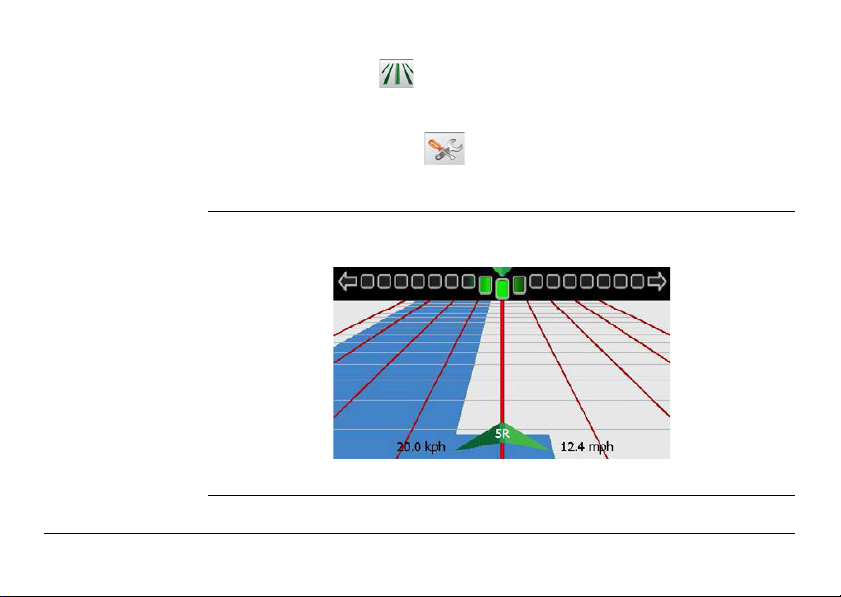
The main navigation screen has five main parts: the lightbar, main display, information area, left menu bar and right menu bar.
1. Lightbar
The lightbar is located at the top of the screen. The operator can configure the
lightbar to be either a Smart lightbar or a Crosstrack only lightbar. Refer to
Section "3.4 Lightbar Configuration" for information on setting up the lightbar.
Page 28
Leica mojoMINI 2, System Start Up and Settings
2. Main Display
The main part of the screen shows waylines in perspective and highlights the
nearest line.
3. Information Area
The information area is located at the bottom of the screen. Centred in this area
is the wayline row number. To the left of this is the current speed as kilometres
per hour (kph), and to the right is the current speed as miles per hour (mph).
4. Left Menu Bar
The menu bar located on the left side of the screen provides buttons for:
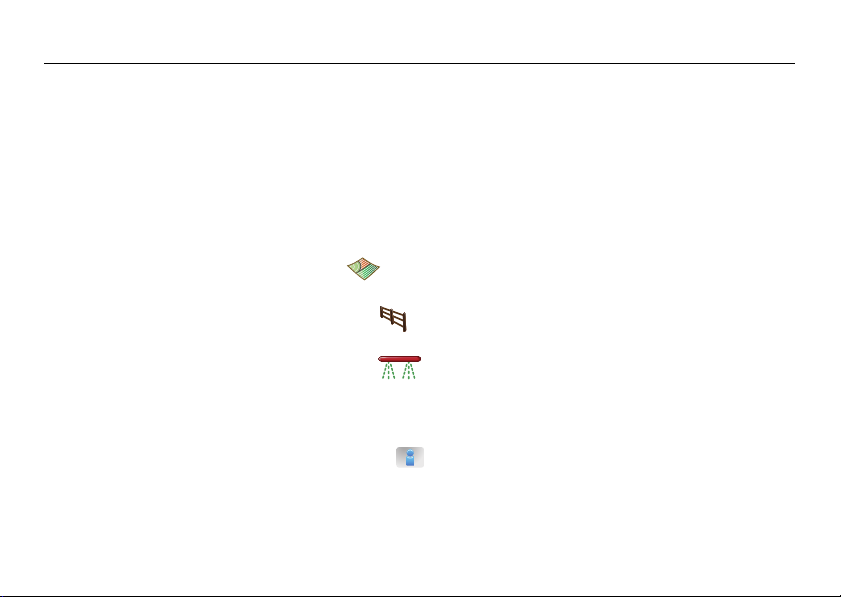
• Field button, , to start a new field or continue an existing field. Refer to
Chapter "4 Field Navigation" for details.
• Boundary button, , to record a field boundary. Refer to Section "4.8 Field
Boundaries" for details.
• Coverage button, , to start and stop recording coverage. Refer to
Section "4.7 Recording Coverage" for details.
5. Right Menu Bar
The menu bar located on the right side of the screen provides buttons for:
• Information button, , to access GPS status and the calculator.
28
Page 29
• Guidance button, , to access setting AB, A+ Heading, Contour and Pivot
waylines. Refer to "4 Field Navigation" for details on setting up waylines and
wayline management.
• System Settings button, , to set up the day/night mode and SBAS mode.
Refer to Section "3.5 Day/Night Settings" for details on day/night mode, and
Section "4.12 SBAS" for details on SBAS.
Display Area Optimization
Leica mojoMINI 2, System Start Up and Settings 29
If the operator does not touch the screen for 20 seconds, the menu buttons on the
left and right of the screen disappear to give the operator a greater display area.
To get the menu buttons to reappear, tap the screen anywhere under the lightbar.
Page 30

Leica mojoMINI 2, System Start Up and Settings
3.4 Lightbar Configuration
30
Overview The lightbar has two modes that the operator can select from: Smart lightbar and
Crosstrack lightbar.
Smart lightbar uses both crosstrack error and heading error to
guide you to the line.
Crosstrack - Chase the lightbar represents where the line is relative
to where the vehicle is, and to steer to the line,
you steer towards the light - that is, you "chase"
the light.
Crosstrack - Pull the lightbar represents the position of the vehicle
relative to the line, and to steer the vehicle onto
the line, you steer away from the light to "pull"
the light to the line.
Page 31

Lightbar setup
step-by step
Leica mojoMINI 2, System Start Up and Settings 31
To setup the lightbar, carry out the steps below:
1. Tap the lightbar at the top of the screen.
The Lightbar setup screen appears.
2. Select the desired lightbar mode by tapping
the Lightbar Mode button until the button
matching the mode appears.
Smart Lightbar
Crosstrack Chase
Crosstrack Pull
Page 32

Leica mojoMINI 2, System Start Up and Settings
3. If a Crosstrack lightbar is selected, configure
the amount of crosstrack error per lightbar
segment but tapping the up arrow or
down arrow on the imperial or metric
measurement.
This setting determines how much crosstrack
error is represented by each segment in the
lightbar. A small number makes the lightbar
more sensitive and hard to follow, but more
accurate. A large number makes the lightbar
less sensitive and easy to follow, but less accurate. This value has a range of 0.4"/1cm to
8.0"/20cm per segment.
4. To return to the main navigation screen, tap the bottom right corner of the
screen.
32
Page 33

3.5 Day/Night Settings
Day/night settings The screen background may be set to bright (daylight setting) or dull (night setting).
To change from one background setting to the other, carry out the following procedure:
1. On the main navigation screen, tap on the
settings icon .
2. The Settings screen appears.
3. The icon that displays on the top left indicates
the current background setting, where:
• is Day, and
• is Night.
To change the background of the display, tap
on the day or night icon.
Leica mojoMINI 2, System Start Up and Settings 33
Page 34

Leica mojoMINI 2, System Start Up and Settings
3.6 Calculator
34
The Calculator The calculator is a standard one-memory calculator with a square-root function and
Unit Conversions The calculator screen contains buttons for unit conversions:
a number of quick-conversion buttons.
To open the calculator, either:
• tap the calculator icon at the bottom of the opening screen; or
• tap the calculator icon on the Field Navigation information screen.
• hectares to acres, and acres to hectares
• kilograms to pounds, and pounds to kilograms
• litres to US gallons, and US gallons to litres.
Enter the number that you wish to convert, and tap the conversion button. The
answer appears immediately.
• The gallon used in conversions is the US gallon, not the Imperial gallon (which is
about 20% larger than the US gallon).
Page 35

4 Field Navigation
mojoMINI_2_009
a
bcd
4.1 Starting Field Navigation
Starting field guidance
Leica mojoMINI 2, Field Navigation 35
On the mojoMINI 2 opening screen, tap on the Field icon .
The Field screen appears:
a) GPS and speed status
b) Start new field
c) Continue last field
d) Return button, returns
to the start screen
Press to start a new field or to continue your last field with the previous
wayline.
Page 36

Leica mojoMINI 2, Field Navigation
36
Some features may not be available until the mojoMINI 2 has a GPS position. The GPS
status icon has many possible states, indicating the current status:
Good Data, poor signal strength
Good Data, low signal strength
Good Data, medium signal strength
Good Data, good signal strength
Configuration error
Configuring
Invalid data
No data
Page 37

4.2 Starting a New Field
Setting the vehicle
offsets
Leica mojoMINI 2, Field Navigation 37
After selecting the start new field option set the implement offset, implement width
and distance from the antenna to the implement by tapping the measurement you
want to change.
All measurements are important for spacing out the waylines and accurately
displaying treatment coverage.
1. When the start new field option is selected,
the Vehicle Measurements screen appears.
2. To set the implement offset measurement, tap
in the first measurement box.
The Implement Offset screen appears.
Page 38

Leica mojoMINI 2, Field Navigation
3. The left-most button indicates whether the implement is offset to the left or the
right.
If your implement is centered behind the antenna, it does not matter which
offset button is active.
Tap the button to change it to the one that represents your configuration.
4. To enter the implement offset measurement, tap the up or down arrows on the
screen. The measurement is shown in both metric and US units: either may be
adjusted, and the other changes accordingly.
5. The middle button is for configuring whether the implement is locked, that is, it
does not swap to the other side of the vehicle when the vehicle turns around, or
whether it is not locked.
upon turning.
upon turning.
Tap the button to change it to the one that represents your configuration.
38
- implement is offset to the left
- implement is offset to the right
- implement is locked and does not swap to the other side of the vehicle
- implement is not locked and does swap to the other side of the vehicle
Page 39

6. To return to the vehicle measurements screen and continue the implement
setup, tap the button.
7. For the implement width (3rd measurement
shown in the picture) and the distance from
the antenna to the implement (2nd measurement shown in the picture), select the measurement to change, and specify the value by
tapping the up or down arrows on the screen.
The measurements are shown in both metric
and US units: either may be adjusted, and the
other changes accordingly.
8. Tap on after setting each measurement.
When you are finished tap on while all
measurements are being displayed to continue
to the next screen.
Leica mojoMINI 2, Field Navigation 39
Page 40

Leica mojoMINI 2, Field Navigation
mojoMINI_2_010
abc
def
40
9. Tap on the appropriate guidance type.
a) AB Parallel guidance
b) Fixed Contour guidance
c) Information
d) A+ Heading guidance
e) Pivot guidance
f) Navigation Screen: Go
straight to the field view
without setting guidance
Page 41

4.3 Setting AB Waylines
Setting an AB
wayline
To set an AB parallel wayline (a straight line
between two selected points), carry out the
following procedure:
1. On the guidance screen, tap on the AB Parallel guidance icon .
2. The first AB Parallel guidance screen appears.
3. Drive to the position in the field where you
want to set (waypoint A) and tap A on the
screen.
Leica mojoMINI 2, Field Navigation 41
Treatment coverage can be turned on or off by tapping while setting the
wayline.
Page 42

Leica mojoMINI 2, Field Navigation
4. Drive to the desired endpoint (waypoint B) and
tap B.
42
The distance between points A and B must be at least 30 metres (100 feet). The
greater the distance between the waypoints, the better the accuracy of the working
line will be.
5. Turn the tractor until the red line is vertical,
and drive along the wayline.
Page 43

4.4 Setting A+ Heading Guidance
Setting an A+
wayline
To set an A+ Heading wayline (starting point plus
compass bearing), carry out the following procedure:
1. On the guidance screen, tap on the A+ Heading guidance icon .
2. The first A+ Heading guidance screen appears.
3. Drive to the position in the field where you
want to start (waypoint A) and tap A on the
screen.
Leica mojoMINI 2, Field Navigation 43
Treatment coverage can be turned on or off by tapping while setting the
wayline.
Page 44

Leica mojoMINI 2, Field Navigation
4. Use the upper arrows to enter the compass
bearing of the wayline, in degrees. (0° is north,
90° is east, 180° is south, and 270° is west.)
5. Tap on .
6. Turn the tractor until the red line is vertical,
and drive along the wayline.
44
Page 45

4.5 Setting Fixed Contours Guidance
Setting a fixed
contour
To set a Fixed Contour wayline, carry out the
following procedure:
1. On the guidance screen, tap on the Fixed Contour guidance icon .
2. The first Fixed Contour guidance screen
appears.
3. Drive to the position in the field where you
want to start (waypoint A) and tap A on the
screen.
Leica mojoMINI 2, Field Navigation 45
Treatment coverage can be turned on or off by tapping while setting the
wayline.
Page 46

Leica mojoMINI 2, Field Navigation
4. Drive along the curved line to the desired
endpoint (waypoint B) and tap B.
While the mojoMINI 2 is recording contour data, the pause symbol is shown. If
you want to pause the recording at any time, tap the pause symbol. The resume
symbol will appear. Tap the resume symbol when you are ready to continue
recording.
46
If you are recording a contour that contains one or more straight-line sections joining
curved sections, pause the recording at the beginning of each straight-line section
and resume recording at the end of the straight line. The mojoMINI 2 will calculate a
straight line to fill the gap between the two points.
Page 47

5. Turn the tractor until the red line is vertical,
and drive along the wayline.
Leica mojoMINI 2, Field Navigation 47
Page 48

Leica mojoMINI 2, Field Navigation
4.6 Setting Pivot Guidance
Setting a pivot
wayline
To set up Pivot (circular) guidance, carry out the
following procedure:
1. On the guidance screen, tap on the Pivot guidance icon .
2. The first Pivot guidance screen appears.
3. Drive to the starting point of the circle in the
field (waypoint A) and tap A on the screen.
48
Treatment coverage can be turned on or off by tapping while setting the
wayline.
Page 49

4. Drive part way around the circle to waypoint B,
and tap B.
5. Drive further around the circle to waypoint C,
and tap C.
6. Turn the tractor until the red line is vertical,
and drive along the wayline.
Leica mojoMINI 2, Field Navigation 49
The row number indicator at the bottom of the screen shows the position
of the tractor, and the number of rows inside or outside the original pivot
wayline. The row numbers are minus (-) for pivot lines which are smaller
than the primary line and positive (+) for lines that are larger.
Page 50

Leica mojoMINI 2, Field Navigation
4.7 Recording Coverage
50
Overview The mojoMINI 2 can record and display the covered area (max. 300 ha / 740 ac).
Start and stop
coverage recording
Recording coverage is useful for showing where you have already been and how
much ground you have covered. When used with the field boundary feature coverage
recording can be used to calculate how much ground is still to be covered.
To record coverage, carry out the following steps:
1. To turn coverage on tap . If you are not
moving the coverage will not be turned on but
will be paused as shown.
If the menu buttons are not visible, tap
the screen.
2. Once you have started to move and have
covered some ground the system will display
covered ground in blue as shown.
Page 51

3. If you stop the vehicle while coverage is turned
on it will again be paused.
Leica mojoMINI 2, Field Navigation 51
• When the vehicle is not moving coverage can be switched between off and
paused by tapping .
• When the vehicle is moving coverage can be switched between off and on by
tapping .
Page 52

Leica mojoMINI 2, Field Navigation
mojoMINI_2_011
abc
4.8 Field Boundaries
52
Overview By recording a field boundary the operator is able to determine accurately, how much
product is required for the field. This significantly reduces waste and problems
related to the disposal of excess product.
Recording a field
boundary
To record a field boundary, carry out the following steps:
1. To set a field boundary go to the main field navigation screen and tap .
2. You will then have the option to set the boundary on the left wing of the implement, in the center where the GPS antenna is located or the right wing of the
implement. These three options are represented by the three buttons below:
a) Left implement tip
b) Antenna point
c) Right implement tip
3. Tap the button which is suits the current job you are doing.
Page 53

4. Drive around the field boundary, the path will be recorded and displayed on
screen.
5. As you approach the start of the boundary the Close Boundary button will
flash. You can choose to tap and the boundary will close by joining the
current boundary recording point to the start of the boundary recording.
6. After you close the boundary you will be taken to the information screen which
will show the area within the boundary.
---Treated area (ha)
---Total field area (ha)
---Treated area (ac)
---Total field area (ac)
Leica mojoMINI 2, Field Navigation 53
• The boundary can be closed automatically if you drive across the very start of the
boundary.
• You can set a guidance pattern as well as start and stop coverage recording while
you are recording a boundary.
Page 54

Leica mojoMINI 2, Field Navigation
4.9 Continue Last Field
54
Overview If you stop work before completing a field you may want to come back and continue
Continuing a field,
step-by-step
that field. This situation can also apply if you turned the mojoMINI 2 off before
completing the field. The continue last field option allows the operator to pick up
exactly where they left off. The field overview quickly gives the operator a reminder
of the shape of the field and what areas have not been covered.
To continue working in a field, carry out the following steps:
1. On the initial field guidance screen tap .
2. A top down view of the work done before the
mojoMINI 2 was last turned off is displayed.
Tap on to continue.
Page 55

The continue last field screen displays how much area is already covered and the area
remaining within the boundary. This can be helpful for calculating how much product
you still need to apply to the field.
3. You will then be taken to the main navigation screen where you can continue
work.
Leica mojoMINI 2, Field Navigation 55
When continuing the last field it is possible that the wayline will not be in the same
place. This can be fixed using nudge (refer to "4.11 Nudging").
Page 56

Leica mojoMINI 2, Field Navigation
4.10 Data Export
56
Overview Data export allows the operator to export the current wayline, field boundary and
CAUTION To prevent loss of data or damage to the card or device, the card should only be
CAUTION Take care when inserting the card. The card must be inserted in the correct orienta-
coverage data as a KML file, to the mojoMINI 2’s micro SD card.
KML files can be viewed on a personal computer using Google Earth.
Ensure you have a micro SD card inserted in the mojoMINI 2.
inserted or removed when the device is turned off.
tion to prevent permanent damage to the card or device.
Page 57

Exporting Data To export the current wayline, field boundary and coverage data, carry out the
Leica mojoMINI 2, Field Navigation 57
following steps:
1. On the main navigation screen, tap the treat-
ment button.
The Field screen appears.
2. Tap the Continue last field button.
The Continue Field screen appears showing the
current coverage map and boundary, if
created.
3. Tap the Export button to export the data
to the mojoMINI 2’s micro SD card.
An hourglass displays briefly while the export is
in progress.
Page 58

Leica mojoMINI 2, Field Navigation
If a micro SD card is not inserted in the
mojoMINI 2, or the SD card is corrupted,
an error screen is displayed.
4. Tap the button to return to the main navigation screen.
58
Page 59

4.11 Nudging
Adjusting for position drift
Leica mojoMINI 2, Field Navigation 59
When continuing the last field it is possible that the wayline will not be in the same
place due to drift in the GPS position. Nudge can be used to realign the waylines and
coverage data to the correct position in the field.
Misalignment can be seen when the vehicle is in the right place but waylines,
coverage and boundary on the mojoMINI 2 are not in the right place.
1. Position the vehicle on the wheel tracks of a previously completed pass.
2. On the main navigation screen, tap the light
bar at the top of the screen.
3. Tap the nudge button .
Page 60

Leica mojoMINI 2, Field Navigation
4. The main navigation screen is displayed and
the wayline is where the vehicle is.
60
Page 61

4.12 SBAS
Overview Space Based Augmentation Systems (SBAS) can be configured for use by the
Turning SBAS on
and off, step-bystep
Leica mojoMINI 2, Field Navigation 61
mojoMINI 2 as a correction source for position data, for regions that support SBAS.
Depending on the location where the system is being used, and also on the configuration of the mojoMINI 2, some users may experience different performance
depending on whether or not they are utilising SBAS (which include WAAS in North
America and EGNOS (European Geostationary Navigation Overlay Service) in Europe).
To turn SBAS on and off, carry out the following steps:
An SBAS configuration file can be used and modified to allow for future
changes in the satellites used by SBAS providers. Refer to the Leica
mojoMINI 2 Downloads page on www.virtualwrench.com for further information.
1. At the main navigation screen, tap the
settings icon .
The Settings screen appears.
Page 62

Leica mojoMINI 2, Field Navigation
The settings screen has an SBAS Mode button
that has three possible states:
2. To select the SBAS mode suitable for your system, tap the SBAS Mode button
until the appropriate button appears.
3. To return to the main navigation screen, tap the return button in the bottom
right corner of the screen.
62
- SBAS Off
- SBAS On: EGNOS
- SBAS On: WAAS
Page 63

5 Care and Transport
5.1 Transport
Shipping When transporting the product by rail, air or sea, always use the complete original
Shipping, transport
of batteries
Leica mojoMINI 2, Care and Transport 63
Leica Geosystems packaging, transport container and cardboard box, or its equivalent, to protect against shock and vibration.
When transporting or shipping batteries, the person in charge of the product must
ensure that the applicable national and international rules and regulations are
observed. Before transportation or shipping, contact your local passenger or freight
transport company.
Page 64

Leica mojoMINI 2, Care and Transport
5.2 Storage
64
Product Respect the temperature limits when storing the equipment, particularly in summer
Li-Ion batteries • Refer to "7 Technical Data" for information about storage temperature range.
if the equipment is inside a vehicle. Refer to "7 Technical Data" for information about
temperature limits.
For storage ensure the mojoMINI 2 display reset switch is in the OFF position to
prevent the internal battery from being drained.
• A storage temperature range of 0 to +30°C/+32 to 86°F in a dry environment is
recommended to minimise self-discharging of the battery.
• At the recommended storage temperature range, batteries containing a 10% to
50% charge can be stored for up to one year. After this storage period the
batteries must be recharged.
• After storage recharge batteries before using.
Page 65

5.3 Cleaning and Drying
Product and accessories
Damp products Dry the product, the transport container, the foam inserts and the accessories at a
Cables and plugs Keep plugs clean and dry. Blow away any dirt lodged in the plugs of the connecting
Leica mojoMINI 2, Care and Transport 65
Use only a clean, soft, lint-free cloth for cleaning. If necessary, moisten the cloth with
water or pure alcohol. Do not use other liquids; these may attack the polymer components.
temperature not greater than 40°C / 104°F and clean them. Do not repack until
everything is completely dry. Always close the transport container when using in the
field.
cables.
Page 66

Leica mojoMINI 2, Safety Directions
6 Safety Directions
6.1 General Introduction
66
Description • The following directions should enable the person responsible for the product,
and the person who actually uses the equipment, to anticipate and avoid operational hazards.
• The person responsible for the product must ensure that all users understand
these directions and adhere to them.
Page 67

6.2 Intended Use
Permitted use • Field guidance.
• Data communication with external appliances.
• Measuring raw data and computing coordinates using satellite signals.
Adverse use • Use of the product without instruction.
• Use outside of the intended limits.
• Disabling safety systems.
• Removal of hazard notices.
• Opening the product using tools.
• Modification or conversion of the product.
• Use after misappropriation.
• Use of products with obviously recognizable damages or defects.
• Use with accessories from other manufacturers without the prior explicit
approval of Leica Geosystems.
• Inadequate safeguards at a work site.
WARNING Adverse use can lead to injury, malfunction and damage.
Leica mojoMINI 2, Safety Directions 67
It is the task of the person responsible for the equipment to inform the user about
hazards and how to counteract them. The product is not to be operated until the user
has been instructed on how to work with it.
Page 68

Leica mojoMINI 2, Safety Directions
WARNING Unauthorised modification of agricultural machinery by mounting or installing the
product may alter the function and safety of that agricultural machinery.
Precautions:
Follow the instructions of the machinery manufacturer. If no appropriate instruction
is available, ask the machinery manufacturer for instructions before mounting or
installing the product.
6.3 Limits of Use
68
Environment Suitable for use in an atmosphere appropriate for permanent human habitation: not
DANGER Local safety authorities and safety experts must be contacted before working in
suitable for use in aggressive or explosive environments.
hazardous areas, or in close proximity to electrical installations or similar situations
by the person in charge of the product.
Page 69

6.4 Responsibilities
Manufacturer of
the product
Manufacturers of
non
Leica Geosystems
accessories
Person in charge of
the product
WARNING The person responsible for the product must ensure that it is used in accordance with
Leica mojoMINI 2, Safety Directions 69
Leica Geosystems AG, CH-9435 Heerbrugg, hereinafter referred to as Leica Geosystems, is responsible for supplying the product, including the user manual and original
accessories, in a completely safe condition.
The manufacturers of non Leica Geosystems accessories for the product are responsible for developing, implementing and communicating safety concepts for their
products, and are also responsible for the effectiveness of those safety concepts in
combination with the Leica Geosystems product.
The person in charge of the product has the following duties:
• To understand the safety instructions on the product and the instructions in the
user manual.
• To be familiar with local regulations relating to safety and accident prevention.
• To inform Leica Geosystems immediately if the product and the application
becomes unsafe.
• To ensure that the national laws, regulations and conditions for the operation of
radio transmitters are respected.
the instructions. This person is also accountable for the training and the deployment
of personnel who use the product and for the safety of the equipment in use.
Page 70

Leica mojoMINI 2, Safety Directions
6.5 Hazards of Use
WARNING The absence of instruction, or the inadequate imparting of instruction, can lead to
CAUTION Watch out for erroneous measurement results if the product has been dropped or
WARNING If the product is used with accessories, for example masts, staffs, poles, you may
incorrect or adverse use, and can give rise to accidents with far-reaching human,
material, financial and environmental consequences.
Precautions:
All users must follow the safety directions given by the manufacturer and the directions of the person responsible for the product.
has been misused, modified, stored for long periods or transported.
Precautions:
Periodically carry out test measurements and perform the field adjustments indicated
in the user manual, particularly after the product has been subjected to abnormal use
and before and after important measurements.
increase the risk of being struck by lightning.
Precautions:
Do not use the product in a thunderstorm.
70
Page 71

WARNING Inadequate securing of the working site can lead to dangerous situations, for
WARNING Only Leica Geosystems authorised service workshops are entitled to repair these
CAUTION If the accessories used with the product are not properly secured and the product is
CAUTION The product uses the GPS P-Code signal which by U.S. policy may be switched off
CAUTION During the transport, shipping or disposal of batteries it is possible for inappropriate
Leica mojoMINI 2, Safety Directions 71
example in traffic, on building sites, and at industrial installations.
Precautions:
Always ensure that the working site is adequately secured. Adhere to the regulations
governing safety and accident prevention and road traffic.
products.
subjected to mechanical shock, for example blows or falling, the product may be
damaged or people may sustain injury.
Precautions:
When setting-up the product, make sure that the accessories are correctly adapted,
fitted, secured, and locked in position.
Avoid subjecting the product to mechanical stress.
without notice.
mechanical influences to constitute a fire hazard.
Precautions:
Before shipping the product or disposing of it, discharge the batteries by running the
product until the batteries are flat.
Page 72

Leica mojoMINI 2, Safety Directions
When transporting or shipping batteries, the person in charge of the product must
ensure that the applicable national and international rules and regulations are
observed. Before transportation or shipping contact your local passenger or freight
transport company.
CAUTION Installing near mechanically moving machine components may damage the product.
CAUTION Beware of inadequate steering if machine is defective like after a crash or other
WARNING While steering or navigating the machine accidents may occur due a) the operator
Precautions:
Deflect the mechanically moving machine components as far as possible and define
a safe installation zone.
damaging events or alterations to the machine.
Precautions:
Periodically perform control measurements and field adjustments on the machine as
specified in the User Manual.
not paying attention to the surroundings (persons, ditches, traffic, etc), or b)
malfunctions (… of a system component, interference, etc.).
Precautions:
The operator assures that the machine is operated, guided and monitored by a qualified user (e.g., a licensed driver). The user has to be able to take emergency measures, for example an emergency stop.
72
Page 73

WARNING Batteries not recommended by Leica Geosystems may be damaged if charged or
WARNING Using a battery charger not recommended by Leica Geosystems can destroy the
WARNING High mechanical stress, high ambient temperatures or immersion into fluids can
WARNING If battery terminals come in contact with jewellery, keys, metallised paper or other
Leica mojoMINI 2, Safety Directions 73
discharged. They may burn and explode.
Precautions:
Only charge and discharge batteries recommended by Leica Geosystems.
batteries. This can cause fire or explosions.
Precautions:
Only use chargers recommended by Leica Geosystems to charge the batteries.
cause leackage, fire or explosions of the batteries.
Precautions:
Protect the batteries from mechanical influences and high ambient temperatures. Do
not drop or immerse batteries into fluids.
metals, short circuited battery terminals can overheat and cause injury or fire, for
example by storing or transporting in pockets.
Precautions:
Make sure that the battery terminals do not come into contact with metallic objects.
Page 74

Leica mojoMINI 2, Safety Directions
DANGER If the product is used with accessories, for example, masts, staffs, or poles, you may
increase the risk of being struck by lightning. Danger from high voltages also exists
near power lines. Lightning, voltage peaks, or the touching of power lines can cause
damage, injury and death.
Precautions:
• Do not use the product in a thunderstorm as you may increase the risk of being
struck by lightning.
• Be sure to remain at a safe distance from electrical installations. Do not use the
product directly under or in close proximity to power lines. If it is essential to
work in such an environment contact the safety authorities responsible for electrical installations and follow their instructions.
• To prevent damages due to indirect lightning strikes (voltage spikes) cables, for
example for antenna, power source or modem should be protected with appropriate protection elements, like a lightning arrester. These installations must be
carried out by an authorised specialist.
• If there is a risk of a thunderstorm, or if the equipment is to remain unused and
unattended for a long period, protect your product additionally by unplugging all
systems components and disconnecting all connecting cables and supply cables.
74
Page 75

WARNING If the product is improperly disposed of, the following can happen:
Leica mojoMINI 2, Safety Directions 75
• If polymer parts are burnt, poisonous gases are produced, which may impair
health.
• If batteries are damaged or are heated strongly, they can explode and cause
poisoning, burning, corrosion, environmental contamination, or all of these.
• By disposing of the product irresponsibly you may enable unauthorised persons
to use it in contravention of the regulations, exposing themselves and third
parties to the risk of severe injury and rendering the environment liable to
contamination.
Precautions:
The product must not be disposed with household waste. Dispose of the
product appropriately in accordance with the national regulations in force in
your country. Always prevent access to the product by unauthorised
personnel.
Product specific treatment and waste management information can be downloaded
from the Leica Geosystems home page at http://www.leica-geosystems.com/treatment or obtained from your Leica Geosystems dealer.
Page 76

Leica mojoMINI 2, Safety Directions
6.6 Electromagnetic Compatibility EMC
76
Description The term Electromagnetic Compatability is taken to mean the capability of the
WARNING Electromagnetic radiation can cause disturbances in other equipment.
CAUTION There is a risk that disturbances may be caused in other equipment if the product is
product to function smoothly in an environment where electromagnetic radiation and
electrostatic discharges are present, and without causing electromagnetic disturbances to other equipment.
Although the product meets the strict regulations and standards that are in force in
this respect, Leica Geosystems cannot completely exclude the possibility that other
equipment may be disturbed.
used in conjunction with accessories from other manufacturers, for example field
computers, personal computers, two-way radios, non-standard cables or external
batteries.
Precautions:
Use only the equipment and accessories recommended by Leica Geosystems. When
combined with the product, they meet the strict requirements stipulated by the
guidelines and standards. When using computers and two-way radios, pay attention
to the information about electromagnetic compatibility provided by the manufacturer.
Page 77

CAUTION Disturbances caused by electromagnetic radiation can result in erroneous measure-
WARNING If the product is operated with connecting cables attached at only one of their two
ments. Although the product meets the strict regulations and standards which are in
force in this respect, Leica Geosystems cannot completely exclude the possibility that
the product may be disturbed by very intense electromagnetic radiation produced by,
for example, nearby radio transmitters, two-way radios, or diesel generators.
Precautions:
Check the plausibility of results obtained under these conditions.
ends, the permitted level of electromagnetic radiation may be exceeded and the
correct functioning of other products may be impaired.
Precautions:
While the product is in use, connecting cables must be connected at both ends.
Radios or digital
cellular phones
WARNING Electromagnetic fields can cause disturbances in other equipment, in installations, in
Leica mojoMINI 2, Safety Directions 77
Use of the product with radio or digital cellular phone devices:
medical devices, for example pacemakers or hearing aids and in aircraft. It can also
affect humans and animals.
Precautions:
Although the product meets the strict regulations and standards which are in force
in this respect, Leica Geosystems cannot completely exclude the possibility that other
equipment may be disturbed or that humans or animals may be affected.
Page 78

Leica mojoMINI 2, Safety Directions
• Do not operate the product with radio or digital cellular phone devices in the
vicinity of filling stations or chemical installations, or in other areas where an
explosion hazard exists.
• Do not operate the product with radio or digital cellular phone devices near to
medical equipment.
• Do not operate the product with radio or digital cellular phone devices in aircraft.
78
Page 79

6.7 FCC Statement, Applicable in U.S.
WARNING
Leica mojoMINI 2, Safety Directions 79
This device complies with Part 15 of the FCC Rules. Operation is subject to the
following two conditions:
1. this device may not cause harmful interference, and
2. this device must accept any interference received, including interference that
may cause undesired operation.
This equipment has been tested and found to comply with the limits for a Class B
digital device, pursuant to part 15 of the FCC rules.
These limits are designed to provide reasonable protection against harmful interference in a residential installation.
This equipment generates, uses and can radiate radio frequency energy and, if not
installed and used in accordance with the instructions, may cause harmful interference to radio communications. However, there is no guarantee that interference will
not occur in a particular installation.
If this equipment does cause harmful interference to radio or television reception,
which can be determined by turning the equipment off and on, the user is encouraged to try to correct the interference by one or more of the following measures:
Page 80

Leica mojoMINI 2, Safety Directions
• Reorient or relocate the receiving antenna.
• Increase the separation between the equipment and the receiver.
• Connect the equipment into an outlet on a circuit different from that to which
the receiver is connected.
• Consult the dealer or an experienced radio/TV technician for help.
WARNING Changes or modifications not expressly approved by Leica Geosystems for compli-
ance could void the user's authority to operate the equipment.
80
Page 81

6.8 Labelling
S/N: XXXXXXXXXX
Leica Geosystems AG
CH-9435 Heerbrugg
Switzerland
Made in ________
Article:817532 Power:DC 5V 1.5A
Type:
N18771
mojoMINI_2_013
GEOSPECTIVE-2[LEICAG]
XXXX00000000X
HW Rev: X.XX
Made in Canada
P/N:01019256
Leica Art. No.:817528
Leica Geosystems AG
CH-9435 Heerbrugg
Switzerland
N18771
Input:
8 - 36 V
Max 425 mA
25
This product is protected
by various U.S. patents.
See user documentation
mojoMINI_2_014
Labelling
mojoMINI 2
Labelling
GeoSpective 2
smart antenna
Leica mojoMINI 2, Safety Directions 81
Page 82

Leica mojoMINI 2, Technical Data
7 Technical Data
7.1 GeoSpective 2 Smart Antenna Performance
82
Performance
Item Description
Channel configuration 10 GPS L1 + 4 GLONASS (with SBAS disabled)
Horizontal position accuracy (RMS)
Measurement precision L1 C/A code
Maximum data rate Measurements
Time to first fix Cold start
Signal re-acquisition L1 <1.0 s (typical)
Time accuracy 20 ns RMS(GPS), 40 ns RMS(GLO)
Velocity accuracy 0.05 m/s RMS
1
8 GPS L1 + 4 GLONASS (with SBAS enabled)
Absolute
Autonomous
SBAS
L1 carrier phase
Position
3
Hot start
4
5 cm RMS(GPS), 35 cm RMS(GLO)
0.6 mm RMS(GPS), 1.5 mm
1.5 m
2
0.9 m
RMS(GLO)
up to 10 Hz
up to 10 Hz
< 85 s
< 55 s
Page 83

1. Typical values. Performance specifications subject to GPS system characteristics,
US DOD operational degradation, ionospheric and tropospheric conditions, satellite geometry, baseline length, multipath effects and the presence of intentional
or unintentional interference sources. Export licensing restricts operation to a
maximum velocity of 515 meters per second.
2. GPS only. Clock aligned to GPS system time.
3. Typical value. No almanac or ephemerides and no approximate position or time.
4. Typical value. Almanac and recent ephemerides saved and approximate time
entered.
Leica mojoMINI 2, Technical Data 83
Page 84

Leica mojoMINI 2, Technical Data
7.2 GeoSpective 2 Smart Antenna Specifications
84
Input-output
connectors
Connector protection
Connector Description
GeoSpective 2 COM/PWR +8 to +36 V DC at 2.5 W (typical while logging)
Serial Com port RS232 F compliant (Rx and Tx signals only)
Emulated radar output High= supply voltage -0.5 V minimum
Low= 0.5 V minimum
Load= 3K Ohm minimum Default Radar Frequency Step
36.1 Hz/kph
* When tracking GPS satellites.
Item Protection Standard
Electrical conducted/coupled distur-
ISO 7637:2002 (Survives all pulse types)
bance tolerance
*
Page 85

Size and weight
Weight:
490 g maximum
Environmental
specifications
Item Specification
Operating Temperature -40°C to +75°C
Storage Temperature -55°C to +90°C
Humidity MIL-STD-810G Method 507.5
Immersion MIL-STD-810G Method 512.5
Vibration Random MIL-STD-810G Method 514.6 E-1
Sinusoidal ASAE EP455, 5.15.2 Level 1
Shock MIL-STD-810 G Method 516.6
Leica mojoMINI 2, Technical Data 85
Page 86

Leica mojoMINI 2, Technical Data
7.3 mojoMINI 2 Specifications
Type Navigation device, 4.3” TFT with touch screen, 480 x 272 pixel resolution
86
Interfaces 1 x micro SD Card slot
2 x RS-232 serial connection (cradle)
1 x mini USB port (USB 2.0)
Power Supply
Input Voltage: 12 to 24 V on cradle
Size and weight
73.2 mm
mojoMINI_2_012
118.5 mm
16 mm
Weight:
142 g approx.
Page 87

Environmental
specifications
Item Specification
Operating Temperature -10°C to +60°C
Storage Temperature -20°C to +70°C
Humidity < 95%
Leica mojoMINI 2, Technical Data 87
Page 88

Leica mojoMINI 2, Technical Data
7.4 Conformity to National Regulations
88
Conformity to
national regulations
Frequency band 1575.42 ±3 MHz
Output power None
Antenna Internal patch antenna
• FCC Part 15 (applicable in US).
Hereby, Leica Geosystems AG, declares that the mojoMINI 2 and the
GeoSpective 2 smart antenna are in compliance with the essential
requirements and other relevant provisions of the applicable European
Directives. The declaration of conformity may be consulted at
http://www.leica-geosystems.com/ce.
• The conformity for countries with other national regulations not covered by the
FCC part 15 has to be approved prior to use and operation.
Page 89

8 International Limited Warranty, Software Li-
cence Agreement
International
Limited Warranty
Software Licence
Agreement
Leica mojoMINI 2, International Limited Warranty, Software Licence Agreement 89
This product is subject to the terms and conditions set out in the International
Limited Warranty which you can download from the Leica Geosystems home page at
http://www.leica-geosystems.com/internationalwarranty or collect from your Leica
Geosystems distributor.
The foregoing warranty is exclusive and is in lieu of all other warranties, terms or
conditions, express or implied, either in fact or by operation of law, statutory or
otherwise, including warranties, terms or conditions of merchantability, fitness for a
particular purpose, satisfactory quality and non-infringement, all of which are
expressly disclaimed.
This product contains software that is preinstalled on the product, or that is supplied
to you on a data carrier medium, or that can be downloaded by you online pursuant
to prior authorization from Leica Geosystems. Such software is protected by copyright and other laws and its use is defined and regulated by the Leica Geosystems
Software Licence Agreement, which covers aspects such as, but not limited to, Scope
of the Licence, Warranty, Intellectual Property Rights, Limitation of Liability, Exclusion
of other Assurances, Governing Law and Place of Jurisdiction. Please make sure, that
at any time you fully comply with the terms and conditions of the Leica Geosystems
Software Licence Agreement.
Page 90

Leica mojoMINI 2, International Limited Warranty, Software Licence Agreement
Such agreement is provided together with all products and can also be referred to
and downloaded at the Leica Geosystems home page at http://www.leica-geosystems.com/swlicense or collected from your Leica Geosystems dealer.
You must not install or use the software unless you have read and accepted the
terms and conditions of the Leica Geosystems Software Licence Agreement. Installation or use of the software or any part thereof, is deemed to be an acceptance of all
the terms and conditions of such licence agreement. If you do not agree to all or
some of the terms of such licence agreement, you may not download, install or use
the software and you must return the unused software together with its accompanying documentation and the purchase receipt to the dealer from whom you
purchased the product within ten (10) days of purchase to obtain a full refund of the
purchase price.
90
Page 91

Appendix A Troubleshooting
WARNING Never try to repair the unit yourself: it is dangerous to do so.
Possible problems The following suggestions may be useful in solving simple problems. If you suspect
Leica mojoMINI 2, Troubleshooting 91
that something is wrong, turn the power off immediately and disconnect the power
source.
Problem Possible Cause Possible Solution
Cannot turn the unit on. The mojoMINI 2 cable is
not connected to the
GeoSpective 2 cable.
The battery needs
recharging.
Connect the mojoMINI 2
cable to the GeoSpective 2
cable using the square
grey connectors.
Connect the mojoMINI 2
cable to the GeoSpective 2
cable using the square
grey connectors.
Ensure the vehicle’s cigarette lighter socket has
power.
Page 92

Leica mojoMINI 2, Troubleshooting
Problem Possible Cause Possible Solution
The mojoMINI 2 is
connected to the
GeoSpective 2 cable, and
pressing the standby
button has no effect.
The screen is dark. The brightness may be
When turned on, the
screen lights up, but does
not display the start
screen. Grey and white
vertical lines may be seen.
The mojoMINI 2 has not
been used for a long time,
and the battery is
completely discharged.
Power switch may be
turned off.
turned down.
The screen has been
exposed to extreme
temperature.
The internal battery level is
very low and the device is
not connected to a stable
power source.
92
Turn the vehicle ignition
key to the point that
provides power to the
cigarette lighter outlet.
Adjust the brightness.
Turn off, and disconnect
the screen. Leave the
device at room temperature for a few hours for
the LCD to recover.
Connect to power, and
allow the device to charge
before switching on.
Page 93

Problem Possible Cause Possible Solution
The mojoMINI 2 cannot
receive GPS signals, or the
signals received are weak
and cannot be used.
The reception of GPS
signals is intermittent or
unstable.
Leica mojoMINI 2, Troubleshooting 93
The view of the sky may be
obstructed by buildings or
metal objects.
The view of the sky may be
intermittently obstructed.
Bad connection to the
receiver.
Loose cigarette power
socket causing the
GeoSpective 2 Smart
Antenna to restart.
Ensure the GeoSpective 2
smart antenna has a clear
view of the sky.
Remove the obstruction.
Check the connection to
the receiver and if necessary, clean all cable
connections.
Cut off the cigarette
lighter plug and hardwire
to a fuse power source.
Page 94

Leica Geosystems AG
Heinrich-Wild-Strasse
CH-9435 Heerbrugg
Switzerland
Phone +41 71 727 31 31
www.leica-geosystems.com
Original text
820738-1.1.0en
Printed in Switzerland © 2 014 Leica Geosystems AG, Heerb rugg, Switzerland
 Loading...