

Page 1
Leica IP C
Printer for tissue cassettes
V 1.2 English - 03/2007
It is recommended to read the full operating
instructions carefully before working with
the Leica IP C, e.g. the important information
(symbols and their meaning) and safety instructions!
Key Instructions
Leica IP C
Page 2

VERY IMPORTANT!
Never turn the power switch located on the back of the instrument to the OFF
position for more than 24 hours unless the ink supply has been flushed from
the system. See Instructions below.
Control Panel
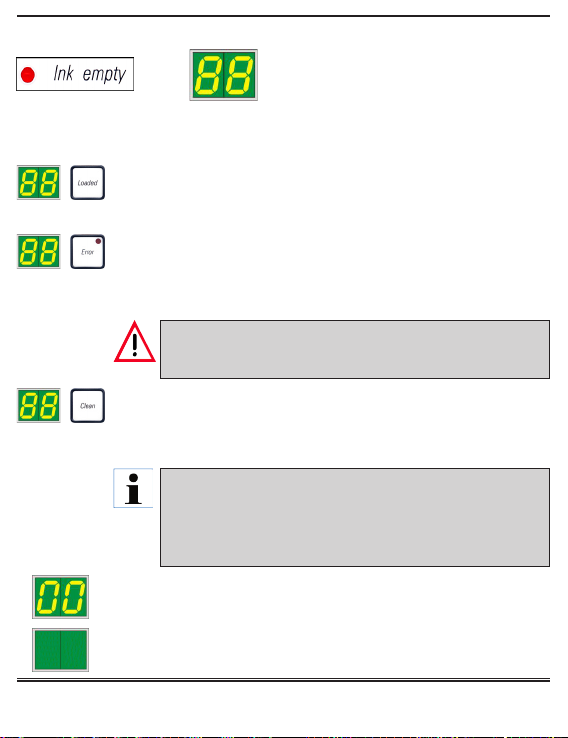
LED ‘INK EMPTY’
LED off:
Sufficient quantity of ink remaining printing is possible without any restrictions. See “date of insertation“
LED flashes:
Ink cartridge will be empty shortly - keep
replacement cartridge handy.
LED illuminates:
Ink cartridge empty, no further printing
possible.
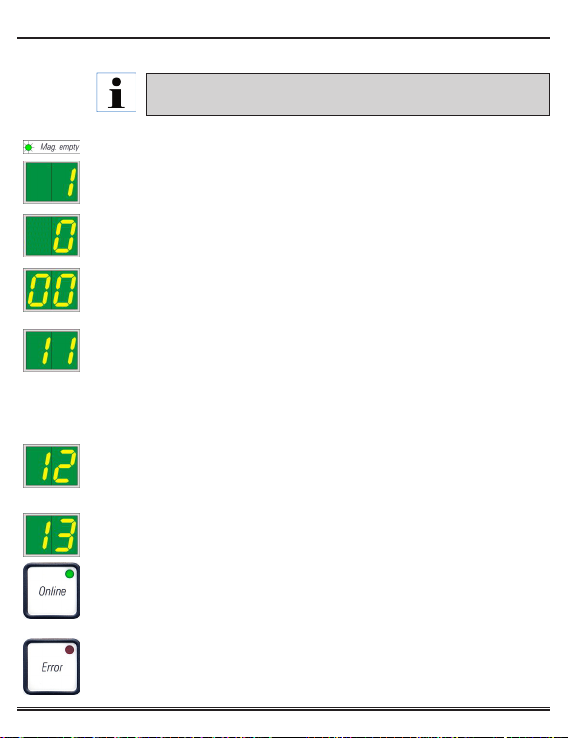
LED ‘MAG. EMPTY’
LED off:
Fig. 1
Magazines are full or no cassette has
been requested from a magazine that has
just been emptied.
LED flashes:
Flashing LED and number on display indicate which magazine is empty.
If several magazines are emptied at the same time, the corresponding
magazine numbers are indicated in a recurring sequence.
Leica IPC Key Instructions 1v2 - 03/2007
- 2 -
Page 3
Inserting an Ink Cartridge
85
64
5
73
69
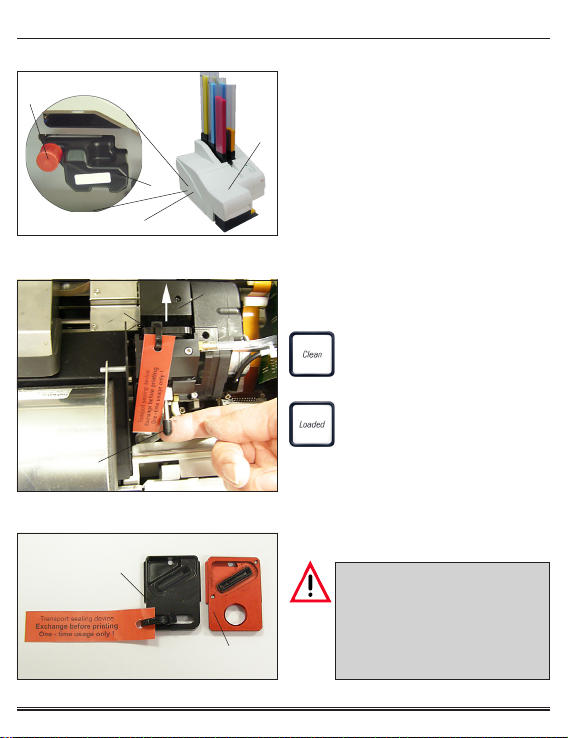
The printer is delivered with a cleaning
cartridge (64) inserted. To be able to print,
the cleaning cartridge must be ex-
4
changed for an ink cartridge.
To do so, proceed as follows:
• Open the cover plate (5) on the left side
of the instrument (pressing its top left
corner), fig. 2.
Fig. 2
• Unscrew the red cap (85) of the
cleaning cartridge (64) by one turn
72
(fig. 2), switch on the printer and wait
for it to initialize.
• Open the printer lid (4, fig.2)
and press CLEAN and
LOADED simultaneously.
++
+
++
• The print head (72) will elevate
½½
about
½ inch from the re-
½½
placement plate, fig. 4.
• Raise the lever (69), remove the black
transport plate (73) and insert the
Fig. 3
replacement plate (70) which is
required for printing, fig. 3.
73
70
Fig. 4
Leica IPC Key Instructions 1v2 - 03/2007
- 3 -
Do not reinstall a used transport
plate (73), as it will no longer
completely seal the print head.
To prevent damage to the print
head, always use the red replacement plate when printing.
Page 4
Inserting an Ink Cartridge (continued)
85
86
64
→→
→
→→
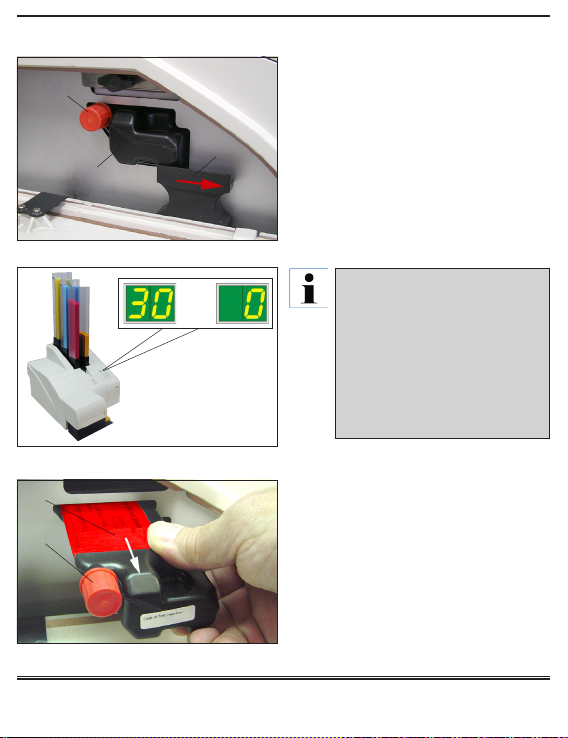
The last 30 seconds
before the head closes
are counted down.
64
85
• Press the small lever (69 in fig. 3) down
into its original position.
• Press any key to reposition the print
head and return the printer to operational status.
• Slide the safety catch (86) toward the
front of the instrument (open), fig. 5.
Fig. 5
Caution!
If no key is pressed, the print
head will close automatically
150 seconds after opening to
prevent it from drying out. An
acoustic signal (5 beeps) will
sound after 120 seconds, after
which the final 30 seconds will
be counted down on the display.
Fig. 6
• Pull the cleaning cartridge (64) approx.
3 cm out of the instrument, retighten the
red cap (85), then remove the cartridge
completely.
• Store the removed cleaning cartridge
in a sealed container. The cartridge is
full and can be used twice more to
clean the print head. The expiration
date can be found on the red label.
Fig. 7
Leica IPC Key Instructions 1v2 - 03/2007
- 4 -
Page 5
Inserting an Ink Cartridge (continued)
66
87
87
88
86
66
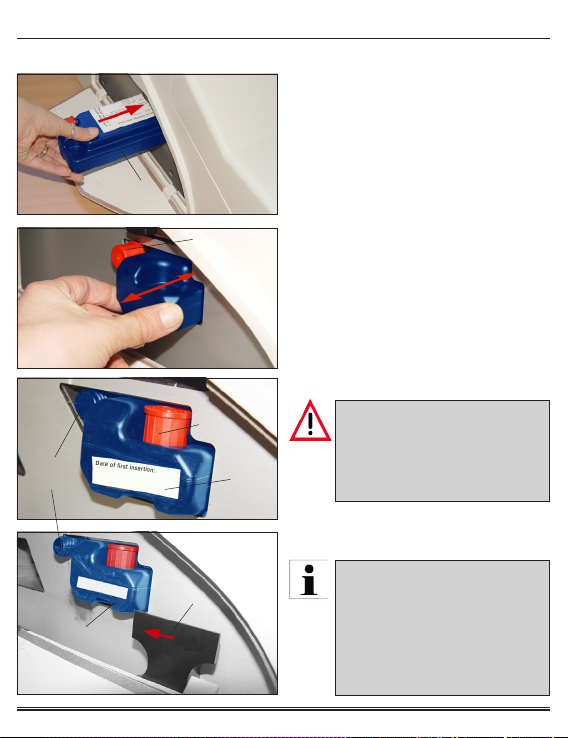
• Shake the closed and packed ink
Fig. 8
catridge about 4-5 times.
• Check the expiration date on the package and write the “date opened” on the
white label (65), fig. 10.
• The ink cartridge must be replaced ev-
½½
ery 3
½ months or every 60.000 print-
½½
outs.
• Loosen the cap (87) on the new ink car-
Fig. 9
tridge one full turn but do not remove it
completely yet. Then insert the new ink
cartridge until it stops by smooth pressure, fig. 9.
• Insert the ink cartridge completely , remove / insert about 3 times, fig. 9.
• Remove the cap completely and store
Fig. 10
it in the groove on the cartridge, fig. 10.
VERY IMPORTANT!
Prior to EACH transport, the red
cap (87) must be screwed onto
65
the nozzle (88) to prevent the ink
from spilling.
• Slide the safety catch (86) in front of the
Fig. 11
cartridge (66), fig. 11.
If your instrument is not
equipped with a safety catch,
look for it in the accessories kit.
Before installing the ink cartridge, you need to install the
safety catch in unbolted position. (fig. 11)
Leica IPC Key Instructions 1v2 - 03/2007
- 5 -
Page 6
Inserting an Ink Cartridge (continued)
→→
→
→→
At this point, the instrument has to be ”told” which type of cartridge
has been inserted. There are three options:
1. New ink cartridge:
Press LOADED to indicate that a new ink cartridge was inserted
(the printer will begin to record usage).
2. Used ink cartridge:
If an ink cartridge is removed and then reinserted Press ERROR the printer resumes recording the ink usage of the cartridge
(length of time and number of prints).
NEVER press CLEAN while an ink cartridge is in the instrument! The entire contents of the ink cartridge will spill into
the printer.
3. Used or new cleaning cartridge:
If a used or new cleaning cartridge is inserted Press CLEAN. The
printer retains the settings of the ink cartridge that was previously
used (length of time and number of prints).
The cleaning cartridge level is not monitored. Each use
should be noted on the cartridge. The cartridge can only be
used for 2 cleaning cycles. The cycle time when inserting a
cleaning cartridge is 3.5 minutes and is thus considerably
longer than that of an ink cartridge.
• The ink replacement routine will begin after one of the three keys
has been pressed
• Code “00” will appear, indicating that the instrument is priming.
• Display will return to a blank screen when the instrument is ready
for use.
Leica IPC Key Instructions 1v2 - 03/2007
• The sensor in the cartridge slot recognizes the presence of a new cartridge.
• The indicator LED “Ink Empty“ goes out,
code “88” appears in the display.
- 6 -
Page 7
Display Indications
Display
Status Messages
Magazine empty (in combination with ‘Mag. Empty’ LED)
Displays the number of an empty magazine.
Indicates that “MANUAL FEED” has been selected in the printer driver
settings.
00 - Clean cycle in progress.
11 - Temperature in the flash power supply is too high.
Printer is too hot - there will be a short cool-down period. The print job
should resume automatically after a short cool down period of time.
If the temperature does not drop to a value within the allowed range
within 10 minutes, ’55’ is displayed.
12 - Drying module temperature too low / too high.
If the temperature does not drop to a value within the allowed range
within 6 minutes, “43“ is displayed.
13 - Flash tube has reached its maximum life.
Replace flashtube as soon as possible to avoid compromizing the chemical resistance of the ink.
After changing the bulb, switch the printer back on.
Then go to OFFLINE-mode, press and hold the ERROR button for 10 seconds - code “13“ disappears from the display.“ The replacement of a de-
10 s.
fective flashtube must also be confirmed in this manner to ensure that
the full service life of the new lamp is taken into account.
Brief descriptions of display messages - see the operating
instuctions for more information.
Leica IPC
- 7 -
Key Instructions 1v2 - 03/2007
Page 8

Display Indications (continued)
Display
14 - Prompt requesting maintenance
Press ERROR to confirm this message. Schedule a maintenance promptly. After about 3 weeks the message will be displayed again and will not
disappear from the screen when pressing ERROR.
15 - Print head cleaning
Request for manual cleaning of the print head (alcohol + foam swab).The
printer is off-line. No new print jobs are accepted.
87 - After the last cartridge change, CLEAN was pressed to indicate that
a cleaning cartridge was inserted.
Cancel the print job. Switch the printer off and back on and change the
cartridge.
Then press LOADED or ERROR and wait for 2 minutes.
Carry out the same procedure if the CLEAN key was pressed accidentally.
88 - Ink cartridge has been changed; instrument waiting for confirmation
via ERROR, CLEAN, or LOADED button.
Caution!
Never press LOADED after reinserting an ink cartridge which
has already been used. This could cause permanent damage to
the printer.
83 - Warning - Problem with cassette ejection from a magazine
The code displayed consists of two figures: The “8” indicates that a
magazine ejection mechanism does not work properly. The second digit
indicates the number of the magazine concerned.
Check ejection mechanism. Remove foreign objects, then clean with the
brush.
Leica IPC Key Instructions 1v2 - 03/2007
- 8 -
Page 9

Troubleshooting and Handling Errors
++
+
++
If an error or status warning occurs during printing, an error code (41 in this sample) will be displayed and the
ERROR LED will flash.
• Check the error code list below to determine the cause.
• Remove any trays blocking the cover from the unload station (if installed) before
opening the lid.
• Remove all cassettes that are in the instrument (chute, carrier or drying module).
Discard if printed but not flashed! Carefully check the drying module area since
objects are not always easily visible. If all objects are not successfully removed,
additional error codes will be generated.
• Close the lid and press ERROR. The printer will then verify that the processing
paths are unobstructed and the source of the error has been corrected.
• If properly cleared and multiple attempts to remove the error code are unsuccessful, a Reset can be performed by pressing ERROR and LOADED simultaneously.
• In the event an error message is still displayed, check again for objects. If none
are present, switch printer off at main switch (back panel), wait 30 seconds and
switch back on. Call your Leica Service agent if the error appears again.
• Interrupted print jobs are resumed and the discarded cassettes are automatically
reprinted.
The following list contains all possible error messages.
Display
Magazine output mechanically blocked.
Faulty ejection of a cassette. Magazine output blocked.
Transfer of a cassette from the chute to the cassette carrier failed.
Horizontal motor either incorrectly positioned or mechanically blocked.
A cassette is stuck in the feeding chute.
Horizontal drive is mechanically blocked.
Vertical drive is mechanically blocked.
Source of error
Troubleshooting solution
Remove the cause of the
blockage.
Remove the cassette.
Remove the cassette.
Remove the cassette.
Remove the cassette.
Remove the cassette.
Leica IPC
- 9 -
Key Instructions 1v2 - 03/2007
Page 10

Error Messages (continued)
Display
Lifting table end sensor does not switch.
Lifting table position sensor does not switch.
Flash power supply:
overtemperature for more than 10 minutes.
Faulty control data received (program bug).
Settings for the serial interface incorrect or the instrument configuration conflicts with the PC configuration.
Transmitted data do not contain confirmation of receipt or data transmission was not confirmed by the
PC.
Print image exceeding the vertical limit.
Print image exceeding the horizontal limit.
The CRC test of the EEPROM returned an error
when the instrument was switched on.
Source of error
Troubleshooting solution
Call Leica Technical Service.
Call Leica Technical Service.
Call Leica Technical Service.
Carry out a RESET on the printer.
Check cable connection to the PC.
Check configuration of serial port
of the PC and reboot the PC.
Follow the same procedure as for
ERROR 60.
Try another printer cable.
Error caused by application software.
Error caused by application software.
Call Leica Technical Service.
Internal firmware error or
to
defective controller.
Mains power supply unit does not achieve standard
operating voltage.
Firmware only partially loaded or not loaded at all.
Flash memory defective.
Wrong firmware.
Leica IPC Key Instructions 1v2 - 03/2007
- 10 -
Call Leica Technical Service.
Call Leica Technical Service.
Call Leica Technical Service.
Call Leica Technical Service.
Page 11

Error Messages (continued)
Source of error Troubleshooting solutionDisplay
Rotational motion is mechanically blocked.
Cassette not correctly clamped in cassette carrier
or did not reach the cassette carrier.
Cassette did not leave the cassette carrier.
The ink print head is getting too hot. Ambient temperature too high or electronics defective.
No or incorrect voltage at ink print head.
Cover not closed properly.
Safety switch triggered.
Flash standby state not reached within the
prescribed time. Charging electronics defective.
No flash or flash duration too short.
Flash bulb dirty or defective.
The temperature in the drying module is not
within the permissible temperature range.
Unload station mechanically blocked.
Heater fan not running or running too slowly.
No cassette in the drying module for flashing. Cassette left the cassette carrier, but did not reach the
drying module.
Cassette not successfully ejected from drying module.
Cassette in the drying module during initialization or
prior to a print job being carried out.
The flap of the drying module either does not close
or does not open; flap is blocked (e.g. by a cassette)
Leica IPC
Remove the cassette.
Remove the cause of the blockage.
Remove the cassette.
Switch instrument off and let it
cool off.
Call Leica Technical Service.
Ensure that the cover is not
or
- 11 -
blocked by, e.g., the manual unload station. Close cover completely.
Check whether flashtube works - observe the stray light on the cover.
Never open the cover to check!
No flash --> install a new flash bulb.
Carry out a RESET.
Remove the cause of the blockage.
Call Leica Technical Service.
Remove the cassette.
Remove the cassette.
Remove the cassette.
Remove the cause of the blockage.
Key Instructions 1v2 - 03/2007
Page 12

Maintenance - Weekly
• At least two replacement plates
(Leica catalog number 0601 40162)
should be available at all times.
Print Head Cleaning
Minimun once a week, or if
message “15“ is displayed, the
print head must be cleaned
manually.
72
• Open the printer lid and
press CLEAN and LOADED
++
+
++
simultaneously.
• The print head (72) will elevate about
½½
½ inch from the
½½
replacement plate, fig. 12.
Fig. 12
• Raise the small lever (69) located beneath the replacement plate (70) to release it, fig. 13.
• Pull out the replacement plate (70) and
clean the print head (next point) and
70
69
then install a clean, dry alternate plate.
• The replacement plate that was removed should be cleaned from waste
ink and then soaked in a covered container of 95% or 100% alcohol until it is
Fig. 13
used again.
The print head will lower automatically after approximately
2:30 minutes (see page 4, fig. 6).
When not ready in this time,
press CLEAN and LOADED again.
Leica IPC Key Instructions 1v2 - 03/2007
• The sealing lip (pos. 71, in fig. 15) must
be completely clean - no ink residue
must be left. Check whether the sealing lip is damaged.
- 12 -
Page 13

Print Head Cleaning (continued)
Fig. 14
• Next, insert a new, clean moistened
foam swab, apply light pressure upwards (on print head) and gently rub
back and forth on the print head.
• Repeat steps with clean foam swabs
until ink on foam swab begins to lighten.
• Replace the replacement plate with a clean, alternate
71
plate.
Attention! The replacement plate must be completely dry.
• Press the small lever (69 in fig. 13) down into its original
70
position.
• Press any key to reposition the print head and return the
printer to operational status.
• The print head moves back to parking position - message
Fig. 15
“15“ disappears from the display.
• Close the printer front lid.
• Moisten (not too wet !) a new, clean
foam swab (supplied with the instrument - Leica catalog number 060139637)
in 95% or 100% alcohol.
Never use acetone or xylene!
Only use 95% or 100% alcohol
for cleaning purposes.
• Insert a the moistened foam swab into
the gap between the print head and the
park station and gently rub back and
forth on the park station.
Never rotate the foamswab during cleaning! The nozzle plate of
the print head could become
scratched and prematurely
worn.
Leica IPC Key Instructions 1v2 - 03/2007
- 13 -
Page 14

Use of the Cleaning Cartridge
• The cleaning cartridge should only be used if the instrument will
not be used for a period of one month or longer, if the instrument is
moved from one location to another or if the main power switch will
be turned off for 24 hours or longer. For proper use, see IP instruction manual.
Cleaning the Instrument
• For general cleaning instructions, please refer to Chapter 6 of the
IP C instruction manual for direction.
Good to know
Outer surfaces
Automated cassette unload station
Inner Areas
• Never use compressed air to clean the IP-printer of debris.
• Never touch the flash tube with bare hands. Always turn the instrument off and unplug it from the mains power before touching the
flash tube.
• Clean the outer surfaces (including those of the automated cassette unload station) with a mild detergent and subsequently dry
with a slightly moistened cloth. Do not use any solvents!
• Regularly remove dust from the ventilation slots on the back of the
instrument using a small vacuum cleaner.
• Remove the unload trays; with a brush or a small vacuum cleaner,
remove dust and debris from guides and ejector.
• The trays themselves can be cleaned with a household cleaner. Do
not use any solvents to clean the trays!
• Prior to reinserting them into the instrument, the trays must be completely dry.
• Switch the printer offline.
• Remove magazines from instrument.
Leica IPC Key Instructions 1v2 - 03/2007
- 14 -
Page 15

Cleaning the Instrument (continued)
Cassette guiding mechanisms
Cleaning of the following IP modules indicaed by an arrow is of particular importance:
• Load Station Magazine & Chute, fig. 16
With a brush (standard delivery) remove any debris from the magazine
load station and chute.
Always ensure that the sensor at the
end of the chute is clean.
Fig. 16
• Transport-Station, fig. 17
Remove dust and debris from the cassette transport-clamp.
Fig. 17
• Drying-Station, fig. 18
Remove any debris from drying station
chute.
Caution!
Sensitive electronics components are located in this area.
Use no liquid in this area!
Fig. 18
Leica IPC Key Instructions 1v2 - 03/2007
- 15 -
Page 16

Installing / Exchanging the Flashtube
41
49
Fig. 20
Caution!
To insert / remove, hold the flashtube as shown in fig. 22 (right).
Do not take hold of the sides of the
flashtube or compress it as shown
in fig. 21 (risk of splintering).
Fig. 210 Fig. 22
43
44
Fig. 23
Exchanging- Removing the Flashtube
Switch the instrument off and
unplug it from mains. Allow the
42
flashtube to cool before removing it. Do not handle the flash
tube with bare hands. Use a
glove or tissue.
• Open the lid (4, fig. 2) to gain access to
the reflector.
• Loosen screw (49) (use screwdriver
supplied as part of tool set). - Mind the
washer (42).
• Swing the reflector (41) upwards.
• Carefully pull out the old flashtube (43)
straight to the right, do not twist it. If
the flashtube cannot be pulled out easily, gently rock it back and forth to get
it unseated from the socket.
• Make sure the contact spring (44) is
removed from the priming wire (45) of
the lamp.
(See also fig. 24 and 27).
Leica IPC Key Instructions 1v2 - 03/2007
- 16 -
Page 17

Exchanging the Flashtube (continued)
86
46
44
85
86
Inserting the Flashtube
47
48
• Insert the shielding glass (85) in the two
Fig. 24
holders (86), fig. 24.
48
47
• Insert the new flashtube into socket (46)
(fig. 21); then push it carefully inwards
as far as it will go (fig. 24) (the polarity
marker (+) (47) must not be visible any
longer). If necessary, move flashtube
gently up and down.
Fig. 25
• Important!
Make sure that the new flashtube is
inserted correctly – the lamp electrode
(47) marked with a ”+” must be inserted
into the socket (46) that bears the same
mark (48), fig. 25.
Fig. 26
Caution!
If the lamp electrodes are in-
45
serted the wrong way, the flashtube will still work, but will
wear out and break much faster.
• Once the flashtube has been inserted,
contact spring (44) must sit close to the
priming wire (45) of the lamp.
43
Leica IPC Key Instructions 1v2 - 03/2007
• Swing the reflector downwards. Reinsert and retighten screw (49), fig. 20.
• Close lid of the printer again.
Fig. 27
- 17 -
Page 18

Storing the Instrument
Please observe the following instructions whenever the printer will be
idle for an extended period up to three mont.
Important!
• If the instrument will remain connected to a mains power supply
and turned on, the ink cartridge must remain in place until its expiration date.
• The printer will regularly clean the print head to prevent it from
drying out.
• Please replace the ink cartridge once its expiration date has been
reached.
If the instrument will be off and disconnected from the mains, please
observe the following instructions:
Storage Instructions
88
The ink cartridge cannot be used
in a different printer, as the ink
level counter is stored in the
printer itself.
A printer may be stored for a maximum of three months after
following the procedure described below. Storing the printer
for longer periods may result in damage to the print head.
87
• Open the cover plate on the left side of
the instrument by pressing its top left
corner (see fig. 2, page 3) and slide the
86
safety catch (86) toward the front of the
instrument, fig. 28.
• Pull the ink cartridge (87) approx. 3 cm
out of the instrument so that the "Ink
Empty" LED lights.
Fig. 28
• Screw the red cap (87) onto the nozzle
(88), seal it tightly and remove it completely.
• Store the cartridge in a horizontal position in a sealed container.
Leica IPC Key Instructions 1v2 - 03/2007
- 18 -
Page 19

Storage Instructions (continued)
64
85
→→
→
→→
• Insert a (new) cleaning cartridge until
it stops by smooth pressure, fig. 29.
• Unscrew the red cap (85) 1 turn and
slide the cartridge fully home.
• Slide the safety catch (86, in fig. 28)
back in front of the cartridge.
Fig. 29
• The “Ink Empty“ LED will go out and
“88“ will appear on the display.
→→
→
→→
The cleaning process with solvent takes approx. 3.5 minutes.
72
69
Leica IPC Key Instructions 1v2 - 03/2007
• Press CLEAN to rinse the print head;
“00“ will appear on the display. The display will go out when the cleaning process is complete.
• Open the printer lid and
press CLEAN and LOADED
++
+
++
• Raise the small lever (69) located beneath the replacement plate to release
it, fig. 30 and fig. 13, page 12.
Fig. 30
simultaneously.
• The print head (72) will elevate about
replacement plate, fig. 30.
- 19 -
½½
½ inch from the
½½
Page 20

Storage Instructions (continued)
• Pull out the replacement plate (70),
fig. 31.
70
• Clean the print head with foam swabs
and alcohol as described on page 13
(see also fig. 32).
Cleaning swabs for the print
head may only be used once.
• After cleaning the print
Fig. 31
head, insert a new transport plate (73).
73
• Press the small lever (69 in
fig. 30) down into its original position.
• Close the printer front lid.
• Press any key to reposition
the print head and return
the printer to operational
status.
• Screw tightly the red cap (85, in fig. 29)
Fig. 32
of the cleaning cartridge and close the
cover plate on left side of the printer.
Imprtant !
Turn the printer off and disconnect it from the mains at this point to prevent
damage to the print head!
Never use a cleaning cartridge together with a replacement plate (70).
Do not reuse a used transport sealing device (73), the sealing of the print
head is no longer reliable.
Leica IPC Key Instructions 1v2 - 03/2007
- 20 -
Page 21

Storage Instructions (continued)
Transporting the Instrument
To prepare the printer for transport, please make sure that the instructions for storing the instrument are completed and then do the following:
• Open the lid and loosen the screw that secures the cover (41) over
the flashtube, see fig. 20, page 16.
• Open the cover and remove the flashtube following the instructions
on pages 16 / 17 of this manual.
• Close flashtube-cover and lid.
• Use the original packaging material and bolt the printer to the bottom plate (see unpacking instructions).
• Install the transport anchorage for the print head (see operating
instructions, fig. 7, page 18) and secure the cover with adhesive
tape.
• The replacement plate (70) that was re-
70
71
moved should be cleaned from waste
ink.
• The sealing lip (71) must be completely
free of ink residue. Check the sealing
lip for damage. Do not reuse a replacement plate with a damaged sealing lip.
• Clean the instrument thoroughly as de-
Fig. 33
scribed on pages 12 - 13.
• Ensure that the instrument is transported in an upright position only.
Leica IPC Key Instructions 1v2 - 03/2007
- 21 -
Page 22

Leica Part Number: 0602 43436
 Loading...