

Page 1
User Instructions
Smart Wi-Fi LED Strip 5m kit
LTTP5WIFI
RGB & CCT (2700K-6500K)
Please read these instructions and retain them for future reference.
Important information
It is recommended that the strips are installed by a qualified
electrician ensuring the installation complies with current IEE
wiring regulations & local building control.
These products are designed for connection to a 220-240V
mains supply.
Specifications:
• Input: 220-240 V/AC, 50/60 Hz
• Output Voltage: DC 12V
• Power: 4.8W/m
• Adapter: DC 12V, 2A, 24W
• Length: 5m
• Strip Width: 12mm
• IP Rating: IP65
• Silicone Gel coating
• Self-adhesive Tape for Easy Installation
• Cut to size in 10cm intervals
• 30 x 3 LEDs/m (RGB+W+WW)
• Luminous Flux: 400-450lm/m
• RGB & CCT (2700-6500K) full control
• Dimmable through the APP
• Control Type: Remote and APP
• App Control: 2.4Ghz WiFi using Smart Life APP
• Compatible with Amazon Alexa & Google Home
• Working Temperature: -25 C~40 C
Package Contains:
• 1 x 5m Reel of Self-adhesive Tape
• 1 x 12V/DC UK Power Adaptor
• 1 x WiFi Smart Controller
• 1 x 24 Key Remote Control
SCAN THE QR CODE
to download the APP
or search "Smart Life"
on your App Store
or Android Market
by Mobile Phone.
0 0
Installation:
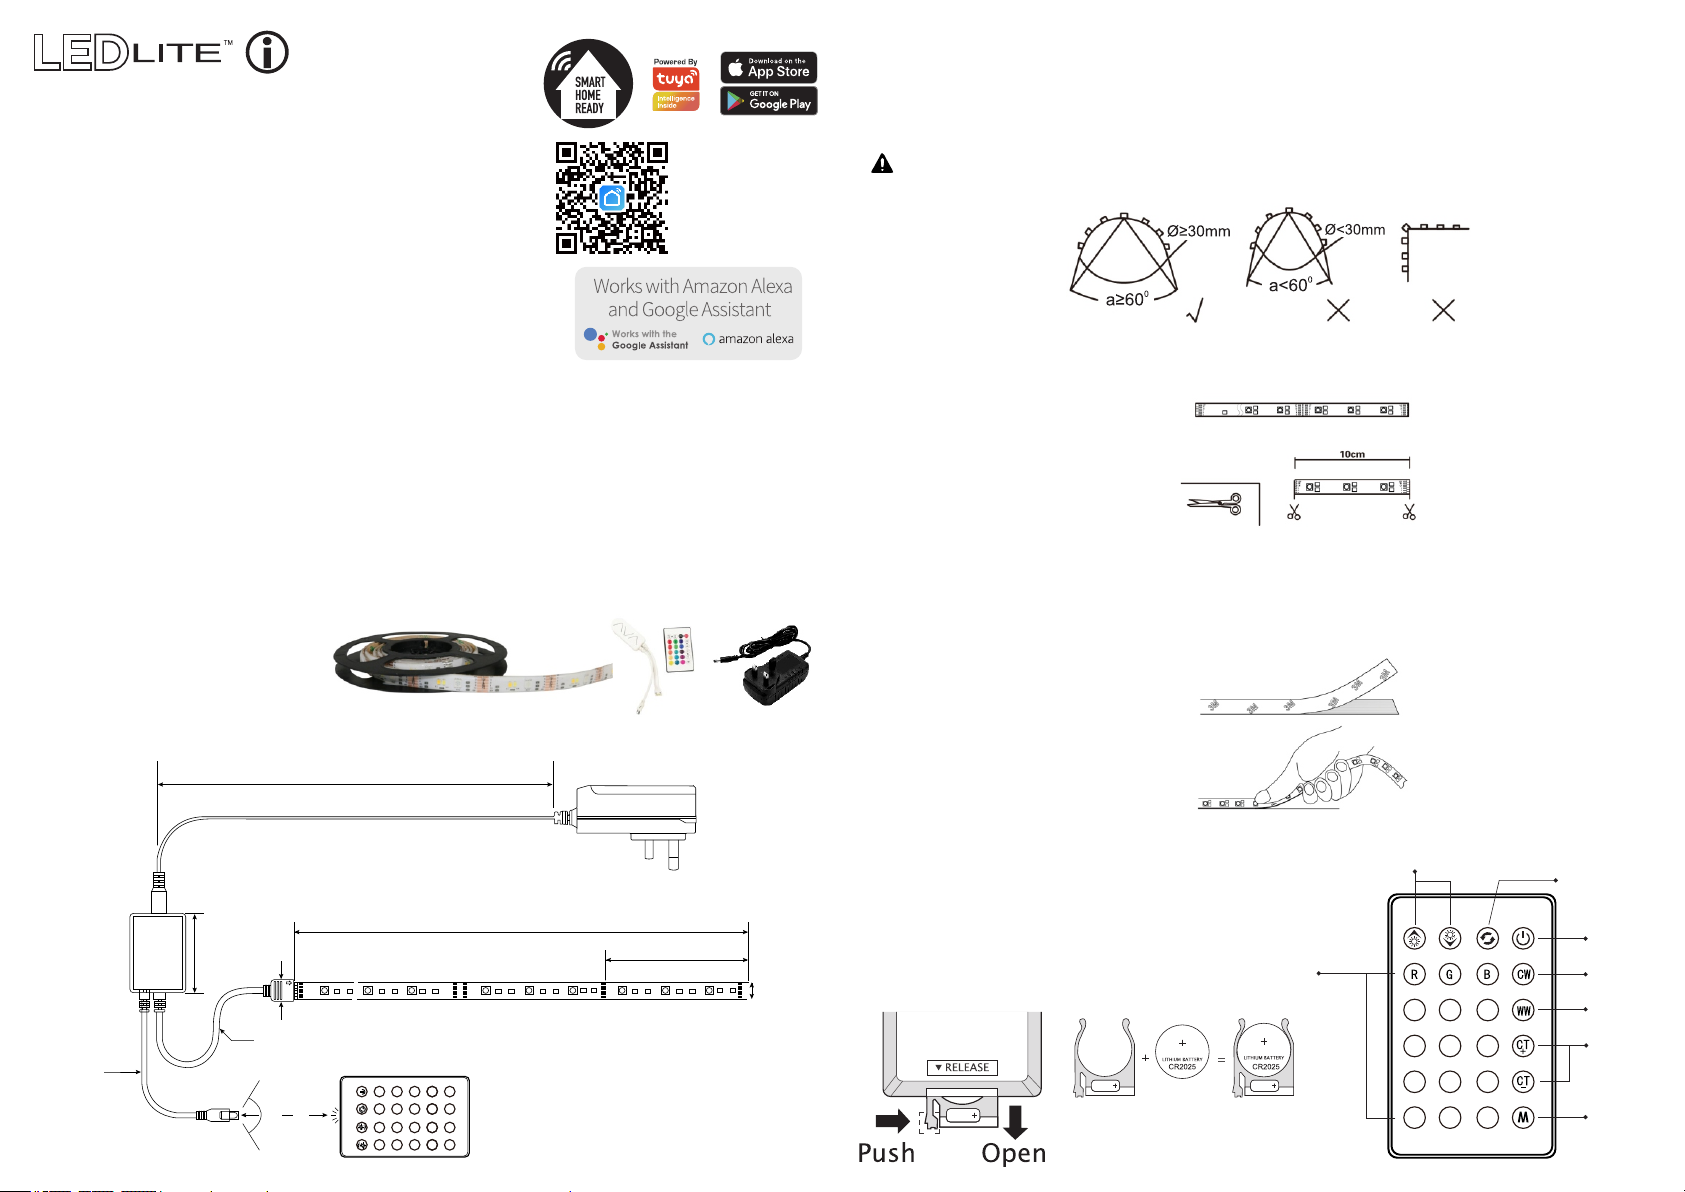
1. Precautions:
• Ensure the installation surface is clear of dirt or dust and clean it thoroughly before use.
• Do not twist the LED strip
• The LED strip has excellent flexibility but requires the bending to be over 60 and the diameter
to be no smaller than 30 mm. All bends need to sweep round, do not use sharp corners (Fig. 1).
CAUTION – Twisting, pressing on LEDs, over-bending the strip, cutting at non-cut points,
incorrectly powering the strip will invalidate the warranty.
Fig. 1
2. Cutting the tape:
• Unplug the power supply before cutting.
• Measure the tape needed and use sharp scissors to cut it at the marked 10cm intervals (Fig. 2).
Fig. 2
3. Tape fitting:
• Remove the self-adhesive backing tape from the strip gradually during installation.
Do not remove it all at once to avoid the strip becoming entangled and sticking to itself.
• Stick the LED strip to the mounting surface by pressing on the strip (Fig. 3).
4. Connect the tape to the supplied adaptor and plug in.
5. Control the tape using the phone APP (see next page for instructions) or the IR remote control.
0
Dimensions:
3cm
12.5cm
7cm
1.5cm
11.5cm
3m
120°
3m
12V
W
CW
B
R
G
≥5m
150cm
R G B CW
WWWCT+CT
Fig. 3
IR Remote Control Functions:
Dimming buttons
● Control Distance: up to 6m
500cm
90LEDs/m
10cm
12V
12V
W
W
CW
CW
B
B
R
R
G
G
-
12V
W
CW
B
R
G
12V
W
CW
B
R
G
12mm
● Random Mode selector button
● Brightness and speed adjustments
● Battery Type: CR2025 (included)
● Replacing the Battery:
Static monochrome
buttons
(15 colour choices)
Switch back and forth
2 different colours
ON/OFF Button
6500K
2700K
CCT+/-
Random Mode
Selector button
Page 2
LTTP5WIFI - Smart Wi-Fi Lamps APP Instructions
NO.1
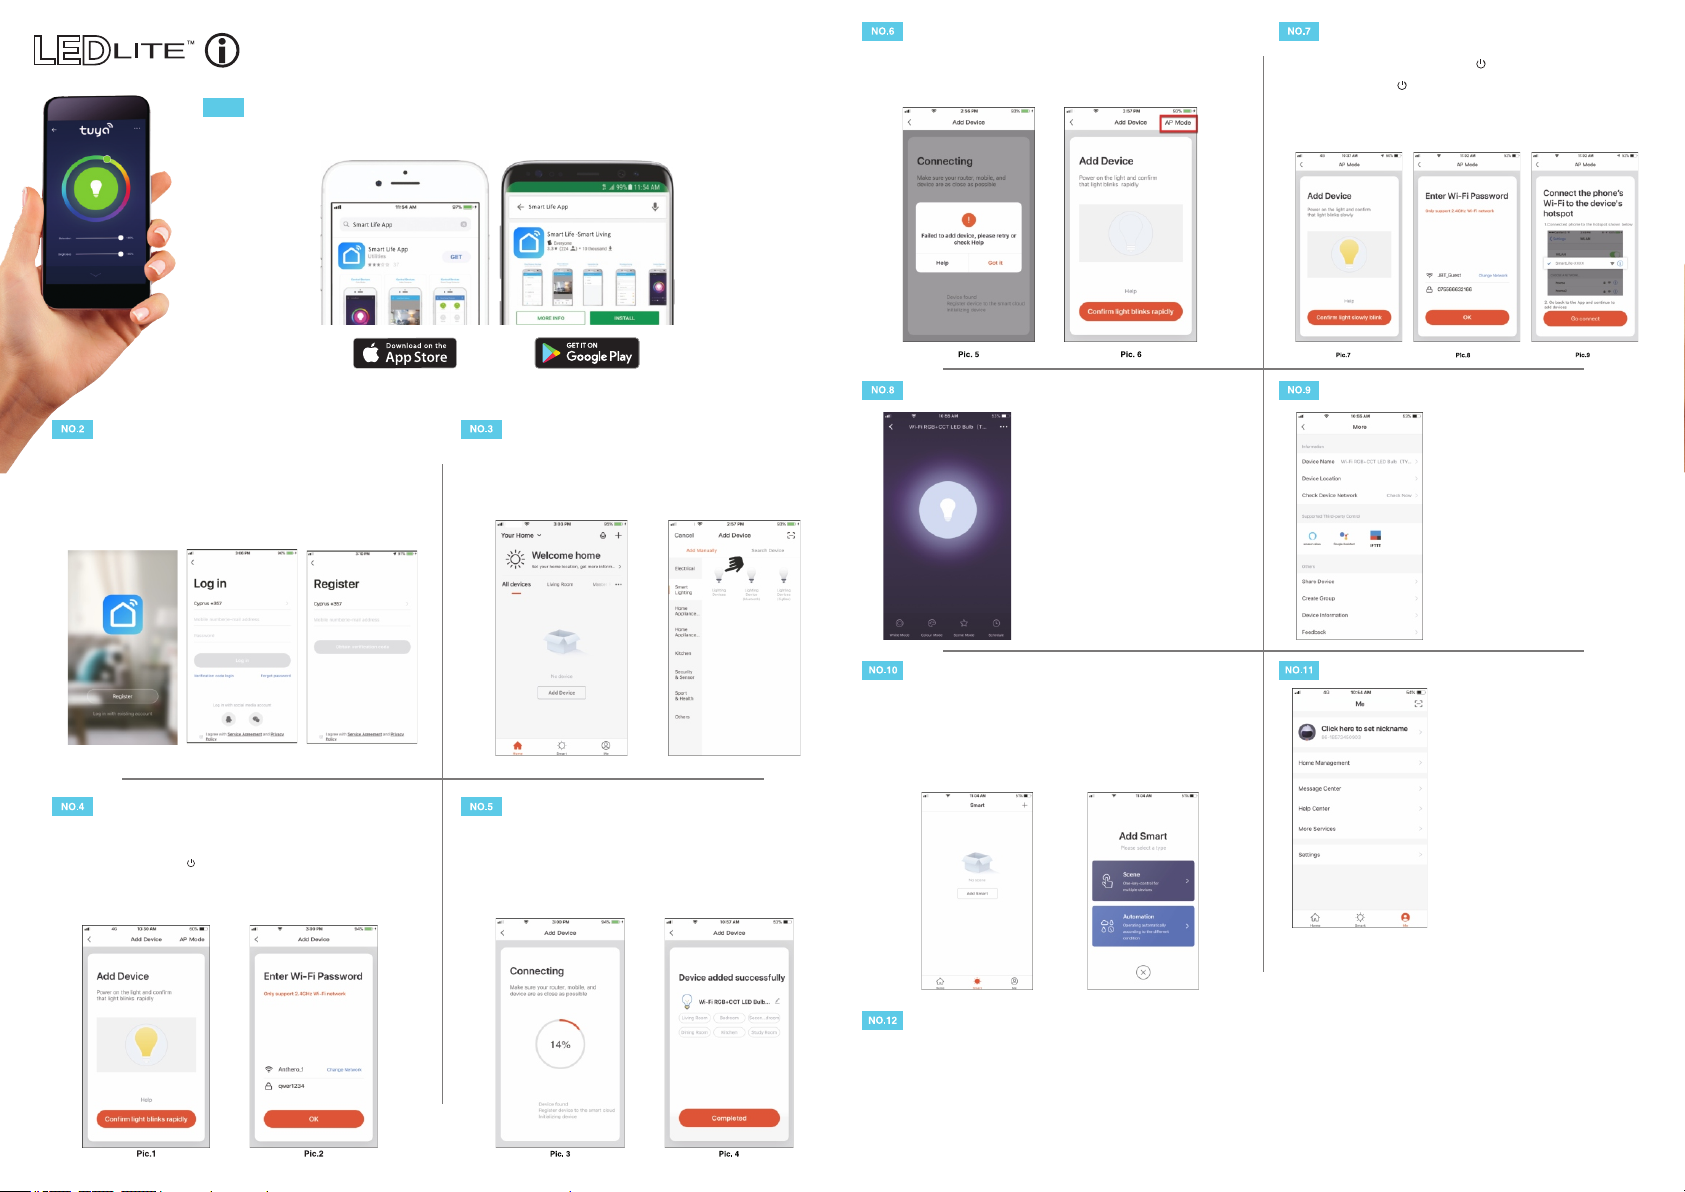
Download the Smart Life APP
Scan the QR code present on the packaging box or in the instructions to download the APP. You can also
search "Smart Life" in either App Store or Google Play to install the APP.
Connection Failed
If the Application shows the page as in Picture 5, it means that the light connection
has failed.
By pressing "Got it" you can try to connect it again in EZ mode or select the AP Mode
by pressing on the top right as shown in Picture 6.
Add New Device - AP Procedure
To connect the device in AP mode switch the light on and, after 10 seconds, switch it
off then on 3 times (or keep the power button on the controller pressed for 5 seconds)
until it flashes quickly (about 3 times per second). Continue switching the light off then on
3 times (or press again the button on the controller for 5 seconds) and it will start
flashing slowly (about once every 3 seconds). At this point press "Confirm light slowly
blink" (Pic.7), enter the password of the WiFi network you are connected to, press "OK"
(Pic.8) and you will open the page as shown in Picture 9. By pressing "Go connect" your
mobile phone will take you to the WiFi Setting page. Select the "Smartlife-XXX" network,
go back to the Smart Life APP and your new device will connect correctly.
Note: This item works only on a 2.4GHz WiFi network, not on a 5GHz WiFi network. Please consult the
manual of your router for settings.
Login/Registration Add New Device
After downloading the free Smart Life App from Apple Store or Play Store create
a new account by following these steps:
1. Press "Login"
2. Select Your country code, enter the e-mail address or phone number you want
to use to login and press "Obtain verification code"
3. Enter the code received by e-mail or phone, set your personal password and
press "Completed". Now you can access the pages for the creation of your
Smart Home.
To add your new device open Smart Life APP on "My Home" page, press"+"
in the upper right corner and then " Lighting Devices".
The Application offers two different procedures to add your device:
EZ and AP mode.
Please use the default EZ mode. If it fails, please try again or use AP mode.
Add New Device - EZ Procedure Add New Device - EZ Procedure
Make sure your new device is in EZ mode, otherwise reset it by switching on
light and, after 10 seconds, switching it off then on 3 times. The light will start
blinking quickly (about 3 times per second). The light can also be reset by
pressing the power button ( ) on the controller for 5 seconds.
After resetting the device:
1. Press "Confirm light blinks rapidly" (Pic.1). A new page will open (Pic.2).
2. Enter the password of the WiFi network you are connected to and press
"OK" to connect. The WiFi network supported is 2.4Ghz (disable the 5Ghz
WiFi network).
When connecting the device, you can see the connection status as shown in
Picture 3. Once connected, a page will open as shown in Picture 4.
Select the location of the device in your smart home and press "Completed"
to access the control page of your new device.
Now your new light is ready to be controlled via the APP, even remotely.
Device Control
After connecting the device, the control page will
be opened automatically.
Here you can do the following:
• Select the colour of the light.
• Change the colour of the white, from warm white
to cool white.
• Dim the light.
• Select one of the scenarios already created
for you.
• Use Schedule to program the switching on and
off at predefined times.
Creation of Scenarios and Automations
You can create an infinite number of Scenarios and Automations enabling other devices
to interact with each other.
By pressing "Smart" at the bottom centre of the home page and then "+" in the upper
right corner, you can choose whether to add a new scenario or a new automation.
• A Scenario is a set of commands assigned to the various devices that will be
activated simultaneously whenever you click on the created scenario or in the days
and hours programmed.
• An Automation is the execution of a specific command given to a device when a
specific condition has been activated.
Device Menu
Profile
By pressing on the menu symbol at the top right
you can:
• Change the name of your device.
• Select the location of the device in your home.
• Check how to connect it to your voice control
device (Google Home or Amazon Alexa).
• Share control of the device with other family
members or friends.
• Create a group of multiple devices so that you
can control them together.
• Update the device firmware.
• Remove the device.
"Me" is the page where you can change your
settings:
1. Your Profile.
2. Home Management.
3. Message Centre.
4. Additional services, such as the list of devices
that can be associated with the application
(Google Home, Amazon Alexa) in order to
control your home via voice commands.
5. Settings to activate push notifications and
other features.
Sharing Devices
You can share your devices with your family and friends who have downloaded the Smart Live APP and have a registered account. The people you share your devices with
will be able to control them, but they will not be able to add new devices to your home or delete any devices shared with them.
You have two different ways to share your devices:
A. Enter the page of your profile, press "Home Management" and "Share Devices" to enter the page where you can select the devices you want to share.
Enter the e-mail address used in the Smart Life APP by the user you want to share the devices with.
If you want to delete sharing with a user, place your finger on the user's name, drag to the left and then press "Delete".
B. Enter the menu of the device you want to add, press "Shared Devices" and enter the e-mai address used in the Smart Life APP by the user you want to share the devices with.
If you want to delete sharing with a user, place your finger on the user's name, drag to the left and then press "Delete".
 Loading...