

Page 1
USER´S MANUAL
BEDIENUNGSANLEITUNG
MANUEL D`UTILISATION
MANUAL DE USUARIO
INSTRUKCJA OBSŁUGI
MANUALE D‘ USO
操作说明书
操作說明書
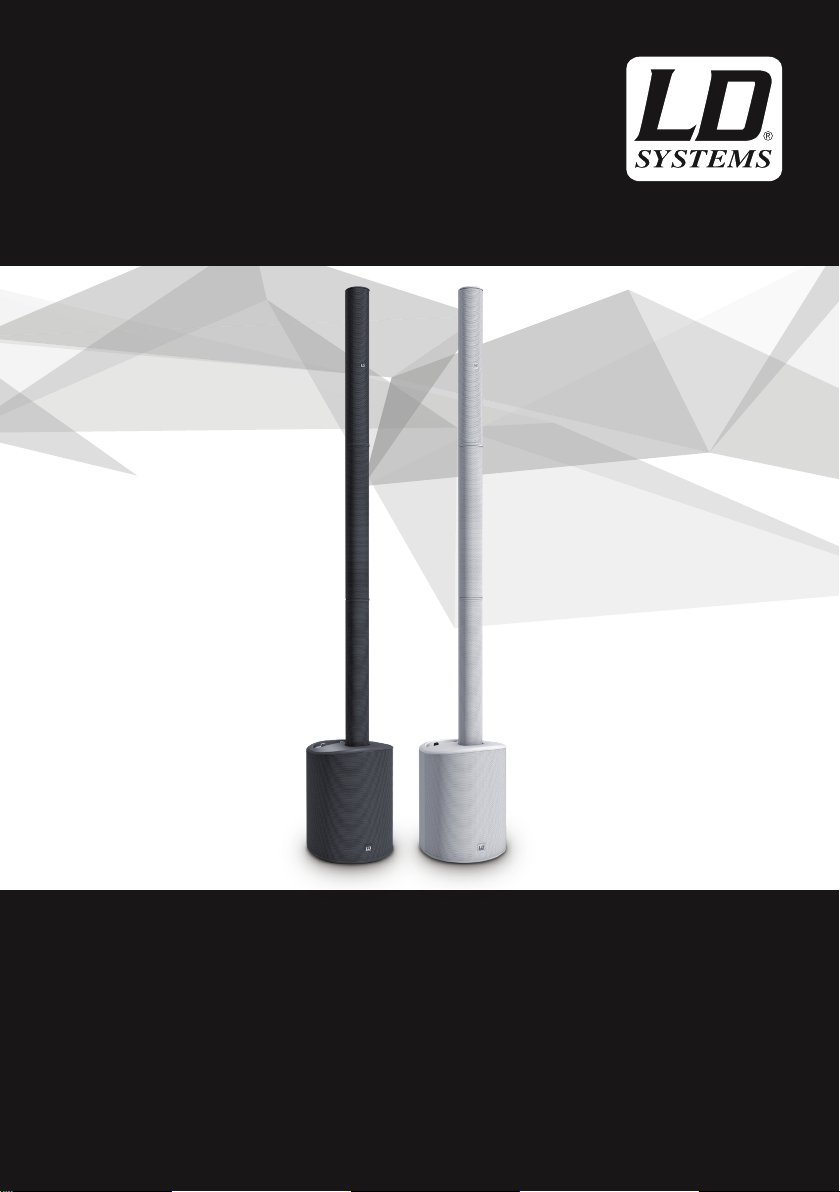
MAUI 5 G0
ULTRA PORTABLE BATTERY POWERED COLUMN PA SYSTEM
WITH MIXER & BLUETOOTH
BLACK HOUSING WHITE HOUSING
LDMAUI5GO LDMAUI5GOW
®
Page 2

CONTENTS / INHALTSVERZEICHNIS / CONTENU / CONTENIDO / TREŚĆ / CONTENUTO /
目录 / 目錄
ENGLISH
SAFETY INSTRUCTIONS 3-4
INTRODUCTION 5-6
CONNECTIONS, OPERATING AND DISPLAY ELEMENTS 7-9
LD SYSTEMS LECC DSP 10
WIRING EXAMPLES 10-11
OPTIONAL ACCESSORIES 11
TECHNICAL DATA 11-12
MANUFACTURER’S DECLARATIONS 13
DEUTSCH
SICHERHEITSHINWEISE 14-15
EINFÜHRUNG 16-17
ANSCHLÜSSE, BEDIEN- UND ANZEIGENELEMENTE 18-20
LD SYSTEMS LECC DSP 21
VERKABELUNGSBEISPIELE 21-22
OPTIONALES ZUBEHÖR 23
TECHNISCHE DATEN 23-24
HERSTELLERERKLÄRUNGEN 24
FRANCAIS
MESURES PRÉVENTIVES 25-27
INTRODUCTION 27-28
RACCORDEMENTS, ÉLÉMENTS DE COMMANDE ET
D‘AFFICHAGE 29-32
DSP LECC LD SYSTEMS 32
EXEMPLES DE CÂBLAGE 33-34
ACCESSOIRES DISPONIBLES EN OPTION 35
CARACTÉRISTIQUES TECHNIQUES 35-36
DÉCLARATIONS DU FABRICANT 36
ESPAÑOL
MEDIDAS DE SEGURIDAD 37-39
INTRODUCCIÓN 39-40
CONEXIONES, ELEMENTOS DE MANEJO Y ELEMENTOS
DE VISUALIZACIÓN 41-43
LECC DSP DE LD SYSTEMS 44
EJEMPLOS DE CABLEADO 44-45
ACCESORIOS OPCIONALES 46
DATOS TÉCNICOS 46-47
DECLARACIONES DEL FABRICANTE 47
POLSKI
ŚRODKI OSTROŻNOŚCI 48-49
WPROWADZENIE 50-51
GNIAZDA, PANEL OBSŁUGI I WSKAŹNIKI 52-54
LD SYSTEMS LECC DSP 55
PRZYKŁADY OKABLOWANIA 55-56
OPCJONALNE AKCESORIA 56
DANE TECHNICZNE 56-57
OŚWIADCZENIA PRODUCENTA 57
ITALIANO
MISURE PRECAUZIONALI 59-60
INTRODUZIONE 61-62
COLLEGAMENTI, DISPOSITIVI DI COMANDO
E VISUALIZZAZIONE 63-65
LECC DSP DI LD SYSTEMS 66
ESEMPI DI CABLAGGIO 66-67
ACCESSORI OPZIONALI 68
DATI TECNICI 68-69
DICHIARAZIONI DEL PRODUTTORE 69
简体中文
安全须知 70-71
引言 71-73
接口、操作和显示元件 74-76
LDSYSTEMSLECCDSP 77
接线示例 77-78
可选配件 79
技术参数 79-80
制造商声明 80
繁體中文
安全注意事項 81-82
簡介 82-83
連接、操作及顯示元件 84-86
LD系統的LECCDSP(LDSYSTEMSLECCDSP)87
接線示例 87-88
可選附件 89
技術規格 89-90
製造商聲明 90
Page 3
ENGLISH
YOU‘VE MADE THE RIGHT CHOICE!
We have designed this product to operate reliably over many years. LD Systems stands for this with its name and many years of experience
as a manufacturer of high-quality audio products. Please read this User‘s Manual carefully, so that you can begin making optimum use of
your LD Systems product quickly.
You can find more information about LD-SYSTEMS at our Internet site WWW.LD-SYSTEMS.COM
PREVENTIVE MEASURES
1. Please read these instructions carefully.
2. Keep all information and instructions in a safe place.
3. Follow the instructions.
4. Observe all safety warnings. Never remove safety warnings or other information from the equipment.
5. Use the equipment only in the intended manner and for the intended purpose.
6. Use only sufficiently stable and compatible stands and/or mounts (for fixed installations). Make certain that wall mounts are properly installed and
secured. Make certain that the equipment is installed securely and cannot fall down.
7. During installation, observ e the applicable safety regulations for your country.
8. Never install and operate the equipment near radiators, heat registers, ovens or other sources of heat. Make certain that the equipment is always
installed so that is cooled sufficiently and cannot overheat.
9. Never place sources of ignition, e.g., burning candles, on the equipment.
10. Ventilation slits must not be blocked.
11. Keep a minimum distance of 20 cm around and above the device.
12. Do not use this equipment in the immediate vicinity of water (does not apply to special outdoor equipment - in this case, observe the
special instructions noted below. Do not expose this equipment to flammable materials, fluids or gases. Avoid direct sunlight!
13. Make certain that dripping or splashed water cannot enter the equipment. Do not place containers filled with liquids, such as vases or
drinking vessels, on the equipment.
14. Make certain that objects cannot fall into the device.
15. Use this equipment only with the accessories recommended and intended by the manufacturer.
16. Do not open or modify this equipment.
17. After connecting the equipment, check all cables in order to prevent damage or accidents, e.g., due to tripping hazards.
18. During transport, make certain that the equipment cannot fall down and possibly cause property damage and personal injuries.
19. If your equipment is no longer functioning properly, if fluids or objects have gotten inside the equipment or if it has been damaged in anot
her way, switch it off immediately and unplug it from the mains outlet (if it is a powered device). This equipment may only be repaired by
authorized, qualified personnel.
20. Clean the equipment using a dry cloth.
21. Comply with all applicable disposal laws in your country. During disposal of packaging, please separate plastic and paper/cardboard.
22. Plastic bags must be kept out of reach of children.
23. Please note that changes or modifications not expressly approved by the party responsible for compliance could void the user´s authority
to operate the equipment.
FOR EQUIPMENT THAT CONNECTS TO THE POWER MAINS
24. CAUTION: If the power cord of the device is equipped with an earthing contact, then it must be connected to an outlet with a protective
ground. Never deactivate the protective ground of a power cord.
25. If the equipment has been exposed to strong fluctuations in temperature (for example, after transport), do not switch it on immediately.
Moisture and condensation could damage the equipment. Do not switch on the equipment until it has reached room temperature.
26. Before connecting the equipment to the power outlet, first verify that the mains voltage and frequency match the values specified on the
equipment. If the equipment has a voltage selection switch, connect the equipment to the power outlet only if the equipment values and the
mains power values match. If the included power cord or power adapter does not fit in your wall outlet, contact your electrician.
27. Do not step on the power cord. Make certain that the power cable does not become kinked, especially at the mains outlet and/or power
adapter and the equipment connector.
28. When connecting the equipment, make certain that the power cord or power adapter is always freely accessible. Always disconnect the
equipment from the power supply if the equipment is not in use or if you want to clean the equipment. Always unplug the power cord and
power adapter from the power outlet at the plug or adapter and not by pulling on the cord. Never touch the power cord and power adapter
with wet hands.
29. Whenever possible, avoid switching the equipment on and off in quick succession because otherwise this can shorten the useful life of
the equipment.
30. IMPORTANT INFORMATION: Replace fuses only with fuses of the same type and rating. If a fuse blows repeatedly, please contact an
authorised service centre.
31. To disconnect the equipment from the power mains completely, unplug the power cord or power adapter from the power outlet.
32. If your device is equipped with a Volex power connector, the mating Volex equipment connector must be unlocked before it can be removed.
However, this also means that the equipment can slide and fall down if the power cable is pulled, which can lead to personal injuries and/or
other damage. For this reason, always be careful when laying cables.
33. Unplug the power cord and power adapter from the power outlet if there is a risk of a lightning strike or before extended periods of disuse.
ENGLISH
DEUTSCH
FRANCAIS
ESPAÑOL
POLSKIITALIANO
简体中文
繁體中文
3
Page 4
ENGLISH
DEUTSCH
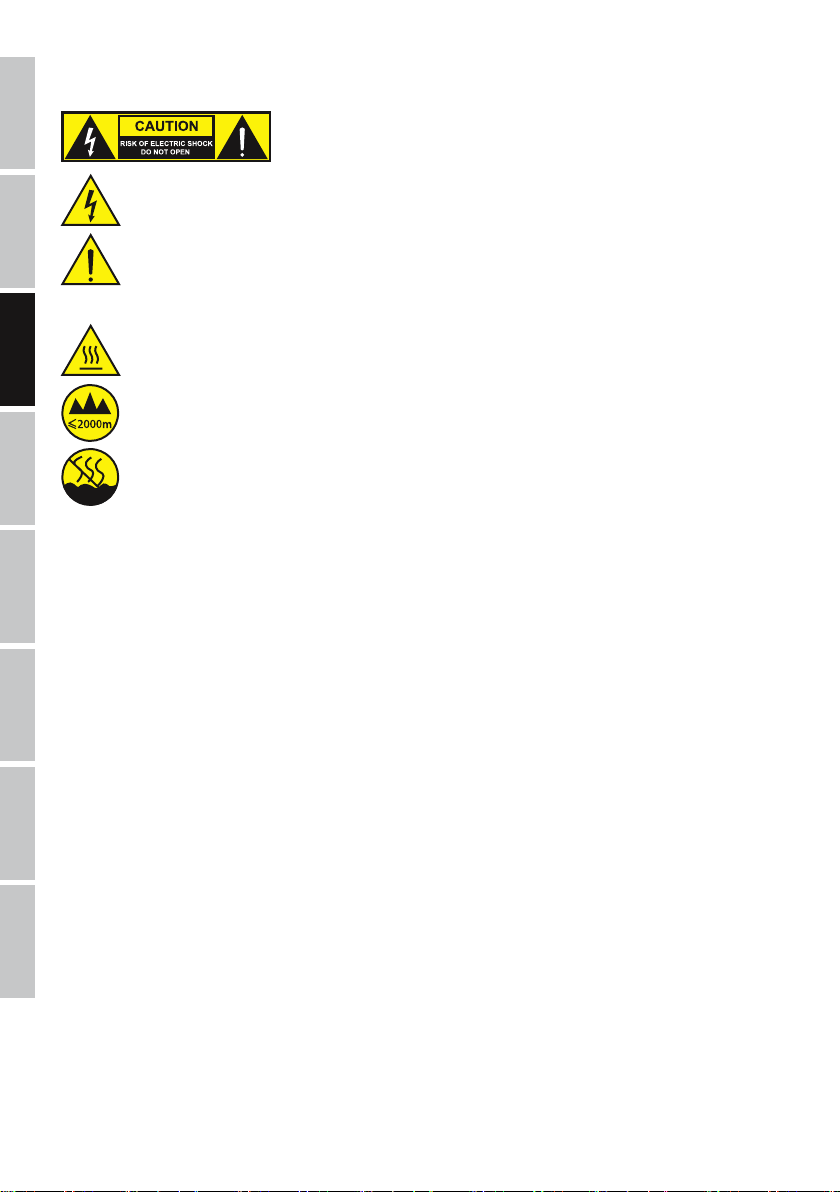
CAUTION:
To reduce the risk of electric shock, do not remove cover (or back). There are no user serviceable parts
inside. Maintenance and repairs should be exclusively carried out by qualified service personnel.
The warning triangle with lightning symbol indicates dangerous uninsulated voltage inside the unit, which may cause an
electrical shock.
The warning triangle with exclamation mark indicates important operating and maintenance instructions.
Warning! This symbol indicates a hot surface. Certain parts of the housing can become hot during operation. After use, wait for
a cool-down period of at least 10 minutes before handling or transporting the device.
FRANCAIS ESPAÑOL POLSKI
CAUTION! HIGH VOLUMES IN AUDIO PRODUCTS!
This device is meant for professional use. Therefore, commercial use of this equipment is subject to the respectively applicable national
accident prevention rules and regulations. As a manufacturer, Adam Hall is obligated to notify you formally about the existence of potential
health risks.
Hearing damage due to high volume and prolonged exposure: When in use, this product is capable of producing high sound-pressure levels
(SPL) that can lead to irreversible hearing damage in performers, employees, and audience members. For this reason, avoid prolonged
exposure to volumes in excess of 90 dB.
NOTE: This equipment has been tested and found to comply with the limits for a Class B digital device, pursuant to Part 15 of the FCC
Rules. These limits are designed to provide reasonable protection against harmful interference in a residential installation. This equipment
generates, uses and can radiate radio frequency energy and, if not installed and used in accordance with the instructions, may cause
harmful interference to radio communications. However, there is no guarantee that interference will not occur in a particular installation. If
this equipment does cause harmful interference to radio or television reception, which can be determined by turning the equipment off and
on, the user is encouraged to try to correct the interference by one or more of the following measures:
ITALIANO
- Reorient or relocate the receiving antenna.
- Increase the separation between the equipment and receiver.
- Connect the equipment into an outlet on a circuit different from that to which the receiver is connected.
- Consult the dealer or an experienced radio/TV technician for help.
BATTERY SAFETY
简体中文 繁體中文
1. Keep conductive objects such as keys, jewellery or other materials away from the battery terminals. Failure to do so may result in the
battery being short-circuited, which could lead to injury or burns.
2. Never reverse the polarity of the battery contacts.
3. Keep the battery away from excessive heat and direct sunlight. Do not place it on or in heating appliances, such as a microwave ovens or
radiators. Batteries can explode if overheated.
4. Do not attempt to alter or modify the battery, to insert foreign materials into the battery or to immerse it in or bring it into contact with
water or any other liquid. Failure to do so could lead to a fire, explosion or other dangerous situations.
5. In the event of leakage of battery acid, ensure that it does not come into contact with skin or eyes. If this occurs, rinse immediately with
clean water and consult a doctor.
6. In the event of the battery becoming deformed, overheating or changing colour during charging or storage, refrain from using the device
immediately and remove the battery. Further use of the device could lead to leakage of battery acid or may cause a fire or an explosion.
7. Do not put batteries into a fire because they may explode. Damaged batteries may also explode.
8. Dispose of used batteries in accordance with local regulations. Improper use of the battery can cause a fire, an explosion or other
dangerous situations.
9. Do not allow children or pets to chew or suck on the battery. This could lead to damage or an explosion.
10. Do not strike, puncture or place the battery under high pressure. Otherwise this could lead to a short circuit or overheating.
Warning! This device is designed for use below 2000 metres in altitude.
Warning! This product is not intended for use in tropical climates.
4
Page 5
11. Do not drop the device or battery. If the device or battery is dropped, especially onto a hard surface, either or both could be damaged.
12. If the standby time of the device is significantly reduced, replace the battery.
13. If the device has a built-in, non-removable battery, do not attempt to remove the battery, because this could cause damage to the
device. Take the device to an authorised service centre for replacement of the battery.
IMPORTANT: Charge the battery only with the dedicated charging system (charging system in MAUI5 GO Subwoofer, charging dock
LDMAUI5GOCD)
INTRODUCTION
Perfectly equipped throughout, the MAUI® 5 GO is the ultimate system to deliver crystal-clear, powerful sound in any location. The battery-powered column-PA is supplied by a high-performance lithium-ion unit. The charger is built into the subwoofer. An external charging
dock is available as an accessory. Inputs for microphone, instrument and line signals as well as Bluetooth® stereo streaming make the
MAUI® 5 GO the ideal system for street musicians or for music and speech reproduction at private and business events and all mains
power-free applications. Its superlight weight of just 13 kg makes the four-piece design ultra-easy to transport, and thanks to its special
multipin connectors, it is assembled and ready to use in seconds. The line-array arrangement of the drivers achieves an extremely high
range. The system’s wide dispersion and excellent feedback-resistance removes the need for separate monitors. For unparalleled sound
quality in all applications, the column system features LD Systems' LECC DSP with multi-band limiter, equalizer, compressor and crossover.
The integrated 4-channel mixer provides separate volume controls for the input channels, sum and subwoofer as well as a variable
high-frequency boost to facilitate fast and balanced adjustment to the sound.
GENERAL NOTES
The subwoofer of the LD MAUI5 GO speaker system must be positioned vertically on a flat surface on its feet prior to operation. Never operate the system on a trolley, because there is a risk that the entire system may begin to move in an uncontrolled manner. This may result in
accidents and damage. To ensure sufficient cooling during operation, a minimum distance of 50 cm must be maintained between the back
of the subwoofer and other similar objects such as walls.
Please ensure that the system as well as any connected devices such as mixing consoles, CD players etc. are connected to the correct
audio and power connections. Use only undamaged cables with a suitable diameter and always unroll cable reels fully. Use cable protectors
to avoid tripping accidents caused by loose cables. Never position the device directly on an edge. Do not place the subwoofer on a table. In
order to eliminate unwanted noise when turning on connected devices, always switch the system on last and switch it off first.
ASSEMBLY
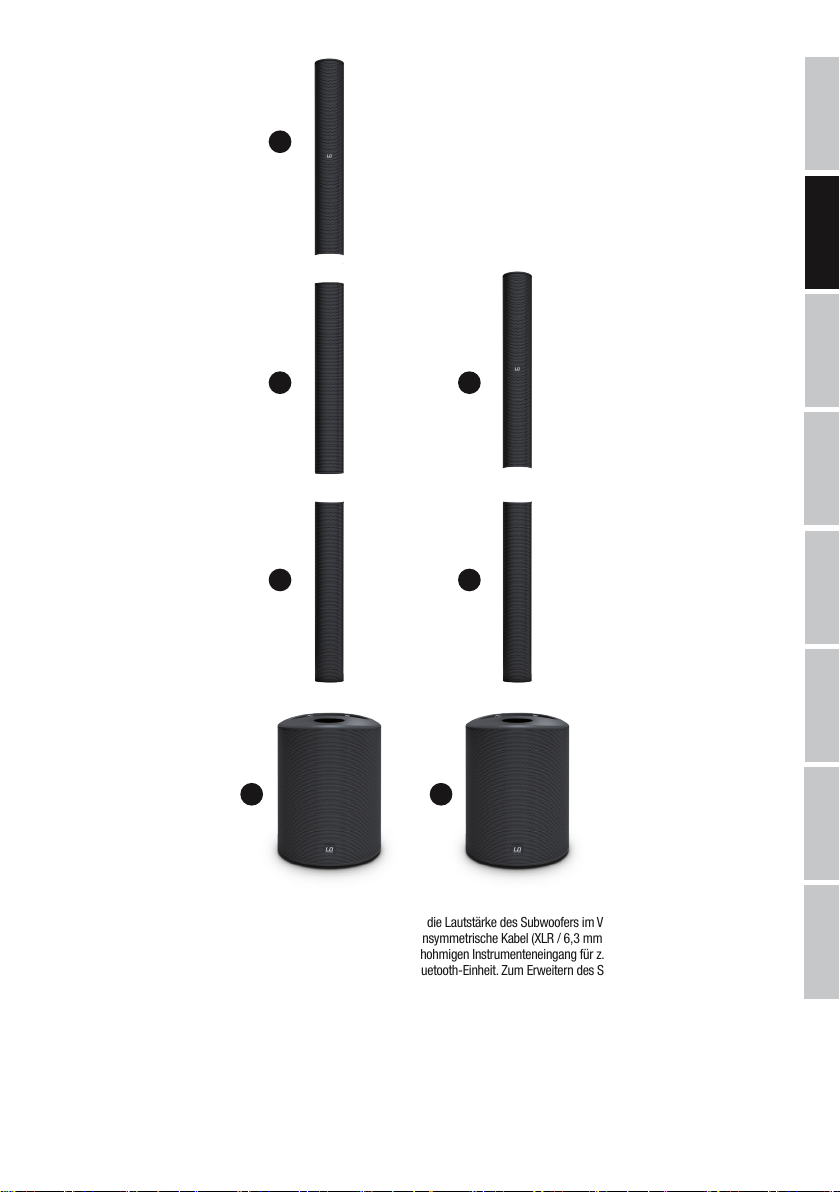
The LD MAUI5 GO speaker system comprises four components:
A. Subwoofer with integrated electronics for all system components, including a charging module for charging the battery and a connection
for the column sections on the top side.
B. Column section with integrated rechargeable battery, charging status display and connections on the underside and top side.
C. Spacer with connections on the underside and top side.
D. Column section with speakers and connector on the underside.
After the subwoofer has been placed in the desired position, the column sections with integrated rechargeable battery and spacer are
attached to the subwoofer, then the column section to the speakers. Depending on the application, the speaker system may also be used
without the spacer.
The MAUI5 GO speaker system can be used either connected to the mains or independently of the mains by using the column section
with built-in battery. When operating on AC power, the battery is charged automatically. The operating time for battery application can be
prolonged by replacing column sections with an empty battery with column sections with a fully charged battery (available as an option).
Replacing the battery takes only a few seconds and the system is once again ready to use.
ENGLISH
DEUTSCH
FRANCAIS
ESPAÑOL
POLSKIITALIANO
简体中文
5
繁體中文
Page 6

ENGLISH
DEUTSCH
FRANCAIS ESPAÑOL POLSKI
D
C
B
D
B
ITALIANO
简体中文 繁體中文
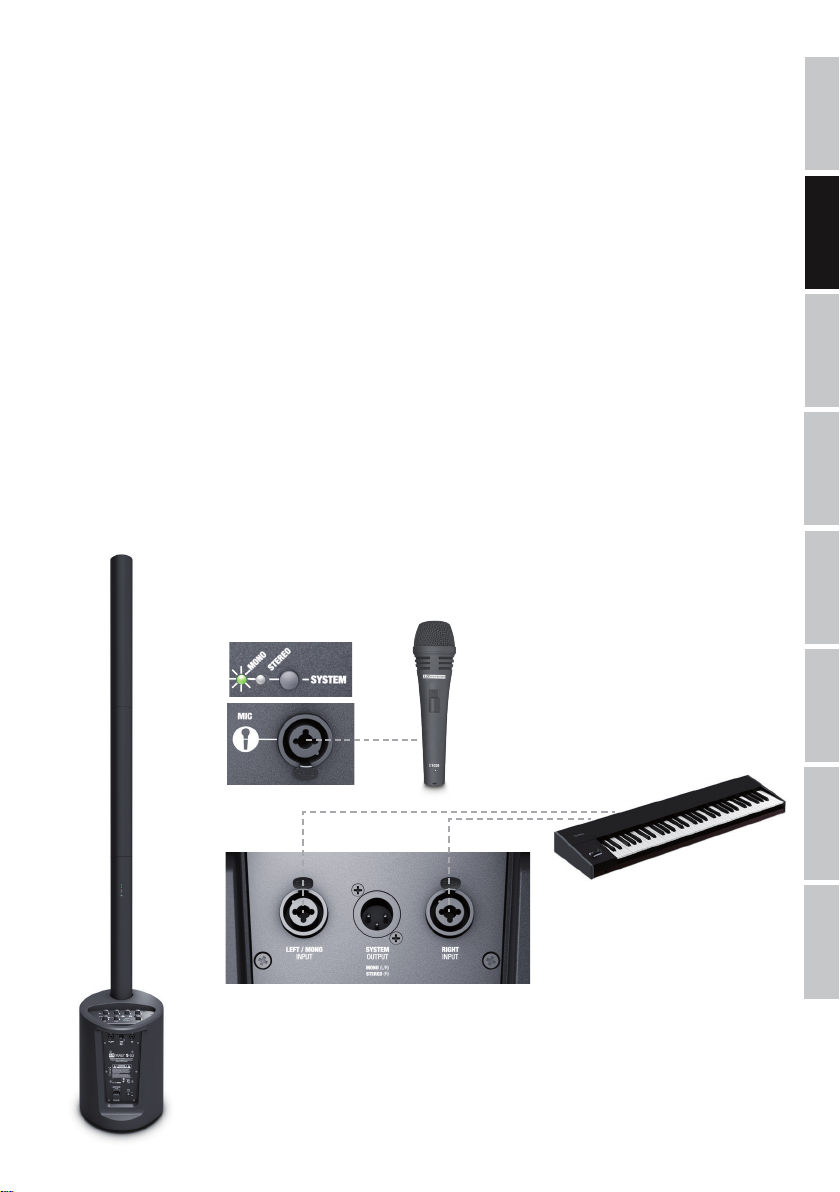
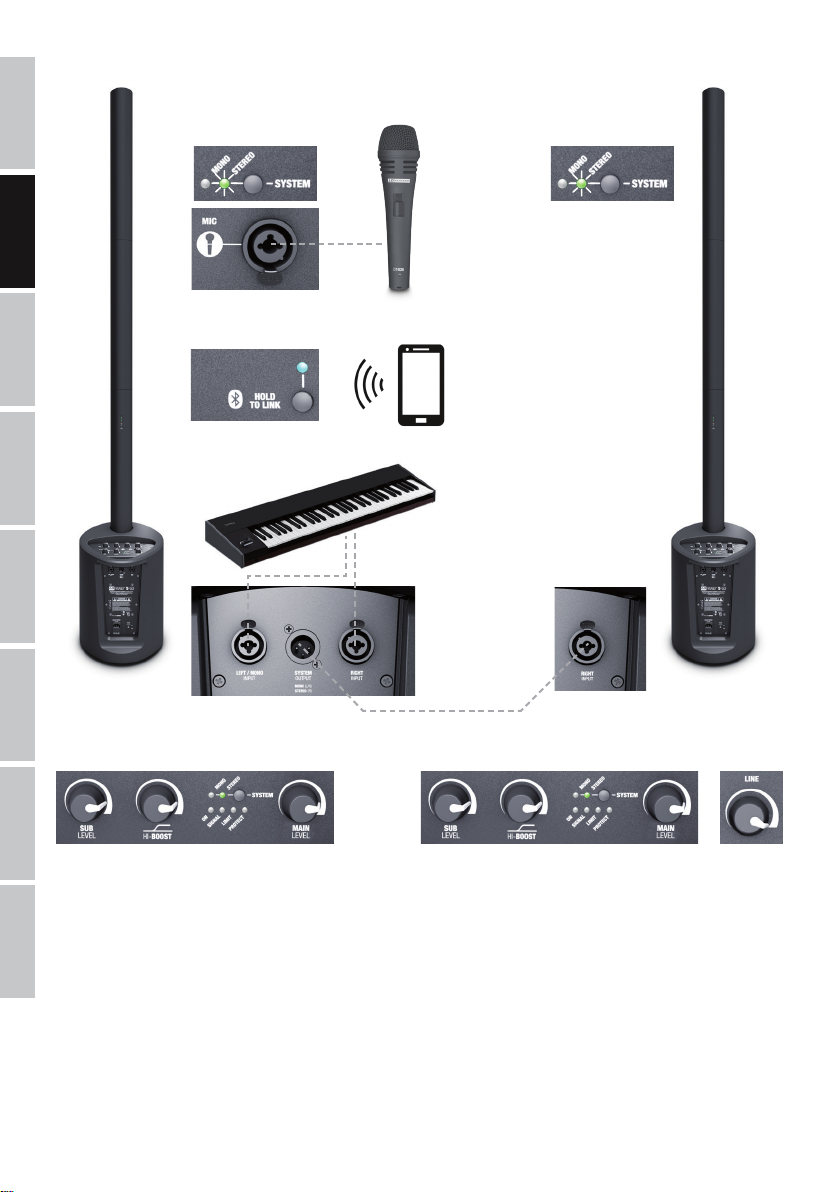
CONNECTION AND OPERATION
Both the volume of the entire system as well as the volume of subwoofer relative to the overall volume can be adjusted on the device. Playback
devices can be connected via both balanced and unbalanced cables (XLR/6.3 mm jack/mini phone plug). The integrated 4-channel mixer provides
a microphone input, a high-impedance instrument input for e.g. an electro-acoustic guitar, an input for playback devices with line level and a
Bluetooth unit. To expand the system, the subwoofer has a balanced line output with XLR socket (SYSTEM OUTPUT).
A
A
6
Page 7
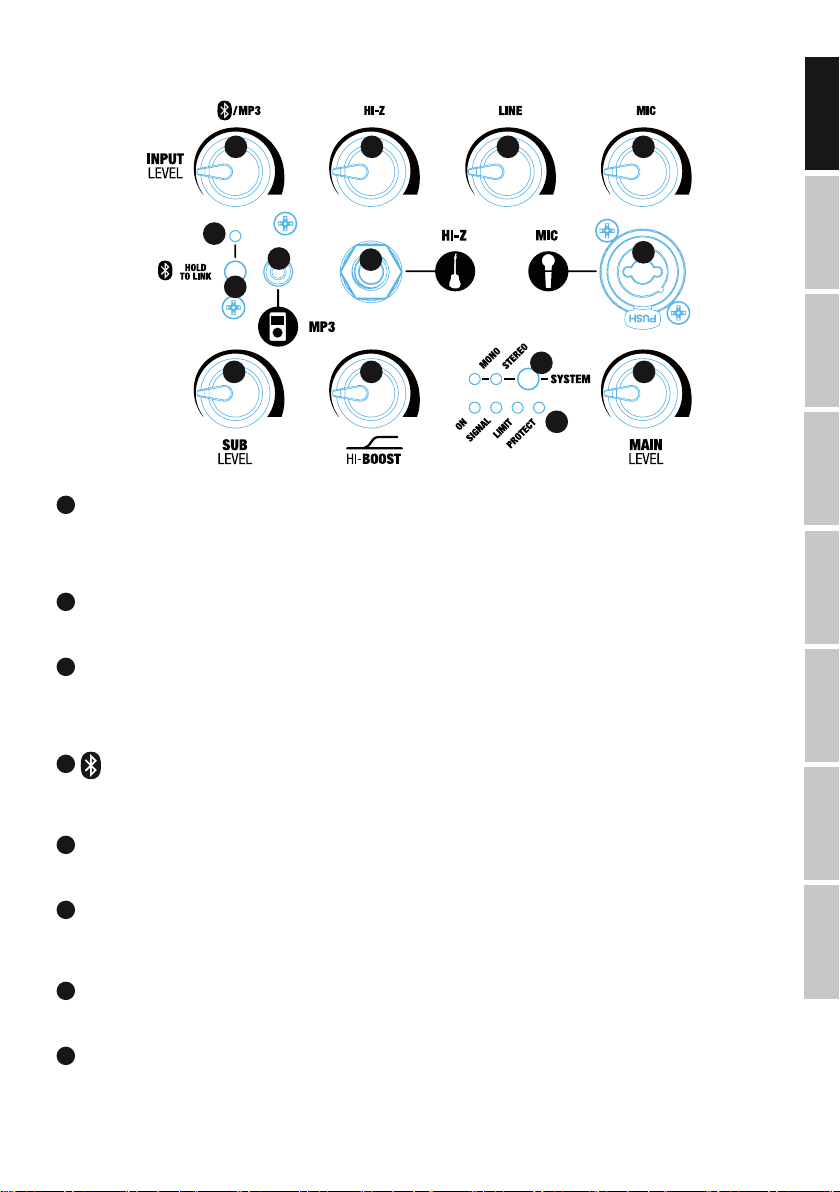
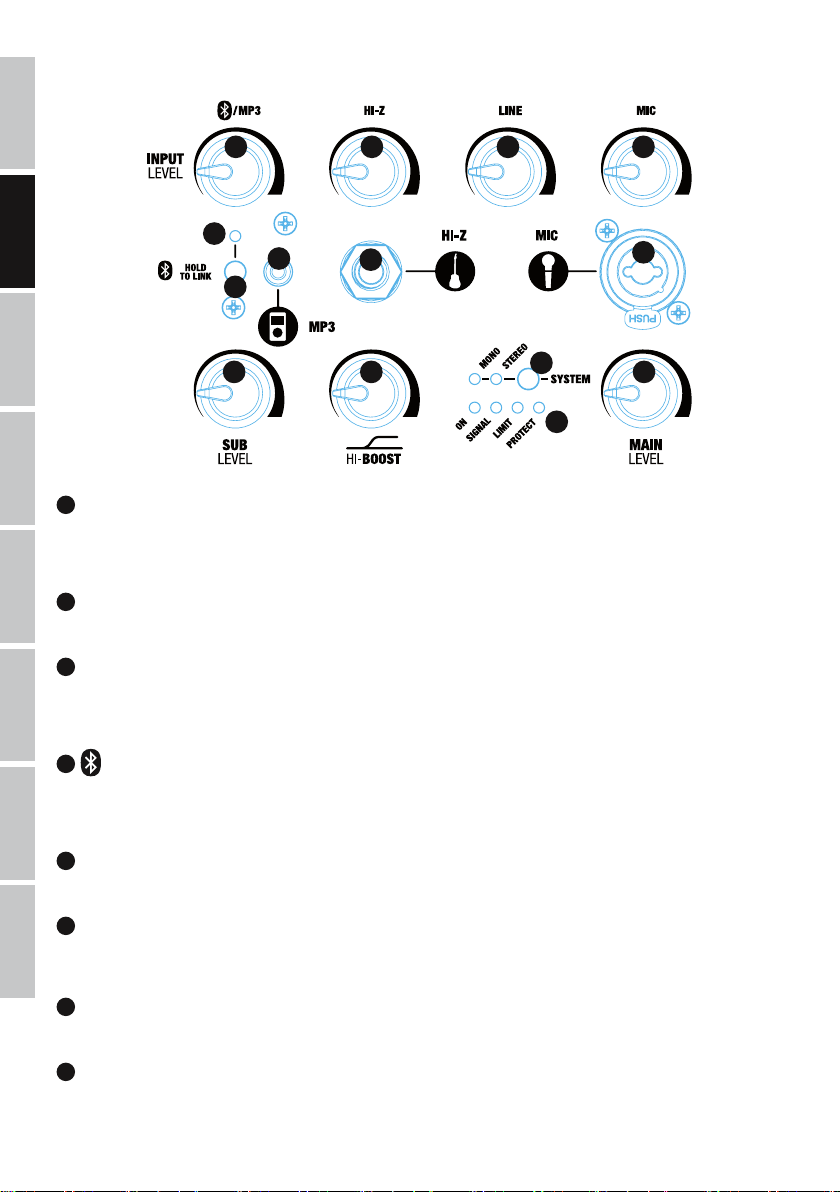
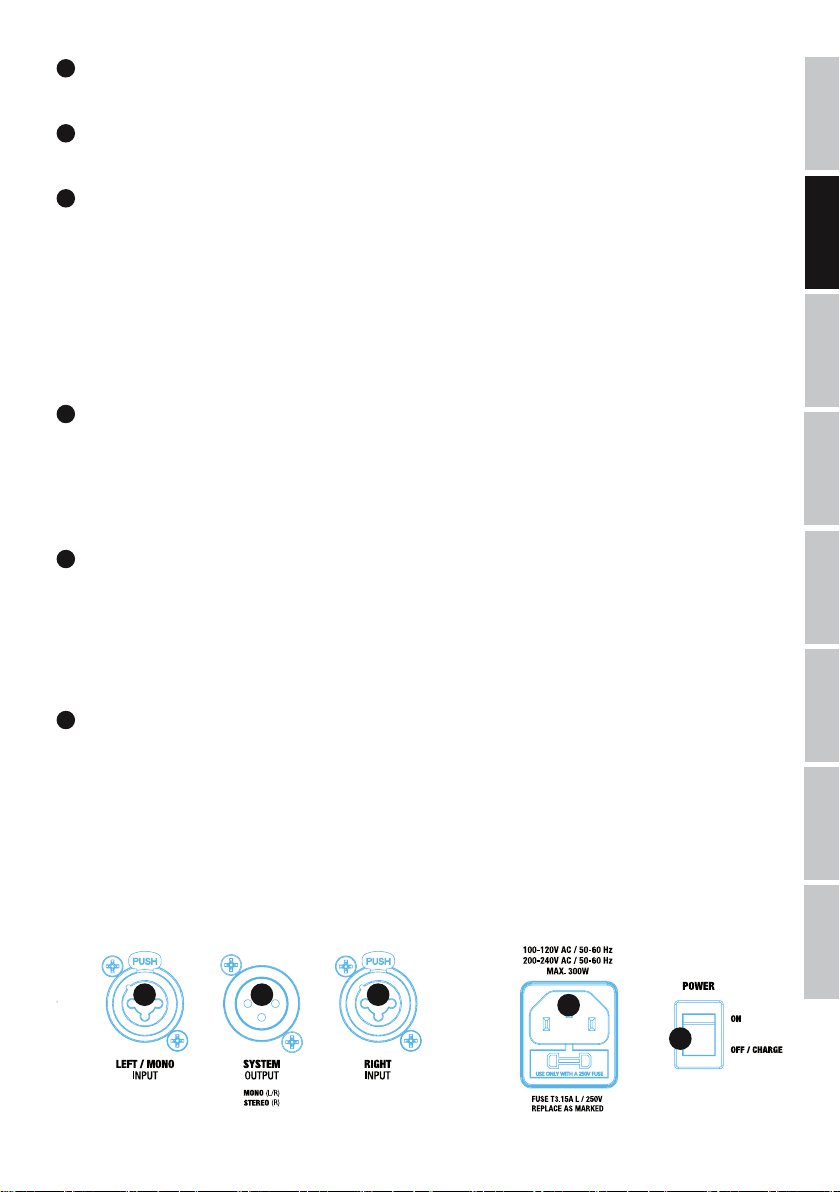
CONNECTIONS, OPERATING AND DISPLAY ELEMENTS
4 5 6 7
12
3
13
9 8
1
MIC INPUT
Balanced microphone input (XLR/6.3 mm jack combo). The use of an unbalanced microphone cable (mono jack) is also possible. The microphone
input has a built-in 100 Hz noise filter to suppress any unpleasant low-frequency signal artefacts. PLEASE NOTE: There is no phantom power on the
microphone input.
2
HI-Z INPUT
High-impedance mono input with 6.3 mm jack socket for an electro-acoustic or electric guitar.
3
MP3
Stereo line input with 3.5 mm jack socket for an MP3 player or other playback device. The two interfaces for MP3 and Bluetooth can be
used simultaneously. The volume ratio must be set on the playback devices. When using a single MAUI5 GO system, activate the mono
preset (see point 14).
2
14
11
1
10
ENGLISH
DEUTSCH
FRANCAIS
ESPAÑOL
POLSKIITALIANO
4
BLUETOOTH®/MP3
Volume control for the Bluetooth module or MP3 input. Rotate to the left to decrease and to the right to increase the volume. The two inputs
for MP3 and Bluetooth can be used simultaneously. The volume ratio must be set on the playback devices.
5
HI-Z
Volume control for the HI-Z input. Rotate to the left to decrease and to the right to increase the volume.
6
LINE
Volume control for the line channel (line inputs on the back of the subwoofer). Rotate to the left to decrease and to the right to increase the
volume.
7
MIC
Volume control for the microphone channel. Rotate to the left to decrease and to the right to increase the volume.
8
HI-BOOST
High shelf-filter for fine-tuning the high-frequency response to suit the room acoustics (rotate all the way to the left [1] for a neutral sound,
and rotate to the right to increase the highs).
简体中文
繁體中文
7
Page 8
9
ENGLISH
DEUTSCH
FRANCAIS ESPAÑOL POLSKI
SUB LEVEL
Setting the volume balance between the subwoofer and the column loudspeakers.
10
MAIN LEVEL
Setting the overall volume level. The subwoofer volume level is controlled by adjusting the SUB LEVEL volume control accordingly.
11
DISPLAY LEDs
ON: Lights up when the device is properly connected to the mains and switched on.
SIGNAL: Lights up when the device is receiving an audio signal. The signal is received before the MAIN LEVEL control.
LIMIT: Lights up when the speaker system is being operated in its upper limit range. Brief illumination of the LED is not critical. To protect
the system, any excessive signal level is lowered smoothly by the integrated limiter. If the limiter LED remains lit for longer or permanently,
reduce the volume level. Failure to do so may result in distorted sound reproduction and damage the speaker system.
PROTECT: Lights up if the system is overloaded/overheating. The amplifiers are automatically muted. After reaching normal operating
conditions, the unit returns to the normal operating mode after a few minutes.
12
BLUETOOTH
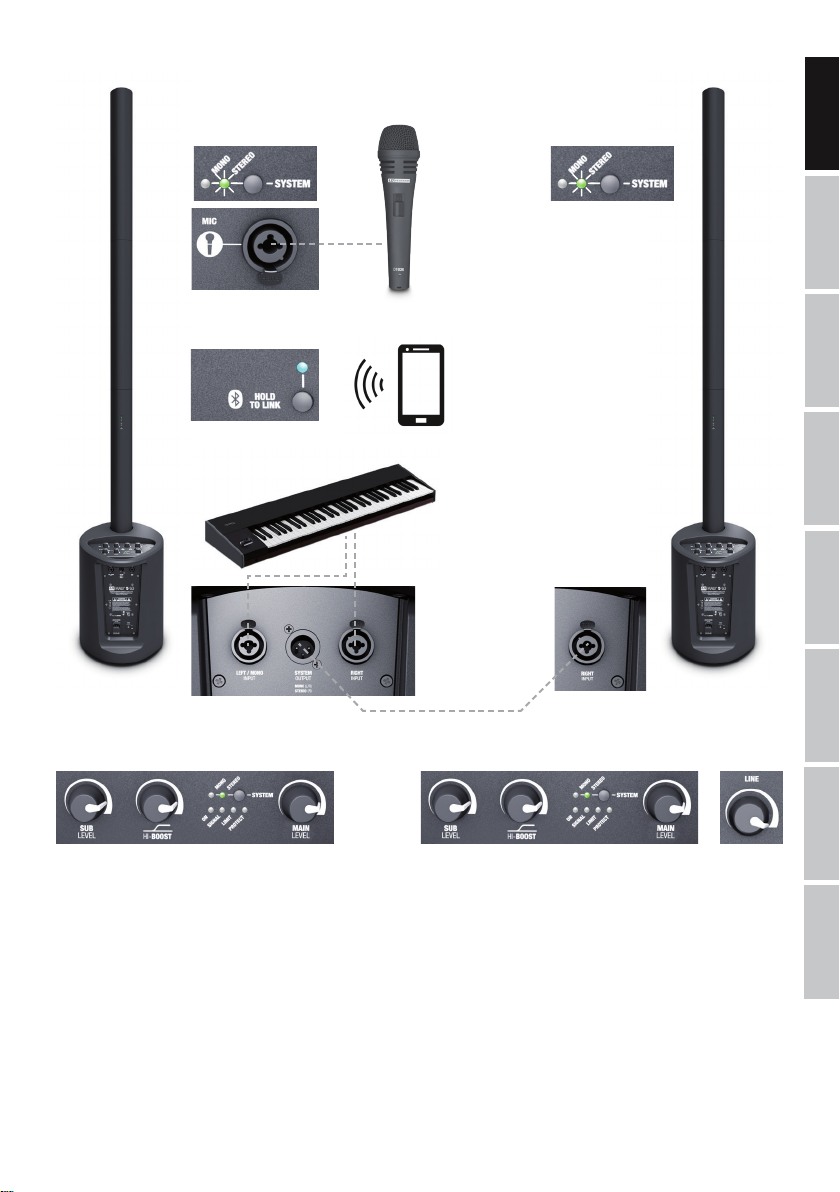
The mixer of the MAUI5 GO array system is equipped with Bluetooth technology, which means that audio files from another
Bluetooth device (e.g. Smartphone) can be played back on the MAUI5 GO speaker system (maximum distance between the two devices is
approx. 10 metres). If no Bluetooth device is connected to the internal Bluetooth unit, the blue Bluetooth LED doesn’t display a signal. During
pairing, the LED flashes rhythmically at a frequency of approximately 3 Hz. If the Bluetooth LED lights up permanently, there is a Bluetooth
connection and playback can be started. The volume is controlled via the MP3/Bluetooth volume control (No 4), or on the playback device.
13
HOLD TO LINK
To pair and connect the internal Bluetooth unit with a Bluetooth device, press and hold the HOLD TO LINK button for approximately 3 seconds until
the Bluetooth LED flashes rhythmically (approx. 3 Hz). Enable Bluetooth on your Bluetooth device and search on the user interface for available
devices. Select “LD MAUI5 GO” and pair your Bluetooth device with the Bluetooth unit.
Playback can now be started. To end the connection, press and hold the HOLD TO LINK button again for about 3 seconds. If the Bluetooth connection
is interrupted (e.g. range is exceeded), the Bluetooth LED goes out. Connection can be restored automatically within approx. 90 seconds (Bluetooth
device back in range). If the 90-second period is exceeded, the Bluetooth module of the MAUI5 GO speaker system is automatically deactivated.
ITALIANO
14
SYSTEM MONO/STEREO
Buttons and indicator lights for mono or stereo operation.
MONO: If you are using a single MAUI5 GO, activate the mono preset (press the button until the MONO LED lights up). Any stereo signal
present will now be summed to mono internally. If you are using a second MAUI5 GO speaker system as a mono extension, connect the line
output (SYSTEM OUTPUT) of the main unit to the line input (INPUT LEFT/MONO) of the expansion unit with a balanced XLR cable.
STEREO: If you are using two MAUI5 GO speaker systems in stereo, activate the stereo preset (press the button until the STEREO LED lights
简体中文 繁體中文
up). You can control the stereo expansion unit with the line output on the main unit (SYSTEM OUTPUT -> expansion unit RIGHT INPUT).
Examples of cabling and system expansion can be found in this manual under WIRING EXAMPLES.
®
LED
15 16 15
17
18
8
Page 9

15
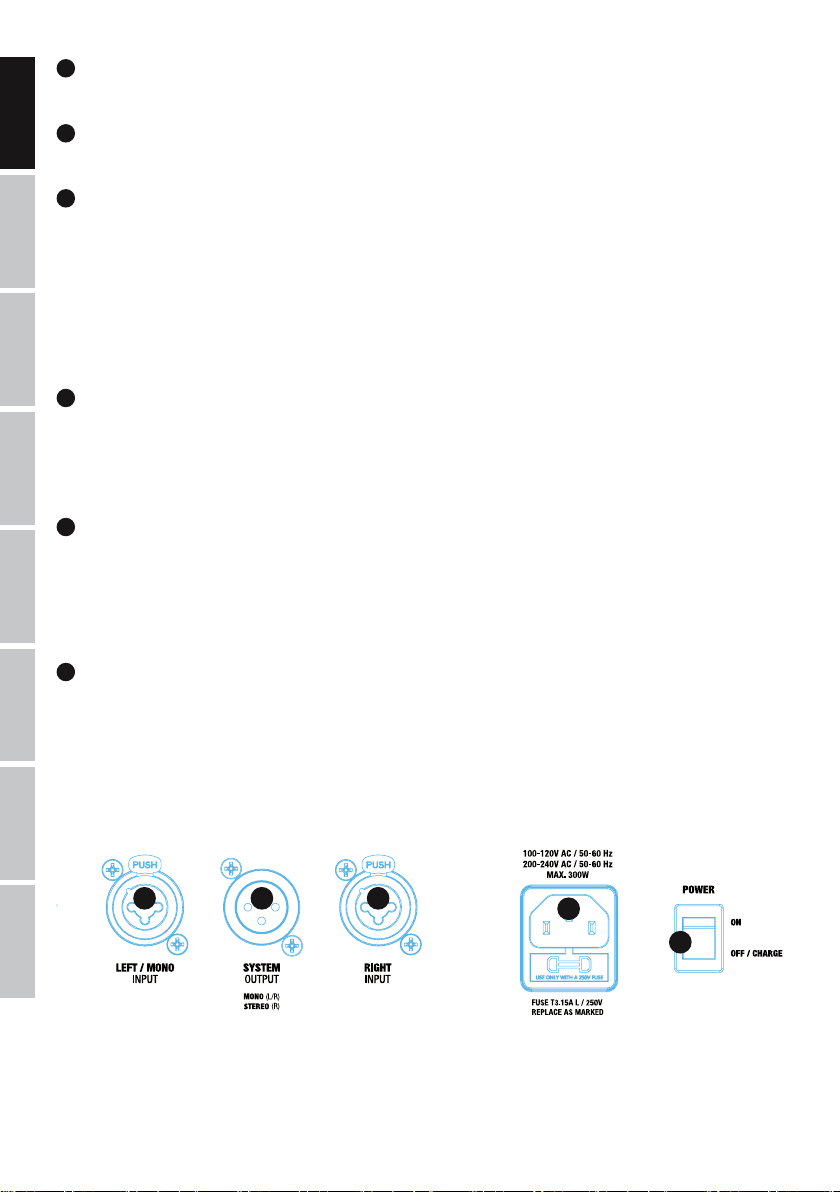
LINE INPUT LEFT/RIGHT
Balanced line input with XLR/6.3 mm jack combo sockets (left/right) to connect a playback device (such as a mixer, keyboard). If connecting
a mono signal source, please use the line input LEFT/MONO.
16
SYSTEM OUTPUT
Balanced line output with male XLR socket for connecting to other MAUI5 GO speaker systems.
17
POWER SOCKET AND FUSE HOLDER
IEC mains socket with built-in fuse holder. A suitable power cable is included.
IMPORTANT: Replace the fuse only with a fuse of the same type and value. Follow the instructions printed on the housing. In the event of
repeated fuse failure, please contact an authorised service centre.
18
POWER ON-OFF/CHARGE
This switch does not disconnect the system from the power supply in any position. Secure all-pole disconnection is only achieved by
removing the mains plug. The system is ready to use in the ON position, either operating on batteries without an external power supply or,
if an external power supply is available, regardless of the battery charge level. The system is switched off in the OFF/CHARGE position,
but the battery will charge if connected to the mains.
20
19
ENGLISH
DEUTSCH
FRANCAIS
ESPAÑOL
POLSKIITALIANO
21
19
BATTERY CHECK
Button for displaying battery status with the status LEDs (No. 20).
20
BATTERY STATUS LEDs
4-segment LED battery status display. Press button no. 19 for display of battery status by the status LEDs. If all 4 LEDs light up, the battery
is fully charged. If only the red LOW LED is lit, charge the battery immediately, or exchange it for a fully charged battery.
21
CHARGE
The battery in the corresponding column section is charged and the CHARGE LED lights up as soon as the speaker system is correctly connected to
the power supply (a separate charging dock is optionally available). The battery is also charged if the speaker system is connected to the mains power
supply, but is switched off (OFF/CHARGE). The charge current is 2.5 A. If the speaker system is switched on, the charge current is 1.5 A. Charging time
when the system is switched-off (OFF/CHARGE) is approximately 3 hours. When full charge voltage is reached, the charging process is automatically
stopped and the CHARGE LED goes out. The charging system checks the battery voltage at regular intervals and automatically restarts the charging
process if full charge voltage (as defined in the charging system) is not achieved.
简体中文
繁體中文
9
Page 10
LD SYSTEMS LECC DSP
ENGLISH
WHAT DOES THE DESIGNATION “LD SYSTEMS LECC DSP” MEAN?
DSP is short for Digital Signal Processing, LECC is short for Limiter, EQ, Compressor and Crossover. Digital signal processing ensures
optimum audio playback with maximum clarity and at the same time protects the PA system from overload.
HOW DOES LECC DSP ACTUALLY WORK?
DEUTSCH
The limiter function protects the speakers and prevents distortion caused by overload. Separate limiters for the bass, mid and high ranges
weaken the signal when the level exceeds a value that could have negative effects. Each limiter is optimised for one of the three seamlessly
linked frequency ranges (multiband-limiter). In this way, the system can be used at a higher overall sound pressure level, as extreme signal
peaks are automatically reduced so that the overall volume does not have to be reduced.
The multi-band EQ tailors the entire frequency range and optimises the overall sound of the system.
FRANCAIS ESPAÑOL POLSKI
The compressor is automatically activated to increase the bass and thus create a more powerful sound. At increased volume, the bass-boost
is automatically reduced. The automatically controlled lows are optimally integrated into the overall sound.
The crossovers send the audio signal to the respective speakers, depending on the frequency range, i.e. the subwoofer, mid-range and
high-frequency drivers in the array column. The optimisation of amplitudes and run-time of the crossovers ensures that all frequencies are
distributed evenly and reach the audience at the same time.
WIRING EXAMPLES
Example for mono operation
ITALIANO
简体中文 繁體中文
10
Page 11
Example for stereo operation
ENGLISH
DEUTSCH
FRANCAIS
ESPAÑOL
POLSKIITALIANO
Main unit Stereo extension
Same settings as main unit Maximum
简体中文
繁體中文
11
Page 12
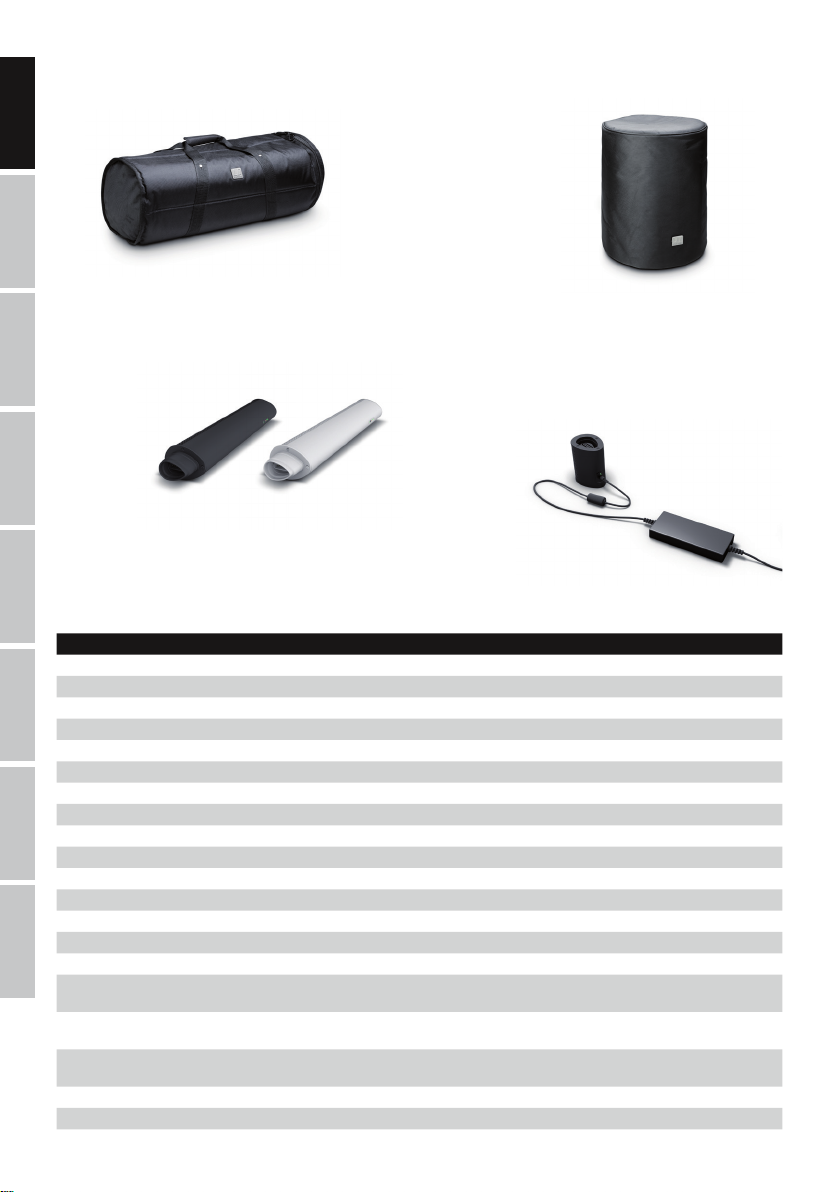
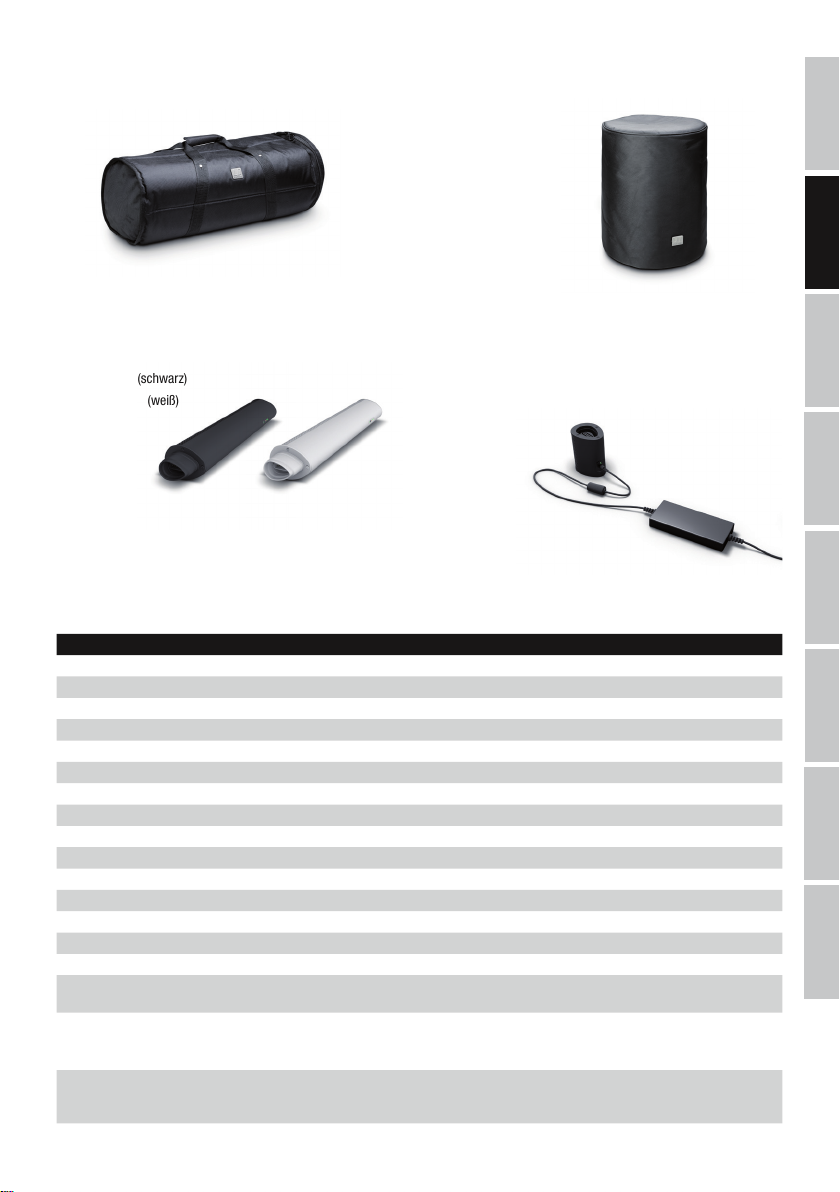
OPTIONAL ACCESSORIES
ENGLISH
Transport bag for up to 4 column sections
LDM5SATBAG
DEUTSCH
FRANCAIS ESPAÑOL POLSKI
Protective cover for subwoofer
LDM5SUBPC
Column section with integrated battery (29.6 V/5200 mAh)
LDMAUI5GOBC (black)
LDMAUI5GOBCW (white)
Charging dock for charging the battery
(Charging adapter with charging system &
power supply)
LDMAUI5GOCD
TECHNICAL DATA
Model number: LDMAUI5GO(W)
Type: Ultra-portable column PA system with battery and mixer
ITALIANO
Subwoofer: 1 x 8“ Bass reflex
Vertical array system: 4 x 2.8“
Amplification: Class D
Dispersion (H x V): 120° x 20°
Power Output (RMS/Peak) 2 x 100 W / 2 x 400 W
简体中文 繁體中文
Battery nominal voltage: 29.6V
Battery capacity: 5200 mAh
Battery technology: Lithium-Ion
Battery brand: LG
Battery protection circuits: protective circuits prevent overcharging and deep discharge
Charging electronics: Integrated in subwoofer
Frequency response: 50 Hz - 20 kHz
Max. SPL (peak): 120 dB
Protection: DSP based multiband limiter, Short circuit, over current, overheating
Controls: Main Level, Subwoofer Level, Hi Boost, Mic Level, MP3/Hi-Z Level, Line Level, Bluetooth
Indicators: Mixer: On, signal, limit, protect, Bluetooth
Subwoofer connectors: Line Input: 2 x XLR/6.3 mm Jack Combo, Mic input: XLR/6.3 mm Jack, MP3 input: 3.5 mm
Column connectors: Custom made multi pin connector
Cabinet material: ABS
Level, Bluetooth
Battery: Battery status, Charge
Jack, Hi-Z input: 6.3 mm Jack ; XLR System Out
®
Button, ON/OFF switch, Mono/Stereo Switch
®
, Mono/Stereo
12
®
Page 13
Cabinet colour: Black (LDMAUI5GO)
Power Supply: SMPS
Power Connector: IEC
Operating Voltage: AC 110-120V, 50/60Hz
Power Consumption (max.): 300W
AD/DA converter: 24bit
DSP sampling frequency: 48kHz
Ambient Temperature (in operation): 0°C - 50°C
Humidity Range: 10% - 70% rel. (non condensing)
Dimensions (W x H x D): Subwoofer: 305 x 405 x 395 mm
Weight: Subwoofer: 8.5kg
Features: Signal processing LD LECC DSP (limiter, equalizer, compressor, crossover), Hi Boost, 100Hz
White (LDMAUI5GOW)
AC 220-240V, 50/60Hz (automatic changeover)
Column (3 pcs): 82 x 535 x 105 mm
Height in total: 1985 mm
Battery Column: 1.7kg
Spacer Column: 0.8kg
Loudspeaker Column: 1.3kg
Weight in total: 12.3kg
low cut in Mic channel, easy connection with multipin plug, Bluetooth
®
ENGLISH
DEUTSCH
FRANCAIS
MANUFACTURER´S DECLARATIONS
MANUFACTURER‘S WARRANTY & LIMITATIONS OF LIABILITY
You can find our current warranty conditions and limitations of liability at:
https://cdn-shop.adamhall.com/media/pdf/Manufacturers-Declarations-LDSYSTEMS_DE_EN_ES_FR.pdf.
To request warranty service for a product, please contact Adam Hall GmbH, Adam-Hall-Str. 1, 61267 Neu Anspach /
Email: Info@adamhall.com / +49 (0)6081 / 9419-0.
CORRECT DISPOSAL OF THIS PRODUCT
(valid in the European Union and other European countries with a differentiated waste collection system)
This symbol on the product, or on its documents indicates that the device may not be treated as household waste. This is to avoid
environmental damage or personal injury due to uncontrolled waste disposal. Please dispose of this product separately from other waste
and have it recycled to promote sustainable economic activity. Household users should contact either the retailer where they purchased
this product, or their local government office, for details on where and how they can recycle this item in an environmentally friendly manner.
Business users should contact their supplier and check the terms and conditions of the purchase contract. This product should not be mixed
with other commercial waste for disposal.
FCC STATEMENT
This device complies with Part 15 of the FCC Rules. Operation is subject to the following two conditions:
(1) This device may not cause harmful interference, and
(2) This device must accept any interference received, including interference that may cause undesired operation
CE Compliance
Adam Hall GmbH states that this product meets the following guidelines (where applicable):
R&TTE (1999/5/EC) or RED (2014/53/EU) from June 2017
Low voltage directive (2014/35/EU)
EMV directive (2014/30/EU)
RoHS (2011/65/EU)
The complete declaration of conformity can be found at www.adamhall.com.
Furthermore, you may also direct your enquiry to info@adamhall.com.
ESPAÑOL
POLSKIITALIANO
简体中文
繁體中文
13
Page 14

DEUTSCH
ENGLISH
SIE HABEN DIE RICHTIGE WAHL GETROFFEN!
Dieses Gerät wurde unter hohen Qualitätsanforderungen entwickelt und gefertigt, um viele Jahre einen reibungslosen Betrieb zu gewährleisten.
Dafür steht LD Systems mit seinem Namen und der langjährigen Erfahrung als Hersteller hochwertiger Audioprodukte. Bitte lesen Sie diese
Bedienungsanleitung sorgfältig, damit Sie Ihr neues Produkt von LD Systems schnell optimal einsetzen können.
Mehr Informationen zu LD SYSTEMS finden Sie auf unserer Internetseite WWW.LD-SYSTEMS.COM
DEUTSCH
SICHERHEITSHINWEISE
1. Lesen Sie diese Anleitung bitte sorgfältig durch.
2. Bewahren Sie alle Informationen und Anleitungen an einem sicheren Ort auf.
3. Befolgen Sie die Anweisungen.
4. Beachten Sie alle Warnhinweise. Entfernen Sie keine Sicherheitshinweise oder andere Informationen vom Gerät.
5. Verwenden Sie das Gerät nur in der vorgesehenen Art und Weise.
6. Verwenden Sie ausschließlich stabile und passende Stative bzw. Befestigungen (bei Festinstallationen). Stellen Sie sicher, dass Wandhalterungen
FRANCAIS ESPAÑOL POLSKI
ordnungsgemäß installiert und gesichert sind. Stellen Sie sicher, dass das Gerät sicher installiert ist und nicht herunterfallen kann.
7. Beachten Sie bei der Installation die für Ihr Land geltenden Sicherheitsvorschriften.
8. Installieren und betreiben Sie das Gerät nicht in der Nähe von Heizkörpern, Wärmespeichern, Öfen oder sonstigen Wärmequellen. Sorgen
Sie dafür, dass das Gerät immer so installiert ist, dass es ausreichend gekühlt wird und nicht überhitzen kann.
9. Platzieren Sie keine Zündquellen wie z.B. brennende Kerzen auf dem Gerät.
10. Lüftungsschlitze dürfen nicht blockiert werden.
11. Halten Sie einen Mindestabstand von 20 cm seitlich und oberhalb des Geräts ein.
12. Betreiben Sie das Gerät nicht in unmittelbarer Nähe von Wasser. Bringen Sie das Gerät nicht mit brennbaren Materialien, Flüssigkeiten
oder Gasen in Berührung. Direkte Sonneneinstrahlung vermeiden!
13. Sorgen Sie dafür, dass kein Tropf- oder Spritzwasser in das Gerät eindringen kann. Stellen Sie keine mit Flüssigkeit gefüllten Behältnisse
wie Vasen oder Trinkgefäße auf das Gerät.
14. Sorgen Sie dafür, dass keine Gegenstände in das Gerät fallen können.
15. Betreiben Sie das Gerät nur mit dem vom Hersteller empfohlenen und vorgesehenen Zubehör.
16. Öffnen Sie das Gerät nicht und verändern Sie es nicht.
17. Überprüfen Sie nach dem Anschluss des Geräts alle Kabelwege, um Schäden oder Unfälle, z. B. durch Stolperfallen zu vermeiden.
18. Achten Sie beim Transport darauf, dass das Gerät nicht herunterfallen und dabei möglicherweise Sach- und Personenschäden verursachen kann.
19. Wenn Ihr Gerät nicht mehr ordnungsgemäß funktioniert, Flüssigkeiten oder Gegenstände in das Geräteinnere gelangt sind, oder das
Gerät anderweitig beschädigt wurde, schalten Sie es sofort aus und trennen es von der Netzsteckdose (sofern es sich um ein aktives Gerät
handelt). Dieses Gerät darf nur von autorisiertem Fachpersonal repariert werden.
20. Verwenden Sie zur Reinigung des Geräts ein trockenes Tuch.
21. Beachten Sie alle in Ihrem Land geltenden Entsorgungsgesetze. Trennen Sie bei der Entsorgung der Verpackung bitte Kunststoff und
Papier bzw. Kartonagen voneinander.
22. Kunststoffbeutel müssen außer Reichweite von Kindern aufbewahrt werden.
ITALIANO
23. Sämtliche vom Benutzer vorgenommenen Änderungen und Modifikationen, denen die für die Einhaltung der Richtlinien verantwortliche
Partei nicht ausdrücklich zugestimmt hat, können zum Entzug der Betriebserlaubnis für das Gerät führen.
BEI GERÄTEN MIT NETZANSCHLUSS
24. ACHTUNG: Wenn das Netzkabel des Geräts mit einem Schutzkontakt ausgestattet ist, muss es an einer Steckdose mit Schutzleiter
angeschlossen werden. Deaktivieren Sie niemals den Schutzleiter eines Netzkabels.
25. Schalten Sie das Gerät nicht sofort ein, wenn es starken Temperaturschwankungen ausgesetzt war (beispielsweise nach dem Transport).
简体中文 繁體中文
Feuchtigkeit und Kondensat könnten das Gerät beschädigen. Schalten Sie das Gerät erst ein, wenn es Zimmertemperatur erreicht hat.
26. Bevor Sie das Gerät an die Steckdose anschließen, prüfen Sie zuerst, ob die Spannung und die Frequenz des Stromnetzes mit den auf
dem Gerät angegebenen Werten übereinstimmen. Verfügt das Gerät über einen Spannungswahlschalter, schließen Sie das Gerät nur an die
Steckdose an, wenn die Gerätewerte mit den Werten des Stromnetzes übereinstimmen. Wenn das mitgelieferte Netzkabel bzw. der mitgelieferte Netzadapter nicht in Ihre Netzsteckdose passt, wenden Sie sich an Ihren Elektriker.
27. Treten Sie nicht auf das Netzkabel. Sorgen Sie dafür, dass spannungsführende Kabel speziell an der Netzbuchse bzw. am Netzadapter
und der Gerätebuchse nicht geknickt werden.
28. Achten Sie bei der Verkabelung des Geräts immer darauf, dass das Netzkabel bzw. der Netzadapter stets frei zugänglich ist. Trennen Sie
das Gerät stets von der Stromzuführung, wenn das Gerät nicht benutzt wird, oder Sie das Gerät reinigen möchten. Ziehen Sie Netzkabel und
Netzadapter immer am Stecker bzw. am Adapter und nicht am Kabel aus der Steckdose. Berühren Sie Netzkabel und Netzadapter niemals mit
nassen Händen.
29. Schalten Sie das Gerät möglichst nicht schnell hintereinander ein und aus, da sonst die Lebensdauer des Geräts beeinträchtigt werden könnte.
30. WICHTIGER HINWEIS: Ersetzen Sie Sicherungen ausschließlich durch Sicherungen des gleichen Typs und Wertes. Sollte eine Sicherung
wiederholt auslösen, wenden Sie sich bitte an ein autorisiertes Servicezentrum.
31. Um das Gerät vollständig vom Stromnetz zu trennen, entfernen Sie das Netzkabel bzw. den Netzadapter aus der Steckdose.
32. Wenn Ihr Gerät mit einem verriegelbaren Netzanschluss bestückt ist, muss der passende Gerätestecker entsperrt werden, bevor er entfernt
werden kann. Das bedeutet aber auch, dass das Gerät durch ein Ziehen am Netzkabel verrutschen und herunterfallen kann, wodurch Personen
verletzt werden und/oder andere Schäden auftreten können. Verlegen Sie Ihre Kabel daher immer sorgfältig.
33. Entfernen Sie Netzkabel und Netzadapter aus der Steckdose bei Gefahr eines Blitzschlags oder wenn Sie das Gerät länger nicht verwenden.
14
Page 15

ACHTUNG
Entfernen Sie niemals die Abdeckung, da sonst das Risiko eines elektrischen Schlages besteht. Im
Inneren des Geräts befinden sich keine Teile, die vom Bediener repariert oder gewartet werden können.
Lassen Sie Wartung und Reparaturen ausschließlich von qualifiziertem Servicepersonal durchführen.
Das gleichseitige Dreieck mit Blitzsymbol warnt vor nichtisolierten, gefährlichen Spannungen im Geräteinneren, die einen
elektrischen Schlag verursachen können
Das gleichseitige Dreieck mit Ausrufungszeichen kennzeichnet wichtige Bedienungs- und Wartungshinweise.
ENGLISH
Warnung! Dieses Symbol kennzeichnet heiße Oberflächen. Während des Betriebs können bestimmte Teile des Gehäuses heiß
werden. Berühren oder transportieren Sie das Gerät nach einem Einsatz erst nach einer Abkühlzeit von mindestens 10 Minuten.
Warnung! Dieses Gerät ist für eine Nutzung bis zu einer Höhe von maximal 2000 Metern über dem Meeresspiegel bestimmt.
Warnung! Dieses Gerät ist nicht für den Einsatz in tropischen Klimazonen bestimmt.
ACHTUNG HOHE LAUTSTÄRKEN BEI AUDIOPRODUKTEN!
Dieses Gerät ist für den professionellen Einsatz vorgesehen. Der kommerzielle Betrieb dieses Geräts unterliegt den jeweils gültigen
nationalen Vorschriften und Richtlinien zur Unfallverhütung. Als Hersteller ist Adam Hall gesetzlich verpflichtet, Sie ausdrücklich auf mögliche
Gesundheitsrisiken hinzuweisen. Gehörschäden durch hohe Lautstärken und Dauerbelastung: Bei der Verwendung dieses Produkts können
hohe Schalldruckpegel (SPL) erzeugt werden, die bei Künstlern, Mitarbeitern und Zuschauern zu irreparablen Gehörschäden führen können.
Vermeiden Sie länger anhaltende Belastung durch hohe Lautstärken über 90 dB.
AKKUSICHERHEIT
1. Halten Sie die Akkupole von leitenden Gegenständen fern, wie Schlüssel, Schmuck oder andere Materialien. Ansonsten wird möglicherweise
der Akku kurzgeschlossen, was zu Verletzungen und Verbrennungen führen kann.
2. Verändern Sie niemals die Polung der Kontakte des Akkus.
3. Halten Sie den Akku fern von übermäßiger Hitze und direkter Sonneneinstrahlung. Legen Sie ihn nicht auf oder in Heizgeräte, wie Mikrowellen,
Öfen oder Heizkörper. Akkus können bei Überhitzung explodieren.
4. Versuchen Sie nicht, den Akku zu ändern oder zu überarbeiten, Fremdkörper in den Akku einzuführen oder ihn in Wasser oder andere
Flüssigkeiten einzutauchen bzw. mit diesen in Kontakt zu bringen. Andernfalls kann es zu einem Brand, einer Explosion oder anderen
gefährlichen Situationen kommen.
5. Stellen Sie bei Austreten von Batteriesäure sicher, dass diese nicht auf die Haut oder in die Augen gerät. Sollte dies dennoch der Fall sein,
spülen Sie diese unverzüglich mit klarem Wasser ab bzw. aus und suchen Sie einen Arzt auf.
6. Bei einer Verformung, einer Farbänderung oder einer Überhitzung von Akkus während des Ladevorgangs oder der Aufbewahrung stellen
Sie die Verwendung des Geräts sofort ein und entnehmen Sie den Akku. Wenn Sie das Gerät weiterhin verwenden, kann Batteriesäure
austreten oder es kann zu einem Brand oder einer Explosion kommen.
7. Werfen Sie Akkus nicht ins Feuer, da sie explodieren können. Beschädigte Akkus können ebenfalls explodieren.
8. Entsorgen Sie gebrauchte Akkus in Übereinstimmung mit den lokalen Vorschriften. Eine unsachgemäße Nutzung des Akkus kann zu
einem Brand, einer Explosion oder anderen gefährlichen Situationen führen.
9. Lassen Sie Kinder und Haustiere nicht auf dem Akku kauen oder daran nuckeln bzw. saugen. Andernfalls kann es zu Schäden oder einer
Explosion kommen.
10. Zerschlagen oder durchstechen Sie den Akku nicht und setzen Sie ihn keinen hohen Drücken aus. Ansonsten kann es zu einem Kurzschluss
oder Überhitzung kommen.
11. Lassen Sie das Gerät bzw. den Akku nicht fallen. Wenn das Gerät oder der Akku fallen gelassen wird, insbesondere auf eine harte
Oberfläche, kann es bzw. er beschädigt werden.
12. Wenn sich die Standby-Zeit des Geräts deutlich verkürzt, tauschen Sie den Akku aus.
13. Falls das Gerät über einen integrierten, nicht herausnehmbaren Akku verfügt, versuchen Sie nicht, den Akku zu entnehmen, da das Gerät
ansonsten beschädigt werden kann. Zum Austauschen des Akkus bringen Sie das Gerät zu einem autorisierten Service-Center.
DEUTSCH
FRANCAIS
ESPAÑOL
POLSKIITALIANO
简体中文
繁體中文
WICHTIGER HINWEIS: Laden Sie den Akku ausschließlich mit Hilfe der dafür vorgesehenen Ladeelektronik (Ladeelektronik im MAUI5 GO
Subwoofer, Ladedock LDMAUI5GOCD)
15
Page 16

EINFÜHRUNG
ENGLISH
Rundum perfekt ausgestattet, ist die MAUI® 5 GO das ultimative System, um allerorts einen kristallklaren, druckvollen Sound zu präsentieren. Die akkubetriebene Säulen-PA wird von einem leistungsstarken Lithium-Ionen-Element versorgt. Das Ladegerät ist im Subwoofer integriert, ein externes Ladedock ist als Zubehör erhältlich. Eingänge für Mikrofon, Instrumente und Line-Signale sowie Bluetooth®- Stereo-Streaming machen die MAUI® 5 GO zur idealen Anlage für Straßenmusiker, die Musik- und Sprachwiedergabe bei privaten und geschäftlichen
Events und alle netzunabhängigen Anwendungen. Durch das niedrige Gewicht von nur knapp 13 kg lässt sich die vierteilige Konstruktion
ultraleicht transportieren und dank spezieller Multipin-Verbinder in Sekundenschnelle spielbereit aufstellen. Die Line-Array-Anordnung
DEUTSCH
der Treiber erzielt eine extrem hohe Reichweite, dazu machen die breite Abstrahlung und hervorragende Rückkopplungsfestigkeit der
Anlage separate Monitorlautsprecher überflüssig. Für eine unübertroffene Klangqualität bei allen Einsätzen verfügt die Säulenanlage über
LD Systems‘ LECC DSP mit Multiband-Limiter, Equalizer, Compressor und Frequenzweiche. Der integrierte 4-Kanal-Mixer bietet separate
Lautstärkeregler für die Eingangskanäle, Summe und Subwoofer sowie eine variable Höhenanhebung, die eine schnelle und ausgewogenen
Soundeinstellung ermöglichen.
ALLGEMEINE HINWEISE
Der Subwoofer des LD MAUI5 GO Lautsprechersystems muss vor der Inbetriebnahme senkrecht auf ebener Fläche auf seine Füße gestellt
FRANCAIS ESPAÑOL POLSKI
werden. Betreiben Sie das System niemals auf einem Rollwagen, da die Gefahr besteht, dass sich das gesamte System unkontrolliert in
Bewegung setzt. Unfälle und Beschädigungen können die Folge sein. Um eine ausreichende Kühlung zu gewährleisten, muss bei Betrieb
zwischen der Rückseite des Subwoofers und anderen Objekten wie Wänden o. ä. ein Mindestabstand von 50 cm eingehalten werden.
Bitte achten Sie bei dem System sowie den angeschlossenen Geräten wie Mischpulten, CD-Playern etc. auf den korrekten Anschluss von
Audio- und Stromverbindungen. Verwenden Sie ausschließlich unbeschädigte Kabel mit geeignetem Durchmesser und rollen Sie Kabelrollen
immer vollständig ab. Verwenden Sie gegebenenfalls Kabelbrücken, um Stolperfallen durch lose Kabel zu vermeiden. Stellen Sie das Gerät
niemals direkt an einer Kante auf. Positionieren Sie den Subwoofer nicht auf einem Tisch. Um ungewollte Nebengeräusche beim Einschalten
angeschlossener Geräte zu vermeiden, schalten Sie das System immer als letztes Gerät ein und als erstes Gerät aus.
AUFBAU
Das LD MAUI5 GO Lautsprechersystem besteht aus vier Komponenten:
A. Subwoofer mit integrierter Elektronik für alle Systemkomponenten inklusive Lademodul zum Laden des Akkus und Anschluss für die
Säulenelemente auf der Oberseite.
B. Säulenelement mit integriertem Akku, Ladestatusanzeige und Anschlüssen auf Unter- und Oberseite.
C. Distanzstück mit Anschlüssen auf Unter- und Oberseite.
D. Säulenelement mit den Lautsprechern und dem Anschluss auf der Unterseite.
ITALIANO
Nachdem der Subwoofer an der gewünschten Stelle aufgestellt wurde, werden Säulenelement mit integriertem Akku und Distanzstück auf
den Subwoofer aufgesteckt, danach das Säulenelement mit den Lautsprechern. Je nach Anwendung kann das Lautsprechersystem auch
ohne Distanzstück eingesetzt werden.
Das MAUI5 GO Lautsprechersystem kann sowohl netzunabhängig mit Hilfe des Säulenelements mit integriertem Akku betrieben werden,
als auch netzgebunden. Bei Betrieb am Stromnetz wird der Akku automatisch geladen. Die Spielzeit bei netzunabhängigem Einsatz kann
beliebig verlängert werden, indem Säulenelemente mit leerem Akku gegen optional erhältliche Säulenelemente mit voll geladenem Akku
简体中文 繁體中文
ersetzt werden. Der Wechsel eines Akkus dauert nur wenige Sekunden und das System ist wieder spielbereit.
16
Page 17
D
ENGLISH
C
B
D
B
DEUTSCH
FRANCAIS
ESPAÑOL
POLSKIITALIANO
A
A
ANSCHLUSS UND BETRIEB
Am Gerät lässt sich sowohl die Lautstärke des gesamten Systems als auch die Lautstärke des Subwoofers im Verhältnis zur Gesamtlautstärke
einstellen. Zuspielgeräte lassen sich sowohl über symmetrische als auch unsymmetrische Kabel (XLR / 6,3 mm Klinke / Mini-Klinke) anschließen.
Das integrierte 4-Kanal Mischpult bietet einen Mikrofoneingang, einen hochohmigen Instrumenteneingang für z.B. eine elektroakustische Gitarre,
einen Eingang für Zuspielgeräte mit Line-Pegel und darüber hinaus eine Bluetooth-Einheit. Zum Erweitern des Systems verfügt der Subwoofer über
einen symmetrischen Line-Ausgang mit XLR-Buchse (SYSTEM OUTPUT).
简体中文
繁體中文
17
Page 18
ANSCHLÜSSE, BEDIEN- UND ANZEIGENELEMENTE
ENGLISH
4 5 6 7
DEUTSCH
12
3
13
2
1
FRANCAIS ESPAÑOL POLSKI
9 8
1
MIC INPUT
Symmetrischer Mikrofoneingang (XLR / 6,3 mm Klinke Combo). Die Nutzung eines unsymmetrischen Mikrofonkabels (Mono-Klinke) ist
ebenfalls möglich. Der Mikrofoneingang verfügt über ein eingebautes 100Hz Trittsschallfilter um störende tieffrequente Signalanteile zu
unterdrücken. HINWEIS: Am Mikrofoneingang liegt keine Phantomspeisung an.
2
HI-Z INPUT
Hochohmiger Mono-Eingang mit 6,3 mm Klinken-Buchse für eine elektroakustische oder E-Gitarre.
ITALIANO
3
MP3
Stereo-Line-Eingang mit 3,5 mm Klinken-Buchse für einen MP3-Player oder ein anderes Zuspielgerät. Die beiden Schnittstellen MP3 und
Bluetooth können simultan genutzt werden, das Lautstärkenverhältnis muss an den Zuspielgeräten eingestellt werden. Aktivieren Sie bei der
Verwendung einer einzelnen MAUI5 GO Anlage das Mono-Preset (siehe Punkt 14).
4
简体中文 繁體中文
BLUETOOTH® / MP3
Lautstärkeregler für das Bluetooth-Modul, bzw. MP3-Eingang. Nach links gedreht verringert sich, nach rechts gedreht erhöht sich die
Lautstärke. Die beiden Eingänge Bluetooth und MP3 können simultan genutzt werden, das Lautstärkeverhältnis muss an den Zuspielgeräten
eingestellt werden.
14
11
10
5
HI-Z
Lautstärkeregler für den HI-Z-Eingang. Nach links gedreht verringert sich, nach rechts gedreht erhöht sich die Lautstärke.
6
LINE
Lautstärkeregler für den Line-Kanal (Line-Eingänge auf der Rückseite des Subwoofers). Nach links gedreht verringert sich, nach rechts
gedreht erhöht sich die Lautstärke.
7
MIC
Lautstärkeregler für den Mikrofon-Kanal. Nach links gedreht verringert sich, nach rechts gedreht erhöht sich die Lautstärke.
8
HI-BOOST
High-Shelf-Filter zur Anpassung der Höhenwiedergabe an die Raumakustik (Linksanschlag = neutraler Klang,
Drehung nach rechts = Höhenanhebung).
18
Page 19
9
SUB LEVEL
Einstellung des Lautstärkeverhältnisses des Subwoofers zum Säulenlautsprecher.
10
MAIN LEVEL
Einstellung der Gesamtlautstärke. Die Subwooferlautstärke wird entsprechend der Voreinstellung am SUB LEVEL Pegelsteller mitgeregelt.
11
ANZEIGE LEDS
ENGLISH
ON: Leuchtet, wenn das Gerät korrekt am Stromnetz angeschlossen und eingeschaltet ist.
SIGNAL: Leuchtet auf, wenn am Gerät ein Audiosignal anliegt. Die Signalerfassung erfolgt vor dem MAIN LEVEL-Regler.
LIMIT: Leuchtet auf, wenn das Lautsprecher-System im oberen Grenzbereich betrieben wird. Ein kurzes Aufleuchten der LED ist dabei
unkritisch. Um das System zu schützen, wird ein überhöhter Signal-Pegel vom integrierten Limiter sanft heruntergeregelt. Leuchtet die
Limiter-LED länger oder dauerhaft, reduzieren Sie den Lautstärkepegel. Eine Nichtbeachtung kann zu einer verzerrten Klangwiedergabe und
zur Beschädigung des Lautsprechersystems führen.
PROTECT: Leuchtet auf, falls das System überlastet/überhitzt. Die Verstärker werden automatisch stummgeschaltet. Nach Erreichen normaler
Betriebsbedingungen wechselt das Gerät nach einigen Minuten wieder in den normalen Betriebsmodus.
12
BLUETOOTH
Das Mischpult des MAUI5 GO Array Systems ist mit Bluetooth ausgestattet, was bedeutet, dass Audio-Dateien eines anderen
Bluetooth-Geräts (z.B. Smartphone) auf dem MAUI5 GO Lautsprechersystem wiedergegeben werden können (maximale Entfernung zwischen
beiden Geräten ca. 10 Meter). Ist kein Bluetooth-Gerät mit der internen Bluetooth-Einheit verbunden, zeigt die blaue Bluetooth-LED kein Signal
an, während der Kopplungsbereitschaft blinkt die LED rhythmisch in einer Frequenz von ca. 3 Hz, leuchtet die Bluetooth-LED permanent,
besteht eine Bluetooth-Verbindung und die Titelwiedergabe kann gestartet werden. Die Lautstärkeeinstellung erfolgt mit Hilfe des
MP3 / Bluetooth Lautstärkereglers (Nr. 4), bzw. am Zuspielgerät.
13
HOLD TO LINK
Um die interne Bluetooth-Einheit mit einem Bluetooth-Gerät zu koppeln und zu verbinden, drücken und halten Sie den HOLD to LINK-Taster für ca. 3
Sekunden bis die Bluetooth-LED rhythmisch blinkt (ca. 3 Hz), aktivieren Bluetooth auf Ihrem Bluetooth-Gerät und suchen auf der Benutzeroberfläche
nach verfügbaren Geräten. Wählen Sie den Eintrag „LD MAUI5 GO“ und koppeln damit Ihr Bluetooth-Gerät mit der Bluetooth-Einheit.
Die Titelwiedergabe kann nun gestartet werden. Um die Verbindung zu beenden, drücken und halten Sie den HOLD to LINK-Taster abermals für
ca. 3 Sekunden. Wird die Bluetooth-Verbindung unterbrochen (z.B. überschreiten der Reichweite), erlischt die Bluetooth-LED. Innerhalb von ca. 90
Sekunden kann die Verbindung automatisch wiederhergestellt werden (Bluetooth-Gerät wieder in Reichweite). Bei Überschreiten der Zeitdauer von
90 Sekunden, wird das Bluetooth-Modul des MAUI5 GO Lautsprechersystems automatisch deaktiviert.
14
SYSTEM MONO / STEREO
Taster und Anzeige-LEDs für die Mono-, bzw. Stereo-Betriebsart.
MONO: Aktivieren Sie bei der Verwendung eines einzelnen MAUI5 GO Lautsprechersystems das Mono-Preset (Taster drücken, sodass
Anzeige-LED MONO leuchtet). Ein anliegendes Stereo-Signal wird nun intern Mono summiert. Bei der Verwendung eines zweiten MAUI5 GO
Lautsprechersystems als Mono-Erweiterung, verbinden Sie den Line-Ausgang SYSTEM OUTPUT der Haupt-Einheit und den Line-Eingang
INPUT LEFT/MONO der Erweiterungs-Einheit mit Hilfe eines symmetrischen XLR-Kables.
STEREO: Aktivieren Sie bei der Verwendung zweier MAUI5 GO Lautsprechersysteme als Stereo-Set das Stereo-Preset (Taster drücken,
sodass Anzeige-LED STEREO leuchtet). Steuern Sie die Stereo Erweiterungs-Einheit mit Hilfe des Line-Ausgangs SYSTEM OUTPUT an
(Haupt-Einheit SYSTEM OUTPUT -> Erweiterungs-Einheit RIGHT INPUT).
®
LED
DEUTSCH
FRANCAIS
ESPAÑOL
POLSKIITALIANO
简体中文
Beispiele für Verkabelung und Systemerweiterung finden Sie in dieser Anleitung unter VERKABELUNGSBEISPIELE.
15 16 15
17
繁體中文
18
19
Page 20
15
ENGLISH
LINE INPUT LEFT / RIGHT
Symmetrischer Line-Eingang mit XLR / 6,3 mm Klinke Combo-Buchsen (links / rechts) zum Anschließen eines Zuspielgeräts (z.B. Mischpult,
Keyboard). Beim Anschließen einer Mono-Signalquelle verwenden Sie bitte den Line-Eingang LEFT / MONO.
16
SYSTEM OUTPUT
Symmetrischer Line-Ausgang mit männlicher XLR-Buchse für die Ansteuerung weiterer MAUI5 GO Lautsprechersysteme.
DEUTSCH
17
NETZBUCHSE UND SICHERUNGSHALTER
IEC Netzbuchse mit integriertem Sicherungshalter. Ein geeignetes Netzkabel befindet sich im Lieferumfang.
WICHTIGER HINWEIS: Ersetzen Sie die Sicherung ausschließlich durch eine Sicherung des gleichen Typs und mit gleichen Werten. Achten Sie
auf den Aufdruck auf dem Gehäuse. Sollte die Sicherung wiederholt auslösen, wenden Sie sich bitte an ein autorisiertes Servicezentrum.
FRANCAIS ESPAÑOL POLSKI
18
POWER ON - OFF / CHARGE
Dieser Schalter trennt das System in keiner Stellung vom Stromversorgungsnetz. Eine sichere allpolige Trennung wird nur durch Ziehen
des Netzsteckers erreicht. In Position ON ist das System spielbereit, entweder netzunabhängig im Batteriebetrieb oder, bei vorhandenem
Netzanschluss, unabhängig vom Ladezustand der Batterie.
In Position OFF / CHARGE ist das System abgeschaltet, bei vorhandenem Netzanschluss wird jedoch auch in dieser Stellung die Batterie
geladen.
20
ITALIANO
19
21
简体中文 繁體中文
19
BATTERIE CHECK
Taster für die Anzeige des Batteriestatus durch die Status-LEDs (Nr. 20).
20
BATTERIESTATUS LEDS
Vier-Segment LED Batteriestatus-Anzeige. Drücken Sie den Taster Nr. 19, um den Batteriestatus durch die Status-LEDs anzeigen zu lassen.
Leuchten alle 4 LEDs, ist der Akku voll geladen. Sobald nur noch die rote LOW-LED leuchtet, laden Sie den Akku umgehend auf, oder
tauschen ihn gegen einen voll geladenen Akku aus.
21
CHARGE
Der Akku im entsprechenden Säulenelement wird geladen und die CHARGE-LED leuchtet, sobald das Lautsprechersystem korrekt am Stromnetz
angeschlossen ist (separates Ladedock optional erhältlich). Der Akku wird auch geladen, wenn das Lautsprechersystem am Stromnetz angeschlossen,
aber ausgeschaltet ist (OFF / CHARGE), der Ladestrom beträgt hierbei 2,5A. Bei eingeschaltetem Lautsprechersystem beträgt der Ladestrom 1,5A.
Die Ladezeit am ausgeschalteten System (OFF / CHARGE) beträgt circa 3 Stunden. Nach erreichen der Ladeschlussspannung wird der Ladevorgang
automatisch gestoppt und die CHARGE-LED erlischt. Die Ladeelektronik überprüft die Akkuspannung in regelmäßigen Abständen und startet den
Ladevorgang automatisch neu, falls die in der Ladeelektronik definierte Batteriespannung unterschritten wird.
20
Page 21
LD SYSTEMS LECC DSP
WAS BEDEUTET DIE BEZEICHNUNG LD SYSTEMS LECC DSP?
DSP ist die Abkürzung für Digital Signal Processing (Digitale Signalverarbeitung), LECC für Limiter, EQ, Compressor und Crossover (Limiter,
EQ, Kompressor und Frequenzweiche). Die digitale Signalverarbeitung gewährleistet eine optimale Audiowiedergabe mit maximaler Klarheit
und schützt gleichzeitig das PA-System vor Überlastung.
WAS GENAU BEWIRKT LECC DSP?
Die Limiter-Funktion schützt die Lautsprecher und verhindert durch Übersteuerung verursachte Verzerrungen. Separate Limiter für den
Bass- Mitten- und Höhenbereich schwächen das Signal ab, sobald der Pegel einen Wert übersteigt, der sich negativ auswirken könnte.
Jeder Limiter ist für einen der drei nahtlos aneinander anschließenden Frequenzbereiche optimiert (Multiband-Limiter). Das System lässt
sich auf diese Weise mit einem insgesamt höheren Schalldruck betreiben, da extreme Signalspitzen automatisch abgeschwächt werden,
sodass die Gesamtlautstärke nicht reduziert werden muss.
Der Multiband-EQ bearbeitet den gesamten Frequenzbereich und optimiert den Gesamtklang des Systems.
Der Kompressor wird automatisch zugeschaltet, um die Bässe anzuheben und damit einen druckvolleren Sound zu erzeugen. Mit steigender
Lautstärke wird der Bass-Boost automatisch reduziert. Die auf diese Weise automatisch ausgesteuerten Bässe fügen sich optimal in den
Gesamtklang ein.
Die Frequenzweichen teilen das Audiosignal je nach Frequenzbereich den jeweiligen Lautsprechern, also dem Subwoofer bzw. den Mittel- und
Hochtönern der Array-Säule zu. Die Amplituden- und Laufzeit-Optimierung der Frequenzweichen sorgt dafür, dass alle Frequenzen gleichmäßig
ausgegeben werden und den Zuhörer zeitgleich erreichen.
VERKABELUNGSBEISPIELE
Beispiel für Mono-Betriebsart
ENGLISH
DEUTSCH
FRANCAIS
ESPAÑOL
POLSKIITALIANO
21
简体中文
繁體中文
Page 22
Beispiel für Stereo-Betriebsart
ENGLISH
DEUTSCH
FRANCAIS ESPAÑOL POLSKI
ITALIANO
简体中文 繁體中文
22
Haupt-Einheit Stereo-Erweiterung
Gleiche Einstellungen wie Haupt-Einheit Maximum
Page 23
OPTIONALES ZUBEHÖR
Transporttasche für bis zu 4 Säulenelemente
LDM5SATBAG
Schutzhülle für den Subwoofer
LDM5SUBPC
ENGLISH
DEUTSCH
Säulenelement mit integriertem Akku (29,6V / 5200mAh)
LDMAUI5GOBC (schwarz)
LDMAUI5GOBCW (weiß)
Ladedock zum Laden des Akkus
(Lade-Adapter mit Ladeelektronik & Netzteil)
LDMAUI5GOCD
TECHNISCHE DATEN
Modellbezeichnung: LDMAUI5GO(W)
Typ: Ultrakompaktes Säulen-PA-System mit Akku und Mixer
Subwoofer: 1 x 8" Bassreflex
Säulen-Array-System: 4 x 2,8"
Verstärker: Class D
Abstrahlwinkel (H x V): 120° x 20°
Ausgangsleistung (RMS/Peak): 2 x 100 W / 2 x 400 W
Akku-Nennspannung: 29,6 V
Akku-Kapazität: 5200 mAh
Akku-Technologie: Lithium-Ionen
Akku-Marke: LG
Akku-Schutzschaltungen: Schutzschaltungen gegen Überladung und Tiefentladung
Ladeelektronik: Integriert in Subwoofer
Frequenzgang: 50 Hz – 20 kHz
Max. Schalldruckpegel (Peak): 120 dB
Schutzschaltungen: DSP-basierter Multiband-Limiter, Kurzschluss, Überstrom, Überhitzung
Bedienelemente: Main Level, Subwoofer Level, Hi-Boost, Mic Level, MP3/Hi-Z Level, Line Level, Bluetooth
Anzeigeelemente:
Anschlüsse Subwoofer: Line-Eingänge: 2 x XLR/6,3-mm-Klinke (Kombibuchse), Mikrofon-Eingang: XL-
Level, Bluetooth
Mixer:
Akku:
R/6,3-mm-Klinke, MP3-Eingang: 3,5-mm-Klinke, Hi-Z-Eingang: 6,3-mm-Klinke; XLR-System-Ausgang
®
-Taste, ON/OFF-Schalter, Mono/Stereo-Schalter
On (An), Signal, Limiter, Protect (Schutzschaltung aktiv), Bluetooth
Akkustatus, Ladevorgang
®
, Mono/Stereo
FRANCAIS
ESPAÑOL
POLSKIITALIANO
简体中文
繁體中文
®
23
Page 24
Anschlüsse Säulenlautsprecher: Spezielle Multipin-Verbinder
ENGLISH
Gehäusematerial: ABS
Gehäusefarbe: Schwarz (LDMAUI5GO)
Stromversorgung: Schaltnetzteil
Netzanschluss: IEC
Betriebsspannung: AC 110 – 120 V, 50/60 Hz
DEUTSCH
Leistungsaufnahme (Max.): 300 W
AD/DA-Wandler: 24 Bit
DSP-Sampling-Frequenz: 48 kHz
Umgebungstemperatur (Betrieb): 0° C – 50° C
FRANCAIS ESPAÑOL POLSKI
Luftfeuchtigkeit: 10% – 70% rel. (nicht kondensierend)
Abmessungen (B x H x T): Subwoofer: 305 x 405 x 395 mm
Gewicht: Subwoofer: 8,5 kg
Merkmale: Signalverarbeitung: LD LECC DSP (Limiter, Equalizer, Kompressor, Frequenzweiche),
Weiß (LDMAUI5GOW)
AC 220 – 240 V, 50/60 Hz (automatische Umschaltung)
Säule (3 Teile): 82 x 535 x 105 mm
Höhe insgesamt: 1985 mm
Akku-Säulenelement: 1,7 kg
Distanzstück-Säulenelement: 0,8 kg
Lautsprecher-Säulenelement: 1,3 kg
Gewicht insgesamt: 12,3 kg
Hi-Boost, 100-Hz-Hochpass (Trittschallfilter) im Mikrofonkanal, unkomplizierte Verbindung
über Multipin-Verbinder (mehrpoliger Steckverbinder), Bluetooth
®
HERSTELLERERKLÄRUNGEN
HERSTELLERGARANTIE & HAFTUNGSBESCHRÄNKUNG
Unsere aktuellen Garantiebedingungen und Haftungsbeschränkung finden Sie unter:
https://cdn-shop.adamhall.com/media/pdf/Manufacturers-Declarations-LDSYSTEMS_DE_EN_ES_FR.pdf.
Im Service Fall wenden Sie sich bitte an Adam Hall GmbH, Adam-Hall-Str. 1, 61267 Neu Anspach /
E-Mail Info@adamhall.com / +49 (0)6081 / 9419-0.
ITALIANO
简体中文 繁體中文
KORREKTE ENTSORGUNG DIESES PRODUKTS
(Gültig in der Europäischen Union und anderen europäischen Ländern mit Mülltrennung) Dieses Symbol auf dem Produkt oder dazu-
gehörigen Dokumenten weist darauf hin, dass das Gerät am Ende der Produktlebenszeit nicht zusammen mit dem normalen Hausmüll
entsorgt werden darf, um Umwelt- oder Personenschäden durch unkontrollierte Abfallentsorgung zu vermeiden. Bitte entsorgen Sie dieses
Produkt getrennt von anderen Abfällen und führen es zur Förderung nachhaltiger Wirtschaftskreisläufe dem Recycling zu. Als Privatkunde
erhalten Sie Informationen zu umweltfreundlichen Entsorgungsmöglichkeiten über den Händler, bei dem das Produkt erworben wurde, oder
über die entsprechenden regionalen Behörden. Als gewerblicher Nutzer kontaktieren Sie bitte Ihren Lieferanten und prüfen die ggf. vertraglich
vereinbarten Konditionen zur Entsorgung der Geräte. Dieses Produkt darf nicht zusammen mit anderen gewerblichen Abfällen entsorgt werden.
CE-Konformität
Hiermit erklärt die Adam Hall GmbH, dass dieses Produkt folgenden Richtlinien entspricht (soweit zutreffend):
R&TTE (1999/5/EG) bzw. RED (2014/53/EU) ab Juni 2017
Niederspannungsrichtlinie (2014/35/EU)
EMV-Richtlinie (2014/30/EU)
RoHS (2011/65/EU)
Die vollständige Konformitätserklärung finden Sie unter www.adamhall.com.
Des Weiteren können Sie diese auch unter info@adamhall.com anfragen.
24
Page 25
FRANCAIS
VOUS AVEZ FAIT LE BON CHOIX!
Cet appareil a été développé et fabriqué en appliquant des exigences de qualité très élevées : il garantit des années de fonctionnement sans
problème. Grâce à de nombreuses années d‘expérience, LD Systems est un nom connu dans le domaine des produits audio haut de gamme.
Veuillez lire attentivement ce Manuel Utilisateur : vous apprendrez rapidement à utiliser votre appareil LD Systems de façon optimale.
Pour plus d‘informations sur LD Systems, visitez notre site Web, WWW.LD-SYSTEMS.COM
MESURES PRÉVENTIVES
1. Veuillez lire attentivement ce manuel.
2. Rangez tous les documents d‘information et d‘instructions en lieu sûr.
3. Veuillez suivre toutes les instructions
4. Observez tous les messages d‘avertissement N‘enlevez pas de l‘appareil les étiquettes de sécurité ou autres informations.
5. N‘utilisez l‘appareil que pour des applications et de la façon appropriées.
6. Utilisez exclusivement des pieds et des dispositifs de fixation stables et adaptés lorsque l‘appareil est utilisé en installation fixe.
Assurez-vous que les fixations murales ont été montées correctement, et qu‘elles sont sécurisées. Vérifiez que l‘appareil est installé en toute
sécurité, et qu‘il ne peut pas tomber.
7. Lors de l‘installation, observez les règlementations de sécurité en vigueur dans votre pays.
8. N‘installez et n‘utilisez pas l‘appareil à proximité de radiateurs, d‘accumulateurs de chaleur, de fours ou de toute autre source de chaleur. Vérifiez
que l‘appareil est installé de façon à bénéficier en permanence d‘un refroidissement efficace et qu‘il ne peut pas chauffer de façon excessive.
9. Ne placez aucune source de flamme sur l‘appareil – par exemple, une bougie allumée.
10. Ne bloquez pas les ouïes d‘aération. Éviter toute exposition directe aux rayons du soleil !
11. Gardez une distance minimale de 20 cm autour et au-dessus de l‘appareil.
12. N‘utilisez pas l‘appareil à proximité immédiate d‘eau (à moins qu‘il ne s‘agisse d‘un appareil conçu pour une utilisation en extérieur –
dans ce cas, respectez les instructions correspondantes ci après) Ne mettez pas l‘appareil en contact avec des matériaux, des liquides ou
des gaz inflammables.
13. Vérifiez qu‘aucune projection ou liquide ne puisse s‘introduire dans l‘appareil. Ne posez sur l‘appareil aucun objet renfermant du liquide
: vase, verre d‘eau...
14. Vérifiez qu‘aucun petit objet ne puisse tomber à l‘intérieur de l‘appareil.
15. N‘utilisez avec cet appareil que des accessoires recommandés et approuvés par le fabricant.
16. N‘ouvrez pas l‘appareil, et n‘essayez pas de le modifier.
17. Lors du branchement de l‘appareil, sécurisez le passage du câble secteur, afin d‘éviter tout dommage ou accident, par exemple quelqu‘un qui trébuche sur le câble.
18. Lors du transport, vérifiez que l‘appareil ne peut tomber, ce qui pourrait provoquer des dommages matériels et/ou corporels.
19. Si votre appareil ne fonctionne plus correctement, que de l‘eau ou des objets ont pénétré à l‘intérieur, ou qu‘il a été endommagé de
quelque façon que ce soit, éteignez-le immédiatement et débranchez sa prise secteur (s‘il s‘agit d‘un appareil alimenté). Cet appareil ne
doit être réparé que par un personnel autorisé.
20. Pour le nettoyage de l‘appareil, utilisez un chiffon sec/
21. Observez toutes les réglementations en vigueur dans votre pays pour mettre l‘appareil au rebut. Lorsque vous jetez l‘emballage de
l‘appareil, veuillez séparer plastique, papier et carton.
22. Les films plastique doivent être mis hors de portée des enfants.
23. Veuillez noter que les changements ou modifications n‘ayant pas été expressément approuvés par la partie responsable de la conformité
pourraient annuler le droit accordé à l‘utilisateur de faire fonctionner l‘équipement.
APPAREILS RELIÉS AU SECTEUR
24. ATTENTION : Si le câble de l‘appareil est muni d‘un fil de terre, il doit être relié à une prise murale avec terre. Ne désactivez jamais la
mise à la terre d‘un appareil.
25. N‘allumez pas l‘appareil immédiatement s‘il a subi une grande différence de température ambiante (par exemple, lors du transport). L‘humidité
et la condensation pourraient l‘endommager. Ne mettez l‘appareil sous tension que lorsqu‘il est parvenu à la température de la pièce.
26. Avant de relier l‘appareil à la prise murale, vérifiez que la valeur et la fréquence de tension secteur sur laquelle il est réglé correspondent bien à la valeur et à la fréquence de la tension secteur locale. Si l‘appareil possède un sélecteur de tension, ne le branchez sur la prise
murale qu‘après avoir vérifié que la valeur réglée correspond à la valeur effective de la tension secteur. Si la fiche du cordon secteur ou du
bloc adaptateur livré avec votre appareil ne correspond pas au format de votre prise murale, veuillez consulter un électricien.
27. Ne piétinez pas le câble secteur. Assurez-vous que le câble secteur n‘est pas trop pincé, notamment au niveau de l‘arrière de l‘appareil
(ou de son adaptateur secteur) et de la prise murale.
28. Lors du branchement de l‘appareil, vérifiez que l‘accès au câble secteur ou au bloc adaptateur reste facile. Sortez la fiche secteur de la
prise murale dès que vous n‘utilisez pas l‘appareil pendant un certain temps, ou si vous désirez nettoyer l‘appareil. Pour ce faire, tirez toujours
sur la fiche elle-même, ou sur le bloc secteur lui-même ; ne tirez jamais sur le câble. Ne manipulez jamais le câble secteur ou l‘adaptateur
secteur avec des mains mouillées.
29. N‘éteignez/rallumez pas l‘appareil rapidement plusieurs fois de suite : vosu risquez de réduire la longévité de ses composants internes.
30. CONSEIL IMPORTANT : Ne remplacez le fusible que par un fusible de même type et du même calibre. Si le fusible fond de façon répétée,
veuillez consulter un centre de réparations agréé.
31. Pour séparer complètement l‘appareil du secteur, débranchez le cordon secteur ou l‘adaptateur de la prise murale.
32. Si votre appareil est muni d‘un connecteur secteur verrouillable (Volex), il faut d‘abord déverrouiller le mécanisme avant d‘enlever le
cordon secteur. Attention, lorsque vous retirez le câble secteur, à ne pas faire bouger l‘appareil, ce qui pourrait se traduire par un risque de
chute, de blesser quelqu‘un, ou tout autre dommage. Manipulez toujours le cordon secteur avec soin.
ENGLISH
DEUTSCH
FRANCAIS
ESPAÑOL
POLSKIITALIANO
简体中文
繁體中文
25
Page 26
33. Débranchez la fiche secteur ou l‘adaptateur de la prise murale en cas d‘orage, ou si vous n‘utilisez pas l‘appareil pendant une longue période.
ENGLISH
ATTENTION :
Ne démontez jamais le couvercle de l‘appareil, vous risquez de recevoir un choc électrique.
L‘appareil ne renferme aucune pièce ni composant réparable ou remplaçable par l‘utilisateur. Ne
confiez l‘entretien et la réparation qu‘à un personnel qualifié.
DEUTSCH
FRANCAIS ESPAÑOL POLSKI
ATTENTION ! NIVEAUX SONORES ÉLEVÉS SUR LES PRODUITS AUDIO
Cet appareil a été conçu en vue d‘une utilisation professionnelle. L‘utilisation commerciale de cet appareil est soumise aux réglementations
et directives en vigueur dans votre pays en matière de prévention d‘accident. En tant que fabricant, Adam Hall est tenu de vous avertir
formellement des risques relatifs à la santé. Risques provoqués par une exposition prolongée à des niveaux sonores élevés : Lors de
l‘utilisation de ce produit, il est possible d‘atteindre des niveaux de pression sonore (exprimés en dB SPL) élevés, susceptibles de provoquer
des dommages auditifs irréparables chez les artistes, les techniciens et le public. Évitez toute exposition prolongée à des niveaux de
pression sonore élevés (supérieurs à 90 dB SPL).
ITALIANO
SÉCURITÉ DE LA BATTERIE
1. Éloignez les pôles de la batterie des objets conducteurs tels que les clés, les bijoux ou d'autres matériaux. Cela pourrait entraîner un
court-circuit de la batterie et provoquer des blessures et des brûlures.
2. N'inversez jamais la polarité des contacts de la batterie.
3. Tenez la batterie à l'écart d'une chaleur excessive et de la lumière directe du soleil. Ne la posez pas sur ou dans des appareils de chauffage tels que des micro-ondes, des fours ou des radiateurs. Les batteries peuvent exploser en cas de surchauffe.
简体中文 繁體中文
4. N'essayez pas de modifier ou de remanier la batterie, d'y introduire des corps étrangers, de l'immerger ou de la mettre en contact avec
de l'eau ou d'autres liquides. Cela pourrait entraîner un incendie, une explosion ou d'autres situations dangereuses.
5. Si la batterie fuit, assurez-vous que l'électrolyte n'entre pas en contact avec la peau ou les yeux. Toutefois, si cela se produit, rincez-les
immédiatement à l'eau claire et consultez un médecin.
6. En cas de déformation, de coloration ou de surchauffe des batteries pendant le processus de charge ou le stockage, arrêtez immédiatement
d'utiliser l'appareil et retirez la batterie. Si vous continuez à utiliser l'appareil, la batterie peut fuir ou un incendie ou une explosion peut se produire.
7. Ne jetez pas les batteries au feu car elles pourraient exploser. Les batteries endommagées peuvent également exploser.
8. Éliminez les batteries usagées conformément aux prescriptions locales. Une utilisation non conforme de la batterie peut entraîner un
incendie, une explosion ou d'autres situations dangereuses.
9. Ne laissez pas les enfants ou les animaux mordre ou sucer la batterie. Cela pourrait provoquer des dommages ou une explosion.
10. Évitez d'écraser ou de perforer la batterie et ne la soumettez pas à des pressions élevées. Cela pourrait produire un court-circuit ou une
surchauffe.
11. Ne faites pas tomber l'appareil ou la batterie. La chute de l'appareil ou de la batterie, en particulier sur une surface dure, risque de
l'endommager.
12. Si la durée de veille de l'appareil diminue considérablement, remplacez la batterie.
13. Si l'appareil dispose d'une batterie intégrée non amovible, n'essayez pas de retirer la batterie, car vous risqueriez d'endommager
l'appareil. Pour remplacer la batterie, confiez l'appareil à un centre de réparation agréé.
26
Le pictogramme en forme de triangle équilatéral contenant un éclair terminé d‘une flèche avertit l‘utilisateur de la présence
d‘une tension dangereuse à l‘intérieur de l‘appareil, tension susceptible de provoquer un choc électrique.
Le pictogramme en forme de triangle équilatéral renfermant un point d‘exclamation signale à l‘utilisateur la présence
d‘instructions importantes concernant l‘utilisation ou l‘entretien de l‘appareil.
Bedienungs- und Wartungshinweise.
ATTENTION ! Ce symbole correspond à des surfaces chaudes. En cours de fonctionnement, certaines parties de l’appareil peuvent
devenir chaudes. Après utilisation, ne manipulez ou ne transportez l’appareil qu’au bout de 10 minutes de refroidissement.
Attention ! Cet appareil est conçu pour une utilisation à une altitude maximale de 2000 m au-dessus du niveau de la mer.
Metern über dem Meeresspiegel bestimmt.
Attention ! Ce produit ne convient pas à une utilisation dans les climats tropicaux.
Page 27

REMARQUE IMPORTANTE: Chargez la batterie exclusivement à l'aide de l'électronique de charge prévue à cet effet (électronique de
charge dans le caisson de graves MAUI5 GO, station de charge LDMAUI5GOCD)
INTRODUCTION
Parfaitement équipé, le MAUI® 5 GO est le système ultime pour obtenir un son cristallin et puissant, où que vous soyez. Le système de
sonorisation en colonne fonctionnant sur batterie est alimenté par un élément lithium-ion très performant. Le chargeur est intégré au
caisson de graves, tandis qu'une station de charge externe est disponible en option. Grâce à ses entrées pour microphone, instruments et
signaux de ligne ainsi qu'à sa capacité de streaming stéréo Bluetooth®, le MAUI® 5 GO est l'installation idéale pour les musiciens de rue,
pour la reproduction musicale et vocale lors d'événements privés et commerciaux ainsi que pour toutes les applications indépendantes
du réseau électrique. Avec son faible poids d'à peine 13 kilos, le système composé de 4 éléments est très facile à transporter et peut être
installé et prêt à l'emploi en quelques secondes seulement grâce à des connecteurs multibroches spéciaux. La configuration en line array
des haut-parleurs permet d'atteindre une portée extrêmement étendue; en outre, l'angle de dispersion large et l'incroyable insensibilité de
l'installation à l'effet larsen rendent superflue l'utilisation de haut-parleurs retours séparés. Pour une qualité sonore incomparable dans toutes les applications, l'installation en colonne est équipée du module DSP LECC de LD Systems avec limitateur multibande, égaliseur, compresseur et filtre répartiteur. Le mixeur 4 canaux intégré offre des potentiomètres de réglage du volume distincts pour les canaux d'entrée,
le volume général et le caisson de graves ainsi qu'une amplification variable des aigus, permettant un réglage sonore rapide et équilibré.
REMARQUES GÉNÉRALES
Le caisson de graves du système de haut-parleurs LD MAUI5 GO doit être placé verticalement sur ses pieds et sur une surface plane avant
sa mise en service. N'utilisez jamais le système s'il est posé sur un chariot à roulettes car le système risque de se mettre à bouger de façon
incontrôlée, ce qui peut provoquer des accidents et des dommages. Afin de garantir un refroidissement suffisant lors de l'utilisation, il convient
de respecter une distance minimale de 50cm entre la paroi arrière du caisson de graves et d'autres éléments, comme un mur par exemple.
Veuillez vous assurer que les raccords électriques et audio sont bien raccordés au système ainsi qu'aux autres appareils connectés comme
les consoles de mixage, les lecteurs CD etc. Utilisez uniquement des câbles en parfait état ayant le diamètre adéquat, et déroulez toujours
entièrement le rouleau de câble. Si nécessaire, utilisez des passages de câble afin d'éviter tout risque de chute ou de trébuchement lié à des
câbles en vrac sur le sol. Ne posez jamais l'appareil directement sur une arête. N'installez pas le caisson de graves sur une table. Pour éviter
tout crépitement lors de la mise sous tension des appareils raccordés, allumez toujours le système en dernier, et éteignez-le en premier.
STRUCTURE
Le système de haut-parleurs LD MAUI5 GO se compose de quatre éléments:
A. Caisson de graves avec électronique intégrée pour tous les composants du système, y compris le module de charge pour charger les
batteries et le connecteur pour les éléments de colonne sur le dessus.
B. Élément de colonne avec batterie intégrée, affichage du niveau de charge et connecteurs sur le dessus et en dessous.
C. Barre d'écartement avec connecteurs sur le dessus et en dessous.
D. Élément de colonne avec les haut-parleurs et le connecteur en dessous.
Après avoir installé le caisson de graves à l'emplacement souhaité, l'élément de colonne avec batterie intégrée et la barre d'écartement
sont enfichés sur le caisson de graves, puis l'élément de colonne avec les haut-parleurs. Selon l'application, le système de haut-parleurs
peut également être utilisé sans barre d'écartement.
Le système de haut-parleurs MAUI5 GO peut fonctionner soit de manière indépendante du réseau électrique à l'aide de l'élément de
colonne avec batterie intégrée, soit être relié au réseau électrique. En cas de fonctionnement sur secteur, la batterie est automatiquement
chargée. La durée d'utilisation de manière indépendante du réseau électrique peut être prolongée à volonté en remplaçant les éléments de
colonne avec batterie vide par des éléments de colonne entièrement chargés disponibles en option. Le changement d'une batterie ne prend
que quelques secondes et le système est de nouveau opérationnel.
ENGLISH
DEUTSCH
FRANCAIS
ESPAÑOL
POLSKIITALIANO
简体中文
27
繁體中文
Page 28
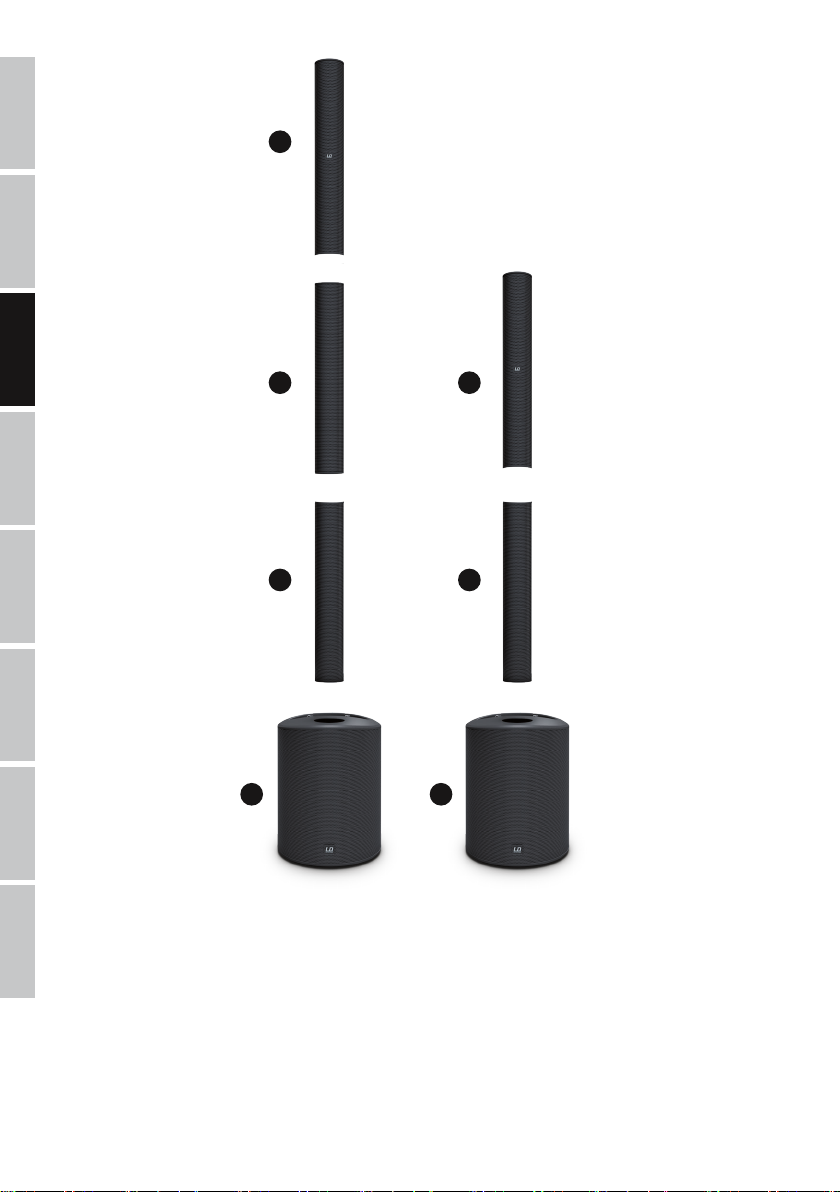
ENGLISH
DEUTSCH
FRANCAIS ESPAÑOL POLSKI
D
C
B
D
B
ITALIANO
简体中文 繁體中文
RACCORDEMENT ET FONCTIONNEMENT
Sur l'appareil, il est possible de régler aussi bien le volume de l'ensemble du système que le volume du caisson de graves par rapport au volume général. Les supports de lecture peuvent être raccordés par le biais de câbles symétriques ou asymétriques (XLR / jack 6,3mm / mini-jack).
La console de mixage 4 canaux intégrée offre une entrée microphone, une entrée instrument à haute impédance pour par exemple une guitare
électro-acoustique, une entrée pour les supports de lecture avec niveau ligne, ainsi qu'une unité Bluetooth. Pour étendre le système, le caisson
de graves dispose d'une sortie ligne symétrique avec connecteur XLR (SYSTEM OUTPUT).
A
A
28
Page 29

RACCORDEMENTS, ÉLÉMENTS DE COMMANDE ET D'AFFICHAGE
4 5 6 7
12
3
13
9 8
1
MIC INPUT
Entrée microphone symétrique (XLR / jack 6,3mm Combo). Il est également possible d‘utiliser un câble micro asymétrique (jack mono).
L‘entrée microphone possède un filtre passe-haut 100Hz intégré pour supprimer les composantes de signal basse fréquence perturbatrices.
REMARQUE: Il n‘y a aucune alimentation fantôme au niveau de l‘entrée microphone.
2
HI-Z INPUT
Entrée mono à haute impédance avec prise jack 6,3mm pour une guitare électro-acoustique ou électrique.
3
MP3
Entrée ligne stéréo avec prise jack 3,5mm pour un lecteur MP3 ou un autre support de lecture. Les deux interfaces MP3 et Bluetooth peuvent
être utilisées simultanément, le volume doit être réglé sur les supports de lecture. En cas d‘utilisation d‘une seule installation MAUI5 GO, activez
le préréglage mono (voir point 14).
2
14
11
1
10
ENGLISH
DEUTSCH
FRANCAIS
ESPAÑOL
POLSKIITALIANO
4
BLUETOOTH® / MP3
Potentiomètre de réglage du volume pour le module Bluetooth ou l‘entrée MP3. Tournez le potentiomètre vers la gauche pour baisser le
volume, vers la droite pour l‘augmenter. Les deux entrées Bluetooth et MP3 peuvent être utilisées simultanément, le volume doit être réglé
sur les supports de lecture.
5
HI-Z
Potentiomètre de réglage du volume pour l‘entrée HI-Z. Tournez le potentiomètre vers la gauche pour baisser le volume, vers la droite pour
l‘augmenter.
6
LINE
Potentiomètre de réglage du volume pour le canal ligne (entrées ligne au dos du caisson de graves). Tournez le potentiomètre vers la
gauche pour baisser le volume, vers la droite pour l‘augmenter.
7
MIC
Potentiomètre de réglage du volume pour le canal microphone. Tournez le potentiomètre vers la gauche pour baisser le volume, vers la
droite pour l‘augmenter.
简体中文
繁體中文
29
Page 30

8
ENGLISH
DEUTSCH
FRANCAIS ESPAÑOL POLSKI
HI-BOOST
Filtre de dégradé High-Shelf pour adapter la restitution des aigus à l‘acoustique de la pièce (butée à gauche = son neutre,
rotation vers la droite = amplification des aigus).
9
SUB LEVEL
Réglage du volume du caisson de graves par rapport à l‘enceinte en colonne.
10
MAIN LEVEL
Réglage du volume général. Le volume du caisson de graves est réglé en fonction du préréglage de l‘égaliseur SUB LEVEL.
11
LED D‘AFFICHAGE
ON: La LED s‘allume lorsque l‘appareil est correctement raccordé au réseau électrique et mis en route.
SIGNAL: La LED s‘allume lorsque l‘appareil reçoit un signal audio. L‘acquisition de signal s‘effectue en amont du potentiomètre MAIN LEVEL.
LIMIT: La LED s‘allume lorsque le système de haut-parleurs fonctionne dans la partie supérieure limite de la plage de puissance. Si la
LED ne s‘allume que brièvement, la situation n‘est pas critique. Pour protéger le système, des limiteurs intégrés permettent de réduire en
douceur un niveau de signal excessif. Si la LED du limiteur s‘allume plus longtemps ou de façon permanente, baissez le volume sonore. Le
non-respect de ces consignes peut provoquer une distorsion du son et endommager le système de haut-parleurs.
PROTECT: La LED s‘allume si le système est en surcharge/surchauffe. Les amplificateurs sont automatiquement mis en sourdine. Une fois
les conditions de fonctionnement normales rétablies, l‘appareil repasse en mode normal au bout de quelques minutes.
12
LED BLUETOOTH
La console de mixage du système array MAUI5 GO est équipée du Bluetooth, ce qui veut dire que des fichiers audio d‘un autre
appareil Bluetooth (par ex. un smartphone) peuvent être lus sur le système de haut-parleurs MAUI5 GO (distance maximale entre les deux appareils: env. 10 mètres). Si aucun appareil Bluetooth n‘est connecté à l‘unité Bluetooth interne, la LED Bluetooth bleue n‘indique aucun signal;
lorsque l‘appareil est prêt à être associé, la LED clignote de façon rythmique à une fréquence d‘environ 3Hz; lorsque la LED Bluetooth reste
allumée en permanence, une connexion Bluetooth est en cours et la lecture des titres peut être lancée. Le réglage du volume s‘effectue à l‘aide
du potentiomètre de réglage du volume MP3 / Bluetooth (n° 4) ou sur le support de lecture.
®
ITALIANO
13
HOLD TO LINK
Pour associer et connecter l‘unité Bluetooth interne à un appareil Bluetooth, appuyez sur la touche HOLD TO LINK et maintenez-la enfoncée
pendant environ 3 secondes jusqu‘à ce que la LED Bluetooth clignote de façon rythmique (env. 3Hz), activez le Bluetooth sur votre appareil
Bluetooth et recherchez sur l‘interface utilisateur les appareils disponibles. Sélectionnez l‘entrée «LD MAUI5 GO» et associez ainsi votre
appareil Bluetooth à l‘unité Bluetooth.
La lecture des titres peut à présent être lancée. Pour mettre fin à la connexion, appuyez à nouveau sur la touche HOLD TO LINK et mainte-
简体中文 繁體中文
nez-la enfoncée pendant environ 3secondes. Si la connexion Bluetooth est interrompue (par ex. appareil hors de portée), la LED Bluetooth
s‘éteint. La connexion peut être rétablie automatiquement dans les 90secondes environ (appareil Bluetooth de nouveau à portée). En cas de
dépassement de la période de 90secondes, le module Bluetooth du système de haut-parleurs MAUI5 GO est automatiquement désactivé.
14
SYSTEM MONO / STEREO
Touche et LED d‘affichage pour le mode de fonctionnement mono ou stéréo.
MONO: En cas d‘utilisation d‘un seul système de haut-parleurs MAUI5 GO, activez le préréglage mono (appuyer sur la touche pour que la
LED d‘affichage MONO s‘allume). Un signal stéréo en présence est alors additionné en mono en interne. En cas d‘utilisation d‘un deuxième
système de haut-parleurs MAUI5 GO en tant qu‘extension mono, reliez la sortie ligne SYSTEM OUTPUT de l‘unité principale à l‘entrée ligne
INPUT LEFT/MONO de l‘unité d‘extension à l‘aide d‘un câble XLR symétrique.
STEREO: En cas d‘utilisation de deux systèmes de haut-parleurs MAUI5 GO en tant qu‘ensemble stéréo, activez le préréglage stéréo
(appuyer sur la touche pour que la LED d‘affichage STEREO s‘allume). Pilotez l‘unité d‘extension stéréo à l‘aide de la sortie ligne SYSTEM
OUTPUT (SYSTEM OUTPUT de l‘unité principale -> RIGHT INPUT de l‘unité d‘extension).
Vous trouverez des exemples de câblage et d‘extension du système au chapitre «EXEMPLES DE CÂBLAGE» de ce manuel.
30
Page 31

15 16 15
15
LINE INPUT LEFT / RIGHT
Entrée ligne symétrique avec connecteur XLR / prise jack 6,3mm Combo (gauche / droite) pour le raccordement d'un support de lecture
(par ex. console de mixage, clavier). En cas de raccordement d'une source de signal mono, veuillez utiliser l'entrée ligne LEFT / MONO.
16
SYSTEM OUTPUT
Sortie ligne symétrique avec connecteur XLR mâle pour le pilotage de systèmes de haut-parleurs MAUI5 GO supplémentaires.
17
EMBASE SECTEUR ET PORTE-FUSIBLE
Embase secteur au format CEI, avec porte-fusible intégré. Un câble d'alimentation adapté est fourni.
REMARQUE IMPORTANTE: Remplacez le fusible exclusivement par un fusible de même type et de même valeur. Respectez les indications
figurant sur le boîtier. Si le fusible saute de façon récurrente, veuillez contacter un centre de réparation agréé.
18
POWER ON - OFF / CHARGE
Ce commutateur ne coupe le système de l’alimentation électrique dans aucune position. Une coupure omnipolaire sûre n’est possible qu’en
déconnectant la fiche du secteur. En position ON, le système est opérationnel soit de manière indépendante du réseau électrique en fonctionnement sur batterie, soit indépendamment de l’état de charge de la batterie lorsqu’un raccordement au réseau est possible. En position
OFF/CHARGE, le système est coupé. Toutefois, lorsqu’un raccordement au réseau existe, la batterie est aussi en charge dans cette position.
17
18
ENGLISH
DEUTSCH
FRANCAIS
ESPAÑOL
POLSKIITALIANO
20
19
21
19
BATTERIE CHECK
Bouton pour l'affichage de l'état de la batterie par les LED d'état (n° 20).
20
LED D'ÉTAT DE LA BATTERIE
Affichage de l'état de la batterie par LED à quatre segments. Appuyez sur le bouton n° 19 pour que les LED d'état affichent l'état de la
batterie. Si les 4 LED s'allument, la batterie est entièrement chargée. Dès que la seule LED allumée est la LED LOW, chargez immédiatement
la batterie ou remplacez-la par une batterie entièrement chargée.
简体中文
繁體中文
31
Page 32

ENGLISH
21
CHARGE
La batterie dans l‘élément de colonne correspondant est en charge et la LED CHARGE s‘allume dès que le système de haut-parleurs est
correctement raccordé au réseau électrique (une station de charge séparée est disponible en option). La batterie se charge également
lorsque le système de haut-parleurs est raccordé au réseau électrique, mais qu‘il est éteint (OFF/CHARGE) ; le courant de charge est alors
de 2,5 A. Lorsque le système de haut-parleurs est en marche, le courant de charge est de 1,5 A. La charge lorsque le système est éteint
(OFF/CHARGE) dure environ 3 heures. Une fois que la tension de fin de charge est atteinte, le processus de charge est arrêté automatique-
DEUTSCH
ment et la LED CHARGE s‘éteint. L‘électronique de charge vérifie la tension de la batterie à intervalles réguliers et redémarre automatiquement le processus de charge si la tension de la batterie passe au-dessous du seuil de tension défini dans l’électronique de charge.
DSP LECC LD SYSTEMS
QUE SIGNIFIE L'APPELLATION DSP LECC LD SYSTEMS?
DSP est l'abréviation de Digital Signal Processing (traitement numérique des signaux) et LECC de Limiter, EQ, Compressor et Crossover
FRANCAIS ESPAÑOL POLSKI
(limiteur, égaliseur, compresseur et filtre répartiteur). Le traitement numérique des signaux garantit une reproduction audio optimale avec
une clarté maximale et protège en même temps le système de sonorisation des surcharges.
QU'ACCOMPLIT PRÉCISÉMENT LE MODULE DSP LECC?
La fonction limiteur protège les haut-parleurs et évite les distorsions causées par les surcharges. Des limiteurs distincts pour les basses,
les médiums et les aigus atténuent le signal dès que la valeur dépasse un niveau donné, potentiellement dommageable. Chaque limiteur
est optimisé pour l'une des trois plages de fréquences adjacentes (limiteur multibande). De cette façon, le système peut fonctionner avec
une pression acoustique globalement plus élevée car les crêtes extrêmes du signal sont automatiquement atténuées de sorte que le volume
général n'ait pas à être réduit.
L'égaliseur multibande intervient sur l'ensemble de la plage de fréquences pour optimiser la sonorité globale du système.
Le compresseur est automatiquement désactivé pour amplifier les basses et ainsi obtenir un son plus puissant. Lorsque le volume est
plus élevé, le boost des basses est automatiquement réduit. Les basses réglées automatiquement de cette manière s'intègrent de manière
optimale dans la sonorité globale.
Les filtres répartiteurs répartissent le signal audio selon la plage de fréquences des haut-parleurs concernés, c'est-à-dire du caisson de
graves ou des enceintes médiums et des tweeters de la colonne array. L'optimisation de l'amplitude et de la durée de fonctionnement des
ITALIANO
filtres répartiteurs garantit en outre une restitution homogène et simultanée de toutes les fréquences.
简体中文 繁體中文
32
Page 33

EXEMPLES DE CÂBLAGE
Exemple pour le mode de fonctionnement mono
ENGLISH
DEUTSCH
FRANCAIS
ESPAÑOL
POLSKIITALIANO
33
简体中文
繁體中文
Page 34

Exemple pour le mode de fonctionnement stéréo
ENGLISH
DEUTSCH
FRANCAIS ESPAÑOL POLSKI
ITALIANO
简体中文 繁體中文
34
Unité principale Extension stéréo
Mêmes réglages que l'unité principale Maximum
Page 35

ACCESSOIRES DISPONIBLES EN OPTION
Sac de transport pour 4 éléments de colonne
maximum
LDM5SATBAG
Housse de protection pour le caisson de graves
LDM5SUBPC
ENGLISH
DEUTSCH
Élément de colonne avec batterie intégrée (29,6V / 5200mAh)
LDMAUI5GOBC (noir)
LDMAUI5GOBCW (blanc)
Station de charge pour charger la batterie
(Adaptateur de charge avec électronique de
charge et bloc secteur)
LDMAUI5GOCD
CARACTÉRISTIQUES TECHNIQUES
Numéro de modèle : LDMAUI5GO(W)
Type: Système de sonorisation ultra-portable en colonne avec batterie et mélangeur
Caisson de basses : 1 x 8“ Bass reflex
Arrangement vertical : 4 x 2,8“
Amplification : Classe D
Dispersion (H x V) : 120 ° x 20 °
Puissance de sortie (RMS / Crête) 2 x 100 W / 2 x 400 W
Tension nominale de la batterie : 29,6 V
Capacité de la batterie : 5200mAh
Technologie de la batterie : Lithium-Ion
Marque de la batterie : LG
Circuits de protection de la batterie : les circuits de protection évitent la surcharge et la décharge profonde
Électronique de charge : Intégrée dans le caisson de basses
Réponse en fréquence : 50 Hz - 20 kHz
Max. SPL (crête) : 120dB
Protection: Limiteur multi-bande basé sur DSP, court-circuit, surintensité, surchauffe
Réglages: Niveau général, Niveau Subwoofer, Hi Boost, Niveau Mic , Niveau MP3/Hi-Z, Niveau ligne ,
Niveau Bluetooth
Indicateurs: Mélangeur : ON, signal, limiteur, protection, Bluetooth
Batterie : État de la batterie, Charge
Connecteurs du caisson de basses : Entrée de ligne: 2 x XLR/6.3 mm Jack Combo, entrée Mic : XLR/6.3 mm Jack, entrée MP3
: 3.5 mm Jack, entrée Hi-Z : 6.3 mm Jack ; sortie système XLR
Connecteurs de colonne : Connecteur propriétaire multipoint
Matériau du caisson : ABS
®
, Bouton Bluetooth® , Interrupteur ON/OFF, Interrupteur Mono/Stéréo
®
, Mono/Stéréo
FRANCAIS
ESPAÑOL
POLSKIITALIANO
简体中文
繁體中文
35
Page 36

Couleur du caisson : Noir (LDMAUI5GO)
ENGLISH
Alimentation électrique : SMPS
Connecteur d'alimentation : CEI
Tension secteur: CA 110-120V, 50/60Hz
Consommation d'énergie (max.) : 300W
DEUTSCH
Convertisseur AD/DA 24 bit
DSP Fréquence d'échantillonnage : 48 kHz
Température ambiante (en fonctionnement): 0°C - 50°C
Plage d’humidité : 10% - 70% rel. (sans condensation)
Dimensions (l x h x p) : Caisson de basses : 305 x 405 x 395 mm
FRANCAIS ESPAÑOL POLSKI
Poids: Caisson de basses : 8.5kg
Caractéristiques : Traitement de signal LD LECC DSP (limiteur, égaliseur, compresseur, répartiteur), Hi Boost,
Blanc (LDMAUI5GOW)
CA 220-240V, 50/60Hz (basculement automatique)
colonne (3 pcs): 82 x 535 x 105 mm
hauteur totale : 1985mm
Colonne batterie : 1.7kg
Colonne séparateur : 0.8kg
Colonne haut-parleur : 1.3kg
Poids total : 12,3 kg
coupure basse 100 Hz dans le canal Mic, connexion facile avec connecteur multipoint,
®
Bluetooth
DECLARATIONS
GARANTIE FABRICANT & LIMITATION DE RESPONSABILITÉ
Nos conditions actuelles de garantie et de limitation de responsabilité sont disponibles à l‘adresse suivante :
https://cdn-shop.adamhall.com/media/pdf/Manufacturers-Declarations-LDSYSTEMS_DE_EN_ES_FR.pdf.
Pour les réparations, veuillez contacter Adam Hall GmbH, Adam-Hall-Str. 1, 61267 Neu Anspach /
E-Mail Info@adamhall.com / +49 (0)6081 / 9419-0.
TRI ET MISE AUX DÉCHETS CORRECTE DE CE PRODUIT
ITALIANO
简体中文 繁體中文
(Valid in the European Union and other European countries with waste separation)
(Applicable dans l‘Union Européenne et les autres pays européens pratiquant le tri des déchets) La présence de ce symbole sur le
produit ou sur la documentation correspondante indique qu‘en fin de vie, le produit ne doit pas être jeté avec les déchets normaux, afin
d‘éviter tout dommage à l‘environnement ou aux personnes consécutive à une élimination non contrôlée des déchets. Séparez-le des autres types de déchets et recyclez-le, afin de promouvoir la réutilisation durable des ressources naturelles. Nous conseillons aux utilisateurs
non professionnels de contacter le revendeur chez qui ils ont acheté le produit, ou un représentant gouvernemental local, pour plus de
détails sur le lieu de collecte et la façon de recycler cet appareil dans le meilleur respect de l‘environnement possible.. Nous invitons les
utilisateurs professionnels à contacter leur fournisseur et à vérifier les termes et conditions de leur contrat d‘achat. Ce produit ne doit pas
être mélangé à d‘autres déchets commerciaux lors de la collecte.
Conformité CE
La société Adam Hall GmbH déclare par la présente que ce produit est compatible avec les régulations suivantes (le cas échéant) :
R&TTE (1999/5/EG) et RED (2014/53/EU) à partir de juin 2017
Directive basse tension (2014/35/EU)
Directive CEM (2014/30/EU)
RoHS (2011/65/EU)
La Déclaration de Conformité complète est disponible sur le site Web www.adamhall.com.
Pour toute information complémentaire, contactez-nous : info@adamhall.com.
36
Page 37

ESPAÑOL
¡GRACIAS POR ELEGIR LD-SYSTEMS!
Este equipo está diseñado y fabricado con los estándares de calidad más exigentes, para garantizar un correcto funcionamiento durante
muchos años. Los productos de LD-Systems se caracterizan por su gran calidad, avalada por el prestigio de la marca y una dilatada experiencia como fabricante. Lea atentamente este manual de usuario para poder aprovechar rápidamente toda la funcionalidad de su nuevo
producto de LD Systems.
Si desea obtener información sobre LD-SYSTEMS, visite nuestro sitio web WWW.LD-SYSTEMS.COM
MEDIDAS DE SEGURIDAD
1. Lea atentamente las instrucciones de este manual.
2. Guarde toda la información en un lugar seguro para futuras consultas.
3. Siga las instrucciones indicadas.
4. Siga todas las advertencias. No quite las instrucciones de seguridad ni cualquier otra información indicada en el equipo.
5. Utilice el equipo únicamente según la finalidad prevista.
6. Utilice solo soportes y fijaciones que sean robustos y adecuados cuando instale el equipo en instalaciones fijas. Asegúrese de que los soportes de
pared están correctamente instalados y firmemente fijados. Asegúrese de que el equipo está sólidamente instalado y no se puede caer.
7. Al instalar el equipo, respete las normas de seguridad aplicables en su país.
8. Evite instalar el equipo cerca de radiadores, acumuladores de calor, estufas o cualquier otra fuente de calor. Asegúrese de que el equipo esté
instalado en un lugar con ventilación suficiente para evitar cualquier sobrecalentamiento.
9. No coloque sobre el equipo fuentes de llamas sin protección, por ejemplo, velas encendidas.
10. Evite bloquear las rejillas de ventilación. ¡Evite la luz solar directa!
11. Mantenga una distancia mínima de 20 cm alrededor y encima del equipo.
12. No utilice este equipo cerca del agua (excepto los equipos específicamente diseñados para uso en exterior, en cuyo caso tenga en cuenta las
indicaciones mencionadas a continuación). No exponga este equipo a materiales, líquidos o gases inflamables.
13. Evite exponer el equipo a gotas o salpicaduras que puedan caer dentro del mismo. No coloque recipientes llenos de líquido, como floreros o
vasos, sobre el equipo.
14. Asegúrese de no dejar caer ningún objeto dentro del equipo.
15. Emplee el equipo únicamente con los accesorios recomendados por el fabricante.
16. No abra el equipo ni intente modificarlo.
17. Una vez conectado el equipo, compruebe que en toda la longitud del cableado no hay peligro de que provoque una caída, por ejemplo.
18. Durante el transporte, asegúrese de que el equipo no se caiga y pueda causar daños personales o materiales.
19. Si el equipo no funciona correctamente, o si se ha vertido líquido sobre él, o si un objeto ha caído en su interior o si ha sufrido algún
desperfecto, apague inmediatamente el equipo y desenchufe el cable eléctrico (si se trata de un equipo activo). Únicamente un técnico
especialista debe reparar el equipo.
20. Para limpiar el equipo utilice un paño seco.
21. Procure seguir las normas vigentes en su país sobre reciclaje de desechos. Separe los componentes de plástico, papel y cartón del paquete
para reciclarlos en sus contenedores respectivos.
22. No deje las bolsas de plástico al alcance de los niños.
23. Tenga en cuenta que la realización de cambios o modificaciones que no estén expresamente autorizados por el responsable de cumplimiento
normativo podría anular la autoridad del usuario para utilizar el equipo.
PARA LOS EQUIPOS CON TOMA ELÉCTRICA
24. ADVERTENCIA: Si el cable eléctrico está provisto de un contacto de protección, debe conectarse a una toma eléctrica con conexión a tierra. No
desactivar nunca esta conexión de protección a tierra del cable eléctrico.
25. Si el equipo ha estado expuesto a un cambio brusco de temperatura (por ejemplo, después del transporte), no lo encienda inmediatamente. La
condensación o la humedad podrían dañar el equipo. Deje que el equipo alcance la temperatura ambiente antes de encenderlo.
26. Antes de conectar el cable eléctrico a la toma de corriente, compruebe si la tensión y la frecuencia del suministro eléctrico coinciden
con las especificaciones de este equipo. Si el equipo dispone de un selector de tensión, antes de enchufarlo a la red eléctrica, asegúrese de
que el valor seleccionado coincide con la tensión de suministro. Si el enchufe o el adaptador de corriente no encajan en la toma eléctrica,
consulte a un electricista.
27. Asegúrese de que el cable eléctrico no está pinzado. Evite que el cable resulte pellizcado, sobre todo en los extremos de conexión al equipo y en
la toma eléctrica.
28. Al conectar el equipo, asegúrese de que el cable eléctrico o el adaptador de corriente estén siempre accesibles. Desconecte el equipo de la
toma de corriente cuando no esté en uso o antes de limpiarlo. Para ello, desconecte el cable eléctrico y el adaptador de corriente del conector del
equipo en vez de desenchufar el cable de la toma eléctrica. No tocar el cable eléctrico ni el adaptador de corriente con las manos húmedas.
29. No encienda y apague el equipo en cortos intervalos de tiempo, ya que se reduce así la vida útil del sistema.
30. NOTA IMPORTANTE: Sustituya los fusibles únicamente por otros del mismo tipo y de las mismas características. Si el fusible se funde continuamente, póngase en contacto con un servicio técnico autorizado.
31. Para desconectar completamente el equipo de la tensión eléctrica, desenchufe el cable eléctrico o el adaptador de corriente de la toma eléctrica.
32. Si el equipo dispone de un enchufe eléctrico Volex, deberá desbloquearse el Volex del equipo para desenchufarlo. Esto implica que un tirón en el
cable eléctrico puede desplazar el equipo y provocar daños personales o materiales. Por tanto, asegúrese de instalar los cables con sumo cuidado.
ENGLISH
DEUTSCH
FRANCAIS
ESPAÑOL
POLSKIITALIANO
简体中文
繁體中文
37
Page 38

33. Si es probable que caiga un rayo por una tormenta eléctrica o si no va a emplear el equipo durante mucho tiempo, desenchufe el cable eléctrico
ENGLISH
y el adaptador de corriente.
ATENCIÓN:
Para evitar el riesgo de descarga eléctrica, no retire la tapa. El equipo no contiene elementos que
el usuario pueda reparar o sustituir. Para cualquier tarea de mantenimiento o reparación, acuda a
un técnico cualificado.
DEUTSCH
Le pictogramme en forme de triangle équilatéral contenant un éclair terminé d‘une flèche avertit l‘utilisateur de la présence
d‘une tension dangereuse à l‘intérieur de l‘appareil, tension susceptible de provoquer un choc électrique.
El símbolo de exclamación dentro de un triángulo equilátero advierte al usuario de la existencia de importantes instrucciones
de uso y mantenimiento.
FRANCAIS ESPAÑOL POLSKI
¡ADVERTENCIA: ALTO VOLUMEN!
Este equipo se destina a un uso profesional. Por consiguiente, si se aplica a un uso comercial, estará sujeto a las normas y reglamentos
de la Asociación para la prevención de accidentes de su sector profesional. Como fabricante, Adam Hall tiene la obligación de informar
formalmente a los usuarios de la existencia de posibles riesgos para la salud. Daños auditivos por exposición prolongada a un nivel SPL
alto: este equipo puede generar fácilmente un nivel de presión sonora (SPL) lo suficientemente elevado como para causar daños auditivos
permanentes a los artistas, el personal de producción y el público. Deben tomarse precauciones para evitar la exposición prolongada a un
SPL de más de 90dB.
SEGURIDAD DE LA BATERÍA
ITALIANO
1. Mantenga los polos de la batería alejados de objetos conductores de electricidad como llaves, joyas u otros materiales. De lo contrario, se
podría producir un cortocircuito en la batería que puede causar lesiones y quemaduras.
2. No cambie nunca la polaridad de los contactos de la batería.
3. Mantenga la batería alejada de un calor excesivo y de la radiación solar directa. No la coloque encima ni dentro de aparatos de calentamiento
como microondas, hornos o radiadores. Las baterías pueden explotar si se sobrecalientan.
简体中文 繁體中文
4. No intente modificar ni adaptar la batería, introducir cuerpos extraños en ella o sumergirla/hacerla entrar en contacto con agua u otros
líquidos. Si esto ocurre, puede dar lugar a un incendio, una explosión u otras situaciones peligrosas.
5. Si se ha salido el ácido de la batería, asegúrese de que no entre en contacto con la piel ni con los ojos. Si ocurriera, enjuague de inmediato la
zona afectada con agua limpia y acuda al médico.
6. Si la batería se deforma, decolora o sobrecalienta durante el proceso de carga o el almacenamiento, deje de utilizar el equipo inmediatamente y
retire la batería. Si sigue utilizando el equipo, puede salirse el ácido de la batería o producirse un incendio o una explosión.
7. No eche baterías al fuego, ya que pueden explotar. Las baterías dañadas también pueden explotar.
8. Deseche las baterías usadas de acuerdo con las normas locales. El uso indebido de las baterías puede dar lugar a un incendio, una
explosión u otras situaciones peligrosas.
9. No permita que los niños o las mascotas muerdan, chupen o laman la batería. Si esto ocurre, puede resultar dañada o incluso explotar.
10. No aplaste ni perfore la batería, ni tampoco la exponga a presiones altas. Si esto ocurre, se puede producir un cortocircuito o sobrecalentamiento.
11. No deje que se caiga el aparato o la batería. Si se deja caer el equipo o la batería, especialmente sobre una superficie dura, estos
pueden resultar dañados.
12. Si el tiempo de espera del equipo se reduce considerablemente, cambie la batería.
13. Si el equipo lleva una batería integrada no extraíble, no intente extraerla, ya que puede dañar el equipo. Para cambiar la batería, lleve el
equipo a un centro de servicio autorizado.
¡Advertencia! Este símbolo indica la presencia de superficies calientes. Durante el funcionamiento, algunas partes de la
carcasa pueden llegar a calentarse bastante. Por ello, una vez apagado el equipo, espere al menos 10 minutos antes de
manipularlo o transportarlo.
¡Advertencia! Este equipo está diseñado para ser utilizado a una altura que no supere los 2000metros sobre el nivel del mar.
¡Advertencia! Este equipo no está diseñado para funcionar en climas tropicales.
38
Page 39

NOTA IMPORTANTE: Cargue la batería únicamente con el sistema electrónico de carga previsto para ello (sistema electrónico de carga en
el subwoofer del MAUI5 GO, base de carga LDMAUI5GOCD).
INTRODUCCIÓN
Con su equipamiento perfecto en todos los sentidos, el MAUI® 5 GO es el sistema definitivo para presentar un sonido nítido y potente en cualquier
lugar. El PA de columna está alimentado por una potente batería de iones de litio. El cargador está integrado en el subwoofer, y se puede adquirir
una base de carga externa como accesorio. Las entradas para micrófono e instrumentos y las señales de línea, así como el streaming estéreo
por Bluetooth®, hacen del MAUI® 5 GO el equipo ideal para músicos callejeros y para la reproducción musical y vocal en eventos privados y
corporativos, así como en todas las aplicaciones sin conexión a la red eléctrica. Es muy fácil de transportar gracias a su reducido peso, que no llega
a 13 kg, y a su diseño dividido en cuatro piezas, y está operativo en cuestión de segundos gracias al conector multipin especial. La disposición de
array lineal de los motores logra un alcance extremadamente alto y, además, la amplia cobertura y excelente resistencia a los acoples del equipo
hacen innecesario el uso de monitores adicionales. Para ofrecer una calidad de sonido inigualable en todas las aplicaciones, el equipo de columna
dispone del procesador de señales LECC DSP de LD Systems con limitador multibanda, ecualizador, compresor y crossover. El mezclador integrado
de 4 canales ofrece reguladores de volumen independientes para los canales de entrada, suma y subwoofer, así como un incremento de agudos
variable, que permiten un ajuste rápido y equilibrado del sonido.
INDICACIONES GENERALES
Antes de ponerlo en marcha, el subwoofer del sistema de altavoces LD MAUI5 GO debe colocarse sobre una superficie plana y apoyado
verticalmente sobre sus pies. Este sistema nunca debe funcionar sobre una plataforma con ruedas, pues se corre el peligro de que todo el sistema
se ponga en movimiento de forma incontrolada. Esto puede dar lugar a accidentes y daños. Para asegurar una refrigeración suficiente, durante su
funcionamiento deberá mantenerse una distancia mínima de separación de 50 cm entre el panel posterior del subwoofer y paredes u otros objetos.
Al usar este sistema y los equipos que se le conecten como, por ejemplo, mesas de mezclas o reproductores de CD, se deberá asegurar la
conexión correcta de los equipos de audio y de la fuente de alimentación eléctrica. Deberán utilizarse exclusivamente cables en perfecto
estado que tengan la sección adecuada y queden siempre completamente extendidos. En caso necesario, se recomienda utilizar pasacables
para prevenir caídas por tropiezos causados por cables sueltos. El equipo nunca deberá instalarse cerca de un borde. El subwoofer no
deberá colocarse sobre una mesa. Para evitar ruidos de fondo no deseados al encender los equipos conectados al sistema, este deberá
encenderse siempre en último lugar y ser el primero en apagarse.
MONTAJE
El sistema de altavoces LD MAUI5 GO está compuesto por cuatro componentes:
A. Subwoofer con sistema electrónico integrado para todos los componentes del sistema, incluido un módulo de carga para cargar la batería
y una conexión para los elementos de columna en la parte superior.
B. Elemento de columna con batería integrada, indicador de estado de la batería y conexiones en las partes inferior y superior.
C. Pieza distanciadora con conexiones en las partes inferior y superior.
D. Elemento de columna con los altavoces y conexión en la parte inferior.
Después de colocar el subwoofer en el lugar deseado, se conectan encima el elemento de columna con batería integrada y la pieza distanciadora.
Por último, se conecta el elemento de columna que tiene los altavoces. En función de la aplicación, también es posible utilizar el sistema de altavoces
sin pieza distanciadora.
El sistema de altavoces MAUI5 GO se puede utilizar tanto sin conexión a la red mediante el elemento de columna con batería integrada
como conectado a la red. Al utilizarlo conectado a la red eléctrica, la batería se carga automáticamente. El tiempo de reproducción al
utilizarlo con batería se puede prolongar cuanto se desee intercambiando el elemento de columna con la batería agotada por otro con la
batería completamente cargada, el cual puede adquirirse opcionalmente. El cambio de batería lleva apenas unos segundos y el sistema
estará operativo de nuevo.
ENGLISH
DEUTSCH
FRANCAIS
ESPAÑOL
POLSKIITALIANO
简体中文
39
繁體中文
Page 40

ENGLISH
DEUTSCH
FRANCAIS ESPAÑOL POLSKI
D
C
B
D
B
ITALIANO
简体中文 繁體中文
CONEXIÓN Y FUNCIONAMIENTO
En el equipo se puede ajustar tanto el volumen de todo el sistema como el volumen del subwoofer en relación con el volumen total. Se pueden
conectar reproductores tanto mediante cables balanceados como mediante cables no balanceados (XLR / jack de 6,3 mm / minijack). La mesa
de mezclas integrada de 4 canales ofrece una entrada de micrófono, una entrada de alta impedancia para instrumentos, p. ej., para una guitarra
electroacústica, una entrada para reproductores con nivel de línea y, además, una unidad Bluetooth. Para ampliar el sistema, el subwoofer dispone
de una salida de línea balanceada con toma XLR (SYSTEM OUTPUT).
A
A
40
Page 41

CONEXIONES, ELEMENTOS DE MANEJO Y ELEMENTOS DE VISUALIZACIÓN
4 5 6 7
12
3
13
9 8
1
MIC INPUT
Entrada de micrófono balanceada (combo XLR/jack de 6,3 mm). También es posible utilizar un cable de micrófono no balanceado (jack mono).
La entrada de micrófono dispone de un filtro paso alto de 100 Hz integrado para restringir las señales de baja frecuencia indeseadas. NOTA: En
la entrada de micrófono no hay alimentación fantasma.
2
HI-Z INPUT
Entrada mono de alta impedancia con toma para jack de 6,3 mm para guitarra electroacústica o eléctrica.
3
MP3
Entrada de línea estéreo con toma para jack de 3,5 mm para un reproductor MP3 u otro tipo de reproductor. Las interfaces de MP3 y
Bluetooth se pueden utilizar simultáneamente; la relación de volumen se debe ajustar en los reproductores. Al utilizar un solo equipo MAUI5
GO, active el preset mono (véase el punto 14).
2
14
11
1
10
ENGLISH
DEUTSCH
FRANCAIS
ESPAÑOL
POLSKIITALIANO
4
BLUETOOTH® / MP3
Regulador de volumen para el módulo Bluetooth o la entrada MP3. Gírelo a la izquierda para reducir el volumen y a la derecha para aumentarlo. Las entradas de Bluetooth y MP3 se pueden utilizar simultáneamente; la relación de volumen se debe ajustar en los reproductores.
5
HI-Z
Regulador de volumen para la entrada HI-Z. Gírelo a la izquierda para reducir el volumen y a la derecha para aumentarlo.
6
LINE
Regulador de volumen para el canal de línea (entradas de línea en la parte posterior del subwoofer). Gírelo a la izquierda para reducir el
volumen y a la derecha para aumentarlo.
7
MIC
Regulador de volumen para el canal de micrófono. Gírelo a la izquierda para reducir el volumen y a la derecha para aumentarlo.
8
HI-BOOST
Filtro high shelf para adaptar la emisión de agudos a la acústica de la sala (girado totalmente a la izquierda = sonido neutro,
giro a la derecha = incremento de agudos).
简体中文
繁體中文
41
Page 42

9
ENGLISH
DEUTSCH
FRANCAIS ESPAÑOL POLSKI
SUB LEVEL
Ajuste de la relación de volumen del subwoofer respecto al altavoz de columna.
10
MAIN LEVEL
Ajuste del volumen general El volumen del subwoofer se regula en función del preajuste con el regulador de nivel SUB LEVEL.
11
INDICADORES LED
ON: Este LED se ilumina al encender el equipo tras haberlo conectado correctamente a la red eléctrica.
SIGNAL: Se enciende cuando el equipo recibe una señal de audio. La detección de señal tiene lugar antes del regulador MAIN LEVEL.
LIMIT: Se enciende cuando se utiliza el sistema de altavoces en el rango máximo. Si el LED parpadea brevemente, eso no supone un
problema. Para proteger el sistema, el limitador integrado regula el nivel de la señal bajándolo levemente cuando es excesivo. Si el LED
del limitador se enciende durante más tiempo o de forma permanente, se deberá bajar el volumen. Si no se sigue esta recomendación, se
puede provocar una reproducción acústica distorsionada y causar daños en el sistema de altavoces.
PROTECT: Se enciende cuando el sistema se sobrecalienta o se sobrecarga. Los amplificadores se silencian automáticamente. Después de
alcanzar las condiciones normales de funcionamiento, el equipo cambia de nuevo al modo de funcionamiento normal transcurridos unos minutos.
12
LED BLUETOOTH
La mesa de mezclas del sistema array MAUI5 GO está equipada con Bluetooth, lo que significa que se pueden reproducir archivos de audio
de otro
dispositivo con Bluetooth (p. ej., un smartphone) en el sistema de altavoces MAUI5 GO (distancia máxima entre los dos dispositivos: 10
metros aproximadamente). Si no hay conectado ningún dispositivo Bluetooth con la unidad interna de Bluetooth, el LED de Bluetooth azul no
muestra ninguna señal. Durante el acoplamiento, el LED parpadea rítmicamente a una frecuencia de unos 3 Hz, y cuando la conexión está
ya establecida, el LED de Bluetooth permanece encendido y se puede iniciar la reproducción de las pistas. El ajuste del volumen tiene lugar
mediante el regulador del MP3/Bluetooth (n.º 4) o en el reproductor.
13
HOLD TO LINK
Para acoplar y conectar la unidad interna de Bluetooth con un dispositivo Bluetooth, mantenga pulsado el botón HOLD to LINK durante unos 3
segundos hasta que el LED de Bluetooth parpadee rítmicamente (a unos 3 Hz), active el Bluetooth en su dispositivo Bluetooth y utilice la interfaz
de usuario para buscar los dispositivos disponibles. Seleccione la entrada «LD MAUI5 GO» para acoplar su dispositivo Bluetooth con la unidad de
Bluetooth.
Ahora se puede iniciar la reproducción de pistas. Para finalizar la conexión, vuelva a mantener pulsado el botón HOLD to LINK durante unos 3
ITALIANO
segundos. Si se interrumpe la conexión por Bluetooth (p. ej., al salirse del alcance), el LED de Bluetooth se apaga. La conexión se puede restablecer
automáticamente en un intervalo de 90 segundos (el dispositivo Bluetooth vuelve a estar dentro del alcance). Una vez transcurridos los 90 segundos, el módulo Bluetooth del sistema de altavoces MAUI5 GO se desactiva automáticamente.
14
SYSTEM MONO / STEREO
Botón e indicadores LED para los modos de funcionamiento mono y estéreo.
简体中文 繁體中文
MONO: Al utilizar un solo sistema de altavoces MAUI5 GO, active el preset mono (pulse el botón para que se encienda el indicador LED
MONO). Internamente, las señales estéreo se pasarán a mono. Al utilizar un segundo sistema de altavoces MAUI5 GO como ampliación
mono, conecte la salida de línea SYSTEM OUTPUT de la unidad principal y la entrada de línea INPUT LEFT/MONO de la unidad de ampliación
con un cable XLR balanceado.
STEREO: Al utilizar dos sistemas de altavoces MAUI5 GO como set estéreo, active el preset estéreo (pulse el botón para que se encienda
el indicador LED STEREO). Puede alimentar la unidad de ampliación estéreo con ayuda de la salida de línea SYSTEM OUTPUT (SYSTEM
OUTPUT de la unidad principal -> RIGHT INPUT de la unidad de ampliación).
Encontrará ejemplos de cableado y ampliación del sistema en el apartado «EJEMPLOS DE CABLEADO» de este manual.
®
42
15 16 15
17
18
Page 43

15
LINE INPUT LEFT / RIGHT
Entrada de línea balanceada con tomas combo para XLR / jack de 6,3 mm (izquierda/derecha) para conectar un reproductor (p. ej., mesa de
mezclas, teclado). Al conectar una fuente de señales mono, utilice la entrada de línea LEFT / MONO.
16
SYSTEM OUTPUT
Salida de línea balanceada con conector macho XLR para alimentar más sistemas de altavoces MAUI5 GO.
17
TOMA DE RED Y PORTAFUSIBLE
Toma eléctrica IEC con soporte de fusible integrado. En la entrega se incluye un cable de red adecuado para el producto.
NOTA IMPORTANTE: El fusible deberá sustituirse exclusivamente por otro del mismo tipo y con las mismas características técnicas. Prestar
atención a las características que aparecen impresas en la carcasa del equipo. Si el fusible salta de forma recurrente, dirigirse a un centro
de servicio técnico autorizado.
18
POWER ON - OFF / CHARGE
Este interruptor no desconecta el sistema de la red eléctrica en ninguna posición. Para una desconexión segura de todos los polos, es
necesario desenchufar el conector. En la posición ON, el sistema está listo para funcionar, ya sea desconectado de la red (haciendo uso de
la batería) o bien conectado a la red existente (independientemente del estado de carga de la batería). En la posición OFF / CHARGE,
el sistema está apagado, pero si está conectado a la red, la batería también se carga en esta posición.
20
ENGLISH
DEUTSCH
FRANCAIS
ESPAÑOL
POLSKIITALIANO
19
21
19
BOTÓN DE COMPROBACIÓN DE LA BATERÍA
Botón para mostrar el estado de la batería mediante los LED de estado (n.º 20).
20
LED DE ESTADO DE LA BATERÍA
Indicador del estado de la batería con cuatro LED. Pulse el botón n.º 19 para que los LED de estado le indiquen el estado de la batería. Si
se encienden los 4 LED, es que la batería está completamente cargada. Cuando se encienda solo el LED rojo «LOW», cargue la batería de
inmediato o cámbiela por otra completamente cargada.
21
CHARGE
Al conectar el sistema de altavoces correctamente a la red eléctrica, se carga la batería del elemento de columna correspondiente y se enciende el LED
CHARGE (opcionalmente, se puede adquirir una base de carga independiente). La batería también se carga cuando el sistema de altavoces está conectado a la red eléctrica pero apagado (OFF / CHARGE), en cuyo caso la corriente de carga es de 2,5 A. Cuando el sistema de altavoces está encendido, la
corriente de carga es de 1,5 A. El tiempo de carga con el sistema apagado (OFF / CHARGE) es de unas 3 horas. Una vez alcanzada la tensión de final de
carga, el proceso de carga se detiene automáticamente y el LED CHARGE se apaga. El sistema electrónico de carga comprueba la tensión de la batería
a intervalos regulares y vuelve a iniciar el proceso de carga automáticamente en caso de que la tensión de la batería sea inferior a la definida en el
sistema electrónico de carga.
简体中文
繁體中文
43
Page 44

LD SYSTEMS LECC DSP
ENGLISH
¿QUÉ SIGNIFICA LA DENOMINACIÓN LECC DSP DE LD SYSTEMS?
DSP es el acrónimo de Digital Signal Processing (procesamiento digital de señales), y LECC hace referencia a Limiter, EQ, Compressor y
Crossover (limitador, ecualizador, compresor y crossover). El procesamiento digital de señales garantiza una reproducción óptima del audio
con la máxima claridad y protege a su vez el sistema de PA frente a la sobrecarga.
¿QUÉ HACE EXACTAMENTE EL LECC DSP?
DEUTSCH
La función de limitador protege los altavoces y evita las distorsiones causadas por la saturación. Los limitadores independientes para los
rangos de graves, medios y agudos atenúan la señal cuando un determinado valor alcanza un nivel tan alto que pudiese tener un efecto
negativo. Cada limitador está optimizado para uno de los tres rangos de frecuencia, interconectados a la perfección (limitador multibanda). De
esta forma, el sistema se puede utilizar con un SPL alto en general, ya que los picos extremos de las señales se atenúan automáticamente para
no tener que reducir el volumen global.
FRANCAIS ESPAÑOL POLSKI
El ecualizador multibanda procesa todo el rango de frecuencias y optimiza el sonido global del sistema.
El compresor se activa automáticamente para elevar los graves y generar así un sonido potente. Al aumentar el volumen se reduce
automáticamente el Bass-Boost. Los graves controlados automáticamente de esta forma se integran de manera óptima en el sonido global.
Los crossover distribuyen la señal de audio según el rango de frecuencias a los altavoces correspondientes, es decir, al subwoofer o a los
altavoces de medios y agudos de la columna array. La optimización de amplitudes y tiempos de los crossover se encarga de que todas las
frecuencias se emitan de forma uniforme y de que lleguen a los oyentes al mismo tiempo.
EJEMPLOS DE CABLEADO
Ejemplo de modo mono
ITALIANO
简体中文 繁體中文
44
Page 45

Ejemplo de modo estéreo
ENGLISH
DEUTSCH
FRANCAIS
ESPAÑOL
POLSKIITALIANO
Unidad principal Ampliación estéreo
Mismos ajustes que la unidad principal Máximo
简体中文
繁體中文
45
Page 46

ACCESORIOS OPCIONALES
ENGLISH
Bolsa de transporte para hasta 4 elementos de columna
LDM5SATBAG
DEUTSCH
FRANCAIS ESPAÑOL POLSKI
Funda protectora para el subwoofer
LDM5SUBPC
Elemento de columna con batería integrada
(29,6 V / 5200 mAh)
LDMAUI5GOBC (negro)
LDMAUI5GOBCW (blanco)
Base de carga para la batería
(Adaptador de carga con sistema electrónico de
carga y fuente de alimentación)
LDMAUI5GOCD
DATOS TÉCNICOS
Número de modelo: LDMAUI5GO(W)
Tipo: sistema de PA de columna ultraportátil con batería y mezclador
ITALIANO
Subwoofer: bass reflex de 1 x 8"
Sistema de array vertical: 4 x 2,8"
Amplificación: clase D
Dispersión (H x V): 120° x 20°
Salida de potencia (RMS/pico) 2 x 100 W / 2 x 400 W
简体中文 繁體中文
Tensión nominal de la batería: 29,6 V
Capacidad de la batería: 5200 mAh
Tecnología de la batería: iones de litio
Marca de la batería: LG
Circuitos de protección de la batería: los circuitos de protección previenen la sobrecarga y la descarga profunda
Sistema electrónico de carga: integrado en el subwoofer
Respuesta en frecuencia: 50 Hz - 20 kHz
Máx. SPL (pico): 120 dB
Protección: limitador multibanda basado en DSP, cortocircuito, sobrecorriente, sobrecalentamiento
Controles: nivel principal, nivel de subwoofer, Hi Boost, nivel de micro, nivel de MP3/Hi-Z, nivel de
Indicadores: Mezclador: encendido, señal, límite, protección, Bluetooth
Conectores del subwoofer: Entrada de línea: 2 x combo XLR/jack de 6,3 mm, entrada de micro: XLR/jack de 6,3 mm,
Conectores de columna: conector multipin personalizado
línea, nivel de Bluetooth
mono/estéreo
Batería: estado de la batería, carga
entrada de MP3: jack de 3,5 mm, entrada de Hi-Z: jack de 6,3 mm; salida de sistema XLR
®
, botón Bluetooth®, interruptor de encendido/apagado, interruptor
®
, mono/estéreo
46
Page 47

Material de la caja: ABS
Color de la caja: negro (LDMAUI5GO)
Alimentación eléctrica: SMPS
Conector de alimentación: IEC
Tensión de funcionamiento: 110-120 V CA, 50/60 Hz
Consumo energético (máx.): 300 W
Conversor AD/DA: 24 bits
Frecuencia de muestreo DSP: 48 kHz
Temperatura ambiente (en funcionamiento): 0 °C - 50 °C
Rango de humedad: 10 % - 70 % de humedad relativa (sin condensación)
Dimensiones (Ancho × Alto × P): Subwoofer: 305 x 405 x 395 mm
Peso: Subwoofer: 8,5 kg
Características: procesador de señales LD LECC DSP (limitador, ecualizador, compresor, crossover), Hi
blanco (LDMAUI5GOW)
220-240 V CA, 50/60 Hz (cambio automático)
Columna (3 piezas): 82 x 535 x 105 mm
Altura total: 1985 mm
Columna de batería: 1,7 kg
Columna distanciadora: 0,8 kg
Columna de altavoz: 1,3 kg
Peso total: 12,3 kg
Boost, corte de graves de 100 Hz en el canal de micro, conexión sencilla con conector
multipin, Bluetooth
®
DECLARACIÓN DEL FABRICANTE
GARANTÍA DEL FABRICANTE Y LIMITACIÓN DE RESPONSABILIDAD
Consulte nuestras condiciones de garantía y limitaciones de responsabilidad en:
https://cdn-shop.adamhall.com/media/pdf/Manufacturers-Declarations-LDSYSTEMS_DE_EN_ES_FR.pdf.
En caso de necesitar servicio técnico, póngase en contacto con Adam Hall GmbH, Adam-Hall-Str. 1, 61267 Neu Anspach (Alemania);
correo electrónico Info@adamhall.com; +49 (0)6081 / 9419-0.
ELIMINACIÓN CORRECTA DE ESTE PRODUCTO
(Aplicable en la Unión Europea y en los países europeos que dispongan de un sistema de recogida selectiva) El símbolo que aparece
sobre el producto o en la documentación adjunta indica que al final de la vida útil del equipo, no deberá desecharlo con los demás
residuos domésticos, con el fin de evitar posibles efectos negativos en el medio ambiente y en la salud humana debidos al vertido
incontrolado de desechos. La recogida selectiva ayuda a su posterior reciclaje y fomenta la reutilización sostenible de los componentes de
este equipo. Si es un particular, póngase en contacto con el distribuidor donde adquirió este producto, o con el ayuntamiento, para
informarse sobre el reciclaje adecuado de este equipo. Si es una empresa, póngase en contacto con su proveedor para informarse sobre los
términos y condiciones de su contrato de compra-venta. Este producto no debe mezclarse con otros residuos industriales.
Conformidad CE
Adam Hall GmbH declara por la presente que este producto es conforme con las siguientes directivas (según sea aplicable):
R&TTE (1999/5/CE) o RED (2014/53/UE) a partir de junio de 2017
Directiva de baja tensión (2014/35/UE)
Directiva EMC (2014/30/UE)
RoHS (2011/65/UE)
Puede consultar la declaración de conformidad completa en www.adamhall.com.
También puede solicitarla a info@adamhall.com.
ENGLISH
DEUTSCH
FRANCAIS
ESPAÑOL
POLSKIITALIANO
简体中文
47
繁體中文
Page 48

POLSKI
ENGLISH
GRATULUJEMY WYBORU!
To urządzenie zostało zaprojektowane i wyprodukowane przy zastosowaniu najwyższych kryteriów jakościowych w celu zapewnienia wieloletniej bezawaryjnej eksploatacji. Firma LD Systems gwarantuje to swoją marką i wieloletnim doświadczeniem w wytwarzaniu wysokiej
jakości produktów audio. Proszę starannie przeczytać niniejszą instrukcję obsługi, aby móc jak najszybciej zacząć użytkować ten produkt
marki LD Systems.
Dalsze informacje na temat firmy LD SYSTEMS dostępne są na naszej stronie internetowej WWW.LD-SYSTEMS.COM
DEUTSCH
ŚRODKI OSTROŻNOŚCI
1. Należy dokładnie przeczytać niniejszą instrukcję.
2. Wszystkie informacje i instrukcje przechowywać w bezpiecznym miejscu.
3. Należy przestrzegać zaleceń.
4. Należy przestrzegać wszystkich wskazówek ostrzegawczych. Nie wolno usuwać wskazówek bezpieczeństwa ani innych informacji
znajdujących się na urządzeniu.
FRANCAIS ESPAÑOL POLSKI
5. Używać urządzenia wyłącznie w sposób zgodny z jego przeznaczeniem.
6. Stosować wyłącznie stabilne i pasujące statywy, ew. elementy mocujące (w przypadku instalacji stałych). Należy zadbać o prawidłową instalację
uchwytów ściennych i ich odpowiednie zabezpieczenie. Zapewnić bezpieczną instalację urządzenia i upewnić się, że urządzenie nie spadnie.
7. Podczas instalacji przestrzegać obowiązujących w danym kraju przepisów bezpieczeństwa.
8. Urządzenie instalować i eksploatować z dala od grzejników, zasobników ciepła, pieców i innych źródeł ciepła. Zadbać o zainstalowanie urządzenia w
taki sposób, aby zawsze było ono wystarczająco chłodzone i nie mogło ulec przegrzaniu.
9. Nie umieszczać na urządzeniu źródeł zapłonu, takich jak np. palące się świece.
10. Nie wolno blokować szczelin wentylacyjnych. Unikać bezpośredniego działania promieni słonecznych!
11. Zachowaj odległość co najmniej 20 cm wokół i nad urządzeniem.
12. Nie używać urządzenia w bezpośrednim sąsiedztwie wody (nie dotyczy specjalnych urządzeń do stosowania na zewnątrz – w takim
przypadku należy przestrzegać podanych poniżej wskazówek specjalnych). Urządzenie nie może mieć kontaktu z palnymi materiałami,
płynami ani gazami.
13. Zabezpieczyć urządzenie przed wniknięciem kapiącej lub pryskającej wody. Nie wolno stawiać na urządzeniu pojemników napełnionych
płynami, takich jak wazony czy naczynia z piciem.
14. Należy zadbać o to, aby do urządzenia nie wpadały żadne przedmioty.
15. Urządzenie można eksploatować tylko przy użyciu akcesoriów zalecanych i przewidzianych przez producenta.
16. Nie otwierać urządzenia ani nie dokonywać w nim zmian.
17. Po podłączeniu urządzenia sprawdzić wszystkie ciągi kablowe, aby zapobiec szkodom lub wypadkom np. w wyniku potknięcia.
18. Podczas transportu zadbać o to, aby urządzenie nie upadło, gdyż może to spowodować uszkodzenie mienia i obrażenia ciała.
19. Jeśli urządzenie nie działa prawidłowo, do jego wnętrza dostały się płyny lub przedmioty lub jeśli urządzenie zostało uszkodzone w inny
sposób, należy je natychmiast wyłączyć i odłączyć od gniazda sieciowego (jeśli urządzenie jest aktywne). Naprawę takiego urządzenia może
wykonać tylko autoryzowany personel specjalistyczny.
ITALIANO
20. Do czyszczenia urządzenia stosować suchą ściereczkę.
21. Przestrzegać obowiązujących w danym kraju przepisów dotyczących usuwania odpadów. Podczas utylizacji opakowania oddzielić
tworzywo sztuczne od papieru i tektury.
22. Worki z tworzywa sztucznego należy przechowywać w miejscu niedostępnym dla dzieci.
23. Wszelkie zmiany czy modyfikacje urządzeń, które nie zostały wyraźnie zatwierdzone przez stronę odpowiedzialną za zgodność, mogą
spowodować utratę przez użytkownika prawa do posługiwania się tym sprzętem.
简体中文 繁體中文
DOTYCZY URZĄDZEŃ Z ZASILANIEM SIECIOWYM
24. UWAGA: jeśli kabel sieciowy urządzenia jest wyposażony w zestyk ochronny, należy go podłączyć do gniazda z przewodem uziemiającym. Nigdy nie wolno dezaktywować przewodu uziemiającego kabla sieciowego.
25. Nie włączać urządzenia bezpośrednio po narażeniu go na silne wahania temperatury (np. po transporcie). Wilgoć i skropliny mogą uszkodzić
urządzenie. Włączyć urządzenie dopiero wtedy, gdy osiągnie temperaturę pokojową.
26. Przed podłączeniem urządzenia do gniazda elektrycznego należy sprawdzić, czy napięcie i częstotliwość sieci elektrycznej odpowiada wartościom podanym na urządzeniu. Jeśli urządzenie jest wyposażone w przełącznik napięcia, należy podłączyć je do gniazda tylko
wówczas, gdy wartości urządzenia odpowiadają wartościom sieci elektrycznej. Jeśli dołączony kabel sieciowy lub dołączony adapter
sieciowy nie pasuje do gniazda elektrycznego, należy skontaktować się z elektrykiem.
27. Nie stawać na kablu sieciowym. Należy zadbać o to, aby kable przewodzące napięcie nie były zagięte przy gnieździe sieciowym, przy
adapterze sieciowym ani przy gnieździe urządzenia.
28. Przy podłączaniu urządzenia zawsze należy zadbać o to, aby kabel sieciowy lub adapter sieciowy był zawsze łatwo dostępny. Odłączyć
urządzenie od źródła zasilania, gdy nie jest ono używane lub gdy ma zostać poddane czyszczeniu. Zawsze należy wyjmować kabel sieciowy
i adapter sieciowy z gniazda, chwytając za wtyczkę lub adapter, a nie za kabel. Nigdy nie dotykać kabla sieciowego i adaptera sieciowego
mokrymi dłońmi.
29. W miarę możliwości nie włączać i wyłączać urządzenia w krótkich odstępach czasu, gdyż może to mieć negatywny wpływ na jego żywotność.
30. WAŻNA INFORMACJA: bezpieczniki należy wymieniać wyłącznie na bezpieczniki tego samego typu i o takich samych wartościach. Jeśli bezpiecznik
stale się przepala, należy skontaktować się z autoryzowanym centrum serwisowym.
31. Aby całkowicie odłączyć urządzenie od sieci, należy wyjąć kabel sieciowy lub adapter sieciowy z gniazda.
48
Page 49

32. Jeśli urządzenie jest wyposażone w przyłącze sieciowe Volex, konieczne jest odblokowanie odpowiedniej wtyczki urządzenia Volex, zanim
będzie możliwe jej odłączenie. Oznacza to także, iż w wyniku pociągnięcia za kabel urządzenie może się przesunąć i spaść, co może spowodować
obrażenia ciała i/lub inne szkody, dlatego ważne jest, aby przewody były odpowiednio poprowadzone.
33. W przypadku zagrożenia uderzeniem pioruna lub jeśli urządzenie przez dłuższy czas nie jest używane, należy wyjąć kabel sieciowy i
adapter sieciowy z gniazda.
UWAGA:
Nigdy nie zdejmować pokrywy, gdyż grozi to porażeniem prądem. We wnętrzu urządzenia nie ma
żadnych części, które mogłyby zostać naprawione bądź poddane czynnościom konserwacyjnym przez
użytkownika. Czynności konserwacyjne i naprawy może przeprowadzać wyłącznie wykwalifikowany
Trójkąt równoboczny z symbolem błyskawicy sygnalizuje nieizolowane, niebezpieczne napięcie we wnętrzu urządzenia, które
może spowodować porażenie prądem.
Trójkąt równoboczny z wykrzyknikiem oznacza ważne wskazówki dotyczące obsługi i konserwacji.
¡Advertencia! Este símbolo indica la presencia de superficies calientes. Durante el funcionamiento, algunas partes de la
carcasa pueden llegar a calentarse bastante. Por ello, una vez apagado el equipo, espere al menos 10 minutos antes de
manipularlo o transportarlo.
Ostrzeżenie! To urządzenie przeznaczone jest do użytku do maksymalnej wysokości 2000 m n.p.m.
Ostrzeżenie! To urządzenie nie jest przewidziane do użytku w tropikalnych strefach klimatycznych.
UWAGA! WYSOKI POZIOM GŁOŚNOŚCI PRODUKTÓW AUDIO!
To urządzenie przewidziane jest do zastosowań profesjonalnych. Komercyjne stosowanie tego urządzenia podlega obowiązującym w danym
kraju przepisom i wytycznym dotyczącym zapobiegania wypadkom. Firma Adam Hall jest jako producent zobowiązana do wyraźnego
informowania o potencjalnym zagrożeniu dla zdrowia. Utrata słuchu w wyniku wysokiego poziomu głośności i długotrwałego narażenia: podczas stosowania tego produktu może powstać wysoki poziom ciśnienia akustycznego (SPL), który może doprowadzić do nieodwracalnego
uszkodzenia słuchu u artystów, pracowników i widzów. Należy unikać długotrwałego narażenia na wysoki poziom głośności powyżej 90 dB.
personel serwisowy.
ENGLISH
DEUTSCH
FRANCAIS
ESPAÑOL
POLSKIITALIANO
ZASADY BEZPIECZEŃSTWA
1. Nie zbliżaj przedmiotów wykonanych z materiałów przewodzących prąd elektryczny, takich jak klucze, biżuteria itp., do biegunów akumulatora. W
przeciwnym razie może dojść do zwarcia, które grozi obrażeniami i poparzeniami.
2. Nigdy nie zmieniaj biegunów akumulatora.
3. Chroń akumulator przed wysoką temperaturą i bezpośrednim oddziaływaniem promieniowania słonecznego. Nie kładź akumulatora na
urządzeniach grzejnych, takich jak kuchenki mikrofalowe, piece i kaloryfery, ani nie wkładaj go do środka tych urządzeń. W razie przegrzania
akumulator może wybuchnąć.
4. Nie próbuj przerabiać akumulatora, wkładać do niego jakichkolwiek przedmiotów, zanurzać go w wodzie lub innych cieczach. Chroń
przed kontaktem z wilgocią. W przeciwnym wypadku grozi pożar, wybuch lub inne niebezpieczeństwa.
5. W razie wycieku kwasu z akumulatora nie dopuść do kontaktu ze skórą lub oczami. Gdyby do tego doszło, natychmiast płucz miejsce
kontaktu czystą wodą i skontaktuj się z lekarzem.
6. W razie odkształcenia, przebarwienia lub przegrzania akumulatora podczas ładowania lub przechowywania natychmiast przerwij pracę
urządzenia i wyjmij akumulator. W razie dalszej pracy urządzenia może dość do wycieku kwasu i pożaru lub wybuchu.
7. Nie wrzucaj akumulatorów do ognia, ponieważ grozi to wybuchem. Także uszkodzone akumulatory mogą wybuchnąć.
8. Zużyte akumulatory utylizuj zgodnie z miejscowymi przepisami. Nieprawidłowe używanie akumulatora grozi pożarem, wybuchem lub
innymi niebezpieczeństwami.
9. Gryzienie, oblizywanie lub ssanie akumulatora przez dzieci lub zwierzęta domowe może spowodować uszkodzenie lub wybuch akumulatora.
10. Nie dopuść do roztrzaskania akumulatora, nie nakłuwaj go ani nie poddawaj działaniu wysokiego ciśnienia. Może to spowodować
zwarcie lub przegrzanie akumulatora.
11. Chroń urządzenie i akumulator przed upadkiem, ponieważ upadek, szczególnie na twarde podłoże, grozi jego uszkodzeniem.
12 Wymień akumulator, gdy czas pracy urządzenia w trybie gotowości znacznie się skróci.
13. Jeżeli akumulator w Twoim urządzeniu jest zintegrowany i wbudowany na stałe, nie próbuj go wyjmować, ponieważ grozi to uszkodzeniem
urządzenia. W celu wymiany akumulatora zanieś urządzenie do autoryzowanego centrum serwisu.
简体中文
繁體中文
49
Page 50

WAŻNA WSKAZÓWKA: Ładuj akumulator tylko za pomocą dostarczonego układu elektronicznego (układ elektroniczny modułu ładowania
ENGLISH
subwoofera MAUI5 GO, stacja dokowania LDMAUI5GOCD)
WPROWADZENIE
Doskonale wyposażony zestaw MAUI® 5 GO to najlepszy system zapewniający krystalicznie czyste, mocne brzmienie w dowolnym miejscu.
Kolumna PA jest zasilana wydajnym akumulatorem litowo-jonowym. Ładowarka jest zintegrowana z subwooferem. Dodatkowo jest dostępna
ładowarka zewnętrzna. Wejścia mikrofonowe, na instrumenty i sygnał liniowy oraz strumieniowe przesyłanie stereofoniczne Bluetooth® sprawi,
DEUTSCH
że MAUI® 5 GO będzie idealnym rozwiązaniem dla ulicznych muzyków, odtwarzania muzyki i głosu na prywatnych i biznesowych wydarzeniach
oraz wszystkich zastosowań, gdzie nie ma dostępu do sieci zasilającej. Dzięki niskiej wadze zaledwie 13 kg ta czteroczęściowa konstrukcja może
być łatwo transportowana i przygotowana do użytku w kilka sekund za pomocą specjalnego złącza wielopinowego. Wyrównany liniowo głośnik ma
bardzo duży zasięg, niezwykle szeroki kąt emisji dźwięku i dużą odporność na sprzężenia, dzięki czemu osobne monitory odsłuchowe są zbędne.
System kolumn jest wyposażony w rozwiązanie LECC DSP firmy LD Systems z wielopasmowym limiterem, korektorem, kompresorem i zwrotnicą,
zapewniając dźwięk doskonałej jakości przy wszystkich zastosowaniach. Zintegrowany czterokanałowy mikser zapewnia osobne regulatory
głośności dla kanałów wejściowych, sumatora i subwoofera, jak również wzmocnienie wyższych tonów, co umożliwia szybkie i zrównoważone
FRANCAIS ESPAÑOL POLSKI
ustawienie dźwięku.
WSKAZÓWKI OGÓLNE
Przed uruchomieniem subwoofera, należącego do systemu LD MAUI5 GO, należy ustawić go na nóżkach, na równej powierzchni. Nie wolno
użytkować systemu na wózku jezdnym, ponieważ stwarza to niebezpieczeństwo niekontrolowanego przemieszczenia się całego systemu. W
rezultacie może dojść do uszkodzenia sprzętu lub wypadku. Aby zapewnić wystarczające chłodzenie, podczas eksploatacji należy zachować
minimalny odstęp między tylną ścianą subwoofera a innymi obiektami, wynoszący 50cm.
W przypadku systemu i podłączonych urządzeń, takich jak pulpity mikserskie, odtwarzacze CD itp., zwrócić uwagę na prawidłowe
podłączenie przewodów audio i przewodów prądowych. Stosować wyłącznie nieuszkodzone kable o odpowiedniej średnicy; zawsze należy
całkowicie rozwijać bębny kablowe. Ewentualnie należy użyć mostów kablowych, aby uniknąć potknięcia się o leżące luzem kable. Nigdy
nie stawiać urządzenia bezpośrednio przy krawędziach. Nie umieszczać subwoofera na stole. Aby uniknąć niepożądanych trzasków podczas
włączania podłączonych urządzeń, system należy zawsze włączać jako ostatni, a wyłączać jako pierwszy.
MONTAŻ
System głośnikowy LD MAUI5 GO składa się z następujących elementów:
A. Subwoofer ze zintegrowanym układem elektronicznym do wszystkich elementów systemu, w tym modułu ładowania akumulatora i złączy
na górze kolumny.
B. Kolumna ze zintegrowanym akumulatorem, wskaźnikiem naładowania i złączami u góry i u dołu.
C. Element dystansowy ze złączami u dołu i u góry.
ITALIANO
D. Kolumna z głośnikami i złączem u dołu.
Po umieszczeniu subwoofera w żądanym położeniu kolumna ze zintegrowanym akumulatorem i elementem dystansowym jest podłączona
do subwoofera, a następnie do kolumny z głośnikami. W zależności od zastosowania system głośnikowy może być również używany bez
elementu dystansowego.
简体中文 繁體中文
System głośnikowy MAUI5 GO może być zasilany za pomocą zintegrowanego akumulatora, a także z sieci. Akumulator jest ładowany automatycznie
podczas pracy przy zasilaniu sieciowym. Pracę można przedłużyć na czas nieokreślony przez zastąpienie kolumny z wyczerpanym akumulatorem przed
opcjonalnie dostępnymi kolumnami z w pełni naładowanym akumulatorem. Wymiana akumulatora trwa kilka sekund i system może działać dalej.
50
Page 51

D
ENGLISH
C
B
D
B
DEUTSCH
FRANCAIS
ESPAÑOL
POLSKIITALIANO
A
A
GNIAZDA I DZIAŁANIE
Głośność całego systemu, jak również głośność subwoofera można dostosować do całkowitej głośności. Urządzenia zewnętrzne można podłączyć
zarówno za pomocą przewodów symetrycznych, jak i niesymetrycznych (gniazdo XLR / jack 6,3 mm / mini jack). Zintegrowany 4-kanałowy
pulpit mikserski zawiera wejście mikrofonowe, wejście o wysokiej impedancji na instrument, np. gitarę elektroakustyczną, wejście na urządzenia
zasilające o poziomie liniowym, a ponadto moduł Bluetooth. W celu rozszerzenia systemu subwoofer ma symetryczne wyjście liniowe z gniazdem
XLR (SYSTEM OUTPUT).
简体中文
繁體中文
51
Page 52

GNIAZDA, PANEL OBSŁUGI I WSKAŹNIKI
ENGLISH
4 5 6 7
DEUTSCH
12
3
13
2
1
FRANCAIS ESPAÑOL POLSKI
9 8
1
MIC INPUT
Symetryczne wejście mikrofonowe (XLR / jack Combo 6,3 mm). Możliwe jest również zastosowanie asymetrycznego kabla mikrofonowego
(jack mono). Wejście mikrofonowe ma wbudowany filtr dźwiękowy tłumiący częstotliwości 100 Hz w celu wyeliminowania składowych
sygnału niskiej częstotliwości. WSKAZÓWKA: Na wejściu mikrofonu nie ma zasilania fantomowego.
2
HI-Z INPUT
Wejście mono o dużej impedancji z gniazdem jack 6,3 mm na gitarę elektroakustyczną lub elektryczną.
ITALIANO
3
MP3
Liniowe wejście stereofoniczne z gniazdem jack 3,5 mm na odtwarzacz MP3 lub inne urządzenie zewnętrzne. Oba interfejsy MP3 i Bluetooth
mogą być użyte jednocześnie. Należy wtedy ustawić współczynnik głośności na urządzeniach zewnętrznych. Przy używaniu pojedynczego
gniazda MAUI5 GO włącz funkcję mono (zobacz punkt 14).
4
简体中文 繁體中文
BLUETOOTH® / MP3
Regulator głośności modułu Bluetooth lub wejścia MP3. Przekręcenie w lewo spowoduje zmniejszenie, a przekręcenie w prawo zwiększenie
głośności. Oba wejścia Bluetooth i MP3 mogą być użyte jednocześnie. Należy wtedy ustawić współczynnik głośności na urządzeniach
zewnętrznych.
14
11
10
5
HI-Z
Regulator głośności wejścia HI-Z. Przekręcenie w lewo spowoduje zmniejszenie, a przekręcenie w prawo zwiększenie głośności.
6
LINE
Regulacja głośności kanału liniowego (wejścia liniowe z tyłu subwoofera). Przekręcenie w lewo spowoduje zmniejszenie, a przekręcenie w
prawo zwiększenie głośności.
7
MIC
Regulacja głośności kanału mikrofonowego. Przekręcenie w lewo spowoduje zmniejszenie, a przekręcenie w prawo zwiększenie głośności.
8
HI-BOOST
Filtr High Shelf do regulacji odtwarzania tonów wysokich dostosowanych do akustyki pomieszczenia (przekręcenie w lewo = neutralny
dźwięk, przekręcenie
w prawo = wzmocnienie tonów wysokich).
52
Page 53

9
SUB LEVEL
Ustawienie relacji głośności subwoofera względem głośników satelitarnych.
10
MAIN LEVEL
Ustawienia ogólnej głośności głośników. Głośność subwoofera jest ustawiana zgodnie z ustawieniem domyślnym na regulatorze SUB LEVEL.
11
ANZEIGE LEDS
ENGLISH
ON Świeci się, gdy urządzenie jest prawidłowo podłączone do sieci zasilającej i włączone.
SIGNAL Świeci się, gdy urządzenie odbiera sygnał audio. Sygnał jest odbierany przed regulatorem MAIN LEVEL.
LIMIT Świeci się, gdy system głośnikowy jest eksploatowany w górnym zakresie granicznym. Krótkotrwały rozbłysk diody LED nie ma
istotnego znaczenia. Aby chronić system, zbyt wysoki poziom sygnału będzie łagodnie redukowany przez zintegrowany limiter. Jeśli dioda
LED limitera będzie świecić się przez dłuższy czas lub w sposób ciągły, należy zredukować poziom głośności. Zignorowanie tego wskazania
może spowodować zakłócenia w odtwarzaniu dźwięku oraz uszkodzenie systemu głośnikowego.
PROTECT: Zaświeca się, gdy system jest przeciążony / przegrzany. Wzmacniacze są wyciszane automatycznie. Po osiągnięciu normalnych
warunków pracy po kilku minutach urządzenie powróci do normalnego trybu pracy.
12
BLUETOOTH
Pulpit mikserski systemu MAUI5 GO jest wyposażony w technologię Bluetooth, co oznacza, że pliki dźwiękowe można odtwarzać na innych
urządzeniach
Bluetooth (np. smartfonach) bezpośrednio z systemu głośnikowego MAUI5 GO (maksymalna odległość między oboma urządzeniami może
wynosić ok. 10 m). Jeśli urządzenie Bluetooth nie jest podłączone do wewnętrznego modułu Bluetooth, niebieska dioda LED Bluetooth
nie świeci. Po nawiązaniu połączenia dioda LED miga rytmicznie z częstotliwością około 3 Hz, a dioda LED Bluetooth świeci stale. Można
rozpocząć odtwarzanie utworów. Głośność jest regulowana za pomocą regulatora głośności MP3 / Bluetooth (nr 4) lub na urządzeniu
zewnętrznym.
13
HOLD TO LINK
Aby połączyć wewnętrzny moduł Bluetooth z urządzeniem Bluetooth, naciśnij i przytrzymaj przycisk HOLD to LINK przez około 3 sekundy,
aż dioda LED Bluetooth zacznie migać rytmicznie (z częstotliwością około 3 Hz), włącz funkcję Bluetooth w urządzeniu Bluetooth i wyszukaj
dostępne urządzenia w interfejsie użytkownika. Wybierz „LD MAUI5 GO” i połącz z urządzeniem Bluetooth.
Można rozpocząć odtwarzanie utworów. Aby zakończyć połączenie, naciśnij i przytrzymaj przycisk HOLD to LINK przez około 3 sekundy. Jeśli
połączenie Bluetooth zostanie przerwane (na przykład z powodu przekroczenia zasięgu), dioda LED Bluetooth zgaśnie. W ciągu około 90 sekund
połączenie może zostać automatycznie przywrócone (gdy urządzenie Bluetooth znów znajdzie się w zasięgu). Gdy czas 90 sekund zostanie
przekroczony, moduł Bluetooth systemu MAUI5 GO zostanie automatycznie wyłączony.
14
SYSTEM MONO / STEREO
Przyciski i wskaźniki LED trybu mono lub stereo.
MONO: W przypadku korzystania z pojedynczego systemu głośnikowego MAUI5 GO należy włączyć tryb mono (nacisnąć przycisk, aby
zaświeciła się kontrolka MONO). Powiązany sygnał stereo jest sumowany z zewnętrznym sygnałem mono. W przypadku używania drugiego
systemu głośnikowego MAUI5 GO jako rozszerzenia mono, podłącz wyjście liniowe SYSTEM OUTPUT urządzenia głównego do wejścia
liniowego INPUT LEFT/MONO modułu rozszerzającego przy użyciu symetrycznego przewodu XLR.
STEREO: W przypadku korzystania z dwóch systemów głośnikowych MAUI5 GO należy włączyć tryb stereo (nacisnąć przycisk, aby
zaświeciła się kontrolka STEREO). Użyj wyjścia liniowego SYSTEM OUTPUT, aby sterować modułem rozszerzającym stereo (SYSTEM OUTPUT
jednostki głównej -> moduł rozszerzający RIGHT INPUT).
®
LED
DEUTSCH
FRANCAIS
ESPAÑOL
POLSKIITALIANO
简体中文
Przykłady okablowania i rozszerzenia systemu można znaleźć w podręczniku w części PRZYKŁADY OKABLOWANIA.
15 16 15
17
繁體中文
18
53
Page 54

15
ENGLISH
LINE INPUT LEFT / RIGHT
Symetryczne wejście liniowe z gniazdami jack XLR / 6,3 mm (lewy / prawy) do podłączenia urządzenia wejściowego (na przykład pulpitu
mikserskiego, keyboardu). Podłączając źródło sygnału mono, użyj wejścia liniowego LEFT / MONO.
16
SYSTEM OUTPUT
Symetryczne wyjście liniowe z męskim gniazdem XLR do sterowania kolejnymi systemami głośnikowymi MAUI5 GO.
DEUTSCH
17
GNIAZDO SIECIOWE I PODSTAWA BEZPIECZNIKOWA
Gniazdo sieciowe IEC ze zintegrowaną podstawą bezpiecznikową. Kabel zasilający znajduje się w zestawie.
WAŻNA WSKAZÓWKA: Bezpiecznik wymieniać wyłącznie na bezpiecznik tego samego typu i o tej samej wartości. Należy zapoznać się z
etykietami na obudowie. Jeżeli bezpiecznik zadziała wielokrotnie, proszę zwrócić się do autoryzowanego centrum serwisowego.
FRANCAIS ESPAÑOL POLSKI
18
POWER ON - OFF / CHARGE
Ten przełącznik nie odłącza systemu od sieci zasilającej. Bezpieczne odłączenie wszystkich biegunów można uzyskać tylko przez wyjęcie
wtyczki. W pozycji ON system jest gotowy do pracy w trybie zasilania akumulatorem, niezależnie od zasilania sieciowego lub, jeśli jest
dostępne zasilanie sieciowe, niezależnie od stanu naładowania akumulatora. W pozycji OFF/CHARGE system jest wyłączony, ale akumulator
jest ładowany, jeśli jest dostępne podłączenie do sieci.
20
19
ITALIANO
21
简体中文 繁體中文
19
BATTERIE CHECK
Przycisk pokazujący stan akumulatora za pomocą diody LED stanu (nr 20).
20
BATTERIESTATUS LEDS
Czterosegmentowy wskaźnik LED stanu akumulatora. Naciśnij przycisk 19, aby wyświetlić stan akumulatora za pomocą diod LED stanu.
Akumulator jest w pełni naładowany, gdy świecą wszystkie cztery diody LED. Gdy zaświeci się czerwona dioda LOW, należy natychmiast
naładować akumulator lub wymienić akumulator na naładowany.
21
CHARGE
Akumulator odpowiedniej kolumny jest ładowany i dioda CHARGE świeci się, gdy system głośnikowy zostanie prawidłowo podłączony do źródła
zasilania (opcjonalnie dostępna jest oddzielna stacja ładowania). Akumulatory są także ładowane, gdy system głośnikowy jest podłączony do zasilania,
ale jest wyłączony (OFF / CHARGE); prąd ładowania wynosi 2,5 A. Gdy system głośnikowy jest włączony, prąd ładowania wynosi 1,5 A. Czas ładowania
przy wyłączonym systemie (OFF / CHARGE) wynosi około 3 godzin. Po osiągnięciu końcowego napięcia ładowania proces ładowania zostaje automatycznie zatrzymany, a dioda CHARGE gaśnie. Układ elektroniczny modułu ładowania sprawdza napięcie akumulatora w regularnych odstępach i
automatycznie uruchamia proces ładowania, gdy napięcie w układzie elektronicznym ładowania obniży się.
54
Page 55

LD SYSTEMS LECC DSP
CO OZNACZA SYMBOL LD SYSTEMS LECC DSP?
DSP to skrót oznaczający cyfrowe przetwarzanie sygnału (Digital Signal Processing), LECC to pierwsze litery od słów Limiter, EQ (equalizer),
Compressor (kompresor) i Crossover (zwrotnica). Cyfrowe przetwarzanie sygnału zapewnia optymalne odtwarzanie dźwięku z maksymalną
wyraźnością, chroniąc system PA przed przeciążeniem.
JAK DZIAŁA LECC DSP?
Funkcja limitera chroni głośniki i zapobiega zniekształceniom spowodowanym przeciążeniem. Oddzielny limiter basów, tonów średnich i
wysokich tłumi sygnał, gdy tylko poziom przekracza wartość, która może mieć negatywny wpływ. Każdy limiter jest zoptymalizowany pod
kątem jednego z trzech zakresów częstotliwości (limiter wielopasmowy). W ten sposób system może pracować przy wyższym ogólnym
ciśnieniu akustycznym, ponieważ ekstremalne szumy sygnału są automatycznie tłumione tak, aby całkowita głośność nie musiała być
zmniejszona.
Wielopasmowy equalizer obejmuje cały zakres częstotliwości i optymalizuje całkowity dźwięk systemu.
Kompresor jest włączany automatycznie, aby zwiększyć poziom basów i stworzyć mocniejszy dźwięk. Po zwiększeniu głośności wzmocnienie
basów zostanie automatycznie zmniejszone. Basy są automatycznie regulowane tak, aby optymalnie pasowały do całego dźwięku.
Zwrotnice głośnikowe dzielą sygnał audio w zależności od zakresu częstotliwości na odpowiednie głośniki, tj. subwoofer lub kolumny
średnio- i wysokotonowe. Optymalizacja amplitudy i czasu działania zwrotnicy głośnikowej gwarantuje, że wszystkie częstotliwości są
równomiernie emitowane i docierają do słuchacza w tym samym czasie.
ENGLISH
DEUTSCH
FRANCAIS
PRZYKŁADY OKABLOWANIA
Przykład trybu pracy mono
ESPAÑOL
POLSKIITALIANO
简体中文
繁體中文
55
Page 56

Przykład trybu pracy stereo
ENGLISH
DEUTSCH
FRANCAIS ESPAÑOL POLSKI
ITALIANO
简体中文 繁體中文
56
Główna jednostka Rozszerzenie stereo
Takie same ustawienia jak dla jednostki głównej Maksimum
Page 57

OPCJONALNE AKCESORIA
Torba transportowa na 4 kolumny
LDM5SATBAG
Pokrowiec na subwoofer
LDM5SUBPC
ENGLISH
DEUTSCH
Kolumna ze zintegrowanym akumulatorem (29,6 V / 5200 mAh)
LDMAUI5GOBC (czarna)
LDMAUI5GOBCW (biała)
Stacja dokowania do ładowania akumulatora
(Adapter do ładowania z układem elektronicznym i
zasilaczem sieciowym)
LDMAUI5GOCD
DANE TECHNICZNE
Numer modelu: LDMAUI5GO(W)
Typ: ultra-przenośny system PA z akumulatorem i mikserem
Subwoofer: 1 x 8" bass reflex
System kolumnowy: 4 x 2,8"
Wzmocnienie: klasa D
Dyspersja (poziomo x pionowo): 120° x 20°
Wyjście zasilania (RMS/Peak)
Nominalne napięcie akumulatora: 29,6 V
Pojemność akumulatora:
Technologia akumulatora: litowo-jonowa
Marka akumulatora:
Obwody ochronne akumulatora: obwody ochronne zabezpieczające przed przeładowaniem oraz głębokim rozładowaniem
Układy elektroniczne modułu ładowania: zintegrowane w subwooferze
Odpowiedź częstotliwościowa: 50 Hz — 20 kHz
Maks. SPL (szczytowy): 120 dB
Ochrona: wielopasmowy limiter DSP, zabezpieczenie przed zwarciem, przeciążeniem prądowym,
Elementy sterujące: poziom główny, poziom subwoofera, Hi Boost, poziom mikrofonu, poziom MP3/Hi-Z,
Kontrolki: Mikser: włącznik, sygnał, limit, ochrona, Bluetooth
Złącza subwoofera: Wejście liniowe: 2 x XLR/6,3 mm Jack Combo, wejście mikrofonu: XLR/6,3 mm Jack,
przeciążeniem termicznym
®
poziom wejścia liniowego, poziom wyjścia Bluetooth
łącznik, przełącznik mono/stereo
Akumulator: stan akumulatora, ładowanie
wejście MP3: 3,5 mm Jack, wejście Hi-Z: 6,3 mm Jack; wyjście systemu XLR
, przycisk Bluetooth®, włącznik/wy-
®
, mono/stereo
FRANCAIS
ESPAÑOL
POLSKIITALIANO
简体中文
繁體中文
57
Page 58

Złącza kolumn: Niestandardowe złącze wielopinowe
ENGLISH
Materiał obudowy:
Kolor obudowy: czarny (LDMAUI5GO)
Zasilanie:
Złącze zasilania:
Napięcie robocze: AC 110–120 V, 50/60 Hz
DEUTSCH
Zużycie energii (maks.): 300 W
Konwerter AD/DA: 24-bitowy
Częstotliwość próbkowania DSP: 48 kHz
Temperatura otoczenia (podczas pracy): 0°C–50°C
FRANCAIS ESPAÑOL POLSKI
Zakres wilgotności: 10% — 70% wzgl. (bez kondensacji)
Wymiary (szer. x wys. x dł.): Subwoofer: 305 x 405 x 395 mm
Masa: Subwoofer: 8,5 kg
Charakterystyka: przetwarzanie sygnału LD LECC DSP (limiter, korektor, kompresor, zwrotnica), Hi Boost,
biały (LDMAUI5GOW)
AC 220–240 V, 50/60 Hz (zmiana automatyczna)
kolumna (3 szt.): 82 x 535 x 105 mm
Wysokość całkowita:
Kolumna akumulatora: 1,7 kg
Kolumna dystansowa: 0,8 kg
Kolumna głośnikowa: 1,3 kg
Całkowita masa: 12,3 kg
100 Hz — obcinanie niskich częstotliwości w kanale mikrofonowym, łatwe połączenie z
wielopinową wtyczką, Bluetooth
®
DEKLARACJE PRODUCENTA
GWARANCJA PRODUCENTA I OGRANICZENIE ODPOWIEDZIALNOŚCI
Nasze aktualne warunki gwarancji i informacje dotyczące ograniczenia odpowiedzialności znajdą Państwo na stronie:
https://cdn-shop.adamhall.com/media/pdf/Manufacturers-Declarations-LDSYSTEMS_DE_EN_ES_FR.pdf.
W razie konieczności skorzystania z serwisu proszę skontaktować się z firmą Adam Hall GmbH, Adam-Hall-Str. 1, 61267 Neu Anspach /
e-mail Info@adamhall.com / +49 (0)6081 / 9419-0.
ITALIANO
简体中文 繁體中文
PRAWIDŁOWA UTYLIZACJA NINIEJSZEGO PRODUKTU
(Obowiązuje w Unii Europejskiej i innych krajach europejskich stosujących system sortowania odpadów) Niniejszy symbol na produkcie lub
związanych z nim dokumentach wskazuje, iż urządzenie po zakończeniu okresu użytkowania nie może być utylizowane razem ze standardowymi odpadami domowymi, aby uniknąć szkód w środowisku lub szkód na osobie powstałych w wyniku niekontrolowanego usuwania odpadów.
Niniejszy produkt należy utylizować oddzielnie od innych odpadów i przekazać do punktu recyklingu w celu ponownego wykorzystania użytych w
nim materiałów w ramach idei zrównoważonego rozwoju. Klienci prywatni otrzymują informacje w zakresie przyjaznych dla środowiska możliwości
usuwania odpadów od sprzedawcy, u którego produkt został zakupiony, lub w odpowiednich placówkach regionalnych. Użytkownicy będący
przedsiębiorcami proszeni są o kontakt ze swoimi dostawcami i ewentualne sprawdzenie uzgodnionych umownie warunków utylizacji urządzeń.
Niniejszy produkt nie może być utylizowany razem z innymi odpadami przemysłowymi.
Deklaracja zgodności CE
Firma Adam Hall GmbH niniejszym oświadcza, że produkt ten jest zgodny z następującymi dyrektywami (o ile mają zastosowanie):
dyrektywa w sprawie urządzeń radiowych i końcowych urządzeń telekomunikacyjnych (1999/5/WE) lub dyrektywa w sprawie urządzeń
radiowych (2014/53/UE) od czerwca 2017 r.
dyrektywa niskonapięciowa (2014/35/UE)
dyrektywa w sprawie kompatybilności elektromagnetycznej (2014/30/UE)
dyrektywa w sprawie ograniczenia stosowania niektórych niebezpiecznych substancji w sprzęcie elektrycznym i elektronicznym (2011/65/UE)
Pełna wersja deklaracji zgodności znajduje się na stronie internetowej www.adamhall.com.
Ponadto zapytania w tej sprawie można przesyłać na adres e-mail info@adamhall.com.
58
Page 59

ITALIANO
AVETE FATTO LA SCELTA GIUSTA!
Quest‘apparecchio è stato sviluppato e prodotto secondo elevati standard qualitativi che garantiscono un funzionamento regolare per molti
anni. Per questo motivo LD Systems, con il suo nome e la pluriennale esperienza, rappresenta un‘azienda produttrice di prodotti audio di
qualità. Leggete attentamente questo manuale d‘uso per utilizzare al meglio il vostro nuovo prodotto LD Systems.
Per maggiori informazioni su LD SYSTEMS, consultate la nostra pagina web WWW.LD-SYSTEMS.COM
MISURE PRECAUZIONALI
1. Leggere attentamente il presente manuale di istruzioni.
2. Conservare tutte le indicazioni e le istruzioni in un luogo sicuro.
3. Seguire le istruzioni.
4. Rispettare tutte le avvertenze. Non rimuovere dal dispositivo le indicazioni sulla sicurezza o altre informazioni.
5. Utilizzare il dispositivo solo nei modi previsti dal manuale.
6. Utilizzare esclusivamente stativi e fissaggi stabili e adatti (per installazioni fisse). Verificare che i supporti a parete siano installati e fissati a
regola d‘arte. Verificare che il dispositivo sia installato in modo stabile e non possa cadere.
7. Durante l‘installazione, osservare le normative sulla sicurezza in vigore nel proprio Paese.
8. Non installare né azionare il dispositivo in prossimità di radiatori, accumulatori termici, stufe o altre fonti di calore. Accertarsi che il dispositivo
sia sempre installato in modo che venga raffreddato a sufficienza e non possa surriscaldarsi.
9. Non appoggiare sul dispositivo fonti di combustione, quali candele accese.
10. Le fessure di areazione non devono essere bloccate. Evitare l‘esposizione diretta ai raggi solari.
11. Mantenere una distanza minima di 20 cm intorno e sopra al dispositivo.
12. Non attivare il dispositivo nelle immediate vicinanze di acqua (questo punto non interessa i dispositivi specifici per l‘esterno, per i quali
valgono le speciali indicazioni riportate di seguito). Non portare mai il dispositivo a contatto con materiali, liquidi o gas infiammabili.
13. Accertarsi che all‘interno del dispositivo non possa penetrare acqua per gocciolamento o spruzzo. Non collocare sul dispositivo oggetti
contenenti liquidi, quali vasi, tazze o bicchieri.
14. Assicurarsi che non sia possibile la caduta di oggetti nel dispositivo.
15. Azionare il dispositivo esclusivamente con gli accessori appositamente consigliati e previsti dal produttore.
16. Non aprire né modificare il dispositivo.
17. Una volta collegato il dispositivo, verificare tutti i cavi per evitare danni o incidenti, ad esempio per inciampo.
18. Durante il trasporto, assicurarsi che il dispositivo non possa cadere e causare possibili danni a cose e/o persone.
19. Se il dispositivo non funzionasse più correttamente, vi fosse caduto sopra del liquido o un oggetto o fosse stato danneggiato in altro
modo, spegnerlo immediatamente e staccare la spina (se si tratta di un dispositivo attivo). La riparazione del dispositivo deve essere affidata
esclusivamente a personale qualificato autorizzato.
20. Per la pulizia del dispositivo utilizzare un panno pulito.
21. Rispettare le leggi sullo smaltimento in vigore nel Paese di installazione. Al momento di smaltire l‘imballo, separare la plastica dalla
carta e dal cartone.
22. I sacchetti di plastica devono essere tenuti lontani dalla portata dei bambini.
23. Notare che eventuali modifiche o alterazioni non espressamente approvate dal responsabile della conformità possono annullare la
facoltà dell‘utente di utilizzare l‘apparecchiatura.
DISPOSITIVI CON ALLACCIAMENTO DI RETE
24. ATTENZIONE: se il cavo di rete è dotato di contatto di protezione, deve essere collegato a una presa di rete con messa a terra. Non
disattivare mai la connessione di messa a terra di un cavo di rete.
25. Non accendere il dispositivo subito dopo essere stato sottoposto a forti variazioni di temperatura (ad esempio dopo il trasporto). Umidità
e condensa potrebbero danneggiare il dispositivo. Accendere il dispositivo solo dopo che ha raggiunto la temperatura ambiente.
26. Prima di collegare il dispositivo alla presa, controllare innanzitutto se la tensione e la frequenza della rete elettrica coincidono con i
valori indicati sul dispositivo stesso. Nel caso di dispositivo munito di selettore di tensione, collegarlo alla presa unicamente se i valori del
dispositivo coincidono con quelli della rete elettrica. Se il cavo di rete o l‘adattatore di rete forniti in dotazione non sono compatibili con la
presa, rivolgersi a un elettricista.
27. Non calpestare il cavo di rete. Accertarsi che i cavi sotto tensione, in particolare della presa di rete o dell‘adattatore di rete,
non vengano pizzicati.
28. Durante il cablaggio del dispositivo, verificare sempre che il cavo di rete e l‘adattatore di rete siano costantemente accessibili. Staccare
sempre il dispositivo dall‘alimentazione di rete quando non è utilizzato o durante la pulizia. Per staccare dalla presa il cavo di rete e l‘adattatore
di rete, tirare sempre dalla spina o dall‘adattatore e non dal cavo. Non toccare mai il cavo di alimentazione e l’alimentatore con le mani umide.
29. Evitare per quanto possibile di accendere e spegnere velocemente il dispositivo per non pregiudicarne la durata.
30. NOTA IMPORTANTE: Sostituire i fusibili esclusivamente con fusibili dello stesso tipo e valore. Se un fusibile continua a saltare, rivolgersi a
un centro di assistenza autorizzato.
31. Per staccare completamente il dispositivo dalla rete elettrica, rimuovere il cavo di rete o l‘adattatore di rete dalla presa.
32. Per staccare un dispositivo provvisto di presa Volex, è prima necessario sbloccare la relativa spina Volex del dispositivo stesso. Tirando il
cavo di rete, però, il dispositivo potrebbe spostarsi e cadere, provocando danni alle persone o di altro genere. Prestare quindi la più scrupolosa attenzione durante la posa dei cavi.
33. In caso di pericolo di caduta di fulmine, o se il dispositivo rimane inutilizzato a lungo, staccare sempre il cavo di rete e l‘adattatore di
rete dalla presa.
ENGLISH
DEUTSCH
FRANCAIS
ESPAÑOL
POLSKIITALIANO
简体中文
繁體中文
59
Page 60

ENGLISH
DEUTSCH
Il triangolo equilatero con il simbolo del lampo segnala la presenza di tensioni pericolose non isolate all‘interno
dell‘apparecchio che possono causare scosse elettriche.
Il triangolo equilatero con punto esclamativo segnala la presenza di importanti informazioni relative all’uso e alla manutenzione.
Avvertimento! Questo simbolo indica superfici calde. Alcune parti della cassa potrebbero scaldarsi durante l‘impiego. Dopo aver
usato l‘apparecchiatura, lasciarla raffreddare per almeno 10 minuti prima di toccarla o trasportarla.
ATTENZIONE:
non togliere mai il coperchio di protezione perché sussiste il pericolo di scosse elettriche.
L‘interno del dispositivo non contiene parti che possono essere riparate o sottoposte a
manutenzione da parte dell‘utente. Per gli interventi di manutenzione e di riparazione rivolgersi
esclusivamente a personale qualificato.
FRANCAIS ESPAÑOL POLSKI
Avvertimento! Questo dispositivo è destinato per l’utilizzo a un’altitudine non superiore ai 2.000metri sul livello del mare.
Avvertimento! Questo dispositivo non è destinato all’uso nei climi tropicali.
ATTENZIONE! PRODOTTI AUDIO con LIVELLI SONORI ELEVATI!
Questo dispositivo è destinato a uso professionale. Il suo utilizzo in ambito commerciale è soggetto alle normative e alle direttive nazionali
vigenti in materia di prevenzione di infortuni. In qualità di produttore, Adam Hall è tenuto per legge a informare espressamente gli utenti
degli eventuali rischi per la salute. Danni all‘udito provocati da un’esposizione prolungata a un livello sonoro elevato: l‘utilizzo di questo
prodotto può generare elevati livelli di pressione sonora (SPL) che possono provocare danni irreparabili all‘udito di artisti, collaboratori e
spettatori. Evitare l‘esposizione prolungata a livelli sonori elevati, superiori a 90dB.
SICUREZZA DELLA BATTERIA
1° Non far entrate in contatto i poli della batteria con elementi conduttori, quali ad esempio chiavi, braccialetti, collane o altri materiali
metallici. Tale azione potrebbe cortocircuitare la batteria ed esporre al rischio di infortuni o bruciature.
2. Non modificare mai la polarità dei contatti della batteria.
ITALIANO
3° Tenere la batteria lontana da fonti di calore eccessivo e non esporla alla luce diretta del sole. Non collocarla in prossimità di dispositivi di
riscaldamento, quali ad esempio forni a microonde, stufe o termosifoni. Le batterie surriscaldate rischiano di esplodere.
4. Non tentare di modificare o ricostruire la batteria, non inserirvi corpi estranei o bagnarla con acqua o altri liquidi o portarla a contatto con
essi. Tali azioni possono provocare un incendio, un’esplosione o altri eventi pericolosi.
5. Se la batteria ha una perdita, evitare che l’elettrolito venga a contatto diretto con la pelle o gli occhi. In caso di contatto con la pelle o con
gli occhi, sciacquare immediatamente con acqua pulita e consultare un medico.
简体中文 繁體中文
6. In caso di deformazione della batteria, cambiamento di colore o di surriscaldamento durante la fase di ricarica o la conservazione, interrompere
immediatamente l’utilizzo dell’apparecchio e rimuovere la batteria. Continuare ad utilizzarla potrebbe infatti comportare perdite, incendi o esplosione
della batteria.
7. Non gettare le batterie nelle fiamme in quanto potrebbero esplodere. Anche le batterie danneggiate possono esplodere.
8. Smaltire le batterie usate in conformità con le normative locali. L'uso improprio delle batterie può provocare incendi, esplosioni o altre
situazioni di pericolo.
9. Non permettere ai bambini e agli animali domestici di avvicinare la batteria e i suoi accessori alla bocca, di morderli o succhiarli. Tali
azioni possono provocare danni o esplosioni.
10. Non frantumare né forare la batteria ed evitare di esporla a elevate pressioni. Tali azioni possono provocare un cortocircuito o surriscaldare
la batteria.
11. Evitare che l’apparecchio e/o la batteria cadano. Questa azione può provocare danni all’apparecchio o alla batteria, in particolare in caso
di caduta su una superficie dura.
12. Quando il tempo di standby dell’apparecchio è notevolmente ridotto, sostituire la batteria.
13. Non si deve tentare di rimuovere una batteria incorporata e non rimovibile poiché si potrebbe danneggiare l’apparecchio. Per sostituire
la batteria, affidare l’apparecchio a un centro di assistenza autorizzato.
NOTA IMPORTANTE: Caricare la batteria utilizzando esclusivamente il sistema elettronico di ricarica appropriata (sistema elettronico di
ricarica nel subwoofer MAUI5 GO, dock di ricarica LDMAUI5GOCD)
60
Page 61

INTRODUZIONE
Perfettamente equipaggiato, il MAUI® 5 GO è il sistema ideale per fornire ovunque un suono cristallino e potente. La colonna PA a batteria è
alimentata da un potente elemento agli ioni di litio. Il caricabatterie è integrato nel subwoofer, mentre come accessorio è disponibile un dock
di ricarica esterno. Gli ingressi per microfono, strumenti e segnali di linea e lo streaming stereo Bluetooth® fanno di MAUI® 5 GO il sistema
ideale per musicisti di strada, riproduzione musicale e vocale in occasione di eventi privati e aziendali e per tutte le applicazioni off-grid.
Grazie al peso ridotto di soli 13 kg circa, la struttura di quattro elementi è facilissima da trasportare e grazie agli speciali connettori multipin
è possibile installarla nel giro di pochi secondi. La configurazione line array dei driver raggiunge un raggio d'azione estremamente elevato.
Inoltre l'ampia copertura e l'eccellente resistenza al feedback del sistema rendono superflui gli altoparlanti monitor separati. Per una qualità
audio senza eguali in tutte le applicazioni, il sistema a colonna è dotato di LECC DSP LD Systems con limitatore multibanda, equalizzatore,
compressore e crossover. Il mixer a 4 canali integrato è dotato di controlli di volume separati per i canali d'ingresso, sommatori e subwoofer,
oltre a un boost degli acuti variabile che consente una regolazione rapida e bilanciata del suono.
NOTE GENERALI
Prima di essere messo in funzione, il subwoofer del sistema di altoparlanti MAUI 5 GO di LD Systems deve essere collocato in posizione
verticale su una superficie piana, facendolo appoggiare sui suoi piedini. Non utilizzare mai il sistema quando si trova su un carrello per
evitarne spostamenti incontrollati che potrebbero provocare danni e infortuni. Per consentire una sufficiente dissipazione del calore durante
l'uso dell'apparecchio, mantenere una distanza di 50cm tra il pannello posteriore del subwoofer e altri oggetti, pareti, ecc.
Assicurarsi che il sistema e tutti i dispositivi collegati, come mixer, lettori CD, ecc., siano connessi correttamente all'audio e all'alimentazione
elettrica. Utilizzare esclusivamente cavi integri di sezione adeguata e svolgere sempre completamente gli avvolgicavi. Se del caso, utilizzare
pressacavi per evitare di inciampare in cavi liberi a pavimento. Non posizionare mai il dispositivo direttamente su un dislivello. Non collocare
il subwoofer su un tavolo. Per evitare rumori fastidiosi al momento dell'accensione dei dispositivi collegati, avere cura di accendere sempre
il sistema per ultimo e di spegnerlo per primo.
INSTALLAZIONE
Il sistema di altoparlanti MAUI5 GO di LD Systems è costituito da quattro componenti:
A. Subwoofer con elettronica integrata per tutti i componenti del sistema, compreso il modulo di ricarica per la ricarica della batteria e il
collegamento degli array a colonna sul lato superiore.
B. Array a colonna con batteria integrata, indicatore dello stato di carica e collegamenti sul lato superiore e inferiore.
C. Distanziale con connettori sul lato inferiore e superiore.
D. Array a colonna con gli altoparlanti e il connettore sulla parte inferiore.
Dopo aver posizionato il subwoofer come desiderato, inserire su quest'ultimo l'array a colonna con la batteria integrata e il distanziale, infine
l'array a colonna con gli altoparlanti. A seconda dell'applicazione è possibile utilizzare il sistema di altoparlanti anche senza distanziale.
Il sistema di altoparlanti MAUI5 GO può essere utilizzato sia indipendentemente dalla rete elettrica, utilizzando l'array a colonna con batteria
integrata, sia collegandolo alla rete. Se l'unità viene alimentata dalla rete elettrica, la batteria viene caricata automaticamente. Il tempo di
riproduzione per l'uso off-grid può essere prolungato a piacere, sostituendo gli array a colonna con batteria vuota con degli array a colonna
disponibili opzionalmente con batterie completamente cariche. La sostituzione della batteria richiede pochi secondi e il sistema è nuovamente
pronto per la riproduzione.
ENGLISH
DEUTSCH
FRANCAIS
ESPAÑOL
POLSKIITALIANO
61
简体中文
繁體中文
Page 62

ENGLISH
DEUTSCH
FRANCAIS ESPAÑOL POLSKI
D
C
B
D
B
ITALIANO
简体中文 繁體中文
CONNESSIONE E ACCENSIONE
È possibile regolare sia il volume complessivo del sistema, sia quello del subwoofer in relazione al volume complessivo. I dispositivi di riproduzione
possono essere collegati con cavi bilanciati o non bilanciati (XLR/jack da 6,3 mm/mini jack). Il mixer integrato a 4 canali dispone di un ingresso
microfono, un ingresso strumenti ad alta impedenza, ad esempio per una chitarra elettrica, ingressi per dispositivi di riproduzione con livello di linea
e un'unità Bluetooth. Per ampliare il sistema, il subwoofer è dotato di un'uscita di linea bilanciata con connettore XLR (SYSTEM OUTPUT).
A
A
62
Page 63

CONNESSIONI, DISPOSITIVI DI COMANDO E VISUALIZZAZIONE
4 5 6 7
12
3
13
9 8
1
MIC INPUT
Ingresso microfono bilanciato (combo XLR/jack da 6,3mm). È anche possibile utilizzare un cavo microfono non bilanciato (jack mono).
L’ingresso del microfono dispone di un filtro integrato da 100 Hz per rumore di calpestio, che sopprime i segnali di bassa frequenza indesiderati. NOTA: l’ingresso del microfono non è munito di alimentazione phantom.
2
HI-Z INPUT
Ingresso mono ad elevata impedenza con presa jack da 6,3 mm per chitarra elettroacustica o elettrica.
3
MP3
Ingresso di linea stereo con presa jack da 3,5mm per un riproduttore MP3 o altro dispositivo di riproduzione. Le interfacce MP3 e Bluetooth® si possono utilizzare contemporaneamente, impostando il rapporto del volume sul dispositivo di riproduzione. Se si utilizza un impianto
MAUI5 GO singolo, attivare le impostazioni mono predefinite premendo il tasto SYSTEM (v. Punto 14).
2
14
11
1
10
ENGLISH
DEUTSCH
FRANCAIS
ESPAÑOL
POLSKIITALIANO
4
BLUETOOTH® / MP3
Controllo del volume per il modulo Bluetooth o l’ingresso MP3. Ruotando il pomolo verso sinistra si abbassa il volume, verso destra lo si alza.
Gli ingressi MP3 e Bluetooth
5
HI-Z
Controllo del volume per l’ingresso HI-Z. Ruotando il pomolo verso sinistra si abbassa il volume, verso destra lo si alza.
6
LINE
Regolatore del volume per il canale di linea (ingresso di linea sul pannello posteriore del subwoofer). Ruotando il pomolo verso sinistra si
abbassa il volume, verso destra lo si alza.
7
MIC
Regolatore di volume audio per il canale microfono. Ruotando il pomolo verso sinistra si abbassa il volume, verso destra lo si alza.
8
HI-BOOST
Filtro high self per adattare la riproduzione degli acuti all’acustica del locale (ruotato completamente a sinistra = suono neutro,
ruotato completamente a destra = aumento degli acuti).
®
si possono utilizzare contemporaneamente, impostando il rapporto del volume sul dispositivo di riproduzione.
简体中文
繁體中文
63
Page 64

9
ENGLISH
DEUTSCH
FRANCAIS ESPAÑOL POLSKI
SUB LEVEL
Impostazione del rapporto di volume del subwoofer e dell’altoparlante a colonna.
10
MAIN LEVEL
Impostazione del volume generale. Il volume dei subwoofer si regola in base alla preimpostazione con il fader SUB LEVEL.
11
SPIE LED
ON: Si accende se il dispositivo è correttamente connesso alla rete elettrica e acceso.
SIGNAL: Si accende quando sul dispositivo compare un segnale audio. Il segnale viene rilevato prima del regolatore MAIN LEVEL.
LIMIT: Si accende quando il sistema di altoparlanti supera la gamma limite. Una breve accensione del LED non è un segnale critico. Per
proteggere il sistema, il limitatore integrato riduce delicatamente l’eccessivo livello di segnale. Se il LED del limitatore lampeggia a lungo o
resta acceso, abbassare il volume, poiché in caso contrario si possono generare distorsioni nella riproduzione del suono e danni al sistema
altoparlanti.
PROTECT: Si accende in caso di sistema sovraccarico o surriscaldato. Gli amplificatori vengono silenziati automaticamente. Una volta
raggiunte le normali condizioni di esercizio, dopo qualche minuto il dispositivo torna alla normale modalità di funzionamento.
12
BLUETOOTH
Il mixer del sistema array MAUI5 GO è dotato di Bluetooth. Grazie a questa funzione, sul sistema di altoparlanti MAUI5 GO è possibile
riprodurre i file audio di un altro
dispositivo Bluetooth (ad esempio smartphone), a condizione che la distanza massima tra i due dispositivi non superi i 10 metri circa. Se
all’unità Bluetooth non è collegato alcun dispositivo Bluetooth, il LED blu del Bluetooth è spento; durante l’accoppiamento il LED lampeggia
ritmicamente a circa 3 Hz. Se il LED del Bluetooth rimane acceso, ciò significa che il collegamento Bluetooth è stato stabilito e la riproduzione dei titoli può essere avviata. La regolazione del volume avviene mediante l’apposito regolatore dell’MP3/Bluetooth® (n° 4), o del
dispositivo di riproduzione.
13
HOLD TO LINK
Per accoppiare e collegare un’unità Bluetooth interna con un altro dispositivo Bluetooth, premere e tenere premuto per circa 3 secondi il tasto HOLD
to LINK, fino a quando il LED Bluetooth lampeggia ritmicamente (circa Hz), attivare il Bluetooth sul proprio dispositivo Bluetooth e cercare i dispositivi
disponibili sull’interfaccia utente. Selezionare l’opzione “LD MAUI5 GO” e utilizzarlo per accoppiare il dispositivo Bluetooth con l’unità Bluetooth.
Ora è possibile avviare la riproduzione delle tracce. Per scollegarlo, premere e mantenere premuto il tasto HOLD to LINK brevemente per circa
3secondi. Se la connessione Bluetooth si interrompe (ad esempio se è fuori copertura), il LED Bluetooth si spegne. Se il dispositivo Bluetooth torna
ITALIANO
nella zona di copertura prima che siano trascorsi 90 secondi, la connessione si ripristina automaticamente. Superati questi 90 secondi, il modulo
Bluetooth del sistema di altoparlanti MAUI5 GO si disattiva automaticamente.
14
SYSTEM MONO / STEREO
Pulsante e LED indicatori per la modalità di funzionamento mono e stereo.
简体中文 繁體中文
MONO: Se si utilizza un sistema MAUI5 GO singolo, attivare le impostazioni mono predefinite premendo il tasto SYSTEM (premere il
pulsante, in modo che la spia LED MONO si illumini). A questo punto, internamente, viene sommato un segnale stereo presente e passa a
mono. Quando si utilizza un secondo sistema di altoparlanti MAUI5 GO come estensione mono, collegare l’uscita di linea SYSTEM OUTPUT
dell’unità principale e l’ingresso di linea INPUT LEFT/MONO dell’unità di espansione utilizzando un cavo bilanciato XLR.
STEREO: Quando si utilizzano due sistemi di altoparlanti MAUI5 GO come set stereo, attivare il preset stereo (premere il pulsante in modo
che il LED STEREO si illumini). Controllare l’unità di espansione stereo utilizzando l’uscita di linea SYSTEM OUTPUT (unità principale SYSTEM
OUTPUT -> unità di estensione RIGHT INPUT).
Esempi di ampliamenti del sistema e cablaggio sono riportati in questo manuale, alla sezione ESEMPI DI CABLAGGIO.
®
LED
64
15 16 15
17
18
Page 65

15
LINE INPUT LEFT/RIGHT
Ingresso di linea bilanciato con presa combo XLR/jack da 6,3mm, (sinistro/destro) per il collegamento di un dispositivo di riproduzione (ad
es. mixer o tastiere). Se si collega una fonte di segnale mono, utilizzare l'ingresso della linea LEFT/MONO.
16
SYSTEM OUTPUT
Uscita di linea bilanciata con connettore XLR maschio per il controllo di ulteriori sistemi di altoparlanti MAUI5 GO.
17
PRESA DI RETE E PORTAFUSIBILI
Presa di rete IEC con portafusibili integrato. L'apposito cavo di alimentazione è fornito in dotazione.
NOTA IMPORTANTE: sostituire il fusibile solo con un altro dello stesso tipo e con gli stessi valori. Prestare attenzione alla dicitura riportata
sull'alloggiamento. Se il fusibile continua a scattare, rivolgersi a un centro assistenza autorizzato.
18
POWER ON - OFF / CHARGE
Questo interruttore non scollega il sistema dall’alimentazione in alcuna posizione. Il disinserimento completo e sicuro può essere ottenuto
solo estraendo la spina di alimentazione. In posizione ON, il sistema è pronto per il funzionamento, sia nella modalità a batteria, indipendentemente dalla rete di alimentazione o, qualora sia disponibile il collegamento alla rete, senza considerare lo stato di carica della batteria. In
posizione OFF / CHARGE il sistema si spegne, ma la batteria viene altresì caricata qualora sia disponibile il collegamento di rete.
20
19
ENGLISH
DEUTSCH
FRANCAIS
ESPAÑOL
POLSKIITALIANO
21
19
BATTERY CHECK
Pulsante per la visualizzazione dello stato della batteria mediante LED di stato (N° 20).
20
LED DELLO STATO DELLA BATTERIA
Indicatore di stato della batteria a LED a quattro segmenti. Premere il pulsante n°19 per visualizzare lo stato della batteria attraverso i LED
di stato. Se tutti i 4 LED sono accesi, la batteria è completamente carica Non appena il LED rosso LOW si illumina, caricare immediatamente
la batteria o sostituirla con una completamente carica.
21
CHARGE
La batteria dell’array a colonna corrispondente viene caricata e il LED CHARGE si illumina non appena il sistema di altoparlanti viene collegato
correttamente all’alimentazione elettrica (dock di caricamento separato opzionale disponibile). La batteria si carica anche quando il sistema di
altoparlanti è spento ma collegato alla rete (OFF/CHARGE); la corrente di carica è pari a 2,5 A. Quando il sistema di altoparlanti è acceso, la corrente
di carica è 1,5 A. Il tempo di ricarica del sistema spento (OFF/CHARGE) è di circa 3 ore. Una volta raggiunta la tensione di fine carica, il processo di
ricarica si arresta automaticamente e il LED CHARGE si spegne. Il sistema elettronico di carica controlla la tensione della batteria a intervalli regolari
e se la tensione della batteria definita nel sistema elettronico di carica scende, riavvia automaticamente il processo di ricarica.
简体中文
繁體中文
65
Page 66

LECC DSP DI LD SYSTEMS
ENGLISH
COSA SIGNIFICA IL NOME LECC DSP DI LD SYSTEMS?
DSP è l'acronimo di Digital Signal Processing (elaborazione digitale dei segnali), mentre LECC sta per Limiter, EQ, Compressor e Crossover
(limitatore, equalizzatore, compressore e crossover). Il processore di segnale digitale ottimizza la riproduzione, assicurandone la massima
chiarezza, proteggendo nel contempo il sistema PA dal sovraccarico.
IN CONCRETO, QUALI SONO GLI EFFETTI DEL LECC DSP?
DEUTSCH
La funzione limitatore protegge gli altoparlanti evitando le distorsioni da sovraccarico. Le frequenze basse, medie e alte sono controllate
da limitatori indipendenti che agiscono sul segnale affinché non superi un determinato valore con possibili conseguenze negative. Ogni
limitatore è ottimizzato per una delle tre bande di frequenza integrate adiacenti (limitatore multibanda). Il livello di pressione sonora ottenuto
in questo modo è maggiore dal momento che i picchi di segnale estremi vengono automaticamente indeboliti senza la necessità di ridurre il
volume complessivo del sistema.
FRANCAIS ESPAÑOL POLSKI
L'equalizzatore multibanda elabora tutte le bande di frequenza e ottimizza il suono complessivo del sistema.
Il compressore si attiva automaticamente per esaltare i gravi ed ottenere così un suono più potente. Con il progressivo aumento del volume, il
bass-boost diminuisce proporzionalmente. Il risultato è una risposta dei gravi controllata automaticamente e sempre perfettamente calibrata.
I crossover assegnano il segnale audio al relativo altoparlante in base alle bande di frequenza, vale a dire al subwoofer e agli altoparlanti
dei medi e degli acuti dell'array a colonna. Sono ottimizzati in termini di ampiezza e ritardo, il che si traduce in frequenze coordinate che gli
ascoltatori ricevono in modo simultaneo.
ESEMPIO DI CABLAGGIO
Esempio di modalità mono
ITALIANO
简体中文 繁體中文
66
Page 67

Esempio di modalità stereo
ENGLISH
DEUTSCH
FRANCAIS
ESPAÑOL
POLSKIITALIANO
Unità principale Ampliamento stereo
Stesse impostazioni dell’unità principale
Massimo
简体中文
繁體中文
67
Page 68

ACCESSORI OPZIONALI
ENGLISH
Borsa di trasporto per max. 4 elementi a colonna
LDM5SATBAG
DEUTSCH
FRANCAIS ESPAÑOL POLSKI
Custodia per il subwoofer
LDM5SUBPC
Elemento a colonna con batteria integrata (29,6 V / 5200 mAh)
LDMAUI5GOBC (nero)
LDMAUI5GOBCW (bianco)
Dock di ricarica per caricare la batteria
(Adattatore di carica con sistema elettronico di
carica e alimentatore)
LDMAUI5GOCD
DATI TECNICI
Modello: LDMAUI5GO(W)
Tipo: Sistema PA a colonna ultra-compatto con batteria e mixer
ITALIANO
Subwoofer: Bass reflex 1 x 8"
Sistema ad array verticale: 4 x 2,8"
Amplificazione: Classe D
Dispersione (H x V): 120° x 20°
Potenza di uscita (RMS/picco) 2 x 100 W / 2 x 400 W
简体中文 繁體中文
Tensione nominale della batteria: 29,6 V
Capacità della batteria: 5200 mAh
Tecnologia della batteria: Ioni di litio
Marca della batteria: LG
Circuiti di protezione della batteria: I circuiti di protezione impediscono il sovraccarico e lo scaricamento completo
Elettronica di caricamento: Integrata nel subwoofer
Risposta in frequenza: 50 Hz - 20 kHz
Max. SPL (picco): 120 dB
Protezione: Limitatore multibanda, cortocircuito, sovracorrente, surriscaldamento basati su DSP
Comandi: Main Level, Subwoofer Level, Hi Boost, controllo livello Mic, controllo livello MP3/Hi-Z,
Indicatori: Mixer: On, signal, limit, protect, Bluetooth
Connettori del subwoofer: Entrata LINE INPUT: 2 combo XLR/jack da 6,3 mm, entrata Mic: combo XLR/jack da 6,3
Connettori colonna: Connettore multipin realizzato su misura
controllo livello Line, controllo livello Bluetooth
accensione/spegnimento, interruttore Mono/Stereo
Batteria: Stato della batteria, Carica
mm, entrata MP3: minijack da 3,5 mm, entrata Hi-Z: jack da 6,3 mm; XLR System Out
®
, pulsante Bluetooth®, interruttore di
®
, Mono/Stereo
68
Page 69

Materiale della cassa: ABS
Colore della cassa: Nero (LDMAUI5GO)
Alimentazione: SMPS
Connettore di alimentazione: IEC
Tensione di esercizio: 110-120 VAC, 50/60 Hz
Consumo di potenza (max.): 300 W
Convertitore AD/DA: 24 bit
Frequenza di campionamento DSP: 48 kHz
Temperatura ambiente (in esercizio): 0°C - 50°C
Intervallo di umidità: 10% - 70% rel. (senza condensa)
Dimensioni (L x H x P): Subwoofer: 305 x 405 x 395 mm
Peso: Subwoofer: 8,5kg
Caratteristiche: Elaborazione di segnali LD LECC DSP (limitatore, equalizzatore, compressore, crossover),
Bianco (LDMAUI5GOW)
220-240 VAC, 50/60 Hz (commutazione automatica)
Colonna (3 pz): 82 x 535 x 105 mm
Altezza totale: 1985 mm
Colonna batteria: 1,7kg
Colonna distanziale: 0,8kg
Colonna altoparlante: 1,3 kg
Peso totale: 12,3 kg
filtro Hi Boost, filtro taglia bassi a 100 Hz all'entrata del Mic, connessione agevole con
connettore multipin, Bluetooth
®
DICHIARAZIONI DEL PRODUTTORE
MANUFACTURER’S WARRANTY & LIMITATION OF LIABILITY
Le nostre attuali condizioni di garanzia e la limitazione di responsabilità sono consultabili alla pagina:
https://cdn-shop.adamhall.com/media/pdf/Manufacturers-Declarations-LDSYSTEMS_DE_EN_ES_FR.pdf.
In caso di assistenza, rivolgersi a Adam Hall GmbH, Adam-Hall-Str. 1, 61267 Neu Anspach /
E-mail Info@adamhall.com / +49 (0)6081 / 9419-0.
CORRETTO SMALTIMENTO DEL PRODOTTO
(In vigore nell‘Unione Europea e in altri Paesi europei in cui si attui la raccolta differenziata) Questo simbolo apposto sul prodotto o
sui relativi documenti indica che, per evitare danni all‘ambiente e alle persone causati da uno smaltimento incontrollato dei rifiuti,
alla fine del suo ciclo di vita l‘apparecchio non deve essere smaltito insieme ai normali rifiuti domestici. Il prodotto deve quindi essere
smaltito separatamente da altri rifiuti e riciclato nell‘ottica dell‘incentivazione di cicli economici sostenibili. I clienti privati possono richiedere
informazioni sulle possibilità di smaltimento ecosostenibile al rivenditore presso il quale è stato acquistato il prodotto o presso le autorità
regionali competenti. I clienti aziendali devono invece contattare il proprio fornitore e controllare le eventuali condizioni contrattuali inerenti
allo smaltimento degli apparecchi. Questo prodotto non deve essere smaltito assieme ad altri rifiuti industriali.
Conformità CE
Con la presente Adam Hall GmbH dichiara che questo prodotto soddisfa le seguenti direttive (ove pertinente):
Direttiva R&TTE (1999/5/CE) e RED (2014/53/UE) da giugno 2017
Direttiva bassa tensione (2014/35/CE)
Direttiva CEM (2014/30/UE)
RoHS (2011/65/UE)
La dichiarazione di conformità completa è reperibile al sito www.adamhall.com.
Per ulteriori informazioni è inoltre possibile scrivere a info@adamhall.com.
ENGLISH
DEUTSCH
FRANCAIS
ESPAÑOL
POLSKIITALIANO
简体中文
69
繁體中文
Page 70

简体中文
ENGLISH
购买我们的产品是您正确的选择!
本产品在极高的质量要求下研发制造,可确保长年平稳运作。LDSystems享誉全球、经验丰富,是一家高品质音频设
备制造商。请仔细阅读这本使用说明书,以便您能尽快以最佳方式使用LDSystems的产品。
关于LD SYSTEMS的更多信息请访问我们的网站WWW.LD-SYSTEMS.COM
安全须知
DEUTSCH
1.请仔细通读这本使用说明书。
2.请将所有信息和说明妥善保存。
3.请按照说明中的指示进行操作。
4.请注意所有的警告提示。请勿移除设备上的安全提示或其它信息。
5.请按照说明中规定的方法使用本设备。
6.请将设备放置在稳固、合适的三脚架或固定装置上(固定安装方式)。确保墙面支架安装正确,安全牢固。确保本设
备安装牢固,不会滑落。
FRANCAIS ESPAÑOL POLSKI
7.进行安装时请注意本国适用的安全规定。
8.请勿在暖气、储热器、锅炉及其它热源附近安装和运行本设备。确保本设备安装后能够充分散热冷却。
9.请勿将任何火源(如燃烧的蜡烛)放置在本设备上。
10.请勿堵塞通风口。
11.请勿靠近水源运行本设备。设备不得接触可燃性物质、液体和气体。避免阳光直射!
12.确保不会有水滴入、喷入设备。请勿将盛有液体的容器(如花瓶、水杯等)放置在设备上。
13.确保不会有物体落入设备。
14.仅使用制造商推荐和规定的配件操作本设备。
15.请勿打开、改动设备。
16.设备接线后请检查所有线路,防止诸如因绊倒等引起的损坏或意外事故发生。
17.运输过程中务必确保设备不会掉落,避免造成财物及人身损伤。
18.如果您的设备出现功能故障,液体或物体落入设备内部,或者设备受到其它损坏,请立即关闭设备,并切断电源(
若设备正在运行)。本设备只允许由授权的专业人员进行维修。
19.请使用干布擦拭设备。
20.请遵守本国适用的所有废弃物处理法律。处理包装物时请将塑料与纸张及纸板分类。
21.请勿将塑料袋放置在儿童接触范围内。
对于带电源线的设备
22.注意:如果设备的电源线带有接地保护插头,则必须将其连接到接地插座上。禁止使电源线的接地线失效。
23.请勿在温度急剧变化后立即开启设备(如运输后)。湿气和冷凝水会损坏设备。请在设备达到室温后再开启。
24.设备连接电源之前,请先检查电网的电压和频率是否与设备上标明的数值相符。如果设备配有电压选择开关,请仅
在设备参数与电网参数相符的情况下将设备连接电源。如果设备随附的电源线或适配器与您的电源插座不匹配,请联
系电工。
ITALIANO
25.请勿踩踏电源线。特别应确保电源插座、适配器以及设备插孔处的电线不得弯折。
26.设备接线时确保能够容易接触到电源线和适配器。不使用或要清洁设备时,务必断开电源。断电时应握住插头或适
配器拔出插座,而不要拉扯电线。严禁湿手触摸电线和适配器。
27.尽量避免快速连续开关设备,否则可能会影响设备的使用寿命。
28.重要提示:更换保险丝时请使用型号和电流值相同的保险丝。如果保险丝反复被熔断,请联系授权服务中心。
29.为确保设备完全断电,请将电源线或适配器从插座中拔出。
30.如果设备的电源插头带有锁扣,必须在拔出插头之前先解锁。但这也会使设备在电源线被拉扯时可能滑动掉落,由
简体中文 繁體中文
此导致人身或其它损伤。因此请谨慎敷设电线。
31.存在雷击危险或长时间不使用设备时,请将电源线和适配器拔出插座。
注意
禁止移除盖板,否则存在触电危险。设备内部的部件不得由用户自行修理或维护。
仅允许具备资格的服务人员进行维护修理工作。
70
带闪电符号的等腰三角形警告设备内部存在未绝缘的危险电压,可能会引起触电。
带感叹号的等腰三角形表示重要的操作和维护说明。
警告!这个符号表示表面烫热。设备运行期间,外壳的某些部分可能会很热。设备使用完毕后请至少等待
10分钟,使其冷却后再触摸或移动。
Page 71

警告!本设备仅适用于在海拔2000米以下地区使用。
警告!本设备仅适用于在非热带气候条件下使用。
注意音频设备的高音量!
本设备适用于专业用途。本设备商用时,应遵守本国适用的事故预防性规定和准则。作为制造商,AdamHall公司在法
律上有义务明确提醒您可能存在的健康风险。过高的音量和长时间强音负荷会导致听力受损:使用本产品时可能产生
很高的声压级(SPL),会造成音乐人、工作人员和听众受到不可逆转的听力损伤。请避免长时间
受到音量高于90dB的负荷。
蓄电池安全
1.切勿将蓄电池电极放在导体附近,例如钥匙、首饰或其他物品。否则可能会引起蓄电池短路,进而导致人体受伤和
烧伤。
2.禁止改变蓄电池触点的极性。
3.切勿将蓄电池放在高温热源附近以及直接暴晒在阳光下。切勿将蓄电池放在微波炉、烤箱或暖气管等加热装置的上方
或内部。蓄电池在高温条件下可能会爆炸。
4.切勿改动或修理蓄电池、将异物放入蓄电池、将蓄电池浸没或者接触到水或其它液体。否则可能会引起火灾、爆炸
或其它危险情况。
5.电池酸液泄漏时,确保酸液不会接触到皮肤和眼睛。一旦发生这种情况,应立即用清水冲洗并就医。
6.蓄电池在充电或存放过程中发生变形、颜色改变或温度过高时,应立即停止使用设备,并取出蓄电池。如果继续使用
设备,蓄电池酸液可能会泄漏,或者引起火灾或爆炸。
7.切勿将蓄电池扔进火中,否则可能会爆炸。损坏的蓄电池也可能会爆炸。
8.按照当地规定对旧蓄电池进行报废处理。蓄电池使用不当可能会引起火灾、爆炸或其它危险情况。
9.防止儿童或宠物啃咬、吮吸蓄电池。否则可能会使蓄电池受损或引起爆炸。
10.切勿击碎或穿刺蓄电池,切勿对蓄电池施加高压。否则可能会引起短路或过热。
11.防止设备或蓄电池掉落。如果设备或蓄电池掉落,特别是摔在坚硬的表面上,就可能会受损。
12.如果设备的待机时间显著缩短,应更换蓄电池。
13.如果蓄电池集成在设备中,不能取出,切勿尝试将其取出,否则可能会损坏设备。蓄电池需要更换时,应将设备带
到授权服务中心。
ENGLISH
DEUTSCH
FRANCAIS
ESPAÑOL
POLSKIITALIANO
重要提示:只允许使用专门为此配备的充电装置(MAUI5GO重低音音箱中的充电装置,LDMAUI5GOCD充电座)为
蓄电池充电
引言
MAUI®5GO配有完美装备,是清晰、有力地展现音效的最佳系统。该音柱播放系统由蓄电池驱动,通过性能强大的
锂离子元件供电。充电器集成在重低音音箱中,也可购买外部充电座。MAUI®5GO配有麦克风、乐器、线路信号和
Bluetooth®立体声音频流的输入端,是街头音乐人以及私人、商业活动和所有不接电源的应用情况中用以播放音乐和
语音的理想设备。该产品由4个部分组成,仅重13公斤,可轻松搬运;采用特殊的多针连接器,可快速组装,播放就
绪。扬声器排放成线性阵列,声音覆盖区域大,辐射范围广,抗声反馈性能极佳,无需再使用单独的监听扬声器。该
套音柱设备配有LDSystems的LECCDSP,带有多波段限幅器、均衡器、压缩器和分频器,可在所有应用情况中提供
无与伦比的音质效果。设备内置的4通道混频器为输入信道、混音和重低音音箱提供单独的音量调节器,还有一个高频
增益调节器,可快速、均衡地调整音效。
简体中文
繁體中文
71
Page 72

一般说明
ENGLISH
LDMAUI5GO扬声器系统的重低音音箱必须在使用之前将其支脚垂直放置在平坦的表面上。切勿将扬声器系统放置在
滚轮车上,这会使整个系统存在失控风险,进而造成事故和损伤。为了确保能够充分散热,在使用时应使重低音音箱
的背面与墙面等其它物体之间至少保持50厘米的距离。
请确保扬声器系统以及连接在系统上的混频器、CD播放机等设备的音频和电源连接正确无误。仅使用直径匹配且完好
无损的电线,并将电线卷完全展开。必要时使用电缆过线桥,避免因电线松散而被绊倒。切勿将设备直接放置在边缘
处。请勿将重低音音箱放置在桌子上。为了避免开启相连设备时发出噪音,请将本系统作为最后一个开启且第一个关
闭的设备。
DEUTSCH
安装
LDMAUI5GO扬声器系统由4个部分组成:
A.重低音音箱,集成了所有系统组件的电子装置,包括用于蓄电池充电的充电模块以及位于上表面的音柱接口。
B.内置蓄电池的音柱单元,可显示充电状态,上下底面带接口。
FRANCAIS ESPAÑOL POLSKI
C.间隔柱,上下底面带有接口。
D.带扬声器的音柱单元,下底面有接口。
重低音音箱放置好后,将内置蓄电池的音柱单元和间隔柱装在重低音音箱上,然后将带扬声器的音柱单元装在上面。
在某些应用情况中也可以不使用间隔柱。
MAUI5GO扬声器系统既可以通过内置蓄电池的音柱单元,即无需连接电源,也可以连接电源运行。连接电源运行
时,蓄电池会自动充电。在不接电源的情况下,将蓄电池没电的音柱单元更换成蓄电池已充满的音柱单元(可选购)
,即可随意延长设备使用时间。更换蓄电池只需几秒钟,系统可立即运行就绪。
ITALIANO
简体中文 繁體中文
72
Page 73

D
ENGLISH
C
B
D
B
DEUTSCH
FRANCAIS
ESPAÑOL
POLSKIITALIANO
A
A
连接与运行
在设备上既可以调节整个扬声器系统的音量,也可以调节重低音音箱相对于整体音量的比例。播放器设备既可以通过
对称电缆,也可以通过非对称电缆(XLR/6.3毫米插孔/微型插孔)与扬声器系统相连。系统中集成的4信道混频器提供
了麦克风输入、高阻抗乐器设备(如电声吉他)输入、线路电平播放器设备输入以及蓝牙单元。重低音音箱配有XLR
插口的对称线路输出端(系统输出),可供系统扩展。
简体中文
繁體中文
73
Page 74

接口、操作和显示元件
ENGLISH
DEUTSCH
4 5 6 7
12
3
13
2
1
FRANCAIS ESPAÑOL POLSKI
9 8
1
麦克风输入
对称麦克风电缆输入(XLR/6.3毫米组合插孔)。也可使用非对称麦克风电缆(单声道插孔)。麦克风输入端内置100
赫兹的重低音滤波器,可抑制干扰性低频信号。提示:麦克风输入端没有连接幻象电源。
2
高阻抗输入
6.3毫米插口的高阻抗单声道输入端,用于连接电声吉他或电吉他。
3
ITALIANO
简体中文 繁體中文
MP3
带有3.5毫米插口的立体声线路输入端,用于连接MP3播放器或其它播放器设备。MP3和蓝牙接口可同时使用,音量比
例必须在播放器设备上调节。使用单个MAUI5GO设备时,请启用单声道预设(参见第14条)。
4
蓝牙® / MP3
蓝牙模块或MP3输入的音量调节器。向左旋转降低音量,向右旋转提高音量。MP3和蓝牙输入端可同时使用,音量比
例必须在播放器设备上调节。
14
11
10
5
高阻抗
高阻抗输入的音量调节器。向左旋转降低音量,向右旋转提高音量。
6
线路
线路信道(线路输入端位于重低音音箱背面)的音量调节器。向左旋转降低音量,向右旋转提高音量。
7
麦克风
麦克风信道的音量调节器。向左旋转降低音量,向右旋转提高音量。
8
高音增强
高架滤波器,用于调整高频声音,使之适合室内声学(向左旋转到底=自然音质,
向右旋转=高频增强)。
74
Page 75

9
低音音量
调节重低音音箱相对于音柱扬声器的音量比例。
10
总音量
调节总音量。重低音音箱的音量会根据低音音量调节器上的预设进行同步调节。
11
LED指示灯
启动:设备与电源连接正确且已开启时,该指示灯亮起。
信号:设备与音频信号相连时,该指示灯亮起。在总音量调节器之前获得信号。
限幅:扬声器系统在上限区域运行时,该指示灯亮起。如果指示灯瞬时闪烁,则无关紧要。为了保护扬声器系统,过
高的信号电平会由系统内置的限幅器平缓下调。限幅器指示灯长时间亮起时,请将音量调低。如果忽视该信号,可能
会导致音质失真,损坏扬声器系统。
保护:扬声器系统过载或过热时,该指示灯亮起。功放会自动转为静音。达到正常运行条件几分钟后,设备会自动回
到正常运行模式。
12
蓝牙®LED指示灯
MAUI5GO线阵系统的混频器配有蓝牙,也就是说,另一个蓝牙设备(如智能手机)中的
音频文件可以在MAUI5GO扬声器系统中播放(两个设备最大间距为10米左右)。如果没有连接带内部蓝牙单元的蓝
牙设备,蓝色的蓝牙LED指示灯就不会显示;在建立连接过程中LED会以大约3Hz的频率闪烁;蓝牙LED指示灯常亮
时,
表示蓝牙连接已建立,可启动播放音乐。可通过MP3/蓝牙的
音量调节器(4号)或在播放器设备上进行音量调节。
13
连接蓝牙按键
要将内部蓝牙单元与蓝牙设备连接时,请按下HOLDTOLINK键并保持3秒钟,直至蓝牙LED指示灯开始有规律地闪烁
(大约3Hz频率),然后开启您蓝牙设备上的蓝牙功能,在用户界面上查找可用设备。选择“LDMAUI5GO”,将蓝牙
设备与系统的蓝牙单元相连。
现在可以启动播放音乐。要结束连接时,请再次按下HOLDTOLINK键并保持约3秒钟。蓝牙连接断开时(例如超过连
接距离),蓝牙LED指示灯熄灭。90秒钟内可以自动重新建立连接(当蓝牙设备再次处于连接距离内时)。连接断开
超过90秒后,MAUI5GO扬声器系统的蓝牙模块会自动关闭。
ENGLISH
DEUTSCH
FRANCAIS
ESPAÑOL
POLSKIITALIANO
14
系统单声道/立体声
按键和LED指示灯,用于启用单声道和立体声的运行方式。
单声道:使用单个MAUI5GO扬声器系统时,请启用单声道预设(按下按键,使MONO的LED灯亮起)。此时,与系
统连接的立体声信号会在内部混合为单声道。使用第二台MAUI5GO扬声器系统作为单声道扩展时,请使用一根对称
XLR线缆将主单元的线路输出端SYSTEMOUTPUT与扩展单元的线路输入端INPUTLEFT/MONO连接起来。
立体声:使用两台MAUI5GO扬声器系统作为立体声设备时,请启用立体声预设(按下按键,使STEREO的LED灯
亮起)。通过线路输出端SYSTEMOUTPUT来控制立体声扩展单元(主单元SYSTEMOUTPUT->扩展单元RIGHT
INPUT)。
关于系统扩展和线缆连接的示例请参见本说明书的“接线示例”。
15 16 15
17
18
简体中文
繁體中文
75
Page 76

15
ENGLISH
DEUTSCH
FRANCAIS ESPAÑOL POLSKI
线路输入,左/右
带有XLR/6.3毫米组合插口的对称线路输入端(左/右),用于连接播放器设备(如混音器、键盘)。连接单声道信号
源时,请使用左/单声道(LEFT/MONO)线路输入。
16
系统输出
XLR公插座的对称线路输出,用于控制其它的MAUI5GO扬声器系统。
17
电源插座和保险丝座
IEC电源插座,内置保险丝座。本产品供货范围包括一根匹配的电源线。
重要提示:更换保险丝时请使用型号和电流值相同的保险丝。务必注意外壳上压印的信息。如果保险丝反复被熔断,
请联系授权服务中心。
18
电源开关/充电
这个开关无论在哪个位置上都不表示系统已与电网断开。只有拔下电源插头才表示
设备已全极断电。开关处于ON位置表示系统播放准备就绪,这时可以是未接电源通过蓄电池运行,也可以是连接电源
运行,即与蓄电池充电状态无关。
开关处于OFF/CHARGE位置表示系统已停止运行,在连接电源的情况下,即使开关处于这个位置,蓄电池也仍在充
电。
20
ITALIANO
19
21
简体中文 繁體中文
19
检查电池
该按键可通过LED状态指示灯显示电池充电情况(20号)。
20
LED电池状态指示灯
4个部分组成的LED电池状态指示灯。按下19号按键,通过LED状态指示灯显示电池充电情况。如果4个LED全部亮
起,表示蓄电池已充满。如果只有红色的LOW-LED亮起,应立即充电,或者换成充满的蓄电池。
21
充电
扬声器系统与电源正确连接后,相应的音柱单元里的蓄电池就会开始充电,CHARGE-LED亮起(可单独购买充电座)
。扬声器系统与电源连接后,即使没有开启运行,蓄电池也会充电(OFF/CHARGE),此时充电电流为2.5A。扬声器
系统开启运行后,充电电流为1.5A。系统关闭(OFF/CHARGE)时的充电时间约为3个小时。达到充电终止电压后,
充电过程自动停止,CHARGE-LED灯熄灭。充电装置会定期检验蓄电池电压,当蓄电池电压低于充电装置中设定的电
池电压时,会自动开始充电。
76
Page 77

LD SYSTEMS LECC DSP
LD SYSTEMS LECC DSP是什么意思?
DSP是DigitalSignalProcessing(数字信号处理)的缩写,LECC分别指限幅器(Limiter)、等化器(EQ)、压缩器
(Compressor)和分频器(Crossover)。数字信号处理能够确保音频播放的最佳效果和最大清晰度,同时保护扩音
系统不受到过度负荷。
LECC DSP的具体作用是什么?
限幅器功能可保护扬声器,防止由于过度调音而造成的音质失真。分别用于低音、中音和高音区域的限幅器能够在电
平超过某个阈值时减弱信号,防止对音质产生负面影响。三个彼此衔接的频率范围各有一个专门优化的限幅器(多波
段限幅器)。通过这一方式,扬声器系统可在整体较大的声压级下运行,因为极端的信号峰值会被自动减弱,因此无
需降低总音量。
多波段等化器负责处理整个频率范围,优化扬声器系统的整体音质。
压缩器会自动开启,以增强低音,使声音更强劲有力。音量提高时,会自动减少低音增强。通过这种方式进行自动控
制的低音可完美地融合在整体音效中。
分频器根据频率范围将音频信号分配到相应的扬声器中,即重低音音箱及线阵音柱的中音和高音扬声器。分频器的振
幅和运行时间经过优化,可均匀输出所有频率,同时被听众接收。
ENGLISH
DEUTSCH
FRANCAIS
接线示例
单声道运行方式示例
ESPAÑOL
POLSKIITALIANO
简体中文
繁體中文
77
Page 78

立体声运行方式示例
ENGLISH
DEUTSCH
FRANCAIS ESPAÑOL POLSKI
ITALIANO
简体中文 繁體中文
78
主单元 立体声扩展
与主单元设置相同 最大
Page 79

可选配件
便携包,最多可装4个音柱单元
LDM5SATBAG
重低音音箱的保护罩
LDM5SUBPC
ENGLISH
DEUTSCH
音柱单元,内置蓄电池(29.6V / 5200mAh)
LDMAUI5GOBC(黑色)
LDMAUI5GOBCW(白色)
充电座,用于蓄电池充电
(充电适配器,带有充电装置和电源件)
LDMAUI5GOCD
技术参数
型号: LDMAUI5GO(W)
类型: 超紧凑型柱式扩音系统,带蓄电池和混频器
重低音音箱: 1x8"低音反射式
线阵音柱系统: 4x2.8"
功放: D类
辐射角(水平x垂直): 120°x20°
输出功率(RMS/Peak): 2x100W/2x400W
蓄电池标称电压: 29.6V
蓄电池容量: 5200mAh
蓄电池技术: 锂离子
蓄电池品牌: LG
蓄电池保护电路: 过充电保护、过放电保护
充电装置: 集成在重低音音箱中
频响范围: 50Hz–20kHz
最大声压级(峰值): 120dB
保护电路: 基于DSP的多波段限幅器、短路保护、过流保护、过热保护
操作元件: 总音量、重低音音箱音量、高音增强、麦克风音量、MP3/高阻抗音量、线路
显示元件:
音量、Bluetooth
立体声开关
混频器:
Bluetooth®、单声道/立体声
蓄电池:
®
音量、Bluetooth®按键、电源开关(ON/OFF)、单声道/
电源开(ON)、信号、限幅器、保护(保护电路启用)
蓄电池充电状态、充电过程
FRANCAIS
ESPAÑOL
POLSKIITALIANO
简体中文
繁體中文
79
Page 80

重低音音箱接口: 线路输入:2个XLR/6.3毫米插孔(组合插口),麦克风输入:XLR/6.3毫米
ENGLISH
音柱扬声器接口: 特殊的多针连接器
外壳材料: ABS
外壳颜色: 黑色(LDMAUI5GO)
供电: 开关电源
DEUTSCH
电源连接: IEC
运行电源: AC110–120V,50/60Hz
功率消耗(最大): 300W
AD/DA转换器: 24Bit
FRANCAIS ESPAÑOL POLSKI
DSP采样频率: 48kHz
环境温度(运行时): 0°C–50°C
空气湿度: 相对湿度10%–70%(无冷凝)
尺寸(宽x高x深): 重低音音箱:305x405x395mm
重量: 重低音音箱:8.5kg
特征: 信号处理:LDLECCDSP(限幅器、均衡器、压缩器、分频器),高音增
插孔,MP3输入:3.5毫米插孔,高阻抗输入:6.3毫米插孔;XLR系统输出
白色(LDMAUI5GOW)
AC220–240V,50/60Hz(自动转换)
音柱(3个部分):82x535x105mm
总高度:1985mm
蓄电池音柱单元:1.7kg
间隔柱单元:0.8kg
扬声器音柱单元:1.3kg
总重量:12.3kg
强,麦克风信道中的100Hz高通滤波器(重低音滤波器),便于连接的多针
连接器(多极插塞连接器),Bluetooth
®
制造商声明
制造商质保与责任范围
我们当前适用的质保条件和责任范围请参见:https://cdn-shop.adamhall.com/media/pdf/Manufacturers-Declara-
ITALIANO
tions-LDSYSTEMS_DE_EN_ES_FR.pdf。有关售后服务事宜请联系:AdamHallGmbH,Adam-Hall-Str.1,61267
NeuAnspach/电子邮件:Info@adamhall.com/+49(0)6081/9419-0。
废弃处理本产品的正确方法
(适用于欧盟国家以及其他采取垃圾分类的欧洲国家)产品或其附属文件上的这一符号表示,该设备在使用期结
束后不得与普通的生活垃圾一同丢弃,避免在不受控制的废弃物处理过程中造成环境或人身损害。请将本产品与
其它废弃物分开处理,使其得到回收,促进可持续性经济循环。作为个人,您可通过出售该产品的经销商或通过相应
简体中文 繁體中文
的当地政府机构获取环保处理废弃物的相关信息。作为商业用户,请联系您的供货商,必要时请查看协议中规定的设
备废弃处理条件。本产品不得与其它商用垃圾一同丢弃。
CE符合性声明
AdamHallGmbH公司在此声明,本产品符合以下指令(如适用):
无线设备指令R&TTE(1999/5/EG),2017年6月起由RED(2014/53/EU)取代
低电压指令(2014/35/EU)
电磁兼容指令(2014/30/EU)
RoHS(2011/65/EU)(在电子电气设备中限制使用某些有害物质指令)
完整的符合性声明请参见www.adamhall.com。
您也可以发送邮件至info@adamhall.com询问信息。
80
Page 81

繁體中文
首先祝賀您做出正確的選擇!
本設備依照最高品質標準開發製造,確保長期工作而無故障。LD系統充分體現出我們作為高品質音頻產品製造商所具
備之聲譽和長期的經驗。請仔細閱讀本操作說明書,讓您儘快掌控您新的LD系統之使用。
有關LD系統之更多資訊,請存取我們網站:WWW.LD-SYSTEMS.COM
安全注意事項
1.請仔細閱讀本手冊。
2.請將所有資訊和說明書妥善存放在安全之處。
3.請依照按照說明進行操作。
4.請注意所有警告事項。請勿從設備中去除任何安全說明或其他資料。
5.僅應依照設計用途使用本產品。
6.僅使用穩固、合適之三腳架(固定式安裝時)。確保牆壁式支架正確安裝並固定。確認設備牢固安裝,不會掉落。
7.在安裝期間應遵照您所在國家地區之安全法律規章。
8.請不要在靠近散熱器、電熱器、火爐或其他熱源處安裝或操作設備。確保設備的安裝方式,以便使其充分冷卻,並
且不會過熱。
9.請不要將任何火源(例如:燃燒蠟燭)放置在設備上。
10.通風孔不得堵塞。
11.請不要在水附近操作設備。請勿將本設備使用於接觸易燃材料、液體或氣體之處。應避免陽光直射!
12.確保不會有滴水或濺水進入裝置。請不要在設備上裝有液體的容器(例如:花瓶或飲用器皿)。
13.請確保不會沒有物體可以落入設備。
14.僅使用製造商建議和提供的配件。
15.請勿打開設備,請勿變動設備。
16.設備連接之後,請檢查所有線纜,防止造成損壞或發生事故,例如絆倒。
17.在運輸時,請注意確保設備不會掉落,否則可能造成設備損壞和人身傷害。
18.若您的設備無法正常工作、有液體進入設備或掉入異物,或者設備因為其他原因已經損壞,應立即將其關閉,並從
電源插座上拔下(若為啟用的裝置)。此設備僅應由授權人員進行修理。
19.僅應使用乾布擦拭清潔此設備。
20.應遵守您當地適用的一切處置法規。處理包裝時,請將塑膠和紙或紙板分開。
21.塑膠袋必須存放於孩童無法接觸到之處。
對於附帶電源連接的設備
22.注意:若設備電源線帶有保護接點,則應將其連接到帶保護接地導體之電源插座。切勿禁用電源線之保護導體。
23.若設備受到嚴重溫度波動之影響(例如:在運輸之後),請勿立即開啟設備。濕氣和冷凝會損壞設備。在已達到室
溫之後,才開啟本設備。
24.在設備連接到電源插座之前,請先檢查電源的電壓和頻率是否與設備上顯示的數值相符。若設備上具有電壓選擇器
開關,僅當設備上的數值與電源值相符合之後,方可將設備連接到插座。若提供的電源線或附帶的電源變壓器不適合
您的插座,請與電子專業人員聯絡。
25.請勿踩踏電源纜線。確保帶電電纜不要扭結,特別是在電源插座和電源變壓器和設備插座之處。
26.設備接線時,應確保總是可以自由接入電源線或電源變壓器。不使用設備時,或者希望清潔設備時,應切斷設備電
源。應從插頭或電源變壓器上拔掉電源線和變壓器,不要從插座上拔下纜線。切勿用濕手觸碰電源線和電源變壓器。
27.如果可能的話,請盡量不要快速接通或切斷設備電源,否則會影響設備壽命。
28.重要提示:僅使用相同類型和額定值的保險絲來更換。若保險絲反覆燒斷,請聯絡授權服務中心。
29.若需將設備完全切斷電源,請將電源線或電源變壓器從牆壁插座上拔下。
30.若設備上配有可鎖定的電源連接器,僅當相應的設備插頭解鎖後,方可將其拔下。但是,在拉動電源線時會導致設
備滑落或傾倒,造成人員傷害或其他損壞之危險。請小心佈放纜線。
31.若存在閃電危險時,或者長時間不使用設備時,應從牆壁上插座斷開電源線和電源變壓器。
注意
切勿取下蓋板,否則會有觸電危險。設備內沒有可由操作者修理或維護之部件。只
有合格之維修人員方可執行維護和維修作業。
ENGLISH
DEUTSCH
FRANCAIS
ESPAÑOL
POLSKIITALIANO
简体中文
帶有閃電圖示之等邊三角形警告標誌,表示設備內部具有未經絕緣的危險電壓,可能會導致觸電危險。
帶有驚嘆號之等邊三角形標誌,表明重要的操作和維護說明。
警告!此圖示表示表面炙熱。在運行過程中,殼體的某些部分可能會很熱。僅應在使用完畢至少冷卻10分
鐘之後,方可觸碰或移動。
警告!本設備僅適合用於海拔高度不超過2000公尺之處。
繁體中文
81
Page 82

ENGLISH
注意:本設備為高音量音訊產品!
本設備用於專業用途。將本設備用於商業用途時,務必遵守您所在國家和地區相關事故防範法律法規。作為製造
商,AdamHall有義務明確告知使用者可能面臨的健康損害風險。高音量及持續收聽可能會損傷聽力:使用本產品過
DEUTSCH
程中,會產生很高的聲壓,可能對藝術表演者、員工、觀眾之聽力產生不可逆的損傷。避免長時間暴露於90分貝以上
的高音量電平環境。
電池安全
1.保持電池電極遠離導電物體,例如鑰匙、首飾或其他材料等。否則,電池可能會短路,造成傷害和灼傷。
2.請勿改變電池接點的極性。
FRANCAIS ESPAÑOL POLSKI
3.避免電池過熱和陽光直射。請勿將其放在加熱器上或加熱器中,例如微波爐、烤箱或散熱器等。若電池過熱,可能會
爆炸。
4.请不要試圖改動或改造電池,將異物插入電池,或將其浸入水中或其他液體中。否則可能會引起火災、爆炸或其他
危險情況。
5.電池酸液洩漏時,確保不會接觸到皮膚或眼睛。若有接觸,立即使用清水沖洗並去看醫生。
6.若在充電或存放過程中發生變形、顏色變化或電池過熱,請立即停止使用設備並取下電池。若繼續使用設備,電池酸
液可能會洩漏,或者可能會導致火災或爆炸。
7.請勿將電池投入火中,否則可能會發生爆炸。損壞的電池也可能會爆炸。
8.請依照當地法律法規處置廢舊電池。電池使用不當可能導致火災、爆炸或其他危險情況。
9.請不要讓小孩和寵物咀嚼或吮吸電池。否則,可能會發生損壞或爆炸。
10.請勿破碎或穿透電池,或將其置於高壓之下。否則,可能會導致短路或過熱。
11.請保持設備或電池不會掉落。若設備或電池掉落,特別是在掉落硬表面上,可能會損壞。
12.如果設備的待機時間明顯變短,請更換電池。
13.若設備內置有不可拆卸電池,請勿嘗試取出電池,否則可能會損壞設備。如需更換電池,請將設備送至授權的服務
中心。
警告!本設備不適合用於熱帶氣候。
重要提示:僅應使用所提供的充電電子設備給電池充電(MAUI5GO超低音揚聲器中的充電電子設備,充電底座
ITALIANO
LDMAUI5GOCD)
簡介
MAUI®5GO是配備全面、完美的終極系統,可表現出清澈、透明的聲音。由高性能鋰離子電池給電池供電柱PA供
電。充電器內置在超低音揚聲器中,外部充電座作為附件提供。麥克風、樂器和線路訊號以及藍牙®立體身歷聲流輸入
简体中文 繁體中文
使得MAUI®5GO成為街頭音樂家、私人和商業活動以及所有離網型應用之理想系統。系統重量輕,不到13公斤,結
構可分為四部分運輸,採用特殊的多功能連接器,可在幾秒鐘內裝配完畢。驅動器採用線陣排列,可實現極長距離,
而且,系統的輻射寬和反饋穩定性極佳,因此免去單獨的監聽揚聲器。為在所有應用中實現無與倫比的音質,揚聲器
音柱系統採用LDSystems的LECCDSP,具有多頻段限制器、等化器、壓縮器和分頻器整合式4信道混頻器為輸入信
道、總和以超低音揚聲器提供獨立的音量控制,並提供可變的高音增強,從而實現快速平衡的聲音調節。
一般說明
在調試前,必須將LDMAUI5GOLD揚聲器系統的超低音揚聲器垂直置於其該系統底座平面上。請勿在滾動車上操作該
系統,因為存在由於整套系統失控而造成移動的風險,從而可能會導致事故和損壞。為確保足夠冷卻,在操作時,超
低音揚聲器背面與牆壁等其他類似物體之間必須保持至少50公分的距離。
請確保系統以及所連接的混頻器、CD播放機等設備與合適的音頻及電源連接器連接。請僅使用直徑合適且未损坏的纜
線,并始終將纜線完全展開。必要時請使用纜線橋架,避免因鬆動電纜絆倒的情況。切勿將此設備安裝在邊緣上。請
勿將超低音揚聲器放置在桌上。在接通所連接設備的電源時,為避免不必要的背景噪聲,請始終在所有設備中最後一
個接通並第一個關閉您系統的電源。
安装
LDMAUI5GO揚聲器系統分為四個組成部分:
A.超低音揚聲器,帶有適用於所有系統組件的一體式電子元件,包括用於電池充電的充電模組以及頂面的音柱元件連
接。
B.音柱元件,帶有一體式充電電池、充電狀態指示器以及頂面和底面的連接器。
82
Page 83

C.间隔柱,在頂面和底面帶有連接器。
D.音柱元件,帶有揚聲器及底面連接器。
將超低音揚聲器安裝在所需位置後,將帶有一體式充電電池和間隔柱的音柱元件插入到超低音揚聲器上,然後插入帶
有揚聲器的音柱元件。根據不同的應用情況,揚聲器系統也可以不使用間隔柱。
MAUI5GO揚聲器系統可藉助帶有一體式充電電池的音柱元件獨立於電源工作,也可以採用主電源供電方式。採用主
電源供電方式工作時,電池會自動充電。離網使用時,如需延長播放時間,可以根據需要,使用電池已充滿電的音柱
元件選配件替換電池電量不足的音柱元件。更換電池僅需幾秒鐘時間,系統即可重新工作。
D
ENGLISH
DEUTSCH
FRANCAIS
ESPAÑOL
C
B
A
連接和操作
在設備上,整個系統的音量以及超低音揚聲器的音量均可根據總音量進行調整。可經由對稱和非對稱電纜(XLR/6.3公
釐插孔/微型插孔)連接音源播放機。一體式4信道混頻器帶有一個麥克風輸入端、一個用於電結他等的高阻抗樂器輸入
端、一個帶有線路電平的音源播放機輸入端,以及一個藍牙單元。超低音揚聲器帶有對稱線路輸出及XLR插孔(系統
輸出),可以擴展系統。
D
B
A
POLSKIITALIANO
简体中文
繁體中文
83
Page 84

連接、操作及顯示元件
ENGLISH
DEUTSCH
4 5 6 7
12
3
13
2
1
FRANCAIS ESPAÑOL POLSKI
9 8
1
MIC 輸入
對稱麥克風輸入端(XLR/6.3公釐插孔組合)。亦可使用非對稱式麥克風電纜(單聲道插孔)。麥克風輸入端具有內
置100赫兹低截止濾波器,以壓制干擾性低頻訊號。注意:在麥克風輸入端不存在幻像電源。
2
高阻抗輸入
帶有用於電聲或電結他的6.3公釐插頭插孔的高阻抗單聲道輸入。
3
ITALIANO
简体中文 繁體中文
MP3
帶有3.5公釐插孔的立體身歷聲線路輸入,用於MP3播放機或其他音源播放機。如果需要,可同時使用MP3和藍牙兩個
輸入,必須在播放設備上調整音量比率。使用單個MAUI5GO系統時,啟用單聲道預設(請參閱第14項)。
4
藍牙® / MP3
藍牙模組或MP3輸入的音量控制。向左旋轉減小音量,向右旋轉增大音量。如果需要,可同時使用藍牙和MP3兩個輸
入,必須在播放設備上調整音量比率。
5
高阻抗(HI-Z)
高阻抗輸入的音量控制。向左旋轉減小音量,向右旋轉增大音量。
14
11
10
6
線路(LINE)
線路信道的音量控制(超低音揚聲器背面的線路輸入端)。向左旋轉減小音量,向右旋轉增大音量。
7
麥克風(MIC)
麥克風信道的音量控制。向左旋轉減小音量,向右旋轉增大音量。
8
高音增強(HI-BOOST)
針對室內音響效果調節高音播放的高頻濾波器(左止動位置=中性聲響,
向右旋轉=高音增強)。
9
超低音電平(SUB LEVEL)
依照揚聲器音柱調整超低音揚聲器的音響比例。
84
Page 85

10
主電平(MAIN LEVEL)
調整總音量。根據超低音電平(SUBLEVEL)控制器上的預設調整超低音揚聲器音量。
11
LED指示燈
亮起:指示燈亮起時,表明設備與電網正確連接,并已接通電源。
訊號(SIGNAL):指示亮起時,表明設備上有音頻訊號。在主電平(MAINLEVEL)控制器之前獲得訊號。
限制(LIMIT):指示亮起時,表明揚聲器系統在上限區域工作。LED的瞬時閃爍並不重要。為保護系統,內置限制器
會將過高的訊號電平進行平缓調低。若限制器LED亮起時間更長久或更穩定,可將音量電平降低。若不遵守規則,會
導致聲響播放失真和揚聲器系統損壞。
保護(PROTECT):當系統過載/過熱亮起。放大器會自動靜音。達到正常工作條件時,該裝置在數分鐘之後重新返回
到正常工作模式。
12
藍牙®LED指示燈
MAUI5GO陣列系統的混頻器配備有藍牙,其他藍牙設備(例如:智慧電話)的音頻檔案
可在MAUI5GO揚聲器系統上播放(兩個設備之間最大距離約為10公尺)。若沒有藍牙設備連接到內部藍牙單元,該藍
牙LED藍色指示燈不顯示訊號;在聯接待機時,LED以大約3Hz的頻率有节奏闪烁,若藍牙LED指示燈常亮,
表明存在藍牙連接,可開始播放曲目。使用MP3/藍牙音量控制器(第4項),
或在音源播放機上,可進行音量調整。
13
保持連接(HOLD TO LINK)
若將內置藍牙單元與一個藍牙設備配對連接,按住保持連接(HOLDTOLINK)按鈕大約3秒鐘,直至藍牙指示燈有節奏
性閃爍(大約3Hz),便已在藍牙設備上啟用藍牙,并在使用者介面上搜尋可用設備。選擇條目「LDMAUI5GO」,從
而將藍牙設備與藍牙單元連接,
然後即可開始播放曲目。若要結束連接,再次按住保持連接(HOLDTOLINK)按鈕大約3秒鐘即可。若藍牙連接中斷(
例如,超出有效範圍),藍牙LED指示燈則熄滅。在大約90秒內連接可自動恢復(藍牙設備再次回到有效範圍內)。若
中斷時間超過90秒鐘,MAUI5GO揚聲器系統的藍牙模組會自動關閉。
14
系統單聲道/立體身歷聲(SYSTEM MONO / STEREO)
單聲道或立體身歷聲模式的按鈕和LED指示。
單聲道(MONO):若使用單獨一套MAUI5GO揚聲器系統,則應啟用單聲道預設(按下按鈕,單聲道(MONO)指
示燈亮起)。相鄰的立體身歷聲訊號現已添加到單聲道內。若使用第二套MAUI5GO揚聲器系統作為單聲道擴展時,
則應使用對稱的XLR電纜連接主單元的線路輸出SYSTEMOUTPUT和擴展單元的線路輸入INPUTLEFT/MONO。
立體身歷聲(STEREO):若使用兩套MAUI5GO揚聲器系統作為立體身歷聲組合,則應啟用立體身歷聲預設(按下
按鈕,立體身歷聲(STEREO)LED指示燈亮起)。使用線路輸出SYSTEMOUTPUT(主單元SYSTEMOUTPUT->
擴展單元RIGHTINPUT(右輸入))控制立體身歷聲擴展單元。
ENGLISH
DEUTSCH
FRANCAIS
ESPAÑOL
POLSKIITALIANO
有關接線和系統擴展示例,請參閱本手冊的「接線示例」章節。
15 16 15
17
18
简体中文
繁體中文
85
Page 86

15
ENGLISH
左/右線路輸入(LINE INPUT LEFT / RIGHT)
帶有XLR/6.3公釐插頭組合插孔(左/右)的對稱線路輸入端,用於連接音源播放機(例如:混頻器、鍵盤)。連接單
聲道訊號源時,請使用該線路輸入端(左/單聲道)。
16
系統輸出(SYSTEM OUTPUT)
對稱性線路輸出帶有XLR插孔,用於控制另外的MAUI5GO揚聲器系統。
DEUTSCH
17
電源接座和保險絲座
內置有保險絲座的IEC電源插座。適用電源纜線包括在供貨範圍內。
重要提示:在更換保險絲時,請僅采用相同類型且具相同額定值的保險絲。請注意殼體上的文字。若保險絲反覆燒
斷,請聯絡授權服務中心。
FRANCAIS ESPAÑOL POLSKI
18
電源開關/充電(POWER ON - OFF / CHARGE)
此開關不會斷開系統與電源網路的連接。僅在拔下電源插頭後,
才能實現全部電極的安全斷電。在開(ON)的位置上,系統在電池供電期間可以獨立於主電源供電進行工作,或者在
主電源連接可用情況下,使用主電源工作,而無論電池的充電狀態如何。
系統在關/充電(OFF/CHARGE)位置上關閉,若電源連接可用,電池在此位置也進行充電。
20
ITALIANO
19
21
简体中文 繁體中文
19
電池檢查(BATTERIE CHECK)
經由狀態LED來指示電池狀態的按鈕(第20項)。
20
電池狀態LED指示燈
四段式LED電池狀態指示燈。按下第19項的按鈕,則經由狀態指示燈顯示電池狀態。所有4個LED全部亮起,則表明電
池已充滿電。若僅紅色低電平指示燈亮起,請立即給電池充電或更換上已充滿電的電池。
21
充電(CHARGE)
揚聲器系統正確連接到主電源後,相應音柱元件中的電池即被充電,充電LED指示燈亮起(可選單獨的充電底座)。揚聲
器系統連接到電源後,即便已經關閉(OFF/CHARGE),電池也進行充電,充電電流為2.5A。揚聲器系統開啟後,充電
電流為1.5A。系統關機時(OFF/CHARGE)的充電時間大約為3小時。達到充電結束的電壓後,充電過程自動停止,充
電指示燈熄滅。充電電子設備會定期檢查電池電壓,若低於充電電子設備中定義的電池電壓,則自動重新開始充電過程。
86
Page 87

LD系統的LECC DSP(LD SYSTEMS LECC DSP)
LD Systems LECC DSP是什麼含義?
DSP是數位訊號處理的縮寫,LECC是代表限制器、等化器、壓縮器和分頻器的縮寫。數位訊號處理確保最高清晰度的
最佳音頻播放,同時對PA系統起到過載保護作用。
LECC DSP有什麼作用?
限制器功能用來保護揚聲器,并防止超載造成的失真。電平超過可能帶來負面效應的值時,用於低音、中音和高音範
圍的單獨限制器則會衰減訊號。針對三個彼此緊密關聯的频率范围的其中一個範圍,每個限制器分別進行優化(多頻
段限制器)。系統以這種方式可在更高的整體聲壓下工作,因為極端訊號峰值會自動衰減,總音量則不需要降低。
ENGLISH
多頻帶等化器處理整個频率范围,並優化系統的整體音效。
壓縮器會自動切換,以提高低音,從而產生更強有力的音效。隨著音量越來越高,低音增強(Bass-Boost)效果會自動
降低。在這種方式的自動控制下,低音最佳適應整體音效。
分頻器根據各揚聲器的頻率範圍,以及超低音揚聲器或陣列音柱中的中音和高音揚聲器分配音頻訊號。分頻器的幅度和
運行時間優化確保均勻輸出所有頻率,並同時到達收聽者。
接線示例
單聲道模式示例
DEUTSCH
FRANCAIS
ESPAÑOL
POLSKIITALIANO
87
简体中文
繁體中文
Page 88

立體身歷聲模式示例
ENGLISH
DEUTSCH
FRANCAIS ESPAÑOL POLSKI
ITALIANO
简体中文 繁體中文
88
主單元 立體身歷聲擴展
與主單元相同的設定 最大
Page 89

可選附件
4音柱元件運輸箱
LDM5SATBAG
超低音揚聲器防護罩
LDM5SUBPC
ENGLISH
DEUTSCH
帶一體式電池的音柱元件(29.6V / 5200mAh)
LDMAUI5GOBC(黑色)
LDMAUI5GOBCW(白色)
電池充電用充電底座
(帶充電電子設備和電源的充電適配器)
LDMAUI5GOCD
技術規格
型號說明: LDMAUI5GO(W)
類型: 帶電池和混頻器的超緊湊型柱式PA系統
超低音揚聲器: 1x8"低音反射式
音柱陣列系統 4x2.8"
放大器: D級
聲波角度(HxV): 120°x20°
輸出功率(RMS/峰值): 2x100W/2x400W
電池電壓: 29.6V
電池容量: 5200mAh
電池技術: 鋰離子
電池品牌: LG
電池保護電路: 保護電路防止過度充電和過度放電
充電電子裝置: 整合在超低音揚聲器中
頻率範圍: 50Hz–20kHz
最大聲壓級(峰值): 120dB
保護電路: 基於DSP的多頻段限制器,短路,過流,過熱
控制元件: 主音量,超低音音量,高音增強,麥克風音量,MP3/高阻抗音量,線路音
顯示元件: 混頻器:On(開),訊號,限制器,保護(啟用保護電路),藍牙
超低音揚聲器連接: 線路輸入:2xXLR/6.3mm插頭(組合插孔),麥克風輸入:XLR/6.3mm
音柱揚聲器連接: 專用多針連接器
®
量,藍牙
道/立體身歷聲
電池:電池狀態,充電
插頭,MP3輸入:3.5mm插頭,高阻抗輸入:6.3mm插頭;XLR系統輸出
音量,藍牙®按鈕,ON/OFF開關,單聲道/立體身歷聲開關
®
,單聲
FRANCAIS
ESPAÑOL
POLSKIITALIANO
简体中文
繁體中文
89
Page 90

箱體材料: ABS
ENGLISH
箱體顏色: 黑色(LDMAUI5GO)
電源: 開關電源
電源連接: IEC
工作電壓: AC110–120V,50/60Hz
DEUTSCH
功率消耗(最大): 300W
AD/DA轉換器: 24位元
DSP採樣頻率: 48kHz
環境溫度(工作): 0°C–50°C
濕度: 10%-70%相對(無冷凝)
FRANCAIS ESPAÑOL POLSKI
外形尺寸(寬x高x深): 超低音揚聲器:305x405x395mm
重量: 超低音揚聲器:8.5kg
特性: 訊號處理:LDLECCDSP(限制器、等化器、壓縮器、分頻器),高音增
白色(LDMAUI5GOW)
AC220–240V,50/60Hz(自動切換)
音柱(3件式):82x535x105mm
總高度:1985mm
電池-音柱元件:1.7kg
間隔柱-音柱元件:0.8kg
揚聲器-音柱元件:1.3kg
總重量:12.3kg
強,麥克風信道中的100Hz高通(低截止濾波器),多針連接器型便捷連
®
接,藍牙
製造商聲明
產品保固和責任限制
我們目前的保護條件和責任限制,請查閱:https://cdn-shop.adamhall.com/media/pdf/Manufacturers-Declarations-LDSYSTEMS_DE_EN_ES_FR.pdf。在服務情況下,請聯絡:AdamHallGmbH,Adam-Hall-Str.1,
61267NeuAnspach電郵:info@adamhall.com/+49(0)6081/9419-0。
本產品的之正確處置
ITALIANO
简体中文 繁體中文
(適用於歐盟和其他歐洲國家的垃圾分類系統)產品或相關文件上之此標誌表示此設備不得在產品壽命結束時與
一般生活垃圾一同處置,應避免由於不受控制的廢棄物造成環境破壞或人身傷害。請將此產品獨立於其他垃圾
加以處置,並重新利用,促進可持續之經濟發展。作為私人客戶,您在購買產品之零售商處,或者透過所在地區地方
當局,可獲取有關保護環境的處置方案之資訊。作為商業使用者,請聯絡您的供應商,並檢查合約協定的設備處置條
件。此產品不得與其他商業垃圾一起處置。
CE 認證
AdamHallGmbH特此聲明此產品符合以下指令(若適用):
R&TTE(1999/5/EC)或2017年6月起RED(2014/53/EU)
低電壓指令(2014/35/EU)
EMC指令(2014/30/EU)
RoHS(2011/65/EU)
完整的聲明請查閱:www.adamhall.com。
此外,您也可以經由info@adamhall.com索取。
根據NCC低功率電波輻射性電機管理辦法規定:
(1)第十二條經型式認證合格之低功率射頻電機,非經許可,公司、商號或使用者均不得擅自變更頻率、加大功率或變
更原設
計之特性及功能。(2)第十四條
低功率射頻電機之使用不得影響飛航安全及干擾合法通信;經發現有干擾現象時,應立即停用,並改善至無干擾時方
得繼續使
用。前項合法通信,指依電信法規定作業之無線電通信。低功率射頻電機須忍受合法通信或工業、科學及醫療用電波
輻射性電
機設備之干擾。
90
Page 91

Page 92

LD-SYSTEMS.COM
Adam Hall GmbH | Adam-Hall-Str. 1 | 61267 Neu-Anspach | Germany
Tel. +49(0)6081/9419-0 | Fax +49(0)6081/9419-1000
web : www.adamhall.com | e-mail : mail@adamhall.com
REV: 03
 Loading...