

Land Rover Range Rover User Manual
RANGE ROVER
QUICK START GUIDE
Vehicle access 2
Comfort and safety 4
Climate control 8
Exterior lighting
Facia overview 10
Wipers and washers 11
On-road and off-road 12
Rear seat entertainment 15
Audio system 16
Navigation and telephone systems 18
Gas station information 20
9
Some of the information in this guide may not
apply to your vehicle.
You must refer to your Owner's Handbook for
full operating instructions.
Vehicle access
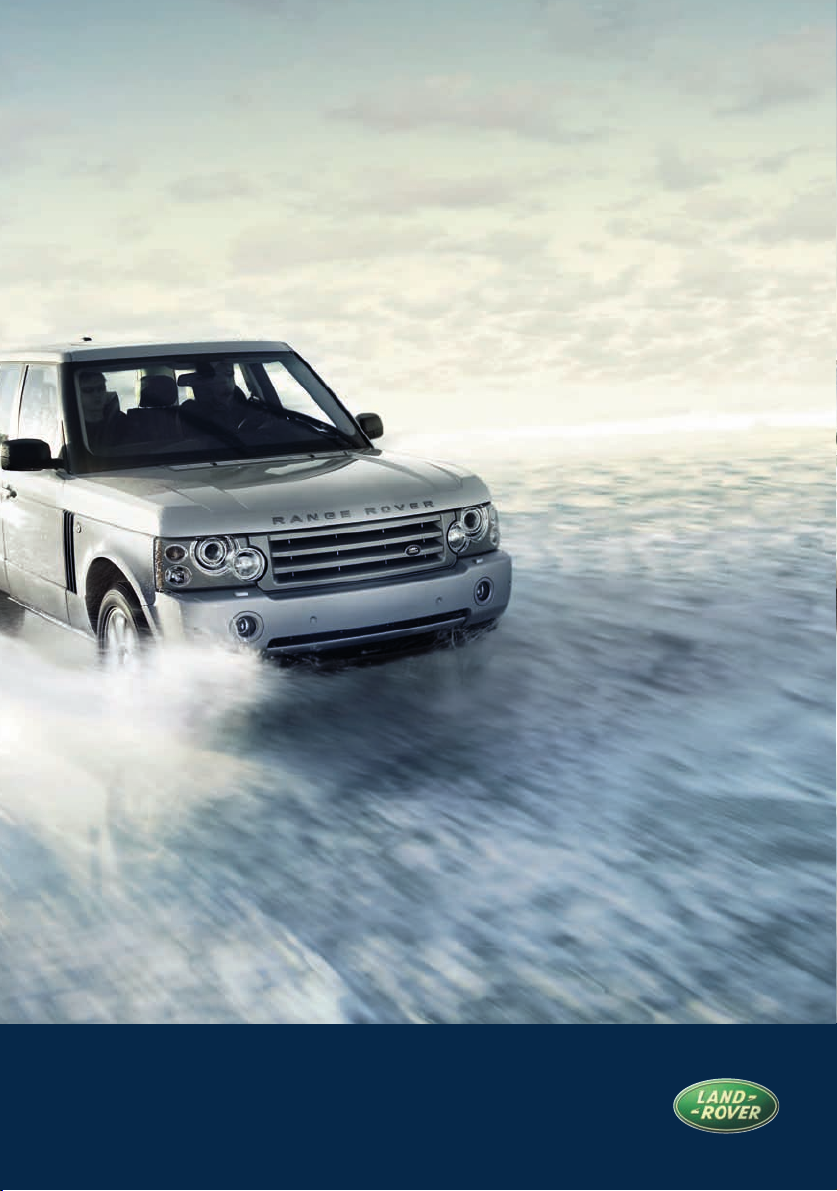
Remote control
Two remote controls, with integral keys are supplied with your vehicle. The type
of remote control supplied will vary according to vehicle specification.
Type 1
Type 1 Type 2
• Press once to lock all doors and activate the alarm.
• Press and hold to close all doors, windows and sunroof.
Type 2
Key blade
Press button (arrowed in illustration) to release
the key blade.
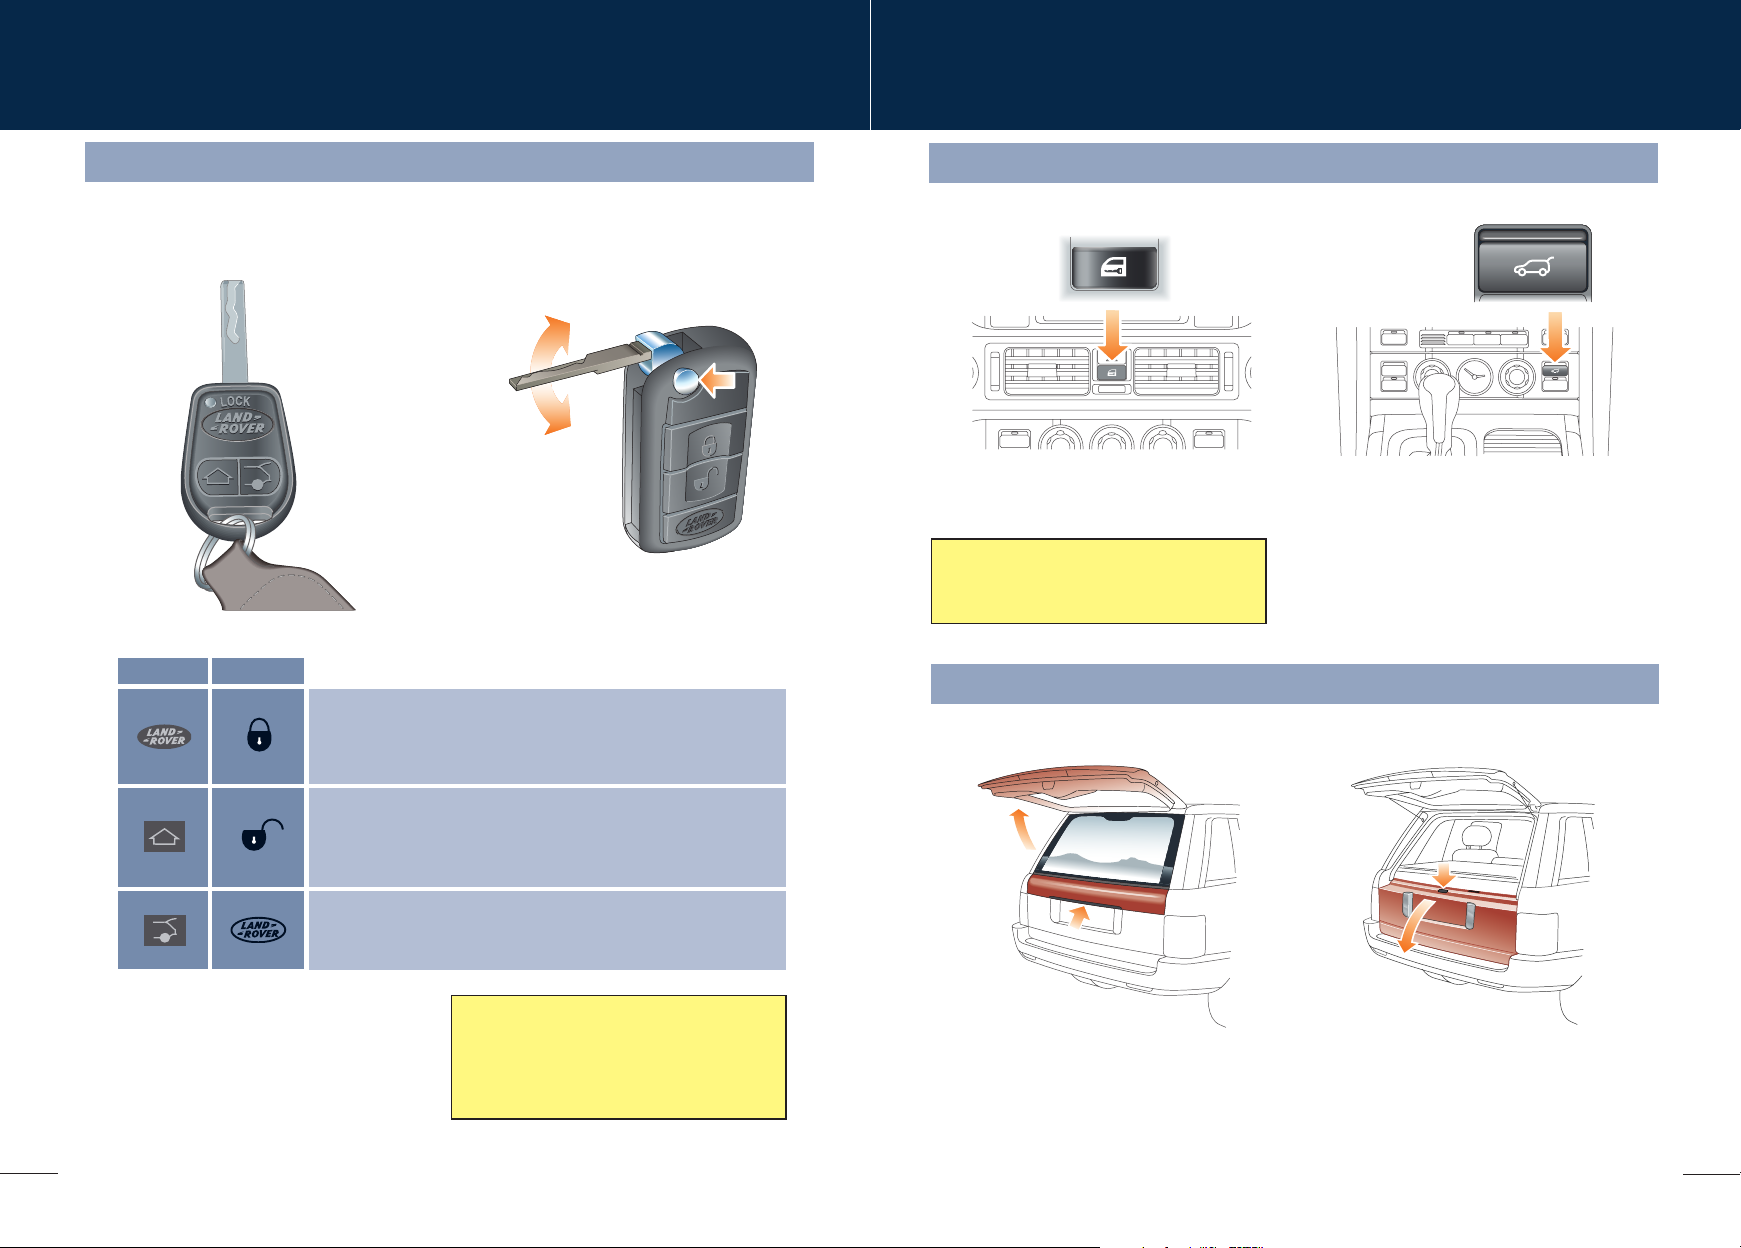
Central locking
Master locking switch
Press the master locking switch to lock or
unlock all the doors. Pressing this switch will
not enable the alarm.
If the locks have already been locked using
the remote control, the switch will not release
the locks.
Taildoor
Opening the upper taildoor
Taildoor release switch
If single point entry has been used and only the
driver’s door is unlocked, the taildoor can be
opened by pressing the release switch.
Opening the lower taildoor
• Press once to unlock the driver’s door and to deactivate the alarm
(single point entry).
• A second press will unlock all the other doors.
• Press and hold to open all doors, windows and sunroof.
• Press to unlock the taildoor and deactivate the interior space
protection only.
• Press and hold to activate the panic alarm.
Single point entry
This is a security feature that unlocks only
the driver’s door. It can be disabled on all
remote controls, or on an individual remote
control, by a Land Rover Dealer.
2
With all doors unlocked, press the switch on the
bottom edge of the upper taildoor and lift to open.
With the upper taildoor open, press the release
switch on the top of the lower taildoor, then
lower the taildoor.
3
Comfort and safety
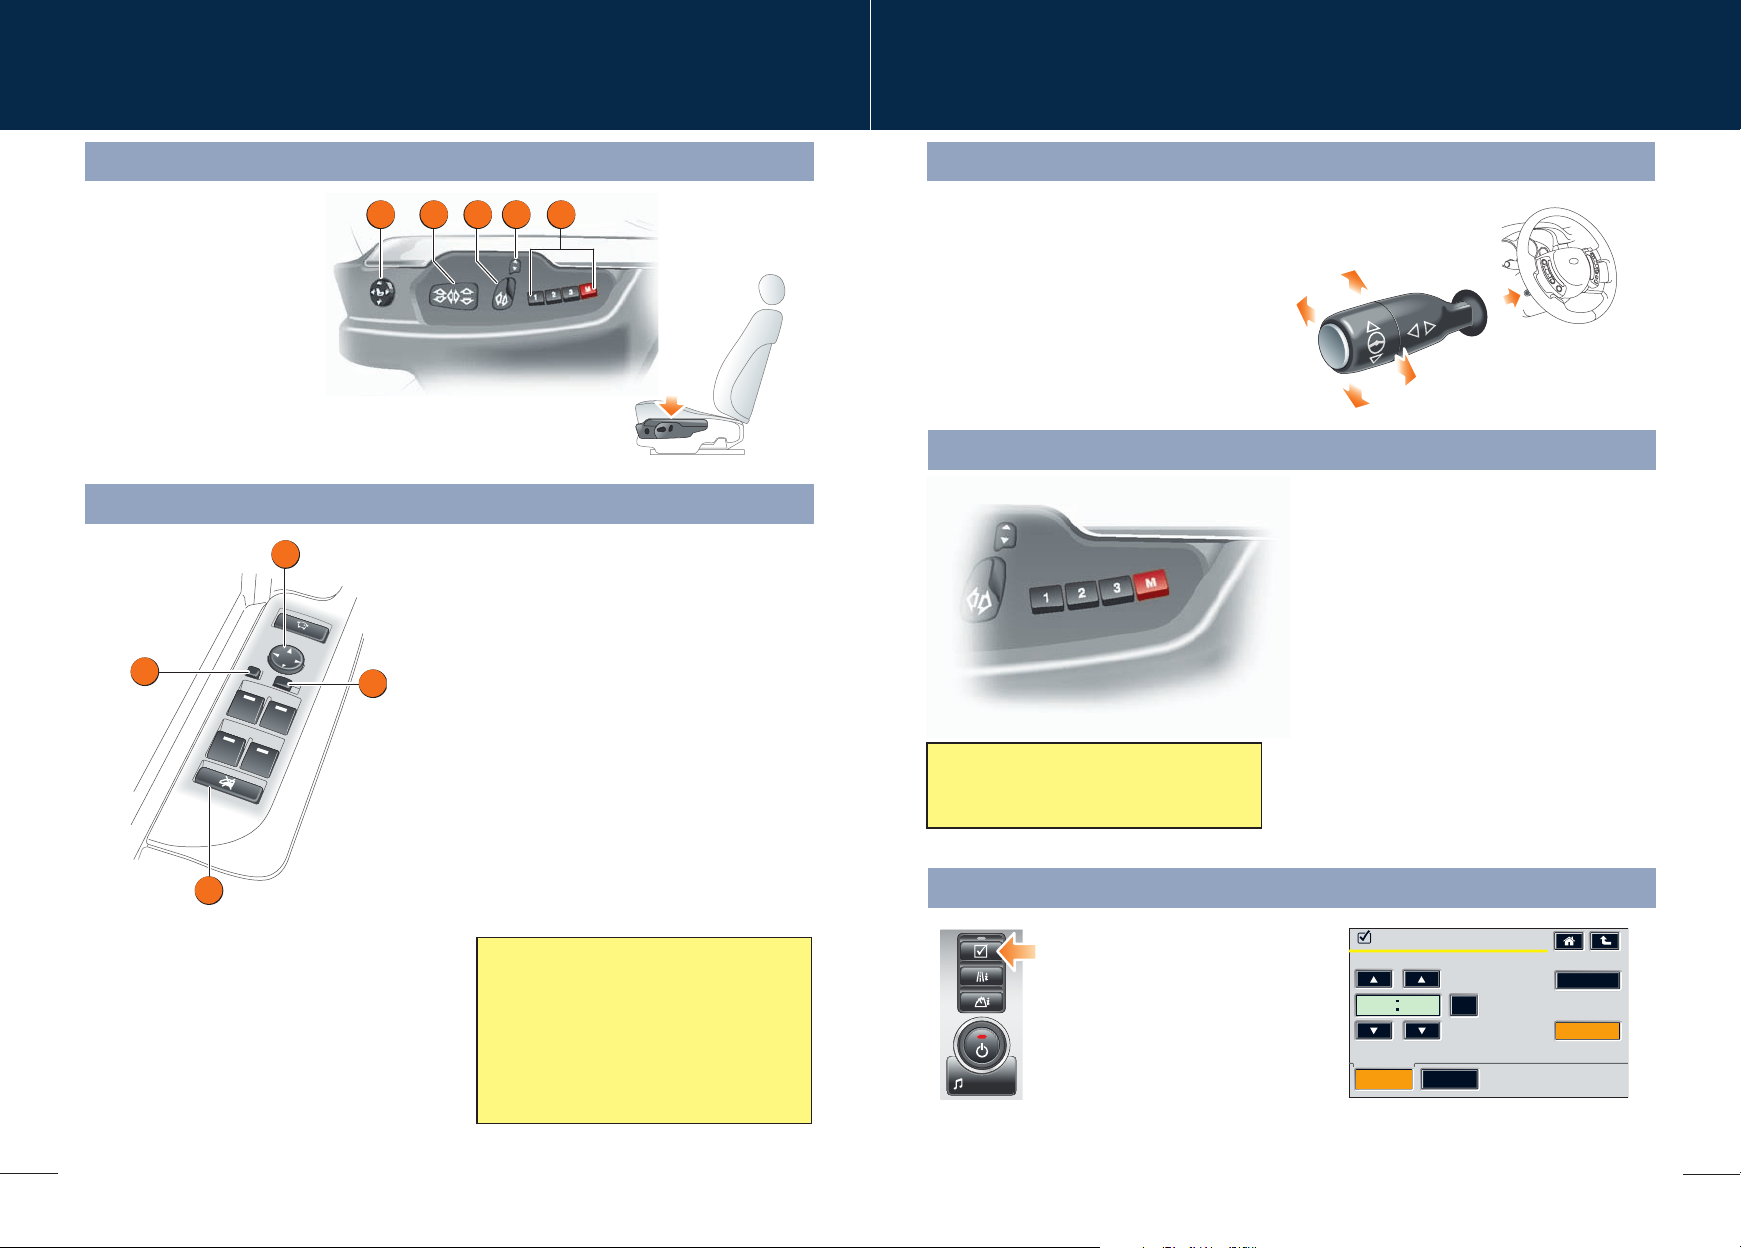
5321 4
Driver’s seat adjustment Steering column adjustment
The steering column adjustment stalk is located
on the left hand side of the steering wheel.
1. Lumbar support switch.
2. Seat fore/aft, cushion height
and cushion angle switch.
3. Seat back switch.
4. Head restraint switch.
5. Driving position memory
controls.
The steering wheel position can be adjusted in
four directions, corresponding with the
movement of the adjustment stalk.
With the vehicle stationary, move the stalk up
and down to adjust the height, and forward or
rearward to move the steering wheel further
away or closer.
Driving position memory
Door mirrors and electric windows
2
1
4
Electric windows
The windows are fitted with a facility that allows
them to be fully opened or closed with a single
operation.
To open a window, fully press the respective
window switch.
To close a window, pull the respective window
switch fully upwards.
The rear window controls can be inhibited by
pressing button 4.
3
Door mirrors
To adjust the door mirrors, move the mirror
selector switch 3 left or right to select the
appropriate mirror. Use the four-way switch 2 to
adjust the position.
Powerfold mirrors (when fitted)
The door mirrors are designed to fold back to
enable the vehicle to negotiate narrow
openings.
Press the mirror fold button 1 to fold the mirrors
back.
Press this button again to return the mirrors to
the normal position.
Resonance with lowered windows
If a resonance/booming sound occurs when
a rear window is open, lowering an adjacent
front window about 25 mm (1 inch) will
eliminate the condition. Press the window
switch lightly to lower the window and
release when the window reaches the
required position.
If button 1, 2 or 3 is not pressed within seven
seconds of the M button being pressed, the
memory function will cancel.
Clock setting
To set the time, press the system
settings button.
From the system settings screen,
touch the Clock icon to access
the Set Clock screen.
INFO
Once you have adjusted the driver's seat,
steering column and exterior mirrors for your
ideal driving position, the vehicle can memorise
these settings for future use.
1. Press the M button to activate the memory
function. The button will illuminate to indicate
the memory function is active.
2. Press button 1, 2 or 3 to store the current
driving position to the chosen number.
With the driver's door open, you can recall a
stored seat position with a press of the
appropriate button; 1, 2 or 3. The seat, steering
wheel and mirrors will move to their preset
positions.
If the driver's door is closed, turn the starter
switch to position IIbefore pressing the seat
memory button.
Set Clock
12hr
mm/dd
24hr
dd/mm
17 32
Set Clock
OK
Set Date
24hr
12hr
Format
dd/mm
mm/dd
4
5

Comfort and safety
Sunroof
Sunroof operation
The sunroof is fitted with an anti-trap mechanism, which will open
the sunroof slightly if resistance is encountered during closing.
1. Press to tilt the sunroof.
2. Push rearward to open the sunroof.
3. Push forward to close the sunroof.
Switch operation
The sunroof switch has two forward and
rearward positions. In the first position the
sunroof will open or close until the switch is
released. To open or close the sunroof fully in
a single operation, push the switch fully
forward or rearward to the second position.
2
Homelink® transmitter
The buttons (arrowed in illustration) can be
programmed to transmit radio frequencies that
can operate external devices i.e. garage doors,
entry gates, security systems, etc.
For more information, refer to Land Rover
Homelink
®
in the Owner's Handbook.
Seat belts and child restraints
A warning light on the instrument pack
will illuminate to alert you that the driver’s
and passenger’s seat belt is unbuckled.
Recommended child seat
Land Rover strongly recommends the use
of LATCH (Lower Anchors and Tethers for
CHildren) child seats.
The LATCH child seat can only be fitted in
the outer rear seating positions.
Passenger air bag
The front passenger seat is fitted with an
occupancy sensor system that determines the
state of seat occupancy and sets the status to
suit:
PASS AIR BAG OFF
• Seat unoccupied - air bag deactivated and
indicator off.
• Seat occupied - air bag activated and
indicator off.
• Seat occupied by a child seat or low weight
object - air bag deactivated and indicator
on.
For further information, refer to Occupant
detection in the Owner’s Handbook.
PASS AIR BAG OFF
3
Operating note
If the indicator becomes permanently
1
illuminated when the seat is definitely empty,
please contact your Land Rover Dealer
immediately.
Parking aid
With the ignition on, the front and rear parking
aid are activated whenever reverse gear is
selected. A short confirmation tone will sound
after one second.
If an obstruction is detected by the sensors, an
intermittent tone will sound. As the vehicle
moves closer to the obstruction the intermittent
tone increases in frequency.
When the distance between the sensor and the
obstruction is less than approximately 30 cm
(1 foot), the tone becomes continuous.
The parking aid is automatically switched off
when the vehicle’s forward speed exceeds
32 km/h (20 mph).
Front parking aid - manual operation
When driving into a limited space, the front parking
aid can be manually activated by pressing the
switch on the facia. The switch will illuminate and a
short confirmation tone will sound.
6
7
 Loading...