


Accu-Vac Grass Collection
System
|
|
Accuz-Z Z52, Z60 & Z72 Mower |
Manual No. 356-537M |
||
|
|
|
|
|
|
|
|
Before You Start |
lpservicedept@landpride.com |
||
|
|
|
Assembly Instructions |
||
|
|
|
|||
|
|
|
|||
When you see this symbol, the subsequent
!instructions and warnings are serious - follow without exception. Your life and the lives of others depend on it!
IMPORTANT: Before you begin, read these instructions and check to be sure all parts and tools are accounted for. Please retain these installation instructions for future reference and parts ordering information.
Your Accu-Vac Grass Collection System is exclusively designed for your Land Pride Z52, Z60 & Z72 Accu-Z Mower. Please read these installation instructions and your Z52, Z60 & Z72 Accu-Z Mower Operator’s Manual thoroughly before beginning. Especially read information relating to safety concerns. Also included in the Operator’s Manual is important information on operation, adjustment, troubleshooting, and maintenance for this attachment (some manual sections do not apply to all accessories).
General Information
These assembly instructions apply to the following AccuVac Grass Collection System Accessories listed below:
356-500A 60" BAGGER ASSEMBLY
356-520A 52" BAGGER ASSEMBLY
356-534A 72" BAGGER ASSEMBLY
Further Assistance
A detailed listing of parts for this accessory kit is provided beginning with page 7. Use the list as a checklist to inventory parts received. Please contact your local Land Pride dealer for any missing hardware.
20851
Your dealer wants you to be satisfied with your new Accu-Vac Grass Collection System. If for any reason you do not understand any part of this manual or are not satisfied with the service received, the following actions are suggested:
1.Discuss the matter with your dealership service manager making sure he is aware of any problems you may have and that he has had the opportunity to assist you.
2.If you are still not satisfied, seek out the owner or general manager of the dealership, explain the problem and request assistance.
3.For further assistance write to:
Land Pride Service Department
1525 East North Street
P.O. Box 5060
Salina, Ks. 67402-5060
E-mail address
© Copyright 2007 |
Pr inted |
06/28/07 |
1 |
Land Pride
Assembly Instructions
ccu-Vac Assembly
! WARNING
Do not operate mower without deflector chute or Accu-Vac in place.
Mower Deck Preparation
Park the Accu-Z mower on a flat surface. Shut off the ignition switch and remove the key from the switch. Disconnect the negative battery cable.
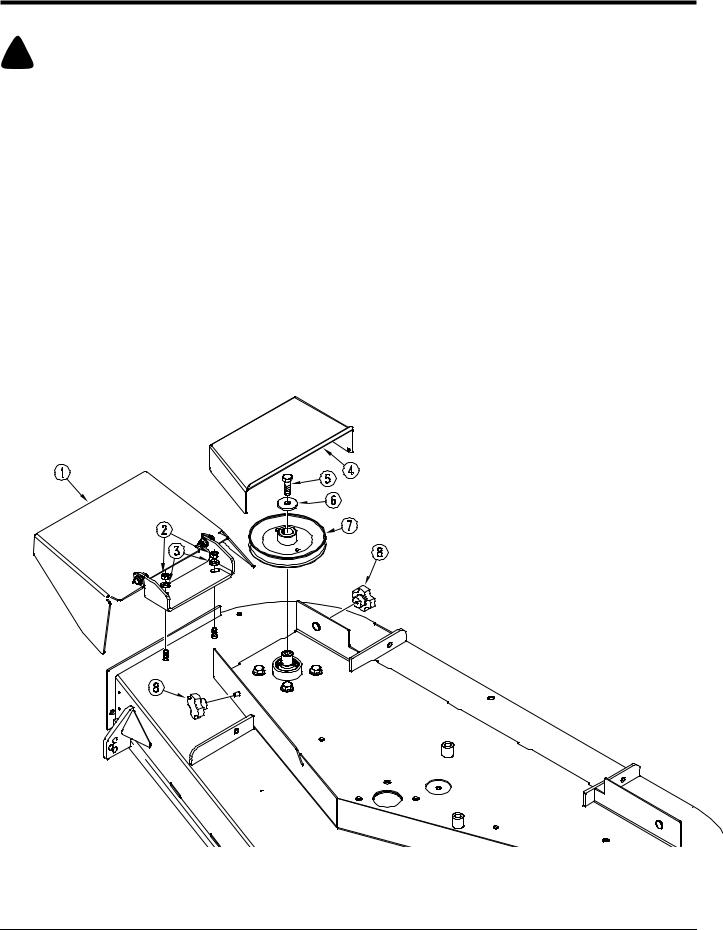
Refer to Figure 1
4.Before the Accu-Vac can be installed, the right side pulley cover (4) and discharge chute assembly (1) must be removed. Loosen the tensioner for the blade belt and remove pulley (7). Parts 2, 3, 6 and 8 will be used to assemble AccuVac.
NOTE: Retain all other parts as they will be re-installed when the
Accu-Vac is removed.
19907
lower, Pulley and Pulley Cover Assembly
Figure 1
Chute, Pulley and Pulley Cover Removal
Refer to Figure 2
2 |
Manual No. 356-537M |
■ 06/28/07 |

Land Pride
Assembly Instructions
1.Install double pulley (13) with the bolt (11) and existing flat washer (12) Torque bolt 65 - 75 lbs.
2.Reinstall blade drive belt on lower grove of pulley (13).
3.Assemble bracket (4) where the chute bracket was assembled using the existing hardware (2) and (3).
4.Install discharge adapter plate (21) to mower deck with two 3/8" x 3/4" hex head cap screws and flange lock nuts (22) as shown. Torque nuts to 31 ft. lbs.
5.Assemble blower pivot (5) with carriage bolt (6) and existing hardware (7), (8), (9) and (10).
6.Assemble lower blower cover (19) to blower (1) with two 3/8" x 1" hex head cap screws (20) four 3/8" flatwashers (3) and two 3/8 hex nuts (2) as shown. Torque nuts to 31 ft. lbs.
7.Install blower (1) on blower pivot (5) and swing blower around and secure to bracket with pin (14) and hair pin cotter (15).
Refer to Figure 3
8.Install blower belt (16) to double pulley and route it as shown. (Belt must be on top pulley)
Blower
Drive Belt (16)
20855
Figure 3 Blower Belt
9. Assemble pulley cover (17) using existing knobs
Route Belt to
Top Pulley
19908
06/28/07 ■ |
Manual No. 356-537M |
3 |
 Loading...