

La Crosse Technology WT 481 Instruction Manual
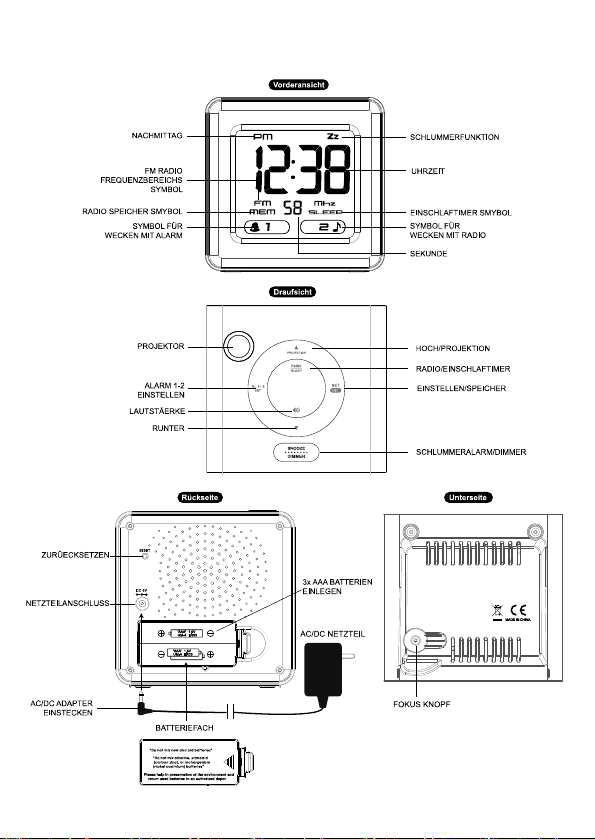
WT 481 BEDIENUNGSANLEITUNG
FUNKWECKER MIT RADIO UND PROJEKTION
DE. 1
INSTALLATION
Stecken Sie den mitgelieferten AC / DC-Adapter (Eingangsspannung 230V AC) (Ausgangsspannung
6V DC) in eine Steckdose, und stecken Sie dann den DC Stecker an der Rückseite des
Radioweckers ein.
BATTERIE BACK-UP INSTALLATION
1. Entfernen Sie die Batterieabdeckung an der Unterseite des Radiow ecker s.
2. Legen Sie 3 x AAA Batterien (Alkaline empfohlen) in richtiger Polarität ein.
3. Legen Sie die Batterieabdeckung wieder drauf, bis sie einrastet.
4. Wenn das Gerät nur mit Batterie n betrieben wird, dann ist die Hintergrundbeleuchtung
nicht dauerhaft eingeschaltet.
UHRZEIT EINSTELLEN
1. Drücken Sie die SET / MEM Taste um in die Zeiteinstellung zu gelangen, die Zeitziffern
blinken.
2. Drücken Sie / um die Uhrzeit einzustelllen, wenn Sie eine der Tasten länger
gedrückt halten, dann wird die Einstellung beschleunigt.
12/24 H ANZEIG E AUSWAEHLEN
1. Drücken Sie wieder die SET / MEM Taste, das Display zeigt 24Hr und blinkt.
2. Drücken Sie / um zwischen 12Hr und 24Hr Anzeige auszuwählen. Wenn 12Hr
Zeitformat gewählt wird, dann wird am Nachmittag das PM-Symbol angezeigt.
EINSTELLUNG DER SNOOZE ZEIT
1. Drücken Sie wieder die SET / MEM Taste, das Display zeigt Zz und 05 blinkt.
2. Drücken / um die gewünschte Schlummerzeitdauer zwischen 5-60Minuten
auszuwählen.
3. Drücken Sie wieder die SET / MEM Taste um in den normalen Zeitanzeigemodus zurück
zu kehren (oder drücken Sie 5 Sekunden keine Taste).
EINSTELLUNG DES ALARMS
1. Drücken Sie ALARM 1- 2 SET Taste um in die Alarmeinstellung zu gehen, das LCD zeigt
abhängig vom gewählten Alarm oder und die Alarmzeit 6:00 blinkt.
2. Drücken Sie
länger gedrückt halten, dann wird die Einstellung beschleunigt.
3. Drücken Sie SET / MEM um zwischen Alarm und Wecken mit Radio zu wählen.
Wenn beide Smybole nicht angezeigt warden, dann ist der Weckalarm ausgeschaltet.
ALARM STOPPEN
Drücken Sie die ALARM 1-2 SET Taste während der Alarm erklingt um ihn zu stoppen und am
nächsten Tag zu wiederholen.
SCHLUMMER ALARM
Drücken Sie die SNOOZE/DIMMER Taste, der Alarm ertönt erneut nach der gewählten
Schlummerzeit.
PROJEKTION
Drücken Sie die PROJECTION um die Projektion ein- oder auszuschalten. Drehen Sie den
Fokusknopf, um die Projektion scharf zu stellen.
DIMMER
Drücken Sie die SNOOZE/DIMMER Taste um die Helligkeit der Hintergrundbeleuchtung
einzustellen. Die Einstellung ist nur möglich, wenn das Radio ausgeschaltet ist.
Hinweis: Wenn das Gerät nur mit Batterien betrieben wird, dann ist die Hintergrundbeleuchtung nicht
dauerhaft eingeschaltet.
/ um die gewünschte Alarmzeit einzustellen, wenn Sie eine der Tasten
DE. 2

RADIO ANTENNE
Rollen Sie das Antennenkabel komplett aus und verändern Sie die Position um den Emp fang z u
verbessern.
RADIOFUNKTION UND EINSTELLUNG DER SENDER
Drücken SLEEP/RADIO, das LCD zeigt “ON” für ein paar Sekunden und anschließend die aktuelle
Frequenz in MHz.
1. Drücken Sie
lassen halten Sie eine der beiden Tasten länger gedrückt und lassen Sie anschließend los.
Es wird, dann nach dem nächsten Radiosender gesucht.
2. Drücken Sie
1 und 15 einzustellen.
3. Drücken Sie die SNOOZE/DIMMER Taste um das Radio auszuschalten.
Anmerkung: Halten Sie Ihr Radio fern vom Leuchtstofflampen, diese können Störungen am Radio
verursachen.
SENDERSPEICHERFUNKTION
Es können bis zu 10 Radiosender eingespeichert werden um diese schneller einstellen zu können.
1. Schalten Sie das Radio mit RADIO / SLEEP ein. Drücken Sie / um einen
Radiosender zu suchen.
2. Drücken und halten Sie die SET / MEM Taste bis “MEM” erschein und “01” blinkt.
Drücken und halten Sie SET / MEM bis “01” aufhört zu blinken. Der Sender ist nun im
Senderspeicher 1 gespeichert.
3. Drücken Sie / um einen anderen Radiosender zu suchen. Drücken und halten Sie
die SET / MEM Taste bis “MEM” erschein und “01” blinkt. Drücken Sie erneut kurz SET /
MEM, “02” wird angezeigt. Drücken und halten Sie SET / MEM um den Sender in
Senderspeicher 2 zu speichern..
4. Um einen gespeicherten Sender zu wählen drücken Sie wiederholt die SET / MEM Ta s te
während das Radio eingeschaltet ist.
SLEEP TIMER
1. Drücken Sie RADIO/SLEEP zweimal, um in den Einschlaftimermodus zu gelangen. Das
SLEEP Symbol “5” (5 minuten) blinkt. Drücken Sie wiederholt RADIO/SLEEP um eine
Einschlafzeit zwischen 10-, 15-, 30-, 45-, 60-, 75-, 90- zu wählen. The sleep timer display
remains for few seconds and then returns to normal clock display. Das SLEEP Symbol
wird angezeigt, wenn der Einschlaftimer eingeschaltet wurde.
2. Nach Ablauf der Zeit schaltet sich das Radio aus. Um zu überprüfen wieviel Zeit noch
übrig ist, drücken Sie einmal die RADIO/SLEEP Taste.
3. Drücken Sie die SNOOZE/DIMMER Taste um das Radio auszuschalten.
FEHLERBEHEBUNG
Betätigen Sie die RESET Taste an der Unterseite des Radioweckers, wenn eine falsche Uhrzeit
angezeigt wird oder andere Fehler auftreten. Benutzen Sie hierfür einen Stift oder Ähnliches. Die
Einstellungen müssen erneut vorgenommen werden.
WARTUNG
1. Platzieren Sie den Radiowecker auf einem stabilen Untergrund.
2. Setzen Sie ihn keiner extremen Temperatur, Wasser oder direkte m Sonnenl i cht aus.
3. 2 . Reinigen Sie den Wecker nur mit einem feuchten Tuch. Vermeiden Sie ätzende
Materialien.
4. Mischen Sie nicht alte mit neuen, Alkali- mit Zinkkohle- oder wiederaufladbare (NickelCadmium) Batterien.
5. Sollte der Radiowecker für längere Zeit nicht benutzt werden (ca. 1 Monat), entnehmen
Sie bitte die Batterien, um mögliche Korrosionen zu verhindern.
/ um nach einem Radiosender zu suchen. Um automatische suchen zu
einmal, das LCD “VOL“, Drücken Sie / um die Lautstärke zwischen
DE. 3
HAFTUNGSAUSSCHLUSS
Elektrischer und elektronischer Abfall enthält gefährliche Substanzen. Entsorgung von
Elektronikschrott in der freien Natur und / oder auf nicht autori sier ten Deponien schädigt die
Umwelt.
Bitte kontaktieren Sie Ihre lokalen und / oder regionalen Behörden, um die Adressen
autorisierter Deponien oder Wertstoffhöfe mit selektiver Abfalltrennung zu erfahren.
Alle elektronischen Geräte müssen dem Recycling zugeführt werden.
Wie auf der Verpackung und auf dem Produkt vermerkt, wird das Lesen der
"Bedienungsanleitung" empfohlen. Dieses Produkt darf nicht im allgemeinen Restmüll entsorgt
werden.
Der Hersteller oder Lieferant übernimmt keine Verantwortung für Folgen, die durch falsche
Bedienung eintreten sollten.
Dieses Produkt darf nicht für medizinische Zwecke oder zur Information der Öffe ntli chkei t
ngesetzt werden.
ei
Die technischen Daten dieses Gerätes können ohne vorherige Ankündigung geändert werden.
Dieses Produkt ist kein Spielzeug. Darf nicht in die Hände von Kindern gelangen.
Kein Teil dieses Handbuchs darf ohne schriftliche Genehmigung des Herstellers reproduziert
w
erden.
Hinweispflicht nach dem Batteriegesetz
Alte Batterien gehören nicht in den Hausmüll, weil sie Schäden für Gesundheit und Umwelt
verursachen könnten. Endnutzer sind durch das Gesetz verpflichtet verbrauchte Batterien beim
Händler oder anderen Sammelstellen zu entsorgen.
DE. 4
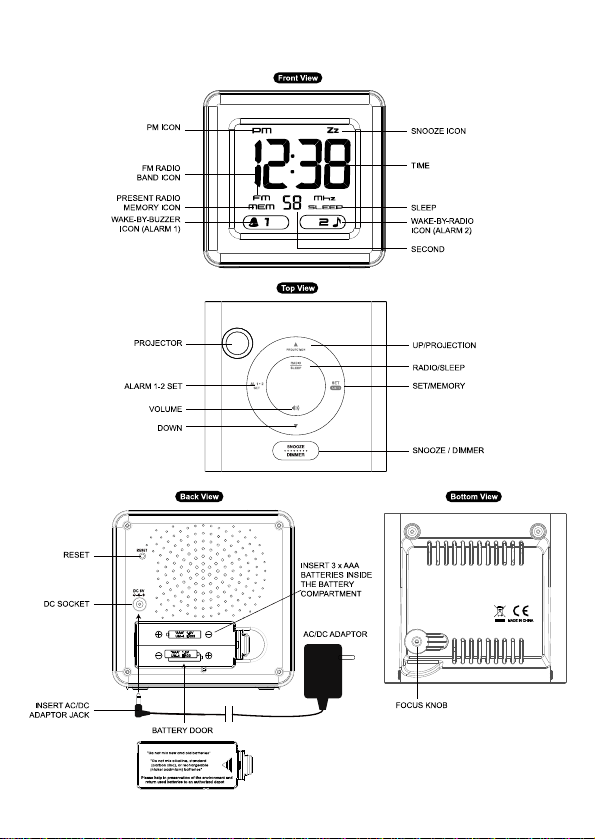
INSTRUCTION MANUAL OF WT481
ALARM CLOCK RADIO WITH PROJECTION
EN. 1

INSTALLATION
Plug the supplied AC/DC adaptor (Input voltage 230V AC) (Output voltage 6V DC) to an AC
household outlet, and then plug the DC jack to the back of the clock radio. Your clock radio is ready
to work for you.
BATTERY BACK-UP INSTALLATION
1. Slide opens the battery cover at the bottom of your unit.
2. Insert 3 x AAA batteries into the battery compartment by observing the correct + / - polarity
signs.
3. Replace the battery cover.
4. When only batteries are being used, the always-on bac klight is disabled.
TO SET TIME
1. Press SET / MEM to enter time set mode, the time digits flash.
2. Press / to set your desired time. Press and hold / will accelerate setting in
faster speed.
TO SET 12HR OR 24 HR TIME FORMAT
1. Press SET / MEM again, the clock display shows 24Hr and flashes.
2. Press / to select 12Hr or 24Hr. When 12Hr time format is selected, the PM icon will
appear on the clock display to indicate the afternoon time.
TO SET THE SNOOZE DURATION (5 TO 60 MINUTES)
1. Press SET / MEM again, the clock display shows Zz and 05 flashes.
2. Press / to set your desired snooze duration from 5 to 60 minutes.
3. Press SET / MEM again (or if no key is pressed within 5 seconds) to return to normal clock
display mode.
TO SET THE ALARMS
1. To set Alarm 1, press AL 1 or 2 once, the LCD shows
2. Press
3. Press SET / MEM one at a time to select Wake-by-Buzzer ( appears) or Wake-By-
4. To set Alarm 2, press AL 1 or 2 once, the LCD shows and alarm digit 6:00 flash,
TO STOP AND RESET THE ALARM TO COME ON THE NEXT DAY
When Alarm 1 sounds, press the AL 1 or 2 once to stop the alarm sound and automatically reset it to
come on the following day. Similarly, stop the alarm by pressing AL 1 or 2 when Alarm 2 sounds.
TO USE THE SNOOZE ALARM
When alarm sounds press SNOOZE/DIMMER once, the alarm will be silenced and come on again
according to the set snooze duration.
TO USE THE PROJECTION CLOCK
Press PROJECTION button to turn on or off the projection clock. Turn the focus knob on the projector
to adjust the image of the projected time onto the wall or ceiling.
/ to set your desired alarm time. Press and hold / will accelerate setting
in faster speed.
Radio
appears). To turn off Alarm 1, press SET / MEM until both and disappear.
(
repeat Step 2 and 3 above.
EN. 2
and alarm digits 6:00 flash.

TO USE THE HI-LO-OFF DIMMER
This clock radio features an adjustable display backlight with “high / low / off” settings. To select a
backlight setting, press SNOOZE/DIMMER one at a time until the brightness is reached. This can
only be done when the radio is off.
Note: Please note the always-on backlight will not work while the clock is operating on battery power.
TO SET UP THE FM ANTENNA
Extend the FM wire antenna fully and vary the direction for best FM reception. Do not strip, alter or
attach to other antennas.
TO TUNE AND PLAY THE RADIO
Press SLEEP/RADIO, the LCD will show “ON” for few seconds and then shows the radio frequency
readings in Mhz.
1. Press / to tune into a desired radio station. To scan the stations, press / for a
few seconds and release. The radio will search and stop on the next strong station.
2. Press
3. Press SNOOZE/DIMMER to turn off the radio.
Remark: keep your radio away from fluorescent lamps, which may cause interference to the radio.
TO USE THE MEMORY SET (RADIO PRESET) FUNCTION
This clock radio features a total of 10 preset memory of FM radio .These allow you to preset your
favorite stations and access them quickly.
1. Turn on the radio by press of RADIO / SLEEP. Press
2. Press and hold the SET / MEM until “MEM” appears and “01” flashes below the time digits.
3. Press / to select another station you like to preset. Then press and hold SET / MEM
4. Repeat Step 2 - 3 to preset up to ten FM stations.
5. To listen to a preset station at any time, simply press the SET / MEM to select a preset
6. To edit a preset station, select another station and then repeat Step 2-4. This overrides the
TO USE THE SLEEP TIMER
1. Press the RADIO/SLEEP twice to enter the sleep mode. The clock display shows the
2. The radio will play for the programmed sleep time and then shut off. To check how many
3. To turn off the radio before the sleep time has elapsed, press SNOOZE/DIMMER once.
TROUBLE SHOOTING
If your clock displays irrelevant time or does not function properly, which may be caused by electrostatic discharge or other interference, use a thin object to press the RESET button at the back. The
clock radio will be reset to default settings and you need to set it again.
once, the LCD shows “VOL“, press / to adjust volume from 01 (minimum)
to 15 (maximum)
like to preset memory.
Press and hold SET / MEM until “01” stops flashing. The preset is now stored in Memory
01.
until “MEM” appears and “01” flashes below the time digits. Press SET / MEM once, “02”
appears. Then press and hold SET / MEM to store Memory 02.
To move to next preset without storing, repeatedly press the SET/MEM button.
station while the radio is on.
original setting.
SLEEP icon and “5” (5 minutes) and flashes keep pressing the RADIO/SLEEP to select a
10-, 15-, 30-, 45-, 60-, 75-, 90-minute sleep timer. The sleep timer display remains for few
seconds and then returns to normal clock display. The SLEEP icon will appear, showing
the radio timer is activated.
sleep time is remaining, press RADIO/SLEEP once.
EN. 3
/ to select a radio station you

CARE OF YOUR PRODUCT
1. Place your clock radio on a stable surface, away from sources of direct sunlight or
excessive heat or moisture.
2. Protect your furniture when placing your units on a natural wood and lacquered finish by
using a cloth or protective material between it and the furniture.
3. Clean your unit with a soft cloth moistened only with mild soap and water. Stronger agents
such as Benzene, thinner or similar materials can damage the surface of the unit. Make
sure the unit is unplugged before cleaning.
4. Do not mix old and new batteries. Do not mix alkaline, standard (carbon-zinc), or
rechargeable (nickel-cadmium) batteries.
5. If the unit is not to be used for a prolonged period, such as a month or longer, remove the
batteries to prevent possible corrosion. Should the battery compartment become corroded
or dirty, clean the compartment thoroughly and replace the batteries.
LIABILITY DISCLAIMER
The electrical and electronic wastes contain hazardous substances. Disposal of electronic
waste in wild country and/or in unauthorized grounds strongly damages the environment.
Please contact your local or/and regional authorities to retrieve the addresses of legal dumping
grounds with selective collection.
All electronic instruments must from now on be recycled. User shall take an active part in the
reuse, recycling and recovery of the electrical and electronic waste.
The unrestricted disposal of electronic waste may do harm on public health and the quality of
environment.
As stated on the gift box and labeled on the product, reading the “User manual” is highly
recommended for the benefit of the user. This product must however not be thrown in general
rubbish collection points.
The manufacturer and supplier cannot accept any responsibility for any incorrect readings and
any consequences that occur should an inaccurate reading take place.
This product is not to be used for medical purposes or for public information.
The specifications of this product may change without prior notice.
This product is not a toy. Keep out of the reach of children.
No part of this manual may be reproduced without written authorization of the manufacturer.
CONSIDERATION OF DUTY ACCORDING TO THE BATTERY LAW
Old batteries do not belong to domestic waste because they could cause damages of health and
environment. End-users are committed by law to bring back needed batteries to distributors and other
collecting points.
EN. 4
 Loading...