

La Crosse Technology WS-9025 Instruction Manual
WS-9025
Weather Projection Station
Instruction Manual
INTRODUCTION:
Congratulations on purchasing this state-of-the-art weather projection station as an example of innovative design and quality piece of
engineering. Providing radio controlled time, date, calendar, moon phase, indoor and outdoor temperature, indoor and outdoor relative
humidity, this unit will never keep you guessing on current and future weather conditions. Operation of this product is simple and
straightforward. By reading this operating manual, the user will receive a better understanding of the weather projection station together
with the optimum benefit of all its features.
FEATURES:
• WWVB Radio controlled time with manual setting option
• Time reception ON/OFF (user selectable)
• 12/24 hour time display
• DST ON/OFF (daylight saving time)
• US time zone map
• Time zone option ±12 hours
• Month, date, weekday calendar display
• Alarm setting with snooze function
• Automatic daylight saving time
• Display 12 moon phases throughout the year with moon/tide
indication
• Weather forecasting with 3 weather icons
• Weather tendency indicator
• Indoor comfort indicator
• Temperature display with MIN/MAX records and time of reception
• Remote transmission of outdoor temperature and humidity to Weather Projection Station by 433 MHz
• Rain proof casing
• Wall mounting case
TO INSTALL AND REPLACE BATTERIES IN THE WEATHER PROJECTION STATION
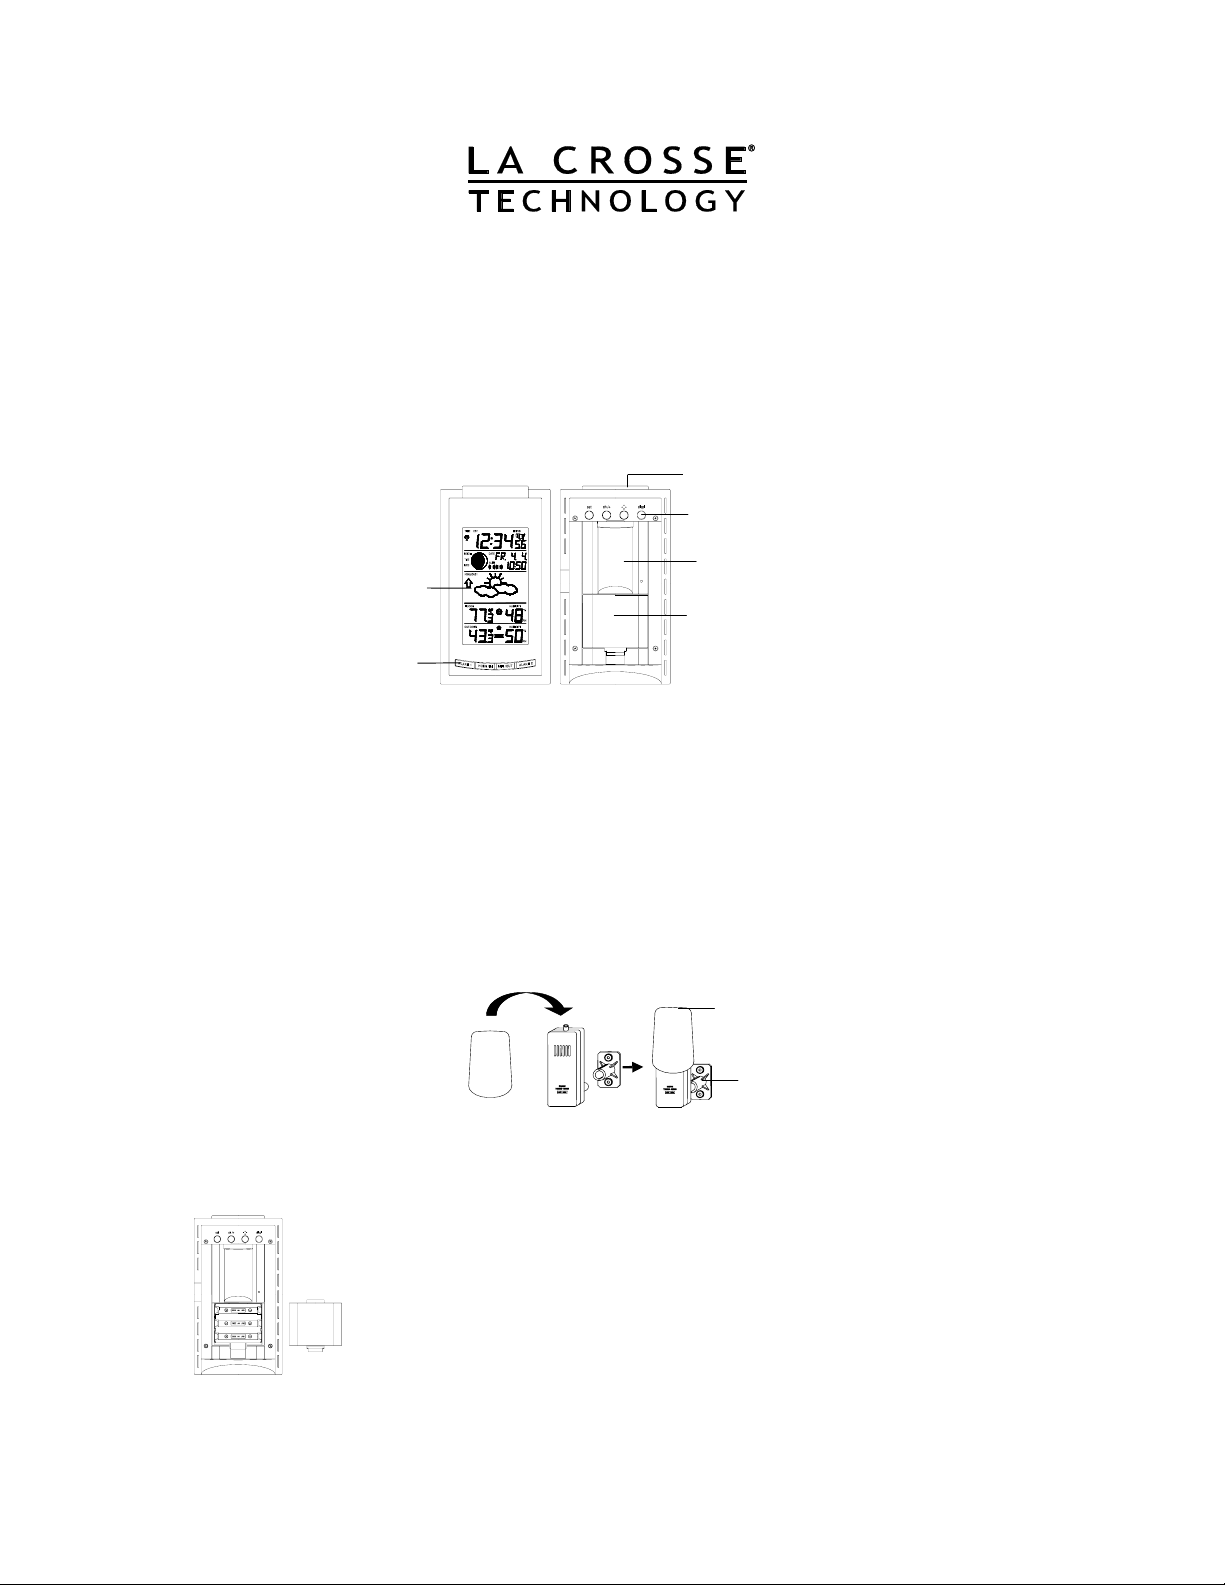
The Weather Projection Station
LCD
Display
Function
keys
SNOOZE
key
Function
keys
Projector
Battery
compartment
• Indoor and outdoor temperature display in ºC/ºF Humidity data with
MIN/MAX records
• Indoor and outdoor humidity display as RH%
• Can receive up to 3 transmitters
• Time projection display (hour and minute)
• Outdoor temperature projection display (degrees ºC or ºF)
• Alternate projection display mode selectable
• Projection with adjustable brightness and projection orientation
possible
• LCD contrast selectable
• LED back light
• Low battery indicator
• Table standing
• AC/DC power adapter included
The Outdoor Thermo-hygro Transmitter
Rain protection
cover
Wall mounting
base
The Weather Projection Station uses 3 x AA, IEC LR6, 1.5V batteries. To install and replace the batteries, please follow the
steps below:
1. Insert finger or other solid object in the space at the bottom center of the battery compartment and lift
up to remove the cover.
2. Insert batteries observing the correct polarity (see marking).
3. Replace compartment cover.

TO INSTALL AND REPLACE BATTERIES IN THE THERMO-HYGRO TRANSMITTER
The Thermo-hygro transmitter uses 2 x AA, IEC LR6, 1.5V batteries. To install and replace the batteries, please follow the steps below:
1. Remove the battery cover.
2. Insert the batteries, observing the correct polarity (see marking).
3. Replace the battery cover on the unit.
Note:
In the event of changing batteries in any of the units, all units need to be reset by following the setting up procedures. This is due to a
random security code assigned by the transmitter at start-up. This code must be received and stored by the Weather Projection Station in
the first 3 minutes of power being supplied to the transmitter.
BATTERY CHANGE:
It is recommended to replace the batteries in all units on an annual basis to ensure optimum accuracy of these units.
SETTING UP
The Weather Projection Station can be either batteries-operated or powered by the provided AC-DC adapter.
BATTERY INSTALLATION:
1. First, insert the batteries into the Weather Projection Station (see “To install and replace batteries in the Weather Projection Station”). Once the
2. Within 4 minutes of activating the Weather Projection Station, place the batteries into the transmitter (see “To install and replace batteries in the Thermo-
3. After inserting the batteries into the transmitter, the Weather Projection Station will start receiving data from the transmitter. The outdoor temperature and
4. The Weather Projection Station can receive up to 3 remote Outdoor Thermo-hygro transmitters. If you have purchased additional transmitters, repeat from
5. With less than 3 transmitters received, the Weather Projection Station will try to pick up the remaining one in approximately another 3 minutes. If 3
6. Once the outdoor temperature and the humidity have been received and displayed on the Weather Projection Station, the WWVB time code reception is
7. If after 10 minutes, the WWVB time has not been received, use the SET key to manually enter a time initially. The clock will automatically attempt to receive
Your Weather Projection Station is now operational!
Note:
If the batteries are used as the main power source:
1. Projected image brightness, alarm volume and back-light strength will be weaker when batteries are low
2. Battery life time will be much less than 1 year; depending on the frequency of projection and alarm.
TO USE THE PROJECTOR POWER ADAPTER
The unit comes with an AC-DC adapter for using the projector for an extended period of time, such as throughout the night.
To connect the AC-DC adapter:
Please participate in the preservation of the environment. Return used batteries to an authorized depot.
batteries are in place, all segments of the LCD will light up briefly and a short signal tone will sound. Then the ALM1 6:00, the indoor temperature and
humidity, the time as 12:00, the date as WE 1.1., the moon icon, the weather icons (sun and clouds) will be displayed. If the indoor temperature and indoor
humidity are not displayed after 15 seconds, remove the batteries and wait for at least 3 minutes before reinserting them. Once the indoor data is displayed
proceed to step 2.
hygro Transmitter“).
humidity should then be displayed on the Weather Projection Station. If this does not happen after 3 minutes, the batteries will need to be removed from
both units and reset from step 1.
step 3 for all extra transmitters. However, ensure that you leave 10 seconds in between the reception of the last transmitter and the set-up of the following
transmitter. The Weather Projection Station will number the transmitters in the order of set-up, i.e. the first transmitter will have the temperature/humidity
displayed with the number 1 against it and so on.
transmitters are received, the Weather Projection Station will stop further reception.
automatically started. This takes typically between 6-8 minutes in good conditions.
the WWVB time from 12:00 to 6:00 a.m. for a successful reception. When WWVB reception signal is successful, the received time will override the manually
set time. The date is also updated with the received time. The next reception attempt will occur on the following day. (Please refer to notes on “About
WWVB Radio controlled Time” and “Manual Time Setting”).
Make sure that your household voltage is 120V! Otherwise it can result in damaging your Weather Projection Station.
1. Connect the AC-DC adapter to a wall socket. Plug the adapter into the jack at the side of the Weather Projection Station. All segments of the LCD will
light up briefly and a short signal tone will sound. Then the ALM 1 6:00, the indoor temperature and humidity, the time as 12:00, the date as WE 1.1.,
the moon icon, the weather icons (sun and clouds) will be displayed. If the indoor temperature and indoor humidity are not displayed after 15
seconds, remove the batteries and wait for at least 3 minutes before reinserting them.
2. Within 4 minutes of activating the Weather Projection Station, place the batteries into the transmitter (see “To install and replace batteries in the
Thermo-hygro Transmitter“).
3. After inserting the batteries into the transmitter, the W eather Projection Station will start receiving data f rom the transmitter. The outdoor temperature
and humidity should then be displayed on the Weather Projection Station. If this does not happen after 3 minutes, the batteries will need to be
removed from both units and reset from step 1.
4. The Weather Projection Station can receive up to 3 remote Outdoor Thermo-hygro transmitters. If you have purchased additional transmitters, repeat
from step 3 for all extra transmitters. However, ensure that you leave 10 seconds in between the reception of the last transmitter and the set-up of the
following transmitter. The Weather Projection Station will number the transmitters in the order of set-up, i.e. the first transmitter will have the
temperature/humidity displayed with the number 1 against it and so on.
5. With less than 3 transmitters received, the Weather Projection Station will try to pick up the remaining one in approximately another 3 minutes. If 3
transmitters are received, the Weather Projection Station will stop further reception.
6. Once the outdoor temperature and the humidity have been received and displayed on the Weather Projection Station, the WWVB time code
reception is automatically started. This takes typically between 6-8 minutes in good conditions.
7. If after 10 minutes, the WWVB time has not been received, use the SET key to manually enter a time initially. The clock will automatically attempt to
receive the WWVB time from 12:00 to 6:00 a.m. for a successful reception. When W WVB reception signal is successful, the received time will
override the manually set time. The date is also updated with the received time. The next reception attempt will occur on the following day. (Please
Your Weather Projection Station is now operational!
Note:
If the Weather Projection Station is powered through the AC-DC adapter, the projection will be constantly ON.
If the Weather Projection Station is battery operated, only when the SNOOZE key is pressed, the projection will turn ON. Once the SNOOZE key is released, there
will be no projection.
USING BOTH BATTERIES THE POWER ADAPTOR
If the Weather Projection Station is first powered by batteries and the AC-DC adapter is subsequently used for extended period of time, the main power source of
the Weather Projection Station will switch to AC power. The batteries will then act as a backup power source in the case of power failure.
refer to notes on “About WWVB Radio controlled Time” and “Manual Time Setting”).
Important!
RESETTING
A
A
The Weather Projection Station and the Thermo-hygro transmitter need to be reset when one of the following conditions occur:
• Unsuccessful 433MHz signal reception.
• Malfunction on the units.
• Batteries replacement.
For resetting, remove all batteries from the units and unplug the AC-DC adapter from any power source. Wait at least for 3 minutes before powering up the
Weather Projection Station again. Proceed from step 1 in “Setting Up”,“Battery Installation” or “How to use the Projector Adaptor”.
HOW TO USE THE PROJECTOR
The projector projects the current time and the current outdoor temperature onto the ceiling, preferable within a darkened room. The projection image can also
be adjusted in 4 upright positions, each with a rotation of 90º by using the key .
TO PROJECT THE TIME OR TEMPERATURE ONTO A FLAT SURFACE:
The projector will only project the current time, outdoor temperature or alternate between time/outdoor temperature only.
1. Point the projection lens to the appropriate direction (maximum distance of the projection is 6 feet/2 meters).
M0 – projecting the current time only.
M1 – projecting the current outdoor temperature only.
M2 – projecting by switching the display of the current time and the current outdoor temperature for every 5 seconds.
3. Adjust the projection image in an upright position with the
Note:
If more than one Thermo-hygro Transmitter is used, only the temperature from transmitter 1 will be projected.
ABOUT WWVB RADIO CONTROLLED TIME
The NIST (National Institute of Standards and Technology—Time and Frequency Division) WWVB radio station is located in Ft. Collins, Colorado, and transmits
the exact time signal continuously throughout the United States at 60 kHz. The signal can be received up to 2,000 miles away through the internal antenna in the
Weather Projection Station. However, due to the nature of the Earth’s Ionosphere, reception is very limited during daylight hours. The Weather Projection Station
will search for a signal every night when reception is best.
The WWVB radio station receives the time data from the NIST Atomic clock in Boulder, Colorado. A team of atomic physicists is continually measuring every
second, of every day, to an accuracy of ten billionths of a second per day. These physicists have created an international standard, measuring a second as
9,192,631,770 vibrations of a Cesium-133 atom in a vacuum. For more detail, visit http://www.boulder.nist.gov/timefreq.htm. To listen to the NIST time, call
(303)499-7111. This number will connect you to an automated time, announced at the top of the minute in “Coordinated Universal Time”, which is also known as
Greenwich Mean Time (GMT). This time does not follow Daylight Saving Time changes. After the top of the minute, a tone will sound for every second. It is
possible that your Weather Projection Station may not be exactly on the second due to the variance in the quartz. However, the clock will adjust the quartz timing
over the course of several days to be very accurate; under 0.10 seconds per day.
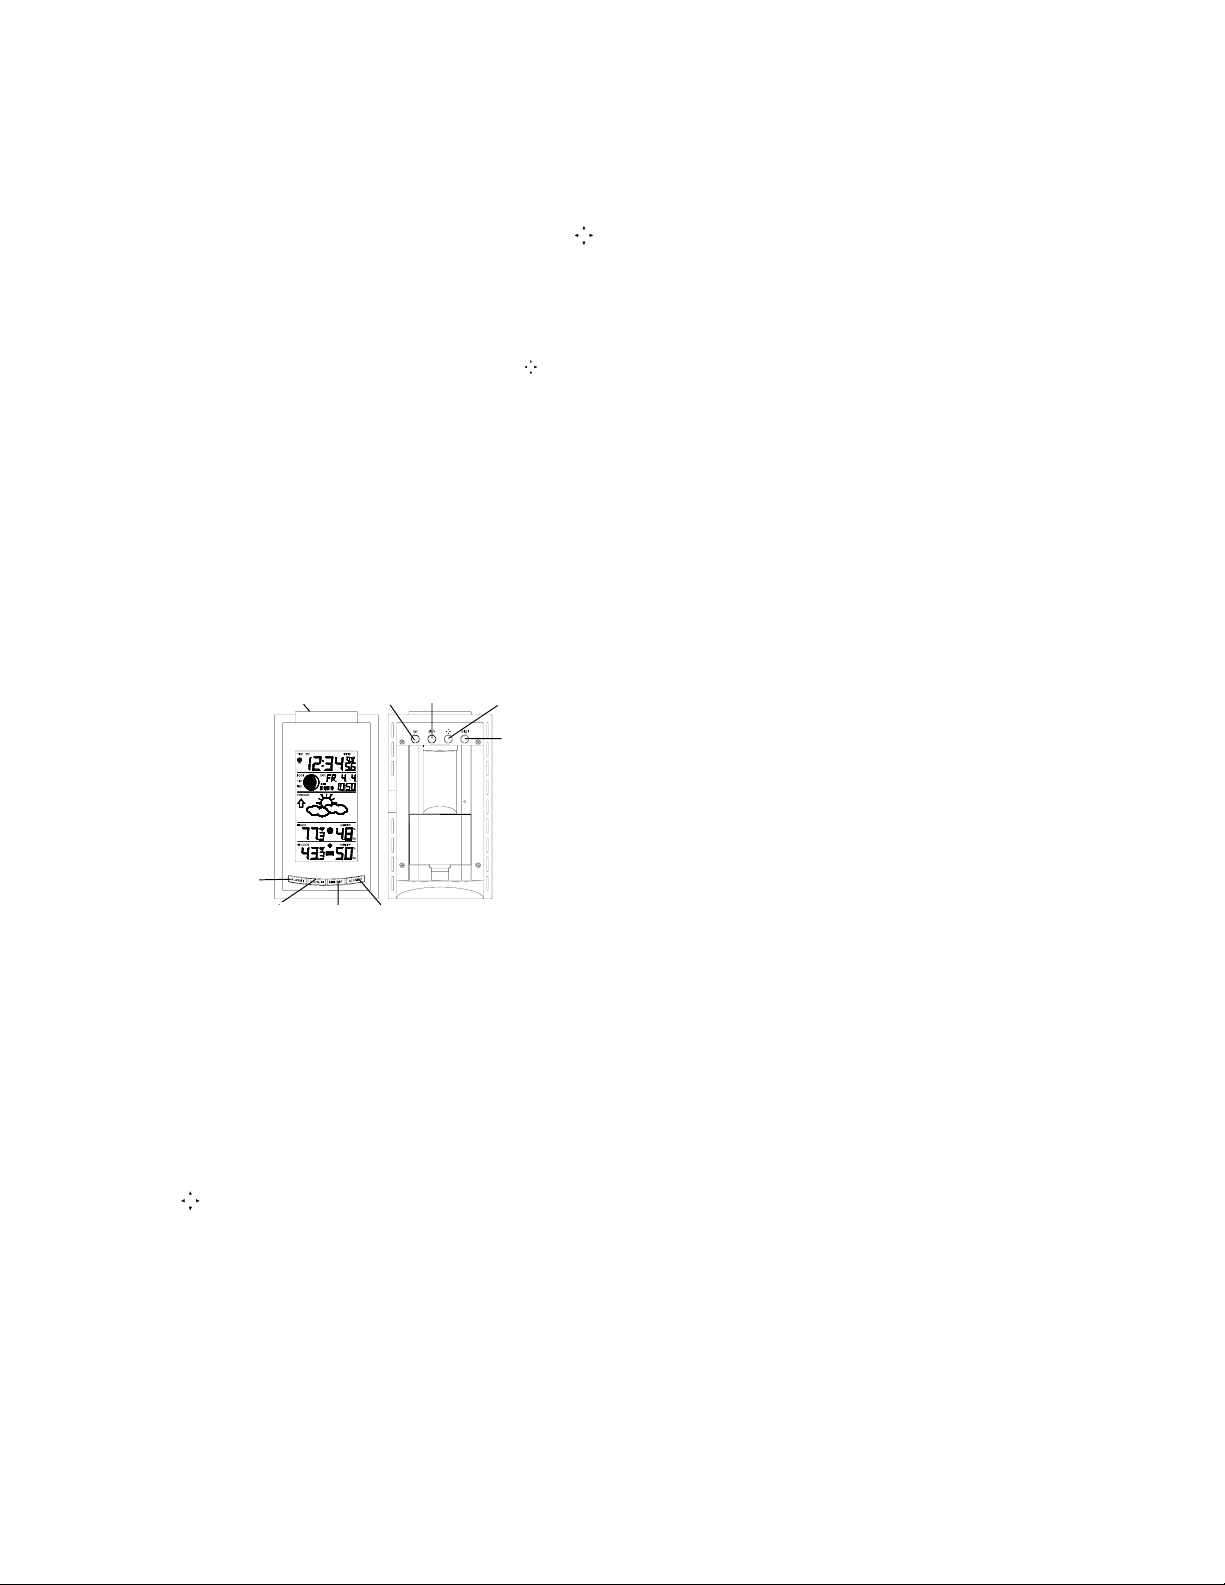
FUNCTION KEYS:
Weather Projection Station:
The Weather Projection Station has 9 easy to use function keys; 4 on the front, 4 on the back, and 1 on the top of the unit:
SET key
• Enter manual setting modes: LCD contrast, time zone, DST
•
• Stop the alarm during alarm ringing
• Stop snooze mode
• Back-light on
CH/+ key
• Increase value in all setting modes
• Stop the alarm during alarm ringing
• Toggle between the outdoor transmitter 1, 2 and 3 (if more than 1
• Stop snooze mode
• Back-light on
• Project the image direction (can display 4 different orientations)
• Back-light on
DISPL key
• Toggle between the time and outdoor temperature or automatic
• Back-light on
ALARM 1 key
• Enter/exit the alarm 1 setting mode
• Active/de-active the alarm time 1 (even inside snooze mode)
• Stop the alarm during alarm ringing
• Back-light on
SNOOZE key
LARM 1 key
HOUR/IN key
ON/OFF, Time reception ON/OFF, 12/24 hour display, manual time
setting, calendar, snooze function, temperature °F or °C, and
weather icon sensitivity setting
transmitter is used)
Key (DIRECTION key)
alternates time/outdoor temperature every 5 seconds display mode
for projection
3. Press the DISPL key to select the desired mode for the projection. There are 3 display modes:
key.
SET key
CH/+ key
DIRECTION key
DISPL key
MIN/OUT key
LARM 2 key
HOUR/IN key
• Press to set the alarm hour (inside alarm setting mode)
• Press shortly to toggle between MIN/MAX and current indoor
temperature and humidity data
• Press and hold for 4 seconds to reset the MIN/MAX indoor
temperature and humidity data
• Stop the alarm during alarm ringing
• Stop snooze mode
• Back-light on
MIN/OUT key
• Press shortly to toggle between MIN/MAX and current
temperature/humidity values for selected outdoor temperature
channel.
• Press and hold for 4 seconds to reset the MIN/MAX records for
selected channel.
• Press to set the alarm minute (inside alarm setting mode)
• Stop the alarm during alarm ringing
• Stop snooze mode
• Back-light on
ALARM 2 key
• Enter/exit the alarm 2 setting mode
• Active/de-active the alarm time 2 (even inside snooze mode)
• Stop the alarm during alarm ringing
• Back-light on
SNOOZE key
• Active/de-active snooze function
• Active the projection in battery operated mode
• Press and hold 2 seconds to stop the alarm during alarm ringing
• Exit the setting modes
• Back-light on
 Loading...